User Manual Criterion CDW2FCMB 6-Cycle Black Built-In Dishwasher

Criterion CDW2FCMB 6-Cycle Black Built-In Dishwasher - Use Manual - Use Guide PDF.
Documents: Go to download!
User Manual
  • User Manual - (English)
Installation Instruction
  • installation instruction - (English)

file thumbnail

Use & Care Manual Dishwasher

DISHWASHER FEATURES

Capacity: 14 place settings

Dimension: 23.89 x 25.6 x 33.74inches W x D x H ( )

Weight: unpacked 99lb 45kg

Power Supply: 120volts 60Hz

Rated power usage: Wash motor 50W Heater 840W

Water Feed Pressure: 20 ~ 120 psi; 138 ~ 828kPa

  1. Top Spray Arm
  2. Cup Shelf
  3. Upper Spray Arm
  4. Lower Spray Arm
  5. Bottom Rack
  6. Heating Element
  7. Rinse Aid Dispenser
  8. Detergen t Dispenser
  9. Tub Gasket
  10. Top Rack
  11. Adjustable Upper Rack
  12. Silverware Basket

Operating instructions

1. Cycles: With the dishwasher door close, you can press the PRO button to select the wash cycle. A light on the display will indicate which cycle has been selected.

Wash Cycle Selections

  • Heavy wash : This cycle is for hard-to-clean, heavily soiled pots, pans and dishes.
  • Normal wash: This cycle is for regularly soiled dinner dishes or silverware.
  • Light wash: This cycle is for lightly soiled and pre-rinsed dishes and silverware.
  • Eco: This cycle is for all items. It can determine the condition of soil on the dishes and initiate the optimal cycle to obtain the best cleaning performance
  • Glass: This cycle is for delicate dishes or glasses.
  • Rinse wash: This cycle is for pre-rinsing dishes or glasses. This is only a rinse that keeps food from drying on your dishes and reduces odor buildup in your dishwasher until you are ready to wash a full load. Do not use detergent.

2. Options: When the wash cycle has been selected, you can choose options by pressing the "Options" button.

  • Sanitize: To sanitize your dishes and glassware, select the Sanitize option. When selected, the light above the pad will turn on and remain on until end of cycle. The water temperature in the final rinse will be raised. The option is available in Heavy and Normal Wash.
  • Hi-Temp Wash: This option can increase the water temperature in the main wash and rinse. This increase in water temperature helps the dishwasher detergent remove food, grease and soil from dishes more effectively. The option is available in Heavy and Normal Wash.
  • Heated Dry: This option is available on all cycles except rinse only. The Heated Dry option in combination with rinse aid will enhance drying performance. You can turn off by pressing Heated Dry so that the light goes off during the period of the washing.

3. Delay Start

  • To delay the start of a selected cycle, press Delay /Start pad until the desired delay time shows in the LED indicator. It allows you to automatically start your dishwasher for a 1 to 24 hour delay.
  • To cancel the Delay Start option and begin the cycle before the delay period is over press the Start/Cancel pad.

4. Start/Cancel

  • Push door firmly closed. The door latches automatically. Select the wash cycle and options desired, the indicator light above the pad will turn on. To start press the Start/Cancel pad once, the light will flash and the wash action begins. To cancel when a cycle is running, press Start/Cancel pad once and the dishwasher will start a 60 second drain and then shut off. At the end of the drain, you can select the desired cycle.
  • When you want to load more dishes or pause the dishwasher while it is already running, make sure to open the door slowly and carefully as there is a possibility of injury from the hot steam inside the dishwasher. You can add more dishes before the main wash starts. Open the door and check the detergent dispenser. If the main wash section of the detergent dispenser is still closed, you can add items. If the door is opened while the dishwasher is running, a safety mechanism is activated and stops the cycle.

5. Child Lock

  • You can lock all controls to prevent children from accidently changing the dishwasher cycle or starting the dishwasher.
  • Press and hold the Delay Start pad for 3 Seconds the lock graphic light will turn on
  • To unlock the control press and hold the Heated Dry pad for 3 seconds, the lock graphic light will turn off.

Indicator light

Sanitize

  • When "sanitize" option is selected, the temperature Child Lock of the water will reach a maximum of 70°C (158°F).
  • Certified residential dishwashers are not intended for licensed food establishments. The sanitize cycle is NSF certified.

Warning: The sanitize option is available with " Heavy" " Normal" " Light" and " ECO" cycle.

Clean

  • The clean light will turn on at the end of the cycle.

Status Window

  • 01-24: If the Delay Start option is selected, the number of delay start hours shows in the Status Window. If the dishwasher is working and the wash cycle time is more than a hour, number of hours and minutes left shows alternately in the Status Window.
  • CL: Flashes once the program has been entered and the Start/Cancel key is pressed. It also flashes if the door is opened during a wash cycle. Close the dishwasher door to begin or continue a wash cycle.
  • MINUTES: Number of minutes left in a cycle (0-59 or 1H-2H). It shows hours and minutes alternately.

NOTE: The remaining time could suddenly increase or decrease by several minutes. This means the Smart Sensor has checked the soil level and adjusted for the appropriate water fill level.

PREPARING AND LOADING DISHES

Dish preparation

  • Scrape away large pieces of food, bones, pits, toothpicks, etc. The continuous filtered wash system will remove the remaining food particles. Burned-on foods should be loosened before loading. Empty liquids from glasses and cups.
  • Foods such as mustard, mayonnaise, vinegar, lemon juice and tomato based products may cause discoloration of stainless steel and plastics if allowed to sit for a long period of time. Unless the dishwasher is to be operated at once it is best to rinse off these food soils.
  • If the dishwasher drains into a food disposer, be sure disposer is completely empty before starting dishwasher.

Loading the upper rack

  • The upper rack is designed for cups, glasses, small plates, bowls and plastic items marked “dishwasher safe” etc.
  • For best results, place the bowls, cups, glasses, sauce pans with soiled surface facing down or toward the center. Tilt slightly for better drainage.
  • Make sure the loaded dishes do not interfere with the rotation of the middle spray arm, which is located at the bottom of the upper rack. (Check this by rotating the middle spray arm by hand.)

Loading the Bottom Rack

  • The bottom rack is designed to load plates, soup bowls, plates, saucers and cookwares. The adjustable rack space will allow you to load maximum 13 inch items.

Large items should be placed along the edge so they do not interfere with the middle spray arm rotation, and make sure they do not prevent the detergent dispenser from opening. Large items should be turned so that the inside faces downward, and make sure these items do not interfere with the lower spray arm rotation.

  • The fold-down tines in the bottom rack make it easy to load those extra large and hard-to-fit items. The tines may be left up for normal use or folded down for more flexible loading. Fold down for more space to load large pots or pans

Loading the Silverware Basket

The silverware basket could be divided into three separate modules that can be used in both upper and lower racks

Adding A Dish

To add or remove items after wash cycle starts:

  1. Open door slightly and wait a few seconds until wash action stops before completely opening.
  2. Add the item.
  3. Close door firmly to latch and cycle will automatically resume

Adjusting the top rack

This dishwasher has a convenient top rack for silverware, cutlery, and small items. This rack can be adjusted to accommodate varying loads, as shown below.

Loading the top rack

You can place the items in the top rack randomly or in an orderly fashion. The image below shows how to load the top rack for 16 place settings:

Adjustable Upper Rack

  • The upper rack height can be easily adjusted to accommodate loading taller dishes in either rack.
  • To accommodate taller dishes in the bottom rack, there are 2 positions available:

Fold-down Tines

  • The fold-down tines in the rack make easy loading for those extra large and hard-to-fit items. The tines may be left up for normal use or folded down for more flexible loading. Fold down for more space to load large pots or pans.

Dishwasher Dispenser and Detergents

Filling the rinse aid dispenser

  • Rinse aid greatly improves drying and reduces water spots and filming. Rinse agent removes spots and prevents new film build up on your dishes, glasses, flatware, cookware and plastic. Without rinse aid your dishes and dishwasher interior will have excessive moisture. The Heated Dry option will not perform as well without rinse aid. The rinse aid dispenser, located next to the automatically Detergent cup, releases a measured amount of rinse aid during the last rinse.
  • If spotting and poor drying is a problem, increase the amount of rinse aid dispensed by rotating the dial to a higher number. The dial is located under the dispenser cap.
  • If the rinse aid is low, the Rinse Aid light is illuminated at the beginning and end of the cycle indicating that it is time to refill.
  • Your dishwasher is designed to use liquid rinse aid. The use of rinse greatly improves drying performance after the final rinse. Do not use a solid or bar-type rinse aid. Under normal conditions, the rinse aid will last approximately one month, try to keep it full, but do not over fill.

Filling the dispenser

  1. Try to keep it full, but do not over fill.
  2. Turn the dispenser cap to the left and lift it out.
  3. Add rinse agent until the indicator window looks full.
  4. Clean up any spilled rinse agent with a damp cloth.
  5. Replace the dispenser cap.

Filling the detergent dispenser

  1. Push the dispenser cover latch downwards and open it .

2. Add the detergent to the main wash compartment.

3. After pouring the detergent into the container, close the lid, first pushing (1) and then pressing on it (2) until hear the click.

CARE AND CLEANING

Clean the Stainless Steel Inner Door and Tub

  • The tub is made of Stainless Steel, it will not rust or corrode if the dishwasher should be scratched or dented.

Clean the Cylinder Filter

  • The Cylinder Filter is designed to collect some big items such as broken glass, bones and pits. The Cylinder Filter needs to be cleaned to maximize wash performance.
  • Remove the lower rack, rotate the Cylinder Filter as shown, lift it out, empty and clean it by rinsing it under running water and replace.

  • Because hard water chemicals will clog the spray arm jets and bearings, it is necessary to clean the spray arms regularly. Wash the arms in soapy, warm water and use a soft brush to clean the jets. Replace them after rinsing thoroughly.
  • To remove the upper or middle spray arm, unscrew the nut clockwise.
  • To remove the lower spray arm, pull upward.

Clean the spots on the steel inner door and tub with a damp nonabrasive cloth.

Clean the Fine Filter

  • Take out the Cylinder Filter and remove the Fine Filter from the dishwasher tub bottom. To remove the Fine Filter you must first remove the bottom spray arm as shown below.
  • Flush the Fine Filter by holding it under running water and replace.

Troubleshooting

SOLUTIONS TO COMMON DISHWASHING PROBLEMS

Problem

Possible cause

Solution

Dishwasher won’t startDoor may not be closed properlyShut the door completely make sure it is latched
Power supply or power line is not connectedCheck and connect the power supply
Delay Start option has been selectedRefer to Delay Start section in this manual to rese
Child Lock activate (selected models)Deactivate the child lockrefer to child lock section in this manual
Dishwasher beeps at the end of the cycleIt indicates the wash cycle finished, the dishwasher will beep
Rinse Aid light onThe rinse aid level is lowAdd rinse aid
Dishwasher operates too longThe dishwasher is connected to cold waterCheck the dishwasher, make sure it connected to the hot water supply
The cycle time will vary due to the soilWhen heavy soil is detected, the normal cycle will automatically increase the cycle time
The sanitize option is selectedWhen sanitize option is selected, the cycle time will be increase to meet the sanitized temperature request
Dishes are not clean enoughWater pressure is temporarily lowUse you dishwasher when the water pressure is normal
The inlet water is low

Make sure the dishwasher is connected to the hot water supply

Try not use your dishwasher when hot water is bein used elsewhere in the house

Dishes are loaded too close togetherLoad the dishes again as the manual introduced
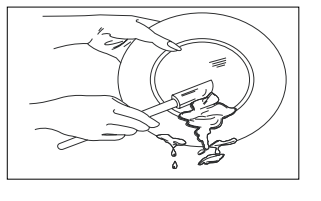
improper use of detergentAdd detergent depending on the water hardness and the cycle you chose. Use fresh deter ent.
The selected cycle is not suitable for food soil conditionChoose anther cycle for longer washing time
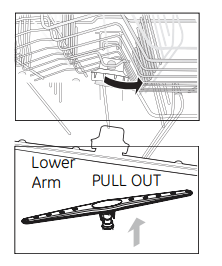
Spay arms is blocked by some itemsMake sure the spay arm is rotating freely
Dishes not drying enoughRinse Aid dispenser is emptyFill rinse aid dispenser or increase the amount of rinse aid.
Improper loading of dishesLoad the dishes again as the manual introduction
The cycle you chose did not included the dryingChoose the proper cycle with drying
Spots and filming on dishesWater hardness is too highFor extremely hard water install a water softener
Improper loading of dishesLoad the dishes again as the manual indicates
Old or damp powder rinse aid is usedUse fresh rinse aid
Rinse Aid dispenser emptyAdd rinse aid to the dispenser
EtchingUsing too much detergentUse less detergent if you have soft water
The inlet water temperature exceeds 150°FLower the inlet water temperature
Detergent left in dispenser cupDetergent may be too oldUse fresh detergent
Spray arm is blockedLoad the dishes, making sure the spray arms are not blocked.
Detergent dispenser will not shutImproper operation of the detergent coverAdd the detergent and rinse aid as indicated by the manual
Water remains in the dishwasherPrevious cycle has not finished or has been interruptedSelect the proper cycle as indicated by the manual
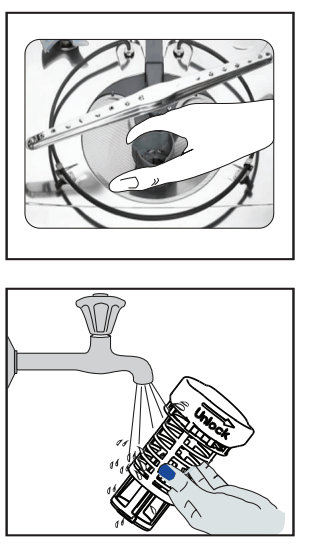
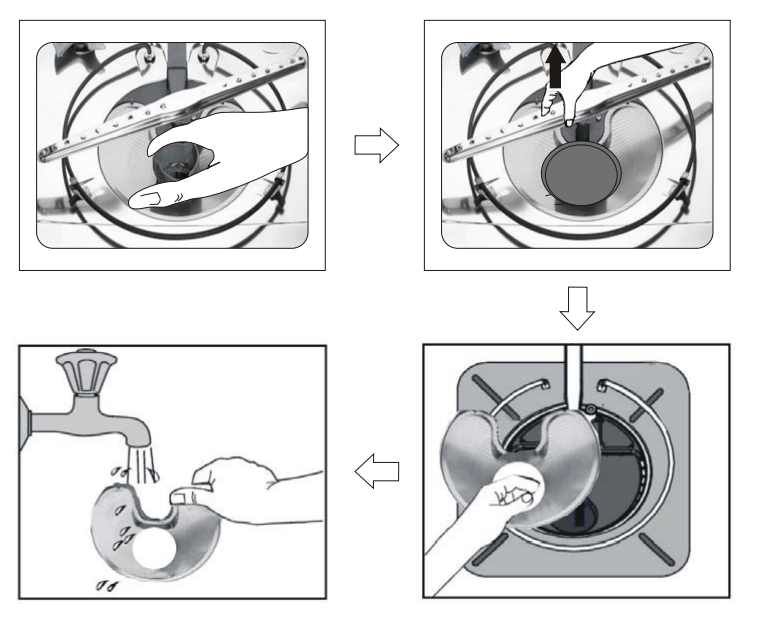
Dishwasher does not drain properlyDrain is clogged

Check the air gap if you have

Make sure the disposer is empty if the dishwasher is connected to the disposer

Drain hose is kinkedMake sure the drain hose is properly connected to the sink
Suds in the tubImproper detergent is usedMake sure to use only the automatic dishwasher detergent
Dishwasher leaksExcessive suds caused by using the improper detergentMake sure to use only the automatic dishwasher detergent
Dishwasher is not levelLeveling the dishwasher (see the installation manual)
Black or gray marks on dishesAluminum utensils have rubbed against dishes

Chose a higher cycle

Make sure the inlet water is no less than 120°F

Stained tub interiorCoffee and tea soilUsing a spot cleaner to remove the soil
Reddish stainSome tomato food will cause this, use of the rinse only cycle right after loading this will decrease the staining
NoisesDetergent cup opening?Drain pump soundThis is normal
A hard object has entered the wash module. When the object is ground up, the sound should stop.If the noise persists after a complete cycle, call for service
Dishwasher won’t fillWater valve is turn offCheck if the water valve is turn on
Door latch may not be properly seatedMake sure the door is closed

Error Codes

When some malfunctions come on, the appliance will display error codes to warn you:

Codes

Meanings

Possible Causes

E1

Longer inlet time.

Faucets is not opened, or water intake is restricted,or water pressure is too low.

E4

Overflow.

Some element of dishwasher leaks .

WARNING!

  • If overflow occurs, turn off the main water supply before calling a service.
  • If there is water in the base pan because of an overfill or small leak, the water should be removed before restarting the dishwasher.


See other models: CRH250C1S CRH160C1B CRH300C1S CMH16M1B CMH16G1W

Criterion CDW2FCMB | Pages: 17 | Created on: 2021-02-25 | File type: PDF | Filename: 72254128_cdw2fcmb.pdf | Size: 4.46 MB | Language: English | Other documents: 1 files.

Download User Manual

Product Infomation and Reviews - CDW2FCMB photo

CDW2FCMB Photo

T: @manualsFile

https://manualsFile.com

Criterion CDW2FCMB Questions and Answers

Find answers or Ask a question.
  • Total questions: 19
  • Questions unAnswered : 7

Q: How,come the light is so dim? Is there a way to make it brighter? I can barely see it. Also why do the dishes not get dry? Reply

Q: how do I open the silverware shelf Reply

Q: How can i turn off the end of cycle beep Reply