This appliance must be grounded. In the event of an electrical short circuit, grounding reduces the risk of electric shock by providing an escape wie for the electric current. This appliance is equipped with a cord having a grounding wire with a grounding plug.The plug must be plugged into an outlet that is properly installed and grounded.
WARNING -Electric Shock Hazard
Improper use of the grounding can result in electric shock. Do not plug into an outlet until appliance is properly installed and grounded.
A short power supply cord is provided to reduce the risks resulting from becoming entangled in or tripping over a longer cord.
Longer cord sets or extension cords are available and may be used if care is exercised in their use.
If a long cord or extension cord is used:
The marked electrical rating of the cord set or extension cord should be at least as great as the electrical rating of the appliance.
The extension cord must be a grounding-type 3-wire cord.
The longer cord should be arranged so that it will not drape over the counter top or tabletop where it can be pulled on by children or tripped over unintentionally.
RADIO INTERFERENCE
Operation of the microwave oven may cause interference to your radio, TV or similar equipment.
When there is interference, it may be reduced or eliminated by taking the following measures:
Clean door and sealing surface of the oven
Reorient the receiving antenna of radio or television.
Relocate the microwave oven with respect to the receiver.
Move the microwave oven away from the receiver.
Plug the microwave oven into a different outlet so that microwave oven and receiver are on different branch circuits.
UTENSILS
Utensil Test:
Fill a microwave-safe container with 1 cup of cold water (250ml) along with the utensil in question.
Cook on maximum power for 1 minute.
Carefully feel the utensil. If the empty utensil is warm, do not use it for microwave cooking.
Do not exceed 1 minute cooking time.
MATERIALS YOU CAN USE IN MICROWAVE OVEN
Utensils
Remarks
Browning dish
Follow manufacturer* instructions. The bottom of browning dish must be at least 3/16 inch (5mm) above the turntable. Incorrect usage may cause the turntable to break.
Dinnerware
Microwave-safe only. Follow manufacturer's instructions. Do not use cracked or chipped dishes.
Glass jars
Always remove lid. Use only to heat food until just warm. Most glass jars are not heat resistant and may break.
Glassware
Heat-resistant oven glassware only. Make sure there is no metallic trim. Do not use cracked or chipped dishes.
Oven cooking bags
Follow manufacturer* instructions. Do not close with metal tie. Make slits to allow steam to escape.
Paper plates and cups
Use for short*erm cooking/warming only. Do not leave oven unattended while cooking.
Paper towels
Use to cover food for reheating and absorbing fat. Use with supervision for a short-term cooking only.
Parchment paper
Use as a cover to prevent splattering or a wrap for steaming.
Plastic
Microwave-safe only. Follow the manufacturer* instructions. Should be labeled "Microwave Safe". Some plastic containers soften, as the food inside gets hot. "Boiling bags" and tightly closed plastic bags should be slit, pierced or vented as directed by package.
Plastic wrap
Microwave-safe only. Use to cover food during cooking to retain moisture. Do not allow plastic wrap to touch food.
Thermometers
Microwave-safe only (meat and candy thermometers).
Wax paper
Use as a cover to prevent splattering and retain moisture.
MATERIALS TO BE AVOIDED IN MICROWAVE OVEN
Utensils
Remarks
Aluminum tray
May cause arcing. Transfer food into microwave-safe dish.
Food carton with metal handle
May cause arcing. Transfer food into microwave-safe dish.
Metal or metaltrimmed utensils
Metal shields the food from microwave energy. Metal trim may cause arcing.
Metal twist ties
May cause arcing and could cause a fire in the oven.
Paper bags
May cause a fire in the oven.
Plastic foam
Plastic foam may melt or contaminate the liquid inside when exposed to high temperature.
Wood
Wood will dry out when used in the microwave oven and may split or crack.
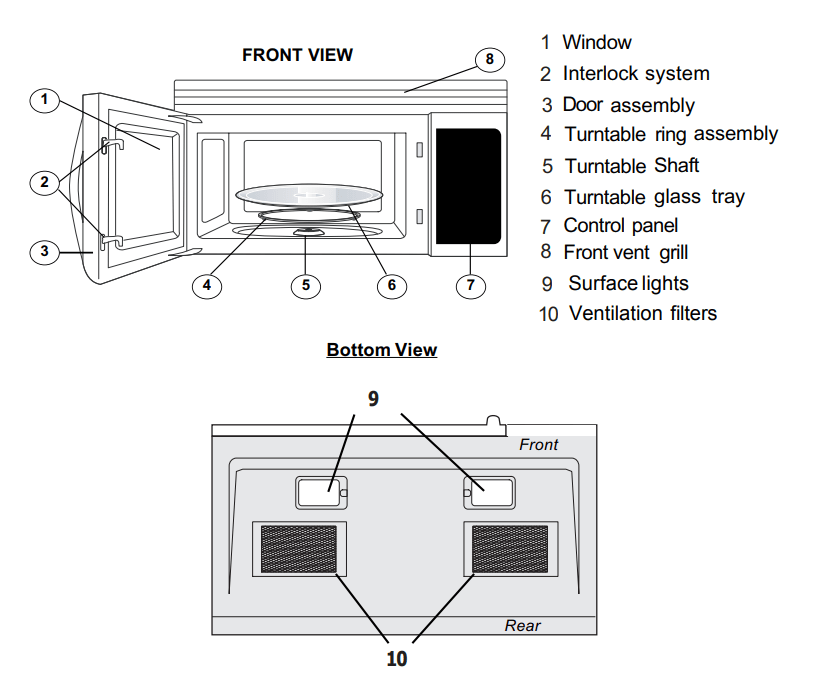
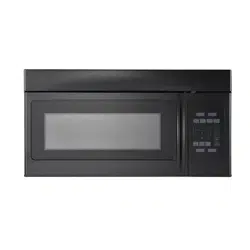
PART NAMES
Microwave features
OPERATION INSTRUCTIONS
1. Clock Setting
Press "CLOCK/AM/PM",the unit enters the clock setting states.AM indicator will light. "0:00" flash to remind you to input the time.
Press "CLOCK/AM/PM" again to select AM or PM. The responding AM or PM indicator lights.
Press the number keys and enter the correct time. For example, time is 10:12 now, please press "1,0,1,2" in turn.
Press "CLOCK/AM/PM" key finish setting the clock. Note: This is a 12 hour clock from 1:00 to 12:59. If the time set is not appropriate, press "CLOCK/AM/PM" will be no used.Buzzer sounds twice and turn back to waiting states.
2. Microwave Cooking
Press " TIME COOK" to select microwave cooking. "0:00" flash to remind you to input the cooking time.
Press the number keys to adjust the cooking time you need. For example, to cook the time for 10 minutes.Please press "1,0,0,0" in turn. The maximum cooking time is 99 minutes 99 seconds.
At the same time, you can choose the power by pressing "POWER".
Press the number keys to select the power level.
Press "START/PAUSE" to start cooking. Time counts down
Note:
If the power level you choose is 100% power, steps "3" and "4" can be skiped and go directly to the step " 5 ".
After cooking finishing, buzzer sounds five times.
Ten power levels are available.
3.Multi-stage Cooking
At most two stages can be input.
For example: to cook the food with 100% microwave power for 10 minutes and then cook with 80% microwave power for 15 minutes. Do as following:
Press "TIME COOK" to choose microwave cooking;
Press "1","0","0","0" to input the cooking time;
Press "POWER" to choose 100% microwave power;
Press "TIME COOK" to choose microwave cooking;
Press "1","5","0","0" to input cooking time;
Press "POWER" to select the microwave power;
Press "8" to choose 80% microwave power;
Press "START" to start cooking.
Note:
a.Microwave cooking can be set as two stages only. Defrost program and auto menu cannot be set here.
b. When the first stage finish, buzzer sounds once and the second stage begins cooking.
4. Speedy Cooking
In waiting states,press " ADD 30 SEC." to start cooking 100% microwave power for 30 seconds.
During cooking states, 30 seconds can be increased for each pressing on "ADD 30 SEC.". The maximum cooking time is 99 minutes and 99 seconds.
Press number keys from 1 to 6 to start cooking with full microwave power for 1-6 minutes.
Note: During speedy cooking, microwave power can be checked and selected.
Press"POWER", the current power displays, then press number keys to choose the power you need
5. Defrost Cooking
A. Defrost By Weight
Press " DEFROST AUTO/TIME" once to choose defrost by weight function. Defrost indicator will light and "lb" indicator flash;
Press number keys from 0 to 9 to input the derfost weight. For example: the food weight is 1.2 Lbs, then "1","2" will be input. The maximum cooking weight is 6.0 Lbs.If the weight input is more than 6.0 Lbs, the unit will turn back to waiting states.
Press "START/PAUSE" to start defrosting. "lb" indicator will be off.
B. Defrost By Time
Press " DEFROST AUTO/TIME" twice to choose defrost by time function. Defrost indicator will light;
Press number keys from 0 to 9 to input the derfost time. The maximum time can be input is 99 minutes and 99 seconds.
Press "START/PAUSE" to start defrosting.
Note: If half the defrost time passes, the buzzer will sound once to remind you to turn the food over. In both weight/time defrost, the defrost icon is blinking on screen during the operation to indicate that defrost is being done.
6. Hood Function
When the exhaust fan is under off states, press "VENT FAN/H/L/OFF" once to choose the fan with high speed;
Press "VENT FAN/H/L/OFF" twice to choose the fan with low speed;
Press "VENT FAN/H/L/OFF" three times to choose the fan to be off.
Except lock states, the fan can be adjusted anytime.
7. Oven Lamp
Press "SURFACE LIGHT ON/OFF" once to turn on the lamp;
Press "SURFACE LIGHT ON/OFF" twice to turn off the lamp.
8. Timer Function
Press "TIMER", timer indicator will light;
Press number keys to input the cooking time you need. The maximum cooking time is 99 minutes and 99 seconds.
Press "TIMER", time counts down.When time counting down is over, buzzer sounds to indicates off
Press "TIMER", the timer function or the buzzer sound will stop
Note: During timer states, hood and oven lamp can be activated. Others function will be no used.
9. Display On/Off Function
In wating states,press "0 " for 3 seconds,buzzer sounds twice.And the display would be off.
Under the mode of display off, press any key, buzzer sound once, the microwave oven is back to waiting mode.
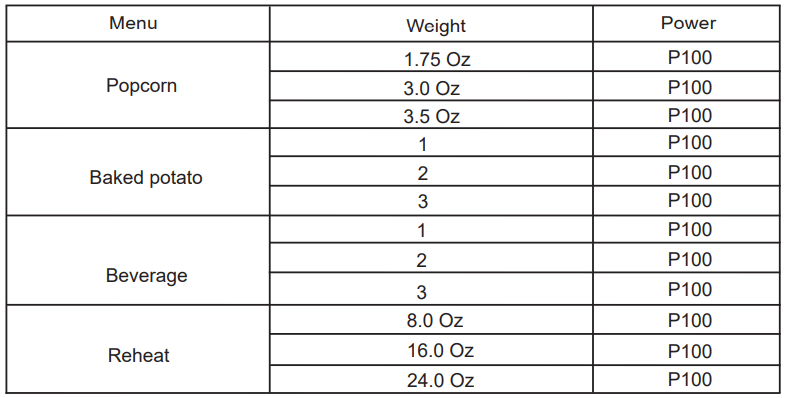
10.Auto Menu
a) Press “ POPCORN “ , ”BAKED PATATO BEVERAGE REHEAT” repeatedly until the number you wish appears in the display.
b) Press " START/PAUSE " to cook.
The menu chart:
11. Inquiring Function
(1) Under microwave cooking states, press "POWER" to check the power level.
(2) During cooking states, press "CLOCK/AM/PM" to check the clock.
12. Lock Function For Children
Lock: In waiting state, press " STOP/CLEAR " for 3 seconds, there will be two beeps denoting the entering into the children-lock state;
Lock quitting: In locked state, press " STOP/CLEAR " for 3 seconds, there will be two beeps denoting that lock is released.
MAINTENANCE
Troubleshooting
Check your problem by using the chart below and try the solutions for each problem. If the microwave oven still does not work properly, contact the nearest authorized service center.
TROUBLE
POSSIBLE CAUSE
POSSIBLE REMEDY
Oven will not start
a. Electrical cord for oven is not plugged in.
b. Door is open.
c. Wrong operation is set.
a. Plug into the outlet.
b. Close the door and try again.
c. Check instructions.
Arcing or sparking
a. Materials to be avoided in microwave oven were used.
b. The oven is operated when empty.
c. Spilled food remains in the cavity.
a. Use microwave-safe cookware only.
b. Do not operate with oven empty.
c. Clean cavity with wet towel.
Unevenly cooked foods
a. Materials to be avoided in microwave oven were used.
b. Food is not defrosted completely.
c. Cooking time, power level is not suit ble.
d. Food is not turned or stirred.
a. Use microwave-safe cookware only.
b. Completely defrost food.
c. Use correct cooking time, power level.
d. Turn or stir food.
Overcooked foods
Cooking time, power level is not suitable.
Use correct cooking time, power level.
Undercooked foods
a. Materials to be avoided in microwave oven were used.
b. Food is not defrosted completely.
c. Oven ventilation ports are restricted.
d. Cooking time, power level is not suitable
a. Use microwave-safe cookware only.
b. Completely defrost food.
c. Check to see that oven venti- lation ports are not restricted.
d. Use correct cooking time, power level.
Improper defrosting
a. Materials to be avoided in microwave oven were used.
b. Cooking time, power level is not suitable.
c. Food is not turned or stirred.
a. Use microwave-safe cookware only.
b. Use correct cooking time, power level.
c. Turn or stir food.
CLEANING AND CARE
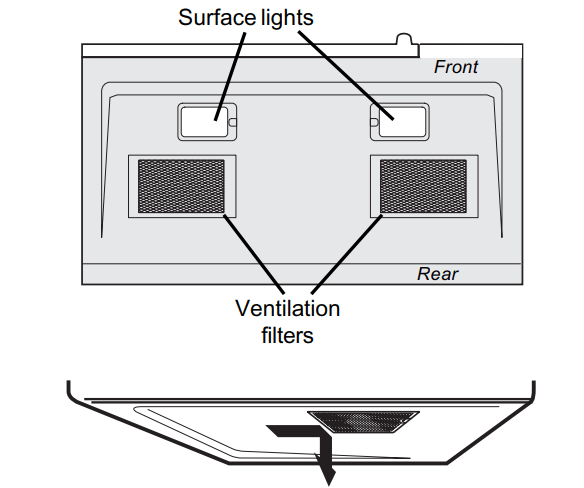
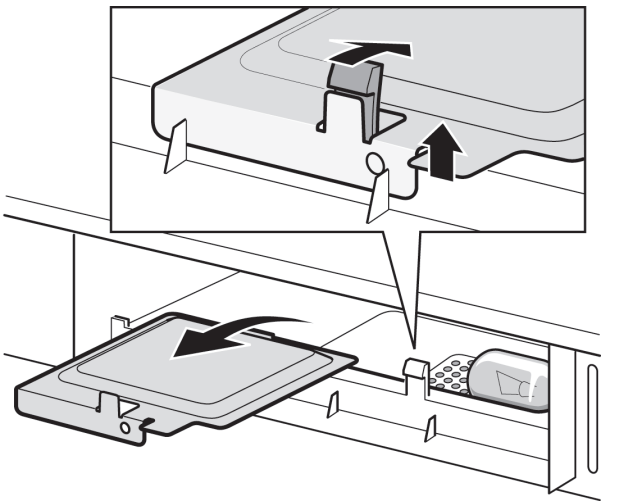
Cleaning the exhaust filters
The oven ventilation exhaust filters should be removed and cleaned often; generally at least once every month.
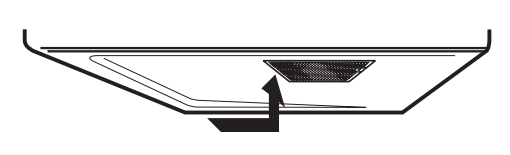
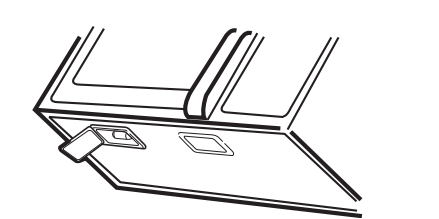
1. To remove the exhaust ventilation filters, slide the filter to the rear. Then pull filter downward and push to the other side. The filter will drop out. Repeat for the 2nd filter.
2. To reinstall the exhaust ventilation filter, slide it into the side slot, then push up and toward oven to lock. Reinstall the 2nd filter using the same procedure.
Surface light replacement
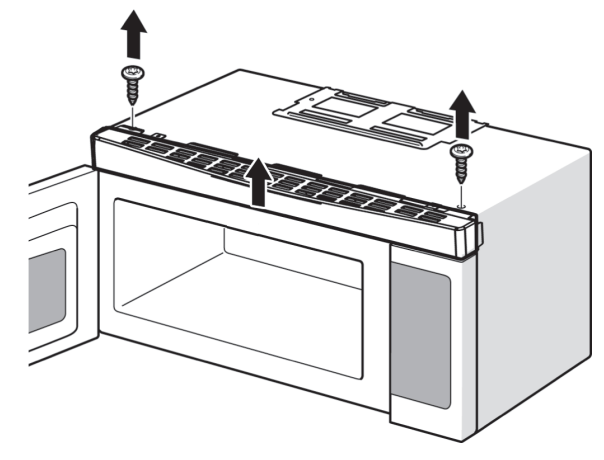
1. Unplug the microwave oven or turn off power at the main circuit breaker.
2. Remove the bulb cover mounting screws at both light positions under the microwave.
3. Replace bulb with 30 watt appliance bulb.
4. Re-install bulb cover and mounting screw.
5. Plug the microwave back into the power supply or turn the power back on at the main circuit breaker.
Charcoal filter replacement
Charcoal Filter installed in your microwave oven, is used for nonvented, recirculated installation. The filter should be changed every 6 to 12 months depending on use.
1. Disconnect power to the microwave oven at the circuit breaker panel or by unplugging.
2. Remove the vent grill mounting screws.
3. Pull the vent grill away from the unit.
4.Remove the charcoal filter by pushing it inwards, then turn and pull it away from the unit.
Oven light replacement
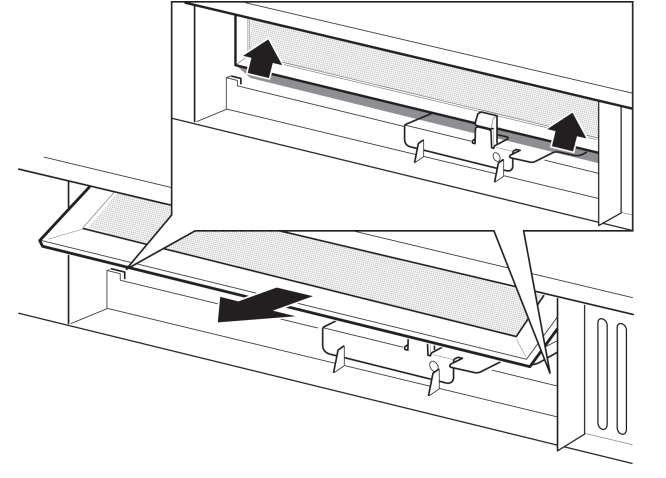
Remove the per instructions 1-4 above and charcoal filter, if used.
1. Open light cover located behind filter mounting by carefully pulling up on the front edge .
2. Remove old light bulb and replace only with equivalent 30 watt bulb available from parts distributor. Bulbs are also available at most hardware stores or lighting centers.
Note: DO NOT USE BULB LARGER THAN 30 WATTS.
3. Replace the microwave oven light cover by carefully pushing into place. Replace the charcoal filter. Push the vent grill back into place (engaging both the bottom and top tabs) and replace the vent grill mouting screws.
Cleaning suggestions
For best performance and for safety reasons, keep the oven clean inside and outside. Take special care to keep the inner door panel and oven fron frame free of food and grease build-up.
Never use rough scouring powder or pads on the microwave. Wipe the microwave oven inside and out with a soft cloth and and warm (not hot) mild detergent solution. Then rinse and wipe completely dry.
Wipe spatters immediately with a wet paper towel, especially after cooking greasy foods like chicken or bacon.
Clean your microwave oven weekly or more often, if needed.
Follow these instructions to clean and care for your microwave oven:
Keep the inside (cavity) of the oven clean. Food particles and spilled liquids can stick to the oven walls, causing the oven to work less efficiently.
Wipe up spills immediately. Use a damp, clean cloth and mild soap. DO NOT use harsh detergents or abrasive cleaners.
To help loosen baked-on food particles or liquids, heat 2 cups of water (add the juice of 1 lemon if you desire to keep the oven fresh smelling) in a 4 cup measuring glass at High power for 5 minutes or until boiling. Let stand in oven cavity for 1 or 2 minutes.
Remove the glass turntable tray from the oven when cleaning the oven cavity or tray. To prevent the glass turntable from breaking, handle with care and do not put it in water immediately after cooking. Wash the turntable tray in warm sudsy water or in the dishwasher.
Clean the outside surface of the microwave with soap and a clean damp cloth. Dry with a clean soft cloth. To prevent damage to the operating parts of the oven, do not let water seep into any vents or openings.
Wash the oven door window with very mild soap and water. Be sure to use a soft clean cloth to avoid scratching.
If steam accumulates inside or outside the oven door, wipe with a soft cloth. Steam can accumulate when operating the oven in high humidity and in no way indicates microwave leakage.
Never operate the oven without food in the oven cavity; this can damage the magnetron tube or glass tray. You may wish to leave a cup of water standing inside the oven when it is not in use to prevent damage if the oven is accidentally turned on.
Q: What kind of grease filter at the bottom we need to replace? And where we can get them. The one came with my house is missing 2 at bottom. Thanks! Reply
Q: Does the " Menu control Panel " light up to assist with being able to see panel choices ??
The clock lights up, but nothing else ??? Reply
Q: Does the menu panel have lights to see the choices available? Such as reheat, add 30 seconds, etc. Reply