FEATURES
• Directional shotgun-style microphone captures the audio in your frame
while rejecting unwanted background noise
• Premium microphone capsule for clear, precise audio
• Works with cameras with standard 3.5mm (1/8") microphone input
• Powered design maximizes compatibility and sound quality
• Built-in shock mount minimizes unwanted vibrations to microphone
• Windscreen lowers wind noise and protects from small bumps.
Note: Cable in illustrations is shown shorter for clarity. The actual cable is
longer than the one pictured.
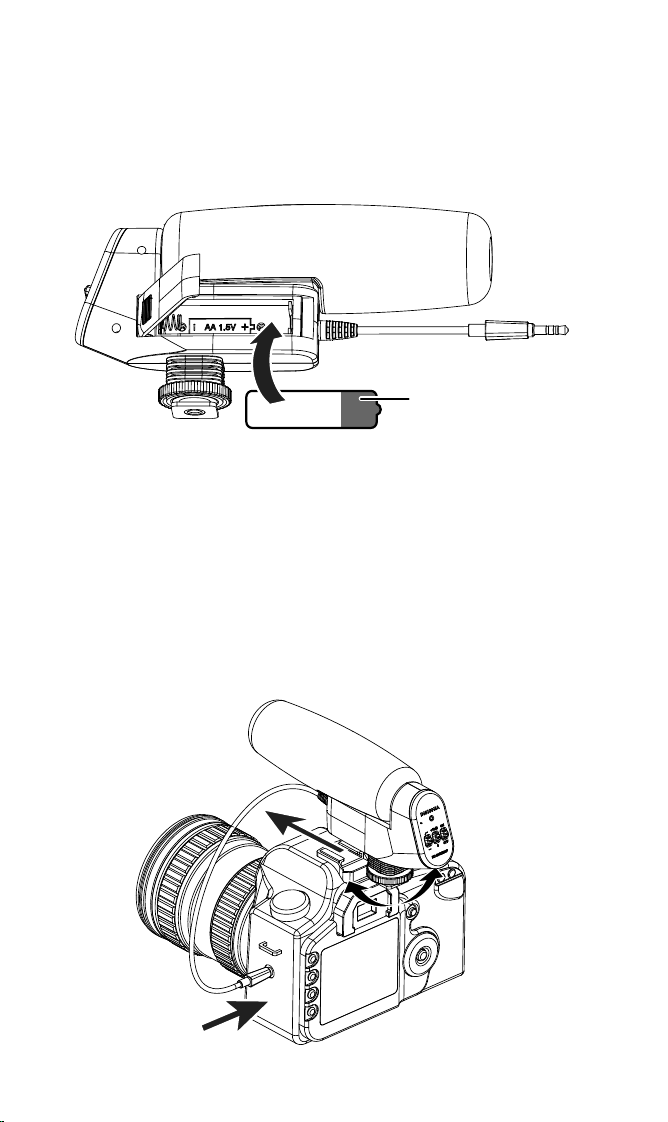
INSTALLING THE BATTERY
1 Slide the battery compartment lid right and lift it up.
2 Insert the AA battery. Make sure that the + and – signs match the
symbols in the compartment.
3 Replace the battery compartment lid.
SETTING UP YOUR MICROPHONE
To attach your microphone to a camera:
1 Loosen the locking knob, then slide your microphone’s shoe mount
onto your camera.
2 Tighten the locking knob to secure your microphone.
3 Connect the 3.5 mm audio cable to your camera.
Before using your new product, please read these instructions to prevent any damage.
PACKAGE CONTENTS
• Microphone
• Foam windscreen
• Carrying pouch
• AA battery
• Quick Setup Guide
TIP: Use this microphone with your camera before recording an
important event. Make sure that you are familiar with its operation
with your specic camera and verify the audio recording results are as
expected.
To attach your microphone to a tripod:
1 Tighten the microphone to the 1/4" screw on a tripod or tripod plate.
See the instructions that came with your tripod for more information.
2 Connect the 3.5 mm audio cable to your camera.
USING YOUR MICROPHONE
1 Turn on your camera.
2 Install the battery in your microphone.
3 Aim the microphone at the sound source and away from unwanted
sound sources (only if used on a tripod).
Tip: If using a tripod, the microphone could be held below or above as well as
straight in-front of the sound source.
4 Slide the power switch to OFF when you are nished recording.
Final at size: 16.52 in x 7 in (419.61 x 177.8 mm)
Final fold size: 4.13 x 7 in. (104.77 x 177.8 mm)
QUICK SETUP GUIDE
Shotgun
Microphone
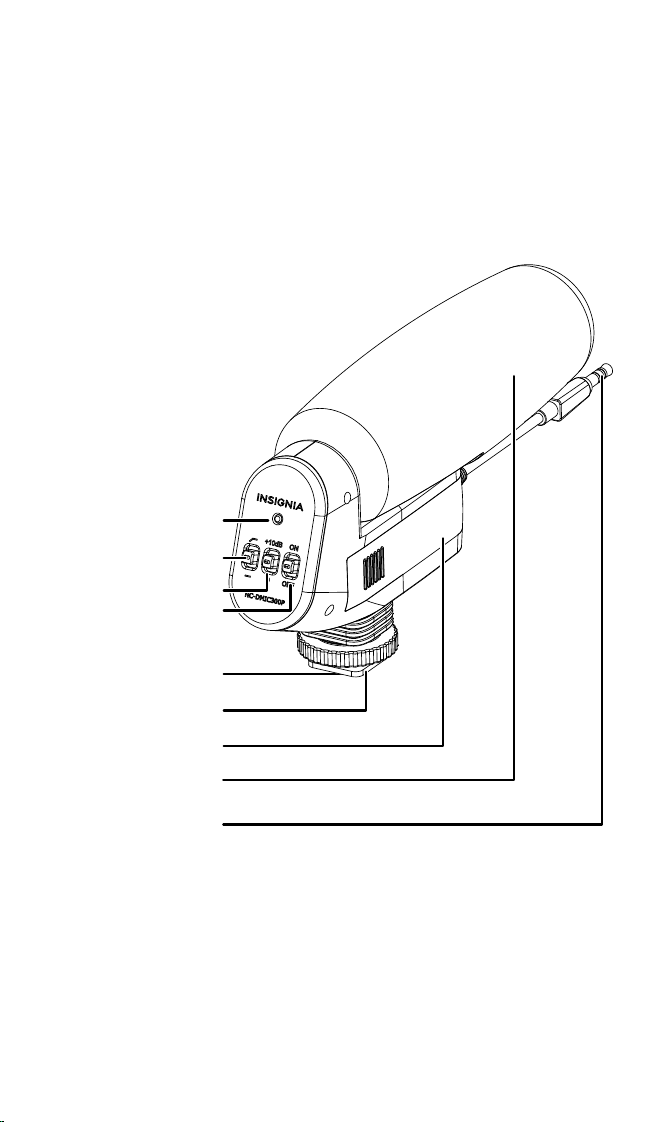
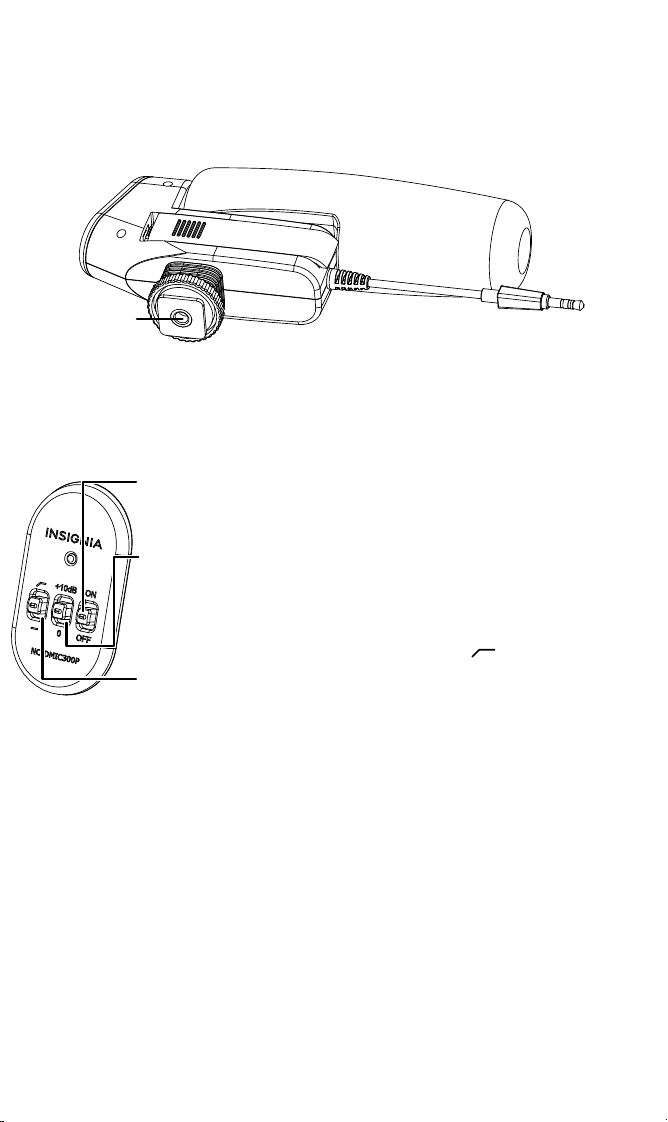
NS-DMIC300P
1/4" mounting
threads
+-
LED Indicator
Low-cut lter switch
Microphone Boost
Power OFF/ON
1/4" mounting threads (not shown)
Cold shoe mount with locking knob
Battery compartment
Foam windscreen
3.5 mm audio cable
Slide the power switch to ON, the LED indicator lights up.
To use the microphone boost, slide the switch up for a
10dB gain and down for no gain.
Note: Use the microphone boost switch to raise the output of the
microphone by 10dB without having to get closer to the subject.
To use the low-cut lter switch, slide up ( ) to turn the
lter on and down (—) to turn it o.
Note: The low-cut lter minimizes the impact of low frequency
hum, camera motor noise, and similar low frequency ambient
noise.
AA battery
NS-DMIC300P_17-0248_QSG_V1_EN.ai 1 5/1/2017 11:20:39 AMNS-DMIC300P_17-0248_QSG_V1_EN.ai 1 5/1/2017 11:20:39 AM
FEATURES
• Directional shotgun-style microphone captures the audio in your frame
while rejecting unwanted background noise
• Premium microphone capsule for clear, precise audio
• Works with cameras with standard 3.5mm (1/8") microphone input
• Powered design maximizes compatibility and sound quality
• Built-in shock mount minimizes unwanted vibrations to microphone
• Windscreen lowers wind noise and protects from small bumps.
Note: Cable in illustrations is shown shorter for clarity. The actual cable is
longer than the one pictured.
INSTALLING THE BATTERY
1 Slide the battery compartment lid right and lift it up.
2 Insert the AA battery. Make sure that the + and – signs match the
symbols in the compartment.
3 Replace the battery compartment lid.
SETTING UP YOUR MICROPHONE
To attach your microphone to a camera:
1 Loosen the locking knob, then slide your microphone’s shoe mount
onto your camera.
2 Tighten the locking knob to secure your microphone.
3 Connect the 3.5 mm audio cable to your camera.
Before using your new product, please read these instructions to prevent any damage.
PACKAGE CONTENTS
• Microphone
• Foam windscreen
• Carrying pouch
• AA battery
• Quick Setup Guide
TIP: Use this microphone with your camera before recording an
important event. Make sure that you are familiar with its operation
with your specic camera and verify the audio recording results are as
expected.
To attach your microphone to a tripod:
1 Tighten the microphone to the 1/4" screw on a tripod or tripod plate.
See the instructions that came with your tripod for more information.
2 Connect the 3.5 mm audio cable to your camera.
USING YOUR MICROPHONE
1 Turn on your camera.
2 Install the battery in your microphone.
3 Aim the microphone at the sound source and away from unwanted
sound sources (only if used on a tripod).
Tip: If using a tripod, the microphone could be held below or above as well as
straight in-front of the sound source.
4 Slide the power switch to OFF when you are nished recording.
Final at size: 16.52 in x 7 in (419.61 x 177.8 mm)
Final fold size: 4.13 x 7 in. (104.77 x 177.8 mm)
QUICK SETUP GUIDE
Shotgun
Microphone
NS-DMIC300P
1/4" mounting
threads
+-
LED Indicator
Low-cut lter switch
Microphone Boost
Power OFF/ON
1/4" mounting threads (not shown)
Cold shoe mount with locking knob
Battery compartment
Foam windscreen
3.5 mm audio cable
Slide the power switch to ON, the LED indicator lights up.
To use the microphone boost, slide the switch up for a
10dB gain and down for no gain.
Note: Use the microphone boost switch to raise the output of the
microphone by 10dB without having to get closer to the subject.
To use the low-cut lter switch, slide up ( ) to turn the
lter on and down (—) to turn it o.
Note: The low-cut lter minimizes the impact of low frequency
hum, camera motor noise, and similar low frequency ambient
noise.
AA battery
NS-DMIC300P_17-0248_QSG_V1_EN.ai 1 5/1/2017 11:20:39 AMNS-DMIC300P_17-0248_QSG_V1_EN.ai 1 5/1/2017 11:20:39 AM
SPECIFICATIONS
• Transducer: Condenser
• Acoustic Principle: Line plug gradient
• Frequency Response: 35-18,000Hz
• Sensitivity: -38dB +/- 1dB / 0dB=1V/Pa,1kHz
• Signal to Noise Ratio: 78dB
• Power Supply: 1.5V battery
• Battery Life: 70 hours approximately
• PAD Switch: 0dB,+10dB
• Plug: 3.5mm jack plug
• Filter: Controlled by low-cut lter switch
• Dimensions (L x H x W): 6.7 x 3.5 x 1.8 in. (171 x 88 x 45 mm)
• Net Weight: 3.35 oz. (95 g)
• Operating temperature: 14°F to 131°F (-10°C to +55°C)
• Storage temperature: -4°F to 167°F (-20°C to +75°C)
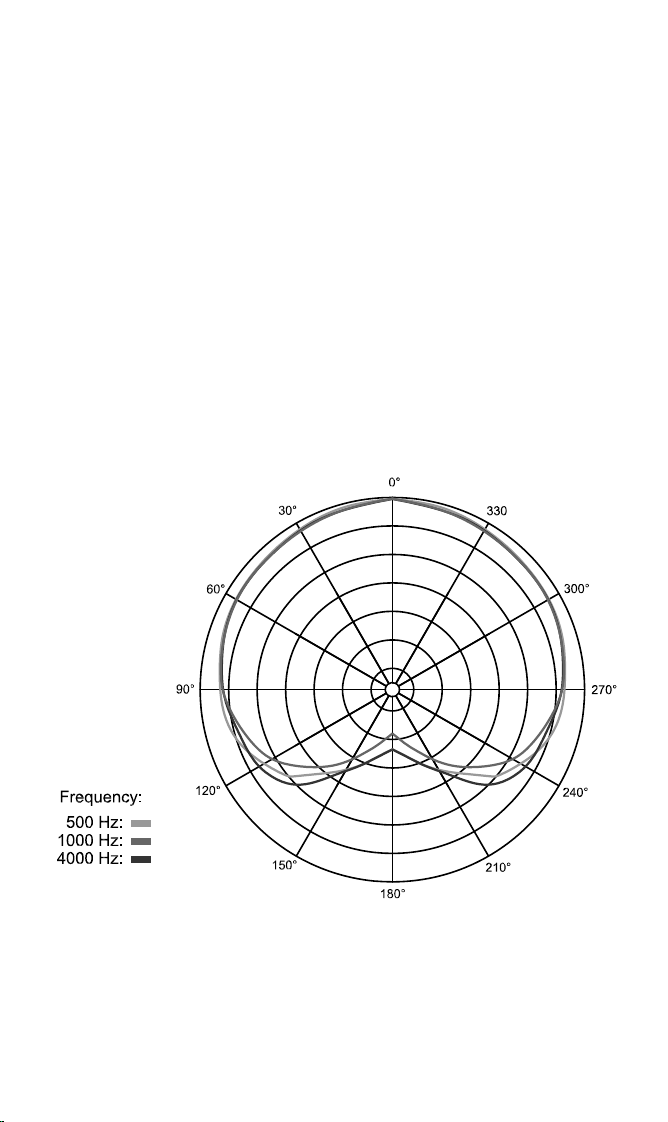
• Polar pattern: Cardioid:
V1 ENGLISH 17-0248
TROUBLESHOOTING
• Microphone stops working: Verify LED is lit when power switch is in the
ON position. Replace battery if not.
• Sound is too quiet: Enable the microphone boost (+10dB switch), move
closer to the subject, consult camera owner’s manual for audio recording
settings.
• Sound is distorted: Make sure the microphone boost is switched o,
move away from the subject, consult camera owner’s manual for audio
recording settings.
MAINTAINING YOUR MICROPHONE
• Keep your microphone away from dust, moisture, or water.
• To clean the housing, wipe with a dry micro-ber cloth to remove dust.
• Store your microphone in the included pouch to protect it from dirt and
dust.
IMPORTANT SAFETY INFORMATION
• Make sure that you follow all safety notes.
• Keep these instructions for use in a safe place. If you sell the equipment or
pass it on to someone else, you should also pass on these instructions for
use.
Marking on the devices
Waste disposal and protection of the environment
Electric and electronic appliances, as well as batteries, must not be
disposed of together with domestic waste. The user is legally
obliged to return electric and electronic appliances as well as
batteries to specially set up public collecting points or the sales
outlet once they have reached the end of their service life. Details
are regulated by national law. The symbol on the product, the instructions
for use, or the packaging refers to these provisions. The recycling of waste
equipment/batteries is an important contribution to the protection of our
environment.
Danger of re and short-circuit
• Do not operate the device with wet hands.
• Clean the equipment only in the way described in Maintaining Your
Microphone.
• Take care to avoid dropping the equipment. Make sure that the device is
properly fastened and reliably mounted. If the device has been dropped,
have it inspected by a skilled technician before you switch it on again.
• Should the equipment be damaged or defective, or if you notice a
scorching smell, remove the batteries immediately. Do not operate the
device with a damaged housing and do not repair the device yourself.
Have the device only repaired by a skilled service person.
• Always keep your device in good condition, as specied in these
instructions for use.
• Do not tamper with or alter the internal components of the microphone.
Danger of suocation caused by small parts
• Keep the device out of the reach of children and pets.
Precautionary measure when using the batteries.
• Batteries/power packs, if inappropriately handled, can run out or explode.
• Please observe the following notes on safety when handling batteries to
be used in this device:
• Use only batteries mentioned in these operating instructions.
• Do not discard of the batteries in a re and do not expose them to direct
heat.
• In order to avoid damage to the product, you must make sure that you
remove the batteries, if you do not use the product over a long period
of time, or if the batteries have been discharged.
• If battery uid comes into contact with skin or clothes, rinse it o
immediately with fresh water.
LEGAL NOTICES
FCC Statement
This device complies with part 15 of the FCC Rules. Operation is subject to the following two conditions:
(1) This device may not cause harmful interference, and (2) this device must accept any interference
received, including interference that may cause undesired operation.
FCC Caution
Changes or modications not expressly approved by the party responsible for compliance could void
the user’s authority to operate the equipment.
FCC Statement
This equipment has been tested and found to comply with the limits for a Class B digital device,
pursuant to part 15 of the FCC Rules. These limits are designed to provide reasonable protection against
harmful interference in a residential installation. This equipment generates, uses and can radiate radio
frequency energy and, if not installed and used in accordance with the instructions, may cause harmful
interference to radio communications. However, there is no guarantee that interference will not occur
in a particular installation. If this equipment does cause harmful interference to radio or television
reception, which can be determined by turning the equipment o and on, the user is encouraged to try
to correct the interference by one or more of the following measures:
—Reorient or relocate the receiving antenna.
—Increase the separation between the equipment and receiver.
—Connect the equipment into an outlet on a circuit dierent from that to which the receiver is
connected.
—Consult the dealer or an experienced radio/TV technician for help.
ONE-YEAR LIMITED WARRANTY
For complete warranty, visit www.insigniaproducts.com.
CONTACT INSIGNIA
1-877-467-4289 (U.S. and Canada) or 01-800-926-3000 (Mexico)
www.insigniaproducts.com
INSIGNIA is a trademark of Best Buy and its aliated companies
Distributed by Best Buy Purchasing, LLC
7601 Penn Ave South, Richeld, MN 55423 U.S.A.
©2017 Best Buy. All rights reserved.
Made in China
NS-DMIC300P_17-0248_QSG_V1_EN.ai 2 5/1/2017 11:20:40 AMNS-DMIC300P_17-0248_QSG_V1_EN.ai 2 5/1/2017 11:20:40 AM

SPECIFICATIONS
• Transducer: Condenser
• Acoustic Principle: Line plug gradient
• Frequency Response: 35-18,000Hz
• Sensitivity: -38dB +/- 1dB / 0dB=1V/Pa,1kHz
• Signal to Noise Ratio: 78dB
• Power Supply: 1.5V battery
• Battery Life: 70 hours approximately
• PAD Switch: 0dB,+10dB
• Plug: 3.5mm jack plug
• Filter: Controlled by low-cut lter switch
• Dimensions (L x H x W): 6.7 x 3.5 x 1.8 in. (171 x 88 x 45 mm)
• Net Weight: 3.35 oz. (95 g)
• Operating temperature: 14°F to 131°F (-10°C to +55°C)
• Storage temperature: -4°F to 167°F (-20°C to +75°C)
• Polar pattern: Cardioid:
V1 ENGLISH 17-0248
TROUBLESHOOTING
• Microphone stops working: Verify LED is lit when power switch is in the
ON position. Replace battery if not.
• Sound is too quiet: Enable the microphone boost (+10dB switch), move
closer to the subject, consult camera owner’s manual for audio recording
settings.
• Sound is distorted: Make sure the microphone boost is switched o,
move away from the subject, consult camera owner’s manual for audio
recording settings.
MAINTAINING YOUR MICROPHONE
• Keep your microphone away from dust, moisture, or water.
• To clean the housing, wipe with a dry micro-ber cloth to remove dust.
• Store your microphone in the included pouch to protect it from dirt and
dust.
IMPORTANT SAFETY INFORMATION
• Make sure that you follow all safety notes.
• Keep these instructions for use in a safe place. If you sell the equipment or
pass it on to someone else, you should also pass on these instructions for
use.
Marking on the devices
Waste disposal and protection of the environment
Electric and electronic appliances, as well as batteries, must not be
disposed of together with domestic waste. The user is legally
obliged to return electric and electronic appliances as well as
batteries to specially set up public collecting points or the sales
outlet once they have reached the end of their service life. Details
are regulated by national law. The symbol on the product, the instructions
for use, or the packaging refers to these provisions. The recycling of waste
equipment/batteries is an important contribution to the protection of our
environment.
Danger of re and short-circuit
• Do not operate the device with wet hands.
• Clean the equipment only in the way described in Maintaining Your
Microphone.
• Take care to avoid dropping the equipment. Make sure that the device is
properly fastened and reliably mounted. If the device has been dropped,
have it inspected by a skilled technician before you switch it on again.
• Should the equipment be damaged or defective, or if you notice a
scorching smell, remove the batteries immediately. Do not operate the
device with a damaged housing and do not repair the device yourself.
Have the device only repaired by a skilled service person.
• Always keep your device in good condition, as specied in these
instructions for use.
• Do not tamper with or alter the internal components of the microphone.
Danger of suocation caused by small parts
• Keep the device out of the reach of children and pets.
Precautionary measure when using the batteries.
• Batteries/power packs, if inappropriately handled, can run out or explode.
• Please observe the following notes on safety when handling batteries to
be used in this device:
• Use only batteries mentioned in these operating instructions.
• Do not discard of the batteries in a re and do not expose them to direct
heat.
• In order to avoid damage to the product, you must make sure that you
remove the batteries, if you do not use the product over a long period
of time, or if the batteries have been discharged.
• If battery uid comes into contact with skin or clothes, rinse it o
immediately with fresh water.
LEGAL NOTICES
FCC Statement
This device complies with part 15 of the FCC Rules. Operation is subject to the following two conditions:
(1) This device may not cause harmful interference, and (2) this device must accept any interference
received, including interference that may cause undesired operation.
FCC Caution
Changes or modications not expressly approved by the party responsible for compliance could void
the user’s authority to operate the equipment.
FCC Statement
This equipment has been tested and found to comply with the limits for a Class B digital device,
pursuant to part 15 of the FCC Rules. These limits are designed to provide reasonable protection against
harmful interference in a residential installation. This equipment generates, uses and can radiate radio
frequency energy and, if not installed and used in accordance with the instructions, may cause harmful
interference to radio communications. However, there is no guarantee that interference will not occur
in a particular installation. If this equipment does cause harmful interference to radio or television
reception, which can be determined by turning the equipment o and on, the user is encouraged to try
to correct the interference by one or more of the following measures:
—Reorient or relocate the receiving antenna.
—Increase the separation between the equipment and receiver.
—Connect the equipment into an outlet on a circuit dierent from that to which the receiver is
connected.
—Consult the dealer or an experienced radio/TV technician for help.
ONE-YEAR LIMITED WARRANTY
For complete warranty, visit www.insigniaproducts.com.
CONTACT INSIGNIA
1-877-467-4289 (U.S. and Canada) or 01-800-926-3000 (Mexico)
www.insigniaproducts.com
INSIGNIA is a trademark of Best Buy and its aliated companies
Distributed by Best Buy Purchasing, LLC
7601 Penn Ave South, Richeld, MN 55423 U.S.A.
©2017 Best Buy. All rights reserved.
Made in China
NS-DMIC300P_17-0248_QSG_V1_EN.ai 2 5/1/2017 11:20:40 AMNS-DMIC300P_17-0248_QSG_V1_EN.ai 2 5/1/2017 11:20:40 AM