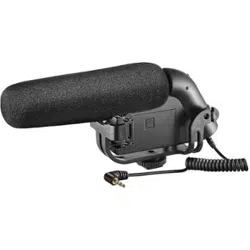
PACKAGE CONTENTS
• Microphone
• Alkaline 9V battery
• Foam windscreen
• Pouch
• Spare rubber bands
• Quick Setup Guide
FEATURES
• Super-cardioid polar pattern picks up more frontal sound
• Two-step high-pass lter minimizes noise
• 3.5 mm audio plug connects to recording devices
• Built-in shock mount reduces vibrations
Quick Setup Guide
|
NS-DMIC190P/NS-DMIC190P-C
Shotgun Condenser Microphone
Before using your new product, please read these instructions to prevent any damage.
INSTALLING THE BATTERY
1 Slide the battery compartment lid down and lift it o.
2 Match the large (-) terminal on the battery to the small terminal on the clip, then
snap the terminals rmly together.
3 Replace the battery compartment lid.
SETTING UP YOUR MICROPHONE
To attach your microphone to a camera:
1 Loosen the locking knob, then slide your microphone’s shoe mount onto your
camera.
2 Tighten the locking knob to secure your microphone.
3 Connect the 3.5 mm audio cable to your camera.
Note: Make sure that your camera is set up to use an external microphone. See the
instructions that came with your camera for more information.
To attach your microphone to a tripod:
1 Tighten the microphone to the 1/4" screw on a tripod or tripod plate. See the
instructions that came with your tripod for more information.
2 Connect the 3.5 mm audio cable to your camera.
Note: You can also attach the microphone to a boom or pistol grip using the 1/4" mounting
threads. See the instructions that came with your boom or pistol grip for more information.
Power switch
1/4" mounting threads
9V battery
compartment
Power switch
Noise reducing
suspension system
3.5 mm audio cable
Cold shoe mount
with locking knob
Low-cut
lter switch
OFF
ON
Low-cut lter switch
OFF
ON
Unwanted
sound source
Sound source
Sound source
Unwanted
sound source
USING YOUR MICROPHONE
1 Turn on your camera.
2 To turn on your microphone:
• Slide the power switch to ON.
OR
• To use the low-cut lter, slide the power switch to .
Note: The low-cut lter minimizes the impact of low frequency hum, camera motor noise,
and similar low frequency ambient noise.
3 Aim the microphone at the sound source and away from unwanted sound
sources.
Tip: If using a tripod or a boom, the microphone could be held below or above as well as
straight in-front of the sound source.
4 Slide the power switch to OFF when you are nished recording.
USING YOUR WINDSCREEN
• To prevent noise if the microphone is moving or in wind, slide the foam
windscreen onto your microphone.
Note: When using the microphone in high wind, use a zeppelin windscreen (not included).
IMPORTANT SAFETY INFORMATION
• Please read these instructions completely before you use this equipment for the
rst time. It contains everything you need to know in order to avoid damage to
yourself or property.
• Make sure that you follow all safety notes.
• Keep these instructions for use in a safe place. If you sell the equipment or pass it
on to someone else, you should also pass on these instructions for use.
Marking on the devices
Waste disposal and protection of the environment
Electric and electronic appliances, as well as batteries, must not be
disposed of together with domestic waste. The user is legally obliged to
return electric and electronic appliances as well as batteries to specially
set up public collecting points or the sales outlet once they have reached
the end of their service life. Details are regulated by national law. The
symbol on the product, the instructions for use, or the packaging refers to
these provisions. The recycling of waste equipment/batteries is an
important contribution to the protection of our environment.
Loading ...
