Before using your new product, please read these instructions to prevent any damage.
User Guide
Digital to Analog
Converter Box
NS-DXA3

Table of Contents
Welcome 3
Safety information 3
Important safety information 4
Features 6
Package contents 6
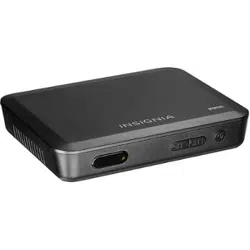
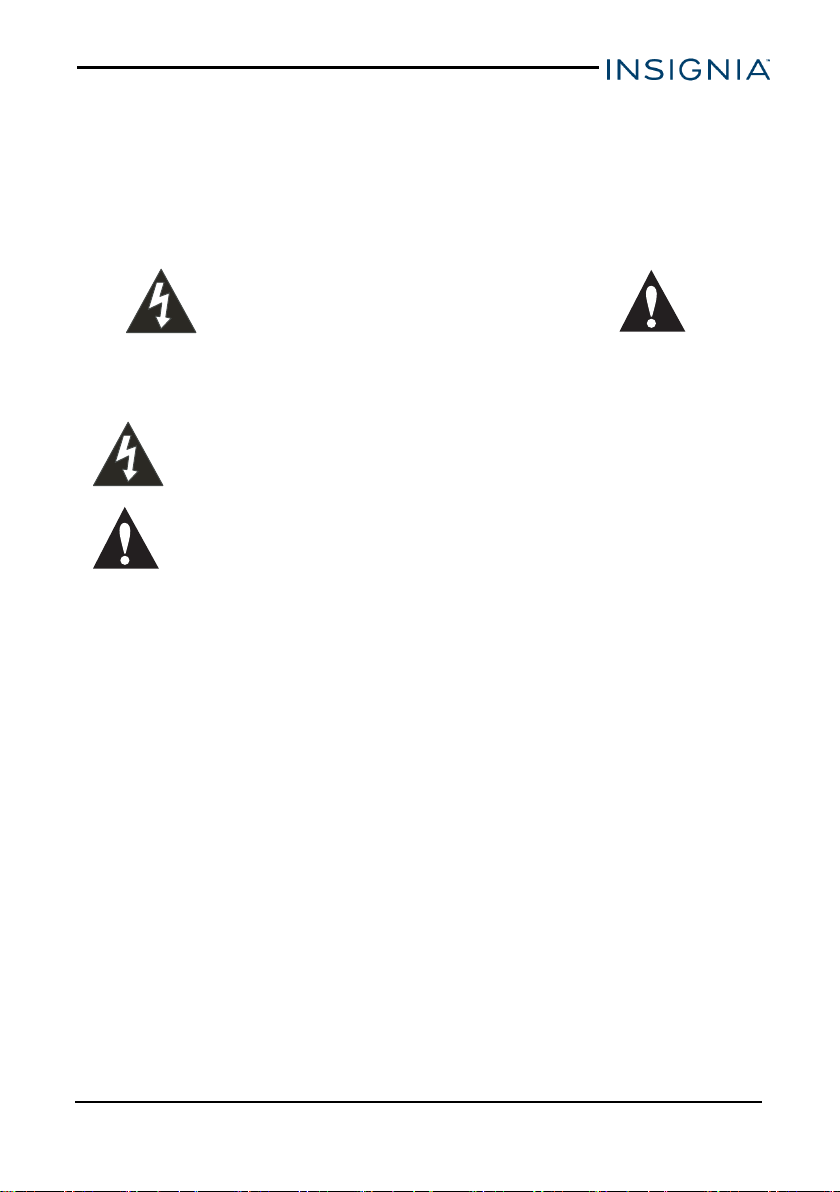
Front 6
Back 7
Remote control 8
Installing the remote control batteries 9
Setting up your converter box 9
Connecting with an HDMI cable (best) 9
Connecting with an AV cable (better) 10
Connecting with an RF (coaxial)cable (good) 11
Setting initial setup options 12
Using your converter box 15
Turning your converter box on or off 15
Changing channels 15
Opening the guide 15
Adding or removing a favorite channel 15
Using analog pass-through 16
Running a channel scan 16
Using the setup menu 17
Settings menu 17
User menu 19
Resetting your converter box 20
Troubleshooting 20
Specifications 22
Legal Notices 23
FCC Statement 23
Open Source Software Notice 23
Warranty 24
www.insigniaproducts.com
2
NS-DXA3
Welcome
Congratulations on your purchase of a high-quality Insignia product. Your
NS-DXA3 represents the state of the art in digital to analog converter box
design and is designed for reliable and trouble-free performance.
Safety information
CAUTION
RISK OF ELECTRIC SHOCK
DO NOT OPEN
CAUTION: TO REDUCE THE RISK OF ELECTRIC SHOCK DO NOT REMOVE
THE COVER (OR BACK). NO USER-SERVICEABLE PARTS INSIDE. REFER
SERVICING TO QUALIFIED SERVICE PERSONNEL.
The lightning flash with arrowhead symbol within a triangle is intended to alert you to
the presence of uninsulated dangerous voltage within your converter box’s
enclosure that may be of sufficient magnitude to constitute risk of electric shock to
persons.
The exclamation point within a triangle is intended to alert you to the presence of
important operating and maintenance (servicing) instructions in the literature
accompanying your converter box.
WARNING: To prevent fire or electric shock hazard, do not expose your converter box to rain or
moisture.
WARNING: Do not install your converter box in a confined space such as a bookcase or similar
unit.
WARNING: Do not block any ventilation openings. Install in accordance with the manufacturer’s
instructions. Slots and openings in the cabinet are provided for ventilation and to ensure reliable
operation of your converter box and to protect it from overheating.
The openings should never be blocked by placing your converter box on a bed, sofa, rug, or
other similar surface. Your converter box should not be placed in a built-in installation such as a
bookcase or rack unless proper ventilation is provided or the manufacturer's instructions have
been adhered to.
CAUTION: Your converter box should not be exposed to water (dripping or splashing) and no
objects filled with liquids, such as vases, should be placed on it.
POWER ADAPTER WARNING: The manufacturers of most appliances recommend that their
appliance be placed on a dedicated circuit—a single outlet circuit which powers only that
appliance and has no additional outlets or branch circuits.
Overloaded power outlets, loose or damaged wall outlets, extension cords, frayed power cords,
or damaged or cracked wire insulation are dangerous. Any of these conditions could result in
electric shock or fire. Periodically examine the power adapter of your converter box, and if its
appearance indicates damage or deterioration, unplug it, discontinue use of your converter box,
and have the power adapter replaced with an exact replacement part by an authorized service
personnel.
Protect the power adapter from physical or mechanical abuse, such as being twisted, kinked,
pinched, closed in a door, or walked upon. Pay particular attention to plugs, wall outlets, and the
point where the power adapter cord exits your converter box.
To disconnect the main power from your converter box, unplug the power adapter from the
power outlet. When installing your converter box, make sure that the plug is easily accessible.
www.insigniaproducts.com
3
Digital to Analog ConverterBox

IMPORTANT SAFETY INFORMATION
1. Read these instructions.
2. Keep these instructions.
3. Heed all warnings.
4. Follow all instructions.
5. Do not use your converter box near water.
6. Clean only with a dry cloth.
7. Do not block any ventilation openings. Install in accordance with the manufacturer's
instructions.
8. Do not install near any heat sources such as radiators, heat registers, stoves, or other
apparatus (including amplifiers) that produces heat.
9. Protect the power cord from being walked on or pinched particularly at plugs, convenience
receptacles, and the point where it exits from the apparatus.
10. Only use attachments or accessories specified by the manufacturer.
11. Unplug your converter box during lightning storms or when unused for long periods of time.
12. Refer all servicing to qualified service personnel. Servicing is required when your converter
box has been damaged in any way, such as when the power cord or plug is damaged, liquid
has been spilled or objects have fallen into your converter box, your converter box has been
exposed to rain or moisture, does not operate normally, or has been dropped.
WARNING
Electric shock hazard
To reduce the risk of fire or electric shock, do not remove any cover or expose the device to rain
or moisture. No user-serviceable parts are inside. Refer servicing to qualified service technicians.
Lightning
For added protection for your device during a lightning storm, or when it is left unattended and
unused for long periods of time, unplug it from the power outlet and disconnect any antenna or
cable system. This helps prevent property damage and personal injury from lightning and power
line surges.
Power lines
An outside antenna system should not be located in the vicinity of overhead power lines or other
electric light or power circuits, or where it can fall into such power lines or circuits. When installing
an outside antenna system, extreme care should be taken to keep from touching such power
lines or circuits as contact with them might be fatal.
Servicing
These servicing instructions are for use by qualified service personnel only. To reduce the risk of
electric shock, do not perform any servicing other than that contained in the operating
instructions unless you are qualified to do so.
www.insigniaproducts.com
4
NS-DXA3
CAUTION
Damage requiring service
Unplug this converter box from the power outlet and refer servicing to qualified service personnel
under the following conditions:
l When the power supply cord or plug is damaged or frayed.
l If liquid has been spilled or objects have fallen into your converter box.
l If your converter box has been exposed to rain or water.
l If your converter box does not operate normally by following the operating instructions.
Adjust only those controls that are covered by the operating instructions because incorrect
adjustment of other controls may result in damage and will often require extensive work by
a qualified technician to restore your converter box to its normal operation.
l If your converter box has been dropped or damaged in any way.
l When your converter box exhibits a distinct change in performance.
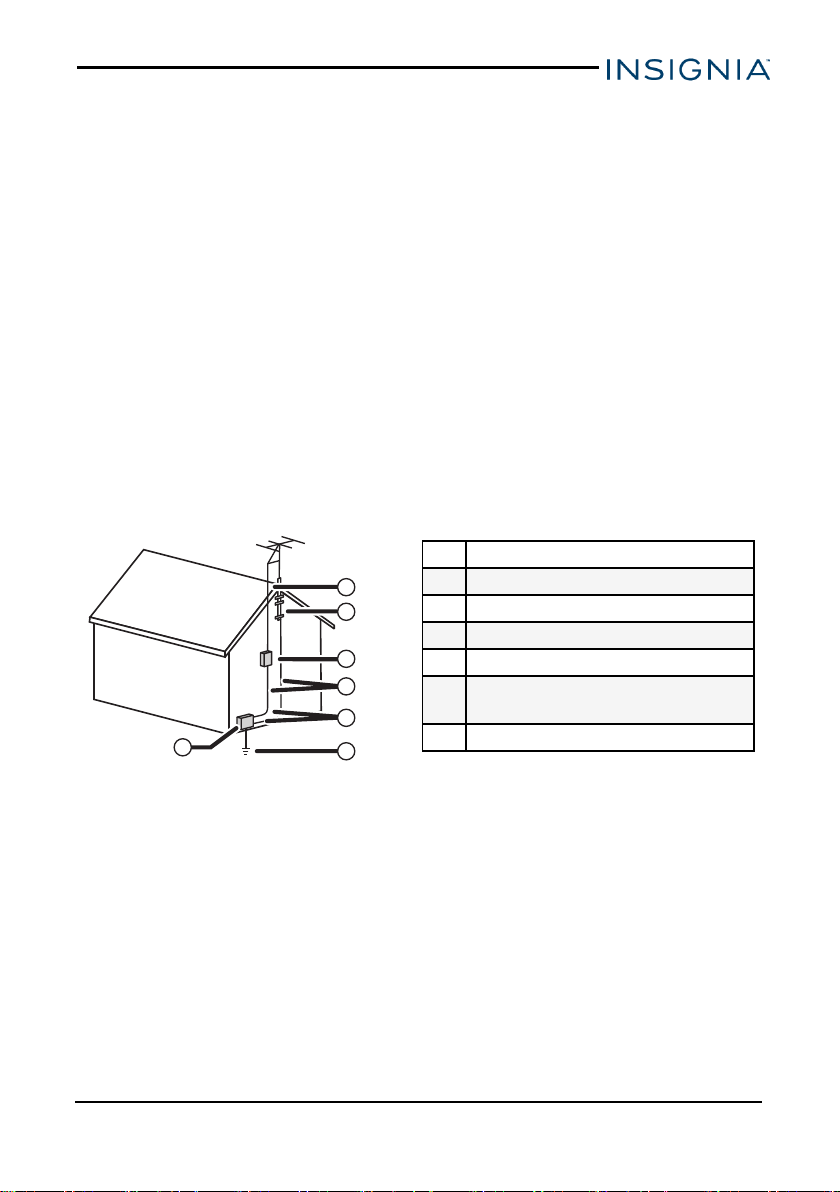
Outdoor antenna grounding
If an outside antenna or cable system is connected to your converter box, make sure that the
antenna or cable system is grounded to provide some protection against voltage surges and
built-up static charges. Article 810 of the National Electrical Code, ANSI/NFPA No. 70, provides
information with respect to correct grounding of the mast and supporting structure, grounding of
the lead-in wire to an antenna discharge unit, size of grounding conductors, location of the
antenna-discharge unit, connection to grounding electrodes, and requirements for the
grounding electrode.
1 Antenna lead-in wire
2 Grounding design
3 Antenna discharge unit
4 Grounding conductors
5 Ground clamps
6
Power service grounding electrode
system
7 Electronic service equipment
2
1
3
4
5
6
7
Note to CATV system installer
Article 820 of the National Electrical Code, ANSI/NFPA No. 40 provides guidance for correct
grounding. Specifically, it states that the cable ground must be connected to the grounding
system of the building as close to the point of cable entry as practical.
www.insigniaproducts.com
5
Digital to Analog ConverterBox
Features
PACKAGE CONTENTS
l Converter box
l Remote control and batteries (2 AA)
l AC adapter
l Coaxial cable
l Quick Setup Guide
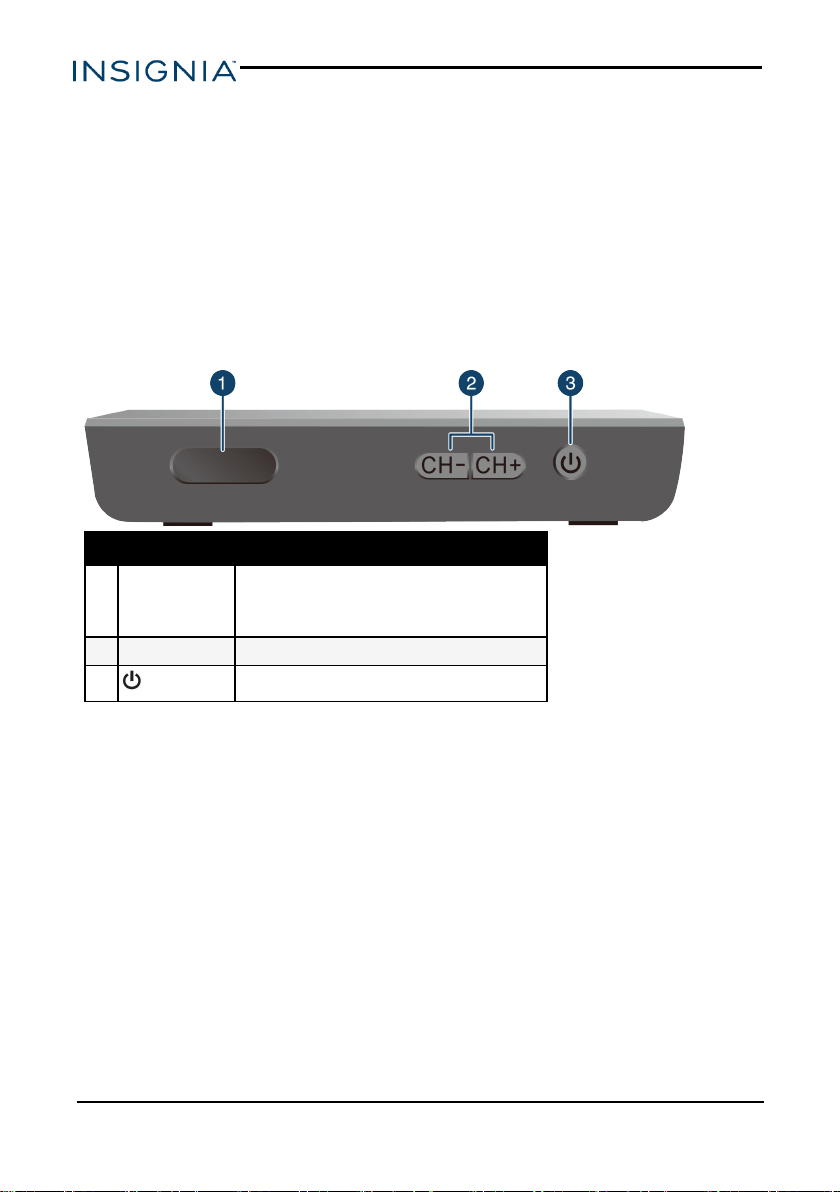
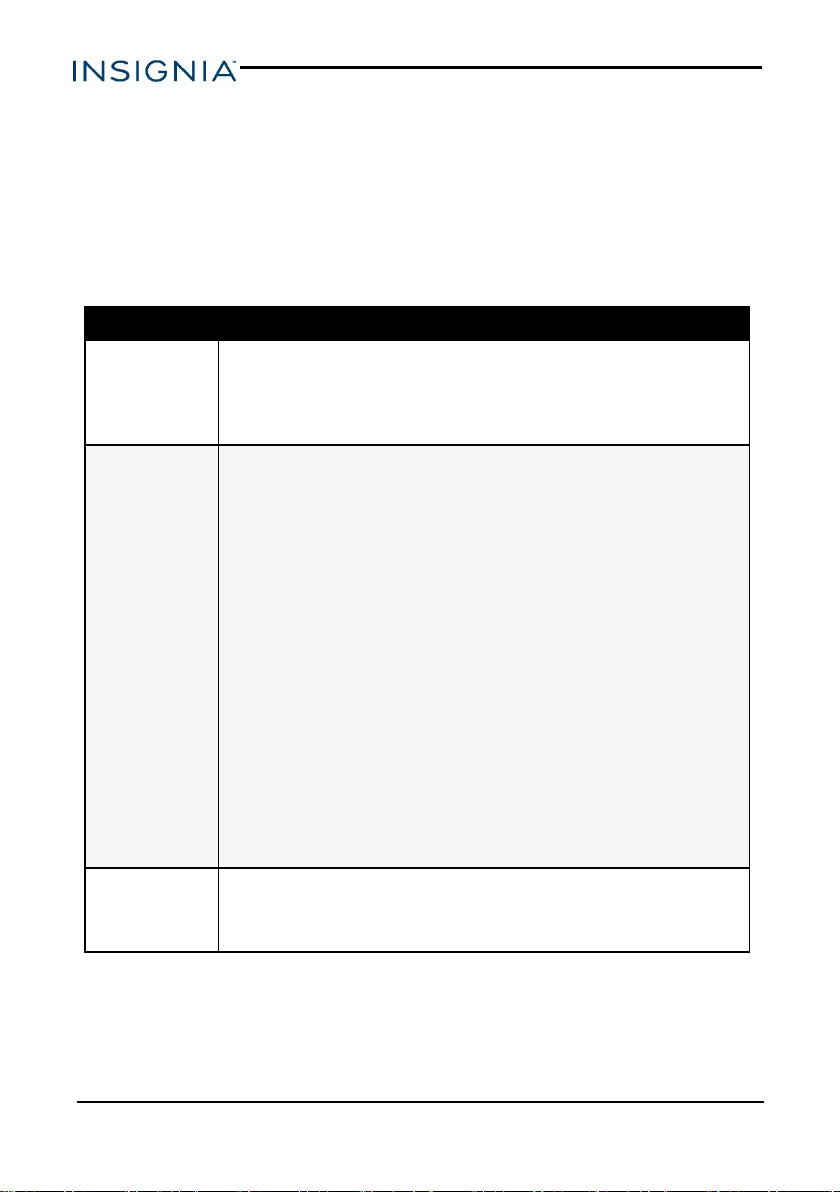
FRONT
No. Component Description
1 Power indicator
Lights when your converter box has power.
Red—Standby mode
Green—On mode
2 CH-/CH+ Press to scan through memorized channels.
3
(power)
Turn the converter box on or off.
www.insigniaproducts.com
6
NS-DXA3
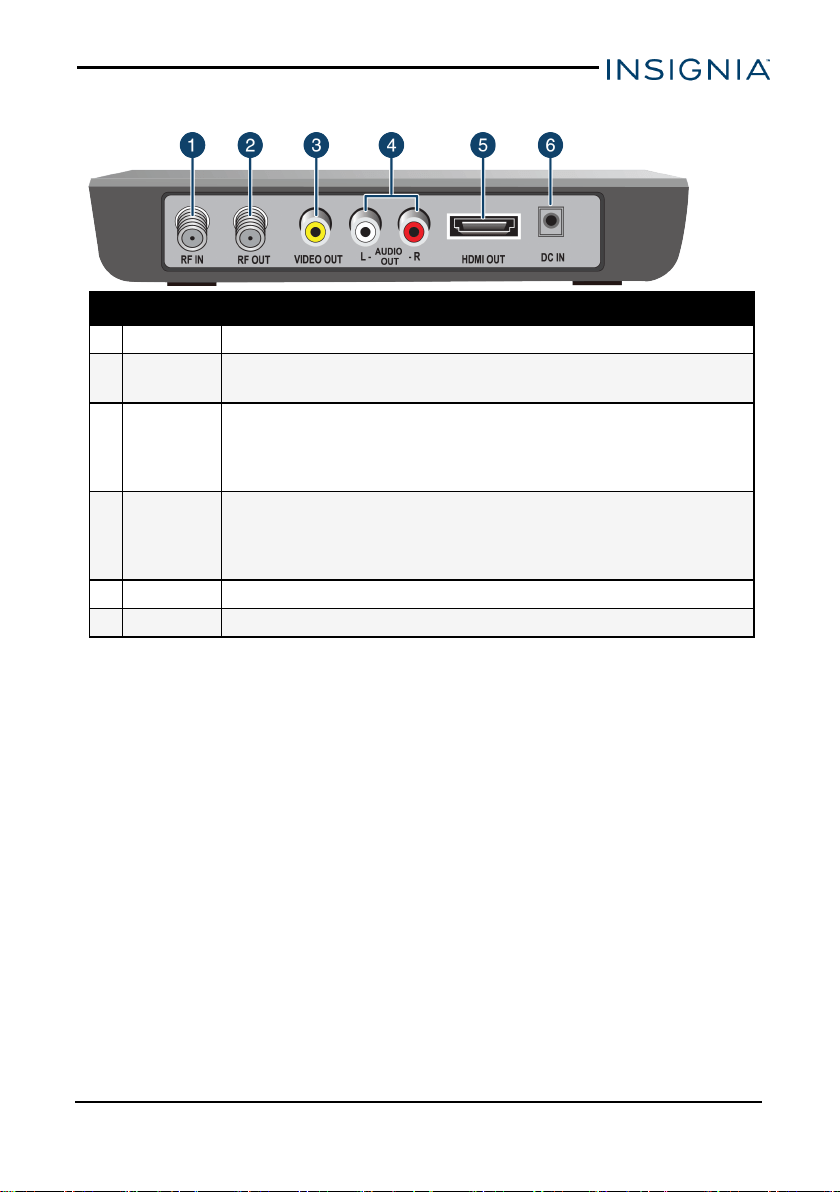
BACK
No. Component Description
1 RF IN Connect this jack to your antenna.
2 RFOUT
If your TV does not have HDMIor A/V jacks, connect this jack to the
Antenna INjack on your TV.
3 VIDEOOUT
Connect a yellow AV cable from this jack to the AV IN jack (yellow) on your
TV.
Note: If your TV does not have AV jacks, connect your TV to the HDMI OUT
(best) or RFOUT (good) jack.
4
AUDIO OUT
L/R
Connect these jacks to the corresponding AUDIO IN L/R (red/white) jacks
on your TV.
Note: If your TV does not have AV jacks, connect your TV to the HDMIOUT
(best) or RF OUT (good) jack.
5 HDMIOUT Connect an HDMI cable from this port to an HDMI IN port on your TV.
6 DC IN Connect the AC power adapter to this jack.
www.insigniaproducts.com
7
Digital to Analog ConverterBox

REMOTE CONTROL
No. Button Description
1 SIGNAL
Display your antenna signal
strength for the current
channel.
2
(power)
Turn the converter box on or
off.
3 SAP
Turn on second audio
program and listen to
English-language
programming in other
languages.
4 AUDIO Open text-to-speech settings.
5 MENU Open the on-screen menu.
6 OK
Select a highlighted menu
item.
7
Go back one level in the on-
screen menu.
8
Green
button
Switch to the System options
in the on-screen menu.
9
Red
button
Switch to RRT (Rating
Region Table).
No. Button Description
10 FAV
Switch to a favorite channel
through the Program Guide
in the on-screen menu.
11 VOL +/-
Increase or decrease the
volume.
12
(mute)
Turn off the sound. Press
again to restore the sound.
13 Numbers
Enter a channel number or
parental control password.
14
(sub-
channel)
Enter a sub-channel number.
For example, to enter sub-
channel 2.1, press 2, press
this button, then press 1.
15 ASPECT
Adjust the aspect ratio of the
video output.
16
PASS-
THRU
By-pass the converter box so
that your TV will function as it
did without the converter box
(receiving analog channels
only).
17 FONT
Access the CC FONT (closed
captioning font) menu.
18 CC Turn on closed captioning.
19 GUIDE Open the Program Guide.
20 ▲▼◄►
Navigate through the on-
screen menus.
21 INFO
Display information about the
current program.
22
Yellow
button
Switch to the User options in
the on-screen menu.
23
Blue
button
Change the PIN in the Lock
settings of the on-screen
menu.
24 CH ▲/▼ Change channels.
25 LAST Return to the last channel.
www.insigniaproducts.com
8
NS-DXA3
Installing the remote control batteries
1. Press the tab on the battery cover, then remove the cover.
2. Insert two AA batteries (included). Make sure that the direction of the +
and – symbols on the batteries match the + and – symbols in the battery
compartment.
3. Replace the battery cover.
Setting up your converter box
You can connect your converter box with HDMI (not included), AV (not
included), or coaxial (included) cables. You must connect an antenna to your
converter box.
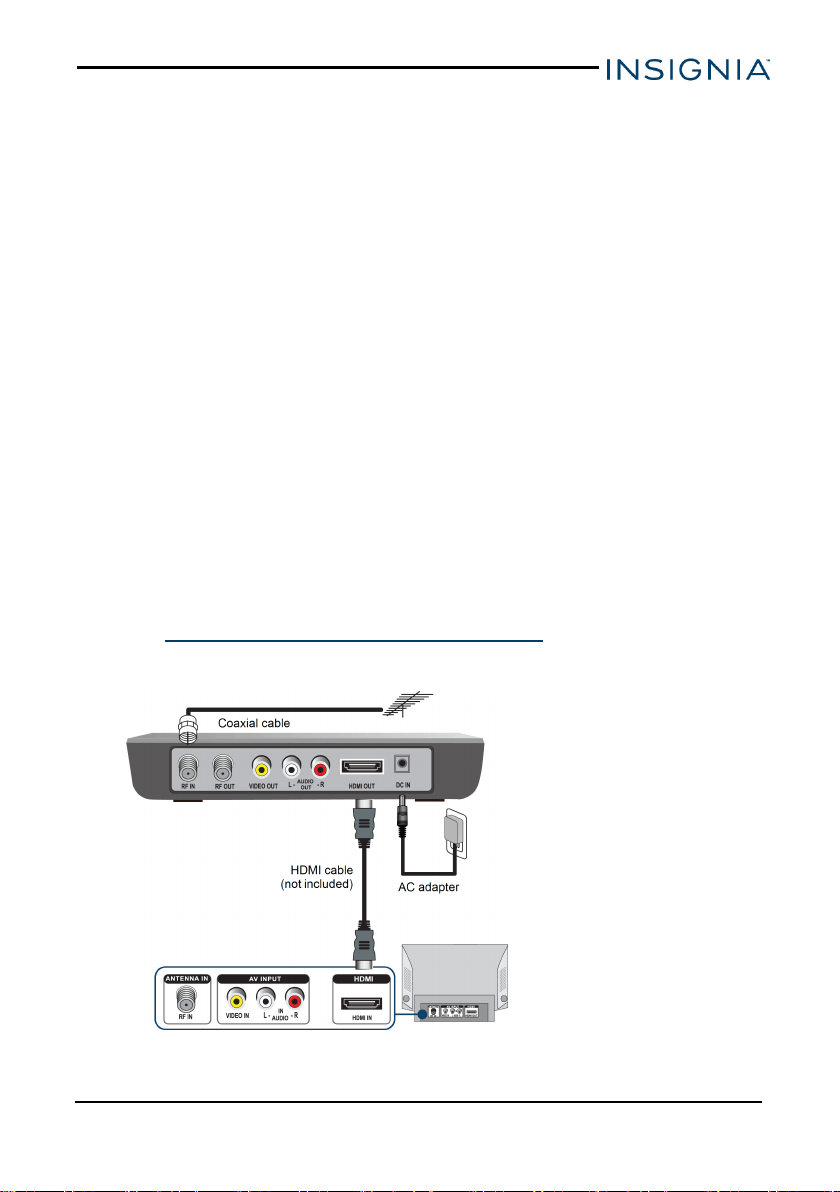
CONNECTING WITH AN HDMI CABLE (BEST)
An HDMI connection provides the best video and audio quality.
1. Connect your existing antenna cable to the RF IN jack on the converter
box. You may need to remove the antenna cable from the back of your TV
and connect it to the converter box.
2. Connect an HDMI cable (not included) from the converter box’s HDMI
OUT port to your TV’s HDMI IN port.
3. Connect the AC adapter from the DC IN jack to a power outlet.
4. See Setting initial setup options (on page12) to finish setting up your
converter.
www.insigniaproducts.com
9
Digital to Analog ConverterBox
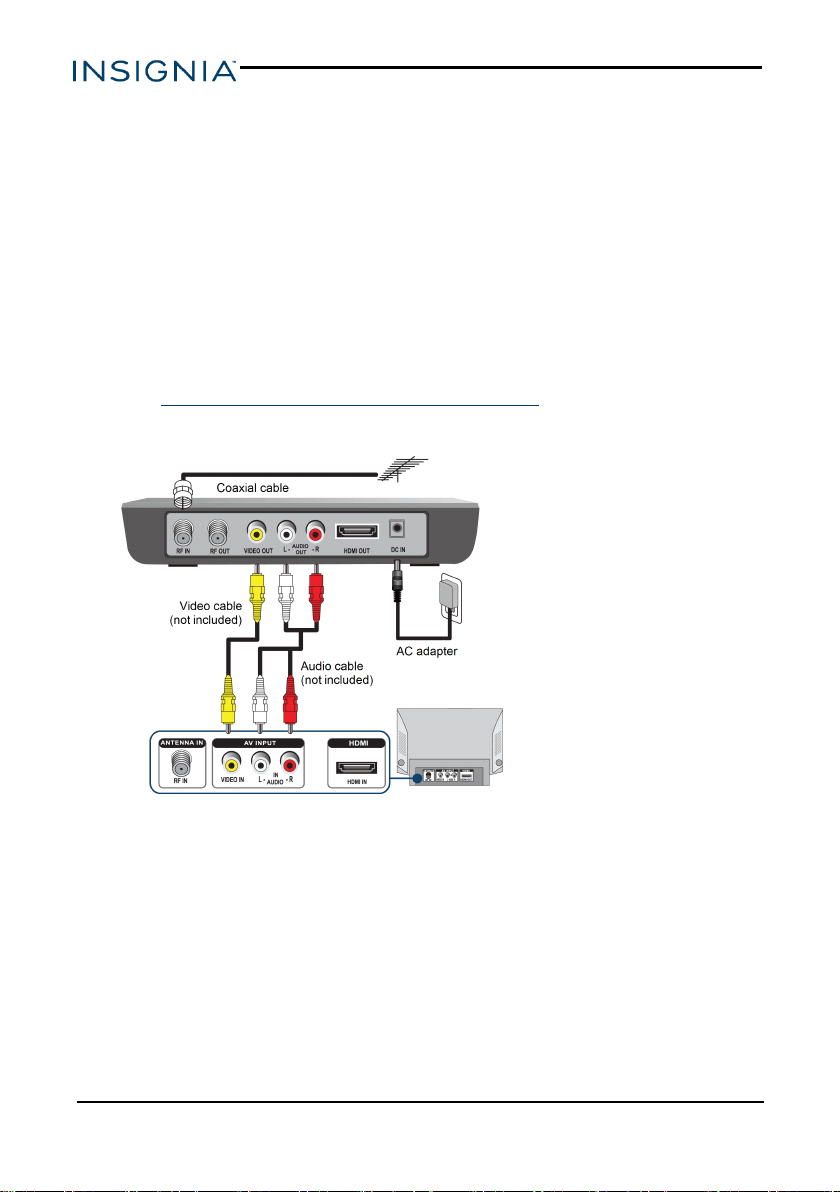
CONNECTING WITH AN AV CABLE (BETTER)
You can use this option if your TV has Video (yellow) and Audio Left/Right
(white/red) AV ports.
1. Connect your existing antenna cable to the RF IN jack on the converter
box. You may need to remove the antenna cable from the back of your TV
and connect it to the converter box.
2. Connect a yellow video cable (not included) from the converter box’s
VIDEO OUT jack to your TV’s VIDEO IN jack.
3. Connect a red and white audio cable (not included) from the converter
box’s AUDIO OUT L/R jacks to your TV’s AUDIO IN L/R jacks.
4. Connect the AC adapter from the DC IN jack to a power outlet.
5. See Setting initial setup options (on page12) to finish setting up your
converter.
www.insigniaproducts.com
10
NS-DXA3
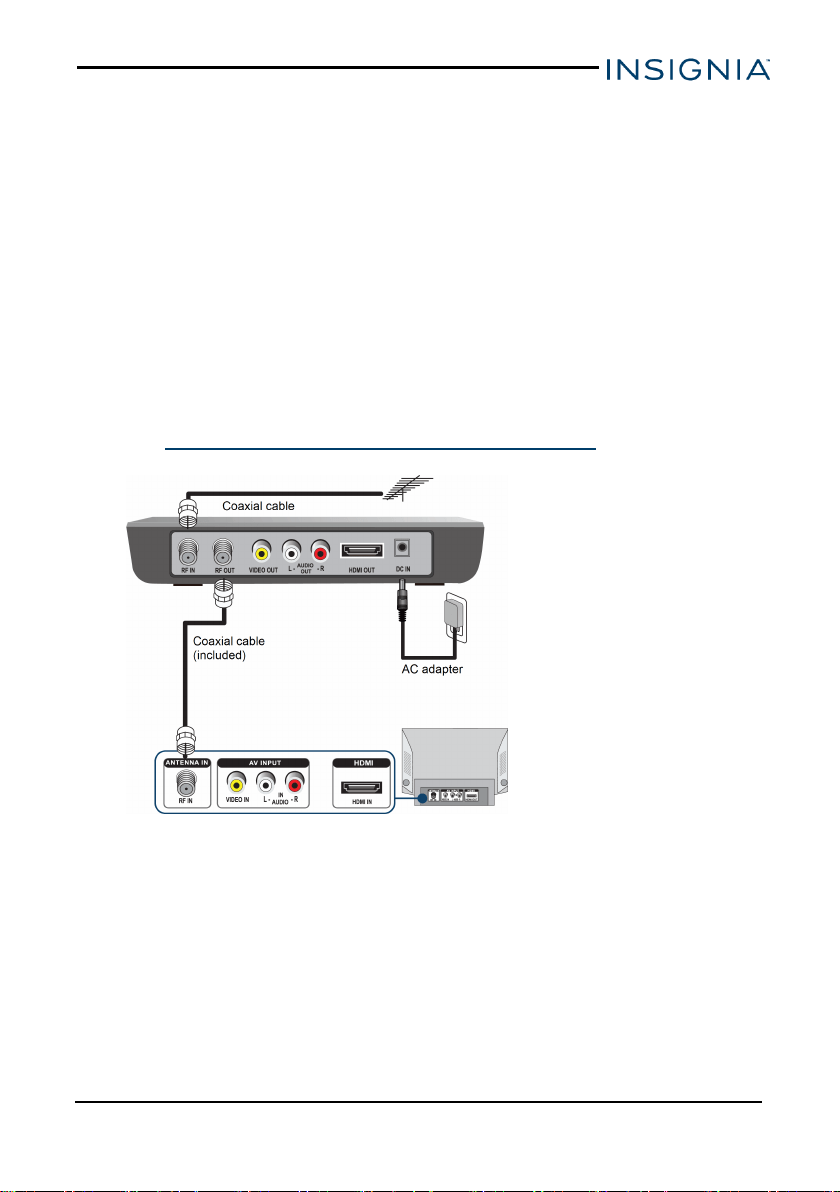
CONNECTING WITH AN RF (COAXIAL)CABLE (GOOD)
The resolution of the video signal output is 480i for both RF and AV
connections, but AV gives better sound and signal quality. You will need an
additional coaxial cable if you use this setup option.
1. Connect your existing antenna cable to the RF IN jack on the converter
box. You may need to remove the antenna cable from the back of your TV
and connect it to the converter box.
2. Connect a coaxial cable (included) from the converter box’s RF OUT jack
to your TV’s ANTENNA IN jack. For best performance with this
connection, change the Audio Output option to Mono from Stereo (see
your TV’s user guide for more information).
3. Connect the AC adapter from the DC IN jack to a power outlet.
4. Turn on your TV and converter box.
5. See Setting initial setup options (on the next page) to finish setting
up your converter.
www.insigniaproducts.com
11
Digital to Analog ConverterBox
SETTING INITIAL SETUP OPTIONS
1. Turn on your converter box and TV.
2. Use your TV’s remote to select the correct source on your TV:
l If you connected the converter box with an HDMI cable, select
HDMI.
l If you connected the converter box with an AV cable, select AV.
l If you connected the converter box with a coaxial cable, tune your TV
to channel 3.
Note
If channel 3 is used as a broadcast station in your area, you need to
switch the converter box's RF Output to channel 4 after the Easy
Install wizard is finished. To change the RF output:
1. Press MENU on the remote control.
2. Select the Settings menu, then select the System options.
3. Press ▲ or ▼ to select RF Output, then press ◄ or ► to select
CH 3 or CH 4.
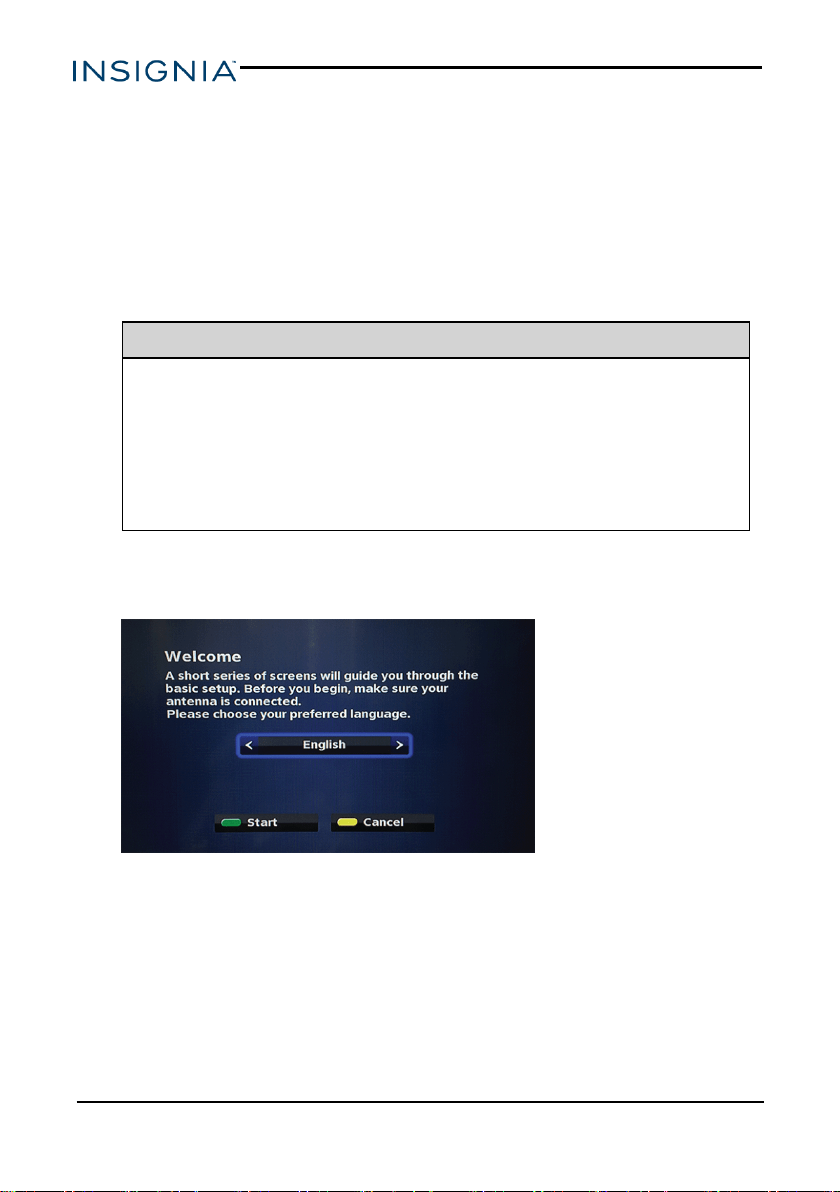
The Welcome screen opens.
3. Press ◄ or ► to select a language, then press OK or the green button on
your remote.The channel scan begins.
www.insigniaproducts.com
12
NS-DXA3
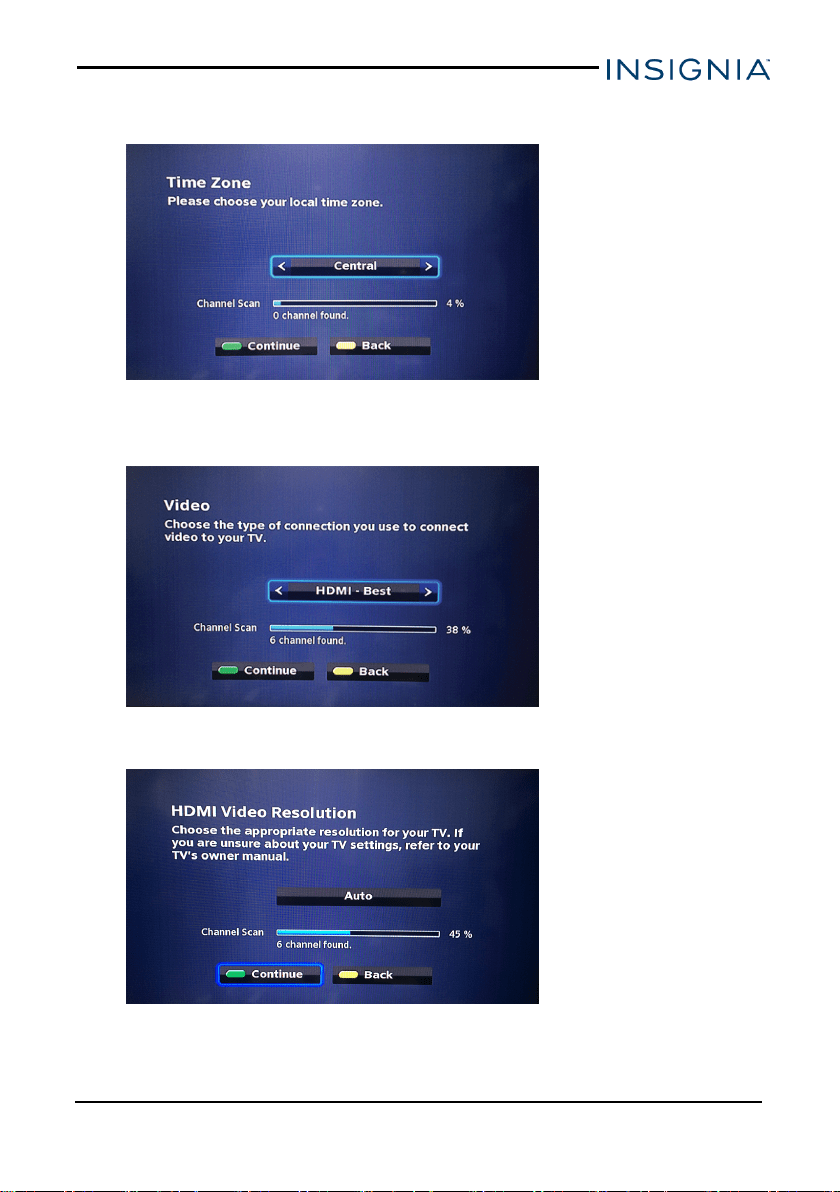
4. Press ◄ or ► to select your time zone, then press OK or the green button
on your remote.
5. Press ◄ or ► to choose the type of connection you used to connect the
converter box to your TV, then press OK or the green button on your
remote.
6. If you selected HDMI in step 5, press ◄ or ► to select your video
resolution, then press OK or the green button on your remote.
www.insigniaproducts.com
13
Digital to Analog ConverterBox
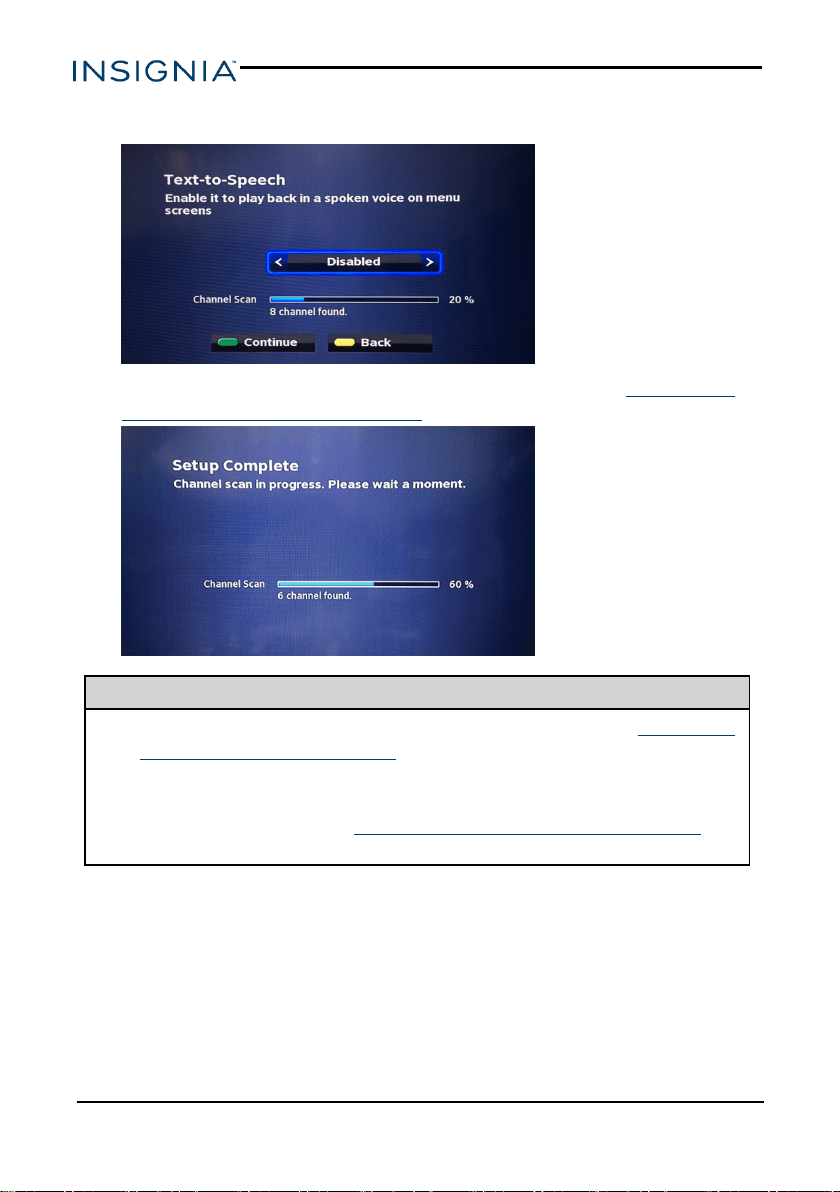
7. Press ◄ or ► to enable Text-to-Speech, then press OK or the green
button on your remote.
8. When the channel scan is finished, setup is complete. See Using your
converter box (on the next page) for more information.
Tips
l The channel scan may not find all available channels. See Changing
channels (on the next page) to learn how to navigate to channels
that aren’t in the memorized list.
l If a channel in range is not in the memorized list, you can run the
channel scan again. See Running a channel scan (on page16) for
instructions.
www.insigniaproducts.com
14
NS-DXA3

Using your converter box
TURNING YOUR CONVERTER BOX ON OR OFF
l Press POWER to turn your converter box on or off. The power indicator
lights:
l Red:Standby mode
l Green:On
CHANGING CHANNELS
You must use the buttons on the converter box, the remote that came with
your converter box, or program a universal remote to work with your converter
box.
l Press CH+ or CH– to select a channel in the memorized list.
OR
l Press the number buttons for the channel you want. To enter a digital sub-
channel (for example 2.1), press the main channel numbers, press ,
then press the numbers for the sub-channel.
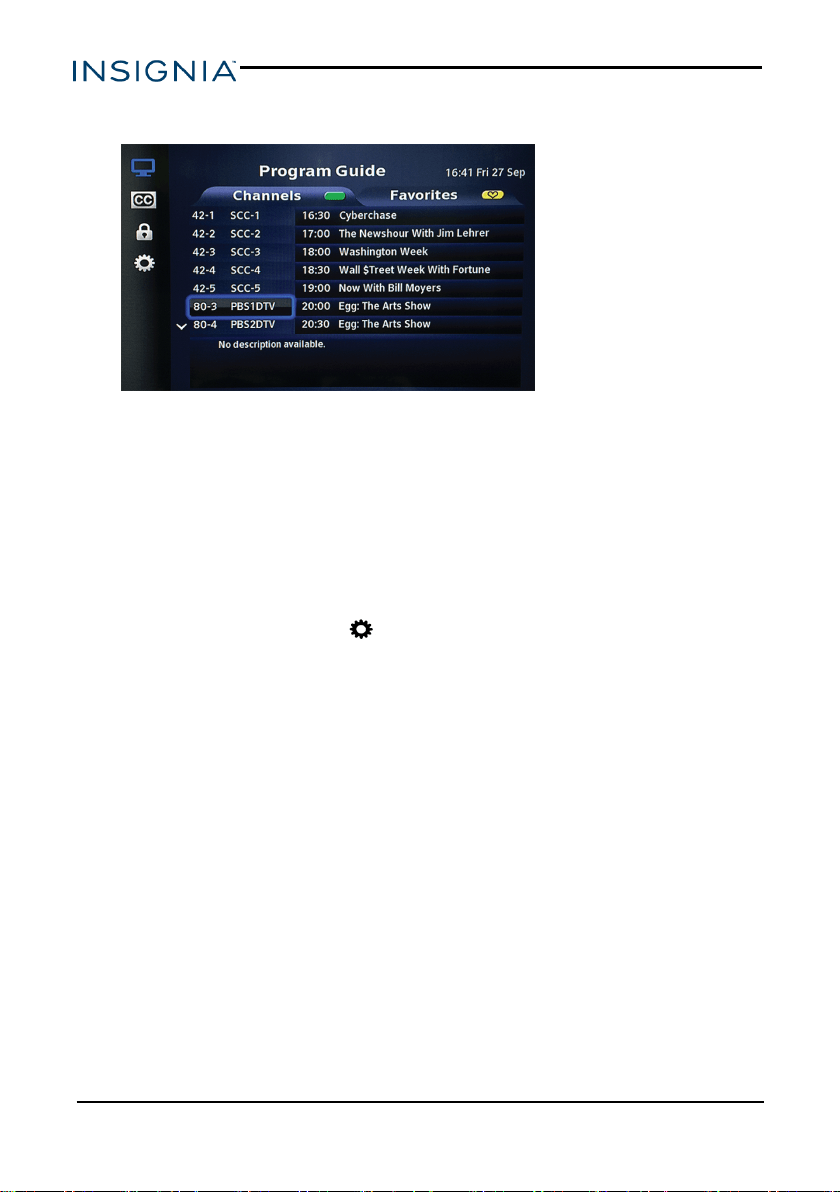
OPENING THE GUIDE
l Press GUIDE on your remote control.
ADDING OR REMOVING A FAVORITE CHANNEL
1. Press MENU on the remote control.
2.
Select Program Guide, then press OK.
3. Press ▲ or ▼ to select the channel you want to add, then press FAV on
your remote.
4. Press the Yellow button to view your Favorites list.
www.insigniaproducts.com
15
Digital to Analog ConverterBox
5. To remove a channel from your Favorites list, select it then press FAV on
your remote.
USING ANALOG PASS-THROUGH
The pass-through function lets your TV function as it did without the converter
box (receiving analog channels only).
l Press PASS-THRU on your remote control to enable or disable.
RUNNING A CHANNEL SCAN
If a channel that you know exists is not in the memorized lists, adjust your
antenna and run the channel scan again:
1.
Press MENU, then select Settings.
2. Press ▲ or ▼ to highlight Channel Scan, the select Start scan.
www.insigniaproducts.com
16
NS-DXA3

Using the setup menu
1. Press MENU on the remote control. The Main Menu opens.
Title Description
Program
Guide
Displays program guide information, schedule, and favorite channels you set.
Closed
Captioning
Press ▲ or ▼ to select the captions setting you want to change, then press
OK or ► to select.
l Analog Service or Digital Service
l FONT: Choose the size, style, color, and effects.
l EDGE: Choose the color and type.
Lock
Enter the 4-digit passcode to set up the parental controls settings including
Channel, Ratings, and RRT. The default passcode is 0000.
Settings
Includes all system and user settings for the converter box.
2. Press ▲ or ▼ to select the menu item you want to review, then press OK
to open.
SETTINGS MENU
1.
Press MENU on the remote control, then press ▼ to select Settings.
2. Press the Green button to open the System options, then press ▲ or ▼
to select the option you want.
www.insigniaproducts.com
17
Digital to Analog ConverterBox
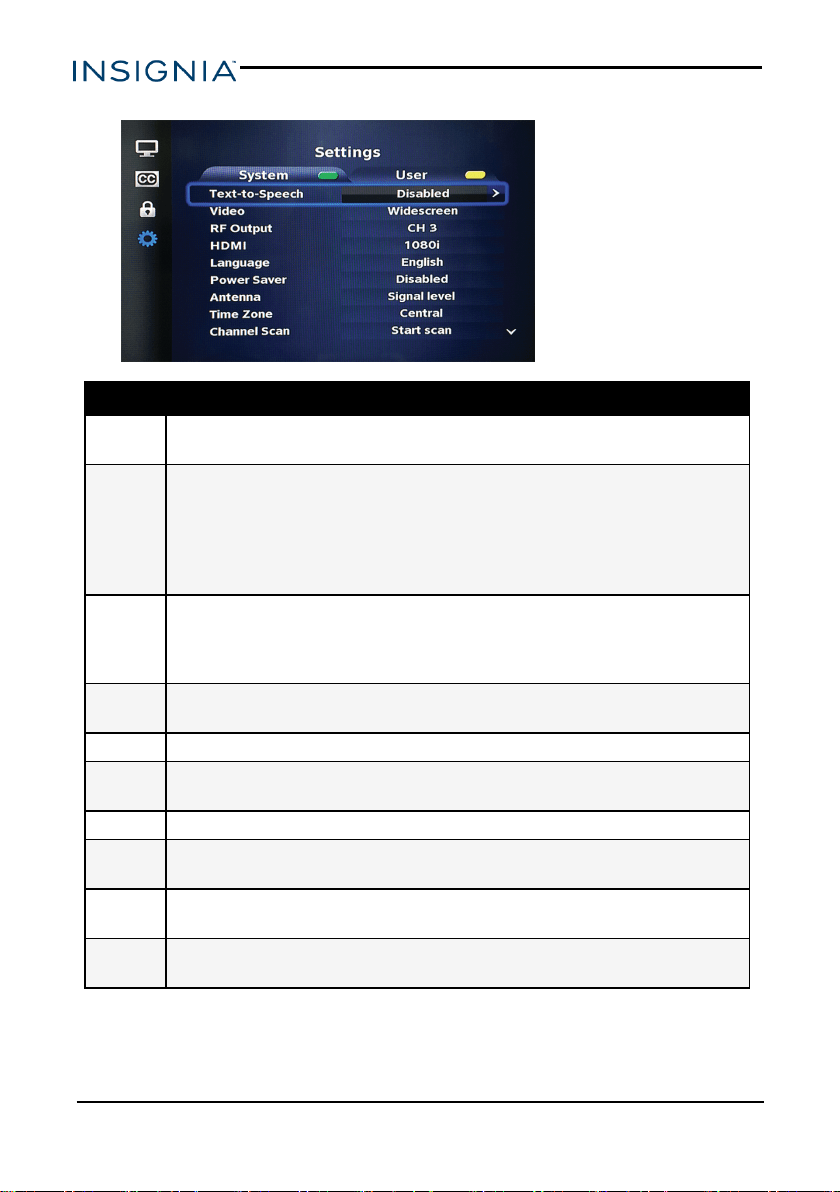
3. Press ► to switch between available options.
Setting Description
Text-to-
Speech
Select to turn on or off text to speech.
Video
Select the aspect ratio you want:
l Widescreen: View content in a 16:9 widescreen aspect ratio.
l Fullscreen: Display a 16:9 picture in the 4:3 aspect ratio.
l Zoom: Zoom in on the picture.
l Stretch: Squeeze a 16:9 picture onto a 4:3 screen.
RF Output
When connected to your TV with an RF cable, you can change the output channel
to 3 or 4.
If channel 3 is used as a broadcast station in your area, switch the RF output to
channel 4.
HDMI
When connected to your TV with an HDMI cable, use this option to select your video
resolution (Auto, 480p, 720p, or 1080i).
Language Select your converter box’s language (English, Spanish, or French).
Power
Saver
Set the sleep timer to turn off your TV after a specified period of time (4 hours, 8
hours, or Disabled).
Antenna Displays your signal level and quality to help adjust your antenna.
Time
Zone
Set your time and time zone.
Channel
Scan
Scan for available channels.
System
Setup
Reset back to factory default settings.
www.insigniaproducts.com
18
NS-DXA3
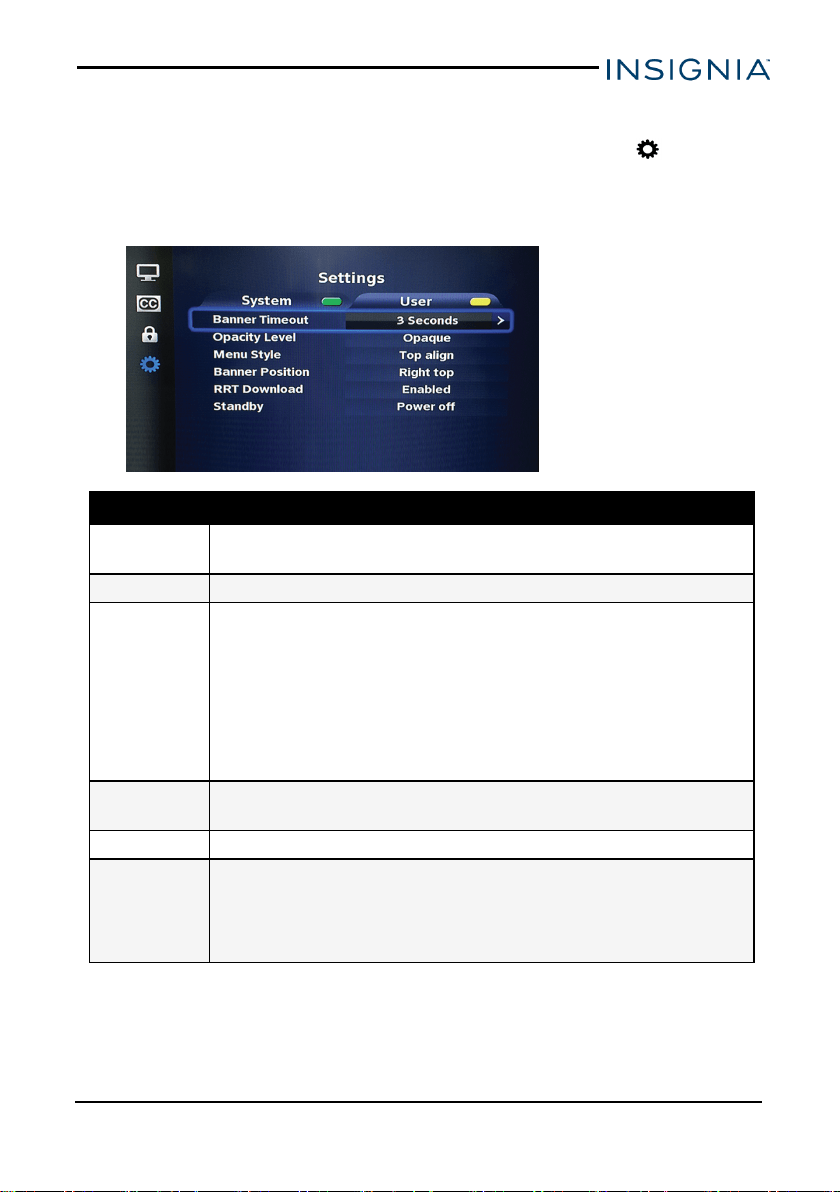
USER MENU
1.
Press MENU on the remote control, then press ▼ to select Settings.
2. Press the Yellow button to open the User options, then press ▲ or ▼ to
select the option you want.
3. Press ► to switch between available options.
Setting Description
Banner
Timeout
Select how long a pop-up banner displays (3, 6, or 9 seconds).
Opacity Level Set the transparency effect of the menu picture (Opaque, 90%, 80%).
Menu Style
Choose the menu alignment:
l Top align: Four menu icons fixed on the left without displaying content.
l Top align (expand): Four menu icons fixed on the left with content.
l Center align: Menu icons are rotating as selected without displaying
content.
l Center align (expand): The menu icons are rotating as selected with
content.
Banner Position
Select the position of the channel banner (bottom left or top right corner).
RRTDownload Enable to download rating region table (RRT)for content.
Standby
Set the standby mode:
l Power off: Turns off the converter box.
l Active standby: Turns off the screen, but keeps the converter box
running.
www.insigniaproducts.com
19
Digital to Analog ConverterBox
Resetting your converter box
1. Unplug the AC adapter from the back of your converter box, then wait 60
seconds.
2. Plug the ACadapter back into the DC INjack, then turn on your converter
box.
Troubleshooting
Problem Solution
Converter box
won’t turn on.
l Make sure that the AC adapter is correctly inserted into a working
power outlet.
l Press the (power) button on the front panel to see if the green light
(power indicator) is on.
Poor picture
quality.
l Make sure that the antenna is pointing in the correct direction. Scan for
available channels after moving the antenna. Press MENU, select
Settings, then select Channel Scan.
l Do not bundle the coaxial cable with the power cord or other cables.
l If you use a UHF/VHF amplifier to boost the signal level, make sure
that it is operating correctly.
l If the picture quality is good on some channels and poor on others, the
problem may be caused by a poor or weak signal from the broadcaster
or cable TV provider.
l If you connect to cable TV without a set-top box and experience poor
picture quality, you may need to install a set-top box to improve signal
reception and picture quality. Contact your cable TV provider about
upgrading to a set-top box.
l Many high-definition (HD) channels upscale standard-definition (SD)
content. The picture displayed on your TV is still displayed as SD, thus
the picture quality will not be as clear or crisp as it would be if the
content was originally recorded in HD.
No audio.
l Make sure that your TV’s volume is turned up and not muted.
l Make sure that the cables are connected correctly and securely.
l Check with local TV stations to see if they are testing new services.
www.insigniaproducts.com
20
NS-DXA3

Problem Solution
No video.
l If your TV is connected to the converter box with an HDMI cable, make
sure that the TV’s input (source) is set to HDMI.
l If your TV is connected to the converter box with an AV cable, make
sure that the TV's input (source) is set to the correct video input (for
example, AV or Video 1).
l If your TV is connected to the converter box with a coaxial cable, make
sure that the TV is set to the correct channel (3 or 4).
l Make sure that the video cable between the TV and the converter box
is connected correctly.
l Scan for available channels. Press MENU, select Settings, then
select Channel Scan.
Some channels
are not available
after running an
Auto Scan.
l Adjust your antenna and scan for available channels. See Running a
channel scan (on page16).
l Make sure that you have the correct antenna type. To determine
which antenna you need for your area, visit www.antennaweb.org.
Type in your address and zip code to find an antenna that will continue
giving you free local broadcast programming.
No closed caption
displayed.
l Make sure that the channel you are watching carries closed caption
information.
l Press the CC button on the remote control to check for closed caption
data output.
Cannot use the
converter box
with my cable box.
l
The converter box works only with over-the-air broadcast television
signals, not cable or satellite service.
www.insigniaproducts.com
21
Digital to Analog ConverterBox
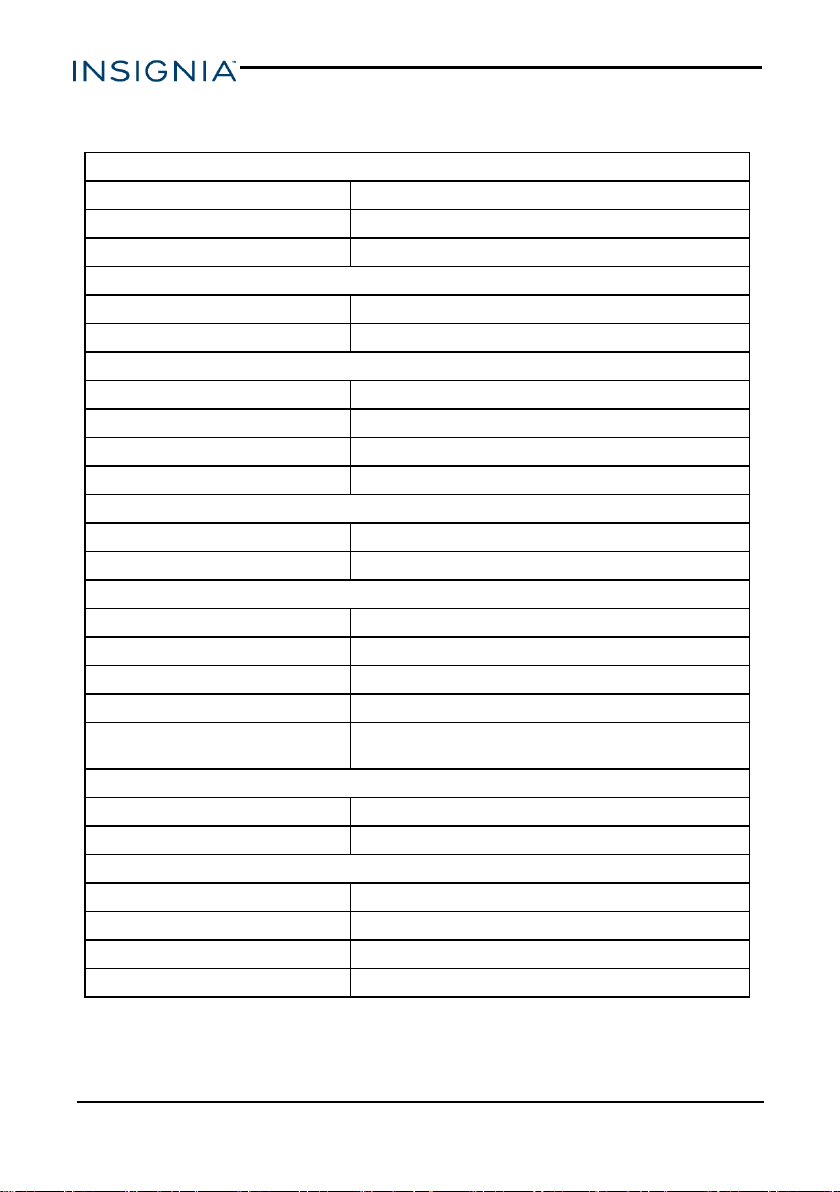
Specifications
RF Input
Demodulation 8VSB
Frequency Range 54 - 860 MHz
Connector Type F-Type × 1
RF Output
Signal Type NTSC
Connector Type F-Type × 1
Video Output
Signal Type NTSC
Impedance 75 Ohms
Output Level 1Vp-p
Connector RCA × 1
HDMI Output
Connector Type Type A × 1
Impedance 100 Ohms ± 15%
Audio Output
Output Left and Right channel
Impedance 600 Ohms (min.)
Output Level 2Vrms±10%@0dBFS
Connector RCA × 2
Front Panel
IR Receiver, 3 Key Function Control,
Status LED (power and standby)
Power Consumption (Product)
Operation 120VAC, 60Hz, 8W (max.)
Standby <0.8W
AC Adapter Specification
Input 100~240VAC, 50~60Hz
Output 5VDC/2.0A/10W
Dimension (W × D × H) 6.9 × 5.3 × 1.3 in. (175 × 135 × 33 mm)
Weight 8.8 oz. (250 g)
www.insigniaproducts.com
22
NS-DXA3

Legal Notices
FCC STATEMENT
This device complies with Part 15 of the FCC Rules. Operation is subject to
the following two conditions: (1) this device may not cause harmful
interference, and (2) this device must accept any interference received,
including interference that may cause undesired operation.
This equipment has been tested and found to comply with the limits for a
Class B digital device, pursuant to Part 15 of the FCC Rules.
These limits are designed to provide reasonable protection against harmful
interference in a residential installation.
This equipment generates, uses and can radiate radio frequency energy and, if
not installed and used in accordance with the instructions, may cause harmful
interference to radio communications. However, there is no guarantee that
interference will not occur in a particular installation.
If this equipment does cause harmful interference to radio or television
reception, which can be determined by turning the equipment off and on, the
user is encouraged to try to correct the interference by one or more of the
following measures:
l Reorient or relocate the receiving antenna.
l Increase the separation between the equipment and receiver.
l Connect the equipment into an outlet on a circuit different from that to
which the receiver is connected.
l Consult the dealer or an experienced radio/TV technician for help.
FCC warning: Changes or modifications not expressly approved by the party
responsible for compliance could void the user’s authority to operate the
equipment.
OPEN SOURCE SOFTWARE NOTICE
This product includes the following:
zlib: Copyright © 1995-2005 Jean-loup Gailly and Mark Adler
THE SOFTWARE IS PROVIDED "AS IS" WITHOUT WARRANTY OF ANY
KIND, EXPRESS OR IMPLIED, INCLUDING BUT NOT LIMITED TO THE
WARRANTIES OF MERCHANTABILITY, FITNESS FOR A PARTICULAR
PURPOSE AND NONINFRINGMENT OF THIRD PARTY RIGHTS. IN NO
EVENT SHALL THE AUTHORS OR COPYRIGHT HOLDERS BE LIABLE
FOR ANY CLAIM, DAMAGES OR OTHER LIABILITY, WHETHER IN AN
ACTION OF CONTRACT, TORT, OR OTHERWISE, ARISING FROM,
OUT OF OR IN CONNECTION WITH THE SOFTWARE OR THE USE OR
OTHER DEALINGS IN THE SOFTWARE.
www.insigniaproducts.com
23
Digital to Analog ConverterBox

Dolby License Notice and Trademark Acknowledgment
Manufactured under license from Dolby Laboratories. Dolby, Dolby
Audio, and the double-D symbol are trademarks of Dolby Laboratories.
Warranty
Definitions:
The Distributor* of Insignia branded products warrants to you, the original
purchaser of this new Insignia-branded product (“Product”), that the Product
shall be free of defects in the original manufacturer of the material or
workmanship for a period of 90 days from the date of your purchase of the
Product (“Warranty Period”).
For this warranty to apply, your Product must be purchased in the United
States or Canada from a Best Buy branded retail store or online at
www.bestbuy.com and www.bestbuy.ca and is packaged with this warranty
statement.
How long does the coverage last?
The Warranty Period lasts for 90 days from the date you purchased the
Product. Your purchase date is printed on the receipt you received with the
Product.
What does this warranty cover?
During the Warranty Period, if the original manufacture of the material or
workmanship of the Product is determined to be defective by an authorized
Insignia repair center or store personnel, Insignia will (at its sole option): (1)
repair the Product with new or rebuilt parts; or (2) replace the Product at no
charge with new or rebuilt comparable products or parts. Products and parts
replaced under this warranty become the property of Insignia and are not
returned to you. If service of Products or parts are required after the Warranty
Period expires, you must pay all labor and parts charges. This warranty lasts
as long as you own your Insignia Product during the Warranty Period.
Warranty coverage terminates if you sell or otherwise transfer the Product.
How to obtain warranty service?
If you purchased the Product at a Best Buy retail store location, please take
your original receipt and the Product to any Best Buy store. Make sure that
you place the Product in its original packaging or packaging that provides the
same amount of protection as the original packaging. If you purchased the
Product from a Best Buy online web site (www.bestbuy.com or
www.bestbuy.ca), mail your original receipt and the Product to the address
listed on the web site. Make sure that you put the Product in its original
packaging or packaging that provides the same amount of protection as the
original packaging.
To obtain warranty service, in the United States call 1-888-BESTBUY and in
Canada call 1-866-BESTBUY. Call agents may diagnose and correct the
issue over the phone.
www.insigniaproducts.com
24
NS-DXA3

Where is the warranty valid?
This warranty is valid only in the United States and Canada at Best Buy
branded retail stores or websites to the original purchaser of the product in the
county where the original purchase was made.
What does the warranty not cover?
This warranty does not cover:
l Customer instruction/education
l Installation
l Set up adjustments
l Cosmetic damage
l Damage due to weather, lightning, and other acts of God, such as power
surges
l Accidental damage
l Misuse
l Abuse
l Negligence
l Commercial purposes/use, including but not limited to use in a place of
business or in communal areas of a multiple dwelling condominium or
apartment complex, or otherwise used in a place of other than a private
home.
l Modification of any part of the Product, including the antenna
l Display panel damaged by static (non-moving) images applied for lengthy
periods (burn-in).
l Damage due to incorrect operation or maintenance
l Connection to an incorrect voltage or power supply
l Attempted repair by any person not authorized by Insignia to service the
Product
l Products sold “as is” or “with all faults”
l Consumables, including but not limited to batteries (i.e. AA, AAA, C etc.)
l Products where the factory applied serial number has been altered or
removed
l Loss or Theft of this product or any part of the product
l Display panels containing up to three (3) pixel failures (dots that are dark
or incorrectly illuminated) grouped in an area smaller than one tenth (1/10)
of the display size or up to five (5) pixel failures throughout the display.
(Pixel based displays may contain a limited number of pixels that may not
function normally.)
www.insigniaproducts.com
25
Digital to Analog ConverterBox

l Failures or Damage caused by any contact including but not limited to
liquids, gels or pastes.
REPAIR REPLACEMENT AS PROVIDED UNDER THIS WARRANTY IS
YOUR EXCLUSIVE REMEDY FOR BREACH OF WARRANTY. INSIGNIA
SHALL NOT BE LIABLE FOR ANY INCIDENTAL OR CONSEQUENTIAL
DAMAGES FOR THE BREACH OF ANY EXPRESS OR IMPLIED
WARRANTY ON THIS PRODUCT, INCLUDING, BUT NOT LIMITED TO,
LOST DATA, LOSS OF USE OF YOUR PRODUCT, LOST BUSINESS OR
LOST PROFITS. INSIGNIA PRODUCTS MAKES NO OTHER EXPRESS
WARRANTIES WITH RESPECT TO THE PRODUCT, ALL EXPRESS
AND IMPLIED WARRANTIES FOR THE PRODUCT, INCLUDING, BUT
NOT LIMITED TO, ANY IMPLIED WARRANTIES OF AND CONDITIONS
OF MERCHANTABILITY AND FITNESS FOR A PARTICULAR
PURPOSE, ARE LIMITED IN DURATION TO THE WARRANTY PERIOD
SET FORTH ABOVE AND NO WARRANTIES, WHETHER EXPRESS OR
IMPLIED, WILL APPLY AFTER THE WARRANTY PERIOD. SOME
STATES, PROVINCES AND JURISDICTIONS DO NOT ALLOW
LIMITATIONS ON HOW LONG AN IMPLIED WARRANTY LASTS, SO THE
ABOVE LIMITATION MAY NOT APPLY TO YOU. THIS WARRANTY
GIVES YOU SPECIFIC LEGAL RIGHTS, AND YOU MAY ALSO HAVE
OTHER RIGHTS, WHICH VARY FROM STATE TO STATE OR
PROVINCE TO PROVINCE.
Contact Insignia:
For customer service please call 1-877-467-4289
www.insigniaproducts.com
INSIGNIA is a trademark of Best Buy and its affiliated companies.
Distributed by Best Buy Purchasing, LLC
7601 Penn Ave South, Richfield, MN 55423 U.S.A.
©2016 Best Buy. All rights reserved.
Made in Taiwan
www.insigniaproducts.com
26
NS-DXA3


1-877-467-4289 (U.S. and Canada) or 01-800-926-3000 (Mexico)
www.insigniaproducts.com
INSIGNIA is a trademark of Best Buy and its affiliated companies.
Distributed by Best Buy Purchasing, LLC
7601 Penn Ave South, Richfield, MN 55423 U.S.A.
©2016 Best Buy. All rights reserved.
Made in Taiwan.
V2_ENG
16-0812