This trimmer is conveniently designed for household use. It should be allowed to charge 1 hour before first use.
Remove the trimmer, recharging transformer and accessories from the packing material.
Connect the transformer to the trimmer. BE SURE TRIMMER IS IN THE “OFF - 0” POSITION WHEN CHARGING.
Plug the recharging transformer into any convenient electrical outlet at the correct voltage.
When trimmer is low in power, it should be connected to the transformer and plugged into an outlet to assure maximum power is available when it is next used. This transformer is designed to completely charge the battery without overcharging. Do not use the trimmer while it is charging.
The battery will take approximately 60 minutes to charge. The Lithium Ion Trimmer also has quick charge capability. Quick charge means for every minute you charge the trimmer, you can get approximately 3 minutes of usage. For example, if you are in a hurry, charging for 3 minutes will give you almost 9 minutes of run time.
Insert only recharging transformer plug supplied by the manufacturer into charger receptacle.
TROUBLESHOOTING
If your trimmer does not seem to take a charge, check the following before returning it for repair:
Check outlet to make sure it is working by plugging in another appliance.
Make sure the outlet simply is not connected to a light switch which turns the power at the outlet off when lights are turned off.
Be sure the trimmer is properly connected to the recharging transformer, all connections are secure and the switch on the trimmer is turned “OFF - 0.”
If your electricity is connected to a master power switch, we suggest the trimmer be disconnected from the charger anytime the master switch is off. Leaving the unit plugged into a dead outlet or an unplugged charger will drain the battery.
If trimmer does not run and it is completely charged, turn the unit “ON - I” and pinch or push the blades manually. (Oil may have dried out between the blades, so they may be temporarily stuck together.)
LITHIUM-ION BATTERY
REPLACEMENT, TRIMMER DISPOSAL AND RECYCLING:
For battery replacement send the entire, intact trimmer unit to: Wahl Annex 3001 North Locust, P.O. Box 578, Sterling, IL 61081
Do not attempt to remove the battery. Lithium-Ion batteries can explode, catch fire, and/or cause burns if disassembled, damaged, or exposed to water or high temperatures.
If you choose not to replace the battery, the entire, intact trimmer unit must be disposed. Do not attempt to remove the battery for disposal. Lithium-Ion batteries may be subject to local disposal regulations. Many locations prohibit disposal in standard waste receptacles. Check your local laws and regulations.
For recycling contact a government recycling agency, waste disposal service
CARING FOR YOUR TRIMMER
OILING BLADES
For best results, use Wahl Clipper Oil on the blades only when necessary, or approximately once a month. Motor bearings are permanently lubricated—do not attempt to oil.
When oiling your trimmer, turn the trimmer “ON - I,” hold the unit with the blades facing DOWN and squeeze three drops across the front of the blade and one drop on each side on the heel of the blade. Wipe off excess oil with soft cloth.
NOTICE—DO NOT OVER OIL!
Excessive oiling or application of liquids will cause damage if allowed to seep back into motor.
BLADE CARE
Trimmer blades have precision-hardened, ground and lapped cutting teeth. Blades should be handled carefully and never bumped or used to cut dirty or abrasive material. Never rinse the blades with water, or the blades may rust. Clean with the included brush.
CLEANING/STORAGE
Before storing your trimmer, use the cleaning brush to whisk any loose hairs from the unit and the blades. For units with a soft-touch grip, use a damp cloth to wipe down the body of the trimmer, taking care not to get the blades wet. Store unit in such a manner so that blades are protected from damage.
When the trimmer is not in use, the trimmer blade guard attachment should be in place to protect the blades.
This appliance should be stored in a manner where it is not subjected to crushing, heating above 100°C (212°F), or incineration.
SPECIAL FEATURES:
Your trimmer has been designed with several advanced features to help you get perfect results every time you trim. Your trimmer may be used to neatly trim goatees, beards, mustaches, neckline, sideburns around the ears and eyebrows, or anywhere you may need grooming. It also makes a great all-around family trimmer for mini haircuts and touch ups between trips to the barber or to clean up the shape of the neck.
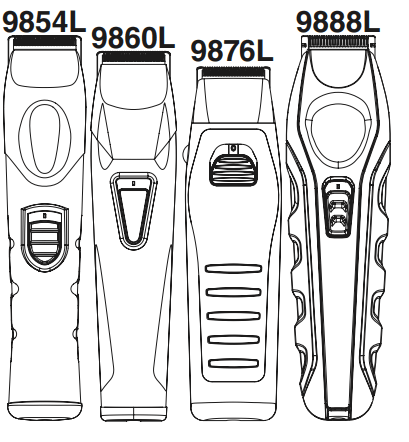
Rubber Grip (9854L, 9860L, 9888L) allows you to hold the trimmer in a comfortable position for precision trimming.
An Ergonomic Shape and Gripping Horizontal Bars (9876L) for added comfort, designed so you always hold the trimmer in a comfortable position for precision trimming.
The shape also provides optimum trimming visibility.
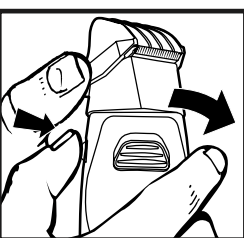
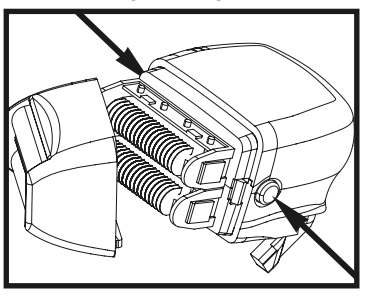
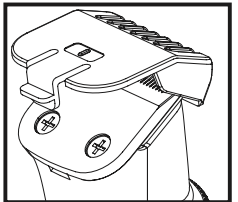
A Rotating Head (9876L). The trimming head rotates 360 degrees, providing two trimming positions. This allows you to achieve the optimum ergonomic relationship between the hand, the trimmer and the face. Rotate the head to the desired position as follows. With the switch in the “OFF - 0” position, depress the lock button and rotate the head clockwise or counterclockwise 360 degrees.
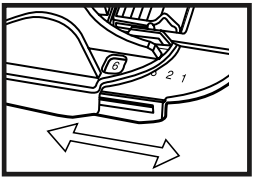
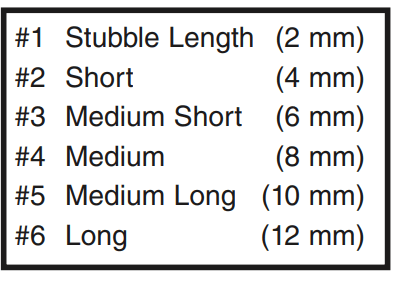
A 6-Position Trimming Guide makes achieving a consistent trim easy every time.
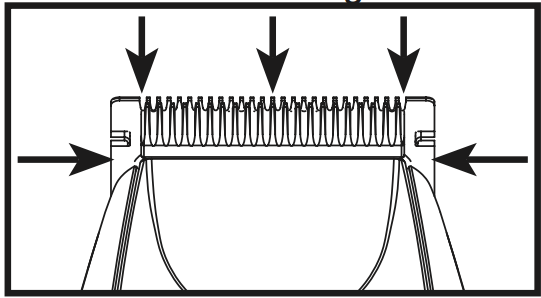
The guide can be removed (providing a seventh cutting position) and reattached without changing the preset cutting length, so once you have found the perfect length, there’s no guesswork in achieving it every trim. The trimming guide is a two-piece assembly, consisting of a base and a comb. It should not be disassembled. To attach the guide, simply slide it on at a slight angle and press the release tab down to secure in position. To remove the guide, gently push up on the release tab and slide the assembly away from the trimmer. Adjust the trimming length by pressing on the thumb lever and moving the comb forward or backward to the desired setting.
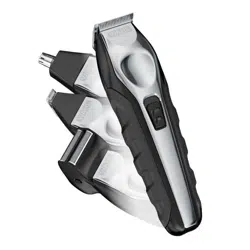
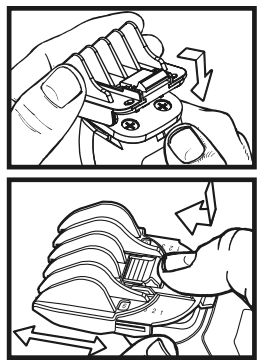
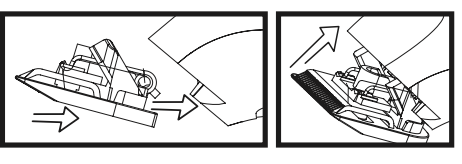
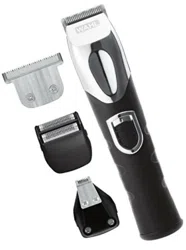
A Detachable blade system enables you to quickly change from a standard-width blade for full grooming to a narrowwidth blade for detail trimming around a mustache, goatee, or anywhere to define the hair line and clip any stray whiskers. To remove attachment, simply pull top edge of blade away from body unit. To attach, align back tab of attachment head to cavity on the inner edge of trimmer unit and push down on top of blade.
Should blades become damaged or dull or if you want additional attachment heads for your trimmer, you may purchase them from Wahl. Be sure to ask for the following attachment with part number from our service and repair department (see last page for contact information):
The trimmer you purchased may not have all of these heads, but they will all work with your trimmer if you wish to purchase them.
Self-sharpening blades are high compression, stainless steel, made to maintain their shape and sharpness for extended periods.
TRIMMING AND EDGING YOUR BEARD
The following are suggested trimming steps and trimmer positions. You may find different procedures work better for you.
Comb your beard in the direction that it grows to help reveal stray hairs that may be longer than the others.
Attach the 6-position trimming guide to trim and taper your beard. Begin with the guide set at a long trimming length. Trim toward your chin in smooth, overlapping strokes, following the lay of your beard. If you trim against the way your beard naturally lays, the trimmer will cut the hair much shorter and the result may be patchy.
Adjust the trimming guide to progressively shorter settings until you reach the desired length of beard. You may wish to set the trimming guide attachment to cut closer near the ear and down under the chin, changing to a longer setting toward the front of the face and point of your chin. When the trimming guide is removed, it will remain at its last length setting until you change it.
Always be sure the trimming guide is locked solidly into the desired position before you start to trim.
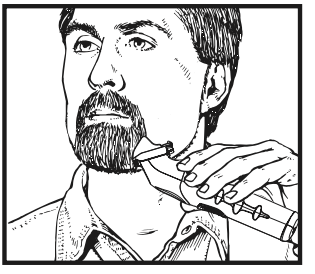
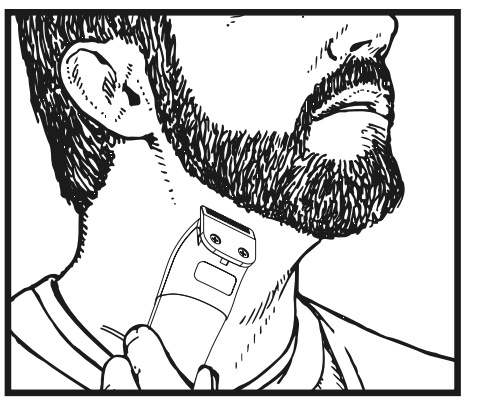
3. To cut the outline of your beard, remove the trimming guide. Starting under your chin and working back toward your jawbone and ears, cut the outer perimeter of your beard underneath the jawbone. Continue the line all the way up to the ears and hairline.
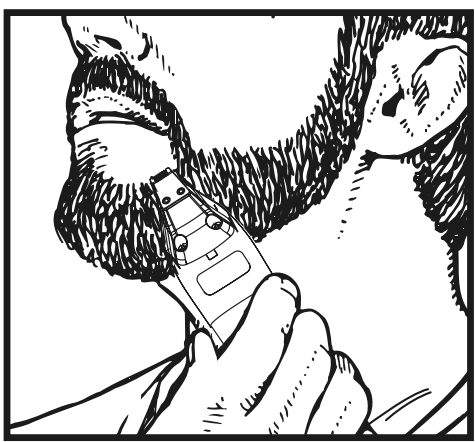
4. Accentuate your beard line by using the trimmer in a downward motion. Start at the line you’ve created and, working from the chin back toward the ears, trim the area right under your beard line.
5. Define the upper part of your beard using the same technique.
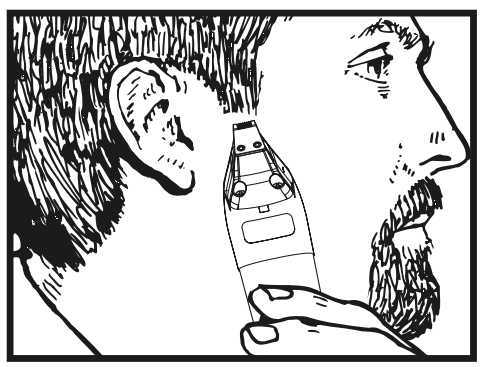
6. For a neater finished look, replace attachment blade to the detail blade forward. Use this blade for fine, detail trimming anywhere it is needed, such as at the sideburns near the ears, goatees, etc
DETAILING NECKLINES, SIDEBURNS, MUSTACHES & BEARDS USING TRIMMER HEAD
Slowly move trimmer downward on desired areas to neatly trim and shape.
TRIMMING ARM & LEG HAIR USING TRIMMER HEAD
Simply glide the trimmer over your arm or leg until desired hair length is achieved. The first time you trim the hair, start by using a longer setting on the guide comb on the trimmer, then use progressively shorter settings if a shorter length is preferred.
TRIMMING CHEST & STOMACH USING TRIMMER HEAD
Glide the trimmer over your torso region, in an upward motion until desired hair length is achieved. For tight, scratch-free trimming, use the #1 guide comb.
For the closest look, after trimming, attach the shaver head. The shaver makes for the perfect tool to groom the total body. Using the same technique, as mentioned prior, you can groom wherever you feel a need. Shave against hair growth while stretching the skin. After every use, remove the shaver foil by pressing both side buttons and carefully using cleaning brush provided.
TRIMMING PRIVATE AREAS WITH THE TRIMMER & DETAILER HEAD
Volume reduction using trimmer head. Attach guide comb and select a long trimming length. Begin trimming, starting at the top and working down. Use progressively closer settings to get the “look” and length you prefer.
For hard to reach or tight areas, use the detailer head. Always pull skin taut. Then slowly move the detailer through area to trim until desired look is accomplished.
Shave in your private areas by gently shaving in the desired area and always keep the skin taut.
TRIMMING NOSE HAIR USING DETAILER HEAD
Make sure the nasal passages are clean. Slowly move the detailer in and out of each nostril, no more than 1/4-inch deep.
TRIMMING EAR HAIR USING DETAILER HEAD
Make sure the outer areas of the ears do not contain any wax. Hold the ear flat with one hand and carefully insert detailer no more than 1/4-inch into the outer ear.
CAUTION: Do not insert the detailer or any other foreign object into the inner ear. For hair growing on the outside of the ear, simply move the detailer slowly along the edges of the ear.
TRIMMING EYEBROWS USING DETAILER HEAD
Slowly move detailer to neatly trim stray hairs. For precise, even trimming, slowly move the detailer closer or farther away from eyebrows to achieve desired length. Do not press against brow as it may remove too much hair
TRIMMING WITH ATTACHMENT COMBS
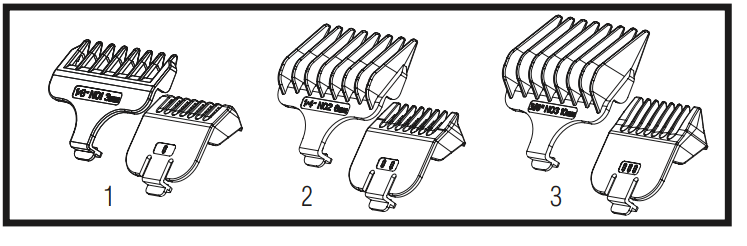
Your trimmer includes three trimming attachments; stubble, medium and long. The stubble guide has 1 bar, the medium-cut attachment has two bars and the long-cut attachment has three bars. These attachments are ideal for blending, tapering and defining beards, as well as for achieving a “close trim” stubble look around the face. To use the attachments, go with the hair direction. To achieve closer looks, go against the hair direction.
SERVICE AND REPAIR
If you have problems with your trimmer, send it prepaid with a note explaining the problem to:
Wahl Clipper Corporation
Attn: Repair Department
3001 Locust Street
Sterling, IL 61081
Telephone (800) 767-9245
For products purchased outside the United States, contact your distributor.