User manual Trimmer
IMPORTANT SAFEGUARDS
When using an electrical appliance, basic precautions should always be followed, including the following:
READ ALL INSTRUCTIONS AND SAFEGUARDS BEFORE USING.
DANGER
To reduce the risk of death or injury by electric shock:
- Do not reach for an appliance that has fallen into water. Unplug immediately. Some electrical parts inside the clipper are electrically live, even with the switch “off.”
- Do not use while bathing or in a shower.
- Do not place or store appliance where it can fall or be pulled into a tub or sink. Do not place in or drop into water or other liquid.
- Always unplug this appliance from the electrical outlet immediately after using.
- Unplug this appliance before cleaning.
WARNING
To reduce the risk of burns, fire, electric shock or injury to persons:
- An appliance should never be left unattended when plugged in.
- Close supervision is necessary when this appliance is used by, on, or near children or disabled persons.
- Use this appliance only for its intended use, as described in this manual. Do not use attachments not recommended by the manufacturer.
- Never operate this appliance if it has a damaged cord or plug, if it is not working properly, if it has been dropped or damaged, or dropped into water. Return the appliance to Wahl Clipper Corporation for examination and repair.
- Keep the cord away from heated surfaces.
- Never operate the appliance with the air openings blocked or while on a soft combustible surface, such as a bed or couch, where air openings may be blocked. Keep the air openings (if any) free from lint, hair or the like.
- Never drop or insert any object into any opening on this appliance.
- Do not use outdoors or operate with aerosol (spray) products or where oxygen is being administered.
- Do not use this appliance with a damaged or broken comb nor with teeth missing from the blades, as injury may occur. Before use, make certain blades are aligned properly. (See Trimmer Maintenance Instructions.)
- During use, do not place or leave appliance where it may be damaged by an animal or exposed to weather.
- To disconnect, turn all controls to “OFF,” then remove plug from outlet.
SAVE THESE INSTRUCTIONS
For Household Use Only CORD
The cord should not be used to pull the trimmer. Since freedom of movement needs to be maintained, care should be used to-keep the cord untwisted and unobstructed. When stored, the cord should be coiled and the unit placed in original box or storage pouch (if provided).
If your trimmer has a polarized plug: To reduce the risk of electric shock, this appliance has a polarized plug (one blade is wider than the other). This plug fits in a polarized outlet only one way. In the event the plug does not fit fully in the outlet, reverse the plug. In the event it still does not fit, contact a qualified electrician to install the proper outlet. Do not change the plug in any way
CARING FOR YOUR TRIMMER
OILING BLADES
For best results, put one or two drops of Wahl Clipper Oil on the blades only when necessary, or approximately once a month. Motor bearings are permanently lubricated—do not attempt to oil.
When oiling your trimmer, turn the trimmer “ON - I,” hold the unit with the blades facing DOWN and squeeze one or two drops of oil onto the blades. Wipe off excess oil with soft cloth.
NOTICE—DO NOT OVER OIL!
Excessive oiling or application of liquids will cause damage if allowed to seep back into motor.
BLADE CARE
Trimmer blades have precision-hardened, ground and lapped cutting teeth. Blades should be handled carefully and never bumped or used to cut dirty or abrasive material. Rinsing is not recommended. Clean with the included brush.
CLEANING/STORAGE
Before storing your trimmer, use the cleaning brush to whisk any loose hairs from the unit and the blades. Store unit in such a manner so that blades are protected from damage.
When the trimmer is not in use, the trimmer guide/blade guard attachment should be in place to protect the blades.
This appliance should be stored in a manner where it is not subjected to Crushing, Heating above 100°C (212°F), or Incineration.
SPECIAL FEATURES:
Your trimmer has been designed with several advanced features to help you get perfect results every time you trim. Your trimmer may be used to neatly trim goatees, beards, mustaches, neckline, sideburns around the ears and eyebrows, or anywhere you may need grooming. It also makes a great all-around family trimmer for mini haircuts and touch ups between trips to the barber or to clean up the shape of the neck.
-277728.png)
A 6-Position Trimming Guide makes achieving a consistent trim easy every time.
The guide can be removed (providing a seventh cutting position) and reattached without changing the preset cutting length, so once you have found the perfect length, there’s no guesswork in achieving it every trim. The trimming guide is a two-piece assembly, consisting of a base and a comb. It should not be disassembled. To attach the guide, simply slide it on at a slight angle and press the release tab down to secure in position. To remove the guide, gently push up on the release tab and slide the assembly away from the trimmer. Adjust the trimming length by pressing on the thumb lever and moving the comb forward or backward to the desired setting.-687481.png)
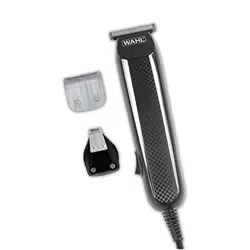
A Detachable blade system enables you to quickly change from a standard-width blade for full grooming to a narrowwidth blade for detail trimming around a mustache, goatee, or anywhere to define the hair line and clip any stray whiskers. To remove attachment, simply pull top edge of blade away from body unit. To attach, align back tab of attachment head to cavity on the inner edge of trimmer unit and push down on top of blade.
-994876.png)
Should blades become damaged or dull or if you want additional attachment heads for your trimmer, you may purchase them from Wahl. Be sure to ask for the following attachment with part number from our service and repair department (see last page for contact information):
-944879.png)
The trimmer you purchased may not have all of these heads, but they will all work with your trimmer if you wish to purchase them.
Self-sharpening blades are high compression, stainless steel, made to maintain their shape and sharpness for extended periods.
Using guide combs:
To attach guide combs, hold comb with the teeth up. Snap guide comb attachment firmly to the bottom of the trimmer blade.
Trimmer Guide Combs:
-695380.png)
Trimming with Guide Combs:
The stubble guide has 1 bar, the medium-cut attachment has two bars and the long-cut attachment has three bars. These attachments are ideal for blending, tapering and defining beards, as well as for achieving a “close trim” stubble look around the face. To use the attachments, go with the hair direction. To achieve closer looks, go against the hair direction
T-BLADE Clipper Guide Combs:
-739533.png)
CUTTING HAIR
The first time you cut the hair, cut only a small amount until you become accustomed to how long each guide comb leaves the hair. Always start by placing the largest guide comb on the trimmer, then use shorter combs (or settings - if using adjustable guide combs) if a shorter length is desired.
Remember, between professional haircuts, the hair grows evenly all over the head and a light trimming at the lower neck and sides may be all that is needed to bring back that neat, well-groomed look.
For uniform cutting, allow the trimmer to cut its way through the hair. Do not force it through at a faster rate.
-800695.png)
-575309.png)
- Start by combing the hair so it falls into its natural direction.
- Place the largest guide comb onto your trimmer and start by trimming the sides from the bottom upwards. Hold the trimmer lightly against the hair, with teeth of the guide comb pointing up but flat against the head. Slowly lift the trimmer up and outward through the hair, cutting only a small amount at a time.
Repeat around sides and back of head.
If you desire shorter hair, either change to a shorter guide comb (or setting if using adjustable guide combs) or apply more pressure and less lift away from head with the present attachment.
This entire procedure requires practice, and it is always better to leave too much hair the first few haircuts.
For the top of the head, you will give a fairly short cut if you use the 1” guide comb (If your kit includes the 1-1/4” or 1-1/2” guide comb, you may use this for a slightly longer cut.) With the teeth flat against the head, slowly start trimming from the front to the back. Again, it is better to leave the hair longer the first few haircuts.
BALD CUT
- For a totally bald look, continue to cut progressively shorter, against the grain, all over the head.
- For a totally smooth, bald effect, we recommend you finish by using an electric shaver or a wet blade shaver to shave the entire head.
TRIMMING AND EDGING YOUR BEARD
The following are suggested trimming steps and trimmer positions. You may find different procedures work better for you.
- Comb your beard in the direction that it grows to help reveal stray hairs that may be longer than the others.
- Attach the 6-position trimming guide to trim and taper your beard. Begin with the guide set at a long trimming length. Trim toward your chin in smooth, overlapping strokes, following the lay of your beard. If you trim against the way your beard naturally lays, the trimmer will cut the hair much shorter and the result may be patchy.
-425821.png)
Adjust the trimming guide to progressively shorter settings until you reach the desired length of beard. You may wish to set the trimming guide attachment to cut closer near the ear and down under the chin, changing to a longer setting toward the front of the face and point of your chin. When the trimming guide is removed, it will remain at its last length setting until you change it.
Always be sure the trimming guide is locked solidly into the desired position before you start to trim.
3. To cut the outline of your beard, remove the trimming guide. Starting under your chin and working back toward your jawbone and ears, cut the outer perimeter of your beard underneath the jawbone. Continue the line all the way up to the ears and hairline.
4. Accentuate your beard line by using the trimmer in a downward motion. Start at the line you’ve created and, working from the chin back toward the ears, trim the area right under your beard line.
5. Define the upper part of your beard using the same technique.
DETAILING NECKLINES, SIDEBURNS, MUSTACHES & BEARDS using trimmer head.
Slowly move trimmer downward on desired areas to neatly trim and shape.
TRIMMING ARM & LEG HAIR using trimmer head.
Simply glide the trimmer over your arm or leg until desired hair length is achieved. The first time you trim the hair, start by using a longer setting on the guide comb on the trimmer, then use progressively shorter settings if a shorter length is preferred.
TRIMMING CHEST & STOMACH using trimmer head.
Glide the trimmer over your torso region, in an upward motion until desired hair length is achieved. For tight, scratch-free trimming, use the #1 guide comb.
Trimming Nose Hair
Make sure the nasal passages are clean. Slowly move the ear/nose trimmer in and out of each nostril, no more than 1/4-inch deep.
Trimming EAR Hair
Make sure the outer areas of the ears do not contain any wax. Hold the ear flat with one hand and carefully insert ear/nose trimmer no more than 1/4- inch into the outer ear.
CAUTION: Do not insert the detailer or any other foreign object into the inner ear. For hair growing on the outside of the ear, simply move the detailer slowly along the edges of the ear.
Trimming Eyebrows
Slowly move detailer to neatly trim stray hairs. For precise, even trimming, slowly move the ear/nose trimmer closer or farther away from eyebrows to achieve desired length. Do not press against brow as it may remove too much hair.
You may also use your trimmer blade with the #2 or #3 guide combs. Move the trimmer with the direction of the hair flow (from the bridge of your nose to the temple). Be sure to mind your eyelashes as you trim.
SERVICE AND REPAIR
If you have problems with your trimmer, send it prepaid with a note explaining the problem to:
Wahl Clipper Corporation
Attn: Repair Department
3001 Locust Street
Sterling, IL 61081
Telephone (800) 767-9245
For products purchased outside the United States, contact your distributor.