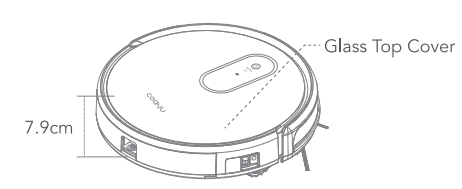
• 7.9cm thickness body, the robot vacuum cleaner can go todeep corner of furnitures, no corner will be missed in cleaning.
• Glass top cover with the best scratch proof feature.
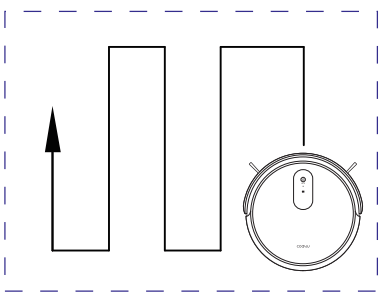
Smart Navigation System
Smart navigation system coordinate with SLAM algorithm helps the robot position and plan the cleaning route.
C550 have 10 groups anti-collision sensor and 4 groups anti-fallsensor, well protect your furnitures and the robot.
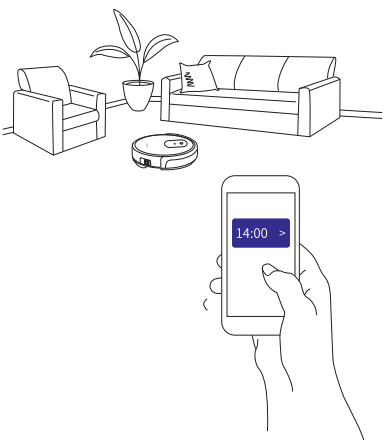
Wi-Fi App Control System
• All operation to the robot vacuum cleaner is in your hand.
• Set the cleaning schedule, check the cleaning status in app,
• Check cleaning maps, battery status, error tips in the app.
Intelligent Water Tank & Dust Bin Design
• Combined water tank and dust bin design, helps the robot do sweep and mop together.
• Intelligent controlled water flow speed, when robot finish cleaning or in charging, it will stop water flow automatically, never worry the water may destroy your floor.
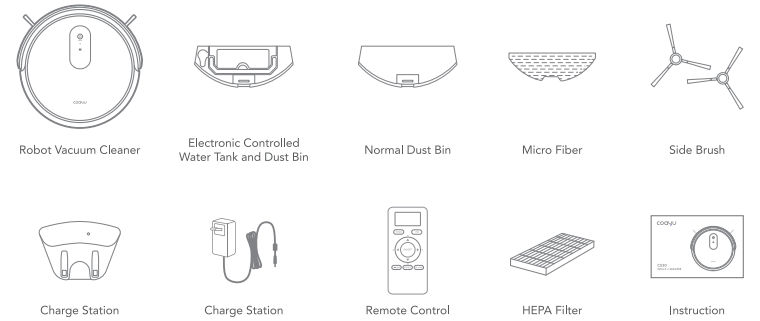
Packages
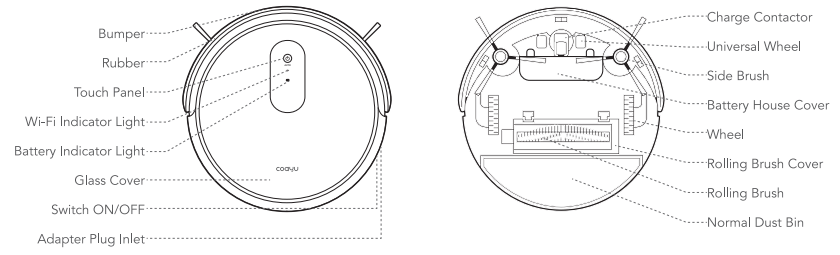
Diagram
Robot Vacuum Cleaner
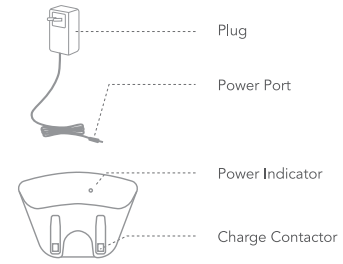
Charge Station
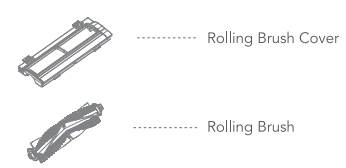
Rolling Brush Kit
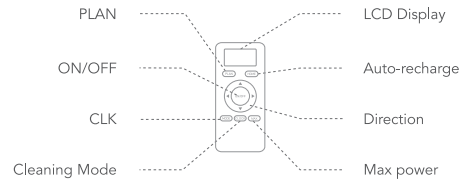
Remote Control
Tips:
Max and CLK key only works inStandby mode.
Please install 2PCS A& A battery before using.
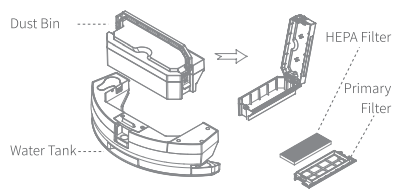
Electronic Controlled Water Tank And Dust Bin
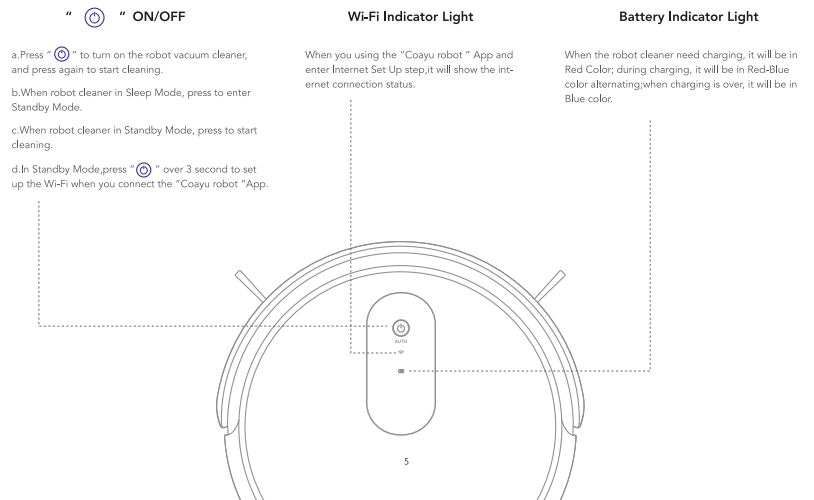
Display Panel
Operation
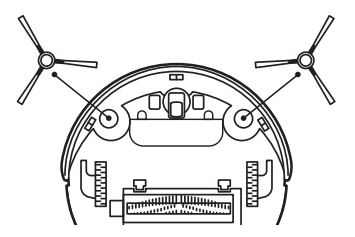
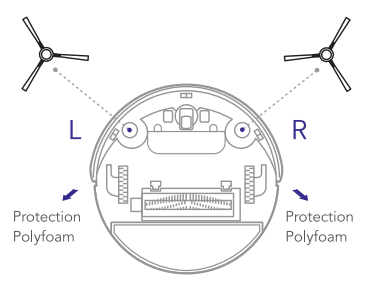
Side Brush Installation
Both robot vacuum cleaner and side brushes marked " L" and " R "on the body, please install side brush marked " L" to the " L" side of robot vacuum cleaner, and " R " side brush to " R " side of the robot.
Tips: the hair is easy to winded around the side brush, please keep cleaning once a time per week.
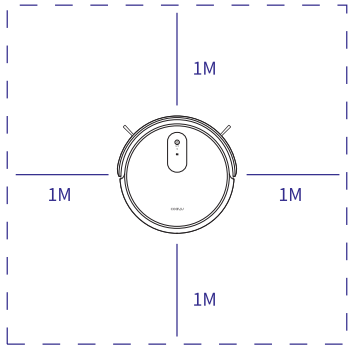
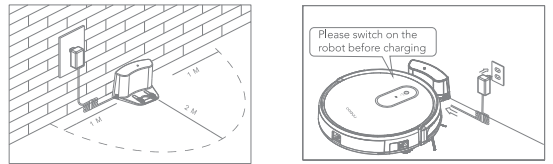
Place Charge Station and Charge Robot
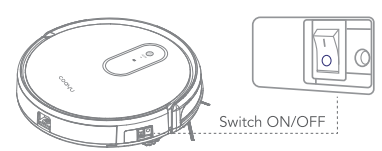
• Please switch on the robot cleaner before charging
• Connect the charge station to the power, and place it against the wall, clear the obstacles 1 meter left/right side to the station,and 2 meters in front of the station. After that put the robot cleaner to the charge station, it will start charging automatically.
Tips: Please make sure charge time over 5 hours in first time.
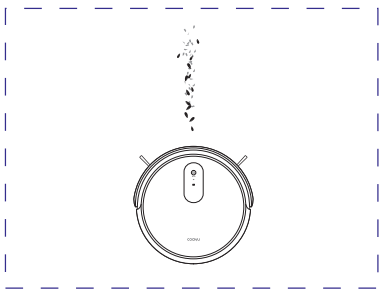
Clear Obstacles
Pick up peel, paper, clothes etc. on the floor
Pick up curtain rope, and entangled wires
Pick up curtain, bedsheets hanged more than 5cm over the ground
Clean water stains over the ground
Tips:
Big garbage easy to block the vacuum port and stuck the wheels,entangled wires easy trap the robot cleaner.
Robot cleaner cannot vacuum the water, it may damage the motherboard and motors.
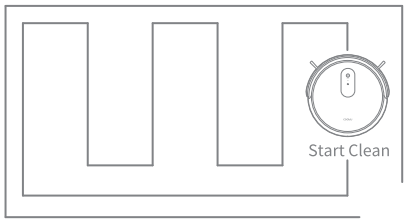
One Key to Start
Press " " on the robot vacuum cleaner to start / Pause the cleaning, when cleaning over, robot will go back to the charge station automatically, please keep the charge station power plugged in.
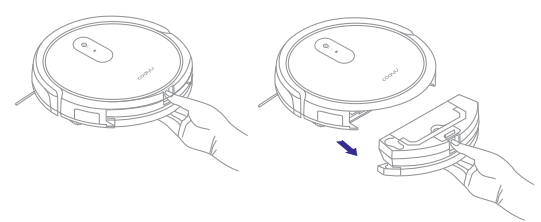
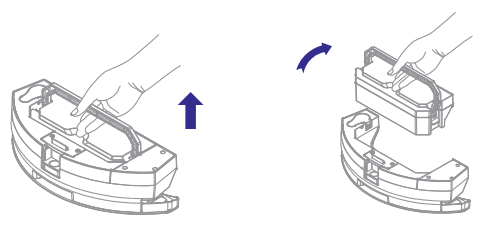
Empty the Dust Bin
Empty dust bin on time to make the robot cleaner keep cleaning effectively.
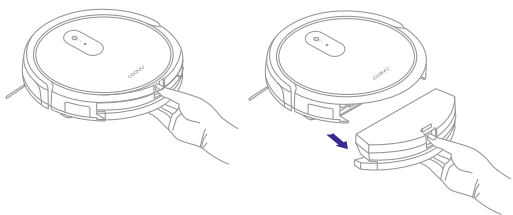
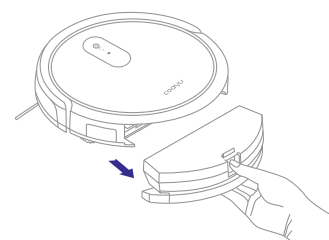
1. Press the buckle of the dust bin;
2. Pull out of the dust bin;
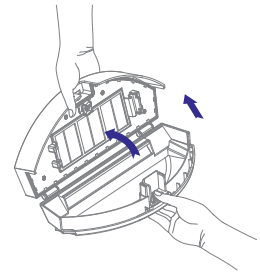
3. One hand press the buckle of dust bin, another hand open the top cover. Be careful not drop the dust out in opening;
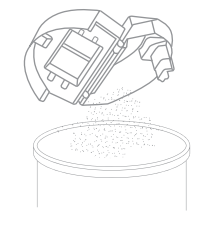
4. Empty the dust bin.
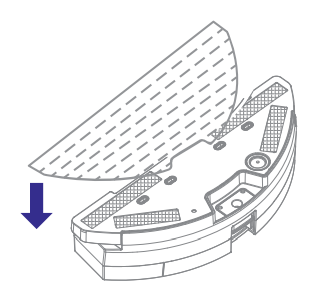
Install Electronic Controlled Water Tank and Dust Bin
1. Install the micro fiber onto the velcro hook of the water tank
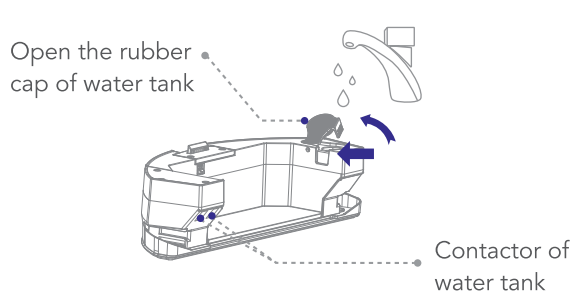
2. Open the rubber cap, add water inside and close the cap.
Tips: Please keep the contactor dry and clean.
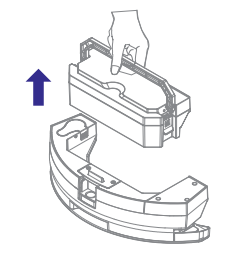
3. Install dust bin onto the water tank kit, make sure the handle placed well.
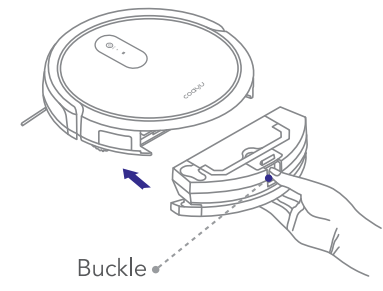
4. Press the buckle of the water tank, and install it into the robot vacuum cleaner.
Start/Standby/Sleep
Start/ Pause
a. Switch On the robot vacuum cleaner.
b. Press " " of touch panel and wait for the blue indicator light not twinkling, press it again to start the robot cleaner.
Standby
Standby means the robot is power on and awaiting for user's operation
a. When robot in working status, press " " on robot;
b. "ON/OFF" on remote control to make robot vacuum cleaner enter Standby status.
Sleep
In Sleep mode, press " " on robot or "ON/OFF" on remote control to wake up the robot vacuum cleaner. In Sleep mode, the robot could maximumly save battery capacity.
• in Standby mode, the robot cleaner will enter Sleep mode automatically in 10 minutes if no operation command;
• if robot cleaner failed back to charge station, it will enter Sleep mode automatically.
Attention: in Sleep mode, the robot cannot be waken up in app, should operate with "ON/OFF" on remote control, or " " on touch panel of robot.
Schedule
Please refer the details of App Using Guide : Schedule Setting.
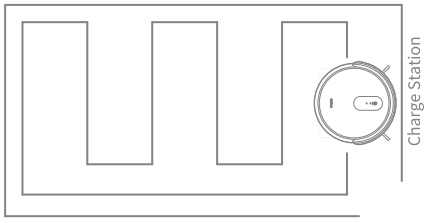
Charge
1. When battery level less than 20%, the robot vacuum cleaner will go back to the charge station automatically.
Or you can use the remote control or "Coayu Robot"app to drive the robot cleaner going back to the station.
Please keep the charge station in power all 24 hours, then the robot could always receive the signal of the station.
3. Ways to extend battery life effectively
• charge the robot cleaner over 5 hours in first time charging.
• please charge on time when battery capacity is less than 20%.
• when robot finish the cleaning or battery capacity less then 20%, the robot vacuum cleaner will go back to the charge station automatically.
• please fully charge the robot cleaner and switch off when you will not use it for a certain time.
• If you did not use the robot over 3 months, please charge over 5 hours firstly, and then use it for cleaning.
Cleaning Mode
Automatic Cleaning
In Standby Mode, press " " on robot or "ON/OFF" on remote control to enter auto cleaning mode.
Max Cleaning
Press "MAX" on remote control, the robot will enter powerful cleaning mode, bigger power and vacuum.
Mode Cleaning
Press "MODE" on remote control to enter Mode Cleaning:
Press "MODE" on remote control to enter MODE1 cleaning: robot will start edge cleaning.
Press "MODE" again, the remote control will display MODE 2: the robot will cleaning in a 2 x 2m area.
Press "MODE" again, the remote control will display MODE 3: the robot will cleaning in random.
Press "MODE" again, the remote control will display MODE 4: the robot will deep clean one area twice.
Press "MODE" again, the remote control will no display MODE anymore, robot enter Standby status.
Schedule Cleaning
If you set schedule cleaning in "Coayu Robot" app, the robot will cleaning automatically at the setted time.
Maintenance
Side Brush
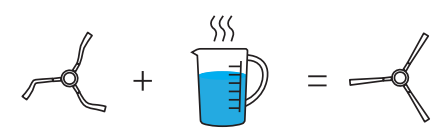
Please clean the side brush every week, if the brushes out of shape.
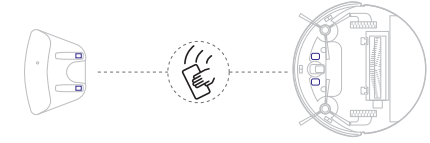
Charging Contactors
Please clean the charging contactors of the station and robot regularly with a soft cloth, never let the sensor get wet.
put them into 90° hot water over 5 second, it will restore.
Tips: we suggest change new side brushes every 3-6 months.
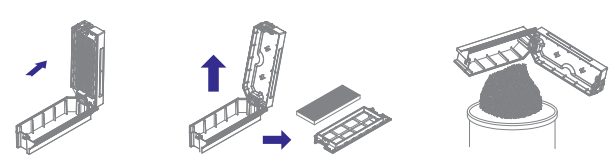
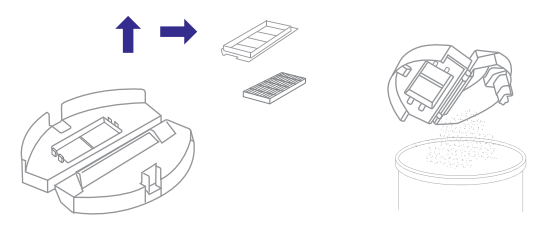
Water Tank and Filters
1. Please press the buckle of water tank and pull it out.
2. Pull up the handle of the dust bin. Take out of the dust bin.
3. Pull the buckle of the dust bin and open it.
Take out of the filters.
Empty the dust bin.
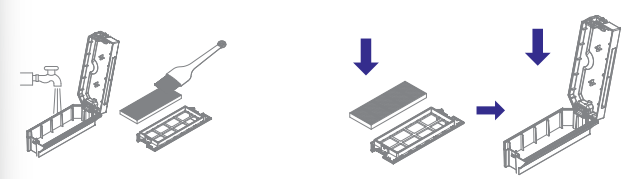
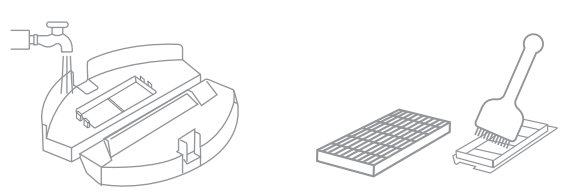
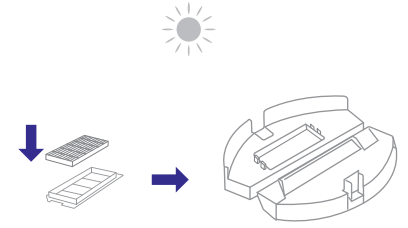
4. Wash the dust bin and use brush to clean the filters. Install filters back to the dust bin.
Dust Bin and Filters
1. Press the buckle of dust bin and pull it out, take out of dust bin.
2. Press the buckle and open the top cover of dust bin, take out of the filters.empty the dust bin.
3. Wash the dust bin and clear the filters with brush.
4. Install the filters back to the dust bin.
Attention: Please make sure the primary filter is dry when you install it back to dust bin.
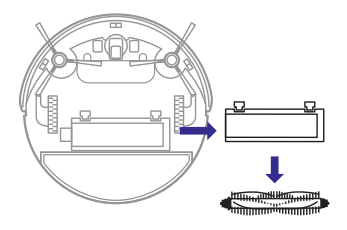
Rolling Brush
Please clean the rolling brush kit every week.
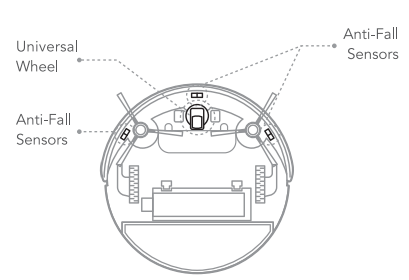
Sensors and Wheels
The universal wheel and anti-fall sensors on the bottom of the robot must be regularly cleaned with a soft cloth. Never let the sensors get wet.
Specification
Note: the specification could be modified with the objective continual improvement.
Troubleshooting
Troubleshooting & Solution
Voice Demonstrate
Solution
Please turn on the power switch
Switch on the robot
Please charge
Put the robot onto the charge station
Please put the machine in a safe place
1, the robot off the floor, please put the robot onto floor
2, the anti-fall sensor may dirty, please clean with cloth
3, the sensor may send false alarm, please restart the robot
Left front bumper fault
Check the bumper if it spring back correct
Wheel overload
Check if foreign body winded the wheels, and remove it
Side brush overload
Check if foreign body winded the side brush, and remove it
Rolling brush overload
Check if foreign body winded the rolling brush, and remove it
Attention :
If above solution not work, please try:
1. restart the robot vacuum cleaner
2. contact our customer service center website for after sale service.
Q: Hello, I can't connect to my phone, it gives an error in the Wi-Fi phase, please help me Reply
Q: Can not find replacement battery for my coayu C530 robot vacuum Reply
Q: Robot will not charge new battery, keeps saying turn power switch on. Tried using charging dock and plug directly to robot, still will not charge. Is there a sequence to do when installing new battery. Robot was doing same way with old battery which prompt me to put new battery. Reply

 " on the robot vacuum cleaner to start / Pause the cleaning, when cleaning over, robot will go back to the charge station automatically, please keep the charge station power plugged in.
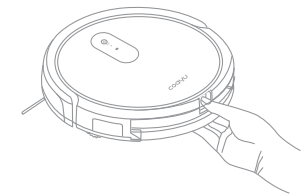
 " of touch panel and wait for the blue indicator light not twinkling, press it again to start the robot cleaner.