User manual
FCC ID:2AZ2R-LT1
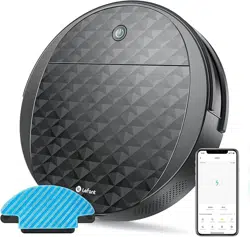
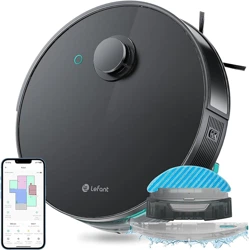
Lefant LT1 Mopping Robot
FCC ID:2AZ2R-J2

1
Congratulations on the purchase of your Lefant ROBOTS!
We hope it brings you satisfaction. We trust your purchase will keep your home clean and provide you a high-quality life.
Should you encounter situations that have not been properly addressed in this User Manual, please contact our Customer Service Center, we will solve your
specific problem.For more information, please visit the Lefant ROBOTICS official website: www.lefant.com or send email to [email protected].
The Company reserves the right to make technological and/or design changes to this product for continuous improvement.

2
IMPORTANT SAFETY INSTRUCTIONS
WARNING: Read all safety warnings and instructions. Failure to follow the warnings and instructions may result in electric shock, fire or serious injury.
READ ALL INSTRUCTIONS BEFORE USING THIS APPLIANCE.
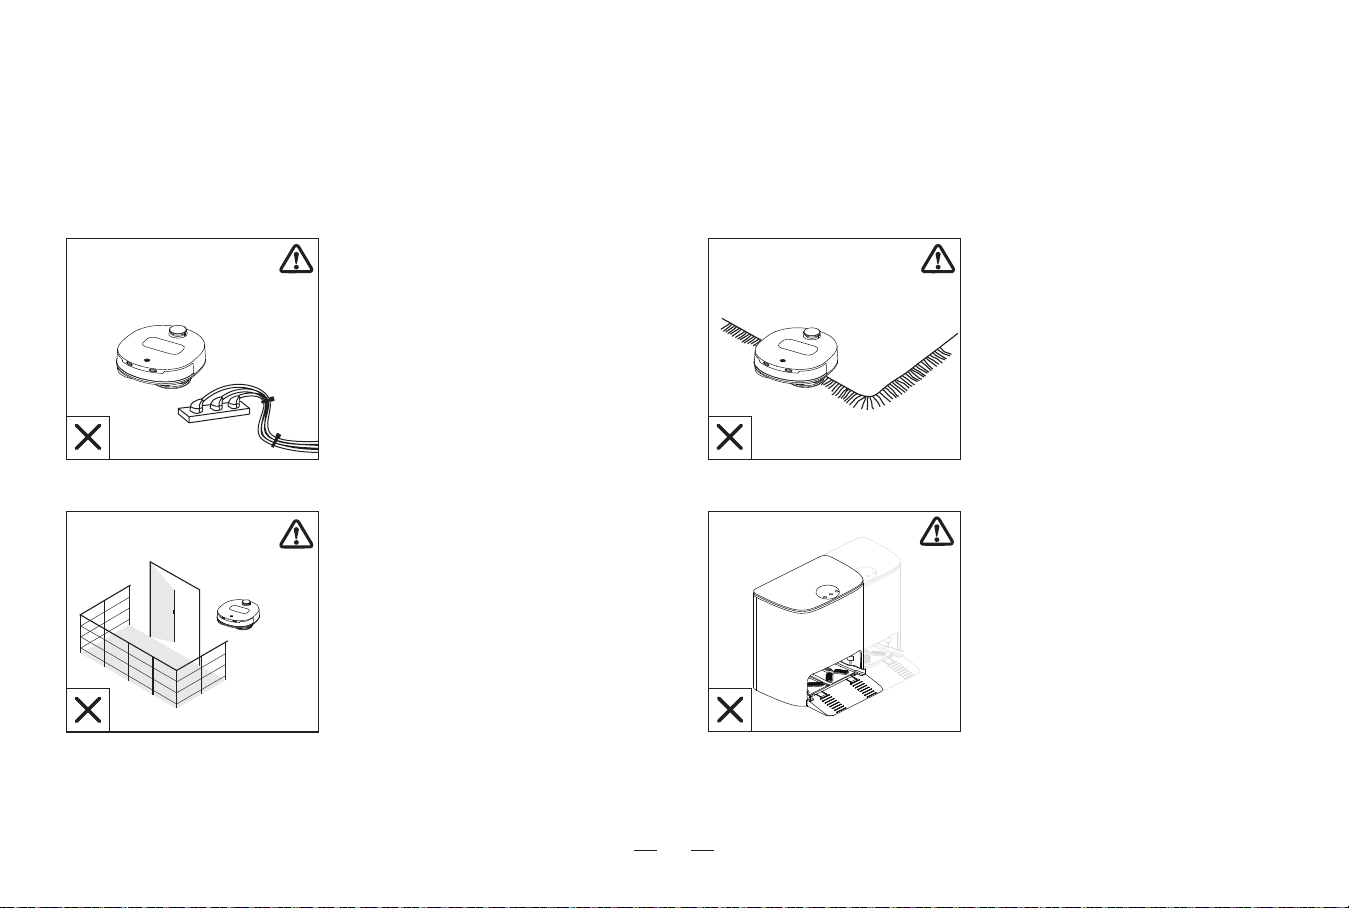
1. The robot must be used in accordance with the directions in this User
Manual. Our company cannot be held liable or responsible for any
damages or injuries caused by improper use.
2. Do not allow to be used as a toy. Close attention is necessary when
used by or near children.x.
Do not allow children to sit on the vacuum.
3. Clear the area to be cleaned. Remove power cords and small objects
from the floor that could entangle the Robot. Tuck rug fringe under the rug
base, and lift items such as curtains and table cloths off the floor.
4. If there is a drop off in the cleaning area due to a step or stairs, you
should operate the Robot to ensure that it can detect the step necessary
to place a physical barrier at the edge to keep the unit from falling. Make
sure the physical barrier is not a trip hazard.
5. Only use as described in this manual. Only use attachments recom-
mended or sold by the manufacturer.
6. Please make sure your power supply voltage matches the base station.
7. Do not handle or plug appliance with wet hands.
8. Non-rechargeable batteries are prohibited.
9. Do not use without dust bin and/or filters in place.
10. Do not operate the robot in an area where there are lit candles or
fragile objects on the floor to be cleaned.
11. Do not use and store in extremely hot or cold environments (below
-5°C /23°F or above 40°C/104°F). Please charge the robot in temperature
above 0°C/32°F and below 40°C/104°F. Follow all charging instructions
and do not charge the battery pack or appliance outside
of the temperature range specified in the instructions. Charging improperly
or at temperatures outside of the specified range may damage the battery
and increase the risk of fire.
12. Keep hair, loose clothing, fingers, and all parts of body away from any
openings and moving parts.
13. Do not operate the robot in a room where an infant or child is sleeping.
14. For INDOOR use ONLY. Do not use the robot in outdoor, commercial or
industrial environments. Do not use Appliance on wet surfaces or surfaces
with standing water.
15. Do not allow the robot to pick up large objects like stones, large pieces
of paper or any item that may clog the robot.
16. Do not use the robot to pick up flammable or combustible materials
such as gasoline, printer or copier toner, or use in areas where they may be
present.
17. Do not use the robot to pick up anything that is burning or smoking, such
as cigarettes, matches, hot ashes, or anything that could cause a fire.
18. Do not put any object into openings. Do not use with any opening
blocked; keep free of dust, lint, hair, and anything that may reduce air flow.
19. Take care not to damage the power cord. Do not pull on or carry the
robot or the base station by the power cord, use the power cord as a
handle, close a door on the power cord, or pull power cord around sharp
edges or corners. Do not run the robot over the power cord.Keep power
cord away from hot surfaces. Do not unplug by pulling on cord, To unplug,
grasp the plug, not the cord.
20. If the power cord is damaged, it must be replaced by the manufacturer
or its service agent in order to avoid a hazard.
For Household use only
When using an electrical appliance, basic precautions should always be followed, including the following:

3
21. Do not use the base station if it is damaged.
22. Do not use the robot or the base station if it is not working properly,
has been dropped, damaged, left outdoors, or come in contact with water.
It must be repaired by the manufacturer or its service agent in order to
avoid a hazard.
23. Turn OFF the power switch before cleaning or maintaining the robot. Turn
off all controls
24. The plug must be removed from the receptacle before cleaning or
maintaining the base station.
25. Remove the robot from the base station, and turn OFF the power
switch to the Appliance before removing the battery for disposal of the
robot.
26. The battery must be removed and discarded according to local laws
and regulations before disposal of the robot.
27. Please dispose of used batteries according to local laws and regula-
tions.
28. Do not incinerate the robot even if it is severely damaged. The batteries
can explode in a fire.
29. When not using the base station for a long period of time, please
unplug it.
30. Prevent unintentional starting. Ensure the switch is in the off position
before connecting to battery pack, picking up or carrying the appliance.
Carrying the robot with your finger on the switch or energizing the robot that
have the switch on invites accidents.
31. When battery pack is not in use, keep it away from other metal objects,
like paper clips, coins,keys, nails, screws,ect, that can make a connection
from one terminal to another. Shorting the battery terminals together may
cause burns or a fire.
32. Under abusive conditions, liquid may be ejected from the battery; avoid
contact. If contact accidentally occurs, flush with water. If liquid contacts
eyes, additionally seek medical help. Liquid ejected from the battery may
cause irritation or burns.
33. Do not use a battery pack that is damaged or modified. Damaged or
modified batteries may exhibit unpredictable behavior resulting in fire,
explosion or risk of injury.
34. Do not expose a battery pack or appliance to fire or excessive tempera-
ture. Exposure to fire or temperature above 130°C/265°F may cause
explosion.
35. Have servicing performed by a qualified repair person using only
identical replacement parts.
36. Do not modify or attempt to repair the robot or the battery pack (as
applicable) except as indicated in the instructions.
37. Do not operate the robot in a room that has lit candles on furniture that
the vacuum may accidentally hit or bump into.
38. Recharge only with the charger specified by the manufacturer. A
charger that is suitable for one type of battery pack may create a risk of
fire when used with another battery pack.
39. Use the robot only with specifically designated battery packs. Use of any
other battery packs may create a risk of injury and fire.
40. The robot contains batteries that are only replaceable by skilled
persons. To replace the robot's battery, please contact Customer Service.
41. If the robot is not going to be used for a long time, fully charge the robot,
power it OFF, and unplug the base station.
4
Keep this product away from heat sources. It is recommended that the product is stored in a sealed container at 0-30°C in a dry and cool place. Keep this
product out of the reach of children and pets. Do not allow this product to come into contact with eyes or skin. In case of accidental contact with the eyes,
rinse slowly and gently with plenty of water for at least 15 minutes, for contact lens wearers remove contact lenses for the first 5 minutes and continue to
rinse eyes. If skin contact occurs, wash off with warm, soapy water. If symptoms persist after these actions, seek medical attention. Do not inhale or
consume this product. If this product is inhaled, move to fresh air. If this product is ingested, rinse your mouth or drink plenty of water. If discomfort persists
after doing so, seek medical attention immediately. Do not add other liquids to this product to prevent it from interfering with the normal use of the machine.
A small amount of suspended matter in the cleaner is normal and should be used with confidence.
Cleaner Precautions
SAVE THESE INSTRUCTIONS
Short-circuit-proof safety isolating transformer
Switch mode power supply
For indoor use only
Direct current
Alternating current
detachable supply unit
S
This marking indicates that this product should not be disposed of with other household waste throughout the EU. To prevent possible harm to the
environment or human health from uncontrolled waste disposal, recycle it responsibly to promote the sustainable reuse of material resources. To
recycle your used device, please use the return and collection systems or contact the retailer where the product was purchased. They can safely
recycle this product.
Correct Disposal of this Product
To satisfy RF exposure requirements, a separation distance of 20 cm or more
should be maintained between this device and persons during device operation.
To ensure compliance, operations at closer than this distance is not recom-
mended. The antenna used for this transmitter must not be co-located in
conjunction with any other antenna or transmitter.

5
Federal Communications Commission (FCC) Interference Statement
This device complies with Part 15 of the FCC Rules.
Operation is subject to the following two conditions:
(1) This device may not cause harmful interference,
and (2) this device must accept any interference received, including
interference that may cause undesired operation.
FCC Caution:
Any changes or modifications not expressly approved by the party
responsible for compliance could void the user 5s authority to operate this
equipment.
RF exposure warning
This equipment complies with FCC radiation exposure limits set forth for
an uncontrolled environment.This equipment must be installed and
operated in accordance with provided instructions and the antenna(s)
used for this transmitter must be installed antenna(s) used for this
transmitter must be installed to provide a separation distance of at least
20 cm from all persons and must not be collocated or operating in
conjunction with any other antenna or transmitter.
This equipment has been tested and found to comply with the limits for a
Class B digital device, pursuant to Part 15 of the FCC Rules.
These limits are designed to provide reasonable protection against harmful
interference in a residential installation. This equipment generate, uses and
can radiate radio frequency energy and, if not installed and used in
accordance with the instructions, may cause harmful interference to radio
communications.
However, there is no guarantee that interference will not occur in a
particular installation. If this equipment does cause harmful interference to
radio or television reception, which can be determined by turning the
equipment off and on, the user is encouraged to try to correct the interfer-
ence by one of the following measures:
• Reorient or relocate the receiving antenna.
• Increase the separation between the equipment and receiver.
• Connect the equipment into an outlet on a circuit different from that to
which the receiver is connected.
• Consult the dealer or an experienced radio/TV technician for help.

6
Contents
1. Product introduction
7
1.1 Packing list
1.2 Part name
····················································
2. Preparation
11
2.1 Assemble and charge
2.2 Using environment preparation
····················································
4. Abnormal symptoms
4.1 Troubleshooting
22
····················································
5. Technical parameters 24
····················································
3. Using the product
13
3.1 How to use the robot buttons
3.2 How to use the station buttons
3.3 Mopping
3.4 App download and configuration
3.5 Maintenance frequency
3.6 Maintenance
····················································
7
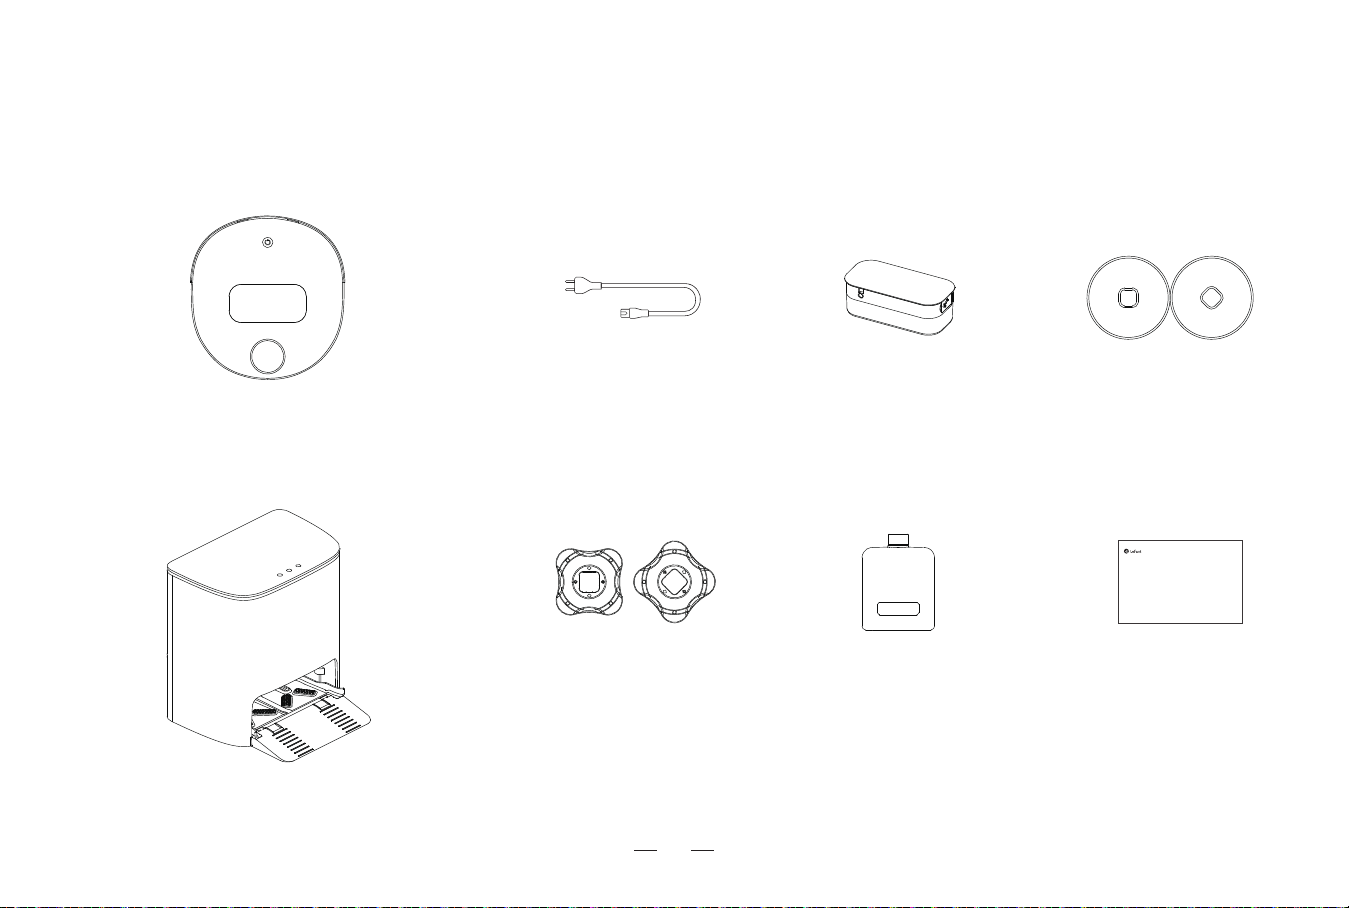
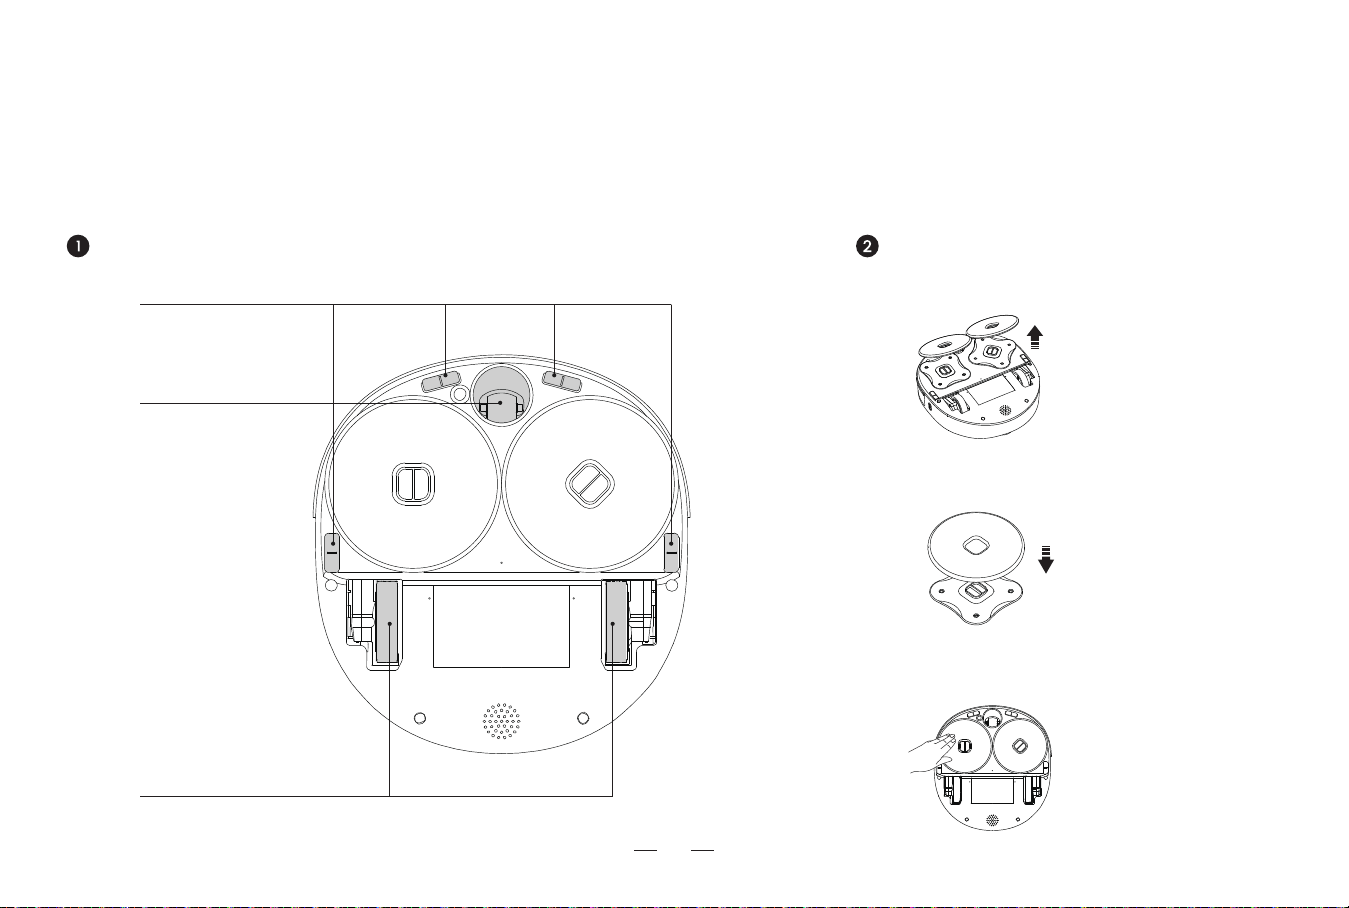
1. Product introduction / 1.1 Packing list
*The picture of the manual is for reference only. The appearance should be subject to the actual manual.
Robot
Mop bracket Cleaner
Self-cleaning station
Water tankPower cable Mop
User manual
User manual
Lefant LT1 Mopping Robot
8
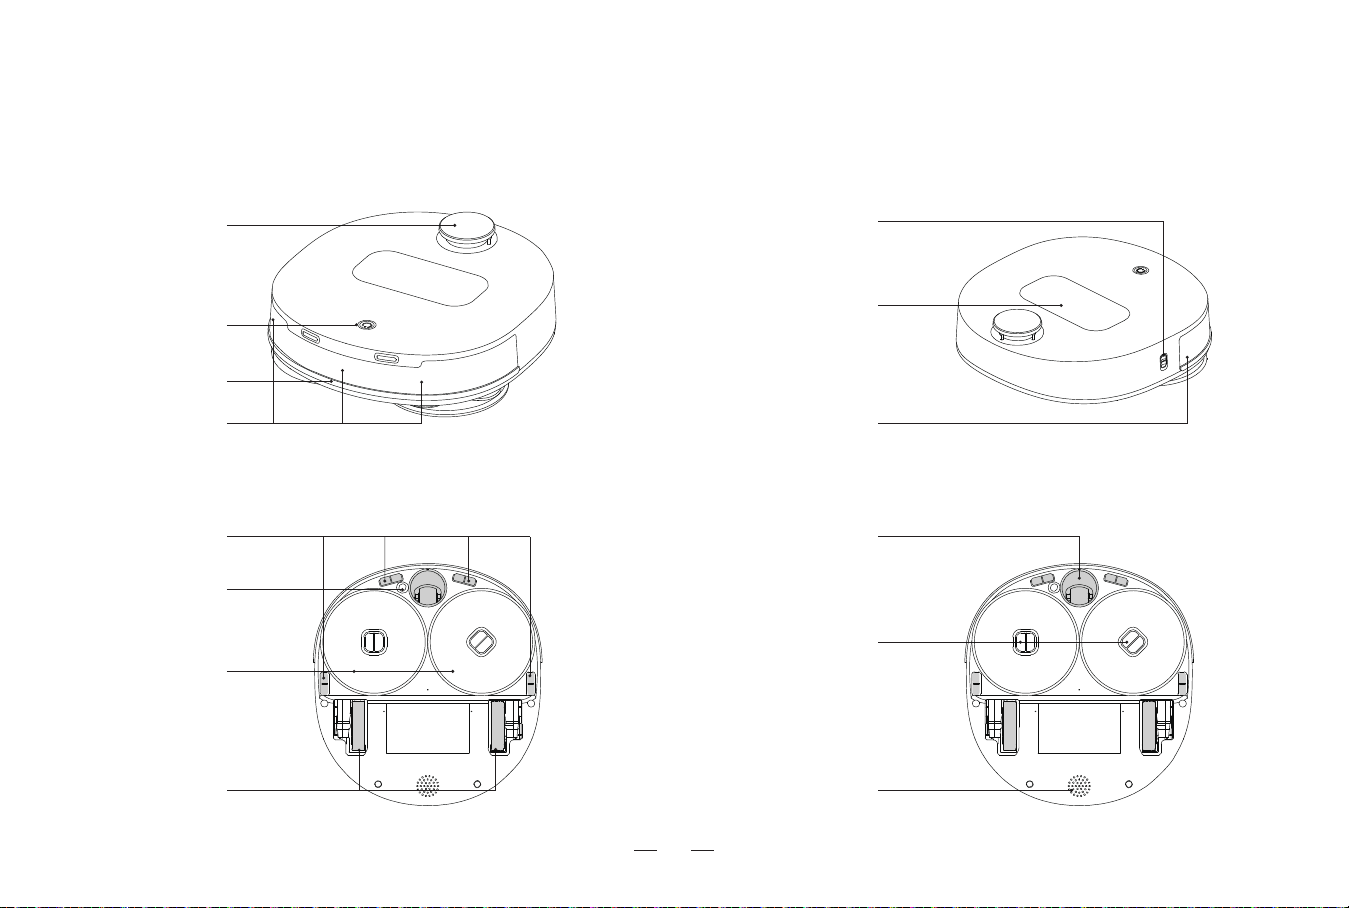
1. Product introduction / 1.2 Part Name
Side view
Bottom view
Front view
dToF Laser
Navigation Sensor
Start/pause button
Line laser sensors Line laser sensors
Bumper
Water tank
Power Switch
Green at the bottom of the switch is on,
Red at the bottom of the switch is off.
Drive Wheel
Anti-falling sensor
Mop
Ultrasonic sensors
Universal Wheel
Speaker
Mop bracket
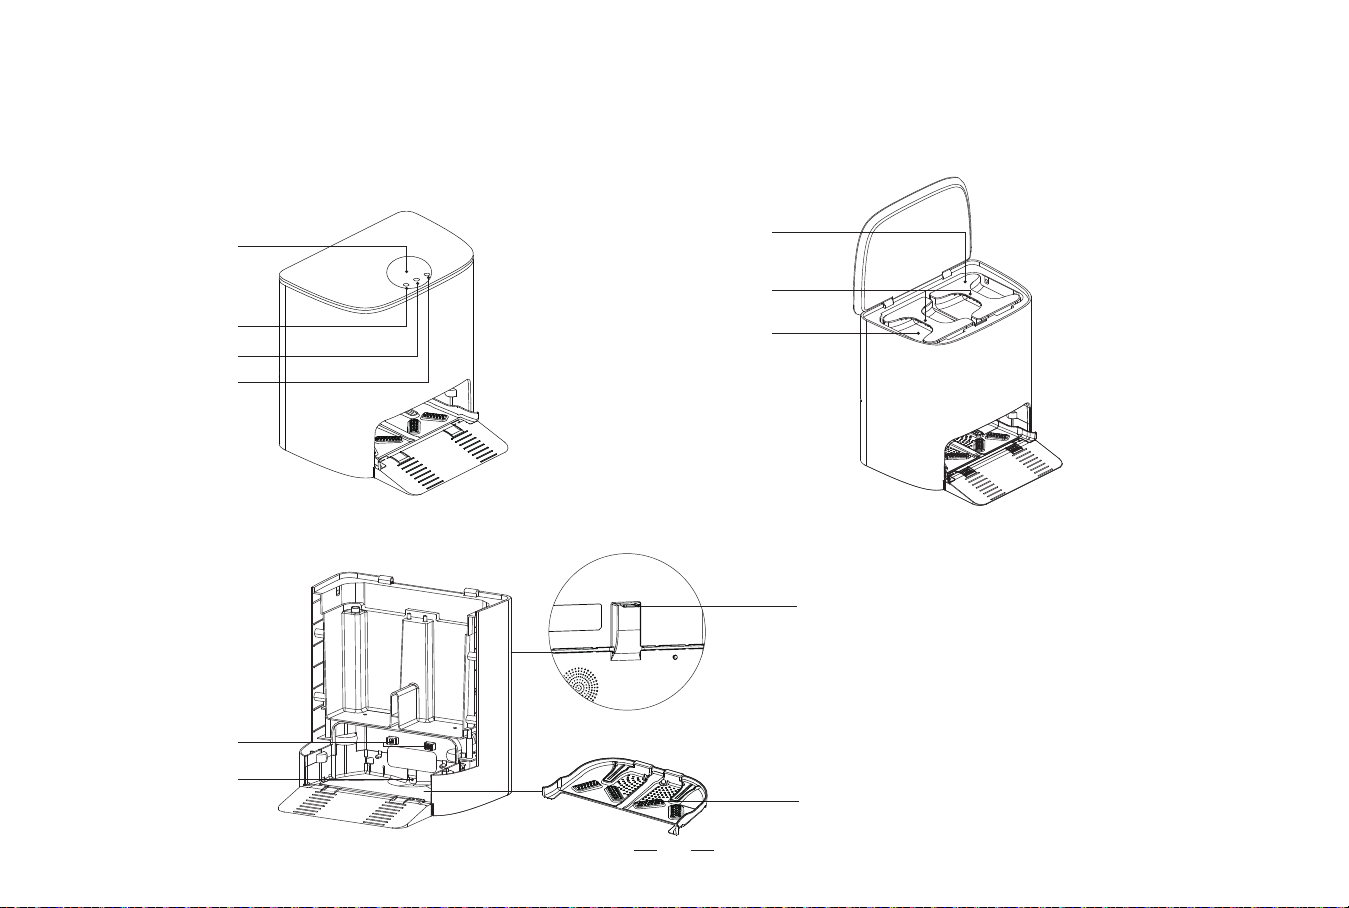
9
1. Product introduction / 1.2 Part Name
Back to wash button
Start/pause button
Mode switch button
Display Screen
Charging electrode
Water intake
Power Socket
Cleaning tray
sewage tank
Tank handle
Clean water tank
Self-cleaning station
10
1. Product introduction / 1.2 Part Name
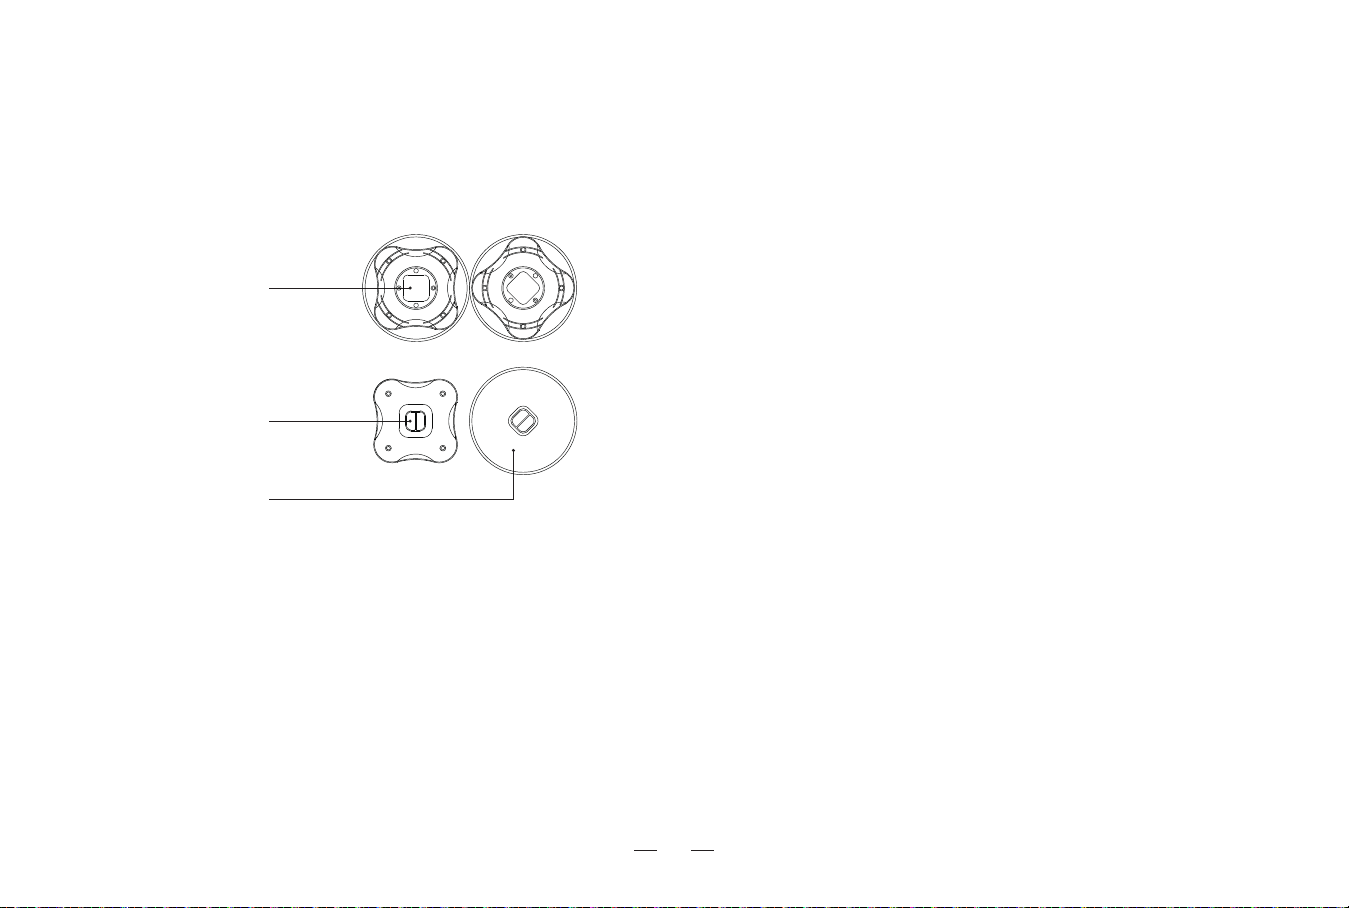
Mopping Module
Handle
Mop installation interface
Mop
11
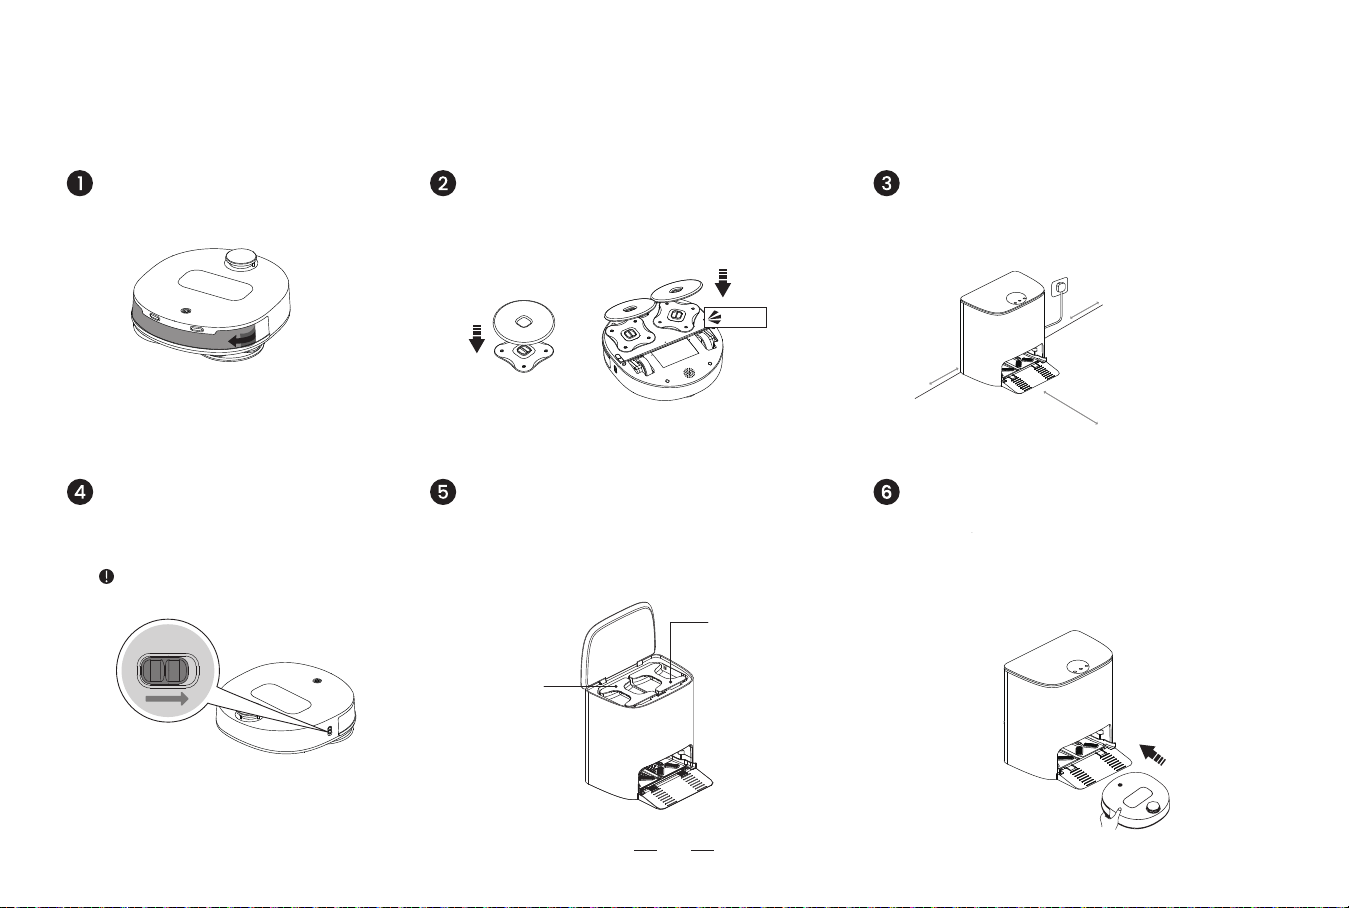
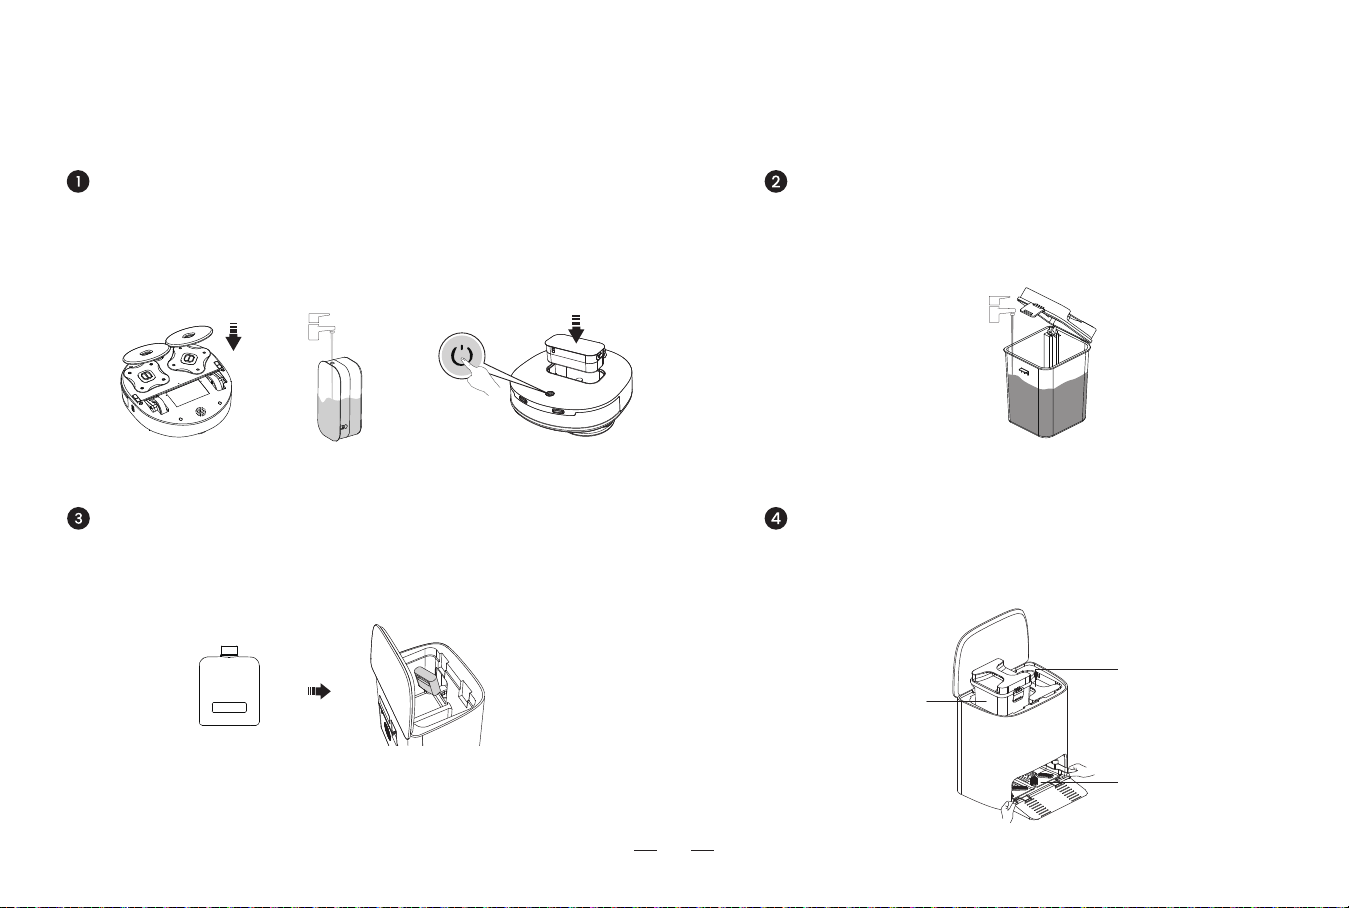
2. Preparation / 2.1 Assemble and charge
*Put the station in an open area.
*Connect power supply and arrange the power cable.
Aim the mop at the installation interface. Revolve the shaft
until it’s pressed in. A “click” sound indicates it’s in place.
Position the station/Connect power supply
Turn on the robot Install the clean water tank/sewage tank
Green at the bottom of the button is on.
Red at the bottom of the button is off.
Open the station cover. Put the clean water tank on the
right and the sewage tank on the left.
Remove the protective film
Install the mop
Reminder: Cannot charge when
the robot is turned off.
>0.5m
(1.64’)
>0.5m
(1.64’)
>1.5m
(4.92’)
Put the robot on the station after connecting power
supply. Pair the robot with the station in the network. If
not paired, the robot cannot respond to the command
of the station.
*Do not move the station during cleaning.
Put the robot on the station
Sewage tank
Clean water tank
click
12
2. Preparation / 2.2 Using environment preparation
Sort out the space to be cleared
If the rug at home has tassels,
put the tassels under the rug in
advance.
Tidy the items from the ground
like cables and slippers to keep
the robot working
When the robot starts to create
a home map, do not move the
station. Otherwise, the map
needs to be recreated. It is
recommended to recreate the
home map when the location of
large objects in the cleaning
area changes.
Do not put the robot in a raised
place like the stairs. Keep the
door of the lavatory and
balcony closed.
13
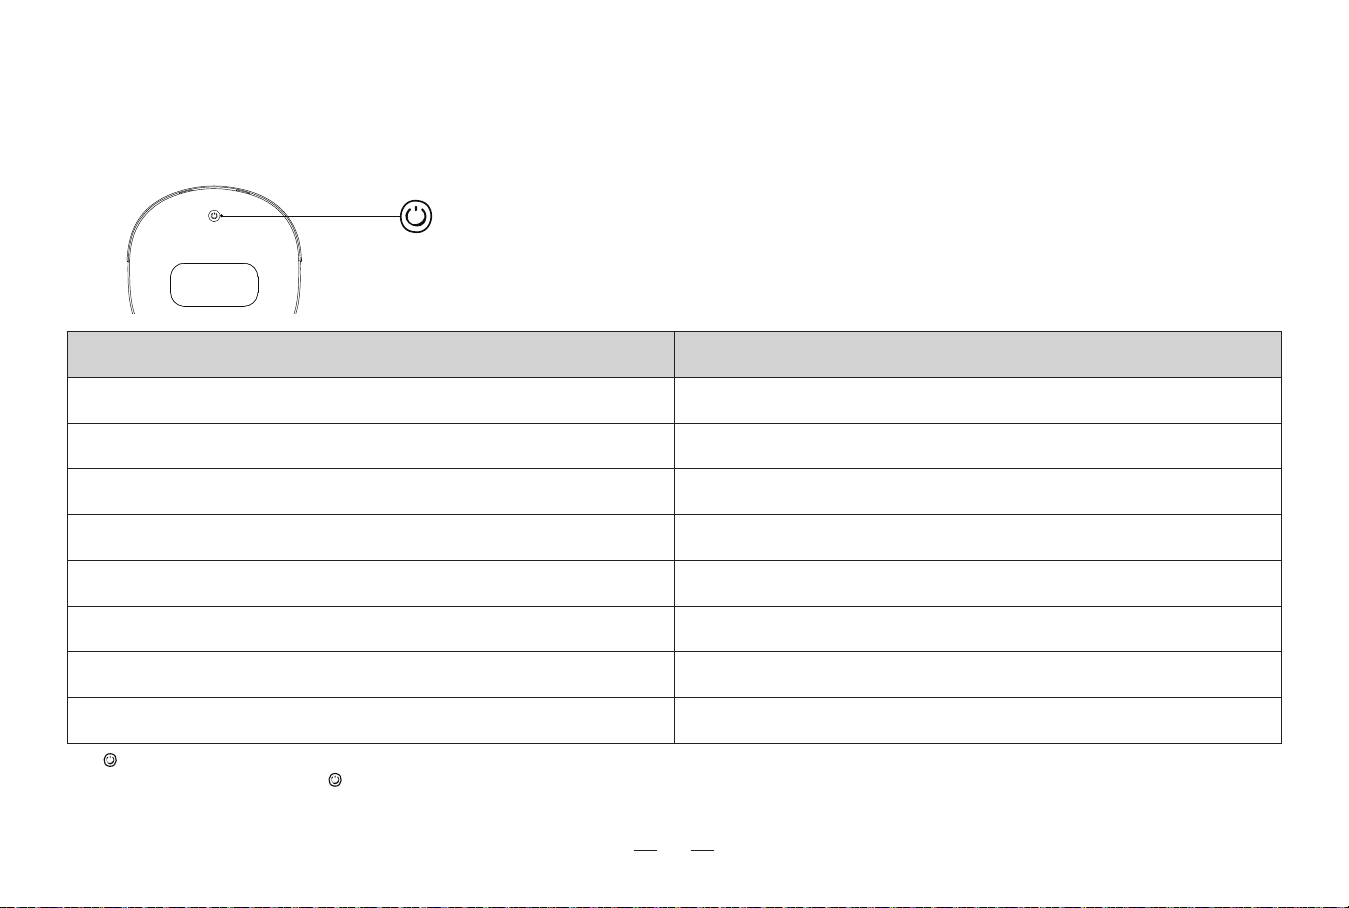
Robot status
Power ON
Mopping
Low battery - automatic return and charge
Cleaning complete - automatic return and charge
Charging/Mop washing
Entering Wi-Fi pairing mode
Wi-Fi pairing complete
Error
Start/pause button light indicator status
White light on (Red light on when low power)
White light on
White light breathes
Red light on
White light on (fully charged)
White light flashes
White light on
Red light flashes
3. Using the product / 3.1 How to use robot buttons
Start/pause button Single press: Start/Pause
Double press: Automatic return and charge
Press and hold for 3 seconds: Enter Wi-Fi pairing mode
Press and hold for 20 seconds to enter energy-saving mode.
Take the robot off the station, and single press to exit energy-saving mode.
Energy-saving mode: After setting the energy-saving mode, the robot will enter the energy-saving mode when it is fully charged on the station, most of the functional components will sleep, and the scheduled cleaning
function will also fail. After entering the energy-saving mode, you need to manually start the robot to clean, and the robot will automatically exit the energy-saving mode after it is started.
14
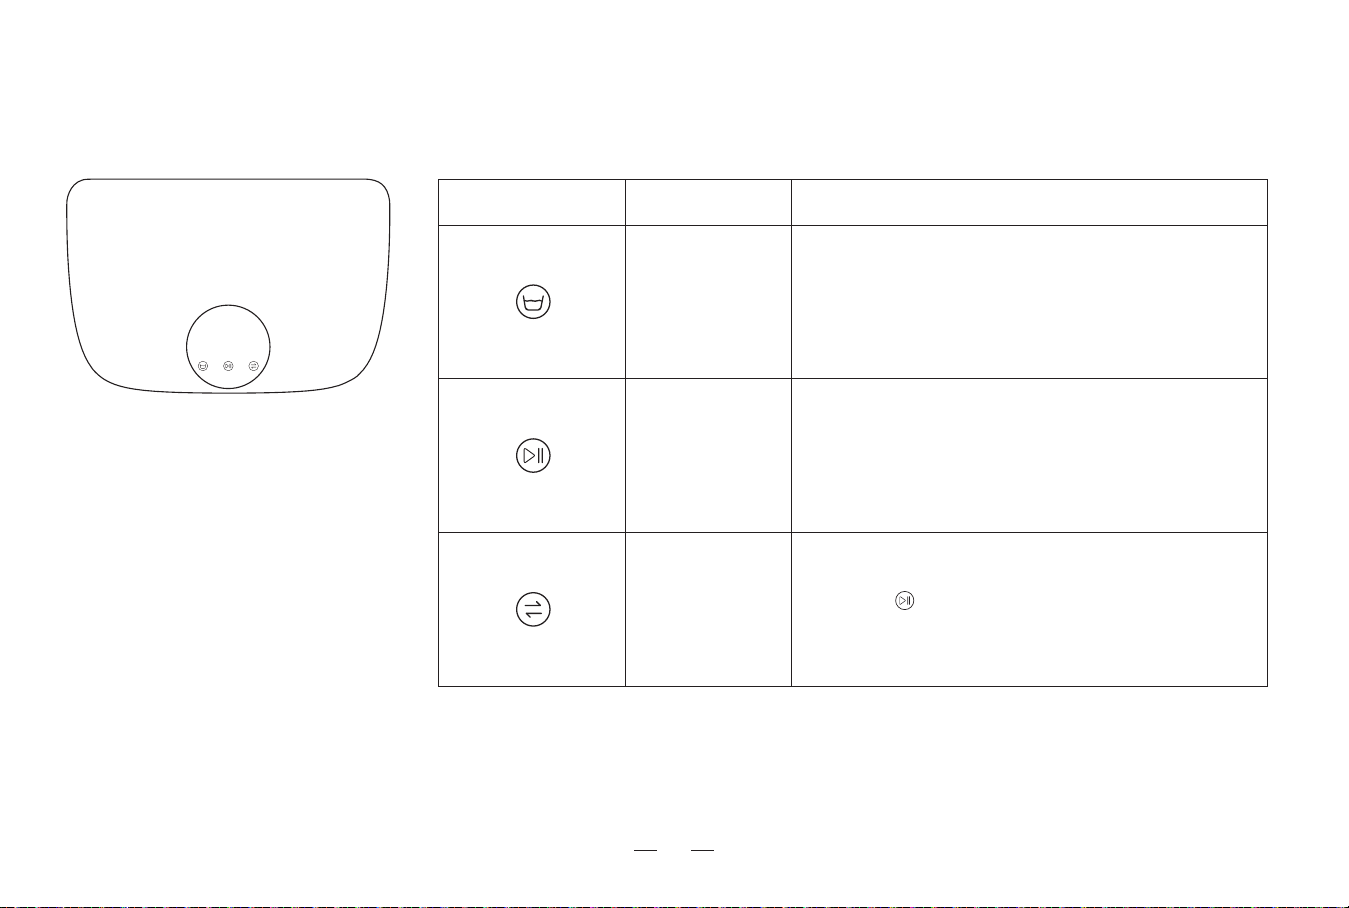
3. Using the product / 3.2 How to use station buttons
Single press: start/pause.
Start/pause button
Single press: Robot returns to the station to wash the mop.
Press and hold for 3 seconds: Wash the mop instantly.
Back to wash
button
Mode switch
button
Button Icon Button Name How to use the button
Single press to switch to Strong mode/Daily mode/Soft
mode/Quick clean mode.
Single press to confirm after choosing the mode.
Press and hold for 3 seconds to exit the mode switch.
Press and hold for 5 seconds to turn on/off the child lock.
Reminder:
1. Single press the button, and the light of the triggered button will be on after flashing alone, and the lights of other buttons will be on. All lights go out 10 seconds after no operation.
2. If there is no operation, the screen will turn off after 10 minutes.
15
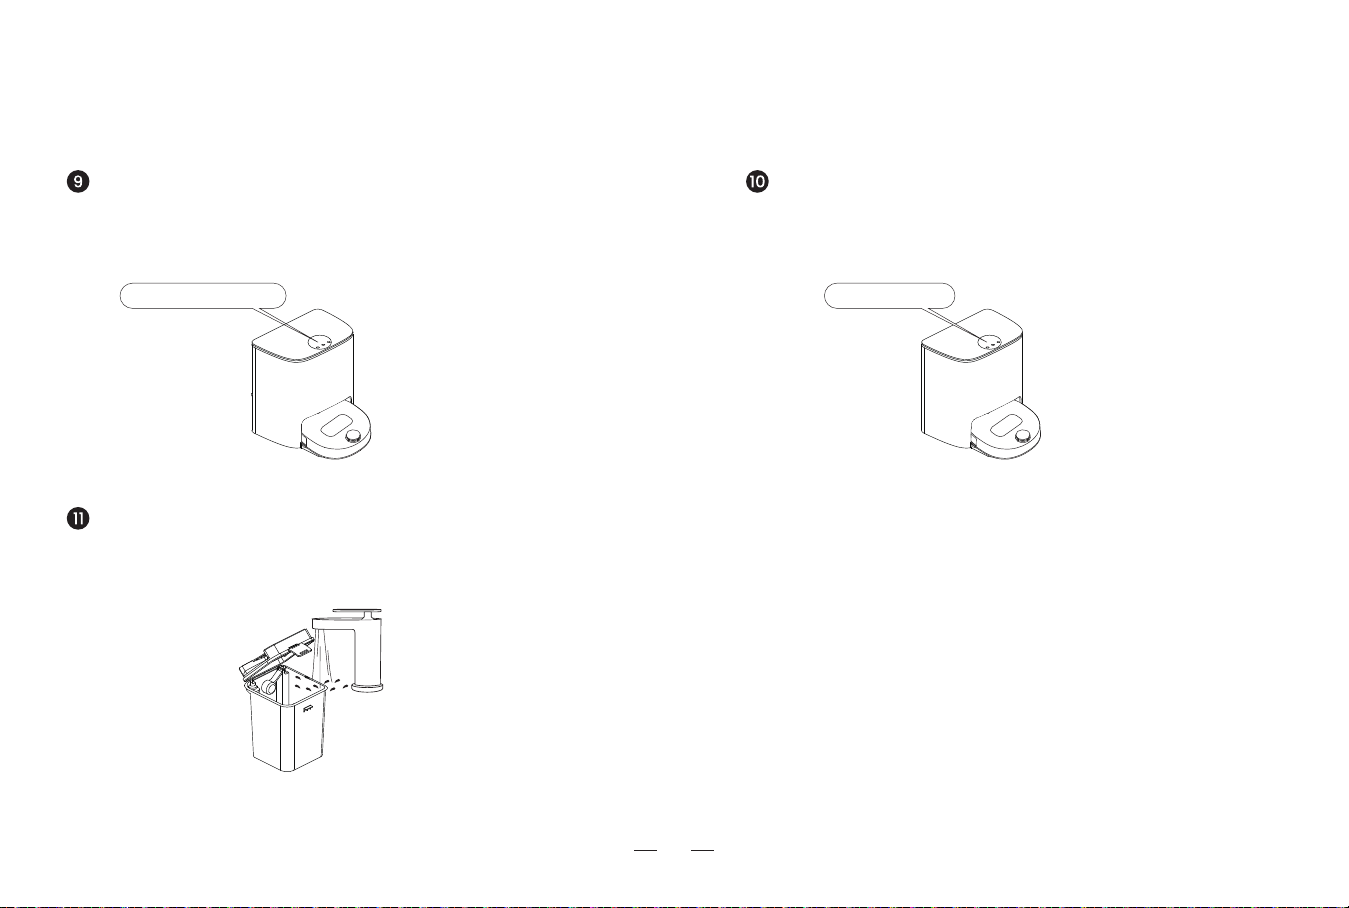
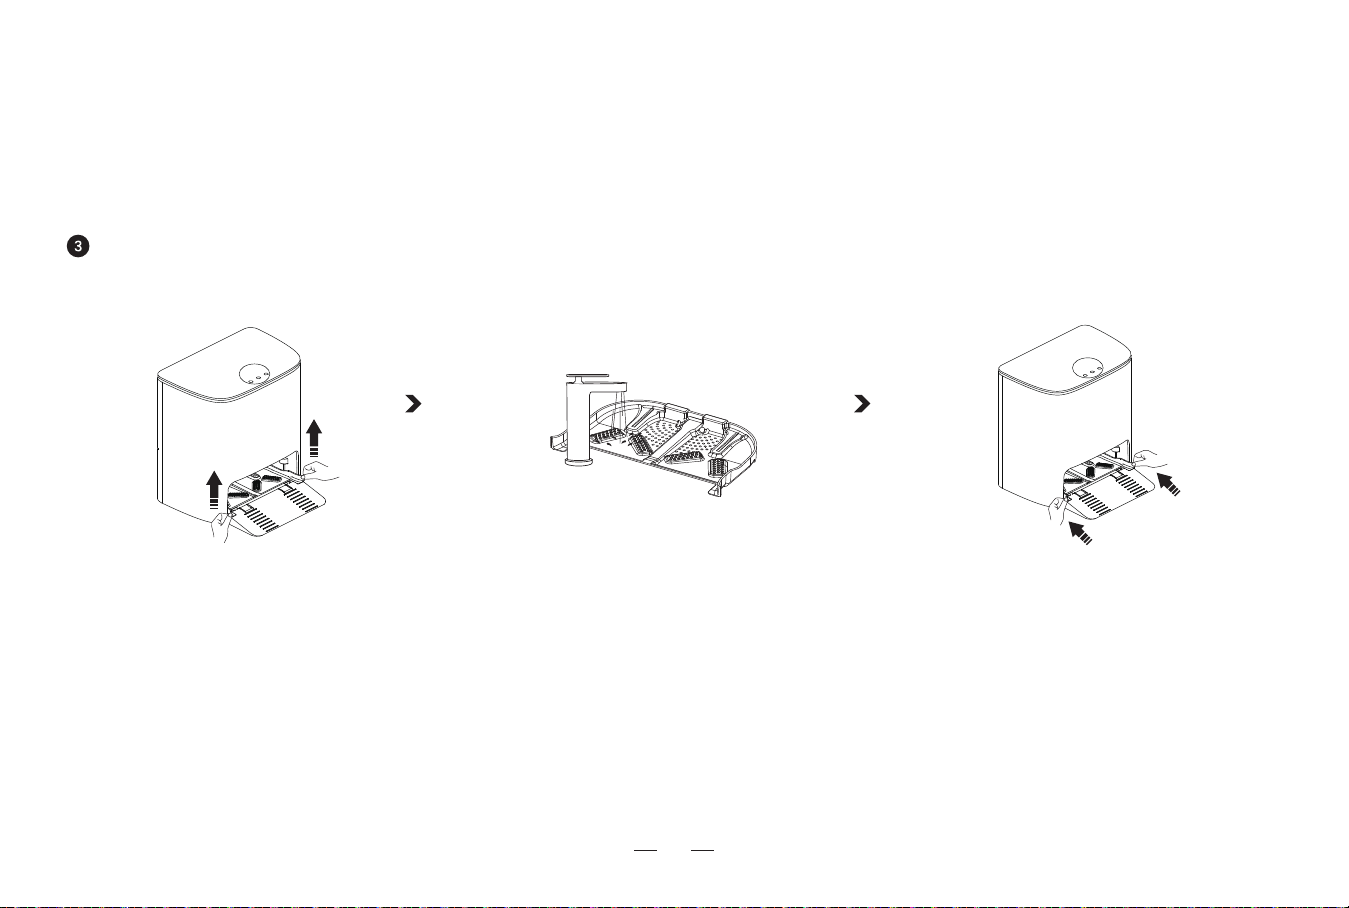
3. Using the product / 3.3 Start mopping
Install the mopping module on the robot. Place the robot flat on the ground. Take out the
water tank, add an appropriate amount of water. Put it back on the robot, and press the
Start/Pause button to turn it on.
Add an appropriate amount of water to the clean water tank.
Please fasten the clatch before lifting the tank to avoid damage to
the rotating shaft.
Install the clean water tank and the sewage tank into the station
correctly, and put the cleaning tray into the groove on the bottom of the
station. Make sure that the cleaning tray is placed flat.
Please use Lefant special cleaner to avoid machine malfunction. The machine can
automatically add cleaners. Cleaners can be purchased and used on demand.
For more information, please visit the Lefant ROBOTICS official website: www.lefant.com or
send email to [email protected].
Insert the bottle mouth into the groove of the station. (bottle body doesn’t tell front and back).
The cleaner bottle is one-time packaged. Forcibly unscrewing the bottle cap will destroy the
airtight and cause liquid leakage, which may cause equipment damage in severe cases.
Fill the clean water tank
Check the water tank and the cleaning trayFill the clean water tank with cleaner
Install the mop/Fill the water tank
sewage tank
Clean water tank
Cleaning tray
16
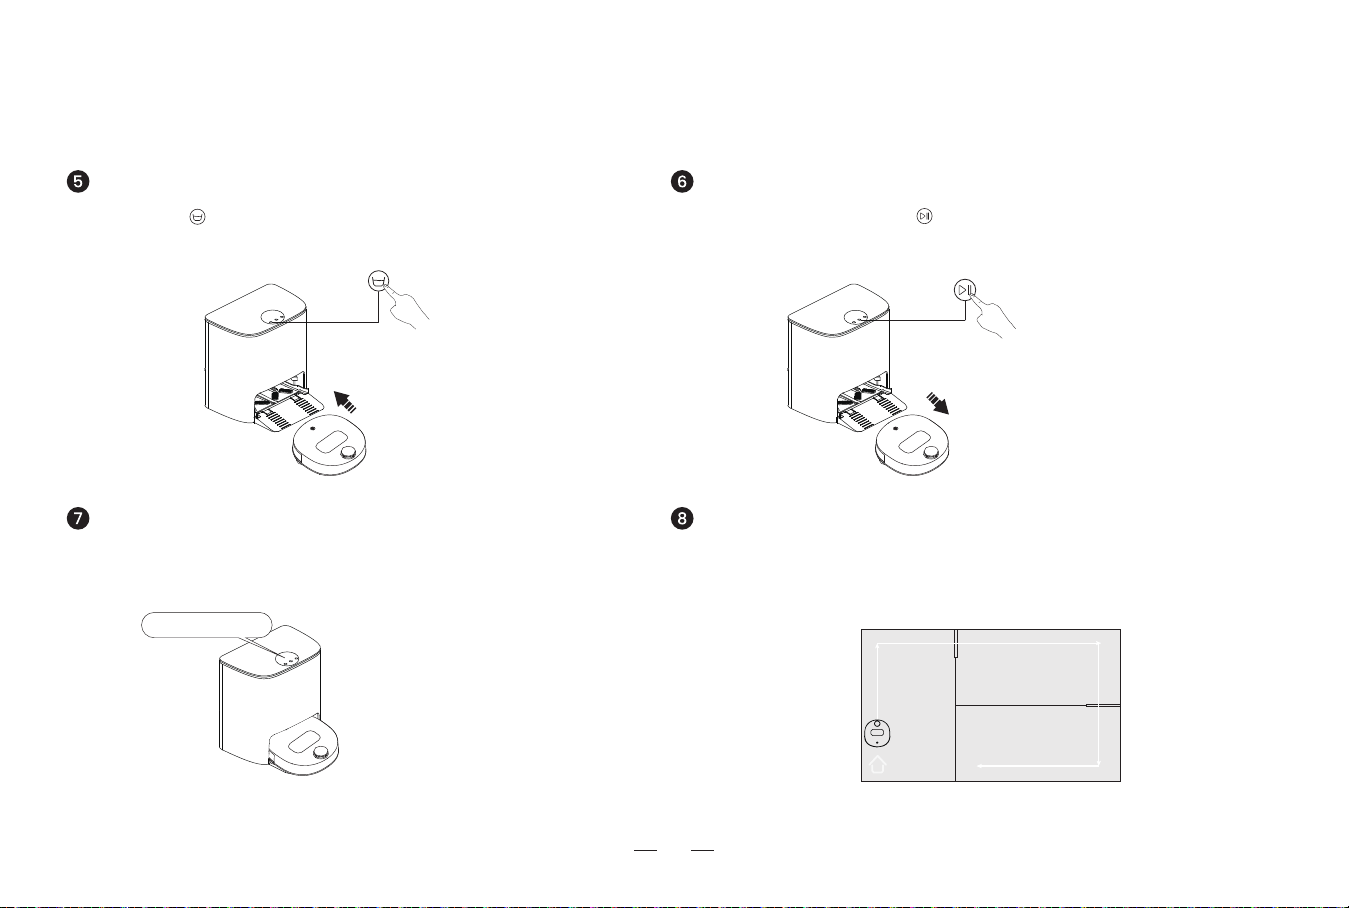
(Note: Please do not follow the robot, and do not stand in the aisle or doorway during the mopping task, otherwise it will cause the lack of map creation.)
3. Using the product / 3.3 Start mopping
Recall the robot to the station Start mopping
Short press to recall the robot to the station.
(If you put the robot into the station by yourself, please pay attention to
put the robot button in the direction of the station.)
Mop cleaning
The robot will clean the mop before the mopping task. Please
wait patiently for the mop washing to complete.
Select the cleaning task. Press on the station. The robot starts to work.
(The robot starts to create a home map the first time it works. Do not move the
robot or station to avoid the failure of the map creation.)
Plan the mopping
The robot will perform the mopping task according to the optimal cleaning plan
made by the created home map.
“cleaning”
17
3. Using the product / 3.3 Start mopping
Check the clean water tank/ Sewage tank Mopping completed
If you run out of water or the tank is full during the mopping process, the
base station screen will display "Insufficient clean water" / "Sewage tank
full", please pay attention to the message on the station screen.
Clean the sewage tanks
After the mopping completed, please clean the sewage tank in time to prevent
the dirty water from producing peculiar smell.
After the robot completes mopping and returns to the station, it will
automatically perform the mop washing and drying tasks.
Cautions
1. The machine will sleep after 10 minutes of no operation.
2. After a 10-minute pause, it will sleep, and the machine will
shut down when the power is lower than 4%.
“Sewage tank full”
“Drying”
18
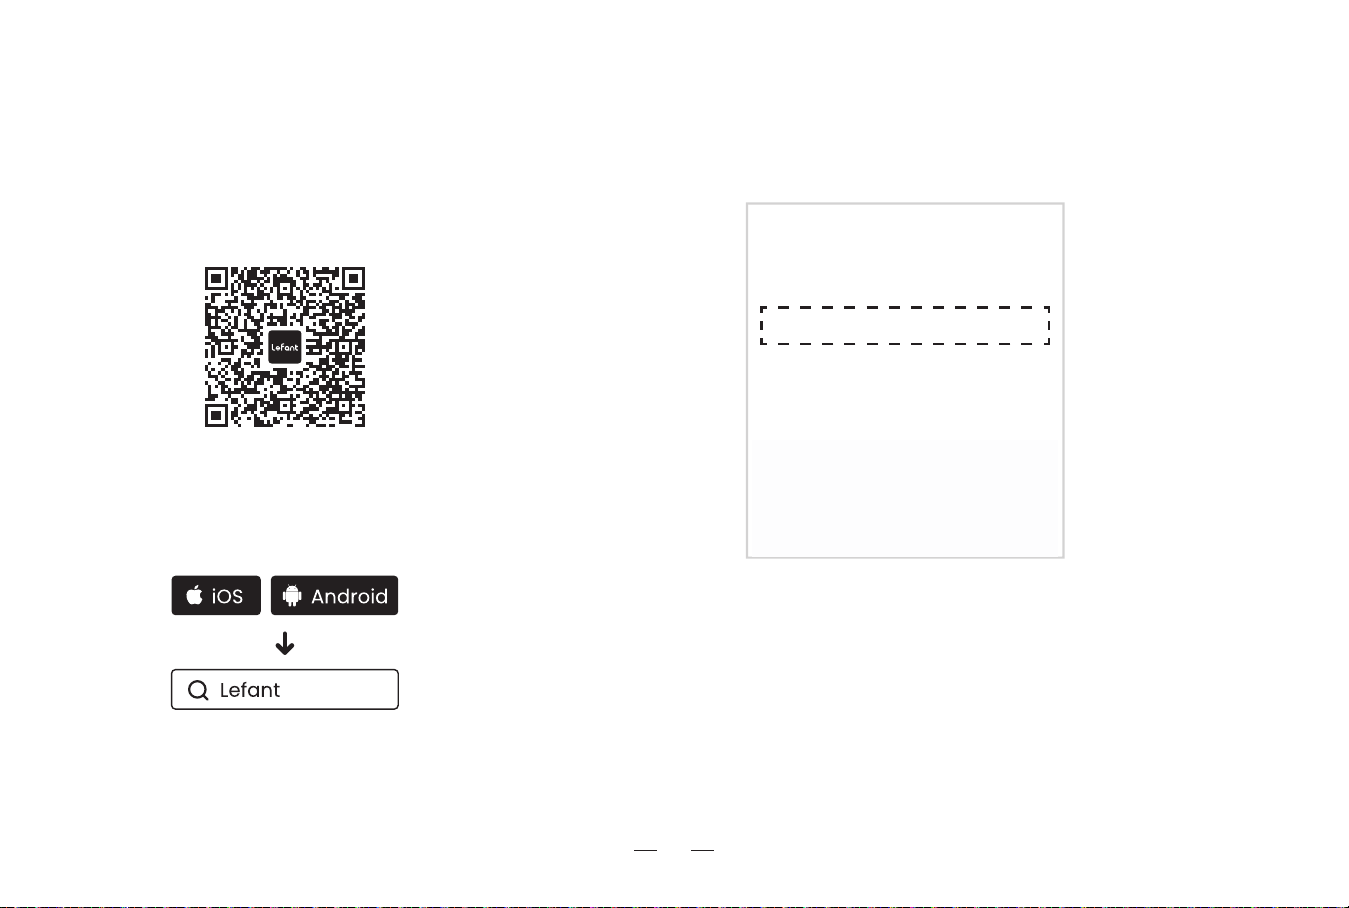
3. Using the product / 3.4 App download and configuration
Downloading and installation of the “Lefant” app
Method I : Scan the following QR code, and then download and
install App as prompted.
Method II : Search "Lefant" in the App store, download and install
the Lefant app.
Tips:
* Follow the guidance in the Lefant app to register, login, and
pair the robot.
* Please make sure that the mobile phone is connected to your
Wi-Fi network before paring the robot vacuum cleaner.
Please connect to a 2.4GHz home Wi-Fi network
Lefant_2.4G
Lefant_5G
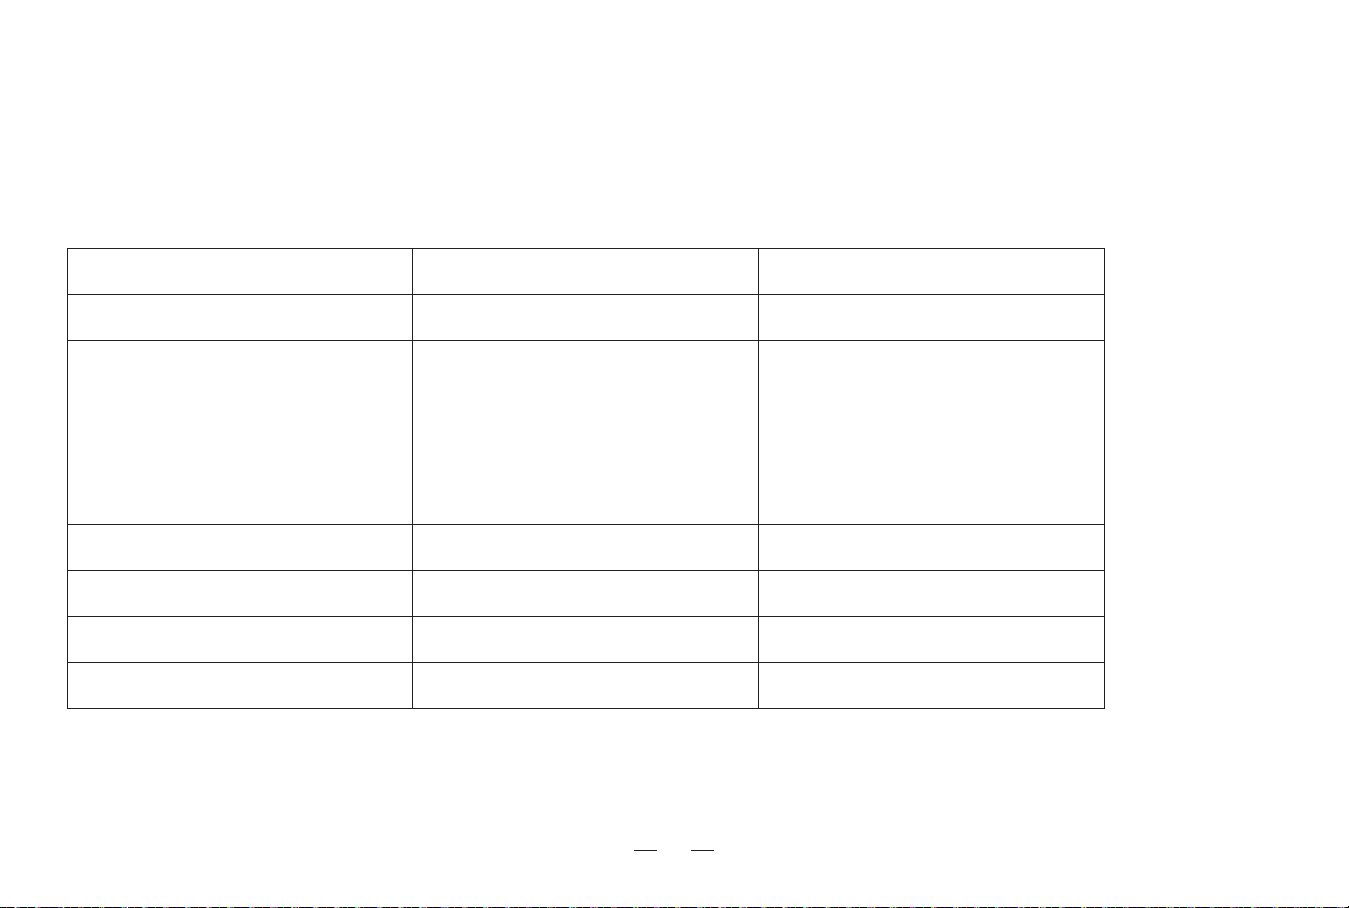
3. Using the product / 3.5 Maintenance frequency
19
In order to maintain the peak performance of the product, it is recommended to perform accessories maintenance with reference to the following
frequency:
Reminder: If you need to buy accessories, all major online stores are available for sale.
Accessory Maintenance frequency Replacement frequency
Mop / Once every 1-2 months
Cleaning trays Once a week /
Clean water tank Once a month /
Sewage tank After each mopping /
Body and bottom of the station Once a month /
dToF laser navigation sensor
Universal Wheel
Anti-fall sensors
Anti-bumping strips
Charging electrode on the robot
Charging electrode on the station
Once a week /
3. Using the product / 3.6 Maintenance
20
* Unplug the station when performing cleaning and maintenance on the robot and its accessories.
2. Past and install the new mop along the shape
of the module.
1. Tear off the old mop and remove it.
The mopBottom of the robot
3. Press the new mop firmly by hand.
3. Clean the drive wheels to keep the
sweeping smooth.
2. Clean the universal wheel to
prevent tangling of hairs.
1. Clean the anti-drop sensor to ensure sensor sensitivity.
21
2. Take out the cleaning tray and rinse
directly with water.
1. Hold the cleaning tray handle with both
hands and lift it up to take it out.
3. Replace the cleaning tray.
Cleaning tray for the station
* Unplug the station when performing cleaning and maintenance on the robot and its accessories.
3. Using the product / 3.6 Maintenance
22
4. Abnormal symptoms / 4.1 Troubleshooting
If the following problems occur during the use of the product, you can cross-reference them and solve them independently.
Mop bracket is tangled.
The sensors may be dirty.
Possible causes
Poor cleaning ability.
FaultS/N
1
Clean up foreign objects.
Refer to the manual section [Maintenance] to clean the main unit and other parts.
Solutions
Incorrect home Wi-Fi username or password
entered.
The robot is in a weak Wi-Fi signal or
unstable network environment.
When the network is connected, the robot has
not entered the network configuration state.
Unable to
connect to APP.
2
Make sure the robot is within a good Wi-Fi signal range.
2.4G network is not in use.
It is necessary to switch to 2.4G network. For details, please refer to the [App download
and configuration] chapter of the manual.
Please enter the correct Wi-Fi username and password.
Press and hold for 3 seconds to enter the network configuration state. For details,
please refer to the [App download and configuration] chapter of the manual.
The power supply is not connected and the
plug is loose.
The charging electrodes of the robot and the
station are not fully contacted.
Batteries deteriorate due to long time of
non-use.
Unable to charge.
4
Regular use of this product is recommended. If you do not use it for a long time, please
turn off the power switch after fully charging it, and keep charging it once a month. If the
battery cannot be charged, please contact the after-sales service personnel.
Make sure that the charging electrodes of the robot and the station are fully connected, and
regularly clean the charging electrodes of the robot and the station.
Check if the both ends of the power cord are connected and powered on normally.
The mop is worn. Replace the mop regularly.
The robot does not
respond to station
commands.
The robot and station are too far apart. Please move the robot to the station.
3
* If the fault cannot be eliminated according to the operation in the table, contact our customer service representative.
23
If the following problems occur during the use of the product, you can cross-reference them and solve them independently.
4. Abnormal symptoms / 4.1 Troubleshooting
Incorrect placement of the station.
The station is powered off or moved.
The recharge route is blocked. For example, the door of
the room with the station is closed or there are too many
obstacles near the station.
The robot does not start cleaning from the
station.
Cannot find the signal
of the station, and
cannot return to the
station.
6
Please put the station in an open area or clear obstacles around the station to keep the
recharging route unobstructed.
Please check that the base station is connected to the power supply. Do not move the base
station position artificially.
Please follow the instructions in the chapter [Assemble and charge] for the correct
placement of the base station.
It is recommended to let the robot start cleaning from the station.
Possible causesFaultS/N
There may be a risk of losing the map when
moving the station.
Map lost.
5
Find the saved map in “Map Management” of the APP, and try to restore it by clicking "Use
Map". If the above solution cannot solve the problem, it is recommended to rebuild the map.
Station abnormal
alarm.
7
The closing plug in the sewage tank is not
properly installed.
The station cannot pump water normally.
Make sure that the two closing plugs of the sewage tank in the station are properly installed.
Click once to observe whether the station can pump water normally. If the fault occurs during
cleaning the mop, please press and hold to end the task, and then click twice to observe
whether pump normally. If the water is pumped normally, please dry the overflow sensor of the
cleaning groove; if the water cannot be pumped, please check whether there is any foreign object
between the sewage tank and the station, and clean it if there is any.
There is a foreign object in the suction port of
the cleaning groove.
Make sure that there is no foreign object in the suction port of the cleaning groove.
The sewage tank not installed correctly.
Gently press down on the sewage tank to ensure it is properly installed.
Trying the above methods still fails to clear the
abnormal alarm.
Replug the station power switch. If you can't solve it, please contact the after-sales service
personnel.
Solutions
* If the fault cannot be eliminated according to the operation in the table, contact our customer service representative.
24
5. Technical parameters
Note: Since the product needs continuous improvement, the actual product shall prevail.
Our company reserves the right to update the product.
Product model
Rated input of Robots
Charging time
Self-cleaning station models
Rated input (state of charge)
Rated output (state of charge)
LT1
≤ 3.5 hours
LT1 Self-cleaning station
100-240V~ 50/60Hz, Max 0.55A
20V
2A
20V
2A

Warranty
This warranty covers the repair or replacement of the malfunction device at our company’s discretion for a period of 1-year. In addition this certificate is void
if altered. The serial number must be provided as well as all accessories to be eligible for warranty coverage. Please kindly fill in below form accurately and
completely.
Important:
When returning this device, carefully pack the product to avoid damage in shipping. Damage in shipping is not covered by the Warranty and shall be the
sole responsibility of Buyer. Damage or loss not covered by this Warranty or occurring outside the Warranty Period will require a fee to cover the cost of
handling and shipping. All such fees and costs shall be the sole responsibility of Buyer.
Exclusion
Unless agreed in writing, the warranty will not apply if the defects relate to:
• Consumable parts such as filters, or brushes etc, that are subject to normal wear and tear, and require regular maintenance and/or replacement to
ensure the proper functioning of your unit.
• Defects caused by rough or inappropriate handling or use or damage caused by accident, misuse, neglect, fire, water, lighting or other acts of nature,
external sources such as weather, electrical outages or power surges.
• Improper operation or maintenance, use not in accordance with the product instructions or connection to improper voltage supply.
• Accident, abuse, misapplication, or any unauthorized repair, modification, or disassembly of the product.
• Any failure to adequately package the Product for transportation.
• Use of parts not in accordance with the product instructions.
• Use of parts and accessories other than those produced or recommended by our company.
• Use in a commercial environment as the Product is designed for residential use only.
• Consequential and incidental damages.
• Any product(s) purchased from unauthorized dealers/resellers.
• Products used outside the country of purchase.
• Lost and/or stolen products.
Order Number:
Serial Number:
Date of Purchase:
LT1-LH20221009-V01
Building 2, Fashion Brand Industrial Park, E'Bu Town,
Shenzhen-Shanwei Special Cooperation Zone, Shenzhen, Guangdong, China.
Shenzhen lohas Technology Co., LTD.
Official website
Website: www.lefant.com
Email: [email protected]
Facebook: @LEFANTOFFICIAL
Community: facebook.com/groups/Lefantofficalcommunity