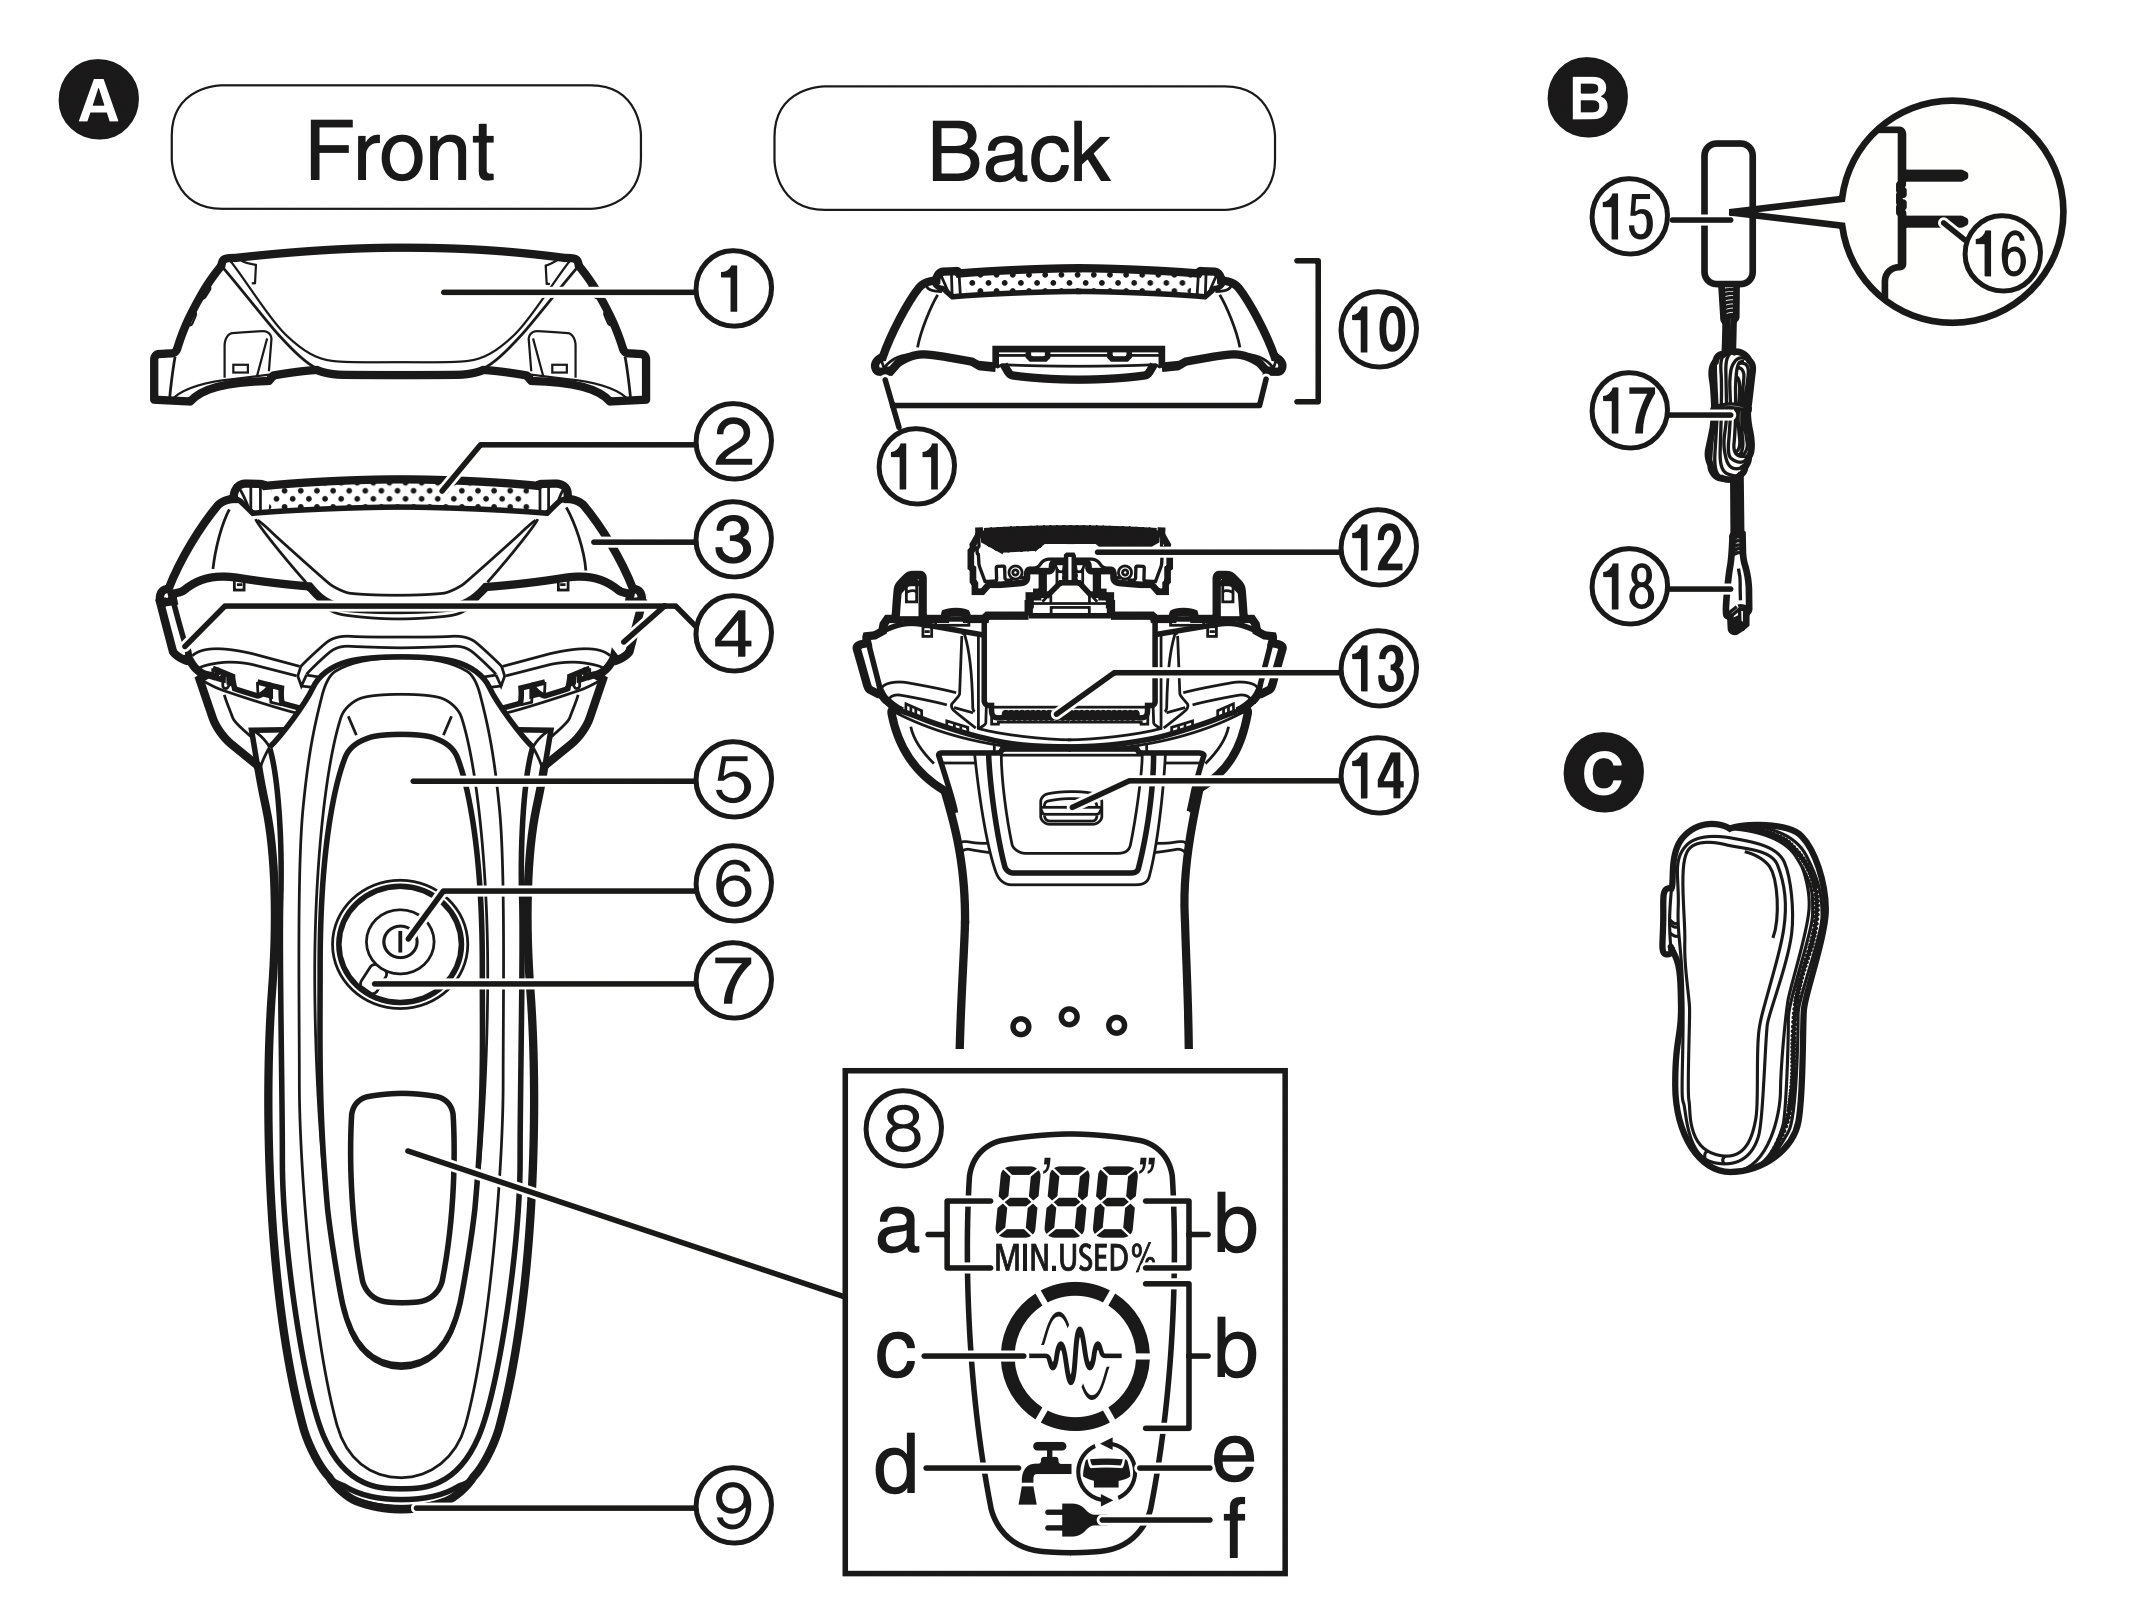
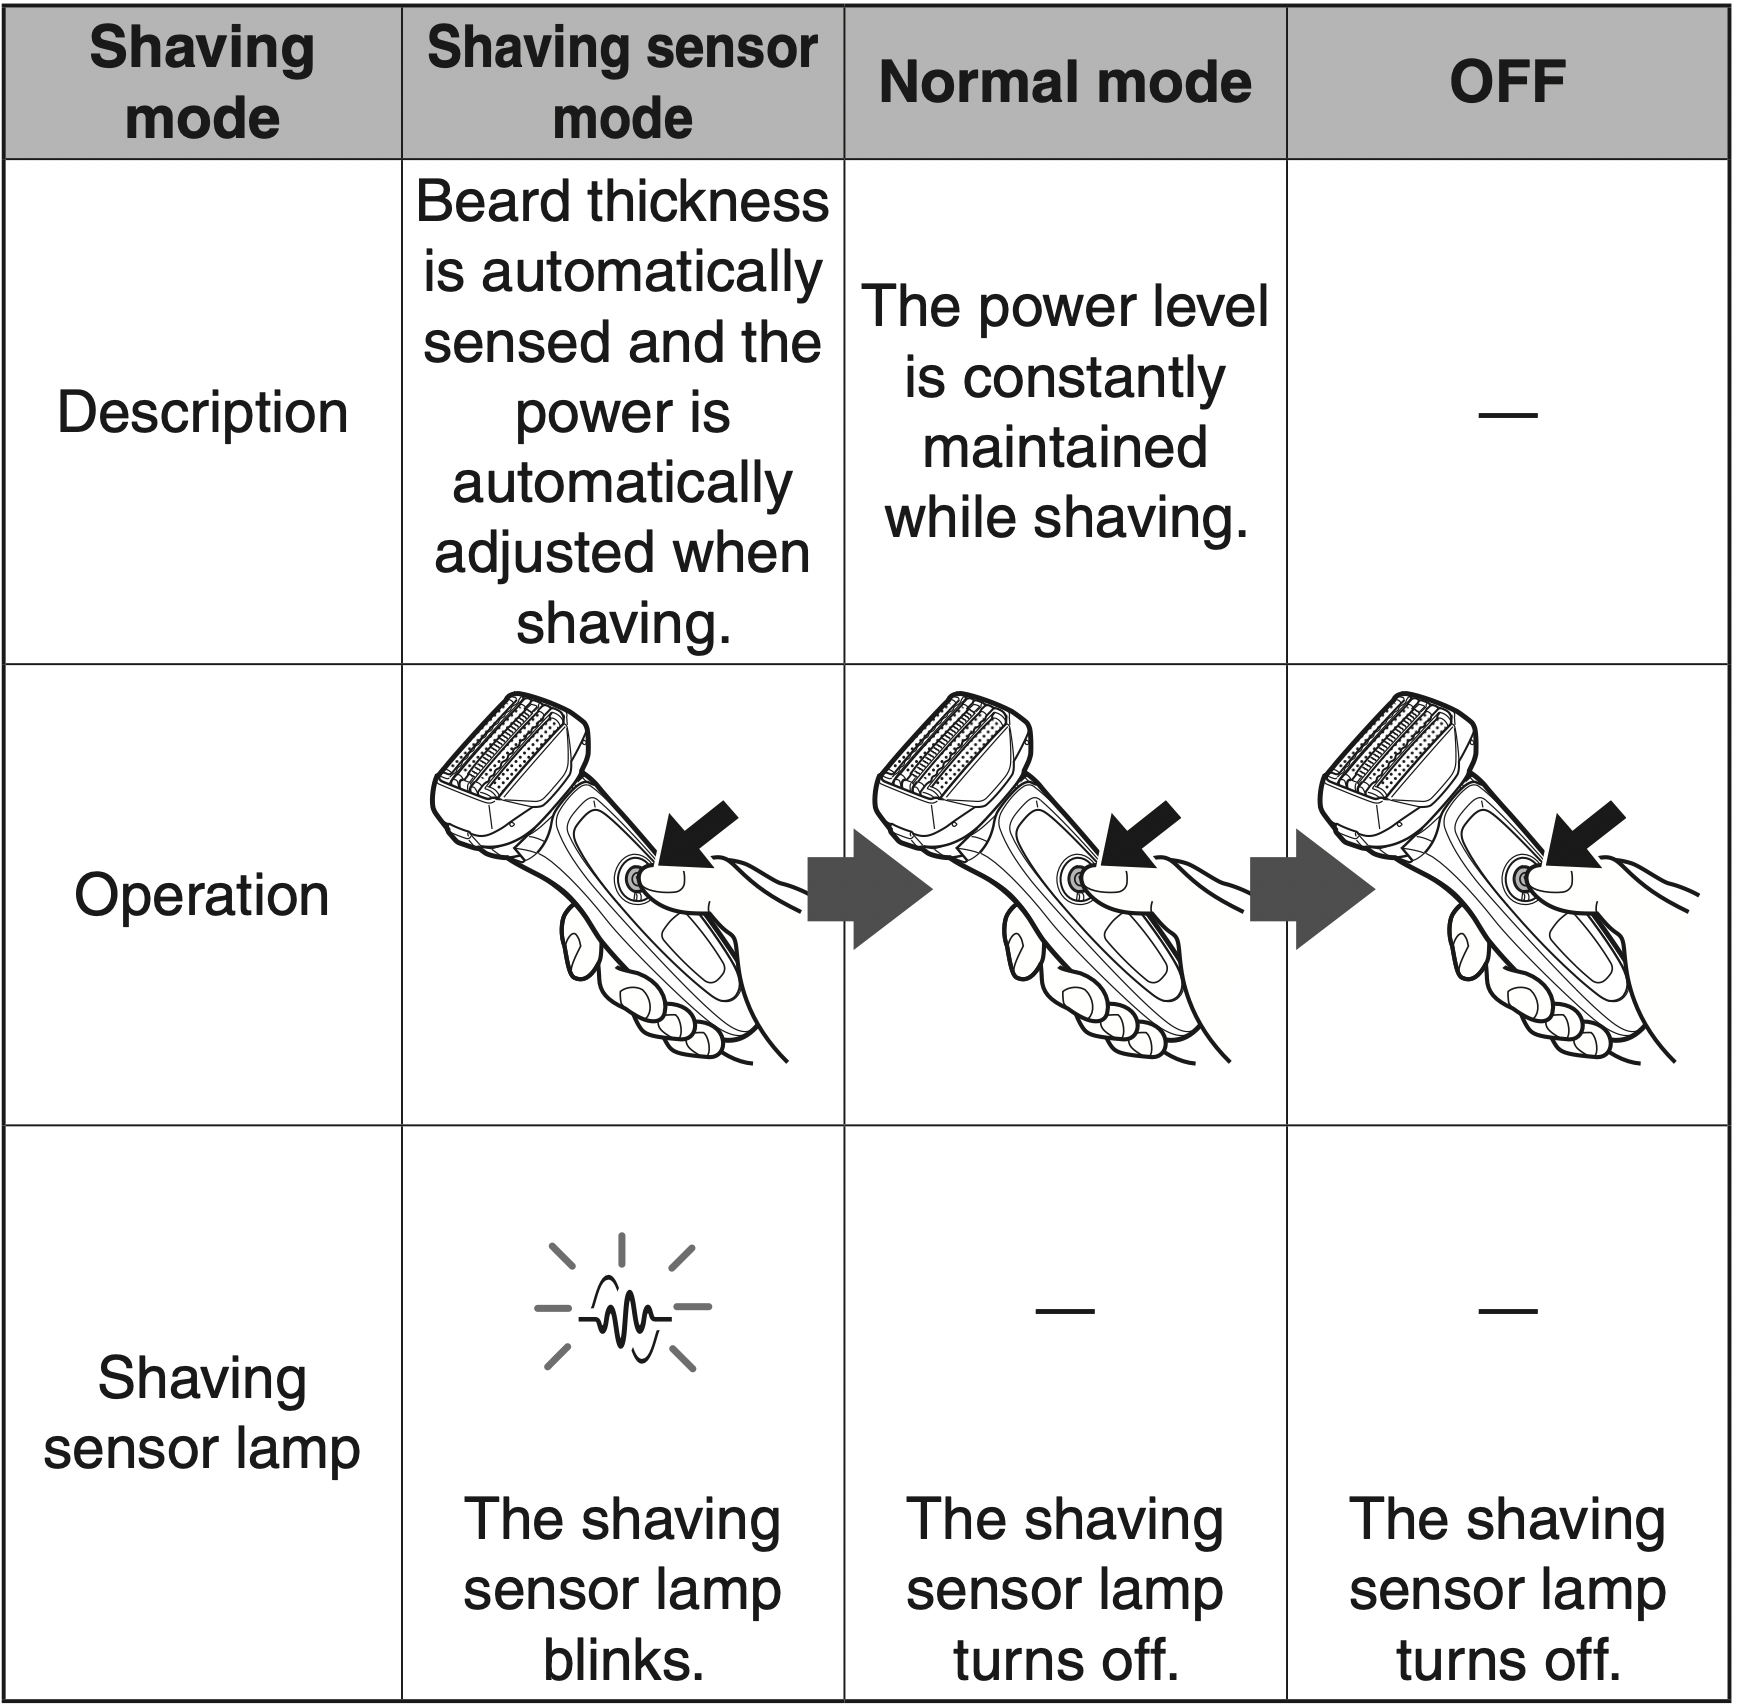
Lamp display a. Used time lamp b. Battery capacity lamp c. Shaving sensor lamp ( ) d. Clean lamp e. Foil/blade check lamp f. Charge status lamp ( )
Appliance socket
Outer foil section
System outer foil release buttons
Inner blades
Trimmer
Trimmer handle B. AC Adaptor
Power plug
Cord
Appliance plug
Accessory C. Travel case
Using the lock ring Use the lock ring to lock or unlock the power switch. Rotate the lock ring until it clicks.
Rotate the lock ring to “ o ” to unlock the power switch: Used when shaving, washing the shaver, lubricating the shaver.
Rotate the lock ring to “ ” to lock the power switch: Used when carrying the shaver.
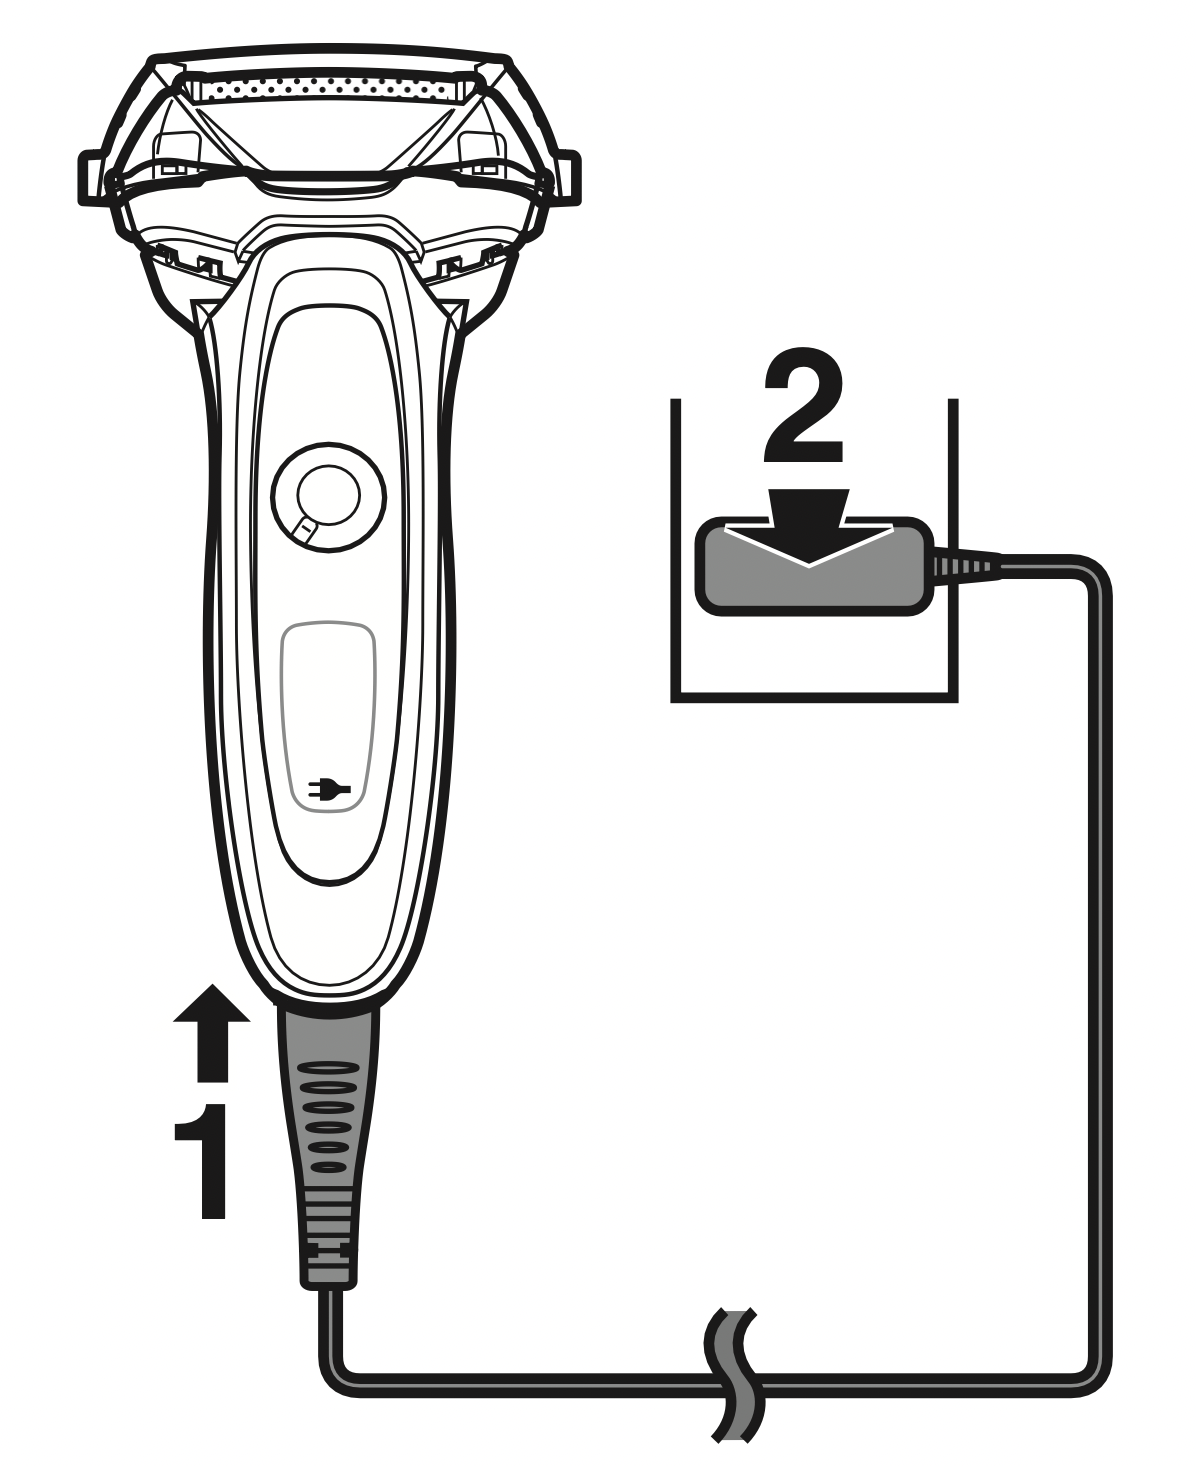
Charging the shaver
Insert the appliance plug into the shaver. Turn the shaver off before inserting.
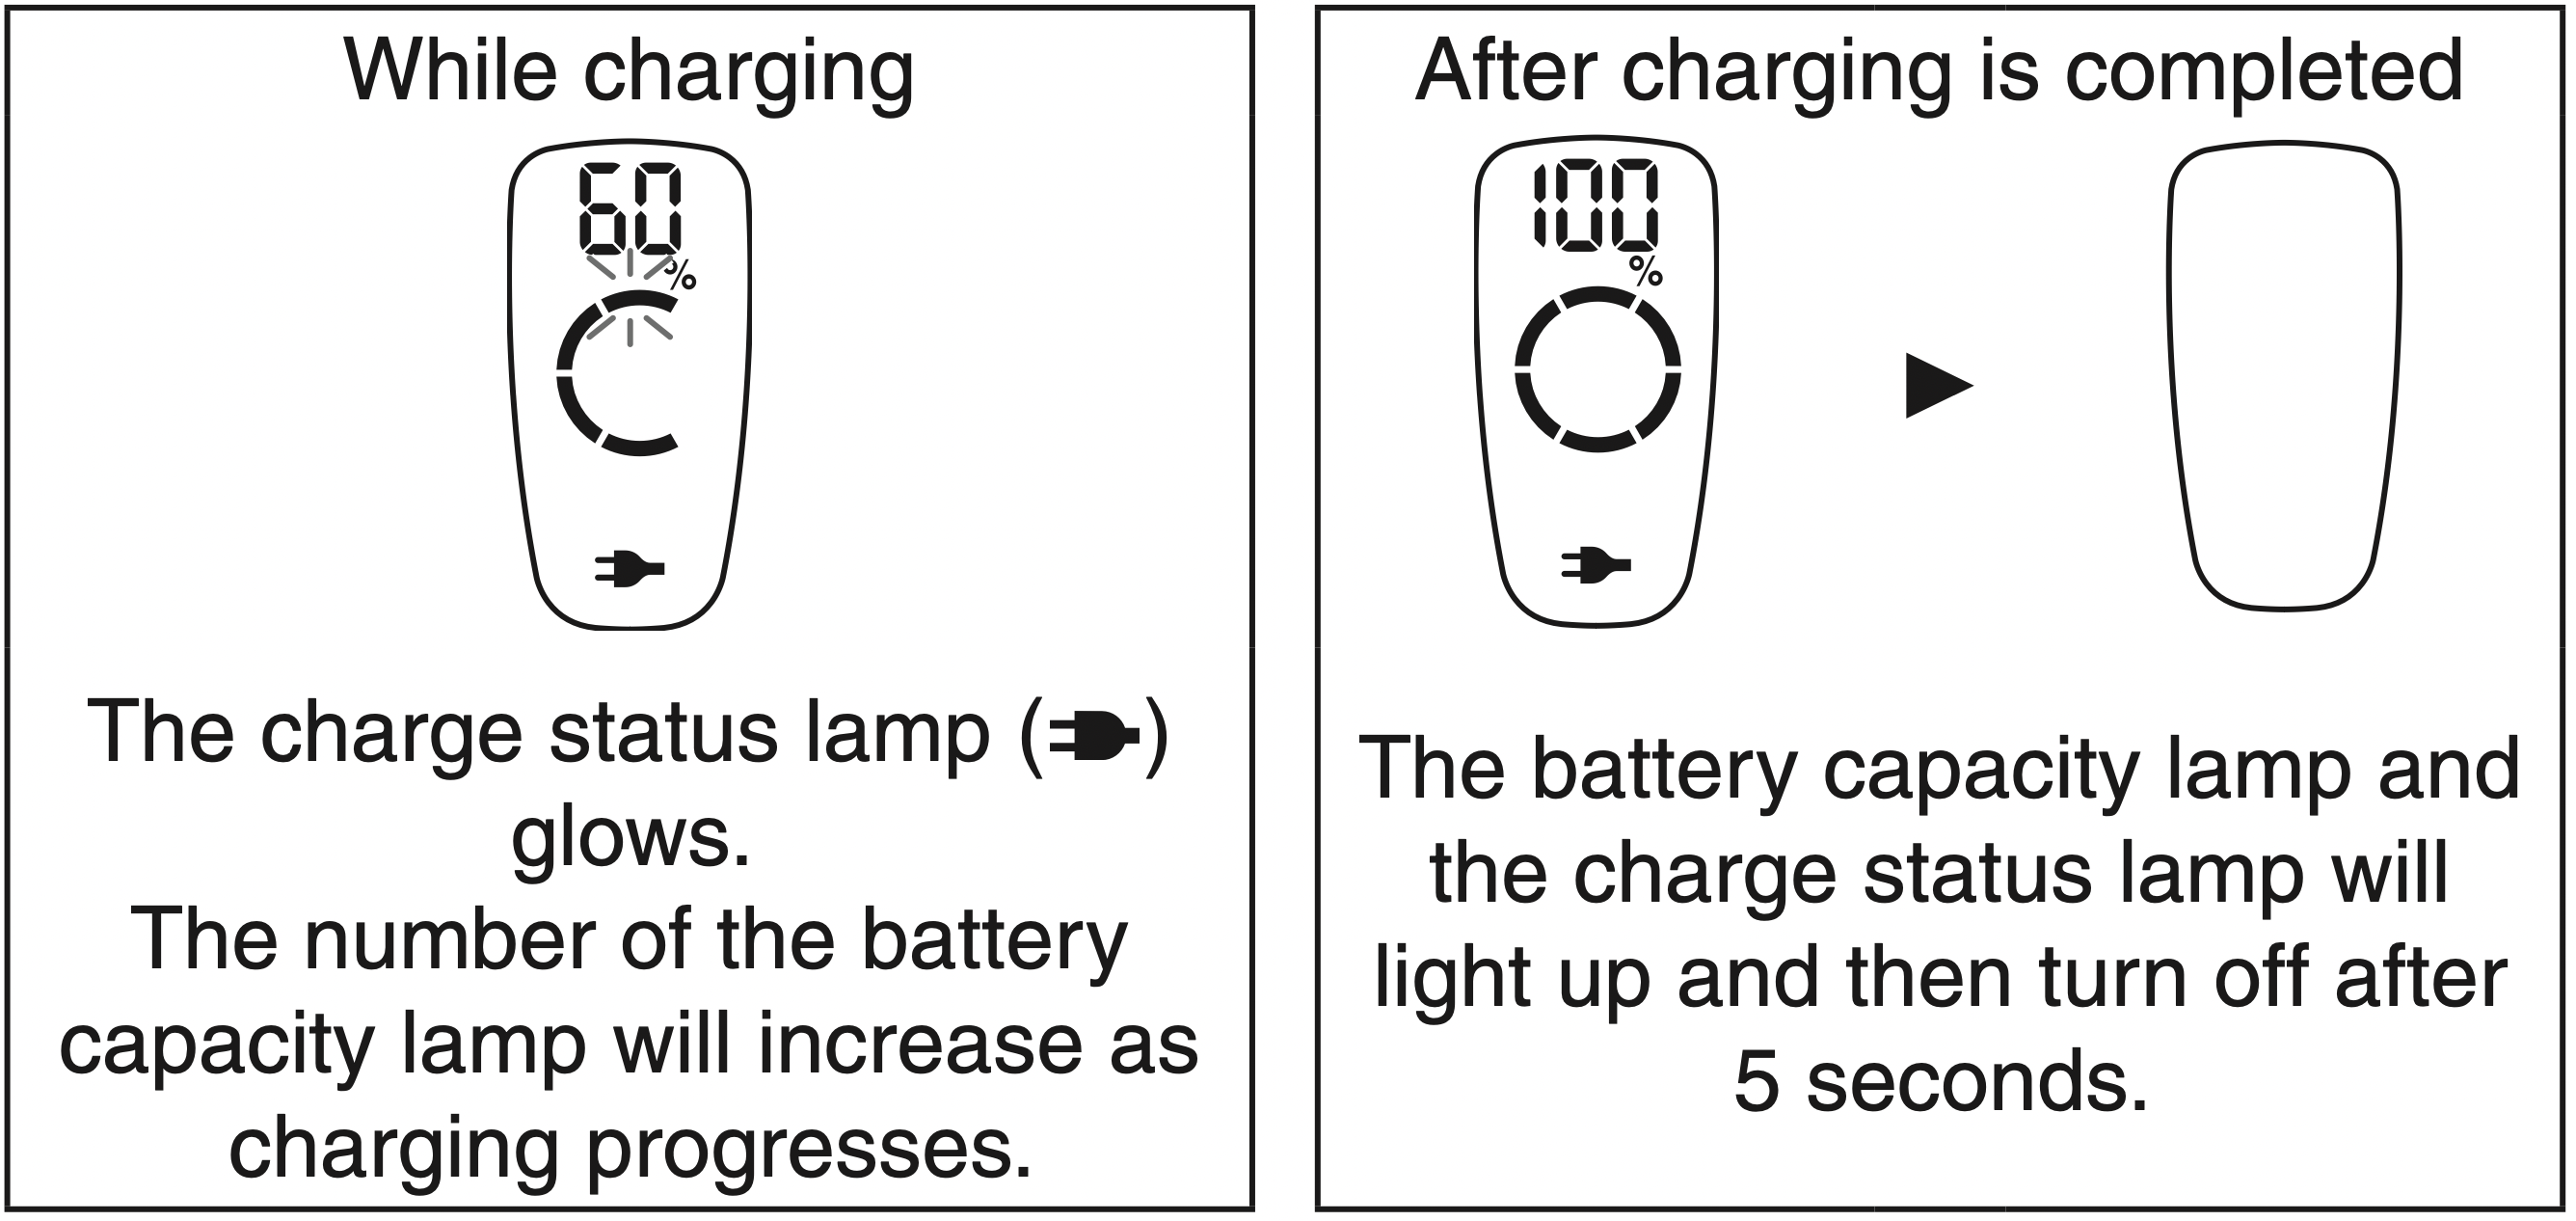
Plug in the adaptor into a household outlet. Check that the charge status lamp ( ) glows. Charging is completed after approx. 1 hour. The charging time may decrease depending on the charging capacity. Wipe off any water droplets on the appliance socket. Check that the outer foil is not deformed or damaged when you are attaching the shaver. If the shape of the plug does not fit the power outlet, use an attachment plug adaptor of the proper configuration. After charging is completed, turning the power switch ON with the shaver plugged in will cause the battery capacity lamp and the charge status lamp to light up and then turn off after 5 seconds. This shows that the shaver is fully charged. Recommended ambient temperature for charging is 10 – 35 °C (50 – 95 °F). It may take longer to charge or the battery may fail to charge properly in extremely high or low temperatures. Charge the shaver within the recommended ambient temperature range. When charging the shaver for the first time or when it has not been in use for more than 6 months, the charge status lamp ( ) may not glow. It will eventually glow if kept connected.
Disconnect the adaptor after charging is completed. Charging the battery for more than 1 hour will not affect battery performance. Note: You cannot operate the shaver while charging.
Using the shaver
Rotate the lock ring to unlock the power switch. (See page 9.)
Press the power switch to select the desired shaving mode. Each time you press the power switch, the shaving mode changes from “Shaving sensor mode” “Normal mode” “OFF”. The shaving sensor may not respond depending on the thickness of the beard or the type of the shaving gel and shaving foam, but this is normal. The shaving sensor may not respond when the remaining battery capacity is low. If this happens, recharge the shaver.
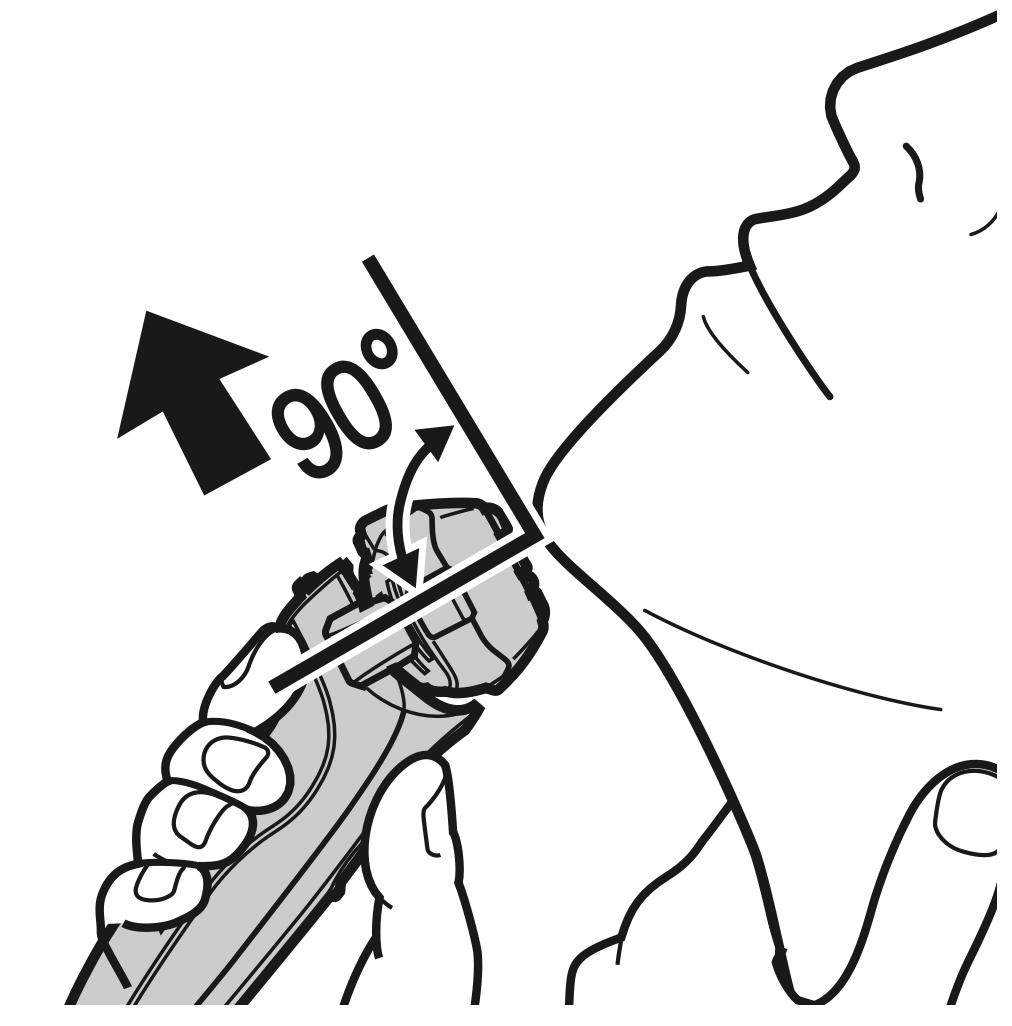
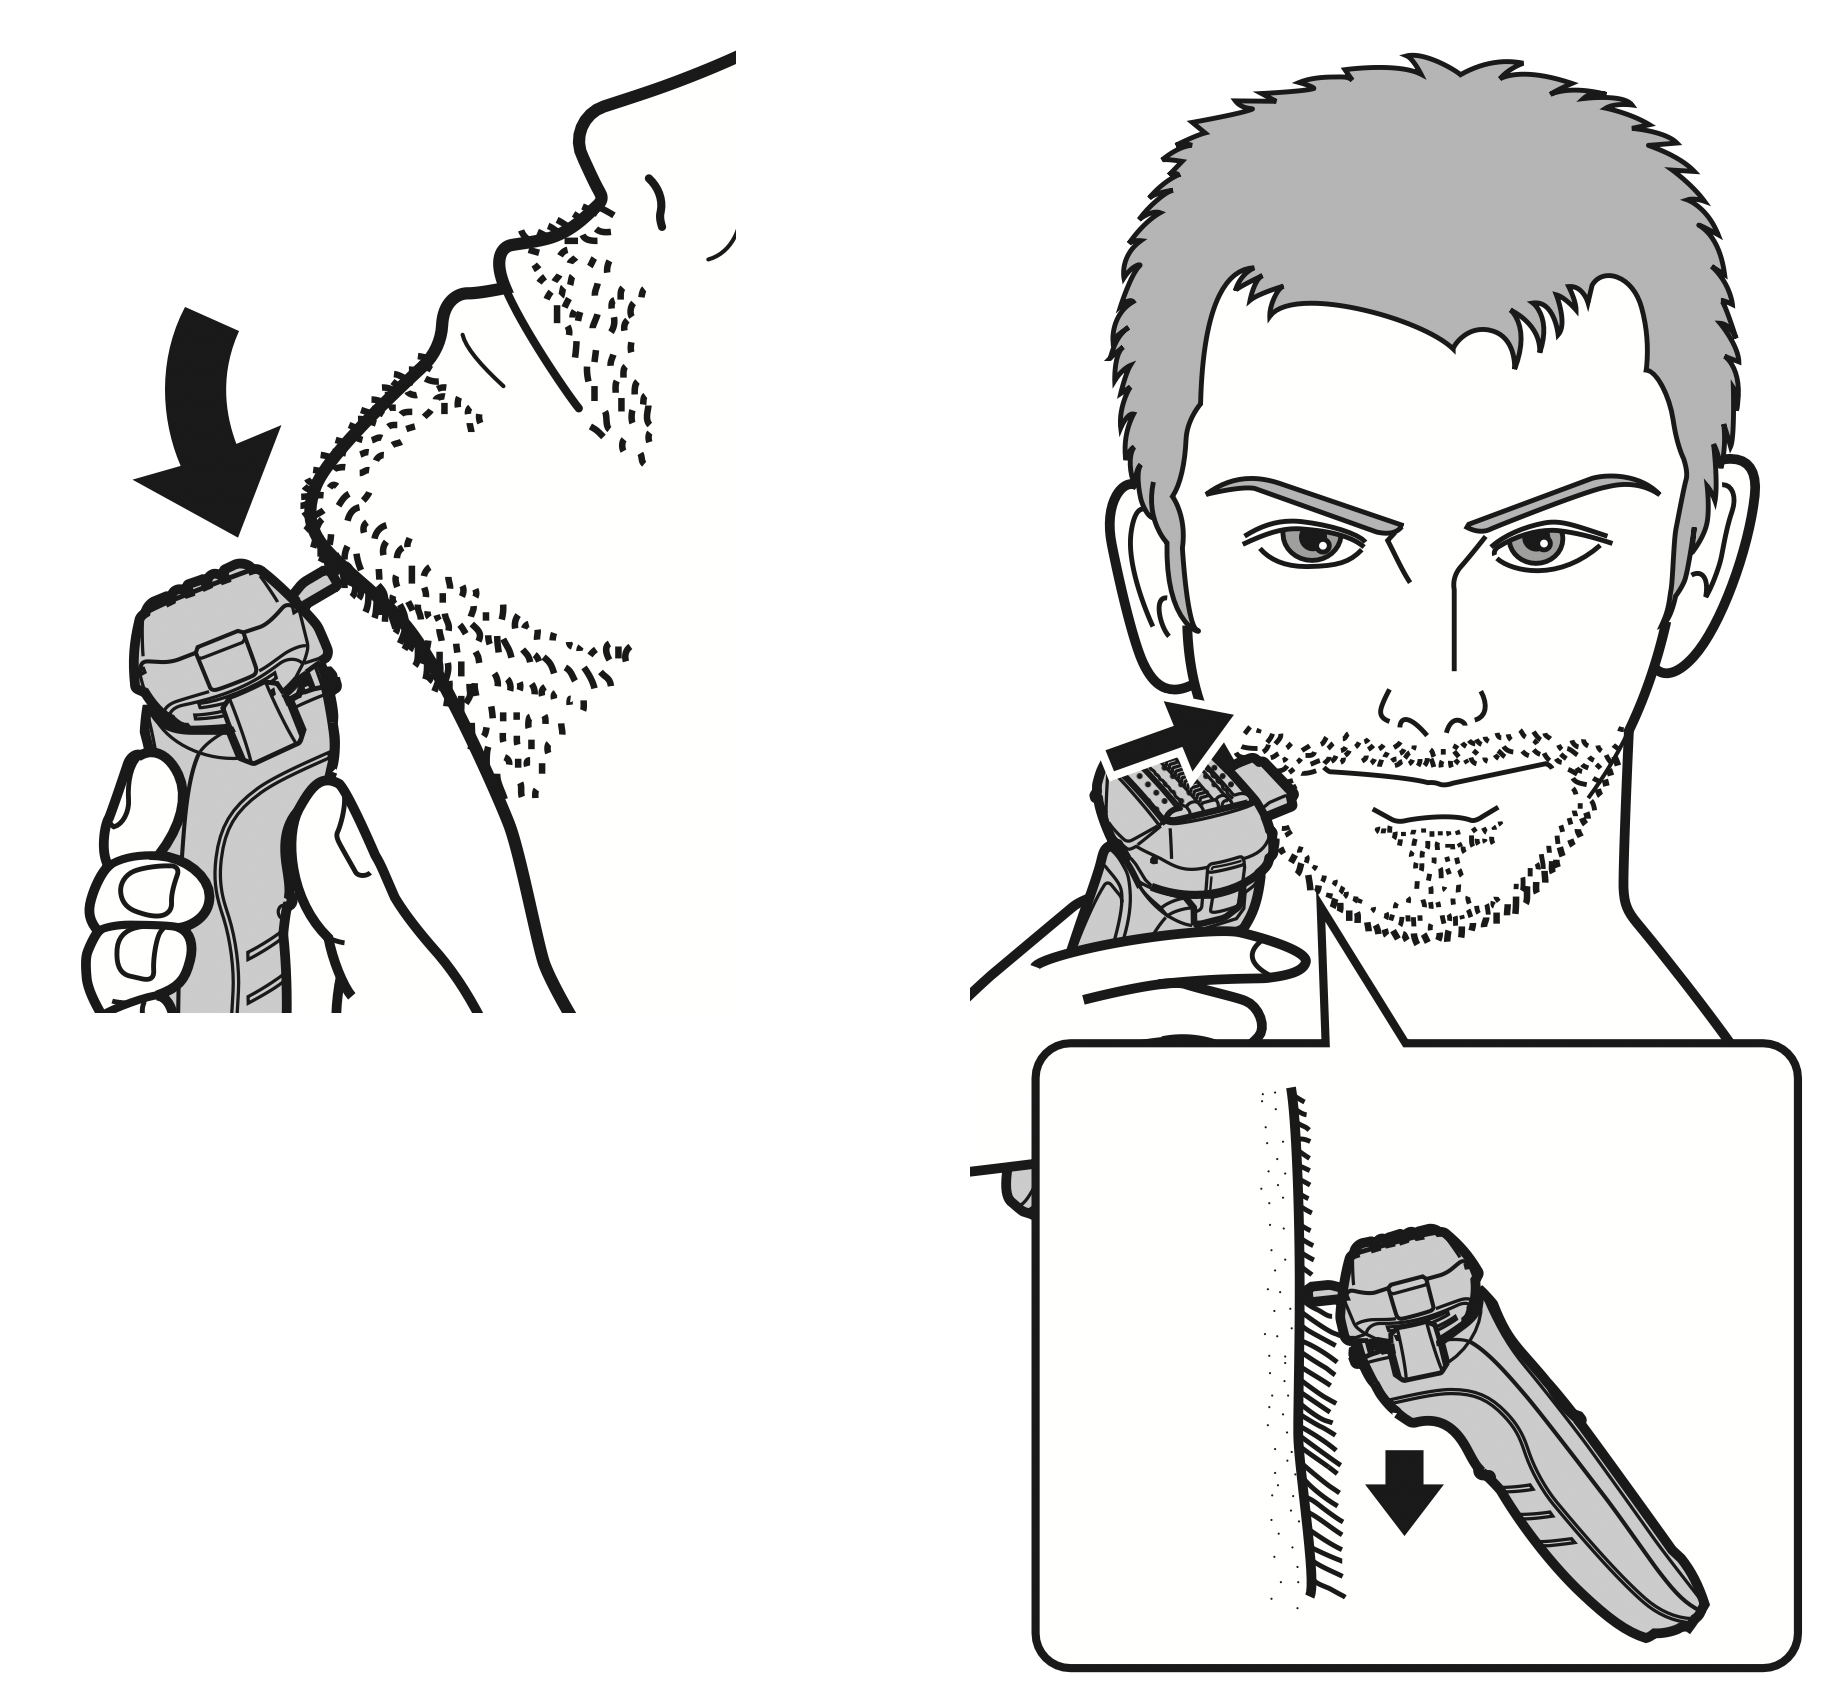
Hold the shaver as illustrated and shave. Start shaving by applying gentle pressure to your face. Stretch your skin with your free hand and move the shaver back and forth in the direction of your beard. You may gently increase the amount of pressure as your skin becomes accustomed to this shaver. Applying excessive pressure does not provide a closer shave.
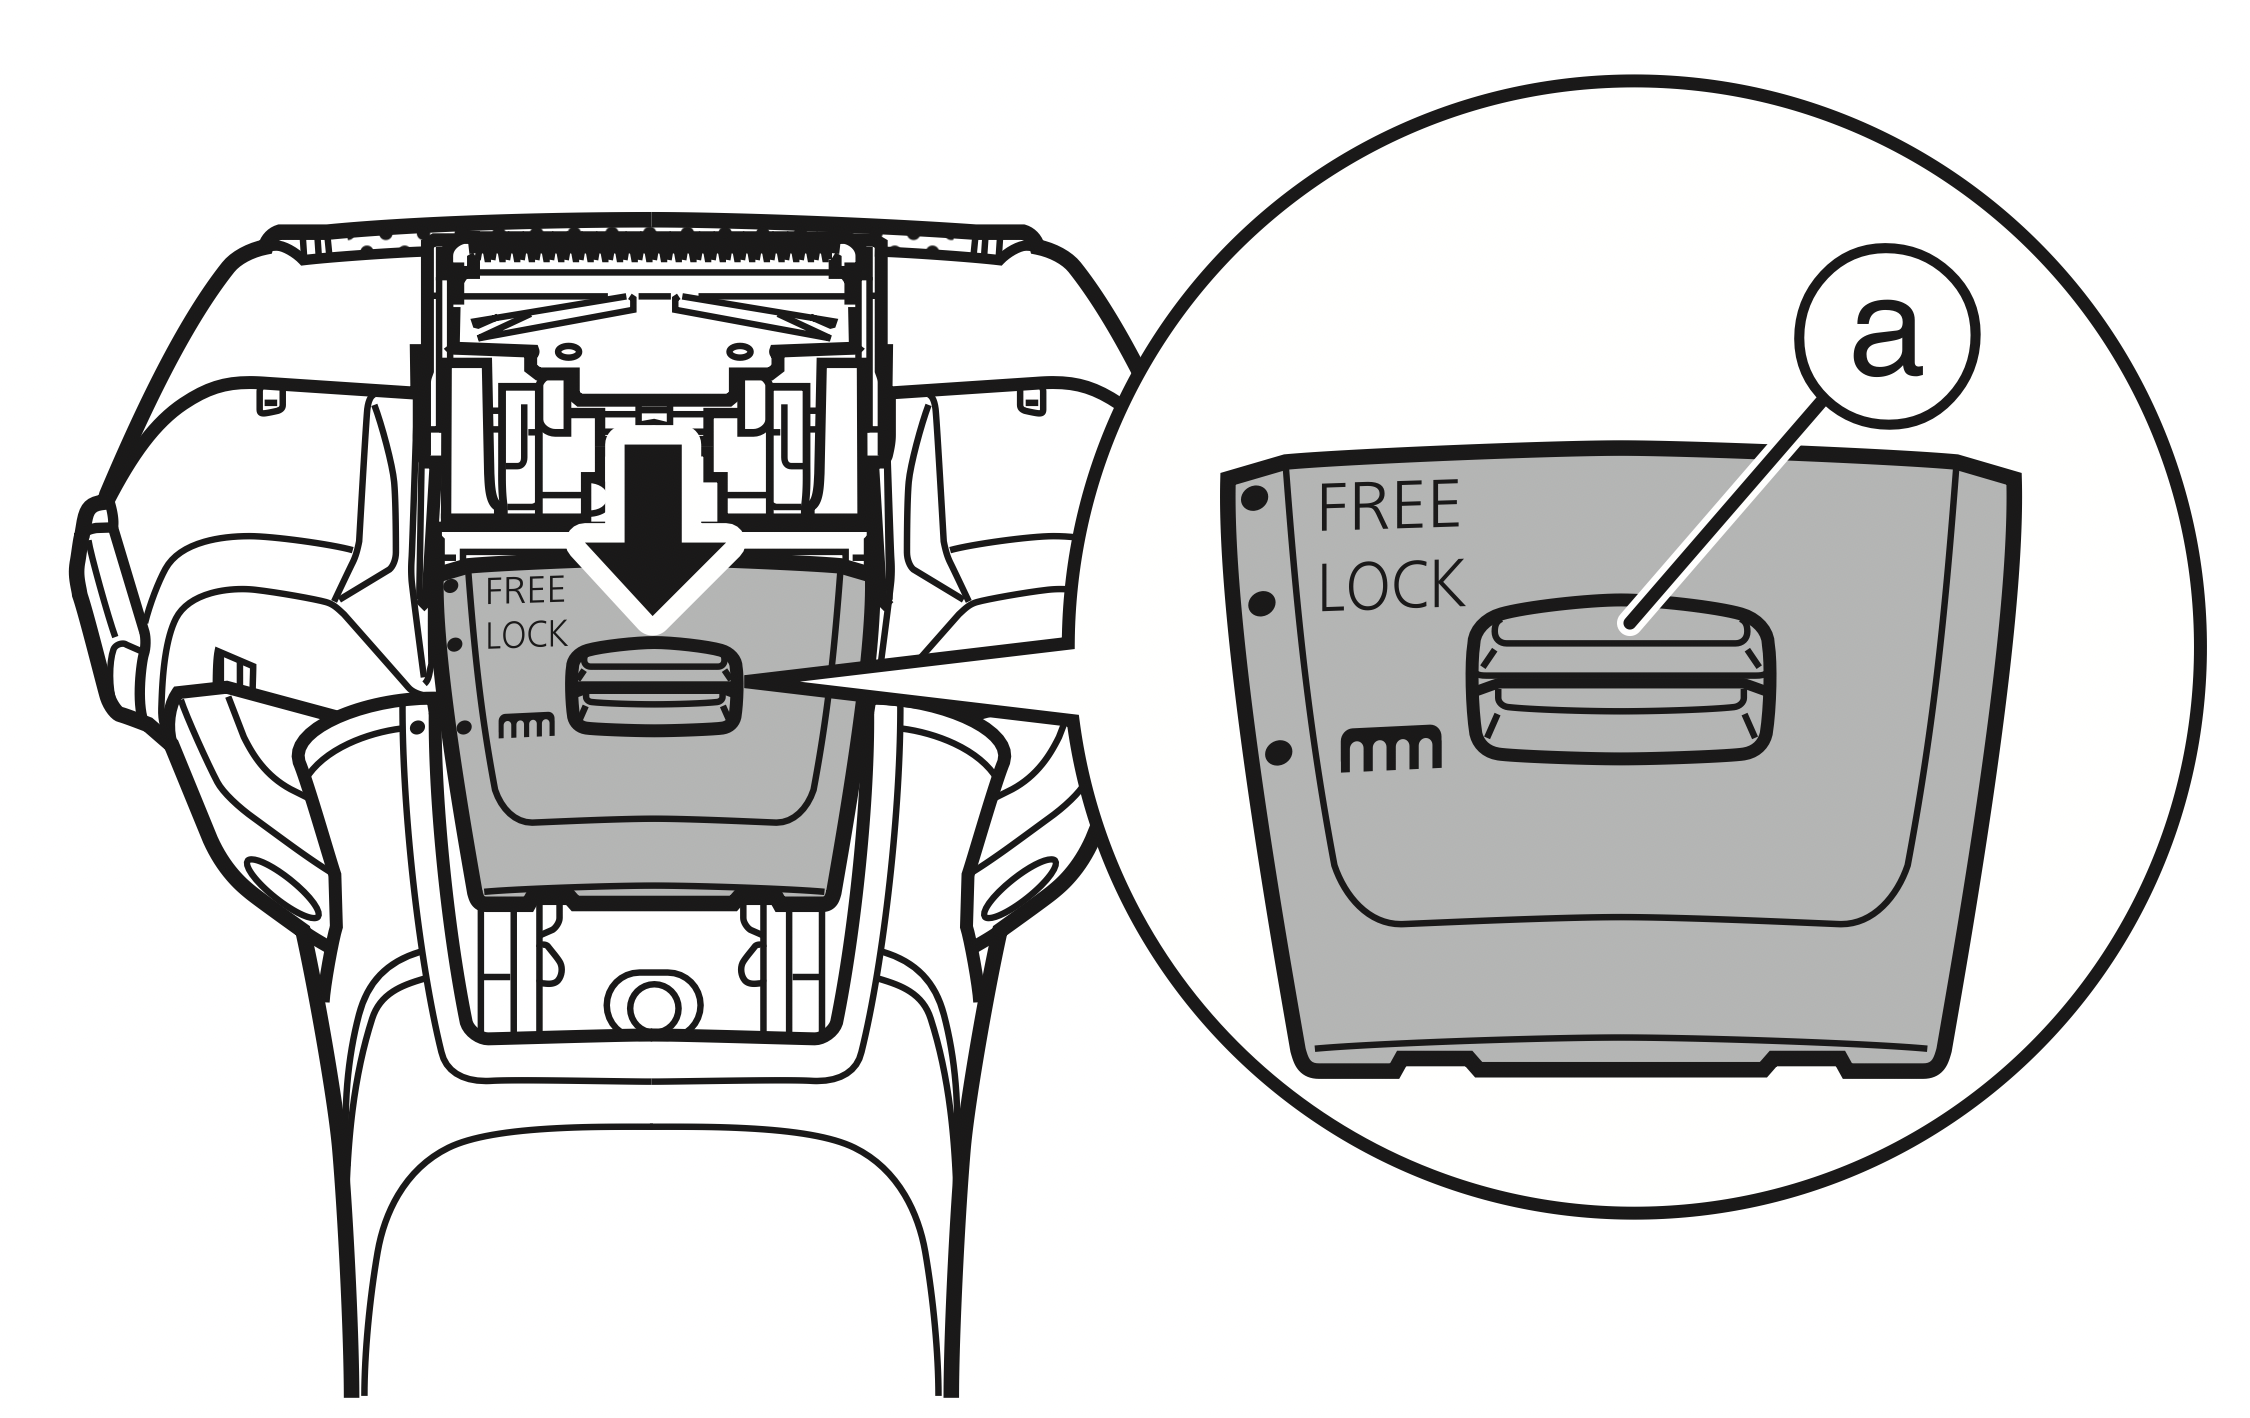
Switching the shaver head
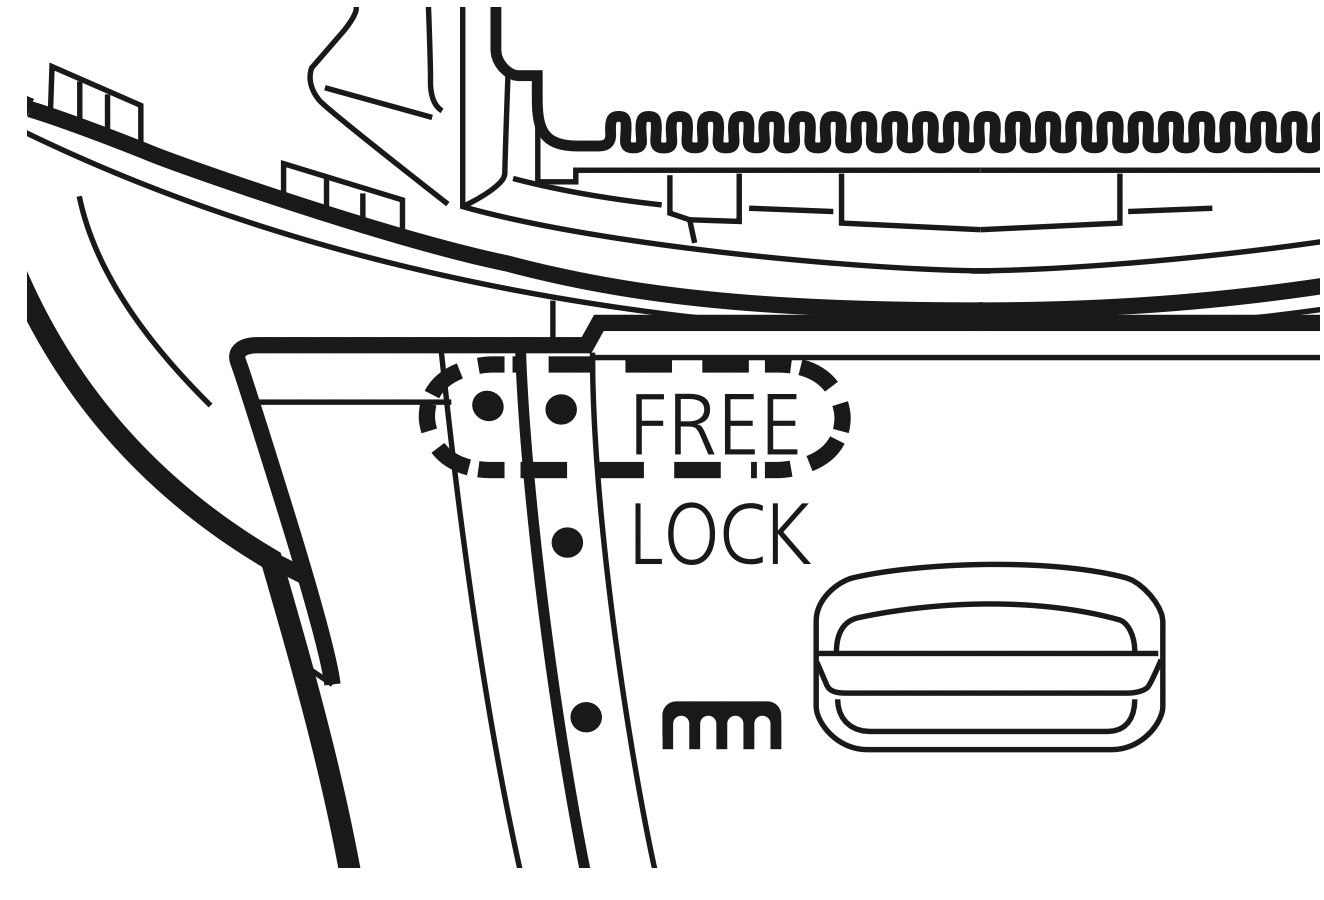
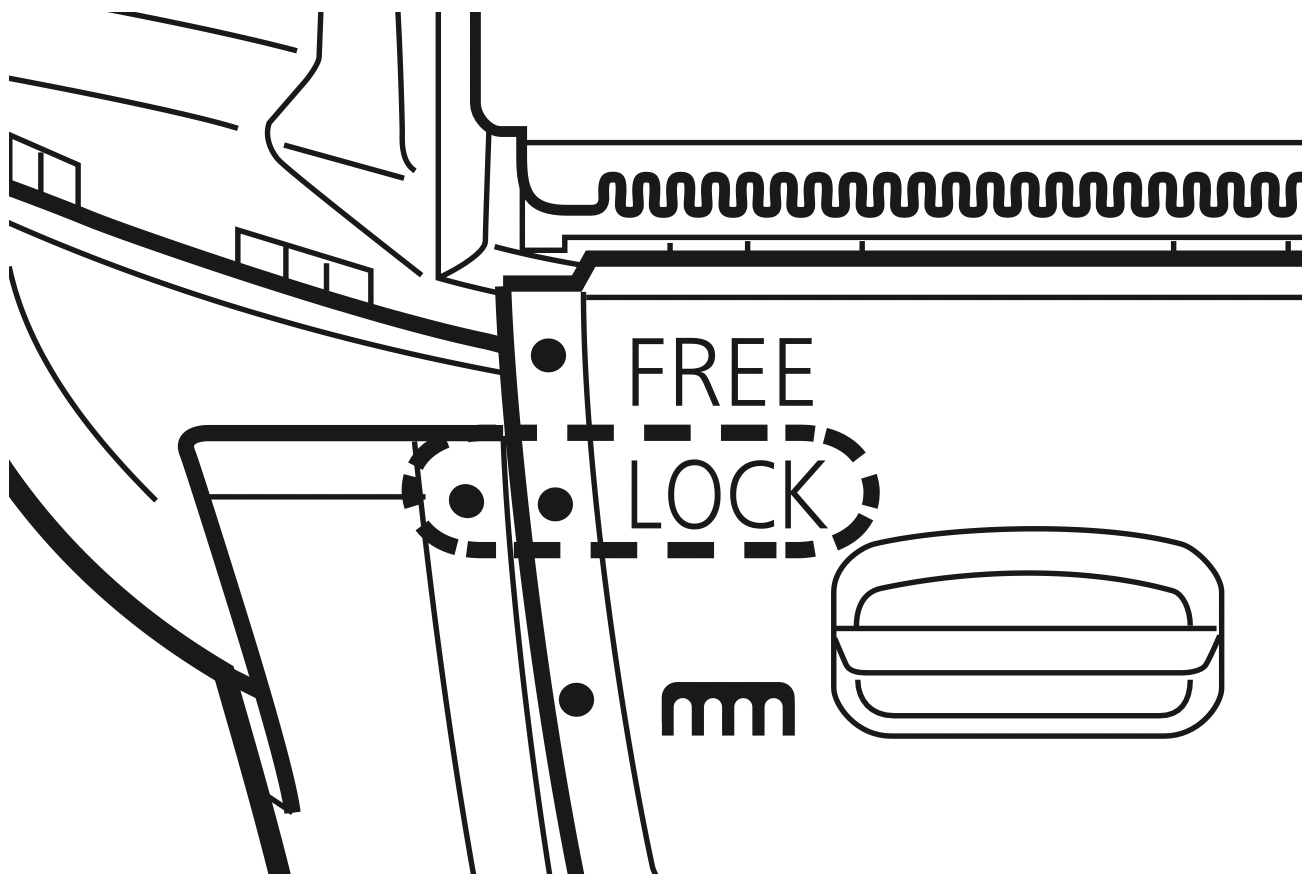
You can change the pivot action.
FREE You can move the shaver head.
LOCK You can lock the shaver head.
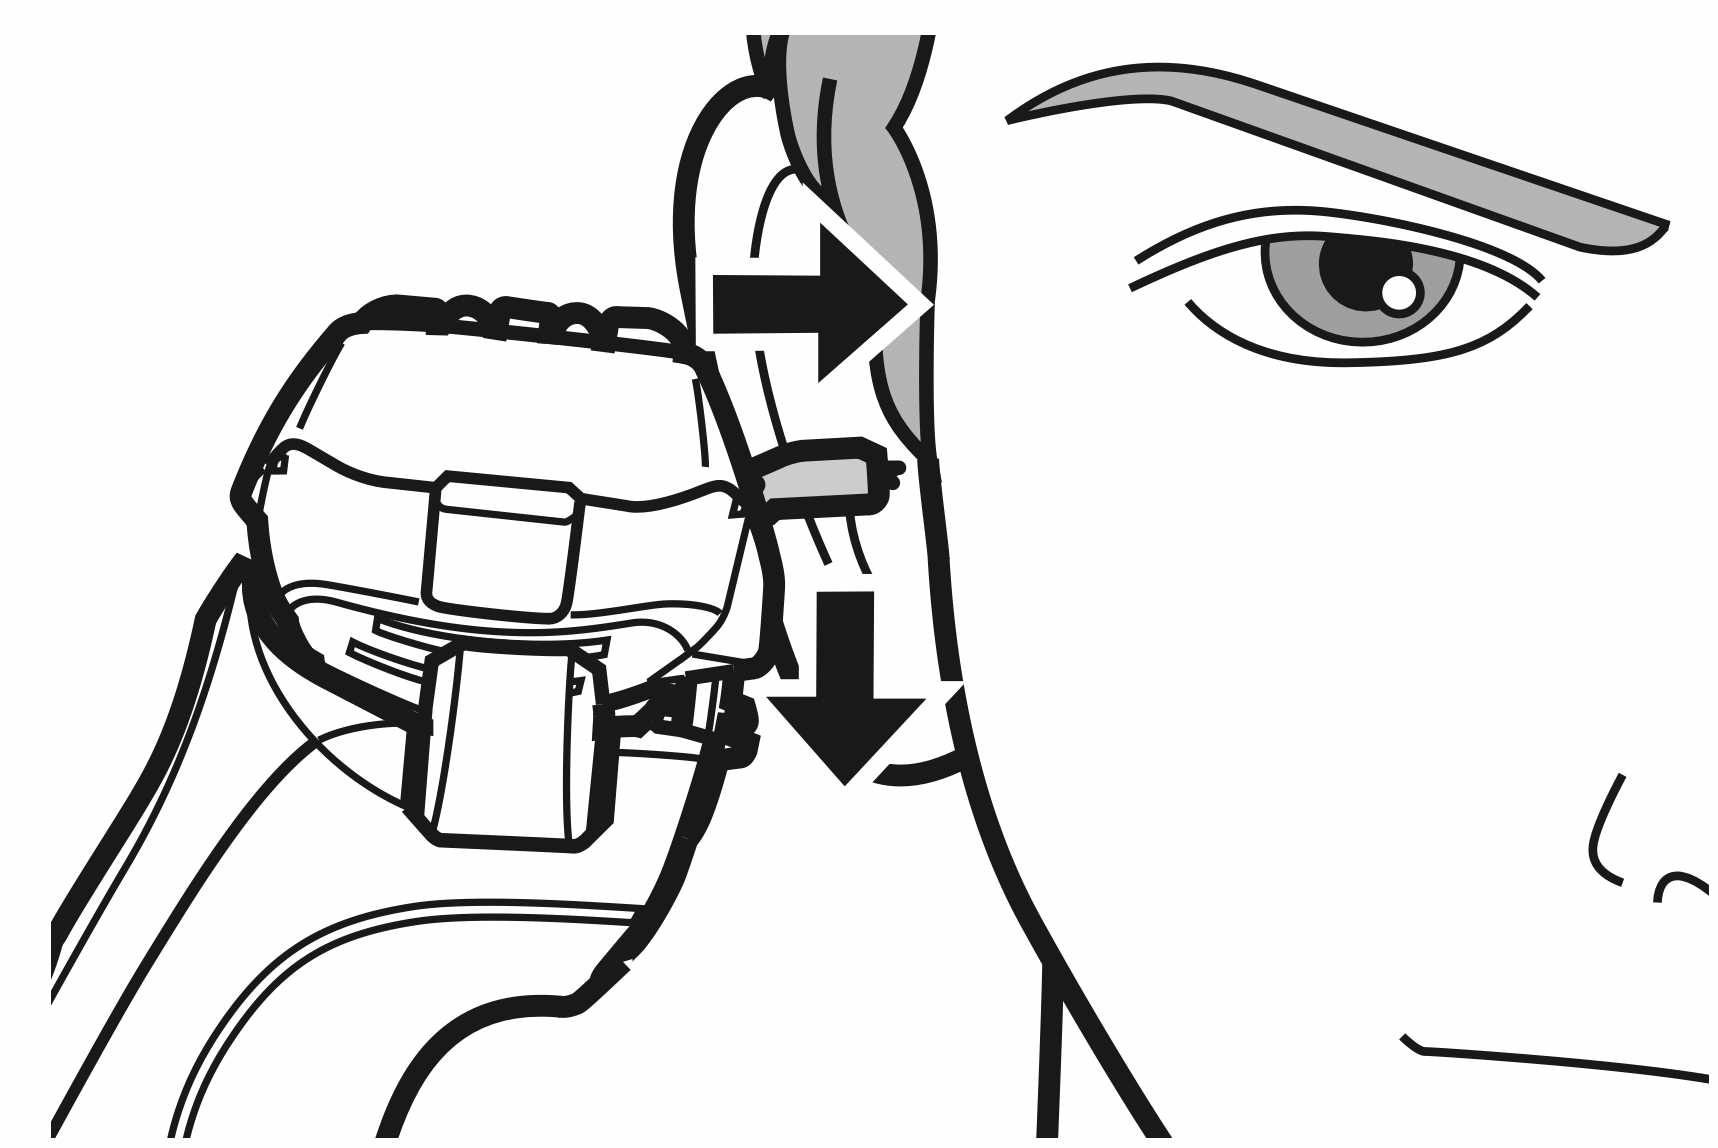
Using the trimmer
Slide the trimmer handle up to the “ ” position so that the trimmer stands upright.
Press and hold the lock release button (a) and slide the trimmer handle down to lower the trimmer.
Trimming sideburns Slide the trimmer handle up. Turn the shaver on and place at a right angle to your skin and move downwards to trim your sideburns.
Pre-shave The trimmer can be used for a pre‑shave of long beards.
Notes
If you press the power switch for more than 2 seconds, the sonic vibration cleaning mode is activated. (See page 13.) You cannot shave in this mode.
Do not place your fingers on the power switch while using the shaver. This may cause the shaver to switch the mode or turn off. Place your fingers on the finger rest while using the shaver.
We recommend using the shaver in an ambient temperature range of 5 – 35 °C (41 – 95 °F). If used outside this range, the appliance may stop operating.
Reading lamps when using
During use
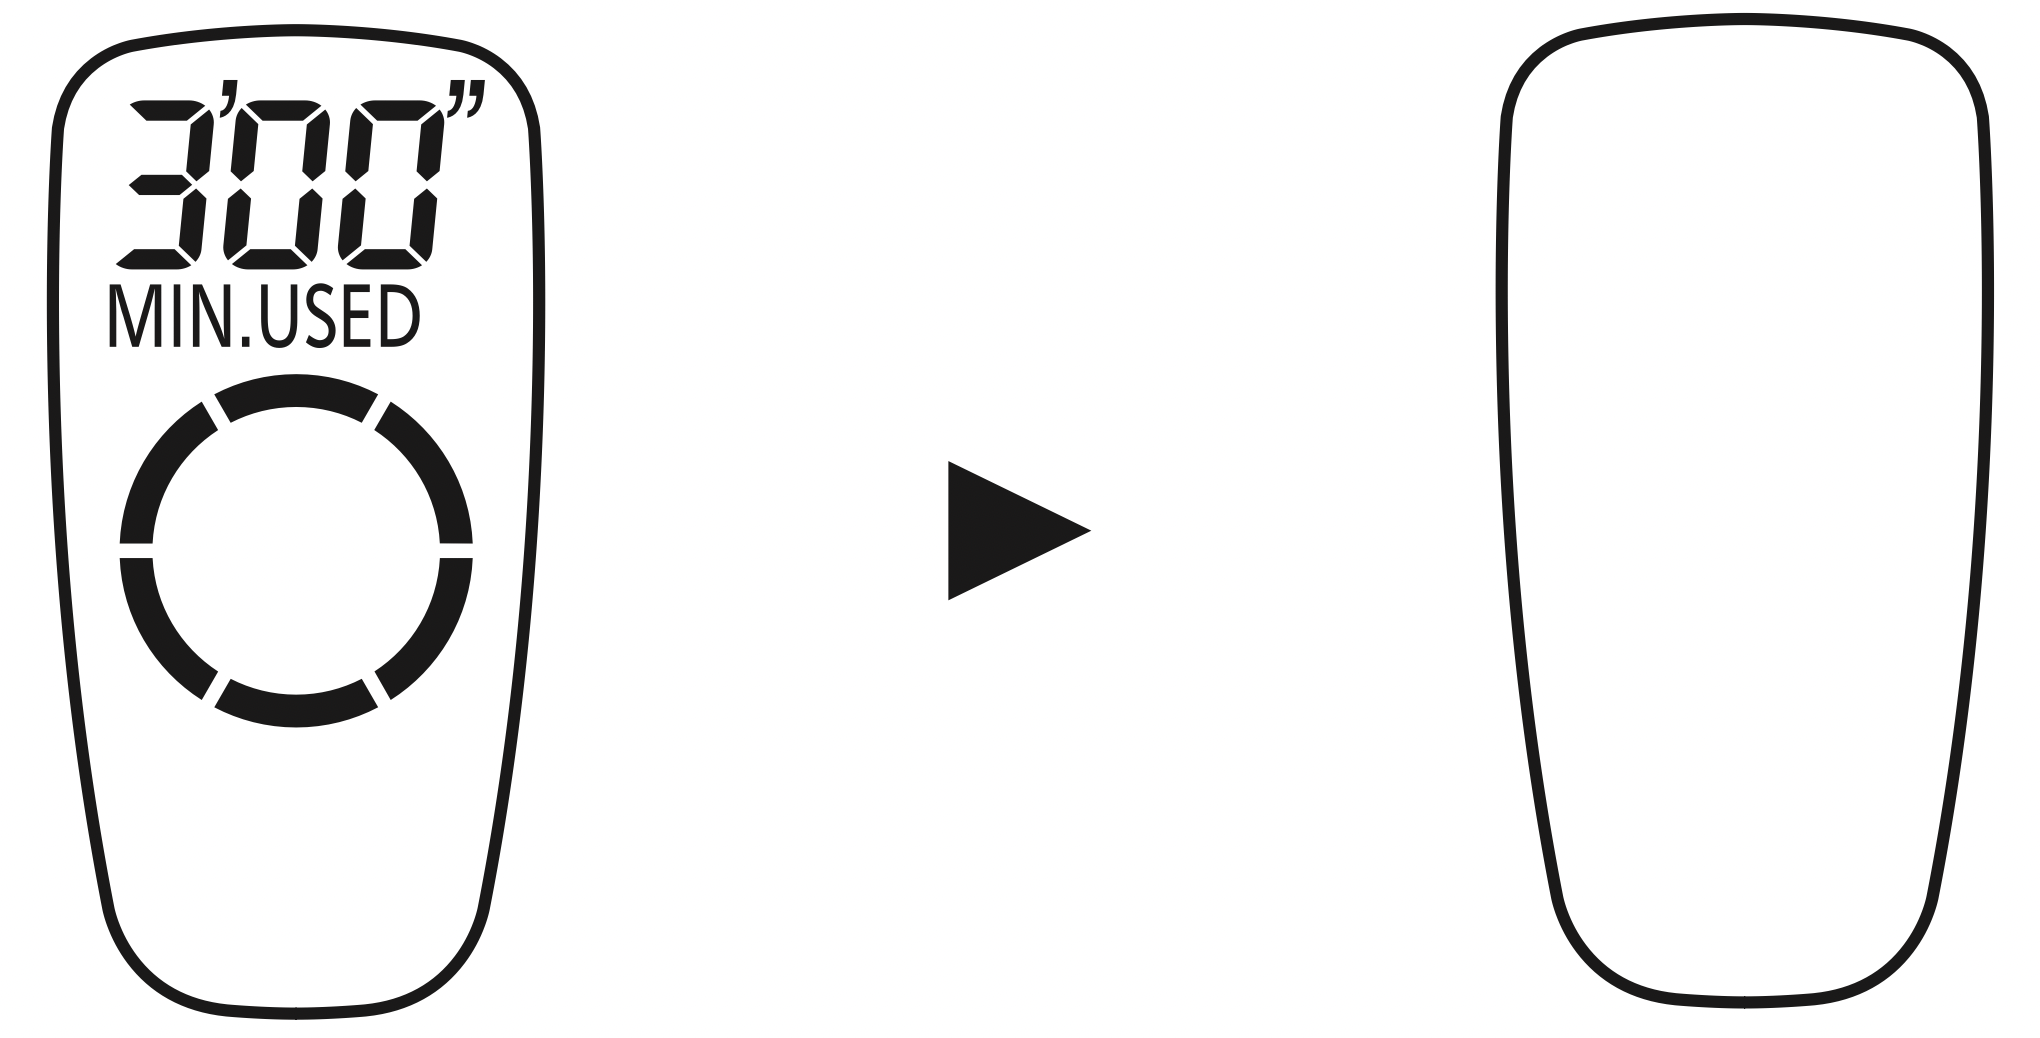
The used time and remaining battery capacity are shown and then turn off after 5 seconds.
The shown time returns to [0’00”] after 10 minutes.
After use
The lamps will light up and then turn off after 8 seconds.
When the battery capacity is low
“10%” appears and “ ” blinks.
You can shave 1 to 2 times after “10%” appears. (This will differ depending on usage.)
A full charge will supply enough power for approx. 14 shaves of 3 minutes each. (This will differ depending on usage.)
Cleaning the shaver
We recommend that you clean your shaver with the sonic vibration cleaning mode when the faucet symbol appears on the lamp display.
Disconnect the cord from the shaver.
Apply some hand soap and some water to the system outer foil.
Rotate the lock ring to unlock the power switch.
Press the power switch for more than 2 seconds to activate the sonic vibration cleaning mode. The battery capacity lamps blink in order. After about 20 seconds, it will be automatically turned off, or you can turn it off by pressing the power switch.
Remove the outer foil section and press the power switch for more than 2 seconds to activate the sonic vibration cleaning mode and clean it with running water.
Wipe off any drops of water with a dry cloth.
Dry the outer foil section and the shaver completely.
Attach the outer foil section to the shaver.
Replacing the system outer foil and the inner blades
appears on the lamp display once a year. (This will differ depending on usage.) We recommend checking the system outer foil and the inner blades when it appears.
Press the power switch for more than 30 seconds to turn off .
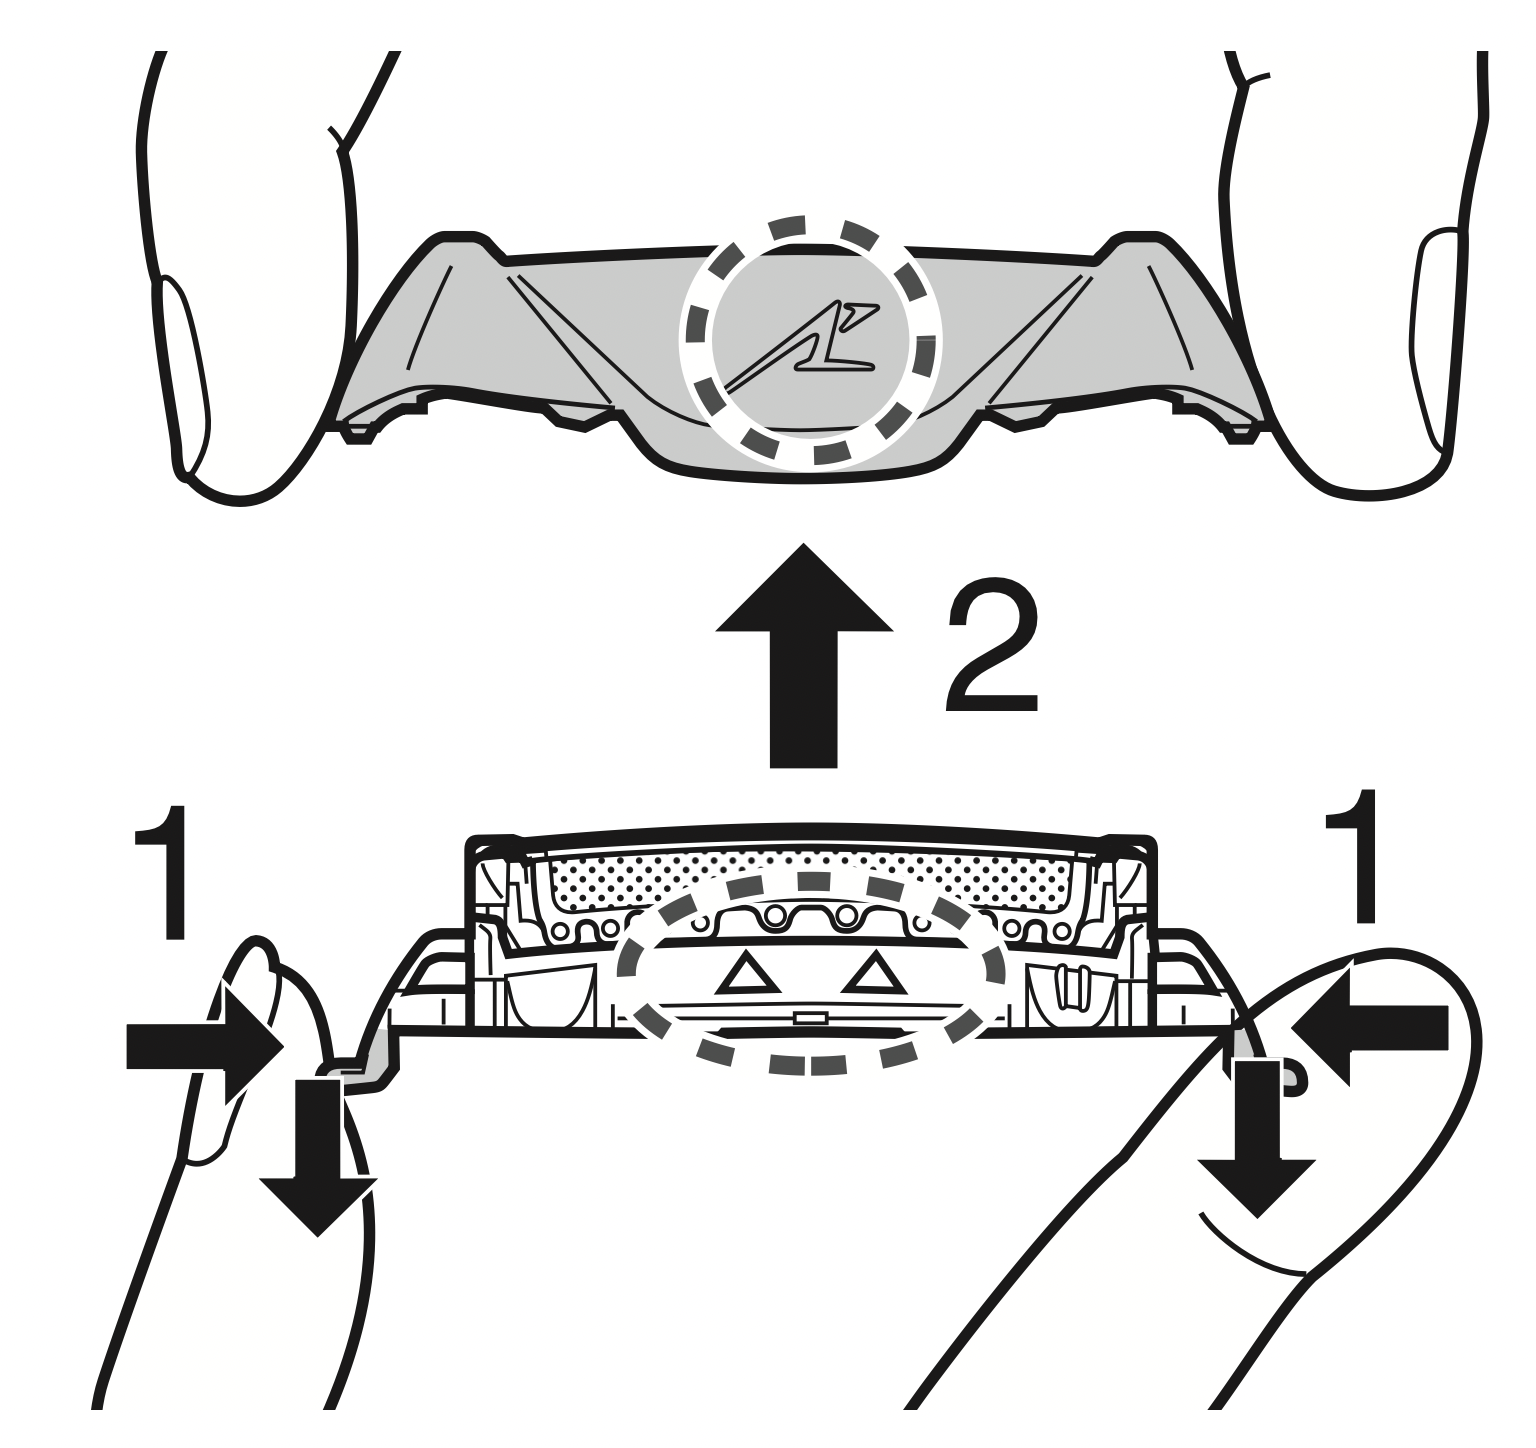
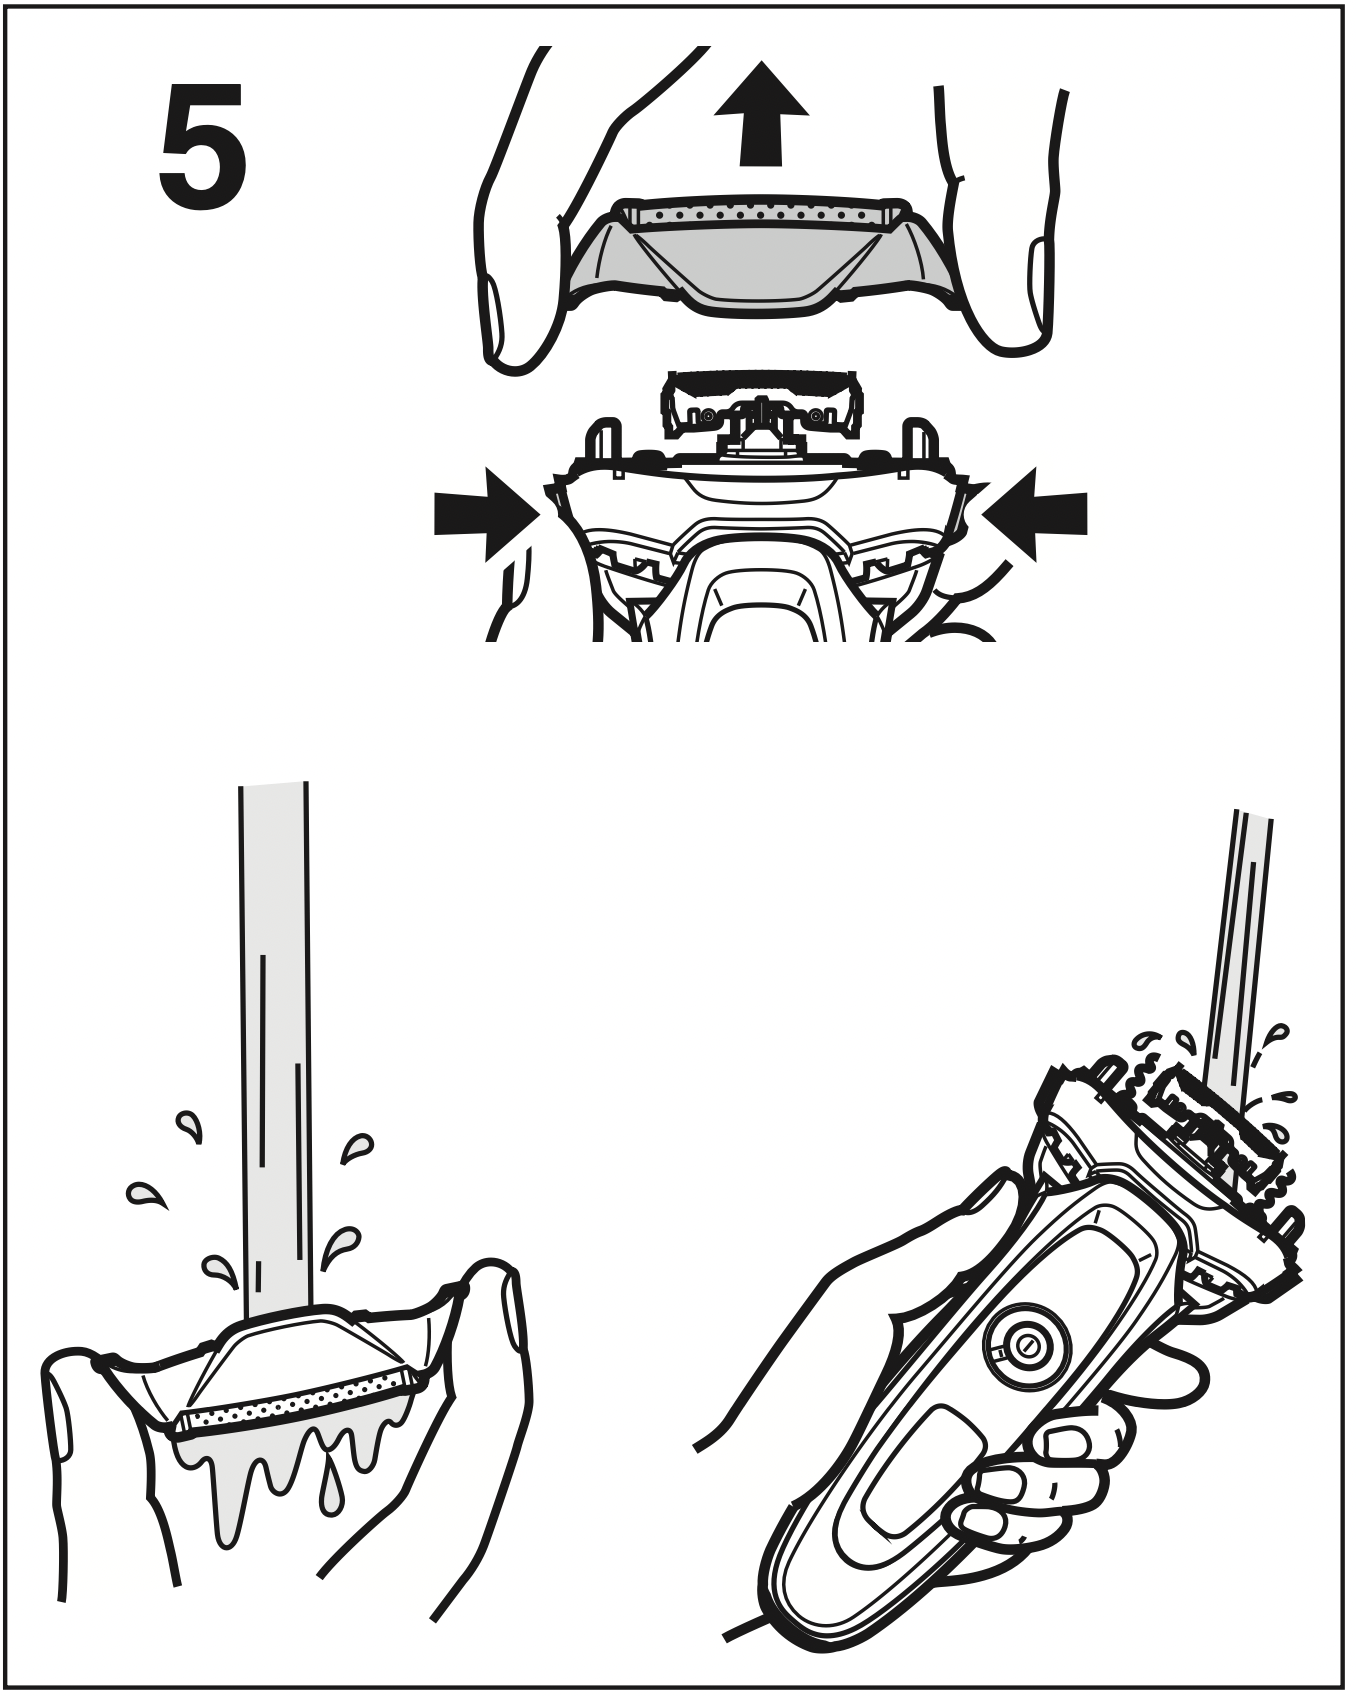
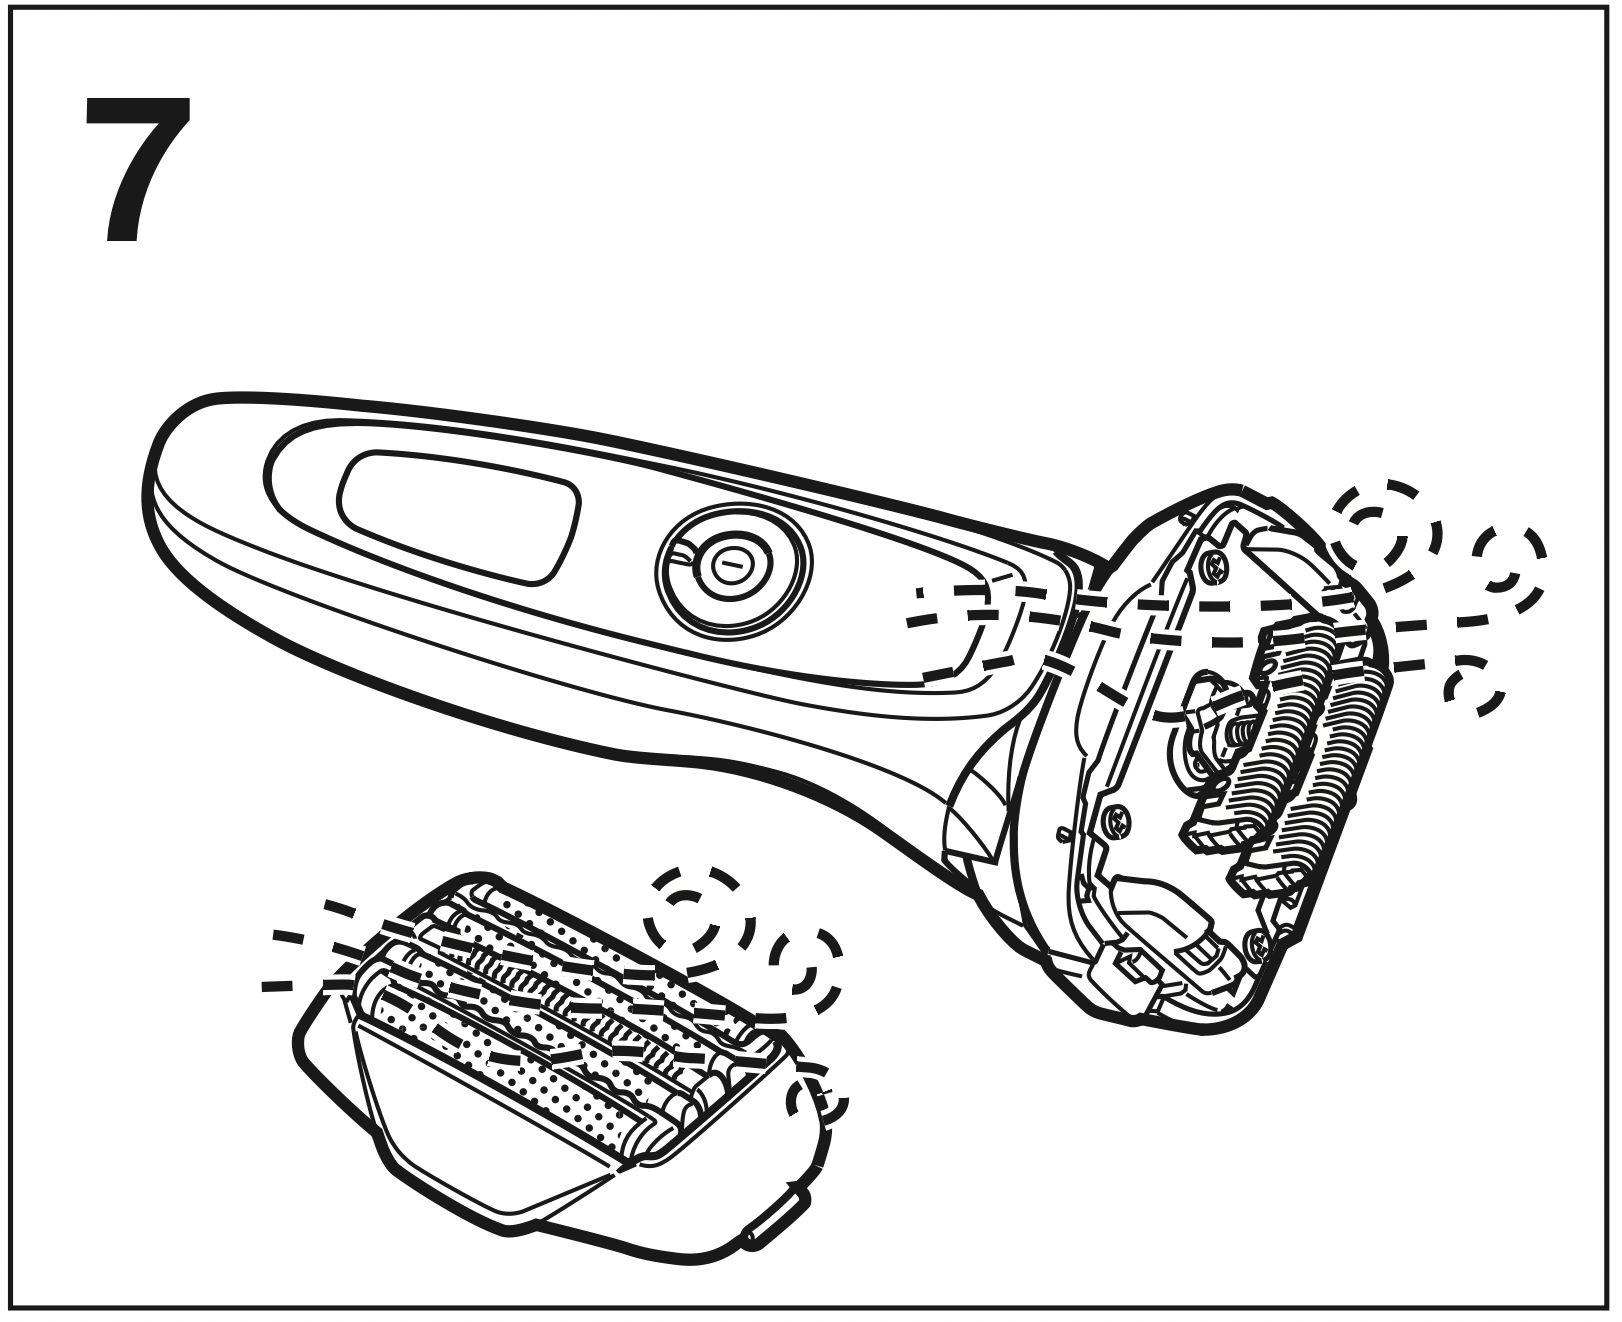
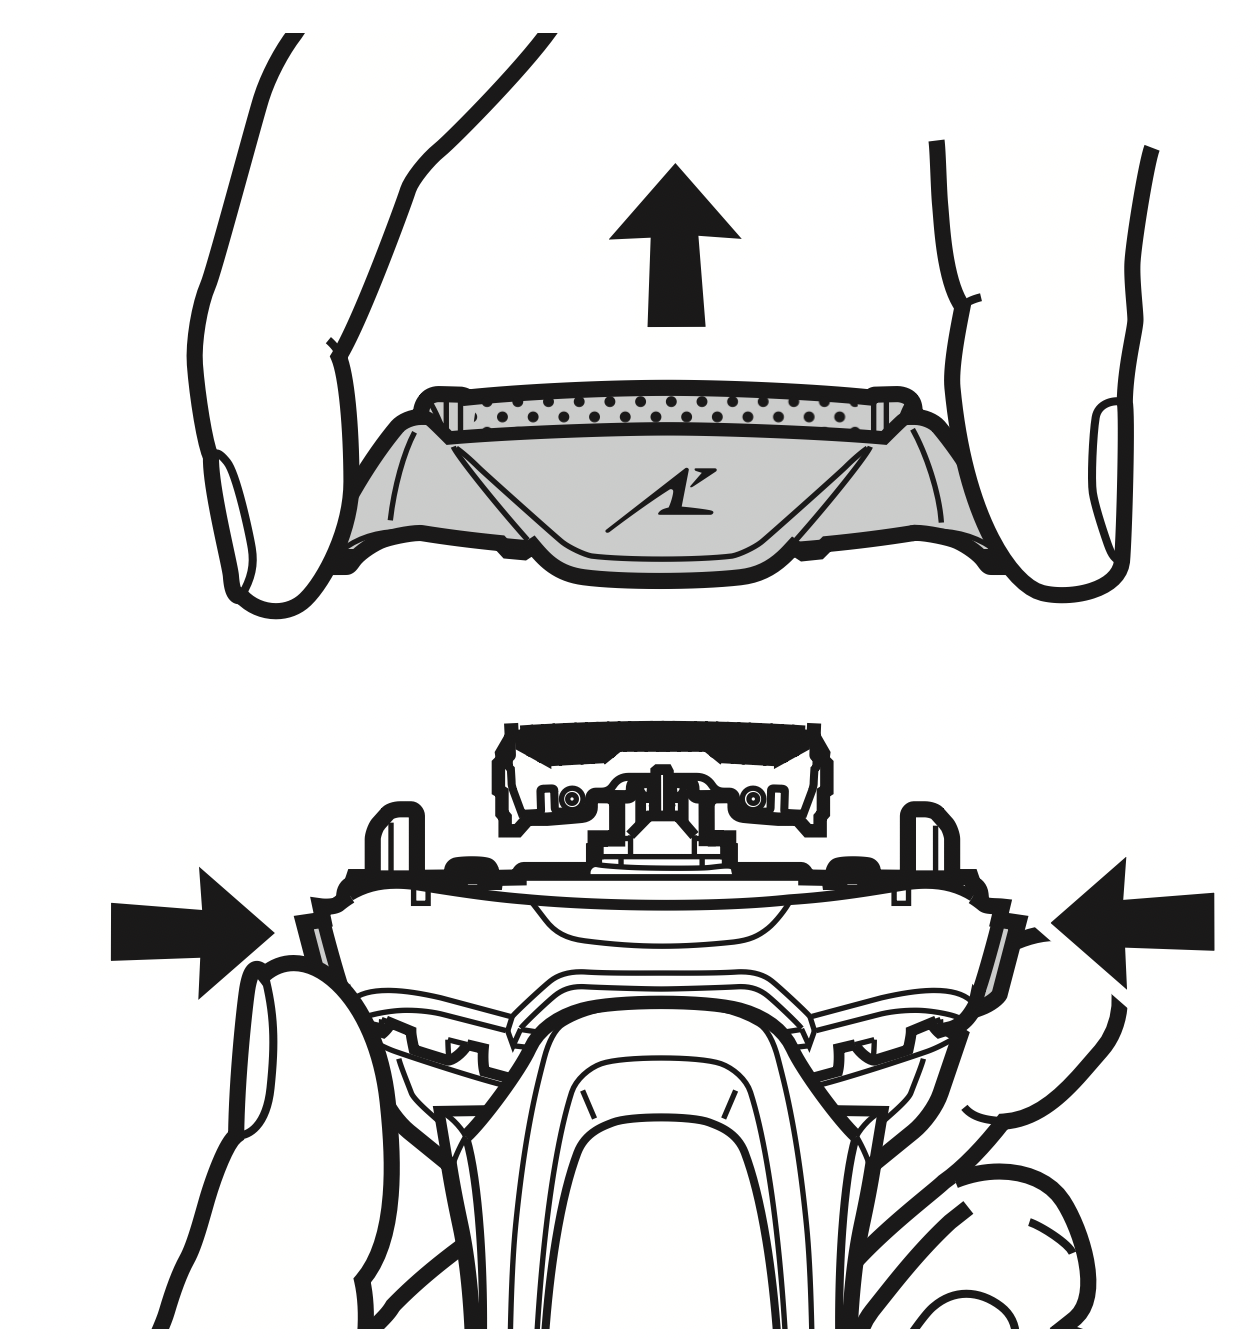
Removing the outer foil section Press the foil frame release buttons and lift the outer foil section upwards.
Attaching the outer foil section After turning the foil frame mark ( ) to the front, securely attach the outer foil section to the shaver until it clicks.
Replacing the system outer foil
Press the system outer foil release buttons and pull down the system outer foil.
Align the foil frame mark ( ) and the system outer foil mark ( ) and securely attach together. The system outer foil cannot be reversely attached. Always insert the system outer foil to the foil frame when attaching to the shaver.
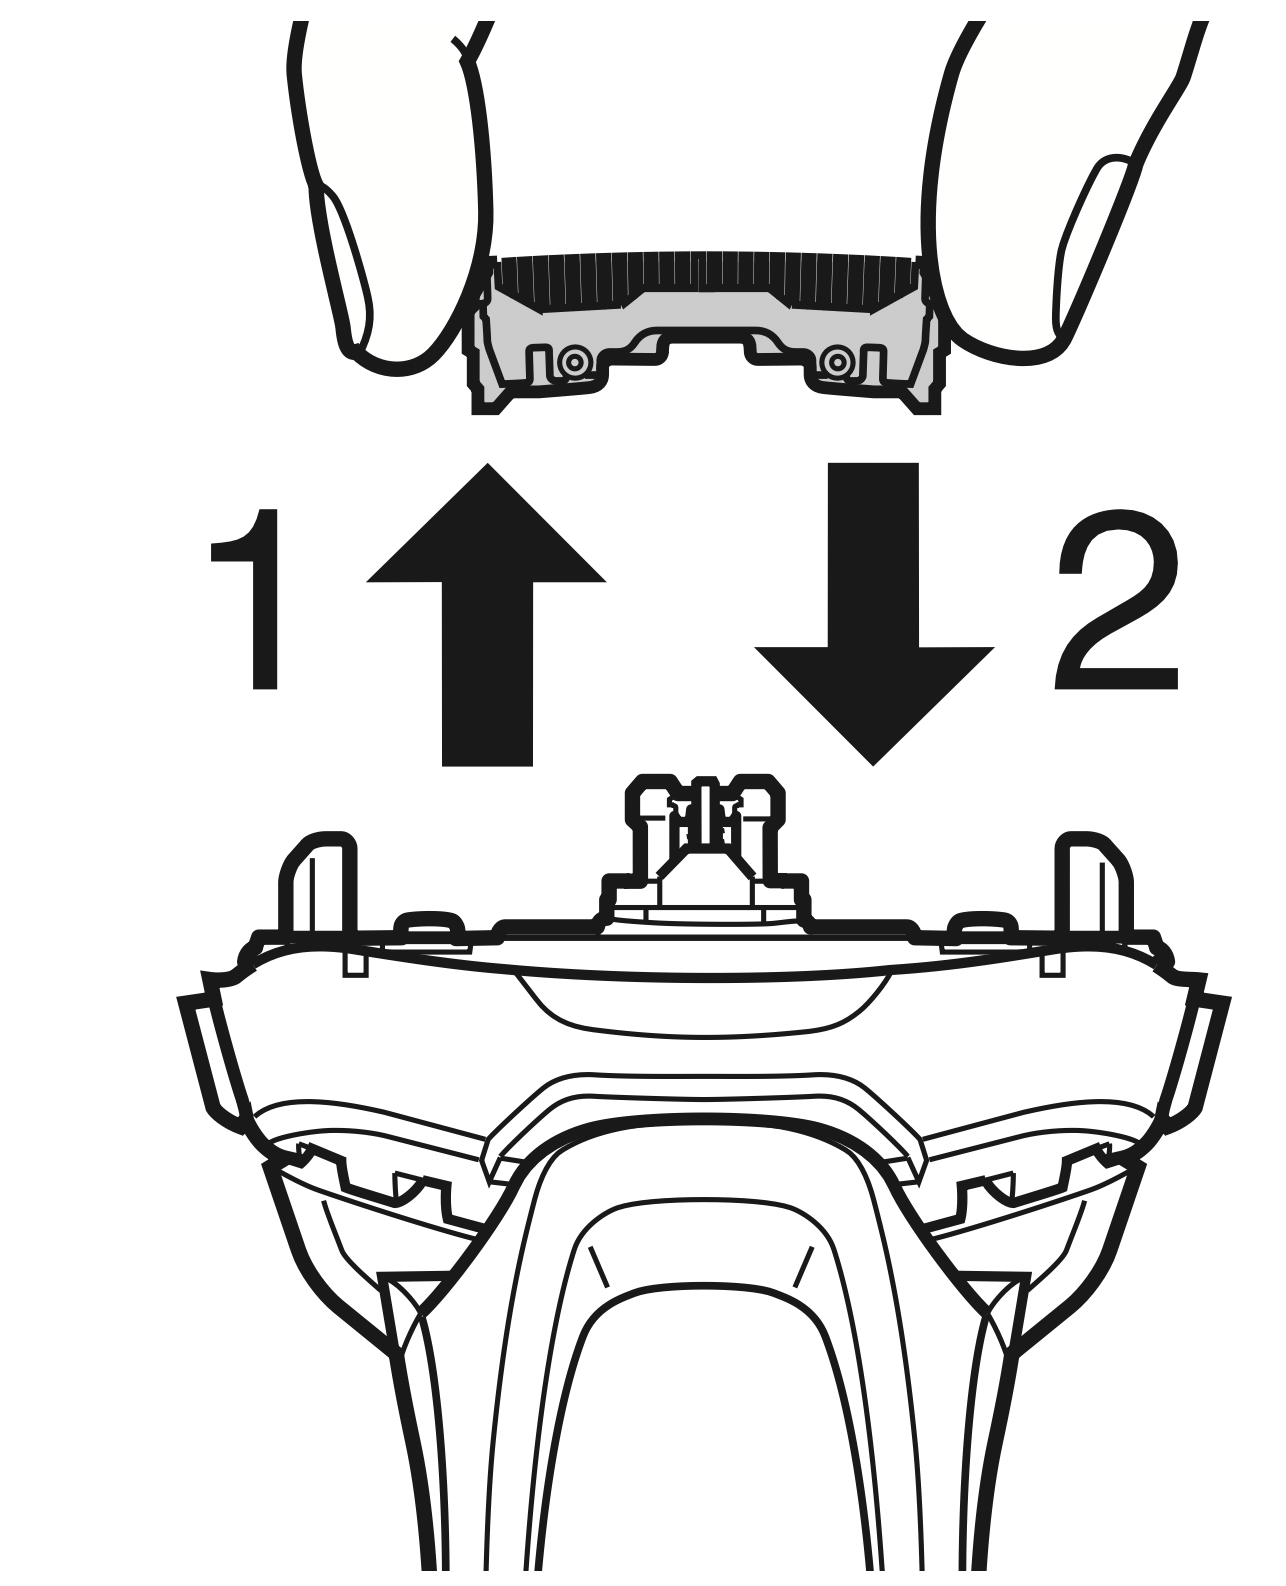
Replacing the inner blades
Remove the inner blades one at a time. Do not touch the edges (metal parts) of the inner blades to prevent injury to your hand.
Insert the inner blades one at a time until they click.
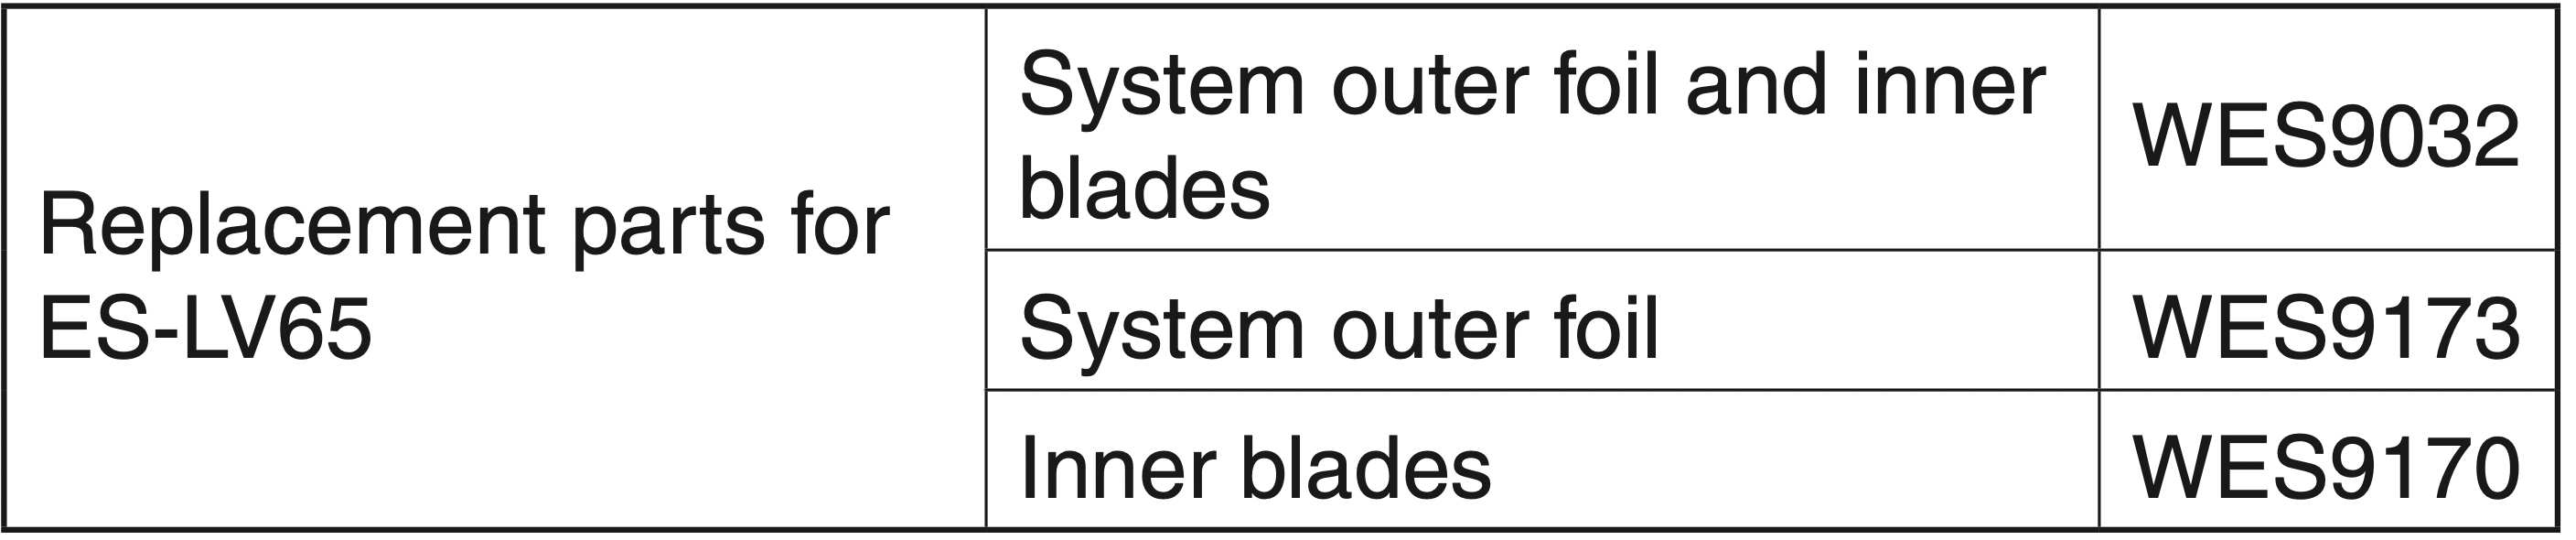
Replacement parts
Replacement parts are available at your dealer or Service Center.
Troubleshooting
Problem
Action
Trimmed hairs fly all over.
This can be improved by cleaning every time after shaving.
Clean the inner blades.
System outer foil gets hot.
Replace the system outer foil if it is damaged or deformed. (See page 13.)
The power switch cannot be pressed.
Unlock the power switch.
Operating time is short even after charging.
When the number of operations per charge starts to decrease, the battery is nearing the end of its life.
Makes a loud sound.
Confirm that the blades are properly attached.
The shaver makes a high‑pitched sound due to the linear motor drive. This does not indicate a problem.
Clean the system outer foil.
The odor is getting stronger.
This can be improved by cleaning every time after shaving.
You do not get as close a shave as before.
This can be improved by cleaning every time after shaving.
Replace the system outer foil and/ or inner blades.
Expected life of system outer foil and inner blades:
System outer foil: Approximately 1 year
Inner blades: Approximately 2 years
The shaving sensor does not respond.
The shaving sensor may not respond when the remaining battery capacity is low. If this happens, recharge the shaver.
Depending on the beard thickness, the shaving sensor may not react and the driving sound may not change. This is not abnormal.
The shaving sensor may not respond depending on the thickness of the beard or the type of the shaving gel and shaving foam, but this is normal.
The shaving sensor responds even though the shaver is not in contact with the skin.
Clean the beard trimmings from the shaver.
When the shaver is extremely dirty, remove the foil frame and wash with water. (See page 13.)
Replace the system outer foil and/ or inner blades.
Expected life of system outer foil and inner blades:
System outer foil: Approximately 1 year
Inner blades: Approximately 2 years
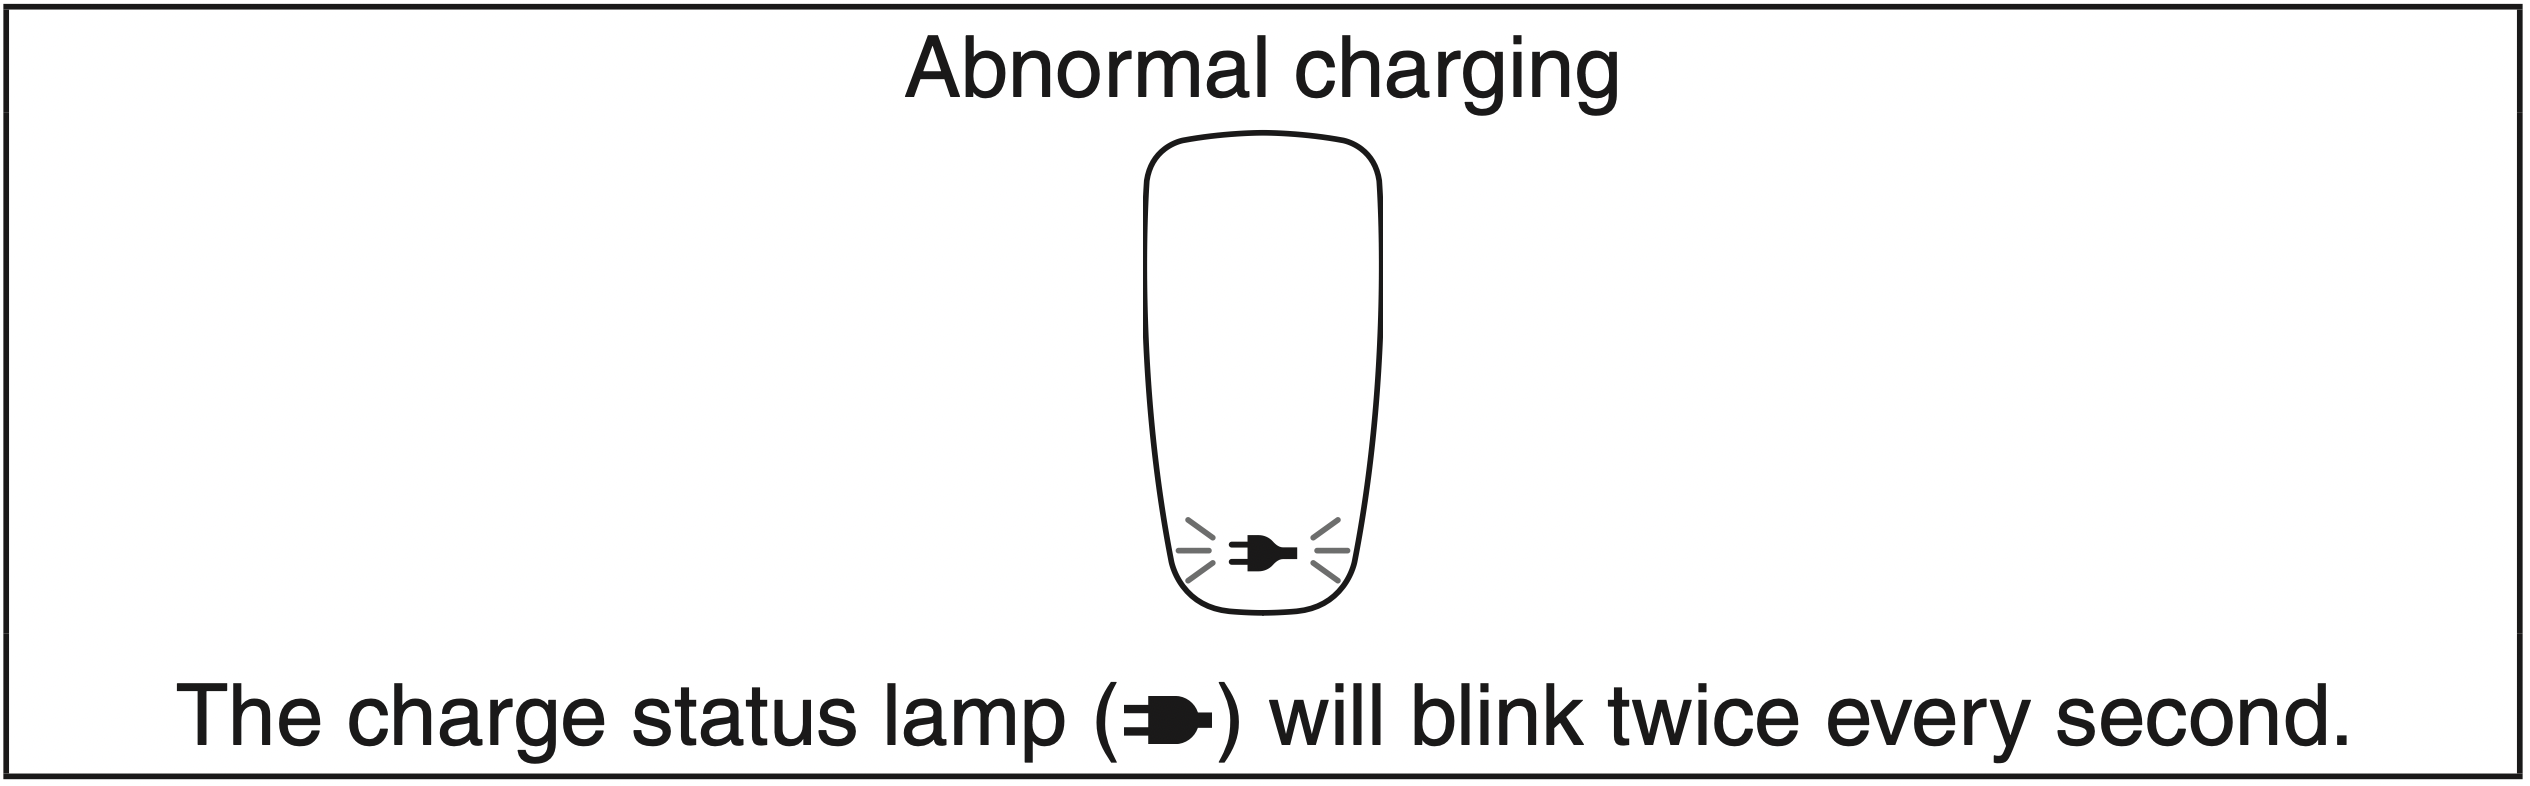
The shaver cannot be charged.
The recommended temperature for charging is 10 – 35 °C (50 – 95 °F). If charged at a temperature other than the recommended temperature, the shaver may take longer to charge or may not charge at all.
Shaver stopped functioning.
Recommended ambient temperature for operation is 5 – 35 °C (41 – 95 °F). The shaver may stop functioning when out of recommended ambient temperature range.
The battery has reached the end of its life.
The driving sound changes while shaving.
While the shaving sensor lamp glows, the shaving sensor is operating. The sound changes depending on the beard thickness.
The power will not switch to OFF.
Press the power switch twice while using in the shaving sensor mode.
If the problems still cannot be solved, contact the store where you purchased the unit or a service center authorised by Panasonic for repair.

 )
) )
)
 ” to lock the power switch: Used when carrying the shaver.
 ” position so that the trimmer stands upright.
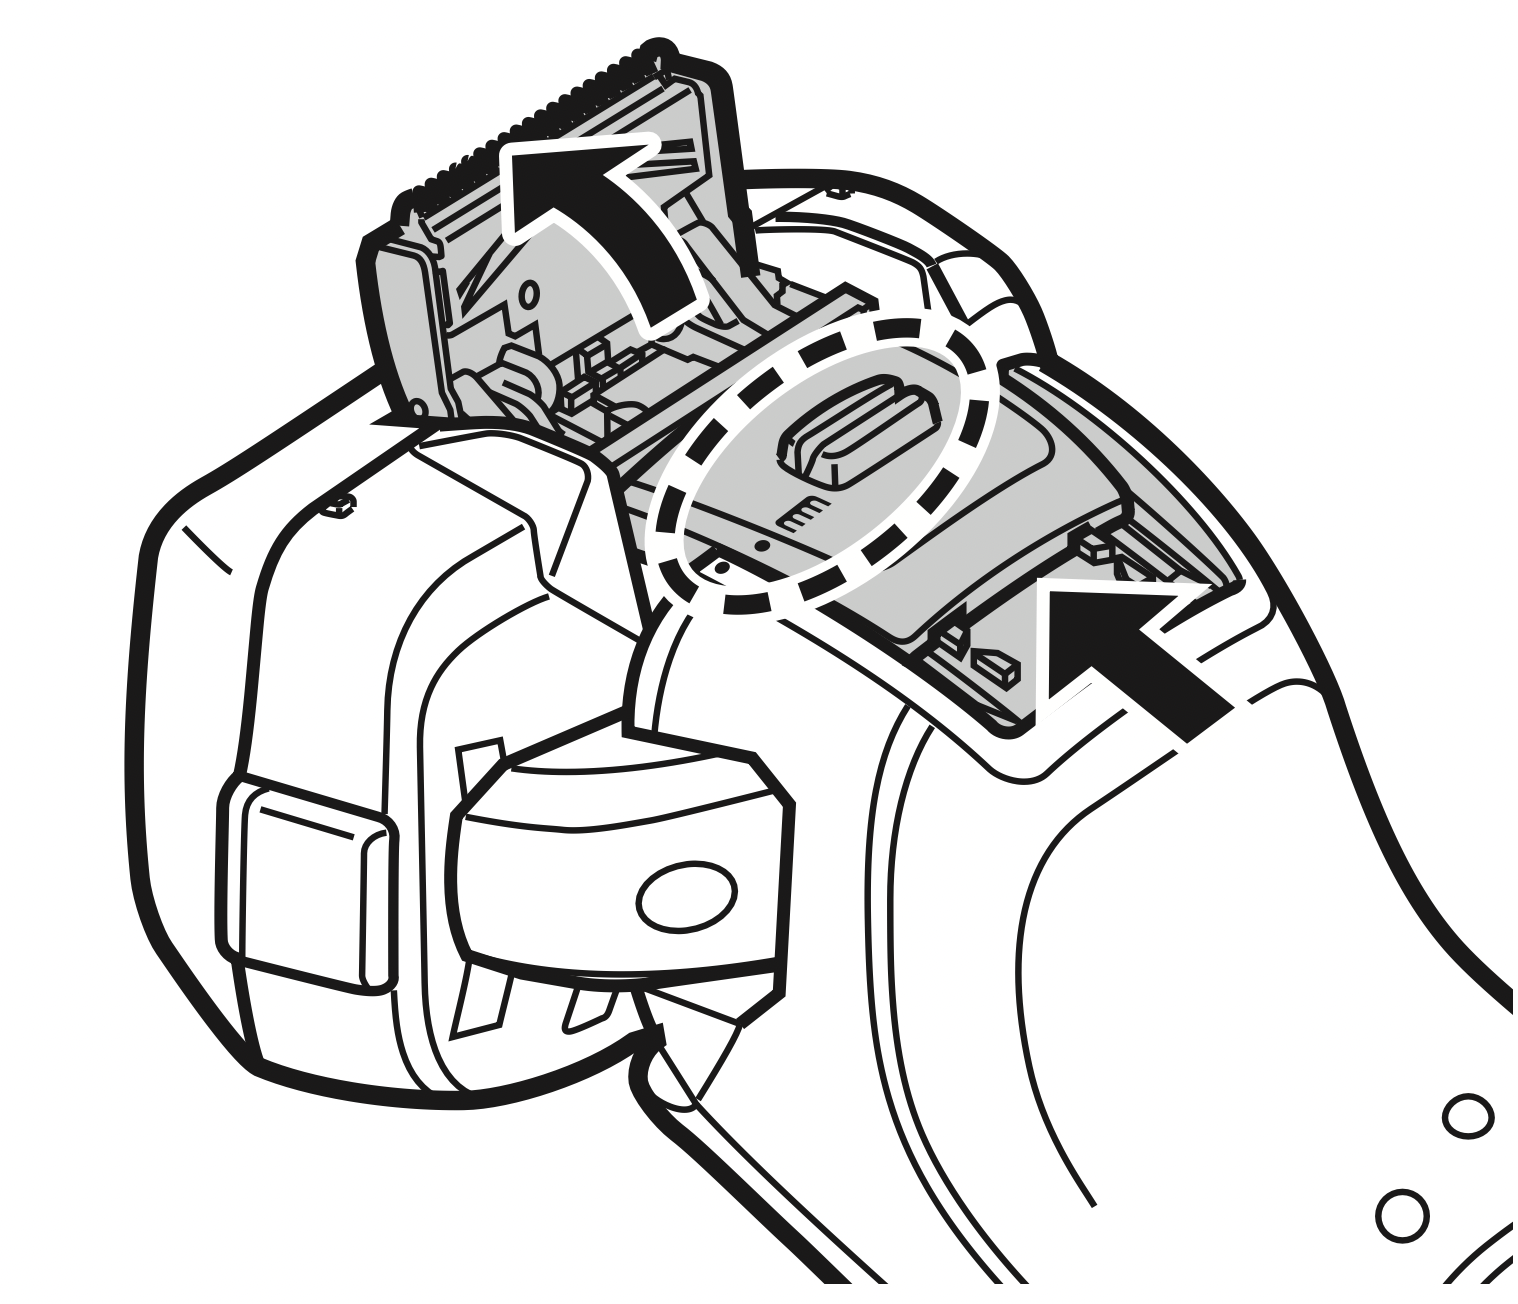

 ” blinks.
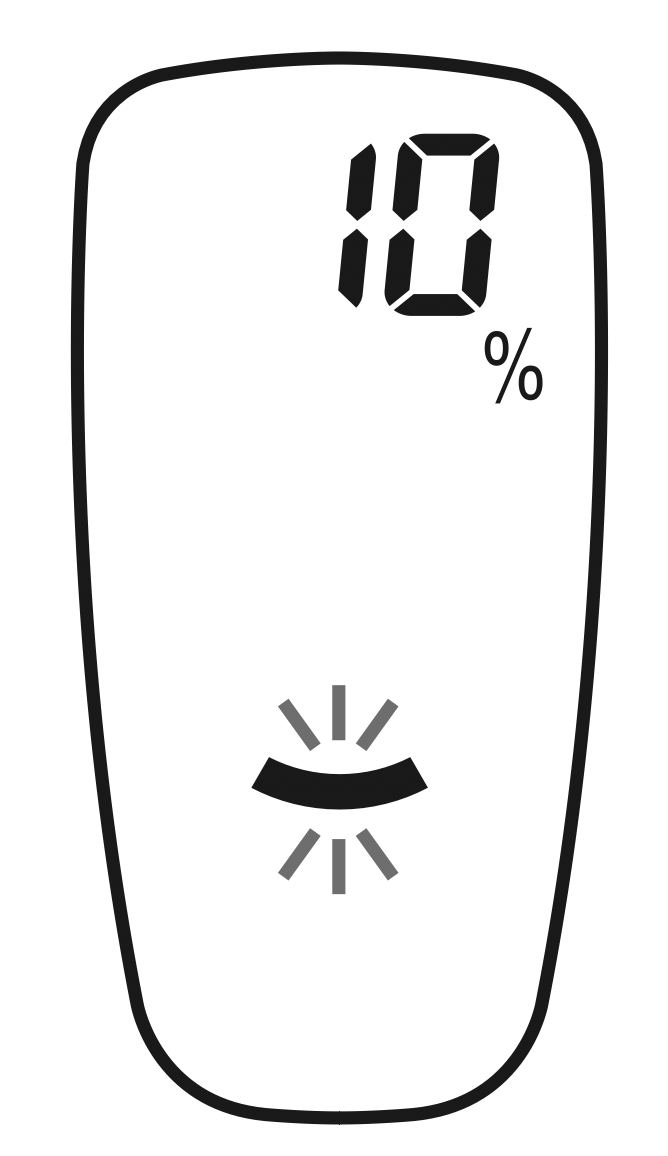
 appears on the lamp display.
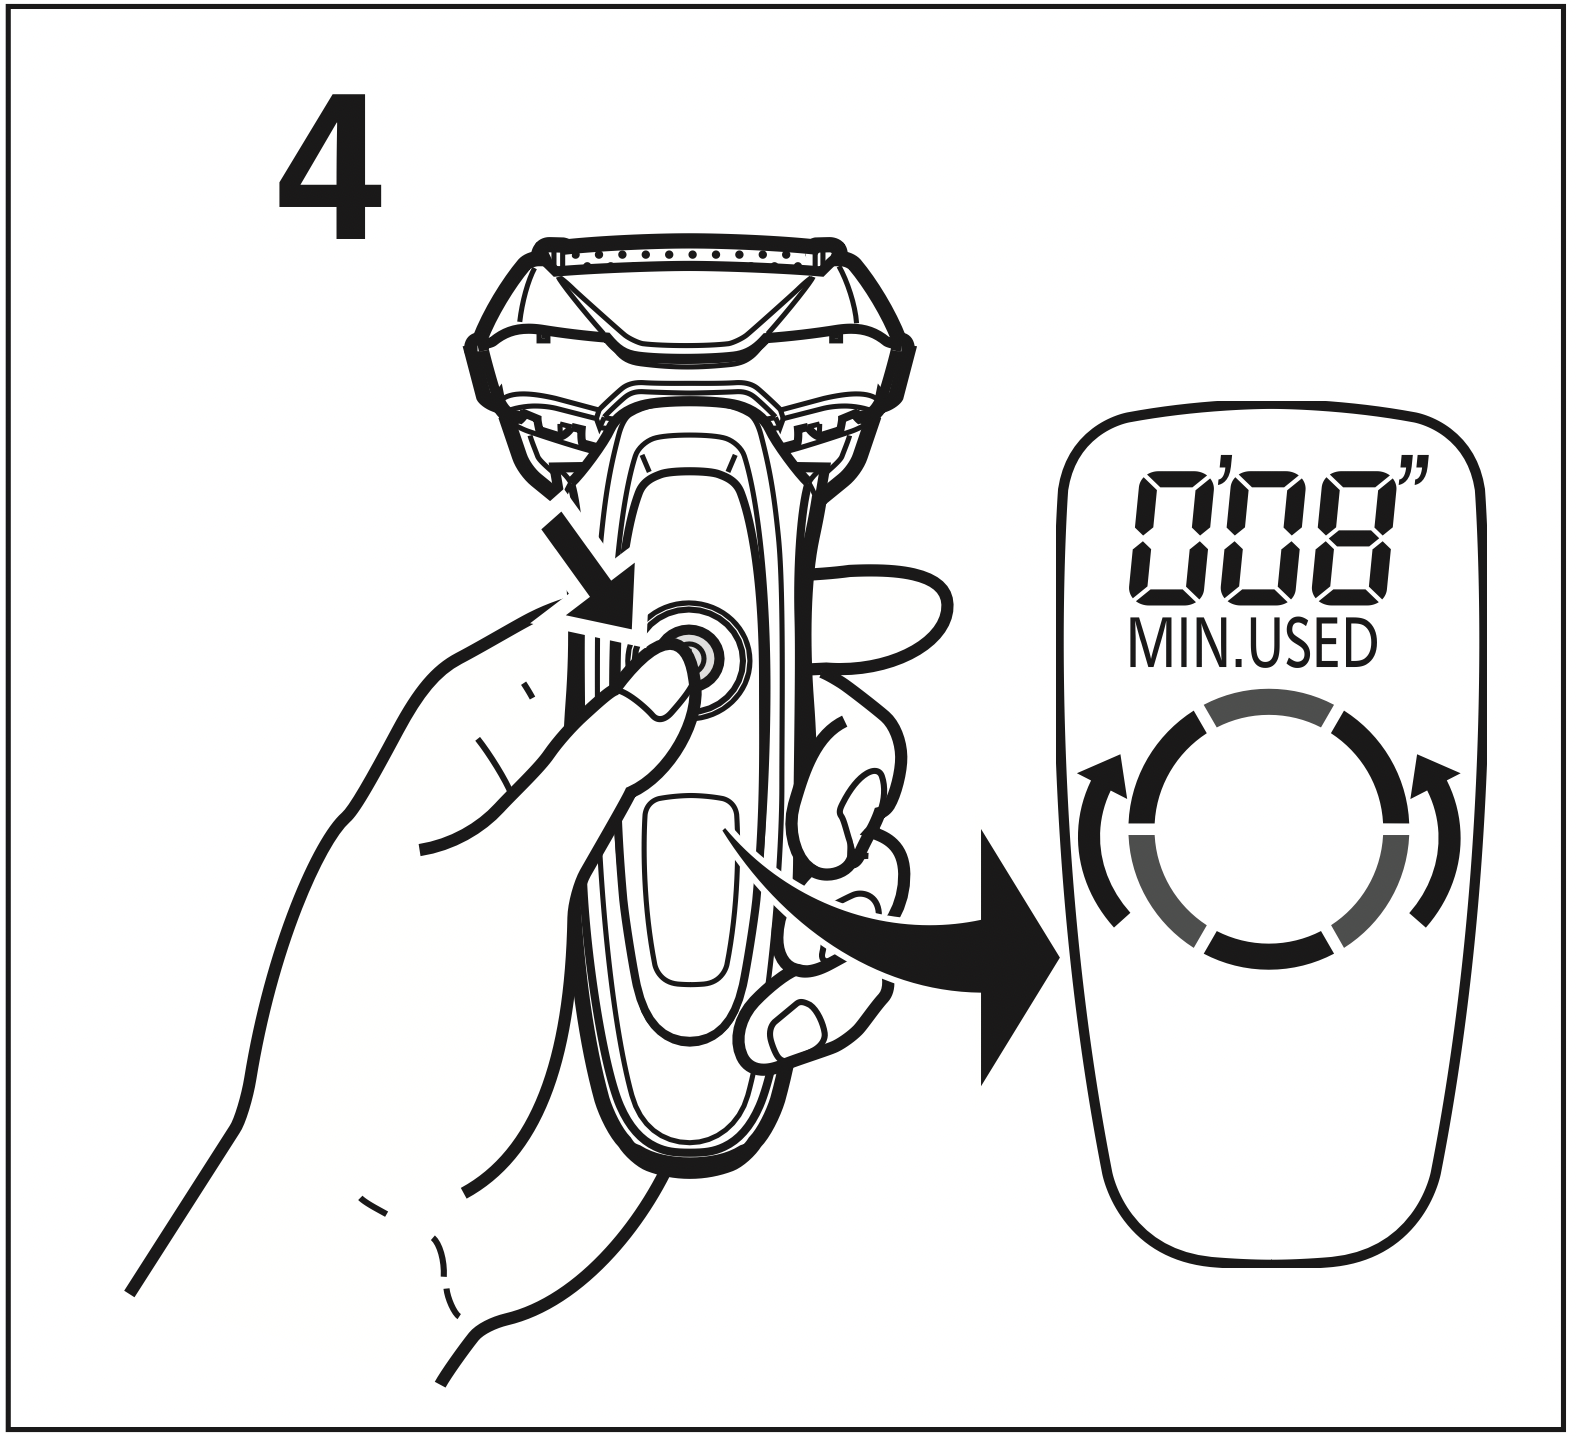
 appears on the lamp display once a year. (This will differ depending on usage.) We recommend checking the system outer foil and the inner blades when it appears.
 .
.
 ) to the front, securely attach the outer foil section to the shaver until it clicks.
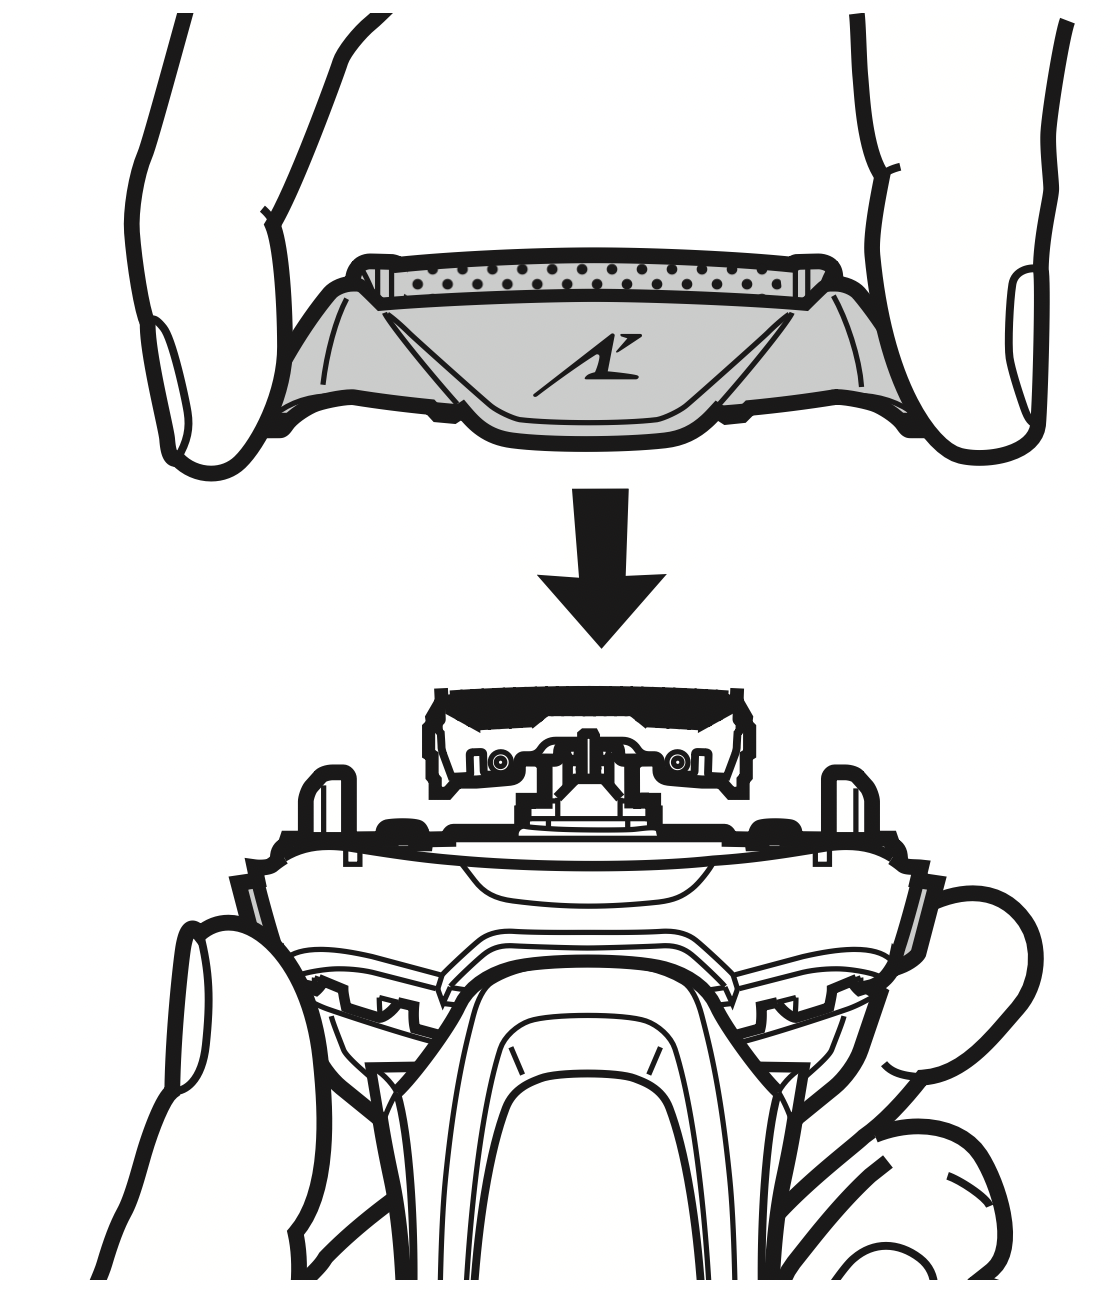
 ) and securely attach together.