Loading ...
Loading ...
Loading ...
Español
Français
English
–
16
–
–
EN
2
P
r
ess
[
B
]
to “AUTO REPEAT” to set “ON” o
r
“OFF”.
P
ress
[
SETUP
]
to ex
i
t.
N
ote(s):
• The auto repeat function can also be set “ON” or “OFF” by pressing
[REPEAT]
on the Remote Control.
• To cancel auto repeat function, follow step 1 above. Then, press
[
B
]
so that “OFF” appears beside “AUTO REPEAT”. Press
[
SETUP
]
to ex
i
t.
• The auto repeat playback will start automatically if you select “AUTO REPEAT” to “ON” in the Stop mode.
1
P
ress
[
SETUP
]
and choose “AUTO REPEAT”.
-
M
E
N
U
-
TIMER PROGRAMMING
SATELLITE LIN
K
B
AUTO REPEAT
[
OFF
]
CLOCK SET
LANGUAGE SELECT
or
A
uto
R
epea
t
W
hen “AUTO REPEAT“ is set to “ON“, the cassette tape will automatically rewind and start over when it reaches the end.
This will continue until auto repeat function is turned off.
1
P
res
s
[
SETUP
]
.
Select “TIMER PROGRAMMING”.
TIMER PROGRAMMING
PROG 12345678
D
ATE
START TIM
E
END TIME
L1/L2
REC SPEE
D
- M E N U
-
B
TIMER PROGRAMMING
SATELLITE LINK
AUTO REPEAT
[
OFF
]
C
L
OC
K
S
ET
LANGUAGE SELECT
Available program number flashes.
2
Select an empty program number.
Th
en press
[
B
]
to go to next step.
PROGRAM NUMBER
1
DATE – – / – –
START TIME – – : – – – –
END
TIME
– – : – – – –
L1/L2 – –
REC SPEED – –
or
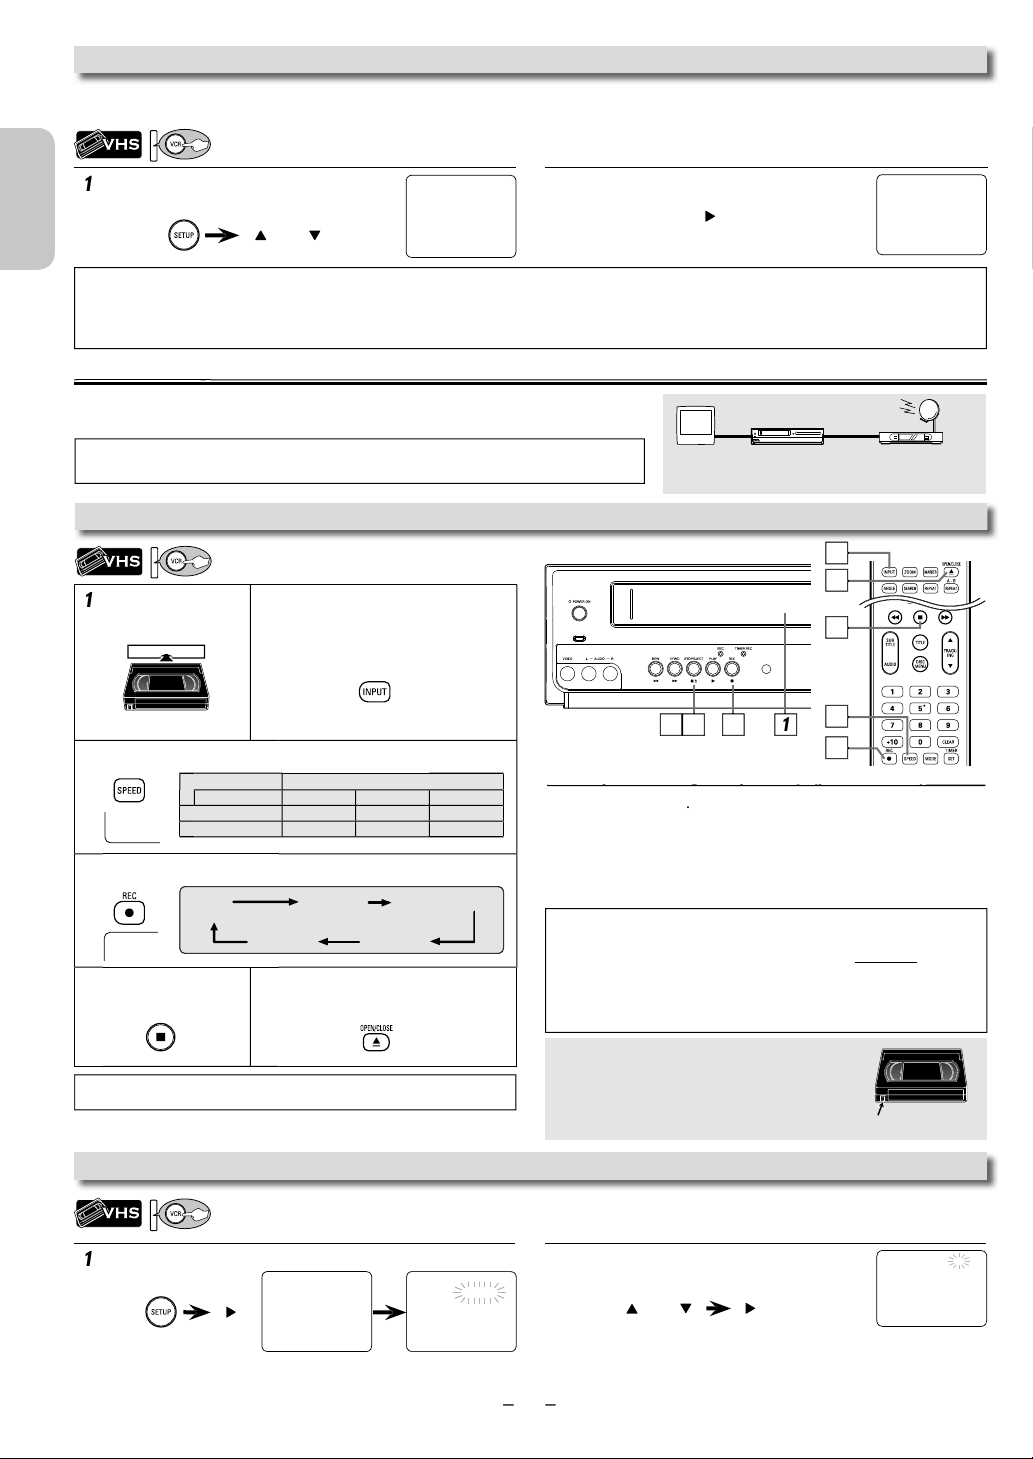
1
I
nsert a recor
d
a
bl
e
casse
tt
e
t
ape.
2
P
ress
[INPUT]
until “L1” or “L2” is
d
isplayed on the TV screen. Select “L1”
to activate rear input jacks. Select “L2”
to activate front input jacks.
3
P
ress
[
SPEED
]
to se
l
ect t
h
e
d
esire
d
tape spee
d
.
4
P
ress
[
REC
I
]
unti
l
d
esire
d
recor
d
ing time is se
l
ecte
d
.
5
P
ress
[
C
(
STOP
)]
to
stop recor
d
ing.
6
P
ress
[
OPEN/CLOSE
A
]
to e
j
ect
t
h
e recor
d
e
d
cassette tape.
Recording
g
Y
ou
C
ANNOT
d
u
b
a
DVD
to a vi
d
eo cassette tape.
T
o sto
p
recordin
g
tem
p
oraril
y
(p
ause mode
)
p g p y (p )
P
ress
[
F
(PAUSE)
]
.
•
D
uring t
h
e recor
d
ing in pause mo
d
e,
5
C
mar
k
s appear on t
h
e
TV
screen.
E
ac
h
C
mark represents 1 minute.
•
P
ress it again to resume recor
d
ing.
• Pause mode will be automatically cancelled after 5 minutes to
prevent
d
amage to t
h
e cassette tape an
d
t
h
e vi
d
eo
h
ea
d
s.
N
ote
(
s
)
:
• Do not change the External Tuner’s (Cable/Satellite or Converter
Set-top Box) channel while you are recording. You
C
ANNOT watc
h
one
c
h
anne
l
w
h
i
l
e recor
d
ing anot
h
er c
h
anne
l
at t
h
e same time
.
• Connect your External Tuner (Cable/Satellite or Converter Set-top Box)
t
o the L1 (rear panel) jacks on this Unit. Connect camcorders and othe
r
such devices to the L2 (front panel) jacks. Refer to page 11, 13.
Th
is
U
nit
h
as no tuner system so it cannot receive
TV
b
roa
d
casts wit
h
out an
E
xterna
l
Tuner (Cable/Satellite or Converter Set-top Box) or such devices.
T
imer Recording
A
ccidental Erasure Preventio
n
T
o prevent acci
d
enta
l
recor
d
ing, remove erasure
prevention ta
b
on t
h
e cassette tape.
T
o recor
d
on it
l
ater, cover t
h
e
h
o
l
e wit
h
a
dh
esive tape
.
R
ecordin
g
& One-touch Timer Recordin
g
(
OTR
)
T
ape spee
d
R
ecording / playback tim
e
T
ype of tap
e
T6
0
T12
0
T16
0
SP mode 1hou
r
2hour
s
2-2/3hour
s
SLP mode
3
hours
6
hour
s
8hour
s
N
ote
(
s
)
:
• You can also set to External Tuner. Refer to “Satellite Link” on page 18.
TV
External Tuner
(Cable/Satellite or
Converter Set-top Box)
this Unit
6
2
3
4
1
6
5
RE
C
SP
erasure
p
revention tab
REC OTR (0:30) OTR (1:00).....
(normal recording)
OTR (8:00) OTR (7:30)
See note on the right.
•
I
nsert a recor
d
a
bl
e cassette tape.
• Make sure to turn on the External Tuner (Cable/Satellite or Converter Set-top Box).
4
Continued on next
p
a
g
e
.
5
-
M
E
N
U
-
TIMER PROGRAMMING
SATELLITE LIN
K
B
AUTO REPEAT
[
ON
]
CLOCK SET
LANGUAGE SELECT
Loading ...
Loading ...
Loading ...