Documents: Go to download!
- Owner's manual - (English)
- CONNECTING THE SOUNDBAR
- USING A WIRED CONNECTION TO THE TV
- USING A WIRELESS CONNECTION TO THE TV
- CONNECTING AN EXTERNAL DEVICE
- CONNECTING A MOBILE DEVICE
- INSTALLING THE WALL MOUNT
- TROUBLESHOOTING
Table of contents
User manual Soundbar
CONNECTING THE SOUNDBAR
Connecting the power and units
Use the power components to connect the Subwoofer and Soundbar to an electrical outlet in the following order:
For more information about the required electrical power and power consumption, refer to the label attached to the product. (Label: Bottom of the Soundbar Main Unit)
1. Connect the Power cord to the Subwoofer.
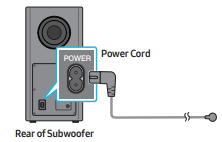
2. First connect the power cable to the AC/DC adapter.
Connect the AC/DC adapter (with the power cable) to the Soundbar.

3. Connect power to the Soundbar and Subwoofer. The Subwoofer is automatically connected when the Soundbar is turned on.

NOTES
- Connect the Subwoofer power before connecting to the Soundbar. The Subwoofer will be automatically connected when turning on the Soundbar.
- If you unplug and reconnect the power cord when the product is turned on, the Soundbar turns on automatically.
- Make sure to rest the AC/DC Adapter flat on a table or the floor. If you place the AC/DC Adapter so that it is hanging with the AC cord input facing upwards, water or other foreign substances could enter the Adapter and cause the Adapter to malfunction.
Manually connecting the Subwoofer
1. Turn off the Soundbar main.
2. Press and hold ID SET on the rear of the subwoofer for at least 5 seconds.
- The red indicator on the rear of the subwoofer turns off and the blue indicator blinks.
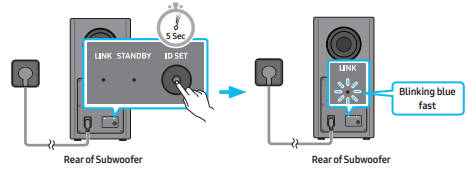
3. Press the Up button on the remote control for 5 seconds or press the ID SET button located at the bottom of the Soundbar.
- The ID SET message appears on the display of the Soundbar for a moment, and then it disappears.
- The Soundbar will automatically power on when ID SET is complete.

4. Check if the LINK LED is solid blue (connection complete).
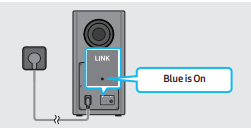
The LINK LED indicator stops blinking and glows a solid blue when a connection is established between the Soundbar and the Wireless Subwoofer.
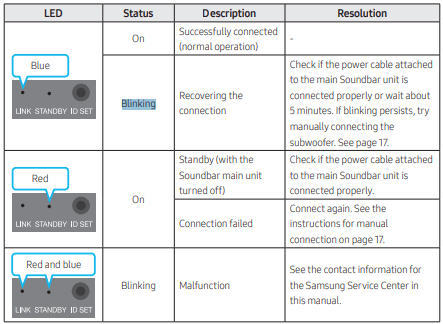
LED Indicator Lights on the Rear of Subwoofer
NOTES
- If the main unit is powered off, the wireless subwoofer will go into stand-by mode and the STANDBY LED on the rear of the sub-woofer will turn red after blinking in blue several times.
- If you use a device that uses the same frequency (5.8GHz) as the Soundbar near the Soundbar, interference may cause some sound interruption.
- The maximum transmission distance of the main unit’s wireless signal is about 32.8 ft (10 m), but may vary depending on your operating environment. If a steel-concrete or metallic wall is between the main unit and the wireless subwoofer, the system may not operate at all because the wireless signal cannot penetrate metal.
CAUTION
- Wireless receiving antennas are built into the wireless subwoofer. Keep the unit away from water and moisture.
- For optimal listening performance, make sure that the area around the wireless subwoofer and the Wireless Receiver Module is clear of any obstructions.
Connecting an SWA-9000 to your Soundbar
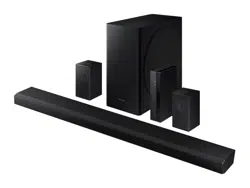
Expand to true wireless surround sound by connecting the Samsung Wireless Rear Speaker Kit (SWA-9000) to your Soundbar.
1. Connect the Wireless Receiver Module to 2 Surround Speakers
Use the speaker cables to connect the two surround sound speakers to the Wireless Receiver Module.
- The speaker cables are color coded.
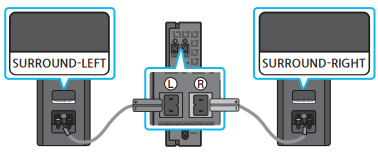
When connecting the speaker cables to the Wireless Receiver Module, follow these steps:
- Insert the grey plug into the grey jack on the Wireless Receiver.
- Insert the blue plug into the blue jack on the Wireless Receiver.
When connecting the speaker cables to the surround speakers, follow these steps:
- Match the speaker cable connected to the grey jack to the speaker with the grey label.
- Match the speaker cable connected to the blue jack to the speaker with the blue label.
- Insert the red and black colored ends of each speaker cable into the red and black jacks of the appropriate speaker.
- The labels are on the backs of the speakers.
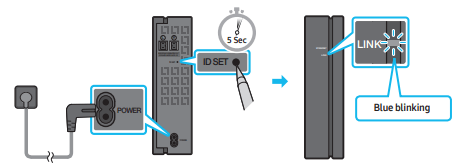
2. Check the standby status after plugging into an electrical outlet
The LINK LED indicator (blue LED) on the Wireless Receiver Module blinks. If the LED does not blink, press the ID SET button on the back of the Wireless Receiver Module with a pen tip for 5~6 seconds until the LINK LED indicator blinks (in Blue).
Attach the Toroidal Ferrite Core to the Power Cord of the Soundbar
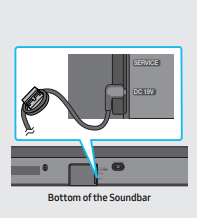
Attach the Toroidal ferrite core to the power cord of the Soundbar to help prevent RF interference from radio signals.
- Pull the fixing tab of the Toroidal ferrite core to open it.
- Make two loops in the Soundbar’s power cord.
- Attach the Toroidal ferrite core to the Soundbar’s power cord as shown in the figure on the left, and then close it by pressing it until it clicks.
- Ensure that the ferrite core is attached as close as possible to the power jack of the Soundbar.
3.Configure “IDSET” using the Soundbar’s remote control
Turn off the Soundbar main. Press the Up button on the remote control for 5 seconds or press the ID SET button located at the bottom of the Soundbar.
- The ID SET message appears on the display of the Soundbar for a moment, and then it disappears.
- The Soundbar will automatically power on when ID SET is complete.

CAUTION: If your Soundbar was playing music when it connects to the SWA-9000, you may hear some stuttering from the woofer as the connection finalizes.
4. Check if the LINK LED is solid blue (connection complete)
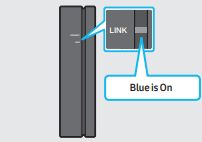
The LINK LED indicator stops blinking and glows a solid blue when a connection is established between the Soundbar and the Wireless Receiver Module.
5. If the SWA-9000 does not connect, take the necessary steps according to the LED Indicator’s status
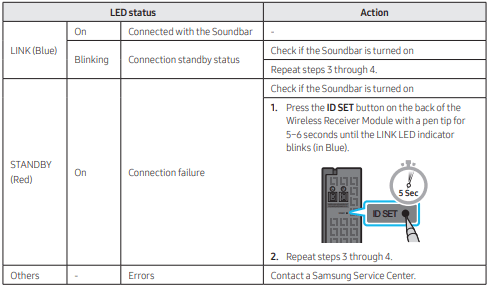
USING A WIRED CONNECTION TO THE TV
Method 1. Connecting with HDMI
Connecting the TV that supports HDMI ARC (Audio Return Channel)
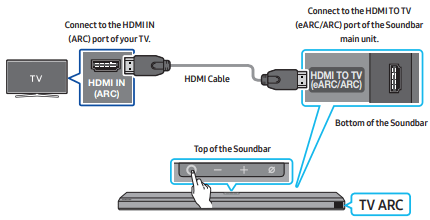
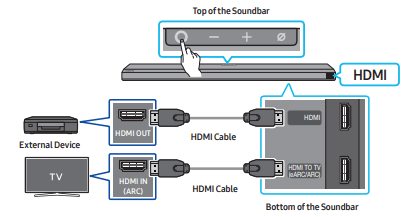
1. With the Soundbar and TV turned off, connect the HDMI cable as shown in the figure.
2. Turn on the Soundbar and TV.
3. “TV ARC” appears in the display window of the Soundbar main unit and the Soundbar plays TV sound.
- When the TV sound is not output, press the
 (Multi Function) button at the top of the Soundbar or the
  (Source) button on the remote control to select the “D.IN” mode. The screen displays “D.IN” and “TV ARC” in sequence, and TV sound is played.
 - When connecting a Samsung TV that supports the eARC function, “eARC” appears on the display and the sound is heard.
- If “TV ARC” does not appear in the display window of the Soundbar main unit, confirm that the HDMI cable is connected to the correct port.
- Use the volume buttons on the TV’s remote control to change the volume on the Soundbar
NOTES
- When you connect the TV that supports the HDMI ARC (Audio Return Channel) to the Soundbar with an HDMI cable, you can transmit the digital video and audio data without connecting a separate optical cable.
- We recommend you use a coreless HDMI cable if possible. If you use a cored HDMI cable, use one whose diameter is less than 0.55 inches (14 mm).
- This function is not available if the HDMI cable does not support ARC.
- When the audio in a broadcast is encoded in Dolby Digital and the “Digital Output Audio Format” on your TV is set to PCM, we recommend that you change the setting to Dolby Digital. When the setting on the TV is changed, you will experience better sound quality. (The TV menu may use different words for Dolby Digital and PCM depending on the TV manufacturer.)
Method 2. Connecting using an Optical Cable
Pre-connection Checklist
- When both the HDMI cable and optical cable are connected, the HDMI signal is received first.
- When you use an optical cable and the terminals have covers, be sure to remove the covers.

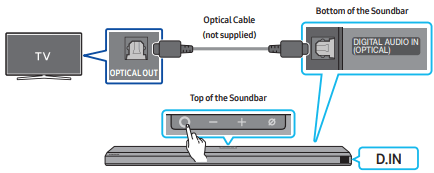
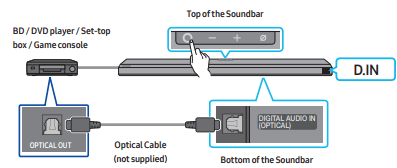
- With the TV and Soundbar turned off, connect the DIGITAL AUDIO IN (OPTICAL) port on the Soundbar and the OPTICAL output port on the TV with the optical cable (not supplied), as shown in the figure.
- Turn on the Soundbar and TV.
- Press the
 (Multi Function) button at the top of the Soundbar or the
  (Source) button on the remote control to select the “D.IN” mode.
 - The TV sound is output from the Soundbar.
Using the Q-Symphony Function
For Q-Symphony, the Soundbar syncs with a Samsung TV to output sound through two devices for optimum surround effect. When the Soundbar is connected, the menu, “TV+Soundbar” appears under the Sound Output menu of the TV. Select the corresponding menu.

- TV menu example: TV series name + [AV] Soundbar series name (HDMI)
NOTES
- It can operate according to the Codec supported by TV.
- This function is supported only when the HDMI Cable or Optical Cable (not supplied) is connected.
- This function is available in Samsung TVs released in 2020 and some Soundbar models.
USING A WIRELESS CONNECTION TO THE TV
Connecting via Bluetooth
When a Samsung TV is connected using Bluetooth, you can hear stereo sound without the hassle of cabling.
- Only one Samsung TV can be connected at a time.
- Samsung TV that supports Bluetooth can be connected. Check the specifications of your TV.

The initial connection
1. Press the  PAIR button on the Soundbar remote control to enter the “BT PAIRING” mode. (OR)
a. Press the  (Multi Function) button on the top panel and then select “BT”. “BT” changes to “BT PAIRING” in a few seconds automatically or changes to “BT READY” if there is a connect record.
b. When “BT READY” appears, press and hold the  (Mic On/Off) button on the top panel of the Soundbar for more than 5 seconds to display “BT PAIRING”.
2. Select Bluetooth mode on the Samsung TV. (e.g. Home ( ) -> Settings (
 ) -> Sound -> Sound Output -> Bluetooth Speaker List -> [AV] Samsung Soundbar Q850T (Bluetooth))
3. Select “[AV] Samsung Soundbar Q850T” from the list on TV’s screen. An available Soundbar is indicated with “Need Pairing” or “Paired” on the TV’s Bluetooth device list. To connect the Samsung TV to the Soundbar, select the message, and then establish a connection.
- When the Samsung TV is connected, [TV Name] → “BT” appears on the Soundbar’s front display.
4. You can now hear Samsung TV sound from the Soundbar.
- After you have connected the Soundbar to your Samsung TV the first time, use the “BT READY” mode to reconnect.
Disconnecting the Soundbar from the Samsung TV
Press the  (Multi Function) button at the top of the Soundbar or the
  (Source) button on the remote control to select the mode other than “BT”.
- Disconnecting takes time because the Samsung TV must receive a response from the Soundbar. (The time required may differ, depending on the Samsung TV model.)
Notes on Bluetooth connection
- Locate a new device within 3.28 ft (1 m) to connect via Bluetooth communication.
- If asked for a PIN code when connecting a Bluetooth device, enter <0000>.
- The Soundbar automatically turns off after 18 minutes in the Ready state.
- The Soundbar may not perform Bluetooth search or connection correctly under the following circumstances:
- If there is a strong electrical field around the Soundbar.
- If several Bluetooth devices are simultaneously paired with the Soundbar.
- If the Bluetooth device is turned off, not in place, or malfunctions.
- Electronic devices may cause radio interference. Devices that generate electromagnetic waves must be kept away from the Soundbar main unit - e.g., microwaves, wireless LAN devices, etc.
CONNECTING AN EXTERNAL DEVICE
Method 1. Connecting using an HDMI Cable (Capable of Dolby Atmos decoding and playback)
- Use an HDMI cable to connect the HDMI OUT port on the external device and the HDMI port on the bottom of the Soundbar.
- Use an HDMI cable to connect the HDMI IN port of the TV and the HDMI TO TV (eARC/ARC) port on the bottom of the Soundbar.
- Turn on the Soundbar, TV, and the external device.
- Press the
 (Multi Function) button on the top of the Soundbar or the
  (Source) button on the remote control to select “HDMI” mode.
 - The Soundbar display indicates that “HDMI” mode is currently selected and the Soundbar will start playing sounds.
NOTES
- When you use Dolby Atmos®: If the input source is Dolby Atmos®, 5.1.2 channels are outputted. When Dolby Atmos® is active, the Soundbar’s sound effect modes controlled by the SOUND MODE button are not available.
- When Dolby Atmos® is activated, “DOLBY ATMOS” appears in the front display.
- ConfiguringDolbyAtmos® on yourBDplayer or other device. Open the audio output options on the settings menu of your BD player or other device and make sure that “No Encoding” is selected for Bitstream. For example, on a Samsung BD Player, go to Home Menu → Sound → Digital Output and then select Bitstream (unprocessed).
Method 2. Connecting using an Optical Cable
- Use an optical cable (not supplied) to connect the DIGITAL AUDIO IN (OPTICAL) on the Soundbar main and the OPTICAL OUT port on the external device.
- Turn on the Soundbar and external device.
- To select “D.IN” mode, press the
 (Multi Function) button on the top of the Soundbar or the
  (Source) button on the remote control.
 - Your Soundbar will play sounds from the external device.
CONNECTING A MOBILE DEVICE
Method 1. Connecting via Bluetooth
When a mobile device is connected using Bluetooth, you can hear stereo sound without the hassle of cabling.
- When you connect a paired Bluetooth device with the Soundbar off, the Soundbar automatically turns on

The initial connection
- When connecting to a new Bluetooth device, make sure the device is within 3.28 ft (1 m) distance.
1. Press the  PAIR button on the Soundbar remote control to enter the “BT PAIRING” mode. (OR)
a. Press the  (Multi Function) button on the top panel and then select “BT”. “BT” changes to “BT PAIRING” in a few seconds automatically or changes to “BT READY” if there is a connect record.
b. When “BT READY” appears, press and hold the  (Mic On/Off) button on the top panel of the Soundbar for more than 5 seconds to display “BT PAIRING”.
2. On your device, select “[AV] Samsung Soundbar Q850T” from the list that appears.
- When the Soundbar is connected to the Mobile device, [Mobile Device Name] → “BT” appears in the front display.
3. Play music files from the device connected via Bluetooth through the Soundbar.
- After you have connected the Soundbar to your mobile device the first time, use the “BT READY” mode to reconnect.
Notes on Bluetooth connection
- Locate a new device within 3.28 ft (1 m) to connect via Bluetooth communication.
- If asked for a PIN code when connecting a Bluetooth device, enter <0000>.
- The Soundbar automatically turns off after 18 minutes in the Ready state.
- The Soundbar may not perform Bluetooth search or connection correctly under the following circumstances:
- If there is a strong electrical field around the Soundbar.
- If several Bluetooth devices are simultaneously paired with the Soundbar.
- If the Bluetooth device is turned off, not in place, or malfunctions.
- Electronic devices may cause radio interference. Devices that generate electromagnetic waves must be kept away from the Soundbar main unit - e.g., microwaves, wireless LAN devices, etc.
- The Soundbar supports SBC data (44.1kHz, 48kHz).
- Connect only to a Bluetooth device that supports the A2DP (AV) function.
- You cannot connect the Soundbar to a Bluetooth device that supports only the HF (Hands Free) function.
- When connecting the Soundbar to a Bluetooth device, place them as close to each other as possible.
- The farther the Soundbar and Bluetooth device are from each other, the lower the sound quality will become.
The Bluetooth connection may break when the devices are out of the effective range.
- The Bluetooth connection may not function as intended in areas with poor reception.
- A Bluetooth device may experience noise or malfunction under in the following conditions:
- When the body is in contact with the signal transceiver on the Bluetooth device or Soundbar
- In corners or when there is an obstacle in proximity, such as a wall or partition, where electrical changes may occur.
- When exposed to radio interferences by other products operating on the same frequency ranges, such as medical equipment, microwave ovens, and wireless LAN devices.
- Obstacles such as doors and walls may still impact the sound quality even when the devices are within the effective range.
- Note that your Soundbar cannot be paired with other Bluetooth devices while using the Bluetooth option.
- This wireless device may cause electrical interference during operation.
Disconnecting the Bluetooth device from a Soundbar
You can disconnect a Bluetooth device from the Soundbar. For instructions, see the Bluetooth device’s user manual.
- The Soundbar will be disconnected.
- When the Soundbar is disconnected from the Bluetooth device, the Soundbar will display “BT DISCONNECTED” on the front display.
Disconnecting the Soundbar from the Bluetooth device
Press the  (Multi Function) button on the top of the Soundbar or the
  (Source) button on the remote control to switch the mode from “BT”.
- Disconnecting takes time because the Bluetooth device must receive a response from the Soundbar. (Disconnection time may differ, depending on the Bluetooth device)
- When the Soundbar is disconnected from the Bluetooth device, the Soundbar will display “BT DISCONNECTED” on the front display.
Method 2. Connecting via Wi-Fi (Wireless Network)
To connect a Soundbar to a mobile device via a wireless network (Wi-Fi), the SmartThings app is required.
The initial connection
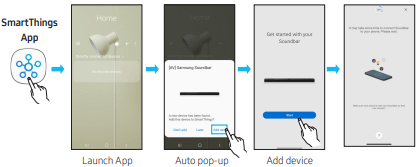
- Install and launch the SmartThings app from your mobile device (smartphone or tablet).
- On the app, follow the screen instructions to add the Soundbar.
- The automatic pop-up (the second screenshot below) may not show on some devices. If the pop-up window does not appear, press “+” on the Home screen. The Soundbar is added to the app.
Using the Tap Sound
Tap the Soundbar with your mobile device to play the sound of content on the mobile device through the Soundbar.
- This function may not be supported, depending on the mobile device.
- This function is only compatible with Samsung mobile devices with Android 8.1 or later.
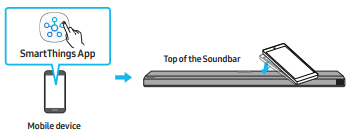
1. Turn on the Tap Sound function on your mobile device.
- For details on how to turn on the function, refer to “Setting the Tap Sound function” below.
2. Tap the Soundbar with the mobile device. Select “Start now” in the displayed message window.
- A connection is established between the mobile device and Soundbar via Bluetooth.
3. Play the sound of content on the mobile device through the Soundbar.
- This function connects a mobile device to the Soundbar via Bluetooth by detecting vibration that occurs when the device touches the Soundbar.
- Make sure the mobile device does not tap a sharp corner of the Soundbar. The Soundbar or mobile device may become scratched or damaged.
- It is recommended that the mobile device be covered with a case. Lightly tap the wide area in the upper portion of the Soundbar, without using excessive force.
- To use this function, update the SmartThings app to the latest version. The function may not be supported, depending on the app version.
Setting the Tap Sound function
Use the SmartThings app to turn on the Tap View, Tap Sound function.
- On the mobile device, run the SmartThings app.
- Select (
 ) in the SmartThings app screen displayed on the mobile device.
 - Set “Tap View, Tap Sound” to On to allow the function to work when a mobile device moves close to the Soundbar. The function is turned on.
NOTES
- When the mobile device is in power-saving mode, the Tap Sound function does not work.
- The Tap Sound function may not work if there are devices near the Soundbar that cause radio interference such as electric devices. Make sure devices that may cause radio interference are placed at a sufficient distance away from the Soundbar.
INSTALLING THE WALL MOUNT
Installation Precautions
- Install on a vertical wall only.
- Do not install in a place with high temperature or humidity.
- Verify whether the wall is strong enough to support the product’s weight. If not, reinforce the wall or choose another installation point.
- Purchase and use the fixing screws or anchors appropriate for the kind of wall you have (plaster board, iron board, wood, etc.). If possible, fix the support screws into wall studs.
- Purchase wall mounting screws according to the type and thickness of the wall you want to mount the Soundbar on.
- Diameter: M5
- Length: 1 3/8 inches (35 mm) or longer recommended.
- Connect cables from the unit to external devices before you install the Soundbar on the wall.
- Make sure the unit is turned off and unplugged before you install it. Otherwise, it may cause an electric shock.
Wallmount Components

Wall Mount Guide (AH63-04369C)

Holder-Screw Screw
(AH61-04110A) (6001-001202)

Bracket-Wall Mount (AH61-04235A)
1. Place the Wall Mount Guide against the wall surface.
- The Wall Mount Guide must be level.
- If your TV is mounted on the wall, install the Soundbar at least 2 inches (5 cm) below the TV.
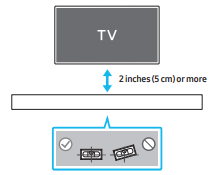
2. Align the Wall Mount Guide’s Center Line with the center of your TV (if you are mounting the Soundbar below your TV), and then fix the Wall Mount Guide to the wall using tape.
- If you are not mounting below a TV, place the Center Line in the center of the installation area.

3. Push a pen tip or sharpened pencil tip through the center of the A-TYPE images on each end of the Guide to mark the holes for the supporting screws, and then remove the Wall Mount Guide.

4. Using an appropriately sized drill bit, drill a hole in the wall at each marking.
- If the markings do not correspond to the positions of studs, make sure you insert appropriate anchors or mollies into the holes before you insert the support screws. If you use anchors or mollies, make sure the holes you drill are large enough for the anchors or mollies you use.
5. Push a screw (not supplied) through each Holder-Screw, and then screw each screw firmly into a support screw hole.

6. Install the 2 Bracket-Wall Mounts in the correct orientation on the bottom of the Soundbar using 2 Screws.
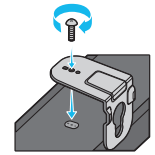
- When assembling, make sure the hanger part of the Bracket-Wall Mounts are located behind the rear of the Soundbar.
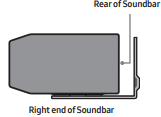
7. Install the Soundbar with the attached Bracket-Wall Mounts by hanging the Bracket-Wall Mounts on the Holder-Screws on the wall.
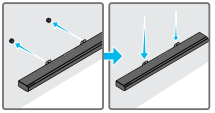
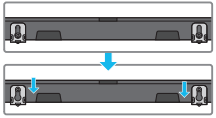
8. Slide the Soundbar down as shown below so that the Bracket-Wall Mounts rest securely on the Holder-Screws.
- Insert the Holder-Screws into the wide (bottom) part of the Bracket-Wall Mounts, and then slide the Bracket-Wall Mounts down so that the Bracket-Wall Mounts rest securely on the Holder-Screws.
TROUBLESHOOTING
Refer to the instructions below if this product does not function properly. If the problem you are experiencing is not listed below or if the instructions below do not help, turn off the product, disconnect the power cord, and contact Samsung Electronics at 1-800-SAMSUNG (1-800-726-7864).
In case the power is not turned on
- Check whether the power cord of the Soundbar is correctly inserted into the outlet.
In case the functions do not work properly
- After removing the power cord, insert it again.
- Remote the power cord from the external device and try again.
- If there is no signal, the Soundbar automatically turns off after a certain period of time. Turn on the power. (See page 11.)
In case the remote control does not work
- Operate the remote control noting the Soundbar closely.
- Replace the batteries with new ones.
In case the Soundbar sound is not output
- The volume of the Soundbar is too low or muted. Adjust the volume.
- When any external device (STB, Bluetooth device, mobile device, etc.) is connected, adjust the volume of the external device.
- For sound output of the TV, select Soundbar. (Samsung TV: Home (
 ) → Settings (
 ) → Sound → Sound Output → Select Soundbar)
 - The cable connection to the Soundbar may not be loose. Remove the cable and connect again.
- Remove the power cord completely, reconnect, and turn the power on.
- Initialize the product and try again. (See page 42.)
In case the sound of the Subwoofer speaker is not output
- Check whether the LED indicator on the rear of the Subwoofer is on in blue. Reconnect the Soundbar and Subwoofer if the indicator is blinking in blue or turned red. (See page 17.)
- You may experience an issue if there is an obstacle between the Soundbar and Subwoofer. Move devices to an area away from obstacles.
- Other devices sending radio frequency signals in proximity may interrupt the connection. Keep your speaker away from such devices.
- Remove and reconnect the power plug.
The Subwoofer volume is too low
- The original volume of the content you are playing may be low. Try adjusting the Subwoofer level. (See page 13.)
- Bring the Subwoofer speaker closer to you.
In case the TV is not connected via HDMI TO TV (eARC/ARC)
- Check whether the HDMI cable is correctly connected to the ARC terminal. (See page 24.)
- Connection may not be possible due to the connected external device (set-top box, game machine, etc.). Directly connect the Soundbar.
- HDMI-CEC may not be activated on the TV. Turn on the CEC on the TV menu. (Samsung TV: Home (
 ) → Settings (
 ) → General → External Device Manager → Anynet+ (HDMI-CEC) ON)
There is no sound in when connecting to the TV in HDMI TO TV (eARC/ARC) mode
- Your device is unable to play the input signal. Change the TV’s audio output to PCM or Dolby Digital. (For a Samsung TV: Home (
 ) → Settings (
 ) → Sound → Expert Settings → Digital Output Audio Format)
In case Bluetooth connection is not possible
- When connecting a new device, switch to “BT PAIRING” for connection. (Press the
 PAIR button on the remote control or press the
  (Mic On/Off) button on the body for at least 5 seconds.)
 - If the Soundbar is connected to another device, disconnect that device first to switch the device.
- Reconnect it after removing the Bluetooth speaker list on the device to connect. (Samsung TV: Home (
 ) → Settings (
 ) → Sound → Sound Output → Bluetooth Speaker List)
 - The automatic TV connection may be disabled. While the Soundbar is in “BT READY”, press and hold the
 button on the Soundbar remote control for 5 seconds to select ON-TV CONNECT. If you see OFF-TV CONNECT, press and hold
  button again for 5 seconds to switch the selection.
 - Remove and reconnect the power plug, then try again.
- Initialize the product and try again. (See page 42.)
In case Bluetooth sound breaking occurs
- Sounds may be breaking due to interference by radio frequency or electronic devices nearby. Keep such devices away from the Soundbar to avoid radio interference. Example: microwave ovens.
- Because the device to connect is far away from the Soundbar, sound breaking may occur. Move the device near the Soundbar.
- If a part of your body is in contact with the Bluetooth transceiver or the product is installed on metal furniture, sound breaking may occur. Check the installation environment and conditions for use.
In case Wi-Fi connection is not possible
- Check whether your wireless router is on.
- Turn off the router, turn it back on, and then try again.
- When the signal of the wireless router is too weak, connection may not be possible. Move the router near the Soundbar or adjust the installed position with no obstacles.
- If your wireless router is new, you will need to reconfigure the speaker’s network settings.
In case Alexa does not respond
When the microphone is turned off or its reception is poor
- Press the
 (Mic On/Off) button at the top of the Soundbar to enable the microphone.
 - Voice recognition may be unavailable due to ambient noise. Reduce the noise and try again.
When the network is disconnected
- The network may be unavailable. Reconfigure the network. (See page 34)
WhenAlexa is not configured correctly
- Using the SmartThings app, reconfigure Alexa. (See page 35)
- Check the Alexa supported countries at the Amazon website. The service is unavailable in those countries.
In case the Soundbar is not turned on as soon as the TV is turned on
- When you turn off the Soundbar while watching TV, power synchronization with the TV is disabled. First turn off the TV.
See other models: MG11T5018CW/AA EF-NG980PPEGUS VS20R9046T3/AA SKK-8K EF-NG985PBEGUS
