FULL MANUAL Soundbar
USING THE SOUNDBAR REMOTE CONTROL
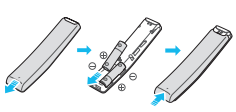
Inserting Batteries before using the Remote Control (AA batteries X 2)
- Slide the back cover in the direction of the arrow until it is completely removed. Insert 2 AA batteries (1.5V) oriented so that their polarity is correct. Slide the battery cover back into position.
How to Use the Remote Control
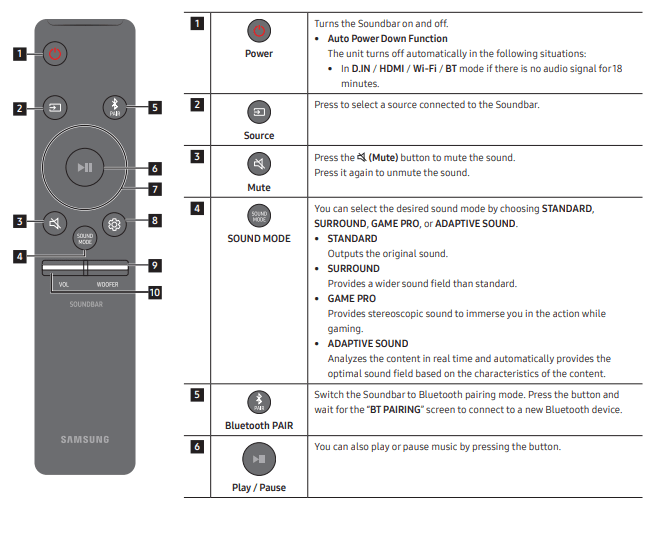
Active Voice Amplifier (AVA)
- Analyses external noise in real time while soundbar is playing, so that voice audio can always be heard clearly.
- No data is saved during the analysis.
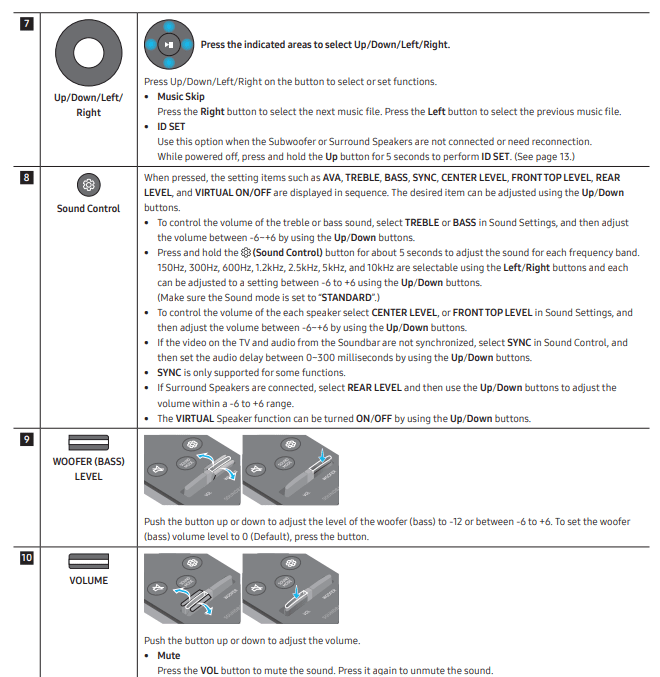
Using the Hidden Buttons (Buttons with more than one function)

Output specifications for the different sound effect modes
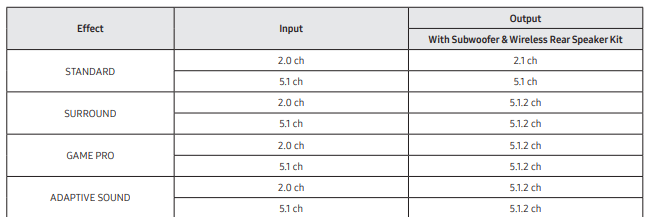
- When the input source is Dolby Atmos®, DTS:X, the Subwoofer-only setup provides 3.1.2 channel audio, while the Subwoofer & Wireless Rear Speaker Kit setup provides 5.1.2 channel audio.
- The Surround Speakers will not produce sounds for 2 channel output while STANDARD mode is in use. To enable sound for the Surround Speakers, change the effect mode to SURROUND.
CONNECTING THE SOUNDBAR
Connecting Electrical Power
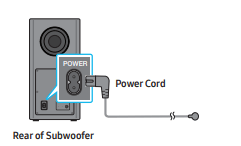
Use the power components to connect the Subwoofer and Soundbar to an electrical outlet in the following order: For more information about the required electrical power and power consumption, refer to the label attached to the product. (Label: Bottom of the Soundbar Main Unit)
- Connect the power cord to the Subwoofer.
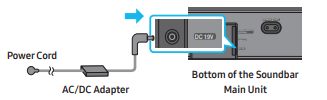
- First connect the power cable to the AC/DC adapter. Connect the AC/DC adapter (with the power cable) to the Soundbar.
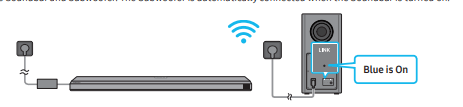
- Connect power to the Soundbar and Subwoofer. The Subwoofer is automatically connected when the Soundbar is turned on.
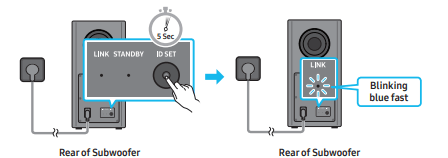
Manually connecting the Subwoofer
Before performing the manual connection procedure below:
- Check whether the power cables for the Soundbar and subwoofer are connected properly.
- Make sure that the Soundbar is turned off.
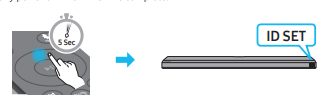
1. Turn off the Soundbar main.
2. Press and hold ID SET on the rear of the subwoofer for at least 5 seconds.
- The red indicator on the rear of the subwoofer turns off and the blue indicator blinks.
3. Press the Up button on the remote control for 5 seconds.
- The ID SET message appears on the display of the Soundbar for a moment, and then it disappears.
- The Soundbar will automatically power on when ID SET is complete
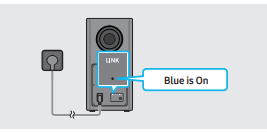
4. Check if the LINK LED is solid blue (connection complete). The LINK LED indicator stops blinking and glows a solid blue when a connection is established between the Soundbar and the Wireless Subwoofer.
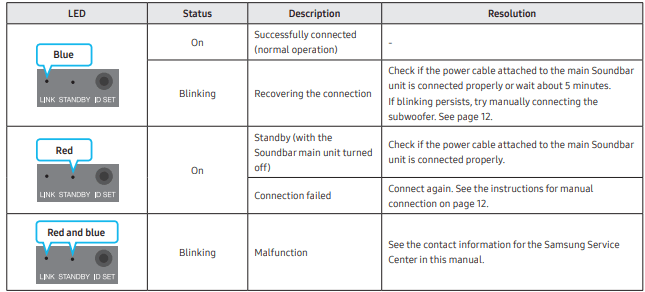
LED Indicator Lights on the Rear of Subwoofer
Connecting an SWA-9100 to your Soundbar
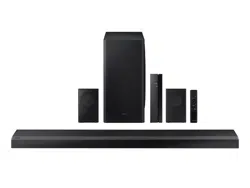
Expand to true wireless surround sound by connecting the Samsung Wireless Surround Speaker SET (SWA-9100) to your Soundbar
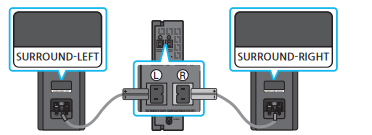
1. Connect the Wireless Receiver Module to 2 Surround Speakers: Use the speaker cables to connect the two surround sound speakers to the Wireless Receiver Module.
- The speaker cables are color coded.
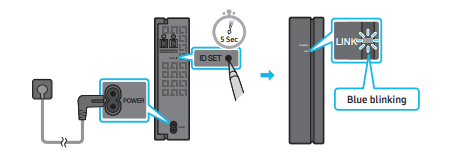
2. Check the standby status after plugging into an electrical outlet The LINK LED indicator (blue LED) on the Wireless Receiver Module blinks. If the LED does not blink, press the ID SET button on the back of the Wireless Receiver Module with a pen tip for 5~6 seconds until the LINK LED indicator blinks (in Blue).
When connecting the speaker cables to the Wireless Receiver Module, follow these steps:
- Insert the grey plug into the grey jack on the Wireless Receiver.
- Insert the blue plug into the blue jack on the Wireless Receiver.
When connecting the speaker cables to the surround speakers, follow these steps:
- Match the speaker cable connected to the grey jack to the speaker with the grey label.
- Match the speaker cable connected to the blue jack to the speaker with the blue label.
- Insert the red and black colored ends of each speaker cable into the red and black jacks of the appropriate speaker.
- The labels are on the backs of the speakers
2. Check the standby status after plugging into an electrical outlet: The LINK LED indicator (blue LED) on the Wireless Receiver Module blinks. If the LED does not blink, press the ID SET button on the back of the Wireless Receiver Module with a pen tip for 5~6 seconds until the LINK LED indicator blinks (in Blue).
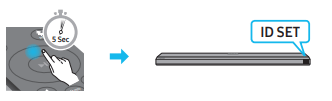
3. Configure “ID SET” using the Soundbar’s remote control Turn off the Soundbar main. Press the Up button on the remote control for 5 seconds.
- The ID SET message appears on the display of the Soundbar for a moment, and then it disappears.
- The Soundbar will automatically power on when ID SET is complete.
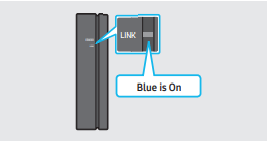
4. Check if the LINK LED is solid blue (connection complete): The LINK LED indicator stops blinking and glows a solid blue when a connection is established between the Soundbar and the Wireless Receiver Module.
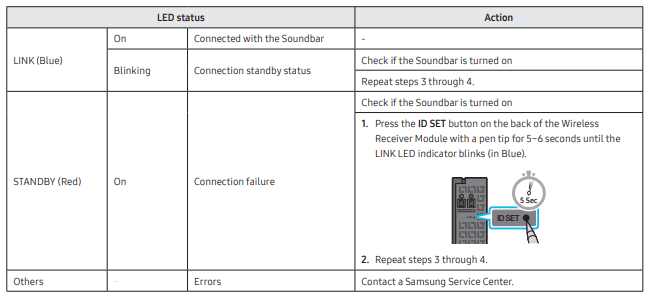
5. If the SWA-9100 does not connect, take the necessary steps according to the LED Indicator’s status:
USING A WIRED CONNECTION TO THE TV
Method 1. Connecting with HDMI
Connecting the TV that supports HDMI ARC (Audio Return Channel)
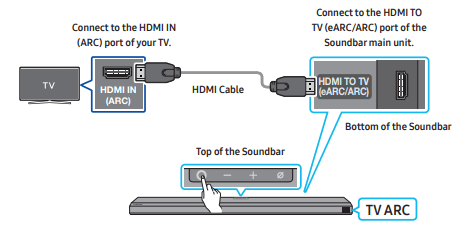
- With the Soundbar and TV turned off, connect the HDMI cable as shown in the figure.
- Turn on the Soundbar and TV.
- “TV ARC” appears in the display window of the Soundbar main unit and the Soundbar plays TV sound.
- When the TV sound is not output, press the
 (Multi Function) button at the top of the Soundbar or the
  (Source) button on the remote control to select the “D.IN” mode. The screen displays “D.IN” and “TV ARC” in sequence, and TV sound is played.
- When connecting a TV that supports the eARC function, “eARC” appears on the display and the sound is heard.
- To connect with eARC, the eARC function in the TV menu should be set to On. Refer to the TV user manual for details on setting. (e.g. Samsung TV : Home (
 ) → Settings (
 ) → Sound → Expert Settings → HDMI-eARC Mode (Auto))
- If “TV ARC” does not appear in the display window of the Soundbar main unit, confirm that the HDMI cable is connected to the correct port.
- Use the volume buttons on the TV’s remote control to change the volume on the Soundbar.
Method 2. Connecting using an Optical Cable
Pre-connection Checklist
- When both the HDMI cable and optical cable are connected, the HDMI signal is received first.
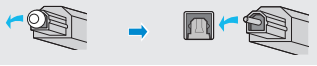
- When you use an optical cable and the terminals have covers, be sure to remove the covers.
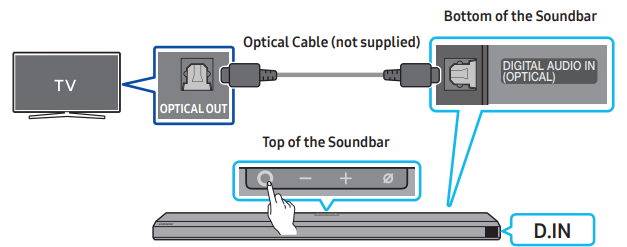
- With the TV and Soundbar turned off, connect the DIGITAL AUDIO IN (OPTICAL) port on the Soundbar and the OPTICAL output port on the TV with the optical cable (not supplied), as shown in the figure.
- Turn on the Soundbar and TV.
- Press the (Multi Function) button at the top of the Soundbar or the (Source) button on the remote control to select the “D.IN” mode.
- The TV sound is output from the Soundbar
Using the Q-Symphony Function: For Q-Symphony, the Soundbar syncs with a Samsung TV to output sound through two devices for optimum surround effect. When the Soundbar is connected, the menu, “TV+Soundbar” appears under the Sound Output menu of the TV. Select the corresponding menu.
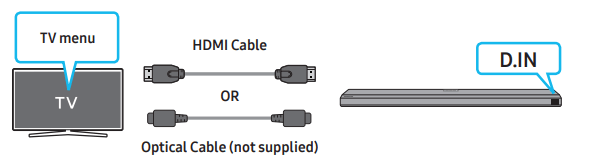
- TV menu example: TV + [AV]Soundbar series name [HDMI]
Using the Spacefit sound
- Provides optimized sound quality by analyzing the listening spaces.
- To enable this function, turn on the Adaptive Sound+ mode on your Samsung TV menu. (Home ( ) → Settings ( ) → General → Intelligent Mode Settings → Adaptive Sound+)
USING A WIRELESS CONNECTION TO THE TV
Method 1. Connecting via Bluetooth
When a Samsung TV is connected using Bluetooth, you can hear stereo sound without the hassle of cabling.
- Only one Samsung TV can be connected at a time.
- Samsung TV that supports Bluetooth can be connected. Check the specifications of your TV
The initial connection
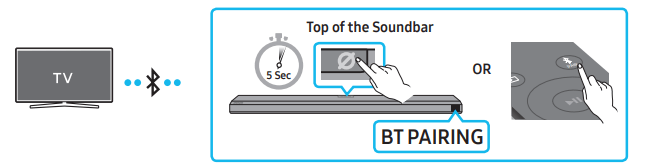
- Press the
 PAIR button on the Soundbar remote control to enter the “BT PAIRING” mode. (OR)
- Press the (Multi Function) button on the top panel and then select “BT”. “BT” changes to “BT PAIRING” in a few seconds automatically or changes to “BT READY” if there is a connect record.
- When “BT READY” appears, press and hold the
 (Mic On/Off) button on the top panel of the Soundbar for more than 5 seconds to display “BT PAIRING”.
- Select Bluetooth mode on the Samsung TV. (e.g. Home ( ) → Settings ( ) → Sound → Sound Output → Bluetooth Speaker List → [AV] Samsung Soundbar Q850A (Bluetooth))
- Select “[AV] Samsung Soundbar Q850A” from the list on TV’s screen. An available Soundbar is indicated with “Need Pairing” or “Paired” on the TV’s Bluetooth device list. To connect the Samsung TV to the Soundbar, select the message, and then establish a connection.
- When the Samsung TV is connected, [TV Name] → “BT” appears on the Soundbar’s front display.
- You can now hear Samsung TV sound from the Soundbar.
- After you have connected the Soundbar to your Samsung TV the first time, use the “BT READY” mode to reconnect.
If the device fails to connect
- If you have an existing Soundbar (e.g., [AV] Samsung Soundbar Q850A) on the list of speakers on the Samsung TV, delete it.
- Then repeat steps 1 through 3.
Disconnecting the Soundbar from the Samsung TV: Press the (Multi Function) button at the top of the Soundbar or the (Source) button on the remote control to select the mode other than “BT”.
- Disconnecting takes time because the Samsung TV must receive a response from the Soundbar. (The time required may differ, depending on the Samsung TV model.)
What is the difference between BT READY and BT PAIRING?
- BT READY : In this mode, you can reconnect any Samsung TV or mobile device that was connected before.
- BT PAIRING : In this mode, you can connect a new device to the Soundbar. (Press the PAIR button on the Soundbar remote control or press and hold the (Mic On/Off) button on the top of the Soundbar for more than 5 seconds while the Soundbar is in “BT” mode.)
Notes on Bluetooth connection
- Locate a new device within 3.28 ft (1 m) to connect via Bluetooth communication.
- If asked for a PIN code when connecting a Bluetooth device, enter .
- The Soundbar automatically turns off after 18 minutes in the Ready state.
- The Soundbar may not perform Bluetooth search or connection correctly under the following circumstances:
- If there is a strong electrical field around the Soundbar.
- If several Bluetooth devices are simultaneously paired with the Soundbar.
- If the Bluetooth device is turned off, not in place, or malfunctions.
- Electronic devices may cause radio interference. Devices that generate electromagnetic waves must be kept away from the Soundbar main unit - e.g., microwaves, wireless LAN devices, etc.
Method 2. Connecting via Wi-Fi
Pre-connection Checklist
- Wi-Fi connection is available only on Samsung TV.
- Check whether the wireless router (Wi-Fi) is turned on and the TV is connected to the router.
- The TV and Soundbar must be connected to the same wireless network (Wi-Fi).
- If your wireless router (Wi-Fi) uses a DFS channel, you will not be able to establish a Wi-Fi connection between the TV and Soundbar. Contact your Internet service provider for details.
- Because the menus may differ depending on the year of manufacture, refer to your TV manual.
- To connect the TV to the Soundbar via Wi-Fi, connect the Soundbar to the wireless router first. See page 23, for details on how to establish a Wi-Fi connection.
1. For more information about Wi-Fi connection to the Soundbar, see page 23, “Method 2. Connecting via Wi-Fi (Wireless Network)”.
2. Change the input source of the TV by using the Audio menu to Soundbar.
- Samsung TVs released in 2017 or later Home ( ) → Settings ( ) → Sound → Sound Output → [AV] Samsung Soundbar Q850A (Wi-Fi)
CONNECTING AN EXTERNAL DEVICE
Method 1. Connecting using an HDMI Cable (Capable of Dolby Atmos decoding and playback)
Pre-connection Checklist
- If the Audio Output options include Secondary Audio, make sure Secondary Audio is set to Off.
- Make sure that the content supports Dolby Atmos®
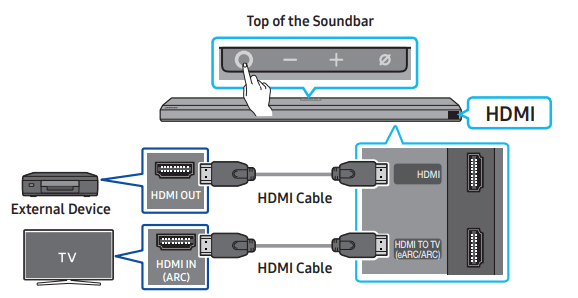
- Use an HDMI cable to connect the HDMI OUT port on the external device and the HDMI port on the bottom of the Soundbar.
- Use an HDMI cable to connect the HDMI IN port of the TV and the HDMI TO TV (eARC/ARC) port on the bottom of the Soundbar.
- Turn on the Soundbar, TV, and the external device.
- Press the (Multi Function) button on the top of the Soundbar or the (Source) button on the remote control to select “HDMI” mode.
- The Soundbar display indicates that “HDMI” mode is currently selected and the Soundbar will start playing sounds
Supported UHD Signals Specification (3840 x 2160p)
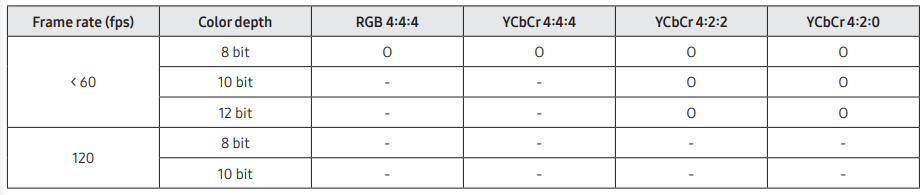
- Supported specification may vary depending on the connected external device or usage conditions
Method 2. Connecting using an Optical Cable
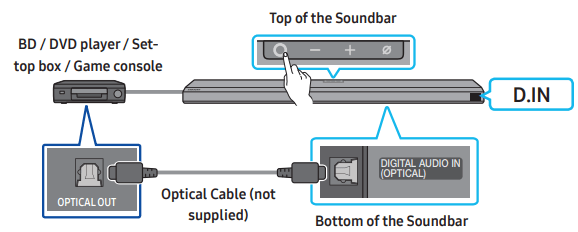
- Use an optical cable (not supplied) to connect the DIGITAL AUDIO IN (OPTICAL) on the Soundbar main and the OPTICAL OUT port on the external device.
- Turn on the Soundbar and external device.
- To select “D.IN” mode, press the (Multi Function) button on the top of the Soundbar or the (Source) button on the remote control.
- Your Soundbar will play sounds from the external device.
CONNECTING A MOBILE DEVICE
Method 1. Connecting via Bluetooth
When a mobile device is connected using Bluetooth, you can hear stereo sound without the hassle of cabling.
- When you connect a paired Bluetooth device with the Soundbar off, the Soundbar automatically turns on.
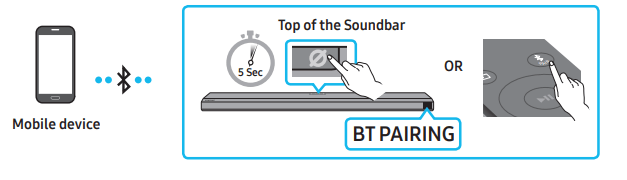
The initial connection: When connecting to a new Bluetooth device, make sure the device is within 3.28 ft (1 m) distance.
- Press the PAIR button on the Soundbar remote control to enter the “BT PAIRING” mode. (OR)
- Press the (Multi Function) button on the top panel and then select “BT”. “BT” changes to “BT PAIRING” in a few seconds automatically or changes to “BT READY” if there is a connect record.
- When “BT READY” appears, press and hold the (Mic On/Off) button on the top panel of the Soundbar for more than 5 seconds to display “BT PAIRING”.
- On your device, select “[AV] Samsung Soundbar Q850A” from the list that appears.
- When the Soundbar is connected to the Mobile device, [Mobile Device Name] → “BT” appears in the front display.
- Play music files from the device connected via Bluetooth through the Soundbar.
- After you have connected the Soundbar to your mobile device the first time, use the “BT READY” mode to reconnect.
If the device fails to connect
- If you have an existing Soundbar (e.g., “[AV] Samsung Soundbar Q850A”) in the list of speakers on the Mobile device, delete it.
- Repeat steps 1 and 2.
What is the difference between BT READY and BT PAIRING?
- BT READY : In this mode, you can reconnect any Samsung TV or mobile device that was connected before.
- BT PAIRING : In this mode, you can connect a new device to the Soundbar. (Press the PAIR button on the Soundbar remote control or press and hold the (Mic On/Off) button on the top of the Soundbar for more than 5 seconds while the Soundbar is in “BT” mode.)
Disconnecting the Bluetooth device from a Soundbar: You can disconnect a Bluetooth device from the Soundbar. For instructions, see the Bluetooth device’s user manual.
- The Soundbar will be disconnected.
- When the Soundbar is disconnected from the Bluetooth device, the Soundbar will display “BT DISCONNECTED” on the front display.
Disconnecting the Soundbar from the Bluetooth device: Press the (Multi Function) button on the top of the Soundbar or the (Source) button on the remote control to switch the mode from “BT”.
- Disconnecting takes time because the Bluetooth device must receive a response from the Soundbar. (Disconnection time may differ, depending on the Bluetooth device)
- When the Soundbar is disconnected from the Bluetooth device, the Soundbar will display “BT DISCONNECTED” on the front display
Method 2. Connecting via Wi-Fi (Wireless Network)
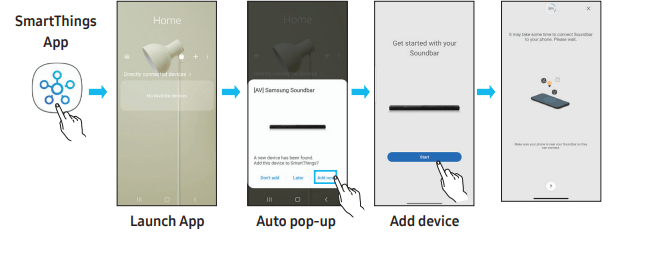
To connect a Soundbar to a mobile device via a wireless network (Wi-Fi), the SmartThings app is required. The initial connection
- Install and launch the SmartThings app from your mobile device (smartphone or tablet).
- On the app, follow the screen instructions to add the Soundbar.
- The automatic pop-up (the second screenshot below) may not show on some devices. If the pop-up window does not appear, press “+ ” on the Home screen. The Soundbar is added to the app.
Getting Started with Amazon Alexa (Built-in Alexa)
- Amazon Alexa is a service provided by Amazon.
- This function may not be supported depending on the model or geographical area.
- This function only supports some languages, and the supported functions may differ depending on the geographical area.
- For product specification or compatibility, refer to the Samsung website
Using Alexa, you can play music, listen to news, see weather forecasts, and control home appliances.
To use Amazon Alexa, an Amazon account is required to connect the Soundbar over the network.
- Install the SmartThings app on your mobile device and then launch it.
- Enter the Alexa account by following the instructions on the app and then log in the service.
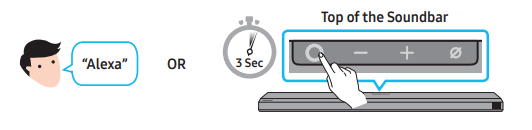
- Call Alexa or press the (Multi Function) button on the Soundbar for 3 seconds to use the Alexa service.
- Press the (Multi Function) button for 3 seconds to call Alexa. Say with the button pressed to enable voice recognition.
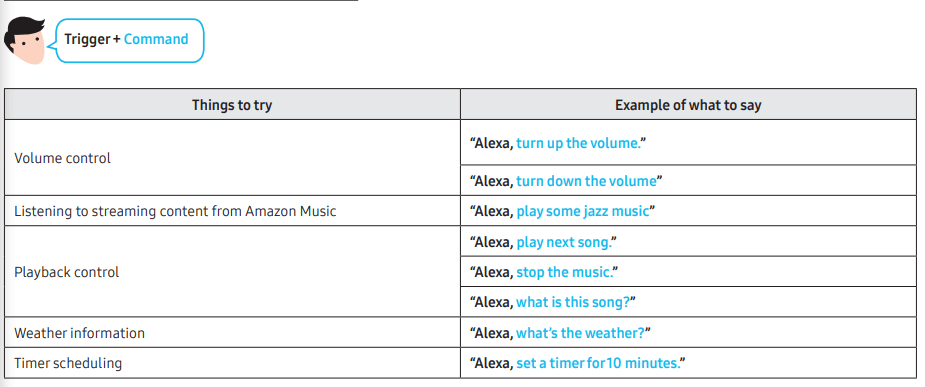
Use voice commands to control the Soundbar
Getting Started with Alexa on Amazon Product (Works with Alexa)
- This function may not be supported depending on the model or geographical area.
- This function only supports some languages, and the supported functions may differ depending on the geographical area.
- For product specification or compatibility, refer to the Samsung website .
- This service is provided by Amazon and can be terminated at any time. Samsung does not assume responsibility for service availability.
- Amazon Alexa app screen is subject to change without prior notice.
Connect and use with an Amazon product (Amazon Echo): Use an Amazon Echo product to control your Soundbar and enjoy music services provided by Amazon Echo. To use Amazon Alexa, an Amazon account is required to connect the Soundbar over the network.
- Install the SmartThings app on your mobile device and then launch it.
- Enter the Alexa account by following the instructions on the app and then log in the service.
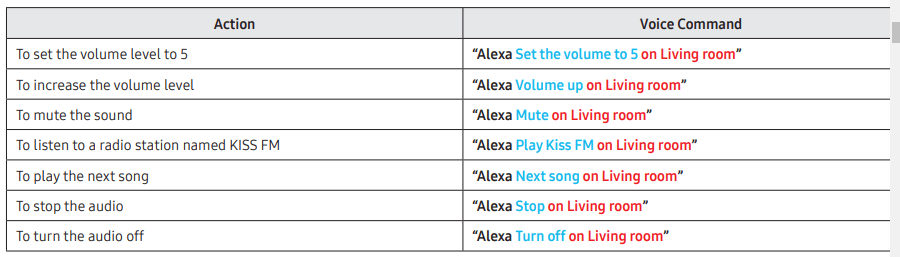
Use voice commands to control the Soundbar
- The Amazon Echo service you can use with your Soundbar is limited to music. Other services provided by Amazon Echo, such as news and weather, can only be accessed through your Amazon Echo product.

* To use voice commands for the Soundbar named “Living room”
Using the Tap Sound: Tap the Soundbar with your mobile device to play the sound of content on the mobile device through the Soundbar.
- This function may not be supported, depending on the mobile device.
- This function is only compatible with Samsung mobile devices with Android 8.1 or later.

- Turn on the Tap Sound function on your mobile device.
- For details on how to turn on the function, refer to “Setting the Tap Sound function” below.
- Tap the Soundbar with the mobile device. Select “Start now” in the displayed message window. A connection is established between the mobile device and Soundbar via Bluetooth.
- Play the sound of content on the mobile device through the Soundbar.
- This function connects a mobile device to the Soundbar via Bluetooth by detecting vibration that occurs when the device touches the Soundbar.
- Make sure the mobile device does not tap a sharp corner of the Soundbar. The Soundbar or mobile device may become scratched or damaged.
- It is recommended that the mobile device be covered with a case. Lightly tap the wide area in the upper portion of the Soundbar, without using excessive force.
- To use this function, update the SmartThings app to the latest version. The function may not be supported, depending on the app version.
Setting the Tap Sound function: Use the SmartThings app to turn on the Tap View, Tap Sound function.
- On the mobile device, run the SmartThings app.
- Select (
 → ) in the SmartThings app screen displayed on the mobile device.
- Set “Tap View, Tap Sound” to On to allow the function to work when a mobile device moves close to the Soundbar. The function is turned on.
CONNECTING TO APPLE AIRPLAY 2
This feature may not be available in some countries. Connect and use with an Apple product
- With AirPlay 2, you can control your home’s audio system from your iPhone, iPad, HomePod, or Apple TV.
- This Samsung Soundbar supports AirPlay 2 and requires iOS 11.4 or later.
NOTE: Confirm that the Soundbar is connected to Wi-Fi. (Refer to Method 2. Connecting via Wi-Fi (Wireless Network))
INSTALLING THE WALL MOUNT
Installation Precautions
- Install on a vertical wall only.
- Do not install in a place with high temperature or humidity.
- Verify whether the wall is strong enough to support the product’s weight. If not, reinforce the wall or choose another installation point.
- Purchase and use the fixing screws or anchors appropriate for the kind of wall you have (plaster board, iron board, wood, etc.). If possible, fix the support screws into wall studs.
- Purchase wall mounting screws according to the type and thickness of the wall you want to mount the Soundbar on.
- Diameter: M5
- Length: 1 3/8 inches (35 mm) or longer recommended.
- Connect cables from the unit to external devices before you install the Soundbar on the wall.
- Make sure the unit is turned off and unplugged before you install it. Otherwise, it may cause an electric shock.
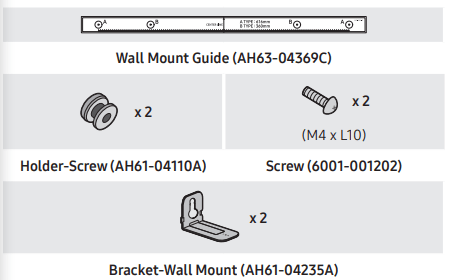
Wallmount Components
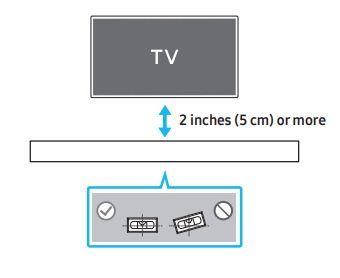
1. Place the Wall Mount Guide against the wall surface.
- The Wall Mount Guide must be level.
- If your TV is mounted on the wall, install the Soundbar at least 2 inches (5 cm) below the TV.
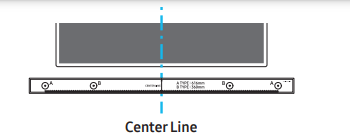
2. Align the Wall Mount Guide’s Center Line with the center of your TV (if you are mounting the Soundbar below your TV), and then fix the Wall Mount Guide to the wall using tape.
- If you are not mounting below a TV, place the Center Line in the center of the installation area.
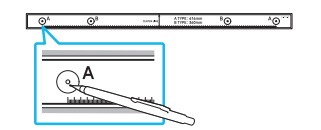
3. Push a pen tip or sharpened pencil tip through the center of the A-TYPE images on each end of the Guide to mark the holes for the supporting screws, and then remove the Wall Mount Guide.
4. Using an appropriately sized drill bit, drill a hole in the wall at each marking.
- If the markings do not correspond to the positions of studs, make sure you insert appropriate anchors or mollies into the holes before you insert the support screws. If you use anchors or mollies, make sure the holes you drill are large enough for the anchors or mollies you use.
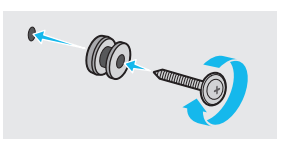
5. Push a screw (not supplied) through each Holder-Screw, and then screw each screw firmly into a support screw hole.
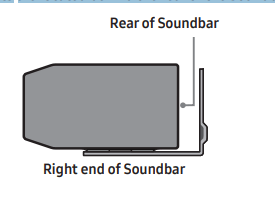
6. Install the 2 Bracket-Wall Mounts in the correct orientation on the bottom of the Soundbar using 2 Screws.
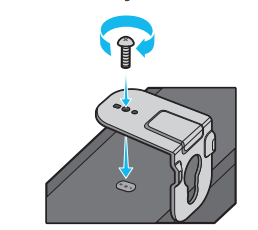
- When assembling, make sure the hanger part of the BracketWall Mounts are located behind the rear of the Soundbar.
7. Install the Soundbar with the attached Bracket-Wall Mounts by hanging the Bracket-Wall Mounts on the Holder-Screws on the wall.
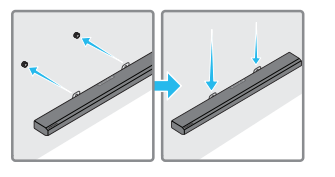
8. Slide the Soundbar down as shown below so that the Bracket-Wall Mounts rest securely on the Holder-Screws.
- Insert the Holder-Screws into the wide (bottom) part of the Bracket-Wall Mounts, and then slide the Bracket-Wall Mounts down so that the Bracket-Wall Mounts rest securely on the Holder-Screws.

INSTALLING THE SOUNDBAR ABOVE A TV STAND
Component

- To install, attach the Rubber-Feet to the bottom of the Soundbar before placing it in position above the TV stand. Make sure you attach the Rubber-Feet so they do not lie outside the edges of the TV stand. Refer to the figure below.
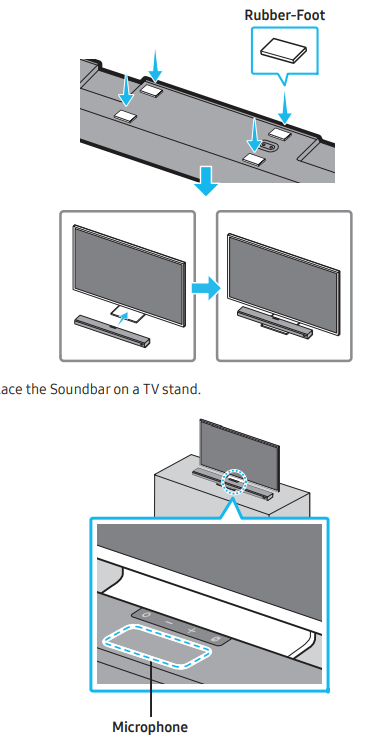
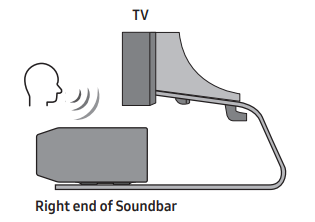
- As illustrated in the image, align the center of the Soundbar with the center of the TV, carefully place the Soundbar onto the TV stand. At this time, place the microphone at the front of the stand not to interfere with voice recognition.
SOFTWARE UPDATE
Auto Update
When the Soundbar is connected to the Internet, software updates automatically occur even when the Soundbar is turned off.
- To use the Auto Update function, the Soundbar must be connected to the Internet. The Wi-Fi connection to the Soundbar will be terminated if the Soundbar’s power cord is disconnected or the power is cut off. If the power is cut off, when the power comes back on or you reconnect the power cord, turn on the Soundbar, and then reconnect it to the Internet.
USB Update
Samsung may offer updates for the Soundbar’s system firmware in the future.
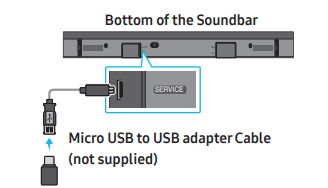
When an update is available, you can update the Soundbar by connecting the USB drive that contains the update firmware to the SERVICE port of the Soundbar.
- Go to the Samsung Electronics website (.samsung.com) → search for the model name from the customer support menu option.
- For more information about update, refer to Upgrade Guide.
- Download the upgrade file (USB type).
- Unzip the file to create a folder with the file name.
- Store the created folder in a USB and then connect it to the Soundbar.
- Turn on the Soundbar. Then the product is updated within 3 minutes with displaying the message, “UPDATE”.
- During update, do not turn it off or remove the USB.
- If “UPDATE” does not appear on the display window, remove the power cord from the Soundbar and then reconnect it.
- When the latest version is installed, no update is performed.
- Depending on the USB type, update may not be supported.
Initialization
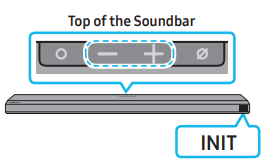
- With the Soundbar on, press the - / +(Volume) buttons on the body at the same time for at least 5 seconds. “INIT” appears on the display and then the Soundbar is initialized
TROUBLESHOOTING
Refer to the instructions below if this product does not function properly. If the problem you are experiencing is not listed below or if the instructions below do not help, turn off the product, disconnect the power cord, and contact Samsung Electronics at 1-800-SAMSUNG
1. Soundbar does not turn on
- Check whether the power cord of the Soundbar is correctly inserted into the outlet.
2. Soundbar works erratically
- After removing the power cord, insert it again.
- Remote the power cord from the external device and try again.
- If there is no signal, the Soundbar automatically turns off after a certain period of time. Turn on the power.
3. In case the remote control does not work
- Point the remote directly at the Soundbar.
- Replace the batteries with new ones.
4. The Soundbar does not output any sound
- The volume of the Soundbar is too low or muted. Adjust the volume.
- When any external device (STB, Bluetooth device, mobile device, etc.) is connected, adjust the volume of the external device.
- For sound output of the TV, select Soundbar. (Samsung TV: Home ( ) → Settings ( ) → Sound → Sound Output → Select Soundbar)
- The cable connection to the Soundbar may not be loose. Remove the cable and connect again.
- Remove the power cord completely, reconnect, and turn the power on.
- Initialize the product and try again.
5. The Subwoofer does not output any sound
- Check whether the LED indicator on the rear of the Subwoofer is on in blue. Reconnect the Soundbar and Subwoofer if the indicator is blinking in blue or turned red.
- You may experience an issue if there is an obstacle between the Soundbar and Subwoofer. Move devices to an area away from obstacles.
- Other devices sending radio frequency signals in proximity may interrupt the connection. Keep your speaker away from such devices.
- Remove and reconnect the power plug.
6. The Subwoofer volume is too low
- The original volume of the content you are playing may be low. Try adjusting the Subwoofer level.
- Bring the Subwoofer speaker closer to you.
7. In case the TV is not connected via HDMI TO TV (eARC/ARC)
- Check whether the HDMI cable is correctly connected to the ARC terminal.
- Connection may not be possible due to the connected external device (set-top box, game machine, etc.). Directly connect the Soundbar.
- HDMI-CEC may not be activated on the TV. Turn on the CEC on the TV menu. (Samsung TV: Home ( ) → Settings ( ) → General → External Device Manager → Anynet+ (HDMI-CEC) ON)
- To connect with eARC, the eARC function in the TV menu should be set to On. (Samsung TV: Home ( ) → Settings ( ) → Sound → Expert Settings → HDMI-eARC Mode (Auto))
8. There is no sound in when connecting to the TV in HDMI TO TV (eARC/ARC) mode
- Your device is unable to play the input signal. Change the TV’s audio output to PCM or Dolby Digital. (For a Samsung TV: Home ( ) → Settings ( ) → Sound → Expert Settings → Digital Output Audio Format)
9. The Soundbar will not connect via Bluetooth
- When connecting a new device, switch to “BT PAIRING” for connection. (Press the PAIR button on the remote control or press the (Mic On/Off) button on the body for at least 5 seconds.)
- If the Soundbar is connected to another device, disconnect that device first to switch the device.
- Reconnect it after removing the Bluetooth speaker list on the device to connect. (Samsung TV: Home ( ) → Settings ( ) → Sound → Sound Output → Bluetooth Speaker List)
- The automatic TV connection may be disabled. While the Soundbar is in “BT READY”, press and hold the
 button on the Soundbar remote control for 5 seconds to select ON-TV CONNECT. If you see OFF-TV CONNECT, press and hold button again for 5 seconds to switch the selection.
- Remove and reconnect the power plug, then try again.
- Initialize the product and try again
10. The sound drops out when connected via Bluetooth
- Some devices can cause radio interference if they are located too close to the Soundbar. e. g. microwaves, wireless routers, etc.
- If your device that is connected via Bluetooth moves too far away from the soundbar, it may cause the sound to drop out. Move the device closer to the soundbar.
- If a part of your body is in contact with the Bluetooth transceiver or the product is installed on metal furniture, the sound may drop out. Check the installation environment and conditions for use.
11. Unable to connect to Wi-Fi
- Check whether your wireless router is on.
- Turn off the router, turn it back on, and then try again.
- The soundbar will not connect if the wireless signal is too weak. Try moving the router closer to the soundbar, or eliminating any obstacles that are between the soundbar and the router, if possible.
- If your wireless router is new, you will need to reconfigure the speaker’s network settings.
12. The Soundbar does not turn on automatically with the TV
- When you turn off the Soundbar while watching TV, power synchronization with the TV is disabled. First turn off the TV.
13. The AVA function is not available in the following cases.
- The AVA function will not be available using Q-symphony function.
- The AVA function will not be available when the microphone is turned off.