Use Manual Oven
Installation
WARNING
This oven must be installed by a qualified technician. The installer is responsible for connecting the oven to the main power, while observing the relevant safety regulations of your area.
What’s included
Make sure all parts and accessories are included in the product package. If you have a problem with the oven or accessories, contact a local Samsung customer centre or the retailer.
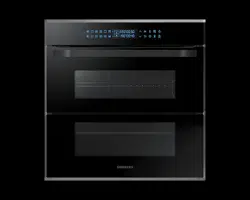
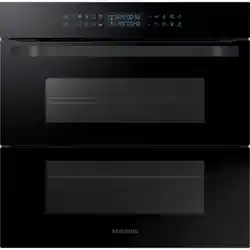
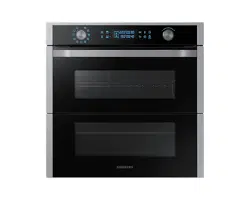
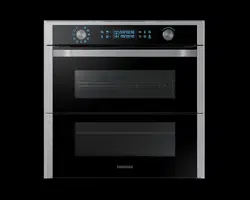
Oven at a glance
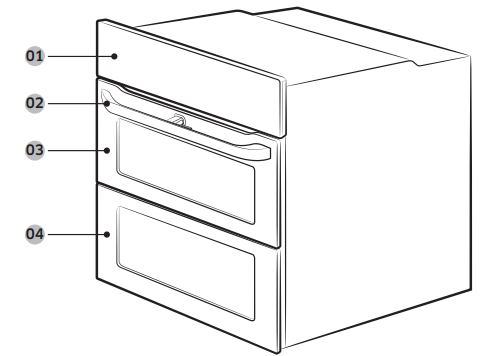
01 Control panel
02 Door handle
03 Up door
04 Main door
Accessories
The oven comes with different accessories that help you prepare different types of food.
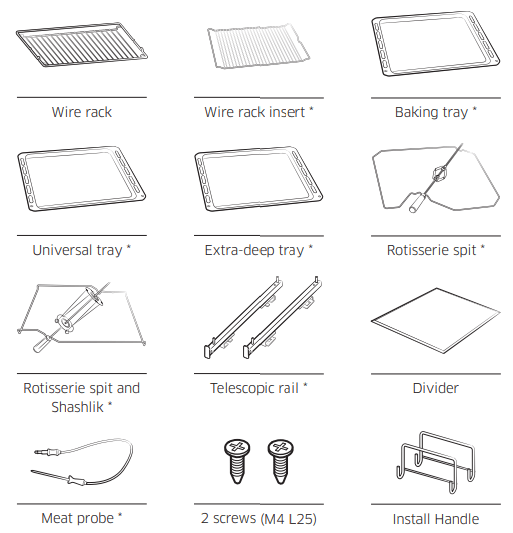
NOTE
Availability of accessories with an asterisk (*) depends on the oven model.
Prepare to install the oven
Power connection
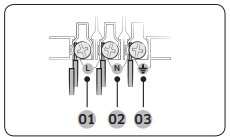
01 BROWN or BLACK
02 BLUE or WHITE
03 YELLOW and GREEN
Plug the oven into an electrical socket. If a plug-type socket is not available due to allowable current limitations, use a multipole isolator switch (with at least 3 mm spacing in-between) in order to meet safety regulations. Use a power cord of sufficient length that supports the specification H05 RR-F or H05 VV-F, min. 1.5-2.5 mm².

Check the output specifications on the label attached to the oven. Open the rear cover of the oven using a screwdriver, and remove the screws on the cord clamp. Then, connect the power lines to the relevant connection terminals. The( ) -terminal is designed for earthgrounding. First connect the yellow and green lines (earthgrounding), which must be longer than the others. If you use a plug-type socket, the plug must remain accessible after the oven is installed. Samsung is not responsible for accidents caused by missing or faulty earthgrounding.
WARNING
Do not step on or twist the wires during installation, and keep them away from heat-emitting parts of the oven.
Cabinet mount
If installing the oven in a built-in cabinet, the cabinet must have its plastic surfaces and adhesive parts resistant up to 90 °C. Samsung is not responsible for damage to furniture from the oven’s heat emission. The oven must be properly ventilated. For ventilation, leave a gap of about 50 mm between the lower shelf of the cabinet and the supporting wall. If you install the oven under a cooktop, follow the cooktop’s installation instructions.
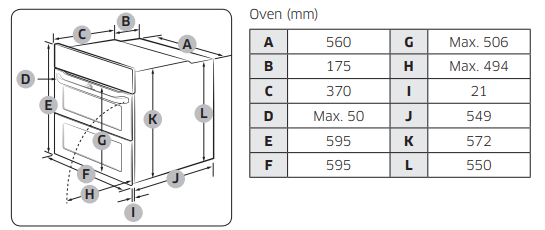
Required Dimensions for Installation
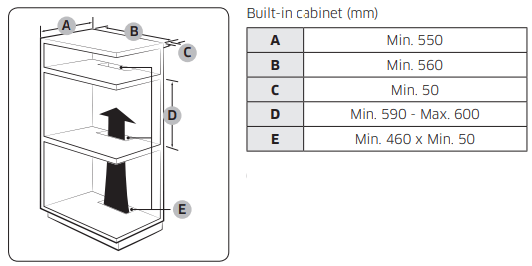
NOTE The built-in cabinet must have vents (E) to ventilate heat and circulate the air.
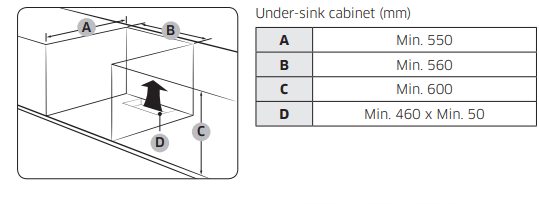
NOTE The built-in cabinet must have vents (D) to ventilate heat and circulate the air.
Mounting the oven
Make sure to leSSave a gap (A) of at least 5 mm between the oven and each side of the cabinet.
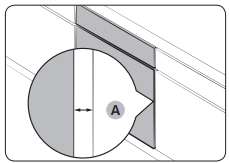
Secure at least 3 mm of gap (B) so that the door opens and closes smoothly.
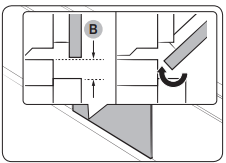
Fit the oven into the cabinet and fix the oven firmly on both sides using 2 screws.
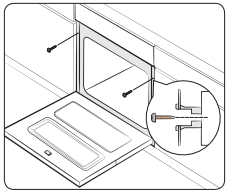
After installation is complete, remove the protective film, tape, and other packing material, and take out the provided accessories from inside the oven. To remove the oven from the cabinet, first disconnect power to the oven and remove 2 screws on both sides of the oven.
WARNING The oven requires ventilation for normal operation. Do not block the vents under any circumstance.
NOTE The actual appearance of the oven may differ with the model.
Before you start
Initial settings
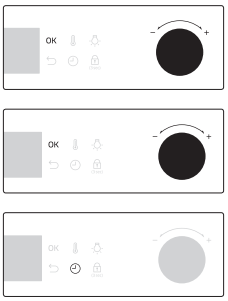
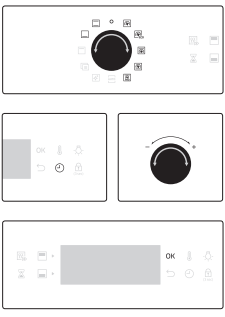
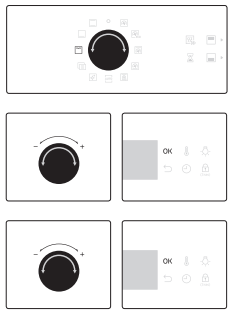
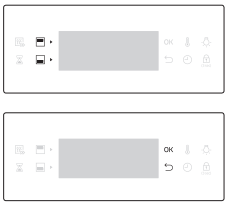
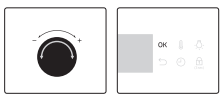
When you power on the oven for the first time, the default time of “12:00” appears on the display where the hour element (“12”) blinks. Follow the steps below to set the current time.
- With the hour element blinking, turn the value dial (right-sided dial) to set the hour, and then press OK to move to the minute element.
- With the minute element blinking, turn the value dial to set the minute, and then press OK.
To change the current time after this initial setting, hold down the button for 3 seconds and follow the above steps
New oven smell
Before using the oven for the first time, clean inside the oven to remove the new oven smell.
- Remove all accessories from inside the oven.
- Run the oven with Convection 200 °C or Conventional 200 °C for an hour. This will burn any remaining production substances in the oven.
- When complete, turn off the oven.
Smart safety mechanism
If you open the door while the oven is operating, the oven light turns on and both the fan and the heating elements stop operation. This is to prevent physical injuries such as burns as well as to prevent unnecessary energy loss. When this happens, simply close the door and the oven continues to operate normally because this is not a system failure.
Accessories
For first time use, clean the accessories thoroughly with warm water, detergent and a soft clean cloth.
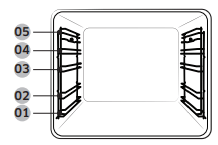
01 Level 1
02 Level 2
03 Level 3
04 Level 4
05 Level 5
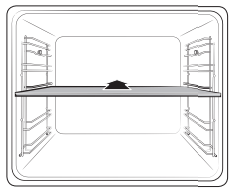
- Insert the accessory to the correct position inside of the oven.
- Allow at least a 1 cm space from the accessory and the bottom of the oven, and from any other accessory.
- Take caution in removing cookware and/or accessories out of the oven. Hot meals or accessories can cause burns.
- The accessories may be deformed while they are gaining heat. Once they have cooled down, they will recover their original appearance and performance
Basic use
For better cooking experience, familiarise yourself with how to use each accessory.
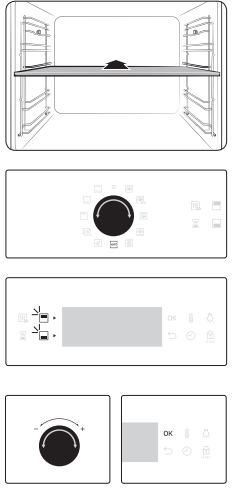
Wire rack
- The wire rack is designed for grilling and roasting. Insert the wire rack into position with the protruding parts (stoppers on both sides) towards the front.
Wire rack insert *
- The wire rack insert is used with the tray, and prevents liquid from dropping onto the bottom of the oven.
Baking tray *
- The baking tray (depth: 20 mm) is used to bake cakes, cookies, and other pastries. Put the slanted side to the front.
Universal tray *
- The universal tray (depth : 30 mm) is used for cooking and roasting. Use the wire-tray insert to prevent liquid from dropping onto the bottom of the oven. Put the slanted side to the front.
Extra-deep tray *
- The extra-deep tray (depth: 50 mm) is used for roasting with or without the wire-tray insert. Put the slanted side to the front.
Rotisserie spit *
- The rotisserie spit is used for grilling food such as chicken. Use the rotisserie spit only in Single mode at level 4 where the spit adapter is available. Unscrew the spit handle to remove while grilling.
Rotisserie spit and Shashlik *
- Put the tray at rack position 1 to collect cooking juices, or on the bottom of the oven for a large serving of meat. It is recommended to use the spit accessories for meat under 1.5 kg.
- Insert the spit into the meat. To help insert the spit, screw the spit handle toward the blunt end.
- Put parboiled potatoes and vegetables around the meat.
- Put the cradle at the middle tray position with the “V” shape to the front. Rest the spit onto the cradle with the pointed end backward and gently push until the tip of the spit enters the turning mechanism at the back of the oven. The blunt end of the spit must rest on the “V” shape. (The spit has two lugs which should be nearest to the oven door so to stop the spit going forward, the lugs also act as a grip for the handle.)
- Unscrew the handle before cooking.
- After cooking, screw the handle back to help remove the spit from the cradle.
Telescopic rails *
- Use the telescopic rail plate to insert the tray as follows:
- Stretch the rail plate out from the oven.
- Put the tray on the rail plate and slide the rail plate into the oven.
- Close the oven door.
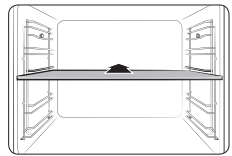
Divider
- The divider is designed to separate the oven in two compartments. Use the divider with Dual cook mode.
Meat probe *
- The meat probe measures the internal temperature of the meat to cook. Use only the meat probe that comes with your oven.
WARNING
- Make sure that the rotisserie handle is seated properly.
- Be careful when using the rotisserie. The forks and pins are pointed and sharp, which can cause physical injury!
- To prevent burns, use gloves to remove the rotisserie because it is very hot.
NOTE Availability of accessories with an asterisk (*) depends on the oven model.
Flexible Door
This oven has a unique Flexible Door that is hinged in the middle, so you only need to open the top half to access the upper cavity. When you’re using the Dual Cook capability, you can access the top oven space much more easily and with greater energy efficiency.
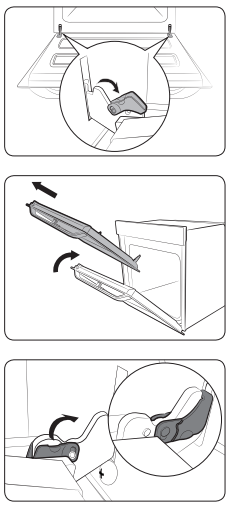
How to use the upper door
1. Completely press the handle lever.
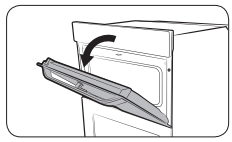
2. Pull the handle.
3. This will open only the upper door as shown.
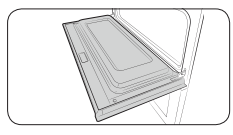
How to use the full door
1. Hold the lever-less area of the handle, and then pull.
2. This will open the whole door as shown.
CAUTION When opening the whole door, make sure to grasp the handle by the lever-less portion. If the lever is pressed halfway through opening the door, the upper door may open, causing physical injury.

NOTE
- Do not put heavy objects on, or apply excessive force, to the upper door.
- Do not let children play with or on the upper door.
Mechanical lock (applicable models only)
Installation
- Insert the thin part (A) of the mechanical lock into the corresponding slot of the lock handle as shown.
- Tighten the screw on the lock handle.
Uninstallation
- Loosen and remove the screw from the lock handle.
Lock/unlock
- To open the door, slightly lift up the lock handle to unlock the door. Then, open the door. • To lock the door, simply close the door. The mechanical lock automatically locks the door
Dual cook mode
You can use both the upper and lower compartments to cook two different recipes, or simply choose one compartment to cook with.
Insert the divider in level 3 to separate the cooking chamber in two compartments. The oven senses the divider and activates the upper compartment by default.
NOTE
Availability of Dual cook mode depends on the recipe. For more information, see the Cooking smart section in this manual.
Operations
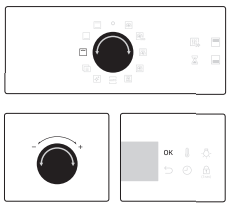
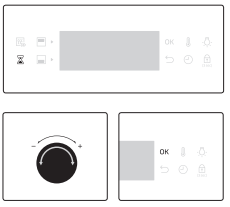
Control panel
The front panel comes in a wide range of materials and colours. For improved quality, the actual appearance of the oven is subject to change without notice.
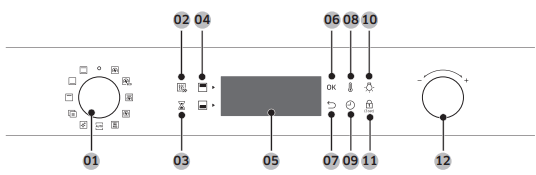
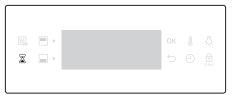
01 Mode selector
Turn to select a cooking mode or function.
02 Fast preheat (applicable models only)
Fast Preheat heats the oven fast to a set temperature.
- Press to toggle on or off the Fast Preheat option.
- Available only with Single mode.
- Disabled for temperatures set at less than 100 °C.
03 Timer
Timer helps you check the time or operating duration while cooking.
04 Upper/Lower compartment
The indicators turn on when the divider is inserted. You can choose Upper or Lower for your recipe.
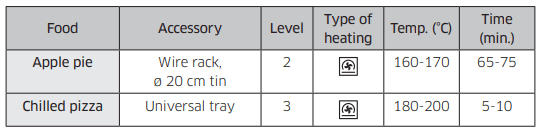
05 Display
Shows necessary information of selected modes or settings.
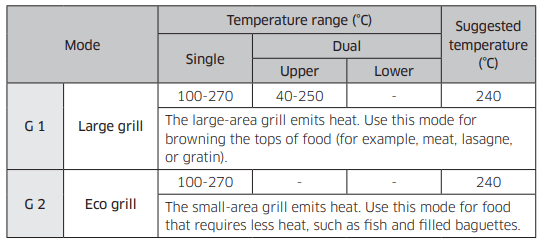
06 OK
Press to confirm your settings.
07 Back
Cancel current settings, and return to the main screen.
08 Temperature
Use to set the temperature.
09 Cooking time
Press to set the cooking time.
10 Oven light
Press to turn the internal light on or off. The oven light turns on automatically when the door is open or when the oven operation starts. And it turns off automatically after a certain period of inactivity in order to save power.
11 Child lock
To prevent accidents, Child lock disables all controls. But you can switch off by turning the mode selector to off. Hold down for 3 seconds to activate, or hold down for 3 seconds again to deactivate the lock on the control panel.
12 Value dial
Use the value dial to:
- Set the cooking time or temperature.
- Choose a sub item of top-level menus: Cleaning, Auto cook, Special function, or Grill.
- Choose a serving size for Auto Cook programmes.
NOTE
Tapping on the display while wearing plastic or oven gloves may not operate properly.
Common settings
It is common to change the default temperature and/or cooking time across all cooking modes. Follow the steps below to adjust the temperature and/or cooking time for the selected cooking mode.
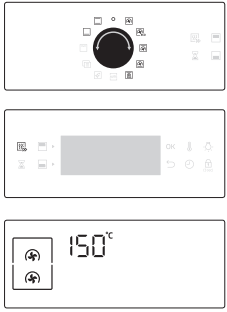
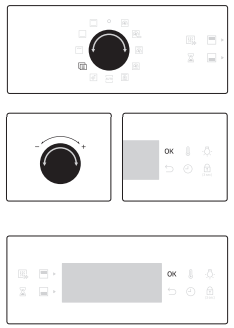
Temperature
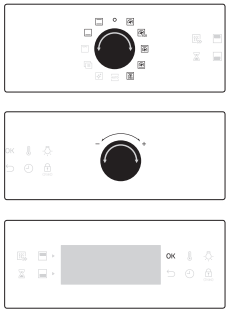
- Turn the mode selector to choose a mode or function. The default temperature of each selection appears.
- Turn the value dial to set a desired temperature.
- Press OK to confirm your changes.
NOTE
- If you do not make any further settings within a few seconds, the oven starts cooking automatically with the default settings.
- To change the set temperature, press the
 button and follow the above steps.
- The exact temperature inside the oven can be measured with authorized thermometer and method defined by an authorized institution. Using other thermometers may cause a measuring error.
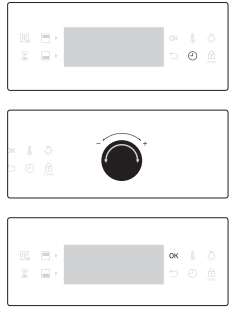
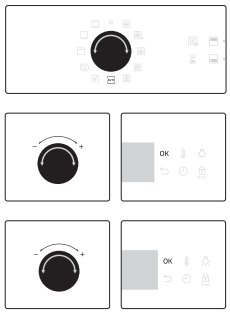
Cooking time
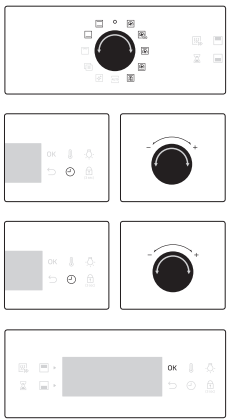
- Turn the mode selector to choose a mode or function.
- Press the button, and then turn the value dial to set a desired time up to 23 hours 59 minutes.
- Optionally, you can delay the end time of your cooking to a desired point. Press the button, and use the value dial to set an end point. See Delay End for more information.
- Press OK to confirm your changes.
NOTE
- You can cook without setting the cooking time if you want to. In this case, the oven starts cooking at set temperatures without time information, and you must stop the oven manually when cooking is complete.
- To change the set cooking time, press button and follow the above steps.
End time
- Turn the mode selector to choose a mode or function.
- Press twice, and turn the value dial to set a desired end time.
- Press OK to confirm your changes.
NOTE
- You can cook without setting the end time if you want to. In this case, the oven starts cooking at set temperatures without time information, and you must stop the oven manually when cooking is complete.
- To change the end time, press twice, and follow the above steps.
Delay End
Delay End is designed to make cooking more convenient.
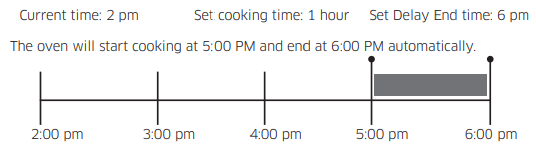
Case 1
Suppose you select a one-hour recipe at 2:00 PM and you want the oven to finish cooking at 6:00 PM. To set the end time, change the Ready At time to 6:00 PM. The oven will start cooking at 5:00 PM and end at 6:00 PM as you set.
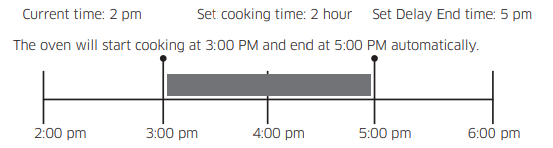
Case 2
CAUTION
- Delay End is not available in Dual cook mode.
- Do not keep cooked food in the oven too long. The food may spoil.
To clear the cooking time
You can clear the cooking time. This is useful if you want to stop the oven manually at any time during the process.
- While the oven is cooking, press the button to display the default cooking time.
- Turn the value dial to set the cooking time to “00:00”. Alternatively, simply press
 .
.
- Press OK.
NOTE
In Dual cook mode, you must first select the upper or lower compartment that you want to clear the cooking time for.
To clear the end time
You can clear the end time. This is useful if you want to stop the oven manually at any time during the process.
- While the oven is cooking, press twice to display the set end time.
- Turn the value dial to set the end time to the current time. Alternatively, simply press .
- Press OK.
NOTE
In Dual cook mode, you must first select the upper or lower compartment that you want to clear the end time for.
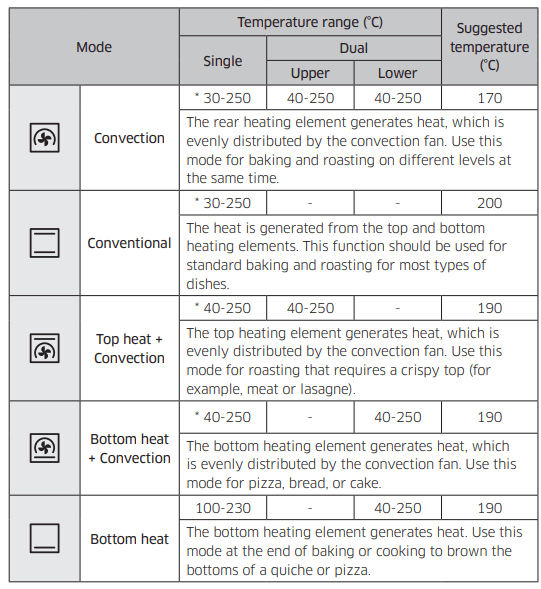
Cooking modes (except for grill)
1. Turn the mode selector to select an cooking mode.
2. Set the cooking time and/or temperature if necessary. See the Common settings section for details.
3. Optionally, you can fast preheat the oven. To do this, press the button, and set the target temperature. The corresponding indicator appears on the display.
The oven starts preheating until the internal temperature reaches the target temperature. When preheating is complete, the indicator disappears with a beep. Preheating is recommended for all cooking modes unless otherwise specified in the cooking guide.
NOTE You can change the cooking time and/or temperature during cooking.
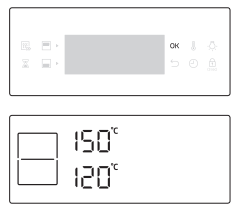
Dual cook mode
You can use the provided divider to separate the cooking chamber in the upper and lower compartments. This allows users to enable two different cooking modes simultaneously, or to simply choose one compartment to cook with.
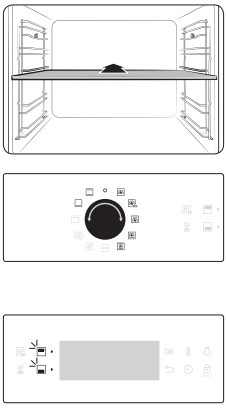
- Insert the Divider in level 3 to separate the cooking chamber in two compartments.
- Turn the mode selector to select an cooking mode. You can select Grill, Convection, and Top heat + Convection mode on the upper compartment and Convection, Bottom heat + Convection, and Bottom heat mode on the lower compartment.
- Press
 to select the upper compartment, or press
 to select the lower compartment.
 icon will appear on the selected compartment.
- Set the cooking time and/or temperature if necessary. See the Common settings section for details
5. When done, press OK.
The oven starts preheating until the internal temperature reaches the target temperature. Preheating is recommended for all cooking modes unless otherwise specified in the cooking guide.
NOTE
Availability of Dual cook mode depends on the cooking mode. For more information, see the Cooking smart section in this manual.
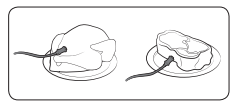
Cooking with the meat probe
The meat probe measures the internal temperature of meat while it’s cooking. When the temperature reaches the target temperature, the oven stops and finishes cooking.
- Use only the meat probe that comes with your oven.
- You cannot set the cooking time if the meat probe is plugged in.

- On the feature panel, press to choose a cooking mode.
- Insert the tip of the meat probe into the centre of the meat to cook. Make sure the rubber handle is not inserted.
3. Plug the probe connector into the socket on the leftsided wall. Make sure you see the Meat Probe indicator with the current temperature of the meat’s core on the display.
4. Turn the value dial (right-sided dial) to set the internal temperature of the meat.
5. Press OK to start cooking. The oven completes cooking with a melody when the internal temperature of the meat reaches the set temperature.
WARNING
- To prevent damage, do not use the meat probe with the spit accessory.
- When cooking is complete, the meat probe becomes very hot. To prevent burns, use oven gloves to take out the food.
NOTE
Not all modes support using the meat probe. If you use the meat probe with inapplicable modes, the current mode indicator blinks. When this happens, remove the meat probe instantly.
Cooking modes (except for grill)
The cooking modes with an asterisk (*) are available for fast preheating and disabled for temperatures set at less than 100 °C.
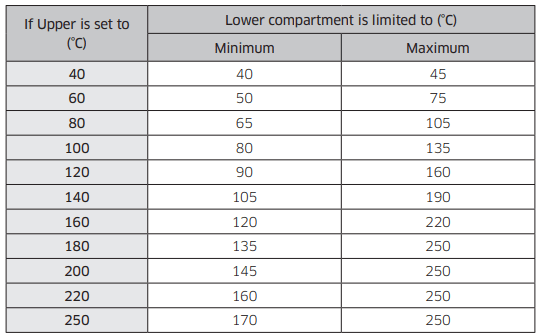
Cooking modes (grill)
- Turn the mode selector to select
 .
.
- Use the value dial to select a Large grill (G 1) or Eco grill (G 2), and then press OK.
- Use the value dial to set the temperature, and then press OK.
Dual cook mode
Grilling with Dual cook mode is useful for small serving sizes to save power. By default, only the Large grill option in the upper compartment is available because the oven uses only the top heating element.
- Insert the divider in level 3 to activate Dual cook mode.
- Turn the mode selector to select . By default, only Large grill (G 1) is selected automatically.
- Use the value dial to set the temperature, and then press OK
Cooking modes (Grill)
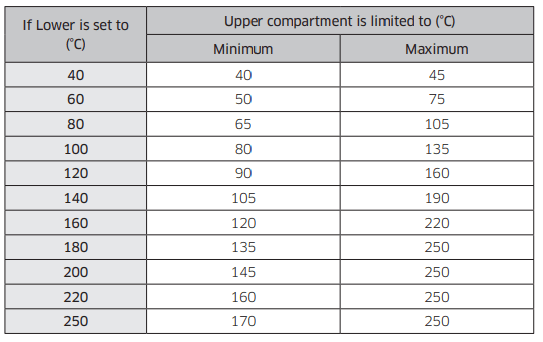
Dual cook mode temperature setting range
You can use both the upper and lower compartments simultaneously for different cooking operations.
In Dual Cook mode, the temperature range of one compartment is affected by the temperature settings of the other compartment. For instance, broiling in the upper compartment will be limited by the operation in the lower compartment in terms of cooking temperatures. However, either compartment limits its temperature settings between minimum 40 and maximum 250.
To stop cooking

While cooking is in process, turn the mode selector to “ ”. The oven turns off in a few seconds. This is because, to avoid accepting incorrect commands by users, the oven waits a few seconds so that they can correct their selection.
To stop cooking for an individual compartment
Follow these instructions to stop cooking in Dual cook mode.
- Press to select the upper compartment, or press to select the lower compartment.
- Press , and then press OK. The oven stops cooking with the selected compartment.
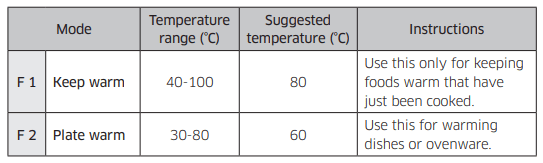
Special function
Add special or additional functions to improve your cooking experience. Special functions are not enabled in Dual cook mode.
- Turn the mode selector to select
 .
.
- Turn the value dial to select a function, and then press OK. The default temperature appears.
- Set the cooking time and/or temperature if necessary. See the Common settings section for details.
- Press OK to start the function.
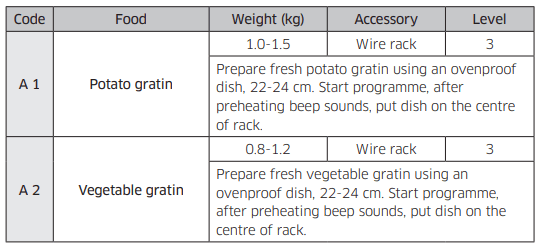
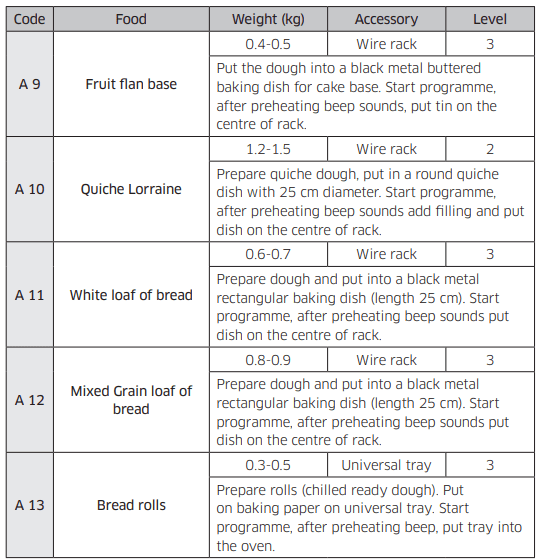
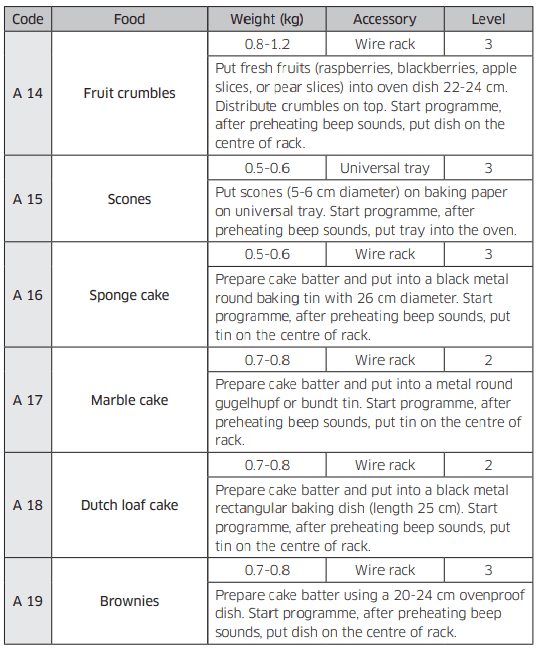
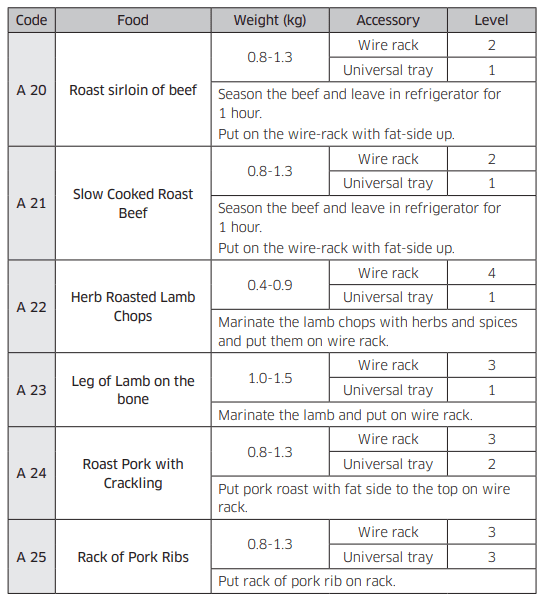
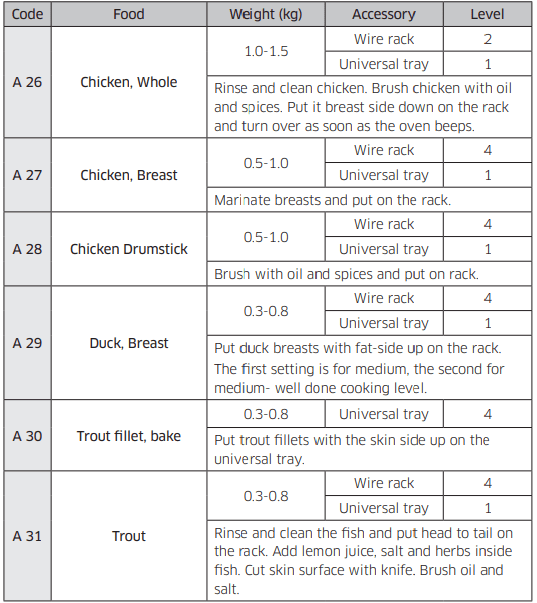
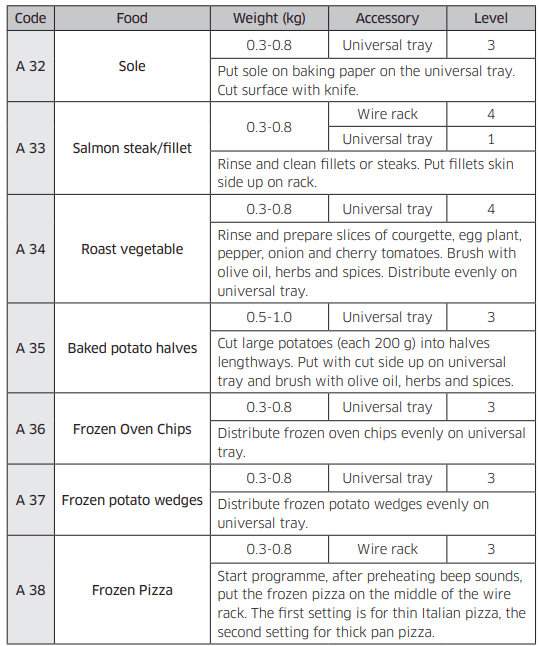
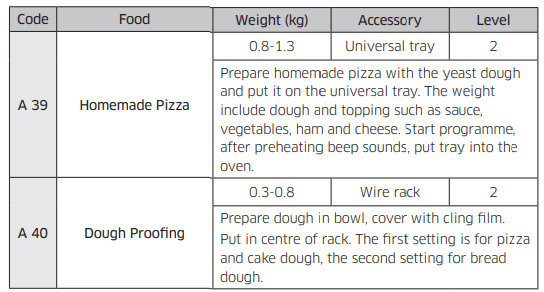
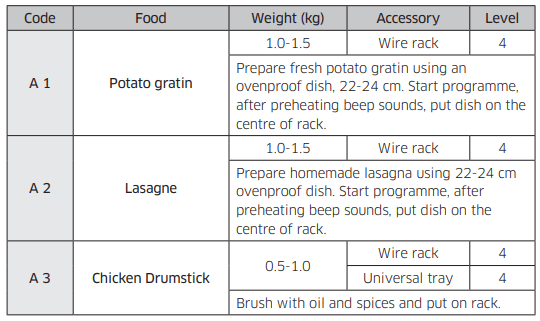
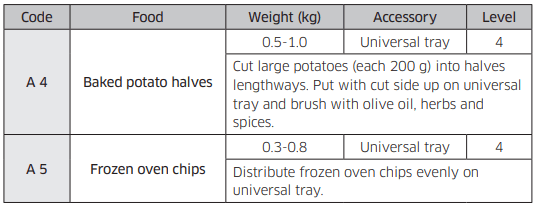
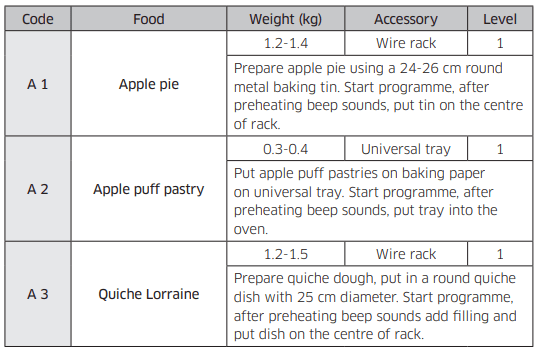
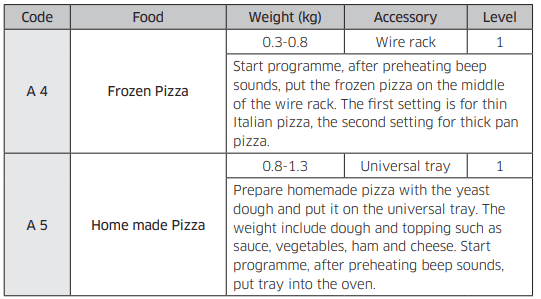
Auto cook
For inexperienced cooks, the oven offers a total of 50 auto cooking recipes. Take advantage of this feature to save you time or shorten your learning curve. The cooking time and temperature will be adjusted according to the selected recipe.
- Turn the mode selector to select
 .
.
- Turn the value dial to select a programme, and then press OK.
- Turn the value dial to select a serving size. The weight range depends on the programme.
- Press OK to start cooking.
NOTE
- Some of the items in the Auto cook programmes include preheating. For those items the preheating progress is displayed. Please put the food in the oven after preheating beep. Then, press Cooking time to start Auto Cook.
- For more information, see the Auto cook programmes section in this manual.
Dual cook mode
- Insert the divider in level 3 to activate Dual cook mode.
- Turn the mode selector to select .
- Press to select the upper compartment, or press to select the lower compartment. icon will appear on the selected compartment.
- Turn the value dial to select a programme for the upper compartment, and press OK
- Turn the value dial to select a serving size. The weight range depends on the programme.
- Press OK to start cooking.
NOTE
For more information, see the Auto cook programmes section in this manual.
Cleaning
Two cleaning modes are available for you. This function saves you time by removing the need for regular manual cleaning.
C 1 Steam cleaning
- This is useful for cleaning light soiling with steaming.
C 2 Pyro cleaning
- Pyrolytic features high temperature thermal cleaning. It burns off oily leftovers to facilitate manual cleaning.
Steam cleaning
This is useful for cleaning light soiling with steaming.
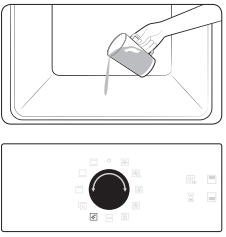
1. Pour 400 ml (3/4 pint) of water onto the bottom of the oven and close the oven door.
2. Turn the mode select
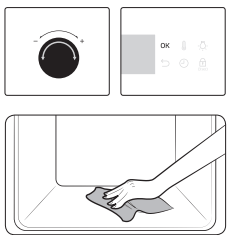
3. Turn the value dial to select Steam cleaning (C 1), and then press OK to start cleaning.
4. Use a dry cloth to clean inside the oven.
WARNING
Do not open the door before the cycle is complete. The water inside the oven is very hot, and it can cause a burn.
NOTE
- If the oven is heavily soiled with grease, for example, after roasting or grilling, it is recommended to remove stubborn soils manually using a cleaning agent before activating Steam cleaning.
- Leave the oven door ajar when the cycle is complete. This is to allow the interior enamel surface to dry thoroughly.
- If the oven is hot inside, cleaning is not activated. Wait until the oven cools down, and try again.
- Do not pour water onto the bottom by force. Do it gently. Otherwise, the water overflows to the front.
Pyro cleaning
Pyrolytic features high temperature thermal cleaning. It burns off oily leftovers to facilitate manual cleaning.


- Remove all accessories including the side racks, and wipe out large pieces of impurities manually from inside the oven. Otherwise, they may cause flames during the cleaning cycle, resulting in fire.
- Turn the mode selector to select .
- Turn the value dial to select Pyro cleaning (C 2), and then press OK.
- Turn the value dial to select a cleaning time from 3 levels: 1 hr 50 min, 2 hr 10 min, and 2 hr 30 min.
- Press OK to start cleaning.
- When complete, wait until the oven cools down, and then wipe the door along its edges using a wet cloth.
CAUTION
- Do not touch the oven because the oven becomes very hot during the cycle.
- To avoid accidents, keep children away from the oven.
- After the cycle is complete, do not power off while the cooling fan is operating to cool the oven down.
NOTE
- Once the cycle starts, the oven becomes hot inside. Then, the door will be locked for safety. When the cycle is complete and the oven cools down, the door will be unlocked.
- Make sure you empty the oven before cleaning. Accessories can be deformed due to high temperatures inside the oven.
Timer
Timer helps you check the time or operating duration while cooking.
- Press
 .
.
- Turn the value dial to set the time, and then press OK.
NOTE
- When the time has elapsed, the oven beeps with a blinking message of “00:00” on the display.
- You can change the timer settings at any time.
Sound on/off
- To mute the sound, hold down for 3 seconds.
- To unmute the sound, hold down again for 3 seconds.
Cooking smart
Manual cooking
WARNING on acrylamide
Acrylamide produced while baking starch-contained food such as potato chips, French fries, and bread may cause health problems. It is recommended to cook these foods at low temperatures and avoid overcooking, heavy crisping, or burning.
CAUTION
Foods that can easily spoil (such as milk, eggs, fish, meat, or poultry) should not stand in the oven for more than 1 hour before cooking begins, and should be removed promptly when cooking is completed. Eating spoiled food can result in sickness from food poisoning.
NOTE
- Pre-heating is recommended for all cooking modes unless otherwise specified in the cooking guide.
- When using Eco Grill, put food in the centre of the accessory tray.
Accessory tips
Your oven comes with a different number or kind of accessories. You may find that some accessories are missing from the table below. However, even if you are not provided with the exact accessories specified in this cooking guide, you can follow along with what you already have, and achieve the same results.
- The Baking tray and the Universal tray are interchangeable.
- When cooking oily foods, it is recommended to put a tray under the Wire rack to collect oil residue. If you are provided with the Wire rack insert, you can use it together with the tray.
- If you are provided with the Universal tray or Extra deep tray, or both, it is better to use whichever is deeper for cooking oily foods
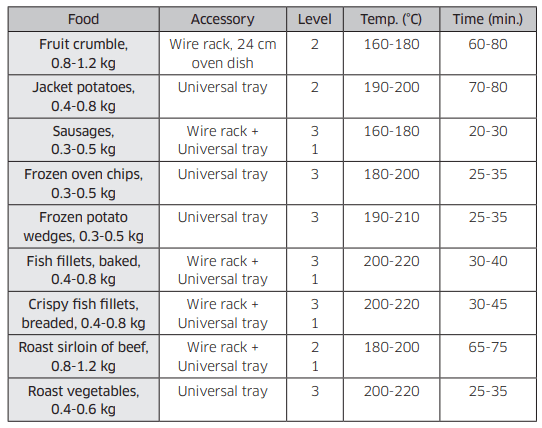
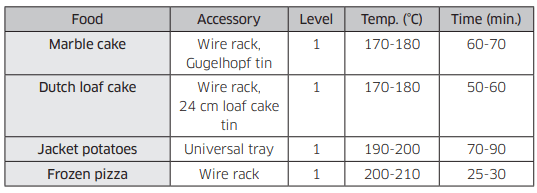
Baking
We recommend to preheat the oven for best results.

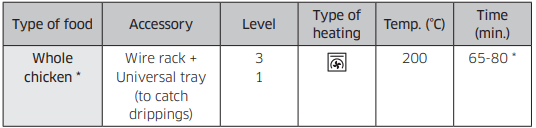
Roasting
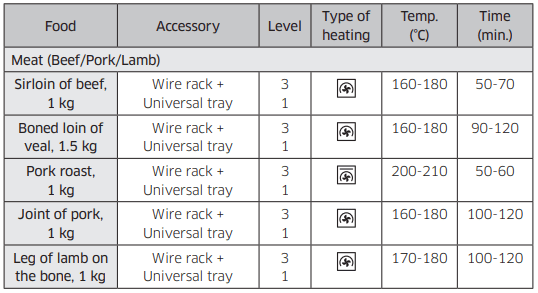
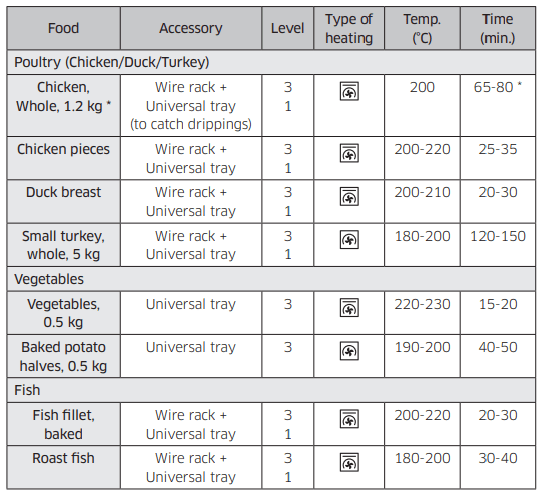
* Turnover after half of time.
Grilling
We recommend preheat the oven using large grill mode. Turn over after half of time.
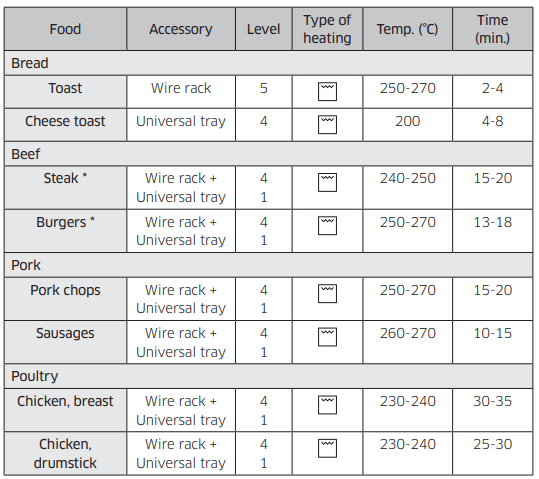
* Turnover after 2/3 of the cooking time
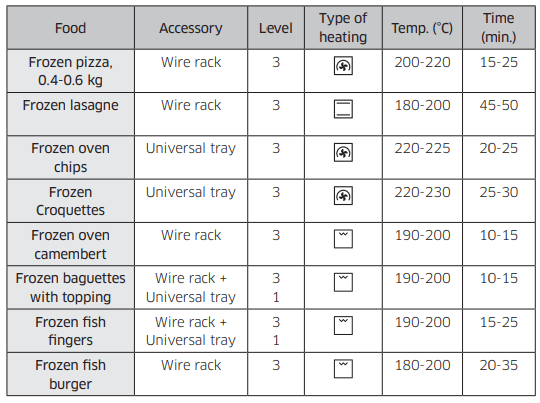
Frozen ready-meal
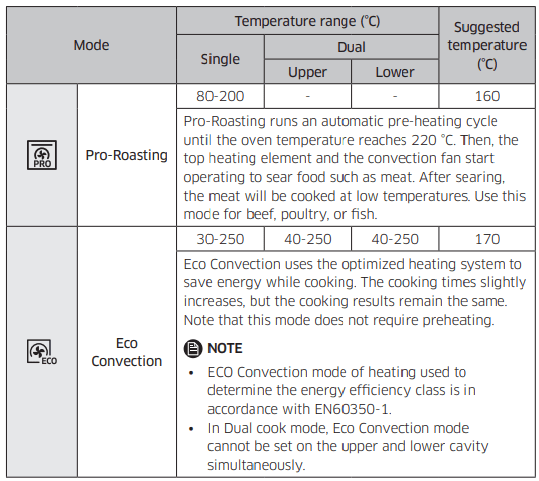
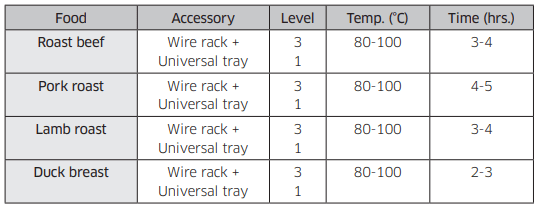
Pro-Roasting
This mode includes an automatic heating-up cycle up to 220 °C. The top heater and the convection fan are operating during the process of searing the meat. After this stage the food is cooked gently by the low temperature of pre-selection. This process is done while the top and the bottom heaters are operating. This mode is suitable for meat roasts and poultry.
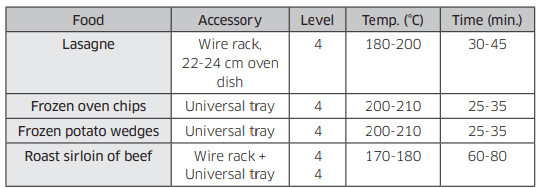
Dual cook
Before using dual cook function insert the divider into the oven. We recommend preheat the oven for best results. The following table presents 5 dual cook guides we recommended for cooking, roasting and baking. Using dual cook function, you will be able to cook your main dish & side dish or main dish & dessert simultaneously.
- Using dual cook function, preheating time can be extended.
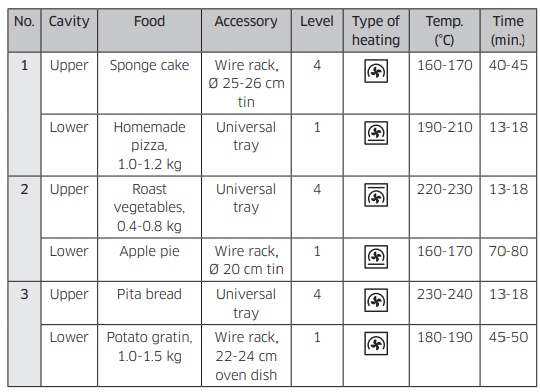
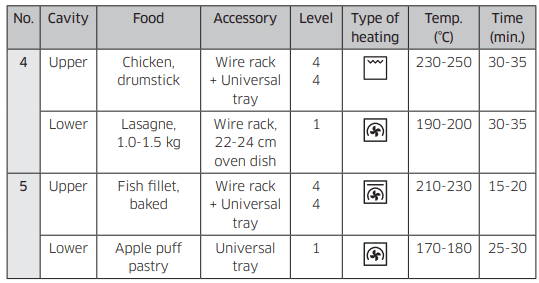
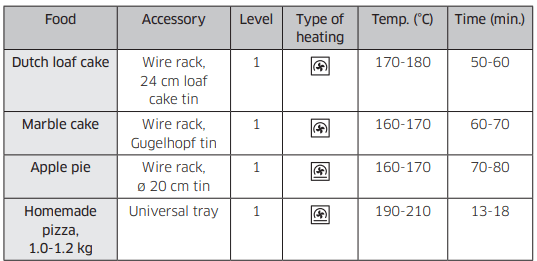
You can also use upper or lower compartment only to save power. The cooking time can be extended when you use separated compartment. We recommend preheat the oven for best results.
Upper
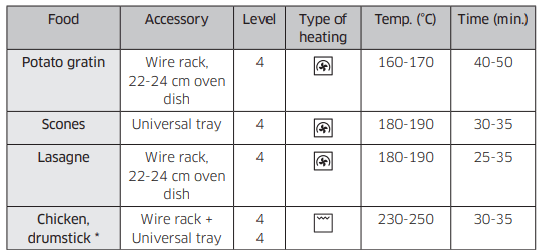
* Do not preheat the oven.
Lower
ECO convection
This mode uses the optimized heating system so that you save the energy during cooking your dishes. The times of this category are suggested to not be preheated before cooking for saving more energy.
Dual cook – eco convection mode
You can alse use eco convection mode at upper or lower compartment to save power. The times of this category are sugessted to not be preheated before cooking for saving more energy.
Upper
Lower
Auto cook programmes
CAUTION
Foods that can easily spoil (such as milk, eggs, fish, meat, or poultry) should not stand in the oven for more than 1 hour before cooking begins, and should be removed promptly when cooking is completed. Eating spoiled food can result in sickness from food poisoning.
Single cook
The following table presents 40 auto programmes for cooking, roasting and baking.
It contains its quantities, weight ranges and appropriate recommendations. Cooking modes and times have been pre-programmed for your convenience. You will find some recipes for the auto programmes in your instruction book. Auto cook programmes 1 to 19, 38 and 39 include preheating and display the preheating progress. Please put the food in the oven after preheating beep. Then, press Cooking time to start Auto Cook.
WARNING
Always use oven gloves while taking out food.

Dual cook
The following table presents 10 auto programmes for cooking, roasting and baking. You can use only upper cavity or lower cavity and use the upper and lower cavity at the same time.
The programme contains its quantities, weight ranges and appropriate recommendations. Cooking modes and times have been pre-programmed for your convenience. You will find some recipes for the auto programmes in your instruction book.
All dual auto cook programmes include preheating and display the preheating progress.
Please put the food in the oven after preheating beep. Then, press Cooking time to start Auto Cook.
WARNING
Always use oven gloves while taking out food.
1. Upper
2. Lower
3. Twin
You can select one auto programme for the lower and upper cavity and cook simultaneously.
CAUTION
When you use either the upper or lower cavity, the fan and the heater of the other cavity may operate for optimal performance. The cavity that is not being used must not be used for any unintended purposes.
Test dishes
According to standard EN 60350-1
1. Baking
The recommendations for baking refer to a preheated oven. Do not use the fast preheat function. Always put trays the slanted side to the door front.
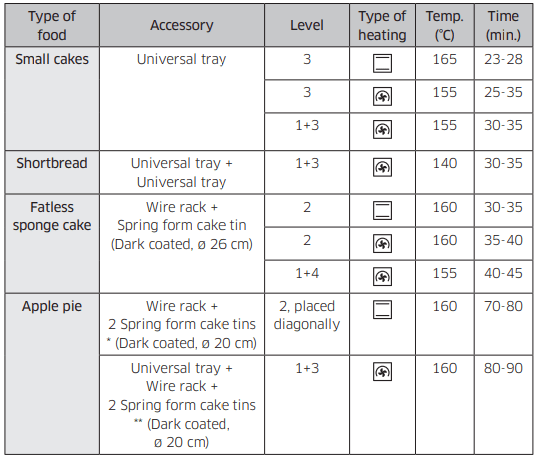
* Two cakes are arranged on the grid at the back left and at the front right.
** Two cakes are arranged in the center on top of each other.
2. Grilling
Preheat the empty oven for 5 minutes using Large Grill function.
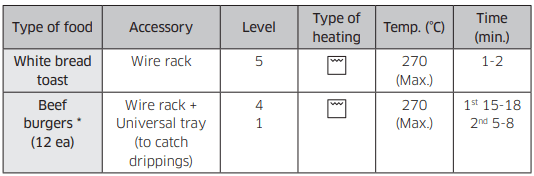
* Turn over after 2/3 of the cooking time.
3. Roasting
* Turnover after half of time.
Collection of frequent auto cook recipes
Potato gratin
Ingredients
- 800 g potatoes, 100 ml milk, 100 ml cream, 50 g beaten whole egg, 1 tbsp each of salt, pepper, nutmeg, 150 g grated cheese, butter, thyme
Directions
- Peel potatoes and slice them to 3 mm thickness. Rub the butter all over the surface of a gratin dish (22-24 cm). Spread the slices on a clean towel and keep them covered with the towel while you prepare the rest of the ingredients. Mix the rest of the ingredients except for grated cheese into a large bowl and stir well. Layer the potato slices in the dish slightly overlapping and pour the mixture over the potatoes. Spread the grated cheese over the top and bake. After cooking, serve sprinkled with a few fresh thyme leaves.
Vegetable gratin
Ingredients
- 800 g vegetables (courgette, tomato, onion, carrot, pepper, pre-cooked potatoes), 150 ml cream, 50 g beaten whole egg, 1 tbsp each of salt, herb (pepper, parsley or rosemary), 150 g grated cheese, 3 tbsp olive oil, some thyme leaves
Directions
- Wash the vegetables and slice them to 3-5 mm thickness. Layer the slices on a gratin dish (22-24 cm) and pour the oil on the vegetables. Mix the rest of the ingredients except for grated cheese and pour on the vegetables. Spread the grated cheese over the top and bake. Then serve sprinkled with a few fresh thyme leaves.
Lasagne
Ingredients
- 2 tbsp olive oil, 500 g minced beef, 500 ml tomato sauce, 100 ml beef stock, 150 g dried lasagne sheets, 1 onion (chopped), 200 g grated cheese, 1 tsp each of dried parsley flakes, oregano, basil
Directions
- Prepare tomato meat sauce. Heat the oil in a frying pan, then cook the minced beef and chopped onion for about 10 min until browned all over. Pour over the tomato sauce and beef stock, add the dried herbs. Bring up to the boil, then simmer for 30 min.
- Cook lasagne noodles according to package directions. Layer the lasagne noodle, meat sauce, and cheese then repeat. Then sprinkle evenly with remaining cheese on the top of layer of noodles and bake.
Apple pie
Ingredients
- Pastry: 275 g flour, 1/2 tbsp salt, 125 g white castor sugar, 8 g vanilla sugar, 175 g cold butter, 1 egg (beaten)
- Filling: 750 g firm whole apples, 1 tbsp lemon juice, 40 g sugar, 1/2 tbsp cinnamon, 50 g seedless raisins, 2 tbsp bread crumbs
Directions
- Sift the flour with the salt above a big bowl. Sift the castor sugar and vanilla sugar with it. Cut with 2 knives the butter through the flour in small cubes. Add 3/4 of the beaten egg. Knead all the ingredients in the food processor until a crumbly mass appears. Form the dough into a ball with your hands. Wrap it in plastic foil and leave it chilled for about 30 min.
- Grease the spring tin (24-26 cm diameter) and dust the surface with flour. Roll out 3/4 of the dough till 5 mm thickness. Put it in the tin (bottom and sides). Peel and core the apples. Cut them in cubes of about 3/4 x 3/4 cm. Sprinkle the apples with lemon juice and mix well. Wash and dry the currants and raisins. Add sugar, cinnamon, raisins and currants. Mix well and sprinkle the bottom of dough with bread crumbs. Press slightly. Roll out the rest of the dough. Cut the dough in small strips and put them cross wise on the filling. Brush the pie evenly with the rest of the beaten egg
Quiche Lorraine
Ingredients
- Pastry: 200 g plain flour, 80 g butter, 1 egg
- Filling: 75 g cubed fatless bacon, 125 ml cream, 125 g crème fraiche, 2 eggs, beaten, 100 g grated cheese from Switzerland, salt and pepper
Directions
- To make the pastry, put the flour, butter and egg in a bowl and mix to a soften pastry and then rest it in the refrigerator for 30 min. Roll out the pastry and placed in the greased ceramic dish for quiche (25 cm diameter). Prick the bottom with a fork. Mix the egg, cream, crème fraiche, cheese, salt and pepper. Pour it on the pastry just before baking.
Fruit crumbles
Ingredients
- Topping: 200 g flour, 100 g butter, 100 g sugar, 2 g salt, 2 g cinnamon powder
- Fruit: 600 g mixed fruits
Directions
- Mix all ingredients until to be crumble for making topping. Spread the mixed fruits into an oven dish and sprinkle the crumble.
Homemade pizza Ingredients
- Pizza dough: 300 g flour, 7 g dried yeast, 1 tbsp olive oil, 200 ml warm water, 1 tbsp sugar and salt
- Topping: 400 g sliced vegetable (aubergine, courgette, onion, tomato), 100 g ham or bacon(chopped), 100 g grated cheese
Directions
- Put the flour, yeast, oil, salt, sugar and warm water in a bowl and mix to a wettish dough. Knead in a mixer or by hand about 5-10 min. Cover with lid and place in oven for 30 min at 35 °C to prove. Roll out the dough on a floured surface into a rectangle shape and put on the tray or pizza pan. Spread the tomato puree on the dough and place ham, mushroom, olive and tomato. Sprinkle evenly with cheese on the top and bake.
Roast sirloin of beef
Ingredients
- 1 kg sirloin of beef joint, 5 g salt, 1 g pepper, 3 g each of rosemary, thyme
Directions
- Season the beef with salt, pepper and rosemary and leave in refrigerator for 1 hour. Put on the Wire rack. Put it in the oven and cook.
Herb roasted lamb chops
Ingredients
1 kg lamb chops (6 pieces), 4 large garlic cloves (pressed), 1 tbsp fresh thyme (crushed), 1 tbsp fresh rosemary(crushed), 2 tbsp salt, 2 tbsp olive oil
Directions
Mix the salt, garlic, herbs and oil and add the lamb. Turn to coat and leave at a room temperature at least 30 min to 1 hour.
Rack of Pork rib
Ingredients
- 2 racks pork spare ribs, 1 tbsp black peppercorns, 3 bay leaves, 1 onion (chopped), 3 garlic cloves (chopped), 85 g brown sugar, 3 tbsp Worcestershire sauce, 2 tbsp Tomato puree, 2 tbsp olive oil
Directions
- Make a barbecue sauce. Heat oil in a sauce pan and add the onion. Cook until softened and add remaining ingredients. Broil and reduce heat and simmer for 30 min until thickened. Marinate the rib with the barbecue sauce at least 30 min to 1 hour.
Cleaning
For easier cleaning, regularly clean the oven.
WARNING
- Make sure the oven and accessories are cool before cleaning.
- Do not use abrasive cleaning agents, hard brushes, scouring pads or cloths, steel wool, knives or any other abrasive materials.
Oven interior
- For cleaning the interior of the oven, use a clean cloth and a mild cleaning agent or warm soapy water.
- Do not hand-clean the door seal.
- To avoid damaging the enamelled oven surfaces, only use standard oven cleaners.
- To remove stubborn soils, use a special oven cleaner.
Oven exterior
For cleaning the exterior of the oven such as the oven door, handle, and display, use a clean cloth and a mild cleaning detergent or warm soapy water, and dry with a kitchen roll or dry towel. Grease and dirt can remain, especially around the handle because of the hot air coming from inside. It is recommended to clean the handle after each use.
Accessories
Wash the accessories after every use, and dry it with a tea towel. To remove stubborn impurities, soak the used accessories in warm soapy water for about 30 minutes before washing.
Catalytic enamel surface (applicable models only)
The removable parts are coated with dark grey catalytic enamel. They can be soiled with oil and fat spattered by the circulating air during convection heating. However, these impurities burn off at oven temperatures of 200 °C or above.
- Remove all accessories from the oven.
- Clean the interior of the oven.
- Select Convection mode with max temperature, and run the cycle for an hour.
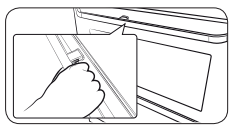
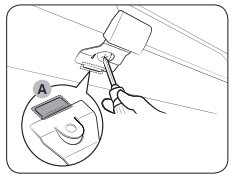
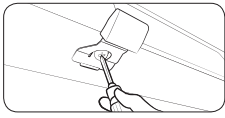
Door
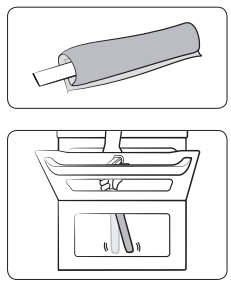
- Tie the wet tissue to stick.
- Put on the towel below door.
- Clean the door.
- Apply detergent to tissue and clean again.
- Wipe the dry tissue to the moisture and bubble.
CAUTION
Do not detach the door for cleaning.
Water collector
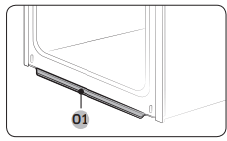
The water collector collects not only excess moisture from cooking but also food residue. Regularly empty and clean the water collector.
WARNING
If you encounter a water leak from the water collector, contact us at a local Samsung service center.
Side racks (applicable models only)
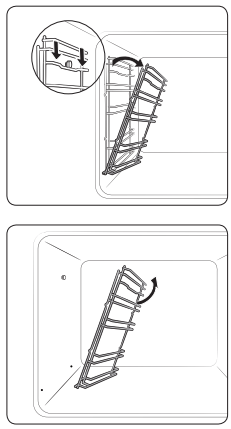
- Press the top line of the left side rack, and lower by approximately 45°.
- Pull and remove the bottom line of the left side rack.
- Remove the right side rack in the same way.
- Clean both side racks.
- When done, follow steps 1 to 2 above in the reverse order to reinsert the side racks.
NOTE
The oven operates without the side racks and racks in position.
Detaching the door
WARNING
The oven door is heavy.
- Open the door and flip open the clips at both hinges.
- Close the door approximately 70°. Hold the oven door by the sides using both hands, and lift and pull upwards until the hinges are removed.
- When done, follow steps 1 to 2 in the reverse order to reinstall the door. Make sure the clips are hinged on both sides.
Replacement
Bulbs
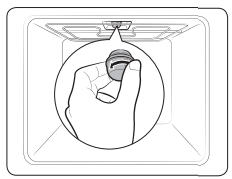
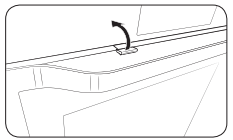
- Remove the glass cap by turning anticlockwise.
- Replace the oven light.
- Clean the glass cap.
- When done, follow step 1 above in the reverse order to reinsert the glass cap.
WARNING
- Before replacing a bulb, turn off the oven and unplug the power cord.
- Use only 25-40 W / 220-240 V, 300 °C heat-resistant bulbs. You can purchase approved bulbs at a local Samsung service center.
- Always use a dry cloth when handling a halogen bulb. This is to prevent the bulb from being tampered with fingerprints or sweat, resulting in a shortened lifecycle.
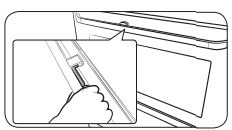
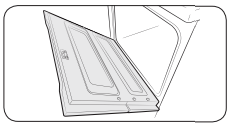
Side oven light
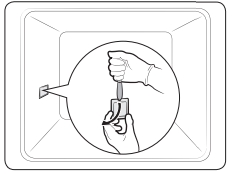
- Hold the lower end of the cover of the side oven light with one hand, and use a flat-sharp tool such as a table knife to remove the cover as shown.
- Replace the side oven light.
- Heinsert the light cover.
Troubleshooting
Checkpoints
If you encounter a problem with the oven, first check the table below and try the suggestions. If the problem continues, contact a local Samsung service centre.
The buttons cannot be pressed properly.
- If there is foreign matter caught between the buttons
- Remove the foreign matter and try again.
- Touch model: if there is moisture on the exterior
- Remove the moisture and try again.
- If the lock function is set
- Check whether the lock function is set.
The time is not displayed.
- If there is no power supplied
- Check whether there is power supplied.
The oven does not work.
- If there is no power supplied
- Check whether there is power supplied.
The oven stops while in operation.
- If it is unplugged from the power socket
The power turns off during operation.
- If continuous cooking takes a long time
- After cooking for a long time, let the oven cool.
- If the cooling fan does not work
- Listen for the sound of the cooling fan.
- If the oven is installed in a place without good ventilation
- Keep the gaps specified in the product installation guide.
- When using several power plugs in the same socket
There is no power to the oven.
- If there is no power supplied
- Check whether there is power supplied.
The oven exterior is too hot during operation.
- If the oven is installed in a place without good ventilation
- Keep the gaps specified in the product installation guide.
The door cannot be opened properly.
- If there is food residue stuck between the door and product interior
- Clean the oven well and then open the door again.
The interior light is dim or does not turn on.
- If the lamp turns on and then off
- The lamp automatically turns off after a certain amount of time to save power. You can turn it on again by pressing the oven light button.
- If the lamp is covered by foreign matter during cooking
- Clean the inside of the oven and then check.
Electric shock occurs on the oven.
- If the power is not properly grounded
- If you are using a socket without grounding
- Check whether the power supply is properly grounded.
There is water dripping.
There is steam through a crack in the door.
There is water remaining in the oven.
- There may be water or steam in some cases depending on the food. This is not a product malfunction.
- Let the oven cool and then wipe with a dry dish towel.
The brightness inside the oven varies.
- The brightness changes depending on power output changes.
- Power output changes during cooking are not malfunctions, so there is no need to worry.
Cooking is finished, but the cooling fan is still running.
- The fan automatically runs for a certain amount of time to ventilate inside the oven.
- This is not a product malfunction, so there is no need to worry.
The oven does not heat.
- If the door is open
- Close the door and restart.
- If oven controls are not correctly set
- Refer to the chapter on oven operation and reset the oven.
- If the household fuse has been blown or the circuit breaker has been tripped.
- Replace the fuse or reset the circuit. If it happens repeatedly, call an electrician.
Smoke comes out during operation.
- During initial operation
- Smoke may come from the heater when you first use the oven. This is not a malfunction, and if you run the oven 2-3 times, it should stop happening.
- If there is food on the heater
- Let the oven cool sufficiently and remove the food from the heater.
There is a burning or plastic smell when using the oven.
- If using plastic or other containers that are not heat-resistant
- Use glass containers suitable for hot temperatures.
The oven does not cook properly.
- If the door is often opened during cooking
- Do not frequently open the door unless you are cooking things that need to be turned. If you frequently open the door, the interior temperature will be lower and this may affect the results of your cooking.
The oven is warm during pyro cleaning.
- This is because pyro cleaning uses high temperatures.
- This is not a product malfunction, so there is no need to worry.
There is a burning smell during pyro cleaning.
- Pyro cleaning uses high temperatures, so you may smell food residue burning.
- This is not a product malfunction, so there is no need to worry.
Steam cleaning does not work.
- This is because the temperature is too high.
- Let the oven cool and then use.
Dual cook mode does not work.
- If the divider is not properly assembled
- Insert the divider correctly and use.
Single cook mode does not work.
- If the divider is inserted in the oven.
- Take out the divider and use.
The fan of the cavity, that is not being used in Dual cook, is operating (or the temperature of the cavity is hot).
- For the best cooking performance and results, fan and the heater of the cavity that is not being used may operate.
- This is not a product malfunction, so there is no need to worry.
Information codes
If the oven fails to operate, you may see an information code on the display. Check the table below and try the suggestions.
C-d1
C-20
C-21
C-22
C-F1
- Only occurs during EEPROM Read/ Write
C-F0
- If there is no communication between the main PCB and sub PCB
- Turn off the oven and then restart. If the problem continues, turn off all power for 30 seconds or more and then reconnect. If the problem is not fixed, please contact a service centre.
C-F2
- Occurs when a communication problem is maintained between the Touch IC Main or Sub micom
- Turn off the oven and then restart. If the problem continues, turn off all power for 30 seconds or more and then reconnect. If the problem is not fixed, please contact a service centre.
C-d0
- Button problem Occurs when a button is pressed and held for a period of time.
- Clean the buttons and make sure there is no water on/ around them. Turn off the oven and try again. If the problem continues, contact a local Samsung service centre.
-dC-
- If the divider is removed during cooking in Dual cook mode. If the divider is inserted during cooking in Single cook mode.
- The divider must not be removed during cooking in Dual cook mode. Turn off the oven and then restart. If the problem continues, turn off all power for 30 seconds or more and then reconnect. If the problem is not fixed, please contact a service centre.
S-01
- Safety shutoff Oven has continued operating at a set temperature for an extended time.
Under 105 °C - 16 hours
From 105 °C to 240 °C - 8 hours
From 245 °C to Max - 4 hours
- This is not system failure. Turn off the oven and remove food. Thenm try again normally
Technical specifications
SAMSUNG strives to improve its products at all times. Both the design specifications and these user instructions are thus subject to change without notice.