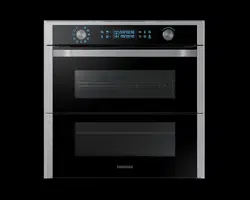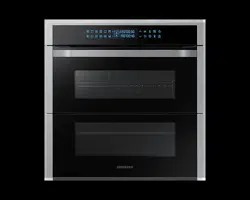

Built-in Oven
User & installation manual
NV75R7676RS / NV75R7676RB
NV75R7676RB_EU_DG68-01054H-00_EN.indd 1 4/17/2019 5:23:53 PM

2 English
Contents
ContentsContents
Using this manual 3
The following symbols are used in this User Manual: 3
Safety instructions 3
Important safety precautions 3
Correct Disposal of This Product (Waste Electrical & Electronic Equipment) 6
Auto energy saving function 6
Installation 7
What’s included 7
Prepare to install the oven 8
Power connection 8
Cabinet mount 8
Before you start 10
Initial settings 10
New oven smell 11
Smart safety mechanism 11
Accessories 11
Flexible Door 13
Mechanical lock (applicable models only) 14
Dual cook mode 14
Operations 15
Control panel 15
Common settings 16
Cooking modes 19
Dual cook mode temperature setting range 22
To stop cooking 23
Special function 23
Auto cook 24
Steam cleaning 25
Pyro cleaning 25
Timer 26
Sound on/off 26
Cooking smart 27
Manual cooking 27
Auto cook programmes 33
Test dishes 39
Collection of frequent auto cook recipes 40
Maintenance 43
Cleaning 43
Detaching the door 45
Replacement 46
Troubleshooting 46
Checkpoints 46
Information codes 48
Technical specications 49
Appendix 50
Product data sheet 50
NV75R7676RB_EU_DG68-01054H-00_EN.indd 2 4/17/2019 5:23:53 PM

English 3
Using this manual
Safety instructions
Thank you for choosing SAMSUNG Built-In Oven.
This User Manual contains important information on safety and instructions
intended to assist you in the operation and maintenance of your appliance.
Please take the time to read this User Manual before using your oven and keep
this book for future reference.
The following symbols are used in this User Manual:
WARNING
Hazards or unsafe practices that may result in severe personal injury, death and/
or property damage.
CAUTION
Hazards or unsafe practices that may result in personal injury and/or property
damage.
NOTE
Useful tips, recommendations, or information that helps users manipulate the
product.
Installation of this oven must be performed only by a licensed electrician. The
installer is responsible for connecting the appliance to the mains power supply in
observance of the relevant safety recommendations.
Important safety precautions
WARNING
This appliance is not intended for use by persons (including
children) with reduced physical, sensory or mental capabilities,
or lack of experience and knowledge, unless they have
been given supervision or instruction concerning use of the
appliance by a person responsible for their safety.
Children should be supervised to ensure that they do not play
with the appliance.
The means for disconnection must be incorporated in the xed
wiring in accordance with the wiring rules.
This Appliance should be allowed to disconnection from the
supply after installation. The disconnection may be achieved by
having the plug accessible or by incorporating a switch in the
xed wiring in accordance with the wiring rules.
Using this manual
NV75R7676RB_EU_DG68-01054H-00_EN.indd 3 4/17/2019 5:23:54 PM

4 English
Safety instructions
Safety instructions
Do not use harsh abrasive cleaners or sharp metal scrapers to
clean the oven door glass since they can scratch the surface,
which may result in shattering of the glass.
If this appliance has cleaning function, excess spillage must be
removed before cleaning and all utensils should not be left in
the oven during steam cleaning or self cleaning. The cleaning
function depends on the model.
If this appliance has cleaning function, during cleaning
conditions the surfaces may get hotter than usual and children
should be kept away. The cleaning function depends on the
model.
Only use the temperature probe recommended for this oven.
(Meat probe model only)
A steam cleaner is not to be used.
WARNING: Ensure that the appliance is switched off before
replacing the lamp to avoid the possibility of electric shock.
The appliance must not be installed behind a decorative door in
order to avoid overheating.
If the supply cord is damaged, it must be replaced by the
manufacturer, its service agent or similarly qualied persons in
order to avoid a hazard.
The method of xing stated is not to depend on the use of
adhesives since they are not considered to be a reliable xing
means.
This appliance can be used by children aged from 8 years and
above and persons with reduced physical, sensory or mental
capabilities or lack of experience and knowledge if they have
been given supervision or instruction concerning use of the
appliance in a safe way and understand the hazards involved.
Children shall not play with the appliance. Cleaning and user
maintenance shall not be made by children without supervision.
Keep the appliance and its cord out of reach of children less
than 8 years.
During use the appliance becomes hot. Care should be taken to
avoid touching heating elements inside the oven.
WARNING: Accessible parts may become hot during use. Young
children should be kept away.
NV75R7676RB_EU_DG68-01054H-00_EN.indd 4 4/17/2019 5:23:54 PM
English 5
Safety instructions
Repairs should be performed by a licensed technician only. Improper repair may
result in considerable danger to you and others. If your oven needs repair, contact
a SAMSUNG Service center or your dealer.
Electrical leads and cables should not be allowed to touch the oven.
The oven should be connected to the mains power supply by means of an
approved circuit breaker or fuse. Never use multiple plug adapters or extension
leads.
The power supply of the appliance should be turned off when it is being repaired
or cleaned.
Take care when connecting electrical appliances to sockets near the oven.
If this appliance has a vapour or steam cooking function, do not operate this
appliance when the water supply cartridge is damaged. (Vapour or steam function
model only)
When the cartridge is cracked or broken, do not use it and contact your nearest
service center. (Vapour or steam function model only)
This oven has been designed only for the cooking of household foods.
During use, the oven interior surfaces become hot enough to cause burns. Do not
touch heating elements or interior surfaces of the oven until they have had time to
cool.
Never store ammable materials in the oven.
The oven surfaces become hot when the appliance is operated at a high
temperature for an extended period of time.
When cooking, take care when opening the oven door as hot air and steam can
escape rapidly.
When cooking dishes that contain alcohol, the alcohol may evaporate due to the
high temperatures and the Vapour can catch re if it comes into contact with a hot
part of the oven.
WARNING: The appliance and its accessible parts become hot
during use. Care should be taken to avoid touching heating
elements. Children less than 8 years of age shall be kept away
unless continuously supervised.
CAUTION: The cooking process has to be supervised. A short
term cooking process has to be supervised continuously.
The door or the outer surface may get hot when the appliance
is operating.
The temperature of accessible surfaces may be high when the
appliance is operating. The surfaces are liable to get hot during
use.
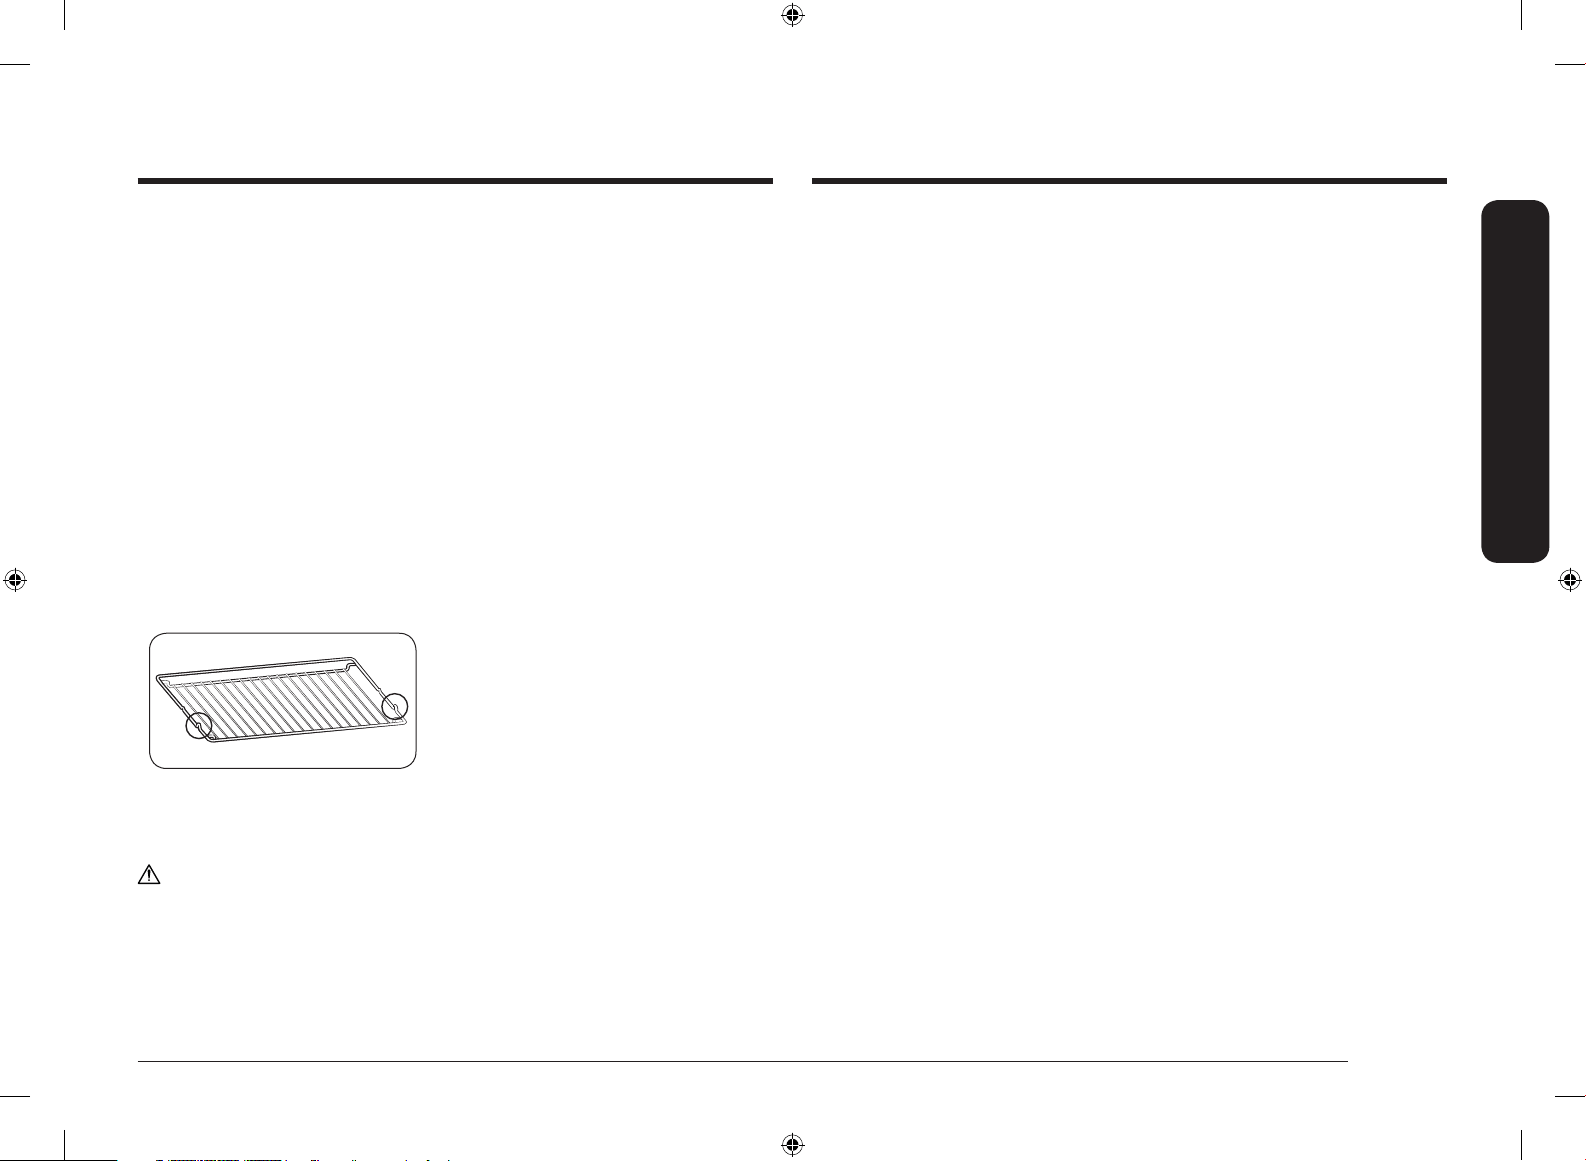
Insert the wire rack into position
with the protruding parts
(stoppers on both sides) towards
the front so that the wire rack
supports the rest position for
large loads.
CAUTION
If the oven has been damaged in transport, do not connect it.
This appliance must be connected to the mains power supply only by a specially
licensed electrician.
In the event of a fault or damage to the appliance, do not attempt to operate it.
NV75R7676RB_EU_DG68-01054H-00_EN.indd 5 4/17/2019 5:23:54 PM
6 English
Safety instructions
Safety instructions
For your safety, do not use high-pressure water cleaners or steam jet cleaners.
Children should be kept at a safe distance when the oven is in use.
Frozen foods such as pizzas should be cooked on the big grid. If the baking tray is
used, it may become deformed due to the great variation in temperatures.
Do not pour water into the bottom of the oven when it is hot. This could cause
damage to the enamel surface.
The oven door must be closed during cooking.
Do not line the bottom of the oven with aluminum foil and do not place any baking
trays or tins on it. The aluminum foil blocks the heat, which may result in damage
to the enamel surfaces and cause poor cooking results.
Fruit juices will leave stains, which can become permanent on the enamel surfaces
of the oven.
When cooking very moist cakes, use the deep pan.
Do not rest bakeware on the open oven door.
Keep children away from the door when opening or closing it as they may bump
themselves on the door or catch their ngers in the door.
Do not step, lean, sit or place heavy items on the door.
Do not open the door with unnecessarily strong force.
WARNING: Do not disconnect the appliance from the main power supply even after
the cooking process is completed.
WARNING: Do not leave the door open while oven is cooking.
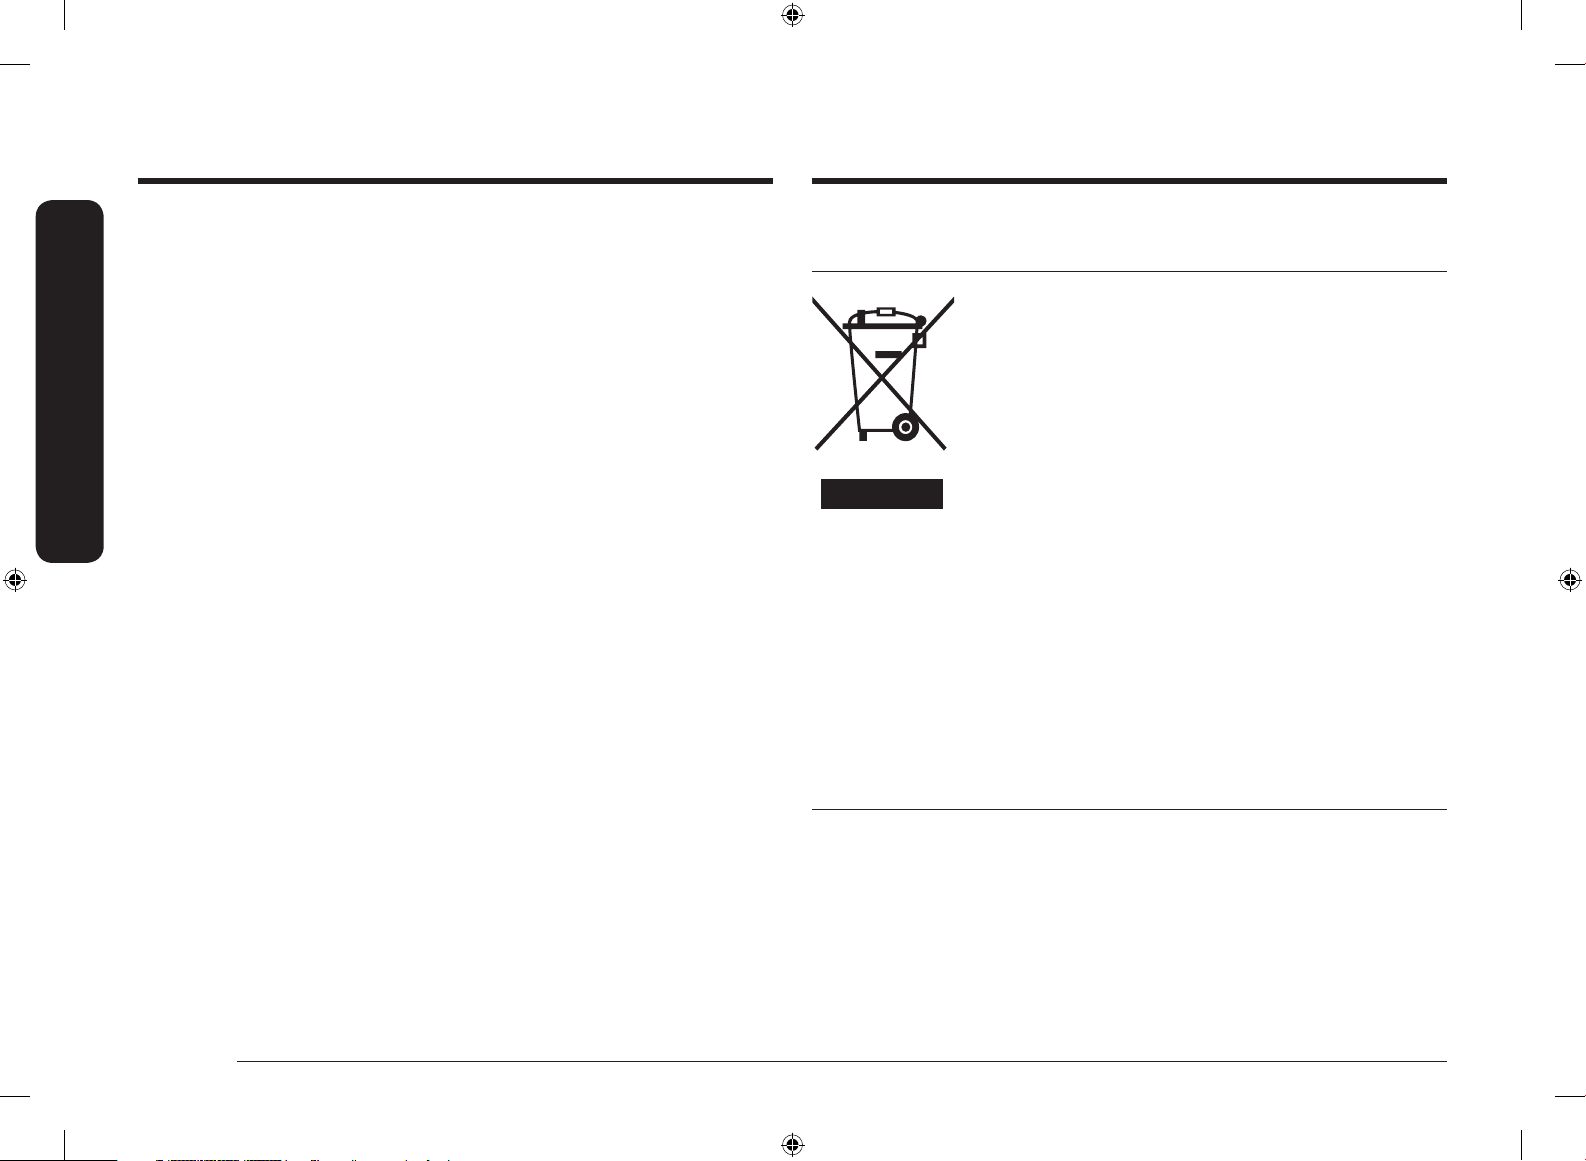
Correct Disposal of This Product (Waste Electrical & Electronic
Equipment)
(Applicable in countries with separate collection systems)
This marking on the product, accessories or literature
indicates that the product and its electronic accessories
(e.g. charger, headset, USB cable) should not be disposed
of with other household waste at the end of their working
life. To prevent possible harm to the environment or human
health from uncontrolled waste disposal, please separate
these items from other types of waste and recycle them
responsibly to promote the sustainable reuse of material
resources.
Household users should contact either the retailer where
they purchased this product, or their local government
ofce, for details of where and how they can take these
items for environmentally safe recycling.
Business users should contact their supplier and check the
terms and conditions of the purchase contract. This product
and its electronic accessories should not be mixed with
other commercial wastes for disposal.
For information on Samsung’s environmental commitments and product-specic
regulatory obligations, e.g. REACH, WEEE, Batteries, visit : samsung.com/uk/
aboutsamsung/samsungelectronics/corporatecitizenship/data_corner.html
Auto energy saving function
• If no user input is made for a certain time while the appliance is operating, the
appliance stops operation and goes to Standby state.
• Light : During cooking process, you can switch off Oven lamp by pressing
‘Oven light’ button. For energy saving, the oven lighting is switched off a few
minutes after cooking program has started.
NV75R7676RB_EU_DG68-01054H-00_EN.indd 6 4/17/2019 5:23:55 PM

English 7
Installation
Installation
WARNING
This oven must be installed by a qualied technician. The installer is responsible
for connecting the oven to the main power, while observing the relevant safety
regulations of your area.
What’s included
Make sure all parts and accessories are included in the product package. If you
have a problem with the oven or accessories, contact a local Samsung customer
centre or the retailer.
Oven at a glance
01
02
04
03
01 Control panel 02 Door handle 03 Up door
04 Main door
Accessories
The oven comes with different accessories that help you prepare different types of
food.
Wire rack Wire rack insert * Baking tray *
Universal tray * Extra-deep tray * Rotisserie spit *
Rotisserie spit and Shashlik *
Telescopic rail * Divider
Meat probe * 2 screws (M4 L25) Install Handle
NOTE
Availability of accessories with an asterisk (*) depends on the oven model.
NV75R7676RB_EU_DG68-01054H-00_EN.indd 7 4/17/2019 5:24:00 PM

8 English
Installation
Installation
Prepare to install the oven
Phillips Screwdriver Drill
Power connection
01 02 03
L N
01 BROWN or BLACK
02 BLUE or WHITE
03 YELLOW and GREEN
Plug the oven into an electrical socket. If
a plug-type socket is not available due to
allowable current limitations, use a multi-
pole isolator switch (with at least 3 mm
spacing in-between) in order to meet safety
regulations. Use a power cord of sufcient
length that supports the specication H05
RR-F or H05 VV-F, min. 1.5-2.5 mm².
Rated current(A) Minimum cross-sectional area
10 < A ≤ 16 1.5 mm
2
16 < A ≤ 25 2.5 mm
2
Check the output specications on the label attached to the oven.
Open the rear cover of the oven using a screwdriver, and remove the screws on
the cord clamp. Then, connect the power lines to the relevant connection terminals.
The ( )-terminal is designed for earthgrounding. First connect the yellow
and green lines (earthgrounding), which must be longer than the others. If
you use a plug-type socket, the plug must remain accessible after the oven is
installed. Samsung is not responsible for accidents caused by missing or faulty
earthgrounding.
WARNING
Do not step on or twist the wires during installation, and keep them away from
heat-emitting parts of the oven.
Cabinet mount
If installing the oven in a built-in cabinet, the cabinet must have its plastic surfaces
and adhesive parts resistant up to 90 °C. Samsung is not responsible for damage to
furniture from the oven’s heat emission.
The oven must be properly ventilated. For ventilation, leave a gap of about 50 mm
between the lower shelf of the cabinet and the supporting wall. If you install the
oven under a cooktop, follow the cooktop’s installation instructions.
Required Dimensions for Installation
D
E
C
B
A
L
K
J
I
F
H
G
Oven (mm)
A 560 G Max. 506
B 175 H Max. 494
C 370 I 21
D Max. 50 J 549
E 595 K 572
F 595 L 550
NV75R7676RB_EU_DG68-01054H-00_EN.indd 8 4/17/2019 5:24:01 PM

English 9
Installation
D
C
B
A
E
Built-in cabinet (mm)
A Min. 550
B Min. 560
C Min. 50
D Min. 590 - Max. 600
E Min. 460 x Min. 50
NOTE
The built-in cabinet must have vents (E) to
ventilate heat and circulate the air.
D
C
B
A
Under-sink cabinet (mm)
A Min. 550
B Min. 560
C Min. 600
D Min. 460 x Min. 50
NOTE
The built-in cabinet must have vents (D) to
ventilate heat and circulate the air.
Mounting the oven
A
Make sure to leave a gap (A) of at least
5 mm between the oven and each side of
the cabinet.
B
Secure at least 3 mm of gap (B) so that the
door opens and closes smoothly.
Fit the oven into the cabinet and x the
oven rmly on both sides using 2 screws.
NV75R7676RB_EU_DG68-01054H-00_EN.indd 9 4/17/2019 5:24:02 PM

10 English
Before you start
Installation
After installation is complete, remove the protective lm, tape, and other packing
material, and take out the provided accessories from inside the oven. To remove
the oven from the cabinet, rst disconnect power to the oven and remove
2 screws on both sides of the oven.
WARNING
The oven requires ventilation for normal operation. Do not block the vents under
any circumstance.
NOTE
The actual appearance of the oven may differ with the model.
Before you start
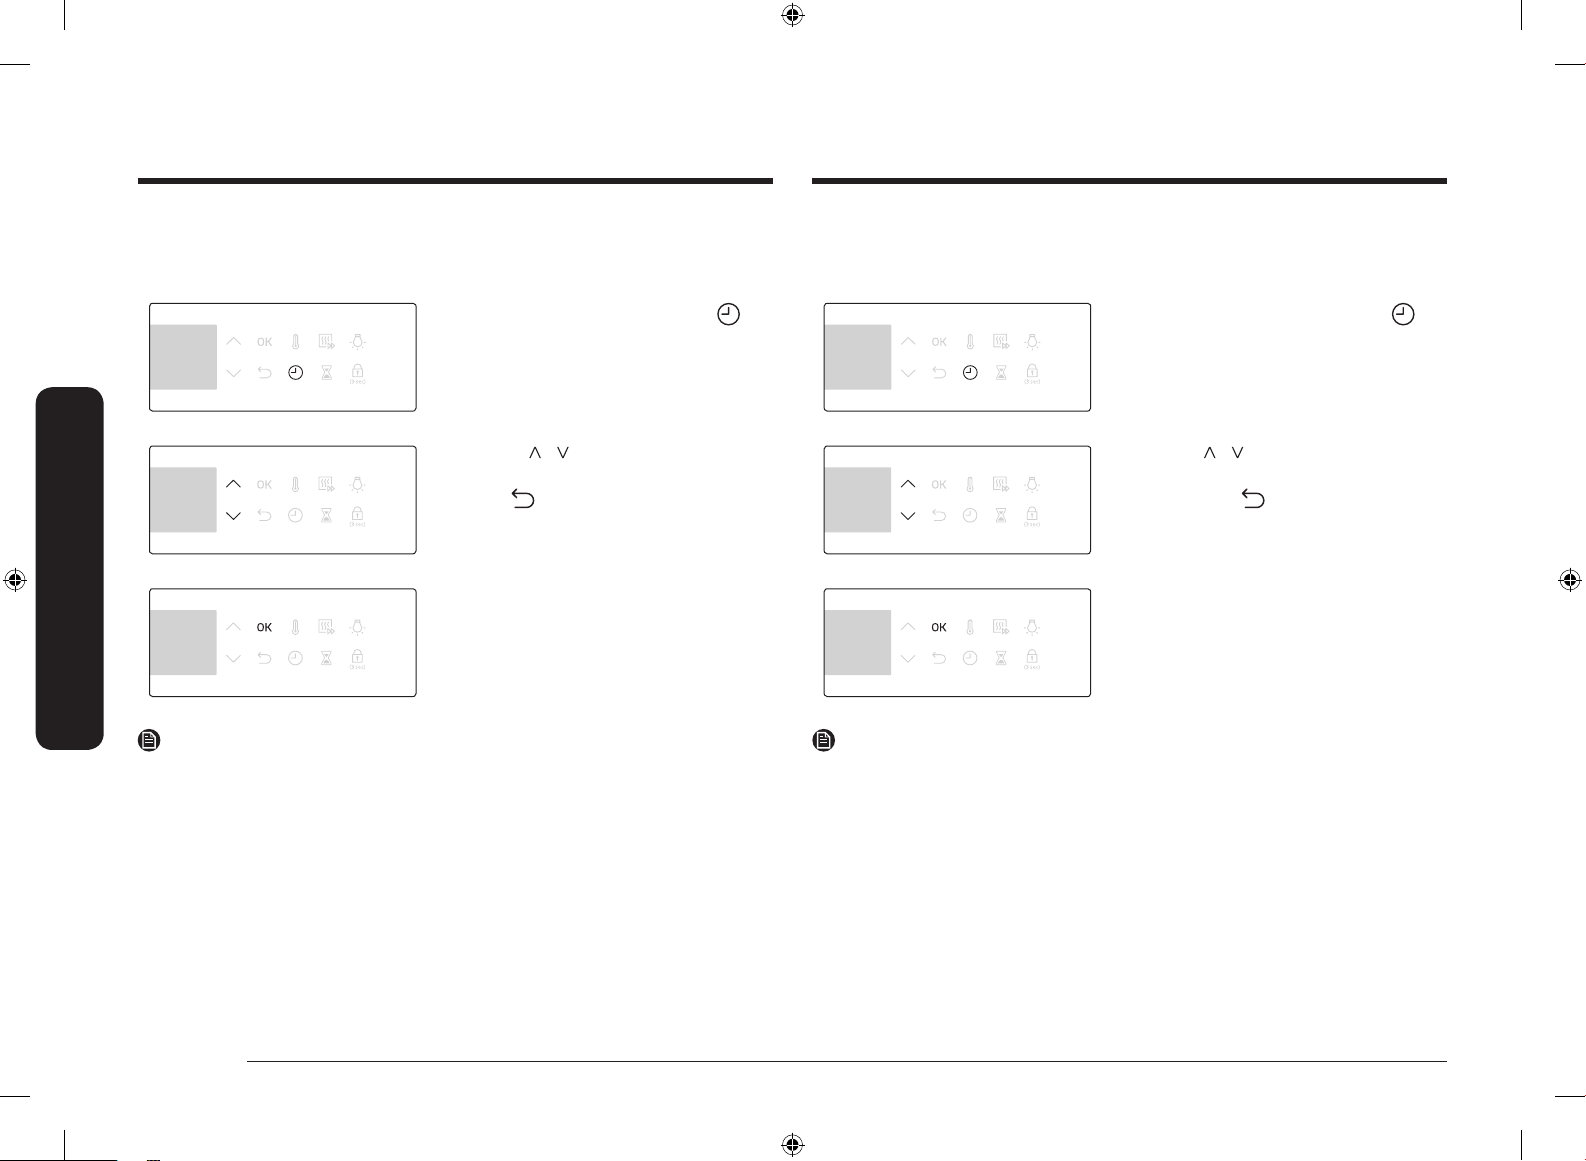
Initial settings
When you power on the oven for the rst time, the default time of “12:00” appears
on the display where the hour element (“12”) blinks. Follow the steps below to set
the current time.
1. Use the / buttons to set the hour,
and then press OK. The minute element
blinks.
2. Use the / buttons to set the minute,
and then press OK.
To change the current time after this initial
setting, hold down the for 3 seconds and
follow the above steps.
NV75R7676RB_EU_DG68-01054H-00_EN.indd 10 4/17/2019 5:24:03 PM

English 11
Before you start
New oven smell
Before using the oven for the rst time, clean inside the oven to remove the new
oven smell.
1. Remove all accessories from inside the oven.
2. Run the oven with Convection 200 °C or Conventional 200 °C for an hour. This
will burn any remaining production substances in the oven.
3. When complete, turn off the oven.
Smart safety mechanism
If you open the door while the oven is operating, the oven light turns on and
both the fan and the heating elements stop operation. This is to prevent physical
injuries such as burns as well as to prevent unnecessary energy loss. When this
happens, simply close the door and the oven continues to operate normally
because this is not a system failure.
Accessories
For rst time use, clean the accessories thoroughly with warm water, detergent
and a soft clean cloth.
05
04
03
02
01
01 Level 1 02 Level 2
03 Level 3 04 Level 4
05 Level 5
• Insert the accessory to the correct
position inside of the oven.
• Allow at least a 1 cm space from the
accessory and the bottom of the oven,
and from any other accessory.
• Take caution in removing cookware
and/or accessories out of the oven. Hot
meals or accessories can cause burns.
• The accessories may be deformed while
they are gaining heat. Once they have
cooled down, they will recover their
original appearance and performance.
Basic use
For better cooking experience, familiarise yourself with how to use each accessory.
Wire rack The wire rack is designed for grilling and roasting. Insert the
wire rack into position with the protruding parts (stoppers
on both sides) towards the front.
Wire rack insert * The wire rack insert is used with the tray, and prevents
liquid from dropping onto the bottom of the oven.
Baking tray * The baking tray (depth: 20 mm) is used to bake cakes,
cookies, and other pastries. Put the slanted side to the front.
Universal tray * The universal tray (depth : 30 mm) is used for cooking and
roasting. Use the wire-tray insert to prevent liquid from
dropping onto the bottom of the oven.
Put the slanted side to the front.
Extra-deep tray * The extra-deep tray (depth: 50 mm) is used for roasting with
or without the wire-tray insert. Put the slanted side to the
front.
NV75R7676RB_EU_DG68-01054H-00_EN.indd 11 4/17/2019 5:24:04 PM
12 English
Before you start
Before you start
Rotisserie spit * The rotisserie spit is used for grilling food such as chicken.
Use the rotisserie spit only in Single mode at level 4 where
the spit adapter is available. Unscrew the spit handle to
remove while grilling.
Rotisserie spit
and Shashlik *
Put the tray at rack position 1 to collect cooking juices, or
on the bottom of the oven for a large serving of meat. It is
recommended to use the spit accessories for meat under
1.5 kg.
1. Insert the spit into the meat. To help insert the spit,
screw the spit handle toward the blunt end.
2. Put parboiled potatoes and vegetables around the meat.
3. Put the cradle at the middle tray position with the “V”
shape to the front. Rest the spit onto the cradle with
the pointed end backward and gently push until the tip
of the spit enters the turning mechanism at the back of
the oven. The blunt end of the spit must rest on the “V”
shape. (The spit has two lugs which should be nearest
to the oven door so to stop the spit going forward, the
lugs also act as a grip for the handle.)
4. Unscrew the handle before cooking.
5. After cooking, screw the handle back to help remove
the spit from the cradle.
Telescopic rails * Use the telescopic rail plate to insert the tray as follows:
1. Stretch the rail plate out from the oven.
2. Put the tray on the rail plate and slide the rail plate into
the oven.
3. Close the oven door.
Divider The divider is designed to separate the oven in two zones.
Use the divider with Dual cook mode.
Meat probe *
The meat probe measures the internal temperature of the
meat to cook. Use only the meat probe that comes with your
oven.
WARNING
• Make sure that the rotisserie handle is seated properly.
• Be careful when using the rotisserie. The forks and pins are pointed and sharp,
which can cause physical injury!
• To prevent burns, use gloves to remove the rotisserie because it is very hot.
NOTE
Availability of accessories with an asterisk (*) depends on the oven model.
NV75R7676RB_EU_DG68-01054H-00_EN.indd 12 4/17/2019 5:24:04 PM

English 13
Before you start
Flexible Door
This oven has a unique Flexible Door that is hinged in the middle, so you only
need to open the top half to access the upper zone. When you’re using the Dual
Cook capability, you can access the top oven space much more easily and with
greater energy efciency.
How to use the upper door
1. Completely press the handle lever.
2. Pull the handle.
3. This will open only the upper door as
shown.
How to use the full door
1. Hold the lever-less area of the handle,
and then pull.
2. This will open the whole door as shown.
CAUTION
When opening the whole door, make sure to
grasp the handle by the lever-less portion.
If the lever is pressed halfway through
opening the door, the upper door may open,
causing physical injury.
NOTE
• Do not put heavy objects on, or apply excessive force, to the upper door.
• Do not let children play with or on the upper door.
NV75R7676RB_EU_DG68-01054H-00_EN.indd 13 4/17/2019 5:24:05 PM

14 English
Before you start
Before you start
Mechanical lock (applicable models only)
Installation
A
1. Insert the thin part (A) of the
mechanical lock into the corresponding
slot of the lock handle as shown.
2. Tighten the screw on the lock handle.
Uninstallation
• Loosen and remove the screw from the
lock handle.
Lock/unlock
• To open the door, slightly lift up the
lock handle to unlock the door. Then,
open the door.
• To lock the door, simply close the door.
The mechanical lock automatically locks
the door.
Dual cook mode
You can use both the upper and lower zones to cook two different recipes, or
simply choose one zone to cook with.
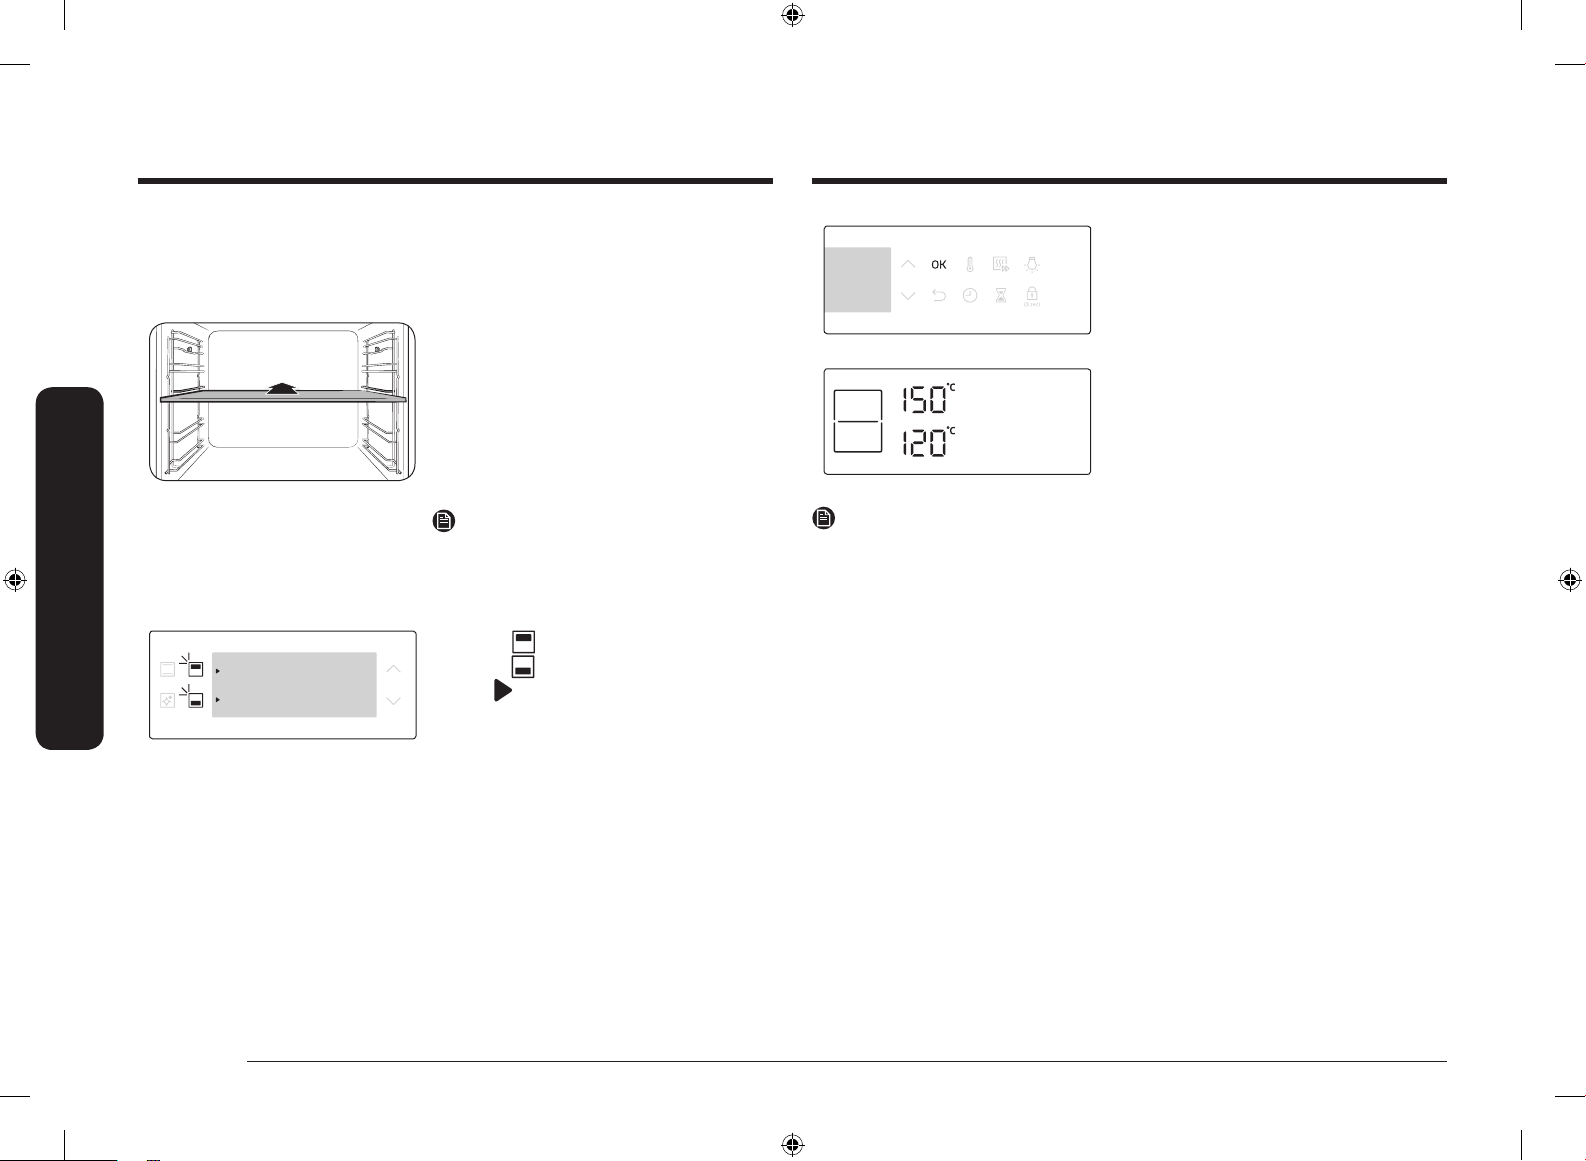
Insert the divider in level 3 to separate the
cooking chamber in two zones. The oven
senses the divider and activates the upper
zone by default.
NOTE
Availability of Dual cook mode depends on
the recipe. For more information, see the
Cooking smart section in this manual.
NV75R7676RB_EU_DG68-01054H-00_EN.indd 14 4/17/2019 5:24:06 PM
English 15
Operations
11 Timer Timer helps you check the time or operating duration
while cooking.
12 Oven light Press to turn the internal light on or off. The oven light
turns on automatically when the door is open or when the
oven operation starts. And it turns off automatically after
a certain period of inactivity in order to save power.
13 Child lock To prevent accidents, Child Lock disables all controls
except for the Power button.
Hold down for 3 seconds to activate, or hold down for 3
seconds again to deactivate the lock on the control panel.
NOTE
Tapping on the display while wearing plastic or oven gloves may not operate
properly.
Operations
Control panel
The front panel comes in a wide range of materials and colours. For improved
quality, the actual appearance of the oven is subject to change without notice.
01 02 0403
05
07
06
09
08
11
10
13
12
01 Power Press to turn the oven on. To turn it off, hold down for 1
seconds.
02 Feature panel Press to select a desired cooking mode or function.
03 Upper/Lower
zone
The indicators turn on when the divider is inserted. You
can choose Upper or Lower for your recipe.
04 Display Shows necessary information of selected modes or
settings.
05 Up / Down Use to adjust the setting value for your selection.
06 OK Press to conrm your settings.
07 Back Cancel current settings, and return to the main screen.
08 Temperature Use to set the temperature.
09 Cooking time Press to set the cooking time.
10 Fast preheat Fast Preheat heats the oven fast to a set temperature.
• Press to toggle on or off the Fast Preheat option.
• Disabled for temperatures set at less than 100 °C.
• Fast preheat is available only with applicable cooking
modes and temperature ranges.
NV75R7676RB_EU_DG68-01054H-00_EN.indd 15 4/17/2019 5:24:06 PM
16 English
Operations
Operations
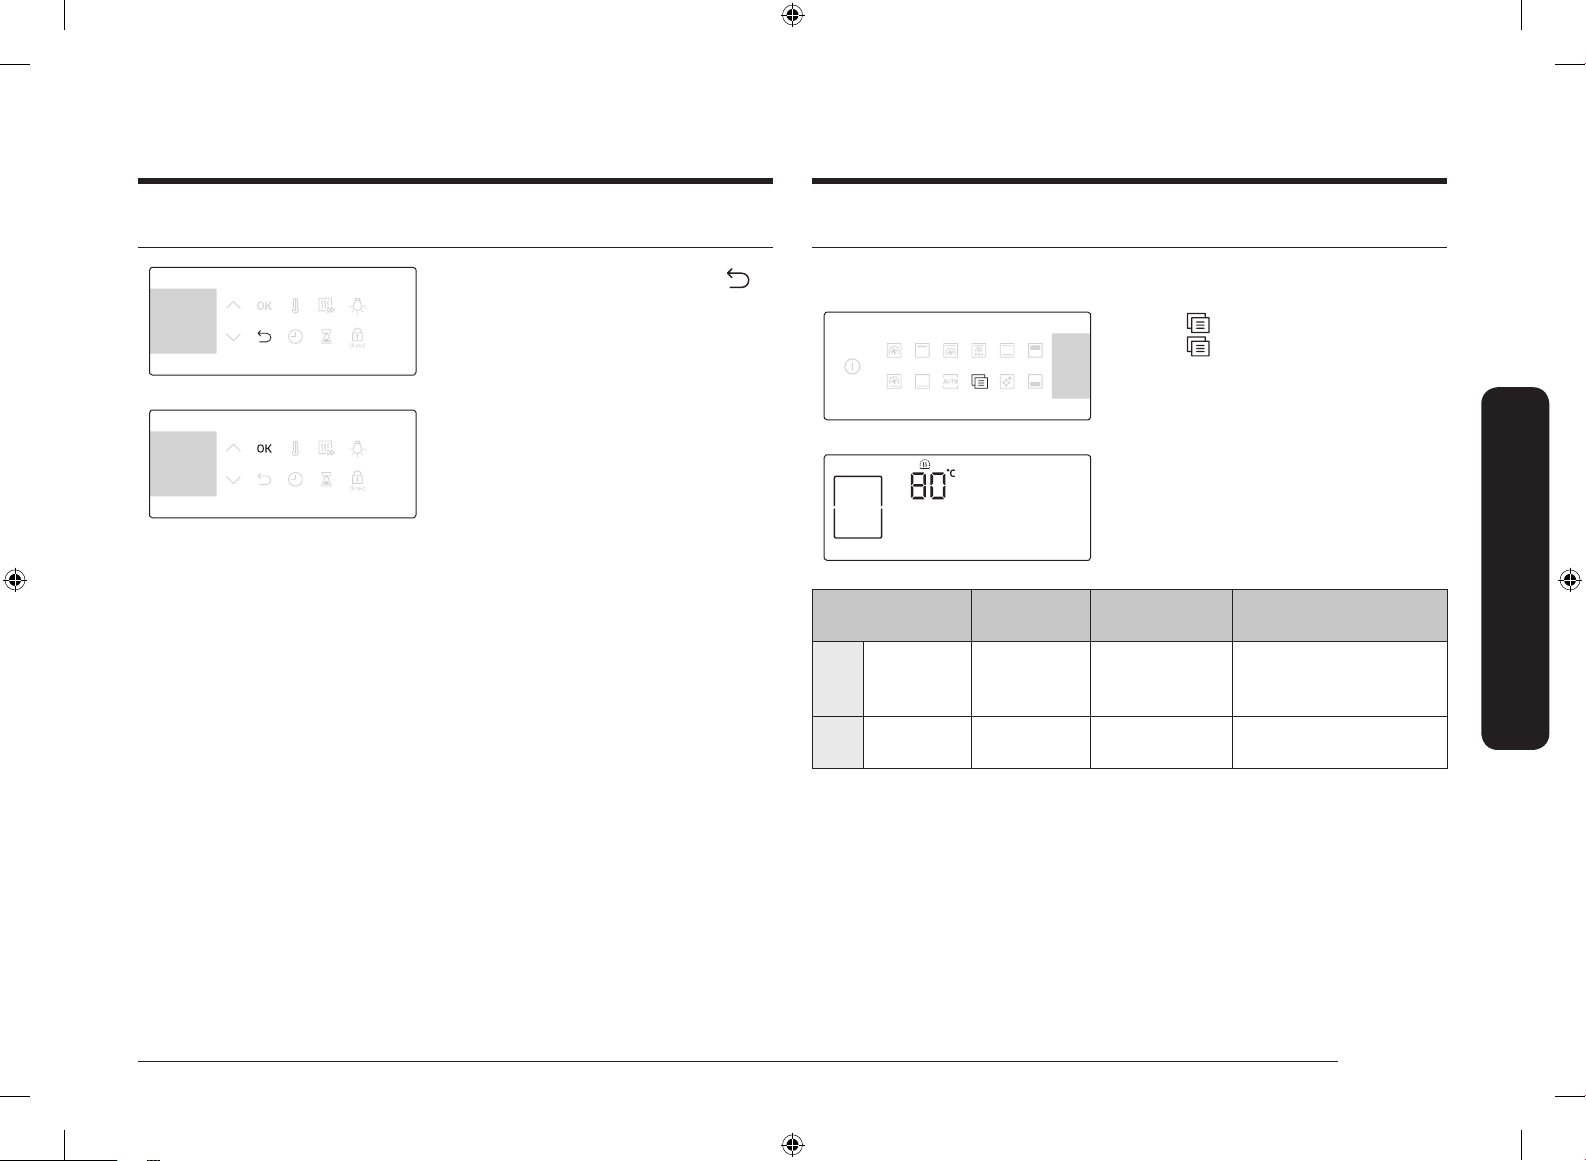
Common settings
It is common to change the default temperature and/or cooking time across all
cooking modes. Follow the steps below to adjust the temperature and/or cooking
time for the selected cooking mode.
Temperature
1. On the feature panel, press to choose a
cooking mode. The default temperature
of each selection appears.
2. Use the / buttons to set the
temperature.
3. Press OK to conrm your changes.
NOTE
• If you do not make any further settings within a few seconds, the oven starts
cooking automatically with the default settings.
• To change the set temperature, press the button and follow the above
steps.
• The exact temperature inside the oven can be measured with authorized
thermometer and method dened by an authorized institution. Using other
thermometers may cause a measuring error.
• The oven beeps when preheating is complete.
Cooking time
1. On the feature panel, press to choose a
cooking mode.
2. Press , and use the / buttons to
set a desired time.
3. Optionally, you can delay the end time
of your cooking to a desired point.
Press , and use the / buttons
to set an end point. See Delay End for
more information.
4. Press OK to conrm your changes.
NOTE
• You can cook without setting the cooking time if you want to. In this case, the
oven starts cooking at set temperatures without time information, and you
must stop the oven manually when cooking is complete.
• To change the set cooking time, press button and follow the above steps.
NV75R7676RB_EU_DG68-01054H-00_EN.indd 16 4/17/2019 5:24:08 PM
English 17
Operations
End time
1. On the feature panel, press to choose a
cooking mode.
2. Press twice, and use the /
buttons to set a desired end time.
3. Press OK to conrm your changes.
NOTE
• You can cook without setting the end time if you want to. In this case, the
oven starts cooking at set temperatures without time information, and you
must stop the oven manually when cooking is complete.
• To change the end time, press twice, and follow the above steps.
Delay End
Delay End is designed to make cooking more convenient.
Case 1
Suppose you select a one-hour recipe at 2:00 PM and you want the oven to
nish cooking at 6:00 PM. To set the end time, change the Ready At time to
6:00 PM. The oven will start cooking at 5:00 PM and end at 6:00 PM as you set.
Current time: 2 pm Set cooking time: 1 hour Set Delay End time: 6 pm
The oven will start cooking at 5:00 PM and end at 6:00 PM automatically.
2:00 pm 3:00 pm 4:00 pm 5:00 pm 6:00 pm
Case 2
Current time: 2 pm Set cooking time: 2 hour Set Delay End time: 5 pm
The oven will start cooking at 3:00 PM and end at 5:00 PM automatically.
2:00 pm 3:00 pm 4:00 pm 5:00 pm 6:00 pm
CAUTION
Do not keep cooked food in the oven too long. The food may spoil.
NV75R7676RB_EU_DG68-01054H-00_EN.indd 17 4/17/2019 5:24:08 PM
18 English
Operations
Operations
To clear the cooking time
You can clear the cooking time. This is useful if you want to stop the oven
manually at any time during the process.
1. While the oven is cooking, press to
display the remaining cooking time.
2. Use the / buttons to set the cooking
time to “00:00”. Alternatively, simply
press .
3. Press OK.
NOTE
In Dual cook mode, you must rst select the upper or lower zone that you want to
clear the cooking time for.
To clear the end time
You can clear the end time. This is useful if you want to stop the oven manually at
any time during the process.
1. While the oven is cooking, press
twice to display the set end time.
2. Use the / buttons to set the end
time to the current time. Alternatively,
simply press .
3. Press OK.
NOTE
In Dual cook mode, you must rst select the upper or lower zone that you want to
clear the end time for.
NV75R7676RB_EU_DG68-01054H-00_EN.indd 18 4/17/2019 5:24:08 PM
English 19
Operations
Cooking modes
1. On the feature panel, press to choose a
cooking mode.
2. Set the cooking time and/or
temperature if necessary. For more
information, see Common settings.
3. Optionally, you can fast preheat the
oven. To do this, press , and set the
target temperature. The corresponding
indicator appears on the display.
4. When done, press OK.
The oven starts preheating until the internal
temperature reaches the target temperature.
When preheating is complete, the indicator
disappears with a beep. Preheating is
recommended for all cooking modes unless
otherwise specied in the cooking guide.
NOTE
You can change the cooking time and/or temperature during cooking.
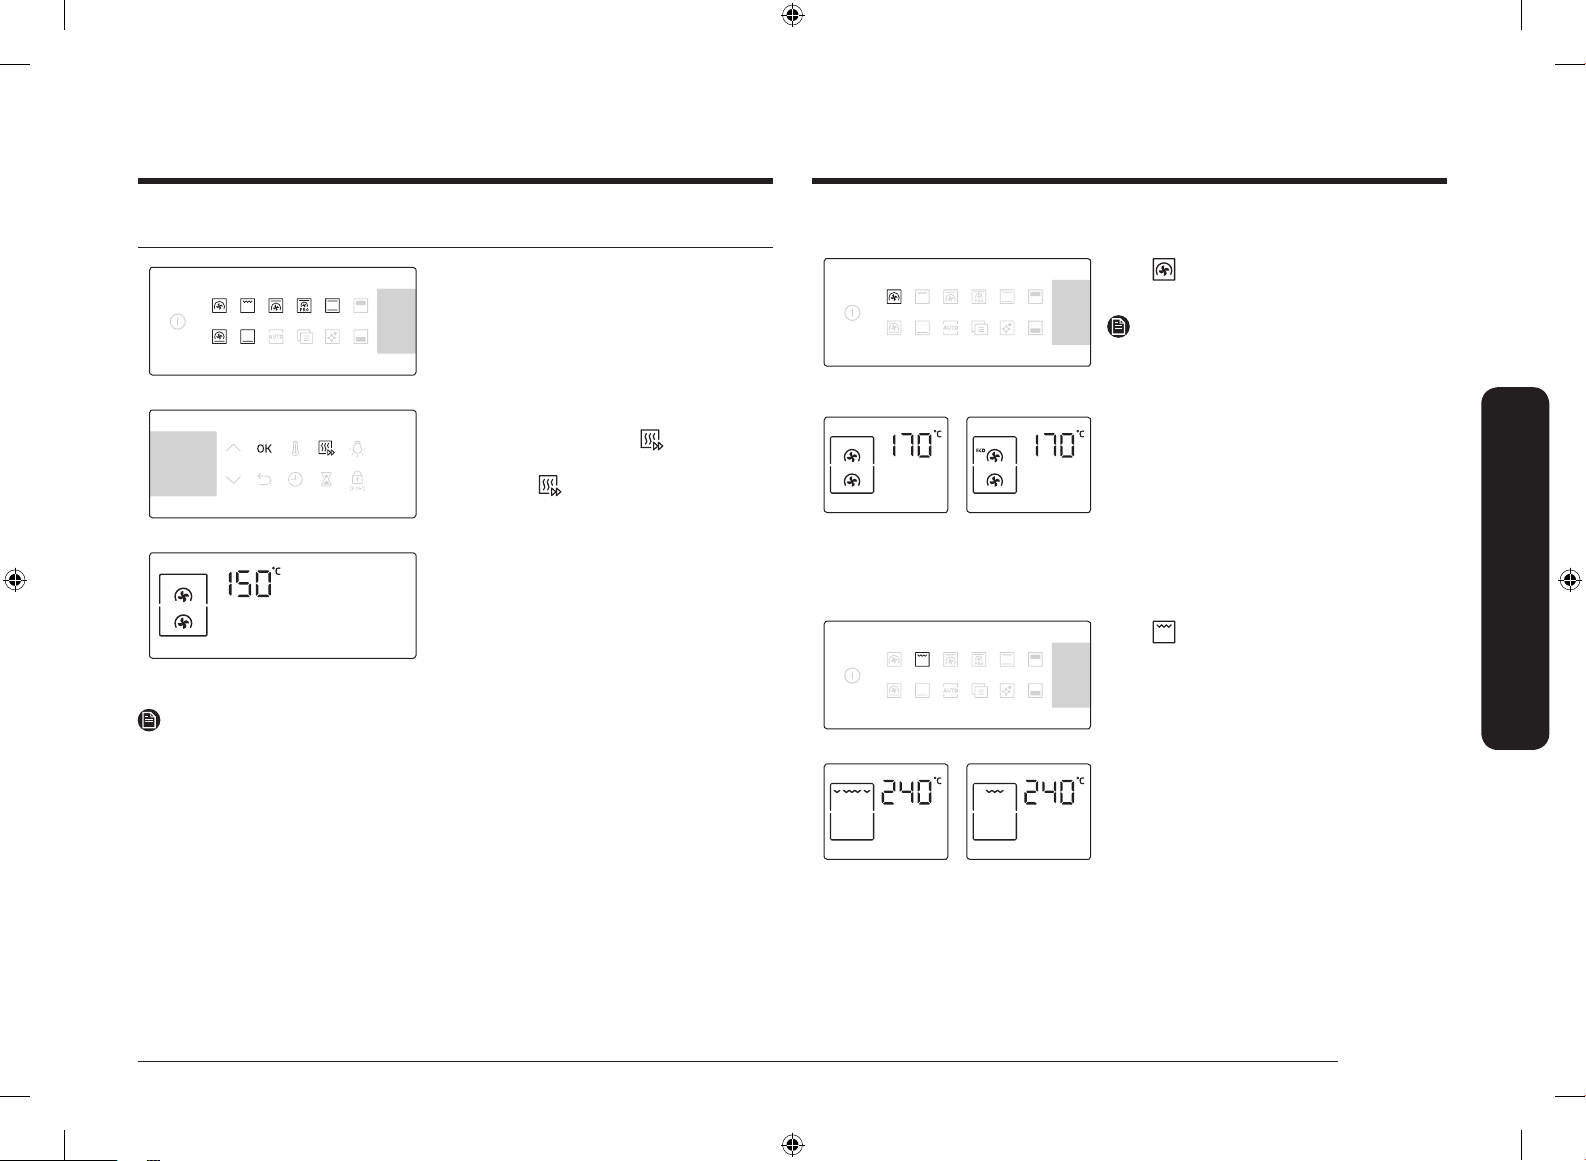
Convection modes
Press to select between Convection
mode and Eco convection mode.
NOTE
You can select the Eco convection mode in
dual cook mode.
Convection Eco Convection
Grill modes
Press to select between Large grill mode
and Eco grill mode.
Large grill Eco grill
NV75R7676RB_EU_DG68-01054H-00_EN.indd 19 4/17/2019 5:24:10 PM
20 English
Operations
Operations
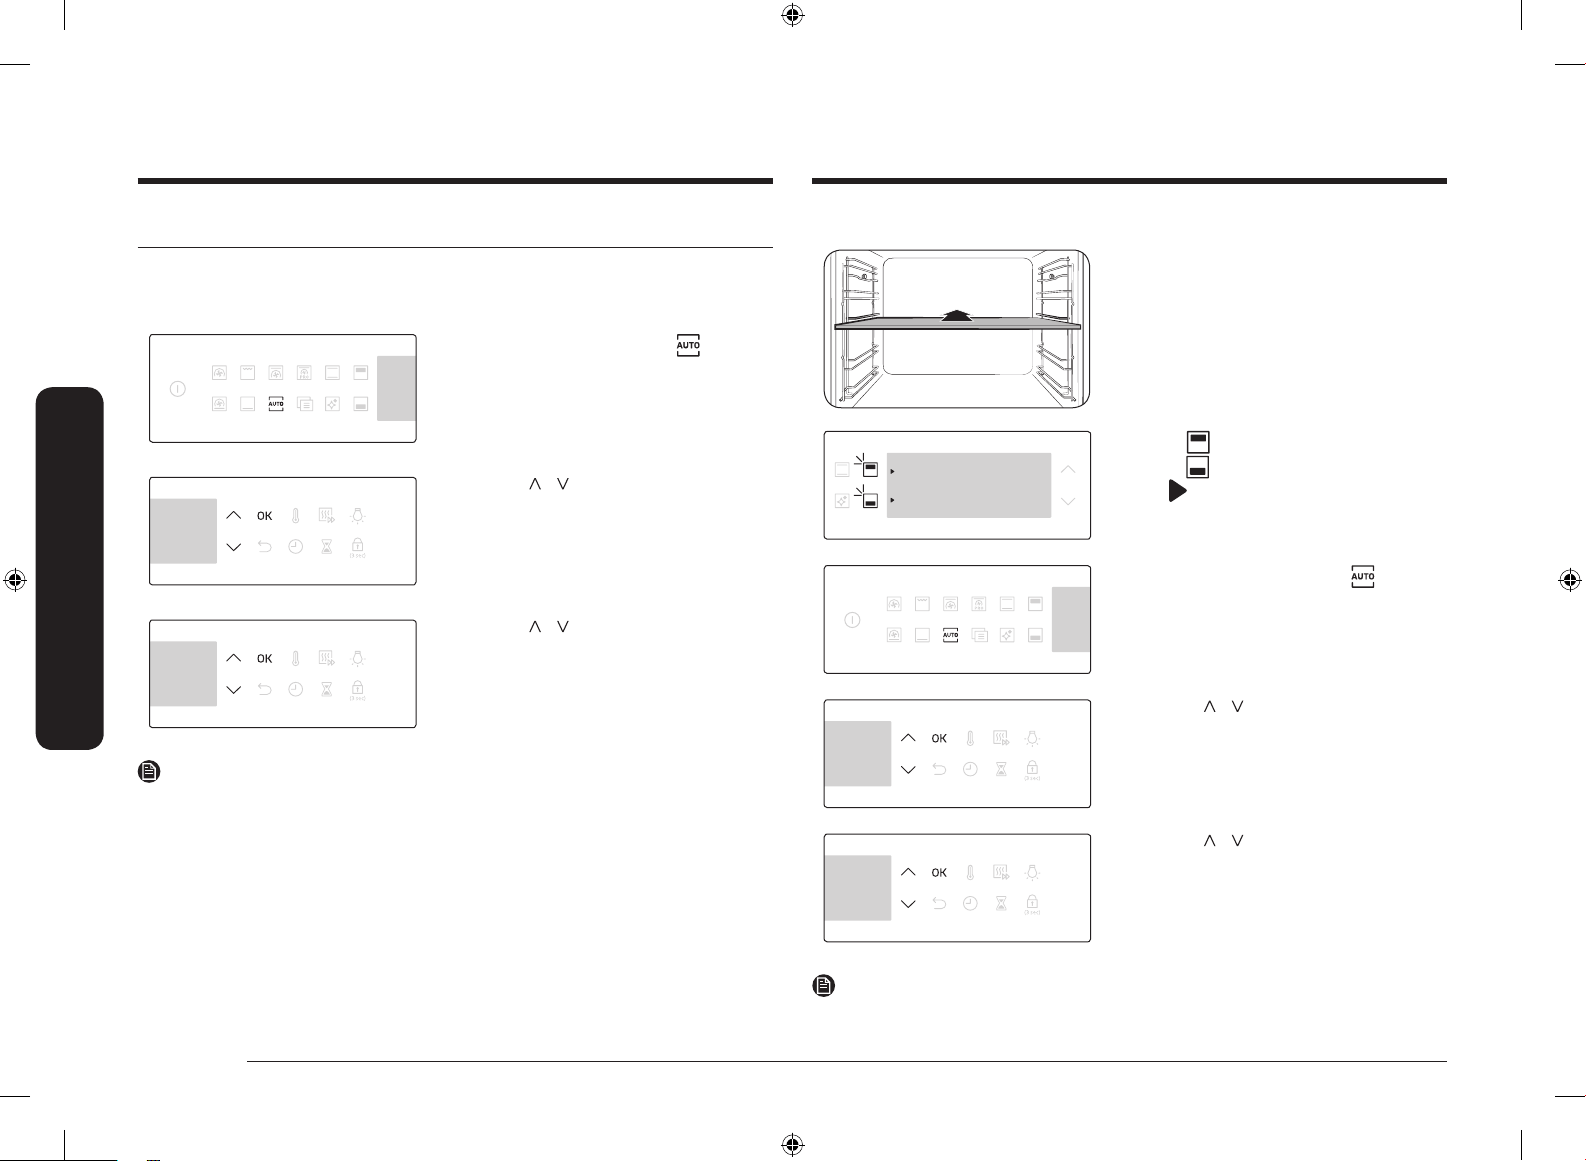
Dual cook mode
You can use the provided divider to separate the cooking chamber in the upper
and lower zones. This allows users to enable two different cooking modes
simultaneously, or to simply choose one zone to cook with.
1. Insert the Divider in level 3 to separate
the cooking chamber in two zones.
2. The upper zone is available with Grill,
Convection, Eco convection, or Top Heat
+ Convection mode. For the lower zone,
Convection, Eco convection, Bottom
Heat + Convection and Bottom Heat
modes can be enabled.
NOTE
Eco convection mode cannot be used
simultaneously on both zones in Dual cook
mode.
3. Press to select the upper zone, or
press to select the lower zone.
An indicator appears next to the
selected zone.
4. On the feature panel, press to choose a
cooking mode.
5. Set the cooking time and/or
temperature if necessary. See the
Common settings section for details.
6. When done, press OK.
The oven starts preheating until the internal
temperature reaches the target temperature.
Preheating is recommended for all cooking
modes unless otherwise specied in the
cooking guide.
NOTE
Availability of Dual cook mode depends on the cooking mode. For more
information, see the Cooking smart section in this manual.
NV75R7676RB_EU_DG68-01054H-00_EN.indd 20 4/17/2019 5:24:11 PM
English 21
Operations
Cooking modes
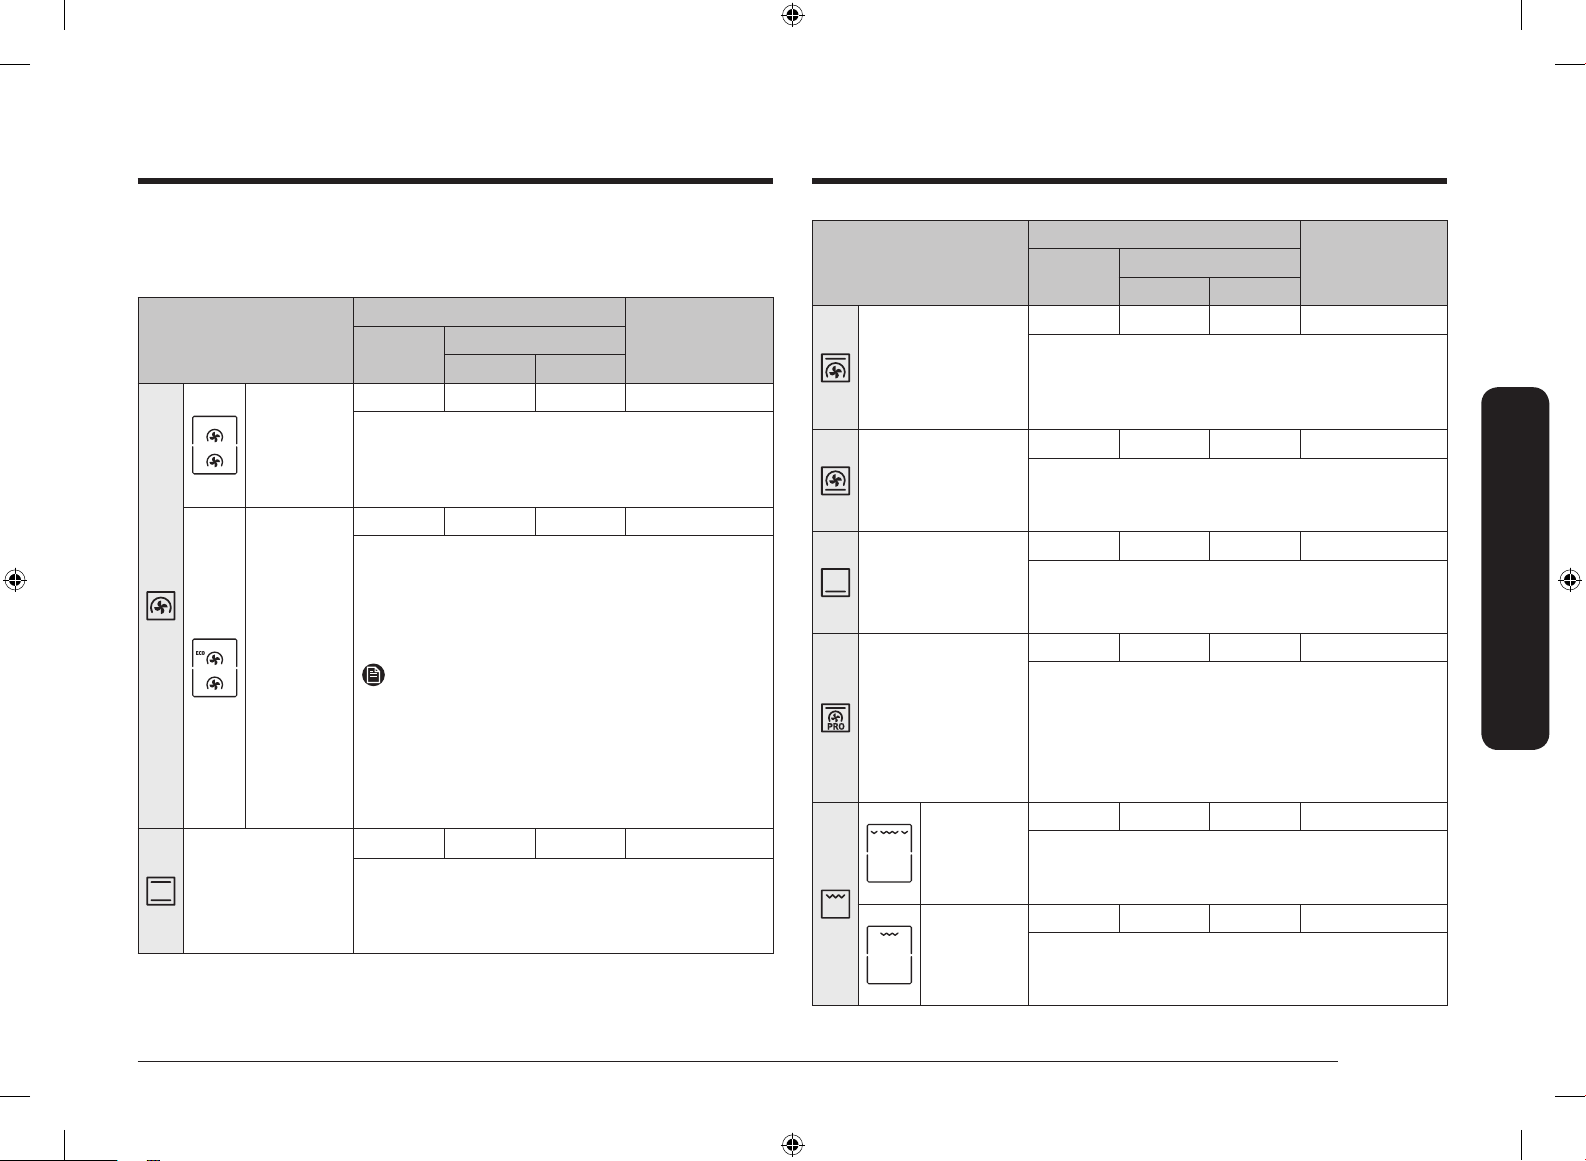
The cooking modes with an asterisk (*) are available for fast preheating and
disabled for temperatures set at less than 100 °C.
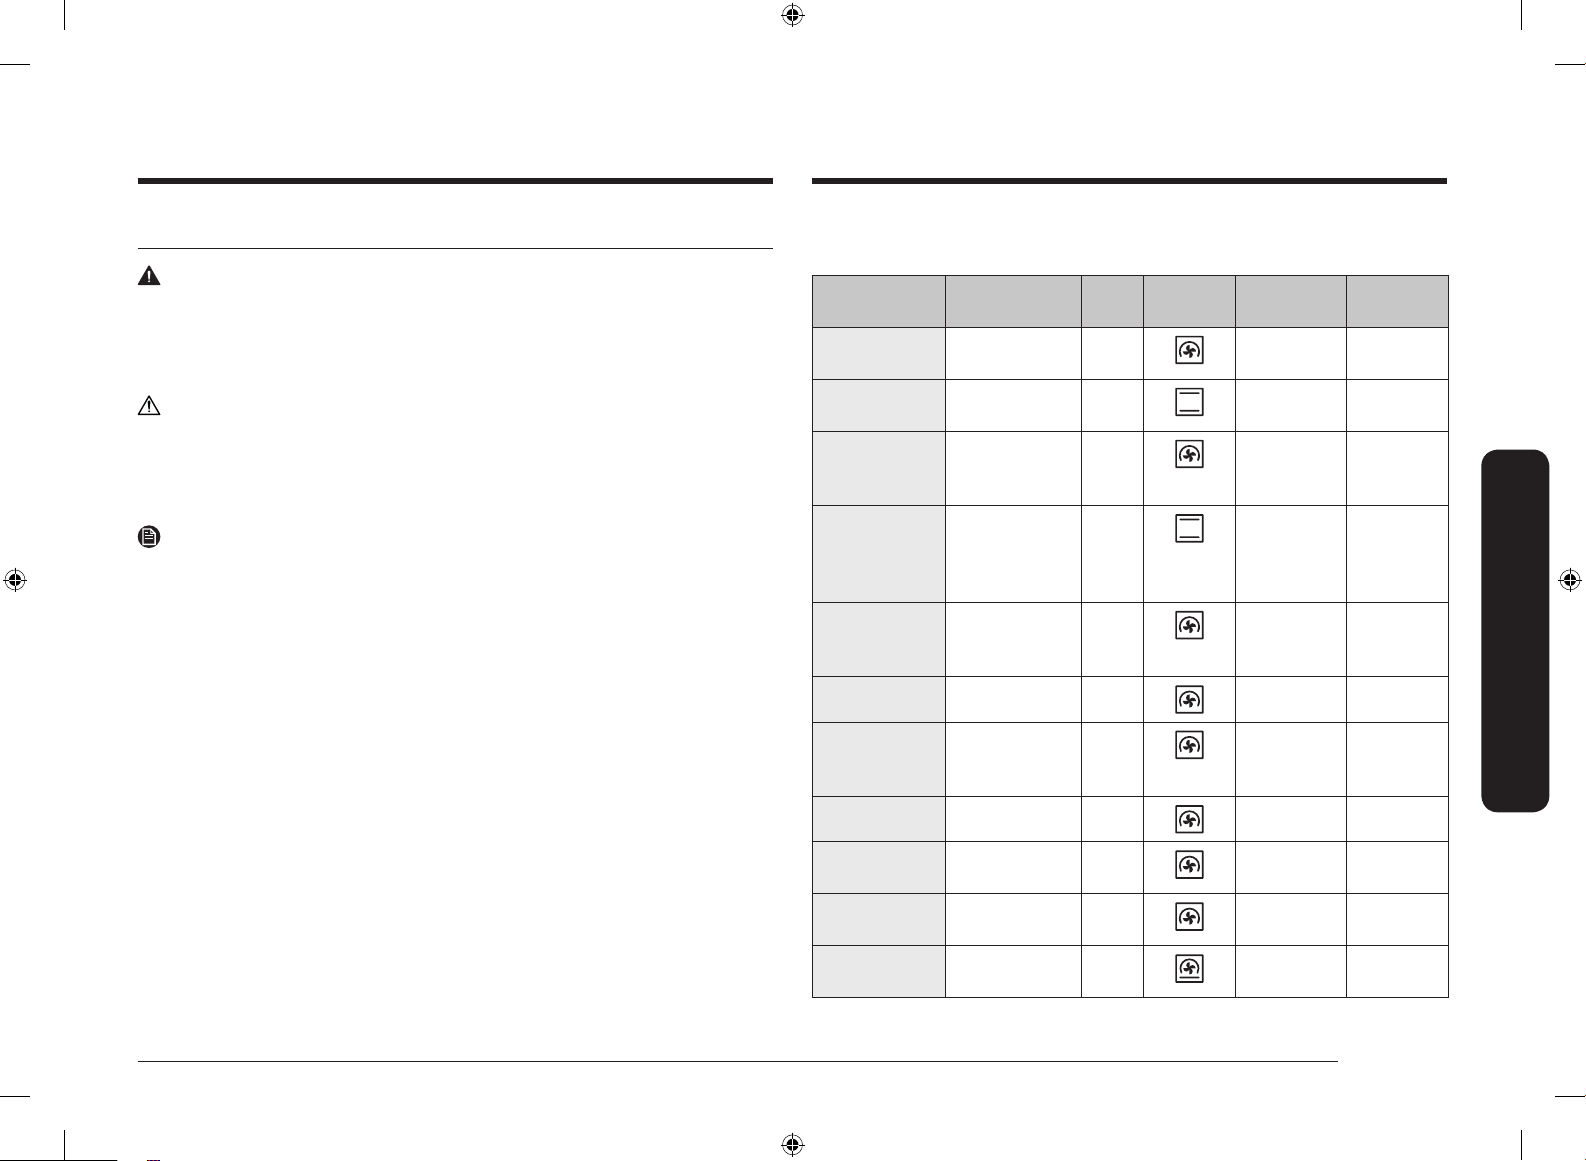
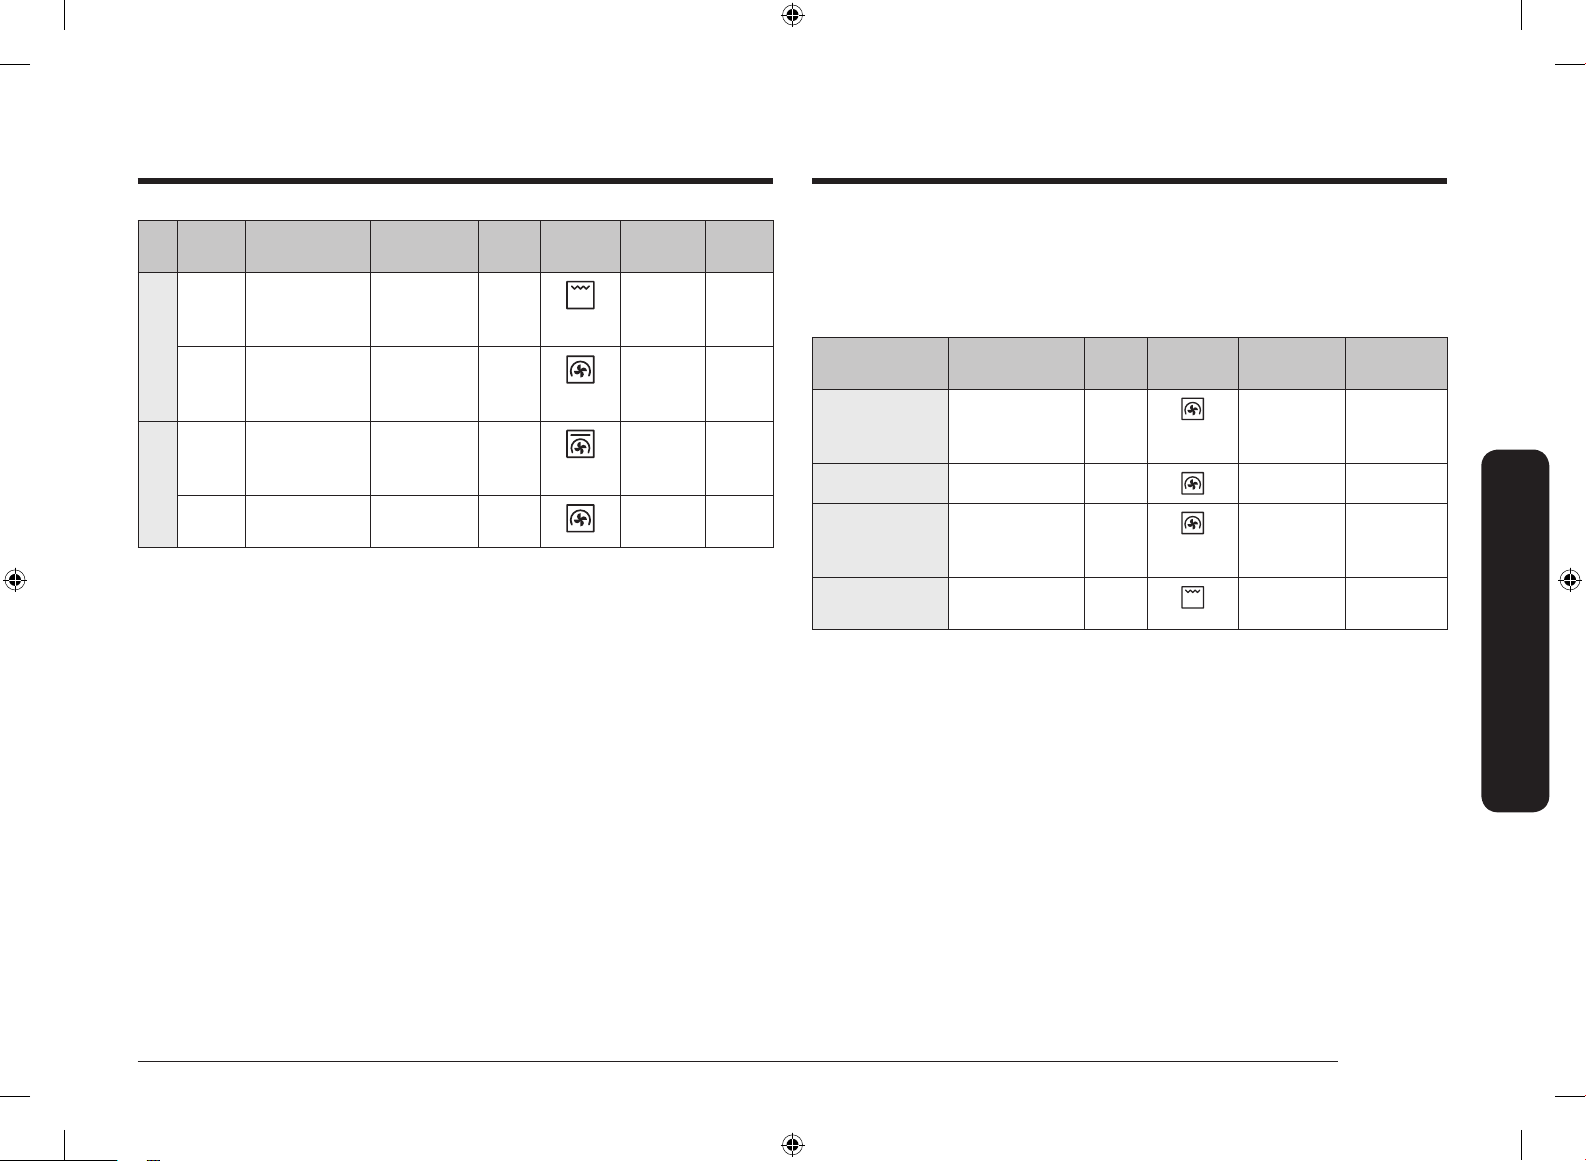
Mode
Temperature range (°C)
Suggested
temperature (°C)
Single
Dual
Upper Lower
Convection
* 30-275 40-250 40-250 170
The rear heating element generates heat, which is
evenly distributed by the convection fan. Use this
mode for baking and roasting on different levels at
the same time.
Eco
Convection
30-275 40-250 40-250 170
Eco Convection uses the optimized heating system
to save energy while cooking. The cooking times
slightly increases, but the cooking results remain
the same. Note that this mode does not require
preheating.
NOTE
• ECO Convection mode of heating used to
determine the energy efciency class is in
accordance with EN60350-1.
• In Dual cook mode, Eco Convection mode
cannot be set on the upper and lower zones
simultaneously.
Conventional
* 30-275 - - 200
The heat is generated from the top and bottom
heating elements. This function should be used for
standard baking and roasting for most types of
dishes.
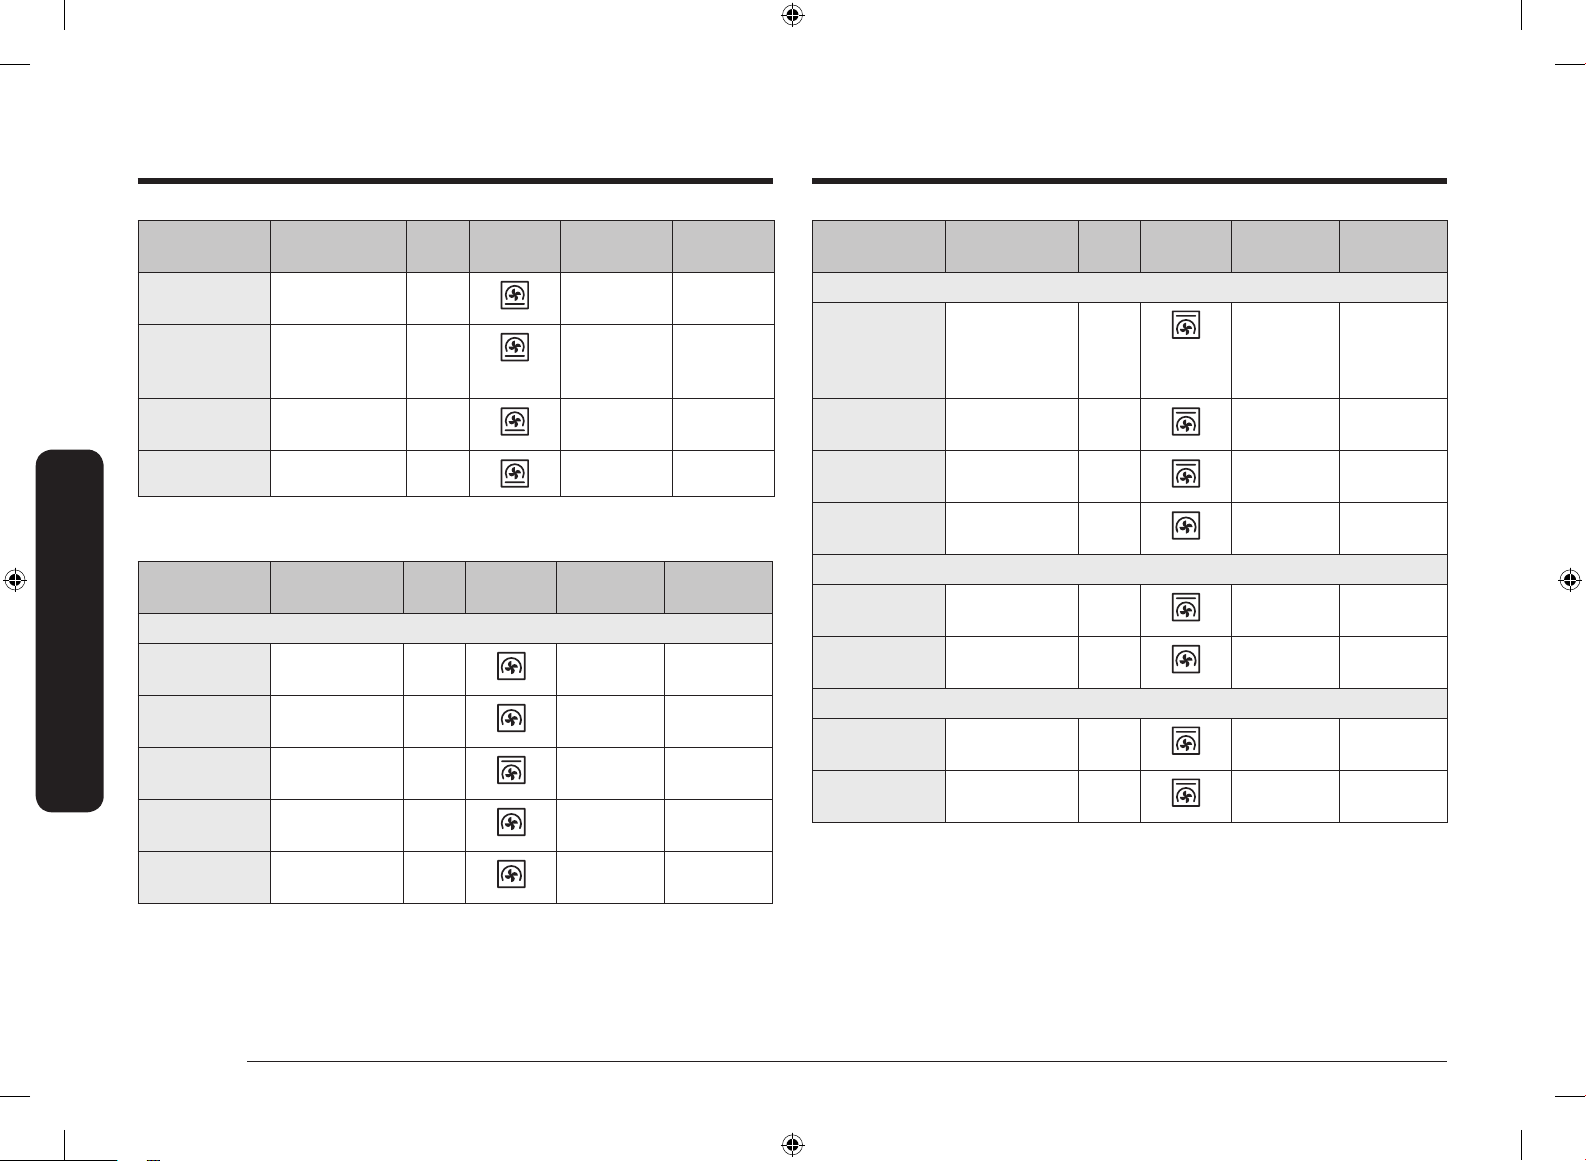
Mode
Temperature range (°C)
Suggested
temperature (°C)
Single
Dual
Upper Lower
Top heat +
Convection
* 40-275 40-250 - 190
The top heating element generates heat, which is
evenly distributed by the convection fan. Use this
mode for roasting that requires a crispy top (for
example, meat or lasagne).
Bottom heat +
Convection
* 40-275 - 40-250 190
The bottom heating element generates heat, which
is evenly distributed by the convection fan. Use this
mode for pizza, bread, or cake.
Bottom heat
100-230 - 40-250 190
The bottom heating element generates heat. Use
this mode at the end of baking or cooking to brown
the bottoms of a quiche or pizza.
Pro-Roasting
80-200 - - 160
Pro-Roasting runs an automatic pre-heating cycle
until the oven temperature reaches 220 °C. Then, the
top heating element and the convection fan start
operating to sear food such as meat. After searing,
the meat will be cooked at low temperatures. Use
this mode for beef, poultry, or sh.
Large grill
100-300 40-250 - 240
The large-area grill emits heat. Use this mode for
browning the tops of food (for example, meat,
lasagne, or gratin).
Eco grill
100-300 - - 240
The small-area grill emits heat. Use this mode for
food that requires less heat, such as sh and lled
baguettes.
NV75R7676RB_EU_DG68-01054H-00_EN.indd 21 4/17/2019 5:24:12 PM

22 English
Operations
Operations
Dual cook mode temperature setting range
You can use both the upper and lower zones simultaneously for different cooking
operations.
In Dual Cook mode, the temperature range of one zone is affected by the
temperature settings of the other zone. For instance, broiling in the upper zone will
be limited by the operation in the lower zone in terms of cooking temperatures.
However, either zone limits its temperature settings between minimum 40 and
maximum 250.
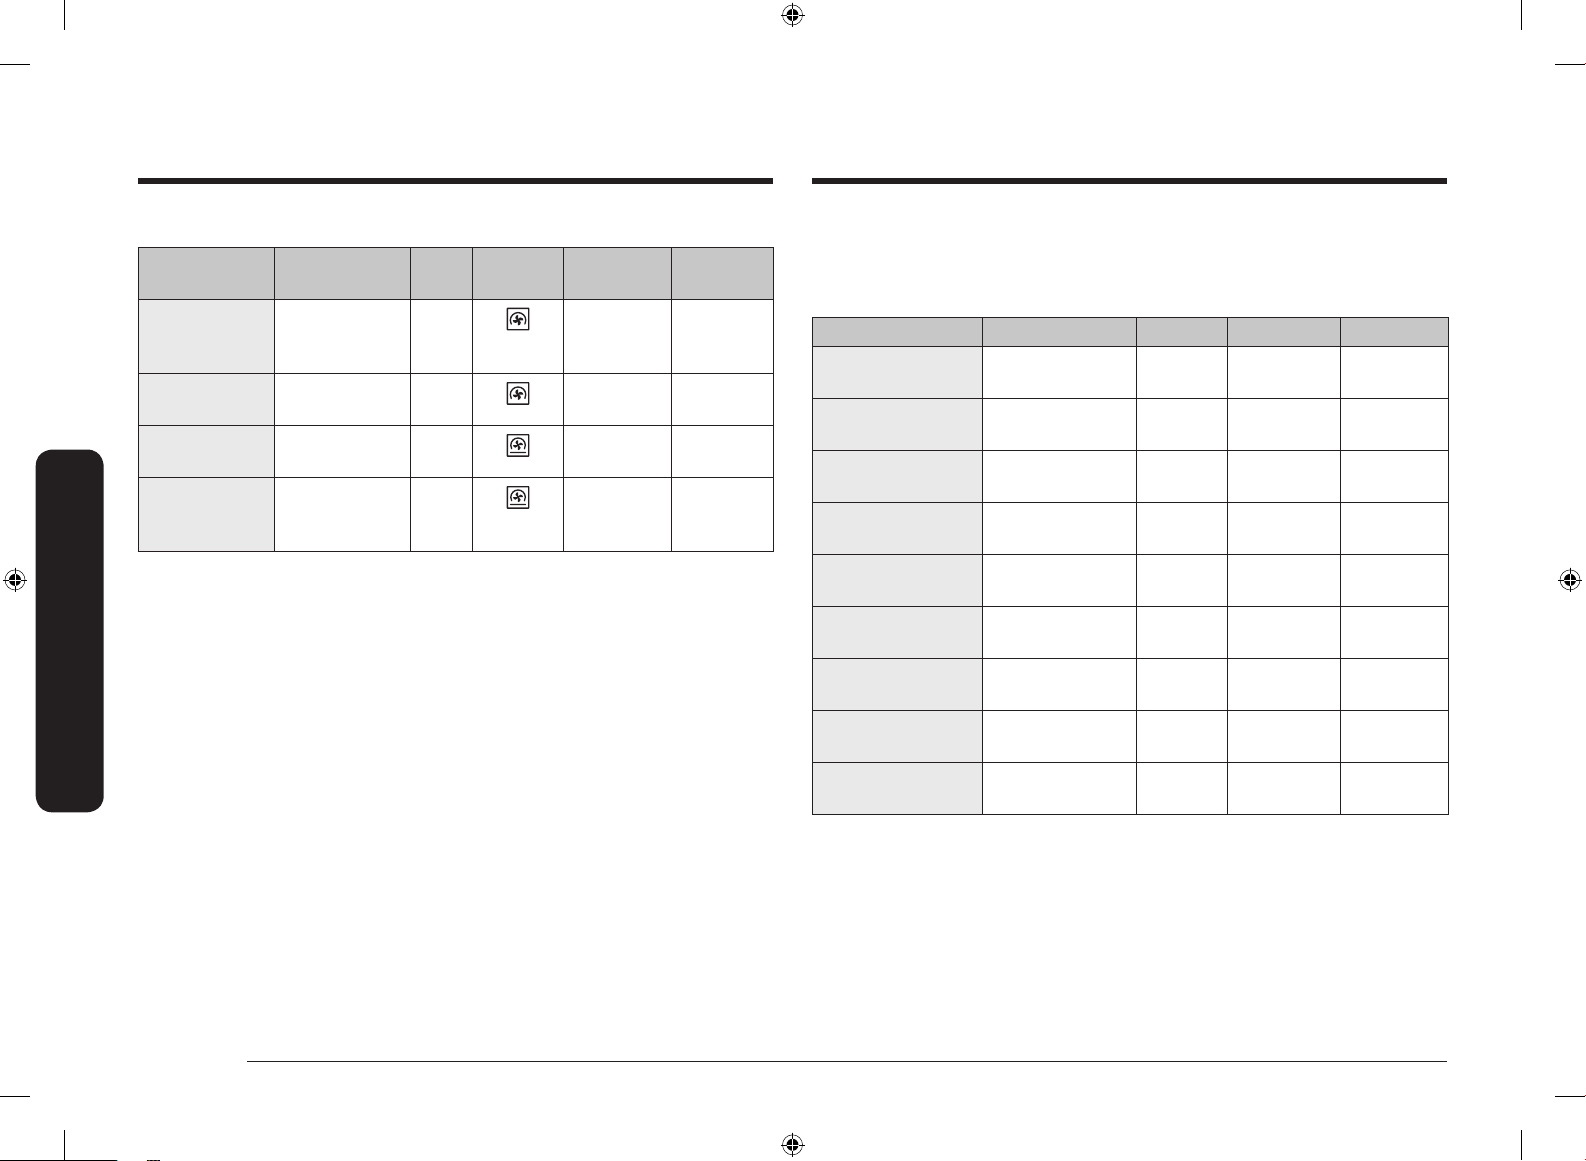
If Upper is set to (°C)
Lower zone is limited to (°C)
Minimum Maximum
40 40 45
60 50 75
80 65 105
100 80 135
120 90 160
140 105 190
160 120 220
180 135 250
200 145 250
220 160 250
250 170 250
If Lower is set to (°C)
Upper zone is limited to (°C)
Minimum Maximum
40 40 45
60 50 75
80 65 105
100 80 135
120 90 160
140 105 190
160 120 220
180 135 250
200 145 250
220 160 250
250 170 250
NV75R7676RB_EU_DG68-01054H-00_EN.indd 22 4/17/2019 5:24:12 PM
English 23
Operations
To stop cooking
1. While cooking is in process, press .
2. Press OK to cancel cooking.
Special function
Add special or additional functions to improve your cooking experience. Special
functions are not enabled in Dual cook mode.
1. Press on the feature panel.
2. Press again to select a function.
3. Set the cooking time and/or
temperature if necessary. For more
information, see Common Settings.
4. The oven starts the selected function
with the default or your settings.
Mode
Temperature
range (°C)
Suggested
temperature (°C)
Instructions
F 1 Keep warm 40-100 80
Use this only for keeping
foods warm that have
just been cooked.
F 2 Plate warm 30-80 60
Use this for warming
dishes or ovenware.
NV75R7676RB_EU_DG68-01054H-00_EN.indd 23 4/17/2019 5:24:13 PM
24 English
Operations
Operations
Auto cook
For inexperienced cooks, the oven offers a total of 50 auto cooking recipes. Take
advantage of this feature to save you time or shorten your learning curve. The
cooking time and temperature will be adjusted according to the selected recipe.
1. On the feature panel, press .
2. Use the / buttons to select a
programme, and then press OK. The
available weight range (serving size) is
presented for you.
3. Use the / buttons to set the serving
size, and then press OK to start cooking.
NOTE
• Some of the items in the Auto cook programmes include preheating. For those
items the preheating progress is displayed. Please put the food in the oven
after preheating beep. Then, press Cooking time to start Auto Cook.
• For more information, see the Auto cook programmes section in this manual.
Dual cook mode
1. Insert the divider in level 3 to activate
Dual cook mode.
2. Press to select the upper zone, or
press to select the lower zone.
An indicator appears next to the
selected zone.
3. On the feature panel, press .
4. Use the / buttons to select a
programme, and then press OK. The
available weight range (serving size) is
presented for you.
5. Use the / buttons to set the serving
size, and then press OK to start cooking.
NOTE
For more information, see the Auto cook programmes section in this manual.
NV75R7676RB_EU_DG68-01054H-00_EN.indd 24 4/17/2019 5:24:14 PM
English 25
Operations
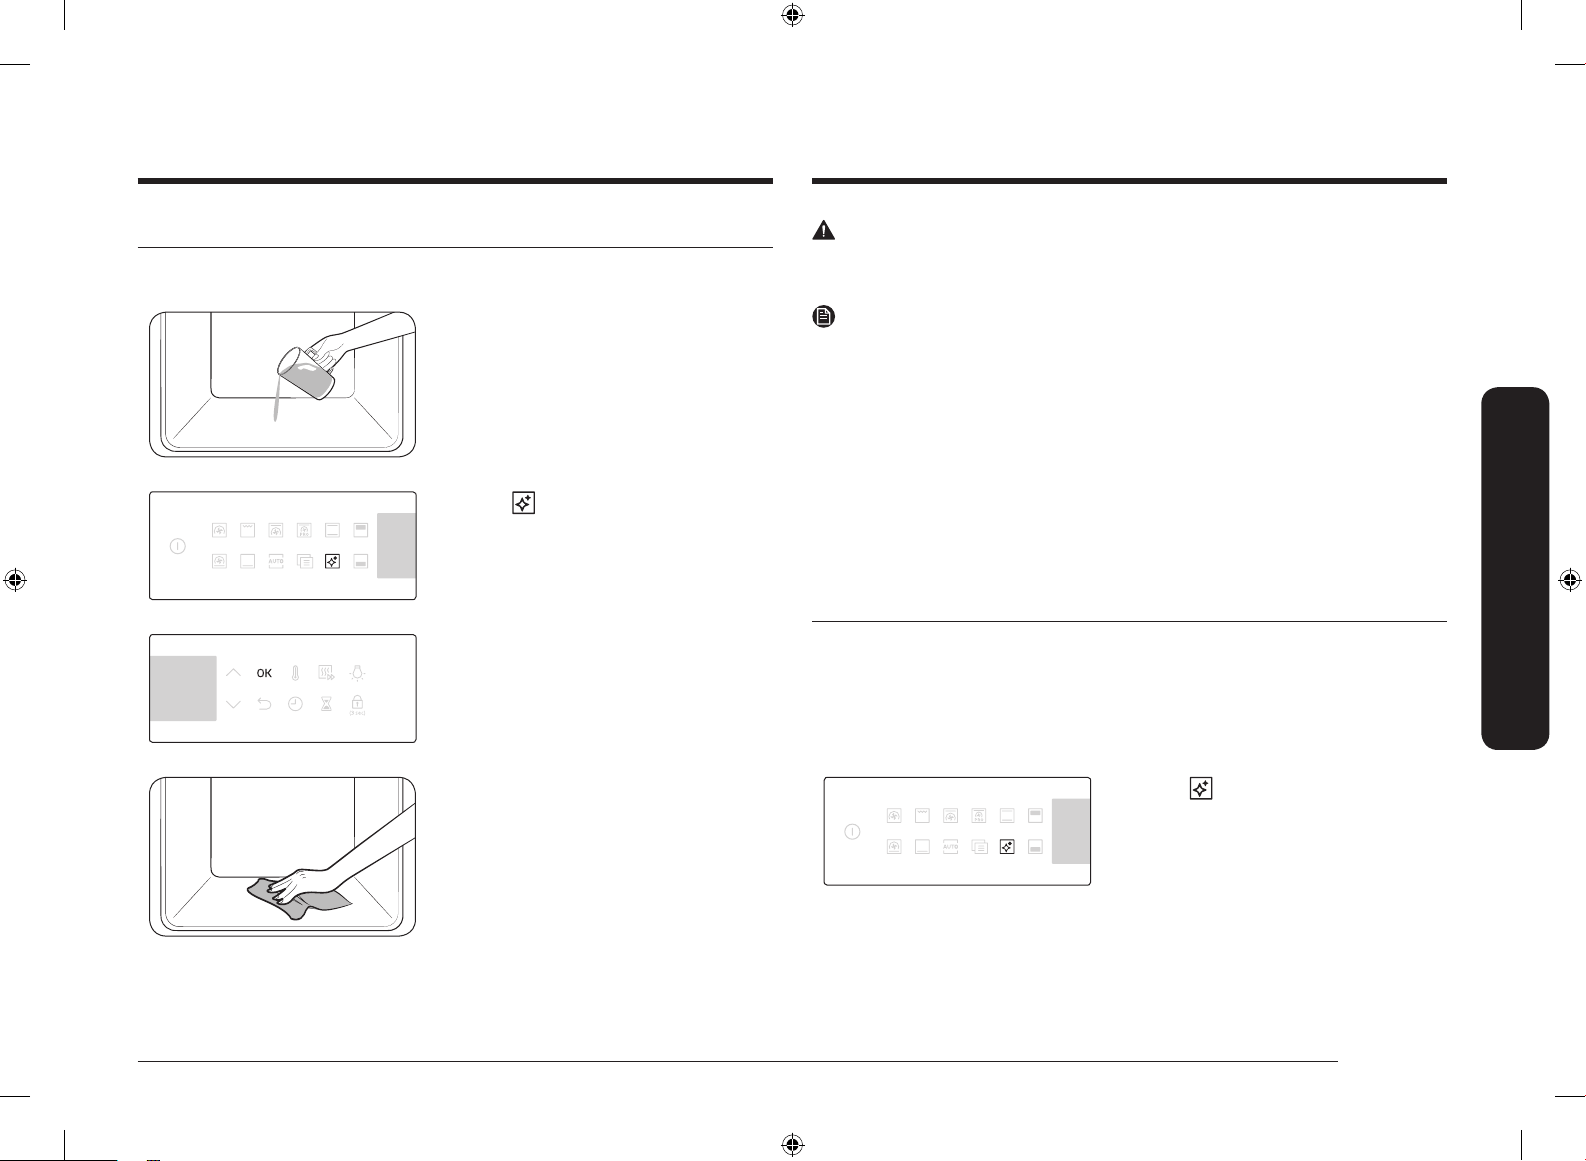
Steam cleaning
This is useful for cleaning light soiling with steaming. This function saves you time
by removing the need for regular manual cleaning.
1. Pour 400 ml (
3
/4 pint) of water onto the
bottom of the oven and close the oven
door.
2. Press on the feature panel.
3. Press OK to start cleaning.
Steam cleaning runs for 26 minutes.
4. Use a dry cloth to clean inside the oven.
WARNING
Do not open the door before the cycle is complete. The water inside the oven is
very hot, and it can cause a burn.
NOTE
• If the oven is heavily soiled with grease, for example, after roasting or grilling,
it is recommended to remove stubborn soils manually using a cleaning agent
before activating Steam cleaning.
• Leave the oven door ajar when the cycle is complete. This is to allow the
interior enamel surface to dry thoroughly.
• If the oven is hot inside, cleaning is not activated. Wait until the oven cools
down, and try again.
• Do not pour water onto the bottom by force. Do it gently. Otherwise, the water
overows to the front.
• The water poured onto the bottom of the oven may not completely evaporate,
this is normal.
Pyro cleaning
Pyrolytic features high temperature thermal cleaning. It burns off oily leftovers to
facilitate manual cleaning.
1. Remove all accessories including the side racks, and wipe out large pieces
of impurities manually from inside the oven. Otherwise, they may cause
ames during the cleaning cycle, resulting in re.
2. Press twice on the feature panel.
NV75R7676RB_EU_DG68-01054H-00_EN.indd 25 4/17/2019 5:24:15 PM
26 English
Operations
Operations
3. Select a cleaning time from 3 levels:
1 hr 50 min, 2 hr 10 min, and 2 hr
30 min.
4. Press OK to start cleaning.
5. When complete, wait until the oven
cools down, and then wipe the door
along its edges using a wet cloth.
CAUTION
• Do not touch the oven because the oven becomes very hot during the cycle.
• To avoid accidents, keep children away from the oven.
• After the cycle is complete, do not power off while the cooling fan is operating
to cool the oven down.
NOTE
• Once the cycle starts, the oven becomes hot inside. Then, the door will be
locked for safety. When the cycle is complete and the oven cools down, the
door will be unlocked.
• Make sure you empty the oven before cleaning. Accessories can be deformed
due to high temperatures inside the oven.
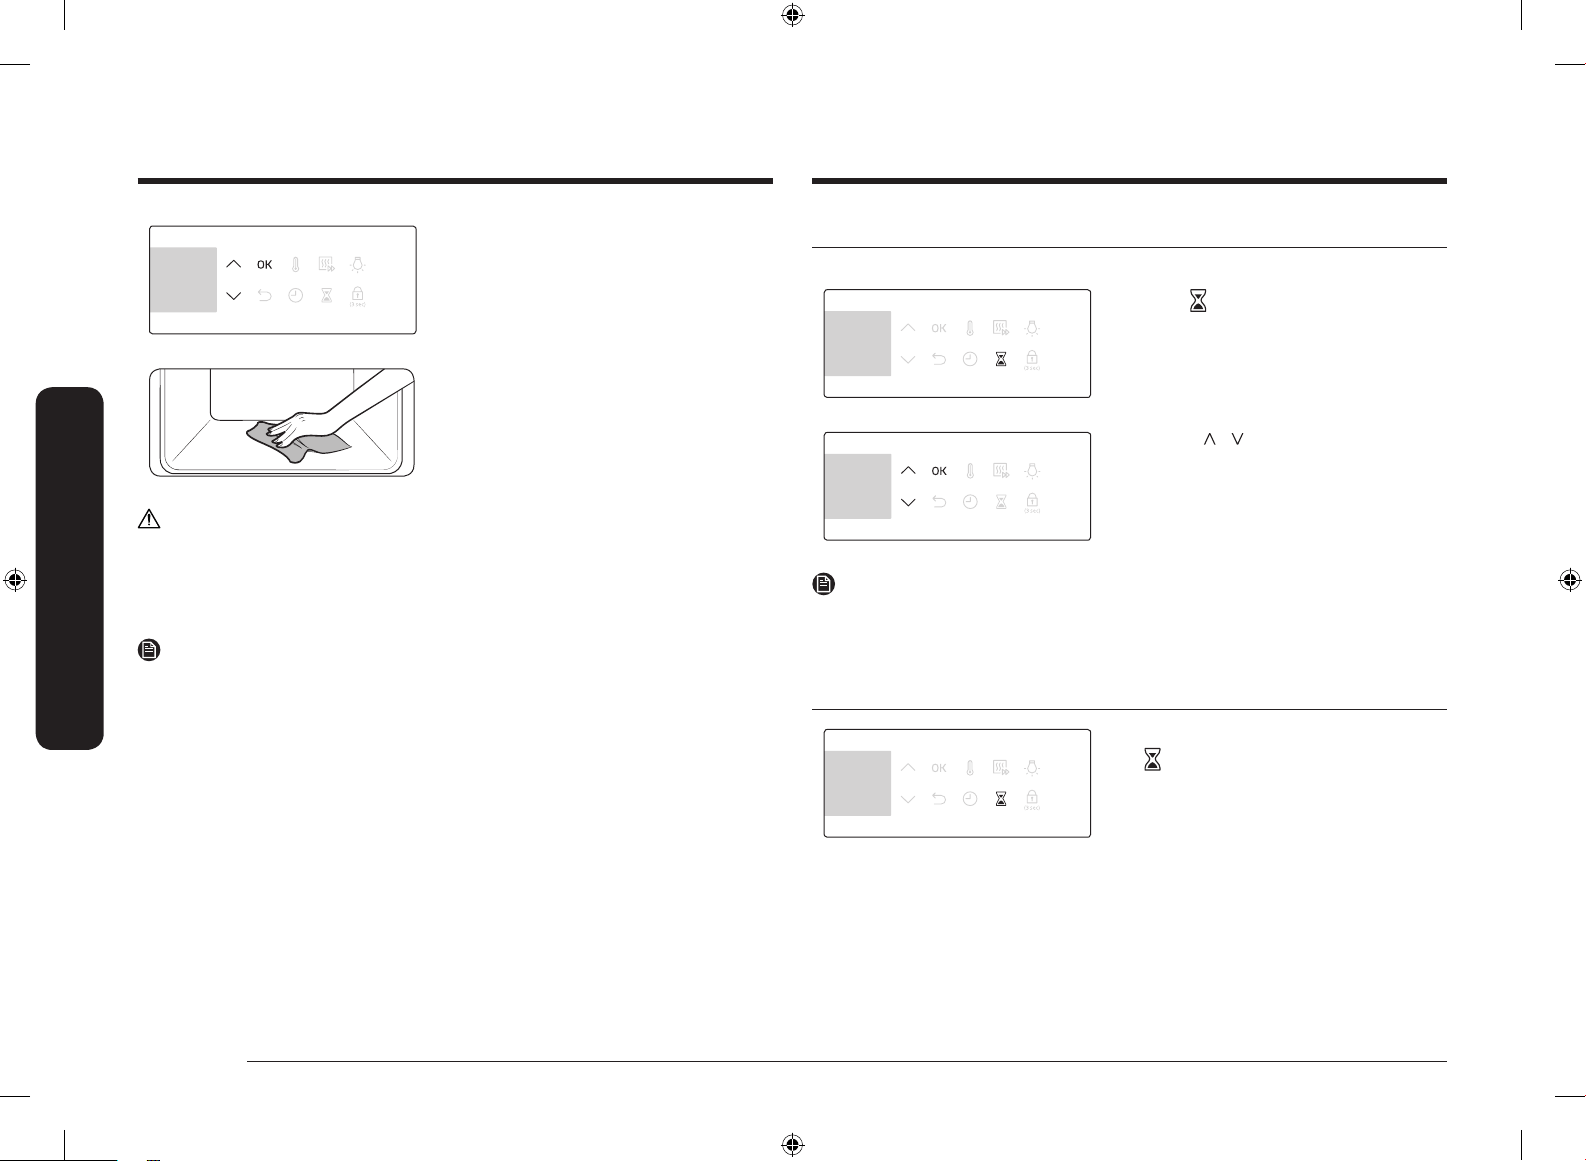
Timer
Timer helps you check the time or operating duration while cooking.
1. Press .
2. Use the / buttons to set the desired
duration, and then press OK.
NOTE
• When the time has elapsed, the oven beeps with a blinking message of
“00:00” on the display.
• You can change the timer settings at any time.
Sound on/off
• To mute the sound, tap and hold down
for 3 seconds.
• To unmute the sound, tap and hold
down again for 3 seconds.
NV75R7676RB_EU_DG68-01054H-00_EN.indd 26 4/17/2019 5:24:16 PM
English 27
Cooking smart
Cooking smart
Manual cooking
WARNING on acrylamide
Acrylamide produced while baking starch-contained food such as potato chips,
French fries, and bread may cause health problems. It is recommended to cook
these foods at low temperatures and avoid overcooking, heavy crisping, or
burning.
CAUTION
Foods that can easily spoil (such as milk, eggs, sh, meat, or poultry) should not
stand in the oven for more than 1 hour before cooking begins, and should be
removed promptly when cooking is completed. Eating spoiled food can result in
sickness from food poisoning.
NOTE
• Pre-heating is recommended for all cooking modes unless otherwise specied
in the cooking guide.
• When using Eco Grill, put food in the centre of the accessory tray.
Accessory tips
Your oven comes with a different number or kind of accessories. You may nd that
some accessories are missing from the table below. However, even if you are not
provided with the exact accessories specied in this cooking guide, you can follow
along with what you already have, and achieve the same results.
• The Baking tray and the Universal tray are interchangeable.
• When cooking oily foods, it is recommended to put a tray under the Wire rack
to collect oil residue. If you are provided with the Wire rack insert, you can
use it together with the tray.
• If you are provided with the Universal tray or Extra deep tray, or both, it is
better to use whichever is deeper for cooking oily foods.
Baking
We recommend to preheat the oven for best results.
Food Accessory Level
Type of
heating
Temp. (°C) Time (min.)
Sponge cake Wire rack,
Ø 25-26 cm tin
2 160-170 35-40
Marble cake Wire rack,
Gugelhopf tin
3 175-185 50-60
Tart Wire rack,
Ø 20 cm tart
tin
3 190-200 50-60
Yeast cake
on tray with
fruits and
crumbles
Universal tray 2 160-180 40-50
Fruit crumble Wire rack,
22-24 cm oven
dish
3 170-180 25-30
Scones Universal tray 3 180-190 30-35
Lasagne Wire rack,
22-24 cm oven
dish
3 190-200 25-30
Meringues Universal tray 3 80-100 100-150
Soufé Wire rack,
soufé cups
3 170-180 20-25
Apple yeast
tray cake
Universal tray 3 150-170 60-70
Homemade
pizza, 1-1.2 kg
Universal tray 2 190-210 10-15
NV75R7676RB_EU_DG68-01054H-00_EN.indd 27 4/17/2019 5:24:16 PM
28 English
Cooking smart
Cooking smart
Food Accessory Level
Type of
heating
Temp. (°C) Time (min.)
Frozen puff
pastry, lled
Universal tray 2 180-200 20-25
Quiche Wire rack,
22-24 cm oven
dish
2 180-190 25-35
Apple pie Wire rack,
Ø 20 cm tin
2 160-170 65-75
Chilled pizza Universal tray 3 180-200 5-10
Roasting
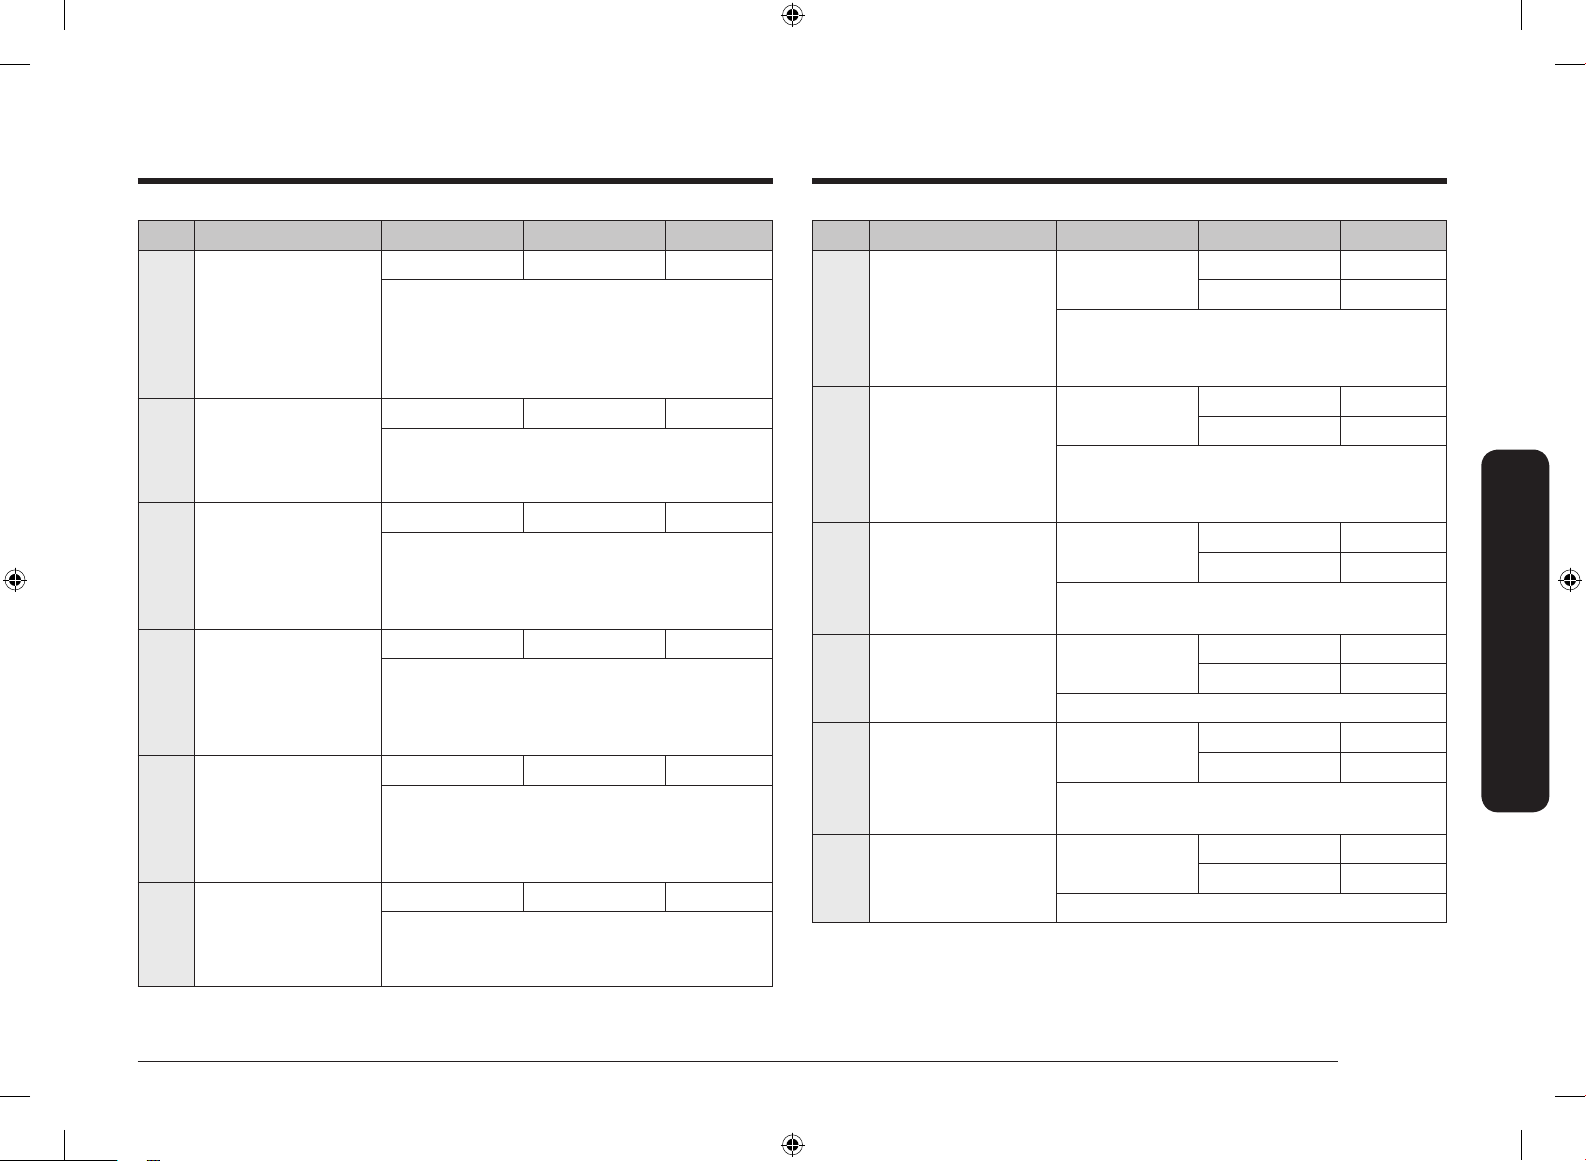
Food Accessory Level
Type of
heating
Temp. (°C) Time (min.)
Meat (Beef/Pork/Lamb)
Sirloin of beef,
1 kg
Wire rack +
Universal tray
3
1
160-180 50-70
Boned loin of
veal, 1.5 kg
Wire rack +
Universal tray
3
1
160-180 90-120
Pork roast,
1 kg
Wire rack +
Universal tray
3
1
200-210 50-60
Joint of pork,
1 kg
Wire rack +
Universal tray
3
1
160-180 100-120
Leg of lamb on
the bone, 1 kg
Wire rack +
Universal tray
3
1
170-180 100-120
Food Accessory Level
Type of
heating
Temp. (°C) Time (min.)
Poultry (Chicken/Duck/Turkey)
Chicken,
Whole, 1.2 kg *
Wire rack +
Universal tray
(to catch
drippings)
3
1
200 65-80 *
Chicken pieces Wire rack +
Universal tray
3
1
200-220 25-35
Duck breast Wire rack +
Universal tray
3
1
200-210 20-30
Small turkey,
whole, 5 kg
Wire rack +
Universal tray
3
1
180-200 120-150
Vegetables
Vegetables,
0.5 kg
Universal tray 3 220-230 15-20
Baked potato
halves, 0.5 kg
Universal tray 3 190-200 40-50
Fish
Fish llet,
baked
Wire rack +
Universal tray
3
1
200-220 20-30
Roast sh Wire rack +
Universal tray
3
1
180-200 30-40
* Turnover after half of time.
NV75R7676RB_EU_DG68-01054H-00_EN.indd 28 4/17/2019 5:24:16 PM
English 29
Cooking smart
Grilling
We recommend preheat the oven using large grill mode. Turn over after half of
time.
Food Accessory Level
Type of
heating
Temp. (°C) Time (min.)
Bread
Toast Wire rack 5 270-300 2-4
Cheese toast Universal tray 4 200 4-8
Beef
Steak * Wire rack +
Universal tray
4
1
240-250 15-20
Burgers * Wire rack +
Universal tray
4
1
250-270 13-18
Pork
Pork chops Wire rack +
Universal tray
4
1
250-270 15-20
Sausages Wire rack +
Universal tray
4
1
260-270 10-15
Poultry
Chicken, breast Wire rack +
Universal tray
4
1
230-240 30-35
Chicken,
drumstick
Wire rack +
Universal tray
4
1
230-240 25-30
* Turnover after
2
/3 of the cooking time.
Frozen ready-meal
Food Accessory Level
Type of
heating
Temp. (°C) Time (min.)
Frozen pizza,
0.4-0.6 kg
Wire rack 3 200-220 15-25
Frozen lasagne Wire rack 3 180-200 45-50
Frozen oven
chips
Universal tray 3 220-225 20-25
Frozen
Croquettes
Universal tray 3 220-230 25-30
Frozen oven
camembert
Wire rack 3 190-200 10-15
Frozen
baguettes with
topping
Wire rack +
Universal tray
3
1
190-200 10-15
Frozen sh
ngers
Wire rack +
Universal tray
3
1
190-200 15-25
Frozen sh
burger
Wire rack 3 180-200 20-35
NV75R7676RB_EU_DG68-01054H-00_EN.indd 29 4/17/2019 5:24:17 PM
30 English
Cooking smart
Cooking smart
Pro-Roasting
This mode includes an automatic heating-up cycle up to 220 °C. The top heater
and the convection fan are operating during the process of searing the meat. After
this stage the food is cooked gently by the low temperature of pre-selection. This
process is done while the top and the bottom heaters are operating. This mode is
suitable for meat roasts and poultry.
Food Accessory Level Temp. (°C) Time (hrs.)
Roast beef Wire rack +
Universal tray
3
1
80-100 3-4
Pork roast Wire rack +
Universal tray
3
1
80-100 4-5
Lamb roast Wire rack +
Universal tray
3
1
80-100 3-4
Duck breast Wire rack +
Universal tray
3
1
80-100 2-3
Dual cook
Before using dual cook function insert the divider into the oven. We recommend
preheat the oven for best results.
The following table presents 5 dual cook guides we recommended for cooking,
roasting and baking. Using dual cook function, you will be able to cook your main
dish & side dish or main dish & dessert simultaneously.
• Using dual cook function, preheating time can be extended.
No. Zone Food Accessory Level Type of
heating
Temp.
(°C)
Time
(min.)
1 Upper Sponge cake Wire rack,
Ø 25-26 cm
tin
4 160-170 40-45
Lower Homemade
pizza,
1.0-1.2 kg
Universal
tray
1 190-210 13-18
2 Upper Roast
vegetables,
0.4-0.8 kg
Universal
tray
4 220-230 13-18
Lower Apple pie Wire rack,
Ø 20 cm tin
1 160-170 70-80
3 Upper Pita bread Universal
tray
4 230-240 13-18
Lower Potato gratin,
1.0-1.5 kg
Wire rack,
22-24 cm
oven dish
1 180-190 45-50
NV75R7676RB_EU_DG68-01054H-00_EN.indd 30 4/17/2019 5:24:17 PM
English 31
Cooking smart
No. Zone Food Accessory Level Type of
heating
Temp.
(°C)
Time
(min.)
4 Upper Chicken,
drumstick
Wire rack
+ Universal
tray
4
4
230-250 30-35
Lower Lasagne,
1.0-1.5 kg
Wire rack,
22-24 cm
oven dish
1 190-200 30-35
5 Upper Fish llet,
baked
Wire rack
+ Universal
tray
4
4
210-230 15-20
Lower Apple puff
pastry
Universal
tray
1 170-180 25-30
You can also use upper or lower zone only to save power. The cooking time can be
extended when you use separated zone. We recommend preheat the oven for best
results.
Upper
Food Accessory Level Type of
heating
Temp. (°C) Time (min.)
Potato gratin Wire rack,
22-24 cm oven
dish
4 160-170 40-50
Scones Universal tray 4 180-190 30-35
Lasagne Wire rack,
22-24 cm oven
dish
4 180-190 25-35
Chicken,
drumstick *
Wire rack +
Universal tray
4
4
230-250 30-35
* Do not preheat the oven.
NV75R7676RB_EU_DG68-01054H-00_EN.indd 31 4/17/2019 5:24:18 PM
32 English
Cooking smart
Cooking smart
Lower
Food Accessory Level Type of
heating
Temp. (°C) Time (min.)
Dutch loaf cake Wire rack,
24 cm loaf
cake tin
1 170-180 50-60
Marble cake Wire rack,
Gugelhopf tin
1 160-170 60-70
Apple pie Wire rack,
Ø 20 cm tin
1 160-170 70-80
Homemade
pizza,
1.0-1.2 kg
Universal tray 1 190-210 13-18
ECO convection
This mode uses the optimized heating system so that you save the energy during
cooking your dishes. The times of this category are suggested to not be preheated
before cooking for saving more energy.
Food Accessory Level Temp. (°C) Time (min.)
Fruit crumble,
0.8-1.2 kg
Wire rack, 24 cm
oven dish
2 160-180 60-80
Jacket potatoes,
0.4-0.8 kg
Universal tray 2 190-200 70-80
Sausages,
0.3-0.5 kg
Wire rack +
Universal tray
3
1
160-180 20-30
Frozen oven chips,
0.3-0.5 kg
Universal tray 3 180-200 25-35
Frozen potato
wedges, 0.3-0.5 kg
Universal tray 3 190-210 25-35
Fish llets, baked,
0.4-0.8 kg
Wire rack +
Universal tray
3
1
200-220 30-40
Crispy sh llets,
breaded, 0.4-0.8 kg
Wire rack +
Universal tray
3
1
200-220 30-45
Roast sirloin of
beef, 0.8-1.2 kg
Wire rack +
Universal tray
2
1
180-200 65-75
Roast vegetables,
0.4-0.6 kg
Universal tray 3 200-220 25-35
NV75R7676RB_EU_DG68-01054H-00_EN.indd 32 4/17/2019 5:24:18 PM
English 33
Cooking smart
Dual cook – eco convection mode
You can alse use eco convection mode at upper or lower zone to save power.
The times of this category are sugessted to not be preheated before cooking for
saving more energy.
Upper
Food Accessory Level Temp. (°C) Time (min.)
Lasagne Wire rack,
22-24 cm oven
dish
4 180-200 30-45
Frozen oven chips Universal tray 4 200-210 25-35
Frozen potato wedges Universal tray 4 200-210 25-35
Roast sirloin of beef Wire rack +
Universal tray
4
4
170-180 60-80
Lower
Food Accessory Level Temp. (°C) Time (min.)
Marble cake Wire rack,
Gugelhopf tin
1 170-180 60-70
Dutch loaf cake Wire rack,
24 cm loaf cake
tin
1 170-180 50-60
Jacket potatoes Universal tray 1 190-200 70-90
Frozen pizza Wire rack 1 200-210 25-30
Auto cook programmes
CAUTION
Foods that can easily spoil (such as milk, eggs, sh, meat, or poultry) should not
stand in the oven for more than 1 hour before cooking begins, and should be
removed promptly when cooking is completed. Eating spoiled food can result in
sickness from food poisoning.
Single cook
The following table presents 40 auto programmes for cooking, roasting and
baking.
It contains its quantities, weight ranges and appropriate recommendations.
Cooking modes and times have been pre-programmed for your convenience. You
will nd some recipes for the auto programmes in your instruction book.
Auto cook programmes 1 to 19, 38 and 39 include preheating and display the
preheating progress. Please put the food in the oven after preheating beep.
Then, press Cooking time to start Auto Cook.
WARNING
Always use oven gloves while taking out food.
Code Food Weight (kg) Accessory Level
A 1 Potato gratin
1.0-1.5 Wire rack 3
Prepare fresh potato gratin using an ovenproof
dish, 22-24 cm. Start programme, after
preheating beep sounds, put dish on the centre
of rack.
A 2 Vegetable gratin
0.8-1.2 Wire rack 3
Prepare fresh vegetable gratin using an
ovenproof dish, 22-24 cm. Start programme,
after preheating beep sounds, put dish on the
centre of rack.
NV75R7676RB_EU_DG68-01054H-00_EN.indd 33 4/17/2019 5:24:18 PM

34 English
Cooking smart
Cooking smart
Code Food Weight (kg) Accessory Level
A 3 Pasta bake
1.2-1.5 Wire rack 3
Prepare pasta gratin using 22-24 cm ovenproof
dish. Start programme, after preheating beep
sounds, put dish on the centre of rack.
A 4 Lasagne
1.0-1.5 Wire rack 3
Prepare homemade lasagna using 22-24 cm
ovenproof dish. Start programme, after
preheating beep sounds, put dish on the centre
of rack.
A 5 Ratatouille
1.2-1.5 Wire rack 3
Put ingredients for Ratatouille in casserole dish
with lid. Start programme, after preheating beep
sounds, put dish on the centre of rack. Bake
covered. Stir before serving.
A 6 Apple pie
1.2-1.4 Wire rack 2
Prepare apple pie using a 24-26 cm round metal
baking tin. Start programme, after preheating
beep sounds, put tin on the centre of rack.
A 7 Croissant
0.3-0.4 Universal tray 3
Prepare croissants (chilled ready dough).
Put on baking paper on universal tray. Start
programme, after preheating beep sounds, put
tray into the oven.
A 8 Apple puff pastry
0.3-0.4 Universal tray 3
Put apple puff pastries on baking paper
on universal tray. Start programme, after
preheating beep sounds, put tray into the oven.
Code Food Weight (kg) Accessory Level
A 9 Fruit an base
0.4-0.5 Wire rack 3
Put the dough into a black metal buttered
baking dish for cake base. Start programme,
after preheating beep sounds, put tin on the
centre of rack.
A 10 Quiche Lorraine
1.2-1.5 Wire rack 2
Prepare quiche dough, put in a round quiche
dish with 25 cm diameter. Start programme,
after preheating beep sounds add lling and put
dish on the centre of rack.
A 11 White loaf of bread
0.6-0.7 Wire rack 3
Prepare dough and put into a black metal
rectangular baking dish (length 25 cm). Start
programme, after preheating beep sounds put
dish on the centre of rack.
A 12
Mixed Grain loaf of
bread
0.8-0.9 Wire rack 3
Prepare dough and put into a black metal
rectangular baking dish (length 25 cm). Start
programme, after preheating beep sounds put
dish on the centre of rack.
A 13 Bread rolls
0.3-0.5 Universal tray 3
Prepare rolls (chilled ready dough). Put
on baking paper on universal tray. Start
programme, after preheating beep, put tray into
the oven.
NV75R7676RB_EU_DG68-01054H-00_EN.indd 34 4/17/2019 5:24:18 PM
English 35
Cooking smart
Code Food Weight (kg) Accessory Level
A 14 Fruit crumbles
0.8-1.2 Wire rack 3
Put fresh fruits (raspberries, blackberries, apple
slices, or pear slices) into oven dish 22-24 cm.
Distribute crumbles on top. Start programme,
after preheating beep sounds, put dish on the
centre of rack.
A 15 Scones
0.5-0.6 Universal tray 3
Put scones (5-6 cm diameter) on baking paper
on universal tray. Start programme, after
preheating beep sounds, put tray into the oven.
A 16 Sponge cake
0.5-0.6 Wire rack 3
Prepare cake batter and put into a black metal
round baking tin with 26 cm diameter. Start
programme, after preheating beep sounds, put
tin on the centre of rack.
A 17 Marble cake
0.7-0.8 Wire rack 2
Prepare cake batter and put into a metal round
gugelhupf or bundt tin. Start programme, after
preheating beep sounds, put tin on the centre of
rack.
A 18 Dutch loaf cake
0.7-0.8 Wire rack 2
Prepare cake batter and put into a black metal
rectangular baking dish (length 25 cm). Start
programme, after preheating beep sounds, put
tin on the centre of rack.
A 19 Brownies
0.7-0.8 Wire rack 3
Prepare cake batter using a 20-24 cm ovenproof
dish. Start programme, after preheating beep
sounds, put dish on the centre of rack.
Code Food Weight (kg) Accessory Level
A 20 Roast sirloin of beef
0.8-1.3
Wire rack 2
Universal tray 1
Season the beef and leave in refrigerator for
1 hour.
Put on the wire-rack with fat-side up.
A 21
Slow Cooked Roast
Beef
0.8-1.3
Wire rack 2
Universal tray 1
Season the beef and leave in refrigerator for
1 hour.
Put on the wire-rack with fat-side up.
A 22
Herb Roasted Lamb
Chops
0.4-0.9
Wire rack 4
Universal tray 1
Marinate the lamb chops with herbs and spices
and put them on wire rack.
A 23
Leg of Lamb on the
bone
1.0-1.5
Wire rack 3
Universal tray 1
Marinate the lamb and put on wire rack.
A 24
Roast Pork with
Crackling
0.8-1.3
Wire rack 3
Universal tray 2
Put pork roast with fat side to the top on wire
rack.
A 25 Rack of Pork Ribs
0.8-1.3
Wire rack 3
Universal tray 3
Put rack of pork rib on rack.
NV75R7676RB_EU_DG68-01054H-00_EN.indd 35 4/17/2019 5:24:18 PM
36 English
Cooking smart
Cooking smart
Code Food Weight (kg) Accessory Level
A 26 Chicken, Whole
1.0-1.5
Wire rack 2
Universal tray 1
Rinse and clean chicken. Brush chicken with oil
and spices. Put it breast side down on the rack
and turn over as soon as the oven beeps.
A 27 Chicken, Breast
0.5-1.0
Wire rack 4
Universal tray 1
Marinate breasts and put on the rack.
A 28 Chicken Drumstick
0.5-1.0
Wire rack 4
Universal tray 1
Brush with oil and spices and put on rack.
A 29 Duck, Breast
0.3-0.8
Wire rack 4
Universal tray 1
Put duck breasts with fat-side up on the rack.
The rst setting is for medium, the second for
medium- well done cooking level.
A 30 Trout llet, bake
0.3-0.8 Universal tray 4
Put trout llets with the skin side up on the
universal tray.
A 31 Trout
0.3-0.8
Wire rack 4
Universal tray 1
Rinse and clean the sh and put head to tail on
the rack. Add lemon juice, salt and herbs inside
sh. Cut skin surface with knife. Brush oil and
salt.
Code Food Weight (kg) Accessory Level
A 32 Sole
0.3-0.8 Universal tray 3
Put sole on baking paper on the universal tray.
Cut surface with knife.
A 33 Salmon steak/llet
0.3-0.8
Wire rack 4
Universal tray 1
Rinse and clean llets or steaks. Put llets skin
side up on rack.
A 34 Roast vegetable
0.3-0.8 Universal tray 4
Rinse and prepare slices of courgette, egg plant,
pepper, onion and cherry tomatoes. Brush with
olive oil, herbs and spices. Distribute evenly on
universal tray.
A 35 Baked potato halves
0.5-1.0 Universal tray 3
Cut large potatoes (each 200 g) into halves
lengthways. Put with cut side up on universal
tray and brush with olive oil, herbs and spices.
A 36 Frozen Oven Chips
0.3-0.8 Universal tray 3
Distribute frozen oven chips evenly on universal
tray.
A 37 Frozen potato wedges
0.3-0.8 Universal tray 3
Distribute frozen potato wedges evenly on
universal tray.
A 38 Frozen Pizza
0.3-0.8 Wire rack 3
Start programme, after preheating beep sounds,
put the frozen pizza on the middle of the wire
rack. The rst setting is for thin Italian pizza, the
second setting for thick pan pizza.
NV75R7676RB_EU_DG68-01054H-00_EN.indd 36 4/17/2019 5:24:18 PM

English 37
Cooking smart
Code Food Weight (kg) Accessory Level
A 39 Homemade Pizza
0.8-1.3 Universal tray 2
Prepare homemade pizza with the yeast dough
and put it on the universal tray. The weight
include dough and topping such as sauce,
vegetables, ham and cheese. Start programme,
after preheating beep sounds, put tray into the
oven.
A 40 Dough Proong
0.3-0.8 Wire rack 2
Prepare dough in bowl, cover with cling lm.
Put in centre of rack. The rst setting is for pizza
and cake dough, the second setting for bread
dough.
Dual cook
The following table presents 10 auto programmes for cooking, roasting and
baking. You can use only upper zone or lower zone and use the upper and lower
zones at the same time.
The programme contains its quantities, weight ranges and appropriate
recommendations. Cooking modes and times have been pre-programmed for
your convenience. You will nd some recipes for the auto programmes in your
instruction book.
All dual auto cook programmes include preheating and display the preheating
progress.
Please put the food in the oven after preheating beep. Then, press Cooking time to
start Auto Cook.
WARNING
Always use oven gloves while taking out food.
1. Upper
Code Food Weight (kg) Accessory Level
A 1 Potato gratin
1.0-1.5 Wire rack 4
Prepare fresh potato gratin using an
ovenproof dish, 22-24 cm. Start programme,
after preheating beep sounds, put dish on the
centre of rack.
A 2 Lasagne
1.0-1.5 Wire rack 4
Prepare homemade lasagna using 22-24 cm
ovenproof dish. Start programme, after
preheating beep sounds, put dish on the
centre of rack.
A 3 Chicken Drumstick
0.5-1.0
Wire rack 4
Universal tray 4
Brush with oil and spices and put on rack.
NV75R7676RB_EU_DG68-01054H-00_EN.indd 37 4/17/2019 5:24:19 PM
38 English
Cooking smart
Cooking smart
Code Food Weight (kg) Accessory Level
A 4 Baked potato halves
0.5-1.0 Universal tray 4
Cut large potatoes (each 200 g) into halves
lengthways. Put with cut side up on universal
tray and brush with olive oil, herbs and
spices.
A 5 Frozen oven chips
0.3-0.8 Universal tray 4
Distribute frozen oven chips evenly on
universal tray.
2. Lower
Code Food Weight (kg) Accessory Level
A 1 Apple pie
1.2-1.4 Wire rack 1
Prepare apple pie using a 24-26 cm round
metal baking tin. Start programme, after
preheating beep sounds, put tin on the centre
of rack.
A 2 Apple puff pastry
0.3-0.4 Universal tray 1
Put apple puff pastries on baking paper
on universal tray. Start programme, after
preheating beep sounds, put tray into the
oven.
A 3 Quiche Lorraine
1.2-1.5 Wire rack 1
Prepare quiche dough, put in a round quiche
dish with 25 cm diameter. Start programme,
after preheating beep sounds add lling and
put dish on the centre of rack.
Code Food Weight (kg) Accessory Level
A 4 Frozen Pizza
0.3-0.8 Wire rack 1
Start programme, after preheating beep
sounds, put the frozen pizza on the middle
of the wire rack. The rst setting is for thin
Italian pizza, the second setting for thick pan
pizza.
A 5 Home made Pizza
0.8-1.3 Universal tray 1
Prepare homemade pizza with the yeast
dough and put it on the universal tray. The
weight include dough and topping such as
sauce, vegetables, ham and cheese. Start
programme, after preheating beep sounds,
put tray into the oven.
3. Twin
You can select one auto programme for the lower and upper zones and cook
simultaneously.
CAUTION
When you use either the upper or lower zone, the fan and the heater of the other
zone may operate for optimal performance. The zone that is not being used must
not be used for any unintended purposes.
NV75R7676RB_EU_DG68-01054H-00_EN.indd 38 4/17/2019 5:24:19 PM
English 39
Cooking smart
Test dishes
According to standard EN 60350-1
1. Baking
The recommendations for baking refer to a preheated oven. Do not use the fast
preheat function. Always put trays the slanted side to the door front.
Type of
food
Accessory Level
Type of
heating
Temp.
(°C)
Time
(min.)
Small cakes Universal tray 3 165 23-28
3 155 25-35
1+3 155 30-35
Shortbread Universal tray +
Universal tray
1+3 140 30-35
Fatless
sponge
cake
Wire rack +
Spring form cake tin
(Dark coated, ø 26 cm)
2 160 30-35
2 160 35-40
1+4 155 40-45
Apple pie Wire rack +
2 Spring form cake tins
* (Dark coated, ø 20 cm)
2, placed
diagonally
160 70-80
Universal tray +
Wire rack +
2 Spring form cake tins
** (Dark coated,
ø 20 cm)
1+3 160 80-90
* Two cakes are arranged on the grid at the back left and at the front right.
** Two cakes are arranged in the center on top of each other.
2. Grilling
Preheat the empty oven for 5 minutes using Large Grill function.
Type of
food
Accessory Level
Type of
heating
Temp.
(°C)
Time
(min.)
White bread
toast
Wire rack 5 300
(max)
1-2
Beef
burgers *
(12 ea)
Wire rack +
Universal tray
(to catch drippings)
4
1
300
(max)
1
st
15-18
2
nd
5-8
* Turn over after
2
/3 of the cooking time.
3. Roasting
Type of
food
Accessory Level
Type of
heating
Temp.
(°C)
Time
(min.)
Whole
chicken *
Wire rack +
Universal tray
(to catch drippings)
3
1
200 65-80
*
* Turnover after half of time.
NV75R7676RB_EU_DG68-01054H-00_EN.indd 39 4/17/2019 5:24:19 PM

40 English
Cooking smart
Cooking smart
Collection of frequent auto cook recipes
Potato gratin
Ingredients 800 g potatoes, 100 ml milk, 100 ml cream, 50 g beaten whole
egg, 1 tbsp each of salt, pepper, nutmeg, 150 g grated cheese,
butter, thyme
Directions Peel potatoes and slice them to 3 mm thickness. Rub the butter
all over the surface of a gratin dish (22-24 cm). Spread the
slices on a clean towel and keep them covered with the towel
while you prepare the rest of the ingredients.
Mix the rest of the ingredients except for grated cheese into
a large bowl and stir well. Layer the potato slices in the dish
slightly overlapping and pour the mixture over the potatoes.
Spread the grated cheese over the top and bake. After cooking,
serve sprinkled with a few fresh thyme leaves.
Vegetable gratin
Ingredients 800 g vegetables (courgette, tomato, onion, carrot, pepper, pre-
cooked potatoes), 150 ml cream, 50 g beaten whole egg, 1 tbsp
each of salt, herb (pepper, parsley or rosemary), 150 g grated
cheese, 3 tbsp olive oil, some thyme leaves
Directions Wash the vegetables and slice them to 3-5 mm thickness. Layer
the slices on a gratin dish (22-24 cm) and pour the oil on the
vegetables. Mix the rest of the ingredients except for grated
cheese and pour on the vegetables. Spread the grated cheese
over the top and bake. Then serve sprinkled with a few fresh
thyme leaves.
NV75R7676RB_EU_DG68-01054H-00_EN.indd 40 4/17/2019 5:24:19 PM

English 41
Cooking smart
Apple pie
Ingredients • Pastry: 275 g our,
1
/2 tbsp salt, 125 g white castor sugar,
8 g vanilla sugar, 175 g cold butter, 1 egg(beaten)
• Filling: 750 g rm whole apples, 1 tbsp lemon juice, 40 g
sugar,
1
/2 tbsp cinnamon, 50 g seedless raisins, 2 tbsp
bread crumbs
Directions Sift the our with the salt above a big bowl. Sift the castor
sugar and vanilla sugar with it. Cut with 2 knives the butter
through the our in small cubes. Add
3
/4 of the beaten egg.
Knead all the ingredients in the food processor until a crumbly
mass appears. Form the dough into a ball with your hands.
Wrap it in plastic foil and leave it chilled for about 30 min.
Grease the spring tin (24-26 cm diameter) and dust the surface
with our. Roll out
3
/4 of the dough till 5 mm thickness. Put it in
the tin (bottom and sides).
Peel and core the apples. Cut them in cubes of about
3
/4 x
3
/4 cm. Sprinkle the apples with lemon juice and mix well.
Wash and dry the currants and raisins. Add sugar, cinnamon,
raisins and currants. Mix well and sprinkle the bottom of dough
with bread crumbs. Press slightly.
Roll out the rest of the dough. Cut the dough in small strips and
put them cross wise on the lling. Brush the pie evenly with
the rest of the beaten egg.
Lasagne
Ingredients 2 tbsp olive oil, 500 g minced beef, 500 ml tomato sauce,
100 ml beef stock, 150 g dried lasagne sheets, 1 onion
(chopped), 200 g grated cheese, 1 tsp each of dried parsley
akes, oregano, basil
Directions Prepare tomato meat sauce. Heat the oil in a frying pan, then
cook the minced beef and chopped onion for about 10 min
until browned all over. Pour over the tomato sauce and beef
stock, add the dried herbs. Bring up to the boil, then simmer for
30 min.
Cook lasagne noodles according to package directions. Layer
the lasagne noodle, meat sauce, and cheese then repeat. Then
sprinkle evenly with remaining cheese on the top of layer of
noodles and bake.
NV75R7676RB_EU_DG68-01054H-00_EN.indd 41 4/17/2019 5:24:19 PM

42 English
Cooking smart
Cooking smart
Homemade pizza
Ingredients • Pizza dough: 300 g our, 7 g dried yeast, 1 tbsp olive oil,
200 ml warm water, 1 tbsp sugar and salt
• Topping: 400 g sliced vegetable (aubergine, courgette,
onion, tomato), 100 g ham or bacon(chopped), 100 g
grated cheese
Directions Put the our, yeast, oil, salt, sugar and warm water in a bowl
and mix to a wettish dough. Knead in a mixer or by hand
about 5-10 min. Cover with lid and place in oven for 30 min
at 35 °C to prove. Roll out the dough on a oured surface into
a rectangle shape and put on the tray or pizza pan. Spread the
tomato puree on the dough and place ham, mushroom, olive
and tomato. Sprinkle evenly with cheese on the top and bake.
Roast sirloin of beef
Ingredients 1 kg sirloin of beef joint, 5 g salt, 1 g pepper, 3 g each of
rosemary, thyme
Directions Season the beef with salt, pepper and rosemary and leave in
refrigerator for 1 hour. Put on the Wire rack. Put it in the oven
and cook.
Quiche Lorraine
Ingredients • Pastry: 200 g plain our, 80 g butter, 1 egg
• Filling: 75 g cubed fatless bacon, 125 ml cream, 125 g
crème fraiche, 2 eggs, beaten, 100 g grated cheese from
Switzerland, salt and pepper
Directions To make the pastry, put the our, butter and egg in a bowl and
mix to a soften pastry and then rest it in the refrigerator for
30 min. Roll out the pastry and placed in the greased ceramic
dish for quiche (25 cm diameter). Prick the bottom with a fork.
Mix the egg, cream, crème fraiche, cheese, salt and pepper.
Pour it on the pastry just before baking.
Fruit crumbles
Ingredients • Topping: 200 g our, 100 g butter, 100 g sugar, 2 g salt,
2 g cinnamon powder
• Fruit: 600 g mixed fruits
Directions Mix all ingredients until to be crumble for making topping.
Spread the mixed fruits into an oven dish and sprinkle the
crumble.
NV75R7676RB_EU_DG68-01054H-00_EN.indd 42 4/17/2019 5:24:19 PM

English 43
Maintenance
Maintenance
Cleaning
For easier cleaning, regularly clean the oven.
WARNING
• Make sure the oven and accessories are cool before cleaning.
• Do not use abrasive cleaning agents, hard brushes, scouring pads or cloths,
steel wool, knives or any other abrasive materials.
Oven interior
• For cleaning the interior of the oven, use a clean cloth and a mild cleaning
agent or warm soapy water.
• Do not hand-clean the door seal.
• To avoid damaging the enamelled oven surfaces, only use standard oven
cleaners.
• To remove stubborn soils, use a special oven cleaner.
Oven exterior
For cleaning the exterior of the oven such as the oven door, handle, and display,
use a clean cloth and a mild cleaning detergent or warm soapy water, and dry with
a kitchen roll or dry towel.
Grease and dirt can remain, especially around the handle because of the hot air
coming from inside. It is recommended to clean the handle after each use.
Accessories
Wash the accessories after every use, and dry it with a tea towel. To remove
stubborn impurities, soak the used accessories in warm soapy water for about
30 minutes before washing.
Catalytic enamel surface (applicable models only)
The removable parts are coated with dark grey catalytic enamel. They can be
soiled with oil and fat spattered by the circulating air during convection heating.
However, these impurities burn off at oven temperatures of 200 °C or above.
1. Remove all accessories from the oven.
2. Clean the interior of the oven.
3. Select Convection mode with max temperature, and run the cycle for an hour.
Herb roasted lamb chops
Ingredients 1 kg lamb chops (6 pieces), 4 large garlic cloves (pressed),
1 tbsp fresh thyme (crushed), 1 tbsp fresh rosemary(crushed),
2 tbsp salt, 2 tbsp olive oil
Directions Mix the salt, garlic, herbs and oil and add the lamb. Turn to coat
and leave at a room temperature at least 30 min to 1 hour.
Rack of Pork rib
Ingredients 2 racks pork spare ribs, 1 tbsp black peppercorns, 3 bay leaves,
1 onion (chopped), 3 garlic cloves (chopped), 85 g brown sugar,
3 tbsp Worcestershire sauce, 2 tbsp Tomato puree, 2 tbsp olive
oil
Directions Make a barbecue sauce. Heat oil in a sauce pan and add the
onion. Cook until softened and add remaining ingredients.
Broil and reduce heat and simmer for 30 min until thickened.
Marinate the rib with the barbecue sauce at least 30 min to
1 hour.
NV75R7676RB_EU_DG68-01054H-00_EN.indd 43 4/17/2019 5:24:19 PM

44 English
Maintenance
Maintenance
Ceiling (applicable models only)
1. Put down the grill heater. For this, turn
the circular nut anticlockwise while
holding the grill heater. The grill heater
is not a removable part. Do not force
the grill heater down.
01
01 Approx. 12°
2. Clean the ceiling of the oven with
soapy water and a clean cloth.
3. When done, put the grill heater back
and turn the circular nut clockwise.
Door
1. Tie the wet tissue to stick.
2. Put on the towel below door.
3. Clean the door.
4. Apply detergent to tissue and clean
again.
5. Wipe the dry tissue to the moisture and
bubble.
CAUTION
Do not detach the door for cleaning.
NV75R7676RB_EU_DG68-01054H-00_EN.indd 44 4/17/2019 5:24:20 PM
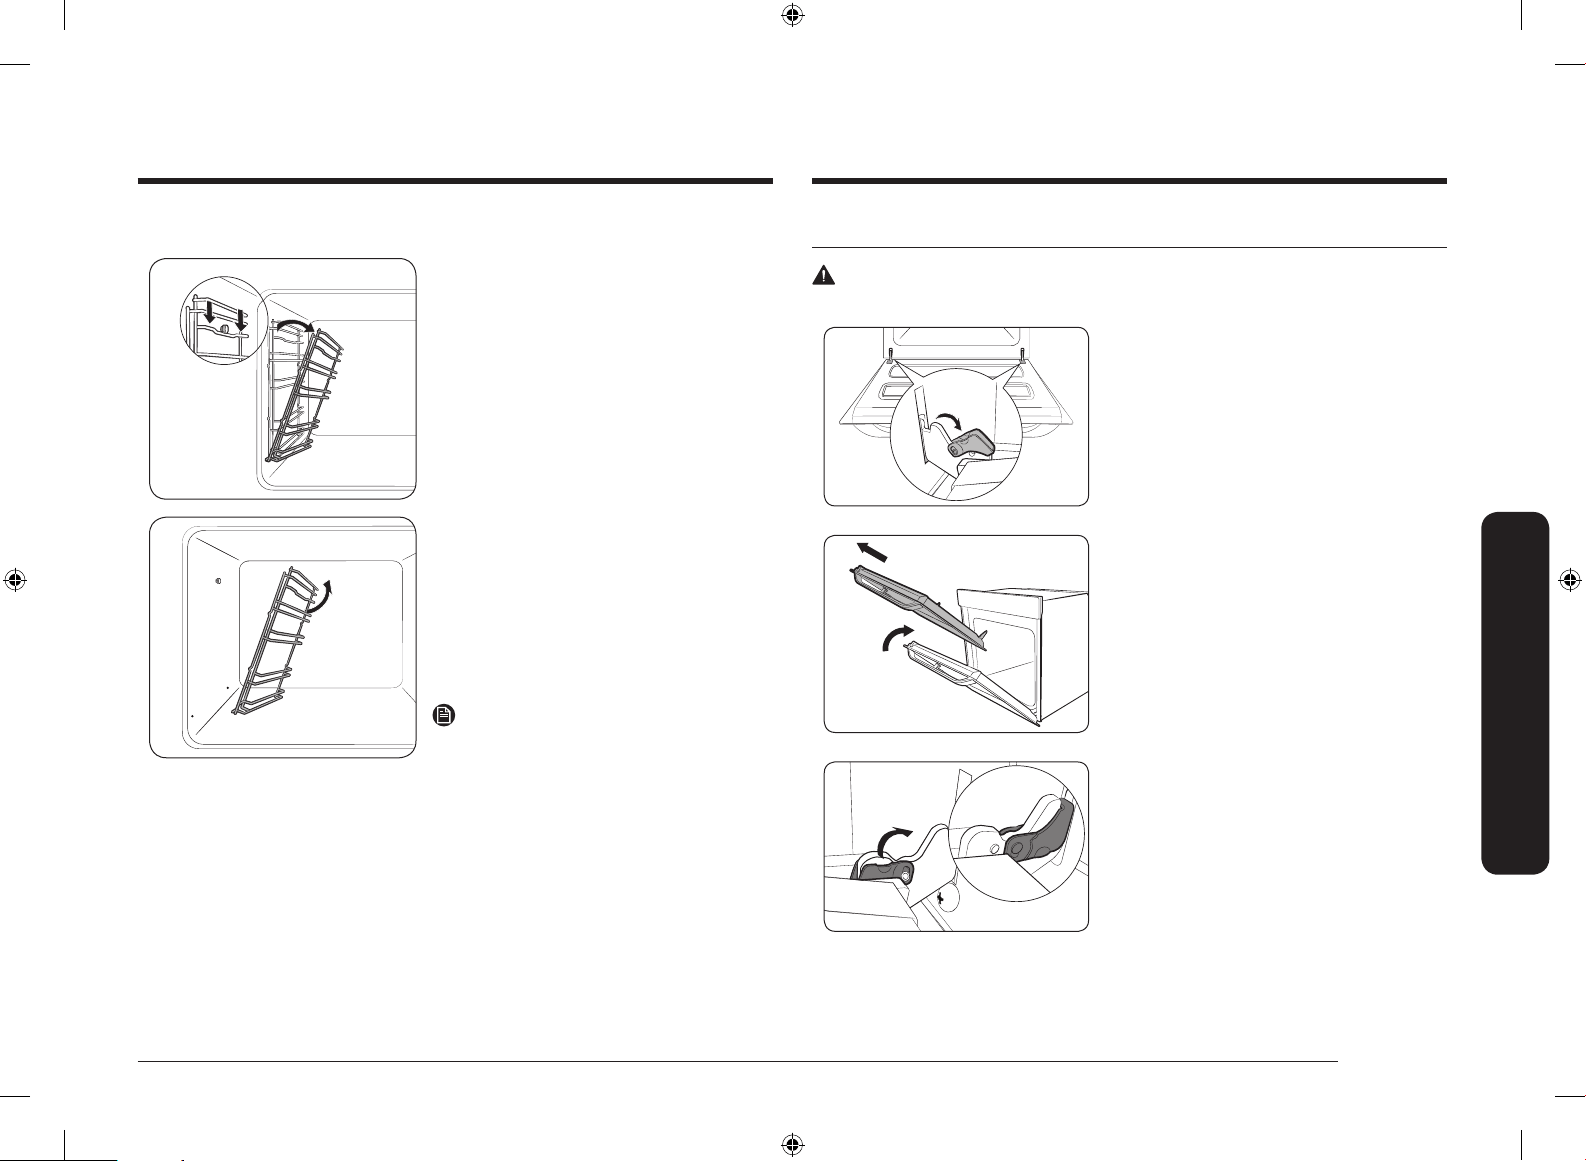
English 45
Maintenance
Side racks (applicable models only)
1. Press the top line of the left side rack,
and lower by approximately 45°.
2. Pull and remove the bottom line of the
left side rack.
3. Remove the right side rack in the same
way.
4. Clean both side racks.
5. When done, follow steps 1 to 2 above
in the reverse order to reinsert the side
racks.
NOTE
The oven operates without the side racks
and racks in position.
Detaching the door
WARNING
The oven door is heavy.
1. Open the door and ip open the clips at
both hinges.
2. Close the door approximately 70°. Hold
the oven door by the sides using both
hands, and lift and pull upwards until
the hinges are removed.
3. When done, follow steps 1 to 2 in the
reverse order to reinstall the door. Make
sure the clips are hinged on both sides.
NV75R7676RB_EU_DG68-01054H-00_EN.indd 45 4/17/2019 5:24:21 PM

46 English
Troubleshooting
Maintenance Troubleshooting
Checkpoints
If you encounter a problem with the oven, rst check the table below and try the
suggestions. If the problem continues, contact a local Samsung service centre.
Problem Cause Action
The buttons cannot
be pressed properly.
• If there is foreign
matter caught
between the buttons.
• Touch model: if there
is moisture on the
exterior.
• If the lock function
is set.
• Remove the foreign
matter and try again.
• Remove the moisture
and try again.
• Check whether the
lock function is set.
The time is not
displayed.
• If there is no power
supplied.
• Check whether there
is power supplied.
The oven does not
work.
• If there is no power
supplied.
• Check whether there
is power supplied.
The oven stops while
in operation.
• If it is unplugged from
the power socket.
• Reconnect the power.
The power turns off
during operation.
• If continuous cooking
takes a long time.
• If the cooling fan does
not work.
• If the oven is installed
in a place without
good ventilation.
• When using several
power plugs in the
same socket.
• After cooking for a
long time, let the oven
cool.
• Listen for the sound
of the cooling fan.
• Keep the gaps
specied in the
product installation
guide.
• Use a single plug.
There is no power to
the oven.
• If there is no power
supplied.
• Check whether there
is power supplied.
Replacement
Bulbs
1. Remove the glass cap by turning anti-
clockwise.
2. Replace the oven light.
3. Clean the glass cap.
4. When done, follow step 1 above in the
reverse order to reinsert the glass cap.
WARNING
• Before replacing a bulb, turn off the oven and unplug the power cord.
• Use only 25-40 W / 220-240 V, 300 °C heat-resistant bulbs. You can purchase
approved bulbs at a local Samsung service center.
• Always use a dry cloth when handling a halogen bulb. This is to prevent the
bulb from being tampered with ngerprints or sweat, resulting in a shortened
lifecycle.
Side oven light
1. Hold the lower end of the cover of the
side oven light with one hand, and use
a at-sharp tool such as a table knife to
remove the cover as shown.
2. Replace the side oven light.
3. Reinsert the light cover.
NV75R7676RB_EU_DG68-01054H-00_EN.indd 46 4/17/2019 5:24:22 PM
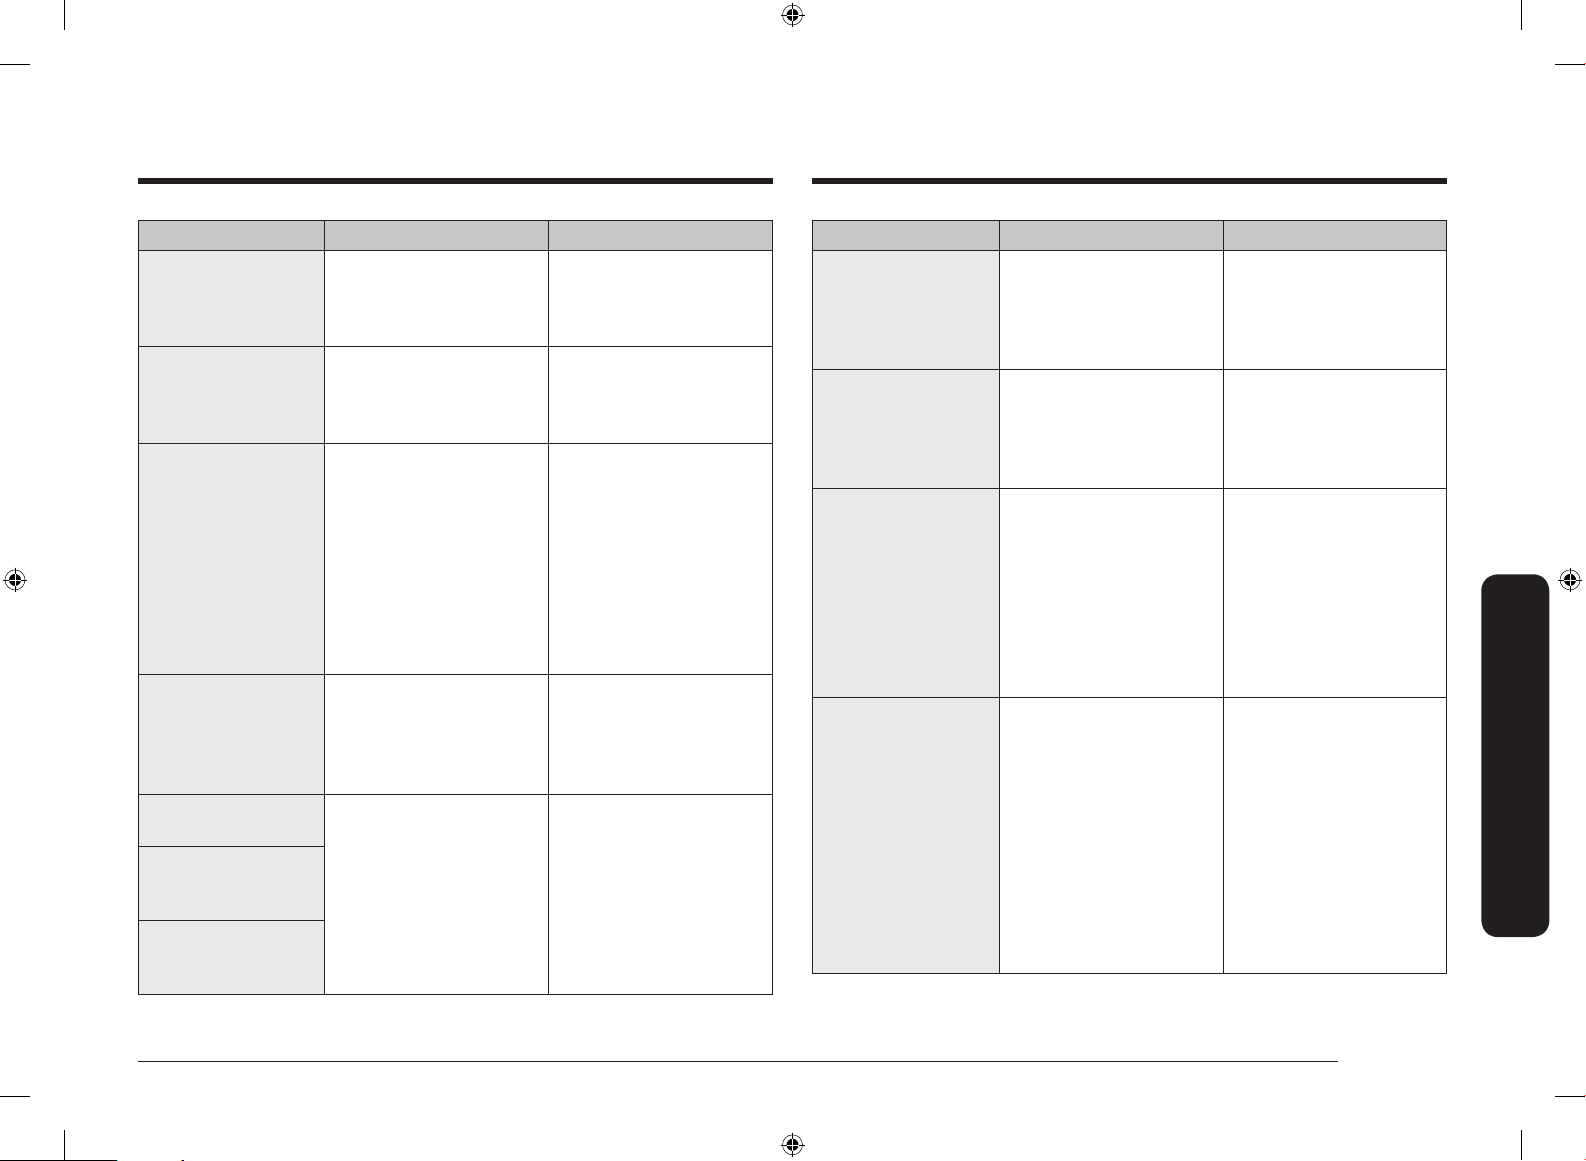
English 47
Troubleshooting
Problem Cause Action
The brightness inside
the oven varies.
• The brightness
changes depending
on power output
changes.
• Power output changes
during cooking are
not malfunctions, so
there is no need to
worry.
Cooking is nished,
but the cooling fan is
still running.
• The fan automatically
runs for a certain
amount of time to
ventilate inside the
oven.
• This is not a product
malfunction, so there
is no need to worry.
The oven does not
heat.
• If the door is open.
• If oven controls are
not correctly set.
• If the household fuse
has been blown or the
circuit breaker has
been tripped.
• Close the door and
restart.
• Refer to the chapter
on oven operation and
reset the oven.
• Replace the fuse or
reset the circuit. If it
happens repeatedly,
call an electrician.
Smoke comes out
during operation.
• During initial
operation.
• If there is food on the
heater.
• Smoke may come
from the heater
when you rst use
the oven. This is not
a malfunction, and if
you run the oven 2-3
times, it should stop
happening.
• Let the oven cool
sufciently and
remove the food from
the heater.
Problem Cause Action
The oven exterior
is too hot during
operation.
• If the oven is installed
in a place without
good ventilation.
• Keep the gaps
specied in the
product installation
guide.
The door cannot be
opened properly.
• If there is food
residue stuck between
the door and product
interior.
• Clean the oven well
and then open the
door again.
The interior light is
dim or does not turn
on.
• If the lamp turns on
and then off.
• If the lamp is covered
by foreign matter
during cooking.
• The lamp
automatically turns
off after a certain
amount of time to
save power. You can
turn it on again by
pressing the oven
light button.
• Clean the inside of the
oven and then check.
Electric shock occurs
on the oven.
• If the power is not
properly grounded.
• If you are using
a socket without
grounding.
• Check whether the
power supply is
properly grounded.
There is water
dripping.
• There may be water
or steam in some
cases depending on
the food. This is not a
product malfunction.
• Let the oven cool and
then wipe with a dry
dish towel.
There is steam
through a crack in the
door.
There is water
remaining in the
oven.
NV75R7676RB_EU_DG68-01054H-00_EN.indd 47 4/17/2019 5:24:22 PM
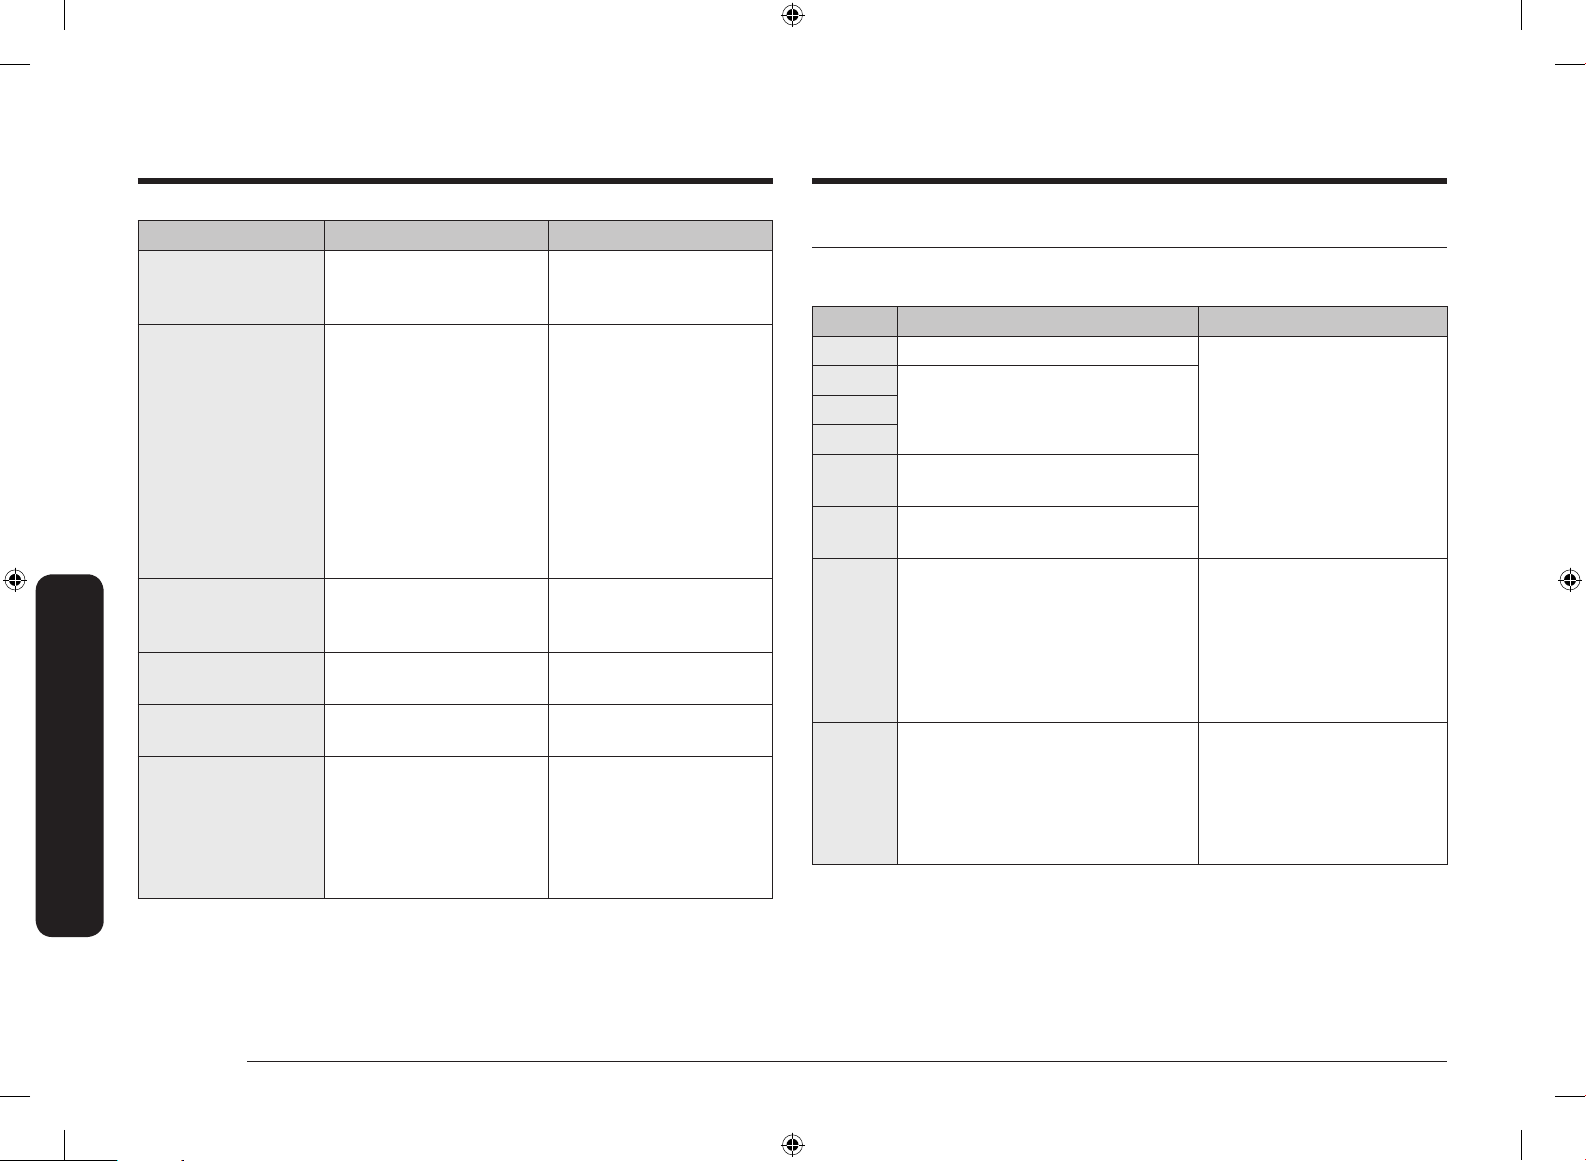
48 English
Troubleshooting
Troubleshooting
Problem Cause Action
There is a burning or
plastic smell when
using the oven.
• If using plastic or
other containers that
are not heat-resistant.
• Use glass containers
suitable for hot
temperatures.
The oven does not
cook properly.
• If the door is often
opened during
cooking.
• Do not frequently
open the door unless
you are cooking
things that need to
be turned. If you
frequently open the
door, the interior
temperature will be
lower and this may
affect the results of
your cooking.
Steam cleaning does
not work.
• This is because the
temperature is too
high.
• Let the oven cool and
then use.
Dual cook mode does
not work.
• If the divider is not
properly assembled.
• Insert the divider
correctly and use.
Single cook mode
does not work.
• If the divider is
inserted in the oven.
• Take out the divider
and use.
The fan of the cavity,
that is not being
used in Dual cook,
is operating (or the
temperature of the
cavity is hot).
• For the best cooking
performance and
results, fan and the
heater of the cavity
that is not being used
may operate.
• This is not a product
malfunction, so there
is no need to worry.
Information codes
If the oven fails to operate, you may see an information code on the display. Check
the table below and try the suggestions.
Code Meaning Action
C-d1 Door lock malfunctions.
Turn off the oven and then
restart. If the problem
continues, turn off all power
for 30 seconds or more and
then reconnect. If the problem
is not xed, please contact a
service centre.
C-20
Sensor malfunctions.
C-21
C-22
C-F1
Only occurs during EEPROM Read/
Write.
C-F0
If there is no communication
between the main PCB and sub PCB.
C-F2
Occurs when a communication
problem is maintained between the
Touch IC <-> Main or Sub micom.
Turn off the oven and then
restart. If the problem
continues, turn off all power
for 30 seconds or more and
then reconnect. If the problem
is not xed, please contact a
service centre.
C-d0
Button problem
Occurs when a button is pressed and
held for a period of time.
Clean the buttons and make
sure there is no water on/
around them. Turn off the
oven and try again. If the
problem continues, contact a
local Samsung service centre.
NV75R7676RB_EU_DG68-01054H-00_EN.indd 48 4/17/2019 5:24:22 PM
English 49
Technical specications
Code Meaning Action
-dC-
If the divider is removed during
cooking in Dual cook mode.
If the divider is inserted during
cooking in Single cook mode.
The divider must not be
removed during cooking in
Dual cook mode.
Turn off the oven and then
restart. If the problem
continues, turn off all power
for 30 seconds or more and
then reconnect.
If the problem is not xed,
please contact a service
centre.
S-01
Safety shutoff
Oven has continued operating at
a set temperature for an extended
time.
• Under 105 °C - 16 hours
• From 105 °C to 240 °C - 8 hours
• From 245 °C to Max - 4 hours
This is not system failure. Turn
off the oven and remove food.
Thenm try again normally.
Technical specications
SAMSUNG strives to improve its products at all times. Both the design
specications and these user instructions are thus subject to change without
notice.
Dimensions (W x H x D) Outside 595 x 595 x 570 mm
Volume 75 liter
Weight Net 47.2 kg
Connection voltage 230–240 V
~
50 Hz
Maximum connected load power 3650-3950 W
NV75R7676RB_EU_DG68-01054H-00_EN.indd 49 4/17/2019 5:24:22 PM
50 English
Appendix
Appendix
Energy saving tips
• During cooking, the oven door should remain closed except for turning food
over. Do not open the door frequently during cooking to maintain the oven
temperature and to save energy.
• Plan oven use to avoid turning the oven off between cooking one item and
the next to save energy and reduce the time for re-heating the oven.
• If cooking time is more than 30 minutes, the oven may be switched off
5-10 minutes before the end of the cooking time to save energy. The residual
heat will complete the cooking process.
• Wherever possible cook more than one item at a time.
Appendix
Product data sheet
SAMSUNG SAMSUNG
Model identication NV75R7676RS / NV75R7676RB
Energy Efciency Index per cavity
(EEI cavity)
81.6
Energy Efciency Class per cavity A+
Energy consumption (electricity)
required to heat a standardised load in a
cavity of an electric heated oven during
a cycle in conventional mode per cavity
(electric nal energy) (EC electric cavity)
1.05 kWh/cycle
Energy consumption required to heat
a standardised load in a cavity of an
electric heated oven during a cycle in
fan-forced mode per cavity
(electric nal energy) (EC electric cavity)
0.71 kWh/cycle
Number of cavities 1
Heat source per cavity (electricity or gas) electricity
Volume per cavity (V) 75 L
Type of oven Built-in
Mass of the appliance (M) 47.2 kg
Data determined according to standard EN 60350-1, EN 50564, Commission
Regulations (EU) No 65/2014 and (EU) No 66/2014.
NV75R7676RB_EU_DG68-01054H-00_EN.indd 50 4/17/2019 5:24:22 PM

Memo
NV75R7676RB_EU_DG68-01054H-00_EN.indd 51 4/17/2019 5:24:22 PM

QUESTIONS OR COMMENTS?
COUNTRY CALL OR VISIT US ONLINE AT
AUSTRIA 0800 72 67 864 (0800-SAMSUNG) www.samsung.com/at/support
BELGIUM 02-201-24-18
www.samsung.com/be/support (Dutch)
www.samsung.com/be_fr/support (French)
DENMARK 707 019 70 www.samsung.com/dk/support
FINLAND 030-6227 515 www.samsung.com//support
FRANCE 01 48 63 00 00 www.samsung.com/fr/support
GERMANY 06196 77 555 77 www.samsung.com/de/support
ITALIA 800-SAMSUNG (800.7267864) www.samsung.com/it/support
CYPRUS 8009 4000 only from landline, toll free
www.samsung.com/gr/support
GREECE
80111-SAMSUNG (80111 726 7864) only from land line
(+30) 210 6897691 from mobile and land line
LUXEMBURG 261 03 710 www.samsung.com/be_fr/support
NETHERLANDS 088 90 90 100 www.samsung.com/nl/support
NORWAY 21629099 www.samsung.com/no/support
PORTUGAL 808 207 267 www.samsung.com/pt/support
SPAIN 0034902172678 www.samsung.com/es/support
SWEDEN 0771 726 786 www.samsung.com/se/support
SWITZERLAND 0800 726 78 64 (0800-SAMSUNG)
www.samsung.com/ch/support (German)
www.samsung.com/ch_fr/support (French)
UK 0330 SAMSUNG (7267864) www.samsung.com/uk/support
IRELAND (EIRE) 0818 717100 www.samsung.com/ie/support
DG68-01054H-00
NV75R7676RB_EU_DG68-01054H-00_EN.indd 52 4/17/2019 5:24:22 PM
Einbaubackofen
Benutzer- und Installationshandbuch
NV75R7676RS / NV75R7676RB
NV75R7676RB_EU_DG68-01054H-00_DE.indd 1 4/17/2019 5:24:39 PM

2 Deutsch
Inhalt
InhaltInhalt
Hinweise zu dieser Bedienungsanleitung 3
In diesem Benutzerhandbuch werden folgende Symbole verwendet: 3
Sicherheitshinweise 3
Wichtige Hinweise zur Sicherheit 3
Korrekte Entsorgung von Altgeräten (Elektroschrott) 6
Automatische Energiesparfunktion 6
Aufstellen des Geräts 7
Lieferumfang 7
Vorbereitung zur Installation des Ofens 8
Netzanschluss 8
Einbau in einen Küchenschrank 8
Vor der ersten Verwendung 10
Anfangseinstellungen 10
Gerüche in Neugeräten 11
Intelligenter Sicherheitsmechanismus 11
Zubehör 11
Flexible Tür 13
Mechanische Sicherung (nur bestimmte Modelle) 14
Doppelgarraumbetrieb 14
Bedienung 15
Bedienfeld 15
Häug genutzte Einstellungen 16
Betriebsarten 19
Temperaturbereiche im Doppelgarraumbetrieb 22
Unterbrechen des Garvorgangs 23
Sonderfunktionen 23
Automatikprogramme 24
Dampfreinigung 25
Pyrolysereinigung 25
Timer 26
Ton ein/aus 26
Verwendung 27
Manuelles Garen 27
Automatikprogramme 33
Testgerichte 39
Häug verwendete Rezepte für die Automatikprogramme 40
Pege 43
Reinigung 43
Ausbauen der Gerätetür 45
Ersetzen von Teilen 46
Fehlerbehebung 46
Problembeschreibungen 46
Informationscodes 48
Technische Daten 49
Anhang 50
Produktdatenblatt 50
NV75R7676RB_EU_DG68-01054H-00_DE.indd 2 4/17/2019 5:24:39 PM

Deutsch 3
Hinweise zu dieser Bedienungsanleitung
Sicherheitshinweise
Vielen Dank, dass Sie sich für einen Einbaubackofen von SAMSUNG entschieden haben.
Dieses Handbuch enthält wichtige Informationen zur Sicherheit und Anweisungen, die Ihnen helfen
sollen, Ihr Gerät zu bedienen und zu pegen.
Bitte nehmen Sie sich vor der Inbetriebnahme Ihres Geräts Zeit, um dieses Handbuch zu lesen und
halten Sie es zur späteren Verwendung bereit.
In diesem Benutzerhandbuch werden folgende Symbole verwendet:
WARNUNG
Gefährliche bzw. unsichere Praktiken, die zu schweren Verletzungen, Tod und/oder Sachschäden
führen können.
VORSICHT
Gefährliche bzw. unsichere Praktiken, die zu Verletzungen und/oder Sachschäden führen können.
HINWEIS
Nützliche Tipps, Empfehlungen oder Informationen, die Ihnen den Umgang mit dem Gerät
erleichtern.
Die Installation dieses Geräts darf nur von einem zugelassenen Elektriker durchgeführt werden.
Der Installateur ist dafür verantwortlich, das Gerät an das Stromnetz anzuschließen und dabei die
einschlägigen Sicherheitsbestimmungen zu beachten.
Wichtige Hinweise zur Sicherheit
WARNUNG
Dieses Gerät ist nicht zur Verwendung durch Personen
(einschließlich Kindern) mit verringerten körperlichen,
sensorischen oder mentalen Fähigkeiten oder einem Mangel
an Erfahrung und Wissen bestimmt, sofern sie nicht von einer
für ihre Sicherheit verantwortlichen Person im Umgang mit
dem Gerät unterwiesen wurden und von dieser beaufsichtigt
werden.
Kinder müssen beaufsichtigt werden, um zu verhindern, dass
sie mit dem Gerät spielen.
Die Trennungsvorrichtungen sind entsprechend den
Anschlussvorschriften in die fest verlegte Leitung einzubauen.
Das Gerät muss so aufgestellt werden, dass es auch
nach der Installation vom Netz getrennt werden kann.
Dies kann erreicht werden, indem der Stecker stets
zugänglich bleibt oder in die fest verlegte Leitung ein den
Anschlussvorschriften entsprechender Schalter eingebaut
wird.
Hinweise zu dieser Bedienungsanleitung
NV75R7676RB_EU_DG68-01054H-00_DE.indd 3 4/17/2019 5:24:41 PM

4 Deutsch
Sicherheitshinweise
Sicherheitshinweise
Benutzen Sie keine scharfen Scheuermittel oder
Metallschaber, um den Glaseinsatz der Gerätetür zu reinigen.
Sie könnten die Oberäche zerkratzen und damit das Glas
zerbrechen lassen.
Wenn dieses Gerät über eine Reinigungsfunktion verfügt,
müssen Sie überschüssiges Wasser und Kochutensilien vor
Verwendung der Dampf- oder Selbstreinigung aus dem Gerät
entfernen. Die Reinigungsfunktion ist modellabhängig.
Wenn dieses Gerät über eine Reinigungsfunktion verfügt,
können die Oberächen während der Reinigung heißer als
üblich werden. Kinder müssen deshalb ferngehalten werden.
Die Reinigungsfunktion ist modellabhängig.
Verwenden Sie ausschließlich das für dieses Gerät
empfohlenen Bratenthermometer. (Nur Modelle mit
Bratenthermometer)
Zur Reinigung des Geräts dürfen keine Dampfreiniger
verwendet werden.
WARNUNG: Stellen Sie sicher, dass das Gerät vor einem
Austausch der Glühlampe vom Stromnetz getrennt wird, da
sonst die Gefahr eines Stromschlags besteht.
Um eine Überhitzung zu vermeiden, darf die Tür des Geräts
nicht mit einer Zierblende versehen werden.
Falls das Netzkabel beschädigt ist, muss es vom Hersteller
oder vom Kundendienst bzw. von einer entsprechend
qualizierten Fachkraft ausgetauscht werden, um
Gefährdungen auszuschließen.
Bei der angegebenen Befestigungsart dürfen keine
Klebemittel eingesetzt werden, da sie keinen ausreichenden
Halt bieten.
Dieses Gerät darf von Kindern ab 8 Jahren und Personen
mit verminderten körperlichen, sensorischen oder geistigen
Fähigkeiten oder einem Mangel an Erfahrung und Wissen
bedient werden, wenn sie unter Aufsicht stehen oder eine
Unterweisung zum sicheren Umgang mit dem Gerät erhalten
haben und die damit verbundenen Gefahren verstehen.
Kinder dürfen nicht mit dem Gerät spielen. Kinder dürfen
bei Reinigung und Pege nur dann helfen, wenn sie dabei
beaufsichtigt werden. Halten Sie das Gerät und das Netzkabel
außerhalb der Reichweite von Kindern unter 8 Jahren.
Das Gerät erhitzt sich im Betrieb. Es ist Vorsicht geboten,
damit Sie die Heizelemente im Innern des Geräts nicht
berühren.
WARNUNG: Zugängliche Teile können sich im Betrieb
erwärmen. Halten Sie Kinder deshalb fern.
NV75R7676RB_EU_DG68-01054H-00_DE.indd 4 4/17/2019 5:24:41 PM
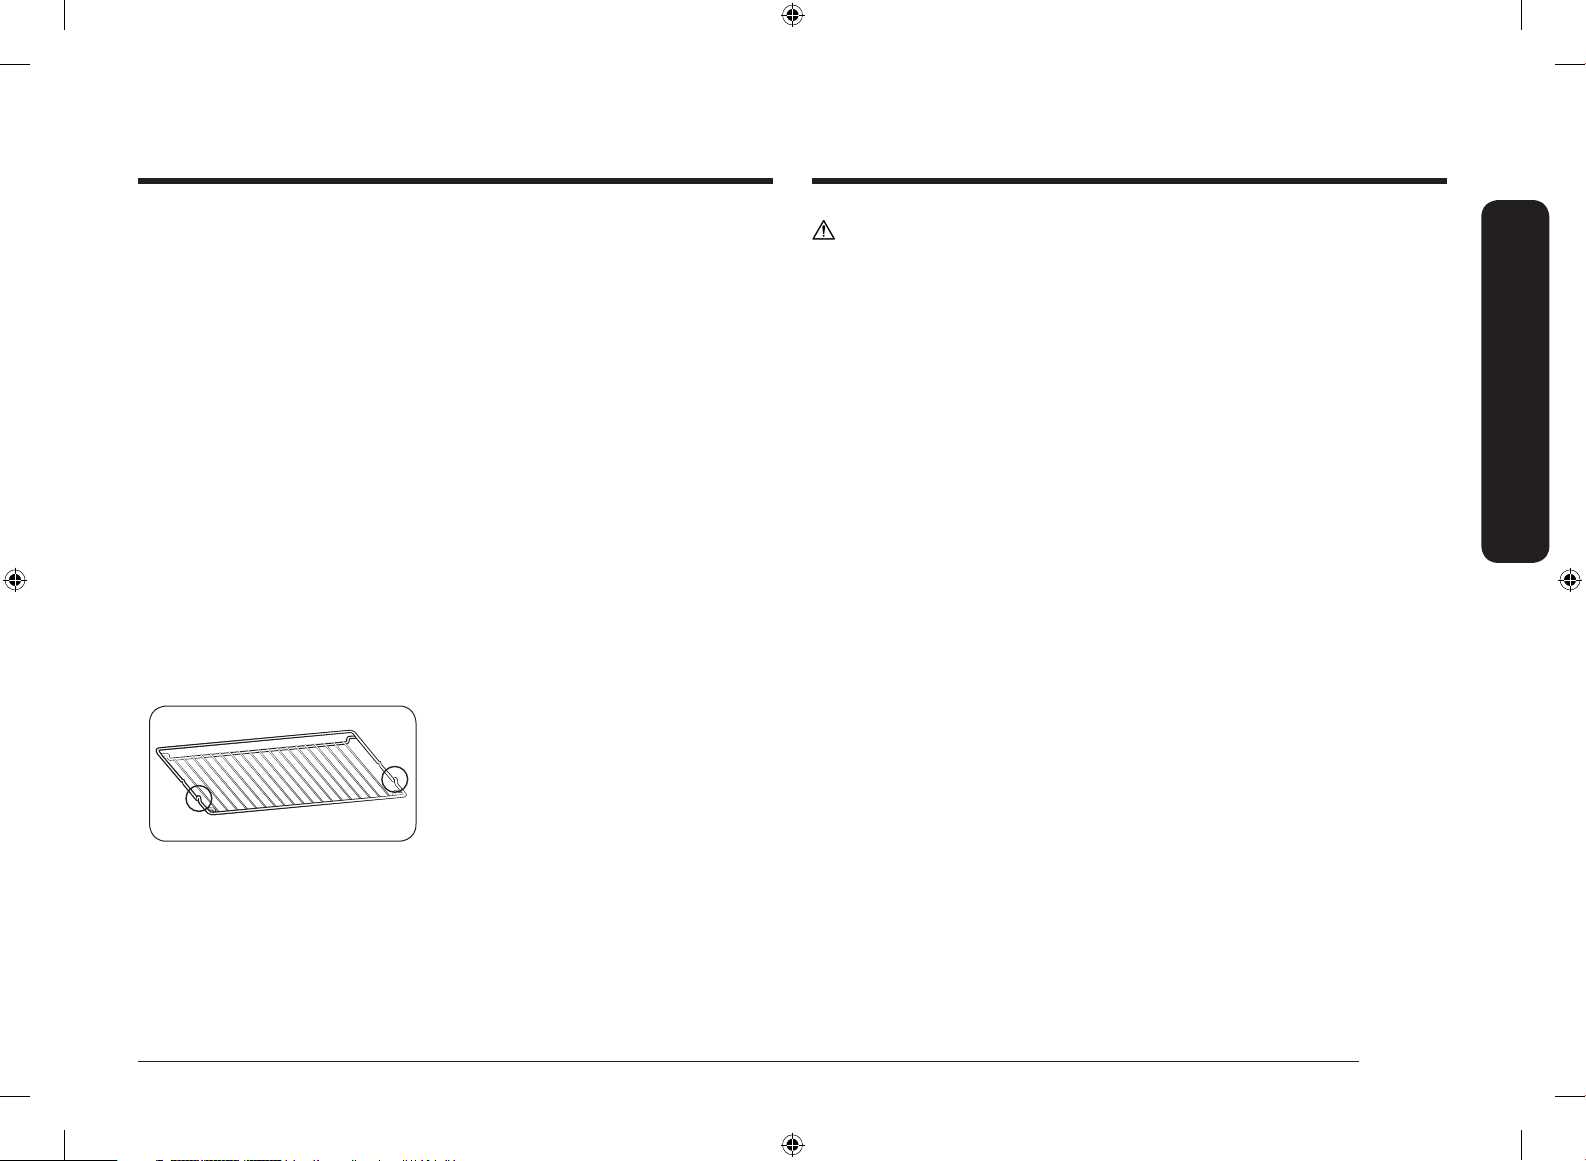
Deutsch 5
Sicherheitshinweise
VORSICHT
Schließen Sie das Gerät nicht an, wenn es während des Transports beschädigt wurde.
Dieses Gerät darf nur von einem speziell zugelassenen Elektriker an das Stromnetz angeschlossen
werden.
Versuchen Sie im Fall eines Problems oder Schadens am Gerät nicht, es zu benutzen.
Reparaturen dürfen nur von entsprechend geschultem Fachpersonal vorgenommen werden.
Unsachgemäß durchgeführte Reparaturen können zu erheblichen Risiken für Sie selbst und
Dritte führen. Wenn Ihr Gerät repariert werden muss, setzen Sie sich bitte mit Ihrem SAMSUNG-
Kundendienstzentrum oder Ihrem Händler in Verbindung.
Elektrische Leitungen und Kabel dürfen das Gerät nicht berühren.
Das Gerät wird über einen zugelassenen Sicherungsautomaten oder Sicherung an das Stromnetz
angeschlossen. Verwenden Sie niemals Mehrfachsteckdosen oder Verlängerungskabel.
Die Stromversorgung des Geräts muss bei Reparaturen oder Reinigungsarbeiten ausgeschaltet
werden.
Gehen Sie vorsichtig vor, wenn Sie weitere elektrische Geräte an Steckdosen in der Nähe dieses
Haushaltsgeräts anschließen.
Wenn dieses Gerät über eine Dampfgarfunktion verfügt, dürfen Sie es nicht in Betrieb nehmen, wenn
der Wasserbehälter beschädigt ist. (Nur Modelle mit Dampfgarfunktion)
Wenn der Wasserbehälter in irgendeiner Weise beschädigt ist, verwenden Sie das Gerät nicht und
wenden Sie sich an Ihr nächstgelegenes Kundendienstzentrum. (Nur Modelle mit Dampfgarfunktion)
Dieses Gerät ist nur für die Verwendung im Haushalt ausgelegt.
Während des Betriebs werden die Innenächen des Geräts so heiß, dass sie Verbrennungen
verursachen können. Berühren Sie die Heizelemente oder Innenächen des Geräts keinesfalls, ohne
sie vorher ausreichend abkühlen zu lassen.
Lagern Sie kein entammbares Material im Gerät.
Die Oberächen des Geräts werden heiß, wenn das Gerät längere Zeit mit hoher Temperatur
verwendet wird.
Passen Sie auf, wenn Sie die Gerätetür im Betrieb öffnen, da heiße Luft und Dampf schnell aus dem
Gerät austreten können.
Wenn Sie Gerichte mit Alkohol zubereiten, kann der Alkohol aufgrund der hohen Temperaturen
verdunsten. Dieser Dampf kann Feuer fangen, wenn er mit einem heißen Teil des Geräts in Kontakt
kommt.
WARNUNG: Das Gerät und seine zugänglichen Teile können
während des Betriebs heiß werden. Es ist Vorsicht geboten,
damit Sie die Heizelemente des Geräts nicht berühren. Wenn
sie nicht unter ständiger Aufsicht stehen, müssen Kinder
unter 8 Jahren von dem Gerät ferngehalten werden.
VORSICHT: Der Kochvorgang muss beaufsichtigt werden.
Ein kurzer Garprozess muss ununterbrochen beaufsichtigt
werden.
Die Gerätetür und die Außenäche können im Betrieb heiß
werden.
Wenn das Gerät in Betrieb ist, können für Sie zugängliche
Flächen heiß sein. Die Oberächen können während des
Gebrauchs heiß werden.
Setzen Sie den Gitterrost mit den
hervorstehenden Teilen (seitliche
Anschläge) nach vorne in den
Garraum ein, sodass er bei der
Zubereitung großer Portionen
eine möglichst hohe Stabilität
gewährleistet.
NV75R7676RB_EU_DG68-01054H-00_DE.indd 5 4/17/2019 5:24:42 PM
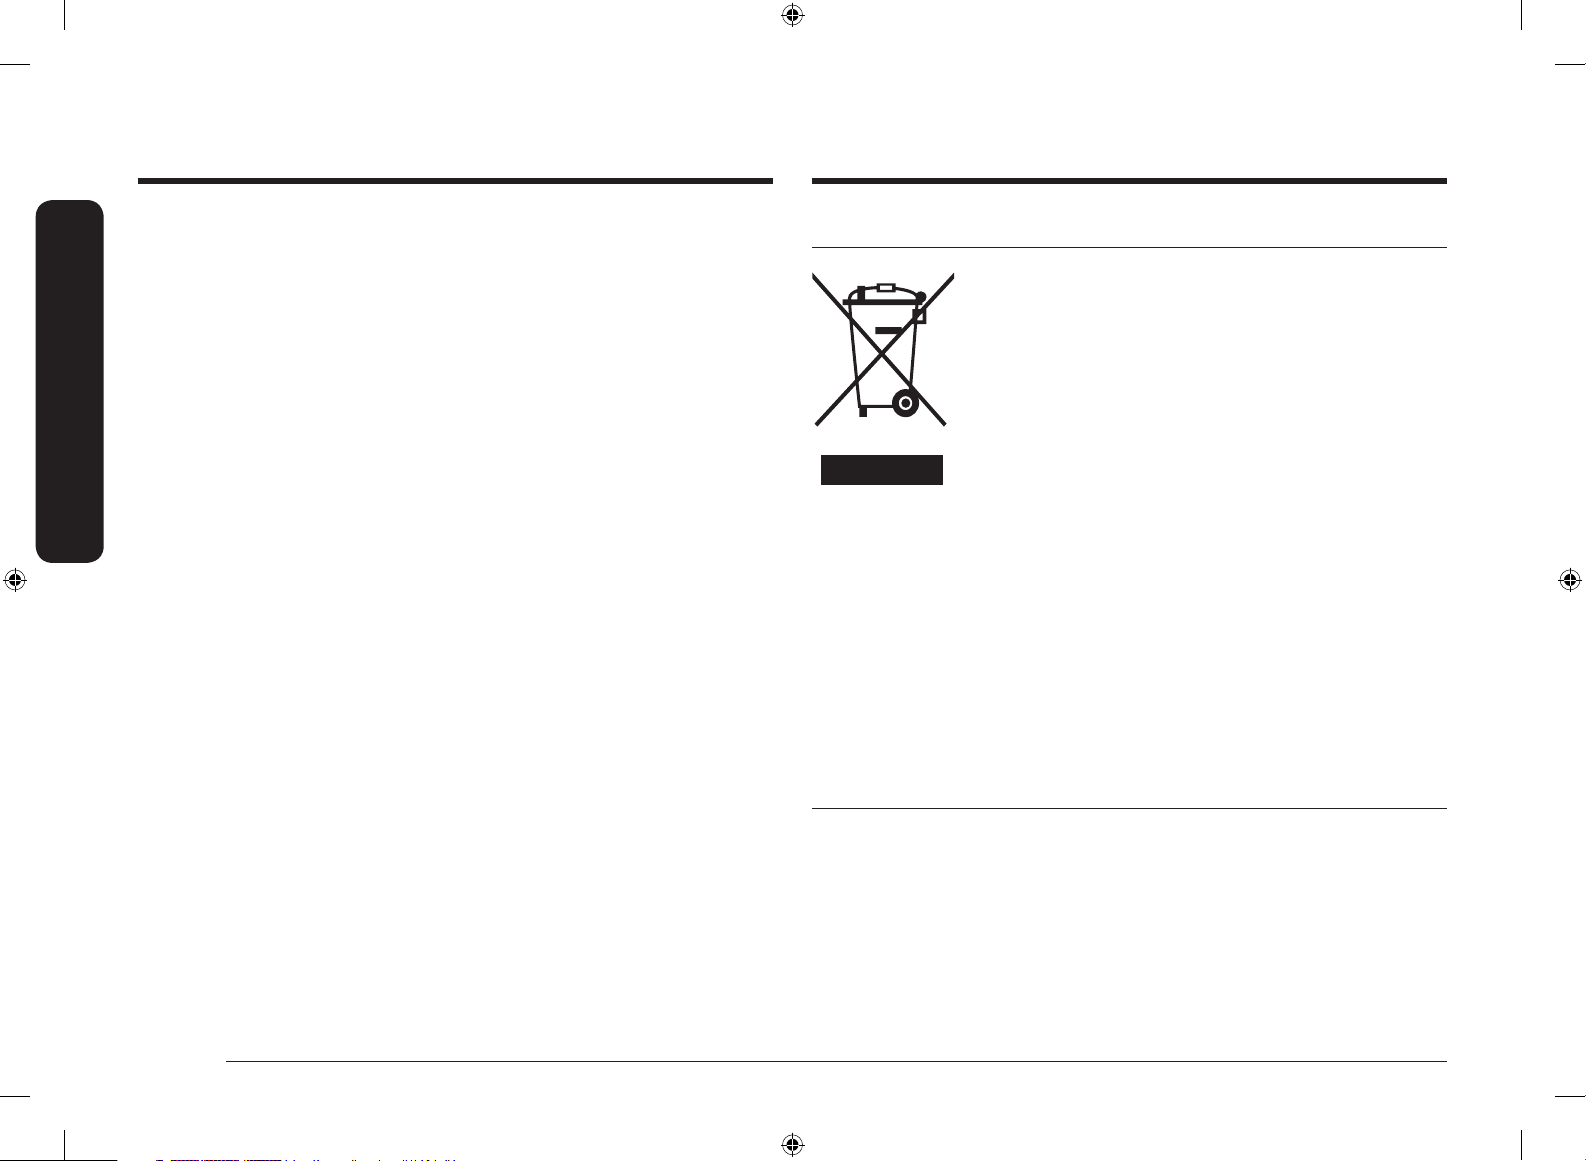
6 Deutsch
Sicherheitshinweise
Sicherheitshinweise
Zu Ihrer eigenen Sicherheit sollten Sie keine Hochdruckwasser- oder -dampfreiniger verwenden.
Halten Sie Kinder in sicherem Abstand, wenn das Gerät in Gebrauch ist.
Tiefgefrorene Lebensmittel wie Pizzas werden auf dem großen Rost zubereitet. Wenn das Backblech
verwendet wird, kann es sich aufgrund der großen Temperaturschwankungen verformen.
Gießen Sie kein Wasser auf den Boden des Garraums, wenn dieser heiß ist. Dies könnte Schäden an
der Emailleoberäche verursachen.
Die Gerätetür muss während des Garvorgangs geschlossen sein.
Legen Sie den Boden des Garraums nicht mit Aluminiumfolie aus, und stellen Sie keine Backbleche
oder Behälter darauf. Die Aluminiumfolie reektiert die Hitze, sodass es zu Schäden an den
Emailleoberächen und zu schlechten Garergebnissen kommen kann.
Obstsäfte hinterlassen auf den Emailleoberächen des Garraums Flecken, die sich möglicherweise
nicht mehr entfernen lassen.
Wenn Sie sehr feuchte Kuchen backen, verwenden Sie die Fettpfanne.
Stellen Sie keine Backwaren auf die geöffnete Gerätetür.
Achten Sie beim Öffnen oder Schließen der Gerätetür auf Kinder in der Nähe, da diese gegen die
Gerätetür laufen oder ihre Finger einklemmen könnten.
Stellen oder legen Sie keine schweren Gegenstände auf die Gerätetür, und lehnen Sie keine schweren
Objekte dagegen.
Öffnen Sie die Gerätetür nicht mit übermäßiger Kraft.
WARNUNG: Trennen Sie das Gerät nicht vom Stromnetz, auch wenn der Garvorgang bereits
abgeschlossen ist.
WARNUNG: Schließen Sie stets die Gerätetür, wenn Sie Speisen im Gerät zubereiten.
Korrekte Entsorgung von Altgeräten (Elektroschrott)
(Gilt für Länder mit Abfalltrennsystemen)
Die Kennzeichnung auf dem Produkt, Zubehörteilen bzw. auf der
dazugehörigen Dokumentation gibt an, dass das Produkt und
Zubehörteile (z. B. Ladegerät, Kopfhörer, USB-Kabel) nach ihrer
Lebensdauer nicht zusammen mit dem normalen Haushaltsmüll entsorgt
werden dürfen. Entsorgen Sie dieses Gerät und Zubehörteile bitte
getrennt von anderen Abfällen, um der Umwelt bzw. der menschlichen
Gesundheit nicht durch unkontrollierte Müllbeseitigung zu schaden.
Helfen Sie mit, das Altgerät und Zubehörteile fachgerecht zu entsorgen,
um die nachhaltige Wiederverwertung von stofichen Ressourcen zu
fördern.
Private Nutzer wenden sich an den Händler, bei dem das Produkt
gekauft wurde, oder kontaktieren die zuständigen Behörden, um in
Erfahrung zu bringen, wo Sie das Altgerät bzw. Zubehörteile für eine
umweltfreundliche Entsorgung abgeben können.
Gewerbliche Nutzer wenden sich an ihren Lieferanten und gehen
nach den Bedingungen des Verkaufsvertrags vor. Dieses Produkt
und elektronische Zubehörteile dürfen nicht zusammen mit anderem
Gewerbemüll entsorgt werden.
Weitere Informationen zum Engagement von Samsung für die Umwelt und zu produktspezischen
Auagen wie z. B. REACH, WEEE, Batterien nden Sie unter samsung.com/uk/aboutsamsung/
samsungelectronics/corporatecitizenship/data_corner.html
Automatische Energiesparfunktion
• Wenn während des Betriebs über einen bestimmten Zeitraum hinweg keine Eingabe durch den
Benutzer erfolgt ist, wird der Betrieb unterbrochen, und das Gerät wechselt in den Standby-
Modus.
• Beleuchtung: Sie können die Beleuchtung im Garraum während des Garvorgangs durch
Drücken der Taste für die Beleuchtung ausschalten. Zu Energiesparzwecken wird die
Garraumbeleuchtung einige Minuten nach Beginn des Garvorgangs ausgeschaltet.
NV75R7676RB_EU_DG68-01054H-00_DE.indd 6 4/17/2019 5:24:42 PM
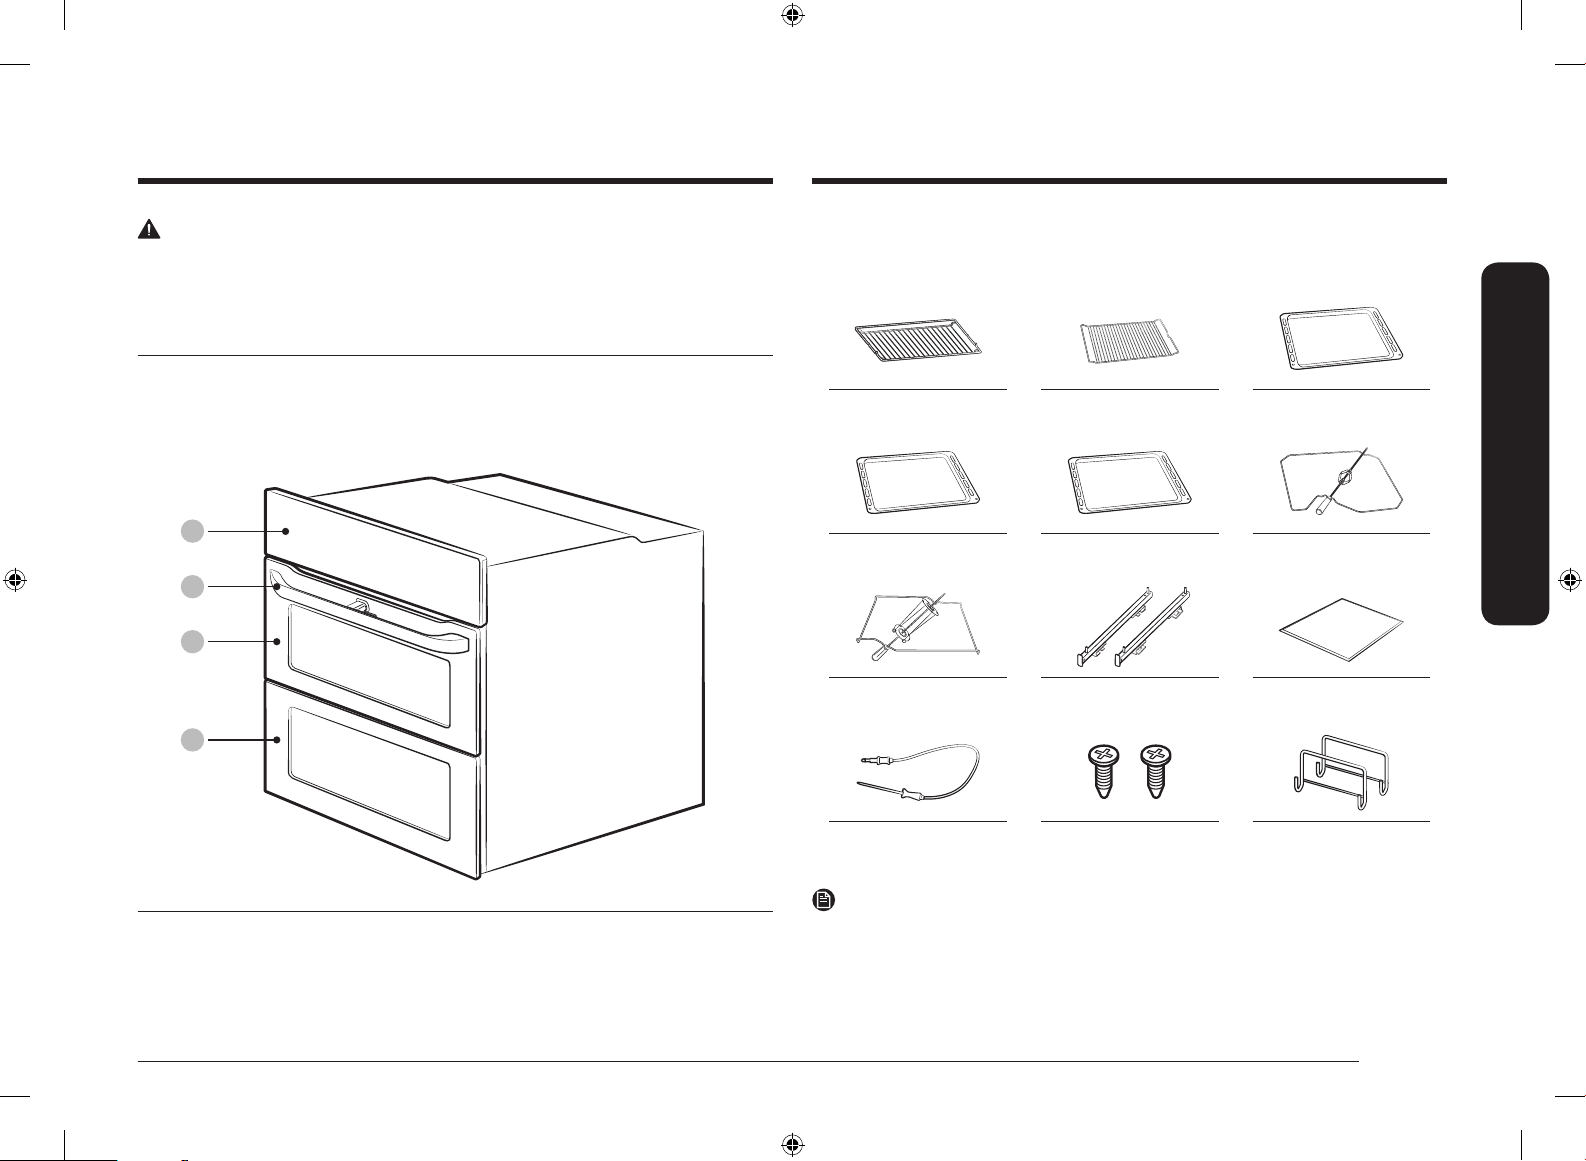
Deutsch 7
Aufstellen des Geräts
Aufstellen des Geräts
WARNUNG
Dieses Gerät darf nur von sachkundigem Fachpersonal installiert werden. Der Installateur ist
dafür verantwortlich, das Gerät an das Stromnetz anzuschließen und dabei die vor Ort geltenden
Sicherheitsbestimmungen zu beachten.
Lieferumfang
Vergewissern Sie sich, dass alle erforderlichen Bau- und Zubehörteile im Lieferumfang Ihres neuen
Geräts enthalten sind. Wenden Sie sich bei Problemen mit diesem Gerät oder seinen Bau- und
Zubehörteilen an den Händler oder das nächstgelegene Samsung-Kundendienstzentrum.
Überblick über das Gerät
01
02
04
03
01 Bedienfeld 02 Griff der Gerätetür 03 Obere Gerätetür
04 Hauptgerätetür
Zubehör
Das Gerät wird mit verschiedenen Zubehörteilen geliefert, die Ihnen beim Zubereiten von Speisen
nützlich sein können.
Gitterrost Gitterrosteinsatz * Backblech *
Universalblech * Extra tiefes Blech * Drehspieß *
Dreh- und Schaschlikspieß * Ausziehbare Schiene * Garraumteiler
Kerntemperaturfühler * 2 Schrauben (M4 L25) Griff einbauen
HINWEIS
Die mit einem Sternchen (*) gekennzeichneten Zubehörteile sind nicht für alle Modelle erhältlich.
NV75R7676RB_EU_DG68-01054H-00_DE.indd 7 4/17/2019 5:24:47 PM
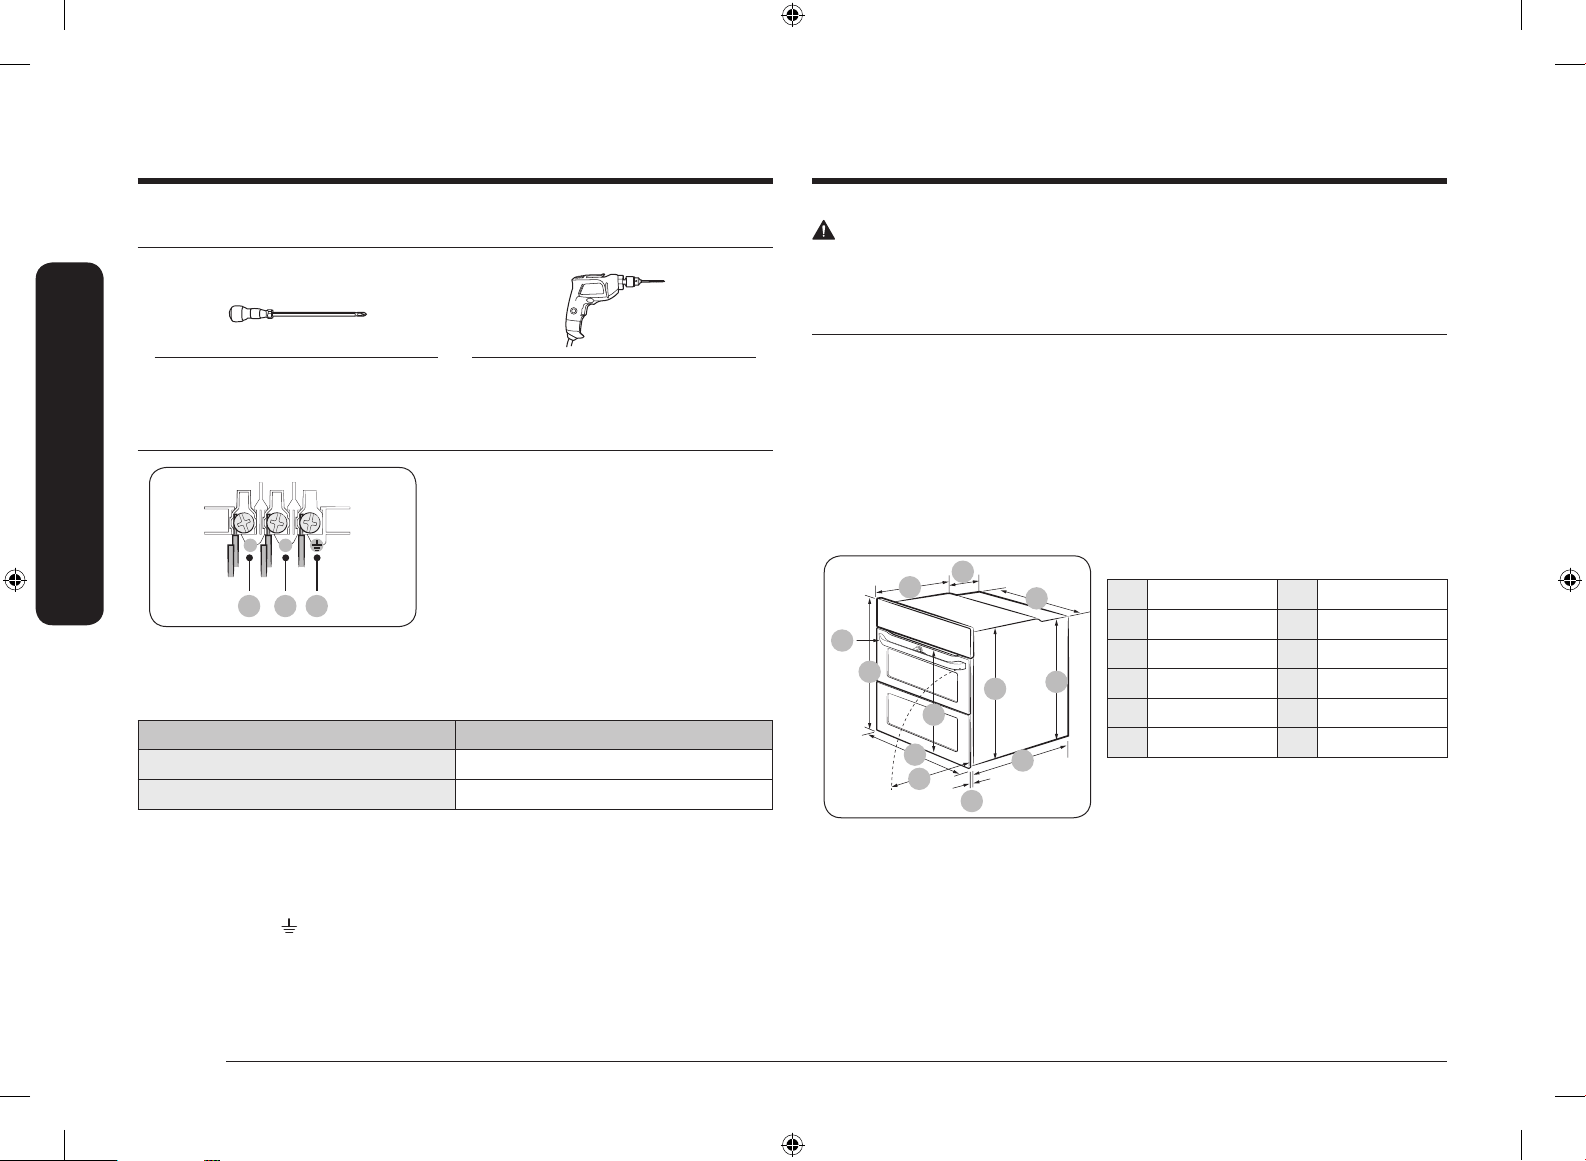
8 Deutsch
Aufstellen des Geräts
Aufstellen des Geräts
Vorbereitung zur Installation des Ofens
Kreuzschlitzschraubendreher Bohren
Netzanschluss
01 02 03
L N
01 BRAUN oder SCHWARZ
02 BLAU oder WEIß
03 GELBGRÜN
Schließen Sie das Gerät an eine Steckdose an. Wenn
auf Grund von Beschränkungen hinsichtlich der
zulässigen Stromstärke keine Schuko-Steckdose
verwendet werden darf, muss ein mehrpoliger
Trennschalter (mit einem Kontaktabstand von
mindestens 3 mm) verwendet werden, um die
Sicherheitsbestimmungen zu erfüllen. Verwenden Sie
ein ausreichend langes Netzkabel (H05 RR-F oder
H05 VV-F; Min. 1,5–2,5 mm²), das den Anforderungen
der Spezikation entspricht.
Nennstrom (A) Mindestquerschnitt
10 < A ≤ 16 1,5 mm
2
16 < A ≤ 25 2,5 mm
2
Die entsprechenden Daten sind auf dem Typenschild des Geräts angegeben.
Öffnen Sie die hintere Verkleidung des Geräts mit Hilfe eines Schlitzschraubendrehers, und entfernen
Sie die Schrauben der Kabelklemme. Schließen Sie dann die einzelnen Leiter an die entsprechenden
Anschlussklemmen an.
Die Anschlussklemme ( ) ist für den Erdungsleiter vorgesehen. Schließen Sie zuerst den gelbgrünen
Leiter (Erdungsleiter) an. Dieser sollte länger sein als die anderen Leiter. Wenn Sie eine Schuko-
Steckdose verwenden, muss diese auch nach Installation des Geräts zugänglich bleiben. Samsung
übernimmt keine Haftung für Unfälle aufgrund fehlender oder fehlerhafter Erdung.
WARNUNG
Treten Sie bei der Installation nicht auf die Kabel, und verlegen Sie sie in ausreichendem Abstand zu
den Teilen des Geräts, die Wärme abstrahlen.
Einbau in einen Küchenschrank
Wenn das Gerät in einen Einbauschrank eingesetzt wird, müssen alle Kunststoffoberächen und
Klebestellen bis mindestens 90 °C hitzefest sein. Samsung übernimmt keine Haftung für Schäden
aufgrund der durch das Gerät abgestrahlten Wärme.
Stellen Sie das Gerät an einer ausreichend belüfteten Stelle auf. Um eine optimale Belüftung lassen
Sie zwischen dem unteren Boden des Schranks und der Rückseite eine Öffnung von etwa 50 mm.
Wenn Sie das Gerät unter einem Kochfeld installieren, befolgen Sie die Einbauanweisungen für das
Kochfeld.
Erforderliche Abmessungen für den Einbau
D
E
C
B
A
L
K
J
I
F
H
G
Gerät (mm)
A 560 G Max. 506
B 175 H Max. 494
C 370 I 21
D Max. 50 J 549
E 595 K 572
F 595 L 550
NV75R7676RB_EU_DG68-01054H-00_DE.indd 8 4/17/2019 5:24:49 PM
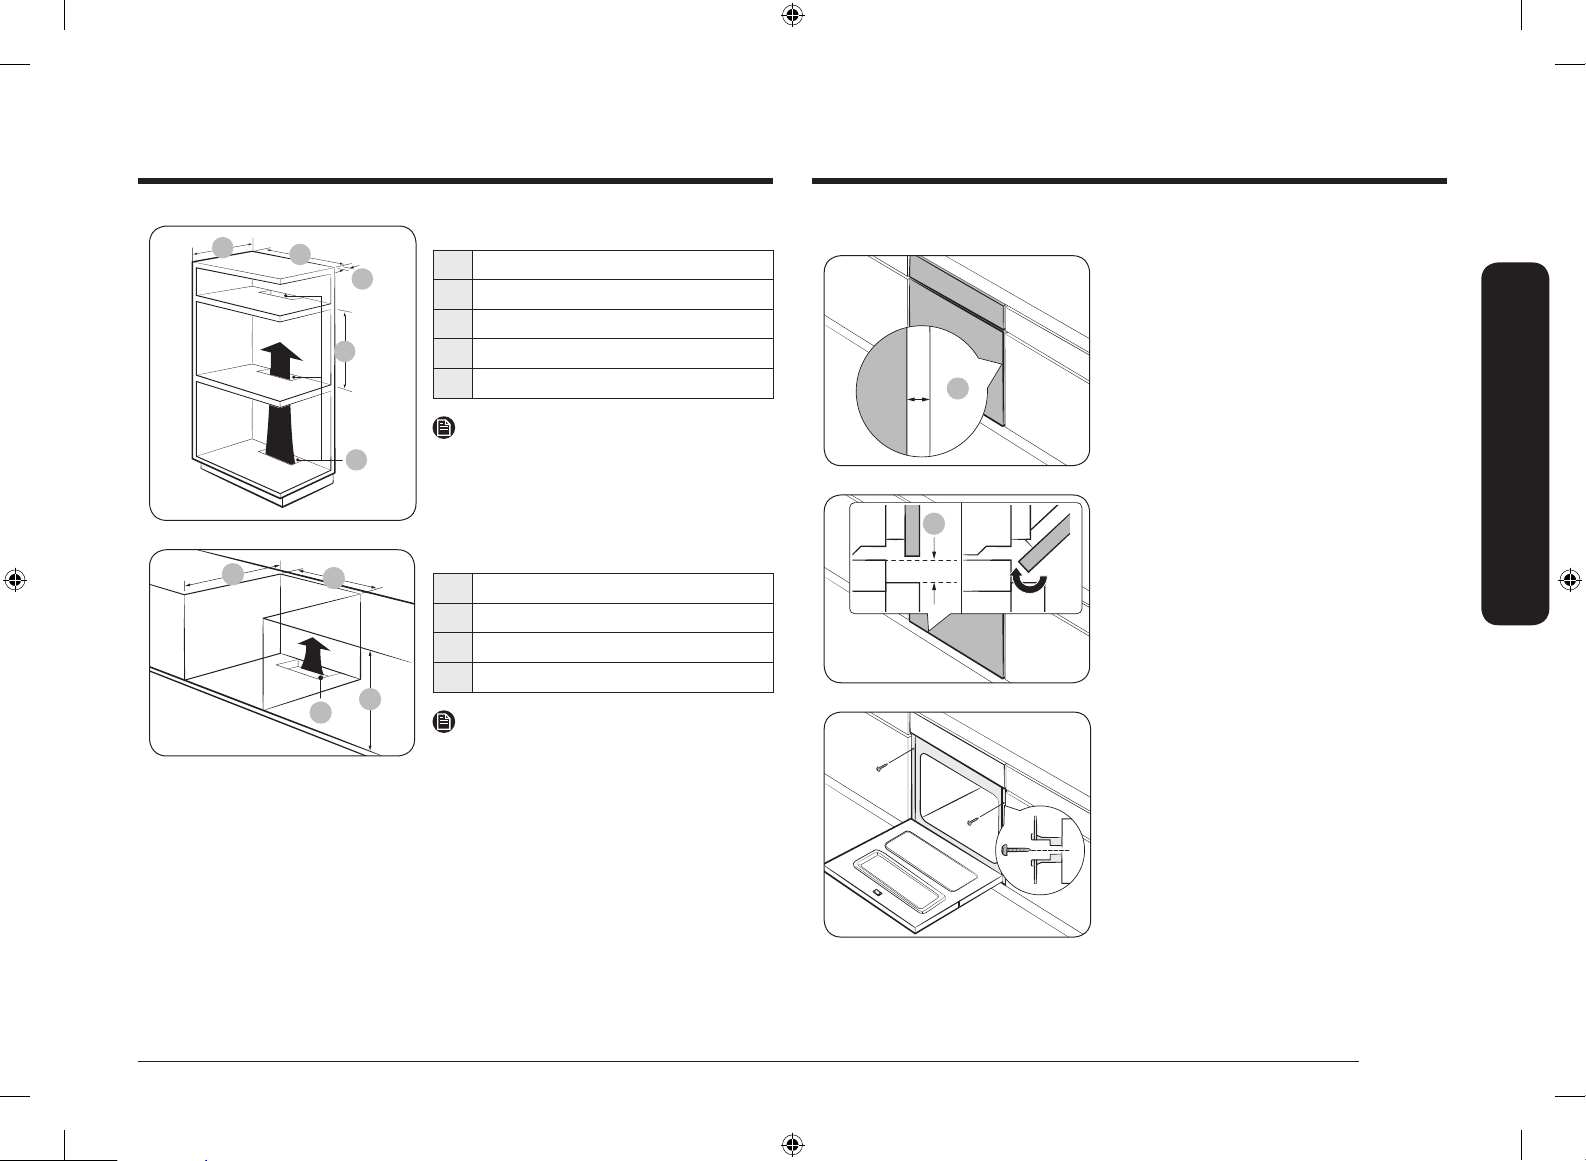
Deutsch 9
Aufstellen des Geräts
D
C
B
A
E
Einbauschrank (mm)
A Min. 550
B Min. 560
C Min. 50
D Min. 590 - Max. 600
E Min. 460 x Min. 50
HINWEIS
Der Einbauschrank muss über Lüftungsöffnungen
(E) verfügen, damit die heiße Luft zirkuliert und
abgeführt werden kann.
D
C
B
A
Unterbauschrank (mm)
A Min. 550
B Min. 560
C Min. 600
D Min. 460 x Min. 50
HINWEIS
Der Einbauschrank muss über Lüftungsöffnungen
(D) verfügen, damit die heiße Luft zirkuliert und
abgeführt werden kann.
Einbauen des Geräts
A
Halten Sie zu beiden Seiten des Geräts einen Abstand
(A) von mindestens 5 mm zu den Seitenwänden des
Schranks ein.
B
Halten Sie an der Unterseite des Geräts einen
Abstand (B) von mindestens 3 mm ein, damit sich die
Gerätetür problemlos öffnen und schließen lässt.
Schieben Sie das Gerät in den Schrank, und befestigen
Sie es auf beiden Seiten mit 2 Schrauben.
NV75R7676RB_EU_DG68-01054H-00_DE.indd 9 4/17/2019 5:24:51 PM
10 Deutsch
Vor der ersten Verwendung
Aufstellen des Geräts
Entfernen Sie nach dem Einbau Schutzfolien, Klebebänder und sonstiges Verpackungsmaterial, und
nehmen Sie die mitgelieferten Zubehörteile aus dem Garraum des Geräts. Wenn Sie das Gerät aus
dem Schrank ausbauen möchten, trennen Sie zunächst die Stromversorgung, und entfernen Sie dann
die 2 Schrauben zu beiden Seiten des Geräts.
WARNUNG
Eine ausreichende Belüftung ist Voraussetzung für die ordnungsgemäße Funktion des Geräts.
Verdecken Sie keinesfalls die Lüftungsöffnungen.
HINWEIS
Das tatsächliche Aussehen des Geräts hängt vom jeweiligen Modell ab.
Vor der ersten Verwendung
Anfangseinstellungen
Wenn Sie das Gerät erstmalig einschalten, wird als Zeit der Standardwert „12:00“ auf dem Display
angezeigt, und das Anzeigeelement für die Stunden („12“) blinkt. Gehen Sie wie folgt vor, um die
richtige Uhrzeit einzustellen.
1. Stellen Sie durch Drücken der Tasten / die
Stunden ein, und drücken Sie dann auf OK. Das
Anzeigeelement für die Minuten blinkt.
2. Stellen Sie durch Drücken der Tasten / die
Minuten ein, und drücken Sie dann auf OK.
Wenn Sie die eingestellte Uhrzeit zu einem späteren
Zeitpunkt ändern möchten, halten Sie die Taste
3 Sekunden lang gedrückt, und gehen Sie gemäß den
oben beschriebenen Schritten vor.
NV75R7676RB_EU_DG68-01054H-00_DE.indd 10 4/17/2019 5:24:53 PM
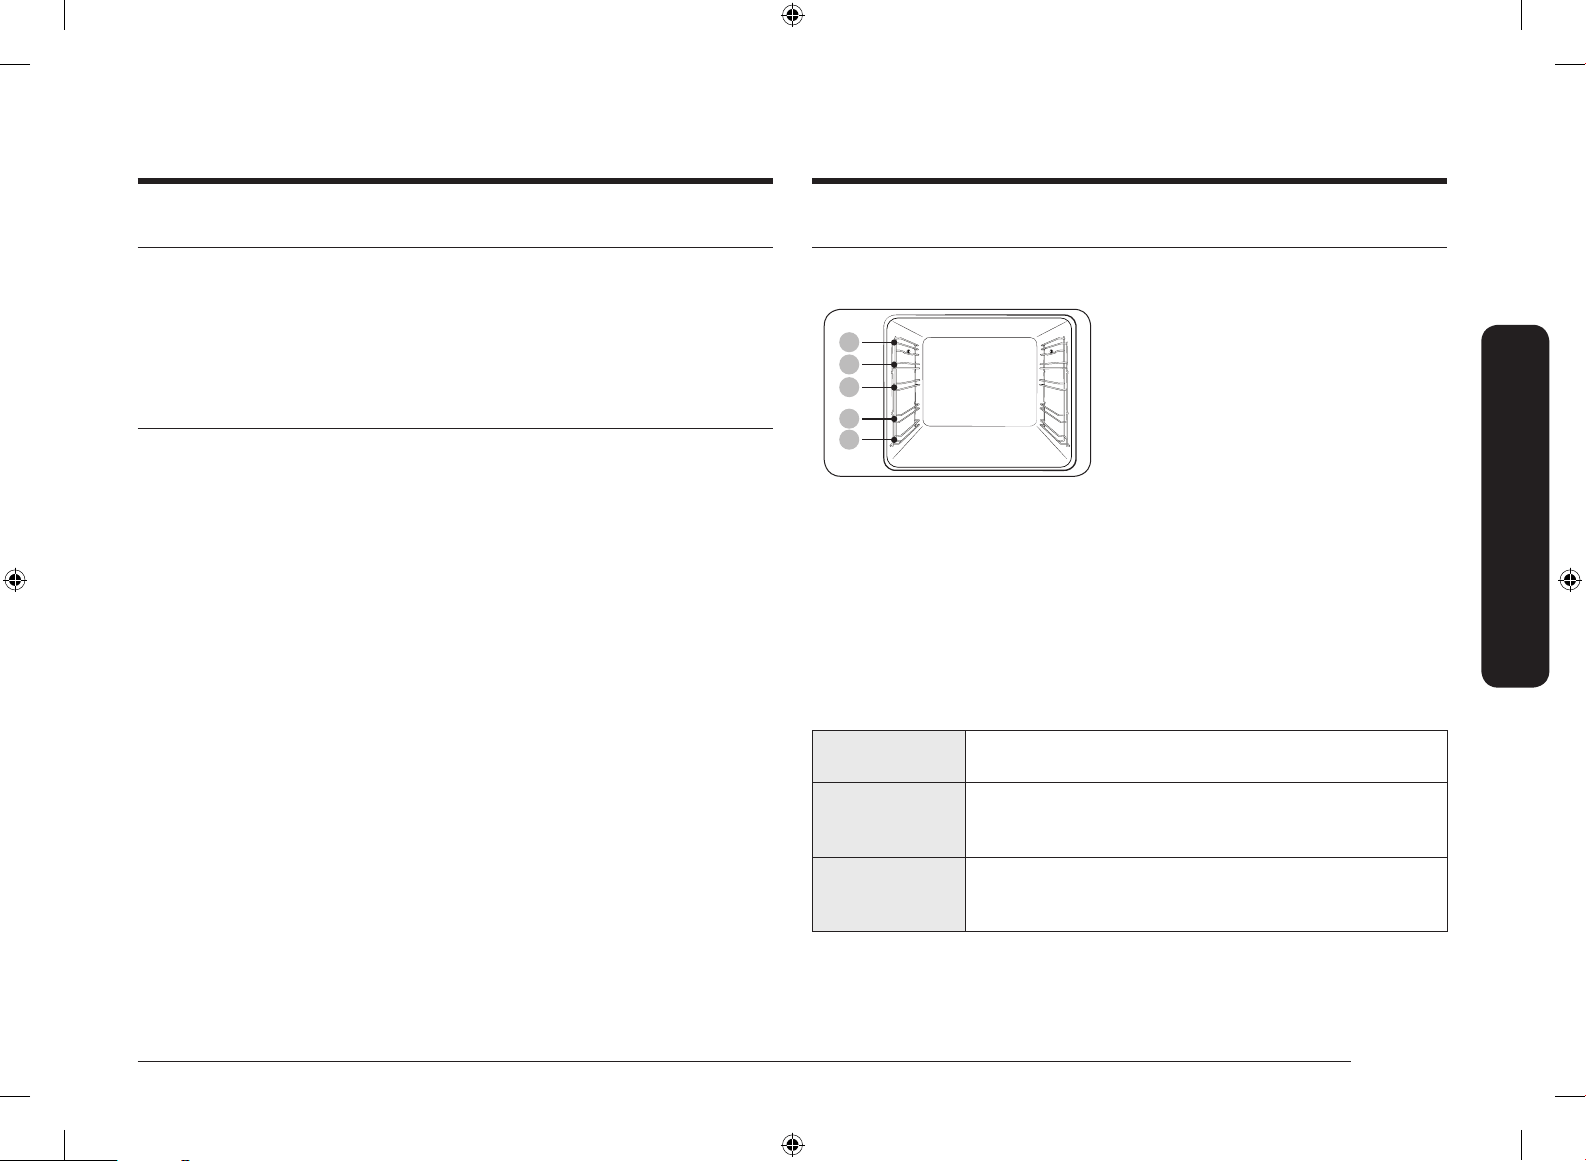
Deutsch 11
Vor der ersten Verwendung
Gerüche in Neugeräten
Reinigen Sie vor der ersten Inbetriebnahme des Geräts den Garraum, um die Gerüche des Neugeräts
zu entfernen.
1. Entnehmen Sie alle Zubehörteile aus dem Garraum des Geräts.
2. Betreiben Sie das Gerät eine Stunde lang bei 200 °C Heißluft oder Ober-/Unterhitze. Auf diese
Weise werden sämtliche Produktionsrückstände im Gerät verbrannt.
3. Schalten Sie das Gerät anschließend aus.
Intelligenter Sicherheitsmechanismus
Wenn Sie die Gerätetür öffnen, während das Gerät in Betrieb ist, wird die Garraumbeleuchtung
eingeschaltet, und sowohl der Ventilator als auch die Heizelemente werden ausgeschaltet. So werden
Verletzungen wie z. B. Verbrennungen verhindert, und es wird einem unnötigen Energieverbrauch
vorgebeugt. Dies ist kein Fehler oder Defekt. Schließen Sie einfach die Gerätetür, damit das Gerät
den Betrieb wieder aufnimmt.
Zubehör
Reinigen Sie die Zubehörteile gründlich mit warmem Wasser, Reinigungsmittel und einem weichen,
sauberen Tuch, bevor Sie sie zum ersten Mal verwenden.
05
04
03
02
01
01 Einschubhöhe 1 02 Einschubhöhe 2
03 Einschubhöhe 3 04 Einschubhöhe 4
05 Einschubhöhe 5
• Setzen Sie die Zubehörteile an der jeweils
vorgesehenen Position in den Garraum des Geräts ein.
• Halten Sie zwischen dem Boden des Garraums und
dem zu unterst eingesetzten Zubehörteil sowie
zwischen allen eingesetzten Zubehörteilen einen
Abstand von mindestens 1 cm ein.
• Beim Entnehmen von Geschirr und/oder
Zubehörteilen aus dem Gerät ist äußerste Vorsicht
geboten. Heiße Speisen oder Zubehörteile können
Verbrennungen verursachen.
• Die Zubehörteile können sich unter Hitze verformen.
Wenn sie abkühlen, nehmen sie ihre ursprüngliche
Form wieder ein. Ihre Leistung oder Funktionsweise
wird dadurch nicht beeinträchtigt.
Grundlegende Verwendungshinweise
Machen Sie sich vor Gebrauch mit den jeweiligen Zubehörteilen vertraut, damit Sie sie später
leichter verwenden können.
Gitterrost
Der Gitterrost ist zum Grillen und Braten geeignet. Setzen Sie den Gitterrost mit
den hervorstehenden Teilen (seitliche Anschläge) nach vorne in den Garraum ein.
Gitterrosteinsatz * Wenn Sie den Gitterrosteinsatz in Verbindung mit dem Blech verwenden,
verhindern Sie, dass die bei der Zubereitung entstehenden Flüssigkeiten auf
den Boden des Garraums tropfen.
Backblech * Das Backblech (Tiefe: 20 mm) wird zum Backen von Kuchen, Plätzchen und
anderem Gebäck verwendet. Schieben Sie das Blech so ein, dass die schräge
Seite nach vorne weist.
NV75R7676RB_EU_DG68-01054H-00_DE.indd 11 4/17/2019 5:24:53 PM
12 Deutsch
Vor der ersten Verwendung
Vor der ersten Verwendung
Universalblech * Das Universalblech (Tiefe: 30 mm) wird zum Garen und Braten verwendet.
Verwenden Sie es zusammen mit dem Gitterrosteinsatz, um zu verhindern,
dass die bei der Zubereitung entstehenden Flüssigkeiten auf den Boden des
Garraums tropfen.
Schieben Sie das Blech so ein, dass die schräge Seite nach vorne weist.
Extra tiefes Blech * Das extra tiefe Blech (Tiefe: 50 mm) kann zum Braten mit oder ohne
Gitterrosteinsatz verwendet werden. Schieben Sie das Blech so ein, dass die
schräge Seite nach vorne weist.
Drehspieß * Der Drehspieß kann zum Grillen von Lebensmitteln wie beispielsweise
Hühnchen eingesetzt werden. Verwenden Sie den Drehspieß ausschließlich
im Einfachbetrieb in Einschubhöhe 4, wo sich auch die Aussparung für die
Spießhalterung bendet. Schrauben Sie den Handgriff des Spießes ab, bevor Sie
den Spieß zum Grillen verwenden.
Dreh- und
Schaschlikspieß *
Schieben Sie ein Blech in Einschubhöhe 1 oder stellen Sie es bei sehr
großen Fleischportionen auf den Boden des Garraums, um die beim Garen
herabtropfende Flüssigkeit aufzufangen. Wir empfehlen, das Zubehör für den
Spieß nur für Fleisch bis maximal 1,5 kg zu verwenden.
1. Schieben Sie das Fleisch auf den Spieß. Das Fleisch lässt sich leichter auf
den Spieß schieben, wenn zuvor der Handgriff an das stumpfe Ende des
Spießes angeschraubt wurde.
2. Umgeben Sie das Fleisch mit vorgekochten Kartoffeln und Gemüse.
3. Schieben Sie die Halterung so in den mittleren Einschub, dass das „V“-
förmige Teil nach vorn weist. Legen Sie den Spieß so in der Halterung ab,
dass das spitze Ende zur Rückseite weist, und schieben Sie ihn vorsichtig
nach hinten, bis die Spitze des Spießes in den Drehmechanismus an der
Rückwand des Garraums eingesteckt ist. Das stumpfe Ende des Spießes
muss in der „V“-förmigen Mulde auiegen. (Der Spieß besitzt zwei Ösen.
Diese benden sich in der Nähe der Gerätetür, damit der Spieß nicht
nach vorn rutschen kann. Die Ösen dienen zugleich als Halterung für den
Handgriff.)
4. Entfernen Sie den Handgriff, bevor der Garvorgang gestartet wird.
5. Schrauben Sie den Handgriff nach dem Garen wieder fest, damit Sie den
Spieß aus der Halterung entnehmen können.
Ausziehbare Schienen * Sie können ein Blech wie folgt auf den Auageächen der ausziehbaren
Schienen in den Garraum schieben:
1. Ziehen Sie die ausziehbaren Schienen vollständig nach vorne.
2. Legen Sie das Blech auf die Auageächen der Schienen, und schieben
Sie es in den Garraum.
3. Schließen Sie die Gerätetür.
Garraumteiler Mit Hilfe des Garraumteilers können Sie den Garraum des Geräts in zwei
Zonen unterteilen. Setzen Sie den Garraumteiler ein, wenn Sie das Gerät im
Doppelgarraumbetrieb verwenden möchten.
Kerntemperaturfühler * Der Kerntemperaturfühler misst die Temperatur im Innern von zu garendem
Fleisch. Verwenden Sie ausschließlich den im Lieferumfang des Geräts
enthaltenen Kerntemperaturfühler.
WARNUNG
• Vergewissern Sie sich, dass der Handgriff des Drehspießes richtig sitzt.
• Verwenden Sie den Drehspieß mit Vorsicht. Die Gabeln und Stifte sind scharf und spitz. Sie
können sich also verletzen!
• Um Verbrennungen zu verhindern, müssen Sie beim Entfernen des Drehspießes Handschuhe
tragen.
HINWEIS
Die mit einem Sternchen (*) gekennzeichneten Zubehörteile sind nicht für alle Modelle erhältlich.
NV75R7676RB_EU_DG68-01054H-00_DE.indd 12 4/17/2019 5:24:53 PM

Deutsch 13
Vor der ersten Verwendung
Flexible Tür
Dieses Gerät verfügt über eine besondere exible Tür, die in der Mitte mit Scharnieren versehen
ist, so dass nur die obere Hälfte geöffnet werden muss, um auf die obere Zone zuzugreifen. Wenn
Sie den Doppelgarraumbetrieb nutzen, können Sie die obere Hälfte des Ofens viel einfacher und
energieefzienter nutzen.
So verwenden Sie die obere Gerätetür
1. Drücken Sie den Griffhebel ganz durch.
2. Ziehen Sie am Griff.
3. Wie in der Abbildung gezeigt, wird dadurch
lediglich die obere Gerätetür geöffnet.
So verwenden Sie die gesamte Gerätetür
1. Halten Sie den hebellosen Bereich des Griffs fest
und ziehen Sie anschließend.
2. Wie in der Abbildung gezeigt, wird dadurch die
gesamte Gerätetür geöffnet.
VORSICHT
Achten Sie beim Öffnen der gesamten Gerätetür
darauf, dass Sie den Griff am hebellosen Teil greifen.
Wenn der Hebel während des Öffnens der Gerätetür
betätigt wird, kann sich die obere Gerätetür unter
Umständen öffnen, was zu Verletzungen führen kann.
HINWEIS
• Stellen Sie keine schweren Gegenstände auf die obere Gerätetür und vermeiden Sie
übermäßige Krafteinwirkung auf diese.
• Lassen Sie Kinder nicht auf oder mit der oberen Gerätetür spielen.
NV75R7676RB_EU_DG68-01054H-00_DE.indd 13 4/17/2019 5:24:55 PM
14 Deutsch
Vor der ersten Verwendung
Vor der ersten Verwendung
Mechanische Sicherung (nur bestimmte Modelle)
Aufstellen des Geräts
A
1. Setzen Sie den dünnen Teil (A) der
mechanischen Sicherung – wie gezeigt
– in den entsprechenden Schlitz des
Sicherungsverriegelung ein.
2. Ziehen Sie die Schraube an der
Sicherungsverriegelung fest.
Demontage
• Lösen und entfernen Sie die Schraube Von der
Sicherungsverriegelung.
Verriegeln/Entriegeln
• Heben Sie zum Öffnen der Gerätetür die
Sicherungsverriegelung leicht an, um die Tür zu
entriegeln. Öffnen Sie dann die Gerätetür.
• Schließen Sie die Gerätetür einfach, um sie
zu verriegeln. Die mechanische Sicherung
verriegelt die Tür automatisch.
Doppelgarraumbetrieb
Sie können den Garraum in eine untere und eine obere Zone unterteilen, um gleichzeitig zwei
unterschiedliche Gerichte zuzubereiten, oder Sie benutzen einfach nur eine einzige Zone.
Schieben Sie den Garraumteiler in Einschubhöhe 3,
um den Garraum in zwei Zonen zu unterteilen. Das
Gerät erkennt den Garraumteiler automatisch und
aktiviert standardmäßig die obere Zone.
HINWEIS
Die Verfügbarkeit der Funktion für den
Doppelgarraumbetrieb hängt vom jeweiligen
Rezept ab. Weitere Informationen nden Sie unter
Verwendung in diesem Handbuch.
NV75R7676RB_EU_DG68-01054H-00_DE.indd 14 4/17/2019 5:24:56 PM

Deutsch 15
Bedienung
10 Schnelles
Vorheizen
Mit der Funktion zum schnellen Vorheizen können Sie das Gerät
schnell auf eine zuvor eingestellte Temperatur vorheizen.
• Drücken Sie auf diese Taste, um die Funktion zum schnellen
Vorheizen zu aktivieren bzw. zu deaktivieren.
• Nur verfügbar für Temperaturen über 100 °C.
• Die Funktion für schnelles Vorheizen ist nur in Kombination
mit bestimmten zulässigen Garmodi und Temperaturbereichen
verfügbar.
11 Timer Mit Hilfe der Timerfunktion können Sie bei einem Garvorgang die
benötigte Zeit bzw. Betriebsdauer überprüfen.
12 Garraumbeleuchtung
Durch Drücken dieser Taste wird die Beleuchtung im Garraum
ein- bzw. ausgeschaltet. Die Garraumbeleuchtung wird automatisch
eingeschaltet, sobald die Gerätetür geöffnet oder das Gerät in
Betrieb genommen wird. Sie wird zu Energiesparzwecken nach
einer bestimmten Zeit ohne Benutzereingabe automatisch wieder
ausgeschaltet.
13 Kindersicherung Zur Vermeidung von Unfällen sind bei aktivierter Kindersicherung alle
Bedienelemente außer der Taste Leistung gesperrt.
Halten Sie die Taste 3 Sekunden lang gedrückt, um die Kindersicherung
zu aktivieren, und halten Sie sie erneut 3 Sekunden lang gedrückt, um
das Bedienfeld wieder freizugeben.
HINWEIS
Das Tippen auf dem Display funktioniert möglicherweise nicht einwandfrei, wenn Sie dabei
Handschuhe aus Kunststoff oder Küchenhandschuhe tragen.
Bedienung
Bedienfeld
Die Front des Geräts ist in verschiedenen Material- und Farbausführungen erhältlich. Änderungen
am tatsächlichen Aussehen des Geräts zum Zweck der Qualitätsverbesserung sind vorbehalten.
01 02 0403
05
07
06
09
08
11
10
13
12
01 Leistung Durch Drücken dieser Taste schalten Sie das Gerät ein. Zum
Ausschalten des Geräts halten Sie die Taste 1 Sekunde lang gedrückt.
02 Funktionsbereich In diesem Bereich können Sie die gewünschten Betriebsarten oder
Funktionen des Geräts auswählen.
03 Obere/Untere Zone Diese Anzeigen sind aktiviert, wenn der Garraumteiler eingesetzt
wurde. Sie können dann für die Zubereitung Ihrer Gerichte zwischen
dem oberen und unteren Garraum wählen.
04 Display Hier werden die jeweils ausgewählten Betriebsarten und Einstellungen
angezeigt.
05 Auf/Ab Hiermit ändern Sie die Einstellungen für die aktuelle Auswahl.
06 OK Hiermit bestätigen Sie zuvor programmierte Einstellungen.
07 Zurück Hiermit setzen Sie Ihre aktuellen Einstellungen zurück und kehren zum
Hauptbildschirm zurück.
08 Temperatur Hiermit stellen Sie die Gartemperatur ein.
09 Garzeit Hiermit stellen Sie die Garzeit ein.
NV75R7676RB_EU_DG68-01054H-00_DE.indd 15 4/17/2019 5:24:57 PM
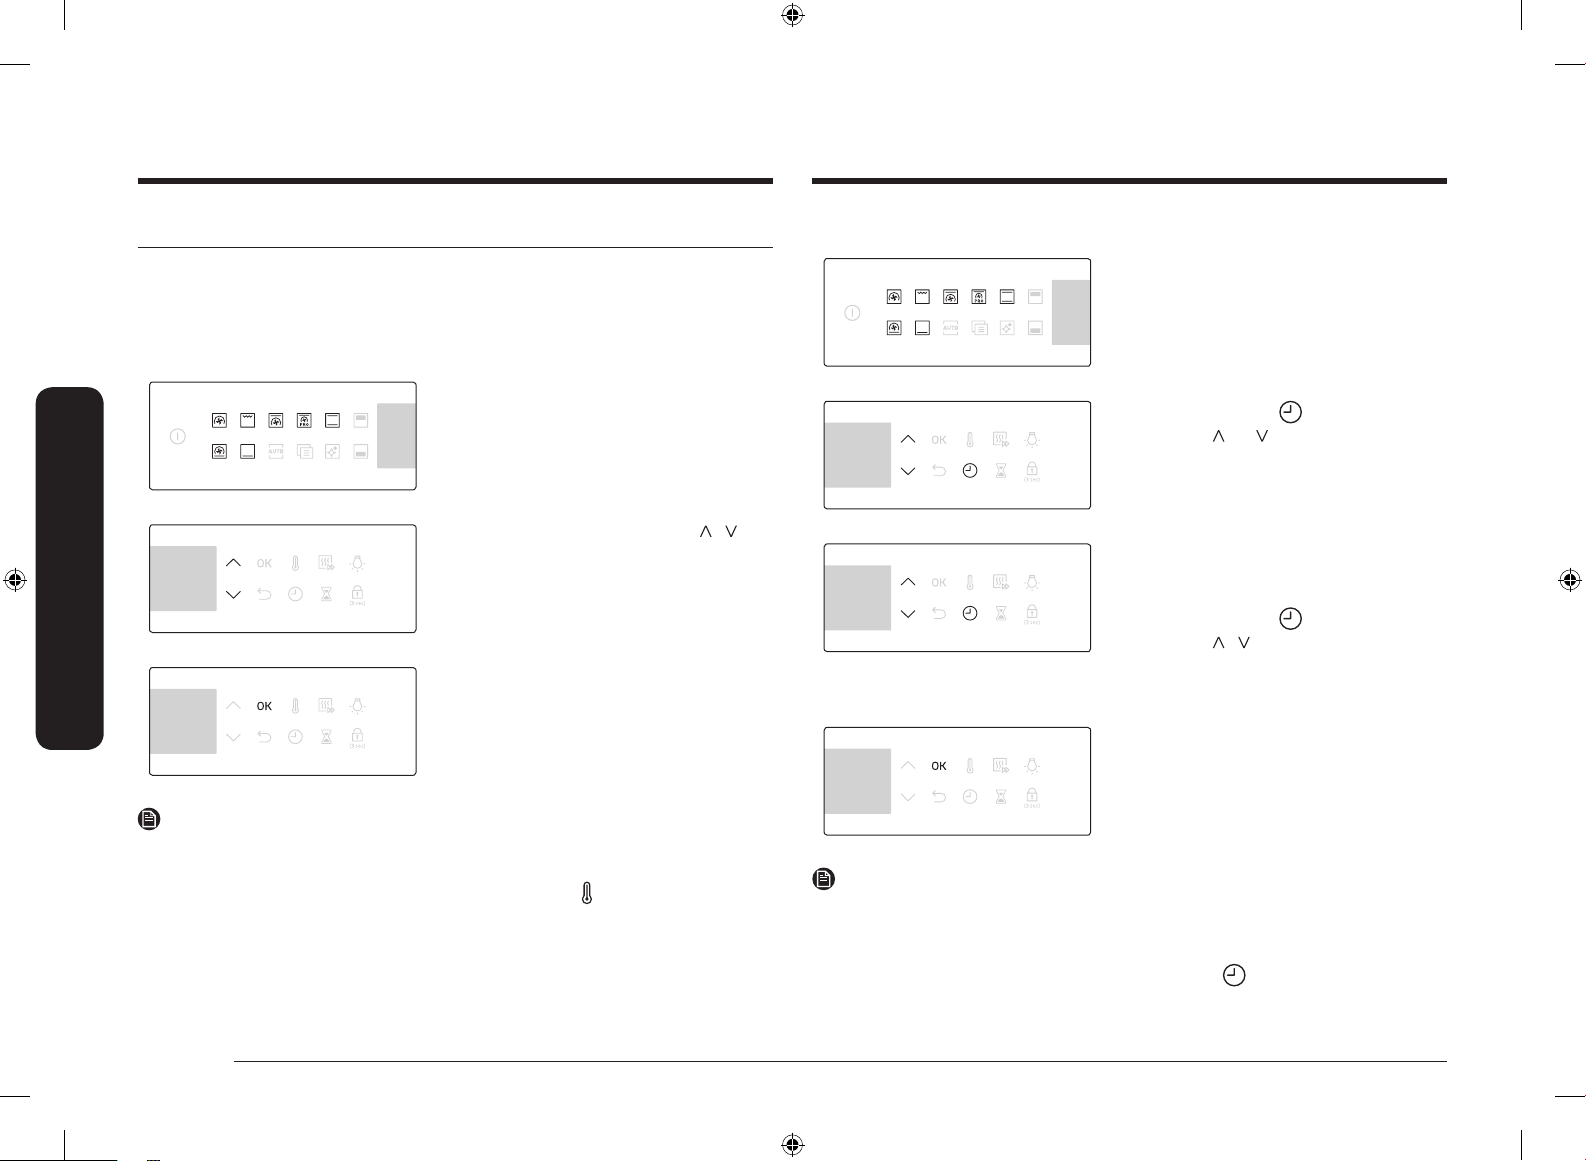
16 Deutsch
Bedienung
Bedienung
Häug genutzte Einstellungen
In allen Betriebsarten muss die Standardtemperatur und/oder -garzeit häug geändert werden.
Im Folgenden wird beschrieben, wie Sie die Temperatur und/oder die Garzeit für die ausgewählte
Betriebsart nach Ihren Bedürfnissen einstellen können.
Temperatur
1. Drücken Sie im Funktionsbereich die Taste
für die gewünschte Betriebsart. Im Display
erscheint die Standardtemperatur für die
jeweilige Auswahl.
2. Stellen Sie durch Drücken der Tasten / die
Temperatur ein.
3. Drücken Sie auf OK, um Ihre Einstellungen zu
speichern.
HINWEIS
• Wenn Sie nicht innerhalb von einigen Sekunden weitere Einstellungen vornehmen, startet das
Gerät den Garvorgang automatisch mit den Standardeinstellungen.
• Drücken Sie zum Ändern der eingestellten Temperatur die Taste und befolgen Sie die oben
beschriebenen Schritte.
• Die genaue Temperatur im Garraum kann mit Hilfe eines Thermometers und einer von einer
autorisierten Stelle zugelassen Methode gemessen werden. Bei Verwendung nicht zugelassener
Thermometer kommt es möglicherweise zu Messfehlern.
• Der Ofen gibt einen Signalton aus, wenn das Vorheizen abgeschlossen ist.
Garzeit
1. Drücken Sie im Funktionsbereich die Taste für
die gewünschte Betriebsart.
2. Drücken Sie die Taste und stellen Sie mit
den Tasten und die gewünschte Zeit ein.
3. Optional können Sie als Endzeit für Ihren
Garvorgang einen bestimmten Zeitpunkt in der
Zukunft einstellen.
Drücken Sie die Taste und stellen Sie mit
den Tasten / die gewünschte Endzeit
ein. Weitere Informationen nden Sie unter
Programmende.
4. Drücken Sie auf OK, um Ihre Einstellungen zu
speichern.
HINWEIS
• Sie müssen die Garzeit nicht einstellen. Das Gerät startet den Garvorgang auch dann mit der
eingestellten Zeit, wenn keine Zeit angegeben wurde. In diesem Fall müssen Sie das Gerät bei
Abschluss des Garvorgangs manuell ausschalten.
• Drücken Sie zum Ändern der eingestellten Garzeit die Taste und befolgen Sie die oben
beschriebenen Schritte.
NV75R7676RB_EU_DG68-01054H-00_DE.indd 16 4/17/2019 5:24:58 PM
Deutsch 17
Bedienung
Endzeit
1. Drücken Sie im Funktionsbereich die Taste für
die gewünschte Betriebsart.
2. Drücken Sie die Taste zweimal und stellen
Sie mit den Tasten und die gewünschte
Endzeit ein.
3. Drücken Sie auf OK, um Ihre Einstellungen zu
speichern.
HINWEIS
• Sie müssen die Endzeit nicht einstellen. Das Gerät startet den Garvorgang auch dann mit der
eingestellten Zeit, wenn keine Zeit angegeben wurde. In diesem Fall müssen Sie das Gerät bei
Abschluss des Garvorgangs manuell ausschalten.
• Drücken Sie zum Ändern der Endzeit zweimal die Taste und befolgen Sie die oben
beschriebenen Schritte.
Programmende
Die Funktion „Programmende“ erleichtert Ihnen das Garen und Backen.
1. Fall:
Sie möchten um 14:00 Uhr ein Gericht zubereiten, das eine Stunde gegart werden muss und um
18:00 Uhr fertig sein soll. Stellen Sie zum Aktivieren der Funktion „Programmende“ die unter
„Fertig um“ angezeigte Zeit auf „18:00“ Uhr ein. Das Gerät startet um 17:00 Uhr automatisch den
Garvorgang, damit dieser gemäß Ihrer Einstellung um 18:00 Uhr beendet ist.
Aktuelle Uhrzeit: 14:00 Uhr Garzeit einstellen: 1 Stunde Endzeit einstellen: 18:00 Uhr
Das Gerät startet um 17:00 Uhr den Garvorgang, damit dieser automatisch um 18:00 Uhr beendet
ist.
14:00 15:00 16:00 17:00 18:00
2. Fall:
Aktuelle Uhrzeit: 14:00 Uhr Garzeit einstellen: 2 Stunden Endzeit einstellen: 17:00 Uhr
Das Gerät startet um 15:00 Uhr den Garvorgang, damit dieser automatisch um 17:00 Uhr beendet
ist.
14:00 15:00 16:00 17:00 18:00
VORSICHT
Bewahren Sie bereits gegarte Speisen nicht über einen längeren Zeitraum im Garraum auf. Die
Speisen können verderben.
NV75R7676RB_EU_DG68-01054H-00_DE.indd 17 4/17/2019 5:24:59 PM

18 Deutsch
Bedienung
Bedienung
Zurücksetzen der Garzeit
Sie können die Garzeit zurücksetzen. Dies ist nützlich, wenn Sie den Garvorgang vor dem geplanten
Ende manuell unterbrechen möchten.
1. Drücken Sie während eines Garvorgangs
die Taste , um die verbleibende Garzeit
anzuzeigen.
2. Stellen Sie durch Drücken der Tasten und
die Garzeit auf „00:00“ ein. Alternativ können
Sie auch einfach auf die Taste drücken.
3. Drücken Sie auf OK.
HINWEIS
Im Doppelzonenbetrieb müssen Sie zuerst diejenige der beiden Zonen auswählen, für die Sie die
Garzeit zurücksetzen möchten.
Zurücksetzen der Endzeit
Sie können die Endzeit zurücksetzen. Dies ist nützlich, wenn Sie den Garvorgang vor dem geplanten
Ende manuell unterbrechen möchten.
1. Drücken Sie während eines Garvorgangs
zweimal die Taste , um die eingestellte
Endzeit anzuzeigen.
2. Stellen Sie durch Drücken der Tasten und
die aktuelle Uhrzeit als Endzeit ein. Alternativ
können Sie auch einfach auf die Taste
drücken.
3. Drücken Sie auf OK.
HINWEIS
Im Doppelzonenbetrieb müssen Sie zuerst diejenige der beiden Zonen auswählen, für die Sie die Sie
die Endzeit zurücksetzen möchten.
NV75R7676RB_EU_DG68-01054H-00_DE.indd 18 4/17/2019 5:24:59 PM
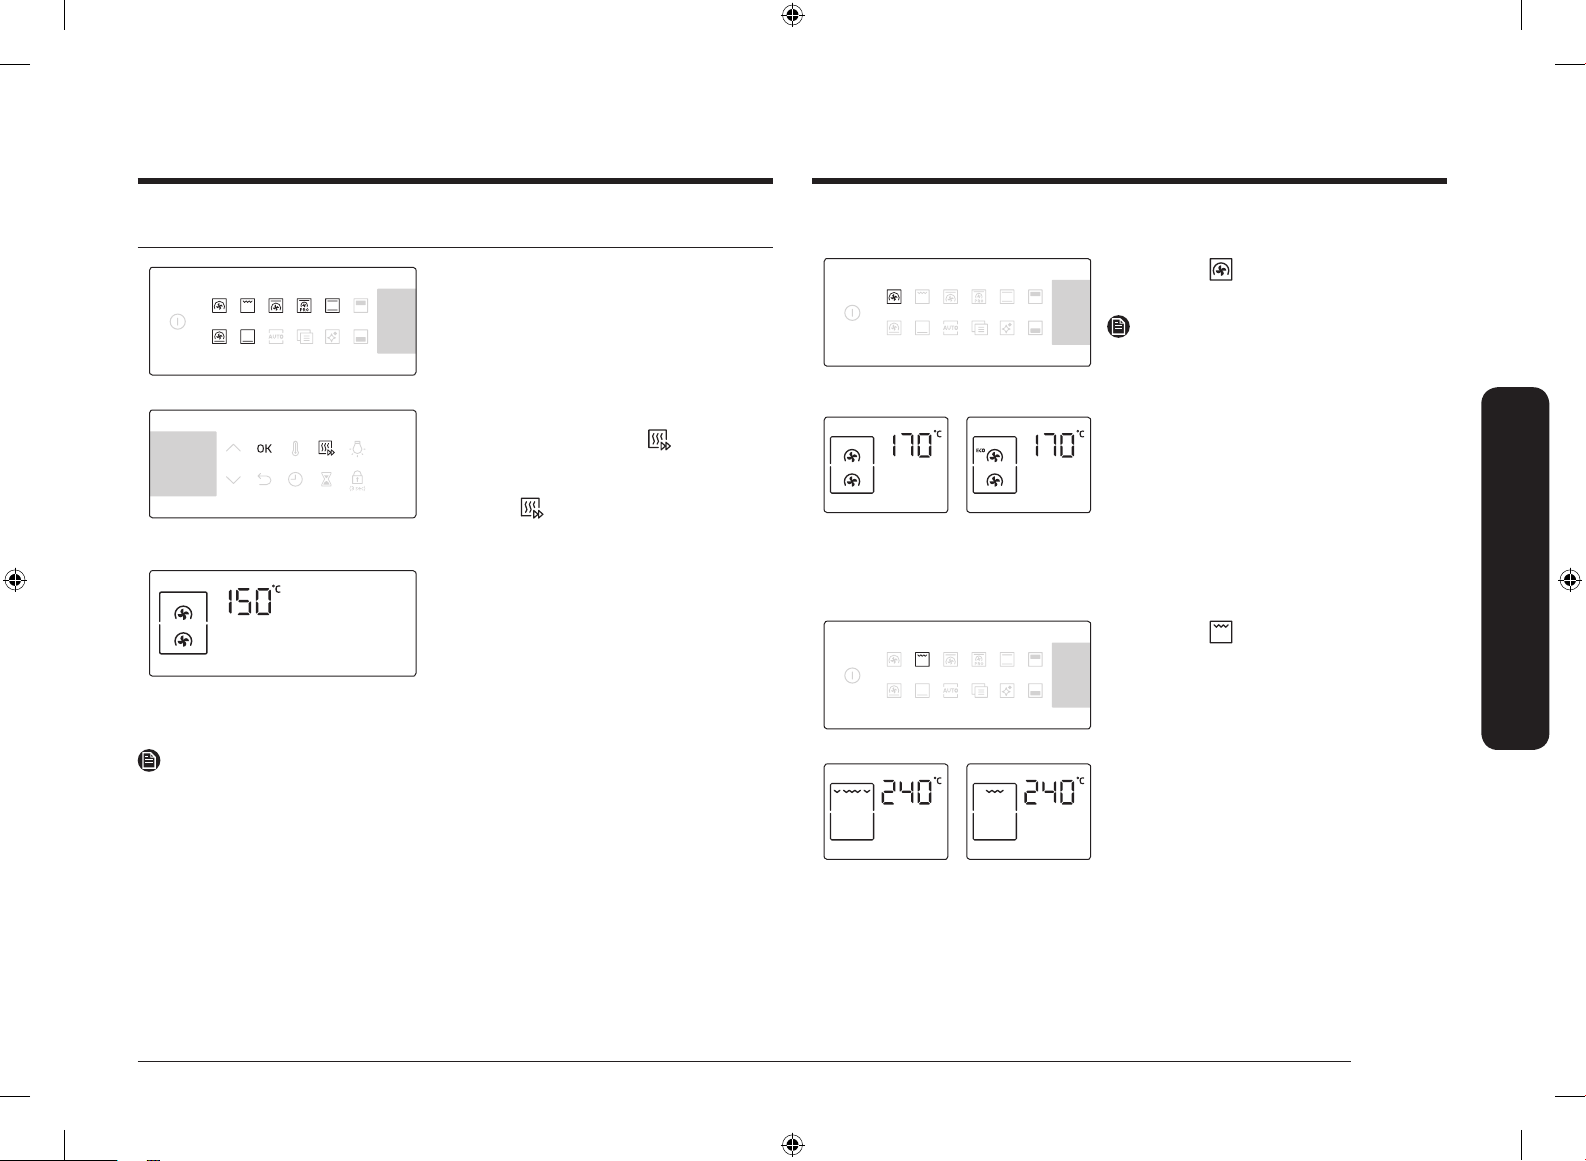
Deutsch 19
Bedienung
Betriebsarten
1. Drücken Sie im Funktionsbereich die Taste für
die gewünschte Betriebsart.
2. Stellen Sie je nach Bedarf die Garzeit und/oder
-temperatur ein. Weitere Informationen erhalten
Sie unter Häug genutzte Einstellungen.
3. Optional können Sie das Gerät schnell vorheizen.
Drücken Sie hierzu die Taste , und stellen Sie
die Temperatur ein, auf die das Gerät vorgeheizt
werden soll. Im Display wird die entsprechende
Anzeige gezeigt.
4. Drücken Sie danach auf OK.
Das Gerät beginnt mit dem Vorheizen und erhitzt
den Garraum auf die eingestellte Zieltemperatur.
Nach Abschluss des Vorheizens erklingt ein
Signalton und die Anzeige erlischt. Sofern in den
Zubereitungshinweisen nicht abweichend angegeben,
wird empfohlen, den Garraum unabhängig von der
Betriebsart stets vorzuheizen.
HINWEIS
Sie können die Garzeit und/oder -temperatur während des Betriebs ändern.
Heißluftmodi
Drücken Sie auf , um zwischen Heißluftmodus und
Öko-Heißluftmodus zu wählen.
HINWEIS
Sie können den Öko-Heißluftmodus im
Doppelgarraumbetrieb auswählen.
Heißluft Öko-Heißluft
Grillenmodi
Drücken Sie auf , um zwischen den Modi Großer
Grill und Öko-Grill zu wählen.
Großer Grill Öko-Grill
NV75R7676RB_EU_DG68-01054H-00_DE.indd 19 4/17/2019 5:25:01 PM
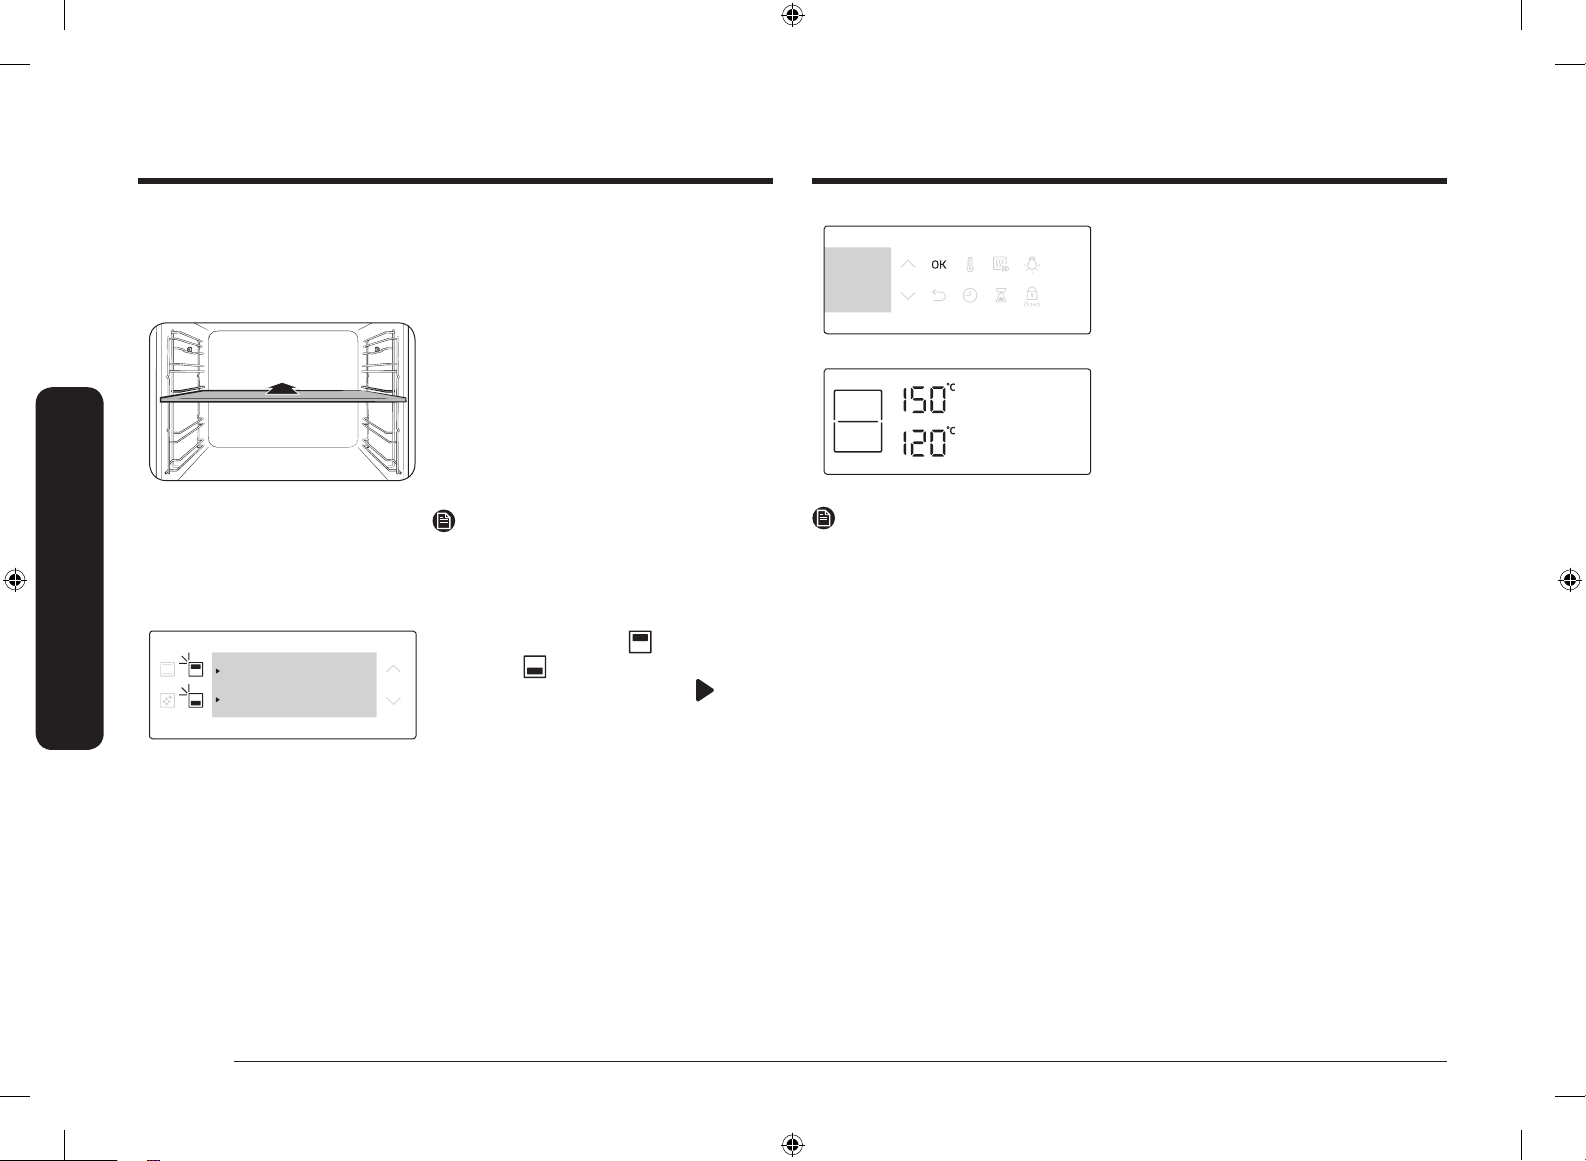
20 Deutsch
Bedienung
Bedienung
Doppelgarraumbetrieb
Mit Hilfe des Garraumteilers können Sie den Garraum des Geräts in eine obere und eine untere
Zone unterteilen. Auf diese Weise können Sie das Gerät in zwei unterschiedlichen Betriebsarten
gleichzeitig einsetzen. Alternativ können Sie auch nur eine der beiden Zonen nutzen.
1. Schieben Sie den Garraumteiler in Einschubhöhe
3, um den Garraum in zwei Zonen zu unterteilen.
2. In der oberen Zone stehen Funktionen
für Grillen, Heißluft, Öko-Heißluft und
Oberhitze+Heißluft zur Verfügung. Im unteren
Bereich stehen Funktionen für Heißluft, Öko-
Heißluft, Unterhitze+Heißluft und Unterhitze zur
Verfügung.
HINWEIS
Der Öko Heißluft-Modus kann im
Doppelgarraumbetrieb nicht gleichzeitig in beiden
Zonen verwendet werden.
3. Drücken Sie auf die Taste , um die obere
bzw. auf , um die untere Zone auszuwählen.
Neben der ausgewählten Zone wird
angezeigt.
4. Drücken Sie im Funktionsbereich die Taste für
die gewünschte Betriebsart.
5. Stellen Sie je nach Bedarf die Garzeit und/
oder -temperatur ein. Weitere Einzelheiten
hierzu nden Sie im Abschnitt Häug genutzte
Einstellungen.
6. Drücken Sie danach auf OK.
Das Gerät beginnt mit dem Vorheizen und erhitzt den
Garraum auf die eingestellte Zieltemperatur. Sofern
in den Zubereitungshinweisen nicht abweichend
angegeben, wird empfohlen, den Garraum
unabhängig von der Betriebsart stets vorzuheizen.
HINWEIS
Die Verfügbarkeit des Doppelgarraumbetriebs hängt von der jeweiligen Betriebsart ab. Weitere
Informationen nden Sie unter Verwendung in diesem Handbuch.
NV75R7676RB_EU_DG68-01054H-00_DE.indd 20 4/17/2019 5:25:02 PM

Deutsch 21
Bedienung
Betriebsarten
Die mit einem Stern (*) gekennzeichneten Betriebsarten sind beim schnellen Vorheizen verfügbar
und bei Temperaturen unter 100 °C deaktiviert.
Betriebsart
Temperaturbereich (°C)
Empfohlene
Temperatur (°C)
Einfachbetrieb
Doppelgarraumbetrieb
Oberer
Garraum
Unterer
Garraum
Heißluft
* 30-275 40-250 40-250 170
Die durch das hintere Heizelement erzeugte Wärme wird mit
dem Heißluftventilator gleichmäßig im Garraum verteilt. Diese
Betriebsart eignet sich zum Backen und Braten auf mehreren
Einschubhöhen gleichzeitig.
Öko-Heißluft
30-275 40-250 40-250 170
Bei Auswahl von „Öko-Heißluft“ kommt ein optimiertes
Heizsystem zum Einsatz, um während des Garvorgangs
Energie zu sparen. Zwar verlängert sich bei dieser Betriebsart
geringfügig die Garzeit, die Garergebnisse werden dadurch
jedoch nicht beeinträchtigt. Beachten Sie, dass bei dieser
Betriebsart kein Vorheizen erforderlich ist.
HINWEIS
• Die Betriebsart „Öko-Heißluft“ wurde zur Bestimmung der
Energieefzienzklasse gemäß EN60350-1 herangezogen.
• Im Doppelgarraumbetrieb kann der Öko Heißluftbetrieb
nicht gleichzeitig für die obere und die untere Zone
eingestellt werden.
Ober-/Unterhitze
* 30-275 - - 200
Die Wärme wird vom oberen und unteren Heizelement erzeugt.
Diese Funktion kann zum normalen Backen und zum Braten der
meisten Arten von Gerichten verwendet werden.
Betriebsart
Temperaturbereich (°C)
Empfohlene
Temperatur (°C)
Einfachbetrieb
Doppelgarraumbetrieb
Oberer
Garraum
Unterer
Garraum
Oberhitze + Heißluft
* 40-275 40-250 - 190
Die durch das obere Heizelement erzeugte Wärme wird mit
dem Heißluftventilator gleichmäßig im Garraum verteilt. Diese
Betriebsart eignet sich zum Garen von Gerichten, bei denen eine
knusprige Kruste erwünscht ist (z. B. Fleisch oder Lasagne).
Unterhitze + Heißluft
* 40-275 - 40-250 190
Die durch das untere Heizelement erzeugte Wärme wird mit dem
Heißluftventilator gleichmäßig im Garraum verteilt. Diese Betriebsart
eignet sich für die Zubereitung von Pizza, Brot oder Kuchen.
Unterhitze
100-230 - 40-250 190
Die Wärme wird durch das untere Heizelement erzeugt. Diese
Betriebsart eignet sich, um Speisen wie Quiche oder Pizza am
Ende des Garvorgangs von unten zu bräunen.
Anbraten
80-200 - - 160
Bei Auswahl von „Bratautomatik“ wird automatisch ein
Vorheizzyklus gestartet, der so lange läuft, bis im Garraum eine
Temperatur von 220 °C erreicht ist. Danach werden das obere
Heizelement und der Heißluftventilator eingeschaltet, um zum
Beispiel Fleisch scharf anzubraten. Nach dem Anbraten wird das
Fleisch bei Niedertemperatur fertig gegart. Diese Betriebsart
eignet sich für Rind, Geügel oder Fisch.
Großer Grill
100-300 40-250 - 240
Die Wärme wird durch den Großächengrill erzeugt. Diese
Betriebsart eignet sich, um Speisen auf der Oberseite zu bräunen
(z. B. Fleisch, Lasagne oder Gratin).
Öko-Grill
100-300 - - 240
Die Wärme wird durch den Kleinächengrill erzeugt. Diese
Betriebsart eignet sich für Speisen, bei deren Zubereitung
weniger Hitze erforderlich ist (z. B. Fisch und gefüllte Baguettes).
NV75R7676RB_EU_DG68-01054H-00_DE.indd 21 4/17/2019 5:25:04 PM

22 Deutsch
Bedienung
Bedienung
Temperaturbereiche im Doppelgarraumbetrieb
Sie können die obere und die untere Zone gleichzeitig für unterschiedliche Garvorgänge verwenden.
Im Doppelzonenbetrieb wird der verfügbare Temperaturbereich für eine der Zonen jedoch durch
die Temperatureinstellung für die jeweils andere Zone begrenzt. Wenn Sie beispielsweise die obere
Zone zum Grillen verwenden, ist der auswählbare Temperaturbereich aufgrund des Garvorgangs in
der unteren Zone begrenzt. Zugleich sind die Temperatureinstellungen in beiden Zonen auf einen
Bereich zwischen 40 und 250 °C begrenzt.
Eingestellte Temperatur (°C) im
oberen Garraum
Die untere Zone ist begrenzt auf (°C)
Minimum Maximum
40 40 45
60 50 75
80 65 105
100 80 135
120 90 160
140 105 190
160 120 220
180 135 250
200 145 250
220 160 250
250 170 250
Eingestellte Temperatur (°C) im
unteren Garraum
Die obere Zone ist begrenzt auf (°C)
Minimum Maximum
40 40 45
60 50 75
80 65 105
100 80 135
120 90 160
140 105 190
160 120 220
180 135 250
200 145 250
220 160 250
250 170 250
NV75R7676RB_EU_DG68-01054H-00_DE.indd 22 4/17/2019 5:25:04 PM
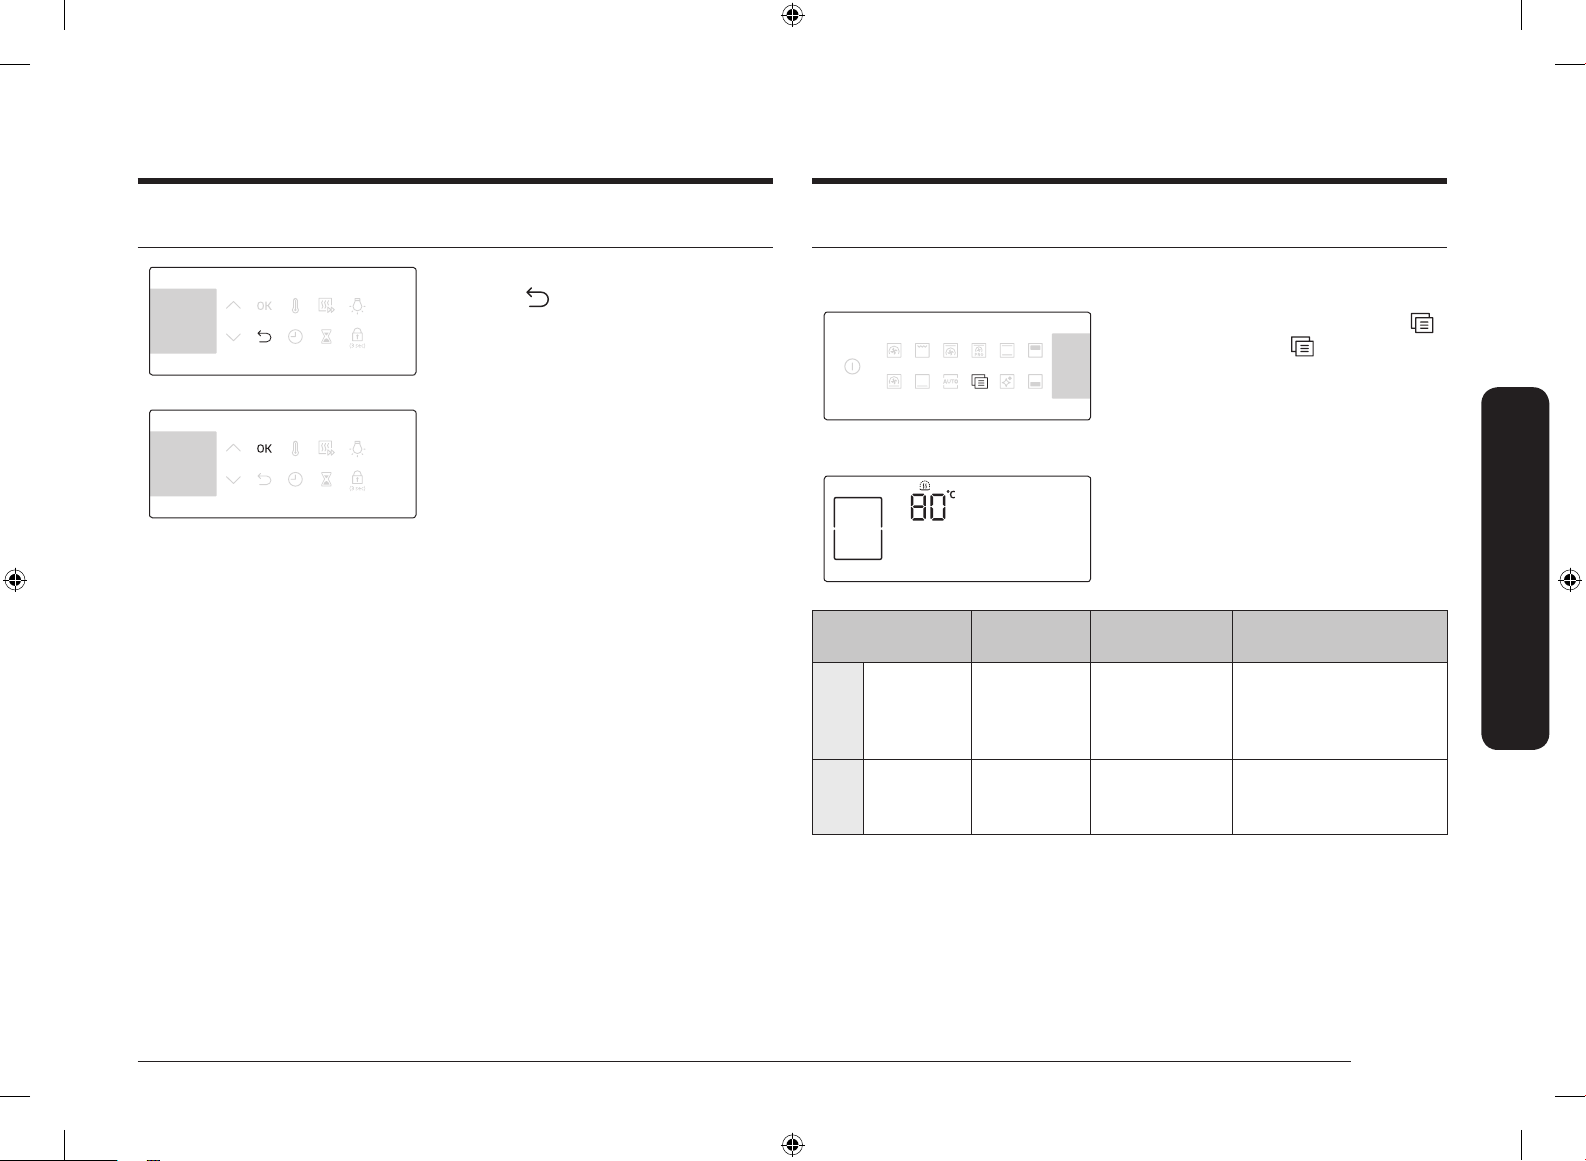
Deutsch 23
Bedienung
Unterbrechen des Garvorgangs
1. Drücken Sie, während das Gerät in Betrieb ist,
die Taste .
2. Drücken Sie auf OK, um den Garvorgang
abzubrechen.
Sonderfunktionen
Um Ihre Garergebnisse zu verbessern, können Sie verschiedene Zusatz- oder Sonderfunktionen
verwenden. Die Sonderfunktionen sind im Doppelgarraumbetrieb nicht verfügbar.
1. Drücken Sie im Funktionsbereich die Taste .
2. Drücken Sie wieder auf , um eine Funktion
auszuwählen.
3. Stellen Sie je nach Bedarf die Garzeit und/oder
-temperatur ein. Weitere Informationen erhalten
Sie im Abschnitt Häug genutzte Einstellungen.
4. Das Gerät startet den Garvorgang in
der ausgewählten Betriebsart mit den
Standardeinstellungen oder den von Ihnen
programmierten Werten.
Betriebsart
Temperaturbereich
(°C)
Empfohlene
Temperatur (°C)
Anleitung
F 1 Warmhalten 40-100 80
Verwenden Sie diese Funktion
nur, um Speisen warmzuhalten,
die Sie kurz zuvor gegart
haben.
F 2
Geschirr
erwärmen
30-80 60
Verwenden Sie diese Funktion
zum Erwärmen von Koch- und
Anrichtegeschirr.
NV75R7676RB_EU_DG68-01054H-00_DE.indd 23 4/17/2019 5:25:05 PM

24 Deutsch
Bedienung
Bedienung
Automatikprogramme
Für unerfahrene Köche bietet das Gerät insgesamt 50 Automatikprogramme. Mit Hilfe der
Automatikprogramme können Sie Zeit sparen und schneller Kochen und Backen lernen. Die Garzeit
und -temperatur wird entsprechend dem ausgewählten Rezept automatisch eingestellt.
1. Drücken Sie neben dem Display die Taste .
2. Wählen Sie mit den Tasten und das
gewünschte Programm aus, und drücken Sie
danach auf OK. Im Display wird der verfügbare
Gewichtsbereich (portionsgröße) angezeigt.
3. Stellen Sie mit den Tasten und die
Portionsgröße ein und drücken Sie auf OK.
HINWEIS
• Einige der Elemente in den Automatikprogrammen beinhalten das Vorheizen. Für diese
Elemente wird der Fortschritt des Vorheizens angezeigt. Geben Sie die Speisen nach dem
Vorheizen in den Garraum, wenn der Signalton erklingt. Drücken Sie dann Garzeit, um die
Automatikprogramme zu starten.
• Weitere Informationen nden Sie unter Automatikprogramme in diesem Handbuch.
Doppelgarraumbetrieb
1. Schieben Sie den Garraumteiler in
Einschubhöhe 3, um den Doppelgarraumbetrieb
zu aktivieren.
2. Drücken Sie auf die Taste , um die obere
bzw. auf , um die untere Zone auszuwählen.
Neben der ausgewählten Zone wird
angezeigt.
3. Drücken Sie neben dem Display die Taste .
4. Wählen Sie mit den Tasten und das
gewünschte Programm aus, und drücken Sie
danach auf OK. Im Display wird der verfügbare
Gewichtsbereich (portionsgröße) angezeigt.
5. Stellen Sie mit den Tasten und die
Portionsgröße ein und drücken Sie auf OK.
HINWEIS
Weitere Informationen nden Sie unter Automatikprogramme in diesem Handbuch.
NV75R7676RB_EU_DG68-01054H-00_DE.indd 24 4/17/2019 5:25:06 PM

Deutsch 25
Bedienung
Dampfreinigung
Diese Funktion dient zum Entfernen leichter Verschmutzungen mit Dampf. Diese Funktionen sparen
Ihnen Zeit, da eine regelmäßige manuelle Reinigung entfällt.
1. Gießen Sie ca. 400 ml Wasser auf den Boden des
Garraums, und schließen Sie die Gerätetür.
2. Drücken Sie im Funktionsbereich die Taste .
3. Drücken Sie auf OK, um den Reinigungsvorgang
zu starten.
Die Dampfreinigung dauert 26 Minuten.
4. Reinigen Sie den Garraum mit einem feuchten
Tuch.
WARNUNG
Öffnen Sie die Gerätetür nicht, bevor der Reinigungszyklus abgeschlossen ist. Das Wasser im
Garraum ist sehr heiß und kann Verbrennungen verursachen.
HINWEIS
• Wenn der Garraum stark mit Fett verunreinigt ist, beispielsweise nach dem Braten oder Grillen,
empehlt es sich, mit Hilfe eines Reinigungsmittels erst den hartnäckigen Schmutz von Hand
zu entfernen und dann die Dampfreinigung zu aktivieren.
• Lassen Sie die Gerätetür nach Abschluss des Reinigungszyklus leicht geöffnet. So können die
emaillierten Innenächen vollständig trocknen.
• Diese Reinigungsfunktion kann erst dann aktiviert werden, wenn der Garraum des Geräts
abgekühlt ist. Warten Sie, bis das Gerät abgekühlt ist, und versuchen Sie es dann erneut.
• Gießen Sie das Wasser nicht mit Schwung auf den Boden des Garraums. Gehen Sie langsam und
vorsichtig vor. Andernfalls kann Wasser an der Vorderseite des Geräts austreten.
• Das Wasser, das auf den Boden des Ofens gegossen wird, kann nicht vollständig verdunsten.
Dies ist normal.
Pyrolysereinigung
Bei der Pyrolyse wird der Garraum bei sehr hoher Temperatur gereinigt. Hierbei werden
Fettrückstände verbrannt, sodass eine manuelle Reinigung leichter vonstatten geht.
1. Entnehmen Sie alle Zubehörteile einschließlich der Seitengitter aus dem Garraum, und
wischen Sie größere Krümel und Verunreinigungen im Inneren des Geräts weg. Andernfalls
können während des Reinigungszyklus offene Flammen oder ein Brand entstehen.
2. Drücken Sie im Funktionsbereich zweimal auf
.
NV75R7676RB_EU_DG68-01054H-00_DE.indd 25 4/17/2019 5:25:06 PM
26 Deutsch
Bedienung
Bedienung
3. Wählen Sie eine von 3 verfügbaren
Reinigungszeiten: 1 h 50 min, 2 h 10 min oder
2 h 30 min.
4. Drücken Sie auf OK, um den Reinigungsvorgang
zu starten.
5. Warten Sie nach Abschluss der Reinigung ab,
bis das Gerät abgekühlt ist, und wischen Sie
anschließend mit einem feuchten Tuch an den
Kanten der Gerätetür entlang.
VORSICHT
• Berühren Sie das Gerät nicht während eines Reinigungszyklus, da es sehr heiß werden kann.
• Halten Sie Kinder vom Gerät fern, um Unfälle zu vermeiden.
• Schalten Sie das Gerät nach Abschluss des Reinigungszyklus erst dann aus, nachdem der
Kühlungsventilator das Gerät ausreichend heruntergekühlt hat und automatisch abgeschaltet
wurde.
HINWEIS
• Nach Beginn des Reinigungszyklus wird der Garraum sehr heiß. Die Gerätetür wird daher
aus Sicherheitsgründen verriegelt. Wenn der Reinigungszyklus abgeschlossen und das Gerät
abgekühlt ist, wird die Gerätetür wieder entsperrt.
• Denken Sie daran, das Gerät vor dem Starten der Reinigungsfunktion zu leeren. Zubehörteile
können sich auf Grund der hohen Temperaturen im Inneren des Geräts verformen.
Timer
Mit Hilfe der Timerfunktion können Sie bei einem Garvorgang die benötigte Zeit bzw. Betriebsdauer
überprüfen.
1. Drücken Sie auf .
2. Wählen Sie mit den Tasten und die
gewünschte Dauer aus, und drücken Sie danach
auf OK.
HINWEIS
• Wenn die eingestellte Zeit abgelaufen ist, erklingt ein Signalton und auf dem Display blinkt die
Anzeige „00:00“.
• Sie können die Timereinstellung jederzeit ändern.
Ton ein/aus
• Zum Ausschalten der Signaltöne halten Sie die
Taste 3 Sekunden lang gedrückt.
• Halten Sie zum Einschalten der Signaltöne die
Taste erneut 3 Sekunden lang gedrückt.
NV75R7676RB_EU_DG68-01054H-00_DE.indd 26 4/17/2019 5:25:07 PM
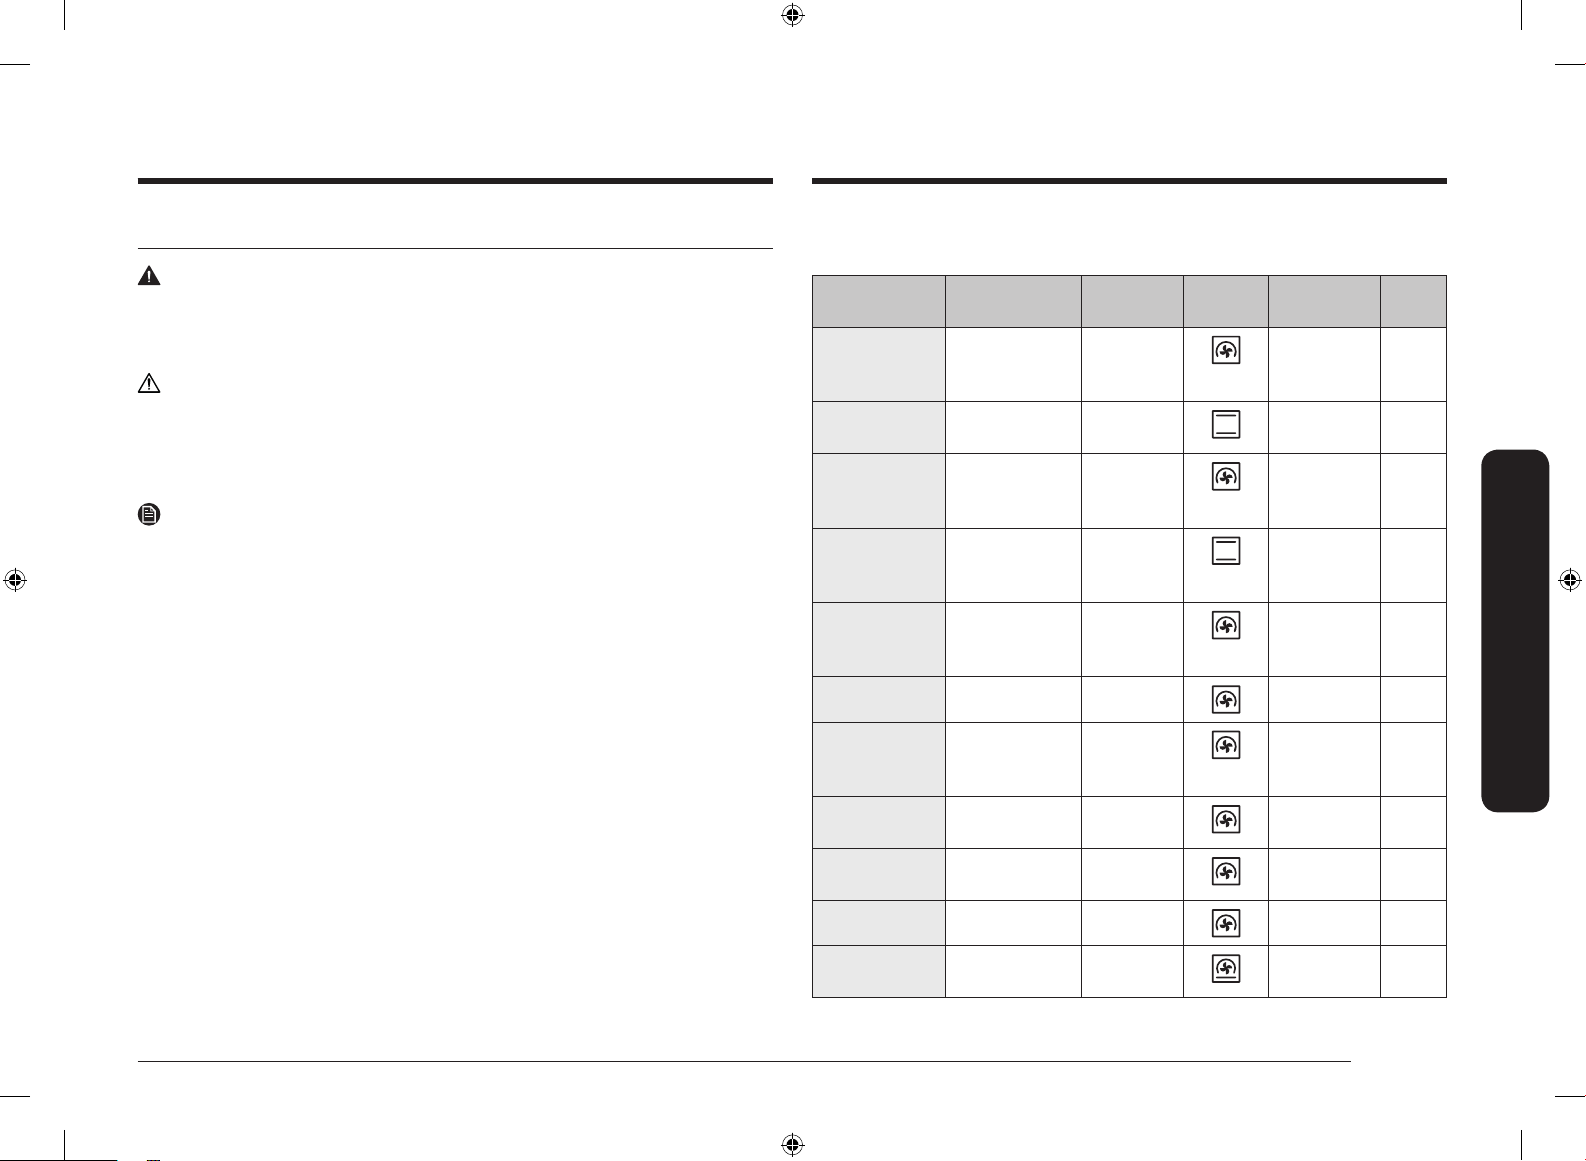
Deutsch 27
Verwendung
Verwendung
Manuelles Garen
WARNUNG vor Acrylamid
Beim Backen von stärkehaltigen Lebensmitteln wie Kartoffelchips, Pommes Frites und Brot kann
gesundheitsschädliches Acrylamid entstehen. Es wird empfohlen, solche Speisen bei niedrigen
Temperaturen zu garen, um ein Übergaren, Austrocknen oder Verbrennen zu vermeiden.
VORSICHT
Lebensmittel, die leicht verderben können (wie Milch, Eier, Fisch, Fisch, Fleisch oder Geügel), dürfen
nicht länger als 1 Stunde vor Beginn des Garvorgangs im Ofen stehen und müssen nach Beendigung
des Garvorgangs unverzüglich entfernt werden. Das Essen verdorbener Lebensmittel kann zu
Krankheiten durch Lebensmittelvergiftungen führen.
HINWEIS
• Es wird empfohlen, den Garraum unabhängig von der Betriebsart stets vorzuheizen, sofern in
den Zubereitungshinweisen nicht abweichend angegeben.
• Wenn Sie die Betriebsart „Öko-Grill“ verwenden, stellen Sie die Speisen in die Mitte des
Backblechs.
Tipps zu den Zubehörteilen
Im Lieferumfang des Geräts sind verschiedene Zubehörteile enthalten. Möglicherweise werden in
der folgenden Tabelle mehr Zubehörteile aufgeführt, als im Lieferumfang Ihres Geräts enthalten
sind. Wenn Ihnen nicht exakt die Zubehörteile aus den Zubereitungshinweisen zur Verfügung stehen,
können Sie auch andere geeignete Zubehörteile verwenden, die Sie bereits besitzen. Dies hat keine
Auswirkungen auf die Garergebnisse.
• Backblech und Universalblech sind untereinander austauschbar.
• Wenn Sie ölige/fettige Speisen zubereiten, empehlt es sich, ein Backblech unter dem
Gitterrost einzusetzen, um herabtropfendes Fett aufzufangen. Wenn im Lieferumfang Ihres
Geräts ein Gitterrosteinsatz enthalten ist, können Sie diesen zusammen mit dem Blech
verwenden.
• Wenn im Lieferumfang Ihres Geräts ein Universalblech, ein extra tiefes Blech oder beides
enthalten ist, empehlt es sich, bei der Zubereitung fettiger Speisen das tiefere Blech zu
verwenden.
Backen
Für optimale Ergebnisse wird empfohlen, den Garraum vorzuheizen.
Gericht Zubehör Einschubhöhe Betriebsart Temperatur (°C)
Zeit
(in Min.)
Biskuit Gitterrost,
Kuchenform
(Ø 25-26 cm)
2 160-170 35-40
Marmorkuchen Gitterrost,
Gugelhupfform
3 175-185 50-60
Tarte Gitterrost,
Tarteform
(Ø 20 cm)
3 190-200 50-60
Hefe-Blechkuchen
mit Obst und
Streuseln
Universalblech 2 160-180 40-50
Obststreusel Gitterrost,
Auaufform
(22-24 cm)
3 170-180 25-30
Scones Universalblech 3 180-190 30-35
Lasagne Gitterrost,
Auaufform
(22-24 cm)
3 190-200 25-30
Baisers Universalblech 3 80-100 100-
150
Soufé Gitterrost, Soufé-
Förmchen
3 170-180 20-25
Hefeblechkuchen Universalblech 3 150-170 60-70
Selbstgemachte
Pizza (1-1,2 kg)
Universalblech 2 190-210 10-15
NV75R7676RB_EU_DG68-01054H-00_DE.indd 27 4/17/2019 5:25:07 PM
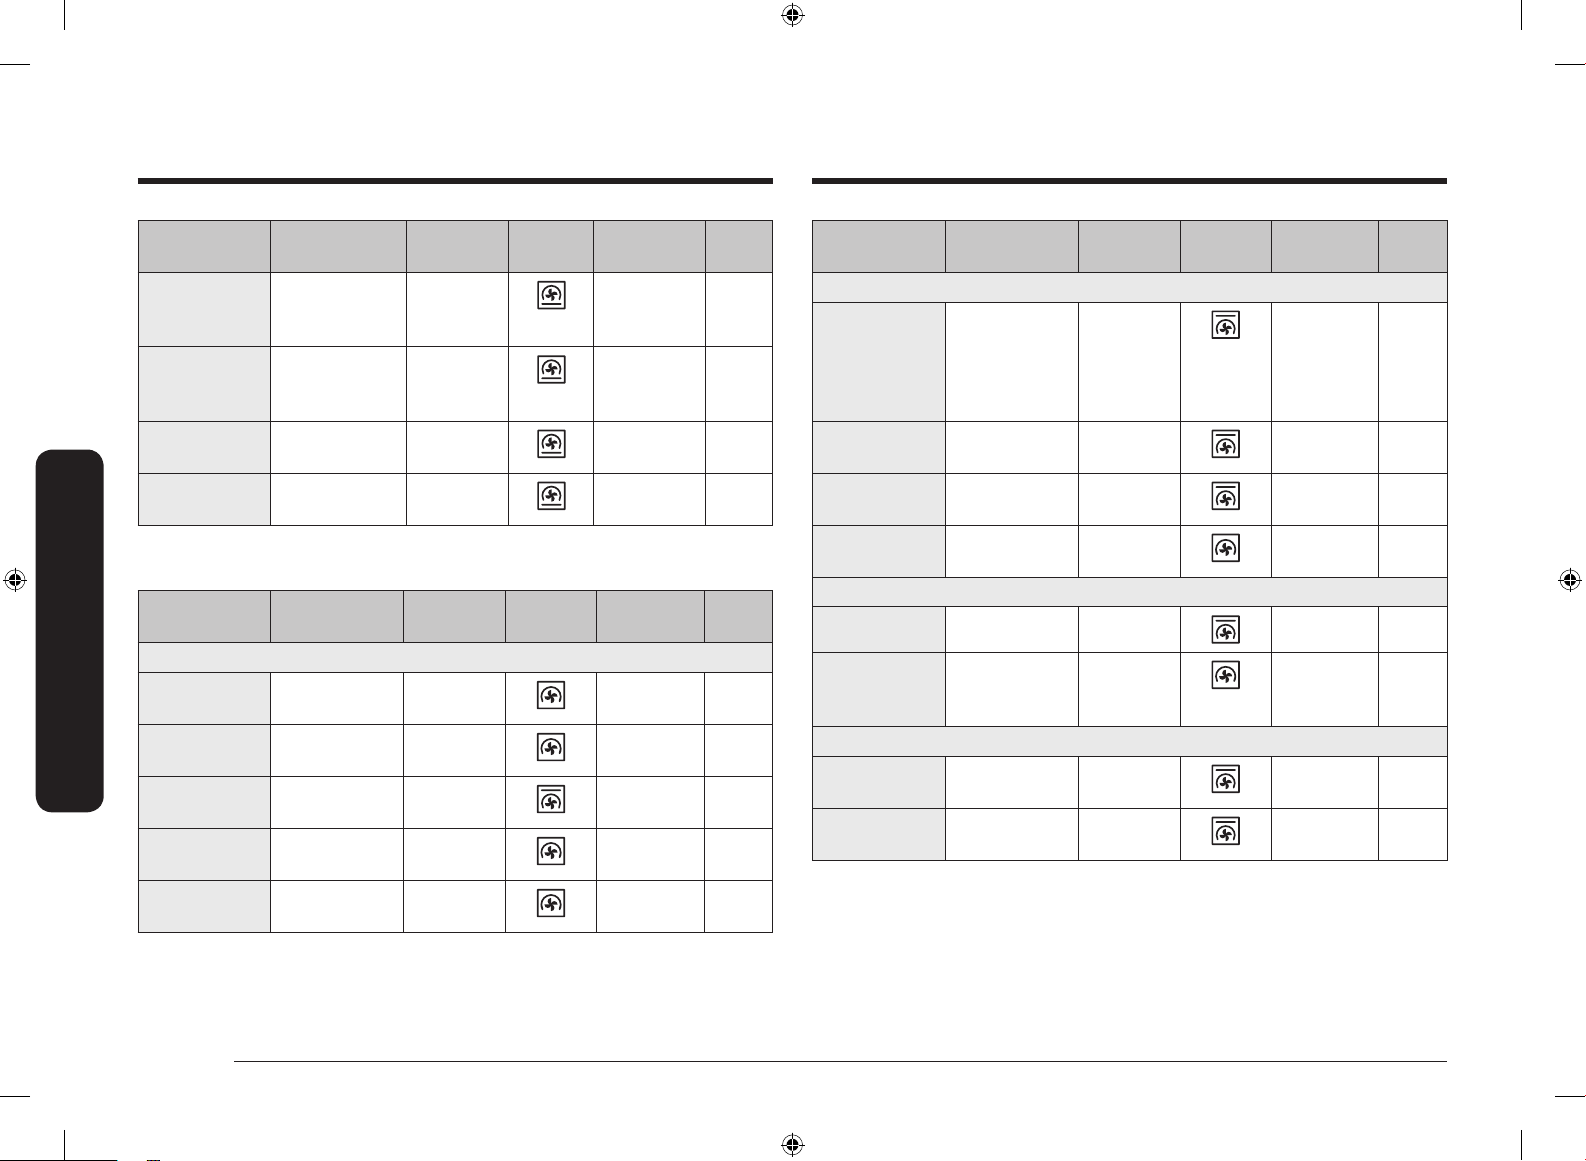
28 Deutsch
Verwendung
Verwendung
Gericht Zubehör Einschubhöhe Betriebsart Temperatur (°C)
Zeit
(in Min.)
Tiefgefrorener
Blätterteigstücke,
gefüllt
Universalblech 2 180-200 20-25
Quiche Gitterrost,
Auaufform
(22-24 cm)
2 180-190 25-35
Gedeckter
Apfelkuchen
Gitterrost, Form
(Ø 20 cm)
2 160-170 65-75
Pizza aus dem
Kühlregal
Universalblech 3 180-200 5-10
Braten
Gericht Zubehör Einschubhöhe Betriebsart Temp. (°C)
Zeit
(in Min.)
Fleisch (Rind/Schwein/Lamm)
Lendenbraten vom
Rind (1 kg)
Gitterrost +
Universalblech
3
1
160-180 50-70
Kalbsbraten
(1,5 kg)
Gitterrost +
Universalblech
3
1
160-180 90-120
Schweinebraten
(1 kg)
Gitterrost +
Universalblech
3
1
200-210 50-60
Schweinenackenbraten
(1 kg)
Gitterrost +
Universalblech
3
1
160-180 100-
120
Lammkeule (1 kg) Gitterrost +
Universalblech
3
1
170-180 100-
120
Gericht Zubehör Einschubhöhe Betriebsart Temp. (°C)
Zeit
(in Min.)
Geügel (Huhn/Ente/Truthahn)
Brathähnchen
(1,2 kg) *
Gitterrost +
Universalblech
(zum Auffangen
von Fett und
Flüssigkeit)
3
1
200 65-80 *
Hähnchenteile Gitterrost +
Universalblech
3
1
200-220 25-35
Entenbrust Gitterrost +
Universalblech
3
1
200-210 20-30
Ganze Pute, klein
(5 kg)
Gitterrost +
Universalblech
3
1
180-200
120-150
Vegetarische Gerichte
Gemüse (0,5 kg) Universalblech 3 220-230 15-20
Halbierte
Ofenkartoffeln
(0,5 kg)
Universalblech 3 190-200 40-50
Fisch
Fischlet,
gebacken
Gitterrost +
Universalblech
3
1
200-220 20-30
Bratsch Gitterrost +
Universalblech
3
1
180-200 30-40
* Nach der Hälfte der Zeit wenden.
NV75R7676RB_EU_DG68-01054H-00_DE.indd 28 4/17/2019 5:25:08 PM

Deutsch 29
Verwendung
Grillen
Es wird empfohlen, den Garraum mit dem Großächengrill vorzuheizen. Nach der Hälfte der Zeit
wenden.
Gericht Zubehör Einschubhöhe Betriebsart Temp. (°C)
Zeit
(in Min.)
Brot
Toast Gitterrost 5 270-300 2-4
Käsetoast Universalblech 4 200 4-8
Rind
Steak * Gitterrost +
Universalblech
4
1
240-250 15-20
Burger * Gitterrost +
Universalblech
4
1
250-270 13-18
Schwein
Schweinekoteletts Gitterrost +
Universalblech
4
1
250-270 15-20
Bratwurst Gitterrost +
Universalblech
4
1
260-270 10-15
Geügel
Hähnchenbrust Gitterrost +
Universalblech
4
1
230-240 30-35
Hähnchenunterschenkel
Gitterrost +
Universalblech
4
1
230-240 25-30
* Nach
2
/3 der Garzeit wenden.
Tiefgefrorene Fertiggerichte
Gericht Zubehör Einschubhöhe Betriebsart
Temperatur
(°C)
Zeit
(in Min.)
Teifgefrorene
Pizza (0,4-0,6 kg)
Gitterrost 3 200-220 15-25
Tiefgefrorene
Lasagne
Gitterrost 3 180-200 45-50
Tiefgefrorene
Backofen-
Pommes
Universalblech 3 220-225 20-25
Tiefgefrorene
Kroketten
Universalblech 3 220-230 25-30
Tiefgefrorener
Backcamembert
Gitterrost 3 190-200 10-15
Tiefgefrorene
belegte Baguettes
Gitterrost +
Universalblech
3
1
190-200 10-15
Tiefgefrorene
Fischstäbchen
Gitterrost +
Universalblech
3
1
190-200 15-25
Tiefgefrorene
Fischburger
Gitterrost 3 180-200 20-35
NV75R7676RB_EU_DG68-01054H-00_DE.indd 29 4/17/2019 5:25:08 PM
30 Deutsch
Verwendung
Verwendung
Anbraten
Bei dieser Betriebsart wird der Garraum zunächst automatisch auf bis zu 220 °C vorgeheizt. Zum
Braten des Fleisches werden dann das obere Heizelement und der Heißluftventilator verwendet.
Anschließend werden die Speisen bei der zuvor ausgewählten niedrigen Temperatur schonend
gegart. Dazu werden das obere und das untere Heizelement eingesetzt. Diese Betriebsart eignet sich
zum Braten von Fleisch und Fisch.
Gericht Zubehör Einschubhöhe Temp. (°C)
Zeit
(Stunden)
Rinderbraten Gitterrost +
Universalblech
3
1
80-100 3-4
Schweinebraten Gitterrost +
Universalblech
3
1
80-100 4-5
Lammbraten Gitterrost +
Universalblech
3
1
80-100 3-4
Entenbrust Gitterrost +
Universalblech
3
1
80-100 2-3
Doppelgarraumbetrieb
Setzen Sie den Garraumteiler in das Gerät ein, bevor Sie es im Doppelgarraumbetrieb verwenden.
Für optimale Ergebnisse wird empfohlen, das Gerät vorzuheizen.
In der folgenden Tabelle sind 5 Programme zum Garen, Braten und Backen im Doppelgarraumbetrieb
aufgeführt. Im Doppelgarraumbetrieb können Sie gleichzeitig Ihr Hauptgericht und die Beilage oder
Ihr Hauptgericht und Ihren Nachtisch zubereiten.
• Bei Verwendung des Doppelgarraumbetriebs verlängert sich möglicherweise die zum
Vorheizen benötigte Zeit.
Nr. Zone Gericht Zubehör
Einschubhöhe
Betriebsart Temperatur
(°C)
Zeit
(in Min.)
1 Oberer
Garraum
Biskuit Gitterrost,
Kuchenform
(Ø 25-26 cm)
4 160-170 40-45
Unterer
Garraum
Selbstgemachte
Pizza
(1,0-1,2 kg)
Universalblech 1 190-210 13-18
2 Oberer
Garraum
Grillgemüse (0,4-
0,8 kg)
Universalblech 4 220-230 13-18
Unterer
Garraum
Gedeckter
Apfelkuchen
Gitterrost,
Form
(Ø 20 cm)
1 160-170 70-80
3 Oberer
Garraum
Fladenbrot Universalblech 4 230-240 13-18
Unterer
Garraum
Kartoffelgratin
(1,0-1,5 kg)
Gitterrost,
Auaufform
(22-24 cm)
1 180-190 45-50
NV75R7676RB_EU_DG68-01054H-00_DE.indd 30 4/17/2019 5:25:09 PM
Deutsch 31
Verwendung
Nr. Zone Gericht Zubehör
Einschubhöhe
Betriebsart Temperatur
(°C)
Zeit
(in Min.)
4 Oberer
Garraum
Hähnchenunterschenkel
Gitterrost +
Universalblech
4
4
230-250 30-35
Unterer
Garraum
Lasagne
(1,0-1,5 kg)
Gitterrost,
Auaufform
(22-24 cm)
1 190-200 30-35
5 Oberer
Garraum
Fischlet,
gebacken
Gitterrost +
Universalblech
4
4
210-230 15-20
Unterer
Garraum
Apfeltaschen Universalblech 1 170-180 25-30
Um Energie zu sparen, können Sie auch nur die obere oder die untere Zone verwenden. Die Garzeit
kann sich verlängern, wenn Sie die getrennte Zonen verwenden. Für optimale Ergebnisse wird
empfohlen, das Gerät vorzuheizen.
Oberer Garraum
Gericht Zubehör Einschubhöhe Betriebsart Temperatur
(°C)
Zeit
(in Min.)
Kartoffelgratin Gitterrost,
Auaufform
(22-24 cm)
4 160-170 40-50
Scones Universalblech 4 180-190 30-35
Lasagne Gitterrost,
Auaufform
(22-24 cm)
4 180-190 25-35
Hähnchenunterschenkel *
Gitterrost +
Universalblech
4
4
230-250 30-35
* Das Gerät nicht vorheizen.
NV75R7676RB_EU_DG68-01054H-00_DE.indd 31 4/17/2019 5:25:09 PM
32 Deutsch
Verwendung
Verwendung
Unterer Garraum
Gericht Zubehör Einschubhöhe Betriebsart Temperatur
(°C)
Zeit
(in Min.)
Holländischer
Kastenkuchen
Gitterrost,
Kastenform (24 cm)
1 170-180 50-60
Marmorkuchen Gitterrost,
Gugelhupfform
1 160-170 60-70
Gedeckter
Apfelkuchen
Gitterrost, Form
(Ø 20 cm)
1 160-170 70-80
Selbstgemachte
Pizza
(1,0-1,2 kg)
Universalblech 1 190-210 13-18
Öko-Heißluft
Bei dieser Betriebsart kommt ein optimiertes Heizsystem zum Einsatz, um während des
Garens Energie zu sparen. Die in diesem Abschnitt angegebenen Garzeiten beziehen sich auf
einen Garvorgang ohne Vorheizen. Bei dieser Art der Zubereitung sollte das Vorheizen aus
Energiespargründen entfallen.
Gericht Zubehör Einschubhöhe
Temperatur
(°C)
Zeit
(in Min.)
Obststreusel
(0,8-1,2 kg)
Gitterrost,
Auaufform (24 cm)
2 160-180 60-80
Backkartoffeln
(0,4-0,8 kg)
Universalblech 2 190-200 70-80
Würstchen (0,3-0,5 kg) Gitterrost +
Universalblech
3
1
160-180 20-30
Tiefgefrorene Backofen-
Pommes (0,3-0,5 kg)
Universalblech 3 180-200 25-35
Tiefgefrorene
Kartoffelecken
(0,3-0,5 kg)
Universalblech 3 190-210 25-35
Fischlets, gebacken
(0,4-0,8 kg)
Gitterrost +
Universalblech
3
1
200-220 30-40
Knusprige Fischlets,
paniert (0,4-0,8 kg)
Gitterrost +
Universalblech
3
1
200-220 30-45
Rinderlende (0,8-1,2 kg) Gitterrost +
Universalblech
2
1
180-200 65-75
Grillgemüse (0,4-0,6 kg) Universalblech 3 200-220 25-35
NV75R7676RB_EU_DG68-01054H-00_DE.indd 32 4/17/2019 5:25:09 PM
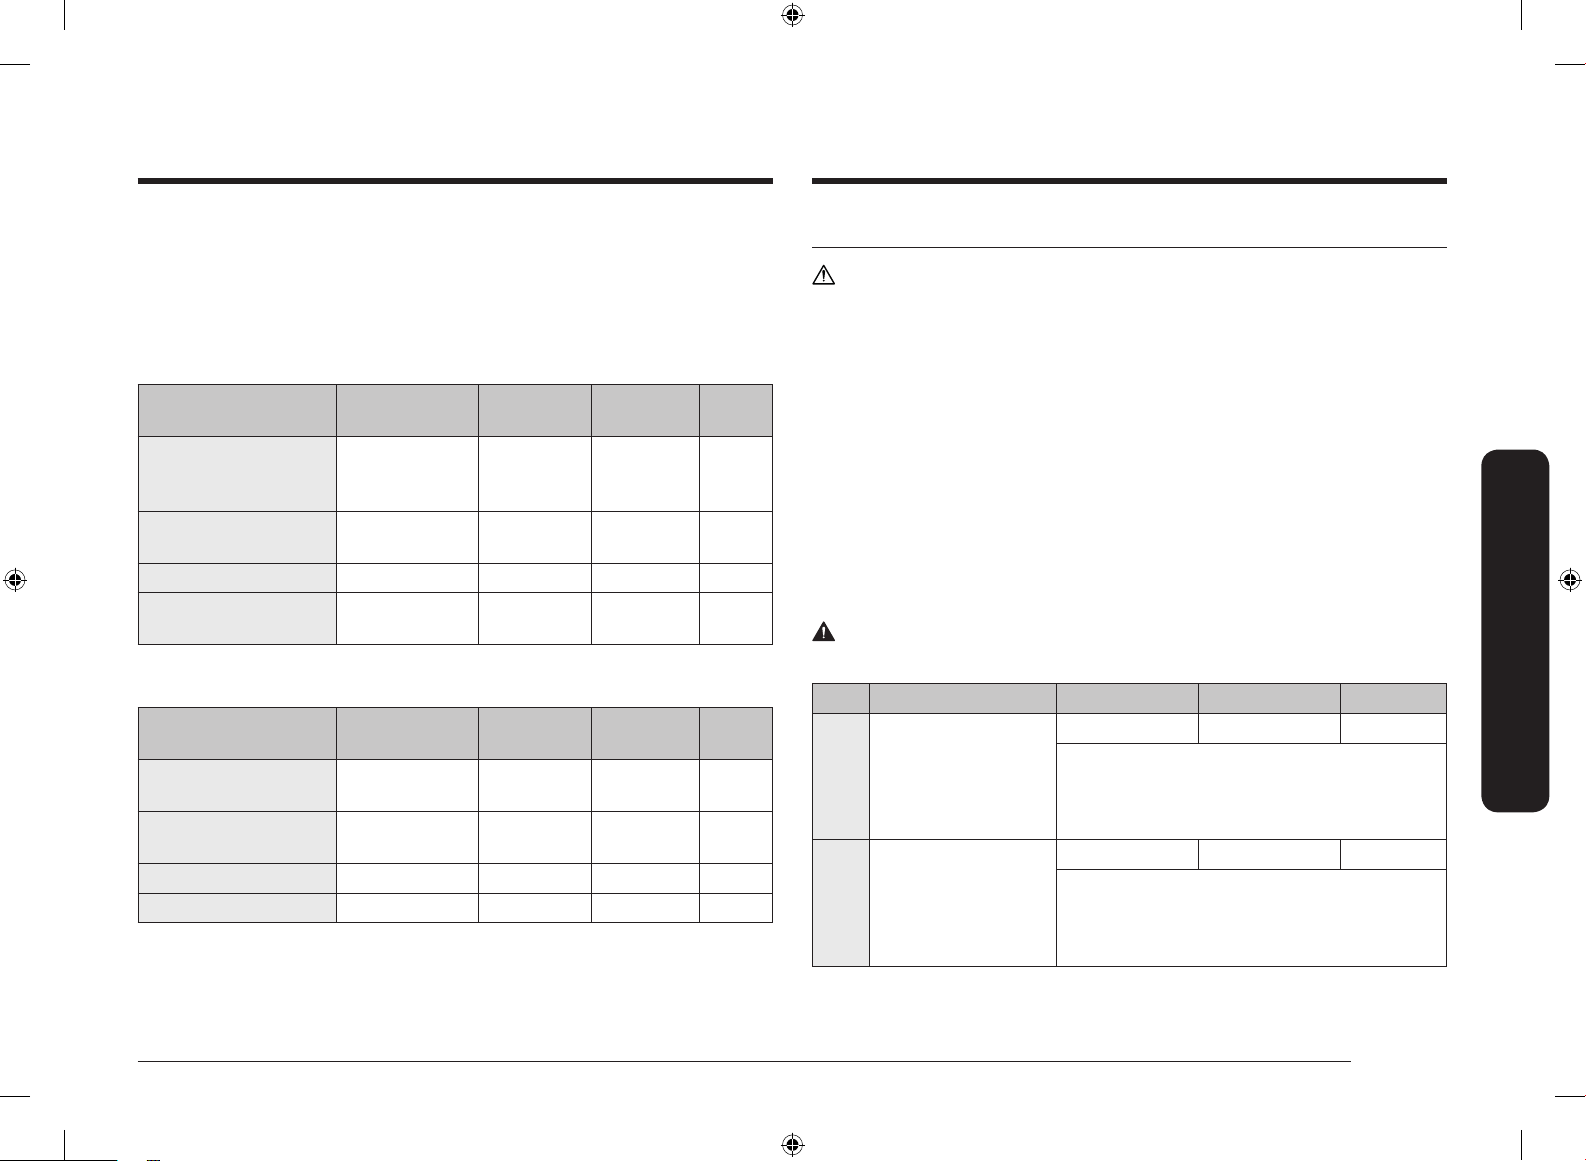
Deutsch 33
Verwendung
Doppelgarraumbetrieb – Betriebsart „Öko-Heißluft“
Um Energie zu sparen, können Sie in der oberen oder unteren Zone auch die Betriebsart „Öko-
Heißluft“ verwenden.
Die in diesem Abschnitt angegebenen Garzeiten beziehen sich auf einen Garvorgang ohne
Vorheizen. Bei dieser Art der Zubereitung sollte das Vorheizen aus Energiespargründen entfallen.
Oberer Garraum
Gericht Zubehör Einschubhöhe Temperatur
(°C)
Zeit
(in Min.)
Lasagne Gitterrost,
Auaufform
(22-24 cm)
4 180-200 30-45
Tiefgefrorene Backofen-
Pommes
Universalblech 4 200-210 25-35
Tiefgefrorene Kartoffelecken Universalblech 4 200-210 25-35
Rinderlende Gitterrost +
Universalblech
4
4
170-180 60-80
Unterer Garraum
Gericht Zubehör Einschubhöhe Temperatur
(°C)
Zeit
(in Min.)
Marmorkuchen Gitterrost,
Gugelhupfform
1 170-180 60-70
Holländischer Kastenkuchen Gitterrost,
Kastenform (24 cm)
1 170-180 50-60
Backkartoffeln Universalblech 1 190-200 70-90
Tiefkühlpizza Gitterrost 1 200-210 25-30
Automatikprogramme
VORSICHT
Lebensmittel, die leicht verderben können (wie Milch, Eier, Fisch, Fisch, Fleisch oder Geügel), dürfen
nicht länger als 1 Stunde vor Beginn des Garvorgangs im Ofen stehen und müssen nach Beendigung
des Garvorgangs unverzüglich entfernt werden. Das Essen verdorbener Lebensmittel kann zu
Krankheiten durch Lebensmittelvergiftungen führen.
Garen auf einer Einschubhöhe
In der folgenden Tabelle sind 40 Automatikprogramme zum Garen, Braten und Backen aufgeführt.
Zudem werden die entsprechenden Mengen, Gewichtsangaben und Zubereitungsempfehlungen
beschrieben. Zur einfacheren Handhabung wurden die Betriebsart und die Garzeit vorprogrammiert.
Die Rezepte für einige der Automatikprogramme können Sie in diesem Handbuch nachlesen.
Die Automatikprogramme 1 bis 19 sowie 38 und 39 umfassen einen zusätzlichen Schritt, bei dem
das Gerät vorgeheizt wird. Der Fortschritt des Vorheizens wird im Display angezeigt. Geben Sie die
Speisen nach dem Vorheizen in den Garraum, wenn der Signalton erklingt.
Drücken Sie dann Garzeit, um die Automatikprogramme zu starten.
WARNUNG
Ziehen Sie beim Entnehmen der Speisen stets Ofenhandschuhe an.
Code Gericht Gewicht (kg) Zubehör Einschubhöhe
A 1 Kartoffelgratin
1,0-1,5 Gitterrost 3
Frisches Kartoffelgratin in einer 22-24 cm großen
Auaufform zubereiten. Programm starten und, wenn nach
dem Vorheizen der Signalton zu hören ist, die Speisen in
die Mitte des Rosts stellen.
A 2 Gemüsegratin
0,8-1,2 Gitterrost 3
Frisches Gemüsegratin in einer 22-24 cm großen
Auaufform zubereiten. Programm starten und, wenn nach
dem Vorheizen der Signalton zu hören ist, die Speisen in
die Mitte des Rosts stellen.
NV75R7676RB_EU_DG68-01054H-00_DE.indd 33 4/17/2019 5:25:10 PM
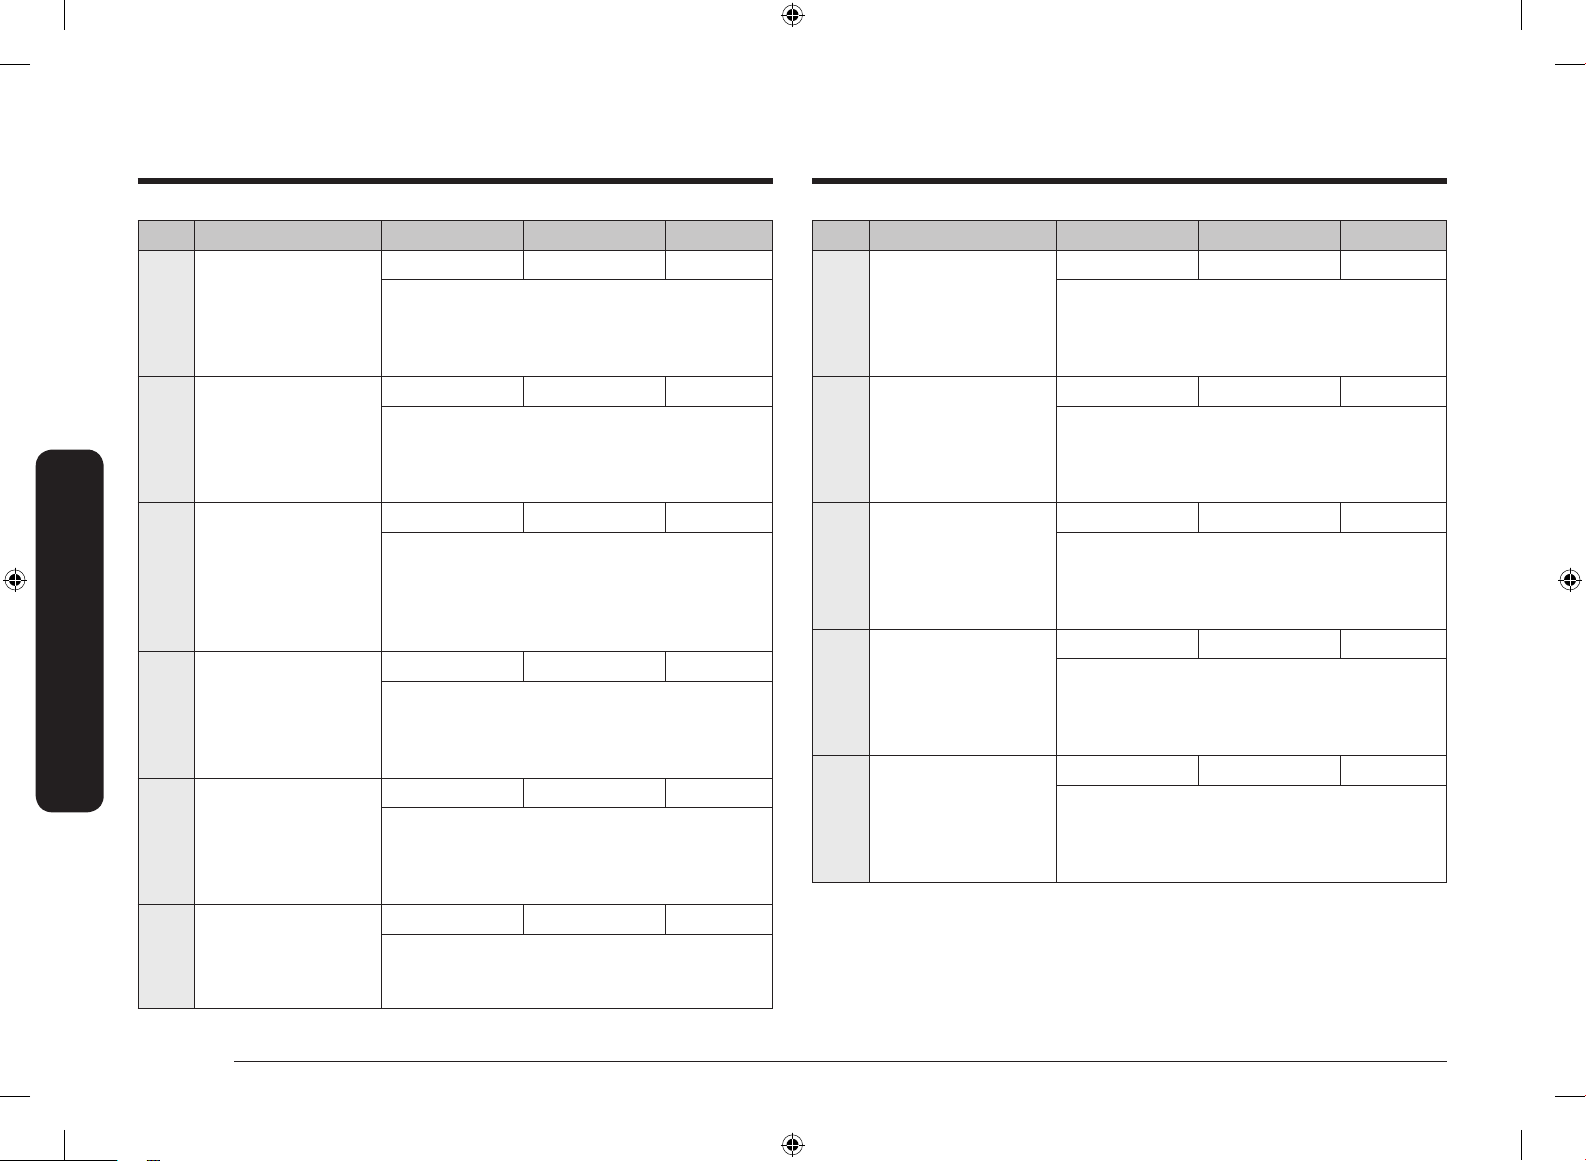
34 Deutsch
Verwendung
Verwendung
Code Gericht Gewicht (kg) Zubehör Einschubhöhe
A 3 Nudelauauf
1,2-1,5 Gitterrost 3
Nudelauauf in einer 22-24 cm großen Auaufform
zubereiten. Programm starten und, wenn nach dem
Vorheizen der Signalton zu hören ist, die Speisen in die
Mitte des Rosts stellen.
A 4 Lasagne
1,0-1,5 Gitterrost 3
Selbstgemachte Lasagne in einer 22-24 cm großen
Auaufform zubereiten. Programm starten und, wenn nach
dem Vorheizen der Signalton zu hören ist, die Speisen in
die Mitte des Rosts stellen.
A 5 Ratatouille
1,2-1,5 Gitterrost 3
Die Zutaten für Ratatouille in einen Schmortopf mit Deckel
geben. Programm starten und, wenn nach dem Vorheizen
der Signalton zu hören ist, die Speisen in die Mitte
des Rosts stellen. Abgedeckt garen. Vor dem Servieren
umrühren.
A 6 Gedeckter Apfelkuchen
1,2-1,4 Gitterrost 2
Gedeckten Apfelkuchen in einer runden Kuchenform aus
Metall mit 24-26 cm Durchmesser zubereiten. Programm
starten und, wenn nach dem Vorheizen der Signalton zu
hören ist, die Kuchenform in die Mitte des Rosts stellen.
A 7 Croissants
0,3-0,4 Universalblech 3
Croissants zubereiten (gekühlter Fertigteig). Auf
Backpapier auf das Universalblech legen. Programm
starten und, wenn nach dem Vorheizen der Signalton zu
hören ist, das Blech in den Garraum schieben.
A 8 Apfeltaschen
0,3-0,4 Universalblech 3
Apfeltaschen auf Backpapier auf das Universalblech legen.
Programm starten und, wenn nach dem Vorheizen der
Signalton zu hören ist, das Blech in den Garraum schieben.
Code Gericht Gewicht (kg) Zubehör Einschubhöhe
A 9 Obstkuchenboden
0,4-0,5 Gitterrost 3
Den Teig in eine gebutterte schwarze Springform aus
Metall geben. Programm starten und, wenn nach dem
Vorheizen der Signalton zu hören ist, die Kuchenform in
die Mitte des Rosts stellen.
A 10 Quiche Lorraine
1,2-1,5 Gitterrost 2
Quiche-Teig zubereiten und in eine runde Quiche-Form mit
25 cm Durchmesser geben. Programm starten und, wenn
nach dem Vorheizen der Signalton zu hören ist, die Füllung
hinzugeben und die Form in die Mitte des Rosts stellen.
A 11 Weißbrot
0,6-0,7 Gitterrost 3
Den Teig zubereiten und in eine 25 cm lange rechteckige
schwarze Backform aus Metall geben. Programm starten
und, wenn nach dem Vorheizen der Signalton zu hören ist,
die Speisen in die Mitte des Rosts stellen.
A 12 Mischbrot
0,8-0,9 Gitterrost 3
Den Teig zubereiten und in eine 25 cm lange rechteckige
schwarze Backform aus Metall geben. Programm starten
und, wenn nach dem Vorheizen der Signalton zu hören ist,
die Speisen in die Mitte des Rosts stellen.
A 13 Brötchen
0,3-0,5 Universalblech 3
Brötchen zubereiten (gekühlter Fertigteig). Auf Backpapier
auf das Universalblech legen. Programm starten und, wenn
nach dem Vorheizen der Signalton zu hören ist, das Blech
in den Garraum schieben.
NV75R7676RB_EU_DG68-01054H-00_DE.indd 34 4/17/2019 5:25:10 PM
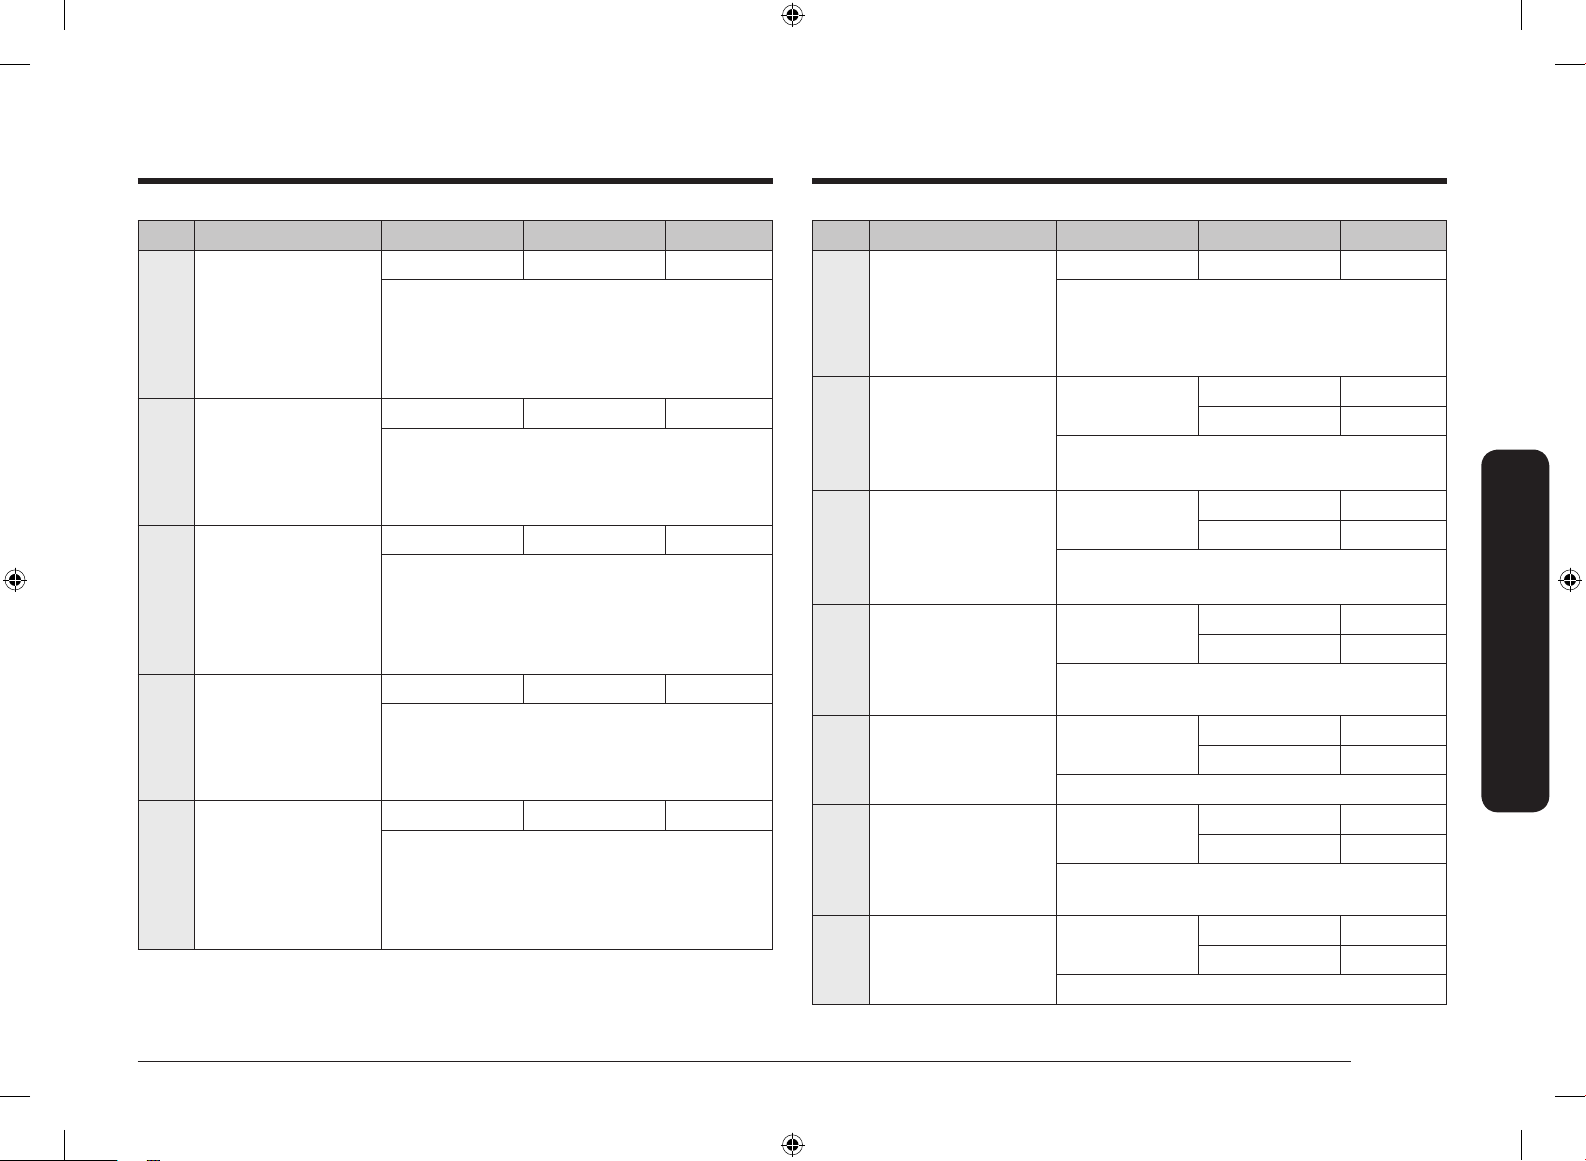
Deutsch 35
Verwendung
Code Gericht Gewicht (kg) Zubehör Einschubhöhe
A 14 Obststreusel
0,8-1,2 Gitterrost 3
Frisches Obst (Himbeeren, Brombeeren, Apfel- oder
Birnenscheiben) in eine 22-24 cm große Auaufform
geben. Streusel darüber verteilen. Programm starten und,
wenn nach dem Vorheizen der Signalton zu hören ist, die
Speisen in die Mitte des Rosts stellen.
A 15 Scones
0,5-0,6 Universalblech 3
Scones (mit 5-6 cm Durchmesser) auf Backpapier auf das
Universalblech legen. Programm starten und, wenn nach
dem Vorheizen der Signalton zu hören ist, das Blech in den
Garraum schieben.
A 16 Biskuit
0,5-0,6 Gitterrost 3
Den Kuchenteig zubereiten und in eine runde schwarze
Backform aus Metall mit 26 cm Durchmesser geben.
Programm starten und, wenn nach dem Vorheizen der
Signalton zu hören ist, die Kuchenform in die Mitte des
Rosts stellen.
A 17 Marmorkuchen
0,7-0,8 Gitterrost 2
Den Kuchenteig zubereiten und in eine runde Gugelhupf-
oder Napfkuchenform aus Metall geben. Programm starten
und, wenn nach dem Vorheizen der Signalton zu hören ist,
die Kuchenform in die Mitte des Rosts stellen.
A 18
Holländischer
Kastenkuchen
0,7-0,8 Gitterrost 2
Den Kuchenteig zubereiten und in eine 25 cm lange
rechteckige schwarze Backform aus Metall geben.
Programm starten und, wenn nach dem Vorheizen der
Signalton zu hören ist, die Kuchenform in die Mitte des
Rosts stellen.
Code Gericht Gewicht (kg) Zubehör Einschubhöhe
A 19 Brownies
0,7-0,8 Gitterrost 3
Kuchenteig in einer 20-24 cm großen Auaufform
zubereiten. Programm starten und, wenn nach dem
Vorheizen der Signalton zu hören ist, die Speisen in die
Mitte des Rosts stellen.
A 20 Rinderlende
0,8-1,3
Gitterrost 2
Universalblech 1
Das Rindeisch würzen und 1 Stunde in den Kühlschrank stellen.
Mit der Fettseite nach oben auf den Gitterrost stellen.
A 21 Roastbeef, Zartgegart
0,8-1,3
Gitterrost 2
Universalblech 1
Das Rindeisch würzen und 1 Stunde in den Kühlschrank stellen.
Mit der Fettseite nach oben auf den Gitterrost stellen.
A 22
Lammkotelett mit
Kräuterkruste
0,4-0,9
Gitterrost 4
Universalblech 1
Die Lammkoteletts mit Kräutern und Gewürzen marinieren
und auf den Gitterrost legen.
A 23 Lammkeule
1,0-1,5
Gitterrost 3
Universalblech 1
Das Lammeisch marinieren und auf den Gitterrost legen.
A 24 Schweinebraten mit Kruste
0,8-1,3
Gitterrost 3
Universalblech 2
Den Schweinebraten mit der Fettseite nach oben auf den
Gitterrost legen.
A 25 Schweinerippchen
0,8-1,3
Gitterrost 3
Universalblech 3
Die Schweinerippchen auf den Rost legen.
NV75R7676RB_EU_DG68-01054H-00_DE.indd 35 4/17/2019 5:25:10 PM
36 Deutsch
Verwendung
Verwendung
Code Gericht Gewicht (kg) Zubehör Einschubhöhe
A 26 Ganzes Brathähnchen
1,0-1,5
Gitterrost 2
Universalblech 1
Das Hähnchen waschen und putzen. Das Hähnchen mit Öl
beträufeln und mit Kräutern würzen. Das Hähnchen mit der
Brust nach unten auf das Blech legen und bei Erklingen
des Signaltons wenden.
A 27 Hähnchenbrust
0,5-1,0
Gitterrost 4
Universalblech 1
Die Bruststücke marinieren und auf den Gitterrost legen.
A 28 Hähnchenunterschenkel
0,5-1,0
Gitterrost 4
Universalblech 1
Die Hähnchenteile mit Öl bestreichen, würzen und auf den
Rost legen.
A 29 Entenbrust
0,3-0,8
Gitterrost 4
Universalblech 1
Die Entenbrust mit der Fettseite nach oben auf den Rost
legen.
Mit der ersten Einstellung wird die Entenbrust rosa, bei der
zweiten halbrosa gegart.
A 30 Forellenlet, gebacken
0,3-0,8 Universalblech 4
Die Forellenlets mit der Hautseite nach oben auf das
Universalblech legen.
A 31 Forelle
0,3-0,8
Gitterrost 4
Universalblech 1
Die Fische waschen und putzen, und abwechselnd Kopf
an Schwanzosse nebeneinander auf den Rost legen.
Innenseite mit Zitronensaft beträufeln, salzen und Kräuter
hineinlegen. Haut leicht mit einem Messer einschneiden.
Mit Öl bestreichen und salzen.
Code Gericht Gewicht (kg) Zubehör Einschubhöhe
A 32 Seezunge
0,3-0,8 Universalblech 3
Die Seezunge auf Backpapier auf das Universalblech legen.
Haut leicht mit einem Messer einschneiden.
A 33 Lachssteak/-let
0,3-0,8
Gitterrost 4
Universalblech 1
Lachslets oder -steaks waschen und putzen. Mit der
Hautseite nach oben auf den Rost legen.
A 34 Grillgemüse
0,3-0,8 Universalblech 4
Zucchini, Aubergine, Paprika, Zwiebel und Kirschtomaten
waschen und vorbereiten. Mit Olivenöl beträufeln und mit
Kräutern würzen. Gleichmäßig auf dem Universalblech
verteilen.
A 35 Halbierte Ofenkartoffeln
0,5-1,0 Universalblech 3
Große Kartoffeln (je 200 g) längs halbieren. Mit der achen
Seite nach oben auf das Universalblech legen, mit Olivenöl
bestreichen und Kräuter und Gewürze darüber streuen.
A 36
Tiefgefrorene Backofen-
Pommes
0,3-0,8 Universalblech 3
Die tiefgefrorenen Backofen-Pommes gleichmäßig auf dem
Universalblech verteilen.
A 37
Tiefgefrorene
Kartoffelecken
0,3-0,8 Universalblech 3
Die tiefgefrorenen Kartoffelecken gleichmäßig auf dem
Universalblech verteilen.
A 38 Tiefkühlpizza
0,3-0,8 Gitterrost 3
Programm starten und, wenn nach dem Vorheizen der
Signalton zu hören ist, die Tiefkühlpizza in die Mitte
des Gitterrosts legen. Die erste Einstellung ist für
dünne italienische Pizza geeignet, die zweite für dicke
amerikanische Pizza.
NV75R7676RB_EU_DG68-01054H-00_DE.indd 36 4/17/2019 5:25:10 PM
Deutsch 37
Verwendung
Code Gericht Gewicht (kg) Zubehör Einschubhöhe
A 39 Selbstgemachte Pizza
0,8-1,3 Universalblech 2
Selbstgemachte Pizza mit Hefeteig zubereiten und auf das
Universalblech legen. Die Gewichtsangabe bezieht sich
auf die gesamte Pizza mit Belag, wie z. B. Sauce, Gemüse,
Schinken und Käse. Programm starten und, wenn nach
dem Vorheizen der Signalton zu hören ist, das Blech in den
Garraum schieben.
A 40 Gehenlassen des Teigs
0,3-0,8 Gitterrost 2
Teig in einer Schüssel zubereiten und mit Frischhaltefolie
abdecken.
In die Mitte des Rosts stellen. Die erste Einstellung ist für
Pizza- und Kuchenteig geeignet, die zweite für Brotteig.
Doppelgarraumbetrieb
In der folgenden Tabelle sind 10 Automatikprogramme zum Garen, Braten und Backen aufgeführt.
Sie können die obere und die untere Zone einzeln oder zusammen verwenden.
Für jedes Programm werden die entsprechenden Mengen, Gewichtsangaben und
Zubereitungsempfehlungen beschrieben. Zur einfacheren Handhabung wurden die Betriebsart und
die Garzeit vorprogrammiert. Die Rezepte für einige der Automatikprogramme können Sie in diesem
Handbuch nachlesen.
Die Automatikprogramme für den Doppelgarraumbetrieb umfassen einen zusätzlichen Schritt, bei
dem das Gerät vorgeheizt wird. Der Fortschritt beim Vorheizen wird im Display angezeigt.
Geben Sie die Speisen nach dem Vorheizen in den Garraum, wenn der Signalton erklingt. Drücken Sie
dann Garzeit, um die Automatikprogramme zu starten.
WARNUNG
Ziehen Sie beim Entnehmen der Speisen stets Ofenhandschuhe an.
1. Oberer Garraum
Code Gericht Gewicht (kg) Zubehör Einschubhöhe
A 1 Kartoffelgratin
1,0-1,5 Gitterrost 4
Frisches Kartoffelgratin in einer 22-24 cm großen
Auaufform zubereiten. Programm starten und, wenn
nach dem Vorheizen der Signalton zu hören ist, die
Speisen in die Mitte des Rosts stellen.
A 2 Lasagne
1,0-1,5 Gitterrost 4
Selbstgemachte Lasagne in einer 22-24 cm großen
Auaufform zubereiten. Programm starten und, wenn
nach dem Vorheizen der Signalton zu hören ist, die
Speisen in die Mitte des Rosts stellen.
A 3 Hähnchenunterschenkel
0,5-1,0
Gitterrost 4
Universalblech 4
Die Hähnchenteile mit Öl bestreichen, würzen und auf
den Rost legen.
NV75R7676RB_EU_DG68-01054H-00_DE.indd 37 4/17/2019 5:25:10 PM

38 Deutsch
Verwendung
Verwendung
Code Gericht Gewicht (kg) Zubehör Einschubhöhe
A 4 Halbierte Ofenkartoffeln
0,5-1,0 Universalblech 4
Große Kartoffeln (je 200 g) längs halbieren. Mit der
achen Seite nach oben auf das Universalblech legen,
mit Olivenöl bestreichen und Kräuter und Gewürze
darüber streuen.
A 5
Tiefgefrorene Backofen-
Pommes
0,3-0,8 Universalblech 4
Die tiefgefrorenen Backofen-Pommes gleichmäßig auf
dem Universalblech verteilen.
2. Unterer Garraum
Code Gericht Gewicht (kg) Zubehör Einschubhöhe
A 1 Gedeckter Apfelkuchen
1,2-1,4 Gitterrost 1
Gedeckten Apfelkuchen in einer runden Kuchenform
aus Metall mit 24-26 cm Durchmesser zubereiten.
Programm starten und, wenn nach dem Vorheizen der
Signalton zu hören ist, die Kuchenform in die Mitte des
Rosts stellen.
A 2 Apfeltaschen
0,3-0,4 Universalblech 1
Apfeltaschen auf Backpapier auf das Universalblech
legen. Programm starten und, wenn nach dem Vorheizen
der Signalton zu hören ist, das Blech in den Garraum
schieben.
A 3 Quiche Lorraine
1,2-1,5 Gitterrost 1
Quiche-Teig zubereiten und in eine runde Quiche-Form
mit 25 cm Durchmesser geben. Programm starten und,
wenn nach dem Vorheizen der Signalton zu hören ist,
die Füllung hinzugeben und die Form in die Mitte des
Rosts stellen.
Code Gericht Gewicht (kg) Zubehör Einschubhöhe
A 4 Tiefkühlpizza
0,3-0,8 Gitterrost 1
Programm starten und, wenn nach dem Vorheizen der
Signalton zu hören ist, die Tiefkühlpizza in die Mitte
des Gitterrosts legen. Die erste Einstellung ist für
dünne italienische Pizza geeignet, die zweite für dicke
amerikanische Pizza.
A 5 Selbstgemachte Pizza
0,8-1,3 Universalblech 1
Selbstgemachte Pizza mit Hefeteig zubereiten und auf
das Universalblech legen. Die Gewichtsangabe bezieht
sich auf die gesamte Pizza mit Belag, wie z. B. Sauce,
Gemüse, Schinken und Käse. Programm starten und,
wenn nach dem Vorheizen der Signalton zu hören ist,
das Blech in den Garraum schieben.
3. Doppelgarraumbetrieb
Sie können für die obere und untere Zone das gleiche Automatikprogramm auswählen und
gleichzeitig Garen.
VORSICHT
Wenn Sie entweder die obere oder die untere Zone verwenden, laufen möglicherweise der Lüfter
und die Heizung der anderen Zone, um optimale Leistung zu erreichen. Die nicht genutzteZone darf
nicht für nicht bestimmungsgemäße Zwecke genutzt werden.
NV75R7676RB_EU_DG68-01054H-00_DE.indd 38 4/17/2019 5:25:10 PM
Deutsch 39
Verwendung
Testgerichte
Gemäß EN 60350-1
1. Backen
Die Backempfehlungen gehen von einem vorgeheizten Garraum aus. Verwenden Sie nicht die Funktion
„Schnelles Vorheizen“. Schieben Sie die Bleche immer so ein, dass die schräge Seite zur Gerätetür weist.
Gericht Zubehör Einschubhöhe Betriebsart
Temperatur
(°C)
Zeit
(in Min.)
Kleine Kuchen Universalblech 3 165 23-28
3 155 25-35
1+3 155 30-35
Mürbeteiggebäck
Universalblech +
Universalblech
1+3 140 30-35
Wasserbiskuit Gitterrost +
Springform
(Dunkel beschichtet,
ø 26 cm)
2 160 30-35
2 160 35-40
1+4 155 40-45
Gedeckter
Apfelkuchen
Gitterrost +
2 Springformen
* (Dunkel beschichtet,
ø 20 cm)
2, diagonal
angeordnet
160 70-80
Universalblech +
Gitterrost +
2 Springformen
** (Dunkel beschichtet,
ø 20 cm)
1+3 160 80-90
* Bei zwei Kuchen werden die Formen hinten links und vorne rechts auf den Rost gestellt.
** Bei zwei Kuchen werden die Formen mittig auf den Blechen/Rosten in zwei verschiedenen
Einschubhöhen platziert.
2. Grillen
Heizen Sie den Garraum 5 Minuten lang mit dem Großächengrill vor.
Gericht Zubehör Einschubhöhe Betriebsart
Temp.
(°C)
Zeit (in Min.)
Toastbrot Gitterrost 5 Max.
300
1-2
Burger mit
Rinderhack *
(12 Stk.)
Gitterrost +
Universalblech
(zum Auffangen von
Fett und Flüssigkeit)
4
1
Max.
300
1. Seite 15-18
2. Seite 5-8
* Nach
2
/3 der Garzeit wenden.
3. Braten
Gericht Zubehör Einschubhöhe Betriebsart Temp. (°C)
Zeit
(in Min.)
Ganzes
Hähnchen *
Gitterrost +
Universalblech
(zum Auffangen von Fett
und Flüssigkeit)
3
1
200 65-80
*
* Nach der Hälfte der Zeit wenden.
NV75R7676RB_EU_DG68-01054H-00_DE.indd 39 4/17/2019 5:25:10 PM

40 Deutsch
Verwendung
Verwendung
Häug verwendete Rezepte für die Automatikprogramme
Kartoffelgratin
Zutaten 800 g Kartoffeln, 100 ml Milch, 100 ml Sahne, 50 g aufgeschlagenes Ei, je
1 EL Salz, Pfeffer und Muskat, 150 g geriebener Käse, Butter, Thymian
Anleitung Kartoffeln schälen und in 3 mm dicke Scheiben schneiden. Mit der Butter
die Innenächen einer geeigneten Auaufform (22-24 cm) einfetten. Die
Kartoffelscheiben auf einem sauberen Geschirrtuch ausbreiten und mit einem
weiteren Geschirrtuch abdecken, während die restlichen Zutaten vorbereitet
werden.
Die restlichen Zutaten außer dem geriebenen Käse in eine große
Schüssel geben und gut mischen. Die Kartoffelscheiben in einer Schicht
leicht überlappender Scheiben in die Form legen und mit der üssigen
Zutatenmischung übergießen. Den geriebenen Käse darüber streuen und
backen. Nach dem Garvorgang mit einigen Blättern frischem Thymian
bestreuen.
Gemüsegratin
Zutaten 800 g Gemüse (Zucchini, Tomaten, Zwiebeln, Karotten, Paprika, vorgekochte
Kartoffeln), 150 ml Sahne, 50 g aufgeschlagenes Ei, je 1 EL Salz, Kräuter/
Gewürze (Pfeffer, Petersilie oder Rosmarin), 150 g geriebener Käse, 3 EL
Olivenöl, einige Blätter Thymian
Anleitung Das Gemüse waschen, putzen und in 3-5 mm dicke Scheiben schneiden. Die
Gemüsescheiben in eine geeignete Auaufform (22-24 cm) geben und das Öl
darüber geben. Die restlichen Zutaten außer dem geriebenen Käse mischen
und über das Gemüse geben. Den geriebenen Käse darüber streuen und
backen. Anschließend mit einigen Blättern frischem Thymian bestreuen.
NV75R7676RB_EU_DG68-01054H-00_DE.indd 40 4/17/2019 5:25:10 PM

Deutsch 41
Verwendung
Gedeckter Apfelkuchen
Zutaten • Teig: 275 g Mehl,
1
/2 EL Salz, 125 g weißer Streuzucker, 8 g
Vanillezucker, 175 g kalte Butter, 1 aufgeschlagenes Ei
• Füllung: 750 g feste ganze Äpfel, 1 EL Zitronensaft, 40 g Zucker,
1
/2 EL
Zimt, 50 g Korinthen/Rosinen, 2 EL Semmelbrösel
Anleitung Das Mehl mit dem Salz in eine große Schüssel sieben. Den Streuzucker und
den Vanillezucker darüber sieben. Die Butter mit zwei Messern in kleine
Würfel schneiden und zur Mehlmischung geben.
3
/4 des aufgeschlagenen Eis
hinzufügen. Alle Zutaten in einer Küchenmaschine zu einer krümeligen Masse
verarbeiten (kein homogener Teig). Den Teig mit den Händen zu Kugeln
formen. In Kunststofffolie einwickeln und 30 Minuten lang kalt stellen.
Die Springform (24-26 cm Durchmesser) einfetten und mit Mehl bestäuben.
3
/4 des Teigs auf ca. 5 mm Dicke ausrollen. In die Form geben, sodass der
Boden und die Seiten bedeckt sind.
Die Äpfel schälen und entkernen. In Würfel mit einer Größe von
3
/4 x
3
/4 cm
schneiden. Den Zitronensaft über die Äpfel geben und alles gut mischen.
Korrinthen/Rosinen waschen und abtupfen. Mit Zucker und Zimt mischen. Die
Semmelbrösel auf dem Boden des Teigs verteilen. Leicht andrücken.
Die Füllung auf dem Teig verteilen. Den restlichen Teig ausrollen. Den Teig
in schmale Streifen schneiden und diagonal auf der Füllung verteilen. Den
Apfelkuchen gleichmäßig mit dem restlichen aufgeschlagenen Ei bestreichen.
Lasagne
Zutaten 2 EL Olivenöl, 500 g Rinderhackeisch, 500 ml Tomatensauce, 100 ml
Rinderfond, 150 g Lasagneplatten, 1 klein gehackte Zwiebel, 200 g
geriebener Käse, je 1 EL getrocknete Petersilie, Oregano und Basilikum
Anleitung Tomatensauce zubereiten. Öl in einer Pfanne erhitzen und das
Rinderhackeisch und die gewürfelte Zwiebel etwa 10 Minuten rundum
anbraten, bis alles leicht gebräunt ist. Die Tomatensauce, den Rinderfond
und die getrockneten Kräuter hinzugeben. Zum Kochen bringen und 30 min
köcheln lassen.
Die Lasagneplatten entsprechend den Hinweisen auf der Verpackung garen.
Schichtweise die Lasagneplatten, die Sauce und den Käse in eine Auaufform
füllen. Mit Käse abschließen und im Ofen überbacken.
NV75R7676RB_EU_DG68-01054H-00_DE.indd 41 4/17/2019 5:25:11 PM

42 Deutsch
Verwendung
Verwendung
Selbstgemachte Pizza
Zutaten • Pizzateig: 300 g Mehl, 7 g Trockenhefe, 1 EL Olivenöl, 200 ml warmes
Wasser, je 1 EL Zucker und Salz
• Belag: 400 g in Scheiben geschnittenes Gemüse (Aubergine, Zucchini,
Zwiebel, Tomaten), 100 g gewürfelter Schinken oder Speck, 100 g
geriebener Käse
Anleitung Mehl, Hefe, Öl, Salz, Zucker und warmes Wasser in einer Schüssel zu einem
feuchten Teig verarbeiten. In einer Küchenmaschine oder von Hand 5-10
Minuten lang durchkneten. Den Teig zugedeckt bei 35 °C für 30 Minuten
in den Ofen stellen, damit er aufgehen kann. Den Teig auf einer mit Mehl
bestäubten Fläche zu einem Rechteck ausrollen und den Teig dann auf
ein Blech oder in eine Pizzaform geben. Die passierten Tomaten auf dem
Teig verteilen und mit Schinken, Pilzen, Oliven und Tomaten belegen. Den
geriebenen Käse darüber streuen und backen.
Rinderlende
Zutaten 1 kg Rinderlende, 5 g Salz, 1 g Pfeffer, je 3 g Rosmarin und Thymian
Anleitung Das Rindeisch mit Salz, Pfeffer und Rosmarin würzen und 1 Stunde in den
Kühlschrank stellen. Auf den Gitterrost stellen. Im Ofen garen.
Quiche Lorraine
Zutaten • Teig: 200 g Weizenmehl, 80 g Butter, 1 Ei
• Füllung: 75 g gewürfelter magerer Speck, 125 ml Sahne, 125 g Crème
fraîche, 2 aufgeschlagene Eier, 100 g geriebener Schweizer Käse, Salz
und Pfeffer
Anleitung Für den Teig Mehl, Butter und Ei in eine Schüssel geben und zu einem
homogenen Teig verarbeitet. Anschließend im Kühlschrank 30 Minuten lang
kalt stellen. Den Teig ausrollen und in eine eingefettete Keramikform für
Quiche (25 cm Durchmesser) geben. Den Boden mit einer Gabel einstechen.
Eier, Sahne, Crème fraîche, Käse, Salz und Pfeffer mischen. Kurz vor dem
Garen auf dem Teig verteilen.
Obststreusel
Zutaten • Belag: 200 g Mehl, 100 g Butter, 100 g Zucker, 2 g Salz, 2 g Zimtpulver
• Obst: 600 g gemischtes Obst
Anleitung Alle Zutaten für den Teig mischen und zu Streuseln verarbeiten. Das
gemischte Obst in einer Auaufform verteilen und mit den Streuseln
bedecken.
NV75R7676RB_EU_DG68-01054H-00_DE.indd 42 4/17/2019 5:25:11 PM

Deutsch 43
Pege
Pege
Reinigung
Das Reinigen des Ofens ist einfacher, wenn Sie die Reinigung regelmäßig durchführen.
WARNUNG
• Vergewissern Sie sich vor jeder Reinigung, dass das Gerät und die verwendeten Zubehörteile vollständig
abgekühlt sind.
• Verwenden Sie keinesfalls schleifende Reinigungsmittel, harte Bürsten, Schleifschwämme oder -tücher, Stahlwolle,
Messer oder andere schleifende Materialien.
Garraum
• Verwenden Sie zum Reinigen des Garraums ein Tuch und ein mildes Reinigungsmittel oder warmes Seifenwasser.
• Reinigen Sie die Dichtungen der Gerätetür nicht von Hand.
• Um Beschädigungen der emaillierten Flächen des Garraums zu vermeiden, verwenden Sie nur handelsübliche
Backofenreiniger.
• Um schwere Verunreinigungen zu entfernen, verwenden Sie einen Spezial-Backofenreiniger.
Außenächen des Geräts
Verwenden Sie zum Reinigen der äußeren Flächen des Geräts, wie z. B. Gerätetür, Türgriff und Display, ein sauberes Tuch
und ein mildes Reinigungsmittel oder warmes Seifenwasser, und wischen Sie die Flächen mit einem Blatt Küchenpapier
oder einem trockenen Handtuch trocken.
Aufgrund der heißen Luft, die aus dem Garraum entweicht, lagern sich insbesondere um den Handgriff Schmutz und Fett
ab. Es wird daher empfohlen, nach jeder Verwendung des Geräts den Handgriff zu reinigen.
Zubehör
Waschen Sie sämtliche Zubehörteile nach jeder Verwendung, und trocknen Sie sie mit einem Küchenhandtuch ab.
Weichen Sie Zubehörteile mit hartnäckigen Verschmutzungen etwa 30 Minuten in warmem Seifenwasser ein, bevor Sie
sie waschen.
Katalytische Emailleoberäche (nur bestimmte Modelle)
Die entnehmbaren Teile sind mit einer dunkelgrauen katalytischen Emaillebeschichtung versehen. Diese kann beim
Garen im Heißluftbetrieb durch die zirkulierende Luft mit Öl und Fett verschmutzt werden. Diese Ablagerungen
verbrennen jedoch bei Temperaturen von 200 °C und mehr.
1. Entnehmen Sie alle Zubehörteile aus dem Gerät.
2. Reinigen Sie den Garraum.
3. Aktivieren Sie die Betriebsart „Heißluft“, stellen Sie die höchstmögliche Temperatur ein, und lassen Sie das Gerät
eine Stunde lang in Betrieb.
Lammkotelett mit Kräuterkruste
Zutaten 1 kg Lammkoteletts (6 Stk.), 4 gepresste große Knoblauchzehen, 1 EL frischer
gehackter Thymian, 1 EL frischer gehackter Rosmarin, 2 EL Salz, 2 EL
Olivenöl
Anleitung Salz, Knoblauch, Kräuter und Öl mischen und zum Lamm geben.
Lammkoteletts wenden und von allen Seiten marinieren. Bei Raumtemperatur
ca. 30 Minuten bis 1 Stunde ruhen lassen.
Schweinerippchen
Zutaten 2 Rippenstücke vom Schwein, 1 EL schwarze Pfefferkörner, 3 Lorbeerblätter,
1 gewürfelte Zwiebel, 3 gehackte Knoblauchzehen, 85 g brauner Zucker, 3 EL
Worcestershiresauce, 2 EL passierte Tomaten, 2 EL Olivenöl
Anleitung Barbecuesauce zubereiten. Öl in einer Soßenpfanne erhitzen und die
Zwiebeln zugeben. Glasig dünsten und die restlichen Zutaten hinzufügen.
Aufkochen und dann bei schwacher Hitze 30 Minuten lang eindicken
lassen. Die Rippenstücke mit der Barbecuesauce marinieren und zwischen
30 Minuten und 1 Stunde ruhen lassen.
NV75R7676RB_EU_DG68-01054H-00_DE.indd 43 4/17/2019 5:25:11 PM
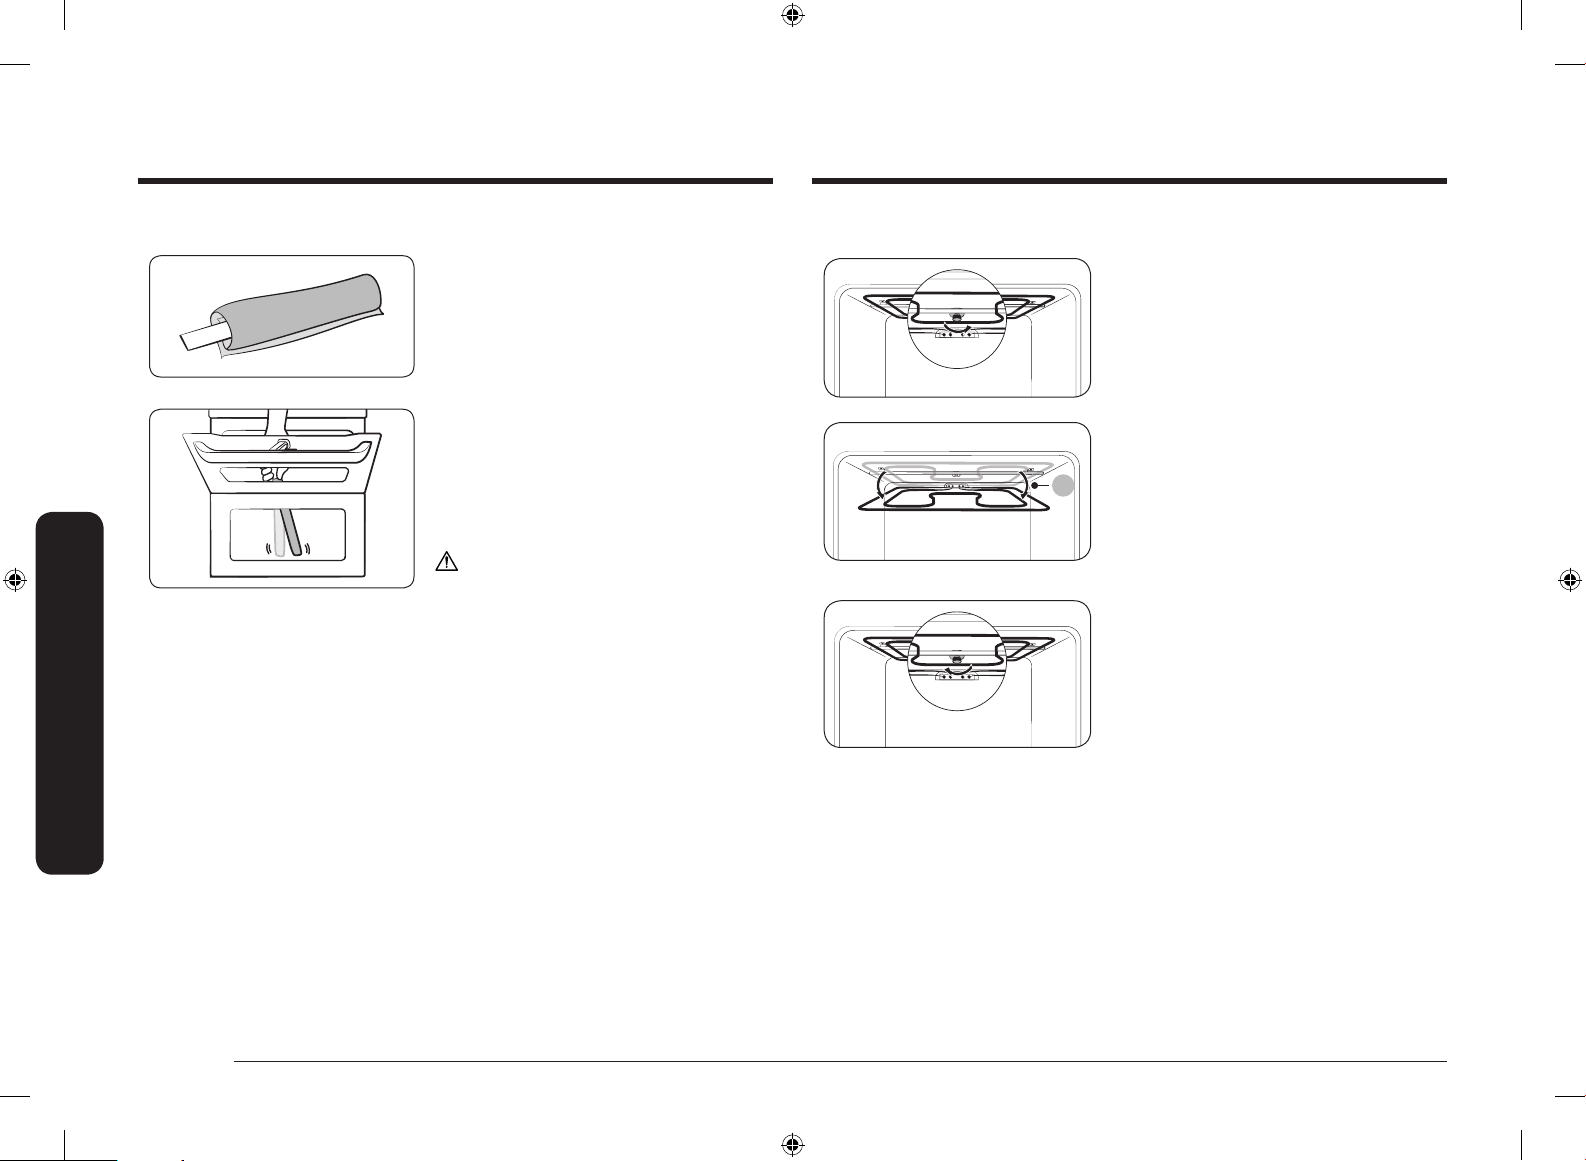
44 Deutsch
Pege
Pege
Garraumdecke (nur bestimmte Modelle)
1. Klappen Sie das Heizelement für den Grill nach
unten. Lösen Sie dazu die Mutter, indem Sie
sie gegen den Uhrzeigersinn drehen. Halten
Sie das Heizelement währenddessen fest. Das
Heizelement kann nicht aus dem Gerät entfernt
werden. Drücken Sie das Heizelement für den
Grill nicht mit Gewalt nach unten.
01
01 Ca. 12°
2. Reinigen Sie die Garraumdecke mit Seifenwasser
und einem sauberen Tuch.
3. Klappen Sie das Heizelement anschließend
wieder nach oben und schrauben Sie die Mutter
im Uhrzeigersinn fest.
Gerätetür
1. Befestigen Sie ein feuchtes Tuch an einem Stock.
2. Legen Sie das Handtuch unter die Tür.
3. Reinigen Sie die Tür.
4. Geben Sie ein wenig Reinigungsmittel auf das
Tuch und reinigen sie erneut.
5. Wischen Sie die Feuchtigkeit und die Blasen mit
dem trockenen Tuch ab.
VORSICHT
Demontieren Sie die Gerätetür nicht zum Reinigen.
NV75R7676RB_EU_DG68-01054H-00_DE.indd 44 4/17/2019 5:25:12 PM

Deutsch 45
Pege
Seitengitter (nur bestimmte Modelle)
1. Drücken Sie mittig auf den oberen Bereich des
linken Seitengitters und kippen Sie es um etwa
45° in den Garraum.
2. Ziehen Sie das linke Seitengitter unten aus den
beiden Bohrungen.
3. Entfernen Sie das rechte Seitengitter auf die
gleiche Weise.
4. Reinigen Sie beide Seitengitter.
5. Setzen Sie die Seitengitter anschließend wieder
ein, indem Sie die oben beschriebenen Schritte
1 und 2 in umgekehrter Reihenfolge ausführen.
HINWEIS
Das Gerät arbeitet ohne Seitengitter und Einschübe.
Ausbauen der Gerätetür
WARNUNG
Die Gerätetür ist schwer.
1. Öffnen Sie die Gerätetür, und klappen Sie die
Clips an den beiden Scharnieren auf.
2. Schließen Sie die Gerätetür um etwa 70°. Halten
Sie die Gerätetür mit beiden Händen an den
Seiten fest, und ziehen Sie sie nach oben, sodass
die Scharniere sich lösen.
3. Bauen Sie die Gerätetür anschließend wieder ein,
indem Sie die oben beschriebenen Schritte 1 und
2 in umgekehrter Reihenfolge ausführen. Achten
Sie darauf, dass die Clips an beiden Seiten
eingeklappt sind.
NV75R7676RB_EU_DG68-01054H-00_DE.indd 45 4/17/2019 5:25:13 PM
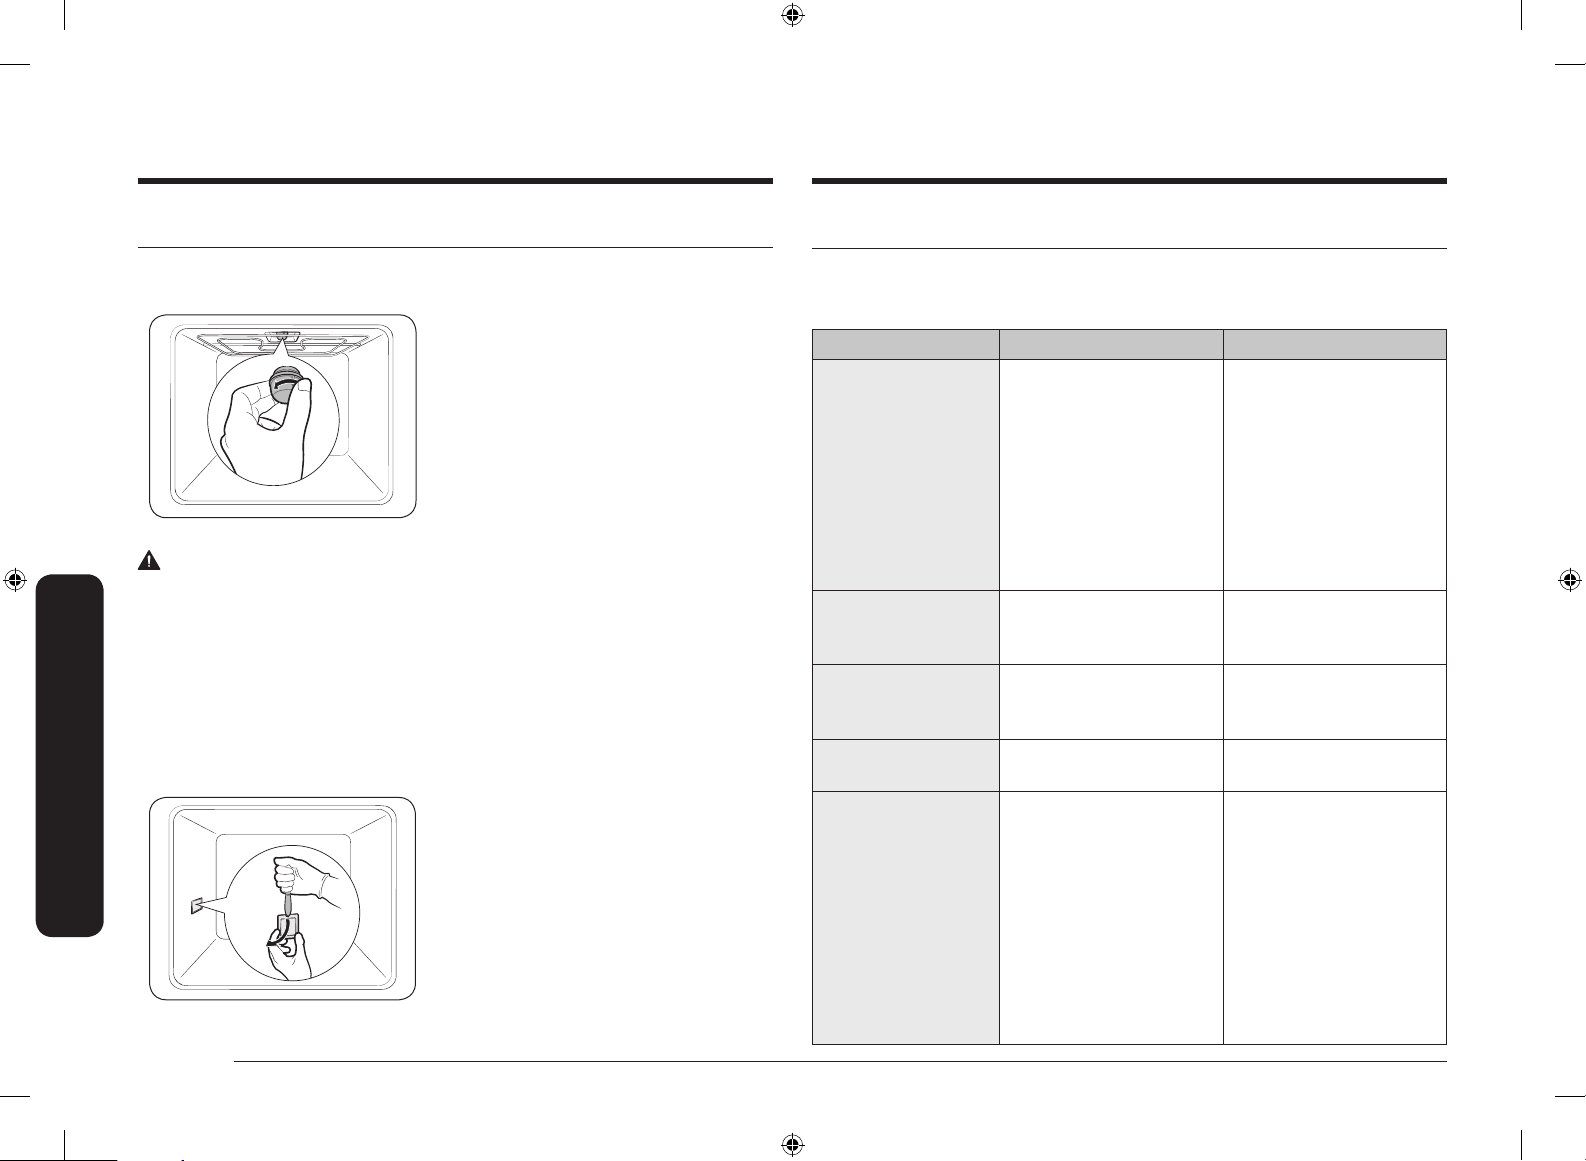
46 Deutsch
Fehlerbehebung
Pege Fehlerbehebung
Problembeschreibungen
Schlagen Sie bei Problemen mit diesem Gerät zuerst in der folgenden Tabelle nach, und probieren
Sie die dort beschriebenen Abhilfemaßnahmen. Wenn das Problem weiterhin besteht, wenden Sie
sich an das nächstgelegene Samsung-Kundendienstzentrum.
Problem Ursache Abhilfemaßnahme
Die Tasten lassen sich nicht
richtig drücken.
• Wenn sich Fremdkörper/-stoffe
um die Tasten angesammelt
haben.
• Modelle mit
berührungsempndlichen
Bedienelementen: Wenn
sich außen Feuchtigkeit
angesammelt hat.
• Wenn die Kindersicherung
aktiviert wurde.
• Entfernen Sie die
Fremdkörper/-stoffe, und
versuchen Sie es erneut.
• Wischen Sie die Feuchtigkeit
weg, und versuchen Sie es
erneut.
• Deaktivieren Sie die
Kindersicherung.
Die Uhrzeit wird nicht
angezeigt.
• Wenn die Stromversorgung
unterbrochen wurde.
• Überprüfen Sie, ob der
Netzstecker in die Steckdose
eingesteckt ist.
Das Gerät startet den Betrieb
nicht.
• Wenn die Stromversorgung
unterbrochen wurde.
• Überprüfen Sie, ob der
Netzstecker in die Steckdose
eingesteckt ist.
Der laufende Betrieb wird
unterbrochen.
• Wenn der Netzstecker aus der
Steckdose gezogen wurde.
• Stecken Sie den Netzstecker
wieder ein.
Das Gerät wird im Betrieb
ausgeschaltet.
• Wenn die zulässige
Betriebsdauer überschritten
wurde.
• Wenn der Kühlungsventilator
nicht ordnungsgemäß arbeitet.
• Wenn das Gerät an einem Ort
ohne ausreichende Belüftung
aufgestellt wurde.
• Wenn mehrere Geräte
an dieselbe Steckdose
angeschlossen sind.
• Lassen Sie das Gerät nach
längeren Garvorgängen
abkühlen.
• Horchen Sie, ob der
Kühlungsventilator in Betrieb
ist.
• Halten Sie die in der
Aufstellanleitung genannten
Abstände ein.
• Schließen Sie das Gerät an eine
eigene Steckdose an.
Ersetzen von Teilen
Glühlampe
1. Drehen Sie die Glasabdeckung gegen den
Uhrzeigersinn ganz heraus.
2. Tauschen Sie die Glühlampe aus.
3. Reinigen Sie die Glasabdeckung.
4. Drehen Sie die Glasabdeckung anschließend
wieder auf die Halterung, indem Sie den obigen
Schritt 1 in umgekehrter Reihenfolge ausführen.
WARNUNG
• Schalten Sie das Gerät vor dem Austausch der Glühlampe aus und ziehen Sie den Netzstecker
aus der Steckdose.
• Verwenden Sie ausschließlich bis 300 °C hitzebeständige Glühlampen die für 25-40 W bei
220-240 V ausgelegt sind. Zugelassene Glühlampen sind bei dem Samsung-
Kundendienstzentrum in Ihrer Nähe erhältlich.
• Fassen Sie Halogenlampen ausschließlich mit einem trockenen Tuch an. Andernfalls wird die
Lampe durch Fingerabdrücke oder Schweiß verschmutzt, wodurch sich die Lebensdauer verkürzt.
Seitliche Garraumbeleuchtung
1. Halten Sie die Unterseite der Abdeckung
mit einer Hand fest, und entfernen Sie die
Abdeckung wie in der Abbildung gezeigt mit
einem achen dünnen Werkzeug (z. B. ein
Messer).
2. Tauschen Sie die Glühlampe für die seitliche
Garraumbeleuchtung aus.
3. Setzen Sie die Abdeckung wieder ein.
NV75R7676RB_EU_DG68-01054H-00_DE.indd 46 4/17/2019 5:25:13 PM
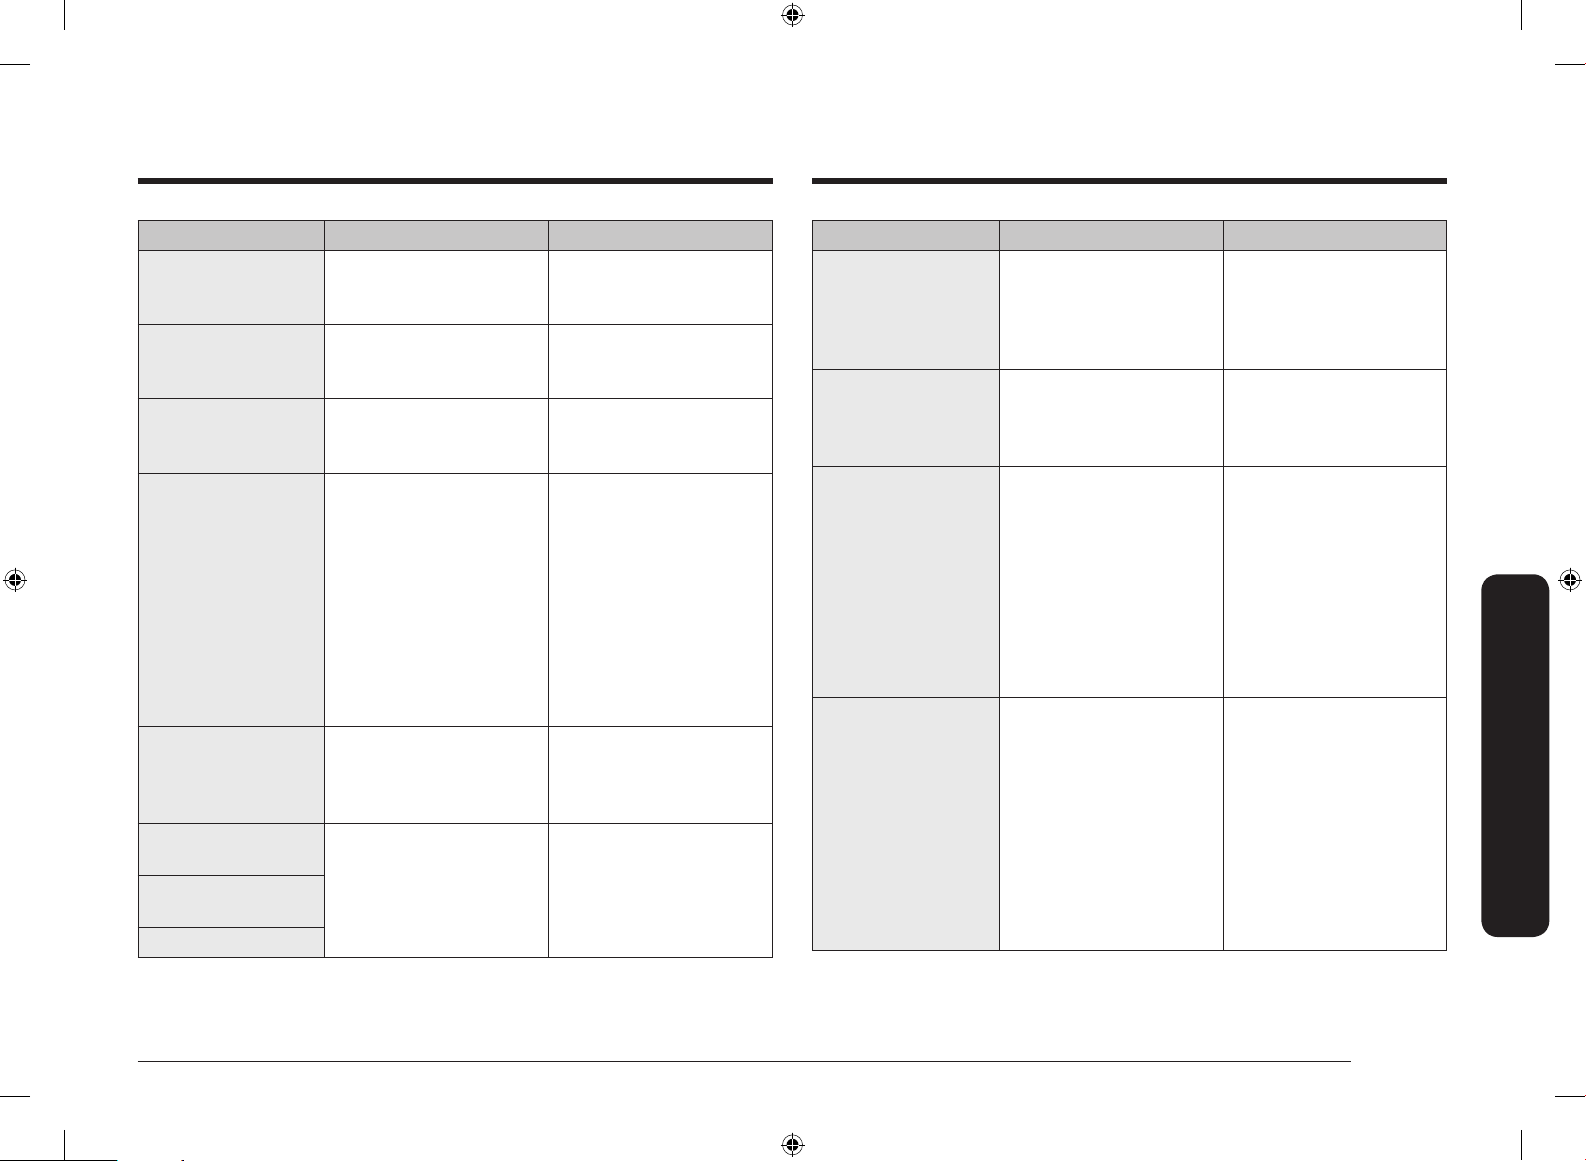
Deutsch 47
Fehlerbehebung
Problem Ursache Abhilfemaßnahme
Die Helligkeit im Garraum
schwankt.
• Die Helligkeit schwankt
in Abhängigkeit von der
abgegebenen Leistung.
• Schwankungen bei der
Leistungsabgabe sind während
eines Garvorgangs normal.
Keine Sorge, dies ist keine
Fehlfunktion des Geräts.
Der Garvorgang ist
abgeschlossen, aber der
Kühlungsventilator läuft
weiter.
• Der Ventilator läuft auch
einige Zeit nach Abschluss des
Garvorgangs weiter, um den
Garraum abzukühlen.
• Keine Sorge, dies ist keine
Fehlfunktion des Geräts.
Der Garraum wird nicht
erhitzt.
• Wenn die Gerätetür offen ist.
• Wenn die falschen
Einstellungen gewählt wurden.
• Ist die Sicherung
im Verteilerkasten
durchgebrannt oder hat
der Leistungsschutzschalter
ausgelöst?
• Schließen Sie die Gerätetür und
starten Sie das Gerät neu.
• Schlagen Sie im Kapitel zur
Bedienung des Geräts nach und
stellen Sie das Gerät neu ein.
• Ersetzen Sie die Sicherungen
bzw. setzen Sie den
Leistungsschutzschalter zurück.
Wenn dies wiederholt passiert,
rufen Sie einen Elektriker.
Im Betrieb tritt Rauch aus dem
Gerät aus.
• Während das Gerät zum ersten
Mal verwendet wird.
• Wenn sich Speisereste am
Heizelement benden.
• Bei erstmaliger Verwendung
kann am Heizelement Rauch
entstehen. Dies ist keine
Fehlfunktion, und das Problem
sollte nach der 2. oder 3.
Verwendung nicht mehr
auftreten.
• Lassen Sie das Gerät
ausreichend abkühlen und
entfernen Sie die Speisereste
vom Heizelement.
Problem Ursache Abhilfemaßnahme
Das Gerät wird nicht mit
Strom versorgt.
• Wenn die Stromversorgung
unterbrochen wurde.
• Überprüfen Sie, ob der
Netzstecker in die Steckdose
eingesteckt ist.
Die Außenächen des Geräts
werden im Betrieb übermäßig
heiß.
• Wenn das Gerät an einem Ort
ohne ausreichende Belüftung
aufgestellt wurde.
• Halten Sie die in der
Aufstellanleitung genannten
Abstände ein.
Die Gerätetür kann nicht
richtig geöffnet werden.
• Wenn Sich zwischen Gerätetür
und Garraum Essensreste
angesammelt haben.
• Reinigen Sie gründlich das
Gerät und versuchen Sie
erneut, die Gerätetür zu öffnen.
Die Garraumbeleuchtung ist
zu dunkel oder funktioniert
überhaupt nicht.
• Wenn die Lampe sich
anschaltet und dann
ausschaltet.
• Wenn die Lampe im Betrieb
durch Fremdkörper/-stoffe
verdeckt ist.
• Die Garraumbeleuchtung
wird zu Energiesparzwecken
nach einer bestimmten Zeit
automatisch ausgeschaltet.
Sie können die Beleuchtung
wieder einschalten, indem
Sie die Taste für die
Garraumbeleuchtung drücken.
• Reinigen Sie den Garraum und
überprüfen Sie die Beleuchtung
erneut.
Das Gerät verursacht
Stromschläge.
• Wenn das Gerät nicht
ordnungsgemäß geerdet ist.
• Wenn eine Steckdose ohne
Schutzleiter verwendet wird.
• Überprüfen Sie, ob das Gerät
ordnungsgemäß geerdet ist.
Aus dem Gerät tritt Wasser
aus.
• In einigen Fällen kann je nach
den zubereiteten Speisen
Wasser oder Dampf aus dem
Gerät austreten. Dies ist keine
Fehlfunktion des Geräts.
• Lassen Sie das Gerät abkühlen,
und wischen Sie es mit einem
trockenen Tuch ab.
Aus einem Spalt in der
Gerätetür tritt Dampf aus.
Im Gerät bleibt Wasser zurück.
NV75R7676RB_EU_DG68-01054H-00_DE.indd 47 4/17/2019 5:25:13 PM

48 Deutsch
Fehlerbehebung
Fehlerbehebung
Problem Ursache Abhilfemaßnahme
Vom Gerät geht ein Brand-
oder Kunststoffgeruch aus.
• Wenn Kunststoff- oder sonstige
Behälter verwendet wurden,
die nicht hitzebeständig sind.
• Verwenden Sie für hohe
Temperaturen geeignete
Glasbehälter.
Die Garergebnisse sind
unzureichend.
• Wenn während des
Garvorgangs die Gerätetür
häug geöffnet wird.
• Öffnen Sie die Gerätetür
im Betrieb nur dann, wenn
Speisen gewendet werden
müssen. Je öfter die Gerätetür
im Betrieb geöffnet wird, desto
stärker sinkt die Temperatur
im Garraum, sodass sich die
Garergebnisse verschlechtern.
Die Dampfreinigung wird
nicht ausgeführt.
• Ist das Gerät ausreichend
abgekühlt?
• Lassen Sie das Gerät
ausreichend abkühlen, bevor
Sie die Reinigung durchführen.
Der Doppelgarraumbetrieb
funktioniert nicht.
• Wenn der Garraumteiler nicht
ordnungsgemäß eingesetzt
wurde.
• Setzen Sie den Garraumteiler
richtig ein, und versuchen Sie
es erneut.
Der Einfachbetrieb
funktioniert nicht.
• Bendet sich der Garraumteiler
im Gerät?
• Entnehmen Sie den
Garraumteiler, und versuchen
Sie es erneut.
Der Ventilator im ungenutzten
Garraum läuft mit (andernfalls
steigt die Temperatur im
Garraum zu stark an).
• Um die beste Kochleistung und
die besten Kochergebnisse
zu erzielen, laufen der Lüfter
und die Heizung des nicht
benutzten Garraums mit.
• Keine Sorge, dies ist keine
Fehlfunktion des Geräts.
Informationscodes
Bei Störungen Ihres Geräts wird ein Informationscode im Display angezeigt. Schlagen Sie in der
folgenden Tabelle nach, und probieren Sie die beschriebenen Abhilfemaßnahmen aus.
Code Bedeutung Abhilfemaßnahme
C-d1 Problem mit der Verriegelung der Gerätetür.
Schalten Sie das Gerät aus, und
starten Sie den Vorgang neu. Wenn
das Problem weiterhin besteht,
ziehen Sie den Netzstecker für
mindestens 30 Sekunden aus der
Steckdose und schließen Sie das
Gerät dann wieder an. Wenn das
Problem dadurch nicht behoben
wird, wenden Sie sich an ein
Kundendienstzentrum in Ihrer Nähe.
C-20
Sensorstörung.
C-21
C-22
C-F1
Tritt nur bei einem Lese-/Schreibproblem mit
dem EEPROM-Speicherchip auf.
C-F0
Tritt auf, wenn keine Kommunikation
zwischen der Haupt- und der Nebenplatine
möglich ist.
C-F2
Tritt auf, wenn ein Kommunikationsproblem
zwischen dem integrierten Sensorschaltkreis
und dem Micom-Haupt- oder -Untersystem
besteht.
Schalten Sie das Gerät aus, und
starten Sie den Vorgang neu. Wenn
das Problem weiterhin besteht,
ziehen Sie den Netzstecker für
mindestens 30 Sekunden aus der
Steckdose und schließen Sie das
Gerät dann wieder an. Wenn das
Problem dadurch nicht behoben
wird, wenden Sie sich an ein
Kundendienstzentrum in Ihrer Nähe.
C-d0
Tastenproblem
Tritt auf, wenn eine Taste längere Zeit
gedrückt wird.
Reinigen Sie die Tasten und achten
Sie darauf, dass an oder auf den
Tasten kein Wasser zurückbleibt.
Schalten Sie das Gerät aus, und
versuchen Sie es erneut. Wenn das
Problem weiterhin besteht, wenden
Sie sich an das nächstgelegene
Samsung-Kundendienstzentrum.
NV75R7676RB_EU_DG68-01054H-00_DE.indd 48 4/17/2019 5:25:13 PM

Deutsch 49
Technische Daten
Code Bedeutung Abhilfemaßnahme
-dC-
Tritt auf, wenn der Garraumteiler während
eines Garvorgangs im Doppelgarraumbetrieb
entfernt wird.
Tritt auf, wenn der Garraumteiler während
eines Garvorgangs im Einfachbetrieb
eingesetzt wird.
Der Garraumteiler darf
während eines Garvorgangs im
Doppelgarraumbetrieb nicht entfernt
werden.
Schalten Sie das Gerät aus, und
starten Sie den Vorgang neu. Wenn
das Problem weiterhin besteht,
ziehen Sie den Netzstecker für
mindestens 30 Sekunden aus der
Steckdose und schließen Sie das
Gerät dann wieder an.
Wenn das Problem dadurch nicht
behoben wird, wenden Sie sich an
ein Kundendienstzentrum in Ihrer
Nähe.
S-01
Sicherheitsabschaltung
Die zulässige maximale Betriebsdauer
für die eingestellte Temperatur wurde
überschritten.
• Bis 105 °C – 16 Stunden
• Von 105 °C bis 240 °C – 8 Stunden
• Von 245 °C bis Max. – 4 Stunden
Dies ist keine Fehlfunktion des
Geräts. Schalten Sie das Gerät aus,
und entnehmen Sie die Speisen.
Versuchen Sie es dann erneut.
Technische Daten
SAMSUNG ist ständig darum bemüht, seine Produkte zu verbessern. Aus diesem Grunde behält sich
Samsung Änderungen am Design und an Bedienungsanleitungen vor.
Abmessungen (B x H x T) Gehäuse 595 x 595 x 570 mm
Fassungsvermögen 75 Liter
Gewicht Netto 47,2 kg
Betriebsspannung 230-240 V
~
50 Hz
Maximal angeschlossene Last 3650-3950 W
NV75R7676RB_EU_DG68-01054H-00_DE.indd 49 4/17/2019 5:25:13 PM
50 Deutsch
Anhang
Anhang
Energiespartipps
• Halten Sie die Gerätetür während des Garvorgangs immer geschlossen, es sei denn, Sie müssen
die Lebensmittel wenden. Öffnen Sie die Gerätetür während des Garvorgangs so selten wie
möglich, um die Temperatur im Garraum zu erhalten und so Energie zu sparen.
• Planen Sie die Verwendung des Geräts im Voraus, damit Sie es zwischen einem Garvorgang und
dem nächsten nicht ausschalten müssen. So sparen Sie Energie und reduzieren die Vorwärmzeit
des Geräts.
• Wenn die Garzeit mehr als 30 Minuten beträgt, können Sie das Gerät 5-10 Minuten vor
Abschluss des Garvorgangs ausschalten, um Energie zu sparen. Der Garvorgang wird mit Hilfe
der Restwärme abgeschlossen.
• Wenn möglich, bereiten Sie immer mehr als ein Gericht zu.
Anhang
Produktdatenblatt
SAMSUNG SAMSUNG
Modellkennung NV75R7676RS / NV75R7676RB
Energieefzienzindex je Garraum (EEI cavity) 81,6
Energieefzienzklasse je Garraum A+
Energieverbrauch (Strom) bei der Erhitzung
einer Standardbeladung im Garraum eines
Elektrobackofens während eines Zyklus im
konventionellen Modus je Garraum (elektrische
Endenergie) (EC electric cavity)
1,05 kWh/Zyklus
Energieverbrauch bei der Erhitzung einer
Standardbeladung im Garraum eines
Elektrobackofens während eines Zyklus im
Umluftmodus je Garraum (elektrische Endenergie)
(EC electric cavity)
0,71 kWh/Zyklus
Anzahl der Garräume 1
Wärmequelle je Garraum (Strom oder Gas) Strom
Volumen je Garraum (V) 75 L
Art des Backofens Eingebaut
Masse des Gerätes (M) 47,2 kg
Daten ermittelt entsprechend den Normen EN 60350-1 und EN 50564 und den
Kommissionsverordnungen (EU) Nr. 65/2014 und (EU) Nr. 66/2014.
NV75R7676RB_EU_DG68-01054H-00_DE.indd 50 4/17/2019 5:25:14 PM

Notizen
NV75R7676RB_EU_DG68-01054H-00_DE.indd 51 4/17/2019 5:25:14 PM

FRAGEN ODER HINWEISE?
LAND RUFEN SIE UNS AN UNTER ODER BESUCHEN SIE UNS ONLINE UNTER
AUSTRIA 0800 72 67 864 (0800-SAMSUNG) www.samsung.com/at/support
BELGIUM 02-201-24-18
www.samsung.com/be/support (Dutch)
www.samsung.com/be_fr/support (French)
DENMARK 707 019 70 www.samsung.com/dk/support
FINLAND 030-6227 515 www.samsung.com//support
FRANCE 01 48 63 00 00 www.samsung.com/fr/support
GERMANY 06196 77 555 77 www.samsung.com/de/support
ITALIA 800-SAMSUNG (800.7267864) www.samsung.com/it/support
CYPRUS 8009 4000 only from landline, toll free
www.samsung.com/gr/support
GREECE
80111-SAMSUNG (80111 726 7864) only from land line
(+30) 210 6897691 from mobile and land line
LUXEMBURG 261 03 710 www.samsung.com/be_fr/support
NETHERLANDS 088 90 90 100 www.samsung.com/nl/support
NORWAY 21629099 www.samsung.com/no/support
PORTUGAL 808 207 267 www.samsung.com/pt/support
SPAIN 0034902172678 www.samsung.com/es/support
SWEDEN 0771 726 786 www.samsung.com/se/support
SWITZERLAND 0800 726 78 64 (0800-SAMSUNG)
www.samsung.com/ch/support (German)
www.samsung.com/ch_fr/support (French)
UK 0330 SAMSUNG (7267864) www.samsung.com/uk/support
IRELAND (EIRE) 0818 717100 www.samsung.com/ie/support
DG68-01054H-00
NV75R7676RB_EU_DG68-01054H-00_DE.indd 52 4/17/2019 5:25:14 PM