USER MANUAL
OPERATING THE GRILL:
BREAKING IN YOUR GRILL:
- In manufacturing and preserving the components of your grill, oil residue may be present on the cooking surfaces of your grill.
- Before cooking on your grill for the first time you should follow “Initial Lighting Instructions” to ensure the auger is fully charged with pellets.
PREHEATING GRILL:
- Prior to use, it is recommended that you preheat your grill. This ensures that the cooking grates are at the desired temperatures to sear the food sugars when cooking. Preheat the grill for 15 to 20 minutes or until it reaches the desired temperature before adding food. Close the lid during the preheat period.
- For searing, allow the controller to reach 500°F and then wait an additional 15 minutes for the cooking grates and ceramic insert to fully heat up.
IF AN EXTENSION CORD IS NECESSARY:
- Use a CSA or UL approved 3-prong grounded extension cord that is rated for at least 7-10 Amp and is marked as suitable for outdoor use.
- Keep the power cord connection dry and off of the ground.
- Avoid running the power or extension cord across walkways, driveways, or anywhere where it could pose a tripping hazard.
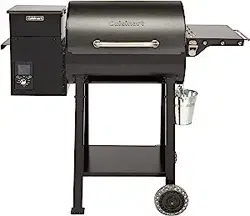
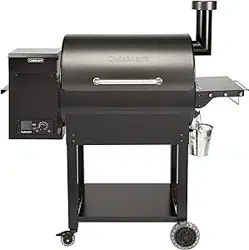
TURNING ON THE GRILL:
Initial Lighting Instructions (To be used on initial firing or anytime the grill runs out of pellets)
Always allow the auger tube to fully load with pellets to ensure proper lighting of the grill.
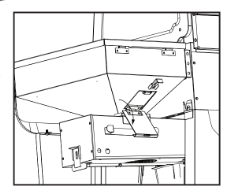
Step 1 Open hood to cooking chamber and remove cooking grates, heat plates and heat baffle from inside the grill. Leave hood open.
Step 2 Make sure temperature control knob is “OFF”. Plug power cord into a GFI (grounded) outdoor electrical outlet. When connecting, first connect plug to the outdoor cooking gas appliance then plug appliance into the outlet; Use only a Ground Fault Interrupter (GFI) protected circuit with this outdoor cooking gas appliance; Never remove the grounding plug or use with an adapter of 2 prongs; and Use only extension cords with a 3 prong grounding plug, rated for the power of the equipment, and approved for outdoor use with a W-A marking.
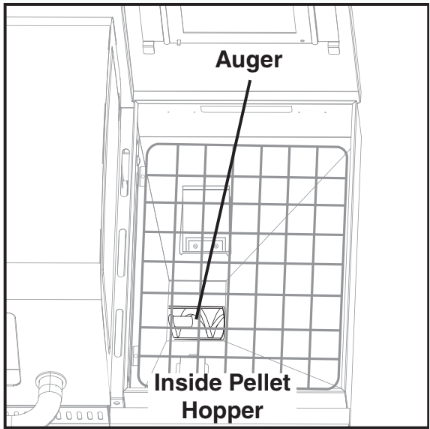
Step 3 Open the pellet hopper lid. Make sure the auger is free from debris and other objects. Turn the temperature control knob to 200°F.
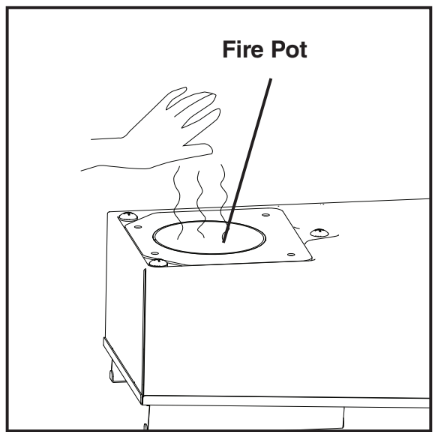
Step 4 In the cooking chamber, place your hand about 3” above the fire pot and make sure you can feel air blowing out from the fire pot.
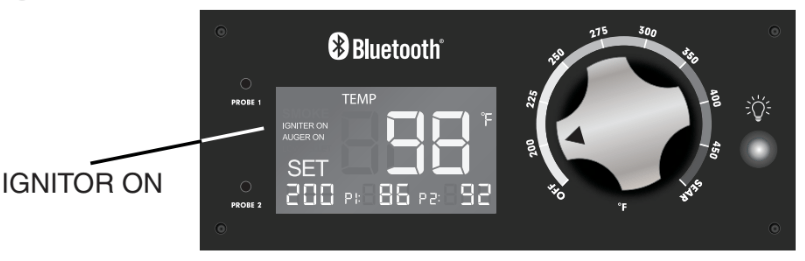
Step 5 Look inside the fire pot and make sure the ignitor is getting hot. It will take a couple of minutes for the ignitor to glow red. DO NOT TOUCH THE IGNITOR! Turn temperature control knob to OFF”.
Step 6 Fill the pellet hopper with cooking pellets. NEVER USE EATING FUEL PELLETS AS THEY ARE NOT SAFE FOR COOKING.
Step 7 Turn the temperature control knob to 200°F.
Step 8 When the pellets start falling into the fire pot, turn the temperature control knob to “OFF”.
Step 9 Replace heat baffle, heat plates and cooking grates into the cooking chamber.
Step 10 Keep the cooking chamber lid open. Turn temperature control knob to 200°F. You should see smoke coming out of the cooking chamber as the pellets ignite in about 2 to 4 minutes.
Step 11 Close cooking chamber lid and set the temperature control knob to the desired setting. See note below for curing process.
SUBSEQUENT LIGHTING INSTRUCTIONS:
Step 1 Open pellet hopper lid and check the pellet level. Add more pellets if necessary.
Step 2 Open cooking chamber lid and turn temperature control knob to 200°F. You should see smoke coming out of the cooking chamber as the pellets ignite in about 2 to 4 minutes.
Step 3 Close cooking chamber lid and set the temperature control knob to the desired setting. For best results, preheat the grill for 15 to 20 minutes with the lid closed before placing food in the grill.
MANUAL START-UP PROCEDURE (To be used is Ignotor is not working properly):
Step 1 Ensure the control knob is in the “OFF” position. Plug the power cord into a grounded power source.
Step 2 Check fire pot to ensure there is no obstruction for proper ignition. Fill pellet hopper with cooking grade pellets.
Step 3 Open the hood. Remove the cooking grates, heat plates, and heat baffle to expose the fire pot.
Place a small handful of pellets into the fire pot. Squirt a gelled fire starter, or other appropriate pellet starter, over the top of the pellets. A small amount of solid fuel fire starter, such as those composed of sawdust and wax, or wood shavings, is also recommended. Add another small handful of pellets in the fire pot.
Step 4 Light the contents of the fire pot using a long match or a long lighter. Allow the starter to burn 3 to 5 minutes. Do not attempt to add more starter into the fire pot as this can cause injury.
Step 5 Quickly and carefully replace the heat baffle, heat plates, and cooking grates. Continue on from step 2 of the “Subsequent Lighting Instructions.”
TURNING OFF THE GRILL:
- Turn the temperature control knob to “OFF”. An auto cool down feature will keep the fan running for minutes. If you don’t allow the grill to run the cool down feature it can cause a fire in the fire pot and catch the pellet hopper on fire.
- Unplug the power cord from the wall outlet.
COOKING:
- Set temperature controller to desired level and allow temperature to be reached.
- Place food on cooking grill.
- With hood closed, cook until desired internal temperature is reached.
- Use caution when removing food from Pellet Grill. All surfaces are HOT and may cause burns. Use protective gloves or long, sturdy cooking tools to remove food.
- This grill is HOT while in use and will remain HOT for a period of time afterwards. Use caution.
- Pellet grills do not provide smoke 100% of the time. Even though you don’t see smoke you are still getting smoke flavor.
OPERATING TIPS:
- Your Pellet Grill should never be moved while it is hot. If you are transporting your grill in a vehicle after cooking on it, make sure the fire is completely out and the grill is cold before placing it in any vehicle. NEVER put water into the fire pot. It will jam the auger and can damage the ignitor.
- The Pellet Grill is designed to operate with the lid closed.
- Make sure the heat baffle is properly seated on its locating brackets. The opening of the heat baffle should be pointing left over the fire pot. If not seated properly, direct heat and flame could come up out of the fire pot and cause a grease fire or grill damage.
- The temperature readout is an approximate and can be affected by the following factors: outside ambient temperature, the amount and direction of wind, the quality of pellet fuel being used, the lid being opened, and the quantity of food.
- When selecting a temperature setting, the auger will feed pellets for several minutes. This will momentarily raise the temperature, but the temperature will decrease and stabilize after 10-15 minutes.
- The auger will not run 100% of the time, it cycles on and off depending on the temperature setting.
- Hot weather can cause the temp to drop very slowly and make it more difficult to cook at lower settings.
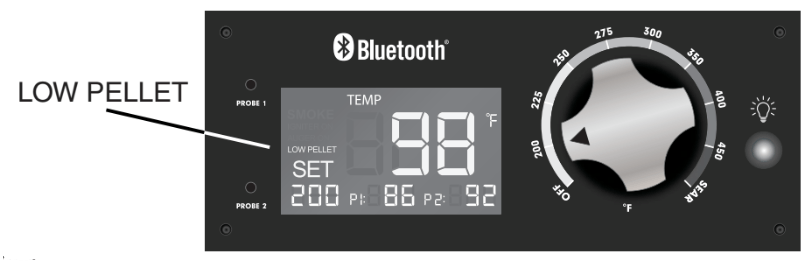
- This grill is equipped with a pellet hopper sensor. “LOW PELLET” will start flashing on the controller and it will start beeping once the pellets are below the sensor.
- Pellets can hang up in the pellet hopper after cooking for a long period of time. It’s important to monitor the pellet level and mix the pellets by hand to ensure they flow into the auger.
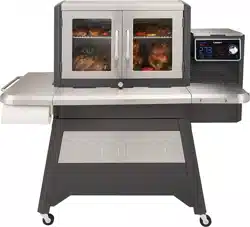
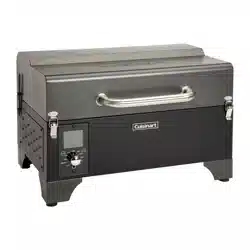
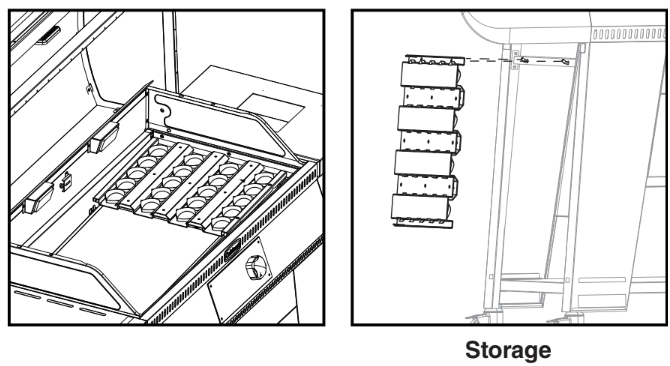
GRILL INSERTS:
- Remove right side heat plate and replace with ceramic sear insert. Turn grill to “SEAR”.
- Wait approximately 20 minutes for the controller and cooking grates to get up to temperature before cooking.
- Wait until the sear insert is cool before trying to remove or clean the insert.
- The ceramic insert can be stored on the left side of the cart.
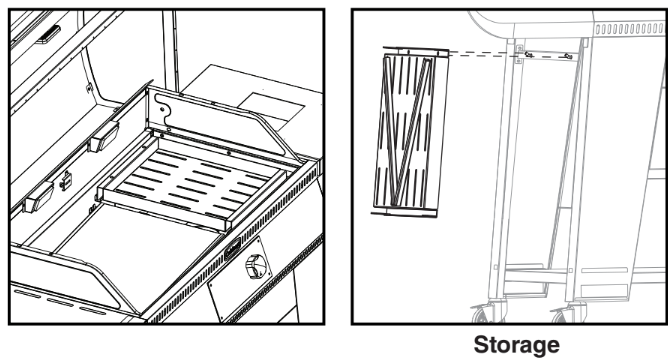
- Remove right side heat plate and install charcoal insert.
- Place approximately 2lbs of charcoal in charcoal tray and spread evenly so there is only one level of charcoal
- Turn grill to “SEAR” and keep hood open. Charcoal should start turning white around 15-20 minutes.
- After charcoal is hot, turn the controller to “OFF” and start cooking.
- Wait until the charcoal insert is cool before trying to remove the insert or cleaning out the ashes.
- The charcoal insert can be stored on the left side of the cart.
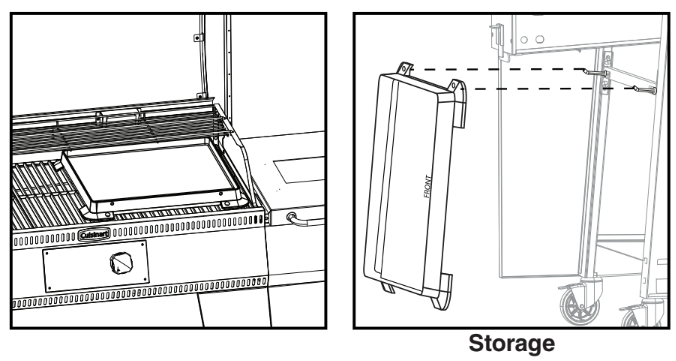
- Place Griddle on top of cooking grates with the grease reservoir toward the back of the grill. Push the Griddle to the back of the grill. It is best to locate the Griddle near the middle of the grill.
- Turn grill to the desired temperature and allow 15 to minutes for griddle to get to desired temperature.
- Keeping the lid closed during cooking will help prevent grease splatter.
- Grease and food particles can be pushed back into the grease reservoir while cooking.
- Do not let the grease reservoir overflow. Stop cooking, allow griddle to cool and remove excess grease.
- Wait until the Griddle is cool before trying to remove the Griddle or clean out the grease reservoir.
- The Griddle can be stored on the right side of the cart.
Before each use, open ash clean-out to get rid of ash and burnt pellets.
- Lift Ash Clean-Out Handle Lock
- Pull Ash Clean-Out Handle to open ash door.
If grill will be left un-attended for a long period of time, we recommend you remove unused pellets. Always store wood pellets away from heat and in a dry location.
- Lift Clean-Out Handle Lock
- Open Hopper Clean-Out door.
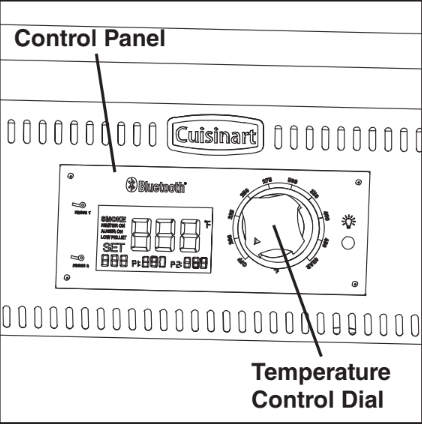
Plug the meat probes into the pellet control panel as shown. You can read the temperature of
Probe 1 and Probe 2 at the bottom of the display screen.
Example: “P1:86” — means Probe 1’s temperature is 86 degrees Fahrenheit.
Example: “P2:__” — Displays nothing when the meat probe is not inserted into controller.
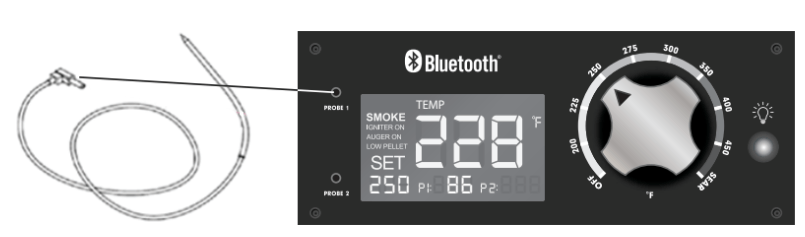
- Your grill is Bluetooth capable.
- This Bluetooth app allows you to monitor the internal grill temperature as well as two meat probe temperatures.
- The Bluetooth range is around 120 ft and can vary with obstructions such as interior and exterior walls.

COOK MODE:
- The temperature dial can be changed at any time to increase or decrease the cooking temperature of the grill.
- The 200°F to 300°F temperature settings are for slow cooking/smoking.
- The 325°F to 450°F temperature settings are for grilling.
- The “SEAR” temperature setting is for searing.
- Adjust the control knob to a desired temperature. The selected temperature will be in the bottom left hand corner of the digital display.
ERROR CODES:
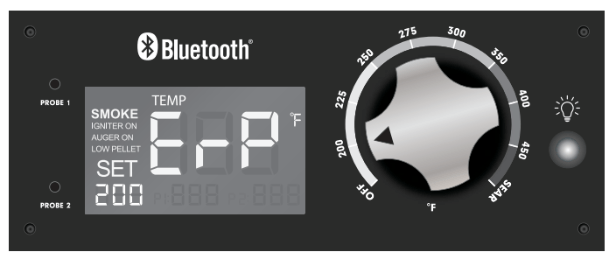
- ErP” – Error Power will occur when grill is plugged into power outlet and the temperature control knob is not in “OFF” position. It will also appear if power is lost during cooking.
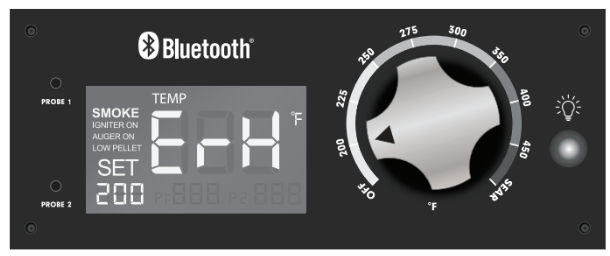
- ErH” – High Temp Limit indicates that the temperature in the cooking chamber has exceeded 775°F.
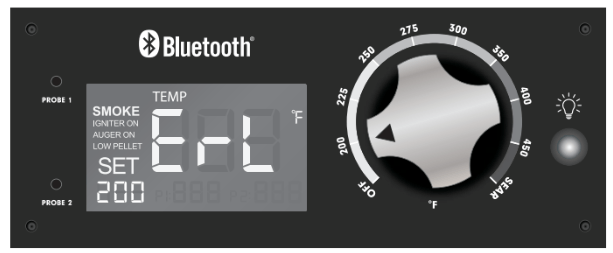
- ErL” – Low Temp Limit indicates that the temperature in the cooking chamber is below 160°F.
- Err” – Thermocouple may be unhooked or damaged.

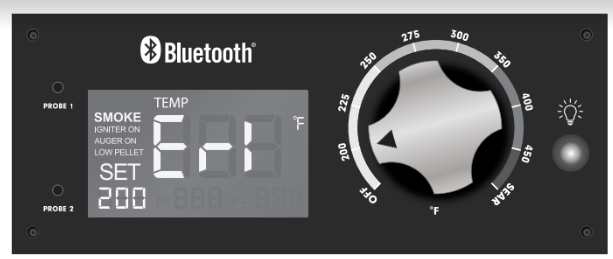
- Er1” – The temperature measured by the on-board temperature sensor of the main control board has exceeded maximum working temperature (158°F)
- Always ON: Low on pellets.
- Flash once a second: Sensor maybe unhooked or damaged.
- OFF: Normal operation.
- Start up
- The temperature is below 120*F in the cooking chamber.
- When falling the temperature is less than of the set temperature.
PROPER CARE & MAINTENANCE:
- Remove wood pellets from hopper if grill will not be used for a long period of time. Wood pellets can become soggy due to moisture/humidity and can cause the auger to bind up or not push pellets to burn chamber.
- Disposal of ashes – Ashes should be placed in a metal container with a tight-fitting lid. The closed container of ashes should be placed on a non-combustible floor or on the ground, well away from all combustible materials, pending final disposal. When the ashes are disposed by burial in soil or otherwise locally dispersed, they should be retained in the closed container until all cinders have thoroughly cooled.
- It’s important to keep your grill always covered when not in use to avoid rain getting inside the grill and damaging the grill and/or cause excessive corrosion. The grill and pellets must be kept dry in order to function properly.
- Wash cooking grates and heat distribution plate with hot, soapy water, rinse well and dry. Lightly coat cooking grill with vegetable oil or vegetable oil spray.
- Clean inside and outside of grill by wiping off with a damp cloth. Apply a light coat of vegetable oil or vegetable oil spray to the interior surface to prevent rusting.
- Never apply paint to the interior surface. Rust spots on the interior surface can be buffed, cleaned, the lightly coated with vegetable oil or vegetable oil spray to minimize rusting.
- Depending on use, periodically remove the cooking grates, grease tray and heat distribution plate to clean the ash from in and around the fire pot. Make sure the grill is cold before starting this procedure.
HELPFUL HINTS:
- If you pre-cook meat or poultry, do so immediately before grilling.
- Never defrost meat at room temperature or on a counter top.
- Refrigerate leftovers within 2 hours of taking food off the grill.
CLEANING AND MAINTENANCE:
- Keep the appliance free and clear of combustible materials, gasoline and other flammable vapors and liquids.
- For safe grilling and peak performance of your grill, perform these checks at least twice per year or after extended periods of storage.
- Be sure to tighten up all hardware (nuts, bolts, screws, etc.) at least twice per year.
- Remove the cooking grates, from inside your grill. Use a brush with hot water and detergent to remove excess residue. NEVER use a commercial oven cleaner. Rinse completely with water. Towel dry and replace all components as described in the assembly instructions.
TRANSPORTING AND STORAGE:
BEFORE STORING YOUR GRILL:
- Clean all surfaces.
- If storing the grill outdoors, close the wood pellet lid and cover the grill with a cover for protection from the weather.
- If the grill is stored outside during the rainy season, care should be taken to ensure that water does not get into the pellet hopper. Wood pellets, when wet, expand greatly and will jam your auger.
GRILL COOKING TIPS:
CLEANLINESS:
- Always wash hands thoroughly with soap and hot water prior to handling food and after handling raw meat, uncooked poultry or seafood.
- When using a platter to carry raw meat, uncooked poultry or seafood to the grill, make sure to wash the platter thoroughly with soap and hot water before placing cooked foods back on the platter or use different platters for raw and cooked foods.
- Never use the same utensils when handling raw meat, uncooked poultry or seafood unless you wash the utensils thoroughly with soap and hot water.
- Never re-use marinade from raw meat or uncooked poultry on foods that have been cooked and are ready to be served.
GRILLING TO PROPER TEMPERATURE:
- Use a meat thermometer to be sure food has reached a safe internal temperature.
- The US Department of Agriculture recommends the minimum temperature be reached for the following food items:
Chops . . . . . . . . . . . . . . . . . . . . . 145 degrees F (62.8° C)
Ground Meat . . . . . . . . . . . . . . . 160 degrees F (71° C)
Pork . . . . . . . . . . . . . . . . . . . . . . 145 degrees F (62.8° C)
Poultry . . . . . . . . . . . . . . . . . . . . 165 degrees F (73.9° C)
Roasts . . . . . . . . . . . . . . . . . . . . 145 degrees F (62.8° C)
Seafood . . . . . . . . . . . . . . . . . . . 145 degrees F (62.8° C)
Vegetables . . . . . . . . . . . . . . . . . 145 degrees F (62.8° C)
TROUBLE SHOOTING:
| PROBLEM |
CAUSE |
CORRECTION |
LCD screen will not
light up |
- Grill is not plugged in.
- The fuse is blown.
- Check that the GFI outlet has not been tripped.
- Control knob is in the “OFF” position.
|
- Make sure the grill is plugged into a working power source. Check and make sure wire connections are properly connected.
- Check the fuse and see if it has blown and needs to be replaced. Use 5 Amp Fuse.
- Reset GFI outlet.
- Control knob is still in the “OFF” position.Turn the control knob to 200° F to start-up the grill. The LCD screen should turn on.
|
Grill is
not getting
hot enough |
- Adjust temperature control knob on temperature controller.
- Avoid the temptation to check food too often.
- Verify that there are pellets in pellet hopper.
- Fire goes out at lower setting.
|
- Turn up heat on the control knob.
- Opening the door allows heat to escape and causes the temperature to vary drastically from the set temperature.
- Add pellets and allow sufficient time for the pellets to travel from the pellet hopper to the fire pot (can take up to 5 minutes).
- Excess ash. Remove all unburned pellets and ash from the fire pot using the ash clean-out.
CAUTION! ASSURE THAT THE GRILL IS COLD TO AVOID A FIRE FROM HOT ASH.
|
| Pellets will not light |
- Auger not primed.
- Auger is jammed.
- Ignitor has failed.
|
- Before the unit is used for the first time or anytime the hopper is emptied, allow the auger tube to fully load with pellets to ensure proper lighting of the grill. Follow Initial Lighting Instructions.
- Remove all components inside the fi rebox.Turn the grill to 200* F and inspect the auger.
- Ignitor needs to be replaced. Contact our Customer Service dept. for a replacement part. Follow Manual Start Up Procedure to continue use of the grill.
|
Grill is getting too
hot |
- Adjust temperature control
|
- Reduce heat by reducing the selecte temperature setting.
|
Smoke comes out
of pellet hopper |
- This is normal due to the air pressure inside the grill. The amount of smoke can vary depending on cooking conditions.
- Unplugged grill too soon.
|
- This condition will not affect cooking.
- Once the grill is turned off the fan will continue to run for 12 minutes. If you do not allow the grill to go through the cool down process it can cause fire to transfer to the auger tube.
|
Temperature
fluctuations |
- Temperature fluctuations are normal for pellet grills. Any significant fluctuations can be caused by wind, air temperature, improper use, or lack of grill maintenance.
|
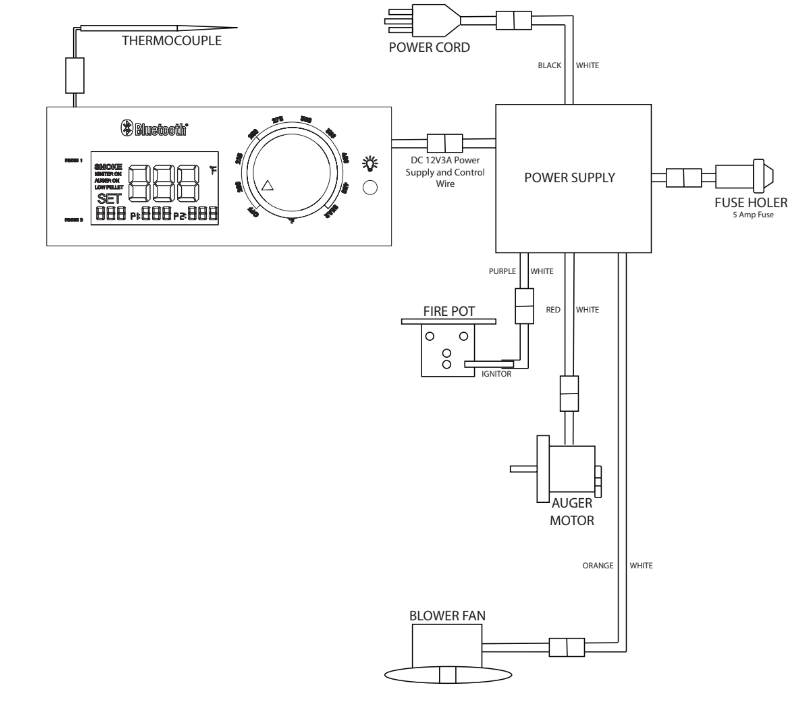
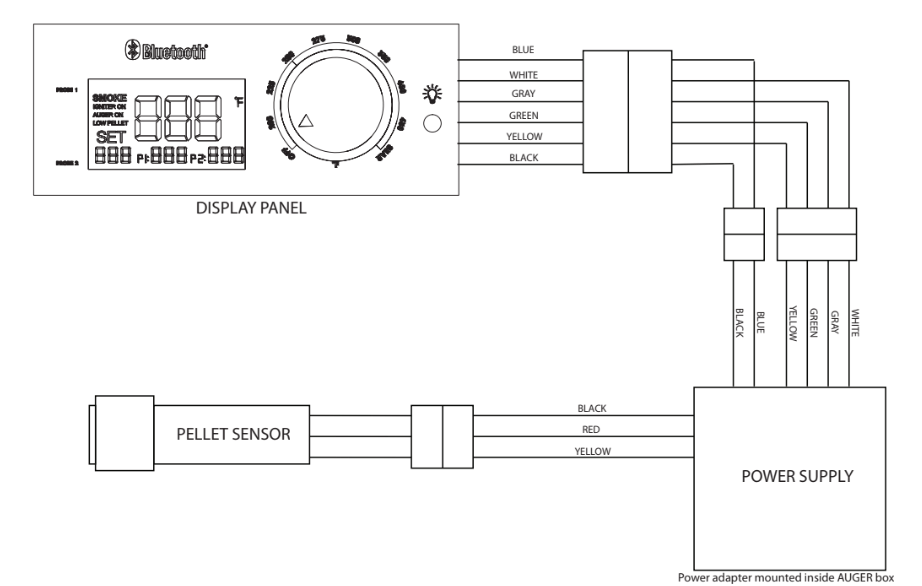
WIRING DIAGRAM: