CAUTION
PLEASEREADTHISENTIREMANUALBEFOREINSTALLATIONANDUSEOFTHISPELLETFUEL‐BURNING
APPLIANCE.KEEPCHILDREN,FURNITURE,ANDALLCOMBUSTIBLES AWAYFROMANYHEATINGAPPLIANCE.
SAFETYNOTICE
FAILURETOFOLLOWTHESEINSTRUCTIONSCANRESULTINPROPERTYDAMAGE,BODILYINJURYOREVEN
DEATH.FORYOURSAFETYANDPROTECTION,FOLLOWTHEINSTALLATIONINSTRUCTIONSOUTLINEDIN
THISMANUAL.CONTACTYOURLOCALBUILDINGORFIREOFFICIALSABOUTRESTRICTIONSAND
INSTALLATIONINSPECTIONREQUIREMENTS(INCLUDINGPERMITS)INYOURAREA.
ManufacturedBy:
England’sStoveWorks,Inc.
POBox206
Monroe,VA24574
Rev.6/2020
SAVETHESEINSTRUCTIONS
INSTALLATION&OPERATION
MANUAL
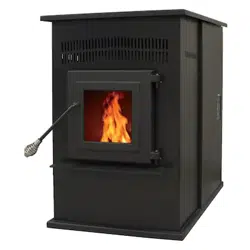
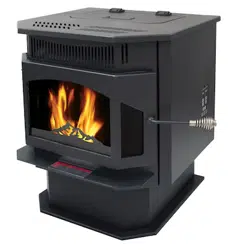
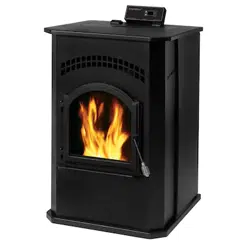
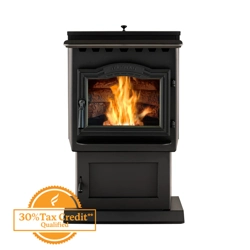
25‐CAB80
55‐SHPCAB80
55‐TRPCAB80
25‐CAB80S
55‐SHPCAB80S
55‐TRPCAB80S
THISWOODHEATERNEEDSPERIODICINSPECTIONANDREPAIRFORPROPEROPERATION.CONSULTTHE
OWNER’SMANUALFORFURTHERINFORMATION.ITISAGAINSTFEDERALREGULATIONSTOOPERATETHIS
WOODHEATERINAMANNERINCONSISTENTWITHTHEOPERATINGINSTRUCTIONSINTHEOWNER’S
MANUAL.
www.heatredefined.com
Parts:(800)516‐3636
Support:(800)245‐6489
2
IMPORTANT!READANDFOLLOWALLINSTALLATIONANDMAINTENANCEINSTRUCTIONS,INCLUDINGCLEANINGTHEUNITASSPECIFIED,AND
REPLACINGGASKETSANNUALLY,ANDPARTSASNEEDED.
ENGLAND’SSTOVEWORKSISNOTRESPONSIBLEFORANYDAMAGEORINJURYINCURREDDUETONEGLECT,ORDUETOUNSAFEINSTALLATIONOR
USAGEOFTHISPRODUCT.CALLTECHNICALSUPPORTWITHANYQUESTIONS.
IMPORTANT:IFYOUHAVEAPROBLEMWITHTHISUNIT,DONOTRETURNITTO
THEDEALER.CONTACTTECHNICALSUPPORT@1‐800‐245‐6489
TamperWarning:
Thiswoodheaterhasamanufacturer‐setminimumlowburnratethatmustnotbe
altered.Itisagainstfederalregulationstoalterthissettingorotherwiseoperate
thiswoodheaterinamannerinconsistentwithoperatinginstructionsinthis
manual.
MobileHomeUse:
Thisfreestandingpelletunitisapprovedformobilehomeordoublewide
installationwiththeoutsidecombustionairhook‐upSeethe“Installation”section
ofthismanualfordetailspertainingtomobilehomeinstallations.Mobilehome
installationmustbeinaccordancewiththeManufacturedHomeandSafety
Standard(HUD),CFR3280,Part24.
WARNING:
USEOFOUTSIDECOMBUSTIONAIRISMANDATORYWITHTHISUNIT.
DONOTOPERATEWITHTHEHOPPEROPEN;LIDMUSTBESHUTANDTIGHTLY
LATCHEDDURINGOPERATION.DONOTOVER‐FIREYOURUNIT.
Note:England’sStoveWorksdoesnotrecommendusingapelletstoveasyour
onlysourceofheat.
Retainforyourfiles
ModelNumber
DateofPurchase
DateofManufacture
SerialNumber

3
IMPORTANT!READANDFOLLOWALLINSTALLATIONANDMAINTENANCEINSTRUCTIONS,INCLUDINGCLEANINGTHEUNITASSPECIFIED,AND
REPLACINGGASKETSANNUALLY,ANDPARTSASNEEDED.
ENGLAND’SSTOVEWORKSISNOTRESPONSIBLEFORANYDAMAGEORINJURYINCURREDDUETONEGLECT,ORDUETOUNSAFEINSTALLATIONOR
USAGEOFTHISPRODUCT.CALLTECHNICALSUPPORTWITHANYQUESTIONS.
Welcome!
Introduction
ThankYou.........................................4
Specifications
HeatingSpecifications.......................5
Dimensions........................................5
EPACompliance.................................5
Installation
InstallationOverview...................6
ClearancestoCombustibles.........7
VentingIntroduction...................8
VentingGuidelines.......................8
AdditionalVentingInformation....9
ApprovedVentingMethods
ThroughtheWall...........10
ThroughtheCeiling........11
ExistingChimney............12
MobileHomeInstallation............13
VentTerminationClearances......14
OutsideAirHookup.....................15
FloorProtection.......... .................16
DailyOperation
ControlBoardTypes…………………17
GettingStarted............................18
LightingaFire..............................18
DailyOperationNotes………………19
ControlBoard
TopMountBoardSettings...........21
ErrorCodes(TopMount)............23
DiagnosticMode(TopMount)....29
SideMountBoardSettings...........31
SideMountErrorCodes...............32
PowerFailure...............................33
Maintenance
Daily
ImportantNotes..............34
DailyAshRemoval............34
CleaningtheBurnPot…...35
Weekly
BaffleRemoval.................36
Monthly
VentingPipeCleaning…..37
Yearly
ImportantNotes..............38
BurnPot………..................39
ExhaustBlower……………..39
ConvectionBlower...........40
Finish…………....................40
Gaskets…………………………40
BasicTroubleshooting.......................41
ReplacingComponents
ConvectionBlower............................43
AugerMotor……….............................44
CombustionBlower............................45
VacuumSwitch...................................46
Igniter............................ .....................48
Gaskets...............................................49
Glass...................................................50
ControlBoard(TopMount)...............51
ControlBoard(SideMount)...............53
HopperLidLatch….............................55
IllustratedPartsDetail
ExplodedPartsDiagram……………………56
PartsList……………………………………..…..57
Warranty
SerialTagSample…………………….………..59
WarrantyDetails……………………………....60
ImportantNotice………….…….....…………62
WarrantyReg.Form………………………….63

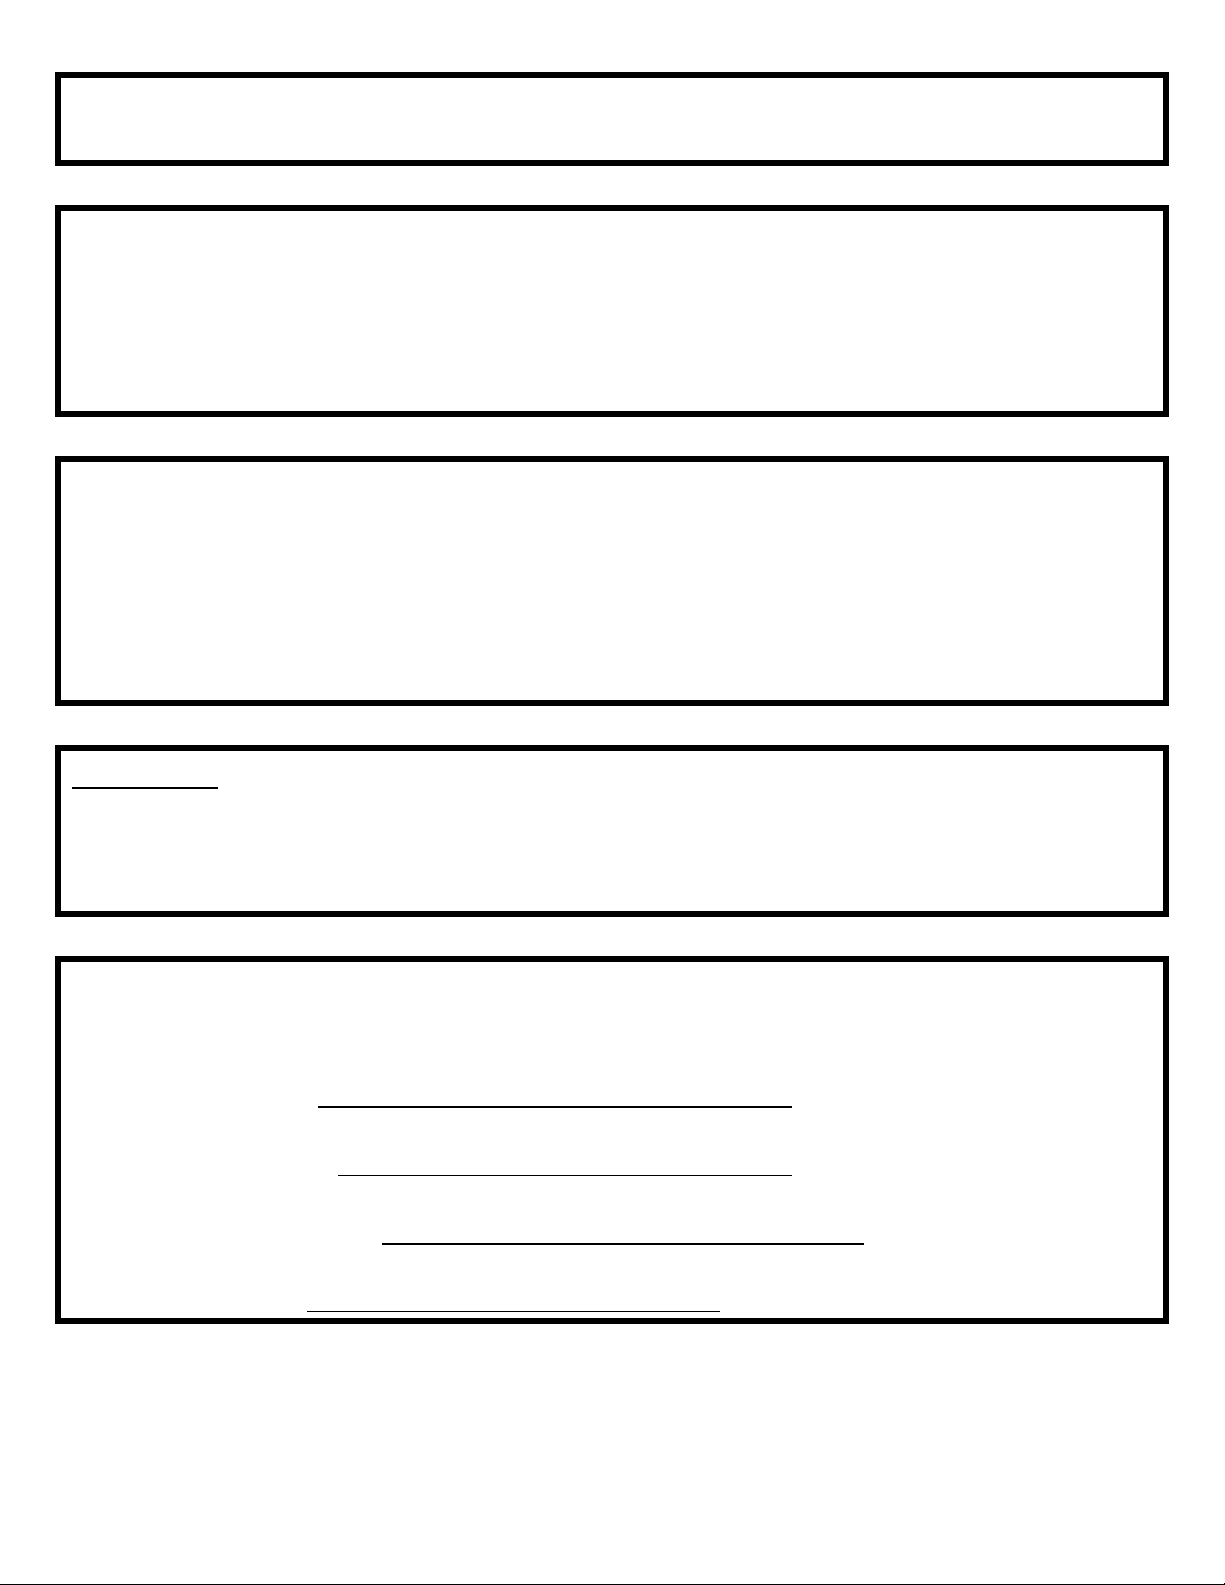
INTRODUCTION
ThankyouforpurchasingthisfineproductfromEngland’sStoveWorks!
England’sStoveWorkswasstarted,andisstillownedby,afamilythatbelieves
stronglyina“DoItYourself”spirit;that’sonereasonyoufoundthisproductat
yourfavorite“DoItYourself”store.
Weintentionallydesignand
buildourstovessothatanyhomeownercanmaintain
theirstovewithbasictools,andwe’realwaysmorethanhappytohelpyoudothe
jobaseasilyandasinexpensivelyaspossible.However,whileremainingsimple,
ourstovesaredesignedtoperformextremelyefficiently,helpingdelivermore
heatfromless
fuel.
PleaselookattheextensiveHelpsectiononourwebsiteandcallourTechnical
SupportDepartmentat(800)245‐6489ifyouneedanyhelpwithyourstove.We
arenearlyalwaysableto“walkyouthrough”anyinstallationissues,repairs,
problemsorotherquestionsthatyoumayhave.
Wishingyouyearsofefficient,qualityand“comfy”heating,
EveryoneatEngland’sStoveWorks
PleaseNote:Whileinformationobtainedfromourwebsiteandthroughour
TechnicalSupportlineisalwaysfreeofcharge,therewillbeaservicecharge
incurredwithany“on‐site”repairsormaintenancethatwemayarrange.
This manual is available for free download on the manufacturer’s web site. It is a copyrighted document and resale
is strictly prohibited. The manufacturer may update this manual occasionally and cannot be responsible for
problems including injuries or damages resulting from the use of information found in any manual from
unauthorized sources.
CAUTION:Stoveisheavy.
Inaddition,whenhandlinganysheetmetalproducts,beawarethattheremaybesharpedgesorburrs.
Althoughwemakeeveryefforttoeliminateanysharpedges,pleaseusecautionwhenhandlinganymetalparts.
Remembertodisconnect(unplug)thestovefromthepowersourceand
allowittocompletelycooldown
beforeperforminganymaintenance.
5
IMPORTANT!READANDFOLLOWALLINSTALLATIONANDMAINTENANCEINSTRUCTIONS,INCLUDINGCLEANINGTHEUNITASSPECIFIED,AND
REPLACINGGASKETSANNUALLY,ANDPARTSASNEEDED.
ENGLAND’SSTOVEWORKSISNOTRESPONSIBLEFORANYDAMAGEORINJURYINCURREDDUETONEGLECT,ORDUETOUNSAFEINSTALLATIONOR
USAGEOFTHISPRODUCT.CALLTECHNICALSUPPORTWITHANYQUESTIONS.
SPECIFICATIONS
HeatingSpecifications
ApproximatePelletBurnRate**……….…………1.0to1.8kg/hr(2.2to3.8lbs/hr)
MaximumBurnTime**………………………………………………………………………..36hours
ApproximateSquareFootageHeated***………...………………………….up2,000sq.ft.
HopperCapacity(fuel)…………………………………….…………………………….…..80pounds
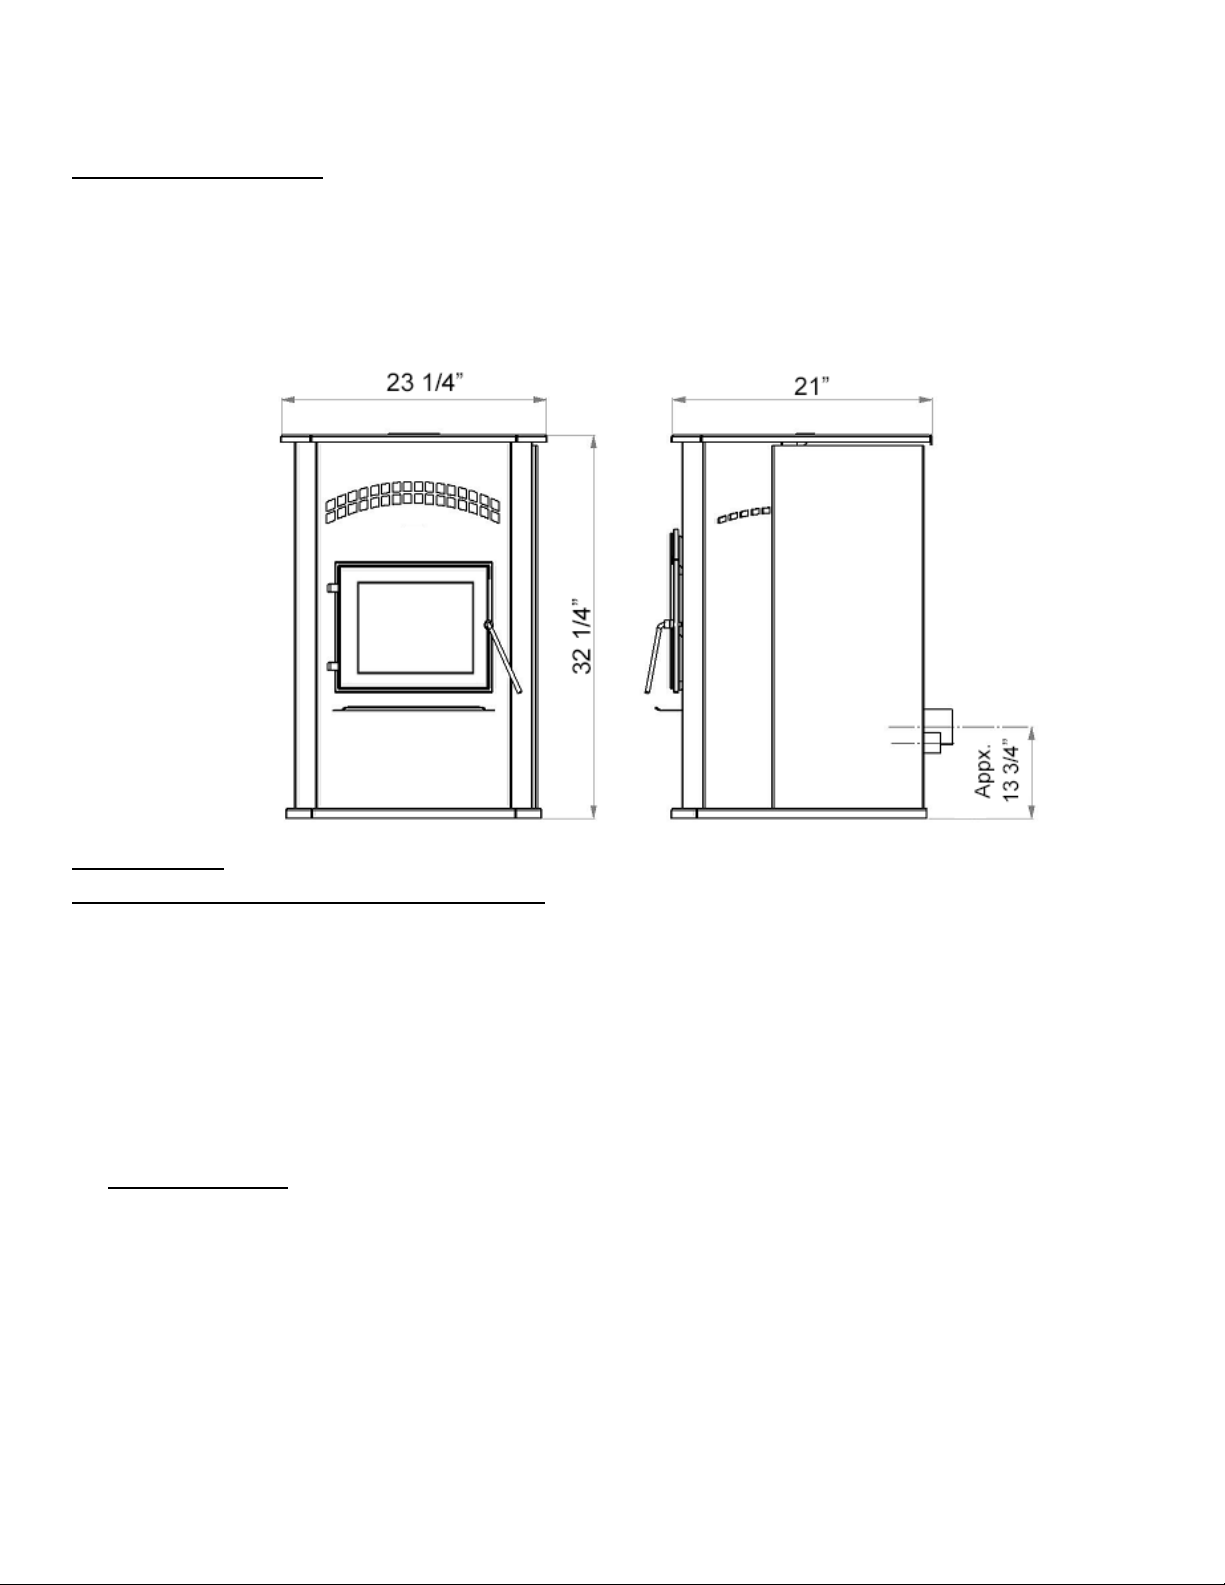
Dimensions
EPAandSafetyComplianceSpecifications
EPAComplianceStatus………………….Certifiedtocomplywith2020particulateemissionstandards
usingpelletfuel.
U.S.TestStandard:USEPA40CFRPart60,Subpart60.536
ParticulateEmissions …………………………………………………………………1.130grams/hr
COEmissions…………………………………………………………………………….0.029grams/hr
Efficiency………………………………………………………………………………………64.1%(HHV)
BTUrating…………………………………………………………………………………….20,511BTU/hr
TestedToUL1482‐00,ASTME1509,ULC/ORD‐C1482‐M1990&ULCS627‐00
Notesforthisunit:Productmayvaryslightlyfromdiagram.Clearancesaretheminimumforthisunit
andmayneedtobeincreasedinthereartohaveproperventclearances.Followallventingmanufacturer
clearancesandlocalcodes.
*‐AstestedperASTM2779‐10
**‐Heatoutput,burnrateandmaximumburntimeareheavilydependentonthetypeofpelletsburnedinthestove;assuch,thesenumbersmayvary.
***‐Themaximumheatingcapacityofthisunitcanvarygreatlybasedonclimate,constructionstyle,insulation
andamyriadofotherfactors.Usethisinformation
inconjunctionwithaBTUlosscalculationforyourhometodetermineifthisunitwillbesufficientforyourneeds.

6
IMPORTANT!READANDFOLLOWALLINSTALLATIONANDMAINTENANCEINSTRUCTIONS,INCLUDINGCLEANINGTHEUNITASSPECIFIED,AND
REPLACINGGASKETSANNUALLY,ANDPARTSASNEEDED.
ENGLAND’SSTOVEWORKSISNOTRESPONSIBLEFORANYDAMAGEORINJURYINCURREDDUETONEGLECT,ORDUETOUNSAFEINSTALLATIONOR
USAGEOFTHISPRODUCT.CALLTECHNICALSUPPORTWITHANYQUESTIONS.
INSTALLATION
InstallationOverview
Whenchoosingalocationforyournewstove,thereareamultitudeoffactorsthat
shouldbetakenintoaccountbeforebeginningtheinstallation.
1. TrafficPatterns–Tohelppreventaccidents,thestoveshouldbeplacedinalocation
whereitisoutofthewayofnormaltravelthrough
thehome.
2. HeatFlowandEfficiency–Whendecidingonalocationforthestove,considertheway
heatmovesthroughoutyourhome.Installthestovewhereyouneedtheheat;
basementinstallationsoftendonotallowsufficientheattoflowtotheupperfloorsand
atopfloor
installationwillnotallowanyheattoreachthefloorsbelow.Always
considerthatheatrisesandwilltakethepathofleastresistancewhileitisstillhot.
3. ExhaustLocation–Outsidewallsaregenerallythebestplacetoinstallastove,since
theyalloweasyexhaustandintake
airinstallation(usingourDuraVentAC‐3000Kit,AC‐
33000ifCanada).Ifthereisnotafeasiblewaytoinstallthestoveonanoutsidewall,
therearemethodsforventingthestoveupthroughtheroof,buttheytendtobemore
costlybecausetheyinvolvethe
useofmorepelletventpipeandcanoftenmakeoutside
airinstallationmoredifficult.
4. WallConstruction–Locatingthestovesothattheexhaustsystemcanpassbetween
studswillsimplifytheinstallationandeliminatetheneedtoreframeanysectionsofthe
walltoaccommodatethewallthimble.
Warning
Donotstoreorusegasolineorotherflammablevaporsandliquidsinthevicinityofthisorany
otherappliance.
DoNotOverfire–Ifanyexternalpartstartstoglow,youareoverfiring.Reducefeedrate.
Overfiringwillvoidyourwarranty.
Complywithallminimumclearancestocombustiblesasspecified.Failuretocomplymay
resultinahousefire.
Testedandapprovedforwoodpelletsonly.Burninganyotherfuelwillvoidyourwarranty.
ForusewithPremiumgradewoodpelletsonly.
7
IMPORTANT!READANDFOLLOWALLINSTALLATIONANDMAINTENANCEINSTRUCTIONS,INCLUDINGCLEANINGTHEUNITASSPECIFIED,AND
REPLACINGGASKETSANNUALLY,ANDPARTSASNEEDED.
ENGLAND’SSTOVEWORKSISNOTRESPONSIBLEFORANYDAMAGEORINJURYINCURREDDUETONEGLECT,ORDUETOUNSAFEINSTALLATIONOR
USAGEOFTHISPRODUCT.CALLTECHNICALSUPPORTWITHANYQUESTIONS.
INSTALLATION
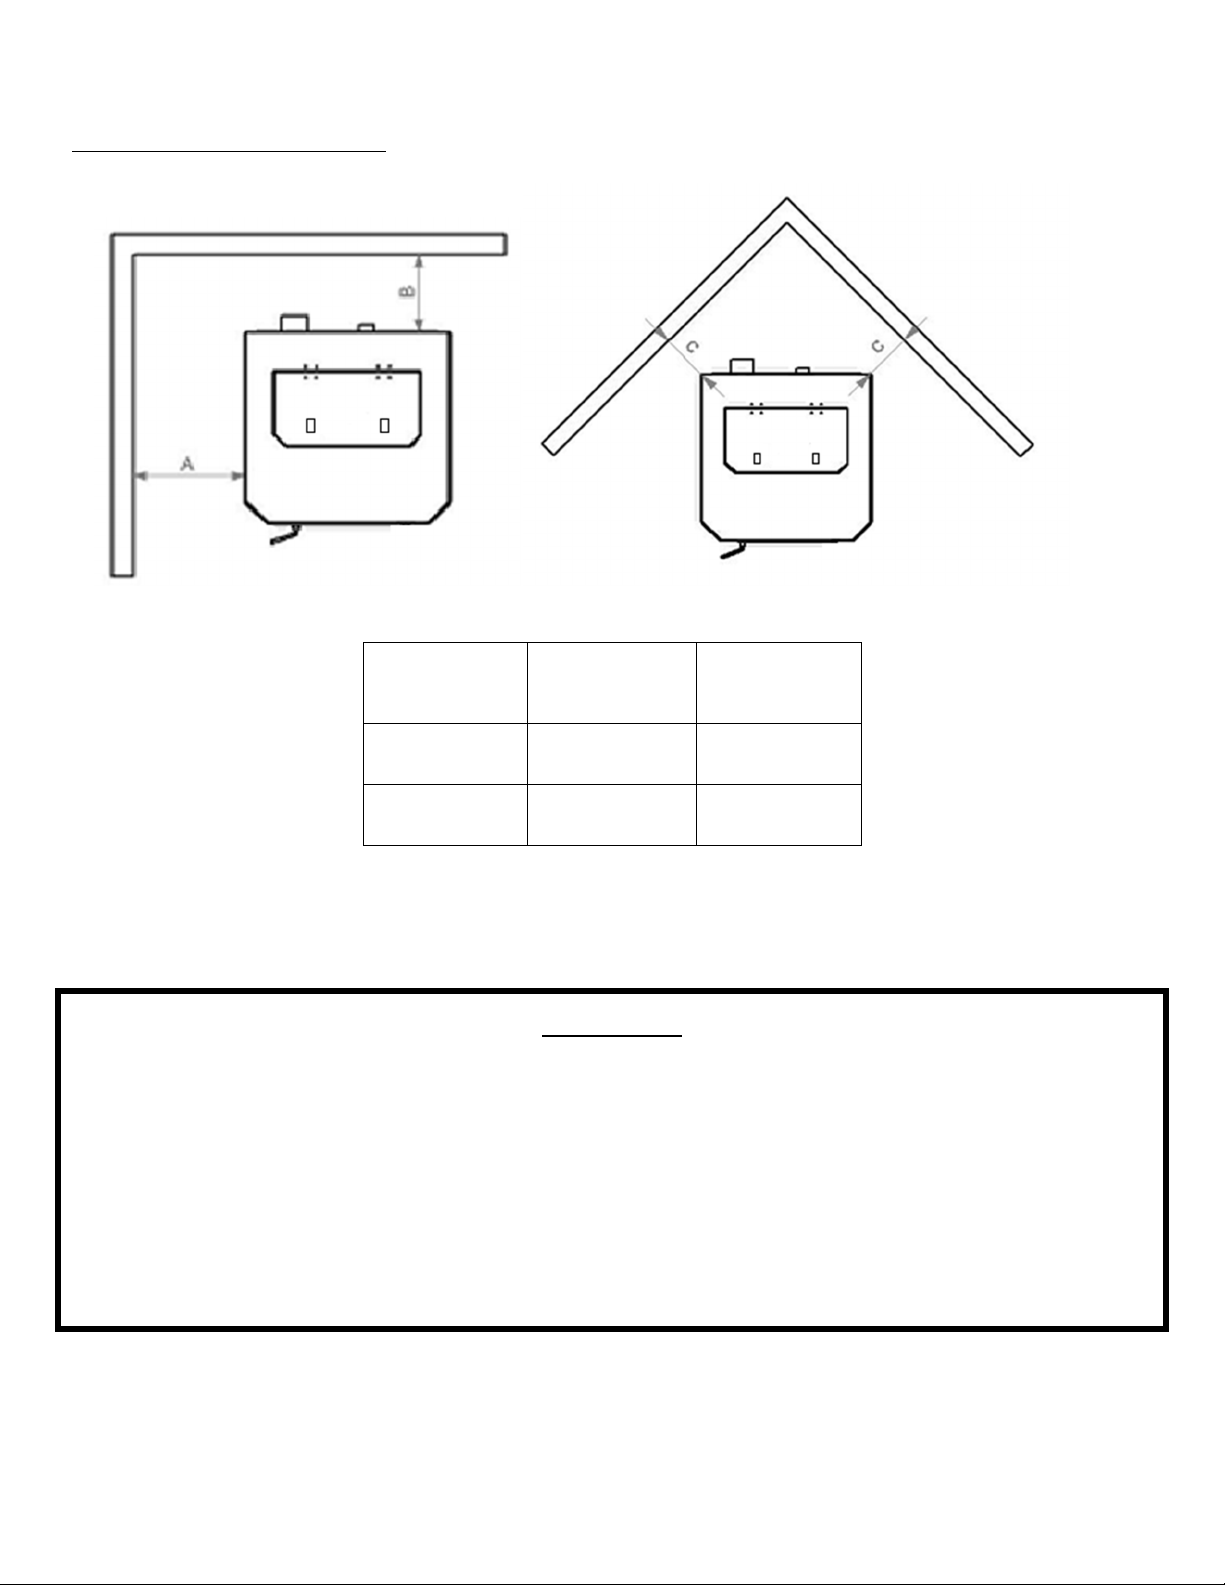
ClearancestoCombustibles
CAUTION
UnitcanbeveryHOTwhileinoperation.Keepchildrenaway.
Supervisechildreninthesameroomasthisappliance.
Alertchildrenandadultstothehazardsofhighte mperatures.
DoNOToperatewithprotectivebarriersopenorremoved.
Keepclothing,furniture,draperiesandothercombustiblesaway.
InstallationMUSTcomplywithlocal,regional,stateandnationalcodesandregulations.
Consultlocalbuilding,fireofficialsorauthoritieshavingjurisdictionaboutrestrictions,installationinspection,and
permits.
DONOTCONNECTTOANYAIRDISTRIBUTIONDUCTORSYSTEM
UnittoSide
Wall(A)
UnittoRear
Wall(B)
UnittoCorner
(C)
7in. 0in. 5in.
178mm 0mm 127mm
8
IMPORTANT!READANDFOLLOWALLINSTALLATIONANDMAINTENANCEINSTRUCTIONS,INCLUDINGCLEANINGTHEUNITASSPECIFIED,AND
REPLACINGGASKETSANNUALLY,ANDPARTSASNEEDED.
ENGLAND’SSTOVEWORKSISNOTRESPONSIBLEFORANYDAMAGEORINJURYINCURREDDUETONEGLECT,ORDUETOUNSAFEINSTALLATIONOR
USAGEOFTHISPRODUCT.CALLTECHNICALSUPPORTWITHANYQUESTIONS.
INSTALLATION
VentingIntroduction
Thispelletstoveoperatesonanegativedraftsystem,whichpullscombustionairthroughthe
burnpotandpushestheexhaustairthroughtheventpipeandoutofthebuilding.Thisunitmustbe
installedinaccordancewiththefollowingdetaileddescriptionsofventingtechniques;notinstalling
thestovein
accordancewiththedetailslistedherecanresultinpoorstoveperformance,property
damage,bodilyinjuryordeath.England’sStoveWorksisnotresponsibleforanydamageincurred
duetoapoororunsafeinstallation.
Ifquestionsarisepertainingtothesafeinstallationofthestove,ourTechnicalSupportline
(800‐245‐6489)isavailable.Contactyourlocalcodeofficialtobecertainyourinstallationmeetslocal
andnationalfirecodesandifyou’reuncertainabouthowtosafelyinstallthestove,westrongly
recommendcontactingalocalNFIcertifiedinstallertoperformtheinstallation.
VentingGuidelines
WARNING‐INSTALLVENTATCLEARANCESSPECIFIEDBYTHEVENTMANUFACTURER.
ALWAYSinstallventpipeinstrictadherencewiththeinstructionsandclearancesincludedwith
yourventingsystem.
DONOTconnectthispelletstovetoachimneyfluewhichalsoservesanotherappliance.
DONOTinstalla
fluepipedamperoranyotherrestrictivedeviceintheexhaustventingsystem
ofthisunit.
USEanapprovedwallthimblewhenpassingthroughawallandaceilingsupport/firestop
whenpassingthroughaceiling.
ONLYuse3.0”or4.0”TypeLorTypePLpipeapproved
forpelletstoveventing;DONOTuse
galvanizedorB‐Ventpipe.
SEALeachjointofpelletventwithhightemperaturesilicone(Part#AC‐RTV3)toprevent
smokespillageintothehome.
AVOIDexcessivehorizontalrunsandelbows,asbothwillreducethedraftoftheventing
system
andwillresultinpoorstoveperformance.
INCLUDEasmuchverticalpipeaspossibletopreventsmokefromtheunitfromenteringyour
homeintheeventofapoweroutage.
INSPECTyourventingsystemoften,tobecertainitisclearoffly‐ashandotherrestrictions.
CLEANtheventingsystemasdetailedinthemaintenancesectionofthismanual.
WARNING
INSTALLVENTATCLEARANCESSPECIFIEDBYTHEVENTMANUFACTURER.
HOT!Donottouch!Severeburnsorclothingignitionmayresult.
Glassandothersurfacesarehotduringoperation.
Donotattempttotouchoropenthefront,sideorbackpanelsduringoperation.Thiscouldresultin
severeburnsorin
j
ur
y
.

9
IMPORTANT!READANDFOLLOWALLINSTALLATIONANDMAINTENANCEINSTRUCTIONS,INCLUDINGCLEANINGTHEUNITASSPECIFIED,AND
REPLACINGGASKETSANNUALLY,ANDPARTSASNEEDED.
ENGLAND’SSTOVEWORKSISNOTRESPONSIBLEFORANYDAMAGEORINJURYINCURREDDUETONEGLECT,ORDUETOUNSAFEINSTALLATIONOR
USAGEOFTHISPRODUCT.CALLTECHNICALSUPPORTWITHANYQUESTIONS.
INSTALLATION
AdditionalVentingInformation
Donotmixandmatchcomponentsfromdifferentpipemanufacturerswhenassemblingyour
ventingsystem(i.e.DoNOTuseventingpipefromonemanufacturerandathimblefrom
another).
Werequireaminimumverticalriseof36in.(3ft.)ofpipetocreatenaturaldraftinthesystem.
Thishelpsevacuatesmokefromthestoveintheeventofapowerfailureorcombustion
blowerfailure.
Ventingsystems15.0ft.orshortermaybecomposedentirelyof3.0in.pelletpipe;toreduce
frictionallosses,ventingsystemslongerthan15.0ft.shouldbecomposedof4.0in.
pelletpipe.
Donotterminatetheventingsystemdirectlybeneathanycombustiblestructuresuchasa
porchordeck.
FollowNFPA211ruleslistedbelowforventingsystemterminationlocationrelativeto
windowsandotheropeningsinthedwelling.
o NFPA211(2006ed.)Section10.4Termination:10.4.5
(1)
Theexitterminalofamechanicaldraftsystemotherthandirectventappliances
(sealedcombustionsystemappliances)shallbelocatedinaccordancewiththe
following:
(a)Notlessthan3ft.(.91m)aboveanyforcedairinletlocatedwithin10ft.
(3.0m).
(b)Notlessthan4
ft.(1.2m)below,4ft.(1.2m)horizontallyfromor1ft.(305
mm)aboveanydoor,windoworgravityairinletintoanybuilding.
(c)Notlessthan2ft.(0.61m)fromanadjacentbuildingandnotlessthan7ft.
(2.1m)abovegradewhenlocated
adjacenttopublicwalkways.
Distancebetweentheterminationopeningandgradeshouldbeaminimumof2ft.(24in.)
contingentonthegradesurfacebelowthetermination.Whendeterminingthetermination
heightabovegrade,considersnowdriftlinesandcombustiblessuchasgrassorleaf
accumulation.Inareas
wheresignificantsnowfallispossible,theterminationheightmustbe
sufficientlyhightokeeptheterminationfreeofsnowaccumulation.
Donotusemakeshiftcompromisesduringinstallationorinstallanycomponentoftheunitor
ventingsysteminsuchamannerthatcouldresultinahazardousinstallation.
A
chimneyconnectorshallnotpassthroughanatticorroofspace,closetorsimilarconcealed
space,orafloor,orceiling.
Wherepassagethroughawallorpartitionofcombustiblematerialisdesired,theinstallation
shallconformtoCAN/CSA‐B365.
INSTALLATION
WARNING:
VentingsystemsurfacesgetHOT,andcancauseburnsiftouched.
Noncombustibleshieldingorguardsmayberequired.
10
IMPORTANT!READANDFOLLOWALLINSTALLATIONANDMAINTENANCEINSTRUCTIONS,INCLUDINGCLEANINGTHEUNITASSPECIFIED,AND
REPLACINGGASKETSANNUALLY,ANDPARTSASNEEDED.
ENGLAND’SSTOVEWORKSISNOTRESPONSIBLEFORANYDAMAGEORINJURYINCURREDDUETONEGLECT,ORDUETOUNSAFEINSTALLATIONOR
USAGEOFTHISPRODUCT.CALLTECHNICALSUPPORTWITHANYQUESTIONS.
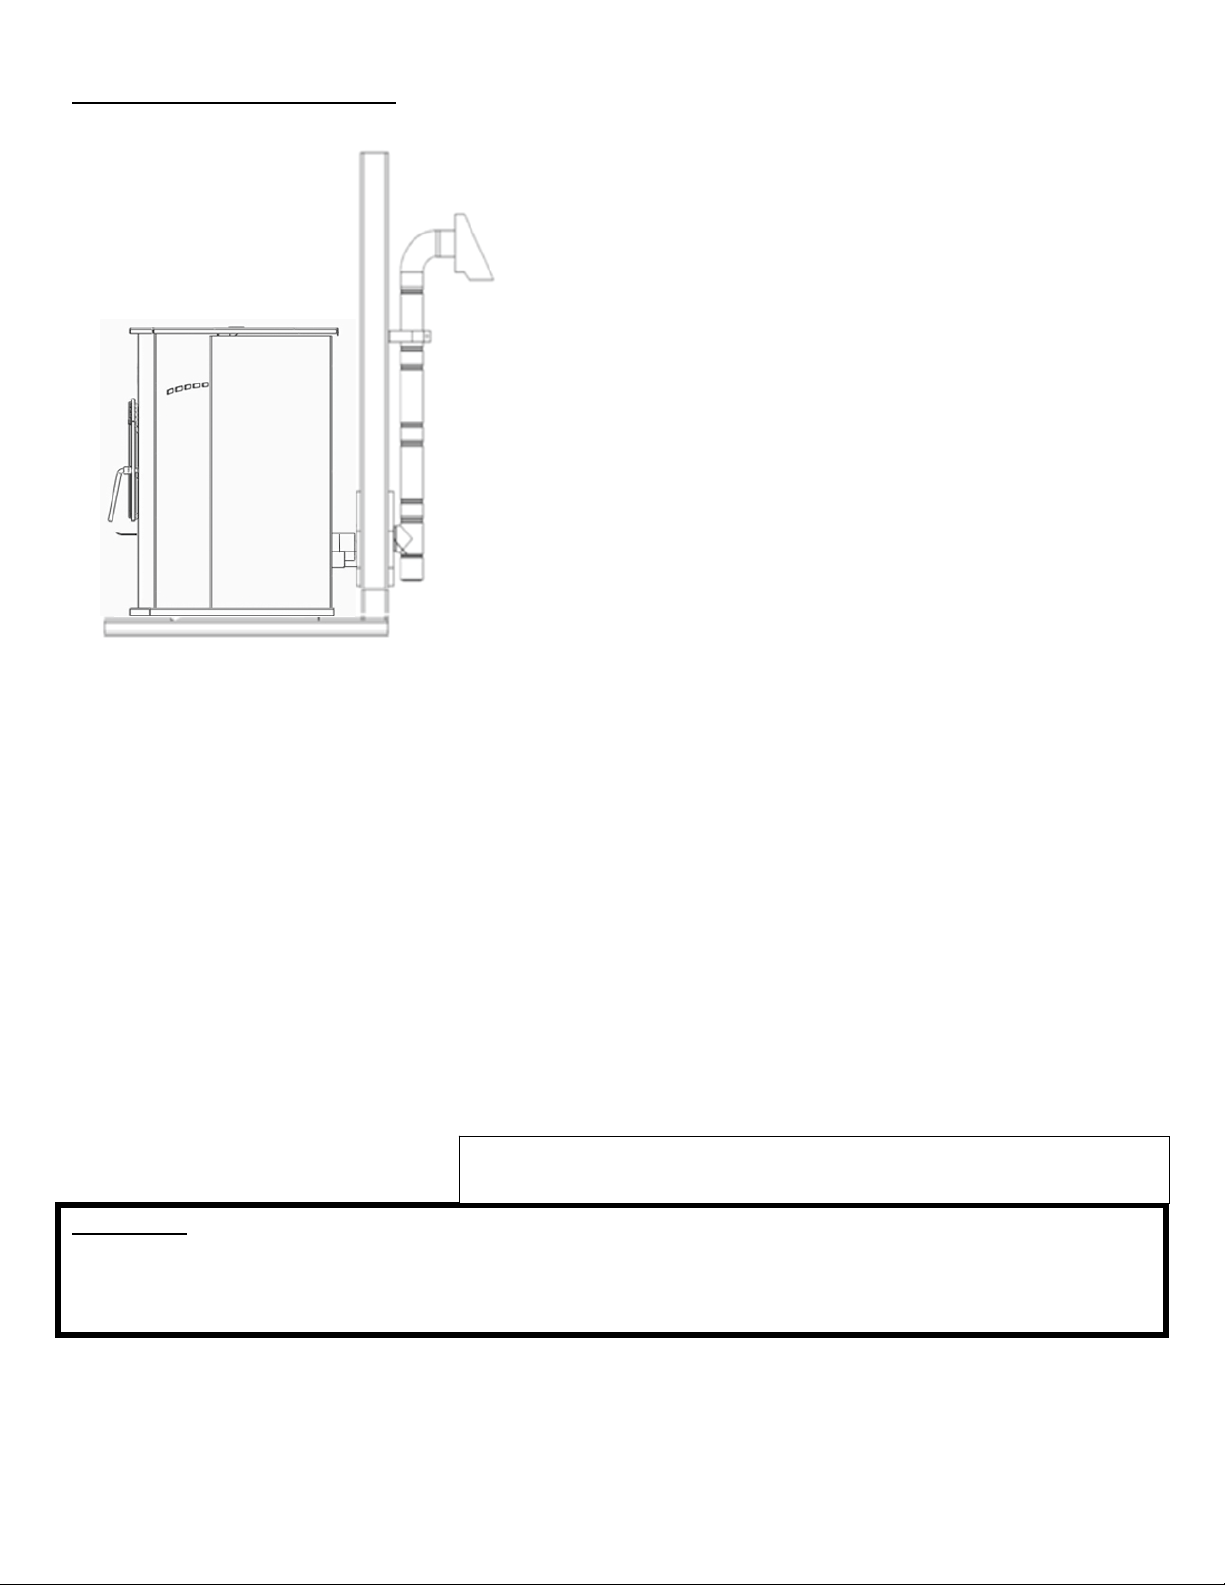
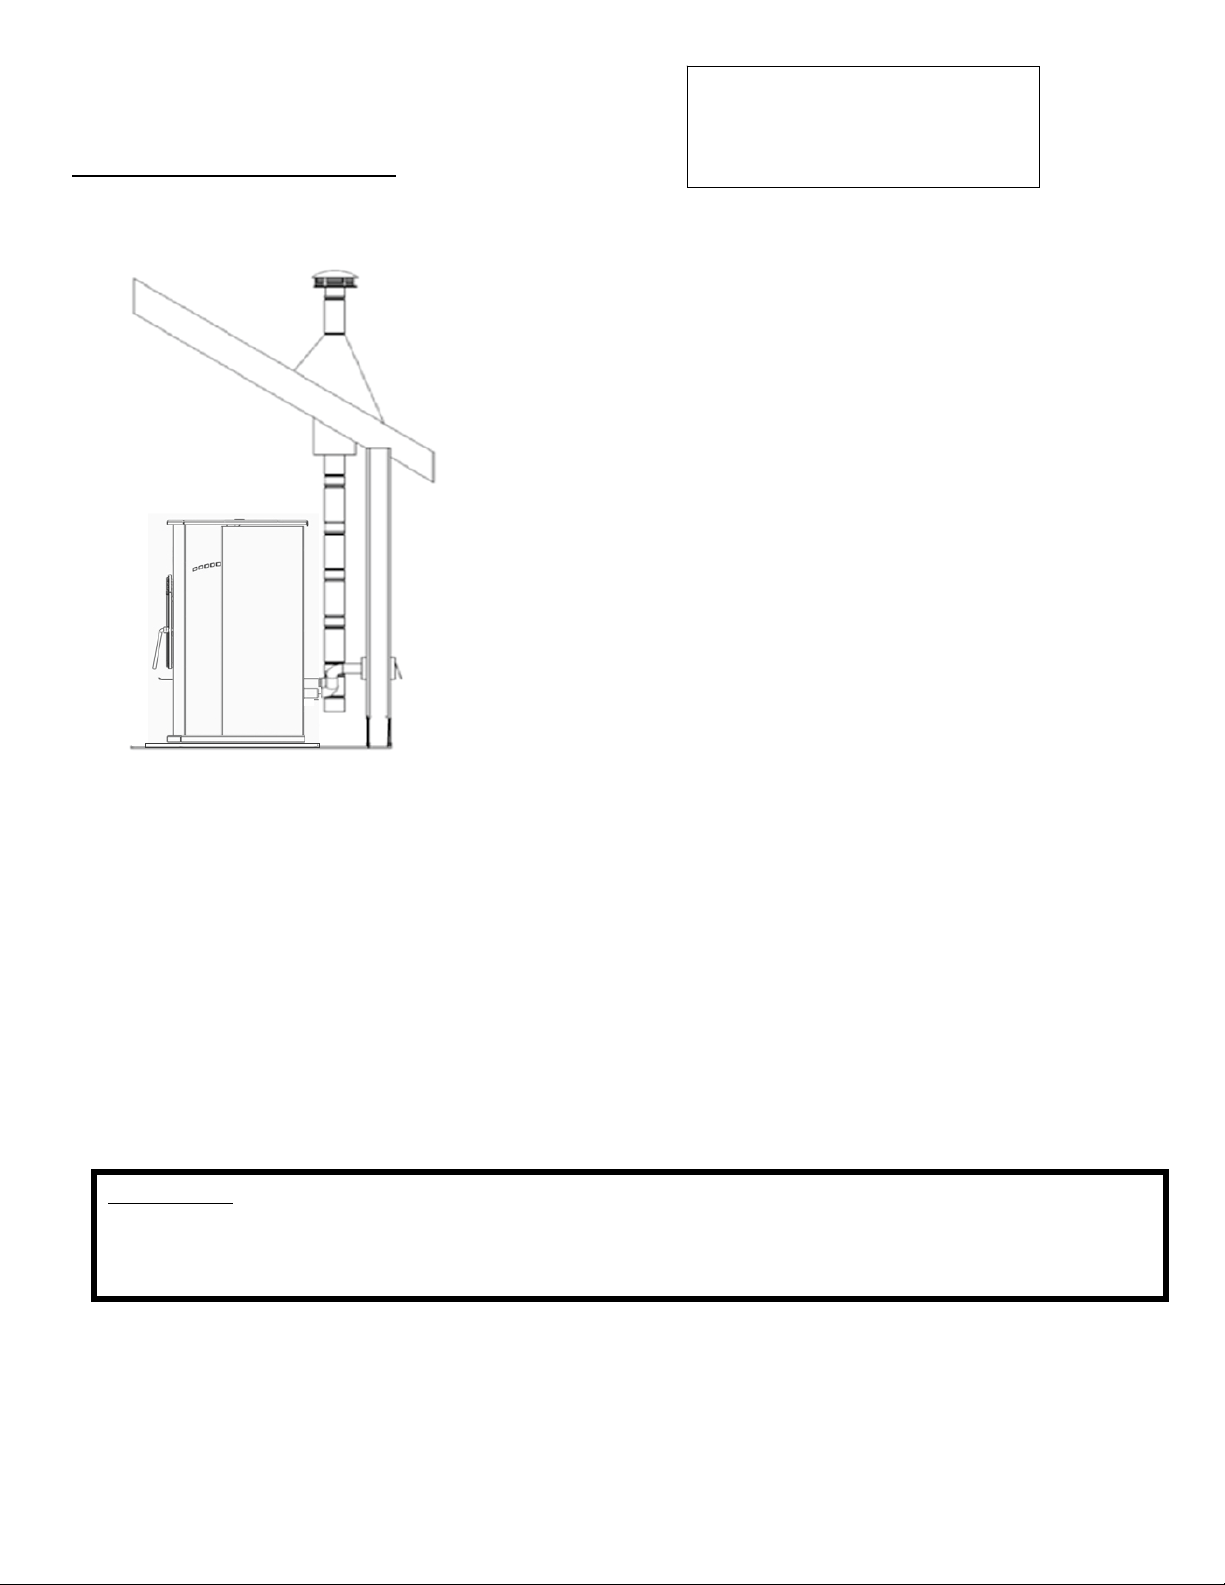
ApprovedVentingMethod1:ThroughtheWall
Generallythesimplestinstallationmethod,venting
throughthewallusingourAC‐3000kit,AC‐33000ifCanada
(orsimilarventingsystem)isalsothepreferredventing
method.Itminimizeshorizontalpipe,allowsthestoveto
beinstalledclosetothewallandkeepstheclean‐outtee
onthe
outsideofthehouse,foreaseofcleaning.
Wheninstallinganyventingsystem,TypeLorTypePL
pipemustbeusedandallclearancestocombustibles
(listedbythepipemanufacturer)mustbestrictlyadhered
to.
Usethepipemanufacturer’sapprovedthimblefor
passingthroughacombustible
wall,andmaintainatleast
theminimumclearancestocombustibles.
Useanappliancecollarwherethepelletventconnects
totheexhaustoutputofthepelletstoveandattachthe
appliancecollartotheexhaustbloweroutputusingthree
sheetmetalscrews.
Securethepelletventtotheoutside
ofthehouseusingawallstrapjustbelowthe90degree
elbow.
SealeachpipeconnectionjointwithhightemperatureRTVSilicone,toensurethesystemisleak
free(Checkwiththespecificventingsystemmanufacturer’sinstructionsbeforedoingso).
Ifthepelletventpipebeingused
isnota“TwistLock”system,three(3)sheetmetalscrewsare
requiredateachpipejoint.
Connectthepelletstovetooutsidecombustionairusingthekitincludedwithyourstoveorusing
analternativemethod,asdescribedinthe“OutsideAir”section,onpage15.
Thisinstallationtype
canbemodifiedforbasement(Basementinstallationsshouldalwaysbe
performedbyaprofessionalinstaller)orotherinstallationswhereintheteeandverticalsectionof
thepipewouldbeinsidethehomeandtheventingsystemwouldsimplypasshorizontallythrough
thethimbleandthenterminate.
PleaseNote:
Installationdiagramsareforreferencepurposesonlyandarenotdrawntoscale,normeanttobeusedasplansforeach
individualinstallation.Pleasefollowallventingsystemrequirements,maintaintherequiredclearancestocombustibles,
andfollowalllocalcodes.
Forhighaltitudeinstallations(above4,000ft.),theventpipeshouldbe
increasedfrom3‐inch(3”)tofour‐inch(4”).
11
IMPORTANT!READANDFOLLOWALLINSTALLATIONANDMAINTENANCEINSTRUCTIONS,INCLUDINGCLEANINGTHEUNITASSPECIFIED,AND
REPLACINGGASKETSANNUALLY,ANDPARTSASNEEDED.
ENGLAND’SSTOVEWORKSISNOTRESPONSIBLEFORANYDAMAGEORINJURYINCURREDDUETONEGLECT,ORDUETOUNSAFEINSTALLATIONOR
USAGEOFTHISPRODUCT.CALLTECHNICALSUPPORTWITHANYQUESTIONS.
INSTALLATION
ApprovedVentingMethod2:ThroughtheCeiling
Ventingthroughtheceiling/roofmaybetheonlyfeasible
ventingoptioninsomecasesandisafactoryrecommended
installation.
Wheninstallinganyventingsystem,TypeLorTypePLpipe
mustbeusedandallclearancestocombustibleslistedbythe
pipemanufacturermustbestrictlyadheredto.
Usethepipemanufacturer’sapprovedceilingsupportfor
passingthroughacombustibleceiling,aswellastherequired
firestops,radiationshields,flashingandstormcollar.
Becertaintofollowthemanufacturer’srequiredheightof
terminationabovetheroofline,andmaintainatleastthe
minimumclearancesto
combustibles.
Useanappliancecollarwherethepelletventconnectstothe
exhaustoutputofthepelletstoveandattachtheappliance
collartotheexhaustbloweroutputusingthreesheetmetal
screws.
SealeachpipeconnectionjointwithhightemperatureRTVSilicone,toensurethesystemisleak
free(Checkwiththespecificpipemanufacturer’sinstructionsbeforedoingso).
Ifthepelletventpipebeingusedisnota“TwistLock”system,three(3)sheetmetalscrewsare
requiredateachpipejoint.
Connectthepelletstovetooutsidecombustionairusingthekitincludedwith
yourstoveorusing
analternativemethod,asdescribedinthe“OutsideAir”section,onpage15.
Thisventingmethodcanalsobemodifiedsothattheventingsystemrunshorizontallythroughthe
wallfromthestove,thentransitionstoverticalandterminatesabovetheroofline.Whenusing
thismodified
versionofthisinstallationbecertaintocarefullyfollowtheventingsystem
manufacturer’sinstructionsdiligently.
PleaseNote:
Installationdiagramsareforreferencepurposesonlyandarenotdrawntoscale,normeanttobeusedasplansforeach
individualinstallation.Pleasefollowallventingsystemrequirements,maintaintherequiredclearancestocombustibles,and
followalllocalcodes.
Forhighaltitudeinstallations
(above4,000ft.),theventpipe
shouldbeincreasedfrom3‐inch
(3”)tofour‐inch(4”).

12
IMPORTANT!READANDFOLLOWALLINSTALLATIONANDMAINTENANCEINSTRUCTIONS,INCLUDINGCLEANINGTHEUNITASSPECIFIED,AND
REPLACINGGASKETSANNUALLY,ANDPARTSASNEEDED.
ENGLAND’SSTOVEWORKSISNOTRESPONSIBLEFORANYDAMAGEORINJURYINCURREDDUETONEGLECT,ORDUETOUNSAFEINSTALLATIONOR
USAGEOFTHISPRODUCT.CALLTECHNICALSUPPORTWITHANYQUESTIONS.
INSTALLATION
ApprovedVentingMethod3:ExistingChimneySystem
Usinganexistingmasonryorfactorybuiltchimneyforventingistheonlyotheracceptablemethod
forventingthispelletunit.
UseTypeLorTypePLventingpipeuntilenteringthe
existingchimney.Usetheappropriatelysizedadapterwhen
transitioningfromthepelletventpipetothemasonry
or
factorybuiltthimbleandbecertainthattheadapteris
sealedtightlytoboththepelletventingsystemandthe
existingchimney.
Beforeusinganexistingchimney,becertainitisingood
condition(Achimneysweepinspectionishighly
recommended).Also,makesurethechimneymeetsthe
minimumstandardslistedinNFPA211(Achimney
professionalcanconfirmthisuponinspection).
Ifconnectingthisstovetoafactorybuiltchimney,itmay
ONLYbea6”flue,UL103HTventingsystem(ULCS629if
Canada).Connectiontoanyotherfactorybuiltchimneymay
resultinapoorly
operatingordangerousstoveinstallation.
Whenconnectingtoanexistingmasonrychimney,thecross‐sectionalareaofthefluemustbe
considered.Achimneywithafluelargerthan6”round(28.27sq.in.)mayrequirereliningwithan
approvedpelletstovechimneyliningsystem.
Useanappliance
collarwherethepelletventconnectstotheexhaustoutputofthepelletstove
andattachtheappliancecollartotheexhaustbloweroutputusingthreesheetmetalscrews.
SealeachpipeconnectionjointwithhightemperatureRTVSilicone,toensurethesystemisleak
free(Checkwiththespecific
pipemanufacturer’sinstructionsbeforedoingso).
Ifthepelletventpipebeingusedisnota“TwistLock”system,three(3)sheetmetalscrewsare
requiredateachpipejoint.
Connectthepelletstovetooutsidecombustionairusingthekitincludedwithyourstoveorusing
an
alternativemethod,asdescribedinthe“OutsideAir”section,onpage15.
PleaseNote:
Installationdiagramsareforreferencepurposesonlyandarenotdrawntoscale,normeanttobeusedasplansforeachindividual
installation.Pleasefollowallventingsystemrequirements,maintaintherequiredclearancestocombustibles,andfollowalllocal
codes.
Forhighaltitudeinstallations
(above4,000ft.),theventpipe
shouldbeincreasedfrom3‐inch
(3”)tofour‐inch(4”).
13
IMPORTANT!READANDFOLLOWALLINSTALLATIONANDMAINTENANCEINSTRUCTIONS,INCLUDINGCLEANINGTHEUNITASSPECIFIED,AND
REPLACINGGASKETSANNUALLY,ANDPARTSASNEEDED.
ENGLAND’SSTOVEWORKSISNOTRESPONSIBLEFORANYDAMAGEORINJURYINCURREDDUETONEGLECT,ORDUETOUNSAFEINSTALLATIONOR
USAGEOFTHISPRODUCT.CALLTECHNICALSUPPORTWITHANYQUESTIONS.
INSTALLATION
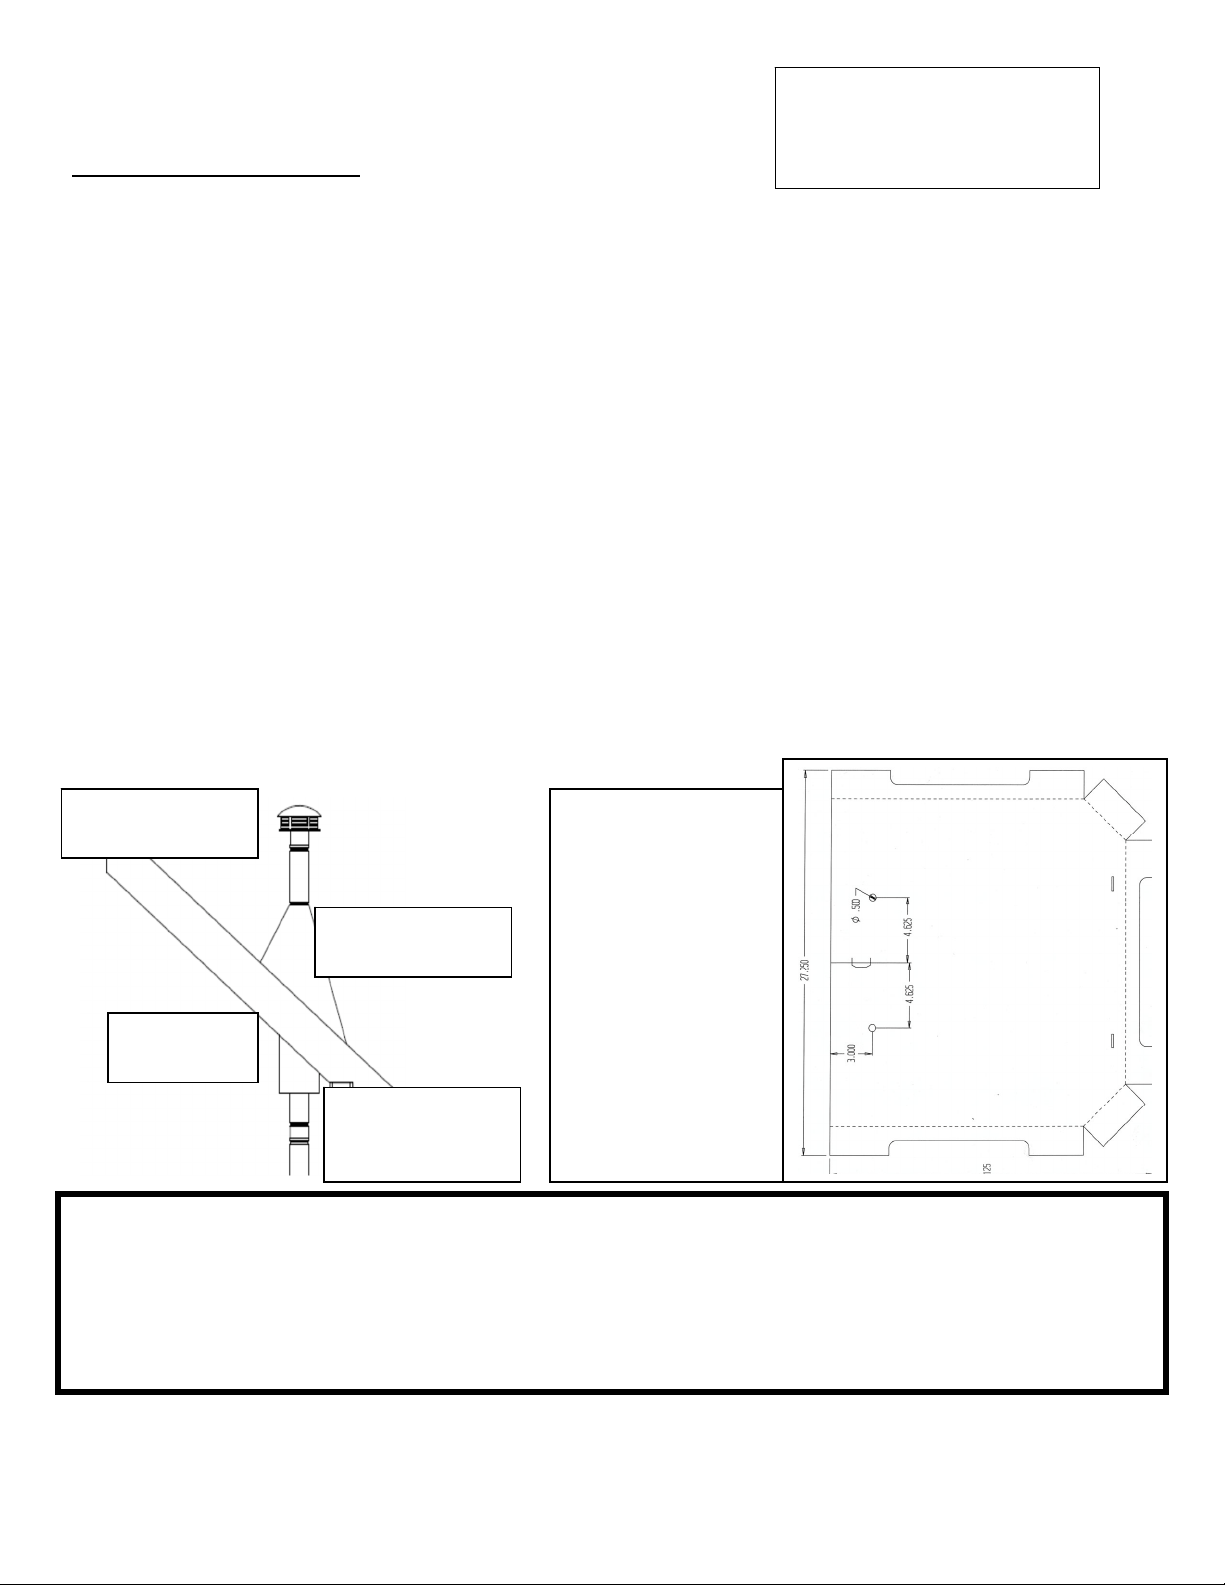
MobileHomeInstallation
TheEngland’sStoveWorks,Inc.outsideairkitMUSTbeusedforinstallationofthisunitina
mobilehome.Pleaseseethe“OutsideAir”sectiononpage15formoreinformationregarding
outsideairconnections.
Theoutsideairinletmustbekeptclearofleaves,iceandother
debris.Keepingtheoutsideair
inletfreeofrestrictioniscrucialtopreventingairstarvationand smokespillage.
ThepelletstoveMUSTbesecuredtothefloorofthemobilehomeusinglagboltsandtheholes
providedinthebottomofthebaseforthispurpose.Outdoor‐aired
spaceheatersmustbe
attachedtothestructure.
ThepelletstoveMUSTbegroundedwith#8solidcoppergroundingwire(orequivalent),
terminatedateachendwithanNECapprovedgroundeddevice.
CarefullyfollowallclearanceslistedintheappropriatesectionofthismanualANDfollowthe
ventingmanufacturer’s
minimumclearancerequirements.Similarly,becertaintheventing
systemusedisapprovedformobilehomeuse.
InstallationmustbeinaccordancewithManufacturersHome&SafetyStandard(HUD)CFR3280,
Part24aswellasanyapplicablelocalcodes.
Usesiliconetocreateaneffectivevaporbarrierat
thelocationwherethechimneyoroutsideair
ductingpassesthroughtotheexteriorofthestructure.
CAUTION
THESTRUCTURALINTEGRITYOFTHEMANUFACTUREDHOMEFLOOR,WALLANDCEILING/ROOFMUSTBE
MAINTAINED.DONOTCUTTHROUGHFLOORJOISTS,WALLSTUDS,CEILINGTRUSSESORANYOTHER
SUPPORTINGMATERIALWHICHCOULDBEDETRIMENTALTOTHESTRUCTURALINTEGRITYOFTHEHOME.
WARNING:DONOTINSTALLINASLEEPINGROOM.
Forhighaltitudeinstallations
(above4,000ft.),theventpipe
shouldbeincreasedfrom3‐inch
(3”)tofour‐inch(4”).
ChimneyCap/
SparkArrestor
JoistShield/
Firestop
RoofFlashingand
StormCollar
MHApproved
TypeLorTypePL
PelletVentPi
p
e
Ifyourunitdoesnot
haveholespre‐drilled
forMobileHome
installation,youmay
drilltwoholesinthe
floorofyourunitthat
are½”(approx..1.25
cm)indiameter.
Eachholeshouldbe
drilledapproximately3”
(7.6cm)insidetherear
oftheunit,and
approximately4.625”
(11.75
cm)awayfrom
thecenterofthefloor.
14
IMPORTANT!READANDFOLLOWALLINSTALLATIONANDMAINTENANCEINSTRUCTIONS,INCLUDINGCLEANINGTHEUNITASSPECIFIED,AND
REPLACINGGASKETSANNUALLY,ANDPARTSASNEEDED.
ENGLAND’SSTOVEWORKSISNOTRESPONSIBLEFORANYDAMAGEORINJURYINCURREDDUETONEGLECT,ORDUETOUNSAFEINSTALLATIONOR
USAGEOFTHISPRODUCT.CALLTECHNICALSUPPORTWITHANYQUESTIONS.
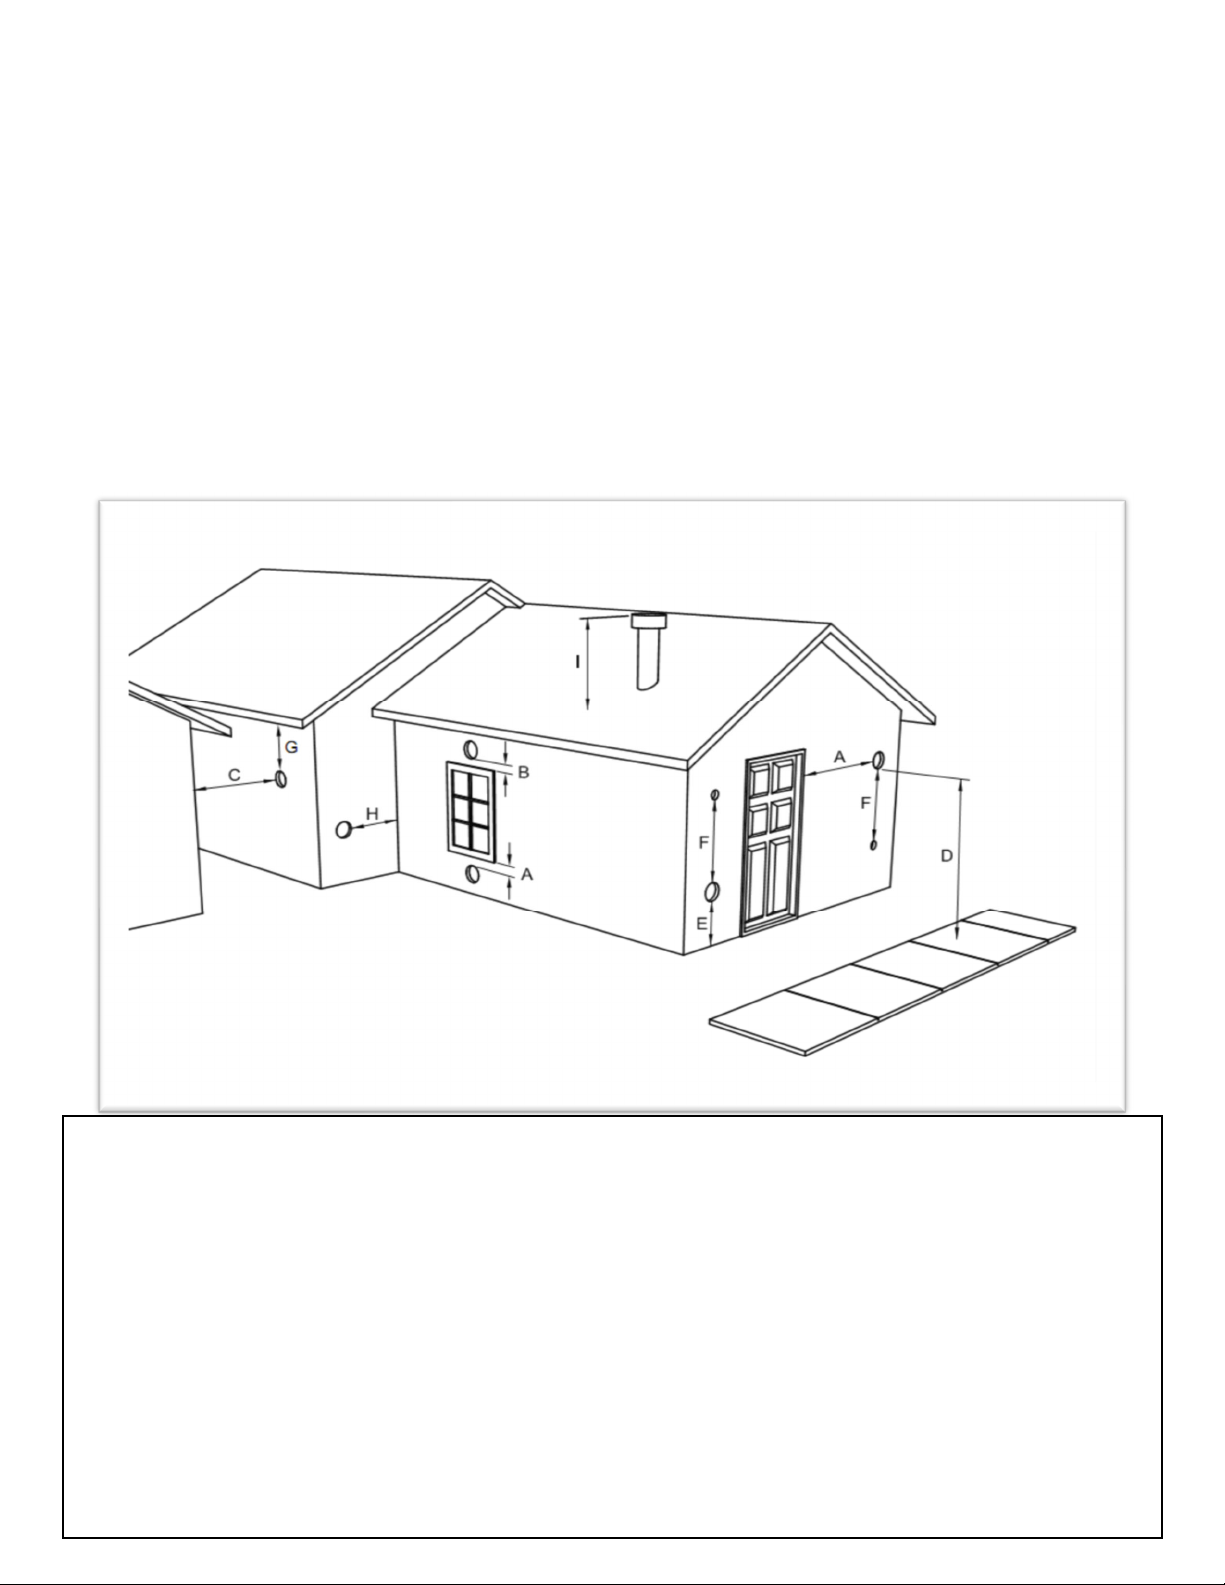
VENTTERMINATIONCLEARANCES
A)Min.4‐ftclearancebeloworbesideanydoororwindowthatopens.
B)Min.1‐ftclearanceaboveanydoororwindowthatopens.
C)Min.2‐ftclearancefromanyadjacentbuilding.
D)Min.7‐ftclearancefromanygradewhenadjacenttopublicwalkways.
E)Min.2
‐ftclearanceaboveanygrass,plants,orothercombustiblematerials.
F)Min.3‐ftclearancefromaforcedairintakeofanyappliance.
G)Min.2‐ftclearancebeloweavesoroverhang.
H)Min.1‐ftclearancehorizontallyfromcombustiblewall.
I)Ventsinstalledwithmechanicalexhaustersshallterminatenot
lessthan12in.(305mm)abovethe
highestpointwheretheypassthroughtheroofsurface.
NotesonterminationofPelletVentPipefromNFPA211(2006ed.)Section10.4Termination:10.4.5
(Seealso“INSTALLATION”sectionofmanualANDadditionalnotesabove):
Notlessthanthree(3)feetaboveanyforcedairinletlocatedwithinten(10)feet.
Notlessthanfour(4)feetbelow,four(4)feethorizontallyfrom,orone(1)footaboveanydoor,
windoworgravityairinletintoanybuilding.
Notlessthantwo(2)feetfromanadjacentbuilding,andnotlessthanseven(7)feetabovegrade
wherelocatedadjacenttopublicwalkways.
Theexhaustexitshallbea rrangedsothatthefluegases arenotdirectedsothatitwillaffectpeople,overheat
combustiblestructures,orenterbuildings.Forceddraftsystemsandallpartsofinduceddraftsystemsunderpositive
pressureduringoperationshallbeinstalledgastightortopreventleakageofcombustion
productsintoa building.
Through‐the‐wallventsshallnotterminateoverpublicwalkways,orwherecondensateorvaporcouldcreatehazards
oranuisance.
Besuretofollowlocalcodesandallmanufacturer’sinstructions(includingexhaustpipe).
Consultaprofessional installerand/orcallTechnicalSupportifyouhaveany
questions.

15
IMPORTANT!READANDFOLLOWALLINSTALLATIONANDMAINTENANCEINSTRUCTIONS,INCLUDINGCLEANINGTHEUNITASSPECIFIED,AND
REPLACINGGASKETSANNUALLY,ANDPARTSASNEEDED.
ENGLAND’SSTOVEWORKSISNOTRESPONSIBLEFORANYDAMAGEORINJURYINCURREDDUETONEGLECT,ORDUETOUNSAFEINSTALLATIONOR
USAGEOFTHISPRODUCT.CALLTECHNICALSUPPORTWITHANYQUESTIONS.
OUTSIDEAIRHOOK‐UP
Theuseofoutsidecombustionairismandatoryonthispelletstove.
Theoutsideairconnectionpipeprotrudesfromthelowerrearcenterofthe
stove;usetheincludedoutsideairkittoattachyourstovetooutside
combustionair.Instructionsandallthepartsneededtomakethe
outsideair
connectiontoyourpelletstoveareincludedwiththeoutsideairkit.
Ifitisnotfeasibletousetheincludedoutsideairhookupkitinyourstove
installation,othermaterialsmaybeused,providedthefollowingrulesare
followed:
Thepipeusedforoutsideair
hookupmustbemetal,withaminimum
thicknessof.0209in.(25gaugemildsteel)orgreaterandaninside
diameterofapproximately2.0in.
Allpipejointsandconnectionsshouldbesealedwithpipeclampsorother
mechanicalmeans,toinsurealeakfreeoutsideairconnection.
Long
runsofpipeandexcessiveelbowsforoutsideairshouldbeavoided.
Duetofrictionalresistanceinpipe,anyexcessiveoutsideairpipingcan
resultinpoorstoveperformance.
Ascreenorotherprotectiondevicemustbefittedovertheoutsideair
terminationpointtopreventrain,debrisand
nuisanceanimalsfrom
enteringthepipingsystem.
Increasetheoutsideairpipesizeto3.0in.diameterpipeiftheoutsideair
connectionismorethan6ft.inlength,morethantwo(2)elbowsareused
orifthestoveisinstalledinabasement.
Theoutsideair
connectionsystemshouldbeinspectedatleastannuallytobe
certainitisfreefromblockage.
Caution
NEVERdrawoutsidecombustionairfrom:
1.Wall,floororceilingcavity.
2.Enclosedspacesuchasanattic,garageorcrawlspace.
16
IMPORTANT!READANDFOLLOWALLINSTALLATIONANDMAINTENANCEINSTRUCTIONS,INCLUDINGCLEANINGTHEUNITASSPECIFIED,AND
REPLACINGGASKETSANNUALLY,ANDPARTSASNEEDED.
ENGLAND’SSTOVEWORKSISNOTRESPONSIBLEFORANYDAMAGEORINJURYINCURREDDUETONEGLECT,ORDUETOUNSAFEINSTALLATIONOR
USAGEOFTHISPRODUCT.CALLTECHNICALSUPPORTWITHANYQUESTIONS.
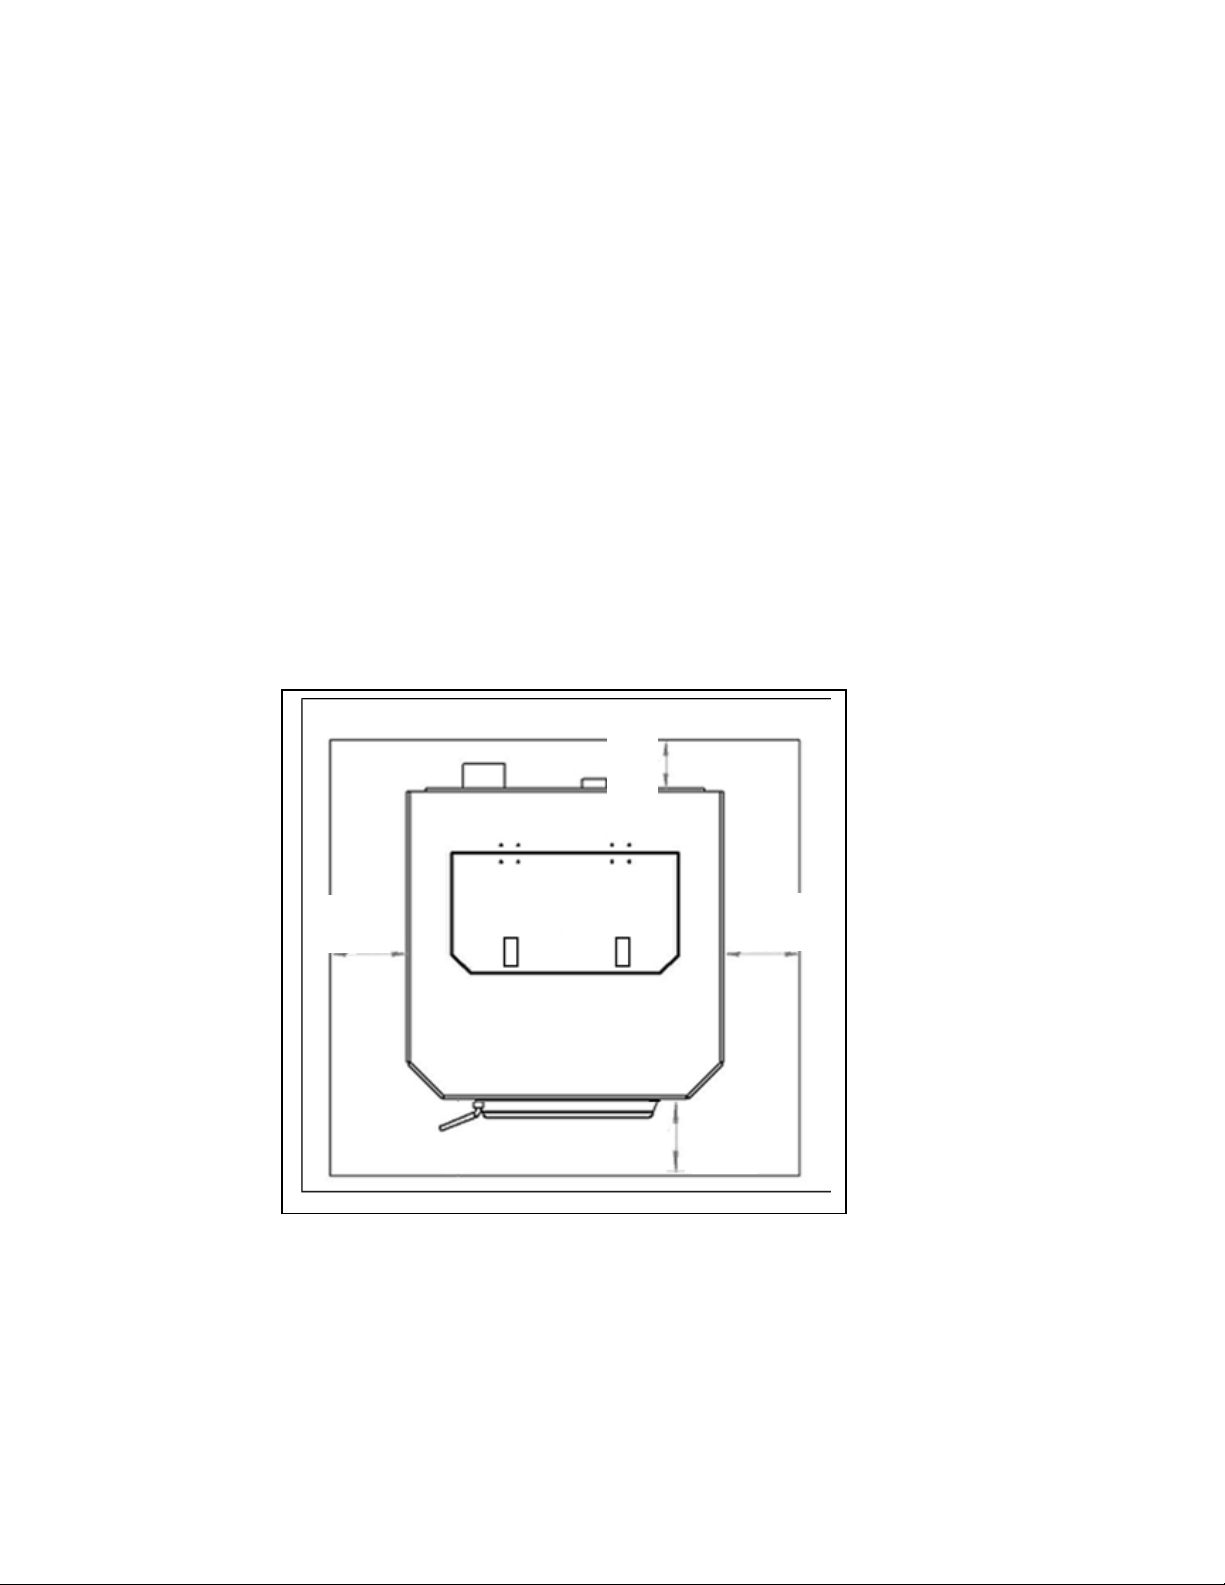
FLOORPROTECTION
Thispelletstoverequiresanon‐combustiblefloorprotectorifthestoveistobeinstalledonacombustible
floor.Ifthefloorthestoveistobeinstalledonisalreadynon‐combustible(i.e.aconcretefloorina
basement)andhasanRvalueequaltoorhigher
than.2,nofloorprotectionisneeded(althougha
decorativefloorprotectorcanstillbeusedforaestheticreasons).
PrefabricatedfloorprotectorswhichareULlisted(ULCifCanada)orequivalentcanbepurchasedorafloor
protectorcanbebuiltfromstandardmaterials:twosheetsof.5”thick
cementboardcoveredwithceramic
tilewouldbeasuitablefloorprotectorwhichmeetsthe.2R‐valuerequirement.
Whenusinganyfloorprotector,considerthatthisstoveisnotonlyheavybutwillinduceheatingand
coolingcyclesonthefloorprotectorwhichcandamagetileandloosenmortarandgroutjoints.Ahearth
rugisNOTanapprovedsubstituteforaproperhearthpad.
FortheUS:Thefloorprotectormustextendatleast6in.(152.4mm)fromthefront&sidesand4in.
(101.6mm)fromtherear.
ForCanada:Thefloorprotectormustextendatleast18.0in.(457.2mm)fromthefrontoftheunit,8.0in.
(203.2mm)fromthesidesoftheunitand4.0in.(101.6mm)fromtherear.
InCanada,itisrequiredthatthenon‐combustiblefloorprotectorisunderneathandextends2in.(50.8
mm.)oneithersideofanyhorizontalventingrunsAND/ORisdirectlyunderneathanyverticalventing
pipe.
6”
(8”Can)
6”
(8”Can)
4”
(Xmm
Can)
6”
(18”Can)
17
IMPORTANT!READANDFOLLOWALLINSTALLATIONANDMAINTENANCEINSTRUCTIONS,INCLUDINGCLEANINGTHEUNITASSPECIFIED,AND
REPLACINGGASKETSANNUALLY,ANDPARTSASNEEDED.
ENGLAND’SSTOVEWORKSISNOTRESPONSIBLEFORANYDAMAGEORINJURYINCURREDDUETONEGLECT,ORDUETOUNSAFEINSTALLATIONOR
USAGEOFTHISPRODUCT.CALLTECHNICALSUPPORTWITHANYQUESTIONS.
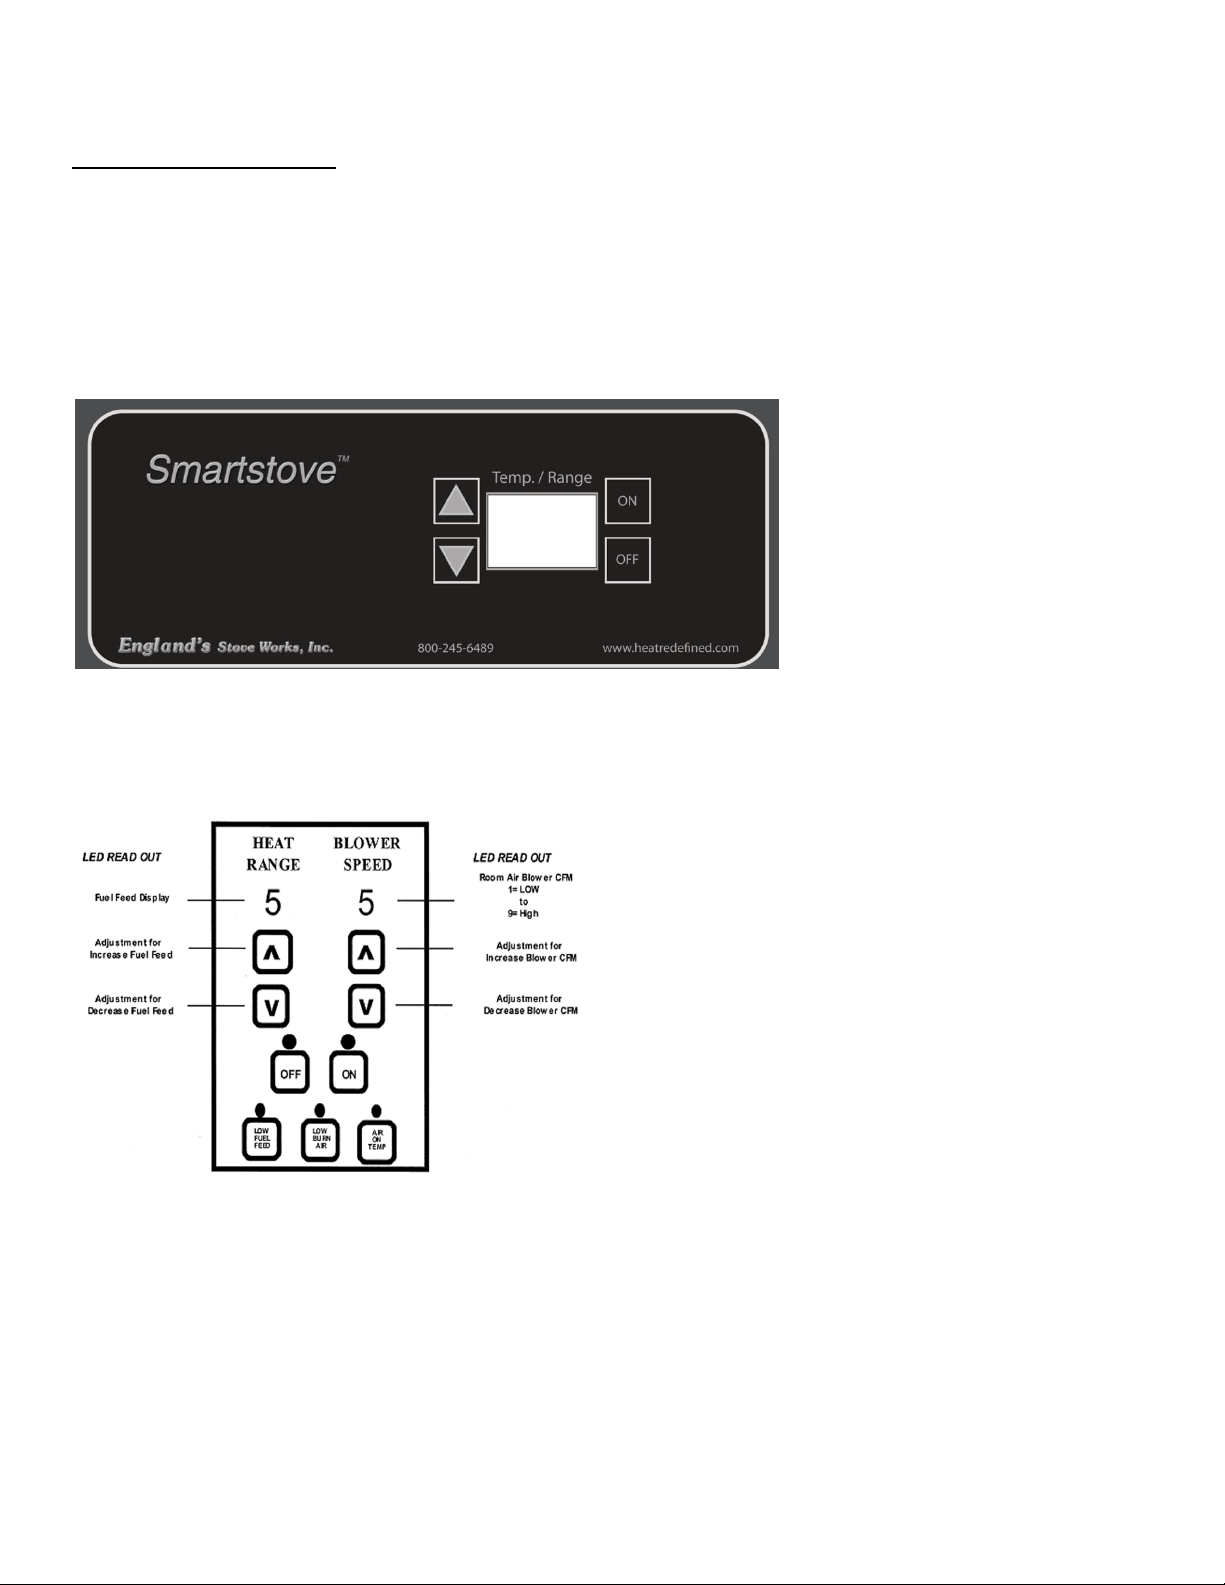
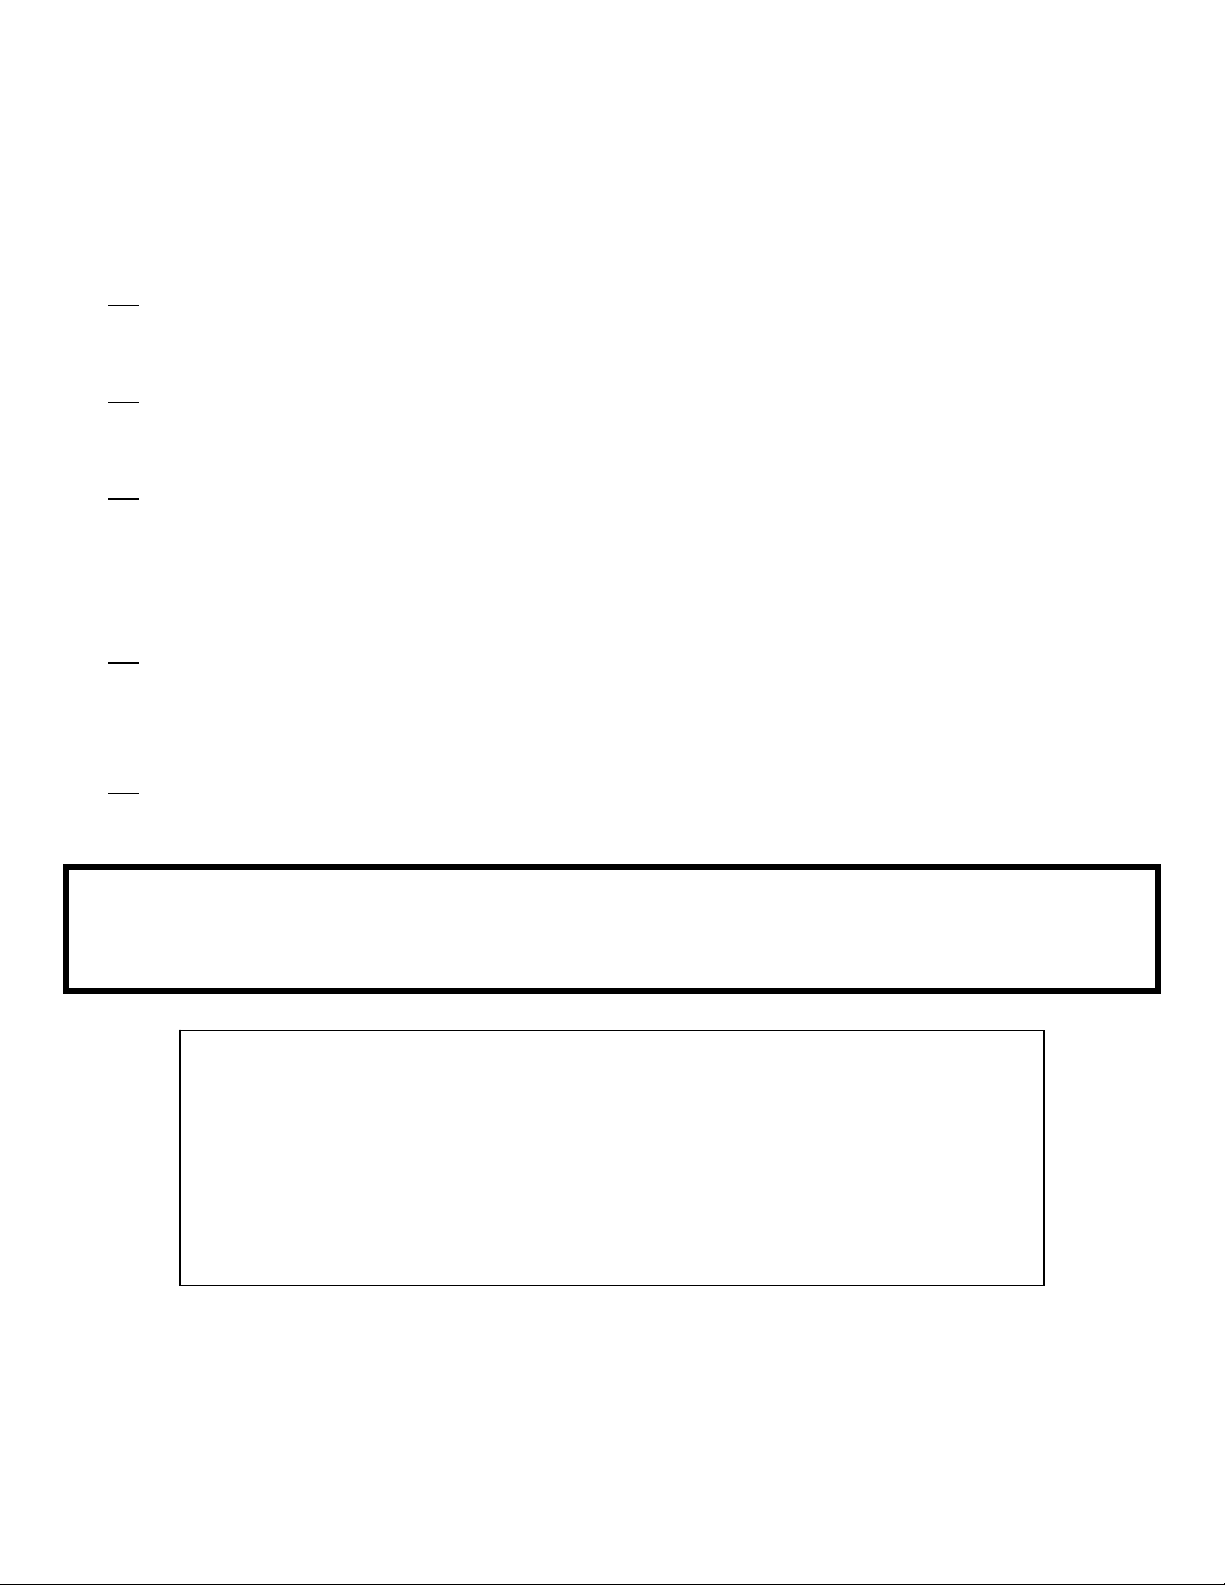
CONTROLBOARDTYPES
ControlBoardTypes
Yourstovemaycomeequippedwithacontrolboardthatismountedonthetopof
thestove,behindthehopper(“TopMount”),oritmaycomeequippedwitha
controlboardthatismountedonthesidewalloftheunit(“SideMount”).
Forreference,aTopMountcontrolboardlookslikethis:
AndasidemountcontrolboardhasseparatewindowsforHeatRangeandBlower
Speed,likethis:
PLEASE NOTE that some instructions in this manual apply to the TOP MOUNT
board,andotherinstructionsapplytotheSIDEMOUNTboard.
Differenceswillbecalledoutsothatyoumayknowwhatinstructionsapplytoyour
particularstove.

18
IMPORTANT!READANDFOLLOWALLINSTALLATIONANDMAINTENANCEINSTRUCTIONS,INCLUDINGCLEANINGTHEUNITASSPECIFIED,AND
REPLACINGGASKETSANNUALLY,ANDPARTSASNEEDED.
ENGLAND’SSTOVEWORKSISNOTRESPONSIBLEFORANYDAMAGEORINJURYINCURREDDUETONEGLECT,ORDUETOUNSAFEINSTALLATIONOR
USAGEOFTHISPRODUCT.CALLTECHNICALSUPPORTWITHANYQUESTIONS.
DAILYOPERATION
GettingStarted
Checktoseethatthehopperiscleanandfreefromforeignmaterials.Besuretoconnectthisunittoaworking
outlet;werecommendusingasurgeprotectortohelpprotecttheelectroniccomponentsfromdamage.
BEFOREyourfirstfire,dryrunyourunit(nopelletfuel
inthehopper)fortwentyminutes;pressingthe“ON”button
withtheunitpluggedinwillinitiatethedryrun.
Whenthe“ON”buttonispressed:
TopMountcontrolboards:theboardwillscrollthemessage“DIDYOUCLEANBURNPOTBEFORE
STARTING?HOLDONTOCONFIRM”.Pressandholdthe“ON”buttonfor3secondstostartthe
unit.
SideMountboards:Afterafewseconds,theletters“SU”willappearinthedisplaywindows.
Oncetheunitstarts,youshouldimmediatelyheartheexhaustblowerstartandoperatecontinuously.The
boardwilldisplaythelastsettingitwassettoforthedurationof
itsoperation,oruntilthesettingis
adjusted.(SideMountcontrolboardswillcontinuetoshow“SU”).
Afteraboutthreetofiveminutes,lookfortheredglowoftheigniterintheigniterportoftheburnpottobe
certainitisoperatingnormally.
Holdthe
hopperlidswitch(See“IllustratedPartsDiagram”atrearofthismanual)downwithyourfingerand
checktoseethattheauge r is turning.Releasethehopperlidswitchandbecertainthattheaugerstops
turning.DONOTPUTYOURFINGERSINTHEHOPPERORNEARTHEROTATING
AUGER.
TopMountboardsPleaseNote:Ifthelidswitchisleftdisengaged(notpresseddown)for60seconds,the
unitwillshutdownwithanerrormessageof“HOPPERLEFTOPEN.SHUTTINGDOWN–ifthishappens,the
unitmustbeallowedtoshutdownandthedry
runwouldthenneedtoberepeatedfromthebeginning.
Notethatthefrontdoormustbeclosedfortheaugertocycle(theboardwillnotgiveavacuumlosserror,
astheboarddoesnotlookforthisuntilproofoffireismet,buttheaugerwill
notcycleifthedoorisopen).
TopMountboards:Afterapproximatelytwentyminutes,thecontrolboardshoulddisplay“FAILEDTOSTART
SHUTTINGDOWN”severaltimes,andthenitwillcontinuetodisplay“FAILEDTOSTART”.Tocleartheerror
messagesimplypressthe“OFF”button.
SideMount
boardswilldisplay“E‐2”inthetwodisplaywindows(moreinformationonErrorCodes
canbefoundintheErrorCodesectionofthismanual).
Atthispoint,thedryruniscompleteandyourpelletheatingapplianceisreadyfornormaloperation.
LightingaFire
Inorderforthisstovetooperate,thehoppermustfirstbefilledwithpelletfuel.Liftthehopperlidandpourthe
pelletfueldirectlyintothehopper.Ofcourse,yourstoveshouldbeconnectedtoyourventingsystematthispoint.
WerecommendusingonlypelletsmanufacturedbyPFICertifiedfacilities,sincepelletsbearingthePFI
stampofapprovalwillbelowinashandmoisture,highinBTU’s,anduniforminsizeandquality.
Thispelletstovewillperformequallywellusingsoftwoodandhardwoodpellets,andalthoughthe
ashmaydiffer
slightlyinappearanceortexture,bothtypesofpelletswillburncleanlyandefficientlyinthisstove.
Thispelletstoveisequippedwithanautomatic pelletignitionsystem.Simplypressthe“ON”button

19
IMPORTANT!READANDFOLLOWALLINSTALLATIONANDMAINTENANCEINSTRUCTIONS,INCLUDINGCLEANINGTHEUNITASSPECIFIED,AND
REPLACINGGASKETSANNUALLY,ANDPARTSASNEEDED.
ENGLAND’SSTOVEWORKSISNOTRESPONSIBLEFORANYDAMAGEORINJURYINCURREDDUETONEGLECT,ORDUETOUNSAFEINSTALLATIONOR
USAGEOFTHISPRODUCT.CALLTECHNICALSUPPORTWITHANYQUESTIONS.
TopMountboards:whenthe“ON”buttonispressed,theboardwillscrollthemessage“DIDYOUCLEAN
BURNPOTBEFORESTARTING?HOLDONTOCONFIRM”.Pressandholdthe“ON”buttonfor3secondsto
starttheunit.
SideMountboards:Shortlyafterpressingthe“ON”button,
theletters“SU”willappearinthedisplay
windowsoftheboard.Thisindicatesthestovehasenteredthestart‐upsequenceandisoperatingnormally.
Afterinitiatingthestart‐upasdescribedabove,themostrecentsettingwillappearinthewindowofthecontrol
board(Side
Mountboardswillcontinuetoshow“SU”).Thisindicatesthestovehasenteredthestart‐upsequence
andisoperatingnormally.
Thefuelfeedrateandcombustionairduringstart‐upisdeterminedbythecon t rolboard, sothestovemaybe
startedonanyheatrange.
Afterapproximatelyfifteenminutes,thefireshouldbeburningbrightly.Atthispoint,thestovehasbegun
normaloperationandthedisplaywindowsonthecontrolboardwilldisplayyoursetting,unlesstheboard
isadjusted.
Itisnormalfortheunittosmokeduringthefirstfire,aspaintsandoilscure.Thisshoulddissipatewithin
thefirsthour.Openadoorand/orwindowduringthefirstfiretoventilatethearea.
DailyOperationNotes
Onlyhighquality,PremiumGrade¼”(.25in.)diameterwoodpelletsshouldbeusedinthisstove.
UsinglowgradewoodpelletswithhighashcontentORwoodpelletswithahighmoisturecontent
cancausetheburnpottofillwithashatamorerapidpaceandcan
causeintervalsbetween
periodicmaintenancetobecomesignificantlyshorter.Pleasereadthe“Maintenance”sectionof
thismanualthoroughlytounderstandhowfuelselectionaffectsstoveoperation,maintenance
andcleaning.
Variationintheflameheightisnormal;notallwoodpelletfuelisuniforminsize,whichcanaffect
the
waypelletsarefedintotheburnpot.Althoughtheflameheightmayincreaseanddecrease
duringoperation,thereisnolossofefficiency.
Alwaysstorewoodpelletfuelinadrylocation;storingwoodpelletfuelinadrylocationensures
thefuelwillremainpelletizedandlowin
moisturecontent.Also,becertainthatallwoodpellet
fuelisstoredatasafedistancefromthepelletheater;storingfuelincloseproximitytothestove
canresultinafire.Donotinstalloroperatethisunitoutside,inagreenhouse,orin anyarea
thatis
highinmoisture.
Thispelletburningroomheaterisequippedwithaspeciallydesignedburnpotwhichcomes
preinstalledfromthefactory.Thisburnpotelevatestheburningpelletsanddeliversairatthe
precisely‐requiredlocations.Pelletsmustonlybeburnedinthefactoryburnpot;nomodifications
should
bemadetothisburnpotandnoadditionalgratesorotherfireelevatorsshouldbeused.

20
IMPORTANT!READANDFOLLOWALLINSTALLATIONANDMAINTENANCEINSTRUCTIONS,INCLUDINGCLEANINGTHEUNITASSPECIFIED,AND
REPLACINGGASKETSANNUALLY,ANDPARTSASNEEDED.
ENGLAND’SSTOVEWORKSISNOTRESPONSIBLEFORANYDAMAGEORINJURYINCURREDDUETONEGLECT,ORDUETOUNSAFEINSTALLATIONOR
USAGEOFTHISPRODUCT.CALLTECHNICALSUPPORTWITHANYQUESTIONS.
TopMountboard:Thecircuitboardisequippedwith“ReminderMessages”whichwillpopupand
scrollonthedisplayatvarioustimes.
ThefollowingapplytotheTopMountboardonly:
Asnotedabove,thecontrolboardwillasktheuseriftheyhavecleanedouttheburnpotpriorto
everystartwith“HOLDONTOCONFIRM”.
“Dailycleaningreminder”‐Aftertheunithasrunfor46consecutivehoursofburntime,theboard
willdisplayareminder
toshuttheunitdownandperformdailycleaningwith“PLEASESHUT
DOWNANDCLEANBURNPOT“.ThisremindercodedoesNOTshuttheunitdown,butWILLscroll
untiltheunitiscompletelyshutdownbytheuser.Controlofthestoveisnotaffectedbythe
scrollingmessage;
theusercanadjustthecontrolboardanditwilldisplaytheadjustmentand
thenrevertbacktothescrollingmessageuntiltheusershutstheunitdown.
“Weeklymaintenancereminder”‐After7daysofcumulativeruntime,thecontrolboardwill
displayascrollingremindermessagetoconfirm
theuserhasperformedtheweeklymaintenance
requiredwith“DIDYOUPERFORMWEEKLYMAINTENANCE?HOLDONBUTTONTOCONFIRM”.
Again,themessagedoesnotaffecttheunit’soperation,andinthiscasecanbeclearedbyholding
the“ON”buttonfor3seconds,atwhichtimetheboardstatuswill
returntoitspreviousstate.
CAUTION
NEVERUSEGASOLINE,GASOLINE‐TYPELANTERNFUEL,KEROSENE,CHARCOALLIGHTERFLUID,OR
SIMILARLIQUIDSTOSTARTOR“FRESHENUP”AFIREINTHISHEATER.KEEPALLSUCHLIQUIDS
WELLAWAYFROMTHEHEATERWHILEINUSE.ADDITIONALLY,NEVERAPPLYFIRE‐STARTERTO
ANYHOTSURFACEOREMBERSINTHESTOVE.DONOTUSECHEMICALSORFLUIDS
TOSTARTTHEFIRE.
DONOTBURNFLAMMABLEFLUIDSSUCHASGASOLINE,NAPHTHAORENGINEOIL.
DONOTBURNGARBAGE;LAWNCLIPPINGSORYARDWASTE;MATERIALSCONTAININGRUBBER,
INCLUDINGTIRES;MATERIALSCONTAININGPLASTIC;WASTEPETROLEUMPRODUCTS,PAINTOR
PAINTTHINNERS,ORASPHALTPRODUCTS;MATERIALSCONTAININGASBESTOS;CONSTRUCTION
ORDEMOLITIONDEBRIS;RAILROADTIESORPRESSURE‐TREATEDWOOD;MANUREORANIMAL
REMAINS;PAPERPRODUCTS,CARDBOARD,PLYWOODORPARTICLEBOARD.THEPROHIBITION
AGAINSTBURNINGTHESEMATERIALSDOESNOTPROHIBITTHEUSEOFFIRESTARTERSMADEFROM
PAPER,CARDBOARD,SAWDUST,WAXANDSIMILARSUBSTANCESFORTHEPURPOSEOFSTARTING
AFIREINANAFFECTEDWOODHEATER.BURNINGTHESEMATERIALSMAYRESULTINRELEASEOF
TOXICFUMESORRENDERTHEHEATERINEFFECTIVEANDCAUSESMOKE.

21
IMPORTANT!READANDFOLLOWALLINSTALLATIONANDMAINTENANCEINSTRUCTIONS,INCLUDINGCLEANINGTHEUNITASSPECIFIED,AND
REPLACINGGASKETSANNUALLY,ANDPARTSASNEEDED.
ENGLAND’SSTOVEWORKSISNOTRESPONSIBLEFORANYDAMAGEORINJURYINCURREDDUETONEGLECT,ORDUETOUNSAFEINSTALLATIONOR
USAGEOFTHISPRODUCT.CALLTECHNICALSUPPORTWITHANYQUESTIONS.
CONTROLBOARDSETTINGS–TOPMOUNTBOARD
PleaseNote:ThefollowingsectiongivesinstructionsforstovemodelswiththeTop
Mountcontrolboard(wherethecontrolboardismountedonthetopofthestove,
behindthehopper).
Pleaseseethesectionofthemanual“ControlBoardSettings–SideMountBoard”
forinstructionspertainingtostoveswith
aSideMountcontrolboard.
Manual/AutomaticMode
AutomaticMode
Your stove will arrive from the factory programmed in automatic mode. First, make sure the thermocouple
wireisrestinglooselyoutsidethebackofthestove(sothatitisreadingtheairtemperature)inasafelocation
whereitcan’tbedamaged.Itshouldnotrestdirectlyonthefloor,oritwillpickupthefloortemperature.The
thermocouple wire is the “room temperature heat sensor” whereby the control board will read the room
temperature.
Inthismode,afterinitiatingthestartupsequence,youselectthedesiredroomtemperature(rangingfrom60
to 90 degreesF) bypressing the Up orDown arrows, andthe stove will operatethe auger feed and blower
speedaccordingtothetemperatureyouhaveselected.
Thestovewillheattowhichevertemperatureyousetthestoveatuntilthecallforheatleaves,atwhichpoint
thestovewilladjustitselfhigherorlowerasneeded,dependingontheroomtemperaturereadingssupplied
bytheroomheatsensor.
Toturnthestoveoffcompletely,presstheOFFbuttononthecontrolboard.
ManualMode
Yourstovecanbechangedtoruninmanualmode,ifdesired.Inmanualmode,afterpressingtheONbutton,
the stove will run continuously, based on desired heat range and blower speed settings. The heat range
settingswillbe1through9(theUparrowwillincreasetheheatrangeandtheDownarrowwilldecreasethe
heatrange),with1beingthelowestaugerfeedsettingand9beingthehighest.Theblowerspeedrangewill
matchtheheatrangethatyouhaveset.
Since the stove runs continuously at the selectedheat rangein this mode, itis generally recommended for
stovesinstalledinless‐insulatedareasofthehomeandextremelycoldclimateregions.
Toturnthestoveoffcompletely,presstheOFFbuttononthecontrolboard.

22
IMPORTANT!READANDFOLLOWALLINSTALLATIONANDMAINTENANCEINSTRUCTIONS,INCLUDINGCLEANINGTHEUNITASSPECIFIED,AND
REPLACINGGASKETSANNUALLY,ANDPARTSASNEEDED.
ENGLAND’SSTOVEWORKSISNOTRESPONSIBLEFORANYDAMAGEORINJURYINCURREDDUETONEGLECT,ORDUETOUNSAFEINSTALLATIONOR
USAGEOFTHISPRODUCT.CALLTECHNICALSUPPORTWITHANYQUESTIONS.
SettingStoveinManualMode
o TosetthestoveinManualMode:Withthestovepluggedinpressthedownarrowandtheup
arrowbuttonsimultaneously.ThiswilltoggleyourstovetoManualMode.
o WhileinManualMode,thestoveboardwilldisplayM1(thelowestsetting)andcanbe
adjustedwiththe
upanddownarrows.
SettingStoveinAutomaticMode
o Tosetthestovebackintoautomaticmode,pressthedownarrowandtheuparrowbutton
simultaneously.ThiswilltogglethestovetoAutomaticMode.
o WhileinAutomaticMode,thestoveboardwilldisplaytheSetTemperature.
o Thecontrolboardonthisstoveallowstheuserto
adjusttheheatoutputandconvection
blowerspeed,turntheunitonandoff,andtestcomponentsforfunction(moreondiagnostic
modelater).
CAUTION
Thisunitismeanttooperateonlywithdoorclosed.Smokespillageandaninefficient,lazy
burnwillresultfromattemptingtooperatethestovewiththedooropen.
Inaddition,usingfuelotherthanwoodpelletscancreateanunsafesituationandcanalso
generateexcesscarbonmonoxide.Carbonmonoxideisanodorless,colorlessgaswhichcan
bedeadly.Besuretoburnonlywoodpellets.
Theuseofacarbonmonoxidedetectorisstronglyrecommended.

23
IMPORTANT!READANDFOLLOWALLINSTALLATIONANDMAINTENANCEINSTRUCTIONS,INCLUDINGCLEANINGTHEUNITASSPECIFIED,AND
REPLACINGGASKETSANNUALLY,ANDPARTSASNEEDED.
ENGLAND’SSTOVEWORKSISNOTRESPONSIBLEFORANYDAMAGEORINJURYINCURREDDUETONEGLECT,ORDUETOUNSAFEINSTALLATIONOR
USAGEOFTHISPRODUCT.CALLTECHNICALSUPPORTWITHANYQUESTIONS.
ERRORCODES–TopMountControlBoard
Errormessageswillappearandscrollacrossthedisplayofthecontrolboardiftheunitexperiencesan
abnormalcondition.Whentheseerrorsoccur,theunitwillproceedtoashutdowncycle,duringwhich
timethecontrolboardwillnotpermittheunittoberestarted.Attheendofthe
shutdowncycle,the
controlboardwillallowthecodetobeclearedand/ortheunittoberestarted.Intheeventanerror
messageappears,however,itisrecommendedtorefertothetroubleshootingsectionofthemanual
(orcallTech.Supportifneeded),todetermineandcorrecttheunderlying
causeofthemessage’s
appearance.
NOTE:SeenextsectionforinformationonTroubleshootingtheErrorCodes
Failedtostart
Iftheunitdoesnotreachitsminimumoperating(or“ProofofFire”)temperaturebythe
endoftheallottedstartuptime,thecontrolboarddisplaywillscroll“FAILEDTOSTART
SHUTTINGDOWN”,atwhichtimetheunitwillinitiateashutdowncycle.Themessagewill
continuetoscrollduring
thistimeuntiltheunitshutscompletelyoff.Duringthistime,the
stovecannotberestarted;ifthe“ON”buttonispressedduringthisshutdown,theunitwill
scroll“STOVEMUSTSHUTDOWNTOCLEARERROR”once,beforerevertingtotheprevious
message.
Oncetheunithasshutdown
completely,thedisplaywillcontinuetoscroll“FAILEDTO
START”.Atthispointthestovecanberestartedinitsnormalsequencebypressingthe
“ON”button,orthecodecanbeclearedbypressingthe“OFF”button.
FailedonOverTemp
If,atanytimewhiletheunitisinoperationandthefireboxsensorreadstoohighofa
temperature,theunitwilldisplaythefollowingmessage:“FAILEDONOVERTEMP
SHUTTINGDOWN”.Theunitwilltheninitiateashutdowncycle,andthemessagewill
continuetoscrollduringthis
timeuntiltheunitshutscompletelyoff.Duringthisshutdown,
thestovecannotberestarted;ifthe“ON”buttonispressedduringshutdowntheunitwill
scroll“STOVEMUSTSHUTDOWNTOCLEARERROR”once,beforerevertingtotheprevious
message.
Oncetheunithasshutdowncompletely,the
displaywillscroll“FAILEDONOVERTEMP”.At
thispointthestovecanberestartedinitsnormalsequencebypressingthe“ON”button,or
thecodecanbeclearedbypressingthe“OFF”button.
VacuumLoss
Thisunitisequippedwithavacuumactuated“DoorAjar”safetyswitch.Ifthisswitchis
sensedasbeingopenforaperiodof30continuousseconds,thecontrolboardwillscroll

24
IMPORTANT!READANDFOLLOWALLINSTALLATIONANDMAINTENANCEINSTRUCTIONS,INCLUDINGCLEANINGTHEUNITASSPECIFIED,AND
REPLACINGGASKETSANNUALLY,ANDPARTSASNEEDED.
ENGLAND’SSTOVEWORKSISNOTRESPONSIBLEFORANYDAMAGEORINJURYINCURREDDUETONEGLECT,ORDUETOUNSAFEINSTALLATIONOR
USAGEOFTHISPRODUCT.CALLTECHNICALSUPPORTWITHANYQUESTIONS.
“FAILEDONVACUUMLOSSSHUTTINGDOWN”.Theunitwilltheninitiateashutdowncycle,
andthemessagewillcontinuetoscrollduringthistimeuntiltheunitshutscompletelyoff.
Duringthisshutdown,thestovecannotberestarted;ifthe“ON”buttonispressedduring
shutdowntheunitwillscroll“STOVE
MUSTSHUTDOWNTOCLEARERROR”once,before
revertingtothepreviousmessage.
Oncetheunithasshutdowncompletelythecontrolboardwillscroll“FAILEDONVACUUM
LOSS”.Atthispointthestovecanberestartedinitsnormalsequencebypressingthe“ON”
button,orthecode
canbeclearedbypressingthe“OFF”button.
HopperLeftOpen
Thisunitisalsoequippedwithahopperlidsafetyswitchthatisactuatedbyatabwhichis
partofthehopperlid.Theswitchisarequiredsafetydevice,whichpreventstheauger
fromcyclingwhenthelidisopen. Anerrormessageistriggeredifthelid
isleftopenfor60
continuousseconds‐ifthisoccurs,thecontrolboardwillscroll“HOPPERLEFTOPEN
SHUTTINGDOWN”.Theunitwilltheninitiateashutdowncycle,andthemessagewill
continuetoscrollduringthistimeuntiltheunitshutscompletelyoff.Duringthisshutdown,
thestovecannot
berestarted;ifthe“ON”buttonispressedduringshutdowntheunitwill
scroll“STOVEMUSTSHUTDOWNTOCLEARERROR”once,beforerevertingtotheprevious
message.
Oncetheunithasshutdowncompletelythecontrolboardwillscroll“HOPPERLEFTOPEN”.
Atthispointthestovecanberestartedinitsnormalsequencebypressingthe“ON”button,
orthecodecanbeclearedbypressingthe“OFF”button.
Ifanerrorcodecontinuestodisplay,iftheerrorcodeseemsunexplainable,orifyouhave
anyotherquestionsabouterrorcodesandwhattheymean,pleasecontactTechnical
Supportat(800)245‐6489.

25
IMPORTANT!READANDFOLLOWALLINSTALLATIONANDMAINTENANCEINSTRUCTIONS,INCLUDINGCLEANINGTHEUNITASSPECIFIED,AND
REPLACINGGASKETSANNUALLY,ANDPARTSASNEEDED.
ENGLAND’SSTOVEWORKSISNOTRESPONSIBLEFORANYDAMAGEORINJURYINCURREDDUETONEGLECT,ORDUETOUNSAFEINSTALLATIONOR
USAGEOFTHISPRODUCT.CALLTECHNICALSUPPORTWITHANYQUESTIONS.
ERRORMESSAGETROUBLESHOOTING–TopMountBoard
NOTE:Insomecasesitwillberecommendedthatyourun“DiagnosticMode”whileTroubleshooting.
SeethesectionimmediatelyfollowingthissectionforinformationonrunningtheDiagnosticModeforyour
stove.
Failedtostart
Eachtimetheunitispoweredupitshouldbeclean;theburnpotshouldbeempty;fuelshouldbealready
loadedintothehopperandboththeloadingdoor(hopperlid)andthefrontdoormustbeclosed.When
poweredup,theunitwillstartthedraft(exhaust)blowerandbegindeliveringfuelthroughthefeedsystem.
Theigniterwillbegintoheatup,aswell.Oncethefuelhasreachedtheleveloftheigniterholeintheburn
pot,theheatfromtheignitershouldquicklybeginignitingthefuel.Oncelitandburning,theunitwillcontinue
inthisstateuntilthefireboxheatsensorrecognizes“proofoffire,”atwhichpointtheunitshouldexitthe
startupsequenceandbeginheatingatthesettingthatwaschosenbytheuser.Iftheunitdoesnotreachthe
operating“proofoffire”temperature,aFailedtostarterrorwillappear.
Potentialcauses:
Draft(exhaust)blowernotrunning‐ifthedraftblowerisstuck,defectiveorpluggedupandisunable
torun,theunitwillnotfeed.Theairflowgeneratedbythedraftbloweractivatesavacuumswitchthat
tellsthecontrolboardthefrontdoorisclosedandthedraftblowerispullingsufficientairthroughthe
burnpottosupportthefire.
o Solution:Cleanthestoveandfluesystem.Cleanoutthedraftblowerandchecktoensurethe
impellorrotatesfreely.Checkwireconnectionsattheblower;testindiagnosticmode.Ifthe
draftblowerstilldoesnotrun,replacethedraft(exhaust)blower.
Draft(exhaust)blowerrunningbutnofuelbeingfed(augernotturning)‐Thiswouldindicateoneof
thefollowingissues:Cloggedaugerordefectiveaugermotor;Vacuumswitchcircuitopen;Improper
ventingmethod;Hopperlidswitchcircuitopen.
o Cloggedaugerordefectiveaugermotor‐clearhopperandfeedsystem.Checkfor“play”in
auger.Testindiagnosticmode.
o Defectiveaugermotor‐ifaugerisclearbutwillnotrunindiagnosticmode,replacetheauger
motor.
o Vacuumswitchopencircuit‐ensurethedoorclosestightly.Next,inspectthevacuumport(in
therightrearwallofburnchambertotherightoftheburnpotcradle)forblockage.Toclean
thisvacuumport,insertatoothpickorsimilarimplementintothemouthoftheportand
(gently)swirlitaroundwhileslidingitbackouttoreamouttheopening.Thisportshouldnot
bevacuumedoutaggressively(i.e.withanytypeofvacuum),asitcoulddamagetheswitch.
Next,cleantheheatexchangeareasandfluesystem.Testindiagnosticmode;ifthecircuitstill
shows‘open,’checkthewireconnectionsbothattheswitchandthecontrolboard.Testagain
indiagnosticmode;ifstillopenreplacevacuumswitch.

26
IMPORTANT!READANDFOLLOWALLINSTALLATIONANDMAINTENANCEINSTRUCTIONS,INCLUDINGCLEANINGTHEUNITASSPECIFIED,AND
REPLACINGGASKETSANNUALLY,ANDPARTSASNEEDED.
ENGLAND’SSTOVEWORKSISNOTRESPONSIBLEFORANYDAMAGEORINJURYINCURREDDUETONEGLECT,ORDUETOUNSAFEINSTALLATIONOR
USAGEOFTHISPRODUCT.CALLTECHNICALSUPPORTWITHANYQUESTIONS.
o Improperventingmethod‐asstatedabove,oneofthekeyrequirementsforproperoperation
isproperairflowthroughtheentiresystem.Ventingsystemswithexcessiveelbowsand/or
longhorizontalrunscanrestricttheflowofairtothepointthatthevacuumswitchmaynot
receiveenoughpressuretoholditclosed.Thiswouldpreventfeed,asthecontrolboardwould
assumethefrontdoorisopen.Adirtyfluesystemcanrestrictairflowinthesamemanner,even
ifinstalledcorrectly.Refertotheinstallationguidetodetermineiftheinstallationiswithin
specifications.
o Hopperlidswitchcircuitopen‐ensurethehopperlidisclosingenoughtoengagetheswitch.
Testindiagnosticmode.Ensuretheswitchcanbepushedmanuallywithhopperopen.Check
wiresatswitchandcontrolboard;testagainindiagnosticmode.Ifthecircuitstillshows
‘open,’replacethehopperlidswitch.
Feedsbutdoesn’tlight‐Testigniterindiagnosticmode;removetheburnpotforobservation.After
energizingtheignitorcircuit,allowapproximately4minutesforthecartridgetofullyheatupand
observetheignitersleeve.Checkwiresatigniter.Replaceigniter.
Stovelightsbutstillhaserror‐Testfireboxsensorindiagnosticmode.Checkconnectionatcontrol
board.Verifymountingscrewforsensoronexhaustcoupleristight.Replacefireboxheatsensor.
OverTemp
Anovertemperrormessagewillappearwhenthefireboxheatsensorreadstoohighofatemperature.The
unitcanproducealargeamountofheat,whichisconvectedoutintotheroombyaconvection(roomair)
blowerthatrunsataratedeterminedbythecontrolboard.Ifthestoveisunabletoshedthegeneratedheat,
theunititselfwillretainahigherpercentageofthisheatandeventuallywillshutdown.
Potentialcauses:
Roomairblowernotrunningordirty‐testindiagnosticmode.Iftheblowerdoesnotrun,removerear
panelandverifythattheblowerfanrotatesfreely.Cleanoutthefan.Checkwireconnections.Replace
roomairblower.
Excessiveashbuilduporimproperventing‐removebaffleandcleantheheatexchangebehindthe
baffle.
Improperventingmethod/Cleanfluesystem‐asstatedabove,oneofthekeyrequirementsfor
properoperationisproperairflowthroughthesystem.Ventingsystemswithexcessiveelbowsand/or
longhorizontalrunscanrestricttheflowofair,causingabuildupoffuelintheburnpotandhigher
exhausttemperatures.Also,adirtyventsystemdoesnotallowasmuchheattransfer,causing
excessiveheattobewastedthroughtheexhaust,wherethefireboxheatsensorislocated.
Confinedspace‐Iftheunitisinstalledinasmallroomoralcovewhichdoesnotallowproper
circulationofheat,theunititselfcouldsimplygettoohot.Refertotheinstallationguidetodetermine
iftheinstallationiswithinspecifications.

27
IMPORTANT!READANDFOLLOWALLINSTALLATIONANDMAINTENANCEINSTRUCTIONS,INCLUDINGCLEANINGTHEUNITASSPECIFIED,AND
REPLACINGGASKETSANNUALLY,ANDPARTSASNEEDED.
ENGLAND’SSTOVEWORKSISNOTRESPONSIBLEFORANYDAMAGEORINJURYINCURREDDUETONEGLECT,ORDUETOUNSAFEINSTALLATIONOR
USAGEOFTHISPRODUCT.CALLTECHNICALSUPPORTWITHANYQUESTIONS.
Burningimproperfuels‐thisunitisdesignedandapprovedtoburnonlypremiumgradewoodpellets.
Burningotherfuelssuchascherrypits,shelledcorn,orpea/ricecoalisnotonlyprohibited,the
practicecanleadtosignificantdamagedonetotheunitinarelativelyshorttime.
Defectivefireboxsensor‐testindiagnosticmode;thedisplayshouldread“firebox87F”(orhigher).If
thesensor’stemperatureisbelow87F,itwilldisplay“FIRESENSORUNPLUGGEDORCOLD”.Usea
lightertoheatupthefireboxsensorbrieflyandobservethedisplayforachangeinthesensor’s
reading.Ifthereadingdoesnotchange,or‐inthecaseofanovertemperrorisreadinganextremely
highnumberwhenthesensorisobviouslycold‐replacethesensor.
Vacuumloss:
Whenthestoveisrunning,avacuumsensorismonitoringtheamountofairflowthroughtheburnchamber.Thisdevice
willstopfeedifthisflowisinterrupted,andresumefeedingwhentheflowisreestablished.Iftheairflowisinterrupted
formorethan30seconds,theunitwillshutdown
withavacuumlosserror.
Potentialcauses:
Frontdooropen/gasketleaking‐thefrontdoormustremainclosedtoallowpressuretoberegistered
bythevacuumswitch.Also,thegasketthatsealsthedoorshouldmakearelativelyairtightsealtothe
faceoftheunit.Inspectthissealusinga“dollarbilltest”:Withthestoveoffandcool,foldadollarbill
inhalflong‐waysandinsertitbetweentheopendoorandthestoveface,thencloseandlatchthe
door.Pullonthedollarbillandnotethereshouldberesistancetothebill,causedbybeingpinched
betweenthegasketandthestoveface.Repeatthisprocessinseveralplacesaroundthedoor.Ifthebill
willslipoutwithnoresistance,thegasketshouldbereplaced.
Draft(exhaust)blowernotrunning‐ifthedraftblowerisstuck,defectiveorpluggedupandisunable
torun,theunitwillnotfeed.Theairflowgeneratedbythedraftbloweractivatesavacuumswitchthat
tellsthecontrolboardthefrontdoorisclosedandthedraftblowerispullingsufficientairthroughthe
burnpottosupportthefire.
o Solution:Cleanthestoveandfluesystem.Cleanoutthedraftblowerandchecktoensurethe
impellorrotatesfreely.Checkwireconnectionsattheblower;testindiagnosticmode.Ifthe
draftblowerstilldoesnotrun,replacethedraft(exhaust)blower.
Improperventingmethod‐asstatedabove,oneofthekeyrequirementsforproperoperationis
properairflowthroughthesystem.Ventingsystemswithexcessiveelbowsand/orlonghorizontalruns
canrestricttheflowofairtothepointthatthevacuumswitchmaynotreceiveenoughpressureto
holditclosed.Thiswouldpreventfeed,asthecontrolboardwouldassumethefrontdoorisopen.
Refertotheinstallationguidetodetermineiftheinstallationiswithinspecifications.
Blockedflue/excessiveashbuildupinstove‐forairflowtobesufficienttosupplyenoughpressureto
thevacuumswitch,theflueandthestoveitselfmustbeclearofblockageorexcessivebuildup.This
situationcanreducetheamountofairflowtotheextentthatitcausesthevacuumswitchtoopen.
Propercleaningofboththefluesystemandthestovemustbeperformedonscheduletoensurethe
requiredairflowcanbemaintained.

28
IMPORTANT!READANDFOLLOWALLINSTALLATIONANDMAINTENANCEINSTRUCTIONS,INCLUDINGCLEANINGTHEUNITASSPECIFIED,AND
REPLACINGGASKETSANNUALLY,ANDPARTSASNEEDED.
ENGLAND’SSTOVEWORKSISNOTRESPONSIBLEFORANYDAMAGEORINJURYINCURREDDUETONEGLECT,ORDUETOUNSAFEINSTALLATIONOR
USAGEOFTHISPRODUCT.CALLTECHNICALSUPPORTWITHANYQUESTIONS.
Pluggedvacuumport‐thevacuumpressurethatisreadbytheswitchispulledatasmallportlocated
inthebackwalloftheburnchamber,totherightoftheburnpotcradle.Thisportcanbecome
restrictedorblockedbyashbuildupinthemouthofthe
port,causingtheswitchtoeitheropen,ornot
closefully,whilethestoveisrunning.Toclearthisportinsertatoothpickorsimilarimplementintothe
mouthoftheportand(gently)swirlitaroundwhileslidingitbackouttoreamouttheopening.This
portshouldnotbevacuumedoutaggressively(i.e.withanytypeofvacuum)asitcoulddamagethe
switch.
Defectivevacuumswitch‐rarelydoesthisswitchfail,soalloftheaboveissuesshouldberuledout
beforereplacingthisswitch.Theswitchcanbetestedindiagnosticmode.
Hopperleftopen:
Thisunithasasafetyswitchinsidethehopperthatpreventstheaugerfromrunningwhenthehopperlidisopen.Ifthe
lidisleftopenformorethan60seconds,theunitwillshutdownwiththiserror.
Potentialcauses:
Ensurethehopperlidisclosingenoughtoengagetheswitch.Testindiagnosticmode;theswitchcan
bepushedmanuallywiththehopperopen.Checkthewiresattheswitchandcontrolboard.Test
againindiagnostic;ifthecircuitstillshowsopen,replacethehopperlidswitch.

29
IMPORTANT!READANDFOLLOWALLINSTALLATIONANDMAINTENANCEINSTRUCTIONS,INCLUDINGCLEANINGTHEUNITASSPECIFIED,AND
REPLACINGGASKETSANNUALLY,ANDPARTSASNEEDED.
ENGLAND’SSTOVEWORKSISNOTRESPONSIBLEFORANYDAMAGEORINJURYINCURREDDUETONEGLECT,ORDUETOUNSAFEINSTALLATIONOR
USAGEOFTHISPRODUCT.CALLTECHNICALSUPPORTWITHANYQUESTIONS.
DiagnosticModeforTopMountControlBoard
ToenterDiagnosticMode,theunitmustbeoffandcompletelyshutdown.
PresstheUP,DOWNandONbuttonssimultaneously,andrelease.
Theunitwillscroll“DIAGNOSTICMODE”followedby“REV3.4”,forexample(orwhateverrevisionis
presentontheboardatthetime).
PresstheONbutton.
o TheboardwillflashtheLED’softhedisplay.ThisistotestthatallLED’sarefunctional.
PresstheONbutton.
o Theboardwillscroll“AUGEROFF”atthispoint.Totesttheaugermotor,presstheUParrow.
Theboardwillthenscroll“AUGERON”andtheaugermotorshouldruncontinuously.Tostop
theauger,presstheDOWNarrow,andtheboardwillreverttoscrolling“AUGEROFF”andthe
motorwillstop.(Itisrecommendedtheburnpotbeinstalledduringthisportionofthetestto
preventpelletsfromdroppingintothecradlebelowtheburnpot).
PresstheONbutton.
o Theboardwillscroll“DRAFTOFF”atthispoint.Totestthedraft(exhaust)blower,presstheUP
arrow.Theboardwillthenscroll”DRAFTON”andthedraftblowerwillrunatitshighestoutput.
Tostopthedraftblower,presstheDOWNarrow,andtheboardwillreverttoscrolling“DRAFT
OFF”andtheblowerwillstop.
o NOTE:thedraftblowermustberunningtotestthevacuumcircuitlaterinthetest,so,toleave
itrunning,simplyleavetheboardinthe“DRAFTON”configuration.DonotpresstheDOWN
arrow;insteadpressONbuttontoskiptothenextstepleavingthedraftblowerrunning.
HavingpressedtheONbutton:
o Theboardwillscroll“ROOMAIROFF”atthispoint.Totesttheroomair(convection)blower,
presstheUParrow.Theboardwillscroll“ROOMAIRON”andtheroomairblowerwillstart
runningatitshighestoutput.Tostoptheroomairblower,presstheDOWNarrow,andthe
boardwillreverttoscrolling“ROOMAIROFF”andtheblowerwillstop.
PresstheONbutton.
o Theboardwillscroll“IGNITEROFF”.Totesttheigniter,presstheUParrow.Theboardwillthen
scroll“IGNITERON”andtheignitorwillenergizeandbegintoheatup.After3to4minutes,the
ignitershouldbeatitsfulltemperatureandtheglowfromitshouldbevisibleinthemouthof
theignitortube(itisrecommendedthattheburnpotberemovedduringthispartofthetest
(USECAUTIONANDNECESSARYPROTECTIVEGLOVES,GEAR,ETC.),especiallyiftheburnpot
hasfuelinitfromtestingtheauger.Also,thedraftblowerisrunningtopullairthroughthe
ignitorsleeveifallstepsabovewerefollowed).Topowerdowntheigniter,presstheDOWN
arrow.Theboardwillreverttoscrolling“IGNITEROFF”andtheignitorwillpowerdown.
PresstheONbutton.

30
IMPORTANT!READANDFOLLOWALLINSTALLATIONANDMAINTENANCEINSTRUCTIONS,INCLUDINGCLEANINGTHEUNITASSPECIFIED,AND
REPLACINGGASKETSANNUALLY,ANDPARTSASNEEDED.
ENGLAND’SSTOVEWORKSISNOTRESPONSIBLEFORANYDAMAGEORINJURYINCURREDDUETONEGLECT,ORDUETOUNSAFEINSTALLATIONOR
USAGEOFTHISPRODUCT.CALLTECHNICALSUPPORTWITHANYQUESTIONS.
o Theboardwillscroll“FIRE087F”,orwhatevertemperaturethefireboxsensorisreadingatthis
point.Theheatsensorcanbetestedusingalighter(orotherheatproducingdevice)towarm
thesensor,andasthesensoriswarmedthedisplaywilladjusttodisplaythetemperatureat
thesensorasitchanges.Ifthefireboxsensorisdisconnectedorreadingbelowitsscale,the
boardwillscroll“FIRESENSORUNPLUGGEDORCOLD”.
PresstheONbutton.
o Theboardwillscroll“ROOM67F”,orwhatevertemperaturetheroomsensorisreadingatthis
point.Theroom
sensorcanbetestedbysimplyholdingthebulbattheendofthewireinyour
hand,allowingbodyheattowarmit.Asthebulbwarmsup,thescrollingdisplaywillindicatea
highertemperaturenumber.Iftheroomtemp.sensorisunpluggedordefective,thedisplay
willscroll“CONNECTROOMTEMPSENSOR”.
PresstheONbutton.
o Theboardwillscroll“H1”or“H0”,“T1”,“V1”or“V0”,dependingonthepositionofthehopper
lidandfrontdoor.
o The“H”indicatesthestatusofthehopperlidswitch,with“H1”meaningthelidisclosedand
“H0”meaningthelidisopen.
o The“T1”shouldalwaysreadassuch,sincethatcircuitisjumpedclosedandisnotusedonthis
model.
o The“V”indicatesthestatusofthevacuumswitch,with“V1”meaningthedoorisclosedand
“V0”meaningthedoorisopen.
o (NOTE:thedraft(exhaust)blowermustberunningtotestthiscircuit).
o Toproperlyperformthisportionofthediagnostic,readthecodesastheyscrollwithboththe
frontdoorandhopperlidclosed.Then,openeach,andnotethescrollingreadouttoseeifthe
boardreflectstheproperstatusofeachswitch.
TocycletheboardbacktothebeginningofthediagnosticmodepresstheONbutton;thisallowsthe
usertocyclebackaroundtoturnthedraftbloweroffortore‐runthetest,ifdesired.
ToexitthetestsimplypresstheOFFbutton.ExitingthetestcanbedonebypressingOFFatanypoint
duringthetest.Theuserdoesnotneedtocycletotheendtoexit,butitisrecommendedtocycle
throughandensureeachcomponenttestissettothe“OFF”statusbeforeexitingthediagnosticmode.
PleaseNote:ThefollowingsectiongivesinstructionsforstovemodelswiththeSide
Mountcontrolboard(wherethecontrolboardismountedonthesidewallofthe
stove).
Pleaseseethesectionofthemanual“ControlBoardSettings–TopMountBoard”
forinstructionspertainingtostoveswithaTopMountcontrolboard.

31
IMPORTANT!READANDFOLLOWALLINSTALLATIONANDMAINTENANCEINSTRUCTIONS,INCLUDINGCLEANINGTHEUNITASSPECIFIED,AND
REPLACINGGASKETSANNUALLY,ANDPARTSASNEEDED.
ENGLAND’SSTOVEWORKSISNOTRESPONSIBLEFORANYDAMAGEORINJURYINCURREDDUETONEGLECT,ORDUETOUNSAFEINSTALLATIONOR
USAGEOFTHISPRODUCT.CALLTECHNICALSUPPORTWITHANYQUESTIONS.
CONTROLBOARDSETTINGS–SIDEMOUNTCONTROLBOARD
Thecontrolboardonthisstoveallowstheusertoadjusttheheatoutputandconvectionblowerspeed,turn
theunitonandoff,andtestcomponentsforfunction(moreondiagnosticmodelater).
Thelowerbuttonsonthecontrolboard(LowFuelFeed,LowBurnAir,andAironTemp)arenotmeantto
beadjustedduringnormaloperationoftheunit.Thesebuttonsarefactorypresetandshouldnotbe
adjustedbytheuser.
Toenergizetheunitandinitiateafire,pressthe“On”button.TheLEDabovethebuttonshouldturngreen
andthecontrolboardshoulddisplay“SU”shortlyafterpressingthebutton.
Toshuttheunitdown,pressthe“Off”button.TheLEDabovethebuttonshouldturnredandtheboard
shoulddisplay“Sd”shortlyafterpressingthebutton.Thisinitiatestheshutdownsequence,andthe
stovewillremaininshutdownmodeuntilithascooleddown.
Toincreasetheheatoutputofthestove,pressthe“Up”heatrangebutton.Thenumberintheheatrange
displaywindowwillincrease,signifyingthatthecontrolboardisnowadjustingtheheatoutputtoyour
desiredlevel.Theblowerspeedwillincreasethesameamountastheheatrange,becausethestoveis
designedtooperatewiththeblowerspeedgreaterthanorequaltotheheatrange.Pressingthe“Down”
arrowwilldecreasetheheatrangeandblowerspeed.
Toincreasetheblowerspeedwithoutincreasingtheheatrange,presstheBlowerSpeed“Up”arrowuntil
thedesiredblowerspeedisshowninthedisplaywindow.Pressingthe“Down”arrowwilldecreasethe
blowerspeed;however,thecontrolboardwillnotallowtheblowerspeedtobesetlowerthantheheat
range.
Caution
Thisunitismeanttooperateonlywiththemainviewingdoorclosed.Smokespillageandan
inefficient,lazyburnwillresultfromattemptingtooperatethestovewiththedooropen.
Inaddition,usingfuelotherthanwoodpelletscancreateanunsafesituationandcanalso
generateexcesscarbonmonoxide.Carbonmonoxideisanodorless,colorlessgaswhichcan
bedeadly.Besuretoburnonlywoodpellets.
Theuseofacarbonmonoxidedetectorisstronglyrecommended.
32
IMPORTANT!READANDFOLLOWALLINSTALLATIONANDMAINTENANCEINSTRUCTIONS,INCLUDINGCLEANINGTHEUNITASSPECIFIED,AND
REPLACINGGASKETSANNUALLY,ANDPARTSASNEEDED.
ENGLAND’SSTOVEWORKSISNOTRESPONSIBLEFORANYDAMAGEORINJURYINCURREDDUETONEGLECT,ORDUETOUNSAFEINSTALLATIONOR
USAGEOFTHISPRODUCT.CALLTECHNICALSUPPORTWITHANYQUESTIONS.
ERRORCODES–SIDEMOUNTCONTROLBOARD
Errorcodes,or“E‐Codes,”arealphanumericcodesthatwillappearintheHeatRangeandBlowerSpeed
windowsoftheControlBoardiftheunitexperiencesanabnormalcondition.Errorcodesarethecontrol
board’swayoftellingtheuserthatsomethingisn’toperatingcorrectlywithinthestove,andthattheunit
shouldbecarefullyinspectedbeforereigniting.Seethe“Trouble‐ShootingGuide,”page41,foradditional
informationonerrorcodes.
E ‐0
Whenthisisdisplayedinthecontrolboardwindows(typicallywhenrestartingafteran“E‐Code”
shutdown),itmeanstherearecurrentlynoerrorsandthestovewillbeginnormaloperation.
E ‐1
Thiserrorcodeisnotusedonthisstove.Ifitisdisplayedinthecontrolboardwindows,please
contactTechnicalSupportandtheywilldiagnosethecauseofthefalsecode.
E ‐2
Whenthiscodeisdisplayedinthecontrolboardwindowitindicatesafailuretolight.Althoughthe
stovemayhaveignitedthepellets,thecontrolboarddidnotregisterahighenoughtemperatureto
determinethefirewaslit.Ifafirewasignited,waitfortheunittocool,cleantheburnpotand
restarttheunit.
E ‐3
Thiserrorcodeindicatesthepresetmaximumallowableexhausttemperaturewasexceeded.
Commonlyreferredtoas“Over‐Firing,”theE‐3codemeanssomethinginthestoveiscausingthe
exhaustgastobehotterthanexpected.
E ‐4
Thiscodeisdisplayedbasedonadropintheexhausttemperature.Thiscodemeansthefireor
“proofofflame”hasbeenlost.Itusuallyresultsfromthehopperbeingempty.
Ifanerrorcodecontinuestodisplay,iftheerrorcodeseemsunexplainable,orifyouhave
anyotherquestionsabouterrorcodesandwhattheymean,pleasecontactTechnical
Supportat(800)245‐6489.
HopperLidSafetySwitch‐Thisunitisalsoequippedwithahopperlidsafetyswitch
(Part#AC‐HLSB)whichisdirectlyconnectedtotheaugermotor.Intheeventthe
hopperlidisleftopenwhilethestoveisinoperation,thehopperlidswitchwill
preventtheaugerfromturning.Thisistopreventbyproductsofcombustionfrom
enteringthehomethroughtheopenhopperlidandalsotosimplypreventoperation
withthehopperlidopen.Improperhopperlidsafetyswitchoperationwillresultin
anaugerthatwillnotturnandthereforeastovethatwillnotburn.NEVERplace
yourhandoranyobjectneartheaugerwhilethestoveisconnectedtopower.
33
IMPORTANT!READANDFOLLOWALLINSTALLATIONANDMAINTENANCEINSTRUCTIONS,INCLUDINGCLEANINGTHEUNITASSPECIFIED,AND
REPLACINGGASKETSANNUALLY,ANDPARTSASNEEDED.
ENGLAND’SSTOVEWORKSISNOTRESPONSIBLEFORANYDAMAGEORINJURYINCURREDDUETONEGLECT,ORDUETOUNSAFEINSTALLATIONOR
USAGEOFTHISPRODUCT.CALLTECHNICALSUPPORTWITHANYQUESTIONS.
POWERFAILURE–TopandSideMountControlBoards
Ifthepowertotheunitisinterruptedforapproximatelythreeminutesorless,theunitwill
resumeoperationwhenpowerisrestoredaccordingtothefollowingtable:
Ifthepowerisinterruptedformorethan(approximately)threeminutes,theunitwill
be“OFF”whenpowerreturns.
IMPORTANT–DoNOTopenthehopperlidorthedoortotheunitduringapower
outage.Opentheclosestoutsidedoorandawindowtoreducethechance
ofany
combustionbyproductsenteringthehomefromthestove.Waitforthepowertobe
restoredandthenpressthe“ON”buttontorestarttheunit,ifnecessary.
Caution–ShockHazard
Pressthe“Off”buttonandlettheappliancecompletelycoolBEFOREunpluggingtheappliance
andbeginninganymaintenance orcomponentreplacement.
Riskofshockifapplianceisnotunpluggedbeforeservice
Unit’sStateBeforePowerLoss StateWhenPowerReturns
ON Warmup(Start‐Up)
Warmup(Start‐Up) Warmup(Start‐Up)
Shut‐Down Shut‐Down
OFF OFF
SmokeDetectors
England’sStoveWorks,Inc.highlyrecommendstheuseofsmokedetectorsineveryroom
ofthehouse.However,locatingasmokedetectordirectlyabovethisunitcanresultin
nuisancealarms.
34
IMPORTANT!READANDFOLLOWALLINSTALLATIONANDMAINTENANCEINSTRUCTIONS,INCLUDINGCLEANINGTHEUNITASSPECIFIED,AND
REPLACINGGASKETSANNUALLY,ANDPARTSASNEEDED.
ENGLAND’SSTOVEWORKSISNOTRESPONSIBLEFORANYDAMAGEORINJURYINCURREDDUETONEGLECT,ORDUETOUNSAFEINSTALLATIONOR
USAGEOFTHISPRODUCT.CALLTECHNICALSUPPORTWITHANYQUESTIONS.
DAILYMAINTENANCE
ImportantNotes
Aswithanymaintenanceconcerningthisunit,be
suretheunitis“OFF”andhascompletedthe
Shut‐DowncycleBEFOREbeginning.
Beawarethatmetalpartsinthefireboxcan
remainHOTlongafterthefirehasgoneoutand
EVENaftertheShut‐Downcycleiscomplete.
Alwaysuseextremecautionwhenhandling
potentiallyhotstoveparts,evenifyouthinkthey
shouldbecold.
Ashesshouldonlyberemovedwhenthestove
hasbeenshutdownandhasbeenallowedtocool
thoroughly.Hotemberscanremainunderashes
longafterthefirehasgoneout,
soalwaysbe
extracarefulwhenhandlinganyashesfromthis
(orany)stove.
Differentpelletswillgeneratevaryingamountsofashandburnpotdeposits.Carefullymonitortheash
buildupinthestovewhenfirstoperatingtheunit,aswellaswheneveradifferentbrandofpelletsis
burned.
Whiletheamountofashesgeneratedbythisunitisnotexcessivecomparedtoatraditionallog‐burning
woodstove,keepingtheunitcleanandfreeofashisESSENTIALforpeakperformanceandmaximum
efficiency.Ashbuild‐uphampersairflow,reducesefficiency,andcancauseasmokeback.
England’sStoveWorks®isnotresponsibleforanydamagesincurredduetoapoorlymaintainedand/or
dirtystove.Thispelletstoveisahighlyefficientmachineand,assuch,requiressufficientmaintenanceto
keepitoperatingatitspeak.
AshRemovalandDisposal(atleasttwiceperweek)
Pressthe“Off”buttonandallowthestovetocompletetheshutdowncycleandcoolcompletely.
Along‐handledscrewdriverorlong‐handledputtyknifecanbeusedtoscrapeanybuild‐uporcrustintothe
burnpotarea.Thiscanthenbepushedleftorrightinto
theashstoragearea.
Removetheasheswithascoop.Followthe“DisposalofAshes”instructionslistedabove(underDaily
Maintenance).
DisposalofAshes–Ashesshouldbeplacedinametalcontainerwithatightfittinglid.
Theclosedcontainerofashesshouldbeplacedonanoncombustiblefloororonthe
ground,wellawayfromallcombustiblematerials,pendingfinaldisposal.Iftheashesare
disposedofbyburialin
soilorotherwiselocallydispersed,theyshouldberetainedinthe
closedcontaineruntilallcindershavebeenthoroughlycooled.
*Failureto
p
roperlycleanyourstovecancausepoorperformanceandpossiblyaburnback!*
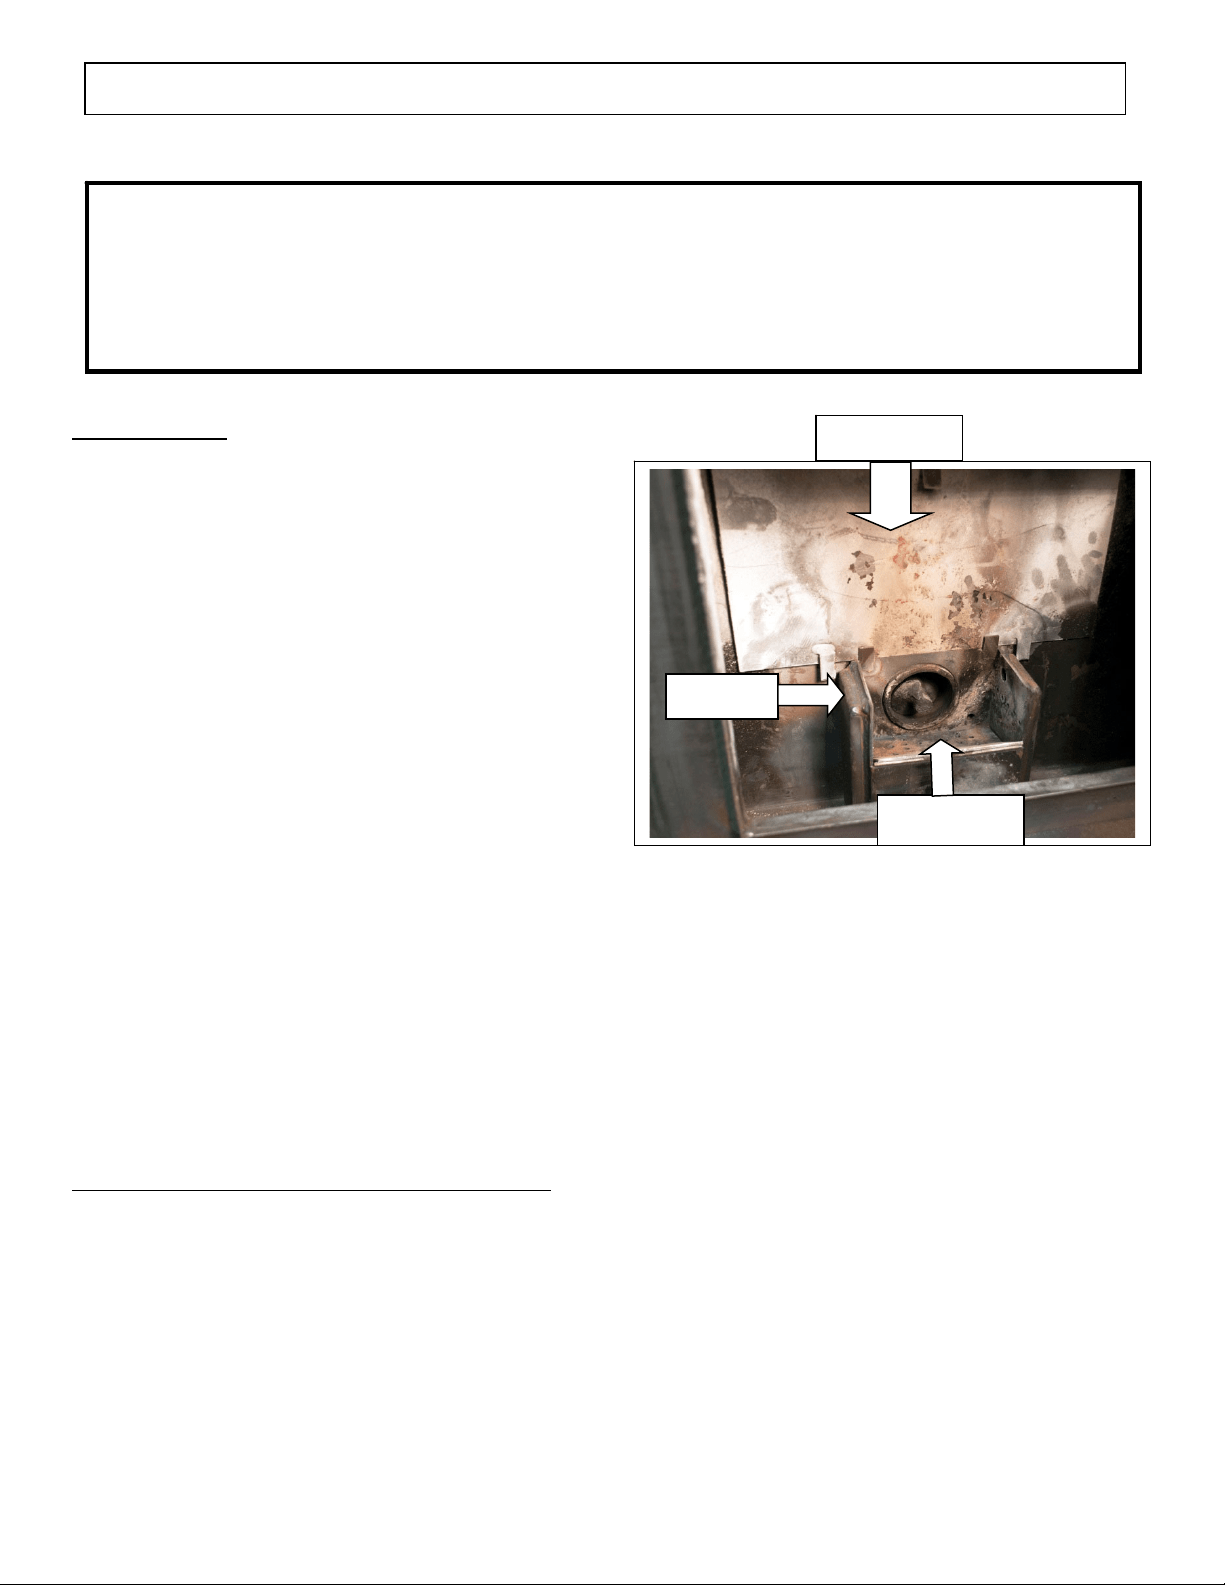
BafflePlate
WearPlate
BurnPot

35
IMPORTANT!READANDFOLLOWALLINSTALLATIONANDMAINTENANCEINSTRUCTIONS,INCLUDINGCLEANINGTHEUNITASSPECIFIED,AND
REPLACINGGASKETSANNUALLY,ANDPARTSASNEEDED.
ENGLAND’SSTOVEWORKSISNOTRESPONSIBLEFORANYDAMAGEORINJURYINCURREDDUETONEGLECT,ORDUETOUNSAFEINSTALLATIONOR
USAGEOFTHISPRODUCT.CALLTECHNICALSUPPORTWITHANYQUESTIONS.
CleaningtheBurnPot
Alongwithremovingashesfromthestove,
cleaningtheburnpotistheotheressentialpart
ofdailymaintenancethatwillkeepthestove
operatingatitspeak.Pelletscontainvarying
amountsofimpuritiesandfusiblematerialthat
willaccumulateintheburnpotovertime.Some
pelletswillcontainmuch
higheramountsof
thesefusibleimpurities,thereforeextravigilance
mayberequiredtomaintainacleanburnpot.
Allowingimpuritiestobuildupintheburnpot
canrestricttheairflowtothefire,resultingina
dirty,inefficientburnandcanshortenthelifeof
theburnpot.
NOTE:Theburnpotshouldactuallybecleanedoutbeforeeachstart‐up(beforepressingthe
ONbutton),anddaily.
Alwaysallowthestovetofinishtheshut‐downcycleandcoolcompletelybeforeperforming
anymaintenanceinsidethefirebox.
Openthefrontdoortoaccesstheburn
pot.WARNING–TheburnpotcanremainHOTlong
afterthefirehasgoneout,sowearprotectivegloveswheneverhandlingapotentiallyhotburn
pot,ifyouremoveit.
Removeandcleantheburnpotwearplate(refertotheexplodeddiagramintherearofthis
manual,
andthediagramonthepreviouspage).
Removeanyashbuild‐upintheareabelowthewearplate.Also,besuretherearenoashesor
obstructionsintheintaketubeunderthewearplate.IMPORTANT:Ashbuild‐upunderthe
wearplatecancausetheunittomalfunction.
Checkforanybuild‐upinthefrontoftheburnarea.Cleanoutallairholesinthewearplate(if
necessary,a1/8”drillbitcanbeused)‐‐theseairholesshouldbekeptclean,astheysupply
combustionairunderandaroundthepelletfuel.
The
burnpotassemblyshouldalsobethoroughlycleaned,includingtheburnbox.When
replacingthewearplate,ensurethatitliesflatinthefireboxandnogaps(fromashresidue)
areunderit.Inserttheburnpotbackintothecradleifyouhaveremovedtheentireburnpot,
andbesuretotightenthesetscrews,butdonotover‐tightenthem.
BottomAugerTube
IntakeTube
underWear
Plate
BurnPot

36
IMPORTANT!READANDFOLLOWALLINSTALLATIONANDMAINTENANCEINSTRUCTIONS,INCLUDINGCLEANINGTHEUNITASSPECIFIED,AND
REPLACINGGASKETSANNUALLY,ANDPARTSASNEEDED.
ENGLAND’SSTOVEWORKSISNOTRESPONSIBLEFORANYDAMAGEORINJURYINCURREDDUETONEGLECT,ORDUETOUNSAFEINSTALLATIONOR
USAGEOFTHISPRODUCT.CALLTECHNICALSUPPORTWITHANYQUESTIONS.
WEEKLYMAINTENANCE
BaffleRemoval
Aswithanymaintenanceconcerningthisunit,besuretheunitis“OFF,”hascompletedthe
Shut‐Downcycle,andiscompletelycoolBEFOREbeginning.Beawarethatmetalpartsinthe
fireboxcanremainHOTlongafterthefirehasgoneoutandEVENaftertheShut‐Downcycle
is
complete.Alwaysuseextremecautionwhenhandlingpotentiallyhotstoveparts,evenifyou
thinktheyshouldbecold.
WeeklymaintenanceshouldincludethestepslistedinthissectionASWELLASthestepslisted
inthe“DailyMaintenance”section.
Thelargebaffleplatethatrestsaboveandbehindtheburnpot(refertotheexplodeddiagram
intherearofthismanualandtheimagesintheDailyMaintenancesection)shouldberemoved
weekly.Thiscanbedonebyliftinguptheplateandpullingitout.Theareabehindtheplate
shouldthenbecleanedthoroughly,andtheplateplacedbackintheoriginalposition.
Useascrewdriverorchiselandbreakanycreosotebuild‐upinthefrontoftheunit,wherethe
pelletsarefedintotheburnpotfromtheBottomAugerTube(seeIllustrationinprevious
section).Moistureinthepelletsandresultingbuild‐upinthisareacancausethebottomauger
to“squeal”orsqueak.
CarbonRemoval:Duringnormaloperationcarbonfromthecombustionofpelletfuelwilltend
tobuilduponthetipoftheauger,onthewearplateandsidesofthefirepot,andinthe
mouthofthefeedtube.Itisessentialthatthisresidueberemovedtoensuretroublefree
operationoftheunit.Thefrequencywithwhichthiscarbonmustberemovedvarieswith
brandsofpellets,dependingonmoisturecontent,woodtype,foreignmaterial(dirt,etc.)in
pellets,andotherfactors.
Toremovethiscarbon,simplyscrapeitoffusingthebladeofaflattippedscrewdriveror
similarinstrument;also,toremovecarbonfromthefeedtube,scrapeasmuchascanbeeasily
reached,theninsertanemeryboard(fingernailfilemadefromapopsiclestickandsandpaper)
betweenthefeedaugerandthefeedtubeandsandoutanyresiduenotremovedfrom
scrapingalone.Clearingthiscarbonresiduefromthefeedtubeisessentialforproper
operationofthefeedauger,whichisdesignedtofloatfreelyinthefeedtubeallowingsmooth
fuelflow,alesserpossibilityofajam,andaquieterunit.
Replacethebafflebyreversingtheabovesteps.
Ifexcessashaccumulationisfoundintheexhaustchamberorventingsystemduringmonthly
maintenance,theintervalbetweencleaningsshouldbereducedtoeliminatethepossibilityof
poorstoveperformanceduetoashaccumulation.
Aspeciallydesignedashvacuum
andpelletstovecleaningkitisavailablefromtheEngland’s
StoveWorkswebsite;pleasesee:heatredefined.com

37
IMPORTANT!READANDFOLLOWALLINSTALLATIONANDMAINTENANCEINSTRUCTIONS,INCLUDINGCLEANINGTHEUNITASSPECIFIED,AND
REPLACINGGASKETSANNUALLY,ANDPARTSASNEEDED.
ENGLAND’SSTOVEWORKSISNOTRESPONSIBLEFORANYDAMAGEORINJURYINCURREDDUETONEGLECT,ORDUETOUNSAFEINSTALLATIONOR
USAGEOFTHISPRODUCT.CALLTECHNICALSUPPORTWITHANYQUESTIONS.
MONTHLYMAINTENANCE
Agoodruleofthumbformonthlymaintenanceisthatitshouldbedoneeachtimeanentiretonof
pelletsisburnedORoncepermonth,whichevercomesfirst.
VentingPipeCleaning
Lowspotsanddirectionchangesintheventingsystem(suchasteesandelbows)areareasfor
potentialfly‐ashandcreosoteaccumulation.INSPECTtheseareasdiligentlytokeepthe
ventingsysteminsafeoperatingcondition.
Dependingonthespecifictypeofventingsystemyourstoveisconnectedto,
itmaybepossible
toremovetheclean‐outteecoverandsimplyrunapipebrushupthepipetoremoveanyfly‐
ashaccumulation.
Horizontalrunsofpipe,suchasfromtheexhaustconnectiononthestovetothevertical
transition,willaccumulateflyashandshould
beinspectedcarefullyandbrushedclean.
Checktheterminationcaptobecertainitisnotcloggedorrestrictedbyanyfly‐ash
accumulation.
Afterthoroughlycleaningtheventingsystem,resealanydisassembledseamswithhigh
temperaturesilicone(Part#AC‐RTV3)ifapplicabletoyourventingsystem.
Inspectseamsthatwerenotdisassembledtobecertainasmoke‐tightsealisstillbeingmade.
Afterprolongeduse,leaksintheventingsystemcanusuallybefoundbysearchingforfly‐ash
depositsontheoutsideofthepipe.Carefullycheckforleaksintheventingsystem
andseal
themaccordingly.
Althoughmostpelletventingsystemsaredesignedtolastalifetime,pelletfly‐ashcanbe
corrosiveundercertainconditions.Whencleaningyourventingsystem,examinethepipe
carefullyforanysignsofdeteriorationandreplacesectionsthatshowexcessivewear.Itis
unlikelythatthis
willeverbeaconcern,butmaintainingyourventingsysteminsafeoperating
conditioniscrucialtosafestoveoperation.

38
IMPORTANT!READANDFOLLOWALLINSTALLATIONANDMAINTENANCEINSTRUCTIONS,INCLUDINGCLEANINGTHEUNITASSPECIFIED,AND
REPLACINGGASKETSANNUALLY,ANDPARTSASNEEDED.
ENGLAND’SSTOVEWORKSISNOTRESPONSIBLEFORANYDAMAGEORINJURYINCURREDDUETONEGLECT,ORDUETOUNSAFEINSTALLATIONOR
USAGEOFTHISPRODUCT.CALLTECHNICALSUPPORTWITHANYQUESTIONS.
YEARLYMAINTENANCE
ImportantNotes
Aswithany maintenanceconcerningthisunit,besuretheunitis“OFF,”hascompleted
theShut‐Downcycle,andiscompletelycoolBEFOREbeginning.
BeawarethatmetalpartsinthefireboxcanremainHOTlong afterthefirehasgoneout
andEVENaftertheShut‐Down
cycleiscomplete.Alwaysuseextremecautionwhen
handlingpotentiallyhotstoveparts,evenifyouthinktheyshouldbecold.
Yearly(orendofseason)maintenanceshouldincludetheste pslistedinthissectionAS
WELLASthestepslistedinthe“DailyMaintenance,”“Weekly Maintenance”and
“Monthly
Maintenance”sectionsofthis manual.
Yearlymaintenanceshouldbeperformedattheendoftheburningseason.Leavingash
andotherbuild‐upinthestoveduringthenon‐heatingmonthscanleadtopremature
metaldegradationinthestoveandventingsystem.Usingextraattentiontodetailand
beingcertaintobeverythoroughin
theendofseasoncleaningwillhelpincreasethe
operatinglifeofthestoveandventingsystem.
Theunitshouldbeunpluggedduringthesummermonths(andperiodsofnon‐use),to
helpprotectagainstthepossibilityofdamageduetolightningstrikesandotherpower
disruptions.
Caution–ShockHazard
Pressthe“Off”buttonandlettheappliancecompletelycoolBEFOREunplugging
theapplianceandbeginninganymaintenanceorcomponentreplacement.
Riskofshockifapplianceisnotunpluggedbeforeservice.
SOOTANDFLYASH:FORMATIONANDNEEDFORREMOVAL
Theproductsofcombustionwillcontainsmallparticlesofflyash.Theflyashwillcollectinthe
exhaustventingsystemandrestricttheflowofthefluegases.Incompletecombustion,such
asthatwhichoccursduringstartup,shutdownorincorrectoperationoftheroomheaterwill
leadtosomesootformationwhichwillcollectintheexhaustventingsystem.Theexhaustventing
systemshouldbethoroughlyinspectedatleastonceeveryyeartodetermineifcleaningisnecessary.

39
IMPORTANT!READANDFOLLOWALLINSTALLATIONANDMAINTENANCEINSTRUCTIONS,INCLUDINGCLEANINGTHEUNITASSPECIFIED,AND
REPLACINGGASKETSANNUALLY,ANDPARTSASNEEDED.
ENGLAND’SSTOVEWORKSISNOTRESPONSIBLEFORANYDAMAGEORINJURYINCURREDDUETONEGLECT,ORDUETOUNSAFEINSTALLATIONOR
USAGEOFTHISPRODUCT.CALLTECHNICALSUPPORTWITHANYQUESTIONS.
YEARLYMAINTENANCE
Thestoveandthefluesystemshouldbegivenacompletecleaningattheendoftheheatingseason.
BurnPot:Removetheburnpotassembly,cleanitthoroughly,andre‐installit(refertoExplodedParts
DiagramintherearofthismanualandtheDailyMaintenance
section);thiswillrequirenewgasketfor
theburnpot.Besuretotightenthesetscrewswhenyoureplacethem,butdonotover‐tighten.
Combustion(Exhaust)BlowerCleaning:Althoughthecombustionblowerandblowerhousingwere
designedtominimizeashbuild‐up,somefly‐ashwillstillaccumulatetherethroughouttheburning
season.Theamountandtypeofashwilldependonthetypeofpelletsandventingsystem,but
generallythisaccumulationwillbemild.If,whencleaningthecombustionblower,alarge
accumulationoffly‐ashisfound,cleaningtheblowerandhousingshouldbeperformedmonthlyor
bimonthlytopreventthisexcessbuildup.
Instructions
Beforebeginningthecombustionblowercleaningprocedure,becertaintheunitisunpluggedand
thoroughlycooleddown.
Disconnecttheventingsystemfromthecombustionblowerjustenoughthatyouwillbeableto
removetheblowerfromthestove.
Removetheleftsideaccesspanel,usinga5/16”wrench.
Removethebackpaneloftheunit,usinga5/16”wrench.
Unplugthetwopowerleadstothecombustionblower,usingthequickconnectplugs.
Loosenthefive(5)
5
/
16
”self‐drillingscrewswhichholdthecombustionblowertotheblowertube.
Liftthecombustionblowerupandoutofthestove.Thegasketwhichsealstheblowertotheblower
tubeisfragile,sotakeextracarewhenremovingtheblower.Evenwhenbeingcareful,though,itis
easytotearthisfragilegasket,andsinceanairtightsealiscrucialhere,youshouldreplacethisgasket
(Part#‐PU‐CBMG)everytimethecombustionblowerisremoved.Removethegasketwithaputty
knife,andinstallthenewgasketbyapplyingadhesivetotheblowerandinstallingthenewgasket
(instructionsandadhesiveareprovidedwiththegasket).
Withthecombustionblowerremoved,useautilityvacuumtoremoveanyashaccumulationinthe
combustionblowertubeonthestove.
Usingasoftpaintbrush,carefullyremoveanyashaccumulationfromtheinsideofthecombustion
blower,andfromtheblowerfanblade.
Inspectthecombustionblowermotorfordustaccumulationandcarefullyremoveit,ensuringthatall
aircoolingholesintothemotorareopenandfreeofdustdeposits.
Installtheblowerinthereverseorderasdescribedabove.Remembertochecktheconditionofthe
combustionblowergasket,andtoreconnectthetwowireswhichconnecttheblowertothestove’s
controlboard.

40
IMPORTANT!READANDFOLLOWALLINSTALLATIONANDMAINTENANCEINSTRUCTIONS,INCLUDINGCLEANINGTHEUNITASSPECIFIED,AND
REPLACINGGASKETSANNUALLY,ANDPARTSASNEEDED.
ENGLAND’SSTOVEWORKSISNOTRESPONSIBLEFORANYDAMAGEORINJURYINCURREDDUETONEGLECT,ORDUETOUNSAFEINSTALLATIONOR
USAGEOFTHISPRODUCT.CALLTECHNICALSUPPORTWITHANYQUESTIONS.
Reinstalltheventingsystemandpanels.
NOTE:Asanoption,thereisaCombustionMotorGasketthatisincludedwithPart#PU‐CBMG,which
allowsyoutoremovethemotor(only)fromthecombustionblowerhousing,cleanthemotorand
insideoftheblowerhousing,andreplace
themotoranditsgasketwithouthavingtoremovetheentire
CombustionBlower.Rememberthattheblowerimpeller,blowertubeandsteelblowerexhausttube
onthestoveshouldbebrushedandvacuumed.
ConvectionBlowerCleaning
Asalways,becertainthestoveiscoolandunpluggedbeforeservicinganycomponentswithinthe
unit.Sincetheconvectionblowerdoesnothandleanyby‐productsofcombustion,itdoesnot
requireseriouscleaningliketheexhaustblower.
However,dustfromthehomeandotherdebrisintheaircanaccumulateonthebladesofthe
convectionblower.Anydustthathasbuiltuponthefanbladescanusuallybeeasilyremovedwith
avacuumorasoftpaintbrush.
Thebackpanelwillneedtoberemovedfromthestove,usinga5/16”wrench.
Thecontrol(circuit)boardwillneedtoberemoved,byremovingthetwo5/16”screwsandpulling
thecontrolboardoutofthestove.Somewiretiesmayneedtobecutsothattheboardcanbe
pulledoutofthewayoftheblower(remembertoreplacethem).
Four5/16”screwswillneedtoberemovedinordertoremovetheconvectionblowerfromthe
stove.Youwilllikelyneedasocketwithalongextension.
Installtheblowerinthereverseorderasdescribedabove.
AlsoseetheConvectionBlowerremovalinstructionsintheReplacingComponentssectionofthe
manual.
FINISH
ThisnewunithasbeenpaintedwithHigh‐Temperaturepaintthatshouldretainitsoriginallookfor
years.
Iftheunitshouldgetwetandrustspotsappear,thespotscanbesandedwithfinesteelwooland
repainted.ItiscrucialthatonlyHigh‐TemperatureSprayPaintisused(Part#AC‐MBSP),asothers
maynotadheretothesurfaceorwithstandthehightemperatures.
Similarly,somebrandsofpaintwillnotadheretodifferentbrandsofpaint,sowehighly
recommendusingourproprietaryHigh‐TemperatureSprayPaint.
GASKETS
Gasketsshouldbeinspectedandreplacedannually.SeetheGasketspageinReplacingComponents
(page49)forinformationandinstructions.

41
IMPORTANT!READANDFOLLOWALLINSTALLATIONANDMAINTENANCEINSTRUCTIONS,INCLUDINGCLEANINGTHEUNITASSPECIFIED,AND
REPLACINGGASKETSANNUALLY,ANDPARTSASNEEDED.
ENGLAND’SSTOVEWORKSISNOTRESPONSIBLEFORANYDAMAGEORINJURYINCURREDDUETONEGLECT,ORDUETOUNSAFEINSTALLATIONOR
USAGEOFTHISPRODUCT.CALLTECHNICALSUPPORTWITHANYQUESTIONS.
Trouble‐ShootingGuide
WARNING:ToavoidELECTRICALSHOCKalwaysdisconnecttheunitfromthepowersourceBEFORE
attemptinganyrepair.Ifthisguidedoesnotcorrecttheproblem,callTechnical
Supportat1‐800‐245‐6489.
*SeeERRORCODESsectionearlierinthismanualforinformationontroubleshootingErrorCodes
Problem Cause Solution
TopAugernotturning 1.Badaugermotor. 1.Replaceaugermotor.
2.Foreignmatterjammingauger. 2.Removepelletsandobject.
3.Vacuumsensor. 3.Checkexhaustblower.
4.Hopperlidswitch 4.Makesurehopperlidisclosed/replace
switch
BottomAugernotturning 1.Badaugermotor. 1.Replaceaugermotor.
2.Foreignmatterjammingauger. 2.Removepelletsandobject.
Smokesmellordustin
house
1.Improperexhaustconnection. 1.Checkexhaustconnectionsforleaks,
especiallytheexhaustblo werconnect.Seal
leakswithsilicone,aluminumtapeorahose
clamp.
Roomblowernotoperating 1.Loosethermalsensor. 1.Tightenconnectiononsensor.
2.Blowerspeedsethigherthanheat
range,causingstovetocooland
blowertocycle.
2.Lowerblowerspeed.
3.Looseconnection. 3.Checkcontrolboardconnection.
Exhaustblowernot
operating
1.Looseconnection. 1.Checkcontrolboardconnection.
2.Badblower. 2.Replaceblower.
3.Badvacuumsensor. 3.Replacevacuumsensor.
LazyFire 1.Badexhaustblower. 1.Inspectandreplaceblower.
2.Excessivepelletmoisture. 2.Keeppelletsdry.
3.Excessiveashbuild‐up. 3.Thoroughlycleanunit.
4.Lowqualitypellets. 4.UseonlyPFIpremiumpellets.
BlownFuse 1.Powersurge. 1.Replacefuse;usesurgeprotector.
2.Exposedwire. 2.Checkforexposedorfrayedwireandloose
connections.
3.Electricalcomponentshorting. 3.Checkmotorsandblowersforobstructions
orshortcircuits.
HighPelletConsumption 1.Lowqualityornon‐uniformlysized
pellets.
1.Usepremiumpelletsortryanotherpellet
brand.
SqueakingNoise 1.Obstructioninaugertube. 1.Checkaugertubeforforeignobjects.
2.BlowerNoise. 2.Remove,clean,andoilblower.
PingingorRattlingNoise 1.Foreignmaterialinblower. 1.Checkbothblowersformaterial.
2.Looseexhaustfansetscrew. 2.Checksetscrewfortightness.

42
IMPORTANT!READANDFOLLOWALLINSTALLATIONANDMAINTENANCEINSTRUCTIONS,INCLUDINGCLEANINGTHEUNITASSPECIFIED,AND
REPLACINGGASKETSANNUALLY,ANDPARTSASNEEDED.
ENGLAND’SSTOVEWORKSISNOTRESPONSIBLEFORANYDAMAGEORINJURYINCURREDDUETONEGLECT,ORDUETOUNSAFEINSTALLATIONOR
USAGEOFTHISPRODUCT.CALLTECHNICALSUPPORTWITHANYQUESTIONS.
Errorcodesrelatedonlytosidemountedcontrolboard
UnitShutsDownin15‐20
minuteswithan"FS"code
(TopMount)or“E‐2”code
(SideMount)oncontrol
board.(FailedStart)
1.Loosethermalsensor. 1.Checkbothsidesofthermalsensor
connection(exhaustblowerandcontrol
board).
2.Controlboardsettings. 2.StartstoveonminimumHeatRange5to
ensureagoodfireisstarted.
3.Failuretolightpellets. 3.Checkigniterforbuilduporfailure.
"OT"Code(TopMount)or
“E‐3”Code(SideMount)on
ControlBoard(OverTemp)
1.Convection(RoomAir)blower
failure.
1.Checkconvectionblowerforproper
function,replaceifnecessary.
2.Partiallyblockedflue. 2.Checkflueforobstructions.
3.Usingfuelotherthanpremiumwood
pellets.
3.UseONLYpremiumwoodpelletsinthis
stove.
Notes:
1.Wheneverinstructedtocheck/replacethevacuumsensor,alsocheckforlooseorcrackedvacuumhose.
Also,becertainthevacuummeasurementportinthefireboxiskeptclean(cleanwithapipecleanerorbrush,
donotuseavacuumtocleanthisport).
2.Torestartandclearanerrorcodedisplayedonthecontrolboard,pushthe"ON"buttonandtheunitshould
resettheerrorandrestart.
3.Ifyouareuncertainaboutthemeaningofanerrorcodeorhaveanyquestionsatall,PLEASEcontact
TechnicalSupportat(800)245‐6489.
IMPORTANT SAFETY NOTE: If the unit or chimney connector pipe “glows” red (or
white), the stove is over-fired. This condition could cause a house or chimney fire.
Do not operate your unit too hot, or over-firing may result.
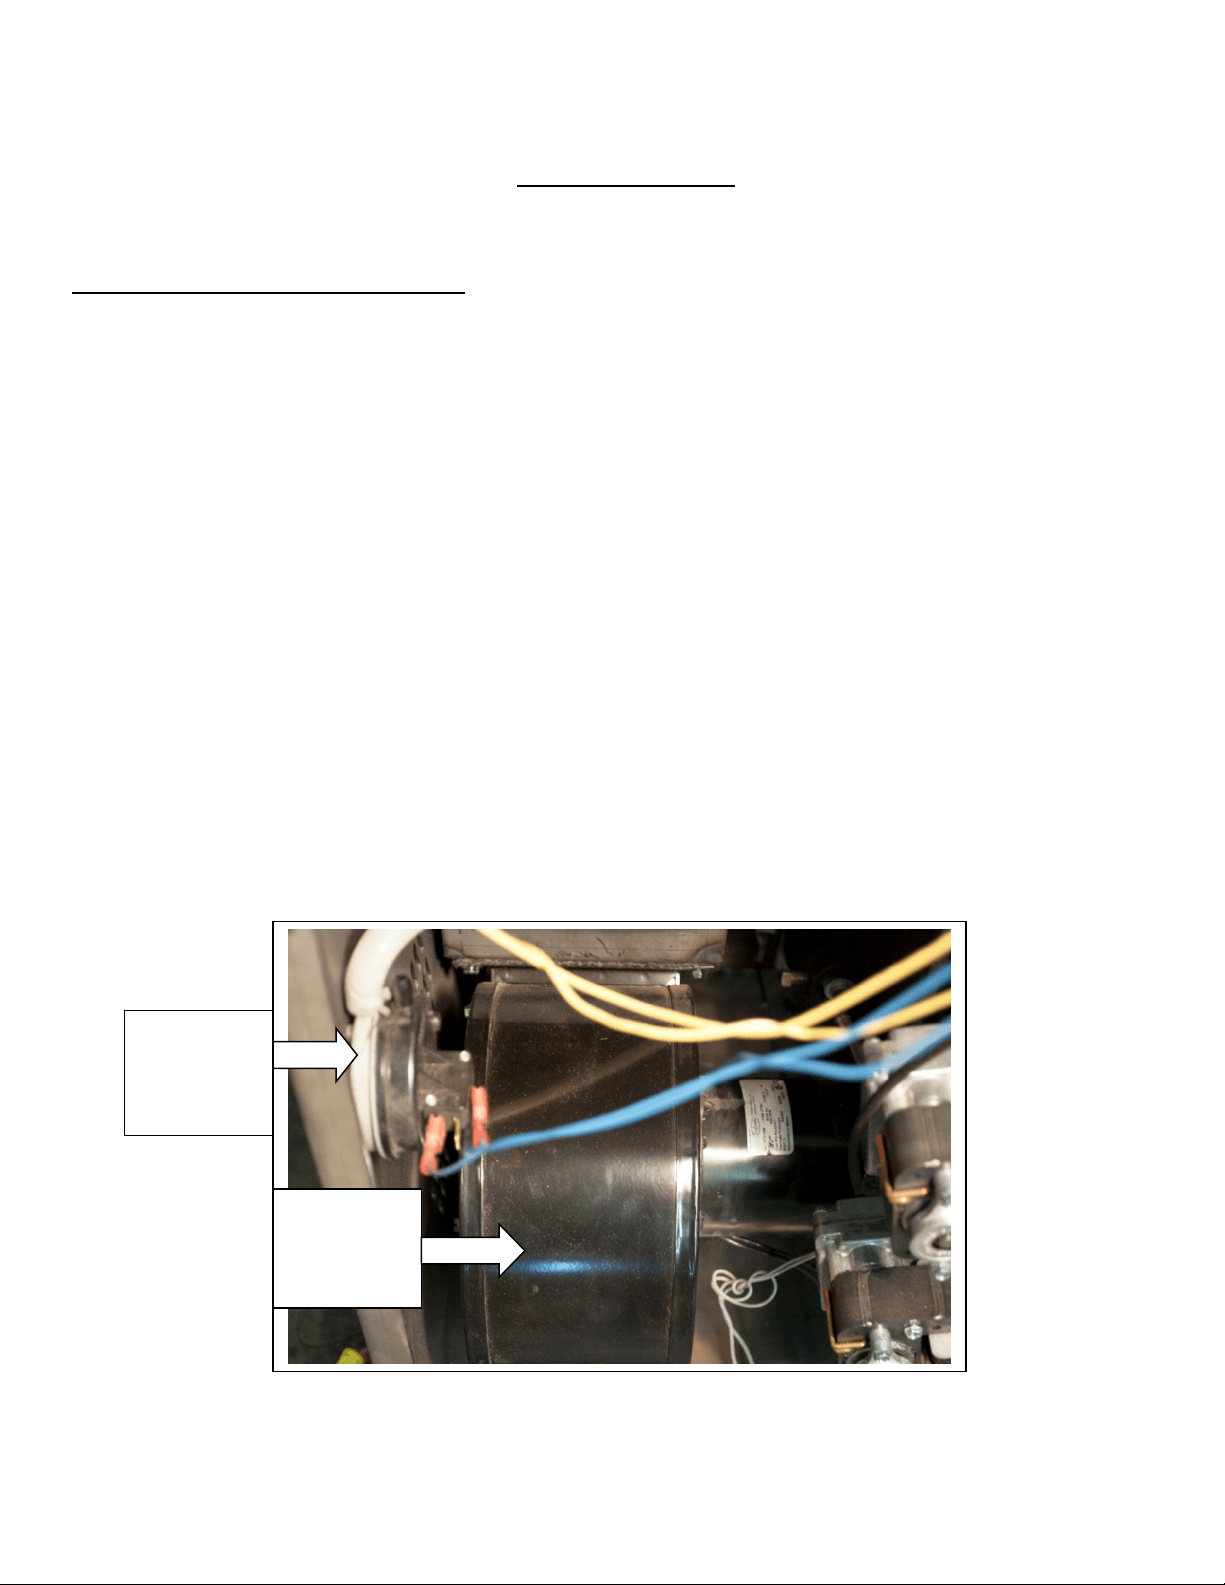
43
IMPORTANT!READANDFOLLOWALLINSTALLATIONANDMAINTENANCEINSTRUCTIONS,INCLUDINGCLEANINGTHEUNITASSPECIFIED,AND
REPLACINGGASKETSANNUALLY,ANDPARTSASNEEDED.
ENGLAND’SSTOVEWORKSISNOTRESPONSIBLEFORANYDAMAGEORINJURYINCURREDDUETONEGLECT,ORDUETOUNSAFEINSTALLATIONOR
USAGEOFTHISPRODUCT.CALLTECHNICALSUPPORTWITHANYQUESTIONS.
REPLACINGCOMPONENTS
SeeExplodedDiagramatrearofmanualforpartsreference
PartsOrders:(800)516‐3636heatredefined.comQuestions:(800)245‐6489
Convection(RoomAir)Blower
Beforebeginninganycomponentreplacement,becertaintheunitisunpluggedand
thoroughlycooleddown.
Removethebackpaneloftheunit,usinga5/16”wrench.
Ifitisaside‐mountcontrolboard,thecontrol(circuit)boardmayneedtoberemoved,by
removingthetwo5/16”
screwsandpullingthecontrolboardoutofthestove.Somewire
tiesmayneedtobecutsothattheboardcanbepulledoutofthewayoftheblower
(remembertoreplacethem).
Locateanddetachthepowerleadstotheconvectionblower.
Usinga
socketwithalongextension,loosenandremovethe(4)
5
/
16
”screwswhichholdthe
blowertothestove;removetheblowerfromthestove.
Installationofthenewblowerisperformedinreverseofremoval;remembertoreconnect
thepowerleadstotheblower,andreplaceanywiretiesbeforereinstallingthecontrol
board.(Wheninstallingthenewblower,
placetheblowermotoropeningpointingUP,
towardsthetopofthestove.)
Visityoutube.com/heatredefinedfordetailedservice‘howto’videos.
Convection
(RoomAir)
Blower
Vacuum
Switch(see
Vac.Switch
section)

44
IMPORTANT!READANDFOLLOWALLINSTALLATIONANDMAINTENANCEINSTRUCTIONS,INCLUDINGCLEANINGTHEUNITASSPECIFIED,AND
REPLACINGGASKETSANNUALLY,ANDPARTSASNEEDED.
ENGLAND’SSTOVEWORKSISNOTRESPONSIBLEFORANYDAMAGEORINJURYINCURREDDUETONEGLECT,ORDUETOUNSAFEINSTALLATIONOR
USAGEOFTHISPRODUCT.CALLTECHNICALSUPPORTWITHANYQUESTIONS.
AugerMotors,Bearings&Shafts
Beforebeginninganycomponentreplacement,becertaintheunitisunpluggedandthoroughly
cooleddown.Also,makesurethehopperisemptybeforeattemptingtoremoveorreplacethe
topaugermotorassembly.
Removethebackpanelofthe
unit,usinga
5
/
16
”wrench.
Beforelooseninganyauger
motorbolts,detachthepower
leadsfromtheaugermotor.
Locatetheappropriateauger
motorassemblyattherearof
thestove,loosenthe5/16”
squareheadsetboltthatis
positionedbetweentheauger
motorandtheaugerblock
bearing.Thisbolt
tightensdown
ontheflatsideofthegearshaft,
andlocksthegearshaftand
augershafttogether.
Oncetheboltisloosened,the
assemblywillslidefromthe
lockingcollarandaugershaft.
Toreplacethetopauger,all
pelletfuelmustberemoved
fromthe
hopperaswellasfromthetopaugerassembly.
Oncethisisdone,thefour½”boltsthatholdinthe
bearingcanberemoved,andthecompleteauger
assemblymayberemovedfromthestove.
Theaugerbearingsareasealedunitanddonot
requirelubrication.
Removethe¾”shaftcollarfromtheauger
shaft/bearingassembly.
Loosenthetwo(2)1/8”setscrewsontheendofthe
augerbearingwitha1/8”Allenwrench,whichwill
disconnectthebearingfromtheshaft(thebearing
assemblyandaugerassemblycanbereplacedby
reversingthis
procedure;pullthebearingflush
againstthe¾”collarbeforetighteningthetwo1/8”
setscrews).
Besuretoinstallanewaugerbearinggasketwhenreplacinganaugerbearing.
TopAuger
AugerBearing
Auger
SupportShelf
BottomAuger
5/16”SquareHeadSetBolttightens
ontheFLATsideofgearshaft
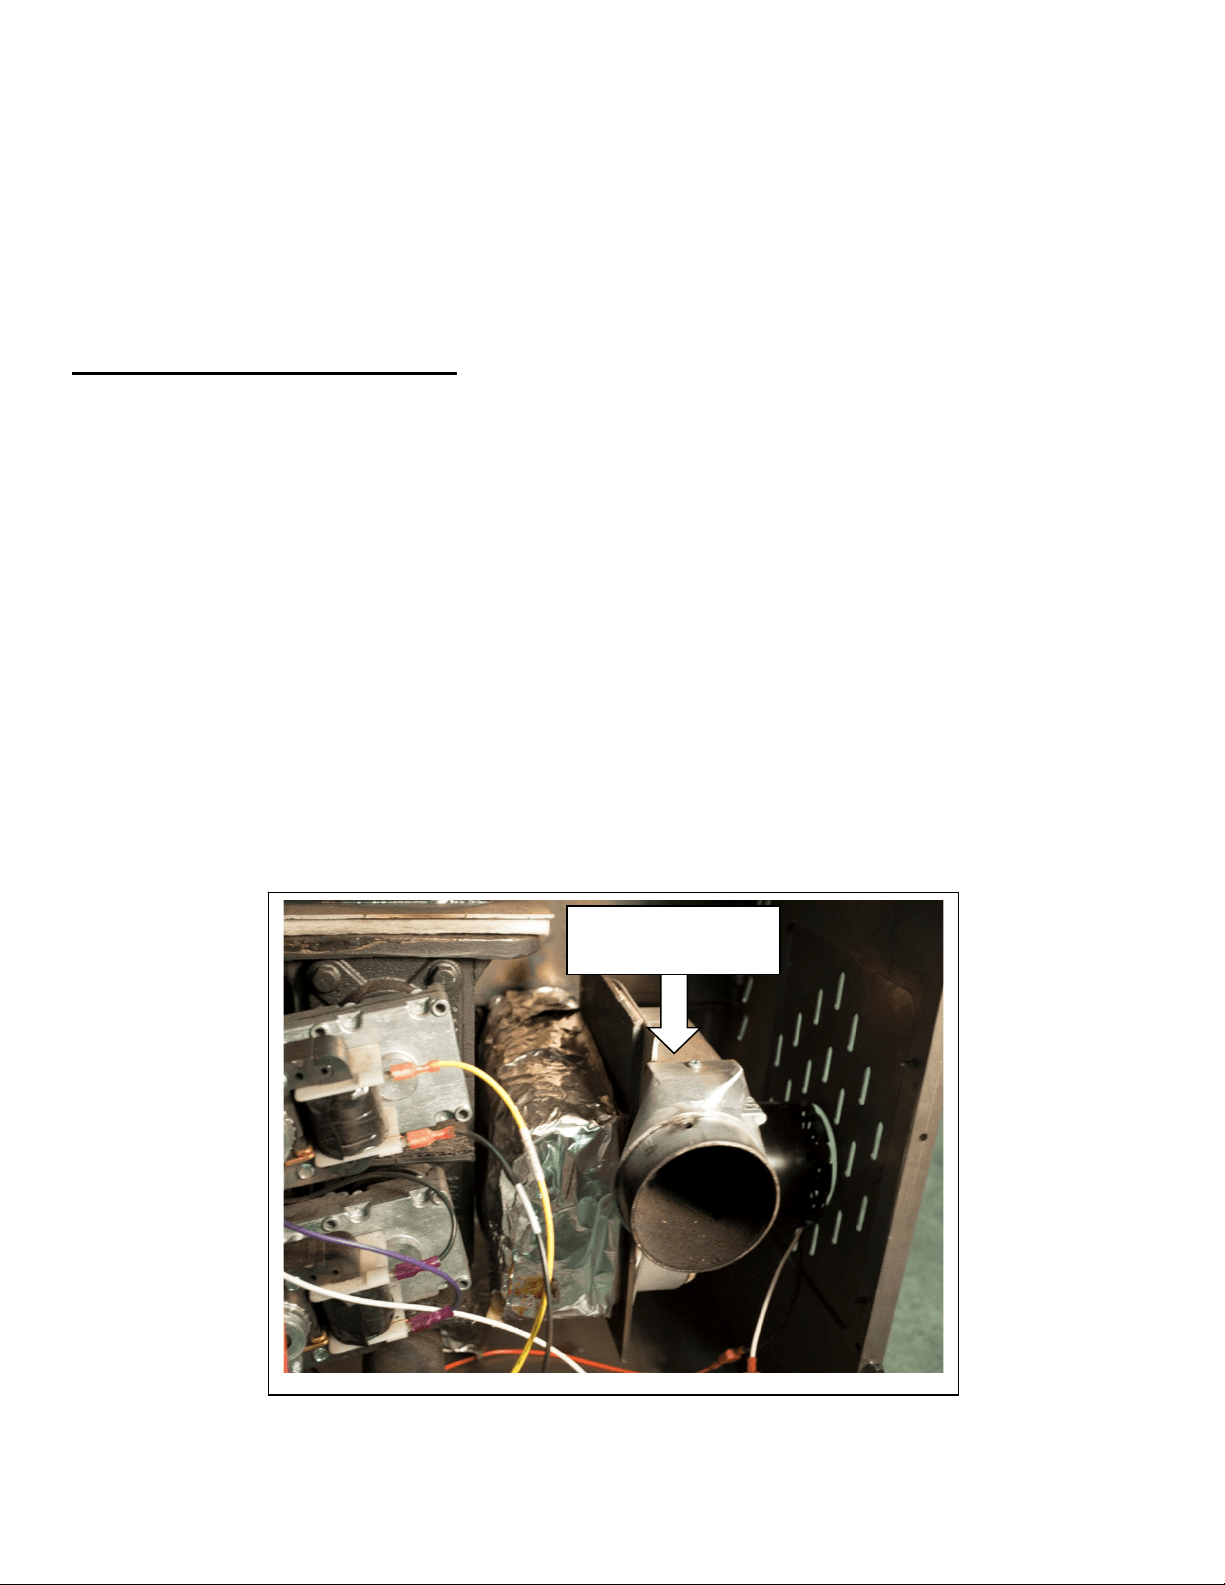
45
IMPORTANT!READANDFOLLOWALLINSTALLATIONANDMAINTENANCEINSTRUCTIONS,INCLUDINGCLEANINGTHEUNITASSPECIFIED,AND
REPLACINGGASKETSANNUALLY,ANDPARTSASNEEDED.
ENGLAND’SSTOVEWORKSISNOTRESPONSIBLEFORANYDAMAGEORINJURYINCURREDDUETONEGLECT,ORDUETOUNSAFEINSTALLATIONOR
USAGEOFTHISPRODUCT.CALLTECHNICALSUPPORTWITHANYQUESTIONS.
Whenplacingtheaugerassemblyintheunit,alwaystightenthefouraugerbearingboltsina
diagonal(criss‐cross)patterntoensurethebearingsandshaftsarealignedproperly.
Remembertoinstalltheaugershelfsupport,placingthetwobottomboltsthroughtheshelf
andtheaugerbearing.
NOTE:Followthesameproceduretoworkonthebottomauger,withtheexceptionthatthe
pelletsdonotnecessarilyhavetoberemovedfromthehopper.
Visityoutube.com/heatredefinedfordetailedservice‘howto’videos.
Combustion(Exhaust)Blower
Beforebeginninganycomponentreplacement,becertaintheunitisunpluggedand
thoroughlycooleddown.
Disconnectthepelletventpipesothatthecombustionblowermaybeaccessed.
Removetheleftsideaccesspanel,using a5/16”wrench..
Removethebackpaneloftheunit,usinga
5/16”wrench.
Disconnectthepowerleadstothecombustionblower.
Removeall (5) screwswhichholdtheexhaustblowertotheexhaustblowertube.Oncethe
screwshavebeenremoved,theblowercanbeliftedupandoutofthestove.
Replacethecombustionblowergasketeach
timeyouremovetheblowerfromthestove
(Part#PU‐CBMG).
Removethegasketwithaputtyknife,andinstallthenewgasketby
applyingadhesivetotheblowerflangeandinstallingthenewgasket(instructionsand
adhesiveareprovidedwiththegasket).
Reinstallationistheexactoppositeofthestepsabove.
Visityoutube.com/heatredefinedfordetailedservice‘howto’videos.
Combustion
(Exhaust)Blower
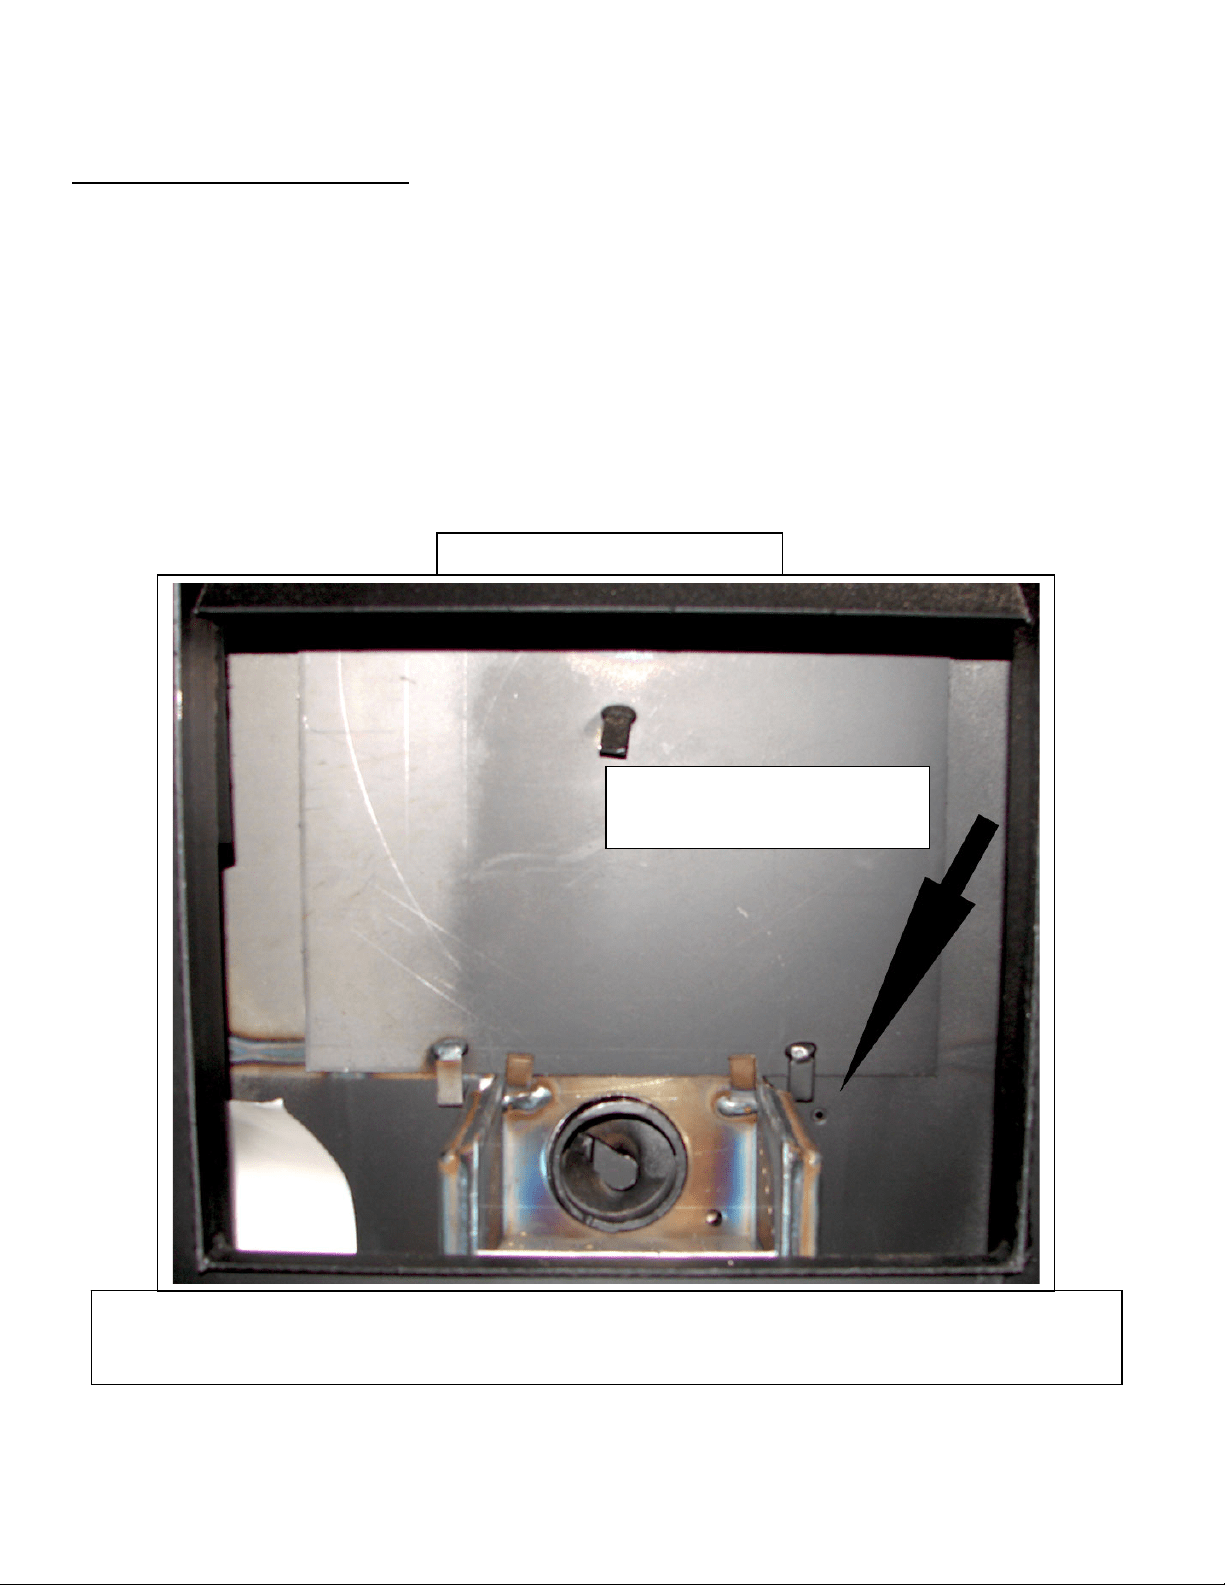
46
IMPORTANT!READANDFOLLOWALLINSTALLATIONANDMAINTENANCEINSTRUCTIONS,INCLUDINGCLEANINGTHEUNITASSPECIFIED,AND
REPLACINGGASKETSANNUALLY,ANDPARTSASNEEDED.
ENGLAND’SSTOVEWORKSISNOTRESPONSIBLEFORANYDAMAGEORINJURYINCURREDDUETONEGLECT,ORDUETOUNSAFEINSTALLATIONOR
USAGEOFTHISPRODUCT.CALLTECHNICALSUPPORTWITHANYQUESTIONS.
REPLACINGCOMPONENTS
VacuumSwitch‐Function
This unit is equipped withaVacuum Shut Down Switch(Part # CU‐VS), whichhelps
controlvariousfunctionsoftheunit.
If an operational error occurs in the unit, a switch will either stop the top (feed)
auger or shut the unit off; if the unit turns off
an error code will appear on the
ControlBoard.
Situations which couldcausethis include power failure, Combustion Blower failure,
improper flue installation, a blocked flue (from rodents, nests, etc.), or “dirty
burning”from burningimproper fuel(see“Important Information”at thebeginning
ofthemanual).
Vacuum Switch Port
NOTE: The vacuum switch port must be kept clean, or the top auger will cease to function. Locate the
port hole to the right of the burn pot and, with the stove unplugged and cooled down, use a brush or
pipe cleaner (not a vacuum) to keep this port clear of ash or other debris (see picture).
Port is located to the right
of the burn pot
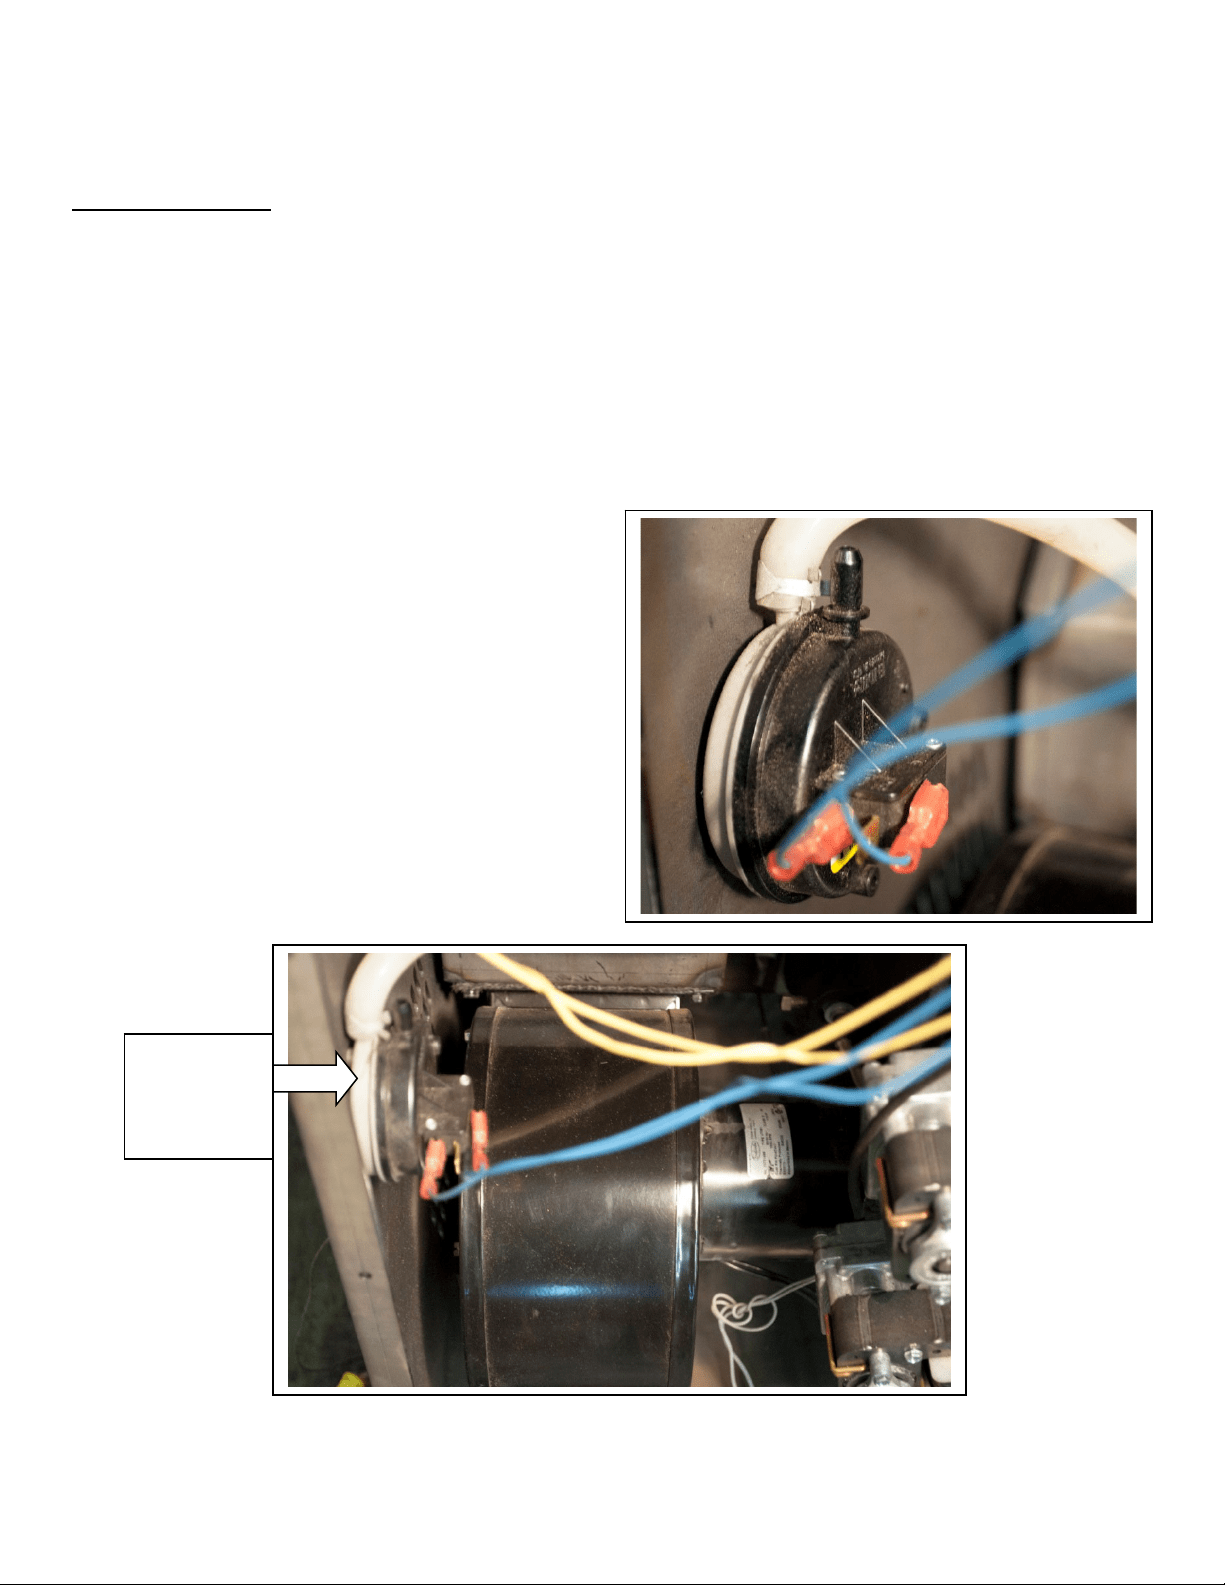
47
IMPORTANT!READANDFOLLOWALLINSTALLATIONANDMAINTENANCEINSTRUCTIONS,INCLUDINGCLEANINGTHEUNITASSPECIFIED,AND
REPLACINGGASKETSANNUALLY,ANDPARTSASNEEDED.
ENGLAND’SSTOVEWORKSISNOTRESPONSIBLEFORANYDAMAGEORINJURYINCURREDDUETONEGLECT,ORDUETOUNSAFEINSTALLATIONOR
USAGEOFTHISPRODUCT.CALLTECHNICALSUPPORTWITHANYQUESTIONS.
REPLACINGCOMPONENTS
VacuumSwitch
Beforebeginninganycomponentreplacement,becertaintheunitisunpluggedand
thoroughlycooleddown.
Removethebackpaneloftheunit,usinga5/16”wrench.
Locatethevacuumswitchasshowninthediagrambelow(ontheleftwalloftheunit).
Disconnectthepowerleads
andvacuumhosefromthevac uumswitch,takingnoteof
whereconnectionsweremade.
Removethe(2)screwswhichholdthe
vacuumswitchtothevacuumswitch
bracket,usingaPhillipsscrewdriver.
Installationisthereverseofremoval;be
absolutelycertainthewiresandvacuum
hoseareconnectedastheypreviously
were(andaccordingtothewiringdiagram
inthismanual).
Visityoutube.com/heatredefinedfor
detailedservice‘howto’videos.
Vacuum
Switch
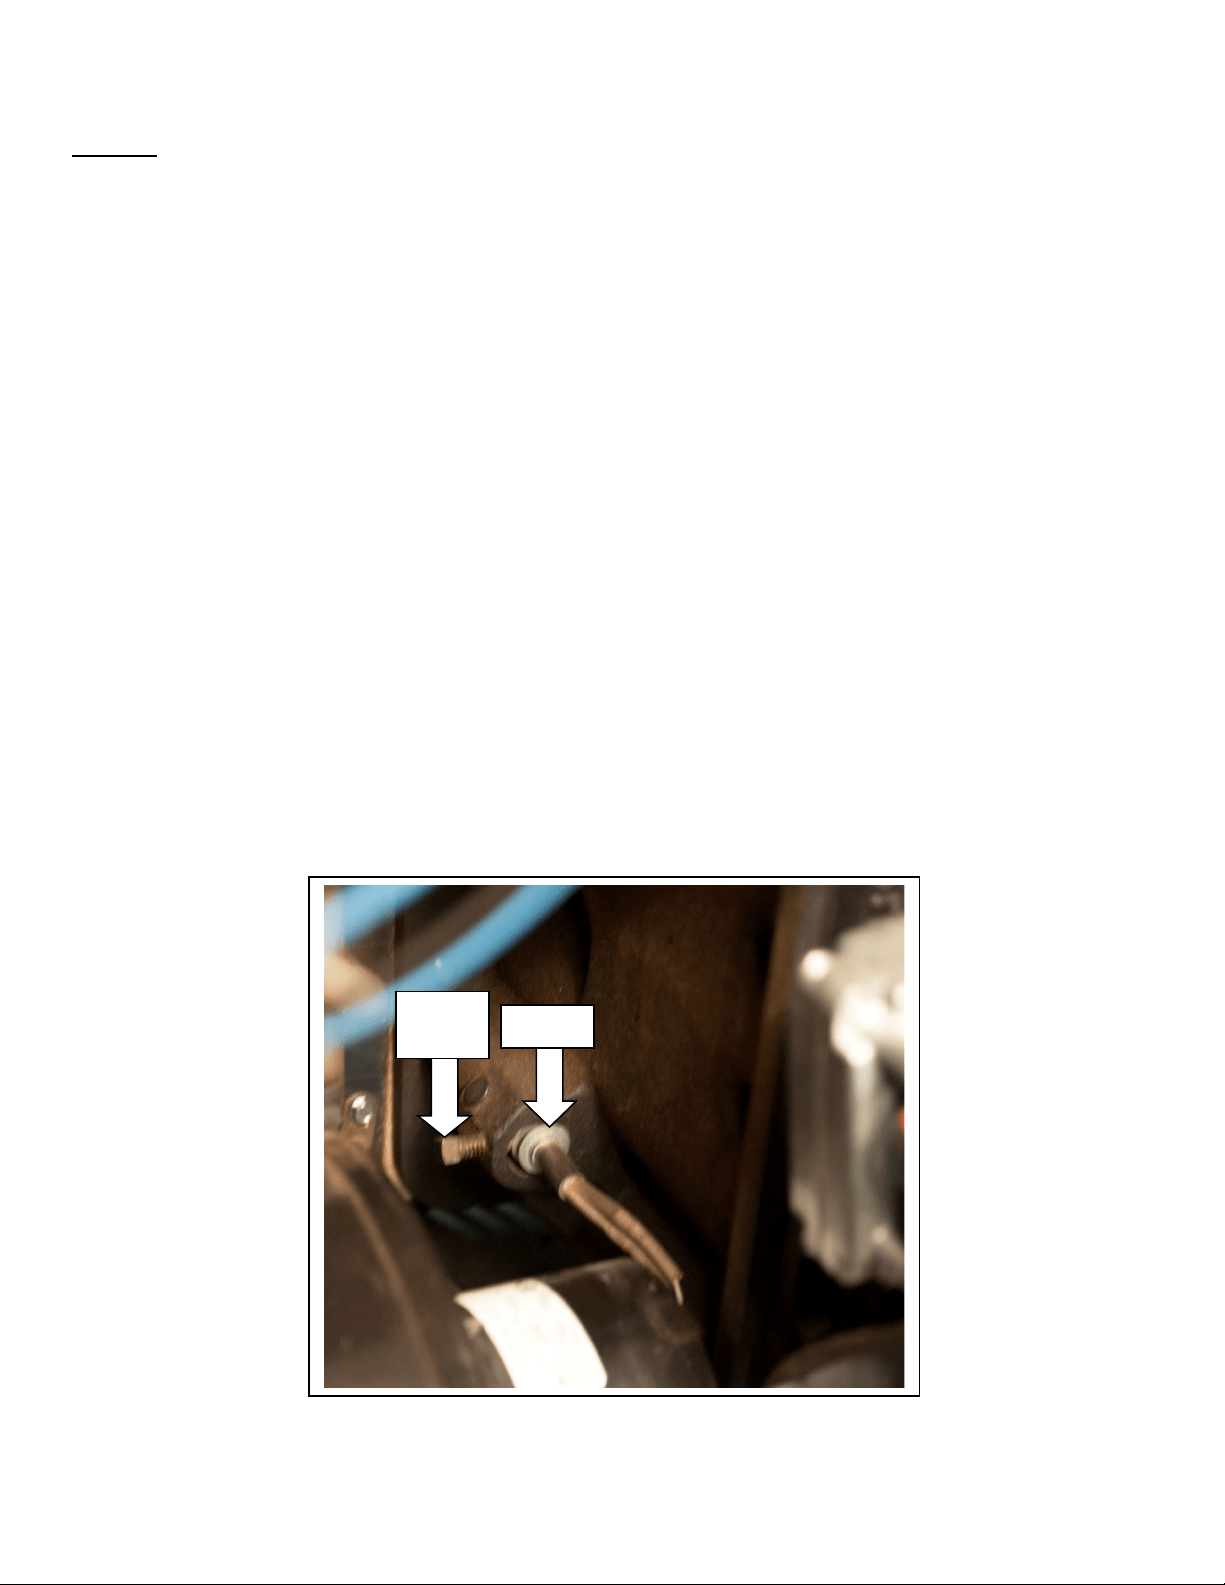
48
IMPORTANT!READANDFOLLOWALLINSTALLATIONANDMAINTENANCEINSTRUCTIONS,INCLUDINGCLEANINGTHEUNITASSPECIFIED,AND
REPLACINGGASKETSANNUALLY,ANDPARTSASNEEDED.
ENGLAND’SSTOVEWORKSISNOTRESPONSIBLEFORANYDAMAGEORINJURYINCURREDDUETONEGLECT,ORDUETOUNSAFEINSTALLATIONOR
USAGEOFTHISPRODUCT.CALLTECHNICALSUPPORTWITHANYQUESTIONS.
REPLACINGCOMPONENTS
Igniter
Beforebeginninganycomponentreplacement,becertaintheunitisunpluggedand
thoroughlycooleddown.
Removethebackpaneloftheunit,usinga5/16”wrench.
Locatetheigniterontheleftsideofthefeederassembly(asviewedfromtherearofthe
unit).
Disconnectthe
powerleadstotheigniter.
Loosenthe5/16”squareheadsetscrewfromtheignitertubeandremovetheoldigniter
cartridge(yourunitmayhaveAllensetscrewwhichneedsa
1
/
8
”Allenwrench).
Install thenewigniterintheignitertube,beingsuretheigniterisflushwiththebackofthe
housing.
Retightenthesetscrewandremembertoreconnectthepowerleads.
Reinstall therearpanel.
Seeyoutube.com/heatredefinedforaservicevideothatshowshow
toreplacetheigniter.
Igniter
Set
Screw

49
IMPORTANT!READANDFOLLOWALLINSTALLATIONANDMAINTENANCEINSTRUCTIONS,INCLUDINGCLEANINGTHEUNITASSPECIFIED,AND
REPLACINGGASKETSANNUALLY,ANDPARTSASNEEDED.
ENGLAND’SSTOVEWORKSISNOTRESPONSIBLEFORANYDAMAGEORINJURYINCURREDDUETONEGLECT,ORDUETOUNSAFEINSTALLATIONOR
USAGEOFTHISPRODUCT.CALLTECHNICALSUPPORTWITHANYQUESTIONS.
REPLACINGCOMPONENTS
Gaskets
1. Door
Thisunitcomeswitha¾”ropegasketinthechannelaroundthedooropeningthat
shouldbereplacedatleastonceeveryyear.Toreplacethedoorgasket(Part#AC‐
DGKHD),theoldgasketmustfirstberemovedentirely—priortoaddingthenew
adhesive,youmay
havetoscrapetheoldcementfromthechannel.Oncethe
cementandgaskethavebeenadded,thedoorshouldbeclosedandlatchedfor
twenty‐fourhourstoallowthecementtoharden.Seenextpageformoreinfo.
2. Window
Ifyouarereplacingthewindowgasket(Part#AC‐GGK),thenewgasketwillalready
haveadhesiveononeside.Removethepaperontheadhesivesideandplacethe
gasketaroundtheoutsideedgeoftheglass,centeredovertheedge.Foldthegasket
edgesoveronthe
glass,forminga“U”shape.
3.
CombustionBlower
TheCombustionBlowerGasket(Part#PU‐CBMG)shouldbereplacedwheneveryou
removeorcleantheCombustionBlowerassembly.
Removethegasketwithaputtyknife,andinstallthenewgasketbyapplying
adhesivetotheblowerflangeandinstallingthenewgasket(instructionsand
adhesiveareprovided
withthegasket).
4. CombustionBlowerMotor
Thecombustionblowermotorgasket(Part#PU‐CBMG)generallydoesnotneed
replacement,asitisnotnormallyremovedfromtheunit.However,iftheexhaust
bloweriscleanedbyremovingonlythemotor,ratherthantheentireblower
assembly,thisgasketmustbeinspectedandreplacedasnecessary.
IMPROPERGASKETMAINTENANCE,INCLUDINGFAILURETOREPLACEGASKETS,
CANCAUSEAIRLEAKSRESULTINGINSMOKE‐BACKS.
ITISMANDATORYTOREPLACEGASKETSANNUALLY.

50
IMPORTANT!READANDFOLLOWALLINSTALLATIONANDMAINTENANCEINSTRUCTIONS,INCLUDINGCLEANINGTHEUNITASSPECIFIED,AND
REPLACINGGASKETSANNUALLY,ANDPARTSASNEEDED.
ENGLAND’SSTOVEWORKSISNOTRESPONSIBLEFORANYDAMAGEORINJURYINCURREDDUETONEGLECT,ORDUETOUNSAFEINSTALLATIONOR
USAGEOFTHISPRODUCT.CALLTECHNICALSUPPORTWITHANYQUESTIONS.
REPLACINGCOMPONENTS
Glass
Thisunithasoneceramicglasspanel(Part#AC‐G9)inthedoor;selfadhesivewindowgasketisincluded
withreplacementwindowspurchaseddirectlyfromEngland’sStoveWorks.Neverreplaceceramicglass
withtemperedoranyothertypeofglassandneveroperatethisunitwithcrackedorbrokenglass.Surface
scratchesareacceptableandnormal,butifthisglassbecomescrackedinanyarea,theunitshouldbeshut
downandtheglassreplacedwiththishigh‐temperatureceramicglass.
CeramicGlassSpecifications
GlassSize:9.125in.(231.78mm)x9.125in.(231.78mm)
GlassType:5mmCeramicGlass
GlassPrecautions
Neverreplaceceramicglasswithtemperedoranyothertypeofglass.
Neveroperatethisunitwithcrackedorbrokenglass.
Donotslamthedoororstriketheglasswithanyobjects.
GlassCleaning
1. BecertainthestoveifOff,andthestoveandtheglassarecompletelycool.
2. Thebuild‐upontheglasswillgenerallybelightandwaterisnormallysufficienttoremovethedeposits.
Ifstubbornsootpersists,useacleanermadespecificallyforthispurpose.Donotscrapetheglassor
useabrasivecleaners.
3. Rinsetheglasswithcleanwateranddrytheglassbeforeresumingnormaloperation.
GlassReplacement(includesDoorGasketreplacementinstructions)
1. Removethedoorfromthestoveandrestitface‐downonafirmworksurface.
2. Removethedoorgasketusingapairofplierstopullitoutofthechannel.
3. Usinga
5
/
16
”wrench,removethe(4)screwsthatholdtheglasstabsinplaceonthedoor.
4. Lifttheoldglasspaneloutanddiscard(beespeciallycarefuliftheoldglassisbrokenorcracked).
5. Thenewglasspanelmustbewrappedwithaself‐adhesivefiberglasstapegasket(Part#AC‐GGK).Thisgasket
servestocushiontheglassfromthesteeldoorandbrackets.
6. Reinstalltheglasstabsusingthescrewspreviouslyremoved.Donotover‐tightenthescrews.
7. Installthenewdoorgasket(Part#AC‐DGKHD)usingtheprovidedhightemperatureadhesive.
8. Hangthedoorbackonthestoveandclosetightlyandallow24hoursforadhesivetocure.
*Seediagramonpage56fordoorassembly.*

51
IMPORTANT!READANDFOLLOWALLINSTALLATIONANDMAINTENANCEINSTRUCTIONS,INCLUDINGCLEANINGTHEUNITASSPECIFIED,AND
REPLACINGGASKETSANNUALLY,ANDPARTSASNEEDED.
ENGLAND’SSTOVEWORKSISNOTRESPONSIBLEFORANYDAMAGEORINJURYINCURREDDUETONEGLECT,ORDUETOUNSAFEINSTALLATIONOR
USAGEOFTHISPRODUCT.CALLTECHNICALSUPPORTWITHANYQUESTIONS.
REPLACINGCOMPONENTS
TopMountedControlBoard
*BEFOREREPLACINGTHECONTROLBOARDBESURETHEUNITISCOOLEDCOMPLETELYAND
UNPLUGGED.*
TheControlBoard(Part#PU‐CB14)isadigitalread‐outboard.Toreplacethecontrolboard,firstunplug
thepowercordfromthewalloutlet.Removethefrontfaceofthecontrolboardbypullingitforward.Once
theboardisapart,useapairofneedlenoseplierstodisconnectthewiringharness,roomsensor,thermostat,
hopperlidandvacuumswitchconnectors.
Whenconnectingthenewboard,reconnectthecomponentsmentionedaboveandsnapthefrontfaceof
thecontrolpanelbackintoplace.Reconnectpowerwhenreadytousetheunit.
RecommendedHeatRanges(ForManualMode):
LowBurn: HeatRangesetting:1 RoomAirBlowersetting:1
MediumLow: HeatRangesetting:2–3 RoomAirBlowersetting:*
MediumHigh: HeatRangesetting:4–8 RoomAirBlowersetting:*
HighBurn: HeatRangesetting:9 RoomAirBlowersetting:9
*NOTE:BlowerSpeedwillautomaticallybeadjustedtothedesiredHeatRangethatyou
select.
Note:Theoverlayonyourunitmayvaryinappearance.
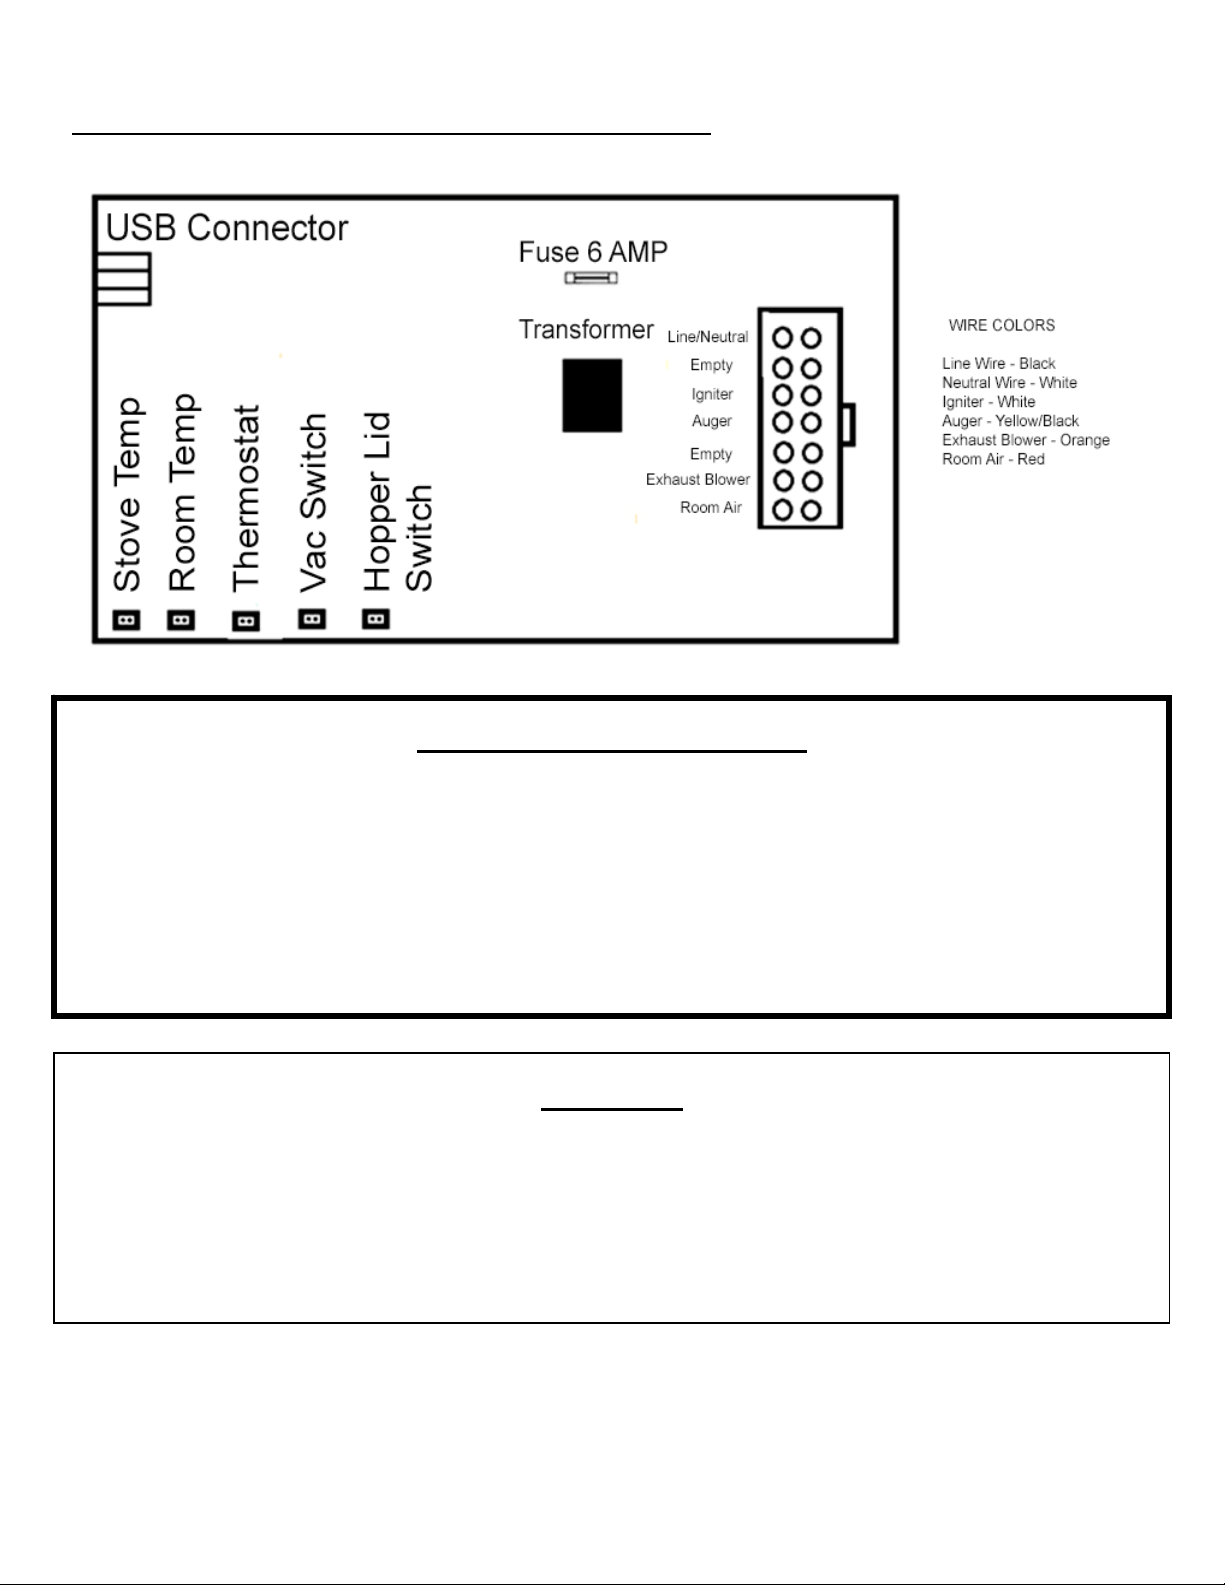
52
IMPORTANT!READANDFOLLOWALLINSTALLATIONANDMAINTENANCEINSTRUCTIONS,INCLUDINGCLEANINGTHEUNITASSPECIFIED,AND
REPLACINGGASKETSANNUALLY,ANDPARTSASNEEDED.
ENGLAND’SSTOVEWORKSISNOTRESPONSIBLEFORANYDAMAGEORINJURYINCURREDDUETONEGLECT,ORDUETOUNSAFEINSTALLATIONOR
USAGEOFTHISPRODUCT.CALLTECHNICALSUPPORTWITHANYQUESTIONS.
ControlBoardWiring–TopMountControlBoard
WIRINGDIAGRAM
Caution–ShockHazard
Pressthe“Off”buttonandlettheappliancecompletelycoolBEFORE
unpluggingtheapplianceandbeginninganymaintenanceorcomponent
replacement.
Riskofshockifapplianceisnotunpluggedbeforeservice.
Caution
Should you see any evidence of smoke in the hopper (smoke back), immediately
close and latch the hopper lid and main door to the unit. Open the nearest windows
and door to the outside, then press the OFF button and let the unit cool for at least 3
hours. Do not open the door or hopper lid. This is a maintenance problem that
needs to be addressed.
Call Technical Support at (800) 245-6489
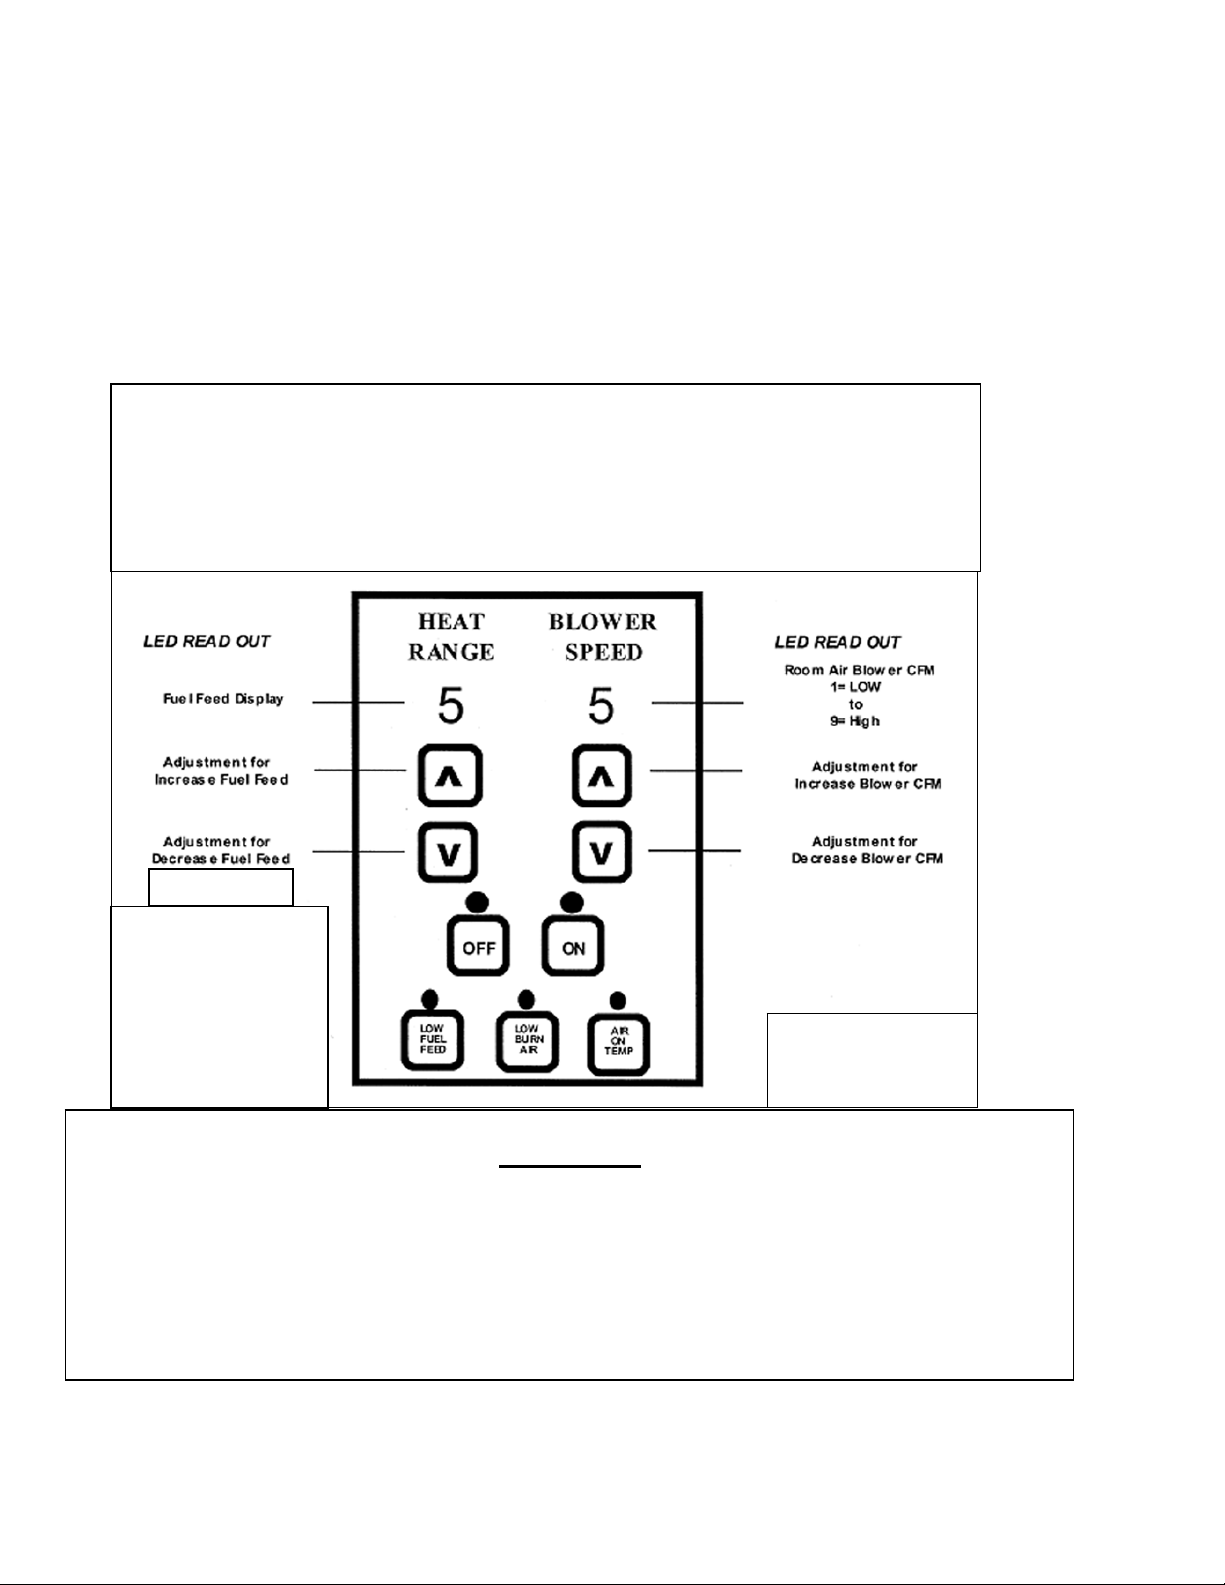
53
IMPORTANT!READANDFOLLOWALLINSTALLATIONANDMAINTENANCEINSTRUCTIONS,INCLUDINGCLEANINGTHEUNITASSPECIFIED,AND
REPLACINGGASKETSANNUALLY,ANDPARTSASNEEDED.
ENGLAND’SSTOVEWORKSISNOTRESPONSIBLEFORANYDAMAGEORINJURYINCURREDDUETONEGLECT,ORDUETOUNSAFEINSTALLATIONOR
USAGEOFTHISPRODUCT.CALLTECHNICALSUPPORTWITHANYQUESTIONS.
REPLACINGCOMPONENTS–SIDEMOUNTEDCONTROLBOARD
The Control Board (Part # PU-CB19) is a digital read-out board. This board offers a wide variety
of settings to operate the unit. This part can be removed from the unit by loosening the two outside
screws and pulling the board back to the inside of the stove. The rear access panel should be
removed prior to removing the control board. A 6-amp “quick-blow” fuse (Part # PU-CBF6) is used on
this Control Board.
NOTE: The bottom three control buttons are preset at the factory and should not require any
changes. See “Operating Instructions” and “Daily Operation” section of the manual for
instructions on other Control Board settings.
RecommendedHeat Ranges:
Low Burn: Heat Range setting: 1 Room Air Blower setting: 1
Medium Low: Heat Range setting: 2 – 3 Room Air Blower setting: *
Medium High: Heat Range setting: 5 – 8 Room Air Blower setting: *
High Burn: Heat Range setting: 9 Room Air Blower setting: 9
* NOTE: Blower Speed should match the Heat Range setting.
NOTE:The bottom
3 buttons are pre‐set at
the factory and do not
needadjustment.
CallServiceat
(800)245‐6489ifyou
havequestionsor
problems.
CAUTION:
ControlBoard
Diagram–Side
Mount
Caution
Should you see any evidence of smoke in the hopper (smoke back),
immediately close and latch the hopper lid and door to the unit. Open the
nearest windows and door to the outside, then press the OFF button and let
the unit cool for at least 3 hours. Do not open the door or hopper lid. This
is a maintenance problem that needs to be addressed.
Call Technical Support at (800) 245-6489
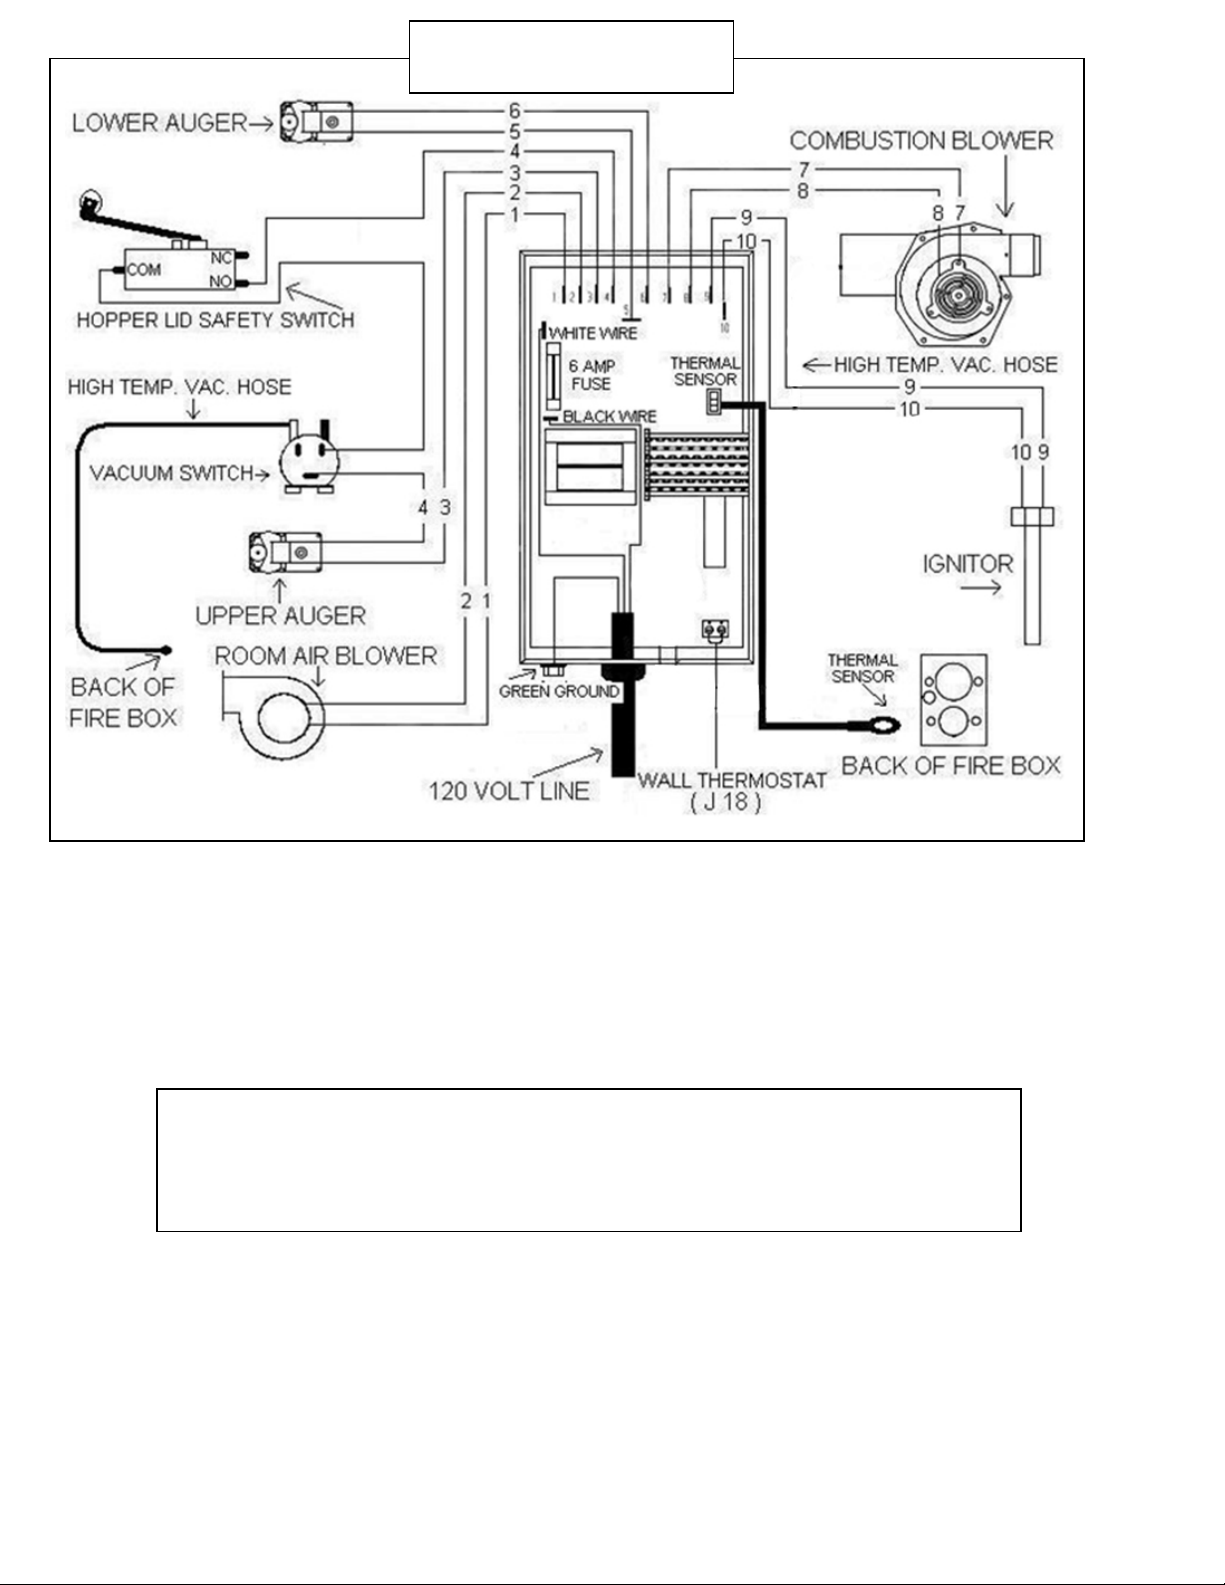
54
IMPORTANT!READANDFOLLOWALLINSTALLATIONANDMAINTENANCEINSTRUCTIONS,INCLUDINGCLEANINGTHEUNITASSPECIFIED,AND
REPLACINGGASKETSANNUALLY,ANDPARTSASNEEDED.
ENGLAND’SSTOVEWORKSISNOTRESPONSIBLEFORANYDAMAGEORINJURYINCURREDDUETONEGLECT,ORDUETOUNSAFEINSTALLATIONOR
USAGEOFTHISPRODUCT.CALLTECHNICALSUPPORTWITHANYQUESTIONS.
CAUTION:MovingPartsMayCauseInjury.
DoNOTOperatewithPanel(s)Off.
DANGER:PartsMayBeHot.RiskofElectricShock.
DisconnectPowerBeforeServicingUnit.
SideMounted
ControlBoardWiringDiagram
IMPORTANT SAFETY NOTE: If the unit or chimney connector pipe
“glows” red (or white), the stove is over-fired. This condition could
cause a house or chimney fire. Do not operate your unit too hot, or
over-firin
g
ma
y
result.
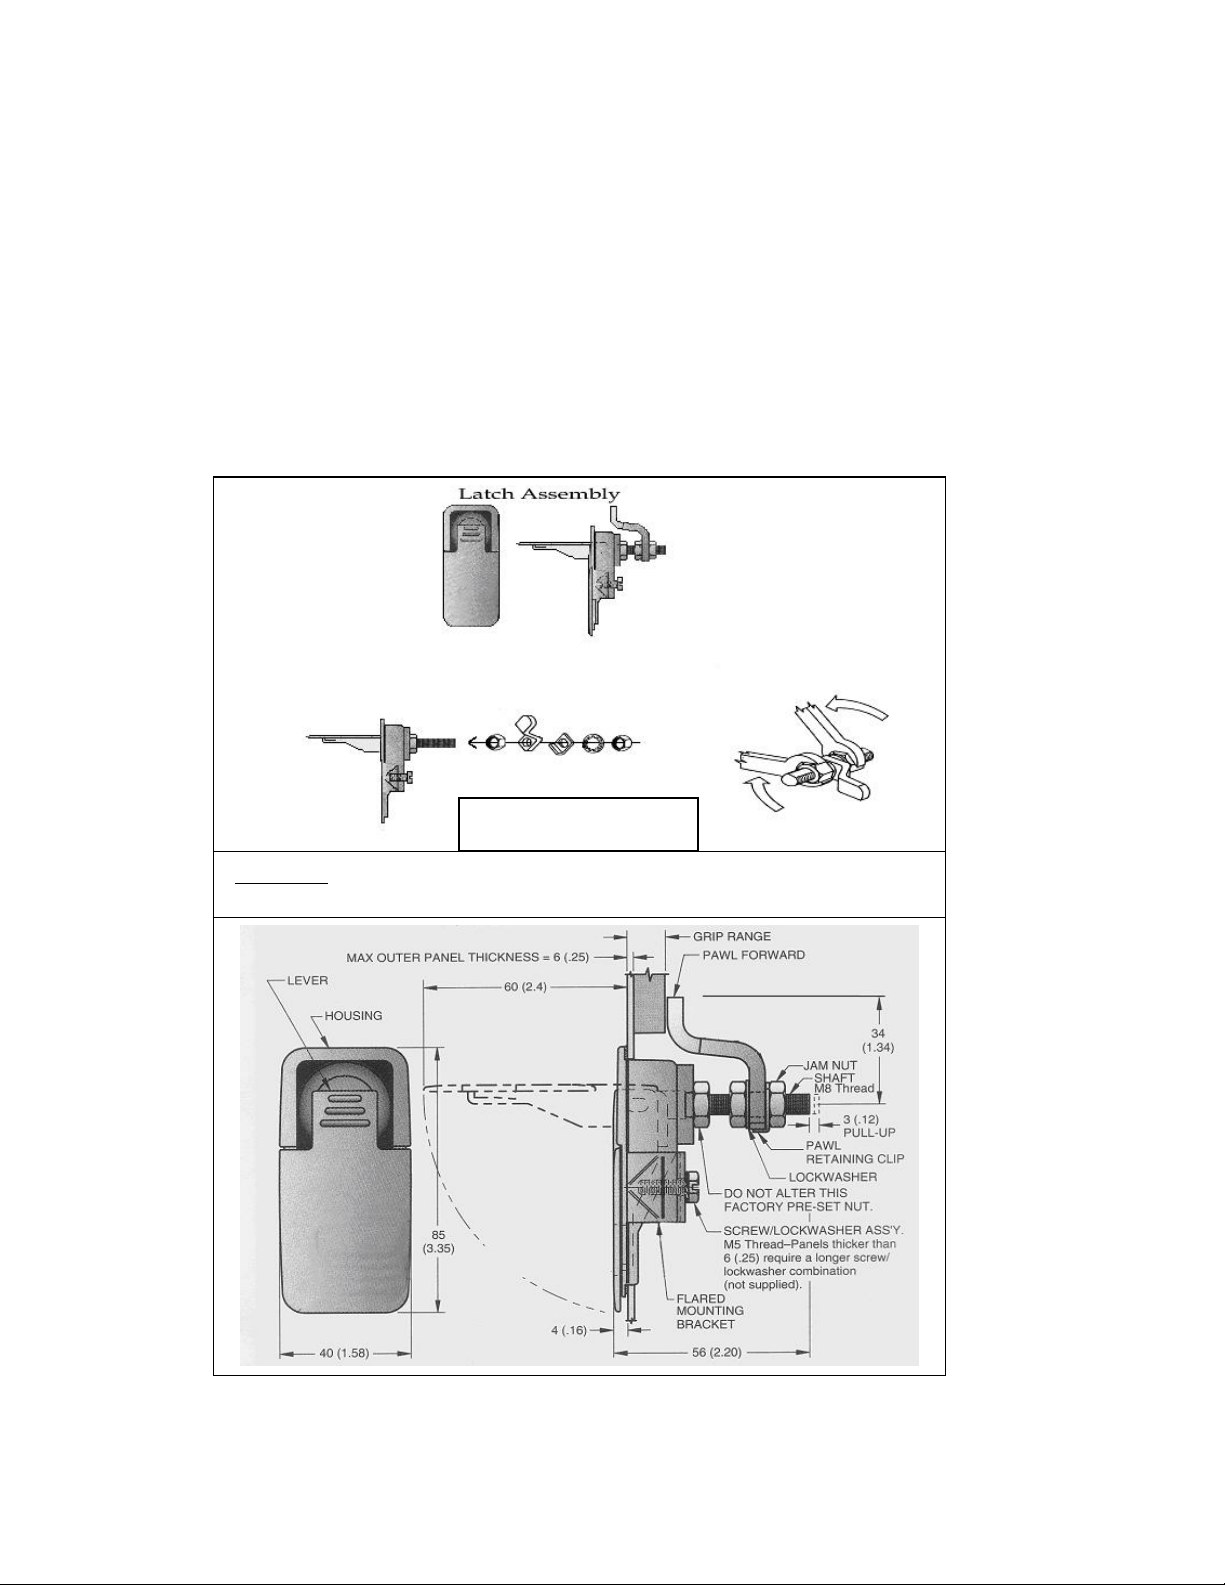
55
IMPORTANT!READANDFOLLOWALLINSTALLATIONANDMAINTENANCEINSTRUCTIONS,INCLUDINGCLEANINGTHEUNITASSPECIFIED,AND
REPLACINGGASKETSANNUALLY,ANDPARTSASNEEDED.
ENGLAND’SSTOVEWORKSISNOTRESPONSIBLEFORANYDAMAGEORINJURYINCURREDDUETONEGLECT,ORDUETOUNSAFEINSTALLATIONOR
USAGEOFTHISPRODUCT.CALLTECHNICALSUPPORTWITHANYQUESTIONS.
Adjusting Hopper Lid Latch
The seals around the top of the pellet hopper are important to safe and efficient operationof the unit. The latch
installedon thisunitisdesignedtopullthehopperlidtightagainstthisseal.Overthecourseofoperationastheseseals
“wearin”andcompress,thetensionof
thelatchshouldbetestedperiodically,andadjustedifnecessary.
To adjust the lidlatch, the following tools will be needed; two ½ inchwrenches, or a ½ inch wrench and a ½inch
socket.
Inordertoadjustthelatch,first(withtheunitunpluggedandcooleddown)open
thehopperlidandthenlockthe
latch in its closed position . Take the ½ inch wrench and loosen the nut closest to the latch. This nut is then adjusted
closertotheliditselftotightenthelatch.Afteradjustingthisnuttothedesiredlocation,holdthisnutin
placewiththe
½inchwrench,thetightendowntheholdingnutontheendofthelatchshaftwiththe½inchsocket(orsecondwrench)
toholdthelatchingassemblyinplace.
Aftertightening the latch, testthe latch for propertension by locking the liddown andlifting eachfront
cornerofthelid.Thelidshouldbefirmlyhelddownbythelatch.Repeatthesameprocedureifthelatchisstill
nottightenough.
Important: HopperLidLatchmustbecheckedperiodicallyandkepttight
sotheto
p
issealedto
p
reventback‐burn.
HopperLidLatch
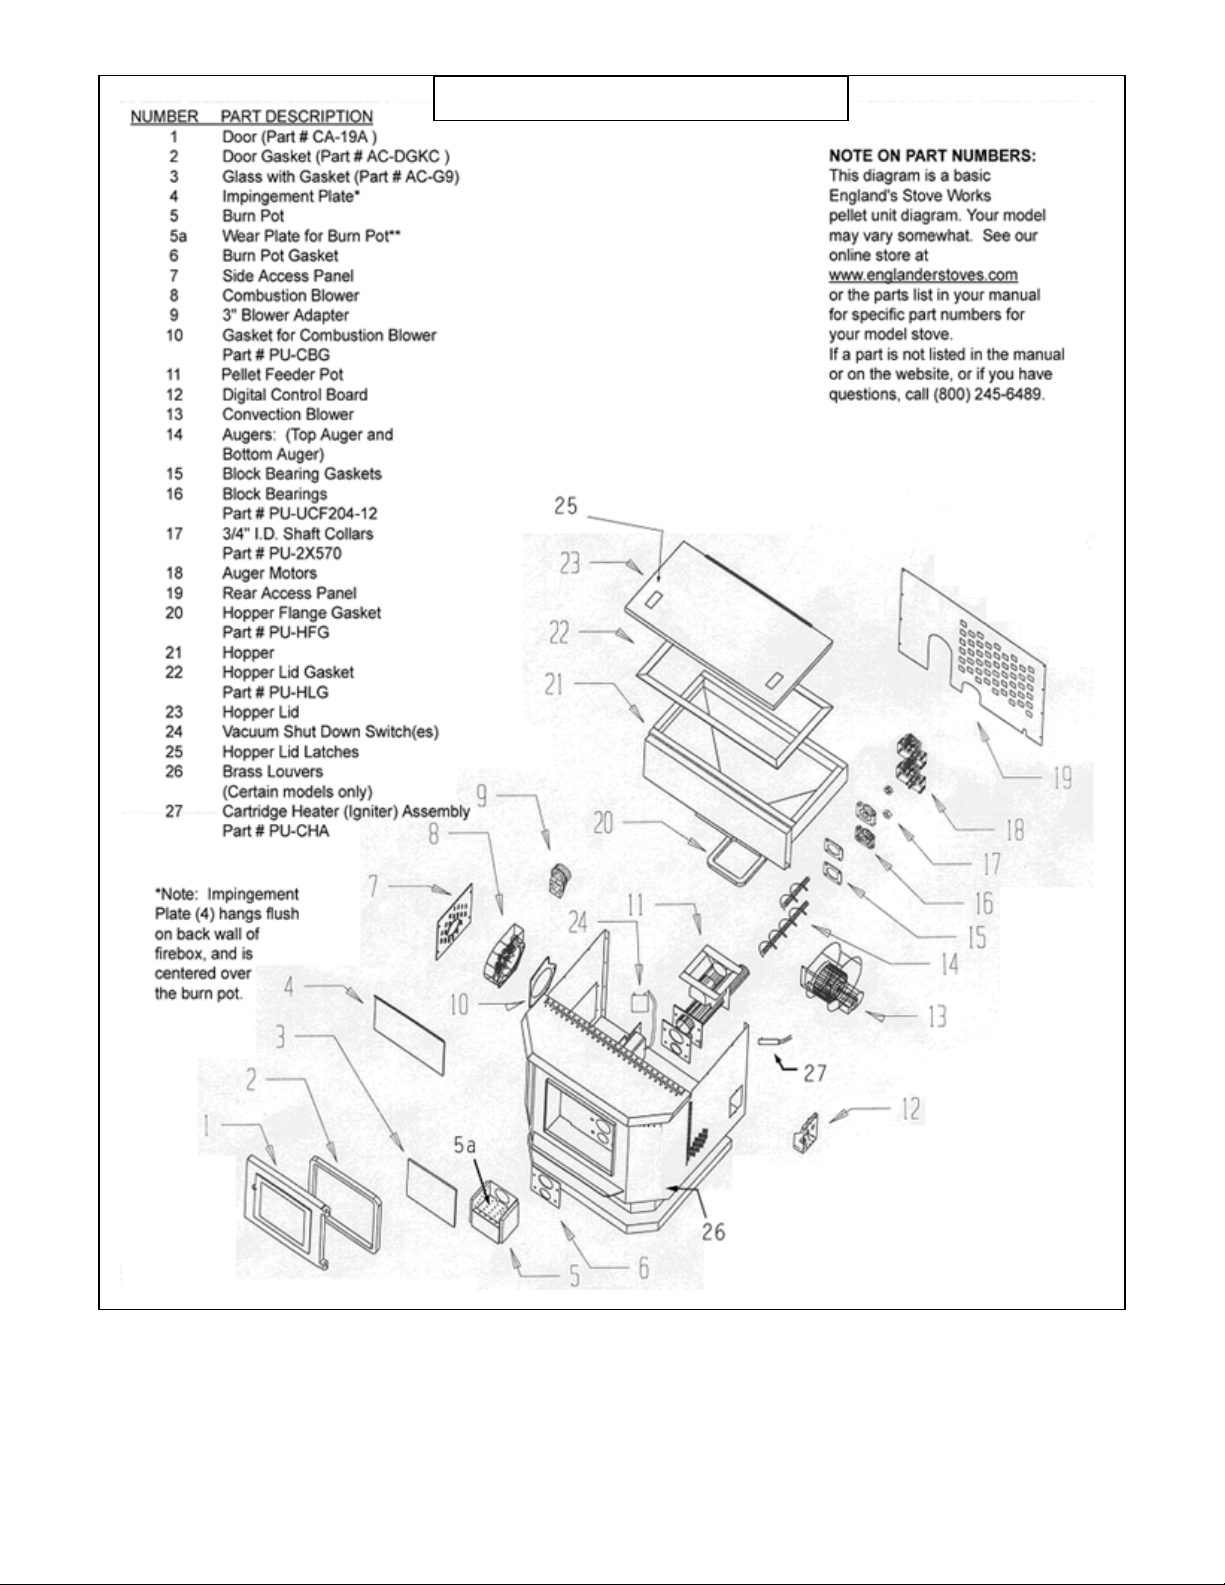
56
IMPORTANT!READANDFOLLOWALLINSTALLATIONANDMAINTENANCEINSTRUCTIONS,INCLUDINGCLEANINGTHEUNITASSPECIFIED,AND
REPLACINGGASKETSANNUALLY,ANDPARTSASNEEDED.
ENGLAND’SSTOVEWORKSISNOTRESPONSIBLEFORANYDAMAGEORINJURYINCURREDDUETONEGLECT,ORDUETOUNSAFEINSTALLATIONOR
USAGEOFTHISPRODUCT.CALLTECHNICALSUPPORTWITHANYQUESTIONS.
PelletStove–ExplodedViewDiagram

57
IMPORTANT!READANDFOLLOWALLINSTALLATIONANDMAINTENANCEINSTRUCTIONS,INCLUDINGCLEANINGTHEUNITASSPECIFIED,AND
REPLACINGGASKETSANNUALLY,ANDPARTSASNEEDED.
ENGLAND’SSTOVEWORKSISNOTRESPONSIBLEFORANYDAMAGEORINJURYINCURREDDUETONEGLECT,ORDUETOUNSAFEINSTALLATIONOR
USAGEOFTHISPRODUCT.CALLTECHNICALSUPPORTWITHANYQUESTIONS.
REPLACEMENTPARTSLIST
PartNo Description
AC‐GGK GlassGasketKit(gasketonly,noglass)
AC‐DGKC DoorGasketKit
AC‐G9 9”x9”GlasswithGasket
AC‐SHN NickelDoorSpringHandle
AC‐MBSP Hi‐TemperatureBlackSprayPaint
PU‐AMS AugerMotorSupportGasket
PU‐047040 1RPMAugerMotorAssembly
PU‐BP18 BurnPotAssembly
PU‐BP18WP WearPlate(fitsinsideburnpot)
PU‐076002B Combustion(Exhaust)Blower–includes3”adapter
PU‐4C447 Convection(RoomAir)Blower
PU‐AF6T TopAugerShaft
PU‐AF11B BottomAugerShaft
PU‐62‐40‐151‐3 HopperLidLatch
PU‐UCF204‐12 AugerBearing
PU‐2X570 ¾”LockingCollar
CU‐VS VacuumShut‐DownSwitch
PU‐VH VacuumHose
PU‐CBMG CombustionBlower&MotorGasket
PU‐BPG BurnPotGasket
PU‐ABGN AugerBearingGasket
PU‐HLG HopperLidGasket
PU‐CHA CartridgeHeater(Igniter)Assembly
PU‐CBF6 6AMPControlBoardFuse
AC‐HLSB HopperLidSafetySwitch
AC‐HP HingePin–rivetforcastdoor
PU‐SSTCW
ThermocoupleWire(onlyincludedontopmountedcontrol
board)
IP‐25PDVC TopBaffle(insidefirebox)
DVD
Manual
PU‐CB14 TopMountedControlBoard(ifincluded)
AC‐CMB
ControlBoardMountingBox(includedwithtop
mountedcontrolboard)
PU‐CB19 SideMountedControlBoard(ifincluded)
Partsmaybeorderedonlineatwww.heatredefined.com

58
IMPORTANT!READANDFOLLOWALLINSTALLATIONANDMAINTENANCEINSTRUCTIONS,INCLUDINGCLEANINGTHEUNITASSPECIFIED,AND
REPLACINGGASKETSANNUALLY,ANDPARTSASNEEDED.
ENGLAND’SSTOVEWORKSISNOTRESPONSIBLEFORANYDAMAGEORINJURYINCURREDDUETONEGLECT,ORDUETOUNSAFEINSTALLATIONOR
USAGEOFTHISPRODUCT.CALLTECHNICALSUPPORTWITHANYQUESTIONS.
Ifyouhaveanyquestions,pleasecontacttheTechnicalSupportDepartment:
TechnicalSupportDepartmentP.O.Box206Monroe,VA24574
Questions:(800)245‐6489
Partsordersonly:(800)516‐3636
Fax:(434)929‐4810
Informationincludingvideos,frequentlyaskedquestions,servicesheetsandmoremaybefoundatour
website:
www.heatredefined.com
Youmaywriteyourunit’sManufactureDateandSerialNumber
intheblankspacesonthissampletag(nextpage),forfuture
reference.
ThissampletagalsoshowsthesafetyinfosuchasUL/ULC
testingstandard,etc.foryourlocalofficials,or anyoneelsewho
mayneeditforreferenceinformation.
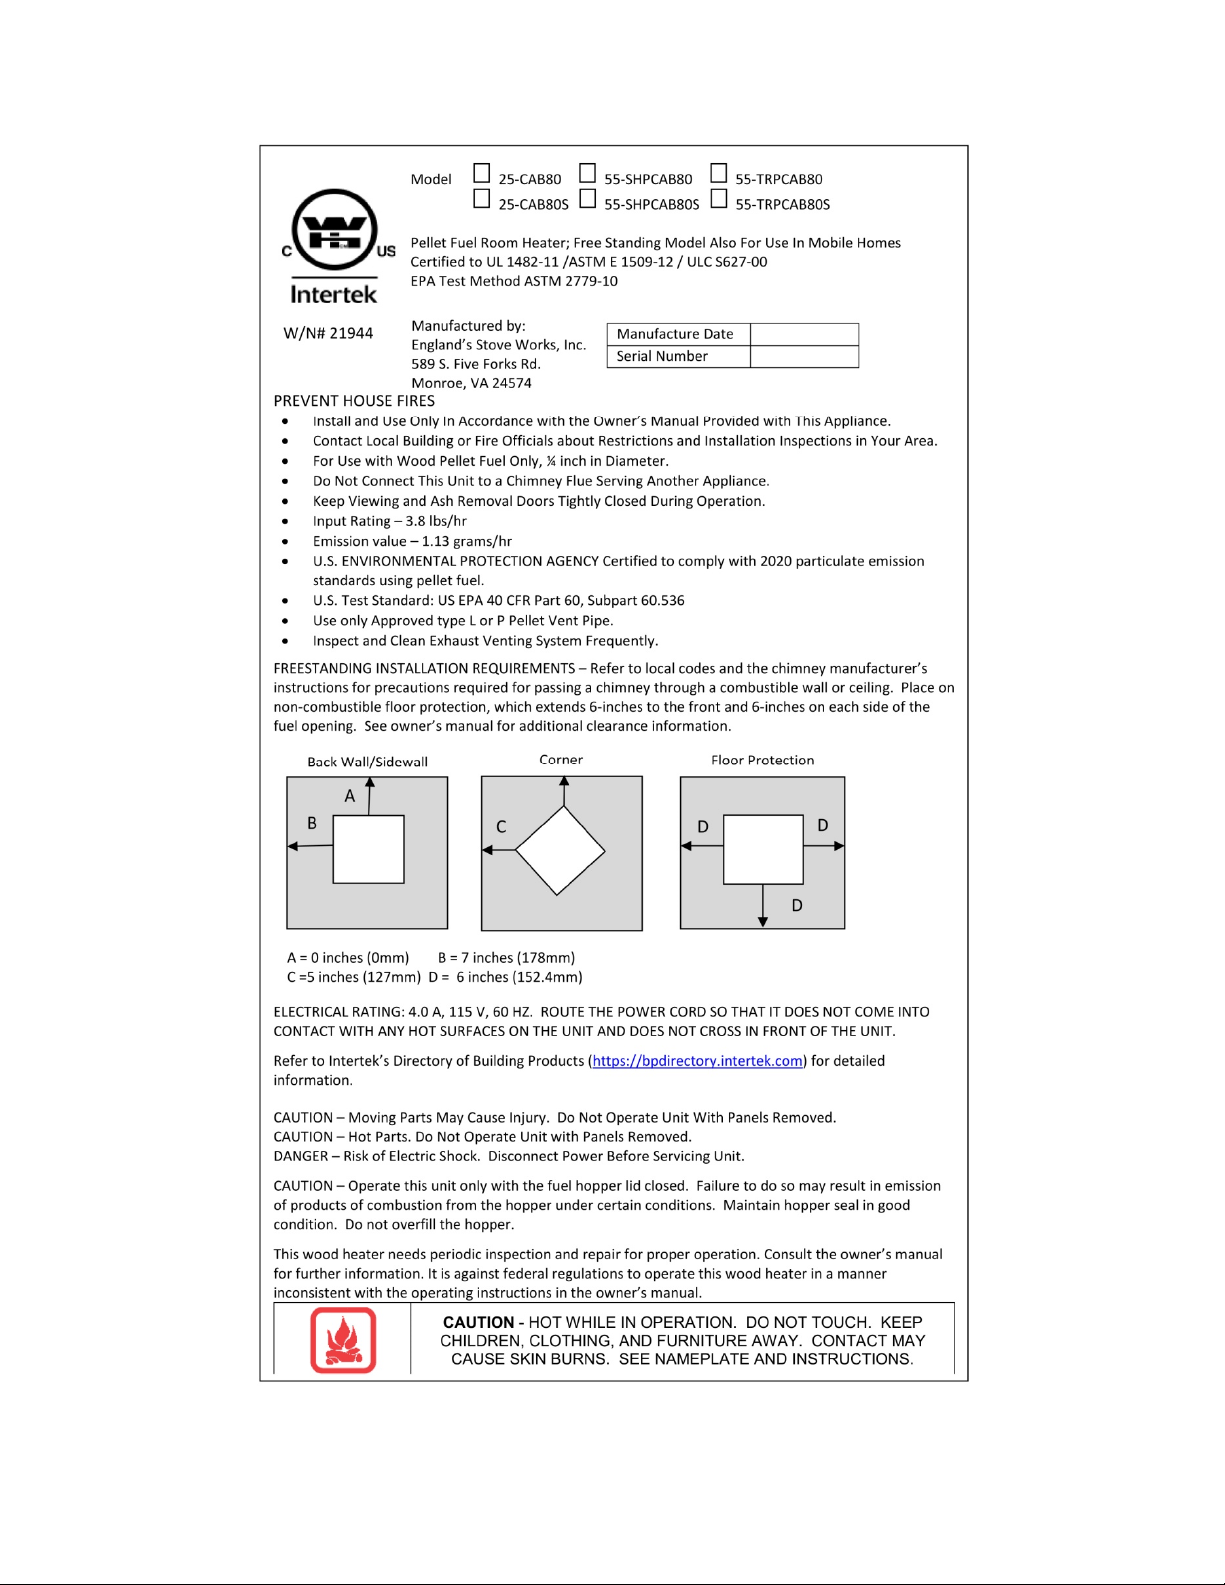
59
IMPORTANT!READANDFOLLOWALLINSTALLATIONANDMAINTENANCEINSTRUCTIONS,INCLUDINGCLEANINGTHEUNITASSPECIFIED,AND
REPLACINGGASKETSANNUALLY,ANDPARTSASNEEDED.
ENGLAND’SSTOVEWORKSISNOTRESPONSIBLEFORANYDAMAGEORINJURYINCURREDDUETONEGLECT,ORDUETOUNSAFEINSTALLATIONOR
USAGEOFTHISPRODUCT.CALLTECHNICALSUPPORTWITHANYQUESTIONS.

60
IMPORTANT!READANDFOLLOWALLINSTALLATIONANDMAINTENANCEINSTRUCTIONS,INCLUDINGCLEANINGTHEUNITASSPECIFIED,AND
REPLACINGGASKETSANNUALLY,ANDPARTSASNEEDED.
ENGLAND’SSTOVEWORKSISNOTRESPONSIBLEFORANYDAMAGEORINJURYINCURREDDUETONEGLECT,ORDUETOUNSAFEINSTALLATIONOR
USAGEOFTHISPRODUCT.CALLTECHNICALSUPPORTWITHANYQUESTIONS.
LIMITEDFIVE(5)YEARWARRANTY
Fromthedateofpurchasetotheoriginalowner.
ModelNumbers25‐CAB80/55‐SHPCAB80/55‐TRPCAB80
Themanufacturerextendsthefollowing warranties:
FiveYearPeriod:
1. Carbonsteelandweldedseamsinthefireboxarecoveredforfive(5)yearsagainst
splitting.
2. Thesteeldoorandhingesarecoveredforfive(5)yearsagainstcracking.
OneYearPeriod:
1. Componentpartssuchasthehopper,auger,burn‐pot,augershaftandfastenersare
coveredforone(1)yearagainstcracking,breakageandweldedseamseparation.
2. Electricalcomponents,accessoryitems,glassandthepaintedsurfaceofthestoveare
coveredforone(1)yearfromthedateofpurchase.
ConditionsandExclusions
1. Damageresultingfromover‐firingwillvoidyourwarranty.
2. Thiswarrantydoesnotapplyifdamageoccursbecauseofanaccident,improper
handling,improperinstallation,improperoperation,abuseorunauthorizedrepairmade
orattemptedtobemade.
3. Themanufacturerisnotliableforindirect,incidental,orconsequentialdamages
in
connectionwiththeproductincludinganycostorexpense,providingsubstitute
equipmentorserviceduringperiodsofmalfunctionornon‐use.*
4. Allliabilityforanyconsequentialdamageforbreachofanywrittenorimpliedwarranty
isdisclaimedandexcluded.
5. ThisunitisEPAcertifiedusinghighquality,
PremiumGradepelletfuel. Warrantyisvoid
iftheunitisusedtoburnmaterialsforwhichtheunitisnotcertifiedbytheEPA.
Warrantyisvoidifunitisnotusedaccordingtotheowner’sm a nual.

61
IMPORTANT!READANDFOLLOWALLINSTALLATIONANDMAINTENANCEINSTRUCTIONS,INCLUDINGCLEANINGTHEUNITASSPECIFIED,AND
REPLACINGGASKETSANNUALLY,ANDPARTSASNEEDED.
ENGLAND’SSTOVEWORKSISNOTRESPONSIBLEFORANYDAMAGEORINJURYINCURREDDUETONEGLECT,ORDUETOUNSAFEINSTALLATIONOR
USAGEOFTHISPRODUCT.CALLTECHNICALSUPPORTWITHANYQUESTIONS.
Procedure
Purchasermustgivenoticeofclaimofdefectwithinthewarrantyperiodandpay
transportationtoandfromaservicecenterdesignatedbythemanufacturer.Thedealerfrom
whichtheunitwaspurchasedorthefactory,atouroption,willperformthewarrantyservice.
OtherRights
Thiswarrantygivesyouspecificlegalrights;youmayalsohaveotherrights,whichmay
varyfromstatetostate.
England’sStoveWorks,Inc.
P.O.Box206
Monroe,VA24574
(800)245‐6489
TosubmitaWarrantyClaim, call (800)245‐6489tospeakwithourTechnicalSupport
department.You
mayalsofileaWarrantyClaimatwww.heatredefined.com
*Somestatesdonotallowtheexclusionoflimitationsofincidentalor
consequentialdamages,sotheabovemaynotapplytoyou
Forparts,warrantyreplacementproceduresmaybefoundatourpartsstoresite
locatedatheatredefined.com

62
IMPORTANT!READANDFOLLOWALLINSTALLATIONANDMAINTENANCEINSTRUCTIONS,INCLUDINGCLEANINGTHEUNITASSPECIFIED,AND
REPLACINGGASKETSANNUALLY,ANDPARTSASNEEDED.
ENGLAND’SSTOVEWORKSISNOTRESPONSIBLEFORANYDAMAGEORINJURYINCURREDDUETONEGLECT,ORDUETOUNSAFEINSTALLATIONOR
USAGEOFTHISPRODUCT.CALLTECHNICALSUPPORTWITHANYQUESTIONS.
ImportantNotice
ThisregistrationinformationMUSTbeonfileforthiswarrantytobevalid.Pleasesendthis
informationwithinthirty(30)daysfromtheoriginaldateofpurchase.
Useanyofthesethreeeasywaystosendyourwarrantyinformationin!
MailingAddress
England’sStoveWorks,Inc.
TechnicalsupportDepartment
P.O.Box206
Monroe,Virginia24574
FaxNumber
(434)929‐4810–Twenty‐fourhoursaday
OnlineRegistration
Toregisteronline,visitourwarrantyregistrationwebsiteat:
http://www.heatredefined.com
PleaseNote:ThiswarrantyisnullandvoidiftheattachedwarrantyregistrationANDa
copyofthesalesreceiptisnotreturnedwithinthirty(30)daysfromthedateof
purchase.
Warrantyisnottransferable.

63
IMPORTANT!READANDFOLLOWALLINSTALLATIONANDMAINTENANCEINSTRUCTIONS,INCLUDINGCLEANINGTHEUNITASSPECIFIED,AND
REPLACINGGASKETSANNUALLY,ANDPARTSASNEEDED.
ENGLAND’SSTOVEWORKSISNOTRESPONSIBLEFORANYDAMAGEORINJURYINCURREDDUETONEGLECT,ORDUETOUNSAFEINSTALLATIONOR
USAGEOFTHISPRODUCT.CALLTECHNICALSUPPORTWITHANYQUESTIONS.
WARRANTYREGISTRATIONforEngland’sStoveWorks®
PurchaserInformation*
I.PurchasedBy(Name) _________________________________________
II.Address ____________________________________________________
III.City _______________________State________ZipCode ____________
IV.TelephoneNumber ___________________________________________
V.EmailAddress _______________________________________________
DealerInformation*
VI.PurchasedFrom _____________________________________________
VII.Address ___________________________________________________
VIII.City_______________________State________ZipCode __________
UnitInformation*
IX.ModelNumber_____________________PurchaseDate _____________
X.PurchasePrice _____________________
XI.SerialNumber_____________________Mfg.Date _________________
PurchaseQuestions
Howdidyoufirsthearaboutourproduct?(Pleasecheckone)
WordofMouth____ BurnTrailerDemonstration____ Internet____
Other: ________________________________________________________
Wheredidyoureceiveinformationaboutourproduct?
ViaTelephone____ Dealer(Nameofdealer)___________ Internet____
Other: ________________________________________________________
*RequiredInformation
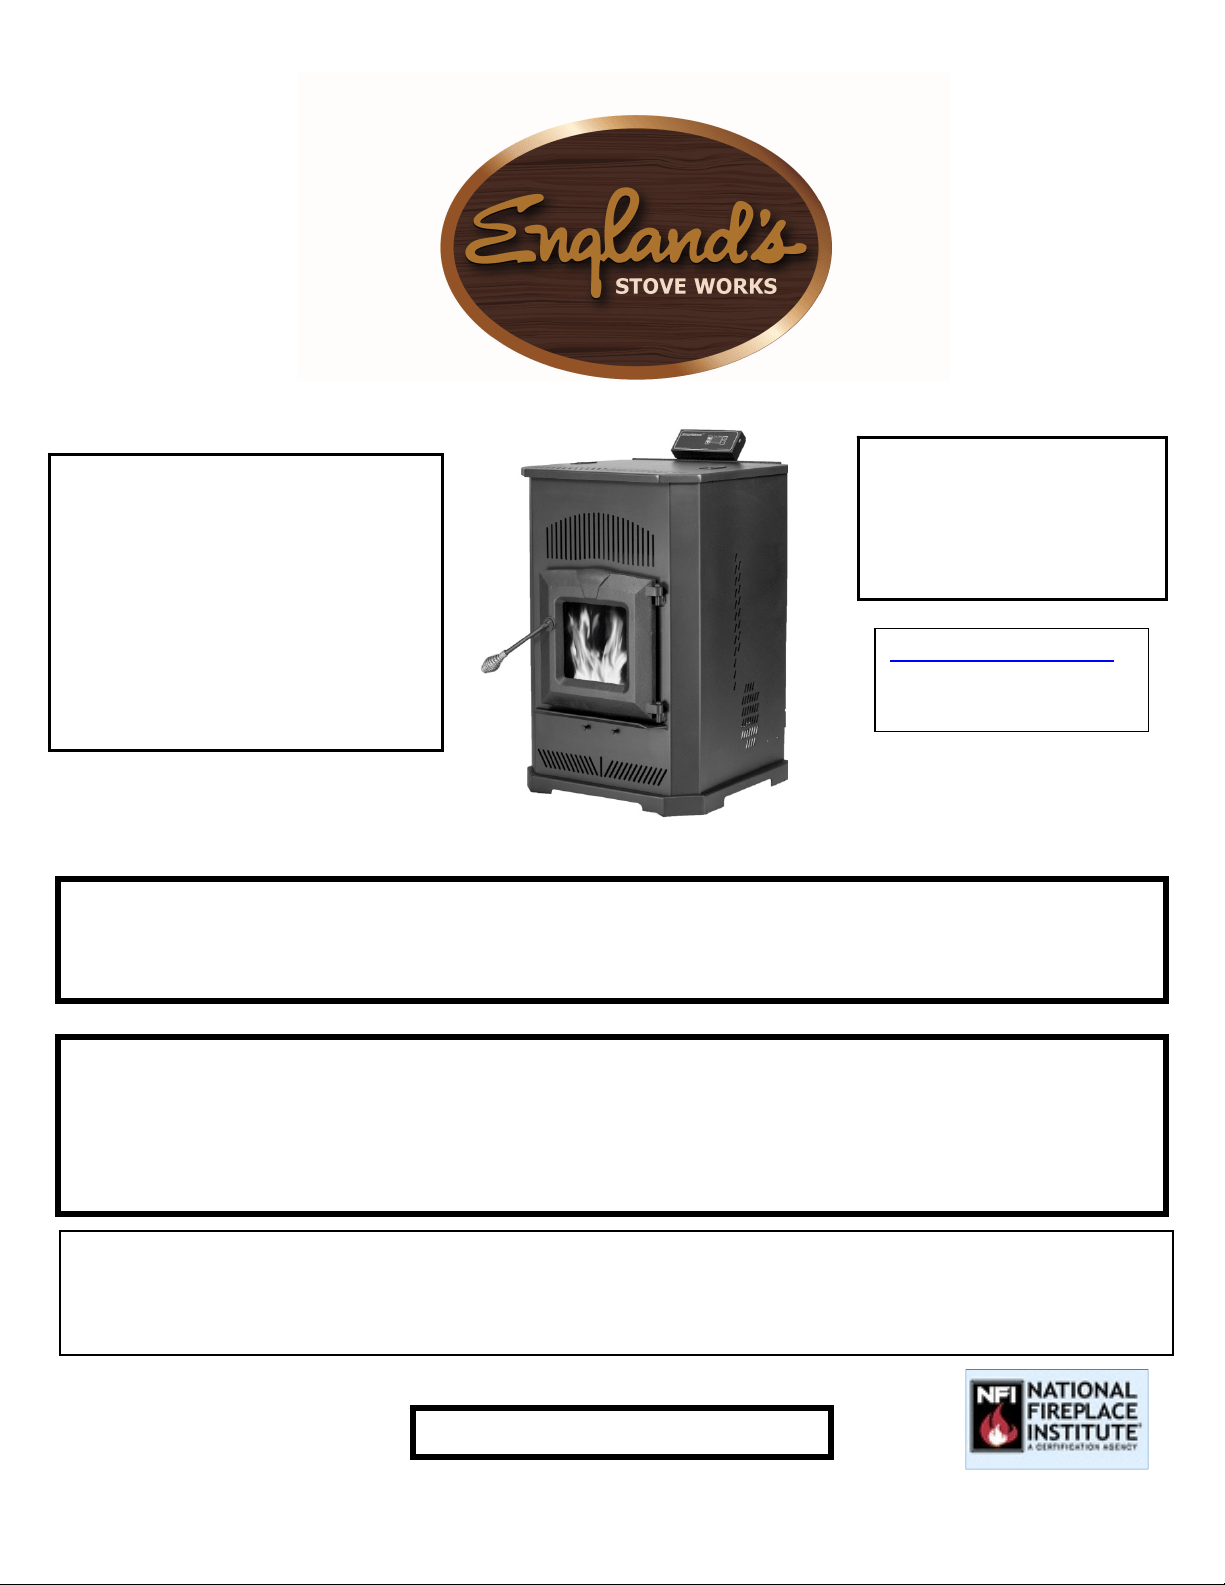
ATTENTION
VEUILLEZLIREL’INTÉGRALITÉDUPRÉSENTGUIDEAVANTD’INSTALLERETD’UTILISERCEPOÊLEÀGRANULES.
GARDEZTOUTAPPAREILDECHAUFFAGEHORSDEPORTÉEDESENFANTS,ETÀBONNEDISTANCEDES
MEUBLESETDESMATIÈRESCOMBUSTIBLES.
AVISDESÉCURITÉ
LENON‐RESPECTDECESINSTRUCTIONSPEUTCAUSERDESDOMMAGESMATÉRIELS,DESBLESSURESOU
MÊMEENTRAÎNERLAMORT.POURVOTRESÉCURITÉETVOTREPROTECTION,SUIVEZLESINSTRUCTIONS
POURL’INSTALLATIONDÉCRITESDANSLEPRÉSENTGUIDE.CONTACTEZLESAUTORITÉSLOCALESENMA TI ÈRE
DECONSTRUCTIONOULESERVICED’INCENDIEAFINDECONNAÎTRELESRESTRICTIONSETLESEXIGENCES
D’INSPECTIONDESINSTALLATIONS(YCOMPRISL’OBTENTIONDEPERMIS)PROPRESÀVOTRERÉGION.
Fabriquépar:
England’sStoveWorks,Inc.
POBox206
Monroe,VA24574,États‐Unis
Rév.6/2020
CONSERVEZCESINSTRUCTIONS
GUIDED’INSTALLATION
ETD’UTILISATION
25‐CAB80
55‐SHPCAB80
55‐TRPCAB80
25‐CAB80S
55‐SHPCAB80S
55‐TRPCAB80S
AFIND’ASSURERLEBONFONCTIONNEMENTDUPOÊLEÀBOIS,VOUSDEVEZL’INSPECTERETLE
RÉPARERPÉRIODIQUEMENT.CONSULTEZLEGUIDED’UTILISATIONPOUROBTENIRDEPLUSAMPLES
RENSEIGNEMENTS.ENVERTUDESRÈGLEMENTSFÉDÉRAUX,ILESTINTERDITD’UTILISERCEPOÊLE
ÀBOISD’UNEMANIÈRENONCONFORMEAUMODED’EMPLOIINDIQUÉDANSLEGUIDED’UTILISATION.
www.heatredefined.com
Pièces: 1800516‐3636
Soutien:1800245‐6489
2
IMPORTANT!LISEZETSUIVEZTOUTESLES INSTRUC T IONSPOURL’INSTALLATIONETL’ENTRETIEN,NOTAM MENTCELLES PORTANTSURLENETTOYA GEDE
L’APPAREILÀEFFECTUERSELO NLESDIRECTIVESETCELLE S PORTANTSURLEREM PLACEMENTDESJOINTS(ANNUELLEMENT)ETDESPIÈCES(AUBESOIN).
ENGLAND’SSTOVEWORKSN’ESTPASRESPONSABLEDESDOMMAGESNIDESBLESSURES,QUELSQU’ILS
SOIENT,SUBISENRAISONDENÉGLIGENCE
OUÀCAUSED’UNEINSTALLATIONOUD’UNEUTILISATIONDANGEREUSEDECEPRODUIT.POURTOUTEQUESTION,COMMUNIQUEZAVECLE
SERVICEDESOUTIENTECHNIQUE.
IMPORTANT:ENCASDEPROBLÈMEAVECCETARTICLE,NELERAMENEZPASAU
DÉTAILLANT.APPELEZLALIGNEDESOUTIENTECHNIQUEAU1800245‐6489.
Avertissementrelatifauxmodifications:
Cepoêleàboisestdotéd’untauxdecombustionbasminimumrégléenusine
quinedoitpasêtremodifié.Envertudesrèglementsfédéraux,ilestinterditde
modifierceréglageetd’utilisercepoêleàboisd’unemanièrenonconformeau
moded’emploiindiquédansleprésentguide.
Utilisationdansunemaisonmobile:
L’utilisationdecepoêleautoportantestapprouvéepourdesmaisonsmobiles
oupouruneinstallationendoublelargeuravecraccordementàl’extérieurpour
l’airdecombustion.Consultezlasection«Installation»duprésentguidepour
connaîtrelesdétailsrelatifsàl’installationdansunemaisonmobile.L’installation
dansdesmaisonstransportablesdoitêtreconformeàlanormeManufactured
HomeandSafetyStandard(HUD),CFR3280,article24.
AVERTISSEMENT:
L’AIRDECOMBUSTIONUTILISÉPARCEPOÊLEDOITPROVENIRDEL’EXTÉRIEUR.
NEPASUTILISERCETAPPAREILAVECLATRÉMIEOUVERTE;LECOUVERCLEDOIT
ÊTREFERMÉETBIENVERROUILLÉAUCOURSDEL’UTILISATION.ÉVITEZDEFAIRE
SURCHAUFFERCETAPPAREIL.
Remarque:England’sStoveWorksrecommandedenepasutiliserunpoêle
àgranulescommeuniquesourcedechaleur.
Àconserverdansvosdossiers
Numérodemodèle
Dated’achat
Datedefabrication
Numérodesérie

3
IMPORTANT!LISEZETSUIVEZTOUTESLES INSTRUC T IONSPOURL’INSTALLATIONETL’ENTRETIEN,NOTAM MENTCELLES PORTANTSURLENETTOYA GEDE
L’APPAREILÀEFFECTUERSELO NLESDIRECTIVESETCELLE S PORTANTSURLEREM PLACEMENTDESJOINTS(ANNUELLEMENT)ETDESPIÈCES(AUBESOIN).
ENGLAND’SSTOVEWORKSN’ESTPASRESPONSABLEDESDOMMAGESNIDESBLESSURES,QUELSQU’ILS
SOIENT,SUBISENRAISONDENÉGLIGENCE
OUÀCAUSED’UNEINSTALLATIONOUD’UNEUTILISATIONDANGEREUSEDECEPRODUIT.POURTOUTEQUESTION,COMMUNIQUEZAVECLE
SERVICEDESOUTIENTECHNIQUE.
Bienvenue!
Introduction
Remerciements...........................................4
Caractéristiques
Caractéristiquesdechauffage.....................5
Dimensions..................................................5
Conformitéauxnormesdel’EPA.................5
Installation
Vued’ensembledel’installation.................6
Dégagemententrel’appareiletles
matièrescombustibles................................7
Introductionàlaventilation........................8
Consignespourlaventilation......................8
Renseignementssupplémentaires
surlaventilation..........................................9
Méthodesdeventilationapprouvées
Àtraverslemur..........................10
Àtraversleplafond.....................11
Cheminéeexistante....................12
Installationdansunemaisonmobile........13
Dégagementsdesterminaisons
desévents..................................................14
Raccordementàl’airextérieur..................15
Protectiondusol.......................................16
Utilisationquotidienne
Typesdepanneaudecommande.............17
Guidededémarrage..................................18
Allumaged’unfeu.....................................18
Remarquesàproposdel’utilisation
quotidienne...............................................19
Panneaudecommande
Réglagesdupanneaudecommande
fixésurledessus........................................21
Codesd’erreurdupanneaude
commandefixésurledessus....................23
Modedediagnosticpourlepanneau
decommandefixésurledessus...............29
Réglagesdupanneaudecommande
fixésurlecôté...........................................
31
Codesd’erreurdupanneaude
commandefixésurlecôté........................32
Pannedecourant......................................33
Entretien
Quotidien
Remarquesimportantes...................34
Retraitquotidiendelacendre..........34
Nettoyagedupotdecombustion........35
Hebdomadaire
Retraitdudéflecteur............................36
Mensuel
Nettoyagedutuyaudeventilation......37
Annuel
Remarquesimportantes......................38
Potdecombustion............................39
Ventilateurd’évacuation...................39
Ventilateurdeconvection.................40
Fini.....................................................40
Jointsd’étanc héité................................40
Dépannagedebase.........................................41
Remplacementdespièces
Ventilateurdeconvection...............................43
Moteurdelavisàgranules..............................44
Ventilateurdecombustion..............................45
Interrupteurdel’aspirateur.............................46
Allumeur..........................................................48
Jointsd’étanchéité...........................................49
Vitre.................................................................50
Panneaudecomm ande (fixésurledessus)......51
Panneau
decommande(fixésurlecôté)........53
Loquetducouvercle delatrémie....................55
Illustrationdétailléedespièces
Vueéclatéedespièces.....................................56
Listedespièces................................................57
Garantie
Exempled’étiquette........................................59
Détailsdelagarantie.......................................60
Avisimportant.................................................62
Formulaired’enregistrementdelagarantie.......63

INTRODUCTION
Mercid’avoirachetécetexcellentproduitd’England’sStoveWorks.
LafamillequiafondéetpossèdeencoreEngland’sStoveWorkscroitfermement
quelestravauxquel’onréalisesoi‐mêmesontlesplussatisfaisants.Voilà
pourquoivousaveztrouvécepoêledansvotremagasindebricolagepréféré.
Nousconcevonset
fabriquonsnospoêlesexpressémentpourquen’importequel
propriétairesoitenmesuredelesentreteniravecdesoutilsdebase.Deplus,nous
sommestoujoursdisposésàvousaideràprocéderdelafaçonlaplussimpleetla
pluséconomiquequisoit.Toutefois,bienqu’ilssoientdeconceptionsimple,nos
poêlesontunrendementextrêmementefficacequipermetdeproduireplusde
chaleuravecmoinsdecombustible.
Sivousavezbesoind’aideausujetdevotrepoêle,veuillezconsulterlavaste
sectiond’aidedenotresiteWebouappelernotreservicedesoutientechnique
au1800245‐6489.Nous
sommespresquetoujoursenmesuredevousguider,
quecesoitpourl’installationoularéparation,ouencasdeproblème,ouencore
pourrépondreàvosquestions.
Nousvoussouhaitonsdesannéesdechauffageagréable,efficaceetdequalité.
Toutel’équiped’England’sStoveWorks
Veuilleznoter:LesrenseignementsobtenussurnotresiteWebouenappelantla
lignedesoutientechniquesontgratuitsentouttemps;cependant,lesréparations
oul’entretienquenousoffronssurplaceoccasionnentdesfrais.
Ce guide peut être téléchargé gratuitement sur le site Web du fabricant. Il s’agit d’un document protégé par le
droit d’auteur et il est strictement interdit de le revendre. Le fabricant peut occasionnellement mettre à jour ce
guide et ne peut être tenu responsable de problèmes, y compris les blessures ou les dommages résultant de
l’utilisation de rensei
g
nements trouvés dans un
g
uide
p
rovenant de sources non autorisées.
ATTENTION:Lepoêleestlourd.
Deplus,lorsquevousmanipulezdestôles,rappelez‐vousqu’ilpeutyavoirdesbordscoupantsoudesbavures.
Bienquenousfassionstousleseffortspossiblespouréliminerlesbordscoupants,veuillezfairepreuvedeprudence
lorsquevousmanipulezdespiècesdemétal.
N’oubliez
pasdedéconnecter(débrancher)lepoêledelasourced’alimentationetdelelaisserrefroidir
complètementavantd’eneffectuerl’entretien.
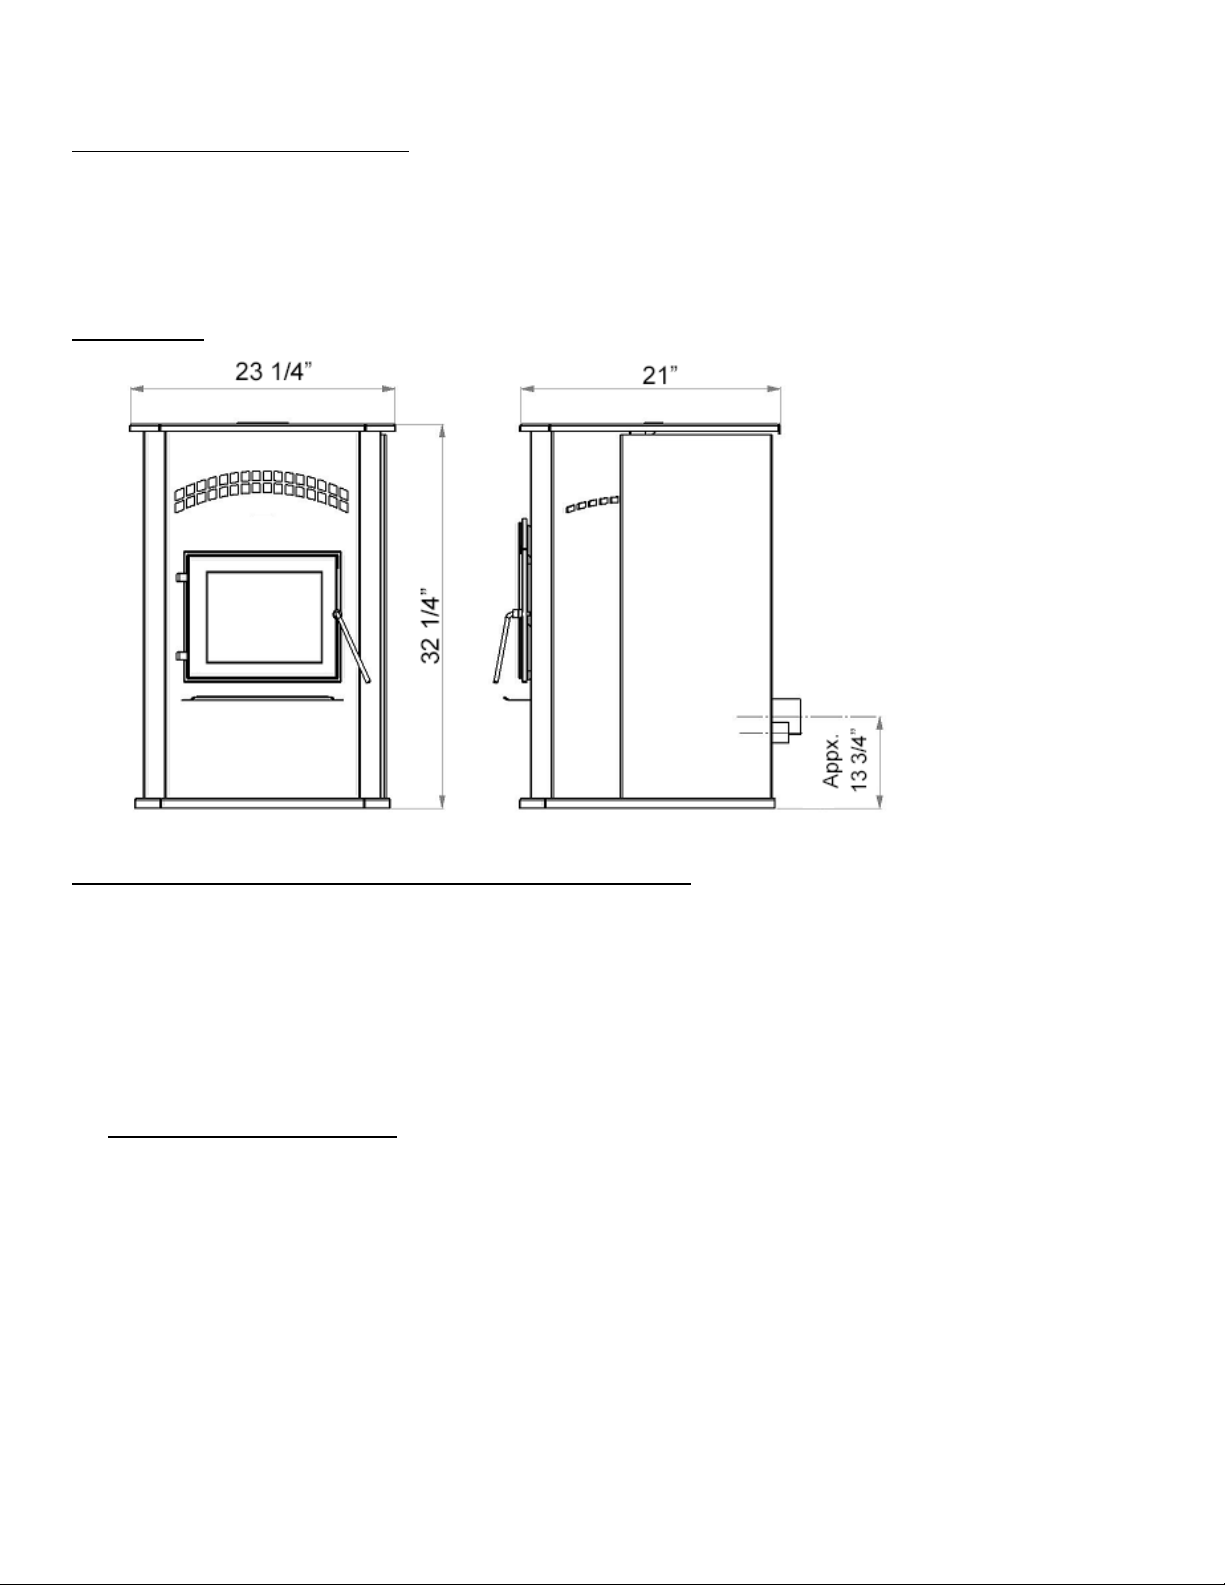
5
IMPORTANT!LISEZETSUIVEZTOUTESLESINSTRUCTIONSPOUR L’INSTALLATIONETL’ENTRETIEN,NOTAMME NTCELLESPORT ANT SURLENET TOYAGEDE
L’APPAREILÀEFFECTUERSELONLESDIRECTIVESETCELLESPORTAN TSURLEREM PLACEMENTDESJOINTS(ANNUELLEMENT)ETDESPIÈCES(AU BESOIN).
ENGLAND’SSTOVEWORKSN’ESTPASRESPONSABLEDESDOMMAGESNIDESBLESSURES,QUELSQU’ILSSOIENT,SUBISENRAISONDENÉGLIGENCE
OUÀCAUSED’UNEINSTALLATIONOUD’UNEUTILISATIONDANGEREUSEDECEPRODUIT.POURTOUTEQUESTION,COMMUNIQUEZAVECLE
SERVICEDESOUTIENTECHNIQUE.
CARACTÉRISTIQUES
Caractéristiquesdechauffage
Tauxapproximatifdecombustiondesgranules**..........de0,99à1,72kg/ h (de2,2à3,8lb/h)
Duréemaximaledecombustion**...............................................................................36heures
Superficieapproximativechauffée***..............................................................jusqu’à185,8m²
Capacitédelatrémie(granules).....................................................................................36,28kg
Dimensions
Conformitéauxnormesdesécuritéetàcellesdel’EPA
Étatdeconformitéauxnormesdel’EPA………………….Certifiéconformeauxnormesde2020sur
l’émissiondeparticuleslorsdel’utilisationdegranulesdebois.
Normed’essaidesÉtats‐Unis:règlement40CFRdel’EPAdesÉtats‐Unis,article60,alinéa60.536
Émissionsdeparticules.............................................................................................1,130g/h
ÉmissionsdeCO2.................................................................................................... 0,029g/h
Efficacité.............................................................................................................64,1%(PCS)
ClassementBTU...............................................................................................20511BTU/h
TestéselonlesnormesUL1482‐00,ASTME1509,ULC/ORD‐C1482‐M1990etULCS627‐00
Remarquespourcetappareil:Leproduitpeutdifférerlégèrementdel’illustration.Lesdistances
indiquéespourcetappareilreprésententleminimumrequis;ledégagementpeutêtreplusimportant
àl’arrièrepourassureruneaérationadéquate.Respecteztouteslesindicationsdufabricantconcernant
lesdistancesminimalesainsiquelesrèglementsmunicipaux.
*–SelonlestestsdelanormeASTM2779‐10
**–L’apportdechaleur,letauxdecombustionetletempsdecombustionmaximumdépendentgrandementdutypedegranulesutilisé,etcesvaleurssont
doncsujettesàvariation.
***–Lacapacitémaximaledechauffagedecetappareil
peutvarierconsidérablementselonleclimat,letypedeconstruction,l’isolationetdenombreuxautres
facteurs.Combinezlesrenseignementsexposésdansleprésentguideauxrésultatsd’uncalculdedéperditionthermiquepourvotremaisonafindedéterminer
sicetappareilsuffiraàcomblervosb esoins.

6
IMPORTANT!LISEZETSUIVEZTOUTESLESINSTRUCTIONSPOUR L’INSTALLATIONETL’ENTRETIEN,NOTAMME NTCELLESPORT ANT SURLENET TOYAGEDE
L’APPAREILÀEFFECTUERSELONLESDIRECTIVESETCELLESPORTAN TSURLEREM PLACEMENTDESJOINTS(ANNUELLEMENT)ETDESPIÈCES(AU BESOIN).
ENGLAND’SSTOVEWORKSN’ESTPASRESPONSABLEDESDOMMAGESNIDESBLESSURES,QUELSQU’ILSSOIENT,SUBISENRAISONDENÉGLIGENCE
OUÀCAUSED’UNEINSTALLATIONOUD’UNEUTILISATIONDANGEREUSEDECEPRODUIT.POURTOUTEQUESTION,COMMUNIQUEZAVECLE
SERVICEDESOUTIENTECHNIQUE.
INSTALLATION
Vued’ensembledel’installation
Ungrandnombredefacteurs–dontvousdevreztenircompteavantdecommencer
l’installation–présidentauchoixdel’emplacementdevotrenouveaupoêle.
1. Habitudesdepassage:afindeprévenirlesaccidents,lepoêledoitêtreinstalléàun
endroitoùiln’encombrepaslepassagehabitueldans
lamaison.
2. Fluxdechaleuret efficacité:tenezcomptedelafaçondontlachaleurcirculedans
votremaisonpourdéciderdel’endroitoùvousinstallerezvotrepoêle.Installezlepoêle
àl’endroitquevousavezbesoindechauffer.Souvent,uneinstallationensous‐solne
permetpas
qu’assezdechaleuratteignelesétagessupérieurs,alorsqu’uneinstallation au
dernierétagenepermetpasquelachaleurserendeauxétages inférieurs.N’oubliezpas
que,tantqu’ilestchaud,l’airmonteetempruntelecheminoffrantlemoinsderésistance.
3. Emplacementdel’évacuation:lesmursextérieurssont
engénéralceuxdevantlesquels
ilconvientd’installerunpoêle,étantdonnéquel’onpeutyinstallerplusfacilementdes
dispositifsd’évacuationetdeprised’air(àl’aidedel’e ns emb le DuraVentAC‐3000,
AC‐33000au Canada).S’iln’estpaspossibled’installerlepoêledevantunmurextérieur,on
peut
avoir recoursàdesméthodespourl’aérerenpassantautraversdutoit; cependant,
cesméthodessontgénéralementpluscoûteu ses, carellesnécessitentlaposed’untuyau
deventilationpluslong,et ellescompliquentsouventl’ installationdelaprised’air.
4. Constructiondesmurs:lefaitdedisposerlepoêle
entrelesmontantsd’unecloison
simplifiel’installationetéliminelanécessitéderestructurerlemurpouryposerle
coupe‐feumural.
Avertissement
Nestockezpasetn’utilisezpasd’essencenitouteautrevapeurouliquideinflammable
àproximitédecetappareiloudetoutautreappareil.
Évitezl’emballementdupoêle.Sidespiècesextérieurescommencentàrougeoyer,
ilyaemballement.Réduisezl’alimentation.L’emballementannuleravotregarantie.
Respectezlesindicationsrelativesàladistanceminimaled’unematièrecombustible.
Lenon‐respectdecesexigencespourraitprovoquerl’incendiedelamaison.
Testéetapprouvépourgranulesdeboisuniquement.L’utilisationdetoutautre
combustibleannuleravotregarantie.
Àutiliseruniquementavecdesgranulesdeboisdequalitésupérieure.

7
IMPORTANT!LISEZETSUIVEZTOUTESLESINSTRUCTIONSPOUR L’INSTALLATIONETL’ENTRETIEN,NO TAMMENTCELLESPOR TAN TSURLENET TOYAGEDE
L’APPAREILÀEFFECTUERSELON LESDIRECTIVESETCELL ESPORTANTSURLEREMPLACEMENTDES JOINTS(ANNUELLEMENT)ETDESPIÈCES(AUBESOIN ).
ENGLAND’SSTOVEWORKSN’ESTPASRESPONSABLEDESDOMMAGESNIDESBLESSURES,QUELSQU’ILSSOIENT,SUBISENRAISONDENÉGLIGENCE
OUÀCAUSED’UNEINSTALLATIONOUD’UNEUTILISATIONDANGEREUSEDECEPRODUIT.POURTOUTEQUESTION,COMMUNIQUEZAVECLE
SERVICEDESOUTIENTECHNIQUE.
INSTALLATION
Dégagemententrel’appareiletlesmatièrescombustibles
ATTENTION
CetappareilpeutdevenirtrèsCHAUDlorsqu’ilestenmarche.Gardezlesenfantsàl’écart.
Surveillezlesenfantsquisetrouventdanslamêmepiècequecetappareil.
Prévenezenfantsetadultesdesrisquesquereprésententlestempératuresélevées.
N’utilisezPASl’appareilsilesbarrièresprotectricessontouvertesoumanquantes.
Tenezlesvêtements,lesmeubles,lesrideauxetlesautresmatièrescomb ustiblesàbonnedistance.
L’installationDOITêtreconformeauxcodesetauxrèglementsmunicipaux,régionaux,provinciauxetnationaux.
Consultezlesautoritéslocalesenmatièredeconstruction,leserviced’incendieoulesorganismesdecontrôlelocaux
àproposdesrestrictions,del’inspectiondesinstallationsetdel’ob tentiondepermis.
NERACCORDEZL’APPAREILÀAUCUNCONDUITNISYSTÈME DEDISTRIBUTIONDEL’AIR
Del’appareilau
murlatéral(A)
Del’appareilau
murdufond(B)
Del’appareil
aucoin(C)
17,78cm 0cm 12,7cm
7po 0po 5po

8
IMPORTANT!LISEZETSUIVEZTOUTESLESINSTRUCTIONSPOUR L’INSTALLATIONETL’ENTRETIEN,NOTAMME NTCELLESPORT ANT SURLENET TOYAGEDE
L’APPAREILÀEFFECTUERSELONLESDIRECTIVESETCELLESPORTAN TSURLEREM PLACEMENTDESJOINTS(ANNUELLEMENT)ETDESPIÈCES(AU BESOIN).
ENGLAND’SSTOVEWORKSN’ESTPASRESPONSABLEDESDOMMAGESNIDESBLESSURES,QUELSQU’ILSSOIENT,SUBISENRAISONDENÉGLIGENCE
OUÀCAUSED’UNEINSTALLATIONOUD’UNEUTILISATIONDANGEREUSEDECEPRODUIT.POURTOUTEQUESTION,COMMUNIQUEZAVECLE
SERVICEDESOUTIENTECHNIQUE.
INSTALLATION
Introductionàlaventilation
Cepoêleàgranulesfonctionneavecàunsystèmeàtiragenégatifquitirel’airdecombustion
autraversdupotdecombustionetpoussel’airviciéautraversdutuyaudeventilationpuisà
l’extérieurdubâtiment.Cetappareil doitêtreinstalléconformémentauxtechniquesdeventilation
décritesci‐après;
lenon‐respectdesdétailsmentionnéspourraitréduiresonrendementetcauserdes
dommagesmatériels,desblessuresoulamort.England’sStoveWorksn’estpasresponsabledes
dommagescausésparuneinstallationincorrecteounonsécuritaire.
Notreservicedesoutientechniqueest joignableau1800245‐6489pourrépondre
aux
questionsrelativesàl’installationsécuritairedu poêle. Communiquezavecunagentresponsablelocal
afindevousassurerquel’installationestconformeauxexigencesmunicipalesetnationalesenmatière
depréventiondesincendies.Sivousn’êtespascertaindepouvoirinstallerlepoêledefaçon
sécuritaire,nousvoussuggéronsfortement
defaireappelàuninstallateurlocalcertifiéparleNFI
(NationalFireplaceInstitutedesÉtats‐Unis).
Consignespourlaventilation
AVERTISSEMENT:INSTALLEZL’ÉVENTENRESPECTANTLESDÉGAGEMENTSINDIQUÉSPARLE
FABRICANTDEL’ÉVENT.
Installez
TOUJOURSletuyaudeventilationenrespectantrigoureusementlesinstructionsetles
indicationssurledégagementquiaccompagnentlesystèmedeventilation.
NERACCORDEZPASlepoêleàgranulesàunconduitdefuméedéjàutilisépourunautreappareil.
N’INSTALLEZPASderégulateurdetirage,niaucunautre
dispositifderéglagedanslesystème
d’évacuationparventilationdecetappareil.
UTILISEZuncoupe‐feumuralapprouvélorsqueleconduittraverseunmuretunsupportde
plafondavecuncoupe‐feusileconduittraverseleplafond.
UTILISEZUNIQUEMENTdestuyauxdetypeLouPL
de3poou4poapprouvéspourla
ventilationdespoêlesàgranules;N’UTILISEZPASdetuyauxgalvanisés,nidetuyauxdetypeB.
SCELLEZchaquejointdel’éventavecdusiliconepourhautetempérature(piècenºAC‐RTV3)
afind’éviterquelafuméeserépandedanslamaison.
ÉVITEZautantquepossibleleslongssegmentshorizontauxetlescoudes,carceux‐ciréduisent
letiragedusystèmedeventilation,cequiamoindritlerendementdupoêle.
DISPOSEZautantquepossibleletuyauàlaverticaleafind’éviterquelafuméedel’appareilne
pénètredansvotre
maisondanslecasd’unecoupured’électricité.
INSPECTEZsouventlesystèmedeventilationafindevousassurerqu’iln’estpasengorgépar
descendresvolantesouparquoiquecesoitd’autre.
NETTOYEZlesystèmedeventilationcommel’indiquelasectionsurl’entretienduprésentguide.
AVERTISSEMENT
INSTALLEZL’ÉVENTENRESPECTANTLESDISTANCESMINIMALESINDIQUÉESPARSONFABRICANT.
CHAUD!N’ytouchezpas!Celapourraitentraînerdegr avesbrûluresoul’inflamma tiondesvêtements.
Lavitreainsiquelesautressurfacesdeviennentchaudesaucoursdel’utilisation.
N’essayezpasdetouchernid’ouvrirlespanneauxfrontaux,
latérauxouarrièreaucoursde
l’utilisation.Vouspourriezsubirdegravesbrûluresoublessures.

9
IMPORTANT!LISEZETSUIVEZTOUTESLESINSTRUCTIONSPOUR L’INSTALLATIONETL’ENTRETIEN,NOTAMME NTCELLESPORT ANT SURLENET TOYAGEDE
L’APPAREILÀEFFECTUERSELONLESDIRECTIVESETCELLESPORTAN TSURLEREM PLACEMENTDESJOINTS(ANNUELLEMENT)ETDESPIÈCES(AU BESOIN).
ENGLAND’SSTOVEWORKSN’ESTPASRESPONSABLEDESDOMMAGESNIDESBLESSURES,QUELSQU’ILSSOIENT,SUBISENRAISONDENÉGLIGENCE
OUÀCAUSED’UNEINSTALLATIONOUD’UNEUTILISATIONDANGEREUSEDECEPRODUIT.POURTOUTEQUESTION,COMMUNIQUEZAVECLE
SERVICEDESOUTIENTECHNIQUE.
INSTALLATION
Renseignementssupplémentairessurlaventilation
Nemélangezpasetn’associezpasdepiècesprovenantdedifférentsfabricantslorsquevous
installezlesystèmedeventilation(parexemple,n’utilisezPASletuyaud’unfabricantavecla
gainepourtuyaud’unautrefabricant).
Ilestnécessairequeletuyausoitdisposéverticalementsuraumoins91,44cm
pourcréerun
tiragenatureldanslesystème.Celafaciliteral’évacuationdelafuméedupoêledanslecas
d’unepanned’électricitéoud’unedéfectuositéduventilateurdecombustion.
Lessystèmesdeventilationlon gsde4,57mou moinsdevraientêtrecomposésinté g r a le m en t
detuyauxpourpoêleàgranules
de3poafinderéduirelespertesattribuablesàlafriction.Les
systèmespluslongs,quantàeux, doiventêtrecomposésdetuyaux pourpoêleàgranulesde4po.
Nefaitespasaboutirlesystèmedeventilationdirectementsousunestructurecombustible
commeunporcheouuneterrasse.
RespectezlesnormesNFPA211énuméréesci‐dessous,relativesàl’emplacementdela
terminaisondessystèmesdevent ilationenfonctiondel’emplacementdesfenêtresetdes
autresouverturesd’unerésidence.
o NFPA211(version2006)Section10.4Terminaison:10.4.5
(1)L’extrémitédesortiedessystèmesmécaniquesdetirage
autresquelesdispositifsde
ventilationdirecte(dispositifspourdesappareilsàcombustionétanche)doitêtresituée
conformémentauxindicationssuivantes:
(a)Àaumoins0,91m(3pi)au‐dessusdetouteprised’airparventilationforcée
situéedansunrayonde3,04m(10pi).
(b)
Àaumoins1,21m(4pi)endessous,1,21m(4pi)latéralementet0,3m(1pi)
au‐dessusdetouteporte,fenêtreouprised’airpargravitéd’unbâtiment.
(c)Àaumoins0,6m(2pi)d’unbâtimentvoisinetàaumoins2,13m
(7pi)
au‐dessusdutrottoirlorsqu’ellejouxtelavoiepublique.
Lahauteurdel’ouvertureparrapportauniveaudusolàsonaplombdoitêtred’aumoins0,6m
(60,96cm).Lorsquevousmesurezlahauteurdelaterminaison,prenezencomptelahauteur
habituelledesbancsdeneige
etlaprésenced’élémentscombustiblescommelestasd’herbes
oudefeuilles.Danslesrégionsoùdeschutesdeneigeimportantessontpossibles,lahauteur
delaterminaisondoitêtresuffisantepourquecettedernièrenesoitpasobstruéeparles
accumulationsdeneige.
N’ayezpasrecoursàdes
expédientsaucou rsdel’insta llatio netnedisposezaucunedespièces
del’ appareiloudusystèmedeventilationd’unefaçonquipourraitproduiredeseffetsdangereux.
Leraccorddecheminéenedoitpastraverserdegrenier,decomble,deplacardnid’autres
espacesdissimuléssimilaires,deplancher,nideplafond.
Lepassageautraversd’unmuroud’unecloisonenmatériaucombustibledoitêtreréalisé
conformémentàlanormeCAN/CSA‐B365.
AVERTISSEMENT:
Lessurfacesdusystème deventilationdeviennentCHAUDESetpeuventcauserdesbrûluressivous
lestouchez.
Ilpeutêtrenécessaired’utiliserunrevêtementoudesgrillesdeprotectionincombustibles.
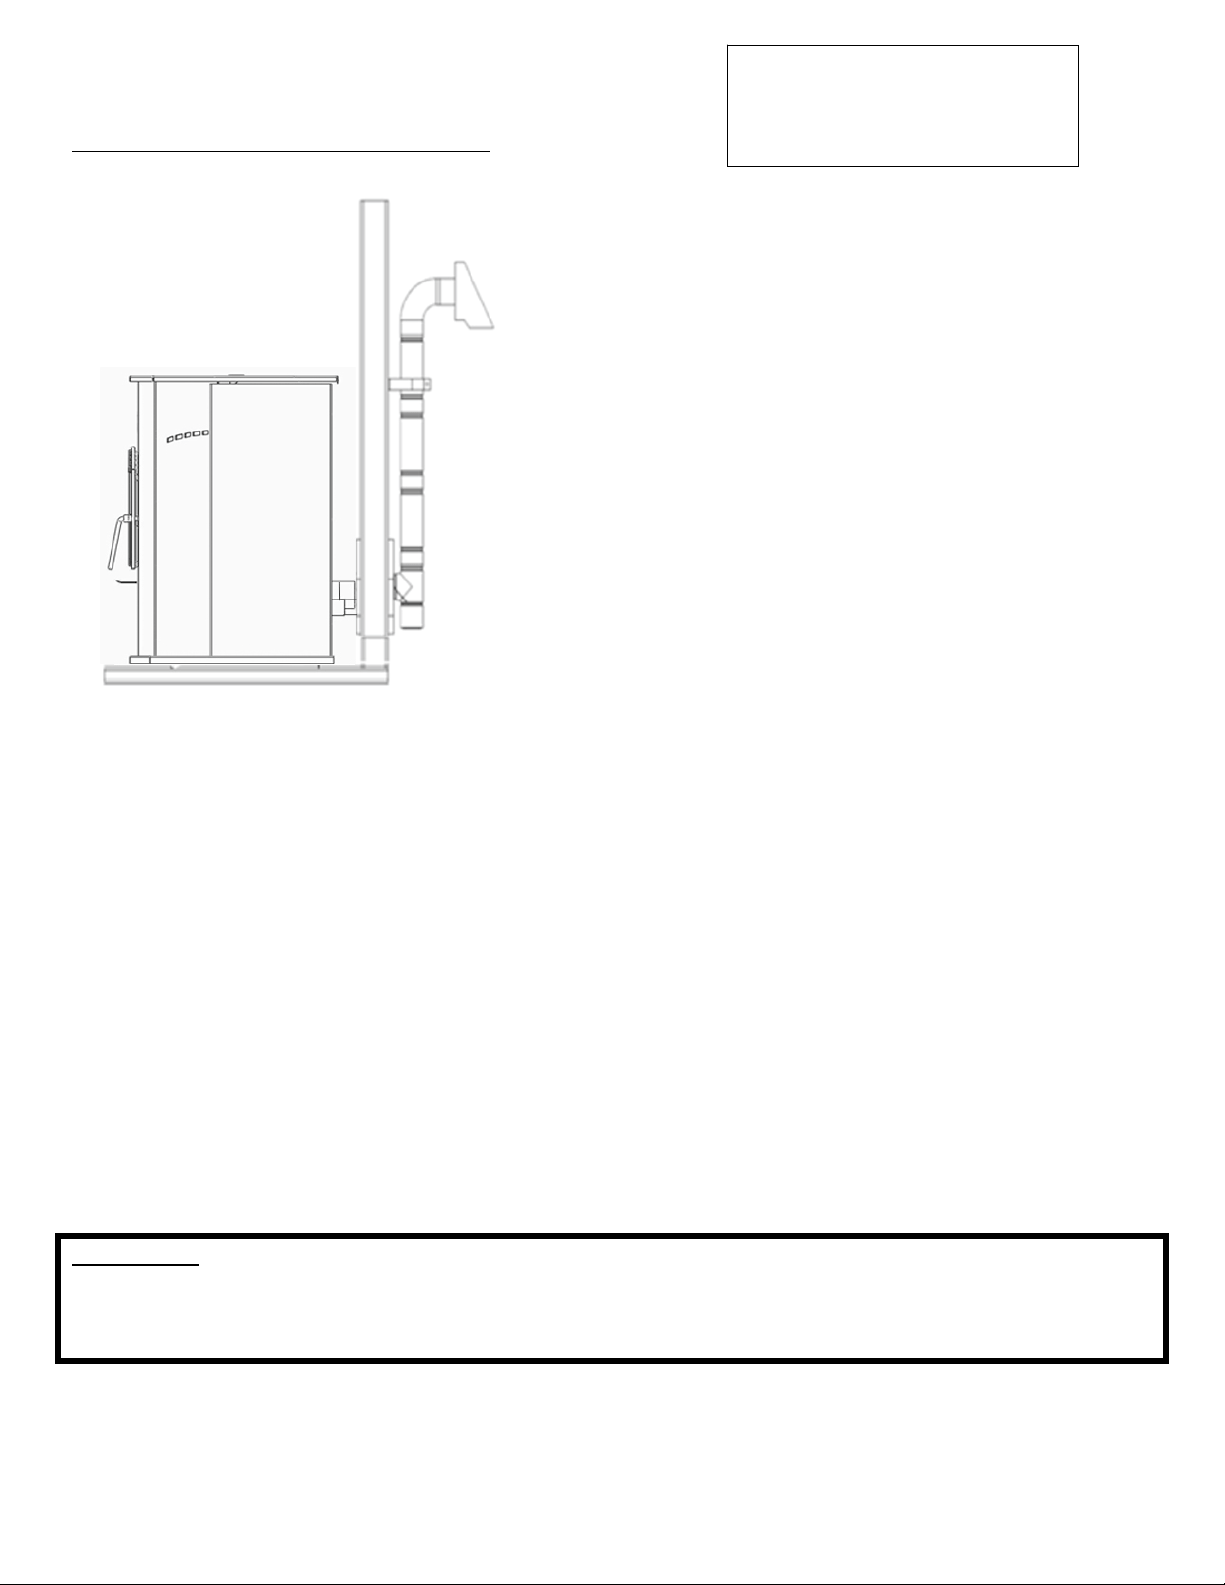
10
IMPORTANT!LISEZETSUIVEZTOUTESLESINSTRUCTIONSPOUR L’INSTALLATIONETL’ENTRETIEN,NOTAMME NTCELLESPORT ANT SURLENET TOYAGEDE
L’APPAREILÀEFFECTUERSELONLESDIRECTIVESETCELLESPORTAN TSURLEREM PLACEMENTDESJOINTS(ANNUELLEMENT)ETDESPIÈCES(AU BESOIN).
ENGLAND’SSTOVEWORKSN’ESTPASRESPONSABLEDESDOMMAGESNIDESBLESSURES,QUELSQU’ILSSOIENT,SUBISENRAISONDENÉGLIGENCE
OUÀCAUSED’UNEINSTALLATIONOUD’UNEUTILISATIONDANGEREUSEDECEPRODUIT.POURTOUTEQUESTION,COMMUNIQUEZAVECLE
SERVICEDESOUTIENTECHNIQUE.
INSTALLATION
Méthodedeventilationapprouvée1:Àtraverslemur
Ils’agitengénéraldelaméthodelaplussimple.
L’installationàtraverslemuràl’aidedenotreensemble
AC‐3000ouAC‐33000auCanada(oud’unsystèmede
ventilationsimilaire)estcellequenouspréconisons.
Cetteméthodepermetderéduireauminimumlalongueur
detuyaudisposé
horizontalement,deplacerlepoêleà
proximitéd’unmuretdelaisserleregardduraccorden
Tàl’extérieurdelamaisonpourfaciliterlenettoyage.
Lorsquevousinstallezunsystèmedeventilation,
destuyauxdetypeLoudetypePLdoiventêtreutilisés,
ettoutesles
distancesminimalesavecdesmatières
combustibles(dontlalisteestdresséeparlefabricant
destuyaux)doiventêtrerigoureusementrespectées.
Utilisezuncoupe‐feumuralapprouvéparlefabricant
dutuyaulorsquecederniertraverseunmurfaitde
matériauxcombustibles,etrespectezlesdistances
minimalesdescombustibles.
Utilisez
unebuseàl’endroitoùl’éventestraccordéàlabouched’évacuationdupoêleàgranules,
etfixezcettebuseàl’aidedetroisvisàtôle.
Fixezl’éventàl’extérieurdelamaisonàl’aided’unecourroiedemur,justeendessousducoude
à90degrés.
Scellezchaqueraccorddetuyauavecdusiliconerésistantauxvariationsdetempératureainsi
qu’auxhautestempératuresafindevousassurerquelesystèmeestexemptdefuites(consultez
lesindicationsdufabricantdusystèmedeventilation avantdeprocéderàcetteopération).
Siletuyaudeventilationutilisén’est
pasdotéd’unsystèmedeverrouillageparrotation,vous
aurezbesoindetrois(3)visàtôlepourchaquejointdutuyau.
Raccordezlepoêleàgranulesàl’airdecombustionextérieuràl’aidedel’ensemblefourniavec
votrepoêle,ouensuivantuneautreméthode,commeledécrit
lasection«Raccordementàl’air
extérieur»,àlapage15.
L’installationpeutêtreadaptéepourles sous‐sols(lesinstallationsensous‐soldoiventtoujoursêtre
effectuéesparuninstallateurprofessionnel)oupourd’autrescasdefigurepourlesquelsleraccord
enTetlapartieverticaledutuyau
setrouventàl’intérieurdelamaison,etlesystèmedeventilation
passehorizontalementautraversducoupe‐feumuralavantdes’arrêter.
Veuilleznoter:
Lesschémasd’installationsontfournisàtitrederéférenceuniquementetnesontpasàl’échelle.Ilsnesontpasdestinés
àêtreutiliséscommedesplans universelsd’installation.Veuillezrespectertouteslesexigencesrelativesausystèmede
ventilationetauxdistancesmini malesaveclesmatièrescombustibles,etsuivretouslesrèglementslocaux.
Pourlesinstallationsenaltitude
(plushautque1219,2m),letuyau
deventilationdoitêtrede4po
plutôtquede3po.
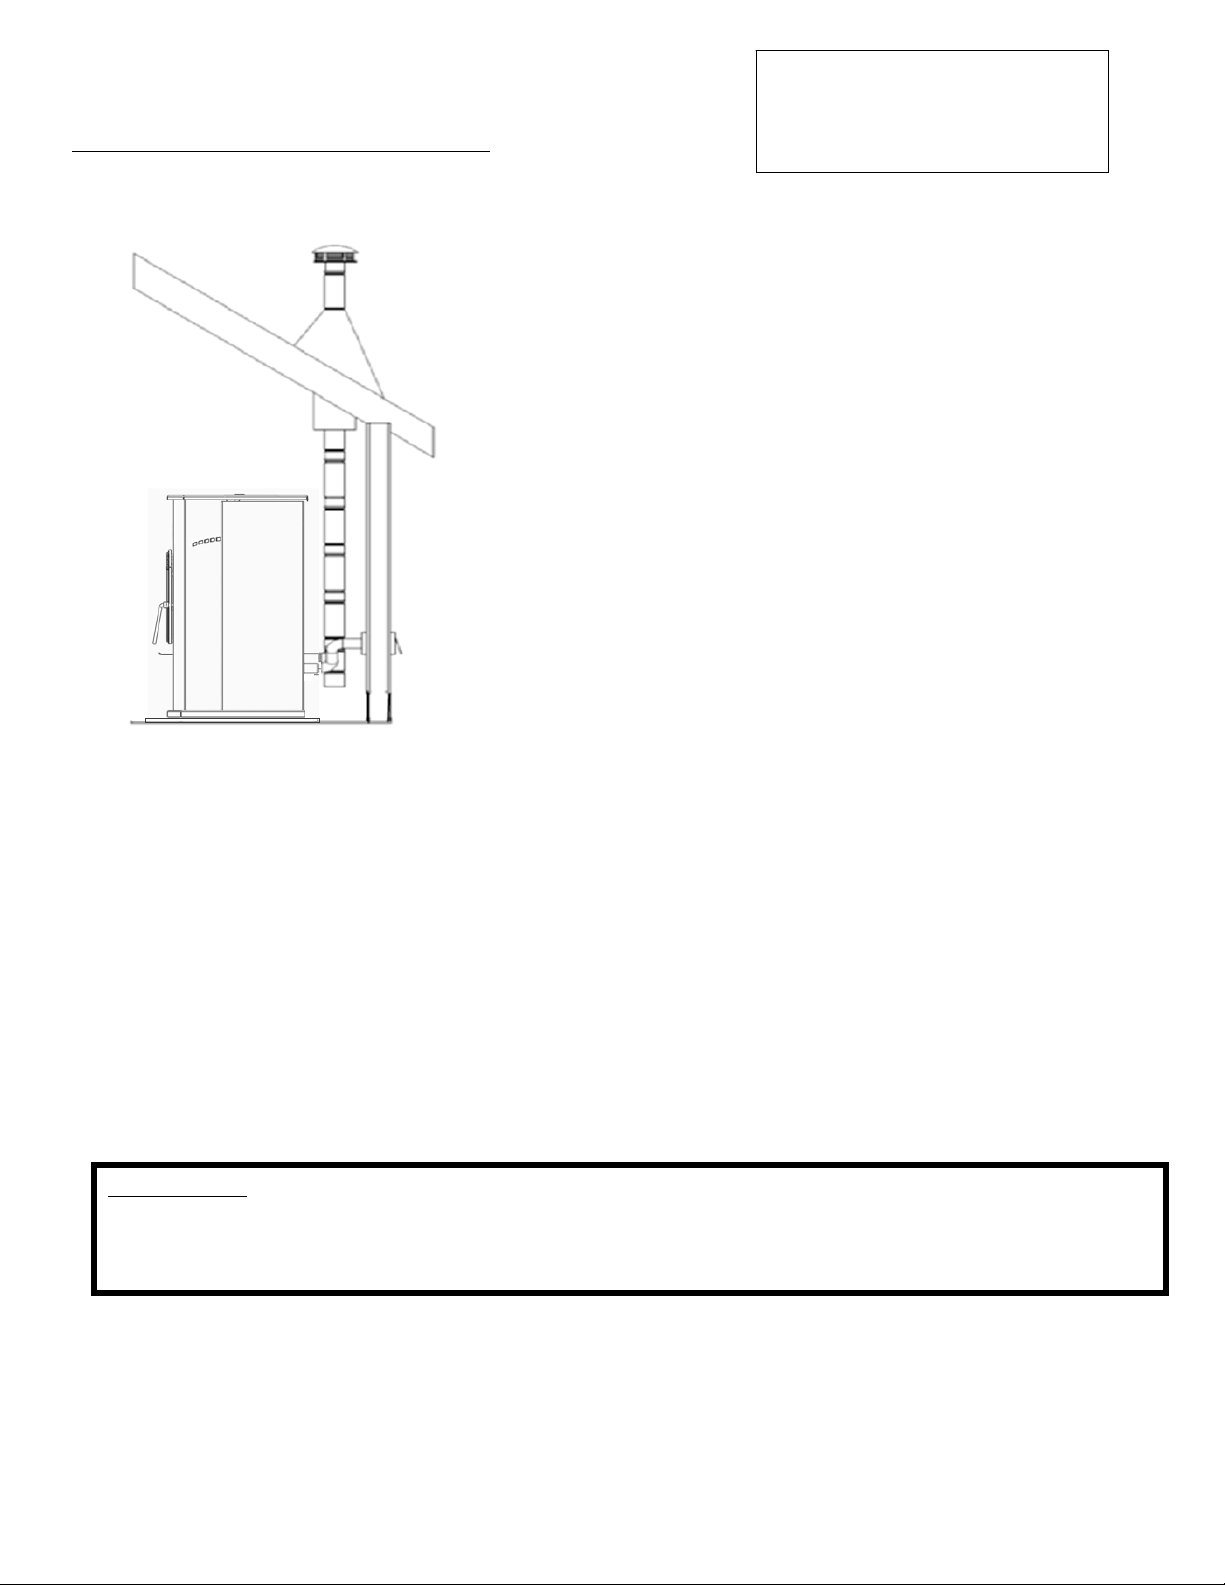
11
IMPORTANT!LISEZETSUIVEZTOUTESLESINSTRUCTIONSPOUR L’INSTALLATIONETL’ENTRETIEN,NOTAMME NTCELLESPORT ANT SURLENET TOYAGEDE
L’APPAREILÀEFFECTUERSELONLESDIRECTIVESETCELLESPORTAN TSURLEREM PLACEMENTDESJOINTS(ANNUELLEMENT)ETDESPIÈCES(AU BESOIN).
ENGLAND’SSTOVEWORKSN’ESTPASRESPONSABLEDESDOMMAGESNIDESBLESSURES,QUELSQU’ILSSOIENT,SUBISENRAISONDENÉGLIGENCE
OUÀCAUSED’UNEINSTALLATIONOUD’UNEUTILISATIONDANGEREUSEDECEPRODUIT.POURTOUTEQUESTION,COMMUNIQUEZAVECLE
SERVICEDESOUTIENTECHNIQUE.
INSTALLATION
Méthodedeventilationapprouvée2:Àtraversleplafond
Ilsepeutquelaventilationautraversduplafondetdutoitsoitlaseuleoptionenvisageabledans
certainscas.Cetyped’installationestpréconisépourlesusines.
Lorsquevousinstallezunsystèmedeventilation,destuyaux
detypeLoudetypePLdoiventêtreutilisés,et
toutesles
distancesminimalesavecdesmatièrescombustiblesdont
lalisteestdresséeparlefabricantdestuyauxdoiventêtre
rigoureusementrespectées.
Utilisezlesupportdeplafondapprouvéparlefabricant
dutuyaupourfairepassercedernierautraversd’unplafond
faitdematériauxcombustibles.Ilenva
demêmepour
lescoupe‐feu,lecoupe‐feuradiant,lesolinetlamitre.
Assurez‐vousdebiensuivrelesindicationsdufabricant
relativesàlahauteurdelaterminaisonparrapportàlalignede
toiture,etrespectezlesdistancesminimalesdescombustibles.
Utilisezunebuseà
l’endroitoùl’éventestraccordéàla
bouched’évacuationdupoêleàgranules,etfixezcettebuse
àl’aidedetroisvisàtôle.
Scellezchaqueraccorddetuyauavecdusiliconerésistant
auxvariationsdetempératureainsiqu’auxhautestempératuresafindevousassurerquele
systèmeest
exemptdefuites(consultezlesindicationsdufabricantdutuyauavantdeprocéder
àcetteopération).
Siletuyaudeventilationutilisén’estpasdotéd’unsystèmedeverrouillageparrotation,vousaurez
besoindetro is (3)visàtôlepourchaquejointdutuyau.
Raccordezlepoêleà
granulesàl’airdecombustionextérieuràl’aidedel’ensemblefourniavec
votrepoêle,ouensuivantuneautreméthode,commeledécritlasection«Raccordementàl’air
extérieur»,àlapage15.
Cetteméthodedeventilationpeutêtreadaptéedetellesortequeletuyaude
ventilationsortedu
poêleettraverseunmurhorizontalement,avantdesedirigerverticalementversletoitau‐dessus
duquelilterminerasacourse.Sivouschoisissezcetteoptiond’installation,suivezattentivement
lesinstructionsfourniesparlefabricantdusystèmedeventilation.
Veuilleznoter:
Lesschémasd’installationsontfournisàtitrederéférenceuniquementetnesontpasàl’échelle.Ilsnesontpasdestinésàêtre
utiliséscommedesplansuniverselsd’installation.Veuillezrespectertouteslesexigencesrelativesausystèmedeventilationet
auxdistancesminimalesaveclesmatièrescombustibles,etsuivretouslesrèglementslocaux.
Pourlesinstallationsenaltitude
(plushautque1219,2m),letuyau
deventilationdoitêtrede4po
plutôtquede3po.
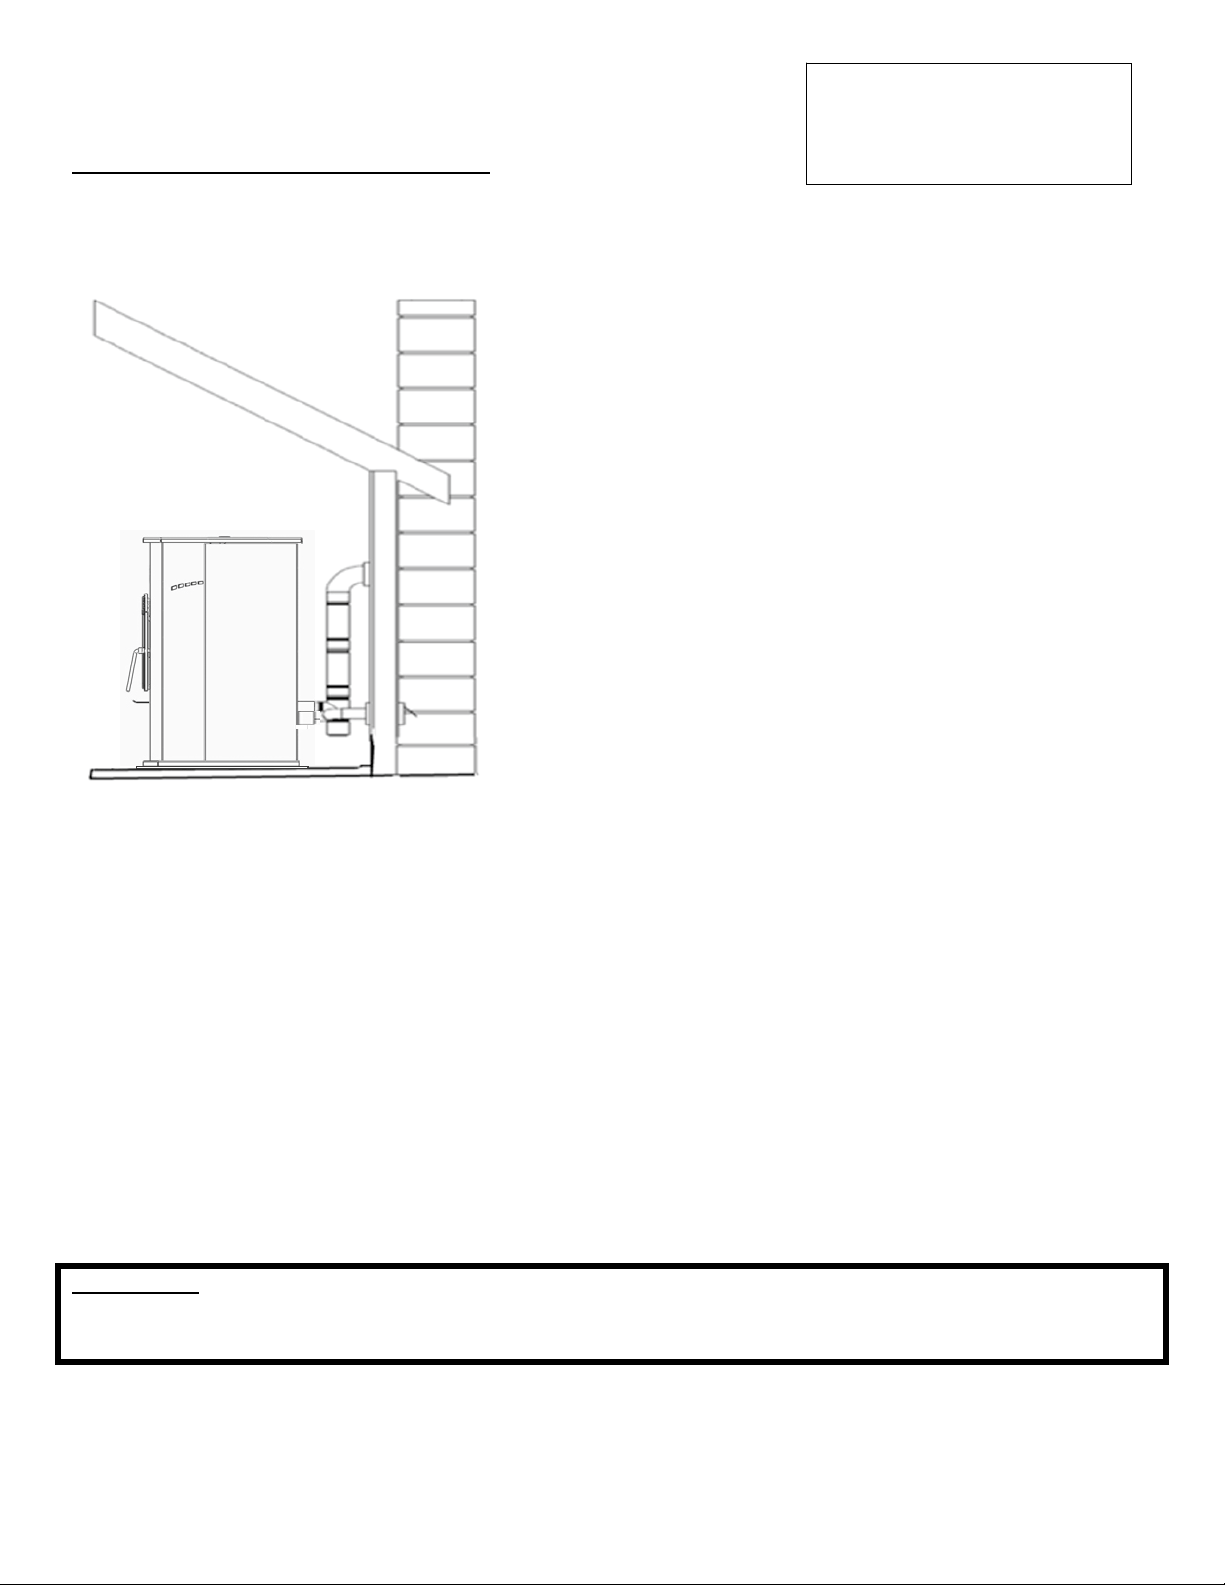
12
IMPORTANT!LISEZETSUIVEZTOUTESLESINSTRUCTIONSPOUR L’INSTALLATIONETL’ENTRETIEN,NOTAMME NTCELLESPORT ANT SURLENET TOYAGEDE
L’APPAREILÀEFFECTUERSELONLESDIRECTIVESETCELLESPORTAN TSURLEREM PLACEMENTDESJOINTS(ANNUELLEMENT)ETDESPIÈCES(AU BESOIN).
ENGLAND’SSTOVEWORKSN’ESTPASRESPONSABLEDESDOMMAGESNIDESBLESSURES,QUELSQU’ILSSOIENT,SUBISENRAISONDENÉGLIGENCE
OUÀCAUSED’UNEINSTALLATIONOUD’UNEUTILISATIONDANGEREUSEDECEPRODUIT.POURTOUTEQUESTION,COMMUNIQUEZAVECLE
SERVICEDESOUTIENTECHNIQUE.
INSTALLATION
Méthodedeventilationapprouvée3:Systèmeutilisantune
cheminéeexistante
L’utilisationd’unecheminéeexistanteenmaçonnerieoupréfabriquéeconstituelaseuleautreoption
acceptablepourlaventilationdecetappareilàgranules.
UtilisezdestuyauxdeventilationdetypeLoude
typePLjusqu’àl’entréedelacheminéeexistante.Utilisez
unadaptateurdedimensionappropriéepourassurerla
transitionentreletuyaudeventilationdupoêleetlavirole
delacheminéeenmaçonnerieoupréfabriquée,etassurez‐
vousquecetadaptateurestbienscellé,tantausystèmede
ventilationdupoêlequ’àlacheminée.
Avantd’utiliserunecheminéeexistante,assurez‐vous
quecettedernièreesten
bonétat(uneinspectionparun
ramoneurestfortementsuggérée).Assurez‐vouségalement
quelacheminéerépondauxnormesminimalesdécritesà
l’article211delaNFPA(unprofessionneldudomainepeut
vousenassureraprèsinspection).
Sivousraccordezlepoêleàunecheminéepréfabriquée,
celle‐cidoitIMPÉRATIVEMENT
êtreconformeàlanorme
UL103HT(ULCS629auCanada)etêtredotéed’unconduit
defuméede6po.Unraccordàunautretypedecheminée
préfabriquéepourraitavoirdesconséquencesnégativessur
lefonctionnementdupoêleetêtrelacaused’uneinstallationdangereuse.
Dansle
casd’unraccordàunecheminéeenmaçonnerie,lasectiontransversaleduconduitde
fuméedoitêtrepriseencompte.Pourlescheminéesdontleconduitdefuméeaundiamètre
supérieurà6po(surfacedelasectionde28.27po
2
),ilsepeutquelaposed’undoublagede
cheminéeapprouvépourutilisationavecunpoêleàgranulessoitnécessaire.
Utilisezunebuseàl’endroitoùl’éventestraccordéàlabouched’évacuationdupoêleàgranules,
etfixezcettebuseàl’aidedetroisvisàtôle.
Scellezchaqueraccorddetuyauavecdusiliconerésistantauxvariationsdetempératureainsi
qu’auxhautestempératuresafindevousassurerquelesystèmeestexemptdefuites(consultez
lesindicationsdufabricantdutuyauavantdeprocéderàcetteopération).
Siletuyaudeventilationutilisén’estpas
dotéd’unsystèmedeverrouillageparrotation,vous
aurezbesoindetrois(3)visàtôlepourchaquejointdutuyau.
Raccordezlepoêleàgranulesàl’airdecombustionextérieuràl’aidedel’ensemblefourniavec
votrepoêle,ouensuivantuneautreméthode,commeledécritlasection
«Raccordementàl’air
extérieur»,àlapage15.
Veuilleznoter:
Lesschémasd’installationsontfournisàtitrederéférenceuniquementetnesontpasàl’échelle.Ilsnesontpasdestinésàêtre
utiliséscommedesplansuniverselsd’installation.Veuillezrespectertouteslesexigencesrelativesausystèmedeventilationet
auxdistancesminimalesaveclesmatièrescombustibles,etsuivretouslesrèglementslocaux.
Pourlesinstallationsenaltitude
(plushautque1219,2m),le
tuyaudeventilationdoitêtre
de4poplutôtquede3po.
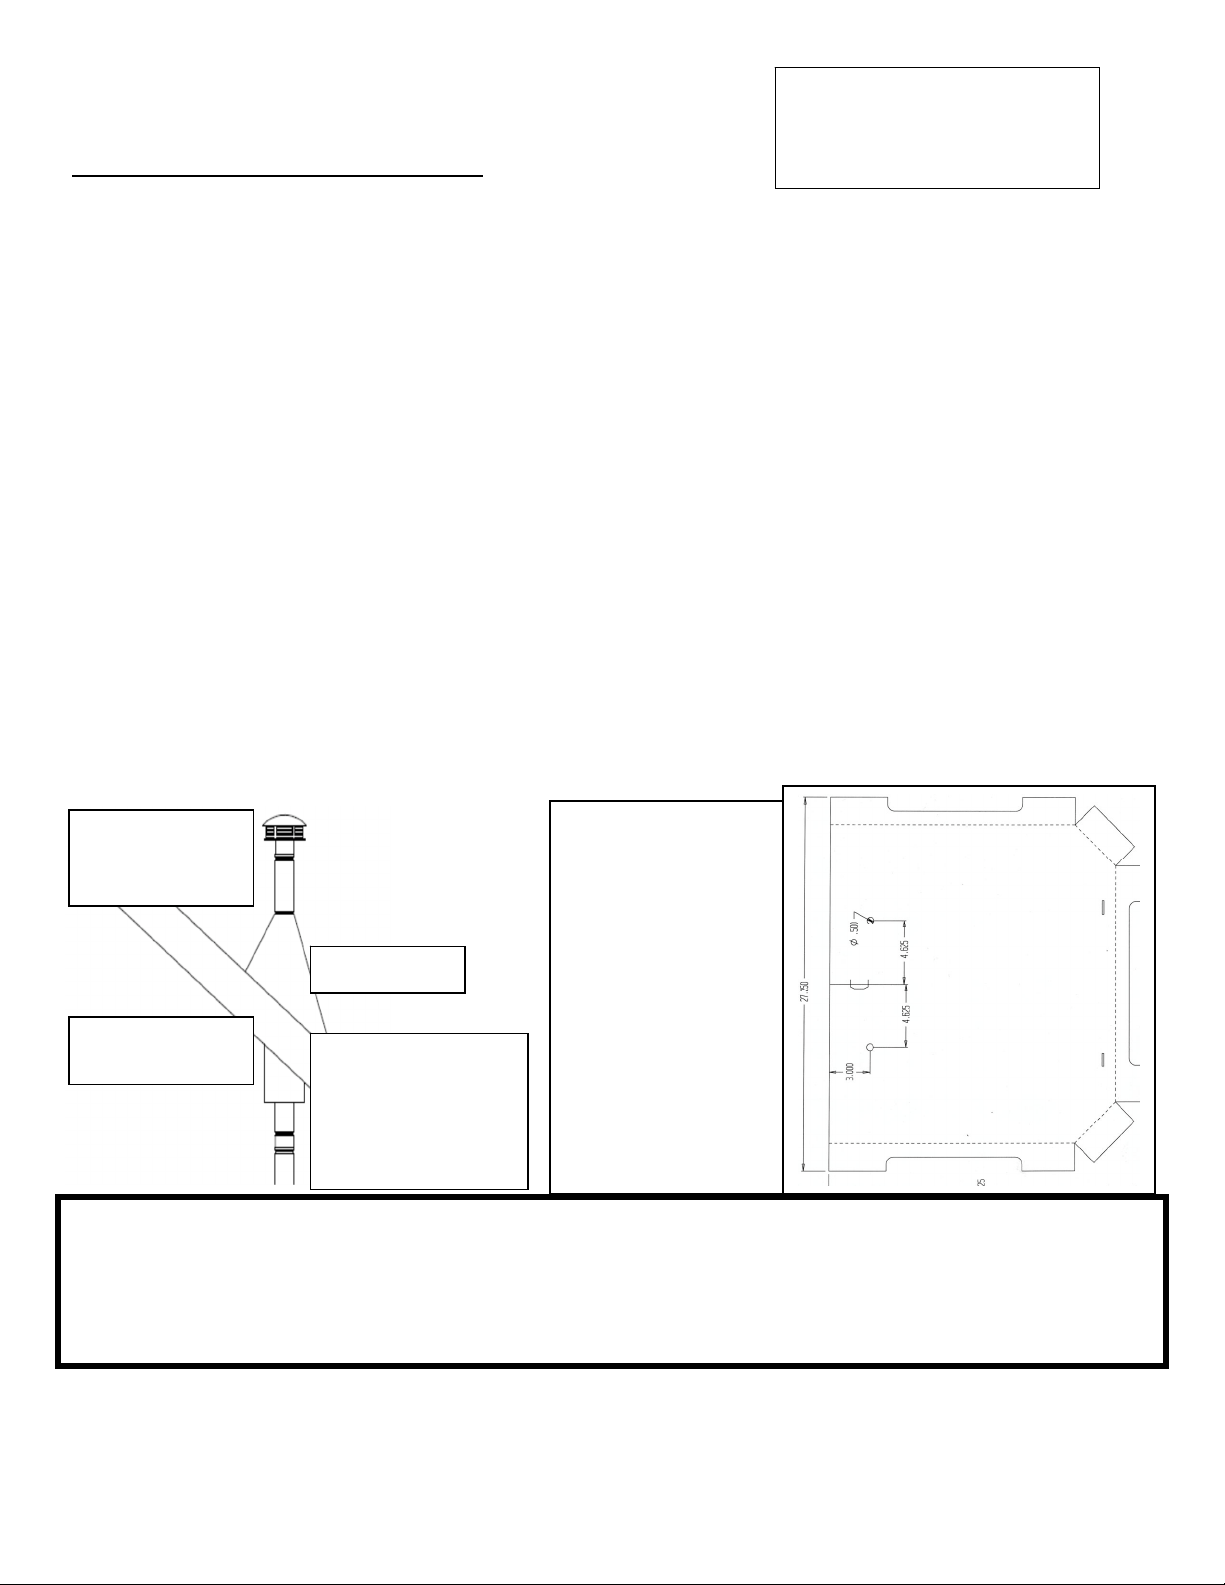
13
IMPORTANT!LISEZETSUIVEZTOUTESLESINSTRUCTIONSPOUR L’INSTALLATIONETL’ENTRETIEN,NO TAMMENTCELLESPOR TAN TSURLENET TOYAGEDE
L’APPAREILÀEFFECTUERSELON LESDIRECTIVESETCELL ESPORTANTSURLEREMPLACEMENTDES JOINTS(ANNUELLEMENT)ETDESPIÈCES(AUBESOIN ).
ENGLAND’SSTOVEWORKSN’ESTPASRESPONSABLEDESDOMMAGESNIDESBLESSURES,QUELSQU’ILSSOIENT,SUBISENRAISONDENÉGLIGENCE
OUÀCAUSED’UNEINSTALLATIONOUD’UNEUTILISATIONDANGEREUSEDECEPRODUIT.POURTOUTEQUESTION,COMMUNIQUEZAVECLE
SERVICEDESOUTIENTECHNIQUE.
INSTALLATION
Installationdansunemaisonmobile
L’ensemblederaccordementàl’airextérieurfourniparEngland’sStoveWorks,IncDOITêtre
utilisépoureffectueruneinstallationdel’appareildansunemaisontransportable.Veuillez
consulterlasection«Raccordementàl’airextérieur»àlapage15duprésentguidepour
obtenirdavantagederenseignementssurlesraccords
àl’airextérieur.
Laprised’airextérieuredoitêtredégagéedesfeuilles,delaglaceetdesautreséléments
susceptiblesdel’obstruer.Ilestprimordialdelibérerlaprised’airafind’éviterlemanqued’air
etlapropagationdefumée.
LepoêleàgranulesDOITêtrefixéau
soldelamaisontransportableàl’aidedetire‐fondsdisposés
danslestrousprévusàceteffetdanslapartieinférieuredesabase.Lessystèmesdechauffage
ventilésàl’airextérieurdoiventêtrefixésà lastructuredanslaquelleilssetrouvent.
LepoêleàgranulesDOITêtre
misàlaterreàl’aided’unfildemiseàlaterreencuivremassifde
calibre8AWGoul’équivalent,dontchaqueextrémitéestmunied’undispositifavecmiseàla
terreapprouvéparlecodenationaldel’électricité.
Respectezscrupuleusementtouteslesindicationsrelativesaudégagement
mentionnéesàla
sectionappropriéeduprésentguideETrespectezégalementlesexigencesdufabricantdu
systèmedeventilationenlamatière.Deplus,assurez‐vousquevotresystèmedeventilation
estapprouvépouruneutilisationdansunemaisontransportable.
L’installationdoitêtreconformeàlanormeduManufacturersHome
&SafetyStandard(HUD)
CFR3280,article24,ainsiqu’auxrèglementslocaux.
Créezunpare‐vapeurefficaceàl’aidedesiliconeàl’endroitoùlacheminéeouleconduitd’air
extérieurtraverselemurdelastructure.
ATTENTION
L’INTÉGRITÉSTRUCTURELLEDUPLANCHER,DESMURS,DUPLAFONDETDUTOITDELAMAISON
PRÉFABRIQUÉEDOITÊTREPRÉSERVÉE.NECOUPEZPASLESSOLIVESDEPLANCHER,LESMONTANTSDE
CLOISON,LESFERMESNIAUCUNAUTREÉLÉMENTPORTEURDONTL’ALTÉRATIONPOURRAITENDOMMAGER
L’INTÉGRITÉSTRUCTURELLEDELAMAISON.
AVERTISSEMENT:N’INSTALLEZPASL’APPAREILDANSUNECHAMBREÀCOUCHER.
Pourlesinstallationsenaltitude
(plushautque1219,2m),le
tuyaudeventilationdoitêtre
de4poplutôtquede3po.
Chapeaude
cheminéeet
pare‐étincelles
Protecteurde
solive/cou
p
e‐feu
Solinetmitre
Tuyaudeventilation
pourpoêleàgranules
detypeLoudetype
PLapprouvépourune
utilisationdansune
maison mobile
Sivotreunitén'apasde
trouspré‐percéspour
l'installationdansune
maisonmobile,vous
pouvezpercerdeux
trousdansleplancher
devotreunitéquiont
undiamètrede½po
(environ1,25cm).
Chaquetroudoitêtre
percéàenviron3po
(7,6cm)àl'intérieurde
l'appareil
etàenviron
4,625po(11,75cm)du
centredusol.
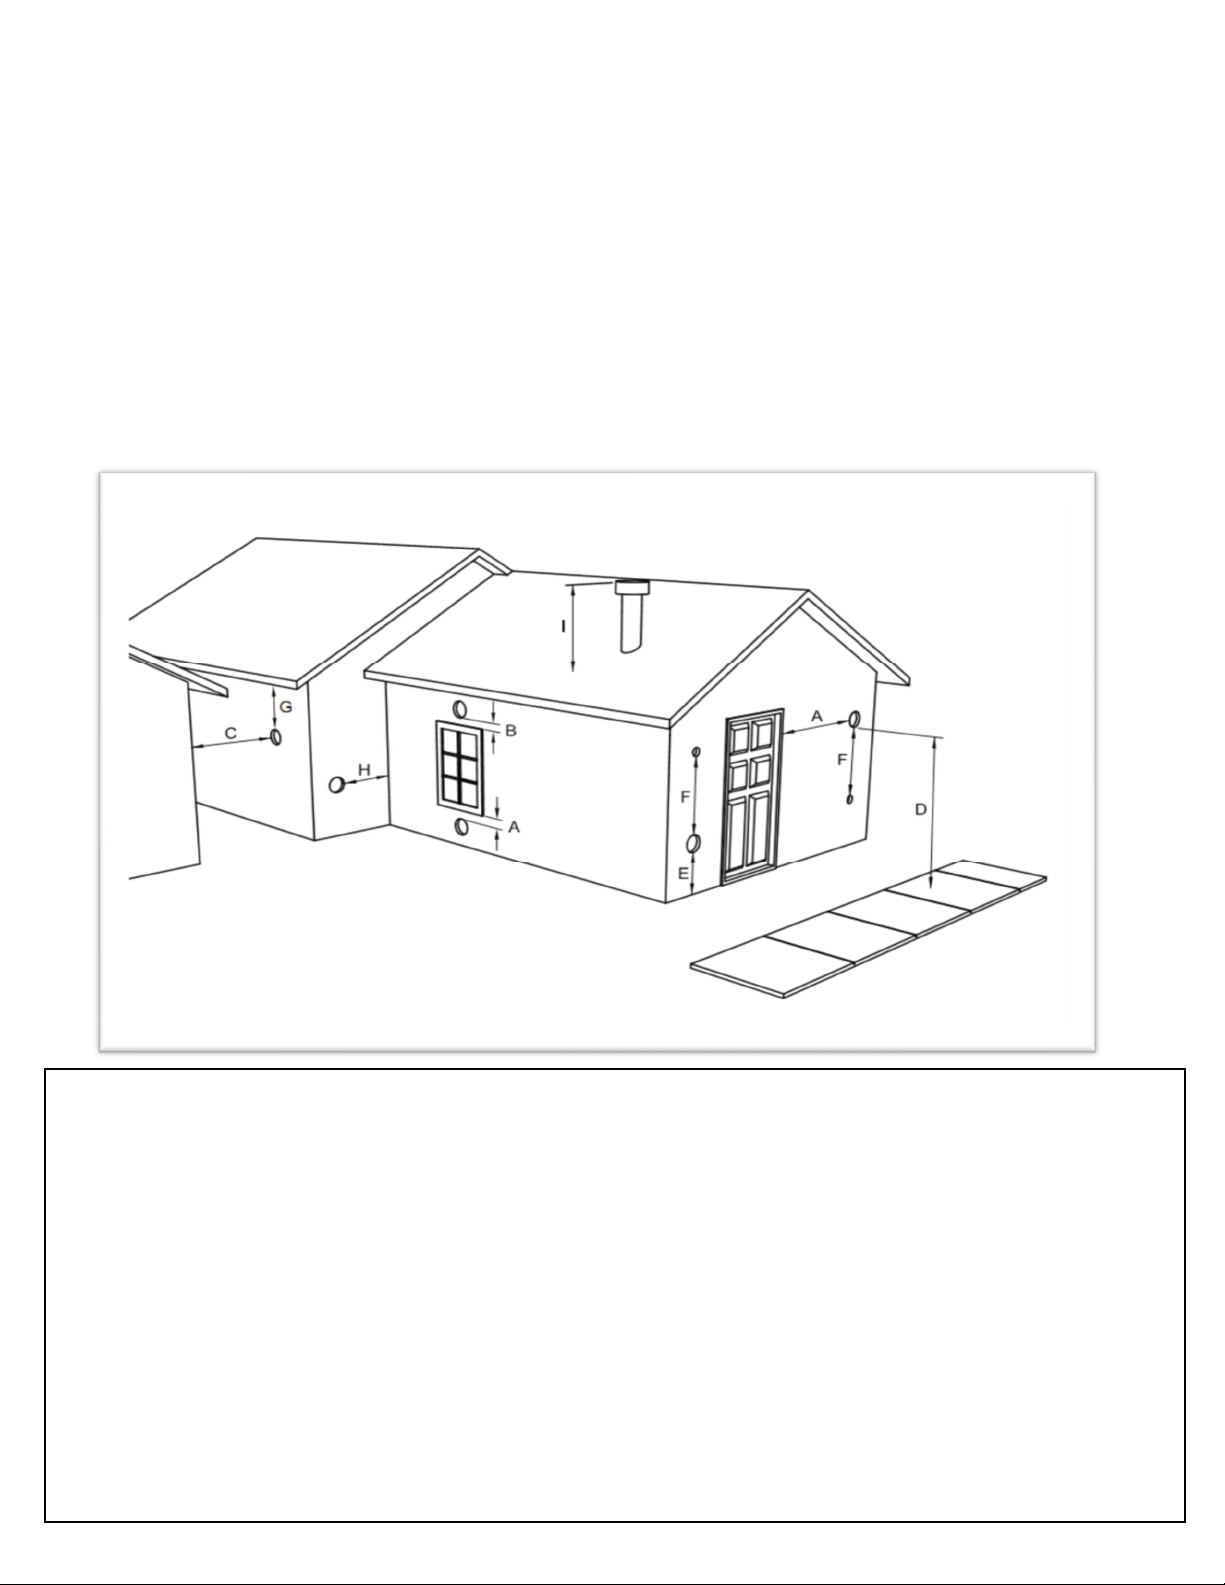
14
IMPORTANT!LISEZETSUIVEZTOUTESLESINSTRUCTIONSPOUR L’INSTALLATIONETL’ENTRETIEN,NO TAMMENTCELLESPOR TAN TSURLENET TOYAGEDE
L’APPAREILÀEFFECTUERSELON LESDIRECTIVESETCELL ESPORTANTSURLEREMPLACEMENTDES JOINTS(ANNUELLEMENT)ETDESPIÈCES(AUBESOIN ).
ENGLAND’SSTOVEWORKSN’ESTPASRESPONSABLEDESDOMMAGESNIDESBLESSURES,QUELSQU’ILSSOIENT,SUBISENRAISONDENÉGLIGENCE
OUÀCAUSED’UNEINSTALLATIONOUD’UNEUTILISATIONDANGEREUSEDECEPRODUIT.POURTOUTEQUESTION,COMMUNIQUEZAVECLE
SERVICEDESOUTIENTECHNIQUE.
DÉGAGEMENTSDESTERMINAISONSDESÉVENTS
A)Dégagementd’aumoins1,21mendessousousurlecôtédetouteporteoufenêtrepouvants’ouvrir.
B)Dégagementd’aumoins0,3mau‐dessusdetouteporteoufenêtrepouvants’ouvrir.
C)Dégagementd’aumoins0,6mdetoutbâtimentvoisin.
D)Dégagementd’aumoins2,13mà
partirduniveaudusollorsquel’installationjo uxtelavoiepublique.
E)Dégagementd’aumoins0,6 mau‐dessusdesherbes,desplantesetdetoutautrematériaucom bustible.
F)Dégagementd’aumoins0,91mdelaprised’airparventilationforcéed’unappareil,quelqu’ilsoit.
G)Dégagementd’au
moins0,6mendessousdesavant‐toitsoudessaillies.
H)Dégagementd’aumoins0,3mdesmursfaitdematériauxcombustibles.
I)Lasortied’évacuationd’unsystèmedeventilationcomportantdesaspirateursmécaniquesdoit
dépasserd’aumoins30,48cm(12po)lazoneoùcesystèmedeventilationtraverse
letoit.
RemarquessurlaterminaisondutuyaudeventilationpourpoêleàgranulestiréesdelanormeNFPA211(version2006)
Section10.4Terminaison:10.4.5
(Reportez‐vouségalementàlasection«INSTALLATION»duprésentguideETauxremarquessupplémentairesci‐dessus) :
Aumoinsà0,91mau‐dessusdetouteprised’airparventilationforcéesituéedansunrayonde3,04m.
Aumoinsà1,21mendessous,1,21mlatéralementet0,3mau‐dessusdetouteporte,fenêtreouprise
d’airpargravitéd’unbâtiment.
Aumoinsà0,6md’unbâtimentadjacentetaumoinsà2,13mau‐dessusdu solsiellejouxtelavoiepublique.
Lasortied’airdoitêtredisposéedefaçonàcequelefluxdesgazdecombusti on n’affectepas les gens,nesurchauffepas
lesstructurescombustiblesetnes’infiltrepasdanslesbâtiments.Lessystèmesdetirageforcéettouteslespiècesdes
systèmesdetirageparaspirationsouspression
positivependantl’utilisationdoiventêtreinstallésdefaçonhermétique
pourprévenirtoutefuitedeproduitsdecombustiondansunbâtiment.Lessortiesd’évacuationquipassentàtraversle
murnedoiventpasterminerprèsdelavoiepubliqueouàunendroitoùlacond ensationoulavapeurpourraitreprésenter
unenuisanceouundanger.
Assurez‐vousderespecterlesrèglementslocauxettouteslesinstructionsdufabricantdesproduitsutilisés(ycomprisle
tuyaud’évacuation).Sivousavezdesquestions,consultezuninstallateurprofessionneloucommuniquezavecleservicede
soutientechnique.

15
IMPORTANT!LISEZETSUIVEZTOUTESLESINSTRUCTIONSPOUR L’INSTALLATIONETL’ENTRETIEN,NOTAMME NTCELLESPORT ANT SURLENET TOYAGEDE
L’APPAREILÀEFFECTUERSELONLESDIRECTIVESETCELLESPORTAN TSURLEREM PLACEMENTDESJOINTS(ANNUELLEMENT)ETDESPIÈCES(AU BESOIN).
ENGLAND’SSTOVEWORKSN’ESTPASRESPONSABLEDESDOMMAGESNIDESBLESSURES,QUELSQU’ILSSOIENT,SUBISENRAISONDENÉGLIGENCE
OUÀCAUSED’UNEINSTALLATIONOUD’UNEUTILISATIONDANGEREUSEDECEPRODUIT.POURTOUTEQUESTION,COMMUNIQUEZAVECLE
SERVICEDESOUTIENTECHNIQUE.
RACCORDEMENTÀL’AIREXTÉRIEUR
L’airdecombustionutiliséparcepoêledoitprovenirdel’extérieur.
Letuyauderaccordement àl’airextérieur dépassedelapartieinférieure
centraledel’arrièredupoêle.Utilisezl’ensemblederaccordementqui
accompagnevotrepoêlepourraccordercelui‐ciàl’airextérieu r. Lesinstructions
ainsiquetoutesles
piècesnécessairesauraccordementdevotrepoêleà
granulesàl’airextérieursontinclusesdansl’ensemblederaccordementàl’air
extérieur.
S’ilnevousestpaspossibled’utiliserl’ensemblederaccordementàl’airextérieur,
vouspouvezutiliserd’autrespiècesàconditionderespectercequisuit:
Le
tuyauutilisépourleraccordementàl’airextérieurdoitêtreenmétal
d’uneépaisseurd’aumoins0,0209po(acierdouxdecalibre25)etson
diamètreintérieurdoitêtred’approximativement2po.
Touslesjointsetraccordsdutuyaudoiventêtrescellésàl’aidedecolliers
deserrageoud’un
autremoyenmécanique,afinqueleraccordement
àl’airextérieurneprésentepasdefuites.
Ilestdéconseilléd’utiliserunetropgrandelongueurdetuyauetd’y
formerunnombreexcessifdecoudes.Enraisondelarésistanceau
frottementdansletuyau,lerendementdupoêleseraréduit
siletuyau
deraccordementàl’airextérieuresttroplong.
Unegrilleouunautredispositifdeprotectiondoitêtreplacéàl’extrémité
dutuyauderaccordementàl’airextérieur,afind’éviterquelapluie,
desdébrisoudesanimauxnuisiblesnepénètrentdanslatuyauterie.
Utilisezun
tuyaud’undiamètrede3posilalongueurduraccordement
àl’airextérieurestdeplusde1,82m,sileraccordementprésenteplus
dedeux(2)coudesousilepoêleestinstallédansunsous‐sol.
Leraccordementàl’airextérieurdoitfairel’objetd’aumoins
uneinspection
annuelleafindes’assurerqu’iln’estpasobstrué.
Attention
NECAPTEZJAMAISl’airextérieurdecombustiondans:
1.Lacavitéd’unmur,d’unplancheroud’unplafond.
2.Unespaceclostelqu’ungrenier,ungarageouunvidesanitaire.
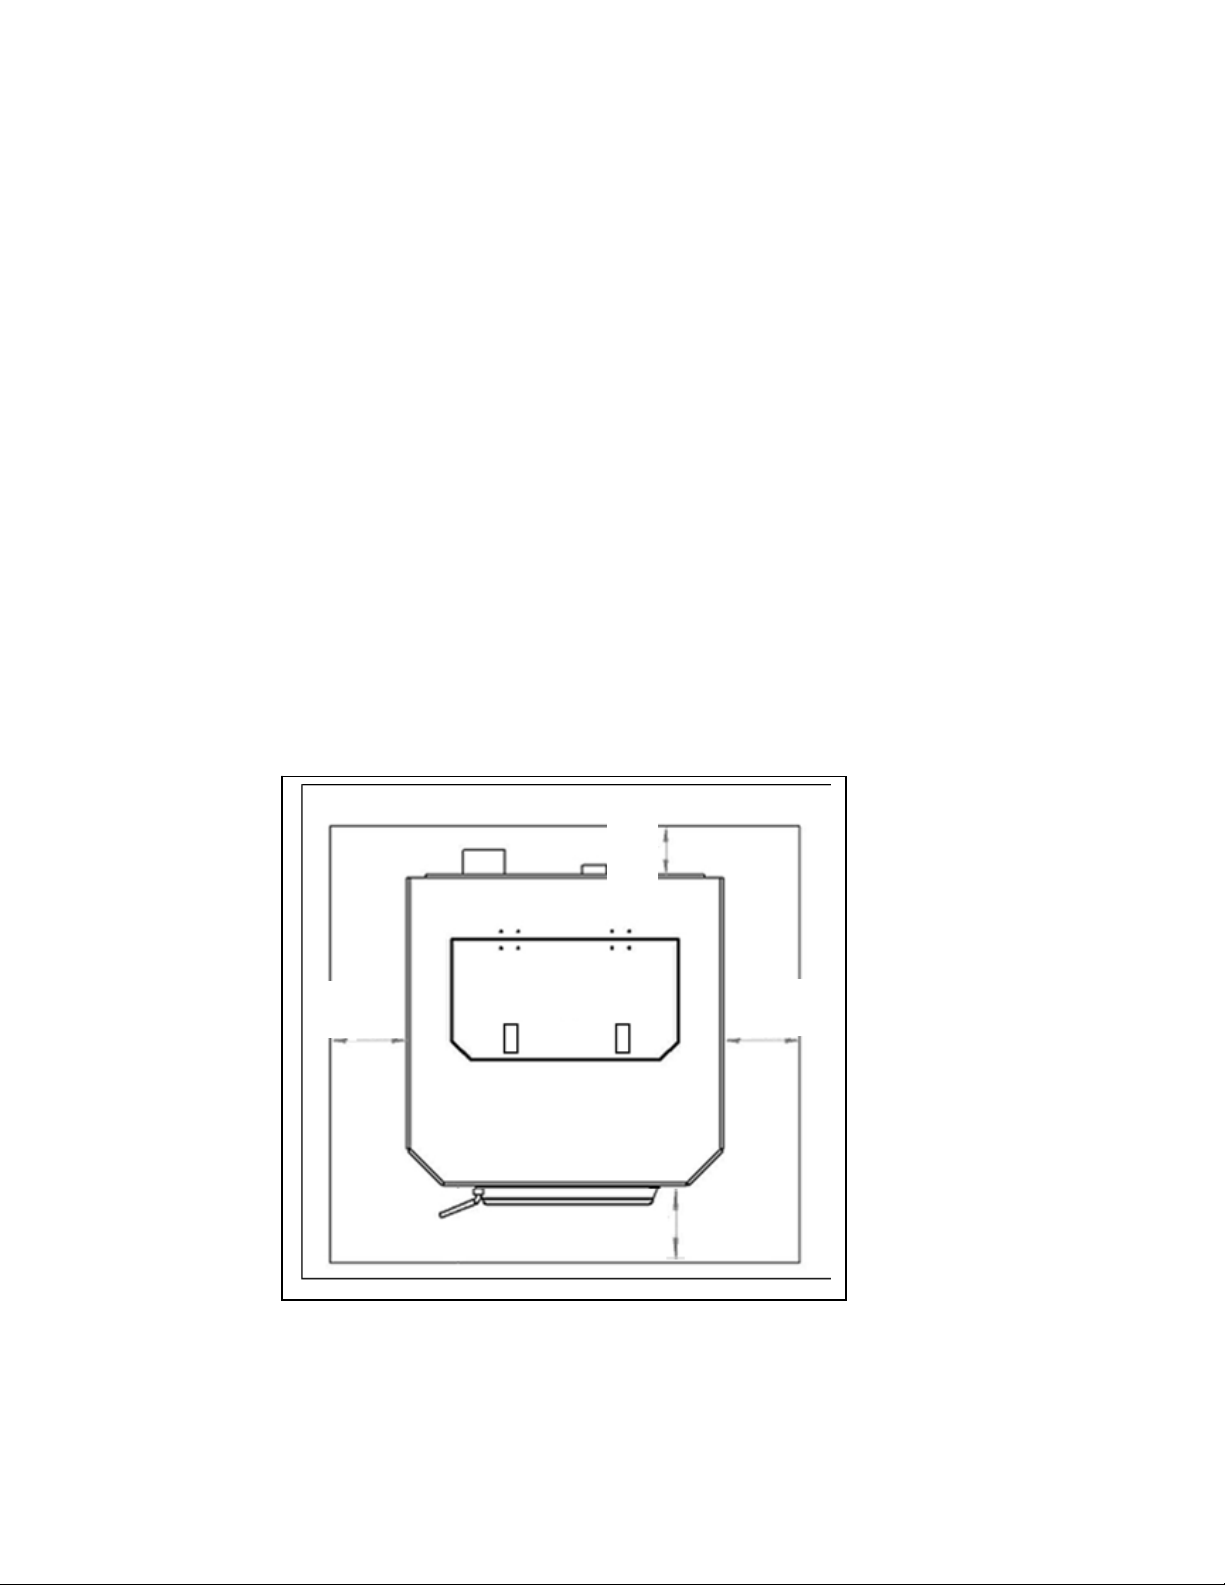
16
IMPORTANT!LISEZETSUIVEZTOUTESLESINSTRUCTIONSPOUR L’INSTALLATIONETL’ENTRETIEN,NOTAMME NTCELLESPORT ANT SURLENET TOYAGEDE
L’APPAREILÀEFFECTUERSELONLESDIRECTIVESETCELLESPORTAN TSURLEREM PLACEMENTDESJOINTS(ANNUELLEMENT)ETDESPIÈCES(AU BESOIN).
ENGLAND’SSTOVEWORKSN’ESTPASRESPONSABLEDESDOMMAGESNIDESBLESSURES,QUELSQU’ILSSOIENT,SUBISENRAISONDENÉGLIGENCE
OUÀCAUSED’UNEINSTALLATIONOUD’UNEUTILISATIONDANGEREUSEDECEPRODUIT.POURTOUTEQUESTION,COMMUNIQUEZAVECLE
SERVICEDESOUTIENTECHNIQUE.
PROTECTIONDUSOL
Danslecasoùlepoêleàgranulesestinstallésurunplanchercombustible,sonutilisationnécessitela
posed’unprotecteurdeplancherincombustible.Sileplanchersurlequellepoêledoitêtreinstalléest
déjàincombustible(parexemple,leplancherenbétond’unsous‐sol)etpossèdeunevaleur
d’isolation
thermique«R»aumoinségaleà0,2,aucunprotecteurdeplanchern’estrequis(vouspouveztoutefois
installerunprotecteurdeplancherdécoratif).
Vouspouvezacheterunprotecteurdeplancherpréfabriquéhomologu éUL (ULCauCanada)ouéquivalent,
ouencorefabriquerunprotecteurdeplancheràpartir
dematériauxstandards:deuxpanneauxdeciment
d’uneépaisseurde12,7 mmrecouvertsdecarreauxencéramiqueconstituentparexempleunprotecteur
deplancheradéquat,dontlavaleurd’isolationthermique«R»estaumoinségaleà0,2.
Gardezàl’espritquelepoêleestnonseulementlourd,maisqu’ilimposeégalementdesécartsde
températureauprotecteurdeplancher,écartsquipeuventendommagerlescarreaux,etdétacherle
mortieretlesjoints.Untapispourfoyern’estPASapprouvépourremplacerunprotecteurdeplancher.
PourlesÉtats‐Unis:Leprotecteurdeplancherdoitdépasserd’aumoins15,24cm(6po)àl’avantetsur
lescôtésdupoêleetde10,16cm(4po)àl’arrière.
PourleCanada:Leprotecteurdeplancherdoitdépasserd’aumoins45,72cm(18po)àl’avantdupoêle,
de20,32cm(8po)surlescôtésetde10,16cm(4po)àl’arrière.
AuCanada,leprotecteurdeplancherincombustibledoitêtreégalementdisposésoustouttuyaude
ventilationhorizontaletdépasserde5,08cm(2po)surchacundescôtésETêtreplacédirectement
soustouttuyaudeventilationvertical.
15,24cm
(20,32cmau
Canada)
15,24cm
(20,32cmau
Canada)
10,16po
15,24cm
(45,72cmau
Canada
)

17
IMPORTANT!LISEZETSUIVEZTOUTESLESINSTRUCTIONSPOUR L’INSTALLATIONETL’ENTRETIEN,NO TAMMENTCELLESPOR TAN TSURLENET TOYAGEDE
L’APPAREILÀEFFECTUERSELON LESDIRECTIVESETCELL ESPORTANTSURLEREMPLACEMENTDES JOINTS(ANNUELLEMENT)ETDESPIÈCES(AUBESOIN ).
ENGLAND’SSTOVEWORKSN’ESTPASRESPONSABLEDESDOMMAGESNIDESBLESSURES,QUELSQU’ILSSOIENT,SUBISENRAISONDENÉGLIGENCE
OUÀCAUSED’UNEINSTALLATIONOUD’UNEUTILISATIONDANGEREUSEDECEPRODUIT.POURTOUTEQUESTION,COMMUNIQUEZAVECLE
SERVICEDESOUTIENTECHNIQUE.
TYPESDEPANNEAUDECOMMANDE
Typesdepanneaudecommande
Lepoêlepeutêtremunid’unpanneaudecommandefi xésoitsurledessusdupoêle,
derrièrelatrémie(«fixésurledessus»),soitsurlecôtél’appareil(«fixésurlecôté»).
Auxfinsderéférence,voiciàquoiressemblelepanneaudecommandefixésurle
dessus:
Unpanneaudecommandefixésurlecôtéestdotéd’écransd’affichageséparéspour
laplagedechaleur etlavitesseduventilateur,commececi:
VEUILLEZ NOTER que certaines instructions du présent guide s’appliquent au
panneau de commande FIXÉ SUR LE DESSUS et que d’autres s’appliquent au
panneauFIXÉSURLECÔTÉ.
Les différences seront mentionnées afin que vous sachiez quelles instructions
s’appliquentàvotrepoêle.

18
IMPORTANT!LISEZETSUIVEZTOUTESLESINSTRUCTIONSPOUR L’INSTALLATIONETL’ENTRETIEN,NOTAMME NTCELLESPORT ANT SURLENET TOYAGEDE
L’APPAREILÀEFFECTUERSELONLESDIRECTIVESETCELLESPORTAN TSURLEREM PLACEMENTDESJOINTS(ANNUELLEMENT)ETDESPIÈCES(AU BESOIN).
ENGLAND’SSTOVEWORKSN’ESTPASRESPONSABLEDESDOMMAGESNIDESBLESSURES,QUELSQU’ILSSOIENT,SUBISENRAISONDENÉGLIGENCE
OUÀCAUSED’UNEINSTALLATIONOUD’UNEUTILISATIONDANGEREUSEDECEPRODUIT.POURTOUTEQUESTION,COMMUNIQUEZAVECLE
SERVICEDESOUTIENTECHNIQUE.
UTILISATIONQUOTIDIENNE
Guidededémarrage
Vérifiezquelatrémieestpropreetnecontientpasdecorpsétrangers.Assurez‐vousdebranchercetappareilàune
prisefonctionnelle;nousvoussuggéronsd’utiliserunparasurtenseurafindeprotégersescomposantsélectriques.
AVANTdefairelepremierfeu,faitesfonctionnerl’appareilàvide(sansmettre
degranulesdanslatrémie)pendant
vingtminutes;pourcela,appuyezsurlebouton«ON»(marche)aprèsavoirbranchél’appareil.
Lorsquevousappuyezsurlebouton«ON»(marche):
Panneauxdecommandefixéssurledessus:lemessage«DIDYOUCLEANBURNPOTBEFORE
STARTING?(avez ‐vousnettoyéle
potdecombustionavant decommencer?)s’affiche.HOLDONTO
CONFIRM(maintenezleboutonenfoncépourconfirmer)»défileraàl’écrandupanneaudecommande.
Appuyezsu rlebouton«ON»(marche)ettenez‐leen foncépendant3secondespouractiverl’appareil.
Panneauxdecommandefixéssurle
côté:aprèsquelquessecondes,leslettres«SU»s’affichent
surlesécransd’affichage.
Unefoisl’appareilactivé,vousdevriezentendreleventilateurd’évacuationdémarrer,puisfonctionner
defaçoncontinue.L’écranaffichera alorsledernierréglagepourtouteladuréedefonctionnementde
l’appareil,oujusqu’àceque
leréglagesoitmodifié.(Leslettres«SU»continuentdes’affichersurles
écransdupanneaudecommand efixésurlecôté.)
Aprèstroisàcinqminutes,cherchezàvoirlerougeoiementdel’allumeurdanslepotdecombustion,
afindevousassurerqu’ilfonctionnecorrectement.
Abaissezmanuellementl’interrupteurducouvercledelatrémie(voirle«Schémadespièces»auversodu
présentguide)etvérifiezquelavisàgranulestournebien.Relâchezl’interrupteurducouvercledelatrémie
etassurez‐vousquelavisàgranulesarrêtedetourne r.NEMETTEZPASVOS
DOIGTSDANSLATRÉMIEET
NELESAPPROCHEZPASDELAVISÀGRANULESLORSQUECELLE‐CIESTENROTATION.
Pourlespanneauxfixéssurledessus,veuilleznoter:sil’interrupteurducouver cledelatrémien’estpas
activé(c.‐à‐d.qu’iln’apasétéabaissé)pendant
60secondes,l’appareils’éteindraetafficheralemessage
d’erreur«HOPPERLEFTOPEN(trémielaisséeouverte).SHUTTINGDOWN(arrêtdel’appareil)».Sicelase
produit,ilfautlaisserl’appareils’éteindre.Lefonctionnementàvidedevraalorsêtrereprisdepuisledébut.
Veuilleznoterquelaporteavantdoit
êtreferméepourquelavisàgranulestourne.Lepanneau de
commanden’afficherapasunmessaged’erreurprovoquéeparunepertedepression,carlesystèmene
détecterapasdepertedepressiontantqu’iln’aurapasdétectéunfeu.Néanmoins,lavisàgranulene
tournerapassila
porteestouverte.
Panneauxdecommandefixéssurledessus:aprèsenvironvingtminutes,lemessage«FAILEDTOSTART
SHUTTINGDOWN(échecdudémarrage–arrêtdel’appareil)»devraits’afficherplusieursfoissurle
panneaudecommande.Lemessage«FAILEDTOSTART(échecdudémarrage)
»s’afficheensuite.
Poureffacerlemessaged’erreur,ilsuffitd’appuyersurlebouton«OFF»(arrêt).
Lesdeuxécransd’affichagedespanneauxfixéssurlecôtédevraientafficher«E‐2»(voustrouverezde
plusamplesinformationssu rlescodesd’e rreurdanslasectionquitraitede
cesujetdansleprésentguide).
Lamarcheàvideestalorsterminéeetvotreappareildechauffageàgranulesestprêtàfonctionner
normalement.
Allumaged’unfeu
Vousdevezremplirlatrémiedegranulesdeboisafindefairefonctionnerlepoêle.Soulevezlecouvercledela
trémieetversezlesgranulesdeboisdanslatrémie.Biensûr,àcetteétape,vousdevezavoirconnectélesystèmede
ventilationaupoêle.

19
IMPORTANT!LISEZETSUIVEZTOUTESLESINSTRUCTIONSPOUR L’INSTALLATIONETL’ENTRETIEN,NOTAMME NTCELLESPORT ANT SURLENET TOYAGEDE
L’APPAREILÀEFFECTUERSELONLESDIRECTIVESETCELLESPORTAN TSURLEREM PLACEMENTDESJOINTS(ANNUELLEMENT)ETDESPIÈCES(AU BESOIN).
ENGLAND’SSTOVEWORKSN’ESTPASRESPONSABLEDESDOMMAGESNIDESBLESSURES,QUELSQU’ILSSOIENT,SUBISENRAISONDENÉGLIGENCE
OUÀCAUSED’UNEINSTALLATIONOUD’UNEUTILISATIONDANGEREUSEDECEPRODUIT.POURTOUTEQUESTION,COMMUNIQUEZAVECLE
SERVICEDESOUTIENTECHNIQUE.
Nousrecommandonsden’utiliserquedesgranulesfabriquéesdansdesinstallationsapprouvées
parlePFI(PelletFuelInstitute).Lesgranulesportantlesceaud’approbationduPFIontdefaibles
tauxdecendresetd’humidité,unegrandevaleurcalorifique,etleurqualitéetleurtaillesont
uniformes.
Cepoêleaura
unaussibonrendementavecdesgranulesdeboisderésineuxqu’avecdesgranulesdeboisde
feuilluset,bienquelacendrepuisseavoirunaspectouunetexturelégèrementdifférents,lesdeuxtypesde
granulesbrûlerontproprementeteffica cement.
Cepoêleàgranulesestéquipéd’unsystème
d’allumageautomatique.Ilsuffitd’appuyersurlebouton
«ON»(marche).
Panneauxdecommandefixéssurledessus:lorsquevousappuyezsurlebouton«ON»(marche),
lemessage«DIDYOUCLEANBURNPOTBEFORESTARTING?(avez‐vousnettoyélepotdecombustion
avantdecommencer?)
HOLDONTOCONFIRM(maintenezleboutonenfoncépourconfirmer)»défilera
àl’écrandupanneaudecommande.Appuyezsurlebouton«ON»(marche)ettenez‐leenfoncé
pendant3secondespouractiverl’appareil.
Panneauxdecommandefixéssurlecôté:uncourtmomentaprèsque
vousavezappuyésurlebouton
«ON»(marche),leslettres«SU»s’affichentsurlesécransd’affichage dupanneaudecommande.
Celaindiquequelepoêleacommencésaséquencededémarrageetqu’ilfonctionnecorrectement.
Aprèsavoiractivél’appareil,commeindiquéci‐dessus,leplus
récentréglages’afficheradanslafenêtredu
panneaudecommande(lesécransd’affichagedespanneauxfixéssurlecôtécontinuentd’afficher«SU»).
Celaindiquequelepoêleacommencésaséquencededémarrageetqu’ilfonctionnecorrectement.
Lerythmedel’alimentationengranulesetlaquantité
d’airdecombustionutiliséeaucoursdudémarragesont
déterminésàl’aidedupanneaudecommande.Lepoêlepeutainsiêtreréglésurn’importequelleplagedechaleur
audémarrage.
Aprèsunequinzainedeminutes,lefeudevraitbrûlerintensément.Lepoêlefonctionnealorsnormalementetles
écransd’affichagedu
panneaudecommandeaffichentvot reréglage,àmoinsquevousnerégliezlepanneau.
Ilestnormalqu el’appareilémett edelafu m éelorsdupremierfeu,étantdonnéquelespeinturesetleshuiles
finissentdesécher.Cettefuméedevraitsedissiperauco ursdelapremièreheure
d’utilisation.Ouvrezuneporteou
unefenêtreaucoursdupr em ierfeu,afind’aérerlapièce.
Remarquesàproposdel’utilisationquotidienne
Seulesdesgranulesdeboisdequalitésupérieure,d’undiamètrede6,35mm,doiventêtreutiliséesdansce
poêle.L’utilisationdegranulesdemoindrequalitécontenantunegrandequantitédecendresOUdegranules
dontletauxd’humiditéestélevépeutprovoquerunengorgementplusrapidedupotdecombustion
parles
cendresetpeutnécessiterquel’entretienpériodiquesoitconsidérablementplusfréquent.Veuillezconsulterla
section«Entretien»duprésentguideafindemieuxcomprendreenquoilechoixducombustibleaune
incidencesurlefonctionnement,l’entretienetlenettoyagedupoêle.
Ilestnormalde
constaterdesfluctuationsdanslahauteurdelaflamme.Eneffet,lesgranulesdeboisn’ontpas
touslamêmetaille,cequipeutavoiruneincidencesurl’alimentationdupotdecombustion.L’intensitédela
flammepeutvariersansquecelaprovoqueunepertederendement.
Conserveztoujoursles
granulesdeboisdansunendroitsecafinqu’ilsconserventleurformeetqueleurtaux
d’humiditérestebas.Assurez‐vouségalementquelatotalitédesgranulesdeboisestconservéeàunedistance
sécuritairedupoêle.Sinon,unincendiepourraitsedéclarer.N’installezpasetn’utilisezpascetappareil
à
l’extérieur,dansuneserreoudansunendroittrèshumide.
Cepoêleàgranulesestmunid’unpotdecombustionspécialementconçuquiaétéinstalléenusine.Cepotde
combustionélèvelesgranulesquiseconsumentetdirigel’airprécisémentàl’endroitrequis.Lesgranulesne
doiventêtrebrûléesquedanscepotdecombustion,quinedoitsubiraucunemodification.Deplus,aucune
grilleniaucunrehausseurdefeunedoitêtreutilisé.

20
IMPORTANT!LISEZETSUIVEZTOUTESLESINSTRUCTIONSPOUR L’INSTALLATIONETL’ENTRETIEN,NOTAMME NTCELLESPORT ANT SURLENET TOYAGEDE
L’APPAREILÀEFFECTUERSELONLESDIRECTIVESETCELLESPORTAN TSURLEREM PLACEMENTDESJOINTS(ANNUELLEMENT)ETDESPIÈCES(AU BESOIN).
ENGLAND’SSTOVEWORKSN’ESTPASRESPONSABLEDESDOMMAGESNIDESBLESSURES,QUELSQU’ILSSOIENT,SUBISENRAISONDENÉGLIGENCE
OUÀCAUSED’UNEINSTALLATIONOUD’UNEUTILISATIONDANGEREUSEDECEPRODUIT.POURTOUTEQUESTION,COMMUNIQUEZAVECLE
SERVICEDESOUTIENTECHNIQUE.
Panneaudecommandefixésurledessus:lacartedecircuitimpriméestmunied’unefonction
de«messagesderappel».Ceux‐cis’afficherontdansdesfenêtrescontextuellesetdéfileront
àl’écrandemanièreponctuelle.
Lesinstructionssuivantess’a ppliquentaupanneaufixésurledessusseulement :
Commeindiquéci‐dessus,lepanneaudecommandedemanderaàl’utilisateursilepotde
combustionaéténettoyéavantledémarrage,suividumessage«HOLDONTOCONFIRM
(maintenezleboutonenfoncépourconfirmer)».
«Rappeldenettoyagequotidien»:unefo isquel’appareilafonctionnépendantuneduréede
combustionde46heuresconsécutives,lepanneaudecommandeafficheraunrappelpouravertir
l’utilisateurquel’appareildoitêtreéteintpourlenettoyagequotidien.Lemessage «PLEASESHUT
DOWNANDCLEAN BURN
POT(veuillezéteindrel’appareiletnettoyerlepotdecombustion)»
s’afficheraàl’écrandupanneaudecommande.Cemessagederappeln’éteintPASl’appareil,
maislemessageCONTINUERAdedéfilertantquel’appareiln’aurapasétécomplètementéteint
parl’utilisateur.Lemessagedéfilantn’aaucuneincidencesurlecontrôle
dupoêle;l’utilisateur
peuttoujoursréglerl’appareilàl’aid e dupanneaudecommande.Celui‐ciafficheraalorsleréglage,
puisrecommenceraàafficherlemessagedéfilantjusqu’àcequel’utilisateuréteignel’appareil.
«Rappeld’entretienhebdomadaire»:après7jours defonctionnementcumulatif,lepanneaude
commandeafficheralemessagederappeldéfilant«DIDYOUPERFORMWEEKLYMAINTENANCE?
(avez‐vouseffectuél’e ntretienhebdomadaire?)HOLDONBUTTONTOCONFIRM(maintenezle
boutonenfoncépourconfirmer)»,etce ,afinde
s’assurerquel’utilisateuraeffectuél’en tretien
hebdomadairenécessaire.Encoreunefois,lemessagen’aaucuneincidencesurlefonctionnement
del’ appareil. Lemessagepeutêtreeffacéenmaintenantlebouton«ON»(ma rche) enfoncépendant
3secondes,aprèsquoilepanneaudecomman dereviendraàl’affichageprécédent.
ATTENTION
N’UTILISEZJAMAISD’ESSENCE,DECOMBUSTIBLEPOURLAMPEAPPARENTÉÀL’ESSENCE,
DEKÉROSÈNE,DELIQUIDED’ALLUMAGEPOURCHARBON,NIAUCUNLIQUIDESIMILAIREPOUR
ALLUMEROURAVIVERUNFEUDANSCESYSTÈMEDECHAUFFAGE.CONSERVEZDETELSLIQUIDES
ÀBONNEDISTANCEDUPOÊLELORSQUECELUI‐CIFONCTIONNE.DEPLUS,NEDISPOSEZJAMAIS
D’ALLUME‐FEUXSURUNESURFACECHAUDENISURDESTISONSDANSLEPOÊLE.N’UTILISEZPAS
DEPRODUITSCHIMIQUESNIDEFLUIDESPOURALLUMERLEFEU.
NEFAITESPASBRÛLERDELIQUIDESINFLAMMABLESCOMMEDEL’ESSENCE,DUNAPHTAOUDE
L’HUILEPOURMOTEUR.NEFAITESPASBRÛLERDESDÉCHETS,DUGAZONCOUPÉOUDESRÉSIDUS
DEJARDINAGE,DESMATÉRIAUXCONTENANTDUCAOUTCHOUC,YCOMPRISDESPNEUS,DES
MATÉRIAUXCONTENANTDUPLASTIQUE,DESDÉCHETSDEPRODUITS PÉTROLIERS,DELAPEINTURE
OUDUDILUANTÀPEINTURE,DESPRODUITSBITUMINEUX,DESMATÉRIAUXCONTENANTDE
L’AMIANTE,DESDÉBLAISOUDESDÉBRISDECONSTRUCTION,DESTRAVERSESDECHEMINDEFER
OUDUBOISTRAITÉSOUSPRESSION,DUFUMIEROUDESRESTESD’ANIMAUX,DESPRODUITSDE
PAPIER,DUCARTON,DUCONTREPLAQUÉOUDESPANNEAUXDEPARTICULES.L’INTERDICTIONDE
BRÛLERCESMATÉRIAUXNEVOUSEMPÊCHEPASD’UTILISERDESALLUME‐FEUÀBASEDEPAPIER,
DECARTON,DESCIURE,DECIREOUD’AUTRESSUBSTANCESSEMBLABLESPOURALLUMERUNFEU
DANSLEPOÊLEÀBOIS.LACOMBUSTIONDECESMATÉRIAUXPEUTCOMPROMETTREL’EFFICACITÉ
DUPOÊLEETPRODUIREDELAFUMÉEETDESVAPEURSTOXIQUES.

21
IMPORTANT!LISEZETSUIVEZTOUTESLESINSTRUCTIONSPOUR L’INSTALLATIONETL’ENTRETIEN,NOTAMME NTCELLESPORT ANT SURLENET TOYAGEDE
L’APPAREILÀEFFECTUERSELONLESDIRECTIVESETCELLESPORTAN TSURLEREM PLACEMENTDESJOINTS(ANNUELLEMENT)ETDESPIÈCES(AU BESOIN).
ENGLAND’SSTOVEWORKSN’ESTPASRESPONSABLEDESDOMMAGESNIDESBLESSURES,QUELSQU’ILSSOIENT,SUBISENRAISONDENÉGLIGENCE
OUÀCAUSED’UNEINSTALLATIONOUD’UNEUTILISATIONDANGEREUSEDECEPRODUIT.POURTOUTEQUESTION,COMMUNIQUEZAVECLE
SERVICEDESOUTIENTECHNIQUE.
RÉGLAGESDUPANNEAUDECOMMANDEFIXÉSURLEDESSUS
Veuilleznoter:Lesinstructionsdelasectionsuivantes’appliquentauxmodèles
depoêledotésd’unpanneaudecommandefixésurledessus(oùlepanneaude
commandeestfixésurledessusdupoêle,derrièrelatrémie).
Veuillezconsulterlasectionduguide«Réglagesdupanneaudecommandefixé
surlecôté»pourobtenirlesinstructionss’appliquantauxpoêlesdotésd’un
panneaudecommandefixésurlecôté.
Modesmanueletautomatique
Modeautomatique
Pardéfaut, lepoêleestprogrammé enmodeautomatique.Assurez‐vousd’abord quelefilduthermocouple
repose lâchement à l’extérieur de l’arrière du poêle (de façon à ce qu’il puisse mesurer la température
ambiante), à un endroit sûr où l’onne pourrait pas marcher dessus ni l’endommager.Il nedoit pasreposer
directementsurleplancher,sinonilenmesureralatempérature.Lefil duthermocoupleestle détecteurdela
températureambiantepermettantaupanneaudecommanded’afficherlatempérature.
Lorsque ce mode est activé, une fois la séquence de démarrage lancée, vous choisissez la température
ambiante désirée (entre 15,5°C et 32,2°C) en appuyant sur la flèche orientée vers le haut ou sur celle
orientéeversle bas.Lepoêlecommandel’alimentationparlavisàgranulesainsiquelavitesseduventilateur
enfonctiondelatempératurequevousavezchoisie.
Lepoêle chauffera jusqu’à ce qu’il atteignelatempératureà laquelle il aété régléet que l’appelde chaleur
cesse.Lepoêleajusteraensuitesapuissancedecombustionenfonctiondesdonnéessurlatempératuredela
piècefourniesparlecapteurdechaleurdelapièce.
Pouréteindrecomplètementlepoêle,appuyezsurlebouton«OFF»(arrêt)dupanneaudecommande.
Modemanuel
Si vous le souhaitez,vous pouvez programmervotre poêlepour qu’ilfonctionne en modemanuel. En mode
manuel, après avoir appuyé sur le bouton «ON» (marche), le poêle fonctionne continuellement, selon la
plagede chaleur et lesréglagesde la vitessedu ventilateur désirés. Les réglages delaplage de chaleur sont
de1à9 (laflècheorientéevers lehautpermetd’augmenter la plagede chaleuret celleorientéeverslebas
permetde la diminuer), où1 représente l’alimentation la plusbasse parla visà granules etoù 9 représente
l’alimentation la plus importante. La plage de vitesse du ventilateur correspondra à la plage de chaleur que
vousaurezréglée.
Commelepoêlefonctionnecontinuellementenfonctiondelaplagedetempératuresélectionnéedanscemode,
celui‐ci est généralement recommandé pour les poêles installés dans des endroits peu isolés de la maison et
dansdesrégionsoùleclimatestextrêmementfroid.
Pouréteindrecomplètementlepoêle,appuyezsurlebouton«OFF»(arrêt)dupanneaudecommande.

22
IMPORTANT!LISEZETSUIVEZTOUTESLESINSTRUCTIONSPOUR L’INSTALLATIONETL’ENTRETIEN,NOTAMME NTCELLESPORT ANT SURLENET TOYAGEDE
L’APPAREILÀEFFECTUERSELONLESDIRECTIVESETCELLESPORTAN TSURLEREM PLACEMENTDESJOINTS(ANNUELLEMENT)ETDESPIÈCES(AU BESOIN).
ENGLAND’SSTOVEWORKSN’ESTPASRESPONSABLEDESDOMMAGESNIDESBLESSURES,QUELSQU’ILSSOIENT,SUBISENRAISONDENÉGLIGENCE
OUÀCAUSED’UNEINSTALLATIONOUD’UNEUTILISATIONDANGEREUSEDECEPRODUIT.POURTOUTEQUESTION,COMMUNIQUEZAVECLE
SERVICEDESOUTIENTECHNIQUE.
Réglagedupoêleenmodemanuel
o Pourréglerlepoêleenmodemanuel,appuyezsurlesflèchesorientéesverslehautetversle
bassimultanémentlorsquelepoêleestbranché.Celaferapasserlepoêleaumodemanuel.
o Enmodemanuel,lepanneaudupoêleaffichelavaleur«M1»(leréglagele
plusbas);vous
pouvezl’ajusteràl’aidedesflèchesorientéesverslehautetverslebas.
Réglagedupoêleenmodeautomatique
o Pourremettrelepoêleenmodeautomatique,appuyezsurlesflèchesorientéesverslehaut
etverslebassimultanément.Celaferapasserlepoêleaumodeautomatique.
o Enmodeautomatique,lepanneaudupoêleaffichelatempératureréglée.
o Lepanneaudecommandedecepoêlevouspermet
deréglerl’émissiondechaleuretla
vitesseduventilateurdeconvection,d’allumeretd’éteindrel’appareil,etdetesterlebon
fonctionnementdescomposants(deplusamplesinformationssurlemodedediagnostic
vontsuivre).
ATTENTION
Cetappareilestconçupourfonctionneruniquementlorsquelaporteestfermée.
L’utilisationdupoêleaveclaporteouverteprovoqueraitunrefoulementdefuméeet
unecombustionlenteetinefficace.
Deplus,l’utilisationdecombustiblesautresquelesgranulesdeboispeutêtred angereuse
etproduireunexcèsdemonoxydedecarbone.Lemonoxydedecarboneestungazmortel
quiestinodoreetincolore.N’utilisezquedesgranulesdeboisdansvotrepoêle.
Ilestfortementrecommandéd’utiliserundétecteurdemonoxydedecarbone.

23
IMPORTANT!LISEZETSUIVEZTOUTESLESINSTRUCTIONSPOUR L’INSTALLATIONETL’ENTRETIEN,NOTAMME NTCELLESPORT ANT SURLENET TOYAGEDE
L’APPAREILÀEFFECTUERSELONLESDIRECTIVESETCELLESPORTAN TSURLEREM PLACEMENTDESJOINTS(ANNUELLEMENT)ETDESPIÈCES(AU BESOIN).
ENGLAND’SSTOVEWORKSN’ESTPASRESPONSABLEDESDOMMAGESNIDESBLESSURES,QUELSQU’ILSSOIENT,SUBISENRAISONDENÉGLIGENCE
OUÀCAUSED’UNEINSTALLATIONOUD’UNEUTILISATIONDANGEREUSEDECEPRODUIT.POURTOUTEQUESTION,COMMUNIQUEZAVECLE
SERVICEDESOUTIENTECHNIQUE.
Codesd’erreurdupanneaudecommandefixésurledessus
Desmessagesd’erreurs’afficherontetdéfilerontàl’écrandupanneaudecommandesil’appareilne
fonctionnepasnormalement.Lorsqueceserreursseproduisent,l’appareileffectuerauncycled’arrêt
aucoursduquellepanneaudecommandenepermettrapasuneremiseenmarchedel’appareil.Une
foislecycled’arrêtterminé,il
serapossibled’effacerlemessaged’erreurouderedémarrerl’appareil
aumoyendupanneaudecommande.Toutefois,lorsquel’appareilafficheunmessaged’erreur,nous
vousrecommandonsdeconsulterlasectionDépannageduprésentguide(oud’appelerl’assistance
technique,aubesoin)pourdétermineretcorrigerlacausedumessage.
REMARQUE:
Consultezlasectionsuivantepourensavoirdavantagesurledépannageencasde
codesd’erreur
Échecdudémarrage
Sil’appareiln’atteintpassatempératuredefonctionnementminimale(c.‐à‐d.le«signal
defeu»)autermedudélaidedémarrageprévu,lemessage«FAILEDTOSTARTSHUTTING
DOWN(échecdudémarrage–arrêtdel’appareil)»défileraàl’écrandupanneaude
commande,aprèsquoi
l’appareillancerasoncycled’arrêt.Cemessagecontinuerade
défilerjusqu’àcequel’appareilsoitcomplètementéteint.Pendantcetemps,lepoêlene
peutêtreremisenmarche.Sivousappuyezsurlebouton«ON»(marche)pendantlecycle
d’arrêt,lemessage«STOVEMUSTSHUT DOWNTO
CLEARERROR(lepoêledoitêtreéteint
poureffacerlesmessagesd’erreurs)»défilerauneseulefoisavantquel’écrann’affichele
messageprécédent.
Unefoisquel’appareilestéteintcomplètement,l’écrancontinueradefairedéfilerle
message«FAILEDTOSTART(échecdudémarrage)».Àcetteétape,
lepoêlepeutêtre
redémarrénormalementenappuyantsurlebouton«ON»(marche),oulecodepeut
êtreeffacéenappuyantsurlebouton«OFF»(arrêt).
Écheccauséparunetempératuretropélevée
Si,àtoutmomentpendantquel’appareilestencoursd’utilisation,lecapteurdu poêle
détecteunetempératuretropélevée,lemessagesuivants’affichera:«FAILEDONOVER
TEMPSHUTTINGDOWN(écheccauséparunetempératuretropélevée–arrêtde
l’appareil)».L’appareillanceraensuitesoncycled’arrêt
etlemessagecontinueraàdéfiler
jusqu’àcequel’appareils’arrêtecomplètement.Pendantlecycled’arrêt,lepoêle nepeut
êtreremisenmarche.Sivousappuyezsurlebouton«ON»(marche)pendantlecycle
d’arrêt,lemessage«STOVEMUSTSHUT DOWNTOCLEARERROR(lepoêle
doitêtreéteint
poureffacerlesmessagesd’erreur)»défilerauneseulefoisavantquel’écrann’affichele
messageprécédent.

24
IMPORTANT!LISEZETSUIVEZTOUTESLESINSTRUCTIONSPOUR L’INSTALLATIONETL’ENTRETIEN,NOTAMME NTCELLESPORT ANT SURLENET TOYAGEDE
L’APPAREILÀEFFECTUERSELONLESDIRECTIVESETCELLESPORTAN TSURLEREM PLACEMENTDESJOINTS(ANNUELLEMENT)ETDESPIÈCES(AU BESOIN).
ENGLAND’SSTOVEWORKSN’ESTPASRESPONSABLEDESDOMMAGESNIDESBLESSURES,QUELSQU’ILSSOIENT,SUBISENRAISONDENÉGLIGENCE
OUÀCAUSED’UNEINSTALLATIONOUD’UNEUTILISATIONDANGEREUSEDECEPRODUIT.POURTOUTEQUESTION,COMMUNIQUEZAVECLE
SERVICEDESOUTIENTECHNIQUE.
Unefoisl’appareiléteintcomplètement,lemessage«FAILEDONOVERTEMP(écheccausé
parunetempératuretropélevée)»défileraàl’écran.Àcetteétape,lepoêlepeutêtre
redémarrénormalementenappuyantsurlebouton«ON»(marche),oulecodepeutêtre
effacéenappuyantsur
lebouton«OFF»(arrêt).
Pertedepression
Cetappareilestmunid’undépressiocontacteurdesécuritépour«porteentrouverte».
Sicetinterrupteurestactivépendantunepériodede30secondesconsécutives,lemessage
«FAILEDONVACUUMLOSSSHUTTINGDOWN(écheccauséparunepertedepression–
arrêtdel’appareil)»défileraàl’écrandu
panneaudecommande.L’appareillanceraensuite
soncycled’arrêtetlemessagecontinueraàdéfilerjusqu’àcequel’appareils’arrête
complètement.Pendantlecycled’arrêt,lepoêlenepeutêtreremisenmarche.Sivous
appuyezsurlebouton«ON»(marche)pendantlecycled’arrêt,lemessage«
STOVEMUST
SHUTDOWNTOCLEARERROR(lepoêledoitêtreéteintpoureffacerlesmessages
d’erreur)»défilerauneseulefoisavantquel’écrann’affichelemessageprécédent.
Unefoisl’appareiléteintcomplètement,lemessage«FAILEDONVACUUMLOSS
(écheccauséparunepertedepression)»défileraàl’écrandupanneaudecommande.
Àcetteétape,lepoêlepeutêtreredémarrénormalementenappuyantsurlebouton
«ON»(marche),oulecodepeutêtre
effacéenappuyantsurlebouton«OFF»(arrêt).
Trémielaisséeouverte
Cetappareilestég alementdotéd’uninterrupteurdesé curitéducouvercle delatrémie.Celui‐ci
estactionnéparunelanguettequifaitpartieducouvercledelatrém ie.L’interrupteurestun
dispositifdesécuriténécessairequiempêchelavisàgranulesdetournerlorsq uelecouvercle
estouvert.Un
messaged’erreurs’afficherasilecouve rcleestlaisséouvertpendant60seco ndes
consécutives.Sicelaseproduit,lemessage«HOPPERLEFTOPENSHUTTINGDOWN(trémie
laisséeouverte–arrêtdel’appareil)»défileraàl’écrandupanneaudecommande.L’appareil
lanceraensuiteso ncycled’arrêtetlemessageco ntinuera
àdéfilerjusqu’ àcequel’ appareil
s’arrêteco mplètemen t.Pendantlecycled’arrêt,lepoêlenepeutêtreremisenmarche.Sivous
appuyezsu rlebouton«ON»(marche)pendantlecycled’arrêt,lemessage«STOVEMUST
SHUTDOWNTOCLEARERROR(lepoêledoitêtreéteintpoureffacer
le smessagesd’erreur)»
défilerauneseulefoisavantquel’écrann’affichelemessageprécédent.
Unefoisl’appareiléteintcomplètement,lepanneaudecommandeaffichera«HOPPER
LEFTOPEN(trémielaisséeouverte)».Àcetteétape,lepoêlepeutêtreredémarré
normalementenappuyantsurlebouton«ON»(marche),oulecodepeutêtreeffacé
enappuyantsurlebouton«OFF»(arrêt).
Sil’affichaged’uncoded’erreurpersiste,siuncoded’erreursembleinexplicable,ousivous
avezdesquestionsàproposdescodesd’erreuroudeleursignification,veuillezcontacterle
servicedesoutientechniqueau1800245‐6489.

25
IMPORTANT!LISEZETSUIVEZTOUTESLESINSTRUCTIONSPOUR L’INSTALLATIONETL’ENTRETIEN,NOTAMME NTCELLESPORT ANT SURLENET TOYAGEDE
L’APPAREILÀEFFECTUERSELONLESDIRECTIVESETCELLESPORTAN TSURLEREM PLACEMENTDESJOINTS(ANNUELLEMENT)ETDESPIÈCES(AU BESOIN).
ENGLAND’SSTOVEWORKSN’ESTPASRESPONSABLEDESDOMMAGESNIDESBLESSURES,QUELSQU’ILSSOIENT,SUBISENRAISONDENÉGLIGENCE
OUÀCAUSED’UNEINSTALLATIONOUD’UNEUTILISATIONDANGEREUSEDECEPRODUIT.POURTOUTEQUESTION,COMMUNIQUEZAVECLE
SERVICEDESOUTIENTECHNIQUE.
Dépannagedesmessagesd’erreurdupanneaudecommande
fixésurledessus
REMARQUE:Danscertainscas,ilestrecommandéd’exécuterle«modedediagnostic»lorsdudépannage.
Consultezlasectionsuivantepourdesrenseignementsconcernantl’exécutiondumodedediagnosticde
votrepoêle.
Échecdudémarrage
L’appareildoitêtreproprechaquefoisqu’ilestmissoustension;lepotdecombustiondoitêtrevide;
lecombustibledoitdéjàêtrechargédanslatrémie;laportedechargement(couvercledelatrémie)ainsi
quelaporteavantdoiventêtrefermées.Unefoisl’appareilsoustension,leventilateurdecirculationd’air
(d’évacuation)s’activeetl’appareilcommenceàdistribuerlecombustibledanslesystèmed’alimentation.
L’allumeurcommenceaussiàseréchauffer.Lorsquelecombustibleatteintleniveaudel’orificedel’allumeur
danslepotdecombustion,lachaleurdel’allumeurdevraitrapidementcommenceràenflammerle
combustible.Unefoisl’allumagecommencé,l’appareilmaintientcetétatjusqu’àcequelecapteurde
chaleurdupoêlereconnaissele«signaldefeu».Àcestade,l’appareilinterromptlaséquencededémarrage
etcommencelechauffageenfonctionduréglagedéfiniparl’utilisateur.Sil’appareiln’atteintpasla
températuredefonctionnementselonle«signaldefeu»,unmessaged’échecdedémarrages’affiche.
Causespossibles:
Leventilateurdecirculationd’air(d’évacuation)nefonctionnepas–sileventilateurdecirculation
d’airestcoincé,défectueuxoubouché,l’appareilstoppel’alimentation.Ledébitd’airgénéréparle
ventilateurdecirculationd’airactiveuninterrupteuràvidequiindiqueaupanneaudecommande
quelaporteavantestferméeetqueleventilateurdecirculationd’airenvoiesuffisammentd’air
verslepotdecombustionpourentretenirlefeu.
o Mesurecorrective:Nettoyezlepoêleetlesystèmedeconduitdefumée.Nettoyezleventilateur
decirculationd’airetvérifiezsilaroue tournelibrement.Vérifiezlesbranchementsdu
ventilateur;faitesuntestenmodediagnostic.Sileventilateurdecirculationd’airnefonctionne
pas,remplacezleventilateurdecirculationd’air(d’évacuation).
Leventilateurdecirculation(évacuation)d’airtourne,maisiln’yapasd’alimentationencombustible
(lavisàgranulesnetournepas)–ilpourraits’agirdel’unedescausessuivantes:lavisàgranulesest
obstruéeoulemoteurdelavisàgranulesestdéfectueux;lecircuitdel’interrupteuràvideestouvert;
laméthodedeventilationestinadéquate;lecircuitdel’interrupteurducouvercledelatrémieest
ouvert.
o Visàgranulesobstruéeoumoteurdelavisàgranulesdéfectueux:nettoyezlatrémieetle
systèmed’alimentation.Vérifiezs’ilyadujeudanslavisàgranules.Faitesuntestenmode
diagnostic.
o Visàgranulesdéfectueuse:silavisneprésentepasdeproblème,maisqu’ellenetournepas
enmodediagnostic,remplacezlemoteurdelavisàgranules.

26
IMPORTANT!LISEZETSUIVEZTOUTESLESINSTRUCTIONSPOUR L’INSTALLATIONETL’ENTRETIEN,NOTAMME NTCELLESPORT ANT SURLENET TOYAGEDE
L’APPAREILÀEFFECTUERSELONLESDIRECTIVESETCELLESPORTAN TSURLEREM PLACEMENTDESJOINTS(ANNUELLEMENT)ETDESPIÈCES(AU BESOIN).
ENGLAND’SSTOVEWORKSN’ESTPASRESPONSABLEDESDOMMAGESNIDESBLESSURES,QUELSQU’ILSSOIENT,SUBISENRAISONDENÉGLIGENCE
OUÀCAUSED’UNEINSTALLATIONOUD’UNEUTILISATIONDANGEREUSEDECEPRODUIT.POURTOUTEQUESTION,COMMUNIQUEZAVECLE
SERVICEDESOUTIENTECHNIQUE.
o Circuitdel’interrupteuràvideouvert:assurez‐vousquelaportefermeparfaitement.Vérifiez
ensuitesil’orificed’aspiration(s urlaparoiarrièredroitedelachambredecombustion,àdroite
dusupportdupotdecombustion)es tobstrué.Pournettoyercetorificed’as piration,insérezun
cure‐dentouunoutilsemblabledansl’orificeetnettoyez(délicatement)lasurfaceintérieure
dansunmouvementcirculaire,endirigeantl’outilversl’entréedel’orifice.Cetorificenedoitpas
êtrenettoyédefaçonbrutale(c’est‐à‐direavecunaspirateurdequelquetypequecesoit),car
celapourraitendommagerl’interrupteur.Ensuite,nettoyezleszonesd’échangedechaleuret
lesystèmedeconduitdefumée.Faitesuntestenmodediagnostic;silecircuitaffichetoujou rs
«ouvert»,vérifiezlesbranchementsdel’interrupteuretdupanneaudecommande.Faitesun
autretestenmodediagnostic;silecircuitesttoujoursou vert,remplacezl’interrupteuràvide.
o Méthodedeventilationinadéquate:commeindiquéprécédemment,lefonctionnement
adéquatdépendd’unebonnecirculationd’airdanstoutlesystème.Lessystèmesdeventilation
comportanttropdecoudesoudotésdelongstuyauxhorizontauxpeuventrestreindrela
circulationd’air.Lapressionestalorsinsuffisantepourgarderl’interrupteurfermé.Celaapour
effetderestreindrel’alimentation,carlepanneaudecommandeconsidèrequelaporteavant
estouverte.Unsystèmedeconduitdefuméesalepeutrestreindreledébitd’airdelamême
façon,mêmes’ilestinstallécorrectement.Consultezleguided’installationafindedéterminer
sil’installationestconformeauxspécifications.
o Circuitd’interrupteurducouvercledelatrémieouvert:assurez‐vousquelecouvercledela
trémiesefermesuffisammentpourenclencherl’interrupteur.Faitesuntestenmodediagnostic.
Assurez‐vousquel’interrupteurpuisse êtrepoussémanuellementlorsquelatrémieestouverte.
Vérifiezlesfilsdel’interrupteuretdupanneaudecommande;faitesunnouveautestenmode
diagnostic.Silecircuitindiquetoujours«ouvert»,remplacezl’interrupteurducouvercledela
trémie.
Alimentationencours,maisallumagedéfaillant:testezl’allumeurenmodediagnostic;retirezlepot
decombustionàdesfinsdevérification.Aprèslamisesoustensionducircuitdel’allumeur,laissezla
cartoucheseréchaufferentièrementpendantenviron4minutesetobservezlemanchondel’allumeur.
Vérifiezlesfilsdel’allumeur.Remplacezl’allumeur.
Lepoêles’allume,maisilyaencoreuneerreur:testezlecapteurdupoêleenmodediagnostic.
Vérifiezlesbranchementsdupanneaudecommande.Vérifiezsilavisdemontageducapteursur
leraccorddusystèmed’évacuationestbienserrée.Remplacezlecapteurdechaleurdupoêle.
Températuretropélevée
Unmessaged’erreurdetempératuretropélevées’affichelorsquelecapteurdechaleurdupoêleafficheune
températuretropélevée.L’appareilpeutgénérerunegrandequantitédechaleurquiestensuitedistribuée
danslapièceparconvectionàl’aided’unventilateurdeconvectionquitourneàunevitessedéterminéepar
lepanneaudecommande.Silepoêleestincapabled’évacuerlachaleurgénérée,l’appareilretientalorsun
pourcentageplusélevédecettechaleuretfinitpars’éteindre.
Causespossibles:
Ventilateurd’airambiantsaleounonfonctionnel:effectuezuntestenmodediagnostic.Sile
ventilateurnefonctionnepas,retirezlepanneauarrièreetvérifiezsileventilateurpivotelibrement.
Nettoyezleventilateur.Vérifiezlesbranchements.Remplacezleventilateurd’airambiant.

27
IMPORTANT!LISEZETSUIVEZTOUTESLESINSTRUCTIONSPOUR L’INSTALLATIONETL’ENTRETIEN,NOTAMME NTCELLESPORT ANT SURLENET TOYAGEDE
L’APPAREILÀEFFECTUERSELONLESDIRECTIVESETCELLESPORTAN TSURLEREM PLACEMENTDESJOINTS(ANNUELLEMENT)ETDESPIÈCES(AU BESOIN).
ENGLAND’SSTOVEWORKSN’ESTPASRESPONSABLEDESDOMMAGESNIDESBLESSURES,QUELSQU’ILSSOIENT,SUBISENRAISONDENÉGLIGENCE
OUÀCAUSED’UNEINSTALLATIONOUD’UNEUTILISATIONDANGEREUSEDECEPRODUIT.POURTOUTEQUESTION,COMMUNIQUEZAVECLE
SERVICEDESOUTIENTECHNIQUE.
Accumulationexcessivedecendresouventilationinadéquate:retirezledéflecteuretnettoyez
l’échangeurdechaleursituéderrièrecelui‐ci.
Méthodedeventilationinadéquate–nettoyagedusystèmedeconduitdefumée:commeindiqué
précédemment,lefonctionnementadéquatdépendd’unebonnecirculationd’airdanstoutle
système.Lessystèmesdeventilationcomportanttropdecoudesoudotésdelongstuyauxhorizontaux
peuventrestreindrelacirculationd’airetentraînerl’accumulationdecombustibledanslepotde
combustionetl’élévationdelatempératured’évacuation.Deplus,unsystèmedeventilationsale
nepermetpasuntransfertdechaleuradéquat.Lachaleurexcessiveestalorsévacuéeàtraversle
systèmed’évacuation,làoùsetrouvelecapteurdechaleurdupoêle.
Espaceclos:sil’appareilestinstallédansunepetitepièceoudansunrenfoncementquinepermetpas
unecirculationadéquatedelachaleur,l’appareilpourraittoutsimplementdevenirtropchaud.
Consultezleguided’installationafindedéterminersil’installationestconformeauxspécifications.
Combustiblesinadéquats:cetappareilestconçuetcertifiéuniquementpourlacombustionde
granulesdeboisdequalitésupérieure.L’utilisationdecombustiblestelsquedesnoyauxdecerise,
dumaïségrenéouducharbonderizoudepoisestinterditeetpeutégalementcauserdesdommages
importantsàl’appareilenpeudetemps.
Capteurdupoêledéfectueux:faitesuntestenmodediagnostic;l’écrandevraitafficher«firebox87F
(poêleà87°F)»(ouplus).Silatempératureindiquéeparlecapteurestinférieureà87°F,celui‐ci
affiche«FIRESENSORUNPLUGGEDORCOLD(capteurdefeudébranchéoufroid)».Utilisezunbriquet
pourréchaufferbrièvementlecapteurdupoêleetregardezsil’affichagechange.Sil’affichagene
changepasousiunetempératureextrêmementélevées’affichetandisquelecapteurestdetoute
évidencefroid,remplacezlecapteur.
Pertedepression:
Lorsquelepoêleestenmarche,uncapteurdedépressionsurveilleledébitd’airdanslachambredecombustion.
Cedispositifstoppel’alimentationsiledébitest interrompuet rétablitl’alimentationlorsqueledébitestrétabli.
Siledébitd’airestinterrompupendantplusde30secondes,l’appareil s’éteintetafficheuneerreurdepertede
pression.
Causespossibles:
Porteavantouverteoufuitedujointd’étanchéité : laporteavantdoitresterferméepourquela
pressionsoitdétectéeparl’interrupteuràvide.Deplus,lejointd’étanchéitédelaportedevraitclore
hermétiquementlapartieavantdel’appareil.Inspectezcejointd’étanchéitéàl’aidedu«testdubillet
debanque»:lorsquelepoêleestferméetfroid,pliezunbilletdebanqueendeuxdanslesensdela
longueuretinsérez‐leentrelaporteouverteetl’ avantdel’appareil,puisfermezetverrouillezlaporte.
Ensuite,tirezsurlebilletdebanque.Ildevraityavoirunerésistancecauséeparlapressiondujoint
surlebilletcoincéentrelaporteetl’avantdupoêle.Répétezcetestàplusieursendroitsautourdela
porte.Silebilletglissefacilement,celasignifiequelejointdevraitêtreremplacé.
Leventilateurdecirculationd’air(d’évacuation)nefonctionnepas:sileventilateurdecirculation
d’airestcoincé,défectueuxoubouché,l’appareilstoppel’alimentation.Ledébitd’airgénéréparle
ventilateurdecirculationd’airactiveuninterrupteuràvidequiindiqueaupanneaudecommande
quelaporteavantestferméeetqueleventilateurdecirculationd’airenvoiesuffisammentd’air
verslepotdecombustionpourentretenirlefeu.

28
IMPORTANT!LISEZETSUIVEZTOUTESLESINSTRUCTIONSPOUR L’INSTALLATIONETL’ENTRETIEN,NOTAMME NTCELLESPORT ANT SURLENET TOYAGEDE
L’APPAREILÀEFFECTUERSELONLESDIRECTIVESETCELLESPORTAN TSURLEREM PLACEMENTDESJOINTS(ANNUELLEMENT)ETDESPIÈCES(AU BESOIN).
ENGLAND’SSTOVEWORKSN’ESTPASRESPONSABLEDESDOMMAGESNIDESBLESSURES,QUELSQU’ILSSOIENT,SUBISENRAISONDENÉGLIGENCE
OUÀCAUSED’UNEINSTALLATIONOUD’UNEUTILISATIONDANGEREUSEDECEPRODUIT.POURTOUTEQUESTION,COMMUNIQUEZAVECLE
SERVICEDESOUTIENTECHNIQUE.
o Mesurecorrective:Nettoyezlepoêleetlesystèmedeconduitdefumée.Nettoyezle
ventilateurdecirculationd’airetvérifiezsilarouetournelibrement.Vérifiezlesbranchements
duventilateur;faitesuntestenmodediagnostic.Sileventilateurdecirculationd’airne
fonctionnepas,remplacezleventilateurdecirculationd’air(d’évacuation).
Méthodedeventilationinadéquate:commeindiquéprécédemment,lefonctionnementadéquat
del’appareildépendd’unebonnecirculationd’airdanslesystème.Lessystèmesdeventilation
comportanttropdecoudesoudotésdelongstuyauxhorizontauxpeuventrestreindrelacirculation
d’air.Lapressionestalorsinsuffisantepourgarderl’interrupteurfermé.Celaapoureffetde
restreindrel’alimentation,carlepanneaudecommandeconsidèrequelaporteavantestouverte.
Consultezleguided’installationafindedéterminersil’installationestconformeauxspécifications.
Conduitdefuméebloquéouaccumulationexcessivedecendresdanslepoêle:pourassurerquele
débitd’airfournitunepressionsuffisanteàl’interrupteuràvide,ilestnécessairedenettoyertout
blocageouaccumulationdecendresdanslepoêleetleconduitdefumée.Cettesituationpeut
diminuerledébitd’airetprovoquerledéclenchementdel’interrupteuràvide.Ilestnécessairede
nettoyeradéquatementleconduitdefuméeetlepoêleselonlafréquenceprescritepours’assurer
demaintenirledébitd’airrequis.
Orificed’aspirationobstrué:l’airutilisépourexercerlapressiond’aspirationquiseradétectéepar
l’interrupteurestaspiréparunpetitorificequisetrouvesurlaparoiarrièredelachambrede
combustion,àdroitedusupportdupotdecombustion.Ilsepeutquel’accumulationdecendresà
l’entréedel’orificeobstrueougênelacirculationd’air,provoquantledé clenchementdel’interrupteur
ouempêchantsafermeturecomplètelorsquelepoêleestenmarche.Pournettoyerl’orifice,insérez
uncure‐dentouunoutilsemblabledansl’orificeetnettoyez(délicatement)lasurfaceintérieuredans
unmouvementcirculaire,enramenantl’outilversl’entréedel’orifice.Cetorificenedoitpasêtre
nettoyédefaçonbrutale(c’est‐à‐direavecunaspirateurdequelquetypequecesoit),carcelapourrait
endommagerl’interrupteur.
Interrupteuràvidedéfectueux:ilesttrèsrarequecetinterrupteursoitdéfectueux,c’estpourquoiil
estimportantdepasserenrevuetouteslescausesdeproblèmesdécritesci‐dessusavantderemplacer
celui‐ci.L’interrupteurpeutêtretestéenmodediagnostic.
Trémielaisséeouverte:
Cetappareilestmunid’uninterrupteurdesécuritéàl’intérieurdelatrémiequiempêchelavisàgranulede
tournerlorsquelecouvercledelatrémieestouvert.Silecouvercleestouvertpendantplusde60secondes,
l’appareils’éteindraetafficheracemessaged’erreur.
Causespossibles:
Assurez‐vousquelecouvercledelatrémiesefermesuffisammentpourenclencherl’interrupteur.
Testenmodediagnostic:l’interrupteurpeutêtreactivémanuellementlorsquelatrémieestouverte.
Vérifiezlecâblagedel’interrupteuretdupanneaudecommande.Testenmodediagnostic:sil’appareil
indiquetoujoursquelecircuitestouvert,remplacezl’interrupteurducouvercledelatrémie.

29
IMPORTANT!LISEZETSUIVEZTOUTESLESINSTRUCTIONSPOUR L’INSTALLATIONETL’ENTRETIEN,NOTAMME NTCELLESPORT ANT SURLENET TOYAGEDE
L’APPAREILÀEFFECTUERSELONLESDIRECTIVESETCELLESPORTAN TSURLEREM PLACEMENTDESJOINTS(ANNUELLEMENT)ETDESPIÈCES(AU BESOIN).
ENGLAND’SSTOVEWORKSN’ESTPASRESPONSABLEDESDOMMAGESNIDESBLESSURES,QUELSQU’ILSSOIENT,SUBISENRAISONDENÉGLIGENCE
OUÀCAUSED’UNEINSTALLATIONOUD’UNEUTILISATIONDANGEREUSEDECEPRODUIT.POURTOUTEQUESTION,COMMUNIQUEZAVECLE
SERVICEDESOUTIENTECHNIQUE.
Modedediagnostic pourlepanneaudecommandefixé
surledessus
Pourpasserenmodedediagnostic,l’appareildoitêtrecomplètementéteint.
Appuyezsimu ltanémentsurlaflècheverslehaut,laflècheverslebasetleboutonON(marche ),puisrelâchez‐les.
Lemessage«DIAGNOSTICMODE(modediagnostic)»défileraàl’écran,suividumessage«REV3.4
(révision3.4)»oud’unautremessageindiquantlaversion
actuelle.
AppuyezsurleboutonON(marche).
o LesDELdel’écrandupanneaudecommandeclignote ront.Il s’agitd’untestpourvérifierquetoutesles
DELfonctionnent.
AppuyezsurleboutonON(marche).
o Lemessage «AUGEROFF(visàgranuledésactivée)»défileraàl’éc ran.Pour
testerlemoteurdelavisà
granules,appu yezsurlaflècheverslehaut.Lemessage«AUGERON(visàgranulesactivée)»d éfileraàl’écran
dupanneaudecommandeetlemoteurdelavisàgranulesdevraitsemettreenmarcheetfonctionnerdefaçon
continue.
Pourarrêterlavisàgranules,ap puyezsurlaflèchever slebas.Lemessage«AUGEROFF(visàgranule
désactivée)»défileraàl’éc randupanneaudecommandeetlemoteurs’arrêter a.(Àcetteétapedutest,nous
recommandonsd’in stallerlepotdecombustionpourempêcherlesgranulesde
tomberdan slesupportquise
trouvesouslepotdecombustion.)
AppuyezsurleboutonON(marche).
o Lemessage«DRAFTOFF(ventilateurdésactivé)»défileraàl’écran.Pourtesterleventilateurde
circulationd’air(d’évacuation),appuyezsurlaflècheverslehaut.Lemessage «DRAFT
ON(ventilateur
activé)»défileraalorsàl’écrandupanneaudecomm ande etleventilateurdecirculationd’airsemettra
àfonctionneràsapuissancemaximale.Pourarrêterleventilateurdecircula tiond’air,appuyezsurla
flècheverslebas.Lemessage«DRAFTOFF(ventilateurdésactivé)»défileraàl’écran
dupanneaude
commandeetleventilateurs’arrêtera.
o REMARQUE:Leventilateurdecirculationd’airdoitêtreenmarchepourvérifierlecircuitdel’aspirateurà
uneétapeultérieuredutest.Pourlelaisserenmarche,assurez‐vousquelepanneaudecomman deestbien
régléà«DRA FT
ON(ventilateuractivé)».N’appuyezpassu rlaflècheverslebas.Ap puyezplutôtsurle
boutonON(marche)pourpasseràl’étapesuivanteenlaissantleventilateurdecirculationd’airenmarche.
UnefoisquevousavezappuyésurleboutonON(marche):
o Lemessage«ROOM
AIROFF(ventilateurd’airambiantdésactivé)»défileraàl’écran.Pourtesterle
ventilateur(deconvection)d’airambiant,appuyezsurlaflècheverslehaut.Lemessage«ROOMAIR
ON(ventilateurd’airambiantactivé)»défileraàl’écranetleventilateurd’airambiantsemettraà
fonctionneràsa
puissancemaximale.Pourarrêterleventilateurd’airambiant,appuyezsurlaflèche
verslebas.Lemessage«ROOMAIROFF(ventilateurd’airambiantdésactivé)»défileraàl’écrandu
panneaudecommandeetleventilateurs’arrêtera.
AppuyezsurleboutonON(marche).
o Lemessage «IGNITEROFF(allumeur
désactivé)»défileraàl’écran.Pourtesterl’allumeur,appuyezsurla
flècheve rslehaut.Lemessage«IGNITERON(allumeuractivé)»défileraàl’écranetl’allumeursemettrasous
tensionetcommenceraàchauffer.Après3à4minutes,l’allumeurdevraitatteindresatempératuremaximale.
Ildevrait alors
êtrepossibled’observersonrougeoiementparletroudutubedel’al lumeur,surtoutsidu
matérielcombustibleaétéversédanslepotdecombustionlorsdutestdelavisàgranule.Nous
recommandonsderetirerlepotdecom bustionpourcetteétapedutest:FAITESPREUVEDEPRUDENCE
ETUTILISEZTOUTL’ÉQUIPEMENTDEPROTECTION(GA NTSETAUTRES)NÉCESSAIRE.Deplus,sitoutesles
étapesci‐dessusontétéeffectuées,leventilateurdecirculationd’airdevrait êtreenmarcheetaspirerl’ai r
parlemanchondel’allumeur.Pouréteindrel’allumeur,appuyezsurlaflècheve rslebas.Lemessage
«IGNITEROFF(allumeurdésactivé)»défileraàl’écrandupanneaudecommandeetl’allumeurs’éteindra.

30
IMPORTANT!LISEZETSUIVEZTOUTESLESINSTRUCTIONSPOUR L’INSTALLATIONETL’ENTRETIEN,NOTAMME NTCELLESPORT ANT SURLENET TOYAGEDE
L’APPAREILÀEFFECTUERSELONLESDIRECTIVESETCELLESPORTAN TSURLEREM PLACEMENTDESJOINTS(ANNUELLEMENT)ETDESPIÈCES(AU BESOIN).
ENGLAND’SSTOVEWORKSN’ESTPASRESPONSABLEDESDOMMAGESNIDESBLESSURES,QUELSQU’ILSSOIENT,SUBISENRAISONDENÉGLIGENCE
OUÀCAUSED’UNEINSTALLATIONOUD’UNEUTILISATIONDANGEREUSEDECEPRODUIT.POURTOUTEQUESTION,COMMUNIQUEZAVECLE
SERVICEDESOUTIENTECHNIQUE.
AppuyezsurleboutonON(marche).
o Lepanneauafficheralemessage«FIRE087F(températuredupoêleà87°F)»outouteautre
températuredétectéeparlecapteurdupoêle.Lecapteurdechaleurpeutêtretestéenleréchauffantà
l’aided’unbriquet(oud’unautre
dispositifproduisantdelachaleur).Aufuretàmesurequelecapteur
seréchauffera,latempératurecorrespondanteseraindiquéeàl’écran.Silecapteurdechaleurdupoêle
estdébranchéous’ildétecteunetempératureinférieureàsaplagedetempératurecible,lemessage
«FIRESENSORUNPLUGGEDOR
COLD(capteurdechaleurdébranchéoufroid)»défileraàl’écrandu
panneaudecommande.
AppuyezsurleboutonON(marche).
o Lepanneauaffichera«ROOM67F(températuredelapièceà67°F)»outouteautretempératuredela
piècedétectéeparlecapteur.Vouspouveztester
lecapteurdelapièceentenantsimplementdans
votremainl’ampoulesituéeàl’extrémitédufiletenlaissantvotrechaleurcorporellelaréchauffer.À
mesurequel’ampouleseréchauffe,latempératureaffichéeàl’écrandedéfilementaugme nte.Sile
capteurdetempératuredelapièceestdébranchéou
défectueux,lemessage«CONNECTROOMTEMP
SENSOR(branchezlecapteurdetempératuredelapièce)»s’afficheraàl’écrandedéfilement.
AppuyezsurleboutonON(marche).
o Lescodes«H1»ou«H0»,«T1»,«V1»ou«V0»défilerontà
l’écran,selonlapositionducouvercle
delatrémieetdelaporteavant.
o Lecode«H»indiquel’étatdel’interrupteurducouvercledelatrémie,«H1»indiquequelecouvercle
estferméet«H0»,quelecouvercleestouvert.
o Lecode
«T1»devraittoujourss’affichertelquel,puisquelecircuitestdésactivéetn’estpasutilisépour
cemodèle.
o Lecode«V»affichel’étatdel’interrupteuràvide,«V1»indiquequelaporteestferméeet«V0»,
qu’elleestouverte.
o (REMARQUE:
Leventilateurdecirculation[d’évacuation]d’airdoitêtreenmarchepourquelecircuit
puisseêtrevérifié.)
o Afindebienexécutercettepartiedudiagnostic,assurez‐vousdelirelescodesàmesurequ’ilsdéfilent
pendantquelaporteavantetlecouvercledelatrémiesontfermés.Ensuite,
ouvrezlecouvercledela
trémieetlaporteavant,puisnotezl’affichageàl’écrandedéfilementpourvoirsilepanneauindique
l’étatappropriépourchaqueinterrupteur.
Pourrecommencerlemodedediagnosticdepuisledébutetfairedéfilerl’affichagedenouveau,appuyezsurle
bouton«ON»
(marche).Celaperm etàl’utilisateurderetourneraudébutducyclepouréteindreleventilateur
decirculationd’airoud’effectuerletestànouveaus’illedésire.
Poursortirdumodetest, appuyezsimple mentsurlebouton«OFF»(arrêt).Vouspouvezappuyersurlebouton
«OFF
»(arrêt)àtoutmomentpendantletestpoursortirdecemode.L’utilisateurn’apasbesoind’attendrelafin
ducyclepoursortirdumode,maisilestconseilléd’effectuerlecyclecompletetdes’assurerqu echaque
composantestàlaposition«OFF»(arrêt)avantdesortir
dumodedediagnostic.
Veuilleznoter:Lesinstructionsdelasectionsuivantes’appliquentauxmodèlesdepoêle
dotésd’unpanneaudecommandefixésurlecôté(oùlepanneaudecommandeestfixé
surlepanneaulatéraldupoêle).
Veuillezconsulterlasectionduguide«Réglagesdupanneaudecommandefixésurle
dessus»pourobtenirlesinstructionss’appliquantauxpoêlesdotésd’unpanneaude
commandefixésurledessus.

31
IMPORTANT!LISEZETSUIVEZTOUTESLESINSTRUCTIONSPOUR L’INSTALLATIONETL’ENTRETIEN,NOTAMME NTCELLESPORT ANT SURLENET TOYAGEDE
L’APPAREILÀEFFECTUERSELONLESDIRECTIVESETCELLESPORTAN TSURLEREM PLACEMENTDESJOINTS(ANNUELLEMENT)ETDESPIÈCES(AU BESOIN).
ENGLAND’SSTOVEWORKSN’ESTPASRESPONSABLEDESDOMMAGESNIDESBLESSURES,QUELSQU’ILSSOIENT,SUBISENRAISONDENÉGLIGENCE
OUÀCAUSED’UNEINSTALLATIONOUD’UNEUTILISATIONDANGEREUSEDECEPRODUIT.POURTOUTEQUESTION,COMMUNIQUEZAVECLE
SERVICEDESOUTIENTECHNIQUE.
RÉGLAGESDUPANNEAUDECOMMANDEFIXÉSURLECÔTÉ
Lepanneaudecommandedecepoêlevouspermetderéglerl’émissiondechaleuretlavitesseduventilateur
deconvection,d’allumeretd’éteindrel’appareil,etdetesterlebonfonctionnementdescomposants(deplus
amplesinformationssurlemodedediagnosticvontsuivre).
Lesboutonsaubasdupanneaudecommande(alimentationfaible,airdecombustionfaible,température
del’airentrant)nedoiventpasêtreutilisésaucoursdufonctionnementnormaldupoêle.Cesboutons
sontpréréglésenusineetnedoiventpasêtreréglésparlesutilisateurs.
Appuyezsurlebouton«On»(marche)pourallumerlepoêleetdémarrerunfeu.Levoyantlumineuxà
DELsituéau‐dessusduboutondoitdevenirvertetl’indication«SU»doits’affichersurlepanneaude
commandepeudetempsaprès.
Appuyezsurlebouton«Off»(arrêt)pouréteindrelepoêle.Levoyantlumineuxsituéau‐dessusdu
boutondoitdevenirrougeetl’indication«Sd»doits’affichersurlepanneaudecommandepeudetemps
après.Laséquenced’arrêtdel’appareildébutealors,etcedernierresteenmoded’arrêtjusqu’àcequ’il
aitrefroidi.
Pouraugmenterlachaleursortantdupoêle,appuyezsurlaflècheverslehautquiestassociéeàlaplage
dechaleur.Lavaleuraffichéesurl’écrandelaplagedechaleuraugmentealors,cequisignifiequele
panneaudecommanderèglel’apportdechaleurenfonctiondevotrepréférence.Lavitesseduventilateur
augmenteproportionnellementàlatempérature.Lepoêleestconçupourquelavaleurassociéeàla
vitessedeventilationsoittoujoursplusélevéeouégaleàcelleassociéeàlaplagedetempérature.
Laflècheverslebaspermetdediminuerlatempératureainsiquelavitesseduventilateur.
Appuyezsurlaflècheverslehautquiestassociéeàlavitesseduventilateurpouraugmentercelle‐cisans
augmenterlatempérature.Appuyezjusqu’àcequelavaleursouhaitées’afficheàl’écran.Enappuyant
surlaflècheorientéeverslebas,vousdiminuerezlavitesseduventilateur,sanstoutefoisquelavaleur
associéeàcelle‐cipuissedevenirinférieureàcellequiestassociéeàlaplagedechaleur.
Attention
Cetappareilestconçupourfonctionneruniquementlorsquelaporteprincipaleestfermée.
L’utilisationdupoêleaveclaporteouverteprovoqueraitunrefoulementdefuméeetune
combustionlenteetinefficace.
Deplus,l’utilisationdecombustiblesautresquelesgranulesdeboispeutêtred angereuse
etproduireunexcèsdemonoxydedecarbone.Lemonoxydedecarboneestungazmortel
quiestinodoreetincolore.N’utilisezquedesgranulesdeboisdansvotrepoêle.
Ilestfortementrecommandéd’utiliserundétecteurdemonoxydedecarbone.
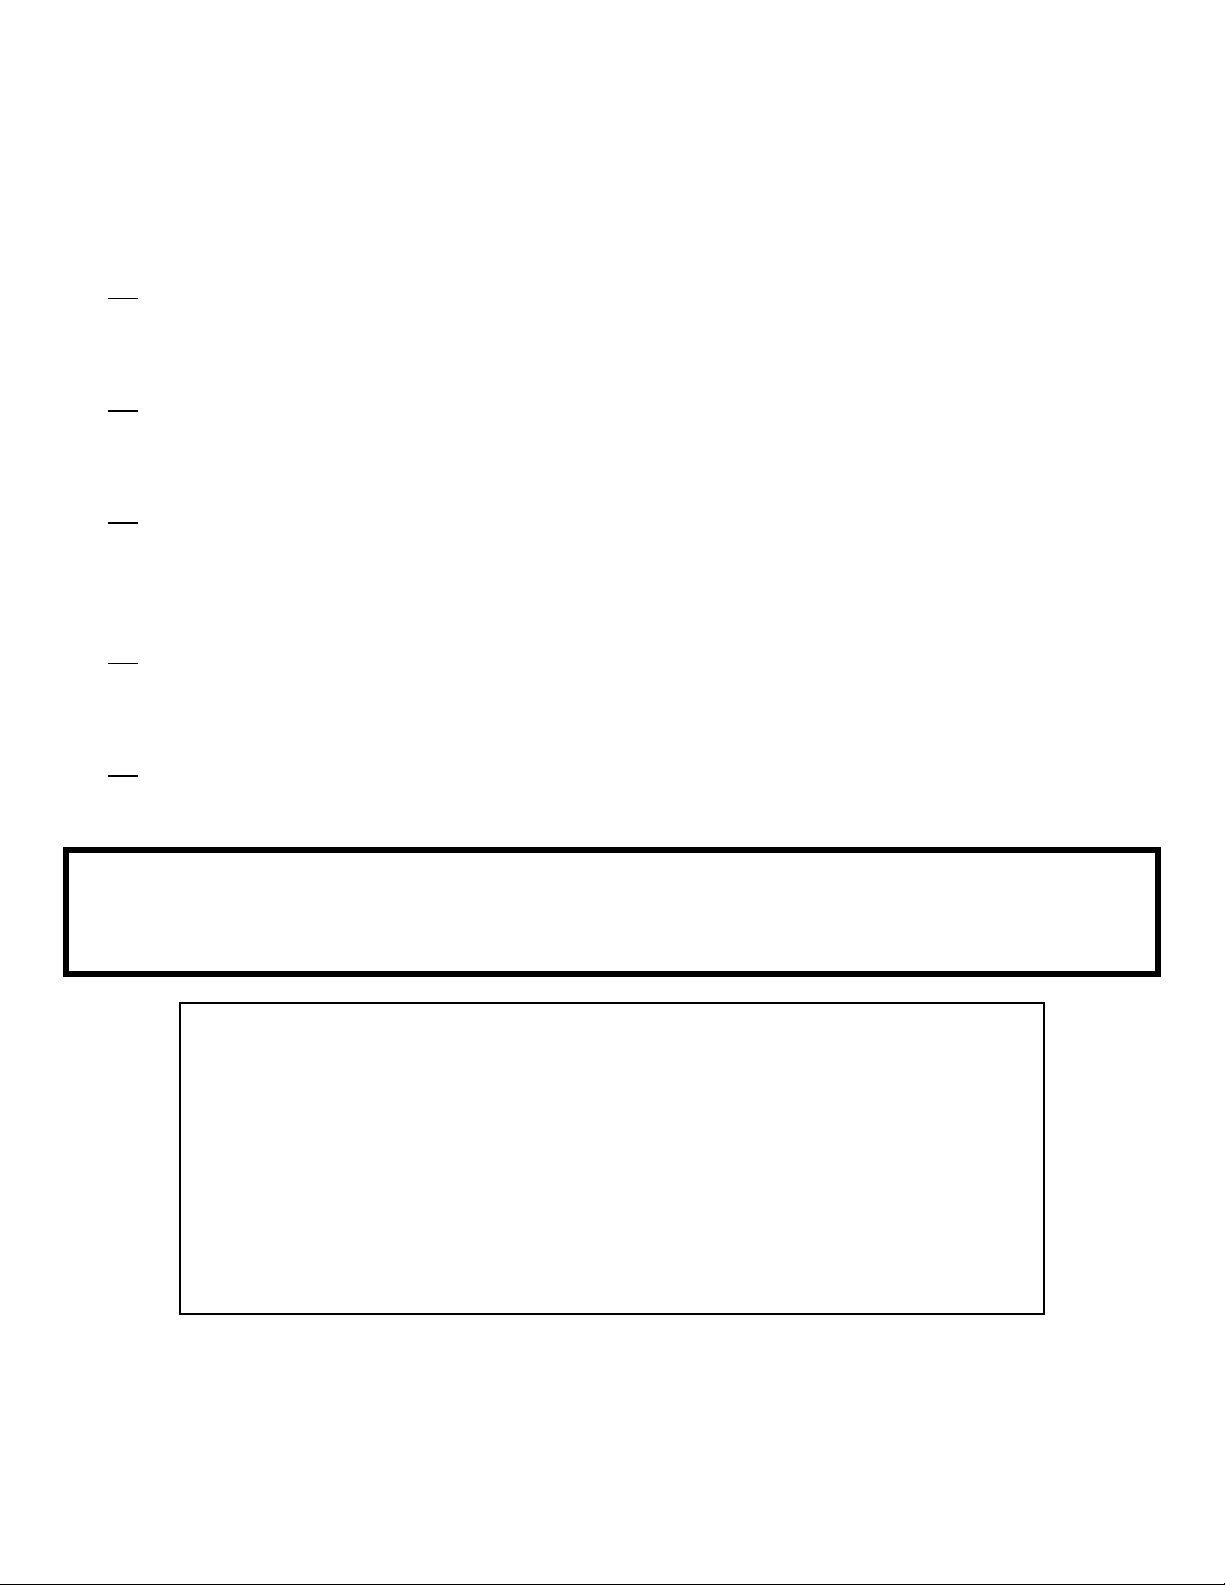
32
IMPORTANT!LISEZETSUIVEZTOUTESLESINSTRUCTIONSPOUR L’INSTALLATIONETL’ENTRETIEN,NOTAMME NTCELLESPORT ANT SURLENET TOYAGEDE
L’APPAREILÀEFFECTUERSELONLESDIRECTIVESETCELLESPORTAN TSURLEREM PLACEMENTDESJOINTS(ANNUELLEMENT)ETDESPIÈCES(AU BESOIN).
ENGLAND’SSTOVEWORKSN’ESTPASRESPONSABLEDESDOMMAGESNIDESBLESSURES,QUELSQU’ILSSOIENT,SUBISENRAISONDENÉGLIGENCE
OUÀCAUSED’UNEINSTALLATIONOUD’UNEUTILISATIONDANGEREUSEDECEPRODUIT.POURTOUTEQUESTION,COMMUNIQUEZAVECLE
SERVICEDESOUTIENTECHNIQUE.
CODESD’ERREURDUPANNEAUDECOMMANDEFIXÉSURLECÔTÉ
Lescodesd’erreurou«E‐Codes»sontdescodesalphanumériquesquiapparaissentsurlesécransd’affichage
associésàlaplagedechaleuretàlavitesseduventilateurdanslepanneaudecommande,lorsquel’appareil
nefonctionnepasnormalement.Cescodespréviennentl’utilisateurquequelquechosenefonctionnepas
correctementdanslepoêleetquecedernierdoitêtre soigneusementinspectéavantd’êtrerallumé.
Consultezleguidededépannageàlapage41pourensavoirdavantagesurlescodesd’erre ur.
E‐0
Lorsquececodes’affichesurlesécransdupanneaudecommande(engénéral,lorsd’unredémarrage
subséquentàunarrêtcauséparuncoded’erreur),celasignifiequ’iln’yaplusd’erreuretquelepoêle
peutreprendresonfonctionnementnormal.
E‐1
Cecoded’erreurn’estpasutilisépourcetypedepoêle.S’ils’affichaitnéanmoinssurlesécransdu
panneaudecommande,contactezleservice desoutientechniqueafinqu’undiagnosticpuisseêtre
établiquantàlacausedesonapparition.
E‐2
Cecodeindiquequel’allumagedesgranulesaéchoué.Ilsepeutquelepoêleaitenfaitalluméles
granules,maisquelepanneaudecommanden’aitpasdéte ctéunetempératuresuffisammentélevée
pourdéterminerque lefeuapris.Sitelestlecas,attendezquel’appareilrefroidisse,nettoyezlepotde
combustionetredémarrezlepoêle.
E‐3
Cecoded’erreurindiquequelatempératured’évacuationadépassélavaleurmaximalepréréglée.
LecodeE‐3désignecequel’onnommecommunémentun«emballement»,c’est‐à‐direquel’air
d’évacuationestpluschaudqu’ilnedevraitl’être.
E‐4
Cecodes’afficheàlasuited’unebaissedelatempératuredel’évacuation.Ilsignifiequelefeuou
quele«signaldeflamme»aétéperdu.Celaseproduitgénéralementlorsquelatrémieestvide.
Sil’affichaged’uncoded’erreurpersiste,siuncoded’erreursembleinexplicable,
ousivousavezdesquestionsàproposdescodesd’erreuroudeleursignification,
veuillezcontacterleservicedesoutientechniqueau1800245‐6489.
Interrupteurdesécuritéducouvercledelatrémie:cetappareilestégalementdoté
d’uninterrupteurdesécuritéducouvercledelatrémie(piècenºAC‐HLSB)quiest
directementraccordéaumoteurdelavisàgranules.Dansl’éventualitéoùlecouvercle
delatrémieestlaisséouvertpendantque
lepoêleestenmarche,l’interrupteurdu
couvercledelatrémieempêcheralavisàgranulesdetourner.Celapermetd’éviterque
lessous‐produitsdecombustionpénètrentdanslamaisonàl’aidedel’ouverturelaissée
parlecouvercledelatrémieetaussid’empêcherl’appareildefonctionnerpendantque
lecouvercleestouvert.Uneutilisationinadéquatedel’interrupteurdesécuritédu
couvercledelatrémieempêcheralavisàgranulesdetourner;parconséquent,lepoêle
nefonctionnerapas.NeplacezJAMAISvotremainnitoutautreobjet,prèsdelavisà
granulespendantquelepoêleestbranché.
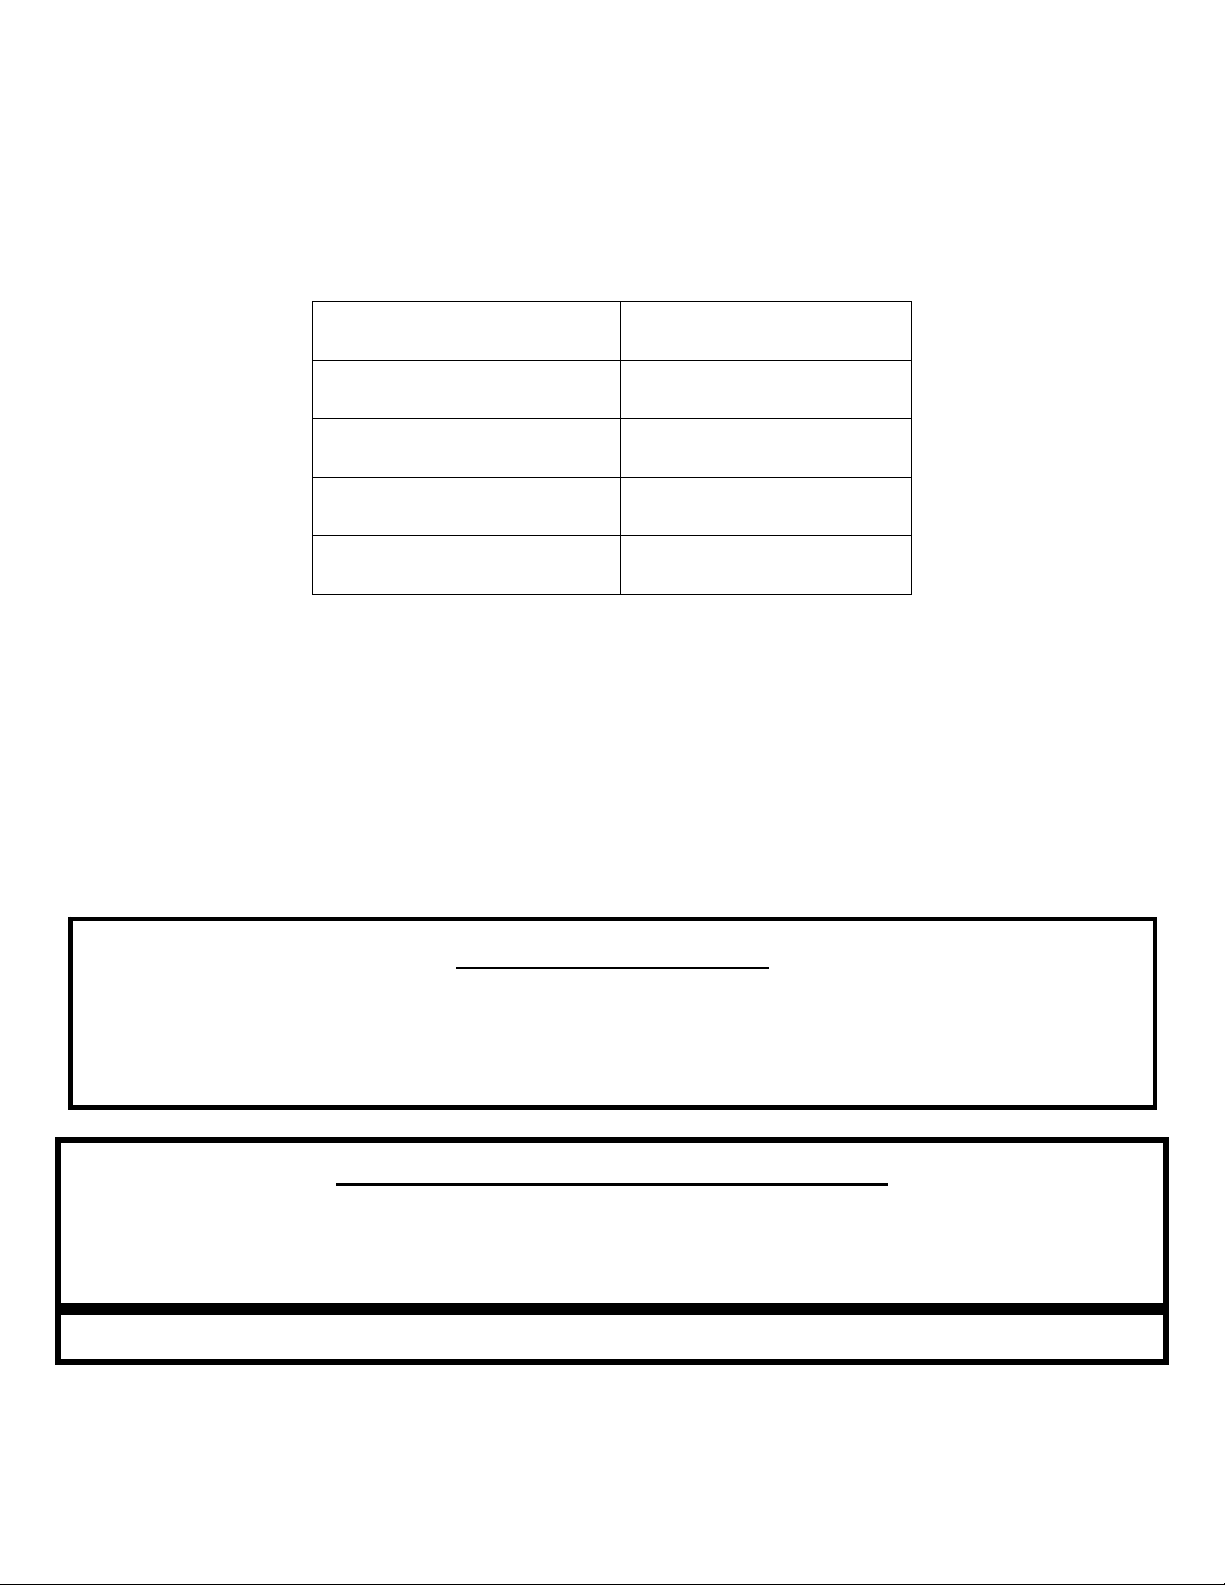
33
IMPORTANT!LISEZETSUIVEZTOUTESLESINSTRUCTIONSPOUR L’INSTALLATIONETL’ENTRETIEN,NOTAMME NTCELLESPORT ANT SURLENET TOYAGEDE
L’APPAREILÀEFFECTUERSELONLESDIRECTIVESETCELLESPORTAN TSURLEREM PLACEMENTDESJOINTS(ANNUELLEMENT)ETDESPIÈCES(AU BESOIN).
ENGLAND’SSTOVEWORKSN’ESTPASRESPONSABLEDESDOMMAGESNIDESBLESSURES,QUELSQU’ILSSOIENT,SUBISENRAISONDENÉGLIGENCE
OUÀCAUSED’UNEINSTALLATIONOUD’UNEUTILISATIONDANGEREUSEDECEPRODUIT.POURTOUTEQUESTION,COMMUNIQUEZAVECLE
SERVICEDESOUTIENTECHNIQUE.
PANNEDECOURANT–panneauxdecommandefixés
surledessusetsurlecôté
Sil’appareilmanqued’électricitépouruneduréedetroisminutesoumoins,ilreprendrason
fonctionnementlorsquel’alimentationélectriqueserarétablie,enfonctiondesindications
suivantes:
Sil’appareilmanqued’électricitépouruneduréeapproximativedeplusdetrois
minutes,ildemeureraéteintlorsquel’alimentationélectrique serarétablie.
IMPORTANT:N’ouvrezNIlecouvercledelatrémienilaportedel’appareilpendant
unepannedecourant.Ouvrezlaplusprochedesportessurl’extérieurainsi
qu’une
fenêtre,afinderéduirelesrisquesquedessous‐produitsdecombustionen
provenancedupoêles’accumulentdanslamaison. Attendezquel’alimentation
électriquesoitrétablie,puisappuyezsurlebouton«ON»(marche)pourredémarrer
l’appareilaubesoin.
Attention–risquedechocélectrique
Appuyezsurlebouton«OFF»(arrêt)etlaissezl’appareilserefroidircomplètementAVANT
deledébrancheretdeprocéderàsonentretienouauremplacementd’unepièce.
Risquedechocélectriquesil’appareiln’estpasdébranchéavantsonentretien
Étatdel’appareilaumoment
delacoupured’électricité
Étatdel’appareillorsque
l’alimentationestrétablie
ON(marche) Réchauffement(démarrage)
Réchauffement(démarrage) Réchauffement(démarrage)
Misehorstension Misehorstension
OFF(arrêt) OFF(arrêt)
Détecteursdefumée
England’sStoveWorks,Inc.recommandefortementl’utilisationdedétecteursdefumée
danschaquepiècedelamaison.Cependant,lefaitdeposerundétecteurdefumée
directementau‐dessusdel’appareilpourraitcauserdesalarmesintempestives.
34
IMPORTANT!LISEZETSUIVEZTOUTESLESINSTRUCTIONSPOUR L’INSTALLATIONETL’ENTRETIEN,NOTAMME NTCELLESPORT ANT SURLENET TOYAGEDE
L’APPAREILÀEFFECTUERSELONLESDIRECTIVESETCELLESPORTAN TSURLEREM PLACEMENTDESJOINTS(ANNUELLEMENT)ETDESPIÈCES(AU BESOIN).
ENGLAND’SSTOVEWORKSN’ESTPASRESPONSABLEDESDOMMAGESNIDESBLESSURES,QUELSQU’ILSSOIENT,SUBISENRAISONDENÉGLIGENCE
OUÀCAUSED’UNEINSTALLATIONOUD’UNEUTILISATIONDANGEREUSEDECEPRODUIT.POURTOUTEQUESTION,COMMUNIQUEZAVECLE
SERVICEDESOUTIENTECHNIQUE.
ENTRETIENQUOTIDIEN
Remarquesimportantes
Commepourtoutetâched’entretiendece
produit,assurez‐vousquel’appareilesthors
tension(«OFF»)etqu’ilestcomplètementarrêté
AVANTdeprocéder.
N’oubliezpasquelespiècesmétalliquesdufoyer
peuventresterCHAUDESlongtempsaprèsqueles
flammessesontéteintesetMÊMElongtemps
après
l’arrêtcompletdel’appareil.Soyeztoujours
trèsprudentlorsquevousmanipulezdespièces
dupoêlequipeuventêtrechaudes,mêmesivous
pensezqu’ellessontrefroidies.
N’enlevezlescendresquelorsquelepoêleest
arrêtéetqu’ilacomplètementrefroidi.Desbraises
peuventresterchaudessouslescendreslongt emps
aprèsqu elefeus’estéteintdanscepoêle(comme
danstoutautreappareildumêmetype).
Laquantitédecendresetdedépôtsgénérésparlesgranulesdanslepotdecombustionpeutvarier.
Surveillezattentivementl’accumulationdecendresdanslepoêleàlapremièreutilisationetchaquefois
quevousybrûlezunnouveautypedegranule.
Bienquelaquantitédecendresproduiteparcetappareilnesoitpastrèsgrandeparrapportàcelled’un
poêleàboistraditionnel,ilestESSENTIELquevouslegardiezpropreetexemptdecendrespourmaintenir
uneefficacité
etunrendementoptimaux.L’accumulationdecendresgênelacirculationd’air,réduit
l’efficacitéetpeutproduireunretourdefumée.
England’sStoveWorks®n’estpasresponsabledesdommages,quelsqu’ilssoient,subisàcaused’un
poêlemalentretenuetmalnettoyé.Cepoêleàgranulesestunappareilextrêmementefficace
s’ilreçoit
l’entretienadéquatluipermettantdemaintenirunrendementoptimal.
Retraitetéliminationdescendres(aumoinsdeuxfoisparsemaine)
Appuyezsurlebouton«OFF»(arrêt)etlaiss ezlepo êleterminersoncycled’arrêtet refroidircomplètement.
Untournevisouuncouteauàmastiqueràmanchelongpeuventêtreutiliséspourenlevertoute
accumulationoucroûtedanslepotdecombustion.Poussezensuitelescendresversla
droiteoulagauche,
jusquedansl’espacedestinéàcontenirlescendres.
Retirezlescendresàl’aided’unepelleàmain.Suivezlesinstructionsdelasectionci‐dessusrelativeà
l’éliminationdescendres(souslasection«Entretienquotidien»).
Éliminationdescendres
–
Lescendresdoiventêtreplacéesdansuncontenant
métalliqueaveccouverclehermétique.Cecontenantdoitêtreplacésurunplanchernon
combustibleousurlesol,loindetousmatériauxcombustibles,jusqu’àcequeles
cendressoientcomplètementrefroidiesetqu’ellessoientfinalementenfouiesdanslesol
oudisperséessur
place.
*Unmauvaisnettoyagedu poêlepeutentraînerunebaisseder end ement etunretourdeflamm es.*
Déflecteur
Plaqued’usure
Potde
combustion
35
IMPORTANT!LISEZETSUIVEZTOUTESLESINSTRUCTIONSPOUR L’INSTALLATIONETL’ENTRETIEN,NOTAMME NTCELLESPORT ANT SURLENET TOYAGEDE
L’APPAREILÀEFFECTUERSELONLESDIRECTIVESETCELLESPORTAN TSURLEREM PLACEMENTDESJOINTS(ANNUELLEMENT)ETDESPIÈCES(AU BESOIN).
ENGLAND’SSTOVEWORKSN’ESTPASRESPONSABLEDESDOMMAGESNIDESBLESSURES,QUELSQU’ILSSOIENT,SUBISENRAISONDENÉGLIGENCE
OUÀCAUSED’UNEINSTALLATIONOUD’UNEUTILISATIONDANGEREUSEDECEPRODUIT.POURTOUTEQUESTION,COMMUNIQUEZAVECLE
SERVICEDESOUTIENTECHNIQUE.
Nettoyagedupotdecombustion
Aprèsleretraitdescendresdupoêle,le
nettoyagedupotdecombustionestl’autre
tâchequotidienned’entretienquiassurerale
fonctionnementoptimaldupoêle.Lesgranules
contiennentdesquantitésvariablesd’impuretés
etdematériauxfusiblesquis’accumulerontdans
lepotdecombustionaufildutemps.Certaines
granulescontiennentdes
quantitésbeaucoup
plusélevéesd’impuretésfusibles.Vousdevez
doncvousmontrerencoreplusvigilantafinde
garderlepotdecombustionpropre.Permettre
auximpuretésdes’accumulerdanslepotde
combustionpeutrestreindr el’arrivéed’airaux
flammes,cequidonnelieuàunecombustion
saleetinefficaceenplus
deréduireladuréede
viedupotdecombustion.
REMARQUE:Lepotdecombustiondoitêtrenettoyéquotidiennementetavantchaque
miseenmarche(avantd’appuyersurlebouton«ON»[marche]).
Laisseztoujoursl’appareilterminersoncycled’arrêtetserefroidircomplètementavant
d’effectuertoutetâched’entretiendufoyer.
Ouvrezlapo rte avantpouraccéder
aupotdecombustion.AVERTISSEMENT–Lepotde
combustionpeutresterCHAUDlon gtempsaprèsquelesflammessesontéteintes;par
conséquent,vousdevriezporterdesgantsdeprotectionlorsquevouslemanipulezpourleretirer.
Retirezetnettoyezlaplaqued’usuredupotdecombustion(reportez‐vous
àlavueéclatéeau
versoduprésentguideetauschémadelapageprécédente).
Enleveztouteaccumulationdecendresdanslazonesituéesouslaplaqued’usure.Assurez‐
vouségalementqu’iln’yapasdecendresdansletubed’admissionsouslaplaqued’usureet
qu’iln’estpas
obstrué.IMPORTANT:Uneaccumulationdecendressouslaplaqued’usure
peutcréerunedéfaillancedel’appareil.
Vérifiezs’ilyauneaccumulationàl’avantdelazonedebrûlage.Nettoyeztouslestrousd’air
delaplaqued’usure(utilisezunforetde1/8poaubesoin).Cestrousdevraientresterpropres
entouttempspuisqu’ilsfournissentl’aircomburantsouslesgranulesetautourdeceux‐ci.
L’ensembledepotdecombustiondoitégalementêtresoigneusementnettoyé,ycomprisla
boîtedecombustion.Lorsduremplacementdelaplaqued’usure,assurez‐vousqu’ellerepose
àplatdanslefoyeretqu’iln’yaaucunespacesouscelle‐ci(créépardesrésidusdecendres).
Replacezle
potdecombustiondanslesupportsivousavezretirél’ensembledupotde
combustionetassurez‐vousdeserrerlesvisdecalage,maisneserrezpasexcessivement.
Tubedevisàgranulesinférieure
Tubed’a d mission
souslaplaque
d’usure
Potde
combustion

36
IMPORTANT!LISEZETSUIVEZTOUTESLESINSTRUCTIONSPOUR L’INSTALLATIONETL’ENTRETIEN,NOTAMME NTCELLESPORT ANT SURLENET TOYAGEDE
L’APPAREILÀEFFECTUERSELONLESDIRECTIVESETCELLESPORTAN TSURLEREM PLACEMENTDESJOINTS(ANNUELLEMENT)ETDESPIÈCES(AU BESOIN).
ENGLAND’SSTOVEWORKSN’ESTPASRESPONSABLEDESDOMMAGESNIDESBLESSURES,QUELSQU’ILSSOIENT,SUBISENRAISONDENÉGLIGENCE
OUÀCAUSED’UNEINSTALLATIONOUD’UNEUTILISATIONDANGEREUSEDECEPRODUIT.POURTOUTEQUESTION,COMMUNIQUEZAVECLE
SERVICEDESOUTIENTECHNIQUE.
ENTRETIENHEBDOMADAIRE
Retraitdudéflecteur
Commepourtoutetâched’entretienconcernantceproduit,assurez‐vousquel’appareilest
horstension(«OFF»)(arrêt)etqu’ilestcomplètementarrêtéetrefroidiAVANTdeprocéder
àl’entretien.N’oubliezpasquelespiècesmétalliquesdufoyerpeuventresterCHAUDES
longtempsaprèsquelesflammessesontéteintes
etMÊMElongtempsaprèsl’arrêtcompletde
l’appareil.Soyeztoujourstrèsprudentlorsquevousmanipulezdespiècesdupoêlequipeuvent
êtrechaudes,mêmesivouspensezqu’ellessontrefroidies.
L’entretienhebdomadairecomprendlesétapesdelaprésentesectionAINSIQUElesétapes
delasection«Entretienquotidien
».
Legranddéflecteursituéau‐dessusdupotdecombustionetderrièrecelui‐ci(reportez‐vous
àlavueéclatéeauversoduprésentguideetauximagesdelasection«Entretienquotidien»)
doitêtreretiréchaquesemaine. Pourcefaire,soulevezlaplaqueettirez‐la.Nettoyezensuite
soigneusementlazonederrièrelaplaque,puisreplacez‐ladanssapositiond’origine.
Utilisezuntournevisouunciseau etbrisezlesaccumulationsdecréosotesurledevantdel’appareil,
àl’endroitoùlepotdecombustio nestalim entéengranulesparletubedelavisàgranules
inférieure(reportez‐vousàl’illustrationdelasectionprécédente).Silesgranulessonthumides
ousicettezoneprésentedesaccumulations,letubedevisàgranulesin férieurpeutgrincer.
Retraitdesrésidusdecarbone:Pendantlefonctionnementnormal,lecarboneprovenantde
lacombustiondesgranulesauratendanceàs’accumulersurl’extrémitédelavisà granules,
surlaplaqued’usureetlescôtésdufoyerainsiquedanslabouchedutubed’alimentation.
Ilestessentielderetirercesrésiduspourassurerunfonctionnementsansproblèmede
l’appareil.Lafréquencederetraitdesrésidusdecarbonevarieselonlamarquedesgranules,
lateneurenhumidité,letypedebois,lescorpsétrangers(saleté,etc.)danslesgranuleset
d’autresfacteurs.
Pourenlevercesrésidusdecarbone,ilsuffitdelesgratteràl’aidedelalamed’untournevis
àtêteplateoud’uninstrumentsemblable.Pourretirerlesrésidusdecarbonedutube
d’alimentation,gratteztousceuxquevouspouvezfacilementatteindre,puisinsérezune
lime‐émeri(limeàonglesfaited’unbâtonnetetdepapierabrasif)entrelavisàgranulesetle
tubed’alimentation,puisponceztoutrésiduencoreprésentaprèslegrattage.Leretraitde
cesrésidusdecarbonedutubed’alimentation estessentielpourlebonfonctionnementdela
visàgranules,quiestconçuepourflotterlibrementdansletubed’alimentation,permettant
ainsiundébitdecombustiblerégulier,réduisantlespossibilitésdeblocageetassurantle
fonctionnementplussilencieuxdel’appareil.
Suivezlesétapesci‐dessusàl’enverspourreplacerledéflecteur.
Sitropdecendres’accumuledanslachambred’évacuationoudanslesystèmedeventilation
pendantlemois,ontdoitréduirelesintervallesentrelesnettoyagesafind’éviterque
l’accumulationdecendrenuiseaurendementdupoêle.
Unensembled’aspirationdecendresetdenettoyageconçuspécialementpourlespoêlesà
granulesestoffertsurlesiteWebd’England’sStoveWorksàl’adresse:heatredefined.com

37
IMPORTANT!LISEZETSUIVEZTOUTESLESINSTRUCTIONSPOUR L’INSTALLATIONETL’ENTRETIEN,NOTAMME NTCELLESPORT ANT SURLENET TOYAGEDE
L’APPAREILÀEFFECTUERSELONLESDIRECTIVESETCELLESPORTAN TSURLEREM PLACEMENTDESJOINTS(ANNUELLEMENT)ETDESPIÈCES(AU BESOIN).
ENGLAND’SSTOVEWORKSN’ESTPASRESPONSABLEDESDOMMAGESNIDESBLESSURES,QUELSQU’ILSSOIENT,SUBISENRAISONDENÉGLIGENCE
OUÀCAUSED’UNEINSTALLATIONOUD’UNEUTILISATIONDANGEREUSEDECEPRODUIT.POURTOUTEQUESTION,COMMUNIQUEZAVECLE
SERVICEDESOUTIENTECHNIQUE.
ENTRETIENMENSUEL
Larègleàsuivreestlasuivante:l’entretienmensueldoiteffectivementêtreeffectuéunefoispar
moisOUchaquefoisquel’onabrûlé907kgdegranulesavantlafindumois.
Nettoyagedutuyaudeventilation
Lespiècesinférieuresetderaccordementdusystèmedeventilation(commelestésetles
coudes)constituentdeszonesoùlescendresvolantesetlecréosotepeuvents’accumuler.
VÉRIFIEZsoigneusementl’accumulationdansceszonesafindevousassurerquelesystème
deventilationpeutfonctionnerentoutesécurité.
Selon
letypedesystèmedeventilationdevotrepoêle,ilpeutêtrepossibled’ôterlecouvercle
entédesorificesdenettoyageetdesimplementenleverlescendresvolantesaccumuléesà
l’aided’unebrossepourtuyau.
Lespartieshorizontalesdestuyaux,tellesqueletuyauderaccorddel’évacuation
autuyau
vertical,accumulentlescendresvolantesetdoiventêtreinspectéesminutieusementet
nettoyéesàl’aided’unebrosse.
Vérifiezsilesemboutsnesontpasbouchésouobstruésparlescendresvolantesaccumulées.
Aprèsavoirsoigneusementnettoyélesy stèm edeventilation,refermeztousles jointsdémontés
avecdusilicone
hautetempérature(piècenºAC‐RTV3),sicelas’appliqueàvo tre systèmede
ventilation.
Inspectezlesjointsquin’ontpasétédémontéspourvousassurerqu’ilssontétanchesaux
fumées.
Aprèsuneutilisationprolongéedupoêle,voustrouverezgénéralementleszonesdefuitedu
systèmedeventilationen
cherchantlesdépôtsdecendresvolantesàl’extérieurdutuyau.
Surveillezsoigneusementlesfuitesdusystèmedeventilationetscellezlestuyauxen
conséquence.
Bienquelaplupartdessystèmesdeventilationdespoêlesàgranulessoientconçuspour
durertouteunevie,lescendresvolantesproduitesparlesgranules
peuventlescorroderdans
certainscas.Lorsdunettoyagedevotresystèmedeventilation,examinezattentivementles
tuyauxpourdétectertoutsignededétérioration,et remplacezlespiècesexcessivementusées.
Ilestpeuprobablequevousayezàvouspréoccuperdecetaspect,maisilestimportantde
maintenirvotre
systèmedeventilationenbonétatpourgarantirlefonctionnementsécuritaire
devotrepoêle.

38
IMPORTANT!LISEZETSUIVEZTOUTESLESINSTRUCTIONSPOUR L’INSTALLATIONETL’ENTRETIEN,NOTAMME NTCELLESPORT ANT SURLENET TOYAGEDE
L’APPAREILÀEFFECTUERSELONLESDIRECTIVESETCELLESPORTAN TSURLEREM PLACEMENTDESJOINTS(ANNUELLEMENT)ETDESPIÈCES(AU BESOIN).
ENGLAND’SSTOVEWORKSN’ESTPASRESPONSABLEDESDOMMAGESNIDESBLESSURES,QUELSQU’ILSSOIENT,SUBISENRAISONDENÉGLIGENCE
OUÀCAUSED’UNEINSTALLATIONOUD’UNEUTILISATIONDANGEREUSEDECEPRODUIT.POURTOUTEQUESTION,COMMUNIQUEZAVECLE
SERVICEDESOUTIENTECHNIQUE.
ENTRETIENANNUEL
Remarquesimportantes
Commepourtoutetâched’entretienconcernantceproduit,assu rez‐vousquel’appareil
esthorstension(« OFF»)etqu’ilestcomplètementarrêtéetrefroidiAVANTdeprocéder
àl’entretien.
N’oubliezpasquelespiècesmétalliquesdufoyerpeuventresterCHAUDESlongtemps
aprèsquelesflammessesontéteintes
etMÊMElongtempsaprèsl’arrêtcompletde
l’appareil.Soyeztoujourstrèsprudentlorsquevousmanipulezdespiècesdupoêlequi
peuventêtrechaudes,mêmesivouspensezqu’ellessontrefro i dies.
L’entretienannuel(ouàlafindelasaison)comprendlesétapesdelaprésentesection,
AINSIQUEles
étapesdessections«Entretienquotidien»,«Entretienhebdomadaire»
et«Entretienmensuel».
Vousdevezeffectuerl’entr etienannuelàlafinde lasaisondechauff age .Laisserles
cendresetlesautresmatièresaccumuléesdanslepoêlependantlesmoisoùonne
l’utilisepaspeutcauser
unedégradationprématuréedumétaldupoêleetdusystèmede
ventilation.Portezparticulièrementattentionauxdétailsetnettoyez minutieusementle
poêleàlafin delasaisondechauffage.Celavouspermettrad’utiliservotrepoêleetson
systèmedeventilationlongtemps.
L’appareildoitêtredébranchépendantl’été(etlorsqu’iln’estpasutilisé),afind’aider
àleprotégercontrelesrisquesdedommagescausésparlafoudreetpard’autres
perturbationsducourantélectrique.
Attention–risquedechocélectrique
Appuyezsurlebouton«OFF»(arrêt)etlaissezl’appareilserefroidir
complètementAVANTdeledébrancheretdeprocéderàsonentretienouau
remplacementd’unepièce.
Risquedechocélectriquesil’appareiln’estpasdébranchéavantsonentretien.
SUIEETCENDRESVOLANTES:FORMATIONETRETRAIT
Lesproduitsdecombustioncontiennentdespetitesparticulesdecendresvolantes.Ces
cendresvolantess’accumulentdanslesystèmed’évacuationparventilation,etrestreignent
lefluxdesgazdecombustion.Lacombustionincomplète,commecellequisurvientlorsdu
démarrageetdel’arrêtdupoêleouencasdemauvaisfonctionnementdupoêle,produitdela
suiequis’accumuledanslesystèmed’évacuationparventilation.Inspectezminutieusementlesystème
d’évacuationparventilationaumoinsunefoisparanpoursavoirs’ilabesoind’êtrenettoyé.

39
IMPORTANT!LISEZETSUIVEZTOUTESLESINSTRUCTIONSPOUR L’INSTALLATIONETL’ENTRETIEN,NOTAMME NTCELLESPORT ANT SURLENET TOYAGEDE
L’APPAREILÀEFFECTUERSELONLESDIRECTIVESETCELLESPORTAN TSURLEREM PLACEMENTDESJOINTS(ANNUELLEMENT)ETDESPIÈCES(AU BESOIN).
ENGLAND’SSTOVEWORKSN’ESTPASRESPONSABLEDESDOMMAGESNIDESBLESSURES,QUELSQU’ILSSOIENT,SUBISENRAISONDENÉGLIGENCE
OUÀCAUSED’UNEINSTALLATIONOUD’UNEUTILISATIONDANGEREUSEDECEPRODUIT.POURTOUTEQUESTION,COMMUNIQUEZAVECLE
SERVICEDESOUTIENTECHNIQUE.
ENTRETIENANNUEL
Lepoêleetlesystèmedeconduitdefuméedevraientêtrenettoyéscomplètementàlafindela
périodedechauffage.
Potdecombustion:Retirezl’ensembledepotdecombustion,nettoyez‐lesoigneusementetréinstallez‐le
(reportez‐vousàlavueéclatéedespiècesauversoduprésentguideetàlasection«Entret ienquotidien»).
Lepotdecombus tionnécessiteraalorsunnouveaujointd’étanchéité.Assurez‐vousdebien serrerlesvis
decalagelorsquevouslesreplacez,maisneserrezpasexcessiv emen t.
Nettoyageduventil ateur (d’évacuation)decombustion:Mêmesileventilateurdecombustionet son
boîtierontétéconçusdefaçonàréduirel’accumulationdecen dres,unecertainequantitédecendres
s’yaccumulerapendanttoutelasaisondechauffage.Laquantitéetletypedecendresdépendentdutype
degr anulesetdusystèmedeventilation,mais,en général,ilyapeud’accumulation.Sivoustrouvez une
grandequantitédecendresvolantesdansleventilateurdecombustionlorsdesonnettoyage,vousdevez
eneffectuerl’ entret ientouslesmoisoudeuxfoisparmoispouréviteruneaccu mulationexcessive.
Instructions
Avantdeprocéderàl’entretienduventilateurdecombustion,assurez‐vousquel’appareilest
débranchéetcomplètementrefroidi.
Dégagezlégèrementlesystèmedeventilationduventilateurdecombustiondefaçonàpouvoirretirer
celui‐cidupoêle.
Retirezlepanneaud’accèslatéralgaucheàl’aided’unecléde5/16po.
Retirezlepanneauarrièredel’appareilàl’aided’unecléde5/16po.
Débranchezlesdeuxfilsdetensionduventilateurdecombustionàl’aidedesemboutsàraccordrapide.
Dévissezlescinq(5)visautotaraudeusesde5/16poquifixentleventilateurdecombustionautube
d’évacuation.
Soulevezleventilateurdecombustionetretirez‐ledupoêle.Lejointquiscelleleventilateurautuyau
d’évacuationestfragile,alorssoyeztrèsprudentlorsquevousretirezleventilateur.Cependant,même
enétantprudent,ilestfacilededéchirercejointfragileet,commel’étanchéitéestessentielleàcet
endroit,vousdevrezprobablementremplacerlejoint(piècenº‐PU‐CBMG)chaquefoisquevous
enlèverezleventilateurdecombustion.Retirezlejointd’étanchéitéàl’aided’uncouteauàmastiquer,
puisinstallezlenouveaujointenappliquantdel’adhésifsurleventilateuretenposantlenouveaujoint
(lesinstructionsetl’adhésifsontfournisaveclejointd’étanchéité).
Aprèsavoirenlevéleventilateurdecombustion,nettoyeztouteaccumulationdecendresdansletuyau
decombustiondupoêleàl’aided’unaspirateurd’atelier.
Utilisezunpinceaudouxpourretirersoigneusementtouteaccumulationdecendresàl’intérieurdu
ventilateurdecombustionetsursapale.
Inspectezlemoteurduventilateurdecombustionpourtrouvertouteaccumulationdepoussièreet
enlevez‐lasoigneusement,envousassurantquetouslestrousderefroidissementdumoteursont
dégagésetsansdépôtsdepoussière.
Réinstallezleventilateurensuivantàl’inverselesétapesdécritesprécédemment.N’oubliezpasde
vérifierl’étatdujointd’étanchéitéduventilateurdecombustionetderebrancherlesdeuxfilsqui
relientleventilateuraupanneaudecommandedupoêle.
Réinstallezlesystèmedeventilationetlespanneaux.

40
IMPORTANT!LISEZETSUIVEZTOUTESLESINSTRUCTIONSPOUR L’INSTALLATIONETL’ENTRETIEN,NOTAMME NTCELLESPORT ANT SURLENET TOYAGEDE
L’APPAREILÀEFFECTUERSELONLESDIRECTIVESETCELLESPORTAN TSURLEREM PLACEMENTDESJOINTS(ANNUELLEMENT)ETDESPIÈCES(AU BESOIN).
ENGLAND’SSTOVEWORKSN’ESTPASRESPONSABLEDESDOMMAGESNIDESBLESSURES,QUELSQU’ILSSOIENT,SUBISENRAISONDENÉGLIGENCE
OUÀCAUSED’UNEINSTALLATIONOUD’UNEUTILISATIONDANGEREUSEDECEPRODUIT.POURTOUTEQUESTION,COMMUNIQUEZAVECLE
SERVICEDESOUTIENTECHNIQUE.
REMARQUE:UnjointdemoteurdecombustionestinclusaveclapiècenºPU‐CBMG.Ilvouspermet
deretirerlemoteur(seulement)duboîtierduventilateurdecombustion,denettoyerlemoteuret
l’intérieurduboîtierduventilateur,puisdereplacerlemoteuretsonjointd’étanchéitésansavoir
àretirerl’ensembleduventilateurdecombustion.N’oubliezpasquelaroue,letubeetletube
d’évacuationenacierduventilateurdupoêledevraientêtrebrossésetnettoyésàl’aide d’un
aspirateur.
Nettoyageduventilateurdeconvection
Commetoujours,assurez‐vousquelepoêleestrefroidietdébranchéavantd’effectuerl’entretien
d’undesescomposants,quelqu’ilsoit.Commeleventilateurdeconvectionnetraitepaslessous‐
produitsdecombustion,ilnenécessitepasunnettoyageaussiminutieuxqueleventilateur
d’évacuation.
Cependant,lapoussièredelamaisonetd’autresdébrisprésentsdansl’airpeuvents’accumuler
surlespalesduventilateurdeconvection.Engénéral,lapoussièrequis’estaccumuléesurles
palesduventilateurpeutêtreenlevéefacilementàl’aided’unaspirateuroud’unpinceaudoux.
Vousdevezretirerlepanneauarrièredupoêleàl’aided’unecléde5/16po.
Lepanneau(decircuits)decommandedoitêtreretiréenenlevantlesdeuxvisde5/16po,puis
lepanneaudecommandedupoêle.Ilpeutêtrenécessairedecoupercertainesattachesafinque
vouspuissiezretirerlepanneausanstoucherauventilateur(n’oubliezpasdelesremplacer).
Quatrevisde5/16podoiventêtreretiréespourenleverleventilateurdeconvectiondupoêle.
Vousaurezprobablementbesoind’unedouilleetd’unelonguerallonge.
Réinstallezleventilateurensuivantàl’inverselesétapesdécritesprécédemment.
Consultezégalementlesinstructionspourleretraitduventilateurdeconvectiondanslasection
«Remplacementdespièces»duprésentguide.
FINI
Cenouvelappareilaétépeintavecdelapeinturehautetempératurequidevraitconserverson
aspectd’originependantdesannées.
Sil’appareilestmouilléetquedestachesderouilleapparaissent,vouspouvezlesponceravec
delalained’acierfineetrepeindrel’appareil.Ilestimportantden’utiliserquedelapeintureen
aérosolhautetempérature(piècenºAC‐MBSP),carlesautrestypesdepeinturepourraientne
pasadhéreràlasurfaceounepassupporterlestempératuresélevées.
Demême,lapeinturedecertainesmarquesn’adhèrepasauxpeinturesd’autresmarques;par
conséquent,nousvousrecommandonsfortementd’utilisernotrepeintureenaérosolexclusive
résistantauxtempératuresélevées.
JOINTSD’ÉTANCHÉITÉ
Lesjointsd’étanchéitédoiventêtreinspectésetremplacéstouslesans.Reportez‐vousàlasection
«Jointsd’étanchéité»danslasection«Remplacementdespièces»(page49)pourconsulterles
instructionsetobtenirdeplusamplesrenseignements.

41
IMPORTANT!LISEZETSUIVEZTOUTESLESINSTRUCTIONSPOUR L’INSTALLATIONETL’ENTRETIEN,NOTAMME NTCELLESPORT ANT SURLENET TOYAGEDE
L’APPAREILÀEFFECTUERSELONLESDIRECTIVESETCELLESPORTAN TSURLEREM PLACEMENTDESJOINTS(ANNUELLEMENT)ETDESPIÈCES(AU BESOIN).
ENGLAND’SSTOVEWORKSN’ESTPASRESPONSABLEDESDOMMAGESNIDESBLESSURES,QUELSQU’ILSSOIENT,SUBISENRAISONDENÉGLIGENCE
OUÀCAUSED’UNEINSTALLATIONOUD’UNEUTILISATIONDANGEREUSEDECEPRODUIT.POURTOUTEQUESTION,COMMUNIQUEZAVECLE
SERVICEDESOUTIENTECHNIQUE.
Guidededépannage
AVERTISSEMENT:PouréviterlesCHOCSÉLECTRIQUES,débrancheztoujoursl’appareildel’alimentation
AVANTdecommenceruneréparation.Sivousnetrouvezpasdesolutionàvotreproblèmedansleprésentguide,
communiquezaveclesoutientechniqueau1800245‐6489.
*ConsultezlasectionCODESD’ERREURduprésentguidepourplusd’informationssurledépannagedescodes d’erreur.
Problème Cause Solution
Lavisàgranulessupérieure
netournepas
1.Lemoteurdelavisàgranulesesten
mauvaisétat.
1.Remplacezlemoteurdelavisàgranules.
2.Unematièreétrangèrebloquelavis
àgranules.
2.Enlevezlesgranulesetlesautressources
d’obstruction.
3.Détecteurdel’aspirateur. 3.Vérifiezleventilateurd’évacuation.
4.Interrupteurducouvercledelatrémie. 4.Assurez‐vousquelecouvercledelatrémie
estferméouremplacezl’interrupteur.
Lavisàgranulesinférieure
netournepas
1.Lemoteurdelavisàgranulesesten
mauvaisétat.
1.Remplacezlemoteurdelavisàgranules.
2.Unematièreétrangèrebloquelavis
àgranules.
2.Enlevezlesgranulesetlesautressources
d’obstruction.
Odeurdefuméeoupoussière
danslamaison
1.Connexionincorrectedel’évacuation. 1.Vérifiezlesconnexionsdel’évacuationpourtrouver
lesfuites,particulièrementlaconnexionduventilateur
d’évacuation.Colmatezlesfuitesavecdusilicone,
duruband’ alum iniumouuncollie
r
de serrage.
Leventilateurd’airambiant
nefonctionnepas
1.Détecteurthermiquelâche. 1.Resserrezlaconnexionsurledétecteur.
2.Lavitesse duventilateur esttropélevéepar
rapportàlaplagedechale ur, cequirefroidi t
lepo êleetentraînel’arr êtduventilateur.
2.Réduisezlavitesseduventilateur.
3.Unfilestmalraccordé. 3.Vérifiezlesconnexionsdanslepanneaude
commande.
Leventilateurd’évacuation
nefonctionnepas
1.Unfilestmalraccordé. 1.Vérifiezlesconnexionsdanslepanneaude
commande.
2.Leventilateurfonctionnemal. 2.Remplacezleventilateur.
3.Ledétecte urdel ’aspirat eurfonctionnemal. 3.Remplacezledétecteurdel’aspirateur.
Flammespeuintenses
1.Leventilateurd’évac uation fonctionnemal. 1.Inspectezetremplacezleventilateur.
2.Granulesexcessivementhumides. 2.Gardezlesgranulesausec.
3.Accumulationexcessivedecendres. 3.Nettoyezsoigneusementl’appareil.
4.Granulesdequalitéinférieure. 4.N’utilisezquedes granulesdepremièr equalité
approuvéesparlePFI(PelletFuelInstitute).
Unfusibleasauté 1.Surtension. 1.Remplacezlefusible;utilisezunparasurtenseur.
2.Fildénudé. 2.Vérifiezs’ilyadesfilsdénudésoudescâbles
dontlagaineprotectriceestabîmée.
3.Ilyacourt‐circuitdansuncomposant
électrique.
3.Vérifiezsidesélémentsbloquentlesmoteurs
etlesventilateursous’ilyadescourts‐circuits.
Consommationélevéede
granules
1.Lesgranulessontdequalitéinférieure
ouleurtaillen’estpasuniforme.
1.Utilisezdesgranulesdepremièrequalité,
ouessayezuneautremarquedegranules.
Grincements 1.Unélémentobstrueletubedelavis
àgranules.
1.Vérifiezs’ilyadesélémentsquiobstruent
letubedelavisàgranules.
2.Ventilateurbruyant. 2.Retirez,nettoyezethuilezleventilateur.
Cognementsoucliquetis 1.Matièresdansleventilateur.
1.Vérifiezquelesdeuxventilateurssontlibres
d’obstructions.
2.Lavisdecalageduventilateur
d’évacuationestlâche.
2.Vérifiezsilavisdecalageestbienserrée.

42
IMPORTANT!LISEZETSUIVEZTOUTESLESINSTRUCTIONSPOUR L’INSTALLATIONETL’ENTRETIEN,NOTAMME NTCELLESPORT ANT SURLENET TOYAGEDE
L’APPAREILÀEFFECTUERSELONLESDIRECTIVESETCELLESPORTAN TSURLEREM PLACEMENTDESJOINTS(ANNUELLEMENT)ETDESPIÈCES(AU BESOIN).
ENGLAND’SSTOVEWORKSN’ESTPASRESPONSABLEDESDOMMAGESNIDESBLESSURES,QUELSQU’ILSSOIENT,SUBISENRAISONDENÉGLIGENCE
OUÀCAUSED’UNEINSTALLATIONOUD’UNEUTILISATIONDANGEREUSEDECEPRODUIT.POURTOUTEQUESTION,COMMUNIQUEZAVECLE
SERVICEDESOUTIENTECHNIQUE.
Codesd’erreurrelatifsaupanneaudecommandefixésurlecôtéseulem ent
L’appareils’arrêteaprès
15à20minutesde
fonctionnement,etlepanneau
decommandeaffichelecode
«FS»(panneaufixésurle
dessus)oulecode«E‐2»
(panneaufixésurlecôté)
(échecdudémarrage)
1.Détecteurthermiquelâche. 1.Vérifiezlesdeuxcôtésde
laconnexiondu
détecteurthermique(ventilateurd’évacuation
etpanneaudecommande).
2.Réglagesdupanneaudecommande. 2.Démarrezlepoêleaudegrédechaleurminimal
de5pourvousassurerqu’unbonfeus’allume.
3.Lesgranulesneprennentpasfeu. 3.Vérifiezs’ilyadesaccumulationsdans
l’allumeurousicedernierestenpanne.
Lecode«OT»(panneaufixé
surledessus)ou«E‐3»
(panneaufixésurlecôté)
s’affichentsurlepanneau
decommande(température
excessive)
1.Défaillanceduventilateurdeconvection
(airdelapièce).
1.Vérifiezsileventilateurdeconvection
fonctionnecorrectement,etremplacez‐le
au
besoin.
2.Fluxpartiellementbloqué. 2.Vérifiezsidesélémentsobstruentleflux.
3.Utilisationd’uncombustibleautreque
desgranulesdeboisdepremièrequalité.
3.UtilisezSEULEMENTdesgranulesdeboisde
premièrequalitédanscepoêle.
Remarques:
1.Chaquefoisquevousdevezvérifierouremplacerledétecteurdel’aspirateur,vérifiezégalementsileboyaude
l’aspirateurestlâcheoufissuré.Deplus,assurez‐vousqueleportdemesuredel’aspirateurdanslefoyeresttoujours
propre(nettoyez‐leàl’aided’ungoupillonoud’unebrosse;n’utilisez
pasunaspirateurpournettoyerceport).
2.Pourredémarrereteffaceruncoded’erreuraffichédanslepanneaudecommande,appuyezsurlebouton
«ON»(marche).L’appareildevraitseréinitialiseretredémarrer.
3.Sivousn’êtespassûrdelasignificationd’uncoded’erreurousivousavezdesquestions,NOUSVOUSPRIONSde
communiqueravecleservicedesoutientechniqueau1800245‐6489
.
CONSIGNES DE SÉCURITÉ IMPORTANTES: Si l’appareil ou le tuyau de raccord de
cheminée rougit (ou blanchit), le poêle est surchauffé. Cette situation pourrait
causer un incendie ou un feu de cheminée. Ne faites pas fonctionner votre appareil
à une température trop élevée, car il pourrait surchauffer.
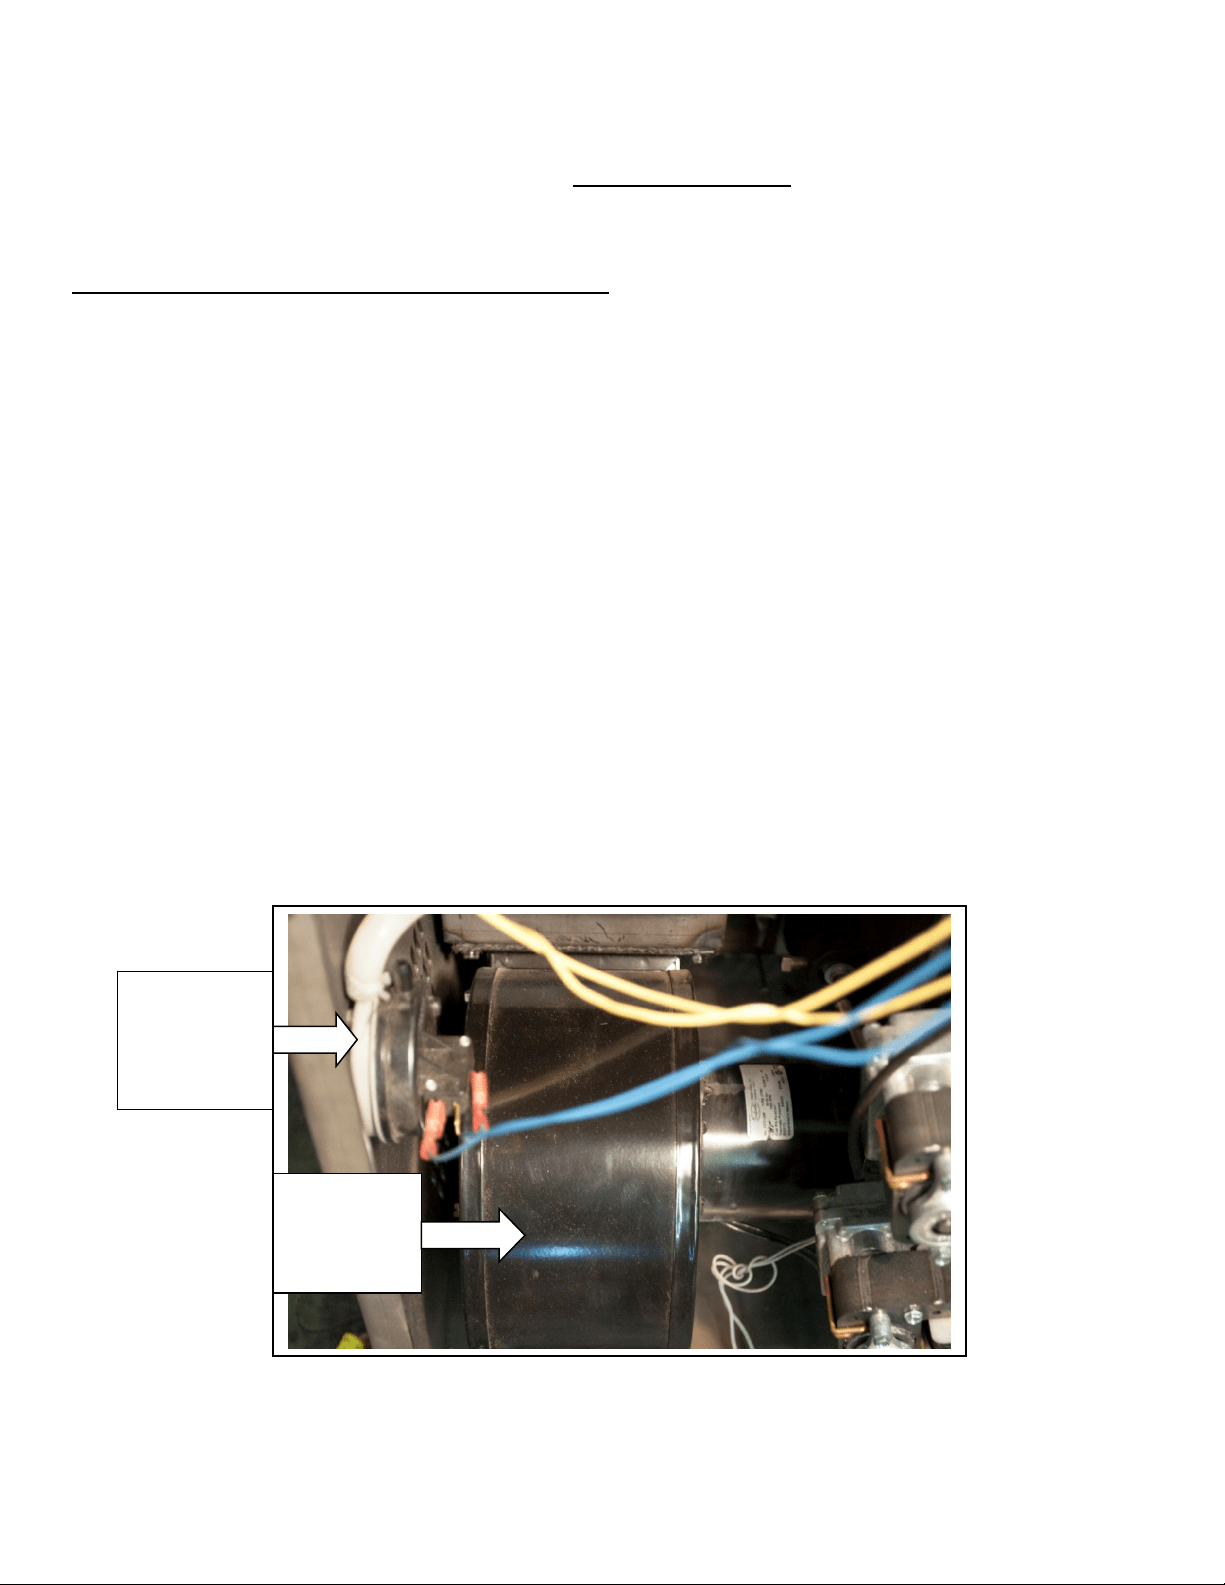
43
IMPORTANT!LISEZETSUIVEZTOUTESLESINSTRUCTIONSPOUR L’INSTALLATIONETL’ENTRETIEN,NOTAMME NTCELLESPORT ANT SURLENET TOYAGEDE
L’APPAREILÀEFFECTUERSELONLESDIRECTIVESETCELLESPORTAN TSURLEREM PLACEMENTDESJOINTS(ANNUELLEMENT)ETDESPIÈCES(AU BESOIN).
ENGLAND’SSTOVEWORKSN’ESTPASRESPONSABLEDESDOMMAGESNIDESBLESSURES,QUELSQU’ILSSOIENT,SUBISENRAISONDENÉGLIGENCE
OUÀCAUSED’UNEINSTALLATIONOUD’UNEUTILISATIONDANGEREUSEDECEPRODUIT.POURTOUTEQUESTION,COMMUNIQUEZAVECLE
SERVICEDESOUTIENTECHNIQUE.
REMPLACEMENTDESPIÈCES
Reportez‐vousàlavueéclatéeauversoduprésentguidepourdesréférencessurlespièces
Commandesdepièces:1800516‐3636heatredefined.comQuestions:1800245‐6489
Ventilateurdeconvection(d’airambiant)
Avantdeprocéderauremplacementd’unepièce,assurez‐vousquel’appareilest
débranchéetcomplètementrefroidi.
Retirezlepanneauarrièredel’appareilàl’aided’unecléde5/16po.
S’ils’agitd’unpanneaudecommandefixésurlecôté,ilsepeutquevousdeviezretirerle
panneau
(decircuits)decommandeenenlevantlesdeuxvisde5/16po,puislepanneau
decommandedupoêle.Ilpeutêtrenéce ssairedecoupercertainesattachesafinquevous
puissiezretirerlepanneausanstoucherauventilateur(n’oubliezpasdelesremplacer).
Repérezlesfilsdetensionet
débranchez‐lesduventilateurdeconvection.
Àl’aided’unedouilleetd’unelonguerallonge,desserrezetretirezles4visde5/16poqui
fixentleventilateuraupoêle;retirezleventilateurdupoêle.
L’installationdunouveauventilateurs’effectuedansl’ordreinverse;n’o ubliezpasde
rebrancherleventilateuraux
filsdetensionetderemplacerlesattachesavantdereplacerle
panneaudecommande.(Lorsdel’installationdunouveau ventilateur,placezlemoteurdu
ventilateurdesortequel’ouverturepointeversleHAUT,verslapartiesupérieuredupoêle.)
Consultezlesiteyoutube.com/heatredefinedpourregarderdesvidéosd’entretien
détailléesafindesavoircommentprocéder.
Ventilateur
deconvection
(d’air
ambiant)
Interrupteur
del’aspirateur
(reportez‐vousà
lasection
«Interrupteur
del’as
p
irateur»
)
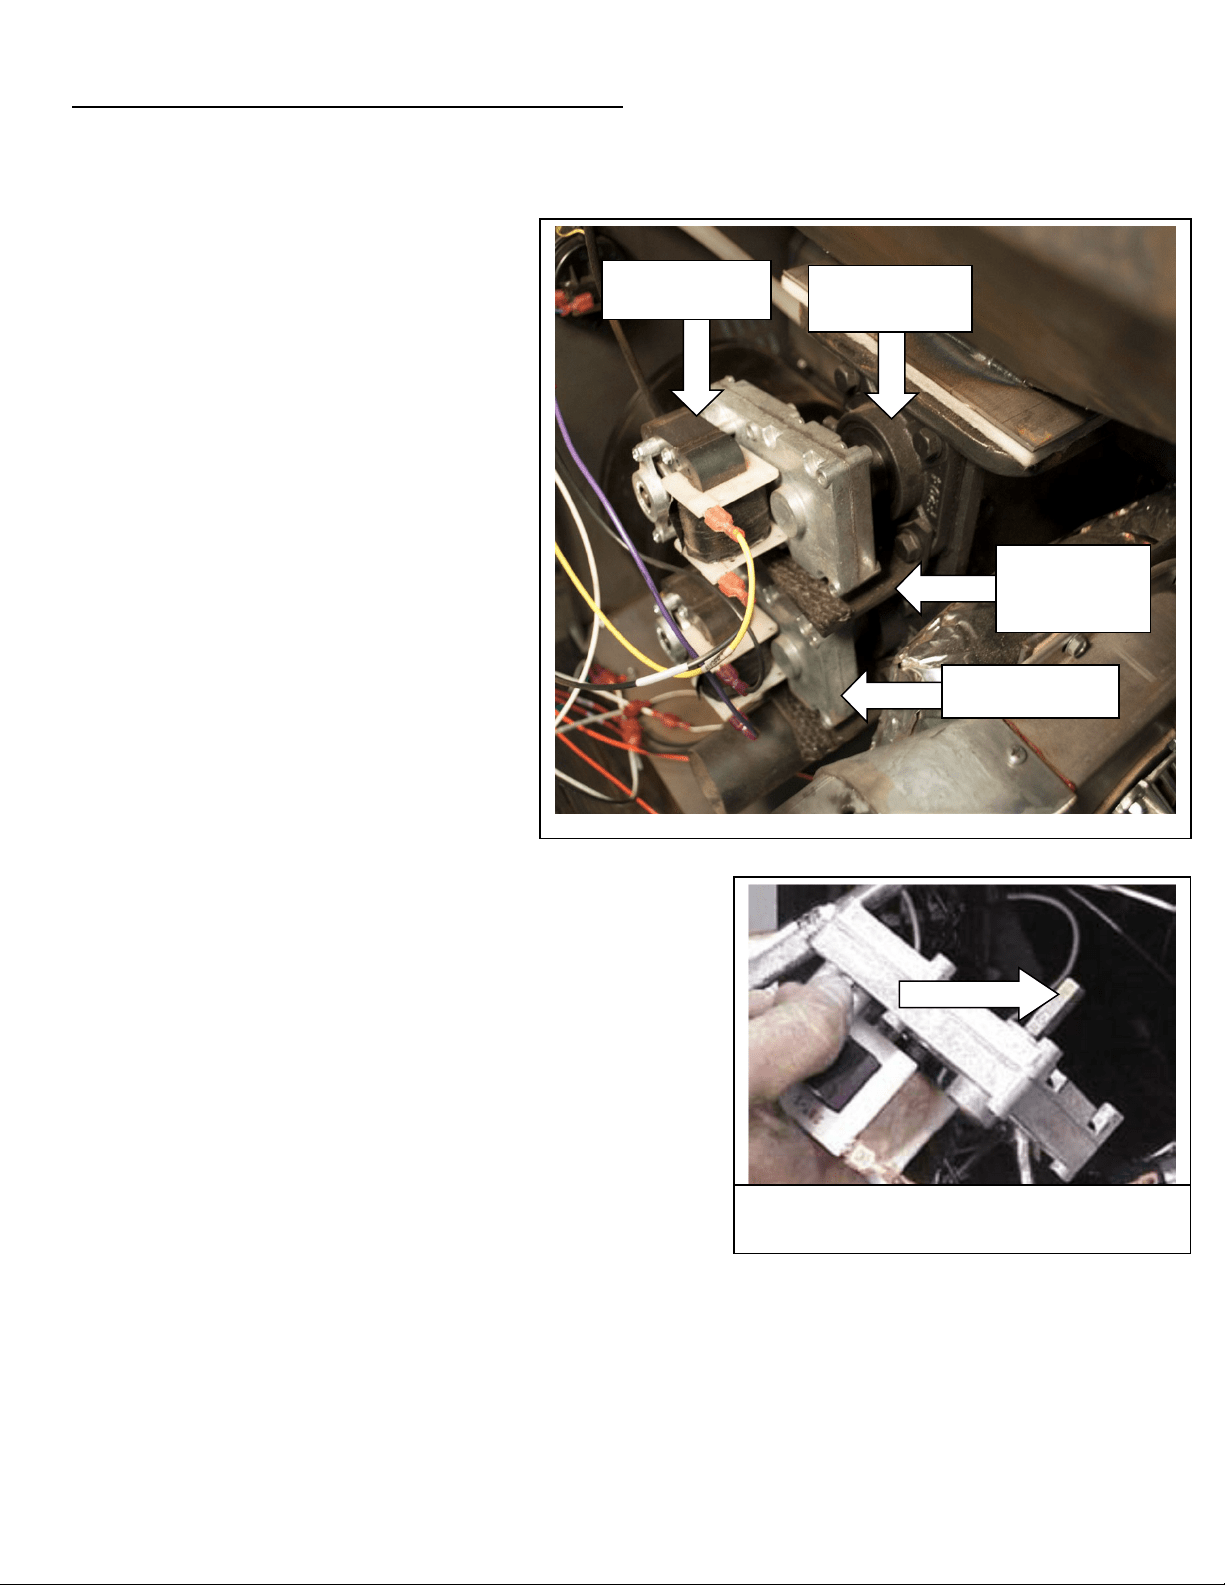
44
IMPORTANT!LISEZETSUIVEZTOUTESLESINSTRUCTIONSPOUR L’INSTALLATIONETL’ENTRETIEN,NO TAMMENTCELLESPOR TAN TSURLENET TOYAGEDE
L’APPAREILÀEFFECTUERSELON LESDIRECTIVESETCELL ESPORTANTSURLEREMPLACEMENTDES JOINTS(ANNUELLEMENT)ETDESPIÈCES(AUBESOIN ).
ENGLAND’SSTOVEWORKSN’ESTPASRESPONSABLEDESDOMMAGESNIDESBLESSURES,QUELSQU’ILSSOIENT,SUBISENRAISONDENÉGLIGENCE
OUÀCAUSED’UNEINSTALLATIONOUD’UNEUTILISATIONDANGEREUSEDECEPRODUIT.POURTOUTEQUESTION,COMMUNIQUEZAVECLE
SERVICEDESOUTIENTECHNIQUE.
Moteur,paliersetaxesdelavisàgranules
Avantdeprocéderauremplacementd’unepièce,assurez‐vousquel’appareilestdébranché
etcomplètementrefroidi.Assurez‐vouségalementquelatrémieestvideavantdetenter
d’enleverouderemplacer
l’ensemblemoteurdelavis
àgranulessupérieure.
Retirezlepanneauarrière
del’appareilàl’aided’une
clé
de5/16po.
Avantdedesserrerlesboulons
dumoteurdelavisàgranules,
détachezlesfilsdetensiondu
moteur.
Repérezl’ensembledumoteur
delavisàgranulesappropriéà
l’arrièredupoêle,puisdesserrez
leboulondecalageàtêtecarrée
de5/16po
situéentrelemoteur
etlepalierdelavisàgranules.
Ceboulonseserreducôtéplat
del’arbred’engrenageetsert
àverrouillerl’arbred’engrenage
etl’axedelavisàgranules
ensemble.
Unefoisleboulondesserré,
l’ensembleglissehorsdela
baguedeblocageet
del’axe
delavisàgranules.
Pourremplacerlavisàgranulessupérieure,vous
devezretirertouteslesgranulesdelatrémieainsi
quedel’ensembledelavisàgranulessupérieure.
Vouspouvezensuiteenleverlesquatreboulonsde
1/2poquitiennent le palier en
place,puisretirer
l’ensembledelavisàgranulesenentierdupoêle.
Lespaliersdelavisàgranulessontscellésetne
nécessitentaucunelubrification.
Retirezlabaguedelatigede3/4podel’ensemble
del’axeetdupalierdelavisàgranules.
Desserrezlesdeux(2)visdecalagede1/8poà
l’extrémitédupalierdelavisàgranulesàl’aide
d’unecléhexagonalede1/8po. Ceci détacherale
palierdel’axe.(L’ensembledepalieretl’ensembledevisàgranulespeuventêtrereplacésen
effectuant
cetteprocéduredans
l’ordreinverse.Appuyezbienlepaliercontrelabaguede3/4poavantde
serrerlesdeuxvisdecalagede1/8po.)
Visàgranules
su
p
érieure
Palierdela
visàgranules
Plaque
d’appuidela
visàgranules
Visàgranules
inférieure
Leboulondecalageàtêtecarréede5/16pose
serreducôtéPLATdel’arbred’engrenage
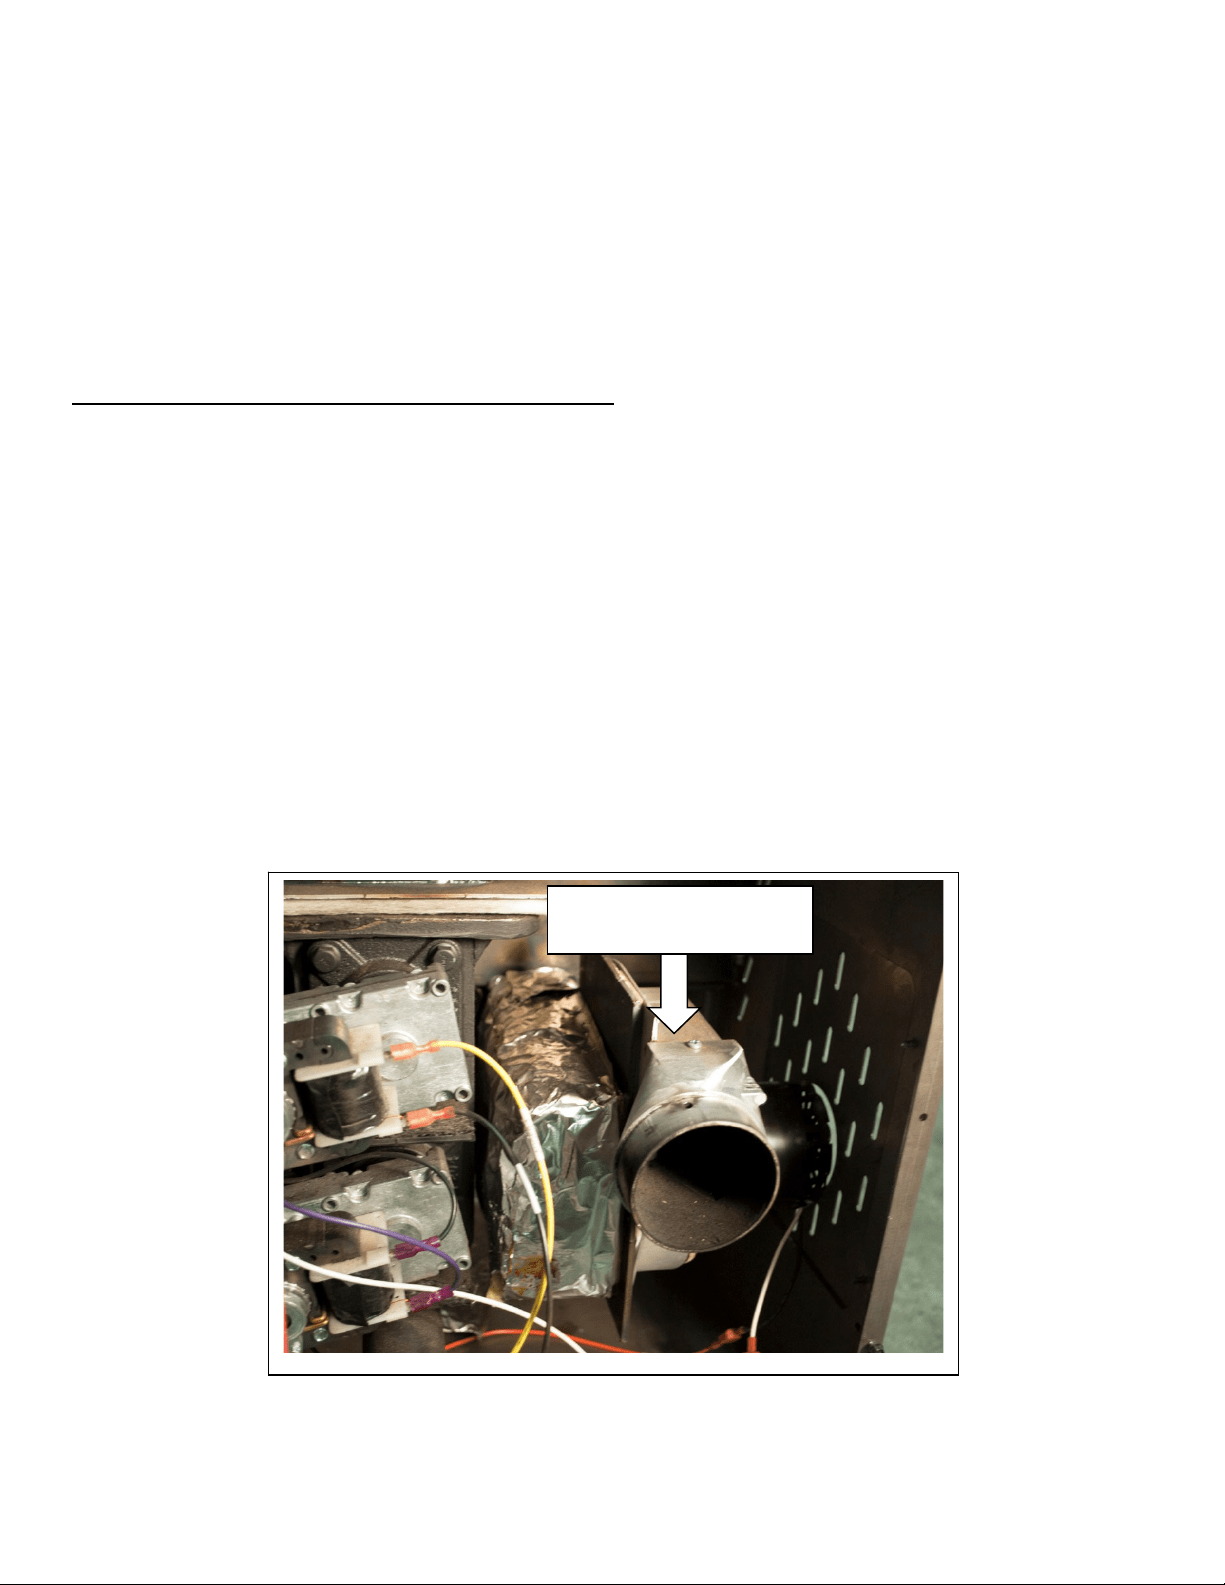
45
IMPORTANT!LISEZETSUIVEZTOUTESLESINSTRUCTIONSPOUR L’INSTALLATIONETL’ENTRETIEN,NOTAMME NTCELLESPORT ANT SURLENET TOYAGEDE
L’APPAREILÀEFFECTUERSELONLESDIRECTIVESETCELLESPORTAN TSURLEREM PLACEMENTDESJOINTS(ANNUELLEMENT)ETDESPIÈCES(AU BESOIN).
ENGLAND’SSTOVEWORKSN’ESTPASRESPONSABLEDESDOMMAGESNIDESBLESSURES,QUELSQU’ILSSOIENT,SUBISENRAISONDENÉGLIGENCE
OUÀCAUSED’UNEINSTALLATIONOUD’UNEUTILISATIONDANGEREUSEDECEPRODUIT.POURTOUTEQUESTION,COMMUNIQUEZAVECLE
SERVICEDESOUTIENTECHNIQUE.
Assurez‐vousd’installerunnouveaujointd’étanchéitédepalierdelavisàgranuleslorsdu
remplacementd’unpalier.
Lorsquevou splacezl’ensembledevisàgranulesdansl’appareil,serreztoujours lesquatreboulons
depalierdelavis àgranulesendiagonale(d’uncoinàl’autre)pourvous
assurerquelespalierset
lesaxessontcorrect ementalignés.N’oubliezpasd’installerlaplaqued’appuidelavisàgranules
enins érantlesdeuxboulonsinférieurs àtraverslaplaqueetlepalierdelavisàgranules.
REMARQUE:Suivezlamêmeprocédurepourtravaillersurla
visàgranulesinférieure.
Lesgranulesnedoiventcependantpasêtreobligatoirementretiréesdelatrémie.
Consultezlesiteyoutube.com/heatredefinedpourregarderdesvidéosd’entretiendétaillées
afindesavoircommentprocéder.
Ventilateur(d’évacuation)decombustion
Avantdeprocéderauremplacementd’unepièce,assurez‐vousquel’appareilest
débranchéetcomplètementrefroidi.
Débranchezletuyaudeventilationpouraccéderauventilateurdecombustion.
Retirezlepanneaud’accèslatéralgaucheàl’aided’unecléde5/16po.
Retirezlepanneauarrièredel’appareilà
l’aided’unecléde5/16po.
Débranchezlesfilsdetensionduventilateurdecombustion.
Retirezles5visquifixentleventilateurd’évacuationautubed’évacuation.Unefoisque
vousavezretirélesvis,soulevezleventilateuretretirez‐ledupoêle.
Remplacezlejointd’étanchéité
duventilateurdecombustionchaquefoisquevousretirezle
ventilateurdupoêle(piècenºPU‐CBMG).
Ret irezlejointd’étanchéitéàl’aided’uncouteauà
mastiquer,puisinstallezlenouveaujointenappliquantdel’adhésifsurle rebordduventilateur
eten posantlenouveaujoint(lesinstructionsetl’adhésifsontfournisaveclejointd’étanchéité).
Pourlaréinstallation,effectuezlesétapesci‐dessusexactementdans
l’ordreinverse.
Consultezlesiteyoutube.com/heatredefinedpourregarderdesvidéosd’entretien
détailléesafindesavoircommentprocéder.
Ventilateur(d’évacuation)
decombustion
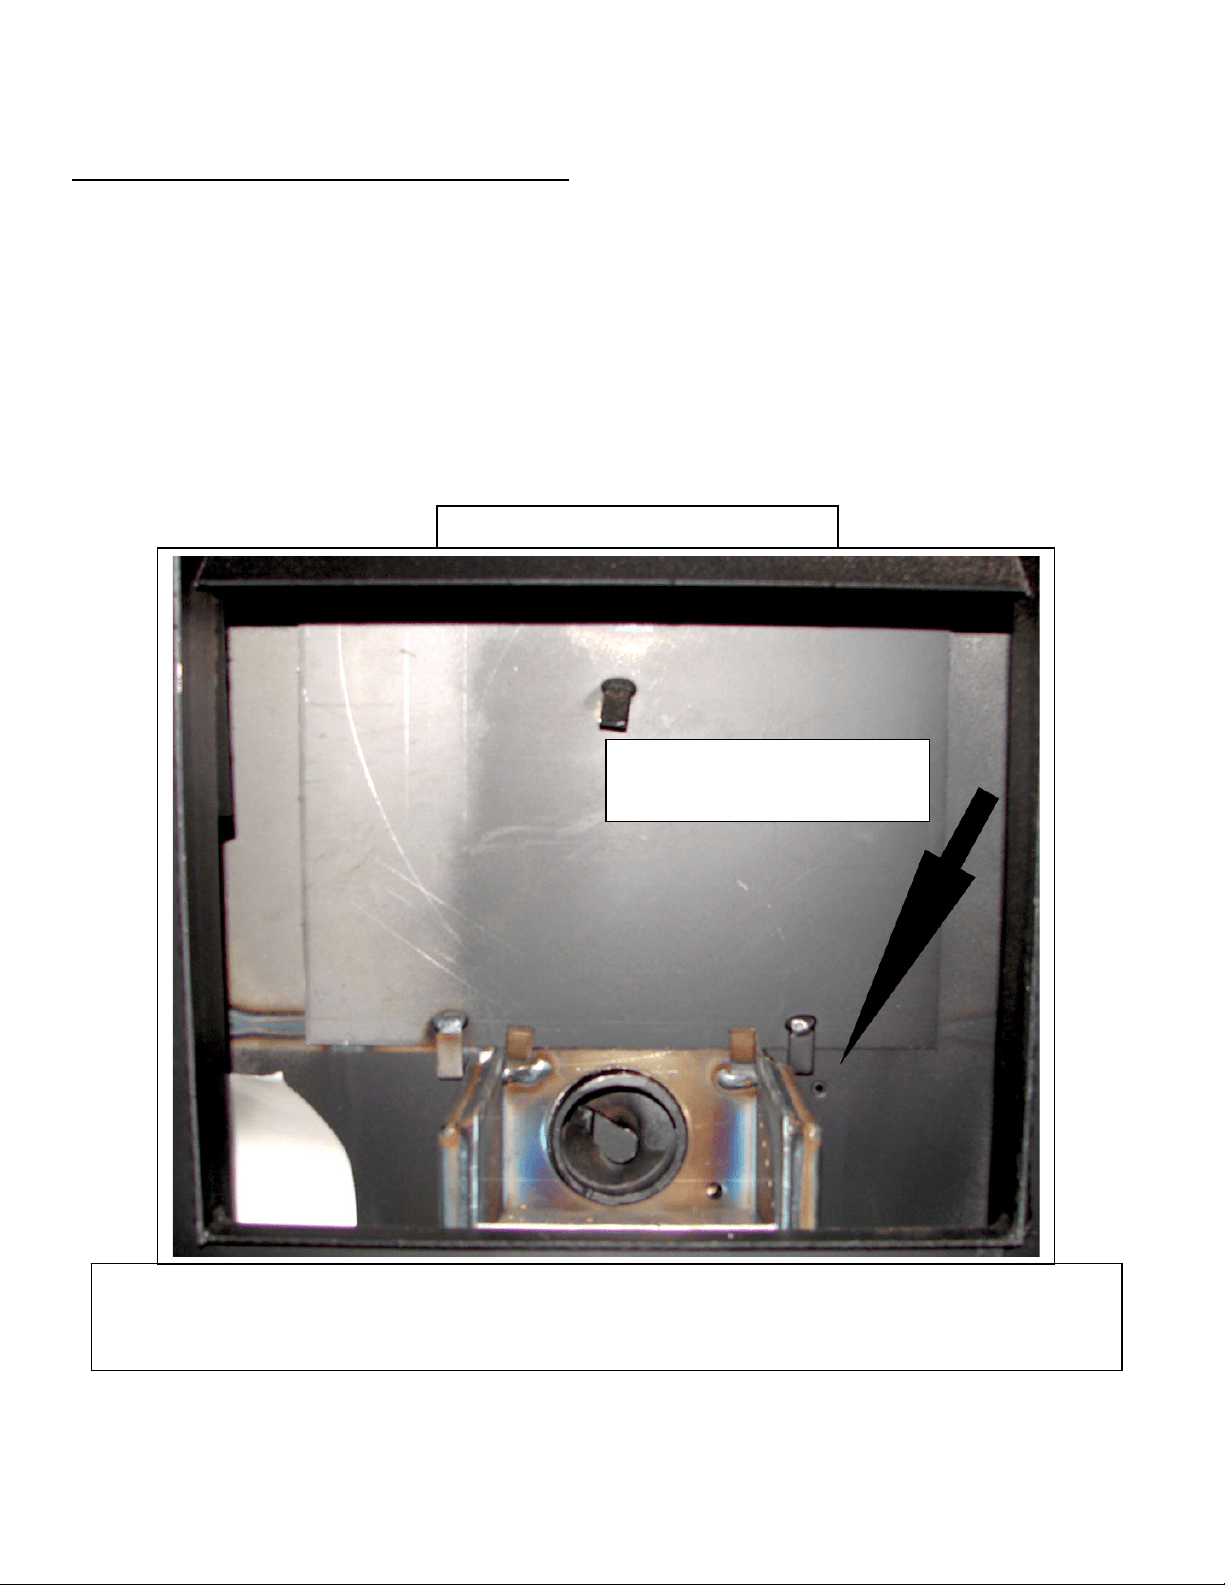
46
IMPORTANT!LISEZETSUIVEZTOUTESLESINSTRUCTIONSPOUR L’INSTALLATIONETL’ENTRETIEN,NOTAMME NTCELLESPORT ANT SURLENET TOYAGEDE
L’APPAREILÀEFFECTUERSELONLESDIRECTIVESETCELLESPORTAN TSURLEREM PLACEMENTDESJOINTS(ANNUELLEMENT)ETDESPIÈCES(AU BESOIN).
ENGLAND’SSTOVEWORKSN’ESTPASRESPONSABLEDESDOMMAGESNIDESBLESSURES,QUELSQU’ILSSOIENT,SUBISENRAISONDENÉGLIGENCE
OUÀCAUSED’UNEINSTALLATIONOUD’UNEUTILISATIONDANGEREUSEDECEPRODUIT.POURTOUTEQUESTION,COMMUNIQUEZAVECLE
SERVICEDESOUTIENTECHNIQUE.
REMPLACEMENTDESPIÈCES
Interrupteurdel’aspirateur–fonction
Cet appareil possède un interrupteur d’arrêt de l’aspirateur (pièce nº CU‐VS) qui
permetd’aideràcontrôlercertainesfonctionsdel’appareil.
Si une erreur de fonctionnement survient dans l’appareil, un interrupteur arrête
l’alimentationde la visà granulesouéteint l’appareil.Si l’appareils’éteint,un code
d’erreurs’affichesur
lepanneaudecommande.
Parmi les situations qui pourraient provoquer cela, on retrouve une panne de
courant, une panne du ventilateur de combustion, une installation incorrecte du
conduitdefumée,unconduit defuméebloqué(enraisonderongeurs,denids,etc.)
ou une «combustion sale» à
la suite de la combustion d’un mauvais combustible
(consultezlasection«Informationsimportantes»audébutduguide).
Port de l’interrupteur de l’aspirateur
REMARQUE : Le port de l’interrupteur de l’aspirateur doit être propre, sinon la vis à granules
supérieure cessera de fonctionner. Repérez l’orifice du port à droite du pot de combustion et, une fois
le poêle débranché et refroidi, utilisez un pinceau ou un goupillon (pas un aspirateur) pour garder ce
p
ort exem
p
t de cendres et d’autres débris
(
re
p
ortez-vous à l’illustration
)
.
Le port est situé à droite
du pot de combustion
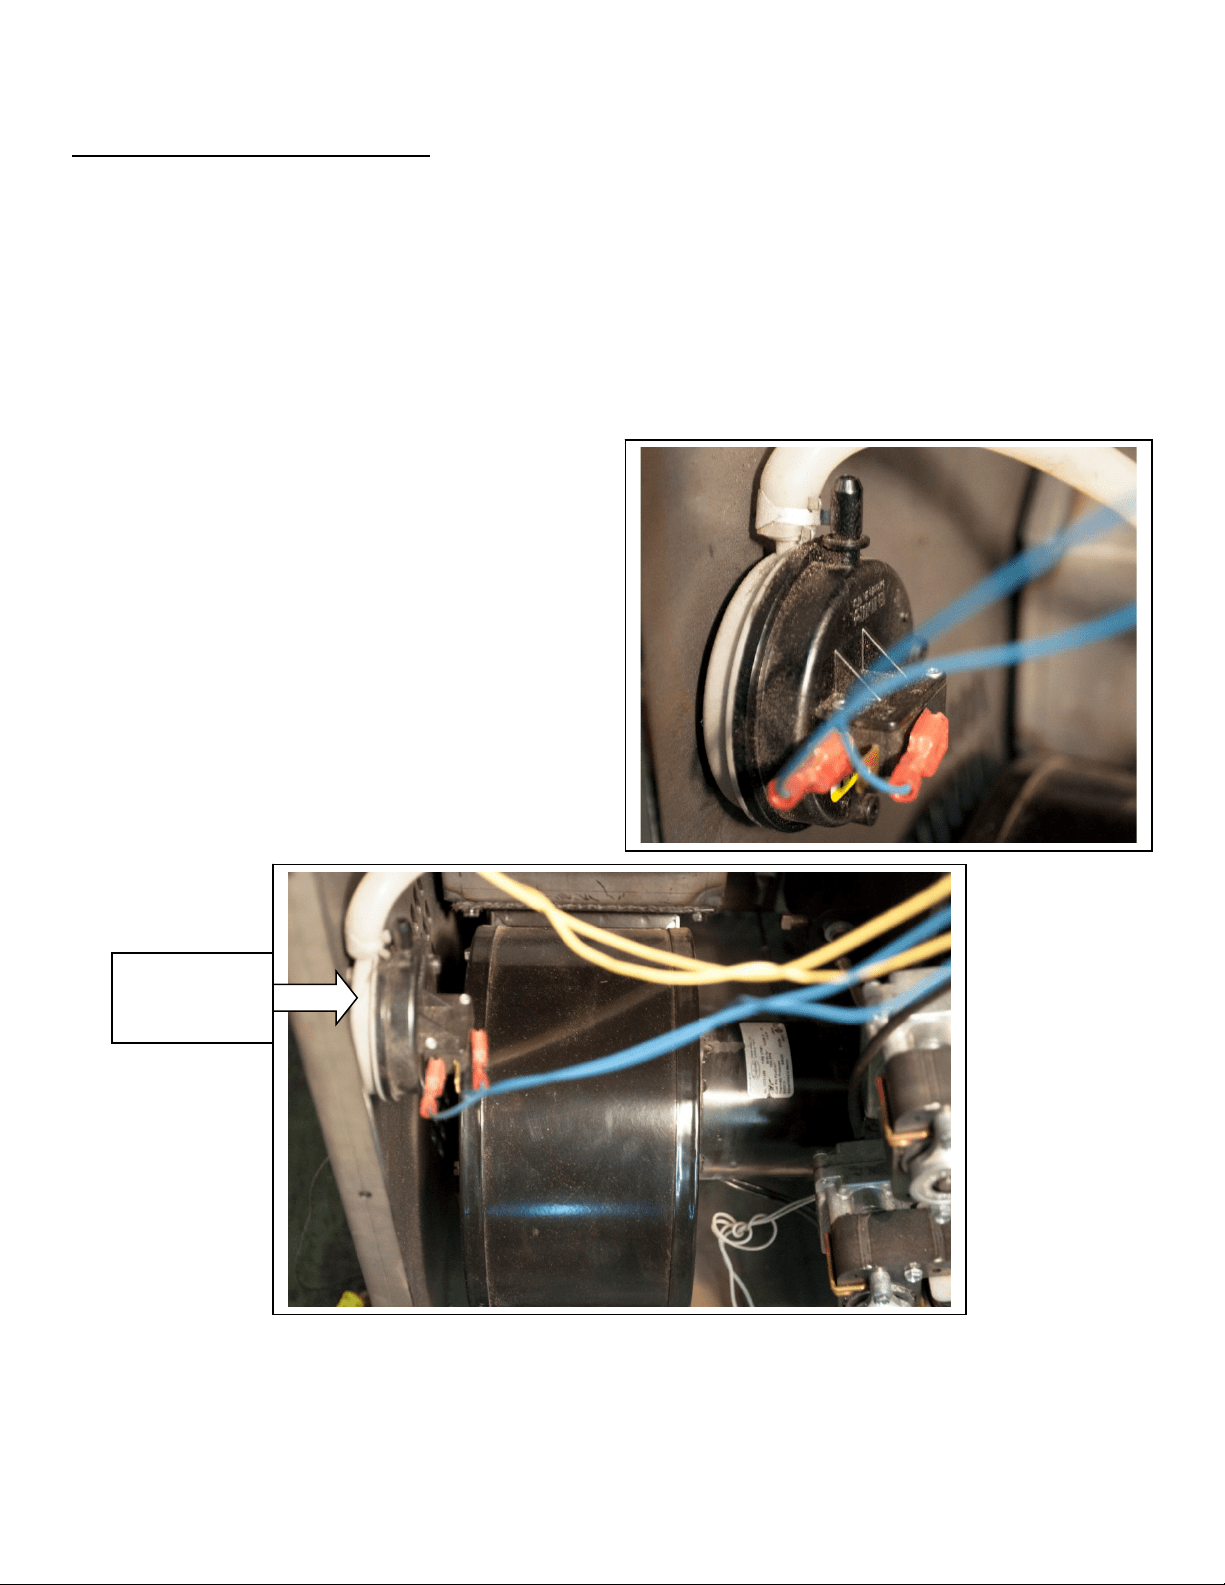
47
IMPORTANT!LISEZETSUIVEZTOUTESLESINSTRUCTIONSPOUR L’INSTALLATIONETL’ENTRETIEN,NOTAMME NTCELLESPORT ANT SURLENET TOYAGEDE
L’APPAREILÀEFFECTUERSELONLESDIRECTIVESETCELLESPORTAN TSURLEREM PLACEMENTDESJOINTS(ANNUELLEMENT)ETDESPIÈCES(AU BESOIN).
ENGLAND’SSTOVEWORKSN’ESTPASRESPONSABLEDESDOMMAGESNIDESBLESSURES,QUELSQU’ILSSOIENT,SUBISENRAISONDENÉGLIGENCE
OUÀCAUSED’UNEINSTALLATIONOUD’UNEUTILISATIONDANGEREUSEDECEPRODUIT.POURTOUTEQUESTION,COMMUNIQUEZAVECLE
SERVICEDESOUTIENTECHNIQUE.
REMPLACEMENTDESPIÈCES
Interrupteurdel’aspirateur
Avantdeprocéderauremplacementd’unepièce,assurez‐vousquel’appareilest
débranchéetcomplètementrefroidi.
Retirezlepanneauarrièredel’appareilàl’aided’unecléde5/16po.
Repérezl’interrupteurdel’aspirateurcommelemontrel’illustrationci‐dessous(surle
panneaugauchedel’appareil).
Débranchezles
filsdetensionetletuyaudel’aspirateurdel’interrupteurdel’aspirateur,
ennotantl’emplacementdesbranchements.
Àl’aided’untourneviscruciforme,retirez
les2visquifixentl’interrupteurde
l’aspirateuràsonsupport.
Réinstallezlespiècesdansl’ordreinverse;
vérifiezsoigneusementquelesfilsetle tuyau
del’asp irateursontraccordésdelamême
façonqueprécédemment(etconformément
auschémadecâb lagefourn idansceguide).
Consultezlesiteyoutube.com/heatredefined
pourregarderdesvidéosd’entretien
détailléesafindesavoircomment
procéder.
Interrupteur
del’aspirateur

48
IMPORTANT!LISEZETSUIVEZTOUTESLESINSTRUCTIONSPOUR L’INSTALLATIONETL’ENTRETIEN,NOTAMME NTCELLESPORT ANT SURLENET TOYAGEDE
L’APPAREILÀEFFECTUERSELONLESDIRECTIVESETCELLESPORTAN TSURLEREM PLACEMENTDESJOINTS(ANNUELLEMENT)ETDESPIÈCES(AU BESOIN).
ENGLAND’SSTOVEWORKSN’ESTPASRESPONSABLEDESDOMMAGESNIDESBLESSURES,QUELSQU’ILSSOIENT,SUBISENRAISONDENÉGLIGENCE
OUÀCAUSED’UNEINSTALLATIONOUD’UNEUTILISATIONDANGEREUSEDECEPRODUIT.POURTOUTEQUESTION,COMMUNIQUEZAVECLE
SERVICEDESOUTIENTECHNIQUE.
REMPLACEMENTDESPIÈCES
Allumeur
Avantdeprocéderauremplacementd’unepièce,assurez‐vousquel’appareilest
débranchéetcomplètementrefroidi.
Retirezlepanneauarrièredel’appareilàl’aided’unecléde5/16po.
Repérezl’allumeurducôtégauchedel’ensembled’alimentation(vudel’arrièrede
l’appareil).
Débranchezlesfilsdetension
del’allumeur.
Desserrezlavisdecalageàtêtecarréede5/16podutubedel’allumeur,puisretirez
l’anciennecartouchedel’allumeur(sivotreappareilprésenteunevisdecalagehexagonale,
vousaurezbesoind’unecléhe xagonale de1/8po).
Installezlenouvelallumeur dansletube
del’allumeur,envousassurantquel’allumeurest
bienappuyécontrel’arrièreduboîtier.
Resserrezlavisdecalageetn’oubliez pasderebrancherlesfilsdetension.
Replacezlepanneauarrière.
Consultezlesiteyoutube.com/heatredefinedpourregarderunevidéod’entretiensurle
remplacementdel’allumeur.
Allumeur
Visde
calage

49
IMPORTANT!LISEZETSUIVEZTOUTESLESINSTRUCTIONSPOUR L’INSTALLATIONETL’ENTRETIEN,NOTAMME NTCELLESPORT ANT SURLENET TOYAGEDE
L’APPAREILÀEFFECTUERSELONLESDIRECTIVESETCELLESPORTAN TSURLEREM PLACEMENTDESJOINTS(ANNUELLEMENT)ETDESPIÈCES(AU BESOIN).
ENGLAND’SSTOVEWORKSN’ESTPASRESPONSABLEDESDOMMAGESNIDESBLESSURES,QUELSQU’ILSSOIENT,SUBISENRAISONDENÉGLIGENCE
OUÀCAUSED’UNEINSTALLATIONOUD’UNEUTILISATIONDANGEREUSEDECEPRODUIT.POURTOUTEQUESTION,COMMUNIQUEZAVECLE
SERVICEDESOUTIENTECHNIQUE.
REMPLACEMENTDESPIÈCES
Jointsd’étanchéité
1. Porte
Cetappareilestmunid’unjointd’étanchéitécordéde19,05mminsérédansla
cannelureautourdel’ouverturedelaporte,lequeldoitêtreremplacéaumoinsune
foisparannée.Pourremplacerlejointd’étanchéitédelaporte(piècenºAC‐DGKHD),
retirezd’abordlevieuxjointenentier.
Avantd’ajouterlenouveladhésif,vousdevrez
peut‐êtregratterlavieillecolledelacanneluredelaporte.Aprèsavoirajoutédela
colleetinstallélejoint,fermezetverrouillezlaporte,etlaissez‐laainsipendant
vingt‐quatreheurespourquelacolledurcisse.Consultezlapage
suivantepourplus
derenseignements.
2. Fenêtre
Sivousremplacezlejointdelafenêtre(piècenºAC‐GGK),undescôtésdunouveau
jointseradéjàenduitdecolle.Retirezlepapierducôtéadhésifetplacezlejoint
autourdubor dextérieurdelavitre,centrésurlebord.Repliezlesbordsdujointsur
lavitreenformantun«U».
3. Ventilateurdecombustion
Vousdevriezremplacerlejointduventilateurdecombustion(piècenºPU‐CBMG)
chaquefoisquevousretirezounettoyezl’ensembledeventilateurdecombustion.
Retirezlejointd’étanchéitéàl’aided’uncouteauàmastiquer,puisinstallezle
nouveaujointenappliquantdel’adhésifsurlerebordduve ntilateur
etenposant
lenouveaujoint(lesinstructionsetl’adhésifsontfournisaveclejointd’étanchéité).
4. Moteurduventilateurdecombustion
Lejoint(piècenºPU‐CBMG)dumoteurduventilateurdecombustionn’a
généralementpasbesoind’êtreremplacé,car,normalement,onneretirepasce
moteurdel’appareil.Cependant,si vousnettoyezleventilateurd’évacuationen
retirantlemoteurseulementplutôtquel’ensembleduventilateur,vousdevez
inspectercejoint
etleremplaceraubesoin.
L’ENTRETIENINADÉQUATDESJOINTS,YCOMPRISLEDÉFAUTDEREMPLACEMENT
DESJOINTS,PEUTENTRAÎNERDESFUITESD’AIRCAUSANTDESRETOURSDEFUMÉE.
ILESTESSENTIELDEREMPLACERLESJOINTSANNUELLEMENT.

50
IMPORTANT!LISEZETSUIVEZTOUTESLESINSTRUCTIONSPOUR L’INSTALLATIONETL’ENTRETIEN,NOTAMME NTCELLESPORT ANT SURLENET TOYAGEDE
L’APPAREILÀEFFECTUERSELONLESDIRECTIVESETCELLESPORTAN TSURLEREM PLACEMENTDESJOINTS(ANNUELLEMENT)ETDESPIÈCES(AU BESOIN).
ENGLAND’SSTOVEWORKSN’ESTPASRESPONSABLEDESDOMMAGESNIDESBLESSURES,QUELSQU’ILSSOIENT,SUBISENRAISONDENÉGLIGENCE
OUÀCAUSED’UNEINSTALLATIONOUD’UNEUTILISATIONDANGEREUSEDECEPRODUIT.POURTOUTEQUESTION,COMMUNIQUEZAVECLE
SERVICEDESOUTIENTECHNIQUE.
REMPLACEMENTDESPIÈCES
Vitre
Cetappareilcomporteunpanneaudevitrocéramique(piècenºAC‐G9)danslaporte;unjointde
fenêtreautoadhésifestfourniaveclesfenêtresderechangeachetéesdirectementàEngland’sStove
Works.Neremplacezjamaisuncomposantenvitrocéramiqueparunevitreenverretrempéoutout
autretypedeverre,etnefaitesjamaisfonctionnercetappareillorsquelavitreestfissuréeoubrisée.
Lesrayuresdesurfacesontacceptablesetnormales,maissin’importequellepartiedecettevitrese
fissure,arrêtezl’appareiletremplacezlavitreparunevitreenvitrocéramiquehautetempérature.
Caractéristiquesdelavitreenvitrocéramique
Dimensionsdelavitre:231,77mmx231,77mm(9.125pox9.125po)
Typedeverre:vitrocéramiquede5mm
Précautionsrelativesàlavitre
Neremplacezjamaislavitreenvitrocéramiqueparunevitreenverretrempéoutoutau tretypedeverre.
Nefaitesjamaisfonctionnercetappareillorsquesavitreestfissuréeoubrisée.
Neclaquezpaslaporteetnefrappezpaslavitreavecunobjet.
Nettoyagedelavitre
1. Assurez‐vousquelepoêleestéteint,etquecelui‐cietlavitresontcomplètementrefroidis.
2. Ilyagénéralementpeudedépôtssurlavitreetilspeuventhabituellementêtrenettoyésavecde
l’eau.Silasuiesefaittenace,utilisezunnettoyantspécialementconçupourl’enlever.Vousnedevez
pasgratterlavitrenilanettoyeravecunproduitabrasif.
3. Rincezlavitreavecdel’eaupropreetséchez‐laavantdefairefonctionnerlepoêleànouveau.
Remplacementdelavitre(comprendlesinstructionsderemplacementdujoint
d’étanchéitédelaporte)
1. Retirezlaportedupoêleetplacez‐lasurunesurfacedetravailsolide,faceverslebas.
2. Àl’aidedepinces,retirezlejointdelaporteenletiranthorsdelacannelure.
3. Àl’aided’unecléde5/16po,retirezles4visquitiennentleslanguettesdelavitreenplacesurlaporte.
4. Soulevezl’ancienpanneaudeverreenleretirantdelaporte,puisjetez‐le(soyezparticulièrement
prudentsil’anciennevitreestbriséeoufissurée).
5. L’emballage dunouveaupanneaudeverredoitcontenirunjointd’étanchéitéautoadhésifenfibre
deverre(piècenºAC‐GGK).Cejointsertdecoussinentreverreetportesetsupportsenacier.
6. Réinstallezleslanguettesdelavitreàl’aidedesvisretiréesprécédemment.Évitezdeserrer
excessivementlesvis.
7. Installezlenouveaujointd’étanchéitédelaporte(piècenºAC‐DGKHD)àl’aidedel’adhésifrésistant
auxtempératuresélevéesquiestfourni.
8. Réinstallezlaportesurlepoêleetfermez‐labien.Laissezl’adhésifsécherpendant24heures.
*Voirleschémad’assemblagedelaporteà lapage56.*
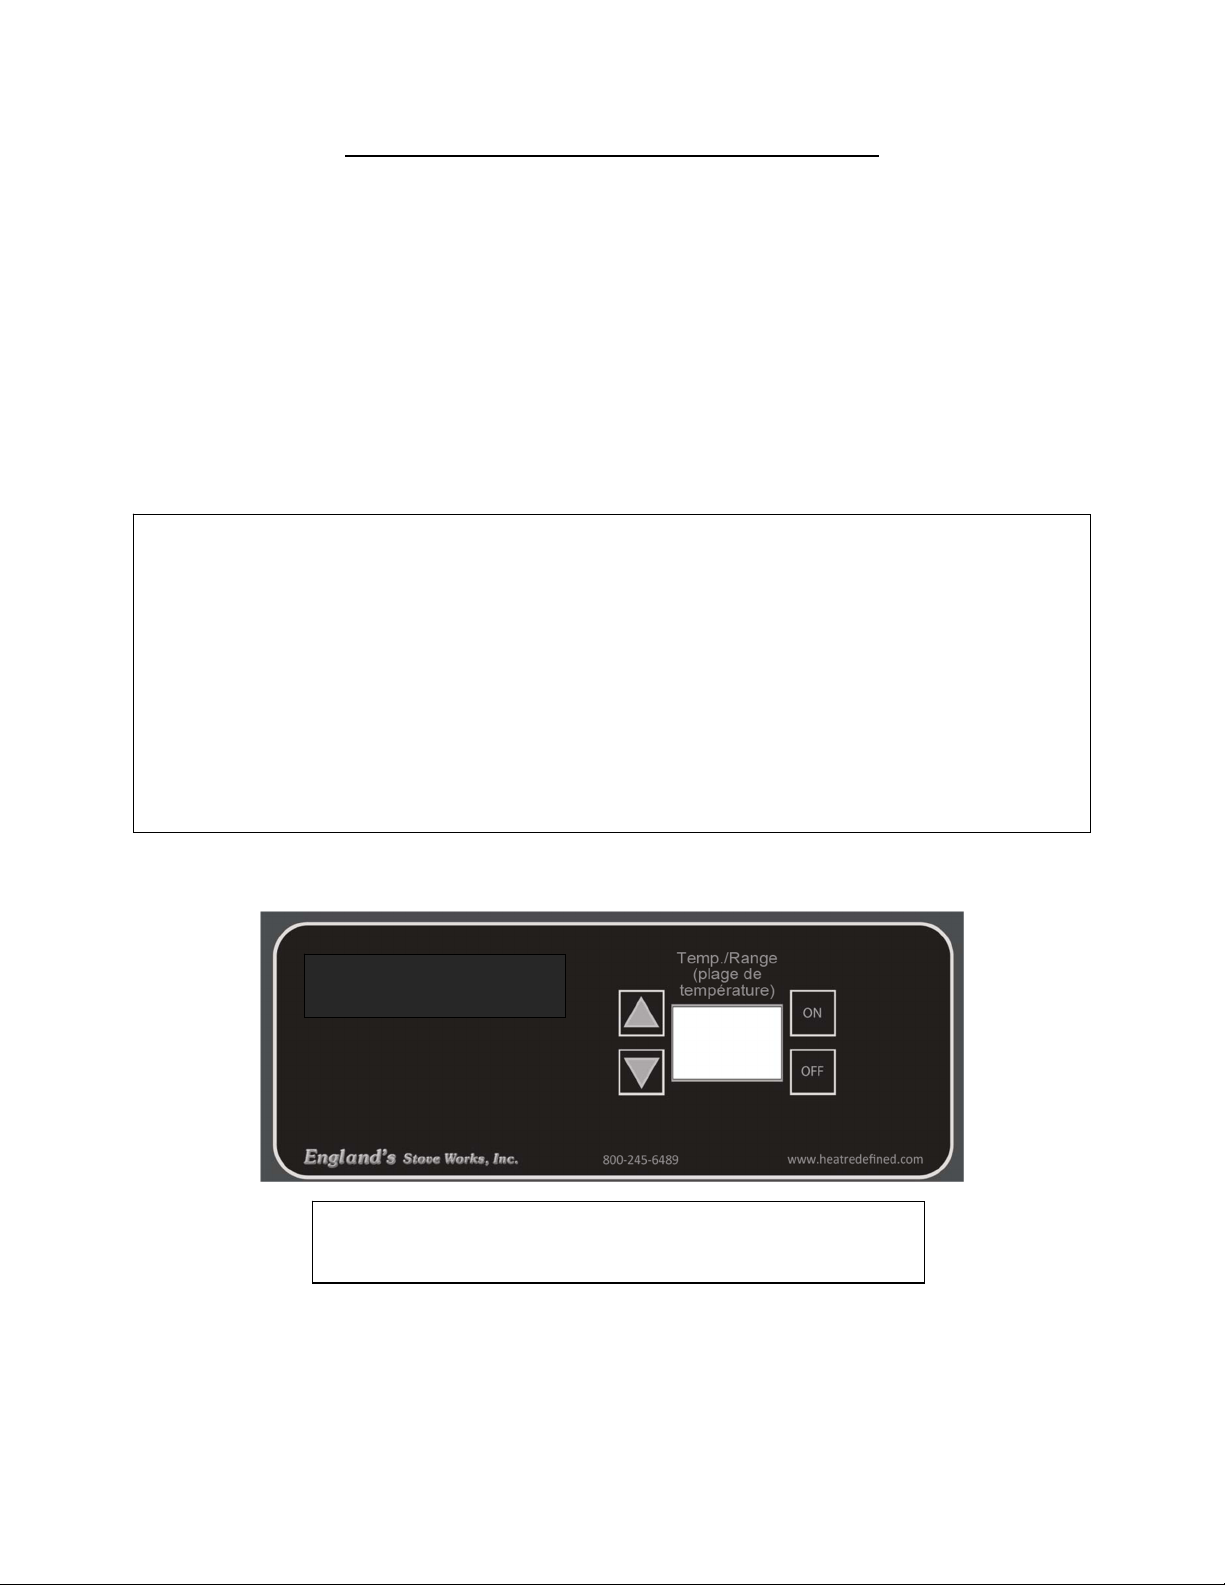
51
IMPORTANT!LISEZETSUIVEZTOUTESLESINSTRUCTIONSPOUR L’INSTALLATIONETL’ENTRETIEN,NO TAMMENTCELLESPOR TAN TSURLENET TOYAGEDE
L’APPAREILÀEFFECTUERSELON LESDIRECTIVESETCELL ESPORTANTSURLEREMPLACEMENTDES JOINTS(ANNUELLEMENT)ETDESPIÈCES(AUBESOIN ).
ENGLAND’SSTOVEWORKSN’ESTPASRESPONSABLEDESDOMMAGESNIDESBLESSURES,QUELSQU’ILSSOIENT,SUBISENRAISONDENÉGLIGENCE
OUÀCAUSED’UNEINSTALLATIONOUD’UNEUTILISATIONDANGEREUSEDECEPRODUIT.POURTOUTEQUESTION,COMMUNIQUEZAVECLE
SERVICEDESOUTIENTECHNIQUE.
REMPLACEMENTDESPIÈCES
Panneaudecommandefixésurledessus
*AVANTDEREMPLACERLEPANNEAUDECOMMANDE,ASSUREZ‐VOUSQUEL’APPAREILEST
DÉBRANCHÉETQU’ILESTCOMPLÈTEMENTREFROIDI.*
Letableaudecommande(piècenºPU‐CB14)estunpanneaud’affichagenumérique.Pourréinstallerle
panneaudecommande,débranchezd’abordlecordond’alimentationdelaprisemurale.Retirezlasurface
avantdupanneaudecommandeenletirantversl’avant.Unefoislepanneaudésassemblé,àl’aidedepinces
àbeceffilé,débranchezlefaisceaudecâblage,ledétecteurdelatempératureambiante,lethermostat,
lecouvercledelatrémieetlesconnecteursdudétecteurdel’aspirateur.
Pourbrancherlenouveaupanneau,rebranchezlespiècesmentionnéesci‐dessusetenclenchezlasurface
avantdupanneaudecommandeenplace.Rebranchezl’alimentationélectriquequandvousserezprêtà
utiliserl’appareil.
Plagesdechaleurrecommandées (pourlemodemanuel):
Combustionfaible: Réglagedeplagedechaleur:1 Réglageduventilateurd’airambiant :1
Moyennementfaible: Réglagedeplagedechaleur:2–3 Réglageduventilateurd’airambiant:*
Moyennementélevée: Réglagedeplage
dechaleur:4–8 Réglageduventilateurd’airambiant:*
Combustionmaximale: Réglagedeplagedechaleur :9 Réglageduventilateurd’airambiant:9
*REMARQUE:Lavitesseduventilateurs’ajusteraautomatiquementenfonctiondelaplagedechaleur
quevoussélectionnerez.
Remarque:L’apparencedupanneaude commandede
votreappareilpeutvarier.
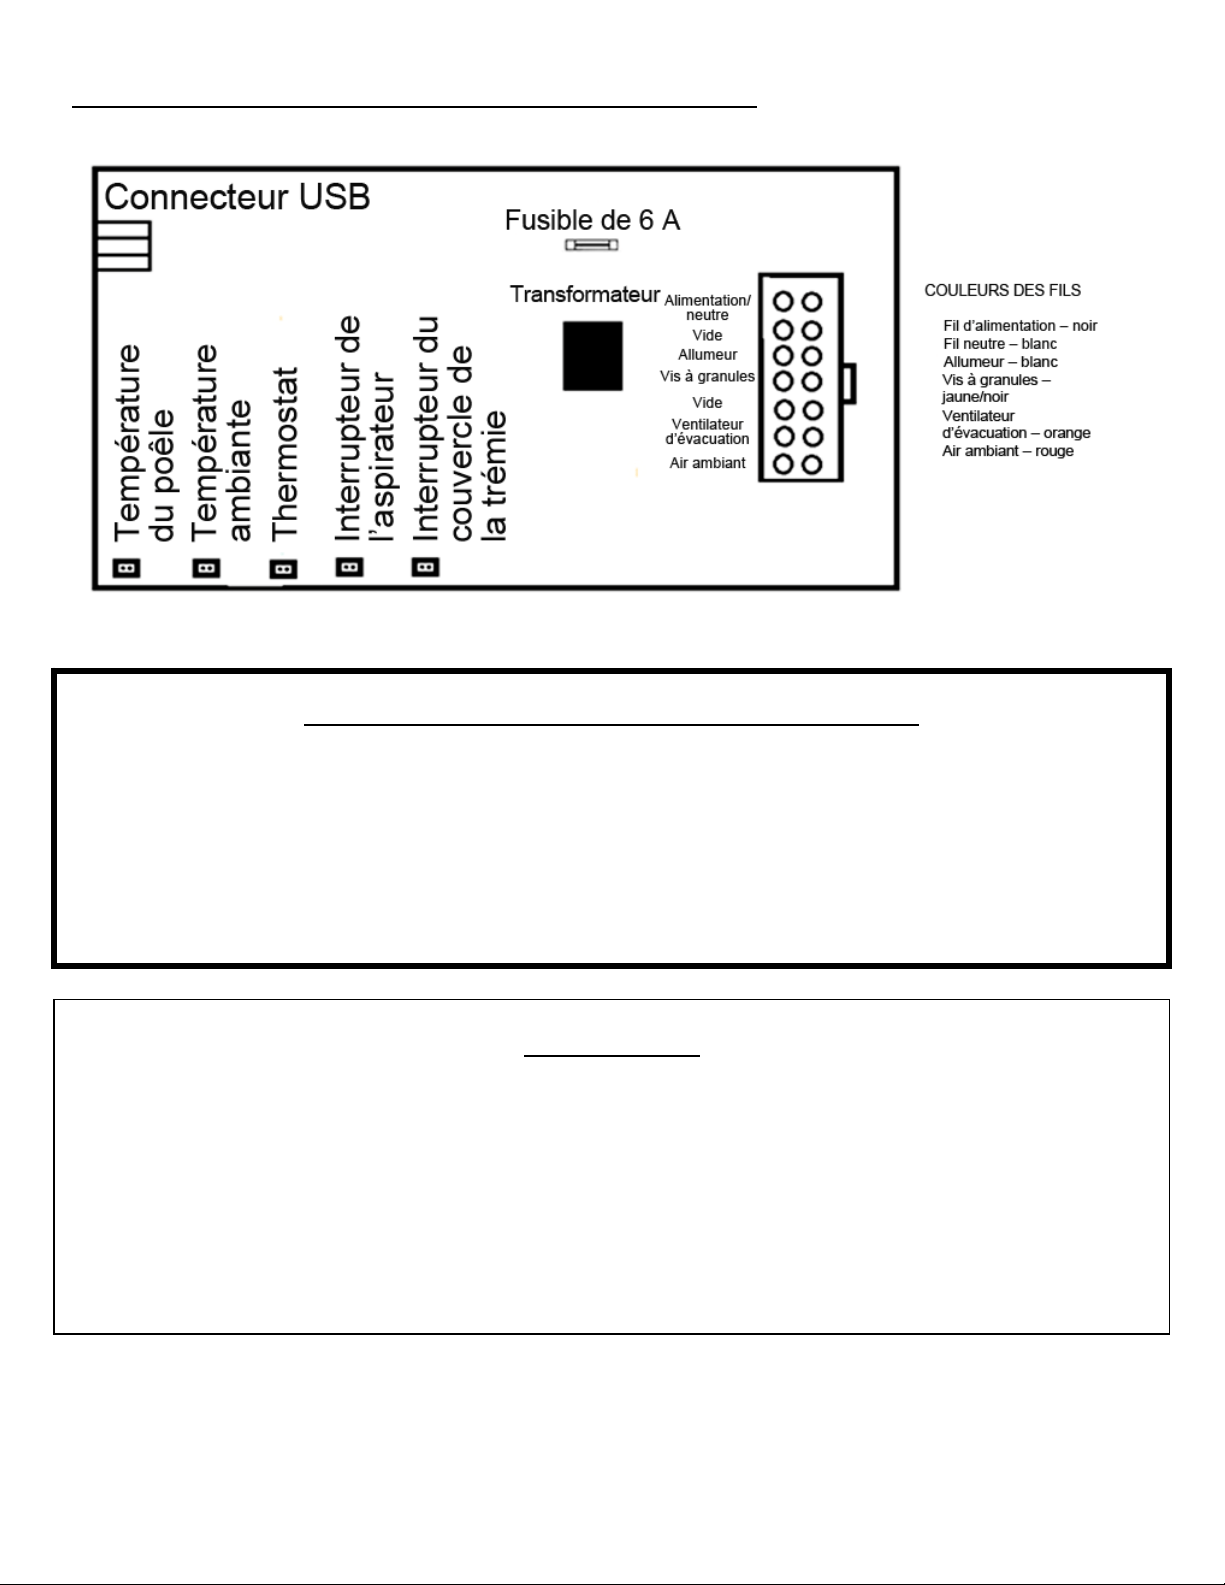
52
IMPORTANT!LISEZETSUIVEZTOUTESLESINSTRUCTIONSPOUR L’INSTALLATIONETL’ENTRETIEN,NOTAMME NTCELLESPORT ANT SURLENET TOYAGEDE
L’APPAREILÀEFFECTUERSELONLESDIRECTIVESETCELLESPORTAN TSURLEREM PLACEMENTDESJOINTS(ANNUELLEMENT)ETDESPIÈCES(AU BESOIN).
ENGLAND’SSTOVEWORKSN’ESTPASRESPONSABLEDESDOMMAGESNIDESBLESSURES,QUELSQU’ILSSOIENT,SUBISENRAISONDENÉGLIGENCE
OUÀCAUSED’UNEINSTALLATIONOUD’UNEUTILISATIONDANGEREUSEDECEPRODUIT.POURTOUTEQUESTION,COMMUNIQUEZAVECLE
SERVICEDESOUTIENTECHNIQUE.
Câblagedupanneaudecommandefixésurledessus
SCHÉMADECÂBLAGE
Attention–risquedechocélectrique
Appuyezsurlebouton«OFF»(arrêt)etlaissezl’appareilserefroidir
complètementAVANTdeledébrancheretdeprocéderàsonentretien
ouauremplacementd’unepièce.
Risquedechocélectriquesil’appareiln’estpasdébranchéavantsonen t retien.
Attention
Si vous constatez la présence de fumée dans la trémie (retour de fumée), fermez
immédiatement le couvercle de la trémie et la porte principale de l’appareil, puis
verrouillez le couvercle. Ouvrez les fenêtres et la porte menant à l’extérieur les plus
proches, puis appuyez sur le bouton « OFF » (arrêt) et laissez l’appareil refroidir
pendant au moins 3 heures. N’ouvrez pas la porte de l’appareil ou le couvercle de la
trémie. Il s’agit d’un problème d’entretien qui doit être corrigé.
Communiquez avec le service de soutien technique au
1 800 245
-
6489.
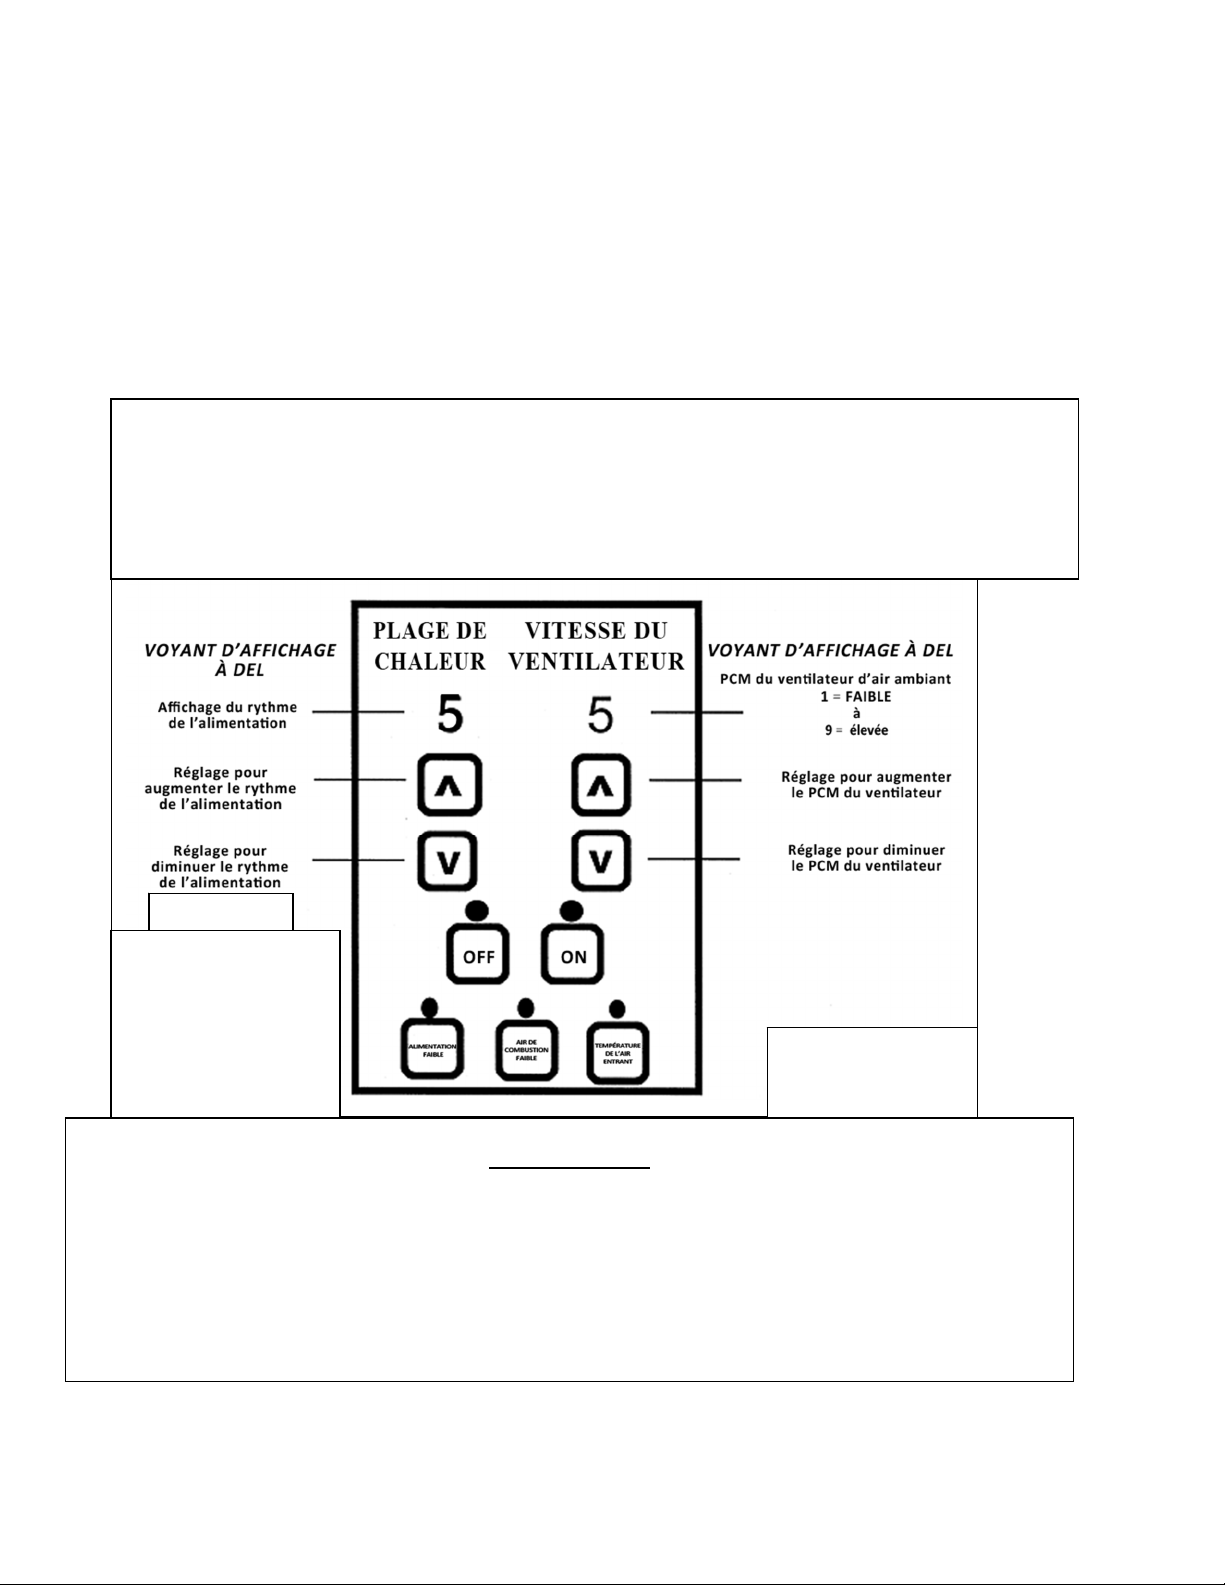
53
IMPORTANT!LISEZETSUIVEZTOUTESLESINSTRUCTIONSPOUR L’INSTALLATIONETL’ENTRETIEN,NO TAMMENTCELLESPOR TAN TSURLENET TOYAGEDE
L’APPAREILÀEFFECTUERSELON LESDIRECTIVESETCELL ESPORTANTSURLEREMPLACEMENTDES JOINTS(ANNUELLEMENT)ETDESPIÈCES(AUBESOIN ).
ENGLAND’SSTOVEWORKSN’ESTPASRESPONSABLEDESDOMMAGESNIDESBLESSURES,QUELSQU’ILSSOIENT,SUBISENRAISONDENÉGLIGENCE
OUÀCAUSED’UNEINSTALLATIONOUD’UNEUTILISATIONDANGEREUSEDECEPRODUIT.POURTOUTEQUESTION,COMMUNIQUEZAVECLE
SERVICEDESOUTIENTECHNIQUE.
REMPLACEMENTDESPIÈCES–PANNEAUDECOMMANDE
FIXÉSURLECÔTÉ
Le panneau de commande (pièce nº PU-CB19) est un panneau d’affichage numérique. Ce panneau
comprend plusieurs réglages qui aident à faire fonctionner l’appareil. Cette pièce peut être retirée de l’appareil
en desserrant les deux vis externes et en poussant le panneau vers l’intérieur du poêle. Le panneau d’accès
arrière devrait être retiré avant de retirer le panneau de commande. Le panneau de commande utilise un
fusible à action rapide de 6 A (pièce nº PU-CBF6).
REMARQUE : Les trois boutons de commande inférieurs sont préréglés en usine et ne devraient pas nécessiter
de changement. Reportez-vous aux sections « Mode d’emploi » et « Utilisation quotidienne »
du présent guide pour des instructions sur les autres réglages du panneau de commande.
Plagesdechaleurrecommandées :
Combustion faible : Réglage de plage de chaleur : 1 Réglage du ventilateur d’air ambiant : 1
Moyennement faible : Réglage de plage de chaleur : 2 – 3 Réglage du ventilateur d’air ambiant : *
Moyennement élevée : Réglage de plage de chaleur : 5 – 8 Réglage du ventilateur d’air ambiant : *
Combustion maximale : Réglage de plage de chaleur : 9 Réglage du ventilateur d’air ambiant : 9
* REMARQUE : Le réglage de la vitesse du ventilateur devrait correspondre au réglage de la plage
de chaleur.
REMARQUE:Lestrois
boutonsinférieursontété
préréglésenusineetne
nécessitentpasderéglages
supplémentaires.
Communiquezavecnotre
serviceau
1800245‐6489pourtoute
questionoutoutproblème.
ATTENTION:
Schémadupanneau
decommandefixé
surlecôté
Attention
Si vous constatez la présence de fumée dans la trémie (retour de fumée), fermez
immédiatement le couvercle de la trémie et la porte de l’appareil, puis verrouillez
le couvercle. Ouvrez les fenêtres et la porte menant à l’extérieur les plus proches,
puis appuyez sur le bouton « OFF » (arrêt) et laissez l’appareil refroidir pendant
au moins 3 heures. N’ouvrez pas la porte de l’appareil ou le couvercle de la
trémie. Il s’agit d’un problème d’entretien qui doit être corrigé.
Communi
q
uez avec le service de soutien techni
q
ue au 1 800 245
-
6489.
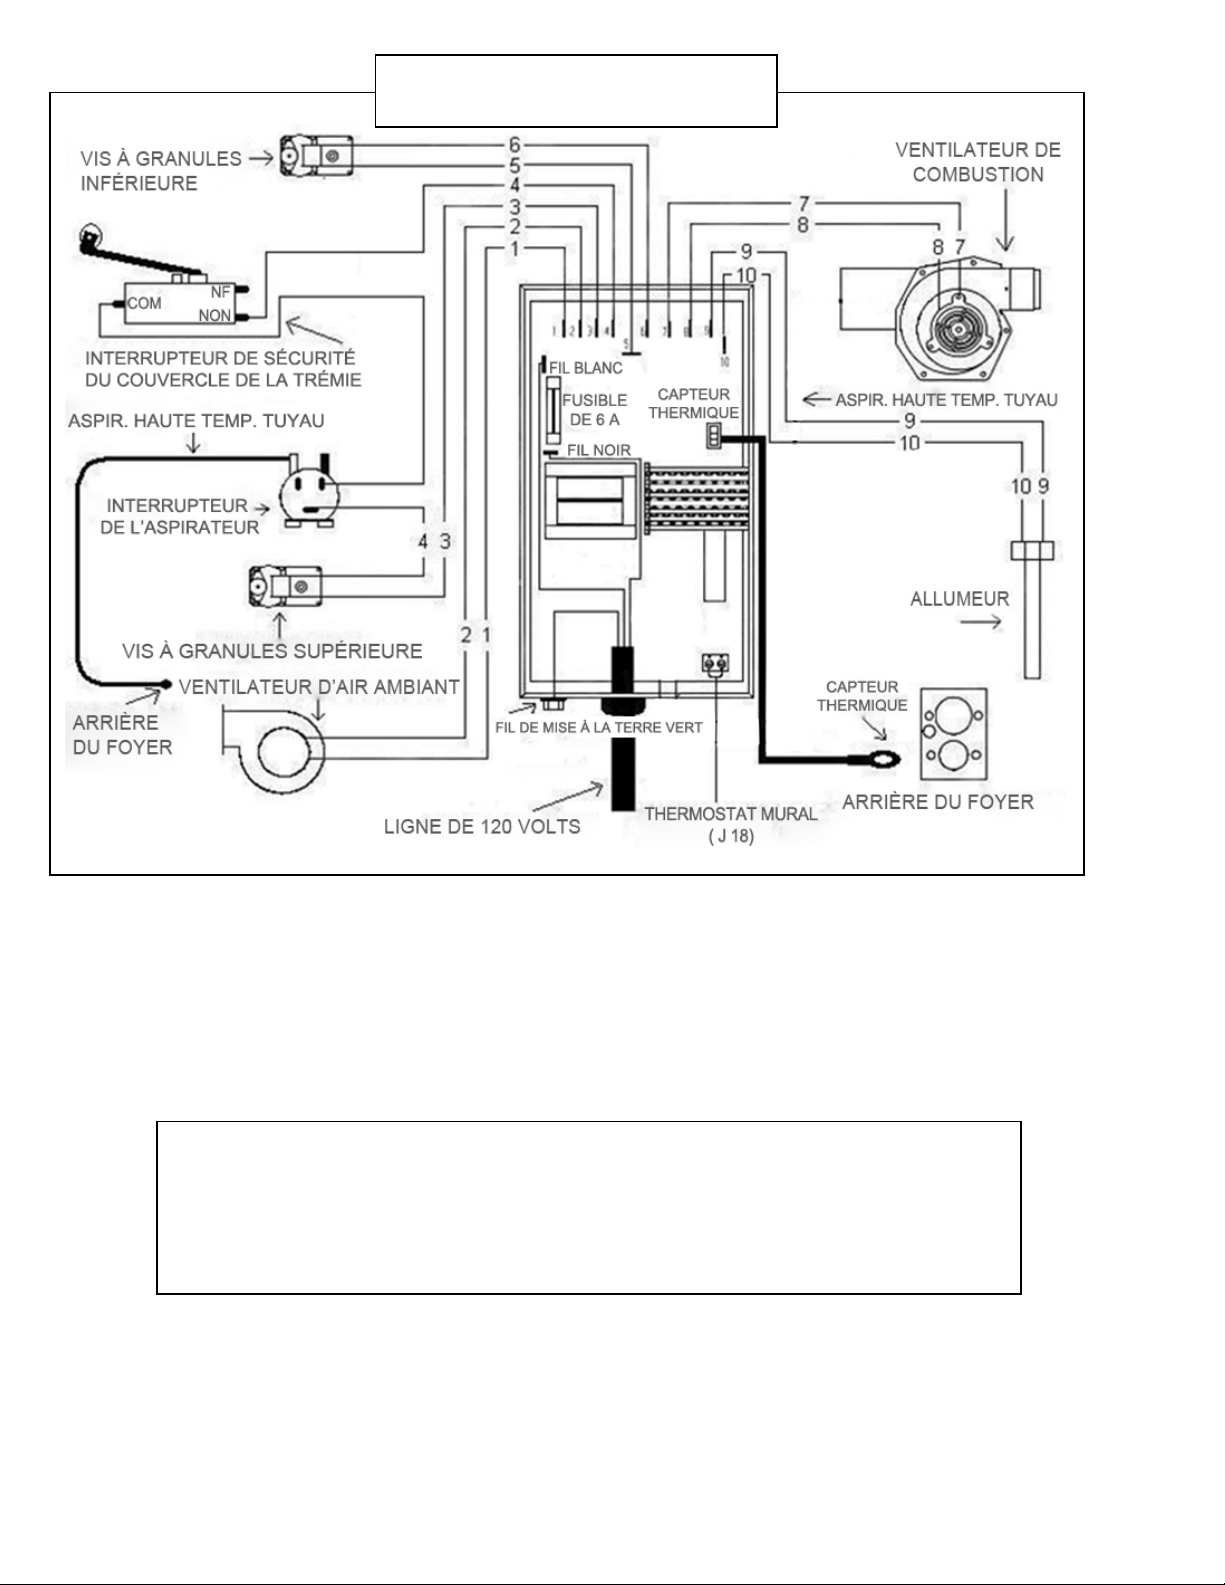
54
IMPORTANT!LISEZETSUIVEZTOUTESLESINSTRUCTIONSPOUR L’INSTALLATIONETL’ENTRETIEN,NOTAMME NTCELLESPORT ANT SURLENET TOYAGEDE
L’APPAREILÀEFFECTUERSELONLESDIRECTIVESETCELLESPORTAN TSURLEREM PLACEMENTDESJOINTS(ANNUELLEMENT)ETDESPIÈCES(AU BESOIN).
ENGLAND’SSTOVEWORKSN’ESTPASRESPONSABLEDESDOMMAGESNIDESBLESSURES,QUELSQU’ILSSOIENT,SUBISENRAISONDENÉGLIGENCE
OUÀCAUSED’UNEINSTALLATIONOUD’UNEUTILISATIONDANGEREUSEDECEPRODUIT.POURTOUTEQUESTION,COMMUNIQUEZAVECLE
SERVICEDESOUTIENTECHNIQUE.
ATTENTION:Lespiècesmobilespeuventcauserdesblessures.
N’utilisezPASl’appareilsidespanneauxnesontpasenplace.
DANGER:Lespiècespeuventêtrechaudes.Risquedechocélectrique.
Coupezl’alimentationavantd’effectuerl’entretiendel’appareil.
Schémaducâblage
dupanneaudecommandefixésurlecôté
CONSIGNESDE SÉCURITÉIMPORTANTES:Si l’appareil ou le tuyau de
raccord de cheminée rougit (ou blanchit), le poêle est surchauffé.
Cette situation pourrait causer un incendie ou un feu de cheminée.
Ne faites pas fonctionner votre appareil à une température trop
élevée, car il pourrait surchauffer.
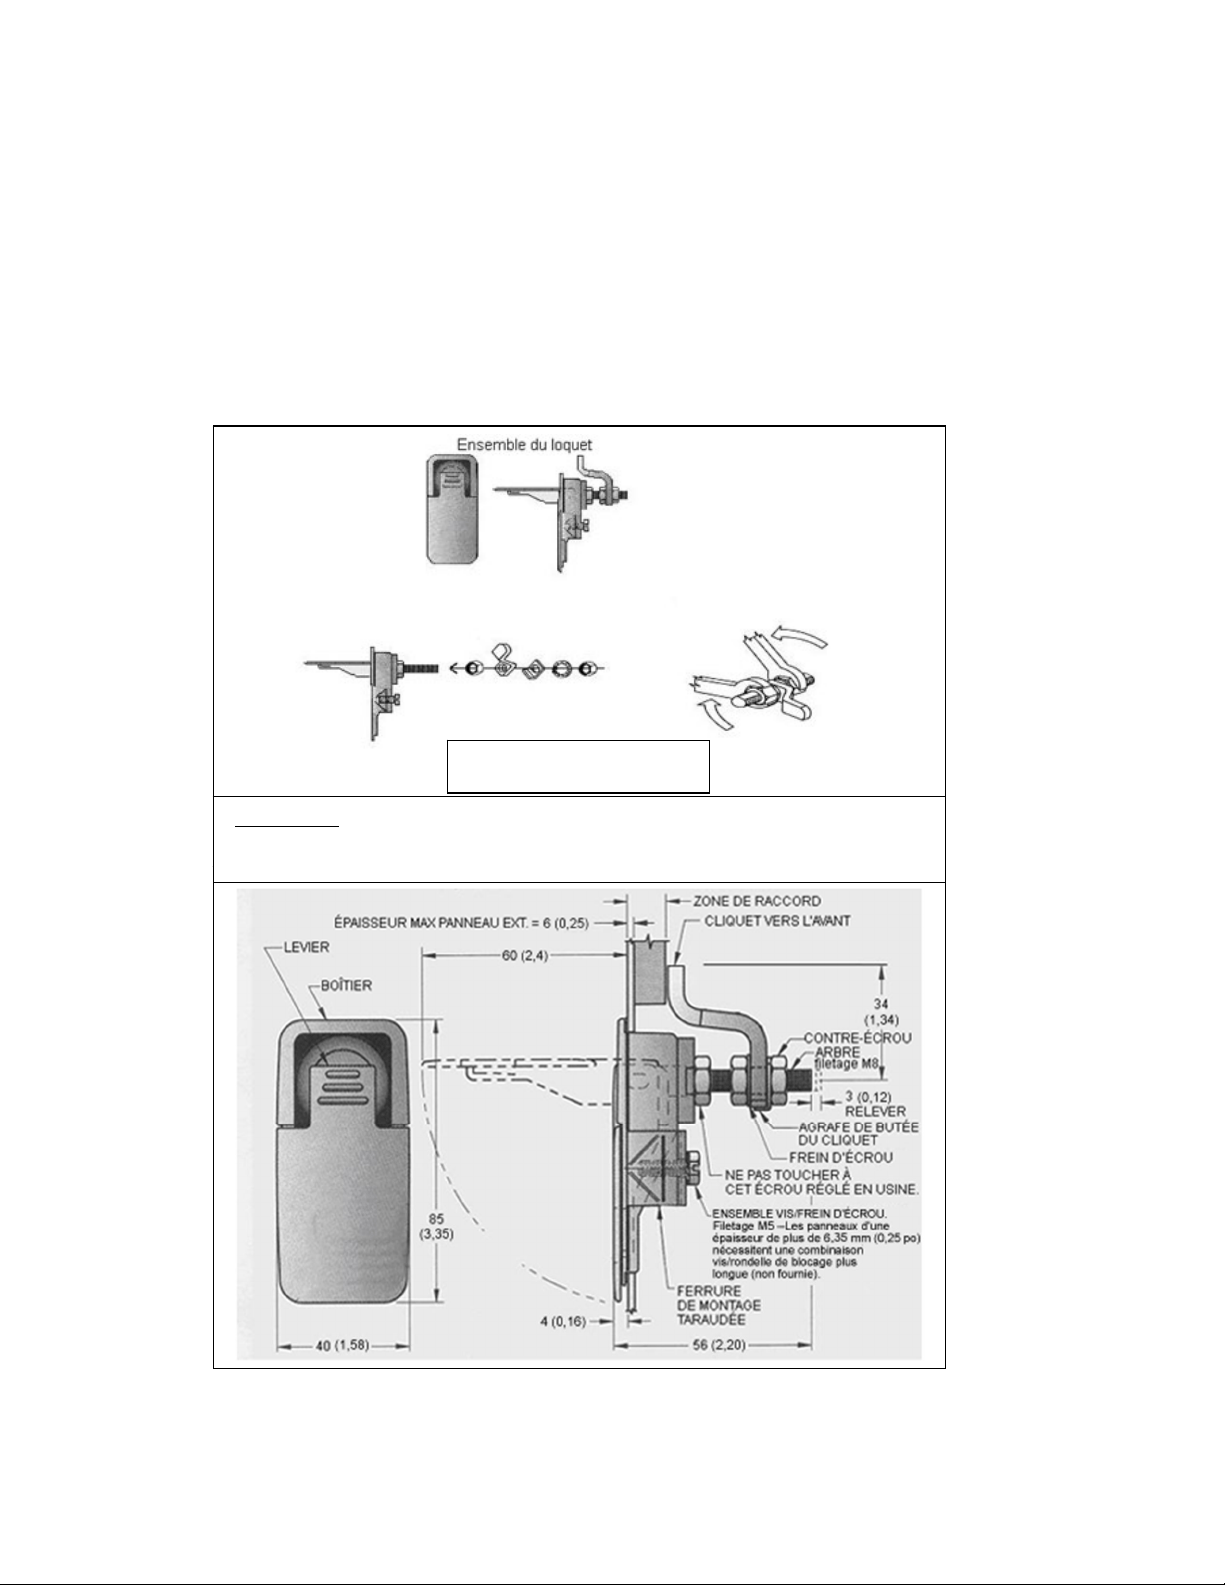
55
IMPORTANT!LISEZETSUIVEZTOUTESLESINSTRUCTIONSPOUR L’INSTALLATIONETL’ENTRETIEN,NO TAMMENTCELLESPOR TAN TSURLENET TOYAGEDE
L’APPAREILÀEFFECTUERSELON LESDIRECTIVESETCELL ESPORTANTSURLEREMPLACEMENTDES JOINTS(ANNUELLEMENT)ETDESPIÈCES(AUBESOIN ).
ENGLAND’SSTOVEWORKSN’ESTPASRESPONSABLEDESDOMMAGESNIDESBLESSURES,QUELSQU’ILSSOIENT,SUBISENRAISONDENÉGLIGENCE
OUÀCAUSED’UNEINSTALLATIONOUD’UNEUTILISATIONDANGEREUSEDECEPRODUIT.POURTOUTEQUESTION,COMMUNIQUEZAVECLE
SERVICEDESOUTIENTECHNIQUE.
Ajustements du loquet du couvercle de la trémie
Lesjointsd’étanchéitéautourdelapartiesupérieuredelatrémieàgranulessontessentielspourlefonctionnement
sûr et efficace de l’appareil. Le loquet installé sur cet appareil sertà tenir le couvercle de la trémieserré sur ce joint.
Aufil des u t ilisations, ces joints « s’usent » et
se compressent. La te nsion du loquet doit donc être vérifiée
périodiquementetajustéeaubesoin.
Pourréglerleloquetducouvercle,vousavezbesoindesoutilssuivants:deuxclésde1/2po,ouunecléde1/2poet
unedouillede1/2po.Pourajusterleloquet, ouvrez
d’abordlecouvercledela trémie,puisverrouillezleloquetdans sa
position fermée. Ensuite, à l’aide de la clé de 1/2 po, desserrez l’écrou le plus proche du loquet. Cet écrou est alors
ajustéprèsducouverclelui‐mêmepourserrerleloquet. Aprèsavoirajustécetécrouàla
positiondésirée,maintenez‐le
enplaceaveclacléde1/2po,puis serrezl’écrouderetenuesurleboutdel’axeduloquetavecladouillede1/2pooula
secondeclédefaçonàmaintenirenplacel’ensembleloque t.Enfin,un efoisleloque tserré,testezla
tensionduloquet
enverrouillantlecouvercleverslebaseten soulevantlescoinsavant.Lecouvercledoitêtrefermementretenuparle
loquet.Répétezles mêmesétapessileloquetn’esttoujourspasassezserré.
Important: Leloquetducouvercledelatrémiedoitêtrevérifié
périodiquementetmaintenuserré,desortequelapartie
su
p
érieuresoitscelléeetem
p
êcheunretourdefeu.
Assemblageduloquet
ducouvercledelatrémie
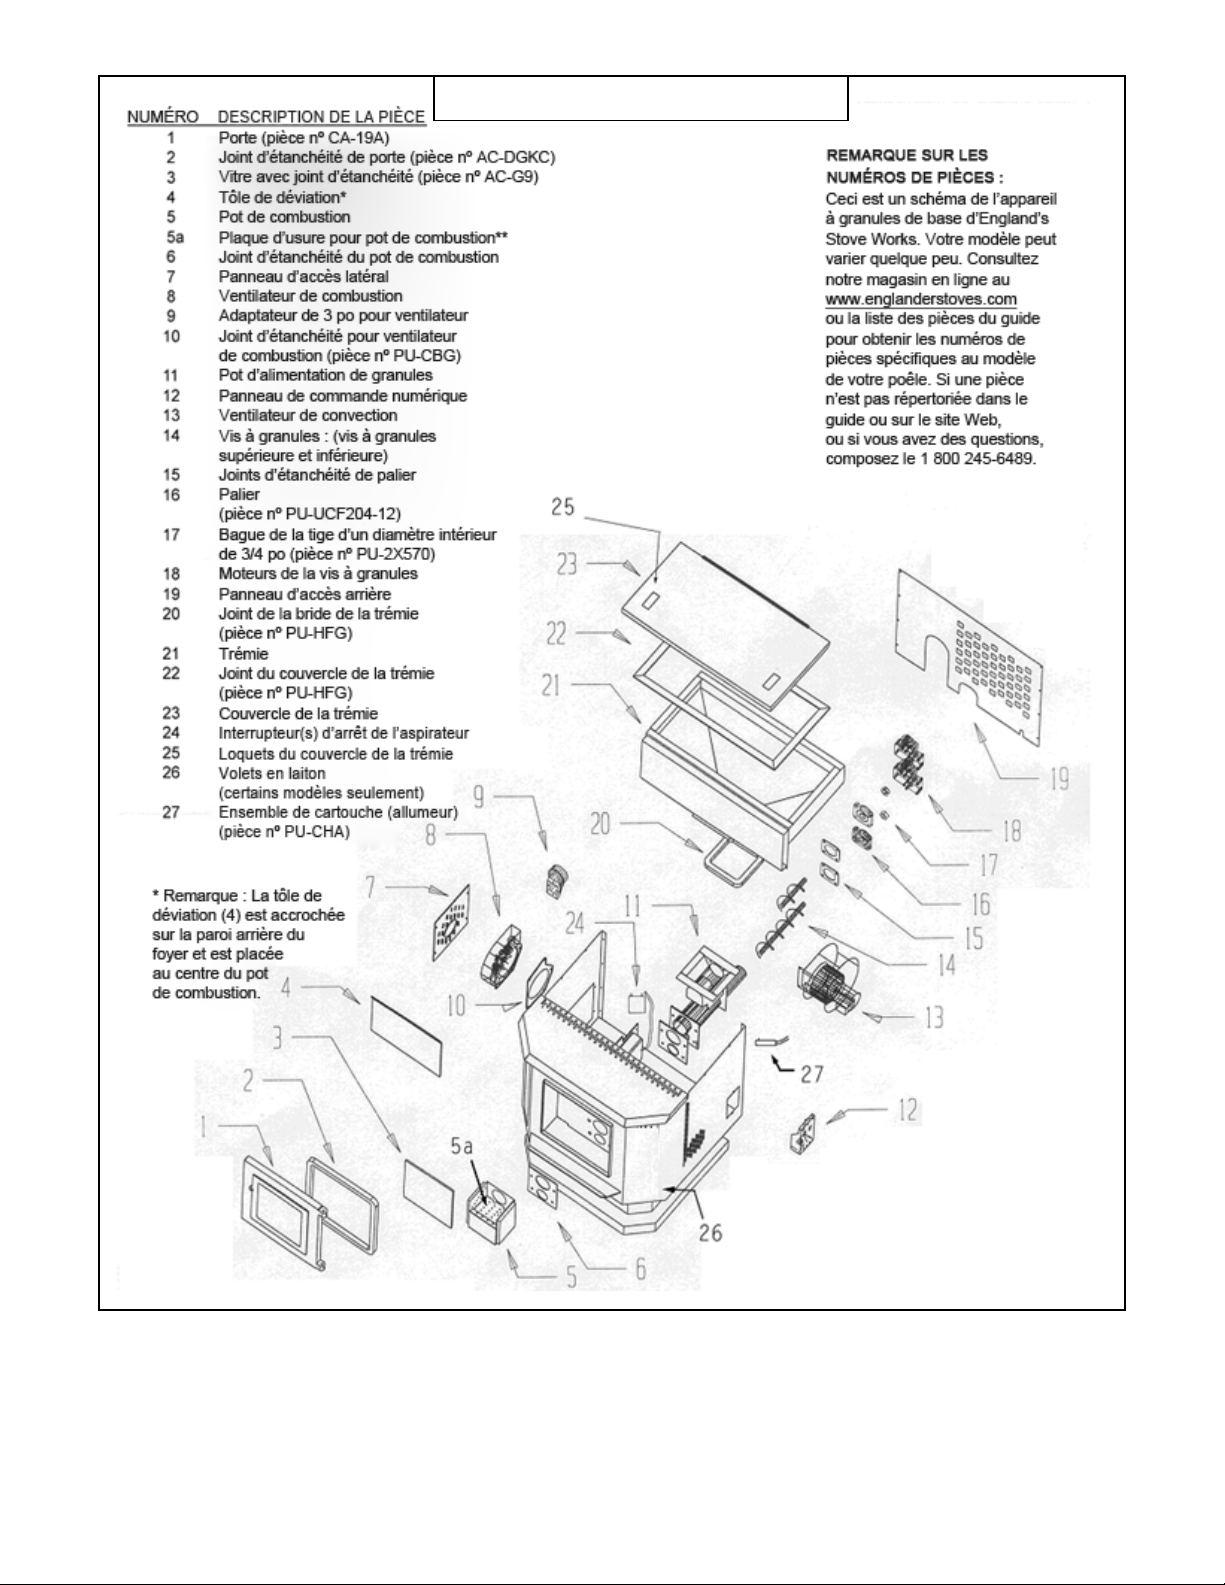
56
IMPORTANT!LISEZETSUIVEZTOUTESLESINSTRUCTIONSPOUR L’INSTALLATIONETL’ENTRETIEN,NOTAMME NTCELLESPORT ANT SURLENET TOYAGEDE
L’APPAREILÀEFFECTUERSELONLESDIRECTIVESETCELLESPORTAN TSURLEREM PLACEMENTDESJOINTS(ANNUELLEMENT)ETDESPIÈCES(AU BESOIN).
ENGLAND’SSTOVEWORKSN’ESTPASRESPONSABLEDESDOMMAGESNIDESBLESSURES,QUELSQU’ILSSOIENT,SUBISENRAISONDENÉGLIGENCE
OUÀCAUSED’UNEINSTALLATIONOUD’UNEUTILISATIONDANGEREUSEDECEPRODUIT.POURTOUTEQUESTION,COMMUNIQUEZAVECLE
SERVICEDESOUTIENTECHNIQUE.
Poêleàgranules–vueéclatée

57
IMPORTANT!LISEZETSUIVEZTOUTESLESINSTRUCTIONSPOUR L’INSTALLATIONETL’ENTRETIEN,NOTAMME NTCELLESPORT ANT SURLENET TOYAGEDE
L’APPAREILÀEFFECTUERSELONLESDIRECTIVESETCELLESPORTAN TSURLEREM PLACEMENTDESJOINTS(ANNUELLEMENT)ETDESPIÈCES(AU BESOIN).
ENGLAND’SSTOVEWORKSN’ESTPASRESPONSABLEDESDOMMAGESNIDESBLESSURES,QUELSQU’ILSSOIENT,SUBISENRAISONDENÉGLIGENCE
OUÀCAUSED’UNEINSTALLATIONOUD’UNEUTILISATIONDANGEREUSEDECEPRODUIT.POURTOUTEQUESTION,COMMUNIQUEZAVECLE
SERVICEDESOUTIENTECHNIQUE.
LISTEDESPIÈCESDERECHANGE
Nºdepièce Description
AC‐GGK
Ensembledejointd’étanchéitédevitre
(jointuniquement,pasdevitre)
AC‐DGKC Ensembledejointd’étanchéitédeporte
AC‐G9 Vitrede22,86cmx22,86cmavecjoint
AC‐SHN Poignéedeporteàressortennickel
AC‐MBSP
Peintureàpulvérisernoirerésistantauxhautes
températures
PU‐AMS
Jointd’étanchéitédeplaqued’appuidumoteurde
lavisàgranules
PU‐047040
Ensembledumoteurdelavisàgranulesà1tourpar
minute
PU‐BP18 Ensembledepotdecombustion
PU‐BP18WP Plaqued'usurepourpotdecombustion
PU‐076002B
Ventilateur(d’évacuation)decombustion
–
comprend
unadaptateurde3po
PU‐4C447 Ventilateurdeconvection(d’airambiant)
PU‐AF6T Axedelavisàgranulessupérieure
PU‐AF11B Axedelavisàgranulesinférieure
PU‐62‐40‐151‐3 Loquetducouvercledelatrémie
PU‐UCF204‐12 Palierdelavisàgranules
PU‐2X570 Baguedeblocagede3/4po
CU‐VS Interrupteurd’arrêtdel’aspirateur
PU‐VH Tuyaudel’aspirateur
PU‐CBMG Jointduventilateuretdumoteurdecombustion
PU‐BPG Jointd’étanchéitédupotdecombustion
PU‐ABGN Jointd’étanchéitédupalierdelavisàgranules
PU‐HLG Jointducouvercledelatrémie
PU‐CHA Ensembledecartouche(allumeur)
PU‐CBF6 Fusiblede6Adupanneaudecommande
AC‐HLSB Interrupteurdesécuritéducouvercledelatrémie
AC‐HP Axedecharnière
–
rivetpourportemoulée
PU‐SSTCW
Filduthermocouple(seulementinclusaveclepanneaude
commandefixésurledessus)
IP‐25PDVC Réflecteursupérieur(danslefoyer)
DVD
Guide
PU‐CB14 Panneaudecommandefixésurledessus(siinclus)
AC‐CMB
Boîtedemontagedupanneaudecommande(inclus
aveclepanneaudecommandefixésurledessus)
PU‐CB19 Panneaudecommandefixésurlecôté(siinclus)
Lespiècespeuventêtrecommandéesenligneauwww.heatredefined.com
Sivousavezdesquestions,veuillezcommuniqueravecleservicedesoutientechnique:

58
IMPORTANT!LISEZETSUIVEZTOUTESLESINSTRUCTIONSPOUR L’INSTALLATIONETL’ENTRETIEN,NOTAMME NTCELLESPORT ANT SURLENET TOYAGEDE
L’APPAREILÀEFFECTUERSELONLESDIRECTIVESETCELLESPORTAN TSURLEREM PLACEMENTDESJOINTS(ANNUELLEMENT)ETDESPIÈCES(AU BESOIN).
ENGLAND’SSTOVEWORKSN’ESTPASRESPONSABLEDESDOMMAGESNIDESBLESSURES,QUELSQU’ILSSOIENT,SUBISENRAISONDENÉGLIGENCE
OUÀCAUSED’UNEINSTALLATIONOUD’UNEUTILISATIONDANGEREUSEDECEPRODUIT.POURTOUTEQUESTION,COMMUNIQUEZAVECLE
SERVICEDESOUTIENTECHNIQUE.
TechnicalSupportDepartmentP.O.Box206Monroe,VA24574
Questions:1800245‐6489
Commandesdepiècesseulement:1800516‐3636
Télécopieur:1434929‐4810
Desrenseignements,ycomprisdesvidéos,lafoireauxquestions,desfichesd’entretienetplusencore,
peuventêtreconsultéssurnotresiteWeb:
www.heatredefined.com
Vouspouvezinscrireladatedefabricationetlenuméro
desériedevotreappareildanslesespacesprévusàceteffet
surcetteétiquette(pagesuivante),pourréférenceultérieure.
Cetteétiquettecomprendégalementdesrenseignements
desécurité,commelesnormesd’essaiUL,ULC,etc.,
àl’intentiondevosagentslocaux
oudetouteautre
personnequipeutenavoirbesoin.
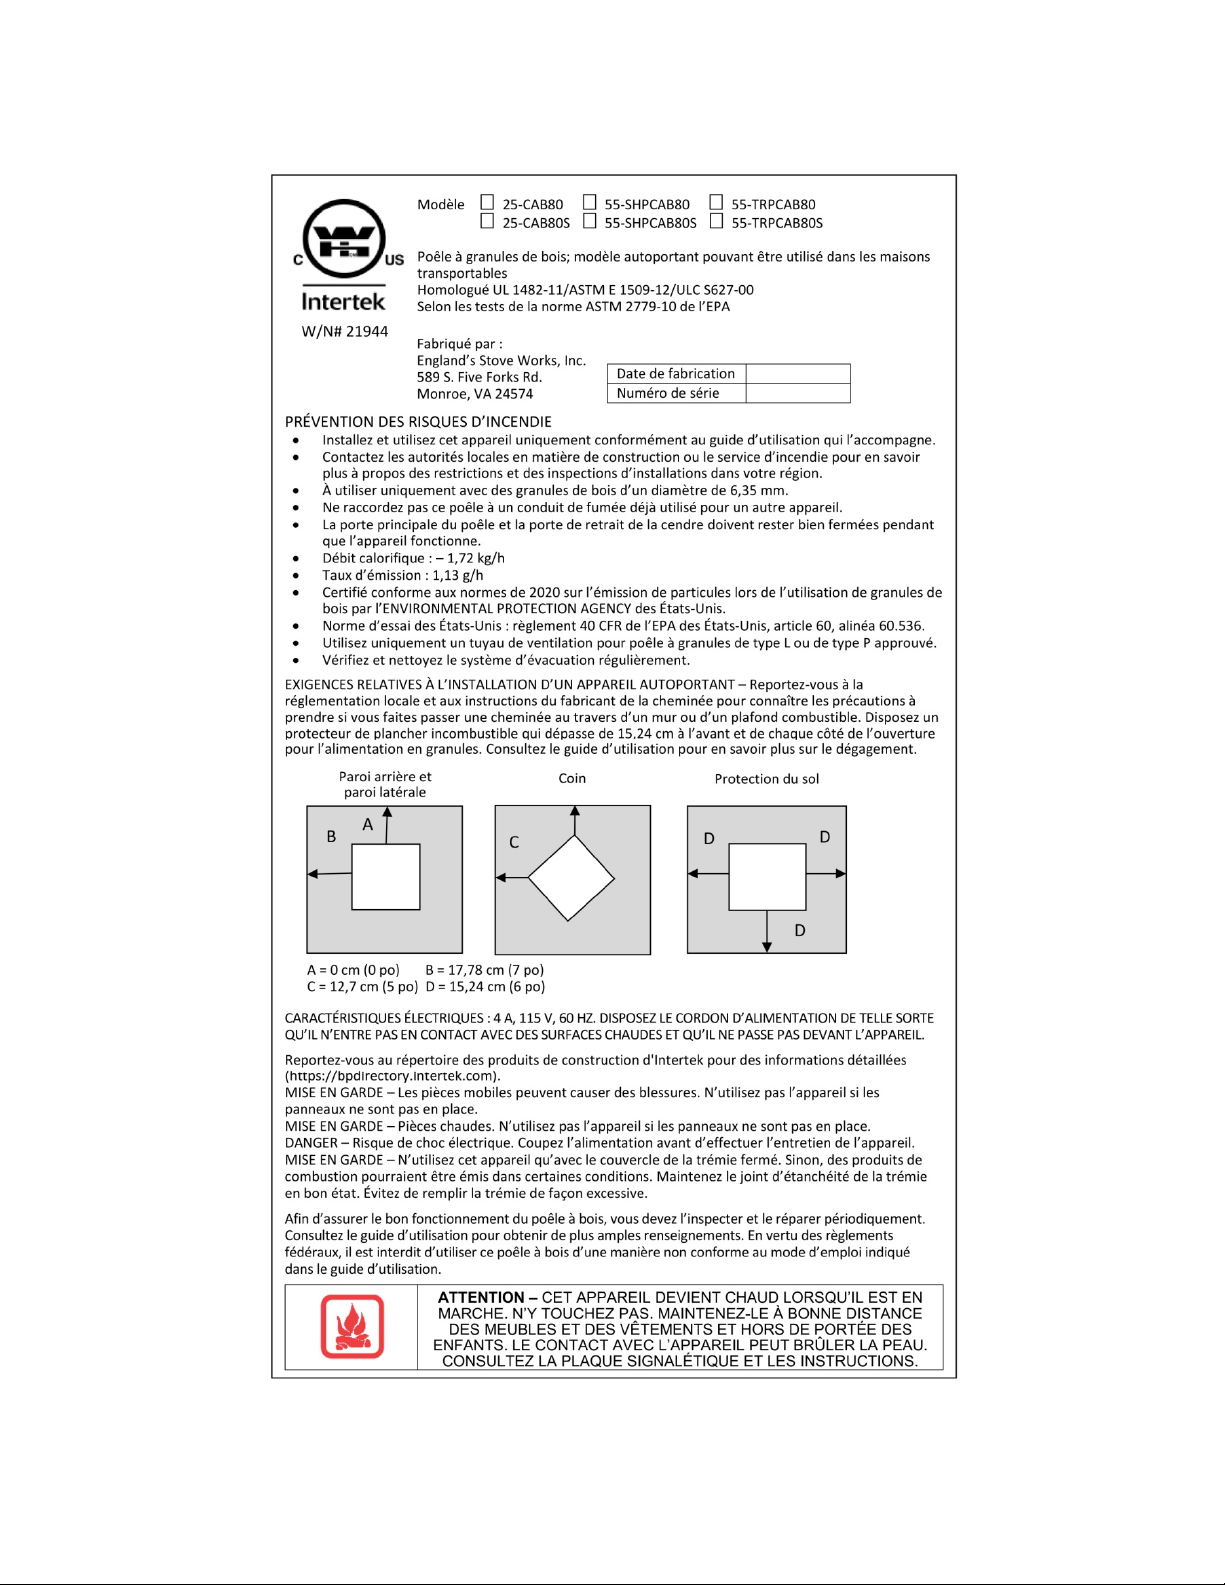
59
IMPORTANT!LISEZETSUIVEZTOUTESLESINSTRUCTIONSPOUR L’INSTALLATIONETL’ENTRETIEN,NOTAMME NTCELLESPORT ANT SURLENET TOYAGEDE
L’APPAREILÀEFFECTUERSELONLESDIRECTIVESETCELLESPORTAN TSURLEREM PLACEMENTDESJOINTS(ANNUELLEMENT)ETDESPIÈCES(AU BESOIN).
ENGLAND’SSTOVEWORKSN’ESTPASRESPONSABLEDESDOMMAGESNIDESBLESSURES,QUELSQU’ILSSOIENT,SUBISENRAISONDENÉGLIGENCE
OUÀCAUSED’UNEINSTALLATIONOUD’UNEUTILISATIONDANGEREUSEDECEPRODUIT.POURTOUTEQUESTION,COMMUNIQUEZAVECLE
SERVICEDESOUTIENTECHNIQUE.

60
IMPORTANT!LISEZETSUIVEZTOUTESLESINSTRUCTIONSPOUR L’INSTALLATIONETL’ENTRETIEN,NOTAMME NTCELLESPORT ANT SURLENET TOYAGEDE
L’APPAREILÀEFFECTUERSELONLESDIRECTIVESETCELLESPORTAN TSURLEREM PLACEMENTDESJOINTS(ANNUELLEMENT)ETDESPIÈCES(AU BESOIN).
ENGLAND’SSTOVEWORKSN’ESTPASRESPONSABLEDESDOMMAGESNIDESBLESSURES,QUELSQU’ILSSOIENT,SUBISENRAISONDENÉGLIGENCE
OUÀCAUSED’UNEINSTALLATIONOUD’UNEUTILISATIONDANGEREUSEDECEPRODUIT.POURTOUTEQUESTION,COMMUNIQUEZAVECLE
SERVICEDESOUTIENTECHNIQUE.
GARANTIELIMITÉEDECINQ(5)ANS
Àpartirdeladated’achatparlepropriétaired’origine.
Numérosdemodèle25‐CAB80/55‐SHPCAB80/55‐TRPCAB80
Lagarantielimitéedufabricantcouvrelesélémentsci‐dessous.
Cinqans:
1. Lesjointsd’acieraucarboneetlesjointssoudésdufoyersontgarantispendant
cinq(5)anscontrelefendillement.
2. Laporteetlescharn ièresenaciersont garantiespendantcinq(5)anscontrelafissuration.
Unan:
1. Lespiècestellesquelatrémie,lavisàgranules,lepotdecombustion,l’axedelavisà
granulesetlesfixationssontgarantiespendantun(1)ancontrelesfissures,lesbrisures
etlefendillementdesjointssoudés.
2. Lescomposantsélectriques,lesaccessoires,leverreet
lasurfacepeintedupoêlesont
garantispendantun(1)anàpartirdeladated’achat.
Conditionsetexclusions
1. Lesdommagesdécoulantd’unemballementannulentvotregarantie.
2. Cettegarantienes’appliquepassilesdommagesdécoulentd’unaccident,d’une
manipulationinadéquate,d’uneinstallationinadéquate,d’uneutilisationinadéquate,
d’abus,d’uneré parationnonautoriséeoud’unetentativederéparationnonautorisée.
3. Lefabricantn’estpasresponsabledesdommagesindirects,
accessoiresouconsécutifs
découlantduproduit, ycomprislescoûtsoudépenses,lafournituredematérielde
rechangeoularéparationpendantlespériodesdemauvaisfonctionnementoude
non‐utilisationduproduit*.
4. Lefabricantdéclineratouteresponsabilitépourlesdommagesindirectsencasde
violationdetoutegarantie
écriteouimplicite.
5. Ceproduitesthomologuéparl’EPApoursonutilisationdegranulesdeboisdequalité
supérieure.Lagarantienes’appliquepassileproduitestutilisépourbrûlerdes
matériauxnonconformesàsonhomolog a tionparl’EPA.Lagarantienes’appliquepas
sileproduitn’estpas
utiliséconformémentauguided’utilisation.

61
IMPORTANT!LISEZETSUIVEZTOUTESLESINSTRUCTIONSPOUR L’INSTALLATIONETL’ENTRETIEN,NOTAMME NTCELLESPORT ANT SURLENET TOYAGEDE
L’APPAREILÀEFFECTUERSELONLESDIRECTIVESETCELLESPORTAN TSURLEREM PLACEMENTDESJOINTS(ANNUELLEMENT)ETDESPIÈCES(AU BESOIN).
ENGLAND’SSTOVEWORKSN’ESTPASRESPONSABLEDESDOMMAGESNIDESBLESSURES,QUELSQU’ILSSOIENT,SUBISENRAISONDENÉGLIGENCE
OUÀCAUSED’UNEINSTALLATIONOUD’UNEUTILISATIONDANGEREUSEDECEPRODUIT.POURTOUTEQUESTION,COMMUNIQUEZAVECLE
SERVICEDESOUTIENTECHNIQUE.
Procédure
L’acheteurdoitdonneravisderéclamationdedéfautpendantlapériodedegarantie
etpayerletransportversuncentredese rviceetàpartird’uncentredeservicedésignépar
lefabricant.Lerevendeurquiavendul’appareiloulefabricant,ànotregré,effectuerala
réparationsousgarantie.
Autresdroits
Cettegarantievousconfèredesdroitspréc is.Ilestpossiblequevousdisposiez
égalementd’autresdroits,quivarientd’unÉtatoud’uneprovinceàl’autre.
England’sStoveWorks,Inc.
P.O.Box206
Monroe,VA24574
1800245‐6489
Poureffectueruneréclamationautitredelagarantie,veuillezcommuniquer
avecnotre
servicedesoutientechniqueau1800245‐6489.Vouspouvezégalementeffectuerune
réclamationautitredelagarantiesurlesitewww.heatredefined.com
*CertainsÉtatsoucertainesprovincesnepermettentpasl’exclusionoula
limitationdesdommagesaccessoiresouconsécutifs,desortequelesexclusions
Danslecasdespièces,lesprocéduresderemplacementautitredelagarantiese
trouventsurlesitedenotremagasindepièces:heatredefined.com

62
IMPORTANT!LISEZETSUIVEZTOUTESLESINSTRUCTIONSPOUR L’INSTALLATIONETL’ENTRETIEN,NOTAMME NTCELLESPORT ANT SURLENET TOYAGEDE
L’APPAREILÀEFFECTUERSELONLESDIRECTIVESETCELLESPORTAN TSURLEREM PLACEMENTDESJOINTS(ANNUELLEMENT)ETDESPIÈCES(AU BESOIN).
ENGLAND’SSTOVEWORKSN’ESTPASRESPONSABLEDESDOMMAGESNIDESBLESSURES,QUELSQU’ILSSOIENT,SUBISENRAISONDENÉGLIGENCE
OUÀCAUSED’UNEINSTALLATIONOUD’UNEUTILISATIONDANGEREUSEDECEPRODUIT.POURTOUTEQUESTION,COMMUNIQUEZAVECLE
SERVICEDESOUTIENTECHNIQUE.
Avisimportant
L’informationd’enregistrementDOITêtreverséedansnosdossierspourquelaprésente
garantiesoitvalide.Veuilleznousenvoyercetteinformationdanslestrente(30)jours
suivantladated’achatinitiale.
Ilyatroismoyensfacilesdenousfaireparvenircetteinformation.
Adressepostale
England’sStoveWorks,Inc.
TechnicalsupportDepartment
P.O.Box206
Monroe,Virginia24574,États‐Unis
Partélécopieuraunumérosuivant:
1434929‐4810–24heuresparjour
Enregistrementenligne:
Pourvousinscrireenligne,visiteznotresiteWebpourl’enregistrementdela
garantieàl’adresse
http://www.heatredefined.com
Veuilleznoter:Cettegarantieseranulleetnonavenuesil’acheteurn’envoiepasla
carted’enregistrementdelagarantieci‐jointeETunecopiedureçudanslestrente(30)
jours,àcompterdeladated’achat.
Cettegarantieestnontransférable.

63
IMPORTANT!LISEZETSUIVEZTOUTESLESINSTRUCTIONSPOUR L’INSTALLATIONETL’ENTRETIEN,NOTAMME NTCELLESPORT ANT SURLENET TOYAGEDE
L’APPAREILÀEFFECTUERSELONLESDIRECTIVESETCELLESPORTAN TSURLEREM PLACEMENTDESJOINTS(ANNUELLEMENT)ETDESPIÈCES(AU BESOIN).
ENGLAND’SSTOVEWORKSN’ESTPASRESPONSABLEDESDOMMAGESNIDESBLESSURES,QUELSQU’ILSSOIENT,SUBISENRAISONDENÉGLIGENCE
OUÀCAUSED’UNEINSTALLATIONOUD’UNEUTILISATIONDANGEREUSEDECEPRODUIT.POURTOUTEQUESTION,COMMUNIQUEZAVECLE
SERVICEDESOUTIENTECHNIQUE.
ENREGISTREMENTDELAGARANTIEsurlesproduitsengland’sstoveworks®
Renseignementssurl’acheteur*
I.Nomdel’acheteur___________________________________________________________________
II.Adresse___________________________________________________________________________
III.Ville______________________________Province__________Codepostal___________________
IV.Numérodetéléphone_______________________________________________________________
V.Courriel___________________________________________________________________________
Renseignementssurledétaillant*
VI.Nomdudétaillant__________________________________________________________________
VII.Adresse__________________________________________________________________________
VIII.Ville______________________________Province__________Codepostal__________________
Renseignementssurl’appareil*
IX.Numérodemodèle___________________________Dated’achat___________________________
X.Prixd’achat_______________________________
XI.Numérodesérie_____________________________Datedefabrication______________________
Questionsrelativesàl’achat
Commentavez‐vousentenduparlerdenotreproduit?(Veuillezcocherl’unedesréponsessuivantes.)
Deboucheàoreille Démonstration Internet___________
Autre:______________________________________________________________________________
Àquelendroitvousa‐t‐ondonnédesrenseignementssurnotreproduit?
Autéléphone Chezundétaillant(nomdudétaillant) Internet_______
Autre:______________________________________________________________________________
*Renseignementsnécessaires