CAUTION
PLEASEREADTHISENTIREMANUALBEFOREINSTALLATIONANDUSEOFTHISPELLETFUEL‐BURNING
APPLIANCE.KEEPCHILDREN,FURNITURE,ANDALLCOMBUSTIBLESAWAYFROMANYHEATINGAPPLIANCE.
SAFETYNOTICE
FAILURETOFOLLOWTHESEINSTRUCTIONSCANRESULTINPROPERTYDAMAGE,BODILYINJURYOREVEN
DEATH.FORYOURSAFETYANDPROTECTION,FOLLOWTHEINSTALLATIONINSTRUCTIONSOUTLINEDIN
THISMANUAL.CONTACTYOURLOCALBUILDINGORFIREOFFICIALSABOUTRESTRICTIONSAND
INSTALLATIONINSPECTIONREQUIREMENTS(INCLUDINGPERMITS)INYOURAREA.
ManufacturedBy:
England’sStoveWorks,Inc.
POBox206
Monroe,VA24574
Rev.03/2019
SAVETHESEINSTRU CTIONS
INSTALLATION&OPERATION
MANUAL
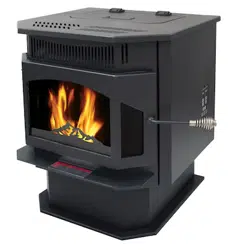
25‐CBPAH
55‐SHPCBPAH
55‐TRPCBPAH
THISWOODHEATERNEEDSPERIODICINSPECTIONANDREPAIRFORPROPEROPERATION.CONSULTTHE
OWNER’SMANUALFORFURTHERINFORMATION.ITISAGAINSTFEDERALREGULATIONSTOOPERATETHIS
WOODHEATERINAMANNERINCONSISTENTWITHTHEOPERATINGINSTRUCTIONSINTHEOWNER’S
MANUAL.
www.heatredefined.com
Parts:(800)516‐3636
Support:(800)245‐6489
2
IMPORTANT!READANDFOLLOWALLINSTALLATIONANDMAINTENANCEINSTRUCTIONS,INCLUDINGCLEANINGTHEUNITASSPECIFIED,AND
REPLACINGGASKETSANNUALLY,ANDPARTSASNEEDED.
ENGLAND’SSTOVEWORKSISNOTRESPONSIBLEFORANYDAMAGEORINJURYINCURREDDUETONEGLECT,ORDUETOUNSAFEINSTALLATIONOR
USAGEOFTHISPRODUCT.CALLTECHNICALSUPPORTWITHANYQUESTIONS.
IMPORTANT:IFYOUHAVEAPROBLEMWITHTHISUNIT,DONOTRETURNITTO
THEDEALER.CONTACTTECHNICALSUPPORT@1‐800‐245‐6489
TamperWarning:
Thiswoodheaterhasamanufacturer‐setminimumlowburnratethatmustnotbe
altered.Itisagainstfederalregulationstoalterthissettingorotherwiseoperate
thiswoodheaterinamannerinconsistentwithoperatinginstructionsinthis
manual.
MobileHomeUse:
Thisfreestandingpelletunitisapprovedformobilehomeordoublewide
installationwiththeoutsidecombustionairhook‐upSeethe“Installation”section
ofthismanualfordetailspertainingtomobilehomeinstallations.Mobilehome
installationmustbeinaccordancewiththeManufacturedHomeandSafety
Standard(HUD),CFR3280,Part24.
WARNING:
USEOFOUTSIDECOMBUSTIONAIRISMANDATORYWITHTHISUNIT.
DONOTOPERATEWITHTHEHOPPEROPEN;LIDMUSTBESHUTANDTIGHTLY
LATCHEDDURINGOPERATION.DONOTOVER‐FIREYOURUNIT.
Note:England’sStoveWorksdoesnotrecommendusingapelletstoveasyour
onlysourceofheat.
Retainforyourfiles
ModelNumber
DateofPurchase
DateofManufacture
SerialNumber

3
IMPORTANT!READANDFOLLOWALLINSTALLATIONANDMAINTENANCEINSTRUCTIONS,INCLUDINGCLEANINGTHEUNITASSPECIFIED,AND
REPLACINGGASKETSANNUALLY,ANDPARTSASNEEDED.
ENGLAND’SSTOVEWORKSISNOTRESPONSIBLEFORANYDAMAGEORINJURYINCURREDDUETONEGLECT,ORDUETOUNSAFEINSTALLATIONOR
USAGEOFTHISPRODUCT.CALLTECHNICALSUPPORTWITHANYQUESTIONS.
Welcome!
Introduction
ThankYou.........................................5
Specifications
HeatingSpecifications.......................6
Dimensions........................................6
EPACompliance.................................6
Installation
InstallationOverview...................7
ClearancestoCombustibles.........8
VentingIntroduction...................9
VentingGuidelines.......................9
AdditionalVentingInformation...10
ApprovedVentingMethods
ThroughtheWall...........11
ThroughtheCeiling........12
ExistingChimney............13
MobileHomeInstallation............14
VentTerminationClearances......15
OutsideAirHookup.....................16
FloorProtection...........................17
DailyOperation
GettingStarted............................18
LightingaFire..............................18
DailyOperationNotes………………19
ControlBoard
ControlBoardSettings................20
ErrorCodes..................................21
PowerFailure……..……………………22
Maintenance
Daily
ImportantNotes..............23
DailyAshRemoval...........23
CleaningtheBurnPot......24
Weekly
BaffleRemoval...........25
Clean‐OutCovers.............25
Monthly
ImportantNotes…………….26
VentingPipeCleaning…….27
Yearly
ImportantNotes..............28
ExhaustBlower................29
ConvectionBlower...........29
HopperFines....................30
CheckingGaskets.............30
BasicTroubleshooting.......................31
ReplacingComponents
AugerMotor.......................................33
ConvectionBlower.............................34
CombustionBlower............................35
VacuumSwitch...................................36
Igniter.................................................37
Gaskets...............................................38
Glass...................................................39
ControlBoard.....................................40
WiringDiagram..................................41
HopperLidHinges..............................42
HopperLidHandle..............................42
Panels………………………………………………43
Finish……………………………………………….43
IllustratedPartsDetail
ExplodedPartsDiagram……………………44
PartsList……………………………………..…..45
Warranty
SerialTagSample…………………….………..47
WarrantyDetails……………………………....48
ImportantNotice………….…….....…………50
WarrantyReg.Form………………………….51
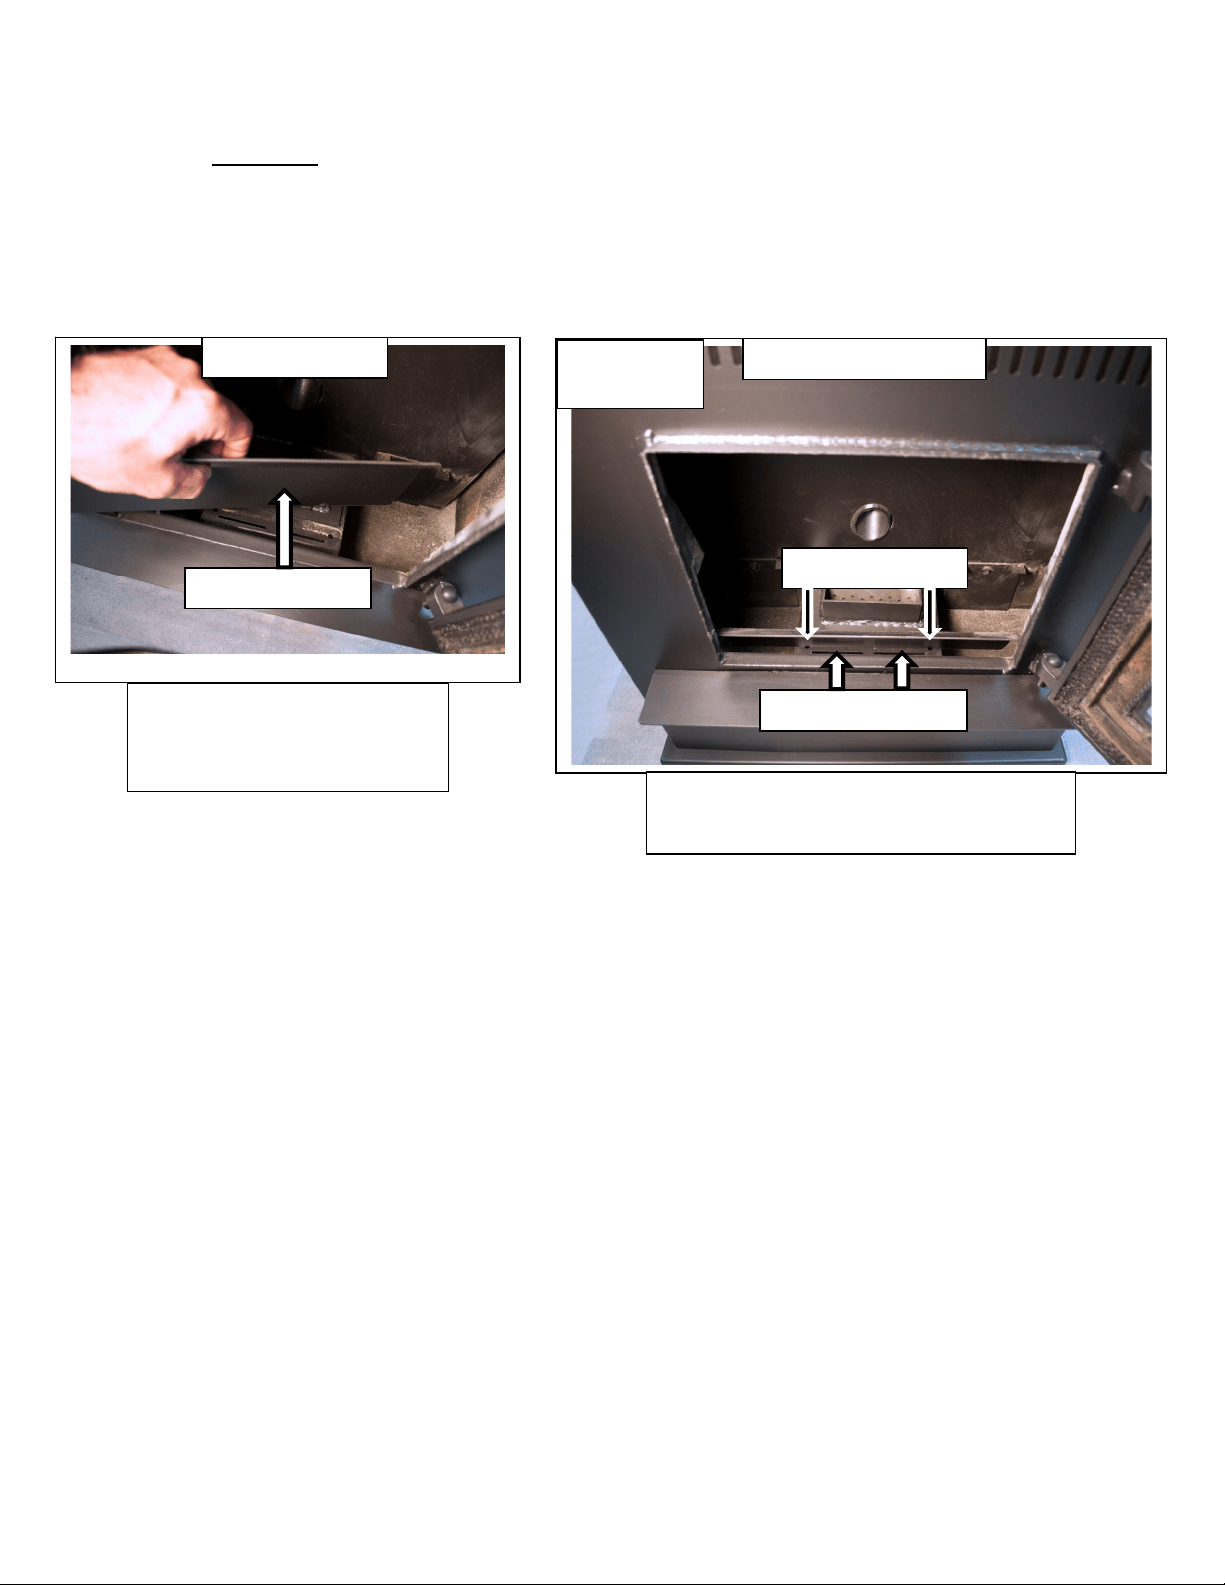
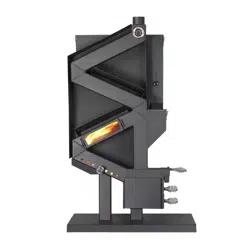
AIR WASH BAR PLACEMENT
CAUTION:TheAirWashBarmaybecomejarredlooseduringshipping.
BESUREthattheAirWashBarisinstalledproperlybeforeeachfire,
includingaftercleaningandmaintenance.
TheAirWashBarshouldfitintothetwoinstallationholesand‘lean
forward’onthefrontwallofthestove.
Thebendinthebarshouldbendtowardthefrontdooropening,andnot
backwardtowardtheburnpot.
InstallationHoles
AirWashChannels
FireBox
InstalltheAirWashBartabsintotheholes
andnotintotheairwashchannels
Thebendoftheairwashbar
shouldfaceTOWARDthefront
door
FrontDoorO
p
enin
g
AirWashBar
(installed)
AirWashBar

5
IMPORTANT!READANDFOLLOWALLINSTALLATIONANDMAINTENANCEINSTRUCTIONS,INCLUDINGCLEANINGTHEUNITASSPECIFIED,AND
REPLACINGGASKETSANNUALLY,ANDPARTSASNEEDED.
ENGLAND’SSTOVEWORKSISNOTRESPONSIBLEFORANYDAMAGEORINJURYINCURREDDUETONEGLECT,ORDUETOUNSAFEINSTALLATIONOR
USAGEOFTHISPRODUCT.CALLTECHNICALSUPPORTWITHANYQUESTIONS.
INTRODUCTION
ThankyouforpurchasingthisfineproductfromEngland’sStoveWorks!
England’sStoveWorkswasstarted,andisstillownedby,afamilythatbelieves
stronglyina“DoItYourself”spirit;that’sonereasonyoufoundthisproductat
yourfavorite“DoItYourself”store.
Weintentionallydesignandbuild
ourstovessothatanyhomeownercanmaintain
theirstovewithbasictools,andwe’realwaysmorethanhappytohelpyoudothe
jobaseasilyandasinexpensivelyaspossible.However,whileremainingsimple,
ourstovesaredesignedtoperformextremelyefficiently,helpingdelivermore
heatfromless
fuel.
PleaselookattheextensiveHelpsectiononourwebsiteandcallourTechnical
SupportDepartmentat(800)245‐6489ifyouneedanyhelpwithyourstove.We
arenearlyalwaysableto“walkyouthrough”anyinstallationissues,repairs,
problemsorotherquestionsthatyoumayhave.
Wishingyouyearsofefficient,qualityand“comfy”heating,
EveryoneatEngland’sStoveWorks
PleaseNote:Whileinformationobtainedfromourwebsiteandthroughour
TechnicalSupportlineisalwaysfreeofcharge,therewillbeaservicecharge
incurredwithany“on‐site”repairsormaintenancethatwemayarrange.
Thismanualencompassesallversionsofthe25‐CBPAH,includingthe55‐SHPCBPAHandthe55‐TRPCBPAH.
However,forsimplicityofdescription,thestovewillbereferredtobythegeneric25‐CBPAHdesignation.
This manual is available for free download on the manufacturer’s web site. It is a copyrighted document and resale
is strictly prohibited. The manufacturer may update this manual occasionally and cannot be responsible for
problems including injuries or damages resulting from the use of information found in any manual from
unauthorized sources.
CAUTION:Stoveisheavy.
Inaddition,whenhandlinganysheetmetalproducts,beawarethattheremaybesharpedgesorburrs.
Althoughwemakeeveryefforttoeliminateanysharpedges,pleaseusecautionwhenhandlinganymetalparts.
Remembertodisconnect(unplug)thestovefromthepowersourceand
allowittocompletelycooldown
beforeperforminganymaintenance.
6
IMPORTANT!READANDFOLLOWALLINSTALLATIONANDMAINTENANCEINSTRUCTIONS,INCLUDINGCLEANINGTHEUNITASSPECIFIED,AND
REPLACINGGASKETSANNUALLY,ANDPARTSASNEEDED.
ENGLAND’SSTOVEWORKSISNOTRESPONSIBLEFORANYDAMAGEORINJURYINCURREDDUETONEGLECT,ORDUETOUNSAFEINSTALLATIONOR
USAGEOFTHISPRODUCT.CALLTECHNICALSUPPORTWITHANYQUESTIONS.
SPECIFICATIONS
HeatingSpecifications
ApproximatePelletBurnRate**………….…………0.7to1.7kg/hr(1.5to3.8lbs/hr)
MaximumBurnTime**………………………………………………………………………..76hours
HeatOutput**…………………………………………………………13,429‐21,807BTU/hr
ApproximateSquareFootageHeated***…….………………………….upto2,200sq.ft.
HopperCapacity………………………………………………………………………….…..120pounds
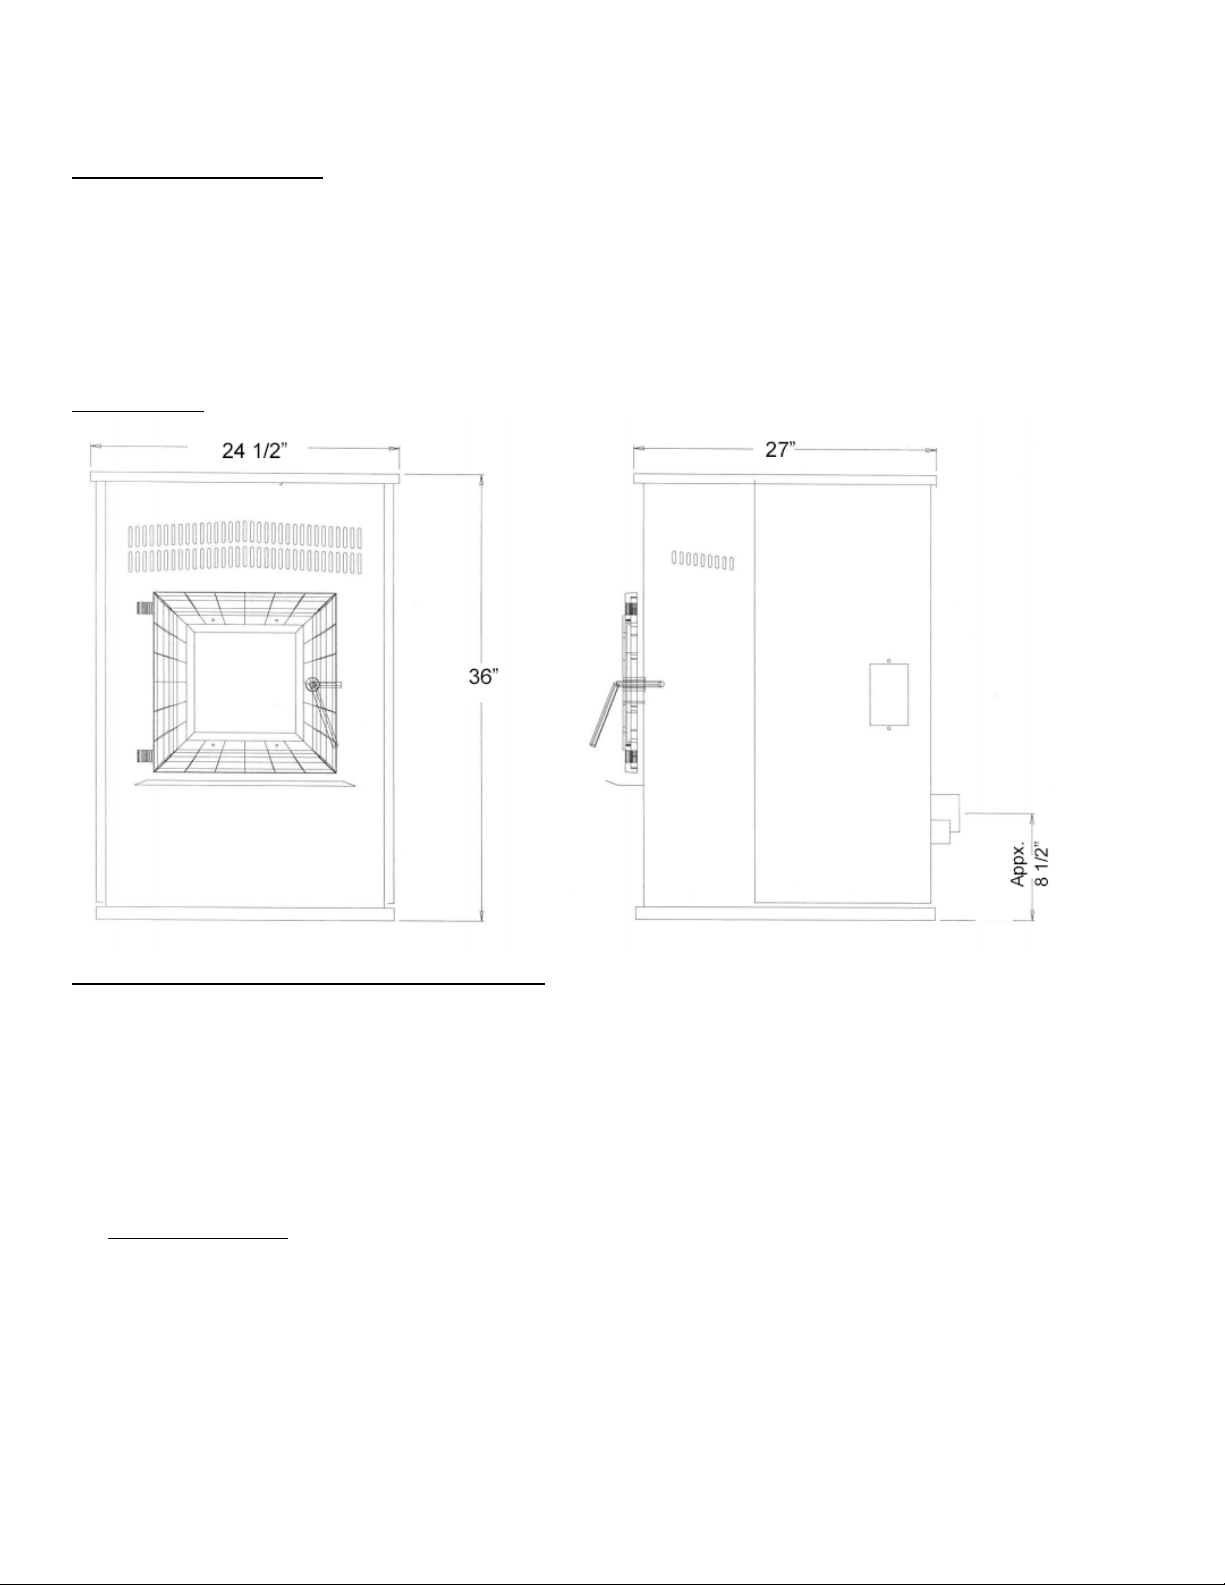
Dimensions
EPAandSafetyComplianceSpecifications
EPAComplianceStatus…….........................................Certifiedtocomplywith2020particulate
emissionstandardsusingpelletfuel.
U.S.TestStandard:USEPA40CFRPart60,Subpart60.536
ParticulateEmissions …………………………………………………………………0.763grams/hr
COEmissions………………………………………………………………………….0.013grams/min
Efficiency………………………………………………………………………………………77.6%(HHV)
TestedToUL1482‐00,ASTME1509,ULC/ORD‐C1482‐M1990&ULCS627‐00
Notesforthisunit:Productmayvaryslightlyfromdiagram.Clearancesaretheminimumforthisunit
andmayneedtobeincreasedinthereartohaveproperventclearances.Followallventingmanufacturer
clearancesandlocalcodes.
*‐AstestedperASTM2779‐10
**‐Heatoutput,burnrateandmaximumburntimeareheavilydependentonthetypeofpelletsburnedinthestove;assuch,thesenumbersmayvary.
***‐Themaximumheatingcapacityofthisunitcanvarygreatlybasedonclimate,constructionstyle,insulation
andamyriadofotherfactors.Usethisinformation
inconjunctionwithaBTUlosscalculationforyourhometodetermineifthisunitwillbesufficientforyourneeds.

7
IMPORTANT!READANDFOLLOWALLINSTALLATIONANDMAINTENANCEINSTRUCTIONS,INCLUDINGCLEANINGTHEUNITASSPECIFIED,AND
REPLACINGGASKETSANNUALLY,ANDPARTSASNEEDED.
ENGLAND’SSTOVEWORKSISNOTRESPONSIBLEFORANYDAMAGEORINJURYINCURREDDUETONEGLECT,ORDUETOUNSAFEINSTALLATIONOR
USAGEOFTHISPRODUCT.CALLTECHNICALSUPPORTWITHANYQUESTIONS.
INSTALLATION
InstallationOverview
Whenchoosingalocationforyournewstove,thereareamultitudeoffactorsthat
shouldbetakenintoaccountbeforebeginningtheinstallation.
1. TrafficPatterns–Tohelppreventaccidents,thestoveshouldbeplacedinalocation
whereitisout ofthewayofnormaltravelthrough
thehome.
2. HeatFlowandEfficiency–Whendecidingonalocationforthestove,considertheway
heatmovesthroughoutyourhome.Installthestovewhereyouneedtheheat;
basementinstallationsoftendonotallowsufficientheattoflowtotheupperfloorsand
atopfloor
installationwillnotallowanyheattoreachthefloorsbelow. Always
considerthatheatrisesandwilltakethepathofleastresistancewhileitisstillhot.
3. ExhaustLocation–Outsidewallsaregenerallythebestplacetoinstalla stove,since
theyalloweasyexhaustandintake
airinstallation(usingourDuraVentAC‐3000Kit,AC‐
33000ifCanada).Ifthereisnotafeasiblewaytoinstallthestoveonanoutsidewall,
therearemethodsforventingthestoveupthroughtheroof,buttheytendtobemore
costlybecausetheyinvolvethe
useofmorepelletventpipeandcanoftenmakeoutside
airinstallationmoredifficult.
4. WallConstruction–Locatingthestovesothattheexhaustsystemcanpassbetween
studswillsimplifytheinstallationandeliminatetheneedtoreframeanysectionsofthe
walltoaccommodatethewallthimble.
Warning
Do not store or use gasoline or other flammable vapors and liquids in the vicinity of this or any
other appliance.
Do Not Over fire – If any external part starts to glow, you are over firing. Reduce feed rate.
Over firing will void your warranty.
Comply with all minimum clearances to combustibles as specified. Failure to comply may
result in a house fire.
Tested and approved for wood pellets only. Burning any other fuel will void your warranty.
For use with Premium grade wood pellets only.
8
IMPORTANT!READANDFOLLOWALLINSTALLATIONANDMAINTENANCEINSTRUCTIONS,INCLUDINGCLEANINGTHEUNITASSPECIFIED,AND
REPLACINGGASKETSANNUALLY,ANDPARTSASNEEDED.
ENGLAND’SSTOVEWORKSISNOTRESPONSIBLEFORANYDAMAGEORINJURYINCURREDDUETONEGLECT,ORDUETOUNSAFEINSTALLATIONOR
USAGEOFTHISPRODUCT.CALLTECHNICALSUPPORTWITHANYQUESTIONS.
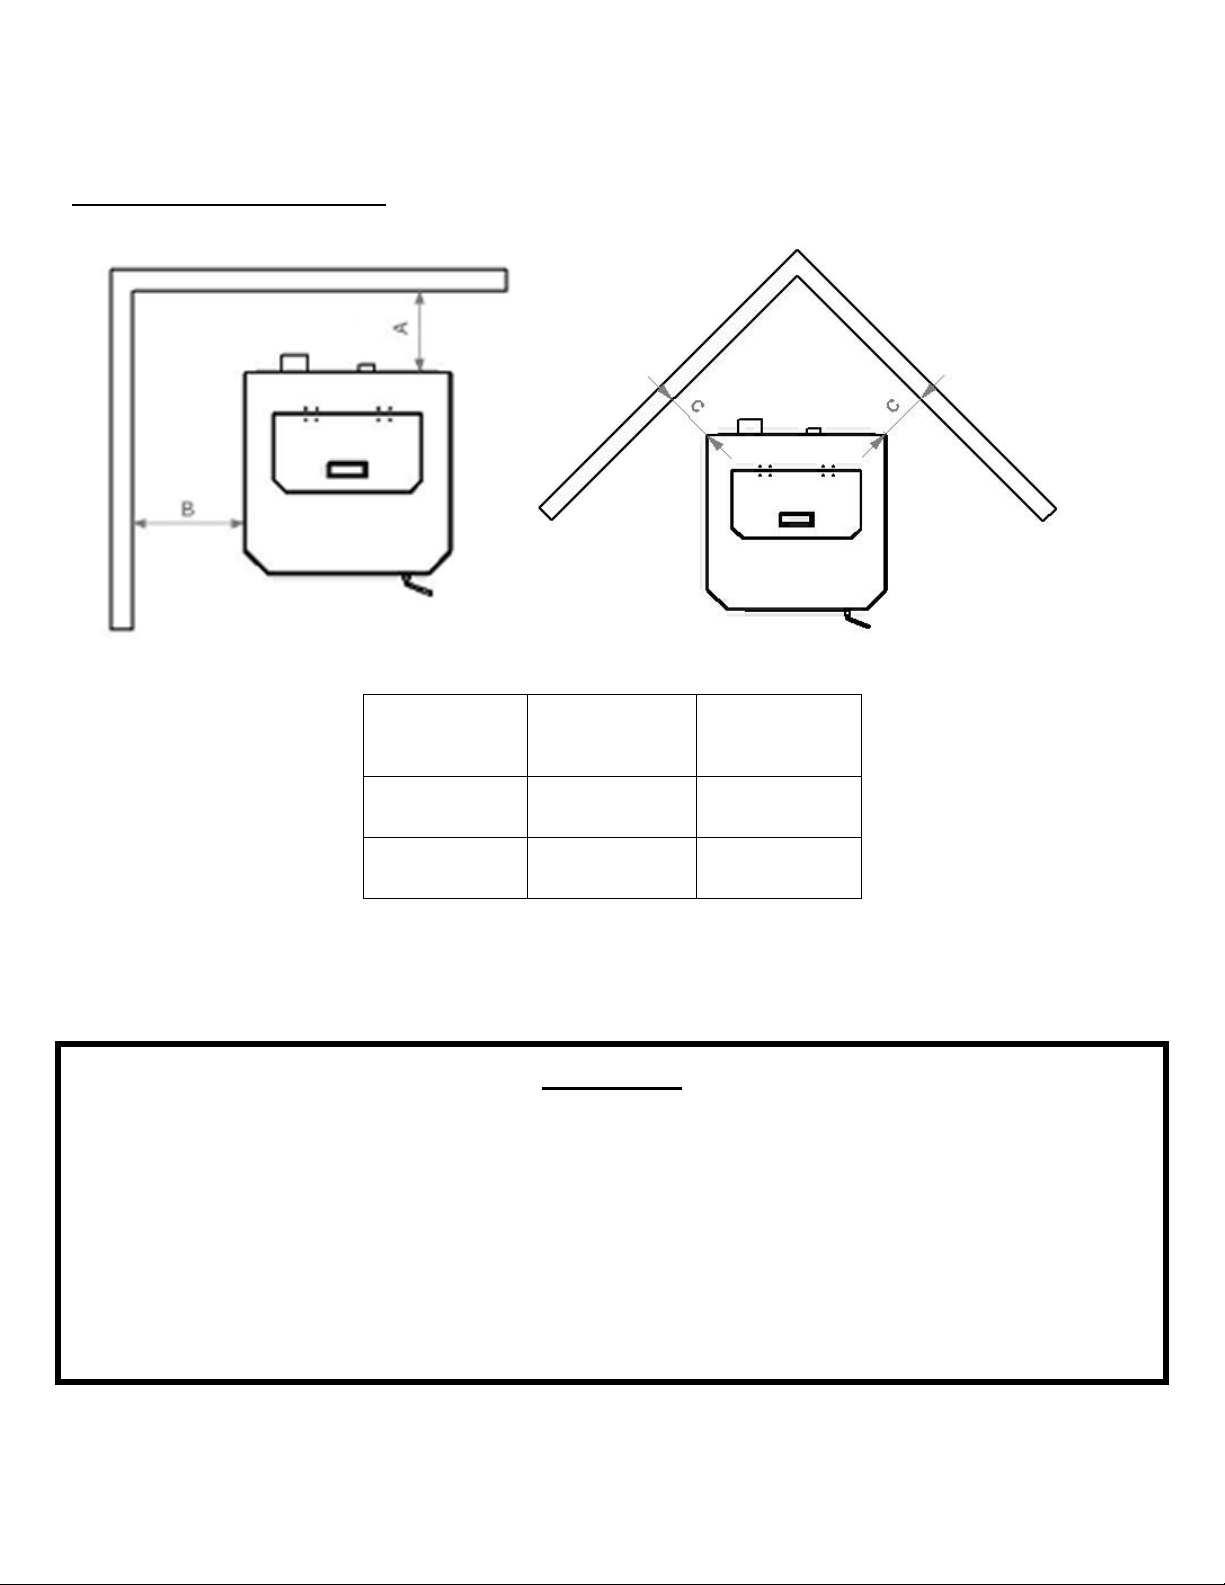
INSTALLATION
ClearancestoCombustibles
CAUTION
UnitcanbeveryHOTwhileinoperation.Keepchildrenaway.
Supervisechildreninthesameroomasthisappliance.
Alertchildrenandadultstothehazardsofhightemperatures.
DoNOToperatewithprotectivebarriersopenorremoved.
Keepclothing,furniture,draperiesandothercombustiblesaway.
InstallationMUSTcomplywithlocal,regional,stateandnationalcodesandregulations.
Consultlocalbuilding,fireofficialsorauthoritieshavingjurisdictio n about restrictions,install a tioninspection,and
permits.
DONOTCONNECTTOANYAIRDISTRIBUTIONDUCTORSYSTEM
UnittoRear
Wall(A)
UnittoSide
Wall(B)
UnittoCorner
(C)
0in. 8in. 6in.
0mm 203mm 152mm

9
IMPORTANT!READANDFOLLOWALLINSTALLATIONANDMAINTENANCEINSTRUCTIONS,INCLUDINGCLEANINGTHEUNITASSPECIFIED,AND
REPLACINGGASKETSANNUALLY,ANDPARTSASNEEDED.
ENGLAND’SSTOVEWORKSISNOTRESPONSIBLEFORANYDAMAGEORINJURYINCURREDDUETONEGLECT,ORDUETOUNSAFEINSTALLATIONOR
USAGEOFTHISPRODUCT.CALLTECHNICALSUPPORTWITHANYQUESTIONS.
INSTALLATION
VentingIntroduction
Thispelletstoveoperatesonanegativedraftsystem,whichpullscombustionairthroughthe
burnpotandpushestheexhaustairthroughtheventpipeandoutofthebuilding.Thisunitmustbe
installedinaccordancewiththefollowingdetaileddescriptionsofventingtechniques;notinstalling
thestovein
accordancewiththedetailslistedherecanresultinpoorstoveperformance,property
damage,bodilyinjuryordeath.England’sStoveWorksisnotresponsibleforanydamageincurred
duetoapoororunsafeinstallation.
Ifquestionsarisepertainingtothesafeinstallationofthestove,ourTechnicalSupportline
(800‐245‐6489)isavailable.Contactyourlocalcodeofficialtobecertainyourinstallationmeetslocal
andnationalfirecodesandifyou’reuncertainabouthowtosafelyinstallthestove,westrongly
recommendcontactingalocalNFIcertifiedinstallertoperformtheinstallation.
VentingGuidelines
WARNING‐INSTALLVENTATCLEARANCESSPECIFIEDBYTHEVENTMANUFACTURER.
ALWAYSinstallventpipeinstrictadherencewiththeinstructionsandclearancesincludedwith
yourventingsystem.
DONOTconnectthispelletstovetoachimneyfluewhichalsoservesanotherappliance.
DONOTinstalla
fluepipedamperoranyotherrestrictivedeviceintheexhaustventingsystem
ofthisunit.
USEanapprovedwallthimblewhenpassingthroughawallandaceilingsupport/firestop
whenpassingthroughaceiling.
ONLYuse3.0”or4.0”TypeLorTypePLpipeapproved
forpelletstoveventing;DONOTuse
galvanizedorB‐Ventpipe.
SEALeachjointofpelletventwithhightemperaturesilicone(Part#AC‐RTV3)toprevent
smokespillageintothehome.
AVOIDexcessivehorizontalrunsandelbows,asbothwillreducethedraftoftheventing
system
andwillresultinpoorstoveperformance.
INCLUDEasmuchverticalpipeaspossibletopreventsmokefromtheunitfromenteringyour
homeintheeventofapoweroutage.
INSPECTyourventingsystemoften,tobecertainitisclearoffly‐ashandotherrestrictions.
CLEANtheventingsystemasdetailedinthemaintenancesectionofthismanual.
WARNING
INSTALLVENTATCLEARANCESSPECIFIEDBYTHEVENTMANUFACTURER.
HOT!Donottouch!Severeburnsorclothingignitionmayresult.
Glassandothersurfacesarehotduringoperation.
Donotattempttotouchoropenthefrontorsidepanelsduringoperation.Thiscouldresultinsevere
burnsorin
j
ur
y
.

10
IMPORTANT!READANDFOLLOWALLINSTALLATIONANDMAINTENANCEINSTRUCTIONS,INCLUDINGCLEANINGTHEUNITASSPECIFIED,AND
REPLACINGGASKETSANNUALLY,ANDPARTSASNEEDED.
ENGLAND’SSTOVEWORKSISNOTRESPONSIBLEFORANYDAMAGEORINJURYINCURREDDUETONEGLECT,ORDUETOUNSAFEINSTALLATIONOR
USAGEOFTHISPRODUCT.CALLTECHNICALSUPPORTWITHANYQUESTIONS.
INSTALLATION
AdditionalVentingInformation
Donotmixandmatchcomponentsfromdifferentpipemanufacturerswhenassemblingyour
ventingsystem(i.e.DoNOTuseventingpipefromonemanufacturerandathimblefrom
another).
Werequireaminimumverticalriseof36in.(3ft.)ofpipetocreatenaturaldraftinthesystem.
Thishelpsevacuatesmokefromthestoveintheeventofapowerfailureorcombustion
blowerfailure.
Ventingsystems15.0ft.orshortermaybecomposedentirelyof3.0in.pelletpipe;toreduce
frictionallosses,ventingsystemslongerthan15.0ft.shouldbecomposedof4.0in.
pelletpipe.
Donotterminatetheventingsystemdirectlybeneathanycombustiblestructuresuchasa
porchordeck.
FollowNFPA211ruleslistedbelowforventingsystemterminationlocationrelativeto
windowsandotheropeningsinthedwelling.
o NFPA211(2006ed.)Section10.4Termination:10.4.5
(1)
Theexitterminalofamechanicaldraftsystemotherthandirectventappliances
(sealedcombustionsystemappliances)shallbelocatedinaccordancewiththe
following:
(a)Notlessthan3ft.(.91m)aboveanyforcedairinletlocatedwithin10ft.
(3.0m).
(b)Notlessthan4
ft.(1.2m)below,4ft.(1.2m)horizontallyfromor1ft.(305
mm)aboveanydoor,windoworgravityairinletintoanybuilding.
(c)Notlessthan2ft.(0.61m)fromanadjacentbuildingandnotlessthan7ft.
(2.1m)abovegradewhenlocated
adjacenttopublicwalkways.
Distancebetweentheterminationopeningandgradeshouldbeaminimumof2ft.(24in.)
contingentonthegradesurfacebelowthetermination.Whendeterminingthetermination
heightabovegrade,considersnowdriftlinesandcombustiblessuchasgrassorleaf
accumulation.Inareas
wheresignificantsnowfallispossible,theterminationheightmustbe
sufficientlyhightokeeptheterminationfreeofsnowaccumulation.
Donotusemakeshiftcompromisesduringinstallationorinstallanycomponentoftheunitor
ventingsysteminsuchamannerthatcouldresultinahazardousinstallation.
A
chimneyconnectorshallnotpassthroughanatticorroofspace,closetorsimilarconcealed
space,orafloor,orceiling.
Wherepassagethroughawallorpartitionofcombustiblematerialisdesired,theinstallation
shallconformtoCAN/CSA‐B365.
WARNING:
VentingsystemsurfacesgetHOT,andcancauseburnsiftouched.
Noncombustibleshieldingorguardsmayberequired.
11
IMPORTANT!READANDFOLLOWALLINSTALLATIONANDMAINTENANCEINSTRUCTIONS,INCLUDINGCLEANINGTHEUNITASSPECIFIED,AND
REPLACINGGASKETSANNUALLY,ANDPARTSASNEEDED.
ENGLAND’SSTOVEWORKSISNOTRESPONSIBLEFORANYDAMAGEORINJURYINCURREDDUETONEGLECT,ORDUETOUNSAFEINSTALLATIONOR
USAGEOFTHISPRODUCT.CALLTECHNICALSUPPORTWITHANYQUESTIONS.
INSTALLATION
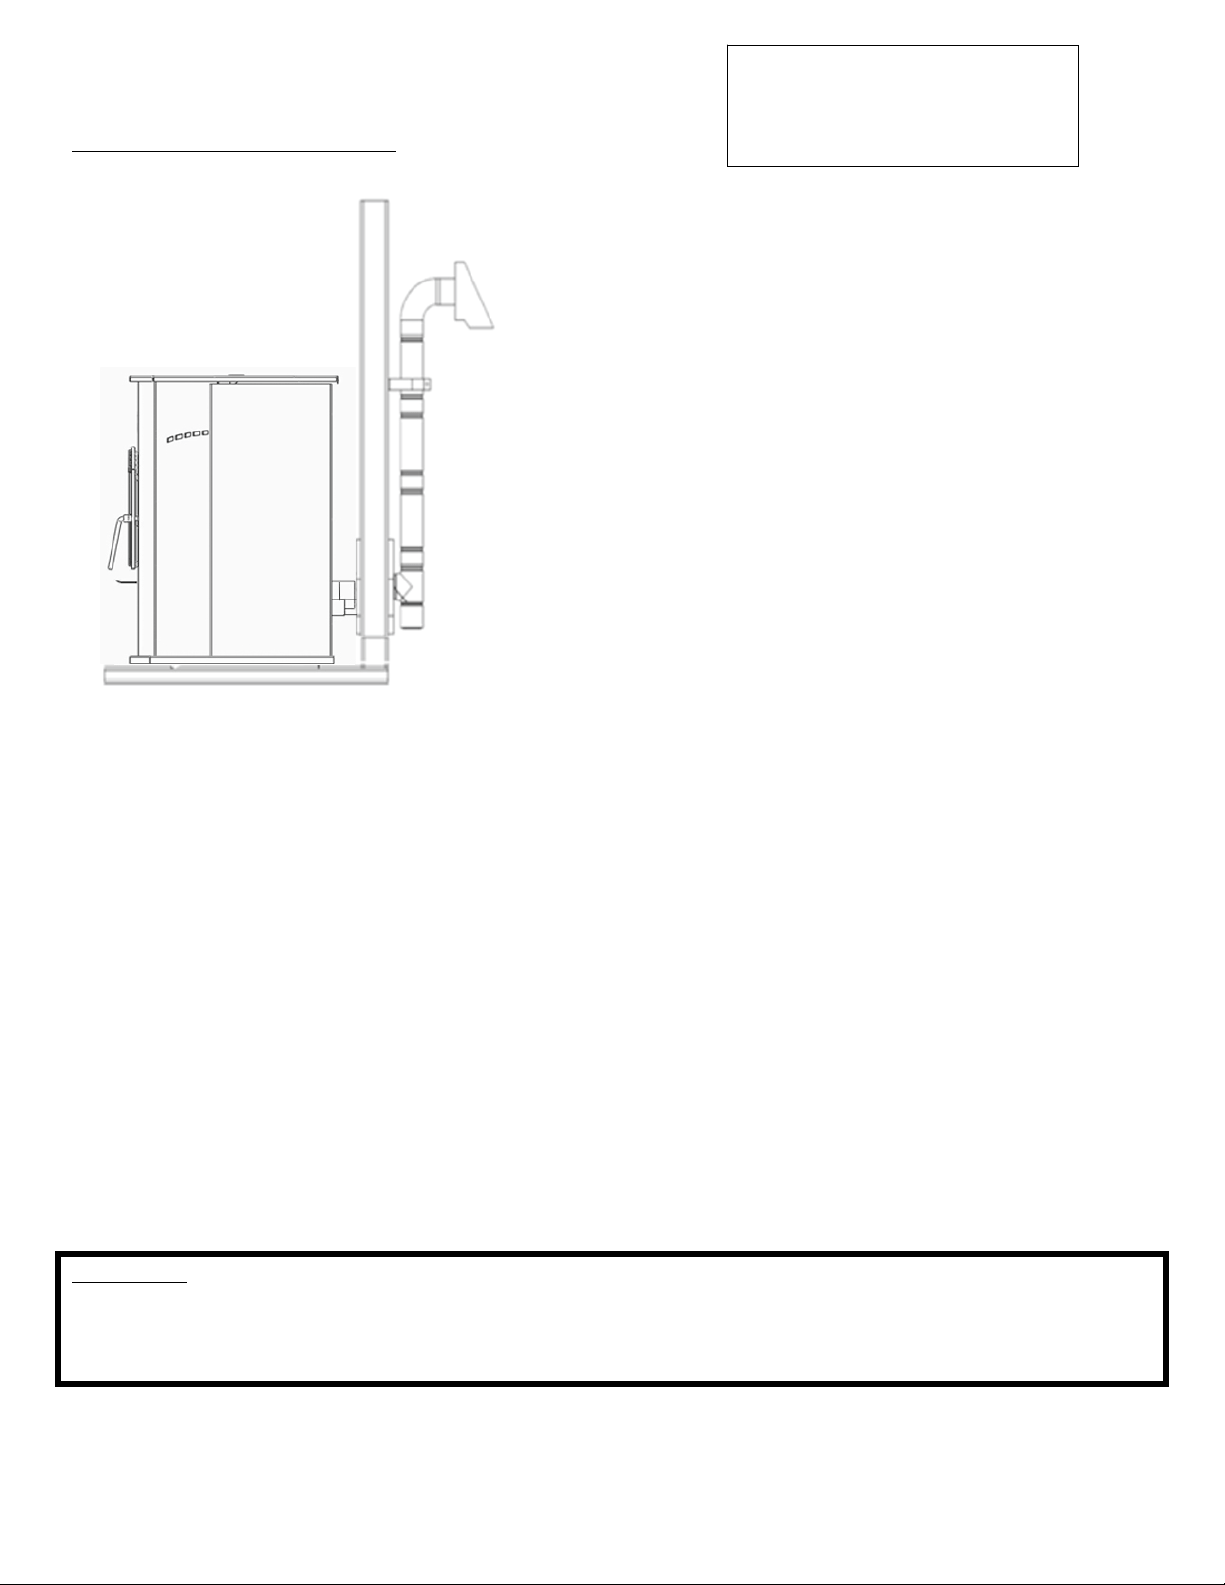
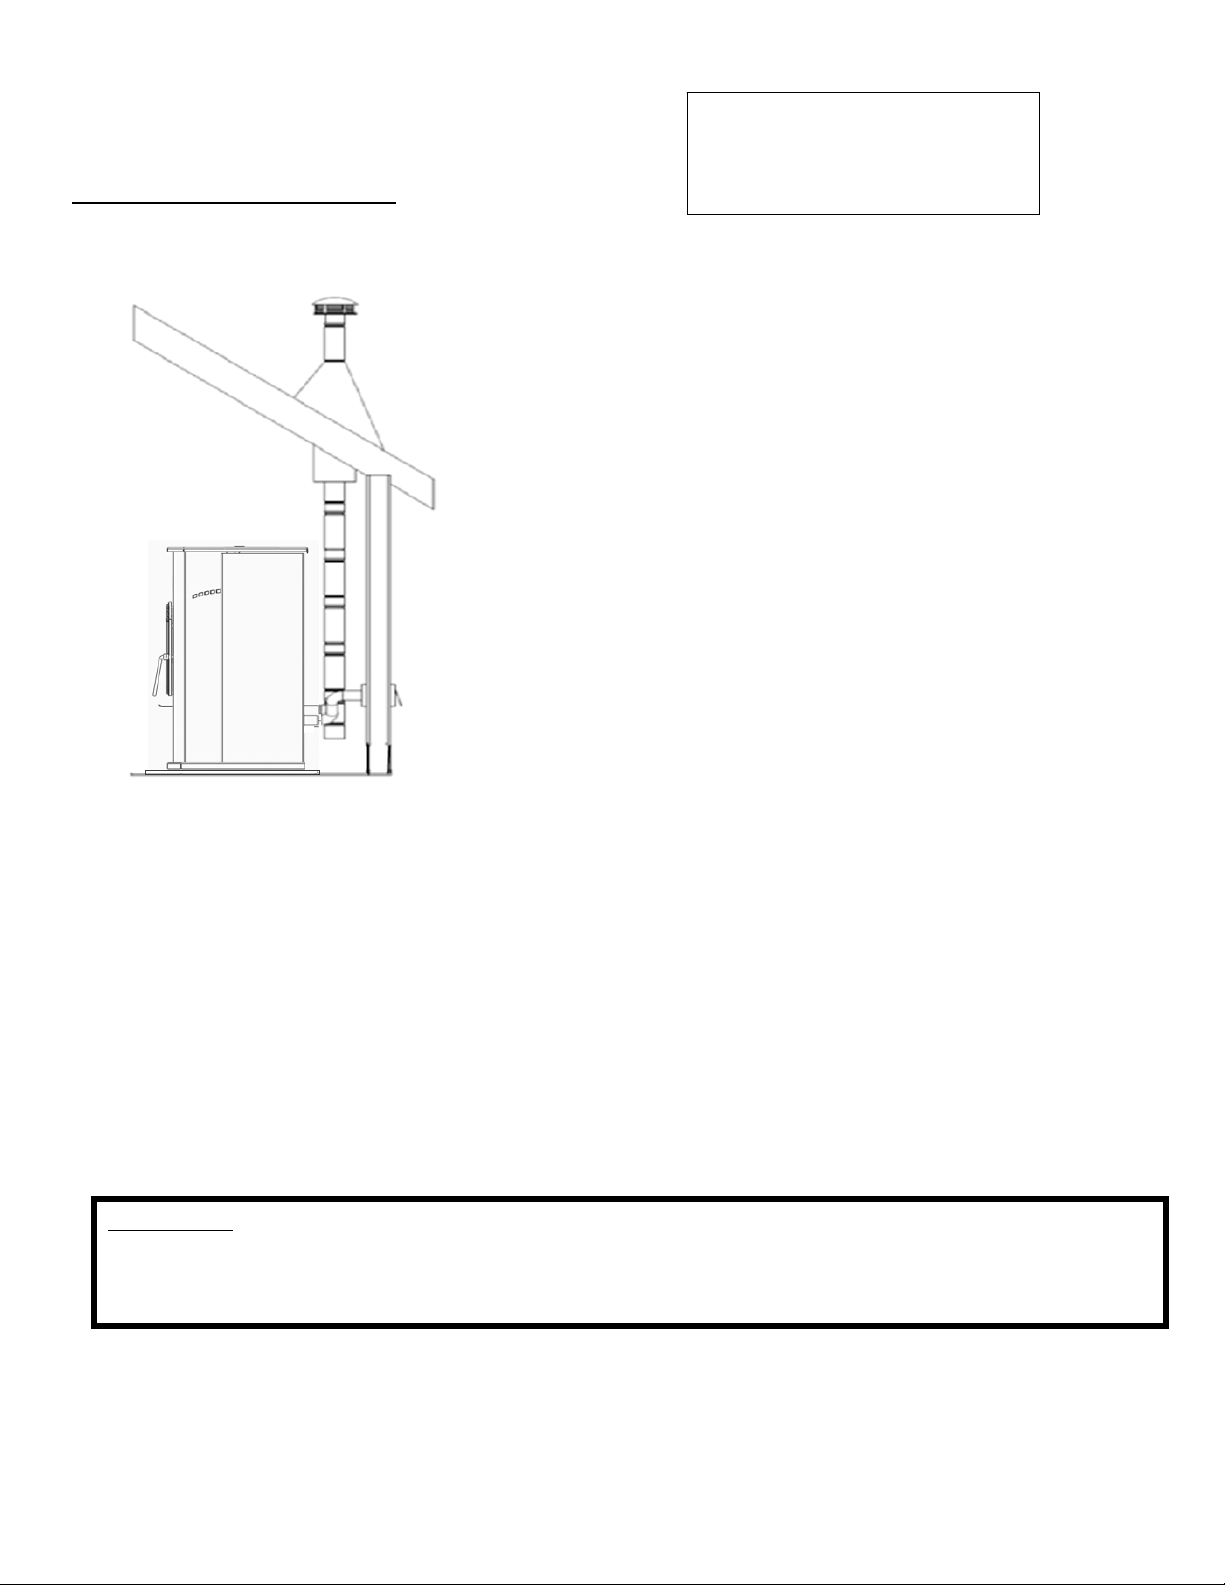
ApprovedVentingMethod1:ThroughtheWall
Generallythesimplestinstallationmethod,venting
throughthewallusingourAC‐3000kit,AC‐33000ifCanada
(orsimilarventingsystem)isalsothepreferredventing
method.Itminimizeshorizontalpipe,allowsthestoveto
beinstalledclosetothewallandkeepstheclean‐outtee
onthe
outsideofthehouse,foreaseofcleaning.
Wheninstallinganyventingsystem,TypeLorTypePL
pipemustbeusedandallclearancestocombustibles
(listedbythepipemanufacturer)mustbestrictlyadhered
to.
Usethepipemanufacturer’sapprovedthimblefor
passingthroughacombustible
wall,andmaintainatleast
theminimumclearancestocombustibles.
Useanappliancecollarwherethepelletventconnects
totheexhaustoutputofthepelletstoveandattachthe
appliancecollartotheexhaustbloweroutputusingthree
sheetmetalscrews.
Securethepelletventtotheoutside
ofthehouseusingawallstrapjustbelowthe90degree
elbow.
SealeachpipeconnectionjointwithhightemperatureRTVSilicone,toensurethesystemisleak
free(Checkwiththespecificventingsystemmanufacturer’sinstructionsbeforedoingso).
Ifthepelletventpipebeingused
isnota“TwistLock”system,three(3)sheetmetalscrewsare
requiredateachpipejoint.
Connectthepelletstovetooutsidecombustionairusingthekitincludedwithyourstoveorusing
analternativemethod,asdescribedinthe“OutsideAir”section,onpage16.
Thisinstallationtype
canbemodifiedforbasement(Basementinstallationsshouldalwaysbe
performedbyaprofessionalinstaller)orotherinstallationswhereintheteeandverticalsectionof
thepipewouldbeinsidethehomeandtheventingsystemwouldsimplypasshorizontallythrough
thethimbleandthenterminate.
PleaseNote:
Installationdiagramsareforreferencepurposesonlyandarenotdrawntoscale,normeanttobeusedasplansforeach
individualinstallation.Pleasefollowallventingsystemrequirements,maintaintherequiredclearancestocombustibles,
andfollowalllocalcodes.
Forhighaltitudeinstallations
(above4,000ft.),theventpipe
shouldbeincreasedfrom3‐inch
(3”)tofour‐inch(4”).
12
IMPORTANT!READANDFOLLOWALLINSTALLATIONANDMAINTENANCEINSTRUCTIONS,INCLUDINGCLEANINGTHEUNITASSPECIFIED,AND
REPLACINGGASKETSANNUALLY,ANDPARTSASNEEDED.
ENGLAND’SSTOVEWORKSISNOTRESPONSIBLEFORANYDAMAGEORINJURYINCURREDDUETONEGLECT,ORDUETOUNSAFEINSTALLATIONOR
USAGEOFTHISPRODUCT.CALLTECHNICALSUPPORTWITHANYQUESTIONS.
INSTALLATION
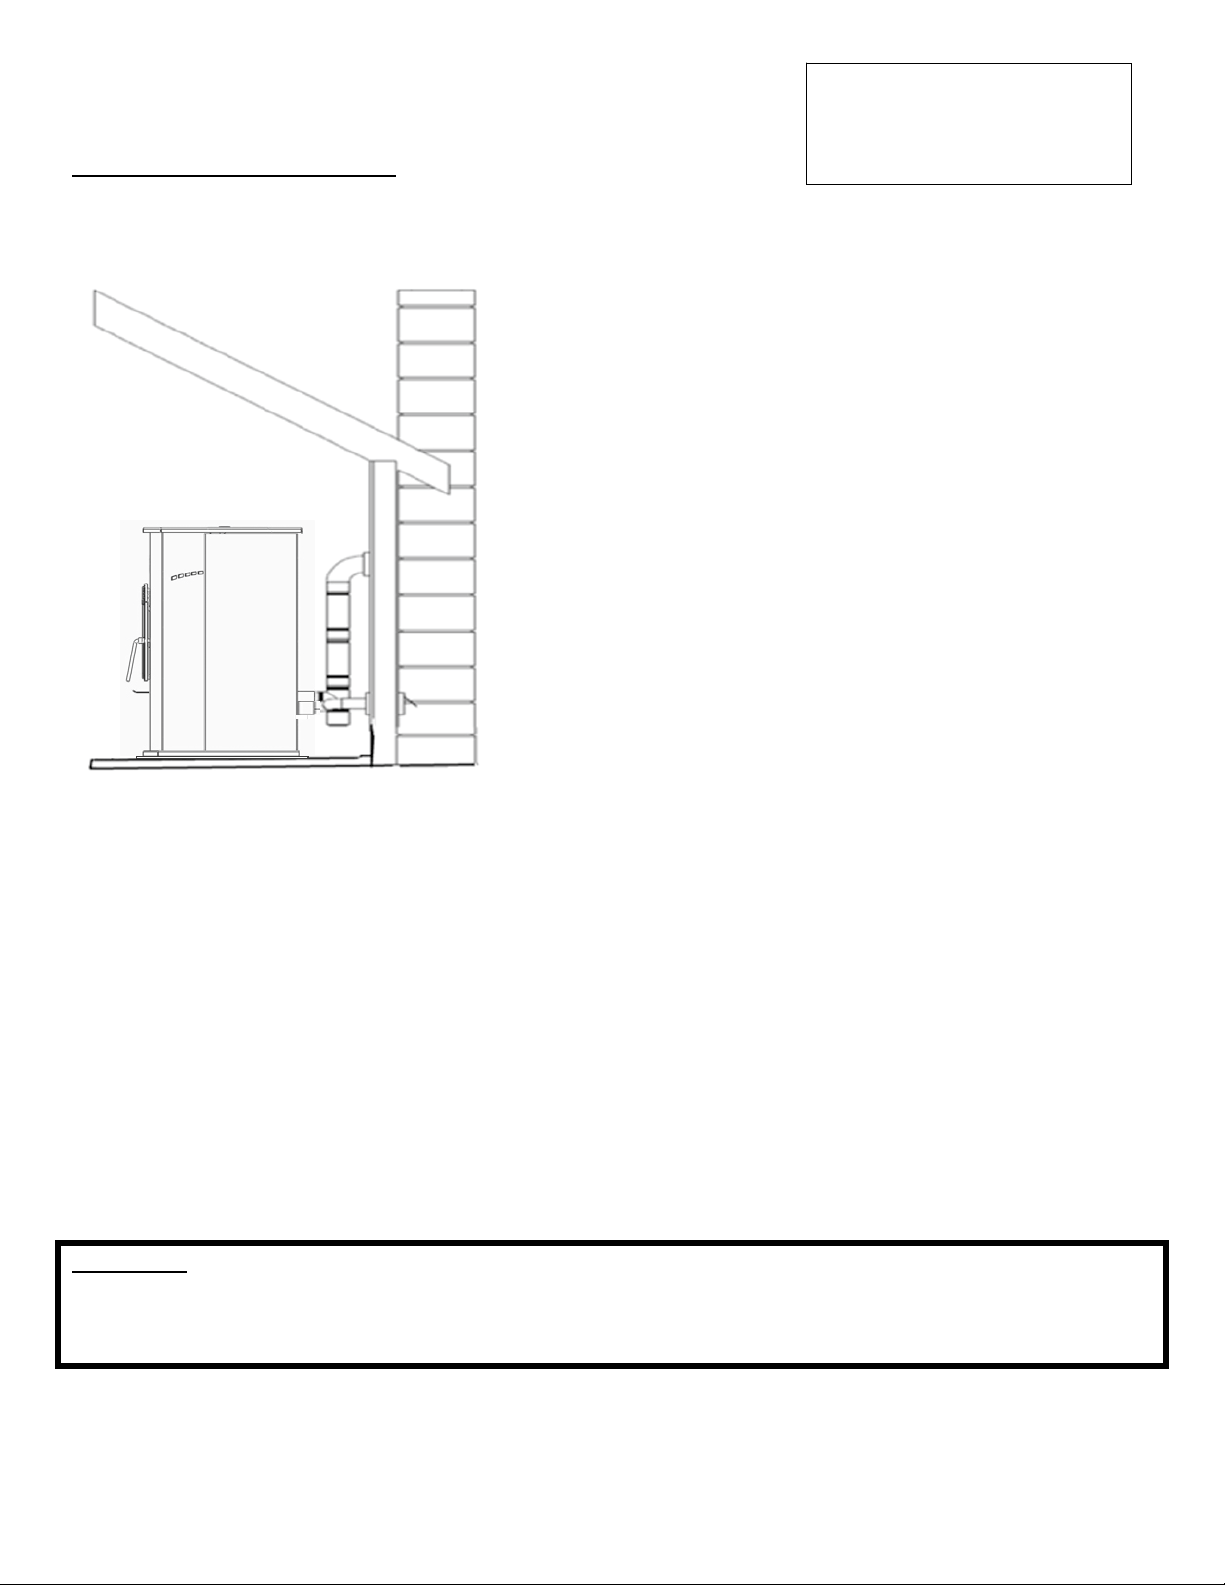
ApprovedVentingMethod2:ThroughtheCeiling
Ventingthroughtheceiling/roofmaybetheonlyfeasible
ventingoptioninsomecasesandisafactoryrecommended
installation.
Wheninstallinganyventingsystem,TypeLorTypePLpipe
mustbeusedandallclearancestocombustibleslistedbythe
pipemanufacturermustbestrictlyadheredto.
Usethepipemanufacturer’sapprovedceilingsupportfor
passingthroughacombustibleceiling,aswellastherequired
firestops,radiationshields,flashingandstormcollar.
Becertaintofollowthemanufacturer’srequiredheightof
terminationabovetheroofline,andmaintainatleastthe
minimumclearancesto
combustibles.
Useanappliancecollarwherethepelletventconnectstothe
exhaustoutputofthepelletstoveandattachtheappliance
collartotheexhaustbloweroutputusingthreesheetmetal
screws.
SealeachpipeconnectionjointwithhightemperatureRTVSilicone,toensurethesystemisleak
free(Checkwiththespecificpipemanufacturer’sinstructionsbeforedoingso).
Ifthepelletventpipebeingusedisnota“TwistLock”system,three(3)sheetmetalscrewsare
requiredateachpipejoint.
Connectthepelletstovetooutsidecombustionairusingthekitincludedwith
yourstoveorusing
analternativemethod,asdescribedinthe“OutsideAir”section,onpage16.
Thisventingmethodcanalsobemodifiedsothattheventingsystemrunshorizontallythroughthe
wallfromthestove,thentransitionstoverticalandterminatesabovetheroofline.Whenusing
thismodified
versionofthisinstallationbecertaintocarefullyfollowtheventingsystem
manufacturer’sinstructionsdiligently.
PleaseNote:
Installationdiagramsareforreferencepurposesonlyandarenotdrawntoscale,normeanttobeusedasplansforeach
individualinstallation.Pleasefollowallventingsystemrequirements,maintaintherequiredclearancestocombustibles,and
followalllocalcodes.
Forhighaltitudeinstallations
(above4,000ft.),theventpipe
shouldbeincreasedfrom3‐inch
(3”)tofour‐inch(4”).
13
IMPORTANT!READANDFOLLOWALLINSTALLATIONANDMAINTENANCEINSTRUCTIONS,INCLUDINGCLEANINGTHEUNITASSPECIFIED,AND
REPLACINGGASKETSANNUALLY,ANDPARTSASNEEDED.
ENGLAND’SSTOVEWORKSISNOTRESPONSIBLEFORANYDAMAGEORINJURYINCURREDDUETONEGLECT,ORDUETOUNSAFEINSTALLATIONOR
USAGEOFTHISPRODUCT.CALLTECHNICALSUPPORTWITHANYQUESTIONS.
INSTALLATION
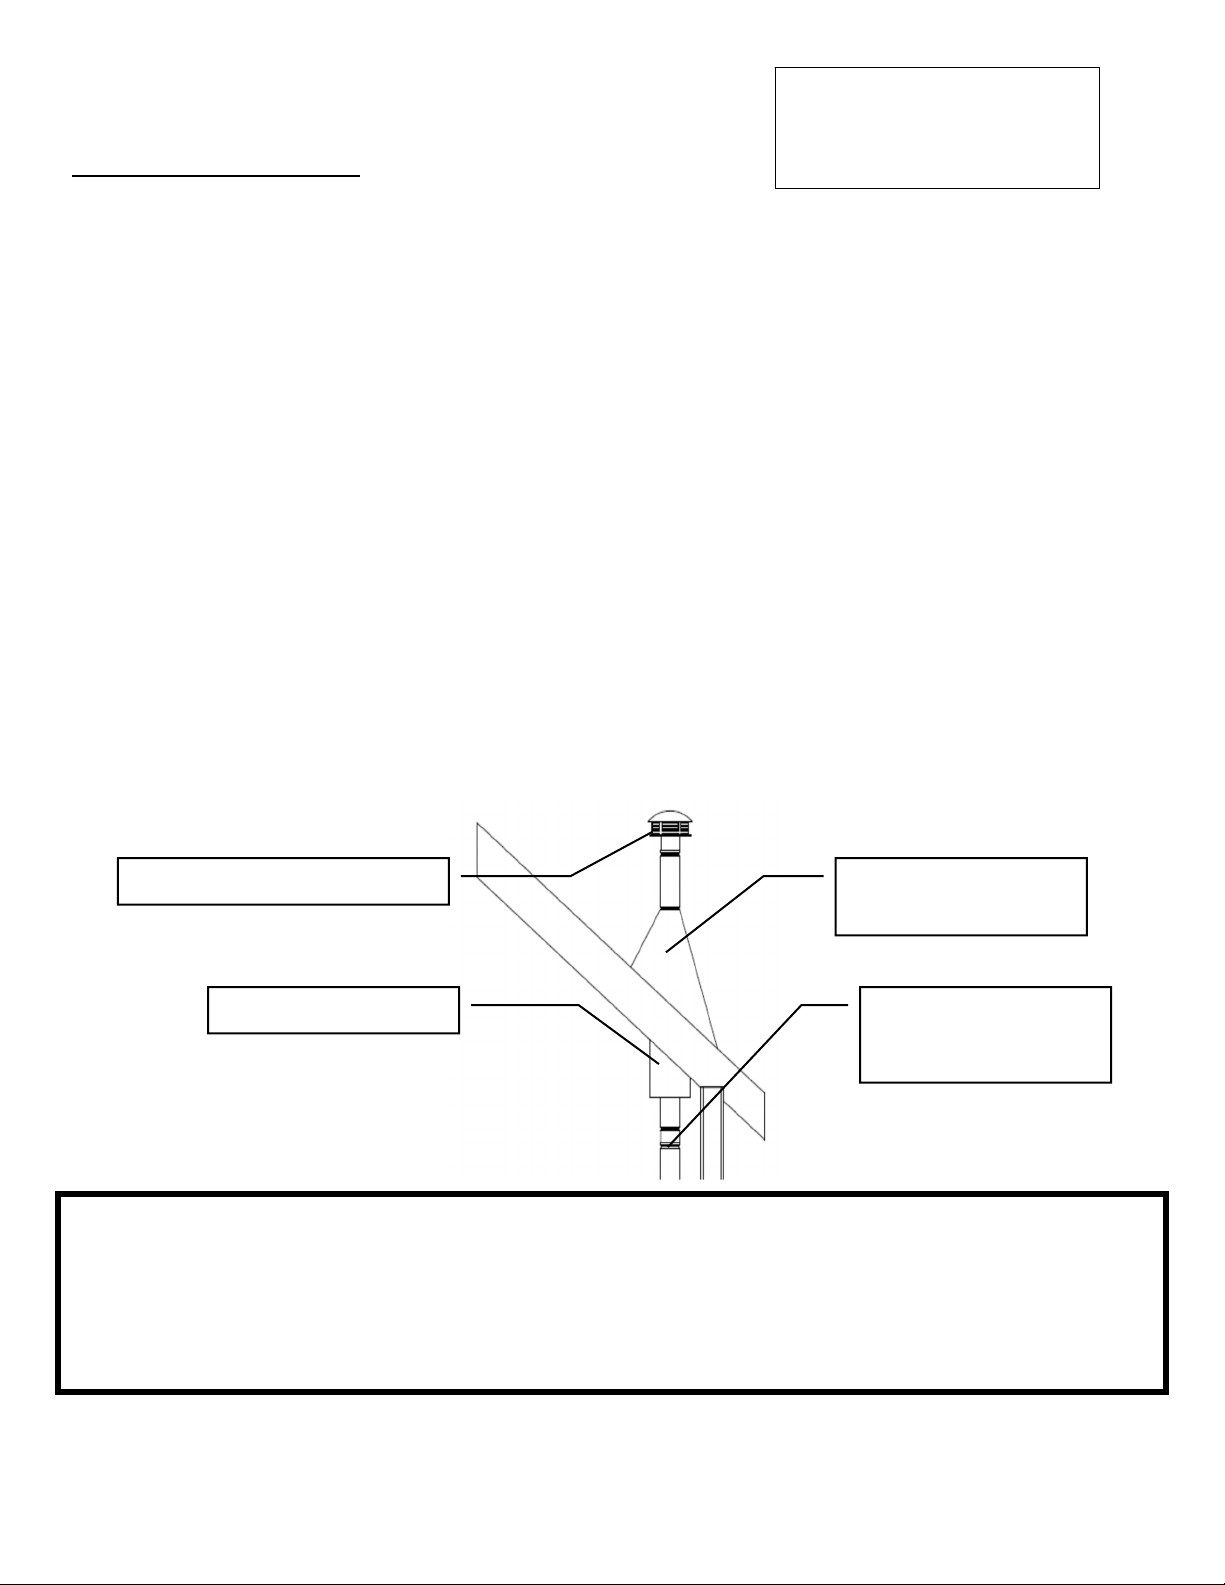
ApprovedVentingMethod3:ExistingChimneySystem
Usinganexistingmasonryorfactorybuiltchimneyforventingistheonlyotheracceptablemethod
forventingthispelletunit.
UseTypeLorTypePLventingpipeuntilenteringthe
existingchimney.Usetheappropriatelysizedadapterwhen
transitioningfromthepelletventpipetothemasonry
or
factorybuiltthimbleandbecertainthattheadapteris
sealedtightlytoboththepelletventingsystemandthe
existingchimney.
Beforeusinganexistingchimney,becertainitisingood
condition(Achimneysweepinspectionishighly
recommended).Also,makesurethechimneymeetsthe
minimumstandardslistedinNFPA211(Achimney
professionalcanconfirmthisuponinspection).
Ifconnectingthisstovetoafactorybuiltchimney,itmay
ONLYbea6”flue,UL103HTventingsystem(ULCS629if
Canada).Connectiontoanyotherfactorybuiltchimneymay
resultinapoorly
operatingordangerousstoveinstallation.
Whenconnectingtoanexistingmasonrychimney,thecross‐sectionalareaofthefluemustbe
considered.Achimneywithafluelargerthan6”round(28.27sq.in.)mayrequirereliningwithan
approvedpelletstovechimneyliningsystem.
Useanappliance
collarwherethepelletventconnectstotheexhaustoutputofthepelletstove
andattachtheappliancecollartotheexhaustbloweroutputusingthreesheetmetalscrews.
SealeachpipeconnectionjointwithhightemperatureRTVSilicone,toensurethesystemisleak
free(Checkwiththespecific
pipemanufacturer’sinstructionsbeforedoingso).
Ifthepelletventpipebeingusedisnota“TwistLock”system,three(3)sheetmetalscrewsare
requiredateachpipejoint.
Connectthepelletstovetooutsidecombustionairusingthekitincludedwithyourstoveorusing
an
alternativemethod,asdescribedinthe“OutsideAir”section,onpage16.
PleaseNote:
Installationdiagramsareforreferencepurposesonlyandarenotdrawntoscale,normeanttobeusedasplansforeachindividual
installation.Pleasefollowallventingsystemrequirements,maintaintherequiredclearancestocombustibles,andfollowalllocal
codes.
Forhighaltitudeinstallations
(above4,000ft.),theventpipe
shouldbeincreasedfrom3‐inch
(3”)tofour‐inch(4”).
14
IMPORTANT!READANDFOLLOWALLINSTALLATIONANDMAINTENANCEINSTRUCTIONS,INCLUDINGCLEANINGTHEUNITASSPECIFIED,AND
REPLACINGGASKETSANNUALLY,ANDPARTSASNEEDED.
ENGLAND’SSTOVEWORKSISNOTRESPONSIBLEFORANYDAMAGEORINJURYINCURREDDUETONEGLECT,ORDUETOUNSAFEINSTALLATIONOR
USAGEOFTHISPRODUCT.CALLTECHNICALSUPPORTWITHANYQUESTIONS.
INSTALLATION
MobileHomeInstallation
TheEngland’sStoveWorks,Inc.outsideairkitMUSTbeusedforinstallationofthisunitina
mobilehome.Pleaseseethe“OutsideAir”sectiononpage16formoreinformationregarding
outsideairconnections.
Theoutsideairinletmustbekeptclearofleaves,iceandother
debris.Keepingtheoutsideair
inletfreeofrestrictioniscrucialtopreventingairstarvationandsmokespillage.
ThepelletstoveMUSTbesecuredtothefloorofthemobilehomeusinglagboltsandtheholes
providedinthebottomofthebaseforthispurpose.Outdoor‐aired
spaceheatersmustbe
attachedtothestructure.
ThepelletstoveMUSTbegroundedwith#8solidcoppergroundingwire(orequivalent),
terminatedateachendwithanNECapprovedgroundeddevice.
CarefullyfollowallclearanceslistedintheappropriatesectionofthismanualANDfollowthe
ventingmanufacturer’s
minimumclearancerequirements.Similarly,becertaintheventing
systemusedisapprovedformobilehomeuse.
InstallationmustbeinaccordancewithManufacturersHome&SafetyStandard(HUD)CFR3280,
Part24aswellasanyapplicablelocalcodes.
Usesiliconetocreateaneffectivevaporbarrierat
thelocationwherethechimneyoroutsideair
ductingpassesthroughtotheexteriorofthestructure.
CAUTION
THESTRUCTURALINTEGRITYOFTHEMANUFACTUREDHOMEFLOOR,WALLANDCEILING/ROOFMUSTBE
MAINTAINED.DONOTCUTTHROUGHFLOORJOISTS,WALLSTUDS,CEILINGTRUSSESORANYOTHER
SUPPORTINGMATERIALWHICHCOULDBEDETRIMENTALTOTHESTRUCTURALINTEGRITYOFTHEHOME.
WARNING:DONOTINSTALLINASLEEPINGROOM.
JoistShield/Firestop MobileHomeApproved
TypeLorTypePLPellet
VentPipe
ChimneyCap/SparkArrestor RoofFlashingandStorm
Collar
Forhighaltitudeinstallations
(above4,000ft.),theventpipe
shouldbeincreasedfrom3‐inch
(3”)tofour‐inch(4”).
15
IMPORTANT!READANDFOLLOWALLINSTALLATIONANDMAINTENANCEINSTRUCTIONS,INCLUDINGCLEANINGTHEUNITASSPECIFIED,AND
REPLACINGGASKETSANNUALLY,ANDPARTSASNEEDED.
ENGLAND’SSTOVEWORKSISNOTRESPONSIBLEFORANYDAMAGEORINJURYINCURREDDUETONEGLECT,ORDUETOUNSAFEINSTALLATIONOR
USAGEOFTHISPRODUCT.CALLTECHNICALSUPPORTWITHANYQUESTIONS.
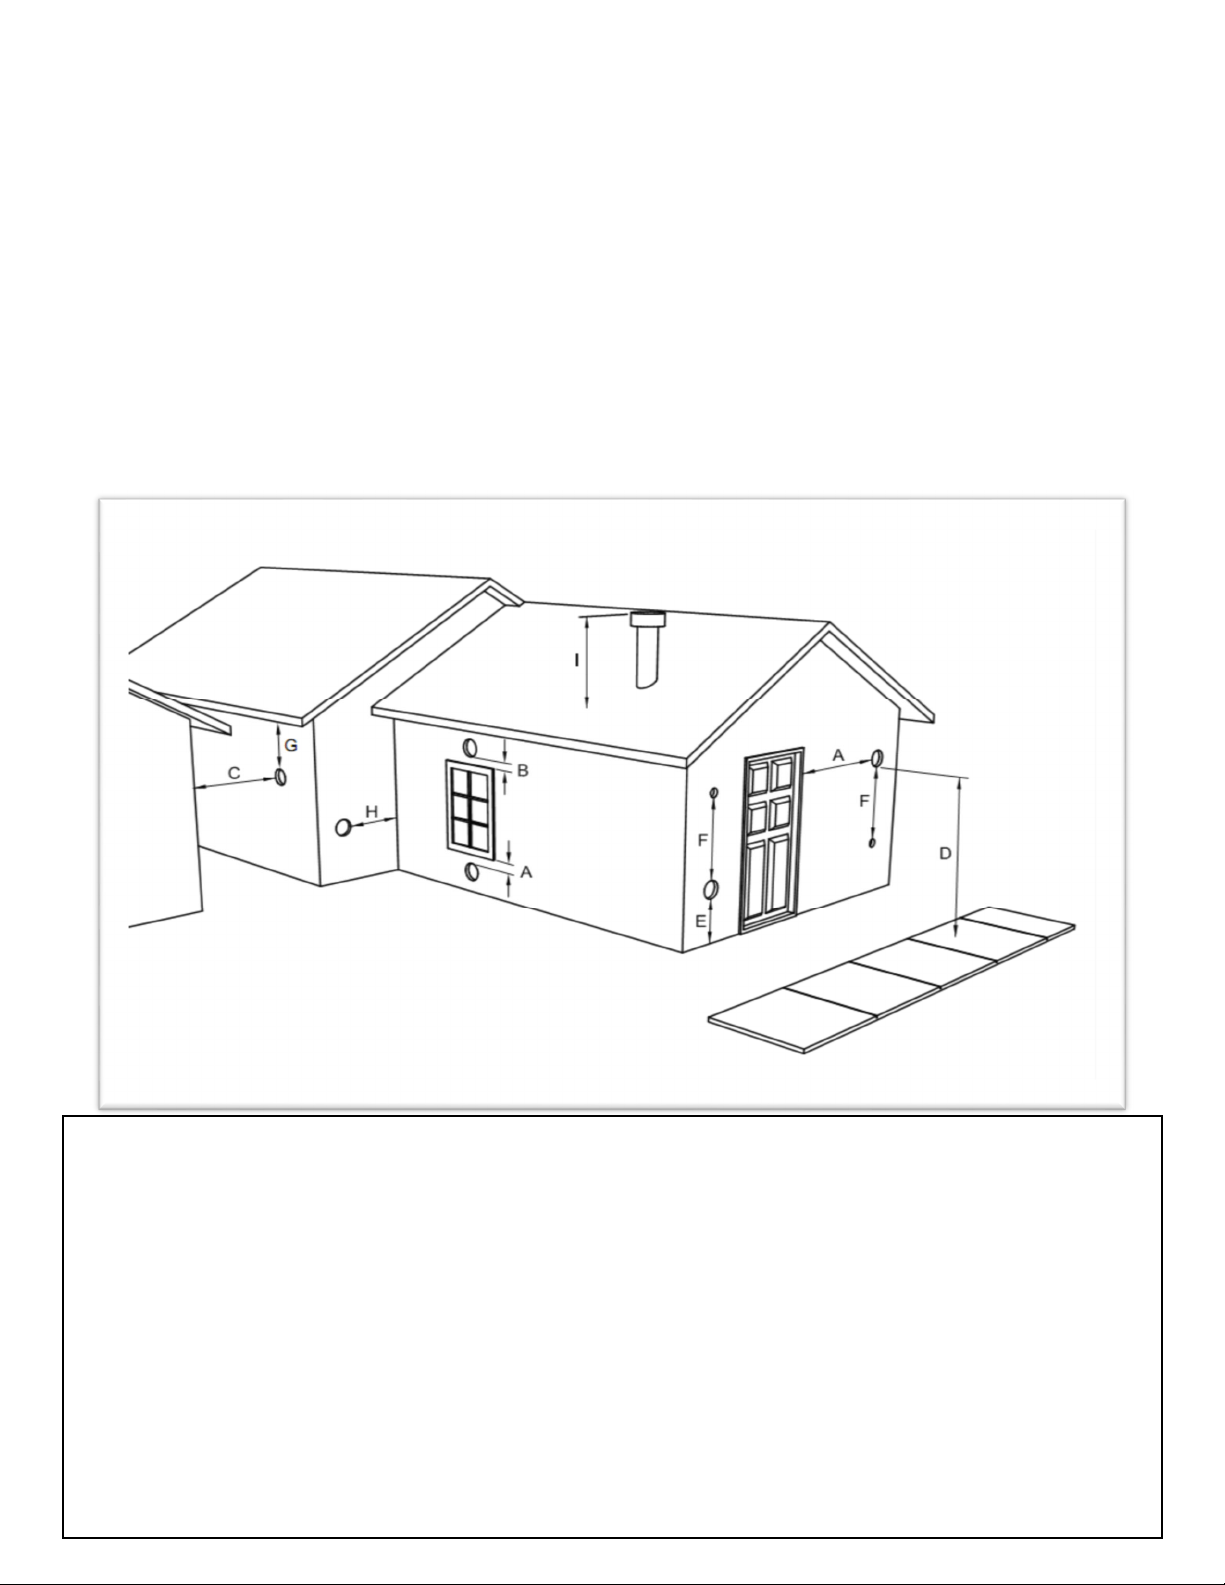
VENTTERMINATIONCLEARANCES
A)Min.4‐ftclearancebeloworbesideanydoororwindow that opens.
B)Min.1‐ftclearanceaboveanydoororwindowthatopens.
C)Min.2‐ftclearancefromanyadjacentbuilding.
D)Min.7‐ftclearancefromanygradewhenadjacenttopublicwalkways.
E)Min.2
‐ftclearanceaboveanygrass,plants,orothercombustiblematerials.
F)Min.3‐ftclearancefromaforcedairintakeofanyappliance.
G)Min.2‐ftclearancebeloweavesoroverhang.
H)Min.1‐ftclearancehorizontallyfromcombustiblewall.
I)Ventsinstalledwithmechanicalexhaustersshallterminatenot
lessthan12in.(305mm)abovethe
highestpointwheretheypassthroughtheroofsurface.
NotesonterminationofPelletVentPipefromNFPA211(2006ed.)Section10.4Termination:10.4.5
(Seealso“INSTALLATION”sectionofmanualANDadditionalnotesabove):
Notlessthanthree(3)feetaboveanyforcedairinletlocatedwithinten(10)feet.
Notlessthanfour(4)feetbelow,four(4)feethorizontallyfrom,orone(1)footaboveanydoor,
windoworgravityairinletintoanybuilding.
Notlessthantwo(2)feetfromanadjacentbuilding,andnotlessthanseven(7)feetabovegrade
wherelocatedadjacenttopublicwalkways.
Theexhaustexitshallbea rrangedsothatthefluegases arenotdirectedsothatitwillaffectpeople,overheat
combustiblestructures,orenterbuildings.Forceddraftsystemsandallpartsofinduceddraftsystemsunderpositive
pressureduringoperationshallbeinstalledgastightortopreventleakageofcombustion
productsintoa building.
Through‐the‐wallventsshallnotterminateoverpublicwalkways,orwherecondensateorvaporcouldcreatehazards
oranuisance.
Besuretofollowlocalcodesandallmanufacturer’sinstructions(includingexhaustpipe).
Consultaprofessional installerand/orcallTechnicalSupportifyouhaveany
questions.

16
IMPORTANT!READANDFOLLOWALLINSTALLATIONANDMAINTENANCEINSTRUCTIONS,INCLUDINGCLEANINGTHEUNITASSPECIFIED,AND
REPLACINGGASKETSANNUALLY,ANDPARTSASNEEDED.
ENGLAND’SSTOVEWORKSISNOTRESPONSIBLEFORANYDAMAGEORINJURYINCURREDDUETONEGLECT,ORDUETOUNSAFEINSTALLATIONOR
USAGEOFTHISPRODUCT.CALLTECHNICALSUPPORTWITHANYQUESTIONS.
OUTSIDEAIRHOOK‐UP
Theuseofoutsidecombustionairismandatoryonthispelletstove.
Theoutsideairconnectionpipeprotrudesfromthelowerrearcenterofthe
stove;usetheincludedoutsideairkittoattachyourstovetooutside
combustionair.Instructionsandallthepartsneededtomakethe
outsideair
connectiontoyourpelletstoveareincludedwiththeoutsideairkit.
Ifitisnotfeasibletousetheincludedoutsideairhookupkitinyour stove
installation,othermaterialsmaybeused,providedthefollowingrulesare
followed:
Thepipeusedforoutsideair
hookupmustbemetal,withaminimum
thicknessof.0209in.(25gaugemildsteel)orgreaterandaninside
diameterofapproximately2.0in.
Allpipejointsandconnectionsshouldbesealedwithpipeclampsorother
mechanicalmeans,toinsurealeakfreeoutsideairconnection.
Long
runsofpipeandexcessiveelbowsforoutsideairshouldbeavoided.
Duetofrictionalresistanceinpipe,anyexcessiveoutsideairpipingcan
resultinpoorstoveperformance.
Ascreenorotherprotectiondevicemustbefittedovertheoutsideair
terminationpointtopreventrain,debrisand
nuisanceanimalsfrom
enteringthepipingsystem.
Increasetheoutsideairpipesizeto3.0in.diameterpipeiftheoutsideair
connectionismorethan6ft.inlength,morethantwo(2)elbowsareused
orifthestoveisinstalledinabasement.
Theoutsideair
connectionsystemshouldbeinspectedatleastannuallytobe
certainitisfreefromblockage.
Caution
NEVERdrawoutsidecombustionairfrom:
1.Wall,floororceilingcavity.
2.Enclosedspacesuchasanattic,garageorcrawlspace.

17
IMPORTANT!READANDFOLLOWALLINSTALLATIONANDMAINTENANCEINSTRUCTIONS,INCLUDINGCLEANINGTHEUNITASSPECIFIED,AND
REPLACINGGASKETSANNUALLY,ANDPARTSASNEEDED.
ENGLAND’SSTOVEWORKSISNOTRESPONSIBLEFORANYDAMAGEORINJURYINCURREDDUETONEGLECT,ORDUETOUNSAFEINSTALLATIONOR
USAGEOFTHISPRODUCT.CALLTECHNICALSUPPORTWITHANYQUESTIONS.
FLOORPROTECTION
Thispelletstoverequiresanon‐combustiblefloorprotectorifthestoveistobeinstalledonacombustible
floor.Ifthefloorthestoveistobeinstalledonisalreadynon‐combustible(i.e.aconcretefloorina
basement)andhasanRvalueequaltoorhigher
than.2,nofloorprotectionisneeded(althougha
decorativefloorprotectorcanstillbeusedforaestheticreasons).
PrefabricatedfloorprotectorswhichareULlisted(ULCifCanada)orequivalentcanbepurchasedorafloor
protectorcanbebuiltfromstandardmaterials:twosheetsof.5”thick
cementboardcoveredwithceramic
tilewouldbeasuitablefloorprotectorwhichmeetsthe.2R‐valuerequirement.
Whenusinganyfloorprotector,considerthatthisstoveisnotonlyheavybutwillinduceheatingand
coolingcyclesonthefloorprotectorwhichcandamagetileandloosenmortarandgroutjoints.Ahearth
rugisNOTanapprovedsubstituteforaproperhearthpad.
FortheUSandCanada:Thefloorprotectormustextendatleast6in.(152mm)fromthefront&sides.
InCanada,itisrequiredthatthenon‐combustiblefloorprotectorisunderneathandextends2in.(50.8
mm.)oneithersideofanyhorizontalventingrunsAND/ORisdirectlyunderneathanyverticalventing
pipe.

18
IMPORTANT!READANDFOLLOWALLINSTALLATIONANDMAINTENANCEINSTRUCTIONS,INCLUDINGCLEANINGTHEUNITASSPECIFIED,AND
REPLACINGGASKETSANNUALLY,ANDPARTSASNEEDED.
ENGLAND’SSTOVEWORKSISNOTRESPONSIBLEFORANYDAMAGEORINJURYINCURREDDUETONEGLECT,ORDUETOUNSAFEINSTALLATIONOR
USAGEOFTHISPRODUCT.CALLTECHNICALSUPPORTWITHANYQUESTIONS.
DAILYOPERATION
GettingStarted
Checktoseethatthehopperiscleanandfreefromforeignmaterials.Besuretoconnectthisunittoa
workingoutlet;werecommendusingasurgeprotectortohelpprotecttheelectroniccomponentsfrom
damage.
BEFOREyourfirstfire,dryrunyourunit(nopelletfuelinthehopper)fortwentyminutes;pressingthe
“ON”buttonwiththeunitpluggedinwillinitiatethedryrun.
Oncethe“ON”buttonispressed,youshouldimmediatelyheartheexhaustblowerstartand
operatecontinuously.
Afteraboutthreetofiveminutes,lookfortheredglowoftheigniterintheigniterportoftheburn
pottobecertainitisoperatingnormally.
Holdthehopperlidswitch(See“IllustratedPartsDiagram”pg.44)downwithyourfingerandcheck
toseethattheaugeristurning.Releasethehopperlidswitchandbecertainthattheaugerstops
turning.DONOTPUTYOURFINGERSINTHEHOPPERORNEARTHEROTATINGAUGER.
Afterabouttwentyminutes,thecontrolboardshoulddisplay“E‐2”inthetwodisplaywindows(More
informationonErrorCodescanbefoundintheErrorCodesectionofthismanual).
Atthispoint,thedryruniscompleteandyourpelletheatingapplianceisreadyfornormaloperation.
LightingaFire
Inorderforthisstovetooperate,thehoppermustfirstbefilledwithpelletfuel.Liftthehopperlidusing
theflush‐mounthandleandpourthepelletfueldirectlyintothehopper.
WerecommendusingonlypelletsmanufacturedbyPFICertifiedfacilities,sincepelletsbearing
thePFIstampofapprovalwillbelowinashandmoisture,highinBTU’s,anduniforminsizeand
quality.
Thispelletstovewillperformequallywellusingsoftwoodandhardwoodpellets,andalthoughtheashmay
differslightlyinappearanceortexture,bothtypesofpelletswillburncleanlyandefficientlyinthisstove.
Thispelletstoveisequippedwithanautomaticpelletignitionsystem;theonlyuserinputrequiredtolight
thestoveisasimplepressofthe“On”button.
Shortlyafterpressingthe“On”button,theletters“SU”willappearintheheatrangeandblowerspeed
windowsofthecontrolboard.Thisindicatesthestovehasenteredthestart‐upsequenceandisoperating
normally.
Thefuelfeedrateandcombustionairduringstart‐upisdeterminedbythecontrolboard,sothestovemay
bestartedonanyheatrange.
Afterapproximatelyfifteenminutes,thefireshouldbeburningbrightlyandthe“SU”shoulddisappear
fromthecontrolboard.Atthispoint,thestovehasbegunnormaloperationandthedisplaywindowson
thecontrolboardwillremainempty,unlesstheHeatRangeorBlowerSpeedisadjusted.

19
IMPORTANT!READANDFOLLOWALLINSTALLATIONANDMAINTENANCEINSTRUCTIONS,INCLUDINGCLEANINGTHEUNITASSPECIFIED,AND
REPLACINGGASKETSANNUALLY,ANDPARTSASNEEDED.
ENGLAND’SSTOVEWORKSISNOTRESPONSIBLEFORANYDAMAGEORINJURYINCURREDDUETONEGLECT,ORDUETOUNSAFEINSTALLATIONOR
USAGEOFTHISPRODUCT.CALLTECHNICALSUPPORTWITHANYQUESTIONS.
Itisnormalfortheunittosmokeduringthefirstfire,aspaintsandoilscure.Thisshoulddissipatewithin
thefirsthour.Openadoorand/orwindowduringthefirstfiretoventilatethearea.
DailyOperationNotes
Onlyhighquality,PremiumGrade¼”(.25in.)diameterwoodpelletsshouldbeusedinthisstove.Using
lowgradewoodpelletswithhighashcontentORwoodpelletswithahighmoisturecontentcancausethe
burnpottofillwithashatamorerapidpaceandcancauseintervalsbetweenperiodicmaintenanceto
becomesignificantlyshorter.Pleasereadthe“Maintenance”sectionofthismanualthoroughlyto
understandhowfuelselectionaffectsstoveoperation,maintenanceandcleaning.
Variationintheflameheightisnormal;notallwoodpelletfuelisuniforminsize,whichcanaffecttheway
pelletsarefedintotheburnpot.Althoughtheflameheightmayincreaseanddecreaseduringoperation,
thereisnolossofefficiency.
Alwaysstorewoodpelletfuelinadrylocation;storingwoodpelletfuelinadrylocationensuresthefuel
willremainpelletizedandlowinmoisturecontent.Also,becertainthatallwoodpelletfuelisstoredata
safedistancefromthepelletheater;storingfuelincloseproximitytothestovecanresultinafire.Donot
installoroperatethisunitoutside,inagreenhouse,orinanyareathatishighinmoisture.
Thispelletburningroomheaterisequippedwithaspeciallydesignedburnpotwhichcomespreinstalled
fromthefactory.Thisburnpotelevatestheburningpelletsanddeliversairattheprecisely‐required
locations.Pelletsmustonlybeburnedinthefactoryburnpot;nomodificationsshouldbemadetothis
burnpotandnoadditionalgratesorotherfireelevatorsshouldbeused.
CAUTION
NEVERUSEGASOLINE,GASOLINE‐TYPELANTERNFUEL,KEROSENE,CHARCOALLIGHTERFLUID,OR
SIMILARLIQUIDSTOSTARTOR“FRESHENUP”AFIREINTHISHEATER.KEEPALLSUCHLIQUIDS
WELLAWAYFROMTHEHEATERWHILEINUSE.ADDITIONALLY,NEVERAPPLYFIRE‐STARTERTO
ANYHOTSURFACEOREMBERSINTHESTOVE.DONOTUSECHEMICALSORFLUIDS
TOSTARTTHEFIRE.
DONOTBURNFLAMMABLEFLUIDSSUCHASGASOLINE,NAPHTHAORENGINEOIL.
DONOTBURNGARBAGE;LAWNCLIPPINGSORYARDWASTE;MATERIALSCONTAININGRUBBER,
INCLUDINGTIRES;MATERIALSCONTAININGPLASTIC;WASTEPETROLEUMPRODUCTS,PAINTOR
PAINTTHINNERS,ORASPHALTPRODUCTS;MATERIALSCONTAININGASBESTOS;CONSTRUCTION
ORDEMOLITIONDEBRIS;RAILROADTIESORPRESSURE‐TREATEDWOOD;MANUREORANIMAL
REMAINS;PAPERPRODUCTS,CARDBOARD,PLYWOODORPARTICLEBOARD.THEPROHIBITION
AGAINSTBURNINGTHESEMATERIALSDOESNOTPROHIBITTHEUSEOFFIRESTARTERSMADEFROM
PAPER,CARDBOARD,SAWDUST,WAXANDSIMILARSUBSTANCESFORTHEPURPOSEOFSTARTING
AFIREINANAFFECTEDWOODHEATER.BURNINGTHESEMATERIALSMAYRESULTINRELEASEOF
TOXICFUMESORRENDERTHEHEATERINEFFECTIVEANDCAUSESMOKE.
20
IMPORTANT!READANDFOLLOWALLINSTALLATIONANDMAINTENANCEINSTRUCTIONS,INCLUDINGCLEANINGTHEUNITASSPECIFIED,AND
REPLACINGGASKETSANNUALLY,ANDPARTSASNEEDED.
ENGLAND’SSTOVEWORKSISNOTRESPONSIBLEFORANYDAMAGEORINJURYINCURREDDUETONEGLECT,ORDUETOUNSAFEINSTALLATIONOR
USAGEOFTHISPRODUCT.CALLTECHNICALSUPPORTWITHANYQUESTIONS.
CONTROLBOARDSETTINGS
Thecontrolboardonthisstoveallowstheusertoadjusttheheatoutputandconvectionblowerspeed,turn
theunitonandoff,andtestcomponentsforfunction(moreondiagnosticmodelater).
Thelowerbuttonsonthecontrolboard(LowFuelFeed,LowBurnAir,andAironTemp)arenotmeantto
beadjustedduringnormaloperationoftheunit.Thesebuttonsarefactorypresetandcannotbeadjusted
bytheuser.
Toenergizetheunitandinitiateafire,pressthe“On”button.TheLEDabovethebuttonshouldturngreen
andthecontrolboardshoulddisplay“SU”shortlyafterpressingthebutton.
Toshuttheunitdown,pressthe“Off”button.TheLEDabovethebuttonshouldturnredandtheboard
shoulddisplay“Sd”shortlyafterpressingthebutton.Thisinitiatestheshutdownsequence,andthe
stovewillremaininshutdownmodeuntilithascooleddown.
Toincreasetheheatoutputofthestove,pressthe“Up”heatrangebutton.Thenumberintheheatrange
displaywindowwillincrease,signifyingthatthecontrolboardisnowadjustingtheheatoutputtoyour
desiredlevel.Theblowerspeedwillincreasethesameamountastheheatrange,becausethestoveis
designedtooperatewiththeblowerspeedgreaterthanorequaltotheheatrange.Pressingthe“Down”
arrowwilldecreasetheheatrangeandblowerspeed.
Toincreasetheblowerspeedwithoutincreasingtheheatrange,presstheBlowerSpeed“Up”arrowuntil
thedesiredblowerspeedisshowninthedisplaywindow.Pressingthe“Down”arrowwilldecreasethe
blowerspeed;however,thecontrolboardwillnotallowtheblowerspeedtobesetlowerthantheheat
range.
Caution
Thisunitismeanttooperateonlywiththemainviewingdoorclosed.Smoke
spillageandaninefficient,lazyburnwillresultfromattemptingtooperatethe
stovewiththedooropen.
Inaddition,usingfuelotherthanwoodpelletscancreateanunsafesituationand
canalsogenerateexcesscarbon
monoxide.Carbonmonoxideisanodorless,
colorlessgaswhichcanbedeadly.
BurnONLYwoodpellets.
CarbonMonoxideDetector
England’sStoveWorks,Inc.highlyrecommendstheuseofacarbonmonoxide
detectorintheproximityofthestoveandoneperfloorofthehome.
Acertainamountofcarbonmonoxideisproducedwithinthestoveasaby‐productofcombustion.
AllexhaustventconnectionsmustbesealedwithRTVSiliconetoassureatightseal.Anyleaksinto
aconfinedareacausedbyfaultyinstallationorimproperoperationofthestovecouldproduce
dizziness,nauseaandinextremecases,death.TheCOconcentrationduringtestingwasfoundto
be0.013g/min.

21
IMPORTANT!READANDFOLLOWALLINSTALLATIONANDMAINTENANCEINSTRUCTIONS,INCLUDINGCLEANINGTHEUNITASSPECIFIED,AND
REPLACINGGASKETSANNUALLY,ANDPARTSASNEEDED.
ENGLAND’SSTOVEWORKSISNOTRESPONSIBLEFORANYDAMAGEORINJURYINCURREDDUETONEGLECT,ORDUETOUNSAFEINSTALLATIONOR
USAGEOFTHISPRODUCT.CALLTECHNICALSUPPORTWITHANYQUESTIONS.
ERRORCODES
Errorcodes,or“E‐Codes,”arealphanumericcodesthatwillappearintheHeatRangeandBlowerSpeed
windowsoftheControlBoardiftheunitexperiencesanabnormalcondition.Errorcodesarethecontrol
board’swayoftellingtheuserthatsomethingisn’toperatingcorrectlywithinthestove,andthattheunit
shouldbecarefullyinspectedbeforereigniting.Seethe“Trouble‐ShootingGuide,”page31,foradditional
informationonerrorcodes.
E‐0
Whenthisisdisplayedinthecontrolboardwindows(typicallywhenrestartingafteran“E‐Code”
shutdown),itmeanstherearecurrentlynoerrorsandthestovewillbeginnormaloperation.
E‐1
Thiserrorcodeisnotusedonthisstove.Ifitisdisplayedinthecontrolboardwindows,please
contactTechnicalSupportandtheywilldiagnosethecauseofthefalsecode.
E‐2
Whenthiscodeisdisplayedinthecontrolboardwindowitindicatesafailuretolight.Althoughthe
stovemayhaveignitedthepellets,thecontrolboarddidnotregisterahighenoughtemperatureto
determinethefirewaslit.Ifafirewasignited,waitfortheunittocool,cleantheburnpotand
restarttheunit.
E‐3
Thiserrorcodeindicatesthepresetmaximumallowableexhausttemperaturewasexceeded.
Commonlyreferredtoas“Over‐Firing,”theE‐3codemeanssomethinginthestoveiscausingthe
exhaustgastobehotterthanexpected.
E‐4
Thiscodeisdisplayedbasedonadropintheexhausttemperature.Thiscodemeansthefireor
“proofofflame”hasbeenlost.Itusuallyresultsfromthehopperbeingempty.
Ifanerrorcodecontinuestodisplay,iftheerrorcodeseems
unexplainable,orifyouhaveanyotherquestionsabouterrorcodes
andwhattheymean,pleasecontactTechnicalSupportat
(
800
)
245‐6489.
HopperLidSafetySwitch‐Thisunitisalsoequippedwithahopperlidsafetyswitch(Part#AC‐HLSB)
whichisdirectlyconnectedtotheaugermotor.Intheeventthehopperlidisleftopenwhilethe
stoveisinoperation,thehopperlidswitchwillpreventtheaugerfromturning.Thisistoprevent
byproductsofcombustionfromenteringthehomethroughtheopenhopperlidandalsotosimply
preventoperationwiththehopperlidopen.Improperhopperlidsafetyswitchoperationwillresult
inanaugerthatwillnotturnandthereforeastovethatwillnotburn.NEVERplaceyourhandorany
objectneartheaugerwhilethestoveisconnectedtopower.
22
IMPORTANT!READANDFOLLOWALLINSTALLATIONANDMAINTENANCEINSTRUCTIONS,INCLUDINGCLEANINGTHEUNITASSPECIFIED,AND
REPLACINGGASKETSANNUALLY,ANDPARTSASNEEDED.
ENGLAND’SSTOVEWORKSISNOTRESPONSIBLEFORANYDAMAGEORINJURYINCURREDDUETONEGLECT,ORDUETOUNSAFEINSTALLATIONOR
USAGEOFTHISPRODUCT.CALLTECHNICALSUPPORTWITHANYQUESTIONS.
POWERFAILURE
Ifthepowertotheunitisinterruptedforapproximatelythreeminutesorless,theunitwillresumeoperation
whenpowerisrestoredaccordingtothefollowingtable:
Unit’sStateBeforePowerLoss StateWhenPowerReturns
ON Start‐Up
Start‐Up Start‐Up
Shut‐Down Shut‐Down
OFF OFF
Ifthepowerisinterruptedformorethan(approximately)threeminutes,theunitwillbe“OFF”
whenpowerreturns.
IMPORTANT–DoNOTopenthehopperlidorthedoortotheunitduringpoweroutage.Openthe
closestoutsidedoorandawindowtoreducethechanceofanycombustionbyproductsentering
thehomefromthestove.
Waitforthepowertoberestoredandthenpressthe“ON”buttontorestarttheunit,ifnecessary.
Caution–ShockHazard
Pressthe“Off”buttonandlettheappliancecompletelycoolBEFOREunpluggingthe
applianceandbeginninganymaintenanceorcomponentreplacement.
Riskofshockifapplianceisnotunpluggedbeforeservice.
SmokeDetectors
England’sStoveWorks,Inc.highlyrecommendstheuseofsmokedetectorsineveryroom
ofthehouse.However,locatingasmokedetectordirectlyabovethisunitcanresultin
nuisancealarms.
23
IMPORTANT!READANDFOLLOWALLINSTALLATIONANDMAINTENANCEINSTRUCTIONS,INCLUDINGCLEANINGTHEUNITASSPECIFIED,AND
REPLACINGGASKETSANNUALLY,ANDPARTSASNEEDED.
ENGLAND’SSTOVEWORKSISNOTRESPONSIBLEFORANYDAMAGEORINJURYINCURREDDUETONEGLECT,ORDUETOUNSAFEINSTALLATIONOR
USAGEOFTHISPRODUCT.CALLTECHNICALSUPPORTWITHANYQUESTIONS.
DAILYMAINTENANCE
ImportantNotes
Aswithanymaintenanceconcerningthisunit,besuretheunitis“OFF”andhascompletedthe
Shut‐DowncycleBEFOREbeginning.
BeawarethatmetalpartsinthefireboxcanremainHOTlongafterthefirehasgoneoutand
EVENaftertheShut‐Downcycleiscomplete.
Alwaysuseextremecautionwhenhandling
potentiallyhotstoveparts,evenifyouthinktheyshouldbecold.
Ashesshouldonlyberemovedwhenthestovehasbeenshutdownandhasbeenallowedto
coolthoroughly.Hotemberscanremainunderasheslongafterthefirehasgoneout,
so
alwaysbeextracarefulwhenhandlinganyashesfromthis(orany)stove.
Differentpelletswillgeneratevaryingamountsofashandburnpotdeposits.Carefullymonitor
theashbuildupinthestovewhenfirstoperatingtheunit,aswellaswheneveradifferent
brandofpelletsis
burned.
Whiletheamountofashesgeneratedbythisunitisnotexcessivecomparedtoatraditional
log‐burningwoodstove,keepingtheunitcleanandfreeofashisESSENTIALforpeak
performanceandmaximumefficiency.Ashbuild‐uphampersairflow,reducesefficiency,and
cancauseasmokeback.
England’sStoveWorks®isnotresponsibleforanydamagesincurredduetoapoorly
maintainedand/ordirtystove.Thispelletstoveisahighlyefficientmachineand,assuch,
requiressufficientmaintenancetokeepitoperatingatitspeak.
AshRemovalandDisposal
Pressthe“Off”buttonandallowthestovetocompletetheshutdowncycleandcool
completely.
DisposalofAshes–Ashesshouldbeplacedinametalcontainerwitha
tightfittinglid.Theclosedcontainerofashesshouldbeplacedona
noncombustiblefloororontheground,wellawayfromallcombustible
materials,pendingfinaldisposal. Iftheashesaredisposedofbyburialin
soilorotherwiselocallydispersed,theyshouldberetainedintheclosed
containeruntilallcindershavebeenthoroughlycooled.
*Failuretoproperlycleanyourstovecancausepoorperformanceandpossiblyaburnback!*
24
IMPORTANT!READANDFOLLOWALLINSTALLATIONANDMAINTENANCEINSTRUCTIONS,INCLUDINGCLEANINGTHEUNITASSPECIFIED,AND
REPLACINGGASKETSANNUALLY,ANDPARTSASNEEDED.
ENGLAND’SSTOVEWORKSISNOTRESPONSIBLEFORANYDAMAGEORINJURYINCURREDDUETONEGLECT,ORDUETOUNSAFEINSTALLATIONOR
USAGEOFTHISPRODUCT.CALLTECHNICALSUPPORTWITHANYQUESTIONS.
Becauseoftheopendesignofthefirebox,themajorityoftheashwillbeoneithersideofthe
cradle.Openthedoorofthestoveanduseanoldpaintbrushorputtyknifetomoveashfrom
aroundtheburnpotandintotheopenareasbeside
thecradle.
Usingthecleaningtoolprovided,removeanydepositsleftintheburnpot,beingcarefulto
removethemfromtheburnpotandnotallowthemtofilterdownintothecradlearea.
Excessiveashbuild‐upinthecradlecancausepoorstoveperformance(See“Cleaning
theBurn
pot,”below).
WARNING:Usecautionwhenusingthe
cleaningtool,asithasasharppointandmay
havesomesharpedges(aswithanymetal
tool).Aswerecommendwithany
maintenance,usegloves,safetyglassesand
anynecessarysafetyapparelwhenhandling
thecleaningtool.
CleaningtheBurnPot
Alongwithremovingashesfromthestove,
cleaningtheburnpotistheotheressentialpartofdailymaintenancethatwillkeepthestove
operatingatitspeak.Pelletscontainvaryingamountsofimpuritiesandfusiblematerialthatwill
accumulateintheburnpotovertime.Somepelletswillcontainmuch
higheramountsofthese
fusibleimpurities,thereforeextravigilancemayberequiredtomaintainacleanburnpot.Allowing
impuritiestobuildupintheburnpotcanrestricttheairflowtothefire,resultinginadirty,inefficient
burnandcanshortenthelifeoftheburnpot.
NOTE:Theburnpotshouldbecleanedoutbeforeeachstart‐up(beforepressingtheON
button),anddaily.
Alwaysallowthestovetofinishtheshut‐downcycleandcoolcompletelybeforeperforming
anymaintenanceinsidethefirebox.
Openthefrontdoorandremovetheburnpot
byliftingitstraightupandoutofthecradle.
WARNING–TheburnpotcanremainHOTlongafterthefirehasgoneout,sowearprotective
gloveswheneverhandlingapotentiallyhotburnpot.
Oncetheburnpotisoutofthestove,usethecleaningtoolto
removeanydepositsfromthe
insideoftheburnpot.
Becertainallairholesareclearandunrestrictedbyfusibleashmatter;thecleaningtool
providedisdesignedtofittheseholesandwillbeusefulinremovingstubborndepositsfrom
theseholes.
Burn
Pot
Cleanout
Cover
Cleanout
Cover

25
IMPORTANT!READANDFOLLOWALLINSTALLATIONANDMAINTENANCEINSTRUCTIONS,INCLUDINGCLEANINGTHEUNITASSPECIFIED,AND
REPLACINGGASKETSANNUALLY,ANDPARTSASNEEDED.
ENGLAND’SSTOVEWORKSISNOTRESPONSIBLEFORANYDAMAGEORINJURYINCURREDDUETONEGLECT,ORDUETOUNSAFEINSTALLATIONOR
USAGEOFTHISPRODUCT.CALLTECHNICALSUPPORTWITHANYQUESTIONS.
Removeanyashmaterialfromthebottomofthecradleandbrushanyashfromthetopofthe
cradleintothesidesofthefirebox.Keepingthetopofcradlefreeofashiscrucialinallowing
theburnpottoseatproperlyinthecradle.
Insertthe
burnpotbackintothecradleusingthereverseoftheproceduredetailedabove.
WEEKLYMAINTENANCE
BaffleRemoval
Aswithanymaintenanceconcerningthisunit,besuretheunitis“OFF,”hascompleted
theShut‐Downcycle,andiscompletelycoolBEFOREbeginning.Beawarethatmetal
partsinthefireboxcanremainHOTlongafterthefirehasgoneoutandEVENafterthe
Shut‐Downcycle
iscomplete.Alwaysuseextremecautionwhenhandlingpotentially
hotstoveparts,evenifyouthinktheyshouldbecold.
WeeklymaintenanceshouldincludethestepslistedinthissectionASWELLASthesteps
listedinthe“DailyMa intenance”section.
Removethetopbaffle(insidethefirebox,abovethedoor)byliftingitupandpulling it
forward,thentiltingitsidewaystoremoveitfromthestove.Thepartnumberforthe
topbaffleisAC‐PAHTB.
Removeanyashthathasaccumulatedbehindthebaffleinthestove.
Theuseofautilityvacuumishighlyrecommende dbecauseitwillpreventfly‐ashfrom
fallingthroughtheexhaustholesandintotheexhaustchamber.
Replacethebafflebyreversingtheabovesteps.Besurethetabsinthebafflefitintothe
matchingholesinthefireboxwallofthestove.Thetopofthebafflewillrestagainstthe
frontwallofthestovewhenitisproperlyinstalled.
Clean‐OutCovers
Theexhaustchamberofthestovewasintentionallydesignedasanashaccumulation
area.Allowingashtoaccumulateherepreventsexcessashbuild‐upinthecombustion
blowerandtheventingsystem.Similarly,theexhaustchamberiseasilyaccessiblevia
thetwoexhaustchamberclean‐outportslocatedinthe
firebox.
Removetheexhaustchamberclean‐outportcovers(lowerleftandright,oneitherside
oftheburnpot,seeimageonpreviouspage).Usea5/16”socketwrenchtoloosenthe
screwoneachcover,thenpullthecoverupwardstoremoveitfromthescrew.
BEFOREvacuumingthechamberout,observethetypeandquantityofashbuild‐up.
Theashdepositedintheexhaustchambershouldbelight,fluffy,greyorwhiteincolor,
andshouldbenohigherthanhalfwayuptheclean‐outport.

26
IMPORTANT!READANDFOLLOWALLINSTALLATIONANDMAINTENANCEINSTRUCTIONS,INCLUDINGCLEANINGTHEUNITASSPECIFIED,AND
REPLACINGGASKETSANNUALLY,ANDPARTSASNEEDED.
ENGLAND’SSTOVEWORKSISNOTRESPONSIBLEFORANYDAMAGEORINJURYINCURREDDUETONEGLECT,ORDUETOUNSAFEINSTALLATIONOR
USAGEOFTHISPRODUCT.CALLTECHNICALSUPPORTWITHANYQUESTIONS.
Usingautilitytypevacuumcleaner,vacuumtheflyashoutoftheexhaustchamber.A
shortpieceofhosecanbeattachedtotheendoftheutilityvacuumlineandcanbe
usefulinreachingtheash.Replacetheclean‐outportcoverswhenfinished.
Aspeciallydesignedashvacuumisavailable fromtheEngland’sStoveWorkswebsite;
pleasesee:store.heatredefined.com.
MONTHLYMAINTENANCE
NOTE:Aswithanymaintenanceconcerningthisunit,besuretheunitis“OFF,”has
completedtheShut‐Downcycle,andiscompletelycoolBEFOREbeginning.
BeawarethatmetalpartsinthefireboxcanremainHOTlongafterthefire hasgoneout
andEVENaftertheShut
‐Downcycleiscomplete.Alwaysuseextremecautionwhen
handlingpotentiallyhotstoveparts,evenifyouthinktheyshouldbecold.
MonthlymaintenanceshouldincludethestepslistedinthissectionASWELLASthe
stepslistedinthe“DailyMaintenance”and“WeeklyMaintenance”section.
Intervalsbetween
monthlycleaningswilldependonthedurationthatthestoveis
burningonadailybasis.Astovewhichisoperatedcontinuouslywillneedmore
frequentmonthlycleaningsthanastovewhichisusedperiodicallyassupplemental
heat.
Agoodruleofthumbformonthlymainte nanceisthatitshould
bedoneeachtimean
entiretonofpelletsisburne dORoncepermonth,whichevercomesfirst.
Ifexcessashaccumulationisfoundintheexhaustchamberorventingsystemduring
monthlymaintenance,theintervalbetweencleaningsshouldbereducedtoeliminate
thepossibilityofpoorstoveperformance
duetoashaccumulation.
Aspeciallydesignedashvacuumisavailable fromtheEngland’sStoveWorkswebsite;
pleasesee:store.heatredefined.com
(Continuednextpage)

27
IMPORTANT!READANDFOLLOWALLINSTALLATIONANDMAINTENANCEINSTRUCTIONS,INCLUDINGCLEANINGTHEUNITASSPECIFIED,AND
REPLACINGGASKETSANNUALLY,ANDPARTSASNEEDED.
ENGLAND’SSTOVEWORKSISNOTRESPONSIBLEFORANYDAMAGEORINJURYINCURREDDUETONEGLECT,ORDUETOUNSAFEINSTALLATIONOR
USAGEOFTHISPRODUCT.CALLTECHNICALSUPPORTWITHANYQUESTIONS.
MONTHLYMAINTENANCE
VentingPipeCleaning
Lowspotsanddirectionchangesintheventingsyste m(suchasteesandelbows)are
areasforpotentialfly‐ashandcreosoteaccumulation.INSPECTtheseareasdiligentlyto
keeptheventingsysteminsafeoperatingcondition.
Dependingonthespecifictypeofventingsystemyourstoveisconnectedto,
itmaybe
possibletoremovetheclean ‐outteecoverandsimplyrunapipebrushupthepipeto
removeanyfly‐ashaccumulation.
Horizontalrunsofpipe,suchasfromtheexhaustconnectiononthestovetothevertical
transition,willaccumulateflyashandshould
beinspectedcarefullyandbrushedclean.
Checktheterminationcaptobecertainitisnotcloggedorrestricte dbyanyfly‐ash
accumulation.
Afterthoroughlycleaningtheventingsystem,resealanydisassembledseamswithhigh
temperaturesilicone(Part#AC‐RTV3)ifapplicabletoyourventingsystem.
Inspectseamsthatwerenotdisassembledtobecertainasmoke‐tightsealisstillbeing
made.
Afterprolongeduse,leaksintheventingsystemcanusuallybefoundbysearchingfor
fly‐ashdepositsontheoutsideofthepipe. Carefullycheckforleaksintheventing
system
andsealthemaccordingly.
Althoughmostpelletventingsystemsaredesignedtolastalifetime,pelletfly‐ashcan
becorrosiveundercertainconditions.Whencleaningyourventingsyste m,examinethe
pipecarefullyforanysignsofdeteriorationandreplacesectionsthatshowexcessive
wear.Itisunlikelythatthis
willeverbeaconcern,butmaintainingyourventingsystem
insafeoperatingconditioniscrucialtosafestoveoperation.
28
IMPORTANT!READANDFOLLOWALLINSTALLATIONANDMAINTENANCEINSTRUCTIONS,INCLUDINGCLEANINGTHEUNITASSPECIFIED,AND
REPLACINGGASKETSANNUALLY,ANDPARTSASNEEDED.
ENGLAND’SSTOVEWORKSISNOTRESPONSIBLEFORANYDAMAGEORINJURYINCURREDDUETONEGLECT,ORDUETOUNSAFEINSTALLATIONOR
USAGEOFTHISPRODUCT.CALLTECHNICALSUPPORTWITHANYQUESTIONS.
YEARLYMAINTENANCE
ImportantNotes
Aswithanymaintenanceconcerningthisunit,besuretheunitis“OFF,”hascompleted
theShut‐Downcycle,andiscompletelycoolBEFOR E beginning.
BeawarethatmetalpartsinthefireboxcanremainHOTlongafterthefire hasgoneout
andEVENaftertheShut‐Down
cycleiscomplete.Alwaysuseextremecautionwhen
handlingpotentiallyhotstoveparts,evenifyouthinktheyshouldbecold.
Yearly(orendofseason)maintenanceshouldincludethestepslistedinthissectionAS
WELLASthestepslistedinthe“DailyMaintenance, ”“WeeklyMaintenance”and
“Monthly
Maintenance”sectionsofthismanual.
Yearlymaintenanceshouldbeperformedattheendoftheburningseason.Leavingash
andotherbuild‐upinthestoveduringthenon‐heatingmonthscanleadtopremature
metaldegradationinthestoveandventingsystem.Usingextraattentiontodetailand
beingcertaintobeverythoroughin
theendofseasoncleaningwillhelpincreasethe
operatinglifeofthestoveandventingsystem.
Theunitshouldbeunpluggedduringthesummermonths(andperiodsofnon‐use),to
helpprotectagainstthepossibilityofdamageduetolightningstrikesandotherpower
disruptions.
Caution–ShockHazard
Pressthe“Off”buttonandlettheappliancecompletelycoolBEFOREunplugging
theapplianceandbeginninganymaintenanceorcomponentreplacement.
Riskofshockifapplianceisnotunpluggedbeforeservice.
SOOTANDFLYASH:FORMATIONANDNEEDFORREMOVAL
Theproductsofcombustionwillcontainsmallparticlesofflyash.Theflyashwillcollectinthe
exhaustventingsystemandrestricttheflowofthefluegases.Incompletecombustion,such
asthatwhichoccursduringstartup,shutdownorincorrectoperationoftheroomheaterwill
leadtosomesootformationwhichwillcollectintheexhaustventingsystem.Theexhaustventing
systemshouldbeinspectedatleastonceeveryyeartodetermineifcleaningisnecessary.
29
IMPORTANT!READANDFOLLOWALLINSTALLATIONANDMAINTENANCEINSTRUCTIONS,INCLUDINGCLEANINGTHEUNITASSPECIFIED,AND
REPLACINGGASKETSANNUALLY,ANDPARTSASNEEDED.
ENGLAND’SSTOVEWORKSISNOTRESPONSIBLEFORANYDAMAGEORINJURYINCURREDDUETONEGLECT,ORDUETOUNSAFEINSTALLATIONOR
USAGEOFTHISPRODUCT.CALLTECHNICALSUPPORTWITHANYQUESTIONS.
YEARLYMAINTENANCE
ExhaustBlowerCleaning
Althoughtheexhaustblowerandblowerhousing
weredesignedtominimizeashbuild‐up,somefly‐ashwill
stillaccumulatetherethroughouttheburningseason.
Theamountandtypeofashwilldependonthetypeof
pelletsandventingsystem,butgenerallythis
accumulationwillbemild.If,whencleaningtheexhaust
blower,alargeaccumulationoffly‐ashisfound,cleaning
theexhaustblowerandhousingshouldbeperformed
monthlyorbimonthlytopreventthisexcessbuildup.
Instructions
Beforebeginningtheexhaustblowercleaningprocedure,becertaintheunitisunpluggedand
thoroughlycooleddown.
Removetheleftsidepanelofthestove,usinga5/16”wrenchornutdriver.
Disconnecttheventingsystemfromtheexhaustblowerjustenoughthatyouwillbeabletoremove
theexhaustblowerfromthestove.
Oncethepanelisoff,theexhaustblowerwillbeclearlyvisible.
Unplugthetwowireswhichconnectthestovewiringharnesstotheexhaustblower,usingthequick
connectplugs.Disconnecttheheatsensorthatismounted(withascrew)totheexhaustblower.
Loosenthefive(5)
5
/
16
”self‐drillingscrewswhichholdtheexhaustblowertotheexhaustblowertube.
Lifttheexhaustblowerupandoutofthestove.Thegasketwhichsealstheexhaustblowertothe
exhaustblowertubeisfragile,sotakeextracarewhenremovingtheblower.Evenwhenbeingcareful,
though,itiseasytotearthisfragilegasket,andsinceanairtightsealiscrucialhere,itisbesttoreplace
thisgasket(Part#‐PU‐CBMG)everytimetheexhaustblowerisremoved.
Withtheexhaustblowerremoved,useautilityvacuumtoremoveanyashaccumulationintheexhaust
blowertube.
Useasoftpaintbrushandcarefullyremoveanyashaccumulationfromtheinsideoftheexhaust
blower,andfromtheexhaustblowerfanblade.
Inspecttheexhaustblowermotorfordustaccumulationandcarefullyremoveit,ensuringthatallair
coolingholesintothemotorareopenandfreeofdustdeposits.
Installtheblowerinthereverseorderasdescribedabove.Remembertochecktheconditionofthe
exhaustblowergasketandtoreplacetheheatsensorontotheexhaustblower.
Reinstalltheventingsystemandpanels.
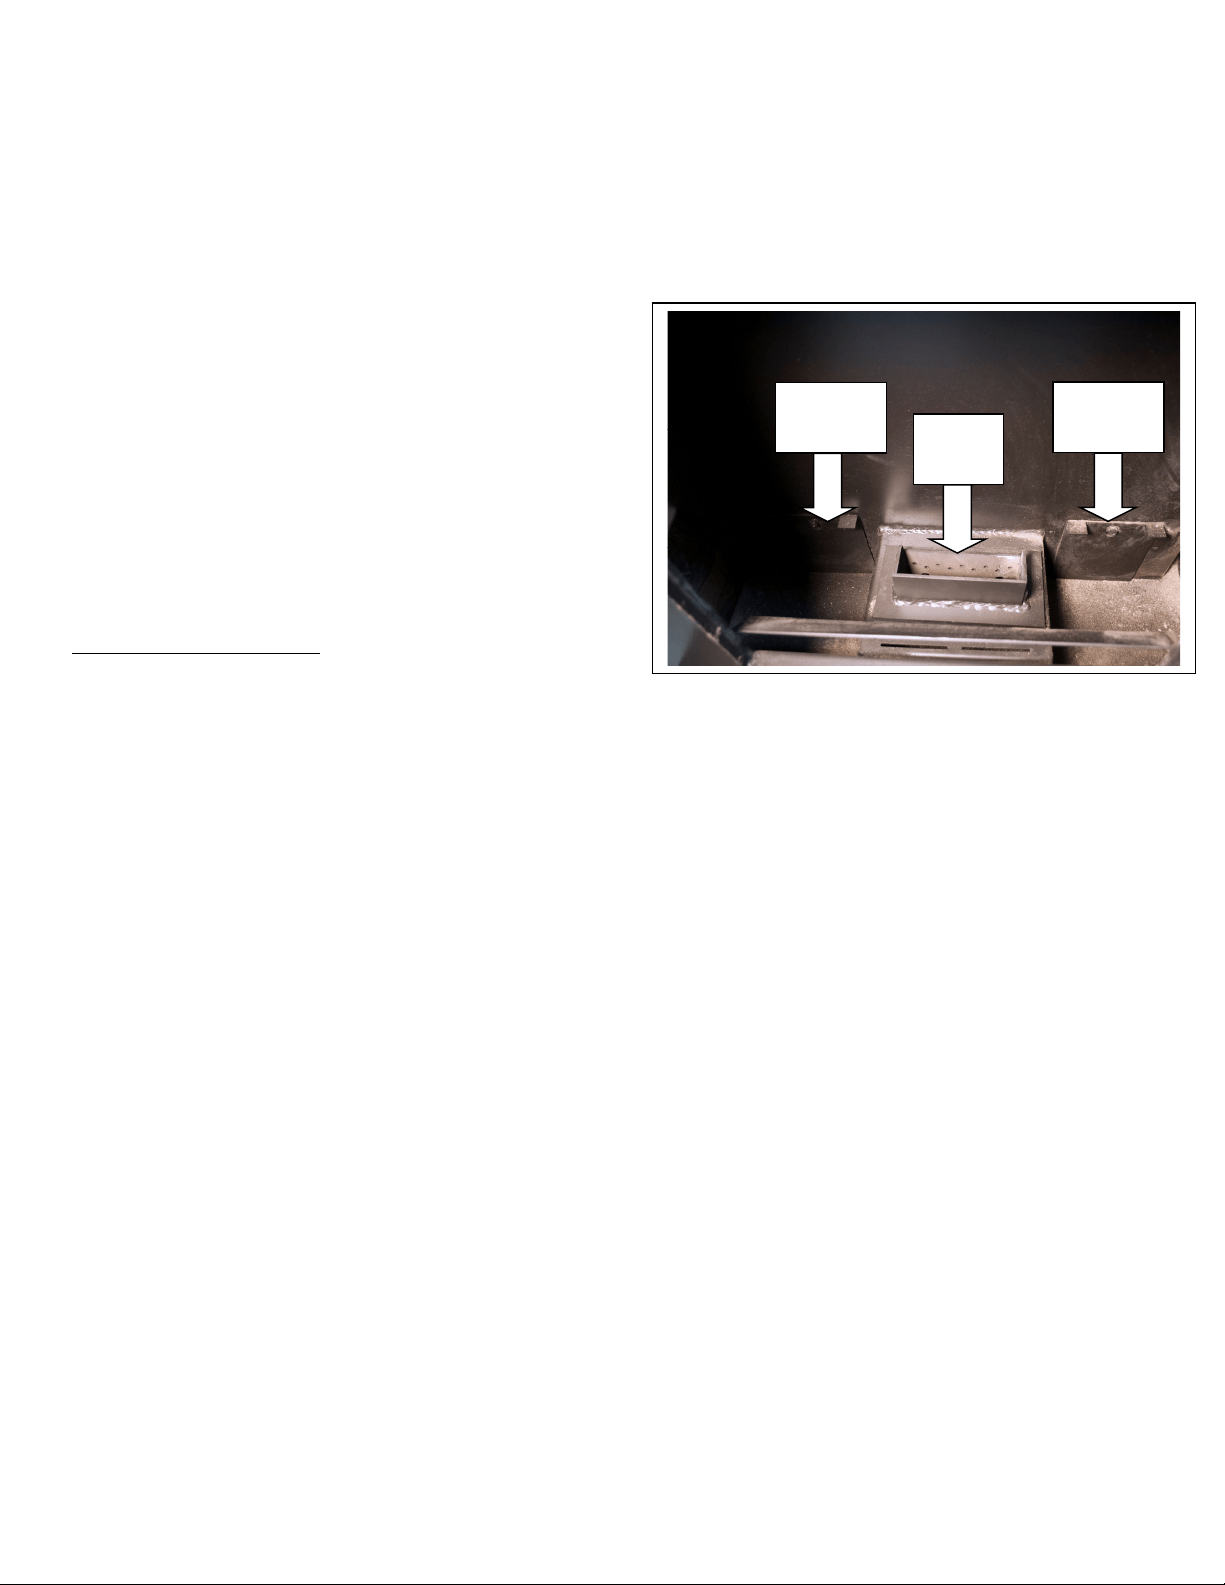
ConvectionBlowerCleaning
Asalways,becertainthestoveiscoolandunpluggedbeforeservicinganycomponentswithintheunit.
Sincetheconvectionblowerdoesnothandleanyby‐productsofcombustion,itdoesnotrequireserious
cleaningliketheexhaustblower.However,dustfromthehomeandotherdebrisintheaircanaccumulateon
thebladesoftheconvectionblower.Removetherearpaneloftheunit,usinga5/16”wrenchornutdriver.
Theconvectionblowerislocatedinthemiddleofthestove(seeimage,above).Anydustthathasbuiltupon
Exhaust
Blower
Convection
Blower

30
IMPORTANT!READANDFOLLOWALLINSTALLATIONANDMAINTENANCEINSTRUCTIONS,INCLUDINGCLEANINGTHEUNITASSPECIFIED,AND
REPLACINGGASKETSANNUALLY,ANDPARTSASNEEDED.
ENGLAND’SSTOVEWORKSISNOTRESPONSIBLEFORANYDAMAGEORINJURYINCURREDDUETONEGLECT,ORDUETOUNSAFEINSTALLATIONOR
USAGEOFTHISPRODUCT.CALLTECHNICALSUPPORTWITHANYQUESTIONS.
thefanblades(onbothsidesoftheblower)canusuallybeeasilyremovedwithavacuumorasoftpaintbrush.
Remove(4)
5
/
16
”screwsthatholdthebracketinplacetoremovetheblower,ifnecessary.
CleaningPelletFinesfromtheHopperandAuger
Dependingonthetypeandqualityofpelletsburnedinthestove,someaccumulationofpelletfinesand
dustispossibleinthehopper.Thelowestpartoftheauger,nearthebackofthestove,iswheremostfines
willaccumulate.Withthestoveoff,unplugged,completelycoolandwiththehopperempty,useautility
vacuumtoremovethefinesfromtheaugertube.Ifthefinescannotberemovedfromthetopofthehopper:
Removethebackpanel,usinga
5
/
16
”socketornutdrivertoremovethescrews.
Locatetheaugermotorassemblyatthemiddlerearofthestove,andonceitisfound,findthe
twosetscrewsoneithersideofthecastironmountingcollar.
Usinga
1
/
8
”allenwrench,loosenthesetscrewoneithersideoftheaugermountingcollar.
Withautilityvacuuminhand,lettheaugerassemblyslideoutoftheaugertubejustenough
sothatthevacuumcanbeusedtoremoveanyfinesfromthisarea.
Reinstallthe
augerassemblyandtightenthetwosetscrews;reinstallthebackpanel,being
certaintotightentheretainingscrewsontherearofthestove.
CleaningPelletFinesInsideAugerTube
Removetheaugercoverplate(locatedabovetheaugeratthebottomofthehopper)by
removingthe(8)5/16”screwsthatholditinplace.Usingautilityvacuumremoveanyexcess
dustorfinesthathavecollectedintheaugertubearoundtheauger.
Re‐installauger
coverplateinreversemethod.
CheckingGaskets
Anairtightsealatthedooropeningiscrucialtoproperstoveperformance.Anyairleaksinthisareacan
notonlycauseadirty,inefficientburnbutcanalsoposeaserioussafetythreat.Becauseofthis,thedoor
gasketshouldalwaysbemaintainedingoodcondition,andreplacedannuallyorsoonerifnecessary.Gasket
tightnesscanbecheckedusingthe“dollar‐bill”method:
Placeadollarbillbetweenthegasketandthestovebody(atthelocationwherethegasket
meetsthestove).
Closethedoortightlyandattempttopullthedollarbillout.Ifthedollarbillslidesinandout
easily,thegasketneedstobereplaced.Thistest
shouldberepeatedaroundtheentiregasket
perimeter,asgasketswillsometimessealtightlyononeside,butwillbewornandsealpoorly
onanotherside.

31
IMPORTANT!READANDFOLLOWALLINSTALLATIONANDMAINTENANCEINSTRUCTIONS,INCLUDINGCLEANINGTHEUNITASSPECIFIED,AND
REPLACINGGASKETSANNUALLY,ANDPARTSASNEEDED.
ENGLAND’SSTOVEWORKSISNOTRESPONSIBLEFORANYDAMAGEORINJURYINCURREDDUETONEGLECT,ORDUETOUNSAFEINSTALLATIONOR
USAGEOFTHISPRODUCT.CALLTECHNICALSUPPORTWITHANYQUESTIONS.
Trouble‐ShootingGuide
WARNING:ToavoidELECTRICALSHOCKalwaysdisconnecttheunitfromthepowersourceBEFORE
attemptinganyrepair.Ifthisguidedoesnotcorrecttheproblem,callyourlocaldealerorTechnical
Supportat1‐800‐245‐6489.
*SeeERRORCODESsectionearlierinthismanualforinformationontroubleshootingErrorCodes
Problem Cause Solution
Augernotturning 1.Badaugermotor. 1.Replaceaugermotor.
2.Foreignmatterjammingauger. 2.Removepelletsandobject.
3.Vacuumsensor. 3.Checkexhaustblower.
Smokesmellordustinhouse 1.Improperexhaustconnection. 1.Checkexhaustconnectionsfor
leaks,especiallytheexhaustblower
connect.Sealleakswithsilicone,
aluminumtapeorahoseclamp.
Roomblowernotoperating 1.Loosethermalsensor. 1.Tightenconnectiononsensor.
2.Blowerspeedsethigherthanheatrange,
causingstovetocoolandblowertocycle.
2.Lowerblowerspeed.
3.Looseconnection. 3.Checkcontrolboardconnection.
Exhaustblowernotoperating 1.Looseconnection. 1.Checkcontrolboardconnection.
2.Badblower. 2.Replaceblower.
3.Badvacuumsensor. 3.Replacevacuumsensor.
LazyFire 1.Badexhaustblower. 1.Inspectandreplaceblower.
2.Excessivepelletmoisture. 2.Keeppelletsdry.
3.Excessiveashbuild‐up. 3.Thoroughlycleanunit.
4.Lowqualitypellets. 4.UseonlyPFIpremiumpellets.
BlownFuse 1.Powersurge. 1.Replacefuse;usesurgeprotector.
2.Exposedwire. 2.Checkforexposedorfrayedwire
andlooseconnections.
3.Electricalcomponentshorting. 3.Checkmotorsandblowersfor
obstructionsorshortcircuits.
HighPelletConsumption 1.Lowqualityornon‐uniformlysized
pellets.
1.Usepremiumpelletsortryanother
pelletbrand.
SqueakingNoise 1.Obstructioninaugertube. 1.Checkaugertubeforforeign
objects.
2.BlowerNoise. 2.Remove,clean,andoilblower.
PingingorRattlingNoise 1.Foreignmaterialinblower. 1.Checkbothblowersformaterial.
2.Looseexhaustfansetscrew. 2.Checksetscrewfortightness.

32
IMPORTANT!READANDFOLLOWALLINSTALLATIONANDMAINTENANCEINSTRUCTIONS,INCLUDINGCLEANINGTHEUNITASSPECIFIED,AND
REPLACINGGASKETSANNUALLY,ANDPARTSASNEEDED.
ENGLAND’SSTOVEWORKSISNOTRESPONSIBLEFORANYDAMAGEORINJURYINCURREDDUETONEGLECT,ORDUETOUNSAFEINSTALLATIONOR
USAGEOFTHISPRODUCT.CALLTECHNICALSUPPORTWITHANYQUESTIONS.
UnitShutsDownin15‐20
minuteswithan"FS"codeon
controlboard.(FailedStart)
1.Loosethermalsensor. 1.Checkbothsidesofthermalsensor
connection(exhaustblowe rand
controlboard).
2.Controlboardsettings. 2.StartstoveonminimumHeatRange
5toensureagoodfireisstarted.
3.Failuretolightpellets. 3.Checkigniterforbuilduporfailure.
"OT"CodeonControlBoard
(OverTemp)
1.Convection(RoomAir)blowerfailure. 1.Checkconvectionblowerforproper
function,replaceifnecessary.
2.Partiallyblockedflue. 2.Checkflueforobstructions.
3.Usingfuelotherthanpremiumwood
pellets.
3.UseONLYpremiumwoodpelletsin
thisstove.
Notes:
1.Wheneverinstructedtocheck/replacethevacuumsensor,alsocheckforlooseorcrackedvacuumhose.
Also,becertainthevacuummeasurementportinthefireboxiskeptclean(cleanwithapipecleanerorbrush,
donotuseavacuumtocleanthisport).
2.Torestartandclearanerrorcodedisplayedonthecontrolboard,pushthe"ON"buttonandtheunitshould
resettheerrorandrestart.
3.Ifyouareuncertainaboutthemeaningofanerrorcodeorhaveanyquestionsatall,PLEASEcontact
TechnicalSupportat(800)245‐6489.
33
IMPORTANT!READANDFOLLOWALLINSTALLATIONANDMAINTENANCEINSTRUCTIONS,INCLUDINGCLEANINGTHEUNITASSPECIFIED,AND
REPLACINGGASKETSANNUALLY,ANDPARTSASNEEDED.
ENGLAND’SSTOVEWORKSISNOTRESPONSIBLEFORANYDAMAGEORINJURYINCURREDDUETONEGLECT,ORDUETOUNSAFEINSTALLATIONOR
USAGEOFTHISPRODUCT.CALLTECHNICALSUPPORTWITHANYQUESTIONS.
REPLACINGCOMPONENTS
AugerMotor
Beforebeginninganycomponentreplacement,becertaintheunitisunpluggedand
thoroughlycooleddown.Also,makesurethehopperisemptybeforeattemptingto
removeorreplacetheaugermotorassembly.
Removethebackpaneloftheunit,usinga
5
/
16
”wrench.Beforelooseninganyauger
motorbolts,detachthewiringharnessfromtheaugermotor.
Locatetheaugermotorassemblyattherearofthestove,andbeginbylooseningthe
(2)
1
/
8
”allensetscrewsoneithersideofthecastironaugermotorcoupler.
Slidetheaugerassemblyoutofthetube.
Removethe(4)screwswhichholdthecastironaugermotorcouplertotheauger
motor,usinga
5
/
16
”wrench.Slidethecastironaugermotorcouplerandthesteel
spacerplateoffoftheaugermotor.
Loosenthe
1
/
8
”allensetscrewwhichholdsthesteelaugercouplertotheauger
motoroutputshaft,andremovethesteelaugercoupler,aswellastherubber
vibrationdampe ner.
Reinstallthepartsinreverseorderonthenewaugermotor,beingcarefulnotto
over‐tightentheboltswhichhold
thecastironaugercouplertotheaugermotor.
34
IMPORTANT!READANDFOLLOWALLINSTALLATIONANDMAINTENANCEINSTRUCTIONS,INCLUDINGCLEANINGTHEUNITASSPECIFIED,AND
REPLACINGGASKETSANNUALLY,ANDPARTSASNEEDED.
ENGLAND’SSTOVEWORKSISNOTRESPONSIBLEFORANYDAMAGEORINJURYINCURREDDUETONEGLECT,ORDUETOUNSAFEINSTALLATIONOR
USAGEOFTHISPRODUCT.CALLTECHNICALSUPPORTWITHANYQUESTIONS.
REPLACINGCOMPONENTS
ConvectionBlower
Beforebeginninganycomponentreplacement,becertaintheunitisunpluggedand
thoroughlycooleddown.
Removetherearpanel(usinga
5
/
16
”wrench)andlocatetheconvectionblower.
Detachtheconvectionblowerfromthewiringharnessbeforegoinganyfurther.
Loosenandremovethe(4)
5
/
16
”screwswhichholdtheblowerassemblytothestove;
removetheblowerassemblyfromthestove.
Installationofthenewblowerisperformedinreverseofremoval;remembertoreconnect
thenewblowertothewiringharness.(Wheninstallingthenewblower,placetheblower
motoropeningpointingUP,
towardsthetopofthestove.)
35
IMPORTANT!READANDFOLLOWALLINSTALLATIONANDMAINTENANCEINSTRUCTIONS,INCLUDINGCLEANINGTHEUNITASSPECIFIED,AND
REPLACINGGASKETSANNUALLY,ANDPARTSASNEEDED.
ENGLAND’SSTOVEWORKSISNOTRESPONSIBLEFORANYDAMAGEORINJURYINCURREDDUETONEGLECT,ORDUETOUNSAFEINSTALLATIONOR
USAGEOFTHISPRODUCT.CALLTECHNICALSUPPORTWITHANYQUESTIONS.
REPLACINGCOMPONENTS
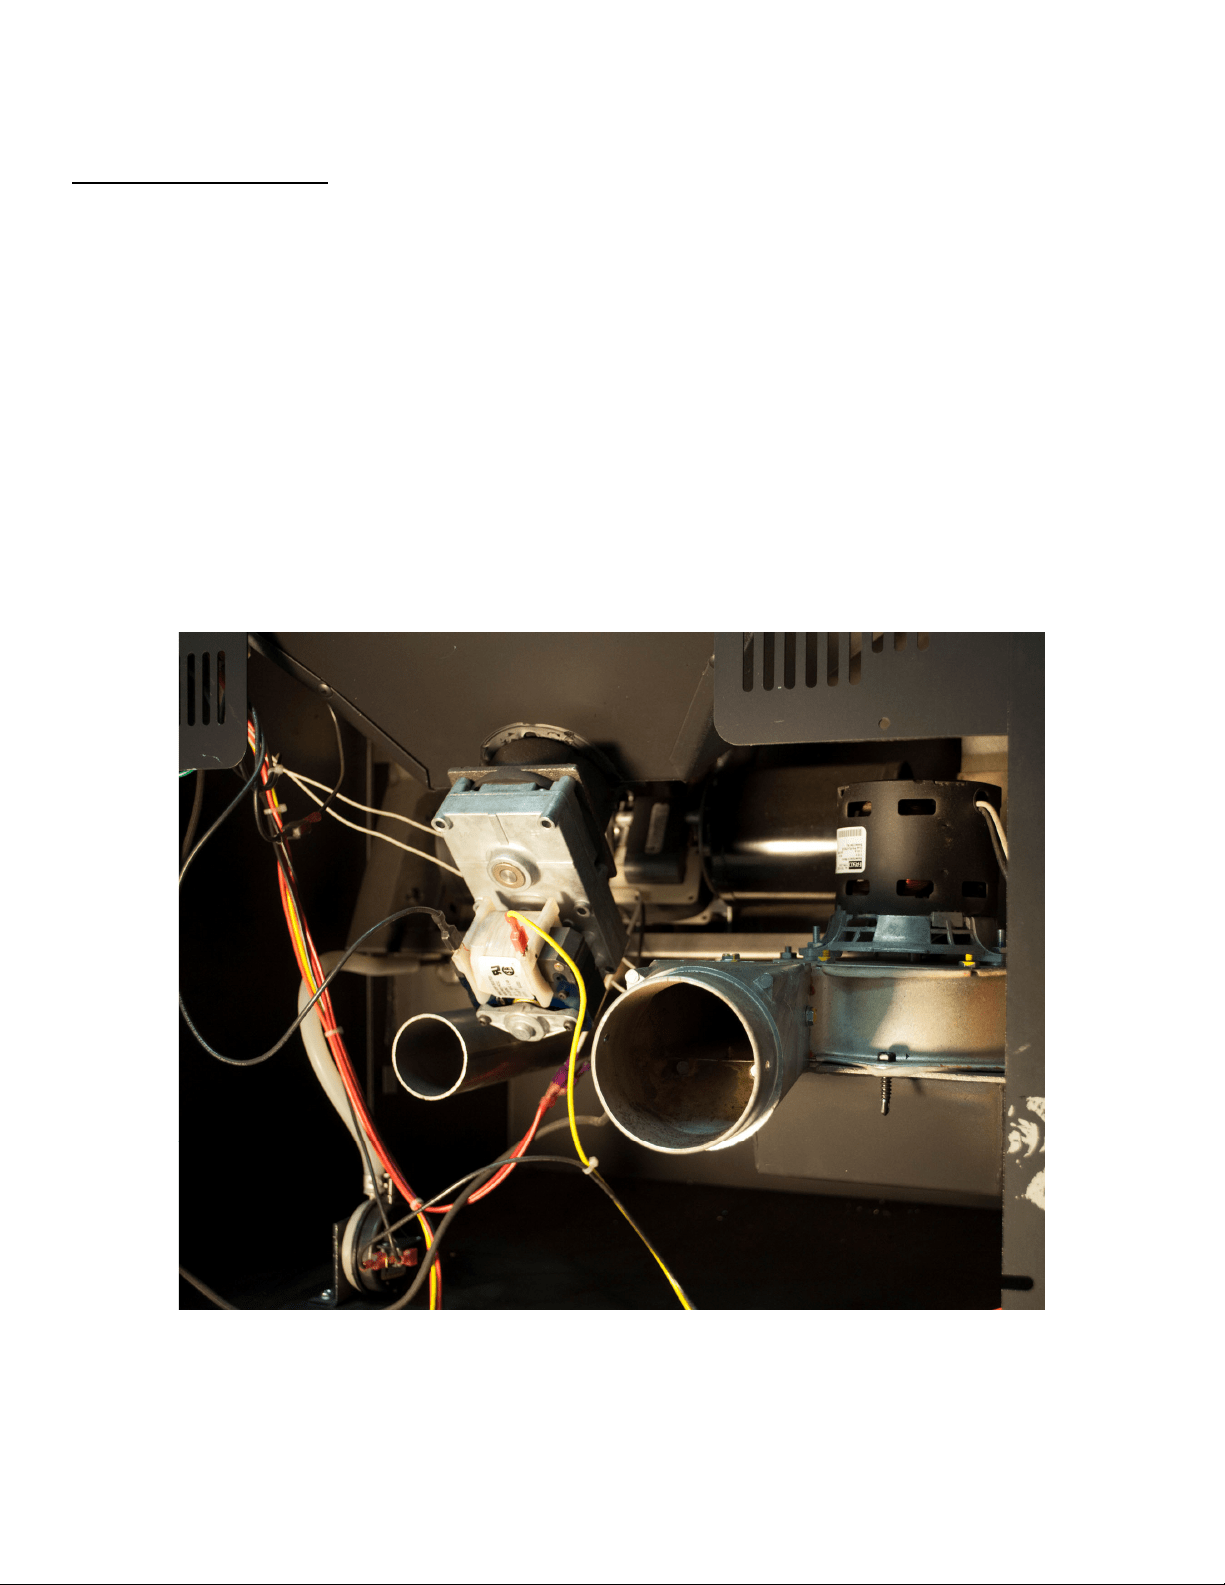
CombustionBlower
Beforebeginninganycomponentreplacement,becertaintheunitisunpluggedand
thoroughlycooleddown.
Removetheleftsidepanelandlocatethecombustion(exhaust)blower.
Disconnecttheventingsystemfromtheexhaustblower,anddisconnecttheexhaust
blowerfromthestovewiringharness.Toremovetheventing
pipe,removaloftherear
panel(usinga
5
/
16
”wrench)maybenecessary.
Removeall(5)screwswhichholdtheexhaustblowertotheexhaustblowertube.Remove
theheatsensorwhichisconnected(withascrew)totheexhaustblower.Oncethescrews
havebeenremove d,theblowercanbeliftedupandoutofthestove.
Reinstallationistheexactopposite ofthestepsabove;however,becertaintocheckthe
conditionoftheexhaustblowergasketandre placeifnecessary.

36
IMPORTANT!READANDFOLLOWALLINSTALLATIONANDMAINTENANCEINSTRUCTIONS,INCLUDINGCLEANINGTHEUNITASSPECIFIED,AND
REPLACINGGASKETSANNUALLY,ANDPARTSASNEEDED.
ENGLAND’SSTOVEWORKSISNOTRESPONSIBLEFORANYDAMAGEORINJURYINCURREDDUETONEGLECT,ORDUETOUNSAFEINSTALLATIONOR
USAGEOFTHISPRODUCT.CALLTECHNICALSUPPORTWITHANYQUESTIONS.
REPLACINGCOMPONENTS
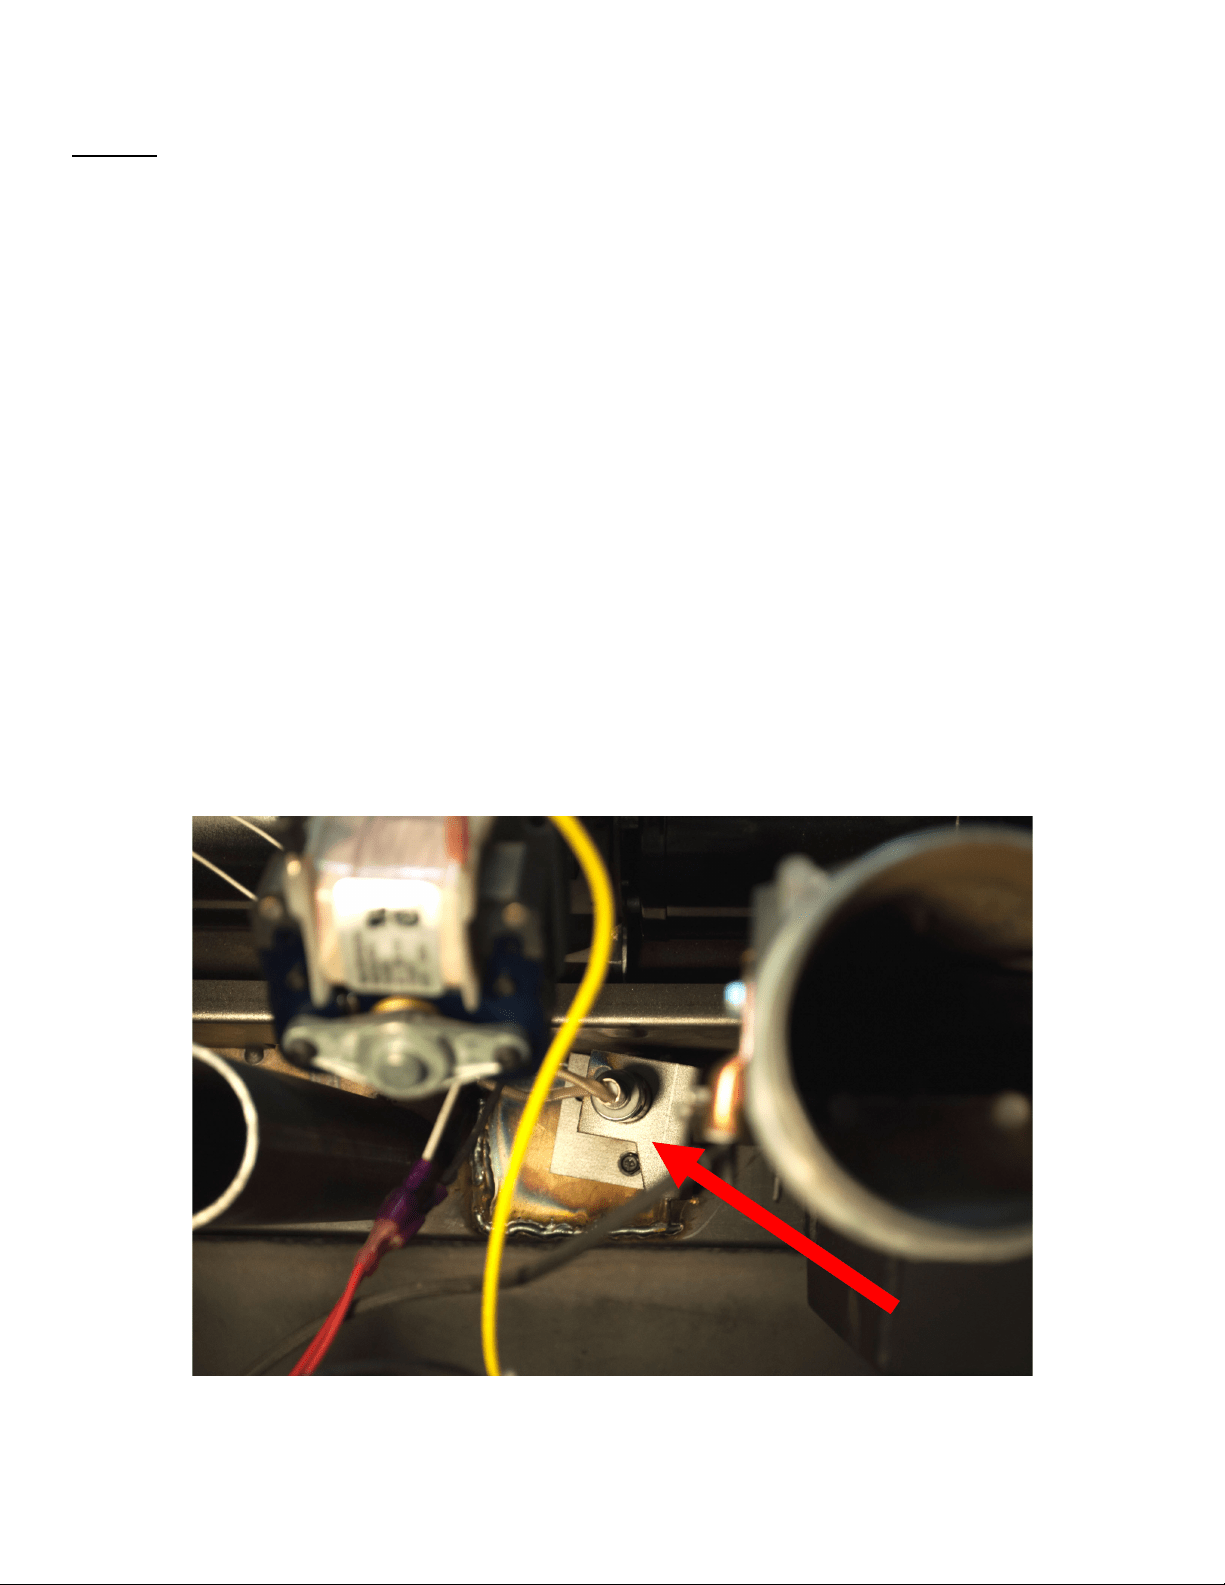
VacuumSwitch
Beforebeginninganycomponentreplacement,becertaintheunitisunpluggedand
thoroughlycooleddown.
Removetherightsidepanel(seepg.43forpanelinstructions).Removaloftherearpanel
mayhelp,aswell.
Locatethevacuumswitchasshowninthediagrambelow.
Disconnectthe
stovewiringharnessandvacuumhosefromthevacuumswitch,takingnote
ofwhereconnectionsweremade.
Removethe(2)screwswhichholdthevacuumswitchtothevacuumswitchbracket,using
aPhillipsscrewdriver.
Installationisthereverseofremoval;beabsolutelycertainthewiresand
vacuumhoseare
connectedastheypreviouslywere(andaccordingtothewiringdiagraminthismanual).
37
IMPORTANT!READANDFOLLOWALLINSTALLATIONANDMAINTENANCEINSTRUCTIONS,INCLUDINGCLEANINGTHEUNITASSPECIFIED,AND
REPLACINGGASKETSANNUALLY,ANDPARTSASNEEDED.
ENGLAND’SSTOVEWORKSISNOTRESPONSIBLEFORANYDAMAGEORINJURYINCURREDDUETONEGLECT,ORDUETOUNSAFEINSTALLATIONOR
USAGEOFTHISPRODUCT.CALLTECHNICALSUPPORTWITHANYQUESTIONS.
REPLACINGCOMPONENTS
Igniter
Beforebeginninganycomponentreplacement,becertaintheunitisunpluggedand
thoroughlycooleddown.
Removetherearpaneloftheunit,usinga
5
/
16
”wrench.
Locatetheigniterasshowninthediagrambelow.
Disconnecttheigniterwiringfromthecontrolboardandusea
5
/
16
”wrenchtoremovethe
twoigniterretainingscrewsthatfastentheassemblytothestove.Removetheassembly
fromthestove.
LoosentheAllensetscrew(
1
/
8
”Allenwrench)fromtheignitertubeandremovetheold
ignitercartridge.
Installthenewigniterintheignitertube,retightenthesetscrewandreinstalltheassembly
intothestove(remembertoreconnectthewiring).
Reinstalltherearpanel.

38
IMPORTANT!READANDFOLLOWALLINSTALLATIONANDMAINTENANCEINSTRUCTIONS,INCLUDINGCLEANINGTHEUNITASSPECIFIED,AND
REPLACINGGASKETSANNUALLY,ANDPARTSASNEEDED.
ENGLAND’SSTOVEWORKSISNOTRESPONSIBLEFORANYDAMAGEORINJURYINCURREDDUETONEGLECT,ORDUETOUNSAFEINSTALLATIONOR
USAGEOFTHISPRODUCT.CALLTECHNICALSUPPORTWITHANYQUESTIONS.
REPLACINGCOMPONENTS
Gaskets
1. Door
Thisunitcomeswitha¾”ropegasketinthechannelaroundthedooropeningthat
shouldbereplacedatleastonceeveryyear.Toreplacethedoorgasket(Part#AC‐
DGKHD),theoldgasketmustfirstberemovedentirely—priortoaddingthenew
adhesive,youmay
havetoscrapetheoldcementfromthechannel.Oncethe
cementandgaskethavebeenadded,thedoorshouldbeclosedandlatchedfor
twenty‐fourhourstoallowthecementtoharden.Seenextpageformoreinfo.
2. Window
Ifyouarereplacingthewindowgasket(Part#AC‐GGK),thenewgasketwillalready
haveadhesiveononeside.Removethepaperontheadhesivesideandplacethe
gasketaroundtheoutsideedgeoftheglass,centeredovertheedge.Foldthegasket
edgesoveronthe
glass,forminga“U”shape.
3.
CombustionBlower
TheCombustionBlowerGasket(Part#PU‐CBMG)shouldbeinspectedwheneveryou
removeorcleantheCombusti onBlower,andreplacedifnecessary.
4. CombustionBlowerMotor
Thecombustionblowermotorgasket(Part#PU‐CBMG)generallydoesnotneed
replacement,asitisnotnormallyremovedfromtheunit.However,iftheexhaust
bloweriscleanedbyremovingthemotor,ratherthantheentireblowerassembly,
thisgasketmustbeinspectedandreplacedasnecessary.
IMPROPERGASKETMAINTENANCE,INCLUDINGFAILURETOREPLACEGASKETS,
CANCAUSEAIRLEAKSRESULTINGINSMOKE‐BACKS.

39
IMPORTANT!READANDFOLLOWALLINSTALLATIONANDMAINTENANCEINSTRUCTIONS,INCLUDINGCLEANINGTHEUNITASSPECIFIED,AND
REPLACINGGASKETSANNUALLY,ANDPARTSASNEEDED.
ENGLAND’SSTOVEWORKSISNOTRESPONSIBLEFORANYDAMAGEORINJURYINCURREDDUETONEGLECT,ORDUETOUNSAFEINSTALLATIONOR
USAGEOFTHISPRODUCT.CALLTECHNICALSUPPORTWITHANYQUESTIONS.
REPLACINGCOMPONENTS
GlassReplacement(includesDoorGasketreplacementinstructions)
1. Removethedoorfromthestoveandrestitface‐downonafirmworksurface.
2. Removethedoorgasketusingapairofplierstopullitoutofthechannel.
3. Usinga
5
/
16
”wrench,removethe(4)screwsthatholdtheglasstabsinplaceonthedoorand
removetheglasstabs.
4. Lifttheoldglasspaneloutanddiscard(beespeciallycarefuliftheoldglassisbrokenor
cracked).
5. Thenewglasspanelmustbewrappedwithaself‐adhesivefiberglasstapegasket(Part#AC‐
GGK).Thisgasketservestocushiontheglassfromthesteeldoorandbrackets.
6. Reinstalltheglasstabsusingthescrewspreviouslyremoved.Donotover‐tightenthescrews.
7. Installthenewdoorgasket(Part#AC‐DGKHD)usingtheprovidedhightemperatureadhesive.
8. Hangthedoorbackonthestoveandclosetightlyandallow24hoursforadhesivetocure.
CeramicGlassSpecifications
GlassSize:9.125in.(232mm)x9.125in.(232mm)
GlassType:5mmCeramicGlass(KeralitePyroceram)
GlassManufacturer:Eurokera
GlassPrecautions
Neverreplaceceramicglasswithtemperedoranyothertypeofglass.
Neveroperatethisunitwithcrackedorbrokenglass.
Donotslamthedoororstriketheglasswithanyobjects.
GlassCleaning
1. Becertainthestoveandtheglassarecompletelycool.
2. Thebuild‐upontheglasswillgenerallybelightandwaterisnormallysufficienttoremovethe
deposits.
Ifstubbornsootpersists,useacleanermadespecificallyforthispurpose.Donotscrapethe
glassoruseabrasive
cleaners.
3. Rinsetheglasswithcleanwateranddrytheglassbeforeresumingnormaloperation.
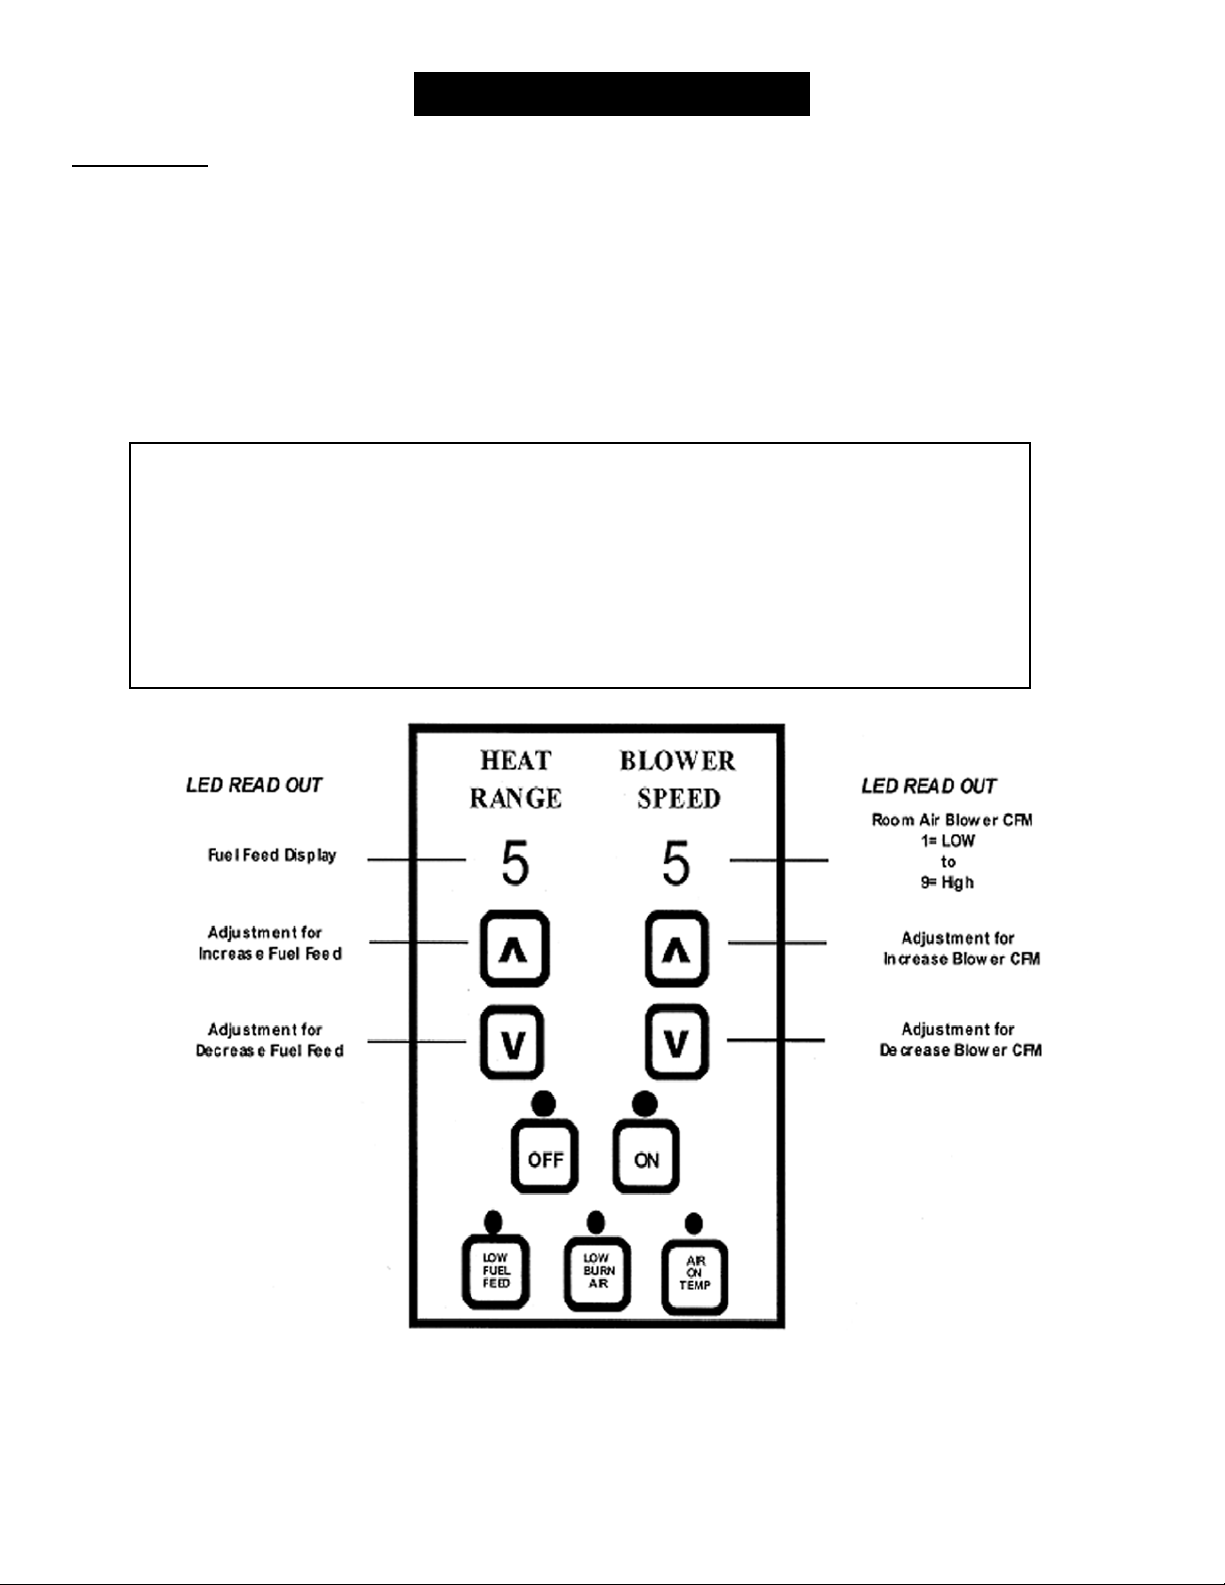
40
IMPORTANT!READANDFOLLOWALLINSTALLATIONANDMAINTENANCEINSTRUCTIONS,INCLUDINGCLEANINGTHEUNITASSPECIFIED,AND
REPLACINGGASKETSANNUALLY,ANDPARTSASNEEDED.
ENGLAND’SSTOVEWORKSISNOTRESPONSIBLEFORANYDAMAGEORINJURYINCURREDDUETONEGLECT,ORDUETOUNSAFEINSTALLATIONOR
USAGEOFTHISPRODUCT.CALLTECHNICALSUPPORTWITHANYQUESTIONS.
REPLACINGCOMPONENTS
ControlBoard
TheControlBoard(Part#PAH‐CB09)isadigitalread‐outboard.Thisboardoffersawide
varietyofsettingstooperatetheunit.Therightsidepanelshouldberemovedpriortoremovingthe
controlboard,usinga
5
/
16
”wrenchornutdriver.Thecontrolboardcanberemovedfromtheunitby
looseningthetwooutsidescrewsandpullingtheboardbacktotheinsideofthestove.A6‐amp
“quick‐blow”fuseisusedonthisControlBoard.
NOTE: Thebottomthreecontrolbuttonsarepresetatthefactoryandarenotuseradjustable.See
the “Daily Operation” section on page 18 of the manual for more instructions on Control
Boardsettings.
RecommendedHeatRanges:
LowBurn: HeatRangesetting:1 RoomAirBlo wer setting:1
MediumLow: HeatRangesetting:2–3 RoomAirBlowersetting:*
MediumHigh: HeatRangesetting:4–8 RoomAirBlowersetting:*
HighBurn: HeatRangesetting:9 RoomAirBlowersetting:9
*NOTE:BlowerSpee d willautomaticallybeadjustedtothedesiredHeatRangethatyouselect.
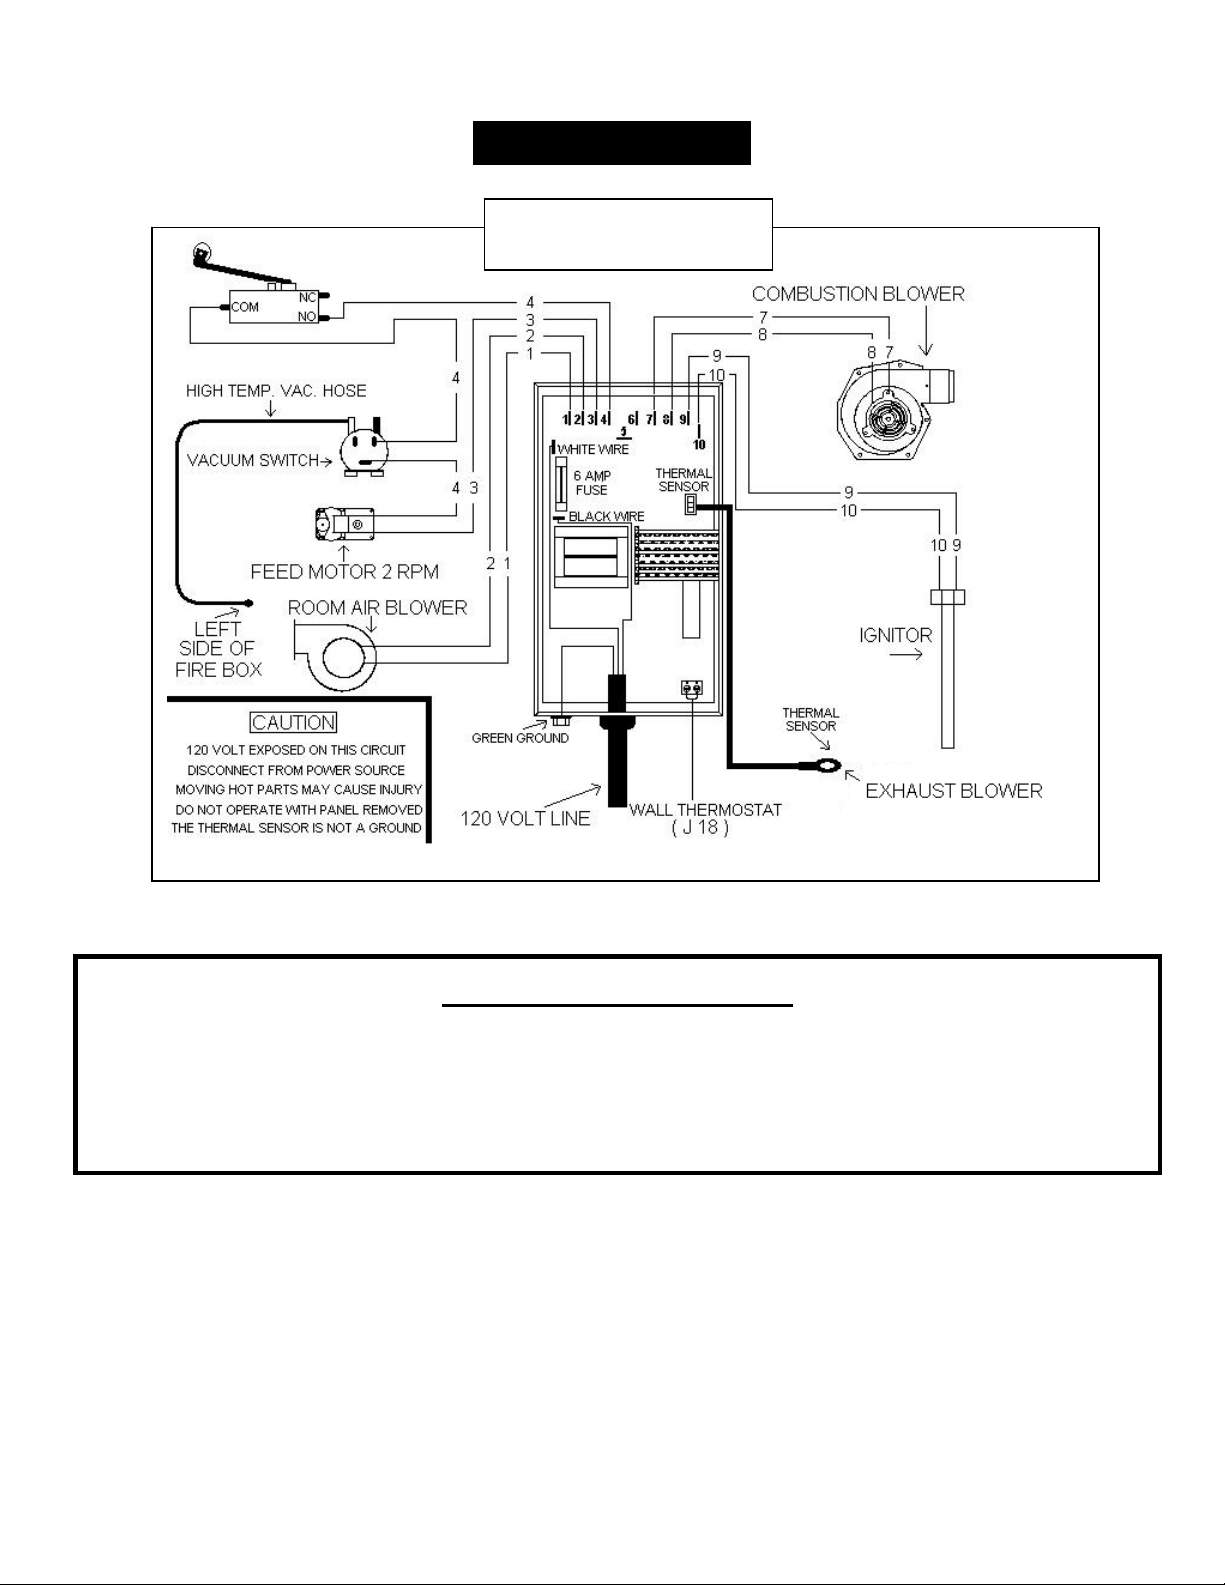
41
IMPORTANT!READANDFOLLOWALLINSTALLATIONANDMAINTENANCEINSTRUCTIONS,INCLUDINGCLEANINGTHEUNITASSPECIFIED,AND
REPLACINGGASKETSANNUALLY,ANDPARTSASNEEDED.
ENGLAND’SSTOVEWORKSISNOTRESPONSIBLEFORANYDAMAGEORINJURYINCURREDDUETONEGLECT,ORDUETOUNSAFEINSTALLATIONOR
USAGEOFTHISPRODUCT.CALLTECHNICALSUPPORTWITHANYQUESTIONS.
WIRINGDIAGRAM
Caution–ShockHazard
Pressthe“Off”buttonandlettheappliancecompletelycoolBEFOREunpluggingthe
applianceandbeginninganymaintenanceorcomponentreplacement.
Riskofshockifapplianceisnotunpluggedbeforeservice.
PAH‐CB09
ControlBoardDiagram
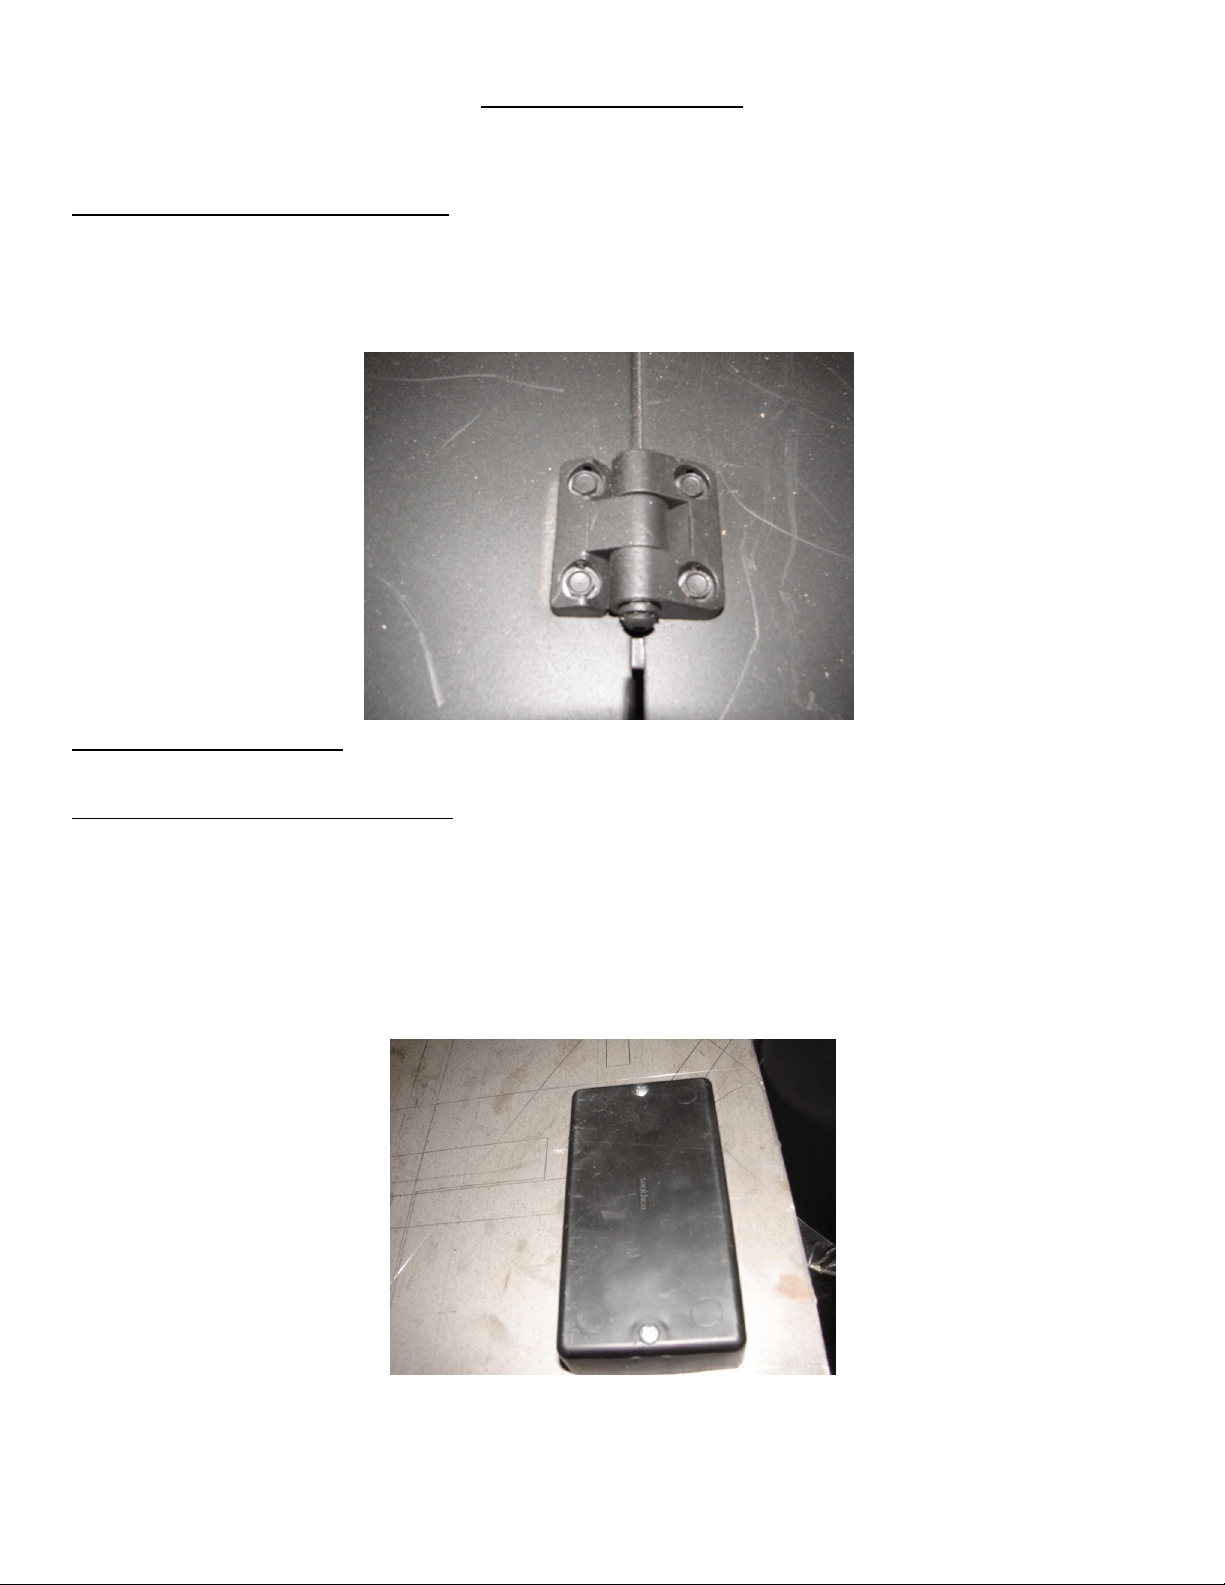
42
IMPORTANT!READANDFOLLOWALLINSTALLATIONANDMAINTENANCEINSTRUCTIONS,INCLUDINGCLEANINGTHEUNITASSPECIFIED,AND
REPLACINGGASKETSANNUALLY,ANDPARTSASNEEDED.
ENGLAND’SSTOVEWORKSISNOTRESPONSIBLEFORANYDAMAGEORINJURYINCURREDDUETONEGLECT,ORDUETOUNSAFEINSTALLATIONOR
USAGEOFTHISPRODUCT.CALLTECHNICALSUPPORTWITHANYQUESTIONS.
HOPPERLIDHINGES
Thehopperlidisattachedtothetopofthestovebytworemovablehinges.
Toremovethehopperlidhinges:
Removethe(4)screwsthatholdeachhingeinplace,usinga
5
/
16
”socket.
Re‐Installhingesinthereversemethod.
HOPPERLIDHANDLE
Thehopperlidhandlesnapsintoplaceintheopeninginthehopperlid.
Toremovethehopperlidhandle:
Liftthehopperlidup(intheopenposition).
Pressuponthebottomofthehandleanditwillpopoutofplace.
Toinstallnewhandle,insertatthetopofthehopperlidandpressdownuntilhandlesnaps
intoplace.

43
IMPORTANT!READANDFOLLOWALLINSTALLATIONANDMAINTENANCEINSTRUCTIONS,INCLUDINGCLEANINGTHEUNITASSPECIFIED,AND
REPLACINGGASKETSANNUALLY,ANDPARTSASNEEDED.
ENGLAND’SSTOVEWORKSISNOTRESPONSIBLEFORANYDAMAGEORINJURYINCURREDDUETONEGLECT,ORDUETOUNSAFEINSTALLATIONOR
USAGEOFTHISPRODUCT.CALLTECHNICALSUPPORTWITHANYQUESTIONS.
SIDEPANELS
Thesidepanelsaredesignedtohangontothesidesofthestoveandcaneasilyberemoved
toperformregularcleaning(andanymaintenancethatmayneedtobedoneinthebackofthe
stove).
Toremoveasidepanel:
Loosen(DONOTREMOVE)the(3)5/16”screwsthatholdthesidepaneltorearofthe
stove.
Graspthepanelandpulluntilthepanelisremovedfromthesidetracksandcomesoff
ofthestove.
Re‐installthesidepanelsusingthereverseofthis
method.
FINISH
ThisnewunithasbeenpaintedwithHigh‐Temperaturepaintthatshouldretainitsoriginal
lookforyears.Iftheunitshouldgetwetandrustspotsappear,thespotscanbesandedwith
finesteelwoolandrepainted.ItiscrucialthatonlyHigh‐TemperatureSprayPaintisused
(Part#
AC‐MBSP),asothersmaynotadheretothesurfaceorwithstandthehightemperatures.
Similarly,somebrandsofpaintwillnotadheretodifferentbrandsofpaint,sowehighly
recommendusingourproprietaryHigh‐TemperatureSprayPaint.
SidePanels Sidepanel(viewedfromfrontofstove)
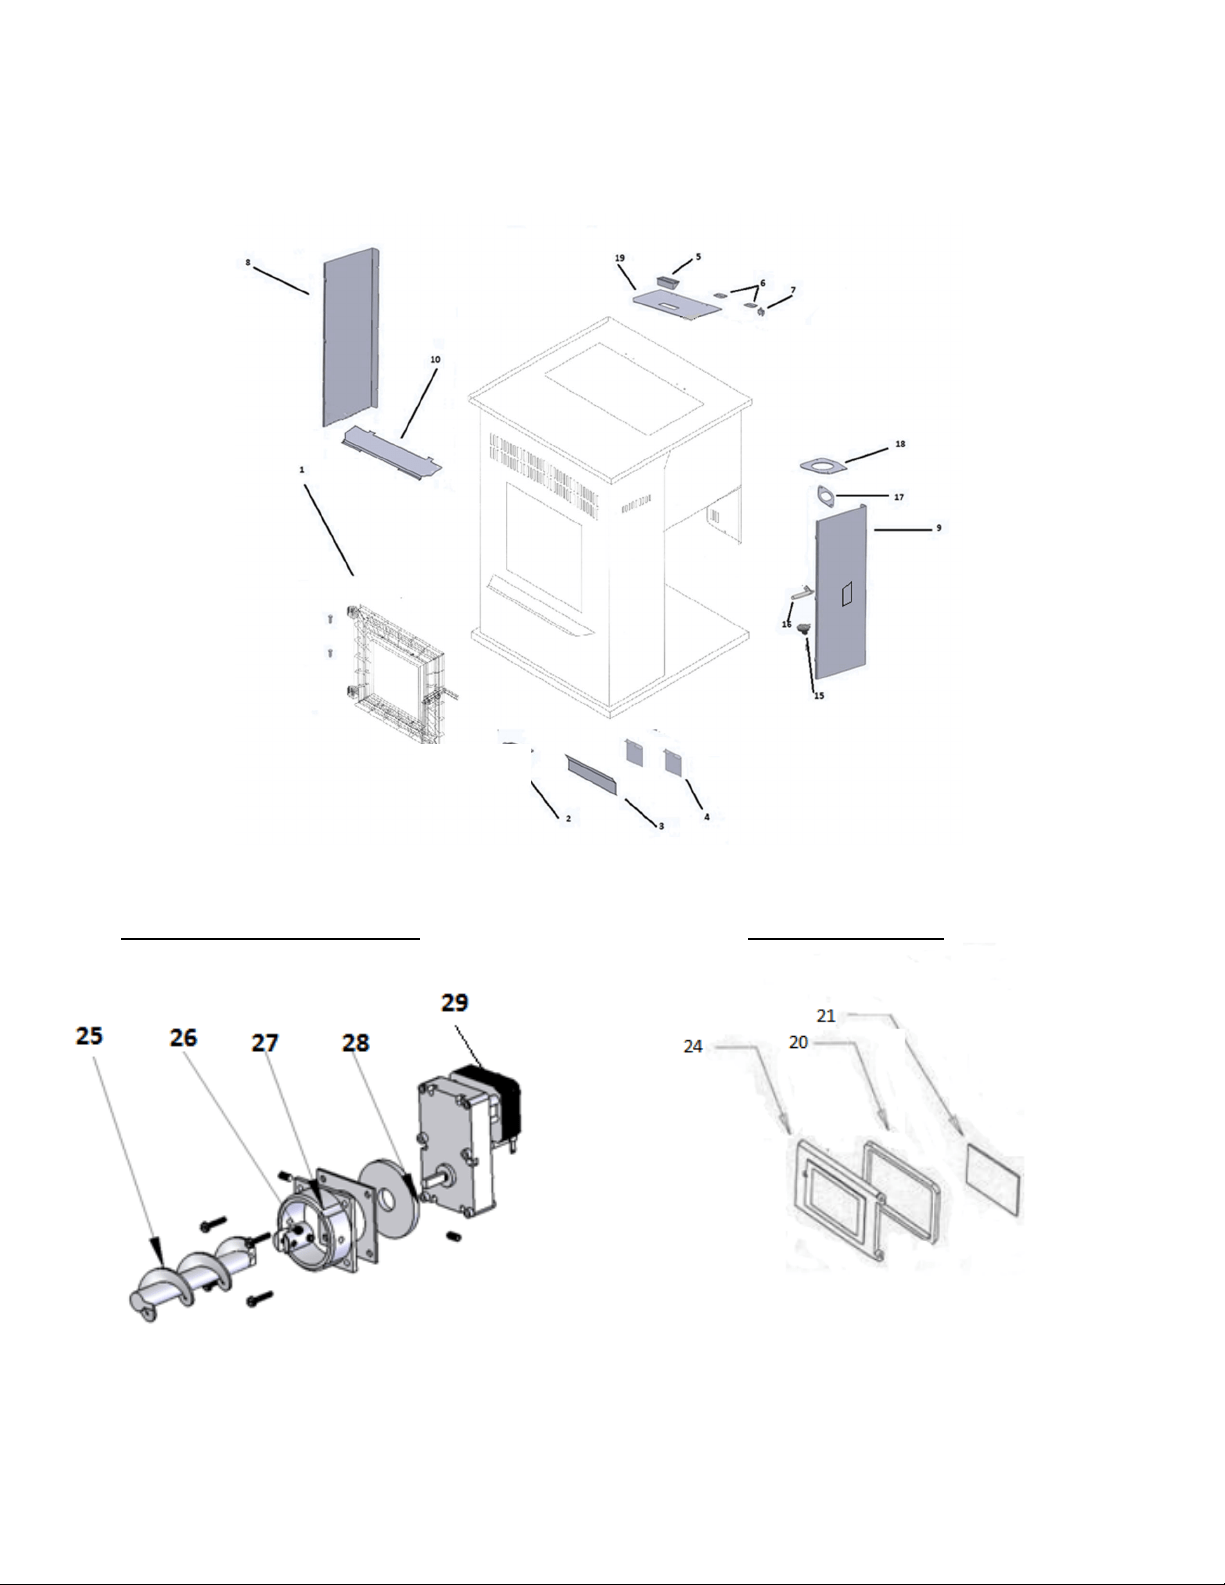
44
IMPORTANT!READANDFOLLOWALLINSTALLATIONANDMAINTENANCEINSTRUCTIONS,INCLUDINGCLEANINGTHEUNITASSPECIFIED,AND
REPLACINGGASKETSANNUALLY,ANDPARTSASNEEDED.
ENGLAND’SSTOVEWORKSISNOTRESPONSIBLEFORANYDAMAGEORINJURYINCURREDDUETONEGLECT,ORDUETOUNSAFEINSTALLATIONOR
USAGEOFTHISPRODUCT.CALLTECHNICALSUPPORTWITHANYQUESTIONS.
ILLUSTRATEDPARTSDIAGRAM
AugerMotorAssembly
DoorAssembly

45
IMPORTANT!READANDFOLLOWALLINSTALLATIONANDMAINTENANCEINSTRUCTIONS,INCLUDINGCLEANINGTHEUNITASSPECIFIED,AND
REPLACINGGASKETSANNUALLY,ANDPARTSASNEEDED.
ENGLAND’SSTOVEWORKSISNOTRESPONSIBLEFORANYDAMAGEORINJURYINCURREDDUETONEGLECT,ORDUETOUNSAFEINSTALLATIONOR
USAGEOFTHISPRODUCT.CALLTECHNICALSUPPORTWITHANYQUESTIONS.
REPLACEMENTPARTSLIST
PartNo Description FromDiagram
BM‐1288 RoomAirBlower NotShown
CU‐047042 2.4RPMAugermotorCWRotation 29
PU‐076002B CombustionExhaustBlower(Neg)NotShown
AC‐DGKHD ¾”HDDoorGasket 20
PU‐HLSB HopperLidSafetySwitch7
CU‐VS .05VacuumSwitch 15
PAH‐CB09 ControlBoard NotShown
R‐WIRE‐H06 ControlBoardWiringHarness NotShown
AC‐HPS HingePin(qty.2) 1
AC‐MBSP StovePaint NotShown
AC‐SHN2 3/8”NickelSpringHandle NotShown
CA‐AC AugerCoupler 26
CA‐AMPP AugerMountingPlate 27
PU‐AFS SteelAuger 25
AC‐CHAPAH IgniterAssembly 16
PU‐HH HopperLidHinge 6
PU‐VH VacuumHose NotShown
AC‐GGK GlassGasket NotShown
AC‐G9 DoorGlass 21
AC‐GS19 GlassTabsNotshown
AC‐HLH HopperLidHandle 5
AC‐PAHTB TopBaffle 10
AC‐SSDTG DropTubeGasket 17
CA‐19A CastIronDoor 24
PU‐BPAH BurnPot 2
PU‐CBMG CombustionBlower&MotorGasket 18
PU‐SSTCW ThermocoupleWire NotShown
PU‐SSACP AugerCoverPlate NotShown
PU‐DVDCBPAH DVDNotShown
MU‐25CBPAH ManualNotshown
PU‐ECPCB120 HeatExchangeCleanoutPlate(Qty.2) 4
PU‐RABMP RoomAirBlowerMountingPlate NotShown

46
IMPORTANT!READANDFOLLOWALLINSTALLATIONANDMAINTENANCEINSTRUCTIONS,INCLUDINGCLEANINGTHEUNITASSPECIFIED,AND
REPLACINGGASKETSANNUALLY,ANDPARTSASNEEDED.
ENGLAND’SSTOVEWORKSISNOTRESPONSIBLEFORANYDAMAGEORINJURYINCURREDDUETONEGLECT,ORDUETOUNSAFEINSTALLATIONOR
USAGEOFTHISPRODUCT.CALLTECHNICALSUPPORTWITHANYQUESTIONS.
CU‐RG RubberVibrationDampener 28
PU‐RSP RightSidePanel 9
PU‐LSP LeftSidePanel 8
PU‐SSHL HopperLid 19
PU‐CBAWB AirWashBar 3
PU‐SSRP RearPanel NotShown
AC‐CT CleaningTool Notshown
Youmaywriteyourunit’sManufactureDateandSerialNumber
intheblankspacesonthissampletag(nextpage),forfuture
reference.
ThissampletagalsoshowsthesafetyinfosuchasUL/ULC
testingstandard,etc.foryourlocalofficials,oranyoneelsewho
mayneeditforreferenceinformation.
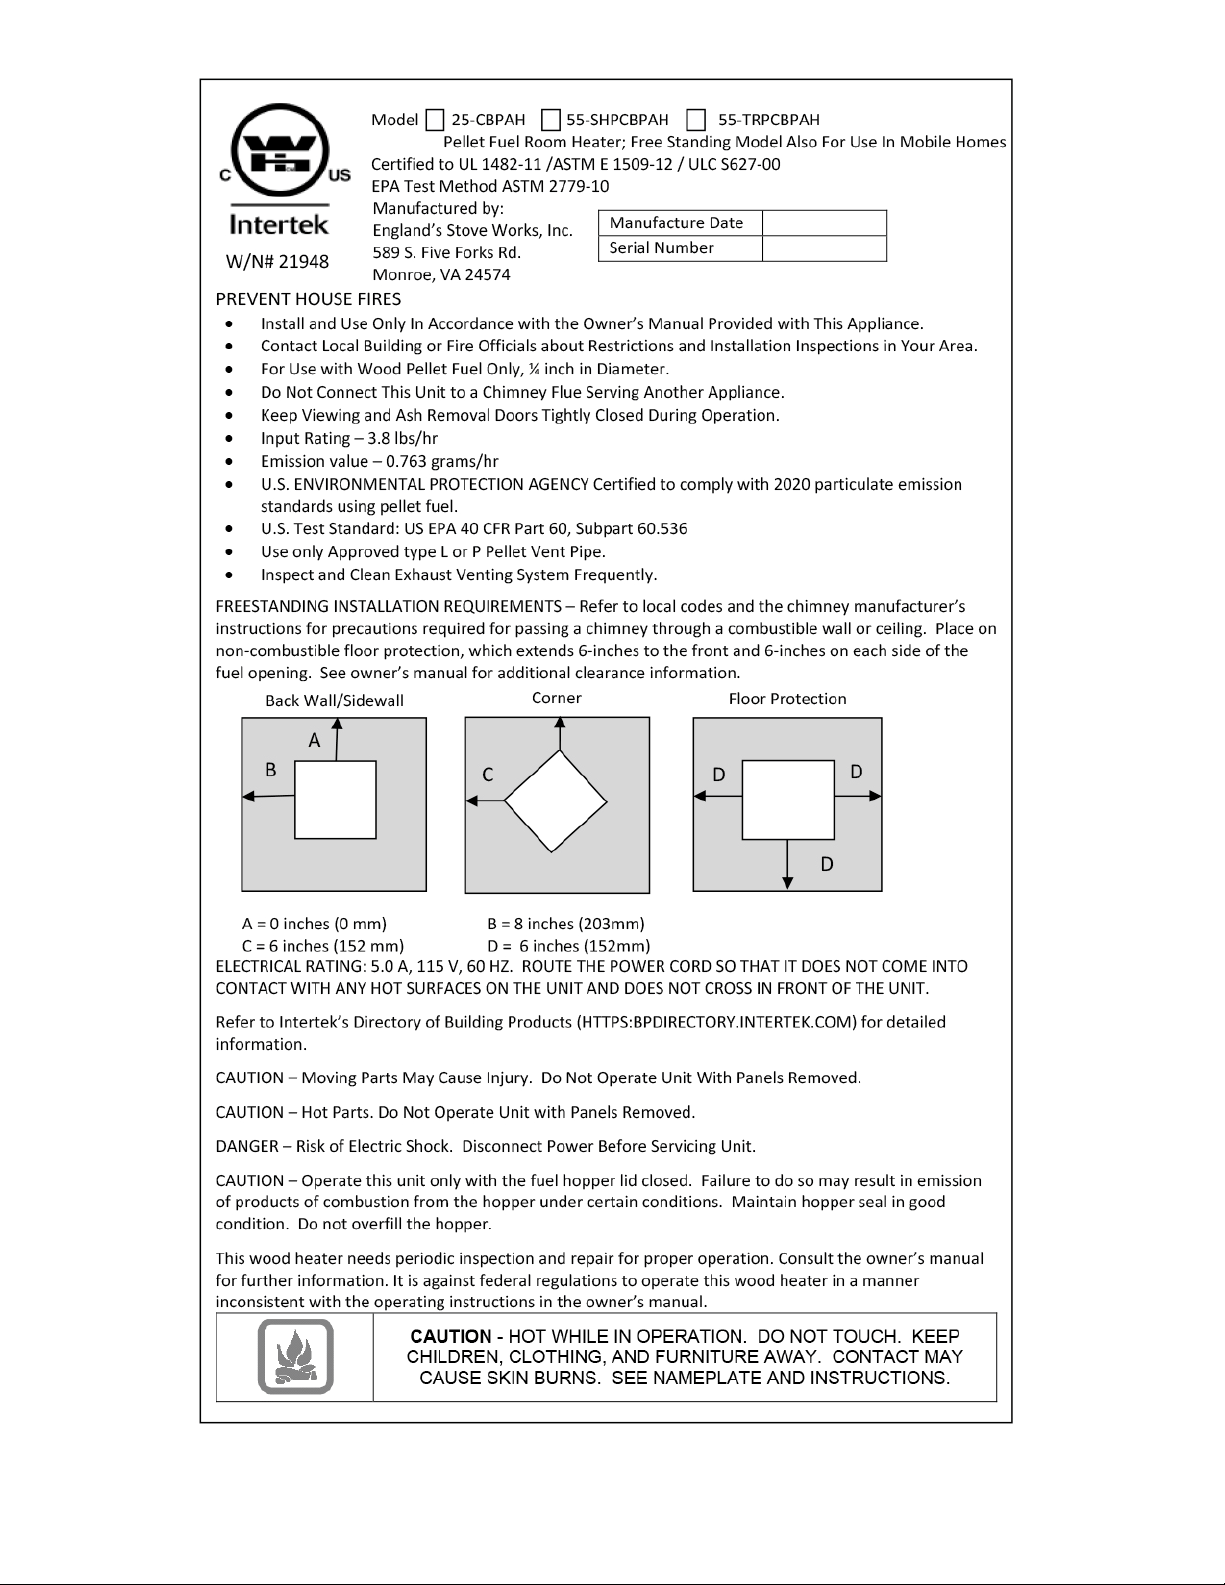
47
IMPORTANT!READANDFOLLOWALLINSTALLATIONANDMAINTENANCEINSTRUCTIONS,INCLUDINGCLEANINGTHEUNITASSPECIFIED,AND
REPLACINGGASKETSANNUALLY,ANDPARTSASNEEDED.
ENGLAND’SSTOVEWORKSISNOTRESPONSIBLEFORANYDAMAGEORINJURYINCURREDDUETONEGLECT,ORDUETOUNSAFEINSTALLATIONOR
USAGEOFTHISPRODUCT.CALLTECHNICALSUPPORTWITHANYQUESTIONS.

48
IMPORTANT!READANDFOLLOWALLINSTALLATIONANDMAINTENANCEINSTRUCTIONS,INCLUDINGCLEANINGTHEUNITASSPECIFIED,AND
REPLACINGGASKETSANNUALLY,ANDPARTSASNEEDED.
ENGLAND’SSTOVEWORKSISNOTRESPONSIBLEFORANYDAMAGEORINJURYINCURREDDUETONEGLECT,ORDUETOUNSAFEINSTALLATIONOR
USAGEOFTHISPRODUCT.CALLTECHNICALSUPPORTWITHANYQUESTIONS.
LIMITEDFIVE(5)YEARWARRANTY
Fromthedateofpurchasetotheoriginalowner.
ModelNumbers25‐CBPAH/55‐SHPCBPAH/55‐TRPCBPAH
Themanufacturerextendsthefollowingwarranties:
FiveYearPeriod:
1. Carbonsteelandweldedseamsinthefireboxarecoveredforfive(5)yearsagainst
splitting.
2. Thesteeldoorandhingesarecoveredforfive(5)yearsagainstcracking.
OneYearPeriod:
1. Componentpartssuchasthehopper,auger,burn‐pot,augershaftandfastenersare
coveredforone(1)yearagainstcracking,breakageandweldedseamseparation.
2. Electricalcomponents,accessoryitems,glassandthepaintedsurfaceofthestoveare
coveredforone(1)yearfromthedateofpurchase.
ConditionsandExclusions
1. Damageresultingfromover‐firingwillvoidyourwarrant y.
2. Thiswarrantydoesnotapplyifdamageoccursbecauseofanaccident,improper
handling,improperinstallation,improper operation,abuseorunauthorizedrepairmade
orattemptedtobemade.
3. Themanufacturerisnotliableforindirect,incidental,orconsequentialdamages
in
connectionwiththeproductincludinganycostorexpense,providingsubstitute
equipmentorserviceduringperiodsofmalfunctionornon‐use.*
4. Allliabilityforanyco nsequentialdamageforbreachofanyw rittenorimpliedwarranty
isdisclaimedandexcluded.
5. ThisunitisEPAcertifiedusinghighquality,
PremiumGradepelletfuel.Warrantyisvoid
iftheunitisusedtoburnmaterialsforwhichtheunitisnotcertifiedbytheEPA.
Warrantyisvoidifunitisnotusedaccording totheowner’smanual.

49
IMPORTANT!READANDFOLLOWALLINSTALLATIONANDMAINTENANCEINSTRUCTIONS,INCLUDINGCLEANINGTHEUNITASSPECIFIED,AND
REPLACINGGASKETSANNUALLY,ANDPARTSASNEEDED.
ENGLAND’SSTOVEWORKSISNOTRESPONSIBLEFORANYDAMAGEORINJURYINCURREDDUETONEGLECT,ORDUETOUNSAFEINSTALLATIONOR
USAGEOFTHISPRODUCT.CALLTECHNICALSUPPORTWITHANYQUESTIONS.
Procedure
Purchasermustgivenoticeofclaimofdefectwithinthewarrantyperiodandpay
transportationtoandfromaservicecenterdesignatedbythemanufacturer.Thedealerfrom
whichtheunitwaspurchasedorthefactory,atouroption,willperformthewarrantyservice.
OtherRights
Thiswarrantygivesyouspecificlegalrights;youmayalsohaveotherrights,whichmay
varyfromstatetostate.
England’sStoveWorks,Inc.
P.O.Box206
Monroe,VA24574
(800)245‐6489
TosubmitaWarrantyClaim,call(800)245‐6489tospeakwithourTechnicalSupport
department.You
mayalsofileaWarrantyClaimatwww.heatredefined.com
*Somestatesdonotallowtheexclusionoflimitationsofincidentalor
consequentialdamages,sotheabovemaynotapplytoyou
Forparts,warrantyreplacementproceduresmaybefoundatourpartsstoresite:
store.heatredefined.com

50
IMPORTANT!READANDFOLLOWALLINSTALLATIONANDMAINTENANCEINSTRUCTIONS,INCLUDINGCLEANINGTHEUNITASSPECIFIED,AND
REPLACINGGASKETSANNUALLY,ANDPARTSASNEEDED.
ENGLAND’SSTOVEWORKSISNOTRESPONSIBLEFORANYDAMAGEORINJURYINCURREDDUETONEGLECT,ORDUETOUNSAFEINSTALLATIONOR
USAGEOFTHISPRODUCT.CALLTECHNICALSUPPORTWITHANYQUESTIONS.
ImportantNotice
ThisregistrationinformationMUSTbeonfileforthiswarrantytobevalid.Pleasesendthis
informationwithinthirty(30) daysfromtheoriginaldateofpurchase.
Useanyofthesethreeeasywaystosendyourwarrantyinformationin!
MailingAddress
England’sStoveWorks,Inc.
TechnicalsupportDepartment
P.O.Box206
Monroe,Virginia24574
FaxNumber
(434)929‐4810–Twenty‐fourhoursaday
OnlineRegistration
Toregisteronline,visitourwarrantyregistrationwebsiteat:
http://www.heatredefined.com
PleaseNote:ThiswarrantyisnullandvoidiftheattachedwarrantyregistrationANDa
copyofthesalesreceiptisnotreturnedwithin thirty(30)daysfromthedateof
purchase.
Warrantyisnottransferable.

51
IMPORTANT!READANDFOLLOWALLINSTALLATIONANDMAINTENANCEINSTRUCTIONS,INCLUDINGCLEANINGTHEUNITASSPECIFIED,AND
REPLACINGGASKETSANNUALLY,ANDPARTSASNEEDED.
ENGLAND’SSTOVEWORKSISNOTRESPONSIBLEFORANYDAMAGEORINJURYINCURREDDUETONEGLECT,ORDUETOUNSAFEINSTALLATIONOR
USAGEOFTHISPRODUCT.CALLTECHNICALSUPPORTWITHANYQUESTIONS.
WARRANTYREGISTRATIONforEngland’sStoveWorks®
PurchaserInformation*
I.PurchasedBy(Name) _________________________________________
II.Address ____________________________________________________
III.City _______________________State________ZipCode ____________
IV.TelephoneNumber ___________________________________________
V.EmailAddress _______________________________________________
DealerInformation*
VI.PurchasedFrom _____________________________________________
VII.Address ___________________________________________________
VIII.City_______________________State________ZipCode __________
UnitInformation*
IX.ModelNumber_____________________PurchaseDate _____________
X.PurchasePrice _____________________
XI.SerialNumber_____________________Mfg.Date _________________
PurchaseQuestions
Howdidyoufirsthearaboutourproduct?(Pleasecheckone)
WordofMouth____ BurnTrailerDemonstration____ Internet____
Other: ________________________________________________________
Wheredidyoureceiveinformationaboutourproduct?
ViaTelephone____ Dealer(Nameofdealer)___________ Internet____
Other: ________________________________________________________
*RequiredInformation

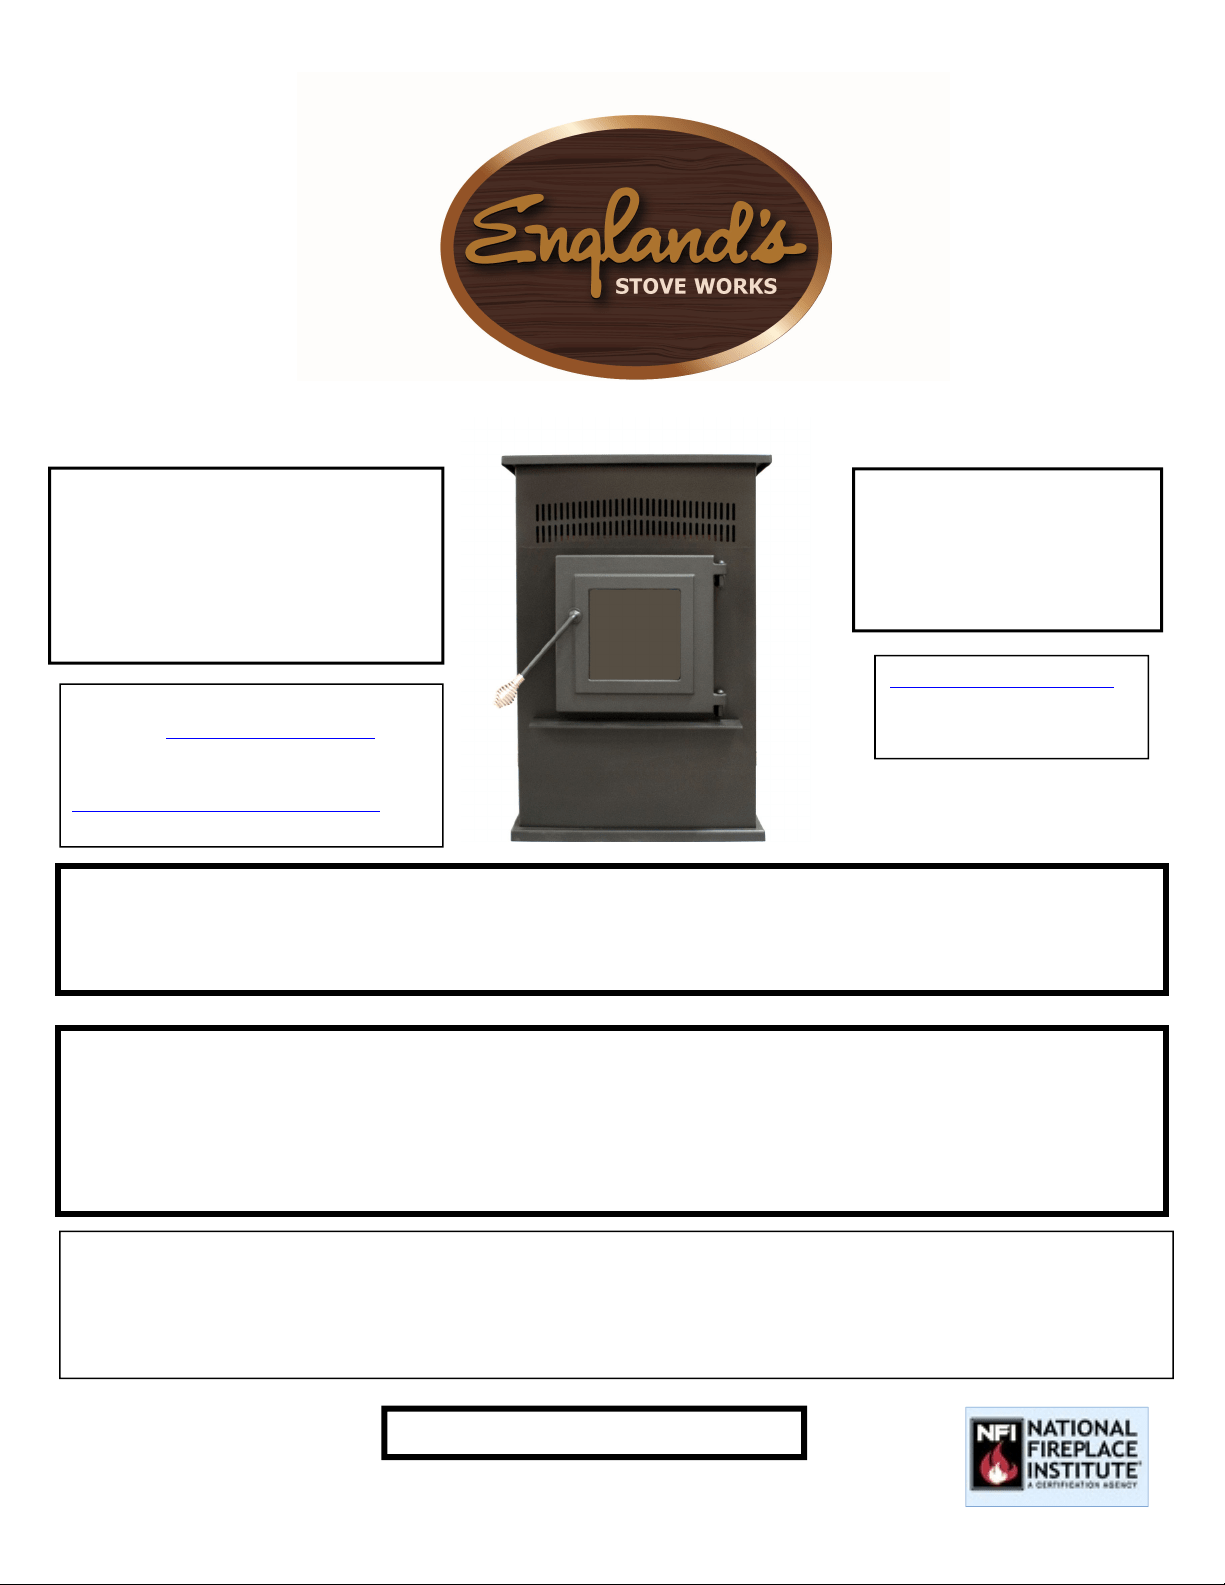
ATTENTION
VEUILLEZLIREL’INTÉGRALITÉDUPRÉSENTGUIDEAVANTD’INSTALLERETD’UTILISERCEPOÊLEÀGRANULES.
GARDEZTOUTAPPAREILDECHAUFFAGEHORSDEPORTÉEDESENFANTS,ETÀBONNEDISTANCEDES
MEUBLESETDESMATIÈRESCOMBUSTIBLES.
AVISDESÉCURITÉ
LENON‐RESPECTDECESINSTRUCTIONSPEUTCA USERDESDOMMAGESMATÉRIELS,DESBLESSURESOU
MÊMEENTRAÎNERLAMORT.POURVOTRESÉCURITÉETVOTREPROTECTION,SUIVEZLESINSTRUCTIONS
POURL’INSTALLATIONDÉCRITESDANSLEPRÉSENTGUIDE.CONTACTEZLESAUTORITÉSLOCALESENMATIÈRE
DECONSTRUCTIONOULESERVICED’INCENDIEAFINDECONNAÎTRELESRESTRICTIONSETLESEXIGENCES
D’INSPECTIONDESINSTALLATIONS(YCO MPRISL’OBTENTIONDEPERMIS)PROPRESÀVOTRERÉGION.
Fabriquépar:
England’sStoveWorks,Inc.
POBox206
Monroe,VA24574
Rév.03/2019
CONSERVEZCESINSTRUCTIO NS
GUIDED’INSTALLATIONET
D’UTILISATION
25‐CBPAH
55‐SHPCBPAH
55‐TRPCBPAH
AFIND’ASSURERLEBONFONCTIONNEMENTDUPOÊLEÀBOIS,VOUSDEVEZL’INSPECTERETLERÉPARER
PÉRIODIQUEMENT.CONSULTEZLEGUIDED’UTILISATIONPOUROBTENIRDEPLUSAMPLES
RENSEIGNEMENTS.ENVERTUDESRÈGLEMENTSFÉDÉRAUX,ILESTINTERDITD’UTILISERCEPOÊLEÀBOIS
D’UNEMANIÈRENONCONFORMEAUMODED’EMPLOIINDIQUÉDANSLEGUIDED’UTILISATION.
www.heatredefined.com
Pièces:1800516‐3636
Soutien:1800245‐6489
Questions?Besoindepiècesou
d'options?www.heatredefined.com
PourunserviceenFrançais–
Courriel:
Telephone(844)411‐2654
2
IMPORTANT!LISEZETSUIVEZTOUTESLESINSTRUCTIONSPOURL’INSTALLATIONETL’ENTRETIEN,NOTAMMENTCELLESPORTANTSURLENETTOYAGEDE
L’APPAREILÀEFFECTUERSELON LESDIRECTIVESETCELLESPORTANTSURLEREMPLACEMENTDESJOINTS(ANNUELLEMENT)ETDE SPIÈCES(AUBESOI N).
ENGLAND’SSTOVEWORKSN’ESTPASRESPONSABLEDESDOMMAGESNIDESBLESSURES,QUELSQU’ILS
SOIENT,SUBISENRAISONDENÉGLIGENCE
OUÀCAUSED’UNEINSTALLATIONOUD’UNEUTILISATIONDANGEREUSEDECEPRODUIT.POURTOUTEQUESTION,COMMUNIQUEZAVECLE
SERVICEDESOUTIENTECHNIQUE.
IMPORTANT:ENCASDEPROBLÈMEAVECCETARTICLE,NELERAMENEZPASAU
DÉTAILLANT.APPELEZLALIGNEDESOUTIENTECHNIQUEAU1800245‐6489.
Avertissementrelatifauxmodifications:
Cepoêleàboisestdotéd’untauxdecombustionbasminimumrégléenusine
quinedoitpasêtremodifié.Envertudesrèglementsfédéraux,ilestinterditde
modifierceréglageetd’utilisercepoêleàboisd’unemanièrenonconformeau
moded’emploiindiquédansleprésentguide.
Utilisationdansunemaisonmobile:
L’utilisationdecepoêleautoportantestapprouvéepourdesmaisonsmobiles
oupouruneinstallationendoublelargeuravecraccordementàl’extérieurpour
l’airdecombustion.Consultezlasection«Installation»duprésentguidepour
connaîtrelesdétailsrelatifsàl’installationdansunemaisonmobile.L’installation
dansdesmaisonstransportablesdoitêtreconformeàlanormeManufactured
HomeandSafetyStandard(HUD),CFR3280,article24.
AVERTISSEMENT:
L’AIRDECOMBUSTIONUTILISÉPARCEPOÊLEDOITPROVENIRDEL’EXTÉRIEUR.
NEPASUTILISERCETAPPAREILAVECLATRÉMIEOUVERTE;LECOUVERCLEDOIT
ÊTREFERMÉETBIENVERROUILLÉAUCOURSDEL’UTILISATION.ÉVITEZDEFAIRE
SURCHAUFFERCETAPPAREIL.
Remarque:England’sStoveWorksrecommandedenepasutiliserunpoêle
àgranulescommeuniquesourcedechaleur.
Àconserverdansvosdossiers
Numérodemodèle
Dated’achat
Datedefabrication
Numérodesérie

3
IMPORTANT!LISEZETSUIVEZTOUTESLESINSTRUCTIONSPOURL’INSTALLATIONETL’ENTRETIEN,NOTAMMENTCELLESPORTANTSURLENETTOYAGEDE
L’APPAREILÀEFFECTUERSELON LESDIRECTIVESETCELLESPORTANTSURLEREMPLACEMENTDESJOINTS(ANNUELLEMENT)ETDE SPIÈCES(AUBESOI N).
ENGLAND’SSTOVEWORKSN’ESTPASRESPONSABLEDESDOMMAGESNIDESBLESSURES,QUELSQU’ILS
SOIENT,SUBISENRAISONDENÉGLIGENCE
OUÀCAUSED’UNEINSTALLATIONOUD’UNEUTILISATIONDANGEREUSEDECEPRODUIT.POURTOUTEQUESTION,COMMUNIQUEZAVECLE
SERVICEDESOUTIENTECHNIQUE.
Bienvenue!
Introduction
Remerciements............................................5
Caractéristiques
Caractéristiquesdechauffage.....................6
Dimensions..................................................6
Conformitéauxnormesdel’EPA.................6
Installation
Vued’ensembledel’installation............7
Dégagemententrel’appareilet
lesmatièrescombustibles.....................8
Introductionàlaventilation..................9
Consignespourlaventilation................9
Renseignementssupplémentaires
surlaventilation....................................10
Méthodesdeventilationapprouvées
Àtraverslemur........................11
Àtraversleplafond..................12
Cheminéeexistante..................13
Installationdansunemaisonmobile…..14
Dégagementsdesterminaisons
desévents..............................................15
Raccordementàl’airextérieur..............16
Protectiondusol....................................17
Utilisationquotidienne
Guidededémarrage..................... .........18
Allumaged’unfeu........................ ..........18
Remarquesàproposde
l’utilisationquotidienne.........................19
Panneaudecommande
Réglagesdupanneaude
commande.............................................20
Codesd’erreur.......................................21
Pannedecourant...................................22
Entretien
Quotidien
Remarquesimportantes............23
Retraitquotidiendelacendre...23
Nettoyagedupot
decombustion………………………...24
Hebdomadaire
Retraitdudéflecteur...............25
Couverclesdesorifices
denettoyage...........................25
Mensuel
Remarquesimportantes...........26
Nettoyagedutuyaude
ventilation.................................27
Annuel
Remarquesimportantes..........28
Ventilateurd’évacuation.........29
Ventilateurdeconvection.......29
Finesdelatrémie....................30
Vérificationdesjoints..............30
Dépannagedebase...................................31
Remplacementdespièces
Moteurdelavisàgranules.......................33
Ventilateurdeconvection.........................34
Ventilateurdecombustion........................35
Interrupteurdel’aspirateur.......................36
Allumeur....................................................37
Joints..........................................................38
Vitre...........................................................39
Panneaudecommande.............................40
Schémadecâblage....................................41
Charnièresducouvercledelatrémie........42
Poignéeducouvercledelatrémie............42
Panneaux...................................................43
Fini.............................................................43
Illustrationdétailléedespièces
Vueéclatéedespièces..............................44
Listedespièces..........................................45
Garantie
Exempled’étiquette..................................47
Détailsdelagarantie.................................48
Avisimportant...........................................50
Formulaired’enregistrementde
lagarantie..................................................51
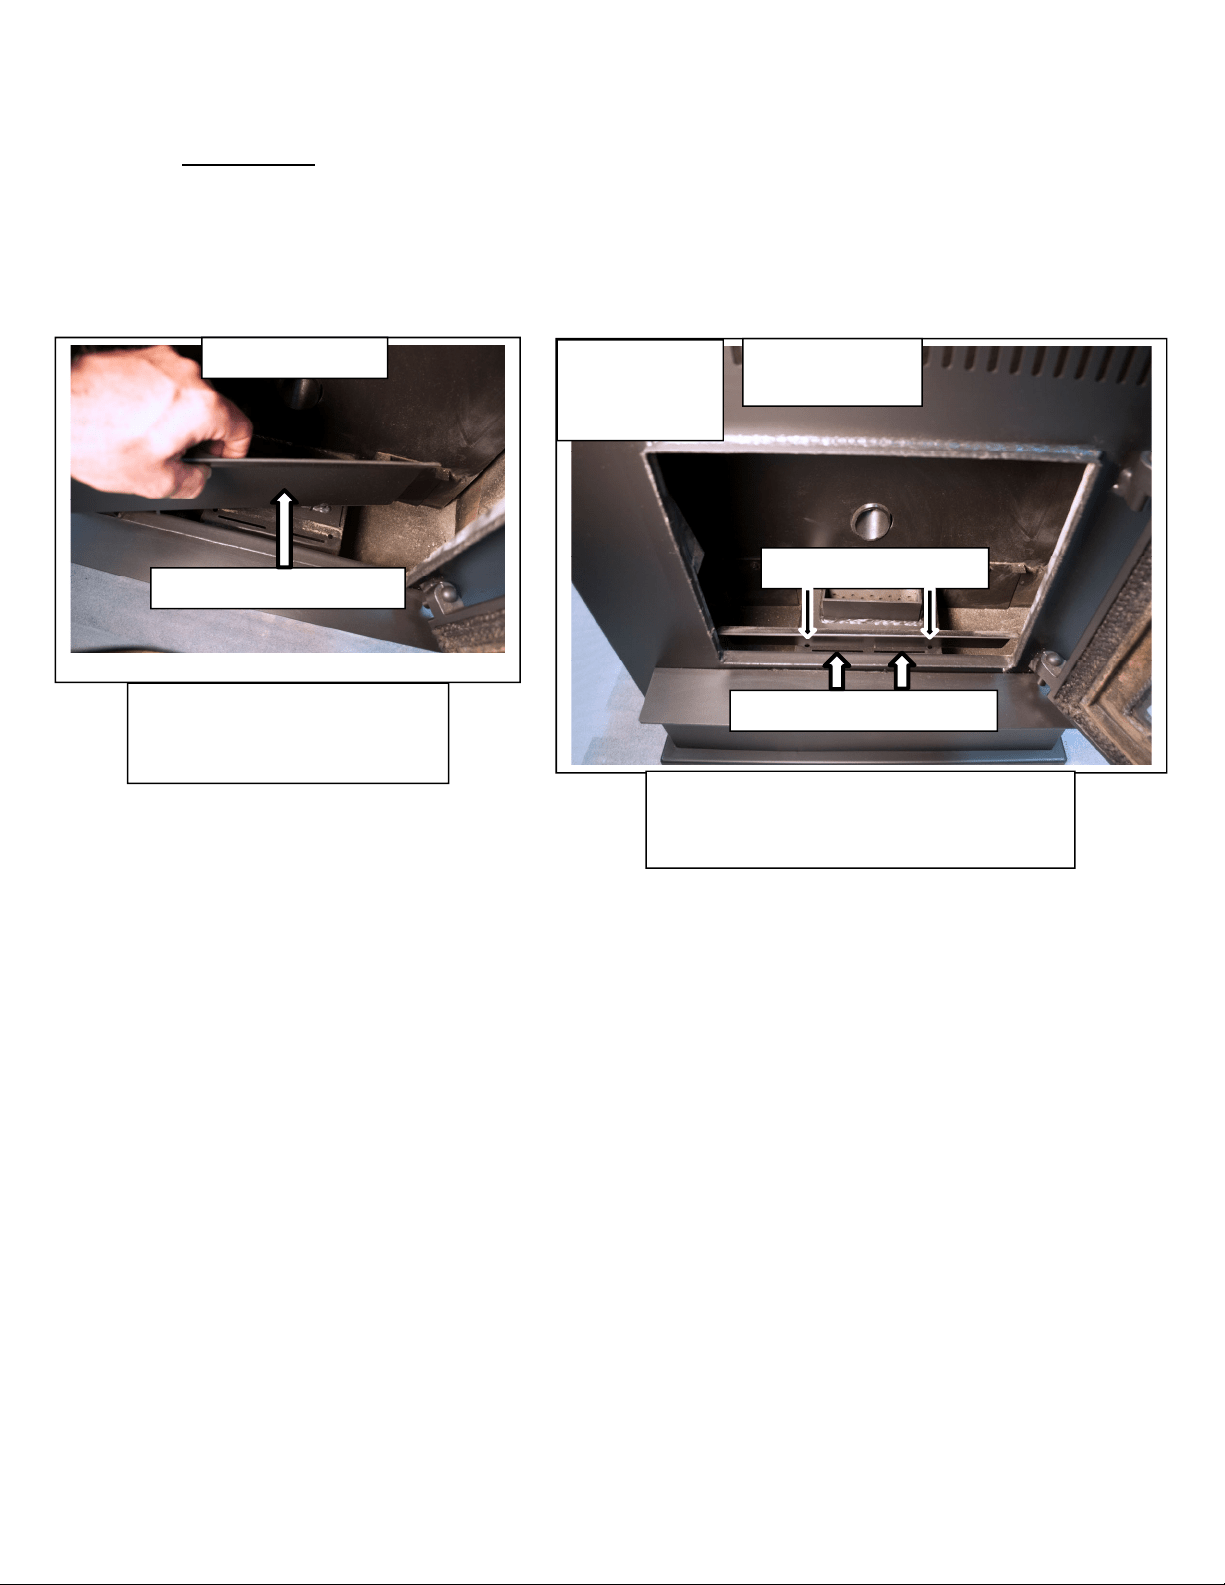
INSTALLATION DE LA BARRE D’ÉVACUATION D’AIR
ATTENTION:Labarred’évacuationd’airpeutsedétacherlorsdutransport.
ASSUREZ‐VOUSquelabarred’évacuationd’airestbieninstalléeavantchaqueutilisation,
notammentaprèsquel’articleeutéténettoyéouentretenu.
Labarred’évacuationd’airdevraits’insérerdanslesdeuxtrous
d’installationetpencherdansladirectiondelaparoiavantdupoêle.
Lapartiecourbéedelabarredevraitêtreorientéeverslaporteavant
etnonverslepotdecombustion.
Trousd’installation
Fentesd’évacuationd’air
Foyer
Insérezleslanguettesdelabarre
d’évacuationd’airdanslestrouset
nondanslesfentesd’évacuationd’air
Lapartiecourbéedelabarre
d’évacuationd’airdevraitêtre
orientéeVERSlaporteavant
Ouverturedela
porteavant
Barre
d’évacuation
d’air(installée)
Barred’évacuationd’air

5
IMPORTANT!LISEZETSUIVEZTOUTESLESINSTRUCTIONSPOURL’INSTALLATIONETL’ENTRETIEN,NOTAMMENTCELLESPORTANTSURLENETTOYAGEDE
L’APPAREILÀEFFECTUERSELON LESDIRECTIVESETCELLESPORTANTSURLEREMPLACEMENTDESJOINTS(ANNUELLEMENT)ETDE SPIÈCES(AUBESOI N).
ENGLAND’SSTO VEWORKSN’E STPASRE SPONSABLEDESDOMMAGESNIDESBLE SSURES,QUELSQU’ILSSOIENT,SUBISENRAISONDENÉGLIGENCEOU
ÀCAUSED’UNEINSTALLATIONOUD’UNEUTILISATIONDANGEREUSEDECEPRODUIT.POURTOUTEQUESTION,COMMUNIQUEZAVECLESERVICEDE
SOUTIENTECHNIQUE.
INTRODUCTION
Mercid’avoirachetécetexcellentproduitd’England’sStoveWorks.Lafamillequi
afondéetpossèdeencoreEngland’sStoveWorkscroitfermementquelestravaux
quel’onréalisesoi‐mêmesontlesplussatisfaisants.Voilàpourquoivousavez
trouvécepoêledansvotremagasindebricolagepréféré.
Nousconcevonsetfabriquons
nospoêlesexpressémentpourquen’importequel
propriétairesoitenmesuredelesentreteniravecdesoutilsdebase.Deplus,nous
sommestoujoursdisposésàvousaideràprocéderdelafaçonlaplussimpleetla
pluséconomiquequisoit.
Toutefois,bienqu’ilssoientdeconceptionsimple,nos
poêlesontunrendementextrêmementefficacequipermetdeproduireplusde
chaleuravecmoinsdecombustible.
Sivousavezbesoind’aideausujetdevotrepoêle,veuillezconsulterlavaste
sectiond’aidedenotresiteWebou appelernotreservicedesoutien
techniqueau
1800 245 ‐6489.Noussommespresquetoujoursenmesuredevous guider,que
cesoitpourl’installationoularéparation,ouencasdeproblème,ouencorepour
répondreàvosquestions.
Nousvoussouhaitonsdesannéesdechauffageagréable,efficaceetdequalité.
Toutel’équiped’England’sStoveWorks
Veuilleznoter:LesrenseignementsobtenussurnotresiteWebouenappelantla
lignedesoutientechniquesontgratuitsentouttemps;cependant,lesréparations
oul’entretienquenousoffronssurplaceoccasionnentdesfrais.
Leprésentguides’appliqueàtouteslesversionsdumodèle25‐CBPAH,ycomprislesversions55‐SHPCBPAH
et55‐TRPCBPAH.Parsoucidesimplicité,lepoêleseradésignéparlecode25‐CBPAH.
Ce manuel peut être téléchargé gratuitement sur le site Web du fabricant. Il s’agit d’un document protégé par
un droit d’auteur et il est strictement interdit de le revendre. Le fabricant peut occasionnellement mettre à jour
ce manuel et ne peut être tenu responsable de problèmes, y compris les blessures ou les dommages résultant
de l’utilisation de rensei
g
nements trouvés dans un manuel
p
rovenant de sources non autorisées.
ATTENTION:Lepoêleestlourd.
Deplus,lorsquevousmanipulezdestôles,rappelez‐vousqu’ilpeutyavoirdesbordscoupantsoudesbavures.
Bienquenousfassionstousleseffortspossiblespouréliminerlesbordscoupants,veuillezfairepreuvede
prudencelorsquevousmanipulezdespiècesdemétal.
N’oubliez
pasdedéconnecter(débrancher)lepoêledelasourced’alimentation
etdelelaisserrefroidircom
p
lètementavantd’eneffectuerl’entretien.
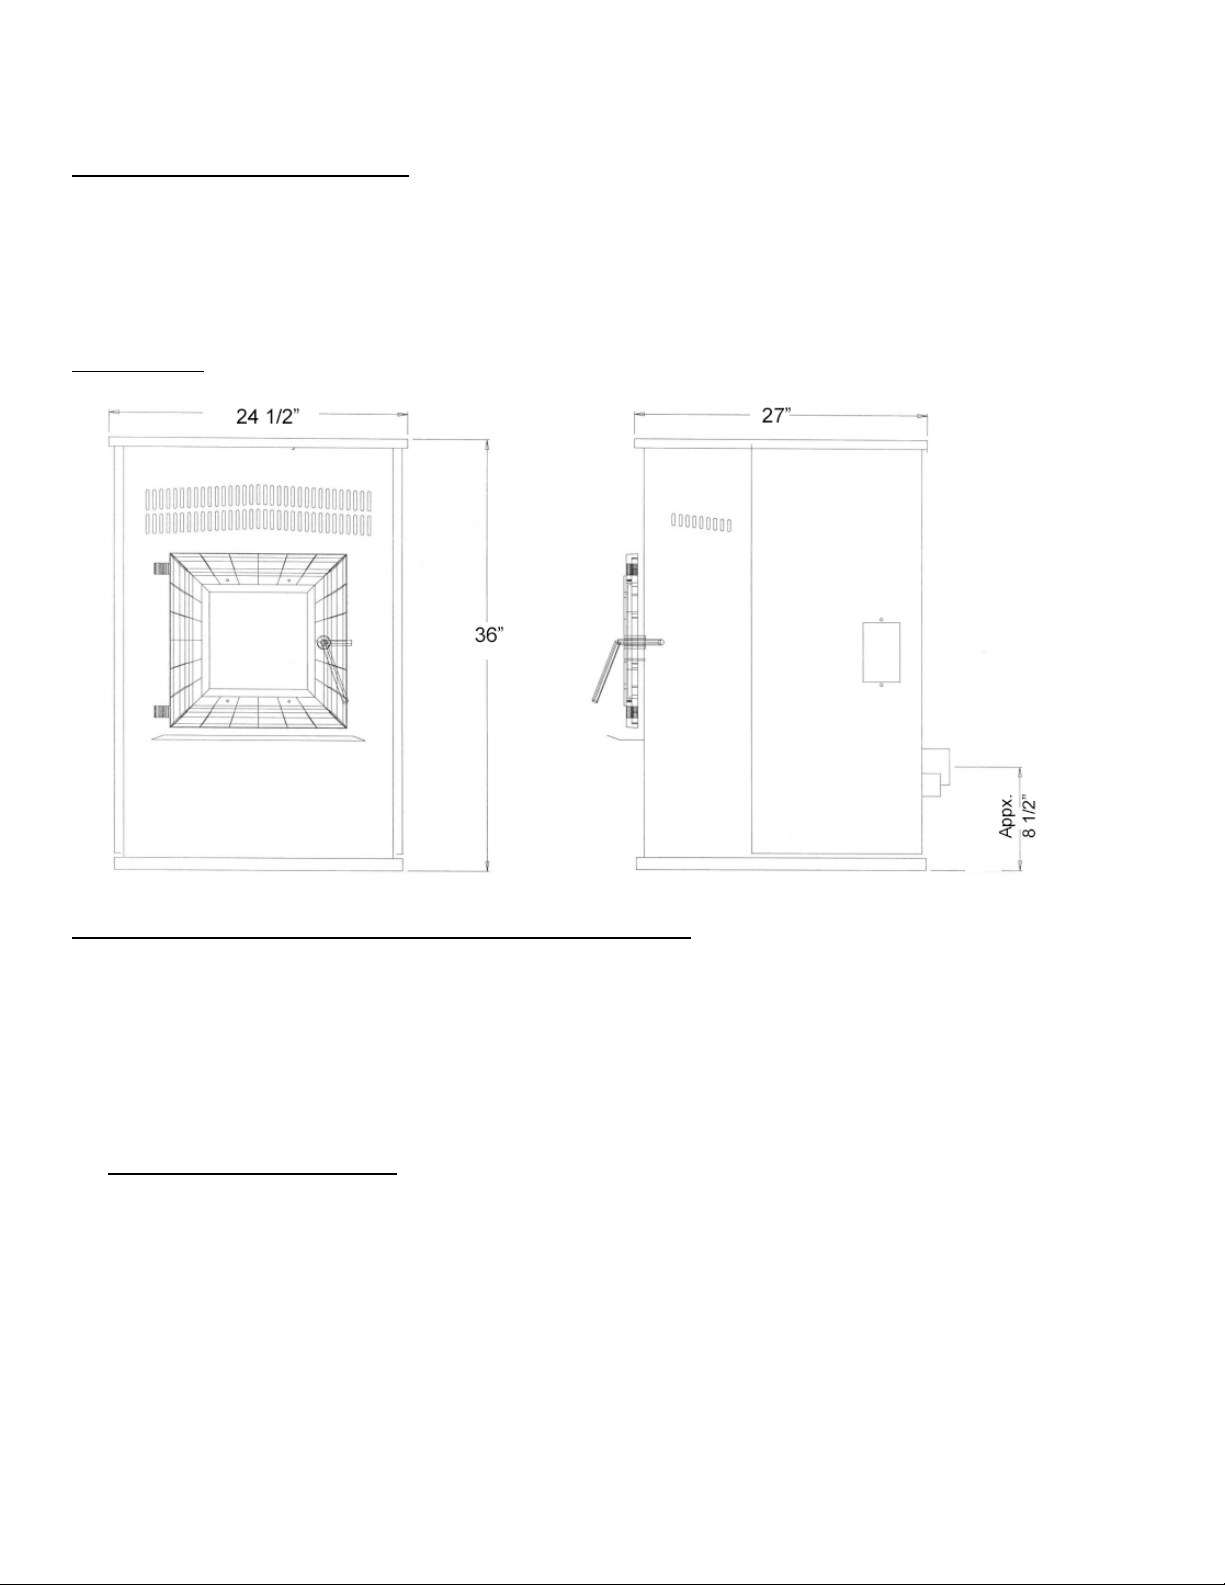
6
IMPORTANT!LISEZETSUIVEZTOUTESLESINSTRUCTIONSPOURL’INSTALLATIONETL’ENTRETIEN,NOTAMMENTCELLESPORTANTSURLENETTOYAGEDE
L’APPAREILÀEFFECTUERSELON LESDIRECTIVESETCELLESPORTANTSURLEREMPLACEMENTDESJOINTS(ANNUELLEMENT)ETDE SPIÈCES(AUBESOI N).
ENGLAND’SSTO VEWORKSN’E STPASRE SPONSABLEDESDOMMAGESNIDESBLE SSURES,QUELSQU’ILSSOIENT,SUBISENRAISONDENÉGLIGENCEOU
ÀCAUSED’UNEINSTALLATIONOUD’UNEUTILISATIONDANGEREUSEDECEPRODUIT.POURTOUTEQUESTION,COMMUNIQUEZAVECLESERVICEDE
SOUTIENTECHNIQUE.
CARACTÉRISTIQUES
Caractéristiquesdechauffage
Tauxapproximatifdecombustiondesgranules**………………………0,68à1,72kg/h(1,5à3,8lb/h)
Duréemaximaledecombustion**……………………………………………………………………………..76heures
Apportdechaleur**…………………………………………………………………………..……13429à21807BTU/h
Superficieapproximativechauffée***…….……………………………………………..……….jusqu’à204,38m²
Capacitédelatrémie……………………………………………………………………..………………………….…..54,43kg
Dimensions
Conformitéauxnormesdesécuritéetàcellesdel’EPA
Étatdeconformitéauxnormesdel’EPA…….........................................Certifiéconformeauxnormes
de2020surl’émissiondeparticuleslorsdel’utilisationdegranulesdebois.
Normed’essaidesÉtats‐Unis:règlement40CFRdel’EPAdesÉtats‐Unis,article60,alinéa60.536
Émissionsdeparticules…………………………………………………………………0,763g/h
ÉmissionsdeCO2………………………………………………………………………….0,013g/min
Efficacité…………………………………………………………………………….…………77,6%(PCS)
TestéselonlesnormesUL1482‐00,ASTME1509,ULC/ORD‐C1482‐M1990etULCS627‐00
Remarquespourcetappareil:Leproduitpeutdifférerlégèrementdel’illustration.Lesdistances
indiquéespourcetappareilreprésententleminimumrequis;ledégagementpeutêtreplusimportant
àl’arrièrepourassureruneaérationadéquate.Respecteztouteslesindicationsdufabricantconcernant
lesdistancesminimalesainsiquelesrèglementsmunicipaux.
*–SelonlestestsdelanormeASTM2779‐10
**–L’apportdechaleur,letauxdecombustionetletempsdecombustionmaximumdépendentgrandementdutypedegranulesutilisé,etcesvaleurssontdonc
sujettesàvariation.
***–Lacapacitémaximaledechauffagedecetappareil
peutvarierconsidérablementselonleclimat,letypedeconstruction,l’isolationetdenombreuxautresfacteurs.
Combinezlesrenseignementsexposésdansleprés en t guideauxrésultatsd’u ncalculdedéperditionthermiquepourvotremaisonafindedéterminersice t appareilsuffira
àcom b lervosbesoins.

7
IMPORTANT!LISEZETSUIVEZTOUTESLESINSTRUCTIONSPOURL’INSTALLATIONETL’ENTRETIEN,NOTAMMENTCELLESPORTANTSURLENETTOYAGEDE
L’APPAREILÀEFFECTUERSELON LESDIRECTIVESETCELLESPORTANTSURLEREMPLACEMENTDESJOINTS(ANNUELLEMENT)ETDE SPIÈCES(AUBESOI N).
ENGLAND’SSTO VEWORKSN’E STPASRE SPONSABLEDESDOMMAGESNIDESBLE SSURES,QUELSQU’ILSSOIENT,SUBISENRAISONDENÉGLIGENCEOU
ÀCAUSED’UNEINSTALLATIONOUD’UNEUTILISATIONDANGEREUSEDECEPRODUIT.POURTOUTEQUESTION,COMMUNIQUEZAVECLESERVICEDE
SOUTIENTECHNIQUE.
INSTALLATION
Vued’ensembledel’installation
Ungrandnombredefacteurs–dontvousdevreztenircompteavantdecommencer
l’installation–présidentauchoixdel’emplacementdevotrenouv eaupoêle.
1. Habitudesdepassage:afindeprévenirlesaccidents,lepoêledoitêtreinstallé
àunendroitoùiln’encombrepaslepassagehabitueldans
lamaison.
2. Fluxdechaleur etefficacité :tenezcomptedelafaçondontlachaleur circuledans
votremaisonpourdéciderdel’endroitoùvousinstallerezvotrepoêle.Installezlepoêle
àl’endroitquevousavezbesoindech auffer.Souvent,uneinstallationensous‐solne
permetpas
qu’assezdechaleuratteignelesétagessupérieurs, alorsqu’uneinstallationau
dernierétagenepermetpasquelachaleurserendeauxétagesin férieurs.N’oubliezpas
que,tantqu’iles tchaud,l’airmonteetempruntelechemin offrantlemoinsderésistance.
3. Emplacementdel’évacuation :lesmursextérieurssont
engénéralceuxdevantlesquels
ilconvientd’installerunpoêle,étantdonnéquel’onpeutyinstallerplusfacilementdes
dispositifsd’évacuationetdeprised’air(àl’aidedel’ensembleDuraVentAC‐3000,AC‐
33000auCanada).S’iln’estpaspossibled’installerlepoêledevantunmurextérieur,on
peut
avoirrecoursàdesméthodespourl’aérerenpassantautravers du toit;cependant,
cesméthodessontgénéralementpluscoûteuses,carellesnécessitentlaposed’un tuyau
deventilationpluslong,etellescompliquentsouventl’installationdelaprised’air.
4. Constructiondesmurs:lefaitdedisposerlepoêle
entrelesmontantsd’unecloison
simplifiel’installationetéliminelanécessitéderestructurerlemurpouryposerle
coupe‐feumural.
Avertissement
Ne stockez pas et n’utilisez pas d’essence ni toute autre vapeur ou liquide inflammable
à proximité de cet appareil ou de tout autre appareil.
Évitez l’emballement du poêle. Si des pièces extérieures commencent à rougeoyer, il
y a emballement. Réduisez l’alimentation. L’emballement annulera votre garantie.
Respectez les indications relatives à la distance minimale d’une matière combustible.
Le non-respect de ces exigences pourrait provoquer l’incendie de la maison.
Testé et approuvé pour des granules de bois uniquement. L’utilisation de tout autre
combustible annulera votre garantie.
À utiliser uniquement avec des granules de bois de qualité supérieure.
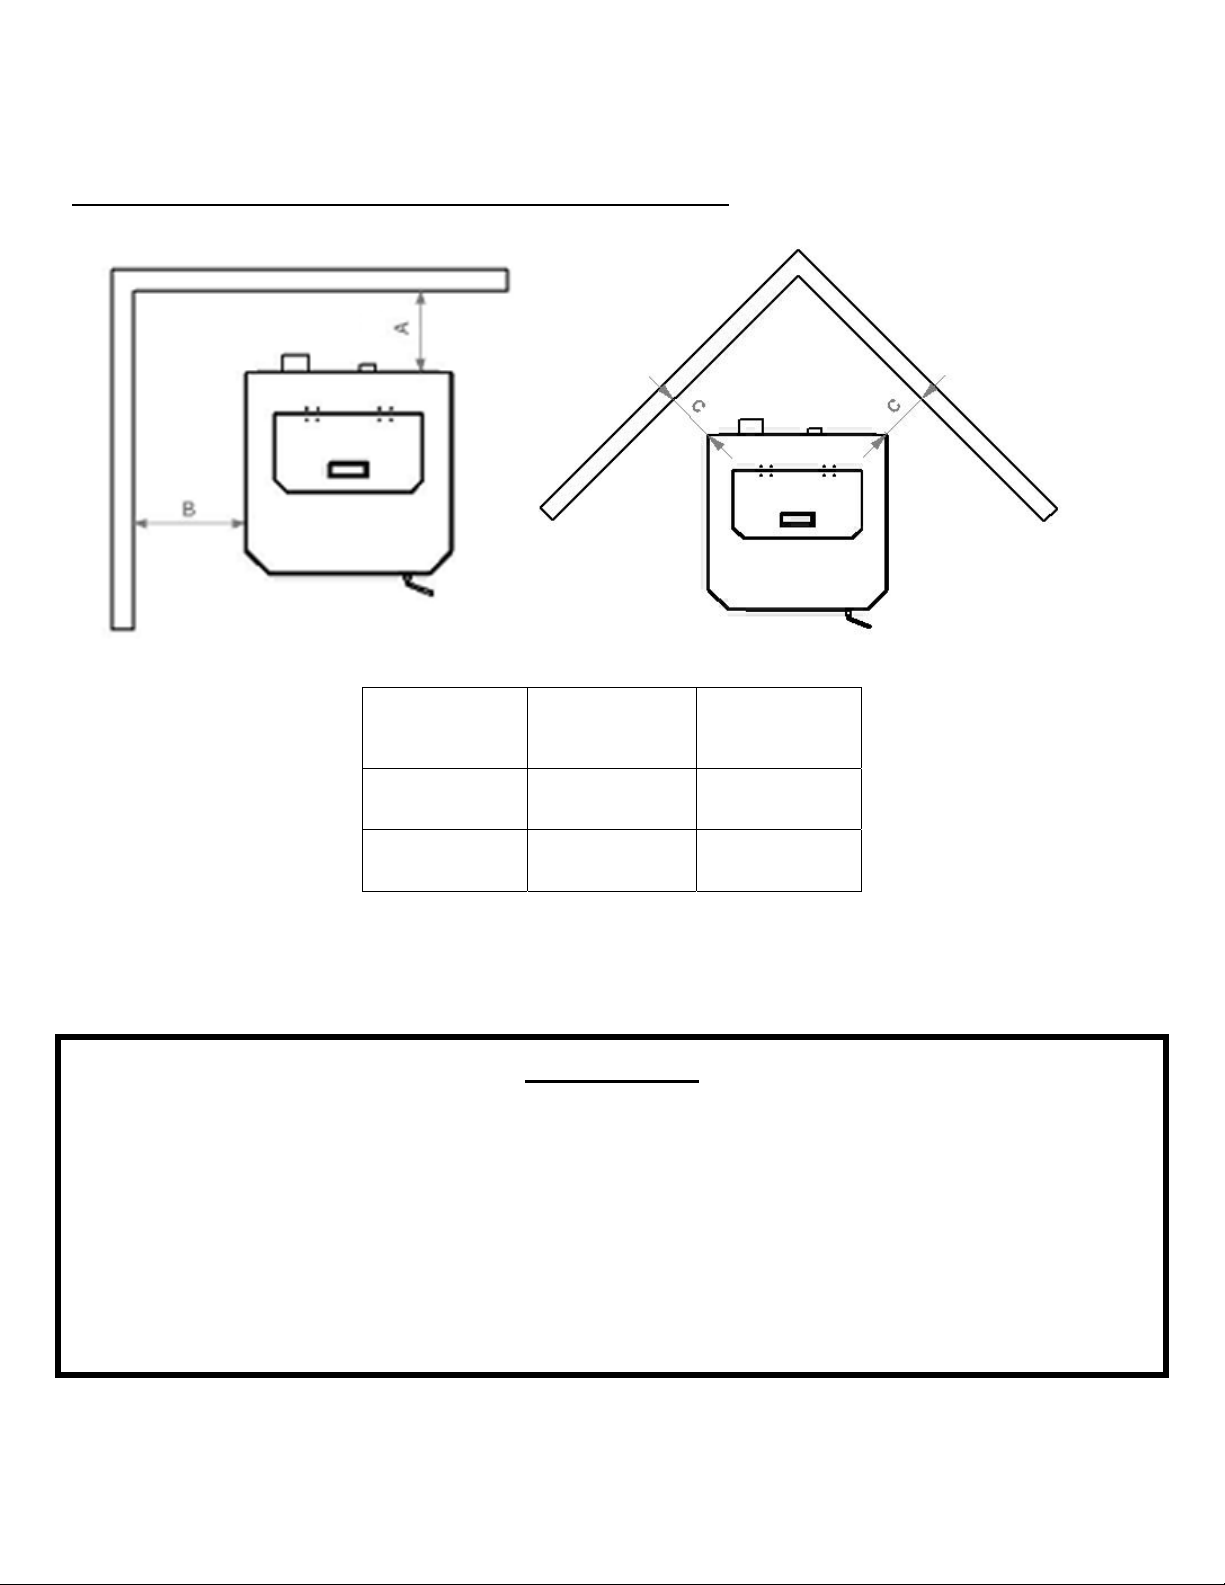
8
IMPORTANT!LISEZETSUIVEZTOUTESLESINSTRUCTIONSPOURL’INSTALLATIONETL’ENTRETIEN,NOTAMMENTCELLESPORTANTSURLENETTOYAGEDE
L’APPAREILÀEFFECTUERSELON LESDIRECTIVESETCELLESPORTANTSURLEREMPLACEMENTDESJOINTS(ANNUELLEMENT)ETDE SPIÈCES(AUBESOI N).
ENGLAND’SSTO VEWORKSN’E STPASRE SPONSABLEDESDOMMAGESNIDESBLE SSURES,QUELSQU’ILSSOIENT,SUBISENRAISONDENÉGLIGENCEOU
ÀCAUSED’UNEINSTALLATIONOUD’UNEUTILISATIONDANGEREUSEDECEPRODUIT.POURTOUTEQUESTION,COMMUNIQUEZAVECLESERVICEDE
SOUTIENTECHNIQUE.
INSTALLATION
Dégagemententrel’appareilet lesmatièrescombustibles
ATTENTION
CetappareilpeutdevenirtrèsCHAUDlorsqu’ilestenmarche.Gardezlesenfantsàl’écart.
Surveillezlesenfantsquisetrouventdanslamêmepiècequecetappareil.
Prévenezenfantsetadultesdesrisquesquereprésententlestempératuresélevées.
N’utilisezPASl’appareilsilesbarrièresprotectricessontouvertesoumanquantes.
Tenezlesvêtements,lesmeubles,lesrideauxetlesautresmatièrescombustiblesàbonnedistance.
L’installationDOITêtreconformeauxcodesetauxrèglementsmunicipaux,régionaux,provinciauxetnationaux.
Consultezlesautoritéslocalesenmatièredeconstruction,leserviced’incendieoulesorganismesdecontrôlelocaux
àproposdesrestrictions,del’inspectiondesinstallationsetdel’obtention depermis.
NERACCORDEZL’APPAREIL ÀAUCUNCONDUITNISYSTÈMEDEDISTRIBUTIONDEL’AIR
Del’appareilau
murarrière(A)
Del’appareilau
murlatéral(B)
Del’appareil
aucoin(C)
0cm 20,32cm 15,24cm
0mm 203mm 152mm

9
IMPORTANT!LISEZETSUIVEZTOUTESLESINSTRUCTIONSPOURL’INSTALLATIONETL’ENTRETIEN,NOTAMMENTCELLESPORTANTSURLENETTOYAGEDE
L’APPAREILÀEFFECTUERSELON LESDIRECTIVESETCELLESPORTANTSURLEREMPLACEMENTDESJOINTS(ANNUELLEMENT)ETDE SPIÈCES(AUBESOI N).
ENGLAND’SSTO VEWORKSN’E STPASRE SPONSABLEDESDOMMAGESNIDESBLE SSURES,QUELSQU’ILSSOIENT,SUBISENRAISONDENÉGLIGENCEOU
ÀCAUSED’UNEINSTALLATIONOUD’UNEUTILISATIONDANGEREUSEDECEPRODUIT.POURTOUTEQUESTION,COMMUNIQUEZAVECLESERVICEDE
SOUTIENTECHNIQUE.
INSTALLATION
Introductionàlaventilation
Cepoêleàgranulesfonctionneavecàunsystèmeàtiragenégatifquitirel’airdecombustionau
traversdupotdecombustionetpoussel’airviciéautraversdutuyaudeventilationpuisàl’extérieurdu
bâtiment.Cetappareildoitêtre installéconformémentauxtechniquesdeventilationdécritesci‐après;
lenon‐respectdesdétailsmentionnéspourraitréduiresonrendementetcauserdesdommages
matériels,desblessuresoulamort.England’sStoveWorksn’estpasresponsabledesdomm ages
causésparuneinstallationincorrecteounonsécuritaire.
Notreservicedesoutientechniqueestjoignableau1800245‐6489pourrépondre
aux
questionsrelativesàl’installationsécuritairedupoêle.Contactezunagentresponsablelocalafinde
vousassurerquel’installationestconformeauxexigencesmunicipalesetnationalesenmatièrede
préventiondesincendies;sivousn’êtespascertaindepouvoirinstallerlepoêledefaçonsécuritaire,
nousvoussuggéronsfortementde
faireappelàuninstallateurlocalcertifiéparleNFI(National
FireplaceInstituteauxÉtats‐Unis).
Consignespourlaventilation
AVERTISSEMENT:INSTALLEZL’ÉVENTENRESPECTANTLESDÉGAGEMENTSINDIQUÉSPARLE
FABRICANTDEL’ÉVENT.
Installez
TOUJOURSletuyaudeventilationenrespectantrigoureusementlesinstructionset
lesindicationssurledégagementquiaccompagnentlesystèmedeventilation.
NERACCORDEZPASlepoêleàgranulesàun conduitdefuméedéjàutilisépourunautreappareil.
N’INSTALLEZPASderégulateurdetirageniaucunautre
dispositifderéglagedanslesystème
d’évacuationparventilationdecetappareil.
UTILISEZuncoupe‐feumuralapprouvélorsqueleconduittraverseunmuretunsupportde
plafondavecuncoupe‐feusileconduittraverseleplafond.
UTILISEZUNIQUEMENTdestuyauxdetypeLouPL
de3poou4poapprouvéspourla
ventilationdespoêlesàgranules;N’UTILISEZPASdetuyauxgalvanisésnidetuyauxdetypeB.
SCELLEZchaquejointdel’éventavecdelasiliconerésistantauxtempératuresélevées
(pièce
nºAC‐RTV3)afind’éviterquelafuméeserépandedanslamaison.
ÉVITEZautantquepossibleleslongssegmentshorizontauxetlescoudes,carceux‐ciréduisent
letiragedusystèmedeventilation,cequiamoindritlerendementdupoêle.
DISPOSEZautantquepossibleletuyauàla
verticaleafind’éviterquelafuméedel’appareil
nepénètredansvotremaisondanslecasd’unecoupured’électricité.
INSPECTEZsouventlesystèmedeventilationafindevousassurerqu’iln’estpasengorgé
pardescendresvolantesouparquoiquecesoitd’autre.
NETTOYEZlesystèmedeventilation
co mmel’indiquelasectionsurl’entretienduprésentguide.
AVERTISSEMENT
INSTALLEZL’ÉVENTENRESPECTANTLESDISTANCESMINIMALESINDIQUÉESPARSONFABRICANT.
CHAUD!N’ytouchezpas!Celapourraitentraînerdegravesbrûluresoul’ infla mmationdesvêtements.
Lavitreainsiquelesautressurfacesdeviennen tchaudesaucoursdel’utilisation.
N’essayezpasdetouchernid’ouvrirlespanneauxfrontaux
oulatérauxaucoursdel’utilisation.
Vouspourriezsubirdegravesbrûluresoublessures.

10
IMPORTANT!LISEZETSUIVEZTOUTESLESINSTRUCTIONSPOURL’INSTALLATIONETL’ENTRETIEN,NOTAMMENTCELLESPORTANTSURLENETTOYAGEDE
L’APPAREILÀEFFECTUERSELON LESDIRECTIVESETCELLESPORTANTSURLEREMPLACEMENTDESJOINTS(ANNUELLEMENT)ETDE SPIÈCES(AUBESOI N).
ENGLAND’SSTO VEWORKSN’E STPASRE SPONSABLEDESDOMMAGESNIDESBLE SSURES,QUELSQU’ILSSOIENT,SUBISENRAISONDENÉGLIGENCEOU
ÀCAUSED’UNEINSTALLATIONOUD’UNEUTILISATIONDANGEREUSEDECEPRODUIT.POURTOUTEQUESTION,COMMUNIQUEZAVECLESERVICEDE
SOUTIENTECHNIQUE.
INSTALLATION
Renseignementssupplémentairessurlaventilation
Nemélangezpasetn’associezpasdepiècesprovenantdedifférentsfabricantslorsquevous
installezlesystèmedeventilation(parexemple,n’utilisezPASletuyaud’unfabricantavec
lagainepourtuyaud’unautrefabricant).
Ilestnécessairequeletuyausoitdisposéverticalementsuraumoins91,44cm
pourcréerun
tiragenatureldanslesystème.Celafaciliteral’évacuationdelafuméedupoêledanslecas
d’unepanned’électricitéoud’unedéfectuositéduventilateurdecombustion.
Lessystèmesdeventilationlongsde4, 57 moumoinsdevraientêtrecomposésintégralement
detu y au xpourpoêleàgranules
de3poafinderéduirelespertesattribuablesàlafriction.Les
systèmespluslong s, quantàeux,doiventêtrecomposésdetuyauxpourpoêle àgranulesde4po.
Nefaitespasaboutirlesystèmedeventilationdirectementsousunestructurecombustible
commeunporcheouuneterrasse.
RespectezlesnormesNFPA211énuméréesci‐dessous,relativesàl’emplacementdela
terminaisondessystèmesdeventilationenfonctiondel’emplacementdesfenêtreset
desautresouverturesd’unerésidence.
o NFPA211(version2006)Section10.4Terminaison:10.4.5
(1)L’extrémitédesortiedessystèmesmécaniquesdetirage
autresquelesdispositifsde
ventilationdirecte(dispositifspourdesappareilsàcombustionétanche)doitêtresituée
conformémentauxindicationssuivantes:
(a)Àaumoins0,91m(3pi)au‐dessusdetouteprised’airparventilationforcée
situéedansunrayonde3,04m(10pi).
(b)
Àaumoins1,21m(4pi)endessous,1,21m(4pi)latéralementet0,3m
(1pi)au‐dessusdetouteporte,fenêtreouprised’airpargravitéd’unbâtiment.
(c)Àaumoins0,6m(2pi)d’unbâtimentvoisinetàaumoins2,13m
(7pi)
au‐dessusdutrottoirlorsqu’ellejouxtelavoiepublique.
Lahauteurdel’ouvertureparrapportauniveaudusolàsonaplombdoitêtred’aumoins0,6m
(60,96cm).Lorsquevousmesurezlahauteurdelaterminaison,prenezencomptelahauteur
habituelledesbancsdeneige
etlaprésenced’élémentscombustiblescommelestasd’herbes
oudefeuilles.Danslesrégionsoùdeschutesdeneigeimportantessontpossibles,lahauteur
delaterminaisondoitêtresuffisantepourquecettedernièrenesoitpasobstruéeparles
accumulationsdeneige.
N’ayezpasrecoursàdes
expédientsaucoursdel’installationetnedispo sezaucunedespiècesde
l’appareiloudusystèm edeve ntilat ion d’unefaço nquipourraitproduiredeseffetsdangereux.
Leraccorddecheminéenedoitpastraverserdegrenier,decomble,deplacardnid’autres
espacesdissimuléssimilaires,deplancher,nideplafond.
Lepassageautraversd’unmuroud’unecloisonenmatériaucombustibledoitêtreréalisé
conformémentàlanormeCAN/CSA‐B365.
AVERTISSEMENT:
Lessurfacesdusystème deventilationdeviennentCHAUDESetpeuventcauserdesbrûluressivouslestouchez.
Il
p
eutêtrenécessair ed’utiliserunrevêtementoudes
g
rillesde
p
rotectionincombustibles.
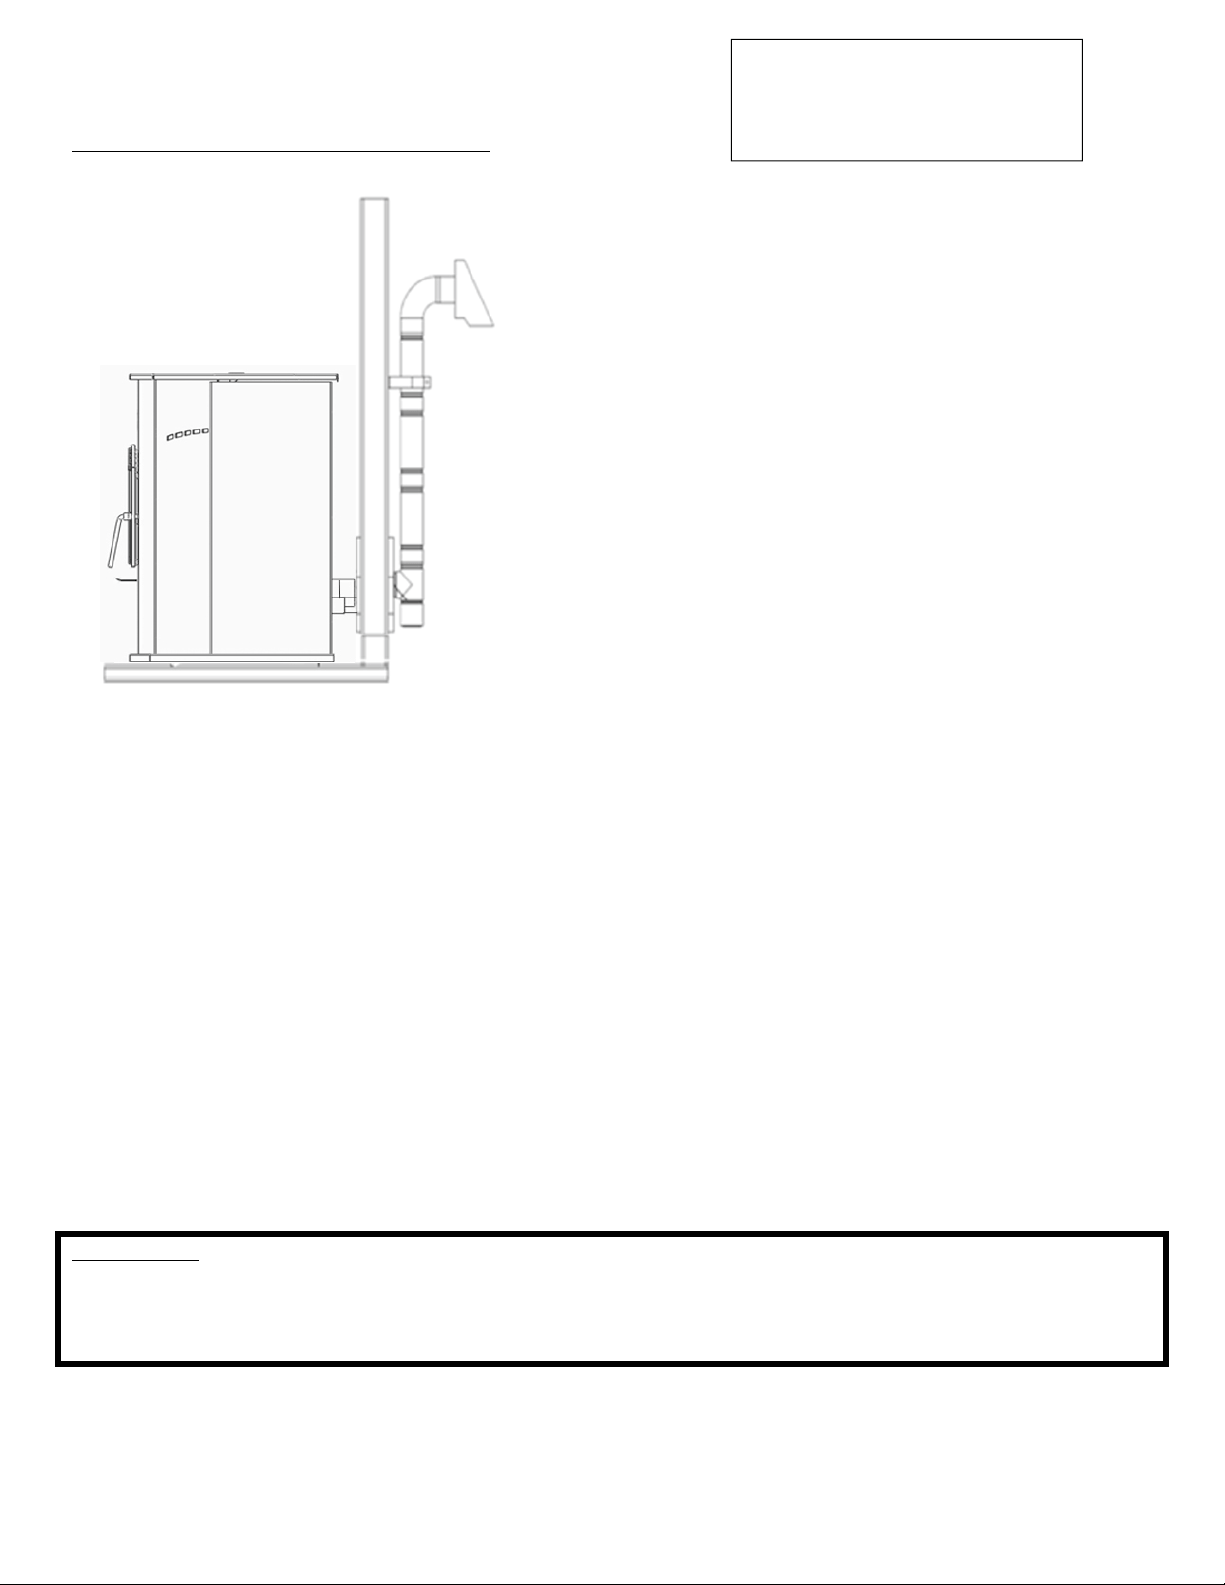
11
IMPORTANT!LISEZETSUIVEZTOUTESLESINSTRUCTIONSPOURL’INSTALLATIONETL’ENTRETIEN,NOTAMMENTCELLESPORTANTSURLENETTOYAGEDE
L’APPAREILÀEFFECTUERSELON LESDIRECTIVESETCELLESPORTANTSURLEREMPLACEMENTDESJOINTS(ANNUELLEMENT)ETDE SPIÈCES(AUBESOI N).
ENGLAND’SSTO VEWORKSN’E STPASRE SPONSABLEDESDOMMAGESNIDESBLE SSURES,QUELSQU’ILSSOIENT,SUBISENRAISONDENÉGLIGENCEOU
ÀCAUSED’UNEINSTALLATIONOUD’UNEUTILISATIONDANGEREUSEDECEPRODUIT.POURTOUTEQUESTION,COMMUNIQUEZAVECLESERVICEDE
SOUTIENTECHNIQUE.
INSTALLATION
Méthodedeventilat ionapprouvée1:Àtraverslemur
Ils’agitengénéraldelaméthodelaplussimple.
L’installationàtraverslemuràl’ a ide denotreensemble
AC‐3000ouAC‐33000auCanada(oud’unsystèmede
ventilationsimilaire)estcellequenouspréconiso ns.
Cetteméthodepermetderéduireauminimumlalongueur
detu y au disposé
horizontalement,deplacerle poêle
àproximitéd’unmuretdelaisserleregardduraccord
enTàl’extérieurdelamaisonpo urfaciliterlenettoyage.
Lorsquevousinstallezunsystèmedeventilation,
destuyauxdetypeLoudetypePLdoiventêtreutilisés,
ettoutesles
distancesminimalesavecdesmatières
combustibles(dontlalisteestdresséeparlefabricant
destuyaux)doiventêtrerigoureusementrespectées.
Utilisezuncoupe‐feumuralapprouvéparlefabricant
dutuyaulorsquecederniertraverseunmurfaitde
matériauxcombustibles,etrespectezlesdistances
minimalesdescombustibles.
Utilisez
unebuseàl’endroitoùl’éventestraccordéàlabouched’évacuationdupoêleàgranules,
etfixezcettebuseàl’aidedetroisvisàtôle.
Fixezl’éventàl’extérieurdelamaisonàl’aided’unecourroiedemur,justeendessousducoude
à90degrés.
Scellezchaqueraccorddetuyauavecdelasiliconerésistantauxvariationsdetempératureainsi
qu’auxtempératuresélevéesafindevousassurerquelesystèmeestexemptdefuites(consultez
lesindicationsdufabricantdusystèmedeventilationavantdeprocéderàcetteopération).
Siletuyaudeventilationutilisé
n’estpasdotéd’unsystèmedeverrouillageparrotation,vous
aurezbesoindetrois(3)visàtôlepourchaquejointdutuyau.
Raccordezlepoêleàgranulesàl’airdecombustionextérieuràl’aidedel’ensemblefourni
avecvotrepoêle,ouensuivantuneautreméthode,commele
décritlasection«Raccordement
àl’airextérieur»,àlapage16.
L’installationpeutêtreadaptéepourles sous‐sols(lesinstallationsensous‐soldoiventtoujoursêtre
effectuéesparuninstallateurprofessionnel)oupourd’autrescasdefigurepourlesquelsleraccord
enTetlapartieverticaledu
tuyausetrouventàl’intérieurdelamaison,etlesystèmedeventilation
passehorizontalementautraversducoupe‐feumuralavantdes’arrêter.
Veuilleznoter:
Lesschémasd’installationsontfournisàtitrederéférenceuniquementetnesontpasàl’échelle.Ilsnesontpasdestinés
àêtreutiliséscommedesplans universelsd’installation.Veuillezrespectertouteslesexigencesrelativesausystèmede
ventilationetauxdistancesmini malesaveclesmatièrescombustibles,etsuivretouslesrèglementslocaux.
Pourlesinstallationsenaltitude
(plushautque1219,2m),letuyau
deventilationdoitêtrede4po
plutôtquede3po.
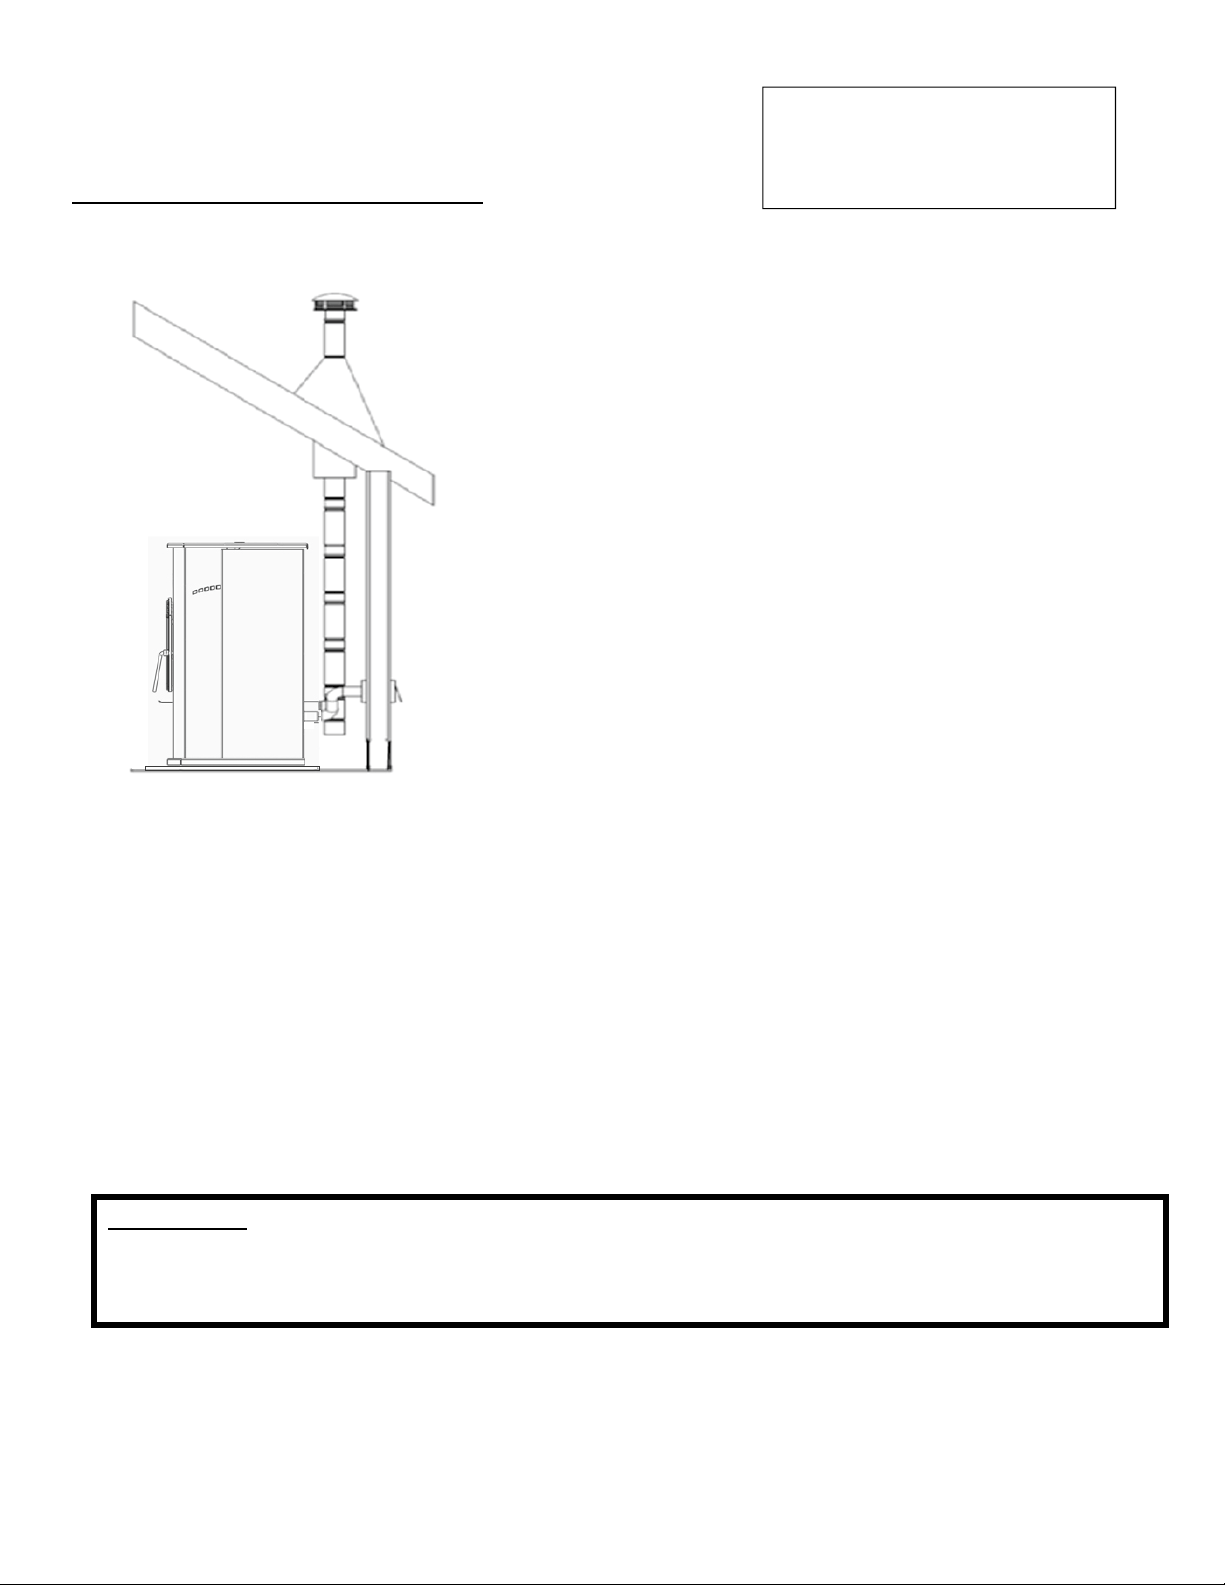
12
IMPORTANT!LISEZETSUIVEZTOUTESLESINSTRUCTIONSPOURL’INSTALLATIONETL’ENTRETIEN,NOTAMMENTCELLESPORTANTSURLENETTOYAGEDE
L’APPAREILÀEFFECTUERSELON LESDIRECTIVESETCELLESPORTANTSURLEREMPLACEMENTDESJOINTS(ANNUELLEMENT)ETDE SPIÈCES(AUBESOI N).
ENGLAND’SSTO VEWORKSN’E STPASRE SPONSABLEDESDOMMAGESNIDESBLE SSURES,QUELSQU’ILSSOIENT,SUBISENRAISONDENÉGLIGENCEOU
ÀCAUSED’UNEINSTALLATIONOUD’UNEUTILISATIONDANGEREUSEDECEPRODUIT.POURTOUTEQUESTION,COMMUNIQUEZAVECLESERVICEDE
SOUTIENTECHNIQUE.
INSTALLATION
Méthodedeventilationapprouvée2:Àtraversleplafond
Ilsepeutquelaventilationautraversduplafondetdutoit
soitlaseuleoptionenvisageabledanscertainscas.Cetype
d’installationestpréconisépourlesusines.
Lorsquevousinstallezunsystèmedeventilation,destuyaux
detypeLoudetypePLdoiventêtreutilisés,et
toutesles
distancesminimalesavecdesmatièrescombustiblesdont
lalisteestdresséeparlefabricantdestuyauxdoiventêtre
rigoureusementrespectées.
Utilisezlesupportdeplafondapprouvéparlefabricantdu
tuyaupourfairepassercedernierautraversd’unplafond
faitdematériauxcombustibles.Ilenva
demêmepourles
coupe‐feu,lecoupe‐feuradiant,lesolinetlamitre.
Assurez‐vousdebiensuivrelesindica tionsdufabricant
relativesàlahauteurde laterminaisonparrap portàlalignede
toiture,etre s p e c te z lesdistancesminimalesdescombustibl es.
Utilisezunebuseà
l’endroitoùl’éventestraccordéàla
bouched’évacuationdupoêleàgranules,etfixezcette
buseàl’aidedetroisvisàtôle.
Scellezchaqueraccorddetuyauavecdelasiliconerésistantauxvariationsdetempératureainsi
qu’auxtempératuresélevéesafindevousassurerquelesystème
estexemptdefuites(consultez
lesindicationsdufabricantdutuyauavantdeprocéderàcetteopération).
Siletuyaudeventilationutilisén’estpasdotéd’unsystèmedeverrouillageparrotation,vous
aurezbesoindetrois(3)visàtôlepourchaquejointdutuyau.
Raccordezlepoêle
àgranulesàl’airdecombustionextérieuràl’aidedel’ensemblefourniavec
votrepoêle,ouensuivantuneautreméthode,commeledécritlasection«Raccordementàl’air
extérieur»,àlapage16.
Cetteméthodedeventilationpeutêtreadaptéedetellesortequeletuyau
deventilationsortedu
poêleettraverseunmurhorizontalement,avantdesedirigerverticalementversletoitau‐dessus
duquelilterminerasacourse.Sivouschoisissezcetteoptiond’installation,suivezattentivement
lesinstructionsfourniesparlefabricantdusystèmedeventilation.
Veuilleznoter:
Lesschémasd’installationsontfournisàtitrederéférenceuniquementetnesontpasàl’échelle.Ilsnesontpasdestinésàêtre
utiliséscommedesplansuniverselsd’installation.Veuillezrespectertouteslesexigencesrelativesausystèmedeventilationet
auxdistancesminimalesaveclesmatièrescombustibles,etsuivretouslesrèglementslocaux.
Pourlesinstallationsenaltitude
(plushautque1219,2m),letuyau
deventilationdoitêtrede4po
plutôtquede3po.
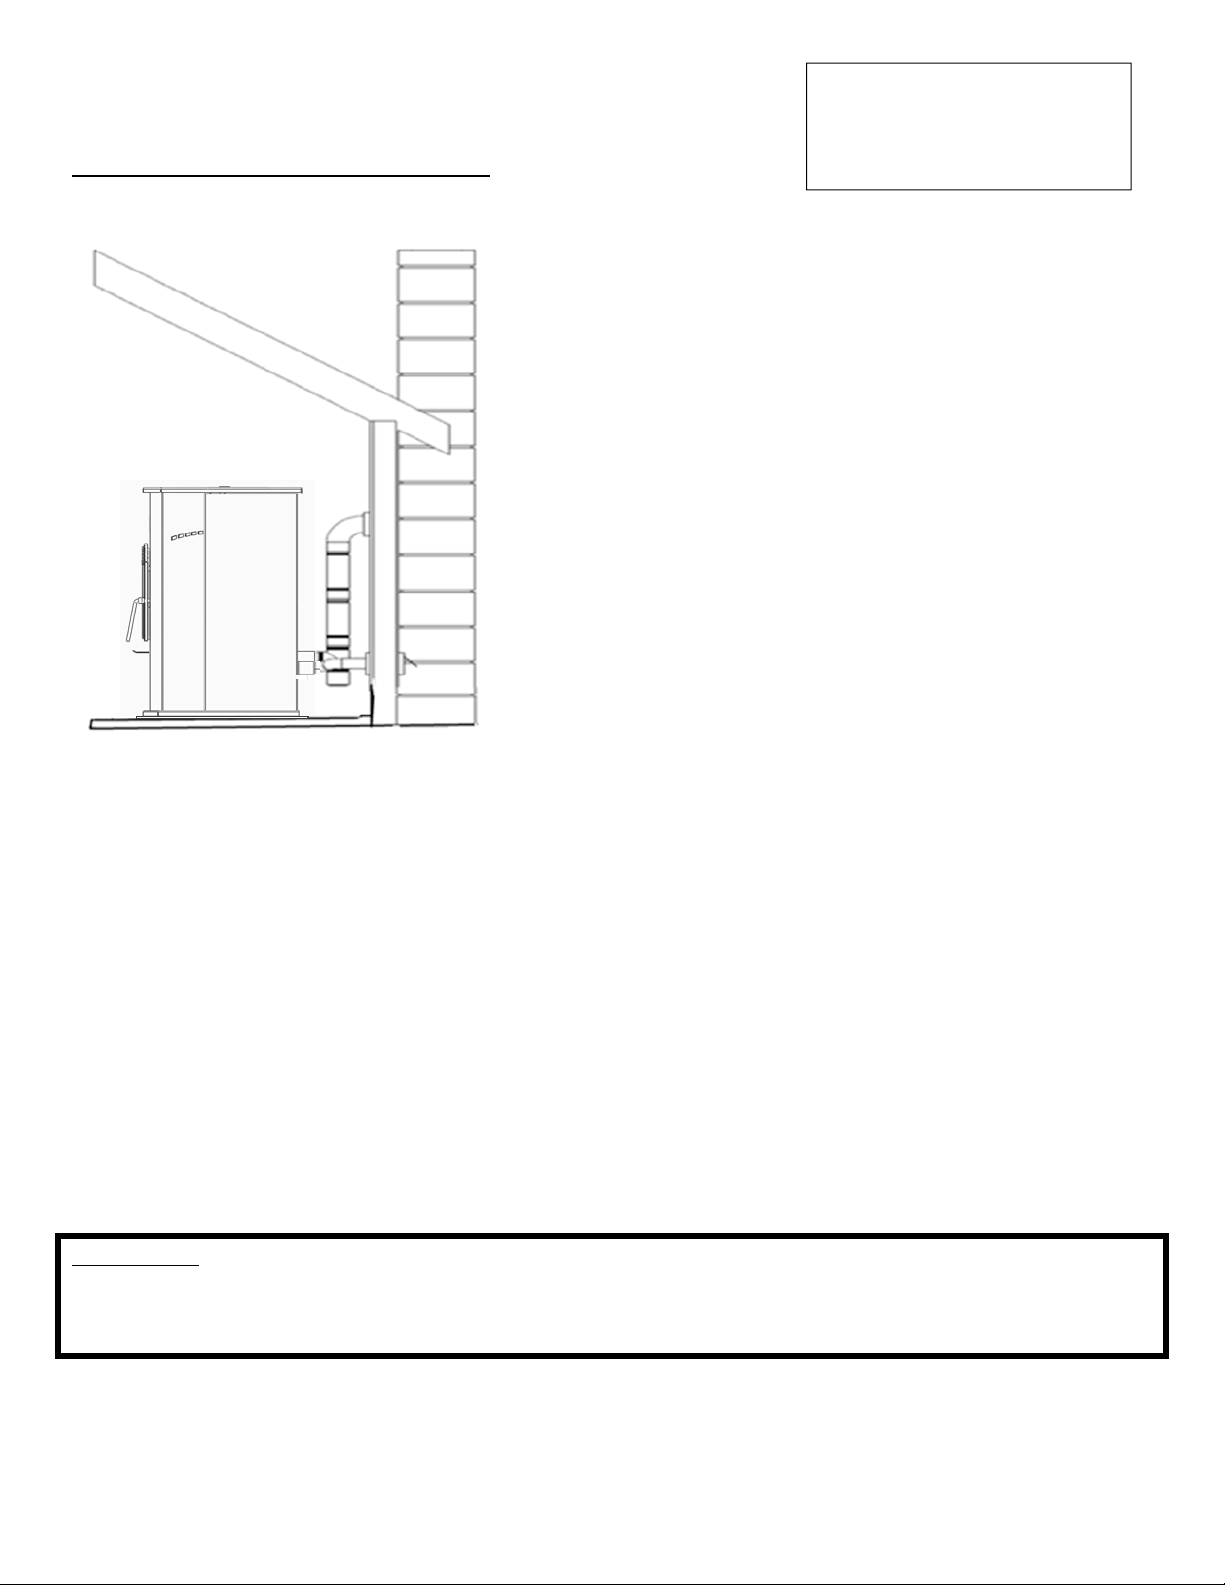
13
IMPORTANT!LISEZETSUIVEZTOUTESLESINSTRUCTIONSPOURL’INSTALLATIONETL’ENTRETIEN,NOTAMMENTCELLESPORTANTSURLENETTOYAGEDE
L’APPAREILÀEFFECTUERSELON LESDIRECTIVESETCELLESPORTANTSURLEREMPLACEMENTDESJOINTS(ANNUELLEMENT)ETDE SPIÈCES(AUBESOI N).
ENGLAND’SSTO VEWORKSN’E STPASRE SPONSABLEDESDOMMAGESNIDESBLE SSURES,QUELSQU’ILSSOIENT,SUBISENRAISONDENÉGLIGENCEOU
ÀCAUSED’UNEINSTALLATIONOUD’UNEUTILISATIONDANGEREUSEDECEPRODUIT.POURTOUTEQUESTION,COMMUNIQUEZAVECLESERVICEDE
SOUTIENTECHNIQUE.
INSTALLATION
Méthodedeventilat ionapprouvée3:Systèmeutilisant
unecheminéeexistante
L’utilisationd’unecheminéeexistanteenmaçonnerieou
préfabriquéeconstituelaseuleautreoptionacceptable
pourlaventilationdecetappareilàgranules.
UtilisezdestuyauxdeventilationdetypeLoudetype
PLjusqu’àl’entréedelacheminéeexistante.Utilisezun
adaptateurdedimensionappropriéepourassurerla
transitionentreletuyaudeventilationdupoêleetla
viroledelacheminéeenmaçonnerieoupréfabriquée,et
assurez‐vousquecetadaptateurestbienscellé,tantau
systèmedeventilationdupoêlequ’àlacheminée.
Avantd’utiliserunecheminéeexistante,assurez‐vous
quecettedernièreesten
bonétat(uneinspectionpar
unramoneurestfortementsuggérée).Assurez‐vous
égalementquelacheminéerépondauxnormesminimales
décritesàl’article211delaNFPA(unprofessionneldu
domainepeutvousenassureraprèsinspection).
Sivo usracc ord ezle poêleàunecheminéepréfabriquée,
celle‐cidoitIMPÉRATIVEMENT
êtreconformeàlano rme
UL103HT(ULCS629auCanada)etêtredotéed’ unconduit
defum éede6po.Unraccordàunautre typedecheminéepréfabriquéepo urraitavoirdes
conséquencesnégativessu rlefonctionnementdupoêleetêtrelacaused’uneinstallationdangereuse.
Dansle
casd’unraccordàunecheminéeenmaçonnerie,lasectiontransversaleduconduitde
fuméedoitêtrepriseencompte.Pourlescheminéesdontleconduitdefuméeaundiamètre
supérieurà6po(surfacedelasectionde28.27po
2
),ilsepeutquelaposed’undoublagede
cheminéeapprouvépourutilisationavecunpoêleàgranulessoitnécessaire.
Utilisezunebuseàl’endroitoùl’éventestraccordéàlabouched’évacuationdupoêleàgranules,
etfixezcettebuseàl’aidedetroisvisàtôle.
Scellezchaqueraccorddetuyauavecdelasiliconerésistantauxvariationsdetempératureainsi
qu’auxtempératuresélevéesafindevousassurerquelesystèmeestexemptdefuites(consultez
lesindicationsdufabricantdutuyauavantdeprocéderàcetteopération).
Siletuyaudeventilationutilisén’est
pasdotéd’unsystèmedeverrouillageparrotation,vous
aurezbesoindetrois(3)visàtôlepourchaquejointdutuyau.
Raccordezlepoêleàgranulesàl’airdecombustionextérieuràl’aidedel’ensemblefourniavec
votrepoêle,ouensuivantuneautreméthode,commeledécritla
section«Raccordementàl’air
extérieur»,àlapage16.
Veuilleznoter:
Lesschémasd’installationsontfournisàtitrederéférenceuniquementetnesontpasàl’échelle.Ilsnesontpasdestinésàêtre
utiliséscommedesplansuniverselsd’installation.Veuillezrespectertouteslesexigencesrelativesausystèmedeventilationet
auxdistancesminimalesaveclesmatièrescombustibles,etsuivretouslesrèglementslocaux.
Pourlesinstallationsenaltitude
(plushautque1219,2m),le
tuyaudeventilationdoitêtre
de4poplutôtquede3po.
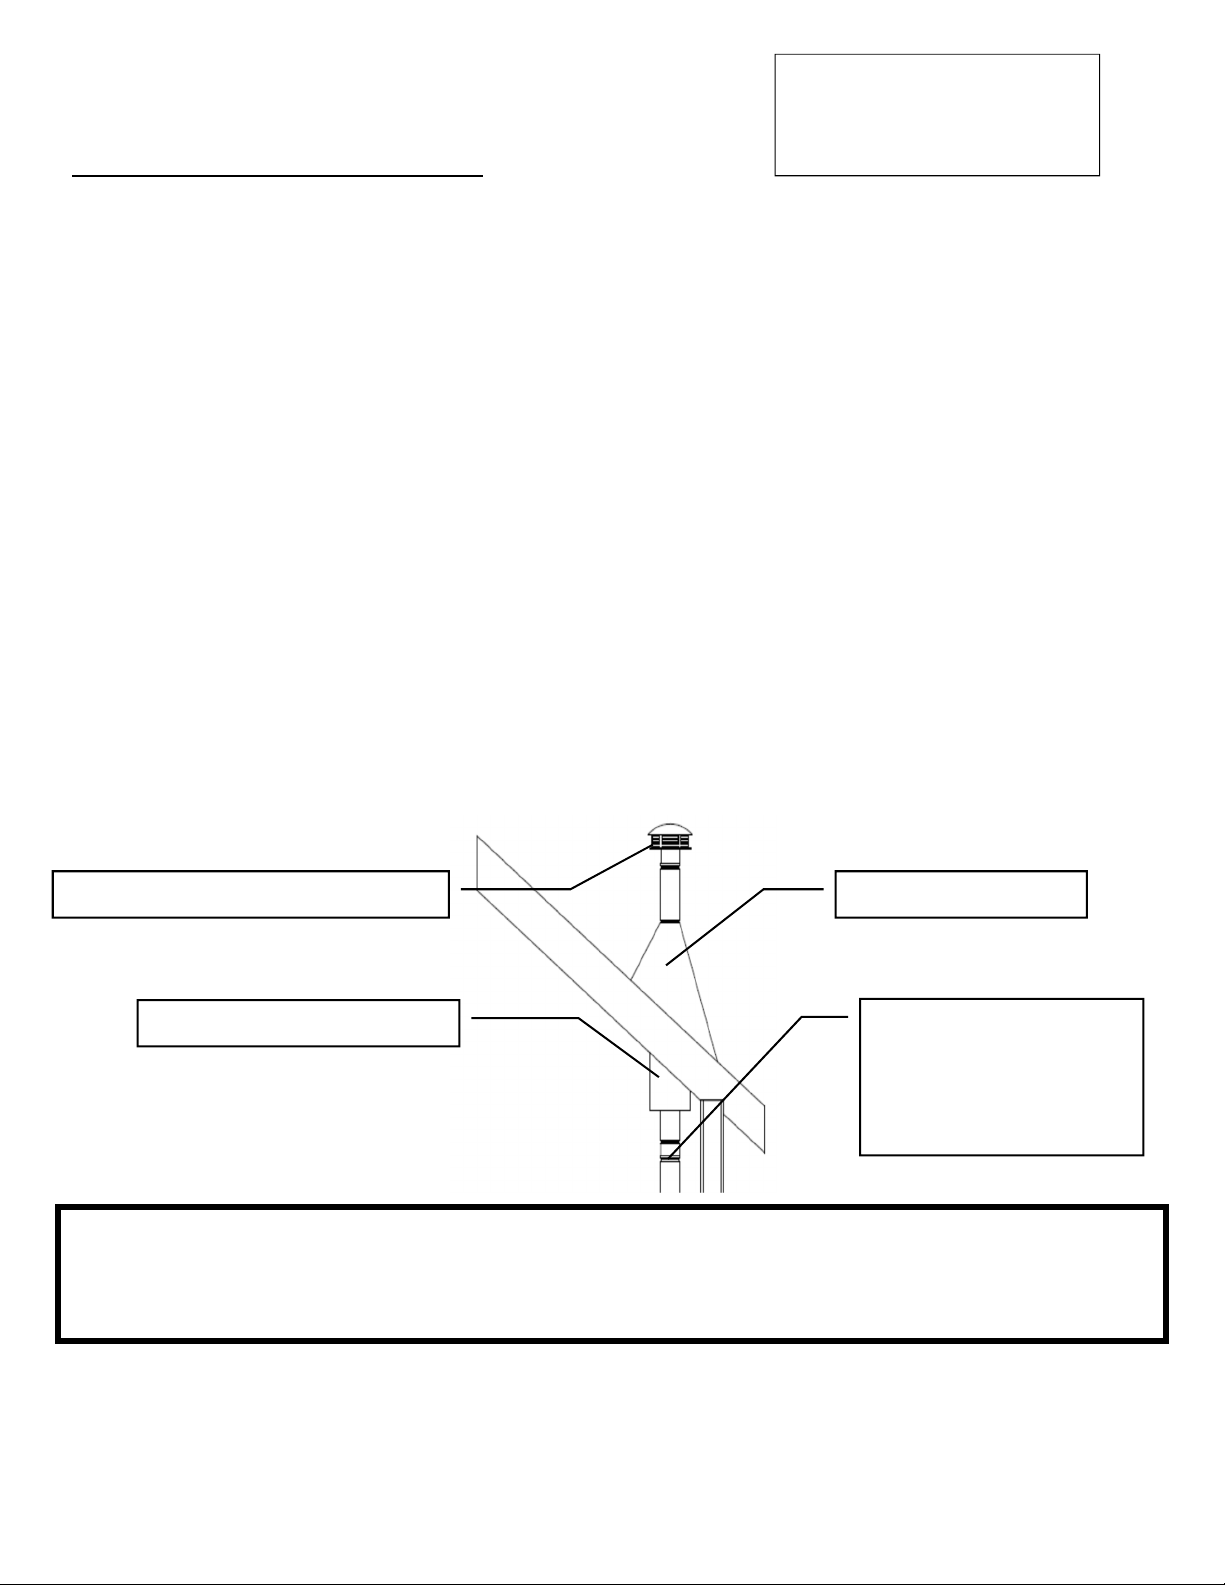
14
IMPORTANT!LISEZETSUIVEZTOUTESLESINSTRUCTIONSPOURL’INSTALLATIONETL’ENTRETIEN,NOTAMMENTCELLESPORTANTSURLENETTOYAGEDE
L’APPAREILÀEFFECTUERSELONLESDIRECTIVESETCELLESPORTANTSUR LEREMPL ACEMENTDESJOINTS(ANNUELLEMENT)ETDE SPIÈCES(AUBESOI N).
ENGLAND’SSTO VEWORKSN’E STPASRE SPONSABLEDESDOMMAGESNIDESBLE SSURES,QUELSQU’ILSSOIENT,SUBISENRAISONDENÉGLIGENCEOU
ÀCAUSED’UNEINSTALLATIONOUD’UNE UTILISATIONDANGEREUSEDECEPRODUIT.POURTOUTEQUESTION, COMMUNIQUEZAVECLESERVICEDE
SOUTIENTECHNIQUE.
INSTALLATION
Installationdansunemaisonmobile
L’ensemblederaccordementàl’airextérieurfourniparEngland’sStoveWorks,Inc.DOITêtre
utilisépoureffectueruneinstallationdel’appareildansunemaisontransportable.Veuillez
consulterlasection«Raccordementàl’airextérieur»àlapage16duprésentguidepourobtenir
davantagederenseignementssurlesraccords
àl’airextérieur.
Laprised’airextérieuredoitêtredégagéedesfeuilles,delaglaceetdesautreséléments
susceptiblesdel’obstruer.Ilestprimordialdelibérerlaprised’airafind’éviterlemanque
d’airetlapropagationdefumée.
LepoêleàgranulesDOITêtrefixéau
soldelamaisontransportableàl’aidedetire‐fondsdisposés
danslestrousprévusàceteffetdanslapartieinférieuredesabase.Lessystèmesdechauffage
ventilésàl’airextérieurdoiventêtrefixésà lastructuredanslaquelleilssetrouvent.
LepoêleàgranulesDOITêtre
misàlaterreàl’aided’unfildemiseàlaterreencuivremassif
decalibre8AWGoul’équivalent,dontchaqueextrémitéestmunied’undispositifavecmiseàla
terreapprouvéparlecodenationaldel’électricité.
Respectezscrupuleusementtouteslesindicationsrelativesaudégagement
mentionnéesàla
sectionappropriéeduprésentguideETrespectezégalementlesexigencesdufabricantdu
systèmedeventilationenlamatière.Deplus,assurez‐vousquevotresystèmedeventilation
estapprouvépouruneutilisationdansunemaisontransportable.
L’installationdoitêtreconformeàlanormeduManufacturersHome
&SafetyStandard(HUD)
CFR3280,article24,ainsiqu’auxrèglementslocaux.
Créezunpare‐vapeurefficaceàl’aidedesiliconeàl’endroitoùlacheminéeouleconduitd’air
extérieurtraverselemurdelastructure.
ATTENTION
L’INTÉGRITÉSTRUCTURELLEDUPLANCHER,DESMURS,DUPLAFONDETDUTOITDELAMAISONPRÉFABRIQUÉEDOITÊTRE
PRÉSERVÉE.NECOUPEZPASLESSOLIVESDEPLANCHER,LESMONTANTSDECLOISON,LESFERMESNIAUCUNAUTREÉLÉMENT
PORTEURDONTL’ALTÉRATIONPOURRAITENDOMMAGERL’INTÉGRITÉSTRUCTURELLEDELAMAISON.
AVERTISSEMENT:N’INSTALLEZPASL’APPAREILDANSUNECHAMBREÀCOUCHER.
Protecteurdesolive/coupe‐feu
Tuyaudeventilationpour
poêleàgranulesdetypeL
oudetypePLapprouvé
pouruneutilisationdans
unemaisonmobile
Chapeaudecheminéeetpare‐étincelles Solinetmitre
Pourlesinstallationsenaltitude
(plushautque1219,2m),le
tuyaudeventilationdoitêtre
de4poplutôtquede3po.
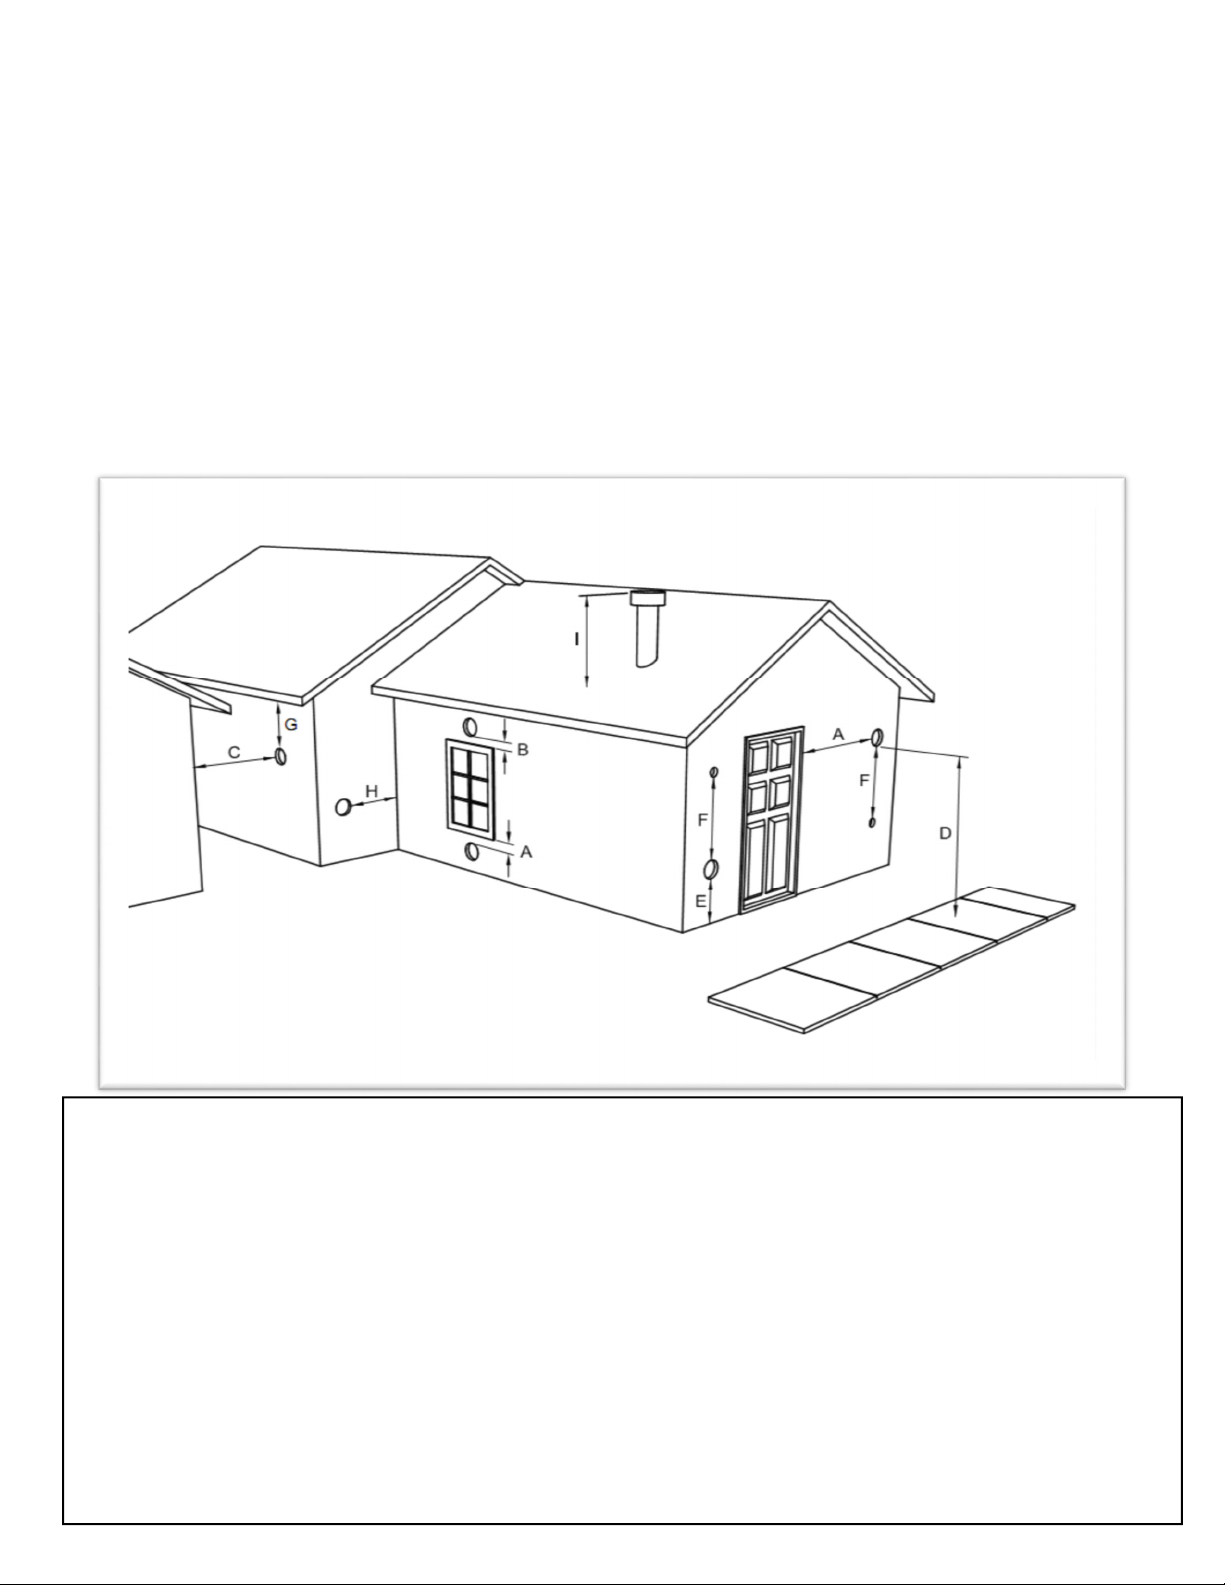
15
IMPORTANT!LISEZETSUIVEZTOUTESLESINSTRUCTIONSPOURL’INSTALLATIONETL’ENTRETIEN,NOTAMMENTCELLESPORTANTSURLENETTOYAGEDE
L’APPAREILÀEFFECTUERSELONLESDIRECTIVESETCELLESPORTANTSUR LEREMPL ACEMENTDESJOINTS(ANNUELLEMENT)ETDE SPIÈCES(AUBESOI N).
ENGLAND’SSTO VEWORKSN’E STPASRE SPONSABLEDESDOMMAGESNIDESBLE SSURES,QUELSQU’ILSSOIENT,SUBISENRAISONDENÉGLIGENCEOU
ÀCAUSED’UNEINSTALLATIONOUD’UNE UTILISATIONDANGEREUSEDECEPRODUIT.POURTOUTEQUESTION, COMMUNIQUEZAVECLESERVICEDE
SOUTIENTECHNIQUE.
DÉGAGEMENTSDESTERMINAISONSDESÉVENTS
A)Dégagementd’aumoins1,21mendessousousurlecôtédetouteporteoufenêtrepouvants’ouvrir.
B)Dégagementd’aumoins0,3mau‐dessusdetouteporteoufenêtrepouvants’ouvrir.
C)Dégagementd’aumoins0,6mdetoutbâtimentvoisin.
D)Dégagementd’aumoins2,13mà
partirduniveaudusollorsquel’installationjouxtelavoiepublique.
E)Dégagementd’aumoins0,6 mau‐dessus desherbes, desplantesetdetoutautrematériaucombustible.
F)Dégagementd’aumoins0,91mdelaprised’airparventilationforcéed’unappareil,quelqu’ilsoit.
G)Dégagementd’au
moins0,6mendessousdesavant‐toitsoudessaillies.
H)Dégagementd’aumoins0,3mdesmursfaitdematériauxcombustibles.
I)Lasortied’évacuationd’unsystèmedeventilationcomportantdesaspirateursmécaniquesdoit
dépasserd’aumoins30,48cm(12po)lazoneoùcesystèmedeventilationtraverse
letoit.
Remarquessurlaterminaisondutuyaudeven ti lationpourpoêleàgranulestiréesdelanormeNFPA211(version2006)
Section10.4Te rmina ison:10.4.5
(Reportez‐vouségalementàlasection«INSTALLATION»duprésentguideETauxremarquessupplé men ta iresci‐dessus) :
Aumoinsà0,91mau‐dessusdetouteprised’airparventilationforcéesituéedansunrayonde3,04m.
Aumoinsà1,21mendessous,1,21mlatéralementet0,3mau‐dessusdetouteporte,fenêtreouprise
d’airpargravitéd’unbâtiment.
Aumoinsà0,6md’unbâtimentadjacentetaumoinsà2,13mau‐dessusdusolsiellejouxt elavoiepublique.
Lasortied’airdoitêtredisposéedefaçonàcequelefluxdesgazdecombustionn’affectepaslesgens,nesurchauffepas
lesstructurescombustiblesetnes’infiltrepasdanslesbâtiments.Lessystèmesdetirageforcéettouteslespiècesdes
systèmesdetirageparaspirationsouspression
positivependantl’utilisationdoiventêtreinstallésdefaçonhermétique
pourprévenirtoutefuitedeproduitsdecombustiondansunbâtiment.Lessortiesd’évacuationquipassentàtraversle
murnedoiventpasterminerprèsdelavoiepubliqueouàunendroitoùlacond ensationoulavapeurpourrait
représenter
unenuisanceouundanger.
Assurez‐vousderespecterlesrèglementslocauxettouteslesinstructionsdufabricantdesproduitsutilisés
(ycomprisletuyaud’évacuation).Sivousavezdesquestions,consultezuninstallateurprofessionnelou
communiquezavecleservicedesoutientechnique.

16
IMPORTANT!LISEZETSUIVEZTOUTESLESINSTRUCTIONSPOURL’INSTALLATIONETL’ENTRETIEN,NOTAMMENTCELLESPORTANTSURLENETTOYAGEDE
L’APPAREILÀEFFECTUERSELON LESDIRECTIVESETCELLESPORTANTSURLEREMPLACEMENTDESJOINTS(ANNUELLEMENT)ETDE SPIÈCES(AUBESOI N).
ENGLAND’SSTO VEWORKSN’E STPASRE SPONSABLEDESDOMMAGESNIDESBLE SSURES,QUELSQU’ILSSOIENT,SUBISENRAISONDENÉGLIGENCEOU
ÀCAUSED’UNEINSTALLATIONOUD’UNEUTILISATIONDANGEREUSEDECEPRODUIT.POURTOUTEQUESTION,COMMUNIQUEZAVECLESERVICEDE
SOUTIENTECHNIQUE.
RACCORDEMENTÀL’AIREXTÉRIEUR
L’airdecombustionutiliséparcepoêledoitprovenirdel’extérieur.
Letuyauderaccordementàl’airextérieurdépassedelapartieinférieurecentrale
del’arrièredupoêle. Utilisezl’ensemblederaccordementquiaccompagnevotre
poêlepourraccordercelui‐ciàl’airextérieu r.Lesinstructionsainsiquetoutesles
piècesnécessairesauraccordementdevotrepoêleàgranulesàl’airextérieur
sontinclusesdansl’ensemblederaccordementàl’airextérieur.
S’ilnevousestpaspossibled’utiliserl’ensemblederaccordementàl’airextérieur,
vouspouvezutiliserd’autrespiècesàconditionderespecter cequisuit:
Le
tuyauutilisépourleraccordementàl’airextérieurdoitêtreenmétal
d’uneépaisseurd’aumoins0,0209po(acierdouxdecalibre25)etson
diamètreintérieurdoitêtred’approximativement2po.
Touslesjointsetraccordsdutuyaudoiventêtrescellésàl’aidedecolliers
deserrageoud’un
autremoyenmécanique,afinqueleraccordement
àl’airextérieurneprésentepasdefuites.
Ilestdéconseilléd’utiliserunetropgrandelongueurdetuyauetd’y
formerunnombreexcessifdecoudes.Enraisondelarésistanceau
frottementdansletuyau,lerendementdupoêleseraréduit
siletuyau
deraccordementàl’airextérieuresttroplong.
Unegrilleouunautredispositifdeprotectiondoitêtreplacéàl’extrémité
dutuyauderaccordementàl’airextérieur,afind’éviterquelapluie,des
débrisoudesanimauxnuisiblesnepénètrentdanslatuyauterie.
Utilisezun
tuyaud’undiamètrede3posilalongueurduraccordement
àl’airextérieurestdeplusde1,82m,sileraccordementprésenteplus
dedeux(2)coudesousilepoêleestinstallédansunsous‐sol.
Leraccordementàl’airextérieurdoitfairel’objetd’aumoins
uneinspection
annuelleafindes’assurerqu’iln’estpasobstrué.
Attention
NECAPTEZJAMAISl’airextérieurdecombustiondans:
1.Lacavitéd’unmur,d’unplancheroud’unplafond.
2.Unespaceclostelqu’ungrenier,ungarageouunvidesanitaire.

17
IMPORTANT!LISEZETSUIVEZTOUTESLESINSTRUCTIONSPOURL’INSTALLATIONETL’ENTRETIEN,NOTAMMENTCELLESPORTANTSURLENETTOYAGEDE
L’APPAREILÀEFFECTUERSELONLESDIRECTIVESETCELLESPORTANTSUR LEREMPL ACEMENTDESJOINTS(ANNUELLEMENT)ETDE SPIÈCES(AUBESOI N).
ENGLAND’SSTO VEWORKSN’E STPASRE SPONSABLEDESDOMMAGESNIDESBLE SSURES,QUELSQU’ILSSOIENT,SUBISENRAISONDENÉGLIGENCEOU
ÀCAUSED’UNEINSTALLATIONOUD’UNE UTILISATIONDANGEREUSEDECEPRODUIT.POURTOUTEQUESTION, COMMUNIQUEZAVECLESERVICEDE
SOUTIENTECHNIQUE.
PROTECTIONDUSOL
Danslecasoùlepoêleàgranulesestinstallésurunplanchercombustible,sonutilisationnécessitelapose
d’unprotecteurdeplancherincombustible.Sileplanchersurlequellepoêledoitêtreinstalléestdéjà
incombustible(parexemple,leplancherenbétond’unsous‐sol)etpossèdeunevaleur
d’isolation
thermique«R»aumoinségaleà0,2,aucunprotecteurdeplanchern’estrequis(vouspouvez
toutefoisinstallerunprotecteurdeplancherdécoratif).
VouspouvezacheterunprotecteurdeplancherpréfabriquéhomologuéUL(ULCauCanada)ouéquivalent,
ouencorefabriquerunprotecteurdeplancheràpartir
dematériauxstandards:deuxpanneauxdeciment
d’uneépaisseurde12,7 mmrecouvertsdecarreauxencéramiqueconstituentparexempleunprotecteurde
plancheradéquat,dont lavaleurd’isolationthermique«R»estaumoinségaleà0,2.
Gardezàl’espritquelepoêleestnonseulementlourd,maisqu’ilimposeégalementdesécartsde
températureauprotecteurdeplancher,écartsquipeuventendommagerlescarreaux,etdétacherle
mortieretlesjoints.Untapispourfoyern’estPASapprouvépourremplacerunprotecteurdeplancher.
PourlesÉtats‐UnisetleCanada:leprotecteurdeplancherdoitdépasserd’aumoins15,24cm(6po)
àl’avantetsurlescôtés.
AuCanada,leprotecteurdeplancherincombustibledoitêtreégalementdisposésoustouttuyaude
ventilationhorizontaletdépasserde5,08cm(2po)surchacundescôtésETêtreplacédirectement
soustouttuyaudeventilationvertical.

18
IMPORTANT!LISEZETSUIVEZTOUTESLESINSTRUCTIONSPOURL’INSTALLATIONETL’ENTRETIEN,NOTAMMENTCELLESPORTANTSURLENETTOYAGEDE
L’APPAREILÀEFFECTUERSELON LESDIRECTIVESETCELLESPORTANTSURLEREMPLACEMENTDESJOINTS(ANNUELLEMENT)ETDE SPIÈCES(AUBESOI N).
ENGLAND’SSTO VEWORKSN’E STPASRE SPONSABLEDESDOMMAGESNIDESBLE SSURES,QUELSQU’ILSSOIENT,SUBISENRAISONDENÉGLIGENCEOU
ÀCAUSED’UNEINSTALLATIONOUD’UNEUTILISATIONDANGEREUSEDECEPRODUIT.POURTOUTEQUESTION,COMMUNIQUEZAVECLESERVICEDE
SOUTIENTECHNIQUE.
UTILISATIONQUOTIDIENNE
Guidededémarrage
Vérifiezquelatrémieestpropreetnecontientpasdecorpsétrangers.Assurez‐vousdebranchercet
appareilàuneprisefonctionnelle;nousvoussuggéronsd’utiliserunparasurtenseurafindeprotéger
sescomposantsélectriques.
AVANTdefairelepremierfeu,faitesfonctionnerl’appareilàvide(sansmettredegranulesdanslatrémie)
pendantvingtminutes;pourcela,appuyezsurlebouton«ON»(marche)aprèsavoirbranchél’appareil.
Toutdesuiteaprèsavoirappuyésurlebouton«ON»(marche),vousdevriezentendrele
ventilateurd’évacuationdémarrer,puisfonctionnerdefaçoncontinue.
Aprèsquetroisàcinqminutessesontécoulées,cherchezàvoirlerougeoiementdel’allumeur
danslepotdecombustion,afindevousassurerqu’ilfonctionnecorrectement.
Abaissezmanuellementl’interrupteurducouvercl e delatrémie(voirle«Schémadespièces»àla
page44)etvérifiezquelavisàg ranulestournebien.Relâchezl’interrupteurducouverc l e dela
trémieetassurez‐vousquelavisàgranulesarrêtedetourner.NEMETTEZPASVOSDOIG TSDANSLA
TRÉMIEETNELESAPPROCHEZPASDELAVISÀGRANULESLORSQUECELLE‐CIESTENROTATION.
Aprèsenvironvingtminutes,lesdeuxécransd’affichagedupanneaudecommandedevraientafficher
«E‐2»(voustrouverezdeplusamplesinformationssurlescodesd’erreurdanslasectionquitraitede
cesujetdansleprésentguide).
Lamarcheàvideestalorsterminéeetvotreappareildechauffageàgranulesestprêtàfonctionner
normalement.
Allumaged’unfeu
Vousdevezremplirlatrémiedegranulesdeboisafindefairefonctionnerlepoêle.Soulevezlecouvercle
delatrémieàl’aidedelapoignéeencastréeetversezlesgranulesdeboisdanslatrémie.
Nousrecommandonsden’utiliserquedesgranulesfabriquéesdansdesinstallations
approuvéesparlePFI(PelletFuelInstitute).Lesgranulesportantlesceaud’approbationdu
PFIontdefaiblestauxdecendresetd’humidité,unegrandevaleurcalorifique,etleurqualité
etleurtaillesontuniformes.
Cepoêleauraunaussibonrendementavecdesgranulesdeboisderésineuxqu’avecdesgranulesdebois
defeuilluset,bienquelacendrepuisseavoirunaspectouunetexturelégèrementdifférents,lesdeux
typesdegranulesbrûlerontproprementetefficacement.
Cepoêleàgranulesestdotéd’unsystèmed’allumageautomatique.L’utilisateurn’aqu’àappuyersurle
bouton«On»(marche)pourallumerlepoêle.
Uncourtmomentaprèsquevousavezappuyésurlebouton«On»(marche),leslettres«SU»s’affichent
surlesécransdelaplagedechaleuretdelavitesseduventilateur,surlepanneaudecommande.Cela
indiquequelepoêleacommencésaséquencededémarrageetqu’ilfonctionnecorrectement.
Lerythmedel’alimentationengranulesetlaquantitéd’airdecombustionutiliséeaucoursdudémarrage
sontdéterminésàl’aidedupanneaudecommande.Lepoêlepeutainsiêtreréglésurn’importequelle
plagedechaleuraudémarrage.
Aprèsunequinzainedeminutes,lefeudevraitbrûlerint e ns émen t etl’indication«SU»devraitdisparaître
dupanneaudecommande.Lepoêlefonctionnealorsnormalement,etlesécransd’affichagedupanneaude
commanderesten téteintsàmoinsquevousnerégliezlaplagedechaleurou lavitesseduventilateur.

19
IMPORTANT!LISEZETSUIVEZTOUTESLESINSTRUCTIONSPOURL’INSTALLATIONETL’ENTRETIEN,NOTAMMENTCELLESPORTANTSURLENETTOYAGEDE
L’APPAREILÀEFFECTUERSELON LESDIRECTIVESETCELLESPORTANTSURLEREMPLACEMENTDESJOINTS(ANNUELLEMENT)ETDE SPIÈCES(AUBESOI N).
ENGLAND’SSTO VEWORKSN’E STPASRE SPONSABLEDESDOMMAGESNIDESBLE SSURES,QUELSQU’ILSSOIENT,SUBISENRAISONDENÉGLIGENCEOU
ÀCAUSED’UNEINSTALLATIONOUD’UNEUTILISATIONDANGEREUSEDECEPRODUIT.POURTOUTEQUESTION,COMMUNIQUEZAVECLESERVICEDE
SOUTIENTECHNIQUE.
Ilestnormalquel’appareilémettedelafuméelorsdupremierfeu,étantdonnéquelespeinturesetles
huilesfinissentdesécher.Cettefuméedevraitsedissiperaucoursdelapremièreheured’utilisation.
Ouvrezuneporteouunefenêtreaucoursdupremierfeu,afind’aérerlapièce.
Remarquesàproposdel’utilisationquotidienne
Seulesdesgranulesdeboisdequalitésupérieure,d’undiamètrede6,35mm,doiventêtreutiliséesdans
cepoêle.L’utilisationdegranulesdemoindrequalitécontenantunegrandequantitédecendresOUde
granulesdontletauxd’humiditéestélevépeutprovoquerunengorgementplusrapidedupotde
combustionparlescendresetpeutnécessiterquel’entretienpériodiquesoitconsidérablementplus
fréquent.Veuillezconsulterlasection«Entretien»duprésentguideafindemieuxcomprendreenquoile
choixducombustibleauneincidencesurlefonctionnement,l’entretienetlenettoyagedupoêle.
Ilestnormaldeconstaterdesfluctuationsdanslahauteurdelaflamme.Eneffet,lesgranulesdebois
n’ontpastouslamêmetaille,cequipeutavoiruneincidencesurl’alimentationdupotdecombustion.
L’intensitédelaflammepeutvariersansquecelaprovoqueunepertederendement.
Conserveztoujourslesgranulesdeboisdansunendroitsecafinqu’ilsconserventleurformeetqueleur
tauxd’humiditérestebas.Assurez‐vouségalementquelatotalitédesgranulesdeboisestconservéeàune
distancesécuritairedupoêle.Sinon,unincendiepourraitsedéclarer.N’installezpasetn’utilisezpascet
appareilàl’extérieur,dansuneserreoudansunendroittrèshumide.
Cepoêleàgranulesestmunid’unpotdecombustionspécialementconçuquiaétéinstalléenusine.Ce
potdecombustionélèvelesgranulesquiseconsumentetdirigel’airprécisémentàl’endroitrequis.Les
granulesnedoiventêtrebrûlésquedanscepotdecombustion,quinedoitsubiraucunemodification.De
plus,aucunegrilleniaucunrehausseurdefeunedoitêtreutilisé.
ATTENTION
N’UTILISEZJAMAISD’ESSENCE,DECOMBUSTIBLEPOURLAMPEAPPARENTÉÀL’ESSENCE,DE
KÉROSÈNE,DELIQUIDED’ALLUMAGEPOURCHARBON,NIAUCUNLIQUIDESIMILAIREPOUR
ALLUMEROURAVIVERUNFEUDANSCESYSTÈMEDECHAUFFAGE.CONSERVEZDETELSLIQUIDES
ÀBONNEDISTANCEDUPOÊLELORSQUECELUI‐CIFONCTIONNE.DEPLUS,NEDISPOSEZJAMAIS
D’ALLUME‐FEUXSURUNESURFACECHAUDENISURDESTISONSDANSLEPOÊLE.N’UTILISEZPASDE
PRODUITSCHIMIQUESNIDEFLUIDESPOURALLUMERLEFEU.
NEFAITESPASBRÛLERDELIQUIDESINFLAMMABLESCOMMEDEL’ESSENCE,DUNAPHTAOUDE
L’HUILEPOURMOTEUR.NEFAITESPASBRÛLERDESDÉCHETS,DUGAZONCOUPÉOUDESRÉSIDUS
DEJARDINAGE,DESMATÉRIAUXCONTENANTDUCAOUTCHOUC,YCOMPRISDESPNEUS,DES
MATÉRIAUXCONTENANTDUPLASTIQUE,DESDÉCHETSDEPRODUITSPÉTROLIERS,DELAPEINTURE
OUDUDILUANTÀPEINTURE,DESPRODUITSBITUMINEUX,DESMATÉRIAUXCONTENANTDE
L’AMIANTE,DESDÉBLAISOUDESDÉBRISDECONSTRUCTION,DESTRAVERSESDECHEMINDEFER
OUDUBOISTRAITÉSOUSPRESSION,DUFUMIEROUDESRESTESD’ANIMAUX,DESPRODUITSDE
PAPIER,DUCARTON,DUCONTREPLAQUÉOUDESPANNEAUXDEPARTICULES.L’INTERDICTIONDE
BRÛLERCESMATÉRIAUXNEVOUSEMPÊCHEPASD’UTILISERDESALLUME‐FEUÀBASEDEPAPIER,
DECARTON,DESCIURE,DECIREOUD’AUTRESSUBSTANCESSEMBLABLESPOURALLUMERUNFEU
DANSLEPOÊLEÀBOIS.LACOMBUSTIONDECESMATÉRIAUXPEUTCOMPROMETTREL’EFFICACITÉ
DUPOÊLEETPRODUIREDELAFUMÉEETDESVAPEURSTOXIQUES.
20
IMPORTANT!LISEZETSUIVEZTOUTESLESINSTRUCTIONSPOURL’INSTALLATIONETL’ENTRETIEN,NOTAMMENTCELLESPORTANTSURLENETTOYAGEDE
L’APPAREILÀEFFECTUERSELON LESDIRECTIVESETCELLESPORTANTSURLEREMPLACEMENTDESJOINTS(ANNUELLEMENT)ETDE SPIÈCES(AUBESOI N).
ENGLAND’SSTO VEWORKSN’E STPASRE SPONSABLEDESDOMMAGESNIDESBLE SSURES,QUELSQU’ILSSOIENT,SUBISENRAISONDENÉGLIGENCEOU
ÀCAUSED’UNEINSTALLATIONOUD’UNEUTILISATIONDANGEREUSEDECEPRODUIT.POURTOUTEQUESTION,COMMUNIQUEZAVECLESERVICEDE
SOUTIENTECHNIQUE.
RÉGLAGESDUPANNEAUDECOMMANDE
Lepanneaudecommandedecepoêlevouspermetderéglerl’émissiondechaleuretlavitesseduventilateur
deconvection,d’allumeretd’éteindrel’appareil,etdetesterlebonfonctionnementdescomposants(deplus
amplesinformationssurlemodedediagnosticvontsuivre).
Lesboutonsaubasdupanneaudecommande(alimentationfaible,airdecombustionfaible,température
del’airentrant)nedoiventpasêtreutilisésaucoursdufonctionnementnormaldel’appareil.Cesboutons
sontpréréglésenusineetnedoiventpasêtreréglésparlesutilisateurs.
Appuyezsurlebouton«On»(marche)pourmettrel’appareilsoustensionetallumerunfeu.Levoyant
lumineuxàDELsituéau‐dessusduboutondoitdevenirvertetl’indication«SU»doits’affichersurle
panneaudecommandepeudetempsaprès.
Appuyezsurlebouton«Off»(arrêt)pouréteindrel’appareil.Levo yantlumineuxsituéau‐dessusdubouton
doitdevenirrougeetl’indication«Sd»doits’affichersurlepanneaudecommandepeudetempsaprès.La
séquenced’arrêtdel’appareildébutealors,etcedernierresteenmo ded’arrêtjusqu’àcequ’ilaitrefroidi.
Pouraccroîtrel’apportdechaleurprovenantdupoêle,appuyezsurlaflècheorientéeverslehautquiest
associéeàlaplagedechaleur.Lavaleuraffichéesurl’écrandelaplagedechaleuraugmentealors,cequi
signifiequelepanneaudecommanderèglel’apportdechaleurenfonctiondevotrepréférence.Lavitesse
duventilateuraugmenteproportionnellementàlatempérature.Lepoêleestconçupourquelavaleur
associéeàlavitessedeventilationsoittoujoursplusélevéeouégaleàcelleassociéeàlaplagede
température.Laflècheverslebaspermetdediminuerlatempératureainsiquelavitesseduventilateur.
Appuyezsurlaflècheorientéeverslehautquiestassociéeàlavitesseduventilateurpouraugmenter
celle‐cisansaugmenterlatempérature.Appuyezjusqu’àcequelavaleursouhaitées’afficheàl’écran.
Enappuyantsurlaflècheorientéeverslebas,vousdiminuerezlavitesseduventilateur,sanstoutefois
quelavaleurassociéeàcelle‐cipuissedevenirinférieureàcellequiestassociéeàlaplagedechaleur.
Attention
Cetappareilestconçupourfonctionneruniquementlorsquelaporteprincipaleest
fermée.L’utilisationdupoêleaveclaporteouverteprovoqueraitunrefoulement
defuméeetunecombustionlenteetinefficace.
Deplus,l’utilisationdecombustiblesautresquelesgranulesdeboispeut
êtredangereuseetproduireunexcèsdemonoxyde
decarbone.Lemonoxyde
decarboneestungazmortelquiestinodoreetincolore.
UtilisezSEULEMENTdesgranulesdeboisdanslepoêle.
Détecteurdemonoxydedecarbone
England’sStoveWorks,Inc.recommandefortementl’utilisationd’undétecteurde
monoxydedecarboneàproximitédupoêleetàtouslesétagesdelamaison.
Unecertainequantitédemonoxydedecarboneestcrééedanslepoêlecommesous‐produitde
combustion.Touslesraccordsdutuyaud’évacuationdoiventêtrescellésavecdelasilicone
résistantauxvariationsdetempératureafind’obtenirunjointétanche.Toutefuitedansunespace
closcauséeparunemauvaiseinstallationouunemauvaiseutilisationdupoêlepeutprovoquerdes
étourdissementsdesnauséeset,danslescasextrêmes,lamort.Laconcentrationdemonoxydede
carbonependantl’essaiétaitde0,013g/min.
21
IMPORTANT!LISEZETSUIVEZTOUTESLESINSTRUCTIONSPOURL’INSTALLATIONETL’ENTRETIEN,NOTAMMENTCELLESPORTANTSURLENETTOYAGEDE
L’APPAREILÀEFFECTUERSELON LESDIRECTIVESETCELLESPORTANTSURLEREMPLACEMENTDESJOINTS(ANNUELLEMENT)ETDE SPIÈCES(AUBESOI N).
ENGLAND’SSTO VEWORKSN’E STPASRE SPONSABLEDESDOMMAGESNIDESBLE SSURES,QUELSQU’ILSSOIENT,SUBISENRAISONDENÉGLIGENCEOU
ÀCAUSED’UNEINSTALLATIONOUD’UNEUTILISATIONDANGEREUSEDECEPRODUIT.POURTOUTEQUESTION,COMMUNIQUEZAVECLESERVICEDE
SOUTIENTECHNIQUE.
CODESD’ERREUR
Lesco desd’erreurou«E‐Codes»sontdescodesalphanumériquesquis’affichentsurlesécrans d’affichage
associésàlaplagedechaleu r etàlavitesseduventilateursurlepanneaude commandelorsquel’appareilne
fonctionnepasnormalement.Cesco despréviennentl’utilisateurquequelquechosenefonctionnepas
correctementdanslepoêleetquecedernierdoitêtresoigneusementinspectéavant d’êtrerallumé.
Consultezleguidededépannageàlapage31pourensavoirdavantagesurlescodesd’erreur.
E‐0
Lorsquececodes’affichesurlesécransdupanneaudecommande(engénéral,lorsd’un
redémarragesubséquentàunarrêtcauséparuncoded’erreur),celasignifiequ’iln’yaplus
d’erreuretquelepoêlepeutreprendresonfonctionnementnormal.
E‐1
Cecoded’erreurn’estpasutilisépourcetypedepoêle.S’ils’affichaitnéanmoinssurlesécransdu
panneaudecommande,contactezleservicedesoutientechniqueafinqu’undiagnosticpuisseêtre
établiquantàlacausedesonapparition.
E‐2
Cecodeindiquequel’allumagedesgranulesaéchoué.Ilsepeutquelepoêleaitenfaitalluméles
granules,maisquelepanneaudecommanden’aitpasdétectéunetempératuresuffisamment
élevéepourdéterminerquelefeuapris.Sitelestlecas,attendezquel’appareilrefroidisse,
nettoyezlepotdecombustionetredémarrezlepoêle.
E‐3
Cecoded’erreurindiquequelatempératured’évacuationadépassélavaleurmaximalepréréglée.
LecodeE‐3désignecequel’onnommecommunémentun«emballement»,c’est‐à‐direquel’air
d’évacuationestpluschaudqu’ilnedevraitl’être.
E‐4
Cecodes’afficheàlasuited’unebaissedelatempératuredel’évacuation.Ilsignifiequelefeuou
quele«signaldeflamme»aétéperdu.Celaseproduitgénéralementlorsquelatrémieestvide.
Sil’affi chag ed’uncoded’erreurpersiste,siun coded’erreursemble
inexplicable,ousivousavezde squestionsàpropos descodesd’erreurou
deleursignification, veuillezco ntacterleservicede soutientechniqueau
1800245‐6489.
Interrupteurdesécuritéducouv er cledelatrémie:cetappareilestégalementdotéd’uninterrupteur
desécuritéducouvercledelatrémie(piècenºAC‐HLSB)quiestdirectementraccordéaumo teurdela
visàgranules.Dansl’éventualitéoùlecouvercledelatrémieestlaisséouvertpendantquelepoêle
estenmarche,l’interrupteurduco uv er cl edelatrémieempêcheralavisàgranulesdetourner.
Celapermetd’éviterquelessous‐produitsdecombustionpénètrentdanslamaisonàl’aidede
l’ouverturelaisséeparlecouvercledelatrémieetaussid’empêcherl’appareildefonctionnerpendant
quelecouv er cle estouvert.Uneutilisationinadéquatedel’interrupteurdesécuritéducouvercledela
trémieempêcheralavisàgranulesdetourner;parconséquent,lepoêlenefonctionnerapas.Neplacez
JAMAISvotremainnitoutautr eob
j
et
,
p
rèsdelavisà
g
ranules
p
endant
q
uele
p
oêleestbranché.

22
IMPORTANT!LISEZETSUIVEZTOUTESLESINSTRUCTIONSPOURL’INSTALLATIONETL’ENTRETIEN,NOTAMMENTCELLESPORTANTSURLENETTOYAGEDE
L’APPAREILÀEFFECTUERSELON LESDIRECTIVESETCELLESPORTANTSURLEREMPLACEMENTDESJOINTS(ANNUELLEMENT)ETDE SPIÈCES(AUBESOI N).
ENGLAND’SSTO VEWORKSN’E STPASRE SPONSABLEDESDOMMAGESNIDESBLE SSURES,QUELSQU’ILSSOIENT,SUBISENRAISONDENÉGLIGENCEOU
ÀCAUSED’UNEINSTALLATIONOUD’UNEUTILISATIONDANGEREUSEDECEPRODUIT.POURTOUTEQUESTION,COMMUNIQUEZAVECLESERVICEDE
SOUTIENTECHNIQUE.
PANNEDECOURANT
Sil’appareilmanqued’électricitépouruneduréedetroisminutesoumoins,ilreprendrasonfonctionnement
lorsquel’alimentationélectriqueserarétablie,enfonctiondesindicationssuivantes:
Étatdel’appareilaumomen tdelacoupured’électricité Étatdel’appareillorsquel’aliment atio nestrétablie
Enmarche Démarrage
Démarrage Démarrage
Misehorstension Misehorstension
Arrêt Arrêt
Sil’appareilmanqued’électricitépouruneduréeapproximativedeplusdetroisminutes,il
demeureraéteintlorsquel’alimentationélectriqueserarétablie.
IMPORTANT:N’ouvrezNIlecouvercledelatrémienilaportedel’appareilpendantunepannede
courant.Ouvrezlaplusprochedesportessurl’extérieu rainsiqu’unefenêtre,af i n deréduireles
risquesquedessous ‐produitsdecombustionenprovenancedupoêles’accumulentdanslamaison.
Attendezquel’alimentationélectriquesoitrétablie,puisappuyezsurlebouton«ON»(marche)pour
redémarrerl’appareilaubesoin.
Attention–risquedechocélectrique
Appuyezsurlebouton«OFF»(arrêt) etlaissezl’appareilserefroidircompl è tement
AVANTdeledébrancheretdeprocéderàsonentretien ouauremplacementd’unepièce.
Risquedechocélectriquesil’appareiln’estpasdébranchéavantsonentretien.
Détecteursdefumée
England’sStoveWorks,Inc.recommandefortementl’utilisationdedétecteursdefumée
danschaquepiècedelamaison.Cependant,lefaitdeposerundétecteurdefumée
directementau‐dessusdel’appareilpourraitcauserdesalarmesintempestives.
23
IMPORTANT!LISEZETSUIVEZTOUTESLESINSTRUCTIONSPOURL’INSTALLATIONETL’ENTRETIEN,NOTAMMENTCELLESPORTANTSURLENETTOYAGEDE
L’APPAREILÀEFFECTUERSELON LESDIRECTIVESETCELLESPORTANTSURLEREMPLACEMENTDESJOINTS(ANNUELLEMENT)ETDE SPIÈCES(AUBESOI N).
ENGLAND’SSTO VEWORKSN’E STPASRE SPONSABLEDESDOMMAGESNIDESBLE SSURES,QUELSQU’ILSSOIENT,SUBISENRAISONDENÉGLIGENCEOU
ÀCAUSED’UNEINSTALLATIONOUD’UNEUTILISATIONDANGEREUSEDECEPRODUIT.POURTOUTEQUESTION,COMMUNIQUEZAVECLESERVICEDE
SOUTIENTECHNIQUE.
ENTRETIENQUOTIDIEN
Remarquesimportantes
Commepourtoutetâched’entretienconcernantceproduit,assurez‐vousquel’appareilest
horstension(«OFF»)etqu’ilestcomplètementarrêtéAVANTdeprocéderàl’entretien.
N’oubliezpasquelespiècesmétalliquesdufoyerpeuventresterCHAUDESlongtempsaprès
quelesflammessesontéteintesetMÊME
longtempsaprèsl’arrêtcompletdel’appareil.
Soyeztoujourstrèsprudentlorsquevousmanipulezdespiècesdupoêlequipeuventêtre
chaudes,mêmesivouspensezqu’ellessontrefroidies.
N’enlevezlescendresquelorsquelepoêleestarrêtéetqu’ilacomplètementrefroidi.
Desbraisespeuventresterchaudessousles
cendreslongtempsaprèsquelefeus’est
éteintdanscepoêle(commedanstoutautreappareildumêmetype).
Laquantitédecendresetdedépôtsgénérésparlesgranulesdanslepotdecombustion
peutvarier.Surveillezattentivementl’accumulationdecendresdanslepoêleàlapremière
utilisationet
chaquefoisquevousybrûlezunnouveautypedegranule.
Bienquelaquantitédecendresproduiteparcetappareilnesoitpastrèsgrandeparrapport
àcelled’unpoêleàboistraditionnel,ilestESSENTIELquevouslegardiezpropreetexemptde
cendrespourmaintenir
uneefficacitéetunrendementoptimaux.L’accumulationdecendres
gênelacirculationd’air,réduitl’efficacitéetpeutproduireunretourdefumée.
England’sStoveWorks®n’estpasresponsabledesdommages,quelsqu’ilssoient,subisàcause
d’unpoêlemalentretenuetmalnettoyé.Cepoêleàgranulesestunappareilextrêmement
efficaces’ilreçoitl’entretienadéquatluipermettantdemaintenirunrendementoptimal.
Retraitetéliminationdescendres
Appuyezsurlebouton«OFF»(arrêt)etlaissezlepoêleterminersoncycled’arrêtetrefroidir
complètement.
Éliminationde scendres
–
Lescendres doiventêtre placéesdansun
contenantmétalliqueaveccouverclehermétique.Cecontenantdoitêtr e
placésurunplanchernoncombustibleousur lesol,loindetousmatériaux
combustibles,jusqu’àcequelescendres soientcomplè tementrefroidies
etqu’ellessoientfinalementenfouiesdanslesolou disperséessur
place.
*Unmauvaisnettoyagedupoêlepeutentraînerunebaissederendementetunretour
de
f
lammes.*
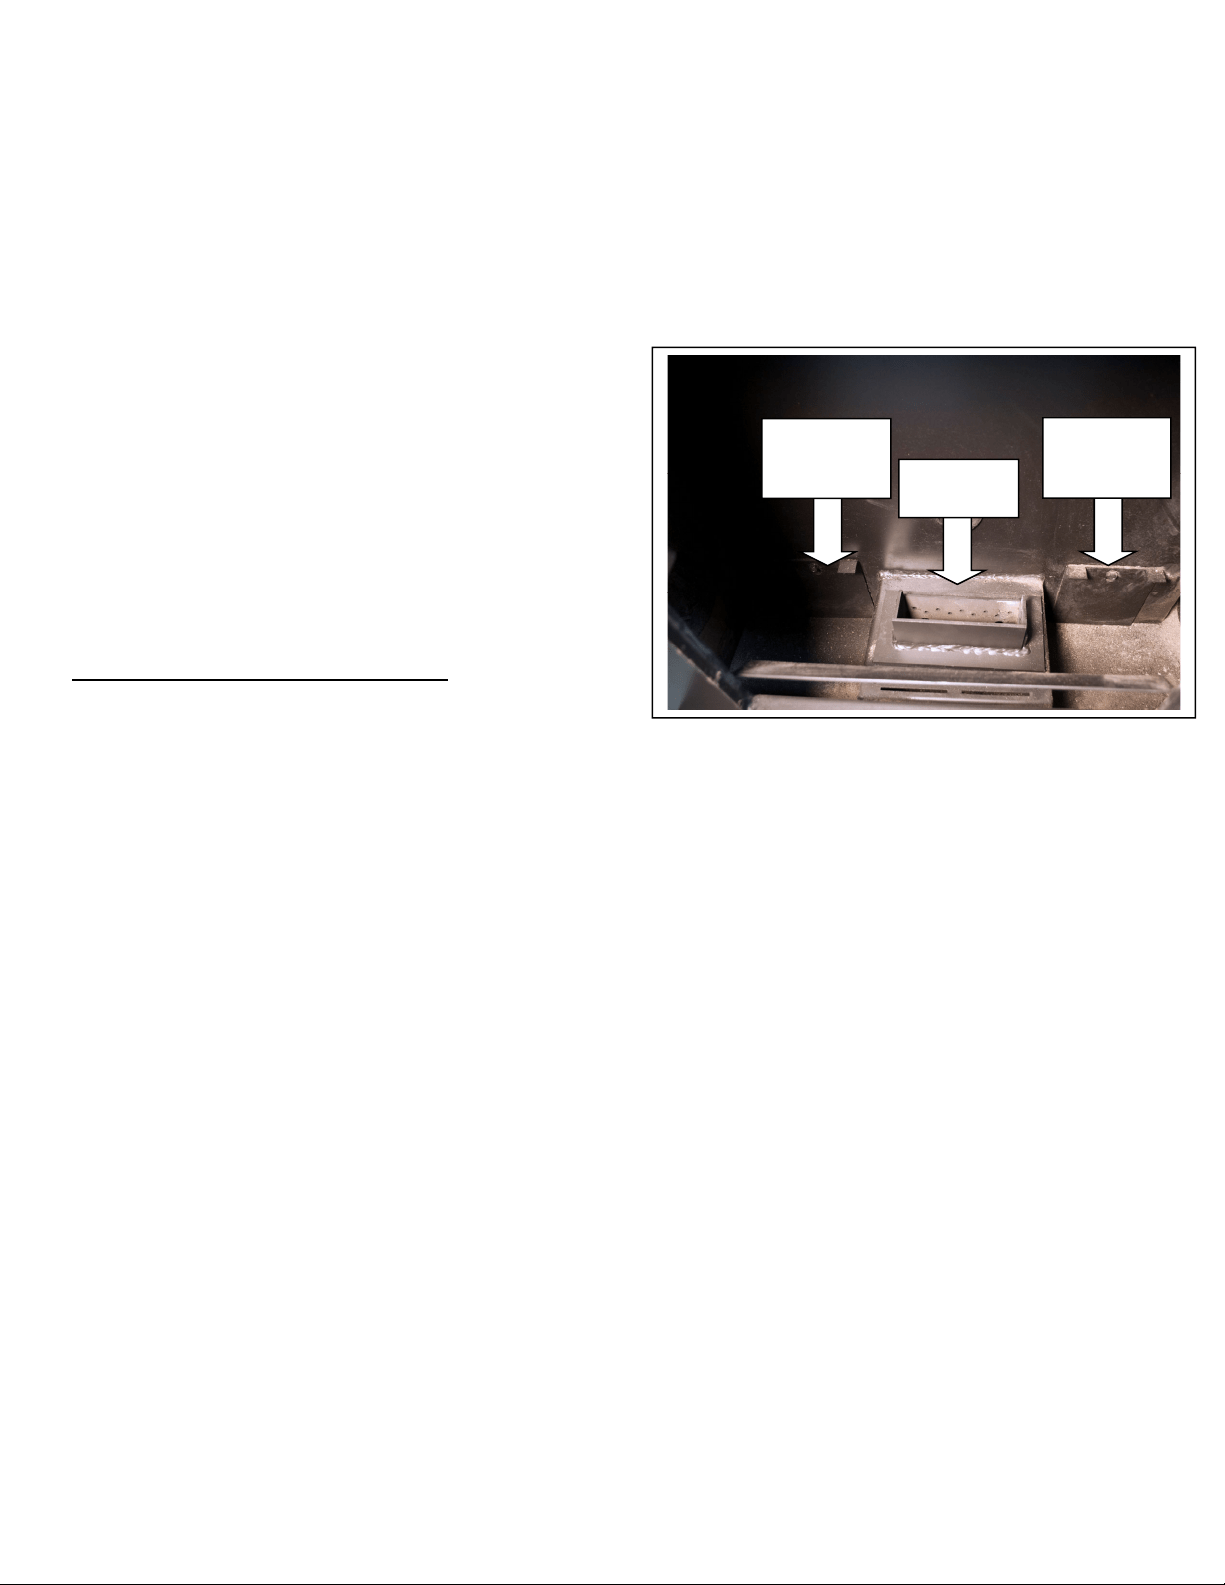
24
IMPORTANT!LISEZETSUIVEZTOUTESLESINSTRUCTIONSPOURL’INSTALLATIONETL’ENTRETIEN,NOTAMMENTCELLESPORTANTSURLENETTOYAGEDE
L’APPAREILÀEFFECTUERSELON LESDIRECTIVESETCELLESPORTANTSURLEREMPLACEMENTDESJOINTS(ANNUELLEMENT)ETDE SPIÈCES(AUBESOI N).
ENGLAND’SSTO VEWORKSN’E STPASRE SPONSABLEDESDOMMAGESNIDESBLE SSURES,QUELSQU’ILSSOIENT,SUBISENRAISONDENÉGLIGENCEOU
ÀCAUSED’UNEINSTALLATIONOUD’UNEUTILISATIONDANGEREUSEDECEPRODUIT.POURTOUTEQUESTION,COMMUNIQUEZAVECLESERVICEDE
SOUTIENTECHNIQUE.
Enraisondelaconceptionouvertedufoyer,lamajeurepartiedelacendres’accumulerade
chaquecôtédusupport.Ouvrezlaportedupoêle,etutilisezunancienpinceauouuncouteau
àmastiquerpourdéplacerlescendresautourdupotdecombustionetdansleszonesouvertes
à
côtédusupport.
Àl’aidedel’outildenettoyagefourni,enlevezlesdépôtsquirestentdanslepotde
combustion,enprenantsoindelesretirerdupotetdenepasleslaissers’infiltrerdansle
support.L’accumulationexcessivedecendresdanslesupportpeutnuireaurendement
dupoêle(voir«Nettoyagedupotdecombustion»ci‐dessous).
AVERTISSEMENT:Soyezprudentlorsquevous
utilisezl’outildenettoyage,carilcomporte
unepointetranchanteetpeutavoirdesbords
coupants(commetoutoutilmétallique).
Commepourtouttravaild’entretien,
ilestrecommandédeporterdesgants,
des
lunettesdesécuritéettoutautre
équipementdesécuriténécessairependant
lamanipulationdel’outildenettoyage.
Nettoyagedupotdecombustion
Aprèsleretraitdescendres dupoêle,lenettoyage
dupo tdecombustionestl’autre tâchequotidienne
d’entretienquiassurerale fonctionnementoptimaldupoêle.Lesgranulescon tie nnentdesquantités
variablesd’ impuretésetdematériauxfusiblesquis’accumulerontdanslepotdecombustionaufildu
temps.Certainesgranulescontiennentdes
quantitésbeaucoupplusélevéesd’impuretésfusibles.Vous
devezdoncvousmontrerencoreplusvigilantafindegarderlepotdecombustionprop re.Permettreaux
impuretésdes’accum ulerdansle potdecom bustionpeutre s trein d rel’arrivéed’airauxflammes,cequi
donnelieuàunecombustionsaleetinefficaceenplus
deréduireladuréedeviedupotdecombustion.
REMARQUE:Lepotdecombustiondoitêtrenettoyéquotidiennementetavantchaquemise
enmarche(avantd’appuyersurlebouton«ON»[marche]).
Laisseztoujoursl’appareilterminersoncycled’arrêtetserefroidircomplètementavant
d’effectuertoutetâched’entretiendufoyer.
Ouvrezlaporteavantetretirez
lepotdecombustionenlesoulevantàlaverticaleetenle
tiranthorsdusupport.AVERTISSEMENT–LepotdecombustionpeutresterCHAUDlongtemps
aprèsquelesflammessesontéteintes;parconséquent,vousdevriezporterdesgantsde
protectionlorsquevouslemanipulez.
Unefois
quevousavezretirélepotdecombustiondupoêle,utilisezl’outildenettoyagepour
enlevertouslesdépôtssetrouvantdanslepot.
Assurez‐vousquetouslesorificesd’entréed’airsontdégagésetqu’ilsnesontpasbouchés
pardesmatièresfusibles;l’outildenettoyagefourniconvientà
cesorificesetestutilepour
éliminerlesdépôtstenacesquis’ytrouvent.
Potde
combustion
Couvercle
desorifices
denetto
y
a
g
e
Couvercle
desorifices
denettoyage

25
IMPORTANT!LISEZETSUIVEZTOUTESLESINSTRUCTIONSPOURL’INSTALLATIONETL’ENTRETIEN,NOTAMMENTCELLESPORTANTSURLENETTOYAGEDE
L’APPAREILÀEFFECTUERSELON LESDIRECTIVESETCELLESPORTANTSURLEREMPLACEMENTDESJOINTS(ANNUELLEMENT)ETDE SPIÈCES(AUBESOI N).
ENGLAND’SSTO VEWORKSN’E STPASRE SPONSABLEDESDOMMAGESNIDESBLE SSURES,QUELSQU’ILSSOIENT,SUBISENRAISONDENÉGLIGENCEOU
ÀCAUSED’UNEINSTALLATIONOUD’UNEUTILISATIONDANGEREUSEDECEPRODUIT.POURTOUTEQUESTION,COMMUNIQUEZAVECLESERVICEDE
SOUTIENTECHNIQUE.
Enleveztouteslescendressetrouvantaufondetsurledessusdusupport,ainsiquesurles
côtésdufoyer.Ilestimportantquevousgardiezlehautdusupportlibredecendrespourque
lepotdecombustionsoitbienenplacesurlesupport.
Réinsérezle
potdecombustiondanslesupportensuivantàl’inverselaprocédureexpliquée
ci‐dessus.
ENTRETIENHEBDOMADAIRE
Retraitdudéflecteur
Commepourtoutetâched’entretienconcernantceproduit,assurez‐vousquel’appareil
esthorstension(« OFF»)etqu’ilestcomplètementarrêtéetrefroidiAVANT deprocéder
àl’entretien.N’oubliezpasqueles piècesmétalliquesdu foyerpeuventresterCHAUDES
longtempsaprèsquelesflammessesontéteintesetMÊMElongtempsaprèsl’arrêt
completdel’appareil.Soyeztoujourstrès prudentlorsquevous
manipulezdespièces
dupoêlequipeuventêtrechaudes, mêmesi vouspensezqu’ellessontrefroidies.
L’entretienhebdomadairecomprendlesétapesdelaprésentesectionAINSIQUEles
étapesdelasection«Entretienquotidien».
Retirezledéflecteursupérieur(àl’intérieurdufoyer,au‐dessusdelaporte)dupoêleen
lesoulevant,enletirantversl’avant,puisenletournantsurlecôté.Lenumérodepièce
dudéflecteursupérieurestAC‐PAHTB.
Enleveztouteaccumulationdecendresderrièreledéflecteur.
L’utilisationd’unaspirateureauetpoussièreestfortementrecommandée,carcelaévite
quelescendresvolantestombentàtraverslestrousd’évacuationetdanslachambre
d’évacuation.
Suivezlesétapesci‐dessusàl’enverspourreplacerledéf lecteur.Assurez‐vousqueles
languettesdudéflecteurentrentdanslestrouscorrespondantssituésdanslaparoi du
foyerdupoêle.Siledéflecteurestcorrectementinstallé,sapartiesupérieurere posera
surlaparoiavantdupoêle.
Couverclesdesorificesdenettoyage
Lachambred’évacuationdupoêleaétéintentionnellementconçuepouraccumulerles
cendres.Accumulerlescendresdanscettechambreprévientleuraccumulationdansle
ventilateurdecombustionetlesystèmedeventilation.Vouspouvezaccéderfacilement
àlachambred’évacuationparsesorificesdenettoyagesituésdanslefoyer.
Retirezlescouverclesdesorificesdenettoyage(coinsinférieurgaucheetinférieurdroit,
dechaquecôtédupotdecombustion;consultezl’imageàlapageprécédente).
Aumoyend’unecléàdouillede5/16po,desserrezlesvisdescouvercles,puistirez
lescouverclesverslehautpourlesretirerdesvis.
AVANTdepasserl’aspirateurdanslachambre,vérifiezletypedecendres,ainsiquela
quantitéaccumulée.Lescendresaccumuléesdanslachambred’évacuationdoiventêtre
légères,moelleuses,grisesoublanches,etl’accumulationnedevraitpasatteindrela
moitiésupérieuredel’orificedenettoyage.

26
IMPORTANT!LISEZETSUIVEZTOUTESLESINSTRUCTIONSPOURL’INSTALLATIONETL’ENTRETIEN,NOTAMMENTCELLESPORTANTSURLENETTOYAGEDE
L’APPAREILÀEFFECTUERSELON LESDIRECTIVESETCELLESPORTANTSURLEREMPLACEMENTDESJOINTS(ANNUELLEMENT)ETDE SPIÈCES(AUBESOI N).
ENGLAND’SSTO VEWORKSN’E STPASRE SPONSABLEDESDOMMAGESNIDESBLE SSURES,QUELSQU’ILSSOIENT,SUBISENRAISONDENÉGLIGENCEOU
ÀCAUSED’UNEINSTALLATIONOUD’UNEUTILISATIONDANGEREUSEDECEPRODUIT.POURTOUTEQUESTION,COMMUNIQUEZAVECLESERVICEDE
SOUTIENTECHNIQUE.
Àl’aided’unaspirate urdetypeeauetpoussière,enlevezlescendresvolantesdela
chambred’évacuation.Pourfacilitercettetâche,vouspouvezfixerunpetitembout
àl’extrémitédutuyaudel’aspirateurd’atelierpouratteindrelescendres.Lorsque
vousavezterminé,replacezlescouverclesdesorificesdenettoyage.
UnaspirateurdecendresspécialementconçuestoffertsurlesiteWeb
d’England’sStoveWorksàl’adresse:store.heatredefined.com.
ENTRETIENMENSUEL
REMARQUE:Commepourtoutetâched’entretienconcernantceproduit,assurez‐vous
quel’appareilesthorstension(«OFF»)etqu’ilestcomplètementarrêtéetrefroidi
AVANTdeprocéderà l’entretien.
N’oubliezpasquelespiècesmétalliquesdufoyerpeuventresterCHAUDESlongtemps
aprèsquelesflammesse
sontéteintesetMÊMElongtempsaprèsl’arrêtcompletde
l’appareil.Soyeztoujourstrèsprudentlorsquevousmanipulezdespiècesdupoêlequi
peuventêtrechaudes,mêmesivouspensezqu’ellessontrefroidies.
L’entretienmensuelcomprendlesétapesdelaprésentesectionAINSIQUElesétapes
dessections«Entretien
quotidien»et«Entretienhebdomadaire».
Lesnettoyagesmensuelspeuvents’effectuerparplusgrandsintervalles,selonla
duréed’utilisationquotidiennedupoêle.Unpoêlequichauffeenpermanenceaplus
fréquemmentbesoindesnettoyagesprévussurune basemensuellequ’unpoêleutilisé
périodiquementcommechauffaged’appoint.
Larègle
àsuivreestlasuivante:l’entretienmensueldoiteffectivementêtreeffectué
unefoisparmoisOUchaquefoisquel’onabrûléunetonnedegranules,selonla
premièredeceséventualités.
Sitropdecendres’accumuledanslachambred’évacuationoudanslesystèmede
ventilationpendant
lemois,ondoitréduirelesintervallesentrelesnettoyagesafin
d’éviterquel’accumulationdecendre nuiseaurendementdupoêle.
UnaspirateurdecendresspécialementconçuestoffertsurlesiteWeb
d’England’sStoveWorksàl’adresse:store.heatredefined.com
(Suiteàlapagesuivante)

27
IMPORTANT!LISEZETSUIVEZTOUTESLESINSTRUCTIONSPOURL’INSTALLATIONETL’ENTRETIEN,NOTAMMENTCELLESPORTANTSURLENETTOYAGEDE
L’APPAREILÀEFFECTUERSELON LESDIRECTIVESETCELLESPORTANTSURLEREMPLACEMENTDESJOINTS(ANNUELLEMENT)ETDE SPIÈCES(AUBESOI N).
ENGLAND’SSTO VEWORKSN’E STPASRE SPONSABLEDESDOMMAGESNIDESBLE SSURES,QUELSQU’ILSSOIENT,SUBISENRAISONDENÉGLIGENCEOU
ÀCAUSED’UNEINSTALLATIONOUD’UNEUTILISATIONDANGEREUSEDECEPRODUIT.POURTOUTEQUESTION,COMMUNIQUEZAVECLESERVICEDE
SOUTIENTECHNIQUE.
ENTRETIENMENSUEL
Nettoyagedutuyaudeventilation
Lespiècesinférieu resetderaccordementdusystèmedeventilation (commelestés
etlescoudes)constituentdeszonesoù lescendresvolantesetlecréosotepeuvent
s’accumuler.VÉRIFIEZsoigneusementl’accumulationdansceszonesafindevousassurer
quelesystèmedeventilationpeutfonctionnerentoutesécurité.
Selon
letypedesystèmedeventilationdevotrepoêle,ilpeutêtrepossibled’ôterle
couvercleentédesorifices denettoyageetdesimplementenleverlescendresvolantes
accumuléesàl’aided’unebrossepourtuyau.
Lespartieshorizontalesdestuyaux,tellesqueletuyauderaccorddel’évacuation
autuy au
vertical,accumulentlescendresvolantesetdoiventêtreinspectéesminutieusemen tet
nettoyéesàl’aided’unebrosse.
Vérifiezsilesemboutsnesontpasbouchésouobstruésparlescendresvolant es
accumulées.
Aprèsavoirsoigneusementnettoyélesystèmedeventilation,refermeztouslesjoints
démontésavecdela
siliconerésistantauxtempératuresélevées(piècenºAC‐RTV3),
sicelas’appliqueàvotresystèmedeventilation.
Inspectezlesjointsquin’ontpasétédémontéspourvousassurerqu’ilssontétanches
auxfumées.
Aprèsuneutilisationprolongéedupoêle,voustrouverezgénéralementleszonesde
fuitedusystème
deventilationencherchantlesdépôtsdecendresvolantesàl’extérieur
dutuyau.Surveillezsoigneusementlesfuitesdusystèmedeventilationetscellezles
tuyauxenconséquence.
Bienquelaplupartdessystèmesdeventilationdespoêlesàgranulessoientconçus
pourdurertouteunevie,lescendresvolantesproduites
parlesgranulespeuventles
corroderdanscertainscas.Lorsdunettoyagedevotresystèmedeventilation,examinez
attentivementlestuyauxpourdétectertoutsignededétérioration,etremplacezles
piècesexcessivementusées.Ilestpeuprobablequevousayezàvouspréoccuperde
cetaspect,maisilestimportant
demaintenirvotresystèmedeventilationenbonétat
pourgarantirlefonctionnementsécuritairedevotrepoêle.
28
IMPORTANT!LISEZETSUIVEZTOUTESLESINSTRUCTIONSPOURL’INSTALLATIONETL’ENTRETIEN,NOTAMMENTCELLESPORTANTSURLENETTOYAGEDE
L’APPAREILÀEFFECTUERSELON LESDIRECTIVESETCELLESPORTANTSURLEREMPLACEMENTDESJOINTS(ANNUELLEMENT)ETDE SPIÈCES(AUBESOI N).
ENGLAND’SSTO VEWORKSN’E STPASRE SPONSABLEDESDOMMAGESNIDESBLE SSURES,QUELSQU’ILSSOIENT,SUBISENRAISONDENÉGLIGENCEOU
ÀCAUSED’UNEINSTALLATIONOUD’UNEUTILISATIONDANGEREUSEDECEPRODUIT.POURTOUTEQUESTION,COMMUNIQUEZAVECLESERVICEDE
SOUTIENTECHNIQUE.
ENTRETIENANNUEL
Remarquesimportantes
Commepourtoutetâched’entretienconcernantceproduit,assurez‐vousquel’appareil
esthorstension(« OFF»)etqu’ilestcomplètementarrêtéetrefroidiAVAN Tde procéder
àl’entretien.
N’oubliezpasquelespiècesmétalliquesdufoyerpeuventresterCHAUDESlongtemps
aprèsquelesflammessesontéteintes
etMÊMElongtempsaprèsl’arrêtcompletde
l’appareil.Soyeztoujourstrèsprudentlorsquevousmanipulezdespiècesdupoêle
quipeuventêtrechaudes,mêmesivouspensezqu’ellessontrefroidies.
L’entretienannuel(ouàlafindelasaison)comprendlesétapesdelaprésentesection,
AINSIQUEles
étapesdessections«Entretienquotidien»,«Entretienhebdomadaire»
et«Entretienmensuel».
Vousdevezeffectuerl’entretienannuel àlafindelasaisondechauffage.Laisserles
cendresetlesautresmatièresaccumuléesdanslepoêlependantlesmoisoùonne
l’utilisepaspeutcauserunedégradationprématuréedumétaldu poêleetdusystèmede
ventilation.Portezparticulièrementattentionauxdétails
etnettoyezminutieusement le
poêleàlafindelasaisondechauffage.Celavouspermettrad’utiliservotrepoêleetson
systèmedeventilationlongtemps.
L’appareildoitêtredébranchépendantl’été(etlorsqu’iln’estpasutilisé),afind’aider
àleprotégercontrelesrisquesdedommagescausésparlafoudreetpard’autres
perturbationsducourantélectrique.
Attention–risquedechocélectrique
Appuyezsurlebouton«OFF»(arrêt)etlaissezl’appareilserefroidir
complètementAVANTdeledébrancheretdeprocéderàsonentretienouau
remplacementd’unepièce.
Risquedechocélectriquesil’appareiln’estpasdébranchéavantsonentretien.
SUIEETCENDRESVOLANTES:FORMATIONETRETRAIT
Lesproduitsdecombustioncontiennentdespetitesparticulesdecendresvolantes.Cescendres
volantess’accumulentdanslesystèmed’évacuationparventilation,et restreignentlefluxdes
gazdecombustion.Lacombustionincomplète,commecellequisurvientlorsdudémarrageet
del’arrêtdupoêleouencasdemauvaisfonctionnementdupoêle,produitdelasuiequi
s’accumuledanslesystèmed’évacuationparventilation.Inspectezlesystèmed’évacuationpar
ventilationaumoinsunefoisparannéepoursavoirs’ilabesoind’êtrenettoyé.
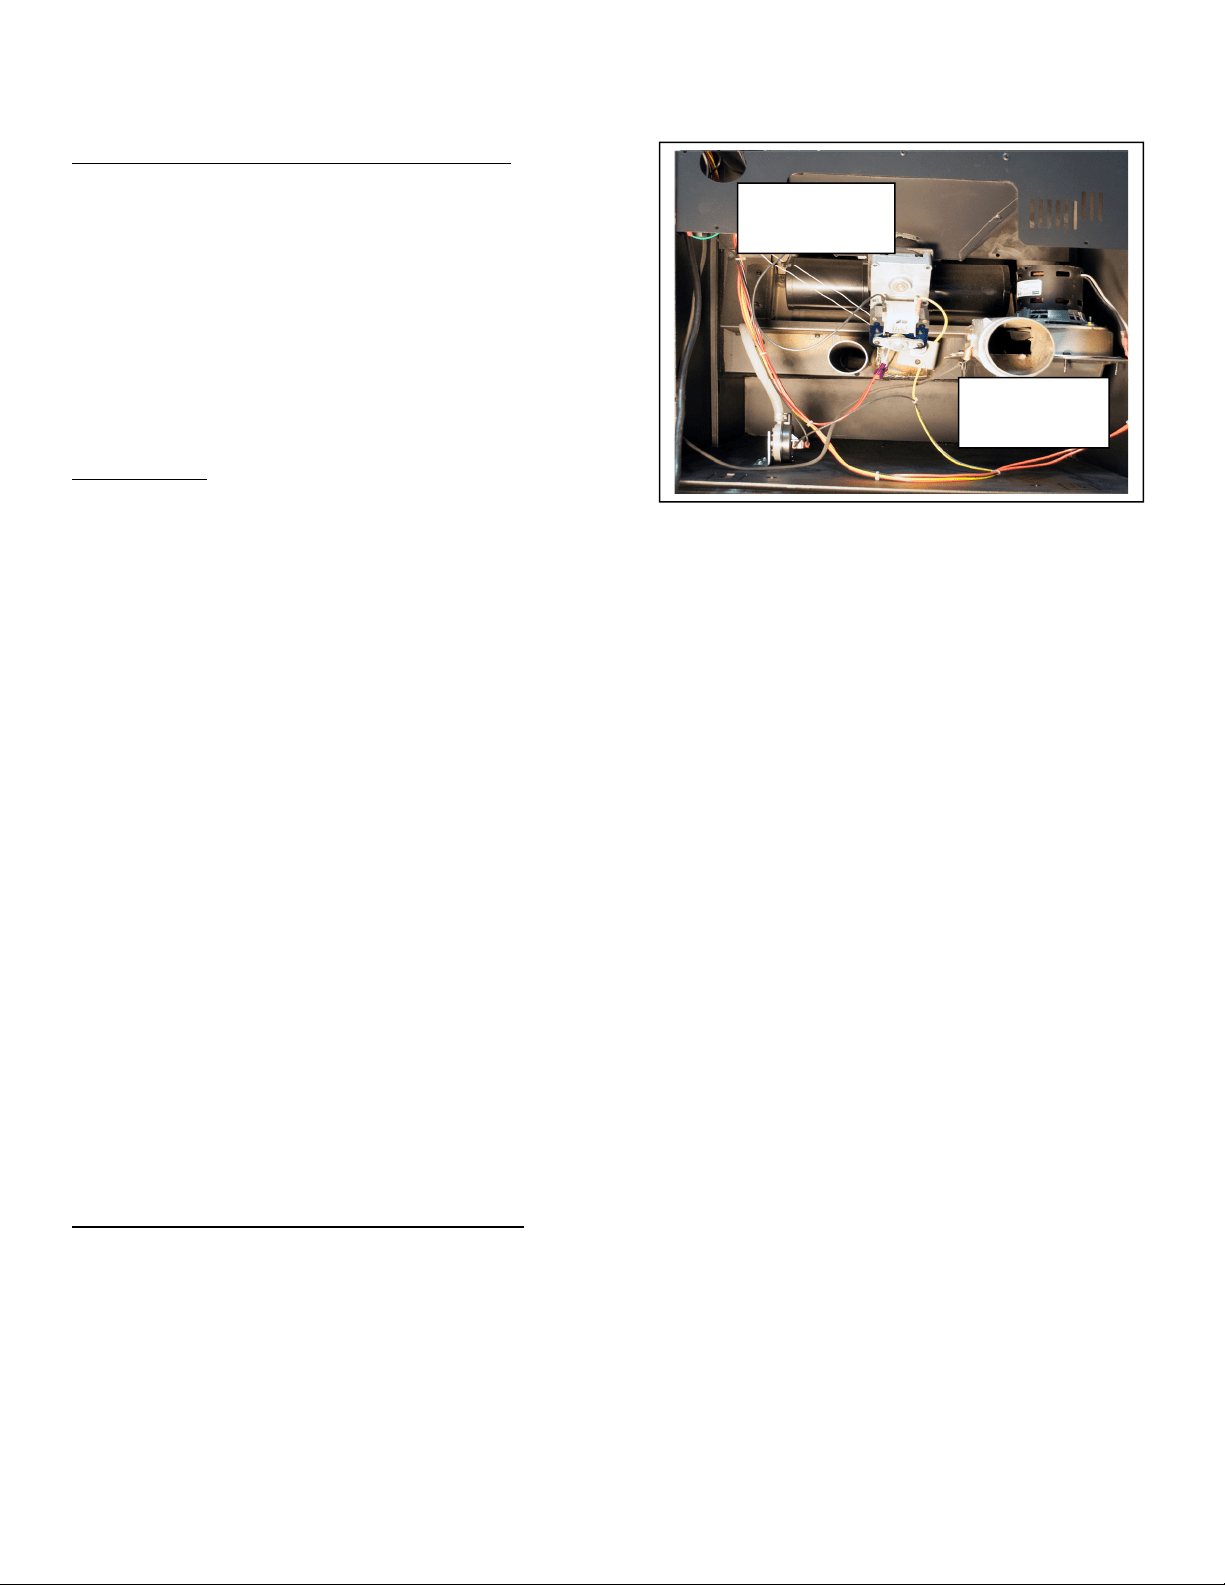
29
IMPORTANT!LISEZETSUIVEZTOUTESLESINSTRUCTIONSPOURL’INSTALLATIONETL’ENTRETIEN,NOTAMMENTCELLESPORTANTSURLENETTOYAGEDE
L’APPAREILÀEFFECTUERSELON LESDIRECTIVESETCELLESPORTANTSURLEREMPLACEMENTDESJOINTS(ANNUELLEMENT)ETDE SPIÈCES(AUBESOI N).
ENGLAND’SSTO VEWORKSN’E STPASRE SPONSABLEDESDOMMAGESNIDESBLE SSURES,QUELSQU’ILSSOIENT,SUBISENRAISONDENÉGLIGENCEOU
ÀCAUSED’UNEINSTALLATIONOUD’UNEUTILISATIONDANGEREUSEDECEPRODUIT.POURTOUTEQUESTION,COMMUNIQUEZAVECLESERVICEDE
SOUTIENTECHNIQUE.
ENTRETIENANNUEL
Nettoyageduventilateurd’évacuation
Mêmesileventilateurd’évacuationetsonboîtieront
étéconçusdefaçonàréduirel’accumulationdecendres,
unecertainequantitédecendress’yaccumulerapendant
toutelasaisondechauffage.Laquantitéetletypede
cendresdépendentdutypedegranulesetdusystèmede
ventilation,mais,engénéral,
ilyapeud’accumulation.
Sivoustrouvezunegrandequantitédecendresvolantes
dansleventilateurd’évacuationlorsdesonnettoyage,
vousdevezeneffectuerl’entretientouslesmoisoudeux
foisparmoispouréviteruneaccumulationexcessive.
Instructions
Avantdeprocéderàl’entretienduventilateur
d’évacuation,assurez‐vousquel’appareilestdébranchéetcomplètementrefroidi.
Retirezlepanneaulatéralgauchedupoêleàl’aided’untournevisàdouilleoud’unecléde5/16po.
Dégagezlégèrementlesystèmedeventilationduventilateurd’évacuationdefaçonà
pouvoirretirercelui‐
cidupoêle.
Unefoislepanneauenlevé,vousverrezclairementleventilateurd’évacuation.
Débranchezlesdeuxfilsquirelientlefaisceaudecâblagedupoêleauventilateurd’évacuationàl’aidedes
emboutsàraccordrapide.Débranchezlecapteurdechaleurquiestfixéà
l’aided’unevissurleventilateur
d’évacuation.
Dévissezlescinq(5)visautotaraudeusesde5/16poquifixentleventilateurd’évacuationautube
d’évacuation.
Soulevezleventilateurd’évacuationetretirez‐ledupoêle.Lejointquiscelleleventilateurd’évacuationau
tuyaud’évacua t i o nestfragile,alorssoyeztrèsprudent
lorsquevousretirezleventilateur.Cependant,même
enétantprudent,ilestfacilededéchirercejo intfragileet,commel’étanchéitéest essentielleàcetendroit,il
estpréférablederemplacerlejoi nt (piècenº‐PU‐CBMG)chaquefoisquevous enlevezleventilateur
d’évacuation.
Aprèsavoirenlevéleventilateurd’évacuation,nettoyeztouteaccumulationdecendresdansletuyau
d’évacuationàl’aided’unaspirateureauetpoussière.
Utilisezunpinceaudouxpourretirersoigneusementtouteaccumulationdecendresàl’intérieurdu
ventilateurd’évacuationetsursapale.
Inspectezlemoteurduventilateurd’évacuationpourtrouvertouteaccumulationde
poussièreetenlevez‐
lasoigneusement,envousassurantquetouslestrousderefroidissementdumoteursontdégagésetlibres
dedépôtsdepoussière.
Réinstallezleventilateuren suivantàl’inverselesétap esdécritesprécédemment.N’oubliezpa sdevérifier
l’étatdujointduventilateurd’évacuationetdefixerlecapteurdechaleurauventilateurd’évac uat ion.
Réinstallezlesystèmedeventilationetlespanneaux.
Nettoyageduventilateurdeconvection
Commetoujours,assurez‐vousquelepoêleestrefroidietdébranchéavantd’effectuerl’entretiend’undeses
composants,quelqu’ilsoit.Commeleventilateurdeconvectionnetraitepaslessous‐produitsdecombustion,
ilnenécessitepasunnettoyageaussiminutieuxqueleventilateurd’évacuation.Cependant,lapoussièredela
maisonetd’autresdébrisprésentsdansl’airpeuvents’accumulersurlespalesduventilateurdeconvection.
Ventilateur
d’évacuation
Ventilateur
deconvection

30
IMPORTANT!LISEZETSUIVEZTOUTESLESINSTRUCTIONSPOURL’INSTALLATIONETL’ENTRETIEN,NOTAMMENTCELLESPORTANTSURLENETTOYAGEDE
L’APPAREILÀEFFECTUERSELON LESDIRECTIVESETCELLESPORTANTSURLEREMPLACEMENTDESJOINTS(ANNUELLEMENT)ETDE SPIÈCES(AUBESOI N).
ENGLAND’SSTO VEWORKSN’E STPASRE SPONSABLEDESDOMMAGESNIDESBLE SSURES,QUELSQU’ILSSOIENT,SUBISENRAISONDENÉGLIGENCEOU
ÀCAUSED’UNEINSTALLATIONOUD’UNEUTILISATIONDANGEREUSEDECEPRODUIT.POURTOUTEQUESTION,COMMUNIQUEZAVECLESERVICEDE
SOUTIENTECHNIQUE.
Retirezlepanneauarrièredel’appareilàl’aided’untournevisàdouilleoud’unecléde5/16po.Leventilateur
deconvectionsetrouveaucentredupoêle(consultezl’imageci‐dessus).Engénéral,lapoussièrequis’est
accumuléesurlespalesduventilateur(desdeuxcôtésdecelui‐ci)peut
êtreenlevéefacilementàl’aided’un
aspirateuroud’unpinceaudoux.Retirezles4visde5/16poquiretiennentlesupportenplaceafind’enlever
leventilateur,aubesoin.
Nettoyagedesfinesdanslatrémieetlavisàgranules
Selonletypeetlaqualitédegranulesbrûléesdanslepoêle,desfinesetdelapoussièrepeuvents’accumulerdans
latrémie.Laplupartdesfiness’accumulerontdanslapartieinférieuredelavis àgranules,versl’arrièredupoêle.
Éteignezlepoêle,débranchez‐le,puislaissez‐lese
refroidircomplètement.Aprèsavoirvidélatrémie,nettoyezles
finessetrouvantdansletubedelavisàgranulesàl’aided’unaspirateureauetpoussière.Sivous nepouv ezpas
enleverlesfinesdelapartiesupérieuredelatrémie:
enlevezlepanneauarrière;pourretirerlesvis,utilisezuntournevisàdouilleouunedouillede
5/16po;
repérezlemoteurdelavisàgranulesdanslapartiecentralearrièredupoêle,puistrouvezlesdeux
visderéglagedechaquecôtéducolletdemontageen
fonte;
àl’aided’unecléhexagonale de1/8po,desserrezlesvisderéglagedechaquecôtéducolletde
montagedelavisàgranules;
entenantl’aspirateureauetpoussièred’unemain,laissezl’ensemblevisàgranulesglisser
légèrementdesontube,defaçonàpouvoir
aspirertouteslesfinessetrouvantdanscettezone;
réinstallezl’ensemblevisàgranulesetserrezlesvis;réinstallezlepanneauarrièreenvous
assurantdeserrerlesvisàl’arrièredupoêle.
Nettoyagedesfinesàl’intérieurdutubedelavisàgranules
Retirezlecouvercledelavisàgranules(situéau‐dessusdelavisàgranules,aufonddelatrémie)en
enlevantles8visde5/16poquilemaintiennentenplace.Àl’aid e d’unaspirateurd’atelier,enle vez
lesex cèsdepoussièreou definesquisesont
accumulésdansletubeautourdelavisàgranules.
• Réinstallezlecouvercledelavisàgranulesensuivantlaméthodeinverse.
Vérificationdesjoints
Ilestessentielquelejointdel’ouverturedeportesoitétancheàl’airpourassurerlerendementadéquat
dupoêle.Unefuited’airdanscettezonepeutcausernonseulementunbrûlagesaleetinefficace,maisaussi
représenterunrisquepourlasécurité.Pourcetteraison,vousdeveztoujoursmaintenirlejointd’étanchéitéde
laporteenbonétatetleremplacerannuellementouplustôt,sinécessaire.Vouspouvezvérifierl’étanchéité
desjointsàl’aidedelaméthodedu«billetdebanque»:
Glissezunbilletdebanqueentrelejointetlecorpsdupoêle(àl’endroitoùlejointtoucheau poêle).
Fermezbienlaporte,puisessayezderetirerlebilletdebanque.Silebilletentreetsortfacilement,
vousdevezremplacerlejoint.Répétezcetestsur
toutlepérimètredujointd’étanchéité,caril
peutêtreenbonétatd’uncôté,maisenmauvaisétatdel’autre.

31
IMPORTANT!LISEZETSUIVEZTOUTESLESINSTRUCTIONSPOURL’INSTALLATIONETL’ENTRETIEN,NOTAMMENTCELLESPORTANTSURLENETTOYAGEDE
L’APPAREILÀEFFECTUERSELON LESDIRECTIVESETCELLESPORTANTSURLEREMPLACEMENTDESJOINTS(ANNUELLEMENT)ETDE SPIÈCES(AUBESOI N).
ENGLAND’SSTO VEWORKSN’E STPASRE SPONSABLEDESDOMMAGESNIDESBLE SSURES,QUELSQU’ILSSOIENT,SUBISENRAISONDENÉGLIGENCEOU
ÀCAUSED’UNEINSTALLATIONOUD’UNEUTILISATIONDANGEREUSEDECEPRODUIT.POURTOUTEQUESTION,COMMUNIQUEZAVECLESERVICEDE
SOUTIENTECHNIQUE.
Guidededépannage
AVERTISSEMENT:PouréviterlesCHOCSÉLECTRIQUES,débrancheztoujoursl’appareildel’alimentationAVANT
decommenceruneréparation.Sivousnetrouvezpasdesolutionàvotreproblèmedansleprésentguide,
communiquezavecvotredétaillantlocaloulesoutientechniqueau1800245‐6489.
*Consult ezlasectionCODESD’ERREUR duprésentguidepourplusd’info rmat ionssurledépann agedescodes
d’erreur.
Problème Cause Solution
Lavisàgranulesne
tournepas
1.Lemoteurdelavisàgranulesesten
mauvaisétat.
1.Remplacezlemoteurdelavisàgranules.
2.Unematièreétrangèrebloquelavisà
granules.
2.Enleverlesgranulesetlesautressources
d’obstruction.
3.Détecteurdel’aspirateur. 3.Vérifiezleventilateurd’évacuation.
Odeurdefumée
oupoussièredans
lamaison
1.Connexionincorrectedel’évacuation. 1.Vérifiezlesconnexionsdel’évacuationpourtrouver
lesfuites,particulièrementlaconnexionduventilateur
d’évacuation.Colmatezlesfuitesavecdelasilicone,
duruband’aluminiumouuncollierdeserrage.
Leventilateurd’air
ambiantnefonctionne
pas
1.Détecteurthermiquelâche.
2.Lavitesseduventilateuresttropélevée
parrapportàlaplagedechaleur,cequi
refroiditlepoêleetentraînel’arrêtdu
ventilateur.
3.Unfilestmalraccordé.
1.Resserrezlaconnexionsurledétecteur.
2.Réduisezlavitesseduventilateur.
3.Vérifiezlesconnexionsdansle pannea ude
commande.
Leventilateur
d’évacuationne
fonctionnepas
1.Unfilestmalraccordé. 1.Vérifiezlesconnexionsdanslepanneau
decommande.
2.Leventilateurfonctionnemal. 2.Remplacezleventilateur.
3.Ledé tec teu
r
de l’aspir ateur
fonctionnemal.
3.Remplacezledétecteurdel’aspirateur.
Flammespeuintenses
1.Leventilateurd’évacu ationfonctionnemal. 1.Inspectezetremplacezleventilateur.
2.Granulesexcessivementhumides. 2.Gardezlesgranulesausec.
3.Accumulationexcessivedecendres. 3.Nettoyezsoigneusementl’appareil.
4.Granulesdequalitéinférieure. 4.N’utilisezquedesgranulesdepremièrequalité
approuvéesparlePFI(PelletFuelInstitute).
Unfusibleasauté 1.Surtension. 1.Remplacezlefusible;utilisezunparasurtenseur.
2.Fildénudé. 2.Vérifiezs’ilyadesfilsdénudésoudescâbles
dontlagaineprotectriceestabîmée.
3.Ilyacourt‐circuitdansuncomposant
électrique.
3.Vérifiezsidesélémentsbloquentlesmoteurset
lesventilateursous’ilyadescourts‐circuits.
Consommation
élevéedegranules
1.Lesgranulessontdequalitéinférieure
ouleurtaillen’estpasuniforme.
1.Utilisezdesgranulesdepremièrequalité,
ouessayezuneautremarquedegranules.
Grincements 1.Unélémentobstrueletubedelavis
àgranules.
1.Vérifiezs’ilyadesélémentsquiobstruent
letubedelavisàgranules.
2.Ventilateurbruyant. 2.Retirez,nettoyezethuilezleventilateur.
Cognementsoucliquetis 1.Matièresdansleventilateur. 1.Vérifiezquelesdeuxventilateurssontlibres
d’obstructions.
2.Lavisdecalageduventilateur
d’évacuationestlâche.
2.Vérifiezsilavisdecalageestbienserrée.

32
IMPORTANT!LISEZETSUIVEZTOUTESLESINSTRUCTIONSPOURL’INSTALLATIONETL’ENTRETIEN,NOTAMMENTCELLESPORTANTSURLENETTOYAGEDE
L’APPAREILÀEFFECTUERSELON LESDIRECTIVESETCELLESPORTANTSURLEREMPLACEMENTDESJOINTS(ANNUELLEMENT)ETDE SPIÈCES(AUBESOI N).
ENGLAND’SSTO VEWORKSN’E STPASRE SPONSABLEDESDOMMAGESNIDESBLE SSURES,QUELSQU’ILSSOIENT,SUBISENRAISONDENÉGLIGENCEOU
ÀCAUSED’UNEINSTALLATIONOUD’UNEUTILISATIONDANGEREUSEDECEPRODUIT.POURTOUTEQUESTION,COMMUNIQUEZAVECLESERVICEDE
SOUTIENTECHNIQUE.
L’appareils’arrête
après15à20minutes
defonctionnement,
etlepanneaude
commandeaffiche
lecode«FS»(échec
dudémarrage)
1.Détecteurthermiquelâche. 1.Vérifiezlesdeuxcôtésdelaconnexiondu
détecteurthermique(ventilateurd’évacuation
etpanneaudecommande).
2.Réglagesdupanneaudecommande. 2.Démarrezlepoêleaudegrédechaleurminimal
de5pourvousassurerqu’unbonfeus’allume.
3.Lesgranulesneprennentpasfeu. 3.Vérifiezs’ilyadesaccumulationsdans
l’allumeurousicedernierestenpanne.
Code«OT»surle
panneaudecommande
(températureexcessi ve)
1.Défaillanceduventilateurde
convection(airdelapièce).
2.Fluxpartiellementbloqué.
3.Utilisationd’uncombustible
autrequedesgranulesdebois
depremièrequalité.
1.Véri fiezsileventilateurdeconvectionfonctionne
correctement,etremplacez‐leau
besoin.
2.Vérifiezsidesélémentsobstruentleflux.
3.UtilisezSEULEMENTdesgranulesdebois
depremièrequalitédanscepoêle.
Remarques:
1.Chaquefoisquevousdevezvérifierouremplacerledétecteurdel’aspirateur,vérifiezégalementsile
boyaudel’aspirateurestlâcheoufissuré.Deplus,assurez‐vousqueleportdemesuredel’aspirateurdans
lefoyeresttoujourspropre(nettoyez‐leàl’aided’ungoupillonoud’unebrosse;n’utilisezpasunaspirateur
pournettoyerceport).
2.Pourredémarrereteffaceruncoded’erreuraffichédanslepanneaudecommande,appuyezsurle
bouton«ON»(marche).L’appareildevraitseréinitialiseretredémarrer.
3.Sivousn’êtespassûrdelasignificationd’uncoded’erreurousivousavezdesquestions,NOUSVOUS
PRIONSdecommuniqueravecleservicedesoutientechniqueau1800245‐6489.
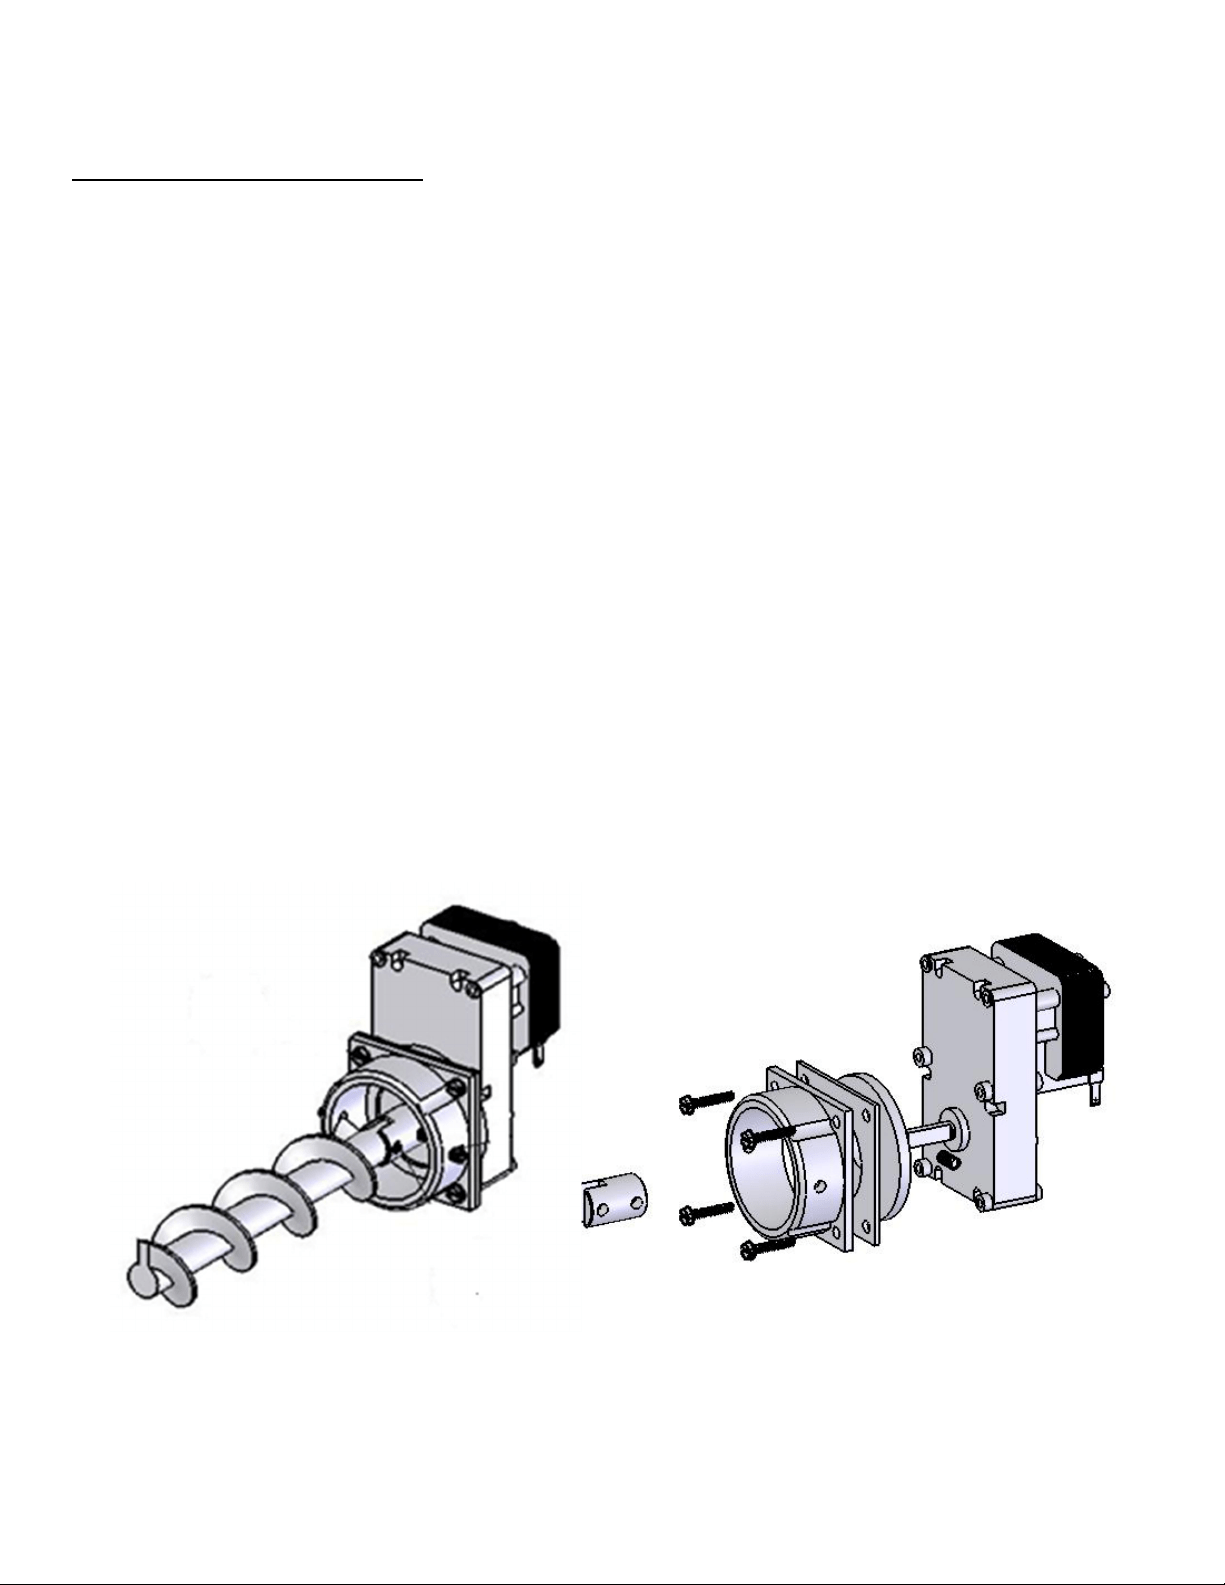
33
IMPORTANT!LISEZETSUIVEZTOUTESLESINSTRUCTIONSPOURL’INSTALLATIONETL’ENTRETIEN,NOTAMMENTCELLESPORTANTSURLENETTOYAGEDE
L’APPAREILÀEFFECTUERSELONLESDIRECTIVESETCELLESPORTANTSUR LEREMPL ACEMENTDESJOINTS(ANNUELLEMENT)ETDE SPIÈCES(AUBESOI N).
ENGLAND’SSTO VEWORKSN’E STPASRE SPONSABLEDESDOMMAGESNIDESBLE SSURES,QUELSQU’ILSSOIENT,SUBISENRAISONDENÉGLIGENCEOU
ÀCAUSED’UNEINSTALLATIONOUD’UNE UTILISATIONDANGEREUSEDECEPRODUIT.POURTOUTEQUESTION, COMMUNIQUEZAVECLESERVICEDE
SOUTIENTECHNIQUE.
REMPLACEMENTDESPIÈCES
Moteurdelavisàgranules
Avantdeprocéderauremplacement d’unepièce,assurez‐vousquel’appareilest
débranchéetcomplètementrefroidi.Assurez‐vouségalementquelatrémieestvide
avantdetenterd’enleverouderemplacerl’ensemblemoteurdelavisàgranule s.
Retirezlepanneauarriè redel’appareilàl’aided’unecléde
5/16
po.Avantde
desserrerlesboulonsdumoteurdelavisàgranules,détachezlefaisceaudecâblage
decemoteur.
Repérezl’ensembledumoteurdelavisàgranulesàl’arrièredupoêleetcommencez
pardesserrerles2visdecalagehexagonalesde
1/8
podechaquecôtéduraccorden
fontedumoteur.
Faitesglisserl’ensembledevisàgranule shorsdutube.
Retirezensuiteles4visquimainti ennentenplaceleraccorden fontedumoteurdela
visàgranules,àl’aided’unecléde5/16 po.Fai tes
glisserleraccordenfontedumoteur
delavisàgranules etlaplaqued’espacementenacierhorsdumoteurdelavis.
Dévissezlesvisdecalagehexagonalesde1/8poquifixentleraccordenacierà
l’arbredesortiedumoteurdelavisàgranules,
puisretirezceraccord,ainsique
l’amortisseurdevibrationencaoutchouc.
Réinstallezlespiècesdansl’ordreinversesurlenouveaumoteurdevisàgranules,
enfaisantattentiondenepastropserrerlesboulo nsquimaintiennentenplacele
raccordenfonteaumoteur.
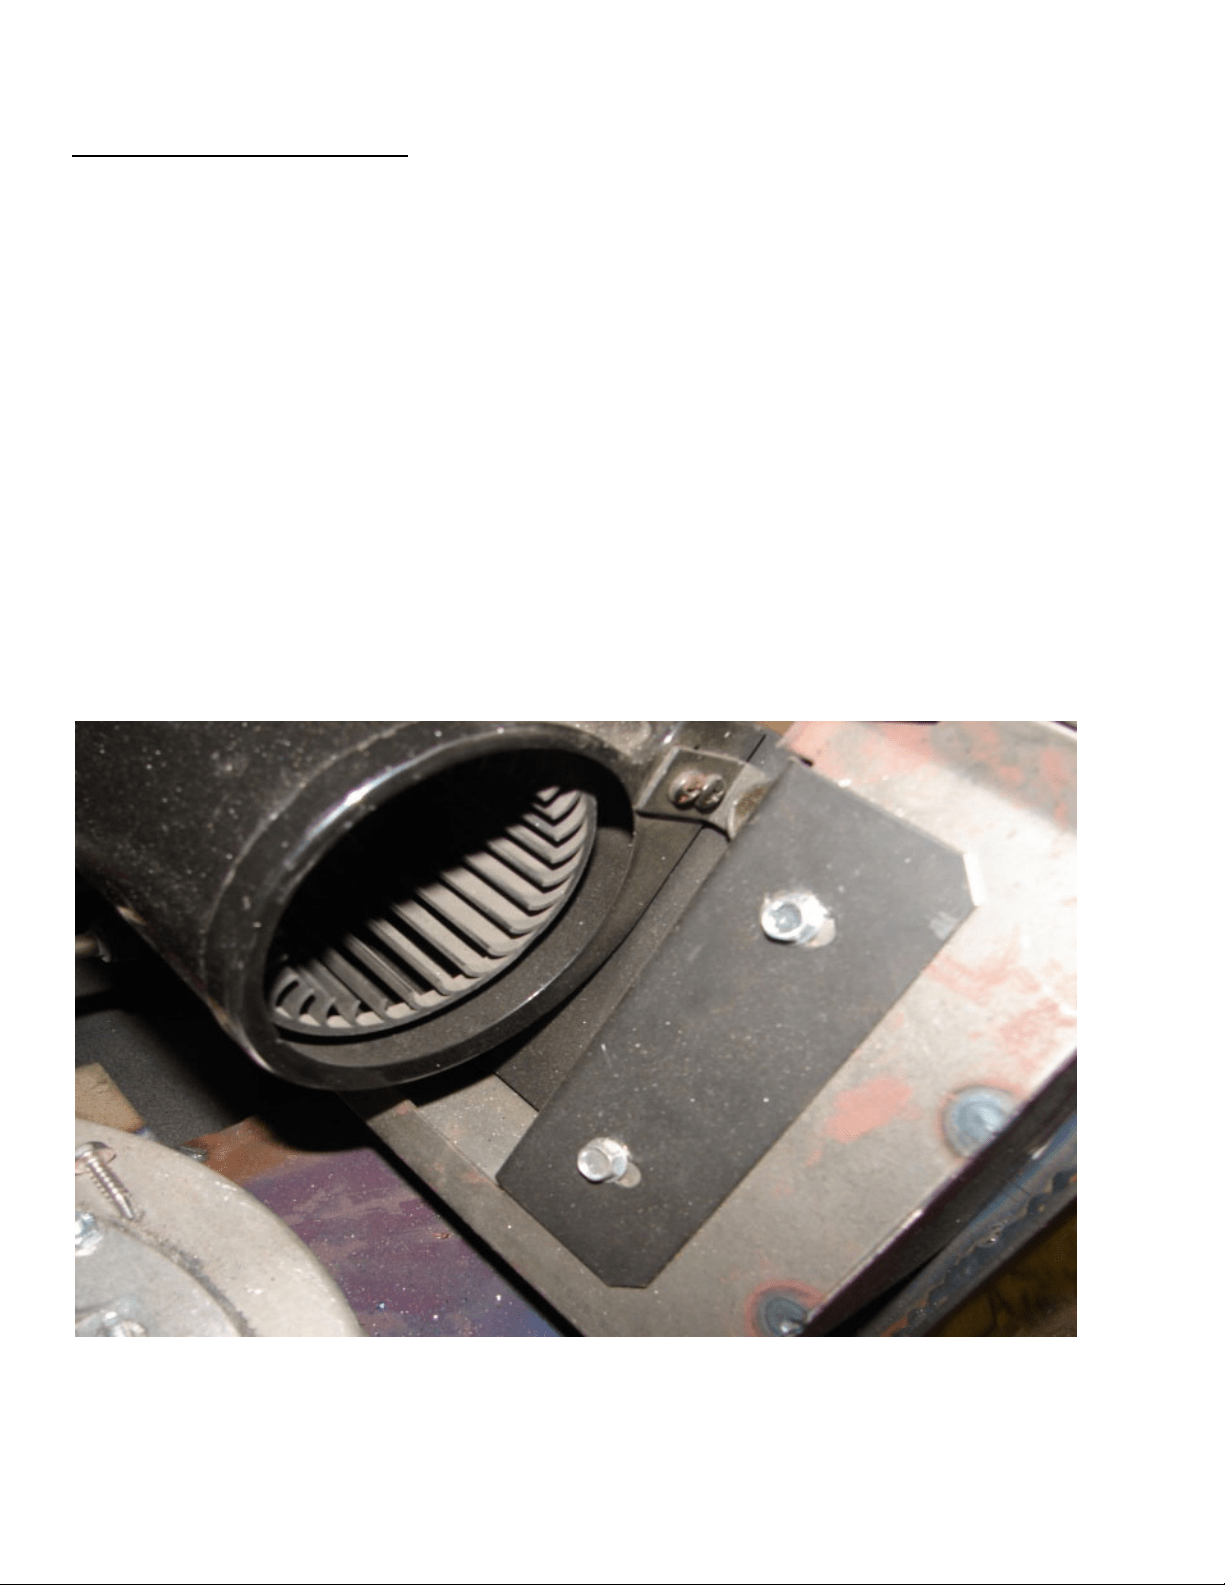
34
IMPORTANT!LISEZETSUIVEZTOUTESLESINSTRUCTIONSPOURL’INSTALLATIONETL’ENTRETIEN,NOTAMMENTCELLESPORTANTSURLENETTOYAGEDE
L’APPAREILÀEFFECTUERSELON LESDIRECTIVESETCELLESPORTANTSURLEREMPLACEMENTDESJOINTS(ANNUELLEMENT)ETDE SPIÈCES(AUBESOI N).
ENGLAND’SSTO VEWORKSN’E STPASRE SPONSABLEDESDOMMAGESNIDESBLE SSURES,QUELSQU’ILSSOIENT,SUBISENRAISONDENÉGLIGENCEOU
ÀCAUSED’UNEINSTALLATIONOUD’UNEUTILISATIONDANGEREUSEDECEPRODUIT.POURTOUTEQUESTION,COMMUNIQUEZAVECLESERVICEDE
SOUTIENTECHNIQUE.
REMPLACEMENTDESPIÈCES
Ventilateurdeconvection
Avantdeprocéderauremplacementd’unepièce,assurez‐vousquel’appareilest
débranchéetcomplètementrefroidi.
Retirezlepanneauarrière(àl’aided’unecléde5/16po),puisrepérezleventilateurde
convection.
Avantd’allerplusloin,détachezlefaisceaudecâblageduventilateurdeconvection.
Desserrez
etretirezles4visde5/16poquifixentl’ensembledeventilateuraupoêle;
retirezl’ensembledeventilateurdupoêle.
L’installationdunouveauventilateurs’effectueensensinversedudémontage;n’oubliez
pasdereconnecterlenouveauventilateuraufaisceaudecâblage. (Lorsdel’installationdu
nouveauventilateur,placez
lemoteurduventilateurdesortequel’ouverture pointeversle
HAUT,verslapartiesupérieuredupoêle.)
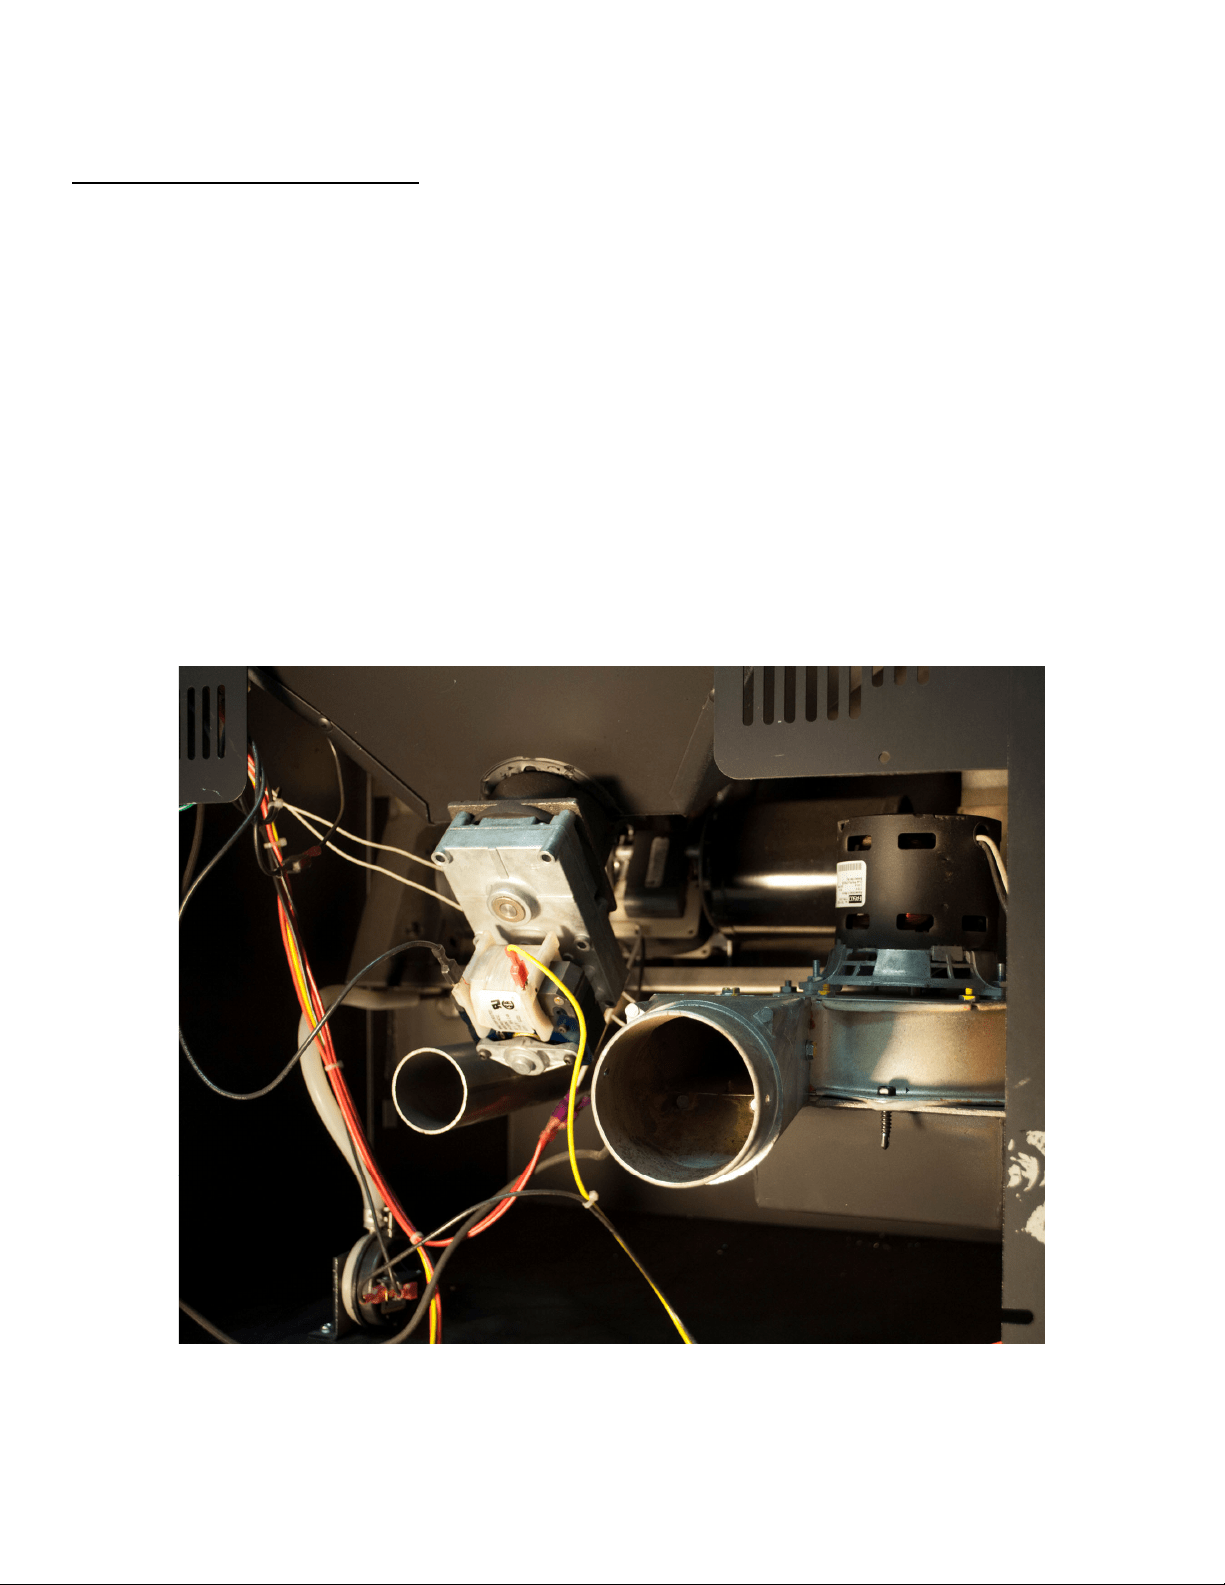
35
IMPORTANT!LISEZETSUIVEZTOUTESLESINSTRUCTIONSPOURL’INSTALLATIONETL’ENTRETIEN,NOTAMMENTCELLESPORTANTSURLENETTOYAGEDE
L’APPAREILÀEFFECTUERSELON LESDIRECTIVESETCELLESPORTANTSURLEREMPLACEMENTDESJOINTS(ANNUELLEMENT)ETDE SPIÈCES(AUBESOI N).
ENGLAND’SSTO VEWORKSN’E STPASRE SPONSABLEDESDOMMAGESNIDESBLE SSURES,QUELSQU’ILSSOIENT,SUBISENRAISONDENÉGLIGENCEOU
ÀCAUSED’UNEINSTALLATIONOUD’UNEUTILISATIONDANGEREUSEDECEPRODUIT.POURTOUTEQUESTION,COMMUNIQUEZAVECLESERVICEDE
SOUTIENTECHNIQUE.
REMPLACEMENTDESPIÈCES
Ventilateurdecombustion
Avantdeprocéderauremplacementd’unepièce,assurez‐vousquel’appareilest
débranchéetcomplètementrefroidi.
Retirezlepanneaudegaucheetrepérezleventilateur(d’évacuation)deconvection.
Déconnectezlesystèmedeventilationduventilateurd’évacuation,puisdébranchezle
ventilateurdecombustiondufaisceaudecâblagedupoêle.
Pourpouvoirretirerletuyau
deventilation,ilpourraitêtrenécessairederetirerlepanneauarrière(àl’aided’uneclé
de5/16po).
Retirezles5visquifixentleventilateurd’évacuationautubed’évacuation.Retirez
lecapteurdechaleurquiestfixéàl’aided’unevissurle
ventilateurd’évacuation.
Unefoisquevousavezretirélesvis,soulevezleventilateuretretirez‐ledupoêle.
Réinstallezlespiècesexactementdansl’ordreinverse;cependant,assurez‐vousquevous
avezvérifiél’étatdesjointsduventilateurd’évacuation,etremplacez‐lesaubesoin.
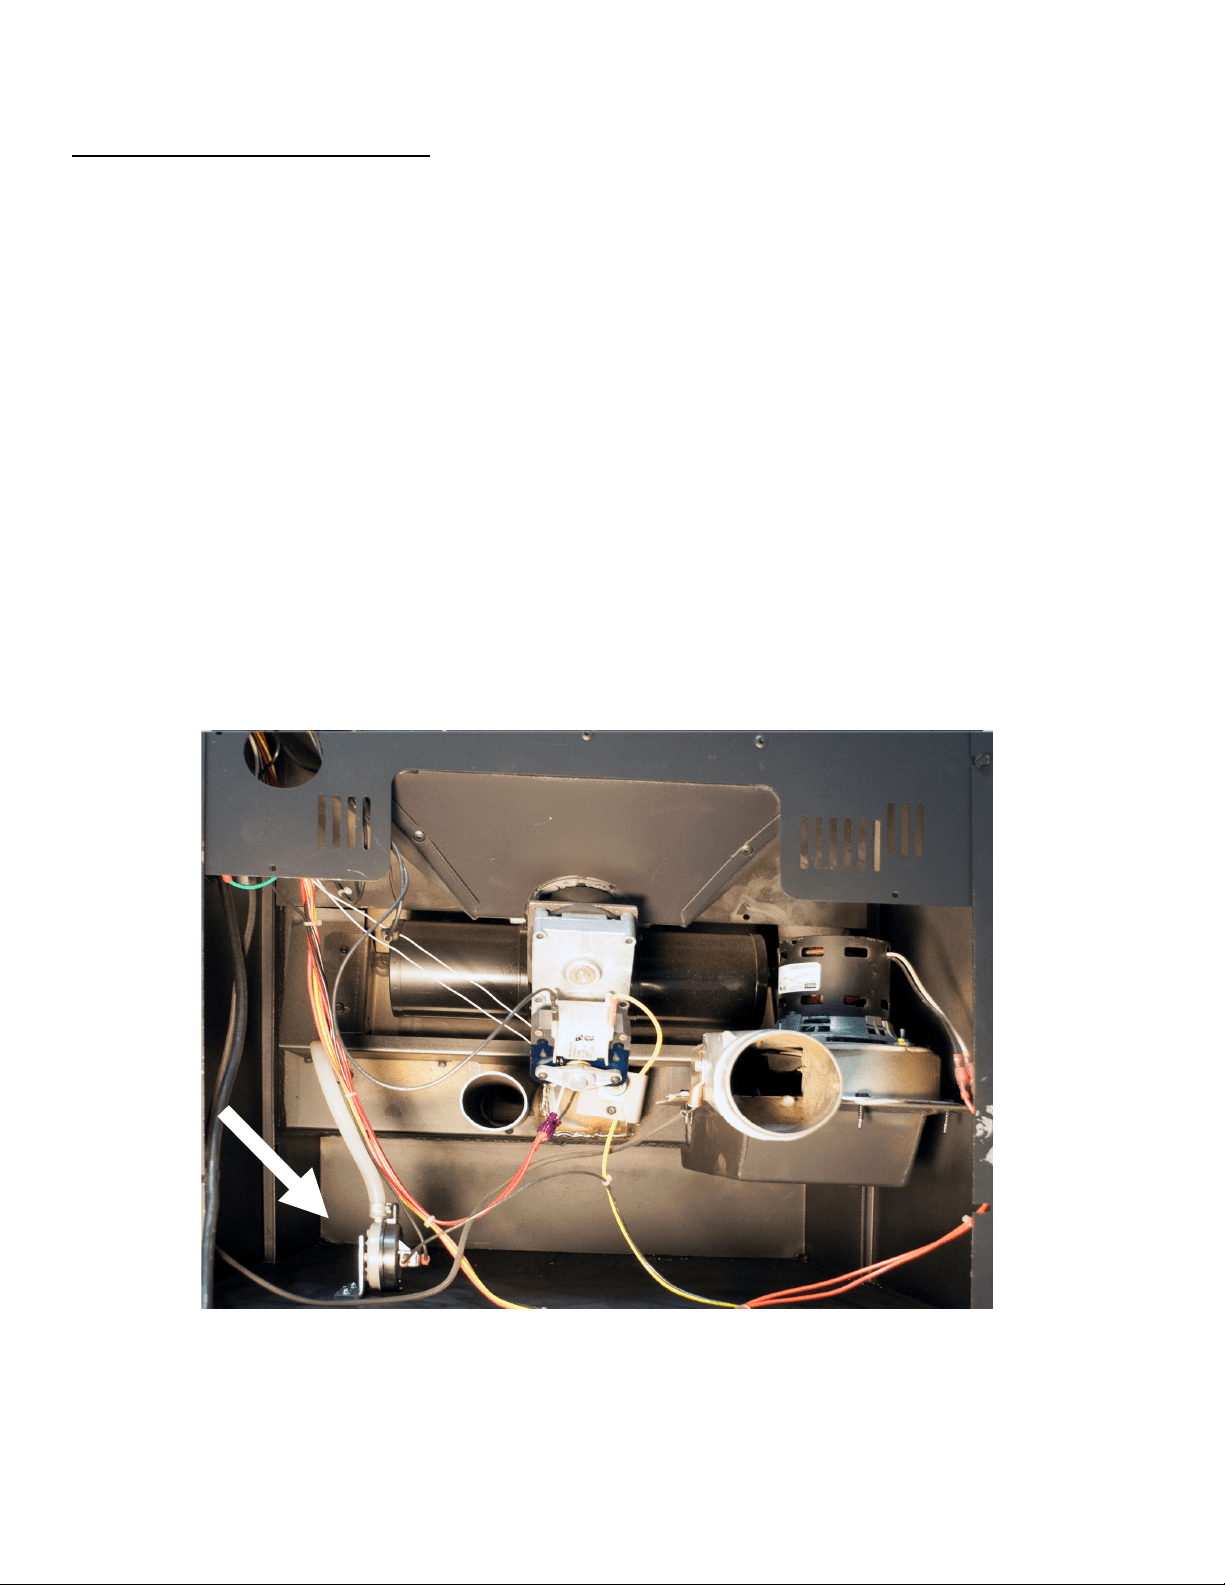
36
IMPORTANT!LISEZETSUIVEZTOUTESLESINSTRUCTIONSPOURL’INSTALLATIONETL’ENTRETIEN,NOTAMMENTCELLESPORTANTSURLENETTOYAGEDE
L’APPAREILÀEFFECTUERSELON LESDIRECTIVESETCELLESPORTANTSURLEREMPLACEMENTDESJOINTS(ANNUELLEMENT)ETDE SPIÈCES(AUBESOI N).
ENGLAND’SSTO VEWORKSN’E STPASRE SPONSABLEDESDOMMAGESNIDESBLE SSURES,QUELSQU’ILSSOIENT,SUBISENRAISONDENÉGLIGENCEOU
ÀCAUSED’UNEINSTALLATIONOUD’UNEUTILISATIONDANGEREUSEDECEPRODUIT.POURTOUTEQUESTION,COMMUNIQUEZAVECLESERVICEDE
SOUTIENTECHNIQUE.
REMPLACEMENTDESPIÈCES
Interrupteurdel’aspirateur
Avantdeprocéderauremplacementd’unepièce,assurez‐vousquel’appareilest
débranchéetcomplètementrefroidi.
Retirezlepanneaulatéraldroit(consultezlesinstructionsrelativesauxpanneauxàla
page43).Leretraitdupanneauarrièrepeutégalementfaciliterl’opération.
Repérezl’interrupteurdel’aspirateur,commelemontrele
schémaci‐dessous.
Débranchezlefaisceaudecâblesdupoêleetletuyaudel’aspirateurdudétecteurde
l’aspirateur,ennotantl’emplacementdesbranchements.
Àl’aided’untourneviscruciforme,retirezles2visquifixentledétecteurdel’aspirateur
àsonsupport.
Réinstallezlespiècesdansl’ordre
inverse;vérifiezsoigneusementquelesfilsetletuyau
del’aspirateursontraccordésdelamêmefaçonqueprécédemment(etconformémentau
schémadecâblagefournidansceguide).
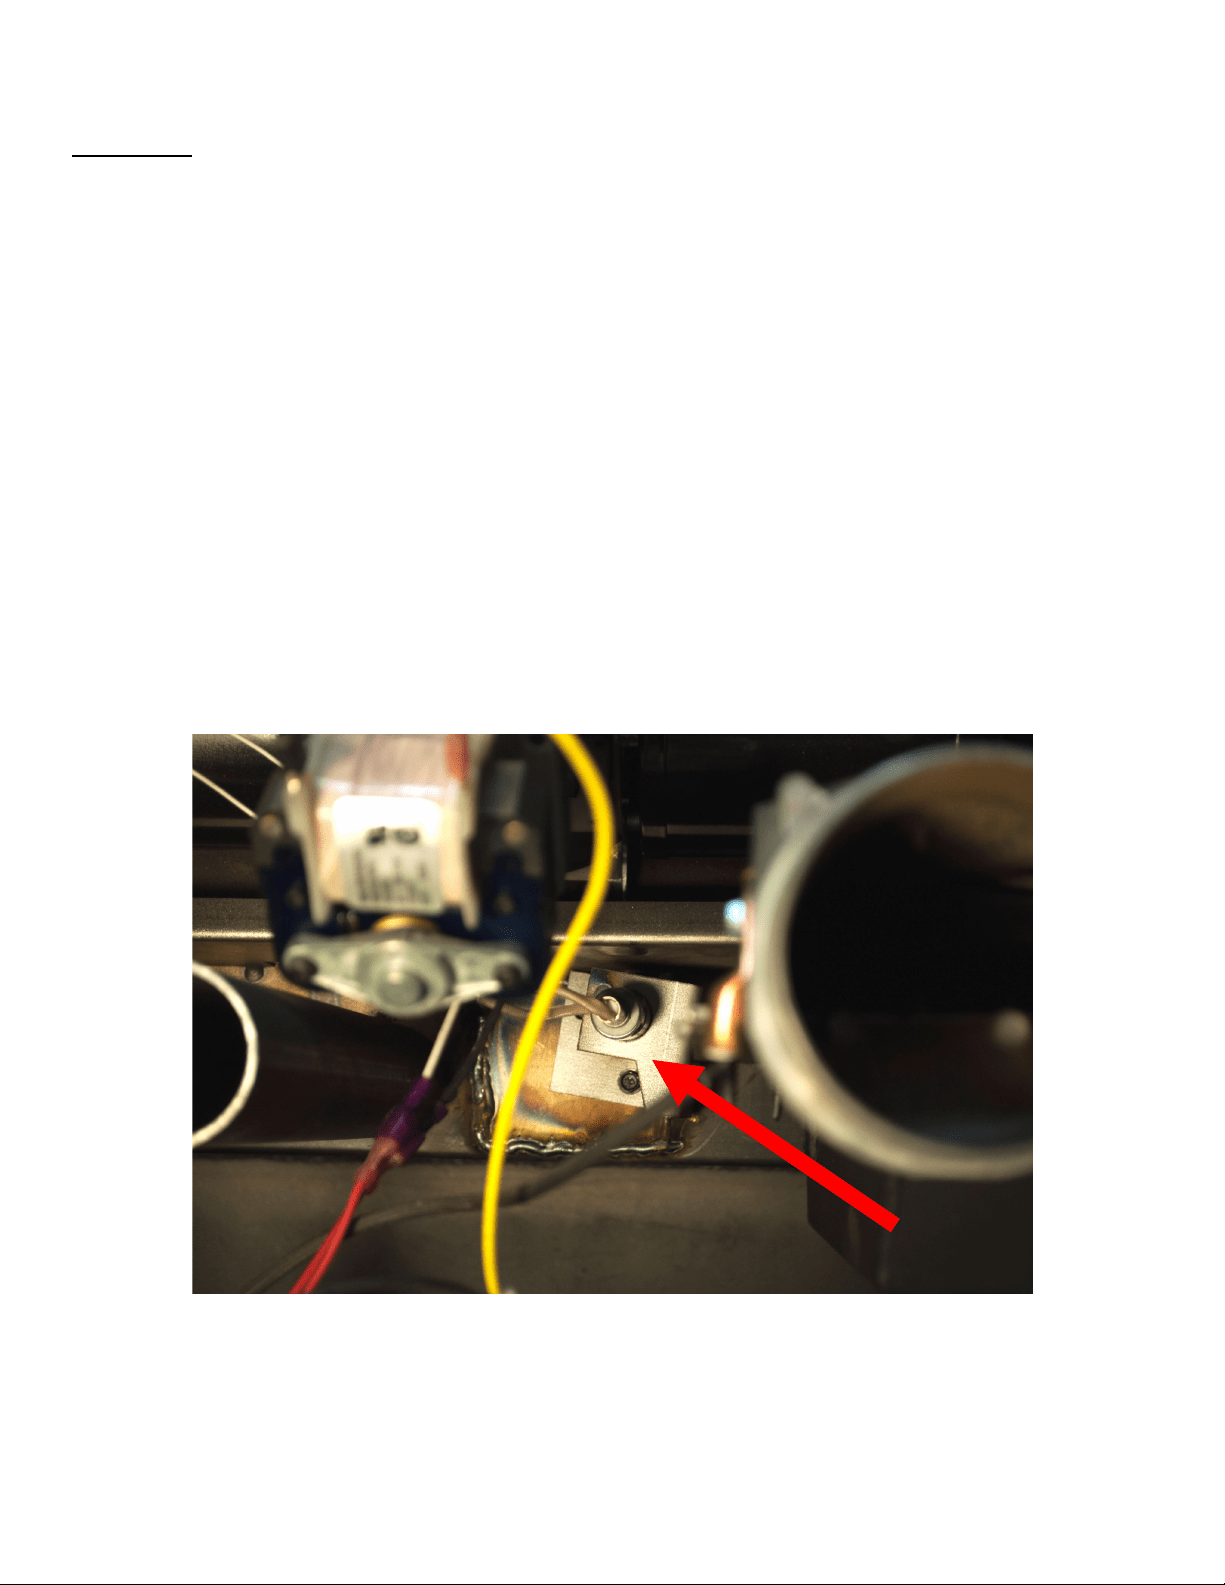
37
IMPORTANT!LISEZETSUIVEZTOUTESLESINSTRUCTIONSPOURL’INSTALLATIONETL’ENTRETIEN,NOTAMMENTCELLESPORTANTSURLENETTOYAGEDE
L’APPAREILÀEFFECTUERSELON LESDIRECTIVESETCELLESPORTANTSURLEREMPLACEMENTDESJOINTS(ANNUELLEMENT)ETDE SPIÈCES(AUBESOI N).
ENGLAND’SSTO VEWORKSN’E STPASRE SPONSABLEDESDOMMAGESNIDESBLE SSURES,QUELSQU’ILSSOIENT,SUBISENRAISONDENÉGLIGENCEOU
ÀCAUSED’UNEINSTALLATIONOUD’UNEUTILISATIONDANGEREUSEDECEPRODUIT.POURTOUTEQUESTION,COMMUNIQUEZAVECLESERVICEDE
SOUTIENTECHNIQUE.
REMPLACEMENTDESPIÈCES
Allumeur
Avantdeprocéderauremplacementd’unepièce,assurez‐vousquel’appareilest
débranchéetcomplètementrefroidi.
Retirezlepanneauarrièredel’appareilàl’aided’unecléde5/16po.
Repérezl’allumeur,commelemontreleschémaci‐dessous.
Débranchezlecâblagedel’allumeurdupanneaudecommande
et,àl’aided’unecléde
5/16po,retirezlesdeuxvisretenantl’ensembled’allumeuraupoêle.Retirezl’ensemble
dupoêle.
Desserrezlavisdecalagedutubedel’allumeuràl’aided’unecléhexagonalede1/8po,
puisretirezl’anciennecartouchedel’allumeur.
Installezlenouvelallumeur
dansletubedel’allumeur,resserrezlavisdecalageet
réinstallezl’ensembledanslepoêle(n’oubliezpasderebrancherlesfils).
Replacezlepanneauarrière.

38
IMPORTANT!LISEZETSUIVEZTOUTESLESINSTRUCTIONSPOURL’INSTALLATIONETL’ENTRETIEN,NOTAMMENTCELLESPORTANTSURLENETTOYAGEDE
L’APPAREILÀEFFECTUERSELON LESDIRECTIVESETCELLESPORTANTSURLEREMPLACEMENTDESJOINTS(ANNUELLEMENT)ETDE SPIÈCES(AUBESOI N).
ENGLAND’SSTO VEWORKSN’E STPASRE SPONSABLEDESDOMMAGESNIDESBLE SSURES,QUELSQU’ILSSOIENT,SUBISENRAISONDENÉGLIGENCEOU
ÀCAUSED’UNEINSTALLATIONOUD’UNEUTILISATIONDANGEREUSEDECEPRODUIT.POURTOUTEQUESTION,COMMUNIQUEZAVECLESERVICEDE
SOUTIENTECHNIQUE.
REMPLACEMENTDESPIÈCES
Joints
1. Porte
Cetappareilestmunid’unjointd’étanchéitécordéde19,05mminsérédansla
cannelureautourdel’ouverturedelaporte,lequeldoitêtreremplacéaumoinsune
foisparannée.Pourremplacerlejointd’étanchéitédelaporte(piècenºAC‐DGKHD),
retirezd’abordlevieuxjointenentier.
Avantd’ajouterlenouveladhésif,vousdevrez
peut‐êtregratterlavieillecolledelacanneluredelaporte.Aprèsavoirajoutédela
colleetinstallélejoint,fermezetverrouillezlaporte,etlaissez‐laainsipendant
vingt‐quatreheurespourquelacolledurcisse.Consultezlapage
suivantepourplus
derenseignements.
2. Fenêtre
Sivousremplacezlejointdelafenêtre(piècenºAC‐GGK),undescôtésdunouveau
jointseradéjàenduitdecolle.Retirezlepapierducôtéadhésifetplacezlejoint
autourdubor dextérieurdelavitre,centrésurlebord.Repliezlesbordsdujointsur
lavitreenformantun«U».
3.
Ventilateurdecombustion
Inspectezlejointduventilateurdecombustion(piècenºPU‐CBMG)chaquefoisque
vousretirezounettoyezleventilateurdecombustion,etremplacez‐leaubesoin.
4. Moteurduventilateurdecombustion
Lejoint(piècenºPU‐CBMG)dumoteurduvent ilateurdecombustionn’a
généralementpasbesoind’êtreremplacé,car,normalement,onneretirepasce
moteurdel’appareil.Cependant,sivousnettoyezleventilateurd’évacuationen
retirantlemoteurseulementplutôtquel’ensembleduventilateur,vousdevez
inspectercejoint
etleremplaceraubesoin.
L’ENTRETIENINADÉQUATDESJOINTS,YCOMPRISLEDÉFAUTDEREMPLACEMENTDES
JOINTS,PEUTSETRADUIREPARDESFUITESD’AIRCAUSANTDESRETOURSDEFUMÉE.

39
IMPORTANT!LISEZETSUIVEZTOUTESLESINSTRUCTIONSPOURL’INSTALLATIONETL’ENTRETIEN,NOTAMMENTCELLESPORTANTSURLENETTOYAGEDE
L’APPAREILÀEFFECTUERSELON LESDIRECTIVESETCELLESPORTANTSURLEREMPLACEMENTDESJOINTS(ANNUELLEMENT)ETDE SPIÈCES(AUBESOI N).
ENGLAND’SSTO VEWORKSN’E STPASRE SPONSABLEDESDOMMAGESNIDESBLE SSURES,QUELSQU’ILSSOIENT,SUBISENRAISONDENÉGLIGENCEOU
ÀCAUSED’UNEINSTALLATIONOUD’UNEUTILISATIONDANGEREUSEDECEPRODUIT.POURTOUTEQUESTION,COMMUNIQUEZAVECLESERVICEDE
SOUTIENTECHNIQUE.
REMPLACEMENTDESPIÈCES
Remplacementdelavitre(comprendlesinstructionsderempl ace mentdujointd’étanchéité
delaporte)
1. Retirezlaportedupoêleetplacez‐lasurunesurfacedetravailsolide,faceverslebas.
2. Àl’aidedepinces,retirezlejointdelaporteenletiranthorsdelacannelure.
3. Àl’aided’unecléde5/16po,retirezles4visquitiennentleslanguettesdelavitreenplace
surlaporte,puisretirezleslanguettes.
4. Soulevezl’ancienpanneaudeverreenleretirantdelaporte,puisjetez‐le(soyez
particulièrementprudentsil’anciennevitreestbriséeoufissurée).
5. L’emballagedunouveaupanneaudeverredoitcontenirunjointd’étanchéitéautoadhésifen
fibredeverre(piècenºAC‐GGK).Cejointsertdecoussinentreleverreetlesporteset
supportsenacier.
6. Réinstallezleslanguettesdelavitreàl’aidedesvisretiréesprécédemment.Évitezdeserrer
excessivementlesvis.
7. Installezlenouveaujointd’étanchéitédelaporte(piècenºAC‐DGKHD)àl’aidedel’adhésif
résistantauxtempératuresélevéesquiestfourni.
8. Réinstallezlaportesurlepoêleetfermez‐labien.Laissezl’adhésifsécherpendant24heures.
Caractéristiquesdelavitreenvitrocéramique
Dimensionsdelavitre:231,77mmx231,77mm(9.125pox9.125po)
Typedeverre:vitrocéramiquede5mm(Keralite/Pyroceram)
Fabricantduverre:Eurokera
Précautionsrelativesàlavitre
Neremplacezjamaislavitreenvitrocéramiqueparunevitreenverretrempéoutoutautre
typedeverre.
Nefaitesjamaisfonctionnercetappareillorsquesavitreestfissuréeoubrisée.
Neclaquezpaslaporteetnefrappezpaslavitreavecunobjet.
Nettoyagedelavitre
1. Assurez‐vousquelepoêleetquelavitresontcomplètementrefroidis.
2. Ilyagénéralementpeudedépôtssurlavitreetilspeuventhabituellementêtrenettoyés
avecdel’eau.
Silasuiesefaittenace,utilisezunnettoyantspécialementconçupourl’enlever.Vousnedevez
pasgratter
lavitrenilanettoyeravecunproduitabrasif.
3. Rincezlavitreavecdel’eaupropreetséchez‐laavantdefairefonctionnerlepoêleànouveau.
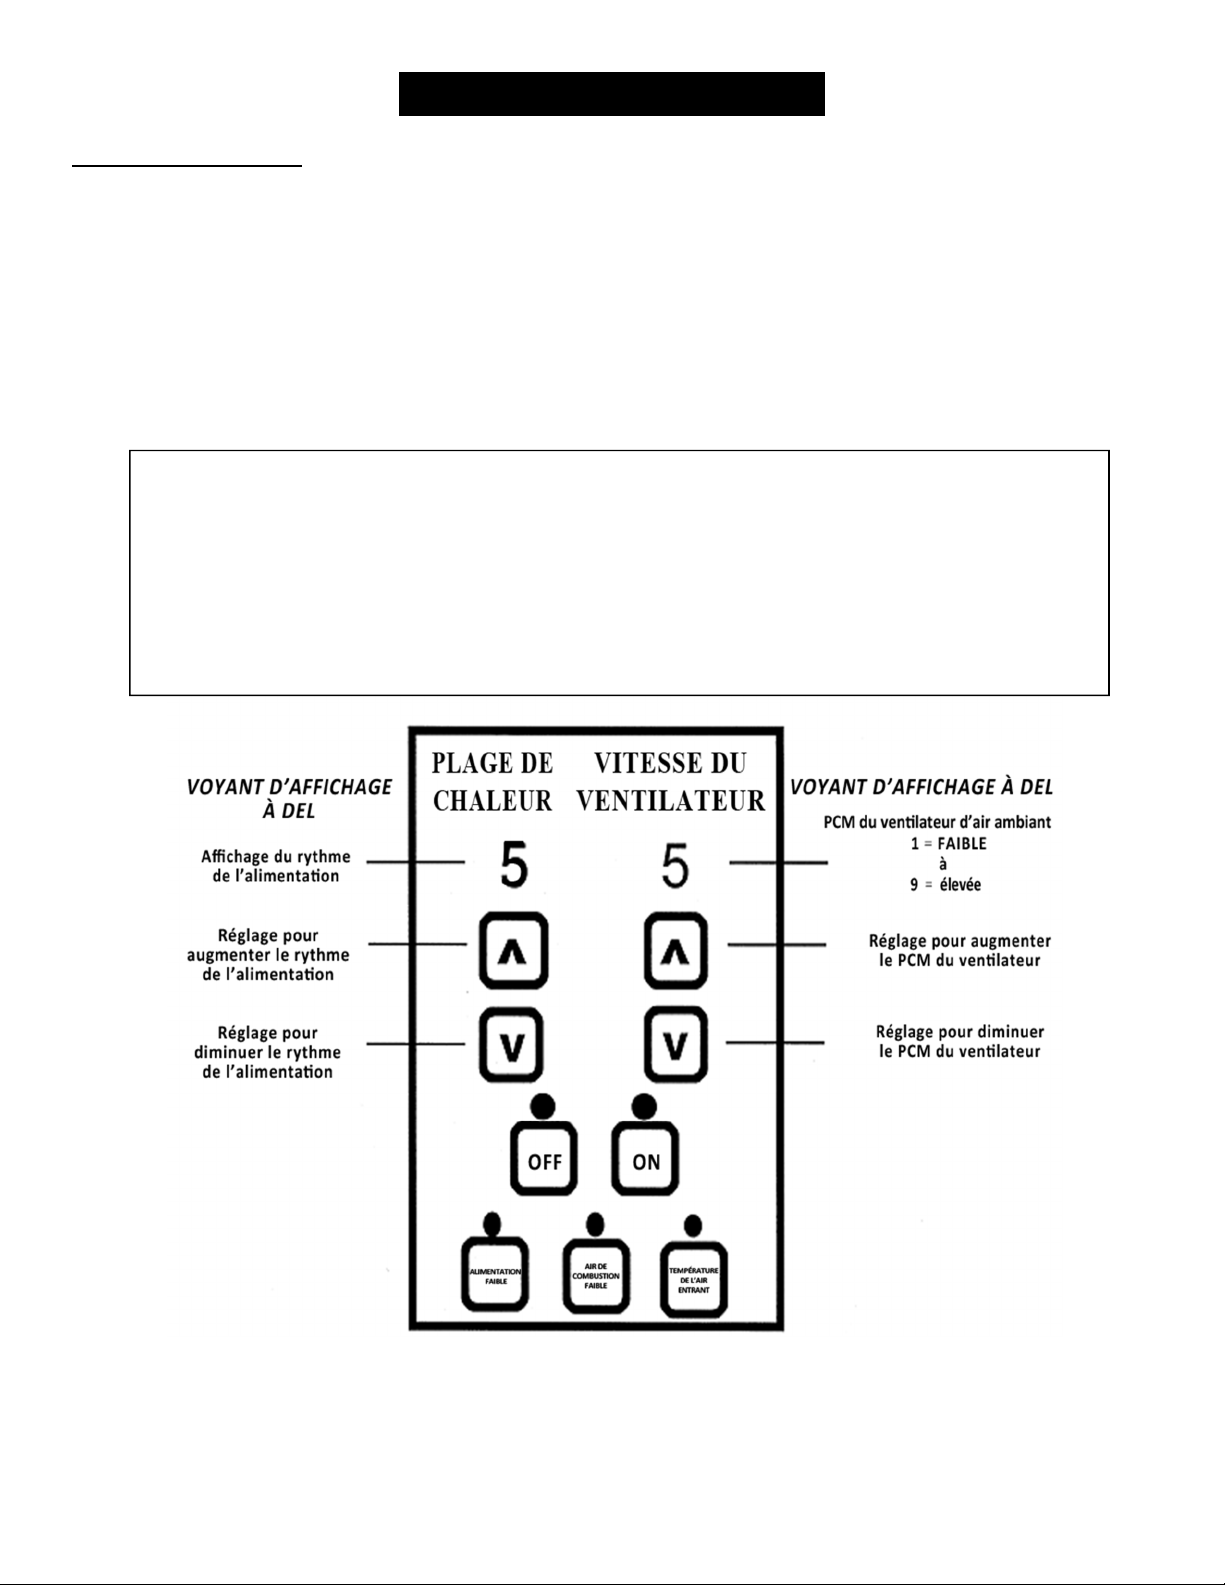
40
IMPORTANT!LISEZETSUIVEZTOUTESLESINSTRUCTIONSPOURL’INSTALLATIONETL’ENTRETIEN,NOTAMMENTCELLESPORTANTSURLENETTOYAGEDE
L’APPAREILÀEFFECTUERSELONLESDIRECTIVESETCELLESPORTANTSUR LEREMPL ACEMENTDESJOINTS(ANNUELLEMENT)ETDE SPIÈCES(AUBESOI N).
ENGLAND’SSTO VEWORKSN’E STPASRE SPONSABLEDESDOMMAGESNIDESBLE SSURES,QUELSQU’ILSSOIENT,SUBISENRAISONDENÉGLIGENCEOU
ÀCAUSED’UNEINSTALLATIONOUD’UNE UTILISATIONDANGEREUSEDECEPRODUIT.POURTOUTEQUESTION, COMMUNIQUEZAVECLESERVICEDE
SOUTIENTECHNIQUE.
REMPLACEMENTDESPIÈCES
Panneaudecommande
Lepanneaudecommande(piècenºPAH‐CB09)estunpanneaud’affichagenumérique.
Cepanneaucomprendplusieursréglagesquiaidentàfairefonctionnerl’appareil.Avantderetirerle
panneaudecommande,enlevezlepanneaulatéraldroitàl’aide d’untournevisàdouilleoud’unecléde
5/16po.Pourretirerle
panneaudecommandedel’appareil,desserrezlesdeuxvisexternesetpoussez
lepanneauvers l’intérieurdupoêle.Lepanneaudecommandeutiliseunfusibleàactionrapidede6A.
REMARQUE:Lestroisboutonsdecommandeinférieurssontpréréglésenusineetnedoivent pasêtre
régléspar
lesutilisateurs.Consultezlasection«Utilisationquotidienne» àlapage18du
présentguidepourplusd’instructionssurlesréglagesdupanneaudecommande.
Plagesdechaleurrecommand ées:
Combustionfaible: Réglagedeplagedechaleur:1 Réglageduventilateurd’airambiant:1
Moyennementfaible: Réglagedeplagedechaleur:2–3 Réglageduventilateurd’airambiant:*
Moyennementélevée: Réglagedeplagedechaleur:4
–8 Réglageduventilateurd’airambiant:*
Combustionmaximale: Réglagedeplagedechaleur:9 Réglageduventilateurd’airambiant:9
*REMARQUE:Lavitesseduventilateurs’ajusteraautomatiquementenfonctiondelaplagedechaleur
quevoussélectionnez.
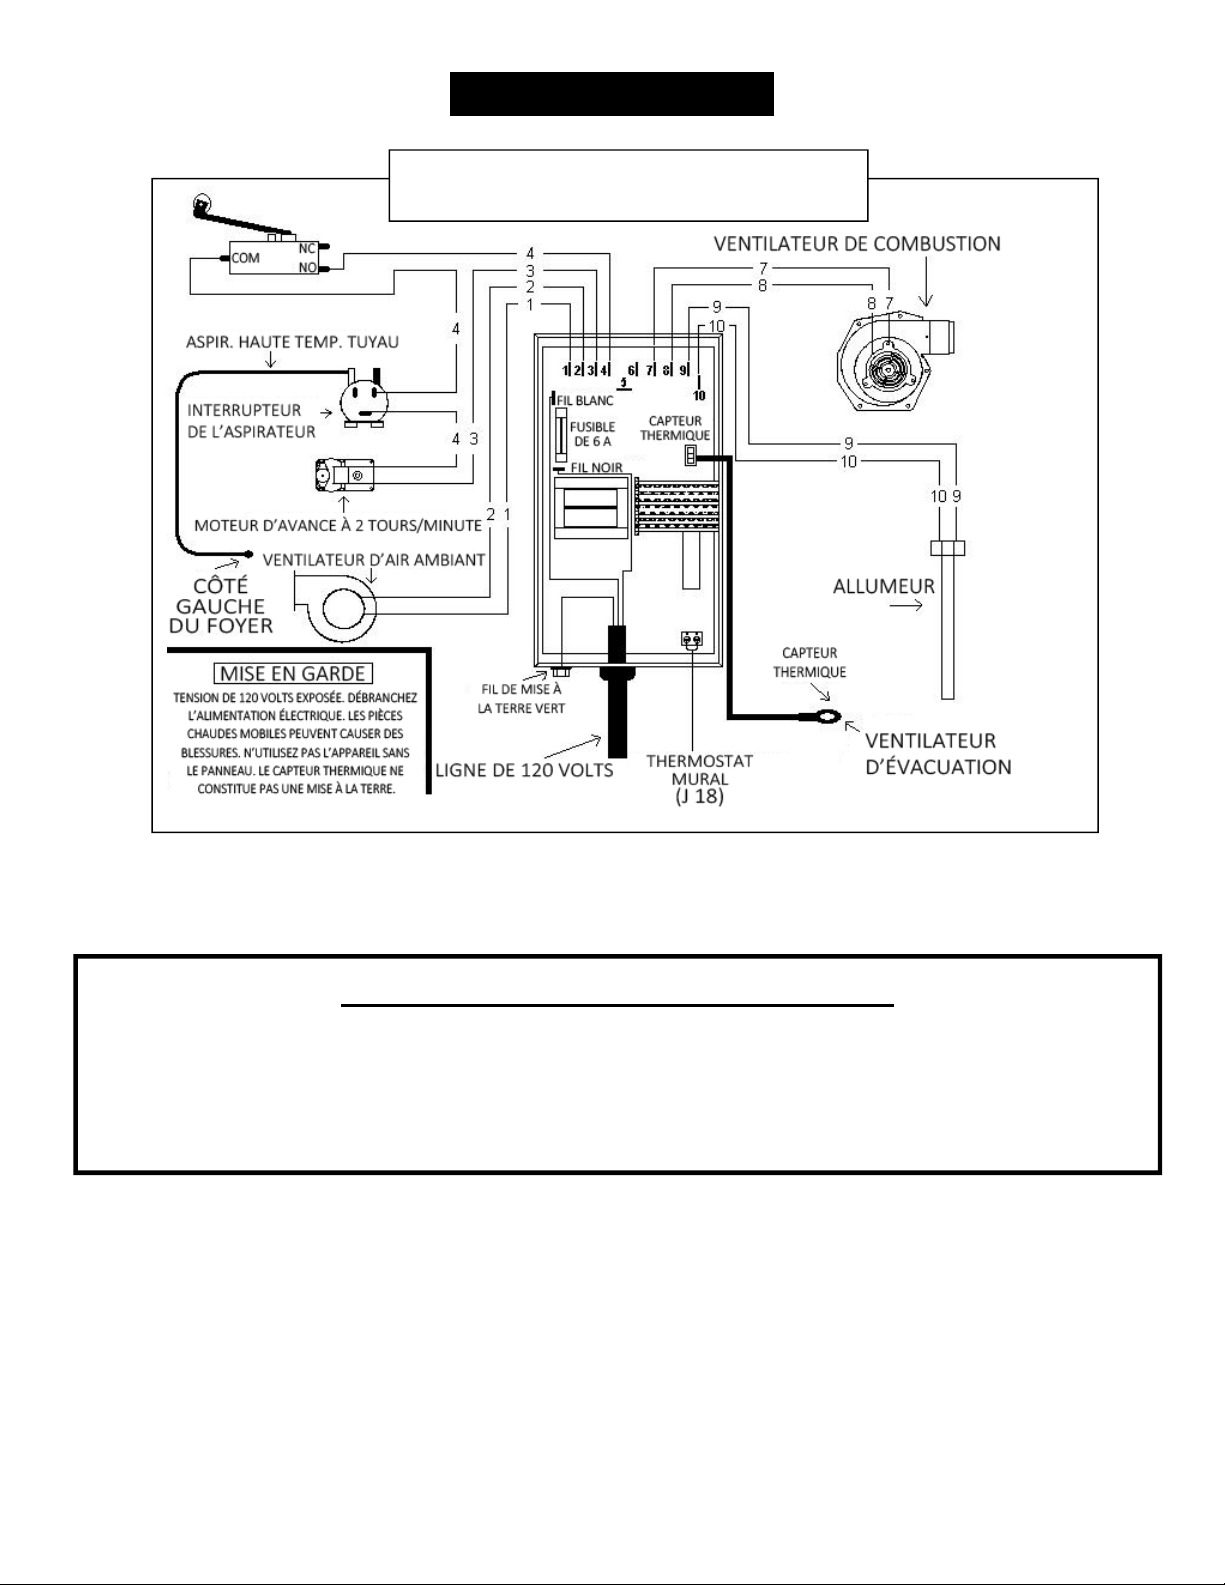
41
IMPORTANT!LISEZETSUIVEZTOUTESLESINSTRUCTIONSPOURL’INSTALLATIONETL’ENTRETIEN,NOTAMMENTCELLESPORTANTSURLENETTOYAGEDE
L’APPAREILÀEFFECTUERSELON LESDIRECTIVESETCELLESPORTANTSURLEREMPLACEMENTDESJOINTS(ANNUELLEMENT)ETDE SPIÈCES(AUBESOI N).
ENGLAND’SSTO VEWORKSN’E STPASRE SPONSABLEDESDOMMAGESNIDESBLE SSURES,QUELSQU’ILSSOIENT,SUBISENRAISONDENÉGLIGENCEOU
ÀCAUSED’UNEINSTALLATIONOUD’UNEUTILISATIONDANGEREUSEDECEPRODUIT.POURTOUTEQUESTION,COMMUNIQUEZAVECLESERVICEDE
SOUTIENTECHNIQUE.
SCHÉMADECÂBLAGE
Attention–risquedechocélectrique
Appuyezsurlebouton«OFF»(arrêt) etlaissezl’appareilserefroidircompl è tement
AVANTdeledébrancheretdeprocéderàsonentretien ouauremplacementd’unepièce.
Risquedechocélectrique sil’appareiln’estpasdébranchéavantsonentretien.
PAH‐CB09
Schémadupanneaudecommande

42
IMPORTANT!LISEZETSUIVEZTOUTESLESINSTRUCTIONSPOURL’INSTALLATIONETL’ENTRETIEN,NOTAMMENTCELLESPORTANTSURLENETTOYAGEDE
L’APPAREILÀEFFECTUERSELON LESDIRECTIVESETCELLESPORTANTSURLEREMPLACEMENTDESJOINTS(ANNUELLEMENT)ETDE SPIÈCES(AUBESOI N).
ENGLAND’SSTO VEWORKSN’E STPASRE SPONSABLEDESDOMMAGESNIDESBLE SSURES,QUELSQU’ILSSOIENT,SUBISENRAISONDENÉGLIGENCEOU
ÀCAUSED’UNEINSTALLATIONOUD’UNEUTILISATIONDANGEREUSEDECEPRODUIT.POURTOUTEQUESTION,COMMUNIQUEZAVECLESERVICEDE
SOUTIENTECHNIQUE.
CHARNIÈRESDUCOUVERCLEDELATRÉMIE
Lecouvercledelatrémieestfixésurlapartiesupérieuredupoêleàl’aidededeuxcharnières
amovibles.
Pourenleverlescharnièresducouvercledelatrémie:
Àl’aided’unedouillede5/16po,retirezles4visquitiennentchaquecharnièreenplace.
Réinstallezlescharnièresensuivantlaméthodeinverse.
POIGNÉEDUCOUVERCLEDELATRÉMIE
Lapoignéeducouvercledelatrémies’enclenchedansl’ouvertur e ducouvercledela trémie.
Pourenleverlapoignéeducouvercledelatrémie:
Soulevezlecouvercledelatrémie(enpositionouverte).
Poussezlebasdelapoignéeverslehautetcelle‐ciressortira.
Pourinstallerunenouvellepoignée,insérezcettedernièresurledessusducouvercledela
trémieetappuyezjusqu’àcequelapoignées’enclenche.
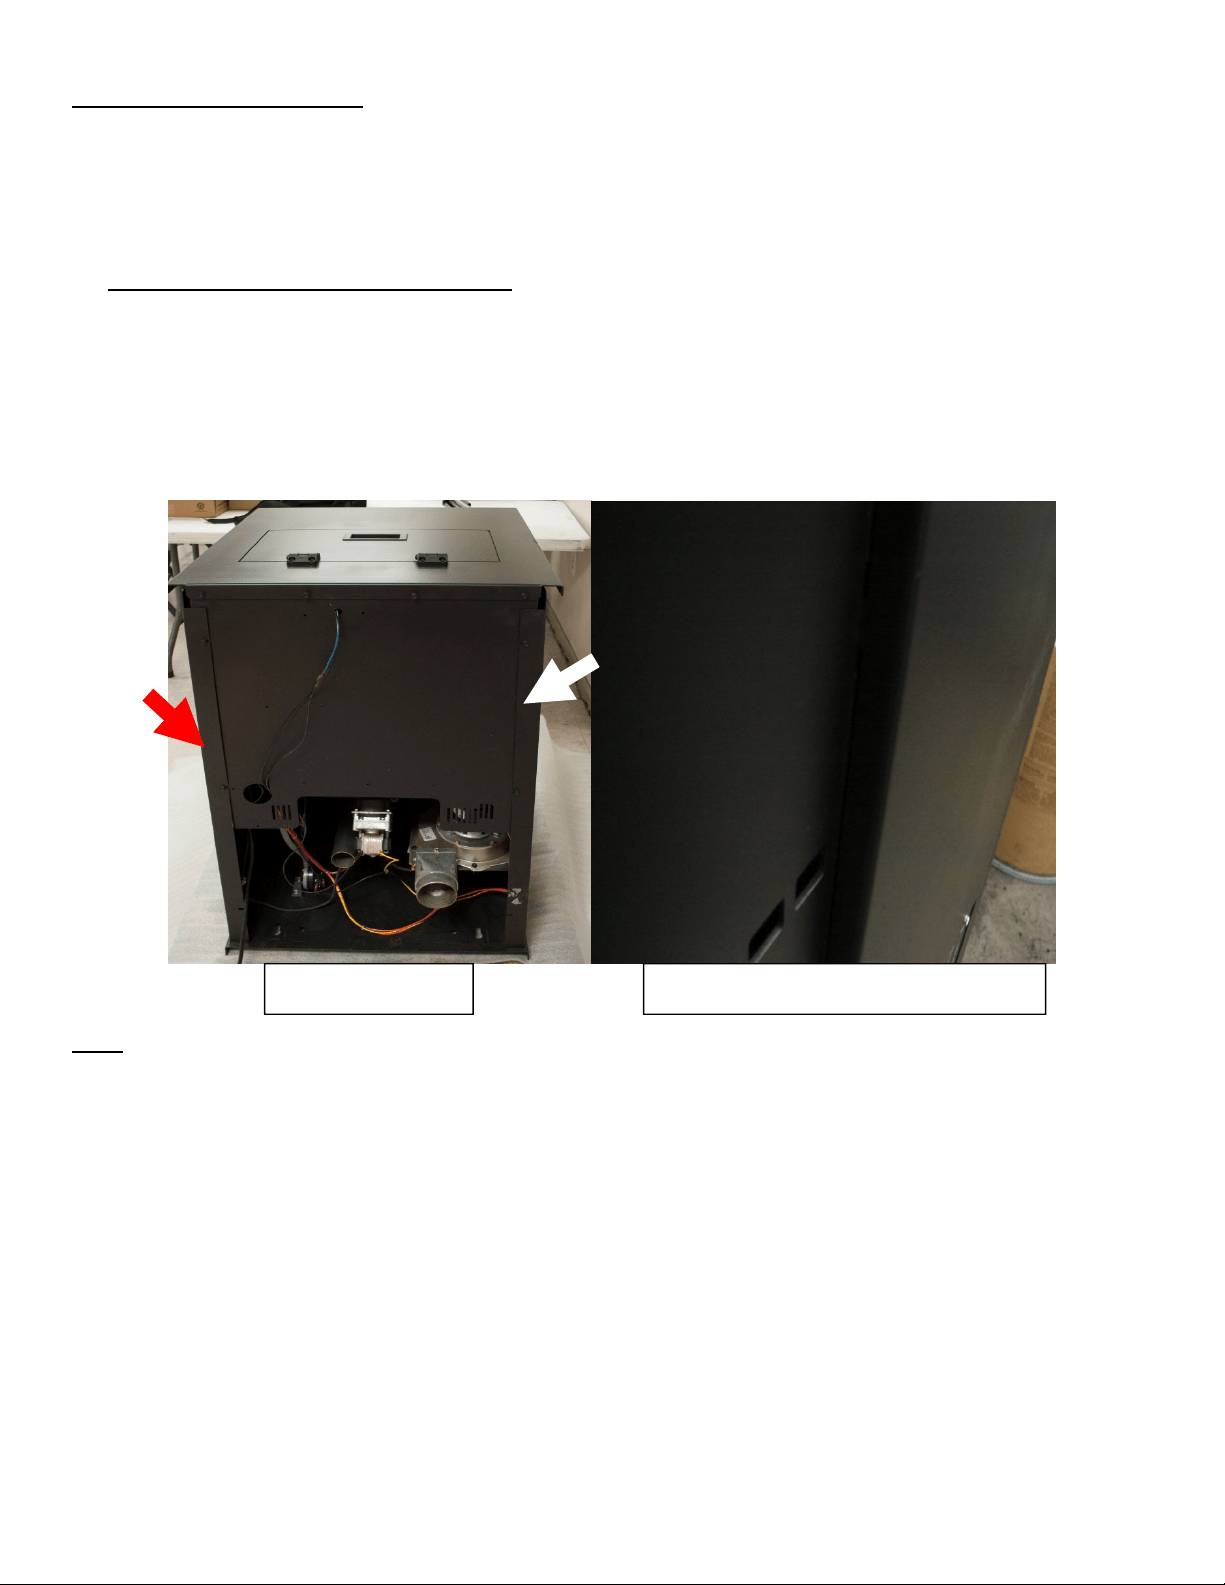
43
IMPORTANT!LISEZETSUIVEZTOUTESLESINSTRUCTIONSPOURL’INSTALLATIONETL’ENTRETIEN,NOTAMMENTCELLESPORTANTSURLENETTOYAGEDE
L’APPAREILÀEFFECTUERSELON LESDIRECTIVESETCELLESPORTANTSURLEREMPLACEMENTDESJOINTS(ANNUELLEMENT)ETDE SPIÈCES(AUBESOI N).
ENGLAND’SSTO VEWORKSN’E STPASRE SPONSABLEDESDOMMAGESNIDESBLE SSURES,QUELSQU’ILSSOIENT,SUBISENRAISONDENÉGLIGENCEOU
ÀCAUSED’UNEINSTALLATIONOUD’UNEUTILISATIONDANGEREUSEDECEPRODUIT.POURTOUTEQUESTION,COMMUNIQUEZAVECLESERVICEDE
SOUTIENTECHNIQUE.
PANNEAUXLATÉRAUX
Lespanneauxlatérauxontétéconçuspourpendresurlescôtésdupoêle.Ilspeuvent
facilementêtreenlevésafind’effectuerunnettoyagenormal(ettoutentretienquidoitêtre
faitàl’arrièredupoêle).
Pourretirerunpanneaulatéral:
Desserrezles3visde5/16poquifixentlepanneaulatéralàl’arrièredupoêle(NELES
ENLEVEZPAS).
Tenezlepanneauettirezjusqu’àcequevousleretiriezdesglissières,puissortez‐le
dupoêle.
Réinstallezlespanneauxlatérauxensuivantlaméthodeinverse.
FINI
Cenouvelappareilaétépeintavecdelapeinturehautetempératurequidevraitconserver
sonaspectd’originependantdesannées.Sil’appareilestmouilléetquedestachesderouille
apparaissent,vouspouvezlesponceravecdelalained’acierfineetrepeindrel’appareil.Ilest
importantden’utiliserque
delapeintureenaérosolhautetempérature(piècenºAC‐MBSP),
carlesautrestypesdepeinturepourraientnepasadhéreràlasurfaceounepassupporterles
températuresélevées.Demême,certainesmarquesdepeintu ren’adhèrentpasàcertaines
autresmarquesdepeinture;parconséquent ,nousvousrecommandons
fortementd’utiliser
notrepeintureenaérosolhautetempératureexclusive.
Panneauxlatéraux Panneaulatéral(vudel’avantdupoêle)
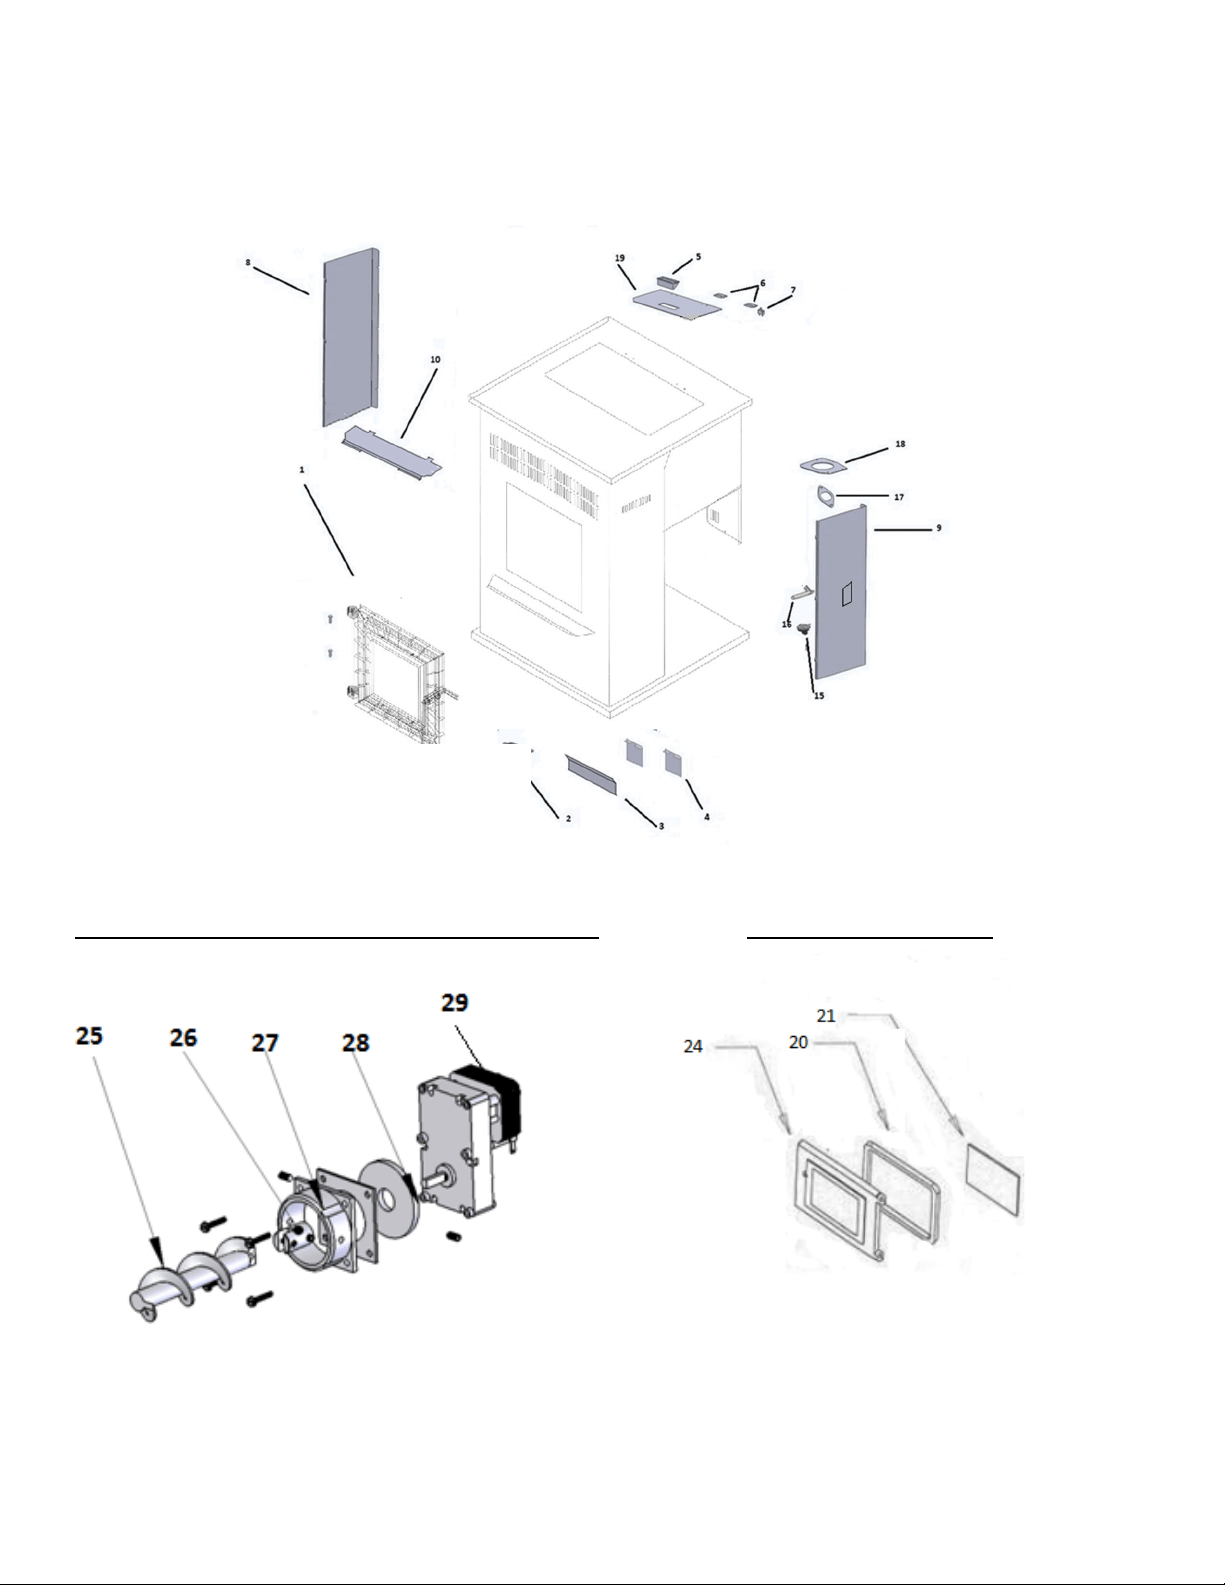
44
IMPORTANT!LISEZETSUIVEZTOUTESLESINSTRUCTIONSPOURL’INSTALLATIONETL’ENTRETIEN,NOTAMMENTCELLESPORTANTSURLENETTOYAGEDE
L’APPAREILÀEFFECTUERSELONLESDIRECTIVESETCELLESPORTANTSUR LEREMPL ACEMENTDESJOINTS(ANNUELLEMENT)ETDE SPIÈCES(AUBESOI N).
ENGLAND’SSTO VEWORKSN’E STPASRE SPONSABLEDESDOMMAGESNIDESBLE SSURES,QUELSQU’ILSSOIENT,SUBISENRAISONDENÉGLIGENCEOU
ÀCAUSED’UNEINSTALLATIONOUD’UNE UTILISATIONDANGEREUSEDECEPRODUIT.POURTOUTEQUESTION, COMMUNIQUEZAVECLESERVICEDE
SOUTIENTECHNIQUE.
SCHÉMADESPIÈCES
Ensembledumoteurdelavisàgranules
Ensembledeporte

45
IMPORTANT!LISEZETSUIVEZTOUTESLESINSTRUCTIONSPOURL’INSTALLATIONETL’ENTRETIEN,NOTAMMENTCELLESPORTANTSURLENETTOYAGEDE
L’APPAREILÀEFFECTUERSELON LESDIRECTIVESETCELLESPORTANTSURLEREMPLACEMENTDESJOINTS(ANNUELLEMENT)ETDE SPIÈCES(AUBESOI N).
ENGLAND’SSTO VEWORKSN’E STPASRE SPONSABLEDESDOMMAGESNIDESBLE SSURES,QUELSQU’ILSSOIENT,SUBISENRAISONDENÉGLIGENCEOU
ÀCAUSED’UNEINSTALLATIONOUD’UNEUTILISATIONDANGEREUSEDECEPRODUIT.POURTOUTEQUESTION,COMMUNIQUEZAVECLESERVICEDE
SOUTIENTECHNIQUE.
LISTEDESPIÈCESDERECHANGE
Nºdepièce Description Nºdansleschéma
BM‐1288 Ventilateurd’airambiant Nonillustré
CU‐047042
Moteurdevisàgranules,rotationdanslesens
desaiguillesd’unemontre,2,4tr/min
29
PU‐076002B Ventilateurd’évacuationdecombustion(nég)Nonillustré
AC‐DGKHD
Jointd’étanchéitédeportehautedensitéde
19,05mm
20
PU‐HLSB Interrupteurdesécuritéducouvercledelatrémie7
CU‐VS Interrupteurdel’aspirateur0,05 15
PAH‐CB09 Panneaudecommande Nonillustré
R‐WIRE‐H06 Faisceaudecâblagedupanneaudecommande Nonillustré
AC‐HPS Axedecharnière(qté:2) 1
AC‐MBSP Peinturedupoêle Nonillustré
AC‐SHN2 Poignéeàressortde9,52mmennickel Nonillustré
CA‐AC Raccorddelavisàgranules 26
CA‐AMPP Plaquedemontagedelavisàgranules 27
PU‐AFS Visàgranulesenacier 25
AC‐CHAPAH Ensembled’allumeur 16
PU‐HH Charnièreducouvercledelatrémie 6
PU‐VH Tuyaudel’aspirateur Nonillustré
AC‐GGK Jointdelavitre Nonillustré
AC‐G9 Portevitrée 21
AC‐GS19 LanguettesdelavitreNonillustré
AC‐HLH Poignéeducouvercledelatrémie 5
AC‐PAHTB Déflecteursupérieur 10
AC‐SSDTG Jointdutubededescente 17
CA‐19A Porteenfonte 24
PU‐BPAH Potdecombustion 2
PU‐CBMG Jointduventilateuretdumoteurdecombustion 18
PU‐SSTCW Filduthermocouple Nonillustré
PU‐SSACP Couvercledelavisàgranules Nonillustr é
PU‐DVDCBPAH DVDNonillustré
MU‐25CBPAH GuideNonillustré
46
IMPORTANT!LISEZETSUIVEZTOUTESLESINSTRUCTIONSPOURL’INSTALLATIONETL’ENTRETIEN,NOTAMMENTCELLESPORTANTSURLENETTOYAGEDE
L’APPAREILÀEFFECTUERSELON LESDIRECTIVESETCELLESPORTANTSURLEREMPLACEMENTDESJOINTS(ANNUELLEMENT)ETDE SPIÈCES(AUBESOI N).
ENGLAND’SSTO VEWORKSN’E STPASRE SPONSABLEDESDOMMAGESNIDESBLE SSURES,QUELSQU’ILSSOIENT,SUBISENRAISONDENÉGLIGENCEOU
ÀCAUSED’UNEINSTALLATIONOUD’UNEUTILISATIONDANGEREUSEDECEPRODUIT.POURTOUTEQUESTION,COMMUNIQUEZAVECLESERVICEDE
SOUTIENTECHNIQUE.
PU‐ECPCB120
Couvercled’orificedenettoyagedutube
d’échangedechaleur(qté:2)
4
PU‐RABMP Plaquedemontageduventilateurd’airambiant Nonillustré
CU‐RG Amortisseurdevibrationencaoutchouc 28
PU‐RSP Panneaulatéraldroit 9
PU‐LSP Panneaulatéralgauche 8
PU‐SSHL Couvercledelatrémie 19
PU‐CBAWB Barred’évacuationd’air 3
PU‐SSRP Panneauarrière Nonillustré
AC‐CT Outildenettoyage Nonillustré
Vouspouvezinscrireladatedefabricationetlenumérode
sériedevotreappareildanslesespacesprévusàceteffetsur
cetteétiquette(pagesuivante),pourréférenceultérieure.
Cetteétiquettecomprendégalementdesrenseignementsde
sécurité,commelesnormesd’essaiUL,ULC,etc.,àl’intention
devosagentslocaux
oudetouteautrepersonnequipeuten
avoirbesoin.
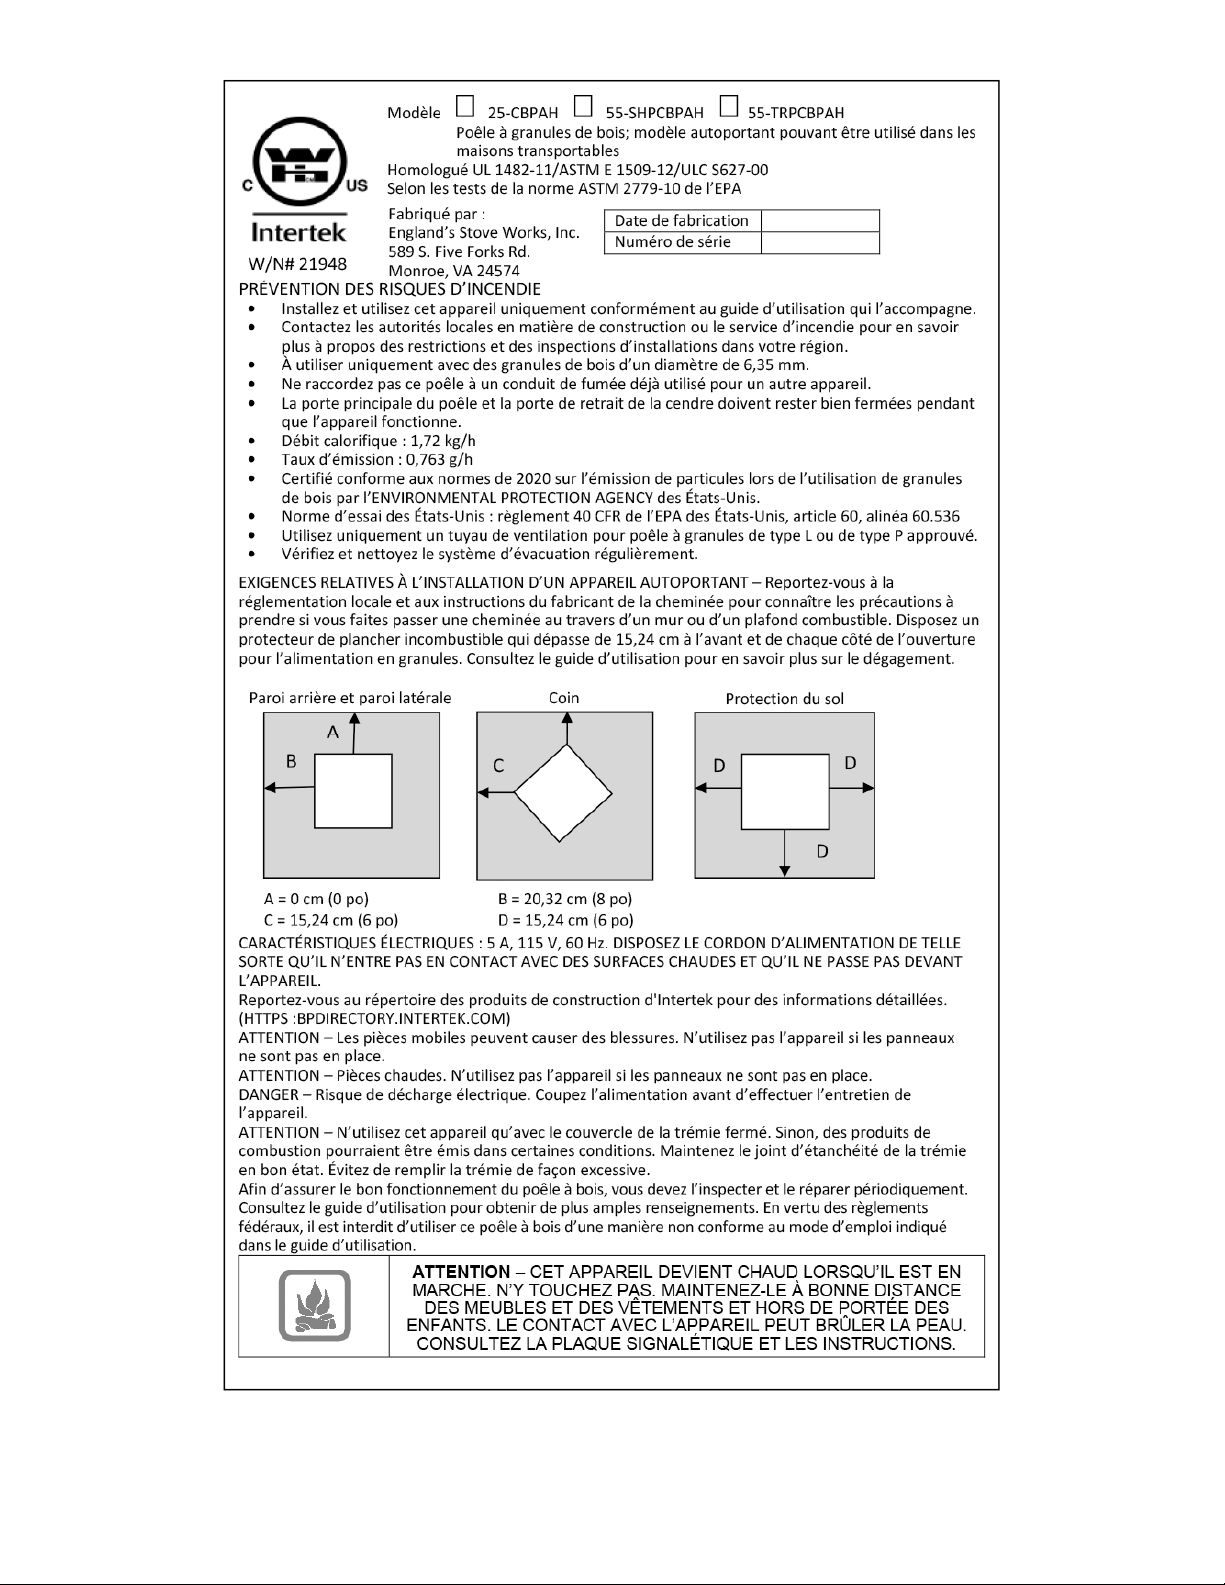
47
IMPORTANT!LISEZETSUIVEZTOUTESLESINSTRUCTIONSPOURL’INSTALLATIONETL’ENTRETIEN,NOTAMMENTCELLESPORTANTSURLENETTOYAGEDE
L’APPAREILÀEFFECTUERSELON LESDIRECTIVESETCELLESPORTANTSURLEREMPLACEMENTDESJOINTS(ANNUELLEMENT)ETDE SPIÈCES(AUBESOI N).
ENGLAND’SSTO VEWORKSN’E STPASRE SPONSABLEDESDOMMAGESNIDESBLE SSURES,QUELSQU’ILSSOIENT,SUBISENRAISONDENÉGLIGENCEOU
ÀCAUSED’UNEINSTALLATIONOUD’UNEUTILISATIONDANGEREUSEDECEPRODUIT.POURTOUTEQUESTION,COMMUNIQUEZAVECLESERVICEDE
SOUTIENTECHNIQUE.

48
IMPORTANT!LISEZETSUIVEZTOUTESLESINSTRUCTIONSPOURL’INSTALLATIONETL’ENTRETIEN,NOTAMMENTCELLESPORTANTSURLENETTOYAGEDE
L’APPAREILÀEFFECTUERSELON LESDIRECTIVESETCELLESPORTANTSURLEREMPLACEMENTDESJOINTS(ANNUELLEMENT)ETDE SPIÈCES(AUBESOI N).
ENGLAND’SSTO VEWORKSN’E STPASRE SPONSABLEDESDOMMAGESNIDESBLE SSURES,QUELSQU’ILSSOIENT,SUBISENRAISONDENÉGLIGENCEOU
ÀCAUSED’UNEINSTALLATIONOUD’UNEUTILISATIONDANGEREUSEDECEPRODUIT.POURTOUTEQUESTION,COMMUNIQUEZAVECLESERVICEDE
SOUTIENTECHNIQUE.
GARANTIELIMITÉEDECINQ(5)ANS
Àpartirdeladated’achatparlepropriétaired’origine.
Numérosdemodèle25‐CBPAH/55‐SHPCBPAH/55‐TRPCBPAH
Lagarantielimitéedufabricantcouvrelesélémentsci‐dessous.
Cinqans:
1. Lesjointsd’acieraucarboneetlesjointssoudésdufoyersontgarantispendantcinq
(5)anscontrelefendillement.
2. Laporteetlesch arniè res enaciersontgarantiespendantcinq(5 )anscontrelafissuration .
Unan:
1. Lespiècestellesquelatrémie,lavisàgranules,lepotdecombustion,l’axedelavisà
granulesetlesfixationssontgarantiespendantun(1)ancontrelesfissures,lesbrisures
etlefendillementdesjointssoudés.
2. Lescomposantsélectriques,lesaccessoires,leverreet
lasurfacepeintedupoêlesont
garantispendantun(1)anàpartirdeladated’achat.
Conditionsetexclusions
1. Lesdommagesdécoulantd’unemballementannulentvotregarantie.
2. Cettegarantienes’appliquepassilesdommagesdécoulentd’unaccident,d’une
manipulationinadéquate,d’uneinstallationinadéquate,d’uneutilisationinadéquate,
d’abus,d’uneréparationnonautoriséeoud’unetentativederéparationnonautorisée.
3. Lefabricantn’estpasresponsabledesdommagesindirects,
accessoiresouconsécutifs
découlantduproduit,ycomprislescoûtsoudépenses,lafournituredematérielde
rechangeoularéparationpendantlespériodesdemauvaisfonctionnementoude
non‐utilisationduproduit*.
4. Lefabricantdéclineratoutere sponsabilitépourlesdommagesindirectsencasde
violationdetoutegarantie
écriteouimplicite.
5. Ceproduitesthomologuéparl’EPApoursonutilisationdegranulesdeboisdequalité
supérieure.Lagarantienes’appliquepassileproduitestutilisépourbrûlerdes
matériauxnonconformesàsonhomologationparl’EPA.Lagarantienes’applique
passileproduitn’estpas
utiliséconformémentauguided’utilisation.

49
IMPORTANT!LISEZETSUIVEZTOUTESLESINSTRUCTIONSPOURL’INSTALLATIONETL’ENTRETIEN,NOTAMMENTCELLESPORTANTSURLENETTOYAGEDE
L’APPAREILÀEFFECTUERSELON LESDIRECTIVESETCELLESPORTANTSURLEREMPLACEMENTDESJOINTS(ANNUELLEMENT)ETDE SPIÈCES(AUBESOI N).
ENGLAND’SSTO VEWORKSN’E STPASRE SPONSABLEDESDOMMAGESNIDESBLE SSURES,QUELSQU’ILSSOIENT,SUBISENRAISONDENÉGLIGENCEOU
ÀCAUSED’UNEINSTALLATIONOUD’UNEUTILISATIONDANGEREUSEDECEPRODUIT.POURTOUTEQUESTION,COMMUNIQUEZAVECLESERVICEDE
SOUTIENTECHNIQUE.
Procédure
L’acheteurdoitsoumettreuneréclamationdedéfautpendantlapériodedegarantie
etpayerletransportversuncentredeserviceetàpartird’uncentredeservicedésignépar
lefabricant.Lerevendeurquiavendul’appareiloulefabricant,ànotregré,effectuerala
réparationsousgarantie.
Autresdroits
Cettegarantievousconfèredesdroitsprécis.Ilestpossiblequevousdisposiez
égalementd’autresdroits,quivarientd’unÉtatoud’uneprovinceàl’autre.
England’sStoveWorks,Inc.
P.O.Box206
Monroe,VA24574
1800245‐6489
Poureffectueruneréclamationautitredelagarantie,veuillezcommuniqueravecnotre
servicedesoutientechniqueau1800245‐6489.Vouspouvezégalementeffectuerune
réclamationautitredelagarantiesurlesite
www.heatredefined.com
*CertainsÉtatsoucertainesprovincesnepermettentpasl’exclusionoulalimitation
desdommagesaccessoiresouconsécutifs,desortequelesexclusionsmentionnées
ci‐dessuspeuventnepass’appliqueràvous.
Danslecasdespièces,lesprocéduresderemplacementautitredelagarantiese
trouventsurlesitedenotremagasindepièces:store.heatredefined.com

50
IMPORTANT!LISEZETSUIVEZTOUTESLESINSTRUCTIONSPOURL’INSTALLATIONETL’ENTRETIEN,NOTAMMENTCELLESPORTANTSURLENETTOYAGEDE
L’APPAREILÀEFFECTUERSELON LESDIRECTIVESETCELLESPORTANTSURLEREMPLACEMENTDESJOINTS(ANNUELLEMENT)ETDE SPIÈCES(AUBESOI N).
ENGLAND’SSTO VEWORKSN’E STPASRE SPONSABLEDESDOMMAGESNIDESBLE SSURES,QUELSQU’ILSSOIENT,SUBISENRAISONDENÉGLIGENCEOU
ÀCAUSED’UNEINSTALLATIONOUD’UNEUTILISATIONDANGEREUSEDECEPRODUIT.POURTOUTEQUESTION,COMMUNIQUEZAVECLESERVICEDE
SOUTIENTECHNIQUE.
Avisimportant
L’informationd’enregistrementDOITêtreverséedansnosdossierspourquelaprésente
garantiesoitvalide.Veuilleznousenvoyercetteinformatio ndanslestrente(30)jours
suivantladated’achatinitiale.
Ilyatroismoyensfacilesdenousfaireparvenircetteinformation.
Adressepostale
England’sStoveWorks,Inc.
TechnicalsupportDepartment
P.O.Box206
Monroe,Virginia24574,États‐Unis
Partélécopieuraunumérosuivant:
1434929‐4810–24heuresparjour
Enregistrementenligne:
Pourvousinscrireenligne,visiteznotresiteWebpourl’enregistrement
delagarantieàl’adresse
http://www.heatredefined.com
Veuilleznoter:Cette garantieseranulleetnon avenuesil’acheteurn’envoiepaslacarte
d’enregistrementdelagarantieci‐jointeETunecopiedureçudanslestrente(30 ) jours,
àcompterdeladated’achat.
Cettegarantieestnontransférable.

51
IMPORTANT!LISEZETSUIVEZTOUTESLESINSTRUCTIONSPOURL’INSTALLATIONETL’ENTRETIEN,NOTAMMENTCELLESPORTANTSURLENETTOYAGEDE
L’APPAREILÀEFFECTUERSELON LESDIRECTIVESETCELLESPORTANTSURLEREMPLACEMENTDESJOINTS(ANNUELLEMENT)ETDE SPIÈCES(AUBESOI N).
ENGLAND’SSTO VEWORKSN’E STPASRE SPONSABLEDESDOMMAGESNIDESBLE SSURES,QUELSQU’ILSSOIENT,SUBISENRAISONDENÉGLIGENCEOU
ÀCAUSED’UNEINSTALLATIONOUD’UNEUTILISATIONDANGEREUSEDECEPRODUIT.POURTOUTEQUESTION,COMMUNIQUEZAVECLESERVICEDE
SOUTIENTECHNIQUE.
ENREGISTREMENTDELAGARANTIEsurlesproduitsEngland’sStoveworks®
Renseignementssurl’acheteur*
I.Nomdel’acheteur________________________________________________________
II.Adresse________________________________________________________________
III.Ville_______________________Province________Codepostal___________________
IV.Numérodetéléphone____________________________________________________
V.Courriel________________________________________________________________
Renseignementssurledétaillant*
VI.Nomdudétaillant_______________________________________________________
VII.Adresse_______________________________________________________________
VIII.Ville_______________________Province________Codepostal_________________
Renseignementssurl’appareil*
IX.Numérodemodèle_____________________Dated’achat_______________________
X.Prixd’achat____________________________
XI.Numérodesérie_____________________Datedefabrication____________________
Questionsrelativesàl’achat
Commentavez‐vousentenduparlerdenotreproduit?(Veuillezcocherl’unedesréponsessuivantes.)
Deboucheàoreille______________Démonstration___________________Internet_____
Autre:__________________________________________________________________
Àquelendroitvousa‐t‐ondonnédesrenseignementssurnotreproduit?
Autéléphone_______Chezundétaillant(nomdudétaillant)____________Internet____
Autre:__________________________________________________________________
*Renseignementsnécessaires