CAUTION
PLEASEREADTHISENTIREMANUALBEFOREINSTALLATIONANDUSEOFTHISPELLETFUEL‐BURNING
APPLIANCE.KEEPCHILDREN,FURNITURE,ANDALLCOMBUSTIBLES AWAYFROMANYHEATINGAPPLIANCE.
SAFETYNOTICE
FAILURETOFOLLOWTHESEINSTRUCTIONSCANRESULTINPROPERTYDAMAGE,BODILYINJURYOREVEN
DEATH.FORYOURSAFETYANDPROTECTION,FOLLOWTHEINSTALLATIONINSTRUCTIONSOUTLINEDIN
THISMANUAL.CONTACTYOURLOCALBUILDINGORFIREOFFICIALSABOUTRESTRICTIONSAND
INSTALLATIONINSPECTIONREQUIREMENTS(INCLUDINGPERMITS)INYOURAREA.
ManufacturedBy:
England’sStoveWorks,Inc.
POBox206
Monroe,VA24574
05/2016
SAVETHESEINSTRUCTIO NS
INSTALLATION&OPERATION
MANUAL
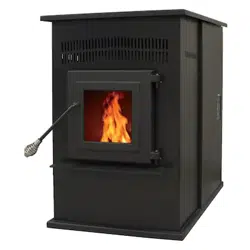
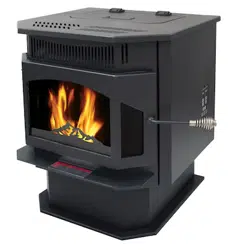
25‐CB120
55‐SHPCB120
55‐TRPCB120
THISWOODHEATERNEEDSPERIODICINSPECTIONANDREPAIRFORPROPEROPERATION.CONSULTTHE
OWNER’SMANUALFORFURTHERINFORMATION.ITISAGAINSTFEDERALREGULATIONSTOOPERATETHIS
WOODHEATERINAMANNERINCONSISTENTWITHTHEOPERATINGINSTRUCTIONSINTHEOWNER’S
MANUAL.
2
IMPORTANT!READANDFOLLOWALLINSTALLATIONANDMAINTENANCEINSTRUCTIONS,INCLUDINGCLEANINGTHEUNITASSPECIFIED,AND
REPLACINGGASKETSANNUALLY,ANDPARTSASNEEDED.
ENGLAND’SSTOVEWORKSISNOTRESPONSIBLEFORANYDAMAGEORINJURYINCURREDDUETONEGLECT,ORDUETOUNSAFEINSTALLATIONOR
USAGEOFTHISPRODUCT.CALLTECHNICALSUPPORTWITHANYQUESTIONS.
IMPORTANT:IFYOUHAVEAPROBLEMWITHTHISUNIT,DONOTRETURNITTO
THEDEALER.CONTACTTECHNICALSUPPORT@1‐800‐245‐6489
TamperWarning:
Thiswoodheaterhasamanufacturer‐setminimumlowburnratethatmustnotbe
altered.Itisagainstfederalregulationstoalterthissettingorotherwiseoperate
thiswoodheaterinamannerinconsistentwithoperatinginstructionsinthis
manual.
MobileHomeUse:
Thisfreestandingpelletunitisapprovedformobilehomeordoublewide
installationwiththeoutsidecombustionairhook‐upSeethe“Installation”section
ofthismanualfordetailspertainingtomobilehomeinstallations.Mobilehome
installationmustbeinaccordancewiththeManufacturedHomeandSafety
Standard(HUD),CFR3280,Part24.
WARNING:
USEOFOUTSIDECOMBUSTIONAIRISMANDATORYWITHTHISUNIT.
DONOTOPERATEWITHTHEHOPPEROPEN;LIDMUSTBESHUTANDTIGHTLY
LATCHEDDURINGOPERATION.DONOTOVER‐FIREYOURUNIT.
Note:England’sStoveWorksdoesnotrecommendusingapelletstoveasyour
onlysourceofheat.
Retainforyourfiles
ModelNumber
DateofPurchase
DateofManufacture
SerialNumber

3
IMPORTANT!READANDFOLLOWALLINSTALLATIONANDMAINTENANCEINSTRUCTIONS,INCLUDINGCLEANINGTHEUNITASSPECIFIED,AND
REPLACINGGASKETSANNUALLY,ANDPARTSASNEEDED.
ENGLAND’SSTOVEWORKSISNOTRESPONSIBLEFORANYDAMAGEORINJURYINCURREDDUETONEGLECT,ORDUETOUNSAFEINSTALLATIONOR
USAGEOFTHISPRODUCT.CALLTECHNICALSUPPORTWITHANYQUESTIONS.
TABLEOFCONTENTS
Introduction
Introduction.......................................4
Specifications
HeatingSpecifications.......................5
Dimensions........................................5
EPACompliance.................................5
Installation
InstallationOverview...................6
ClearancestoCombustibles.........7
VentingIntroduction...................8
VentingGuidelines.......................8
AdditionalVentingInformation....9
ApprovedVentingMethods
ThroughtheWall...........10
ThroughtheCeiling........11
ExistingChimney............12
MobileHomeInstallation............13
VentTerminationClearances......14
OutsideAirHookup.....................15
FloorProtection...........................16
DailyOperation
GettingStarted............................17
LightingaFire...............................17
DailyOperationNotes………………18
ControlBoardSettings............19‐20
ErrorCodes...................................21
PowerFailure...............................22
Maintenance
Daily
ImportantNotes..............23
DailyAshRemoval.......23‐24
CleaningtheBurnPot......24
Weekly
BaffleRemoval............25
Clean‐OutCovers........25
Monthly
ImportantNotes……………..25
VentingPipeCleaning……..26
Yearly
ImportantNotes...............27
ExhaustBlower.................28
ConvectionBlower...........28
HopperFines.....................29
CheckingGaskets..............29
TroubleshootingGuide
Troubleshooting.............................30‐31
ReplacingComponents
AugerMotor.......................................32
ConvectionBlower.............................33
CombustionBlower............................34
VacuumSwitch...................................35
Igniter.................................................36
Gaskets...............................................37
Glass...................................................38
ControlBoard.....................................39
WiringDiagram..................................40
HopperLidHinges..............................41
HopperLidHandle..............................41
Panels………………………………………………42
Finish……………………………………………….42
IllustratedPartsDetail
ExplodedPartsDiagram……………………43
PartsList……………………………………..44‐45
Warranty
SerialTagSample…………………….………..46
WarrantyDetails………………………....47‐48
ImportantNotice………….……..……………49
WarrantyReg.Form………………………….51

INTRODUCTION
ThankyouforpurchasingthisfineproductfromEngland’sStoveWorks!
England’sStoveWorkswasstarted,andisstillownedby,afamilythatbelieves
stronglyina“DoItYourself”spirit;that’sonereasonyoufoundthisproductat
yourfavorite“DoItYourself”store.
Weintentionallydesignand
buildourstovessothatanyhomeownercanmaintain
theirstovewithbasictools,andwe’realwaysmorethanhappytohelpyoudothe
jobaseasilyandasinexpensivelyaspossible.However,whileremainingsimple,
ourstovesaredesignedtoperformextremelyefficiently,helpingdelivermore
heatfromless
fuel.
PleaselookattheextensiveHelpsectiononourwebsiteandcallourTechnical
SupportDepartmentat(800)245‐6489ifyouneedanyhelpwithyourstove.We
arenearlyalwaysableto“walkyouthrough”anyinstallationissues,repairs,
problemsorotherquestionsthatyoumayhave.
Wishingyouyearsofefficient,qualityand“comfy”heating,
EveryoneatEngland’sStoveWorks
PleaseNote:Whileinformationobtainedfromourwebsiteandthroughour
TechnicalSupportlineisalwaysfreeofcharge,therewillbeaservicecharge
incurredwithany“on‐site”repairsormaintenancethatwemayarrange.
Thismanualencompassesallversionsofthe25‐CB120,includingthe55‐SHPCB120andthe55‐TRPCB120.
However,forsimplicityofdescription,thestovewillbereferredtobythegeneric25‐SSP01designation.
This manual is available for free download on the manufacturer’s web site. It is a copyrighted document and resale
is strictly prohibited. The manufacturer may update this manual occasionally and cannot be responsible for
problems including injuries or damages resulting from the use of information found in any manual from
unauthorized sources.
CAUTION:Stoveisheavy.
Inaddition,whenhandlinganysheetmetalproducts,beawarethattheremaybesharpedgesorburrs.
Althoughwemakeeveryefforttoeliminateanysharpedges,pleaseusecautionwhenhandlinganymetalparts.
Remembertodisconnect(unplug)thestovefromthepowersourceand
allowittocompletelycooldown
beforeperforminganymaintenance.

5
IMPORTANT!READANDFOLLOWALLINSTALLATIONANDMAINTENANCEINSTRUCTIONS,INCLUDINGCLEANINGTHEUNITASSPECIFIED,AND
REPLACINGGASKETSANNUALLY,ANDPARTSASNEEDED.
ENGLAND’SSTOVEWORKSISNOTRESPONSIBLEFORANYDAMAGEORINJURYINCURREDDUETONEGLECT,ORDUETOUNSAFEINSTALLATIONOR
USAGEOFTHISPRODUCT.CALLTECHNICALSUPPORTWITHANYQUESTIONS.
SPECIFICATIONS
HeatingSpecifications
ApproximatePelletBurnRate**………………0.78to1.72kg/hr(1.72to3.8lbs/hr)
MaximumBurnTime**………………………………………………………………………..72hours
ApproximateSquareFootageHeated***…….………………………….upto2,200sq.ft.
HopperCapacity………………………………………………………………………….…..120pounds
Dimensions
EPAandSafetyComplianceSpecifications
EPAComplianceStatus…….........................................Certifiedtocomplywith2020particulate
emissionstandardsusingpelletfuel.
U.S.TestStandard:USEPA40CFRPart60,Subpart60.536
ParticulateEmissions ……………………………………………………………………1.37grams/hr
COEmissions…………………………………………………………………………….16.25grams/hr
Efficiency………………………………………………………………………………………75.9%(HHV)
TestedToUL1482‐00,ASTME1509,ULC/ORD‐C1482‐M1990&ULCS627‐00
Notesforthisunit:Productmayvaryslightlyfromdiagram.Clearancesaretheminimumforthisunit
andmayneedtobeincreasedinthereartohaveproperventclearances.Followallventingmanufacturer
clearancesandlocalcodes.
*‐AstestedperASTM2779‐10
**‐Heatoutput,burnrateandmaximumburntimeareheavilydependentonthetypeofpelletsburnedinthestove;assuch,thesenumbersmayvary.
***‐Themaximumheatingcapacityofthisunitcanvarygreatlybasedonclimate,constructionstyle,insulation
andamyriadofotherfactors.Usethisinformation
inconjunctionwithaBTUlosscalculationforyourhometodetermineifthisunitwillbesufficientforyourneeds.

6
IMPORTANT!READANDFOLLOWALLINSTALLATIONANDMAINTENANCEINSTRUCTIONS,INCLUDINGCLEANINGTHEUNITASSPECIFIED,AND
REPLACINGGASKETSANNUALLY,ANDPARTSASNEEDED.
ENGLAND’SSTOVEWORKSISNOTRESPONSIBLEFORANYDAMAGEORINJURYINCURREDDUETONEGLECT,ORDUETOUNSAFEINSTALLATIONOR
USAGEOFTHISPRODUCT.CALLTECHNICALSUPPORTWITHANYQUESTIONS.
INSTALLATION
InstallationOverview
Whenchoosingalocationforyournewstove,thereareamultitudeoffactorsthat
shouldbetakenintoaccountbeforebeginningtheinstallation.
1. TrafficPatterns–Tohelppreventaccidents,thestoveshouldbeplacedinalocation
whereitisout ofthewayofnormaltravelthrough
thehome.
2. HeatFlowandEfficiency–Whendecidingonalocationforthestove,considertheway
heatmovesthroughoutyourhome.Installthestovewhereyouneedtheheat;
basementinstallationsoftendonotallowsufficientheattoflowtotheupperfloorsand
atopfloor
installationwillnotallowanyheattoreachthefloorsbelow.Always
considerthatheatrisesandwilltakethepathofleastresistancewhileitisstillhot.
3. ExhaustLocation–Outsidewallsaregenerallythebestplacetoinstalla stove,since
theyalloweasyexhaustandintake
airinstallation(usingourDuraVentAC‐3000Kit,AC‐
33000ifCanada).Ifthereisnotafeasiblewaytoinstallthestoveonanoutsidewall,
therearemethodsforventingthestoveupthroughtheroof,buttheytendtobemore
costlybecausetheyinvolvethe
useofmorepelletventpipeandcanoftenmakeoutside
airinstallationmoredifficult.
4. WallConstruction–Locatingthestovesothattheexhaustsystemcanpassbetween
studswillsimplifytheinstallationandeliminatetheneedtoreframeanysectionsofthe
walltoaccommodatethewallthimble.
Warning
Do not store or use gasoline or other flammable vapors and liquids in the vicinity of this or any
other appliance.
Do Not Over fire – If any external part starts to glow, you are over firing. Reduce feed rate.
Over firing will void your warranty.
Comply with all minimum clearances to combustibles as specified. Failure to comply may
result in a house fire.
Tested and approved for wood pellets only. Burning any other fuel will void your warranty.
For use with Premium grade wood pellets only.
7
IMPORTANT!READANDFOLLOWALLINSTALLATIONANDMAINTENANCEINSTRUCTIONS,INCLUDINGCLEANINGTHEUNITASSPECIFIED,AND
REPLACINGGASKETSANNUALLY,ANDPARTSASNEEDED.
ENGLAND’SSTOVEWORKSISNOTRESPONSIBLEFORANYDAMAGEORINJURYINCURREDDUETONEGLECT,ORDUETOUNSAFEINSTALLATIONOR
USAGEOFTHISPRODUCT.CALLTECHNICALSUPPORTWITHANYQUESTIONS.
INSTALLATION
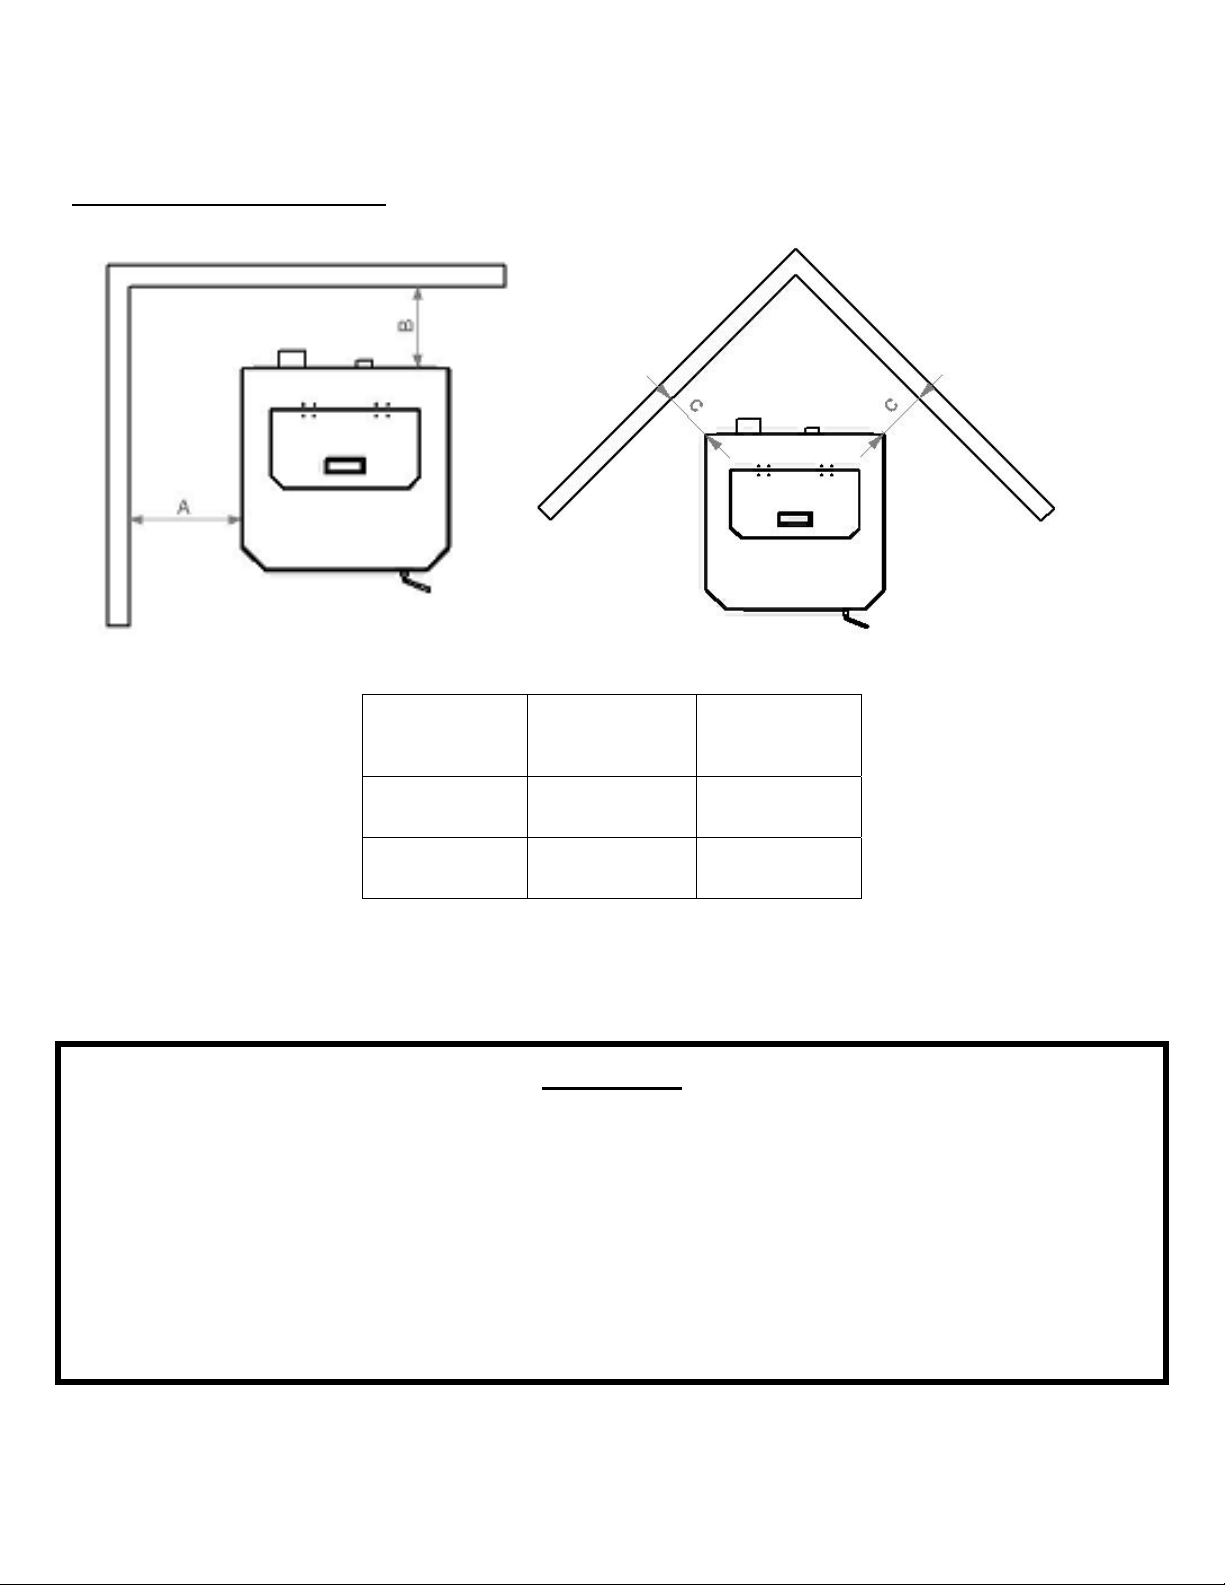
ClearancestoCombustibles
CAUTION
UnitcanbeveryHOTwhileinoperation.Keepchildrenaway.
Supervisechildreninthesameroomasthisappliance.
Alertchildrenandadultstothehazardsofhightemperatures.
DoNOToperatewithprotectivebarriersopenorremoved.
Keepclothing,furniture,draperiesandothercombustiblesaway.
InstallationMUSTcomplywithlocal,regional,state andnationalcodesandregulations.
Consultlocalbuilding,fireofficialsorauthoritieshavingjurisdictio n about restrictions,install a tioninspection,and
permits.
DONOTCONNECTTOANYAIRDISTRIBUTIONDUCTORSYSTEM
UnittoSide
Wall(A)
UnittoRear
Wall(B)
UnittoCorner
(C)
10in. 0in. 10in.
254mm 0mm 254mm

8
IMPORTANT!READANDFOLLOWALLINSTALLATIONANDMAINTENANCEINSTRUCTIONS,INCLUDINGCLEANINGTHEUNITASSPECIFIED,AND
REPLACINGGASKETSANNUALLY,ANDPARTSASNEEDED.
ENGLAND’SSTOVEWORKSISNOTRESPONSIBLEFORANYDAMAGEORINJURYINCURREDDUETONEGLECT,ORDUETOUNSAFEINSTALLATIONOR
USAGEOFTHISPRODUCT.CALLTECHNICALSUPPORTWITHANYQUESTIONS.
INSTALLATION
VentingIntroduction
Thispelletstoveoperatesonanegativedraftsystem,whichpullscombustionairthroughthe
burnpotandpushestheexhaustairthroughtheventpipeandoutofthebuilding.Thisunitmustbe
installedinaccordancewiththefollowingdetaileddescriptionsofventingtechniques;notinstalling
thestovein
accordancewiththedetailslistedherecanresultinpoorstoveperformance,property
damage,bodilyinjuryordeath.England’sStoveWorksisnotresponsibleforanydamageincurred
duetoapoororunsafeinstallation.
Ifquestionsarisepertainingtothesafeinstallationofthestove,ourTechnicalSupportline
(800‐245‐6489)isavailable.Contactyourlocalcodeofficialtobecertainyourinstallationmeetslocal
andnationalfirecodesandifyou’reuncertainabouthowtosafelyinstallthestove,westrongly
recommendcontactingalocalNFIcertifiedinstallertoperformtheinstallation.
VentingGuidelines
ALWAYSinstallventpipeinstrictadherencewiththeinstructionsandclearancesincludedwith
yourventingsystem.
DONOTconnectthispelletstovetoachimneyfluewhichalsoservesanotherappliance.
DONOTinstallafluepipedamperoranyotherrestrictivedeviceintheexhaustventing
system
ofthisunit.
USEanapprovedwallthimblewhenpassingthroughawallandaceilingsupport/firestop
whenpassingthroughaceiling.
ONLYuse3.0”or4.0”TypeLorTypePLpipeapprovedforpelletstoveventing;DONOTuse
galvanizedorB‐Ventpipe.
SEALeachjointofpelletventwithhightemperaturesilicone(Part#AC‐RTV3)toprevent
smokespillageintothehome.
AVOIDexcessivehorizontalrunsandelbows,asbothwillreducethedraftoftheventing
systemandwillresultinpoorstoveperformance.
INCLUDEasmuchvertical
pipeaspossibletopreventsmokefromtheunitfromenteringyour
homeintheeventofapoweroutage.
INSPECTyourventingsystemoften,tobecertainitisclearoffly‐ashandotherrestrictions.
CLEANtheventingsystemasdetailedinthemaintenancesectionof
thismanual.
WARNING
INSTALLVENTATCLEARANCESSPECIFIEDBYTHEVENTMANUFACTURER.
HOT!Donottouch!Severeburnsorclothingignitionmayresult.
Glassandothersurfacesarehotduringoperation.
Donotattempttotouchoropenthefrontorsidepanelsduringoperation.Thiscouldresultinsevere
burnsorinjury.

9
IMPORTANT!READANDFOLLOWALLINSTALLATIONANDMAINTENANCEINSTRUCTIONS,INCLUDINGCLEANINGTHEUNITASSPECIFIED,AND
REPLACINGGASKETSANNUALLY,ANDPARTSASNEEDED.
ENGLAND’SSTOVEWORKSISNOTRESPONSIBLEFORANYDAMAGEORINJURYINCURREDDUETONEGLECT,ORDUETOUNSAFEINSTALLATIONOR
USAGEOFTHISPRODUCT.CALLTECHNICALSUPPORTWITHANYQUESTIONS.
INSTALLATION
AdditionalVentingInformation
Donotmixandmatchcomponentsfromdifferentpipemanufacturerswhenassemblingyour
ventingsystem(i.e.DoNOTuseventingpipefromonemanufacturerandathimblefrom
another).
Werequireaminimumverticalriseof36in.(3ft.)ofpipetocreatenaturaldraftinthesystem.
Thishelpsevacuatesmokefromthestoveintheeventofapowerfailureorcombustion
blowerfailure.
Ventingsystems15.0ft.orshortermaybecomposedentirelyof3.0in.pelletpipe;toreduce
frictionallosses,ventingsystemslongerthan15.0ft.shouldbecomposedof4.0in.
pelletpipe.
Donotterminatetheventingsystemdirectlybeneathanycombustiblestructuresuchasa
porchordeck.
FollowNFPA211ruleslistedbelowforventingsystemterminationlocationrelativeto
windowsandotheropeningsinthedwelling.
o NFPA211(2006ed.)Section10.4Termination:10.4.5
(1)
Theexitterminalofamechanicaldraftsystemotherthandirectventappliances
(sealedcombustionsystemappliances)shallbelocatedinaccordancewiththe
following:
(a)Notlessthan3ft.(.91m)aboveanyforcedairinletlocatedwithin10ft.
(3.0m).
(b)Notlessthan4
ft.(1.2m)below,4ft.(1.2m)horizontallyfromor1ft.(305
mm)aboveanydoor,windoworgravityairinletintoanybuilding.
(c)Notlessthan2ft.(0.61m)fromanadjacentbuildingandnotlessthan7ft.
(2.1m)abovegradewhenlocated
adjacenttopublicwalkways.
Distancebetweentheterminationopeningandgradeshouldbeaminimumof2ft.(24in.)
contingentonthegradesurfacebelowthetermination.Whendeterminingthetermination
heightabovegrade,considersnowdriftlinesandcombustiblessuchasgrassorleaf
accumulation.Inareas
wheresignificantsnowfallis possible,theterminationheightmustbe
sufficientlyhightokeeptheterminationfreeofsnowaccumulation.
Donotusemakeshiftcompromisesduringinstallationorinstallanycomponentoftheunitor
ventingsysteminsuchamannerthatcouldresultinahazardousinstallation.
A
chimneyconnectorshallnotpassthroughanatticorroofspace,closetorsimilarconcealed
space,orafloor,orceiling.
Wherepassagethroughawallorpartitionofcombustiblematerialisdesired,theinstallation
shallconformtoCAN/CSA‐B365.
WARNING:
VentingsystemsurfacesgetHOT,andcancauseburnsiftouched.
Noncombustibleshieldingorguardsmayberequired.
10
IMPORTANT!READANDFOLLOWALLINSTALLATIONANDMAINTENANCEINSTRUCTIONS,INCLUDINGCLEANINGTHEUNITASSPECIFIED,AND
REPLACINGGASKETSANNUALLY,ANDPARTSASNEEDED.
ENGLAND’SSTOVEWORKSISNOTRESPONSIBLEFORANYDAMAGEORINJURYINCURREDDUETONEGLECT,ORDUETOUNSAFEINSTALLATIONOR
USAGEOFTHISPRODUCT.CALLTECHNICALSUPPORTWITHANYQUESTIONS.
INSTALLATION
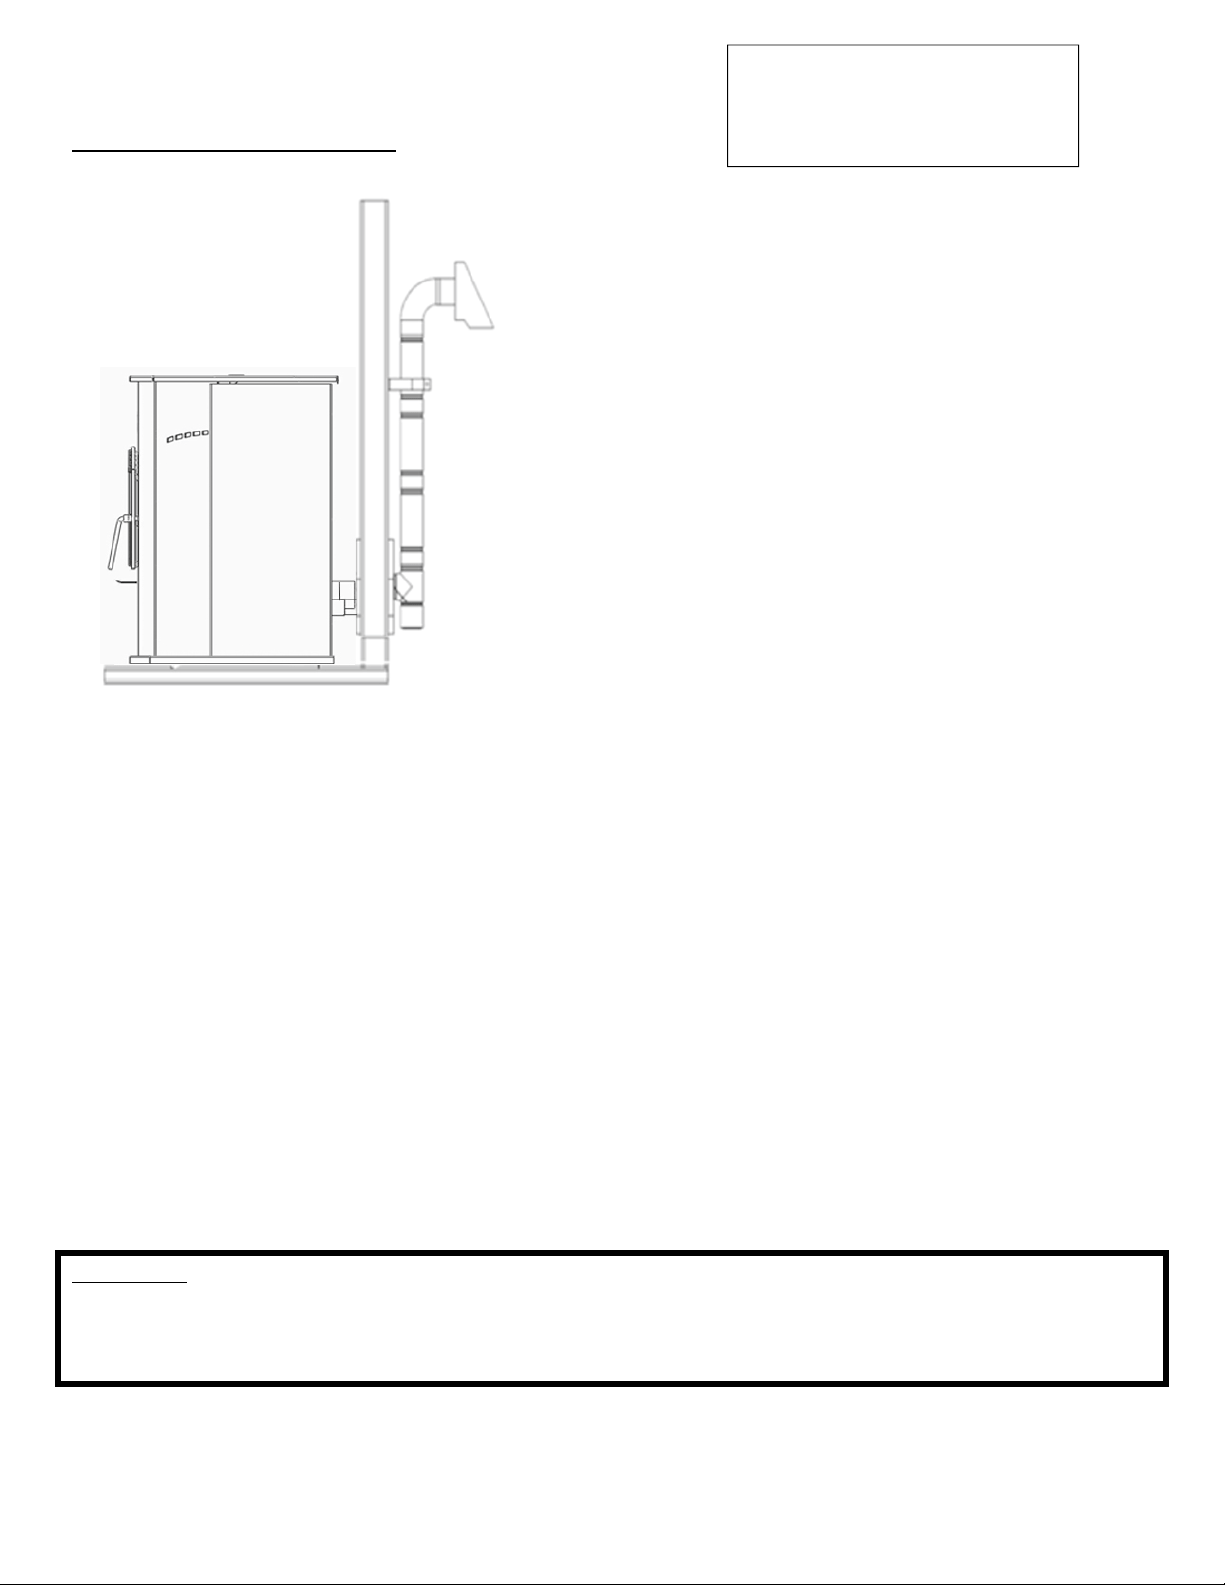
ApprovedVentingMethod1:ThroughtheWall
Generallythesimplestinstallationmethod,venting
throughthewallusingourAC‐3000kit,AC‐33000ifCanada
(orsimilarventingsystem)isalsothepreferredventing
method.Itminimizeshorizontalpipe,allowsthestoveto
beinstalledclosetothewallandkeepstheclean‐outtee
onthe
outsideofthehouse,foreaseofcleaning.
Wheninstallinganyventingsystem,TypeLorTypePL
pipemustbeusedandallclearancestocombustibles
(listedbythepipemanufacturer)mustbestrictlyadhered
to.
Usethepipemanufacturer’sapprovedthimblefor
passingthroughacombustible
wall,andmaintainatleast
theminimumclearancestocombustibles.
Useanappliancecollarwherethepelletvent
connectstotheexhaustoutputofthepelletstoveand
attachtheappliancecollartotheexhaustbloweroutput
usingthreesheetmetalscrews.
Securethepelletventtotheoutside
ofthehouseusingawallstrapjustbelowthe90degree
elbow.
SealeachpipeconnectionjointwithhightemperatureRTVSilicone,toensurethesystemisleak
free(Checkwiththespecificventingsystemmanufacturer’sinstructionsbeforedoingso).
Ifthepelletventpipebeingused
isnota“TwistLock”system,three(3)sheetmetalscrewsare
requiredateachpipejoint.
Connectthepelletstovetooutsidecombustionairusingthekitincludedwithyourstoveorusing
analternativemethod,asdescribedinthe“OutsideAir”section,onpage15.
Thisinstallationtype
canbemodifiedforbasement(Basementinstallationsshouldalwaysbe
performedbyaprofessionalinstaller)orotherinstallationswhereintheteeandverticalsectionof
thepipewouldbeinsidethehomeandtheventingsystemwouldsimplypasshorizontallythrough
thethimbleandthenterminate.
PleaseNote:
Installationdiagramsareforreferencepurposesonlyandarenotdrawntoscale,normeanttobeusedasplansforeach
individualinstallation.Pleasefollowallventingsystemrequirements,maintaintherequiredclearancestocombustibles,
andfollowalllocalcodes.
Forhighaltitudeinstallations
(above4,000ft.),theventpipe
shouldbeincreasedfrom3‐inch
(3”)tofour‐inch(4”).
11
IMPORTANT!READANDFOLLOWALLINSTALLATIONANDMAINTENANCEINSTRUCTIONS,INCLUDINGCLEANINGTHEUNITASSPECIFIED,AND
REPLACINGGASKETSANNUALLY,ANDPARTSASNEEDED.
ENGLAND’SSTOVEWORKSISNOTRESPONSIBLEFORANYDAMAGEORINJURYINCURREDDUETONEGLECT,ORDUETOUNSAFEINSTALLATIONOR
USAGEOFTHISPRODUCT.CALLTECHNICALSUPPORTWITHANYQUESTIONS.
INSTALLATION
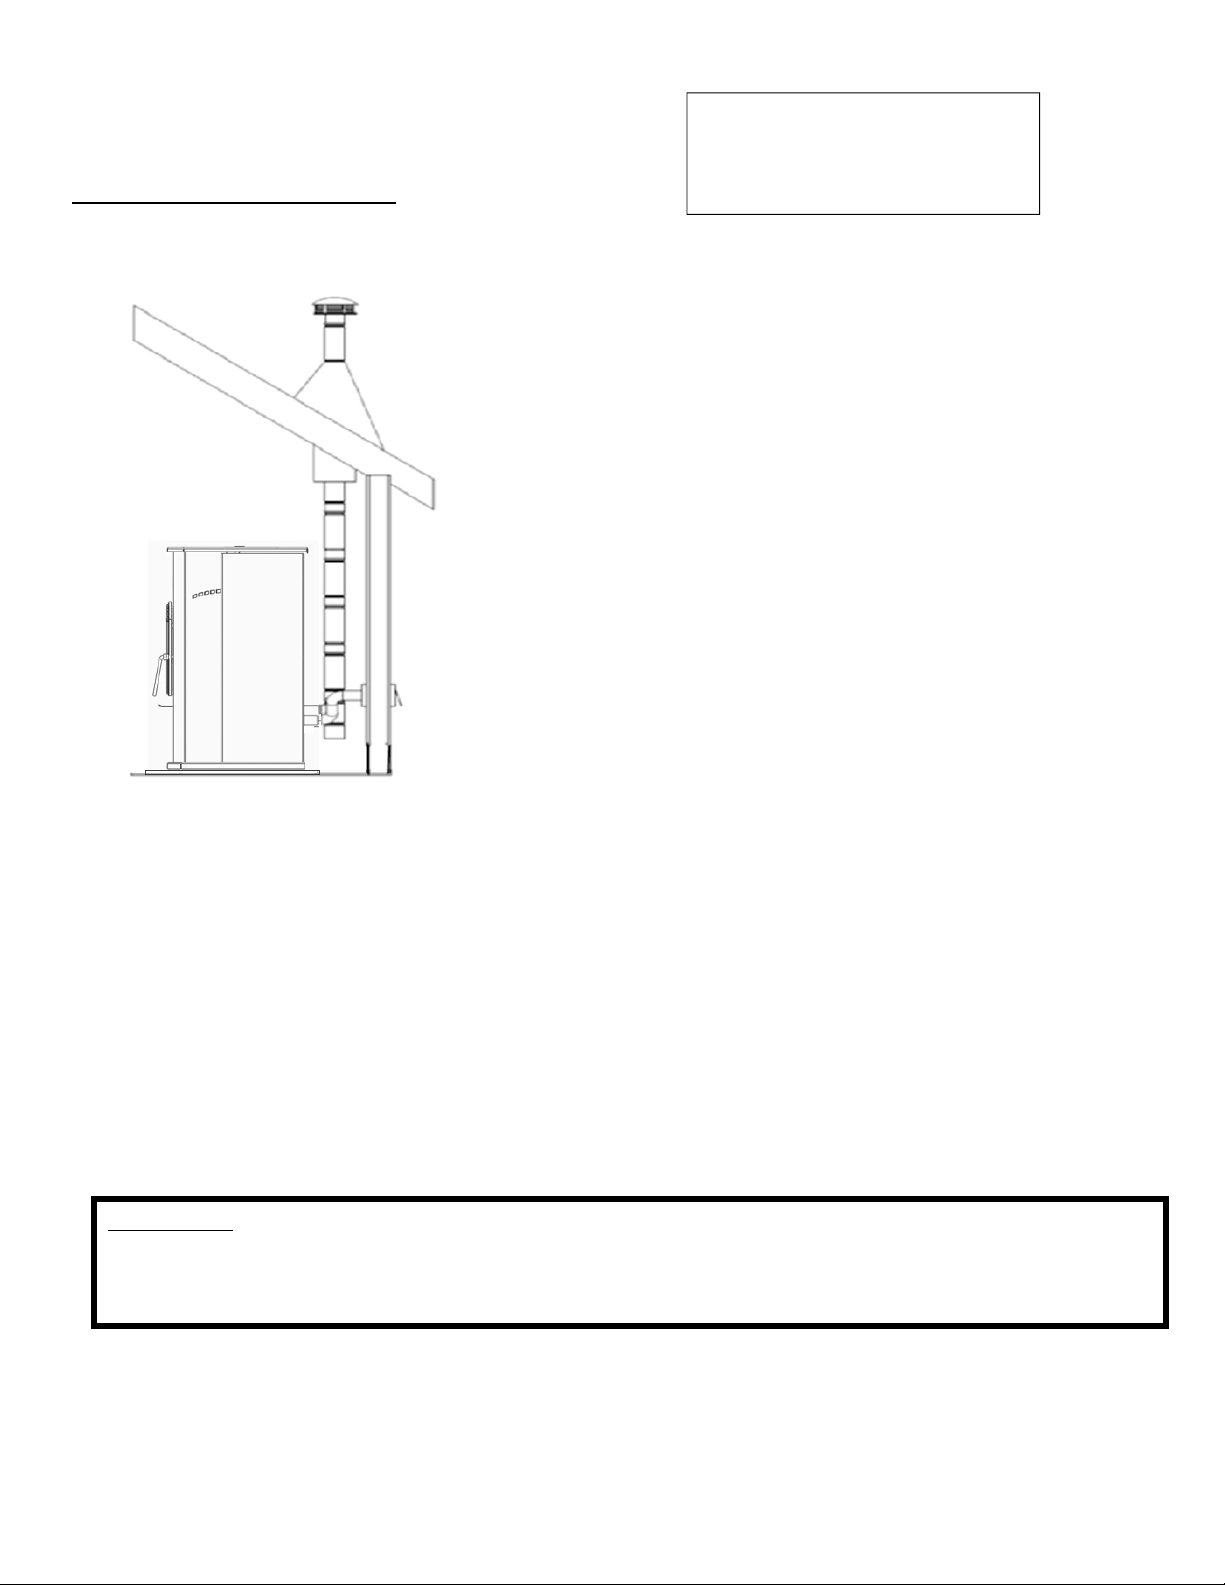
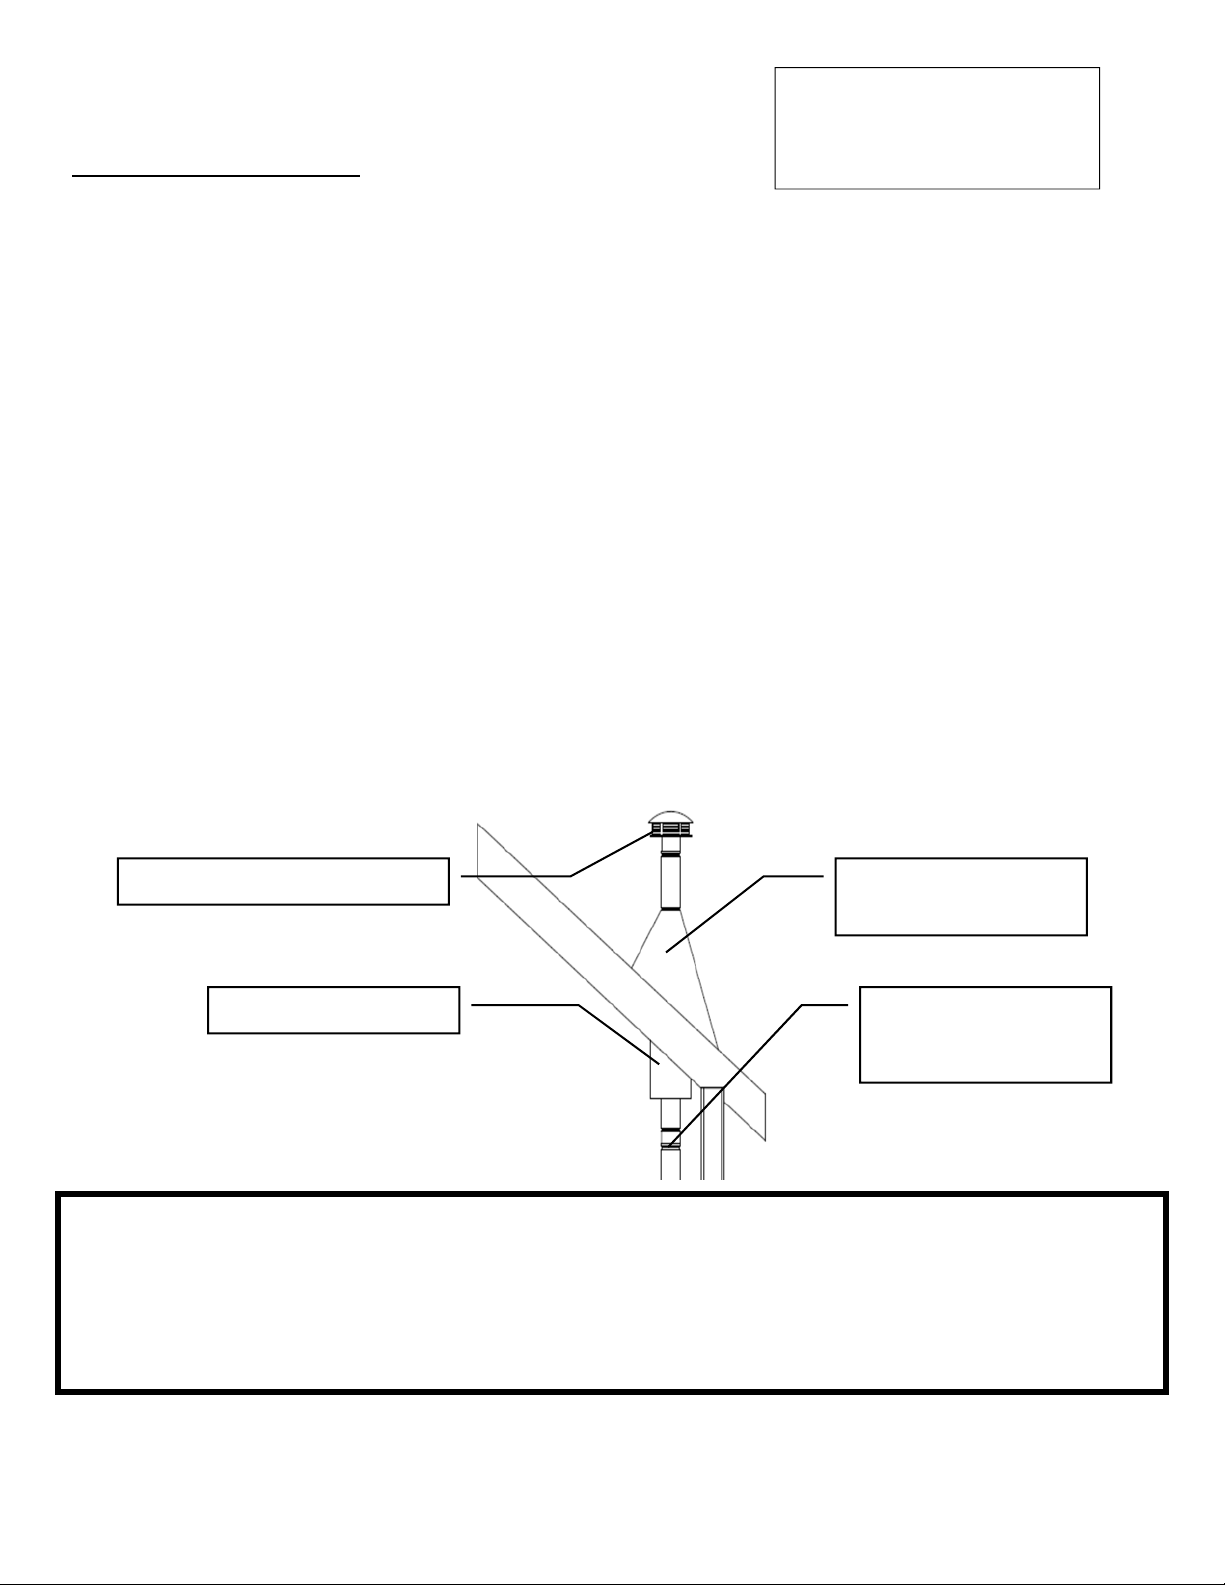
ApprovedVentingMethod2:ThroughtheCeiling
Ventingthroughtheceiling/roofmaybetheonlyfeasible
ventingoptioninsomecasesandisafactoryrecommended
installation.
Wheninstallinganyventingsystem,TypeLorTypePLpipe
mustbeusedandallclearancestocombustibleslistedbythe
pipemanufacturermustbestrictlyadheredto.
Usethepipemanufacturer’sapprovedceilingsupportfor
passingthroughacombustibleceiling,aswellastherequired
firestops,radiationshields,flashingandstormcollar.
Becertaintofollowthemanufacturer’srequiredheightof
terminationabovetheroofline,andmaintainatleastthe
minimumclearancesto
combustibles.
Useanappliancecollarwherethepelletventconnectstothe
exhaustoutputofthepelletstoveandattachtheappliance
collartotheexhaustbloweroutputusingthreesheetmetal
screws.
SealeachpipeconnectionjointwithhightemperatureRTVSilicone,toensurethesystemisleak
free(Checkwiththespecificpipemanufacturer’sinstructionsbeforedoingso).
Ifthepelletventpipebeingusedisnota“TwistLock”system,three(3)sheetmetalscrewsare
requiredateachpipejoint.
Connectthepelletstovetooutsidecombustionairusingthekitincludedwith
yourstoveorusing
analternativemethod,asdescribedinthe“OutsideAir”section,onpage15.
Thisventingmethodcanalsobemodifiedsothattheventingsystemrunshorizontallythroughthe
wallfromthestove,thentransitionstoverticalandterminatesabovetheroofline.Whenusing
thismodified
versionofthisinstallationbecertaintocarefullyfollowtheventingsystem
manufacturer’sinstructionsdiligently.
PleaseNote:
Installationdiagramsareforreferencepurposesonlyandarenotdrawntoscale,normeanttobeusedasplansforeach
individualinstallation.Pleasefollowallventingsystemrequirements,maintaintherequiredclearancestocombustibles,and
followalllocalcodes.
Forhighaltitudeinstallations
(above4,000ft.),theventpipe
shouldbeincreasedfrom3‐inch
(3”)tofour‐inch(4”).
12
IMPORTANT!READANDFOLLOWALLINSTALLATIONANDMAINTENANCEINSTRUCTIONS,INCLUDINGCLEANINGTHEUNITASSPECIFIED,AND
REPLACINGGASKETSANNUALLY,ANDPARTSASNEEDED.
ENGLAND’SSTOVEWORKSISNOTRESPONSIBLEFORANYDAMAGEORINJURYINCURREDDUETONEGLECT,ORDUETOUNSAFEINSTALLATIONOR
USAGEOFTHISPRODUCT.CALLTECHNICALSUPPORTWITHANYQUESTIONS.
INSTALLATION
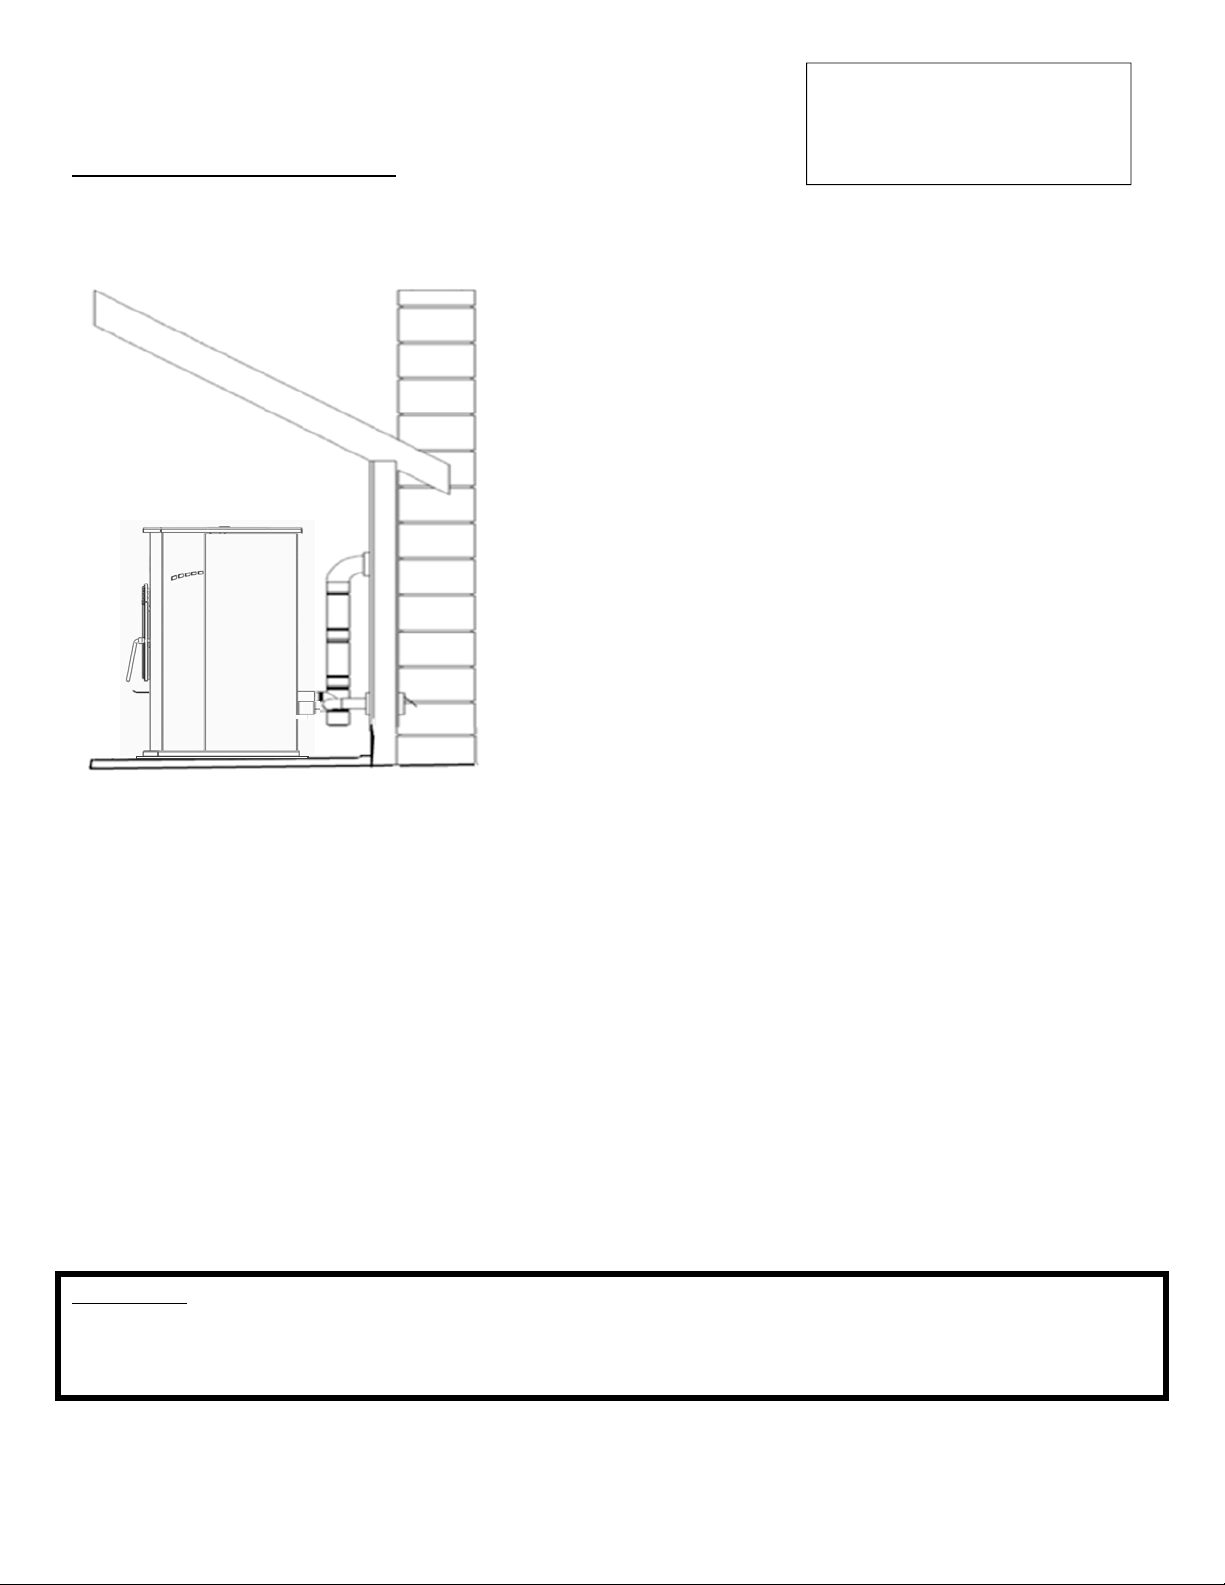
ApprovedVentingMethod3:ExistingChimneySystem
Usinganexistingmasonryorfactorybuiltchimneyforventingistheonlyotheracceptablemethod
forventingthispelletunit.
UseTypeLorTypePLventingpipeuntilenteringthe
existingchimney.Usetheappropriatelysizedadapterwhen
transitioningfromthepelletventpipetothemasonry
or
factorybuiltthimbleandbecertainthattheadapteris
sealedtightlytoboththepelletventingsystemandthe
existingchimney.
Beforeusinganexistingchimney,becertainitisin
goodcondition(Achimneysweepinspectionishighly
recommended).Also,makesurethechimneymeetsthe
minimumstandardslistedinNFPA211(Achimney
professionalcanconfirmthisuponinspection).
Ifconnectingthisstovetoafactorybuiltchimney,it
mayONLYbea6”flue,UL103HTventingsystem(ULCS629
ifCanada).Connectiontoanyotherfactorybuiltchimney
mayresultinapoorly
operatingordangerousstove
installation.
Whenconnectingtoanexistingmasonrychimney,thecross‐sectionalareaofthefluemustbe
considered.Achimneywithafluelargerthan6”round(28.27sq.in.)mayrequirereliningwithan
approvedpelletstovechimneyliningsystem.
Useanappliance
collarwherethepelletventconnectstotheexhaustoutputofthepelletstove
andattachtheappliancecollartotheexhaustbloweroutputusingthreesheetmetalscrews.
SealeachpipeconnectionjointwithhightemperatureRTVSilicone,toensurethesystemisleak
free(Checkwiththespecific
pipemanufacturer’sinstructionsbeforedoingso).
Ifthepelletventpipebeingusedisnota“TwistLock”system,three(3)sheetmetalscrewsare
requiredateachpipejoint.
Connectthepelletstovetooutsidecombustionairusingthekitincludedwithyourstoveorusing
an
alternativemethod,asdescribedinthe“OutsideAir”section,onpage15.
PleaseNote:
Installationdiagramsareforreferencepurposesonlyandarenotdrawntoscale,normeanttobeusedasplansforeachindividual
installation.Pleasefollowallventingsystemrequirements,maintaintherequiredclearancestocombustibles,andfollowalllocal
codes.
Forhighaltitudeinstallations
(above4,000ft.),theventpipe
shouldbeincreasedfrom3‐inch
(3”)tofour‐inch(4”).
13
IMPORTANT!READANDFOLLOWALLINSTALLATIONANDMAINTENANCEINSTRUCTIONS,INCLUDINGCLEANINGTHEUNITASSPECIFIED,AND
REPLACINGGASKETSANNUALLY,ANDPARTSASNEEDED.
ENGLAND’SSTOVEWORKSISNOTRESPONSIBLEFORANYDAMAGEORINJURYINCURREDDUETONEGLECT,ORDUETOUNSAFEINSTALLATIONOR
USAGEOFTHISPRODUCT.CALLTECHNICALSUPPORTWITHANYQUESTIONS.
INSTALLATION
MobileHomeInstallation
TheEngland’sStoveWorks,Inc.outsideairkitMUSTbeusedforinstallationofthisunitina
mobilehome.Pleaseseethe“Outside Air”sectiononpage15formoreinformationregarding
outsideairconnections.
Theoutsideairinletmustbekeptclearofleaves,iceandother
debris.Keepingtheoutsideair
inletfreeofrestrictioniscrucialtopreventingairstarvationand smokespillage.
ThepelletstoveMUSTbesecuredtothefloorofthemobilehomeusinglagboltsandtheholes
providedinthebottomofthebaseforthispurpose.Outdoor‐aired
spaceheatersmustbe
attachedtothestructure.
ThepelletstoveMUSTbegroundedwith#8solidcoppergroundingwire(orequivalent),
terminatedateachendwithanNECapprovedgroundeddevice.
CarefullyfollowallclearanceslistedintheappropriatesectionofthismanualANDfollowthe
ventingmanufacturer’s
minimumclearancerequirements.Similarly,becertaintheventing
systemusedisapprovedformobilehomeuse.
InstallationmustbeinaccordancewithManufacturersHome&SafetyStandard(HUD)CFR3280,
Part24aswellasanyapplicablelocalcodes.
Usesiliconetocreateaneffectivevaporbarrierat
thelocationwherethechimneyoroutsideair
ductingpassesthroughtotheexteriorofthestructure.
CAUTION
THESTRUCTURALINTEGRITYOFTHEMANUFACTUREDHOMEFLOOR,WALLANDCEILING/ROOFMUSTBE
MAINTAINED.DONOTCUTTHROUGHFLOORJOISTS,WALLSTUDS,CEILINGTRUSSESORANYOTHER
SUPPORTINGMATERIALWHICHCOULDBEDETRIMENTALTOTHESTRUCTURALINTEGRITYOFTHEHOME.
WARNING:DONOTINSTALLINASLEEPINGROOM.
JoistShield/Firestop MobileHomeApproved
TypeLorTypePLPellet
VentPipe
ChimneyCap/SparkArrestor RoofFlashingandStorm
Collar
Forhighaltitudeinstallations
(above4,000ft.),theventpipe
shouldbeincreasedfrom3 ‐inch
(3”)tofour‐inch(4”).
14
IMPORTANT!READANDFOLLOWALLINSTALLATIONANDMAINTENANCEINSTRUCTIONS,INCLUDINGCLEANINGTHEUNITASSPECIFIED,AND
REPLACINGGASKETSANNUALLY,ANDPARTSASNEEDED.
ENGLAND’SSTOVEWORKSISNOTRESPONSIBLEFORANYDAMAGEORINJURYINCURREDDUETONEGLECT,ORDUETOUNSAFEINSTALLATIONOR
USAGEOFTHISPRODUCT.CALLTECHNICALSUPPORTWITHANYQUESTIONS.
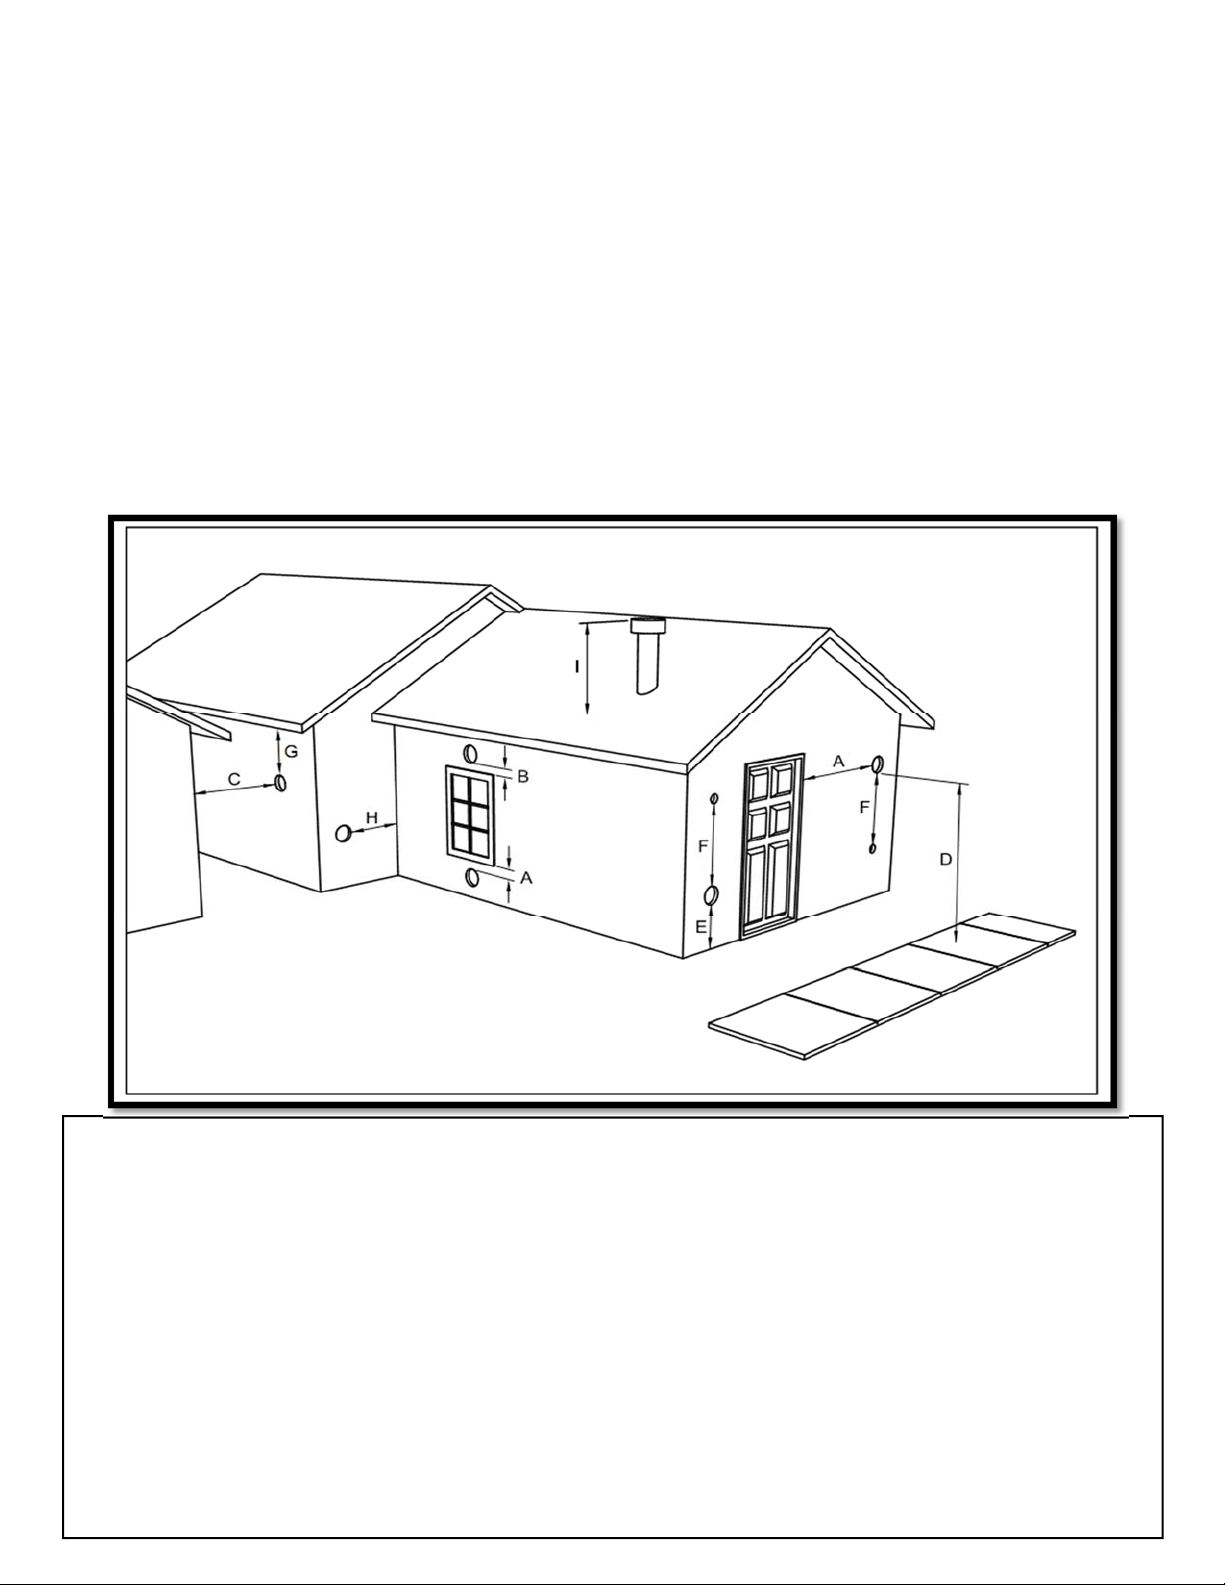
VENTTERMINATIONCLEARANCES
A)Min.4‐ftclearancebeloworbesideanydoororwindowthatopens.
B)Min.1‐ftclearanceaboveanydoororwindowthatopens.
C)Min.2‐ftclearancefromanyadjacentbuilding.
D)Min.7‐ftclearancefromanygradewhenadjacenttopublicwalkways.
E)Min.2
‐ftclearanceaboveanygrass,plants,orothercombustiblematerials.
F)Min.3‐ftclearancefromaforcedairintakeofanyappliance.
G)Min.2‐ftclearancebeloweavesoroverhang.
H)Min.1‐ftclearancehorizontallyfromcombustiblewall.
I)Ventsinstalledwithmechanicalexhaustersshallterminatenot
lessthan12in.(305mm)abovethe
highestpointwheretheypassthroughtheroofsurface.
NotesonterminationofPelletVentPipefromNFPA211(2006ed.)Section10.4Termination:10.4.5
(Seealso“INSTALLATION”sectionofmanualANDadditionalnotesabove):
Notlessthanthree(3)feetaboveanyforcedairinletlocatedwithinten(10)feet.
Notlessthanfour(4)feetbelow,four(4)feethorizontallyfrom,orone(1)footaboveanydoor,
windoworgravityairinletintoanybuilding.
Notlessthantwo(2)feetfromanadjacentbuilding,andnotlessthanseven(7)feetabovegrade
wherelocatedadjacenttopublicwalkways.
Theexhaustexitshallbea rrangedsothatthefluegases arenotdirectedsothatitwillaffectpeople,overheat
combustiblestructures,orenterbuildings.Forceddraftsystemsandallpartsofinduceddraftsystemsunderpositive
pressureduringoperationshallbeinstalledgastightortopreventleakageofcombustion
productsintoa building.
Through‐the‐wallventsshallnotterminateoverpublicwalkways,orwherecondensateorvaporcouldcreatehazards
oranuisance.
Besuretofollowlocalcodesandallmanufacturer’sinstructions(includingexhaustpipe).
Consultaprofessional installerand/orcallTechnicalSupportifyouhaveany
questions.

15
IMPORTANT!READANDFOLLOWALLINSTALLATIONANDMAINTENANCEINSTRUCTIONS,INCLUDINGCLEANINGTHEUNITASSPECIFIED,AND
REPLACINGGASKETSANNUALLY,ANDPARTSASNEEDED.
ENGLAND’SSTOVEWORKSISNOTRESPONSIBLEFORANYDAMAGEORINJURYINCURREDDUETONEGLECT,ORDUETOUNSAFEINSTALLATIONOR
USAGEOFTHISPRODUCT.CALLTECHNICALSUPPORTWITHANYQUESTIONS.
OUTSIDEAIRHOOK‐UP
Theuseofoutsidecombustionairismandatoryonthispelletstove.
Theoutsideairconnectionpipeprotrudesfromthelowerrearcenterofthe
stove;usetheincludedoutsideairkittoattachyourstovetooutside
combustionair.Instructionsandallthepartsneededtomakethe
outsideair
connectiontoyourpelletstoveareincludedwiththeoutsideairkit.
Ifitisnotfeasibletousetheincludedoutsideairhookupkitinyour stove
installation,othermaterialsmaybeused,providedthefollowingrulesare
followed:
Thepipeusedforoutsideair
hookupmustbemetal,withaminimum
thicknessof.0209in.(25gaugemildsteel)orgreaterandaninside
diameterofapproximately2.0in.
Allpipejointsandconnectionsshouldbesealedwithpipeclampsorother
mechanicalmeans,toinsurealeakfreeoutsideairconnection.
Long
runsofpipeandexcessiveelbowsforoutsideairshouldbeavoided.
Duetofrictionalresistanceinpipe,anyexcessiveoutsideairpipingcan
resultinpoorstoveperformance.
Ascreenorotherprotectiondevicemustbefittedovertheoutsideair
terminationpointtopreventrain,debrisand
nuisanceanimalsfrom
enteringthepipingsystem.
Increasetheoutsideairpipesizeto3.0in.diameterpipeiftheoutsideair
connectionismorethan6ft.inlength,morethantwo(2)elbowsareused
orifthestoveisinstalledinabasement.
Theoutsideair
connectionsystemshouldbeinspectedatleastannuallytobe
certainitisfreefromblockage.
Caution
NEVERdrawoutsidecombustionairfrom:
1.Wall,floororceilingcavity.
2.Enclosedspacesuchasanattic,garageorcrawlspace.

16
IMPORTANT!READANDFOLLOWALLINSTALLATIONANDMAINTENANCEINSTRUCTIONS,INCLUDINGCLEANINGTHEUNITASSPECIFIED,AND
REPLACINGGASKETSANNUALLY,ANDPARTSASNEEDED.
ENGLAND’SSTOVEWORKSISNOTRESPONSIBLEFORANYDAMAGEORINJURYINCURREDDUETONEGLECT,ORDUETOUNSAFEINSTALLATIONOR
USAGEOFTHISPRODUCT.CALLTECHNICALSUPPORTWITHANYQUESTIONS.
FLOORPROTECTION
Thispelletstoverequiresanon‐combustiblefloorprotectorifthestoveistobeinstalledonacombustible
floor.Ifthefloorthestoveistobeinstalledonisalreadynon‐combustible(i.e.aconcretefloorina
basement)andhasanRvalueequaltoorhigher
than.2,nofloorprotectionisneeded(althougha
decorativefloorprotectorcanstillbeusedforaestheticreasons).
PrefabricatedfloorprotectorswhichareULlisted(ULCifCanada)orequivalentcanbepurchasedorafloor
protectorcanbebuiltfromstandardmaterials:twosheetsof.5”thick
cementboardcoveredwithceramic
tilewouldbeasuitablefloorprotectorwhichmeetsthe.2R‐valuerequirement.
Whenusinganyfloorprotector,considerthatthisstoveisnotonlyheavybutwillinduceheatingand
coolingcyclesonthefloorprotectorwhichcandamagetileandloosenmortarandgroutjoints.Ahearth
rugisNOTanapprovedsubstituteforaproperhearthpad.
FortheUS:Thefloorprotectormustextendatleast6in.(152.4mm)fromthefront&sidesand4in.
(101.6mm)fromtherear.
ForCanada:Thefloorprotectormustextendatleast18.0in.(457.2mm)fromthefrontoftheunit,8.0in.
(203.2mm)fromthesidesoftheunitand4.0in.(101.6mm)fromtherear.
InCanada,itisrequiredthatthenon‐combustiblefloorprotectorisunderneathandextends2in.(50.8
mm.)oneithersideofanyhorizontalventingrunsAND/ORisdirectlyunderneathanyverticalventing
pipe.
(U.S.A.)
(18”
Can
)

17
IMPORTANT!READANDFOLLOWALLINSTALLATIONANDMAINTENANCEINSTRUCTIONS,INCLUDINGCLEANINGTHEUNITASSPECIFIED,AND
REPLACINGGASKETSANNUALLY,ANDPARTSASNEEDED.
ENGLAND’SSTOVEWORKSISNOTRESPONSIBLEFORANYDAMAGEORINJURYINCURREDDUETONEGLECT,ORDUETOUNSAFEINSTALLATIONOR
USAGEOFTHISPRODUCT.CALLTECHNICALSUPPORTWITHANYQUESTIONS.
DAILYOPERATION
GettingStarted
Checktoseethatthehopperiscleanandfreefromforeignmaterials.Besuretoconnectthisunittoaworking
outlet;werecommendusingasurgeprotectortohelpprotecttheelectroniccomponentsfromdamage.
BEFOREyourfirstfire,dryrunyourunit(nopelletfuel
inthehopper)fortwentyminutes;pressingthe“ON”button
withtheunitpluggedinwillinitiatethedryrun.
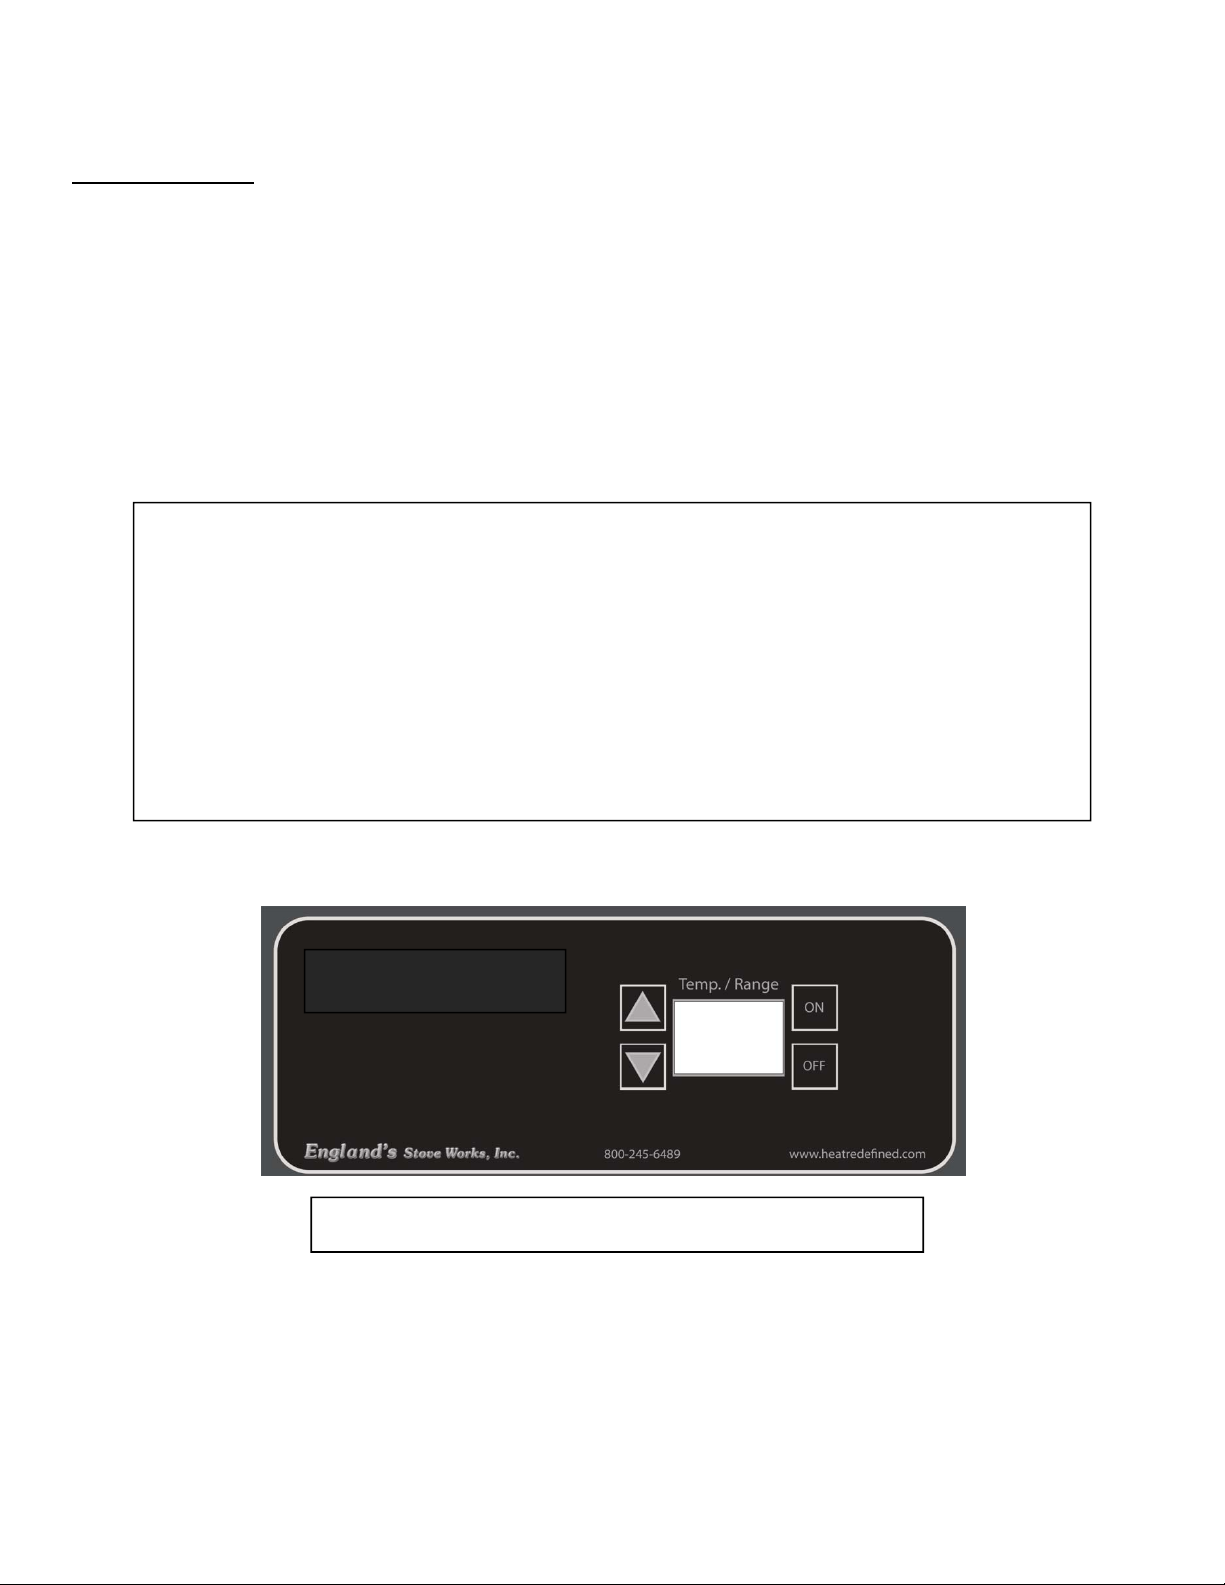
Oncethe“ON”buttonispressed,youshouldimmediatelyheartheexhaustblowerstartandoperate
continuously.Adefaultsettemperaturewillappearinthewindowofthecontrolboard.
Afteraboutthreetofiveminutes,lookforthe
redglowoftheigniterintheigniterportoftheburnpottobe
certainitisoperatingnormally.
Holdthehopperlidswitch(See“IllustratedPartsDiagram”pg.43)downwithyourfingerandchecktosee
thattheaugeristurning.Releasethehopperlid switch
andbecertainthattheaugerstopsturning.DO
NOTPUTYOURFINGERSINTHEHOPPERORNEARTHEROTATINGAUGER.
Afterabouttwentyminutes,thecontrolboardshoulddisplay“FS”inthetwodisplaywindows(Moreinformationon
ErrorCodescanbefoundintheErrorCodesection
ofthismanual).
Atthispoint,thedryruniscompleteandyourpelletheatingapplianceisreadyfornormaloperation.
LightingaFire
Inorderforthisstovetooperate,thehoppermustfirstbefilledwithpelletfuel.Liftthehopperlidusingtheflush‐
mounthandleandpourthepelletfueldirectlyintothehopper.Ofcourse,yourstoveshouldbeconnectedtoyour
ventingsystematthispoint.
We
recommendusingonlypelletsmanufacturedbyPFICertifiedfacilities,sincepelletsbearingthePFI
stampofapprovalwillbelowinashandmoisture,highinBTU’s,anduniforminsizeandquality.
Thispelletstovewillperformequallywellusingsoftwoodandhardwoodpellets,andalthoughtheash
maydiffer
slightlyinappearanceortexture,bothtypesofpelletswillburncleanlyandefficientlyinthisstove.
Thispelletstoveisequippedwithanautomatic pelletignitionsystem;theonlyuserinputrequiredtolightthestove
isasimplepressofthe“On”button.
Afterpressing
the“On”button,themostrecentsettingwillappearinthewindowofthecontrolboard.This
indicatesthestovehasenteredthestart‐upsequenceandisoperatingnormally.
Thefuelfeedrateandcombustionairduringstart‐upisdeterminedbythecon t rolboard, sothestove
maybe
startedonanyheatrange.
Afterapproximatelyfifteenminutes,thefireshouldbeburningbrightly.Atthispoint,thestovehasbegun
normaloperationandthedisplaywindowsonthecontrolboardwilldisplayyoursetting,unlesstheboard
isadjusted.
Itisnormalfortheunittosmokeduringthefirstfire,aspaintsandoilscure.Thisshoulddissipatewithin
thefirsthour.Openadoorand/orwindowduringthefirstfiretoventilatethearea.

18
IMPORTANT!READANDFOLLOWALLINSTALLATIONANDMAINTENANCEINSTRUCTIONS,INCLUDINGCLEANINGTHEUNITASSPECIFIED,AND
REPLACINGGASKETSANNUALLY,ANDPARTSASNEEDED.
ENGLAND’SSTOVEWORKSISNOTRESPONSIBLEFORANYDAMAGEORINJURYINCURREDDUETONEGLECT,ORDUETOUNSAFEINSTALLATIONOR
USAGEOFTHISPRODUCT.CALLTECHNICALSUPPORTWITHANYQUESTIONS.
DailyOperationNotes
Onlyhighquality,PremiumGrade¼”(.25in.)diameterwoodpelletsshouldbeusedinthisstove.
UsinglowgradewoodpelletswithhighashcontentORwoodpelletswithahighmoisturecontent
cancausetheburnpottofillwithashatamorerapidpaceandcan
causeintervalsbetween
periodicmaintenancetobecomesignificantlyshorter.Pleasereadthe“Maintenance”sectionof
thismanualthoroughlytounderstandhowfuelselectionaffectsstoveoperation,maintenance
andcleaning.
Variationintheflameheightisnormal;notallwoodpelletfuelisuniforminsize,whichcanaffect
the
waypelletsarefedintotheburnpot.Althoughtheflameheightmayincreaseanddecrease
duringoperation,thereisnolossofefficiency.
Alwaysstorewoodpelletfuelinadrylocation;storingwoodpelletfuelinadrylocationensures
thefuelwillremainpelletizedandlowin
moisturecontent.Also,becertainthatallwoodpellet
fuelisstoredatasafedistancefromthepelletheater;storingfuelincloseproximitytothestove
canresultinafire.
Thispelletburningroomheaterisequippedwithaspeciallydesignedburnpotwhichcomes
preinstalledfrom
thefactory.Thisburnpotelevatestheburningpelletsanddeliversairatthe
precisely‐requiredlocations.Pelletsmustonlybeburnedinthefactoryburnpot;nomodifications
shouldbemadetothisburnpotandnoadditionalgratesorotherfireelevatorsshouldbeused.
CAUTION
NEVERUSEGASOLINE,GASOLINE‐TYPELANTERNFUEL,KEROSENE,CHARCOALLIGHTERFLUID,OR
SIMILARLIQUIDSTOSTARTOR“FRESHENUP”AFIREINTHISHEATER.KEEPALLSUCHLIQUIDS
WELLAWAYFROMTHEHEATERWHILEINUSE.ADDITIONALLY,NEVERAPPLYFIRE‐STARTERTO
ANYHOTSURFACEOREMBERSINTHESTOVE.DONOTUSECHEMICALSORFLUIDS
TOSTARTTHEFIRE.
DONOTBURNFLAMMABLEFLUIDSSUCHASGASOLINE,NAPHTHAORENGINEOIL.
DONOTBURNGARBAGE;LAWNCLIPPINGSORYARDWASTE;MATERIALSCONTAININGRUBBER,
INCLUDINGTIRES;MATERIALSCONTAININGPLASTIC;WASTEPETROLEUMPRODUCTS,PAINTOR
PAINTTHINNERS,ORASPHALTPRODUCTS;MATERIALSCONTAININGASBESTOS;CONSTRUCTION
ORDEMOLITIONDEBRIS;RAILROADTIESORPRESSURE‐TREATEDWOOD;MANUREORANIMAL
REMAINS;PAPERPRODUCTS,CARDBOARD,PLYWOODORPARTICLEBOARD.THEPROHIBITION
AGAINSTBURNINGTHESEMATERIALSDOESNOTPROHIBITTHEUSEOFFIRESTARTERSMADEFROM
PAPER,CARDBOARD,SAWDUST,WAXANDSIMILA RSUBSTANCESFORTHEPURPOSEOFSTARTING
AFIREINANAFFECTEDWOODHEATER.BURNINGTHESEMATERIALSMAYRESULTINRELEASEOF
TOXICFUMESORRENDERTHEHEATERINEFFECTIVEANDCAUSESMOKE.

19
IMPORTANT!READANDFOLLOWALLINSTALLATIONANDMAINTENANCEINSTRUCTIONS,INCLUDINGCLEANINGTHEUNITASSPECIFIED,AND
REPLACINGGASKETSANNUALLY,ANDPARTSASNEEDED.
ENGLAND’SSTOVEWORKSISNOTRESPONSIBLEFORANYDAMAGEORINJURYINCURREDDUETONEGLECT,ORDUETOUNSAFEINSTALLATIONOR
USAGEOFTHISPRODUCT.CALLTECHNICALSUPPORTWITHANYQUESTIONS.
CONTROLBOARDSETTINGSManual/AutomaticMode
AutomaticMode
Yourstovewillarrivefromthefactoryprogrammedinautomaticmode.First,makesurethethermocouplewire
isrestinglooselyoutsidethebackofthe stove(sothatitisreadingtheairtemperature)inasafelocation where
it can’t be damaged. It should not rest directly on the floor, or it will pick up the floor temperature. The
thermocouple wire is the “room temperature heat sensor” whereby the control board will read the room
temperature.
Inthismode,afterpressingtheONbutton,youselectthedesiredroomtemperature(rangingfrom60to90
degreesF)by pressing the Up orDown arrows, and thestove will operate theaugerfeedandblowerspeed
accordingtothe temperatureyouhaveselected.Whenthedesiredtemperatureisreached,thestovewillgo
intotheshutdownmode.
Thestovewillremainoffaftergoingthroughtheshutdowncycleuntiltheroomtemperaturedropsbelowthe
desiredsetting.Oncethetemperaturedropsbelowthedesiredsetting,thestovewillgothroughstartupand
rununtiltemperaturehasbeenreache dagain.Werecommendrunningthismodeinverywell‐insulatedareas
inthehome,orinmilderclimateregions.Itisnotrecommendedtorunthismodeinless‐insulatedareasofthe
home,orinextremelycoldclimateregions.Runningthestoveinthismodeinthoseenvironmentscausesstrain
ontheigniterandcouldleadtofrequentreplacement,astheunitwillruncyclesmoreoftenthanisoptimal.
Toturnthestoveoffcompletely,presstheOFFbuttononthecontrolboard.
ManualMode
Yourstovecanbechangedtoruninmanualmode,ifdesired.Inmanualmode,afterpressingtheONbutton,
thestovewill runcontinuously,basedondesiredheatrangeandblowerspeedsettings.Theheatrangesettings
willbe1through9(theUparrowwillincreasetheheatrangeandtheDownarrowwilldecreasetheheatrange),
with1beingthelowestaugerfeedsettingand9beingthehighest.Theblowerspeedrangewillmatchtheheat
rangethatyouhaveset.
Sincethestoverunscontinuouslyinthismode,itisgenerallyrecommendedforstovesinstalledinless‐insulated
areasofthehomeandextremelycoldclimateregions.
Toturnthestoveoffcompletely,presstheOFFbuttononthecontrolboard.
SettingStoveinManualMode
o TosetthestoveinManualMode:Withthestovepluggedinpressthedownarrowandtheup
arrowbuttonsimultaneously.ThiswilltoggleyourstovetoManualMode.
o WhileinManualMode,thestoveboardwilldisplayM1(thelowestsetting)andcanbe
adjustedwiththe
upanddownarrows.

20
IMPORTANT!READANDFOLLOWALLINSTALLATIONANDMAINTENANCEINSTRUCTIONS,INCLUDINGCLEANINGTHEUNITASSPECIFIED,AND
REPLACINGGASKETSANNUALLY,ANDPARTSASNEEDED.
ENGLAND’SSTOVEWORKSISNOTRESPONSIBLEFORANYDAMAGEORINJURYINCURREDDUETONEGLECT,ORDUETOUNSAFEINSTALLATIONOR
USAGEOFTHISPRODUCT.CALLTECHNICALSUPPORTWITHANYQUESTIONS.
SettingStoveinAutomaticMode
o Tosetthestovebackintoautomaticmode,pressthedownarrowandtheuparrowbutton
simultaneously.ThiswilltogglethestovetoAutomaticMode.
o WhileinAutomaticMode,thestoveboardwilldisplaytheSetTemperature.
o Thecontrolboardonthisstoveallowstheuser
toadjusttheheatoutputandconvection
blowerspeed,turntheunitonandoff,andtestcomponentsforfunction(moreondiagnostic
modelater).
CAUTION
Thisunitismeanttooperateonlywithdoorclosed.Smokespillageandaninefficient,laz y
burnwillresultfromattemptingtooperatethestovewiththedooropen.
Inaddition,usingfuelotherthanwoodpelletscancreateanunsafesituationandcanalso
generateexcesscarbonmonoxide.Carbonmonoxideisanodorless,colorlessgaswhichcan
bedeadly.Besuretoburnonlywoodpellets.
Theuseofacarbonmonoxidedetectorisstronglyrecommended.

21
IMPORTANT!READANDFOLLOWALLINSTALLATIONANDMAINTENANCEINSTRUCTIONS,INCLUDINGCLEANINGTHEUNITASSPECIFIED,AND
REPLACINGGASKETSANNUALLY,ANDPARTSASNEEDED.
ENGLAND’SSTOVEWORKSISNOTRESPONSIBLEFORANYDAMAGEORINJURYINCURREDDUETONEGLECT,ORDUETOUNSAFEINSTALLATIONOR
USAGEOFTHISPRODUCT.CALLTECHNICALSUPPORTWITHANYQUESTIONS.
ERRORCODES
ErrorcodesarealphanumericcodesthatwillappearintheHeatRangeandBlowerSpeedwindow
oftheControlBoardiftheunitexperiencesanabnormalcondition.Errorcodesarethecontrol
board’swayoftellingtheuserthatsomethingisn’toperatingcorrectlywithinthestove,andthatthe
unitshould
becarefullyinspectedbeforereigniting.Seethe“Trouble‐ShootingGuide,”page30,for
additionalinformationonerrorcodes.
FS
Whenthiscodeisdisplayedinthecontrolboardwindowitindicatesafailuretostart.
Althoughthestovemayhaveignitedthepellets,thecontrolboarddidnotregisterahigh
enoughtemperaturetodeterminethefirewaslit.Ifafirewasignited,waitfortheunitto
cool,cleantheburnpotandrestarttheunit.
OT
Thiserrorcodeindicatesthepresetmaximumallowableexhausttemperaturewas
exceeded.Commonlyreferredtoas“Over‐Temp.,”theOTcodemeanssomethinginthe
stoveiscausingtheexhaustgastobehotterthanexpected.
Ifanerrorcodecontinuestodisplay,iftheerrorcodeseemsunexplainable,orifyouhave
anyotherquestionsabouterrorcodesandwhattheymean,pleasecontactTechnical
Supportat(800)245‐6489.
HopperLidSafetySwitch‐Thisunitisalsoequippedwithahopperlidsafetyswitch(Part#AC‐
HLSB)whichisdirectlyconnectedtotheaugermotor.Intheeventthehopperlidisleftopenwhile
thestoveisinoperation,thehopperlidswitchwillpreventtheaugerfromturning.Thisisto
preventbyproductsofcombustionfromenteringthehomethroughtheopenhopperlidandalso
tosimplypreventoperationwiththehopperlidopen.Improperhopperlidsafetyswitchoperation
willresultinanaugerthatwillnotturnandthereforeastovethatwillnotburn.NEVERplaceyour
handoranyobjectneartheaugerwhilethestoveisconnectedtopower.
22
IMPORTANT!READANDFOLLOWALLINSTALLATIONANDMAINTENANCEINSTRUCTIONS,INCLUDINGCLEANINGTHEUNITASSPECIFIED,AND
REPLACINGGASKETSANNUALLY,ANDPARTSASNEEDED.
ENGLAND’SSTOVEWORKSISNOTRESPONSIBLEFORANYDAMAGEORINJURYINCURREDDUETONEGLECT,ORDUETOUNSAFEINSTALLATIONOR
USAGEOFTHISPRODUCT.CALLTECHNICALSUPPORTWITHANYQUESTIONS.
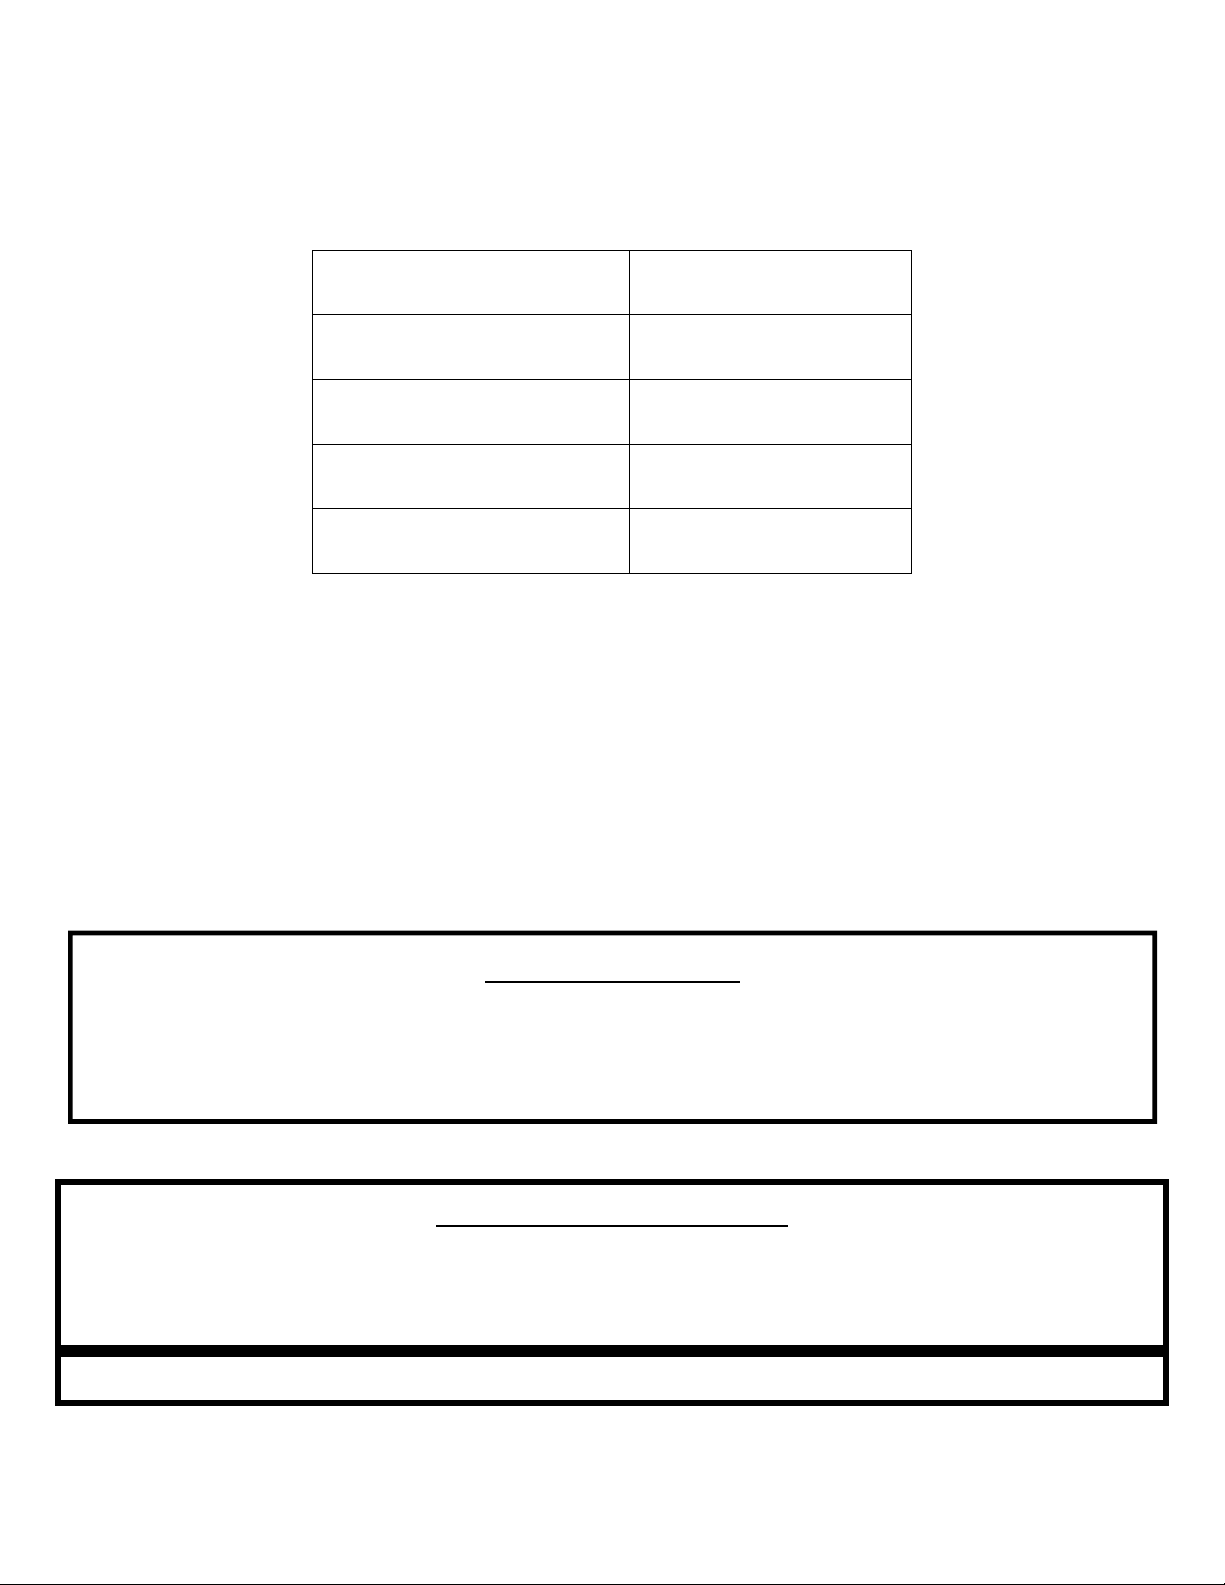
POWERFAILURE
Ifthepowertotheunitisinterruptedforapproximatelythreeminutesorless,theunitwill
resumeoperationwhenpowerisrestoredaccordingtothefollowingta ble:
Ifthepowerisinter ruptedformorethan(approximately)threeminutes,theunitwill
be“OFF”whenpowerreturns.
IMPORTANT–DoNOTopenthehopperlidorthedoortotheunitduringpower
outage.Opentheclosestoutsidedoorandawindowtoreducethechanceof
any
combustionbyproductsenteringthehomefromthestove.
Waitforthepowertoberestoredandthenpressthe“ON”buttontorestarttheunit,if
necessary.
Caution–ShockHazard
Pressthe“Off”buttonandlettheappliancecompletelycoolBEFOREunpluggingtheappliance
andbeginninganymaintenanceorcomponentreplacement.
Riskofshockifapplianceisnotunpluggedbeforeservice
Unit’sStateBeforePowerLoss StateWhenPowerReturns
ON Warmup
Warmup Warmup
Shut‐Down Shut‐Down
OFF OFF
SmokeDetectors
England’sStoveWorks,Inc.highlyrecommendstheuseofsmokedetectorsineveryroom
ofthehouse.However,locatingasmokedetectordirectlyabovethisunitcanre sultin
nuisancealarms.
23
IMPORTANT!READANDFOLLOWALLINSTALLATIONANDMAINTENANCEINSTRUCTIONS,INCLUDINGCLEANINGTHEUNITASSPECIFIED,AND
REPLACINGGASKETSANNUALLY,ANDPARTSASNEEDED.
ENGLAND’SSTOVEWORKSISNOTRESPONSIBLEFORANYDAMAGEORINJURYINCURREDDUETONEGLECT,ORDUETOUNSAFEINSTALLATIONOR
USAGEOFTHISPRODUCT.CALLTECHNICALSUPPORTWITHANYQUESTIONS.
DAILYMAINTENANCE
ImportantNotes
Aswithanymaintenanceconcerningthisunit,besuretheunitis“OFF”andhascompletedthe
Shut‐DowncycleBEFOREbeginning.
BeawarethatmetalpartsinthefireboxcanremainHOTlongafterthefirehasgoneoutand
EVENaftertheShut‐Downcycleiscomplete.
Alwaysuseextremecautionwhenhandling
potentiallyhotstoveparts,evenifyouthinktheyshouldbecold.
Ashesshouldonlyberemovedwhenthestovehasbeenshutdownandhasbeenallowedto
coolthoroughly.Hotemberscanremainunderasheslongafterthefirehasgoneout,
so
alwaysbeextracarefulwhenhandlinganyashesfromthis(orany)stove.
Differentpelletswillgeneratevaryingamountsofashandburnpotdeposits.Carefullymonitor
theashbuildupinthestovewhenfirstoperatingtheunit,aswellaswheneveradifferent
brandofpelletsis
burned.
Whiletheamountofashesgeneratedbythisunitisnotexcessivecomparedtoatraditional
log‐burningwoodstove,keepingtheunitcleanandfreeofashisESSENTIALforpeak
performanceandmaximumefficiency.Ashbuild‐uphampersairflow,reducesefficiency,and
cancauseasmokeback.
England’sStoveWorks®isnotresponsibleforanydamagesincurredduetoapoorly
maintainedand/ordirtystove.Thispelletstoveisahighlyefficientmachineand,assuch,
requiressufficientmaintenancetokeepitoperatingatitspeak.
AshRemovalandDisposal
Pressthe“Off”buttonandallowthestovetocompletetheshutdowncycleandcool
completely.
DisposalofAshes
–
Ashesshouldbeplacedinametalcontainerwitha
tightfittinglid.Theclosedcontainerofashesshouldbeplacedona
noncombustiblefloororontheground,wellawayfromallcombustible
materials,pendingfinaldisposal. Iftheashesaredisposedofbyburialin
soilorotherwise
locallydispersed,theyshouldberetainedintheclosed
containeruntilallcindershavebeenthoroughlycooled.
*Failuretoproperlycleanyourstovecancausepoorperformanceandpossiblyaburnback!*

24
IMPORTANT!READANDFOLLOWALLINSTALLATIONANDMAINTENANCEINSTRUCTIONS,INCLUDINGCLEANINGTHEUNITASSPECIFIED,AND
REPLACINGGASKETSANNUALLY,ANDPARTSASNEEDED.
ENGLAND’SSTOVEWORKSISNOTRESPONSIBLEFORANYDAMAGEORINJURYINCURREDDUETONEGLECT,ORDUETOUNSAFEINSTALLATIONOR
USAGEOFTHISPRODUCT.CALLTECHNICALSUPPORTWITHANYQUESTIONS.
Becauseoftheopendesignofthefirebox,themajorityoftheashwillbeoneithersideofthe
cradle.Openthedoorofthestoveanduseanoldpaintbrushorputtyknifetomoveashfrom
aroundtheburnpotandintotheopenareasbeside
thecradle.
Usingthecleaningtoolprovided,removeanydepositsleftintheburnpot,beingcarefulto
removethemfromtheburnpotandnotallowthemtofilterdownintothecradlearea.
Excessiveashbuild‐upinthecradlecancausepoorstoveperformance(See“Cleaning
theBurn
pot,”below).
WARNING:Usecautionwhenusingthecleaningtool,asithasasharppointandmayhave
somesharpedges(aswithanymetaltool).Aswerecommendwithanymaintenance,use
gloves,safetyglassesandanynecessarysafetyapparelwhenhandlingthecleaningtool.
CleaningtheBurnPot
Alongwithremovingashesfromthestove,cleaningtheburnpotistheotheressentialpartof
dailymaintenancethatwillkeepthestoveoperatingatitspeak.Pelletscontainvaryingamountsof
impuritiesandfusiblematerialthatwillaccumulateintheburnpotovertime.Somepelletswill
containmuch
higheramountsofthesefusibleimpurities,thereforeextravigilancemayberequiredto
maintainacleanburnpot.Allowingimpuritiestobuildupintheburnpotcanrestricttheairflowto
thefire,resultinginadirty,inefficientburnandcanshortenthelifeoftheburnpot.
NOTE:Theburnpotshouldbecleanedoutbeforeeachstart‐up(beforepressingtheONbutton).
Alwaysallowthestovetofinishtheshut‐downcycleandcoolcompletelybeforeperforming
anymaintenanceinsidethefirebox.
Openthefrontdoorandremovetheburnpotbylifting
itstraightupandoutofthecradle.
WARNING–TheburnpotcanremainHOTlongafterthefirehasgoneout,sowearprotective
gloveswheneverhandlingapotentiallyhotburnpot.
Oncetheburnpotisoutofthestove,usethecleaningtooltoremove
anydepositsfromthe
insideoftheburnpot.
Becertainallairholesareclearandunrestrictedbyfusibleashmatter;thecleaningtool
providedisdesignedtofittheseholesandwill beusefulinremovingstubborndepositsfrom
theseholes.
Removeanyashmaterialfromthe
bottomofthecradleandbrushanyashfromthetopofthe
cradleintothesidesofthefirebox.Keepingthetopofcradlefreeofashiscrucialinallowing
theburnpottoseatproperlyinthecradle.
Inserttheburnpotbackintothecradle
usingthereverseoftheproceduredetailedabove.

25
IMPORTANT!READANDFOLLOWALLINSTALLATIONANDMAINTENANCEINSTRUCTIONS,INCLUDINGCLEANINGTHEUNITASSPECIFIED,AND
REPLACINGGASKETSANNUALLY,ANDPARTSASNEEDED.
ENGLAND’SSTOVEWORKSISNOTRESPONSIBLEFORANYDAMAGEORINJURYINCURREDDUETONEGLECT,ORDUETOUNSAFEINSTALLATIONOR
USAGEOFTHISPRODUCT.CALLTECHNICALSUPPORTWITHANYQUESTIONS.
WEEKLYMAINTENANCE
BaffleRemoval
Aswithanymaintenanceconcerningthisunit,besuretheunitis“OFF,”hascompleted
theShut‐Downcycle,andiscompletelycoolBEFOREbeginning.Beawarethatmetal
partsinthefireboxcanremainHOTlongafterthefirehasgoneoutandEVENafterthe
Shut‐Downcycle
iscomplete.Alwaysuseextremecautionwhenhandlingpotentially
hotstoveparts,evenifyouthinktheyshouldbecold.
WeeklymaintenanceshouldincludethestepslistedinthissectionASWELLASthesteps
listedinthe“DailyMa intenance”section.
Removethetopbaffle(insidethefirebox,abovethedoor)byliftingitupandpullingit
forward,thentiltingitsidewaystoremoveitfromthestove.Thepartnumberforthe
topbaffleisAC‐CBTB.
Removeanyashthathasaccumulatedbehindthebaffleinthestove.
Theuseofautilityvacuumishighlyrecommende dbecauseitwillpreventfly‐ashfrom
fallingthroughtheexhaustholesandintotheexhaustchamber.
Replacethebafflebyreversingtheabovesteps.Besurethetabsinthebafflefitintothe
matchingholesinthefireboxwallofthestove.Thetopofthebafflewillrestagainstthe
frontwallofthestovewhenitisproperlyinstalled.
Clean‐OutCovers
Removetheexhaustchamberclean‐outportcovers(lowerleftandright,oneitherside
oftheburnpot).Usea5/16”socketwrenchtoloosenthescrewoneachcover,then
pullthecoverupwardstoremoveitfromthescrew.
BEFOREvacuumingthechamberout,observethetypeandquantityofashbuild‐up.
Theashdepositedintheexhaustchambershouldbelight,fluffy,greyorwhiteincolor,
andshouldbenohigherthanhalfwayuptheclean‐outport.
Usingautilitytypevacuumcleaner,vacuumtheflyashoutoftheexhaustchamber.A
shortpieceofhosecanbeattachedtotheendoftheutilityvacuumlineandcanbe
usefulinreachingtheash.Replacetheclean‐outportcoverswhenfinished.
Aspeciallydesignedashvacuumandpelletstovecleaningkitisavailablefromthe
England’sStoveWorkswebsite;pleasesee:store.heatredefined.com.
MONTHLYMAINTENANCE
NOTE:Aswithanymaintenanceconcerningthisunit,besuretheunitis“OFF,”has
completedtheShut‐Downcycle,andiscompletelycoolBEFOREbeginning.

26
IMPORTANT!READANDFOLLOWALLINSTALLATIONANDMAINTENANCEINSTRUCTIONS,INCLUDINGCLEANINGTHEUNITASSPECIFIED,AND
REPLACINGGASKETSANNUALLY,ANDPARTSASNEEDED.
ENGLAND’SSTOVEWORKSISNOTRESPONSIBLEFORANYDAMAGEORINJURYINCURREDDUETONEGLECT,ORDUETOUNSAFEINSTALLATIONOR
USAGEOFTHISPRODUCT.CALLTECHNICALSUPPORTWITHANYQUESTIONS.
BeawarethatmetalpartsinthefireboxcanremainHOTlongafterthefirehasgoneoutand
EVENaftertheShut‐Downcycleiscomplete.Alwaysuseextremecautionwhenhandling
potentiallyhotstoveparts,evenifyouthinktheyshouldbecold.
Monthlymaintenanceshouldinclude
thestepslistedinthissectionASWELLASthesteps
listedinthe“DailyMaintenance”and“WeeklyMaintenance”section.
Intervalsbetweenmonthlycleaningswilldependonthedurationthatthestoveisburningona
dailybasis.Astovewhichisoperatedcontinuouslywillneedmorefrequentmonthly
cleanings
thanastovewhichisusedperiodicallyassupplementalheat.
Agoodruleofthumbformonthlymaintenanceisthatitshouldbedoneeachtimeanentire
tonofpelletsisburnedORoncepermonth,whichevercomesfirst.
Ifexcessashaccumulationisfoundinthe
exhaustchamberorventingsystemduringmonthly
maintenance,theintervalbetweencleaningsshouldbereducedtoeliminatethepossibilityof
poorstoveperformanceduetoashaccumulation.
AspeciallydesignedashvacuumandpelletstovecleaningkitisavailablefromtheEngland’s
StoveWorkswebsite;pleasesee:store.heatredefined.com
VentingPipeCleaning
Lowspotsanddirectionchangesintheventingsystem(suchasteesandelbows)areareasfor
potentialfly‐ashandcreosoteaccumulation.INSPECTtheseareasdiligentlytokeepthe
ventingsysteminsafeoperatingcondition.
Dependingonthespecifictypeofventingsystemyourstoveisconnectedto,
itmaybepossible
toremovetheclean‐outteecoverandsimplyrunapipebrushupthepipetoremoveanyfly‐
ashaccumulation.Brushesspecificallymadeforcleaningpelletpipeareavailableatthe
England’sStoveWorkswebsite,store.heatredefined.com.
Horizontalrunsofpipe,suchasfrom
theexhaustconnectiononthestovetothevertical
transition,willaccumulateflyashandshouldbeinspectedcarefullyandbrushedclean.
Checktheterminationcaptobecertainitisnotcloggedorrestrictedbyanyfly‐ash
accumulation.
Afterthoroughlycleaningtheventingsystem,resealanydisassembled
seamswithhigh
temperaturesilicone(Part#AC‐RTV3)ifapplicabletoyourventingsystem.
Inspectseamsthatwerenotdisassembledtobecertainasmoke‐tightsealisstillbeingmade.
Afterprolongeduse,leaksintheventingsystemcanusuallybefoundbysearchingforfly‐
ash
depositsontheoutsideofthepipe.Carefullycheckforleaksintheventingsystemandseal
themaccordingly.
Althoughmostpelletventingsystemsaredesignedtolastalifetime,pelletfly‐ashcanbe
corrosiveundercertainconditions.Whencleaningyourventingsystem,examinethepipe
carefullyfor
anysignsofdeteriorationandreplacesectionsthatshowexcessivewear.Itis
unlikelythatthiswilleverbeaconcern,butmaintainingyourventingsysteminsafeoperating
conditioniscrucialtosafestoveoperation.

27
IMPORTANT!READANDFOLLOWALLINSTALLATIONANDMAINTENANCEINSTRUCTIONS,INCLUDINGCLEANINGTHEUNITASSPECIFIED,AND
REPLACINGGASKETSANNUALLY,ANDPARTSASNEEDED.
ENGLAND’SSTOVEWORKSISNOTRESPONSIBLEFORANYDAMAGEORINJURYINCURREDDUETONEGLECT,ORDUETOUNSAFEINSTALLATIONOR
USAGEOFTHISPRODUCT.CALLTECHNICALSUPPORTWITHANYQUESTIONS.
YEARLYMAINTENANCE
ImportantNotes
Aswithanymaintenanceconcerningthisunit,besuretheunitis“OFF,”hascompleted
theShut‐Downcycle,andiscompletelycoolBEFOR E beginning.
BeawarethatmetalpartsinthefireboxcanremainHOTlongafterthefirehasgoneout
andEVENaftertheShut‐Down
cycleiscomplete.Alwaysuseextremecautionwhen
handlingpotentiallyhotstoveparts,evenifyouthinktheyshouldbecold.
Yearly(orendofseason)maintenanceshouldincludethestepslistedinthissectionAS
WELLASthestepslistedinthe“DailyMaintenance, ”“WeeklyMaintenance”and
“Monthly
Maintenance”sectionsofthismanual.
Yearlymaintenanceshouldbeperformedattheendoftheburningseason.Leavingash
andotherbuild‐upinthestoveduringthenon‐heatingmonthscanleadtopremature
metaldegradationinthestoveandventingsystem.Usingextraattentiontodetailand
beingcertaintobeverythoroughin
theendofseasoncleaningwillhelpincreasethe
operatinglifeofthestoveandventingsystem.
Caution
–
ShockHazard
Pressthe“Off”buttonandlettheappliancecompletelycoolBEFOREunplugging
theapplianceandbeginninganymaintenanceorcomponentreplacement.
Riskofshockifapplianceisnotunpluggedbeforeservice.
SOOTANDFLYASH:FORMATIONANDNEEDFORREMOVAL
Theproductsofcombustionwillcontainsmallparticlesofflyash.Theflyashwillcollectinthe
exhaustventingsystemandrestricttheflowofthefluegases.Incompletecombustion,such
asthatwhichoccursduringstartup,shutdownorincorrectoperationoftheroomheaterwill
leadtosomesootformationwhichwillcollectintheexhaustventingsystem.Theexhaustventing
systemshouldbeinspectedatleastonceeveryyeartodetermineifcleaningisnecessary.

28
IMPORTANT!READANDFOLLOWALLINSTALLATIONANDMAINTENANCEINSTRUCTIONS,INCLUDINGCLEANINGTHEUNITASSPECIFIED,AND
REPLACINGGASKETSANNUALLY,ANDPARTSASNEEDED.
ENGLAND’SSTOVEWORKSISNOTRESPONSIBLEFORANYDAMAGEORINJURYINCURREDDUETONEGLECT,ORDUETOUNSAFEINSTALLATIONOR
USAGEOFTHISPRODUCT.CALLTECHNICALSUPPORTWITHANYQUESTIONS.
YEARLYMAINTENANCE
ExhaustBlowerCleaning
Althoughtheexhaustblowerandblowerhousingweredesignedtominimizeashbuild‐up,somefly‐ash
willstillaccumulatetherethroughouttheburningseason.Theamountandtypeofashwilldependonthe
typeofpelletsandventingsystem,butgenerallythisaccumulationwillbemild.If,whencleaningtheexhaust
blower,alargeaccumulationoffly‐ashisfound,cleaningtheexhaustblowerandhousingshouldbe
performedmonthlyorbimonthlytopreventthisexcessbuildup.
Instructions
Beforebeginningtheexhaustblowercleaningprocedure,becertaintheunitisunpluggedand
thoroughlycooleddown.
Removethepaneltotheleft(iffacingthestove).Seepage42forpanelremovalinstructions.
Oncethepanelisoff,theexhaustblowerwillbeclearlyvisible.
Disconnecttheventingsystemfromtheexhaustblowerjustenoughthatyouwillbeabletoremove
theexhaustblowerfromthestove(therearpanelwillalsoneedtoberemoved).
Unplugthetwowireswhichconnectthestovewiringharnesstotheexhaustblower,usingthequick
connectplugs.
Loosenthefive(5)
5
/
16
”self‐drillingscrewswhichholdtheexhaustblowertotheexhaustblowertube.
Lifttheexhaustblowerupandoutofthestove.Thegasketwhichsealstheexhaustblowertothe
exhaustblowertubeisfragile,sotakeextracarewhenremovingtheblower.Evenwhenbeingcareful,
though,itiseasytotearthisfragilegasket,andsinceanairtightsealiscrucialhere,itisbesttoreplace
thisgasket(Part#‐PU‐CBMG)everytimetheexhaustblowerisremoved.
Withtheexhaustblowerremoved,useautilityvacuumtoremoveanyashaccumulationintheexhaust
blowertube.
Useasoftpaintbrushandcarefullyremoveanyashaccumulationfromtheinsideoftheexhaust
blower,andfromtheexhaustblowerfanblade.
Inspecttheexhaustblowermotorfordustaccumulationandcarefullyremoveit,ensuringthatallair
coolingholesintothemotorareopenandfreeofdustdeposits.
Installtheblowerinthereverseorderasdescribedabove.Remembertochecktheconditionofthe
exhaustblowergasket.
Reinstalltheventingsystemandpanels.
ConvectionBlowerCleaning
Asalways,becertainthestoveiscoolandunpluggedbeforeservicinganycomponentswithintheunit.
Sincetheconvectionblowerdoesnothandleanyby‐productsofcombustion,itdoesnotrequireserious
cleaningliketheexhaustblower.However,dustfromthehomeandotherdebrisinthe aircanaccumulateon
thebladesoftheconvectionblower.Theconvectionblowerislocatedinthemiddleofthestove.Anydust
thathasbuiltuponthefanbladescanusuallybeeasilyremovedwithavacuumorasoftpaintbrush.Remove
(4)
5
/
16
”screwsthatholdthebracketinplacetoremovetheblower.

29
IMPORTANT!READANDFOLLOWALLINSTALLATIONANDMAINTENANCEINSTRUCTIONS,INCLUDINGCLEANINGTHEUNITASSPECIFIED,AND
REPLACINGGASKETSANNUALLY,ANDPARTSASNEEDED.
ENGLAND’SSTOVEWORKSISNOTRESPONSIBLEFORANYDAMAGEORINJURYINCURREDDUETONEGLECT,ORDUETOUNSAFEINSTALLATIONOR
USAGEOFTHISPRODUCT.CALLTECHNICALSUPPORTWITHANYQUESTIONS.
YEARLYMAINTENANCE
CleaningPelletFinesfromtheHopperandAuger
Dependingonthetypeandqualityofpelletsburnedinthestove,someaccumulationofpelletfinesand
dustispossibleinthehopper.Thelowestpartoftheauger,nearthebackofthestove,iswheremostfines
willaccumulate.Withthestoveoff,unplugged,completelycooland
withthehopperempty,useautility
vacuumtoremovethefinesfromtheaugertube.Ifthefinescannotberemovedfromthetopofthehopper:
Removethebackpanel,usinga
5
/
16
”sockettoremovethescrews .
Locatetheaugermotorassemblyatthemiddlerearofthestove,andonceitisfound,findthe
twosetscrewsoneithersideofthecastironmountingcollar.
Usinga
1
/
8
”allenwrench,loosenthesetscrewoneithersideoftheaugermountingcollar.
Withautilityvacuuminhand,lettheaugerassemblyslideoutoftheaugertubejustenou gh
sothatthevacuumcanbeusedtoremoveanyfinesfromthisarea.
Reinstallthe
augerassemblyandtightenthetwosetscrews;reinstallthebackpanel,being
certaintotightentheretainingscrewsontherearofthestove.
CleaningPelletFinesInsideAugerTube
Removetheaugercoverplate(locatedabovetheaugeratthebottomofthehopper)by
removingthe(8)5/16”screwsthatholditinplace.Usingautilityvacuumremoveanyexcess
dustorfinesthathavecollectedintheaugertubearoundtheauger.
Re‐installauger
coverplateinreversemethod.
CheckingGaskets
Anairtightsealatthedooropeningiscrucialtoproperstoveperformance.Anyairleaksinthisareacan
notonlycauseadirty,inefficientburnbutcanalsoposeaserioussafetythreat.Becauseofthis,thedoor
gasketshouldalwaysbemaintainedingoodcondition,andreplacedannuallyorsoonerifnecessary.Gasket
tightnesscanbecheckedusingthe“dollar‐bill”method:
Placeadollarbillbetweenthegasketandthestovebody(atthelocationwherethegasket
meetsthestove).
Closethedoortightlyandattempttopullthedollarbillout.Ifthedollarbillslidesinandout
easily,thegasketneedstobereplaced.Thistest
shouldberepeatedaroundtheentiregasket
perimeter,asgasketswillsometimessealtightlyononeside,butwillbewornandsealpoorly
onanotherside.
30
IMPORTANT!READANDFOLLOWALLINSTALLATIONANDMAINTENANCEINSTRUCTIONS,INCLUDINGCLEANINGTHEUNITASSPECIFIED,AND
REPLACINGGASKETSANNUALLY,ANDPARTSASNEEDED.
ENGLAND’SSTOVEWORKSISNOTRESPONSIBLEFORANYDAMAGEORINJURYINCURREDDUETONEGLECT,ORDUETOUNSAFEINSTALLATIONOR
USAGEOFTHISPRODUCT.CALLTECHNICALSUPPORTWITHANYQUESTIONS.
Trouble‐ShootingGuide
WARNING:ToavoidELECTRICALSHOCKalwaysdisconnecttheunitfromthepowersourceBEFORE
attemptinganyrepair.Ifthisguidedoesnotcorrecttheproblem,callyourlocaldealerorTechnical
Supportat1‐800‐245‐6489.
Problem Cause Solution
Augernotturning 1.Badaugermotor. 1.Replaceaugermotor.
2.Foreignmatterjammingauger. 2.Removepelletsandobject.
3.Vacuumsensor. 3.Checkexhaustblower.
Smokesmellordustinhouse 1.Improperexhaustconnection. 1.Checkexhaustconnectionsfor
leaks,especiallytheexhaustblower
connect.Sealleakswithsilicone,
aluminumtapeorahoseclamp.
Roomblowernotoperating 1.Loosethermalsensor. 1.Tightenconnectiononsensor.
2.Blowerspeedsethigherthanheat
range,causingstovetocoolandblowerto
cycle.
2.Lowerblowerspeed.
3.Looseconnection. 3.Checkcontrolboardconnection.
Exhaustblowernotoperating 1.Looseconnection. 1.Checkcontrolboardconnection.
2.Badblower. 2.Replaceblower.
3.Badvacuumsensor. 3.Replacevacuumsensor.
LazyFire 1.Badexhaustblower. 1.Inspectandreplaceblower.
2.Excessivepelletmoisture. 2.Keeppelletsdry.
3.Excessiveashbuild‐up. 3.Thoroughlycleanunit.
4.Lowqualitypellets. 4.UseonlyPFIpremiumpellets.
BlownFuse 1.Powersurge. 1.Replacefuse;usesurgeprotector.
2.Exposedwire. 2.Checkforexposedorfrayedwire
andlooseconnections.
3.Electricalcomponentshorting. 3.Checkmotorsandblowersfor
obstructionsorshortcircuits.
HighPelletConsumption 1.Lowqualityornon‐uniformlysized
pellets.
1.Usepremiumpelletsortry
anotherpelletbrand.
SqueakingNoise 1.Obstructioninaugertube. 1.Checkaugertubeforforeign
objects.
2.BlowerNoise. 2.Remove,clean,andoilblower.
PingingorRattlingNoise 1.Foreignmaterialinblower. 1.Checkbothblowersformaterial.
2.Looseexhaustfansetscrew. 2.Checksetscrewfortightness.

31
IMPORTANT!READANDFOLLOWALLINSTALLATIONANDMAINTENANCEINSTRUCTIONS,INCLUDINGCLEANINGTHEUNITASSPECIFIED,AND
REPLACINGGASKETSANNUALLY,ANDPARTSASNEEDED.
ENGLAND’SSTOVEWORKSISNOTRESPONSIBLEFORANYDAMAGEORINJURYINCURREDDUETONEGLECT,ORDUETOUNSAFEINSTALLATIONOR
USAGEOFTHISPRODUCT.CALLTECHNICALSUPPORTWITHANYQUESTIONS.
UnitShutsDownin15‐20
minuteswithan"FS"codeon
controlboard.(FailedStart)
1.Loosethermalsensor. 1.Checkbothsidesofthermalsensor
connection(exhaustblowe rand
controlboard).
2.Controlboardsettings. 2.StartstoveonminimumHeat
Range5toensureagoodfireis
started.
3.Failuretolightpellets. 3.Checkigniterforbuilduporfailure.
"OT"CodeonControlBoard
(OverTemp)
1.Convection(RoomAir)blowerfailure. 1.Checkconvectionblowerfor
properfunction,replaceifnecessary.
2.Partiallyblockedflue. 2.Checkflueforobstructions.
3.Usingfuelotherthanpremiumwood
pellets.
3.UseONLYpremiumwoodpellets
inthisstove.
Notes:
1.Wheneverinstructedtocheck/replacethevacuumsensor,alsocheckforlooseorcrackedvacuumhose.
Also,becertainthevacuummeasurementportinthefireboxiskeptclean(cleanwithapipe cleaneror
brush,donotuseavacuumtocleanthisport).
2.Torestartandclearanerrorcodedisplayedonthecontrolboard,pushthe"ON"buttonandtheunit
shouldresettheerrorandrestart.
3.Ifyouareuncertainaboutthemeaningofanerrorcodeorhaveanyquestionsatall,PLEASEcontact
TechnicalSupportat(800)245‐6489.
32
IMPORTANT!READANDFOLLOWALLINSTALLATIONANDMAINTENANCEINSTRUCTIONS,INCLUDINGCLEANINGTHEUNITASSPECIFIED,AND
REPLACINGGASKETSANNUALLY,ANDPARTSASNEEDED.
ENGLAND’SSTOVEWORKSISNOTRESPONSIBLEFORANYDAMAGEORINJURYINCURREDDUETONEGLECT,ORDUETOUNSAFEINSTALLATIONOR
USAGEOFTHISPRODUCT.CALLTECHNICALSUPPORTWITHANYQUESTIONS.
REPLACINGCOMPONENTS
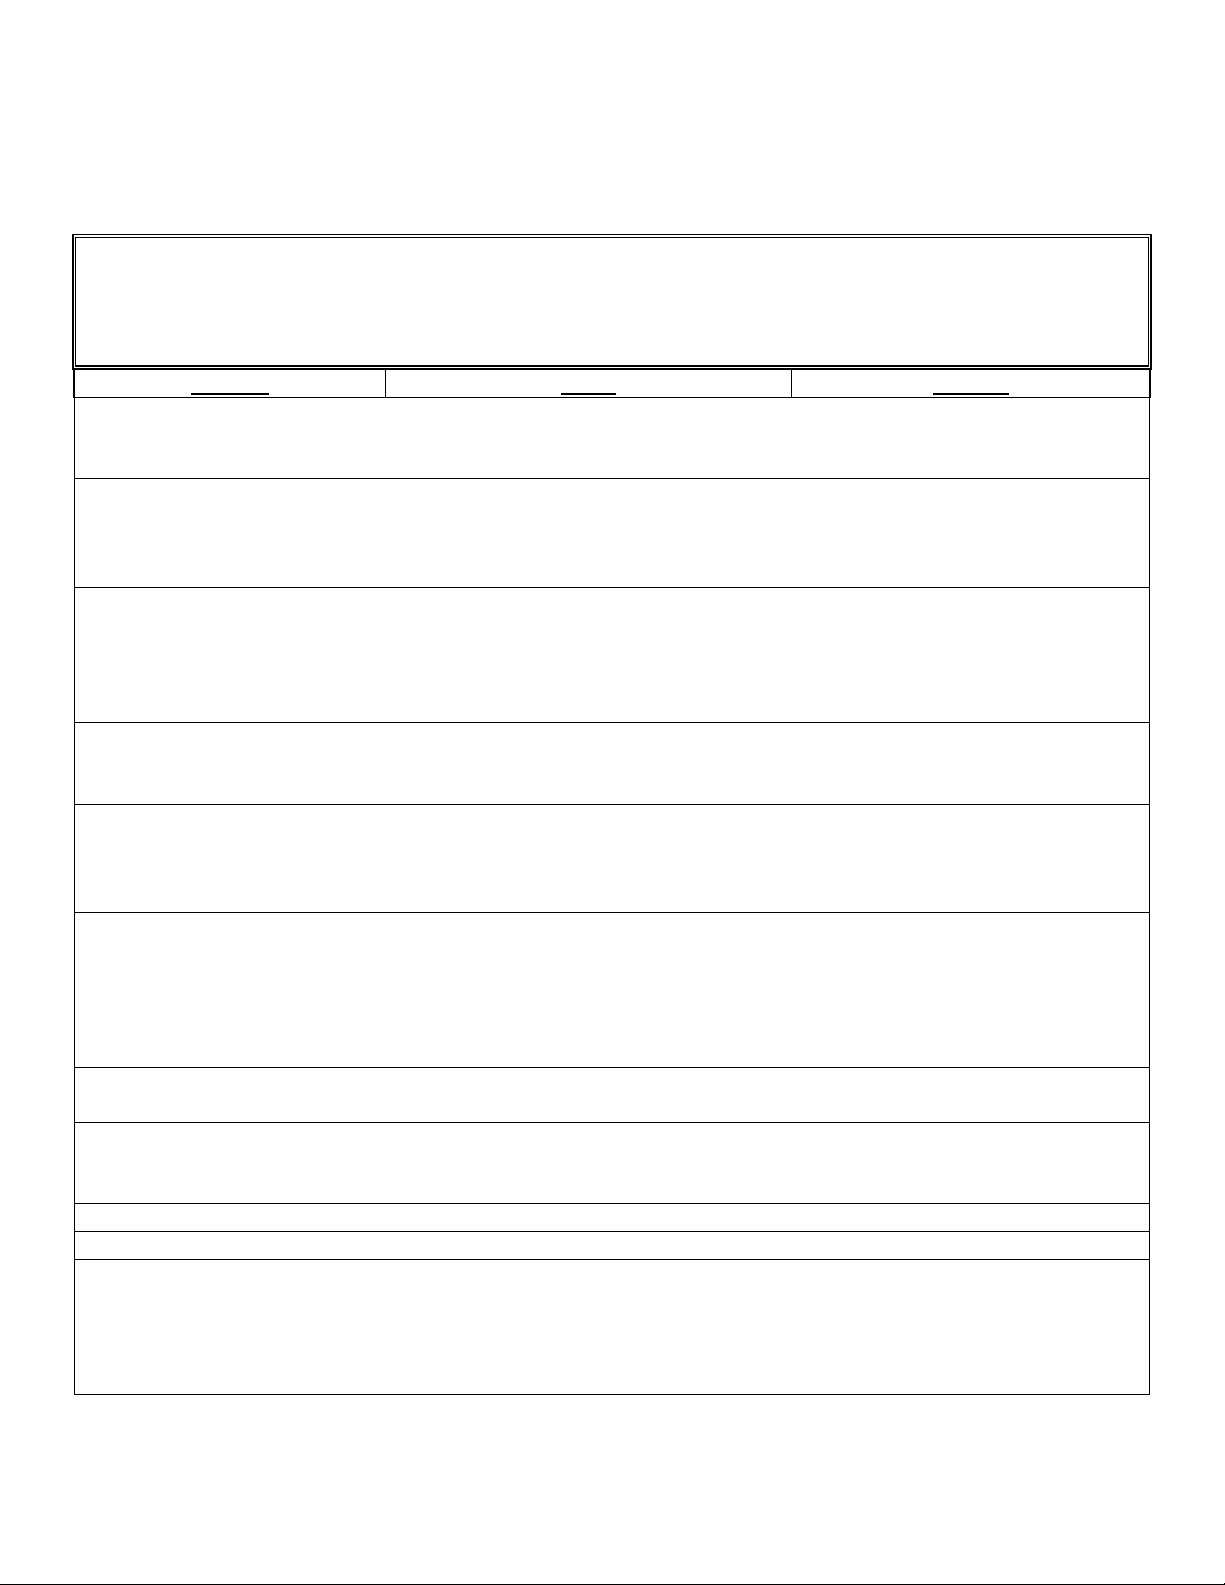
AugerMotor
Beforebeginninganycomponentreplacement,becertaintheunitisunpluggedand
thoroughlycooleddown.Also,makesurethehopperisemptybeforeattemptingto
removeorreplacetheaugermotorassembly.
Removethebackpaneloftheunit,usinga
5
/
16
”wrench.Beforelooseninganyauger
motorbolts,detachthewiringharnessfromtheaugermotor.
Locatetheaugermotorassemblyattherearofthestove,andbeginbylooseningthe
(2)
1
/
8
”allensetscrewsoneithersideofthecastironaugermotorcoupler.
Slidetheaugerassemblyoutofthetube.
Removethe(4)screwswhichholdthecastironaugermotorcouplertotheauger
motor,usinga
5
/
16
”wrench.Slidethecastironaugermotorcouplerandthesteel
spacerplateoffoftheaugermotor.
Loosenthe
1
/
8
”allensetscrewwhichholdsthesteelaugercouplertotheauger
motoroutputshaft,andremovethesteelaugercoupler,aswellastherubber
vibrationdampe ner.
Reinstallthepartsinreverseorderonthenewaugermotor,beingcarefulnotto
over‐tightentheboltswhichhold
thecastironaugercouplertotheaugermotor.

33
IMPORTANT!READANDFOLLOWALLINSTALLATIONANDMAINTENANCEINSTRUCTIONS,INCLUDINGCLEANINGTHEUNITASSPECIFIED,AND
REPLACINGGASKETSANNUALLY,ANDPARTSASNEEDED.
ENGLAND’SSTOVEWORKSISNOTRESPONSIBLEFORANYDAMAGEORINJURYINCURREDDUETONEGLECT,ORDUETOUNSAFEINSTALLATIONOR
USAGEOFTHISPRODUCT.CALLTECHNICALSUPPORTWITHANYQUESTIONS.
REPLACINGCOMPONENTS
ConvectionBlower
Beforebeginninganycomponentreplacement,becertaintheunitisunpluggedand
thoroughlycooleddown.
Removetherearpanel(usinga
5
/
16
”wrench)andlocatetheconvectionblower.
Detachtheconvectionblowerfromthewiringharnessbeforegoinganyfurther.
Loosenandremovethe(4)
5
/
16
”screwswhichholdtheblowerassemblytothestove;
removetheblowerassemblyfromthestove.
Installationofthenewblowerisperformedinreverseofremoval;remembertoreconnect
thenewblowertothewiringharness.(Wheninstallingthenewblower,placetheblower
motoropeningpointingUP,
towardsthetopofthestove.)
34
IMPORTANT!READANDFOLLOWALLINSTALLATIONANDMAINTENANCEINSTRUCTIONS,INCLUDINGCLEANINGTHEUNITASSPECIFIED,AND
REPLACINGGASKETSANNUALLY,ANDPARTSASNEEDED.
ENGLAND’SSTOVEWORKSISNOTRESPONSIBLEFORANYDAMAGEORINJURYINCURREDDUETONEGLECT,ORDUETOUNSAFEINSTALLATIONOR
USAGEOFTHISPRODUCT.CALLTECHNICALSUPPORTWITHANYQUESTIONS.
REPLACINGCOMPONENTS
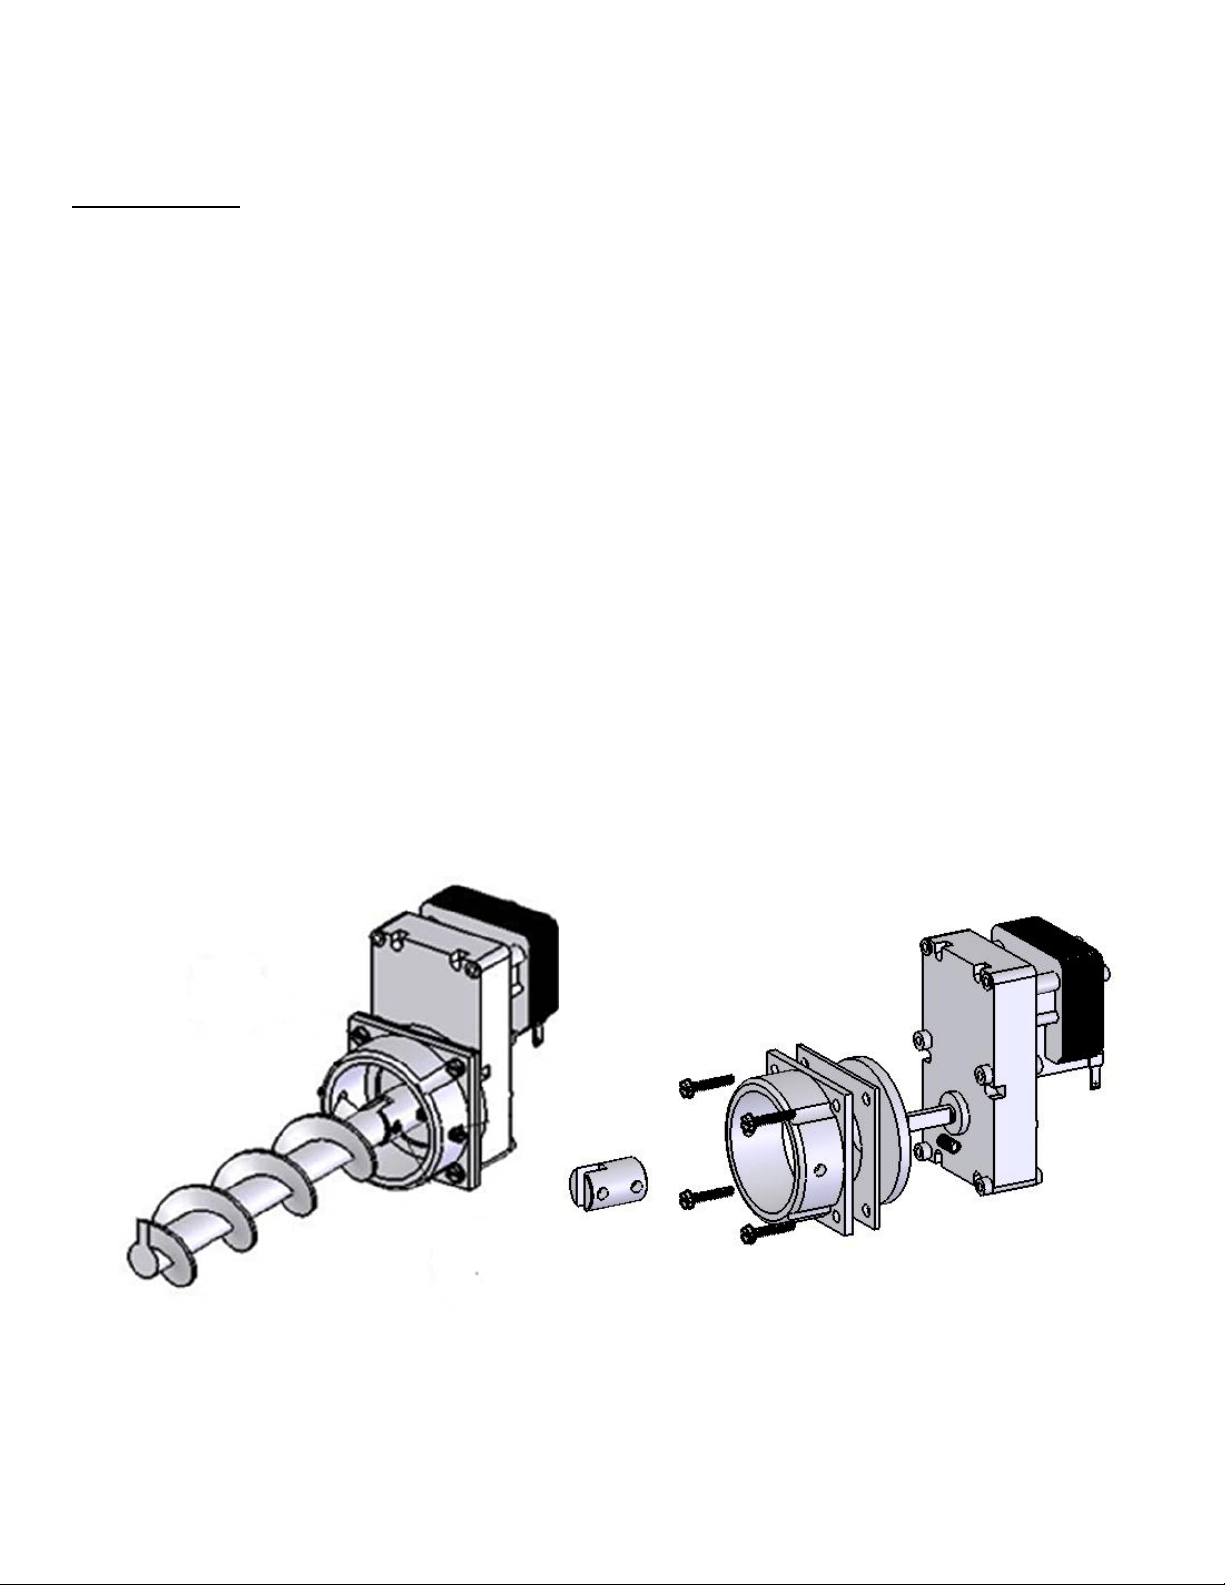
CombustionBlower
Beforebeginninganycomponentreplacement,becertaintheunitisunpluggedand
thoroughlycooleddown.
Removetheleftsidepanelandlocatethecombustionblower.
Disconnecttheventingsystemfromtheexhaustblower,anddisconnecttheexhaust
blowerfromthestovewiringharness.Toremovetheventingpipe,
removaloftherear
panel(usinga
5
/
16
”wrench)maybenecessary.
Removeall(5)screwswhichholdtheexhaustblowertotheexhaustblowertube.Oncethe
screwshavebeenremoved,theblowercanbeliftedupandoutofthestove.
Reinstallationistheexactopposite ofthestepsabove;however,becertainto
checkthe
conditionoftheexhaustblowergasketandre placeifnecessary.
35
IMPORTANT!READANDFOLLOWALLINSTALLATIONANDMAINTENANCEINSTRUCTIONS,INCLUDINGCLEANINGTHEUNITASSPECIFIED,AND
REPLACINGGASKETSANNUALLY,ANDPARTSASNEEDED.
ENGLAND’SSTOVEWORKSISNOTRESPONSIBLEFORANYDAMAGEORINJURYINCURREDDUETONEGLECT,ORDUETOUNSAFEINSTALLATIONOR
USAGEOFTHISPRODUCT.CALLTECHNICALSUPPORTWITHANYQUESTIONS.
REPLACINGCOMPONENTS
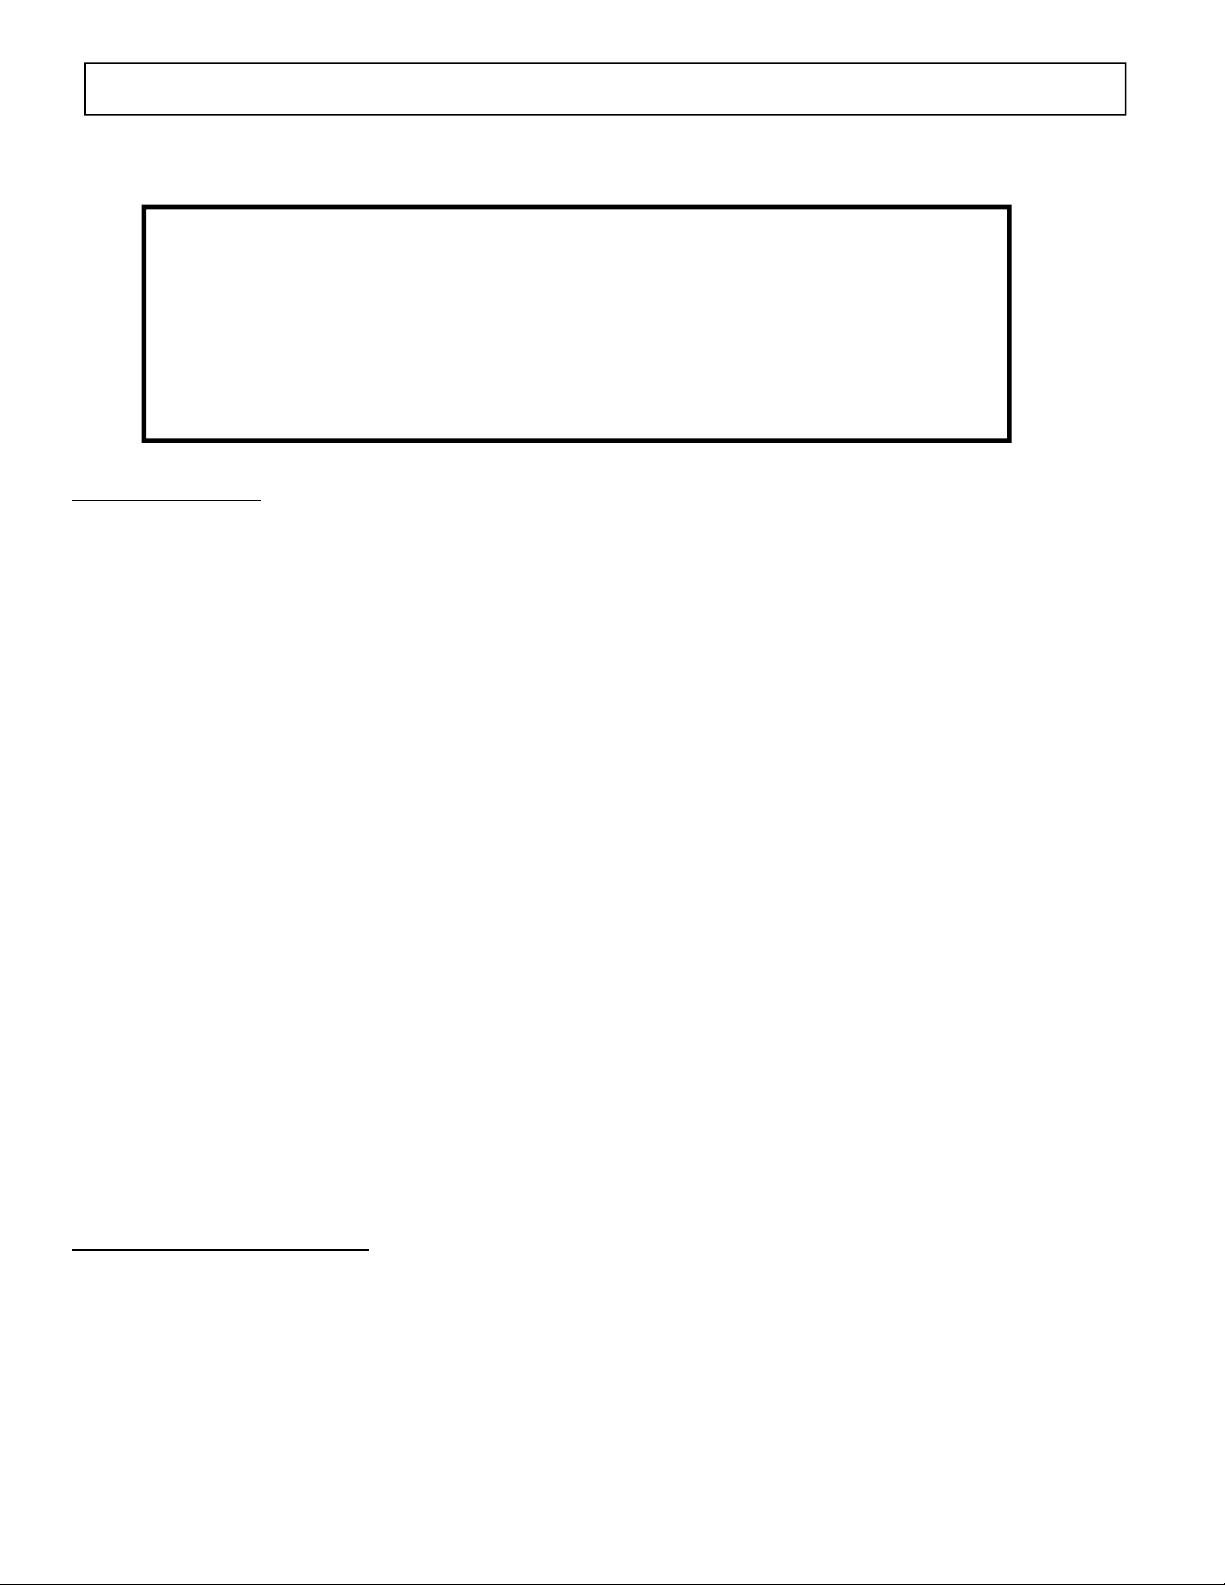
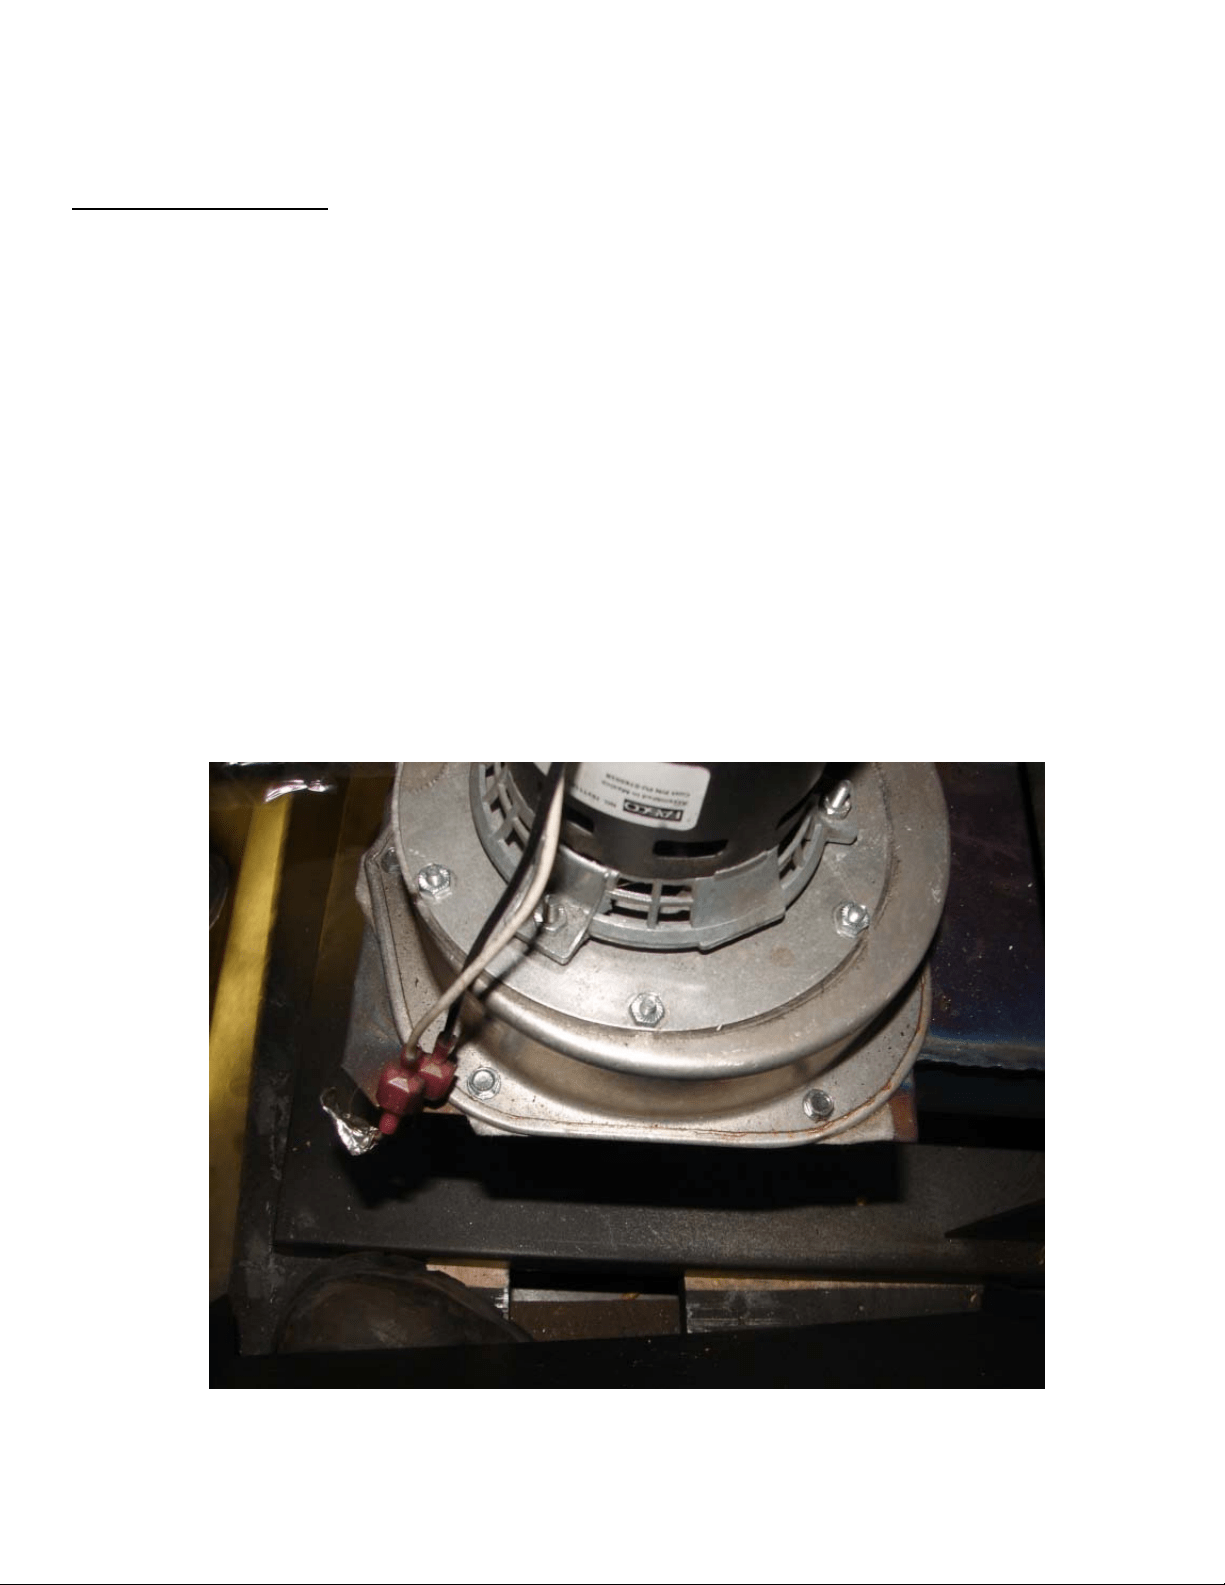
VacuumSwitch
Beforebeginninganycomponentreplacement,becertaintheunitisunpluggedand
thoroughlycooleddown.
Removetherightsidepanel(seep.42forpanelinstructions).
Locatethevacuumswitchasshowninthediagrambelow.
Disconnectthestovewiringharnessandvacuumhosefromthevacuum
switch,takingnote
ofwhereconnectionsweremade.
Removethe(2)screwswhichholdthevacuumswitchtothevacuumswitchbracket,using
aPhillipsscrewdriver.
Installationisthereverseofremoval;beabsolutelycertainthewiresandvacuumhoseare
connectedastheypreviouslywere(and
accordingtothewiringdiagraminthismanual).

36
IMPORTANT!READANDFOLLOWALLINSTALLATIONANDMAINTENANCEINSTRUCTIONS,INCLUDINGCLEANINGTHEUNITASSPECIFIED,AND
REPLACINGGASKETSANNUALLY,ANDPARTSASNEEDED.
ENGLAND’SSTOVEWORKSISNOTRESPONSIBLEFORANYDAMAGEORINJURYINCURREDDUETONEGLECT,ORDUETOUNSAFEINSTALLATIONOR
USAGEOFTHISPRODUCT.CALLTECHNICALSUPPORTWITHANYQUESTIONS.
REPLACINGCOMPONENTS
Igniter
Beforebeginninganycomponentreplacement,becertaintheunitisunpluggedand
thoroughlycooleddown.
Removetherearpaneloftheunit,usinga
5
/
16
”wrench.
Locatetheigniterasshowninthediagrambelow.
Disconnecttheigniterwiringfromthecontrolboardandusea
5
/
16
”wrenchtoremovethe
twoigniterretainingscrewsthatfastentheassemblytothestove.Removetheassembly
fromthestove.
LoosentheAllensetscrew(
1
/
8
”Allenwrench)fromtheignitertubeandremovetheold
ignitercartridge.
Installthenewigniterintheignitertube,retightenthesetscrewandreinstalltheassembly
intothestove(remembertoreconnectthewiring).
Reinstalltherearpanel.
Igniter

37
IMPORTANT!READANDFOLLOWALLINSTALLATIONANDMAINTENANCEINSTRUCTIONS,INCLUDINGCLEANINGTHEUNITASSPECIFIED,AND
REPLACINGGASKETSANNUALLY,ANDPARTSASNEEDED.
ENGLAND’SSTOVEWORKSISNOTRESPONSIBLEFORANYDAMAGEORINJURYINCURREDDUETONEGLECT,ORDUETOUNSAFEINSTALLATIONOR
USAGEOFTHISPRODUCT.CALLTECHNICALSUPPORTWITHANYQUESTIONS.
REPLACINGCOMPONENTS
Gaskets
1. Door
Thisunitcomeswitha¾”ropegasketinthechannelaroundthedooropeningthat
shouldbereplacedatleastonceeveryyear.Toreplacethedoorgasket(Part#AC‐
DGKHD),theoldgasketmustfirstberemovedentirely—priortoaddingthenew
adhesive,youmay
havetoscrapetheoldcementfromthechannel.Oncethe
cementandgaskethavebeenadded,thedoorshouldbeclosedandlatchedfor
twenty‐fourhourstoallowthecementtoharden.Seenextpageformoreinfo.
2. Window
Ifyouarereplacingthewindowgasket(Part#AC‐GGK),thenewgasketwillalready
haveadhesiveononeside.Removethepaperontheadhesivesideandplacethe
gasketaroundtheoutsideedgeoftheglass,centeredovertheedge.Foldthegasket
edgesoveronthe
glass,forminga“U”shape.
3.
CombustionBlower
TheCombustionBlowerGasket(Part#PU‐CBMG)shouldbeinspectedwheneveryou
removeorcleantheCombusti onBlower,andreplacedifnecessary.
4. CombustionBlowerMotor
Thecombustionblowermotorgasket(Part#PU‐CBMG)generallydoesnotneed
replacement,asitisnotnormallyremovedfromtheunit.However,iftheexhaust
bloweriscleanedbyremovingthemotor,ratherthantheentireblowerassembly,
thisgasketmustbeinspectedandreplacedasnecessary.
IMPROPERGASKETMAINTENANCE,INCLUDINGFAILURETOREPLACEGASKETS,
CANCAUSEAIRLEAKSRESULTINGINSMOKE‐BACKS.

38
IMPORTANT!READANDFOLLOWALLINSTALLATIONANDMAINTENANCEINSTRUCTIONS,INCLUDINGCLEANINGTHEUNITASSPECIFIED,AND
REPLACINGGASKETSANNUALLY,ANDPARTSASNEEDED.
ENGLAND’SSTOVEWORKSISNOTRESPONSIBLEFORANYDAMAGEORINJURYINCURREDDUETONEGLECT,ORDUETOUNSAFEINSTALLATIONOR
USAGEOFTHISPRODUCT.CALLTECHNICALSUPPORTWITHANYQUESTIONS.
REPLACINGCOMPONENTS
Glass
Thisunithasoneceramicglasspanel(Part#AC‐G60)inthedoor;selfadhesivewindowgasketis
includedwithreplacementwindowspurchaseddirectlyfromEngland’sStoveWorks.Neverreplaceceramic
glasswithtemperedoranyothertypeofglassandneveroperatethisunitwithcrackedorbrokenglass.
Surfacescratchesareacceptableandnormal,butifthisglassbecomescrackedinanyarea,theunitshould
beshutdownandtheglassreplacedwiththishigh‐temperatureceramicglass.
CeramicGlassSpecifications
GlassSize:13in.(330.20mm)x12.5in.(317.50mm)
GlassType:5mmCeramicGlass(KeralitePyroceram)
GlassManufacturer:Eurokera
GlassPrecautions
Neverreplaceceramicglasswithtemperedoranyothertypeofglass.
Neveroperatethisunitwithcrackedorbrokenglass.
Donotslamthedoororstriketheglasswithanyobjects.
GlassCleaning
1. Becertainthestoveandtheglassarecompletelycool.
2. Thebuild‐upontheglasswillgenerallybelightandwaterisnormallysufficienttoremovethedeposits.
Ifstubbornsootpersists,useacleanermadespecificallyforthispurpose. Donotscrapetheglassor
useabrasivecleaners.
3. Rinsetheglasswithcleanwateranddrytheglassbeforeresumingnormaloperation.
GlassReplacement(includesDoorGasketreplacementinstructions)
1. Removethedoorfromthestoveandrestitface‐downonafirmworksurface.
2. Removethedoorgasketusingapairofplierstopullitoutofthechannel.
3. Usinga
5
/
16
”wrench,removethe(4)screwsthatholdtheglasstabsinplaceonthedoor.
4. Lifttheold glasspaneloutanddiscard(beespeciallycarefuliftheoldglassisbrokenorcracked).
5. Thenewglasspanelmustbewrappedwithaself‐adhesivefiberglasstapegasket(Part#AC‐GGK).Thisgasket
servestocushiontheglassfromthesteeldoorandbrackets.
6. Reinstalltheglasstabsusingthescrewspreviouslyremoved.Donotover‐tightenthescrews.
7. Installthenewdoorgasket(Part#AC‐DGKHD)usingtheprovidedhightemperatureadhesive.
8. Hangthedoorbackonthestoveandclosetightlyandallow24hoursforadhesivetocure.
*Seediagramonpage43fordoorassembly.*
39
IMPORTANT!READANDFOLLOWALLINSTALLATIONANDMAINTENANCEINSTRUCTIONS,INCLUDINGCLEANINGTHEUNITASSPECIFIED,AND
REPLACINGGASKETSANNUALLY,ANDPARTSASNEEDED.
ENGLAND’SSTOVEWORKSISNOTRESPONSIBLEFORANYDAMAGEORINJURYINCURREDDUETONEGLECT,ORDUETOUNSAFEINSTALLATIONOR
USAGEOFTHISPRODUCT.CALLTECHNICALSUPPORTWITHANYQUESTIONS.
REPLACINGCOMPONENTS
ControlBoard
*BEFOREREPLACINGTHECONTROLBOARDBESURETHEUNITISCOOLEDCOMPLETELYAND
UNPLUGGED.*
TheControlBoard(Part#25‐SSCB)isadigitalread‐outboard.Toreplacethecontrolboard,firstunplug
thepowercordfromthewalloutlet.Removethefrontfaceofthecontrolboardbypullingitforward.Once
theboardisapart,useapairofneedlenoseplierstodisconnectthewiringharness,roomsensor,heatsensor,
hopperlidandvacuumswitchconnectors.
Whenconnectingthenewboard,reconnectthecomponentsmentionedaboveandsnapthefrontfaceof
thecontrolpanelbackintoplace.Reconnectpowerwhenreadytousetheunit.
RecommendedHeatRanges(ForManualMode):
LowBurn: HeatRangesetting:1 RoomAirBlowersetting:1
MediumLow: HeatRangesetting:2–3 RoomAirBlowersetting:*
MediumHigh: HeatRangesetting:4–8 RoomAirBlowersetting:*
HighBurn: HeatRangesetting:9 RoomAirBlowersetting:9
*NOTE:BlowerSpeedwillautomaticallybeadjustedtothedesiredHeatRangethatyou
select.
Note:Theoverlayonyourunitmayvaryinappearance.
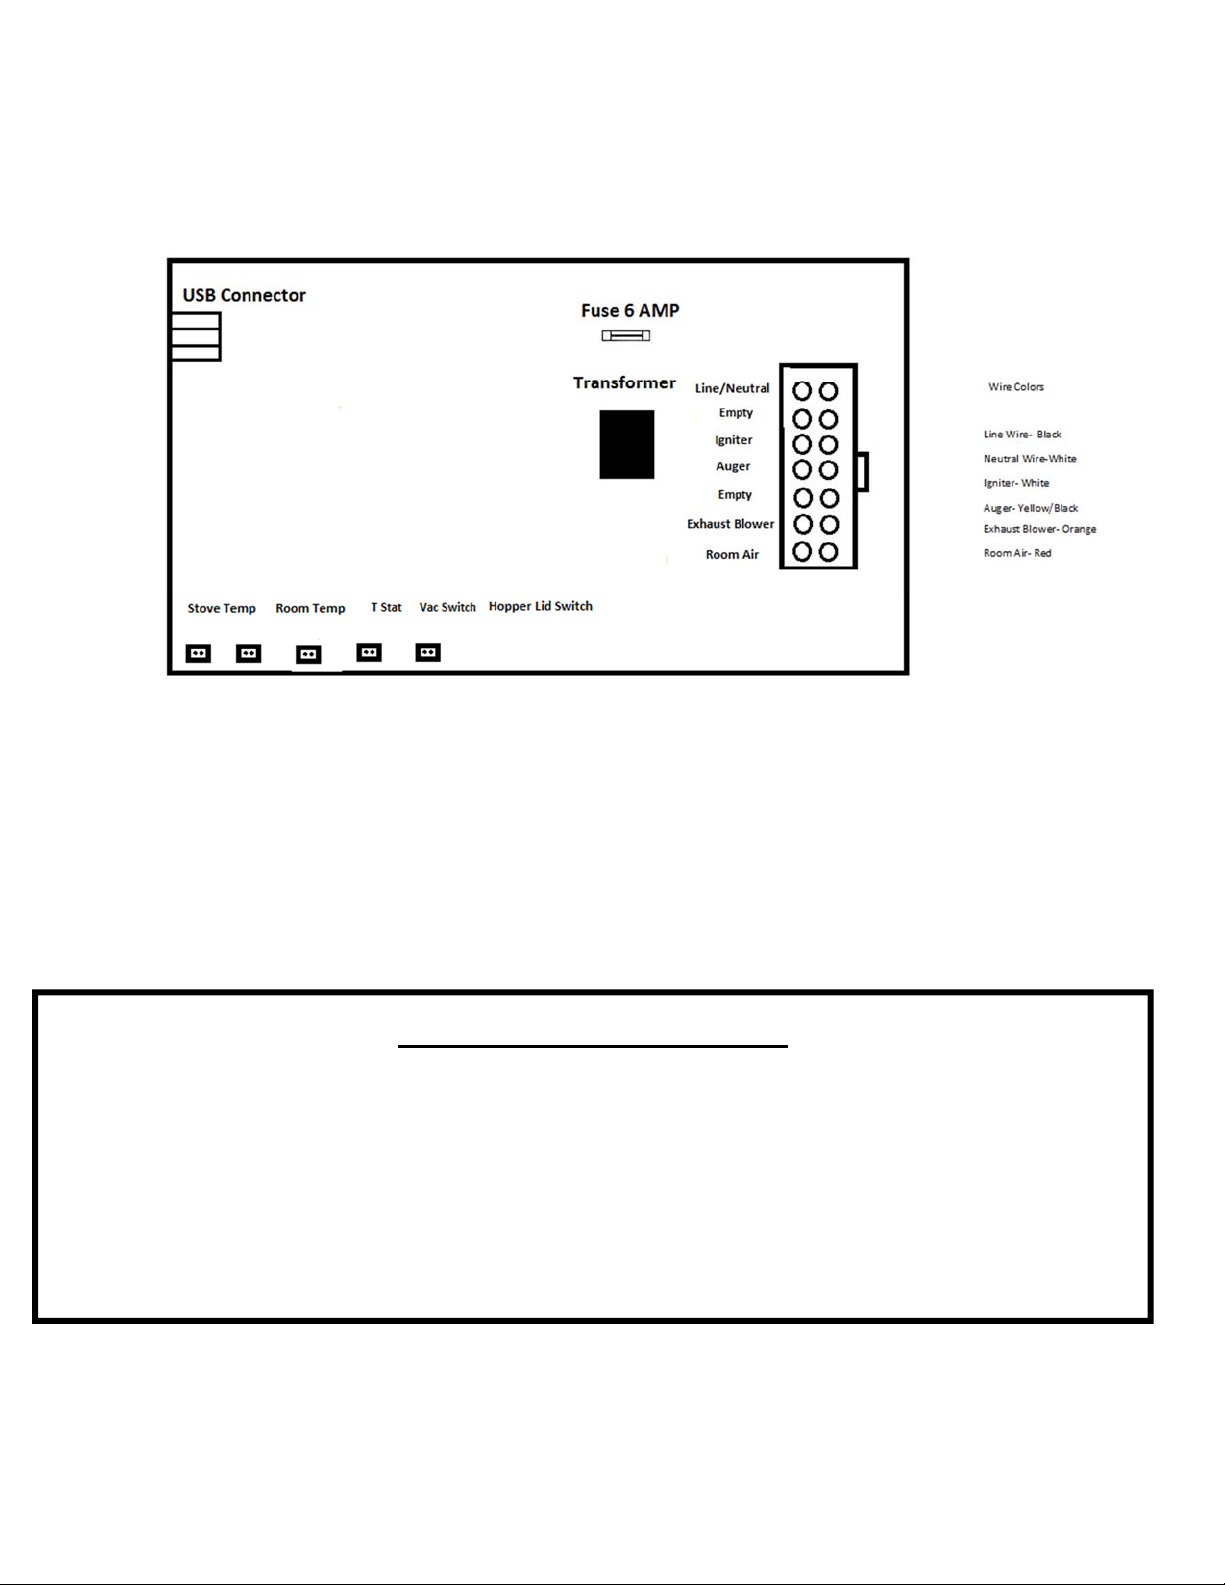
40
IMPORTANT!READANDFOLLOWALLINSTALLATIONANDMAINTENANCEINSTRUCTIONS,INCLUDINGCLEANINGTHEUNITASSPECIFIED,AND
REPLACINGGASKETSANNUALLY,ANDPARTSASNEEDED.
ENGLAND’SSTOVEWORKSISNOTRESPONSIBLEFORANYDAMAGEORINJURYINCURREDDUETONEGLECT,ORDUETOUNSAFEINSTALLATIONOR
USAGEOFTHISPRODUCT.CALLTECHNICALSUPPORTWITHANYQUESTIONS.
WIRINGDIAGRAM
Caution–ShockHazard
Pressthe“Off”buttonandlettheappliancecompletelycoolBEFORE
unpluggingtheapplianceandbeginninganymaintenanceorcomponent
replacement.
Riskofshockifapplianceisnotunpluggedbeforeservice.
VacSwitch/
HopperLidSwitch
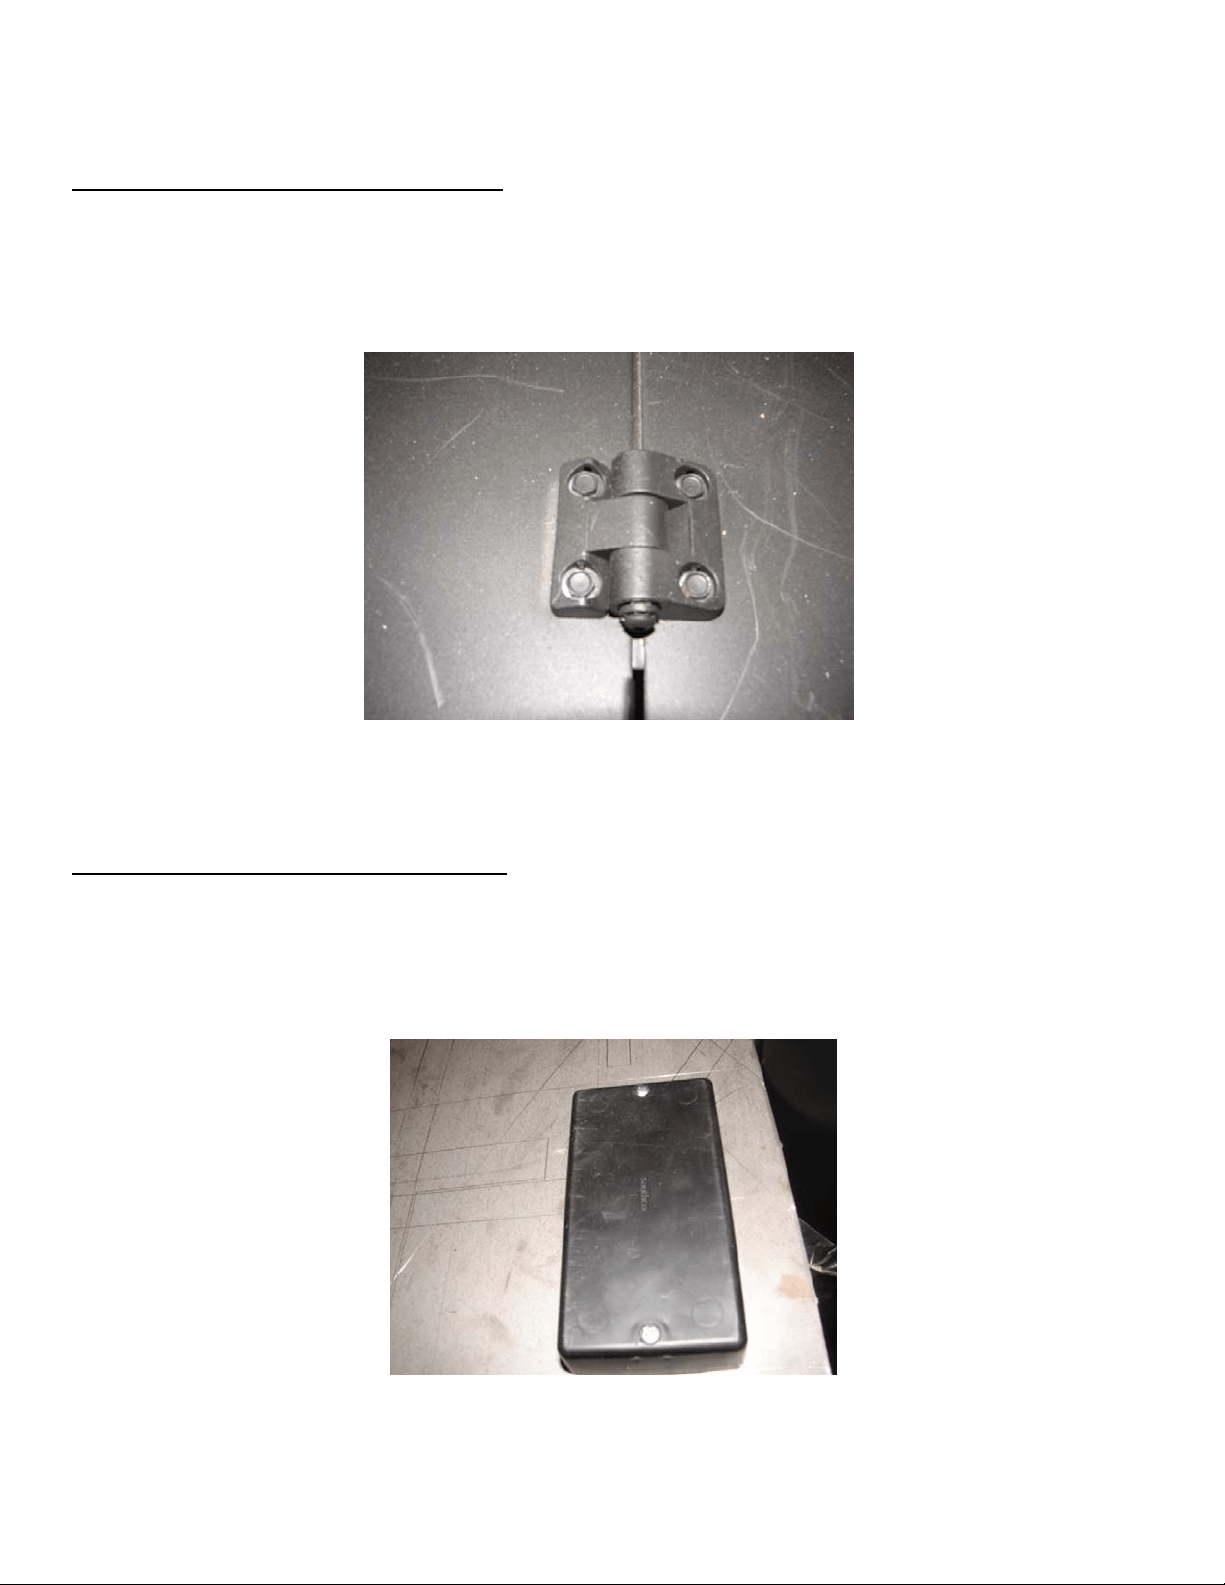
41
IMPORTANT!READANDFOLLOWALLINSTALLATIONANDMAINTENANCEINSTRUCTIONS,INCLUDINGCLEANINGTHEUNITASSPECIFIED,AND
REPLACINGGASKETSANNUALLY,ANDPARTSASNEEDED.
ENGLAND’SSTOVEWORKSISNOTRESPONSIBLEFORANYDAMAGEORINJURYINCURREDDUETONEGLECT,ORDUETOUNSAFEINSTALLATIONOR
USAGEOFTHISPRODUCT.CALLTECHNICALSUPPORTWITHANYQUESTIONS.
HOPPERLIDHINGES
Thehopperlidisattachedtothetopofthestovebytworemovablehinges.
Toremovethehopperlidhinges:
Removethe(4)screwsthatholdeachhingeinplace,usinga
5
/
16
”socket.
Re‐Installhingesinthereversemethod.
HOPPERLIDHANDLE
Thehopperlidhandlesnapsintoplaceintheopeninginthehopperlid.
Toremovethehopperlidhandle:
Liftthehopperlidup(intheopenposition).
Pressuponthebottomofthehandleanditwillpopoutofplace.
Toinstallnewhandle,insertatthetopofthehopperlidandpressdownuntilhandlesnapsintoplace.

42
IMPORTANT!READANDFOLLOWALLINSTALLATIONANDMAINTENANCEINSTRUCTIONS,INCLUDINGCLEANINGTHEUNITASSPECIFIED,AND
REPLACINGGASKETSANNUALLY,ANDPARTSASNEEDED.
ENGLAND’SSTOVEWORKSISNOTRESPONSIBLEFORANYDAMAGEORINJURYINCURREDDUETONEGLECT,ORDUETOUNSAFEINSTALLATIONOR
USAGEOFTHISPRODUCT.CALLTECHNICALSUPPORTWITHANYQUESTIONS.
SIDEPANELS
Thesidepanelsaredesignedtohangontothesidesofthestoveandcaneasilyberemoved
toperformregularcleaning(andanymaintenancethatmayneedtobedoneinthebackofthe
stove).
Toremovesidepanels:
Loosen(DONOTREMOVE)the(2)5/16”screwsthatholdthesidepaneltorearofthe
stove.
Graspthepanelandliftstraightupuntilthetabsareremovedfromthesidetracksand
pullthepaneltowardsyou.
Re‐installthesidepanelsusingthereverse
ofthismethod.
FINISH
ThisnewunithasbeenpaintedwithHigh‐Temperaturepaintthatshouldretainitsoriginal
lookforyears.Iftheunitshouldgetwetandrustspotsappear,thespotscanbesandedwith
finesteelwoolandrepainted.ItiscrucialthatonlyHigh‐TemperatureSprayPaintisused
(Part#
AC‐MBSP),asothersmaynotadheretothesurfaceorwithstandthehightemperatures.
Similarly,somebrandsofpaintwillnotadheretodifferentbrandsofpaint,sowehighly
recommendusingourproprietaryHigh‐TemperatureSprayPaint.

43
IMPORTANT!READANDFOLLOWALLINSTALLATIONANDMAINTENANCEINSTRUCTIONS,INCLUDINGCLEANINGTHEUNITASSPECIFIED,AND
REPLACINGGASKETSANNUALLY,ANDPARTSASNEEDED.
ENGLAND’SSTOVEWORKSISNOTRESPONSIBLEFORANYDAMAGEORINJURYINCURREDDUETONEGLECT,ORDUETOUNSAFEINSTALLATIONOR
USAGEOFTHISPRODUCT.CALLTECHNICALSUPPORTWITHANYQUESTIONS.
ILLUSTRATEDPARTSDIAGRAM

44
IMPORTANT!READANDFOLLOWALLINSTALLATIONANDMAINTENANCEINSTRUCTIONS,INCLUDINGCLEANINGTHEUNITASSPECIFIED,AND
REPLACINGGASKETSANNUALLY,ANDPARTSASNEEDED.
ENGLAND’SSTOVEWORKSISNOTRESPONSIBLEFORANYDAMAGEORINJURYINCURREDDUETONEGLECT,ORDUETOUNSAFEINSTALLATIONOR
USAGEOFTHISPRODUCT.CALLTECHNICALSUPPORTWITHANYQUESTIONS.
REPLACEMENTPARTSLIST
PartNo Description FromDiagram
BM‐1288 RoomAirBlower NotShown
CU‐047042 2.4RPMAugermotorCWRotation 29
PU‐076002B CombustionExhaustBlower(Neg)NotShown
AC‐DGKHD ¾”HDDoorGasket 23
PU‐HLSB HopperLidSafetySwitch7
CU‐VS .05VacuumSwitch 15
25‐SSCB ControlBoard NotShown
25‐SSWH ControlBoardWiringHarness NotShown
AC‐HP HingePin 1
AC‐MBSP StovePaint NotShown
AC‐SH1 3/8”BrassSpringHandle NotShown
AC‐SHN2 3/8”NickelSpringHandle NotShown
CA‐AC AugerCoupler 26
CA‐AMPP AugerMountingPlate 27
PU‐AFS SteelAuger 25
PU‐CHSS IgniterAssembly 16
PU‐HH HopperLidHinge 6
PU‐VH VacuumHose NotShown
AC‐GGK GlassGasket 20
AC‐G60 DoorGlass 21
AC‐SSGT GlassTabsNotshown
AC‐HLH HopperLidHandle 5
AC‐CBRB
RearBaffle(1‐pieceunit)
(Note‐thispartisnotreplaceable)
10
AC‐SSDTG DropTubeGasket 17
CA‐SSD CastIronDoor 24
PU‐SSBP BurnPot 2
PU‐CBMG CombustionBlower/MotorGasket 18
PU‐SSTCW ThermocoupleWire NotShown
PU‐SSACP AugerCoverPlate NotShown
PU‐BMTS ShortBaffleMountingTrack 14
PU‐BMTL LongBaffleMountingTrack 13
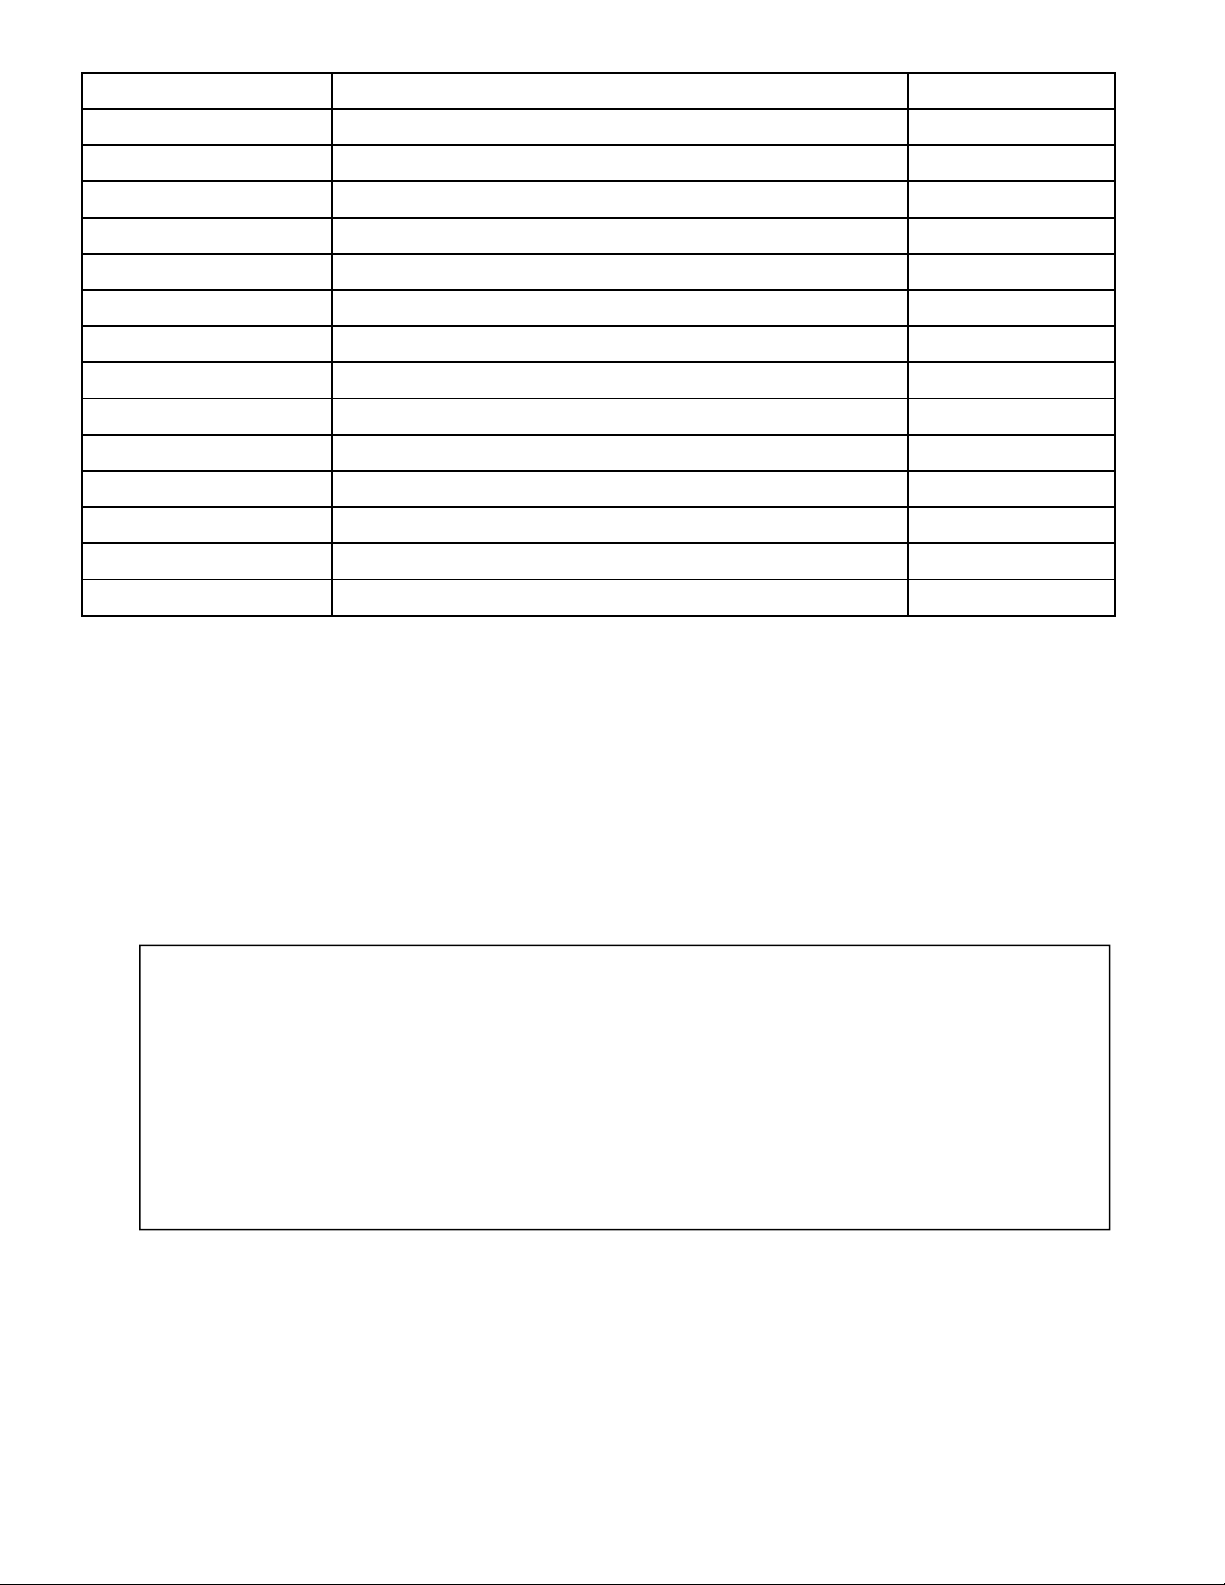
45
IMPORTANT!READANDFOLLOWALLINSTALLATIONANDMAINTENANCEINSTRUCTIONS,INCLUDINGCLEANINGTHEUNITASSPECIFIED,AND
REPLACINGGASKETSANNUALLY,ANDPARTSASNEEDED.
ENGLAND’SSTOVEWORKSISNOTRESPONSIBLEFORANYDAMAGEORINJURYINCURREDDUETONEGLECT,ORDUETOUNSAFEINSTALLATIONOR
USAGEOFTHISPRODUCT.CALLTECHNICALSUPPORTWITHANYQUESTIONS.
AC‐CBTB TopBaffle(insidefirebox) NotShown
PU‐SSDVD DVDNotShown
MU‐SSP01 ManualNotshown
PU‐CBEXCP ExhaustCoverPlate(Qty.2) 4
PU‐RABMP RoomAirBlowerMountingPlate NotShown
CU‐RG RubberVibrationDampener 28
PU‐RSP RightSidePanel 9
PU‐LSP LeftSidePanel 8
PU‐SSHL HopperLid 19
PU‐MBS MiddleBaffleSpacer 3
PU‐SSRP RearPanel NotShown
AC‐CT CleaningTool Notshown
AC‐CMB ControlBoardMountingBox NotShown
AC‐CHSEP CartridgeHeaterSleeve NotShown
PU‐CBAWB AirWashBar NotShown
Youmaywriteyourunit’sManufactureDateandSerialNumber
intheblankspacesonthissampletag(nextpage),forfuture
reference.
ThissampletagalsoshowsthesafetyinfosuchasUL/ULC
testingstandard,etc.foryourlocalofficials,oranyoneelsewho
mayneeditforreferenceinformation.
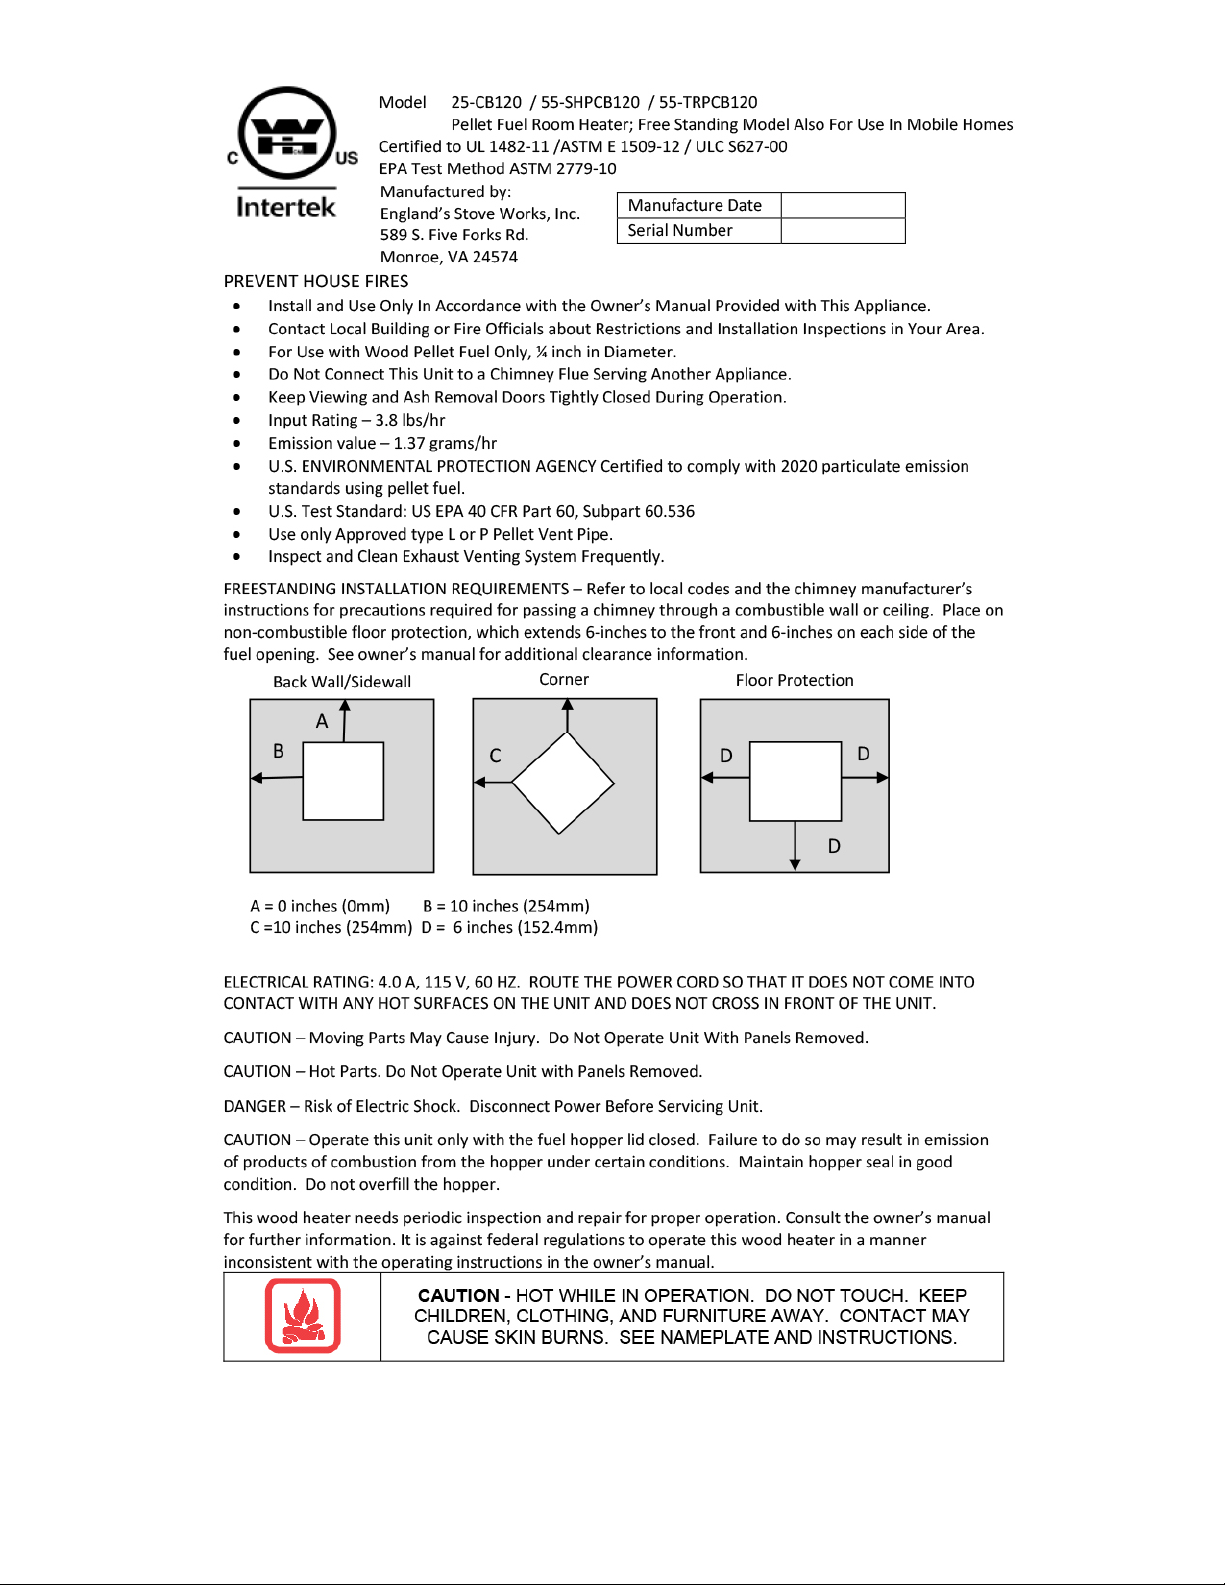
46
IMPORTANT!READANDFOLLOWALLINSTALLATIONANDMAINTENANCEINSTRUCTIONS,INCLUDINGCLEANINGTHEUNITASSPECIFIED,AND
REPLACINGGASKETSANNUALLY,ANDPARTSASNEEDED.
ENGLAND’SSTOVEWORKSISNOTRESPONSIBLEFORANYDAMAGEORINJURYINCURREDDUETONEGLECT,ORDUETOUNSAFEINSTALLATIONOR
USAGEOFTHISPRODUCT.CALLTECHNICALSUPPORTWITHANYQUESTIONS.

47
IMPORTANT!READANDFOLLOWALLINSTALLATIONANDMAINTENANCEINSTRUCTIONS,INCLUDINGCLEANINGTHEUNITASSPECIFIED,AND
REPLACINGGASKETSANNUALLY,ANDPARTSASNEEDED.
ENGLAND’SSTOVEWORKSISNOTRESPONSIBLEFORANYDAMAGEORINJURYINCURREDDUETONEGLECT,ORDUETOUNSAFEINSTALLATIONOR
USAGEOFTHISPRODUCT.CALLTECHNICALSUPPORTWITHANYQUESTIONS.
LIMITEDFIVE(5)YEARWARRANTY
Fromthedateofpurchasetotheoriginalowner.
ModelNumbers25‐CB120/55‐SHPCB120/55‐TRPCB120
Themanufacturerextendsthefollowingwarranties:
FiveYearPeriod:
1. Carbonsteelandweldedseamsinthefireboxarecoveredforfive(5)yearsagainst
splitting.
2. Thesteeldoorandhingesarecoveredforfive(5)yearsagainstcracking.
OneYearPeriod:
1. Componentpartssuchasthehopper,auger,burn‐pot,augershaftandfastenersare
coveredforone(1)yearagainstcracking,breakageandweldedseamseparation.
2. Electricalcomponents,accessoryitems,glassandthepaintedsurfaceofthestoveare
coveredforone(1)yearfromthedateofpurchase.
ConditionsandExclusions
1. Damageresultingfromover‐firingwillvoidyourwarrant y.
2. Thiswarrantydoesnotapplyifdamageoccursbecauseofanaccident,improper
handling,improperinstallation,improper operation,abuseorunauthorizedrepairmade
orattemptedtobemade.
3. Themanufacturerisnotliableforindirect,incidental,orconsequentialdamages
in
connectionwiththeproductincludinganycostorexpense,providingsubstitute
equipmentorserviceduringperiodsofmalfunctionornon‐use.*
4. Allliabilityforanyco nsequentialdamageforbreachofanywrittenorimpliedwarranty
isdisclaimedandexcluded.
5. ThisunitisEPAcertifiedusinghighquality,
PremiumGradepelletfuel.Warrantyisvoid
iftheunitisusedtoburnmaterialsforwhichtheunitisnotcertifiedbytheEPA.
Warrantyisvoidifunitisnotusedaccording totheowner’smanual.

48
IMPORTANT!READANDFOLLOWALLINSTALLATIONANDMAINTENANCEINSTRUCTIONS,INCLUDINGCLEANINGTHEUNITASSPECIFIED,AND
REPLACINGGASKETSANNUALLY,ANDPARTSASNEEDED.
ENGLAND’SSTOVEWORKSISNOTRESPONSIBLEFORANYDAMAGEORINJURYINCURREDDUETONEGLECT,ORDUETOUNSAFEINSTALLATIONOR
USAGEOFTHISPRODUCT.CALLTECHNICALSUPPORTWITHANYQUESTIONS.
Procedure
Purchasermustgivenoticeofclaimofdefectwithinthewarrantyperiodandpay
transportationtoandfromaservicecenterdesignatedbythemanufacturer.Thedealerfrom
whichtheunitwaspurchasedorthefactory,atouroption,willperformthewarrantyservice.
OtherRights
Thiswarrantygivesyouspecificlegalrights;youmayalsohaveotherrights,whichmay
varyfromstatetostate.
England’sStoveWorks,Inc.
P.O.Box206
Monroe,VA24574
(800)245‐6489
TosubmitaWarrantyClaim,call(800)245‐6489tospeakwithourTechnicalSupport
department.
YoumayalsofileaWarrantyClaimat
www.heatredefined.com/support/warranty‐claim‐request/
*Somestatesdonotallowtheexclusionoflimitationsofincidentalor
consequentialdamages,sotheabovemaynotapplytoyou
Forparts,warrantyreplacementproceduresmaybefoundatourpartsstoresite:
store.heatredefined.com

49
IMPORTANT!READANDFOLLOWALLINSTALLATIONANDMAINTENANCEINSTRUCTIONS,INCLUDINGCLEANINGTHEUNITASSPECIFIED,AND
REPLACINGGASKETSANNUALLY,ANDPARTSASNEEDED.
ENGLAND’SSTOVEWORKSISNOTRESPONSIBLEFORANYDAMAGEORINJURYINCURREDDUETONEGLECT,ORDUETOUNSAFEINSTALLATIONOR
USAGEOFTHISPRODUCT.CALLTECHNICALSUPPORTWITHANYQUESTIONS.
ImportantNotice
ThisregistrationinformationMUSTbeonfileforthiswarrantytobevalid.Pleasesendthis
informationwithinthirty(30) daysfromtheoriginaldateofpurchase.
Useanyofthesethreeeasywaystosendyourwarrantyinformationin!
MailingAddress
England’sStoveWorks,Inc.
TechnicalsupportDepartment
P.O.Box206
Monroe,Virginia24574
FaxNumber
(434)929‐4810–Twenty‐fourhoursaday
OnlineRegistration
Visitourwarrantyregistrationwebsiteat:
http://www.heatredefined.com/support/warranty‐registrations/
PleaseNote:ThiswarrantyisnullandvoidiftheattachedwarrantyregistrationANDa
copyofthesalesreceiptisnotreturnedwithinthirty(30)daysfromthedateof
purchase.
Warrantyisnottransferable.

50
IMPORTANT!READANDFOLLOWALLINSTALLATIONANDMAINTENANCEINSTRUCTIONS,INCLUDINGCLEANINGTHEUNITASSPECIFIED,AND
REPLACINGGASKETSANNUALLY,ANDPARTSASNEEDED.
ENGLAND’SSTOVEWORKSISNOTRESPONSIBLEFORANYDAMAGEORINJURYINCURREDDUETONEGLECT,ORDUETOUNSAFEINSTALLATIONOR
USAGEOFTHISPRODUCT.CALLTECHNICALSUPPORTWITHANYQUESTIONS.

51
IMPORTANT!READANDFOLLOWALLINSTALLATIONANDMAINTENANCEINSTRUCTIONS,INCLUDINGCLEANINGTHEUNITASSPECIFIED,AND
REPLACINGGASKETSANNUALLY,ANDPARTSASNEEDED.
ENGLAND’SSTOVEWORKSISNOTRESPONSIBLEFORANYDAMAGEORINJURYINCURREDDUETONEGLECT,ORDUETOUNSAFEINSTALLATIONOR
USAGEOFTHISPRODUCT.CALLTECHNICALSUPPORTWITHANYQUESTIONS.
WARRANTYREGISTRATIONforEngland’sStoveWorks®
PurchaserInformation*
I.PurchasedBy(Name) _________________________________________
II.Address ____________________________________________________
III.City _______________________State________ZipCode ____________
IV.TelephoneNumber ___________________________________________
V.EmailAddress _______________________________________________
DealerInformation*
VI.PurchasedFrom _____________________________________________
VII.Address ___________________________________________________
VIII.City_______________________State________ZipCode __________
UnitInformation*
IX.ModelNumber_____________________PurchaseDate _____________
X.PurchasePrice _____________________
XI.SerialNumber_____________________Mfg.Date _________________
PurchaseQuestions
Howdidyoufirsthearaboutourproduct?(Pleasecheckone)
WordofMouth____ BurnTrailerDemonstration____ Internet____
Other: ________________________________________________________
Wheredidyoureceiveinformationaboutourproduct?
ViaTelephone____ Dealer(Nameofdealer)___________ Internet____
Other: ________________________________________________________
*RequiredInformation