INSTRUCTION AND RECIPE BOOKLET SmartPower 7-Speed Electronic Blender
FEATURES AND BENEFITS

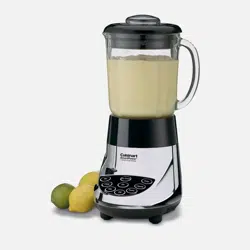
- 1. Cover Just press on. Tight fitting seal resists leakage
- 2-oz. Measured Pour Lid Allows you to measure and add ingredients without removing the cover.
- 40-oz. Glass Jar with Dripless Pour Spout Has a unique, sturdy, widemouth design and a dripless pour spout for no mess pouring.
- Leak-proof Rubber Gasket (not shown) Holds the glass jar snugly in position for safe operation.
- High-quality Cutting Assembly Is strong enough for all blender tasks, including tough jobs, from ice crushing to chopping delicate herbs.
- Locking Ring Is self-aligning so that the glass blender jar slides easily into position.
- Heavy-duty Motor Base Is so sturdy and stable, it will not “walk” on your counter – even during ice crushing!
- 7-Speed Touchpad Control with Indicator Lights Is easy to use, read and clean. The red LED lights clearly indicate what blender speed you are using.
- 8a. Pulse at Any Speed Button Allows you to pulse at any speed from high to low, so you can blend ingredients only as much as needed.
- 8b. Ice Crush Button This button is preset to the best speed for crushed ice.
- Slip-proof Feet Prevent movement during use and prevent damaging marks on countertops or tables.
- Cord Storage (not shown) Keeps countertop safe and neat by conveniently storing excess cord.
ASSEMBLY

To use your Cuisinart® SmartPower® 7-Speed Electronic Blender, begin by assembling the blender jar.
- Turn the blender jar (a) upside down, and place it flat on a sturdy surface.
- Position the rubber gasket (b) on the round opening on the bottom of the blender jar.
- Turn the cutting assembly (c) upside down, and place the blade end in the blender jar opening. Note: Blades are sharp. handle carefully.
- Secure the rubber gasket and cutting assembly into position by placing the smaller opening of the locking ring (d) on top of the cutting assembly. Engage threads by twisting the locking ring clockwise until tightened. Make sure locking ring is tightly fastened to blender jar. Once assembled, turn the blender jar right-side up.
- Push the cover onto the top of the blender jar. Insert the measured pour lid into the cover.
- Place the blender jar on the motor base so that the jar markings are facing you and the handle is positioned to one side.
- Plug in power cord. Your blender is now ready to be used.
HELPFUL REMINDERS
- Once the cover is in position. additional ingredients can be added during blending by simply lifting the measured pour lid. adding ingredients. and replacing the measured pour lid.
- Cover should always be in place while the unit is on.
- Warning: Do not place blender jar onto base while motor is running.
Do not twist locking ring from blender jar when removing blender jar from base. Simply lift blender jar from motor base. - Boiling liquid or solid frozen foods (with the exception of ice cubes or ½-inch [1.3 cm] pieces of frozen fruit) should never be placed in the blender jar.
Do not place ice, frozen foods or very cold liquids in a blender jar which has come directly from a hot dishwasher.- Do not place very hot liquids or foods in a blender jar which has come directly from the freezer. Boiling liquids should cool for 5 minutes before being placed in blender jar.
- Follow Cleaning and Maintenance instructions on page 6. prior to your firct use.
OPERATION
1. Place the motor base of your Cuisinart® SmartPower® 7-Speed Electronic Blender onto a flat, sturdy surface. It is important that the surface be clean and dry. Assemble the blender by following the assembly instructions. Once the jar is assembled and is in position on the motor base, plug the Cuisinart® SmartPower® Electronic Blender into an electrical outlet.
2. Add all necessary ingredients to the blender jar, and replace the cover. You may add more ingredients by lifting the measured pour lid and dropping ingredients through the fill area. Replace the measured pour lid after adding ingredients. Do not place hands into blender jar with blender plugged in. Note: Add liquid ingredients first, then follow with solid ingredients. This will provide more consistent blending and prevent unnecessary stress on the motor. Note: To remove blender jar cover, lift edge of cover upwards. Lifting measured pour lid will not remove cover.
3. To start blending: Press the On button. The red On LED light will flash, indicating that the blender is turned on but no speed has been selected.
4. Press the desired blending speed: Both the On indicator light and the activated speed indicator light will glow. The blender will now be functioning at the desired speed. It is possible to switch speeds without pressing the Off button, by simply pushing the next desired speed button.
5. To stop the blending process: Re-press the activated speed button. The blending process will stop. The red On indicator light will continue to flash to let you know that the blender is still on and can be reactivated by pushing the desired speed button. The blender can be completely deactivated and stopped at any speed by pushing the Off button. You will need to press the On button again to continue blending.
6. To reset the unit: This appliance features an advanced resettable thermal fuse. In the event of an overload condition, the unit will shut down to protect the motor from overheating. To reset the appliance when this happens, unplug the unit and let it cool for a minimum of 15 minutes. Then, reduce the contents of the blender jar or work bowl and/or clear any jams. Restart the unit as noted in the operating directions.
7. Pulse mode: While the blender is turned on, you can create a burst of power for quick, efficient blending, by activating the pulse function. To do so, first push the Pulse button, which will cause the pulse indicator light to flash. Next, push and release the desired speed button. Repeat as desired. You determine the duration of each pulse. While pulsing, all indicator lights (the on, the pulse, and the desired speed) will glow. The pulse function can be used to break apart larger pieces of food or to control the texture of food when chopping. The pulse function is also effective in starting the blending process when you do not want continuous power, or when processing items which do not require an extended amount of blending.

8. To crush ice: The SmartPower® 7-Speed Electronic Blender motor is strong enough to crush ice without liquid at any speed; however, for your convenience, we have preset the best speed for ice crushing. To give you greater control, the ice crush function automatically operates as a pulse function. To crush ice, place ice cubes in the blender jar, and place the cover and the measured pour lid on the blender jar. Press the On button. Press the Ice Crush button in short pulses until ice is crushed to desired consistency. See the Recipe Tips section on page 8 for more details.
9. To dislodge food: Use a rubber or plastic spatula to help remove food lodged around the cutting assembly. Do not use spatula until you have turned the blender off. Replace the cover and measured pour lid and continue blending, if necessary. Make sure spatula is not inside the blender jar before blending.
10. When finished blending: Press the Off button and unplug the blender from the electrical outlet. Never remove the blender jar from the motor base until the blender is off. Do not twist locking ring from blender jar when removing jar from motor base. Simply lift blender jar from motor base. Do not place hands into blender jar with blender plugged in.
CLEANING AND MAINTENANCE
Always unplug your Cuisinart® SmartPower® 7-Speed Electronic Blender from the electrical outlet before cleaning. The blender is made of corrosion-resistant parts which are easy to clean. Before first use and after every use, clean each part thoroughly. Periodically check all parts before reassembly. If any part is damaged or blender jar is chipped or cracked, DO NOT USE BLENDER.
Remove the blender jar from the motor base by lifting straight up and away. Twist off the locking ring by turning counterclockwise. Remove the cutting assembly and rubber gasket. Wash in warm soapy water, rinse, and dry thoroughly. Place the locking ring in the upper rack of the dishwasher or wash in warm water.
CAUTION: Handle the cutting assembly carefully. It is SHARP and may cause injury. Do not attempt to remove blades from cutting assembly. Remove the blender jar cover and the measured pour lid. Wash in warm, soapy water; rinse and dry thoroughly, or place in upper rack of dishwasher. The blender jar must be washed in warm soapy water and rinsed and dried thoroughly. The blender jar can also be placed upside down in dishwasher.
Finally, wipe the motor base clean with a damp cloth to remove any residue, and dry thoroughly. Never submerge the motor base in water or other liquid, or place in a dishwasher.
Any other servicing should be performed by an authorized service representative.
Tip: You may wish to clean your blender cutting assembly as follows: Squirt a small amount of dishwashing liquid into assembled blender jar and fill halfway with warm water. Run on STIR for 15 seconds. Repeat, using clean tap water. Empty blender jar and carefully disassemble parts. Wash cutting assembly, gasket and locking ring in warm, soapy water. Rinse and dry all parts thoroughly.
DOs and DON’Ts WHEN USING YOUR BLENDER
Do:
- Make sure the electrical outlet is rated at the same voltage as that stated on the bottom of the blender motor base.
- Always use the blender on a clean. sturdy and dry surface.
- Always add liquid ingredients to the blender jar first. then add remaining ingredients. This will ensure that ingredients are uniformly mixed.
- Cut most foods into cubes approximately ½ inch (1.3 cm) to 1 inch (2.5 cm) to achieve a more uniform result. Cut all cheeses into pieces no larger than ½ inch (1.3 cm).
- Use the measured pour lid to measure liquid ingredients such as alcohol. Replace measured pour lid after ingredients have been added.
- Use a rubber or plastic spatula as needed, only when the blender is turned off. Never use metal utensils. as damage may occur to the blender jar or cutting assembly.
- Place cover on firmly. Always operate the blender with the cover on.
- Make sure locking ring is tightly attached to blender jar.
- Always remove locking ring, cutting assembly. and rubber gasket before cleaning.
- When scraping the blender jar with a spatula. remove the food from the sides of the blender jar and place food in the center of the blender jar. over the cutting assembly.
- When chopping fresh herbs, garlic, onion, zest, bread crumbs, nuts, spices, etc, make sure the blender jar and cutting assembly are com pletely dry.
- If food tends to stick to the sides of the blender jar when blending. pulse in short bursts.
- Pulses should be short bursts. Space the pulses so the blades stop rotating between pulses.
Don’t:
- Don't store food or liquids in your blender jar.
- Don't place cutting assembly and locking ring onto motor base without the blender jar attached.
- Blender will not mash potatoes, knead heavy dough, or beat egg whites.
- Don't remove blender jar while unit is on. Keep the blender jar cover on the blender jar while blending.
- Don't twist locking ring from blender jar when removing blender jar from motor base. Simply lift blender jar from motor base.
- Don't overprocess foods. Blender will achieve most desired results in seconds, not minutes.
- Don't overload blender. If the motor stalls, turn the blender off immedi lately, unplug the unit. and remove a portion of the food, then continue.
- Don't use any utensil inside the blender jar while the motor is on.
- Don't use any container or accessories not recommended by Cuisinart.
Doing so may result in injury. - Don't place hands inside the blender jar when blender is plugged
- Don't add boiling liquids or frozen foods (except ice cubes or ½ inch pieces of frozen fruit) to glass blender jar. Boiling liquids should cool for 5 minutes before being placed in blender jar.