OWNER’S MANUAL
Safety Information
Get to Know Your Grill
Assembly & Operation
App User Guide
Cleaning & Maintenance
Recipe Book
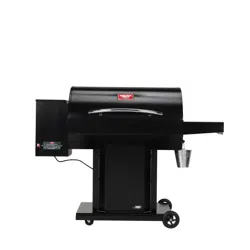
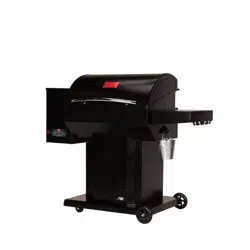
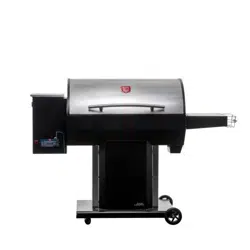
DAVY CROCKETT
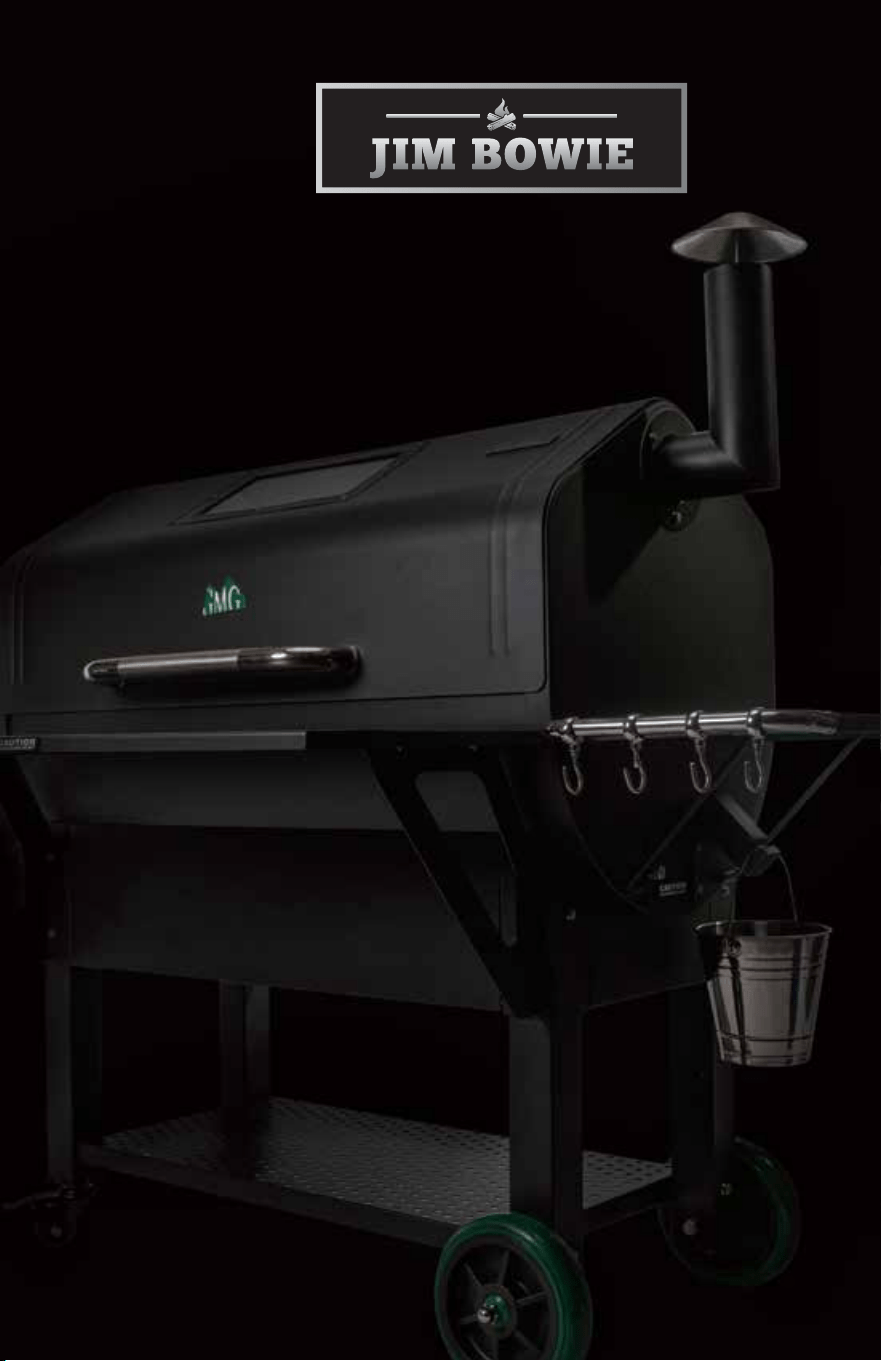
JIM BOWIE
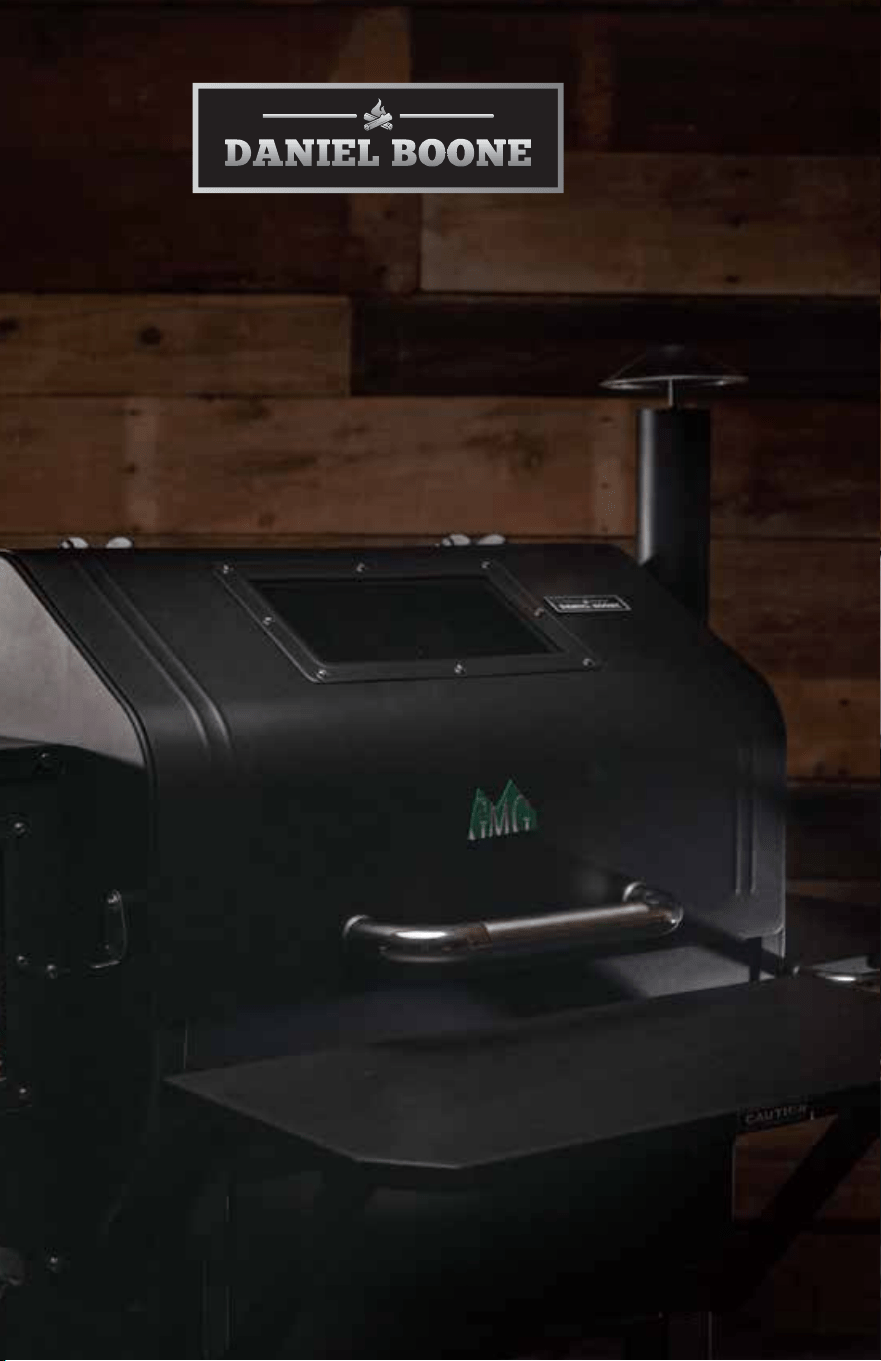
DANIEL BOONE
Thank you for purchasing a Green Mountain Pellet Grill! We
hope that it will provide you with many years of trouble-free
service and allow you to cook extraordinary food that will
enhance your enjoyment of eating.
Your new grill can grill, smoke, slow-cook, barbecue, braise,
roast, bake, and sear at the touch of a button. This manual
will help you get the most out of your pellet grill, so please
read it thoroughly.
Should an unforeseen problem occur, please check the
Troubleshooting section, or visit our website
greenmountaingrills.com/support. After exhausting those
possibilities, please feel free to call us at 530-347-9167 and
select “Technical Support.”
If you have questions about cooking, please see General
Operating Tips and Wood Fired 101 sections in this manual,
or visit our website:
Remember that your new pellet grill is extremely versatile.
While you can grill steaks, hamburgers and all the other
traditional “barbecue” fare, you can also prepare a pot roast,
smoke fish, bake cookies or bread, slow-cook a brisket or
pork butt, roast vegetables, and much more. About the only
limit is your imagination... so get creative!
Welcome to the
Nation
FOLLOW THE GMG NATION
greenmountaingrills.com
Warranty
Safety Info
How a Pellet Grill Works
Premium Pellets
GMG Rubs & Sauces
Accessories
Jim Bowie & Daniel Boone
Get to Know Your Grill
Digital Controller
Key Grill Components
Assembly
Prefire Check
Operation
Davy Crockett
Get to Know Your Grill
Digital Controller
Key Grill Components
Assembly
Prefire Check
Operation
General Operating Tips
Wood Fired 101
Cleaning & Maintenance
Troubleshooting
WiFi App Guide
Recipes
5
7
13
15
17
19
21
23
25
27
31
37
39
45
47
48
49
52
55
57
63
67
71
73
81
119
CONTENTS
Experience the new age of grilling.

This LIMITED WARRANTY covers defects in workmanship and
materials for a period of three (3) years from the date of first
retail purchase. During the warranty period, GMG Products,
LLC (dba Green Mountain Grills) will replace or repair, at its
sole option, any defective Green Mountain grill returned to us,
or to one of our dealers, by its original purchaser. Any claims
under this warranty must be received by the expiration of the
warranty period.
This warranty does not cover problems that result from abuse,
accident, misuse, or problems with electrical power. It does
not over cosmetic elements and components, such as paint
and other finishes. It does not cover uses not in accordance
with the instruction manual. It does not cover commercial use
of the product. It specifically excludes products for which
Green Mountain Grills has not received payment.
THIS WARRANTY GIVES YOU SPECIFIC LEGAL RIGHTS
WHICH MAY VARY FROM STATE TO STATE (PROVINCE TO
PROVINCE IN CANADA). GREEN MOUNTAIN GRILLS
RESPONSIBILITY FOR DEFECTS IN MATERIAL AND
WORKMANSHIP SHALL BE LIMITED TO REPAIR AND/OR
REPLACEMENT AS SET FORTH IN THIS WARRANTY. ALL
EXPRESS AND IMPLIED WARRANTIES, INCLUDING, BUT NOT
LIMITED TO, ANY IMPLIED WARRANTIES AND WARRANTIES
OF MERCHANTABILITY OR FITNESS FOR A PARTICULAR
PURPOSE ARE DISCLAIMED. NO OTHER WARRANTIES ARE
PROVIDED.
IN NO EVENT WILL GMG PRODUCTS, LLC (dba GREEN
MOUNTAIN GRILLS) HAVE ANY LIABILITY FOR SPECIAL,
INCIDENTAL OR CONSEQUENTIAL DAMAGES, WHETHER TO
THE ORIGINAL PURCHASER OR WITH RESPECT TO ANY
THIRD-PARTY CLAIMS FOR DAMAGES AGAINST THE RETAIL
PURCHASER OF THIS PRODUCT. SOME STATES
(PROVINCES IN CANADA) DO NOT ALLOW THE EXCLUSION
OR LIMITATION OF INCIDENTAL OR CONSEQUENTIAL
DAMAGES, SO THIS MAY NOT APPLY TO YOU.
To exercise your rights under this warranty, contact the dealer
from whom you purchased it, or call us at 530-347-9167.
© 2019 GMG Products LLC - All Rights Reserved
3 YEAR
5 6
Warranty
REGISTER YOUR WARRANTY HERE:
greenmountaingrills.com/warranty-registration

IMPORTANT SAFETY INFO
WARNING PLEASE READ CAREFULLY
7 8
Safety Information
• YOU MUST CONTACT YOUR LOCAL HOMEOWNERS’
ASSOCIATION, BUILDING, FIRE OFFICIALS, OR OTHER AUTHORITY
HAVING JURISDICTION, TO OBTAIN THE NECESSARY PERMITS,
PERMISSION OR INFORMATION ON ANY INSTALLATION
RESTRICTIONS, SUCH AS ANY GRILL BEING INSTALLED ON A
COMBUSTIBLE SURFACE, INSPECTION REQUIREMENTS, OR EVEN
THE ABILITY TO OWN AND OPERATE SUCH A GRILL IN YOUR AREA.
• DO NOT OPERATE THE GRILL WHILE TRANSPORTING IT! THE
GRILL MUST ALWAYS BE STATIONARY WHEN IT IS ON. MAKE
CERTAIN THAT THE GRILL IS COLD AND ALL FIRE IN THE FIREBOX
IS EXTINGUISHED BEFORE MOVING IT.
PELLET AND OTHER FUEL RESTRICTIONS
• THIS GRILL IS DESIGNED TO BURN ONLY FOOD-SAFE
HARDWOOD PELLETS. DO NOT USE ANY OTHER TYPE OF FUEL.
• DO NOT USE ANY PELLETS LABELED AS HAVING ADDITIVES OR
DESIGNED FOR USE IN HOME HEATING SYSTEMS.
• DO NOT USE SOFTWOOD PELLETS. THE SMOKE CONTAINS
DANGEROUS PHENOLS THAT YOU DO NOT WANT TO INGEST.
• DO NOT USE HEATING PELLETS, AS THEY MAY CONTAIN UNSAFE
IMPURITIES THAT COULD HARM YOUR HEALTH OR YOUR GRILL.
• GMG’S GRILLS ARE DESIGNED FOR AND TESTED WITH GREEN
MOUNTAIN’S BRAND OF PELLETS. WHILE YOU MAY USE OTHER
BRANDS OF PELLETS, WE DO NOT WARRANT THAT THE GRILL WILL
PERFORM AT THE SAME LEVEL.
• NEVER USE LAVA ROCK, NONPELLETIZED WOOD, OR CHARCOAL
IN THE GRILL.
• DO NOT USE ANY GASOLINE, LANTERN FUEL, WHITE GAS,
DIESEL FUEL, PETROL, LIGHTER FLUID, CHARCOAL LIGHTER,
ALCOHOL GEL, OR ANY OTHER FUEL OR ACCELERANTS FOR
LIGHTING OR RELIGHTING THE GRILL.
GENERAL WARNINGS
PLEASE READ, UNDERSTAND, AND FOLLOW THE DIRECTIONS
IN THIS MANUAL.
• THIS IS AN ELECTRIC APPLIANCE. OBSERVE ALL NORMAL
SAFETY PROCEDURES FOR A HIGH VOLTAGE APPARATUS.
• FOR OUTDOOR USE ONLY.
• DO NOT USE IN ANY ENCLOSED AREA OR ANY AREA WITHOUT
ADEQUATE VENTILATION.
• DO NOT MODIFY THIS GRILL IN ANY MANNER NOT IN
ACCORDANCE WITH MANUFACTURER GUIDELINES.
• DO NOT OPERATE THIS GRILL OTHER THAN AS SPECIFIED IN
THIS MANUAL.
• BE AWARE OF AND RESPOND TO THE INHERENT DANGER OF
ANY APPLIANCE THAT PRODUCES FLAMES.
• DO NOT USE THE GRILL IN RAIN OR AROUND ANY WATER
SOURCE SUCH AS SPRINKLERS.
• DO NOT STORE OR USE COMBUSTIBLE MATERIALS NEAR THIS
GRILL.
• KEEP THE ENTIRE GRILL A MINIMUM OF 24" FROM ALL
COMBUSTIBLES.
• DO NOT PUT A BARBECUE COVER OR ANYTHING FLAMMABLE
ON OR UNDER THE GRILL WHILE IN USE.
• DO NOT ALLOW WATER TO ENTER THE PELLET HOPPER.
PELLETS EXPOSED TO WATER TURN INTO SAWDUST THAT THE
AUGER FEED SYSTEM WILL NOT DELIVER TO THE FIREBOX.
• AFTER A PERIOD OF STORAGE OR NONUSE, THE GRILL SHOULD
BE CHECKED FOR AUGER AND BURN POT OBSTRUCTIONS,
FOREIGN OBJECTS INSIDE BOTH THE GRILL AND THE HOPPER,
AND AIR BLOCKAGE, BEFORE USE, IN ACCORDANCE WITH THE
CORRECT PROCEDURES SET FORTH IN THIS MANUAL.

IMPORTANT SAFETY INFO
WARNING PLEASE READ CAREFULLY
9 10
Safety Information
OPERATING PRECAUTIONS
• THIS GRILL MUST NOT BE USED BY PERSONS WITH REDUCED
PHYSICAL, SENSORY OR MENTAL CAPABILITIES, OR LACK OF
EXPERIENCE AND KNOWLEDGE, UNLESS THEY HAVE BEEN GIVEN
SUPERVISION OR INSTRUCTION CONCERNING THE USE OF THE
APPLIANCE BY A PERSON RESPONSIBLE FOR THEIR SAFETY AND
ARE BEING SUPERVISED BY A RESPONSIBLE ADULT.
• CHILDREN SHOULD NEVER USE THE GRILL.
• ACCESSIBLE PARTS OF THE GRILL WILL BE VERY HOT, AND
YOUNG CHILDREN AND PETS MUST BE KEPT AWAY FROM THE
GRILL WHILE IT IS IN USE.
• NEVER LEAN OVER AN OPEN GRILL OR PLACE HANDS OR
FINGERS ON THE FRONT EDGE OF THE GRILL OR IN THE PELLET
HOPPER.
• DO NOT USE ACCESSORIES NOT DESIGNED FOR USE WITH THIS
GRILL.
• USE HEAT RESISTANT BARBECUE MITTS OR GLOVES WHILE
OPERATING THE GRILL.
• DO NOT TRANSPORT THE GRILL WHILE OPERATING OR WHILE
THE GRILL IS HOT. MAKE SURE THAT THE FIRE IS COMPLETELY
OUT AND THE GRILL IS COMPLETELY COOL TO THE TOUCH
BEFORE MOVING IT.
• ASHES SHOULD BE PLACED IN A METAL CONTAINER WITH A
TIGHT-FITTING LID, AND THE CONTAINER MUST BE PLACED ON A
NONCOMBUSTIBLE FLOOR OR ON THE GROUND, WELL AWAY
FROM ALL COMBUSTIBLE MATERIALS. ASHES SHOULD BE
RETAINED IN THE CONTAINER UNTIL ALL CINDERS HAVE
THOROUGHLY COOLED BEFORE FURTHER DISPOSAL.
WARNINGS RELATING TO USE OF THE
REMOTE CONTROL/SMART CONTROL APP
• IF USING A REMOTE CONTROL OR THE REMOTE CELL PHONE
APPLICATION TO CONTROL THE OPERATION OF THE GRILL, YOU
MUST FIRST MAKE SURE THAT ALL SAFETY PRECAUTIONS
OTHERWISE APPLICABLE TO THE OPERATION OF THE GRILL HAVE
BEEN OBSERVED PRIOR TO STARTING THE GRILL. MOREOVER, A
RESPONSIBLE ADULT FAMILIAR WITH THE OPERATION OF THE
GRILL SHOULD BE AT ALL TIMES ABLE TO VIEW THE GRILL, AND IS
IN CLOSE-ENOUGH PROXIMITY TO THE GRILL TO BE ABLE TO
ADDRESS ANY EMERGENCY CONDITIONS, BEFORE OPERATING
THE GRILL REMOTELY.
MAINTENANCE ISSUES
• THE GRILL MUST BE CLEANED AND MAINTAINED REGULARLY IN
ACCORDANCE WITH THE INSTRUCTIONS SET FORTH IN THIS
MANUAL.
• DO NOT MODIFY OR REMOVE ANY OF THE PARTS OF THE GRILL.
• ALWAYS UNPLUG THE GRILL BEFORE PERFORMING ANY
SERVICE OR MAINTENANCE.
• NEVER ADD PELLETS BY HAND TO THE FIREPOT WHILE THE
GRILL IS RUNNING. IF THE GRILL RUNS OUT OF PELLETS DURING
COOKING, LET THE GRILL COMPLETELY COOL AND START AGAIN
FOLLOWING THE INITIAL START-UP INSTRUCTIONS.
• ALWAYS BE SURE TO INSTALL THE HEAT SHIELD PROPERLY, IN
ACCORDANCE WITH THE INSTRUCTIONS ELSEWHERE IN THIS
MANUAL, TO REDUCE RISK OF A GREASE FIRE.
• GREASE FIRES ARE OFTEN CAUSED BY FAILING TO PROPERLY
MAINTAIN THE GRILL BY CLEANING THE GREASE PAN AND THE
GREASE DRAIN CONSISTENTLY. IF A GREASE FIRE OCCURS, TURN
THE CONTROL UNIT TO “OFF,” AND LEAVE THE LID CLOSED UNTIL
THE FIRE IS OUT. DO NOT UNPLUG THE POWER CORD. IF AN
UNCONTROLLED FIRE DOES OCCUR, IMMEDIATELY CALL THE
LOCAL FIRE DEPARTMENT. NEVER PUT WATER ON THE FIRE.

IMPORTANT SAFETY INFO
WARNING PLEASE READ CAREFULLY
11 12
Safety Information
• MAKE ABSOLUTELY CERTAIN THE GRILL AND ASHES
ARE COLD BEFORE ACCESSING THE INTERIOR.
DO NOT REMOVE HOT ASH FROM THE GRILL, AS IT MAY
CAUSE A FIRE ELSEWHERE.
CREOSOTE
• OVER TIME, A LAYER OF TAR-LIKE SOOT OR CREOSOTE MAY
FORM INSIDE YOUR GRILL. YOU SHOULD REGULARLY REMOVE
SUCH SUBSTANCES FROM INSIDE YOUR GRILL, AS A CREOSOTE
FIRE CAN BURN OUT OF CONTROL.
• DARK AND SOOTY SMOKE MAY INDICATE THE PRESENCE OF A
CREOSOTE BUILDUP INSIDE YOUR GRILL. IF YOU NOTICE THIS,
TURN OFF THE GRILL AND WAIT FOR IT TO COOL COMPLETELY.
THEN, REMOVE ANY COLD CREOSOTE FROM THE GRILL WITH A
TOWEL.
• SHOULD A CREOSOTE FIRE OCCUR, TURN THE CONTROL UNIT
TO “OFF,” AND LEAVE THE LID CLOSED UNTIL THE FIRE IS OUT. DO
NOT UNPLUG THE POWER CORD. DO NOT TRY TO REMOVE THE
GRILL, TRY TO SMOTHER THE FIRE, OR PUT WATER ON THE FIRE.
IF AN UNCONTROLLED FIRE DOES OCCUR, IMMEDIATELY CALL THE
FIRE DEPARTMENT.
CARBON MONOXIDE WARNING
• THE GRILL MUST BE OPERATED AT ALL TIMES IN ACCORDANCE
WITH THESE GUIDELINES TO PREVENT CARBON MONOXIDE FROM
POISONING YOU, YOUR FAMILY, OR OTHERS.
• CARBON MONOXIDE IS COLORLESS AND ODORLESS, SO IT IS
IMPORTANT TO OPERATE THE GRILL IN STRICT ACCORDANCE
WITH THIS OPERATING MANUAL, AND THESE WARNINGS.
• THE GRILL MUST AT ALL TIMES BE OPERATED OUTSIDE, IN A
WELL-VENTILATED AREA, AND IN STRICT ACCORDANCE WITH ALL
OTHER INSTRUCTIONS IN THIS MANUAL TO AVOID CARBON
MONOXIDE POISONING.
• THE SYMPTOMS OF CARBON MONOXIDE POISONING INCLUDE
HEADACHES, DIZZINESS, WEAKNESS, NAUSEA, VOMITING,
SLEEPINESS, AND CONFUSION. CARBON MONOXIDE REDUCES
THE BLOOD'S ABILITY TO CARRY OXYGEN, AND LOW BLOOD
OXYGEN LEVELS CAN RESULT IN LOSS OF CONSCIOUSNESS AND
DEATH.
• ALCOHOL CONSUMPTION AND DRUG USE INCREASE THE
EFFECTS OF CARBON MONOXIDE POISONING.
• CARBON MONOXIDE IS ESPECIALLY TOXIC TO MOTHERS AND
CHILDREN DURING PREGNANCY, INFANTS, THE ELDERLY,
SMOKERS, AND PEOPLE WITH BLOOD OR CIRCULATORY SYSTEM
PROBLEMS, SUCH AS ANEMIA OR HEART DISEASE.
• YOU MUST SEE A DOCTOR IF YOU DEVELOP EITHER COLD OR
FLU-LIKE SYMPTOMS WHILE COOKING IN THE VICINITY OF THE
GRILL, AS CARBON MONOXIDE POISONING CAN EASILY BE
MISTAKEN FOR A COLD OR FLU AND IS OFTEN DETECTED TOO
LATE.
PROP 65 - STATE OF CALIFORNIA
• THIS PRODUCT CAN EXPOSE YOU TO WOOD DUST, WHICH IS
KNOWN TO THE STATE OF CALIFORNIA TO CAUSE CANCER, AND TO
CARBON MONOXIDE, WHICH IS KNOWN TO THE STATE OF
CALIFORNIA TO CAUSE BIRTH DEFECTS OR OTHER
REPRODUCTIVE HARM, OR DEATH. FOR MORE INFORMATION, GO
TO WWW.P65WARNINGS.CA.GOV. THIS PRODUCT IS NOT FOR
HUMAN CONSUMPTION.
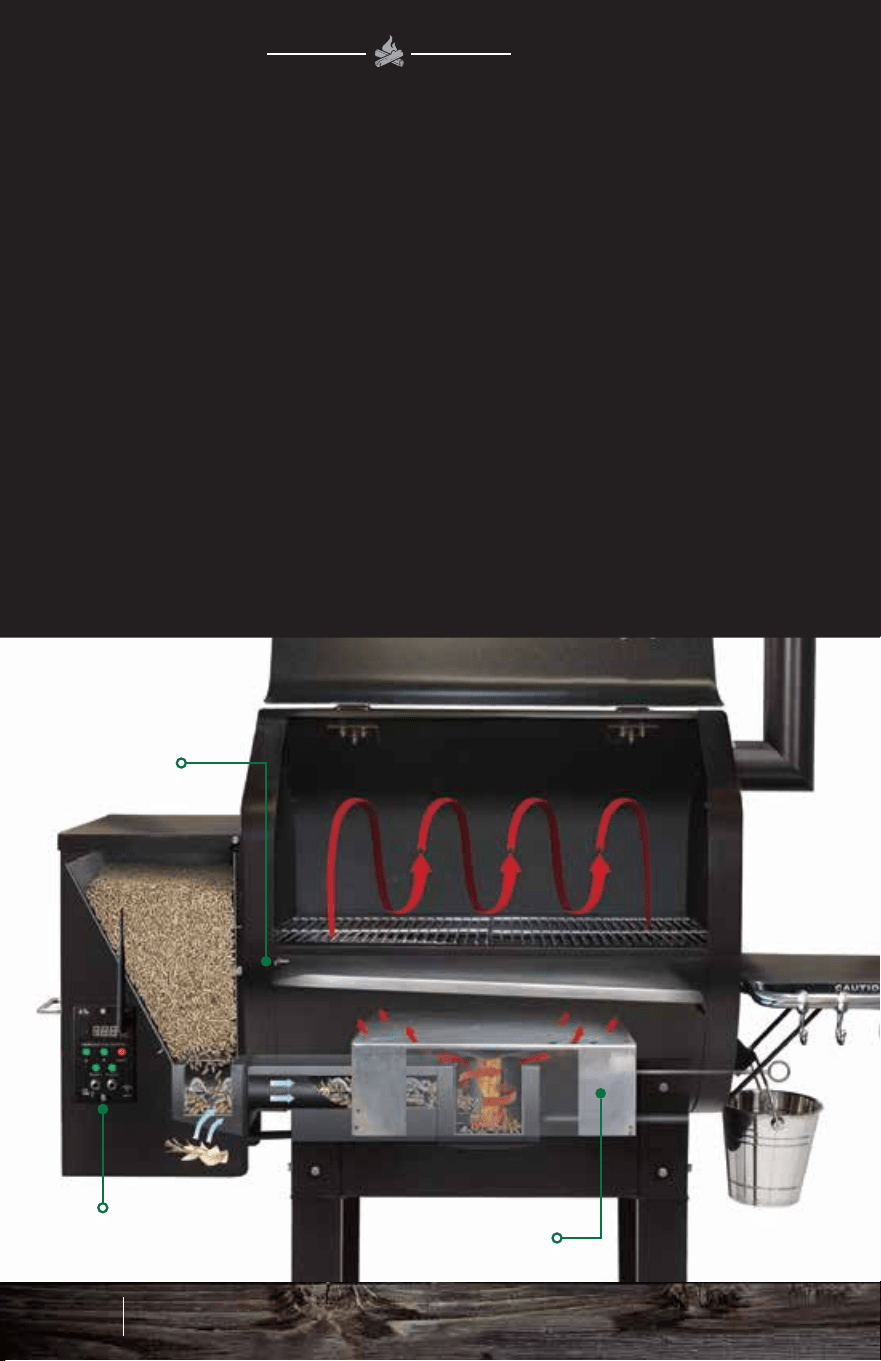
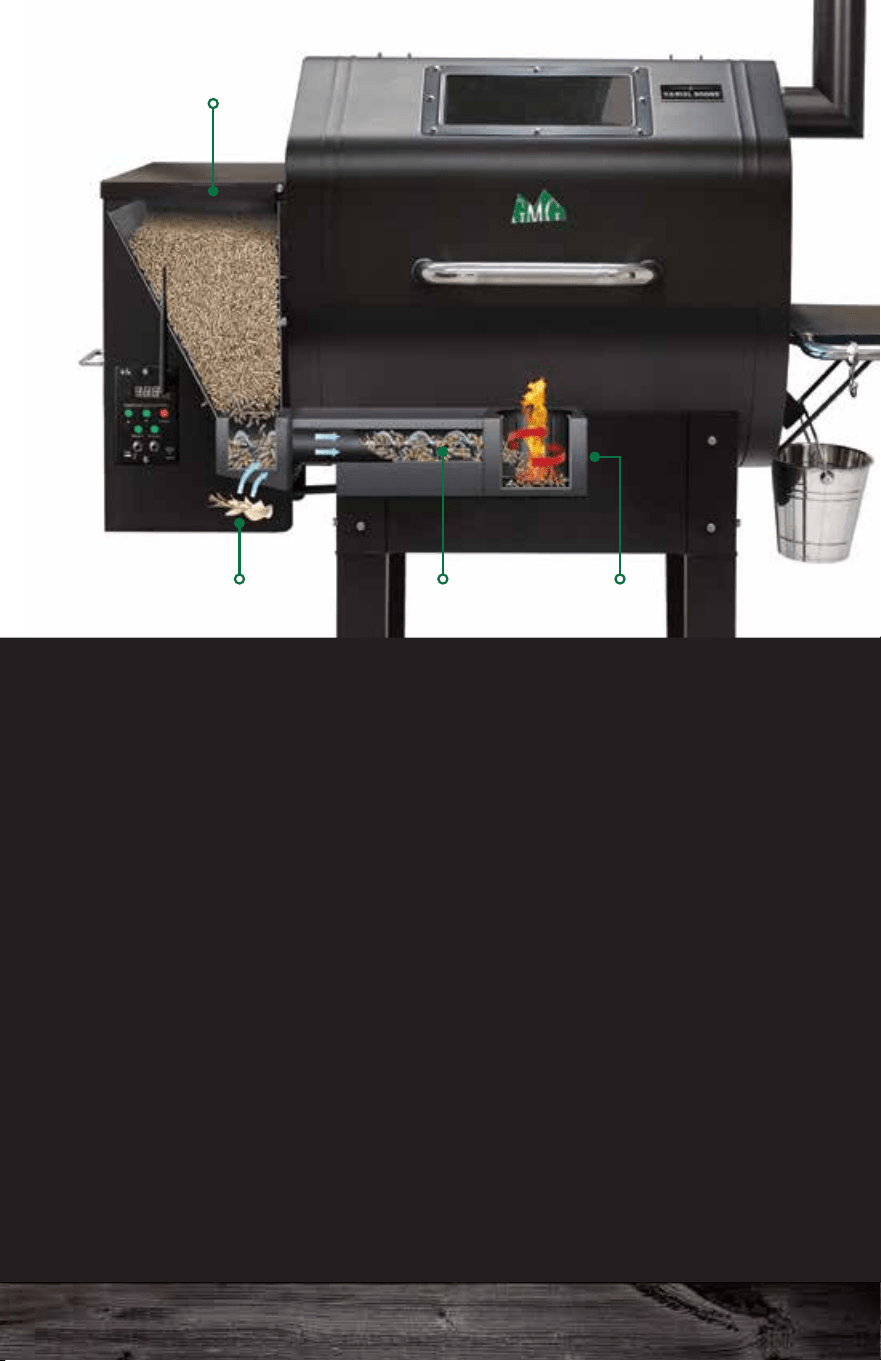
PELLET
HOPPER
HEAT
SHIELD
DIGITAL
CONTROLLER
THERMAL
SENSOR
HOPPER FAN FIREBOXAUGER
A PELLET GRILL
WORKS
HOW
A motor turns an auger that feeds pellets into a Venturi-style
firebox. There, a hot rod automatically ignites the pellets. The
hopper fan provides airflow into the firebox creating a burn pot
cyclone for maximum heat distribution and maintains positive
pressure that prevents burn-back into the auger tube.
WOOD FIRED SCIENCE
The Venturi-style firebox creates maximum heat distribution and
complete combustion of the pellets with minimal waste. The heat
shield that covers the firebox distributes the heat to both sides of
the grill, flowing up into the convection-style grill chamber. The
thermal sensor mounted inside the grill sends data to the on-board
computer ten times every second, and the digital controller adjusts
the air and pellet flow to maintain the temperature you set.
HEAT DISTRIBUTION
13 14
How a Pellet Grill Works
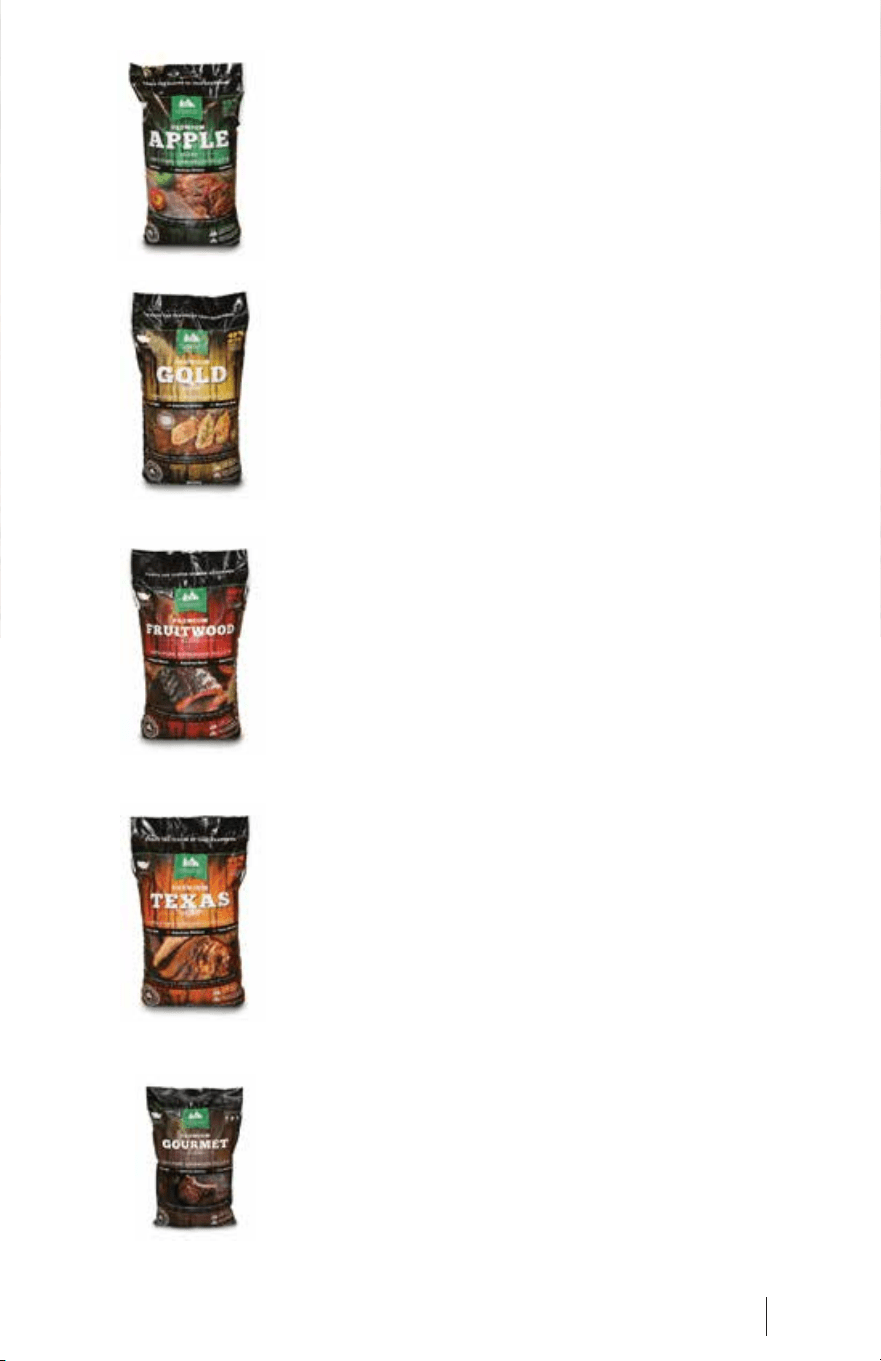
Premium Fruitwood Blend
This bold blend of Orchard Cherry, American
Beech, and Sweet Pecan (yes, pecan is a fruit!)
smells sweet when you cook with it and adds
character to whatever you grill. This blend is
favored by competition barbecue teams
nationwide for its flavorful light smoke.
Premium Gold Blend
This mellow blend of Red Oak, American
Hickory, and Mountain Maple subtly flavors your
food without overpowering it. These are some
of the hardest of the hardwoods; this blend
produces a long burn with modest smoke.
Premium Apple Blend
This sublime blend of Apple Wood, American
Hickory, and Red Oak is mature but gentle. If
you’re unsure about which pellets to use,
choose the Apple Blend for hardy flavors. You
can’t go wrong with this one!
Premium Texas Blend
This aromatic blend of Black Oak, American
Hickory, and a hint of Texas Mesquite offers
more smoke than our other blends. The pellets
are a deep chocolate brown and burn hot. If you
want big taste, the Texas Blend is right for you.
Premium Gourmet Blend
This 8 lb. stand-up resealable bag of Gourmet
Blend pellets is a perfect blend of Black Oak,
American Hickory, and Texas Mesquite. This
bag is space-saving for camping, RV’ing,
picnicking, and tailgating specifically designed
for the Davy Crockett portable grill.
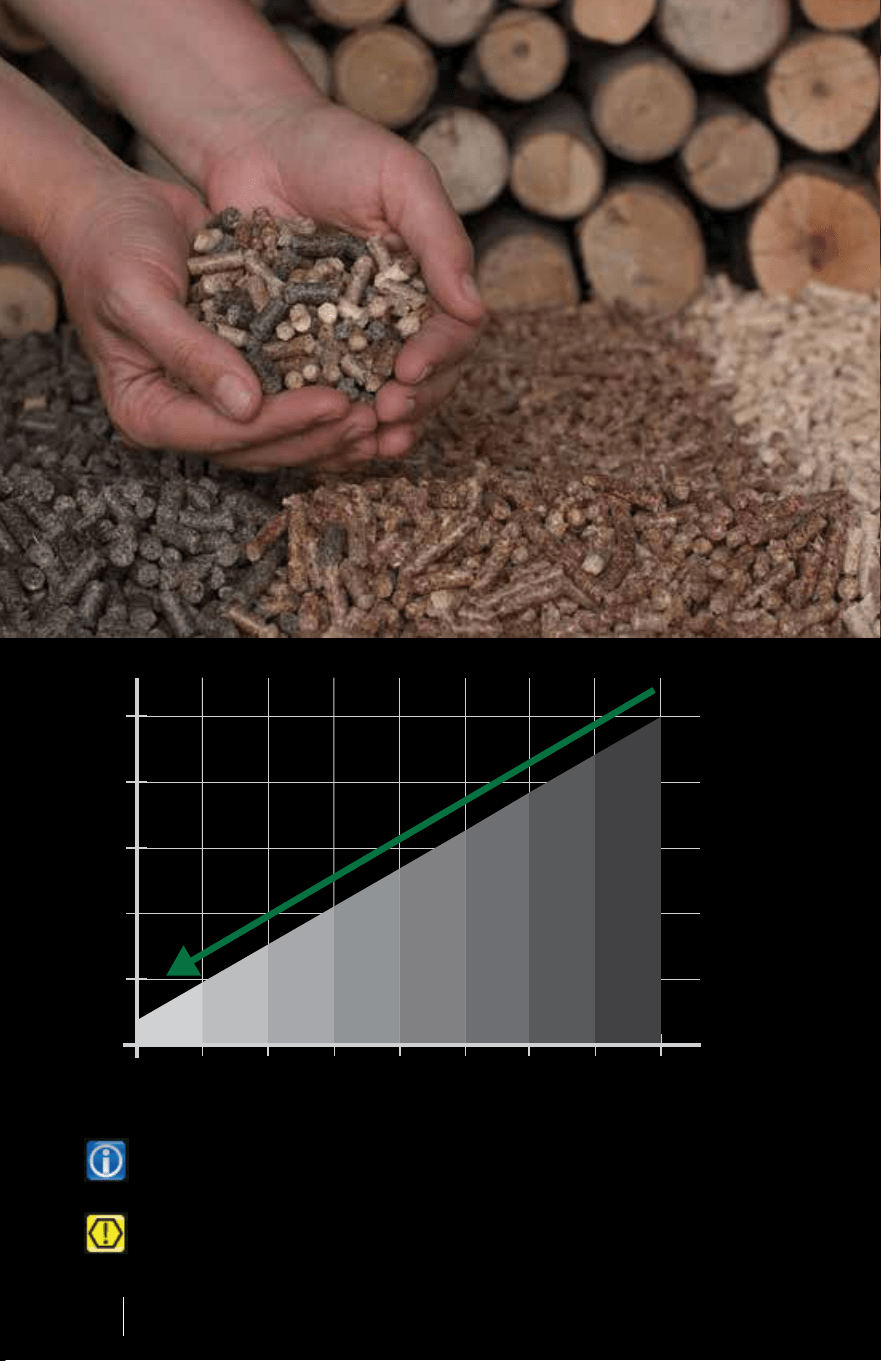
These test results were obtained under the following conditions:
Ambient temperature range of 52-56 degrees Fahrenheit. Usage of GMG
Premium Blend Pellets. No food in cavity. No wind.
Your results may differ due to:
Food in cavity which absorbs BTU’s as it cooks. Usage of different pellets.
Opening and closing the lid. Operating in higher or lower temperatures than
testing conditions. Operating in wind.
15 16
Premium Hardwood Pellets Premium Hardwood Pellets
PREMIUM
HARDWOOD PELLETS
Our pellets are made out of 100% kiln dried sawdust
that never touches the floor. The pellets are held
together with the natural lignin in the wood. GMG 28 lb
bags provide 40% more than our competitors’ 20 lb
bags. Super low ash content with no fillers or additives!
100°
.5 1 1.5 2
200°
300°
400°
500°
TEMPERATURE
LBS. PER HOUR
Premium Fruitwood Blend
This bold blend of Orchard Cherry, American
Beech, and Sweet Pecan (yes, pecan is a fruit!)
smells sweet when you cook with it and adds
character to whatever you grill. This blend is
favored by competition barbecue teams
nationwide for its flavorful light smoke.
Premium Gold Blend
This mellow blend of Red Oak, American
Hickory, and Mountain Maple subtly flavors your
food without overpowering it. These are some
of the hardest of the hardwoods; this blend
produces a long burn with modest smoke.
Premium Apple Blend
This sublime blend of Apple Wood, American
Hickory, and Red Oak is mature but gentle. If
you’re unsure about which pellets to use,
choose the Apple Blend for hardy flavors. You
can’t go wrong with this one!
Premium Texas Blend
This aromatic blend of Black Oak, American
Hickory, and a hint of Texas Mesquite offers
more smoke than our other blends. The pellets
are a deep chocolate brown and burn hot. If you
want big taste, the Texas Blend is right for you.
Premium Gourmet Blend
This 8 lb. stand-up resealable bag of Gourmet
Blend pellets is a perfect blend of Black Oak,
American Hickory, and Texas Mesquite. This
bag is space-saving for camping, RV’ing,
picnicking, and tailgating specifically designed
for the Davy Crockett portable grill.
These test results were obtained under the following conditions:
Ambient temperature range of 52-56 degrees Fahrenheit. Usage of GMG
Premium Blend Pellets. No food in cavity. No wind.
Your results may differ due to:
Food in cavity which absorbs BTU’s as it cooks. Usage of different pellets.
Opening and closing the lid. Operating in higher or lower temperatures than
testing conditions. Operating in wind.
15 16
Premium Hardwood Pellets Premium Hardwood Pellets
PREMIUM
HARDWOOD PELLETS
Our pellets are made out of 100% kiln dried sawdust
that never touches the floor. The pellets are held
together with the natural lignin in the wood. GMG 28 lb
bags provide 40% more than our competitors’ 20 lb
bags. Super low ash content with no fillers or additives!
100°
.5 1 1.5 2
200°
300°
400°
500°
TEMPERATURE
LBS. PER HOUR
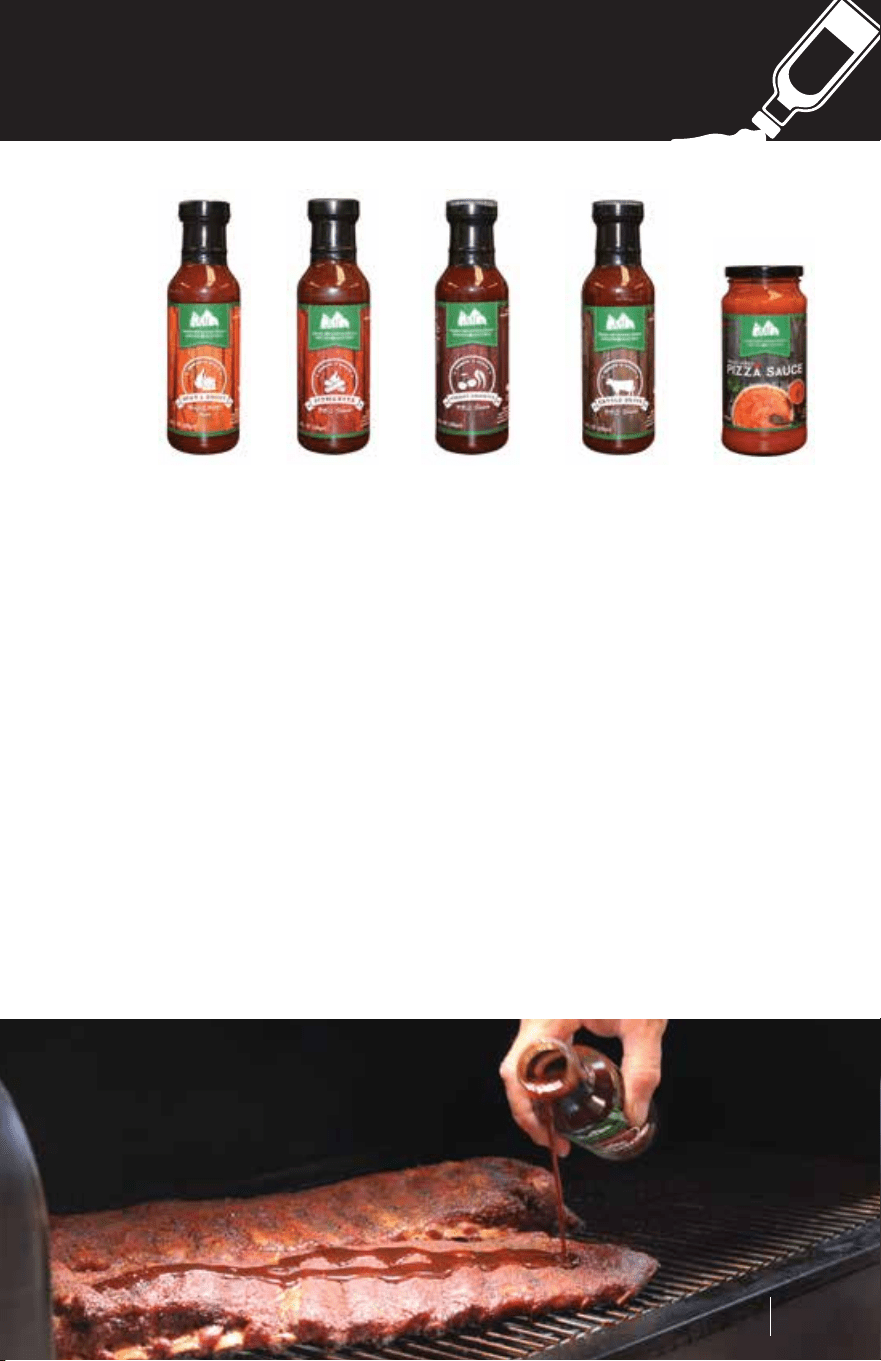
Heat & Sweet – This sweet n’ spicy dipping and grilling sauce
complements wings, ribs, pulled pork – even French fries.
Pitmaster Sauce – The latest addition to our sauce lineup comes
from Rooftop Barbeque team. This sauce has the perfect blend of
sweet and spicy. Be prepared to be amazed with the flavors of this
perfectly blended sauce.
Cherry Chipotle – This decadent mixture of fruit and fire will add
zest to ribs, pork, vegetables, and anything else you think needs a
hint of heat.
Cattle Drive – Our classic sauce will perfectly season your meats
with the traditional style of the Old West.
Pizza Sauce – Take your wood-fired pizza to the next level with this
fresh Italian-inspired blend!
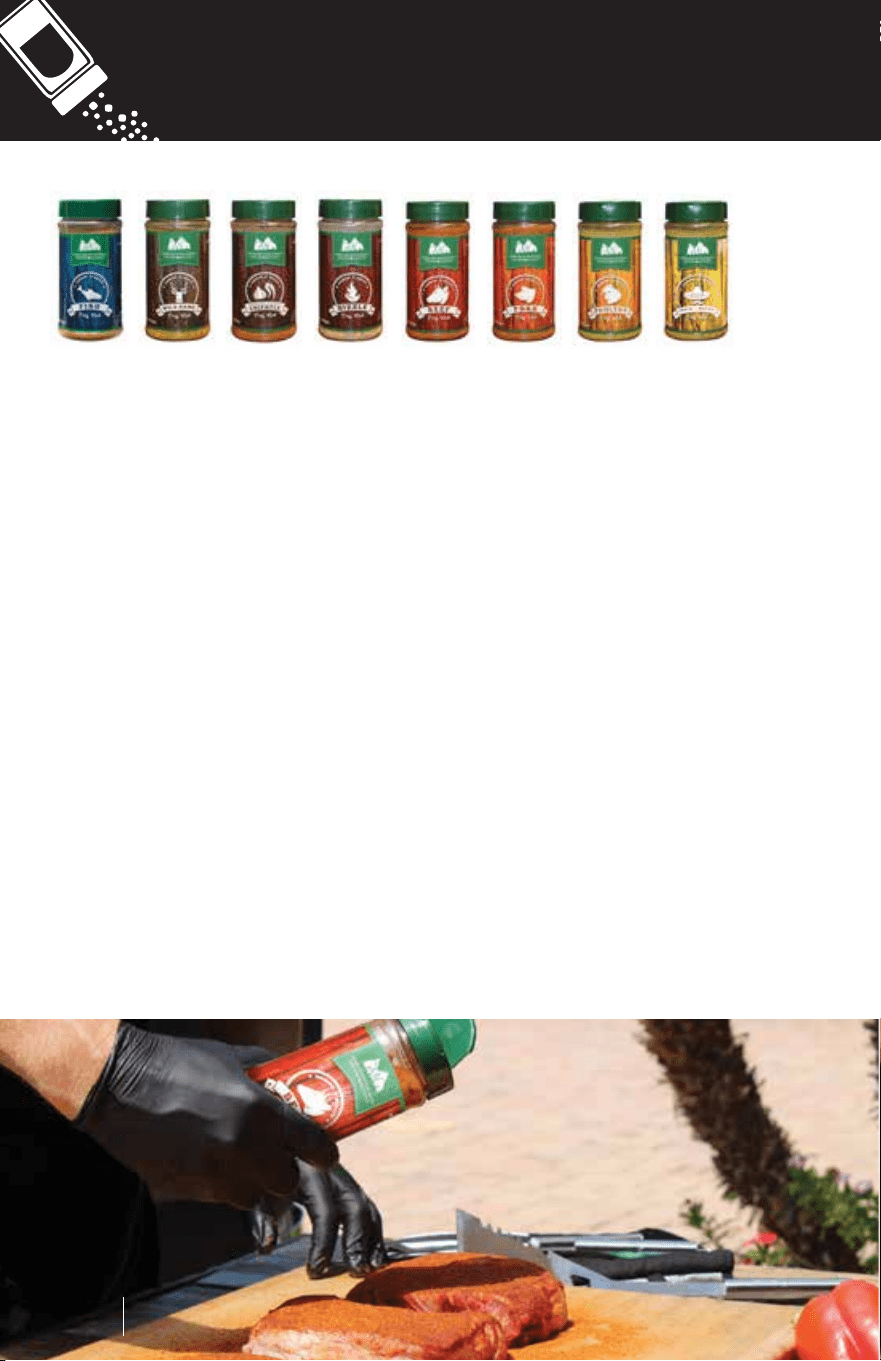
Fish – Exotic ingredients like sereh powder, green peppercorns, and
cilantro season fish and seafood perfectly.
Wild Game – This pleasant, piquant spice rub will enrich your
venison, bear, or bison, but try it on lamb, pork, and beef too.
Roasted Garlic & Chipotle – This will add zest, charm, and dignity
to ribs, roasts, chicken, and vegetables.
Sizzle Blend – If it sizzles when you cook it, add this! You will love it!
Beef – Smoked paprika, mustard, cayenne, and other spices will
enhance the flavor of any beef.
Pork – A winning combination of 11 robust spices give this rub the
potential to turn your ribs, butt, or loin into a blue ribbon dish.
Poultry – A dash of savory adds just the right flavor to make your
fowl taste simply delectable.
South of the Border – If you use this in your Mexican food, amigo,
you will think you’re in Cabo San Lucas!
SAUCES
RUBS
Sauces
17 18
Rubs
Heat & Sweet – This sweet n’ spicy dipping and grilling sauce
complements wings, ribs, pulled pork – even French fries.
Pitmaster Sauce – The latest addition to our sauce lineup comes
from Rooftop Barbeque team. This sauce has the perfect blend of
sweet and spicy. Be prepared to be amazed with the flavors of this
perfectly blended sauce.
Cherry Chipotle – This decadent mixture of fruit and fire will add
zest to ribs, pork, vegetables, and anything else you think needs a
hint of heat.
Cattle Drive – Our classic sauce will perfectly season your meats
with the traditional style of the Old West.
Pizza Sauce – Take your wood-fired pizza to the next level with this
fresh Italian-inspired blend!
Fish – Exotic ingredients like sereh powder, green peppercorns, and
cilantro season fish and seafood perfectly.
Wild Game – This pleasant, piquant spice rub will enrich your
venison, bear, or bison, but try it on lamb, pork, and beef too.
Roasted Garlic & Chipotle – This will add zest, charm, and dignity
to ribs, roasts, chicken, and vegetables.
Sizzle Blend – If it sizzles when you cook it, add this! You will love it!
Beef – Smoked paprika, mustard, cayenne, and other spices will
enhance the flavor of any beef.
Pork – A winning combination of 11 robust spices give this rub the
potential to turn your ribs, butt, or loin into a blue ribbon dish.
Poultry – A dash of savory adds just the right flavor to make your
fowl taste simply delectable.
South of the Border – If you use this in your Mexican food, amigo,
you will think you’re in Cabo San Lucas!
SAUCES
RUBS
Sauces
17 18
Rubs
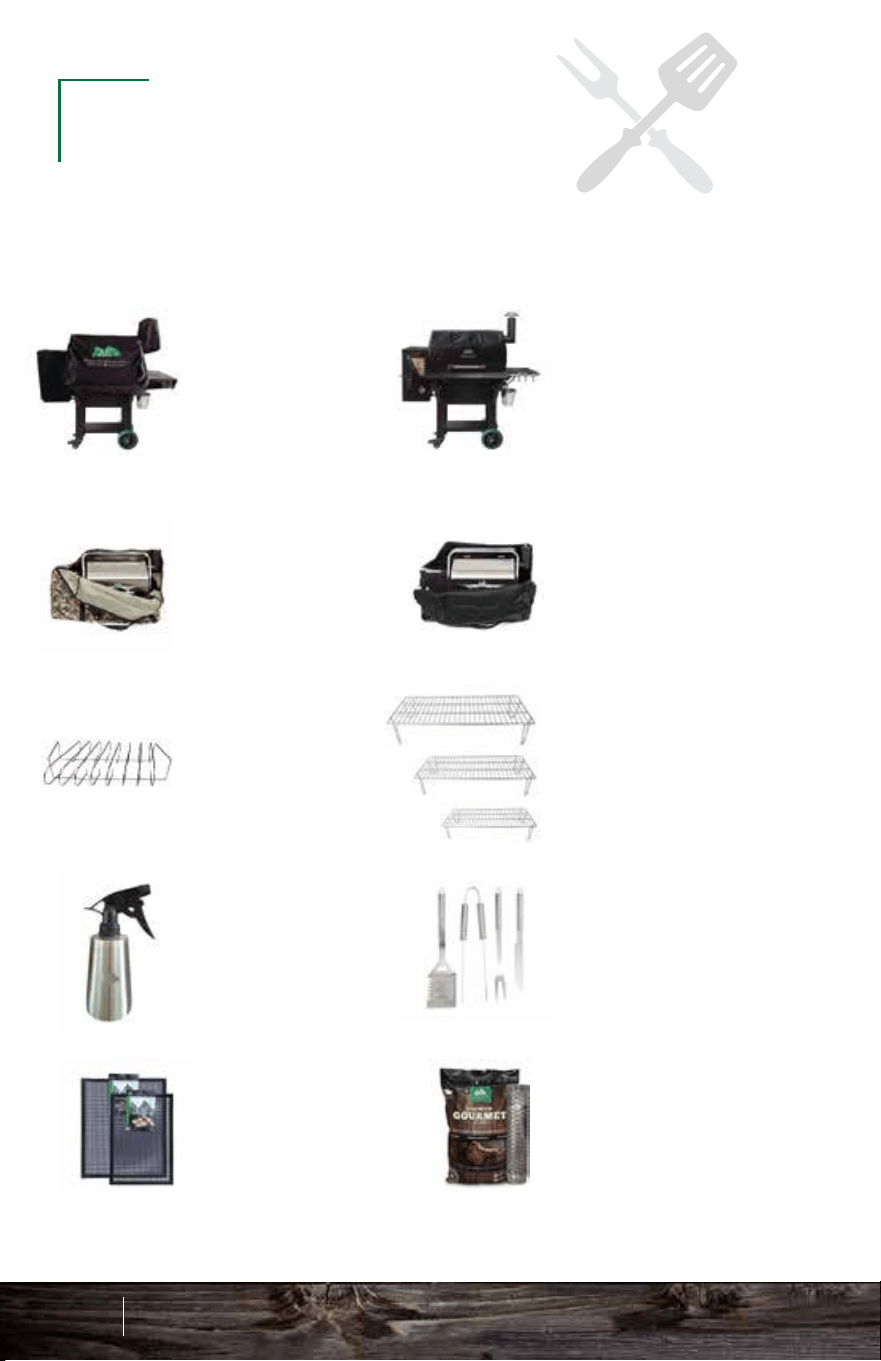
Be sure to visit your local dealer to pick up these great
accessories for your new Green Mountain Grill.
Grill Covers
Our form-fitting grill
covers will withstand
the toughest
weather conditions.
Sizes available for
each grill model.
Thermal Blankets
Keep your grill
warm in the winter
time and cut down
on your pellet usage
by up to 50%. Sizes
available for each
grill model.
Davy Crockett
Tote Camo
Travel in style with
our New Davy
Crockett Carrying
Tote!
Davy Crockett
Tote Black
Travel in style
with our New
Davy Crockett
Carrying Tote!
Griddle
Turn your grill into a
stove top and cook
bacon, eggs,
sandwiches,
pancakes and more!
Grill Pan
Great for keeping
sauces, beans and
sides warm on the
grill.
G-Mats
Teflon-coated
fiberglass fabric
cooking mats, safe
for use up to 450°.
Nonstick (both sides
are usable).
Grill Utensils
Grill in style with
a set of GMG
Grill Utensils.
Mitts
These handsome,
extra-heavy-duty
mitts will protect your
hands and make you
look like a million
dollars!
Thin Blue Smoker
Expandable smoke
tube with easy
slide extension,
11”-18” for
maximum smoke
flavor.
Wood-Fired Pizza
Attachment
Convert your Daniel
Boone or Jim Bowie
model into a
wood-fired gourmet
pizza oven.
Wood Pizza Peel
Convert your Daniel
Boone or Jim Bowie
model into a
wood-fired gourmet
pizza oven.
Food Porter
Keep your food
cold or hot for up
to 4 hours. Great
for travel and
outdoor use.
Digital Probe
Thermometer
Fold out
instant-read food
thermometer with
range from -4°F to
392°F (-20°C to
200°C).
Infared
Thermometer
Accurately measure
your pizza stone
temperature with a
range of -58°F-1022°F
(-50°C - 550°C)
Drip-EZ Grease
Tray Liners
Place the stack of 3
liners on your grease
tray to collect drippings
for easy cleanup!
Drip-EZ Grease
Bucket Liners
Place a liner in your
grease bucket to
collect drippings for
easy cleanup!
Apron
Save the drippings for
later and look like a
pro while you’re at it.
GMG Hats
Look good
alongside your grill
in this premium
quality headwear!
Smoke Shelf
Upper Racks
Add more cooking
room to your grill
with a smoke shelf.
Spritz Bottle
Perfect to keep
meats, poultry, and
even fish nice and
moist while grilling.
Rib Rack
Grill 7 racks of ribs
at the same time
with the GMG
vertical rib rack! Fits
JB and DB only.
ACCESSORIES
19 20
Accessories
20
21 22
20
21 22
1
2
3
4
5
6
7 8
9
10
11
12
13
14
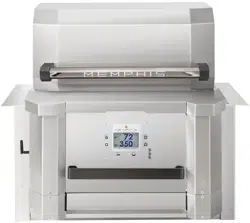
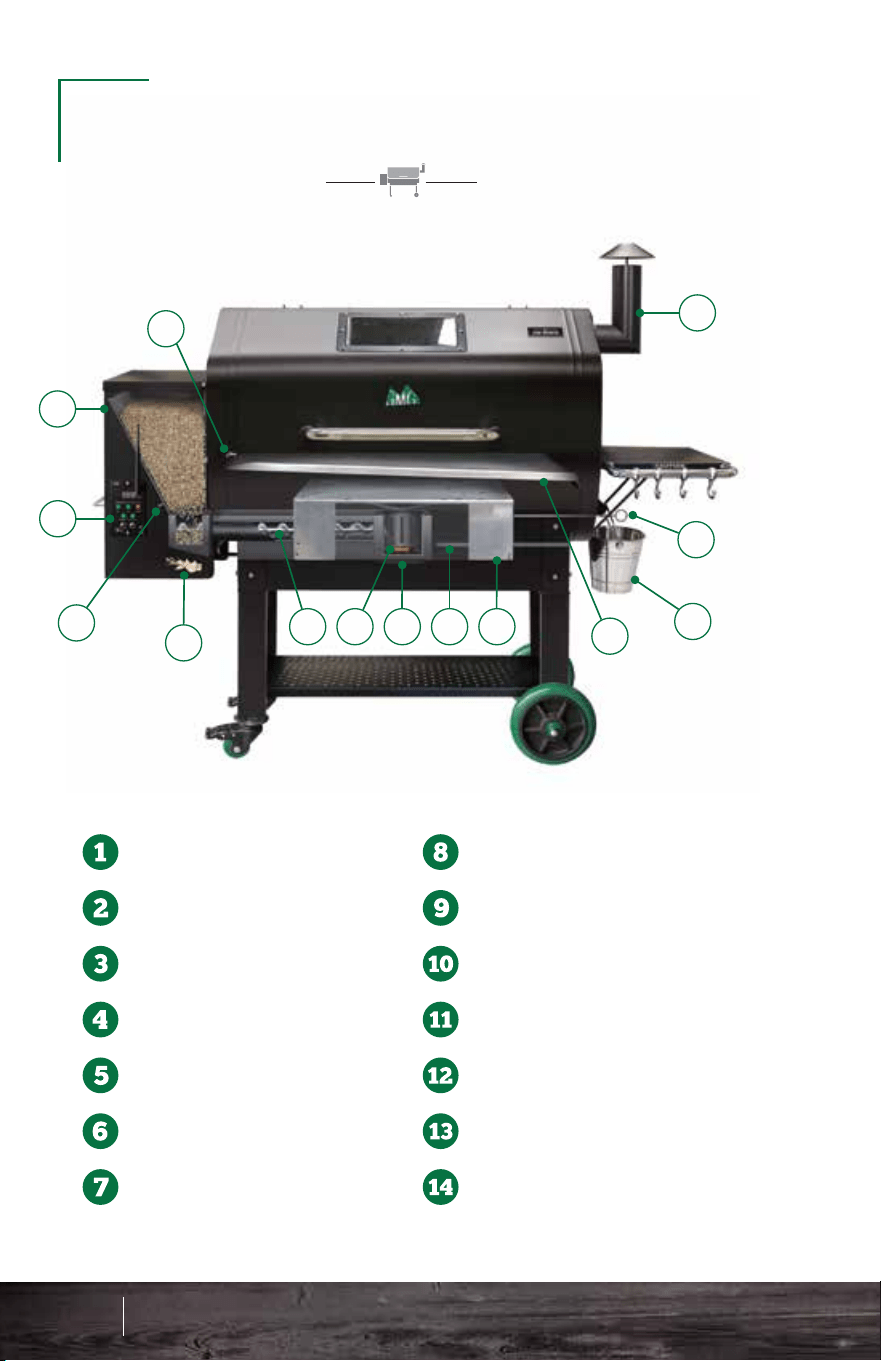
GET TO KNOW YOUR
WOOD PELLET GRILL
DANIEL BOONE
JIM BOWIE
Thermal Sensor
Pellet Hopper
Digital Controller
Low Pellet Alarm
Combustion Fan
Auger
Igniter
Firebox
AshVac
Heat Shield
Grease Tray
Drip Bucket
Heat Shield Adjuster
Chimney
Thermal Sensor
Pellet Hopper
Digital Controller
Low Pellet Alarm
Combustion Fan
Auger
Igniter
Firebox
AshVac
Heat Shield
Grease Tray
Drip Bucket
Heat Shield Adjuster
Chimney
23 24
Know Your Grill - JB & DB
1
2
3
4
5
6
7 8
9
10
11
12
13
14
Jim Bowie & Daniel Boone Know Your Grill

1
2
3
4
5
6
7 8
9
10
11
12
13
14
GET TO KNOW YOUR
WOOD PELLET GRILL
DANIEL BOONE
JIM BOWIE
Thermal Sensor
Pellet Hopper
Digital Controller
Low Pellet Alarm
Combustion Fan
Auger
Igniter
Firebox
AshVac
Heat Shield
Grease Tray
Drip Bucket
Heat Shield Adjuster
Chimney
Thermal Sensor
Pellet Hopper
Digital Controller
Low Pellet Alarm
Combustion Fan
Auger
Igniter
Firebox
AshVac
Heat Shield
Grease Tray
Drip Bucket
Heat Shield Adjuster
Chimney
23 24
Know Your Grill - JB & DB
1
2
3
4
5
6
7 8
9
10
11
12
13
14
Jim Bowie & Daniel Boone Know Your Grill
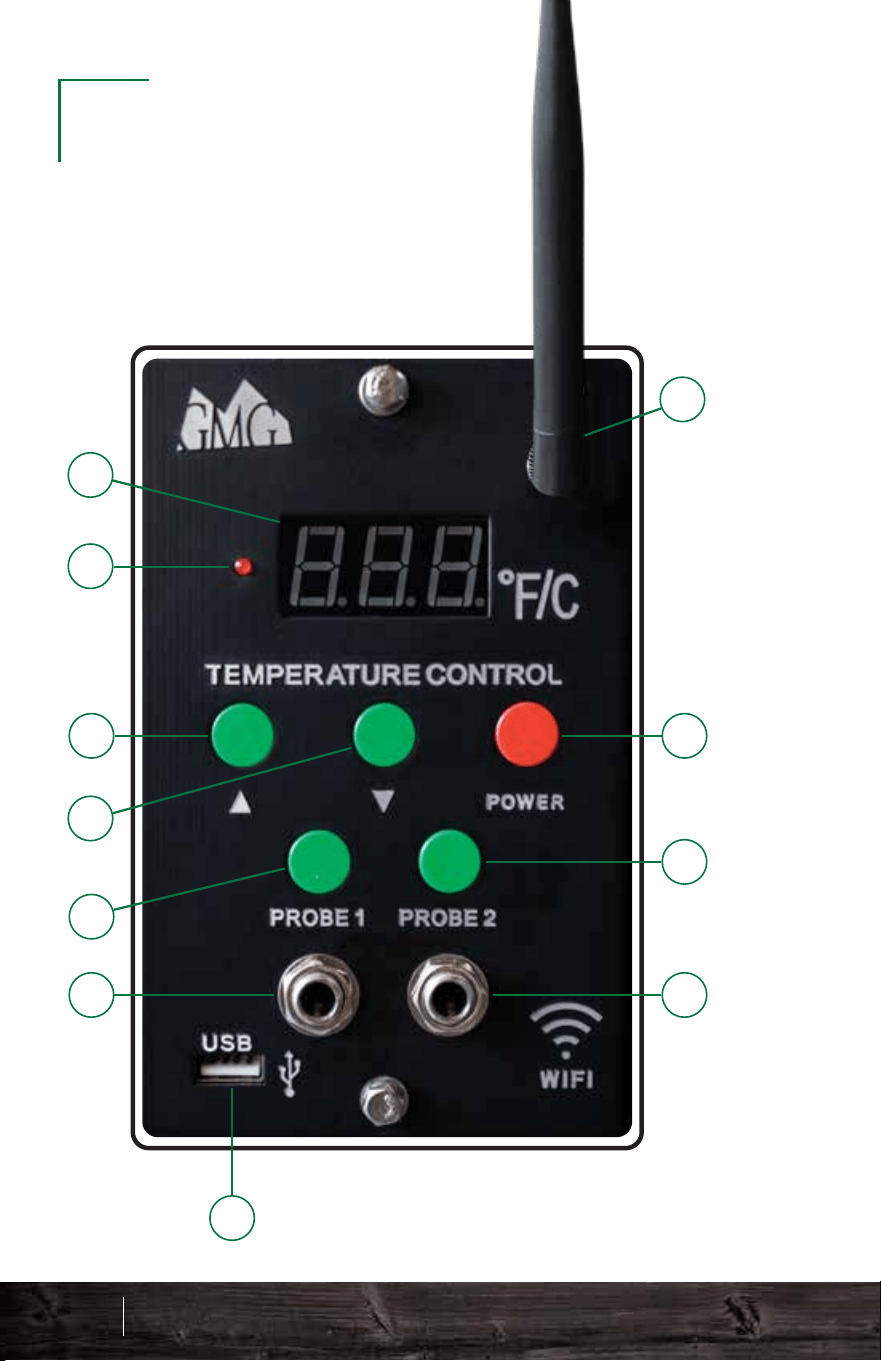
Antenna Connection
Standard on WiFi Smart Control models only
Digital Readout Display
Displays temperature and status codes:
Temperature Up
5-degree increment control
Temperature Down
5-degree increment control
Food Probe 1 Button
When the food probe is connected, press to read
the internal temperature of your food. Press again
to switch back to grill temperature.
Food Probe 1 Connection
Insert a food probe here and run it up and through the
steel swinging door on the left side of the grill.
Food Probe 2 Button
When the food probe is connected, press to read
the internal temperature of your food. Press again
to switch back to grill temperature.
Food Probe 2 Connection
Insert another food probe here and run it up and through
the steel swinging door on the left side of the grill.
Power Button
USB Connection
Plug in USB to charge a phone or other devices.
Signal Indicator Light
OFF - Grill Is Off
FAN - Fan Mode
UPD - Updated
NFD - No Food Detected
FAL - Ignition Failure
SEN - Thermal Sensor Issue
1
2
3
4
5
6
7
9
10
11
8
DIGITAL
CONTROLLER
25 26
Digital Controller - JB & DB
9
10
11
Jim Bowie & Daniel Boone Know Your Grill

Firebox: This sits at the bottom of the
grill, and pellets arrive into it via an
auger tube attached to its left side.
This is also called a burn pot.
Igniter: You will find the igniter (also
called a hot rod) in the firebox. It should
protrude about 1.5–2” into the firebox.
This rod ignites the pellets to start the fire.
Thermal Sensor: This device sends data
to the computer ten times per second.
The computer then averages these
readings over slightly longer periods of
time and adjusts the air and pellet flow to
maintain an accurate temperature in the
cavity.
Grease tray: This slopes downhill
from left to right and carries the
drippings from your food into the
grease bucket for easy disposal.
Make sure the CIRCLE cutout
is on the LEFT SIDE.
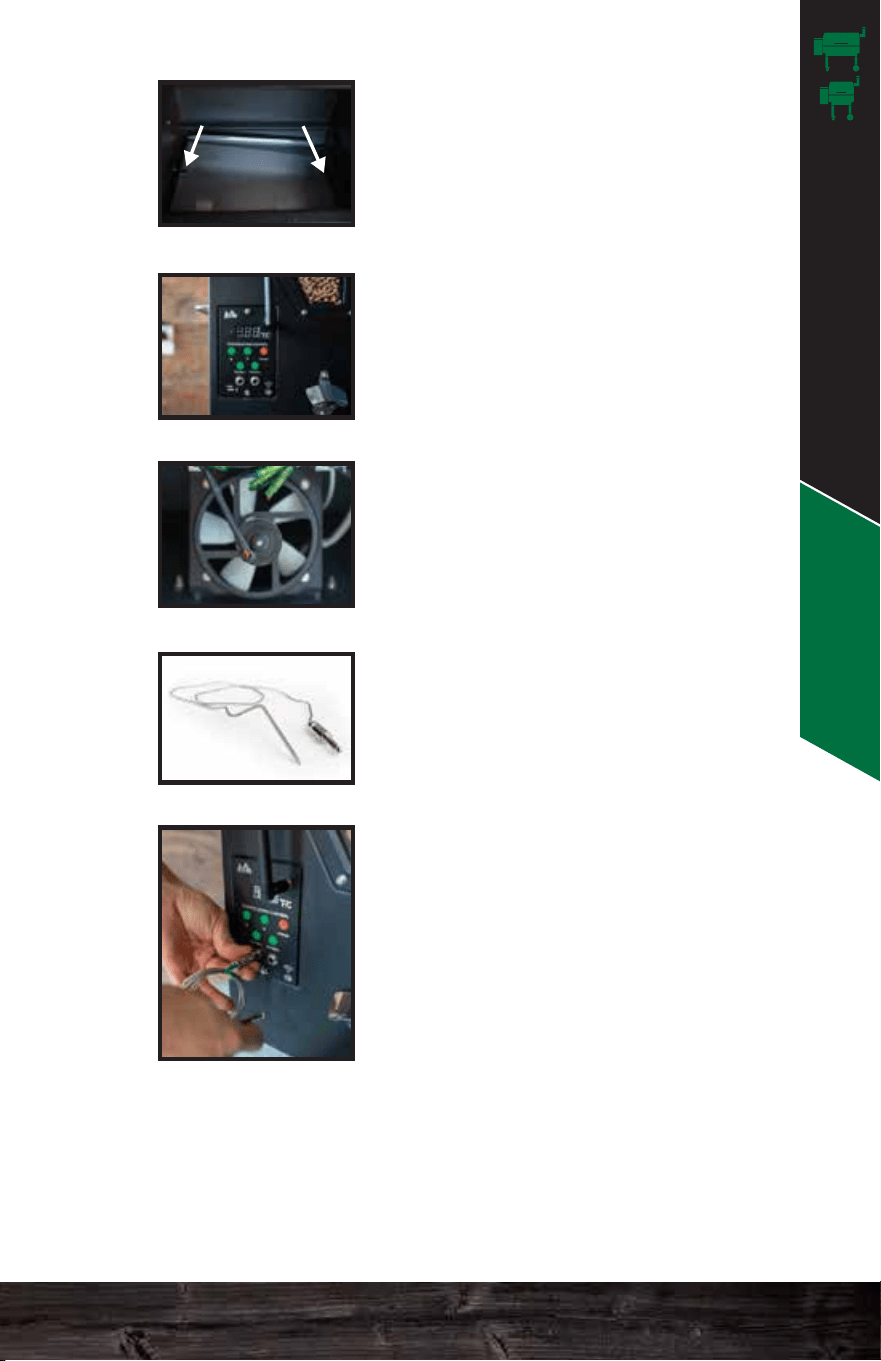
Meat Probes: To use this feature,
just plug the connector into the
receptacle on the front of the
controller.
Lift the stainless flap on the left
side of the grill and push the
probe through the hole. Then,
insert the probe into the center of
the food you are cooking. Press
either the Probe 1 or 2 button to
display the temperature of that
probe. This process takes a
minute or two to stabilize.
To return to the grill temperature display, simply press the
probe button again. If you do not have the probe installed in
the control panel, then your digital display will read “NO FD”
(no food) when you press either probe button. The probe is
not suitable for reading temperatures above 257°F (150°C).
Digital Controller: This is a
state-of-the-art PID
(calculus-based) computer that
will keep your grill at a
reasonably steady temperature.
Heat Shield: Creates maximum heat
distribution between the left and right
side of the grill chamber.
Heat Shield Adjuster: This allows you
to slide the heat shield left and right to
control heat distribution. Move toward
the heat: for example, if the grill is hotter
on the right side, move the heat shield
slightly to the right to even out the temps.
KEY GRILL
COMPONENTS
27 28
Key Grill Components - JB & DB
Combustion Fan: This fan is
located under the hopper and
blows air into the firebox (burn
pot). The speed of this fan will vary
during normal operation.
CIRCLE
LEFT SIDE
HALF-MOON
RIGHT SIDE
Jim Bowie & Daniel Boone Know Your Grill
Firebox: This sits at the bottom of the
grill, and pellets arrive into it via an
auger tube attached to its left side.
This is also called a burn pot.
Igniter: You will find the igniter (also
called a hot rod) in the firebox. It should
protrude about 1.5–2” into the firebox.
This rod ignites the pellets to start the fire.
Thermal Sensor: This device sends data
to the computer ten times per second.
The computer then averages these
readings over slightly longer periods of
time and adjusts the air and pellet flow to
maintain an accurate temperature in the
cavity.
Grease tray: This slopes downhill
from left to right and carries the
drippings from your food into the
grease bucket for easy disposal.
Make sure the CIRCLE cutout
is on the LEFT SIDE.
Meat Probes: To use this feature,
just plug the connector into the
receptacle on the front of the
controller.
Lift the stainless flap on the left
side of the grill and push the
probe through the hole. Then,
insert the probe into the center of
the food you are cooking. Press
either the Probe 1 or 2 button to
display the temperature of that
probe. This process takes a
minute or two to stabilize.
To return to the grill temperature display, simply press the
probe button again. If you do not have the probe installed in
the control panel, then your digital display will read “NO FD”
(no food) when you press either probe button. The probe is
not suitable for reading temperatures above 257°F (150°C).
Digital Controller: This is a
state-of-the-art PID
(calculus-based) computer that
will keep your grill at a
reasonably steady temperature.
Heat Shield: Creates maximum heat
distribution between the left and right
side of the grill chamber.
Heat Shield Adjuster: This allows you
to slide the heat shield left and right to
control heat distribution. Move toward
the heat: for example, if the grill is hotter
on the right side, move the heat shield
slightly to the right to even out the temps.
KEY GRILL
COMPONENTS
27 28
Key Grill Components - JB & DB
Combustion Fan: This fan is
located under the hopper and
blows air into the firebox (burn
pot). The speed of this fan will vary
during normal operation.
CIRCLE
LEFT SIDE
HALF-MOON
RIGHT SIDE
Jim Bowie & Daniel Boone Know Your Grill
Hopper Lid: Keep the hopper lid
closed at all times while your grill is
on. Obviously, if you need to refill the
hopper, you can make a brief
exception. The fan inside the hopper
must blow air into the auger tube to
prevent burn-back from the firepot. If
the hopper lid stays open, this air
pressure just escapes into the
atmosphere.
Low Pellet Alarm: Inside the hopper
is a low pellet alarm. When the level
of pellets falls below this sensor, an
alarm sounds to let you know that
you need to fill the hopper back up.
Once this alarm goes off, you should
add pellets to prevent fuel shortage
and resultant temperature drops.
Chimney Cap: Always leave this
open. Your grill needs to draft.
Always make sure there is at least
a two-finger or 1.5 inch opening.
Pellet Dump: Please ensure that the
stainless steel pellet dump slider is in
place before filling the hopper with
pellets.
*Versions may vary based on model.
AshVac: This allows you to connect a
Shop-Vac to clean out the base of the
burn pot. NEVER pull hot ash out of the
firebox. Make sure the fire is completely
out before using this feature of the grill!
Wait at least 1 hour after you shut down
the grill before attempting to pull ash out
through the clean-out.
Bottle Opener: No more
looking for the opener! It has a
durable stainless steel design.
Grill Lid Window: This allows
you to take a peek at your food
without disrupting the internal
temp.
Hopper Window: This allows
you to always keep an eye on
your pellet supply.
Grill Shelving:
Auger: This is found at the
bottom of the hopper and feeds
pellets into the firebox.
29 30
Key Grill Components - JB & DB
Front Side Bottom
Jim Bowie & Daniel Boone Know Your Grill

Also check out our Assembly & Setup section on our
videos page: www.greenmountaingrills.com/videos
We recommend 2 people for a safe and
proper assembly.
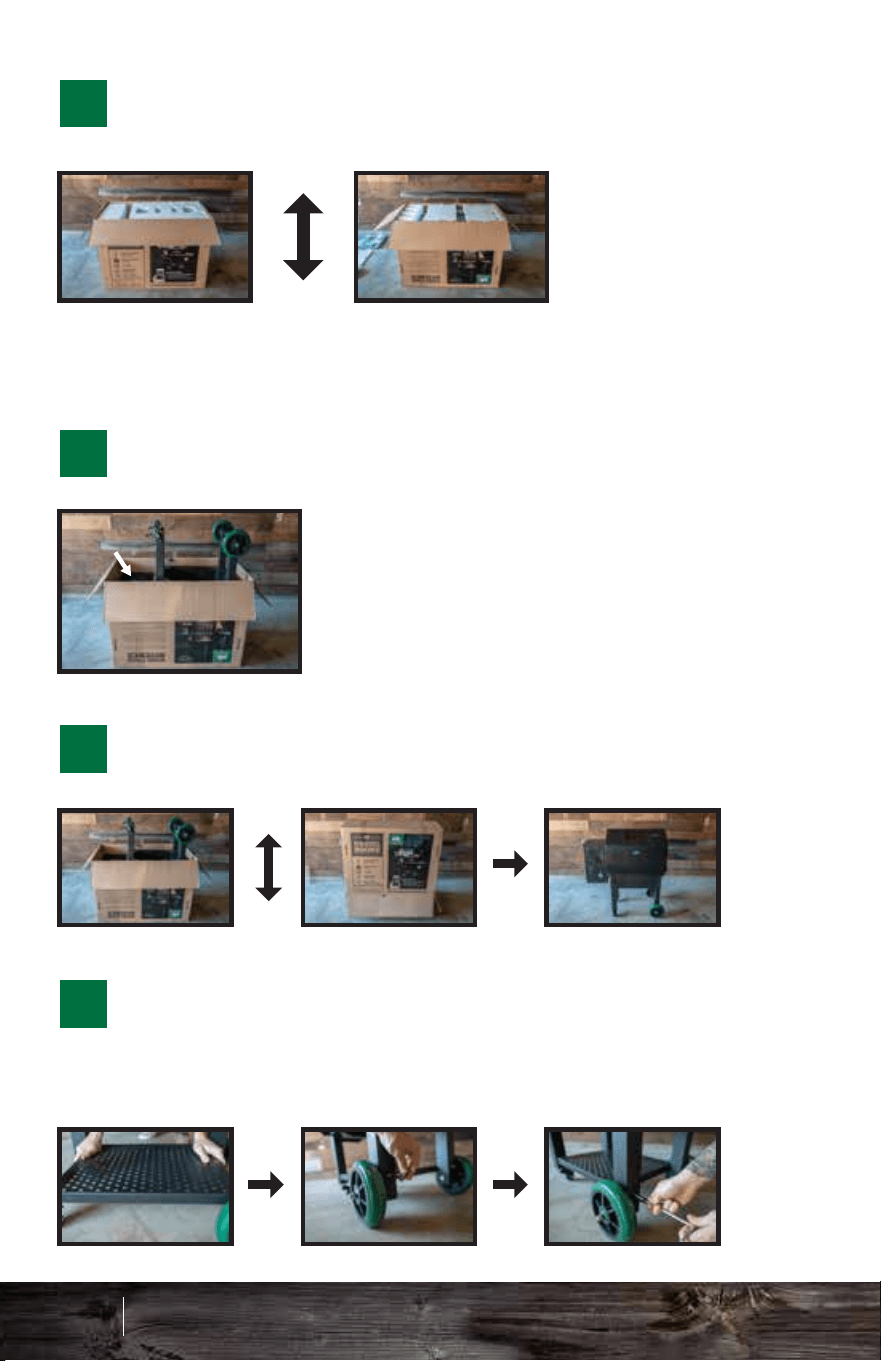
ASSEMBLY
To make it easier to open the grill
lid, cut down the front corners of
the box about 10 in.
Pull back the plastic and open the
grill lid.
Remove front shelf parts, legs, and top Styrofam and set
aside. You will need the Styrofoam again, so keep it nearby.
STAND BOX RIGHT SIDE UP & OPEN TOP
REMOVE THE INTERNAL GRILL PARTS
2
3
31 32
Assembly - JB & DB
1
2
Remove the parts from
inside the grill and set aside.
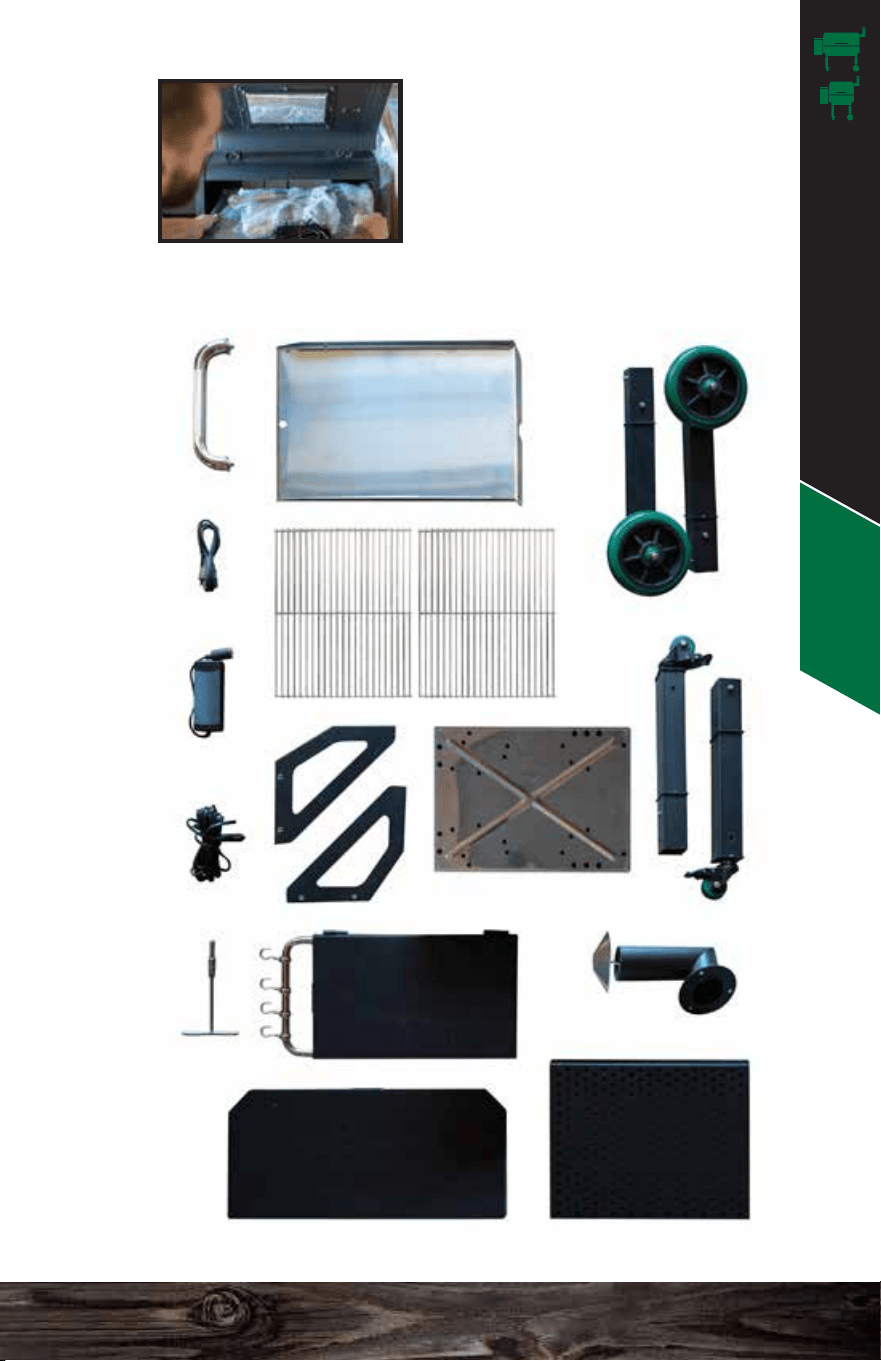
GRILL PARTS INVENTORY
FRONT SHELF BOTTOM SHELF
SIDE SHELF
CHIMNEY
CASTER LEGS x2
GREEN WHEEL LEGS x2
HEAT SHIELD
GRILL GRATES x2
GREASE TRAY
HANDLE
AC POWER
CORD
AC/DC
ADAPTER
GRILL POWER
CORD
BRACKETS x2
FRONT SHELF
SOCKET
WRENCH
Jim Bowie & Daniel Boone Assembly
Also check out our Assembly & Setup section on our
videos page: www.greenmountaingrills.com/videos
We recommend 2 people for a safe and
proper assembly.
ASSEMBLY
To make it easier to open the grill
lid, cut down the front corners of
the box about 10 in.
Pull back the plastic and open the
grill lid.
Remove front shelf parts, legs, and top Styrofam and set
aside. You will need the Styrofoam again, so keep it nearby.
STAND BOX RIGHT SIDE UP & OPEN TOP
REMOVE THE INTERNAL GRILL PARTS
2
3
31 32
Assembly - JB & DB
1
2
Remove the parts from
inside the grill and set aside.
GRILL PARTS INVENTORY
FRONT SHELF BOTTOM SHELF
SIDE SHELF
CHIMNEY
CASTER LEGS x2
GREEN WHEEL LEGS x2
HEAT SHIELD
GRILL GRATES x2
GREASE TRAY
HANDLE
AC POWER
CORD
AC/DC
ADAPTER
GRILL POWER
CORD
BRACKETS x2
FRONT SHELF
SOCKET
WRENCH
Jim Bowie & Daniel Boone Assembly
2
3
33 34
Assembly - JB & DB
Close the lid and replace the Styrofoam back on top of the
grill. This will prevent scratching of the grill when you flip it.
Align the shelf with the holes located on the inside of the 4
legs. Thread the bolt through the legs into the shelf and secure.
REPLACE THE STYROFOAM & FLIP
UPSIDE DOWN
3
FLIP RIGHT SIDE UP AND REMOVE THE BOX
5
INSTALL THE LEGS
4
Install the legs as shown. The
caster legs should be closest to the
hopper side.
INSTALL THE BOTTOM SHELF
6
First, install the shelf brackets onto the front of the grill.
Place the shelf on top and secure it to the brackets.
INSTALL THE FRONT SHELF
7
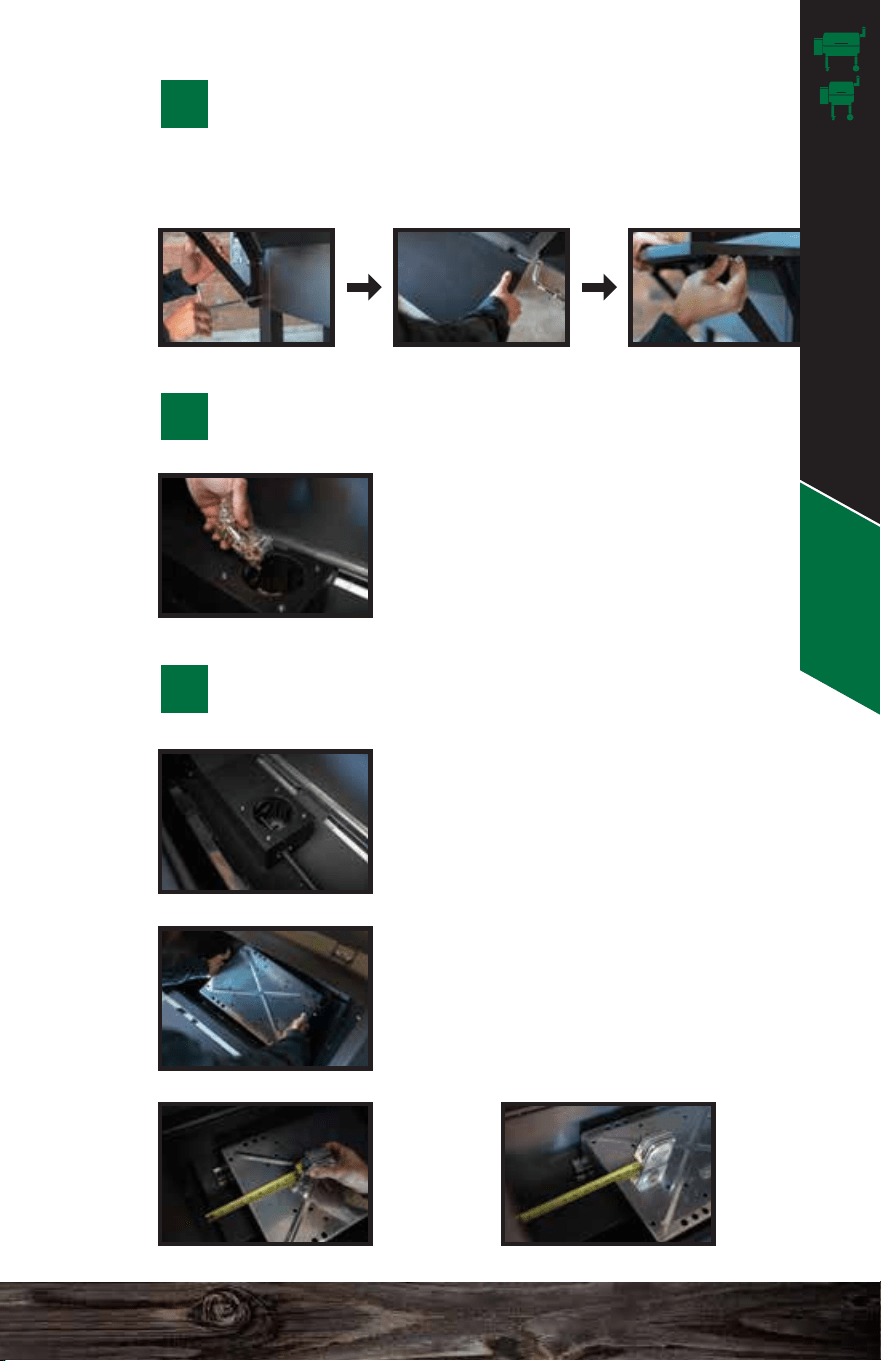
HEAT SHIELD SLIDER
The slider brackets are preinstalled
and located along the back and front
side of the inside base of the grill.
HEAT SHIELD
Place the heat shield into the slider
brackets to properly sit over the firebox.
Line it up per the measurements of the
grill models listed below.
DB
4.25”
From
left wall.
JB
9.25”
From
left wall.
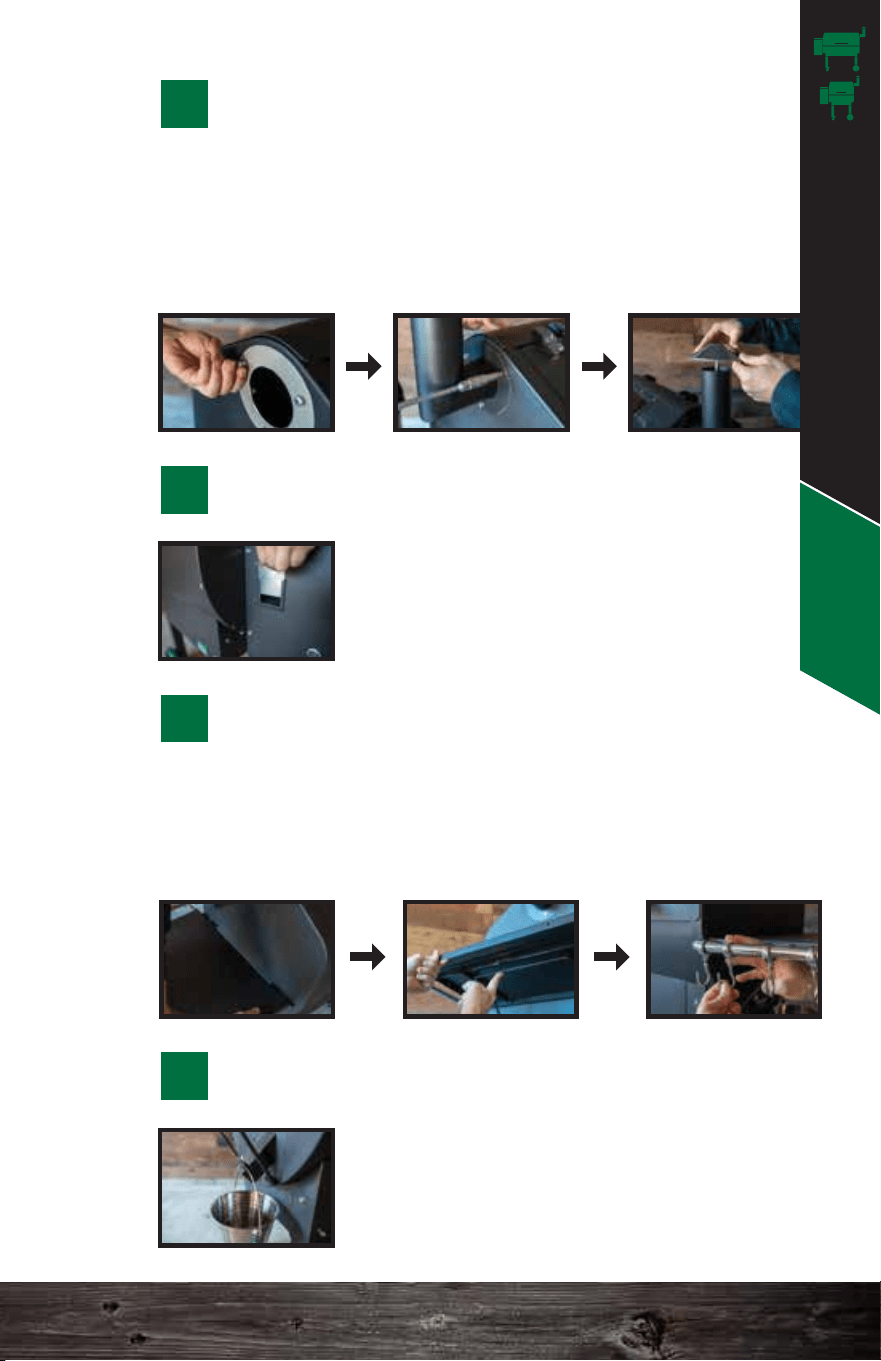
INSERT THE INTERNAL PARTS
9
Important: Pour the contents
of the Ziploc bag into the
firebox before you install the
rest of the parts. This is part of
the initial starting procedure.
PRIME THE FIREBOX
8
HOPPER
SIDE
Jim Bowie & Daniel Boone Assembly
2
3
33 34
Assembly - JB & DB
Close the lid and replace the Styrofoam back on top of the
grill. This will prevent scratching of the grill when you flip it.
Align the shelf with the holes located on the inside of the 4
legs. Thread the bolt through the legs into the shelf and secure.
REPLACE THE STYROFOAM & FLIP
UPSIDE DOWN
3
FLIP RIGHT SIDE UP AND REMOVE THE BOX
5
INSTALL THE LEGS
4
Install the legs as shown. The
caster legs should be closest to the
hopper side.
INSTALL THE BOTTOM SHELF
6
First, install the shelf brackets onto the front of the grill.
Place the shelf on top and secure it to the brackets.
INSTALL THE FRONT SHELF
7
HEAT SHIELD SLIDER
The slider brackets are preinstalled
and located along the back and front
side of the inside base of the grill.
HEAT SHIELD
Place the heat shield into the slider
brackets to properly sit over the firebox.
Line it up per the measurements of the
grill models listed below.
DB
4.25”
From
left wall.
JB
9.25”
From
left wall.
INSERT THE INTERNAL PARTS
9
Important: Pour the contents
of the Ziploc bag into the
firebox before you install the
rest of the parts. This is part of
the initial starting procedure.
PRIME THE FIREBOX
8
HOPPER
SIDE
Jim Bowie & Daniel Boone Assembly
35 36
Assembly - JB & DB
GREASE TRAY
Insert the grease tray with the circle
cutout on the LEFT SIDE near the
thermal sensor and the half-moon
cutout on the RIGHT SIDE.
GRILL GRATES
Insert the grates so that they sit flush
with the back and front edges of the
grill surface.
Slide the stainless steel door into the
door slot. ALWAYS make sure the
door is shut before filling the hopper
with pellets and while the grill is on.
Make sure the grease tray is installed
correctly to ensure proper grease
drainage and thermal sensor reading.
HEAT SHIELD ADJUSTER
Insert the rod into the hole on the right
side of the grill to align and thread into
the right side of the heat shield.
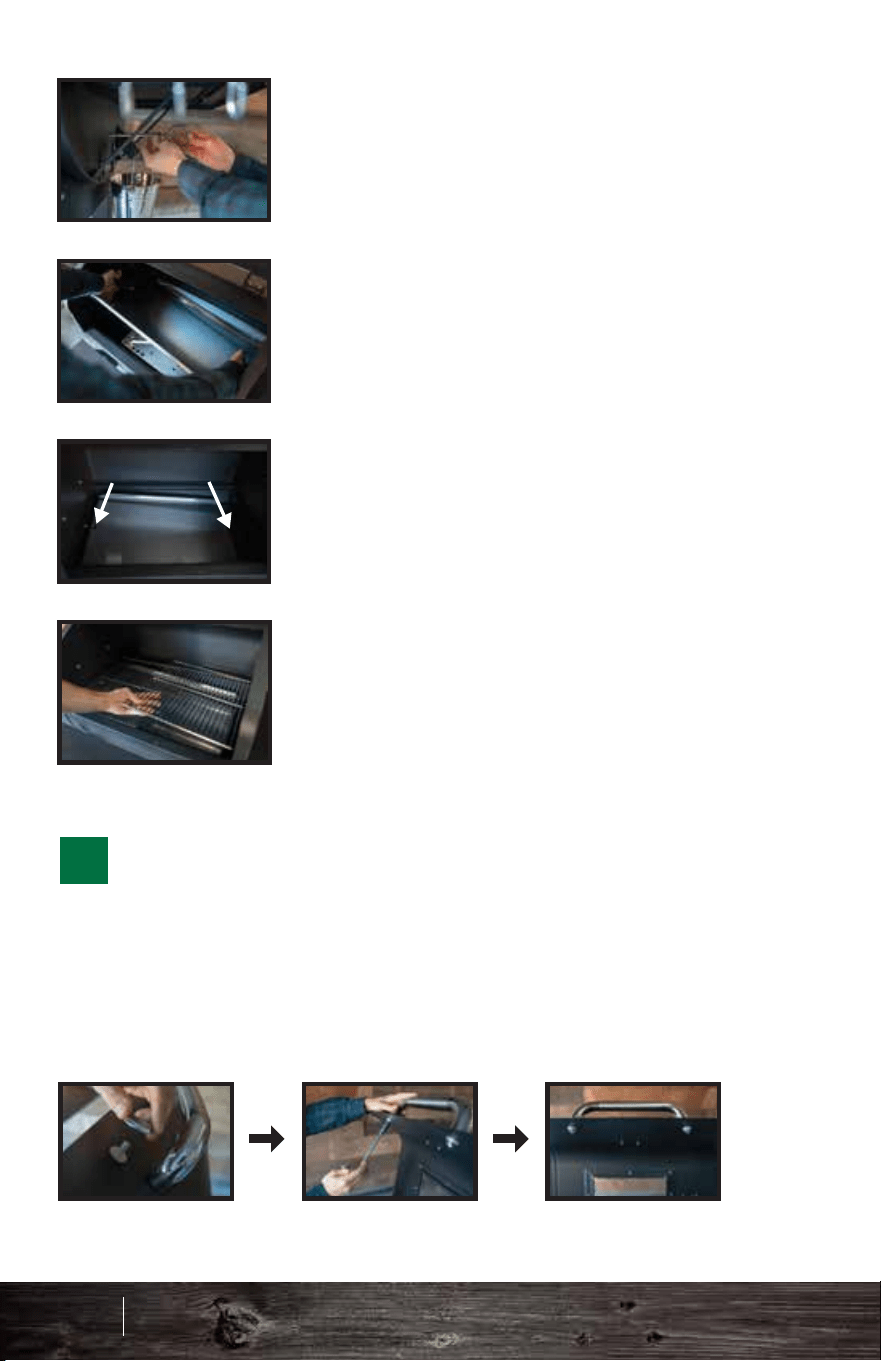
Secure each end of the handle with a thermal insulation
washer between the stainless handle base on the outside
and the metal lid. Insert another one between the bolt and
the metal lid on the inside. This will prevent the handle from
becoming too hot during operation.
INSTALL THE LID HANDLE
9
Line up the bullets with the pins on the side of the grill and
slide to the right. Lift up the side tray support, underneath the
side tray, and push the side tray down to snap it into place.
Fasten the nuts on the hanger hooks to lock them in place.
INSTALL THE SIDE SHELF
Unscrew the 3 bolts from the side of the grill. Install the
chimney using those 3 bolts. Make sure the gasket is
between the chimney and the grill. Finally, twist on the
chimney cap. Make sure there is at least a 1.5 in. open
gap for proper ventilation.
INSTALL THE CHIMNEY
10
INSERT THE PELLET DUMP DOOR
11
Hang the bucket properly on the slot of
the drip spout underneath the side tray.
INSTALL THE DRIP BUCKET
13
12
CIRCLE
LEFT SIDE
HALF-MOON
RIGHT SIDE
Jim Bowie & Daniel Boone Assembly
35 36
Assembly - JB & DB
GREASE TRAY
Insert the grease tray with the circle
cutout on the LEFT SIDE near the
thermal sensor and the half-moon
cutout on the RIGHT SIDE.
GRILL GRATES
Insert the grates so that they sit flush
with the back and front edges of the
grill surface.
Slide the stainless steel door into the
door slot. ALWAYS make sure the
door is shut before filling the hopper
with pellets and while the grill is on.
Make sure the grease tray is installed
correctly to ensure proper grease
drainage and thermal sensor reading.
HEAT SHIELD ADJUSTER
Insert the rod into the hole on the right
side of the grill to align and thread into
the right side of the heat shield.
Secure each end of the handle with a thermal insulation
washer between the stainless handle base on the outside
and the metal lid. Insert another one between the bolt and
the metal lid on the inside. This will prevent the handle from
becoming too hot during operation.
INSTALL THE LID HANDLE
9
Line up the bullets with the pins on the side of the grill and
slide to the right. Lift up the side tray support, underneath the
side tray, and push the side tray down to snap it into place.
Fasten the nuts on the hanger hooks to lock them in place.
INSTALL THE SIDE SHELF
Unscrew the 3 bolts from the side of the grill. Install the
chimney using those 3 bolts. Make sure the gasket is
between the chimney and the grill. Finally, twist on the
chimney cap. Make sure there is at least a 1.5 in. open
gap for proper ventilation.
INSTALL THE CHIMNEY
10
INSERT THE PELLET DUMP DOOR
11
Hang the bucket properly on the slot of
the drip spout underneath the side tray.
INSTALL THE DRIP BUCKET
13
12
CIRCLE
LEFT SIDE
HALF-MOON
RIGHT SIDE
Jim Bowie & Daniel Boone Assembly
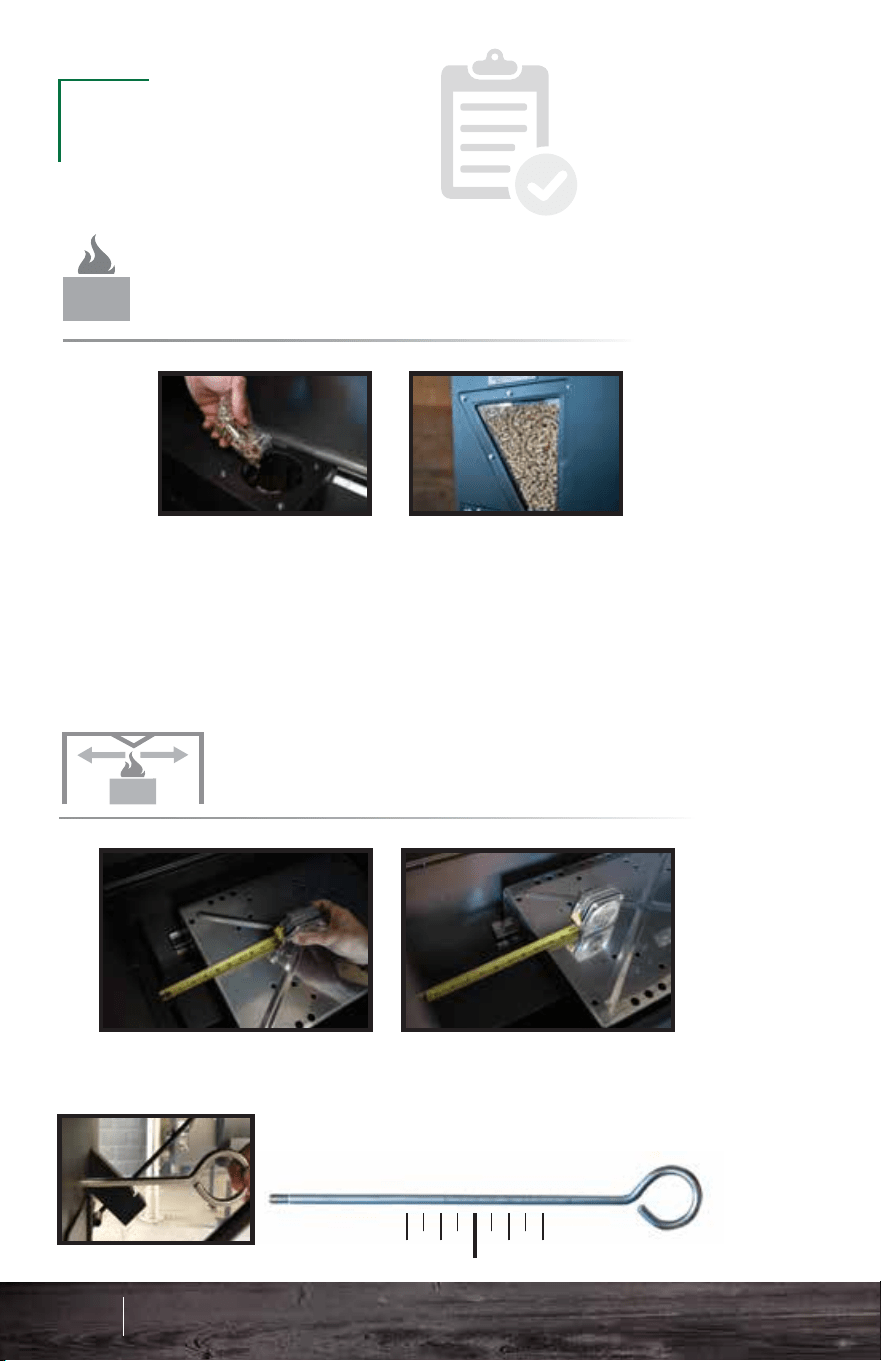
2 1 0 1 2
PREFIRE
CHECK
CHIMNEY CAP
RECOMMENDED INSTALLATION OF THE
IMPORTANT: Install the grease tray with the hole to the left
and half-moon crescent to the right. This ensures proper travel
of grease into your grease trough. For easy cleanup, feel free
to wrap the grease tray in tin foil. MAKE SURE not to cover up
the circle on the left side near the thermal sensor.
GREASE TRAY
RECOMMENDED INSTALLATION OF THE
HEAT SHIELD
RECOMMENDED INSTALLATION OF THE
ALWAYS MAKE SURE THE
CHIMNEY CAP IS OPEN.
Your grill needs to draft. Always
make sure there is at least a
two-finger or 1.5-inch opening.
IMPORTANT: Make sure to pour the contents of the Ziploc bag
into the firebox and fill your hopper with pellets. Priming only
needs to be done the first time running the unit or if the unit
runs out of pellets. See page 40 for an alternative way to prime
the firebox if grill has run out of pellets throughout a cook.
IMPORTANT: Always close the pellet dump, AshVac,
hopper lid, and grill lid before starting the grill.
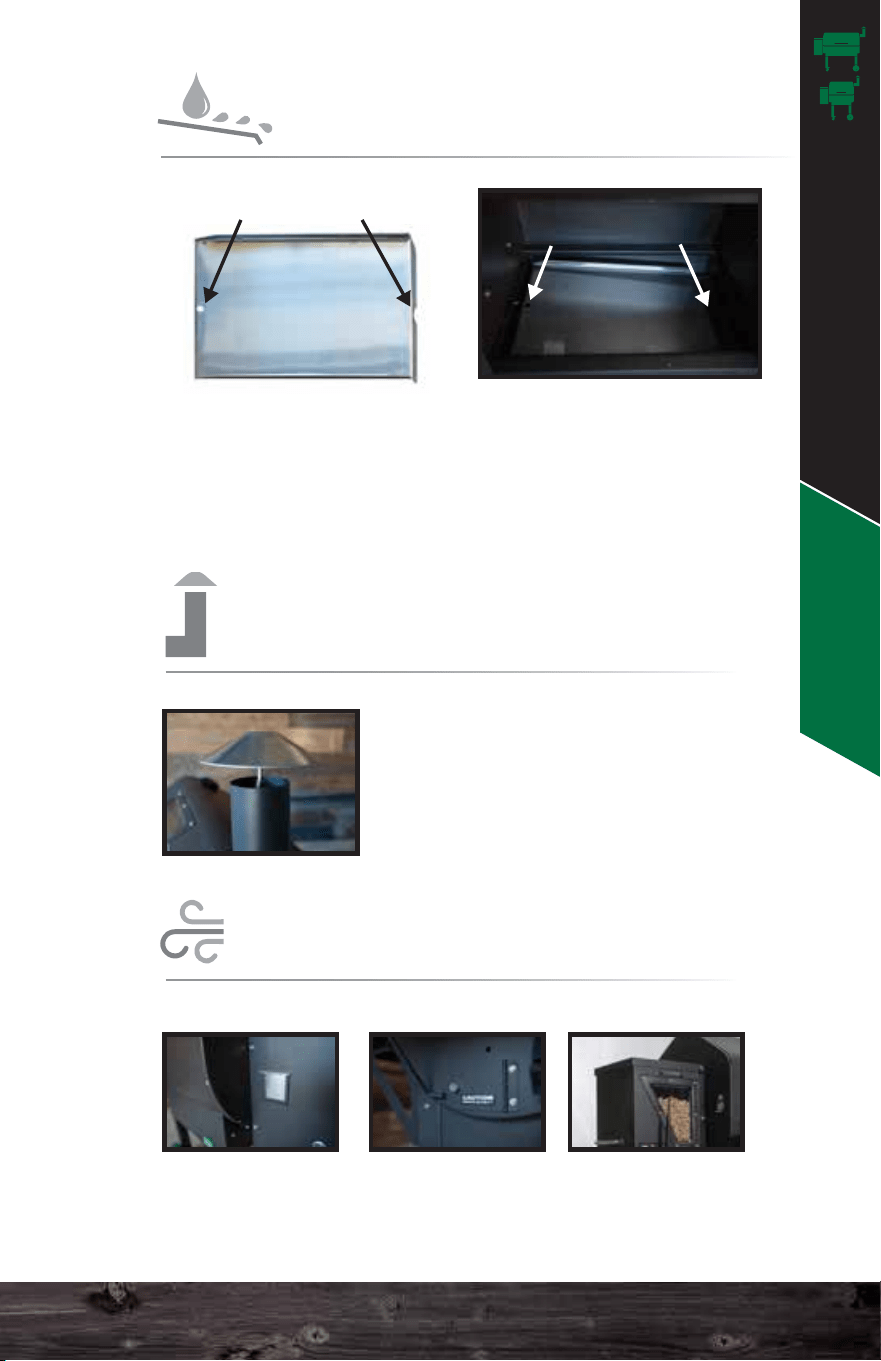
FIREBOX
PRIMING THE
37 38
Prefire Check - JB & DB
Daniel Boone
Approx. 4.25” from the left wall
Jim Bowie
Approx. 9.25” from the left wall
Use the measurement on the heat shield adjustment
rod as a guide. The grill wall should be even with 0”
for optimal heat distribution.
CIRCLE
LEFT SIDE
HALF-MOON
RIGHT SIDE
CIRCLE HALF-MOON
AIRFLOW
CLOSE DOORS & LIDS FOR PROPER
Pellet Dump AshVac Hopper Lid
Jim Bowie & Daniel Boone Prefire Check
2 1 0 1 2
PREFIRE
CHECK
CHIMNEY CAP
RECOMMENDED INSTALLATION OF THE
IMPORTANT: Install the grease tray with the hole to the left
and half-moon crescent to the right. This ensures proper travel
of grease into your grease trough. For easy cleanup, feel free
to wrap the grease tray in tin foil. MAKE SURE not to cover up
the circle on the left side near the thermal sensor.
GREASE TRAY
RECOMMENDED INSTALLATION OF THE
HEAT SHIELD
RECOMMENDED INSTALLATION OF THE
ALWAYS MAKE SURE THE
CHIMNEY CAP IS OPEN.
Your grill needs to draft. Always
make sure there is at least a
two-finger or 1.5-inch opening.
IMPORTANT: Make sure to pour the contents of the Ziploc bag
into the firebox and fill your hopper with pellets. Priming only
needs to be done the first time running the unit or if the unit
runs out of pellets. See page 40 for an alternative way to prime
the firebox if grill has run out of pellets throughout a cook.
IMPORTANT: Always close the pellet dump, AshVac,
hopper lid, and grill lid before starting the grill.
FIREBOX
PRIMING THE
37 38
Prefire Check - JB & DB
Daniel Boone
Approx. 4.25” from the left wall
Jim Bowie
Approx. 9.25” from the left wall
Use the measurement on the heat shield adjustment
rod as a guide. The grill wall should be even with 0”
for optimal heat distribution.
CIRCLE
LEFT SIDE
HALF-MOON
RIGHT SIDE
CIRCLE HALF-MOON
AIRFLOW
CLOSE DOORS & LIDS FOR PROPER
Pellet Dump AshVac Hopper Lid
Jim Bowie & Daniel Boone Prefire Check
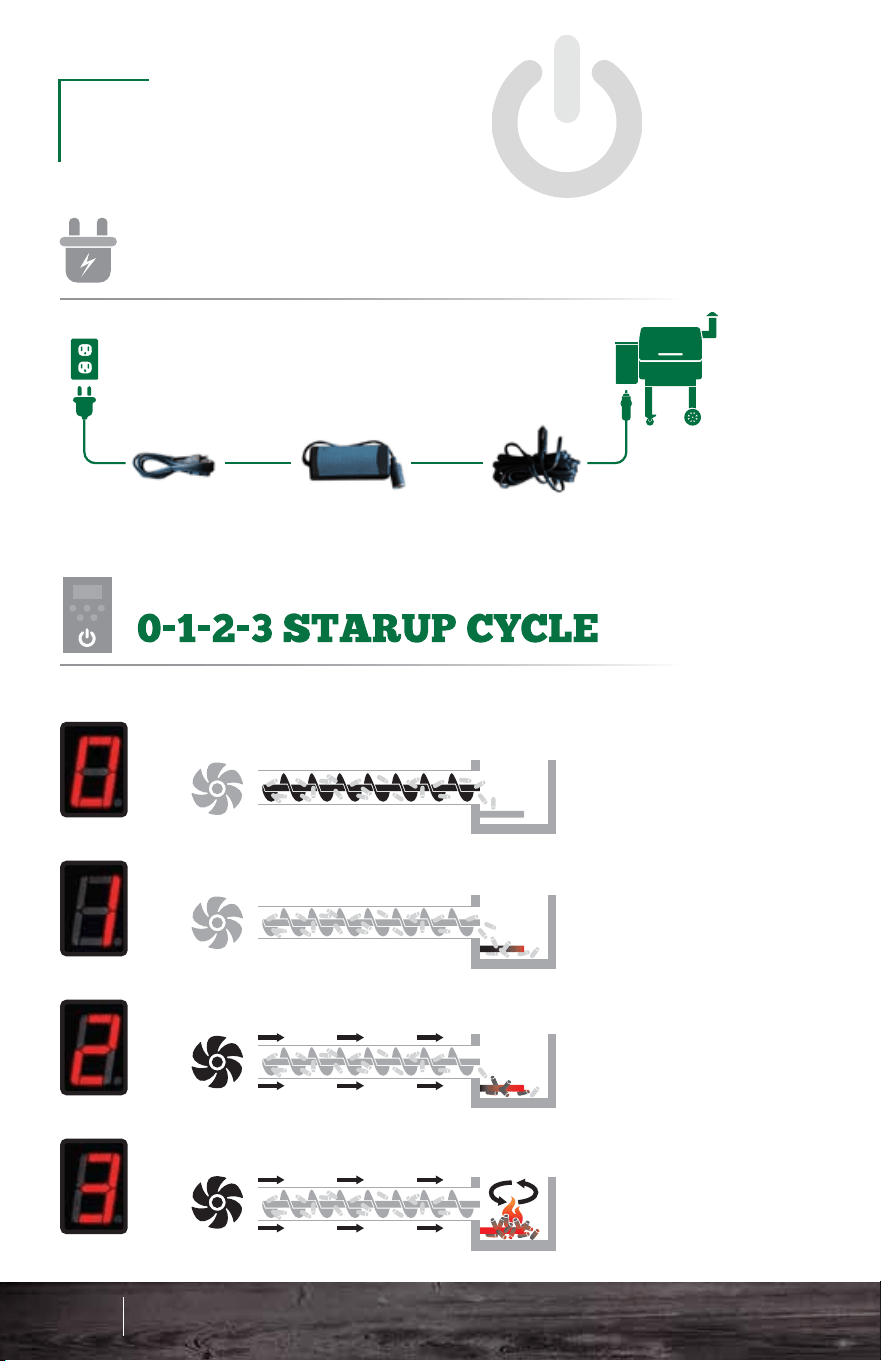
Connect the power cords and adapter as
pictured here. Make sure to keep your cords
safe from the rain or weathering.
OPERATION
GRILL
PLUGGING IN THE
39 40
Operation - JB & DB
GRILL POWER CORDAC/DC ADAPTERAC POWER CORD
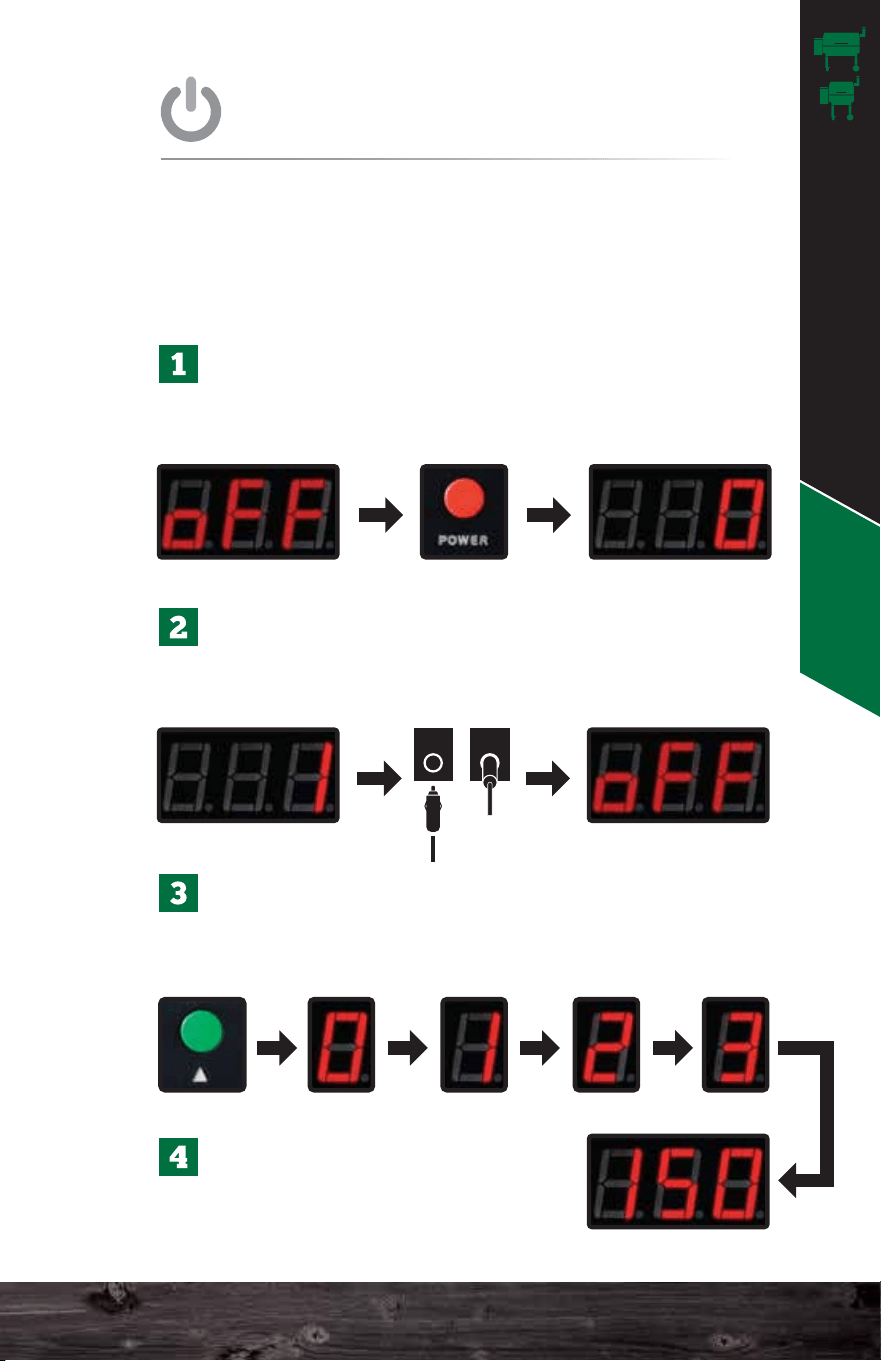
Once the grill is plugged in, the display will read
off. Press the red power button to turn the unit on
so it reads 0.
Once the unit hits number 1 on the screen,
unplug the unit from the back and plug it in
again. The unit should read off on the screen.
Now press the red power button again to restart
the grill. The unit will go through the 0-1-2-3
process and will heat up to 150°F.
This procedure is a way to ensure the auger feeds pellets
and primes the firebox. ONLY perform these steps on the
very first startup or to fill the auger and recharge the
firebox if the grill runs out of pellets during a cook.
Once your grill has reached
150°F you can then adjust to
your desired temperature.
FIRST STARTUP
RECOMMENDED STEPS FOR
Auger turns on and starts pushing pellets into the firebox.
For more detailed startup cycle information, see page 64.
Igniter turns on and starts to heat the pellets.
The combustion fan turns on to ignite the pellets.
The fan and igniter establish proof of fire.
UNDERSTANDING THE
Jim Bowie & Daniel Boone Operation
Connect the power cords and adapter as
pictured here. Make sure to keep your cords
safe from the rain or weathering.
OPERATION
GRILL
PLUGGING IN THE
39 40
Operation - JB & DB
GRILL POWER CORDAC/DC ADAPTERAC POWER CORD
Once the grill is plugged in, the display will read
off. Press the red power button to turn the unit on
so it reads 0.
Once the unit hits number 1 on the screen,
unplug the unit from the back and plug it in
again. The unit should read off on the screen.
Now press the red power button again to restart
the grill. The unit will go through the 0-1-2-3
process and will heat up to 150°F.
This procedure is a way to ensure the auger feeds pellets
and primes the firebox. ONLY perform these steps on the
very first startup or to fill the auger and recharge the
firebox if the grill runs out of pellets during a cook.
Once your grill has reached
150°F you can then adjust to
your desired temperature.
FIRST STARTUP
RECOMMENDED STEPS FOR
Auger turns on and starts pushing pellets into the firebox.
For more detailed startup cycle information, see page 64.
Igniter turns on and starts to heat the pellets.
The combustion fan turns on to ignite the pellets.
The fan and igniter establish proof of fire.
UNDERSTANDING THE
Jim Bowie & Daniel Boone Operation

Huffing noises are normal. The combustion fan, inside
the hopper, will turn off and on regularly to provide the
correct amount of oxygen to the fire to maintain the
set temperature.
Press the red power button to switch the grill into fan mode.
Do not unplug the grill until it has completed fan mode and
the display reads off.
Fan mode is important as it not only cools down the grill
properly but also blows ash out of the firebox for your next
cook.
POWER DOWN
HOW TO CORRECTLY
ODD SOUNDS
THE GRILL WILL MAKE
41 42
Operation - JB & DB
Burn in the grill at 350°F for 30 minutes to remove any
residue from the manufacturing process.
ALWAYS allow the grill to reach 150°F before
adjusting the temperature.
30 mins 350°F
INITIAL BURN
IMPORTANT TIPS FOR
Plug in the grill. The display should read off. Press the
red power button to turn the unit on. The unit will go
through the 0-1-2-3 process and will heat up to 150°F.
ALWAYS allow the grill to reach 150°F before adjusting
to your desired temperature.
IMPORTANT: For first startup please see the previous page.
STARTUP
STANDARD
Jim Bowie & Daniel Boone Operation

AshVac
Use this method to easily clean
out the firebox without removing
any internal parts.
ALWAYS ENSURE THAT THE GRILL IS COLD AND
THE FIRE IS OUT. WAIT AT LEAST ONE HOUR
AFTER TURNING OFF THE GRILL BEFORE USING
THE ASHVAC.
Open the AshVac door located on the right side of the
grill. Place the end of the vacuum hose over the hole of
the clean-out tube that runs into the base of the burn
pot. This will remove most of the excess ash from the
firebox.
GRILL CLEANING
Keep the inside of the grill clean using a shop
vacuum. This will take only a few minutes.
DO NOT DO THIS UNTIL THE GRILL AND ALL
ASHES IN THE FIREBOX ARE STONE COLD!
Remove the interior parts. Vacuum any ash and
residue out of the base and the firebox.
RECOMMENDED REGULAR
AIR TEMPERATURE
UNDERSTANDING
ABOUT
EVERY
2-3 BAGS
80-100 LBS
The PT200 Platinum Sensor sends data to the
computer. This “brain” analyzes the data and adjusts
the airflow and pellet fuel flow to maintain the set
temperature. Many things affect the data gathered by
the sensor–opening the lid, wind, grease splatter,
humidity, altitude, and gravity (if the grill is not on level
ground).
The computer analyzes all the erratic information and
averages it over time. Then, it displays the best result
as the most accurate representation of the grill’s
current temperature. This is why an instantaneous air
temperature reading from a third-party product does
not provide much useful information.
°F
43 44
Operation - JB & DB
Jim Bowie & Daniel Boone Operation
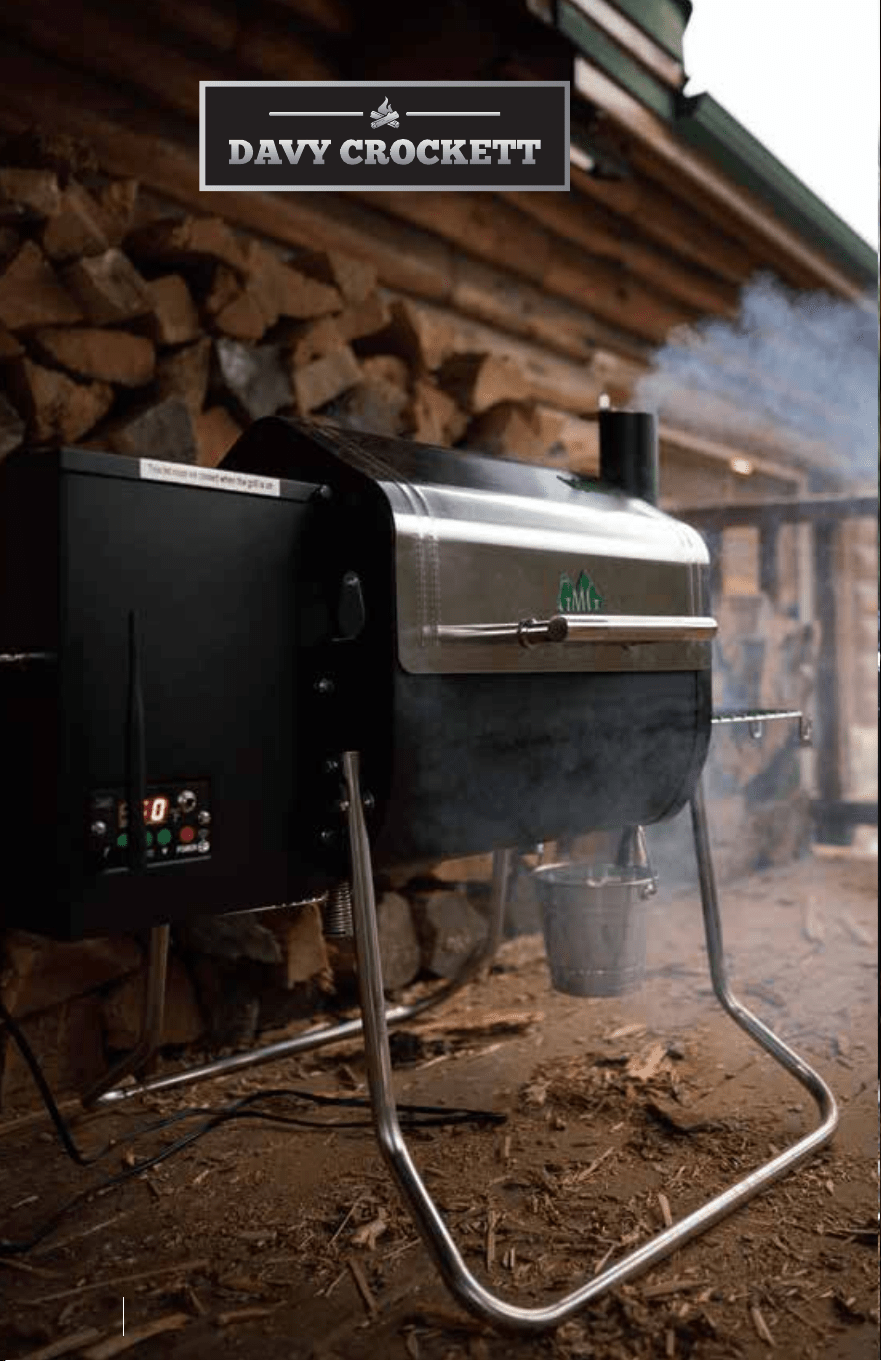
Davy Crockett
Davy Crockett Safety
45 46
Davy Crockett
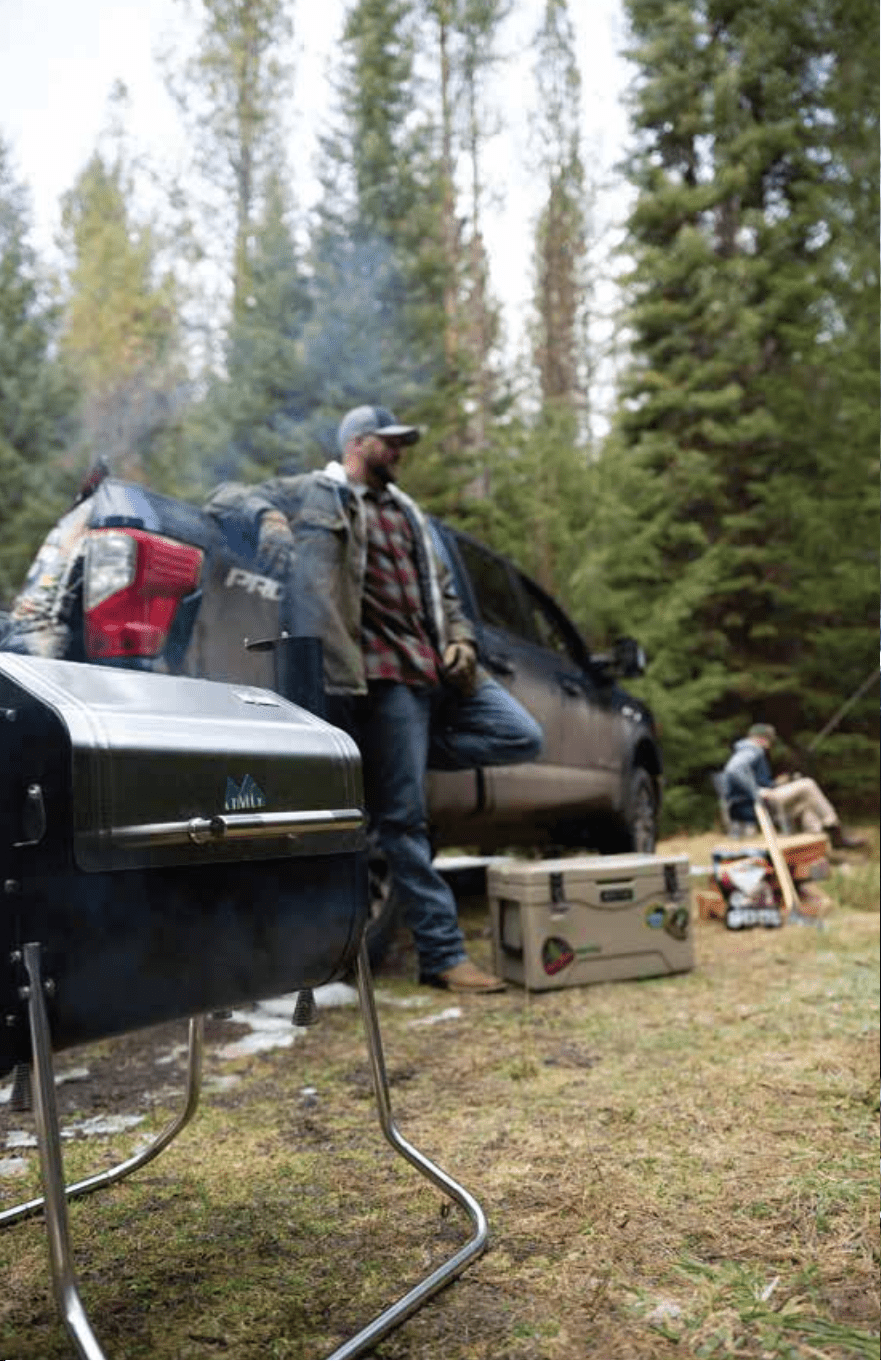
Davy Crockett
Davy Crockett Safety
45 46
Davy Crockett
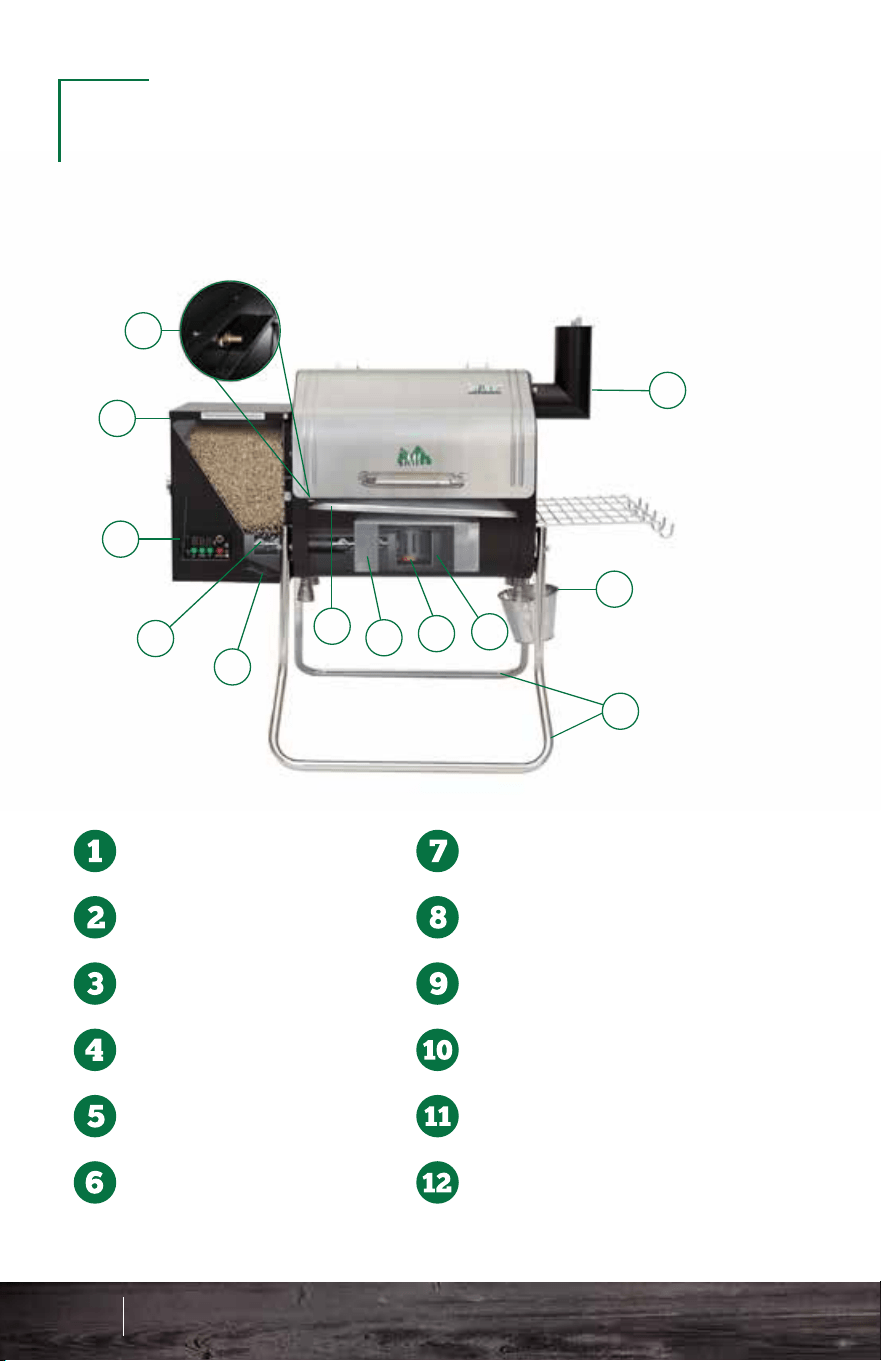
1
2
3
4
5
6
7
8
9
10
11
12
Thermal Sensor
Pellet Hopper
Digital Controller
Auger
Combustion Fan
Grease Tray
Heat Shield
Igniter
Firebox
EZ-Fold & Carry Legs
Drip System
Chimney
Antenna Connection
Digital Readout Display
Displays temperature and status codes:
Temperature Up
Food Temperature
Food Probe
Connection
Power Switch
Signal Indicator Light Temperature Down
OFF - Grill is off
FAN - Fan Mode
UPD - Updated
NFD - No Food Detected
FAL - Ignition Failure
SEN - Thermal Sensor Issue
OUL - Electrical Short
EO1 - Fan Motor Overload
EO2 - Auger Motor Overload
E04 - Igniter Overload
E08 - Low Voltage
DIGITAL
CONTROLLER
1
2
3
4
5 6
7
8
GET TO KNOW YOUR
WOOD PELLET GRILL
47 48
Know Your Grill - DC Digital Controller - DC
Davy Crockett Know Your Grill
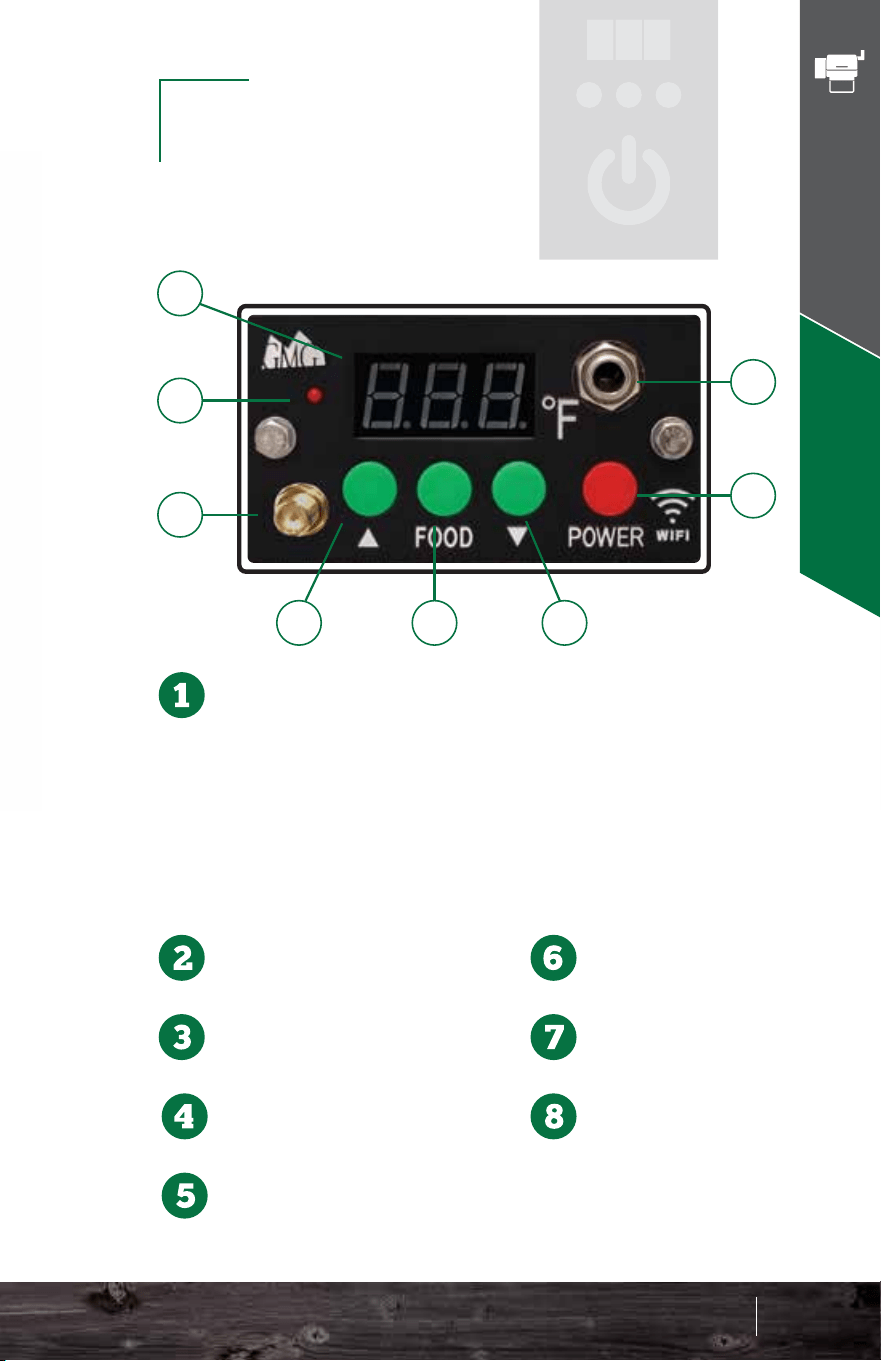
1
2
3
4
5
6
7
8
9
10
11
12
Thermal Sensor
Pellet Hopper
Digital Controller
Auger
Combustion Fan
Grease Tray
Heat Shield
Igniter
Firebox
EZ-Fold & Carry Legs
Drip System
Chimney
Antenna Connection
Digital Readout Display
Displays temperature and status codes:
Temperature Up
Food Temperature
Food Probe
Connection
Power Switch
Signal Indicator Light Temperature Down
OFF - Grill is off
FAN - Fan Mode
UPD - Updated
NFD - No Food Detected
FAL - Ignition Failure
SEN - Thermal Sensor Issue
OUL - Electrical Short
EO1 - Fan Motor Overload
EO2 - Auger Motor Overload
E04 - Igniter Overload
E08 - Low Voltage
DIGITAL
CONTROLLER
1
2
3
4
5 6
7
8
GET TO KNOW YOUR
WOOD PELLET GRILL
47 48
Know Your Grill - DC Digital Controller - DC
Davy Crockett Know Your Grill
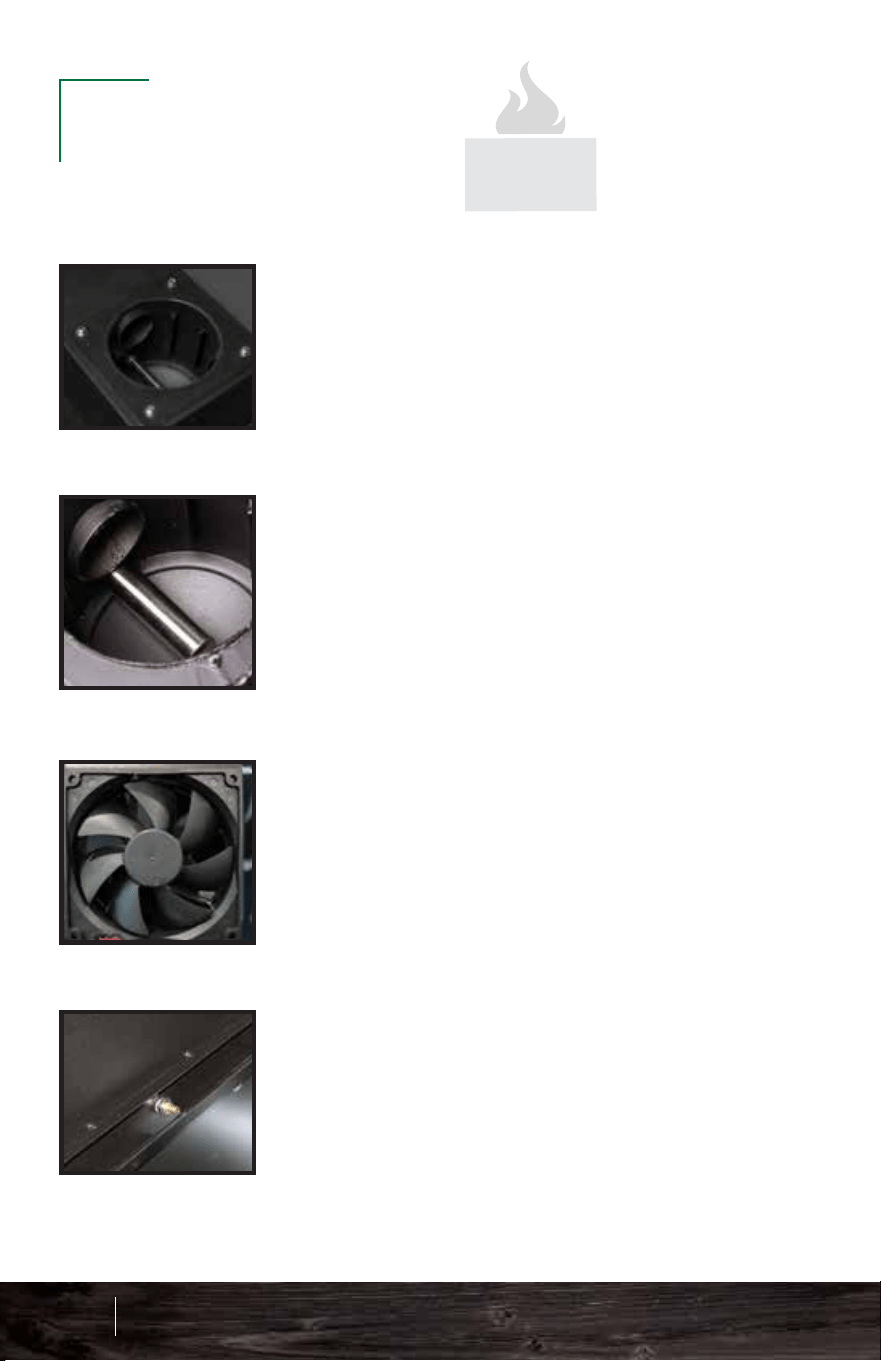
Firebox: This sits at the bottom of the
grill, and pellets arrive into it via an
auger tube attached to its left side. This
is also called a burn pot.
Igniter: You will find the igniter in the
firebox. It should protrude about 1.5–2”
into the firebox. You can adjust this by
loosening the set screw located at the
left side of the firebox on the igniter
tube. However, this should rarely be
necessary. This is also called a hot rod.
Combustion Fan: This fan is located
under the hopper and blows air into the
firebox (burn pot). The speed of this fan
will vary during normal operation.
Thermal Sensor: This device sends data
to the computer ten times per second.
The computer then averages these
readings over slightly longer periods of
time and adjusts the air and pellet flow to
maintain an accurate temperature in the
cavity.
Grease tray: This slopes downhill
from left to right and carries the
drippings from your food into the
grease bucket for easy disposal.
Make sure the half-moon cutout
is on the LEFT SIDE.
Meat Probe: To use this feature, just plug the connector
into the receptacle on the front of the control panel.
Lift the stainless flap on the left side of the grill and push
the probe through the hole. Then, insert the probe into
the center of the food you are cooking. When you press
the FOOD button on the control panel, it will display the
temperature of whatever the probe touches, but this
process takes a minute or two to stabilize.
To return to the grill temperature display, simply press the
FOOD button again.
If you do not have the probe installed in the control panel,
then your digital display will read “NFD” (no food) when
you press the FOOD button.
The probe is not suitable for reading temperatures above
257°F (150°C).
KEY GRILL
COMPONENTS
Key Grill Components - DC
49 50
HALF MOON
LEFT SIDE
Davy Crockett Know Your Grill
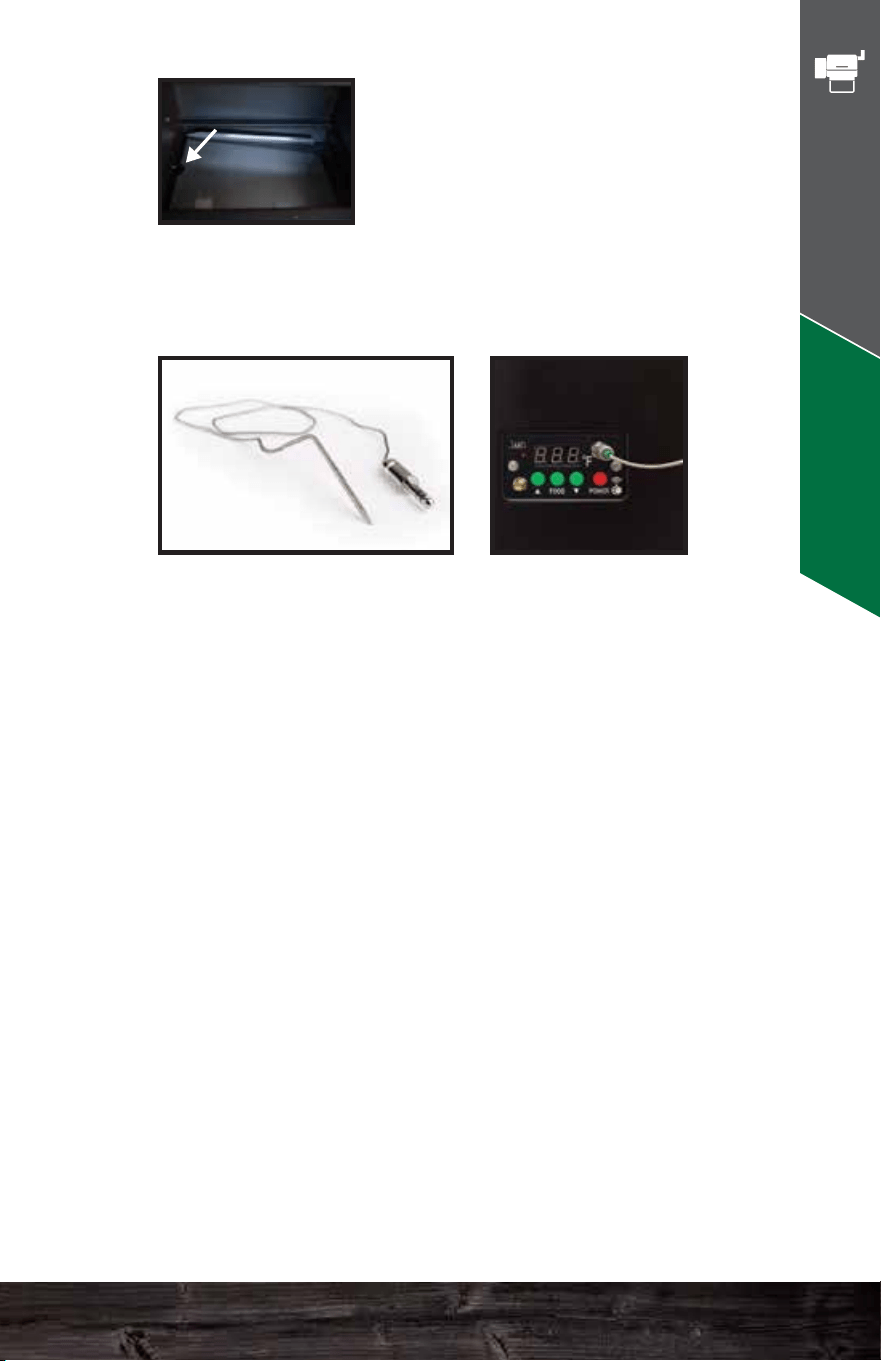
Firebox: This sits at the bottom of the
grill, and pellets arrive into it via an
auger tube attached to its left side. This
is also called a burn pot.
Igniter: You will find the igniter in the
firebox. It should protrude about 1.5–2”
into the firebox. You can adjust this by
loosening the set screw located at the
left side of the firebox on the igniter
tube. However, this should rarely be
necessary. This is also called a hot rod.
Combustion Fan: This fan is located
under the hopper and blows air into the
firebox (burn pot). The speed of this fan
will vary during normal operation.
Thermal Sensor: This device sends data
to the computer ten times per second.
The computer then averages these
readings over slightly longer periods of
time and adjusts the air and pellet flow to
maintain an accurate temperature in the
cavity.
Grease tray: This slopes downhill
from left to right and carries the
drippings from your food into the
grease bucket for easy disposal.
Make sure the half-moon cutout
is on the LEFT SIDE.
Meat Probe: To use this feature, just plug the connector
into the receptacle on the front of the control panel.
Lift the stainless flap on the left side of the grill and push
the probe through the hole. Then, insert the probe into
the center of the food you are cooking. When you press
the FOOD button on the control panel, it will display the
temperature of whatever the probe touches, but this
process takes a minute or two to stabilize.
To return to the grill temperature display, simply press the
FOOD button again.
If you do not have the probe installed in the control panel,
then your digital display will read “NFD” (no food) when
you press the FOOD button.
The probe is not suitable for reading temperatures above
257°F (150°C).
KEY GRILL
COMPONENTS
Key Grill Components - DC
49 50
HALF MOON
LEFT SIDE
Davy Crockett Know Your Grill
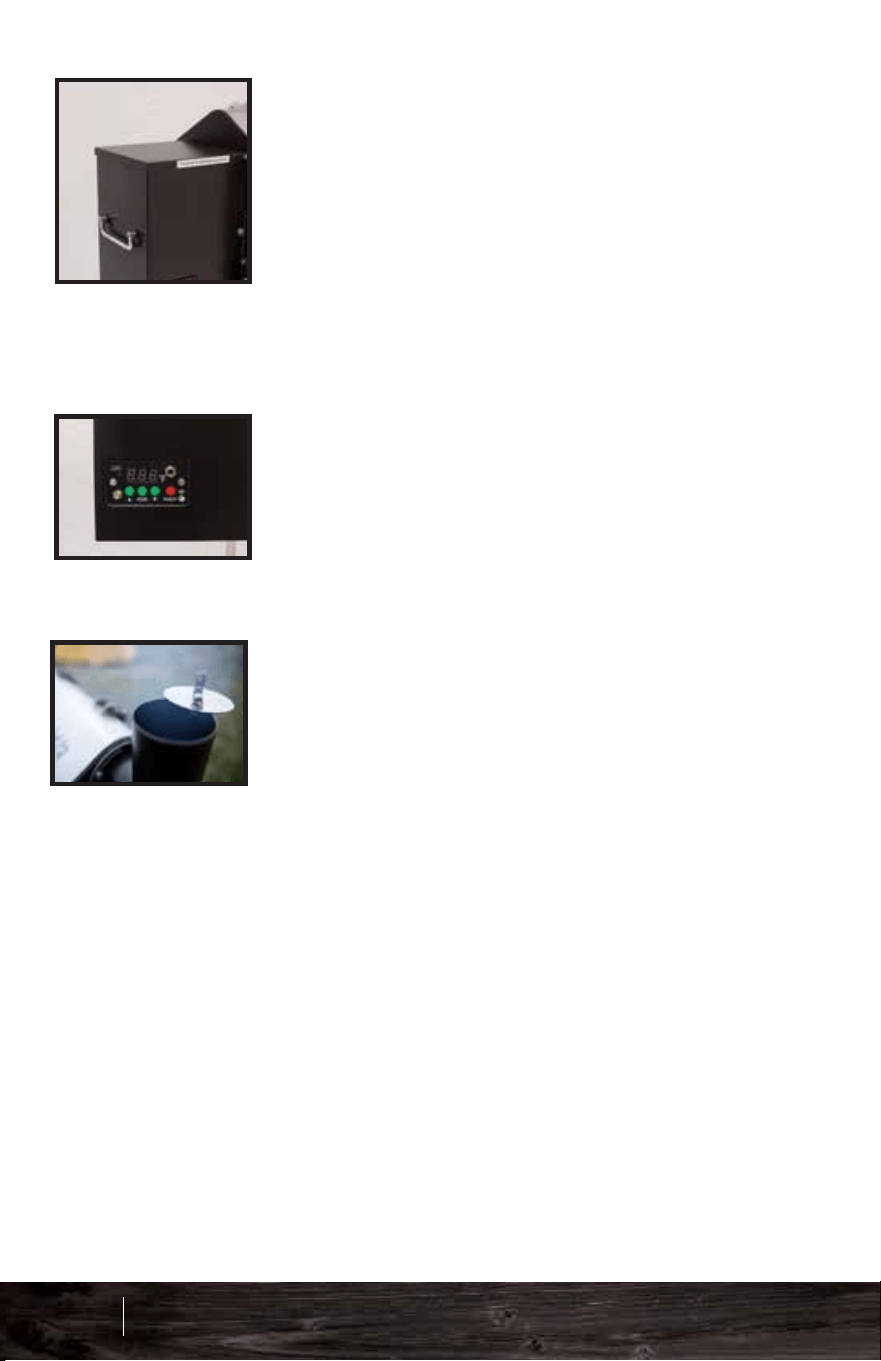
Chimney Cap: Always leave the cap
open. Your grill needs to draft.
Controller: Your controller is a
state-of-the-art PID (calculus-based)
computer that will keep your grill at a
reasonably steady temperature.
Hopper Lid: Keep the hopper lid
closed at all times while your grill is on.
Obviously, if you need to refill the
hopper, you can make a brief
exception. The fan inside the hopper
must blow air into the auger tube to
prevent burn-back from the firepot. If
the hopper lid stays open, this air
pressure just escapes into the
atmosphere.
Many of our dealers preassemble the grills, so this
section will not apply to you in that case.
If you bought your grill unassembled, then you may
use this manual to help you put your grill together. Or
if you’re a visual learner check out our Assembly &
Setup section on our videos page:
www.greenmountaingrills.com/videos
INSTALL THE LEGS
INSTALL THE CHIMNEY
REVERSE THE HANDLE
INSERT THE PARTS
TOOLS NEEDED:
10 mm wrench or socket
ASSEMBLY
51 52
Key Grill Components - DC
Davy Crockett Assembly
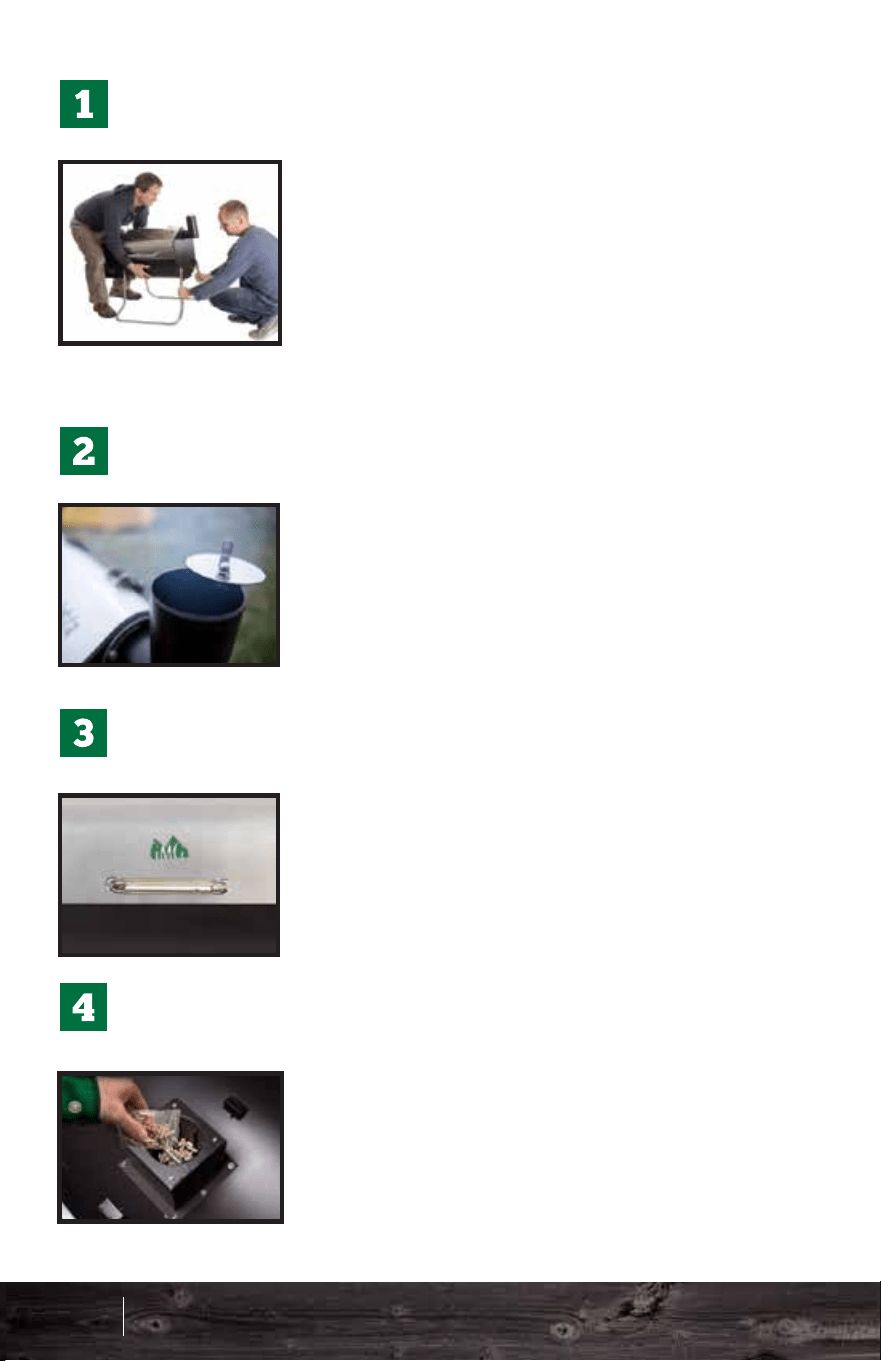
Reverse the handle so it attaches
outside the lid of the grill. Make sure
the thermal isolation washers go
between the metal trim ring and the
lid on the outside, and between the
washer and lid on the inside.
Heat Shield: The slots go in the
front and rear to match the metal
strips inside the grill which hold it
in place. See Quick Start Guide
for proper alignment.
Always use two people, one on
each end, to fold open or close
the legs. This is not a one-person
job. If you plan to leave the grill
more or less permanently placed
on a table, then you might find it
more convenient just to remove
the legs.
Hang the grease pail on the right
side of the grill.
Bolt the chimney into position.
Make sure the rain cap is
always wide open when
cooking.
Grates:
Insert the grates as pictured.
IMPORTANT
Grease tray: Install the grease
tray with the half-moon cutout to
the left.
Important: Pour the contents of the
Ziploc bag into the firebox before you
install the rest of the parts. This is part
of the initial starting procedure.
Important:
Make sure to fill the hopper with
pellets as well before starting
your grill.
REVERSE THE HANDLE
INSERT THE PARTS
HALF MOON
LEFT SIDE
Recommended Installation:
Approx. 4” from the inside left
wall.
INSTALL THE LEGS
INSTALL THE CHIMNEY
53 54
Assembly - DC
Davy Crockett Assembly
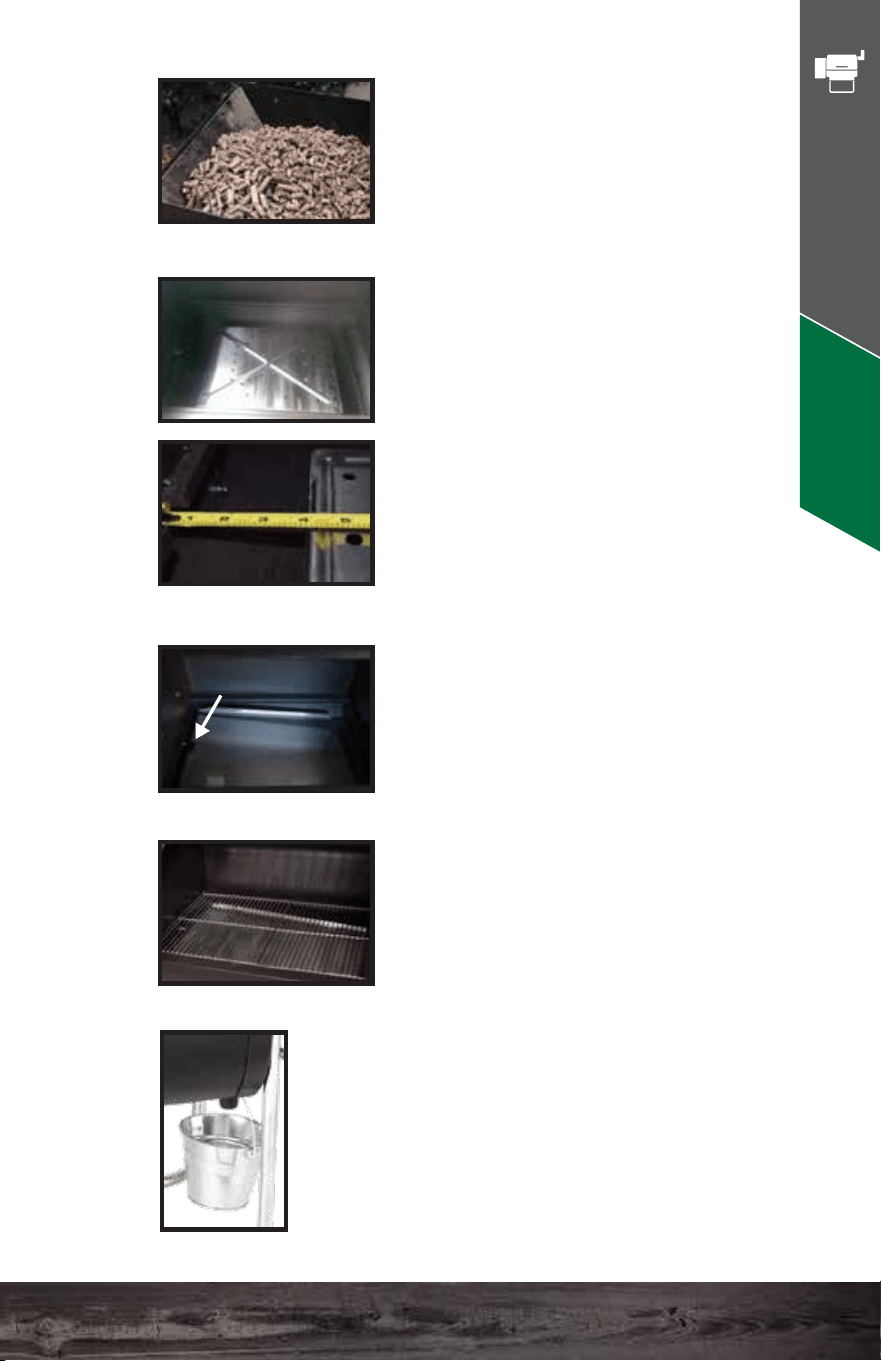
Reverse the handle so it attaches
outside the lid of the grill. Make sure
the thermal isolation washers go
between the metal trim ring and the
lid on the outside, and between the
washer and lid on the inside.
Heat Shield: The slots go in the
front and rear to match the metal
strips inside the grill which hold it
in place. See Quick Start Guide
for proper alignment.
Always use two people, one on
each end, to fold open or close
the legs. This is not a one-person
job. If you plan to leave the grill
more or less permanently placed
on a table, then you might find it
more convenient just to remove
the legs.
Hang the grease pail on the right
side of the grill.
Bolt the chimney into position.
Make sure the rain cap is
always wide open when
cooking.
Grates:
Insert the grates as pictured.
IMPORTANT
Grease tray: Install the grease
tray with the half-moon cutout to
the left.
Important: Pour the contents of the
Ziploc bag into the firebox before you
install the rest of the parts. This is part
of the initial starting procedure.
Important:
Make sure to fill the hopper with
pellets as well before starting
your grill.
REVERSE THE HANDLE
INSERT THE PARTS
HALF MOON
LEFT SIDE
Recommended Installation:
Approx. 4” from the inside left
wall.
INSTALL THE LEGS
INSTALL THE CHIMNEY
53 54
Assembly - DC
Davy Crockett Assembly
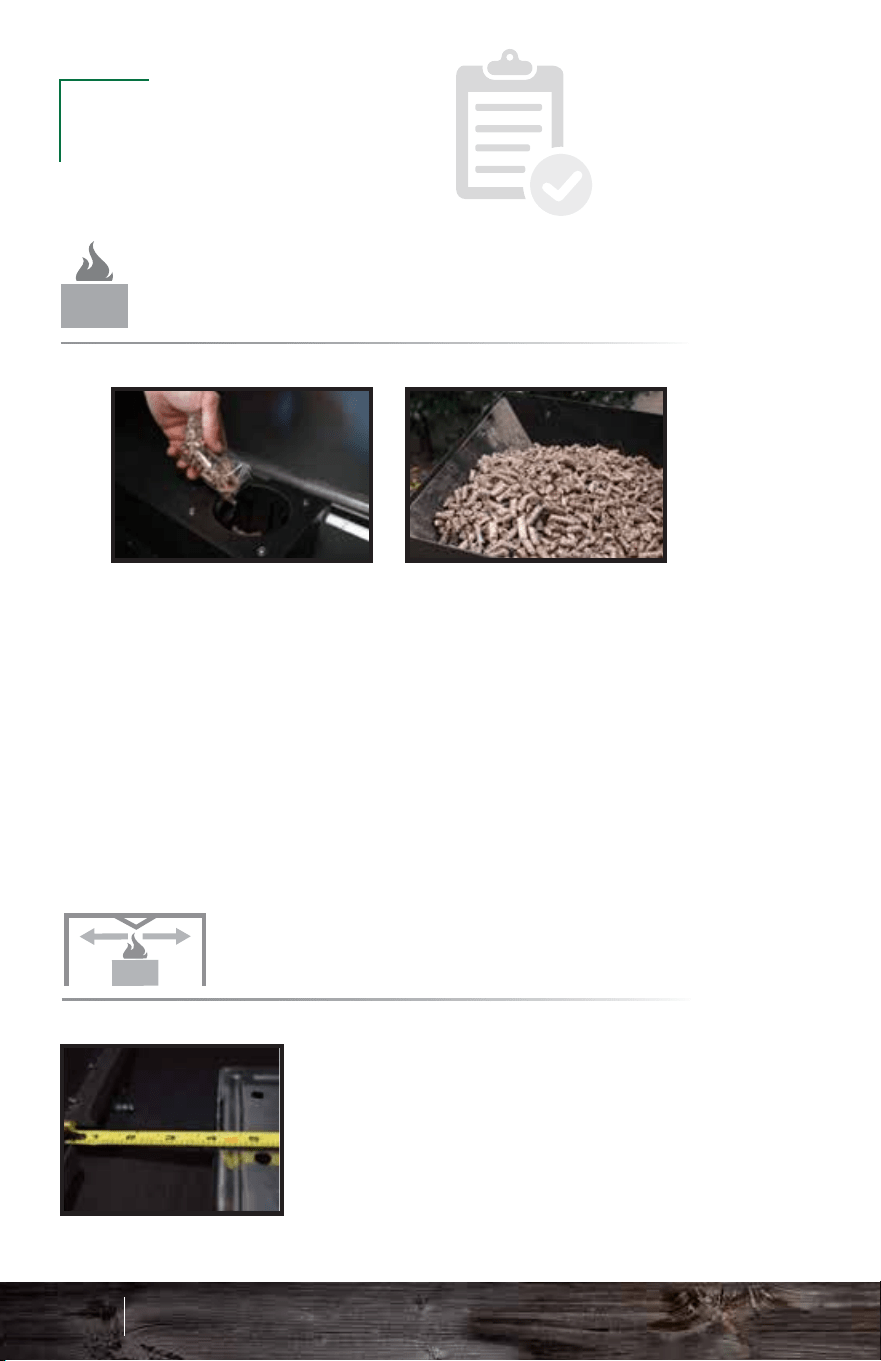
HALF-MOON
LEFT SIDE
IMPORTANT
Make sure to pour the contents of the Ziploc bag into the
firebox and fill your hopper with pellets. Priming only
needs to be done the first time running the unit or if the
unit runs out of pellets.
See page 59 for an alternative way to prime the firebox if
grill has run out of pellets throughout a cook.
CHIMNEY CAP
RECOMMENDED INSTALLATION OF THE
Install the grease tray correctly according to the
picture, before grilling. This ensures proper travel of
grease into your grease trough and down into your
grease bucket. For easy cleanup, feel free to wrap
the grease tray in tin foil.
MAKE SURE not to cover up
the half-moon cut out on the left side near the
thermal sensor.
GREASE TRAY
RECOMMENDED INSTALLATION OF THE
Davy Crockett
Approx. 4” from the inside left wall.
FIREBOX
PRIMING YOUR
HEAT SHIELD
RECOMMENDED INSTALLATION OF THE
It is imperative that your chimney cap is open. A fire needs
oxygen to burn hot and efficiently.
ALWAYS make sure your lid is open when grilling.
2
3
55 56
Prefire Check - DC
PREFIRE
CHECK
Davy Crockett Prefire Check
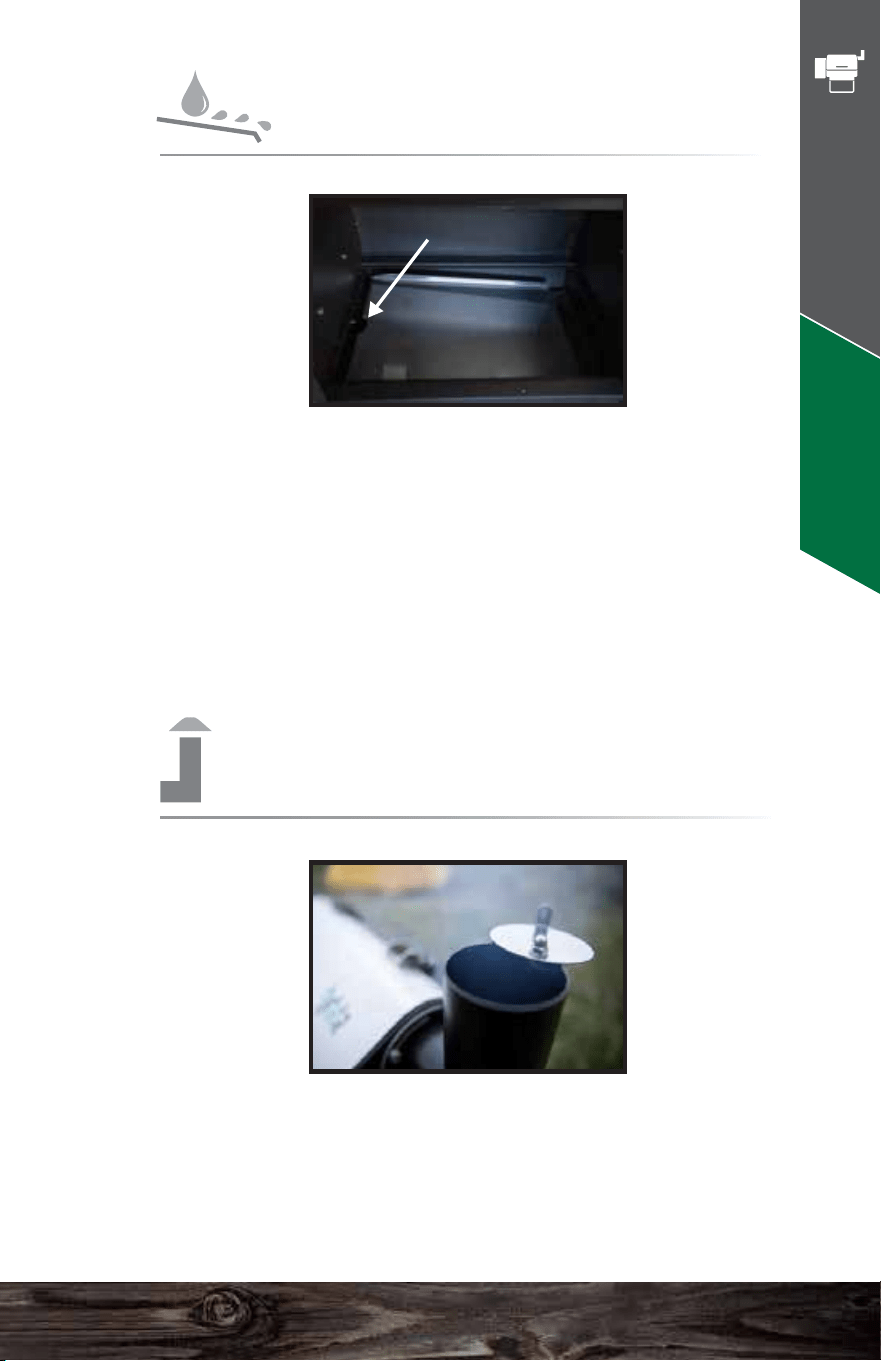
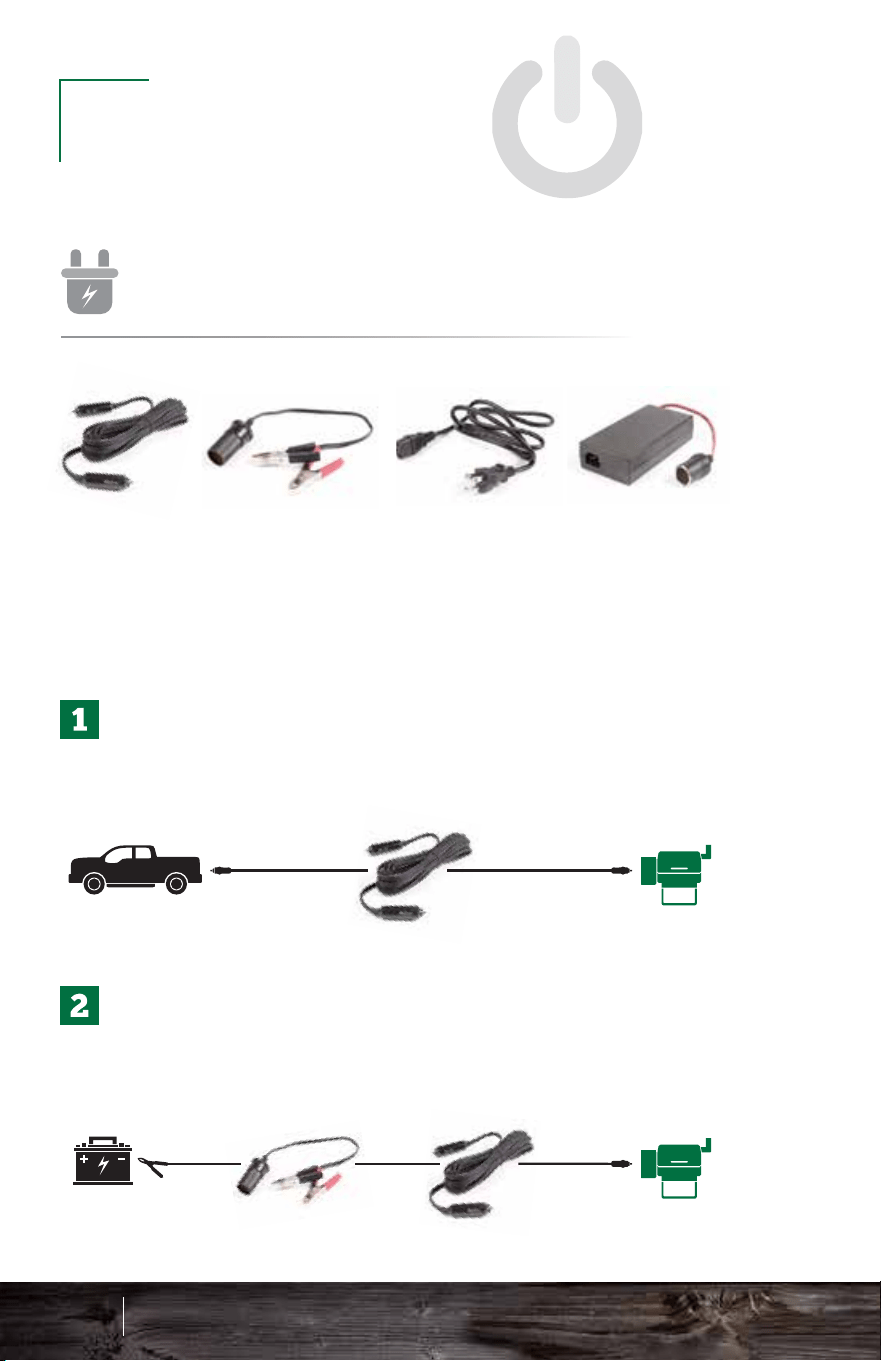
VEHICLE
Plug one end of the vehicle adapter (A) into the back of
the grill and the other into a vehicle’s lighter/cell phone
connector.
BATTERY
Connect A and B, and plug the adapter end into the back
of the grill and connect the alligator clips to a 12-volt
battery (red to positive, black to negative).
WALL OUTLET
Plug C into D and A into D and plug C into a
110-volt wall outlet and the adapter (A) into the
back of the grill.
A B C D
OPERATION
GRILL
PLUGGING IN YOUR
3 POWER OPTIONS
57 58
Operation - DC
GRILL
POWER CORD
BATTERY
ALLIGATOR CLIPS
AC POWER
CORD
AC/DC
ADAPTER
Auger turns on and starts pushing pellets into the firebox.
Igniter turns on and starts to heat the pellets.
The combustion fan turns on to ignite the pellets.
The fan and igniter establish proof of fire.`
UNDERSTANDING THE
For more detailed startup cycle information, see page 64.
ALWAYS make sure to keep your cords safe from the rain
or weathering.
Davy Crockett Operation
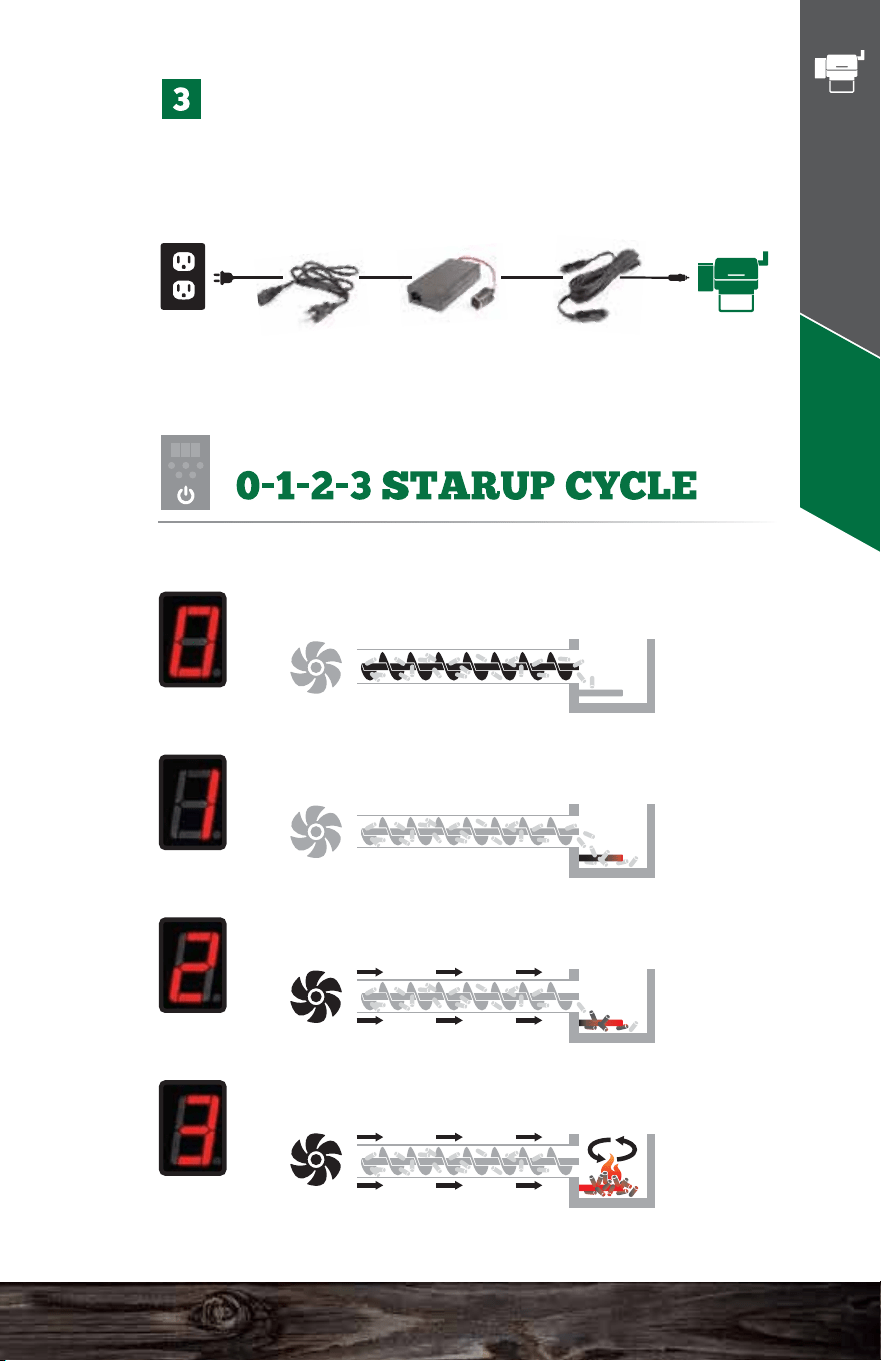
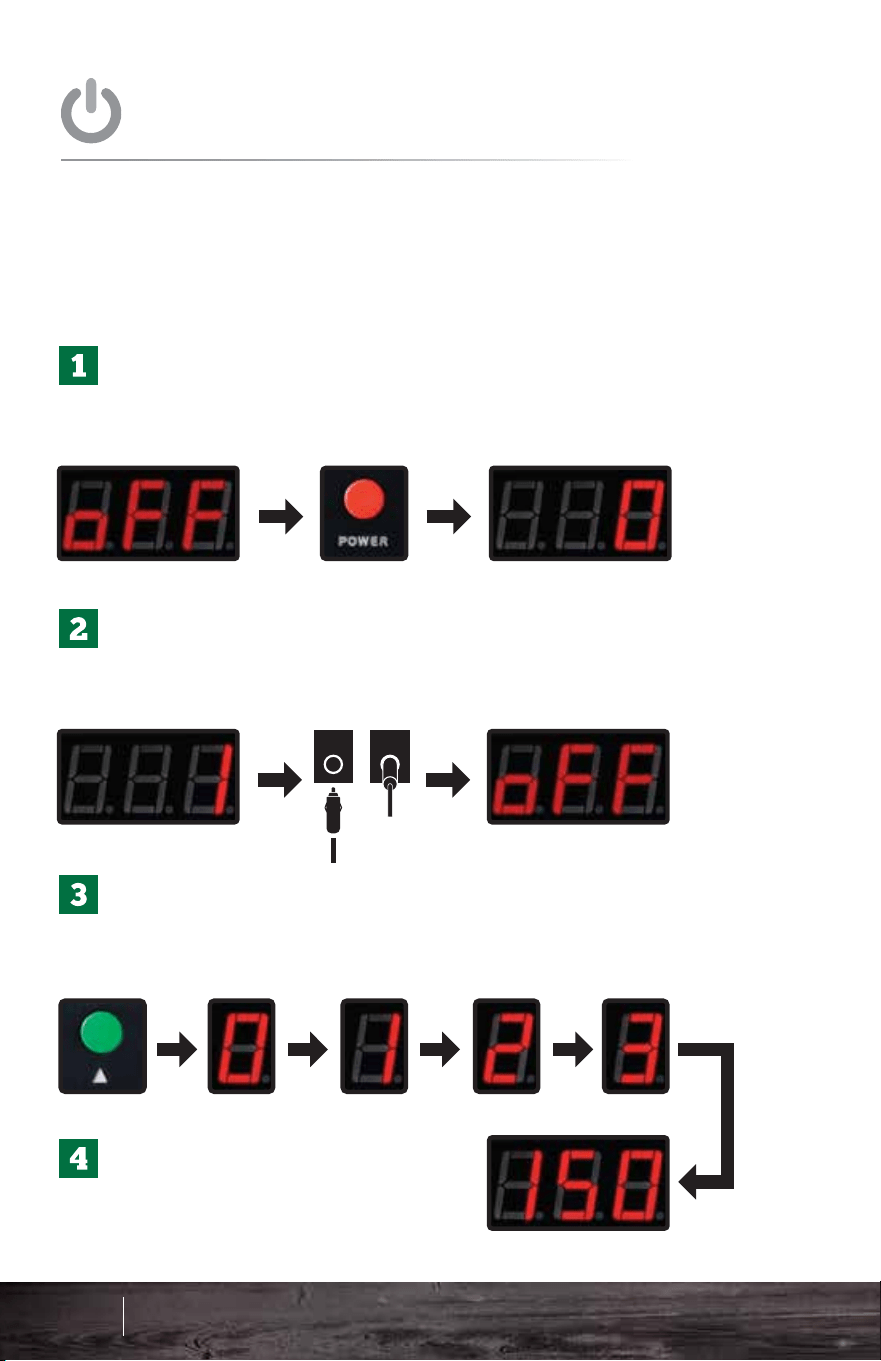
Once the grill is plugged in, the display will read
off. Press the red power button to turn the unit on
so it reads 0.
Once the unit hits number 1 on the screen,
unplug the unit from the back and plug it in
again. The unit should read “off” on the screen.
Now press the red power button again to restart
the grill. The unit will go through the 0-1-2-3
process and will heat up to 150°F.
This procedure is a way to ensure the auger feeds pellets
and primes the firebox. ONLY perform these steps on the
very first startup or to fill the auger and recharge the
firebox if the grill runs out of pellets during a cook.
Once your grill has reached
150°F you can then adjust to
your desired temperature.
FIRST STARTUP
RECOMMENDED STEPS FOR
Burn in the grill at 350°F for 30 minutes to remove any
residue from the manufacturing process.
ALWAYS allow the grill to reach 150°F before
adjusting temperatures up.
30 mins 350°F
INITIAL BURN
IMPORTANT TIPS FOR
Plug in the grill. The display should read off.
Press the red power button to turn the unit on.
The unit will go through the 0-1-2-3 process
and will heat up to 150°F.
ALWAYS allow the grill to reach 150°F before
adjusting to your desired temperature.
IMPORTANT: For first startup please see the previous page.
STARTUP
STANDARD
59 60
Operation - DC
Davy Crockett Operation
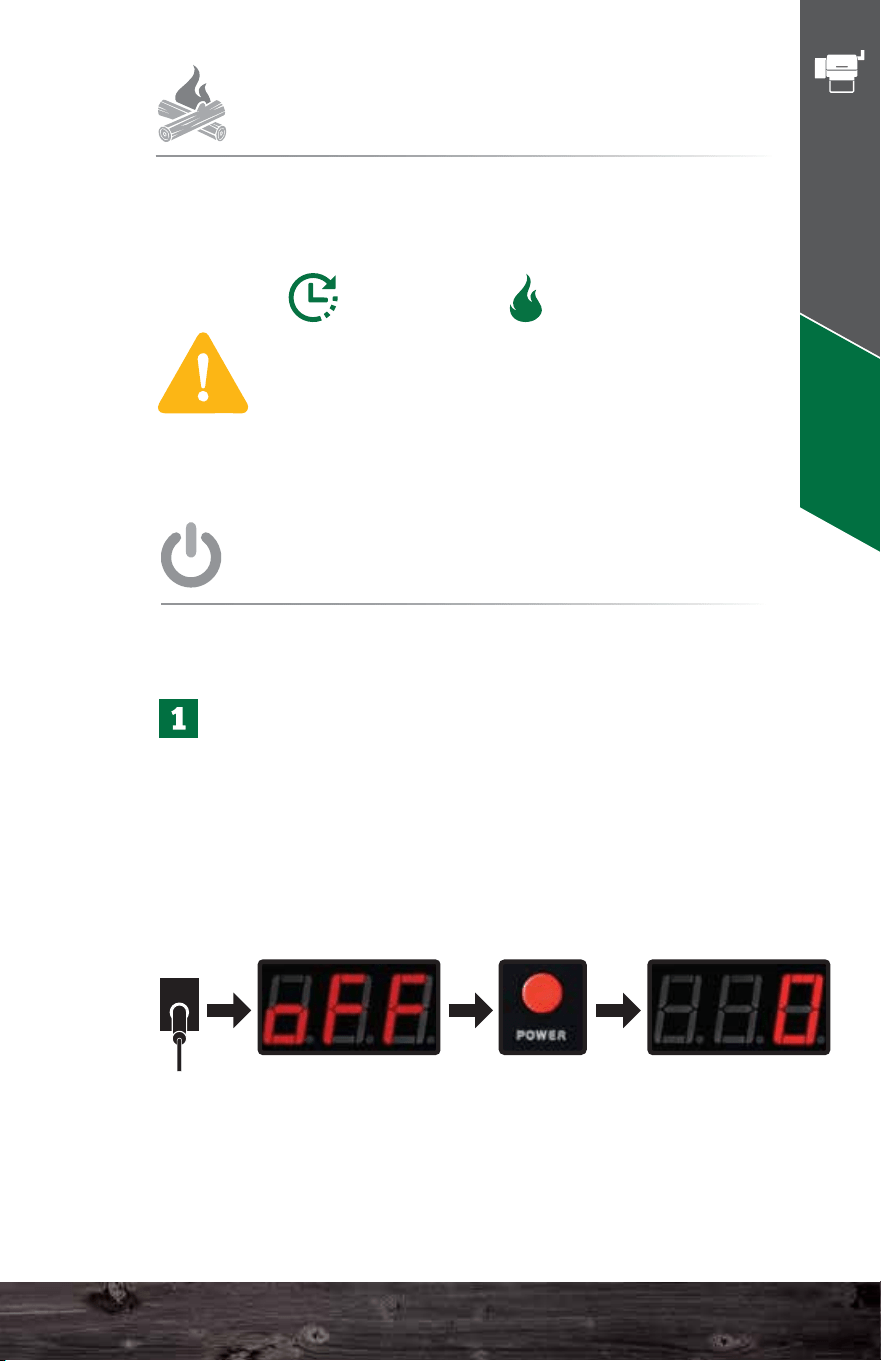
Once the grill is plugged in, the display will read
off. Press the red power button to turn the unit on
so it reads 0.
Once the unit hits number 1 on the screen,
unplug the unit from the back and plug it in
again. The unit should read “off” on the screen.
Now press the red power button again to restart
the grill. The unit will go through the 0-1-2-3
process and will heat up to 150°F.
This procedure is a way to ensure the auger feeds pellets
and primes the firebox. ONLY perform these steps on the
very first startup or to fill the auger and recharge the
firebox if the grill runs out of pellets during a cook.
Once your grill has reached
150°F you can then adjust to
your desired temperature.
FIRST STARTUP
RECOMMENDED STEPS FOR
Burn in the grill at 350°F for 30 minutes to remove any
residue from the manufacturing process.
ALWAYS allow the grill to reach 150°F before
adjusting temperatures up.
30 mins 350°F
INITIAL BURN
IMPORTANT TIPS FOR
Plug in the grill. The display should read off.
Press the red power button to turn the unit on.
The unit will go through the 0-1-2-3 process
and will heat up to 150°F.
ALWAYS allow the grill to reach 150°F before
adjusting to your desired temperature.
IMPORTANT: For first startup please see the previous page.
STARTUP
STANDARD
59 60
Operation - DC
Davy Crockett Operation
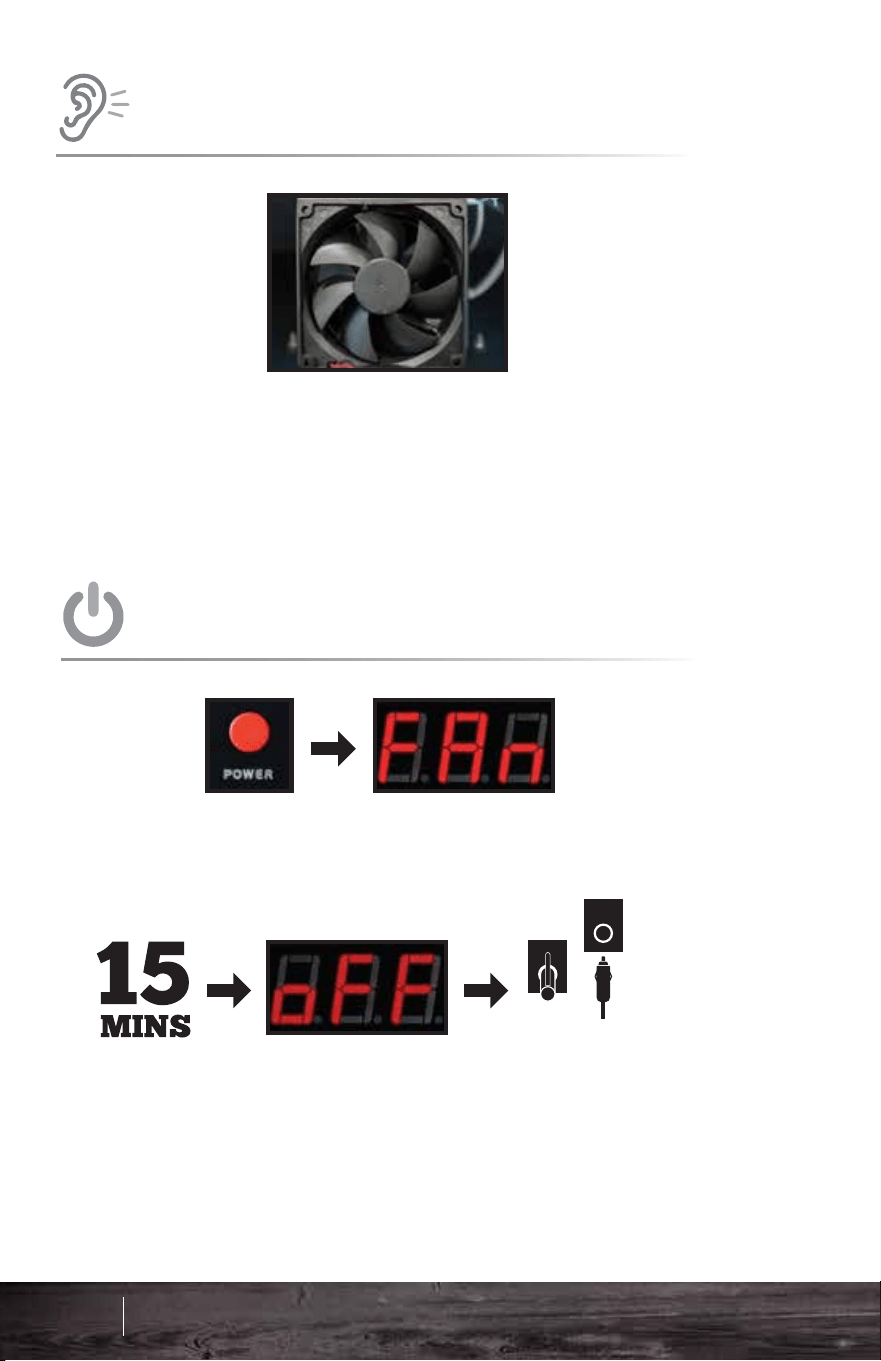
GRILL CLEANING
A good cleaning can go a long way every
once in awhile. A Shop-Vac will do the trick.
ALWAYS make sure the grill is cool. Remove
the grates, grease trays, and heat shield. Now
vacuum accordingly including the base of the
grill chamber and firebox. Cleaning should
take 10 minutes tops.
RECOMMENDED REGULAR
AIR TEMPERATURE
UNDERSTANDING
ABOUT
EVERY
2-3 BAGS
80-100 LBS
The PT100 Platinum Sensor sends data to the
computer. This ‘brain’ analyzes the data and adjusts
the airflow and pellet fuel flow to maintain the set
temperature. Many things affect the data gathered by
the sensor - opening the lid, wind, grease splatter,
humidity, altitude, and gravity (if the grill is not on level
ground).
The computer analyzes all the erratic information and
averages it over time. Then, it displays the best result
as the most accurate representation of the grill’s
current temperature. This is why an instantaneous air
temperature reading from a third-party product does
not provide much useful information.
°F
61 62
Operation - DC
Huffing noises are normal. The combustion fan, inside the
hopper, will turn off and on regularly to provide the correct
amount of oxygen to the fire to maintain the set temperature.
ODD SOUNDS
THE GRILL WILL MAKE
Press the red power button to switch the grill into fan mode.
Do not unplug the grill until it has completed fan mode and
the display reads “off.”
Fan mode is important as it not only cools down the grill
properly but also blows ash out of the firebox for your next
cook.
POWER DOWN
HOW TO CORRECTLY
Davy Crockett Operation

63 64
General Operating Tips
During Cycle 0, the controller feeds the right amount of
pellets into the firebox. Cycle 1 turns on the igniter. At
cycle 2 the fan turns on, and remains on with the igniter for
combustion.
DO NOT INCREASE TEMPERATURE YET.
The grill needs to make P.O.F (Proof of Fire) which is 5
degrees above ambient temperature. At that point the
board will turn the igniter off and start the auger motor to
guide the grill up to 150°F. It is imperative for the grill lid to
be closed for this to happen.
ONCE THE GRILL HAS REACHED 150°F, YOU MAY
INCREASE TO YOUR DESIRED TEMPERATURE.
If there is not a 5° increase within 20 minutes the grill will
display FAL. At this point see page 78 of the
troubleshooting section.
• Setting the Temperature: Do not push any buttons until the
computer finishes the 0-1-2-3 cycles and automatically goes to
150°F (66°C). Once it reaches 150°F (66°C), you can change
to your desired setting.
• Time to Reach Temperature: It should take about 15–20
minutes from the time you first turn the grill on until it achieves
the temperature you set. Make sure not to adjust the
temperature until it reaches 150°F first. Time to heat up will
vary based on the temperature of the climate you live in.
• Temperature Control: You can set the grill as low as 150°F
or as high as 550°F.
• Grill Ready: Wait until the grill heats up before cooking. Aside
from the soot contained in earlier smokes, the grill will not cook
evenly until it gets hot, just as with a charcoal or gas grill. A
slowly blinking light on the digital control panel indicates that
the grill has achieved the target temperature, while no light
means the grill is still heating or cooling.
• Heat Distribution: If you are experiencing larger left-to-right
temperature discrepancies, the heat shield can be moved
along the belly of the grill left or right to assist with these
differences. See our recommended Heat Shield installation in
the Quick Start Guide section.
The grill temperature will climb fairly rapidly. The temperature,
however, falls much more slowly. This is because the fire must
be kept going at all costs, which results in a fairly slow fall in
inside temperature. Here, too, you can speed the process by
opening the lid to let excess heat escape.
• Controller Functions: In case you have an interest in
controller functions, the chart below shows each ignition
state and its function.
GENERAL
OPERATING TIPS
DISPLAY
0
1
2
3
TIME
45 sec.
90 sec.
30 sec.
30 sec.
AUGER
X
IGNITER
X
X
X
FAN
X
X
DANIEL BOONE & JIM BOWIE
DISPLAY
0
1
2
3
TIME
60 sec.
90 sec.
30 sec.
30 sec.
AUGER
X
IGNITER
X
X
X
FAN
X
X
DAVY CROCKETT
Green Mountain Grills General Operating Tips

65 66
General Operating Tips
• Temperature Variances: The temperature on the digital
readout reflects the temperature at the grilling surface on the
left side of the grate where the thermal sensor protrudes into
the grill cavity. You may notice differences between the dome
thermometer and the digital readout, depending on the
quantity of cold food inside the grill or how often you open and
close the lid or how much wind is present. This is normal.
Please understand that if you cook, for instance, a stand-up
chicken, the temperature at the top of the cavity may be
somewhat less than at the grilling surface in the winter and
perhaps higher in the summer. You might have decided to
cook the chicken at 275°F, but you notice that the temp on the
dome thermometer (if your grill has one) only reads 250°F.
Since most of your chicken is well above the cooking surface,
you may want to adjust the digital temp of the grilling surface
up to about 300°F to achieve your target cooking temperature
of 275°F at the chicken level or vice-versa if the dome
thermometer reads higher.
• Weather: You will likely want to keep your grill out of rain and
snow when not in use. In a heavy driving rain, water can
invade the auger tube that will then magically change pellets
to sawdust and then expand and dry into something akin to
concrete. This makes for an unpleasant repair. Melting snow
can also cause the same problem. A grill cover will clearly
help the situation, but the garage seems more foolproof.
• Grilling in Various Temperatures: Because we know that
you will use the grill in a variety of weather conditions, we tend
to overshoot the initial default temperature of 150°F by 20–25
degrees on warm days. We do this so that it does not take
interminably long on a cold day to reach its target
temperature. The grill will eventually cool back down to 150°F
on its own, or you may speed the process by simply opening
the lid to let out excess heat.
Once your outside temperatures drop below 35°F (2°C), the
Turbo mode kicks in to accelerate the volume of pellets and
air so that you do not have to wait so long for the grill to heat
up as you otherwise would without it.
• Thermal Blanket: Tests from users have indicated that
you can reduce your pellet consumption by 40%–50% in
very cold weather by using a GMG thermal blanket. If you
grill regularly in cold weather, this investment will likely
pay off handsomely. Do not use the thermal blanket in the
summertime, as it provides no noticeable benefit and
may actually work against you on very warm days.
• Keep the Lid Closed When Cooking. The grill cooks
with convection heat, so an open lid only dissipates heat
into the atmosphere. “If you’re lookin’, you’re not cookin’.”
• Pellet Checking: Be sure to keep pellets in the hopper!
Check your hopper occasionally so that your grill does
not go out in the middle of cooking your meal.
• Pellet Storage: Store your pellets in a cool, dry place.
Do not allow them to get wet, as they will turn back into
sawdust.
• Bypass Mode for Hot Restarts: Occasionally, you may
experience a power outage while the grill is in use, or
someone accidentally turns the grill off, or you undercook
something and want to resume cooking for a little longer.
Use this method if you still have some fire left in the
firebox, which is usually no longer than about 6–7
minutes later. If you have run the fan mode for more than
about 3–4 minutes, this will not work.
If necessary, make sure the grill is plugged in first. When
the digital readout displays off, press the red power
button to turn the grill back on. Once it is on, hold down
the UP button for approximately 8 seconds, or until the
digital readout displays a temperature.
Now adjust the temperature to your desired setting.
• Powering Down: Simply press the red power button and
your grill will automatically go into fan mode. Allow fan
mode to complete before disconnecting the grill.
Green Mountain Grills General Operating Tips

• Smoke Flavor: You will get more smoke flavor at low
temperatures than at high ones. If you wish to infuse a
piece of meat with a smoky flavor, cook it at 150°–160°F
for an hour or so before you turn up the grill to finish it off.
• Let Meat Rest. Beef, pork, poultry, and fish will generally
continue to cook after you remove them from the grill as
the hot outer part of the meat influences the cooler interior.
While it seems possible to eat immediately upon finishing
your grilling, that seldom works out as a practical matter.
Plan for the internal temperature to rise about 5 degrees
after you take it off the grill. Also, resting allows the juices
to redistribute more evenly throughout the meat.
• Spritz! GMG sells a very nice stainless steel spritz bottle
for about $10. You will use it on the meats you’re cooking
regularly. Pork butts and picnic roasts, steaks, burgers,
chops, and ribs will all benefit from regular, generous
spritzing. A good staple mixture is apple juice plus 2–3
tablespoons of Worcestershire.
• Be Creative! You can cook almost anything on this grill.
Try pizza, bread, marinated vegetables, casseroles, and
corn bread, as well as steaks, roasts, hams, pork chops or
tenderloins, wild game, fish, and poultry. Cook anything
outside in this appliance that you would cook in your
kitchen oven.
• Low Temperature Smoking: For anything you plan to
smoke for several hours, we recommend marinating it
in sugar or salt or both, in the refrigerator for several
hours beforehand. This will normally cure the meat
and should make it safe. We do not recommend
smoking poultry below 185°F for health reasons.
Cooking it at or above that temperature will still impart
a rich, smoky flavor.
• General Cooking Guide. If you’re new to pellet
grilling, this will help you to get started. These are
basic guidelines and temps/times can vary depending
on the size of what you’re cooking, the initial
temperature of the food when you put it in, how often
you open the lid, and other variables. ALWAYS COOK
MEAT TO A SAFE INTERNAL TEMPERATURE.
RECIPES ARE ONLY GUIDELINES.
• GMG Recipes: Please check the Recipes section at the
back of this manual for great recipes or on our site:
www.greenmountaingrills.com/recipes
WOOD FIRED 101
67 68
Wood Fired 101
Green Mountain Grills Wood Fired 101
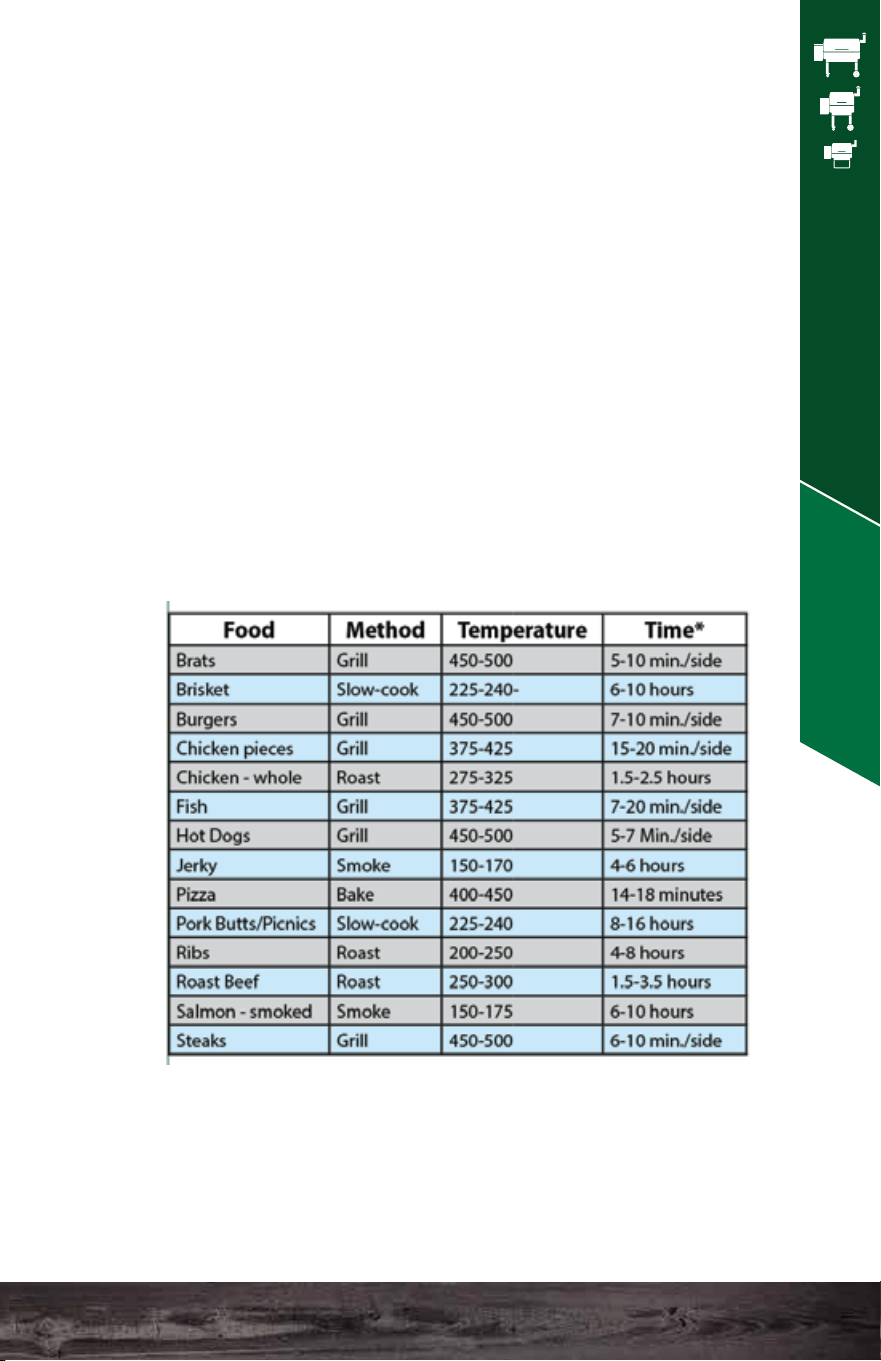
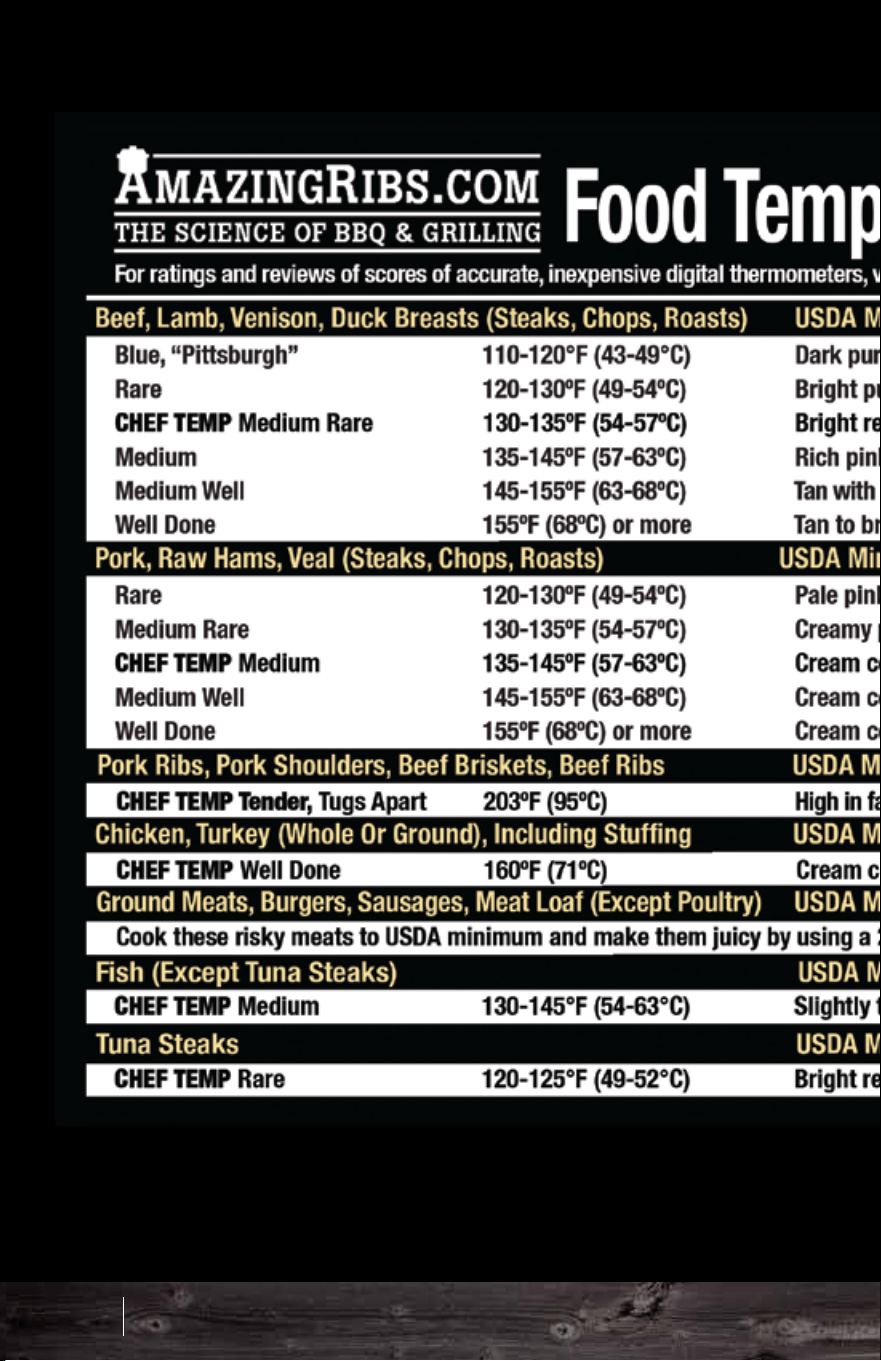
69 70
Food Temperature Guide
Green Mountain Grills Wood Fired 101
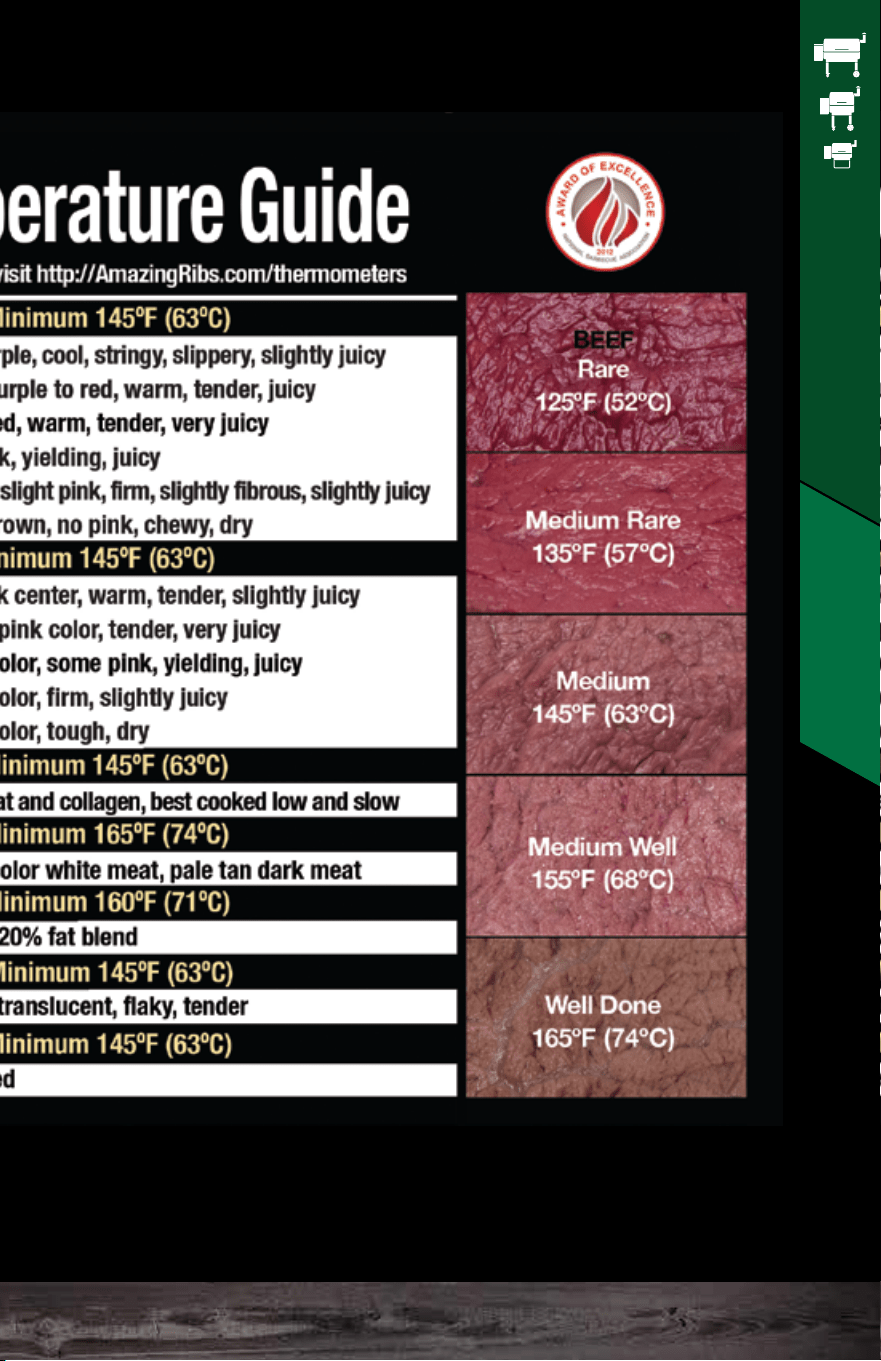
69 70
Food Temperature Guide
Green Mountain Grills Wood Fired 101

• ALWAYS unplug your grill before performing any cleaning,
maintenance, and/or operations involving any of the
electrical components
• Clean the grates and grease tray regularly. You can use
a wire brush to clean the stainless steel grates.
Alternatively, you can use an old camper’s trick of wadding
a piece of aluminum foil and rubbing it lightly on the grates
to clean it.
• Grease fire caution! As with any barbecue, the potential
for a grease fire exists. To reduce this possibility, regularly
clean the grease tray to prevent flammable buildup. An
easy way to do this is to line the tray with aluminum foil or
use our grease tray liners. Use multiple sheets on the tray
and then just peel one off each time you cook. If you are
going to line your tray with aluminum foil, make sure it is at
least a few inches away from the thermal sensor on the left.
• Clean the chimney cap. Wipe down the underside of the
cap regularly to prevent grease drip.
• Clean the drip system. Make sure the trough where
grease drains into the discharge spout is clean and free of
debris.
• Place grill on level ground. The grill should be kept as
level as possible so that the grease flows into the trough
and out into the bucket and also to insure that the sensor
reads evenly, as hot air displaced to one side or the other
will cause irregular operation.
• Clean ash out of the firebox periodically. The best
way to do this is with a Shop-Vac. You should expect
to clean this out about every 2–3 bags of pellets. If
ash covers the igniter, the grill may not light. When
you clean out the ash from your firepot, it is not
necessary to add in more pellets afterwards. The
auger will add in the correct amount of pellets in the
start-up cycle.
• Regularly clean the inside of your grill. Remove
grease with hot, soapy water or a grill cleaner. Keep
liquids away from the auger tube and the pellets.
Liquids will drain through the bottom hole.
Alternatively, just turn the grill on at 500°F for an hour
or more to bake off most internal residues.
• Clean the grill lid window. The window will discolor
over time. The best way to clean the window is with
steel wool.
• Protect your grill. Use a grill cover as much as
possible. Water may be able to get in through the
hopper in wet conditions. Make sure to check for wet
pellets if your grill gets left out in the rain. As stated,
pellets and water do not mix. Your hopper will, for the
most part, stay dry in most weather, but a driving rain
may cause adverse results.
• Service? Answers to most common questions can be
found on our website. You may also contact our
technical support department at 530-347-9167 opt. 1.
While you will hopefully have no problems, machinery
can fail. Fortunately, each part on the grill is modular,
so you can easily replace one if necessary.
CLEANING &
MAINTENANCE
71 72
Cleaning & Maintenance
Green Mountain Grills Maintenance
TROUBLESHOOTING
73 74
Troubleshooting
Grill doesn’t turn on when you press the power
button.
Check to make sure the power cord is plugged in.
When the AC adapter is plugged into the wall, check
that the light on the adapter comes on.
Inspect both ends of the male-to-male power cord to
ensure the connections aren't compromised.
Check the circuit breaker and/or GFCI on the circuit the
adapter is plugged into. Plug a small appliance into the
same outlet to see if you have electricity.
Unplug the grill. Remove the control panel. Check for
loose wires connected to the wiring harness.
Disconnect and reconnect the wiring harness to ensure
a secure connection.
Grill doesn’t come up to temperature.
If grill remains at ambient temperature...
Check the firebox to see if it has overflowed with
pellets. If it has, clean it out and start over. This overfill
can result from turning the grill off without using the fan
mode or from charging the firebox when it does not
need to be charged. Reread the section on “Priming the
Firebox” to understand that. You only need to prime the
firebox the first time you use the grill or on any
subsequent occasions when it runs out of pellets and
the auger runs until empty.
Erratic temperature.
If the digital display reads “SEN” or shows rapid
fluctuation in temperature (faster than the grill could
realistically increase/decrease its internal temperature)
call our technical support 530-347-9167 opt. 1.
Improper shield placement will result in issues
coming to temperature. When using the heat shield
adjustment rod, a centered heat shield should be
positioned approximately at the “0” mark on the rod.
The depth to which the rod is threaded into the
receiving nut varies, so some experimenting might
be needed to find the perfectly adjusted “0” point on
your rod.
Ensure the grease tray is installed correctly.
If grill lights, but does not reach set temperature...
Check the combustion fan to ensure it spins freely
and there is no damage to the blades.
Ensure the heat shield is properly installed.
Jim Bowie
9.25” From left wall
Davy CrockettJim Bowie & Daniel Boone
Daniel Boone
4.25” From left wall
Davy Crockett
4” From left wall
CIRCLE
LEFT SIDE
HALF-MOON
RIGHT SIDE
HALF-MOON
LEFT SIDE

75 76
Troubleshooting
Otherwise, check to make sure you do not have
aluminum foil on the grease tray that is blocking the
thermal sensor. It is okay to wrap your tray in foil.
However it must be wrapped tight to the metal, and the
hole as well as the half-moon cutout must be punched
out of the foil to ensure proper airflow.
A simple way to check the thermal sensor is to look at
the initial temperature reading the grill gives after the
0-1-2-3 start-up process. This temperature should be
close to the ambient air temperature since the grill has
not yet had a chance to heat up.
Improper shield placement will result in issues coming
to temperature. When using the heat shield adjustment
rod, a centered heat shield should be positioned
approximately at the “0” mark on the rod. The depth to
which the rod is threaded into the receiving nut varies,
so some experimenting might be needed to find the
perfectly adjusted “0” point on your rod.
Ensure the grease tray is installed correctly. See the
previous page for proper installation.
Smoke is coming out of the hopper.
Make sure your burn pot is empty of ash and pellets.
Make sure the hopper lid stays closed when you have
the grill on. Press firmly down on each of the corners of
the lid to make certain it is closed tight. If a corner of
the lid sits up even 1/8 inch while the lid is flat, a
warped hopper lid is your issue.
You can test this by running 2 sheets of tin foil over
your hopper then closing the lid down on top of the
foil to make a temporary seal, hopefully preventing
smoke from traveling through your hopper.
Ensure the combustion fan spins freely and is not
damaged.
Ensure the pellet dump door is closed tight. Often, it
doesn’t get pushed all the way down and leaves a
gap that lets out air pressure from the fan. If it is not
slid down all the way, it can have the same effect as
an open hopper lid.
If all else fails, the square gasket seal between the
hopper and auger may be the culprit. You can seal
with high-temp silicone.
Low pellet alarm beeps continuously.
Fill the hopper with pellets so that their level is
above the low pellet sensor. If this does not solve
the problem, unplug the grill then disconnect the
alarm from and reconnect it to the back of the
control panel. If the beeping persists, your alarm is
broken and needs to be replaced. Contact our
technical support 530-347-9167 opt. 1. In the
meantime, you can stop the beeping by unplugging
the low pellet alarm from the circuit board and
leaving it disconnected.
*The low pellet alarm is not necessary for the grill’s
functionality. You can leave the alarm disconnected and
continue cooking.
Green Mountain Grills Troubleshooting
77 78
Troubleshooting
No pellets in the firebox.
Assuming that you’ve charged the firebox so that there
are pellets in the auger tube, turn the grill on and press
the power button to send the control to cycle 0.
Examine the auger bit through the firebox to see if it’s
turning.
If it is and there aren’t any pellets coming through, they
are bridged up over the auger’s intake. Turn the grill off,
sift the pellets around inside the hopper, and put the
grill back into cycle 0. Wait until the pellets emerge into
the firebox. It may take up to 2 full cycle 0’s to get
pellets all the way through the auger tube. Once they
emerge, turn the grill off and start it again all the way
through the 0-1-2-3 cycles to fire it up.
It may take more if the auger is not turning. Listen for
the auger motor. If the auger motor is engaged and the
auger bit is not turning, then there is a broken linkage
between the motor and the auger shaft. Call technical
support on 530-347-9167, opt. 1.
I have uneven heating.
Uneven heat can be corrected by making small
adjustments to your heat shield placement. Try sliding
the shield toward the hot side in ¼ inch increments
while taking note of the temperature changes. Using
the Heat shield adjustment rod, a centered heat shield
should be positioned approximately at the “0” mark on
the rod. The depth to which the rod is threaded into the
receiving nut varies, so some experimenting might be
needed to find the perfectly adjusted “0” point on your
rod. Once you find the best heat shield placement, we
encourage you to mark that distance on the heat shield
adjustment rod. That way, you can subsequently repeat
the positioning whenever the grill is relocated or the
burn pot is cleared internally.
Loud clicking sound when the auger is running.
TThis is typically the sound of a stripped/slipping
gear within the auger’s gearbox. Auger assembly
replacement will be needed.
Grill didn’t light (FAL message).
There may be too much ash in the firebox. Wait until
it cools off, and clean out the ash. Alternatively,
pellets may have overfilled the firebox. Never turn
the grill off and on repeatedly as this will overfill the
firebox with pellets. Each time the grill displays “0”
on start-up, it feeds a full load of pellets into the
burn pot. The igniter won't light the pellets unless air
can flow freely through the combustion chamber.
The combustion fan may not have been operating.
Check to make sure that the fan blades turn freely
and the fan runs on cycles 2 and 3 of the 0-1-2-3
sequence.
The auger might not have turned pellets into the
burn pot. Refer to “No pellets in the firebox” above.
If there isn’t any ash or pellet buildup, the fan works
properly, and fresh pellets are feeding in, your
igniter is most likely out and the grill will require a
replacement.
*The grill can be manually lit if the igniter is out. Charge
the burn pot with a handful of pellets, and light them with
a propane torch or. Once the pellets are able to maintain
a flame by themselves, plug the grill in so it displays “off.”
Hold the “power” button for 10 seconds. The grill will
initially display “0” but then skip to a temperature reading
while turning on the fan and auger. Let the grill come to
150 then select your grilling temperature like normal.
Green Mountain Grills Troubleshooting

79 80
Troubleshooting
Auger is jamming.
Turn the grill into cycle 0 by pressing the “power” button
(first stage of the normal start-up procedure), and listen
for the auger motor. If the motor engages, look inside
your burn pot toward the end of the auger bit to
determine if the auger is spinning. If the auger is
spinning but you don’t have pellets feeding into the
burn pot, you have pellets bridged up over the intake of
the auger tube. Turn the grill off, sift the pellets around
inside the hopper, and put the grill back into cycle 0.
Wait until the pellets emerge into the firebox. It may
take up to 2 full cycle 0’s to get pellets all the way
through the auger tube.
If you have determined that your auger does not turn
when the auger motor is engaged, you can try to work
the affected pellets through the auger tube to clear out
the jam. Remove the grease tray and heat shield from
the body of the grill. Remove all the pellets from the
hopper and the firebox.
Once the auger tube is clear, you will need to refill it
with fresh pellets by running cycle 0 a few more times
after the hopper has been filled. Once you see fresh
pellets coming out, turn off the grill and start it up again
through the entire 0-1-2-3 process with the heat shield
and grease tray installed.
Combustion fan doesn’t seem to be working
properly.
There’s no need for concern if your fan is not
blowing at a constant speed. It will run at many
RPMs in order to maintain the most stable
temperature.
The fan should run continuously from cycle 2 on
start-up until the grill completes the fan mode.
First, unplug the grill. Then, using your finger, flick
the fan to make sure it spins freely and does not
appear to have any visible damage. If there is any
damage to the blades, your grill will require a new
combustion fan.
Check the wires leading to the combustion fan to
make sure those connections are secure and
undamaged.
Green Mountain Grills Troubleshooting
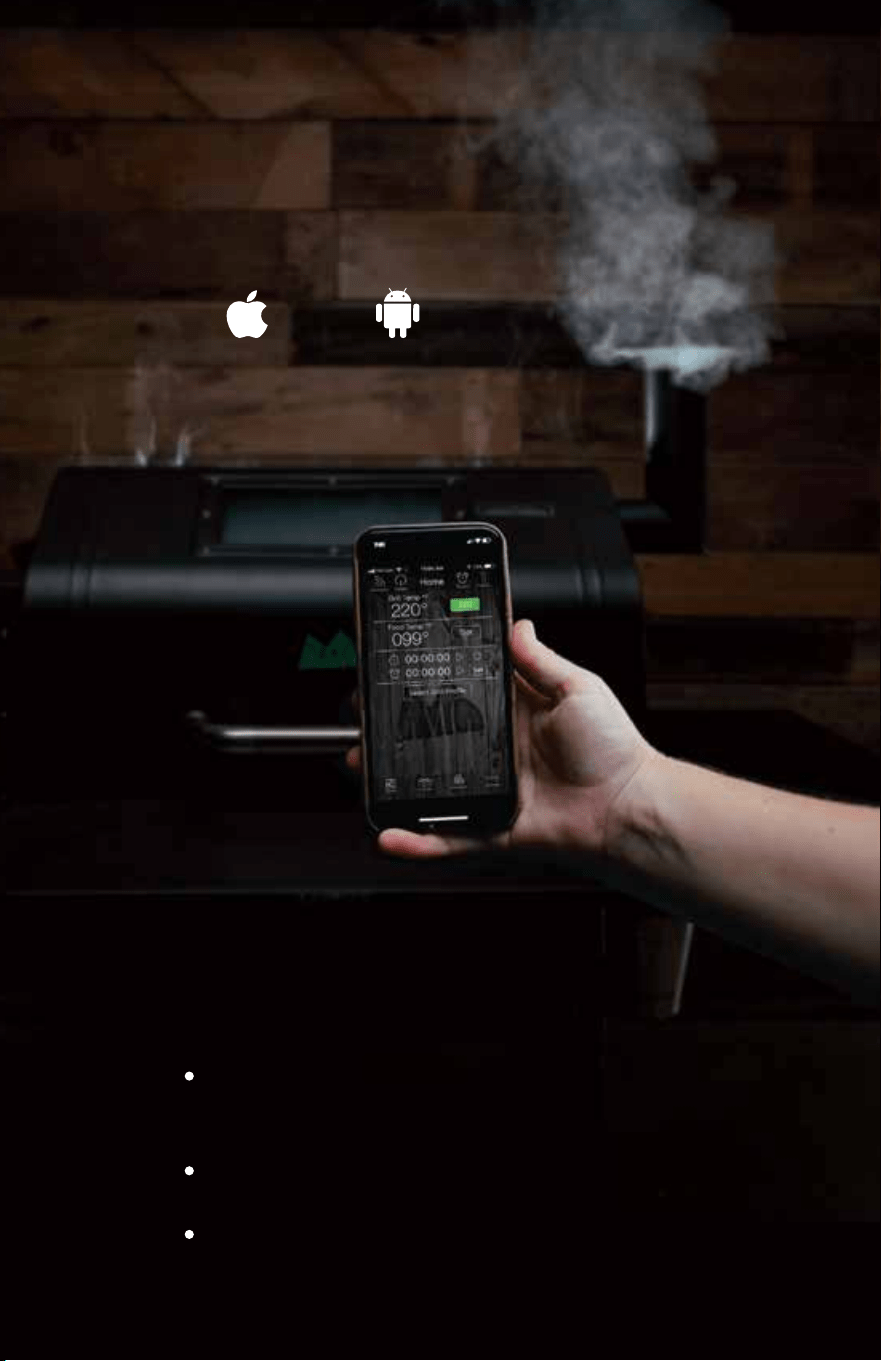
83
84
85
86
87
88
89
90
91
92
93
94
97
98
99
100
101
102
103
104
107
112
116
118
Download the app by
scanning the QR code, or
search Green Mountain
Grills in the iTunes App
Store or on Google Play.
Learn how to:
HOME SCREEN
WARNINGS
CONNECTING TO THE GRILL
iOS
Android
Connecting to the Grill
Turning the Grill On/Off
Setting the Grill Temp
Setting the Food Probe Alert
Stopwatch
Timer
CREATING PROFILES
Creating Steps
Starting Profiles
Editing Profiles
Deleting Profiles
RECIPES
SETTINGS
App Support
Grill Support
FIRMWARE VERSION CHECK
CONTROL BOARD RESET
UPDATING GRILL FIRMWARE
CONNECTING TO WiFi
SERVER MODE
MULTI-GRILL MODE
TECH SUPPORT
INDEX
iOS Android
SMART CONTROL
APP USER GUIDE
Connect to your grill through your
local WiFi and the GMG server
Control and monitor grill temps
Create and manage food profiles
81 82
iOS Android
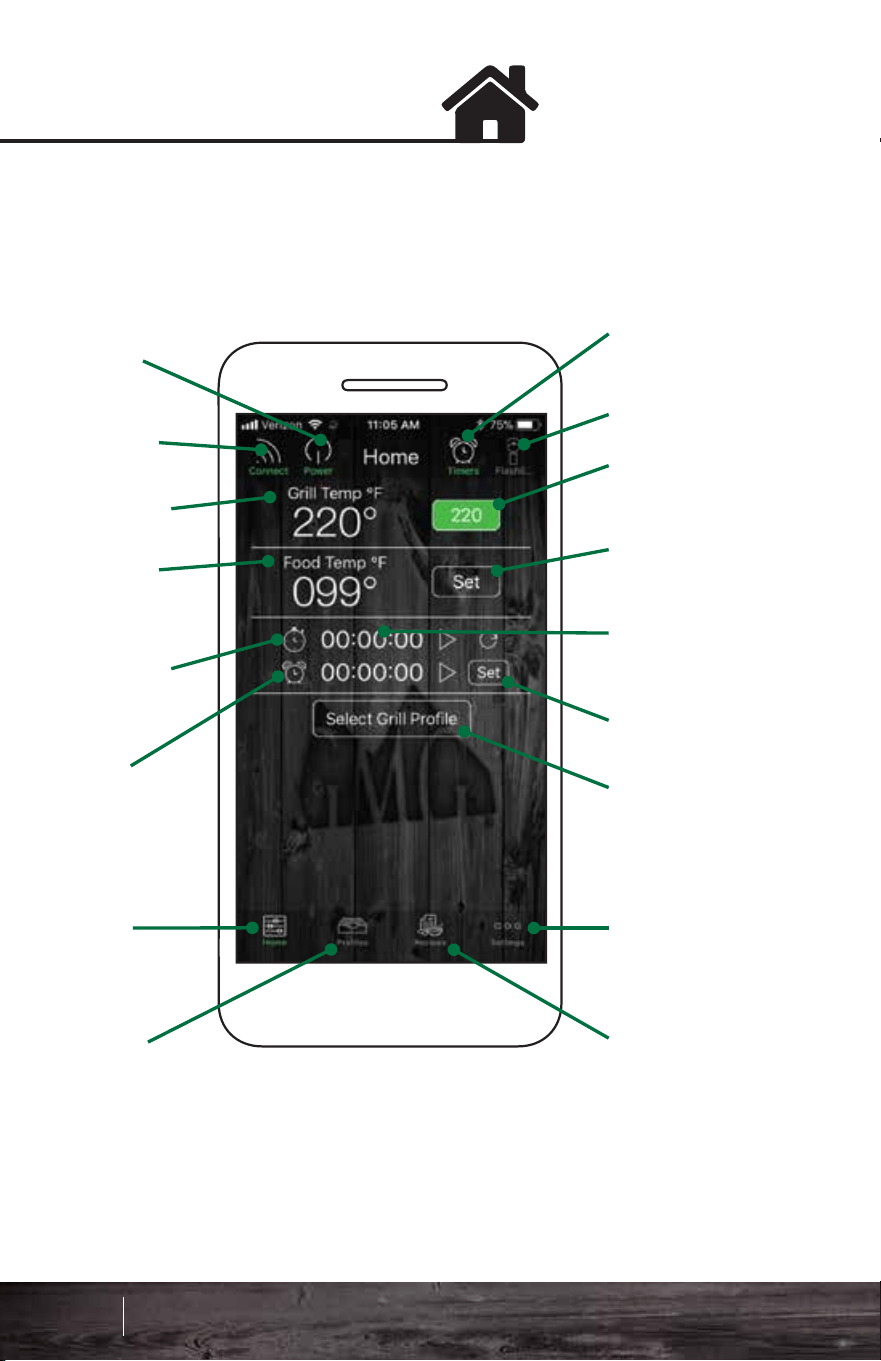
WarningsHome Screen
The Home screen shows your grilling parameters:
The control screen allows you to turn your grill on/off, set the
grill temperature, set the food probe temperature, and set a
timer or stopwatch.
Current
Food Probe
Temp
Current
Grill Temp
Stopwatch
Elapsed
Time
Timer
Timers
Flashlight
User Set
Grill Temp
User Set
Food Temp
Stopwatch
Running
Time
Set Timer
Profile
Selection
Home
Profiles
Settings
Recipes
Power
On/Off
WiFi
Connect
FREE CIRCUIT WARNING
There is an open circuit in your
grill. Unplug from power source
immediately.
LOW FUEL WARNING
The low pellet alarm has been
triggered. Please check the
hopper.
MOTOR WARNING
The auger motor is not working
properly. Unplug from power
source immediately.
BATTERY WARNING
Low voltage detected on the grill.
Check power source.
FAN WARNING
One of the fans is not working
properly. Discontinue use
immediately.
83 84
Smart Control App Guide
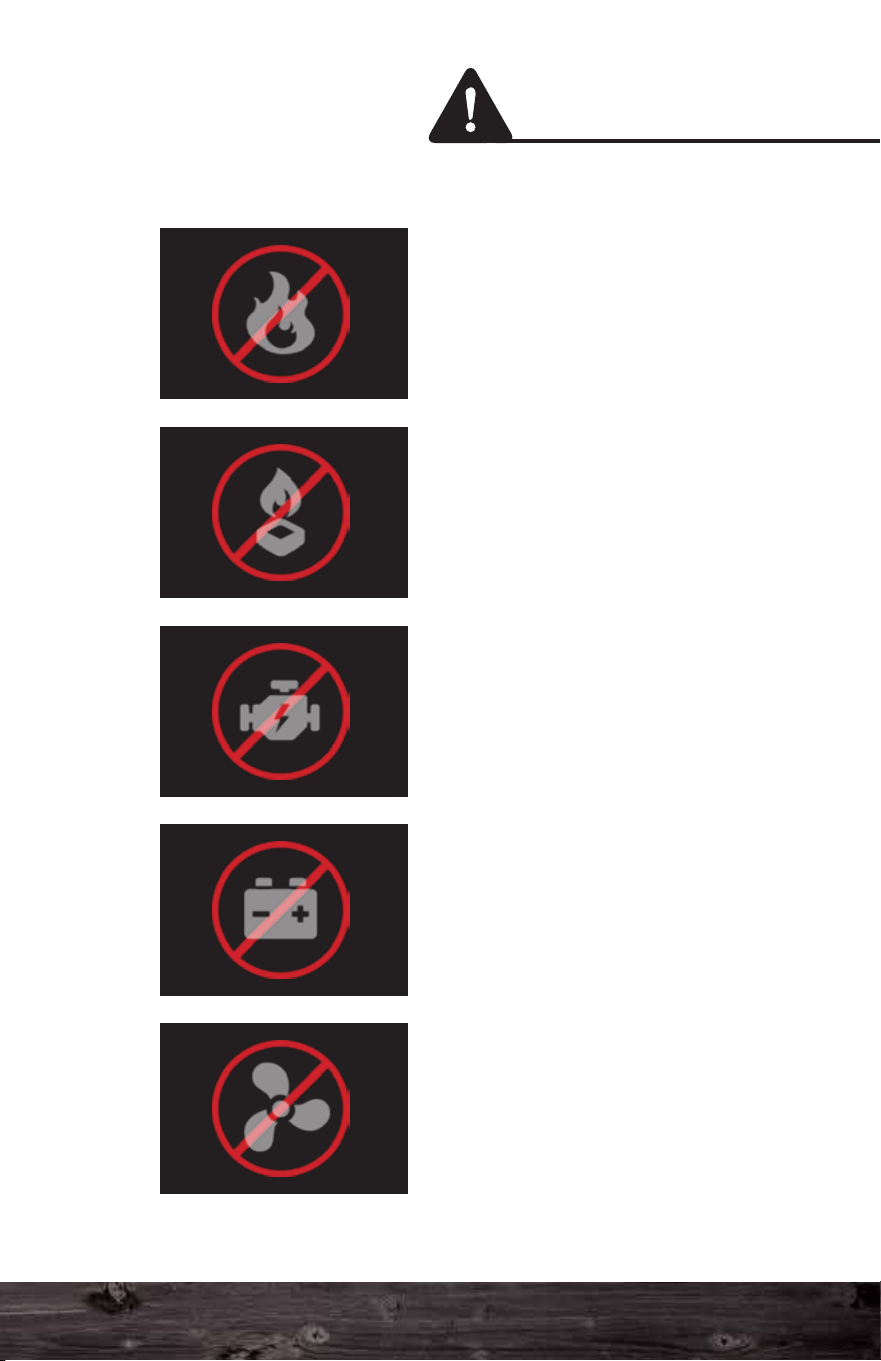
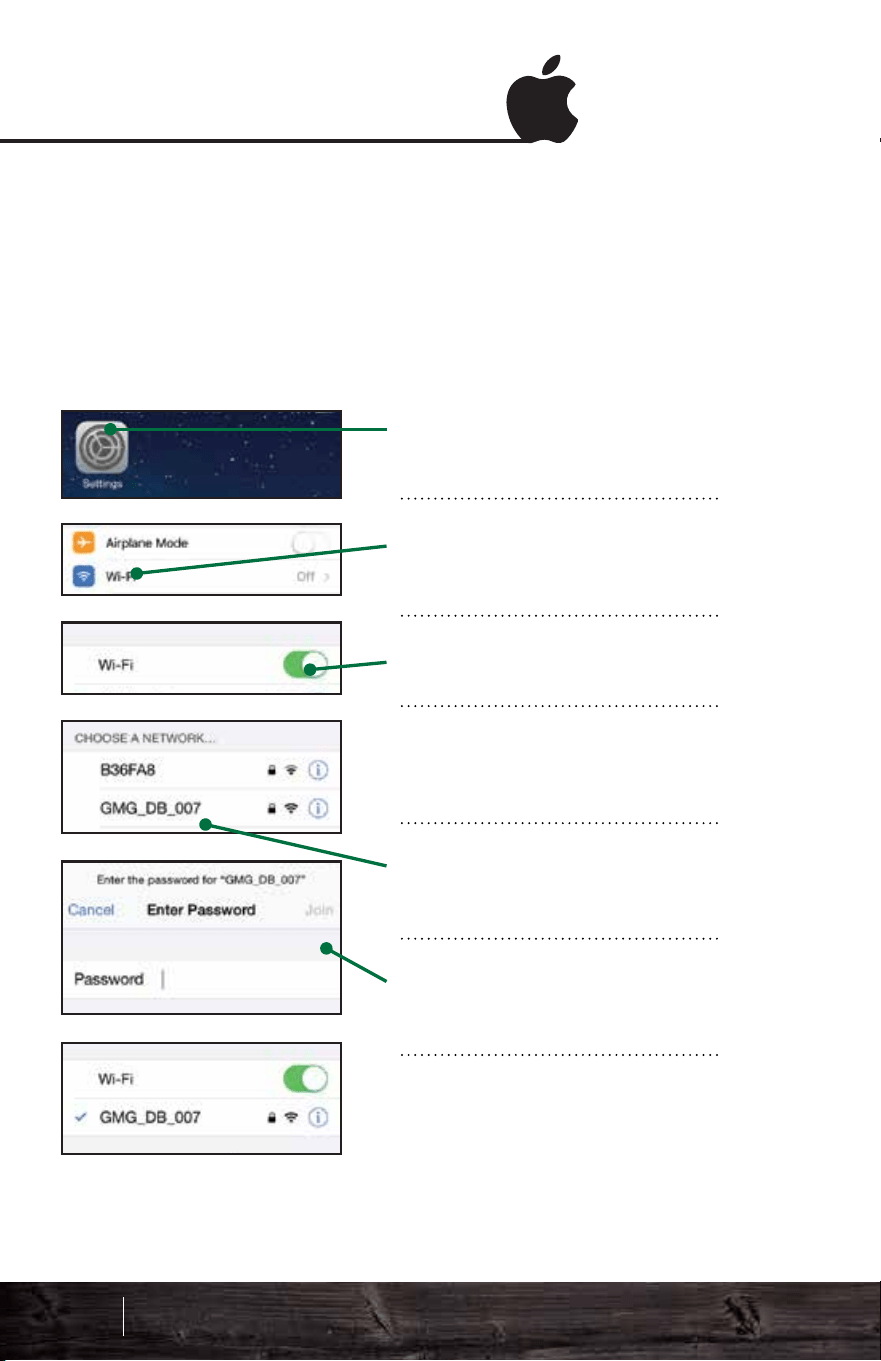
Connect via AndroidConnect via iOS
Locating your grill’s WiFi password
Your WiFi password is your grill's serial number. The number
is located on the green plate on the back of the grill. When
entering the password, use only numbers, and ignore any
letters.
Locating your grill’s WiFi password
Your WiFi password is your grill's serial number. The number
is located on the green plate on the back of the grill. When
entering the password, use only numbers, and ignore any
letters.
Go to “Settings > WiFi” on
your iPhone.
Click on WiFi (the second
item down).
Make sure your WiFi is on.
When WiFi is enabled, a list
of networks will be displayed.
Select the network that
begins with “GMG_”.
Enter the password for your
grill. Press Join.
It may take up to 1 minute to
connect. Once connected,
you will see a check mark.
Start the app. Wait for the
WiFi pop-up, then press
“WiFi Settings.”
Make sure your WiFi is on.
When WiFi is enabled, a list
of networks will be displayed.
Select the network that
begins with “GMG_”.
Enter the password for your
grill. Press Connect.
It may take up to 1 minute to
connect. Once you are
connected, a “Connected”
message will appear below
the network.
Point-to-Point Point-to-Point
85 86
Smart Control App Guide
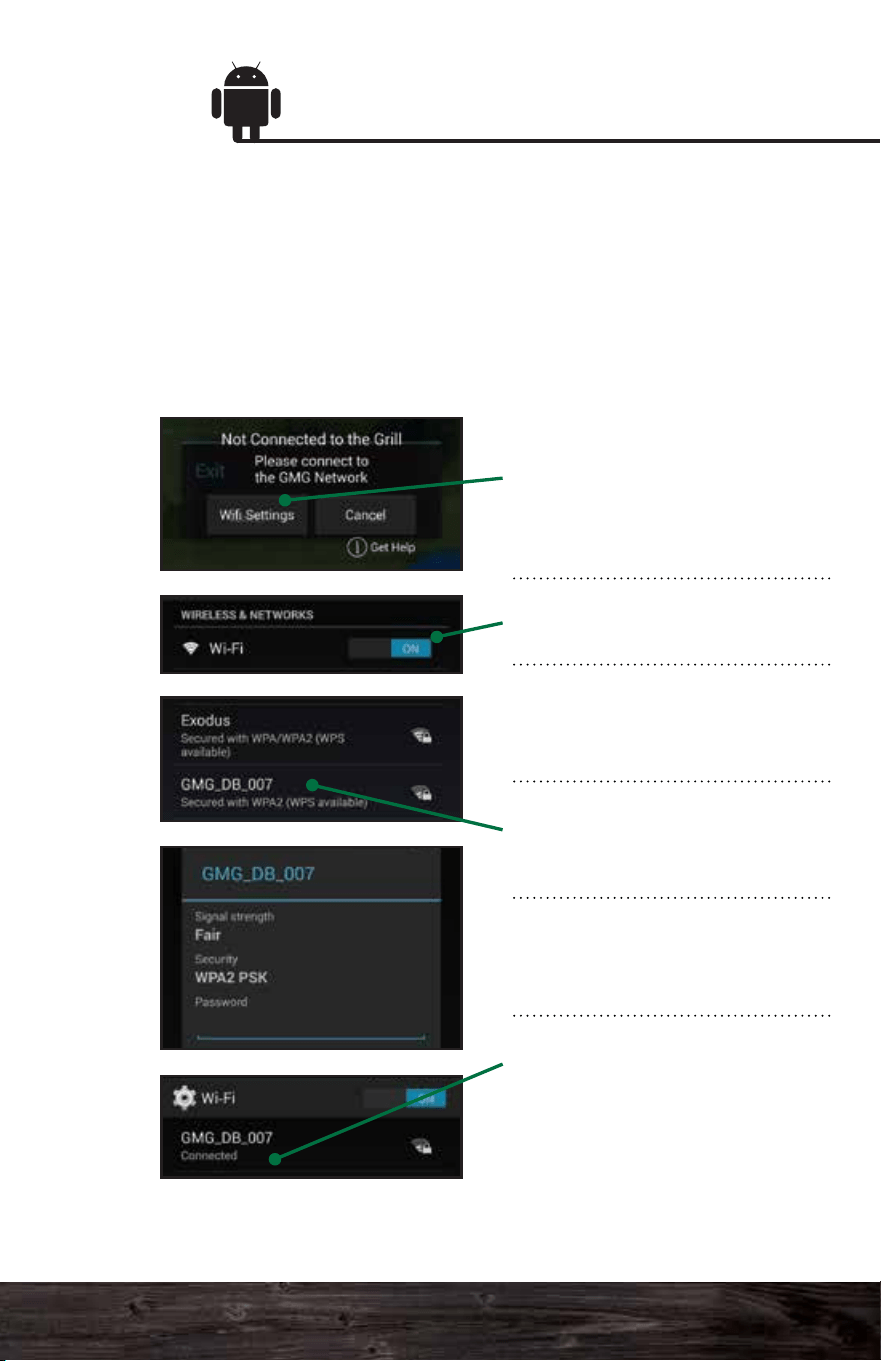
Connect via AndroidConnect via iOS
Locating your grill’s WiFi password
Your WiFi password is your grill's serial number. The number
is located on the green plate on the back of the grill. When
entering the password, use only numbers, and ignore any
letters.
Locating your grill’s WiFi password
Your WiFi password is your grill's serial number. The number
is located on the green plate on the back of the grill. When
entering the password, use only numbers, and ignore any
letters.
Go to “Settings > WiFi” on
your iPhone.
Click on WiFi (the second
item down).
Make sure your WiFi is on.
When WiFi is enabled, a list
of networks will be displayed.
Select the network that
begins with “GMG_”.
Enter the password for your
grill. Press Join.
It may take up to 1 minute to
connect. Once connected,
you will see a check mark.
Start the app. Wait for the
WiFi pop-up, then press
“WiFi Settings.”
Make sure your WiFi is on.
When WiFi is enabled, a list
of networks will be displayed.
Select the network that
begins with “GMG_”.
Enter the password for your
grill. Press Connect.
It may take up to 1 minute to
connect. Once you are
connected, a “Connected”
message will appear below
the network.
Point-to-Point Point-to-Point
85 86
Smart Control App Guide

Turning the Grill On/Off
OFF: To turn the grill off, tap
the Power button, then
press Confirm. The grill will
cycle into fan mode.
FAN MODE: This will cool
down the firebox. When it
has reached a cool temp,
the grill’s digital control
board will read “off”.
ON:
1. Make sure you're
connected to the grill.
2. Tap the Power button. A
pop-up window will display.
3. Press Confirm to turn
the grill on. It will begin its
0-1-2-3 startup sequence.
87 88
Smart Control App Guide
Connecting to the Grill
POWER:
First, confirm the grill is plugged
in and the power switch (Daniel
Boone and Jim Bowie) on the
front of the grill is set to “on”.
Once the grill has power,
connect your smartphone
to the grill’s WiFi network,
“GMG_”.
Press the Connect button.
The app will detect if there
is a grill nearby.
DISCONNECTING:
To disconnect the app from
the grill, simply press the
Connect button again.
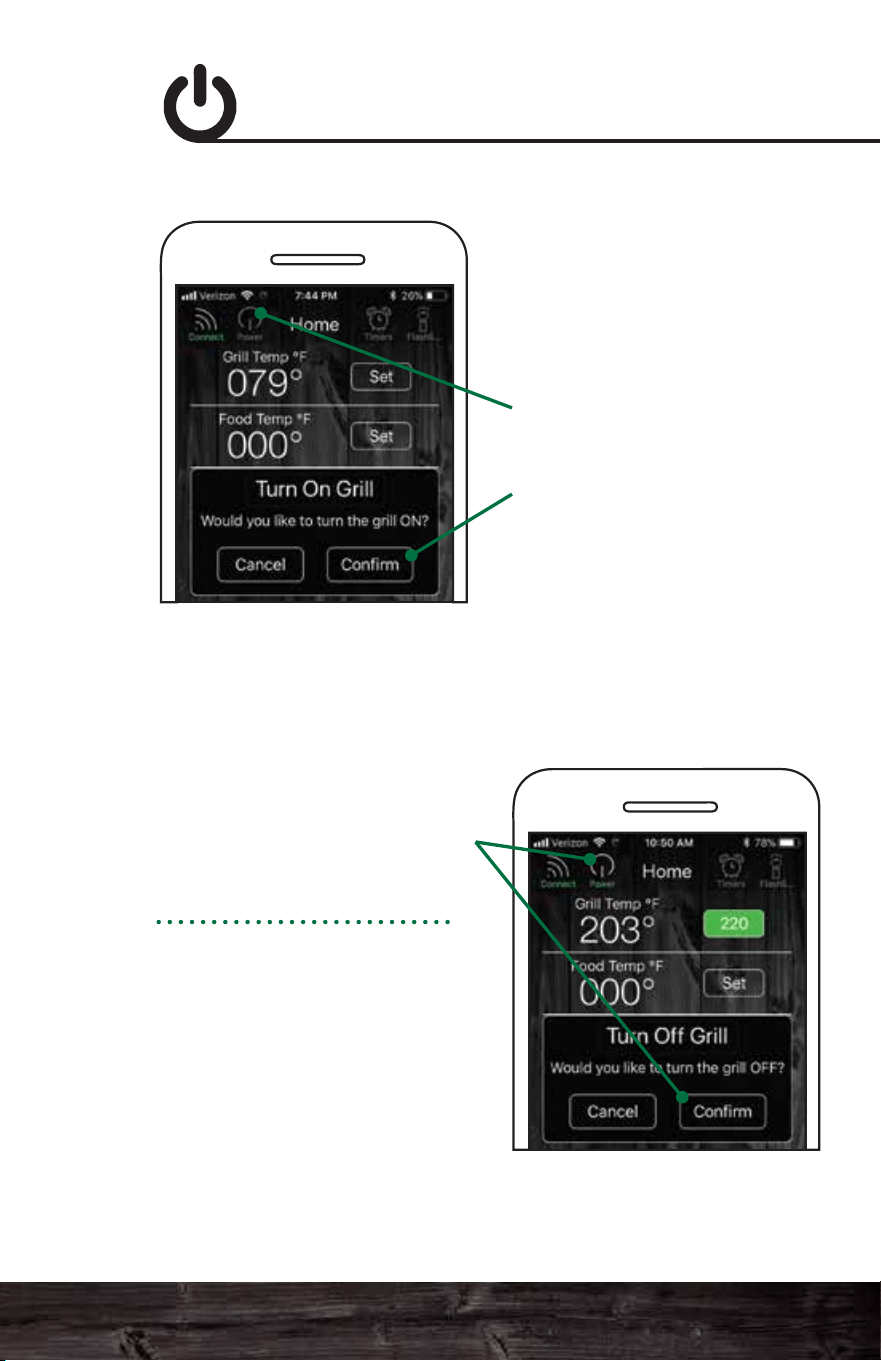
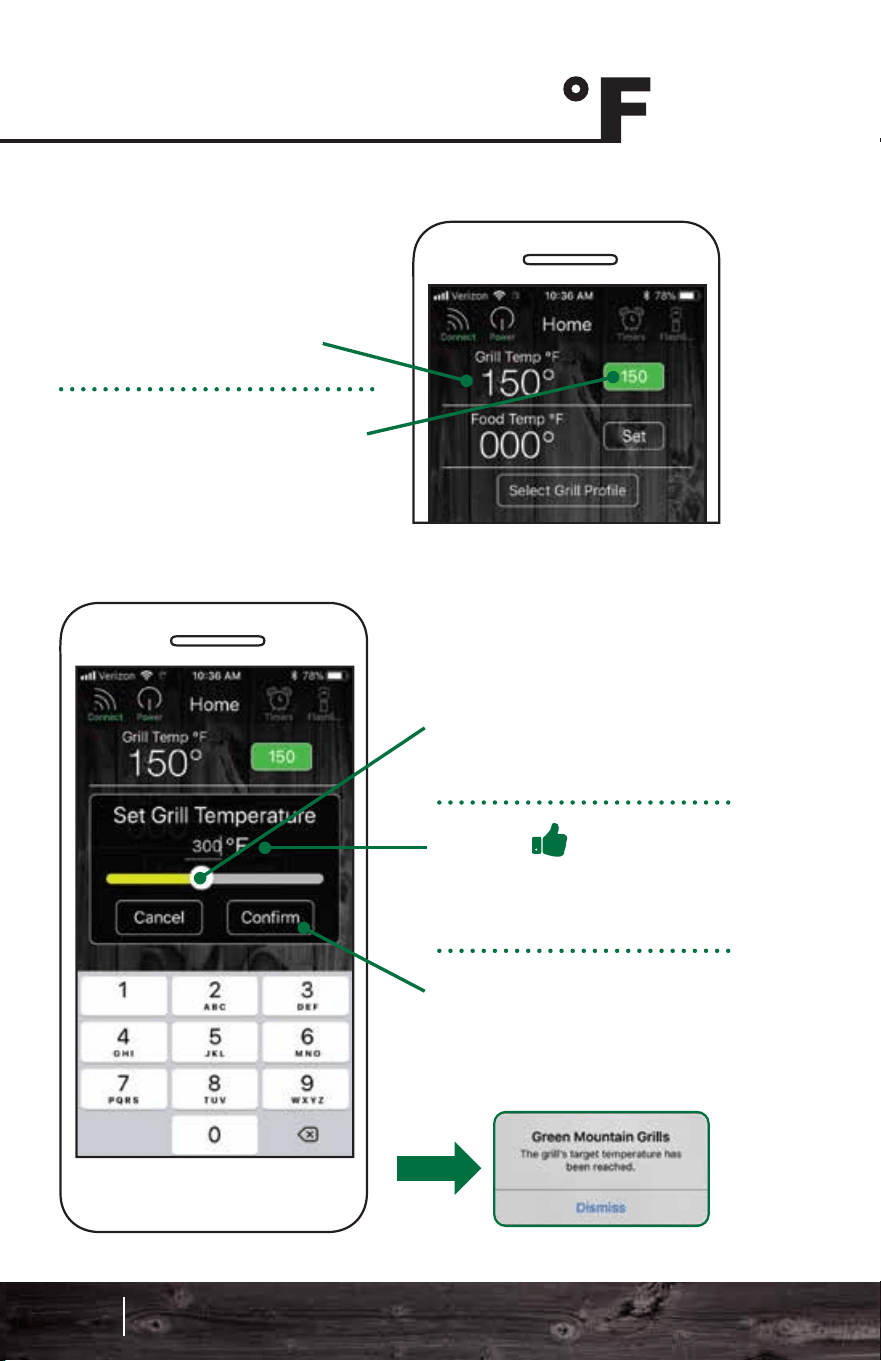
Allow your grill to reach
150°F (66°C) before setting
your desired grill temp.
Press the Set button next to
the grill temp.
Move the slider to the
desired temp for your food
probe alert.
Press Confirm to set the
alert.
The food probe alert will
now trigger an audible alarm
on the grill when the set
temp of the food has been
reached. If your device is
connected, it will receive an
alert notification.
Track the internal temp of
your food with the GMG
Food Probe. The app will
only work with one food
probe at a time.
Set the food probe alert by
pressing the Set button next
to the food temp.
Setting the Grill Temp Food Probe Alert
Move the slider to the
temp you want.
Pro Tip
Tap the temperature digits
for a more precise control.
Press Confirm. The grill
will now adjust to the new
set temp.
89 90
Smart Control App Guide
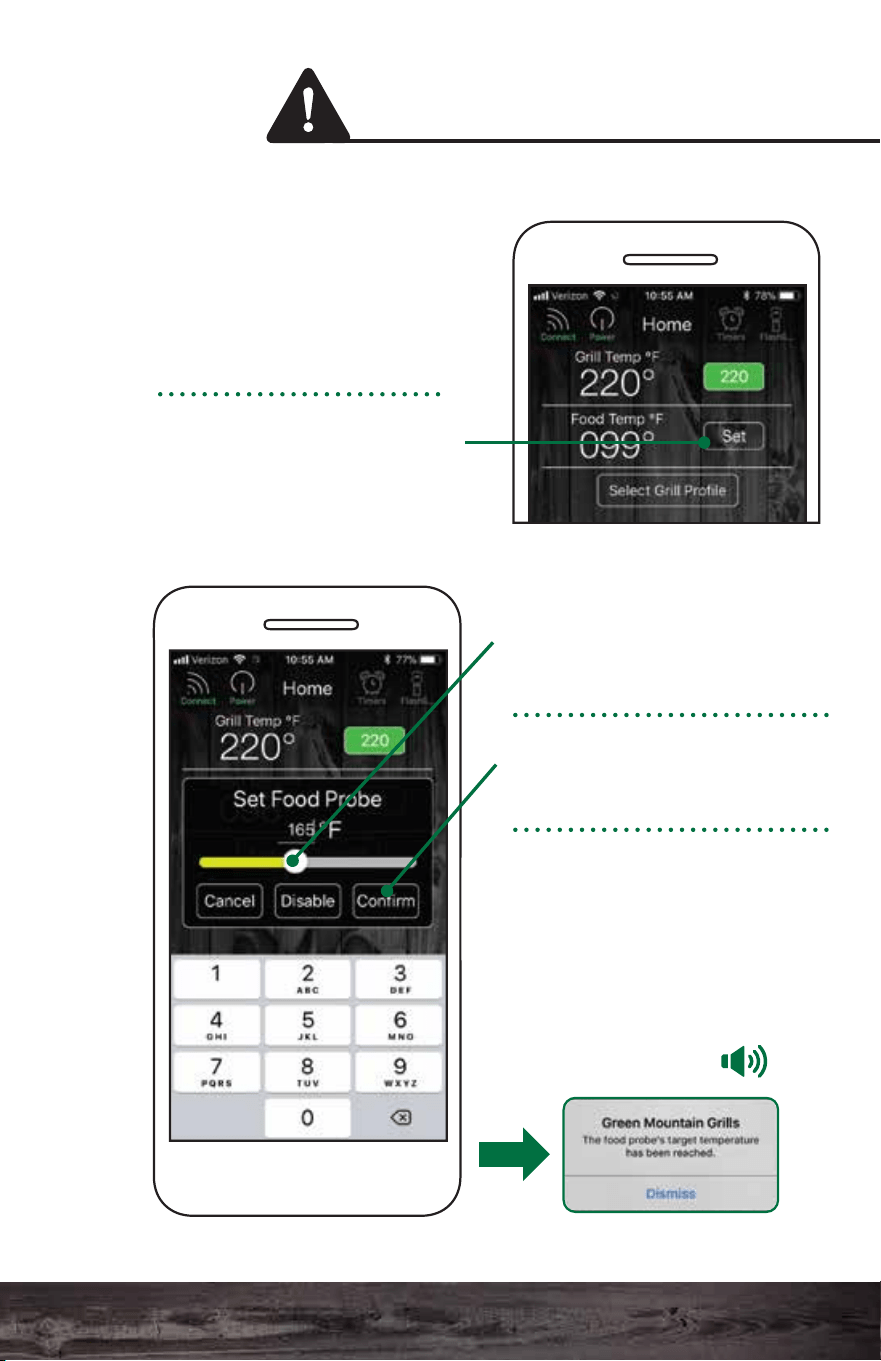
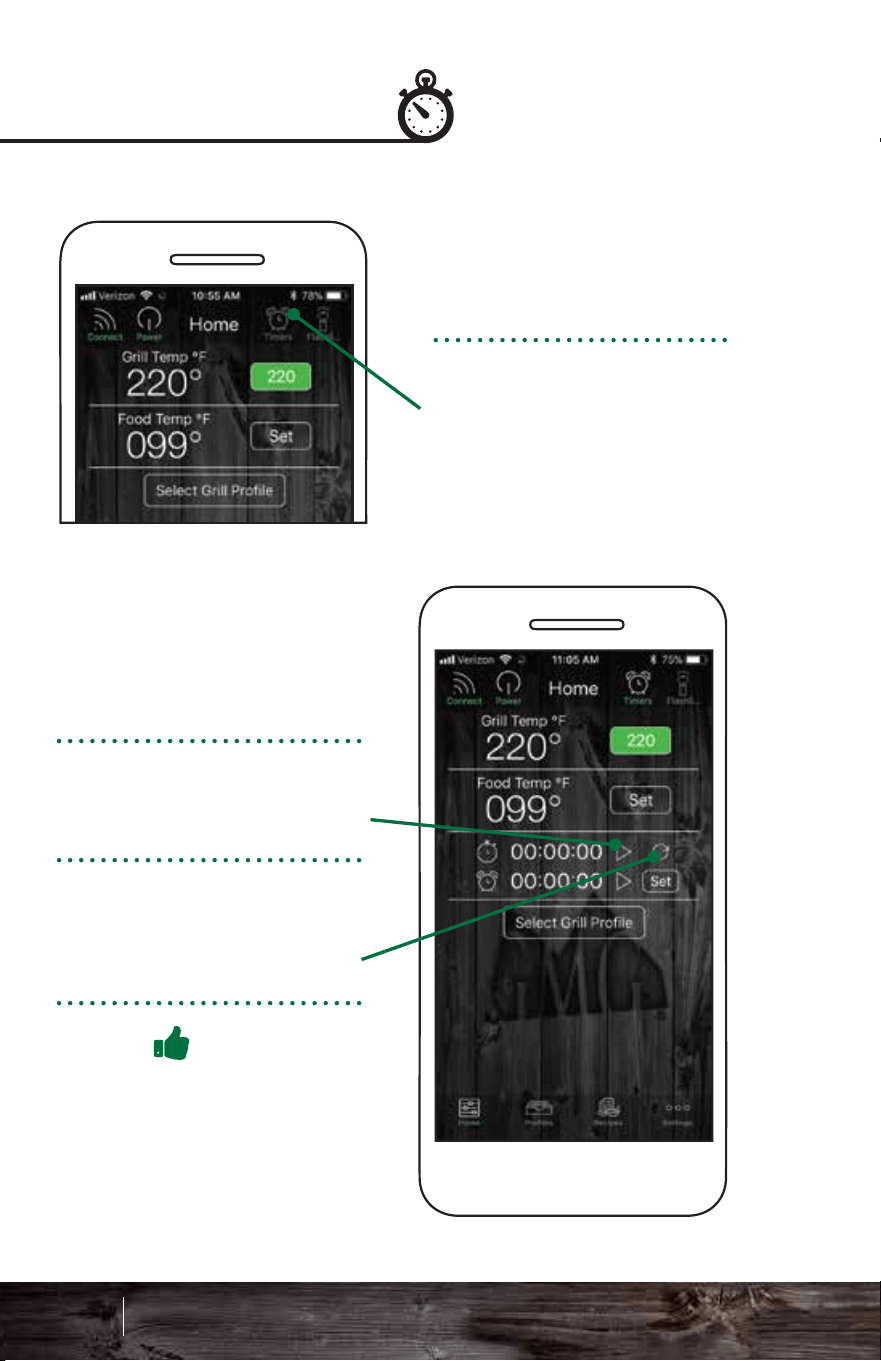
Start the stopwatch by
pressing the Play icon.
To pause the stopwatch
press the Pause icon.
To reset the stopwatch to
00:00:00, press the Reset
icon.
Pro Tip
Experimenting with cooking
times using the stopwatch
can help you build food
profiles.
To set a timer, press the
Set button next to the
timer.
Tap the Play icon to start
the timer.
To pause, press the
Pause icon while the
Timer is running.
Stopwatch Timer
The stopwatch is found
on the Home screen.
Activate the Timers icon
in the top right of screen.
This will drop down the
stopwatch and timer
controls.
A timer box will pop up.
Select the hours and
minutes. Tap Confirm to
set the timer.
An alarm will sound when
the timer runs out.
91 92
Smart Control App Guide
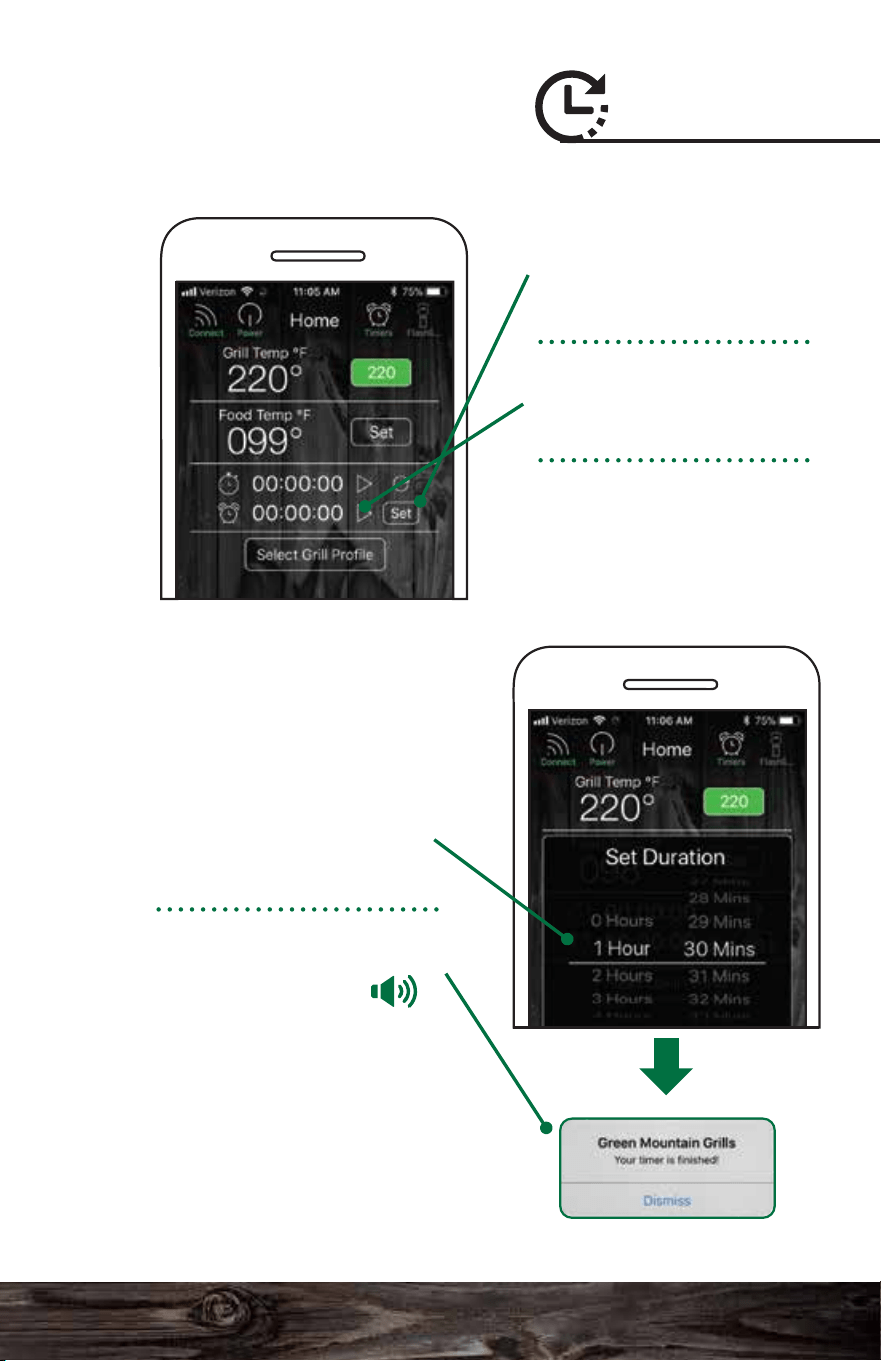
Start the stopwatch by
pressing the Play icon.
To pause the stopwatch
press the Pause icon.
To reset the stopwatch to
00:00:00, press the Reset
icon.
Pro Tip
Experimenting with cooking
times using the stopwatch
can help you build food
profiles.
To set a timer, press the
Set button next to the
timer.
Tap the Play icon to start
the timer.
To pause, press the
Pause icon while the
Timer is running.
Stopwatch Timer
The stopwatch is found
on the Home screen.
Activate the Timers icon
in the top right of screen.
This will drop down the
stopwatch and timer
controls.
A timer box will pop up.
Select the hours and
minutes. Tap Confirm to
set the timer.
An alarm will sound when
the timer runs out.
91 92
Smart Control App Guide
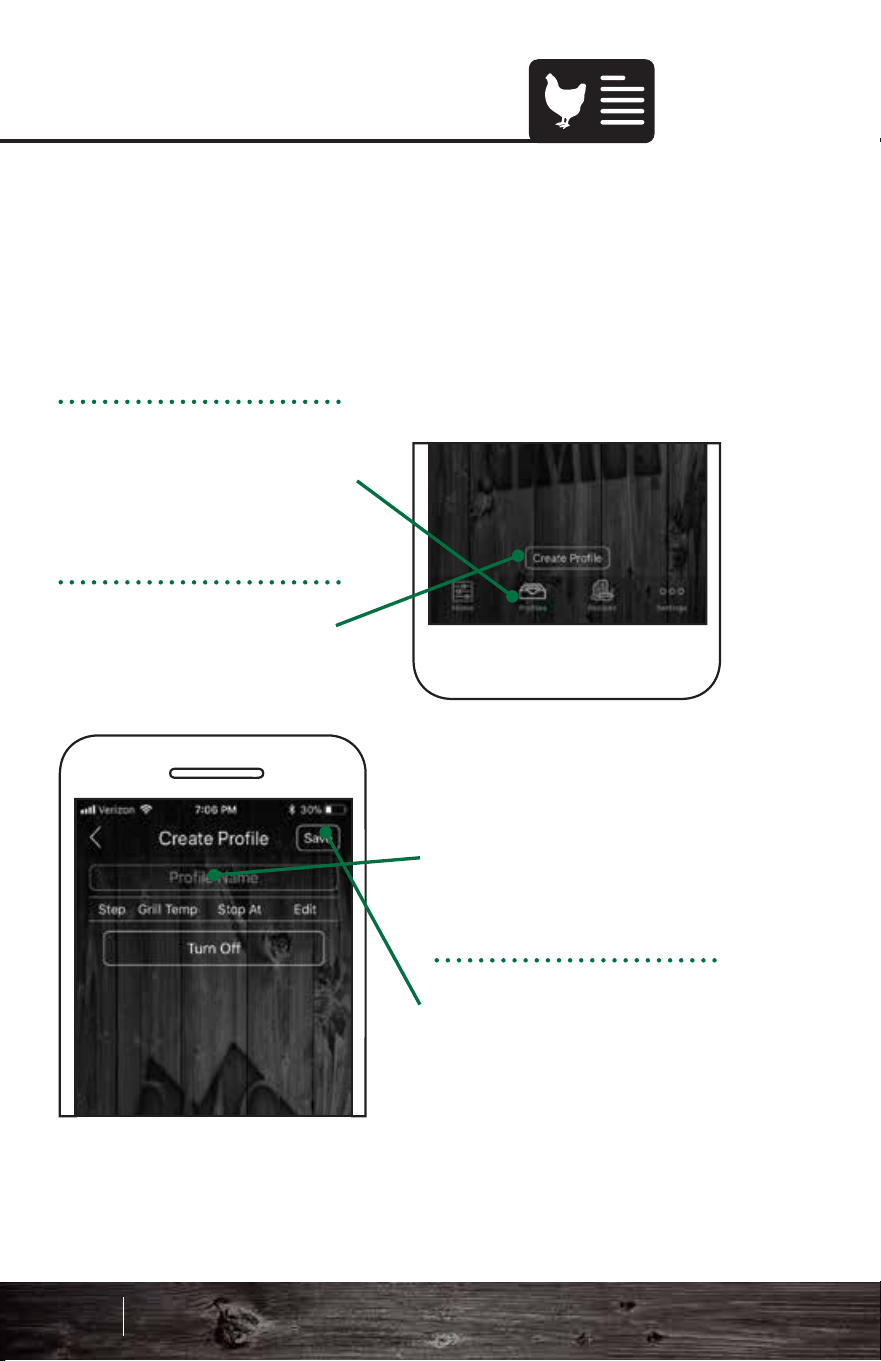
TIME TRIGGERED:
Each step will maintain a
temperature for a specified
amount of time. When the
selected time has run out,
the next step in the profile
will activate.
Press Confirm to save the
new profile step.
To create a new profile,
tap the Profiles icon at the
bottom of the Home
screen.
Press the Create Profile
button.
Choose Profile Name and
enter a name for your
profile.
Press the Save button.
Creating Profiles Creating Steps
1
2
3
To add a new step press
the Add Step button.
Steps allow you to automate temperature changes in a
profile. You can select between temperature and
time-dependent steps. Temperature-dependent steps are
dictated by the food probe. Time-dependent steps use time
to dictate the process.
Profiles allow you to create and use customizable and
programmable cooking instructions to make grilling that
much easier! Whether you are smoking ribs, slow-cooking a
brisket or just grilling chicken breasts, profiles allow you to
easily record and repeat your cook at the click of a button.
93 94
Smart Control App Guide
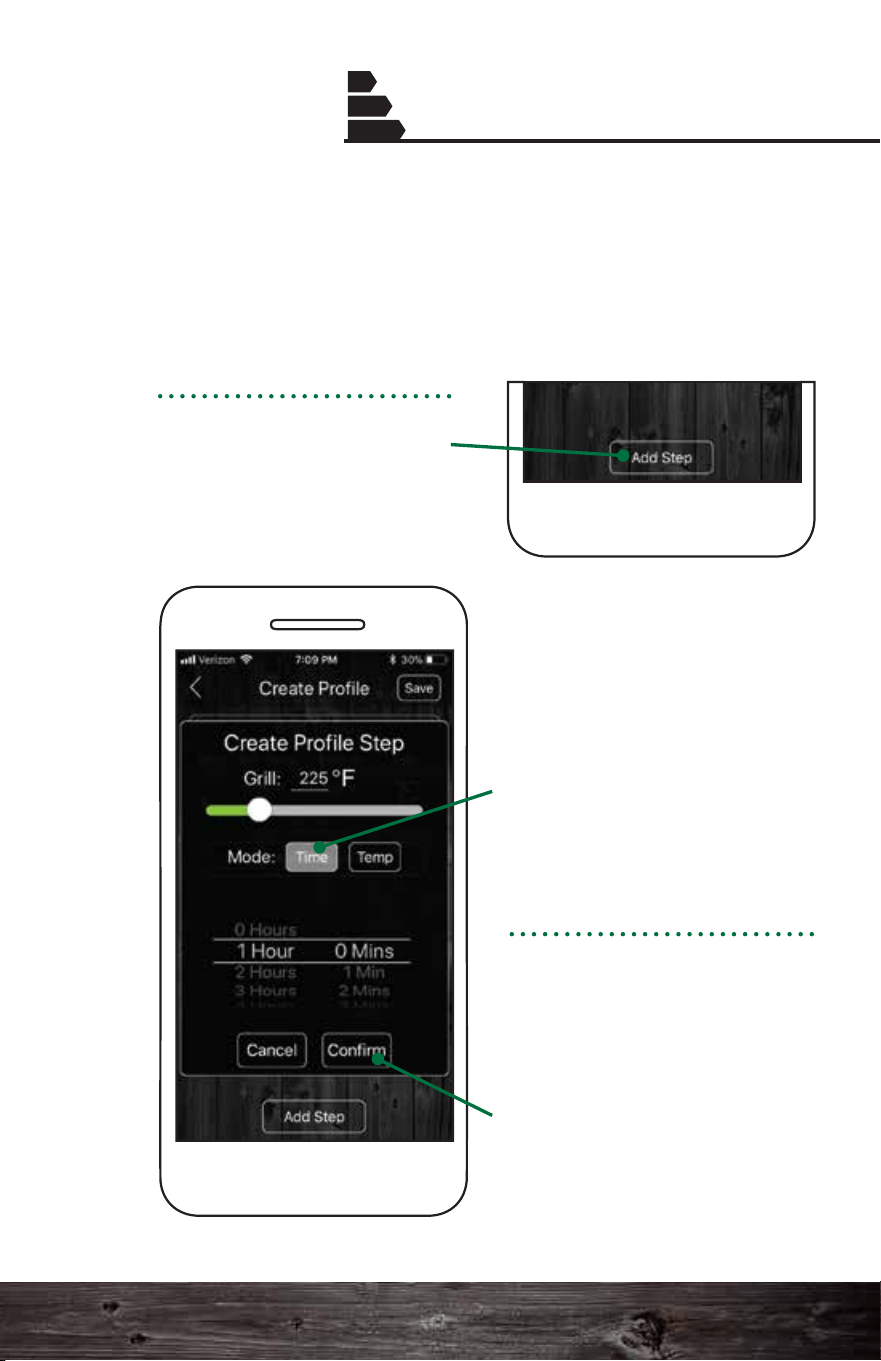
TIME TRIGGERED:
Each step will maintain a
temperature for a specified
amount of time. When the
selected time has run out,
the next step in the profile
will activate.
Press Confirm to save the
new profile step.
To create a new profile,
tap the Profiles icon at the
bottom of the Home
screen.
Press the Create Profile
button.
Choose Profile Name and
enter a name for your
profile.
Press the Save button.
Creating Profiles Creating Steps
1
2
3
To add a new step press
the Add Step button.
Steps allow you to automate temperature changes in a
profile. You can select between temperature and
time-dependent steps. Temperature-dependent steps are
dictated by the food probe. Time-dependent steps use time
to dictate the process.
Profiles allow you to create and use customizable and
programmable cooking instructions to make grilling that
much easier! Whether you are smoking ribs, slow-cooking a
brisket or just grilling chicken breasts, profiles allow you to
easily record and repeat your cook at the click of a button.
93 94
Smart Control App Guide
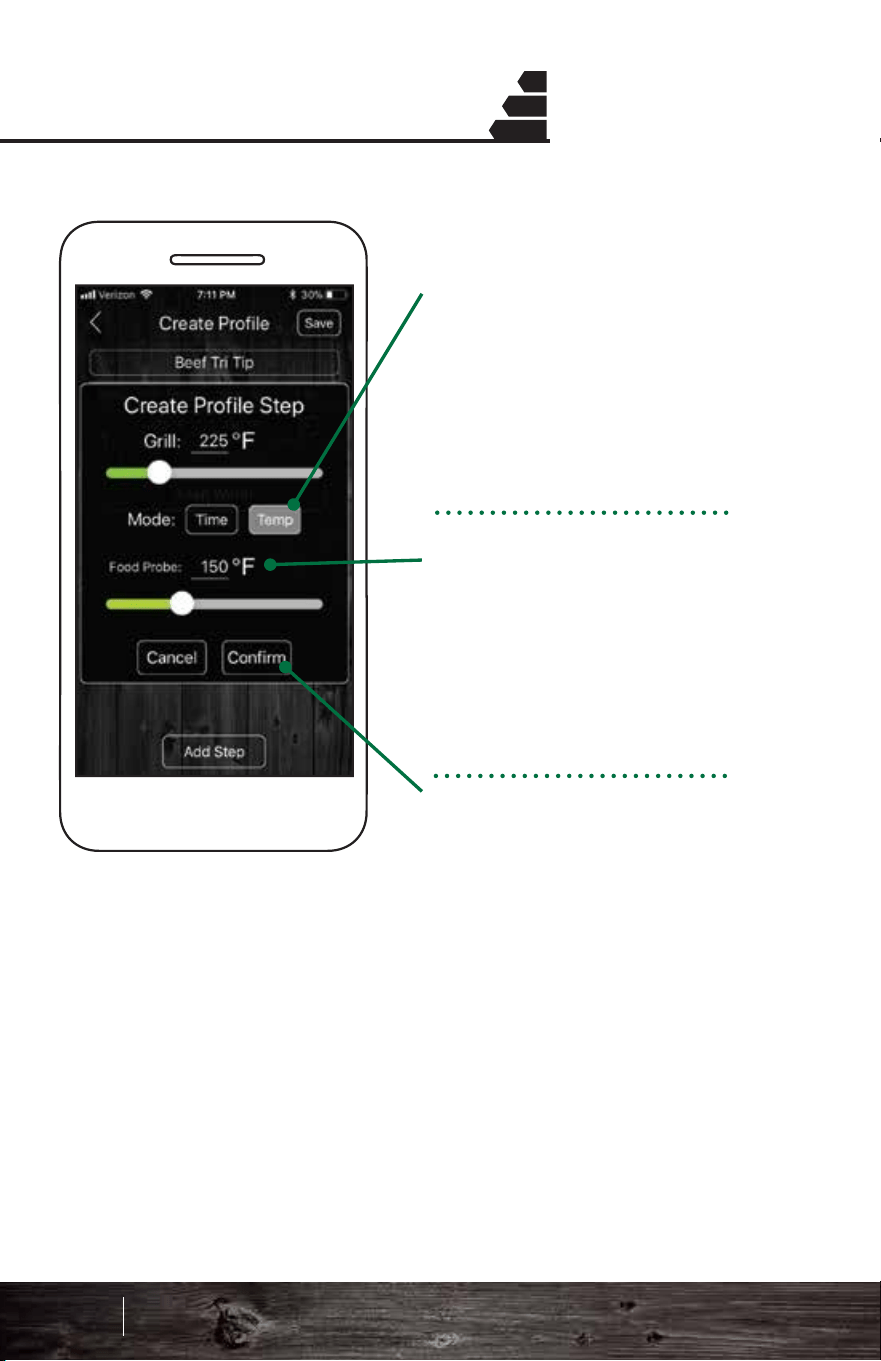
END STEP:
For the end step, the grill
will automatically display a
Keep Warm setting or you
can change it to Turn Off,
which will switch the grill
into fan mode.
To switch between the two
settings simply tap the
current button.
Keep Warm: This setting
will set the grill temp to
150°F and stay there until
the grill is turned off.
Turn Off: This mode will
immediately initiate fan
mode.
* If you're a new user, we
recommend that you use the
Keep Warm setting.
Creating Steps Creating Steps
1
2
3
1
2
3
TEMP TRIGGERED:
Using your GMG food
probe, you can trigger a
profile step based on the
internal temp of a food
item.
When the food probe
reaches the set temp, the
next step in the profile will
activate (i.e. increase or
decrease the grill temp
when internal temp is
reached).
Press Confirm to save the
new profile step.
Pro Tip: If your grill goes into fan mode and food is
not ready, do a hot restart. See page 66 for proper
bypass mode instructions.
95 96
Smart Control App Guide
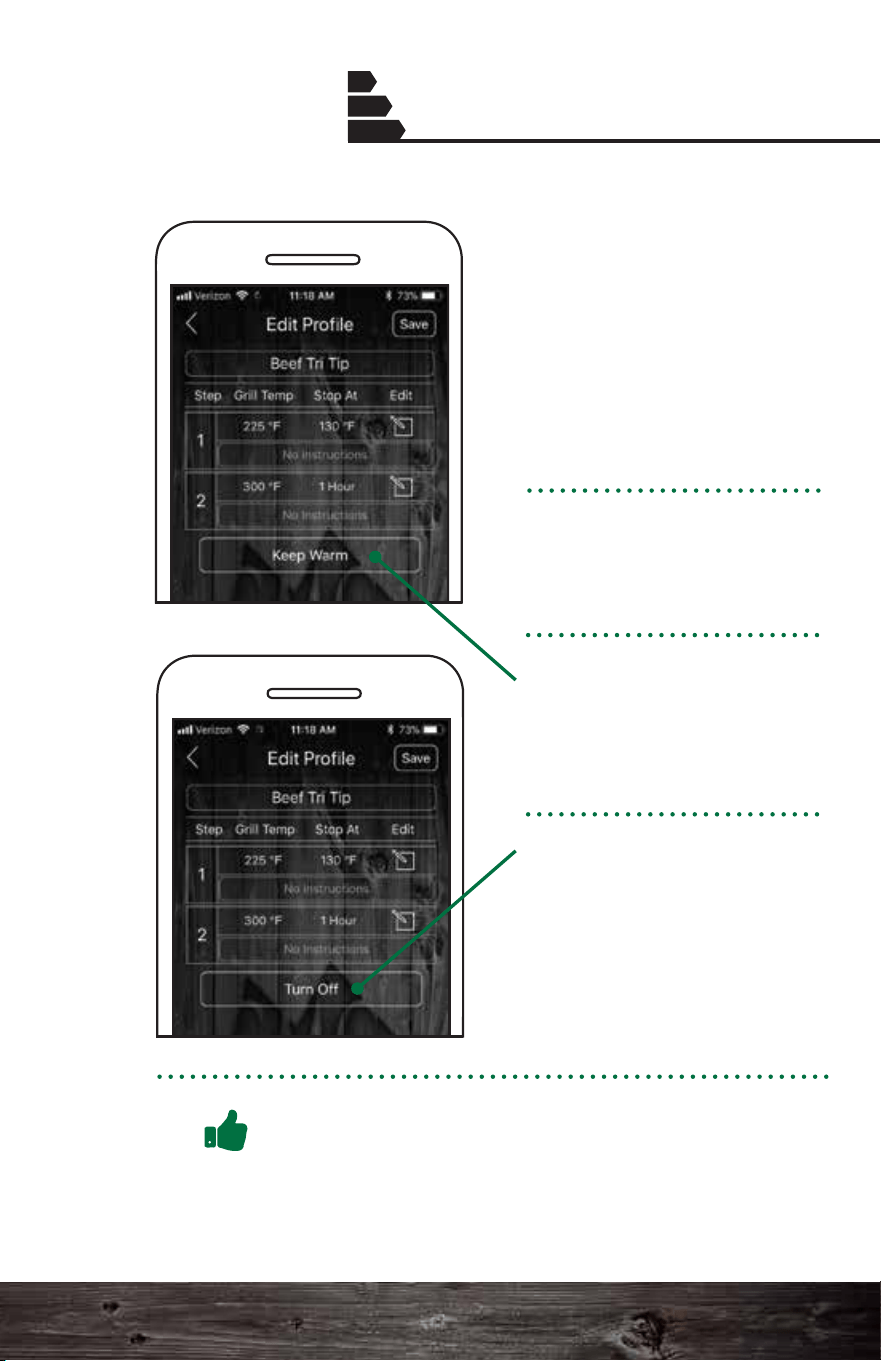
END STEP:
For the end step, the grill
will automatically display a
Keep Warm setting or you
can change it to Turn Off,
which will switch the grill
into fan mode.
To switch between the two
settings simply tap the
current button.
Keep Warm: This setting
will set the grill temp to
150°F and stay there until
the grill is turned off.
Turn Off: This mode will
immediately initiate fan
mode.
* If you're a new user, we
recommend that you use the
Keep Warm setting.
Creating Steps Creating Steps
1
2
3
1
2
3
TEMP TRIGGERED:
Using your GMG food
probe, you can trigger a
profile step based on the
internal temp of a food
item.
When the food probe
reaches the set temp, the
next step in the profile will
activate (i.e. increase or
decrease the grill temp
when internal temp is
reached).
Press Confirm to save the
new profile step.
Pro Tip: If your grill goes into fan mode and food is
not ready, do a hot restart. See page 66 for proper
bypass mode instructions.
95 96
Smart Control App Guide
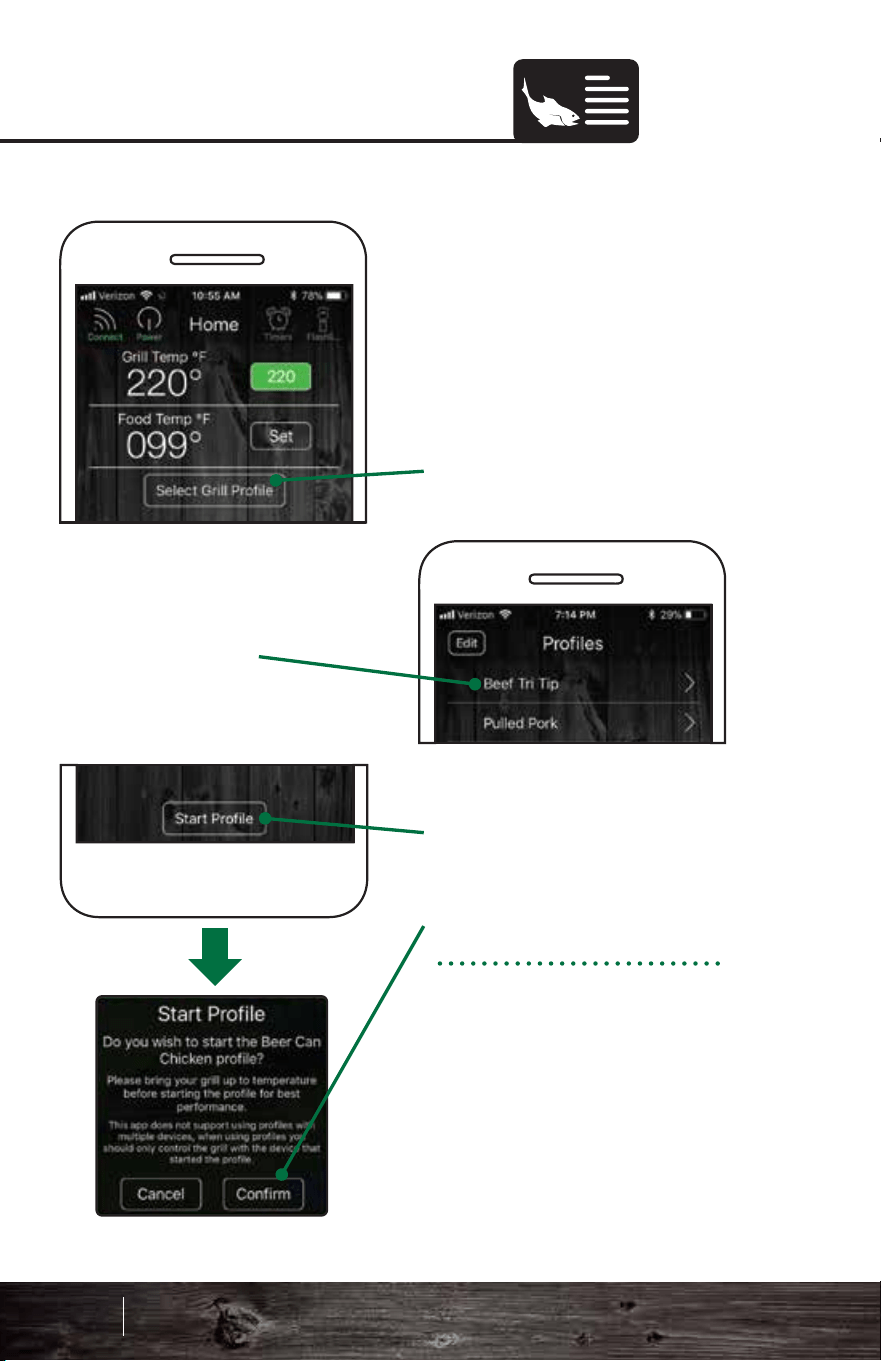
To edit a profile:
1. Tap the profile.
2. Tap the Edit button.
The edit mode will open.
3. To set the grill temp,
stop time or set the food
probe temp, tap the
relevant button.
4. To add a step, tap Add
Step. To remove one, tap
Delete.
5. Tap the Save button to
save your edits.
Editing Profiles
Starting Profiles
Before you begin using a
previously created profile,
make sure the grill is
warmed up. Then:
1. Press the Select Grill
Profile button.
2. Choose the profile you
would like to run.
3. Press the Start Profile
button.
4. Press Confirm.
Profiles are loaded into
the grill's memory, and
will continue to run even
if your phone is
disconnected.
97 98
Smart Control App Guide
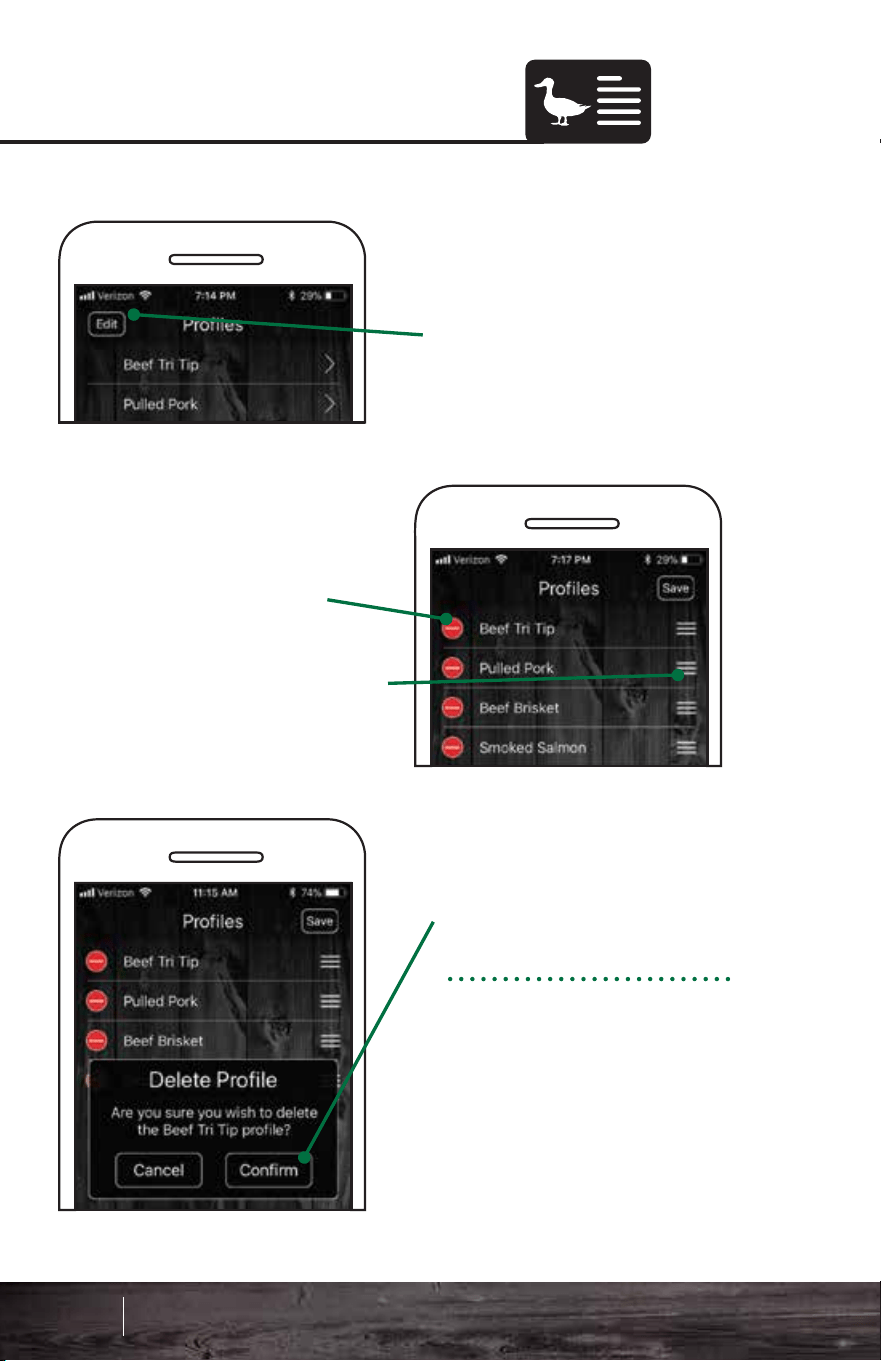
RecipesDeleting Profiles
You have access to all of
our great GMG recipes at
your fingertips!
Scroll through our 12
different recipe categories
to find what you’re in the
mood for.
Use the icon menu at the
top to switch between
categories.
2. Press the red Delete
button.
To delete a profile:
1. Tap the Edit button
3. Press Confirm.
To move profiles around,
press down the 3 bars
next to them. Then you
can pull them up or down
your list.
99 100
Smart Control App Guide
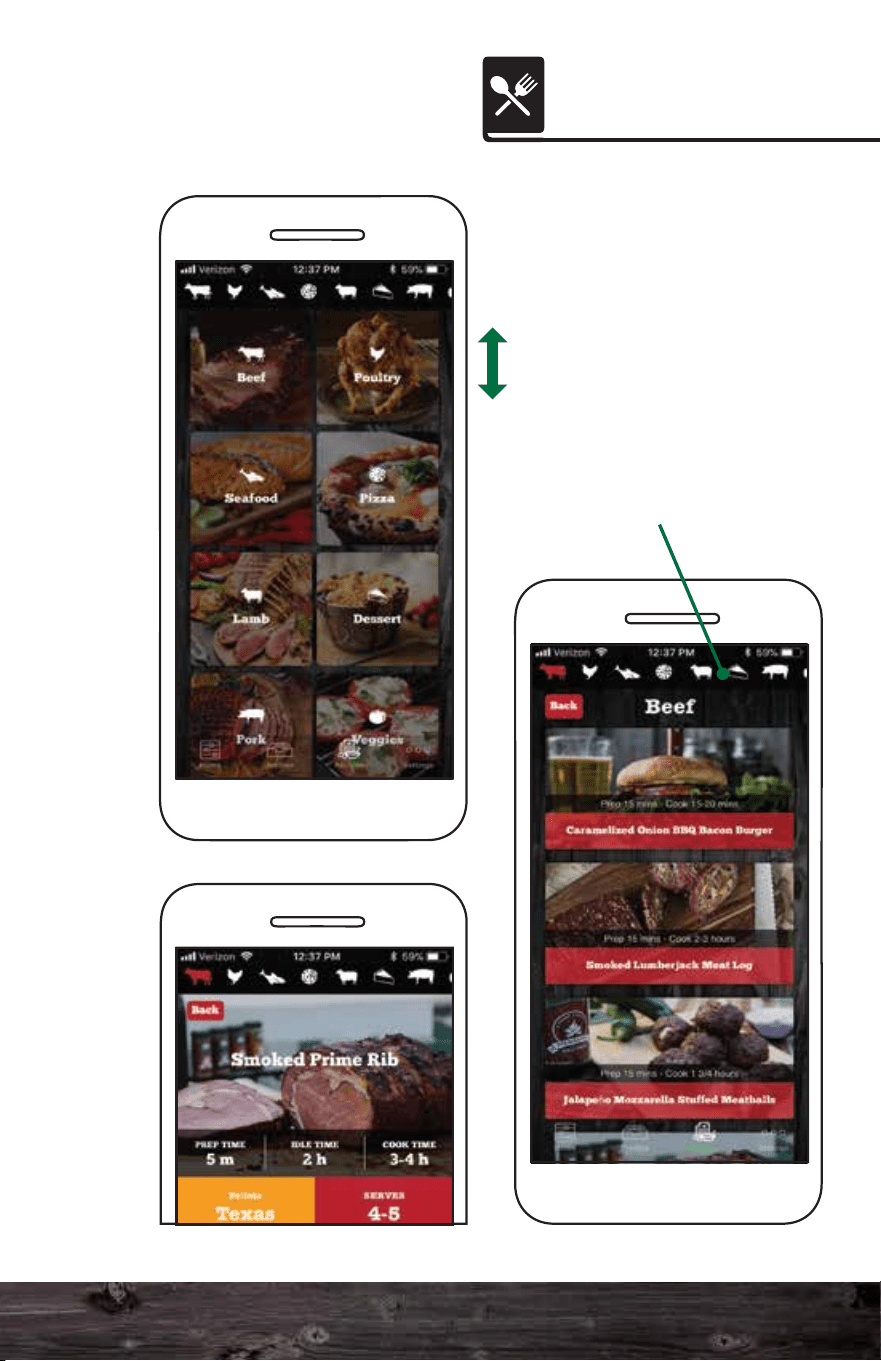
RecipesDeleting Profiles
You have access to all of
our great GMG recipes at
your fingertips!
Scroll through our 12
different recipe categories
to find what you’re in the
mood for.
Use the icon menu at the
top to switch between
categories.
2. Press the red Delete
button.
To delete a profile:
1. Tap the Edit button
3. Press Confirm.
To move profiles around,
press down the 3 bars
next to them. Then you
can pull them up or down
your list.
99 100
Smart Control App Guide
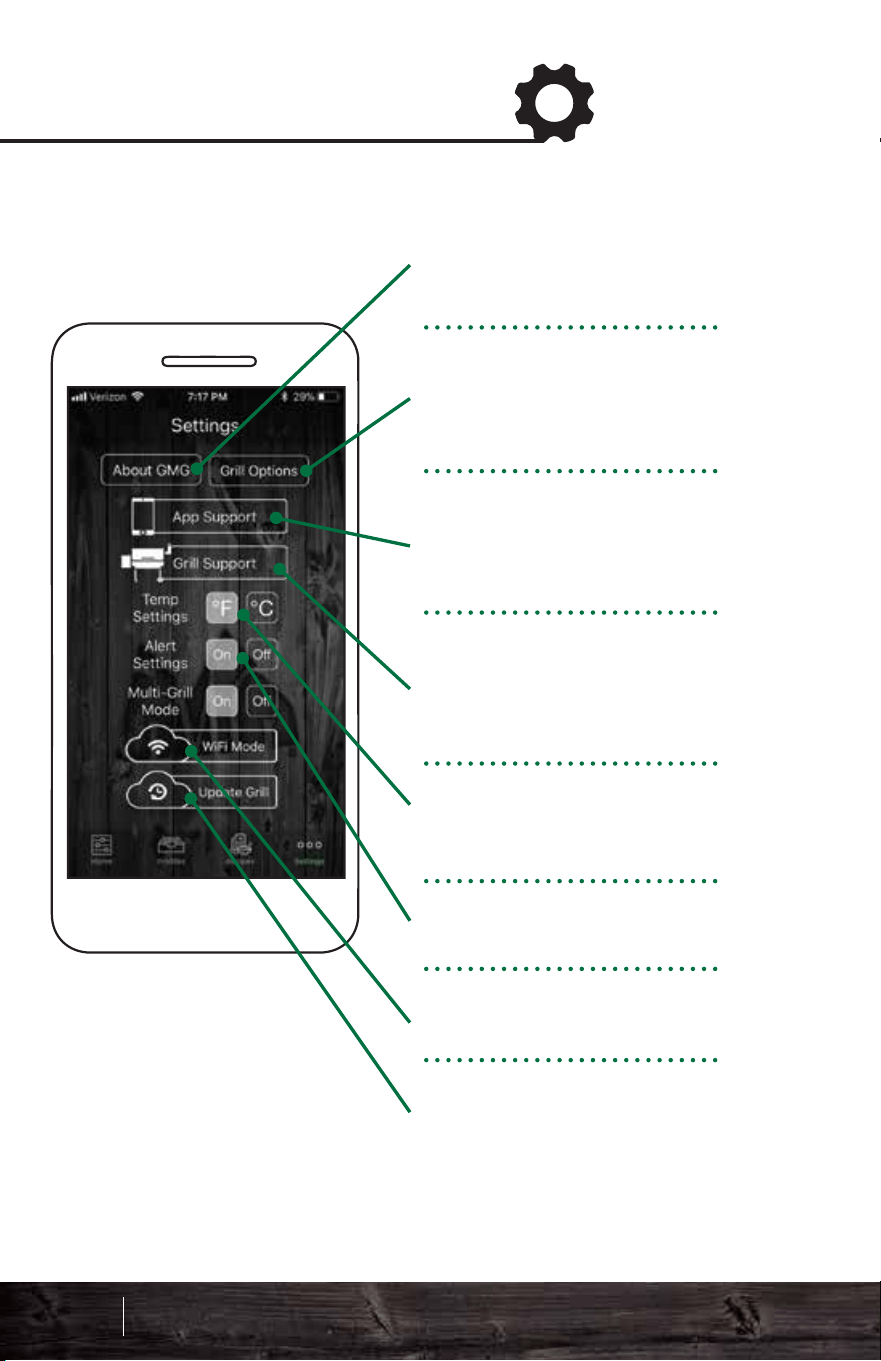
1. Unplug the power cord
from the back of the unit.
2. Hold down the up
button. While holding it
down, plug the cord back
into the grill and continue
to hold down the button.
The LCD screen will flash
the version number. If no
version number is
displayed, you will need to
update the firmware. See
page 100 for firmware
updating.
Latest Firmware
Versions:
Daniel Boone - 1.2
Jim Bowie - 1.2
Davy Crockett - 6.7
* Subect to change with updates
About GMG provides
contact info, mission
statement and app version.
Grill Options allow you to
better calibrate your grill
configuration.
Access App Support
tutorials, FAQs and contact
info.
Access grill support
tutorials, FAQs and contact
info.
Change temperature
settings.
Toggle app notifications.
Access WiFi/Server Mode.
Update grill firmware
system.
Firmware Version Check
Settings Screen
101 102
Smart Control App Guide
To check what version of GMG firmware your grill is
running, follow these steps:
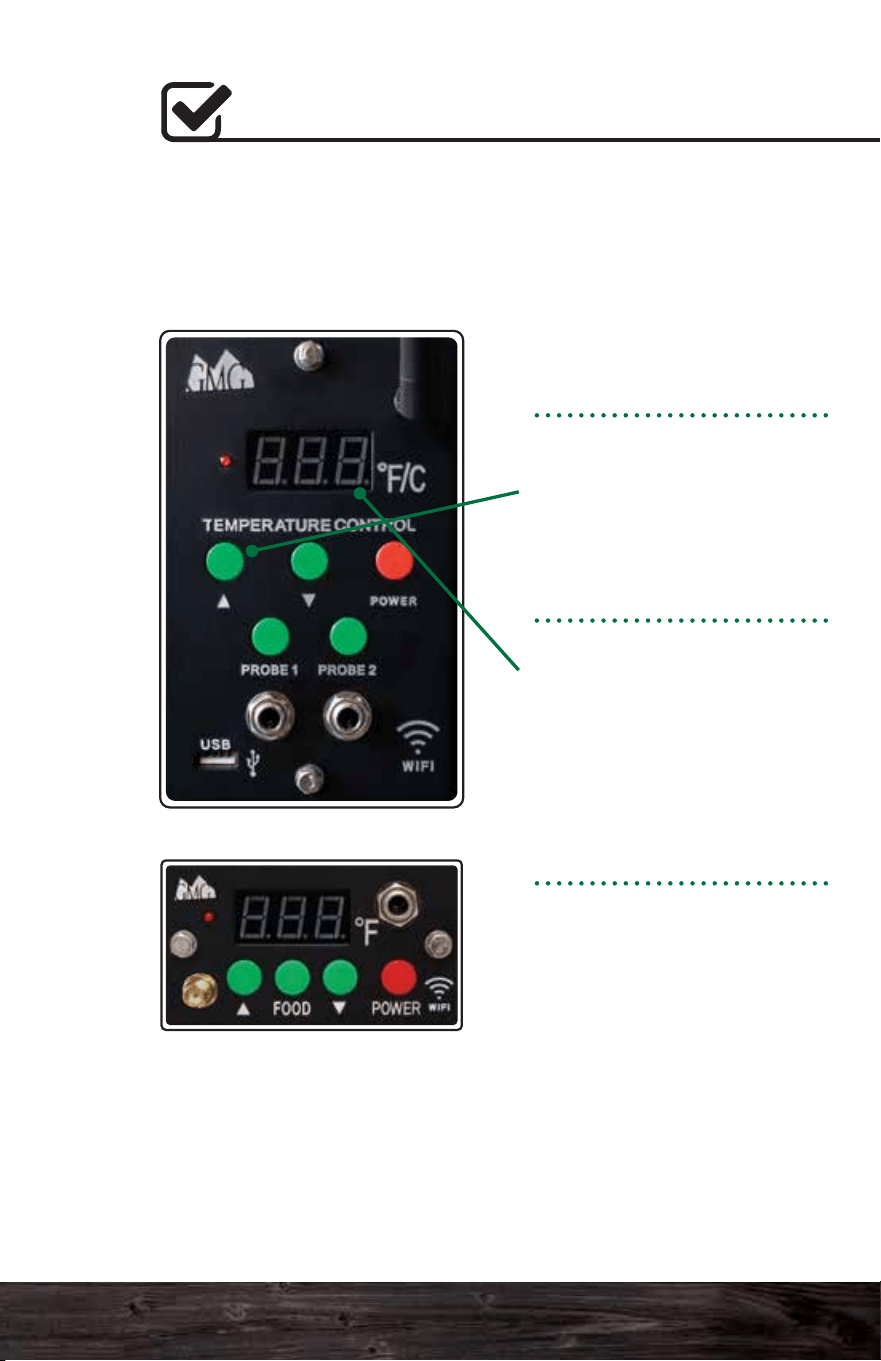
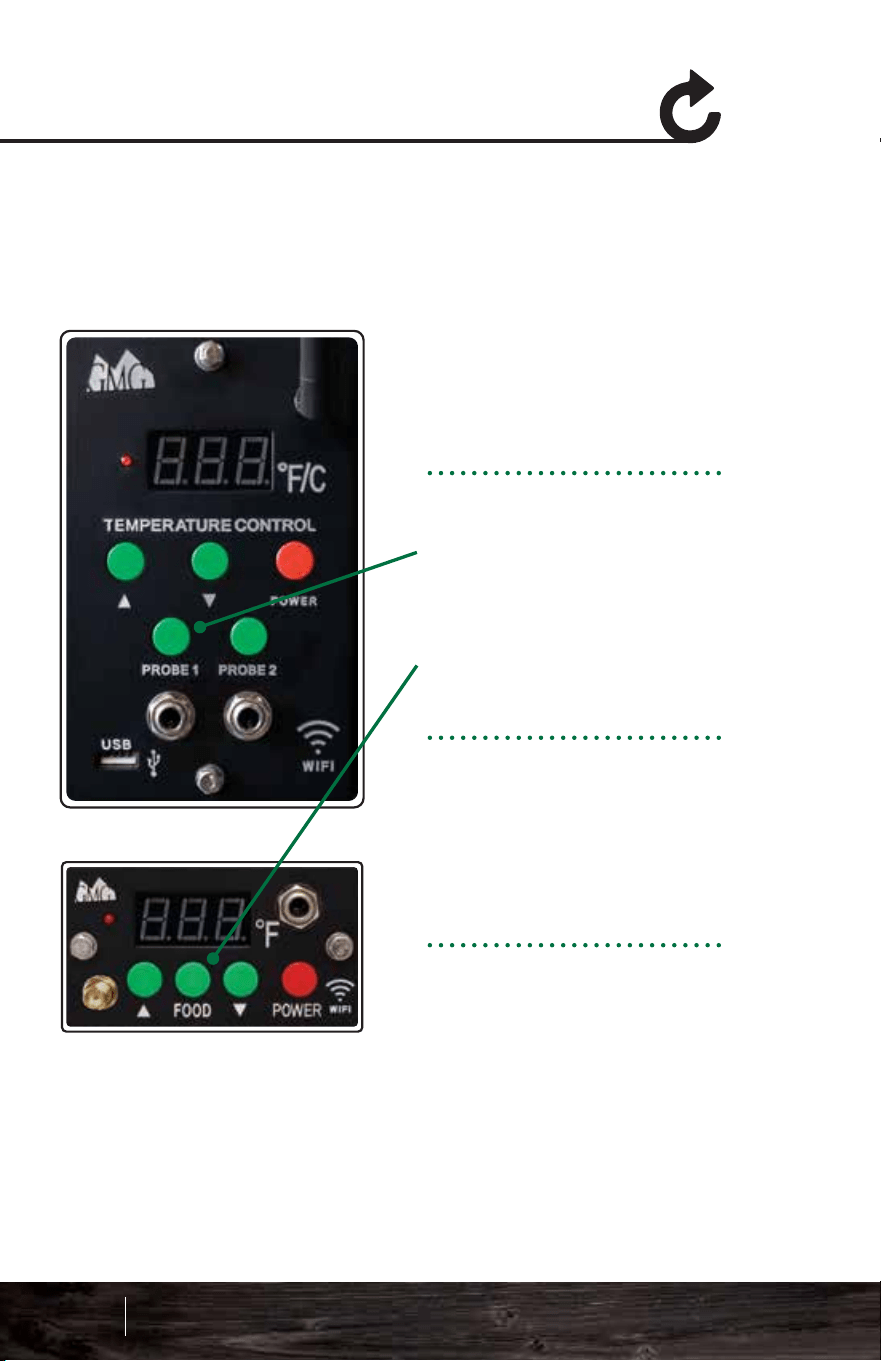
1. Unplug the power cord
from the back of the unit.
DB & JB Models
2. Hold down the PROBE
1 button.
DC Model
2. Hold down the FOOD
button.
3. While holding it down,
plug the power cord back
into the grill. Continue to
hold down the button for
about 15 seconds.
The grill will count up from
0 to 999 then display off.
The grill is now reset to
default.
Updating Grill Firmware
Control Board Reset
To update your grill’s firmware you will need to connect your
grill to your home WiFi network and download the update.
Firmware updates and application updates are separate. You
will need to be at least within 20 feet of your home network.
Updating your firmware typically isn’t necessary unless you
are experiencing an issue with the device.
First, make sure the grill is
on, and the LCD is
displaying “off”. Make sure
you are not cooking while
you attempt the update.
Next select the Update Grill
button to begin the update
process.
103 104
Smart Control App Guide
To reset the system to default settings:
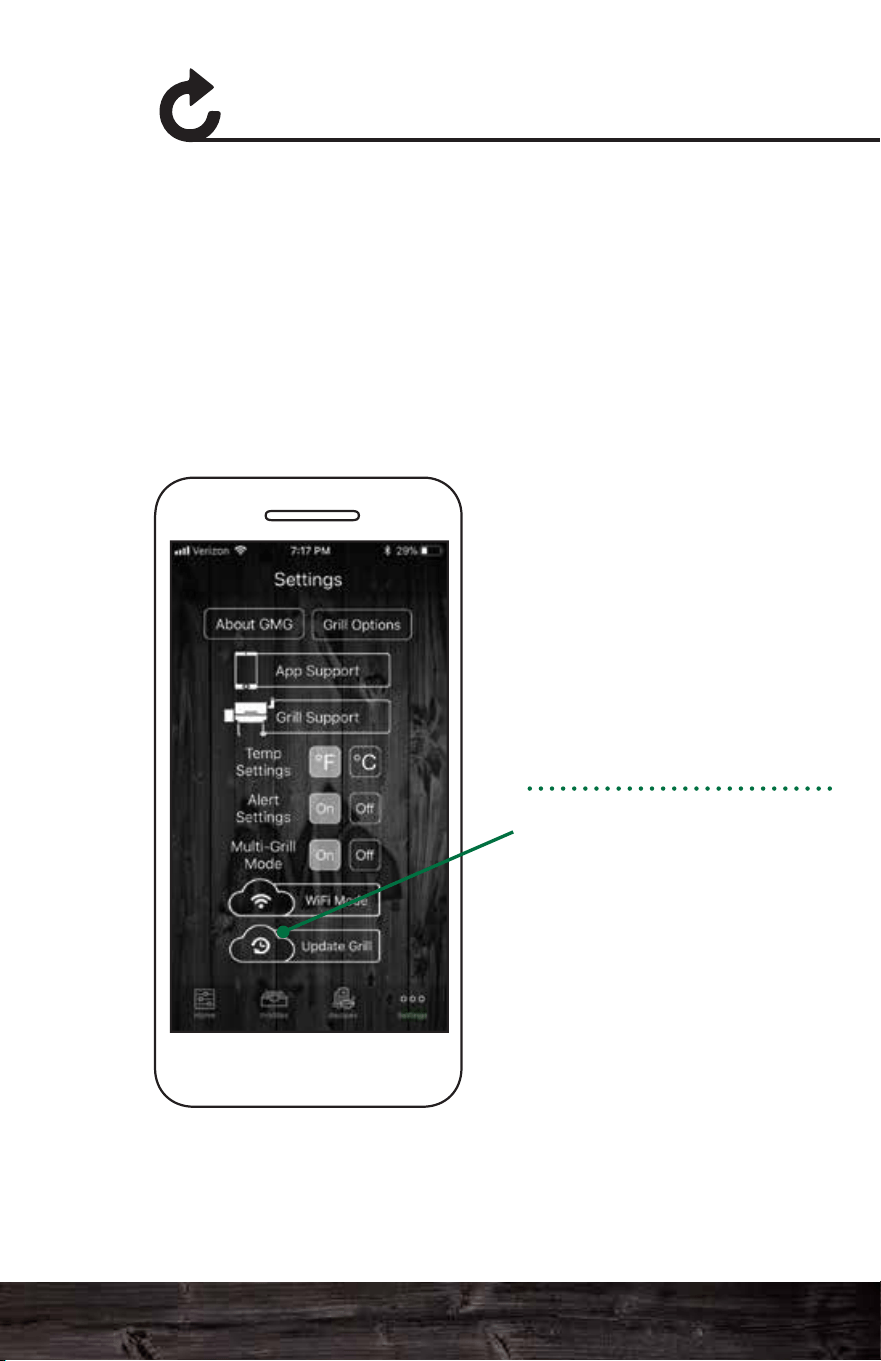
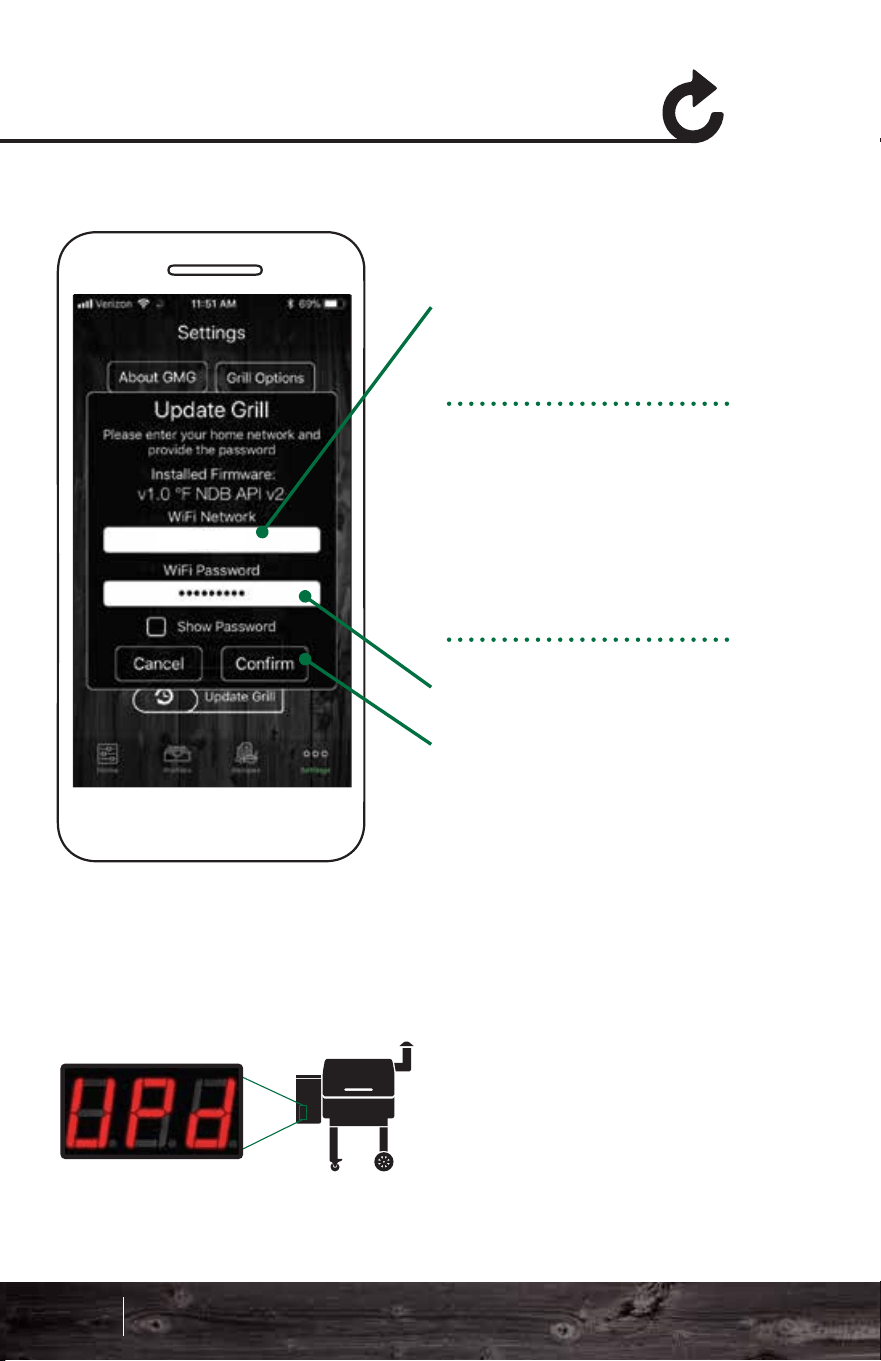
Updating Grill Firmware
Updating Grill Firmware
Your grill’s LCD panel will display “UPD” and connect to your
local network. Once connected, the grill will start
downloading the new firmware.
The LCD screen will start at “0” and climb to “100.” If the
update is successful, the LCD panel will display “SUC.”
If the update is unsuccessful, the LCD panel will display “FAL.”
If your update fails:
1. You are not close enough to your home network (needs to
be within 20 feet).
2. You don’t have the latest version of firmware and the
package update can’t download.
3. Your network does not have a password or is not
compatible with the grill.
Once you see “SUC” unplug the grill and plug it back in again.
The system will now install the update and verify if it is
installed correctly. You will see the grill count from “000” to
“100” during this time. When the update is complete, the grill
will display “off”. It will then disconnect from your local network
and broadcast via the GMG network again.
Select the network you
would like to use to
update your grill. The
network must have a live
network connection.
Android: Select the
network from the drop
down menu.
iOS: Type in your network
(case sensitive).
Enter the password for
your network and press
Confirm. The password is
case sensitive.
YourNetwork
105 106
Smart Control App Guide
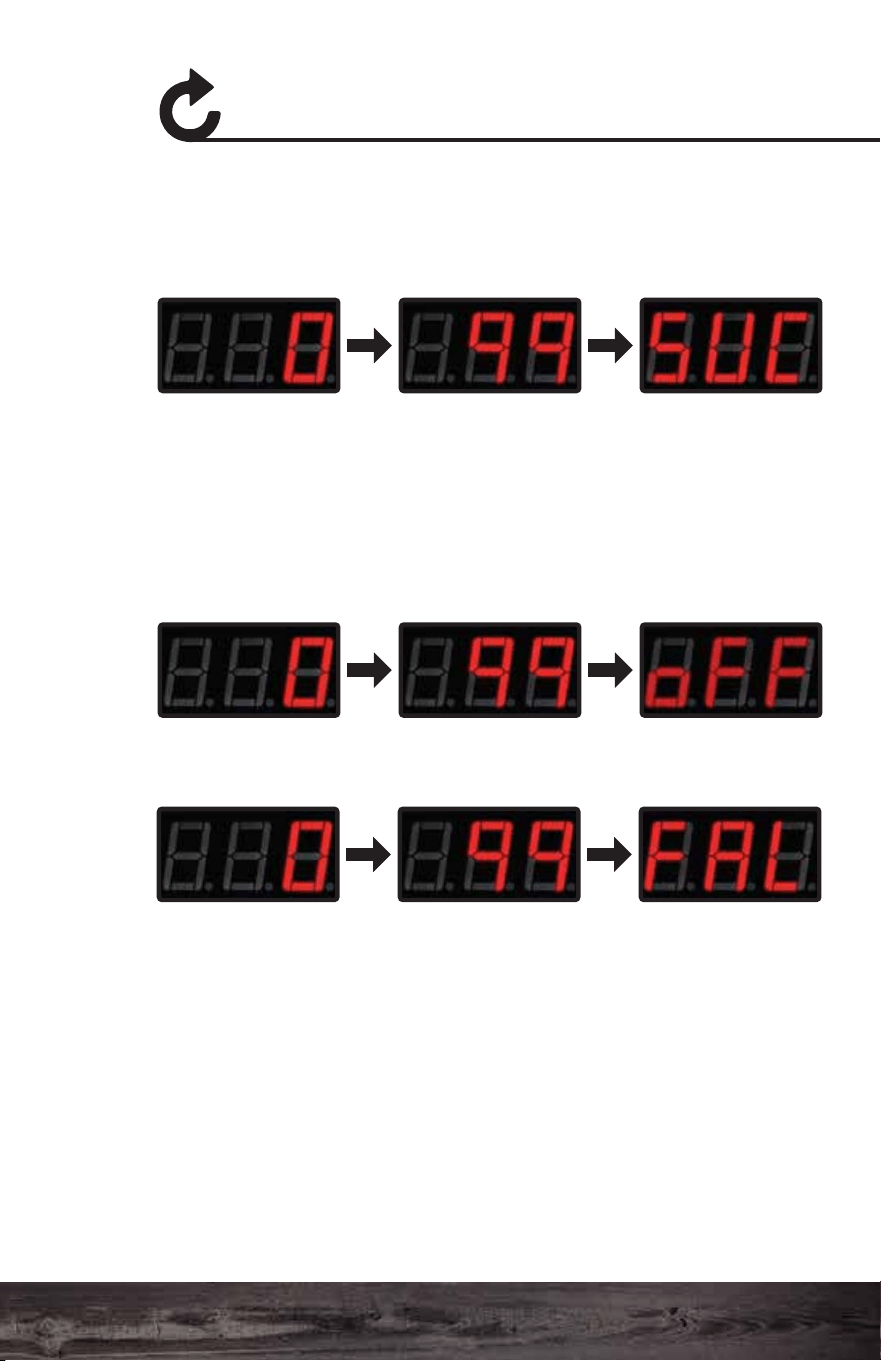
Updating Grill Firmware
Updating Grill Firmware
Your grill’s LCD panel will display “UPD” and connect to your
local network. Once connected, the grill will start
downloading the new firmware.
The LCD screen will start at “0” and climb to “100.” If the
update is successful, the LCD panel will display “SUC.”
If the update is unsuccessful, the LCD panel will display “FAL.”
If your update fails:
1. You are not close enough to your home network (needs to
be within 20 feet).
2. You don’t have the latest version of firmware and the
package update can’t download.
3. Your network does not have a password or is not
compatible with the grill.
Once you see “SUC” unplug the grill and plug it back in again.
The system will now install the update and verify if it is
installed correctly. You will see the grill count from “000” to
“100” during this time. When the update is complete, the grill
will display “off”. It will then disconnect from your local network
and broadcast via the GMG network again.
Select the network you
would like to use to
update your grill. The
network must have a live
network connection.
Android: Select the
network from the drop
down menu.
iOS: Type in your network
(case sensitive).
Enter the password for
your network and press
Confirm. The password is
case sensitive.
YourNetwork
105 106
Smart Control App Guide
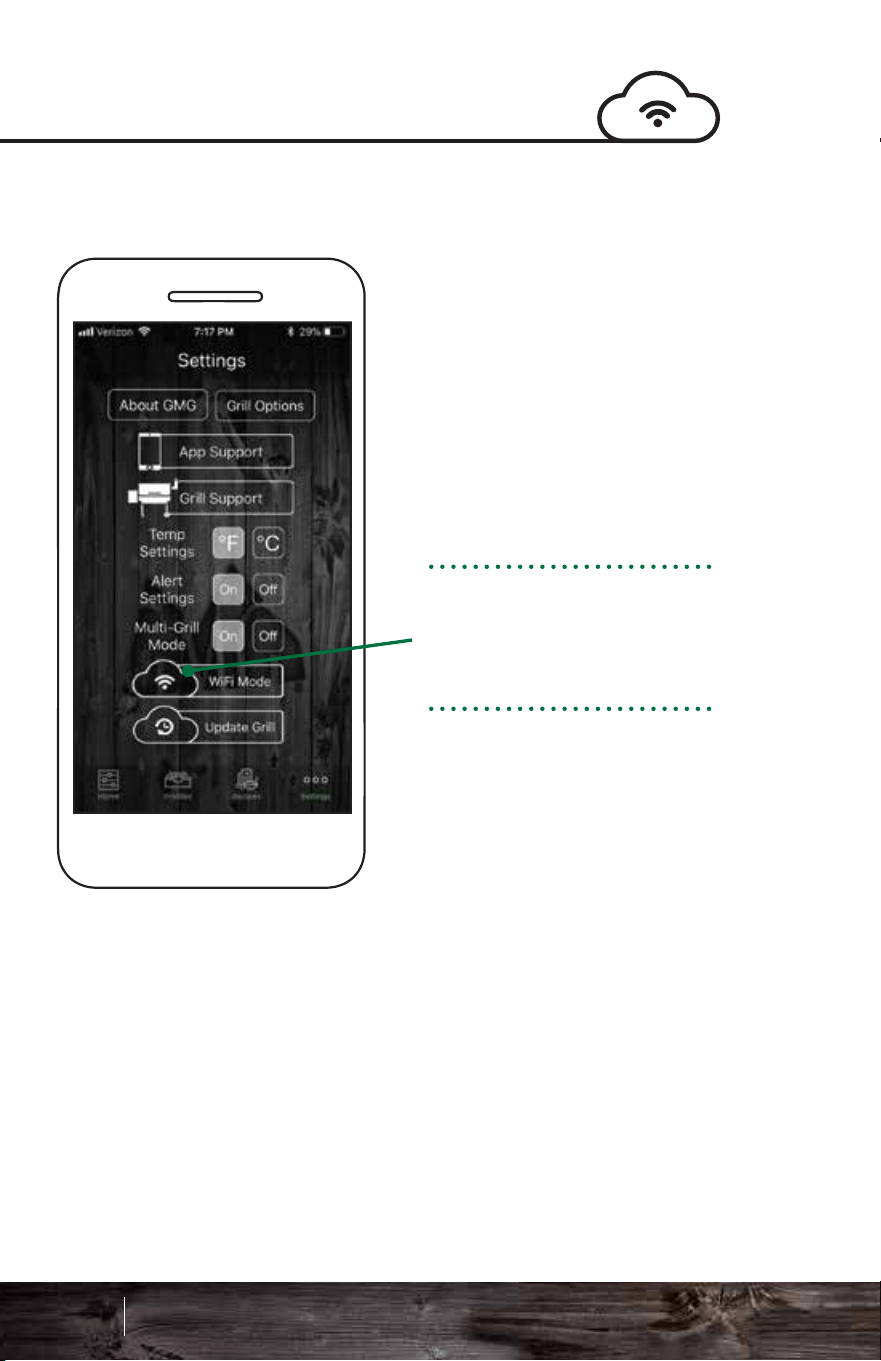
Connecting to WiFiConnecting to WiFi
Android: Choose your
network from the drop
down menu.
iOS: Type in your
network name (case
sensitive).
Please be within 20 feet
of your home router for
the initial update.
Now that the network is
selected, enter your
password. Check the
Show Password box to
display the characters
(passwords are case
sensitive).
Single-Grill Mode:
Connect to your grill in
the default point-to-point
mode on the GMG
network. Make sure the
Connect button is active
and the app is reading
the grill temperature.
Navigate to the Settings
tab and select the WiFi
Mode button.
The next steps will
connect your GMG grill
to your home network.
YourNetwork
107 108
Smart Control App Guide
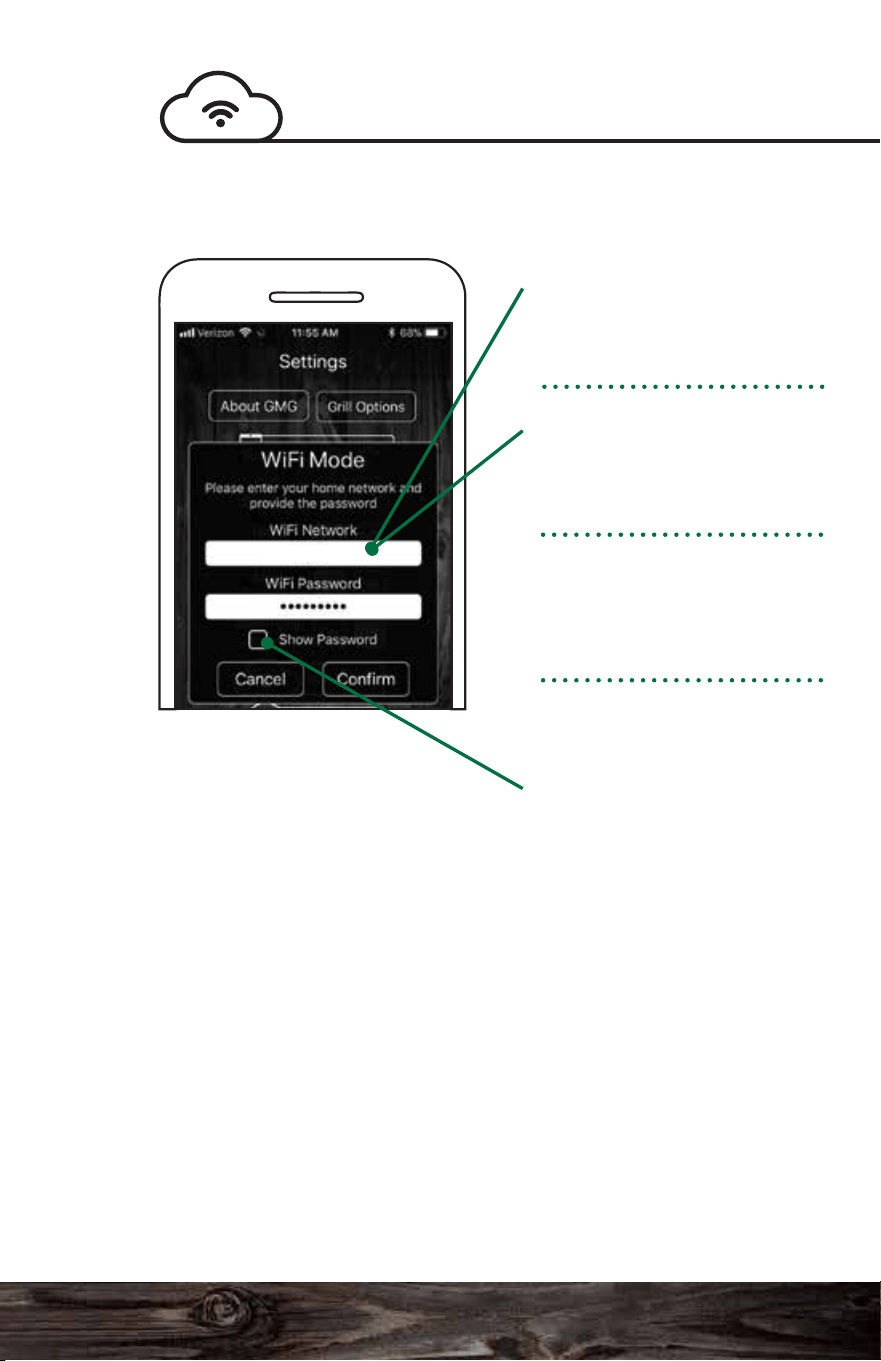
Connecting to WiFiConnecting to WiFi
Android: Choose your
network from the drop
down menu.
iOS: Type in your
network name (case
sensitive).
Please be within 20 feet
of your home router for
the initial update.
Now that the network is
selected, enter your
password. Check the
Show Password box to
display the characters
(passwords are case
sensitive).
Single-Grill Mode:
Connect to your grill in
the default point-to-point
mode on the GMG
network. Make sure the
Connect button is active
and the app is reading
the grill temperature.
Navigate to the Settings
tab and select the WiFi
Mode button.
The next steps will
connect your GMG grill
to your home network.
YourNetwork
107 108
Smart Control App Guide
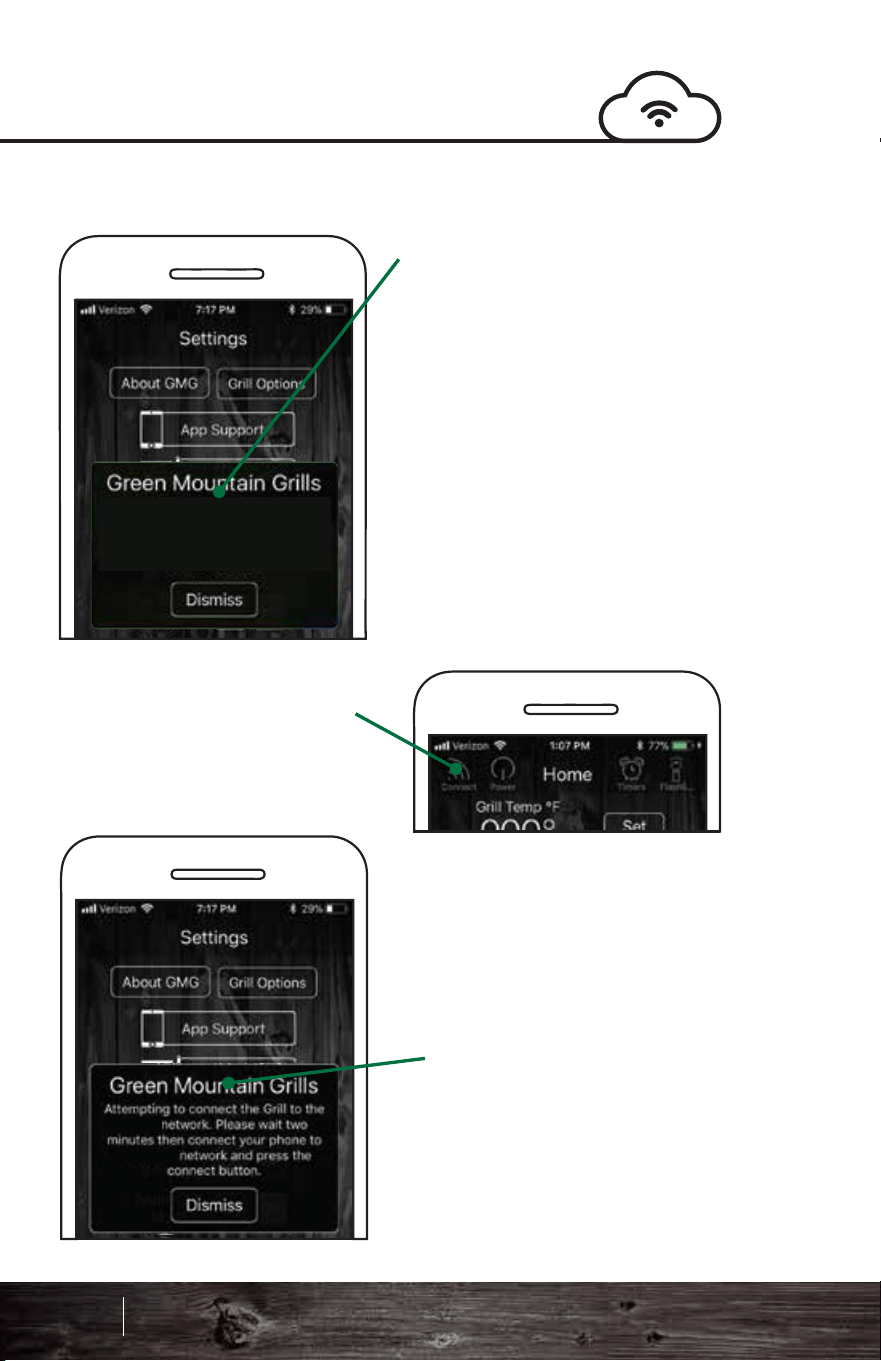
Connecting to WiFi
Connecting to WiFi
If you try to connect too early,
you may receive a “No grills
detected” message. This
means that a grill was not
found during the searching
phase. Please try again, but
allow additional time for grills
to be found. If you continue
to have difficulty connecting,
please contact App Support.
After the grill has been
connected to your home
network, connect your phone
or tablet to your home
network as well.
First, it will check for known
grills. Since you haven’t
connected before, it will not
find any. In the future, this
will speed up the process
of connecting.
Return to the app’s Home
screen and press the
Connect button.
This process has several
steps and will show
various windows.
Next, the app will search
for grills on the local
network. This step will start
the broadcast mode.
No Grills detected. Please make sure
the Grill is on and allow it two minutes
to connect to the Home WiFi.
‘Your’
109 110
Smart Control App Guide
‘YourLocal’
‘YourLocal’
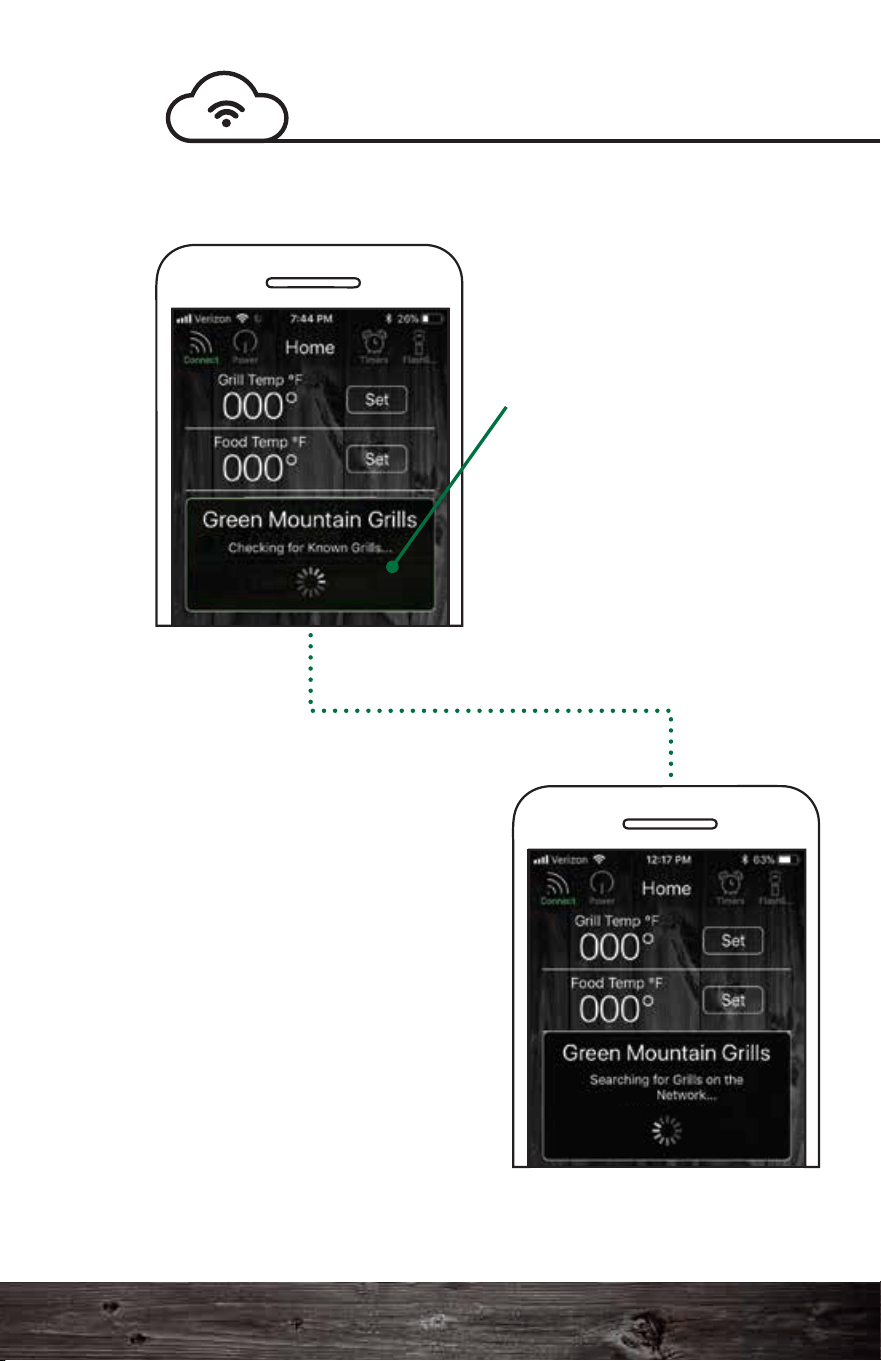
Connecting to WiFi
Connecting to WiFi
If you try to connect too early,
you may receive a “No grills
detected” message. This
means that a grill was not
found during the searching
phase. Please try again, but
allow additional time for grills
to be found. If you continue
to have difficulty connecting,
please contact App Support.
After the grill has been
connected to your home
network, connect your phone
or tablet to your home
network as well.
First, it will check for known
grills. Since you haven’t
connected before, it will not
find any. In the future, this
will speed up the process
of connecting.
Return to the app’s Home
screen and press the
Connect button.
This process has several
steps and will show
various windows.
Next, the app will search
for grills on the local
network. This step will start
the broadcast mode.
No Grills detected. Please make sure
the Grill is on and allow it two minutes
to connect to the Home WiFi.
‘Your’
109 110
Smart Control App Guide
‘YourLocal’
‘YourLocal’
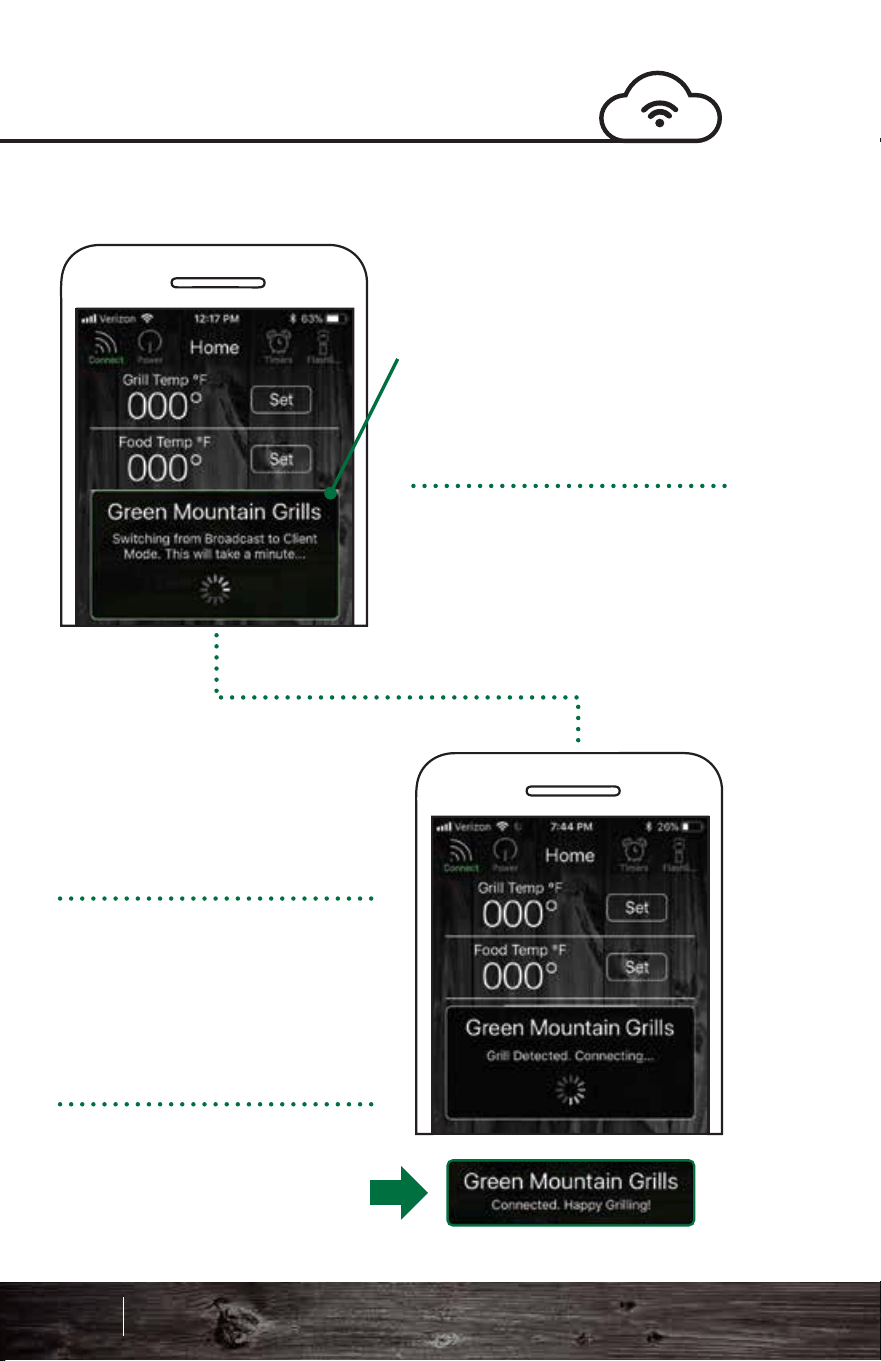
Connecting to WiFi
Welcome to the future of barbecue!
Server mode is designed for remote monitoring and grill
control when you are outside of your home WiFi network.
You can monitor the grill while out running errands or just
hanging out at home.
Capabilities:
• Turn on the grill (only from home WiFi network)
• Turn off the grill
• Increase/decrease the grill temp
• Set the food probe temp
• Start/stop a food profile
Notifications:
You will be notified when:
• The target temperature hits on the grill or food probe
• When a profile step or profile is complete
• The low pellet alarm is activated
Now that the grill is in
broadcast mode, the next
step is to switch it to the
client mode. This step
requires the grill to briefly
disconnect and reconnect
to the router with a new
configuration, which takes
around a minute.
Note: This step only occurs either the
first time you connect, after turning
the grill on or after switching it over to
a home network for the first time.
Future connections will be much
faster as long as the grill is left on.
We are almost there. The grill
has been detected and the
app is now attempting to
connect.
The dialogue should now
display “Connected, Happy
Grilling!” Temperature
readings should be coming
shortly thereafter.
Congrats! Your grill is now
connected over local WiFi.
Server Mode
111 112
Smart Control App Guide
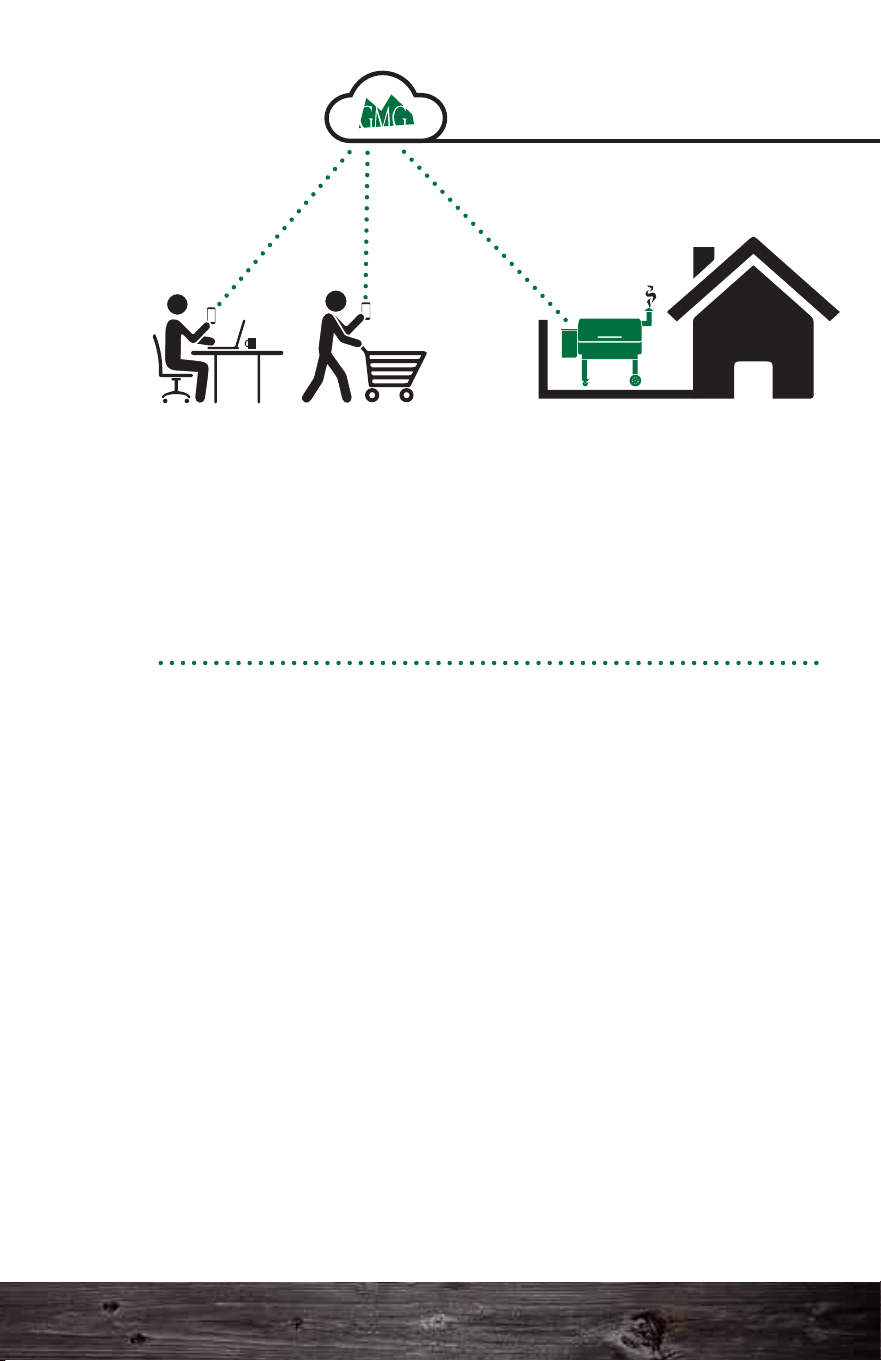
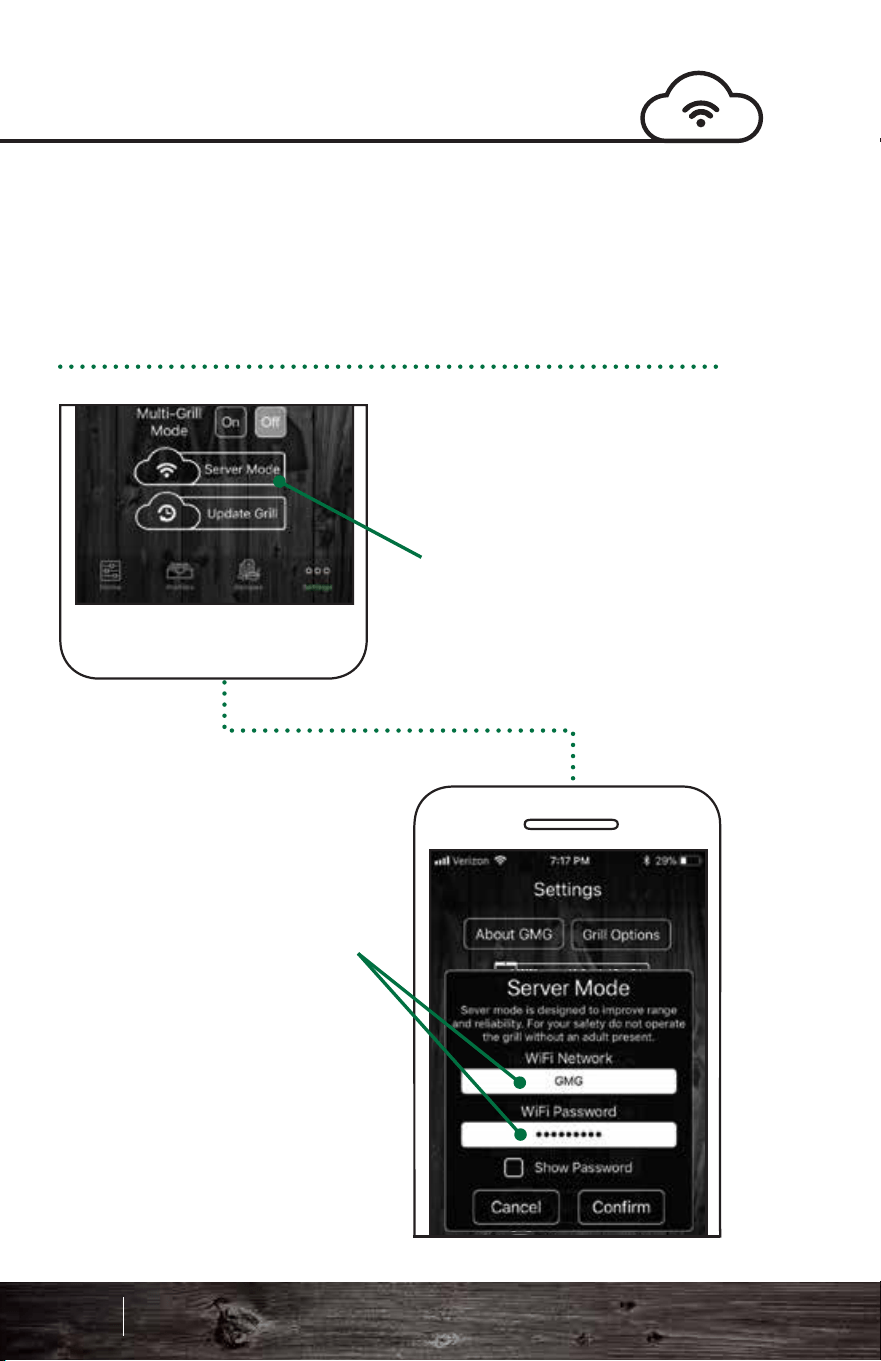
Your grill must be connected to your local home WiFi network
before you can connect to the GMG server.
See page 107 for assistance with connecting to WiFi.
Go to the app settings.
The WiFi mode should
now be set to Server.
Tap the Server Mode
button.
A prompt will display. Enter
your home WiFi network
and password, then press
Confirm.
The grill will take
approximately 30 – 45
seconds to contact and
connect to the GMG Server.
When the grill connects, a
prompt will appear, saying
“Grill Connected to Server.”
Go to the app’s Home
screen. It should now
display the last known grill
temp.
A new Refresh button will
appear in the upper
left-hand corner in place of
the Connect button.
Tap the Refresh button to
display the last date and
time the grill connected to
the server.
The grill is now in server
mode! Monitor and control
the grill from any cell phone
network.
Connecting to the ServerConnecting to the Server
YourNetwork
‘Your’
113 114
Smart Control App Guide
‘Your’
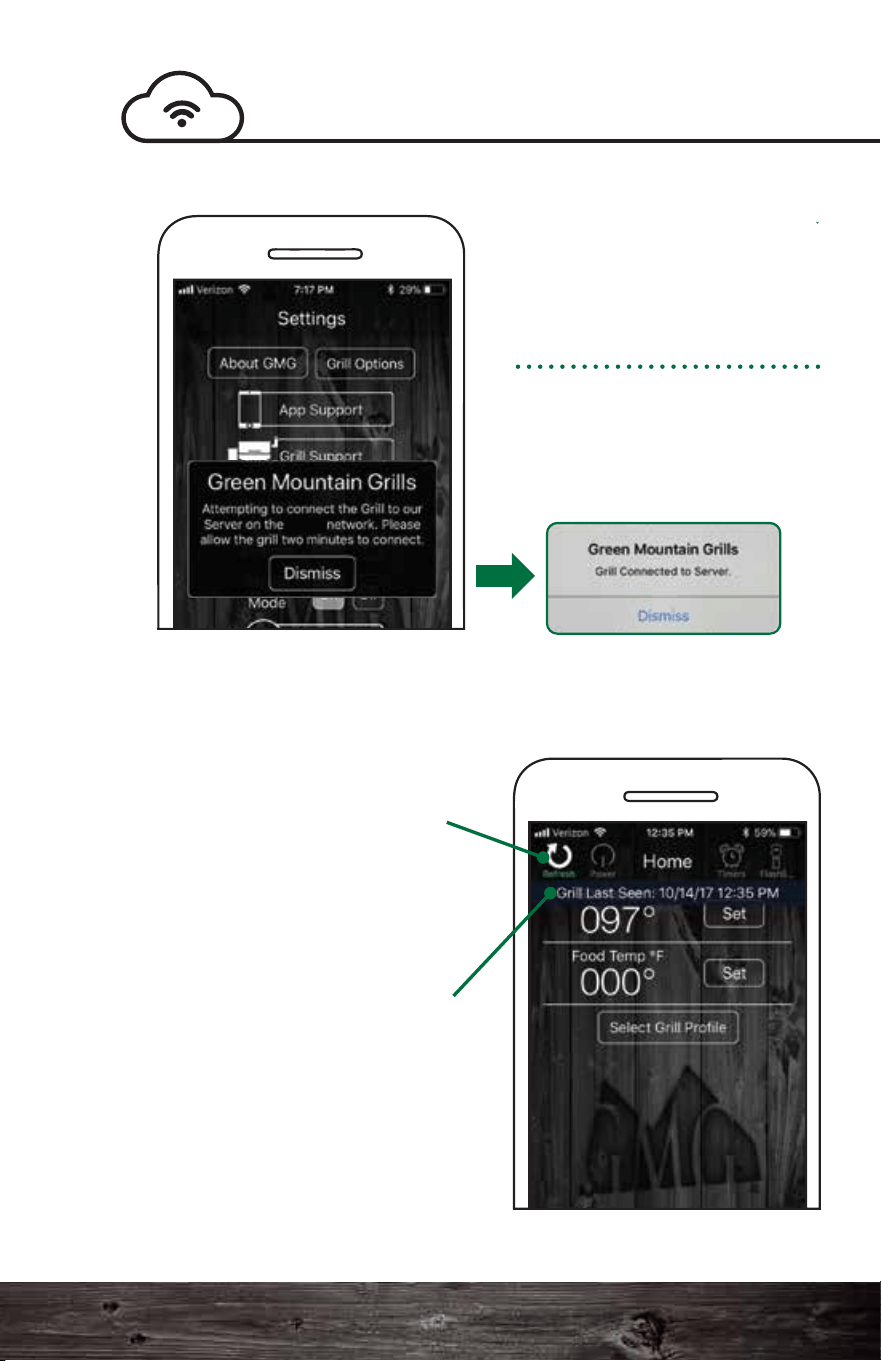
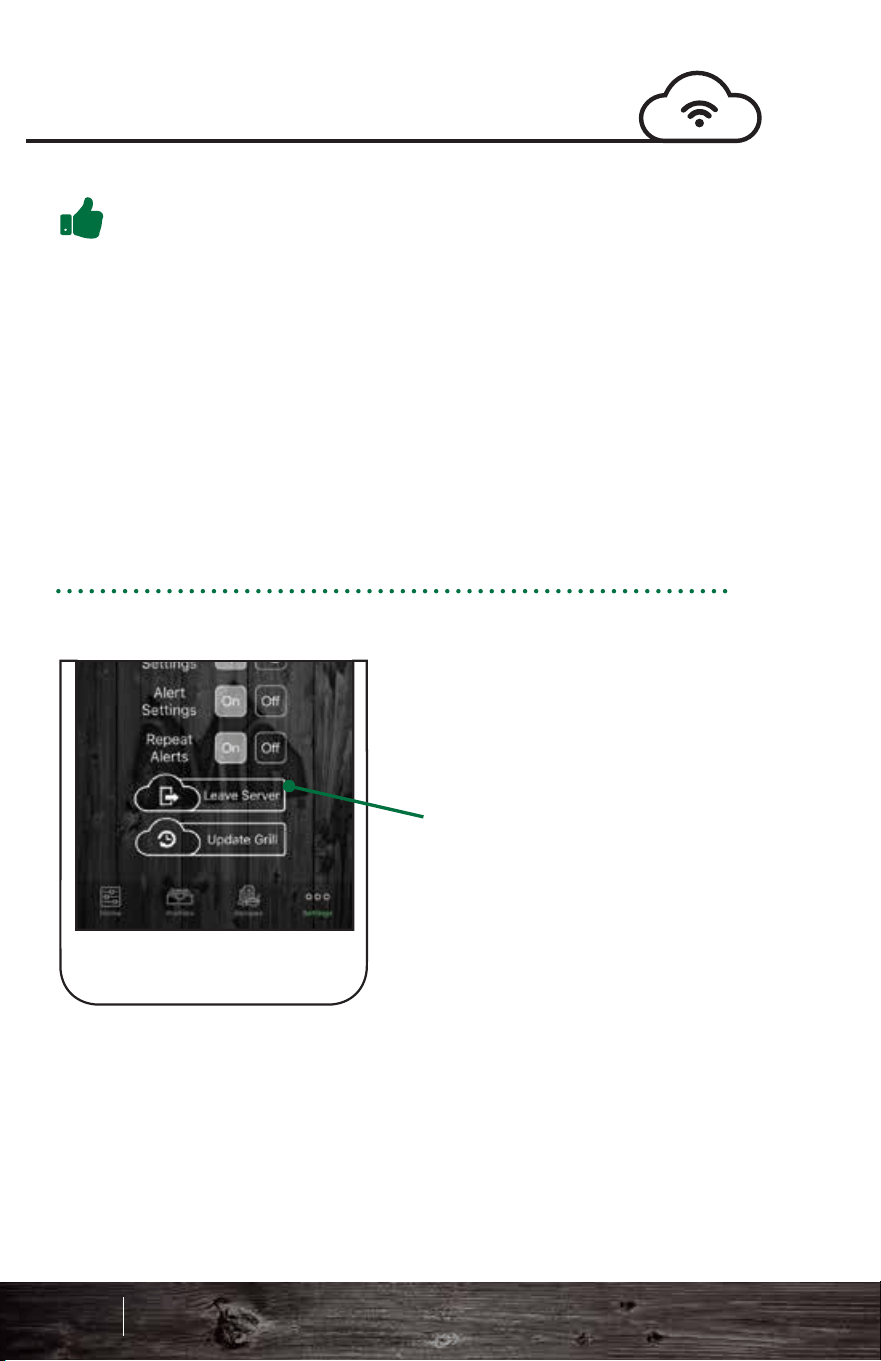
Pro Tips:
Multi-Grill Mode
If you have more than one
grill with WiFi, you can
control each grill
separately. You will need
to connect to each grill
separately and connect
them to your local WiFi
following the steps in
single-grill mode.
Next, follow these steps:
Single-grill mode
connects immediately to
the first grill it finds. By
default the app starts in
single-grill mode because
it is the most common
configuration.
Multi-grill mode extends
these steps a little longer
than normal to allow it to
find every available grill on
the network.
To disconnect from
server mode:
Go to the Settings tab.
Click the Leave Server
button.
The grill should be set
back to WiFi mode. To
reconnect to the grill,
press Connect on the
Home screen.
Connecting to the Server
1. You must have firmware version 1.2 or higher to use
server mode. See page 102 for instructions on checking your
firmware. For instructions on updating your firmware, see
page 104.
2. Make sure your Android or iOS app is up to date.
3. For safety reasons, you can only turn on the grill using
server mode if you are within range of your WiFi network.
In some situations, the grill will go back to point-to-point
mode. If this happens, repeat the WiFi connection process.
See page 107 for details.
Happy Grilling!
115 116
Smart Control App Guide
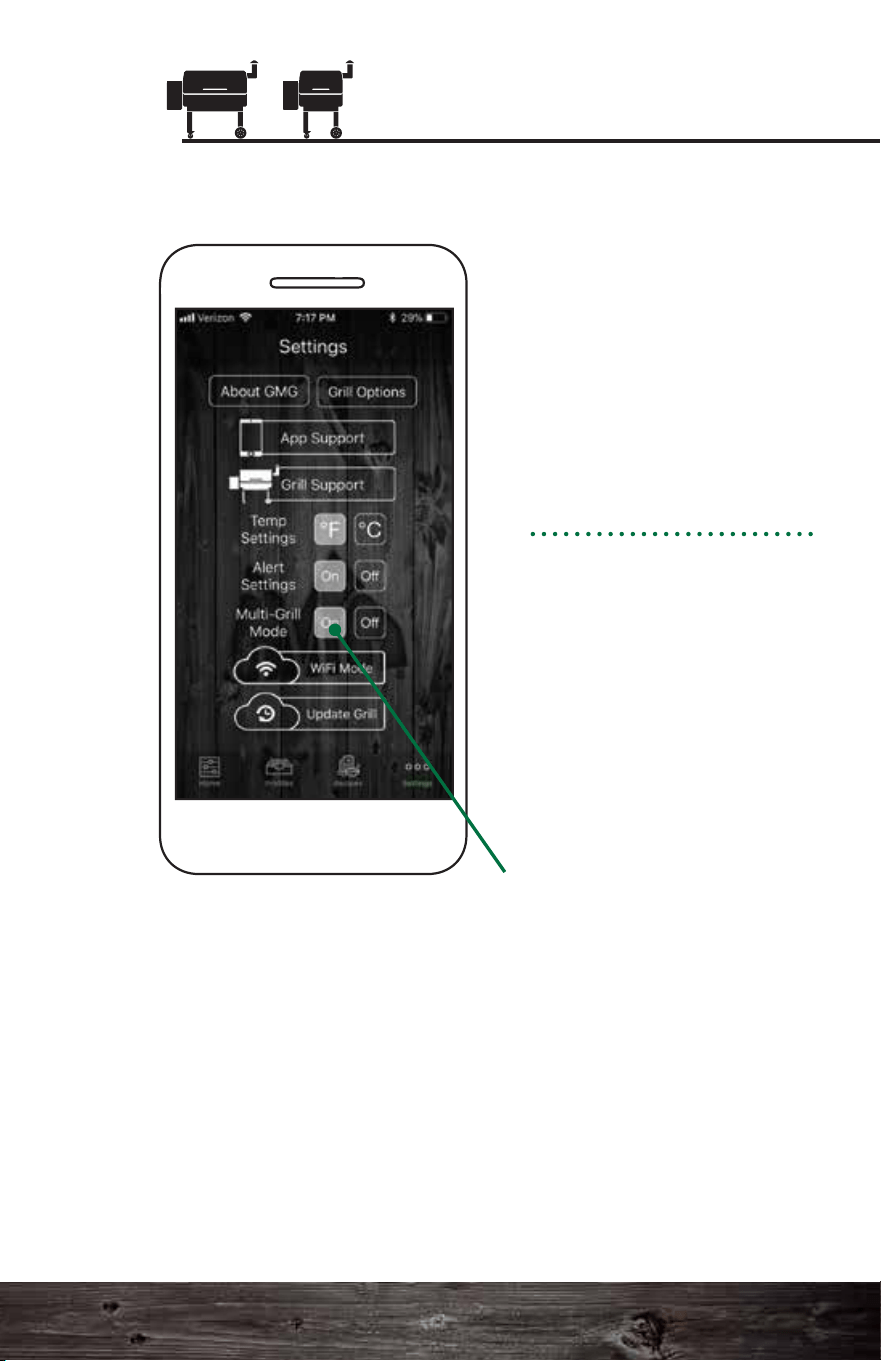
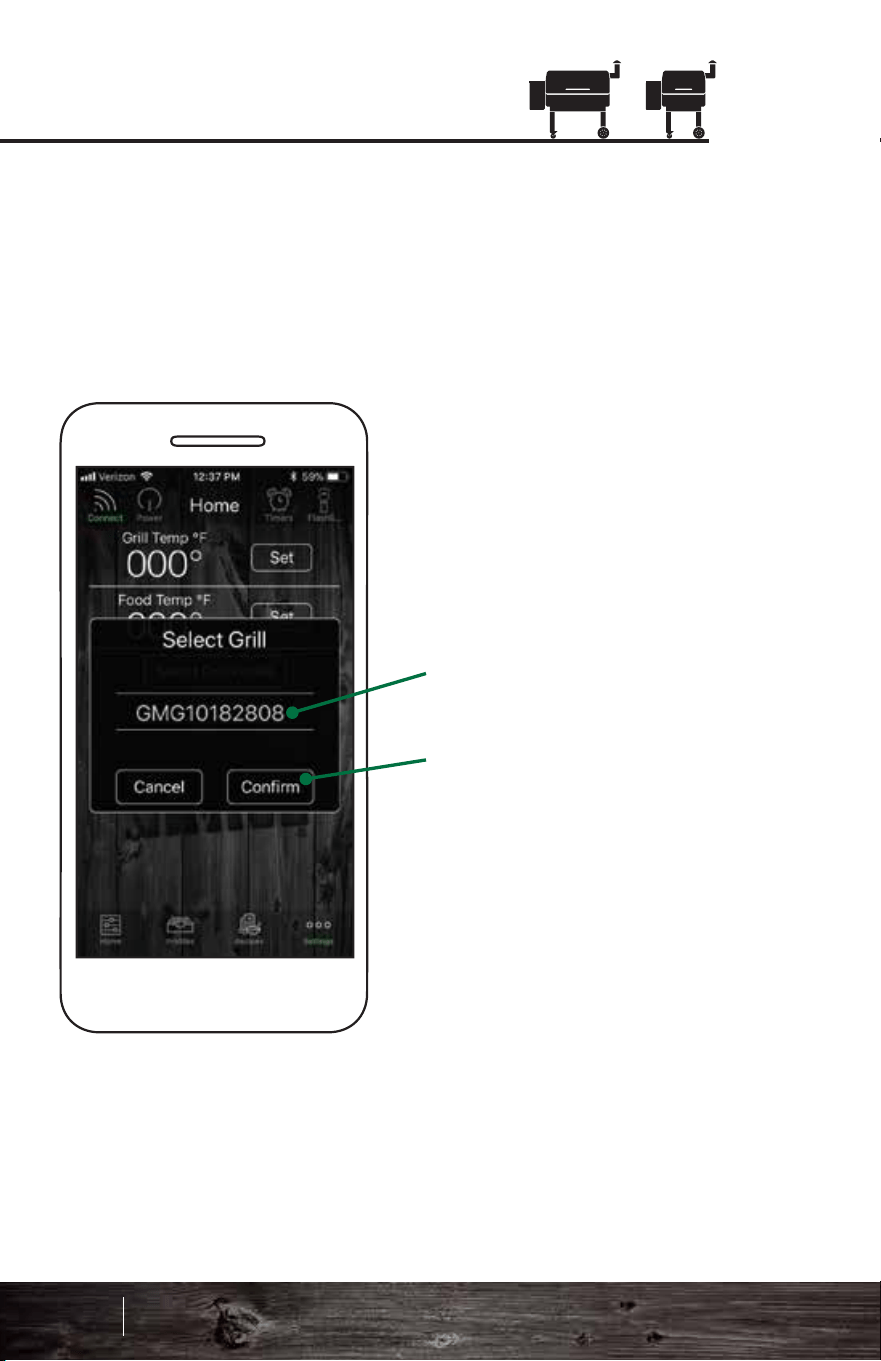
GRILL SUPPORT
For troubleshooting and service tips, check out:
GMG “How To” Videos
www.greenmountaingrills.com/support
Call 1.800.603.3398 - Option 1
Hours 7 am - 7 pm PST M - F, 9 am - 6 pm PST Sat - Sun
(Closed on major holidays)
Contact Us:
Green Mountain Grills LLC.
316 California Ave. Suite 1065
Reno, NV 89509
Toll Free 1.800.603.3398
Phone 530.347.9167
Fax 530.347.9710
Tech Support
After you press Connect in multi-grill mode, the GMG app
will search for all available grills on the local network and
display them in the Select Grill pop-up window.
Choose between the
grills displayed in the
toggle bar.
Grills are identified by
their serial number.
After selecting a grill,
press Confirm to connect.
Multi-Grill Mode
APP SUPPORT
For troubleshooting and service tips, check out:
www.greenmountaingrills.com/support
Call 1.800.603.3398 - Option 15
Email [email protected]
Hours 10 am - 6 pm PST M - F, 9 am - 5 pm PST Saturdays
(Closed on Sundays and major holidays)
We’ve got
you covered!
117 118
Smart Control App Guide