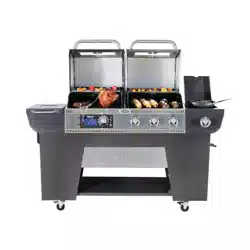
OWNER’S MANUAL Twin Oaks Dual Function Pellet Grill
PELLET GRILL SECTION
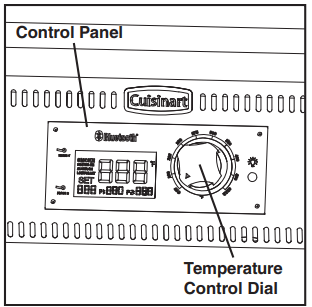
OPERATING THE PELLET GRILL
BREAKING IN YOUR GRILL:
In manufacturing and preserving the components of your grill, oil residue may be present on the cooking surfaces of your grill.
Before cooking on your grill for the first time you should follow “Initial Lighting Instructions” to ensure the auger is fully charged with pellets.
PREHEATING GRILL:
Prior to use, it is recommended that you preheat your grill. This ensures that the cooking grates are at the desired temperatures to sear the food sugars when cooking. Preheat the grill for 15 to 20 minutes or until it reaches the desired temperature before adding food. Close the lid during the preheat period.
IF AN EXTENSION CORD IS NECESSARY:
Use a CSA or UL approved 3-prong grounded extension cord that is rated for at least 7-10 Amp and is marked as suitable for outdoor use.
Keep the power cord connection dry and off of the ground
Avoid running the power or extension cord across walkways, driveways, or anywhere where it could pose a tripping hazard.
TURNING ON THE GRILL:
Step 1 Open hood to cooking chamber and remove cooking grates, heat plates and heat baffle from inside the grill. Leave hood open.
Step 2 Make sure temperature control knob is “OFF”. Plug power cord into a GFI (grounded) outdoor electrical outlet. When connecting, first connect plug to the outdoor cooking gas appliance then plug appliance into the outlet; Use only a Ground Fault Interrupter (GFI) protected circuit with this outdoor cooking gas appliance; Never remove the grounding plug or use with an adapter of 2 prongs; and Use only extension cords with a 3 prong grounding plug, rated for the power of the equipment, and approved for outdoor use with a W-A marking.
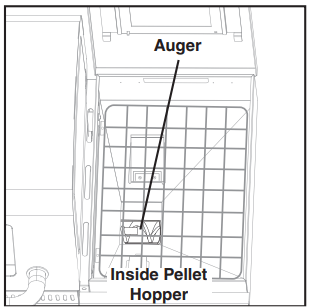
Step 3 Open the pellet hopper lid. Make sure the auger is free from debris and other objects. Turn the temperature control knob to 200°F.
Step 4 In the cooking chamber, place your hand about 3” above the fire pot and make sure you can feel air blowing out from the fire pot.
Step 5 Look inside the fire pot and make sure the ignitor is getting hot. It will take a couple of minutes for the ignitor to glow red. DO NOT TOUCH THE HEATING ELEMENT! Turn temperature control knob to “OFF”.
Step 6 Fill the pellet hopper with cooking pellets. NEVER USE HEATING FUEL PELLETS AS THEY ARE NOT SAFE FOR COOKING.
Step 7 Turn the temperature control knob to 200°F.
NOTE: During the initial loading of the auger tube, it will take approximately 2 minutes for the pellets to move from the pellet hopper to the fire pot.
Step 8 When the pellets start falling into the fire pot, turn the temperature control knob to “OFF”.
Step 9 Replace heat baffle, heat plates and cooking grates into the cooking chamber.
Step 10 Keep the cooking chamber lid open. Turn temperature control knob to 200°F. You should see smoke coming out of the cooking chamber as the pellets ignite in about 2 to 4 minutes.
NOTE: The ignitor will stay on for the first 8 minutes and then turn off.
Step 11 Close cooking chamber lid and set the temperature control knob to the desired setting. See note below for curing process.
NOTE: Curing the grill is highly recommended before first use. Close cooking chamber lid and set temperature control knob to 400°F and allow grill to cure for 45 minutes. This will burn off any oil or paint residue inside the cooking chamber before cooking for the first time.
SUBSEQUENT LIGHTING INSTRUCTIONS
Step 1 Open pellet hopper lid and check the pellet level. Add more pellets if necessary
Step 2 Open cooking chamber lid and turn temperature control knob to 200°F. You should see smoke coming out of the cooking chamber as the pellets ignite in about 2 to 4 minutes.
NOTE: Always start the grill on 200°F. setting with the cooking chamber lid open.
Step 3 Close cooking chamber lid and set the temperature control knob to the desired setting. For best results, preheat the grill for 15 to 20 minutes with the lid closed before placing food in the grill.
MANUAL START-UP PROCEDURE (To be used is Hot Rod is not working properly):
Step 1 Ensure the control knob is in the “OFF” position. Plug the power cord into a grounded power source.
Step 2 Check fire pot to ensure there is no obstruction for proper ignition. Fill pellet hopper with cooking grade pellets.
Step 3 Open the hood. Remove the cooking grates, heat plates, and heat baffle to expose the fire pot. Place a small handful of pellets into the fire pot. Squirt a gelled fire starter, or other appropriate pellet starter, over the top of the pellets. A small amount of solid fuel fire starter, such as those composed of sawdust and wax, or wood shavings, is also recommended. Add another small handful of pellets in the fire pot.
NOTE: Do not use gasoline, lighter fluid, kerosene, or petrol for lighting a fire in your grill
Step 4 Light the contents of the fire pot using a long match or a long lighter. Allow the starter to burn 3 to 5 minutes. Do not attempt to add more starter into the fire pot as this can cause injury.
Step 5 Quickly and carefully replace the heat baffle, heat plates, and cooking grates. Continue on from step 2 of the “Subsequent Lighting Instructions.”
TURNING OFF THE Grill:
Turn the temperature control knob to “OFF”. An auto cool down feature will keep the fan running for 12 minutes. If you don’t allow the grill to run the cool down feature it can cause a fire in the fire pot and catch the pellet hopper on fire.
Unplug the power cord from the wall outlet.
GRILL INSERTS:
• Griddle:
Place Griddle on top of cooking grates with the grease reservoir toward the back of the grill. Push the Griddle to the back of the grill. It is best to locate the Griddle near the middle of the grill.
Turn grill to the desired temperature and allow 15 to 20 minutes for griddle to get to desired temperature.
Keeping the lid closed during cooking will help prevent grease splatter.
Grease and food particles can be pushed back into the grease reservoir while cooking.
Do not let the grease reservoir overflow. Stop cooking, allow griddle to cool and remove excess grease.
Wait until the Griddle is cool before trying to remove the Griddle or clean out the grease reservoir.
The Griddle can be stored on the right side of the cart.
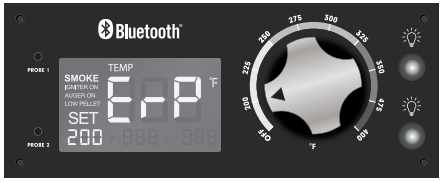
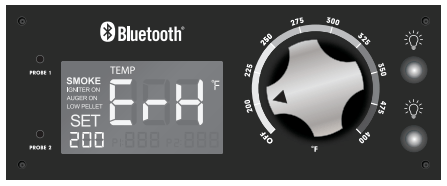
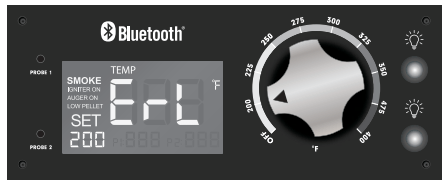
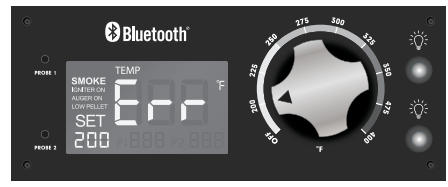
ERROR CODES:
“ErP” – Error Power will occur when grill is plugged into power outlet and the temperature control knob is not in “OFF” position. It will also appear if power is lost during cooking.
“ErH” – High Temp Limit indicates that the temperature in the cooking chamber has exceeded 575°F.
“ErL” – Low Temp Limit indicates that the temperature in the cooking chamber is below 160°F.
“Err” – Thermocouple may be unhooked or damaged.
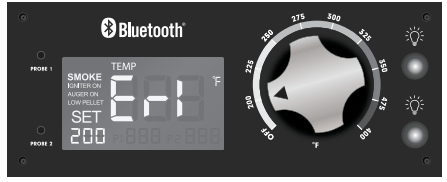
“Er1” – The temperature measured by the on-board temperature sensor of the main control board has exceeded maximum working temperature (158°F)
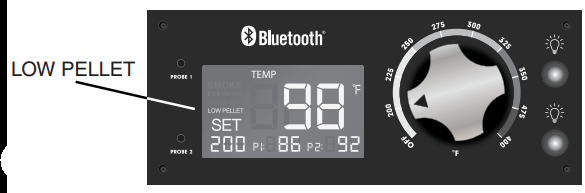
“LOW PELLET”
Always ON: Low on pellets
Flash once a second: Sensor maybe unhooked or damaged.
OFF: Normal operation.
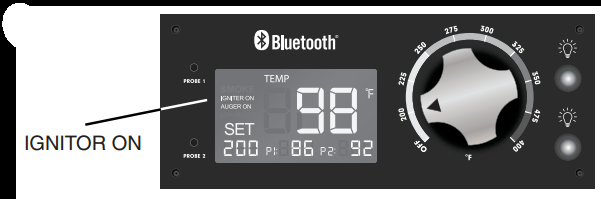
“IGNITOR ON”
Start up
The temperature is below 120*F in the cooking chamber.
When falling the temperature is less than 15% of the set temperature.
PELLET GRILL PROPER CARE & MAINTENANCE:
Remove wood pellets from hopper if grill will not be used for a long period of time. Wood pellets can become soggy due to moisture/humidity and can cause the auger to bind up or not push pellets to burn chamber.
Disposal of ashes – Ashes should be placed in a metal container with a tight-fitting lid. The closed container of ashes should be placed on a non-combustible floor or on the ground, well away from all combustible materials, pending final disposal. When the ashes are disposed by burial in soil or otherwise locally dispersed, they should be retained in the closed container until all cinders have thoroughly cooled.
It’s important to keep your grill always covered when not in use to avoid rain getting inside the grill and damaging the grill and/or cause excessive corrosion. The grill and pellets must be kept dry in order to function properly.
Wash cooking grates and heat distribution plate with hot, soapy water, rinse well and dry. Lightly coat cooking grill with vegetable oil or vegetable oil spray.
Clean inside and outside of grill by wiping off with a damp cloth. Apply a light coat of vegetable oil or vegetable oil spray to the interior surface to prevent rusting.
Never apply paint to the interior surface. Rust spots on the interior surface can be buffed, cleaned, the lightly coated with vegetable oil or vegetable oil spray to minimize rusting.
Depending on use, periodically remove the cooking grates, grease tray and heat distribution plate to clean the ash from in and around the fire pot. Make sure the grill is cold before starting this procedure.
HELPFUL HINTS:
If you pre-cook meat or poultry, do so immediately before grilling.
Never defrost meat at room temperature or on a counter top
Refrigerate leftovers within 2 hours of taking food off the grill.
For additional information, please phone the USDA’s toll free Meat & Poultry Hotline at 800-535- 4555.
CLEANING AND MAINTENANCE:
Keep the appliance free and clear of combustible materials, gasoline and other flammable vapors and liquids.
For safe grilling and peak performance of your grill, perform these checks at least twice per year or after extended periods of storage.
Be sure to tighten up all hardware (nuts, bolts, screws, etc.) at least twice per year.
CAUTION: Some parts may contain sharp edges. Wear protective gloves if necessary.
Remove the cooking grates, from inside your grill. Use a brush with hot water and detergent to remove excess residue. NEVER use a commercial oven cleaner. Rinse completely with water. Towel dry and replace all components as described in the assembly instructions.
PELLET GRILL TROUBLE SHOOTING
PROBLEM
CAUSE
CORRECTION
LCD screen will not light up
1. Grill is not plugged in.
1. Make sure the grill is plugged into a working power source. Check and make sure wire connections are properly connected.
2. The fuse is blown.
2. Check the fuse and see if it has blown and needs to be replaced. Use 5 Amp Fuse.
3. Check that the GFI outlet has not been tripped.
3. Reset GFI outlet.
4. Control knob is in the “OFF” position.
4. Control knob is still in the “OFF” position. Turn the control knob to 200° F to start-up the grill. The LCD screen should turn on.
Grill is not getting hot enough
1. Adjust temperature control knob on temperature controller.
1. Turn up heat on the control knob.
2. Avoid the temptation to check food too often.
2. Opening the door allows heat to escape and causes the temperature to vary drastically from the set temperature.
3. Verify that there are pellets in pellet hopper.
3. Add pellets and allow sufficient time for the pellets to travel from the pellet hopper to the fire pot (can take up to 5 minutes).
4. Fire goes out at lower setting.
4. Excess ash. Remove all unburned pellets and ash from the fire pot using the ash clean-out.
CAUTION! ASSURE THAT THE GRILL IS COLD TO AVOID A FIRE FROM HOT ASH.
Pellets will not light
1. Auger not primed.
1. Before the unit is used for the first time or anytime the hopper is emptied, allow the auger tube to fully load with pellets to ensure proper lighting of the grill. Follow Initial Lighting Instructions.
2. Auger is jammed.
2. Remove all components inside the firebox. Turn the grill to 200* F and inspect the auger.
3. Ignitor has failed.
3. Ignitor needs to be replaced. Contact our Customer Service dept. for a replacement part. Follow Manual Start-Up Procedure to continue use of the grill.
Grill is getting too hot
1. Adjust temperature control
1. Reduce heat by reducing the selected temperature setting.
Smoke comes out of pellet hopper
1. This is normal due to the air pressure inside the grill. The amount of smoke can vary depending on cooking conditions.
1. This condition will not affect cooking.
2. Unplugged grill too soon.
2. Once the grill is turned off the fan will continue to run for 12 minutes. If you do not allow the grill to go through the cool down process it can cause fi re to transfer to the auger tube.
Temperature fluctuations
1. Temperature fluctuations are normal for pellet grills. Any significant fluctuations can be caused by wind, air temperature, improper use, or lack of grill maintenance.
GAS GRILL SECTION
GAS LIGHTING INSTRUCTIONS
LIGHTING THE MAIN BURNERS:
Open lid before lighting burner.
Make sure all control knobs are in the “OFF” position.
Select burner to be lit. Push and hold down the control knob and turn SLOWLY (2 to 3 seconds) to “HIGH”. You should hear the igniter click. Note: Step 3 may need to be repeated 2-3 times to light grill.
If ignition does NOT occur in 5 seconds, turn control knob to “OFF”, wait 5 minutes to allow gas to dissipate and repeat lighting procedure.
To light other burners, follow steps 3-4.
If burner does not ignite using the igniter, see “Match Lighting the Main Burners” section.
To turn off, turn each control knob clockwise until it locks in the “OFF” position. This does not turn off the gas fl ow from the cylinder.
Note: If burner does not light or flame is too low, See “Trouble Shooting” section of the owners manual.
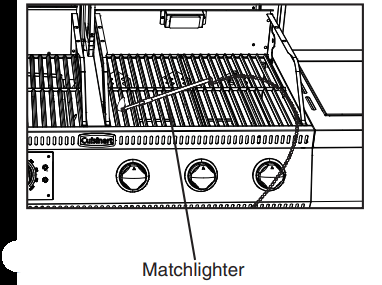
MATCH LIGHTING THE MAIN BURNER:
Open lid before lighting burner.
Make sure all control knobs are in the “OFF” position.
Place a paper match in the end of the matchlighter. Strike the match and place through the cooking grate approximately 1/2” (1 to 2 cm) from the burner to be lit.
Turn the burner control knob to the “HIGH” position. The burner should light within 5 seconds.
If the burner does not light, turn the control knob to “OFF” and wait 5 minutes for gas to dissipate and repeat lighting procedure.
Once lit, light adjacent burners by following steps 3-6.
If the burner does not light within the first few attempts of match lighting, there is a problem with the gas supply. Turn off the gas at the burner and cylinder. DO NOT attempt to operate the grill until the problem is found and corrected.
Note: If burner does not light or flame is too low, See “Trouble Shooting” section of the owners manual.
MATCH LIGHTING THE SIDE BURNER:
Open the lid to the side burner before lighting
Make sure the control knob is in the “OFF” position.
Place a paper match in the end of the matchlighter.
Strike the match and hold it approximately 1/2” (1 to 2 cm) from the burner.
Turn the side burner control knob to the “HIGH” position. The burner should light within 5 seconds.
If the burner does not light, turn the control knob to “OFF” and wait 5 minutes for gas to dissipate and repeat lighting procedure.
If the burner does not light within the first few attempts of match lighting, there is a problem with the gas supply. Turn off the gas at the burner and cylinder. DO NOT attempt to operate the grill until the problem is found and corrected.
Note: If burner does not light or fl ame is too low, See “Trouble Shooting” section of the owners manual.
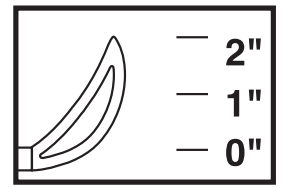
Note: Observe flame height when lit: Flame should be a Blue/Yellow color between 1”–2” when burner is on “HIGH”
GAS GRILL PROPER CARE & MAINTENANCE:
CLEANING INTERIOR OF GRILL:
We recommend cleaning off food residue immediately after cooking by gently scrubbing grates with wire bristle brush and then turning burners to HIGH for approximately 5 minutes.
Make sure coals are completely extinguished and the unit has adequately cooled before cleaning.
Clean up of the grill after each use is required.
INTERIOR OF GRILL LID:
Smoke will accumulate inside grill lid and may flake onto your food. Clean the inside of the grill lid with scrub brush and baking soda/water solution. Dry thoroughly. Do not mistake this for paint. The interior of gas grill lids are not painted.
MAINTAINING EXTERIOR OF GRILL:
To protect your grill from excessive rust, the unit must be kept clean and covered at all times when not in use.
Painted surfaces. Wash with mild detergent or non-abrasive cleaner and warm soapy water.
Stainless steel surfaces. To maintain your grill’s appearance, wash with mild detergent and warm soapy water and wipe dry with a soft cloth after each use. Baked-on grease deposits may require the use of an abrasive plastic cleaning pad. Use only in direction of brushed finish to avoid damage. Do not use abrasive pad on areas with graphics. Car wax may help protect the exterior finish of your grill.
Porcelain surfaces. Because of glass-like composition, most residue can be wiped away with a solution of baking soda and water or specially formulated cleaner. Use non-abrasive scouring powder such as baking soda for stubborn stains.
Plastic and rubber parts. Wash with warm soapy water and wipe dry. Do not use citrisol, abrasive cleaners, degreasers or a concentrated grill cleaner on plastic parts. Damage to and failure of parts can result.
RUST:
Discoloration, rust and rust pits can occur as a result of high cooking temperatures, acidic marinades, grease fires and exposure to coastal climates or other natural elements.
Rust spots on the interior surface can be buffed, cleaned, then lightly coated with vegetable oil or vegetable oil spray to minimize rusting.
Never use cleaners containing chlorine or store swimming pool supplies or chemicals in cart compartment as chlorine promotes rust.
BURNER CLEANING AND MAINTENANCE
Keep the appliance free and clear of combustible materials, gasoline and other flammable vapors and liquids.
Keep the ventilation openings of the cylinder enclosure free and clear of debris.
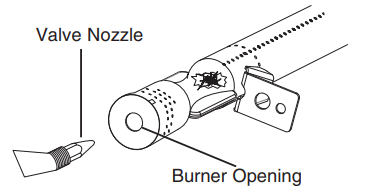
Visually check burner flames for proper operation (see pictorial in “Burner Assembly/Maintenance” under Proper Care and Maintenance). Spiders or other insects can nest in the burner causing gas blockage.
For safe grilling and peak performance of your grill, perform these checks at least twice per year or after extended periods of storage.
Be sure to tighten up all hardware (nuts, bolts, screws, etc.) at least twice per year.
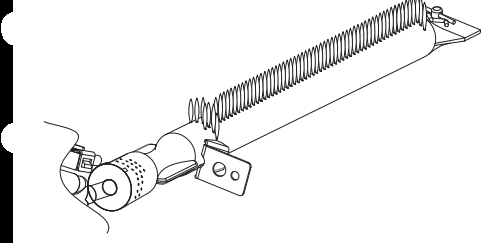
BURNER ASSEMBLY/MAINTENANCE:
Although your burners are constructed of stainless steel, they may corrode as a result of the extreme heat and acids from cooking foods. Regularly inspect the burners for cracks, abnormal holes, and other signs of corrosion damage. If found, replace the burner.
DO NOT block ventilation areas in back of lid, sides, back or cart compartment of grill. Do not store objects or materials inside the grill cart enclosure that would block the flow of combustible air to the underside of either the control panel or firebox. Burner tubes can become blocked by spiders and other insects building their nests. Blocked burner tubes can prevent gas flow to the burners and could result in a burner tube fire or fire beneath the grill. To clean the Burner Assembly follow these instructions to clean and/or replace parts of burner assembly or if you have trouble igniting the grill.
1. Turn gas off at control knobs and LP cylinder tank valve.
2. Remove cooking grills and heat distribution plates.
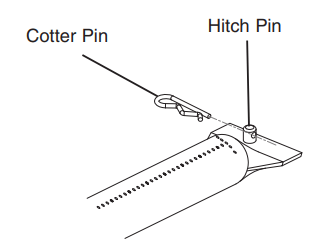
3. Remove hitch pin from each burner.
4. Carefully lift each burner up and away from valve openings.
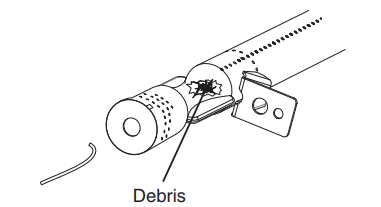
5. Use a narrow bottle brush or a stiff wire bent into a small hook to run through each burner tube or use compressed air to blow into burner tube and out the flame ports. Check each port to make sure air comes out each hole.
6. Use a wire brush to clean the entire outer surface of burner to remove food residue and dirt.
7. Check burner for damage, if any cracks or holes are found replace burner.
8. Install burner in grill, orient burners CORRECTLY.
IMPORTANT: Burner opening must slide over valve nozzle.
9. Replace hitch pins on each burner.
Note: Follow the “Gas Leak Testing” section of this manual. Relight burners to verify proper operation.
10. Replace heat distribution plates and cooking grills.
GAS GRILL TROUBLE SHOOTING
Problem
Possible Cause
Prevention/Cure
Burner will not light
LP gas tank valve is closed
Make sure regulator is securely attached to the LP gas tank, turn LP gas tank valve to “OPEN”
LP gas tank is low or empty
Check if LP gas tank is empty. If empty, replace or refill.
LP gas leak
Turn LP gas tank valve to “CLOSED”
Wait 5 minutes for gas to clear
Follow “Leak Testing” in the owner’s manual
Coupling nut and regulator not fully connected
See section on “Connecting Hose and Regulator”
Obstruction of gas flow
Clean burner assembly
Check for bent or kinked hose
Burner may not be properly seated
Reseat burner and valve. Refer to “Burner Assembly/Maintenance” instructions
Spider webs or insect nest in venturi
Clean venturi and burner assembly
Burner ports clogged or blocked
Clean burner ports
Wires or electrode covered with cooking residue
Clean wire and/or electrode with rubbing alcohol
Electrode and burners are wet
Wipe dry with cloth
Electrode cracked or broken - sparks at crack
Replace electrode
Wire loose or disconnected
Reconnect wire or replace electrode/wire assembly
Wire is shorting (sparking) between ignitor and electrode
Replace ignitor wire/electrode assembly
Bad ignitor
Replace ignitor
Grill does not get hot enough
Out of gas
Replace or refill LP gas tank
Flow limiting device may have been activated
1. Mini Reset:
a. Turn control knobs and LP gas tank valve to “OFF”
b. Wait one minute and relight grill per “Lighting Instructions”
2. If flames are still too low, perform a Full Reset Full Reset:
a. Turn control knobs and LP gas tank valve to “OFF”
b. Disconnect regulator from propane tank
c. Inspect LP cylinder rubber seal
d. Wait 1 minute
e. Reconnect regulator and perform “Leak Testing” on all connections.
f. Light grill per “Lighting Instructions”
Irregular flame pattern. Flame does not run full length of burner
Burner ports are clogged or blocked
Clean burner ports
Flame is yellow or orange
New burner may have residual manufacturing oils
Burn grill for 15 minutes on “HIGH” with the lid closed
Spider webs or insect nest in venturi
Clean venturi and burner assembly
Food residue, grease, etc.
Clean burner assembly
Poor alignment of valve to burner venturi
Make sure burner venturi is properly engaged with valve
Flame blows out
High or gusting winds
Do not use grill in high winds
Low on LP gas
Replace or refill LP gas tank
Burner holes may be obstructed
Refer to “Burner Assembly/Maintenance” instructions
Flow limiting device tripped
Refer to “Regulator Resetting Procedure”
Flare-up
Grease buildup
Clean all grill parts per “Proper Care and Maintenance” instructions
Excess fat in meat
Trim fat from meat before grilling
Excessive cooking temperature
Adjust (lower) cooking temperature
Grease fire
Grease trapped by food buildup around burner system
Turn control knobs and LP gas tank valve to “OFF”
Leave lid in open or closed position and let fi re burn out. Use BC type fire extinguisher or baking soda, sand or dirt to smother fire, if necessary.
After grill cools, remove and clean all parts per “Proper Care and Maintenance” instructions
Flashback (fire in burner tubes) / knobs melting
Burner and/or burner tubes are blocked
Clean burners and/or burner assembly
Inside of lid is peeling (like paint peeling)
Baked on grease buildup has turned into carbon and is flaking off
Clean thoroughly per “Proper Care and Maintenance” instructions