取扱説明書
/ Operating Instructions /
Mode d’emploi
HVL-MT24AM
電気製品は安全のための注意事項を守らないと、
火災や人身事故になることがあります。
この取扱説明書には、事故を防ぐための重要な注意事項と製品の
取り扱いかたを示しています。この取扱説明書をよくお読み
のうえ、製品を安全にお使いください。お読みになったあ
とは、いつでも見られるところに必ず保管してください。
マクロツインフラッシュキット
Macro Twin Flash Kit
Flashs jumelés pour macro
© 2006 Sony Corporation Printed in China
2-889-493-41 (1)
2
安全のために
ソニー製品は安全に充分配慮して設計
されています。しかし、まちがった使
いかたをすると、火災や感電などによ
り人身事故になることがあり危険で
す。事故を防ぐために次のことを必ず
お守りください。
安全のための注意事項を守る
故障したら使わずに、ソニーの相談
窓口に修理を依頼する
万一異常が起きたら
・
・
・
警告表示の意味
取扱説明書では、次のような表示をし
ています。表示の内容をよく理解し
てから本文をお読みください。
この表示の注意事項を守らないと、火
災・感電・破裂などにより死亡や大
けがなどの人身事故が生じます。
この表示の注意事項を守らないと、火
災・感電・事故などにより死亡や大
けがなど人身事故になることがあり
ます。
この表示の注意事項を守らないと、感
電やその他の事故によりけがをした
り周辺の家財に損害を与えたりする
ことがあります。
注意を促す記号
行為を禁止する記号
行為を指示する記号
本機が熱くなり
変なにおい、煙が出た場合
❶
本機の電源を切る。
❷
電池をはずす。
❸
ソニーの相談窓口に修理を依頼
する。
(
60
〜
62
ページも合わせて
お読みください。)

3
目次
安全のために
..................2
主な特長
....................................................4
各部の名前
...............................................5
準備
電池の入れかた
......................................9
マクロフラッシュコントローラー
の取り付け、取りはずしかた
.......11
マクロツインフラッシュの取り付
けかた
......................................................12
ON/OFF
切り換え
.............................19
基本撮影
基本的な撮影(
A
モード・
M
モー
ド撮影)
...................................................20
基本的な撮影(プログラム(
P
)フ
ラッシュ撮影)
.....................................28
応用撮影
マニュアルフラッシュ撮影(
M
)
....................................................................30
テスト発光
............................................38
モデリング発光
...................................39
ワイドパネル
........................................40
ディフューザー
...................................42
カスタム設定
........................................46
その他
本機を使用した撮影例
.....................49
絞り設定範囲表
...................................52
他製品との組み合わせ
.....................54
ご使用上の注意
...................................55
お手入れのしかた
..............................56
主な仕様
.................................................57
保証書とアフターサービス
...........59
安全のために
..............................60

4
お使いになる前に必ずお読みください
本取扱説明書とあわせて、お使いのカメラの取扱説明書もご確認ください。
本機は防じん、防滴、防水仕様ではありません
置いてはいけない場所
使用中、保管中にかかわらず、次のような場所に置かないでください。故障
の原因になります。
異常に高温になる場所
炎天下や夏場の窓を閉め切った自動車内は特に高温になり、放置すると
変形したり、故障したりすることがあります。
直射日光の当たる場所、熱器具の近く
変形したり故障したりすることがあります。
激しい振動のある場所
強力な磁気のある場所
砂地、砂浜などの砂ぼこりの多い場所
海辺や砂地、あるいは砂ぼこりが起こる場所などでは、砂がかからないよ
うにしてください。故障の原因になることがあります。
主な特長
マクロツインフラッシュキットは、マクロ領域でのフラッシュ撮影の自由
度を格段に向上させます。接写領域での草花や昆虫、小物等の撮影に適し
ています。
発光部の取り付け位置、角度の自由度が高く、表現豊かなライティングが
可能です。
長さが
2
段階で調節可能なアームをツインフラッシュユニットとホル
ダーの間に取り付けることにより、比較的倍率の低い接写でもライティ
ングに変化をつけることができます。
同梱のディフューザーを使用することにより、よりソフトなライティン
グが可能となります。
同梱のワイドパネルにより、レンズ表示
24mm
までの焦点距離にも対応
できます。
事前に影の出方が確認できるモデリング発光機能を搭載しています。
・
・
・
・
・
・
・
・
・
・
5
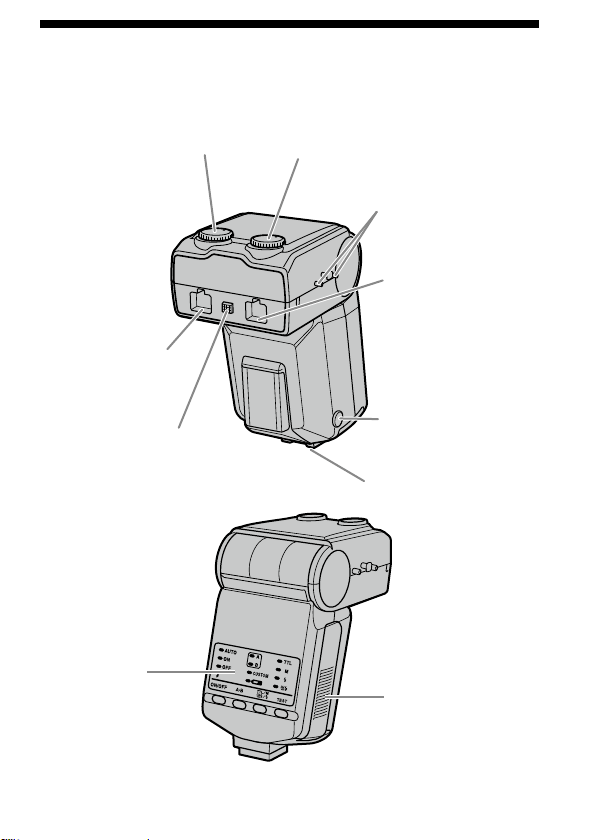
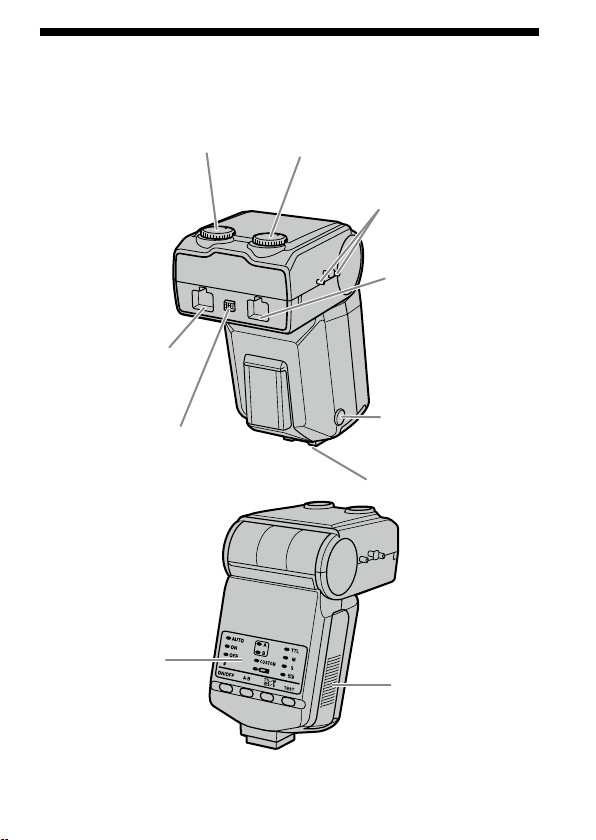
各部の名前
マクロフラッシュコントローラー
マニュアル発光レベル設定ダイヤル
(
B
フラッシュ用、
31
)
ツインフラッシュユ
ニット用ソケット
*
(
A
フラッシュ用、
13
)
取りはずしボタン(
11
)
オートロックアクセサリー
シュー
マニュアル発光レベル設定ダイヤル
(
A
フラッシュ用、
31
)
ツインフラッシュ
ユニット用ソケット
*
(
B
フラッシュ用、
13
)
ツインフラッシュユニット
プラグ取りはずしボタン
(
14
)
コードリール取り付け部
(
16
)
操作部(
6
)
電池ふた(
9
)
*
直接手で触れないでください。
6
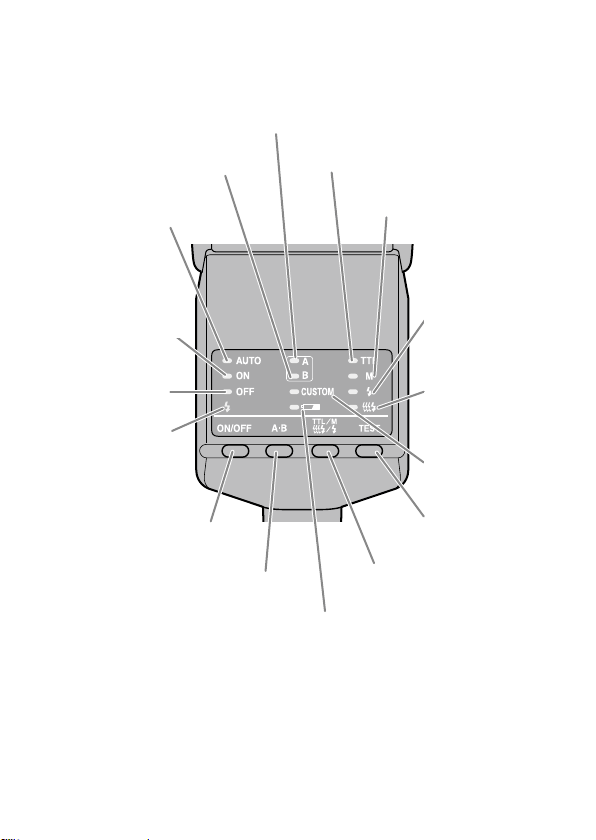
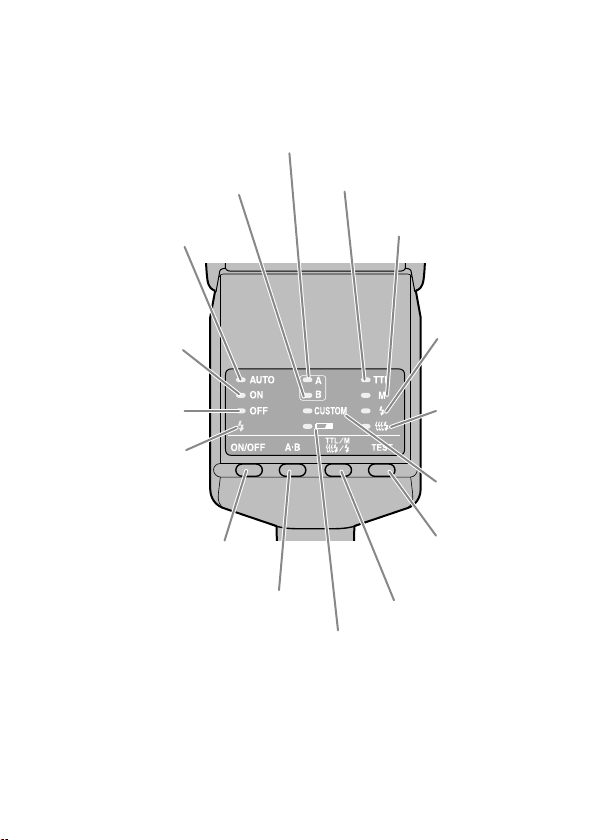
コントローラー操作部
B
フラッシュランプ(
22
)
A
フラッシュランプ(
22
)
TTL
ランプ(
30
)
M
(マニュアルフラッシュ)
ランプ(
30
)
AUTO
(自動)ランプ(
29
)
テスト発光ランプ
(
38
)
モデリング発光
ランプ(
39
)
カスタムランプ
(
48
)
テスト発光/モデリング
発光ボタン(
38
、
39
)
TTL/M/
テスト発光モード
切り換えボタン(
30
)
電池警告ランプ(
10
)
ツインフラッシュユニット
発光部選択ボタン(
22
)
発光
ON/OFF
切り換えボタン
(
19
)
発光
ON
ランプ(
19
)
発光
OFF
ランプ
(
19
)
充電完了ランプ
(
23
)
7
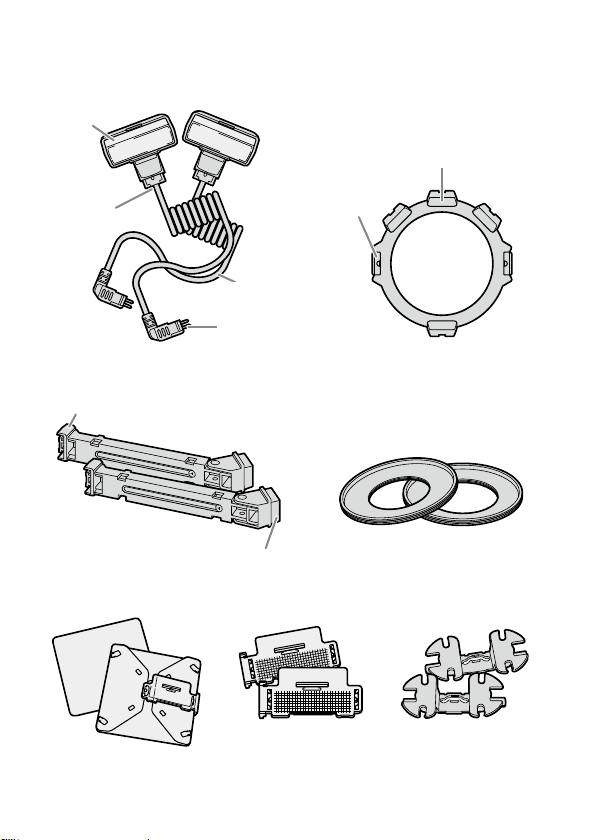
マクロツインフラッシュ
発光部
取り付け部
接続コード
接続プラグ
発光部・アーム取り付け部
着脱つまみ
ツインフラッシュユニット
*
ホルダー(
12
)
アーム
*
(
15
)
アダプターリング(
12
)
∅
49mm
/∅
55mm
ワイドパネル
*
(
40
)
ディフューザー
*
(
42
)
コードリール
*
(
16
)
発光部取り付け部
ホルダー取り付け部
*2
個同梱されています。
8
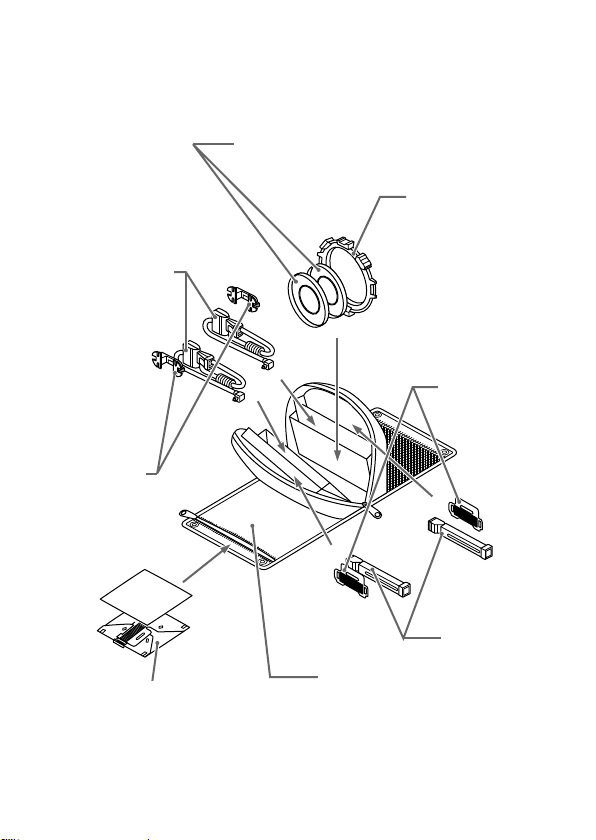
ケース収納例
アダプターリングφ
49mm/
φ
55mm
ツインフラッシュ
ユニット
コードリール
ホルダー
ディフューザー
ケース
ワイドパネル
アーム
9
準備
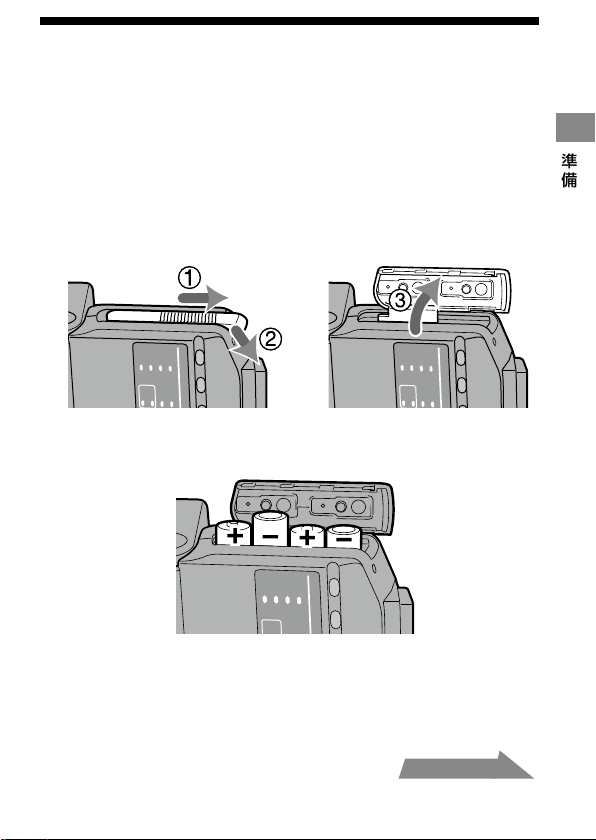
電池の入れかた
以下のいずれかの電池を使用します。
*
電池は同梱していません。
単
3
形アルカリ乾電池
4
本
単
3
形リチウム電池
4
本
単
3
形ニッケル水素電池(
Ni-MH
)
4
本
ニッケル水素電池は、必ず指定の充電器で完全に充電してからお使いく
ださい。
電池ふたを図の方向に押して開ける。
電池室内の表示にしたがって電池を入れる。
電池ふたを閉める。
開けるときと反対の手順に沿ってください。
操作部のランプが点灯します。ランプが点灯しない場合は、発光
ON/OFF
切り換えボタンを押してください。
・
・
・
1
2
3
・
・
次ページにつづく
準備
10
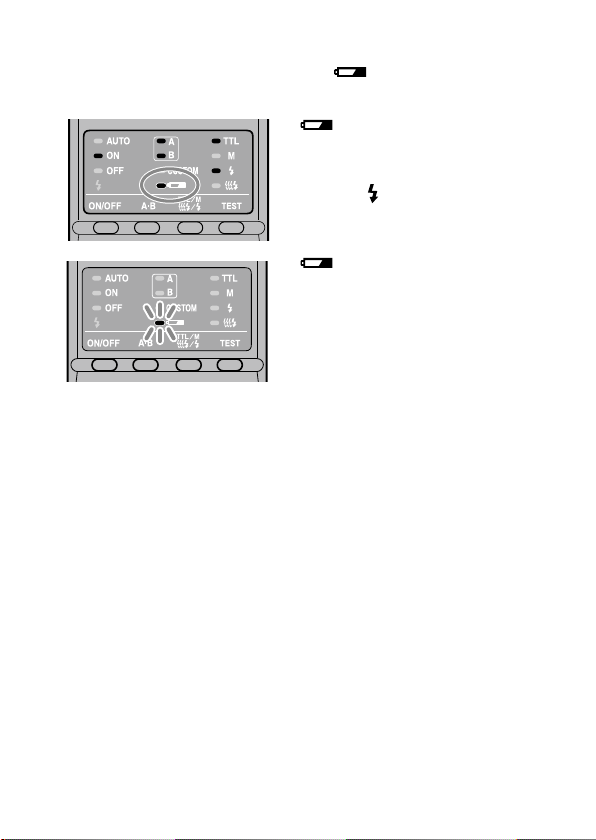
電池残量のチェック
電池の残量が少なくなると、液晶表示部の ランプが点灯または点滅し
ます。
マクロフラッシュコントローラーの発光
ON/OFF
切り換えボタンを押し
てもランプが何も点灯しないときは、電池の向きを確認してください。
・
ランプ点灯
電池の交換をおすすめします。
この状態でも、背面の充電完了ラ
ンプ
が点灯したら、本機は発光
可能です。
ランプのみ点滅
本機は発光しません。
新しい電池と交換してください。

11
準備
マクロフラッシュコントローラーの
取り付け、取りはずしかた
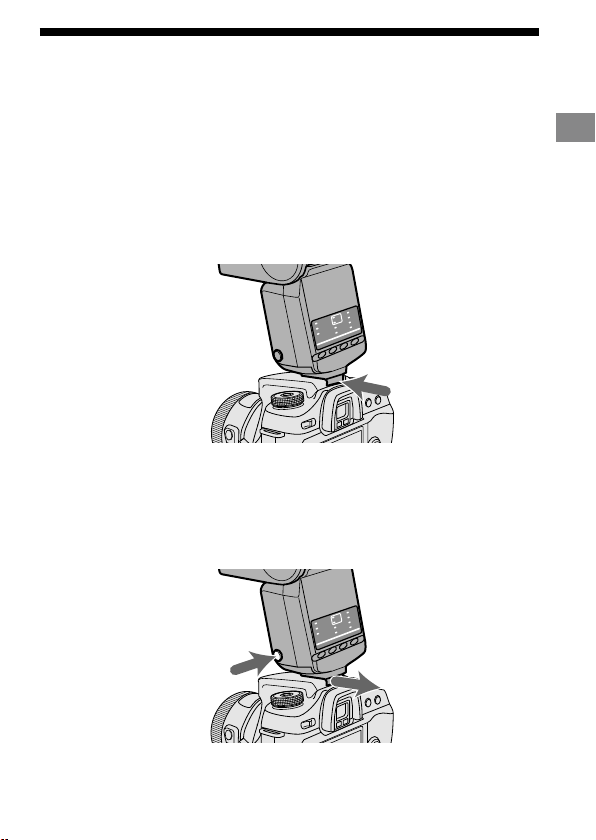
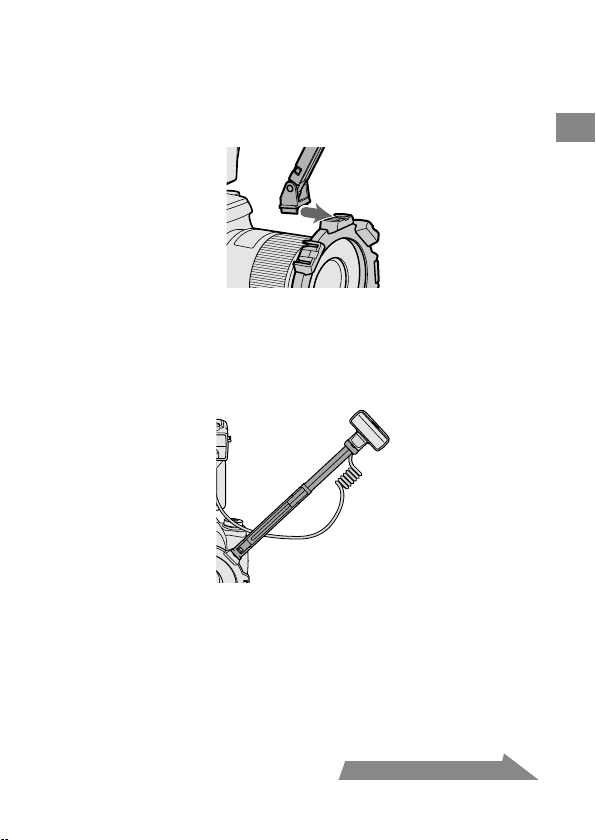
取り付けかた
オートロックアクセサリーシューを、矢印方向に止まるまでし
っかり差し込む。
自動的にロックされます。
カメラの内蔵フラッシュが上がっているときは、下げてから取り付けて
ください。
取りはずしかた
フラッシュ取りはずしボタンを押しながら①、本機を取りはず
す②。
1
2
・
・
12
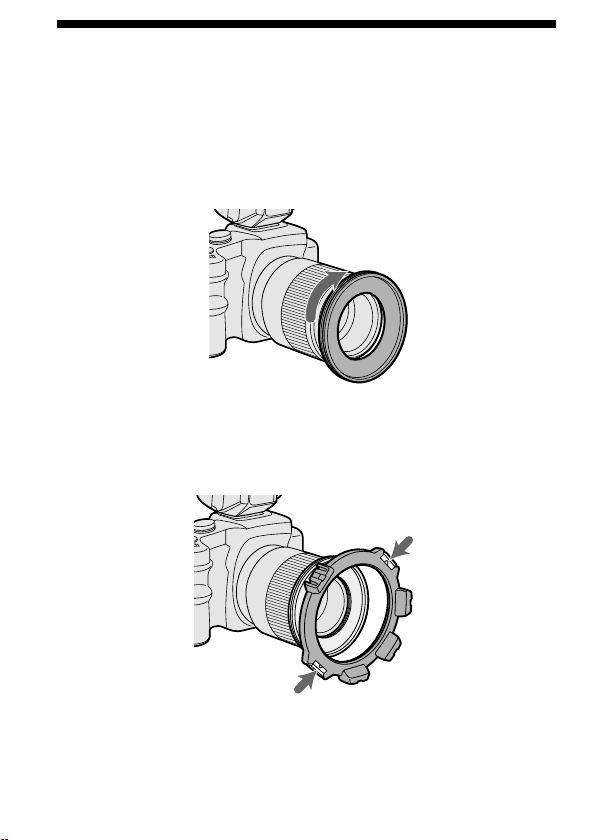
マクロツインフラッシュの取り付けか
た
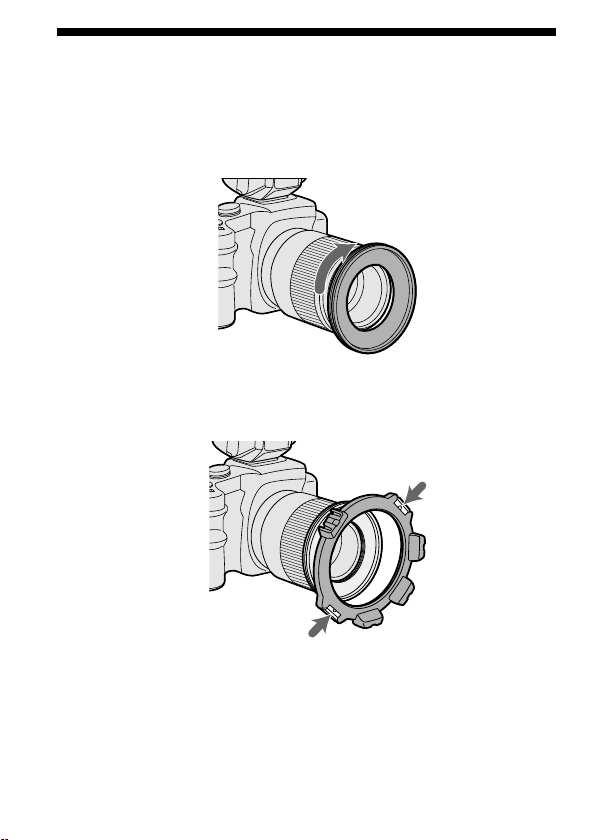
使用レンズのフィルター径にあったアダプターリングをレ
ンズ先端に時計方向にねじ込む。
49 mm
径・
55 mm
径のアダプターリングが同梱されています。
ホルダーの着脱つまみを押さえ、アダプターリングにあわ
せて手を離す。
1
2
13
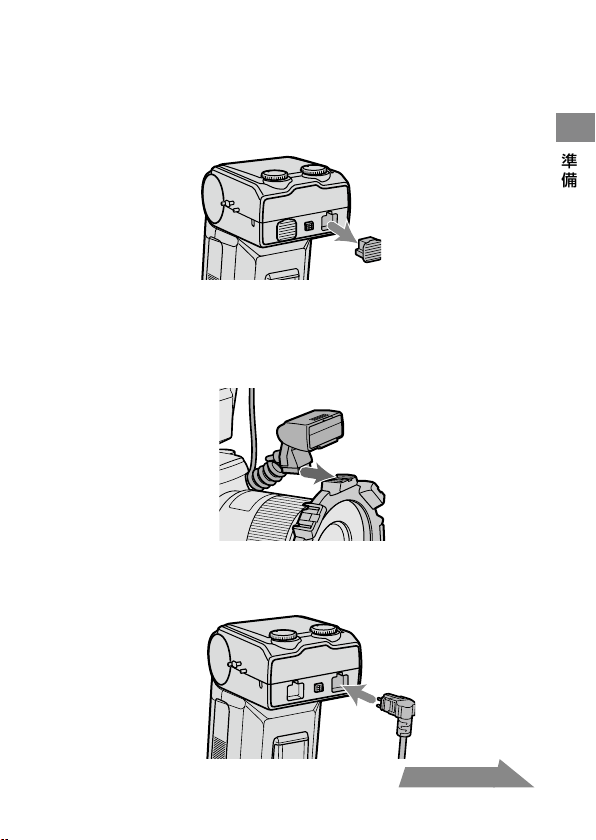
準備
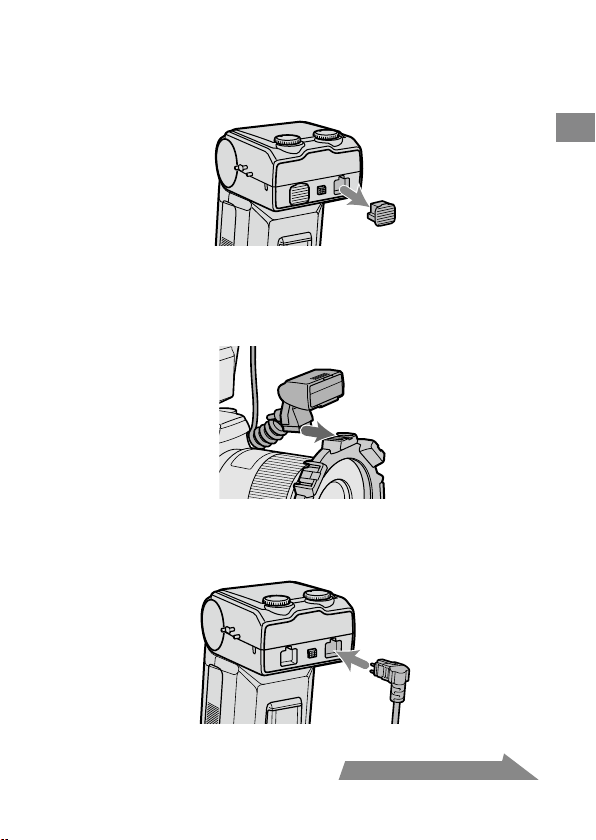
マクロフラッシュコントローラーのソケットのキャップを
はずす。
取りはずしたキャップは紛失しないよう、ケースのポケット等に入
れて保管してください。
使用後はキャップをはめてください。
ツインフラッシュユニットの取り付け部をホルダーの発光
部・アーム取り付け部に差し込む。
アームの使用も可能です(
15
ページ)。
ツインフラッシュユニットの接続プラグをマクロフラッシ
ュコントローラーのツインフラッシュユニット用ソケット
に差し込む。
3
・
・
4
5
次ページにつづく
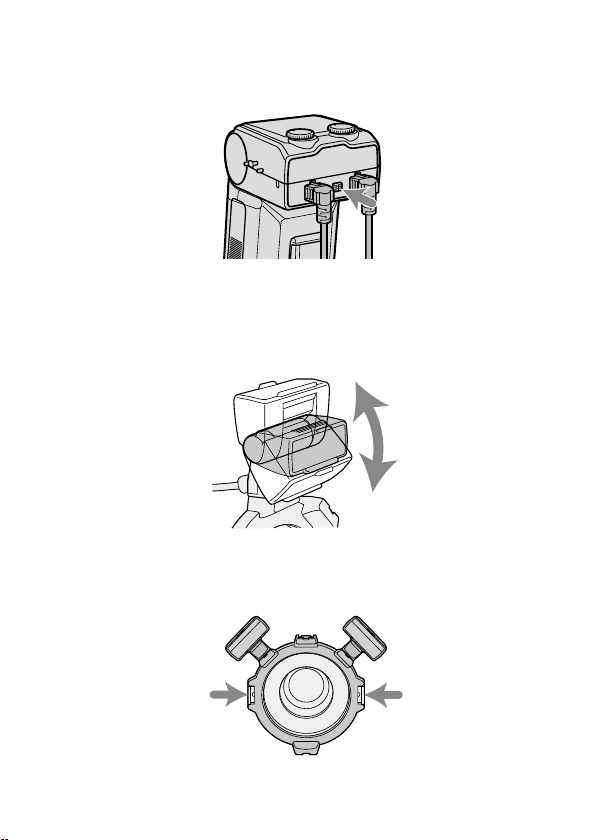
14
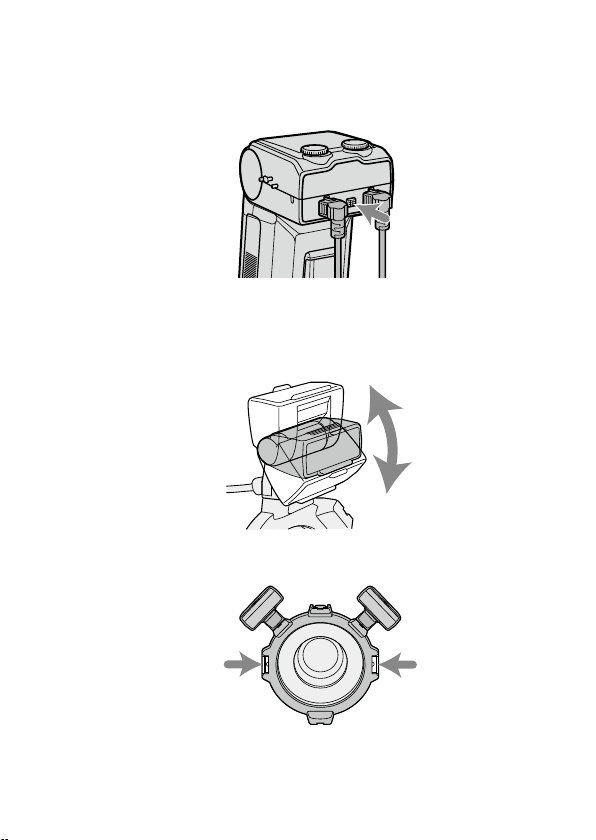
接続プラグをはずすときは、ツインフラッシュユニットプ
ラグ取りはずしボタンを押しながら接続プラグを抜く。
コードを持って引っ張らないでください。
発光部が希望の位置に来るように調整する。
ホルダーの
4
か所の発光部・アーム取り付け部のどの位置にでもツ
インフラッシュユニットの発光部を取り付けることができます。
発光部の角度は自由に調整することができます。
ホルダーの回転も可能です。回転させるときや取りはずすときは、
着脱つまみを押さえてください。
6
・
・
・
15
準備
アームの取り付けかた
ホルダーとツインフラッシュユニットの間にアームを取り付けて、レンズ
からツインフラッシュユニットを離すことができます。
ホルダーの発光部・アーム取り付け部にアームのホルダー
取り付け部を差し込む。
アームの発光部取り付け部にツインフラッシュユニットの
発光部を取り付ける。
長さが足りないときは、アームをのばす。
1
2
3
次ページにつづく
16
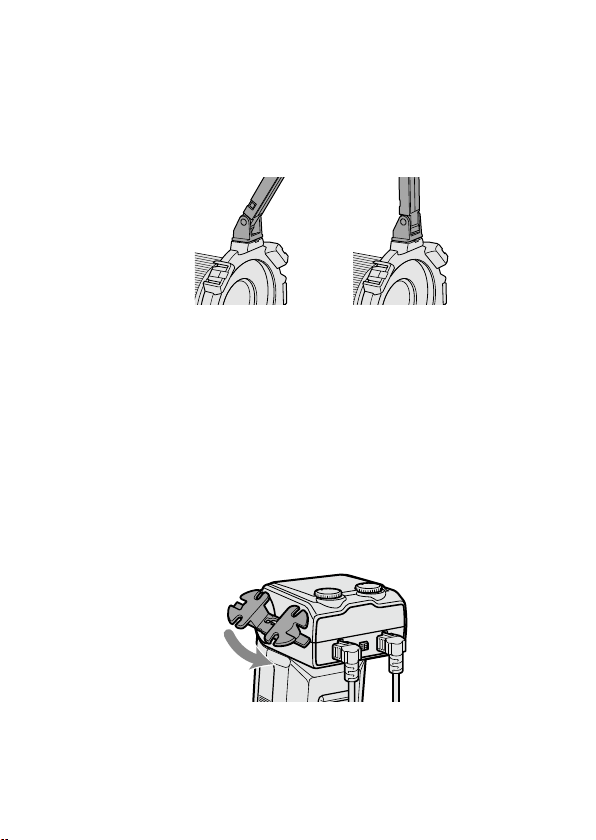
角度を
60
。
位置に変えるときは、アームの両端をしっかり
持って、カチカチと
2
回音がするまで動かして固定する。
アームの角度は
60
˚位置または
90
˚位置の
2
段階に調整できます。
破損防止のため、
60
˚位置・
90
˚位置以上にアームが折れ曲がること
がありますが、これらの
2
か所以外では使用しないでください。また、
2
本のアームの連結も避けてください。アームを傷める原因となり
ます。
60
。
位置
90
。
位置
コードリールの使いかた
同梱のコードリールを取り付けて、余分なコードを巻きつけておくことが
できます。
取り付けかた
下図のように、コードリールの上下の向きを確認し、上から下
に、マクロフラッシュコントローラー横のコードリール取り付
け部にはめ込む。
4
・
・
17
準備
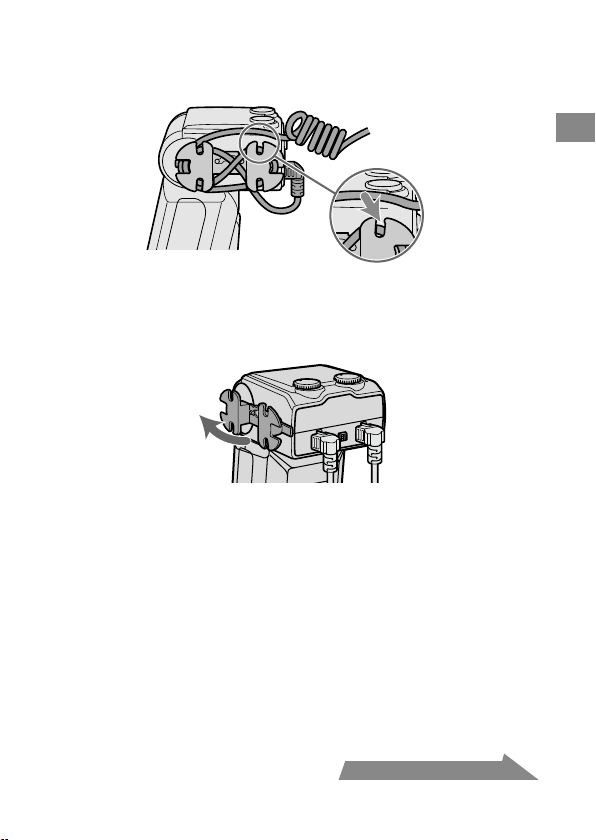
巻きつけかた例
イラストのように巻きつけると、コードを巻いたままコードリールを取り
はずすことができます。
また、コードリールの溝にコードをはさんで止めることもできます。
取りはずしかた
下側を先にはずす。
次ページにつづく
18
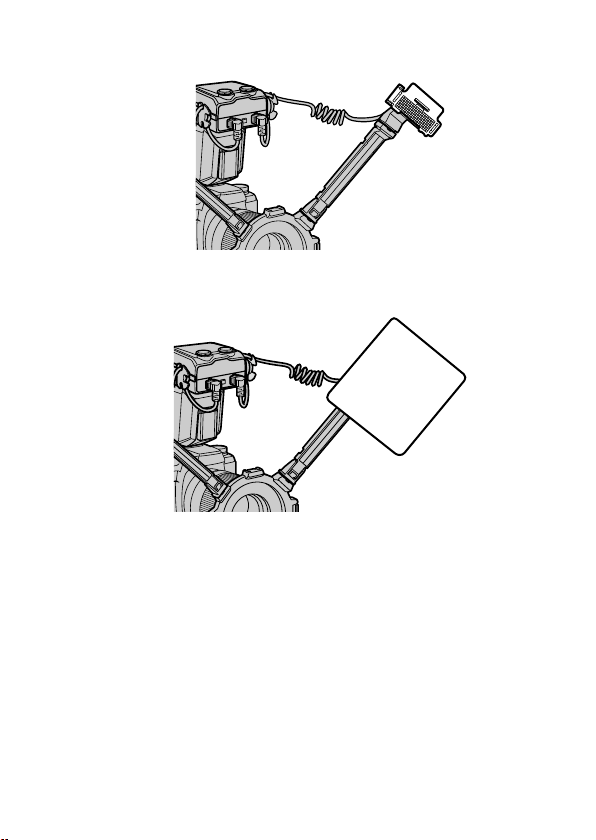
発光部にワイドパネルを取り付けると、照射角を広くすることができま
す(
40
ページ)。
発光部にディフューザーを取り付けると、背景の影を弱め、ソフトなラ
イティングが可能となります。アームと一緒にお使いください(
42
ペー
ジ)。
発光部が被写体に向くように設置してください。また、接続コードが発
光部やレンズをさえぎらないようにしてください。
発光部の位置による写真の効果については
49
ページを参照してくださ
い。
50mm F2.8 Macro
等で非常に近い距離で撮影する場合、アームを使う
と被写体にフラッシュ光が回らなくなります(
51
ページ)。
・
・
・
・
・
19
準備
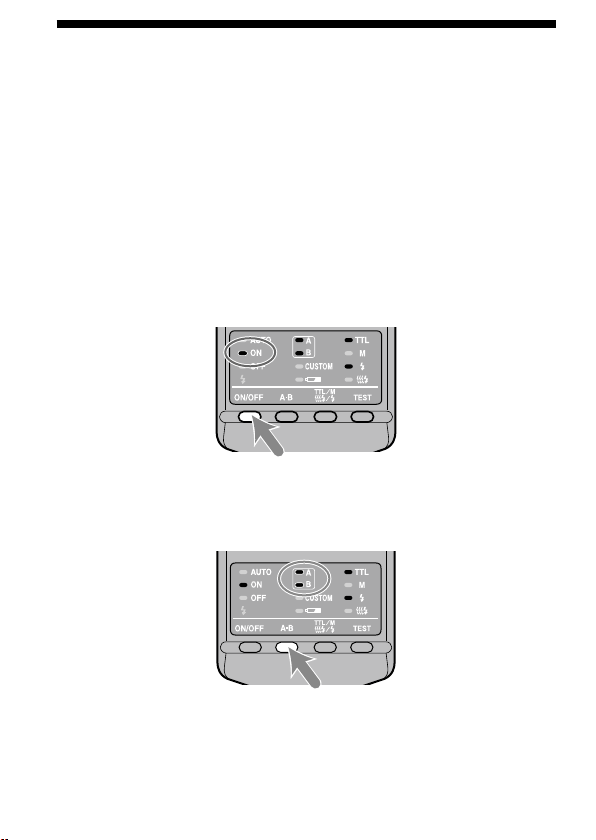
ON/OFF
切り換え
マクロフラッシュコントローラー背面の発光
ON/OFF
切り換
えボタンを押す。
本機の電源が入ります。
オートパワーオフ
カメラまたはマクロフラッシュコントローラーを
4
分以上操作しないでい
ると、節電のため自動的に電源が切れ、表示が消灯します。
カスタム設定により、オートパワーオフまでの時間を変更する、または
オートパワーオフの作動を禁止することもできます(
46
ページ)。
・
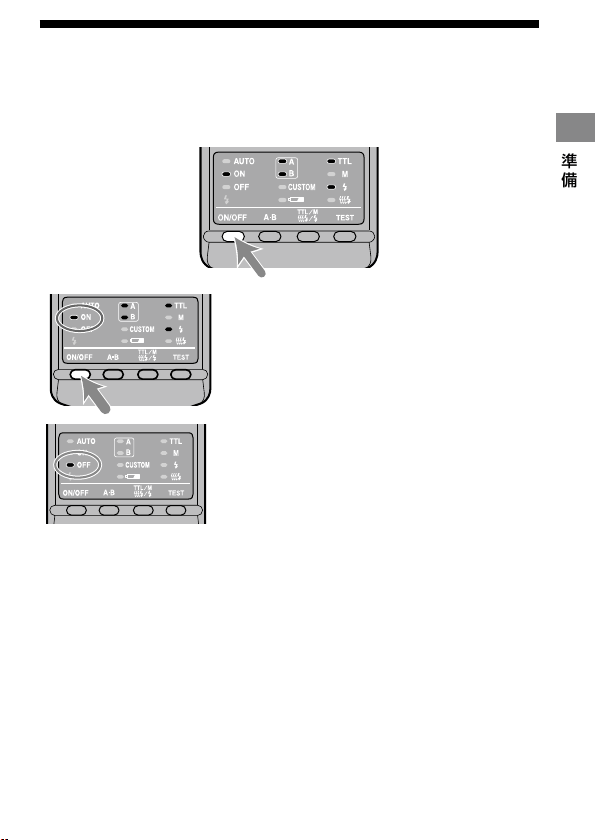
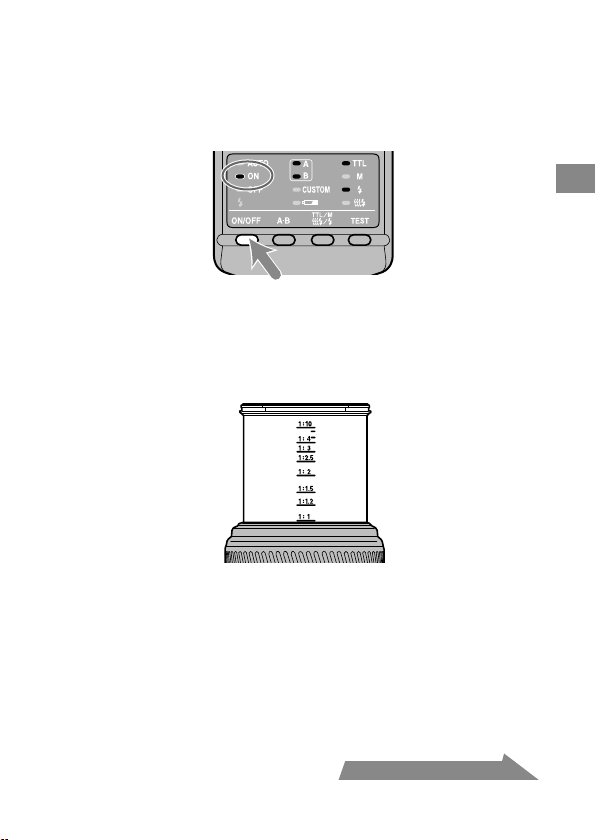
電源が入ると操作部の発光
ON
ランプが点
灯します。
電源が入った状態で発光
ON/OFF
切り換えボ
タンを押すと、電源が切れ、発光
OFF
ランプが
点灯します。
発光
OFF
ランプは
10
数秒後に消えます。
・

20
基本的な撮影
(
A
モード・
M
モード撮影)
カメラの撮影モードは、
A
(絞り優先
AE
)モード
*
または
M
(マニュアル)
モード
*
に設定してください。
一般に近接撮影では、被写界深度
*
が非常に浅くなりがちなので、絞りを
絞り込んで撮影する場合が多くなります。そのため絞り値の選択できる
A
モードまたは
M
モードが適しています。
また、レンズはマクロレンズの使用をおすすめします。
ここでは、適正露出が得られるようフラッシュ光が自動的に調整される
TTL
フラッシュ撮影(
TTL
ランプ点灯)での撮影について説明しています。
次ページからの手順では、以下のカメラとマクロレンズを使用している
と想定して説明しています。
カメラ:
A
(絞り優先
AE
)モードまたは
M
(マニュアル)モードの可能
なカメラ
レンズ:
50mm F2.8 Macro
100mm F2.8 Macro
P
モードで撮影される場合は
28
ページを、上記以外のレンズをお使いの
場合は
52
ページの絞り設定範囲表もあわせてご覧ください。
* A
モード:
希望の絞り値を選ぶことができます。シャッタースピー
ドは適正露出が得られるように自動的に設定されます。
* M
モード:
希望の絞り値とシャッタースピードを選ぶことができま
す。シャッター速度は同調速度以下で選択できます。
*
被写界深度:
ピントをあわせた被写体の前後にある範囲で、写真として
実用上ピントがあって写る範囲のこと。近接撮影ではこ
の範囲が狭くなり、ボケて写る範囲が広くなります。
・
基本撮影
21
基本撮影
カメラの
POWER
スイッチを
ON
にして、撮影モードを
A
モ
ードまたは
M
モードにする。
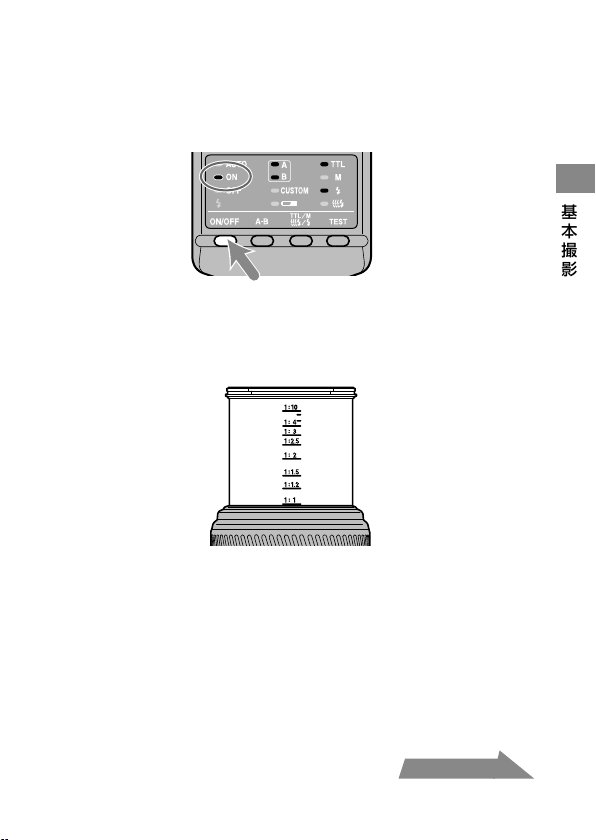
発光
ON/OFF
切り換えボタンを押して、発光
ON
ランプを点
灯させる。
被写体にピントをあわせる。
このとき、レンズの倍率目盛から撮影倍率を読みとることができます。
(撮影倍率表示の位置はレンズによって異なります。)
M
モードの場合は、希望のシャッター速度を選ぶ。
カメラの同調速度より速いシャッター速度は選ぶことができません。
希望の絞り値を選ぶ。
正確な絞り値を求めるには
24
〜
27
ページをご覧ください。
1
2
3
4
5
次ページにつづく
22
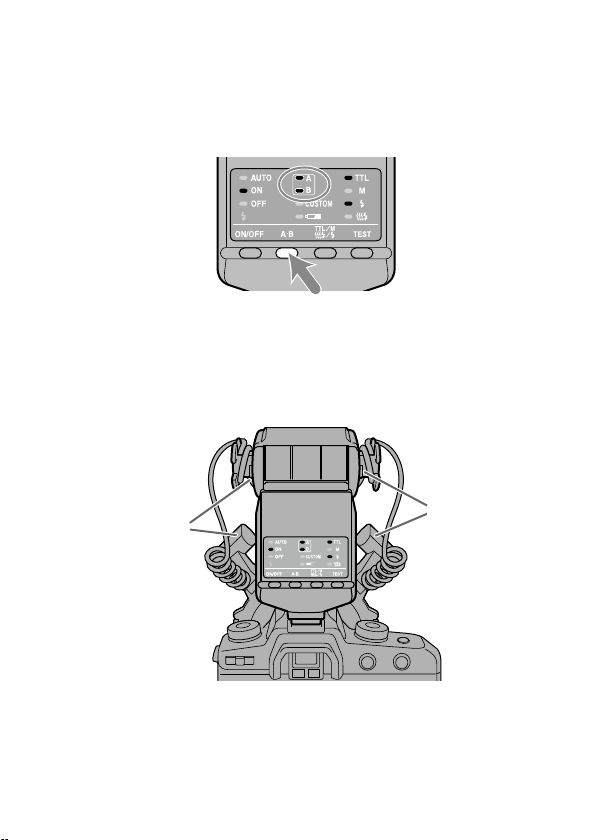
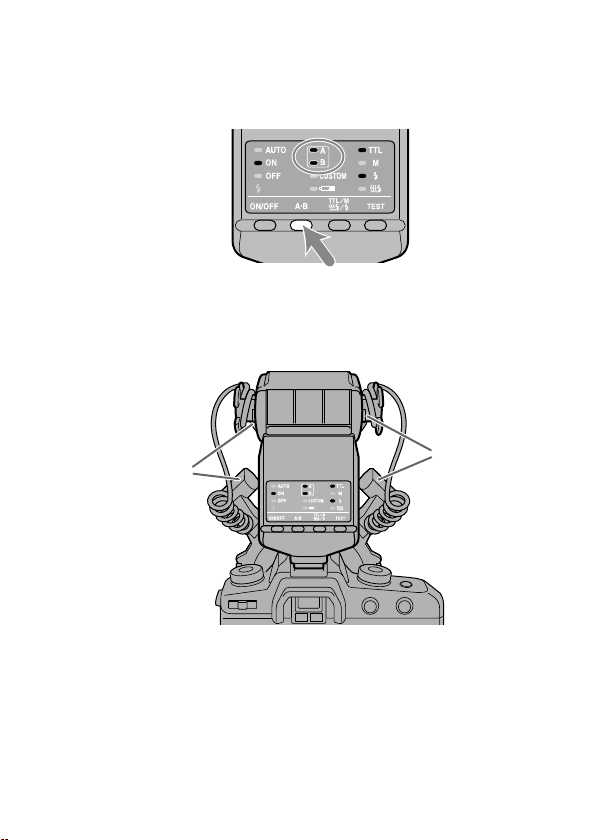
発光部を選択する。
マクロフラッシュコントローラー背面のツインフラッシュユニット発
光部選択ボタンを押して、
A
フラッシュランプ・
B
フラッシュランプ
のいずれかまたは両方が点灯している状態にします(点灯しているフ
ラッシュが発光します)。
カメラを構えた状態で見て、マクロフラッシュコントローラーの左側のツ
インフラッシュユニット用ソケットに取り付けたフラッシュが
A
フラッシ
ュ、右側のソケットに取り付けたフラッシュが
B
フラッシュです。
発光部選択による写真の効果については、
49
〜
51
ページをご覧くださ
い。
B
フラッシュ
A
フラッシュ
6
・

23
基本撮影
マクロフラッシュコントローラーの充電が完了したら、シ
ャッターボタンを押し込んで撮影する。
マクロフラッシュコントローラーは背面の が、カメラはファインダー
内の
がそれぞれ点灯したら、充電完了です。
撮影後、適正露出が得られたときには、マクロフラッシュコントローラー
は背面の
が点滅します。
充電が完了する前に撮影すると、露出アンダーになることがあります。
手ぶれ防止のため、三脚やリモートコードの使用をおすすめします。
マクロフラッシュとしての効果を出すには、撮影距離
0.5 m
以下、撮影倍
率
0.15
倍以上(
1:7
以上)での撮影をおすすめします。
ツインフラッシュユニットを取り付けていない時は、マクロフラッシュ
コントローラーを
OFF
にしてください。
ON
にしていると適正露出が得
られません。
カメラの
AF
補助光は、アダプターリングやツインフラッシュユニットで
さえぎられるので効果がありません。
7
・
・
・
・
・
次ページにつづく

24
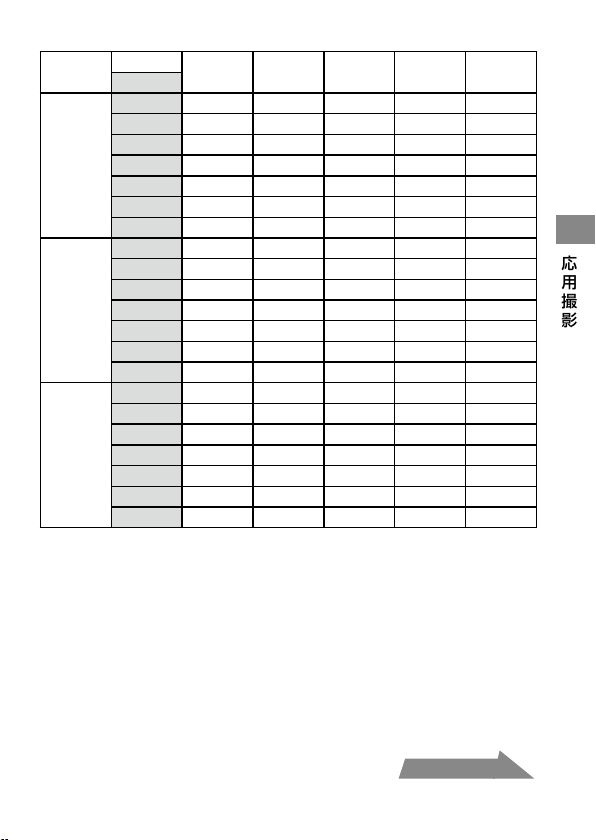
TTL
フラッシュ撮影での絞り値の設定
25
ページの各レンズ別の表は、
ISO 100
で、ワイドパネルおよびディ
フューザーの使用なしを前提としています。
ISO 100
以外、またはワイ
ドパネルやディフューザーを使用する場合は、
26
ページの表に従って
絞り値を加減してください。
表の値は計算上の数値であり、実際のレンズの絞り値には限界がありま
す。
例:
50mm F2.8 Macro
使用、
ISO 100
、アームなし、撮影倍率
1:1
、
2
灯
撮影の場合
→
絞り値
F4
〜
90
(次ページの表参照)
但し、
50mm F2.8 Macro
の絞り値設定可能範囲は
F2.8
〜
32
の
ため、実際のレンズで設定可能な範囲は
F4
〜
32
となります。
ここでは、代表的なレンズおよび撮影倍率での設定範囲を記載していま
す。これら以外のレンズや撮影倍率で撮影される場合は、
52
ページの
絞り設定範囲表をご覧ください。
・
・
・
25
基本撮影
50mm F2.8 Macro
(絞り値設定可能範囲
F2.8
〜
32
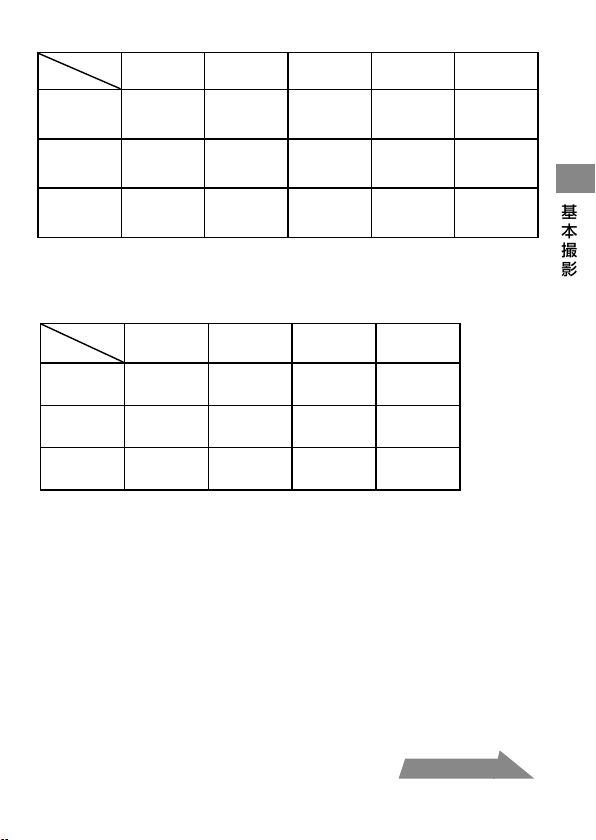
)
撮影倍率
1:1 1:1.5 1:2 1:3 1:4
アームなし
4
〜
90
2.8
〜
64
5.6
〜
128
4
〜
90
8
〜
180
5.6
〜
128
5.6
〜
128
4
〜
90
4.5
〜
108
3.5
〜
76
アーム最短
60
位置
2.4
〜
54
1.7
〜
38
2.8
〜
64
2
〜
45
4
〜
90
2.8
〜
64
4
〜
90
2.8
〜
64
4.5
〜
108
3.5
〜
76
アーム最長
90
位置
1.4
〜
32
1
〜
22
1.4
〜
32
1
〜
22
2
〜
45
1.4
〜
32
2.4
〜
54
1.7
〜
38
2.8
〜
64
2
〜
45
上段は
2
灯撮影、下段は
1
灯のみの撮影
100mm F2.8 Macro
(絞り値設定可能範囲
F2.8
〜
32
)
撮影倍率
1:1 1:1.5 1:2 1:3
アームなし
3.5
〜
76
2.4
〜
54
3.5
〜
76
2.4
〜
54
2.8
〜
64
2
〜
45
2.4
〜
54
1.7
〜
38
アーム最短
60
位置
2
〜
45
1.4
〜
32
2.8
〜
64
2
〜
45
2.8
〜
64
2
〜
45
2.8
〜
64
2
〜
45
アーム最長
90
位置
1.2
〜
27
0.85
〜
19
1.7
〜
38
1.2
〜
27
2
〜
45
1.4
〜
32
2
〜
45
1.4
〜
32
上段は
2
灯撮影、下段は
1
灯のみの撮影
次ページにつづく
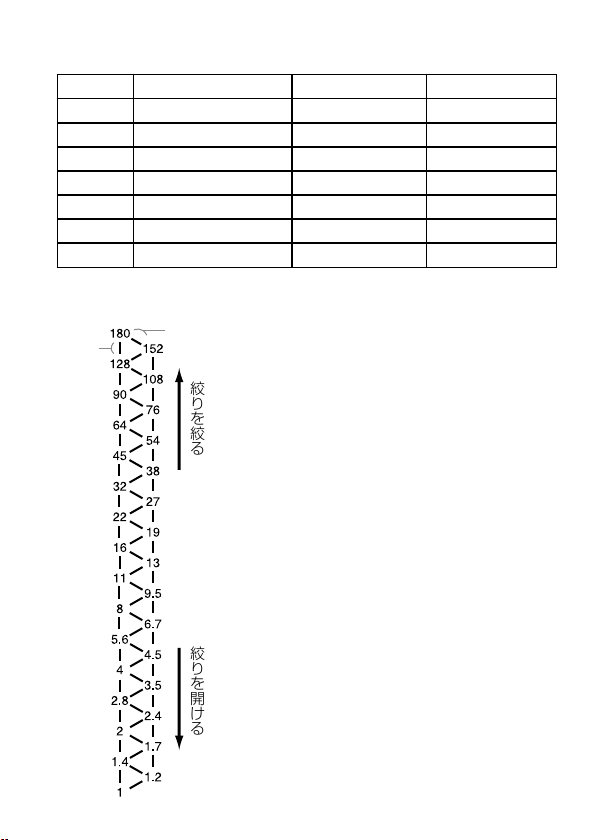
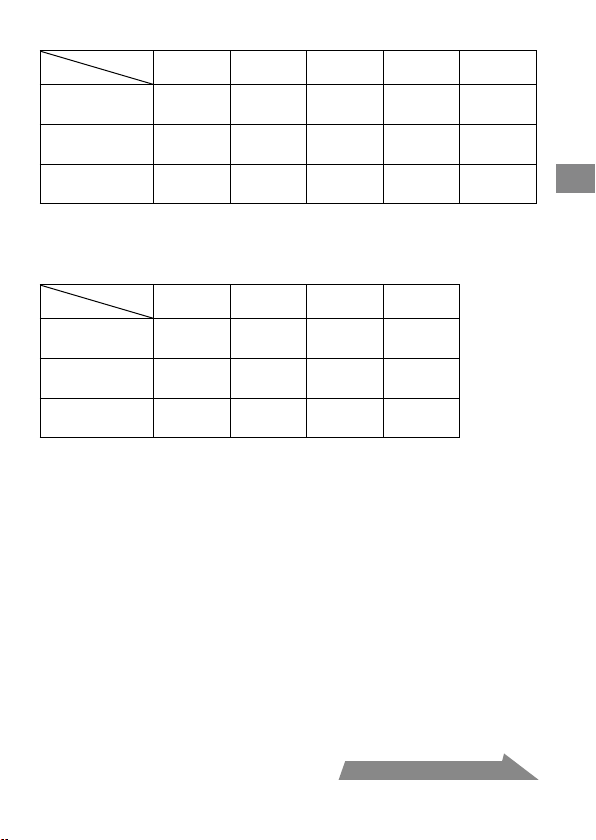
26
ISO 100
以外・ワイドパネル・ディフューザー使用時
25
ページの表に加えて、以下の通り、絞り値を加減してください。
ワイドパネル・ディフューザーなし
ワイドパネル付き
ディフューザー付き
ISO 25 2
段開ける
3.5
段開ける
4.5
段開ける
ISO 50 1
段開ける
2.5
段開ける
3.5
段開ける
ISO 100
そのまま
1.5
段開ける
2.5
段開ける
ISO 200 1
段絞る
0.5
段開ける
1.5
段開ける
ISO 400 2
段絞る
0.5
段絞る
0.5
段開ける
ISO 800 3
段絞る
1.5
段絞る
0.5
段絞る
ISO1600 4
段絞る
2.5
段絞る
1.5
段絞る
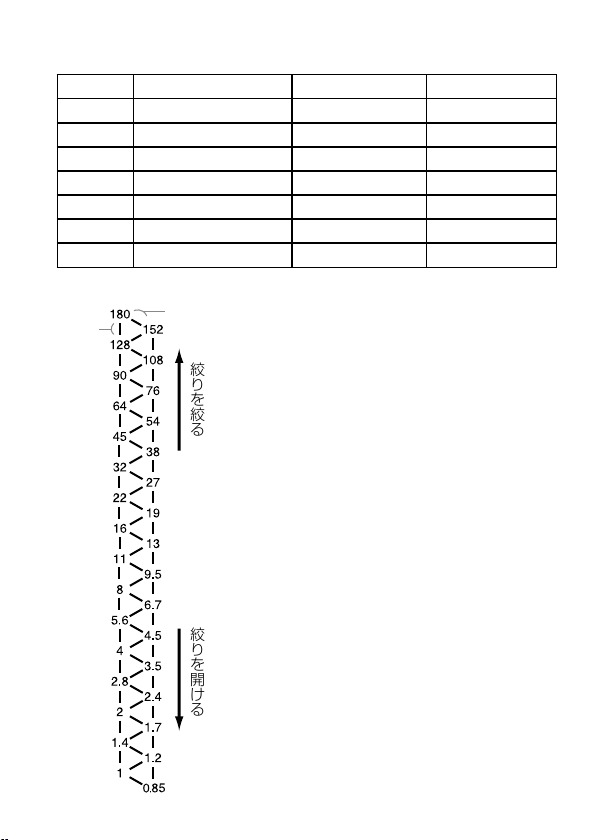
段数表
1
段
0.5
段
絞りを絞る
絞りを開ける
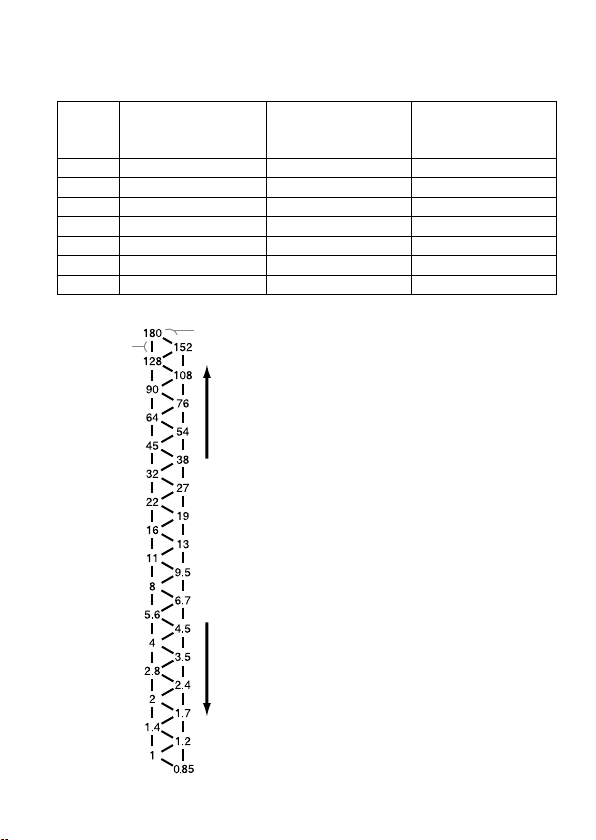
段数表の使いかた
左の段数表で、上下に
1
つ移動すれば絞り
を
1
段変更する、斜めに移動すれば
0.5
段変
更することになります。
ここでの絞り値の設定は
0.5
段刻みを基準
としています。
0.3
段刻みのカメラをお使
いの場合は、前後の値をお使いください。
厳密な撮影をされる場合はブラケット撮
影をおすすめします。
例:
F8
から
1
段絞りを絞った場合
段数表の「
8
」より上に
1
つ移動すると
「
11
」となるので、絞り値は
F11
となり
ます。
F8
から
0.5
段絞りを開けた場合
段数表の「
8
」より斜め下に移動すると
「
6.7
」となるので、絞り値は
F6.7
となり
ます。

27
基本撮影
ISO 100
以外・ワイドパネル・ディフューザー使用時の絞り
値の求めかた
1 25
ページの表より、同じ条件で
ISO 100
の場合の絞り値を調べる。
2 26
ページの表より、
ISO 100
以外、ワイドパネル・ディフューザー使用
時の絞り値の加減方法を調べる。
3 26
ページの段数表に
1
で得られた数値を当てはめ、
2
で得られた加減分
段数表を移動し、絞り値を求める。
4 3
でもとめた「計算上の絞り値」をレンズの絞り値設定可能範囲
F2.8
〜
32
に当てはめ、実際の設定可能な範囲を求める。
例:
50mm F2.8 Macro
使用、アームなし、撮影倍率
1
:
2
、
2
灯撮影、
ISO
200
、ディフューザー付きの場合
1 50mm F2.8 Macro
使用、アームなし、撮影倍率
1
:
2
、
2
灯撮影、
ISO
100
の場合の絞り値を調べる。
→絞り値
F8
〜
180
(
25
ページの表参照)
2 ISO 200
、ディフューザー付きの場合の絞り値の加減方法を調べる。
→
1.5
段開ける(
26
ページの表参照)
3 26
ページの段数表より、
F8
より
1.5
段絞りを開けると
F4.5
となり、
F180
より
1.5
段絞りを開けると
F108
となるので、このときの絞り値
は
F4.5
〜
108
となる。
4 50mm F2.8 Macro
の絞り値設定可能範囲は
F2.8
〜
32
のため、「計算
上の絞り値」
F4.5
〜
108
のうち上限の
F108
は設定可能範囲外となる
ので、実際のレンズ設定可能な範囲は
F4.5
〜
32
となる。
28
基本的な撮影(プログラム(
P
)フラッ
シュ撮影)
プログラムオート(
P
)モード(オートモード・シーンセレクションを含む)
での撮影手順は
A
モードや
M
モードとほぼ同じですが、絞り値が自動的に設
定されます。
カメラの
POWER
スイッチを
ON
にして、撮影モードを
P
モ
ードにする。
発光
ON/OFF
切り換えボタンを押して、発光
ON
ランプを点
灯させる。
被写体にピントをあわせる。
発光部を選択する。
充電が完了したら、シャッターボタンを押し込んで撮影す
る。
1
2
3
4
5
29
基本撮影
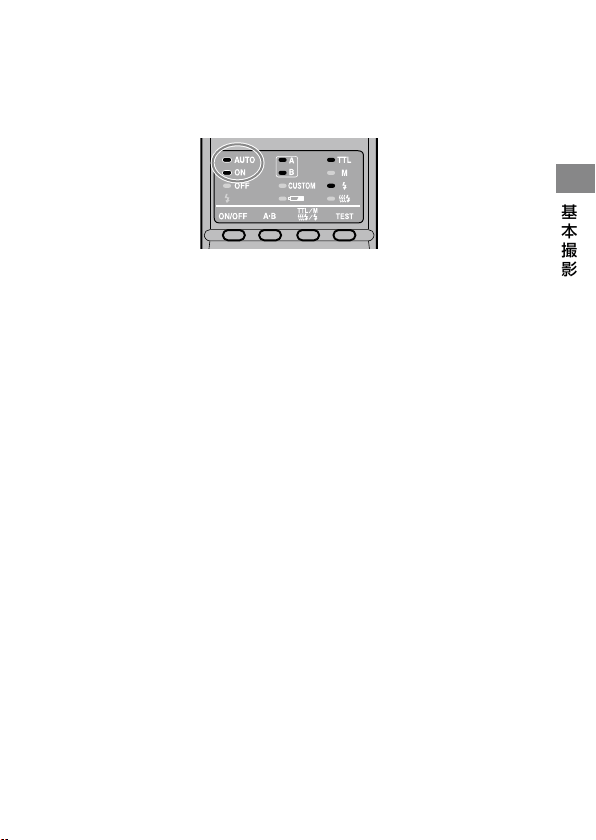
P
モードに設定したとき、カメラの機種によってはツインフラッシュユ
ニットが自動発光になり、一定以上の明るさでは発光しません。自動発
光の場合、マクロフラッシュコントローラーの
AUTO
(自動)ランプが点
灯します。
P
モードフラッシュは、マクロ撮影でなく一般的な撮影を想定して設計さ
れています。マクロ撮影では、被写界深度が非常に浅くなる(ピントの合
う範囲が狭くなる)可能性があります。また、設定された絞り値が
24
〜
27
ページの絞り設定範囲表に当てはまらないと、適正露出が得られませ
ん。
・
・

30
応用撮影
マニュアルフラッシュ撮影(
M
)
通常の
TTL
フラッシュ撮影では、被写体が適正露出になるようにツインフラ
ッシュユニットの発光量が自動的に調整されます。マニュアルフラッシュ
撮影にすると、被写体の明るさやカメラの設定に関係なく、常に一定の発光
量を得ることができます。
マニュアルフラッシュ撮影では、
1/1
を最大発光量として、お好みのレベ
ルに調光します。光量レベル
1
段(例:
1/1
→
1/2
)は、絞り値
1
段(例:
F4
→
5.6
)に相当します。
マニュアルフラッシュ撮影は、カメラの
M
(マニュアル)モードでのみ可
能です。
M
モード以外で行なうと、自動的に
TTL
フラッシュ撮影に切り
換わります。
被写体の反射率に影響されないため、反射率が極端に高いものや低いも
のを撮影するときに便利です。
TTL
フラッシュ撮影
マニュアルフラッシュ撮影
カメラを
M
モードに設定する。
TTL/M/
テスト発光モード切り換えボタンを押して、
M
ラ
ンプを点灯させる。
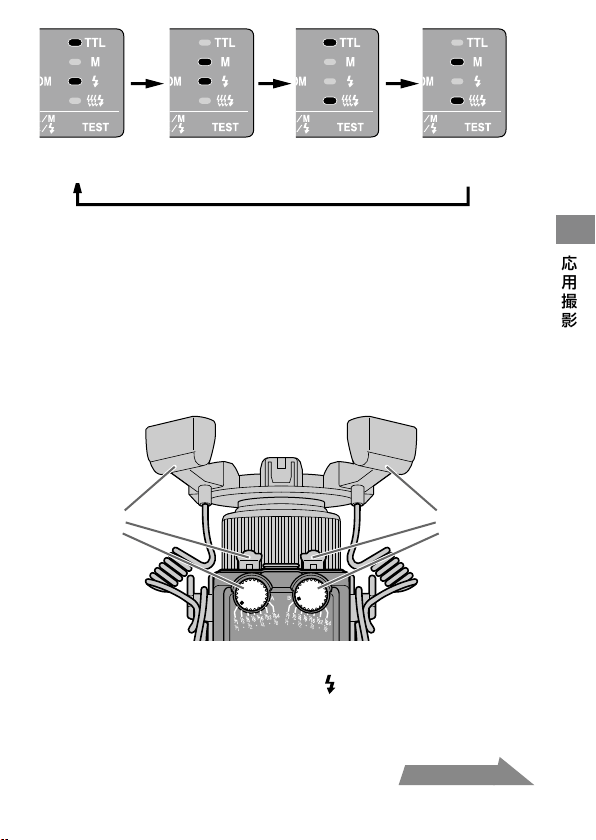
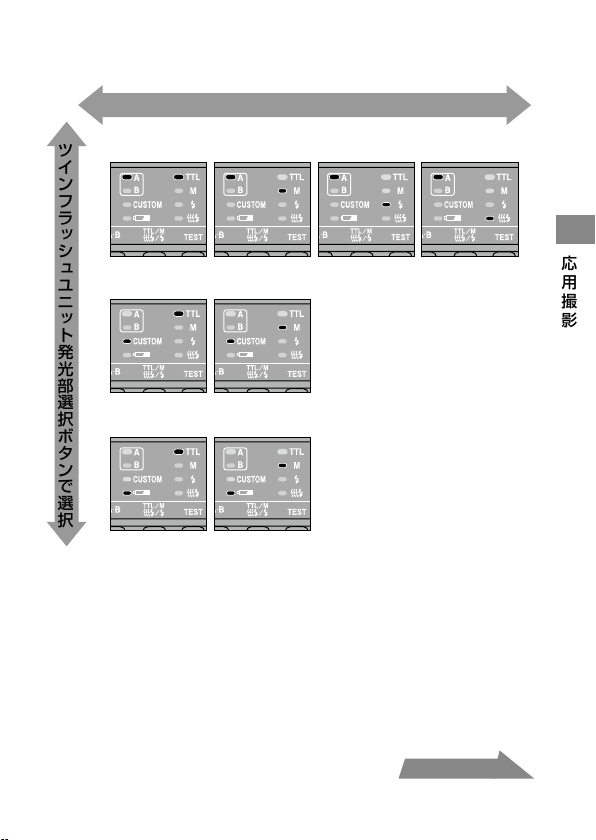
ボタンを押すごとに次の順序で設定が変わります(テスト発光(
38
ペー
ジ)、モデリング発光(
39
ページ))。
・
・
・
1
2
31
応用撮影
TTL
フラッシュ
テスト発光
マニュアルフラッシュ
テスト発光
TTL
フラッシュ
モデリング発光
マニュアルフラッシュ
モデリング発光
希望のシャッタースピードと絞り値(
32
〜
37
ページ)を選
ぶ。
マニュアル発光レベル設定ダイヤルを回して、設定したい
発光レベルを選ぶ(
32
〜
37
ページ)。
カメラを構えた状態で見て、左が
A
フラッシュ用のダイヤル、右が
B
フラッシュ用のダイヤルです。ダイヤルの上段の数値(
1/1
〜
1/64
)
を使用します。
A
フラッシュ
B
フラッシュ
マニュアルフラッシュ撮影では、撮影後適正露出が得られても、マク
ロフラッシュコントローラー背面の
は点滅しません。
カスタム設定により、カメラを
M
モードにしなくてもマニュアルフ
ラッシュ撮影の設定を可能にすることもできます。また、発光レベ
ルのステップをより細かくすることもできます(
46
ページ)。
3
4
・
・
・
次ページにつづく

32
マニュアルフラッシュ撮影での光量と絞り値
の設定
33
〜
34
ページの各レンズ別の表は、
ISO 100
、ワイドパネルおよびディ
フューザーの使用なし、ツインフラッシュユニットは左右同じ発光レベ
ルで発光を前提としています。
ISO 100
以外、またはワイドパネルやディフューザーを使用する場合は、
36
ページの表に従って絞り値を加減してください。ツインフラッシュ
ユニットの左右の発光レベルを変える場合は、
35
ページを参照してく
ださい。
表の値は計算上の数値であり、実際のレンズの絞り値には限界がありま
す。
例:
50mm F2.8 Macro
使用、
ISO 100
、アームなし、発光レベル
1/1
、撮影倍率
1:1
、
2
灯撮影の場合
→
絞り値
F90
(
33
ページの表参照)
但し、
50mm F2.8 Macro
の絞り値設定可能範囲は
F2.8
〜
32
の
ため、このまま撮影すると露出オーバーになります。そのため、
33
ページの表より、発光レベルを
1/8
にすると、絞り値
F32
で適正
露出が得られます。
これらの表では、フラッシュ光が当たっている面の露出が適正になるよ
うな絞り値を記載しています。アームを伸ばして側面または後方から照
射する場合、被写体の形状や配置によっては、適正露出が得られないこと
があります(
51
ページ)。このような場合はテスト撮影やブラケット(露
出ずらし)撮影をおすすめします。
ここでは、代表的なレンズおよび撮影倍率での設定範囲を記載していま
す。これら以外のレンズや撮影倍率で撮影される場合は、
53
ページの
絞り設定範囲表を参照してください。
・
・
・
・
33
応用撮影
50mm F2.8 Macro
(絞り値設定可能範囲
F2.8
〜
32
)
撮影倍率
1:1 1:1.5 1:2 1:3 1:4
発光レベル
アーム
なし
1/1
90
(
64
)
128
(
90
)
180
(
128
)
128
(
90
)
108
(
76
)
1/2
64
(
45
)
90
(
64
)
128
(
90
)
90
(
64
)
76
(
54
)
1/4
45
(
32
)
64
(
45
)
90
(
64
)
64
(
45
)
54
(
38
)
1/8
32
(
22
)
45
(
32
)
64
(
45
)
45
(
32
)
38
(
27
)
1/16
22
(
16
)
32
(
22
)
45
(
32
)
32
(
22
)
27
(
19
)
1/32
16
(
11
)
22
(
16
)
32
(
22
)
22
(
16
)
19
(
13
)
1/64
11
(
8
)
16
(
11
)
22
(
16
)
16
(
11
)
13
(
9.5
)
アーム
最短
60
。
位置
1/1
54
(
38
)
64
(
45
)
90
(
64
)
90
(
64
)
108
(
76
)
1/2
38
(
27
)
45
(
32
)
64
(
45
)
64
(
45
)
76
(
54
)
1/4
27
(
19
)
32
(
22
)
45
(
32
)
45
(
32
)
54
(
38
)
1/8
19
(
13
)
22
(
16
)
32
(
22
)
32
(
22
)
38
(
27
)
1/16
13
(
9.5
)
16
(
11
)
22
(
16
)
22
(
16
)
27
(
19
)
1/32
9.5
(
6.7
)
11
(
8
)
16
(
11
)
16
(
11
)
19
(
13
)
1/64
6.7
(
4.5
)
8
(
5.6
)
11
(
8
)
11
(
8
)
13
(
9.5
)
アーム
最長
90
。
位置
1/1
32
(
22
)
32
(
22
)
45
(
32
)
54
(
38
)
64
(
45
)
1/2
22
(
16
)
22
(
16
)
32
(
22
)
38
(
27
)
45
(
32
)
1/4
16
(
11
)
16
(
11
)
22
(
16
)
27
(
19
)
32
(
22
)
1/8
11
(
8
)
11
(
8
)
16
(
11
)
19
(
13
)
22
(
16
)
1/16
8
(
5.6
)
8
(
5.6
)
11
(
8
)
13
(
9.5
)
16
(
11
)
1/32
5.6
(
4
)
5.6
(
4
)
8
(
5.6
)
9.5
(
6.7
)
11
(
8
)
1/64
4
(
2.8
)
4
(
2.8
)
5.6
(
4
)
6.7
(
4.5
)
8
(
5.6
)
( )内は
1
灯のみで撮影の場合
次ページにつづく

34
100mm F2.8 Macro
(絞り値設定可能範囲
F2.8
〜
32
)
撮影倍率
1:1 1:1.5 1:2 1:3
発光レベル
アーム
なし
1/1
76
(
54
)
128
(
90
)
64
(
45
)
54
(
38
)
1/2
54
(
38
)
54
(
38
)
45
(
32
)
38
(
27
)
1/4
38
(
27
)
38
(
27
)
32
(
22
)
27
(
19
)
1/8
27
(
19
)
27
(
19
)
22
(
16
)
19
(
13
)
1/16
19
(
13
)
19
(
13
)
16
(
11
)
13
(
9.5
)
1/32
13
(
9.5
)
13
(
9.5
)
11
(
8
)
9.5
(
6.7
)
1/64
9.5
(
6.7
)
9.5
(
6.7
)
8
(
5.6
)
6.7
(
4.5
)
アーム
最短
60
。
位置
1/1
45
(
32
)
64
(
45
)
64
(
45
)
64
(
45
)
1/2
32
(
22
)
45
(
32
)
45
(
32
)
45
(
32
)
1/4
22
(
16
)
32
(
22
)
32
(
22
)
32
(
22
)
1/8
16
(
11
)
22
(
16
)
22
(
16
)
22
(
16
)
1/16
22
(
16
)
16
(
11
)
16
(
11
)
16
(
11
)
1/32
8
(
5.6
)
11
(
8
)
11
(
8
)
11
(
8
)
1/64
5.6
(
4
)
8
(
5.6
)
8
(
5.6
)
8
(
5.6
)
アーム
最長
90
。
位置
1/1
27
(
19
)
38
(
27
)
45
(
32
)
45
(
32
)
1/2
19
(
13
)
27
(
19
)
32
(
22
)
32
(
22
)
1/4
13
(
9.5
)
19
(
13
)
22
(
16
)
22
(
16
)
1/8
9.5
(
6.7
)
13
(
9.5
)
16
(
11
)
16
(
11
)
1/16
6.7
(
4.5
)
9.5
(
6.7
)
11
(
8
)
11
(
8
)
1/32
4.5
(
3.5
)
6.7
(
4.5
)
8
(
5.6
)
8
(
5.6
)
1/64
3.5
(
2.4
)
4.5
(
3.5
)
5.6
(
4
)
5.6
(
4
)
( )内は
1
灯のみで撮影の場合
35
応用撮影
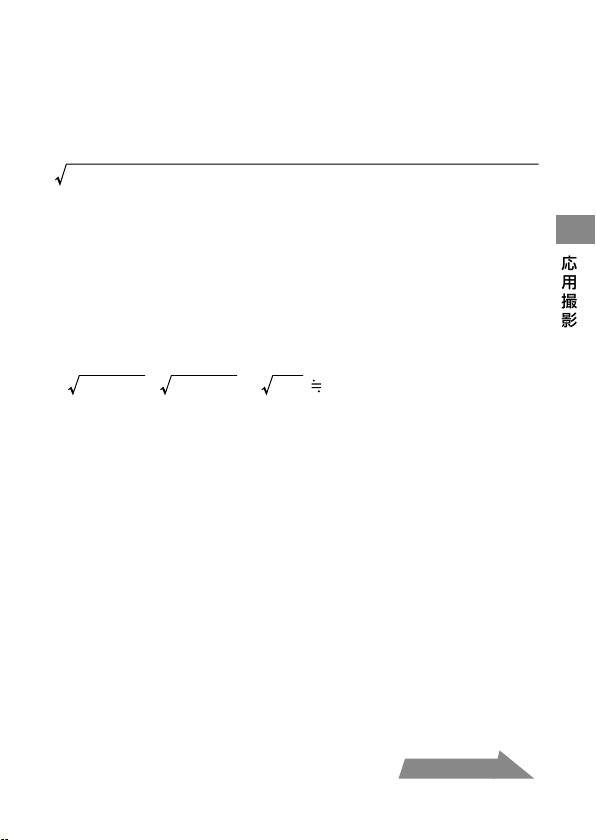
ツインフラッシュユニットの左右の発光レベルを変える場合
33
〜
34
ページの表はツインフラッシュユニットの左右同じ発光レベルで
発光することを前提としています。左右の発光レベルを変えた場合、正確
には以下の計算式で適正露出が得られる絞り値を求めることができます。
左右合わせた絞り値
=
(
A
フラッシュ
1
灯のみでの絞り値
)
+(
B
フラッシュ
1
灯のみでの絞り値
)
例:
100mm F2.8 Macro
使用、アームなし、
A
フラッシュの発光レベルが
1/8
、
B
フラッシュの発光レベルが
1/16
、撮影倍率
1:1
の場合
発光レベル
1/8
の
A
フラッシュ
1
灯のみで撮影した場合の絞り値は
F19
、発光レベル
1/16
の
B
フラッシュ
1
灯のみで撮影した場合の絞り値
は
F13
になります(
34
ページの表参照)。
これらの数値を上の数式に当てはめます。
19
2
+ 13
2
= 361 + 169 = 530 22
計算の結果、適正露出を得られる絞り値は
F22
となります。
次ページにつづく
36
ISO 100
以外・ワイドパネル・ディフューザー使用時
33
〜
34
ページの表に加えて、以下の通り絞り値を加減してください。
ワイドパネル・ディフューザーなし
ワイドパネル付き
ディフューザー付き
ISO 25 2
段開ける
3.5
段開ける
4.5
段開ける
ISO 50 1
段開ける
2.5
段開ける
3.5
段開ける
ISO 100
そのまま
1.5
段開ける
2.5
段開ける
ISO 200 1
段絞る
0.5
段開ける
1.5
段開ける
ISO 400 2
段絞る
0.5
段絞る
0.5
段開ける
ISO 800 3
段絞る
1.5
段絞る
0.5
段絞る
ISO1600 4
段絞る
2.5
段絞る
1.5
段絞る
段数表
1
段
0.5
段
絞りを絞る
絞りを開ける
段数表の使いかた
左の段数表で、上下に
1
つ移動すれば絞り
を
1
段変更する、斜めに移動すれば
0.5
段変
更することになります。
ここでの絞り値の設定は
0.5
段刻みを基準
としています。
0.3
段刻みのカメラをお使
いの場合は、前後の値をお使いください。
厳密な撮影をされる場合はブラケット撮
影をおすすめします。
例:
F8
から
1
段絞りを絞った場合
段数表の「
8
」より上に
1
つ移動すると
「
11
」となるので、絞り値は
F11
となり
ます。
F8
から
0.5
段絞りを開けた場合
段数表の「
8
」より斜め下に移動すると
「
6.7
」となるので、絞り値は
F6.7
となり
ます。

37
応用撮影
ISO 100
以外・ワイドパネル・ディフューザー使用時の絞り
値の求めかた
1 33
〜
34
ページの表より、同じ条件で
ISO 100
の場合の絞り値を調べる。
2 36
ページの表より、
ISO 100
以外、ワイドパネル・ディフューザー使用
時の絞り値の加減方法を調べる。
3 36
ページの段数表に
1
で得られた数値を当てはめ、
2
で得られた加減分
段数表を移動し、絞り値を求める。
例:
100mm F2.8 Macro
使用、アームなし、発光レベル
1/4
、撮影倍率
1
:
1
、
2
灯撮影、
ISO 200
、ディフューザー付きの場合
1 100mm F2.8 Macro
使用、アームなし、発光レベル
1/4
、撮影倍率
1
:
1
、
2
灯撮影、
ISO 100
の場合の絞り値を調べる。
→絞り値
F38
(
34
ページの表参照)
2 ISO 200
、ディフューザー付きの場合の絞り値の加減方法を調べる。
→
1.5
段開ける(
36
ページの表参照)
3 36
ページの段数表より、
F38
より
1.5
段絞りを開けると
F22
となる。
38
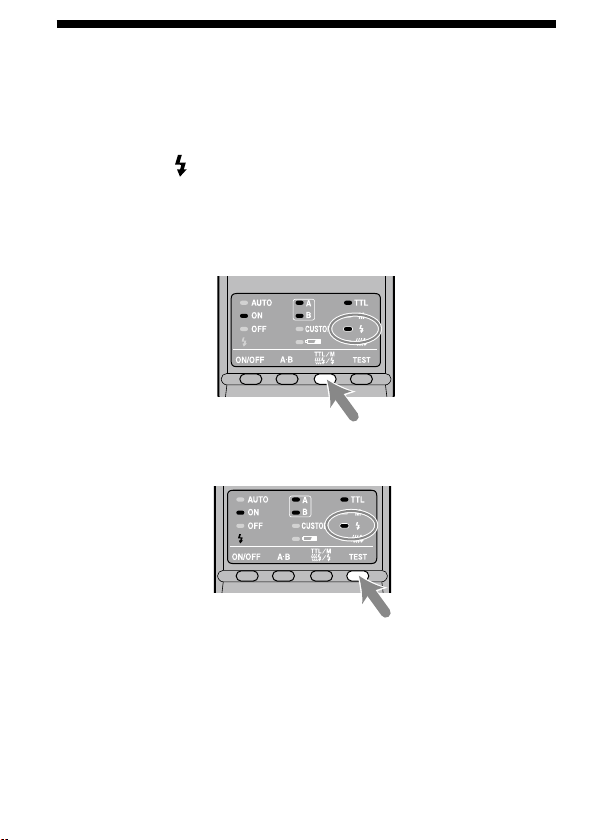
テスト発光
撮影前に、ツインフラッシュユニットをテスト発光させることができます。
フラッシュメーター等を使って撮影する際にご使用ください。
TTL/M/
テスト発光モード切り換えボタンを押して、テスト
発光ランプ
を点灯させる。
TTL
フラッシュ撮影、またはマニュアルフラッシュ撮影(
M
)のどちら
が選択されているかも同時に確認してください(切り換えの順序は
31
ページを参照してください)。
テスト発光/モデリング発光ボタンを押す。
TTL
フラッシュ撮影時は、テスト発光/モデリング発光ボタンを押
すとフラッシュは最大発光量で発光します。
マニュアルフラッシュ撮影時(
30
ページ)は、テスト発光/モデリン
グ発光ボタンを押すと、設定されている光量で
1
回だけ発光します。
フラッシュメーター等をお使いの際に便利です。
1
2
・
・
39
応用撮影
モデリング発光
撮影前に被写体の影の出方を確認するために、フラッシュを連続して発光
させることができます。
1
秒に
40
回の割合で
2
秒間発光します。
TTL/M/
テスト発光モード切り換えボタンを押して、モデリ
ング発光ランプ
を点灯させる。
TTL
フラッシュ撮影、またはマニュアルフラッシュ撮影(
M
)のどちら
が選択されているかも同時に確認してください(切り換えの順序は
31
ページを参照してください)。
テスト発光/モデリング発光ボタンを押す。
フラッシュ発光中は、シャッターボタンを押さないでください。
影の強弱は、実際に撮影したときの影とは異なることがあります。
明るい場所や屋外での発光、またはバウンス撮影時は、影が薄くなるので
確認が難しくなります。
1
2
・
・
・
40
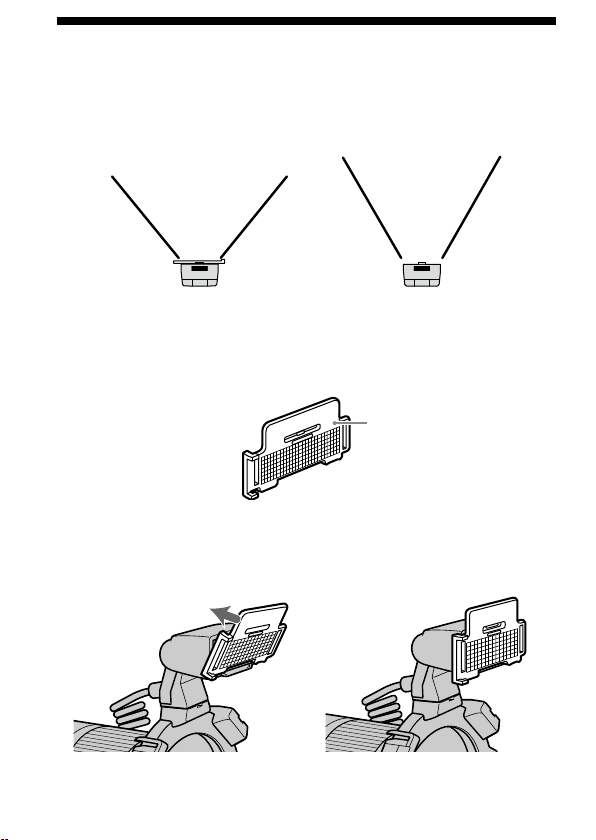
ワイドパネル
ツインフラッシュユニット発光部の照射角は、左右
60
°、上下
45
°(焦点
距離
35 mm
相当)ですが、ワイドパネルを装着すると、左右
78
°、上下
60
°
(焦点距離
24 mm
相当)まで照射角を広げることができます。
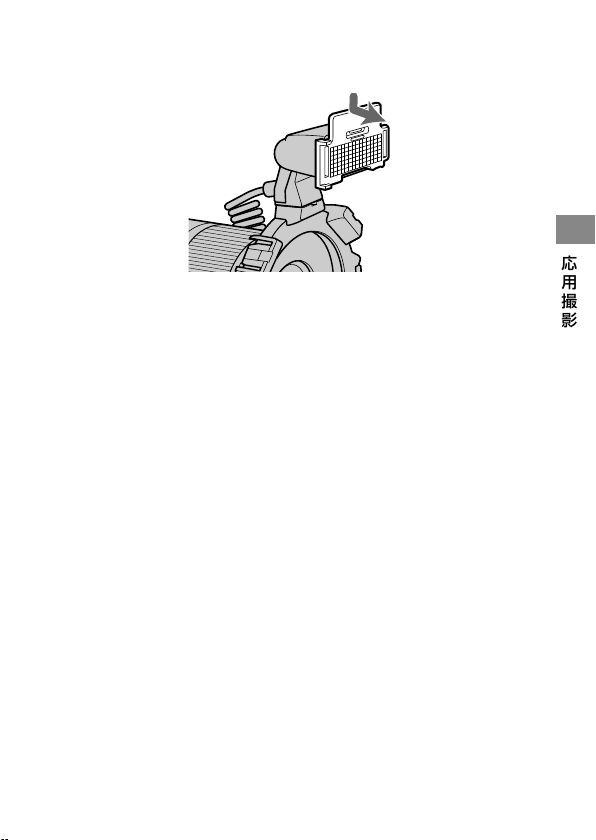
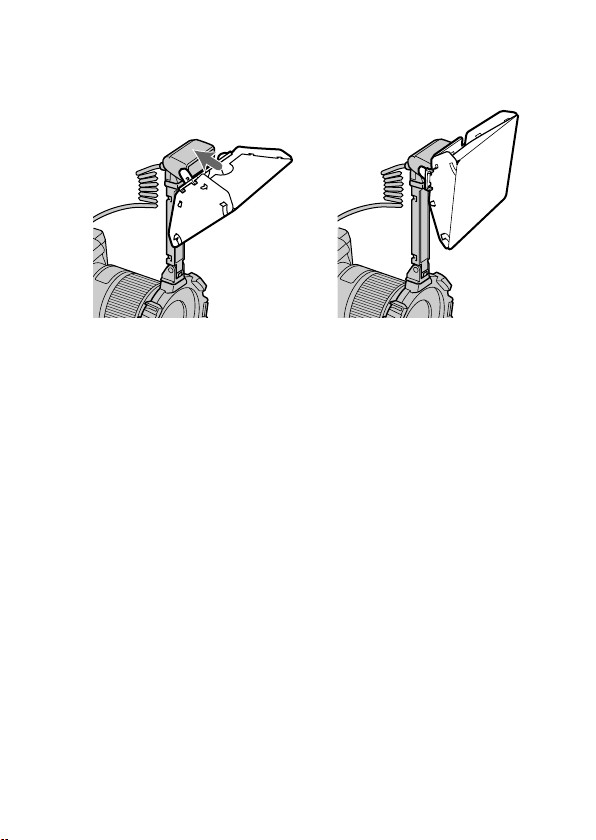
取り付けかた
ワイドパネルの表裏を確認する。
発光部の突起部にワイドパネルの下の溝をあわせて、ワイ
ドパネルの上部をはめ込む。
カチッと音がするまで差し込んでください。
1
2
ワイドパネルを使用した場合 ワイドパネルを使用しない場合
表
41
応用撮影
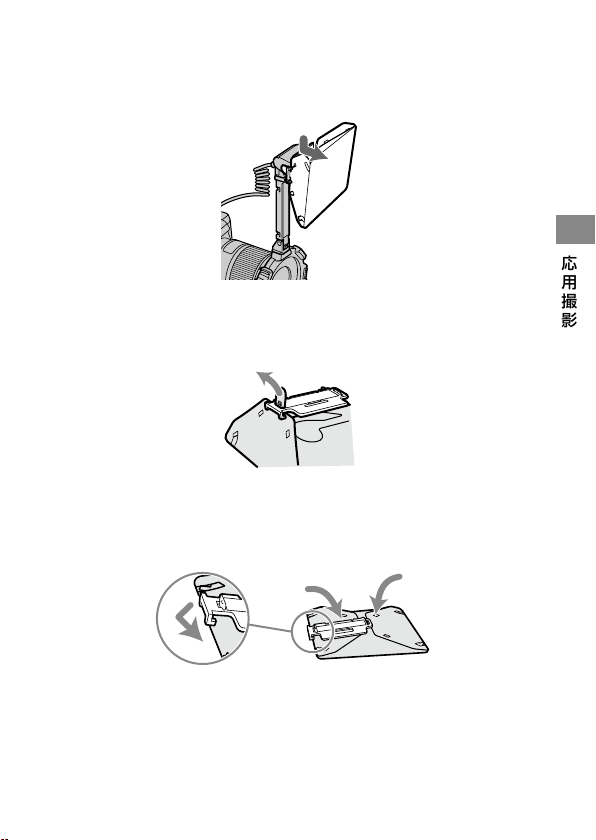
取りはずしかた
ワイドパネルの上部を持ち、少し下に押しながら手前にはず
す。
ワイドパネル使用時は、フラッシュの光量レベルが若干落ちます。
TTL
フラッシュ撮影時は
26
ページ、マニュアルフラッシュ撮影時は
36
ペー
ジをご覧ください。
42
ディフューザー
ツインフラッシュユニット発光部にディフューザーを取り付けると、背景
の影が弱め、ソフトなライティングが可能となります。ディフューザーが
画面に写り込むのを防ぐため、アームと組み合わせてお使いください。
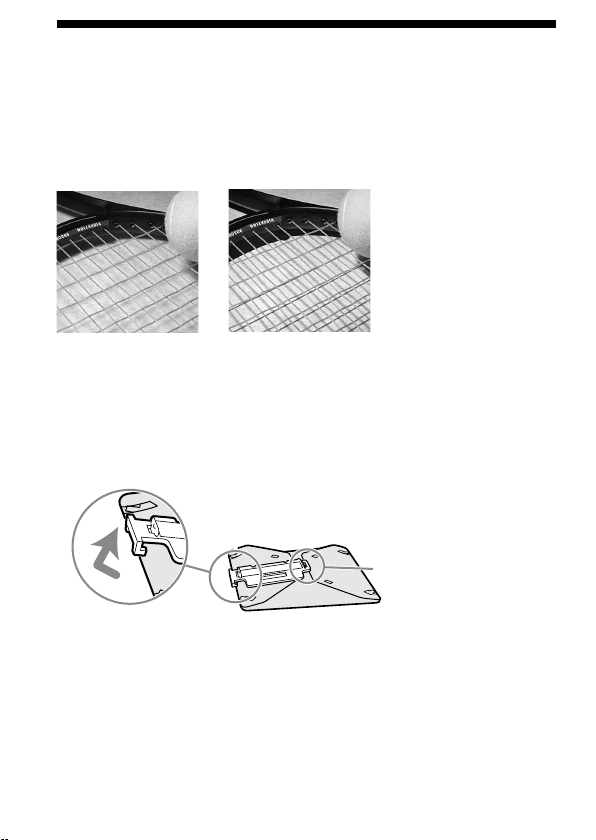
撮影例(
1
灯)
ディフューザーあり
ディフューザーなし
取り付けかた
ディフューザー裏面のパネルをはずす。
こちら側は取りはずせ
ません
1
43
応用撮影
イラストのように、ツメをパネルの穴に通し、パネルの突起
部に引っかけて固定する。
矢印の部分を引き起こし、
4
か所のツメをそれぞれの穴に
入れる。
反対側も同様に引き起こし、
4
か所のツメをそれぞれの穴に入れる。
ツメがそれぞれの穴にうまく入らないときは、ディフューザーを
いったん折りたたんで折り目をしっかり付けてから、再度組み立て
てください。
ご注意
ディフューザーを強く引っぱったり、折り目を逆に折ったりしないで
ください。
2
3
・
次ページにつづく
44
ディフューザーパネルの上部を持ち、発光部の突起部にパ
ネルの下の溝をあわせて、パネルの上部をはめ込む。
カチッと音がするまで差し込んでください。
ディフューザー撮影時の注意
広角レンズ使用時にアーム
60
°位置でディフューザーを使用すると、
ディフューザーの端が画面に写り込むことがあります。
90
°位置での
使用をおすすめします。
ディフューザー使用時は、フラッシュの光量レベルが若干落ちます。
TTL
フラッシュ撮影時は
26
ページ、マニュアルフラッシュ撮影時は
36
ページをご覧ください。
4
・
・
45
応用撮影
取りはずしかた
ディフューザーのパネル上部を持って、少し下に押しなが
ら手前にはずす。
イラストのように、ディフィーザーのツメを少し引っぱり、
パネルの穴から抜く。
ディフューザーを折りたたみ、パネルの端をディフューザ
ーに引っかける。
1
2
3
46
カスタム設定
本機の各種設定を、お好みの状態に変更することができます。
以下の
3
つの項目の変更が可能です。
オートパワーオフまでの時間(
4
分/
15
分/
60
分/なし)
マニュアルフラッシュが設定できる撮影モード
(
M
モードのみ/全モード可能)
マニュアルフラッシュの光量レベルの切り換えステップ
(
1EV / 1/2EV)
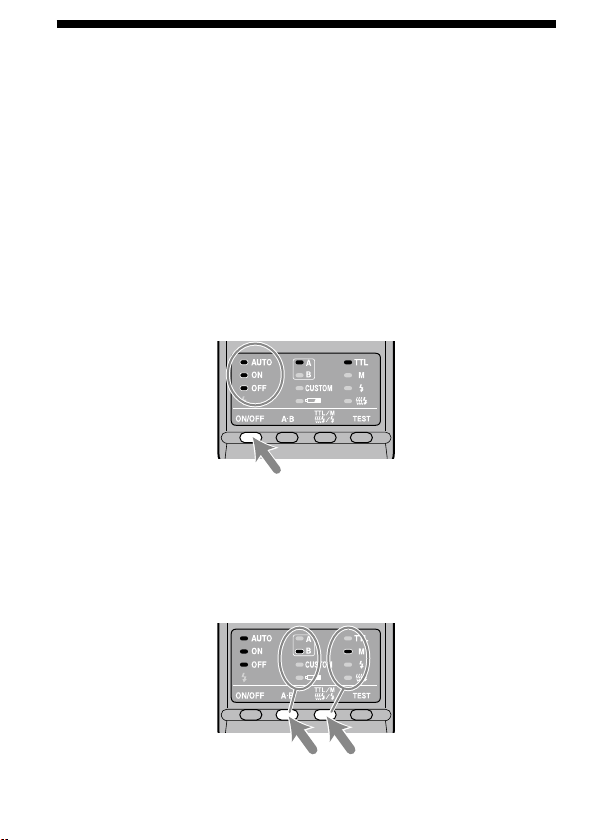
発光
ON/OFF
切り換えボタンを
3
秒間押したままにする。
AUTO
(自動)ランプ、発光
ON
ランプ、発光
OFF
ランプがすべて点灯し、
最初の設定項目(オートパワーオフまでの時間)が表示されます。
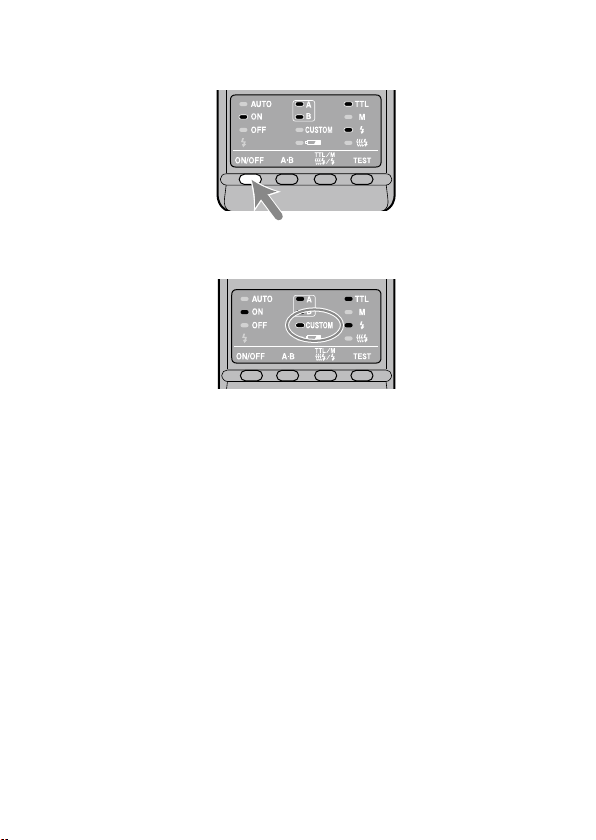
ツインフラッシュユニット発光部選択ボタンを押して項目
を選び、
TTL/M/
テスト発光モードボタンを押して希望の
設定を選ぶ。
ツインフラッシュユニット発光部選択ボタンを押すたびに、上記の
3
つ
の項目の設定画面が順に現れます(
47
ページ)。
・
・
・
1
2
47
応用撮影
次ページにつづく
1.オートパワーオフまでの時間
4分 15分
Mモードのみ 全モード可能
1EV 1/2EV
60分 なし
2.マニュアルフラッシュが設定できる撮影モード
3.マニュアルフラッシュの光量レベルの切り換えステップ
TTL/M/テスト発光モード切り換えボタンで選択
ツインフラッシュユニット発光部選択ボタンで選択
48
発光
ON/OFF
切り換えボタンを押す。
コントローラー操作部のランプが元に戻ります。
カスタムで初期設定以外を選んだ場合、背面のカスタムランプが点
灯します。
項目
2
で「全モード可能」を選ぶと、すべての撮影モードでのマニュア
ルフラッシュ撮影が可能となります。
*
* M
モード以外で撮影を行なうと正しい露出が得られない場合があ
りますので、
M
モードでの使用をおすすめします。
項目
3
で「
1/2EV
」を選んだときは、マニュアルフラッシュ撮影での光
量レベルの切り換えは、ダイヤルの下段の数値(
1/1
〜
1/8
)を使用し
ます。各数値は以下の通りです。
1/1 1/1.4 1/2 1/2.8 1/4 1/5.6 1/8
選択された設定は、本機を
OFF
にしても電池を抜いても、保持されて
います。
3
・
・
・
・
・
49
その他
その他
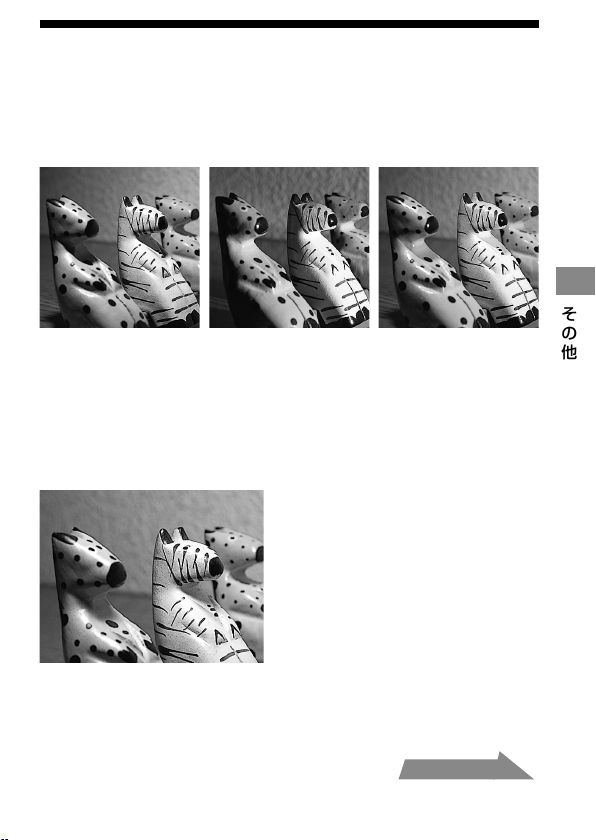
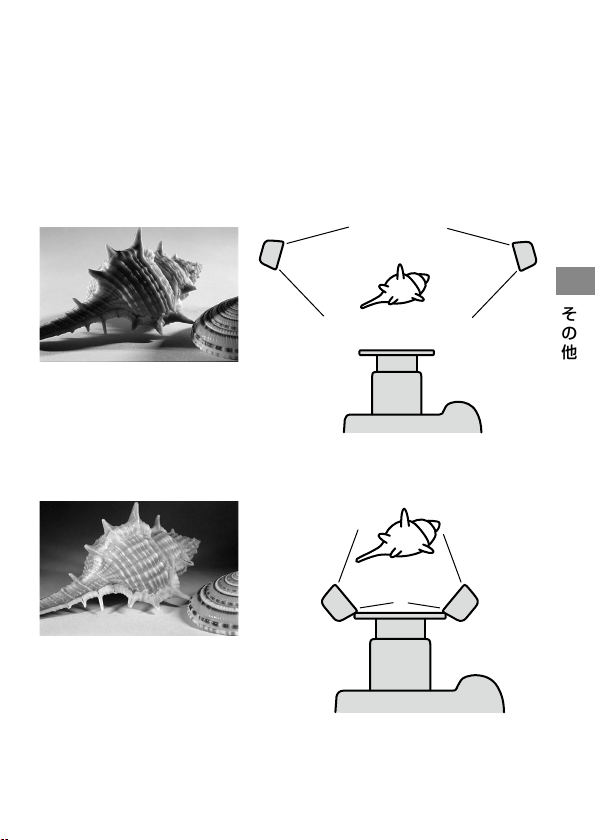
本機を使用した撮影例
本機を使用することで、ツインフラッシュユニット発光部の取り付け位置
や角度によって、表現豊かなライティングが可能となります。
撮影例
上方からのみの照射 右側からのみの照射 上方・右側両方からの
照射
また、ツインフラッシュユニット発光部にディフューザーを取り付けるこ
とにより、被写体の影が弱められ、ソフトなライティングが可能となります
(
42
ページ)。
撮影例
上方からディフューザーを使用した照射
次ページにつづく
50
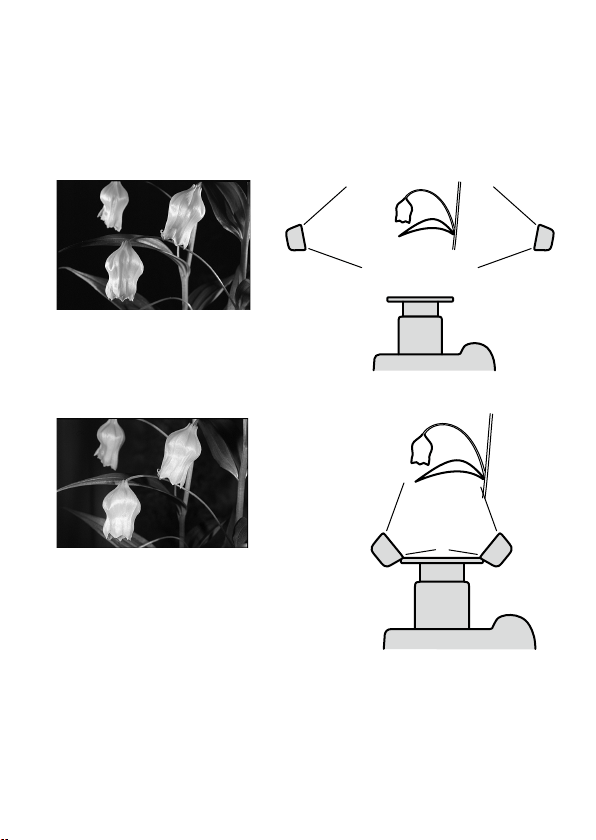
アームを使用した
2
灯撮影
アームを使用してツインフラッシュユニット発光部をレンズから離し
2
灯
撮影をすると、立体的な効果を出すことができます。
撮影例
アームを使用して側面より照射
アームなしで前面から照射
51
その他
ご注意
被写体によっては側面から発光させると、フラッシュ光の当たらない部分
が暗くなります。またフラッシュの光が直接レンズに入ると、フレアの原
因となります。
50mm F2.8 Macro
、アーム付きで近距離で撮影する場合は特に注意し
てください。
撮影例
アームを使用して側面より照射
アームなしで前面から照射
・
52
絞り設定範囲表
マクロレンズでの主な絞り値については、
24
〜
27
ページ(
TTL
フラッシュ
撮影)または
32
〜
37
ページ(マニュアルフラッシュ撮影)に記載していま
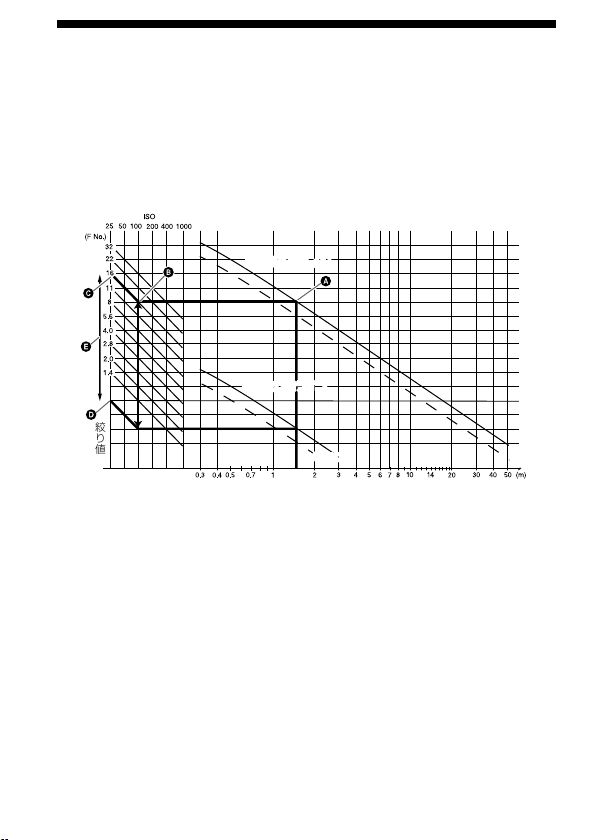
す。記載以外のレンズ使用時や撮影距離が長い場合は、以下のグラフを使
って、絞り値設定範囲を求めてください。
TTL
フラッシュ撮影の場合
ISO感度
発光面一被写体間距離
最
大絞り値ライン最大絞り値ライン
最
小絞り値ライン
1灯 2灯
2灯
1灯
絞り値
最小絞り値ライン
1灯 2灯
2灯
1灯
以下では例として、発光面一被写体間距離が
1.5m
、
ISO 100
、
2
灯撮影時の
絞り値設定範囲の求めかたを説明します。
1
発光面−被写体間距離から上へ線を伸ばし、最大絞り値ラインとの交点
で止めます()。
2
から左へ線を伸ばし、
ISO
感度の縦線との交点で止めます()。
3
から左上へ線を伸ばした値が、適正露出が得られる最大絞り値です
()。
4
最小絞り値も同様にして求めます()。最大絞り値と最小絞り値の間が、
適正露出が得られる絞り値の範囲です()。
この場合、開放〜
F16
までの絞り値をカメラ側で設定すれば適正露出で撮
影することができます。
ツインフラッシュで
1
灯だけ使用する場合は、点線をお使いください。
・
53
その他
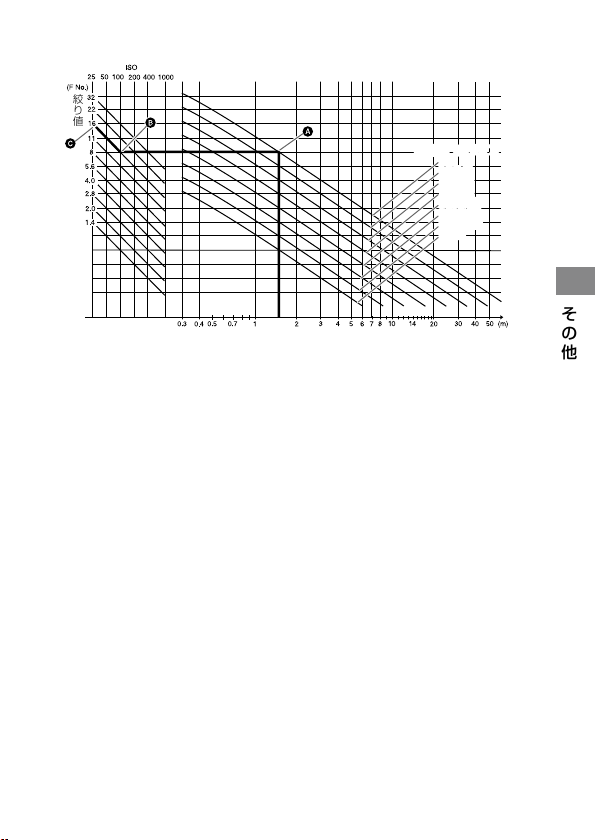
マニュアルフラッシュ撮影の場合
ISO感度
発光面一被写体間距離
発
光レベルライン
絞り値
1/1
1/2(1/1)
1/4(1/2)
1/8(1/4)
1/16(1/8)
1/32(1/16)
1/64(1/32)
(1/64)
発光レベルライン
1/1
1/2(1/1)
1/4(1/2)
1/8(1/4)
1/16(1/8)
1/32(1/16)
1/64(1/32)
(1/64)
以下では例として、発光面一被写体間距離が
1.5m
、光量レベル
1/1
、
ISO
100
、
2
灯撮影時の絞り値の求めかたを説明します。
1
発光面−被写体間距離から上へ線を伸ばし、各発光レベルラインとの交
点で止めます()。
2
から左へ線を伸ばし、
ISO
感度の縦線との交点で止めます()。
3
から左上へ線を伸ばした値が、適正露出の得られる絞り値です()。
この場合、絞り値
F16
をカメラ側で設定すれば適正露出で撮影することが
できます。
ツインフラッシュで
1
灯だけ使用する場合は、(
)内の発光レベルをお使
いください。
・

54
他製品との組み合わせ
レンズ
49 mm
と
55 mm
のアダプターリングが同梱されています。
ピント合わせの時に先端が回転するレンズではご使用になれません。
広角レンズではホルダーの一部が画面に写り込むことがあります。焦点
距離が
24 mm
未満のレンズはご使用になれません。焦点距離が
24 mm
以上
28 mm
未満の場合は、ソニーの相談窓口にお問い合わせください。
焦点距離
50 mm
未満でフィルターをお使いの場合、ホルダーの一部が画
面に写り込むことがあります。
・
・
・
・
55
その他
ご使用上の注意
撮影上の注意
本機は強い光が出ますので、人物の目の前で発光させないでください。
電池について
アルカリ乾電池を入れたまま保管しないでください。液漏れにより電池
室を損傷する原因となります。
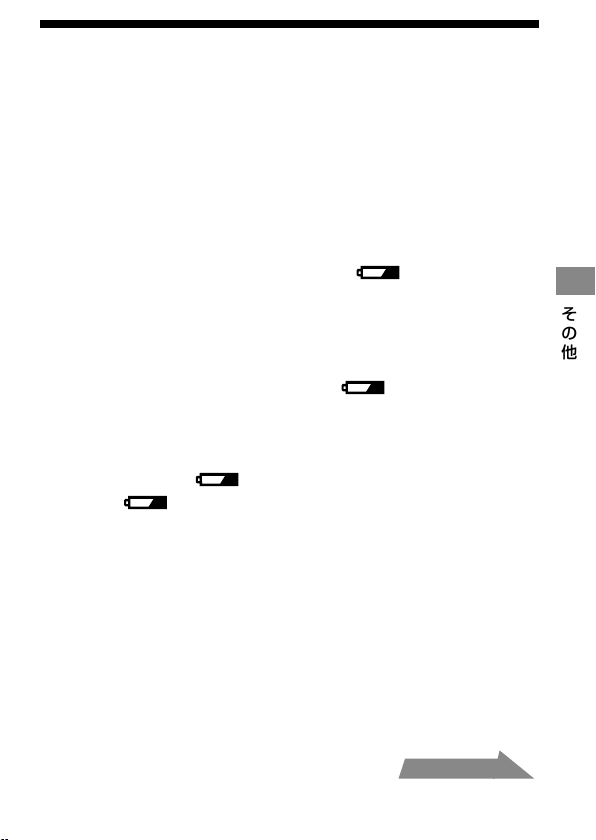
アルカリ乾電池は、温度や保管のしかたによっては、電池残量が実際の残
量よりも低く表示されることがあります。このような場合でも、本機を
しばらく使用すると電池残量が回復します。
ランプが点滅して使
用できない場合でも、発光
ON/OFF
切り換えボタンを何度か押すと、電池
残量が回復し使用可能になることがあります。それでも回復しないとき
は、電池を交換してください。
リチウム電池をご使用の場合、高温下での発光時や連続発光により電池
が発熱すると、電池内部の安全回路が働き、
ランプが点滅して一時
的に本機が使用できなくなる場合があります。しばらく使用を止めて、
電池温度を下げてからお使いください。
ニッケル水素電池は、電池残量が残り少なくなると急激に性能が低下し
ます。撮影中に突然
ランプのみが点滅して本機が使用できなく
なったり、
ランプが点滅し始めてすぐに使用不可能になることも
あります。
電池の製造後の経過期間により、新しい電池でも本機の発光間隔および
発光回数が性能表と異なることがあります。
・
・
・
・
・
・
次ページにつづく

56
使用温度について
本機の使用温度範囲は
0
˚
C
〜
40
˚
C
です。
直射日光下の車内など極度の高温下や、湿度の高いところに本機を放置
しないでください。
急激な温度変化を与えると内部に水滴を生じる危険性があります。ス
キー場のような寒い屋外から温かい室内に持ち込む場合は、屋外でビ
ニール袋に入れ、袋の中の空気を絞り出して密閉します。その後室内に
持ち込み、周囲の温度になじませてから取り出してください。
電池の性能は低温になるほど低下します。低温下では、新しい電池を使
う、保温した予備の電池を用意して暖めながら交互に使う、などの点に留
意してご使用ください。また低温下では、電池の残量が残っていても一
時的に
ランプが点灯することがあります。なお低温のために性能
が低下した電池でも、常温に戻せば性能は回復し再び使えるようになり
ます。
本機は防水性能は備えていません。海辺等で使用されるときは、水や砂
がかからないよう注意してください。水、砂、ホコリ、塩分等が残ってい
ると故障の原因になります。
お手入れのしかた
本機をカメラから取りはずし、柔らかい布でから拭きしてください。砂が
ついたときは、こすると傷を付けますので、ブロアーで軽く吹き飛ばしてく
ださい。汚れがひどいときは、中性洗剤溶液を少し含ませた布で拭いてか
ら、もう一度から拭きしてください。シンナー、ベンジン、アルコールなど
は表面の仕上げを傷めますので使わないでください。
・
・
・
・
・
57
その他
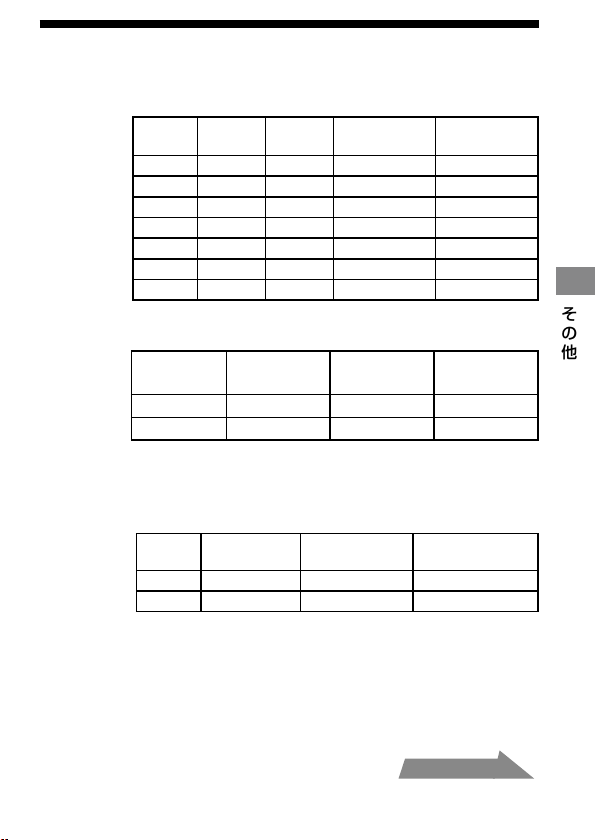
主な仕様
ガイドナンバー
通常(閃光)発光時(
ISO 100
)
光量
レベル
1
灯
2
灯
ワイドパネル
装着時(
1
灯)
ディフューザー
装着時(
1
灯)
1/1 17 24 11 7
1/2 12 17 8 5
1/4 8.5 12 5.6 3.5
1/8 6 8.5 4 2.5
1/16 4.2 6 2.8 1.8
1/32 3 4.2 2 1.3
1/64 2.1 3 1.4 0.9
発光間隔/発光回数
アルカリ リチウム
ニッケル水素
(
1550mAh
)
発光間隔(秒) 約
0.2
〜
6
約
0.2
〜
6
約
0.2
〜
5
発光回数(回) 約
200
〜
4000
約
500
〜
10000
約
150
〜
3000
発光回数とは、新しい電池で電池消耗までに発光できる回
数を表します。
照射角
照射角
ツイン
フラッシュ
ワイドパネル装
着時(
1
灯)
ディフューザー
装着時(
1
灯)
上下
45
˚
60
˚
90
˚
左右
60
˚
78
˚
90
˚
・
次ページにつづく

58
連続発光
5
コマ/秒で
40
回の連続撮影に追随可能
(光量レベル
1/32
、ニッケル水素電池使用時)
調光方式
プリ発光による光量制御
TTL
ダイレクト調光
マニュアル発光
外形寸法
マクロフラッシュコントローラー
約
68
×
123
×
91 mm
(幅/高さ/奥行き)
ツインフラッシュユニット
約
43
×
41
×
37 mm
(幅/高さ/奥行き)
質量
マクロフラッシュコントローラー
約
235 g
(電池含まず)
ツインフラッシュユニット
約
33 g
(
1
個あたり)
動作温度
0
。
C
〜
40
。
C
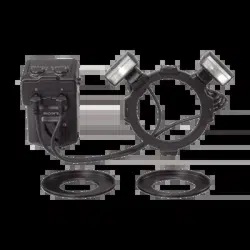
同梱物
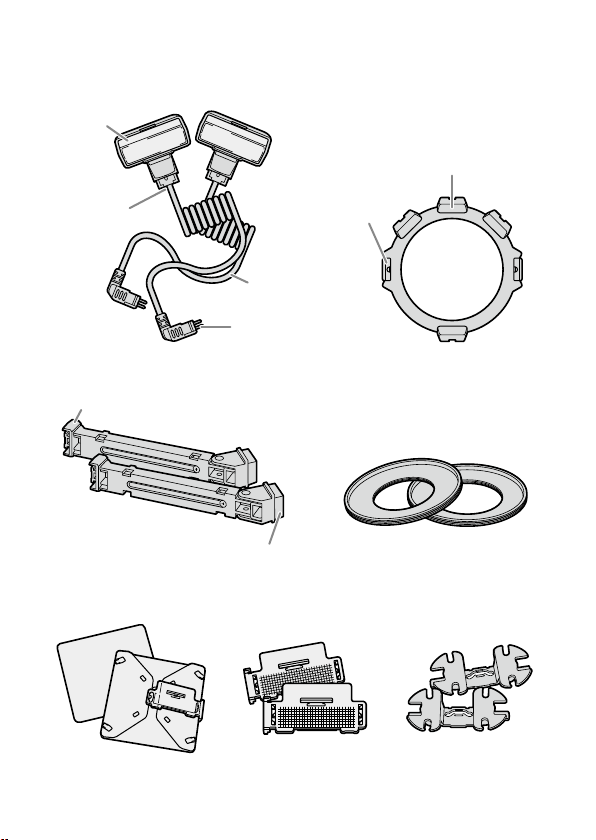
マクロフラッシュコントローラー(
1
)、
ツインフラッシュユニット(
2
)、ホルダー(
1
)、
アーム(
2
)、アダプターリング∅
49mm
(
1
)、
アダプターリング∅
55mm
(
1
)、ワイドパネル(
2
)、
ディフューザー(
2
)、コードリール(
2
)、
コントローラーケース(
1
)、フラッシュケース(
1
)、
印刷物一式
取扱説明書に記載の機能は当社試験条件によります。
本機の仕様および外観は、改良のため予告なく変更することがありますが、
ご了承ください。
59
その他
保証書とアフターサービス
保証書は国内に限られています
付属している保証書は、国内仕様です。外国で万一、故障、不具合が生じた
場合の現地でのアフターサービスおよびその費用については、ご容赦くだ
さい。
保証書
この製品には保証書が添付されておりますので、お買い上げの際お買い
上げ店でお受け取りください。
所定事項の記入および記載内容をお確かめのうえ、大切に保存してくだ
さい。
保証期間は、お買い上げ日より
1
年間です。
アフターサービス
調子の悪いときはまずチェックを
この取扱説明書をもう一度ご覧になってお調べください。
それでも具合の悪いときは
ソニーの相談窓口にご相談ください。
保証期間中の修理は
保証書の記載内容に基づいて修理させていただきます。
詳しくは保証書をご覧ください。
保証期間経過後の修理は
修理によって機能が維持できる場合は、ご要望により有料修理させていた
だきます。当社では本機の補修用性能部品(製品の機能を維持するために
必要な部品)を、製造打ち切り後最低
8
年間保有しています。この部品保有
期間を修理可能の期間とさせていただきます。保有期間が経過したあとも、
故障箇所によっては修理可能の場合がありますので、ソニーの相談窓口に
ご相談ください。
ご相談になるときは、次のことをお知らせください。
品名:
HVL-MT24AM
故障の状態:できるだけ詳しく
購入年月日
・
・
・
・
・
・
60
安全のために
下記の注意事項を守らないと、
火災・感電
により
死亡
や
大けが
の原因となります。
(
2
ページも合わせてお読みください)
分解や改造をしない
火災や感電の原因となります。危険ですので、絶対に自分で分解
しないでください。
内部の点検や修理はソニーの相談窓口にご依頼ください。
内部に水や異物を入れない
水や異物が入ると火災や感電の原因となります。この製品は防
水構造にはなっていませんので、水中や雨天での使用はできませ
ん。万一、水や異物が入ったときは、すぐにカメラ本体のスイッ
チを切り、本機からはずしてください。ソニーの相談窓口にご相
談ください。
雷が鳴りだしたら、使用しない
遠くで雷が鳴りだしたときは、感電を避けるため、すぐにご使用
を中止してください。
本機を布団などでおおった状態で使わない
熱がこもって変形したり、火災の原因となることがあります。
発光部を人の目に近づけて発光させない
強力な光は目をいためる恐れがあります。
落下などで、外装ケースなどが破損したときは、絶対
に露出部分に触れない
感電の原因となることがあります。
自動車などの運転中にストロボを操作したり、運転者
に向けてストロボを発光させない
交通事故の原因となることがあります。
61
安全のために
下記の注意事項を守らないと、
けが
をしたり周辺の
家財
に
損害
を与えたりすることがあります。
万一、使用中に高熱、焦げ臭い、煙が出るなどの異常を
感じたら、すみやかに電池を抜き、使用を中止してく
ださい。
放置すると火災や火傷の原因となります。
湿気やほこり、油煙、湯気の多い場所では使わない
上記のような場所で使うと、火災や感電の原因となることがあり
ます。
ぬれた手で本機をさわらない
感電の原因となることがあります。
乳幼児の手の届かないところで使用/保管する
ケガ、感電、故障の原因になります。
安定した場所に置く
ぐらついた台の上や傾いたところなどに置いたり、不安定な状態
で設置すると、製品が落ちてけがの原因となることがあります。
発光部を皮膚や物で覆ったまま発光させない。
発光のとき、発光部が大変熱くなり、火傷の恐れがあります。
62
電池についての安全上のご注意と
お願い
漏液、発熱、発火、破裂、誤飲による大けがややけど、火災などを避けるた
め、下記の注意事項をお守りください。
火の中に入れない。電子レンジやオーブンで加熱しない。
ショートさせたり改造、分解しない。
コインやヘアピンなどの金属類と一緒に携帯、保管しない。
火のそばや炎天下、高温になった車の中などで放置したりしない。
水・海水・牛乳・清涼飲料水・石鹸水などの液体で濡らさない。
・
・
・
・
・
ハンマーなどでたたいたり、踏みつけたり落下させるなどの強い衝撃を
与えない。
幼児の手の届かない場所に置き、口に入れないよう注意する。万一、飲み
込んだ場合は、ただちに医師に相談してください。
指定された種類の電池を使用する。
・
・
・
乾電池は充電しない。
電池を使い切ったとき、長期間使用しないときは、取り出しておく。
+
と−の向きを正しく入れる。
古い電池と新しい電池、種類、メーカーの異なる電池は一緒に使わない。
・
・
・
・
63
安全のために
充電式電池の回収・リサイクルおよびリサイクル協力店については
有限責任中間法人
JBRC
ホームページ
http://www.jbrc.net/hp/contents/index.html
を参照してください。
商標について
はソニー株式会社の商標です。
ニッケル水素電池は、リサイクルできます。
不要になったニッケル水素電池は、金属部にセロハンテープな
どの絶縁テープを貼ってリサイクル協力店へお持ちください。
お願い
ニッケル
水素電池

2
English
Before operating the product, please read this manual thoroughly and retain it for
future reference.
WARNING
To reduce re or shock hazard, do not expose the unit to rain or moisture.
Tape over lithium battery contacts to avoid short-circuit when disposing of
batteries, and follow local regulations for battery disposal.
Keep batteries or things that could be swallowed away from young children.
Contact a doctor immediately if an object is swallowed.
Immediately remove the batteries and discontinue use if...
the p
roduct is dropped or subjected to an impact in which the interior is
exposed.
the p
roduct emits a strange smell, heat, or smoke.
Do not disassemble. Electric shock may occur if a high voltage circuit inside the
product is touched.
IMPORTANT SAFETY
INSTRUCTIONS
When using your photographic equipment, basic safety
precautions should always be followed, including the
following:
Read and understand all instructions before using.
Close supervision is necessary when any appliance is used
by or near children. Do not leave appliance unattended
while in use.
Care must be taken as burns can occur from touching hot
parts.

3
Do not operate appliance with a damaged cord or if the
appliance has been dropped or damaged- until it has been
examined by a qualied serviceman.
Let appliance cool completely before putting away. Loop
cord loosely around appliance when storing.
To reduce the risk of electric shock, do not immerse this
appliance in water or other liquids.
To reduce the risk of electric shock, do not disassemble
this appliance, but take it to a qualied serviceman when
service or repair work is required. Incorrect reassembly
can cause electric shock when the appliance is used
subsequently.
e use of an accessory attachment not recommended by
the manufacturer may cause a risk of re, electric shock, or
injury to persons.
Batteries may become hot or explode due to improper use.
Use only the batteries specied in this instruction manual.
Do not install the batteries with the polarity (+/-) reversed.
Do not subject batteries to re or high temperatures.
Do not attempt to recharge (except for rechargeable
batteries), short or disassemble.
Do not mix, batteries of dierent types, brands or ages.
SAVE THESE INSTRUCTIONS
CAUTION
Do not touch the ashtube during operation, it may become hot
when the ash res.
Do not expose the batteries to excessive heat such as sunshine, re or the like.

4
For customers in Europe
Disposal of Old Electrical & Electronic Equipment (Applicable
in the European Union and other European countries with
separate collection systems)
is symbol on the product or on its packaging indicates that this
product shall not be treated as household waste. Instead it shall
be handed over to the applicable collection point for the recycling
of electrical and electronic equipment. By ensuring this product
is disposed of correctly, you will help prevent potential negative
consequences for the environment and human health, which could otherwise be
caused by inappropriate waste handling of this product. e recycling of materials
will help to conserve natural resources. For more detailed information about
recycling of this product, please contact your local Civic Oce, your household
waste disposal service or the shop where you purchased the product.
< Notice for the customers in the countries applying EU Directives >
e manufacturer of this product is Sony Corporation, 1-7-1 Konan Minato-ku
Tokyo, 108-0075 Japan. e Authorized Representative for EMC and product safety
is Sony Deutschland GmbH, Hedelnger Strasse 61, 70327 Stuttgart, Germany.
For any service or guarantee matters please refer to the addresses given in separate
service or guarantee documents.
For the customers in the U.S.A.
CAUTION
You are cautioned that any changes or modications not expressly approved in this
manual could void your authority to operate this equipment.
NOTE:
is equipment has been tested and found to comply with the limits for a Class B
digital device, pursuant to Part 15 of the FCC Rules.
ese limits are designed to provide reasonable protection against harmful
interference in a residential installation.
is equipment generates, uses, and can radiate radio frequency energy and, if
not installed and used in accordance with the instructions, may cause harmful
interference to radio communications.
However, there is no guarantee that interference will not occur in a particular
installation. If this equipment does cause harmful interference to radio or television
reception, which can be determined by turning the equipment o and on, the
user is encouraged to try to correct the interference by one or more of following
measures:
–
Re
orient or relocate the receiving antenna.
– Increase the separation between the equipment and receiver.
– Connect the equipment into an outlet on a circuit dierent from that to which
the receiver is connected.
– Co
nsult the dealer or an experienced radio/TV technician for help.

5
Table of contents
Features .......................................... 6
Name of parts ................................ 7
Preparations
Inserting batteries ....................... 11
Attachment and removal of the
macro ash controller ................ 13
Attaching the macro twin ash
....................................................... 14
Auto power ON/OFF ................. 21
Basics
Basic ash modes
(A mode/M mode) ..................... 22
Program auto ash (e basics)
....................................................... 30
Detailed operations
Manual ash (M) ........................ 32
Test ash ...................................... 40
Modeling ash ............................ 41
Wide panel ................................... 42
Diuser ........................................ 44
Custom setting ............................ 48
Additional
Information
Examples of macro twin ash
photography ................................ 51
Aperture range graph ................. 54
Compatibility with other
products ....................................... 56
Notes on use ................................ 57
Maintenance ................................ 58
Specications............................... 59

6
Before use
For details, refer to the operating instructions supplied with your camera.
This ash is not dust-proof, splash-proof or waterproof.
Do not place this ash in the following locations
Regardless of whether this unit is in use or in storage, do not place it in any of the
following locations. Doing so may lead to a malfunction.
Placin
g this ash in locations subject to direct sunlight such as on dashboards or
near a heater may cause this unit to deform or malfunction.
Loc
ations with excessive vibration
Loc
ations with strong electromagnetism
Loc
ations with excessive sand
In locations such as the seashore and other sandy areas or where dust clouds
occur, protect the unit from sand and dust.
is may lead to a malfunction.
Features
e macro twin ash kit provides exible lighting for macro nature photography. It
is ideal for close-up photography of owers, insects, small objects, and so on.
Fre
edom to change the attachment position and angle of the ashtube enables
more expressive photography.
Att
aching two-length adjustable arms between the twin ash units and holders
makes it possible to change the lighting for high magnication close-up
photography.
Using the supplied diuser enables soer lighting.
e su
pplied wide panel expands ash coverage to a focal length of 24 mm.
Mode
ling ash function can check shadows before photographing.
7
Name of parts
Macro Flash Controller
* Do not touch directly.
Manual-ash-control dial
(Twin ash B) (33)
Manual-ash-control dial
(Twin ash A) (33)
Reel-attachment
points (18)
Twin-ash-cord socket
(Twin ash B) (15) *
Twin-ash-cord release
button (16)
Twin-ash-cord socket
(Twin ash A) (15) *
Mounting-foot-release
button (13)
Mounting foot
Control panel (8)
Battery-chamber
door (11)
8
Control Panel
Twin ash B lamp (24)
Flash-ON lamp (21)
Twin ash A lamp (24)
TTL lamp (32)
M (manual-ash-control)
lamp (32)
Test-ash lamp
(40)
Modeling-ash
lamp (41)
Flash-OFF lamp (21)
Auto lamp (31)
Flash-ready lamp (25)
Flash ON/OFF button (21)
A-B button (Twin-ash A-B
selection button) (24)
Low-battery
lamp (12)
TTL/M/Test button (TTL/M/
Test/Modeling ash mode
button) (32)
TEST button (Test/
modeling ash button)
(40, 41)
Custom lamp
(50)
9
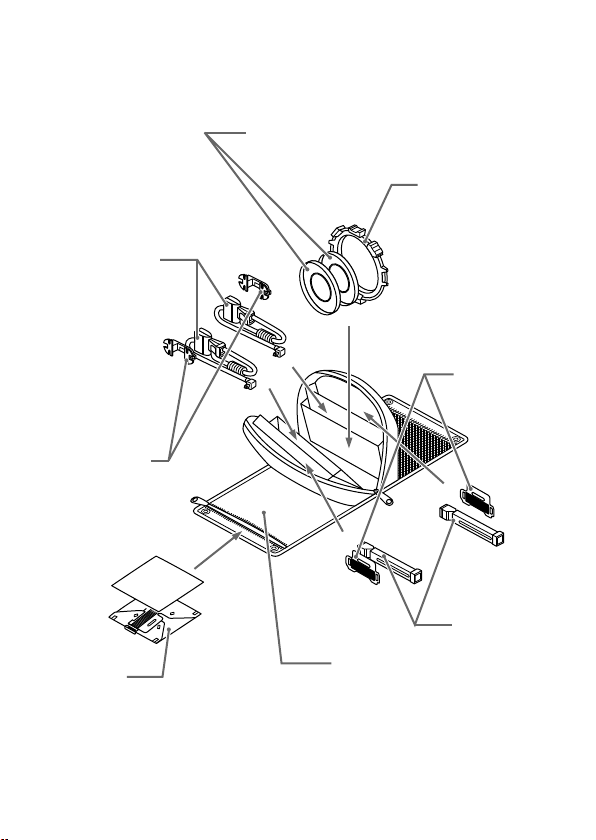
Macro Twin Flash
Twin Flash Unit*
Flashtube
Connecting
cord
Plug
Holder (14)
Shoe
Release
tabs
Attachment
Arm* (17)
Shoe
Base
Adaptor ring (14)
ø49mm, ø55mm
Diuser* (44) Wide panel* (42) Cord reel* (18)
* Two supplied
10
Example of storage
Adaptor ring ø49mm/ø55mm
Holder
Wide panel
Cord reel
Diuser
Arm
Case
Twin ash unit
11
Preparations
Inserting batteries
e HVL-MT24AM may be powered by :
* Batteries are not supplied.
Four AA
-size alkaline batteries
Four AA
-size lithium batteries
Four AA
-size rechargeable nickel-metal hydride (Ni-MH) batteries
Always ensure that rechargeable nickel-metal hydride batteries are charged in
the specied charger unit.
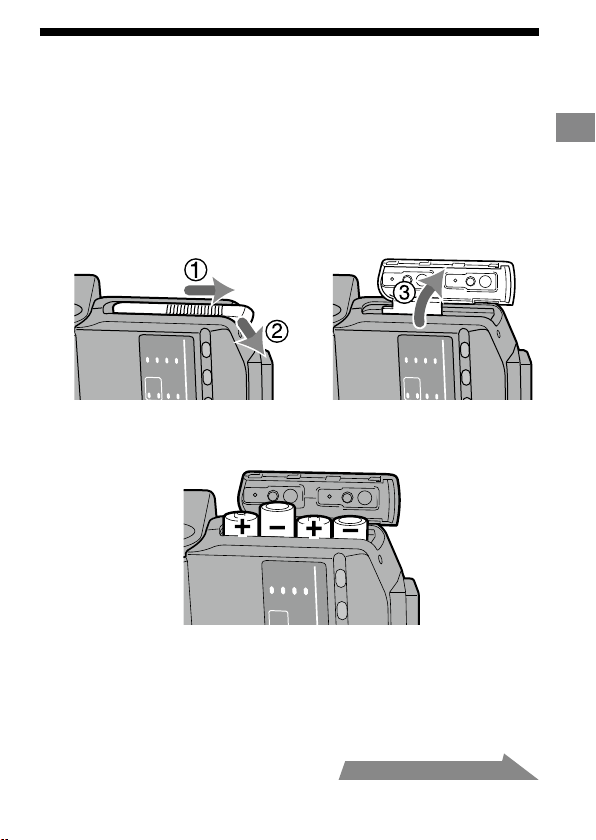
1 Open the battery-chamber door as shown.
2 Insert the batteries in the battery chamber as in the
diagram.
3 Close the battery-chamber door.
Follow the reverse steps when opening the battery-chamber door.
e la
mp on the control panel comes on. If it does not come on, press the ash
ON/OFF button.
Continued on the next page
12
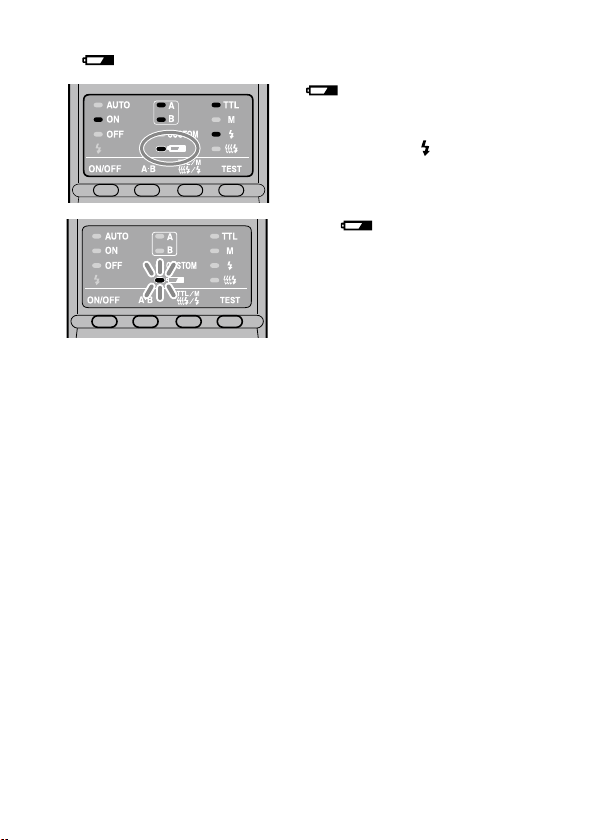
Checking Batteries
e lamp on the control panel comes on or blinks when the batteries are low.
lamp on
Changing the batteries is
recommended. e ash can still be
used in this state if
(Flash-ready
lamp) on the rear of the unit is lit.
Only lamp blinking
Flash cannot be used.
Insert new batteries.
I
f no
thing comes on when the ash ON/OFF button of the macro ash
controller is pressed, check the orientation of the batteries.
13
Preparations
Attachment and removal of the macro
ash controller
Attaching the macro ash controller to the
camera
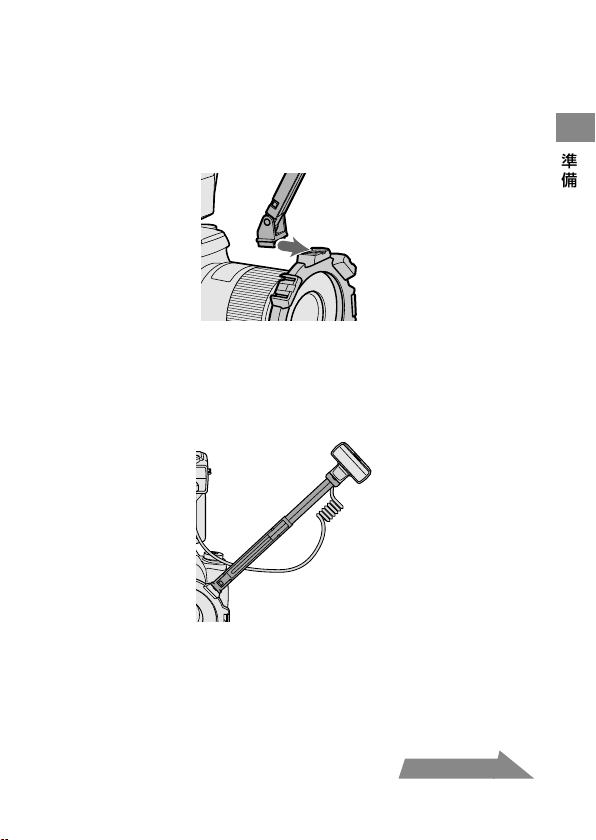
Push the mounting foot rmly onto the camera until it stops.
e macro ash controller is locked in place automatically.
If th
e built-in ash in the camera is protruding, lower it before attaching the
macro ash controller.
Removing the macro ash controller from the
camera
While pressing the mounting foot release button , remove
the macro ash controller .
1
2
14
Attaching the macro twin ash
1 Screw the appropriate adaptor ring clockwise onto the
lens.
49mm and 55mm diameter adaptors are supplied.
2 While pressing the tabs on each side of the holder, place
the holder over the adaptor, and then release both tabs.
15
Preparations
3 Remove the protective socket caps of the macro ash
controller.
For safe-keeping, place the caps in the case.
Repl
ace caps aer use.
4 Place the twin ash unit into the shoe of one of the
holders.
Use of an arm is also possible (p. 17).
5 Insert the plug of the twin ash unit into the twin-ash-
cord socket on the macro ash controller.
Continued on the next page
16
When removing the plug, press the twin ash-cord release
button on the macro ash controller and pull the plug
straight out of the socket.
Do not remove the plug by pulling on the connecting cord.
6 Adjust positions of the ashtubes as desired.
Each ashtube of the twin ash unit can be attached to any of the holder’s
four shoes.
Each
ashtube of the twin ash unit can be tilted.
e holder can be rotated. Press the release tabs when removing or rotating
the holder.
17
Preparations
Attaching the arm
You can use an arm to position the ash unit away from the lens.
1 Attach the arm by sliding its base into one of the four
shoes on the holder.
2 Attach the ashtube of the twin ash unit to the shoe of
the arm.
3 Set the arm at either of two lengths.
Continued on the next page
18
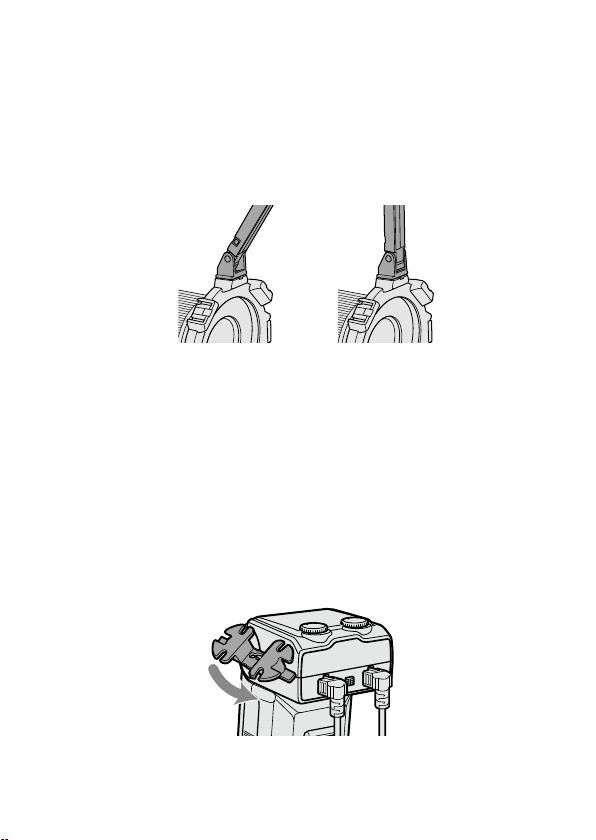
4 When changing the angle to 60° position, hold both ends
of the arm and move it so that it clicks twice into place.
e angle of the arm can be adjusted to either of two positions, 60° or 90°
position.
Alt
hough the arm can be moved past the 60° and 90° positions to prevent
breakage, only use in these two positions. Also, do not attach the two arms
in combination. Doing so may damage the arms.
60° position 90° position
Using the cord reel
e cord reel can be attached to the side of the macro ash controller to take up
slack in the connecting cord of the twin ash unit.
Attaching the cord reel to the macro ash
controller
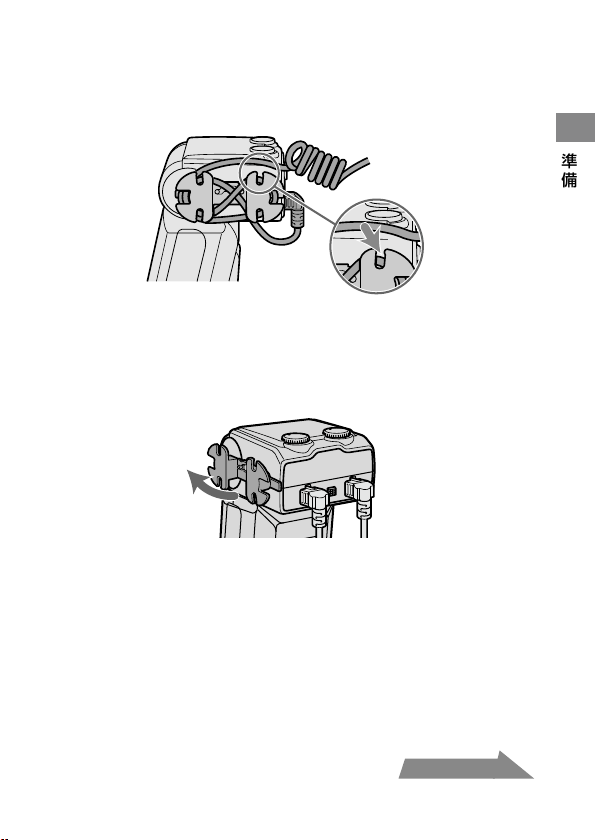
As illustrated, rst check the up-down direction of the cord
reel, and then attach the top of the cord reel followed by the
bottom of the cord reel to the reel-attachment points on the
side of the macro ash controller.
19
Preparations
Example of taking up the connecting cord
Secure the connecting cord slack by wrapping it around the reel and using the
outer notches, as illustrated.
Removing the cord reel
Pull the bottom of the cord reel away from the macro ash
controller to remove it.
Continued on the next page
20
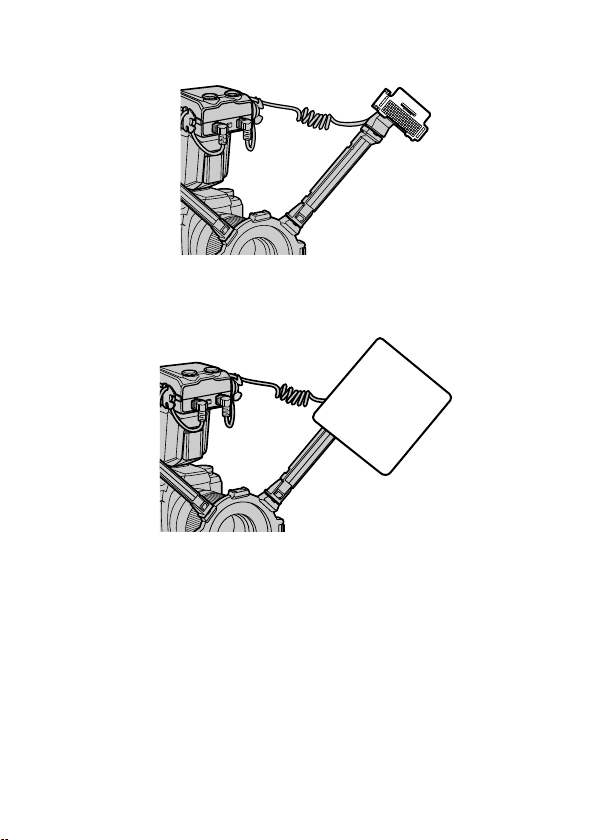
By attaching the wide panel to the ashtube, the ash coverage angle can be
increased (p. 42).
By using the diuser attached to the ashtube, strong shadows can be soened.
Always use the diuser with an arm (p. 44).
Make sure the ashtube is pointing at the subject. Do not allow the cord to get
in front of the ashtube or lens.
See p
age 51 for photographic examples.
If an a
rm is used when taking extreme close-ups with a 50mm F2.8 Macro lens,
the subject may not receive sucient lighting (p. 53).

21
Preparations
Auto power ON/OFF
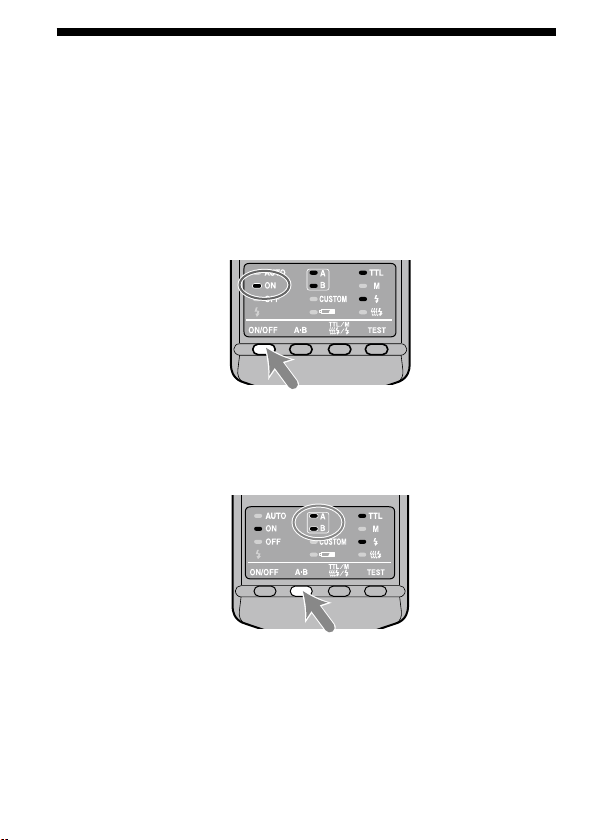
Press the ash ON/OFF button on the back of the macro ash
controller.
Power of the macro ash controller comes on.
When the power of the macro ash controller
is turned on, the ash-ON lamp on the control
panel comes on.
If you press the ash ON/OFF button while the
macro ash controller is turned on, the macro
ash controller switches o and the ash-OFF
lamp on the control panel comes on.
e ash-OFF lamp goes out aer about 10
seconds.
Auto power o
If the camera or macro ash controller is not used for four minutes, the power
switches o and control panel indicators disappear automatically to save the
batteries.
Y
ou c
an disable auto power o or change the auto power o time by changing
the customized settings (p. 48).

22
Basic ash modes (A mode/M mode)
Camera’s exposure mode should be set to either A (aperture priority) mode*
1
, or M
(manual) mode*
2
.
In general close-up photography, the depth-of-eld*
3
must be quite shallow,
which usually requires a smaller aperture when shooting. It is therefore better to
select A or M mode, which enable you to select the aperture.
Using a macro lens is also recommended.
In this section, the basic ash operation in A or M mode with TTL metering (TTL
lamp on) is described.
e following instructions from the next page assume that you are using one of
the following cameras and macro lenses.
C
am
era: A camera with A (aperture priority) mode or M (manual) mode.
Lens: 50mm F2.8 Macro
100mm F2.8 Macro
If you photograph in P mode, refer to page 30. If using a dierent lens, see the
aperture range graph on page 54.
*
1
A mode: In A mode, you select the aperture and the camera
automatically sets the shutter speed required for proper
exposure.
*
2
M mode: You can select both aperture and shutter speed. You can select a
shutter speed that is slower than the camera’s sync speed.
*
3
Depth-of-eld: e range behind and in front of the subject that is sharply
focused. In close-up photography, this range is shallower and
the out-of-focus range is wider.
23
Basics
1 Set the POWER switch of the camera to ON and select A or
M mode.
2 Press the ash ON/OFF button to turn on the ash-ON
lamp on the control panel.
3 Focus your subject and check the magnication ratio.
You can check the magnication ratio with the magnication ratio scale on
the lens. (e location of the magnication ratio scale diers depending on
the lens.)
4 When using M mode, select a shutter speed.
You cannot select the shutter speed faster than the camera’s sync speed.
5 Select the aperture.
To nd the correct aperture number, refer to pages 26 to 29.
Continued on the next page
24
6 Select the ash.
Press the A-B button on the back of the macro ash controller to turn on the
twin ash A lamp, twin ash B lamp or both twin ash lamps. (e lit lamps
indicate which ash will go o.)
As viewed from the rear (control panel side), the A ash is connected to the le
side socket and the B ash to the right side socket.
For t
he eect of selecting the ash, see from page 51 to 53.
A ash
B ash

25
Basics
7 When the macro ash controller is charged, press the
shutter button to take a photo.
e macro ash controller is charged when the ash-ready lamp on the
control panel of the macro ash controller and the
indicator in the camera
viewnder are both on.
When the correct exposure has been obtained for the photo just taken, the
ash-ready lamp
on the control panel blinks.
e photo will be under-exposed if taken before charging is complete.
e us
e of a tripod or remote cord is recommended to reduce camera shake.
A cam
era-to-subject distance of less than 0.5m, and a magnication ratio of
more than 0.15X (greater than 1:7), are recommended to get the best results
from the macro ash units.
Always turn o the macro ash controller if the twin ash unit is not connected.
If the twin ash unit is not attached, but the controller is on, the camera ash
sync will be in eect and the resulting ambient exposures will be incorrect.
e camera’s AF illuminator is blocked by the adaptor ring or twin ash unit and
cannot be used for focusing.
Continued on the next page

26
Selecting Apertures in TTL Flash
e following tables show values when ISO 100 is used without the wide panel
or diuser. For other ISO speeds, or if you use the wide panel or diuser, adjust
the aperture settings according to the tables on page 28.
e aperture ranges given in the tables are calculated values. e actual lens will
have its own usable aperture range.
Example: Using a 50mm F2.8 M
acro lens when ISO 100, with a pair of
twin ash units with no arm, at a magnication ratio of 1:1
e range of acceptable apertures is calculated to be from f/4 to
f/90 (refer to the following table).
However, the lens aperture range is f/2.8 to f/32, so the actual
range possible with this lens is f/4 to f/32.
e following tables show data for certain lenses and magnication ratios. For
other lenses and magnication ratios, see page 54.
27
Basics
Continued on the next page
50mm F2.8 Macro (Lens aperture range : f/2.8 - f/32)
Magnication
ratio
1:1 1:1.5 1:2 1:3 1:4
Without arm
4 ~ 90
2.8 ~ 64
5.6 ~ 128
4 ~ 90
8 ~ 180
5.6 ~ 128
5.6 ~ 128
4 ~ 90
4.5 ~ 108
3.5 ~ 76
Arm (short)
60° position
2.4 ~ 54
1.7 ~ 38
2.8 ~ 64
2 ~ 45
4 ~ 90
2.8 ~ 64
4 ~ 90
2.8 ~ 64
4.5 ~ 108
3.5 ~ 76
Arm (long)
90° position
1.4 ~ 32
1 ~ 22
1.4 ~ 32
1 ~ 22
2 ~ 45
1.4 ~ 32
2.4 ~ 54
1.7 ~ 38
2.8 ~ 64
2 ~ 45
Upper set of numbers is for two twin ash units.
Lower set is for one twin ash unit.
100mm F2.8 Macro (Lens aperture range : f/2.8 - f/32)
Magnication
ratio
1:1 1:1.5 1:2 1:3
Without arm
3.5 ~ 76
2.4 ~ 54
3.5 ~ 76
2.4 ~ 54
2.8 ~ 64
2 ~ 45
2.4 ~ 54
1.7 ~ 38
Arm (short)
60° position
2 ~ 45
1.4 ~ 32
2.8 ~ 64
2 ~ 45
2.8 ~ 64
2 ~ 45
2.8 ~ 64
2 ~ 45
Arm (long)
90° position
1.2 ~ 27
0.85 ~ 19
1.7 ~ 38
1.2 ~ 27
2 ~ 45
1.4 ~ 32
2 ~ 45
1.4 ~ 32
Upper set of numbers is for two twin ash units.
Lower set is for one twin ash unit.
28
When using other than ISO 100, or when using the wide panel
or diuser
An additional adjustment must be applied to the previous tables.
Without wide
panel or diuser
(Exposure adjustment)
With wide panel
(Exposure adjustment)
With diuser
(Exposure adjustment)
ISO 25 +2 Stop +3.5 Stop +4.5 Stop
ISO 50 +1 Stop +2.5 Stop +3.5 Stop
ISO 100 No change +1.5 Stop +2.5 Stop
ISO 200 –1 Stop +0.5 Stop +1.5 Stop
ISO 400 –2 Stop –0.5 Stop +0.5 Stop
ISO 800 –3 Stop –1.5 Stop –0.5 Stop
ISO 1600 –4 Stop –2.5 Stop –1.5 Stop
f/stop scale
a full-stop
a half-stop
Decrease exposure Increase exposure
Using the f/stop scale
Using the f/stop scale at the le, moving
one step vertically is equal to a full-stop
change. Moving one step diagonally is
equal to a half-stop change.
Half a stop is basic for setting the
aperture in this step. When using a
0.3 stop setting camera, adjust the
aperture by a value as close as possible
to a value in the above table and use
the aperture around the f/stop scale.
For precise photography, bracketing is
recommended.
Example:
Starting at f/8, if you decrease the
exposure by a full stop, you get f/11.
If you increase by half a stop, you get
f/6.7.

29
Basics
Selecting the aperture when using other than ISO 100, or
when using the wide panel or diuser
1 Check the calculated acceptable aperture range under the same
condition with ISO 100 by using the table on page 27.
2 Check the additional adjustmen
t when using other than ISO 100 or
when using the wide panel or diuser by using the table on page 28.
3 Check the c
alculated acceptable aperture range by using the f/stop scale
using the results of step1 and step2.
4 Apply the r
esult of step3 to the actual aperture range for this particular
lens and select the usable range for satisfactorily results.
Example: Using a 50mm F2.8 M
acro lens, two twin ash units, no arm,
magnication ratio of 1:2, and ISO 200
1 Check the calculated acceptable aperture range when using a 50mm F2.8 Macro
lens, two twin ash units, no arm, magnication ratio of 1:2, and ISO 100.
f/8 - f/180 (refer to the table on page 27)
2 Check the additional adjustment when using ISO 200 and diuser by using the
table on page 28.
Increase the aperture by +1.5 stops (refer to the table on page 28).
3 e aperture increased by +1.5 stops from f/8 is equal to f/4.5, and the aperture
increased by +1.5 stops from f/180 is equal to f/108.
4 e ac
tual aperture range for a 50mm F2.8 Macro lens is f/2.8 - f/32, so the
upper limit of the adjusted f/4.5 - f/108 range, i.e. f/108, is beyond the range that
can be set. e usable range for satisfactorily results is therefore f/4.5 - f/32.
30
Program auto ash (The basics)
e procedure for P mode, including subject program selection, is the same as that
for A or M mode, except that the aperture is set automatically.
1 Set the POWER switch of the camera to ON and select P
mode.
2 Press the ash ON/OFF button to turn on ash-ON lamp on
the control panel.
3 Focus your subject and check the magnication ratio.
4 Select the ash.
5 When the macro ash controller is charged, press the
shutter button to take a photo.

31
Basics
With some cameras, the ash will re automatically in P mode. In this case, the
auto lamp on the macro ash unit comes on and the ash may not re if the
surrounding conditions are bright.
e P mode ash program is designed for general subjects, not macro subjects.
When taking macro photos, the depth-of-eld may be very shallow. If the
aperture selected by the camera is outside the allowable range, the proper
exposure cannot be obtained (p. 26 - 29).

32
Manual ash (M)
Normal TTL ash metering automatically adjusts the ash intensity to provide
the proper exposure for the subject. Manual ash provides a xed ash intensity
irrespective of the brightness of the subject and the camera setting.
I
n ma
nual ash mode, the maximum ash power is when the manual ash
control is set to 1/1. Each step of the ash power level corresponds to one
aperture stop. Changing the setting by one stop, for example from 1/1 to 1/2, is
equivalent to decreasing the aperture one stop, for example from f/4 to f/5.6.
Man
ual ash can only be used when the camera is in the M mode. In other
modes, TTL measuring is automatically selected.
As ma
nual ash is not aected by the reectivity of the subject, it is convenient
for use with subjects with extremely high or low reectivity.
TTL ash metering Manual ash metering
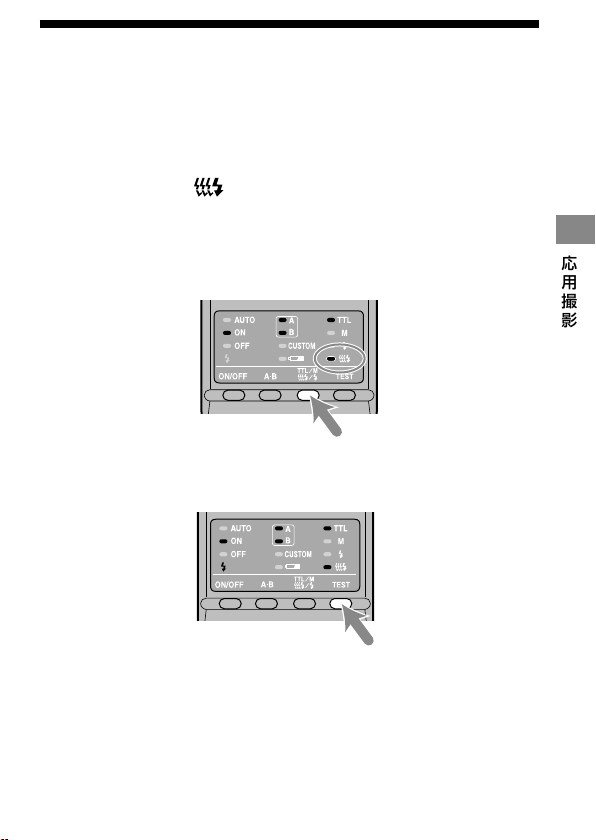
1 Select M mode on the camera.
2 Press the TTL/M/Test button to light on the M (manual-
ash control) lamp.
e modes change in the following order. (Test ash (p. 40), Modeling ash
(p. 41))

33
Detailed operations
TTL ash
Test ash
Manual ash
Test ash
TTL ash
Modeling ash
Manual ash
Modeling ash
3 Select shutter speed and aperture (p. 34 - 39).
4 Turn the appropriate manual-ash-control dial and select
the desired power level (p. 34 - 39).
When viewed from the rear (control panel side), the manual-ash-control
dial for twin ash A is on the le, and that for twin ash B is on the right.
You can select any power level setting on the upper scale from 1/1 to 1/64.
A ash B ash
In manual ash mode, if a proper exposure has been obtained, the ash-
ready lamp
will not blink on the control panel aer a photo is taken.
Using customized functions, manual ash may be selected without setting
the camera in M mode. e size of the steps on the manual-ash-control
dials can also be changed from full-stop increments to half-stop increments
(p. 48).
Continued on the next page

34
Selecting apertures and power level in
manual ash
e following tables show the values when ISO 100 is used without the wide
panel or diuser. For other ISO speeds, or if you use the wide panel or diuser,
adjust the aperture settings according to the table on page 38. When using the
twin ash units, the data assumes that the power lever is the same for both units.
If they are set at dierent power levels, see page 37.
e ap
erture values given in the tables are calculated values. e actual lens will
have its own usable aperture range.
Example: Using a 50mm F2.8 M
acro lens when ISO 100, with a pair
of twin ash units with no arm, power level of 1/1, and a
magnication ratio of 1:1
e aperture is calculated at f/90 (refer to the following table).
Ho
wever, the smallest actual aperture possible with this lens is
f/32.
erefore, if you set the power level to 1/1, the picture will be
overexposed.
But if you set the power level to 1/8, you will get a correct
exposure at f/32.
ese following tables show the apertures where the proper exposure of the
illuminated area is obtained. Actual exposure varies according to the subject’s
shape or position (p. 53). Test photographs or bracketing is recommended
especially when the subject is illuminated from side or behind.
e fo
llowing tables show data for certain lenses and magnication ratios. For
other lenses and magnication ratios, see page 55.
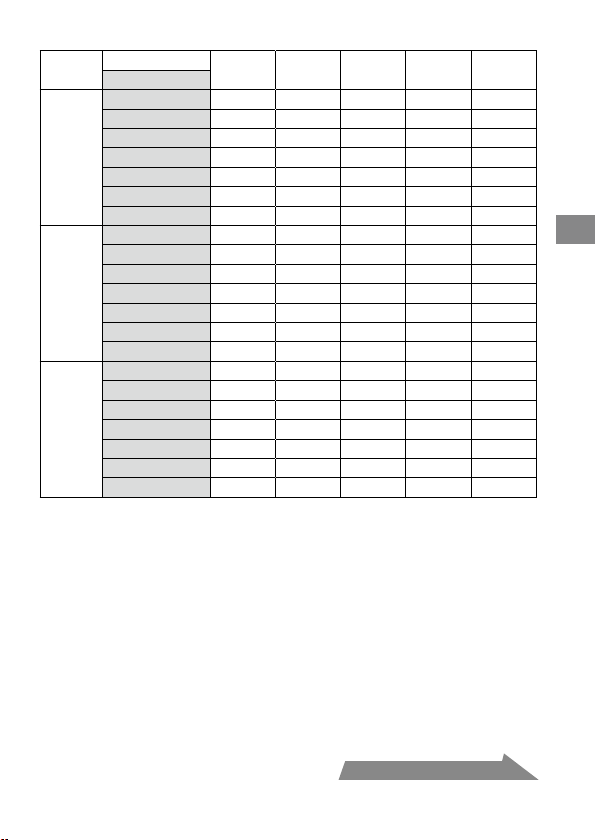
35
Detailed operations
50mm F2.8 Macro (Lens aperture range: f/2.8 - f/32)
Magnication ratio
1:1 1:1.5 1:2 1:3 1:4
Power level
Without
arm
1/1 90 (64) 128 (90) 180 (128) 128 (90) 108 (76)
1/2 64 (45) 90 (64) 128 (90) 90 (64) 76 (54)
1/4 45 (32) 64 (45) 90 (64) 64 (45) 54 (38)
1/8 32 (22) 45 (32) 64 (45) 45 (32) 38 (27)
1/16 22 (16) 32 (22) 45 (32) 32 (22) 27 (19)
1/32 16 (11) 22 (16) 32 (22) 22 (16) 19 (13)
1/64 11 (8) 16 (11) 22 (16) 16 (11) 13 (9.5)
Arm
(short)
60°
position
1/1 54 (38) 64 (45) 90 (64) 90 (64) 108 (76)
1/2 38 (27) 45 (32) 64 (45) 64 (45) 76 (54)
1/4 27 (19) 32 (22) 45 (32) 45 (32) 54 (38)
1/8 19 (13) 22 (16) 32 (22) 32 (22) 38 (27)
1/16 13 (9.5) 16 (11) 22 (16) 22 (16) 27 (19)
1/32 9.5 (6.7) 11 (8) 16 (11) 16 (11) 19 (13)
1/64 6.7 (4.5) 8 (5.6) 11 (8) 11 (8) 13 (9.5)
Arm
(long)
90°
position
1/1 32 (22) 32 (22) 45 (32) 54 (38) 64 (45)
1/2 22 (16) 22 (16) 32 (22) 38 (27) 45 (32)
1/4 16 (11) 16 (11) 22 (16) 27 (19) 32 (22)
1/8 11 (8) 11 (8) 16 (11) 19 (13) 22 (16)
1/16 8 (5.6) 8 (5.6) 11 (8) 13 (9.5) 16 (11)
1/32 5.6 (4) 5.6 (4) 8 (5.6) 9.5 (6.7) 11 (8)
1/64 4 (2.8) 4 (2.8) 5.6 (4) 6.7 (4.5) 8 (5.6)
Use aperture values inside ( ) when only one twin ash unit is used.
Continued on the next page
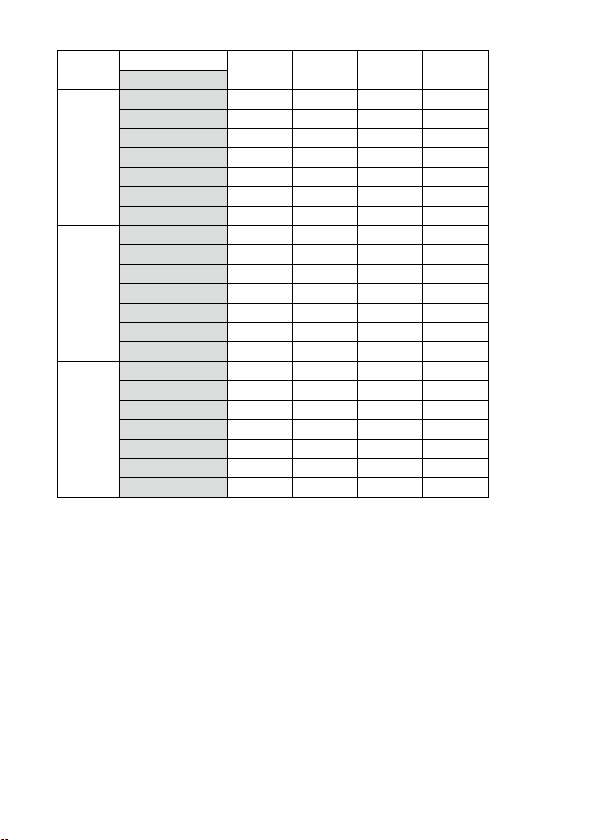
36
100mm F2.8 Macro (Lens aperture range: f/2.8 - f/32)
Magnication ratio
1:1 1:1.5 1:2 1:3
Power level
Without
arm
1/1 76 (54) 76 (54) 64 (45) 54 (38)
1/2 54 (38) 54 (38) 45 (32) 38 (27)
1/4 38 (27) 38 (27) 32 (22) 27 (19)
1/8 27 (19) 27 (19) 22 (16) 19 (13)
1/16 19 (13) 19 (13) 16 (11) 13 (9.5)
1/32 13 (9.5) 13 (9.5) 11 (8) 9.5 (6.7)
1/64 9.5 (6.7) 9.5 (6.7) 8 (5.6) 6.7 (4.5)
Arm
(short)
60°
position
1/1 45 (32) 64 (45) 64 (45) 64 (45)
1/2 32 (22) 45 (32) 45 (32) 45 (32)
1/4 22 (16) 32 (22) 32 (22) 32 (22)
1/8 16 (11) 22 (16) 22 (16) 22 (16)
1/16 11 (8) 16 (11) 16 (11) 16 (11)
1/32 8 (5.6) 11 (8) 11 (8) 11 (8)
1/64 5.6 (4) 8 (5.6) 8 (5.6) 8 (5.6)
Arm
(long)
90°
position
1/1 27 (19) 38 (27) 45 (32) 45 (32)
1/2 19 (13) 27 (19) 32 (22) 32 (22)
1/4 13 (9.5) 19 (13) 22 (16) 22 (16)
1/8 9.5 (6.7) 13 (9.5) 16 (11) 16 (11)
1/16 6.7 (4.5) 9.5 (6.7) 11 (8) 11 (8)
1/32 4.5 (3.5) 6.7 (4.5) 8 (5.6) 8 (5.6)
1/64 3.5 (2.4) 4.5 (3.5) 5.6 (4) 5.6 (4)
Use aperture values inside ( ) when only one twin ash unit is used.
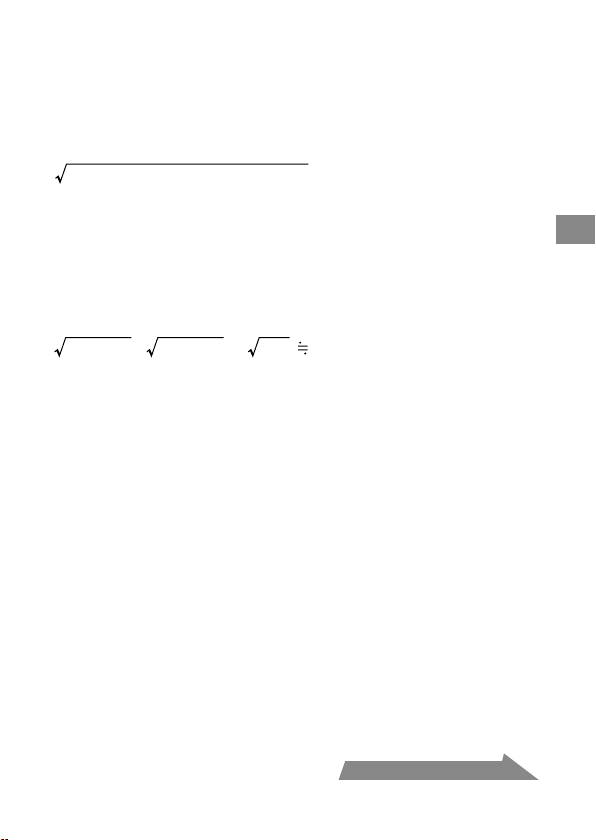
37
Detailed operations
When twin ash units are at dierent power level settings
e values given in the preceding tables for the twin ash units assume that both
twin ash units are set at the same ash level.
When they are set to dierent ash power levels, the aperture needed for correct
exposure can be calculated using the following equation:
Aperture*
=
(A ash aperture)
2
+ (B ash aperture)
2
Example:
Using a 100mm F2.8 Macro lens with a pair of twin ash units with no
arm, “A” ash is set at a power level of 1/8, “B” ash unit is set at 1/16, and
the magnication ratio is 1:1
e A ash aperture set at a power level of 1/8 is f/19 and the B ash aperture set
at a power level of 1/16 is f/13 (refer to the table on 36 page).
Apply these results in the above equation.
19
2
+ 13
2
= 361 + 169 = 530 22
erefore, in the above example, an aperture setting of f/22 will give proper
exposure.
* When both twin ash units are used.
Continued on the next page

38
When using other than ISO 100, or when using the wide panel
or diuser
An additional adjustment must be applied to the previous tables.
Without wide
panel or diuser
(Exposure adjustment)
With wide panel
(Exposure adjustment)
With diuser
(Exposure adjustment)
ISO 25 +2 Stop +3.5 Stop +4.5 Stop
ISO 50 +1 Stop +2.5 Stop +3.5 Stop
ISO 100 No change +1.5 Stop +2.5 Stop
ISO 200 –1 Stop +0.5 Stop +1.5 Stop
ISO 400 –2 Stop –0.5 Stop +0.5 Stop
ISO 800 –3 Stop –1.5 Stop –0.5 Stop
ISO 1600 –4 Stop –2.5 Stop –1.5 Stop
f/stop scale
a full-stop
a half-stop
Decrease exposure Increase exposure
Using the f/stop scale
Using the f/stop scale at the le, moving
one step vertically is equal to a full-stop
change. Moving one step diagonally is
equal to a half-stop change.
Half a stop is basic for setting the
aperture in this step. When using a
0.3 stop setting camera, adjust the
aperture by a value as close as possible
to a value in the above table and use
the aperture around the f/stop scale.
For precise photography, bracketing is
recommended.
Example:
Starting at f/8, if you decrease the
exposure by a full stop, you get f/11.
If you increase by half a stop, you get
f/6.7.

39
Detailed operations
Selecting the aperture when using other than ISO 100, or
when using the wide panel or diuser
1
Check the calculated acceptable aperture under the same condition with
ISO 100 by using the table on pages 35 and 36.
2
Check the additional adjustment when using other than ISO 100 or
when using the wide panel or diuser b
y using the table on page 38.
3
Select the c
alculated acceptable aperture by using the f/stop scale using
the results of step1 and step2.
Example: Using a 100mm F2.8 M
acro lens, two twin ash units, no arm, a
power level of 1/4, magnication ratio of 1:1, ISO 200 with the
diuser
1 Ch
eck the calculated acceptable aperture when using a 100mm F2.8 Macro lens,
two twin ash units, no arm, a power level of 1/4, magnication ratio of 1:1, and
ISO 100.
f/38 (refer to the table on page 36)
2 Ch
eck the additional adjustment when using ISO 200 and diuser by using the
table on page 38.
Increase the aperture by +1.5 stops (refer to the table on page 38).
3 e aperture increased by +1.5 stops from f/38 is equal to f/22.
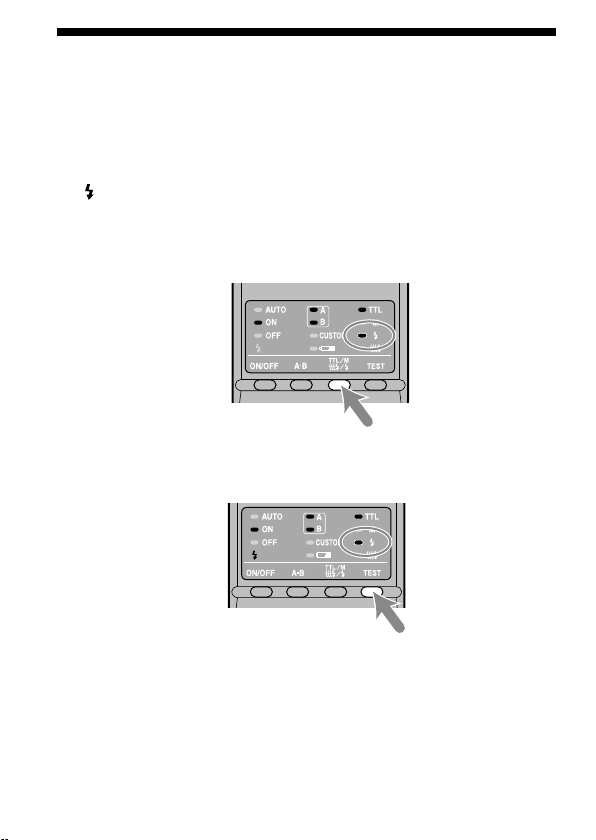
40
Test ash
You can try one test ash before shooting. Use test ash mode when using a ash
meter in manual-ash mode.
1 Press the TTL/M/Test button to turn on the test-ash lamp
.
Each time the TTL/M/Test button is pressed to change the TTL and M lamp
be sure to check that the appropriate lamp is on. (See page 33 for the display
sequence.)
2 Press the TEST button (test/modeling ash button) .
With TTL ash metering, the test ash will re at full power when the
TEST button is pressed.
In ma
nual ash mode, the test ash will re at the selected power level
when the TEST button is pressed. When using a ash meter, use manual
ash mode.
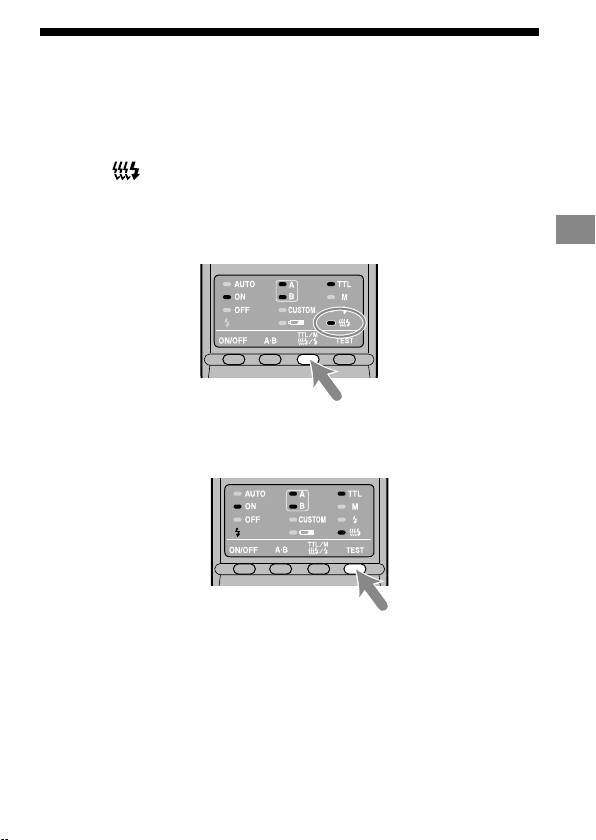
41
Detailed operations
Modeling ash
You can try continuous ash to check for shadows on the subject before shooting.
e ash will re for two seconds at a rate of 40 ashes per second.
1 Press the TTL/M/Test button to turn on the modeling-ash
lamp
.
Each time the TTL/M/Test button is pressed to change the TTL and M lamp
be sure to check that the appropriate lamp is on. (See page 33 for the display
sequence.)
2 Press the TEST button (test/modeling ash button) .
Do not press the shutter button while the ash is in use.
e st
rength of shadows will dier from that during actual photography.
When u
sing the ash in a bright place or outdoors or when using a bounce
ash, shadows are lighter so verication is more dicult.
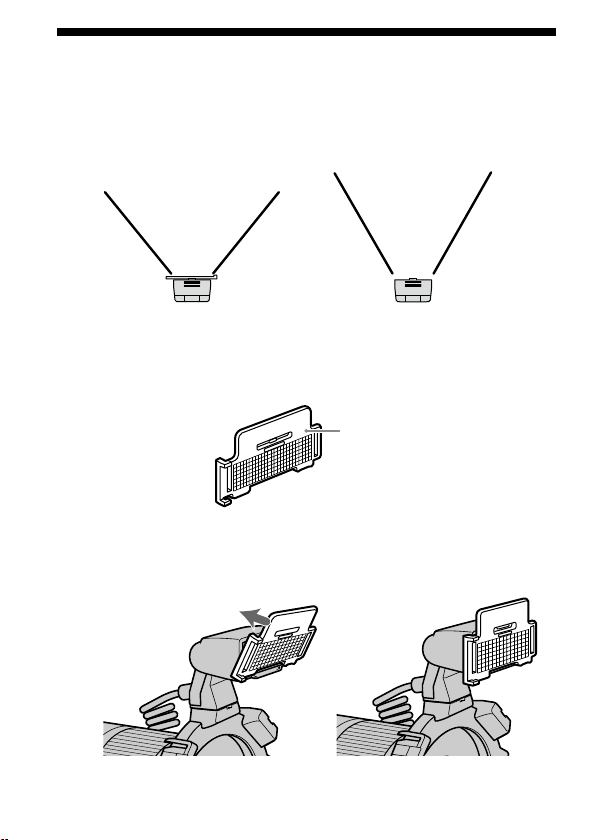
42
Wide panel
e twin ash unit has a coverage of 60° horizontally and 45° vertically (equivalent
to a lens with a 35mm focal length). By attaching the wide panel, the angles are
increased to 78° horizontally and 60° vertically (equivalent to a lens with a 24mm
focal length).
With wide panel
Without wide panel
Attaching the wide panel
1
Check the front side of the wide panel.
Front side
2 Align the lower edge of the wide panel to the projection on
the side of the ashtube and press the wide panel.
Press the wide panel until it clicks into place.

43
Detailed operations
Removing the wide panel
Hold the top tab of the wide panel and remove it forwards
while pressing downward slightly.
e ash output is reduced when using the wide panel. See page 28 for TTL ash
metering and page 38 for manual ash metering.
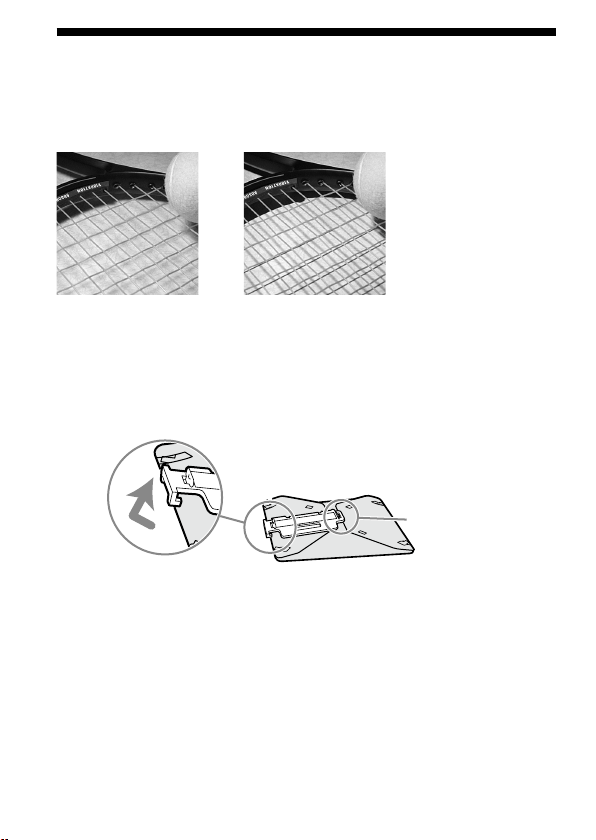
44
Diuser
Strong shadows can be soened by attaching the diuser to the ashtube. Always
use the diuser with an arm to prevent it appearing in the image.
Example:
With diuser Without diuser
Using the diuser
1
Unclip the panel from the diuser.
This side cannot be
detached.
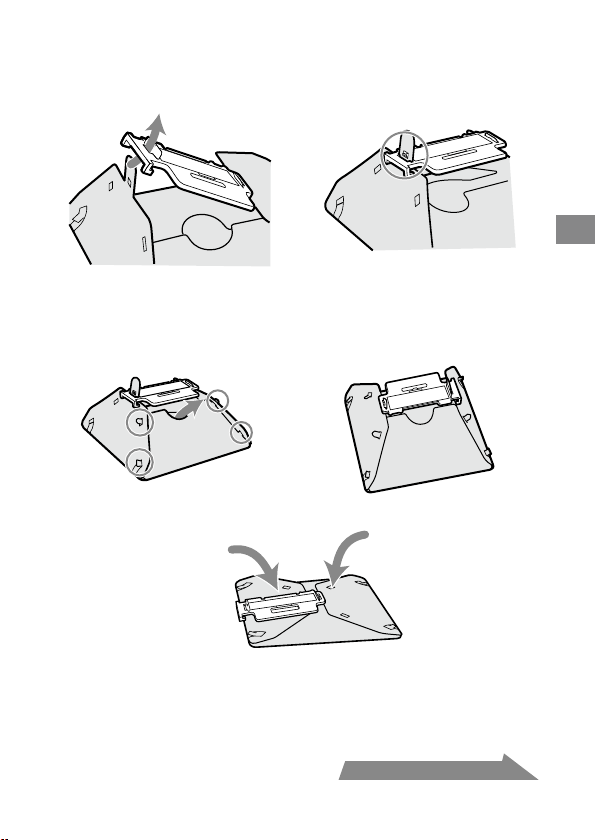
45
Detailed operations
2 As illustration, slide the tab through the slot near the clip.
The dimple above the slot should slide t into the hole in
the tab.
3 Place the four side tabs into the slot on the side of the
diuser.
On the other side, in the same way, place the four side tabs into the slots.
If it is dicult to assemble the diuser, fold it up and try again.
Note
Do not force or pull hard on the diuser. Do not fold the diuser inside out.
Continued on the next page
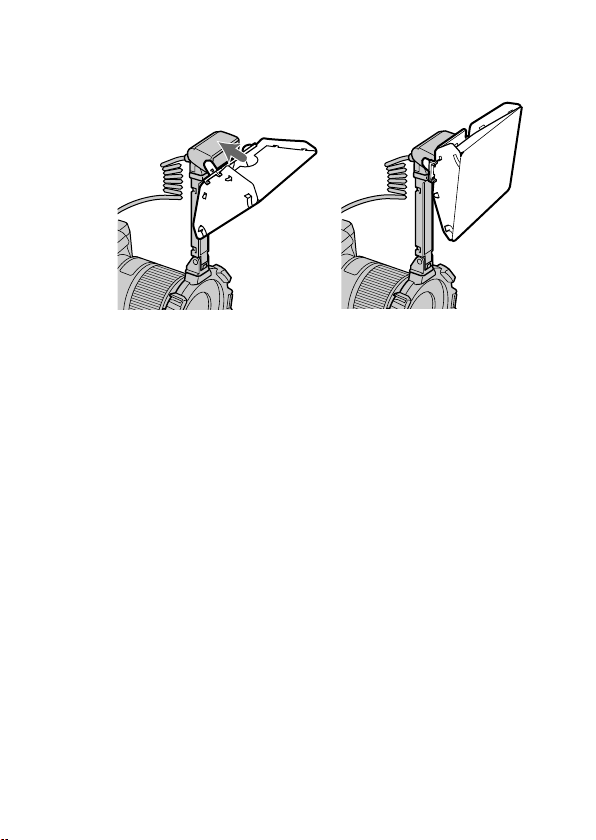
46
4 While holding the diuser by its panel’s top tab, press it
against the face of the twin ash unit.
Press the diuser until it clicks into place.
Notes on using the diuser
If the arm is set at the 60° position and used with a wide angle lens, the diuser
may appear in the image. It is recommended that you always use the diuser
with the arm set at the 90° position.
e ash output is reduced when using the diuser. See page 28 for TTL ash
metering, or page 38 for manual ash metering.
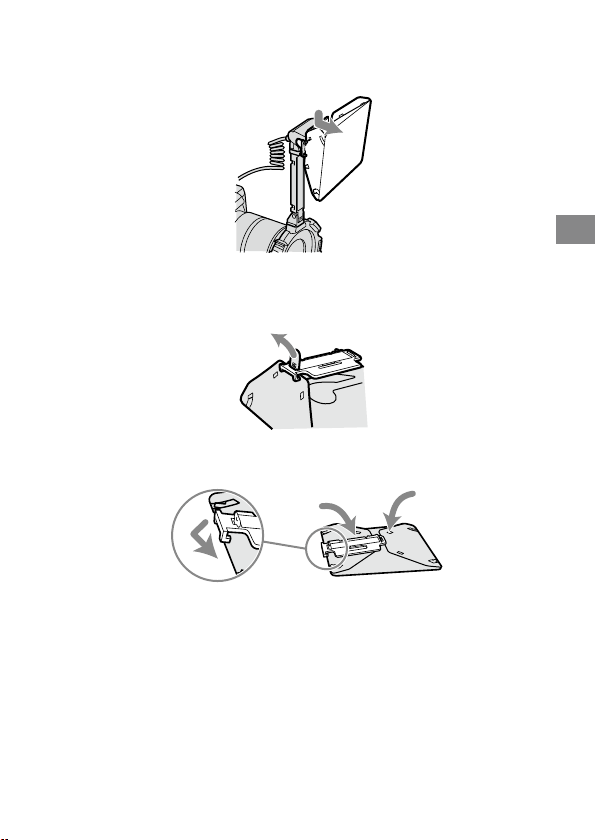
47
Detailed operations
Removing the diuser
1
Remove the diuser while holding its panel’s top tab.
2 Pull the tab o the dimple as illustration. The diuser can
now be easily removed.
3 Refold the diuser and secure it by clipping the panel to it.
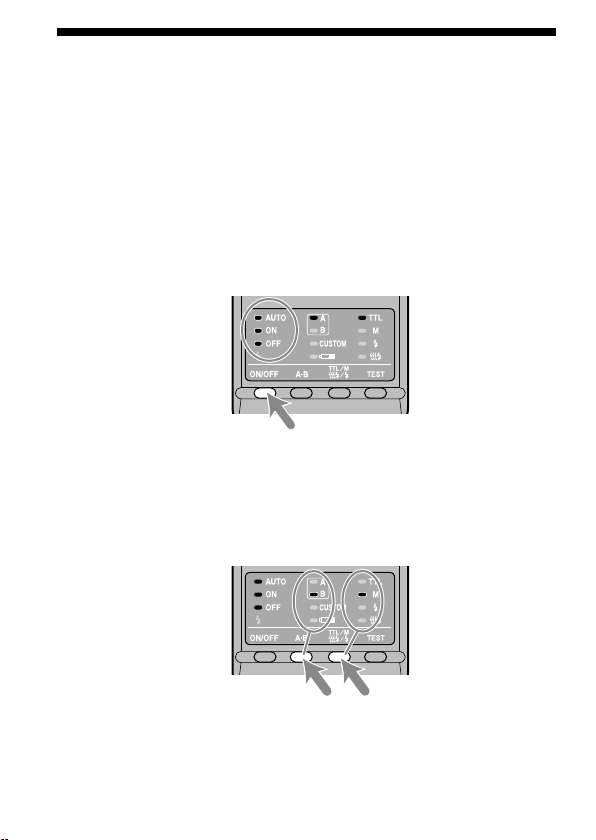
48
Custom setting
e various ash settings can be changed as necessary.
e following three items may be changed.
Time t
o auto power o (4 minutes/15 minutes/60 minutes/None)
Reco
rding modes in which manual ash may be set
(M mode only/All modes)
M
an
ual-ash power-level steps (1EV increments / 1/2EV increments)
1 Press the ash ON/OFF button for three seconds.
e auto lamp, ash-ON lamp and ash-OFF lamp all come on together, and
the item (time to auto power o) is displayed.
2 Press the A-B button (twin-ash A-B selection button) to
select the item, and press the TTL/M/Test button to select
the desired setting.
Each time the A-B button is pressed, the above three items appear on the
control panel (see following page).
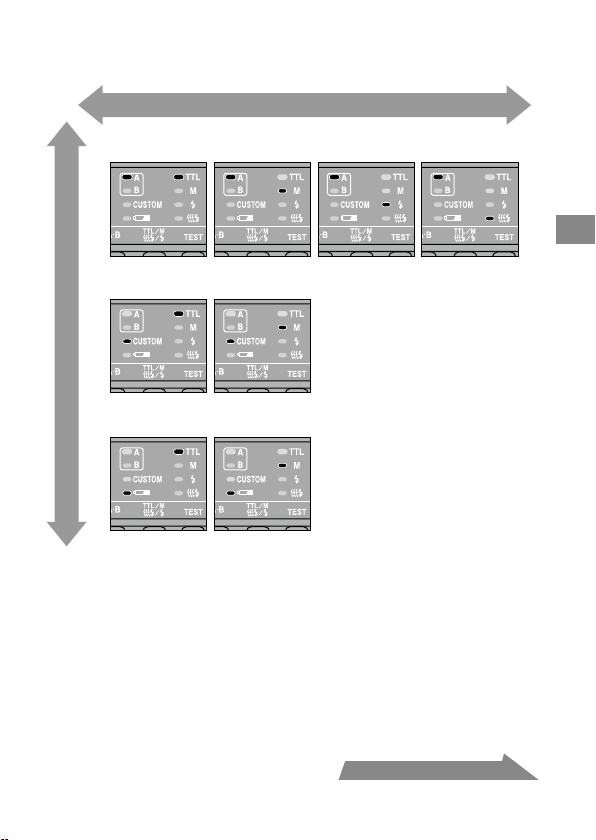
49
Detailed operations
Continued on the next page
1.Time to auto power off
4 minutes 15 minutes
M mode only All modes
1EV increments 1/2EV increments
60 minutes None
2. Recording modes in which manual flash may be set
3. M anual-flash power-level steps
Select using the TTL/M/Test button
Select using the A-B button
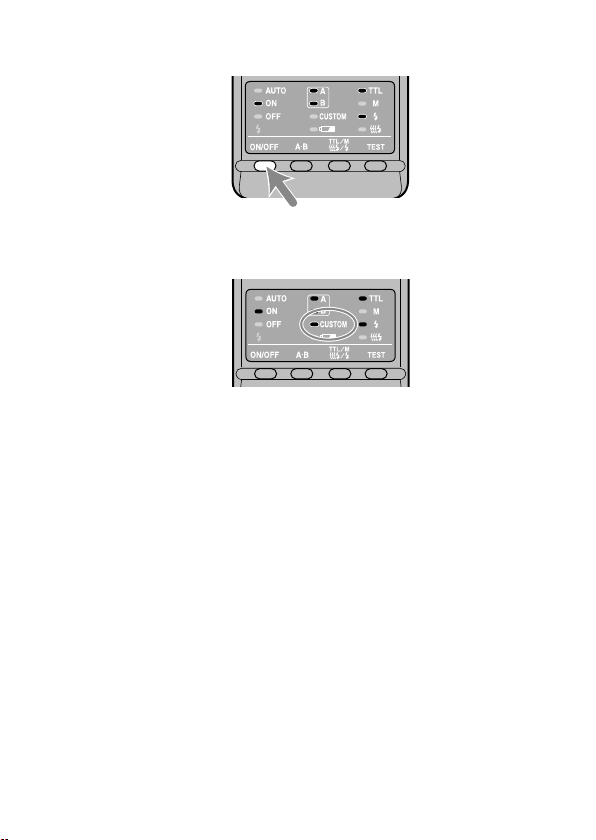
50
3 After making your selections, press the ash ON/OFF
button to return to exit the custom mode.
When a setting other than the default setting is selected in custom mode,
the custom lamp on the control panel comes on.
When “All modes” is selected (see 2. Recording modes in which manual
ash may be set), manual ash may be used in all recording modes.*
* e p
roper exposure may not be obtained in modes other than M mode.
Using M mode is therefore recommended.
If “1/2 EV s
teps” is selected in item 3, use the gray power values provided
on the lower scale of the manual-ash-control dials. e half-stop values
are not written on the scale.
e power values are1/1, 1/1.4, 1/2, 1/2.8, 1/4, 1/5.6, and 1/8.
e se
lected settings are maintained even when the ash unit is turned o
or the battery removed.
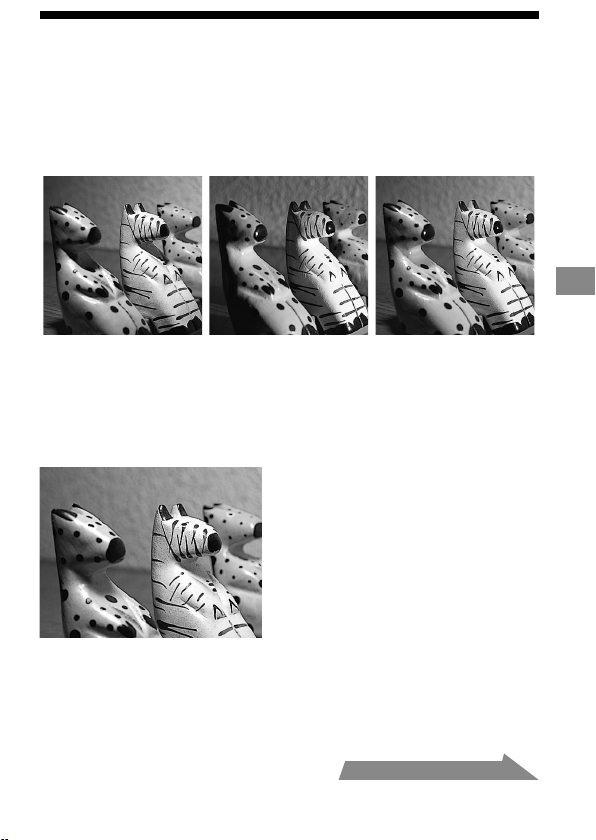
51
Additional Information
Examples of macro twin ash
photography
By using this macro twin ash, you can change the position and angle of the twin
ash unit to achieve more expressive lighting.
Example:
Top light only Side light only Top and side light
Strong shadows of the subjects can be soened by using the diuser attached to the
ashtube (p. 44).
Example:
Top light with diuser
Continued on the next page
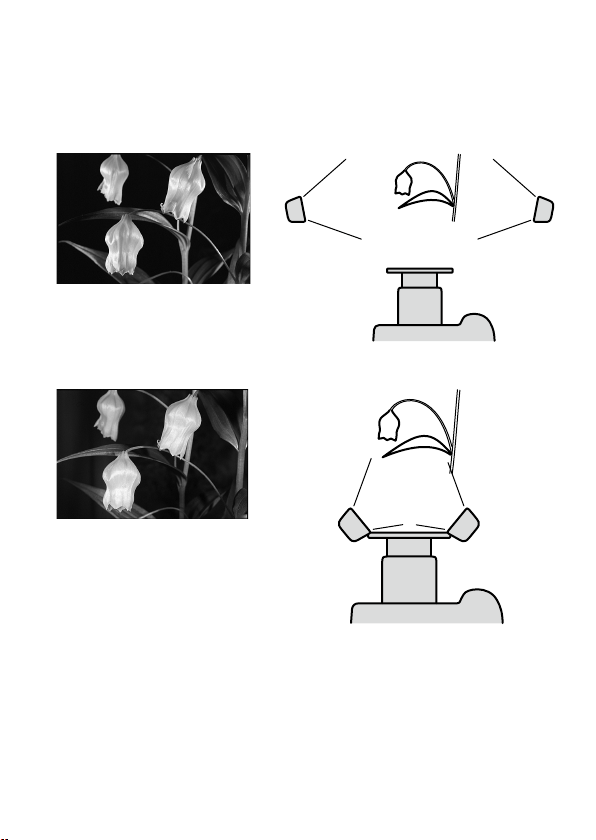
52
Two twin ash shooting with arms
To accent detail and give depth, illuminate the subject from the sides using the
arms.
Example:
With arms from the sides
Without arms from the front
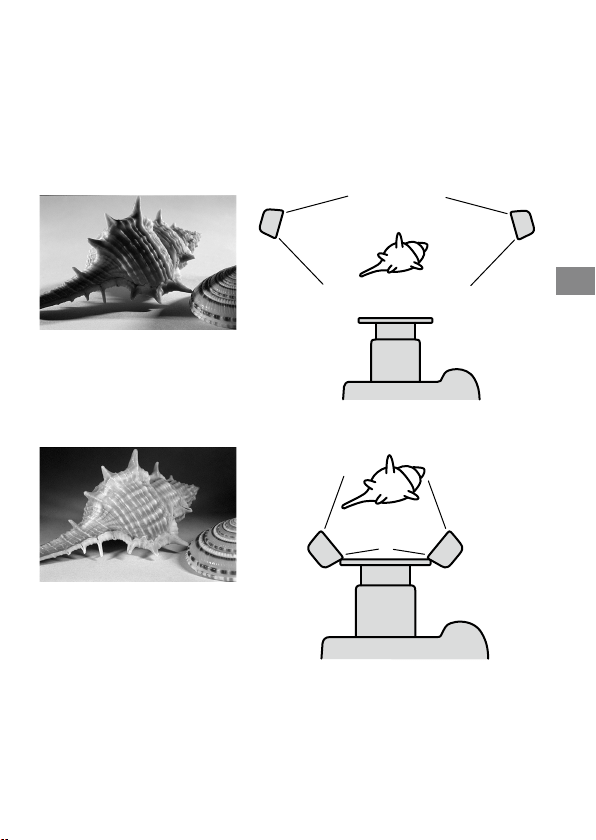
53
Additional Information
Note
If a close-up subject is illuminated from the side using an arm, strong shadows may
occur. Strong ash illumination from behind the subject can cause aring.
is condi
tion is particularly likely to occur with a 50mm F2.8 Macro lens with
ashtubes mounted on arms.
Example:
With arms from the sides
Without arms from the front

54
Aperture range graph
e aperture range for macro lenses is displayed on page 26 (TTL), and page 34
(Manual ash). e aperture ranges described here are for lenses other than macro
lenses, or when the subject distance is large.
TTL ash metering
Flash-subject
distance
M
in. Aperture lines
Aperture
Max. Aperture lines
Min. Aperture lines
Max. Aperture lines
e following explains how to obtain the aperture range using the two twin ash
units with a 1.5 m ash-to-subject distance and at ISO 100.
1 Draw a v
ertical line upwards from the ash-to-subject distance until it reaches
the minimum aperture line ().
2 Draw a horizontal line lewards from until it reaches the vertical ISO line
corresponding to the camera used ().
3
Draw a di
agonal line from upwards and lewards. e result indicates the
minimum aperture that will provide the proper exposure ().
4
e m
aximum aperture can be obtained in the same way by using the maximum
aperture line ().e results of both calculations will give the usable aperture
range for obtaining the proper exposure ().
In this case, the proper exposure can be obtained by setting the camera’s aperture
from maximum to f/16.
e dot
ted lines are employed when only one twin ash unit is used.
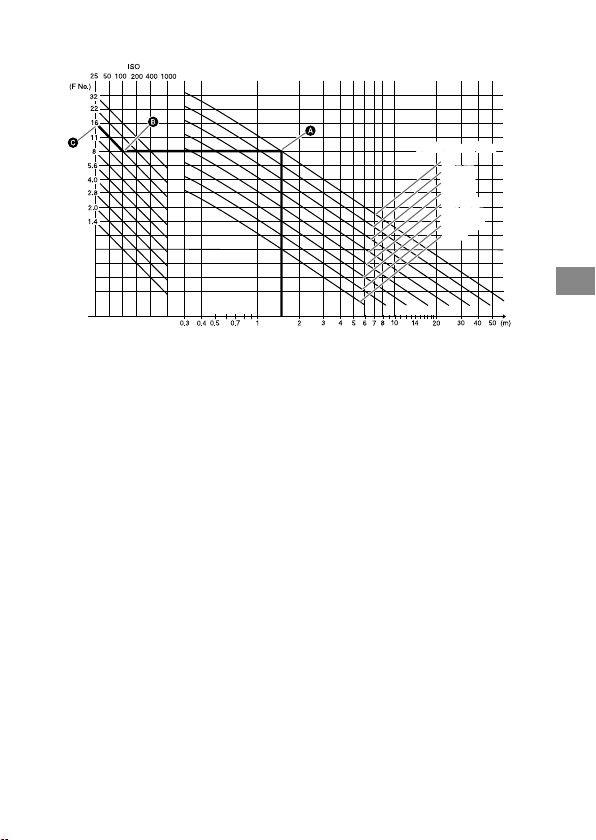
55
Additional Information
Manual ash metering
Flash-subject
distance
Aperture
Flash power lineFlash power line
1/1
1/2 (1/1)
1/4 (1/2)
1/8 (1/4)
1/16 (1/8)
1/32 (1/16)
1/64 (1/32)
(1/64)
1/1
1/2 (1/1)
1/4 (1/2)
1/8 (1/4)
1/16 (1/8)
1/32 (1/16)
1/64 (1/32)
(1/64)
e following explains how to obtain the aperture using the two twin ash units
with a power level of 1/1 at 1.5 m ash-to-subject distance and at ISO 100.
1 Draw a v
ertical line upwards from the ash-to-subject distance until it reaches
the ash power line that corresponds to the set power level ().
2 Draw a horizontal line lewards from until it reaches the vertical ISO line
corresponding to the camera used ().
3
Draw a di
agonal line from upwards and lewards. e result indicates the
aperture that will provide the proper exposure ().
In this case, the proper exposure can be obtained by setting the camera’s aperture
to f/16.
e gures in parenthesis are employed when only one twin ash unit is used.

56
Compatibility with other products
Lens
49 mm and 55 mm adaptor rings are supplied.
Lens
es whose barrels rotate when auto-focusing cannot be used.
When a w
ide angle lens is used, part of the holder may appear in the image. Do
not use lenses whose focal length is shorter than 24 mm. If the focal length is
between 24 mm and 27 mm, contact an authorized Sony dealer.
If using a lter at a focal length of less than 50 mm, part of the holder may
appear in the image.
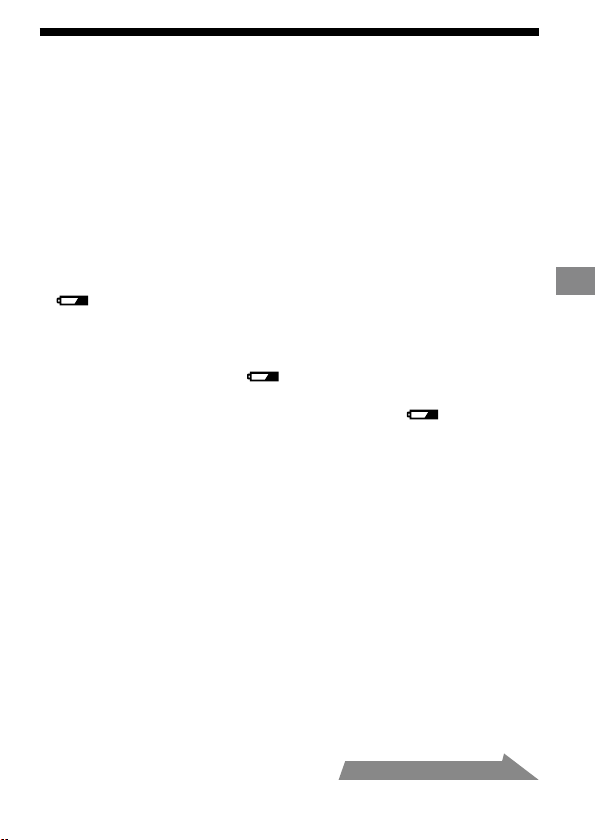
57
Additional Information
Notes on use
While shooting
is ash unit generates strong light, so it should not be used directly in front of
the eyes.
Batteries
Do not store the macro ash controller with the alkaline batteries inside it.
Leakage from the batteries may damage the battery chamber.
Depen
ding on the temperature or storage conditions, the battery level displayed
may be lower than the actual battery capacity. e displayed battery level is
restored to the correct value aer the ash has been used a few times. When
lamp blinks to indicate that the ash cannot be used, pressing the ash
ON/OFF button a number of times may result in restoration of the correct
battery level display. If the battery level is still not restored, replace the battery.
W
hen u
sing lithium batteries, if the batteries become hot due to high
temperature or continuous use,
lamp may blink and the ash may not
work for a while. Wait for the batteries to cool down before using the ash again.
Nick
el-metal hydride batteries can lose power suddenly. If
lamp starts
blinking or the ash can no longer be used while taking pictures, change or
recharge the batteries.
e a
sh frequency and number of ashes provided by new batteries may
vary from the values shown in the table, depending on the time elapsed since
manufacture of the batteries.
Continued on the next page

58
Temperature
e ash unit may be used over a temperature range of 0 °C to 40 °C.
Do no
t expose the ash unit to extremely high temperatures (e.g. in direct
sunlight inside a vehicle) or high humidity.
To pr
event condensation forming on the ash, place it in a sealed plastic bag
when bringing it from a cold environment into a warm environment. Allow it to
reach room temperature before removing it from the bag.
Battery capacity decreases at colder temperatures. Keep your camera and spare
batteries in a warm inside pocket when shooting in cold weather.
lamp
may light on even when there is some power le in the batteries in cold weather.
Batteries will regain some of their capacity when warmed to normal operating
temperature.
i
s ash unit is not waterproof. Be careful not to bring it into contact with
water or sand when using it at the seashore, for example. Contact with water,
sand, dust, or salt may result in a malfunction.
Maintenance
Remove this unit from the camera. Clean the ash with a dry so cloth. If the
ash has been in contact with sand, wiping will damage the surface, and it should
therefore be cleaned gently using a blower. In the event of stubborn stains, use a
cloth lightly dampened with a mild detergent solution, and then wipe the unit clean
with a dry so cloth. Never use strong solvents, such as thinner or benzene, as
these damage the surface nish.
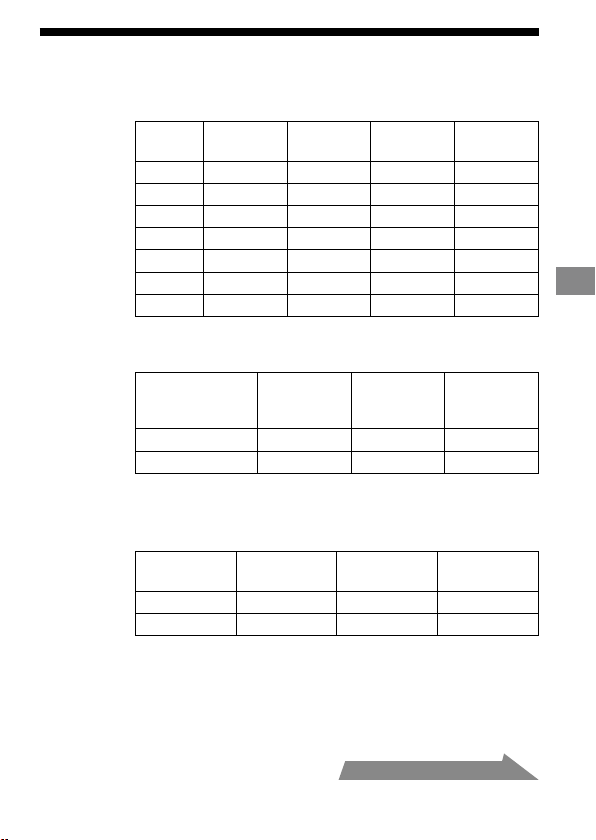
59
Additional Information
Specications
Guide number
Normal ash (ISO 100)
Power
level
1 tube 2 tubes
Wide
panel
Diuser
1/1 17 24 11 7
1/2 12 17 8 5
1/4 8.5 12 5.6 3.5
1/8 6 8.5 4 2.5
1/16 4.2 6 2.8 1.8
1/32 3 4.2 2 1.3
1/64 2.1 3 1.4 0.9
Wide panel and diuser is for one tube.
Frequency/Repetition
Alkaline Lithium
Nickel-
hydride
(1550 mAh)
Frequency (sec) 0.2~6 0.2~6 0.2~5
Repetition (times) 200~4000 500~10000 150~3000
Repet
ition is the approximate number of times that are possible
before a new battery is completely dead.
Flash coverage
Flash
coverage
Twin
ash
Wide
panel
Diuser
Vertical 45° 60° 90°
Horizontal 60° 78° 90°
Continued on the next page

60
Continuous ash performance
40 ashes at 5 ashes per second
(Pow
er level 1/32, nickel-metal hydride battery)
Flash control Flash control using pre-ash, TTL direct metering,
Manual ash
Dimension (Approx.)
Macro ash controller
68 × 123 × 91 mm (2 3/4 × 4 7/8 × 3 5/8 in.) (w × h × d)
Twin
ash unit
43 × 41 × 37 mm (1 3/4 × 1 5/8 × 1 1/2 in.) (w × h × d)
Mas
s (Approx.) Macro ash controller 235 g (8.3 oz.) (without batteries)
Twin ash unit 33 g (1.2 oz.) (per twin ash unit)
Operating temperature
0 °C to 40 °C (32 °F to 104 °F)
Included items Macro ash controller (1), Twin ash unit (2), Holder (1),
Arm (2), Adaptor ring ø 49mm (1),
Ada
ptor ring ø 55mm (1), Wide panel (2), Diuser (2),
Cor
d reel (2), Controller case (1), Flash case (1),
Set of p
rinted documentation
Functions in these operating instructions depend on testing conditions at our rm.
Design and specications are subject to change without notice.

61
Trademark
is a trademark of Sony Corporation.

2
HVL-MT24AM_FR 2-889-493-41 (1)
Français
Avant de faire fonctionner ce produit, lisez attentivement ce mode d’emploi et
conservez-le pour toute référence ultérieure.
AVERTISSEMENT
An de réduire les risques d’incendie ou de décharge électrique, n’exposez pas cet
appareil à la pluie ou à l’humidité.
Scotcher les contacts des piles lithium avant de les jeter. Suivre les éventuelles
consignes locales sur le rejet des piles.
Ne pas laisser les piles ou de petits accessoires à la portée de jeunes enfants qui
pourraient les avaler. En cas d’ingestion accidentelle, contacter immédiatement un
médecin.
Retirer immédiatement les piles du ash si :
L’a
ppareil est tombé ou a reçu un choc à la suite duquel il s’est brisé et laisse
apparaître ses composants internes.
L’a
ppareil chaue anormalement ou émet une fumée ou une odeur étrange.
Ne pas démonter le ash. Risque d’électrocution lié à la présence de circuits haute
tension.
N’exposez pas les piles à une chaleur excessive, notamment aux rayons directs du
soleil, à une amme, etc.
HVL-MT24AM_FR 2-889-493-41 (1)
3
Pour les clients en Europe
Traitement des appareils électriques et électroniques en n
de vie (Applicable dans les pays de l’Union Européenne et
aux autres pays européens disposant de systèmes de collecte
sélective)
Ce symbole, apposé sur le produit ou sur son emballage, indique
que ce produit ne doit pas être traité avec les déchets ménagers. Il
doit être remis à un point de collecte approprié pour le recyclage
des équipements électriques et électroniques. En s’assurant que
ce produit est bien mis au rebut de manière appropriée, vous
aiderez à prévenir les conséquences négatives potentielles pour
l’environnement et la santé humaine. Le recyclage des matériaux
aidera à préserver les ressources naturelles. Pour toute information
supplémentaire au sujet du recyclage de ce produit, vous pouvez
contacter votre municipalité, votre déchetterie ou le magasin où
vous avez acheté le produit.
< Avis aux consommateurs des pays appliquant les Directives UE >
Le fabricant de ce produit est Sony Corporation, 1-7-1 Konan Minato-ku Tokyo,
108-0075 Japon. Le représentant agréé pour la compatibilité électromagnétique et
la sécurité du produit est Sony Deutschland GmbH, Hedelnger Strasse 61, 70327
Stuttgart, Allemagne. Pour toute question relative à la garantie ou aux réparations,
reportez-vous à ľadresse que vous trouverez dans les documents ci-joints, relatifs à
la garantie et aux réparations.
Marque commerciale
est une marque commerciale de Sony Corporation.

4
HVL-MT24AM_FR 2-889-493-41 (1)
Table des matières
Caractéristiques ............................ 5
Nom des pièces ............................. 6
Préparations
Insertion des piles ....................... 10
Fixation et démontage du
contrôleur de ash macro .......... 12
Fixation du ash macro double
....................................................... 13
Mise en marche/Arrêt
automatique ................................. 20
Principes de base
Modes de ash de base
(mode A/mode M) ..................... 21
Flash en mode de programmation
automatique (principes de base)
....................................................... 29
Fonctionnement
détaillé
Flash manuel (M) ....................... 31
Test du ash ................................. 39
Lampe pilote ................................ 40
Diuseur grand angle ................ 41
Diuseur ...................................... 43
Fonctions personnalisables ....... 47
Informations
complémentaires
Exemples de prises de vue avec le
ash macro double ..................... 50
Graphique des plages d’ouverture
....................................................... 53
Compatibilité avec d’autres
produits ........................................ 55
Remarques sur l’utilisation ........ 56
Entretien ...................................... 57
Spécications............................... 58

HVL-MT24AM_FR 2-889-493-41 (1)
5
Avant la première utilisation
Pour plus d’informations, reportez-vous au mode d’emploi fourni avec votre
appareil photo.
Ce ash n’est pas étanche à la poussière, aux gouttes ni à l’eau.
Ne pas le placer dans les endroits suivants :
Où que vous utilisiez ou stockiez cet appareil, ne le placez pas dans les endroits
suivants. Ceci pourrait entraîner un problème de fonctionnement.
Placer ce
ash dans des endroits soumis à la lumière directe du soleil comme sur
un tableau de bord ou à proximité d’un radiateur peut entraîner sa déformation
ou un dysfonctionnement.
Endroits soumis à des vibrations excessives
Endro
its soumis à de fortes ondes magnétiques
Endro
its sablonneux
Prenez garde à ne pas exposer cet appareil au sable lorsque vous êtes sur une
plage ou dans des zones sablonneuses.
Ceci pourrait entraîner un problème de fonctionnement.
Caractéristiques
Le kit ash macro double ore un éclairage exible pour eectuer des prises de
vue macro de la nature. Il est idéal pour photographier des eurs, des insectes, des
petits objets, etc. en gros plan.
L
a lib
erté de modier la position de xation et l’angle du tube à éclairs permet
d’obtenir des photos plus expressives.
La xat
ion des bras réglables de deux longueurs entre les ashs doubles et les
supports permet de modier l’éclairage pour les photographies en gros plan avec
un grossissement maximal.
L’utilisation du diuseur fourni permet d’obtenir un éclairage plus doux.
Le diu
seur grand angle fourni étend la couverture du ash à une longueur
focale de 24 mm.
La fo
nction de lampe pilote permet de visualiser encore plus précisément la
répartition des ombres avant de prendre une photo.
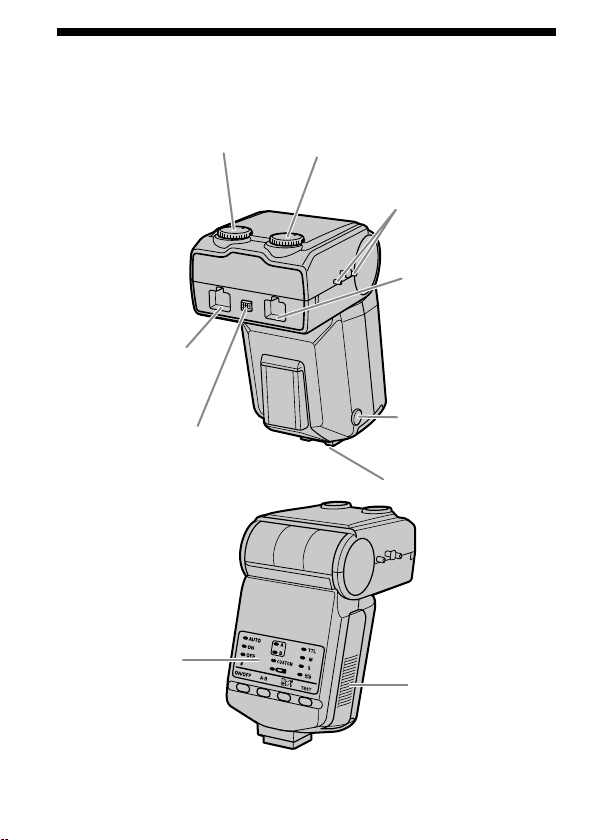
6
HVL-MT24AM_FR 2-889-493-41 (1)
Nom des pièces
Contrôleur de ash macro
* Ne touchez pas directement.
Molette de mode manuel
(ash double B) (32)
Molette de mode manuel
(ash double A) (32)
Points de xation du
dévidoir (17)
Prise de câble de ash
double (ash double B)
(14) *
Bouton de déverrouillage
du câble de ash double
(15)
Prise de câble de ash
double (ash double A)
(14) *
Bouton de
déverrouillage du
sabot (12)
Sabot
Panneau de
commande (7)
Couvercle du
compartiment des
piles (10)
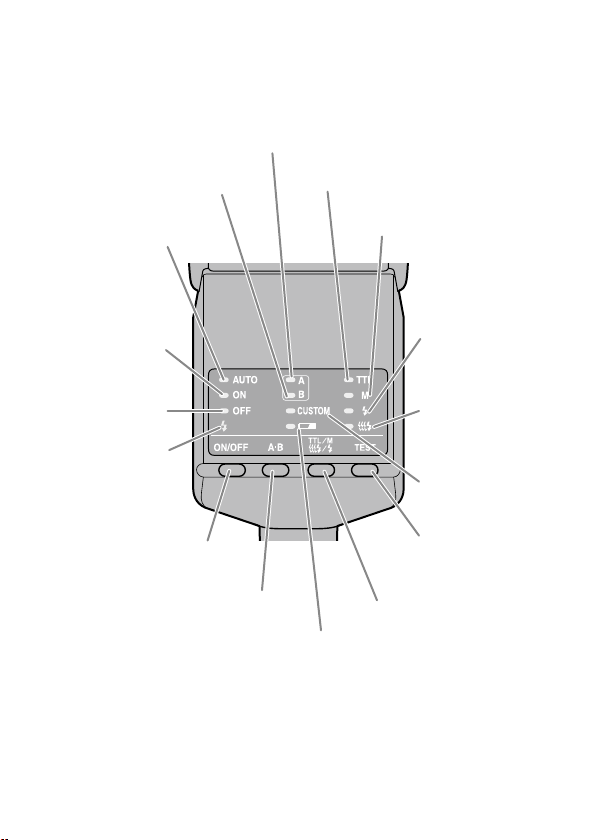
HVL-MT24AM_FR 2-889-493-41 (1)
7
Panneau de commande
Témoin du ash double B (23)
Témoin ON du ash (20)
Témoin du ash double A (23)
Témoin TTL (31)
Témoin M (mode manuel)
(31)
Témoin de test
(39)
Témoin de lampe
pilote (40)
Témoin OFF du ash
(20)
Témoin Auto (30)
Témoin de charge du
ash (24)
Touche ON/OFF du ash (20)
Touche A-B (touche de sélection
A-B du ash double) (23)
Témoin d’usure
des piles (11)
Touche TTL/M/Test
(Touche TTL/M/Test/Mode
de lampe pilote) (31)
Touche TEST (touche test/
lampe pilote) (39, 40)
Témoin Custom
(49)
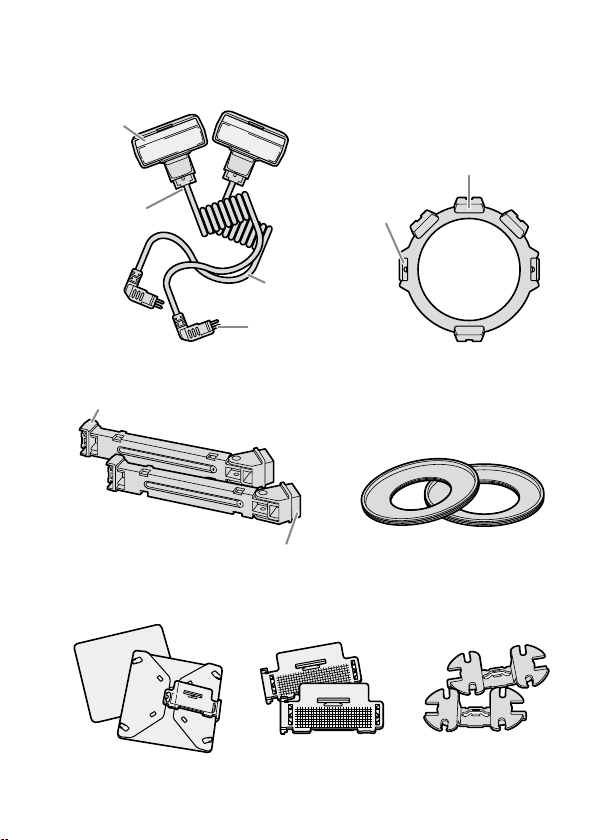
8
HVL-MT24AM_FR 2-889-493-41 (1)
Flash macro double
Flash double*
Tube à éclairs
Cordon de
raccordement
Fiche
Support (13)
Grie
Ergots de
déverrouillage
Fixation
Bras* (16)
Grie
Base
Bagues adaptatrice (13)
ø 49 mm, ø 55 mm
Diuseur* (43) Diuseur grand
angle* (41)
Dévidoir du cor-
don* (17)
* Deux fournis

HVL-MT24AM_FR 2-889-493-41 (1)
9
Exemple de stockage
Bagues adaptatrice ø 49 mm/ø 55 mm
Support
Diuseur
grand
angle
Dévidoir du
cordon
Diuseur
Bras
Etui
Flash double
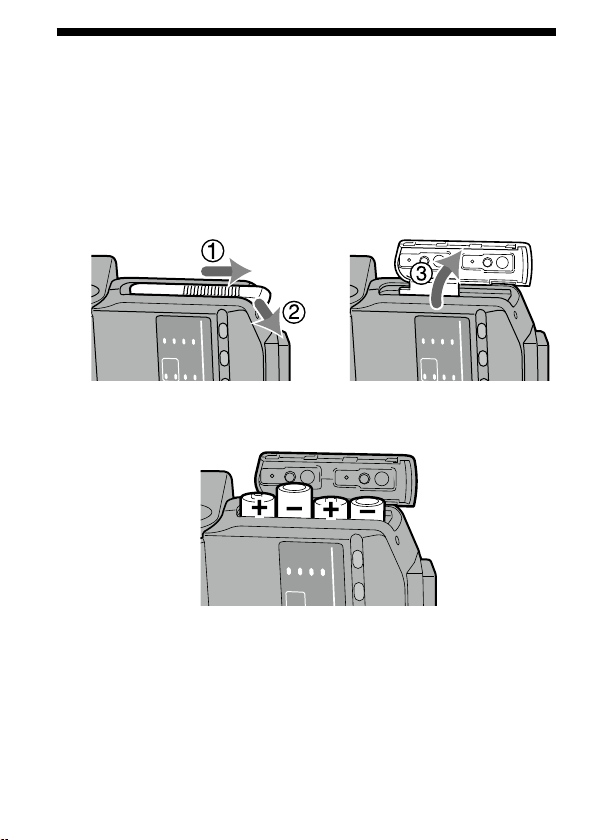
10
HVL-MT24AM_FR 2-889-493-41 (1)
Insertion des piles
Le HVL-MT24AM peut être alimenté par :
* Les piles ne sont pas fournies.
4 piles a
lcalines type AA
4 piles li
thium type AA
4 piles N
i-MH (nickel-métal hydrure) rechargeables type AA
Assurez-vous toujours que ces piles sont bien rechargées avec le chargeur adapté.
1 Ouvrez le compartiment des piles comme indiqué.
2 Mettez les piles en place en respectant les polarités
indiquées sur le schéma gurant dans le compartiment.
3 Refermez le compartiment.
Exécutez les étapes dans le sens inverse lors de l’ouverture du compartiment.
Le tém
oin sur le panneau de commande s’allume. S’il ne s’allume pas, appuyez
sur la touche ON/OFF du ash.
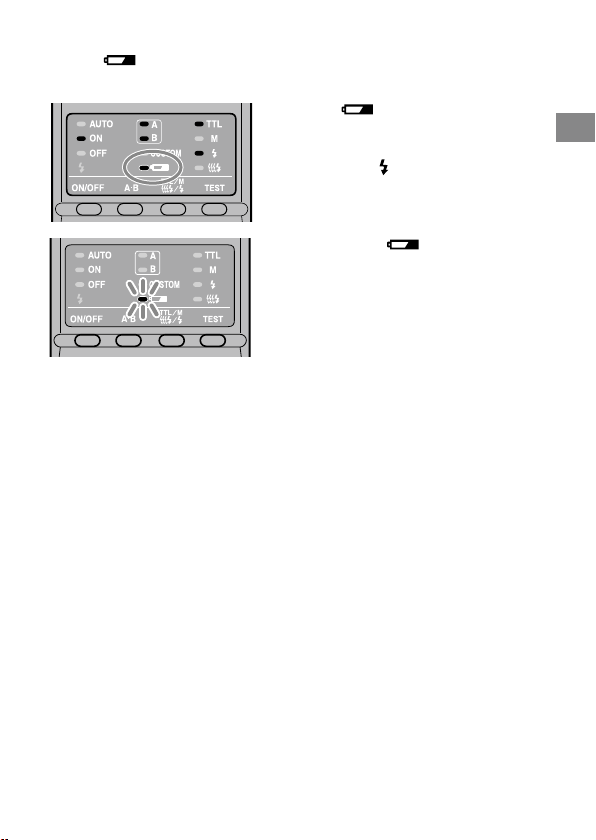
HVL-MT24AM_FR 2-889-493-41 (1)
11
Préparations
Vérication de l’état des piles
Le témoin du panneau de commande s’allume ou clignote si les piles sont
faibles.
Témoin allumé
Il est recommandé de changer les
piles. Le ash peut encore être utilisé
dans cet état si
(témoin de charge
du ash), situé à l’arrière de l’appareil,
est allumé.
Seul le témoin clignote
Le ash ne peut plus fonctionner.
Remplacez les piles.
V
érie
z la mise en place des piles si rien ne se passe après avoir appuyé sur la
touche ON/OFF du contrôleur de ash macro.
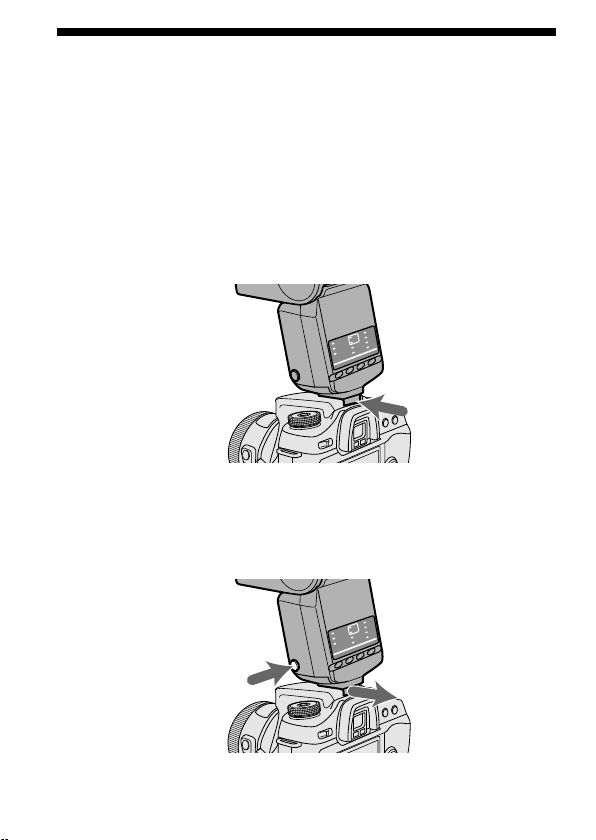
12
HVL-MT24AM_FR 2-889-493-41 (1)
Fixation et démontage du contrôleur
de ash macro
Fixation du contrôleur de ash macro sur
l’appareil photo
Poussez fermement le sabot sur l’appareil photo jusqu’à ce
qu’il s’encliquette.
Le contrôleur de ash macro est automatiquement verrouillé en place.
Si le a
sh intégré de l’appareil photo est déployé, rabattez-le avant de xer le
contrôleur de ash macro.
Retrait du contrôleur de ash macro de
l’appareil photo
Tout en appuyant sur le bouton de déverrouillage du sabot,
retirez le contrôleur de ash macro .
1
2
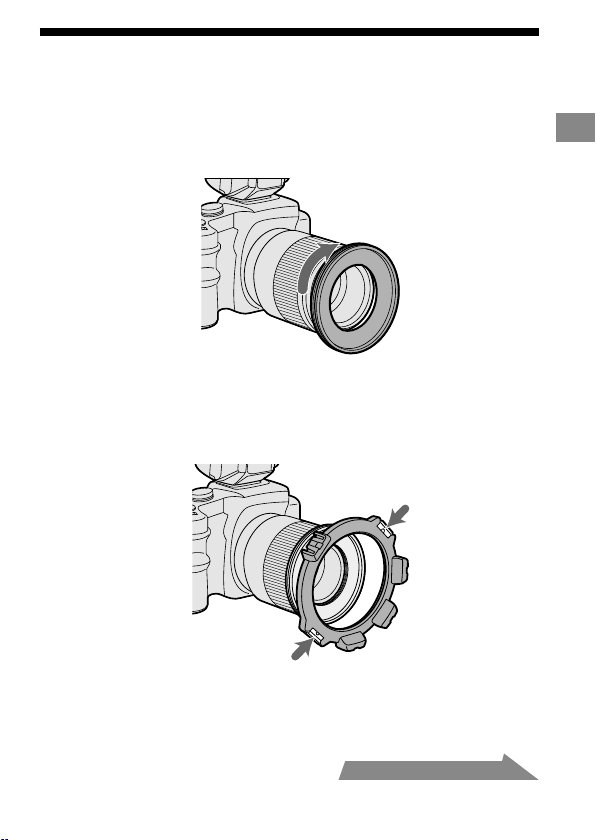
HVL-MT24AM_FR 2-889-493-41 (1)
13
Préparations
Fixation du ash macro double
1 Vissez la bague adaptatrice adaptée sur l’objectif dans le
sens horaire.
Des adaptateurs de 49 mm et 55 mm de diamètre sont fournis.
2 Tout en appuyant sur les ergots situés de chaque côté du
support, placez le support sur l’adaptateur, puis relâchez
les deux ergots.
Suite à la page suivante
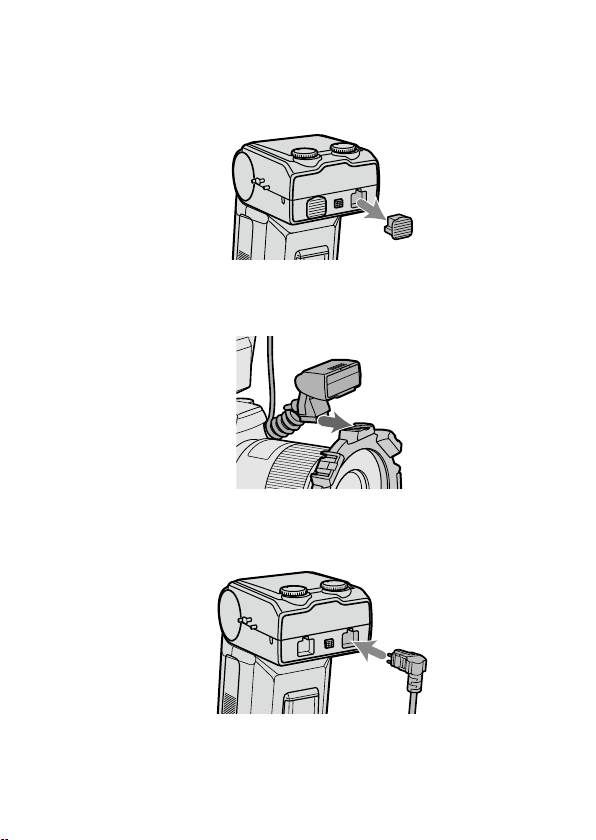
14
HVL-MT24AM_FR 2-889-493-41 (1)
3 Retirez les couvercles de protection des prises du
contrôleur de ash macro.
Pour plus de sûreté, conservez les couvercles dans l’étui.
Repl
acez les couvercles après utilisation.
4 Placez le ash double sur la grie de l’un des supports.
Vous pouvez également utiliser un bras (p. 16).
5 Insérez la che du ash double dans la prise de câble de
ash double du contrôleur de ash macro.
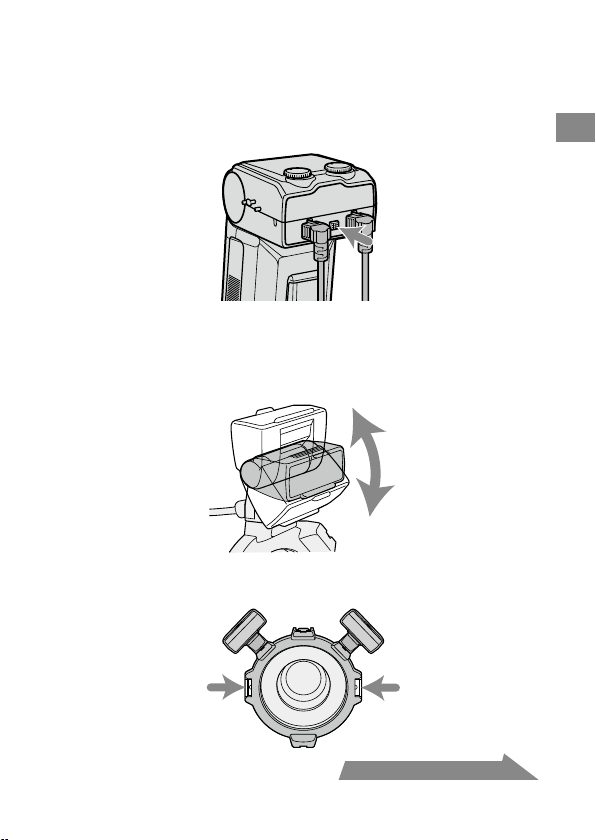
HVL-MT24AM_FR 2-889-493-41 (1)
15
Préparations
Suite à la page suivante
Lors du retrait de la che, appuyez sur le bouton de
déverrouillage du câble de ash double du contrôleur de
ash macro, puis retirez la che de la prise en la tenant
bien droite.
Ne retirez pas la che en tirant sur le cordon de raccordement.
6 Réglez la position des tubes à éclairs à votre convenance.
Chaque tube à éclairs du ash double peut être xé sur n’importe laquelle
des quatre gries du support.
Chaq
ue tube à éclairs du ash double peut être incliné.
Vous pouvez faire pivoter le support. Appuyez sur les ergots de
déverrouillage lors du retrait ou de la rotation du support.

16
HVL-MT24AM_FR 2-889-493-41 (1)
Fixation du bras
Vous pouvez utiliser un bras pour éloigner le ash de l’objectif.
1 Fixez le bras en faisant glisser sa base dans l’une des
quatre gries du support.
2 Fixez le tube à éclairs du ash double sur la grie du bras.
3 Réglez le bras à l’une des deux longueurs.
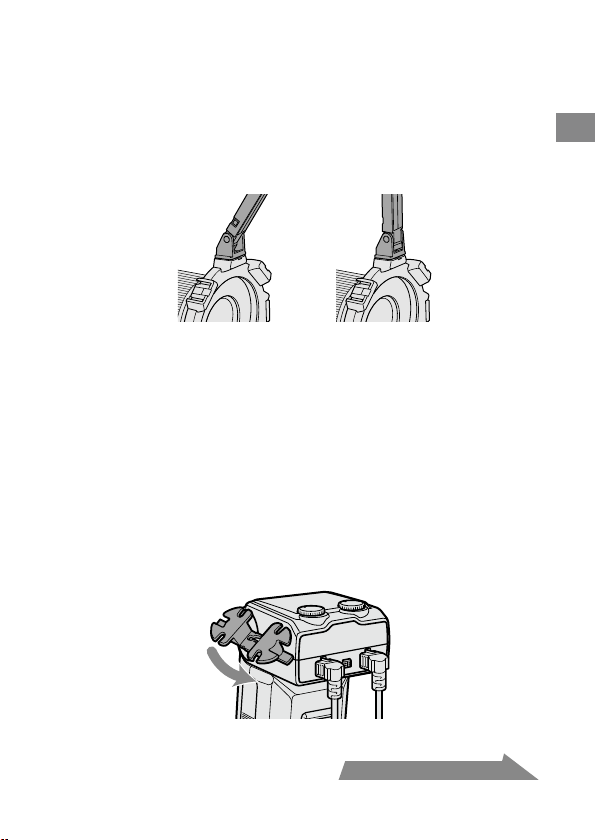
HVL-MT24AM_FR 2-889-493-41 (1)
17
Préparations
4 Lorsque vous modiez l’inclinaison à 60°, maintenez les
deux extrémités du bras et bougez-le jusqu’à entendre
deux déclics de mise en place.
Vous pouvez régler l’angle du bras à l’une des deux positions suivantes, 60°
ou 90°.
Le bra
s peut être déplacé au-delà de 60° et 90° pour éviter toute rupture.
Toutefois, utilisez-le uniquement dans l’une de ces deux positions. Ne xez
pas non plus les deux bras à la fois. Vous risqueriez de les endommager.
60° 90°
Utilisation du dévidoir du cordon
Le dévidoir du cordon peut être xé sur le côté du contrôleur de ash macro an
d’éviter qu’il y ait du jeu au niveau du cordon de raccordement du ash double.
Fixation du dévidoir de cordon sur le
contrôleur de ash macro
Vériez d’abord le sens du dévidoir de cordon, puis xez le
haut du dévidoir de cordon suivi par le bas du dévidoir de
cordon sur les points de xation du dévidoir situés sur le côté
du contrôleur de ash macro, comme illustré.
Suite à la page suivante
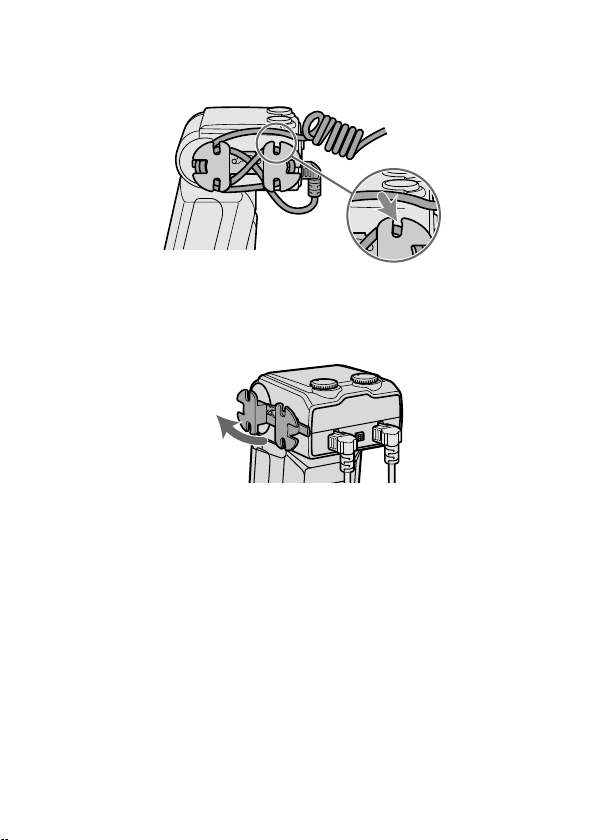
18
HVL-MT24AM_FR 2-889-493-41 (1)
Exemple d’enroulement du cordon de raccordement
Fixez le cordon de raccordement qui pend en l’enroulant autour du dévidoir et en
utilisant les encoches extérieures, comme illustré.
Retrait du dévidoir du cordon
Pour retirer le dévidoir du cordon du contrôleur de ash
macro, tirez sur sa partie inférieure.
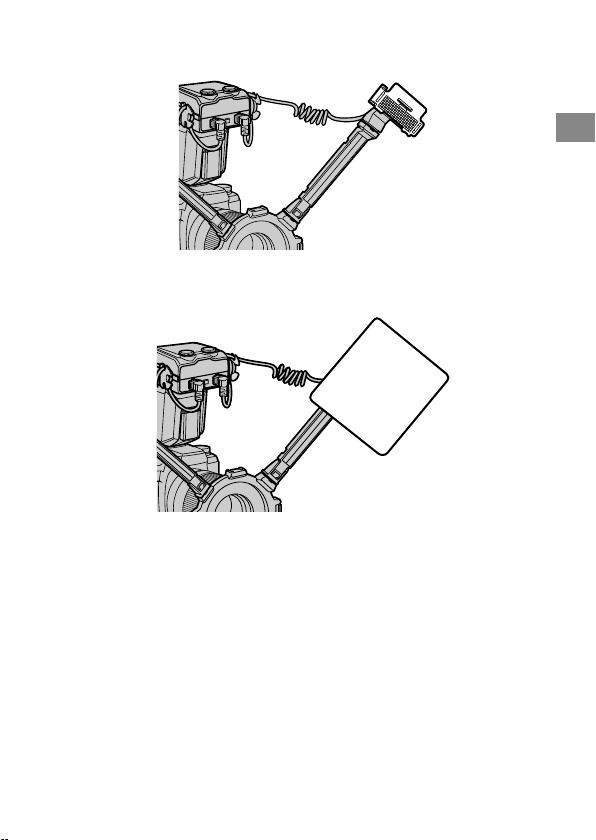
HVL-MT24AM_FR 2-889-493-41 (1)
19
Préparations
En xant le diuseur grand angle au tube à éclairs, vous pouvez élargir l’angle de
couverture du ash (p. 41).
En utilisant le diuseur xé au tube à éclairs, vous pouvez atténuer les ombres
dures. Utilisez toujours le diuseur avec un bras (p. 43).
Vériez que le tube à éclair est bien dirigé vers le sujet. Veillez à ce que le cordon
ne passe pas devant le tube à éclairs ou l’objectif.
Repo
rtez-vous à la page 50 pour des exemples de photographies.
Si vo
us utilisez un bras lors de prises de vue en très gros plan avec un objectif
50mm F2.8 Macro, le sujet risque de ne pas être susamment éclairé (p. 52).
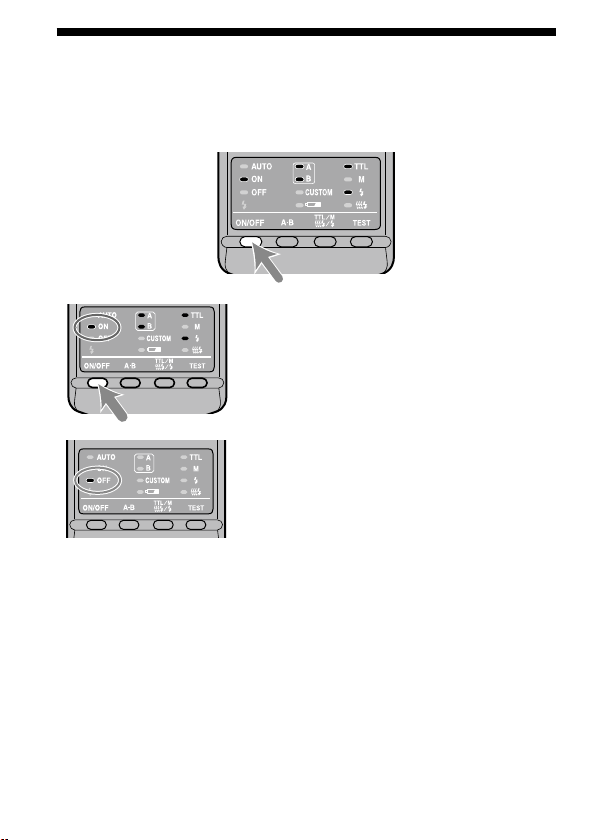
20
HVL-MT24AM_FR 2-889-493-41 (1)
Mise en marche/Arrêt automatique
Appuyez sur la touche ON/OFF du ash située à l’arrière du
contrôleur de ash macro.
Le contrôleur de ash macro est mis sous tension.
Lors de la mise sous tension du contrôleur de
ash macro, le témoin ON du ash du panneau de
commande s’allume.
Si vous appuyez sur la touche ON/OFF du ash
alors que le contrôleur de ash macro est sous
tension, le contrôleur de ash macro s’éteint et le
témoin OFF du ash du panneau de commande
s’allume.
L
e tém
oin OFF du ash s’éteint après 10
secondes.
Auto extinction
Le contrôleur de ash macro est automatiquement mis hors tension et les
indicateurs du panneau de commande s’éteignent an d’économiser les piles lorsque
le contrôleur de ash macro n’a pas été utilisé pendant 4 minutes.
V
ou
s pouvez désactiver la fonction de mise hors tension automatique ou
modier la durée de temporisation avant auto-extinction en modiant les
réglages personnalisés (p. 47).

HVL-MT24AM_FR 2-889-493-41 (1)
21
Principes de base
Modes de ash de base
(mode A/mode M)
Le mode d’exposition de l’appareil photo doit être réglé sur mode A*
1
(priorité
d’ouverture), ou sur mode M*
2
(manuel).
Pour les prises de vue en gros plan, la profondeur de champ*
3
doit être réduite,
ce qui requiert généralement une ouverture plus petite lors de la prise de vue.
Par conséquent, il vaut mieux sélectionner le mode A ou M, qui vous permet de
choisir l’ouverture.
L’utilisation d’un objectif macro est par ailleurs recommandée.
Dans cette section, le fonctionnement de base du ash en mode A ou M avec la
mesure TTL (témoin TTL activé) est décrit.
Les instructions présentées à partir de la page suivante supposent que vous
utilisez l’un des appareils photo et des objectifs macro suivants.
A
pp
areil photo : Appareil photo A en mode A (priorité d’ouverture) ou M
(manuel).
Obj
ectif : 50mm F2.8 Macro
100mm F2.8 Macro
Pour la prise de vue en mode P, reportez-vous à la page 29. Lors de l’utilisation
d’un objectif diérent, reportez-vous au graphique des plages d’ouvertures à la
page 53.
*
1
Mode A : En mode A, vous pouvez sélectionner l’ouverture, et l’appareil
photo règle automatiquement la vitesse d’obturation requise
pour une exposition correcte.
*
2
Mode M : Vous pouvez sélectionner l’ouverture et la vitesse d’obturation.
Vous pouvez sélectionner une vitesse d’obturation plus lente
que la vitesse de synchro normale de l’appareil photo.
*
3
Profondeur de champ : Zone située à l’avant et à l’arrière du sujet sur lequel la
mise au point est nette. Lors de prises de vue en gros
plan, cette zone est réduite et la zone oue est plus
grande.
Suite à la page suivante
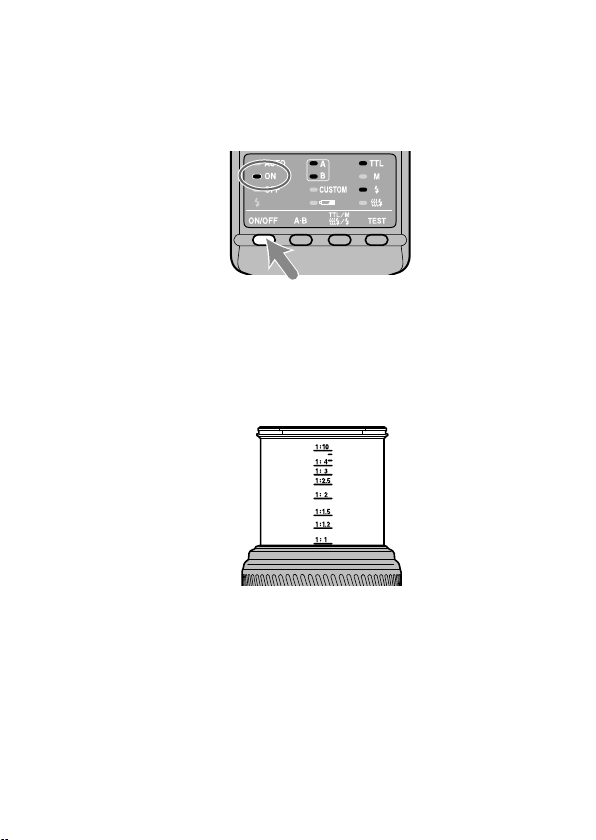
22
HVL-MT24AM_FR 2-889-493-41 (1)
1 Réglez le commutateur POWER de l’appareil photo sur ON
et sélectionnez le mode A ou M
2 Appuyez sur la touche ON/OFF du ash pour allumer le
témoin ON du ash du panneau de commande.
3 Eectuez la mise au point sur le sujet et vériez le rapport
de grossissement.
Vous pouvez vérier le rapport de grossissement à l’aide de l’échelle de
grossissement de l’objectif. (L’emplacement de l’échelle de grossissement dière
selon l’objectif.)
4 En mode M, sélectionnez une vitesse d’obturation.
Vous ne pouvez pas sélectionner une vitesse d’obturation plus rapide que la
vitesse de synchro normale de l’appareil photo.
5 Sélectionnez l’ouverture.
Pour trouvez la valeur d’ouverture correcte, reportez-vous aux pages 25 à 28.
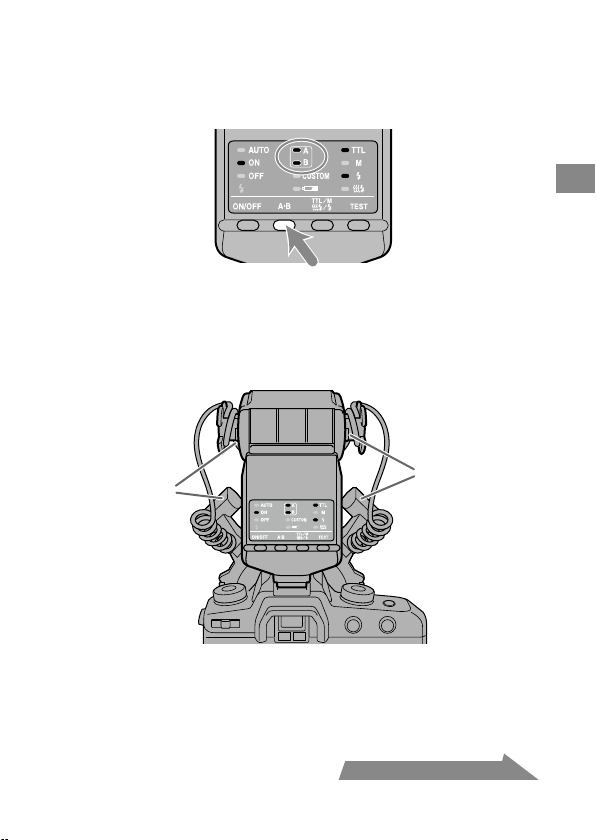
HVL-MT24AM_FR 2-889-493-41 (1)
23
Principes de base
Suite à la page suivante
6 Sélectionnez le ash.
Appuyez sur la touche A-B située à l’arrière du contrôleur de ash macro pour
allumer le témoin du ash double A, le témoin du ash double B ou les deux.
(Les témoins allumés indiquent le ash qui s’éteint.)
De l’arrière (côté du panneau de commande), le ash A est raccordé à la prise
gauche et le ash B à la prise droite.
Pour p
lus d’informations sur l’eet de la sélection du ash, reportez-vous aux
pages 50 à 52.
Flash A
Flash B
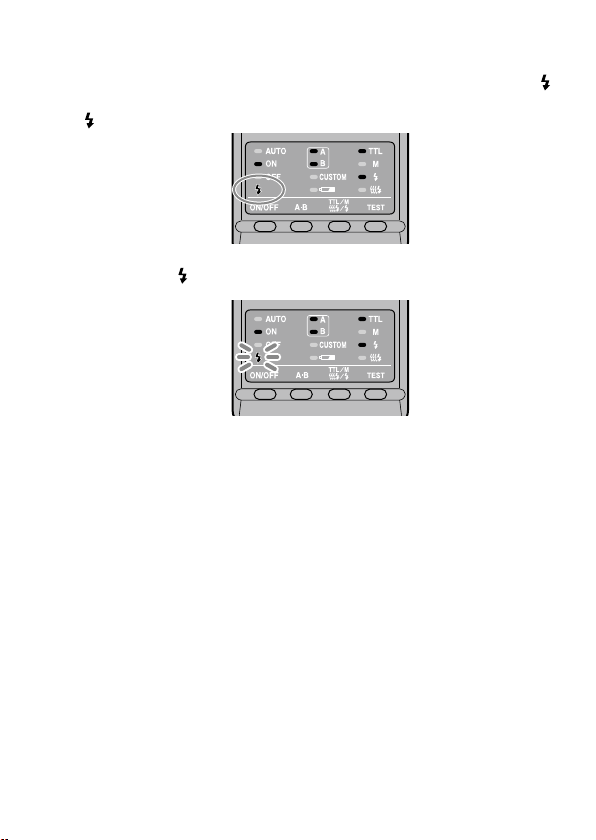
24
HVL-MT24AM_FR 2-889-493-41 (1)
7 Lorsque le contrôleur de ash macro est chargé, appuyez à
fond sur le déclencheur pour prendre une photo.
Le contrôleur de ash macro est chargé lorsque le témoin de charge du ash
situé sur le panneau de commande du contrôleur de ash macro et l’indicateur
dans le viseur sont allumés.
Lorsque l’exposition de la photo qui vient d’être prise est bonne, le témoin de
charge du ash
du panneau de commande clignote.
La photo risque d’être sous-exposée si le déclenchement intervient avant la n de
la charge du ash.
Pour é
viter les bougés, il est recommandé d’installer l’appareil sur un trépied ou
d’utiliser un cordon de télécommande.
Pour o
btenir les meilleurs résultats des ashs macro, une distance entre le sujet
et l’appareil photo inférieure à 0,5 m et un rapport de grossissement supérieur à
0,15X (supérieur à 1:7) sont recommandés.
Mettez toujours le contrôleur de ash macro hors tension lorsque le ash double
n’est pas raccordé. Si le ash double n’est pas xe et que le contrôleur est activé, la
synchro du ash de l’appareil photo fonctionne et l’exposition environnante qui
en résulte sera incorrecte.
L’i
lluminateur AF de l’appareil photo est bloqué par la bague adaptatrice ou le
ash double et ne peut pas être utilisé pour eectuer la mise au point.

HVL-MT24AM_FR 2-889-493-41 (1)
25
Principes de base
Sélection des ouvertures en mode ash TTL
Les tableaux suivants présentent les valeurs avec l’ISO 100 sans diuseur grand
angle ou diuseur simple. Pour les autres vitesses ISO, ou lors de l’utilisation
du diuseur grand angle ou d’un diuseur simple, réglez l’ouverture selon les
tableaux de la page 27.
Les pl
ages d’ouverture présentées dans les tableaux sont des valeurs calculées.
L’objectif utilisé possède sa propre plage d’ouverture utilisable.
Exemple: Si v
ous utilisez un objectif 50mm F2.8 Macro avec l’ISO
100, une paire de ashs doubles sans bras, à un rapport de
grossissement de 1:1
Selon les calculs, la plage d’ouverture acceptable varie entre f/4
et f/90 (rep
ortez-vous au tableau suivant).
Tou
tefois, la plage d’ouverture de l’objectif varie entre f/2,8 et
f/32. La plage réelle possible avec cet objectif varie donc entre
f/4 et f/32.
Les tableaux suivants présentent les données pour certains objectifs et certains
rapports de grossissement. Pour d’autres objectifs et rapports de grossissement,
reportez-vous à la page 53.
Suite à la page suivante
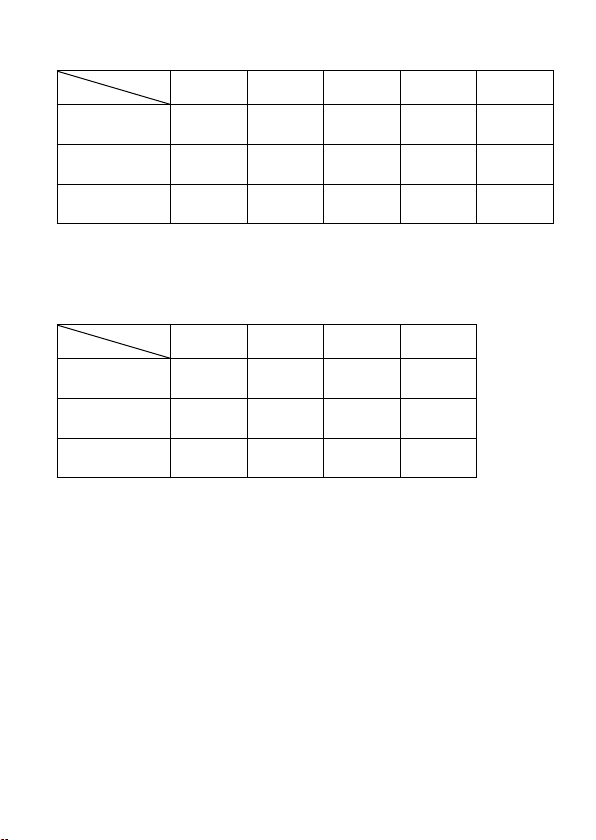
26
HVL-MT24AM_FR 2-889-493-41 (1)
50mm F2.8 Macro
(Plage d’ouverture de l’objectif : f/2,8 - f/32)
Rapport de grossissement
1:1 1:1.5 1:2 1:3 1:4
Sans bras
4 ~ 90
2,8 ~ 64
5,6 ~ 128
4 ~ 90
8 ~ 180
5,6 ~ 128
5,6 ~ 128
4 ~ 90
4,5 ~ 108
3,5 ~ 76
Bras (court) 60°
2,4 ~ 54
1,7 ~ 38
2,8 ~ 64
2 ~ 45
4 ~ 90
2,8 ~ 64
4 ~ 90
2,8 ~ 64
4,5 ~ 108
3,5 ~ 76
Bras (long) 90°
1,4 ~ 32
1 ~ 22
1,4 ~ 32
1 ~ 22
2 ~ 45
1,4 ~ 32
2,4 ~ 54
1,7 ~ 38
2,8 ~ 64
2 ~ 45
Les chires de la ligne supérieure correspondent à deux ashs doubles.
Les chires de la ligne inférieure correspondent à un ash double.
100mm F2.8 Macro
(Plage d’ouverture de l’objectif : f/2,8 - f/32)
Rapport de grossissement
1:1 1:1.5 1:2 1:3
Sans bras
3,5 ~ 76
2,4 ~ 54
3,5 ~ 76
2,4 ~ 54
2,8 ~ 64
2 ~ 45
2,4 ~ 54
1,7 ~ 38
Bras (court) 60°
2 ~ 45
1,4 ~ 32
2,8 ~ 64
2 ~ 45
2,8 ~ 64
2 ~ 45
2,8 ~ 64
2 ~ 45
Bras (long) 90°
1,2 ~ 27
0,85 ~ 19
1,7 ~ 38
1,2 ~ 27
2 ~ 45
1,4 ~ 32
2 ~ 45
1,4 ~ 32
Les chires de la ligne supérieure correspondent à deux ashs
doubles.
Les chires de la ligne inférieure correspondent à un ash double.
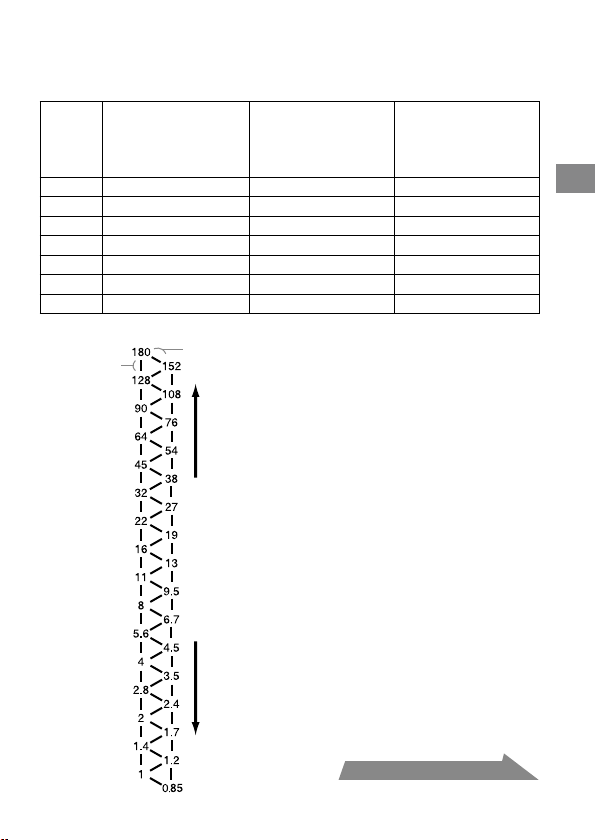
HVL-MT24AM_FR 2-889-493-41 (1)
27
Principes de base
Suite à la page suivante
Lors de l’utilisation d’un ISO autre que l’ISO 100, ou de
l’utilisation du grand angle ou du diuseur simple
Un réglage supplémentaire doit être appliqué aux résultats des tableaux précédents.
Sans diuseur grand
angle ou diuseur
simple (réglage de
l’exposition)
Avec diuseur grand
angle (réglage de
l’exposition)
Avec diuseur
simple (réglage de
l’exposition)
ISO 25 +2 diaphragmes +3,5 Diaphragmes +4,5 Diaphragmes
ISO 50 +1 diaphragme +2,5 Diaphragmes +3,5 Diaphragmes
ISO 100 Aucune modication +1,5 Diaphragmes +2,5 Diaphragmes
ISO 200 –1 diaphragme +0,5 Diaphragmes +1,5 Diaphragmes
ISO 400 –2 Diaphragmes –0,5 Diaphragmes +0,5 Diaphragmes
ISO 800 –3 Diaphragmes –1,5 Diaphragmes –0,5 Diaphragmes
ISO 1600 –4 Diaphragmes –2,5 Diaphragmes –1,5 Diaphragmes
Echelle f/diaphragme
Diaphragme
complet
Demi
diaphragme
Réduit l’exposition Augmente l’exposition
Utilisation de l’échelle
f/diaphragme
Sur l’échelle f/diaphragme à gauche,
se déplacer verticalement d’un
palier équivaut à un changement de
diaphragme complet. Se déplacer d’un
palier en diagonale équivaut à un demi
changement de diaphragme.
Un demi diaphragme est la base pour
le réglage de l’ouverture à cette étape.
Si vous utilisez un appareil photo avec
un réglage de diaphragme de 0,3, réglez
l’ouverture sur une valeur aussi proche
que possible d’une valeur indiquée dans
le tableau ci-dessus et utilisez l’ouverture
autour de l’échelle f/diaphragme.
Pour eectuer de la photographie de
précision, le bracketing est recommandé.
Exemple :
En partant de f/8, si vous diminuez
l’exposition d’un diaphragme complet,
vous obtenez f/11.
Si vous l’augmentez d’un demi
diaphragme, vous obtenez f/6,7.

28
HVL-MT24AM_FR 2-889-493-41 (1)
Sélection de l’ouverture lors de l’utilisation d’un ISO autre que
l’ISO 100, ou de l’utilisation du diuseur grand angle ou du
diuseur simple
1 Vériez la plage d’ouverture acceptable calculée dans les mêmes
conditions qu’avec l’ISO 100 à l’aide du tableau à la page 26.
2 Vériez les r
églages supplémentaires lors de l’utilisation d’un ISO autre
que l’ISO 100 ou lors de l’utilisation du diuseur grand angle ou d’un
diuseur simple à l’aide du tableau de la page 27.
3 Vériez la plage d’ouverture acceptable calculée à l’aide de l’échelle
f/diaphragme, en utilisant les résultats de l’étape 1 et l’étape 2.
4 Appliquez le r
ésultat de l’étape 3 à la plage d’ouverture réelle pour cet
objectif particulier et sélectionnez la plage utilisable pour obtenir des
résultats satisfaisants.
Exemple : Si vous utilisez un objectif 50mm F2.8 Macro, une paire de ashs
doubles, pas de bras, un rapport de grossissement de 1:2 et l’ISO
200
1 Vér
iez la plage d’ouverture acceptable calculée lors de l’utilisation d’un objectif
50mm F2.8 Macro avec une paire de ashs doubles, sans bras, à un rapport de
grossissement de 1:2 et avec l’ISO 100.
f/8 – f/180 (reportez-vous au tableau de la page 26)
2 Vér
iez les réglages supplémentaires lors de l’utilisation de l’ISO 200 et du
diuseur à l’aide du tableau de la page 27.
Augmente l’ouverture de +1,5 diaphragme (reportez-vous au tableau de la
page 27).
3 L’
ouverture augmentée de +1,5 diaphragme à partir de f/8 équivaut à f/4,5, et
l’ouverture augmentée de +1,5 diaphragme à partir de f/180 équivaut à f/108.
4 La p
lage d’ouverture réelle d’un objectif 50mm F2.8 Macro est de f/2,8 à f/32.
Ainsi, la limite supérieure de la plage f/4,5 - f/108 réglée, soit f/108, est inférieure
à la plage pouvant être réglée. La plage utilisable pour obtenir des résultats
satisfaisants est donc comprise entre f/4,5 et f/32.
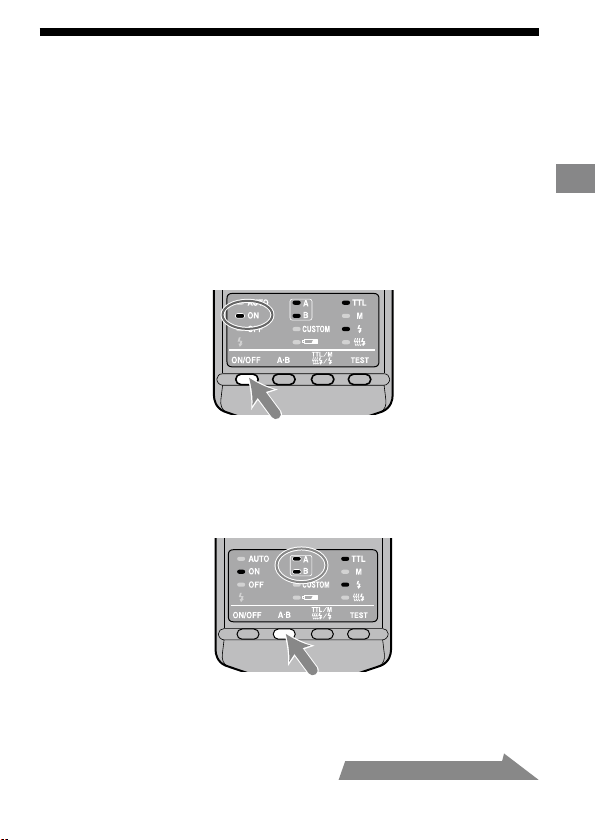
HVL-MT24AM_FR 2-889-493-41 (1)
29
Principes de base
Flash en mode de programmation
automatique (principes de base)
La procédure en mode P, dont la sélection de programmation du sujet, est la même
qu’en mode A ou M, mais l’ouverture est réglée automatiquement.
1 Réglez le commutateur POWER de l’appareil photo sur ON
et sélectionnez le mode P.
2 Appuyez sur la touche ON/OFF du ash pour allumer le
témoin ON du ash du panneau de commande.
3 Eectuez la mise au point sur le sujet et vériez le rapport
de grossissement.
4 Sélectionnez le ash.
5 Lorsque le contrôleur de ash macro est chargé, appuyez à
fond sur le déclencheur pour prendre une photo.
Suite à la page suivante

30
Avec certains appareils photo, le ash se déclenche automatiquement en mode P.
Dans ce cas, le témoin auto du ash macro s’allume et il est possible que le ash
ne se déclenche pas dans un environnement lumineux.
La programmation de ash en mode P est conçue pour les sujets en général, pas
pour les sujets en macro. Lors de prises de vue macro, la profondeur de champ
peut être très restreinte. Si l’ouverture sélectionnée par l’appareil photo est en
dehors de la plage utilisable, l’exposition correcte ne sera pas obtenue (p. 25 à
28).
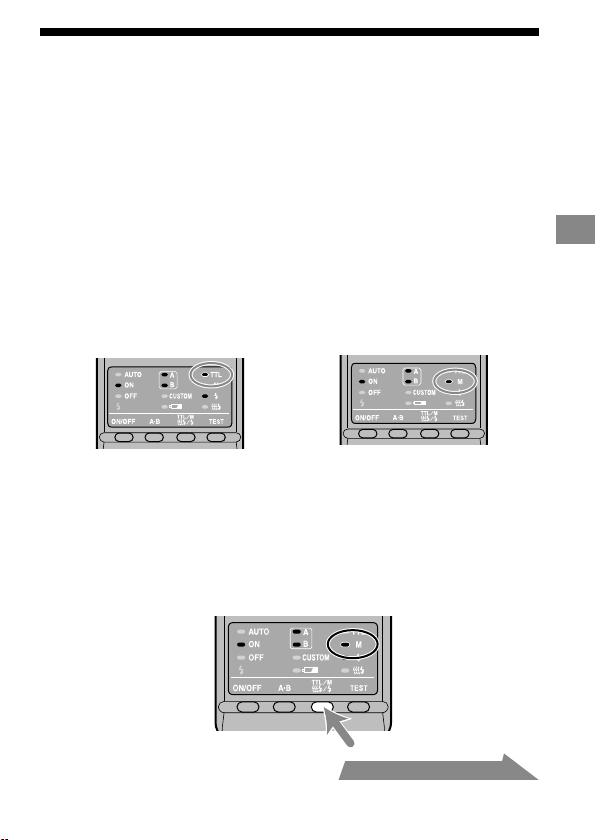
31
Fonctionnement détaillé
Flash manuel (M)
Le ashmètre TTL normal règle l’intensité de l’éclair an d’aboutir à une exposition
idéale pour le sujet. En mode manuel, l’intensité de l’éclair est xe, quels que soient
la luminosité du sujet et les réglages de l’appareil.
En m
ode m
anuel, la puissance maximale du ash est atteinte lorsque la
commande manuelle du ash est réglée sur 1/1. Chaque palier du niveau de
puissance du ash correspond à un diaphragme d’ouverture. Modier le réglage
d’un diaphragme, par exemple de 1/1 à 1/2, équivaut à réduire l’ouverture d’un
diaphragme, par exemple de f/4 à f/5,6.
L
e m
ode manuel ne peut être utilisé que lorsque l’appareil photo lui-même est en
mode manuel (M). Dans les autres modes, la mesure TTL est automatiquement
sélectionnée.
Le mode manuel n’étant pas inuencé par le pouvoir de réexion du sujet, il peut
être utilisé pour exposer des sujets présentant un pouvoir de réexion très fort
ou très faible.
Flashmètre TTL Flashmètre manuel
1 Sélectionnez le mode M sur l’appareil photo.
2 Appuyez sur la touche TTL/M/Test pour allumer le témoin
M (mode manuel).
Les modes changent selon la progression suivante : (Test du ash (p. 39),
lampe pilote (p. 40))
Suite à la page suivante
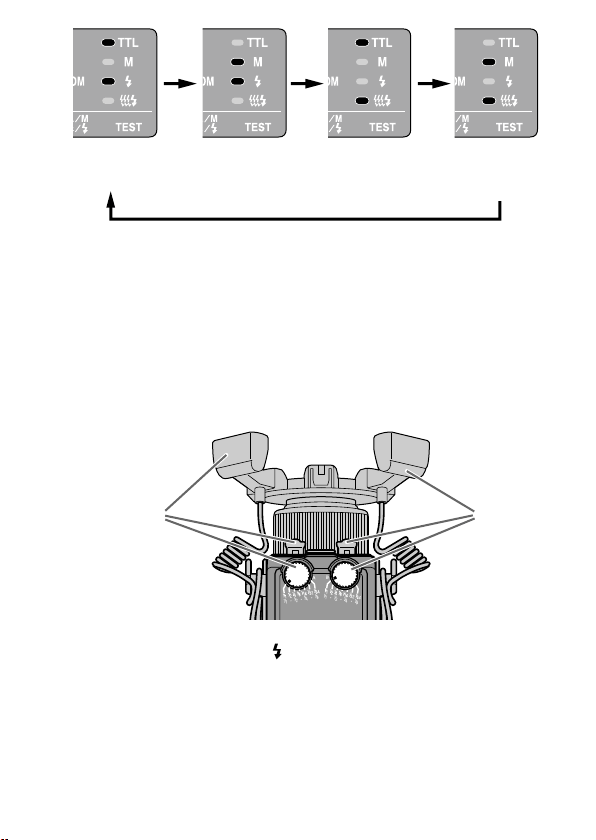
32
HVL-MT24AM_FR 2-889-493-41 (1)
Flash TTL Test du
ash
Flash manuel Test
du ash
Flash TTL Lampe
pilote
Flash manuel
Lampe pilote
3 Sélectionnez la vitesse d’obturation et l’ouverture (p. 33
- 38).
4 Tournez la molette de mode manuel adaptée et
sélectionnez le niveau de puissance souhaité (p. 33 - 38).
De l’arrière (côté du panneau de commande), la molette de mode manuel
pour le ash double A est située à gauche, et celle pour le ash double B à
droite. Vous pouvez sélectionner n’importe quel niveau de puissance sur
l’échelle supérieure entre 1/1 et 1/64.
Flash A Flash B
En mode manuel, si l’exposition de la photo qui vient d’être prise est bonne,
le témoin de charge du ash
ne clignote pas sur le panneau de commande
après la prise de la photo.
Les fo
nctions personnalisées permettent de sélectionner le mode manuel
sans qu’il soit nécessaire de régler l’appareil en mode M. Vous pouvez
également modier la taille des paliers des molettes de mode manuel par
incréments d’un diaphragme complet à un demi diaphragme (p. 47).

HVL-MT24AM_FR 2-889-493-41 (1)
33
Fonctionnement détaillé
Sélection des ouvertures et du niveau de
puissance en mode manuel
Les tableaux suivants présentent les valeurs pour l’ISO 100 sans diuseur grand
angle ou diuseur simple. Pour les autres vitesses ISO, ou lors de l’utilisation du
diuseur grand angle ou d’un diuseur simple, réglez l’ouverture selon le tableau
de la page 37. Lors de l’utilisation des ashs doubles, les données supposent que
le niveau de puissance est le même pour les deux ashs. Si elles sont réglées à
diérents niveaux de puissance, reportez-vous à la page 36.
L
es valeurs d’ouverture présentées dans les tableaux sont des valeurs calculées.
L’objectif utilisé possède sa propre plage d’ouverture utilisable.
Exemple: Si v
ous utilisez un objectif 50mm F2.8 Macro avec l’ISO 100,
une paire de ashs doubles sans bras, un niveau de puissance
de 1/1 et un rapport de grossissement de 1:1
L’ouverture est calculée à f/90 (reportez-vous au tableau suivant).
To
utefois, l’ouverture réelle la plus petite possible avec cet
objectif est f/32.
Par co
nséquent, si vous réglez le niveau de puissance sur 1/1,
l’image sera surexposée.
Cepen
dant, si vous réglez le niveau de puissance sur 1/8, vous
obtiendrez une exposition correcte à f/32.
Les ta
bleaux suivants présentent les ouvertures lorsque l’on obtient l’éclairage
correct de la zone éclairée. L’exposition réelle varie selon la forme ou la position
du sujet (p. 52). Il est recommandé d’eectuer des essais de photo ou de
bracketing, surtout si le sujet est éclairé depuis le côté ou l’arrière.
Les ta
bleaux suivants présentent les données pour certains objectifs et certains
rapports de grossissement. Pour d’autres objectifs et rapports de grossissement,
reportez-vous à la page 54.
Suite à la page suivante

34
HVL-MT24AM_FR 2-889-493-41 (1)
50mm F2.8 Macro
(Plage d’ouverture de l’objectif : f/2,8 à f/32)
Rapport de grossissement
1:1 1:1.5 1:2 1:3 1:4
Niveau de puissance
Sans bras
1/1 90 (64) 128 (90) 180 (128) 128 (90) 108 (76)
1/2 64 (45) 90 (64) 128 (90) 90 (64) 76 (54)
1/4 45 (32) 64 (45) 90 (64) 64 (45) 54 (38)
1/8 32 (22) 45 (32) 64 (45) 45 (32) 38 (27)
1/16 22 (16) 32 (22) 45 (32) 32 (22) 27 (19)
1/32 16 (11) 22 (16) 32 (22) 22 (16) 19 (13)
1/64 11 (8) 16 (11) 22 (16) 16 (11) 13 (9,5)
Bras
(court)
60°
1/1 54 (38) 64 (45) 90 (64) 90 (64) 108 (76)
1/2 38 (27) 45 (32) 64 (45) 64 (45) 76 (54)
1/4 27 (19) 32 (22) 45 (32) 45 (32) 54 (38)
1/8 19 (13) 22 (16) 32 (22) 32 (22) 38 (27)
1/16 13 (9,5) 16 (11) 22 (16) 22 (16) 27 (19)
1/32 9,5 (6,7) 11 (8) 16 (11) 16 (11) 19 (13)
1/64 6,7 (4,5) 8 (5,6) 11 (8) 11 (8) 13 (9,5)
Bras
(long)
90°
1/1 32 (22) 32 (22) 45 (32) 54 (38) 64 (45)
1/2 22 (16) 22 (16) 32 (22) 38 (27) 45 (32)
1/4 16 (11) 16 (11) 22 (16) 27 (19) 32 (22)
1/8 11 (8) 11 (8) 16 (11) 19 (13) 22 (16)
1/16 8 (5,6) 8 (5,6) 11 (8) 13 (9,5) 16 (11)
1/32 5,6 (4) 5,6 (4) 8 (5,6) 9,5 (6,7) 11 (8)
1/64 4 (2,8) 4 (2,8) 5,6 (4) 6,7 (4,5) 8 (5,6)
Utilisez les valeurs d’ouverture entre ( ) uniquement si vous utilisez un ash double.
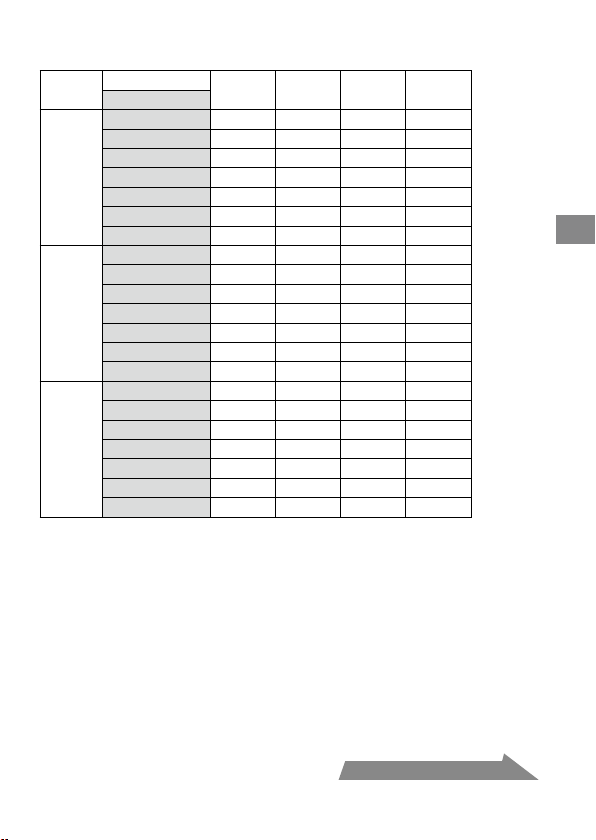
HVL-MT24AM_FR 2-889-493-41 (1)
35
Fonctionnement détaillé
100mm F2.8 Macro
(Plage d’ouverture de l’objectif : f/2,8 à f/32)
Rapport de grossissement
1:1 1:1.5 1:2 1:3
Niveau de puissance
Sans bras
1/1 76 (54) 76 (54) 64 (45) 54 (38)
1/2 54 (38) 54 (38) 45 (32) 38 (27)
1/4 38 (27) 38 (27) 32 (22) 27 (19)
1/8 27 (19) 27 (19) 22 (16) 19 (13)
1/16 19 (13) 19 (13) 16 (11) 13 (9,5)
1/32 13 (9,5) 13 (9,5) 11 (8) 9,5 (6,7)
1/64 9,5 (6,7) 9,5 (6,7) 8 (5,6) 6,7 (4,5)
Bras
(court)
60°
1/1 45 (32) 64 (45) 64 (45) 64 (45)
1/2 32 (22) 45 (32) 45 (32) 45 (32)
1/4 22 (16) 32 (22) 32 (22) 32 (22)
1/8 16 (11) 22 (16) 22 (16) 22 (16)
1/16 11 (8) 16 (11) 16 (11) 16 (11)
1/32 8 (5,6) 11 (8) 11 (8) 11 (8)
1/64 5,6 (4) 8 (5,6) 8 (5,6) 8 (5,6)
Bras
(long)
90°
1/1 27 (19) 38 (27) 45 (32) 45 (32)
1/2 19 (13) 27 (19) 32 (22) 32 (22)
1/4 13 (9,5) 19 (13) 22 (16) 22 (16)
1/8 9,5 (6,7) 13 (9,5) 16 (11) 16 (11)
1/16 6,7 (4.5) 9,5 (6,7) 11 (8) 11 (8)
1/32 4,5 (3,5) 6,7 (4,5) 8 (5,6) 8 (5,6)
1/64 3,5 (2,4) 4,5 (3,5) 5,6 (4) 5,6 (4)
Utilisez les valeurs d’ouverture entre ( ) uniquement si vous utilisez un ash double.
Suite à la page suivante
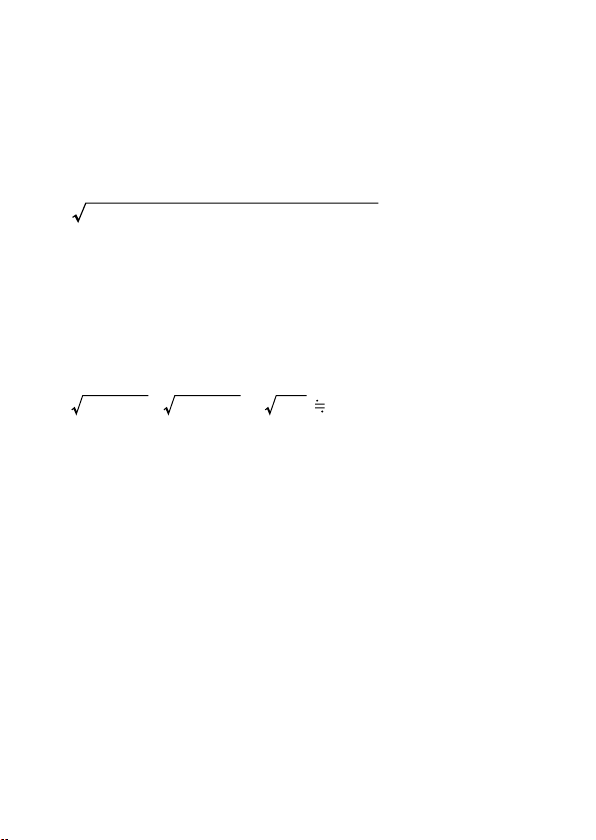
36
HVL-MT24AM_FR 2-889-493-41 (1)
Lorsque les ashs doubles sont réglés sur un niveau de
puissance diérent
Les valeurs pour les ashs doubles données dans le tableau précédent supposent
que les deux ashs doubles sont réglés sur le même niveau de ash.
Lorsque les deux ashs sont réglés sur des niveaux de ash diérents, vous pouvez
calculer l’ouverture nécessaire pour une exposition correcte à l’aide de l’équation
suivante :
Ouverture*
=
(ouverture du ash A)
2
+ (ouverture du ash B)
2
Exemple :
Si vous utilisez un objectif 100mm F2.8 Macro avec une paire de ashs
doubles sans bras, le ash « A » est réglé sur un niveau de puissance de
1/8, le ash « B » est réglé sur 1/16, et le rapport de grossissement est 1:1
L’ouverture du ash A réglée à un niveau de puissance de 1/8 est f/19 et
l’ouverture du ash B réglée à un niveau de puissance de 1/16 est f/13 (reportez-
vous au tableau de la page 35).
Appliquez ces résultats à l’équation ci-dessus.
19
2
+ 13
2
= 361 + 169 = 530 22
Par conséquent, dans l’exemple ci-dessus, un réglage d’ouverture de f/22 donne
l’exposition correcte.
* Lorsque les deux ashs doubles sont utilisés.
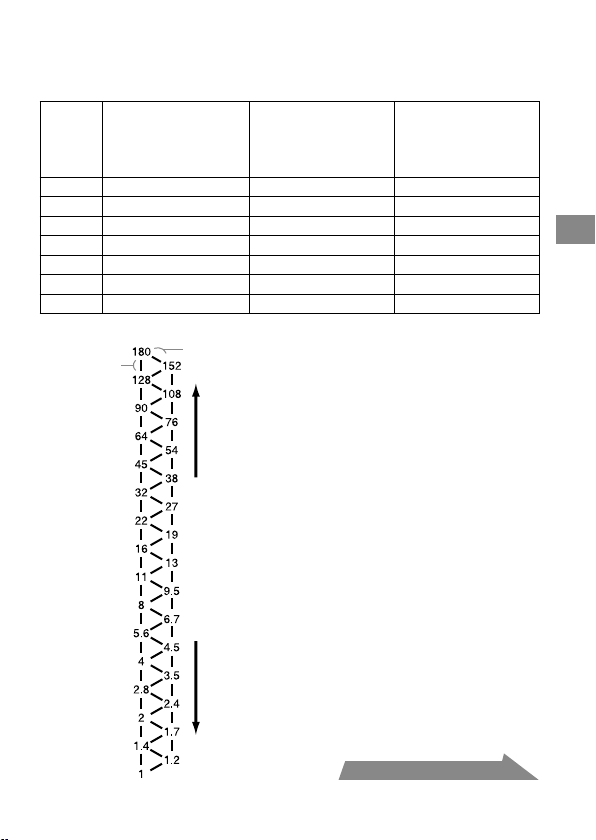
HVL-MT24AM_FR 2-889-493-41 (1)
37
Fonctionnement détaillé
Lors de l’utilisation d’un ISO autre que l’ISO 100 ou lors de
l’utilisation du diuseur grand angle ou du diuseur simple
Un réglage supplémentaire doit être appliqué aux résultats des tableaux précédents.
Sans diuseur grand
angle ou diuseur
simple (réglage de
l’exposition)
Avec diuseur grand
angle (réglage de
l’exposition)
Avec diuseur
simple (réglage de
l’exposition)
ISO 25 +2 Diaphragmes +3,5 Diaphragmes +4,5 Diaphragmes
ISO 50 +1 Diaphragme +2,5 Diaphragmes +3,5 Diaphragmes
ISO 100 Aucune modication +1,5 Diaphragmes +2,5 Diaphragmes
ISO 200 –1 Diaphragme +0,5 Diaphragmes +1,5 Diaphragmes
ISO 400 –2 Diaphragmes –0,5 Diaphragmes +0,5 Diaphragmes
ISO 800 –3 Diaphragmes –1,5 Diaphragmes –0,5 Diaphragmes
ISO 1600 –4 Diaphragmes –2,5 Diaphragmes –1,5 Diaphragmes
Echelle f/diaphragme
Diaphragme
complet
Demi
diaphragme
Réduit l’exposition Augmente l’exposition
Utilisation de l’échelle
f/diaphragme
Sur l’échelle f/diaphragme à gauche,
se déplacer verticalement d’un
palier équivaut à un changement de
diaphragme complet. Se déplacer d’un
palier en diagonale équivaut à un demi
changement de diaphragme.
Un demi diaphragme est la base pour
le réglage de l’ouverture à cette étape.
Si vous utilisez un appareil photo avec
un réglage de diaphragme de 0,3, réglez
l’ouverture sur une valeur aussi proche
que possible d’une valeur indiquée dans
le tableau ci-dessus et utilisez l’ouverture
autour de l’échelle f/diaphragme.
Pour eectuer de la photographie de
précision, le bracketing est recommandé.
Exemple :
En partant de f/8, si vous diminuez
l’exposition d’un diaphragme complet,
vous obtenez f/11.
Si vous l’augmentez d’un demi
diaphragme, vous obtenez f/6,7.
Suite à la page suivante

38
HVL-MT24AM_FR 2-889-493-41 (1)
Sélection de l’ouverture lors de l’utilisation d’un ISO autre que
l’ISO 100, ou de l’utilisation du diuseur grand angle ou du
diuseur simple
1
Vériez la plage d’ouverture acceptable calculée dans les mêmes
conditions qu’avec l’ISO 100 à l’aide du tableau aux pages 34 et 35.
2
Vériez les réglages supplémen
taires lors de l’utilisation d’un ISO autre
que l’ISO 100 ou lors de l’utilisation du diuseur grand angle ou du
diuseur simple à l’aide du tableau de la page 37.
3
Sélectionnez l’ouverture acceptable calculée à l’aide de l’échelle
f/diaphragme, en utilisant les résultats des étapes 1 et 2.
Exemple: Si v
ous utilisez un objectif 100mm F2.8 Macro, une paire de
ashs doubles sans bras, à un niveau de puissance de 1/4, un
rapport de grossissement de 1:1, avec l’ISO 200 avec le diuseur
1 Vér
iez l’ouverture acceptable calculée lors de l’utilisation d’un objectif 100mm
F2.8 Macro avec une paire de ashs doubles, sans bras, à un niveau de puissance
de 1/4, un rapport de grossissement de 1:2 et avec l’ISO 100.
f/38 (reportez-vous au tableau à la page 35)
2 Vér
iez les réglages supplémentaires lors de l’utilisation de l’ISO 200 et du
diuseur à l’aide du tableau de la page 37.
Augmentez l’ouverture de +1,5 diaphragme (reportez-vous au tableau à la
page 37).
3 L’
ouverture augmentée de +1,5 diaphragme à partir de f/38 équivaut à f/22.
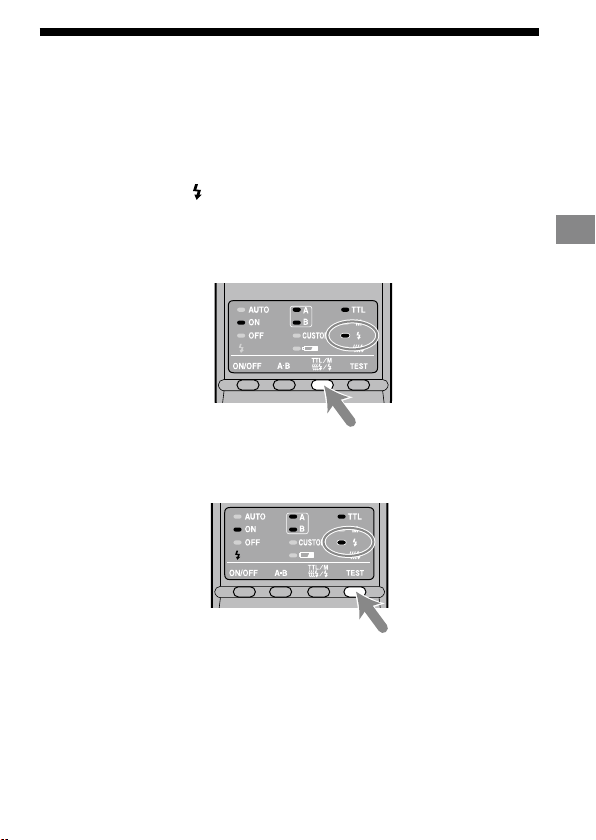
HVL-MT24AM_FR 2-889-493-41 (1)
39
Fonctionnement détaillé
Test du ash
Un éclair peut être commandé avant de déclencher. Utilisez ce mode lors de
l’utilisation d’un ashmètre en mode manuel.
1 Appuyez sur la touche TTL/M/Test pour allumer le témoin
de test du ash
.
A chaque pression sur la touche TTL/M/Test pour modier les témoins TTL
et M, vériez que le témoin approprié est allumé. (Reportez-vous à la page 32
pour la séquence d’achage.)
2 Appuyez sur la touche TEST (touche test/lampe pilote).
Avec le ashmètre TTL, le test de ash émet des éclairs en pleine puissance
lorsque vous appuyez sur la touche TEST.
En mode m
anuel, le test de ash émet des éclairs au niveau de puissance
sélectionné lorsque vous appuyez sur la touche TEST. Lors de l’utilisation
d’un ashmètre, utilisez le mode manuel.
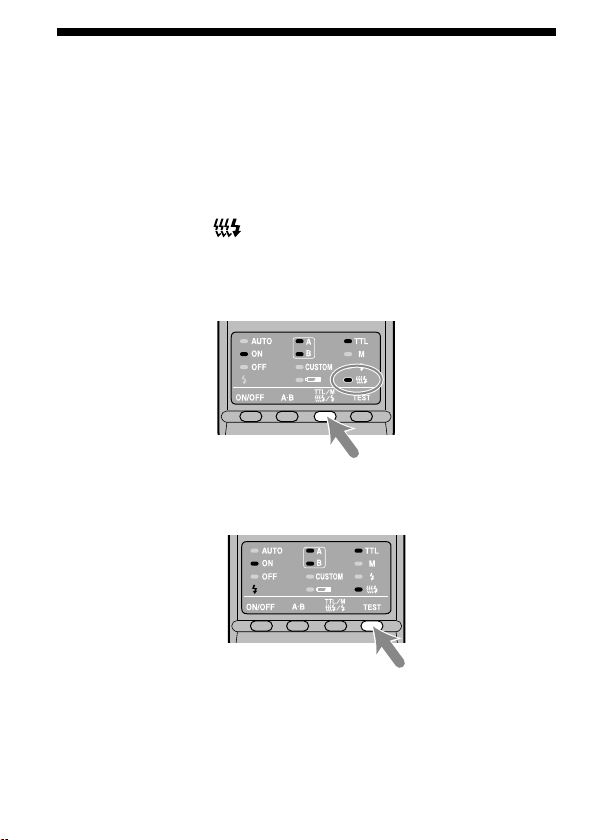
40
HVL-MT24AM_FR 2-889-493-41 (1)
Lampe pilote
Vous pouvez essayer le ash en continu pour visualiser les ombres portées sur un
sujet avant la prise de vue.
Le ash émet des éclairs durant deux secondes à la fréquence de 40 éclairs par
seconde.
1 Appuyez sur la touche TTL/M/Test pour allumer le témoin
de lampe pilote
.
A chaque pression sur la touche TTL/M/Test pour modier les témoins TTL
et M, vériez que le témoin approprié est allumé. (Reportez-vous à la page 32
pour la séquence d’achage.)
2 Appuyez sur la touche TEST (touche test/lampe pilote).
N’appuyez pas sur le déclencheur pendant l’utilisation du ash.
Sur la p
hoto, la dureté des ombres peut être sensiblement diérente de celle
visualisée.
Les om
bres portées sont plus douces lorsque le ash est utilisé dans une
pièce bien éclairée ou à l’extérieur, ou encore, lorsqu’il est utilisé en indirect.
Cependant, la visualisation est encore plus délicate.
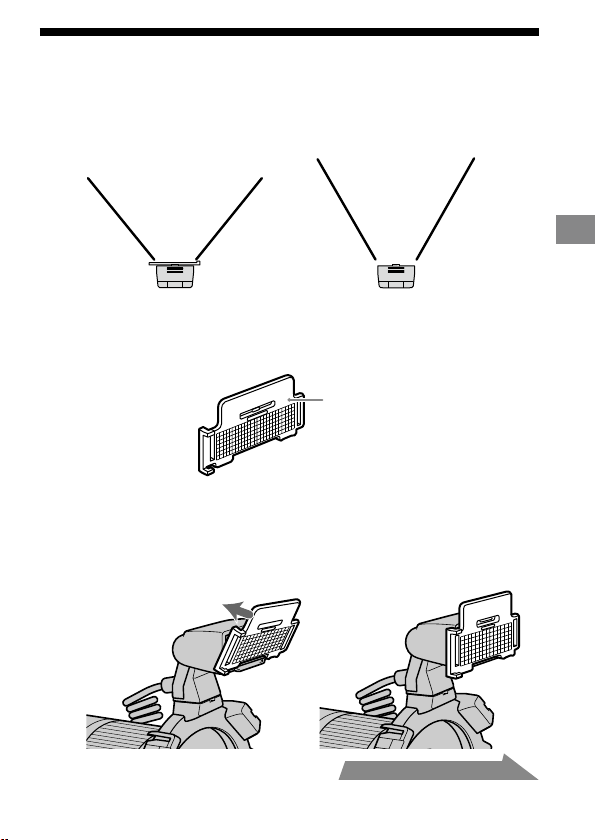
HVL-MT24AM_FR 2-889-493-41 (1)
41
Fonctionnement détaillé
Diuseur grand angle
La couverture du ash double est de 60° horizontalement et 45° verticalement
(équivalent à un objectif avec une longueur focale de 35 mm). Avec le diuseur
grand angle, les angles sont élargis jusqu’à 78° horizontalement et 60° verticalement
(équivalent à un objectif avec une longueur focale de 24 mm).
Avec diuseur grand angle
Sans diuseur grand angle
Fixation du diuseur grand angle
1
Vériez le côté gauche du diuseur grand angle.
Face avant
2 Alignez le bord inférieur du diuseur grand angle sur la
partie saillante sur le côté du tube à éclairs, puis appuyez
sur le diuseur grand angle.
Appuyez sur le diuseur grand angle jusqu’au déclic indiquant qu’il est en
place.
Suite à la page suivante
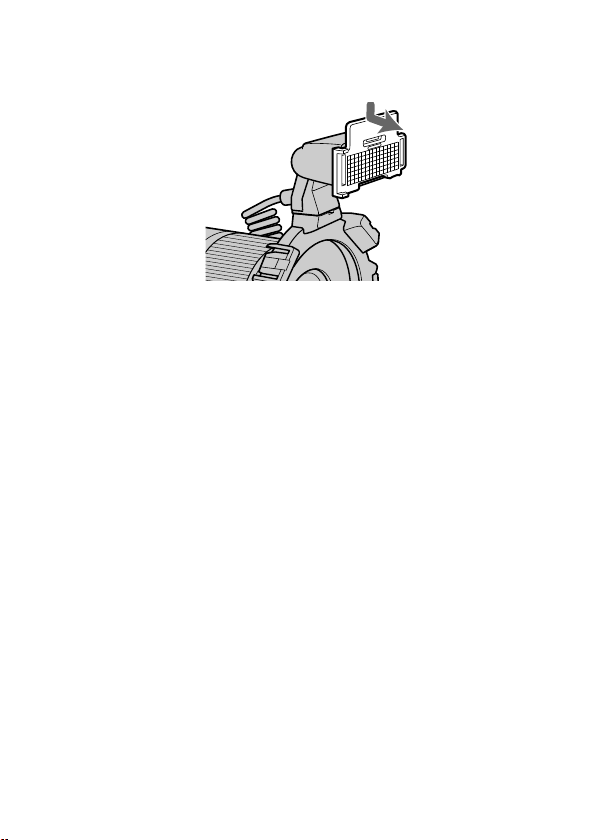
42
HVL-MT24AM_FR 2-889-493-41 (1)
Retrait du diuseur grand angle
Maintenez l’ergot supérieur du diuseur grand angle et tirez-
le vers l’avant tout en appuyant légèrement vers le bas.
Lors de l’utilisation du diuseur grand angle, la sortie de ash est réduite.
Reportez-vous à la page 27 pour plus d’informations sur le ashmètre TTL et à la
page 37 pour plus d’informations sur le ashmètre manuel.

HVL-MT24AM_FR 2-889-493-41 (1)
43
Fonctionnement détaillé
Diuseur
En xant le diuseur au tube à éclairs, vous pouvez atténuer les ombres dures.
Utilisez toujours le diuseur avec un bras pour éviter qu’il n’apparaisse sur les
images.
Exemple:
Avec diuseur Sans diuseur
Utilisation du diuseur
1 Détachez le panneau du diuseur.
Il est impossible de
détacher ce côté.
Suite à la page suivante
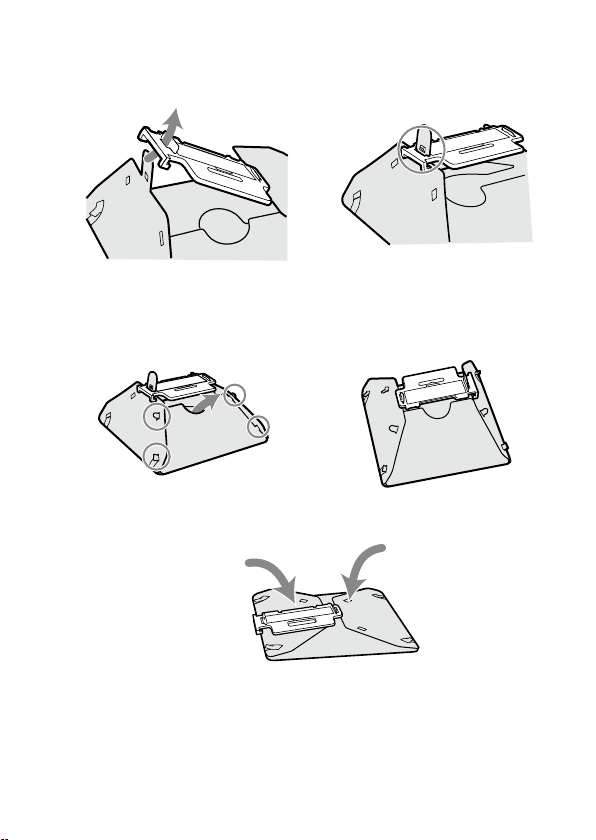
44
HVL-MT24AM_FR 2-889-493-41 (1)
2 Faites glisser l’ergot à travers la fente située près de la
xation, comme illustré. Le creux situé au dessus de la
fente devrait glisser dans le trou de l’ergot.
3 Placez les quatre ergots latéraux dans la fente sur le côté
du diuseur.
Eectuez la même opération de l’autre côté.
Si vous rencontrez des dicultés pour assembler le diuseur, pliez-le et
essayez de nouveau.
Remarque
Ne forcez pas ou ne tirez pas brusquement sur le diuseur. Ne repliez pas le
diuseur à l’envers.
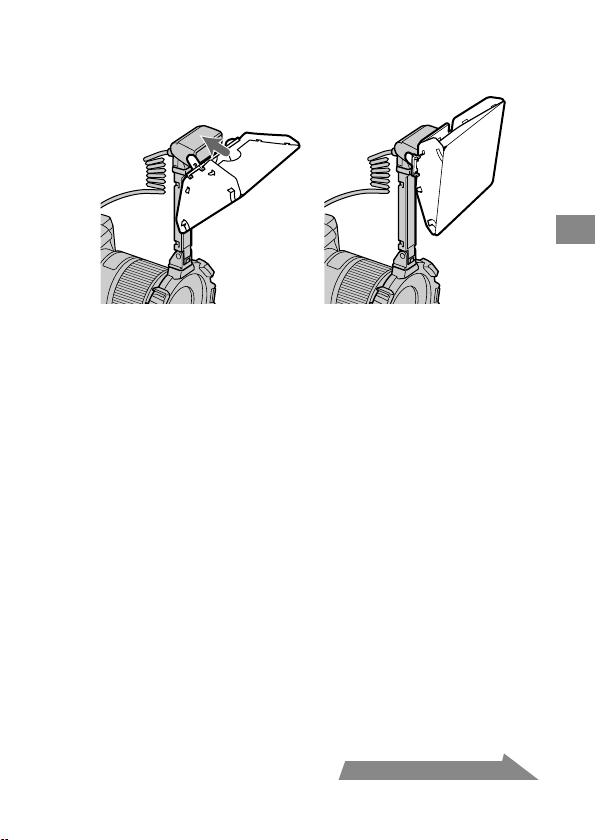
HVL-MT24AM_FR 2-889-493-41 (1)
45
Fonctionnement détaillé
4 Tout en maintenant le diuseur par l’ergot supérieur du
panneau, pressez-le contre la façade du ash double.
Appuyez sur le diuseur jusqu’au déclic indiquant qu’il est en place.
Remarques sur l’utilisation du diuseur
Si le bras est réglé à 60° et utilisé avec un objectif grand angle, il est possible
que le diuseur apparaisse sur l’image. Il est recommandé de toujours utiliser le
diuseur avec le bras réglé à 90°
Lors de l’utilisation du diuseur, la sortie de ash est réduite. Reportez-vous à
la page 27 pour plus d’informations sur le ashmètre TTL, ou à la page 37 pour
plus d’informations sur le ashmètre manuel.
Suite à la page suivante
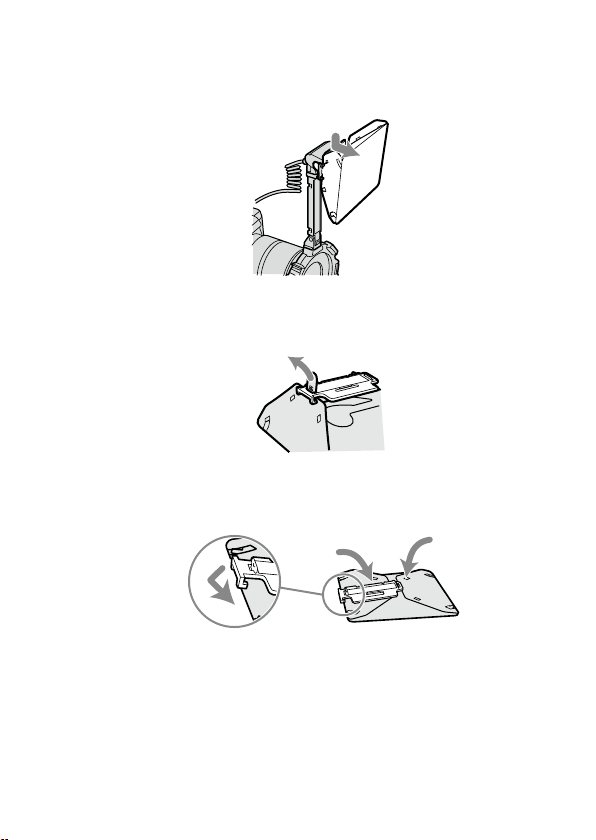
46
HVL-MT24AM_FR 2-889-493-41 (1)
Retrait du diuseur
1
Retirez le diuseur tout en maintenant l’ergot supérieur du
panneau.
2 Retirez l’ergot du creux, comme illustré. Vous pouvez
maintenant retirer facilement le diuseur.
3 Repliez le diuseur et bloquez-le en xant le panneau
dessus.
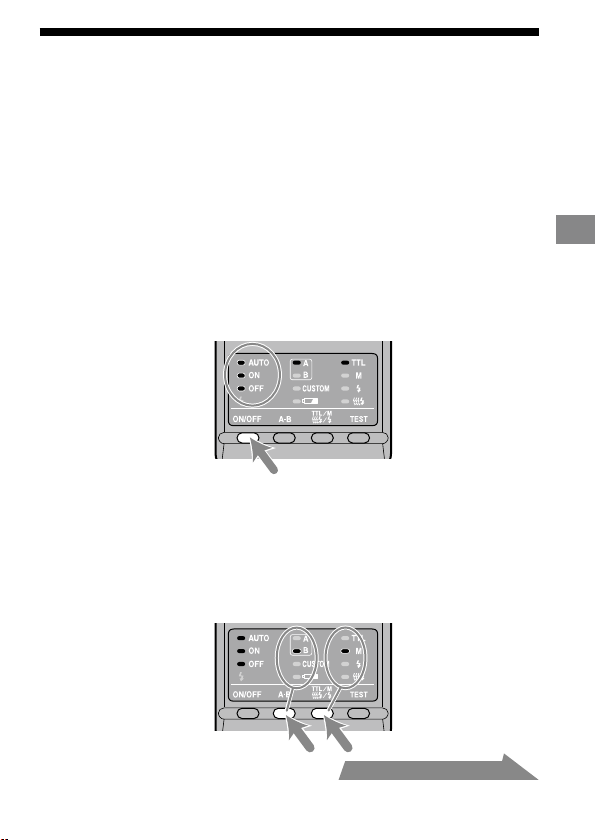
HVL-MT24AM_FR 2-889-493-41 (1)
47
Fonctionnement détaillé
Fonctions personnalisables
Les divers réglages du ash peuvent être modiés si nécessaire.
Les trois paramètres suivants peuvent être modiés.
Duré
e de temporisation avant l’auto-extinction
(4 minutes/15 minutes/60 minutes/Aucune)
M
odes de p
rise de vue pour lesquels le mode manuel peut être utilisé
(Mode M uniquement/Tous les modes)
P
alier
s du niveau de puissance en mode manuel
(Incréments de 1EV / Incréments de 1/2EV)
1 Appuyez sur la touche ON/OFF du ash pendant 3
secondes.
Le témoin auto et les témoins ON et OFF du ash s’allument tous en même
temps, et l’élément (durée de temporisation avant auto-extinction) s’ache.
2 Appuyez sur la touche A-B (touche de sélection A-B du
ash double) pour sélectionner l’élément, puis appuyez
sur la touche TTL/M/Test pour sélectionner le réglage
souhaité.
A chaque pression sur la touche A-B, les trois paramètres ci-dessus s’achent
sur le panneau de commande (voir page suivante).
Suite à la page suivante
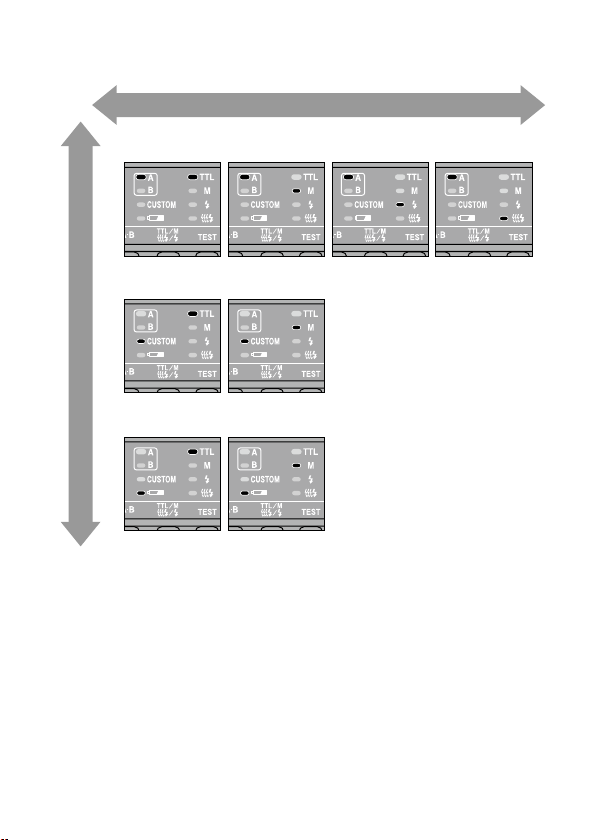
48
HVL-MT24AM_FR 2-889-493-41 (1)
1. Durée de temporisation avant l’auto-extinction
4 minutes 15 minutes
Mode M uniquement
Tous les modes
Incréments de 1EV
Incréments de 1/2EV
60 minutes Aucune
2.
Modes de prise de vue pour lesquels le mode manuel peut être utilisé
3. Paliers du niveau de puissance en mode manuel
Sélection à l’aide de la touche TT L/M/Test
Sélection à l’aide de la touche A-B
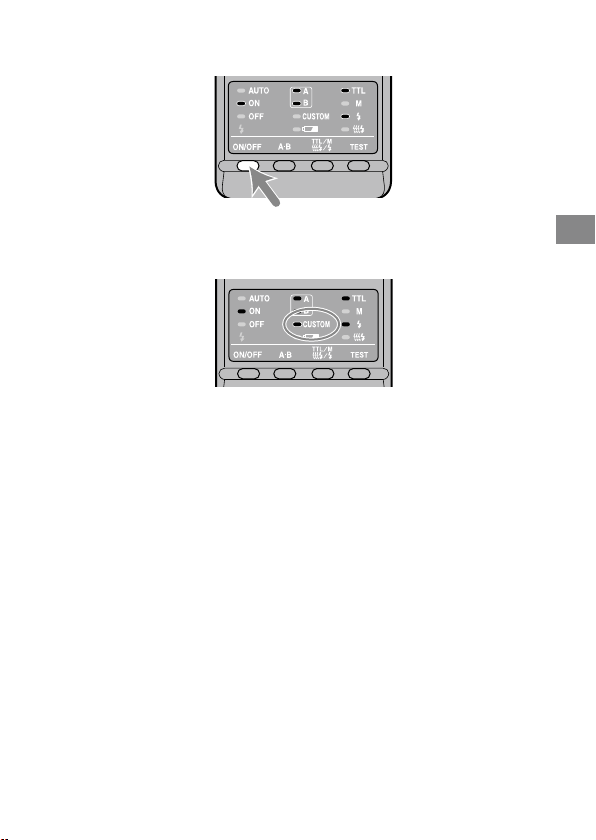
HVL-MT24AM_FR 2-889-493-41 (1)
49
Fonctionnement détaillé
3 Après avoir eectué vos sélections, appuyez sur la touche
ON/OFF du ash pour quitter le mode de personnalisation.
Lorsqu’un réglage autre que le réglage par défaut est sélectionné en mode de
personnalisation, le témoin Custom du panneau de commande s’allume.
Lorsque « Tous les modes » est sélectionné (voir 2. Modes de prise de vue
pour lesquels le mode manuel peut être utilisé), le mode manuel peut être
utilisé dans tous les modes de prise de vue.*
* Vous ne pouvez pas obtenir l’exposition correcte dans un mode autre que
M. Il est donc recommandé d’utiliser le mode M.
Si « In
créments de 1/2 EV » est sélectionné à l’élément 3, utilisez les valeurs
de puissance grisées fournies sur l’échelle inférieure des molettes de mode
manuel. Les valeurs de demi incrément ne sont pas écrites sur l’échelle.
Les valeurs de puissance sont 1/1, 1/1,4, 1/2, 1/2,8, 1/4, 1/5,6 et 1/8.
Les rég
lages sélectionnés sont conservés, même lorsque le ash est mis hors
tension ou si les piles sont retirées.

50
HVL-MT24AM_FR 2-889-493-41 (1)
Exemples de prises de vue avec le ash
macro double
En utilisant le ash macro double, vous pouvez modier la position et l’angle du
ash double pour obtenir un éclairage plus expressif.
Exemple:
Lumière zénithale
uniquement
Lumière latérale
uniquement
Lumière zénithale et
latérale
En utilisant le diuseur xé au tube à éclairs (p. 43), vous pouvez atténuer les
ombres dures portées sur les sujets.
Exemple :
Lumière zénithale avec diuseur

HVL-MT24AM_FR 2-889-493-41 (1)
51
Informations complémentaires
Suite à la page suivante
Prise de vue avec deux ashs doubles avec
bras
Eclairez le sujet latéralement avec les bras pour accentuer des détails et donner de
la profondeur.
Exemple:
Avec bras, latéralement
Sans bras depuis l’avant
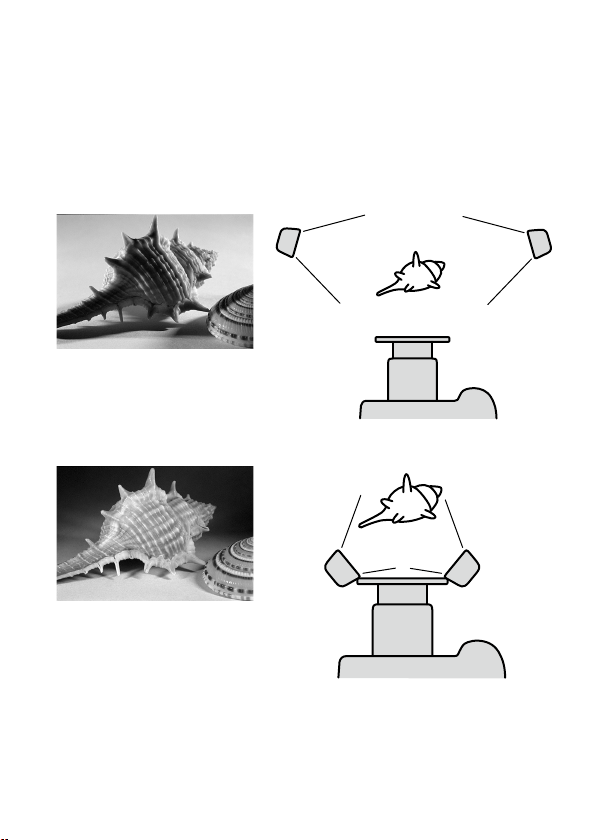
52
HVL-MT24AM_FR 2-889-493-41 (1)
Remarque
Si un sujet en gros plan est éclairé latéralement à l’aide d’un bras, des ombres dures
peuvent être créées. Un éclairage au ash puissant par l’arrière du sujet peut créer
un miroitement.
C
e phén
omène est particulièrement susceptible de se produire avec un objectif
50mm F2.8 Macro avec des tubes à éclairs xés sur les bras.
Exemple:
Avec bras, latéralement
Sans bras depuis l’avant

HVL-MT24AM_FR 2-889-493-41 (1)
53
Informations complémentaires
Graphique des plages d’ouverture
La plage d’ouverture pour les objectifs macro est présentée aux pages 25 (TTL) et
33 (mode manuel). Les plages d’ouverture décrites ici correspondent aux objectifs
autres que les objectifs macro, ou à une situation où la distance par rapport au sujet
est importante.
Flashmètre TTL
Distance flash-sujet
L
ignes d’ouverture minimale
Ouverture
Lignes d’ouverture maximale
Lignes d’ouverture minimale
Lignes d’ouverture maximale
Le paragraphe suivant explique la façon d’obtenir la plage d’ouverture à l’aide des
deux unités de ash double à une distance ash-sujet de 1,5 m, ISO 100.
1 Tracez une ligne verticale vers le bas à partir de la distance ash-sujet jusqu’à ce
qu’elle atteigne la ligne d’ouverture minimale ().
2 Tracez une ligne horizontale vers la gauche à partir de jusqu’à ce qu’elle
atteigne la ligne ISO verticale correspondant à l’appareil utilisé ().
3 Tracez une diagonale à partir de vers le bas puis vers la gauche. Le résultat
indique l’ouverture minimale qui fournit l’exposition correcte ().
4 L’ouverture maximale peut être obtenue de la même façon en utilisant la ligne
d’ouverture maximale (). Les résultats de ces deux calculs donnent la plage
d’ouverture utilisable pour obtenir l’exposition correcte ().
Dans ce cas, l’exposition correcte peut être obtenue en réglant l’ouverture de
l’appareil photo entre le maximum et f/16.
Les lignes pointillées servent uniquement lorsqu’un seul ash double est utilisé.
Suite à la page suivante
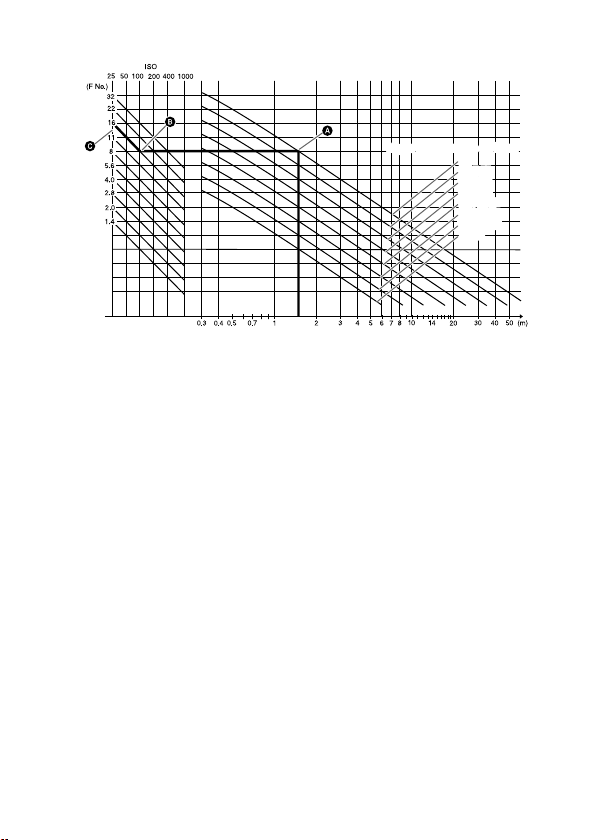
54
HVL-MT24AM_FR 2-889-493-41 (1)
Flashmètre manuel
Distance flash-sujet
Ouverture
Ligne de puissance du flashLigne de puissance du flash
1/1
1/2 (1/1)
1/4 (1/2)
1/8 (1/4)
1/16 (1/8)
1/32 (1/16)
1/64 (1/32)
(1/64)
1/1
1/2 (1/1)
1/4 (1/2)
1/8 (1/4)
1/16 (1/8)
1/32 (1/16)
1/64 (1/32)
(1/64)
Le paragraphe suivant explique la façon d’obtenir l’ouverture à l’aide de la paire de
ashs doubles avec un niveau de puissance de 1/1, à une distance ash-sujet de 1,5
m et avec l’ISO 100.
1
Trace
z une ligne verticale vers le haut à partir de la distance ash-sujet jusqu’à
ce qu’elle atteigne la ligne de puissance du ash correspondant au niveau de
puissance réglé ().
2 Trace
z une ligne horizontale vers la gauche à partir de jusqu’à ce qu’elle
atteigne la ligne ISO verticale correspondant à l’appareil utilisé ().
3
Trace
z une diagonale à partir de vers le bas puis vers la gauche. Le résultat
indique l’ouverture qui fournit l’exposition correcte ().
Dans ce cas, l’exposition correcte peut être obtenue en réglant l’ouverture de
l’appareil photo sur f/16.
L
es chires entre parenthèses servent lorsqu’un seul ash double est utilisé.

HVL-MT24AM_FR 2-889-493-41 (1)
55
Informations complémentaires
Compatibilité avec d’autres produits
Objectif
Des bagues adaptatrices de 49 mm et 55 mm de diamètre sont fournies.
Obj
ectifs dont les montures tournent lorsque la mise au point automatique est
impossible.
Lor
s de l’utilisation d’un objectif grand angle, il est possible qu’une partie du
support apparaisse sur l’image. N’utilisez pas d’objectifs dont la longueur focale
est inférieure à 24 mm. Si la longueur focale est comprise entre 24 mm et 27
mm, contactez un revendeur Sony agréé.
Si vo
us utilisez un ltre dont la longueur focale est inférieure à 50 mm, il est
possible qu’une partie du support apparaisse sur l’image.

56
HVL-MT24AM_FR 2-889-493-41 (1)
Remarques sur l’utilisation
En prise de vues
Ce ash émet des éclairs puissants et ne doit donc pas être dirigé directement
vers les yeux.
Lor
s de l’émission de l’éclair, le tube à éclairs peut être très chaud. Ne pas la
toucher.
Piles
Ne stockez pas le contrôleur de ash macro avec les piles alcalines dedans. Une
fuite des piles pourrait endommager le compartiment.
Le niv
eau de charge aché peut être inférieur à la capacité de charge réelle,
selon la température et les conditions de stockage. Cet achage revient à son
état normal une fois que le ash a émis quelques éclairs. Lorsque le témoin
clignote et indique que le ash n’est plus opérationnel, plusieurs pressions sur la
touche ON/OFF du ash peuvent redonner de l’autonomie aux piles. Si le niveau
de charge des piles n’est pas restauré, remplacez celles-ci.
A
vec des piles lithium, le témoin
peut clignoter si les piles chauent suite
à une température ambiante élevée ou à une sollicitation intensive. Le ash ne
peut plus être utilisé pendant un moment. Attendez que les piles refroidissent
avant d’utiliser le ash à nouveau.
L
es piles au nickel-métal hydrure peuvent subitement perdre de leur puissance.
Si le témoin
clignote ou si le ash ne peut plus être utilisé, changez les piles
ou rechargez-les.
Selo
n l’âge des piles neuves (durée de stockage après fabrication), la fréquence
et le nombre d’éclairs obtenus ave des piles neuves peut diérer des valeurs
indiquées dans le tableau.

HVL-MT24AM_FR 2-889-493-41 (1)
57
Informations complémentaires
Température
L’unité de ash peut être utilisée entre 0 et 40° C.
N’exp
osez pas le ash à des températures extrêmement élevées (exposition
directe au soleil dans une voiture par ex.) ou à une forte humidité.
An d’
éviter la formation de condensation, placez le ash dans un sac en
plastique fermé lorsqu’il doit passer d’un endroit froid à un endroit chaud.
Laissez-le reprendre la température de la pièce avant d’ouvrir le sac.
L’autonomie des piles diminue lorsqu’il fait très froid. Dans ces conditions,
conservez les piles dans une poche et insérez-les dans le ash juste avant la
prise de vues. Lorsqu’il fait froid, le témoin peut s’allumer même si les
piles disposent encore de susamment d’énergie. Des piles aaiblies par une
température basse peuvent retrouver une partie de leur charge une fois que la
température revient à un niveau normal.
C
e ash n’est pas étanche. Utilisez-le avec précautions à proximité de l’eau et du
sable, par exemple au bord de la mer. Evitez tout contact avec l’eau, le sable et la
poussière car cela peut entraîner un dysfonctionnement.
Entretien
Retirez le ash de l’appareil photo. Nettoyez le ash avec un chion doux et sec.
S’il a été en contact avec du sable, souez d’abord les grains avec une souette
avant de l’essuyer. En cas de taches tenaces, nettoyez-le avec un chion légèrement
humidié avec une solution détergente douce, puis essuyez-le avec un chion sec.
N’utilisez jamais de solvants puissants comme du dissolvant ou de l’essence, car ils
pourraient endommager la nition de la surface.
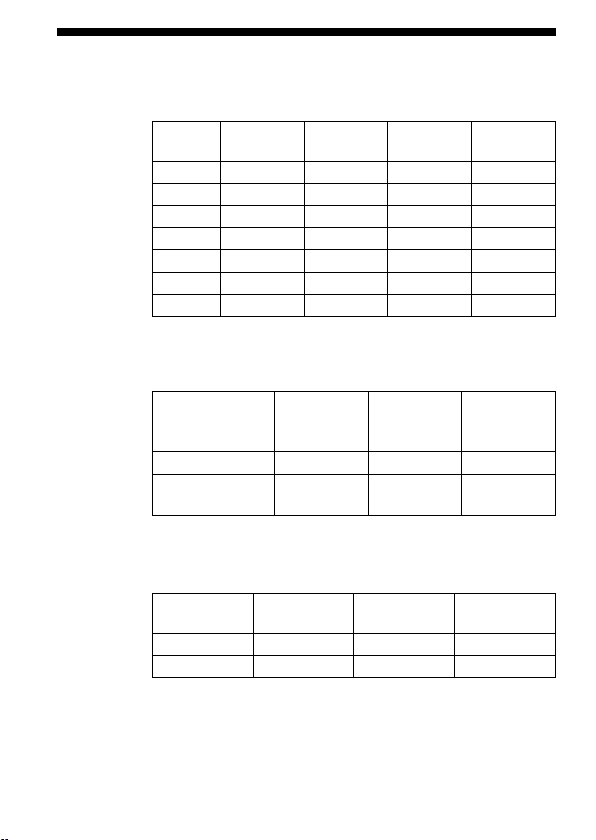
58
HVL-MT24AM_FR 2-889-493-41 (1)
Spécications
Nombre guide
Mode ash normal (ISO 100)
Niveau de
puissance
1 tube 2 tubes
Diuseur
grand angle
Diuseur
1/1 17 24 11 7
1/2 12 17 8 5
1/4 8,5 12 5,6 3,5
1/8 6 8,5 4 2,5
1/16 4,2 6 2,8 1,8
1/32 3 4,2 2 1,3
1/64 2,1 3 1,4 0,9
Le diuseur grand angle et le diuseur simple sont conçus pour
un tube.
Fréquence/Répétition
Alcalines Lithium
Nickel
hydrure
(1 550 mAh)
Fréquence (s.) 0,2~6 0,2~6 0,2~5
Répétition
(nombre)
200~4 000 500~10 000 150~3 000
L
a rép
étition est le nombre approximatif de fois possibles avant
qu’une pile neuve soit complètement inutilisable.
Couverture du ash
Couverture du
ash
Flash double
Diuseur
grand angle
Diuseur
Vertical 45° 60° 90°
Horizontal 60° 78° 90°

HVL-MT24AM_FR 2-889-493-41 (1)
59
Informations complémentaires
Performance du ash en continu
40 cycles en continu de 5 éclairs par seconde
(Niveau de puissance 1/32, pile au nickel-métal hydrure)
Contrôle de ash Contrôle de ash avec le pré-ash, la mesure TTL directe,
le as
h manuel
Dimensions (environ)
Contrôleur de ash macro
68
123 91 mm (2 3/4 4 7/8 3 5/8 pouces) (l h p)
Flas
h double
43
41 37 mm (1 3/4 1 5/8 1 1/2 pouces) (l h p)
Poid
s (environ) Contrôleur de ash macro 235 g (8,3 once) (sans pile)
Flas
h double 33 g (1,2 once)(par ash double)
Température de fonctionnement
0 °C à 40 °C (32 °F à 104 °F)
Articles inclus Contrôleur de ash macro (1), Flash double (2), Support (1),
Bras (2), Bague adaptatrice ø 49 mm (1),
Bague ad
aptatrice ø 55 mm (1), Diuseur grand angle (2),
Dius
eur (2), Dévidoir du cordon (2), Étui du contrôleur (1),
Étui d
u ash (1), Jeu de documents imprimés
Les fonctions présentes dans ce mode d’emploi dépendent des conditions de test au
sein de notre entreprise.
La conception et les spécications sont sujettes à modication sans préavis.

