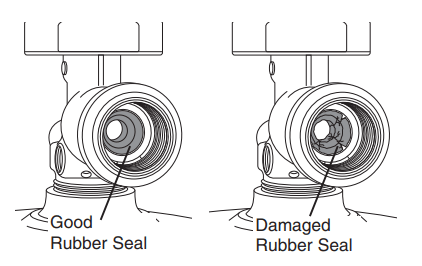
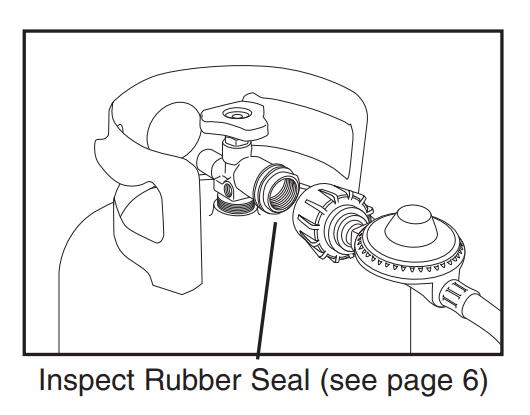
Inspect the propane tank valve rubber seal for cracks, wear or deterioration prior to use. A damaged rubber seal can cause a gas leak, possibly resulting in an explosion, fire or severe bodily harm.
Inspection should be done each time the propane tank is connected to the grill, has been refilled, exchanged or has not been used for more than 60 days.
Do not use a propane tank with a damaged rubber seal. Exchange the tank or have the rubber seal replaced at a qualified propane filling station.
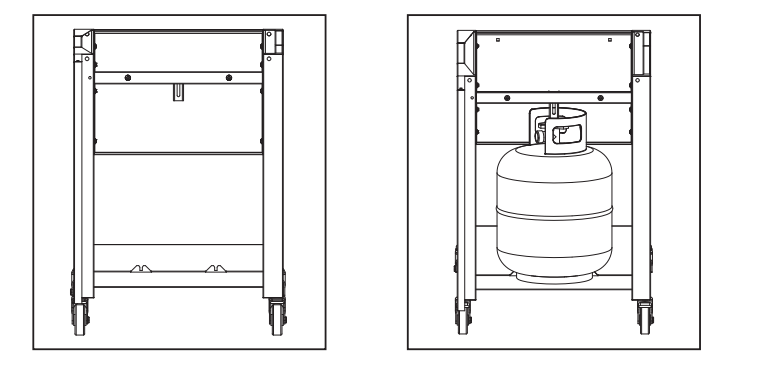
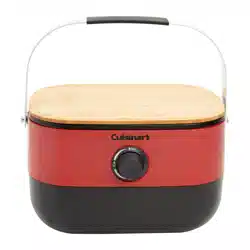
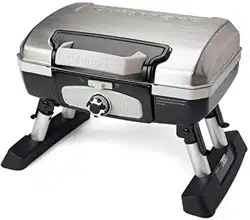
INSTALLING THE LP GAS CYLINDER (TANK) ONTO THE GRILL:
Check that the cylinder valve is closed by turning the knob clockwise. Inspect cylinder valve rubber seal for cracks or deterioration. Do not use propane tank with damaged seal as a gas leak may occur.
Place the cylinder into the cart as shown.
Attach bracket to top of tank.
HOSE & REGULATOR SPECIFICATIONS AND INSTALLATION:
HOSE AND REGULATOR:
Your grill is equipped with a Type 1 connection device with the following features:
The system will not allow gas flow from the cylinder until a positive connection to the valve has been made. Note: The cylinder valve and all grill burner knobs must be turned OFF before any connection is made or removed.
A regulator flow limiting device, when activated, restricts the flow of gas to 10 cubic feet per hour. If the flow limiting device is activated, perform Regulator Resetting Procedure.
Note: If your grill will not get hot enough to cook, the flow limiting device may have been activated.
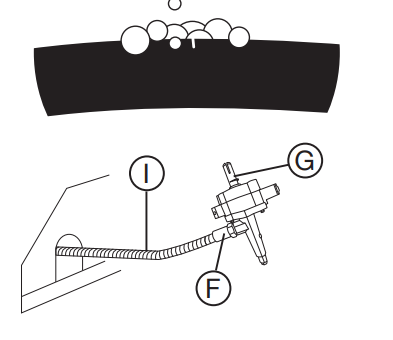
CONNECTING HOSE AND REGULATOR:
Inspect the propane tank valve rubber seal for cracks, wear or deterioration prior to use. A damaged rubber seal can cause a gas leak, possibly resulting in an explosion, fire or severe bodily harm. Do not use a propane tank with a damaged rubber seal.
Attach or detach regulator to the LP gas cylinder only when cylinder is at rest in tank holder.
Check that the cylinder valve is closed by turning the knob clockwise.
Check that the grill’s burner control knobs are in the “OFF” positions.
Visually inspect the hose assembly prior to each use for evidence of damage, excess wear, or deterioration. If found, replace the assembly before using your grill. Only the manufacturer’s supplied replacement should be used.
Remove the protective plastic cap from the cylinder valve.
Check that the hose does not contain kinks, does not contact sharp edges, and does not contact surfaces that may become hot during use.
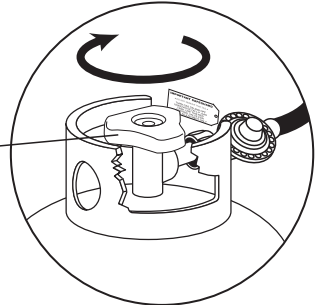
Hold regulator and insert the brass nipple into the LP cylinder valve outlet. Ensure that the device is centered properly.
Turn the large coupling nut clockwise by hand and tighten to a full stop. Take care not to cross thread the coupling nut onto the cylinder valve. Do not use tools to tighten connection. Note: If you are unable to make the connection, repeat Steps 7 and 8.
Leak check all fittings before lighting your grill. See section on “Leak Testing” in this manual.
Note: To remove regulator from propane tank, turn off the tank valve and rotate the large coupling nut counter-clockwise and remove.
REGULATOR RESETTING PROCEDURE:
If your grill will not get hot enough to cook, the flow limiting device may have been activated.
Mini Reset:
Turn ALL burner control knobs to “OFF”, turn off the cylinder valve. Wait one minute. Slowly turn cylinder valve ON and relight grill. If burner flame is higher and grill heats up properly – proceed with cooking.
Full Reset:
Turn ALL burner control knobs to “OFF”, turn off the cylinder valve. Disconnect hose and regulator from cylinder. Wait two minutes, reattach hose and regulator and perform leak test.
LEAK TESTING:
WHEN TO PERFORM A LEAK TEST:
After assembling your grill and before lighting for the first time, even if purchased fully assembled.
Every time the LP gas cylinder is refilled, exchanged or if any of the gas components are disconnected or replaced.
Any time your grill has been moved.
At least once per year or if your grill has not been used for more than 60 days.
CHECKING FOR LEAKS:
CAUTION: Strong odors, colds, sinus congestion, etc. may prevent the detection of propane by smell. Use caution and common sense when testing for leaks.
Note: The leak test must be performed in an area that has adequate lighting in order to see if bubbles are developing and not in a windy or noisy area so larger leaks can be detected by smell or sound.
Create a mixture of 50% water and 50% liquid dishwashing soap.
Open the lid.
Ensure all control knobs are set to the “OFF” position.
Turn on the gas at the cylinder valve. Turn the cylinder valve knob counter-clockwise to full open. If you hear a rushing sound or smell gas, turn the gas off. Tighten any leaking connections. If leak is detected at connection nut and tightening does not stop leak, reinspect propane tank rubber seal.
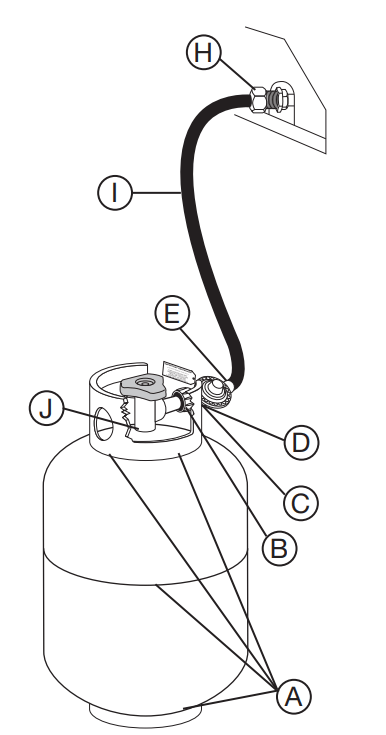
Apply the soapy water mixture to the following:
Supply tank (cylinder) weld.
Connection nut to tank valve.
Back side of connection nut to brass nipple.
Brass nipple connection into regulator.
Regulator connections to gas supply hoses.
Gas supply hose connection to side burner valve assembly.
Side burner valve stem cap.
Hose connection to gas manifold.
The full length of gas supply hose.
Tank valve to cylinder.
Check each place listed (A–J) for growing bubbles, which indicates a leak. Large leaks may not be detected by bubbles but should produce a rushing sound or gas smell.
Turn off gas supply at cylinder valve.
Turn on control knobs to release gas pressure in hose.
Turn control knobs to “OFF” position.
Tighten any leaking connections. If leak is detected at connection nut and tightening does not stop leak, reinspect propane tank rubber seal. (see page 6)
Repeat soapy water test until no leaks are detected.
Turn off gas supply at cylinder valve until you are ready to use your grill.
Wash off soapy residue with cold water and towel dry.
Wait 5 minutes to allow all gas to evacuate the area before lighting grill.
WARNING: DO NOT use the grill if leaks cannot be stopped. Contact a qualified gas appliance repair service.
Watch For Bubbles
PRE-START CHECK LIST:
DANGER: Property damage, bodily harm, severe burns, and death could result from failure to follow these safety steps. These steps should be performed after the grill has been assembled and prior to each use. DO NOT operate this grill until you have read and understand ALL of the warnings and instructions in this manual.
Ensure that the grill is properly assembled.
Inspect the gas supply hose for burns, chaffing, kinks, and proper routing before each use. If it is evident there is excessive abrasion or wear, or the hose is cut, it must be replaced prior to the grill being used. Replace with hose and regulator Model No. 9456-155-7600-0, which can be obtained by contacting customer service at 1-866-212-3150.
Leak check all gas connections, hose and propane tank. See section on “Leak Testing”.
Ensure that all electrical supply cords are properly grounded. Keep any electrical supply cord and the fuel supply hose away from any heated surfaces. Hose should be at least 3 inches from hot surfaces.
Position your grill on a non-combustible level surface in a well ventilated location, a safe distance 10 ft. (3.1 m) from combustible materials, buildings and overhangs.
Properly place the empty grease cup under the grease drain hole in the bottom of the grill to catch grease during use.
DO NOT block ventilation areas in sides, back or cart compartment of grill.
GAS LIGHTING INSTRUCTIONS:
WARNING Read, understand and follow all warnings and instructions contained in this manual. DO NOT skip any of the warnings and instructions contained in the preceding sections of this manual.
Follow the instructions exactly.
OPEN THE GRILL LID before attempting to light a burner so that fumes do not accumulate inside the grill. An explosion could occur if grill lid is down.
Check that all burner control knobs and the cylinder valve are turned to the “OFF” position.
Turn on the fuel supply by slowly rotating the cylinder valve knob counter-clockwise to full open.
DO NOT stand with head, body, or arms over the grill when lighting.
LIGHTING THE MAIN BURNERS:
Open lid before lighting burner.
Make sure all control knobs are in the “OFF” position.
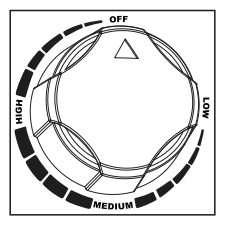
Select burner to be lit. Push and hold down the control knob and turn SLOWLY (2 to 3 seconds) to “HIGH”. You should hear the igniter click. Note: Step 3 may need to be repeated 2-3 times to light grill.
If ignition does NOT occur in 5 seconds, turn control knob to “OFF”, wait 5 minutes to allow gas to dissipate and repeat lighting procedure.
To light other burners, follow steps 3-4.
If burner does not ignite using the igniter, see “Match Lighting the Main Burners” section.
To turn off, turn each control knob clockwise until it locks in the “OFF” position. This does not turn off the gas flow from the cylinder.
Note: If burner does not light or flame is too low, See “Trouble Shooting” section of the owners manual.
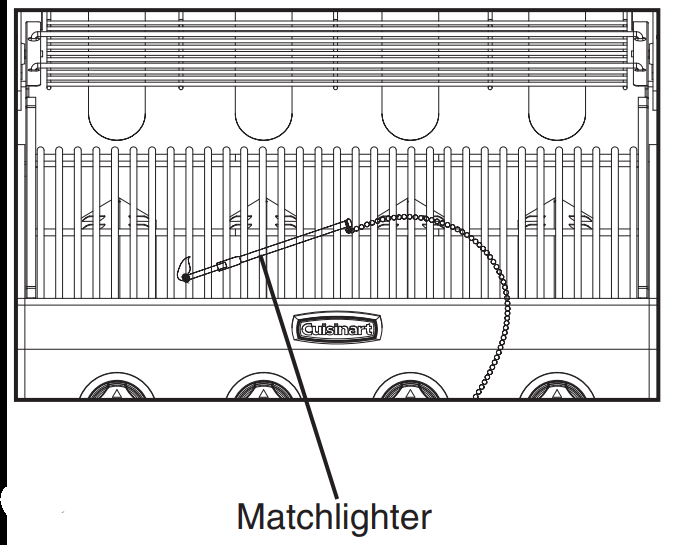
MATCH LIGHTING THE MAIN BURNER:
Open lid before lighting burner.
Make sure all control knobs are in the “OFF” position.
Place a paper match in the end of the matchlighter. Strike the match and place through the cooking grate approximately 1/2” (1 to 2 cm) from the burner to be lit.
Turn the burner control knob to the “HIGH” position. The burner should light within 5 seconds.
If the burner does not light, turn the control knob to “OFF” and wait 5 minutes for gas to dissipate and repeat lighting procedure.
Once lit, light adjacent burners by following steps 3-6.
If the burner does not light within the first few attempts of match lighting, there is a problem with the gas supply. Turn off the gas at the burner and cylinder. DO NOT attempt to operate the grill until the problem is found and corrected.
Note: If burner does not light or flame is too low, See “Trouble Shooting” section of the owners manual.
LIGHTING THE SIDE BURNER:
Open lid before lighting side burner.
Make sure control knob is in the “OFF” position.
Push and hold down side burner control knob and SLOWLY (2 to 3 seconds) turn to “HIGH”. You should hear the igniter click. Note: Step 3 may need to be repeated 2-3 times to light side burner.
If ignition does NOT occur in 5 seconds, turn control knob to “OFF”, wait 5 minutes to allow gas to dissipate and repeat lighting procedure.
If burner does not ignite using the igniter, see “Match Lighting the Side Burner” section.
To turn off, turn control knob clockwise until it locks in “OFF” position.
Note: If burner does not light or flame is too low, See “Trouble Shooting” section of the owners manual.
MATCH LIGHTING THE SIDE BURNER:
Open the lid to the side burner before lighting.
Make sure the control knob is in the “OFF” position.
Place a paper match in the end of the matchlighter.
Strike the match and hold it approximately 1/2” (1 to 2 cm) from the burner.
Turn the side burner control knob to the “HIGH” position. The burner should light within 5 seconds.
If the burner does not light, turn the control knob to “OFF” and wait 5 minutes for gas to dissipate and repeat lighting procedure.
If the burner does not light within the first few attempts of match lighting, there is a problem with the gas supply. Turn off the gas at the burner and cylinder. DO NOT attempt to operate the grill until the problem is found and corrected.
Note: If burner does not light or flame is too low, See “Trouble Shooting” section of the owners manual.
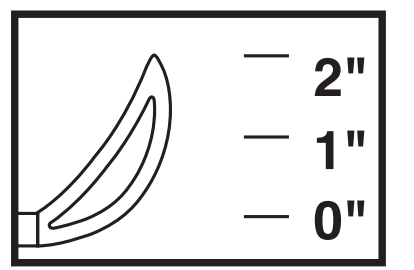
Note: Observe flame height when lit: Flame should be a Blue/Yellow color between 1”–2” when burner is on “HIGH”.
See section in manual on burner adjustment to adjust flame
OPERATING THE GRILL:
BREAKING IN YOUR GRILL:
In manufacturing and preserving the components of your grill, oil residue may be present on the burners and cooking surfaces of your grill.
Before cooking on your grill for the first time you should preheat it for 15 minutes on “HIGH” to burn off these residual oils.
PREHEATING THE GRILL:
Prior to each use, it is recommended that you preheat your grill. This ensures that the grilling surfaces are at the desired temperatures to sear the food sugars when cooking. After lighting your grill, set the main burner control knobs to the “HIGH” position for 5 to 10 minutes. Close the lid during the preheat period.
CONTROLLING FLARE-UPS/GREASE FIRES:
Flare-ups are a part of cooking meats on a gas grill. This adds to the unique flavor of cooking on a gas grill. Use caution when opening the lid as sudden flare-ups may occur. Excessive flare-ups can overcook your food and cause a dangerous situation for you and your grill. Excessive flare-ups result from the build-up of grease in your grill. If this should occur, DO NOT pour water onto the flames. This can cause the grease to splatter and could result in serious burns or bodily harm.
If grease fire occurs while lid is open, leave lid open, turn burner knobs to “OFF”, turn off LP cylinder valve. If possible, relocate food to a different section of cooking grate and allow grease to burn out or smother the flames with baking soda.
If grease fire occurs while lid is closed, leave lid closed, as a sudden burst of air may increase flames.
Turn burner knobs to “OFF”, turn off LP cylinder valve. Allow grease to burn out.
Never pour water on a grease fire as grease may splatter/spread and could result in bodily injury or property damage.
If grease fire does not quickly burn out or the fire is growing/spreading, use type BC dry chemical fire extinguisher or smother with dirt, sand or baking soda. Closing the lid to extinguish a grease fire is not possible.
TO MINIMIZE FLARE-UPS:
Trim excess fat from meats prior to cooking.
Cook meats with high fat contents (chicken or pork) on Low settings or indirectly.
Ensure that your grill is on level ground and the grease is allowed to evacuate the grill through the drain hole in the bottom and into grease cup/tray.
Clean grill frequently to minimize grease buildup.
INDIRECT COOKING:
Indirect cooking is the process of cooking your food without the heat source being directly under your food. You can sear meats over a high flame on one side of the grill while slow cooking a roast on the other (unlit) side of the grill.
ROTISSERIE COOKING:
Your grill was pre-drilled from the factory to include mounting holes for a rotisserie (sold separately).
Read and follow all instructions provided with the rotisserie. Save instructions for future reference.
TURNING OFF THE GRILL:
Turn off the cylinder valve.
Turn all burner control knobs to the “OFF” position.
Note: Turn off LP cylinder first to prevent gas from being left in the system under pressure.
CAUTION:
The cylinder valve should always be in the off, or closed, position when the grill is not in use.
To turn off the cylinder valve, turn knob clockwise until it stops.
USING OTHER FEATURES OF THE GRILL:
THE SIDE BURNER:
The side burner can be used to prepare side dishes such as beans, potatoes, corn, or to warm sauces.
The burner valve can be adjusted from high to low depending upon your cooking demands.
PROPER CARE & MAINTENANCE:
CLEANING INTERIOR OF GRILL:
We recommend cleaning off food residue immediately after cooking by gently scrubbing grates with wire bristle brush and then turning burners to HIGH for approximately 5 minutes.
Make sure coals are completely extinguished and the unit has adequately cooled before cleaning.
Clean up of the grill after each use is required.
WARNING: DO NOT leave grill unattended when grill is on. Wear oven mitts to protect from burns.
The heat from the burners will burn off most food/grease residue from grates & heat tents and turn it to an ash like substance which will fall to the bottom of the firebox or grease tray. After the grill cools (approximately 30 minutes) remove grates and heat tents and brush the ash and any grease out of the firebox. Clean and replace grease cup. Inspect the heat tents for damage or deterioration before reinstalling in the grill. (Replacements can be ordered by calling
CAUTION: DO NOT allow ash residue to remain on the grease tray or firebox as it could block proper grease drainage of the grill.
INTERIOR OF GRILL LID:
Smoke will accumulate inside grill lid and may flake onto your food. Clean the inside of the grill lid with scrub brush and baking soda/water solution. Dry thoroughly. Do not mistake this for paint. The interior of gas grill lids are not painted.
MAINTAINING EXTERIOR OF GRILL:
To protect your grill from excessive rust, the unit must be kept clean and covered at all times when not in use.
Painted surfaces. Wash with mild detergent or non-abrasive cleaner and warm soapy water.
Stainless steel surfaces. To maintain your grill’s appearance, wash with mild detergent and warm soapy water and wipe dry with a soft cloth after each use. Baked-on grease deposits may require the use of an abrasive plastic cleaning pad.
Use only in direction of brushed finish to avoid damage. Do not use abrasive pad on areas with graphics. Car wax may help protect the exterior finish of your grill.
Porcelain surfaces. Because of glass-like composition, most residue can be wiped away with a solution of baking soda and water or specially formulated cleaner. Use non-abrasive scouring powder such as baking soda for stubborn stains.
Plastic and rubber parts. Wash with warm soapy water and wipe dry. Do not use citrisol, abrasive cleaners, degreasers or a concentrated grill cleaner on plastic parts. Damage to and failure of parts can result.
RUST:
Discoloration, rust and rust pits can occur as a result of high cooking temperatures, acidic marinades, grease fires and exposure to coastal climates or other natural elements.
Rust spots on the interior surface can be buffed, cleaned, then lightly coated with vegetable oil or vegetable oil spray to minimize rusting.
Never use cleaners containing chlorine or store swimming pool supplies or chemicals in cart compartment as chlorine promotes rust.
BURNER CLEANING AND MAINTENANCE:
Keep the appliance free and clear of combustible materials, gasoline and other flammable vapors and liquids.
Keep the ventilation openings of the cylinder enclosure free and clear of debris.
Visually check burner flames for proper operation (see pictorial in “Burner Assembly/Maintenance” under Proper Care and Maintenance). Spiders or other insects can nest in the burner causing gas blockage.
For safe grilling and peak performance of your grill, perform these checks at least twice per year or after extended periods of storage.
Be sure to tighten up all hardware (nuts, bolts, screws, etc.) at least twice per year.
CAUTION: Some parts may contain sharp edges. Wear protective gloves if necessary.
Remove the cooking grills, heat distribution plates, and burners from inside your grill. Use a brush with hot water and detergent to remove excess residue. NEVER use a commercial oven cleaner. Rinse completely with water. Towel dry and replace all components as described in the assembly instructions
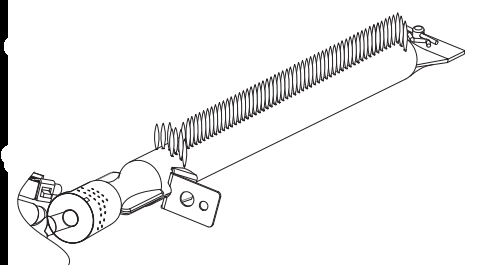
BURNER ASSEMBLY/MAINTENANCE:
Although your burners are constructed of stainless steel, they may corrode as a result of the extreme heat and acids from cooking foods. Regularly inspect the burners for cracks, abnormal holes, and other signs of corrosion damage. If found, replace the burner.
DO NOT block ventilation areas in back of lid, sides, back or cart compartment of grill. Do not store objects or materials inside the grill cart enclosure that would block the flow of combustible air to the underside of either the control panel or firebox. Burner tubes can become blocked by spiders and other insects building their nests. Blocked burner tubes can prevent gas flow to the burners and could result in a burner tube fire or fire beneath the grill. To clean the Burner Assembly follow these instructions to clean and/or replace parts of burner assembly or if you have trouble igniting the grill.
Turn gas off at control knobs and LP cylinder tank valve.
Remove cooking grills and heat distribution plates.
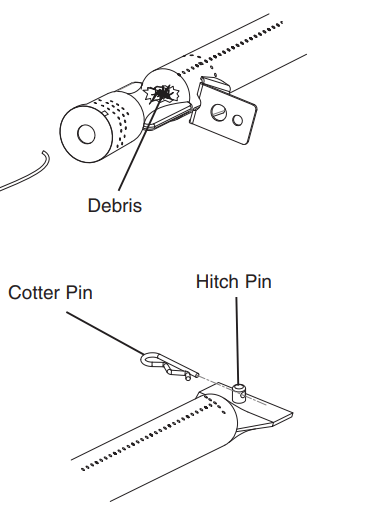
Remove hitch pin from each burner.
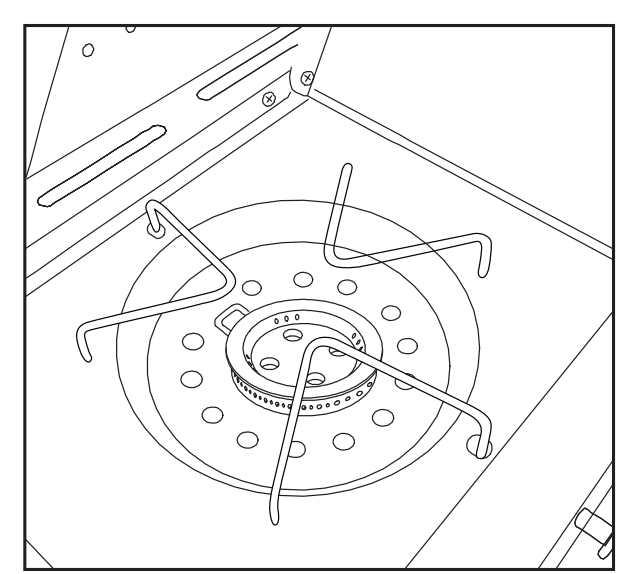
Carefully lift each burner up and away from valve openings.
Use a narrow bottle brush or a stiff wire bent into a small hook to run through each burner tube or use compressed air to blow into burner tube and out the flame ports. Check each port to make sure air comes out each hole. CAUTION: Wear eye protection when using compressed air.
Use a wire brush to clean the entire outer surface of burner to remove food residue and dirt.
Check burner for damage, if any cracks or holes are found replace burner.
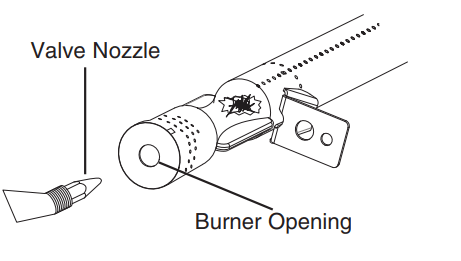
Install burner in grill, orient burners CORRECTLY. IMPORTANT: Burner opening must slide over valve nozzle.
Replace hitch pins on each burner. Note: Follow the “Gas Leak Testing” section of this manual. Relight burners to verify proper operation.
Replace heat distribution plates and cooking grills.
PROPER VALVE TO BURNER ALINGNMENT
Note: Normal flame height is 1˝ to 2˝
TRANSPORTING AND STORAGE:
BEFORE STORING YOUR GRILL:
Ensure that the cylinder valve is fully closed.
Clean all surfaces. Lightly coat the burners with cooking oil to prevent excess rusting.
If storing the grill indoors, disconnect the LP tank and leave the LP tank OUTDOORS.
Place dust cap on cylinder valve outlet whenever the cylinder is not in use. Only install the type of dust cap on the cylinder valve outlet that is provided with the cylinder valve. Other types of caps or plugs may result in leakage of propane.
Check and clean burner prior to use after storing, at the beginning of grilling season or after a period of not being used. Spiders and insects like to build nests in burner tubes (especially during colder months). Blocked burner tubes can prevent gas flow to the burners and could result in a burner tube fire or fire beneath the grill. See “Burner Assembly/Maintenance” under Proper Care and Maintenance.
If storing the grill outdoors, cover the grill with a grill cover for protection from the weather.
TROUBLE SHOOTING:
Problem
Possible Cause
Prevention/Cure
Burner will not light
LP gas tank valve is closed
Make sure regulator is securely attached to the LP gas tank, turn LP gas tank valve to “OPEN”
LP gas tank is low or empty
Check if LP gas tank is empty. If empty, replace or refill.
LP gas leak
Turn LP gas tank valve to “CLOSED”
Wait 5 minutes for gas to clear
Follow “Leak Testing” in the owner’s manual
Coupling nut and regulator not fully connected
See section on “Connecting Hose and Regulator’
Obstruction of gas flow
Clean burner assembly
Check for bent or kinked hose
Burner may not be properly seated
Reseat burner and valve. Refer to “Burner Assembly/Maintenance” instructions
Spider webs or insect nest in venturi
Clean venturi and burner assembly
Burner ports clogged or blocked
Clean burner ports
Wires or electrode covered with cooking residue
Clean wire and/or electrode with rubbing alcohol
Electrode and burners are wet
Wipe dry with cloth
Electrode cracked or broken - sparks at crack
Replace electrode
Wire loose or disconnected
Reconnect wire or replace electrode/wire assembly
Wire is shorting (sparking) between ignitor and electrode
Replace ignitor wire/electrode assembly
Bad ignitor
Replace ignitor
Grill does not get hot enough
Out of gas
Replace or refill LP gas tank
Flow limiting device may have been activated
Mini Reset:
Turn control knobs and LP gas tank valve to “OFF”
Wait one minute and relight grill per “Lighting Instructions”
If flames are still too low, perform a Full Reset Full Reset:
Turn control knobs and LP gas tank valve to “OFF”
Disconnect regulator from propane tank
Inspect LP cylinder rubber seal
Wait 1 minute
Reconnect regulator and perform “Leak Testing” on all connections.
Light grill per “Lighting Instructions”
Irregular flame pattern. Flame does not run full length of burner
Burner ports are clogged or blocked
Clean burner ports
Flame is yellow or orange
New burner may have residual manufacturing oils
Burn grill for 15 minutes on “HIGH” with the lid closed
Spider webs or insect nest in venturi
Clean venturi and burner assembly
Food residue, grease, etc.
Clean burner assembly
Poor alignment of valve to burner venturi
Make sure burner venturi is properly engaged with valve
Flame blows out
High or gusting winds
Do not use grill in high winds
Low on LP gas
Replace or refill LP gas tank
Burner holes may be obstructed
Refer to “Burner Assembly/Maintenance” instructions
Flow limiting device tripped
Refer to “Regulator Resetting Procedure”
Flare-up
Grease buildup
Clean all grill parts per “Proper Care and Maintenance” instructions
Excess fat in meat
Trim fat from meat before grilling
Excessive cooking temperature
Adjust (lower) cooking temperature
Grease fire
Grease trapped by food buildup around burner system
Turn control knobs and LP gas tank valve to “OFF”
Leave lid in open or closed position and let fire burn out. Use BC type fire extinguisher or baking soda, sand or dirt to smother fire, if necessary.
After grill cools, remove and clean all parts per “Proper Care and Maintenance” instructions
Flashback (fire in burner tubes) / knobs melting
Burner and/or burner tubes are blocked
Clean burners and/or burner assembly
Inside of lid is peeling (like paint peeling)
Baked on grease buildup has turned into carbon and is flaking off
Clean thoroughly per “Proper Care and Maintenance” instructions
GRILL COOKING TIPS:
CLEANLINESS:
Always wash hands thoroughly with soap and hot water prior to handling food and after handling raw meat, uncooked poultry or seafood.
When using a platter to carry raw meat, uncooked poultry or seafood to the grill, make sure to wash the platter thoroughly with soap and hot water before placing cooked foods back on the platter or use different platters for raw and cooked foods.
Never use the same utensils when handling raw meat, uncooked poultry or seafood unless you wash the utensils thoroughly with soap and hot water.
Never re-use marinade from raw meat or uncooked poultry on foods that have been cooked and are ready to be served.
GRILLING TO PROPER TEMPERATURE:
Use a meat thermometer to be sure food has reached a safe internal temperature.
The USDA recommends the minimum temperature be reached for the following food items: