Loading ...
Loading ...
Loading ...
›
Unscrew the defective bulb in its housing in an anti-clockwise direction and
remove it.
›
Place a new bulb in the housing and turn it in a clockwise direction as far as
it will go.
›
Insert the housing containing the light bulb in the lamp housing in the oppo-
site direction to arrow
2
.
›
Screw the housing in the opposite direction to arrow
1
until it clicks into
place.
Replacing the bulb for the fog light
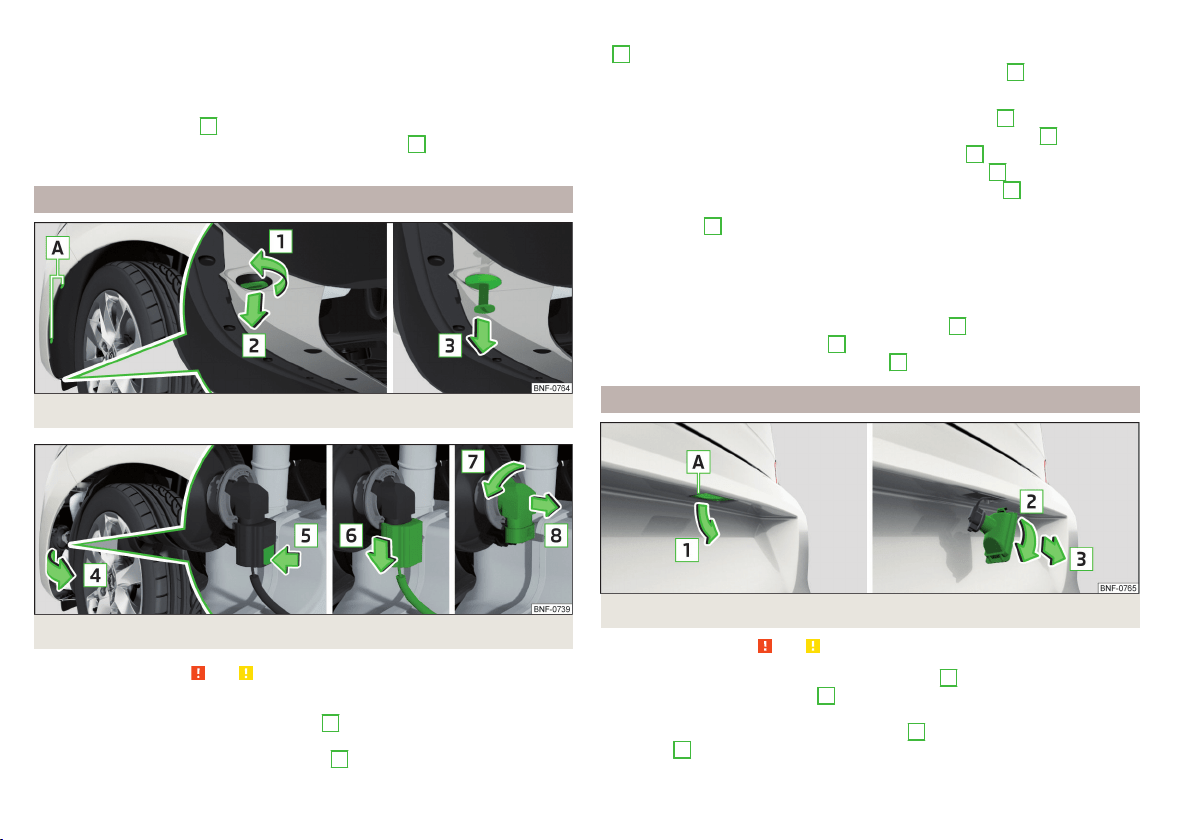
Fig. 144
Removing the wheel house trim
Fig. 145 Changing a bulb
Read and observe and on page 138 first.
Removing the wheel house trim
›
Use the on board tool to remove screws
A
» Fig. 144 from the wheel well.
›
Using a flat, blunt object, e.g. a coin, turn the part of the expansion rivet with
a slit 90 degrees in the direction of arrow
1
.
›
Pull out the part of the expansion rivet with a slit in the direction of arrow
2
.
›
Take out the expansion rivet in the direction of the arrow
3
.
Changing a bulb
›
Open out the wheel house trim in the direction of arrow
4
» Fig. 145 .
›
Press in the locking for the connector in the direction of arrow
5
.
›
Remove the connector in the direction of the arrow
6
.
›
Screw the lamp connector in the direction of the arrow
7
as far as the stop.
›
Remove the lamp connector in the direction of the arrow
8
.
›
Place a new connector with the bulb in the headlamp and turn it in the direc-
tion of arrow
7
as far as the stop.
›
Attach the connector until it clicks firmly into place.
Fitting the wheel house trim
›
Fold the wheel house trim back.
›
Push the expansion rivet back in.
›
Push in the part of the expansion rivet with a slit
2
and turn it 90 degrees in
the opposite direction to arrow
1
» Fig. 144 .
›
Firmly tighten the two attachment bolts
A
with the screwdriver.
Replacing the bulb for the licence plate light
Fig. 146 Removing the licence plate lamp
Read and observe and on page 138 first.
›
Insert a slotted screwdriver into the slot in area
A
» Fig. 146 and free up the
lamp in the direction of arrow
1
.
›
Remove the lamp from the bumper.
›
Unscrew the lamp in the direction of arrow
2
and remove it in the direction
of arrow
3
.
›
Remove the faulty bulb from the housing.
140
Do-it-yourself
Loading ...
Loading ...
Loading ...