Operation Manual RDS AV RECEIVER
Parts and controls
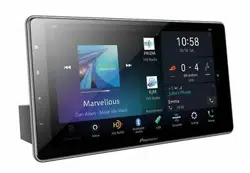
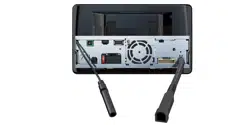
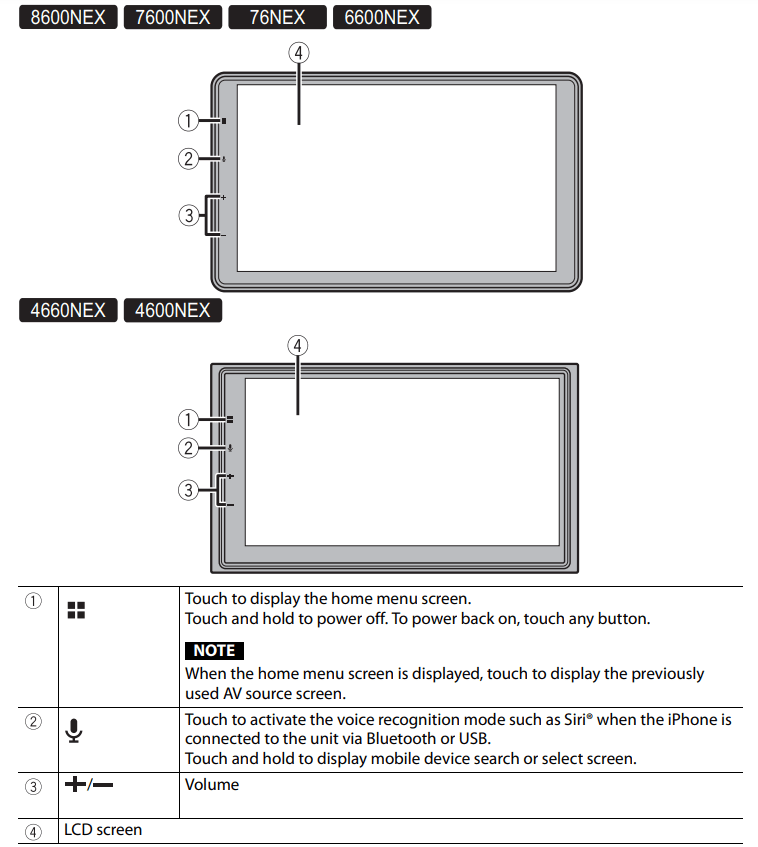
Main unit
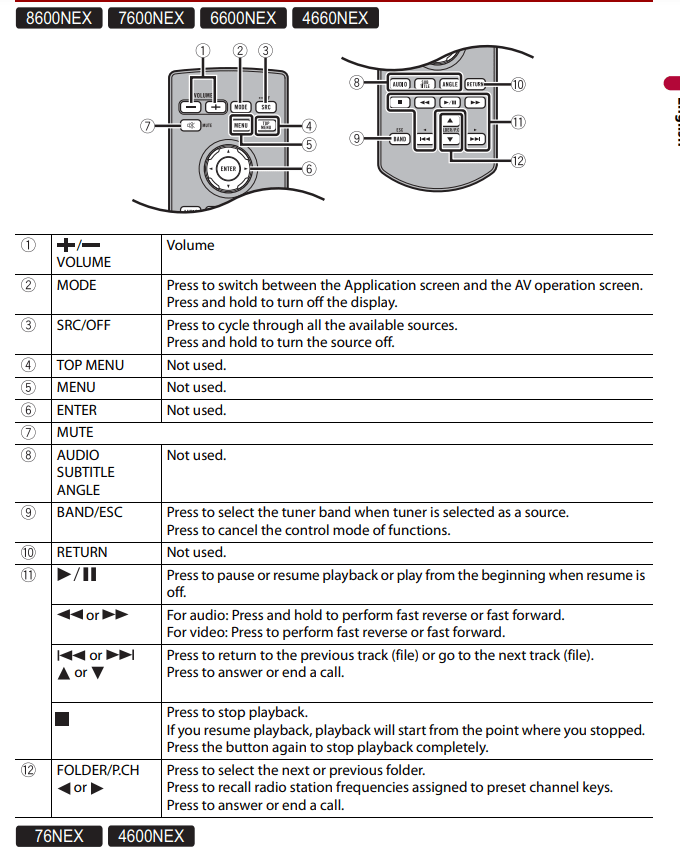
Remote control
Basic operation
Preparing the remote control
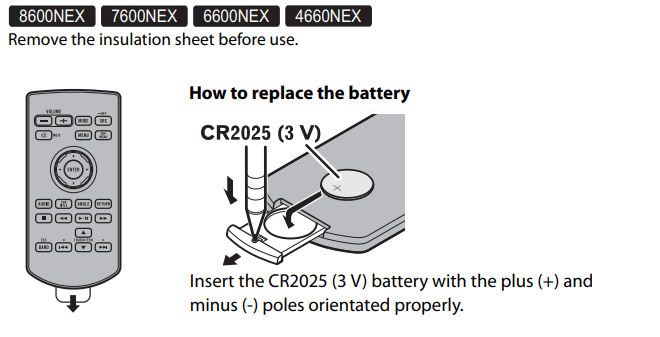
Using the remote control
- Point the remote control in the direction of the front panel to operate.
- NOTE: The remote control may not function properly in direct sunlight.
 Important
- Do not store the remote control in high temperatures or direct sunlight.
- Do not let the remote control fall onto the floor, where it may become jammed under the brake or gas pedal.
Starting up the unit
- Start the engine to boot up the system. The [Select Program Language] screen appears.
- Select the language.
- Touch
 . The [Speaker Mode Settings] screen appears.
- Select the speaker mode. [Standard Mode] 4-speaker system with front and rear speakers, or a 6-speaker system with front and rear speakers and subwoofers. [Network Mode] 3-way system with a high range speaker, middle range speaker and subwoofer (low range speaker) for reproduction of high, middle and low frequencies (bands).
- Touch [OK]. Initial Legal Disclaimer screen appears.
- Touch [OK]. The home menu screen appears.
Switching the speaker mode: To change the speaker mode, you need to restore this product to the default settings.
- Restore the default setting
Using the touch panel
You can operate this product by touching the keys on the screen directly with your fingers.
NOTE: To protect the LCD screen from damage, be sure to touch the screen only with your finger gently.
Common touch panel keys

Operating list screens

- Touching an item on the list allows you to narrow down the options and proceed to the next operation.
- Appears when all characters are not displayed on the display area. If you touch the key, the rests are scrolled for display. NOTE: This function is available only when you stop your vehicle in a safe place and apply the parking brake.
- Appears when items cannot be displayed on a single page. Drag the side bar, the initial search bar or the list to view any hidden items.
Operating the time bar
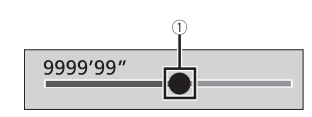
- You can change the playback point by dragging the key. The playback time corresponding to the position of the key is displayed while dragging the key.
Operating the on-screen keyboard
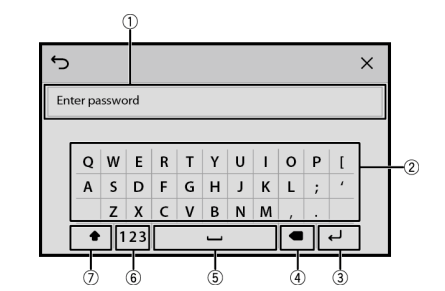
- Displays the characters that are entered.
- Enters the characters in the text box.
- Confirms the entry and proceeds to the next step.
- Deletes the input text to the left of the cursor one letter at a time.
- Enters a space.
- Switches between alphabet and numbers/symbols.
- Switches between capital and lower case letters.
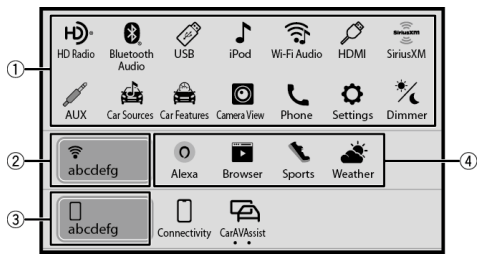
Home menu screen

Customizing the home menu screen
Changing the home menu screen layout
- Touch and hold the favorite source/application area.
- Touch
 .
.
- Select [Lower Dock Area] or [Upper Dock Area].
Rearranging the icons in the favorite source/application area
- Touch and hold the favorite source/application area.
- Drag the icon to the desired position. When you finish rearranging, touch
 .
.
Rearranging the displayed icons in the favorite source/application area
- Touch and hold the favorite source/application area. The source/application list area appears on the screen.
- Drag unneeded icon in the favorite source/application area to the source/ application list area if the favorite source/application area is full.
- Drag the icon to the desired location in the favorite source/application area. When you finish rearranging, touch .
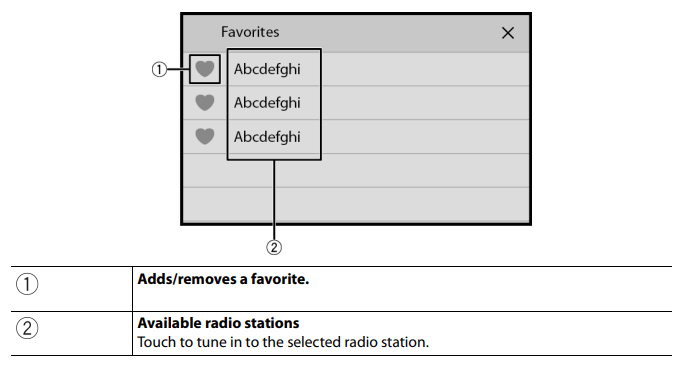
Favorite radio stations
Registering your favorite radio stations allows you to quickly jump to the registered radio stations.
Displaying the favorite radio stations screen
- Touch
 then swipe up on the screen. Swipe down on the screen when you finish.
Favorite radio stations screen

List screen
Bluetooth®
Bluetooth connection
- Turn on the Bluetooth function on the device.
- Touch
 then swipe left on the screen.
- Touch
 then
then  .
.
- Touch [Connection].
- Touch
 . The unit starts to search for available devices, then displays them in the device list.
- Touch
 the list.
TIP: If you touch the device name, the Wi-Fi connection for Apple CarPlay or Android Auto is established.
TIPS
- The Bluetooth connection can also be made by detecting this product from the Bluetooth device. Before registration, make sure that [Visibility] in the [Bluetooth] menu is set to [On] (page 26). For details on Bluetooth device operations, refer to the operating instructions supplied with the Bluetooth device.
- Two cellular phones can be connected to this product at the same time
Bluetooth settings
- Touch then swipe left on the screen.
- Touch then .
- Touch [Bluetooth Settings].
| Menu Item |
Description |
| [Auto Connect] [On] [Off] |
Select [On] to connect the last connected Bluetooth device automatically when using the hands-free phone function.
NOTE: If two Bluetooth devices were connected the last time, the two devices are connected to this product automatically in the order that they are registered in the device list
|
| [Visibility] [On] [Off] |
Select [On] to make this product visible to the other device. |
| [PIN Code Input] |
Change the PIN code for Bluetooth connection. The default PIN code is “0000”.
- Touch [0] to [9] to input the pin code (up to 8 digits).
- Touch
 . .
|
| [Device Information] |
Displaying the device name and address of this product. |
| [Bluetooth Memory Clear] |
Touch [Clear] then [OK] to clear the Bluetooth memory |
| [Sound Quality Settings] [Quality] [Connectivity] |
Select [Quality] to prioritize the Bluetooth sound quality. Select [Connectivity] to prioritize the Bluetooth connection. |
Switching the connected Bluetooth device
After registering and connecting the Bluetooth devices to this product, you can switch among the devices using the switch devices key in the phone function and some audio sources.
- You can register up to five Bluetooth devices on this product
- You can connect one of the registered devices to this product. In cases where the registered device is equipped with a phone function, a total of two devices can be connected at the same time when using the phone function. If two of the five registered devices are already connected, you can connect the remaining third device to use the audio function only from the switch devices key on the audio source screen.
- The icon for the cellular phone currently being used is displayed on the phone menu screen. If you connect two cellular phones to this product at the same time, you can switch between the cellular phones using the switch devices key. The contents of the phone menu are memorized for each connected cellular phone
- The switch devices key will appear for some audio sources. The audio source may automatically switch to another source depending on the selected device.
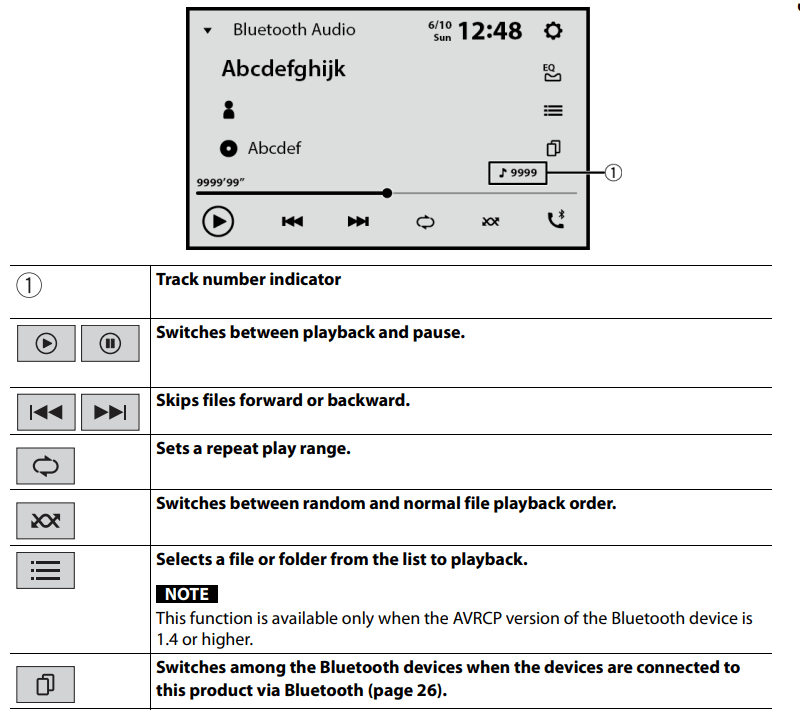
Bluetooth audio
Before using the Bluetooth audio player, register and connect the device to this product
NOTES
- Depending on the Bluetooth audio player connected to this product, the available operations with this product may be limited to the following two levels:
- A2DP (Advanced Audio Distribution Profile): Only playing back songs on your audio player is possible.
- A2DP and AVRCP (Audio/Video Remote Control Profile): Playing back, pausing, selecting songs, etc., are possible.
- Depending on the Bluetooth device connected to this product, the available operations with this product may be limited or differ from the descriptions in this manual.
- While you are listening to songs on your Bluetooth device, refrain from operating the phone function as much as possible. If you try operating, the signal may cause noise for song playback.
- When you are talking on the Bluetooth device connected to this product via Bluetooth, it may pause playback
1. Touch then swipe left on the screen.
2. Touch then  . The system setting screen appears.
3. Touch [AV Source Settings].
4. Confirm that [Bluetooth Audio] is turned on.
5. Touch then swipe left on the screen. The source/application screen appears.
6. Touch [Bluetooth Audio]. The Bluetooth audio playback screen appears.
Basic operation
Bluetooth audio playback screen
Wi-Fi®
By connecting this unit to a Wi-Fi network, you can browse the Internet and use Apple CarPlay or Android Auto via the wireless connection.
Wi-Fi connection
- Turn on the Wi-Fi function on the device.
- Touch then swipe left on the screen.
- Touch then .
- Touch [Wi-Fi Settings: Hotspot].
- Set [Wi-Fi] to [On].
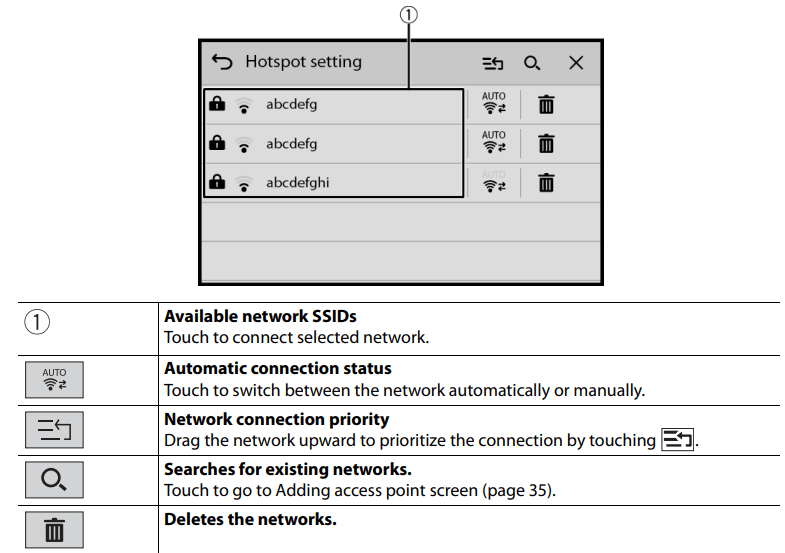
- Touch [Hotspot setting].
- Touch . The available Wi-Fi networks appear on the list.
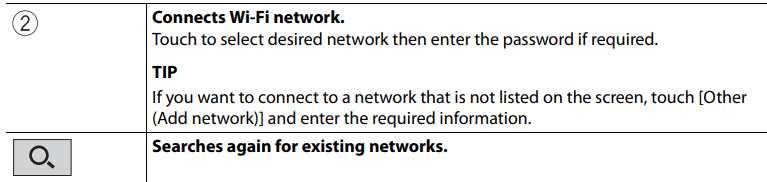
- Touch one of the listed Wi-Fi networks on the list. The network password input screen appears if a password is required.
- Input the network password then touch [Connection].
Important: When you connect this unit to the Internet via Wi-Fi for the first time, the Internet Communication Service the Terms of Use and Privacy Policy is displayed. To use the Internet service, you need to accept the policy. Otherwise, most of the applications that use the Internet are not available. You can select to accept or withdraw from the policy at any time in [Terms of Use / Privacy]
TIP: You can also connect easily to Wi-Fi via WPS
Setting the Wi-Fi access point
- Touch then swipe left on the screen.
- Touch then .
- Touch [Wi-Fi Settings: Hotspot].
- Touch [Hotspot setting].
Access point setting screen
Adding access point screen

Wi-Fi settings
- Touch then swipe left on the screen.
- Touch then .
- Touch [Wi-Fi Settings: Hotspot].
NOTE: This setting is available only when you stop your vehicle in a safe place and apply the parking brake
The menu items vary according to the source/application.
| Menu Item |
Description |
| [Wi-Fi] [On] [Off] |
Switch Wi-Fi connection on or off. |
| [Hotspot setting] |
Set up the Wi-Fi access point |
| [Easy setup] |
Set up the Wi-Fi connection via WPS access |
| [MAC Address] |
Displays the MAC address |
| [IP Address] |
Displays the IP address. |
Browser
The browser enables you to browse registered websites using CarAVAssist.
WARNING
- Do not attempt to operate the web browser while driving. Make sure to pull off the road and park your vehicle in a safe location before attempting to use the controls on the web browser.
- When you use the browser, do not enter your important information such as credit card information, bank account information and personal information.
- When you use the browser, do not install software or programs that Pioneer is not involved with. If you install such software or programs, mechanical trouble may occur with this unit, or your entered information and the personal information registered in this unit may be put at risk.
Using the browser
Important
- To use the browser function, you may need to connect this unit to the Internet via a Wi-Fi network.
- To use the browser function, you need to register webpage URLs as your favorite webpages on CarAVAssist, then import them to this unit in advance
- To use the browser function, you need to accept the Internet Communication Service the Terms of Use and Privacy Policy
- The browser may not be able to access or display some webpages, and some characters may not be displayed properly.
- It may take some time to display webpages.
- The browser may display pages slowly depending on the video resolution.
- The browser may not be able to play some types of video and audio.
- The browser does not display content that uses plug-ins, such as PDF.
- The browser does not support some functions such as downloading files.
Starting procedure
- Touch then swipe left on the screen.
- Touch [Browser].
- Touch your desired registered website icon.
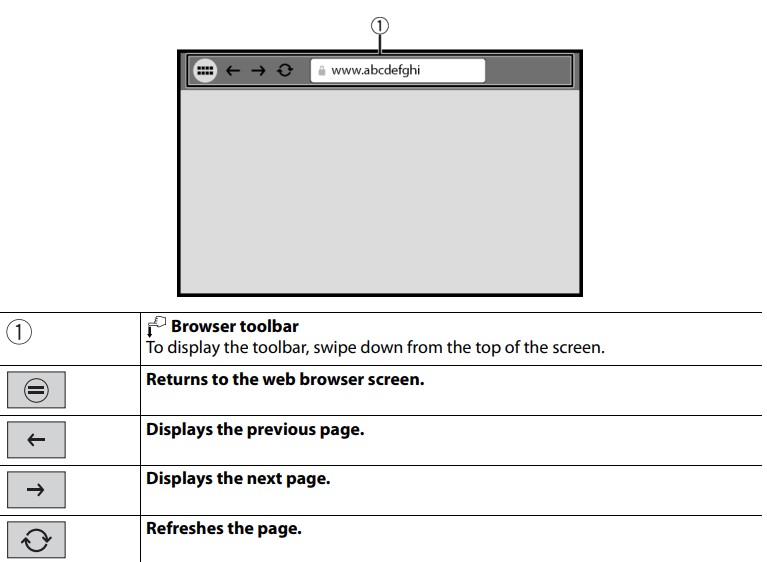
Web browser screen
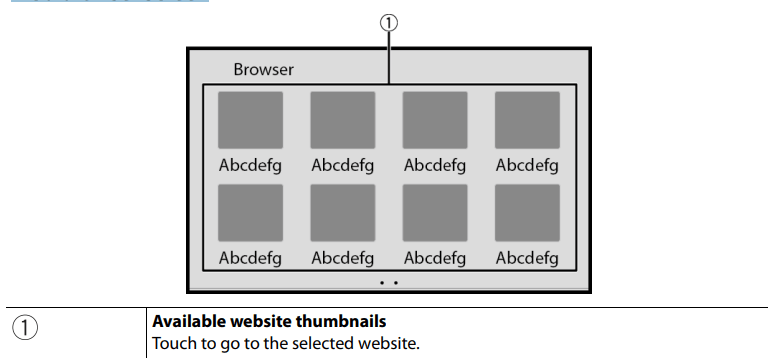
TIP: Swipe left/right to switch between registered webpage list.
Website screen
CarAVAssist
CarAVAssist is an application that allows you to configure and transfer various settings of this unit and register URLs as favorites so that you can browse them using this unit's web browser. You can also update this unit's firmware wirelessly by using this application.
Before you start
WARNING: Do not attempt to operate the application while driving. Make sure to pull off the road and park your vehicle in a safe location before attempting to use the controls on the application.
- For iPhone users: This function is compatible with iOS 12.0 or later. You can download CarAVAssist on the App Store®.

- For smartphone (Android) users: This function is compatible with devices that have Android OS 6.0 or later installed. You can download CarAVAssist on the Google Play Store.

What kind of functions does the application have?
- Promoting the use of the unit: The interface of the unit can be changed by using your iPhone/smartphone (Android).
- Examples
- Customizing the home menu screen including the widget
- Customizing the wallpaper
- Registering your favorite webpage URLs to your bookmarks to see those webpages on the web browser
- Registering your favorite teams to receive information about them on the sports application of the unit
- Organizing notifications on your smartphone (Android) for displaying on the unit
- Downloading the latest firmware
- For details, refer to “Help” in the CarAVAssist application
Transferring the data
- Connect your iPhone or smartphone with CarAVAssist installed on it to this product via Bluetooth
- Open CarAVAssist on the connected iPhone or smartphone then touch the connection button on the top menu screen of the application.
- Touch then swipe left on the screen.
- Touch
 .
.
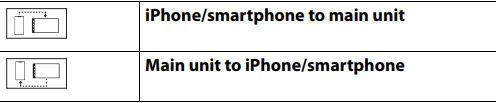
- Touch one of the transfer modes
Updating the firmware wirelessly
- Download the firmware update files into your iPhone or smartphone through CarAVAssist. 2
- Connect your CarAVAssist-installed iPhone or smartphone to this unit via Wi-Fi network
- Touch then swipe left on the screen.
- Touch then .
- Touch [System Information]
- Touch [Firmware Update].
- Touch [CarAVAssist]. Follow the on-screen instructions to finish updating the firmware
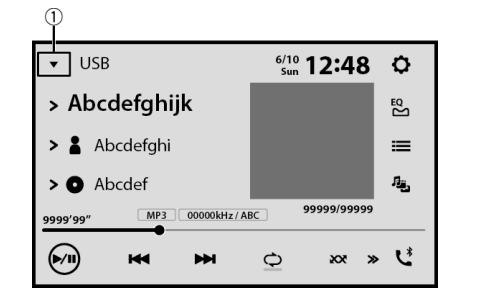
Source/application
Displaying the source/application list screen
- Touch then swipe left on the screen. The source/application screen appears.
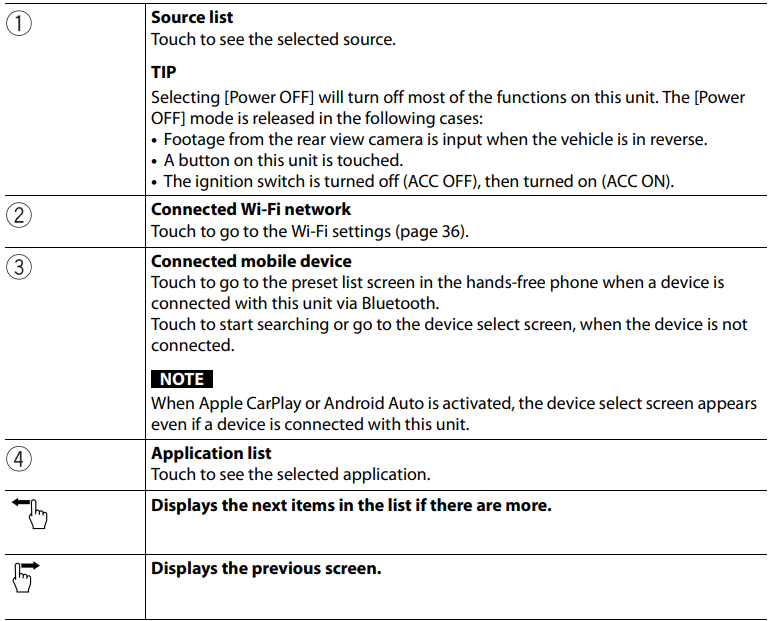
Source/application list screen
Displaying the AV operation screen
- Touch then touch the AV operation key. The AV operation screen appears.
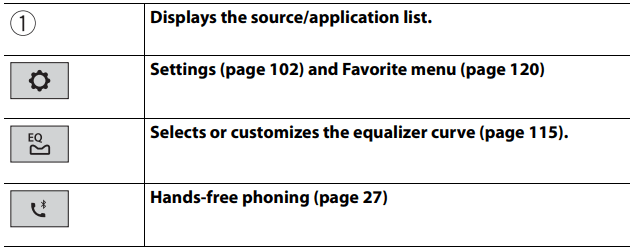
HD Radio™ Technology/ Radio
Starting procedure
- Touch then swipe left on the screen.
- Touch [HD Radio] or [Radio]. The HD Radio or radio screen appears.
Basic operation
HD Radio, Radio screen
* DMH-WT8600NEX, DMH-WT7600NEX, DMH-WT76NEX, DMH-WC6600NEX, DMH-W4660NEX
Storing the strongest broadcast frequencies (BSM)
- The BSM (best stations memory) function automatically stores the six strongest broadcast frequencies under the preset channel keys [1] to [6].
NOTES
- Storing broadcast frequencies with BSM may replace those you have already saved.
- Previously stored broadcast frequencies may remain stored if the number of frequencies stored has not reached the limit.
- Touch and hold
 to begin search. The six strongest broadcast frequencies will be stored under the preset channel keys in the order of their signal strength.
To cancel the storage process
- Touch [Cancel].
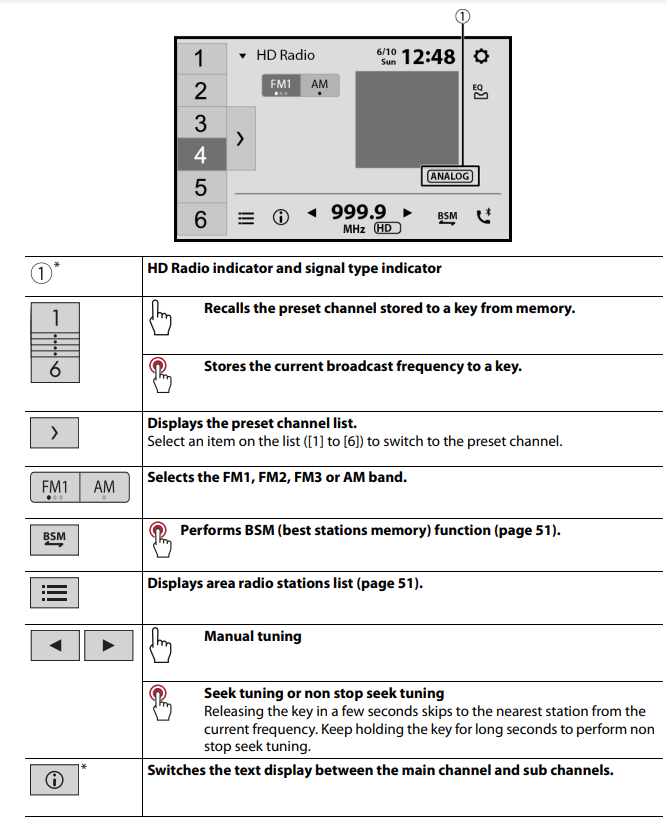
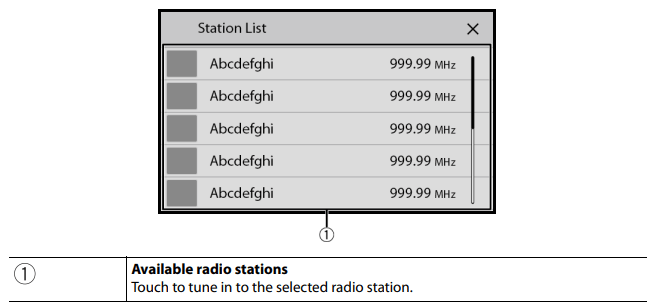
Area radio stations list
This unit displays the radio stations that are available at your current location.
- Touch
 .
.
Important: To use the area radio stations list function, you may need to connect this unit to the Internet via a Wi-Fi network and set [Suggestions] (page 102) to [On].
Limitations: Depending on the availability of the Internet, you may not be able to receive the area radio stations list service.
Area radio stations list screen
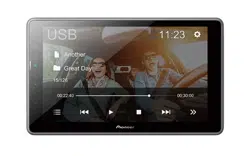
USB
Plugging/unplugging a USB storage device
You can play audio, video, or still image files stored in a USB storage device.
Plugging a USB storage device
- Plug a USB Type-C® storage device into the USB Type-C cable.
TIP: When you use a USB Type-A storage device, use a USB Type-C to USB Type-A adaptor (supplied) for plugging.
NOTES
- This product may not achieve optimum performance with some USB storage devices.
- Connection via a USB hub is not possible.
- A USB Type-C cable is required for connection.
- The supplied USB Type-C cable and the adaptor are for connecting a USB storage device to this unit only. Do not use the cable and the adaptor for other products or purposes.
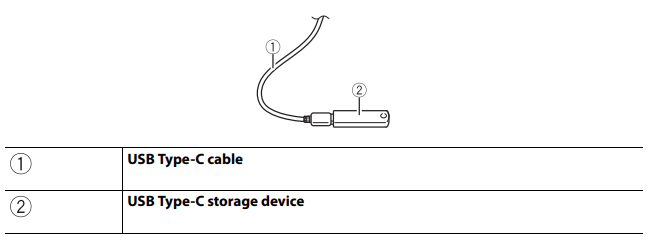
Unplugging a USB storage device
- Pull out the USB Type-C storage device from the USB Type-C cable.
Starting procedure
- Touch then swipe left on the screen.
- Plug the USB Type-C storage device into the USB Type-C cable
- Touch [USB]. Playback is performed in order of folder numbers. Folders are skipped if they contain no playable files.
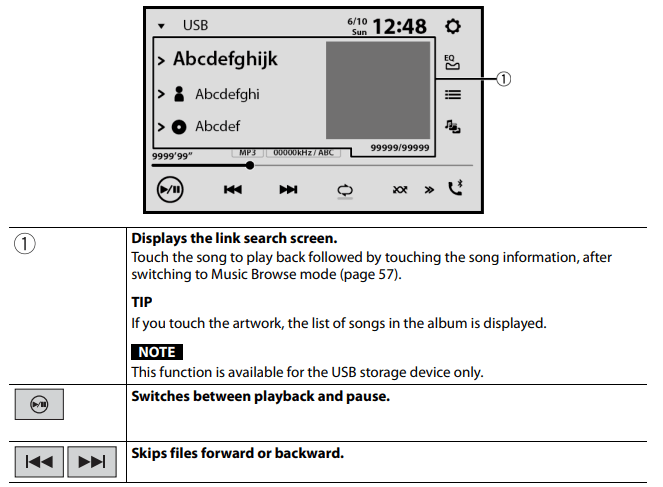
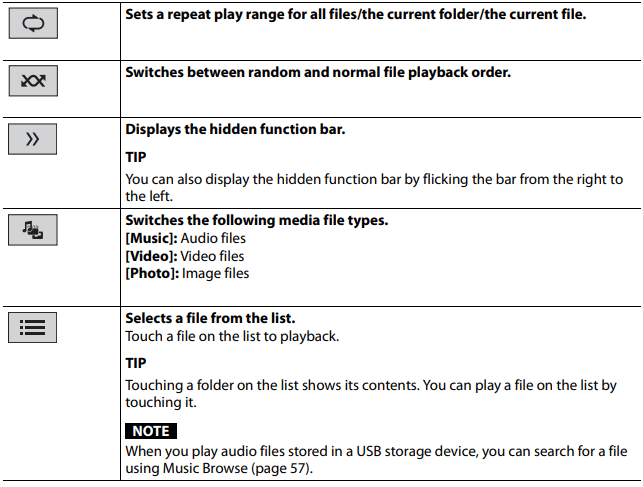
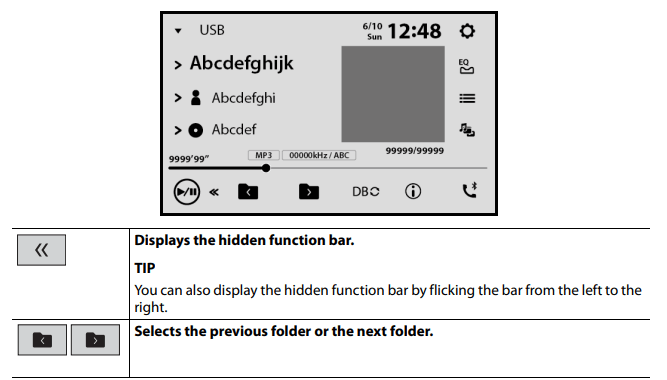
Basic operation
Audio source
Audio source screen 1
Audio source screen 2

iPhone®
Connecting your iPhone
When connecting an iPhone to this product, the settings are automatically configured according to the device to be connected. For details of the compatibility, refer to Compatible iPhone models
- Connect your iPhone.
- iPhone via USB or Bluetooth
- Touch then swipe left on the screen.
- Touch [iPod]
Basic operation
Audio source
Audio source screen
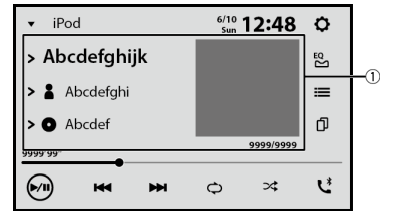
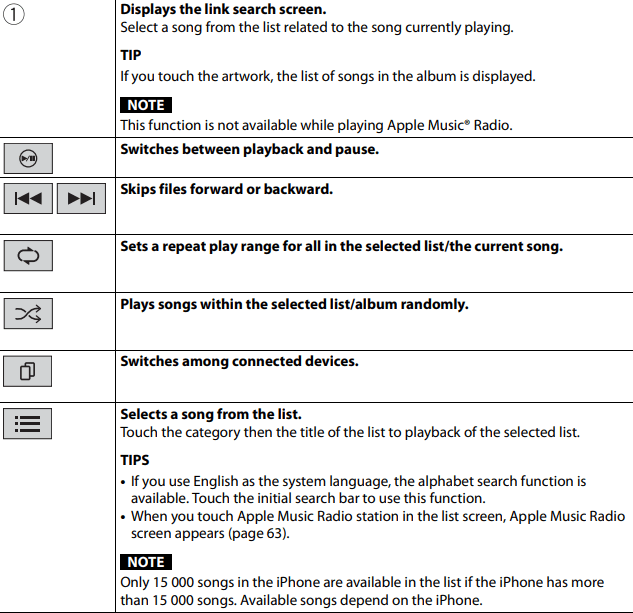
iPhone application screen
You can also play and control the music application in your iPhone in the iPhone source.
iPhone application screen
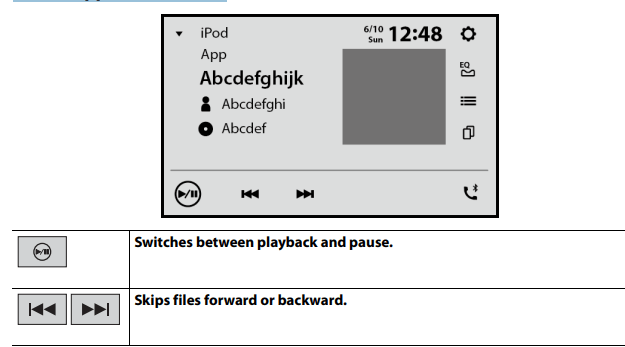
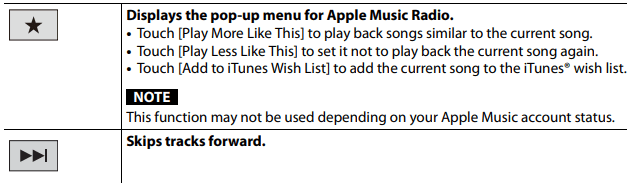
Apple Music Radio source
Apple Music Radio screen
Apple CarPlay™
Using Apple CarPlay
Important :Apple CarPlay may not be available in your country or region. For details about Apple CarPlay, visit the following site: https://www.apple.com/ios/carplay
- The content and functionality of the supported applications are the responsibility of the App providers.
- In Apple CarPlay, usage is limited while driving, with availability of functions and content determined by the App providers.
- Apple CarPlay allows access to applications other than those listed that are subject to limitations while driving.
- PIONEER IS NOT RESPONSIBLE AND DISCLAIMS LIABILITY FOR THIRD PARTY (NON-PIONEER) APPS AND CONTENT, INCLUDING WITHOUT LIMITATION ANY INACCURACIES OR INCOMPLETE INFORMATION.
- Before using Apple CarPlay, make sure the GPS antenna and speed cable are properly connected and installed, and the unit angle is properly set. For details on the installation, refer to the Installation Manual.
Setting the driving position
To achieve optimum usability of Apple CarPlay, set the driving position setting correctly according to the vehicle. The setting will be applied the next time an Apple CarPlay compatible device is connected to this product.
- Touch then swipe left on the screen.
- Touch then . The communication setting screen appears.
- Touch [Driving Position].
- Select the item. [Left] Select for a left-hand drive vehicle. [Right] Select for a right-hand drive vehicle.
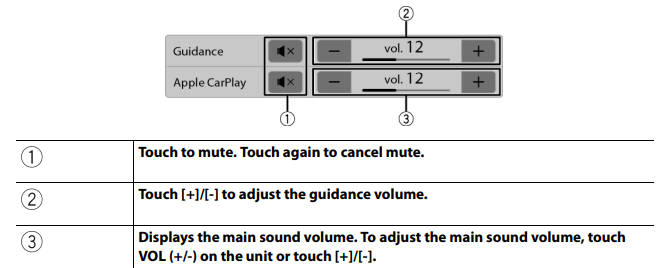
Adjusting the volume
You can adjust the guidance volume separately from the main sound volume when Apple CarPlay is used.
- While Apple CarPlay is activated, touch VOL (+/-). The volume menu will be displayed on the screen.
Troubleshooting
If you have problems operating this product, refer to this section. The most common problems are listed below, along with likely causes and solutions. If a solution to your problem cannot be found here, contact your dealer or the nearest authorized Pioneer service facility.
Common problems
1. A black screen is displayed, and operation is not possible using the touch panel keys.
- [Power OFF] mode is on.
- Touch any button on this product to release the mode.
2. Bluetooth operation does not work.
- The power failed for the Bluetooth module of this product.
- Turn the ignition switch to OFF and then to ON. If the error message is still displayed after performing the above action, please contact your dealer or an authorized Pioneer Service Station.
Problems with the AV screen
1. The screen is covered by a caution message and the video cannot be shown.
- The parking brake lead is not connected or the parking brake is not applied.
- Connect the parking brake lead correctly, and apply the parking brake.
- The speed sensor detects that the vehicle is moving.
- Park your vehicle in a safe place and apply the parking brake.
2. No video output from the connected equipment.
- The [AV Input] or [AUX Input] setting is incorrect.
3. The audio or video skips.
- This product is not firmly secured.
- Secure this product firmly. No sounds are produced.
4. The volume level will not rise.
- Cables are not connected correctly.
- Connect the cables correctly.
5. The icon  is displayed, and operation is impossible.
- The operation is not compatible with the video configuration.
- The operation is not possible.
6. Random playback in Music Browse mode is released in the USB storage device.
- Random playback in Music Browse mode is canceled after the ignition switch is turned off (ACC OFF).
- Switch to Music Browse mode again and turn on random playback.
7. The picture is stretched, with an incorrect aspect ratio.
- The aspect setting is incorrect for the display.
- Select the appropriate setting for that image.
8. iPhone cannot be operated.
- The iPhone is frozen.
- Reconnect the iPhone with the USB interface cable for iPhone.Update the iPhone software version.
- An error has occurred.
- Reconnect the iPhone with the USB interface cable for iPhone.
- Park your vehicle in a safe place, and then turn off the ignition switch (ACC OFF). Subsequently, turn the ignition switch to on (ACC ON) again.
- Update the iPhone software version.
- Reconnect the iPhone via the Wi-Fi connection.
- Cables are not connected correctly.
- Connect the cables correctly.
9. Sound from the iPhone cannot be heard.
- The audio output direction may switch automatically when the Bluetooth and USB connections are used at the same time.
- Use the iPhone to change the audio output direction.
10. No back camera image when the vehicle is in reverse.
- The back camera input setting on the receiver is set to Off.
- Change the back camera setting to On in the settings menu. (Refer to the System Settings section of this manual to adjust.)
- The camera input may be loose or not connected.
- Check the connection and make sure the male end of the camera is connected to the brown input on the back of the receiver. (Refer to the installation manual.)
- The reverse lead on the receiver may not be connected to the proper wire at the reverse lamp.
- Check the connection and make sure that the violet/white lead of the receiver is connected to the lead whose voltage changes when the shift lever is put in reverse. (Refer to the installation manual.)
11. Black screen displayed when the vehicle is in reverse, with no camera installed.
- Back camera input is set to On.
- Turn the setting to Off in the settings menu. (Refer to the System Settings section of this manual to adjust.)
12. Back image displayed when vehicle is not in reverse.
- The camera polarity is not set properly in the Camera settings menu.
- Review System Settings section of this manual for steps to switch the camera polarity. Park in a safe place, then while keeping your foot firmly on the brake, put the vehicle in reverse, access the System Settings menu, and change the camera polarity setting. Put vehicle back in park. (Refer to the System Settings section of this manual to adjust.)
Problems with the phone screen
1. Dialing is impossible because the touch panel keys for dialing are inactive.
- Your phone is out of range for service.
- Retry after re-entering the range for service.
- The connection between the cellular phone and this product cannot be established.
- Perform the connection process.
- Of the two cellular phones connected to this product at the same time, if the first phone is dialing, ringing or a call is in progress, dialing cannot be performed on the second phone.
- When the operation on the first of the two cellular phones is completed, use the switch devices key to switch to the second phone and then dial.
Problems with Application screen
1. A black screen is displayed.
- While operating an application, the application was ended on the smartphone side.
- Touch to display the home menu screen.
- The smartphone OS may be awaiting screen operation.
- Stop the vehicle in a safe place and check the screen on the smartphone.
2. The screen is displayed, but operation does not work at all.
- An error has occurred.
- Park your vehicle in a safe place, and then turn off the ignition switch (ACC OFF). Subsequently, turn the ignition switch to on (ACC ON) again.
- When an Android device is connected, disconnect the Bluetooth connection from this product and then reconnect it.
3. The smartphone was not charged.
- Charging stopped because the temperature of the smartphone rose due to prolonged use of the smartphone during charging.
- Disconnect the smartphone from the cable, and wait until the smartphone cools down.
- More battery power was consumed than was gained from charging.
- This problem may be resolved by stopping any unnecessary services on the smartphone.
Error messages
- When problems occur with this product, an error message appears on the display. Refer to the table below to identify the problem, then take the suggested corrective action. If the error persists, record the error message and contact your dealer or your nearest Pioneer service center.
Common
1. AMP Error
- This product fails to operate or the speaker connection is incorrect; the protective circuit is activated.
- Check the speaker connection. If the message fails to disappear even after the engine is switched off/on, contact your dealer or an authorized Pioneer Service Station for assistance.
2. Product overheat. System will be shut down automatically in 1 minute. Restart the product by ACC-Off/On may fix this problem. If this message keep showing up, it is possible that some problem occured in the product.
- The temperature of the main unit is too high.
- Turn off the ignition switch (ACC OFF) then wait until the main unit temperature reaches low
SiriusXM® Satellite Radio
1. Check Antenna
- The antenna connection is incorrect.
- Check the antenna connection. If the message fails to disappear even after the engine is switched off/on, contact your dealer or the nearest authorized Pioneer service center for assistance.
2. Check Tuner
- The SiriusXM Connect Vehicle Tuner connection is incorrect.
- Check the tuner connection and battery voltage. If the message fails to disappear even after the engine is switched off/on, contact your dealer or the nearest authorized Pioneer service center for assistance.
3. No Signal
- The SiriusXM Connect Vehicle Tuner is having difficulty receiving the SiriusXM satellite signal. – Verify that your vehicle is outdoors with a clear view of the southern sky.
- Verify that the SiriusXM magnetic mount antenna is mounted on a metal surface on the outside of the vehicle.
- Move the SiriusXM antenna away from any obstructions.
4. No Content
- TuneScan™ is not available.
- Perform the operation with another preset channel.
5. Channel Not Available
- The channel that you have requested is not a valid SiriusXM channel.
- Visit www.siriusxm.com for more information about the SiriusXM channel lineup.
6. Subscription Updated Press Enter to Continue
- This product has detected a change in your SiriusXM subscription status.
- Touch [Enter] to clear the message. In the U.S.A., visit www.siriusxm.com or call 1-866-635-2349 if you have questions about your subscription. In Canada, visit www.siriusxm.ca or call 1-877-438-9677 if you have questions about your subscription.
7. Channel Not Subscribed. Call SiriusXM to Subscribe.
- The channel that you have requested is not included in your SiriusXM subscription package.
- Check the content of your SiriusXM subscription package. In the U.S.A., visit www.siriusxm.com or call 1-866-635-2349 if you have questions about your subscription package or would like to subscribe to this channel. In Canada, visit www.siriusxm.ca or call 1-877-438- 9677.
8. Channel Locked Please Enter the Lock Code
- Locked by the radio Parental Control feature.
- Release the channel lock.
9. Memory Full
- The memory has become full while playback was paused.
10. Memory Nearly Full
- The memory has become nearly full while playback was paused.
11. There are no qualified TuneMix music channels in this band.
- There are no qualified TuneMix channels in this band.
- Requires two or more qualified music channels to be stored as presets in the current band.
USB storage device
1. Error-02-9X/-DX
- Communication failed.
- Turn the ignition switch OFF and back ON.
- Disconnect the USB storage device.
- Change to a different source. Then, return to the USB storage device.
2. Unplayable File
- There is no playable file in the USB storage device.
- Check that the files in the USB storage device are compatible with this product.
- Security for the connected USB storage device is enabled.
- Follow the USB storage device instructions to disable security.
3. Skipped
- The connected USB storage device contains DRM protected files.
- The protected files are skipped.
4. Protect
- All the files on the connected USB storage device are embedded with DRM.
- Replace the USB storage device.
5. Incompatible USB
- The connected USB storage device is not supported by this product.
- Disconnect your device and replace it with a compatible USB storage device.
6. Check USB
- The USB connector or USB cable has short-circuited.
- Check that the USB connector or USB cable is not caught in something or damaged.
- The connected USB storage device consumes more than maximum allowable current.
- Disconnect the USB storage device and do not use it. Turn the ignition switch to OFF, then to ACC or ON and then connect a compliant USB storage device.
7. HUB Error
- The connected USB hub is not supported by this product.
- Directly connect the USB storage device to this product.
8. No Response
- This product cannot recognize the connected USB storage device.
- Disconnect the device and replace it with another USB storage device.
- The USB connector or USB cable has short-circuited.
- Check that the USB connector or USB cable is not caught in something or damaged.
- The connected USB storage device consumes more than maximum allowable current.
- Disconnect the USB storage device and do not use it. Turn the ignition switch to OFF, then to ACC or ON and then connect a compliant USB storage device.
- The USB interface cable for iPhone has short-circuited.
- Confirm that the USB interface cable for iPhone or USB cable is not caught in something or damaged.
9. Your device is not authorized to play this DivX protected video.
- This product cannot play copyprotected DivX files.
- Select a file that can be played.
10. Audio Format not supported
- This type of file is not supported on this product.
- Select a file that can be played.
iPhone
1. There was a problem communicating with your iPhone. Please reconnect.
- iPhone failure.
- Disconnect the cable from the iPhone. Once the iPhone’s main menu is displayed, reconnect the iPhone and reset it.
- The iPhone firmware version is old.
- Update the iPhone version.
Apple CarPlay
1. Connection failed.
- Communication failed and the system is trying to connect.
- Wait for a while. Then, perform the actions below if the error message is still displayed.
- Restart the iPhone.
- Disconnect the cable from the iPhone, and then connect the iPhone again after a few seconds.
- Turn the ignition switch to OFF and then to ON.
2. Please attach the GPS antenna in order to use Apple CarPlay over Wireless.
- This unit cannot properly detect the GPS signal from the GPS antenna.
- Check the GPS antenna installation and connection. For details about the connection and installation, refer to the Installation Manual.
3. The speed sensor is disconnected. Please attach it.
- The speed sensor cannot detect any signal.
- Check the speed signal cable connection. For details about the connection, refer to the Installation Manual.
4. Please attach the GPS antenna and the speed sensor in order to use Apple CarPlay over Wireless.
- This unit cannot detect the GPS signal from the GPS antenna and the speed signal from the speed sensor.
- Check the connection and installation for both. For details about the connection and installation, refer to the Installation Manual.
If the error message is still displayed after performing the above action, please contact your dealer or an authorized Pioneer Service Station.
Android Auto
1. Android Auto has stopped.
- The connected device is not compatible with Android Auto.
- Check if the device is compatible with Android Auto.
- The startup of Android Auto failed for some reasons.
- Disconnect the cable from the smartphone, and then connect the smartphone again after a few seconds.
- Restart the smartphone.
- Turn the ignition switch to OFF and then to ON.
2. Android Auto has stopped. Please adjust the time to match that of the Android phone, or check the screen of your Android phone when it is safe to do so.
- The time set in this product or the smartphone is not correct.
- Set the correct time. If the error message is still displayed after performing the above action, please contact your dealer or an authorized Pioneer Service Station.
3. Bluetooth pairing failed.
- The Bluetooth pairing failed for some reasons.
- Pair this product with the device manually.
4. To use Android Auto, please stop your car and check your Android phone.
- The default settings are displayed on the screen of the Android Auto compatible device or images are not output from the Android Auto compatible device.
- Park your vehicle in a safe place, and follow the instructions displayed on the screen. If the error message is still displayed after performing on-screen instructions, please reconnect the device