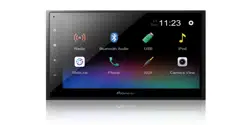
Documents: Go to download!
User Manual
- User Manual - (English)
- Limited Warranty - (English)
- Parts and controls
- Basic operation
- Bluetooth®
- AV source
- Radio
- Disc
- Compressed files
- iPhone
- WebLink™
- AUX
- Camera View
- Settings
- Other functions
- Troubleshooting
- Error messages
- Handling and care of discs
Table of contents
Owner Manual Car Accessories
Parts and controls
Main unit
DMH - 342EX / 341EX / 340EX
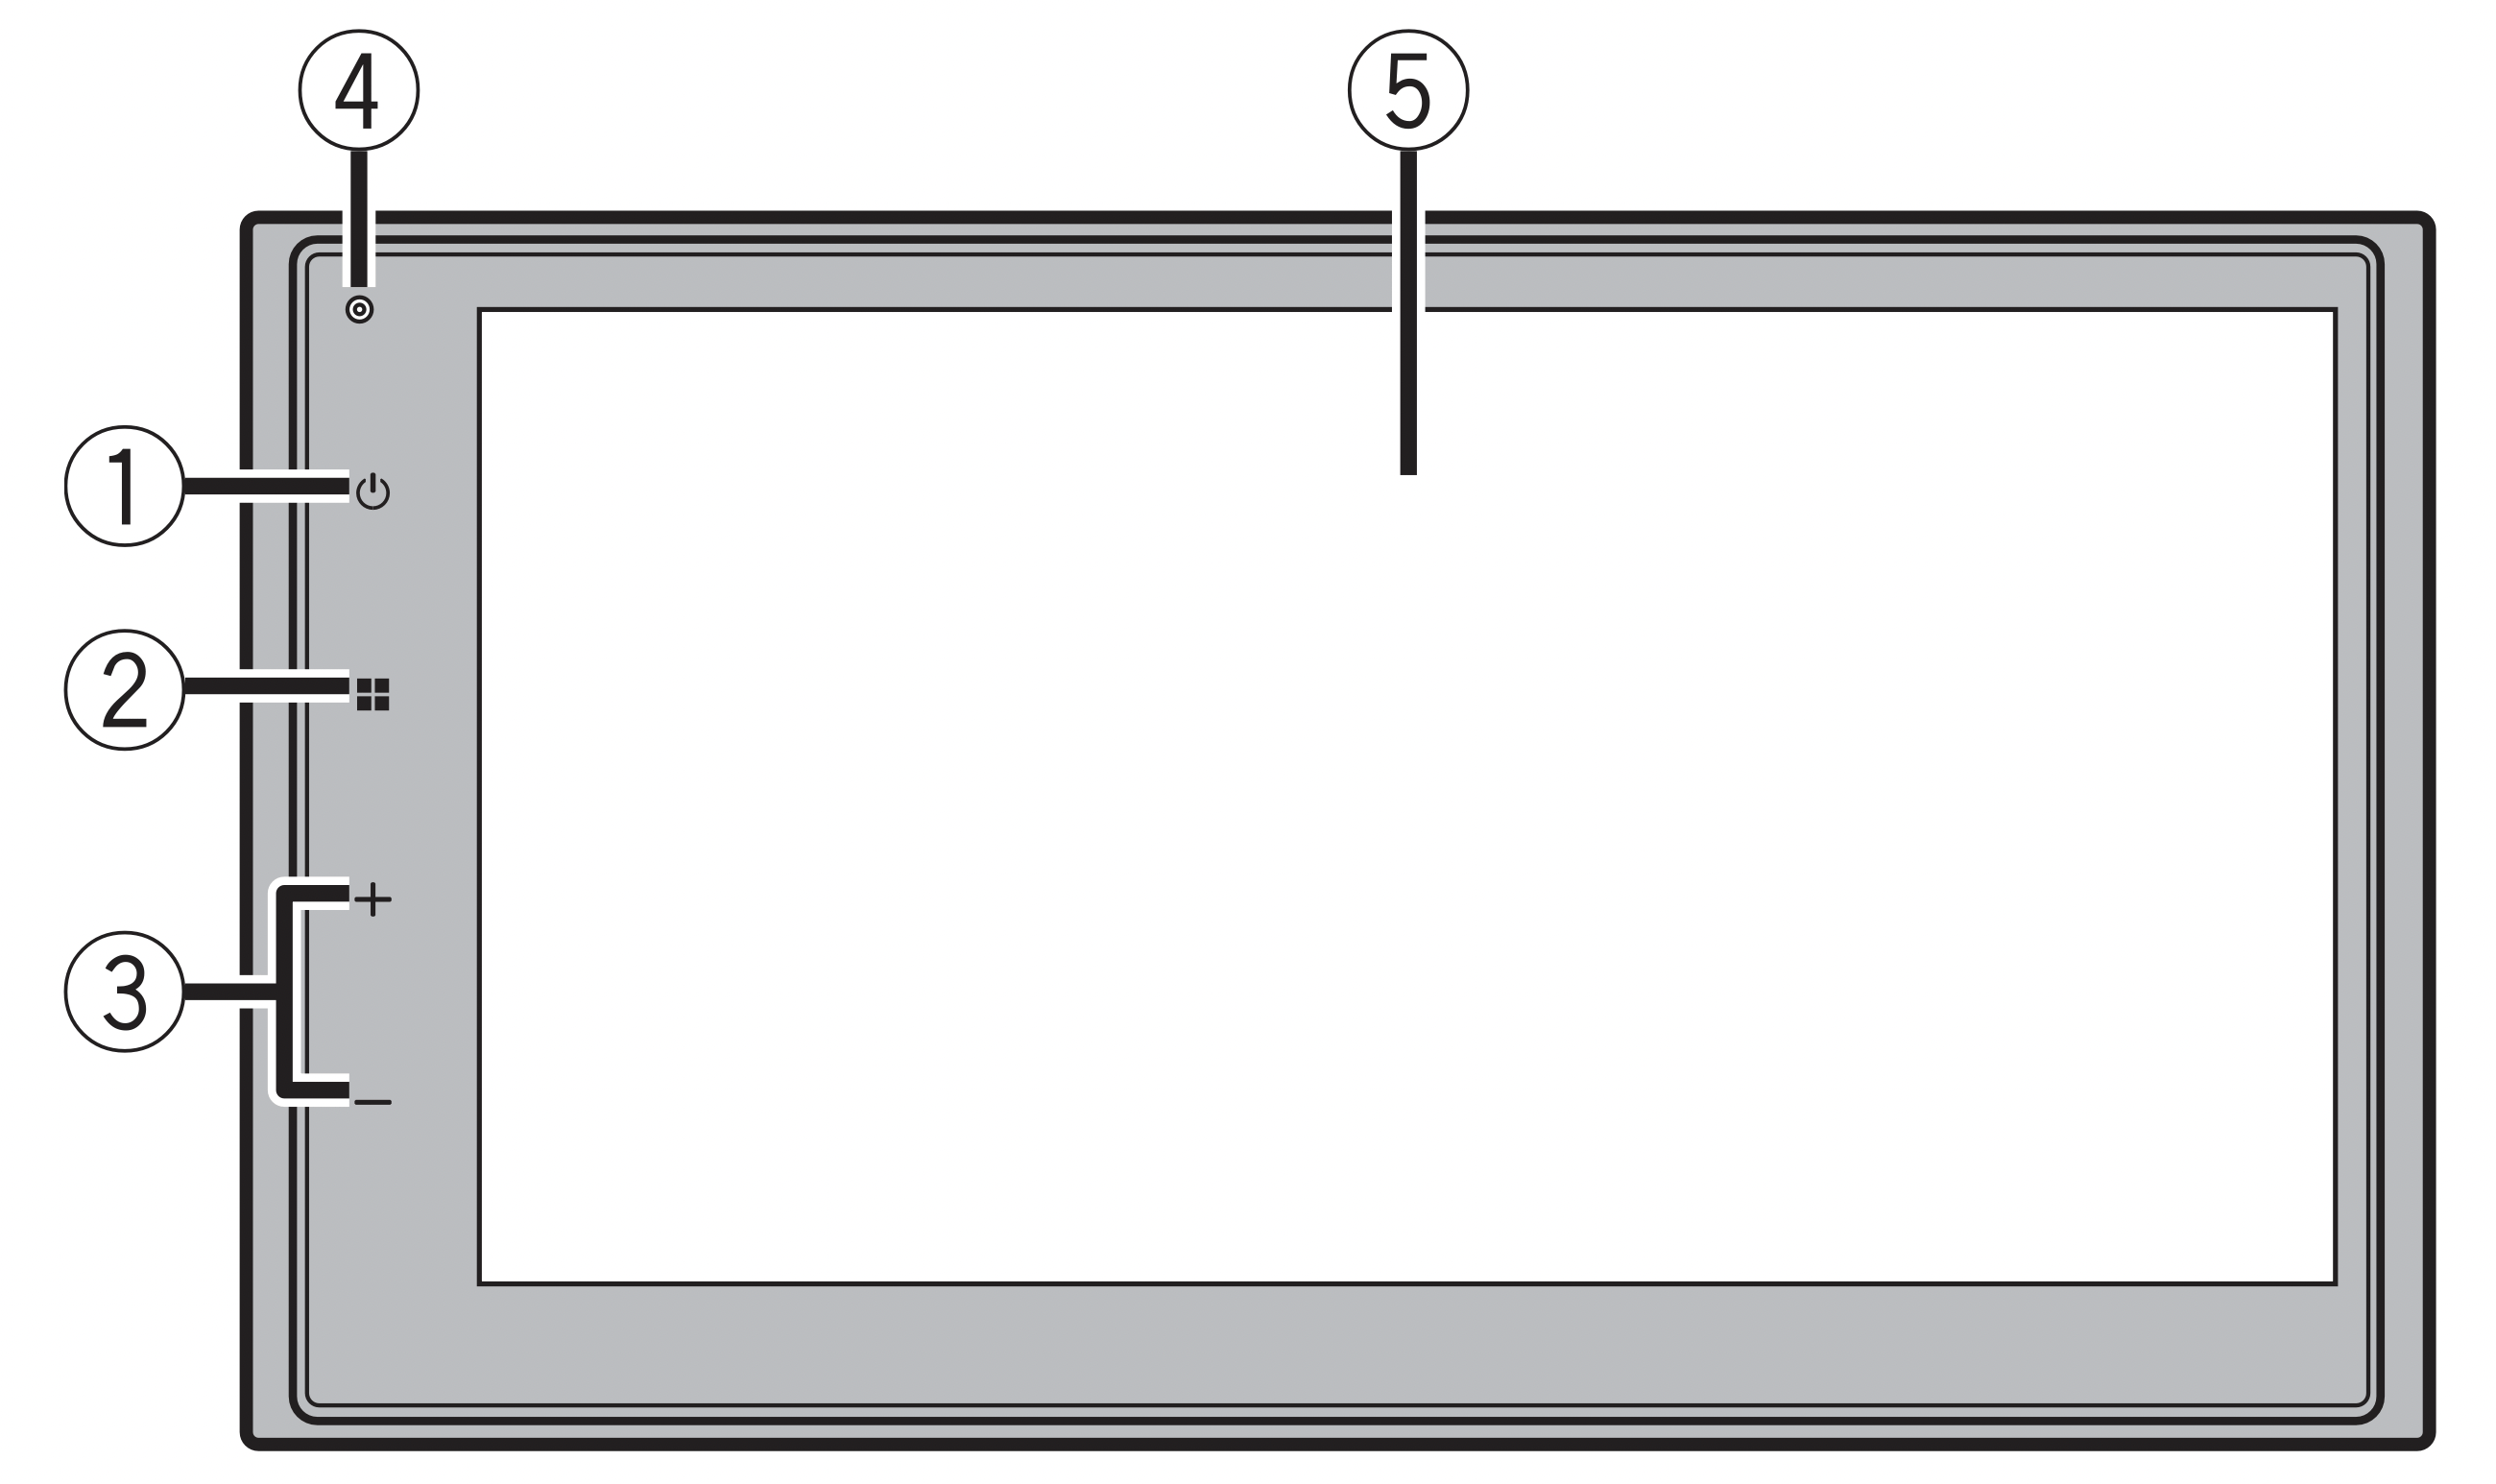
DMH - 241EX / 240EX
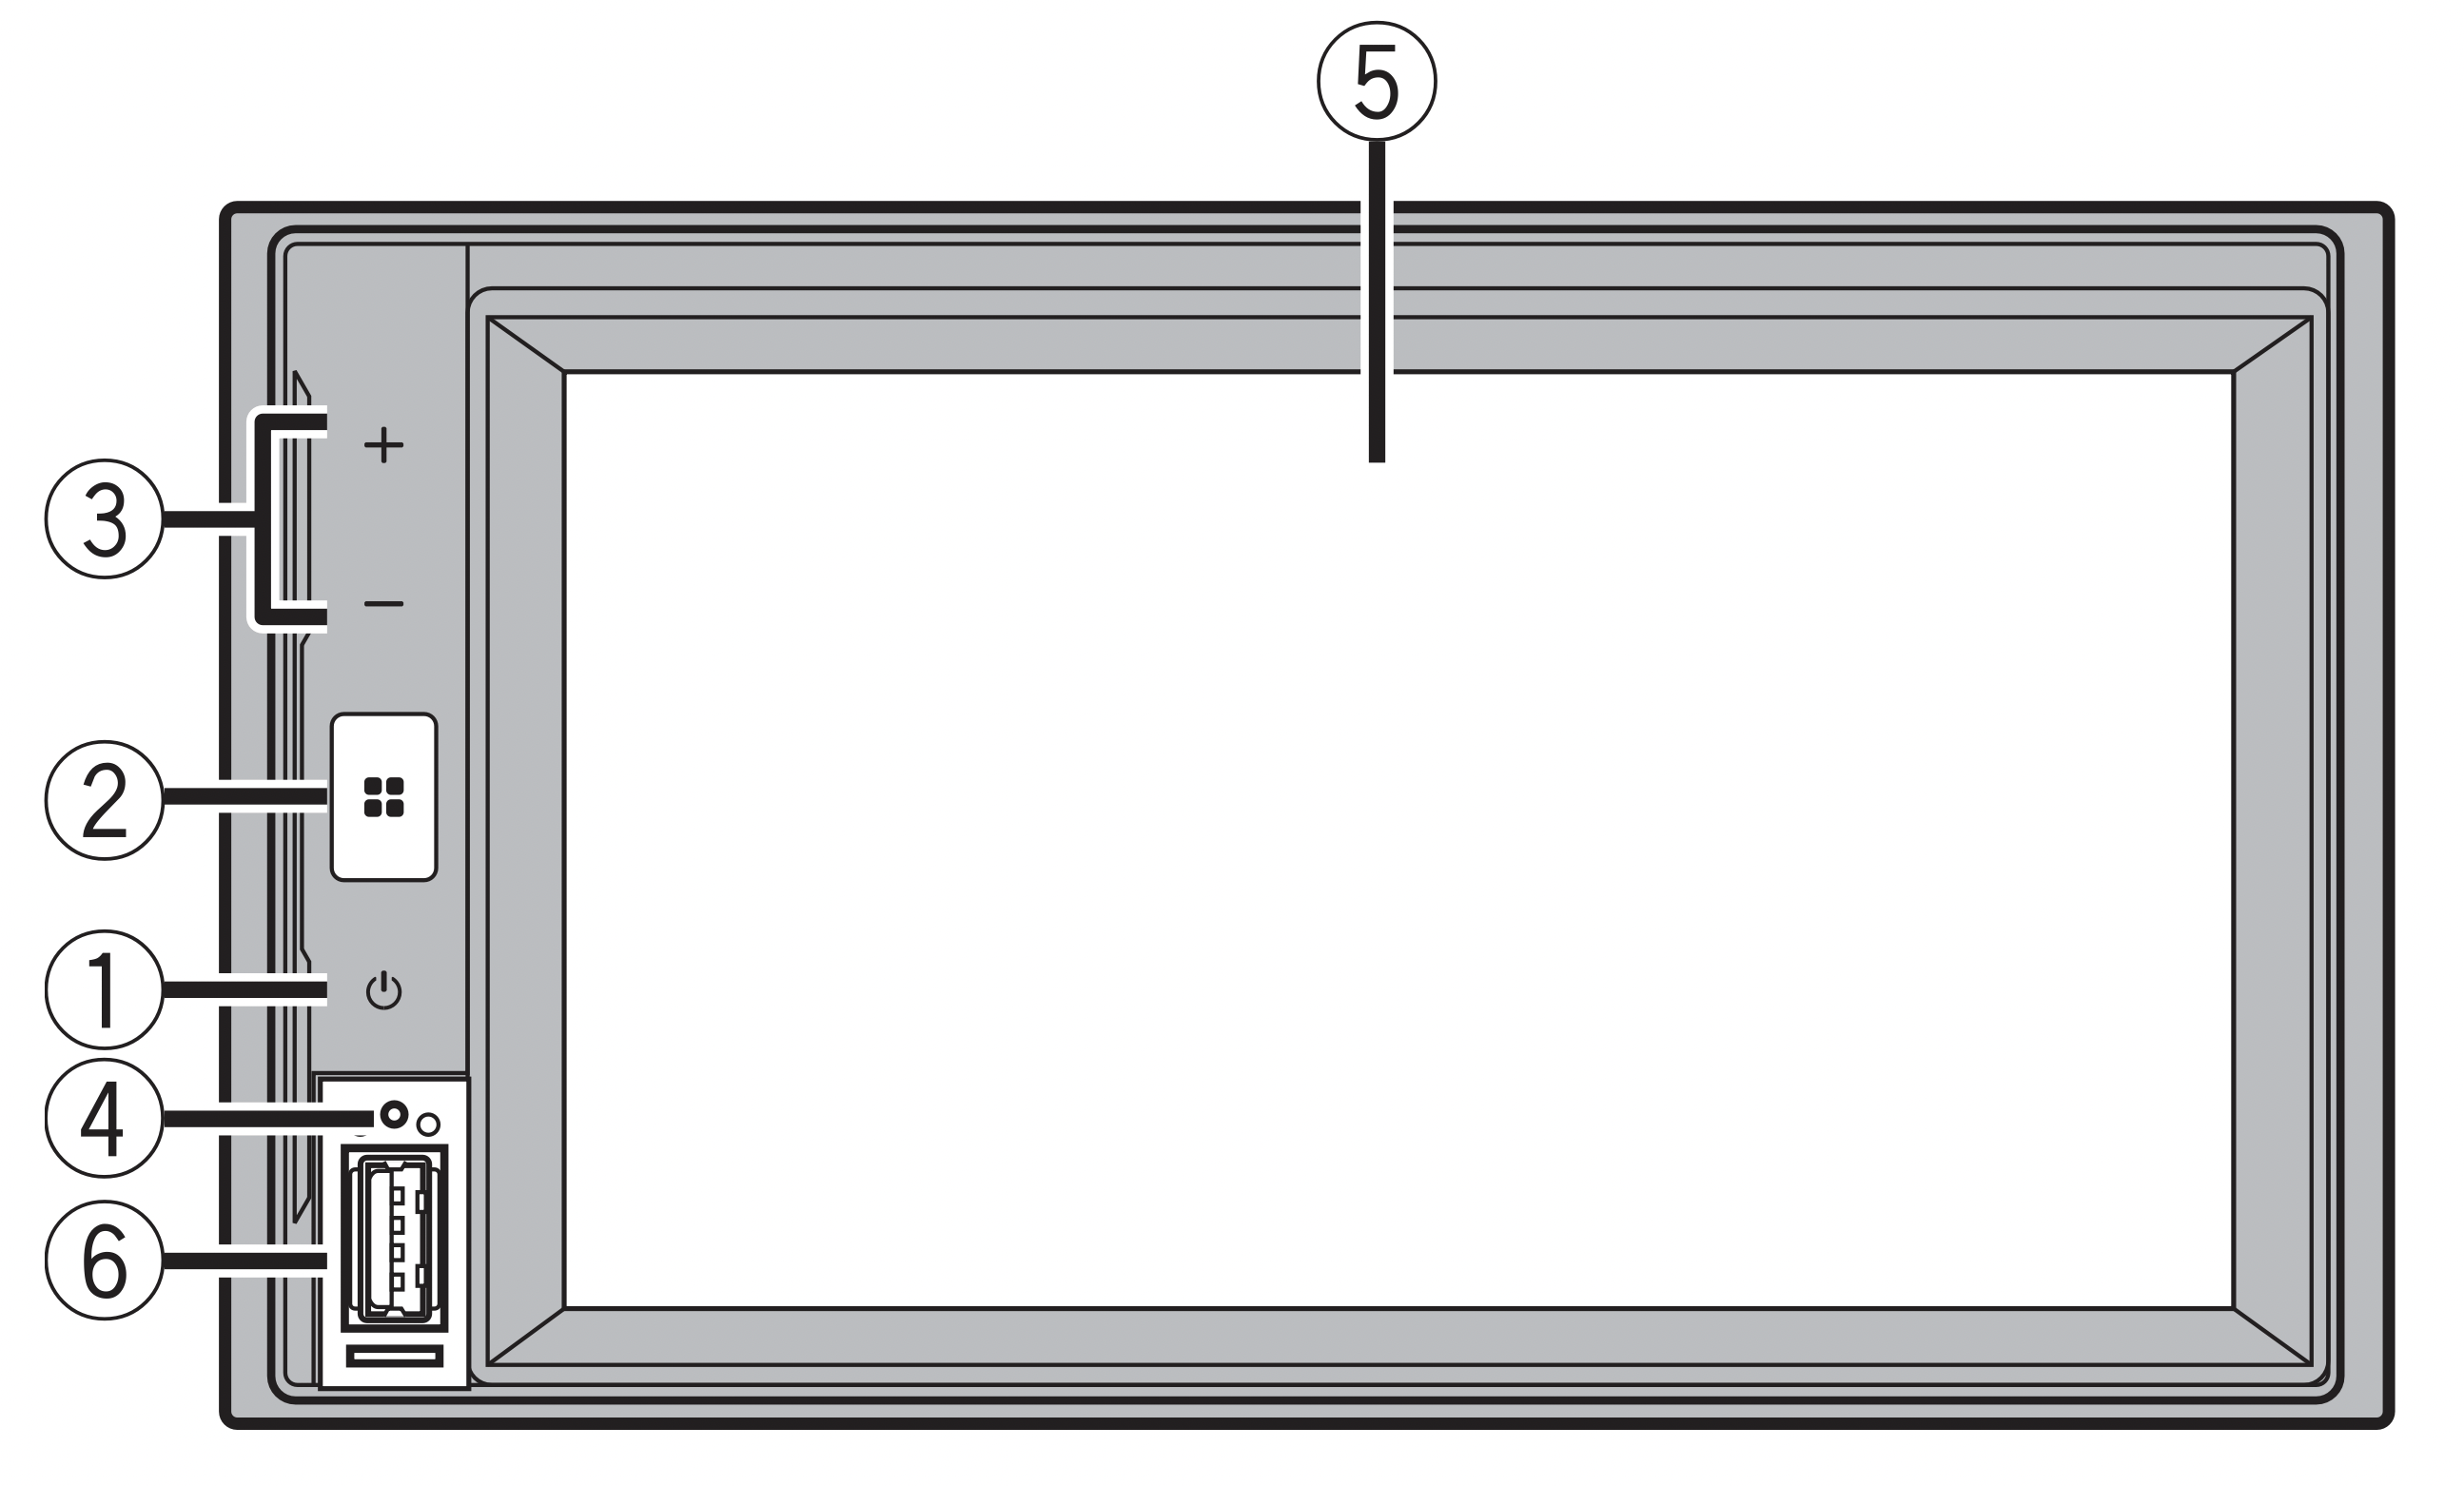
AVH - 241EX / 240EX
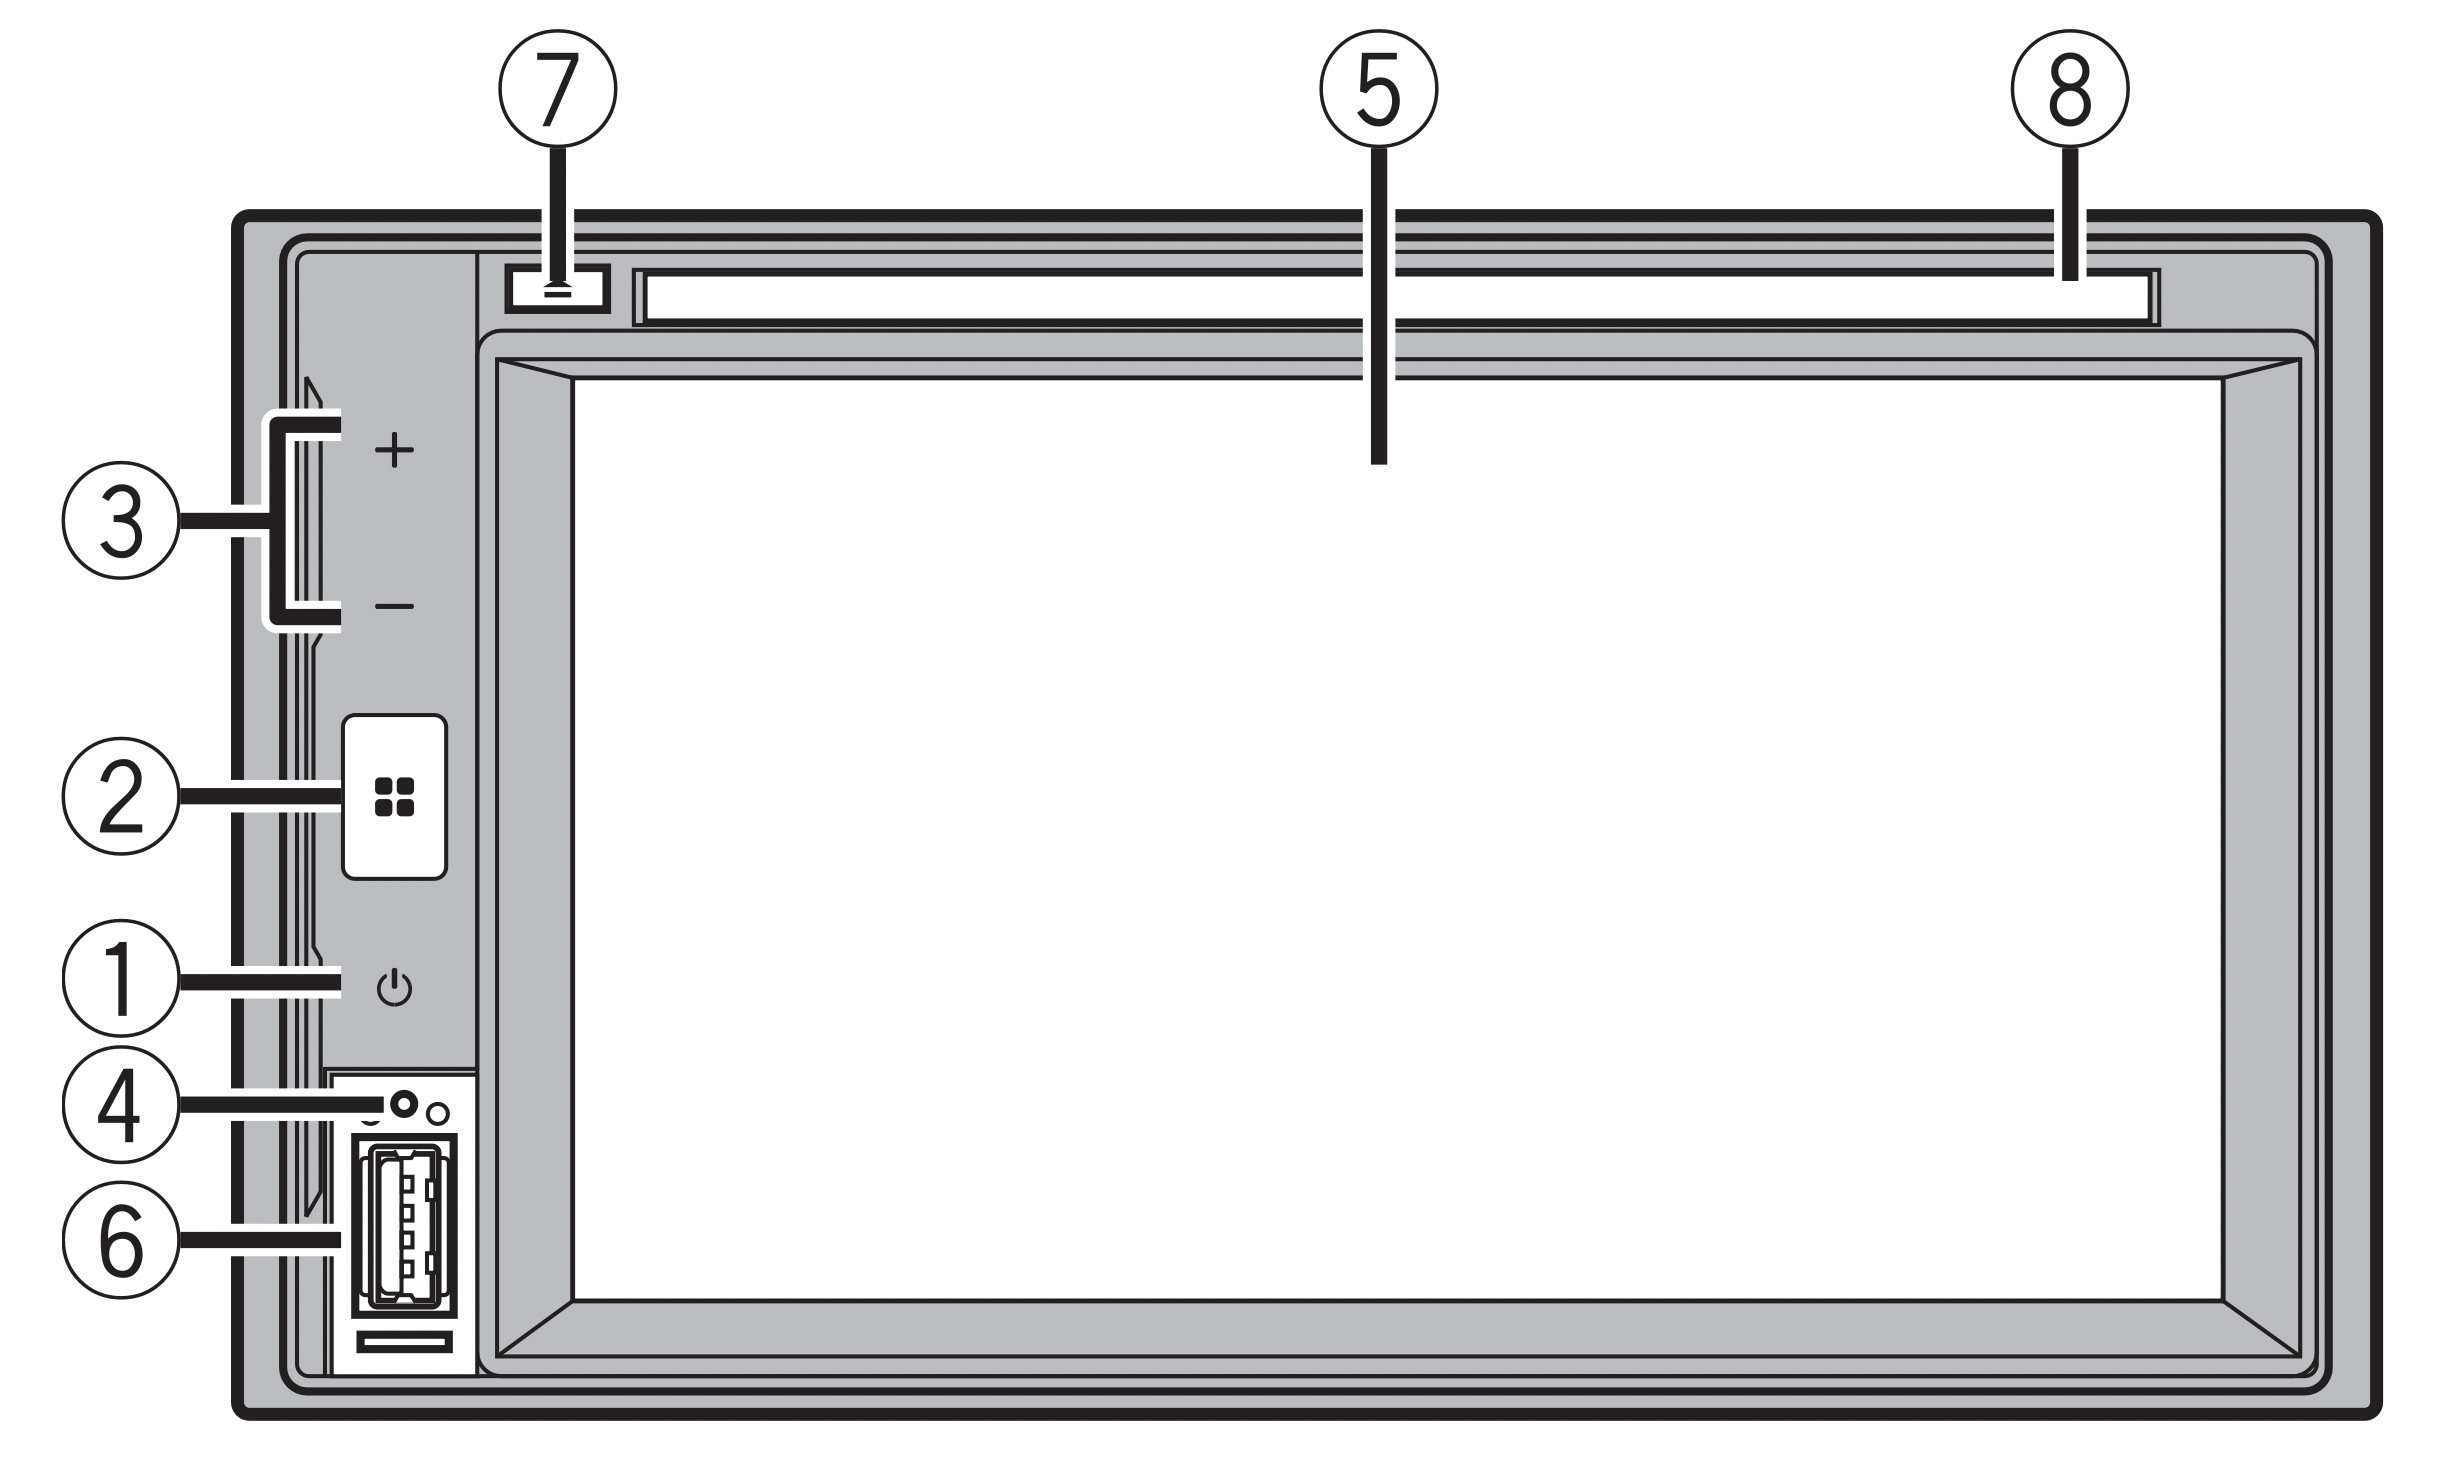
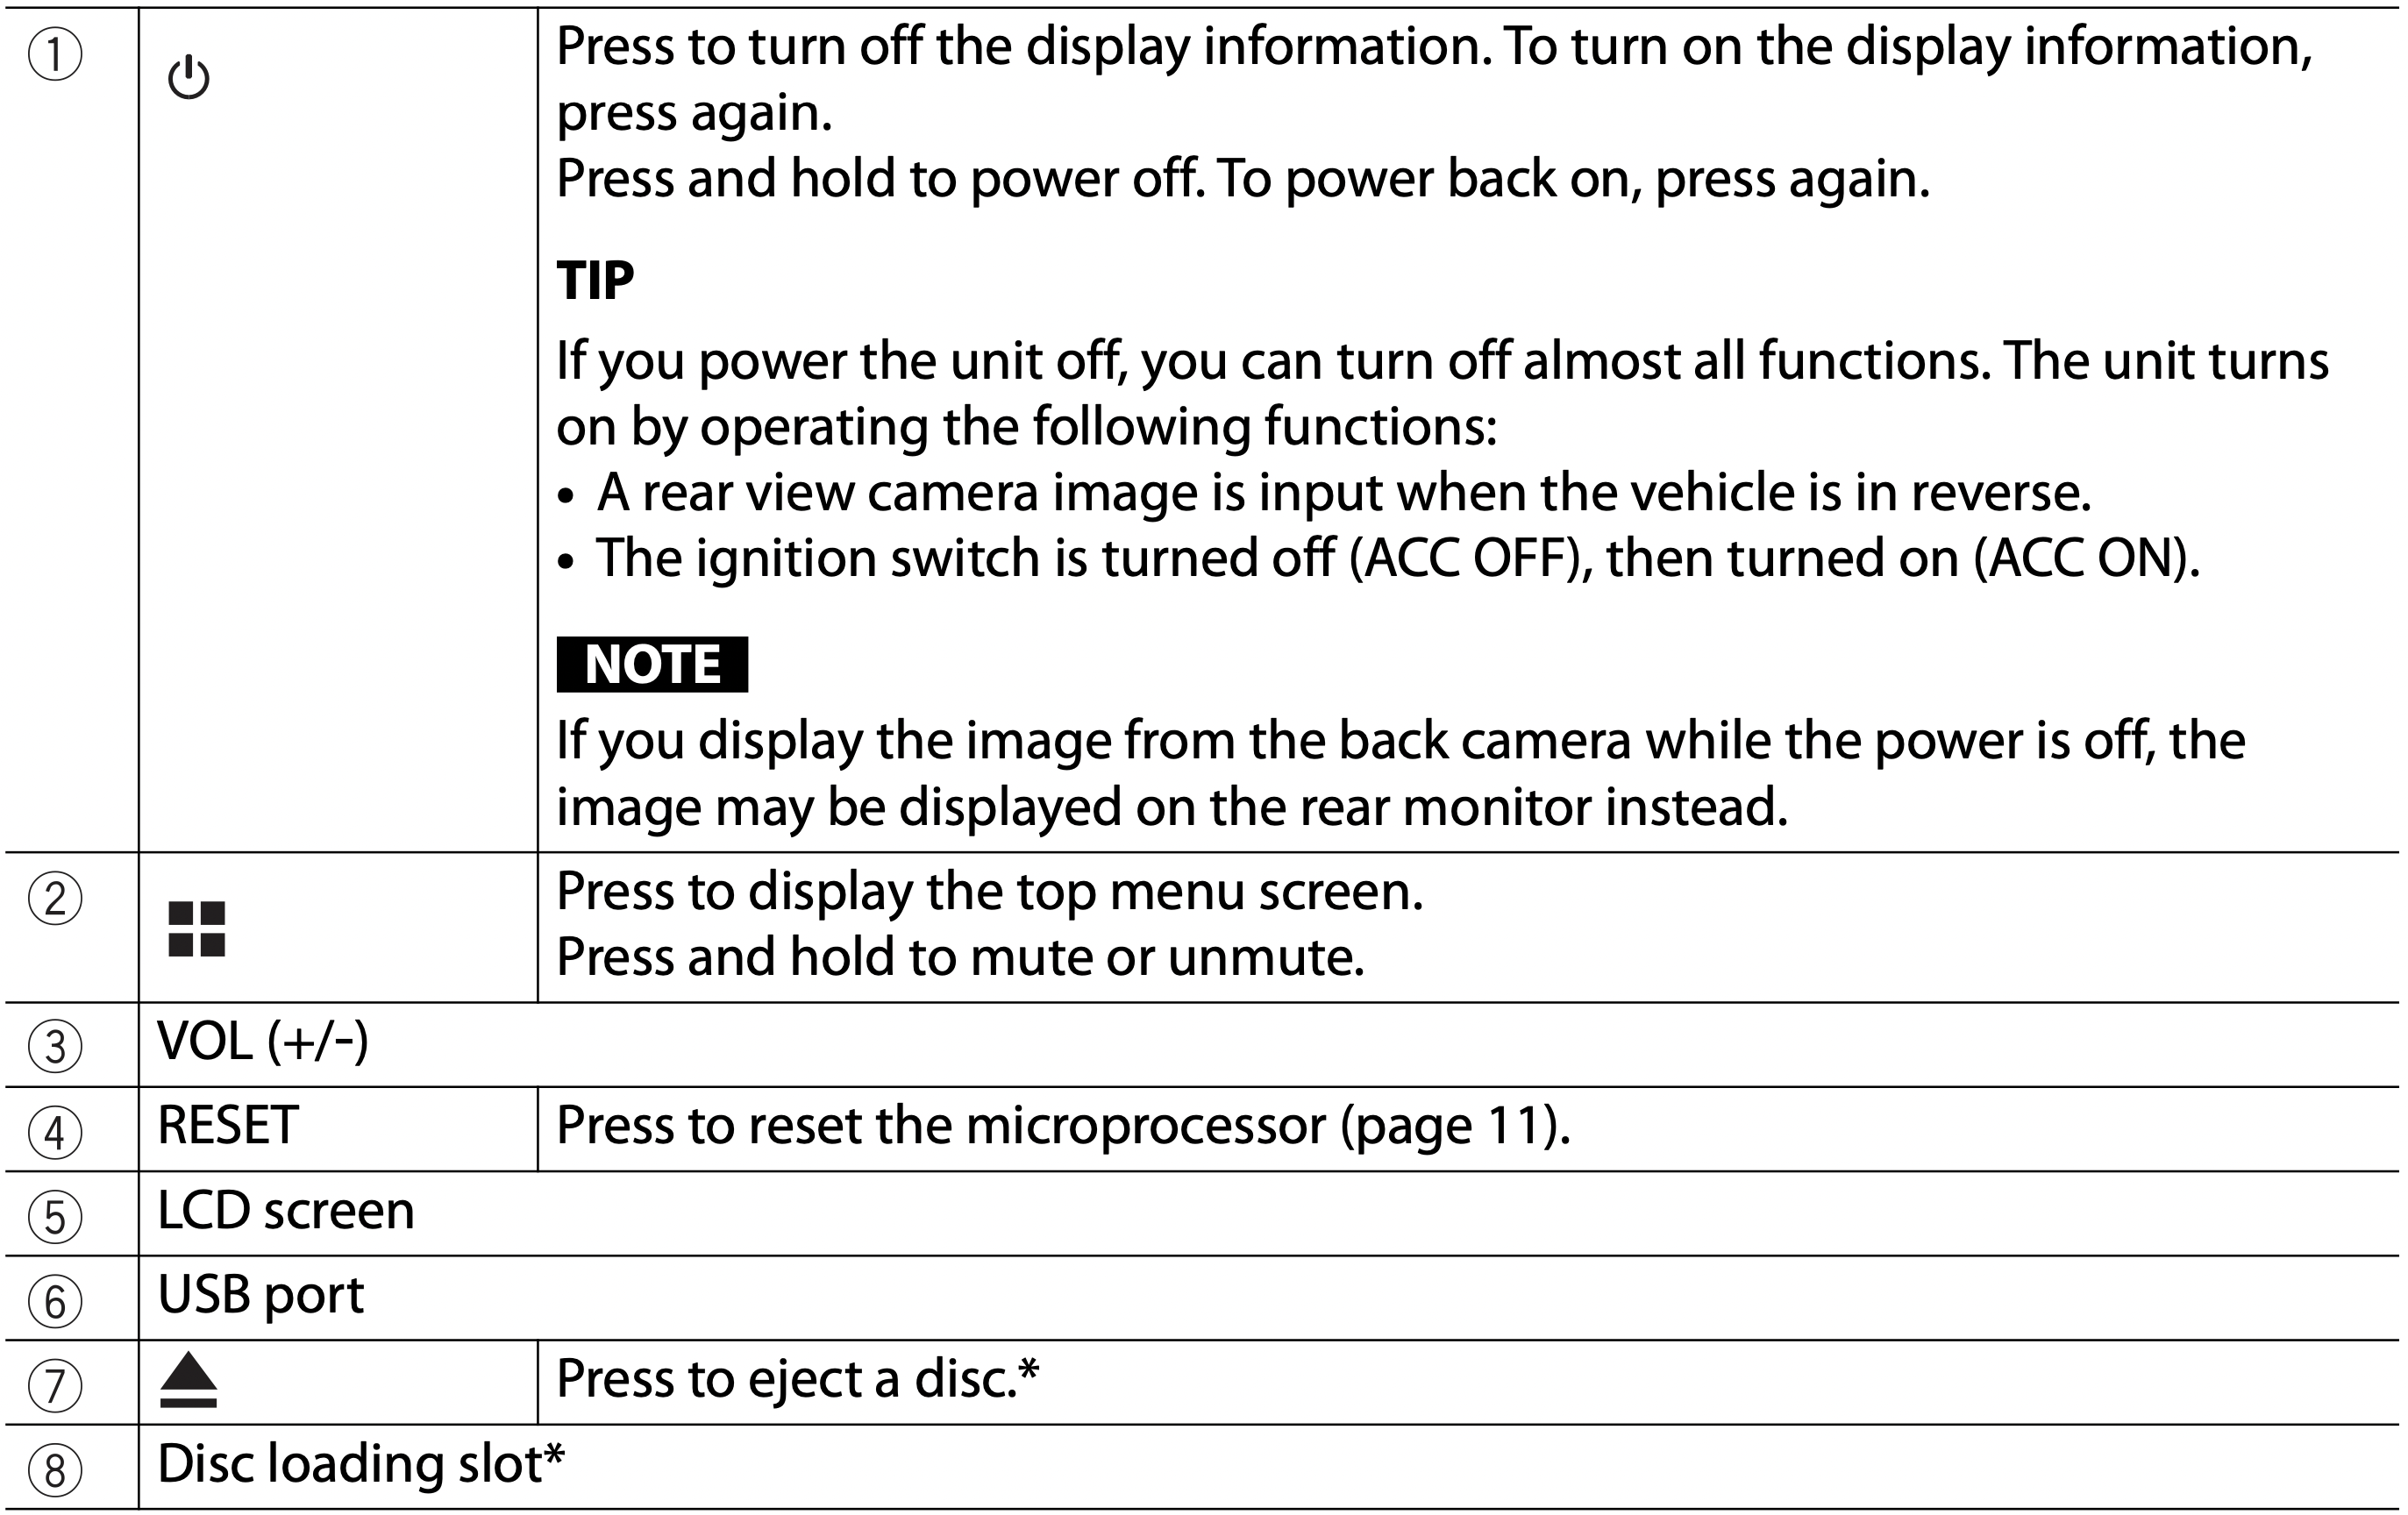
* AVH-241EX, AVH-240EX
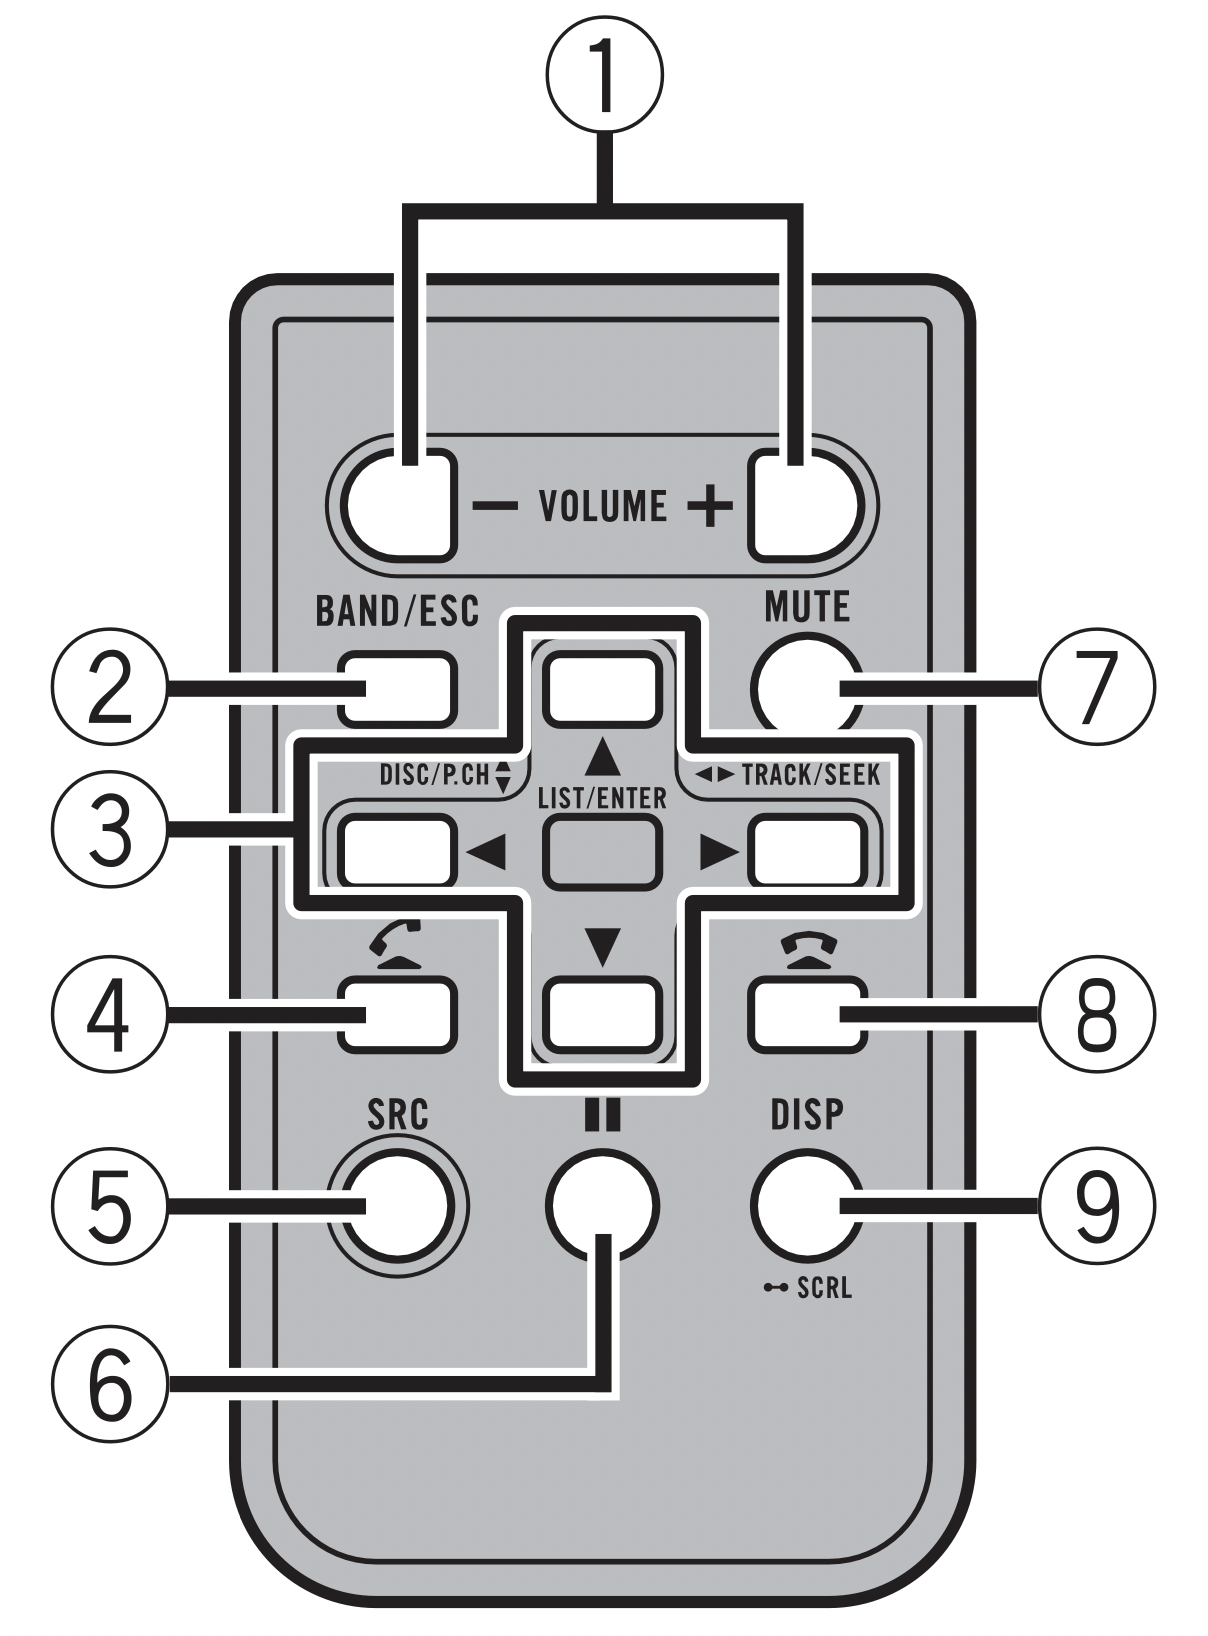
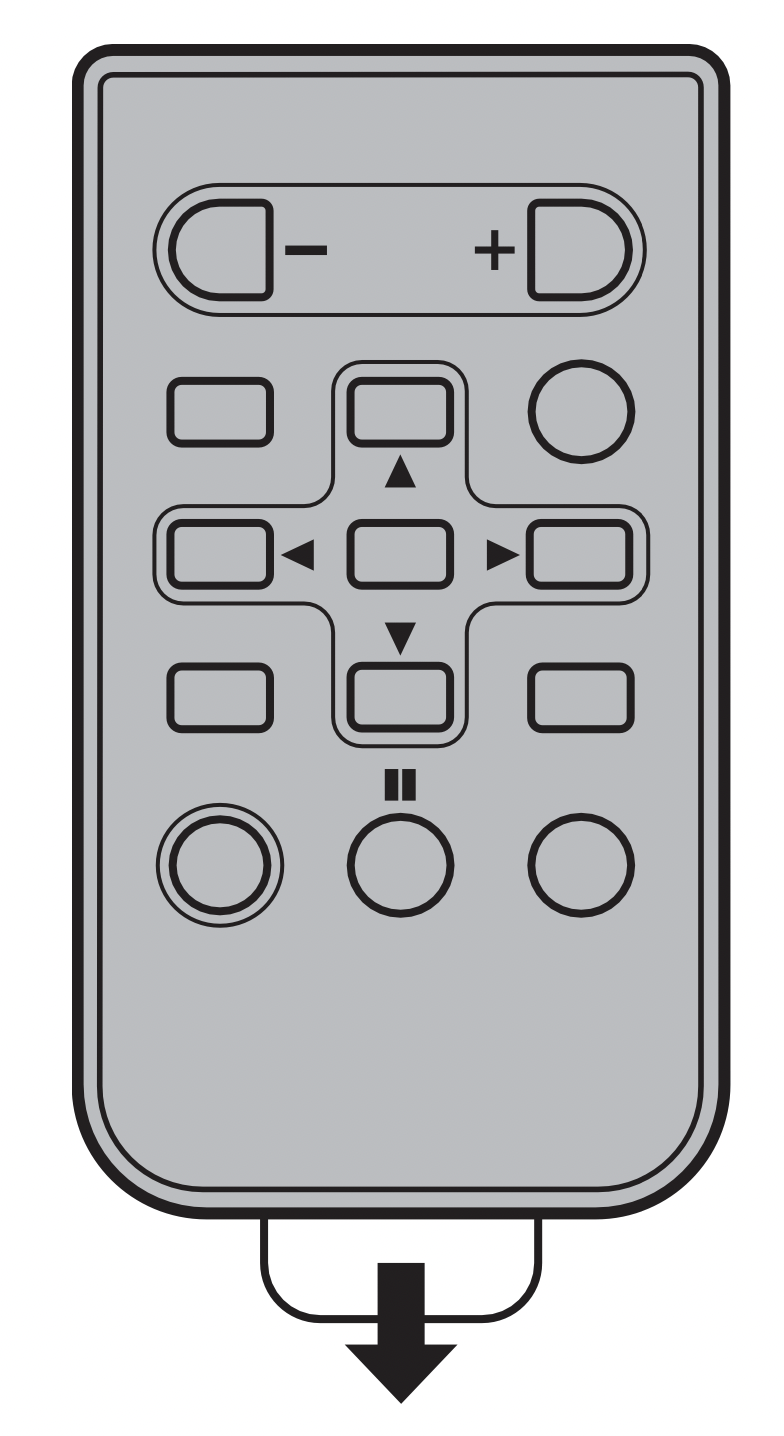
Remote control
342EX / 341EX / 241EX
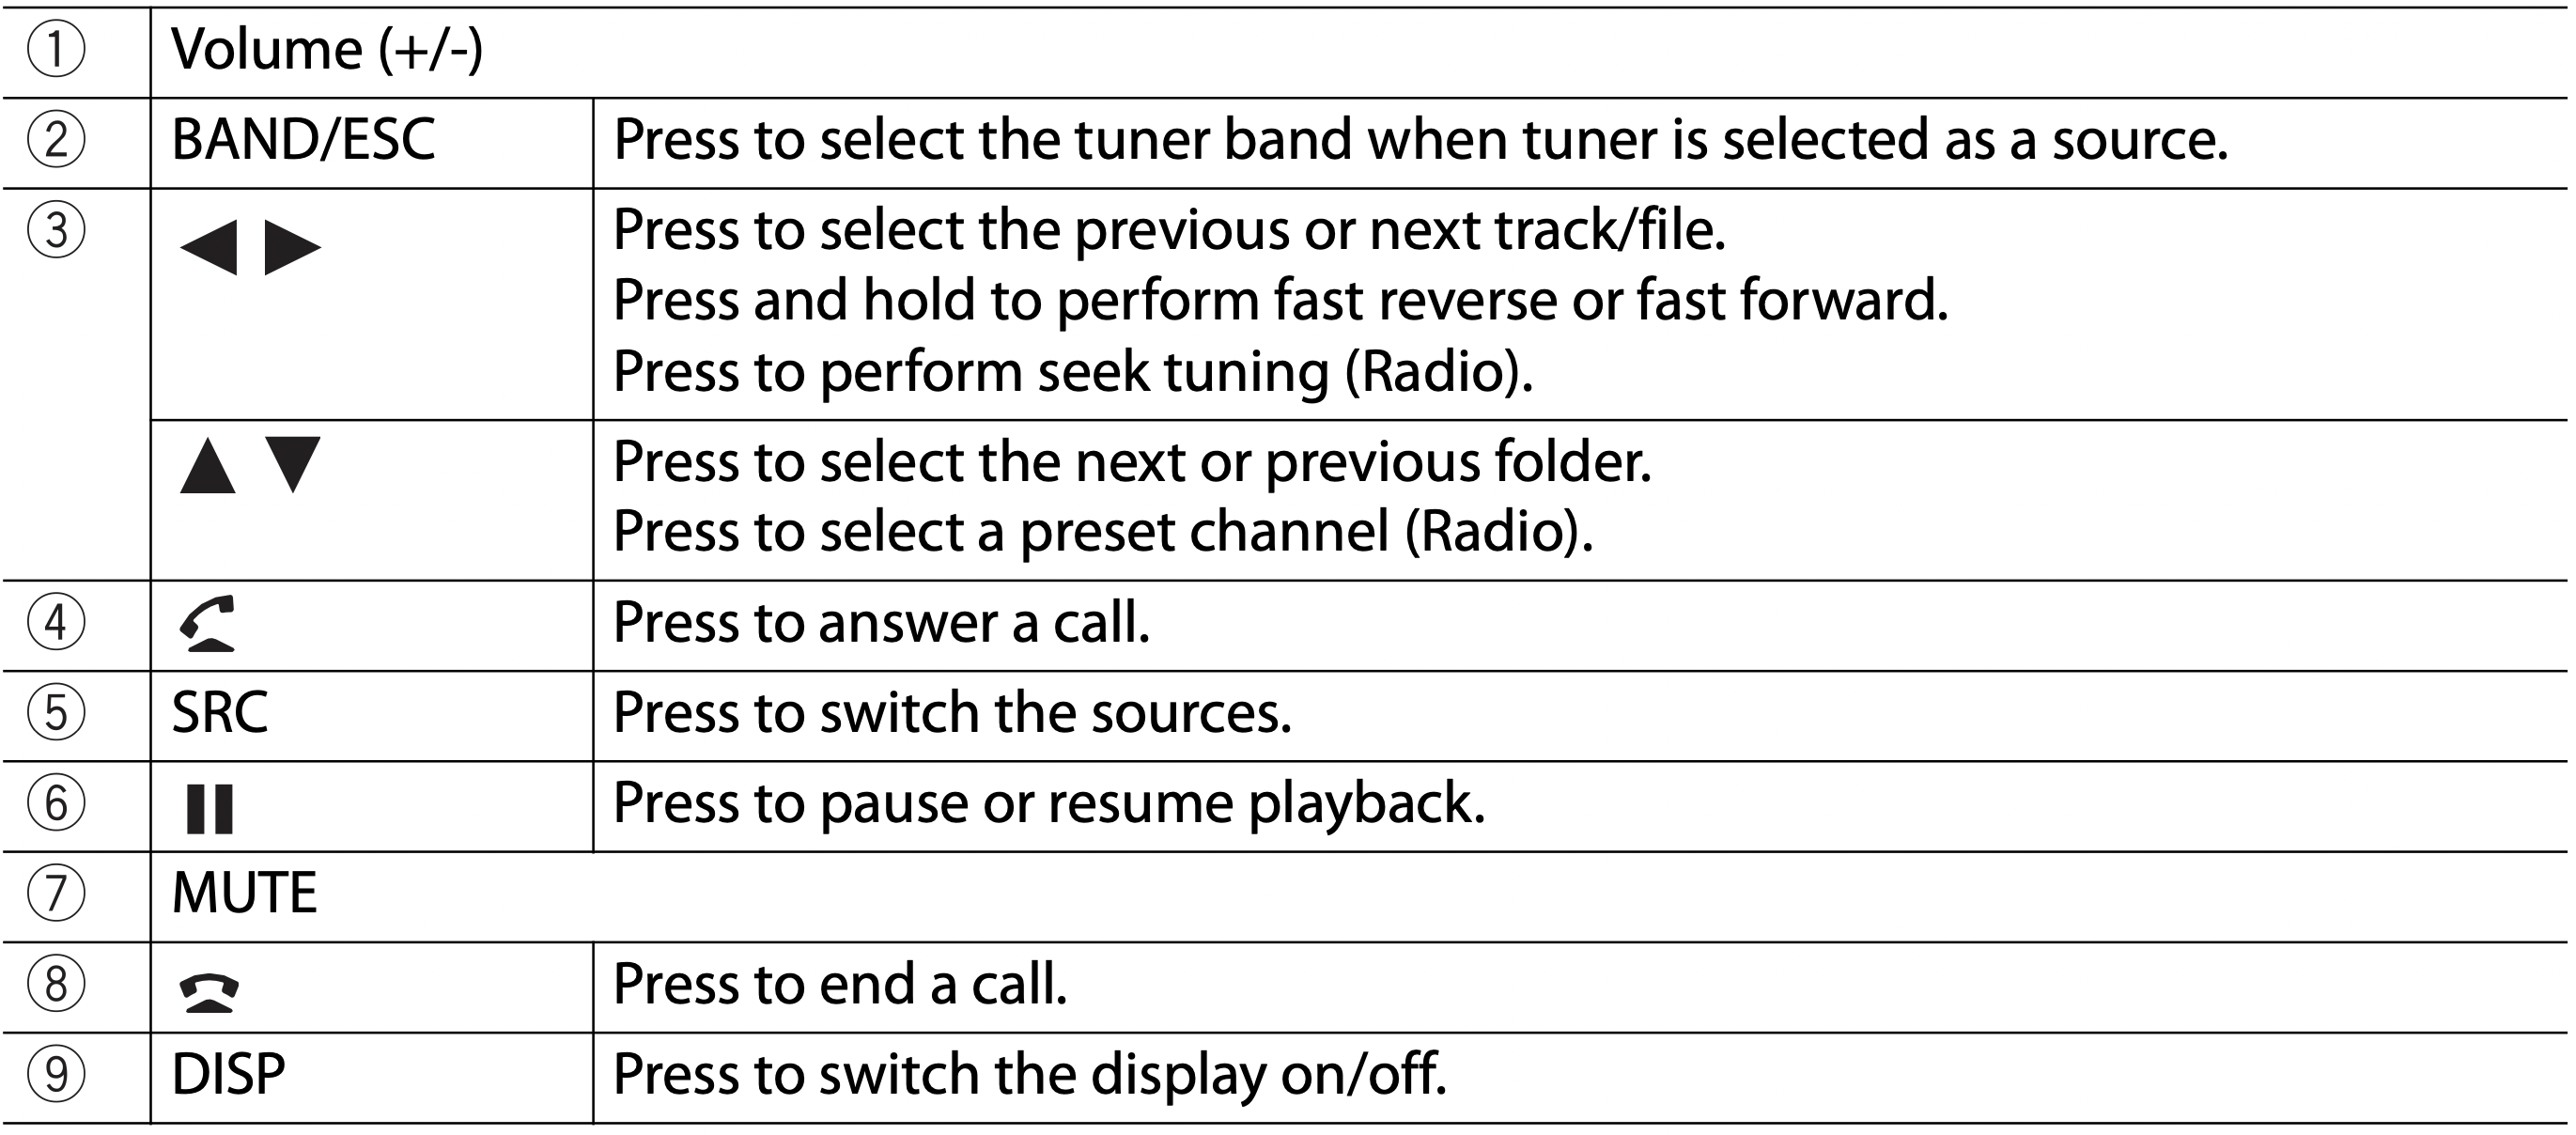
340EX / 240EX
The remote control is sold separately.
Basic operation
Resetting the microprocessor
CAUTION
- Pressing the RESET button resets settings and recorded contents to the factory settings.
- Do not perform this operation when a device is connected to this product.
- Some of the settings and recorded contents will not be reset.
- The microprocessor must be reset under the following conditions:
- Prior to using this product for the first time after installation.
- If this product fails to operate properly.
- If there appears to be problems with the operation of the system.
- Turn the ignition switch OFF.
- Press RESET with a pen tip or other pointed tools.
Settings and recorded contents are reset to the factory settings.
Preparing the remote control
342EX / 341EX / 241EX
Remove the insulation sheet before use.
How to replace the battery
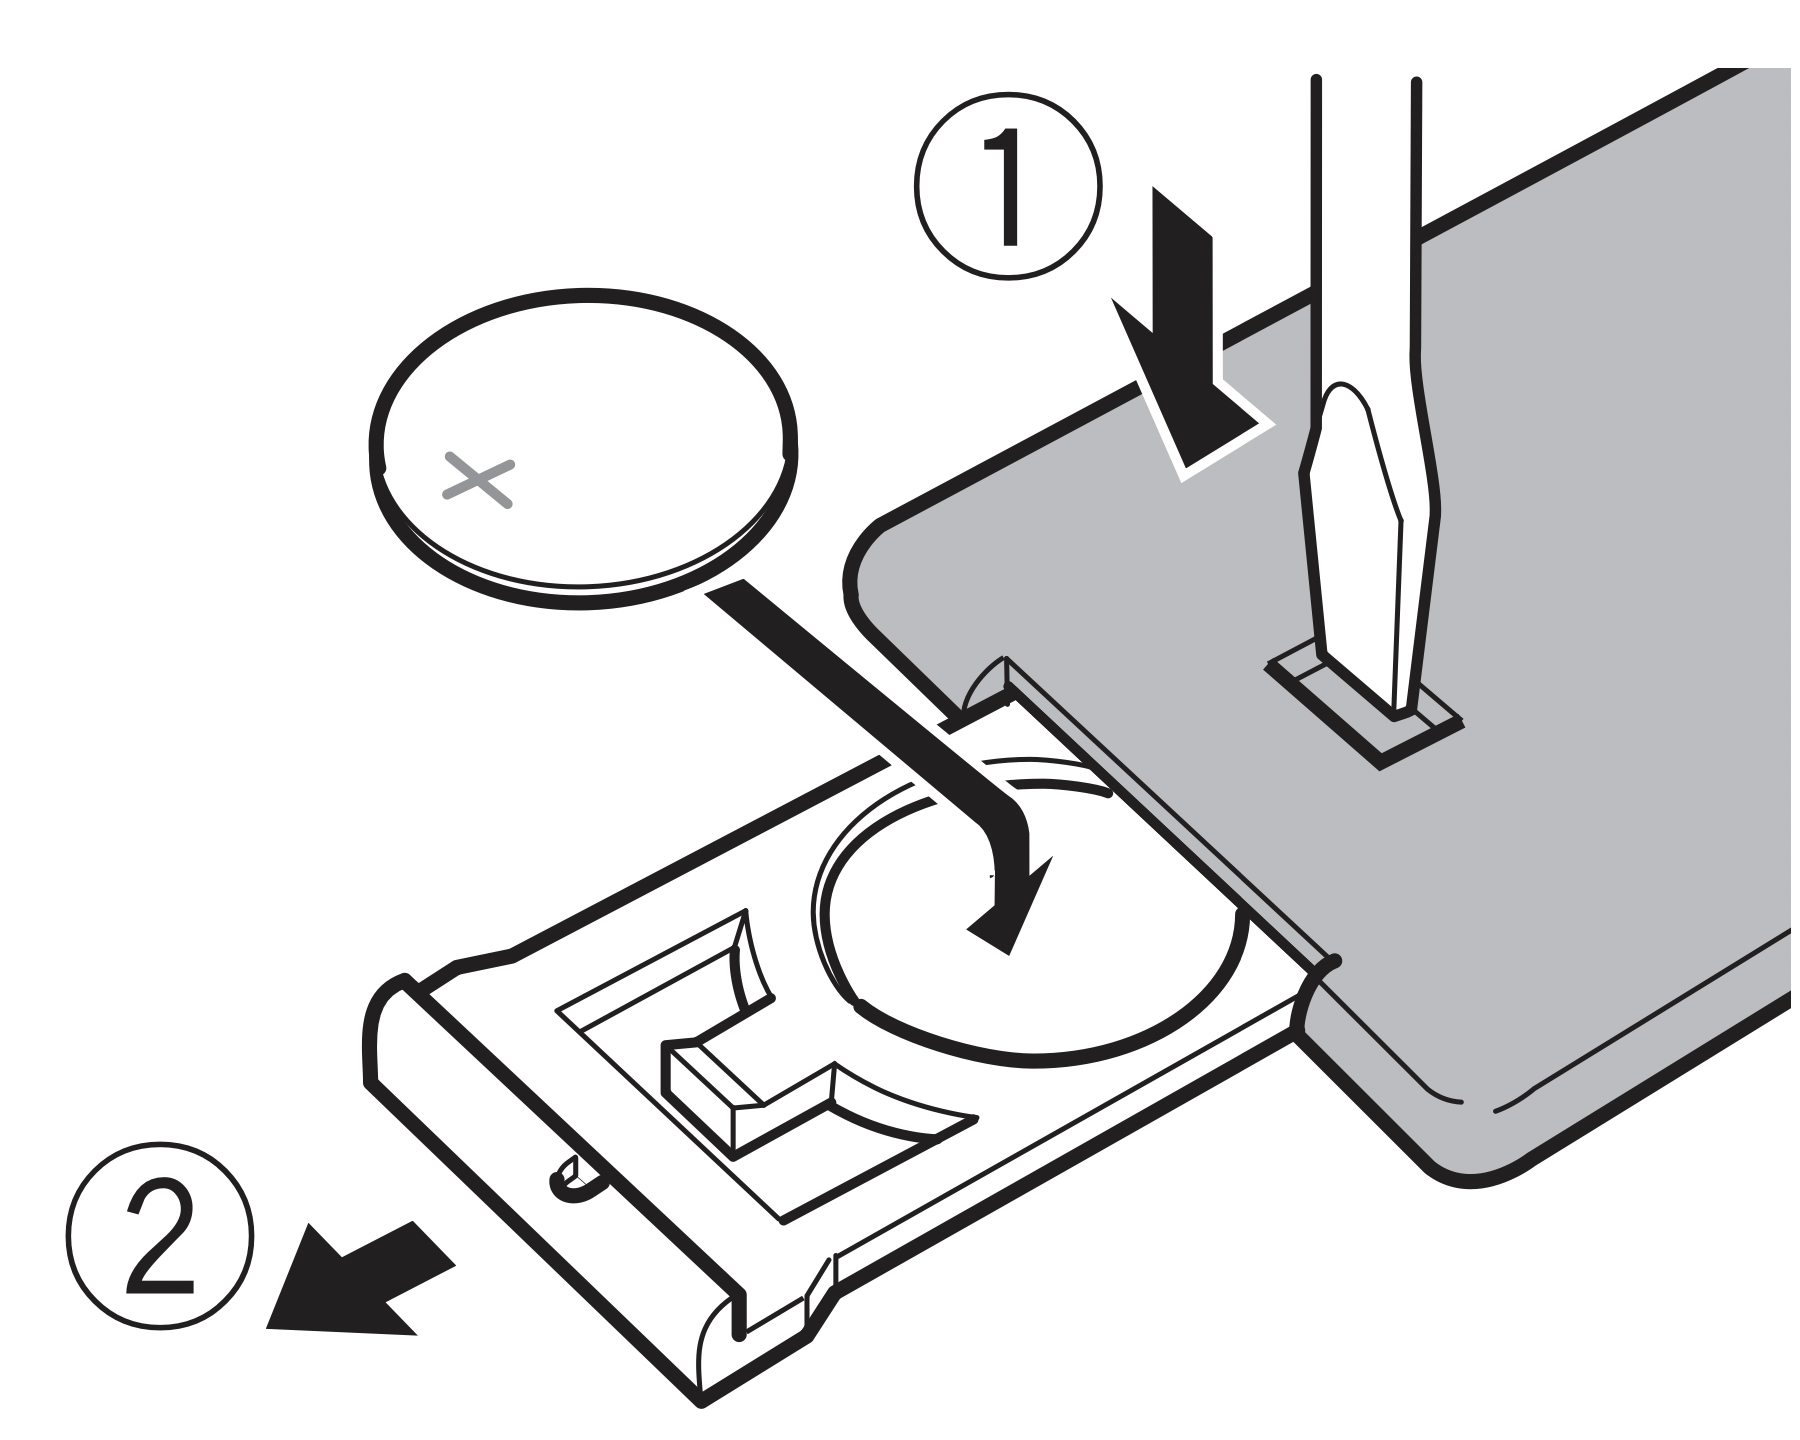
Insert the CR2025 (3 V) battery with the plus (+) and minus (-) poles orientated properly.
WARNING: Batteries (battery pack or batteries installed) must not be exposed to excessive heat such as sunshine, fire or the like.
CAUTION
- Remove the battery if the remote control is not used for a month or longer.
- There is a danger of explosion if the battery is incorrectly replaced. Replace only with the same or equivalent type.
- Do not expose a battery to high or low extreme temperatures during use, storage or transportation.
- Do not dispose of a battery into fire or a hot oven, or crush mechanically or cut a battery, that can result in an explosion.
- Do not handle the battery with metallic tools.
- Do not store the battery with metallic objects.
- If the battery leaks, wipe the remote control completely clean and install a new battery.
- When disposing of used batteries, please comply with governmental regulations or environmental public institution’s rules that apply in your country/area.
- “Perchlorate Material – special handling may apply.
Using the remote control
Point the remote control in the direction of the front panel to operate.
NOTE: The remote control may not function properly in direct sunlight.
Important
- Do not store the remote control in high temperatures or direct sunlight.
- Do not let the remote control fall onto the floor, where it may become jammed under the brake or gas pedal.
Using the touch panel
You can operate this product by touching the keys on the screen directly with your fingers.
NOTE: To protect the LCD screen from damage, be sure to touch the screen only with your finger gently.
Common touch panel keys
 : Returns to the previous screen.
 : Close the screen.
Operating list screens
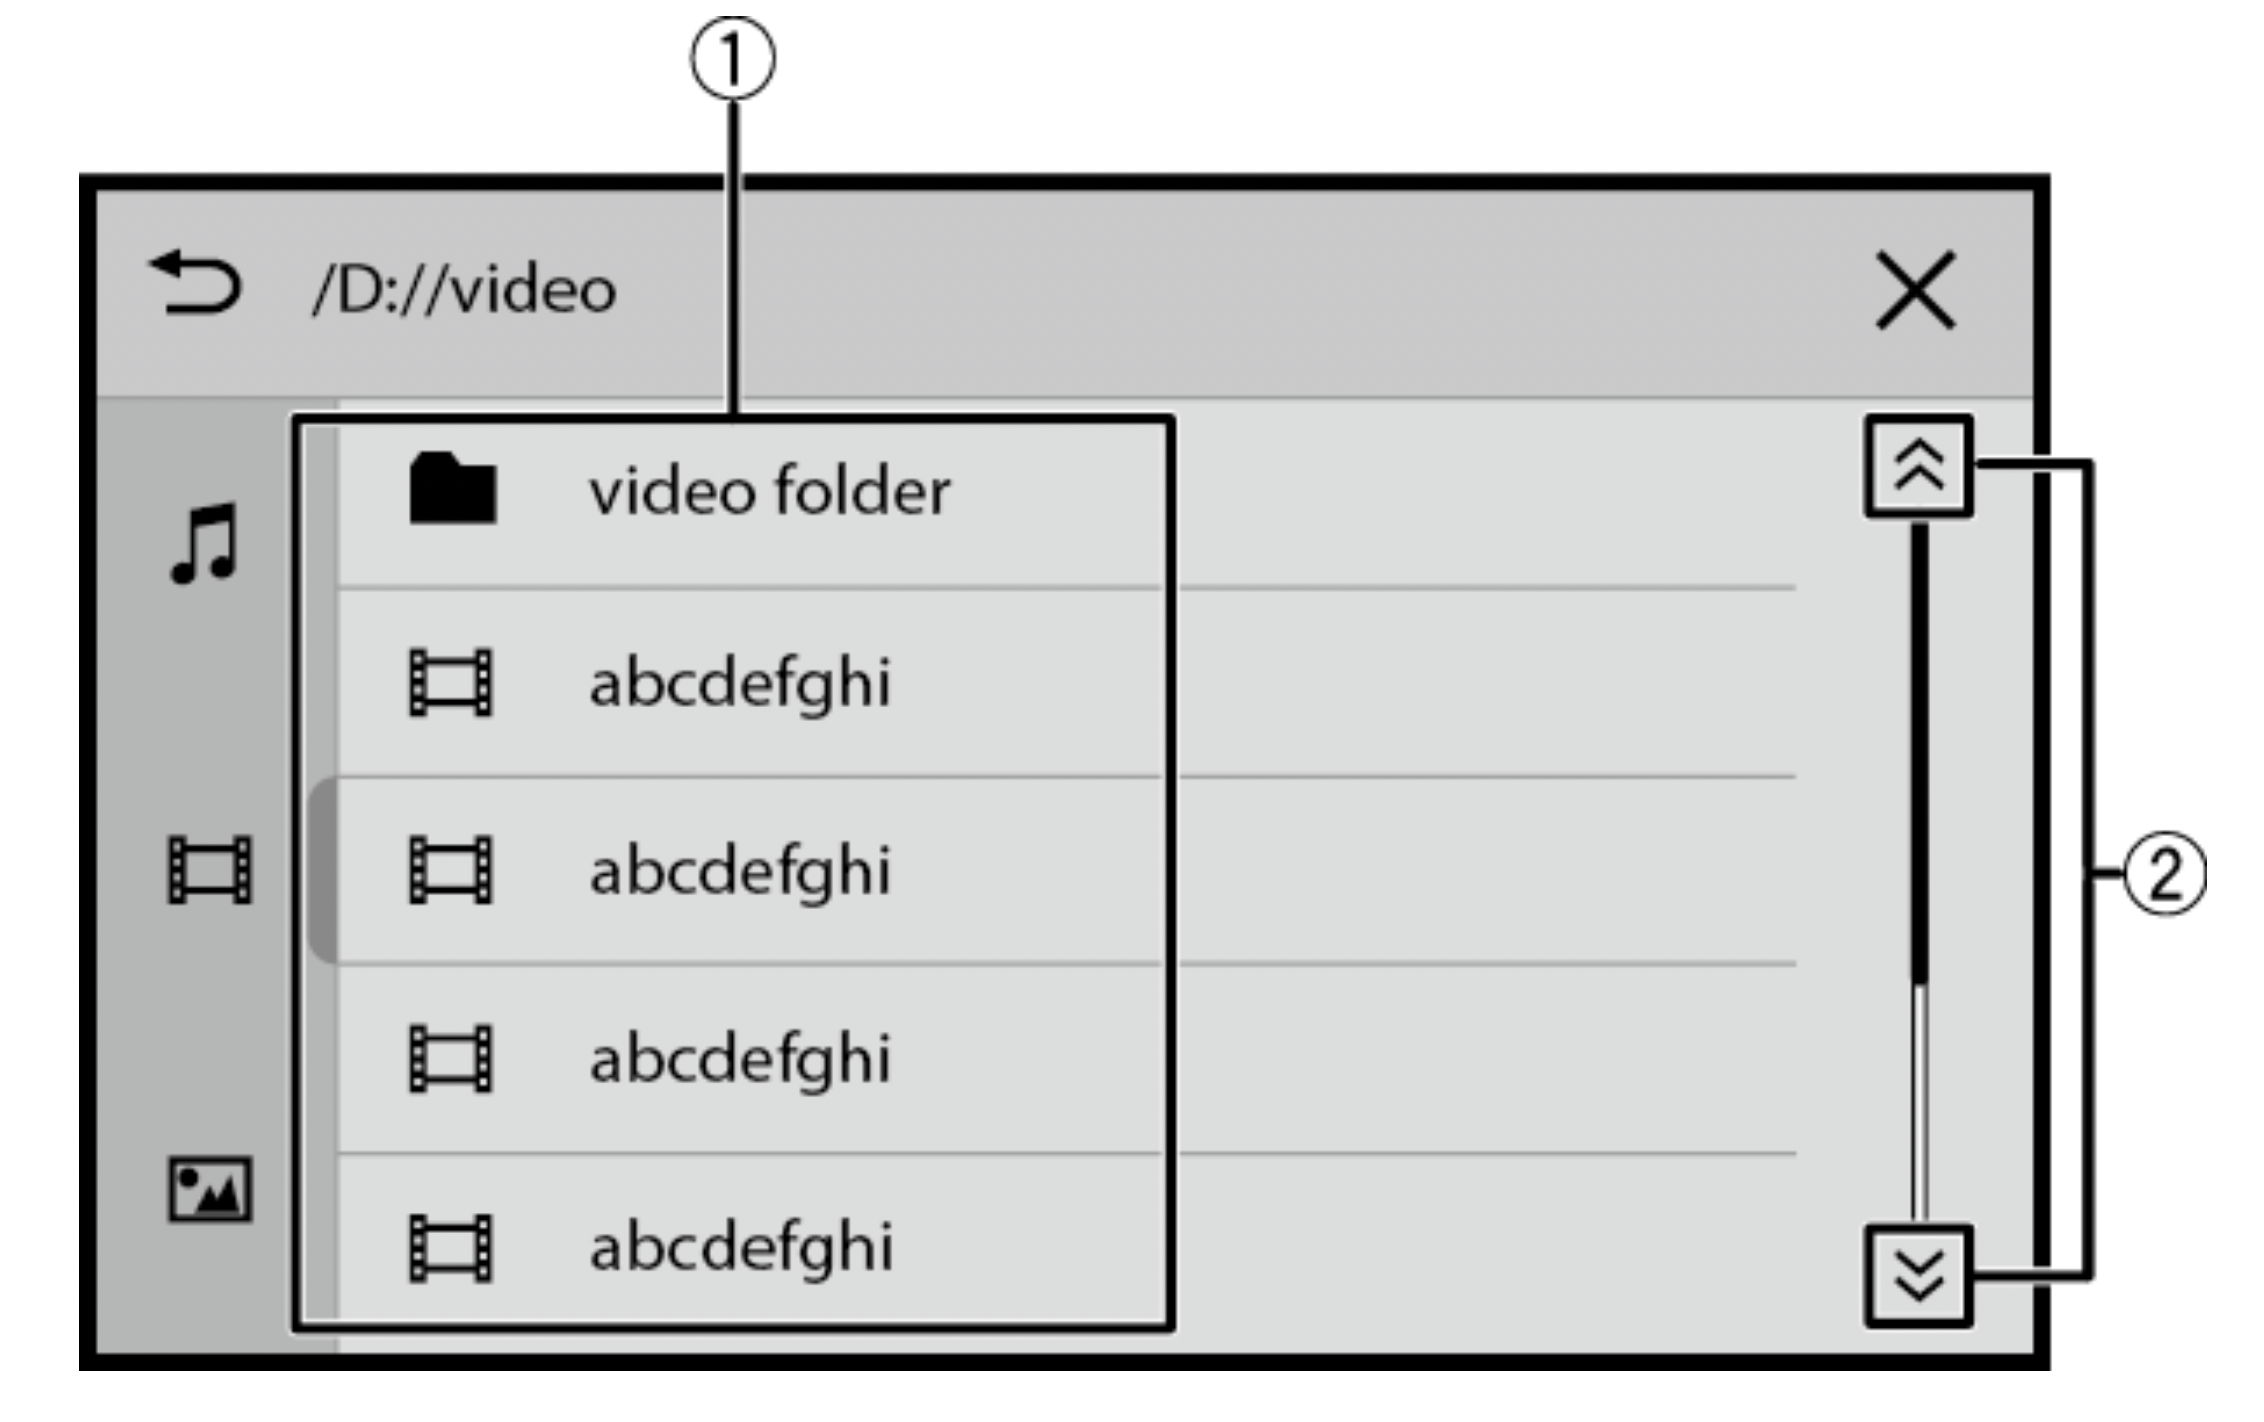
- Touching an item on the list allows you to narrow down the options and proceed to the next operation.
- Touch to view any hidden items.
Operating the time bar

- You can change the playback point by touching in the bar.
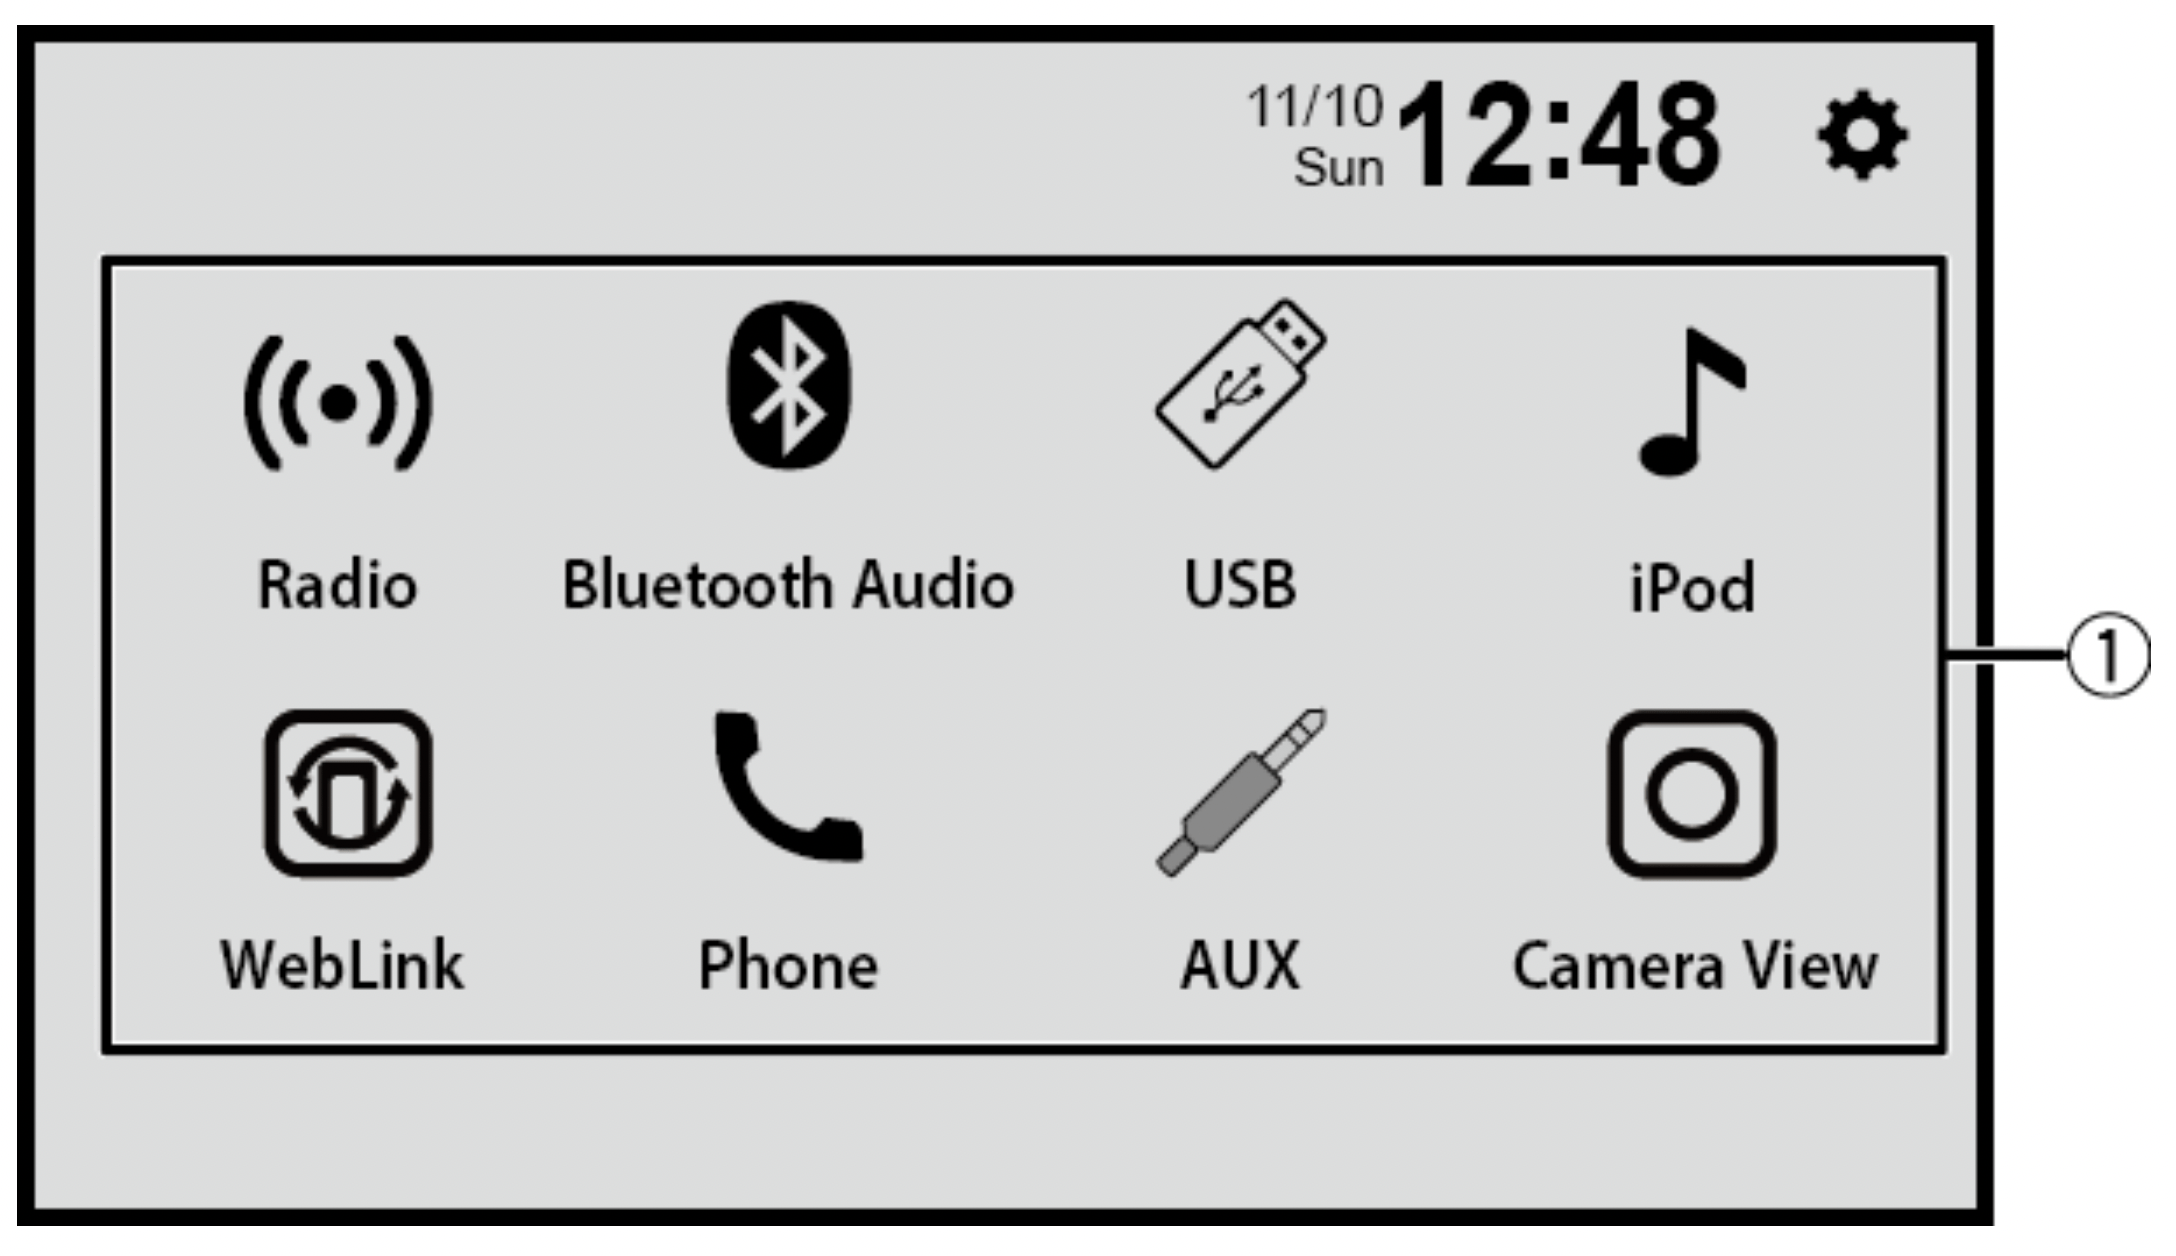
Top menu screen

Bluetooth®
Bluetooth connection
- Turn on the Bluetooth function on the device.
- Press
 .
. - Touch [Phone] or [Bluetooth Audio].
The unit name is shown in the display. - Select the unit name shown in the mobile device display.
- Perform the pairing operation by the mobile device and this unit.
After the device is successfully registered, a Bluetooth connection is established by the system.
TIP: To disconnect the connection, touch the connected device name on the top of the phone number input screen (page 16).
NOTE: You need to disconnect the Bluetooth connection with connected mobile device to connect another mobile device.
Hands-free phoning
To use this function you need to connect your cellular phone to this product via Bluetooth in advance (page 15).
CAUTION: For your safety, avoid talking on the phone as much as possible while driving.
Making a phone call
- Press
 .
. - Touch [Phone].
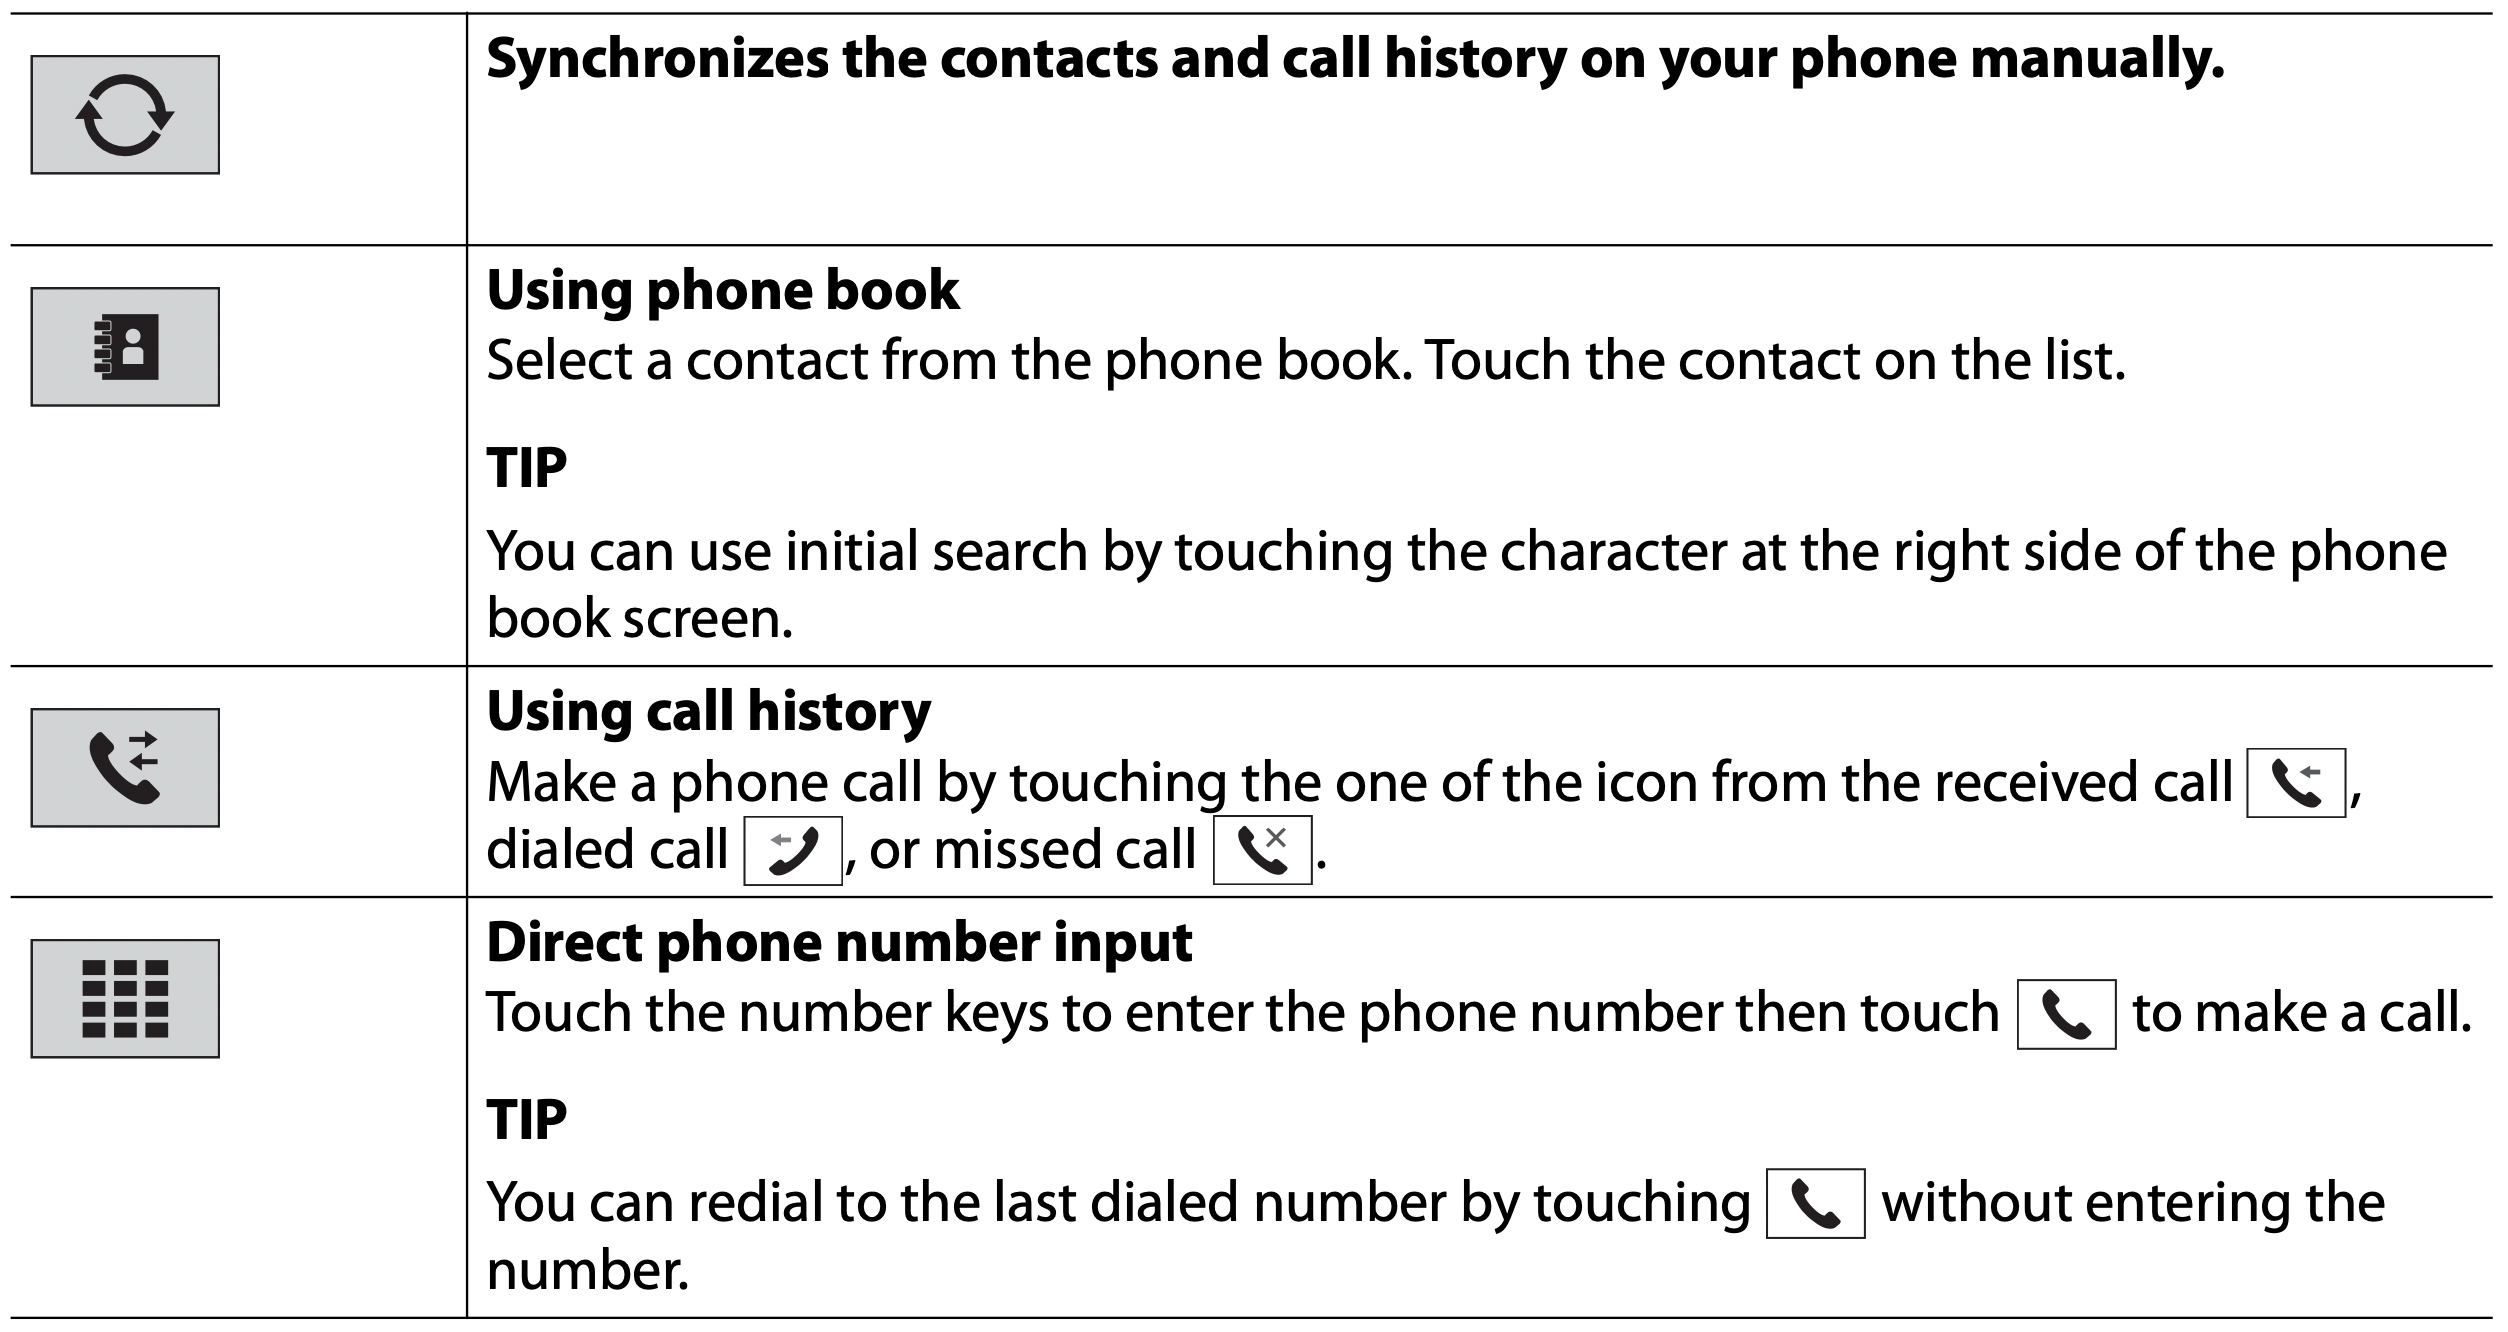
The phone menu screen appears. - Touch one of the call icons on the phone menu screen.
To end the call
- Touch
 .
.
Receiving a phone call
- Touch
 to answer the call.
Touch to end the call.
Voice recognition function (for iPhone)
By connecting your iPhone to this product, you can use the voice recognition function on this product.
Switching the audio output
You can switch the audio output between this unit and the connected mobile device.
- Touch
 when calling.
The audio output switches each time by touching the icon.
TIP: Touch  to mute or unmute the connected microphone.
Notes for hands-free phoning
- General notes
- Connection to all cellular phones featuring Bluetooth wireless technology is not guaranteed.
- The line-of-sight distance between this product and your cellular phone must be 10 meters or less when sending and receiving voice and data via Bluetooth technology.
- With some cellular phones, the ring sound may not be output from the speakers.
- If private mode is selected on the cellular phone, hands-free phoning may be disabled.
- Registration and connection
- Cellular phone operations vary depending on the type of cellular phone. Refer to the instruction manual that came with your cellular phone for detailed instructions.
- When phone book transfer does not work, disconnect your phone and then perform pairing again from your phone to this product.
- Making and receiving calls
- You may hear a noise in the following situations:
- When you answer the phone using the button on the phone.
- When the person on the other end of the line hangs up the phone.
- If the person on the other end of the line cannot hear the conversation due to an echo, decrease the volume level for hands-free phoning.
- With some cellular phones, even after you press the accept button on the cellular phone when a call comes in, hands-free phoning may not be performed.
- The registered name in the phone book is displayed if the phonebook is transferred to this unit.
- You may hear a noise in the following situations:
- The received call and dialed number histories
- You cannot make a call to the entry of an unknown user (no phone number) in the received call history.
- Phone book transfers
- If there are more than 1 000 phone book entries on your cellular phone, not all entries may download completely.
- Depending on the phone, this product may not display the phone book correctly.
- If the phone book in the phone contains image data, the phone book may not be transferred correctly.
- Depending on the cellular phone, phone book transfer may not be available.
Bluetooth audio
Before using the Bluetooth audio player, register and connect the device to this product (page 15).
NOTES
- Depending on the Bluetooth audio player connected to this product, the available operations with this product may be limited to the following two levels:
- A2DP (Advanced Audio Distribution Profile): Only playing back songs on your audio player is possible.
- A2DP and AVRCP (Audio/Video Remote Control Profile): Playing back, pausing, selecting songs, etc., are possible.
- Depending on the Bluetooth device connected to this product, the available operations with this product may be limited or differ from the descriptions in this manual.
- While you are listening to songs on your Bluetooth device, refrain from operating the phone function as much as possible. If you try operating, the signal may cause noise for song playback.
- When you are talking on the Bluetooth device connected to this product via Bluetooth, it may pause playback.
- Press
 .
. - Touch [Bluetooth Audio].
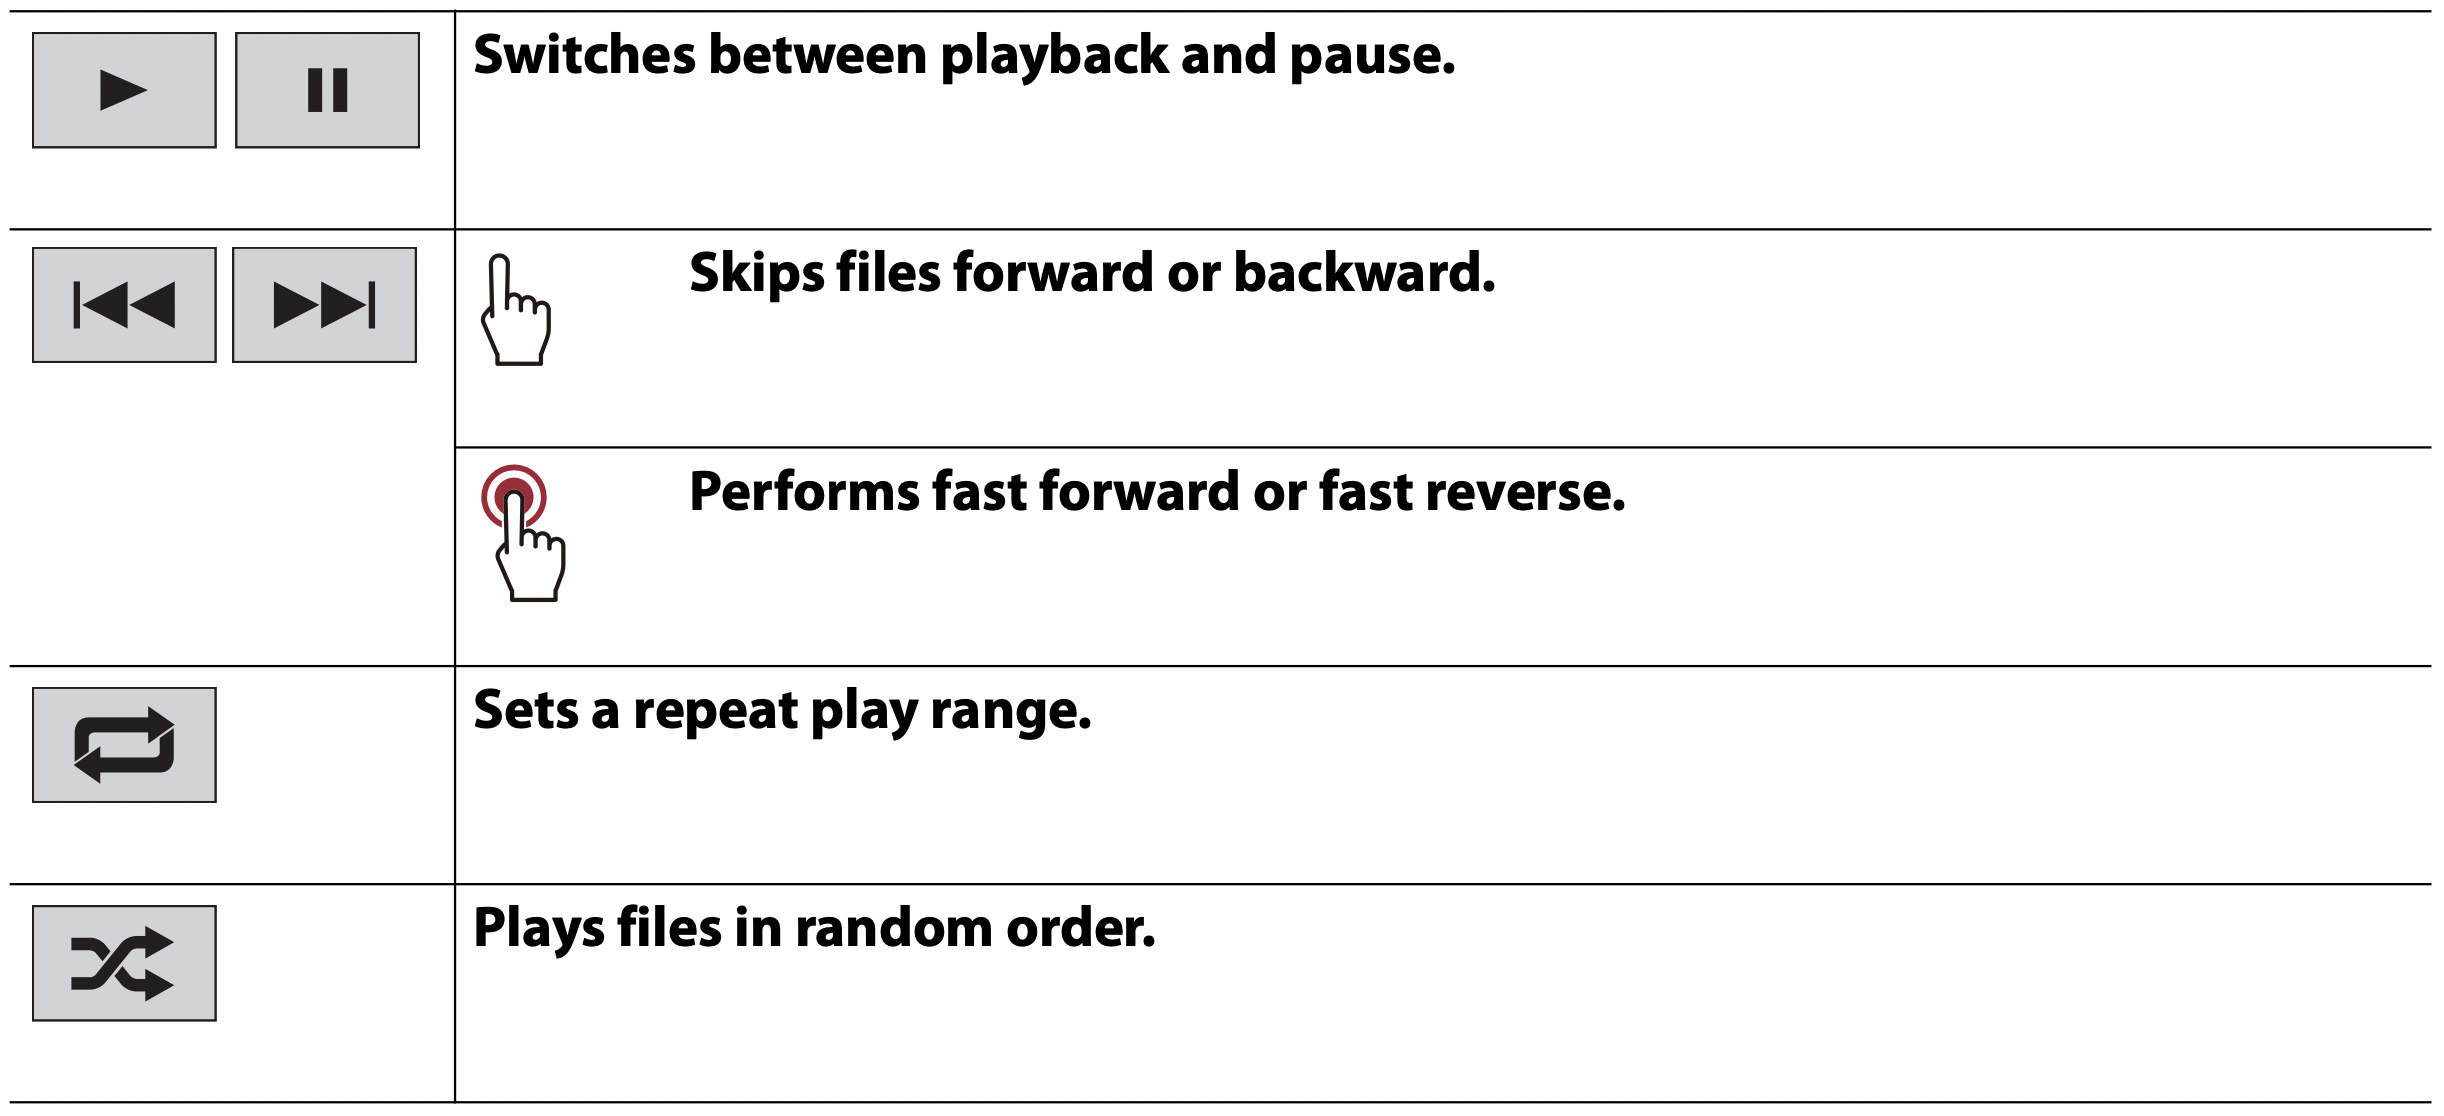
The Bluetooth audio playback screen appears.
Basic operation
AV source
Supported AV source
You can play or use the following sources with this product.
- Radio
- CD*
- ROM (compressed audio or video files on discs)*
- DVD-Video*
- USB
The following sources can be played back or used by connecting an auxiliary device.
- iPhone
- Bluetooth audio
- AUX
* AVH-241EX, AVH-240EX
Selecting a source
- Press
 .
. - Touch the source icon.
TIP: You can display the hidden source icon(s) by swiping left or right on the screen. (some models)
Radio
Starting procedure
- Press
 .
. - Touch [Radio].
The Radio screen appears.
Basic operation
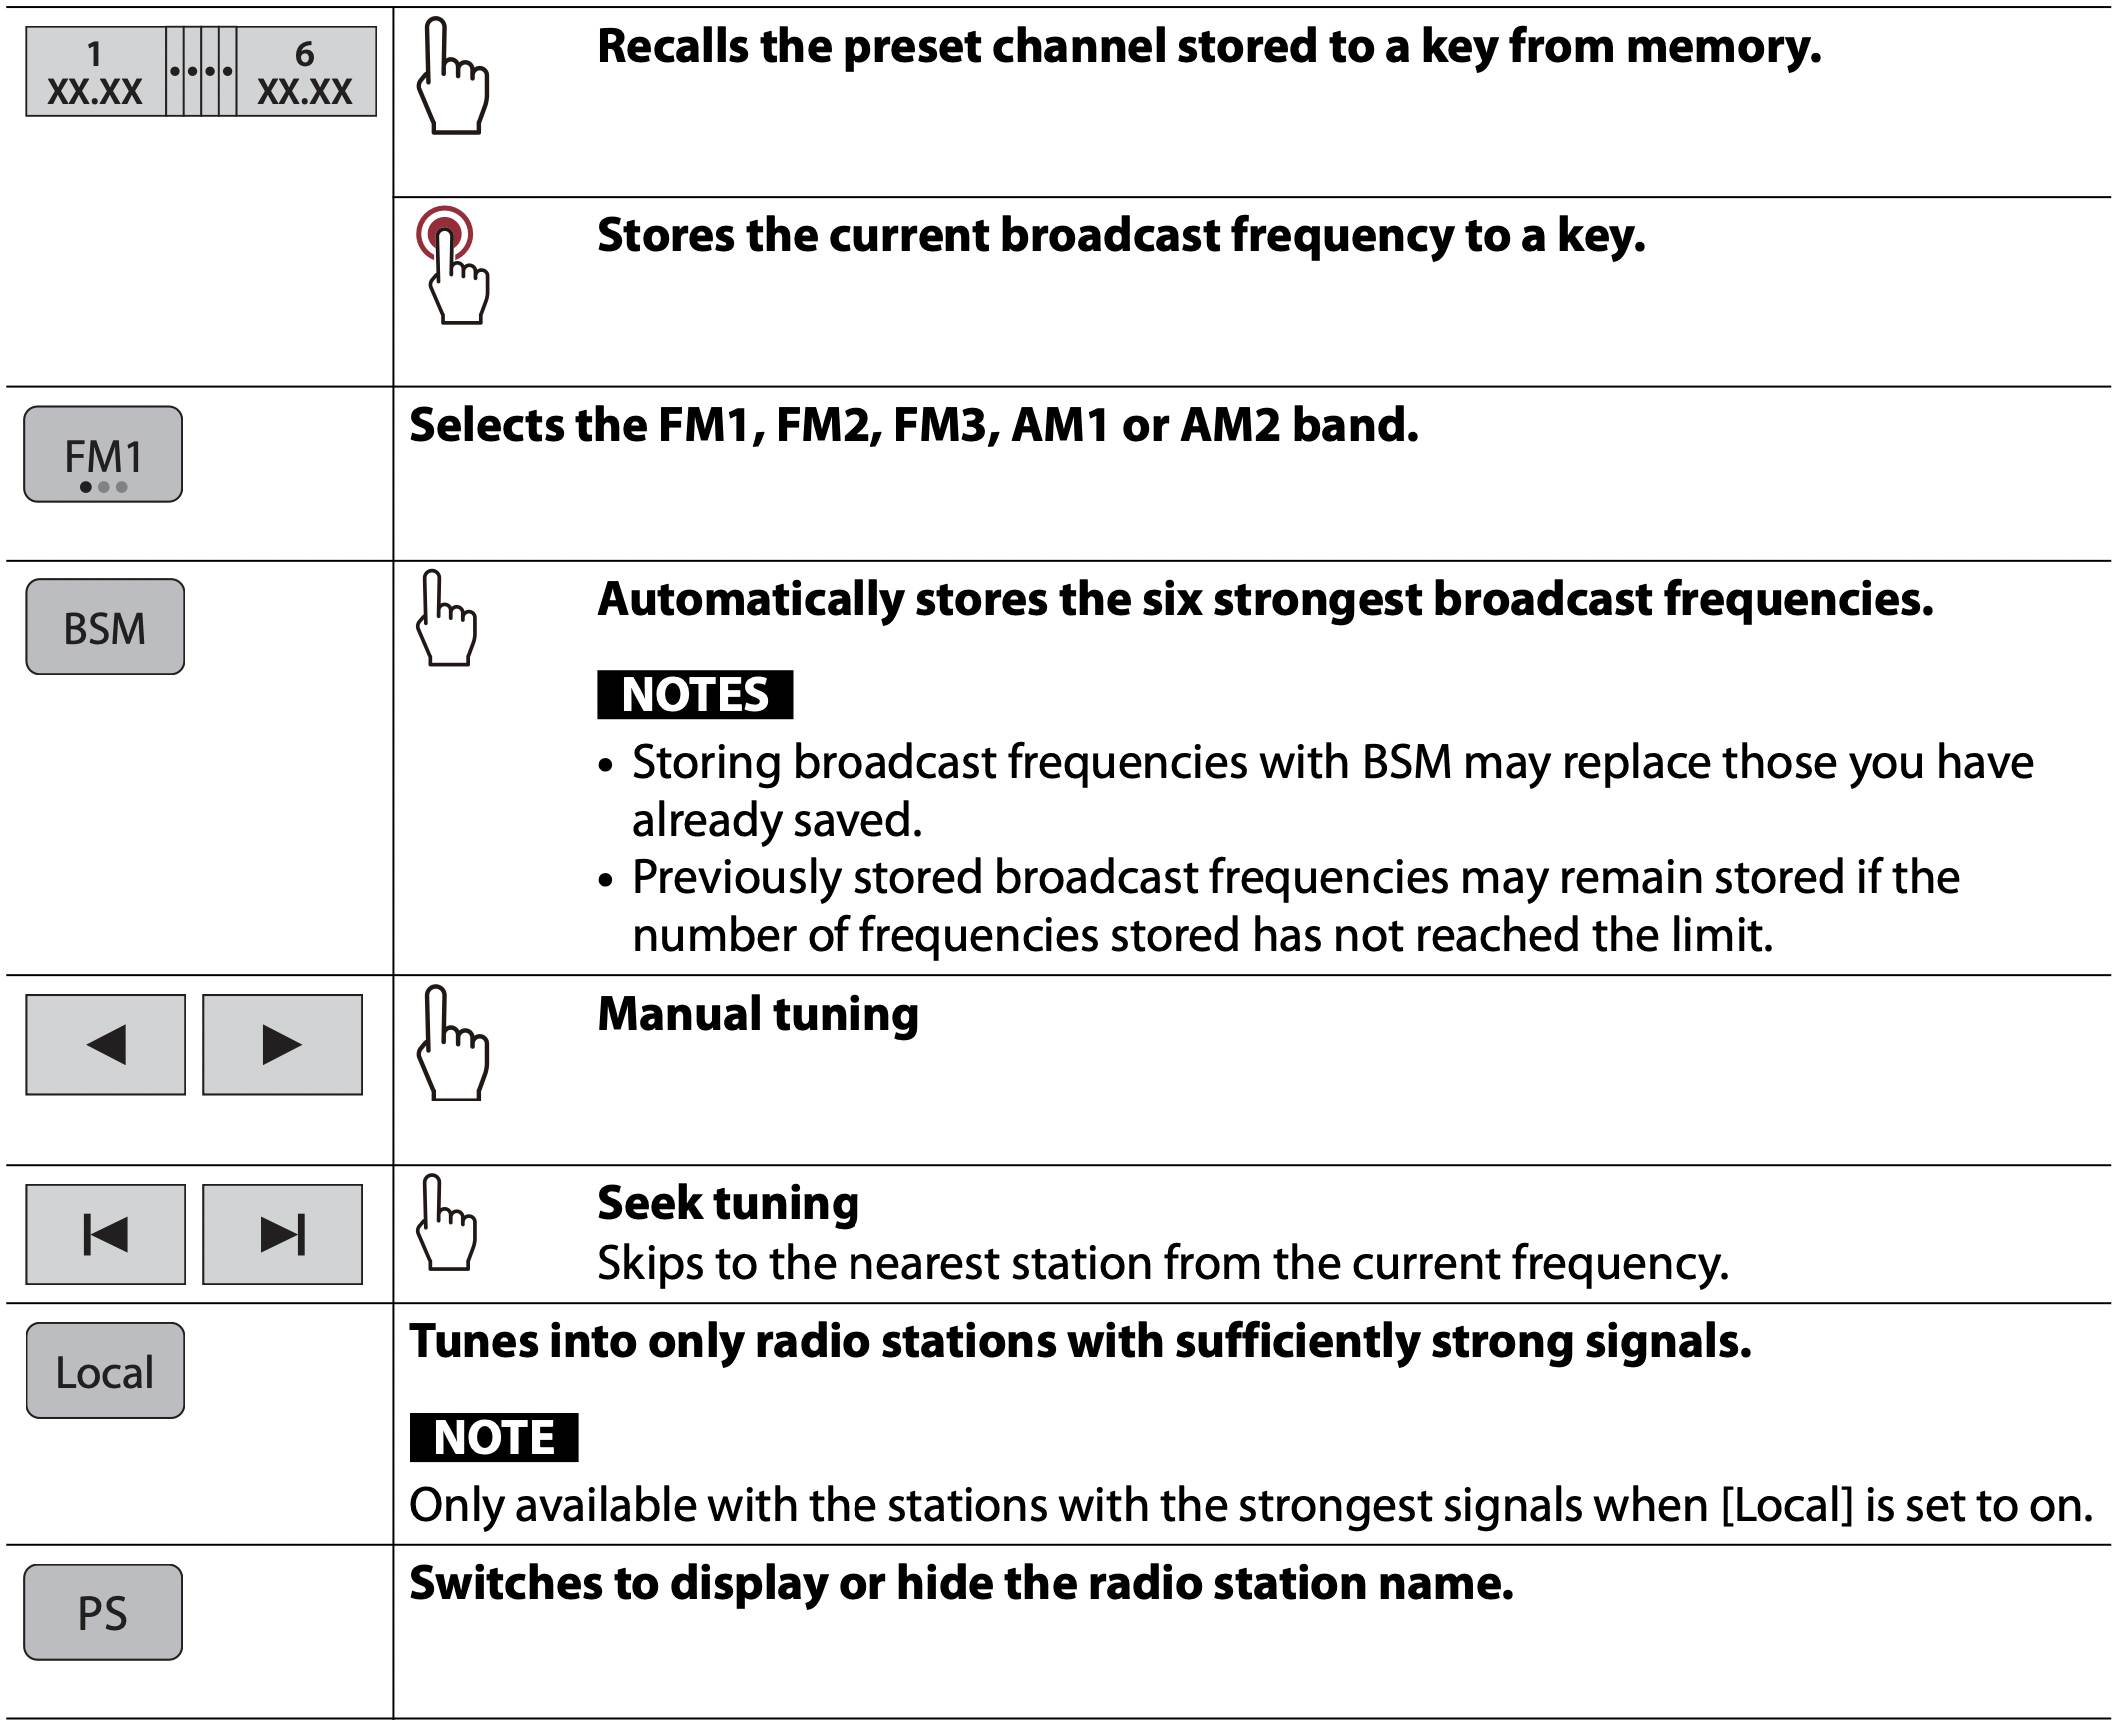
NOTE: Some functions are available only when you receive the FM band.
Disc
AVH - 241EX / 240EX
Inserting and ejecting a disc
You can play a normal music CD, Video-CD, or DVD-Video using the built-in drive of this product.
CAUTION: Do not insert anything other than a disc into the disc-loading slot.
Inserting a disc
- Insert a disc into the disc-loading slot.
The source changes and then playback will start.
NOTE: If the disc is already set, select [Disc] as the playing source.
Ejecting a disc
- Press
 .
.
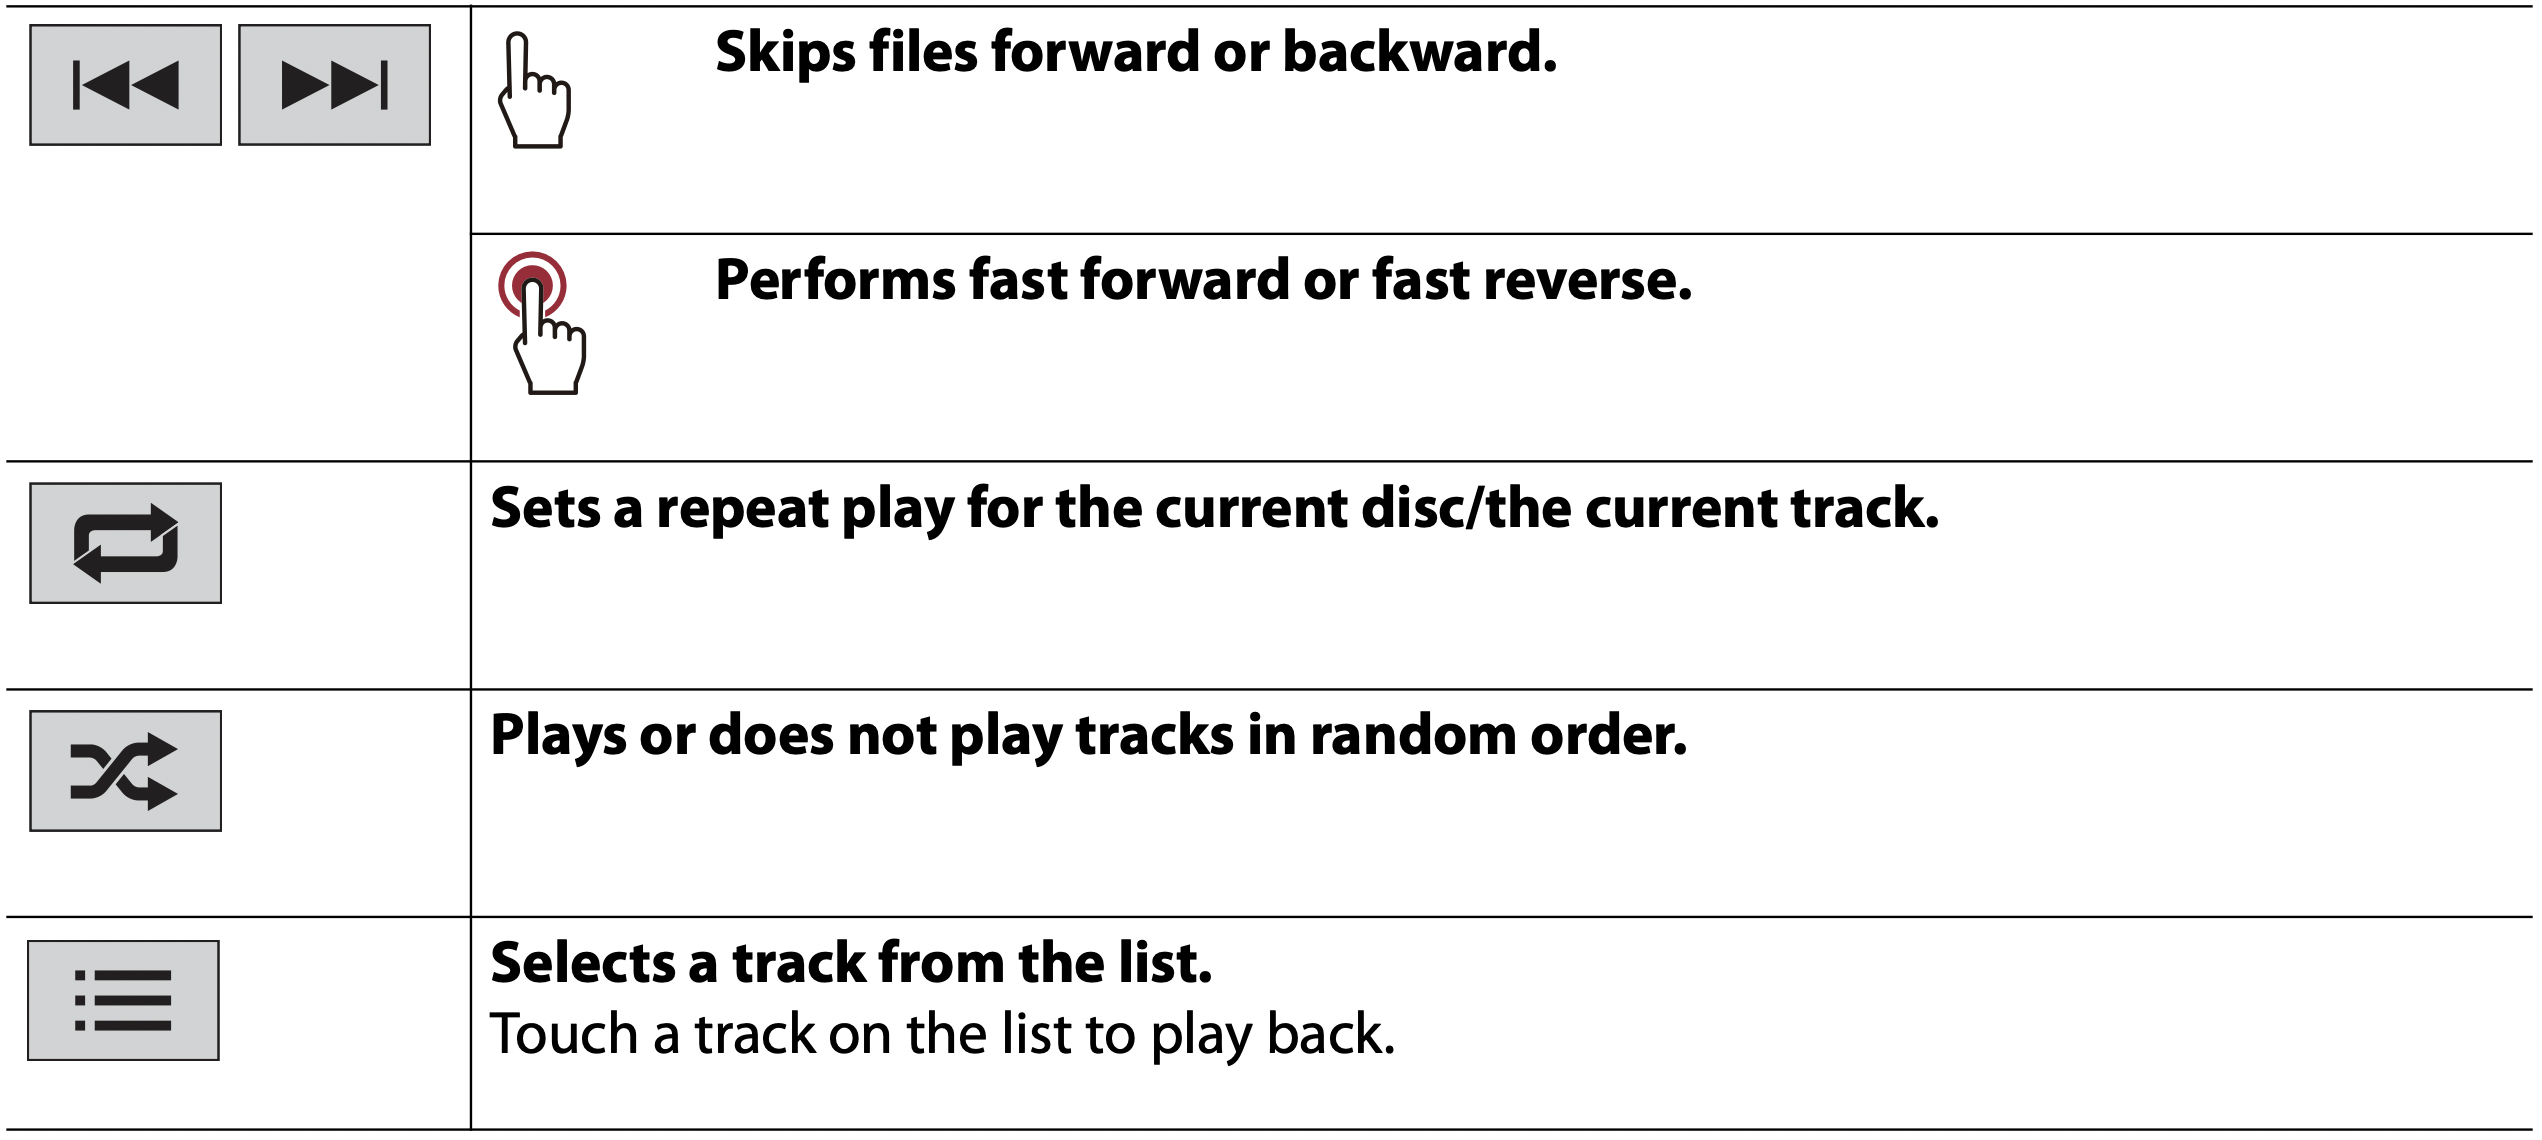
Basic operation
Audio source

Video source
CAUTION: For safety reasons, video images cannot be viewed while your vehicle is in motion. To view video images, stop in a safe place and apply the parking brake.
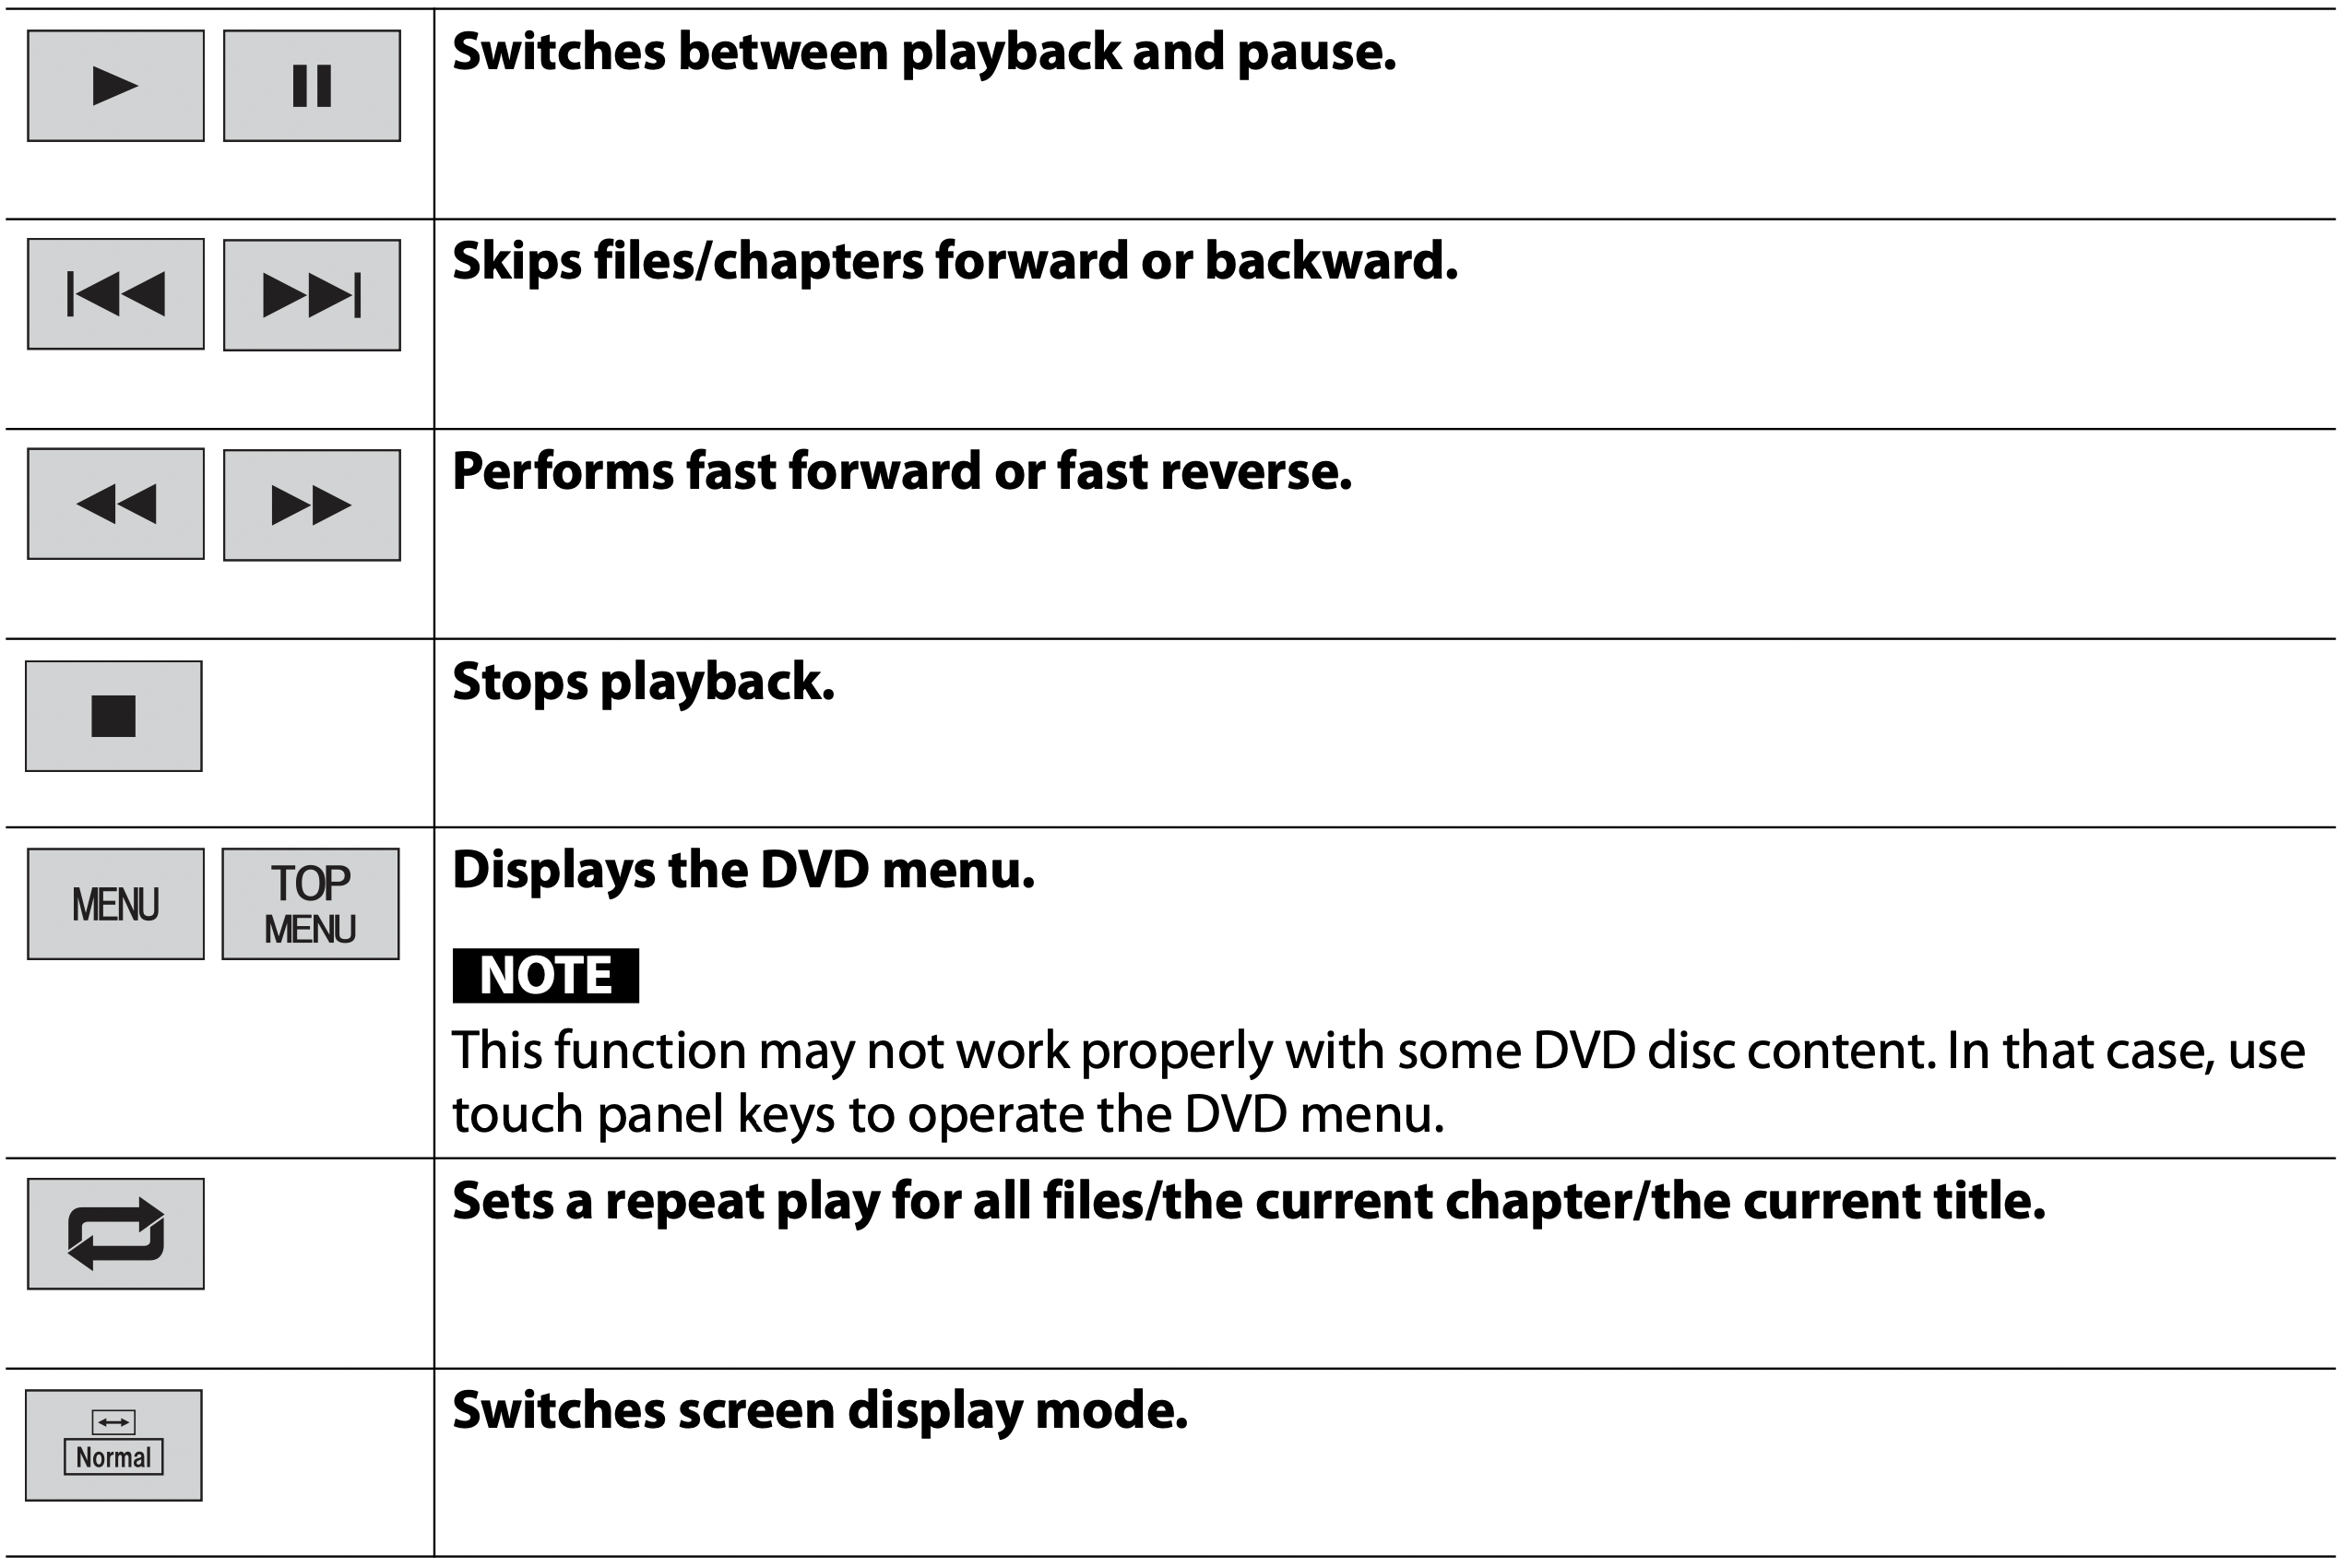
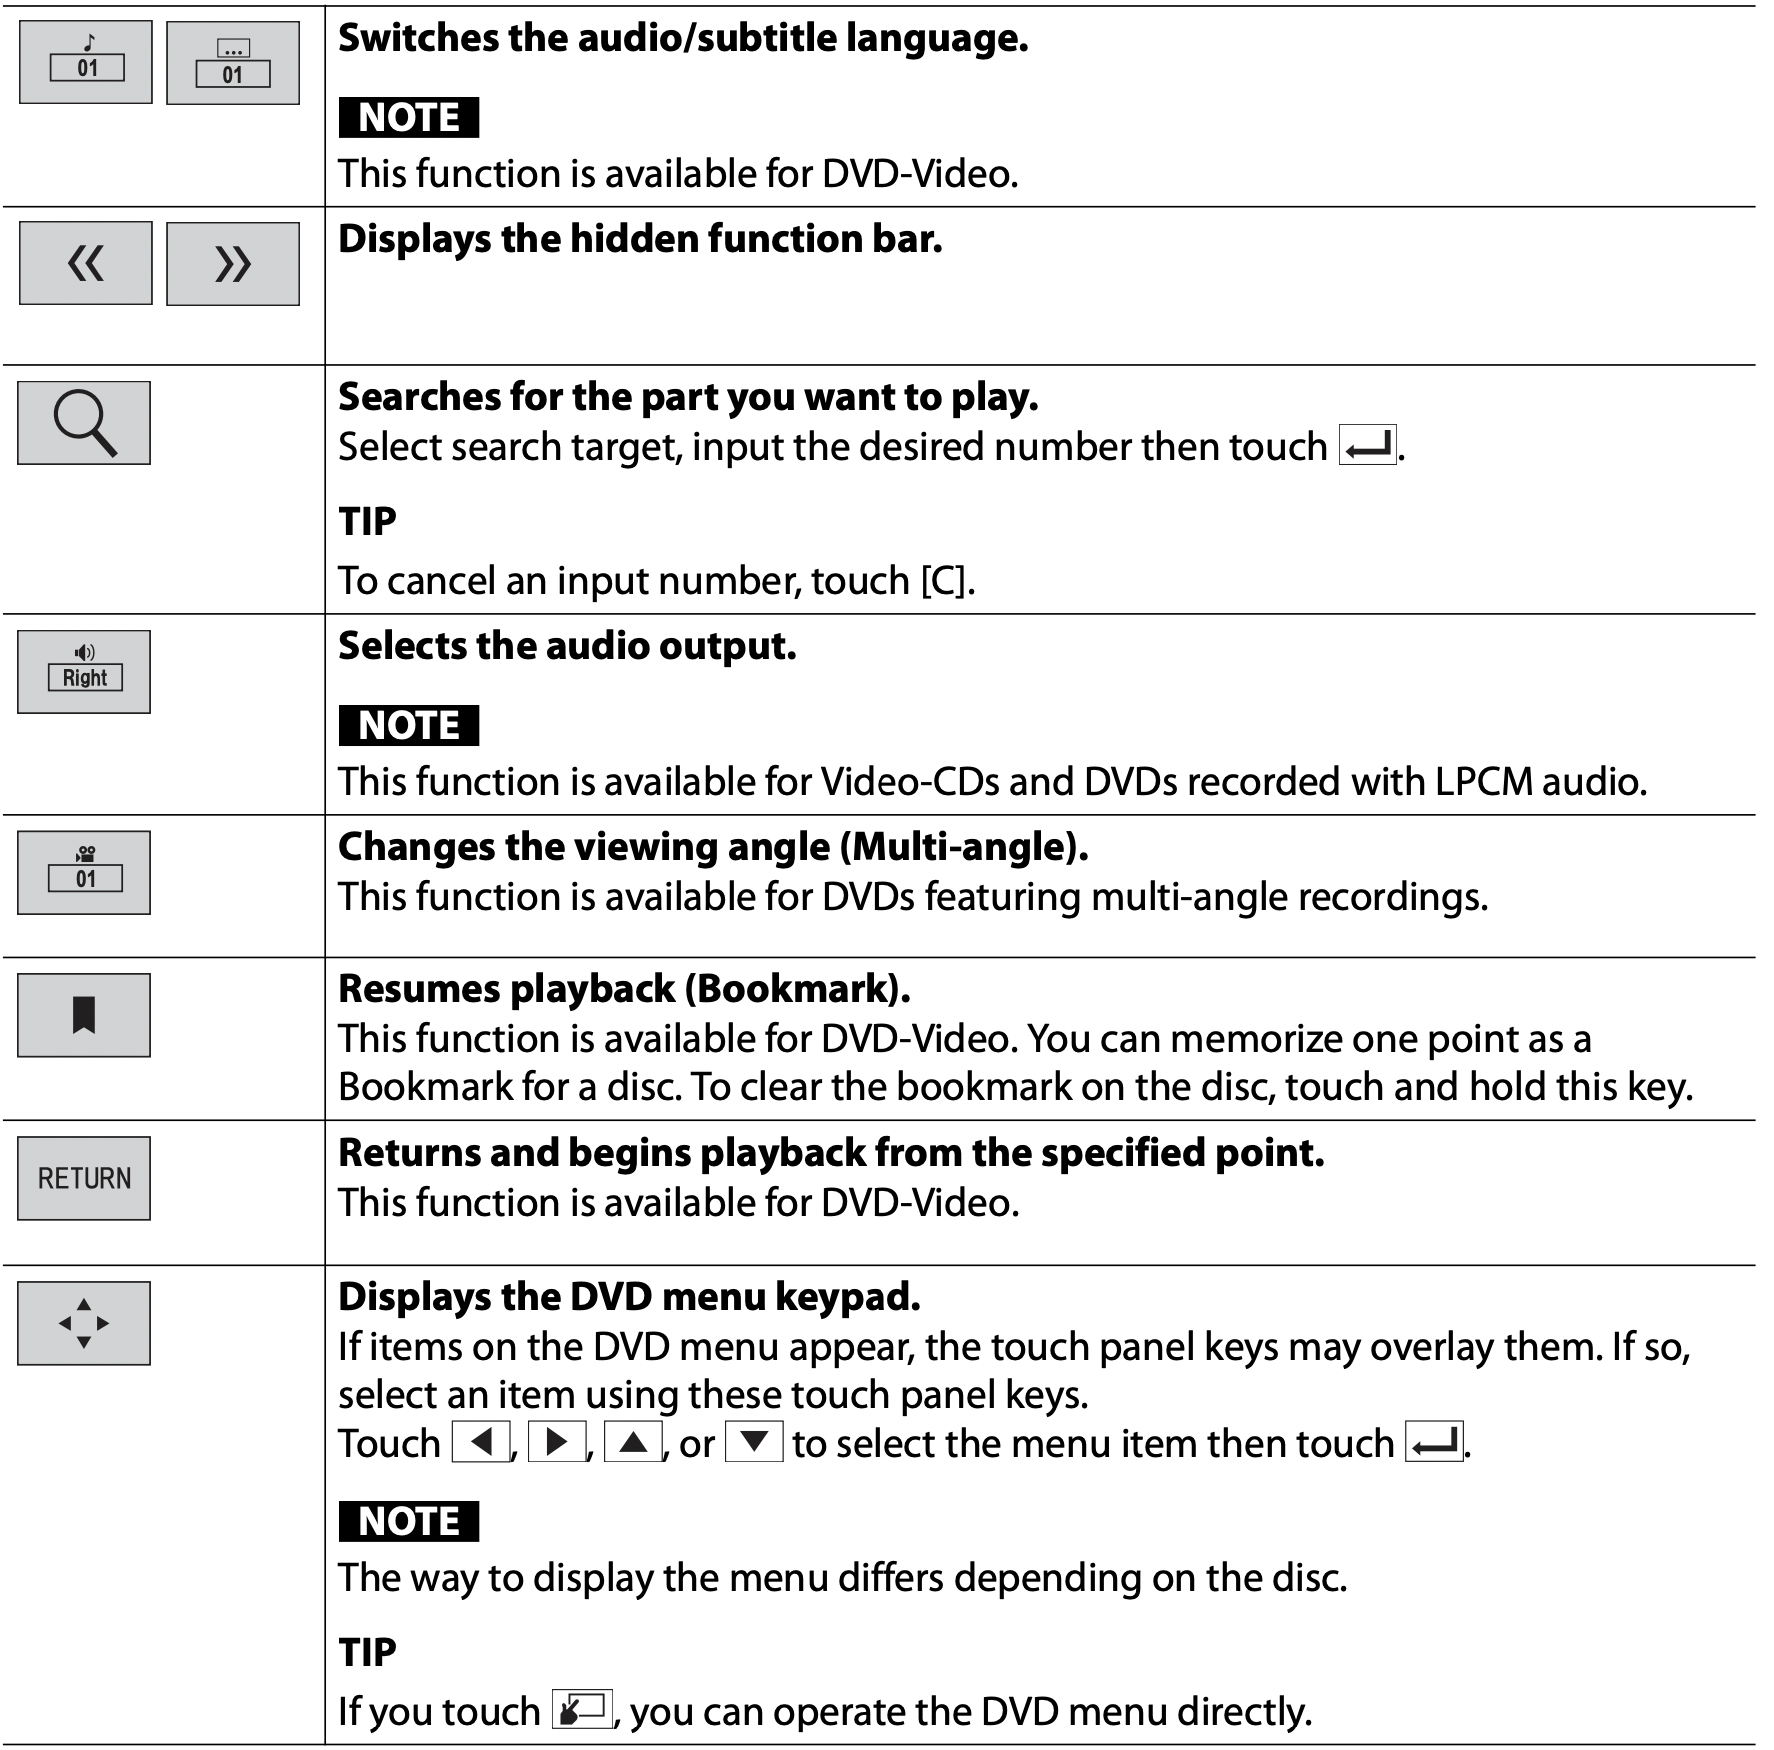
Compressed files
Inserting and ejecting media
You can play compressed audio, compressed video, or still image files stored in a disc or an external storage device.
CAUTION: Do not insert anything other than a disc into the disc-loading slot.
Inserting a disc
AVH-241EX / AVH-240EX
- Insert a disc into the disc-loading slot.
The source changes and then playback will start.
NOTE: If the disc is already set, select [Disc] as the playing source.
Ejecting a disc
AVH-241EX / AVH-240EX
- Press
 .
.
Plugging a USB storage device
DMH-342EX / DMH-341EX / DMH-340EX
- Pull out the plug from the USB port of the USB cable.
- Plug a USB storage device into the USB cable.
DMH-241EX / DMH-240EX / AVH-241EX / AVH-240EX
- Open the USB port cover.
- Plug in the USB storage device using an appropriate cable.
CAUTION: Use a USB cable (sold separately) to connect the USB device as any device connected directly to the unit will protrude out from the unit, which could be dangerous.
NOTES
- This product may not achieve optimum performance with some USB storage devices.
- Connection via a USB hub is not possible.
- A USB cable is required for connection.*
* DMH-342EX, DMH-341EX, DMH-340EX
Unplugging a USB storage device
- Pull out the USB storage device from the USB cable.
NOTES
- Check that no data is being accessed before pulling out the USB storage device.
- Turn off (ACC OFF) the ignition switch before unplugging the USB storage device.
Starting procedure
For Disc
AVH-241EX / AVH-240EX
- Insert the disc.
TIP: If the disc is already set, select [Disc] as the playing source.
For USB
- Plug the USB storage device into the USB cable.
TIP: You can also start this source by pressing  then touching [USB].
Basic operation
Audio source

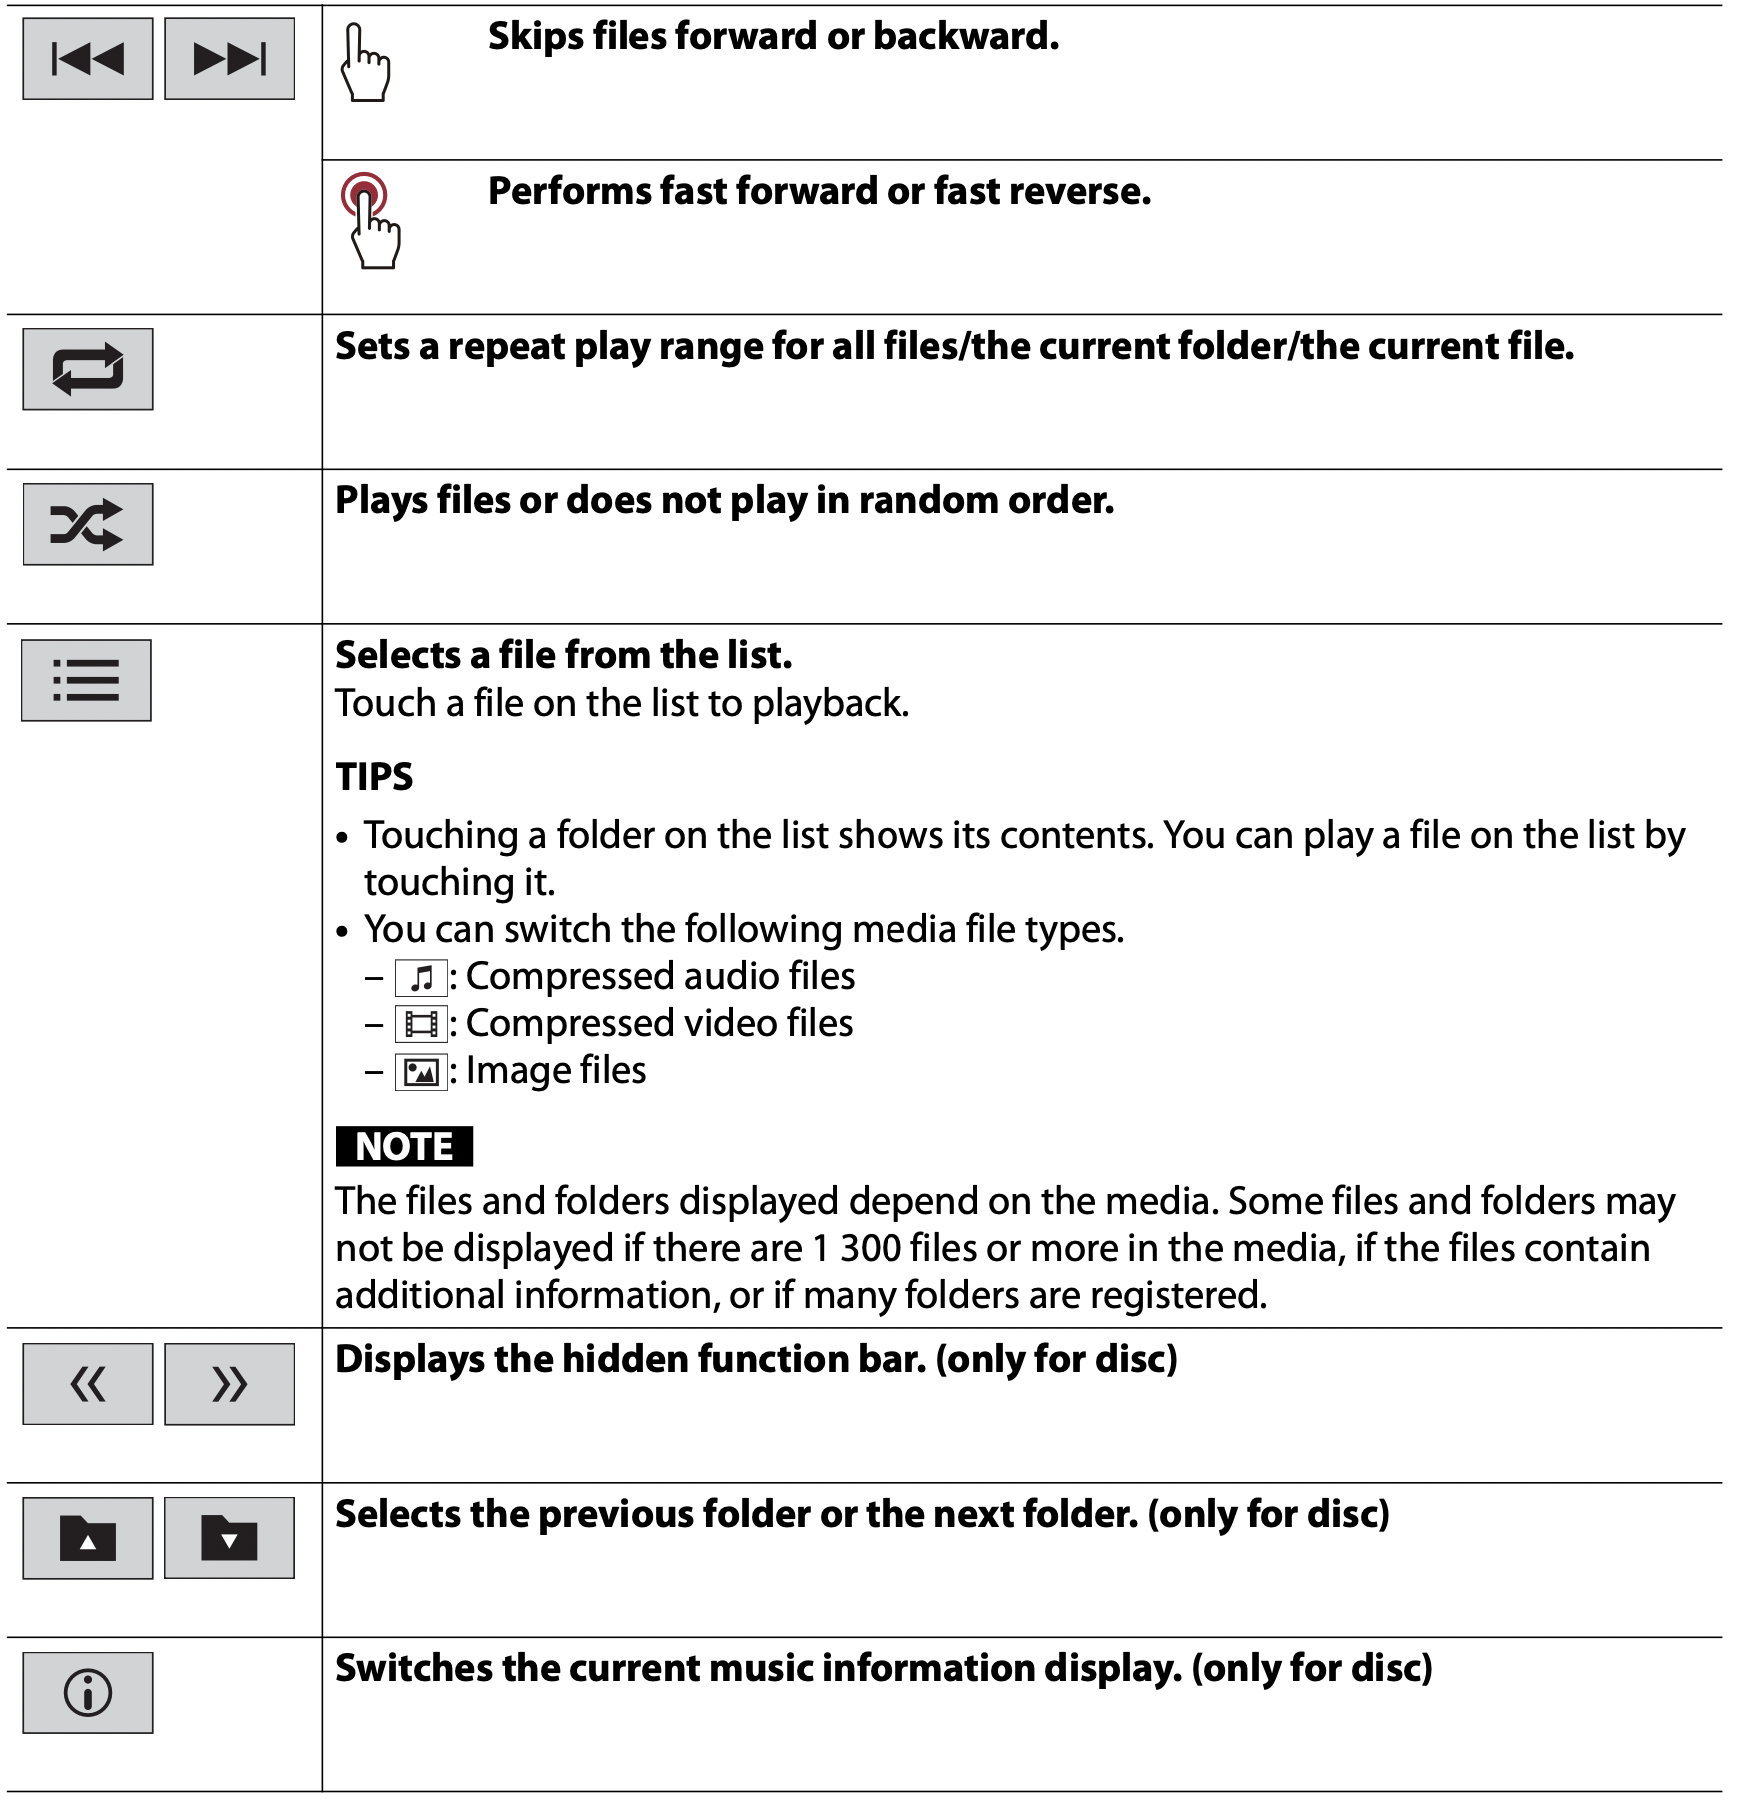
Video source
CAUTION: For safety reasons, video images cannot be viewed while your vehicle is in motion. To view video images, stop in a safe place and apply the parking brake.

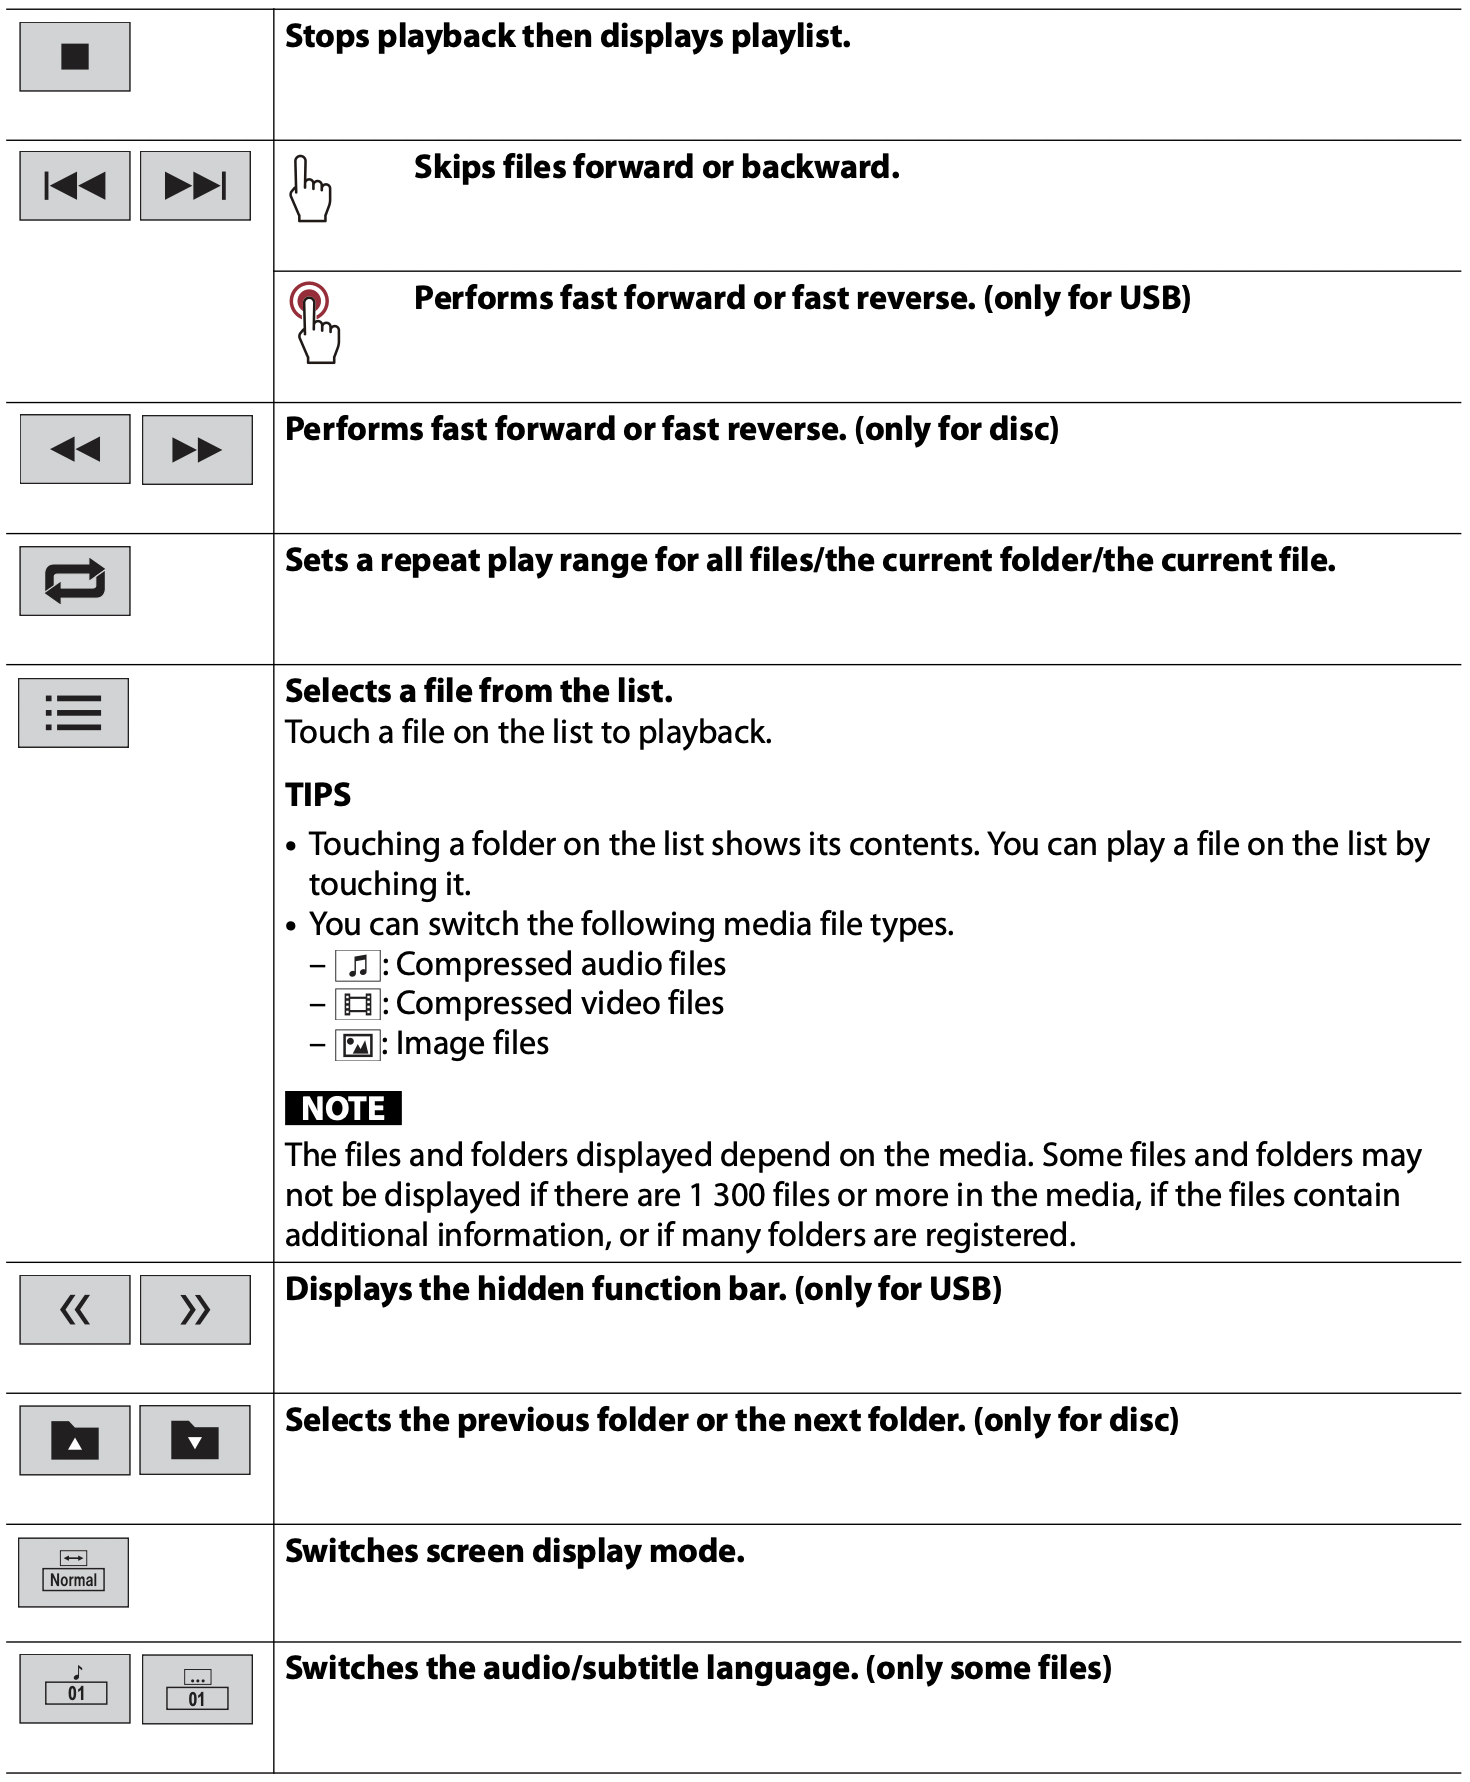
Still image source

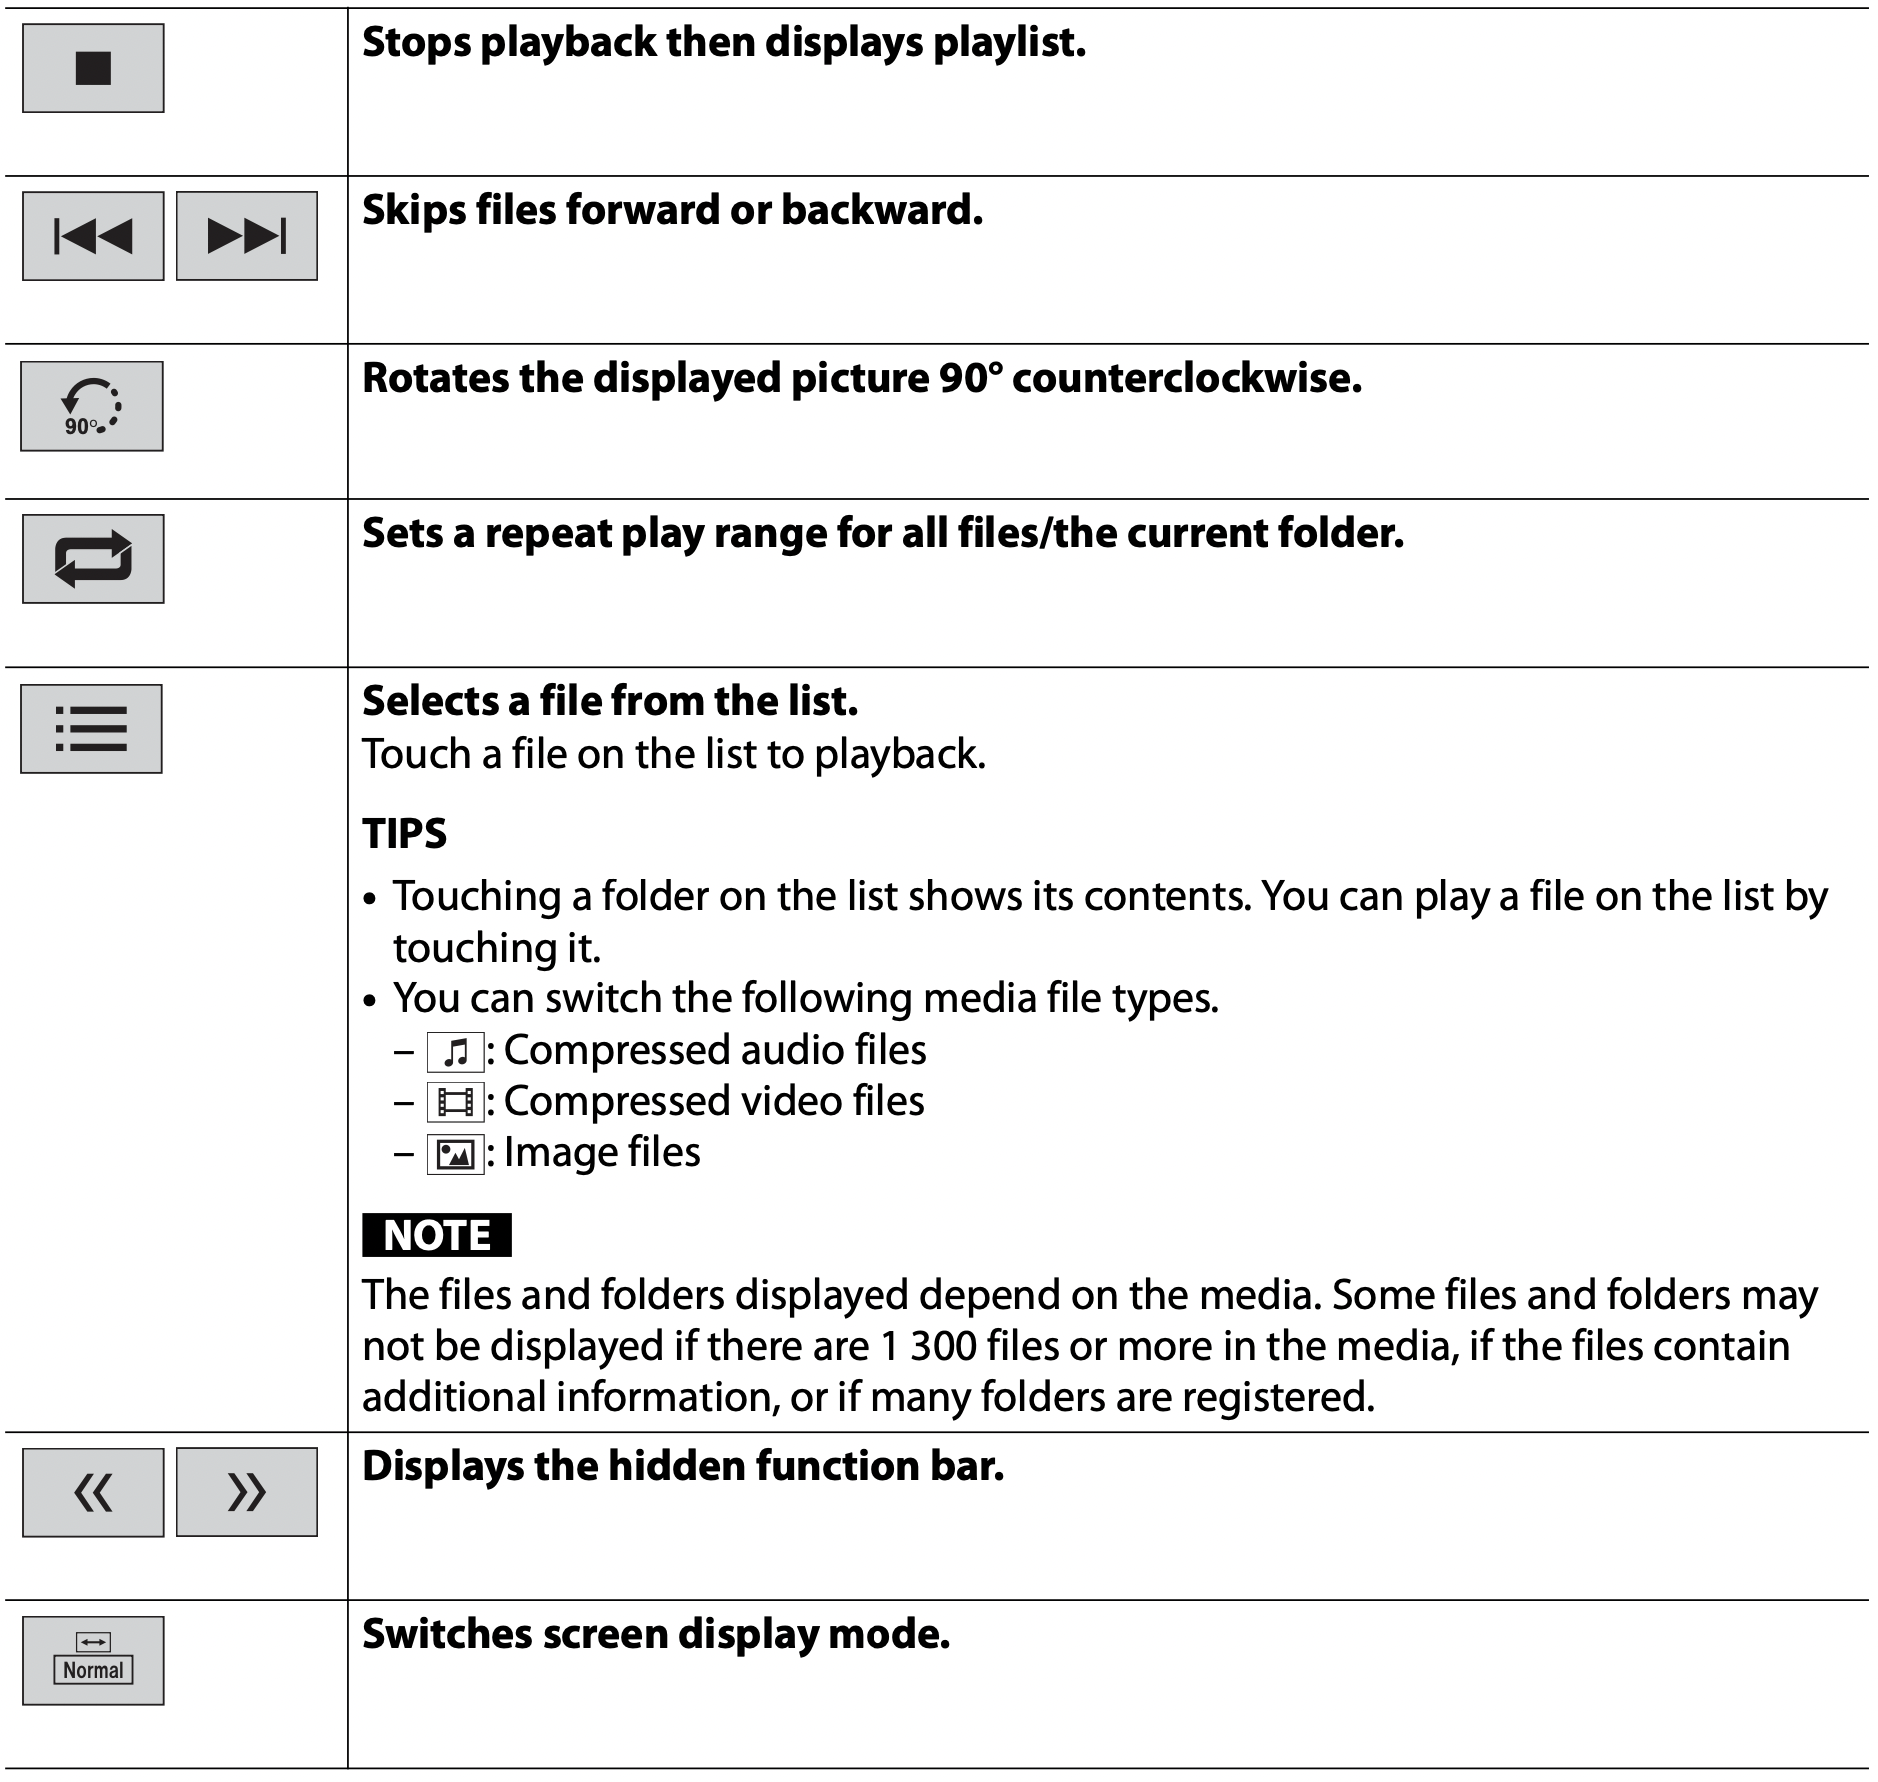
iPhone
NOTE: iPhone may be referred to as iPod in this manual.
Starting procedure
When connecting an iPhone to this product, the settings are automatically configured according to the device to be connected. For details of the compatibility, refer to Compatible iPhone models (page 49).
NOTE: [iPhone USB Settings] is set to [iPod] (page 35).
- Connect your iPhone via USB.
Playback is automatically performed.
TIP: You can also start this source by pressing  then touching [iPod].
NOTE: For USB connection, refer to the Installation Manual.
Basic operation
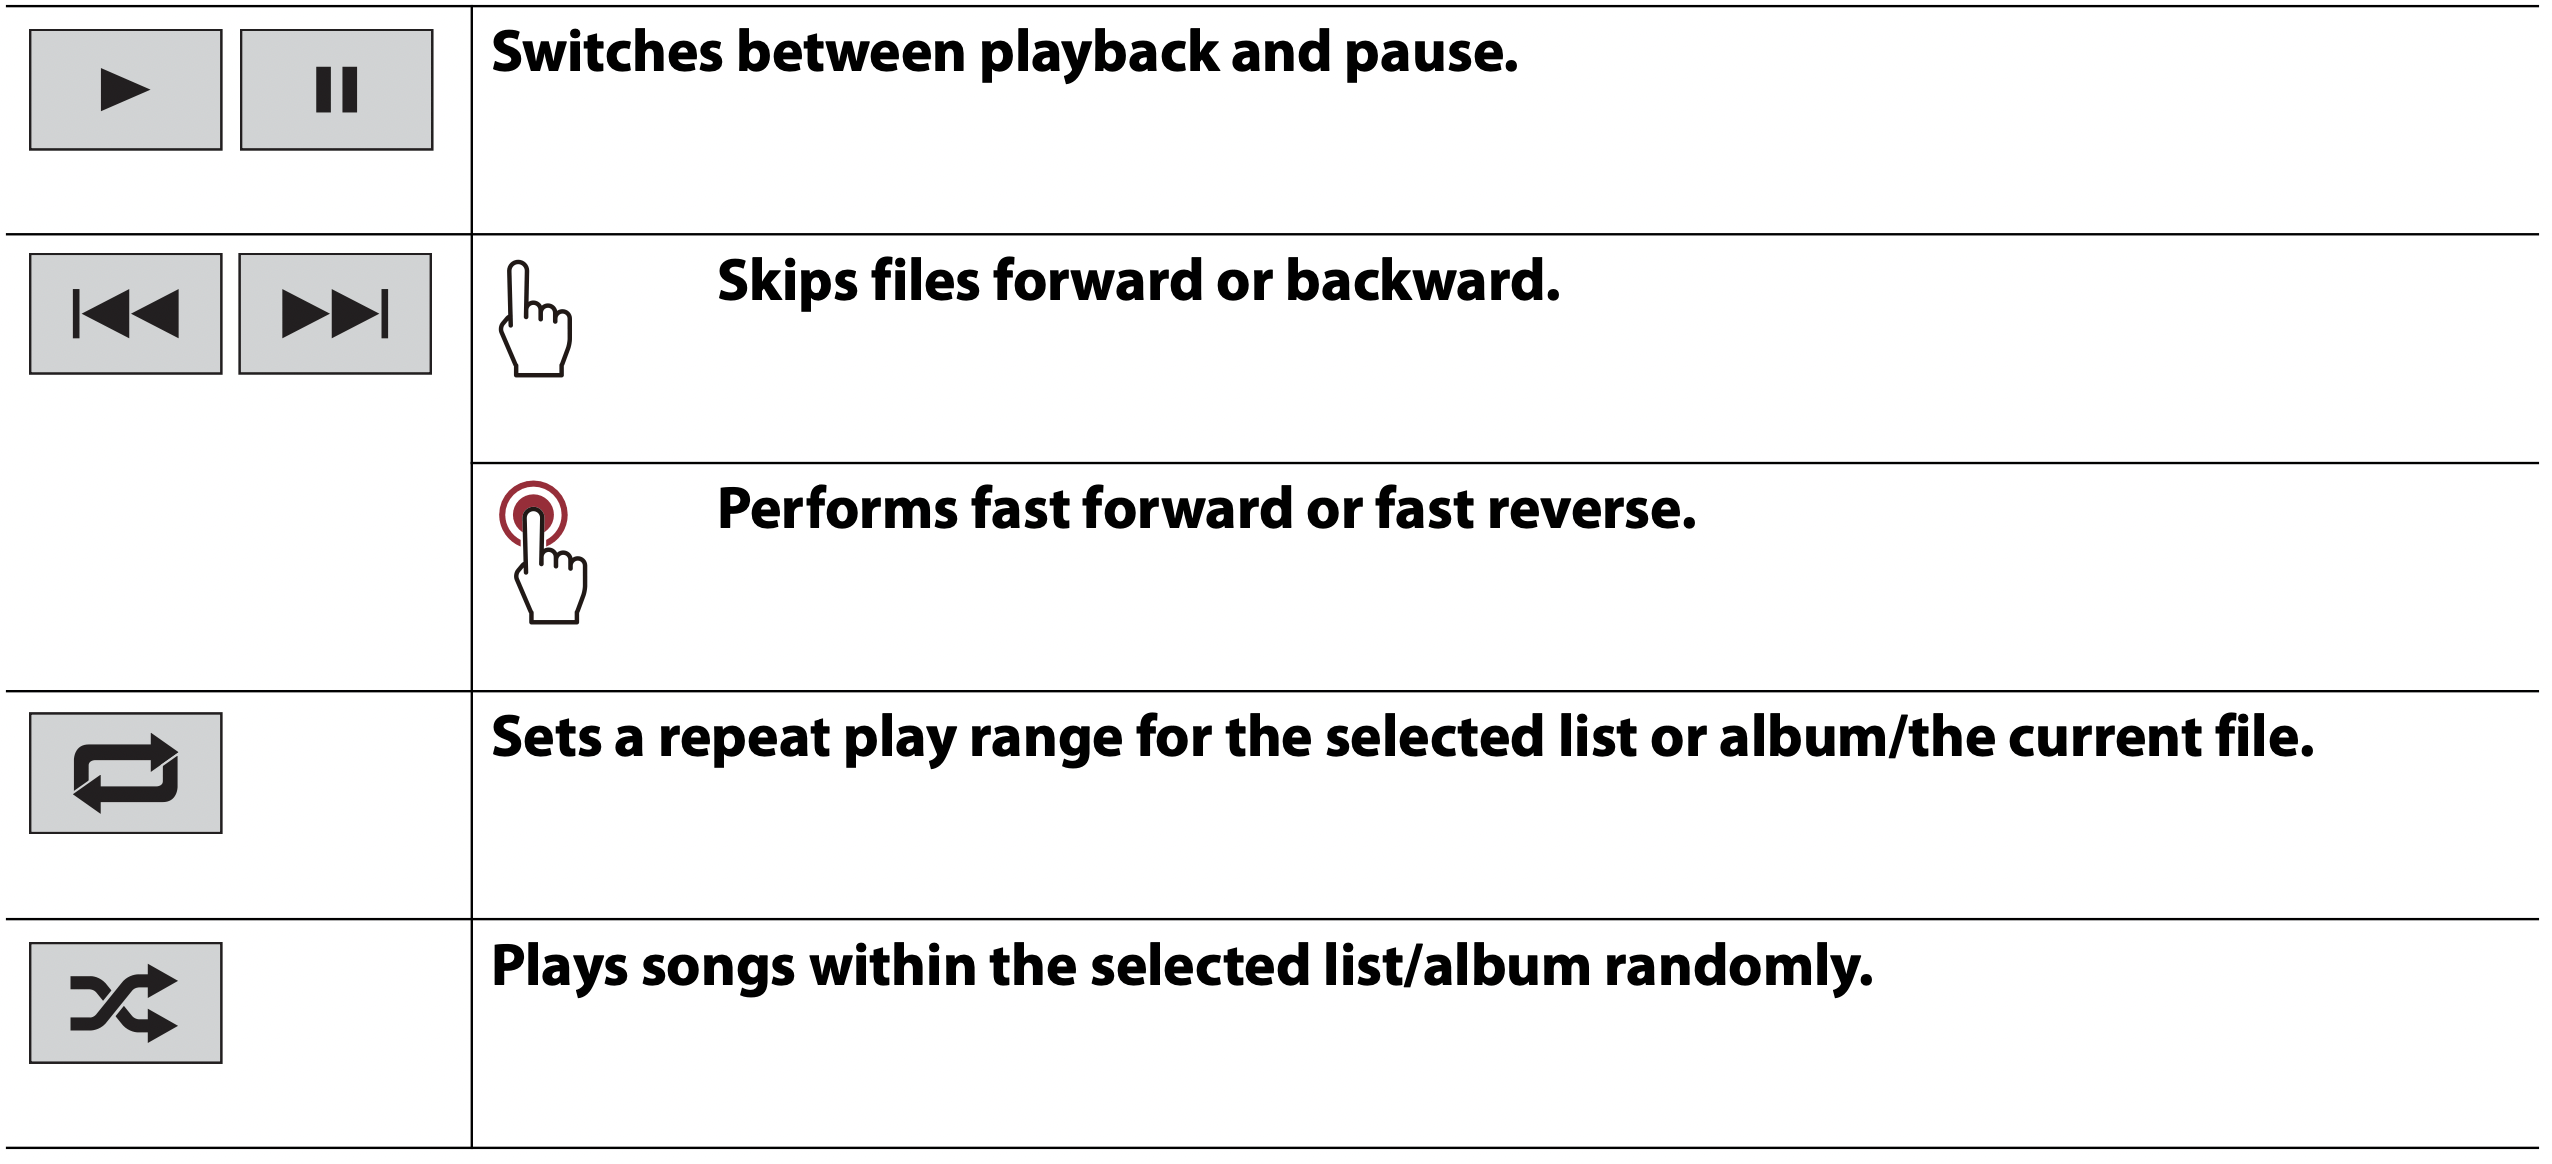
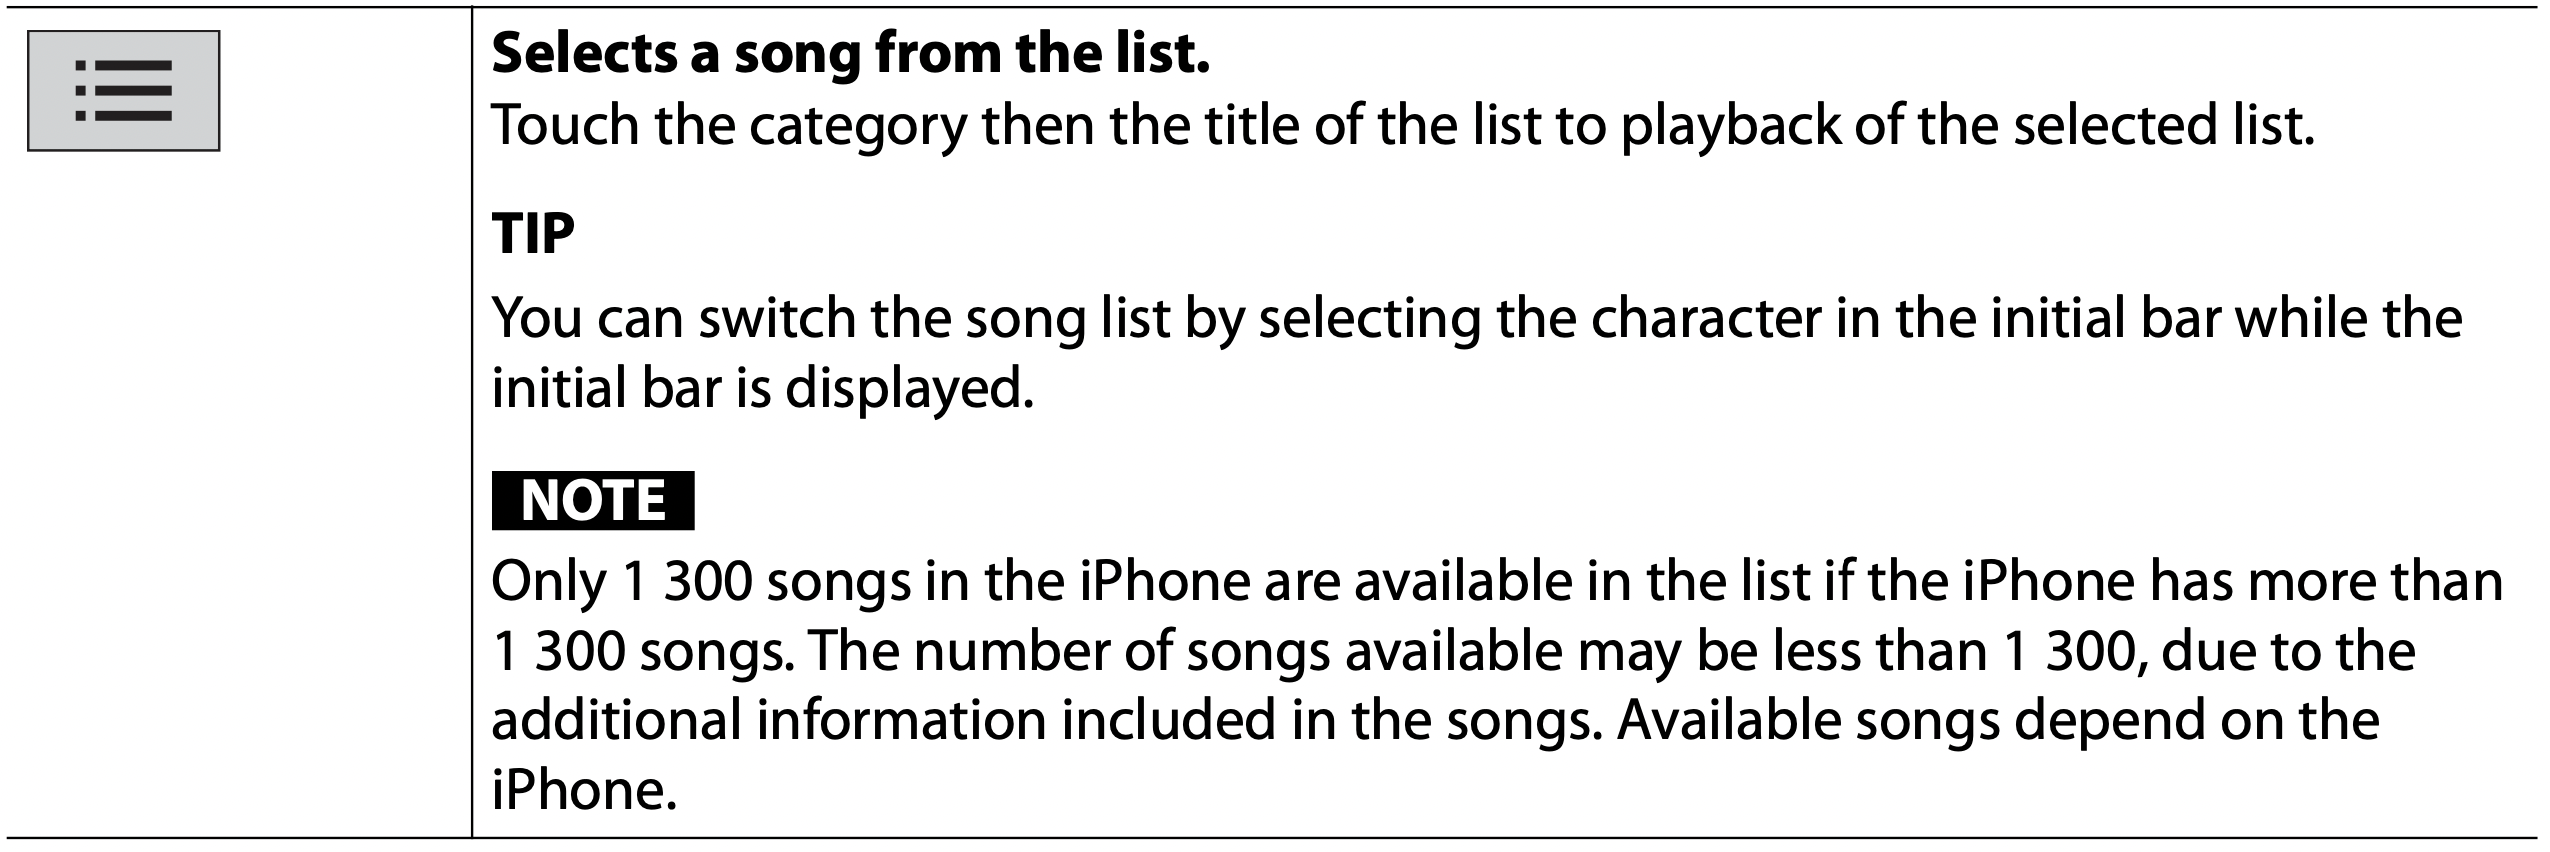
NOTE: Depending on the generation or version of the iPhone, some functions may not be available.
WebLink™
You can operate WebLink compatible applications with finger gestures such as tapping, dragging, scrolling, or flicking on the screen of this product.
NOTES
- The supported finger gestures may vary depending on the WebLink compatible application.
- To use WebLink, you must first install the WebLink Host app on the iPhone or smartphone.
- Be sure to read Using app-based connected content (page 49) before you perform this operation.
- Copyright protected files such as DRM cannot be played.
WARNING: Certain uses of the iPhone or smartphone may not be legal while driving in your jurisdiction, so you must be aware of and obey any such restrictions. If in doubt as to a particular function, only perform it while the car is parked. No feature should be used unless it is safe to do so under the driving conditions you are experiencing.
Using WebLink
Important
- Pioneer is not responsible for content or functions accessed via WebLink, which are the responsibility of the application and content providers.
- Availability of non-Pioneer content and services, including apps and connectivity, may change or discontinue without notice.
- When using WebLink with the Pioneer product, available content and functions will be limited while driving.
- WebLink allows access to applications other than those listed, subject to limitations while driving.
Starting procedure
For iPhone users
System requirement
iOS 13.4 or higher
NOTE: [iPhone USB Settings] is set to [WebLink] (page 35).
- Unlock your iPhone and connect it to this product via USB.
WebLink is automatically launched.
TIP: You can also start this source by pressing  then touching [WebLink].
NOTE: For USB connection, refer to the Installation Manual.
For smartphone (Android™) users
System requirement
Android 7.0 or higher
NOTE: The video playback capability depends on the connected Android device.
- Unlock your smartphone and connect it to this product via USB.
WebLink is automatically launched.
TIP: You can also start this source by pressing  then touching [WebLink].
NOTES
- For USB connection, refer to the Installation Manual.
- Make sure that file transfer mode for USB connection is enabled on your smartphone if WebLink does not start automatically.
Basic operation
Touch the desired application icon after the WebLink app is launched. The desired application is launched, and the application operation screen appears.
 : Displays the main menu of the WebLink source screen.
TIPS
- If you connect your device to this product while a WebLink compatible application is already running, the application operation screen will appear on this product.
- Check the Bluetooth connection between the mobile device and this unit if there is no sound output from this unit (page 15).
AUX
You can display the video image output by the device connected to AUX input.
CAUTION: For safety reasons, video images cannot be viewed while your vehicle is in motion. To view video images, stop in a safe place and apply the parking brake.
NOTE: A Mini-jack AV cable (sold separately) is required for connection. For details, refer to the Installation Manual.
Starting procedure
- Press
 .
. - Touch [AUX].
The AUX screen appears.
Camera View
You can display the video image output by the device connected to camera input. For details, refer to the Installation Manual.
CAUTION: Rear camera function is only as an assistant tool for driving. It cannot replace the drivers' attentions and judgement.
Rear view camera
This product features a function that automatically switches to the full-screen image of the rear view camera installed on your vehicle when the shift lever is in the REVERSE (R) position.
Camera for Camera View mode
Camera View can be displayed at all times. Note that with this setting, the camera image is not resized to fit, and that a portion of what is seen by the camera is not viewable.
CAUTION: Pioneer recommends the use of a camera which outputs mirror reversed images, otherwise the screen image may appear reversed.
- Immediately verify whether the display changes to the rear view camera image when the shift lever is moved to REVERSE (R) from another position.
Starting procedure
- Press
 .
.
AVH-241EX, AVH-240EX
Press then swipe left on the screen.
 - Touch [Camera View] for connected camera view.
The video image is displayed on the screen.
Settings
You can adjust various settings in the main menu.
Displaying the setting screen
- Press
 .
. - Touch
 .
. - Touch one of the following categories, then select the options.
 : System Settings (page 35)
 : Theme Settings (page 38)
 : Audio Settings (page 38)
NOTE: Some settings are available only when you stop your vehicle in a safe place and apply the parking brake.
System Settings
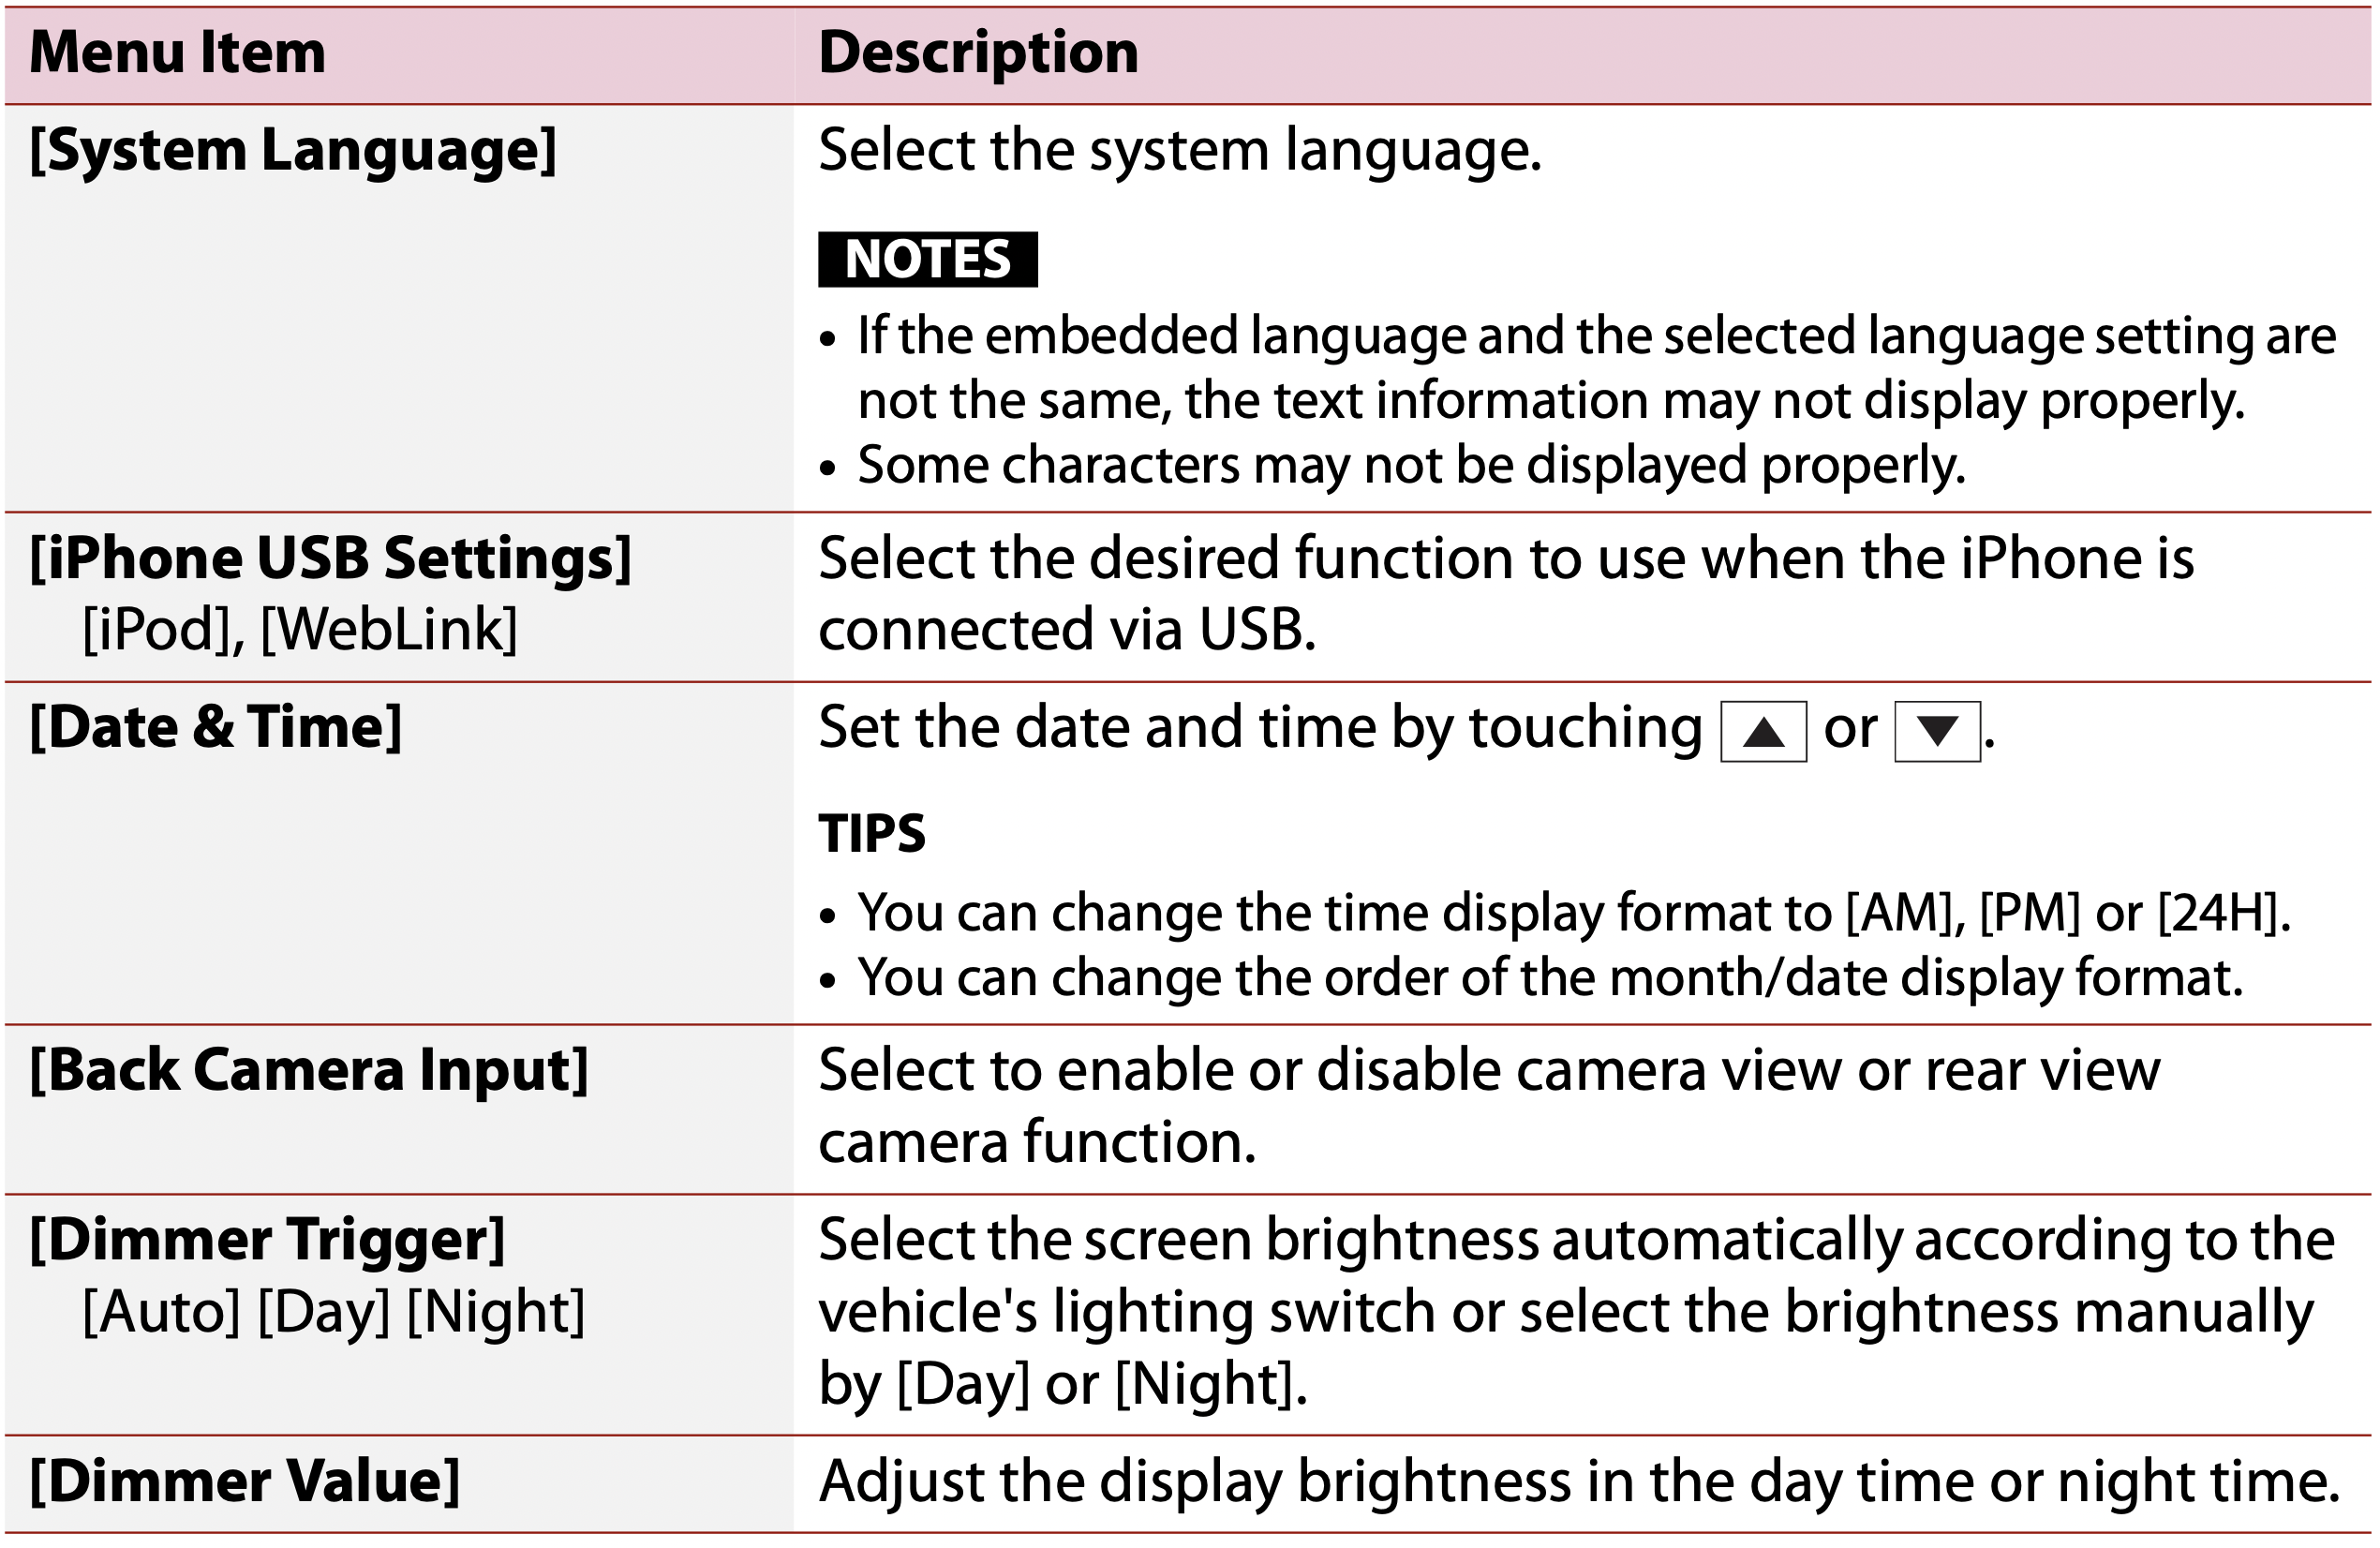
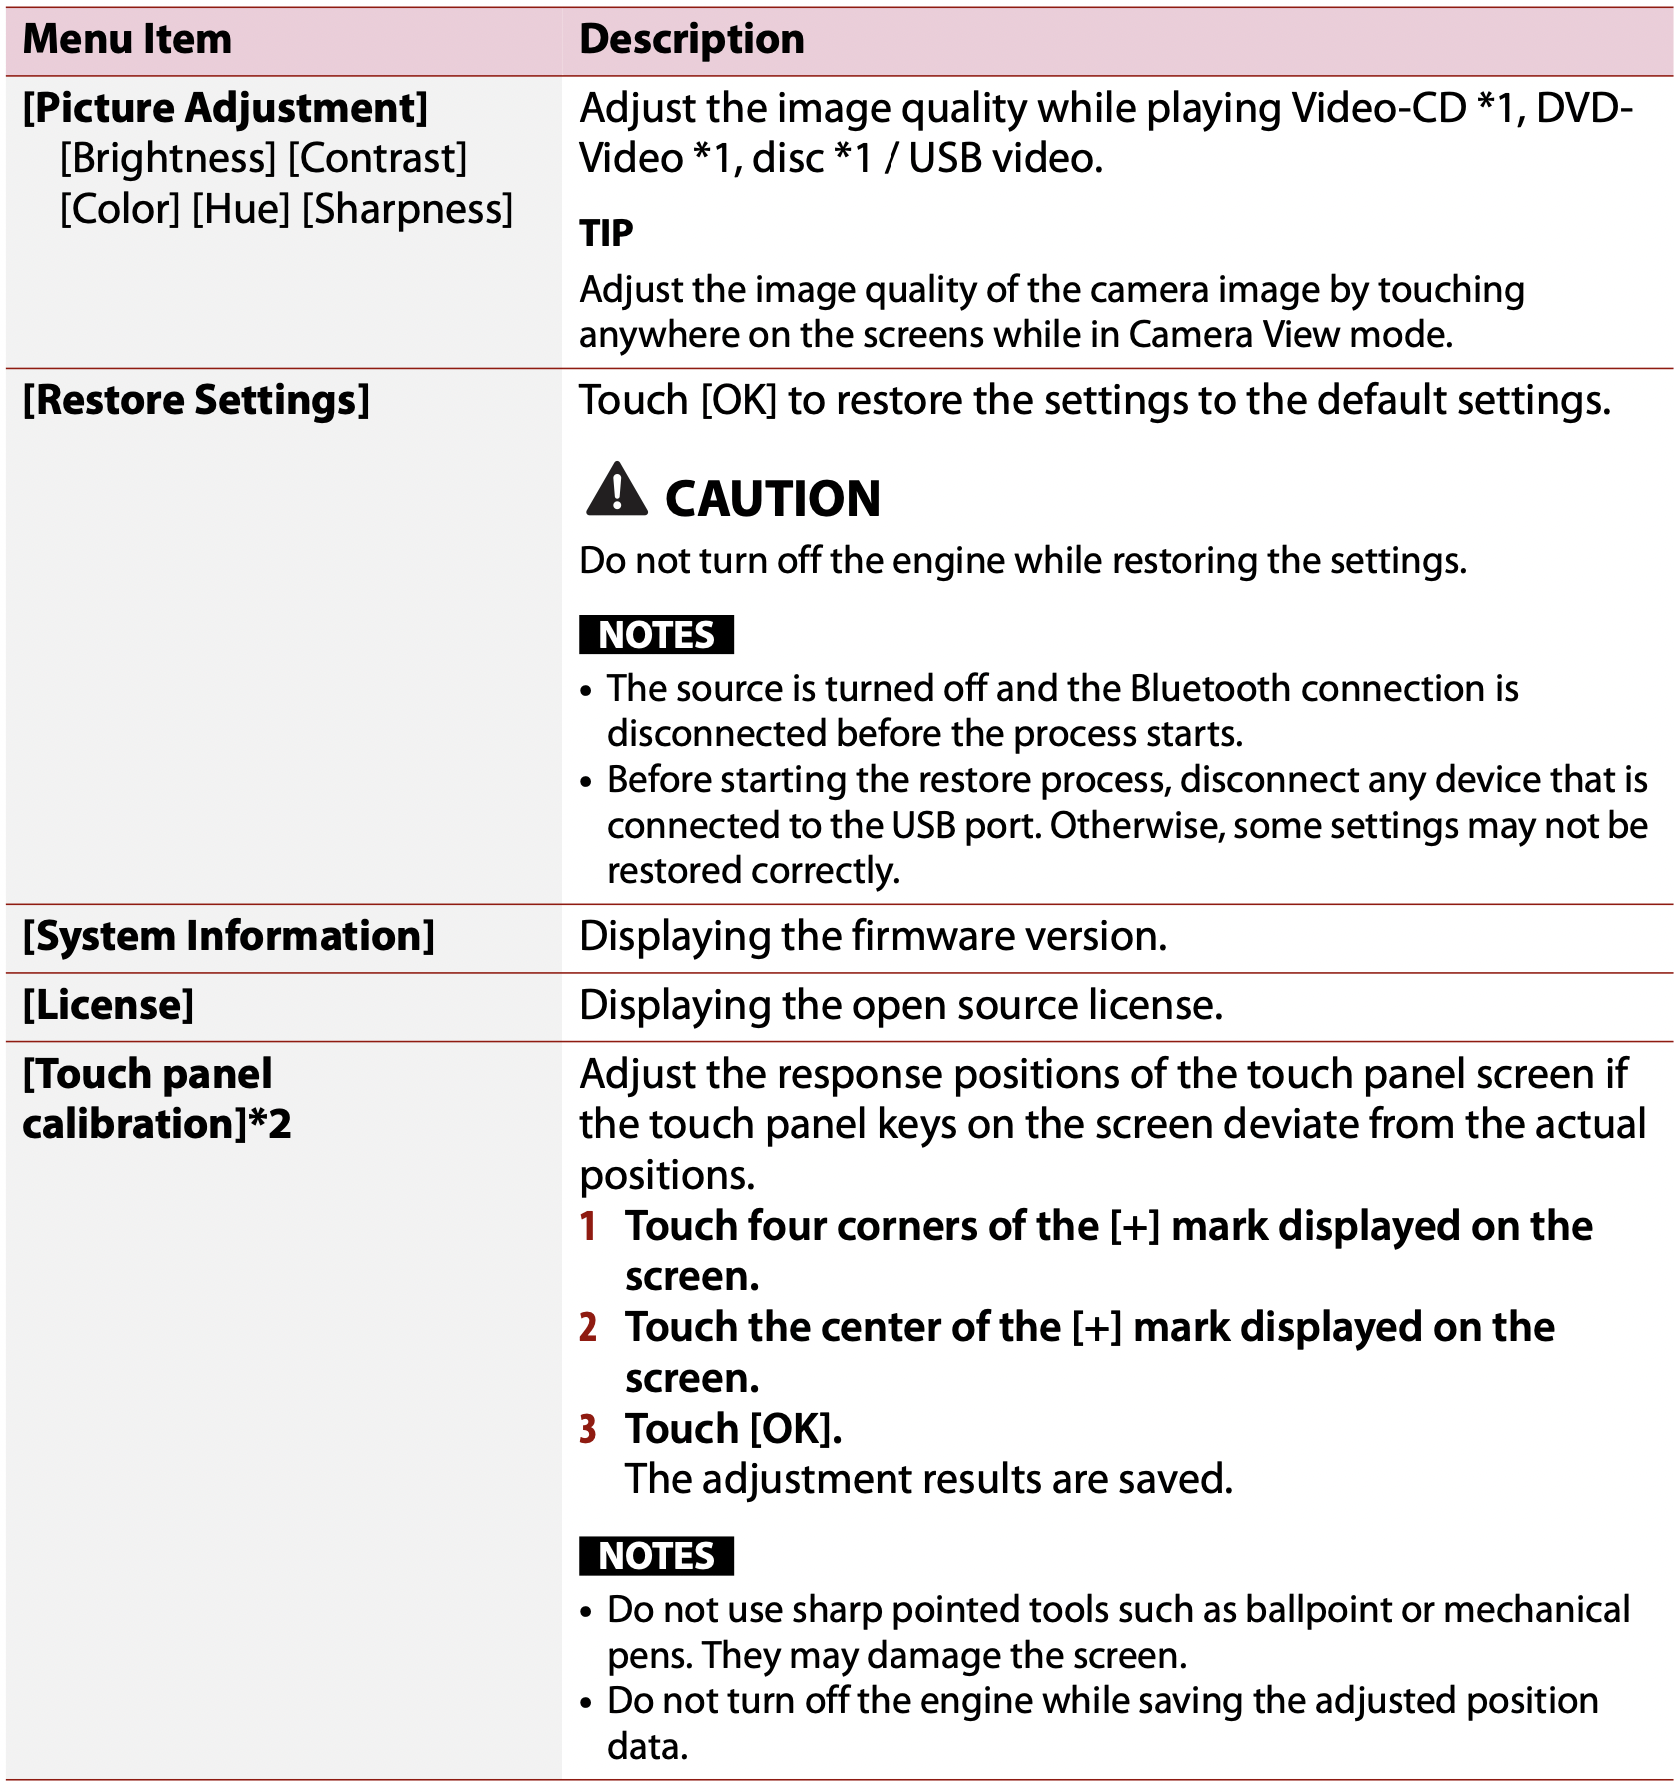
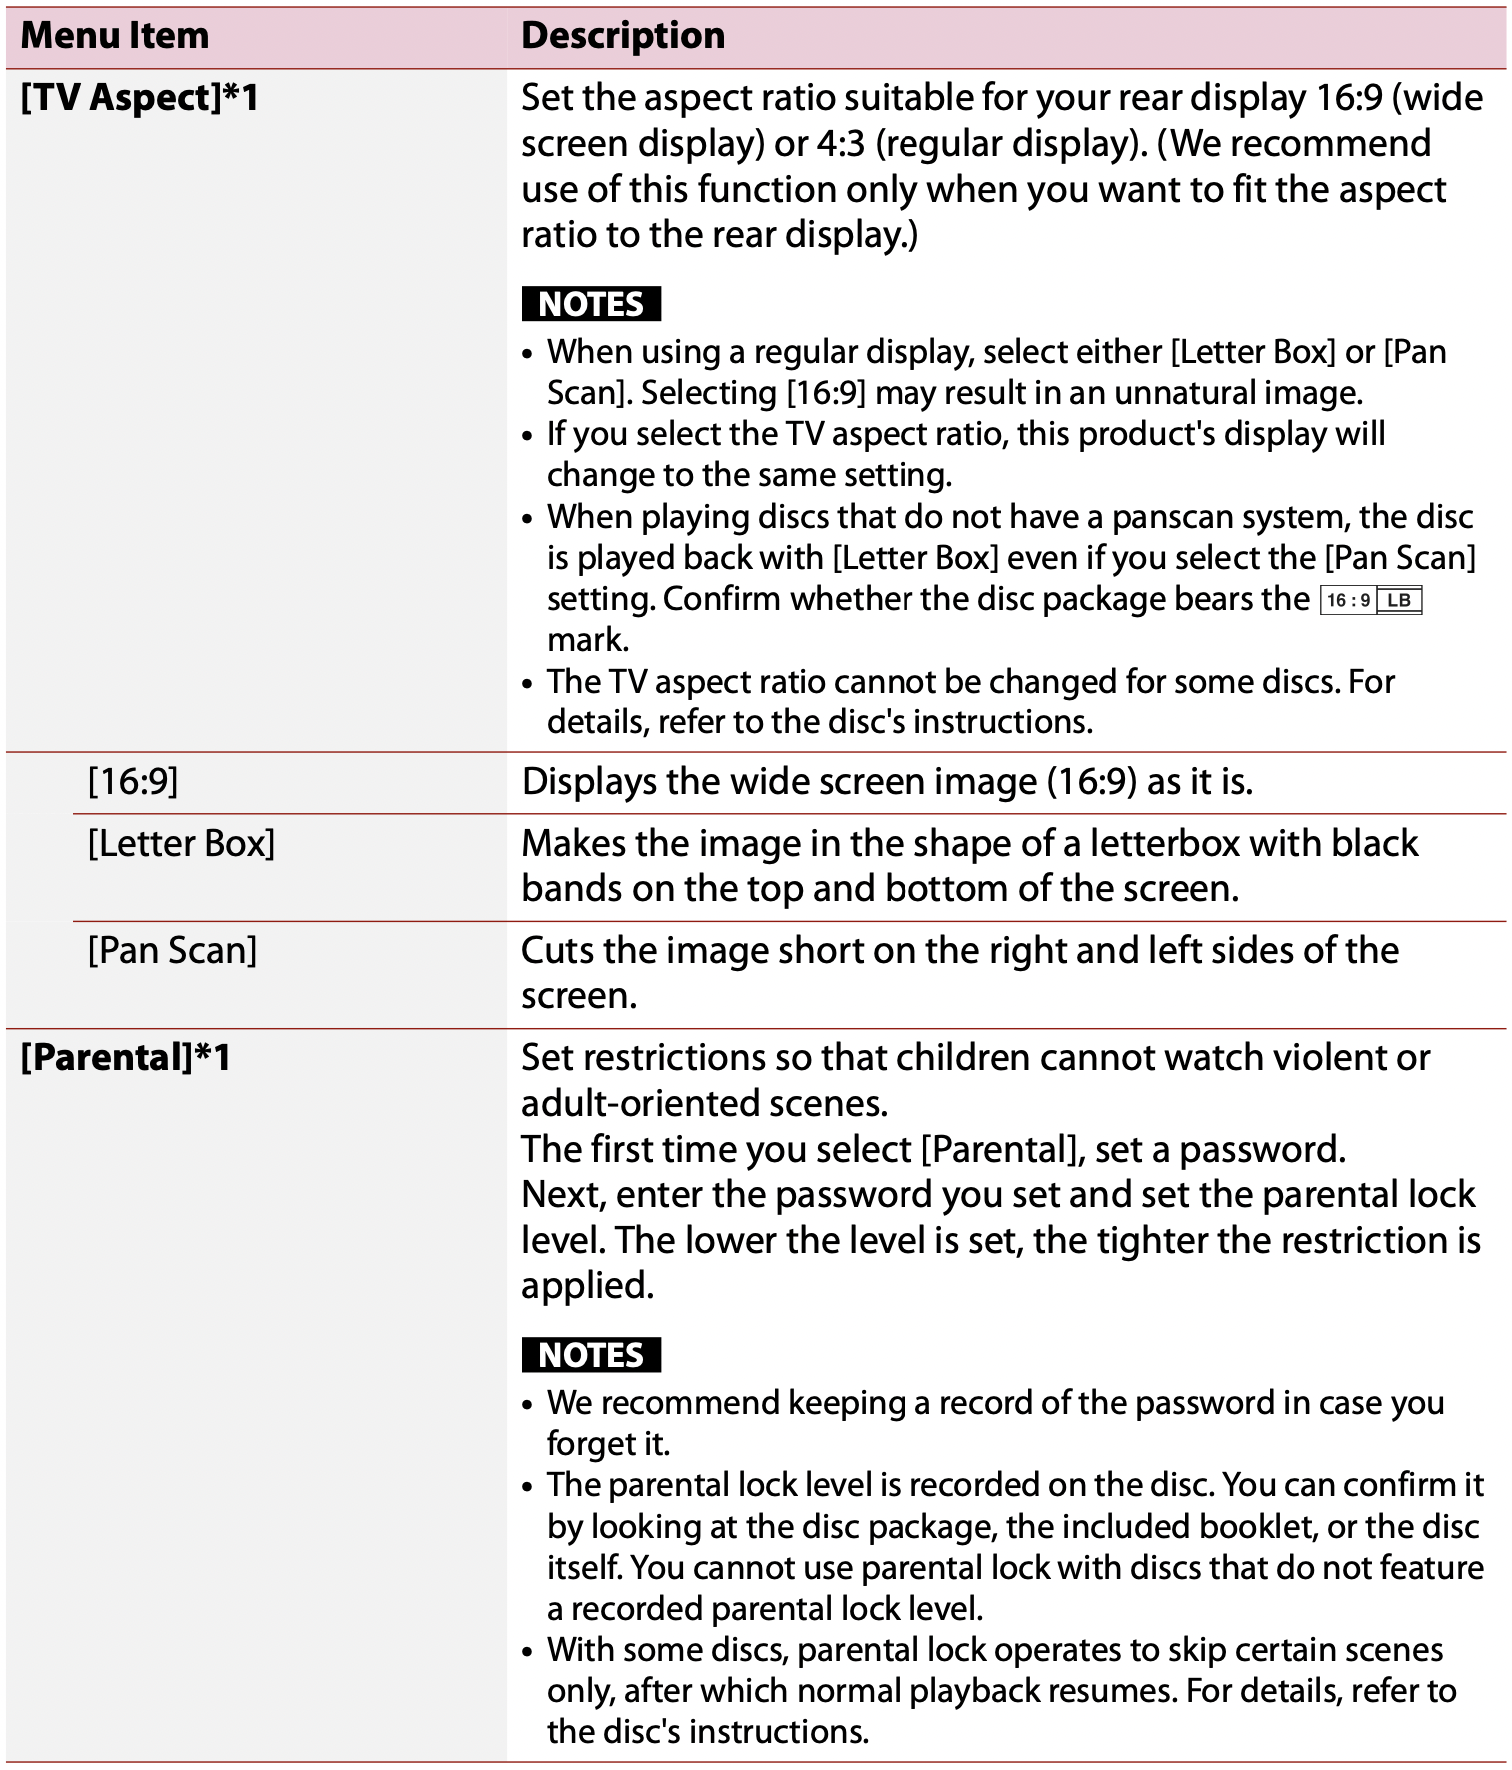
*1 AVH-241EX, AVH-240EX
*2 DMH-241EX, DMH-240EX, AVH-241EX, AVH-240EX
Theme Settings
NOTE: This setting is not available when the video/image file is in playback.

* DMH-342EX, DMH-341EX, DMH-340EX
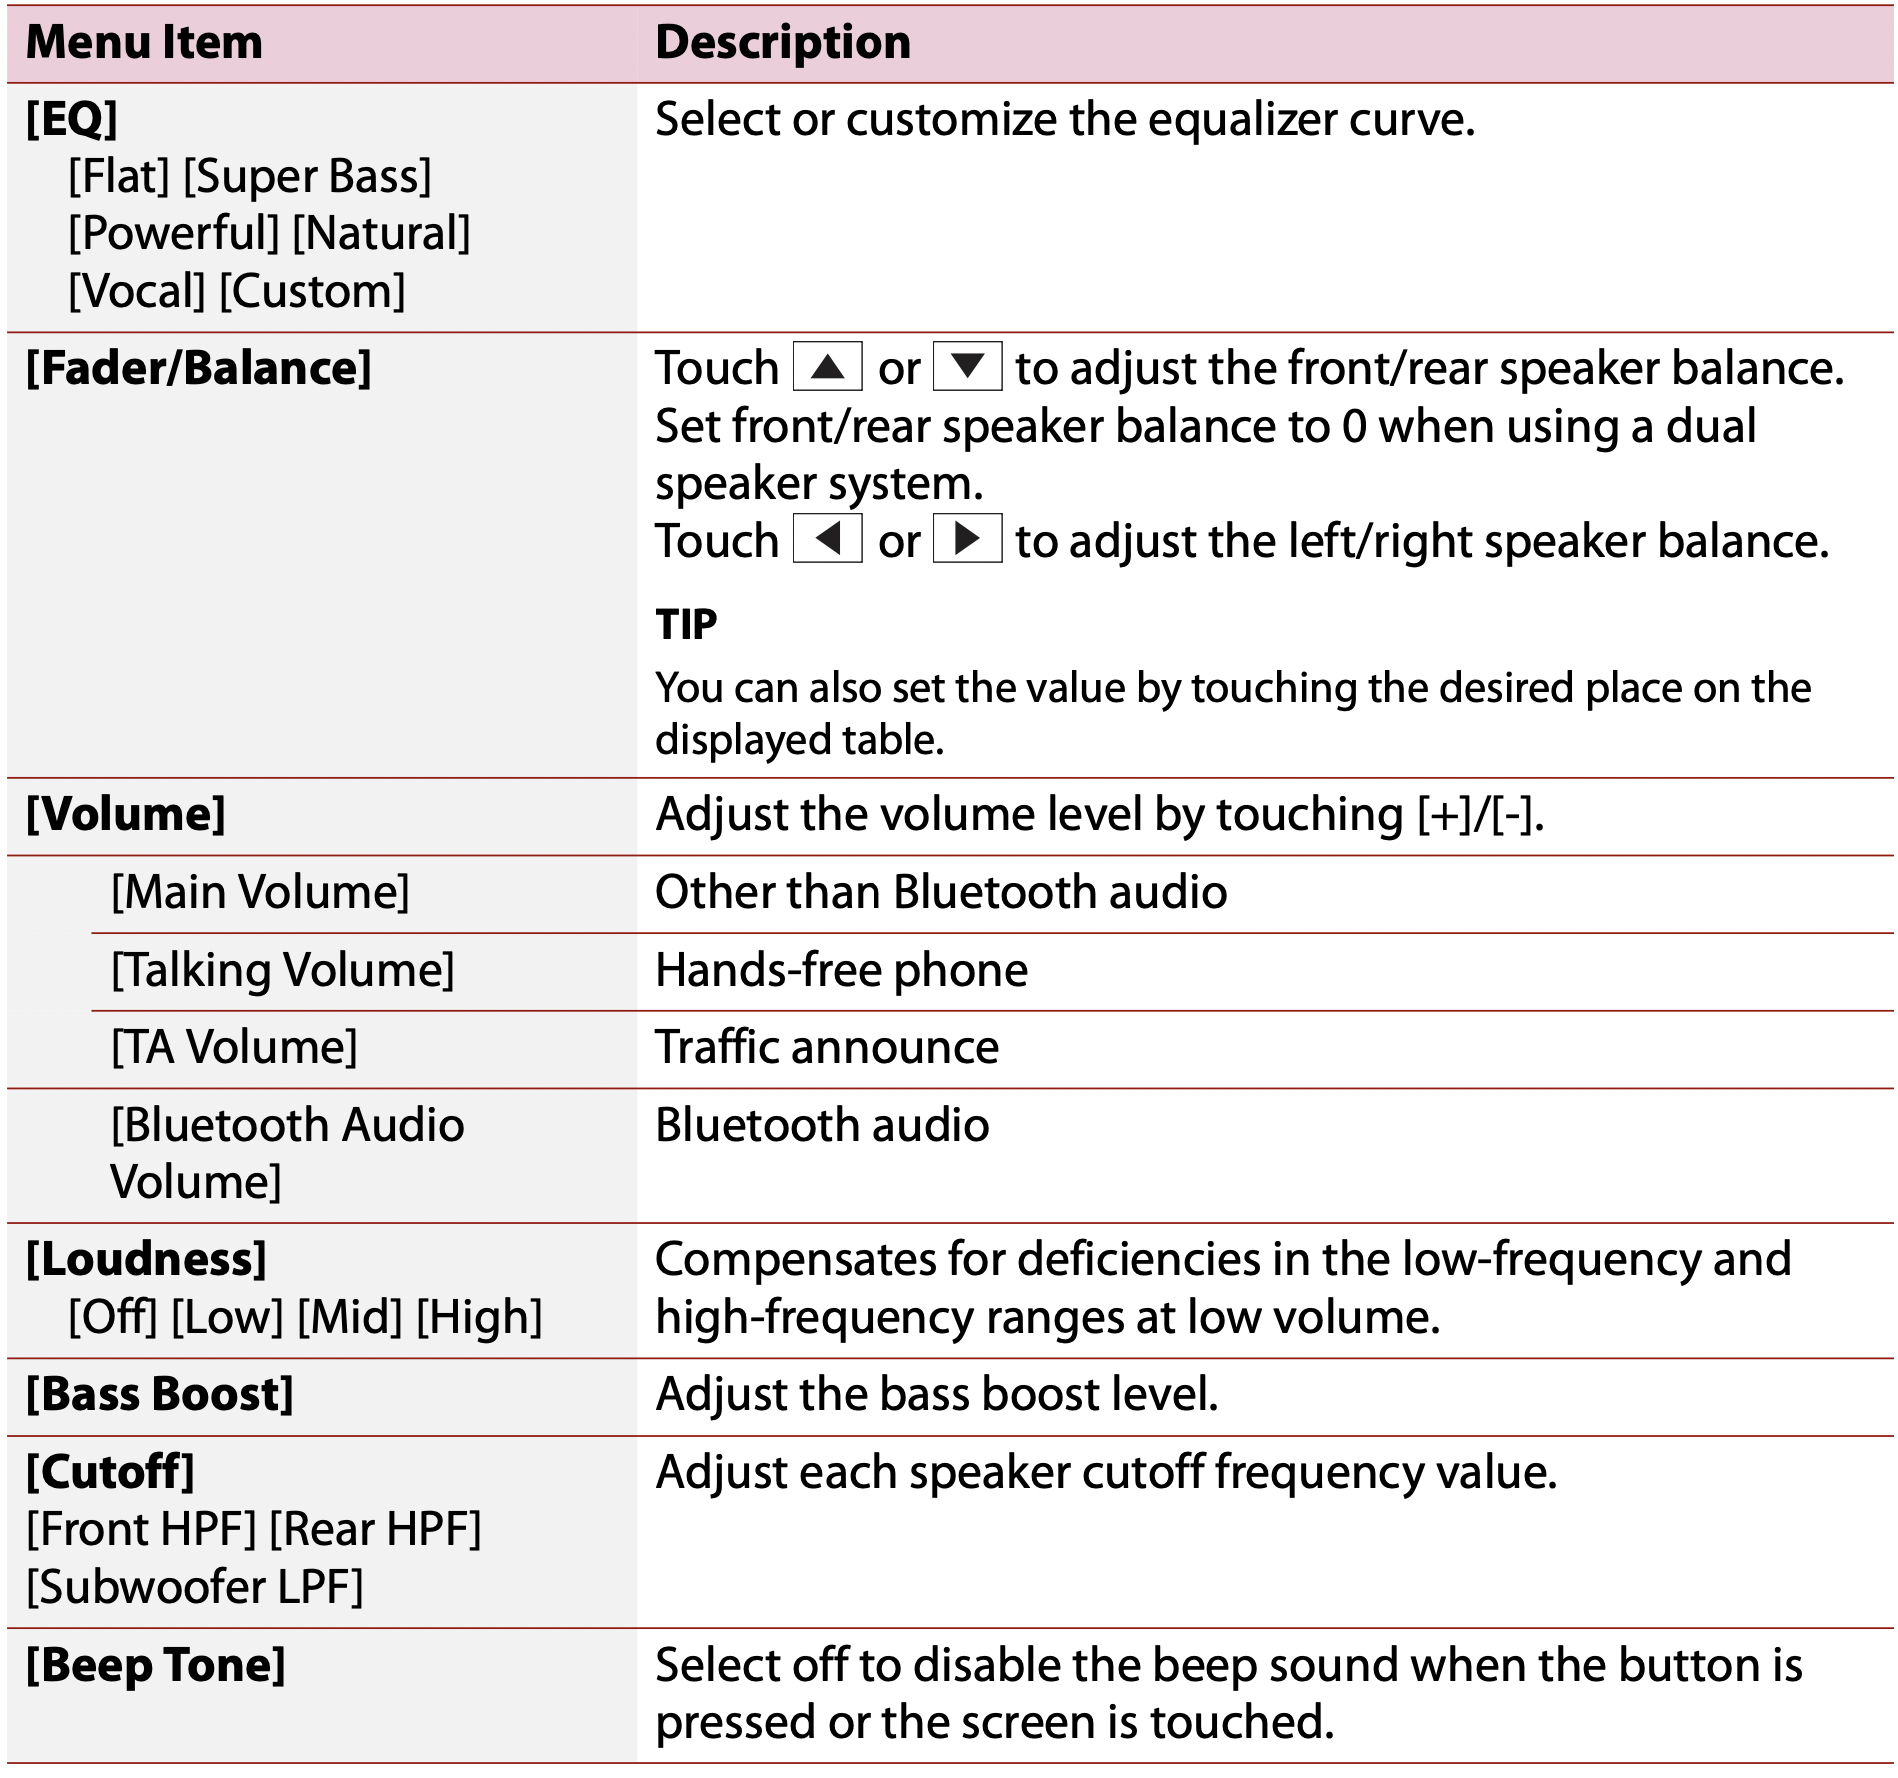
Audio Settings
Other functions
Setting the time and date
You can adjust the date and time from [Date & Time] in the [System Settings] menu (page 35).
Restoring this product to the default settings
You can restore settings or recorded content to the default settings from [Restore Settings] in the [System Settings] menu (page 36).
Firmware update
When the latest software is released on our website, you can update the software of this unit (page 6).
CAUTION
- The USB storage device for updating must contain only the correct update file.
- Never turn this product off, disconnect the USB storage device while the firmware is being updated.
- You can only update the firmware when the vehicle is stopped and the parking brake is engaged.
- Download the firmware update files into your computer.
- Connect a blank (formatted) USB storage device to your computer then locate the correct update file and copy it onto the USB storage device.
- Connect the USB storage device to this product (page 24).
- Follow the on-screen instructions to finish updating the firmware.
NOTES
- This product will reset automatically after the firmware update is completed if the update is successful.
- If an error message appears on the screen, perform the above steps again.
Troubleshooting
If you have problems operating this product, refer to this section. The most common problems are listed below, along with likely causes and solutions. If a solution to your problem cannot be found here, contact your dealer or the nearest authorized Pioneer service facility.
Common problems
A black screen is displayed, and operation is not possible using the touch panel keys.
→ Power off mode is on.
- Press
 to release the mode.
Problems with the AV screen
The screen is covered by a caution message and the video cannot be shown.
→ The parking brake lead is not connected or the parking brake is not applied.
- Connect the parking brake lead correctly, and apply the parking brake.
→ The parking brake interlock is activated.
- Park your vehicle in a safe place and apply the parking brake.
The audio or video skips.
→ This product is not firmly secured.
- Secure this product firmly.
No sounds are produced. The volume level will not rise.
→ Cables are not connected correctly.
- Connect the cables correctly.
iPhone cannot be operated.
→ The iPhone is frozen.
- Reconnect the iPhone with the USB interface cable for iPhone.
- Update the iPhone software version.
→ An error has occurred.
- Reconnect the iPhone with the USB interface cable for iPhone.
- Park your vehicle in a safe place, and then turn off the ignition switch (ACC OFF). Subsequently, turn the ignition switch to on (ACC ON) again.
- Update the iPhone software version.
→ Cables are not connected correctly.
- Connect the cables correctly.
Sound from the iPhone cannot be heard.
→ The audio output direction may switch automatically when the Bluetooth and USB connections are used at the same time.
- Use the iPhone to change the audio output direction.
No back camera image when the vehicle is in reverse.
→ The back camera input setting on the receiver is set to Off.
- Change the back camera setting to On in the settings menu. (Refer to the System Settings section of this manual to adjust.)
→ The camera input may be loose or not connected.
- Check the connection and make sure the male end of the camera is connected to the brown input on the back of the receiver. (Refer to the installation manual.)
→ The reverse lead on the receiver may not be connected to the proper wire at the reverse lamp.
- Check the connection and make sure that the violet/white lead of the receiver is connected to the lead whose voltage changes when the shift lever is put in reverse. (Refer to the installation manual).
Black screen displayed when the vehicle is in reverse, with no camera installed.
→ Back camera input is set to On.
- Turn the setting to Off in the settings menu. (Refer to the System Settings section of this manual to adjust.)
Problems with the phone screen
Dialing is impossible because the touch panel keys for dialing are inactive.
→ Your phone is out of range for service.
- Retry after re-entering the range for service.
Problems with Application screen
The screen is displayed, but operation does not work at all.
→ An error has occurred.
- Park your vehicle in a safe place, and then turn off the ignition switch (ACC OFF). Subsequently, turn the ignition switch to on (ACC ON) again.
The smartphone was not charged.
→ Charging stopped because the temperature of the smartphone rose due to prolonged use of the smartphone during charging.
- Disconnect the smartphone from the cable, and wait until the smartphone cools down.
→ More battery power was consumed than was gained from charging.
- This problem may be resolved by stopping any unnecessary services on the smartphone.
Error messages
When problems occur with this product, an error message appears on the display. Refer to the table below to identify the problem, then take the suggested corrective action. If the error persists, record the error message and contact your dealer or your nearest Pioneer service center.
Common
AMP Error
→ This product fails to operate or the speaker connection is incorrect; the protective circuit is activated.
- Check the speaker connection. If the message fails to disappear even after the engine is switched off/on, contact your dealer or an authorized Pioneer Service Station for assistance.
Disc
Load Failed
→ The disc is dirty.
- Clean the disc.
→ The disc is scratched.
- Replace the disc.
→ The disc is loaded upside down.
- Check that the disc is loaded correctly.
→ The disc format cannot be played back.
- Replace the disc.
→ The loaded disc is a type this product cannot play.
- Check what type of disc it is.
File Error
→ This type of file is not supported on this product.
- Select a file that can be played.
No Media Files
→ There is no playable file on the disc.
- Check that the files in the disc is compatible with this product.
Unplayable File
→ This type of file is not supported on this product.
- Select a file that can be played.
Audio Code Not Supported
→ This type of file is not supported on this product.
- Select a file that can be played.
USB storage device
HUB Error
→ The connected USB hub is not supported by this product.
- Directly connect the USB storage device to this product.
No Response
→ This product cannot recognize the connected USB storage device.
- Disconnect the device and replace it with another USB storage device.
Load Failed
→ Failed to load the USB storage device.
- Reconnect the USB storage device.
→ Security for the connected USB storage device is enabled.
- Follow the USB storage device instructions to disable security.
→ This product cannot recognize the connected USB storage device.
- Disconnect the device and replace it with another USB storage device.
Device Not Supported
→ The connected USB storage device is not supported by this product.
- Disconnect your device and replace it with a compatible USB storage device.
File Error
→ This type of file is not supported on this product.
- Select a file that can be played.
No Media Files
→ There is no playable file in the USB storage device.
- Check that the files in the USB storage device are compatible with this product.
Unplayable File
→ This type of file is not supported on this product.
- Select a file that can be played.
Audio Code Not Supported
→ This type of file is not supported on this product.
- Select a file that can be played.
iPhone
Load Failed
→ Failed to load the iPhone.
- Disconnect the connected iPhone and check the iPhone is working properly.
Device Not Supported
→ The connected iPhone is not supported by this product.
- Disconnect your device and replace it with a compatible iPhone.
No Media Files
→ There is no playable file in the iPhone.
- Check that the files in the iPhone are compatible with this product.
No Music Files
→ There is no playable file in the selected folder.
- Select a compatible file with this product in another folder.
Camera View & AUX
No Video Signal
→ There is no video signal input.
- Confirm whether the connection with the unit is established and there is an output from the external device.
Handling and care of discs
Some basic precautions are necessary when handling your discs.
Built-in drive and care
- Use only conventional, fully circular discs. Do not use shaped discs.
- Do not use cracked, chipped, warped, or otherwise damaged discs as they may damage the built-in drive.
- Use 12-cm discs. Do not use 8-cm discs or an adapter for 8-cm discs.
- When using discs that can be printed on label surfaces, check the instructions and the warnings of the discs. Depending on the discs, inserting and ejecting may not be possible. Using such discs may result in damage to this equipment.
- Do not attach labels, write on or apply chemicals to the surface of the discs.
- Do not attach commercially available labels or other materials to the discs.
- To clean a disc, wipe it with a soft cloth, moving outward from the center.
- Condensation may temporarily impair the built-in drive’s performance.
- Playback of discs may not be possible because of disc characteristics, disc format, recorded application, playback environment, storage conditions and so on.
- Road shocks may interrupt disc playback.
- Read the precautions for discs before using them.
Ambient conditions for playing a disc
- At extremely high temperatures, a temperature cutout protects this product by switching it off automatically.
- Despite our careful design of the product, small scratches that do not affect actual operation may appear on the disc surface as a result of mechanical wear, ambient conditions for use or handling of the disc. This is not a sign of the malfunction of this product. Consider it to be normal wear and tear.
See other models: DMH-WT76NEX TS-D10D2 TS-D12D2 MVH-MS310BT TS-Z65C
