®
English
DMH-WT8600NEX
DMH-WT7600NEX
DMH-WT76NEX
DMH-WC6600NEX
DMH-W4660NEX
DMH-W4600NEX
RDS AV RECEIVER
Important (Serial number)
The serial number is located on the bottom of this unit. For your own security and convenience, be
sure to record this number on the enclosed warranty card.
Operation Manual
- 2 -
English
Important
■Precaution ................................................................................... 4
■Parts and controls..................................................................... 11
■Basic operation ......................................................................... 14
■Bluetooth®................................................................................. 25
■Wi-Fi® ......................................................................................... 34
■Browser...................................................................................... 39
■CarAVAssist................................................................................ 42
■Source/application ................................................................... 45
■HD Radio™ Technology/Radio ................................................. 48
■USB............................................................................................. 54
■iPhone® ...................................................................................... 61
■Apple CarPlay™ ......................................................................... 65
■Android Auto™ .......................................................................... 68
■Sports......................................................................................... 72
■Weather ..................................................................................... 73
■Amazon Alexa ........................................................................... 75
■SiriusXM® Satellite Radio ......................................................... 82
■HDMI .......................................................................................... 90
■AUX ............................................................................................ 91
Contents
Thank you for buying this Pioneer product.
Please read through these instructions so you will know how to operate your model
properly. After you have finished reading the instructions, keep this document in a safe
place for future reference.
The screen shown in the examples may differ from actual screens, which may be
changed without notice for performance and function improvements.

English
- 3 -
■External component................................................................. 93
■iDatalink .................................................................................... 94
■Metra Axxess ............................................................................. 99
■Settings.................................................................................... 102
Displaying the setting screen ................................................................................................................... 102
System settings.............................................................................................................................................. 102
Theme settings............................................................................................................................................... 111
Audio settings ................................................................................................................................................ 113
Video settings................................................................................................................................................. 117
Communication settings............................................................................................................................ 118
■Favorite menu ......................................................................... 120
■Other functions....................................................................... 121
■Appendix ................................................................................. 123

- 4 -
English
CAN ICES-3 B/NMB-3 B
Precaution
Information to user
–This device contains licence-exempt transmitter(s)/receiver(s) that complies with Part 15 of FCC
Rules and Innovation, Science, and Economic Development Canada licence-exempt RSS(s).
Operation is subject to the following two conditions: (1) this device may not cause interference, and
(2) this device must accept any interference, including interference that may cause undesired
operation of this device.
–The Bluetooth antenna cannot be removed (or replaced) by user.
–This equipment complies with FCC/ISED radiation exposure limits set forth for an uncontrolled
environment and meets the FCC radio frequency (RF) Exposure Guidelines and RSS-102 of the ISED
radio frequency (RF) Exposure rules. This equipment should be installed and operated keeping the
radiator at least 20 cm or more away from person's body.
–This transmitter must not be co-located or operated in conjunction with any other antenna or
transmitter.
–Alteration or modifications carried out without appropriate authorization may invalidate the user’s
right to operate the equipment.
–NOTE: This equipment has been tested and found to comply with the limits for a Class B digital
device, pursuant to Part 15 of the FCC Rules. These limits are designed to provide reasonable
protection against harmful interference in a residential installation. This equipment generates, uses
and can radiate radio frequency energy and, if not installed and used in accordance with the
instructions, may cause harmful interference to radio communications. However, there is no
guarantee that interference will not occur in a particular installation. If this equipment does cause
harmful interference to radio or television reception, which can be determined by turning the
equipment off and on, the user is encouraged to try to correct the interference by one or more of
the following measures:
– Reorient or relocate the receiving antenna.
– Increase the separation between the equipment and receiver.
– Connect the equipment into an outlet on a circuit different from that to which the receiver is
connected.
– Consult the dealer or an experienced radio/TV technician for help.
FEDERAL COMMUNICATIONS COMMISSION SUPPLIER'S DECLARATION OF CONFORMITY
Product Name: RDS AV RECEIVER
Model Number: DMH-WT8600NEX, DMH-WT7600NEX, DMH-WT76NEX, DMH-WC6600NEX, DMH-
W4660NEX, DMH-W4600NEX
Responsible Party Name: PIONEER ELECTRONICS (USA), INC. SERVICE SUPPORT DIVISION
Address: 2050 W. 190TH STREET, SUITE 100, TORRANCE, CA 90504, U.S.A.
Phone: 1-800-421-1404
URL: https://www.pioneerelectronics.com/PUSA/
English
- 5 -
WARNING
Slots and openings in the cabinet are provided for ventilation to ensure reliable operation of the
product, and to protect it from overheating. To prevent fire hazard, the openings should never be
blocked or covered with items (such as papers, floor mat, cloths).
CAUTION
This product is evaluated in moderate and tropical climate condition under the Audio, video and
similar electronic apparatus - Safety requirements, IEC 60065.
Get the most out of your equipment by playing it at a safe level—a level that lets the sound come
through clearly without annoying blaring or distortion and, most importantly, without affecting your
sensitive hearing. Sound can be deceiving.
Over time, your hearing “comfort level” adapts to higher volumes of sound, so what sounds “normal”
can actually be loud and harmful to your hearing. Guard against this by setting your equipment at a
safe level BEFORE your hearing adapts.
▶ESTABLISH A SAFE LEVEL:
– Set your volume control at a low setting.
– Slowly increase the sound until you can hear it comfortably and clearly, without
distortion.
– Once you have established a comfortable sound level, set the dial and leave it
there.
▶BE SURE TO OBSERVE THE FOLLOWING GUIDELINES:
– Do not turn up the volume so high that you can’t hear what’s around you.
– Use caution or temporarily discontinue use in potentially hazardous situations.
– Do not use headphones while operating a motorized vehicle; the use of
headphones may create a traffic hazard and is illegal in many areas.
WARNING
• Do not attempt to install or service this product by yourself. Installation or servicing of this product by
persons without training and experience in electronic equipment and automotive accessories may
be dangerous and could expose you to the risk of electric shock, injury or other hazards.
• Do not allow this product to come into contact with liquids. Electrical shock could result. Also,
damage to the product, smoke, and overheating could result from contact with liquids.
• If liquid or foreign matter should get inside this product, park your vehicle in a safe place, turn the
ignition switch off (ACC OFF) immediately and consult your dealer or the nearest authorized Pioneer
Service Station. Do not use this product in this condition because doing so may result in a fire, electric
shock, or other failure.
• If you notice smoke, a strange noise or odor from this product, or any other abnormal signs on the
LCD screen, turn off the power immediately and consult your dealer or the nearest authorized
The Safety of Your Ears is in Your Hands
Important safety information

- 6 -
English
Pioneer Service Station. Using this product in this condition may result in permanent damage to the
system.
• Do not disassemble or modify this product, as there are high-voltage components inside which may
cause an electric shock. Be sure to consult your dealer or the nearest authorized Pioneer Service
Station for internal inspection, adjustments or repairs.
• Do not ingest the battery, Chemical Burn Hazard.
(The remote control supplied or sold separately with) This product contains a coin/button cell
battery. If the coin/button cell battery is swallowed, it can cause severe internal burns in just 2 hours
and can lead to death.
Keep new and used batteries away from children.
If the battery compartment does not close securely, stop using the product and keep it away from
children.
If you think batteries might have been swallowed or placed inside any part of the body, seek
immediate medical attention.
Before using this product, be sure to read and fully understand the following
safety information:
• Do not operate this product, any applications, or the rear view camera option (if
purchased) if doing so will divert your attention in any way from the safe operation of
your vehicle. Always observe safe driving rules and follow all existing traffic
regulations. If you experience difficulty in operating this product, pull over, park your
vehicle in a safe location and apply the parking brake before making the necessary
adjustments.
• Never set the volume of this product so high that you cannot hear outside traffic and
emergency vehicles.
• To promote safety, certain functions are disabled unless the vehicle is stopped and the
parking brake is applied.
• Keep this manual handy as a reference for operating procedures and safety
information.
• Do not install this product where it may (i) obstruct the driver’s vision, (ii) impair the
performance of any of the vehicle’s operating systems or safety features, including air
bags or hazard lamp buttons or (iii) impair the driver’s ability to safely operate the
vehicle.
• Please remember to fasten your seat belt at all times while operating your vehicle. If
you are ever in an accident, your injuries can be considerably more severe if your seat
belt is not properly buckled.
• Never use headphones while driving.
• Rear visibility systems (backup cameras) are required in certain new vehicles sold in
the U.S. and Canada. U.S. regulations began according to a two year phase-in on May
1, 2016, and both the U.S. and Canada require that all such vehicles manufactured on
or after May 1, 2018 have rear visibility systems. Owners of vehicles equipped with
compliant rear visibility systems should not install or use this product in a way
that alters or disables that system's compliance with applicable regulations. If
you are unsure whether your vehicle has a rear visibility system subject to the U.S. or
Canadian regulations, please contact the vehicle manufacturer or dealer.
If your vehicle has a compliant backup camera that displays the backup view through

English
- 7 -
the factory receiver, do not use the Pioneer receiver unless it is connected to and
displays the same view as the factory backup camera. Connection to the factory
backup camera will require an adaptor, sold separately. Not all vehicles may be able to
connect. Please check with a qualified professional installer for installation options
specific to your vehicle.
WARNING
• LIGHT GREEN LEAD AT POWER CONNECTOR IS DESIGNED TO DETECT PARKED STATUS AND
MUST BE CONNECTED TO THE POWER SUPPLY SIDE OF THE PARKING BRAKE SWITCH.
IMPROPER CONNECTION OR USE OF THIS LEAD MAY VIOLATE APPLICABLE LAW AND MAY
RESULT IN SERIOUS INJURY OR DAMAGE.
• To avoid the risk of damage and injury and the potential violation of applicable laws, this
product is not for use with a video image that is visible to the driver.
• In some countries the viewing of video image on a display inside a vehicle even by persons other
than the driver may be illegal. Where such regulations apply, they must be obeyed.
If you attempt to watch video image while driving, the warning “Viewing of front seat
video source while driving is strictly prohibited.” will appear on the screen. To watch
video image on this display, stop the vehicle in a safe place and apply the parking brake.
Please keep the brake pedal pushed down before releasing the parking brake.
The video output terminal (V OUT) is for connection of a display to enable passengers in
the rear seats to watch video images.
WARNING
NEVER install the rear display in a location that enables the driver to watch video images while driving.
Be sure to run the vehicle engine while using this product. Using this product without
running the engine can drain the battery.
WARNING
Do not install this product in a vehicle that does not have an ACC wire or circuitry available.
With an optional rear view camera, you are able to use this product as an aid to keep an
eye on trailers, or backing into a tight parking spot.
To ensure safe driving
When using a display connected to V OUT
To avoid battery exhaustion
Camera function

- 8 -
English
WARNING
• SCREEN IMAGE MAY APPEAR REVERSED.
• USE INPUT ONLY FOR REVERSE OR MIRROR IMAGE REAR VIEW CAMERA. OTHER USE MAY RESULT IN
INJURY OR DAMAGE.
CAUTION
The rear view mode is to use this product as an aid to keep an eye on the trailers, or while backing up.
Do not use this function for entertainment purposes.
CAUTION
• To prevent data loss and damage to the storage device, never remove it from this product while data
is being transferred.
• Pioneer cannot guarantee compatibility with all USB mass storage devices and assumes no
responsibility for any loss of data on media players, iPhone, smartphone, or other devices while using
this product.
• It may not be recognized properly by this product if a USB device that had been incorrectly
disconnected from the computer is connected.
After-sales service for Pioneer products
• When taking this product to the dealer or authorized Pioneer Service Station, make
sure to bring both the unit and LCD display.*
* DMH-WT8600NEX, DMH-WT7600NEX, DMH-WT76NEX, DMH-WC6600NEX
Visit us at the following site:
https://www.pioneerelectronics.com/PUSA/
https://www.pioneerelectronics.ca/POCEN/
Handling the USB connector
Failure to operate
Please contact the dealer or distributor from which you purchased the product for after-sales service
(including warranty conditions) or any other information. In case the necessary information is not
available, please contact the companies listed below.
Please do not ship your product to the companies at the addresses listed below for repair without
making advance contact.
–USA&CANADA
Pioneer Electronics (USA) Inc.
CUSTOMER SUPPORT DIVISION
P.O. Box 1760 Long Beach, CA 90801-1760
800-421-1404
For warranty information, please see the Limited Warranty sheet included with your product.
Visit our website

English
- 9 -
1 Register your product.
2 Receive updates on the latest products and technologies.
3 Download owner’s manuals, order product catalogs, research new products, and
much more.
4 Receive notices of software upgrades and software updates.
• Do not expose the LCD screen to direct sunlight when this product is not used. This
may result in LCD screen malfunction due to the resulting high temperatures.
• When using a cellular phone, keep the antenna of the cellular phone away from the
LCD screen to prevent disruption of the video in the form of spots, colored stripes, etc.
• To protect the LCD screen from damage, be sure to touch the touch panel keys only
with your finger and do so gently.
• A shatterproof film is attached to the unit's display. This film cannot be taken off or
replaced with an alternative film. There may be glue on the edge of the film. However,
this does not affect the usability of this unit.*
* DMH-WT8600NEX, DMH-WT7600NEX, DMH-WT76NEX, DMH-WC6600NEX
• The information will be erased by disconnecting the yellow lead from the battery (or
removing the battery itself).
• Some of the settings and recorded contents will not be reset.
• This manual uses diagrams of actual screens to describe operations. However, the
screens on some units may not match those shown in this manual depending on the
model used.
• When an iPhone is connected to the unit, the source name on the unit appears as
[iPod]. Please note that this unit only supports iPhone regardless of the source name.
For details of iPhone compatibility, refer to Compatible iPhone models (page 135).
Protecting the LCD panel and screen
Notes on internal memory
About this manual
Meanings of symbols used in this manual
This indicates model names that are supported by the described operations.
This indicates to touch the appropriate soft key on the touch screen.
0000NEX

- 10 -
English
This indicates to touch and hold the appropriate soft key on the touch screen.
This indicates to swipe in the direction of the arrow on the touch screen.
This indicates to drag in the direction of the arrow on the touch screen.
English
- 11 -
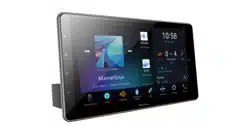
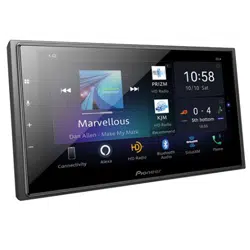
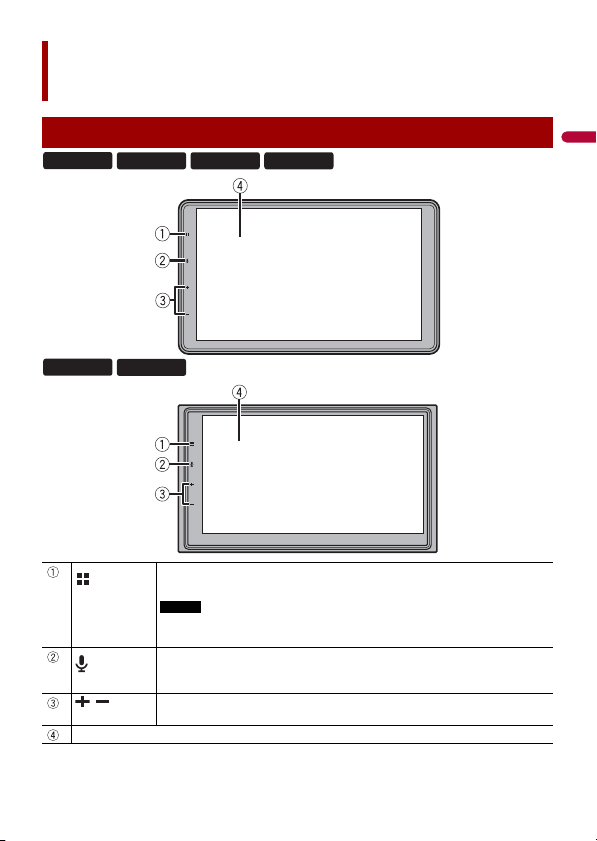
Parts and controls
Main unit
Touch to display the home menu screen.
Touch and hold to power off. To power back on, touch any button.
NOTE
When the home menu screen is displayed, touch to display the previously
used AV source screen.
Touch to activate the voice recognition mode such as Siri® when the iPhone is
connected to the unit via Bluetooth or USB.
Touch and hold to display mobile device search or select screen.
/Volume
LCD screen
8600NEX
7600NEX 76NEX 6600NEX
4660NEX
4600NEX
- 12 -
English
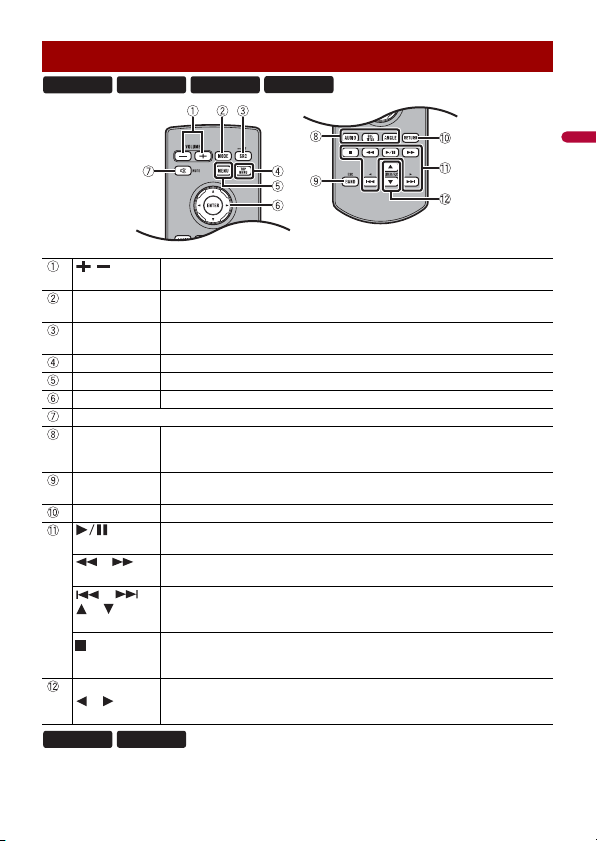
Remote control
/
VOLUME
Volume
MODE Press to switch between the Application screen and the AV operation screen.
Press and hold to turn off the display.
SRC/OFF Press to cycle through all the available sources.
Press and hold to turn the source off.
TOP MENU Not used.
MENU Not used.
ENTER Not used.
MUTE
AUDIO
SUBTITLE
ANGLE
Not used.
BAND/ESC Press to select the tuner band when tuner is selected as a source.
Press to cancel the control mode of functions.
RETURN Not used.
Press to pause or resume playback or play from the beginning when resume is
off.
or For audio: Press and hold to perform fast reverse or fast forward.
For video: Press to perform fast reverse or fast forward.
or
or
Press to return to the previous track (file) or go to the next track (file).
Press to answer or end a call.
Press to stop playback.
If you resume playback, playback will start from the point where you stopped.
Press the button again to stop playback completely.
FOLDER/P.CH
or
Press to select the next or previous folder.
Press to recall radio station frequencies assigned to preset channel keys.
Press to answer or end a call.
8600NEX 7600NEX 6600NEX
4660NEX
76NEX
4600NEX

English
- 13 -
The remote control is sold separately.
- 14 -
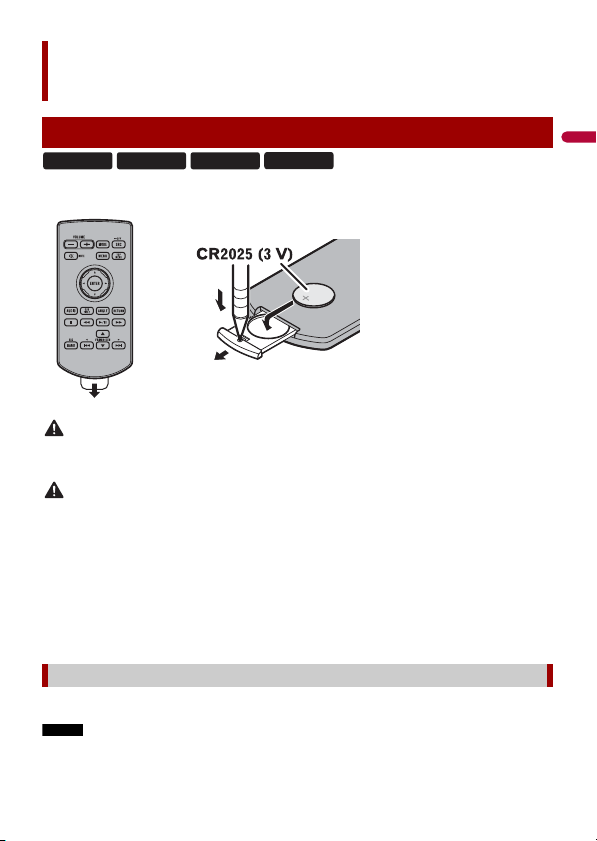
English
Remove the insulation sheet before use.
WARNING
Batteries (battery pack or batteries installed) must not be exposed to excessive heat such as sunshine,
fire or the like.
CAUTION
• Remove the battery if the remote control is not used for a month or longer.
• There is a danger of explosion if the battery is incorrectly replaced. Replace only with the same or
equivalent type.
• Do not handle the battery with metallic tools.
• Do not store the battery with metallic objects.
• If the battery leaks, wipe the remote control completely clean and install a new battery.
• When disposing of used batteries, please comply with governmental regulations or environmental
public institution’s rules that apply in your country/area.
• “Perchlorate Material – special handling may apply. See www.dtsc.ca.gov/hazardouswaste/
perchlorate. (Applicable to California, U.S.A.)”
Point the remote control in the direction of the front panel to operate.
NOTE
The remote control may not function properly in direct sunlight.
Basic operation
Preparing the remote control
Using the remote control
8600NEX 7600NEX 6600NEX
4660NEX
How to replace the battery
Insert the CR2025 (3 V) battery with the plus (+) and
minus (-) poles orientated properly.
English
- 15 -
Important
• Do not store the remote control in high temperatures or direct sunlight.
• Do not let the remote control fall onto the floor, where it may become jammed under the brake or gas
pedal.
1 Start the engine to boot up the system.
The [Select Program Language] screen appears.
NOTE
From the second time on, the screen shown will differ depending on the previous conditions.
2 Select the language.
3 Touch .
The [Speaker Mode Settings] screen appears.
4 Select the speaker mode.
[Standard Mode]
4-speaker system with front and rear speakers, or a 6-speaker system with front and
rear speakers and subwoofers.
[Network Mode]
3-way system with a high range speaker, middle range speaker and subwoofer (low
range speaker) for reproduction of high, middle and low frequencies (bands).
WARNING
Do not use the unit in Standard Mode when a speaker system for 3-way Network Mode is
connected to the unit. This may cause damage to the speakers.
5 Touch [OK].
Initial Legal Disclaimer screen appears.
6 Touch [OK].
The home menu screen appears.
NOTE
Once the speaker mode is set, the setting cannot be changed unless this product is restored to the
default settings. Restore the default settings to change the speaker mode setting (page 122).
To change the speaker mode, you need to restore this product to the default settings.
1 Restore the default setting (page 122).
Starting up the unit
Switching the speaker mode
- 16 -
English
You can operate this product by touching the keys on the screen directly with your
fingers.
NOTE
To protect the LCD screen from damage, be sure to touch the screen only with your finger gently.
: Returns to the previous screen.
: Close the screen.
Using the touch panel
Common touch panel keys
Operating list screens
Touching an item on the list allows you to narrow down the options and
proceed to the next operation.
Appears when all characters are not displayed on the display area.
If you touch the key, the rests are scrolled for display.
NOTE
This function is available only when you stop your vehicle in a safe place and apply
the parking brake.
Appears when items cannot be displayed on a single page.
Drag the side bar, the initial search bar or the list to view any hidden items.
English
- 17 -
Operating the time bar
You can change the playback point by dragging the key.
The playback time corresponding to the position of the key is displayed while
dragging the key.
Operating the on-screen keyboard
Displays the characters that are entered.
Enters the characters in the text box.
Confirms the entry and proceeds to the next step.
Deletes the input text to the left of the cursor one letter at a time.
Enters a space.
Switches between alphabet and numbers/symbols.
Switches between capital and lower case letters.
- 18 -
English
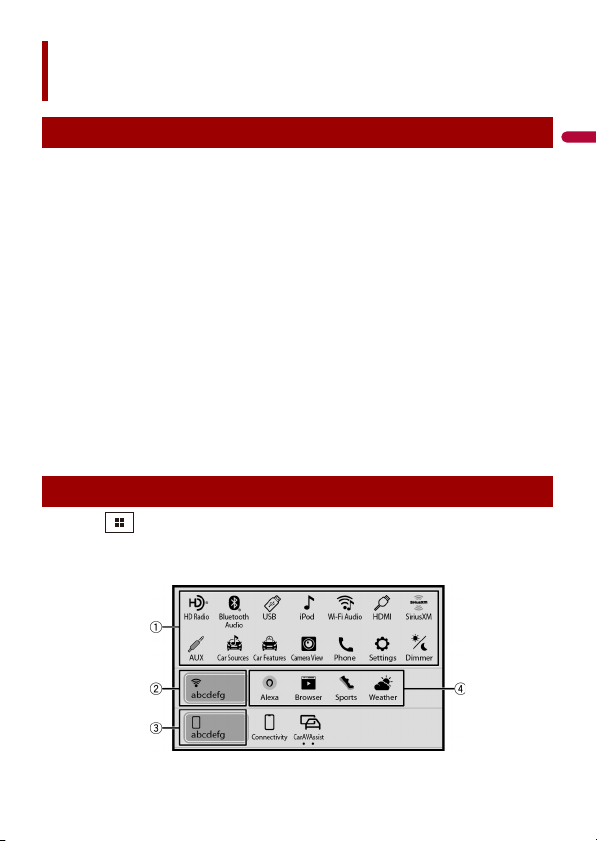
Home menu screen
Widget (page 23)
Touch to see the selected source/application.
Customizing the widget (page 23)
When you finish customizing, touch .
Favorite source/application area
Touch to see the selected source/application.
Customizing the home menu screen (page 19)
The following items can be customized.
• Changing the home menu screen layout (page 19)
• Rearranging the icons in the favorite source/application area (page 19)
• Rearranging the displayed icons in the favorite source/application area
(page 19)
When you finish customizing, touch .
Notification (page 22)
Source/application (page 45)
Favorite radio stations (page 19)
Suggested radio stations (page 21)
English
- 19 -
NOTES
• The layout of the widgets and favorite icons on the home menu screen is saved for each mobile
device connected via Bluetooth. The layout changes depending on the mobile device that is
connected to this unit.
• This function is available only when you stop your vehicle in a safe place and apply the parking brake.
• The [Connectivity] icon cannot be removed from the favorite source/application area.
• The [Connectivity] icon changes to the Apple CarPlay icon or Android Auto icon depending on your
mobile device.
▶Changing the home menu screen layout
1 Touch and hold the favorite source/application area.
2 Touch .
3 Select [Lower Dock Area] or [Upper Dock Area].
▶Rearranging the icons in the favorite source/application area
1 Touch and hold the favorite source/application area.
2 Drag the icon to the desired position.
When you finish rearranging, touch .
▶Rearranging the displayed icons in the favorite source/application area
1 Touch and hold the favorite source/application area.
The source/application list area appears on the screen.
2 Drag unneeded icon in the favorite source/application area to the source/
application list area if the favorite source/application area is full.
3 Drag the icon to the desired location in the favorite source/application area.
When you finish rearranging, touch .
Registering your favorite radio stations allows you to quickly jump to the registered
radio stations.
1 Touch then swipe up on the screen.
Swipe down on the screen when you finish.
Customizing the home menu screen
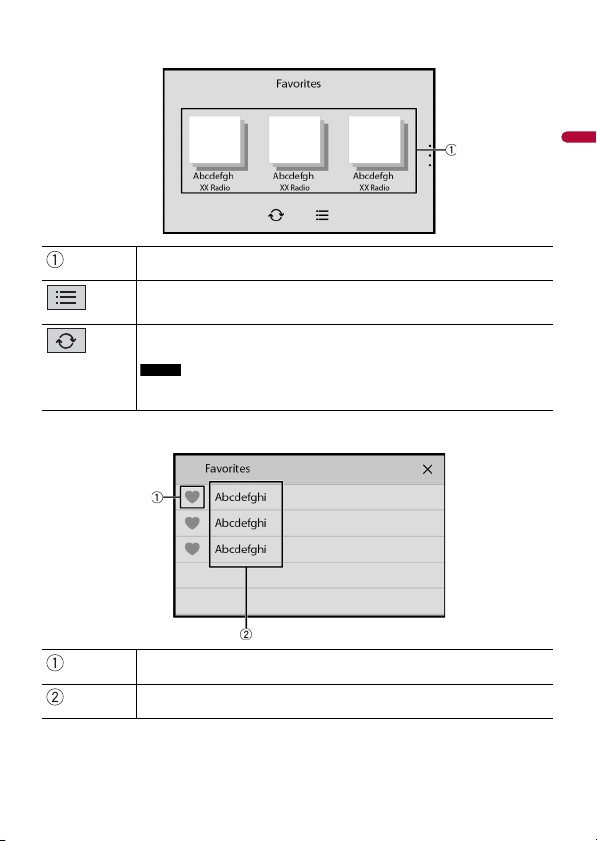
Favorite radio stations
Displaying the favorite radio stations screen
- 20 -
English
Favorite radio stations
Touch to make changes to the selected radio station.
List of favorite radio stations
Touch to select the favorite radio station from the list screen (page 20).
Updates the favorite radio stations.
The next 3 stations on the favorites list are displayed.
NOTE
This function is only available when there are more than 4 favorite radio stations
on the list.
Adds/removes a favorite.
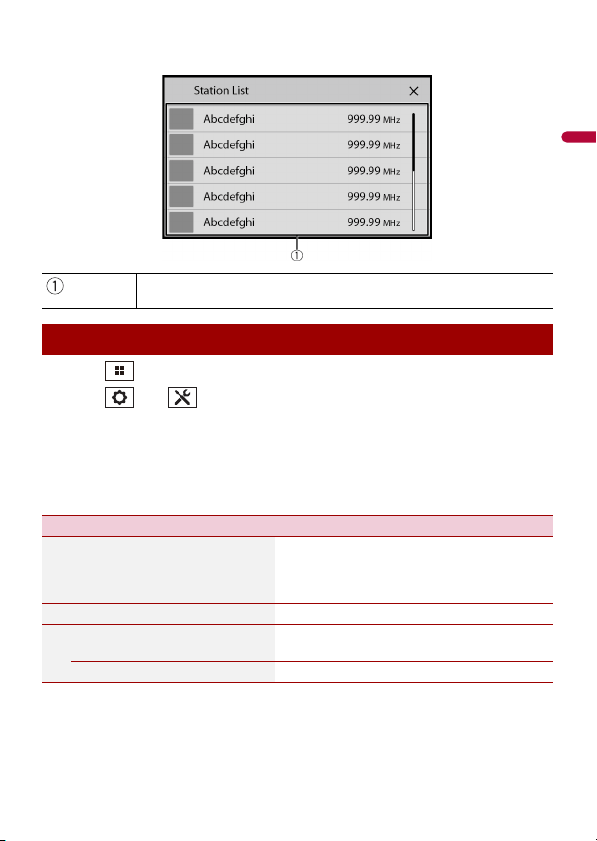
Available radio stations
Touch to tune in to the selected radio station.
Favorite radio stations screen
List screen
English
- 21 -
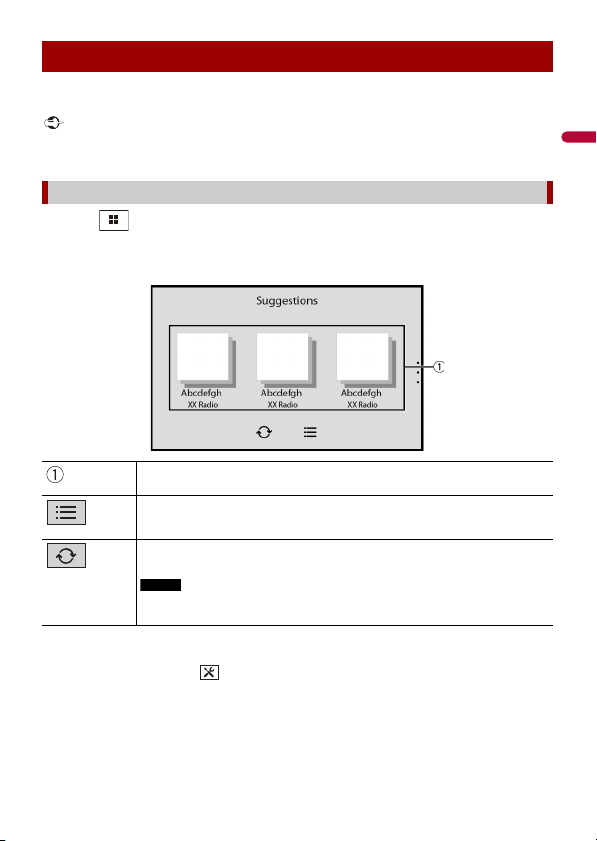
This unit suggests radio stations to you according to your frequently listened music and
radio stations.
Important
To use the suggested radio stations function, you may need to connect this unit to the Internet via a Wi-
Fi network and set [Suggestions] (page 102) to [On].
1 Touch then swipe down on the screen.
Swipe up on the screen when you finish.
TIP
To reset the displayed suggested radio stations, it is necessary to restore all settings to the default
settings in [Restore Settings] in (page 106).
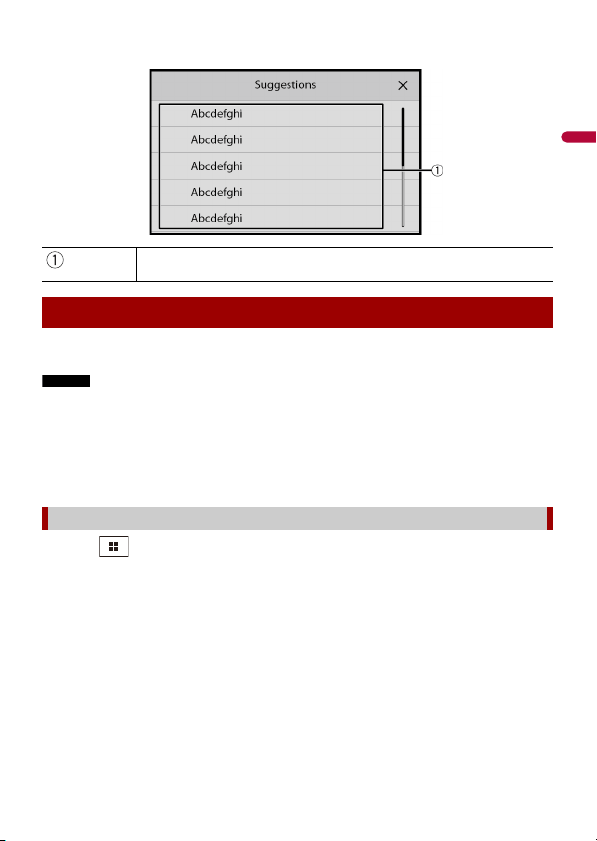
Suggested radio stations
Displaying the suggested radio stations screen
Suggested radio stations
Touch to tune in to the selected radio station.
List of suggested radio stations
Touch to select the suggested radio station from the list screen (page 22).
Updates the suggested radio stations.
The next 3 stations on the suggested list are displayed.
NOTE
This function is only available when there are more than 4 suggested radio
stations on the list.
Suggested radio stations screen
- 22 -
English
Notification displays the notifications from the connected iPhone or smartphone
(Android™) and sports information registered on CarAVAssist.
NOTES
• This function needs to be connected via Bluetooth to an iPhone or a smartphone with CarAVAssist
installed (page 42). For details on Bluetooth connection, refer to Bluetooth connection (page 25).
• To use the sports notification function, you need to register a team in CarAVAssist and import it to this
unit (page 43) in advance.
• To use the sports notification function, make sure that the GPS antenna is installed properly and this
unit is connected to the Internet via a Wi-Fi network (page 34). For details on GPS antenna
installation, refer to the Installation Manual.
1 Touch then swipe right on the screen.
When you finish, swipe left on the screen.
Available radio stations
Touch to tune in to the selected radio station.
Notification
Displaying the notification screen
List screen

English
- 23 -
Widgets enable you to see your favorite sources and application information on the
home menu screen and access shortcuts to them.
NOTE
This function is available only when you stop your vehicle in a safe place and apply the parking brake.
1 Touch .
2 Touch and hold the widgets area.
3 Touch the widget that you want to customize.
When you finish customizing, touch .
Widget customizing screen
Received notifications
Touch to display the details of the notification.
Widget
Customizing the widget
Notification screen
- 24 -
English
▶Switching the widgets
1 Touch .
2 Touch and hold the widgets area.
3 Drag unwanted source/application widgets to the source/application list area.
A maximum of four widgets can fit in the widgets area.
4 Drag the desired source/application to the widgets area.
When you finish switching, touch .
NOTE
Some widgets cannot be placed together in the widgets area. Also, some widget functions may be
limited due to the combination of widgets.
Widget area
To rearrange the widgets, drag them to the desired locations.
To remove a widget, drag the widget to .
Available source/application lists for the widgets
Flick left/right to switch between widget lists.
Adjusts the size of the widgets
Touch a corner of the selected widget and drag it to adjust the size.
TIP
You can fit up to four widgets in the widgets area by adjusting their size.
NOTE
The size can only be adjusted for widgets that display an adjustment key.
English
- 25 -
1 Turn on the Bluetooth function on the device.
2 Touch then swipe left on the screen.
3 Touch then .
4 Touch [Connection].
5 Touch .
The unit starts to search for available devices, then displays them in the device list.
6 Touch in the list.
TIP
If you touch the device name, the Wi-Fi connection for Apple CarPlay or Android Auto is
established.
NOTES
• If five devices are already paired, a message prompting you to delete a paired device is displayed.
Delete a paired device first (page 26).
• If your device supports SSP (Secure Simple Pairing), a six-digit number appears on the display of this
product. Make sure that the six-digit number matches the one that is displayed on the mobile device
before touching [Yes] to pair the device.
• If you try to connect an unconnected cellular phone while two cellular phones are already connected,
the first one of the two connected cellular phones will be disconnected and the unconnected cellular
phone will be connected instead.
TIPS
• The Bluetooth connection can also be made by detecting this product from the Bluetooth device.
Before registration, make sure that [Visibility] in the [Bluetooth] menu is set to [On] (page 26). For
details on Bluetooth device operations, refer to the operating instructions supplied with the
Bluetooth device.
• Two cellular phones can be connected to this product at the same time (page 26).
1 Touch then swipe left on the screen.
2 Touch then .
3 Touch [Bluetooth Settings].
Bluetooth®
Bluetooth connection
Bluetooth settings
- 26 -
English
CAUTION
Never turn this product off and disconnect the device while the Bluetooth setting operation is being
processed.
After registering and connecting the Bluetooth devices to this product, you can switch
among the devices using the switch devices key in the phone function and some audio
sources.
• You can register up to five Bluetooth devices on this product (page 25).
• You can connect one of the registered devices to this product. In cases where the
registered device is equipped with a phone function, a total of two devices can be
connected at the same time when using the phone function. If two of the five
registered devices are already connected, you can connect the remaining third device
to use the audio function only from the switch devices key on the audio source screen.
• The icon for the cellular phone currently being used is displayed on the phone menu
screen. If you connect two cellular phones to this product at the same time, you can
switch between the cellular phones using the switch devices key. The contents of the
phone menu are memorized for each connected cellular phone (page 27).
• The switch devices key will appear for some audio sources. The audio source may
automatically switch to another source depending on the selected device.
Menu Item Description
[Auto Connect]
[On] [Off]
Select [On] to connect the last connected Bluetooth device
automatically when using the hands-free phone function.
NOTE
If two Bluetooth devices were connected the last time, the two
devices are connected to this product automatically in the order
that they are registered in the device list.
[Visibility]
[On] [Off]
Select [On] to make this product visible to the other device.
[PIN Code Input] Change the PIN code for Bluetooth connection.
The default PIN code is “0000”.
1 Touch [0] to [9] to input the pin code (up to 8 digits).
2 Touch .
[Device Information] Displaying the device name and address of this product.
[Bluetooth Memory Clear] Touch [Clear] then [OK] to clear the Bluetooth memory.
[Sound Quality Settings]
[Quality] [Connectivity]
Select [Quality] to prioritize the Bluetooth sound quality.
Select [Connectivity] to prioritize the Bluetooth
connection.
Switching the connected Bluetooth device
English
- 27 -
To use this function, you need to connect your cellular phone to this product via
Bluetooth in advance (page 25).
CAUTION
For your safety, avoid talking on the phone as much as possible while driving.
1 Touch then swipe left on the screen.
2 Touch [Phone].
The phone menu screen appears.
3 Touch one of the call icons on the phone menu screen.
Hands-free phoning
Making a phone call

- 28 -
English
▶To end the call
1 Touch .
The following items are displayed.
• Name of the current cellular phone
• List number of the current cellular phone
• Reception status of the current cellular phone
• Battery status of the current cellular phone
TIP
If you connect two cellular phones to this product at the same time, you can
switch between the cellular phones using the switch devices key.
NOTE
When you switch the connected cellular phone, the following items are also
switched:
• Widgets on the home menu screen
• Favorite icons on the home menu screen
• Browser bookmarks
• Favorite sports teams
• Notification settings
• [Background] settings for the home menu screen and AV operation screen
For details, refer to CarAVAssist (page 42).
Switches the search language to English or system language.
NOTE
It may not appear depending on the system language setting.
Using the preset dial lists (page 29)
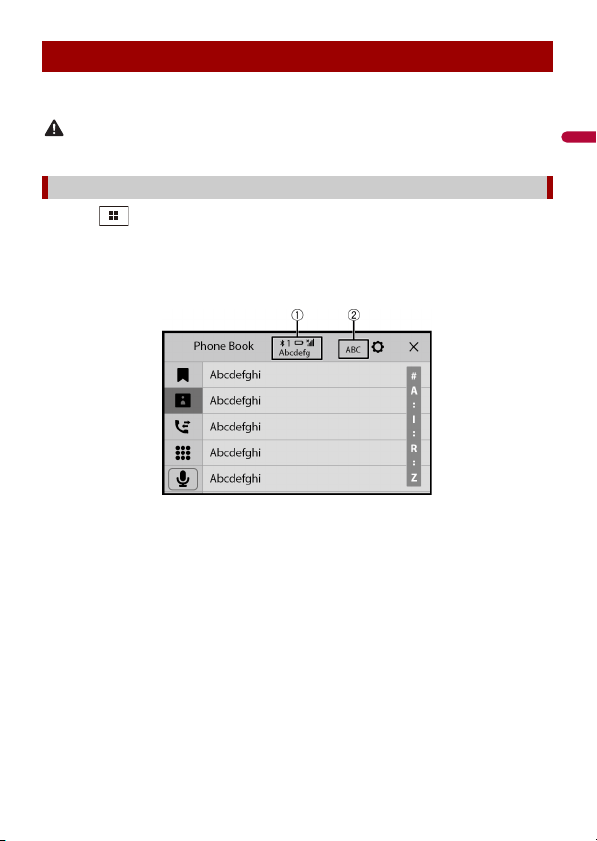
Using phone book
Select a contact from the phone book. Touch the desired name on the list then
select the phone number.
TIPS
• The contacts on your phone will be automatically transferred to this product.
• Update the phone book manually.
NOTES
• [Visibility] of the [Bluetooth] screen should be on (page 26).
• If two cellular phones are automatically connected to this product with the
Bluetooth device auto connect function, the phone book of the first phone is
displayed.
Using call history
Make a phone call from the received call , dialed call , or missed call .
Direct phone number input
Touch the number keys to enter the phone number then touch to make a call.
English
- 29 -
▶Registering a phone number
You can easily store up to six phone numbers per device as presets.
1 Touch then swipe left on the screen.
2 Touch [Phone].
3 Touch or .
On the [Phone Book] screen, touch the desired name to display the contact’s phone
number.
4 Touch .
▶Dialing from the preset dial list
1 Touch then swipe left on the screen.
2 Touch [Phone].
3 Touch .
4 Touch the desired entry on the list to make a call.
The dial screen appears and dialing starts.
▶Deleting a phone number
1 Touch then swipe left on the screen.
2 Touch [Phone].
3 Touch .
4 Touch .
5 Touch [Yes].
1 Touch to answer the call.
Touch to end the call.
TIPS
• Touch while getting a call waiting, switch to the talking person.
• Touch while getting a call waiting to reject the call.
Using the preset dial lists
Receiving a phone call
- 30 -
English
NOTE
When two phones are connected at the same time, if an incoming call is received on the second phone
while you are talking on the first phone, the dial confirmation screen for the second phone will be
displayed.
By connecting your iPhone to this product, you can use the voice recognition function
(Siri Eyes Free Mode) on this product.
NOTE
When an iPhone is used, Siri Eyes Free Mode is available with this product.
1 Touch then swipe left on the screen.
2 Touch [Phone].
3 Touch .
The voice recognition function launches and the voice control screen appears.
TIPS
• You can also launch the voice recognition function by touching button.
• If two cellular phones are automatically connected to this product with the Bluetooth device auto
connect function, the voice recognition function (Siri Eyes Free Mode) will be set on the first phone.
• If you want to use the voice recognition function (Siri Eyes Free Mode) on another connected iPhone,
touch with numbered to the other iPhone. The iPhone that you switch to will be set as the
current device.
1 Touch then swipe left on the screen.
2 Touch then .
3 Touch [Bluetooth Settings].
Voice recognition function (for iPhone)
Phone settings
Menu Item Description
[Auto Answer]
[On] [Off]
Select [On] to answer an incoming call automatically.
[Ring Tone]
[On] [Off]
Select [Off] to use the ring tone of the paired device, or
select [On] to use the ring tone of this unit.
[Invert Name] Select [Yes] to change the order of the first and last names
in the phone book.
English
- 31 -
During a conversation, you can switch to private mode (talk directly on your cellular
phone).
1 Touch or to turn private mode on or off.
NOTES
• If two cellular phones are connected to this product and the first phone is set to private mode, you
can receive incoming calls on the second phone while maintaining the call in progress on the first
phone.
• When two cellular phones are connected to this product and private mode of the first phone is
turned off, if an incoming call on the second phone is answered while a call is in progress on the first
phone or while dialing or receiving a call on the first phone, the call, dialing, or receiving on the first
phone is ended.
This product can be adjusted to the other party’s listening volume.
1 Touch to switch between the three volume levels.
▶General notes
• Connection to all cellular phones featuring Bluetooth wireless technology is not
guaranteed.
• The line-of-sight distance between this product and your cellular phone must be 10
meters or less when sending and receiving voice and data via Bluetooth technology.
• With some cellular phones, the ring sound may not be output from the speakers.
• If private mode is selected on the cellular phone, hands-free phoning may be disabled.
▶Registration and connection
• Cellular phone operations vary depending on the type of cellular phone. Refer to the
instruction manual that came with your cellular phone for detailed instructions.
• When phone book transfer does not work, disconnect your phone and then perform
pairing again from your phone to this product.
▶Making and receiving calls
• You may hear a noise in the following situations:
– When you answer the phone using the button on the phone.
– When the person on the other end of the line hangs up the phone.
• If the person on the other end of the line cannot hear the conversation due to an echo,
decrease the volume level for hands-free phoning.
• With some cellular phones, even after you press the accept button on the cellular
phone when a call comes in, hands-free phoning may not be performed.
Setting the private mode
Adjusting the other party’s listening volume
Notes for hands-free phoning
- 32 -
English
• The registered name will appear if the phone number is already registered in the
phone book. When multiple names are registered for the same phone number, the
names are displayed in the same order as in the phone book.
▶The received call and dialed number histories
• You cannot make a call to the entry of an unknown user (no phone number) in the
received call history.
• If calls are made by operating your cellular phone, no history data will be recorded in
this product.
▶Phone book transfers
• If there are more than 1 000 phone book entries on your cellular phone, not all entries
may download completely.
• Depending on the phone, this product may not display the phone book correctly.
• If the phone book in the phone contains image data, the phone book may not be
transferred correctly.
• Depending on the cellular phone, phone book transfer may not be available.
Before using the Bluetooth audio player, register and connect the device to this product
(page 25).
NOTES
• Depending on the Bluetooth audio player connected to this product, the available operations with
this product may be limited to the following two levels:
– A2DP (Advanced Audio Distribution Profile): Only playing back songs on your audio player is
possible.
– A2DP and AVRCP (Audio/Video Remote Control Profile): Playing back, pausing, selecting songs, etc.,
are possible.
• Depending on the Bluetooth device connected to this product, the available operations with this
product may be limited or differ from the descriptions in this manual.
• While you are listening to songs on your Bluetooth device, refrain from operating the phone function
as much as possible. If you try operating, the signal may cause noise for song playback.
• When you are talking on the Bluetooth device connected to this product via Bluetooth, it may pause
playback.
1 Touch then swipe left on the screen.
2 Touch then .
The system setting screen appears.
3 Touch [AV Source Settings].
4 Confirm that [Bluetooth Audio] is turned on.
5 Touch then swipe left on the screen.
The source/application screen appears.
Bluetooth audio
English
- 33 -
6 Touch [Bluetooth Audio].
The Bluetooth audio playback screen appears.
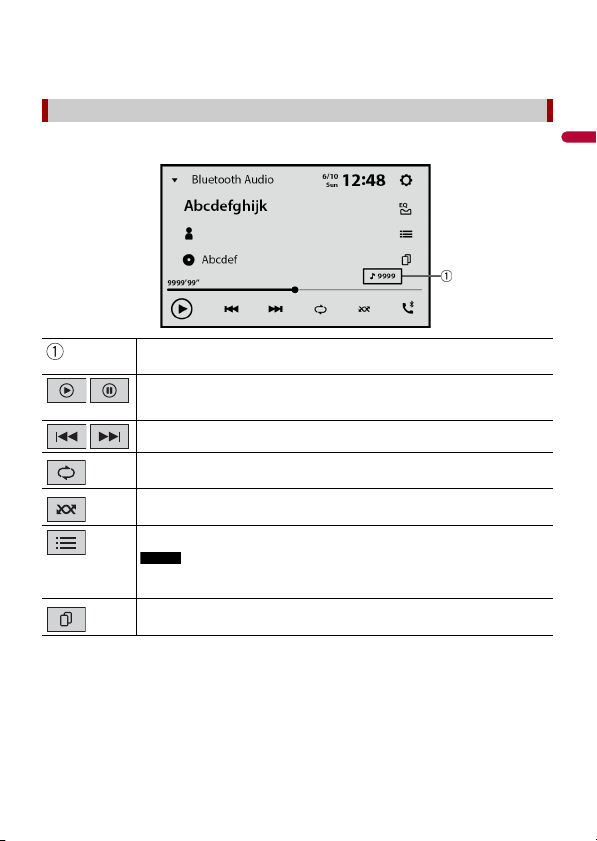
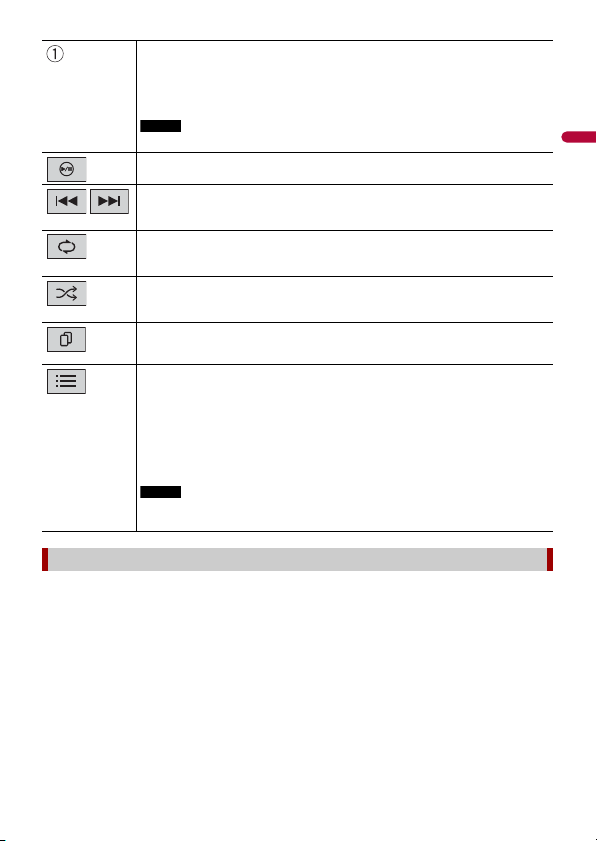
Basic operation
Track number indicator
Switches between playback and pause.
Skips files forward or backward.
Sets a repeat play range.
Switches between random and normal file playback order.
Selects a file or folder from the list to playback.
NOTE
This function is available only when the AVRCP version of the Bluetooth device is
1.4 or higher.
Switches among the Bluetooth devices when the devices are connected to
this product via Bluetooth (page 26).
Bluetooth audio playback screen

- 34 -
English
By connecting this unit to a Wi-Fi network, you can browse the Internet and use Apple
CarPlay or Android Auto via the wireless connection.
1 Turn on the Wi-Fi function on the device.
2 Touch then swipe left on the screen.
3 Touch then .
4 Touch [Wi-Fi Settings: Hotspot].
5 Set [Wi-Fi] to [On].
6 Touch [Hotspot setting].
7 Touch .
The available Wi-Fi networks appear on the list.
8 Touch one of the listed Wi-Fi networks on the list.
The network password input screen appears if a password is required.
9 Input the network password then touch [Connection].
Important
When you connect this unit to the Internet via Wi-Fi for the first time, the Internet Communication
Service the Terms of Use and Privacy Policy is displayed. To use the Internet service, you need to accept
the policy. Otherwise, most of the applications that use the Internet are not available. You can select to
accept or withdraw from the policy at any time in [Terms of Use / Privacy] (page 111).
TIP
You can also connect easily to Wi-Fi via WPS (page 36).
1 Touch then swipe left on the screen.
2 Touch then .
3 Touch [Wi-Fi Settings: Hotspot].
4 Touch [Hotspot setting].
Wi-Fi®
Wi-Fi connection
Setting the Wi-Fi access point
English
- 35 -
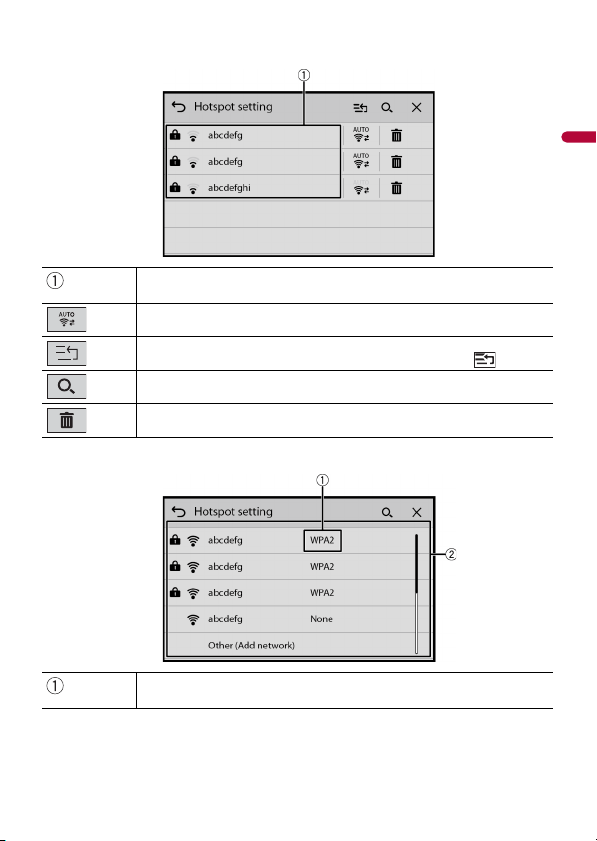
Available network SSIDs
Touch to connect selected network.
Automatic connection status
Touch to switch between the network automatically or manually.
Network connection priority
Drag the network upward to prioritize the connection by touching .
Searches for existing networks.
Touch to go to Adding access point screen (page 35).
Deletes the networks.
Wi-Fi network type
Access point setting screen
Adding access point screen
- 36 -
English
You can connect easily to a Wi-Fi network, if WPS (Wi-Fi Protected Setup™) is available on
the connected device.
▶WPS connection with the push button
1 Touch then swipe left on the screen.
2 Touch then .
3 Touch [Wi-Fi Settings: Hotspot].
4 Touch [Easy setup].
5 Touch [Press the WPS button on the unit and the hotspot to connect them via Wi-
Fi.].
▶WPS connection with PIN code
1 Touch then swipe left on the screen.
2 Touch then .
3 Touch [Wi-Fi Settings: Hotspot].
4 Touch [Easy setup].
5 Touch [Enter PIN code to connect to the hotspot.].
6 Input the displayed PIN code from the device to be connected.
1 Touch then swipe left on the screen.
2 Touch then .
3 Touch [Wi-Fi Settings: Hotspot].
Connects Wi-Fi network.
Touch to select desired network then enter the password if required.
TIP
If you want to connect to a network that is not listed on the screen, touch [Other
(Add network)] and enter the required information.
Searches again for existing networks.
WPS Wi-Fi connection
Wi-Fi settings
English
- 37 -
NOTE
This setting is available only when you stop your vehicle in a safe place and apply the parking brake.
The menu items vary according to the source/application.
This unit can be an access point of the infrastructure mode network. Use this unit as an
access point to use Apple CarPlay or Android Auto via Wi-Fi network.
1 Touch then swipe left on the screen.
2 Touch then .
3 Touch [Wireless Settings: Smartphone].
Before using the Wi-Fi audio player, connect the device to this product via Apple CarPlay
(page 66) or Android Auto wirelessly (page 69).
1 Touch then swipe left on the screen.
2 Touch [Apple CarPlay] or [Android Auto] instead of [Wi-Fi Audio].
Menu Item Description
[Wi-Fi]
[On] [Off]
Switch Wi-Fi connection on or off.
[Hotspot setting] Set up the Wi-Fi access point (page 34).
[Easy setup] Set up the Wi-Fi connection via WPS access (page 36).
[MAC Address] Displays the MAC address.
[IP Address] Displays the IP address.
Access point via Wi-Fi
Access point settings
Menu Item Description
[Access point]
[On] [Off]
Select [On] to enable the access point of the infrastructure
mode network.
[Device Information] Displays this unit's infrastructure mode network
information.
[Password] Displays the infrastructure mode network password.
[Password reset] Touch [OK] to reset the infrastructure mode network
password.
Wi-Fi audio

- 38 -
English
The Wi-Fi audio playback screen appears.
NOTES
• [Wi-Fi Audio] is displayed as [Android Auto] when the Android Auto is in use.
• [Wi-Fi Audio] is displayed as [Apple CarPlay] when the Apple CarPlay is in use.
Wi-Fi audio screen (Example: Apple CarPlay)
Wi-Fi audio with Apple CarPlay operation is same as the iPod® source function. For
details of the operation, refer to the iPhone operation (page 61).
Basic operation

English
- 39 -
The browser enables you to browse registered websites using CarAVAssist.
WARNING
• Do not attempt to operate the web browser while driving. Make sure to pull off the road and park
your vehicle in a safe location before attempting to use the controls on the web browser.
• When you use the browser, do not enter your important information such as credit card information,
bank account information and personal information.
• When you use the browser, do not install software or programs that Pioneer is not involved with. If
you install such software or programs, mechanical trouble may occur with this unit, or your entered
information and the personal information registered in this unit may be put at risk.
Important
• To use the browser function, you may need to connect this unit to the Internet via a Wi-Fi network.
• To use the browser function, you need to register webpage URLs as your favorite webpages on
CarAVAssist, then import them to this unit in advance (page 43).
• To use the browser function, you need to accept the Internet Communication Service the Terms of
Use and Privacy Policy (page 111).
• The browser may not be able to access or display some webpages, and some characters may not be
displayed properly.
• It may take some time to display webpages.
• The browser may display pages slowly depending on the video resolution.
• The browser may not be able to play some types of video and audio.
• The browser does not display content that uses plug-ins, such as PDF.
• The browser does not support some functions such as downloading files.
1 Touch then swipe left on the screen.
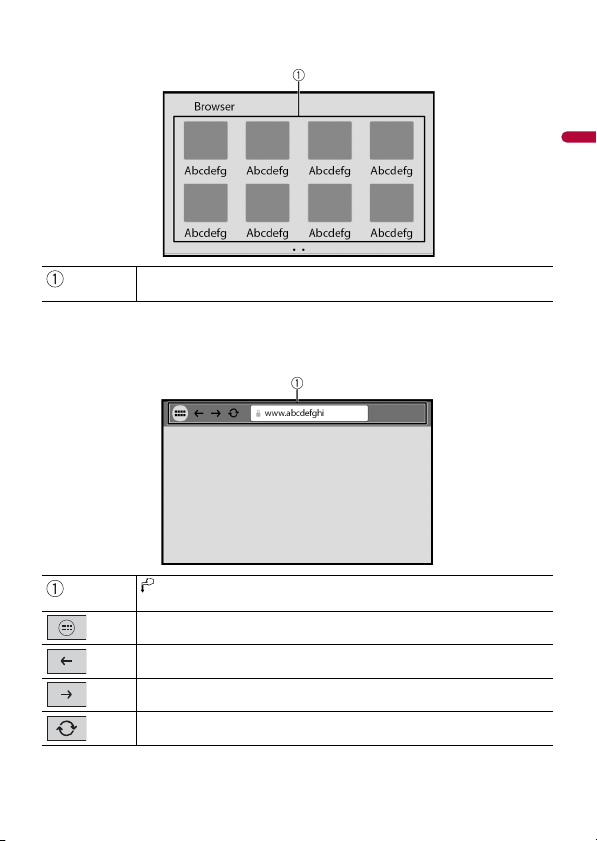
2 Touch [ Browser].
3 Touch your desired registered website icon.
Browser
Using the browser
Starting procedure
- 40 -
English
TIP
Swipe left/right to switch between registered webpage list.
Website screen
Available website thumbnails
Touch to go to the selected website.
Browser toolbar
To display the toolbar, swipe down from the top of the screen.
Returns to the web browser screen.
Displays the previous page.
Displays the next page.
Refreshes the page.
Web browser screen

English
- 41 -
NOTE
When using the browser while Apple CarPlay or Android Auto is in operation, the browser is displayed
on the connected rear monitor only when the browser is displayed on the main monitor. Otherwise, a
black screen is displayed on the connected rear monitor.
- 42 -
English
CarAVAssist is an application that allows you to configure and transfer various settings of
this unit and register URLs as favorites so that you can browse them using this unit's web
browser. You can also update this unit's firmware wirelessly by using this application.
WARNING
Do not attempt to operate the application while driving. Make sure to pull off the road and park your
vehicle in a safe location before attempting to use the controls on the application.
For iPhone users
This function is compatible with iOS 12.0 or later.
You can download CarAVAssist on the App Store®.
For smartphone (Android) users
This function is compatible with devices that have Android OS 6.0 or later installed.
You can download CarAVAssist on the Google Play Store.
Promoting the use of the unit
The interface of the unit can be changed by using your iPhone/smartphone (Android).
Examples
• Customizing the home menu screen including the widget
• Customizing the wallpaper
• Registering your favorite webpage URLs to your bookmarks to see those webpages on
the web browser
CarAVAssist
Before you start
What kind of functions does the application have?
English
- 43 -
• Registering your favorite teams to receive information about them on the sports
application of the unit
• Organizing notifications on your smartphone (Android) for displaying on the unit
• Downloading the latest firmware
For details, refer to “Help” in the CarAVAssist application.
1 Connect your iPhone or smartphone with CarAVAssist installed on it to this
product via Bluetooth (page 25).
2 Open CarAVAssist on the connected iPhone or smartphone then touch the
connection button on the top menu screen of the application.
NOTE
When the Bluetooth connection is disconnected or the main unit is turned off, perform step 1 and
step 2 again after re-establishing the Bluetooth connection or turning on the main unit.
3 Touch then swipe left on the screen.
4 Touch .
5 Touch one of the transfer modes.
CAUTION
• Never turn this product or your iPhone/smartphone off while the firmware is being updated.
• You can only update the firmware when the vehicle is stopped and the parking brake is engaged.
• You cannot update the old firmware version once the latest firmware is updated.
1 Download the firmware update files into your iPhone or smartphone through
CarAVAssist.
2 Connect your CarAVAssist-installed iPhone or smartphone to this unit via Wi-Fi
network (page 34).
3 Touch then swipe left on the screen.
4 Touch then .
5 Touch [System Information].
Transferring the data
iPhone/smartphone to main unit
Main unit to iPhone/smartphone
Updating the firmware wirelessly

- 44 -
English
6 Touch [ Firmware Update].
7 Touch [CarAVAssist].
Follow the on-screen instructions to finish updating the firmware.
NOTES
• This product will reset automatically after the firmware update is completed if the update is
successful.
• If an error message appears on the screen, touch the display and perform the above steps again.
English
- 45 -
You can play or use the following sources or application with this product.
• HD Radio™ Technology/Radio (page 48)
• USB (page 54)
The following sources or applications can be played back or used by connecting an
auxiliary device.
• iPhone® (page 61)
• Bluetooth audio (page 32)
• Wi-Fi audio (page 37)
• SiriusXM® Satellite Radio (page 82)
• AUX (page 91)
• HDMI (page 90)
• Car Sources (iDatalink (page 94))
• Car Features (iDatalink (page 94) or Metra Axxess (page 99))
• Browser (page 39)
• Sports (page 72)
• Weather (page 73)
• Amazon Alexa (page 75)
• Camera view (page 93)
1 Touch then swipe left on the screen.
The source/application screen appears.
Source/application
Supported source and application
Displaying the source/application list screen
Source/application list screen

- 46 -
English
1 Touch then touch the AV operation key.
The AV operation screen appears.
Source list
Touch to see the selected source.
TIP
Selecting [Power OFF] will turn off most of the functions on this unit. The [Power
OFF] mode is released in the following cases:
• Footage from the rear view camera is input when the vehicle is in reverse.
• A button on this unit is touched.
• The ignition switch is turned off (ACC OFF), then turned on (ACC ON).
Connected Wi-Fi network
Touch to go to the Wi-Fi settings (page 36).
Connected mobile device
Touch to go to the preset list screen in the hands-free phone when a device is
connected with this unit via Bluetooth.
Touch to start searching or go to the device select screen, when the device is not
connected.
NOTE
When Apple CarPlay or Android Auto is activated, the device select screen appears
even if a device is connected with this unit.
Application list
Touch to see the selected application.
Displays the next items in the list if there are more.
Displays the previous screen.
Displaying the AV operation screen
English
- 47 -
NOTE
[Source OFF] is only available for AV sources.
1 Touch then swipe left on the screen.
2 Touch the source/application icon.
When you select [Source OFF], the AV source is turned off.
1 Touch when the AV source is in use.
2 Touch the source/application key.
When you select [Source OFF], the AV source is turned off.
NOTE
This function is available only when you stop your vehicle in a safe place and apply the parking brake.
1 Touch when the AV source is in use.
2 Touch .
3 Drag the source/application key to the desired position.
Displays the source/application list.
Settings (page 102) and Favorite menu (page 120)
Selects or customizes the equalizer curve (page 115).
Hands-free phoning (page 27)
Selecting a source/an application
Source/application selection screen
Source/application list
Rearranging the display order of source
- 48 -
English
HD Radio™
Radio
HD Radio stations offer high quality audio and data services. HD Radio stations are
brought to you by your local FM or AM stations.
HD Radio stations feature the following:
• High quality audio
• FM multicasting
• Data service
HD Radio™ Technology/
Radio
About HD Radio stations
8600NEX 7600NEX 76NEX 6600NEX
4660NEX
4600NEX
: Sub channel
AM band
Analog AM
Analog AM Digital AM
FM band
Analog FM
Analog FM Digital FM
Analog FM Digital FM-1ch
Digital FM-2ch
Digital FM-3ch
: Main channel
English
- 49 -
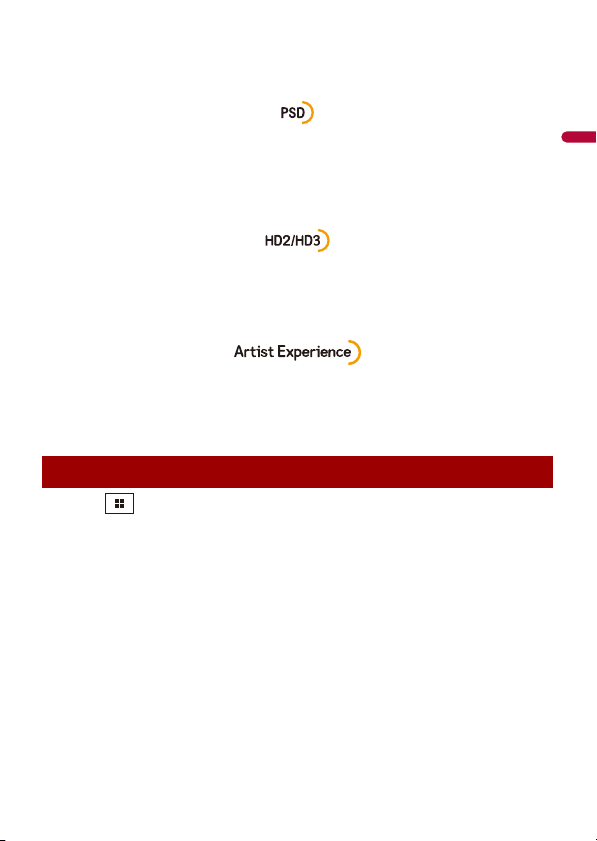
Digital, CD-quality sound. HD Radio Technology enables local radio stations to broadcast
a clean digital signal. AM sounds like today’s FM and FM sounds like a CD.
Program Service Data: Contributes to the superior user experience of HD Radio
Technology. Presents song name, artist, station IDs, HD2/HD3 Channel Guide, and other
relevant data streams.
Adjacent to traditional main stations are extra local FM channels. These HD2/HD3
Channels provide new, original music as well as deep cuts into traditional genre.
Visual information related to content being played on your HD Radio receiver, such as
Album Art, historical photographs, still art from live broadcasts, among other related
content.
1 Touch then swipe left on the screen.
2 Touch [HD Radio] or [Radio].
The HD Radio or radio screen appears.
Starting procedure
- 50 -
English
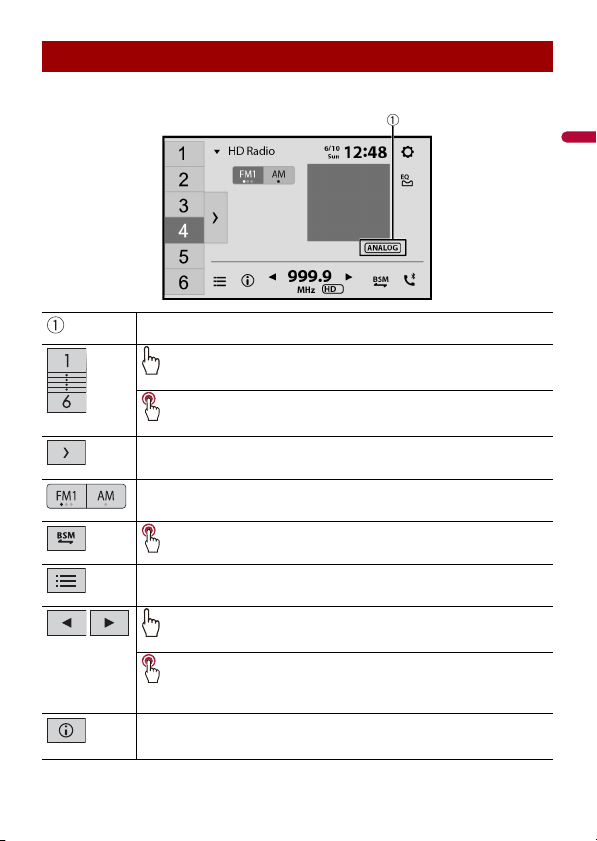
HD Radio, Radio screen
Basic operation
*
HD Radio indicator and signal type indicator
Recalls the preset channel stored to a key from memory.
Stores the current broadcast frequency to a key.
Displays the preset channel list.
Select an item on the list ([1] to [6]) to switch to the preset channel.
Selects the FM1, FM2, FM3 or AM band.
Performs BSM (best stations memory) function (page 51).
Displays area radio stations list (page 51).
Manual tuning
Seek tuning or non stop seek tuning
Releasing the key in a few seconds skips to the nearest station from the
current frequency. Keep holding the key for long seconds to perform non
stop seek tuning.
*
Switches the text display between the main channel and sub channels.
English
- 51 -
* DMH-WT8600NEX, DMH-WT7600NEX, DMH-WT76NEX, DMH-WC6600NEX, DMH-W4660NEX
The BSM (best stations memory) function automatically stores the six strongest
broadcast frequencies under the preset channel keys [1] to [6].
NOTES
• Storing broadcast frequencies with BSM may replace those you have already saved.
• Previously stored broadcast frequencies may remain stored if the number of frequencies stored has
not reached the limit.
1 Touch and hold to begin search.
The six strongest broadcast frequencies will be stored under the preset channel keys
in the order of their signal strength.
1 Touch [Cancel].
This unit displays the radio stations that are available at your current location.
1 Touch .
Important
To use the area radio stations list function, you may need to connect this unit to the Internet via a Wi-Fi
network and set [Suggestions] (page 102) to [On].
Limitations:
Depending on the availability of the Internet, you may not be able to receive the area
radio stations list service.
Storing the strongest broadcast frequencies (BSM)
To cancel the storage process
Area radio stations list
- 52 -
English
Area radio stations list screen
1 Touch then swipe left on the screen.
2 Touch then .
The system setting screen appears.
3 Touch [AV Source Settings].
4 Touch [Radio settings].
The menu items vary according to the source.
Available radio stations
Touch to tune in to the selected radio station.
Radio settings
Menu Item Description
[Blending]*
[On] [Off]
Switches to the analog broadcast of the same
frequency level automatically when reception
of a digital broadcast becomes weak. Select
[Off] to receive only an analog signal.
[Seek]* Select the method of seek tuning.
[Seek All] Seeks stations from both analog and digital
broadcasting.
[Seek HD] Only seeks stations from digital broadcasting.

English
- 53 -
* DMH-WT8600NEX, DMH-WT7600NEX, DMH-WT76NEX, DMH-WC6600NEX, DMH-W4660NEX
[Local]
[Off]
FM: [Level1] [Level2] [Level3] [Level4]
AM: [Level1] [Level2]
Local seek tuning allows you to only tune into
radio stations with sufficiently strong signals.
NOTES
• [Level4] for FM and [Level2] for AM are available only
with the stations with the strongest signals.
• This setting is available only when [HD Radio] is
selected as the source.
Menu Item Description
- 54 -
English
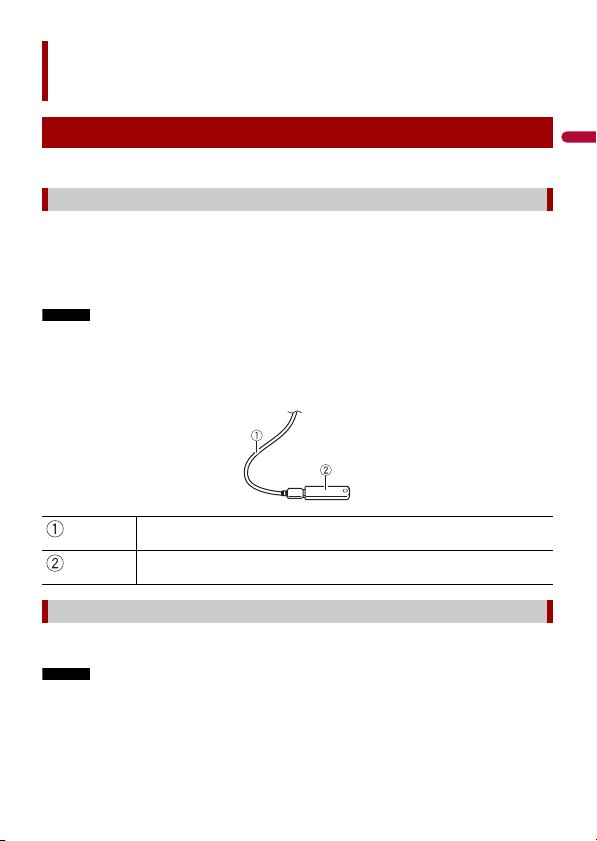
You can play audio, video, or still image files stored in a USB storage device.
1 Plug a USB Type-C® storage device into the USB Type-C cable.
TIP
When you use a USB Type-A storage device, use a USB Type-C to USB Type-A adaptor (supplied) for
plugging.
NOTES
• This product may not achieve optimum performance with some USB storage devices.
• Connection via a USB hub is not possible.
• A USB Type-C cable is required for connection.
• The supplied USB Type-C cable and the adaptor are for connecting a USB storage device to this unit
only. Do not use the cable and the adaptor for other products or purposes.
1 Pull out the USB Type-C storage device from the USB Type-C cable.
NOTES
• Check that no data is being accessed before pulling out the USB storage device.
• Turn off (ACC OFF) the ignition switch before unplugging the USB storage device.
USB
Plugging/unplugging a USB storage device
Plugging a USB storage device
USB Type-C cable
USB Type-C storage device
Unplugging a USB storage device
English
- 55 -
1 Touch then swipe left on the screen.
2 Plug the USB Type-C storage device into the USB Type-C cable (page 54).
3 Touch [USB].
Playback is performed in order of folder numbers. Folders are skipped if they contain
no playable files.
TIP
You can set the screen size for the video and image files (page 121).
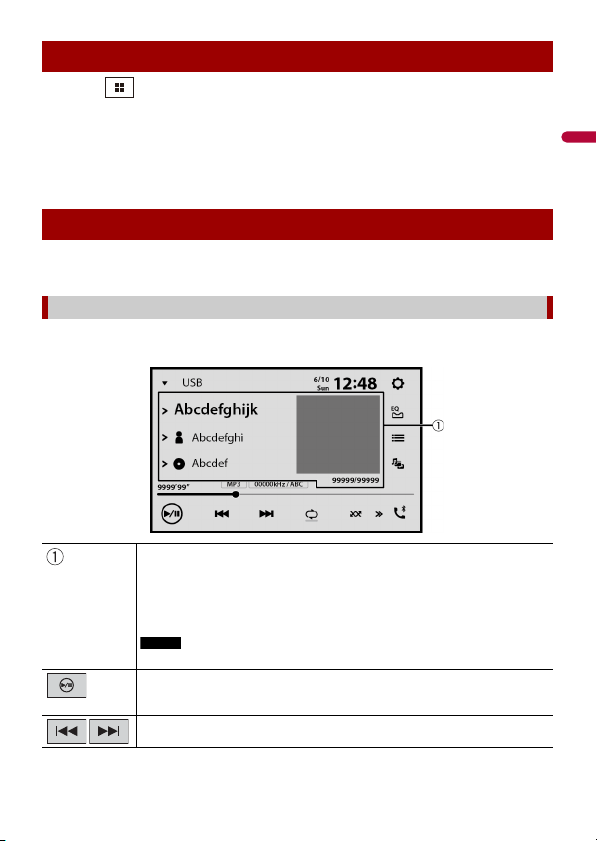
Audio source screen 1
Starting procedure
Basic operation
Audio source
Displays the link search screen.
Touch the song to play back followed by touching the song information, after
switching to Music Browse mode (page 57).
TIP
If you touch the artwork, the list of songs in the album is displayed.
NOTE
This function is available for the USB storage device only.
Switches between playback and pause.
Skips files forward or backward.
- 56 -
English
Audio source screen 2
Sets a repeat play range for all files/the current folder/the current file.
Switches between random and normal file playback order.
Displays the hidden function bar.
TIP
You can also display the hidden function bar by flicking the bar from the right to
the left.
Switches the following media file types.
[Music]: Audio files
[Video]: Video files
[Photo]: Image files
Selects a file from the list.
Touch a file on the list to playback.
TIP
Touching a folder on the list shows its contents. You can play a file on the list by
touching it.
NOTE
When you play audio files stored in a USB storage device, you can search for a file
using Music Browse (page 57).
Displays the hidden function bar.
TIP
You can also display the hidden function bar by flicking the bar from the left to the
right.
Selects the previous folder or the next folder.
English
- 57 -
▶Selecting a file using Music Browse mode
You can select files to play back using the category list if the files contain tag
information.
NOTES
• This function is available for the USB storage device only.
• Music Browse mode cannot be held once the power is turned off.
1 Touch to create a database.
Music Browse mode will be available after the database has been created.
2 Touch .
3 Touch the desired category to display the file list.
4 Touch the item.
Refine the item until the desired song title or file name is displayed on the list.
5 Touch the desired song title or file name to play back.
If the selection made with Music Browse has been canceled, you can switch to Music
Browse mode again by touching the [Tag] tab on the file/folder list screen and
touching the desired track.
TIP
Once the database is created in this unit, there is no need to create the database again as long as the
same contents are saved. To enter the Music Browse mode directly, touch and then touch [Tag]
before selecting the song.
CAUTION
For safety reasons, video images cannot be viewed while your vehicle is in motion. To view video
images, stop in a safe place and apply the parking brake.
Constructs the database for using the Music Browse mode (page 57).
Switches the current music information display.
Video source
- 58 -
English
Video source screen
Hides the touch panel keys.
To display the keys again, touch anywhere on the screen.
Switches between playback and pause.
Performs fast reverse or fast forward.
Touch again to change the playback speed.
Stops playback.
Touch again to start from the beginning next time.
Performs frame-by-frame playback.
Performs slow-motion playback.
Sets a repeat play range for all files/the current folder/the current file.
Switches the audio language.
Switches the following media file types.
[Music]: Audio files
[Video]: Video files
[Photo]: Image files
Selects a file from the list.
Touch a file on the list to playback.
TIP
Touching a folder on the list shows its contents. You can play a file on the list by
touching it.

English
- 59 -
TIP
Image files are not displayed in the rear display.
Skips files forward or backward.
Still image source
Hides the touch panel keys.
To display the keys again, touch anywhere on the screen.
Switches between playback and pause.
Skips files forward or backward.
Selects the previous folder or the next folder.
Saves the current images as the wallpaper.
Touch the following items to overwrite the image.
[As AVScreen]: Saves the image as the wallpaper for the AV screen.
[As HomeScreen]: Saves the image as the wallpaper for the home menu screen.
[As Both]: Saves the image as the wallpaper for both the AV screen and home
menu screen.
NOTE
If you save the new image, the current wallpaper is overwritten except for the
preset image.
Rotates the displayed picture 90° clockwise.
Still image screen
- 60 -
English
Sets a repeat play range for all files/the current folder.
Plays all files in the current repeat play range or does not play them in
random order.
Switches the following media file types.
[Music]: Audio files
[Video]: Video files
[Photo]: Image files
Selects a file from the list.
Touch a file on the list to playback.
TIP
Touching a folder on the list shows its contents. You can play a file on the list by
touching it.

English
- 61 -
NOTE
iPhone may be referred to as iPod in this manual.
When connecting an iPhone to this product, the settings are automatically configured
according to the device to be connected. For details of the compatibility, refer to
Compatible iPhone models (page 135).
1 Connect your iPhone.
• iPhone via USB or Bluetooth
2 Touch then swipe left on the screen.
3 Touch [iPod].
NOTES
• For USB connection, refer to the Installation Manual.
• For Bluetooth connection, see page 25.
iPhone®
Connecting your iPhone
Basic operation
Audio source
Audio source screen
- 62 -
English
You can also play and control the music application in your iPhone in the iPhone source.
Displays the link search screen.
Select a song from the list related to the song currently playing.
TIP
If you touch the artwork, the list of songs in the album is displayed.
NOTE
This function is not available while playing Apple Music® Radio.
Switches between playback and pause.
Skips files forward or backward.
Sets a repeat play range for all in the selected list/the current song.
Plays songs within the selected list/album randomly.
Switches among connected devices.
Selects a song from the list.
Touch the category then the title of the list to playback of the selected list.
TIPS
• If you use English as the system language, the alphabet search function is
available. Touch the initial search bar to use this function.
• When you touch Apple Music Radio station in the list screen, Apple Music Radio
screen appears (page 63).
NOTE
Only 15 000 songs in the iPhone are available in the list if the iPhone has more
than 15 000 songs. Available songs depend on the iPhone.
iPhone application screen
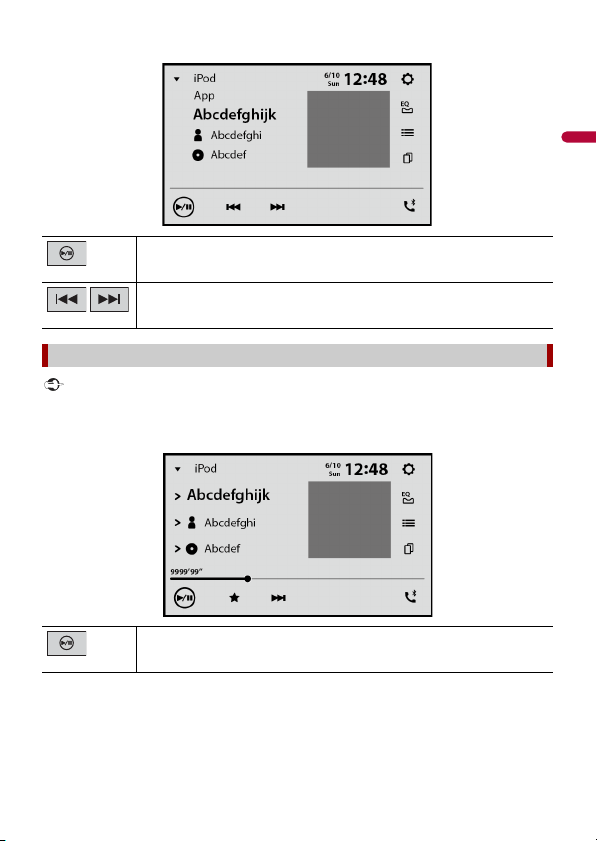
English
- 63 -
iPhone application screen
Important
Apple Music Radio may not be available in your country or region. For details about Apple Music Radio,
visit the following site: https://www.apple.com/music/
Switches between playback and pause.
Skips files forward or backward.
Apple Music Radio source
Switches between playback and pause.
Apple Music Radio screen

- 64 -
English
Displays the pop-up menu for Apple Music Radio.
• Touch [Play More Like This] to play back songs similar to the current song.
• Touch [Play Less Like This] to set it not to play back the current song again.
• Touch [Add to iTunes Wish List] to add the current song to the iTunes® wish list.
NOTE
This function may not be used depending on your Apple Music account status.
Skips tracks forward.

English
- 65 -
You can operate iPhone applications with finger gestures such as tapping, dragging,
scrolling, or flicking on the screen of this product.
Compatible iPhone models
For details about compatibility of iPhone models, refer to the following website.
https://www.apple.com/ios/carplay
NOTES
• The compatible finger gestures vary depending on the application for the iPhone.
• To use the Apple CarPlay function, first turn off the Amazon Alexa or CarAVAssist function.
WARNING
Certain uses of the iPhone may not be legal while driving in your jurisdiction, so you must be aware of
and obey any such restrictions. If in doubt as to a particular function, only perform it while the car is
parked. No feature should be used unless it is safe to do so under the driving conditions you are
experiencing.
Important
Apple CarPlay may not be available in your country or region.
For details about Apple CarPlay, visit the following site:
https://www.apple.com/ios/carplay
• The content and functionality of the supported applications are the responsibility of the App
providers.
• In Apple CarPlay, usage is limited while driving, with availability of functions and content determined
by the App providers.
• Apple CarPlay allows access to applications other than those listed that are subject to limitations
while driving.
• PIONEER IS NOT RESPONSIBLE AND DISCLAIMS LIABILITY FOR THIRD PARTY (NON-PIONEER) APPS
AND CONTENT, INCLUDING WITHOUT LIMITATION ANY INACCURACIES OR INCOMPLETE
INFORMATION.
• Before using Apple CarPlay, make sure the GPS antenna and speed cable are properly connected and
installed, and the unit angle is properly set. For details on the installation, refer to the Installation
Manual.
To achieve optimum usability of Apple CarPlay, set the driving position setting correctly
according to the vehicle. The setting will be applied the next time an Apple CarPlay
compatible device is connected to this product.
1 Touch then swipe left on the screen.
Apple CarPlay™
Using Apple CarPlay
Setting the driving position
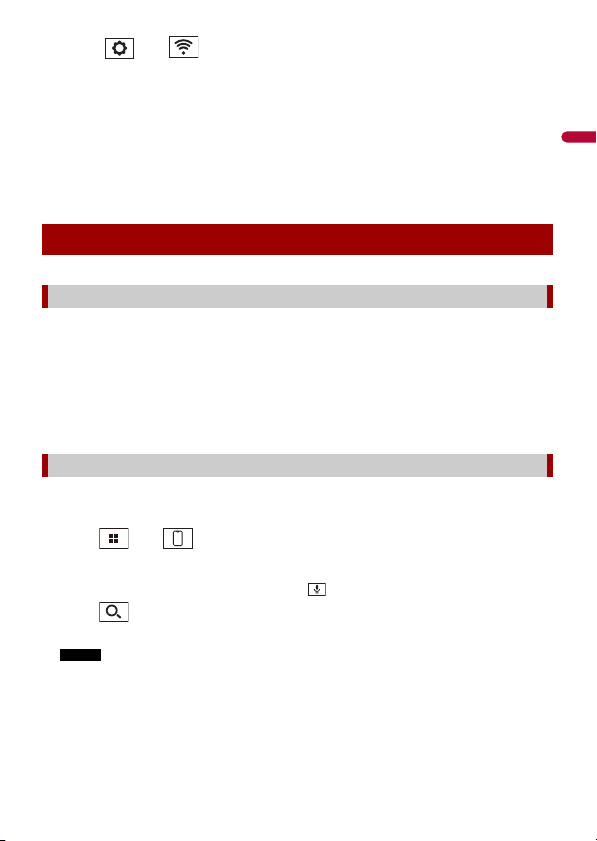
- 66 -
English
2 Touch then .
The communication setting screen appears.
3 Touch [Driving Position].
4 Select the item.
[Left]
Select for a left-hand drive vehicle.
[Right]
Select for a right-hand drive vehicle.
1 Connect an Apple CarPlay compatible device to this unit via USB.
2 Touch the Apple CarPlay icon.
The Apple CarPlay home screen appears.
TIP
You can also start the Apple CarPlay from the source/application list screen by swiping the screen to
the left on the home menu screen.
Before using Apple CarPlay wirelessly, turn on the Bluetooth function on the iPhone.
1 Turn on the Wi-Fi function (page 37).
2 Touch then .
TIP
You can skip the step 2 by touching and holding button.
3 Touch .
The available devices appear on the list.
NOTE
The unit cannot detect the device unless the Bluetooth or Apple CarPlay setting menu is displayed
on the iPhone screen.
4 Touch the desired device on the screen.
The unit configures the connection then starts the application.
Starting procedure
Wired connection
Wireless connection
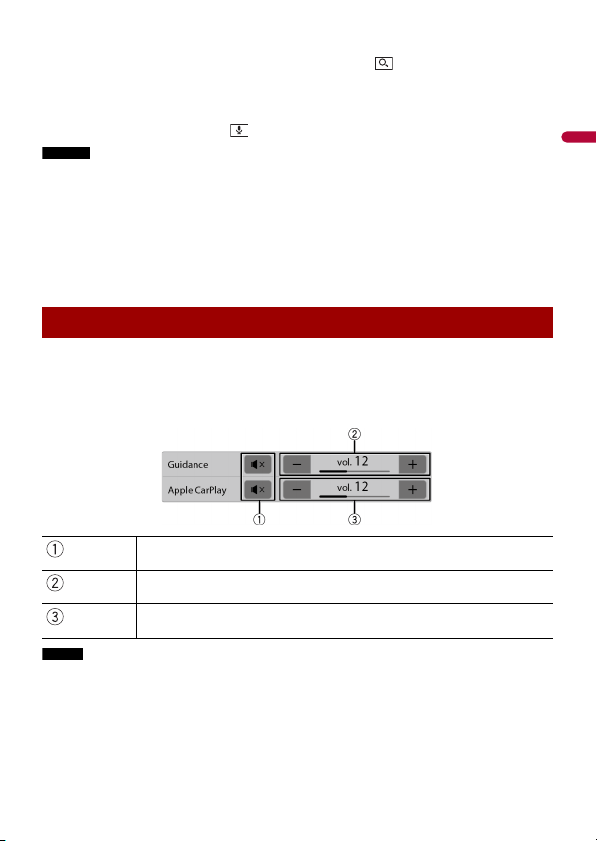
English
- 67 -
TIP
If the device that you want to connect does not appear, touch on the screen again.
You can also start Apple CarPlay with the desired device by opening the Bluetooth or Apple
CarPlay setting menu while displaying the device search or device list screen.
TIP
You can use Siri function by touching button once Apple CarPlay is activated.
NOTES
• For details on USB connection, refer to the Installation Manual.
• If an Apple CarPlay compatible device has been connected and another screen is displayed, touch
Apple CarPlay icon on the source/application screen to display the Application menu screen.
• The Bluetooth connection with the Apple CarPlay compatible device will be terminated automatically
if Apple CarPlay is turned on. While Apple CarPlay is turned on, only a Bluetooth audio connection will
be possible for devices other than the device connected via Apple CarPlay.
• Hands-free phoning via Bluetooth wireless technology is not available while Apple CarPlay is on. If
Apple CarPlay is turned on during a call on a cellular phone other than an Apple CarPlay compatible
device, the Bluetooth connection will be terminated after the call ends.
You can adjust the guidance volume separately from the main sound volume when
Apple CarPlay is used.
1 While Apple CarPlay is activated, touch VOL (+/-).
The volume menu will be displayed on the screen.
NOTE
The volume menu is displayed for four seconds. If the menu disappears, touch VOL (+/-) again. The
menu reappears.
Adjusting the volume
Touch to mute. Touch again to cancel mute.
Touch [+]/[-] to adjust the guidance volume.
Displays the main sound volume. To adjust the main sound volume, touch
VOL (+/-) on the unit or touch [+]/[-].

- 68 -
English
You can operate Android applications with finger gestures such as tapping, dragging,
scrolling, or flicking on the screen of this product.
Compatible Android devices
For details about compatibility of Android models, refer to the following website.
https://support.google.com/androidauto
NOTES
• [USB MTP] is set to [Off] to use Android Auto (page 103).
• The compatible finger gestures vary depending on the application for the smartphone.
• To use the Android Auto function, first turn off the Amazon Alexa function.
WARNING
Certain uses of the smartphone may not be legal while driving in your jurisdiction, so you must be
aware of and obey any such restrictions. If in doubt as to a particular function, only perform it while the
car is parked. No feature should be used unless it is safe to do so under the driving conditions you are
experiencing.
Important
Android Auto may not be available in your country or region.
For details about Android Auto, please refer to the Google™ support site:
https://support.google.com/androidauto
• The content and functionality of the supported applications are the responsibility of the App
providers.
• In Android Auto, usage is limited while driving, with availability of functions and content determined
by the App providers.
• Android Auto allows access to applications other than those listed that are subject to limitations
while driving.
• PIONEER IS NOT RESPONSIBLE AND DISCLAIMS LIABILITY FOR THIRD PARTY (NON-PIONEER) APPS
AND CONTENT, INCLUDING WITHOUT LIMITATION ANY INACCURACIES OR INCOMPLETE
INFORMATION.
• Before using Android Auto, make sure the GPS antenna and speed cable are properly connected and
installed, and the unit angle is properly set. For details on the installation, refer to the Installation
Manual.
To achieve optimum usability of Android Auto, set the driving position setting correctly
according to the vehicle. The setting will be applied the next time an Android Auto
compatible device is connected to this product.
Android Auto™
Using Android Auto
Setting the driving position
English
- 69 -
1 Touch then swipe left on the screen.
2 Touch then .
The communication setting screen appears.
3 Touch [Driving Position].
4 Select the item.
[Left]
Select for a left-hand drive vehicle.
[Right]
Select for a right-hand drive vehicle.
1 Connect an Android Auto™ compatible device to this unit via USB.
2 Touch the Android Auto icon.
The Android Auto home screen appears.
Before using Android Auto wirelessly, turn on the Bluetooth function on the Android
device.
1 Turn on the Wi-Fi function (page 37).
2 Touch then .
TIP
You can skip the step 2 by touching and holding button.
3 Touch .
The available devices appear on the list.
NOTE
The unit cannot detect the device unless the Bluetooth setting menu is displayed on the
smartphone screen.
4 Touch the desired device on the screen.
The unit configures the connection then starts the application.
TIP
If the device that you want to connect does not appear, touch on the screen again.
Starting procedure
Wired connection
Wireless connection
- 70 -
English
TIP
You can use voice recognition function by touching button once Android Auto is activated.
NOTES
• For details on USB connection, refer to the Installation Manual.
• When the device for Android Auto is connected to this unit, the device is also connected via
Bluetooth at the same time. If five devices are already paired, the message confirming whether to
delete the registered device is displayed. If you want to delete the device, touch [Agree]. If you want
to delete other device, touch [BT Settings] and delete the devices manually (page 26).
• If Android Auto is turned on during a call on a cellular phone other than the Android Auto compatible
device, the Bluetooth connection will switch to the Android Auto compatible device after the call.
You can adjust the guidance volume separately from the main sound volume when
Android Auto is used.
1 While Android Auto is activated, touch VOL (+/-).
The volume menu will be displayed on the screen.
NOTE
The volume menu is displayed for four seconds. If the menu disappears, touch VOL (+/-) again. The
menu reappears.
If this function is set to on, the Android Auto screen is displayed automatically when an
Android Auto compatible device is connected to this unit.
NOTE
The Android Auto screen is displayed automatically only when an Android Auto compatible device is
correctly connected to this product.
Adjusting the volume
Touch to mute. Touch again to cancel mute.
Touch [+]/[-] to adjust the guidance volume.
Displays the main sound volume. To adjust the main sound volume, touch
VOL (+/-) on the unit or touch [+]/[-].
Setting the auto-launch function

English
- 71 -
1 Touch then swipe left on the screen.
2 Touch then .
3 Touch [Android Auto Auto-launch] to switch [On] or [Off].

- 72 -
English
Check team information such as the game scores and game information of your favorite
teams registered on CarAVAssist.
The unit displays three days of sports information, for the previous, current, and next
day.
Important
• To use the sports function, you need to connect this unit to the Internet via a Wi-Fi network.
• To use the sports function, you need to register a team in CarAVAssist and import it to this unit
(page 43) in advance.
• To use the sports function, you need to accept the Internet Communication Service the Terms of Use
and Privacy Policy (page 111).
• Before connecting this unit to the Internet, make sure that the GPS antenna is installed properly to
obtain correct time and date. For details on GPS antenna installation, refer to the Installation Manual.
1 Touch then swipe left on the screen.
2 Touch [Sports].
Sports
Using sports
Starting procedure
Switches the game list between fixed and not fixed.
Switches to the displayed radio station.
Sports screen
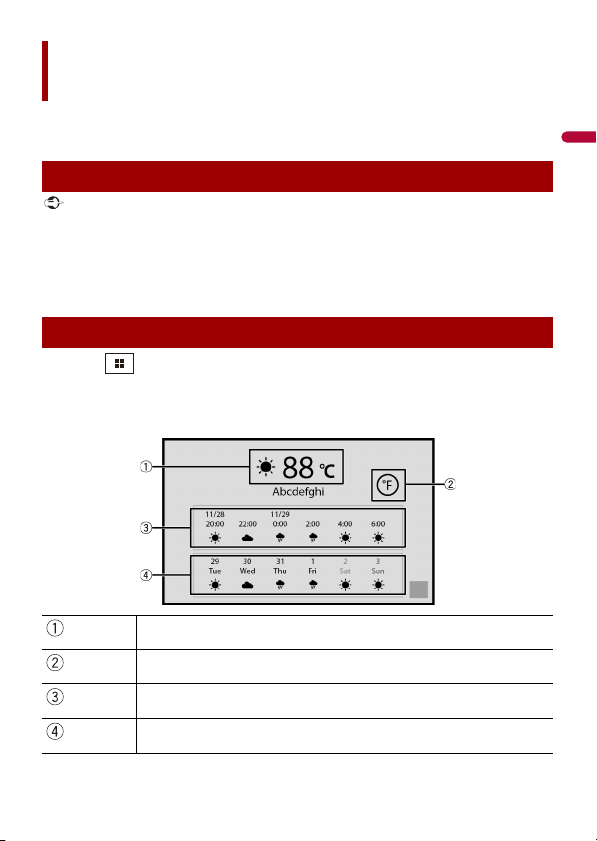
English
- 73 -
Display the current temperature and daily or hourly forecast in your current location. The
weather function uses a location service to determine your current location.
Important
• To use the weather function, you need to connect this unit to the Internet via a Wi-Fi network.
• To use the weather function, you need to accept the Internet Communication Service the Terms of
Use and Privacy Policy (page 111).
• Before connecting this unit to the Internet, make sure that the GPS antenna is installed properly so
that your correct location and time can be used for the weather service and location service. For
details on GPS antenna installation, refer to the Installation Manual.
1 Touch then swipe left on the screen.
2 Touch [Weather].
Weather
Using weather
Starting procedure
Current temperature
Switches the temperature unit between Fahrenheit and Celsius.
Current hourly forecast
Current daily forecast
Weather screen

- 74 -
English
NOTE
If a data item is unknown or missing, “-” is displayed.

English
- 75 -
You can talk to Amazon Alexa on the unit. With Alexa Built-in, you can ask to play music,
place calls, listen to audiobooks, hear the news, check the weather, control smart home
devices and more-all while you keep your hands on the wheel and eyes on the road.
For details, visit the Amazon website for your region.
TIP
You can also use the Alexa Calling, Drop In, Message or Announcement function through this unit.
NOTE
The incoming call of the Drop In is not supported.
Important
• To use the Amazon Alexa function, you need to connect this unit to the Internet via a Wi-Fi network.
• This function is available in the following languages* and countries:
* All of the languages supported by Amazon Alexa are currently not available, but will be available
soon.
Languages*
– English (US), (CA), (UK), (AU), (IN)
– French (FR)
– Spanish (ES)
– German
– Italian
– Japanese
Countries*
– USA
– UK
– Ireland
– Canada
– Germany
– Austria
– India
– Australia
– New Zealand
– France
– Italy
– Spain
– Mexico
– Japan
* Alexa is not available in all languages and countries. Alexa features and functionality may vary by
location.
Amazon Alexa

- 76 -
English
Before using the Amazon Alexa function, it is necessary to authorize the unit.
1 Touch then swipe left on the screen.
2 Touch then .
3 Touch [Amazon Alexa setting].
4 Touch [ Setup].
The introduction screen appears.
5 Touch [Get started].
6 Use your mobile device to go to the displayed URL or scan the displayed code.
7 Enter your Amazon account Email address and password.
8 Enter the authorization code that is shown in step 6.
A completion message is displayed when the unit is authorized.
TIP
If you scan the displayed code in step 6, you can skip this step.
NOTES
• Make sure that you have an Amazon account.
• Amazon Alexa cannot recognize your voice in the following cases:
– Amazon Alexa authorization is not completed.
– Data is being updated.
– The unit is starting.
– The monitor is showing the rearview camera image.
TIP
When you receive notifications from Amazon Alexa, the yellow visual indicator is displayed. To check
the notifications, ask “Alexa, what are my notifications?”
1 Touch then swipe left on the screen.
2 Touch [Alexa].
The visual indicator appears.
3 Talk to Amazon Alexa to perform the desired operation.
How to use Amazon Alexa
Starting procedure
Touch operation
English
- 77 -
TIP
You can operate the Amazon Alexa function by touching the button once Amazon Alexa is
activated.
1 Talk to Amazon Alexa to perform the desired operation by using “Alexa” as the
wake word.
NOTE
Wake words other than “Alexa”, such as “Echo”, “Amazon”, or “Computer”, are not supported.
You can play content through Amazon Music, Kindle books text-to-speech, Audible or
any compatible third party content service by talking to Amazon Alexa.
Important
To use the entertainment function, you need to subscribe to the Amazon service.
▶Touch operation
1 Touch then swipe left on the screen.
2 Touch [Alexa].
3 Talk to Amazon Alexa to perform the desired AV operation.
▶Voice operation
1 Talk to Amazon Alexa to perform the desired AV operation by using “Alexa” as the
wake word.
Voice operation
Entertainment
Starting procedure
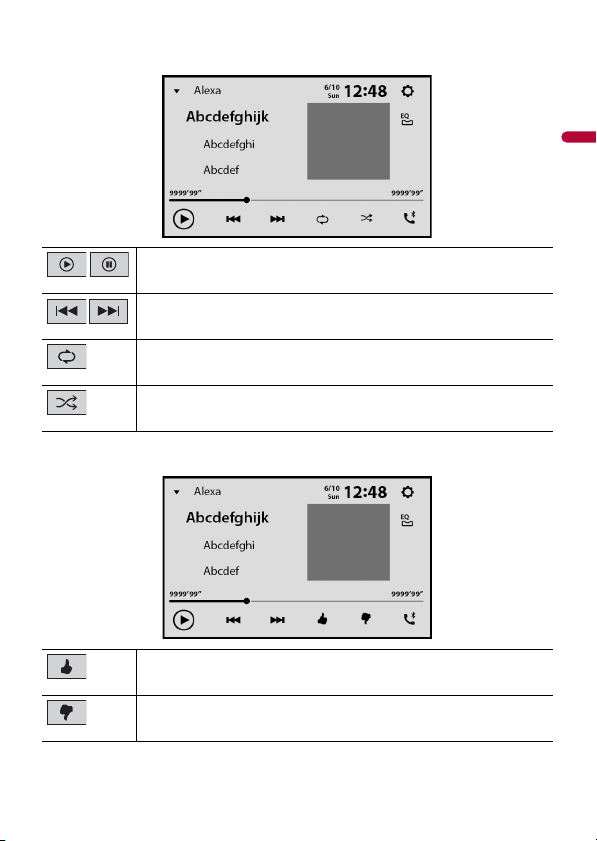
- 78 -
English
Alexa screen 1 (Example: Amazon Music)
Alexa screen 2 (Example: Amazon Music)
Switches between playback and pause.
Skips songs forward or backward.
Switches the repeat function ON/OFF.
Switches between random and normal song playback order.
Gives a Like to the currently playing song.
Gives a Dislike to the currently playing song.
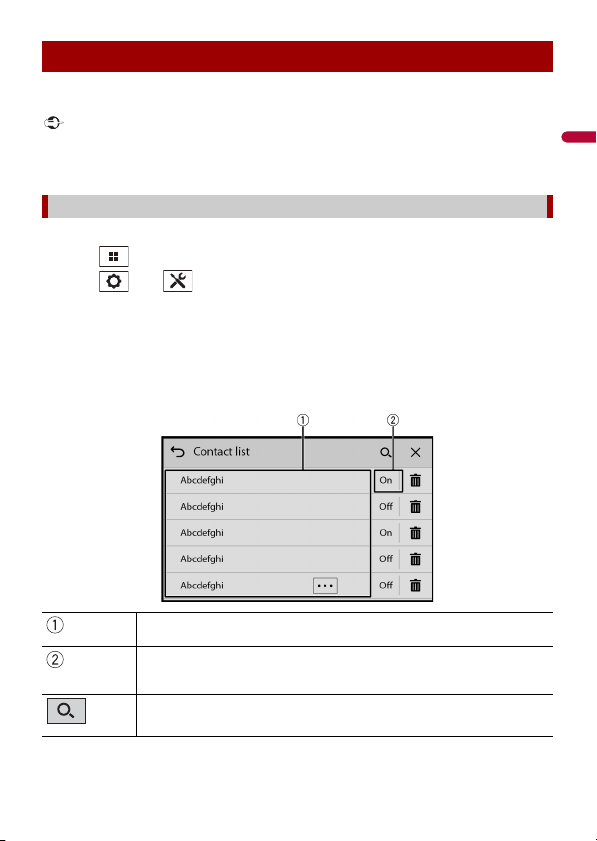
English
- 79 -
Alexa allows you to use voice commands to place or answer calls using a mobile device
paired to this unit.
Important
• To use this function, turn on the Amazon Alexa function.
• To make a phone call using your contacts, you need to allow Alexa to access the contact information
on your mobile device.
Before using this function, connect your mobile device to this unit via Bluetooth.
1 Touch then swipe left on the screen.
2 Touch then .
3 Touch [Amazon Alexa setting] then [Main Menu].
4 Touch [Settings] then [Contact list].
5 Select the desired mobile device.
Contact list screen
Phone call control
Before using phone call control
Device name list
Contact list upload status
Select [On], then select [Yes] on the permission screen to upload the contacts from
the selected mobile device.
Searches for available mobile devices.
- 80 -
English
▶Touch operation
1 Touch then swipe left on the screen.
2 Touch [Alexa].
3 Talk to Amazon Alexa to perform the desired hands-free phone operation.
▶Voice operation
1 Talk to Amazon Alexa to perform the desired hands-free phone operation by using
“Alexa” as the wake word.
For example, say “Alexa, call home” or “Alexa, answer the call”.
1 Touch then swipe left on the screen.
2 Touch then .
3 Touch [Amazon Alexa setting].
Deletes the mobile device.
Starting procedure
Amazon Alexa settings
[Setup]
[Setup] Set up the Amazon Alexa function to be activated.
[Main Menu]
[Settings] Settings for Amazon Alexa for this unit (page 81).
[Things to try] Trial and examples of uses for Amazon Alexa.
[Help & Feedback] Displays the URL of Amazon Alexa help and feedback.
[Sign out] Signs out of your Amazon account and disables the Amazon
Alexa function.
English
- 81 -
You can enable Alexa Skills and control this unit by using Amazon Alexa voice
commands. For details, visit the Alexa Skills Store website for your region.
[Settings]
[Contact list] Displays the list of mobile devices that are connected to
Amazon Alexa then switches whether or not to upload the
contacts from the selected mobile device (page 79).
NOTE
The device search list screen is displayed when no mobile device is
paired via Bluetooth.
[Hands-free listening] Switches whether or not to use the wake word (“Alexa”).
[Notifications] Switches whether or not notifications of received messages are
displayed.
[Share location] Switches whether or not Amazon Alexa has access to location
information.
TIP
When you share your location, Amazon Alexa provides more accurate
service and information, such as weather, traffic information, etc.
NOTE
You need to enable the location services for the Amazon Alexa app on
your mobile device in order to search for nearby places.
[Start of request
sound]
Switches whether or not Amazon Alexa plays a sound when you
begin your request.
[End of request
sound]
Switches whether or not Amazon Alexa plays a sound when you
finish your request.
[Language] Select the language for using Amazon Alexa.
Controlling the unit by Amazon Alexa

- 82 -
English
Only SiriusXM® brings you more of what you love to listen to, all in one place. Get over
140 channels, including commercial-free music plus the best sports, news, talk, comedy,
and entertainment. Welcome to the world of satellite radio. A SiriusXM Connect Vehicle
Tuner and Subscription are required. For more information, visit the website
(www.siriusxm.com).
To take full advantage of all the SiriusXM capabilities, such as TuneMix™, SportsFlash™
and Traffic & Weather Now, please use the SXV300 tuner or one of the newer SiriusXM
tuners (sold separately). Other tuners are compatible but may limit the features.
1 Touch then swipe left on the screen.
2 Touch [SiriusXM].
You should be able to tune in to Channel 1. If you cannot get Channel 1, ensure that
your SiriusXM Connect Vehicle Tuner is installed correctly.
3 Switch to Channel 0 and check the Radio ID.
The SiriusXM Radio ID can be found by tuning in to Channel 0. In addition, the Radio
ID is located on the bottom of the SiriusXM Connect Vehicle Tuner and its packaging.
You will need this number to activate your subscription.
NOTE
The SiriusXM Radio ID does not include the letters I, O, S, or F.
4 Activate the service either online or by phone.
TIP
In the USA, you can activate online or by calling SiriusXM Listener Care:
• Visit the website
www.siriusxm.com/activatenow
• Call SiriusXM Listener Care at
1-866-635-2349
For Canadian subscriptions, please contact:
• Visit the website
www.xmradio.ca
and click on “ACTIVATE RADIO” at the top right corner of the page, or call (1-877-438-9677).
NOTES
• The SiriusXM satellites will send an activation message to your tuner. When the tuner has received the
message, [Subscription Updated Press Enter to Continue] is displayed.
• The activation process usually takes 10 to 15 minutes, but it may take up to an hour. Do not turn off
this product while the activation message is displayed.
SiriusXM® Satellite Radio
Subscribing to the SiriusXM Satellite Radio service
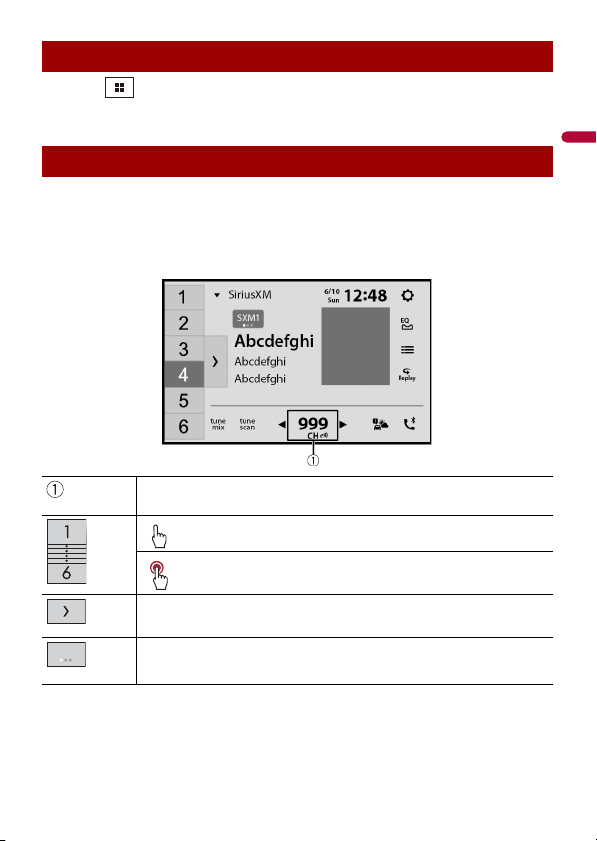
English
- 83 -
1 Touch then swipe left on the screen.
2 Touch [SiriusXM].
TIPS
• On the Featured Favorites Band, the current broadcast frequency cannot be stored to a key (page 87).
• If fewer than two music channels are stored as presets, you cannot use the TuneMix function.
• [RADIO ID] is displayed when Channel 0 is selected.
Current channel display (Live broadcast mode)
Listening to SiriusXM
Basic operation
Selects a channel directly.
Recalls the preset channel stored to a key from the memory.
Stores the current channel to a key.
Displays the preset channels.
Select an item on the list ([1] to [6]) to switch to the preset channel.
Selects a band.
There are 3 bands and a Featured Favorites. You can store 6 channels per band for
a total of 18 presets.
SXM1
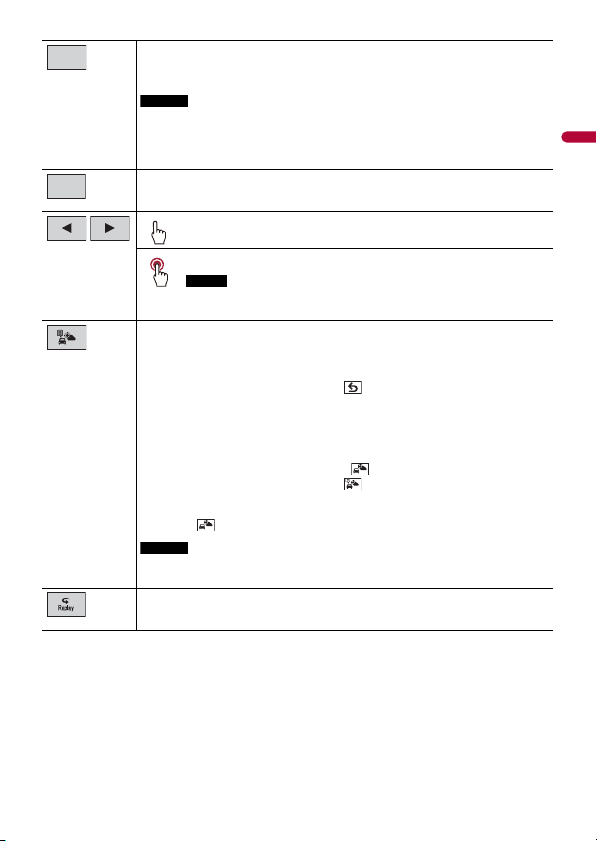
- 84 -
English
Switches TuneMix™ to on or off.
You can use TuneMix™ from each of the music channels stored as presets on the
current band.
NOTES
• When fewer than two music channels are stored as presets, you cannot use
TuneMix™.
• Locked channels will not be used by TuneMix™ until the channels are unlocked
by entering the parental control passcode.
Performs TuneScan™ (page 85).
Performs channel number up/down.
Performs fast channel number up/down.
NOTE
The operation stops if the icon is touched and held for more than 30
seconds. To resume the operation, touch and hold the icon again.
Switches to the channel broadcasting the traffic and weather information for
the selected city (Traffic & Weather Now™).
Touch the desired city to access the latest Traffic & Weather report for your favorite
market.
To cancel Traffic & Weather Now™, touch .
TIPS
• Grayed out: Traffic and weather broadcast for your market is not yet available.
• With green dot: Latest report available, but not listened to yet.
• White: Latest report available to hear again.
• To listen to the information again, touch on the current channel display.
• If you have not selected the city, touch to select the city. You can also select
the city in advance (page 88).
• If you have already selected the city, you can listen to the information only by
touching .
NOTES
• To use this function, select the city in advance (page 88).
• The selected city can be changed in the SiriusXM settings (page 88).
Switches to Replay™ Mode.
tune
mix
tune
scan
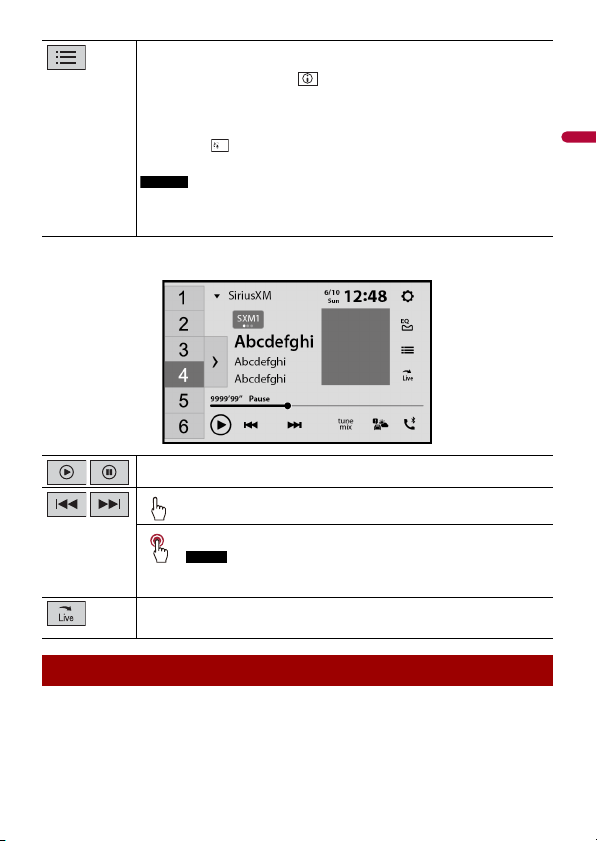
English
- 85 -
Replay™ Mode (Time bar display)
When you activate the TuneScan™ feature, you will hear a few seconds of the songs
which have not been listened to from each of the music channels stored as presets on
the current band.
Selects a channel from the list.
Select the category name or the list of all channels then touch the desired channel.
To switch the display list, touch .
TIPS
• The displayed list switches in the following order.
Channel Name—Artist Name—Song Title—Content Info
• If you touch , you can scan each channel in the selected category.
• When there is no category, you can select the channel from [Others].
NOTES
• The types of categories available depend on the types of channels available.
• It may take time to display the channel list depending on the SiriusXM reception
condition.
Switches between playback and pause.
Performs content forward or backward.
Performs fast forward or rewind.
NOTE
The operation stops if the icon is touched and held for more than 30
seconds. To resume the operation, touch and hold the icon again.
Switches to live broadcast mode.
TuneScan™
Scan
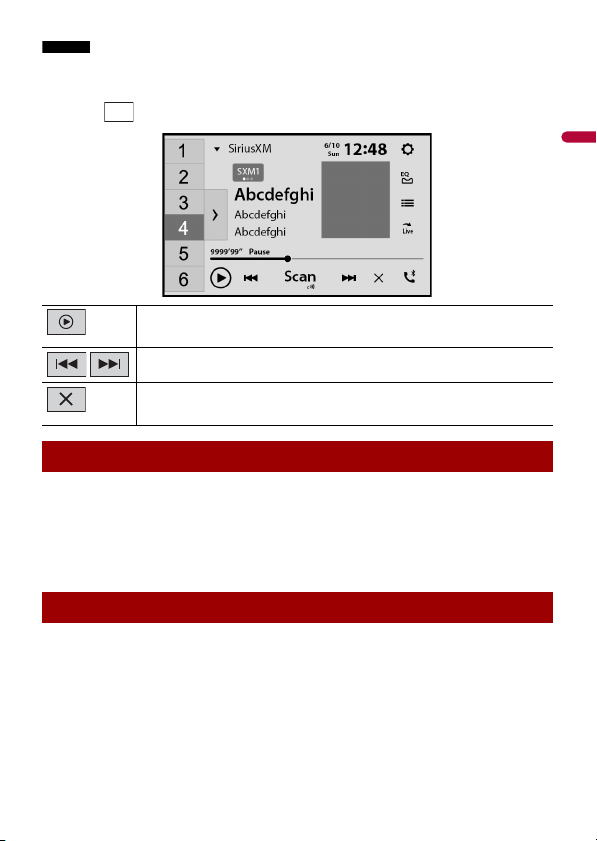
- 86 -
English
NOTES
• When fewer than two music channels are stored as presets, you cannot use TuneScan™.
• TuneScan™ may take a few minutes to become available after the product is turned on or the preset
band is changed.
1 Touch to display the following display.
SportsFlash™ will notify you when a big play happens during a game with one of your
favorite sports teams.
Choose to tune in and hear the play unfold like it was live. Continue listening to the
game, or you can return to your previous channel.
For details, see [SportsFlash] (page 88) and [SportsFlash List] (page 88) in SiriusXM
settings.
All preset channels will buffer the content to be used for Replay, TuneStart, TuneScan
and TuneMix features.
Continues playing the current scanning song or channel.
Skips to the previous/next song during TuneScan™ or to the previous/next
channel during category scan.
Cancels scan play and returns to the previous channel.
SportsFlash™
SmartFavorites
tune
scan
English
- 87 -
Featured Favorites are groups of channels that are created by the SiriusXM Programming
department allowing you to discover new channels. Featured Favorite channels are
dynamic and can change often, allowing you to discover new channels.
For details, see [Featured Favorites] (page 88) and [Featured Band Update Message]
(page 88) in SiriusXM settings.
When there is a Featured Favorite, access it with the band key.
1 Touch the band key.
SXM1—SXM2—SXM3—FF
When there are multiple Featured Favorites, access them from the category list.
It is displayed at the bottom of the category list (page 85).
The Parental Control feature allows you to limit access to any SiriusXM channels,
including those with mature content. When enabled, the Parental Control feature
requires you to enter a passcode to tune to the locked channels.
For details, see [Parental Control] (page 88) in SiriusXM settings.
1 Touch then swipe left on the screen.
2 Touch then .
The system setting screen appears.
3 Touch [AV Source Settings].
4 Touch [SiriusXM settings].
The menu items vary depending on whether SiriusXM is selected as the source.
Using Featured Favorites Band
How to access
Parental lock
SiriusXM settings
Menu Item Description
[Tune Start]
[On] [Off]
Start songs automatically from the beginning when you tune to
one of your preset channels in the current preset band when
TuneStart™ is turned on.
- 88 -
English
[Parental Control] Enter the current passcode then touch to set this function
(the default passcode is 0000).
• To edit the passcode, touch [Edit Code] then touch
followed by entering the new passcode.
• To lock the channel, touch the appropriate channel.
appears and the channel is locked.
TIPS
• When you touch the locked channel, the channel is unlocked.
• When you touch [Clear All], all locked channels are unlocked.
[Featured Favorites]
[On] [Off]
Set to [On] to allow you to discover new channels created by
the SiriusXM Programming department.
NOTE
When [Featured Band Update Message] is set to [On] and the Featured
Favorite Band is updated, the Featured Band Update message will
appear.
[Featured Band
Update Message]
[On] [Off]
Set to [On] to be notified when the featured seasonal theme is
updated.
TIP
To display [Featured Band Update Message] at all times, [Featured
Favorites] needs to be set to [On].
[SportsFlash]
[On] [Off]
Set to [On] to activate the SportsFlash™ function.
• Touch [Play] to listen to the notified channel.
• Touch [Ignore] to stay tuned to the current channel.
• Touch [Cancel] to cancel notifications regarding the game.
[SportsFlash List] Select favorite teams for SportsFlash™.
• Touch [Edit List] then select a league and team to set the
favorite.
TIPS
• You can touch an item again to deselect it.
• If you want to remove all the teams you have set, touch [Clear All].
Setting of priorities
If you set many Favorite Teams, up to 5 Favorite Teams can be
received at once. Set the priorities if more than six teams are set
as Favorite Teams.
1 Touch [Prioritize] on the team selection screen.
2 Select the five high priority teams from the selected
favorite teams.
[City List] Select the city for the latest traffic and weather report in Traffic
& Weather Now™.
Menu Item Description

English
- 89 -
[SiriusXM Reset] Set to restore to the default SiriusXM settings by touching
[Restore].
CAUTION
Do not turn off the engine while restoring the settings.
NOTE
The source is turned off before the process starts.
Menu Item Description
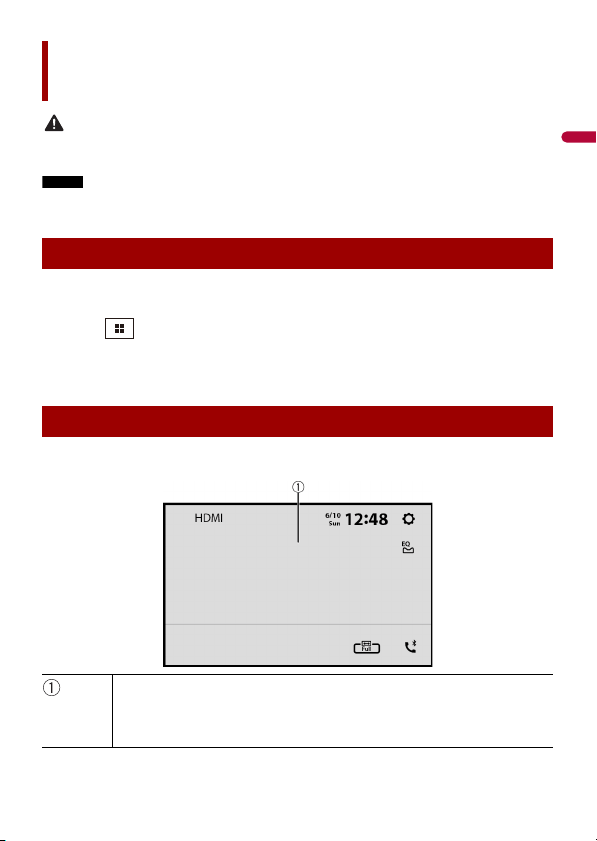
- 90 -
English
CAUTION
For safety reasons, video images cannot be viewed while your vehicle is in motion. To view video
images, stop in a safe place and apply the parking brake.
NOTE
A micro HDMI® cable (sold separately) is required for connection. For details, refer to the Installation
Manual.
1 Connect an HDMI device to this unit via a micro HDMI cable (sold separately)
then turn on the device.
2 Touch then swipe left on the screen.
3 Touch [HDMI].
The HDMI source screen appears.
HDMI source screen
HDMI
Starting procedure
Basic operation
Hides the touch panel keys.
To display the keys again, touch anywhere on the screen.
TIP
You can set the screen size for the video image (page 121).

English
- 91 -
You can display the video image output by the device connected to video input.
CAUTION
For safety reasons, video images cannot be viewed while your vehicle is in motion. To view video
images, stop in a safe place and apply the parking brake.
NOTE
A Mini-jack AV cable (sold separately) is required for connection. For details, refer to the Installation
Manual.
1 Touch then swipe left on the screen.
2 Touch then .
3 Touch [Input/Output settings].
4 Confirm that [AUX Input] is turned on.
5 Touch then swipe left on the screen.
6 Touch [AUX].
The AUX screen appears.
AUX
Starting procedure
Basic operation
AUX screen


English
- 93 -
You can display the video image output using the device connected to the back camera
input or 2nd camera input.* For details, refer to the Installation Manual.
* The 2nd camera input is available only for DMH-WT8600NEX/DMH-WT7600NEX/DMH-WT76NEX/
DMH-WC6600NEX/DMH-W4660NEX.
1 Touch then swipe left on the screen.
2 Touch [Camera View].
Video footage is displayed on the screen.
1 Touch then swipe left on the screen.
2 Touch then .
3 Touch [Input/Output settings].
4 Touch [AV Input].
5 Touch [2nd Camera].
6 Touch then swipe left on the screen.
7 Touch [Camera View].
8 Touch to switch the camera view.
The 2nd camera video footage is displayed on the screen.
External component
Camera view
Starting procedure
Displaying 2nd camera view

- 94 -
English
You can access the satellite radio source provided for the vehicle. The vehicle
information and many OEM systems such as steering wheel controls, warning chimes,
driver safety systems, and etc. can be displayed on this product by connecting the
optional iDatalink adaptor. It is also possible to add visual screens such as gauges,
vehicle information, climate control, and parking assist. However, an extra interface
module is required to access these features.
NOTE
Since the type of module varies depending on the vehicle model, search for your vehicle via the
following URL to determine which features are available for each module. Remember to select the
correct radio model for accurate results.
http://maestro.idatalink.com/support
Important
• For details about vehicle models that are compatible with the iDatalink adaptor, refer to the
information on our website.
• After installing the iDatalink adaptor, be sure to check that it operates properly.
• Functions and displays vary depending on the vehicle model. For details on the functions available
for each model, refer to the information on our website.
• For troubleshooting information about iDatalink functions, visit the following website:
http://maestro.idatalink.com/support
Limitations
• The data is transmitted to this product from your vehicle system via the connected
iDatalink adaptor. Therefore, the actual data contents displayed on your product may
differ from the contents on the screen described in this manual.
• When information on your vehicle or on the devices in your vehicle is sent from the
iDatalink Maestro module, a screen notifying you of such information may pop up.
Before using and/or connecting the iDatalink Maestro adaptor, you will need to first flash
the Maestro RR module with the appropriate vehicle and head unit firmware.
1 Find the device number (12 alphanumeric characters) on the label on the
packaging of this product or on the product itself.
2 Access the following website and follow the on-screen instructions to configure
the desired firmware.
http://maestro.idatalink.com/
iDatalink
Using iDatalink
Activating iDatalink Maestro
English
- 95 -
NOTE
When the serial number input is required, input the device number of this product.
3 Install the vehicle/head unit-specific firmware on your iDatalink Maestro module.
4 Connect this product to the iDatalink Maestro and install this product to the
vehicle.
The iDatalink function will be active.
NOTES
• For details on installing the firmware, refer to iDatalink Maestro website.
• For details on connecting this product to iDatalink Maestro, refer to the Installation Manual.
• You can also check the device number on the [Firmware Information] screen of this product
(page 108).
1 Connect the iDatalink Maestro adaptor to this product.
For details, refer to the Installation manual.
2 Touch .
3 Touch then .
4 Touch [Input/Output settings].
5 Touch [AV Input].
6 Confirm that [iDataLink] is selected.
7 Touch then swipe left on the screen.
8 Touch [Car Sources] or [Car Features].
The menu screen you touched appears.
NOTE
The iDataLink function is available only when the input signal is received by the iDatalink Maestro
adaptor.
[Car Sources] is operated almost the same way as the built-in AV sources on this product
is operated. For details on the operation, refer to the following relevant pages.
• Operating via USB/iPhone (page 54) (page 61)
• Operating via SiriusXM (page 82)
• Operating via Bluetooth audio (page 32)
• Operating via Hands-free phone (page 27)
Starting procedure
Using the functions on [Car Sources]
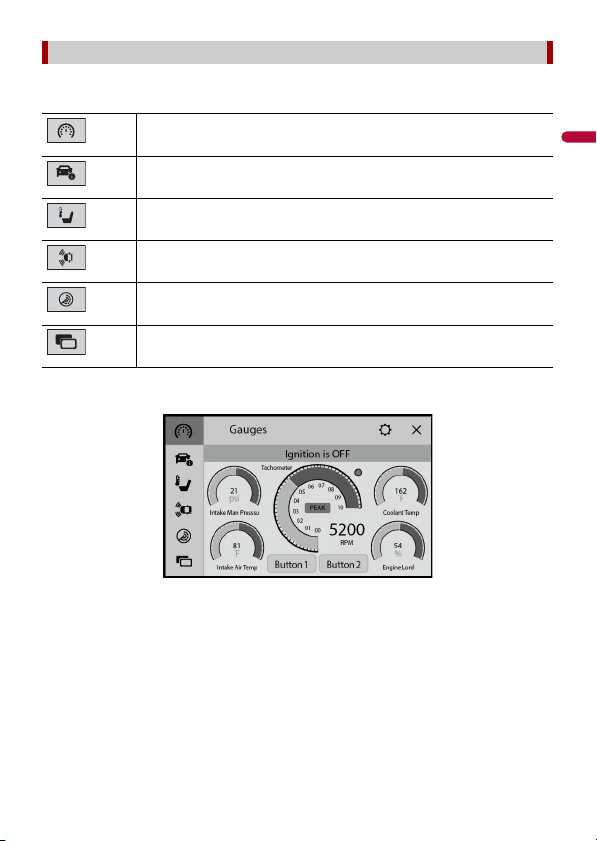
- 96 -
English
You can check and use the following screens after selecting [Car Features] in the starting
procedure. Touch one of the icons on the left side of the screen to change a feature.
Gauges screen
Using the functions on [Car Features]
Displays the Gauge screen.
Displays the Vehicle Information screen.
Displays the Climate screen.
Displays the Parking Assist screen.
Displays the Speed Radar Detector screen.
Displays rear monitor mirroring when the rear monitor is connected via
iDatalink.
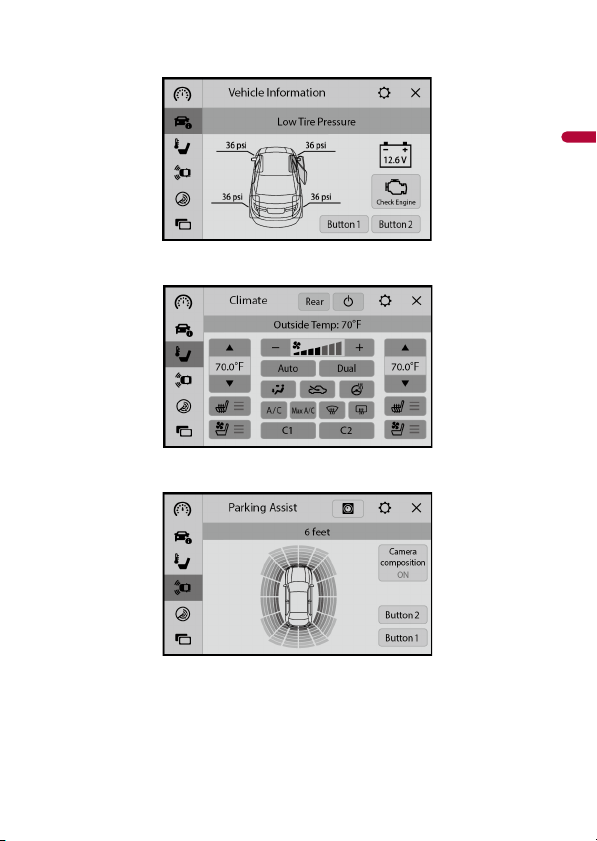
English
- 97 -
Vehicle Information screen
Climate screen
Parking Assist screen
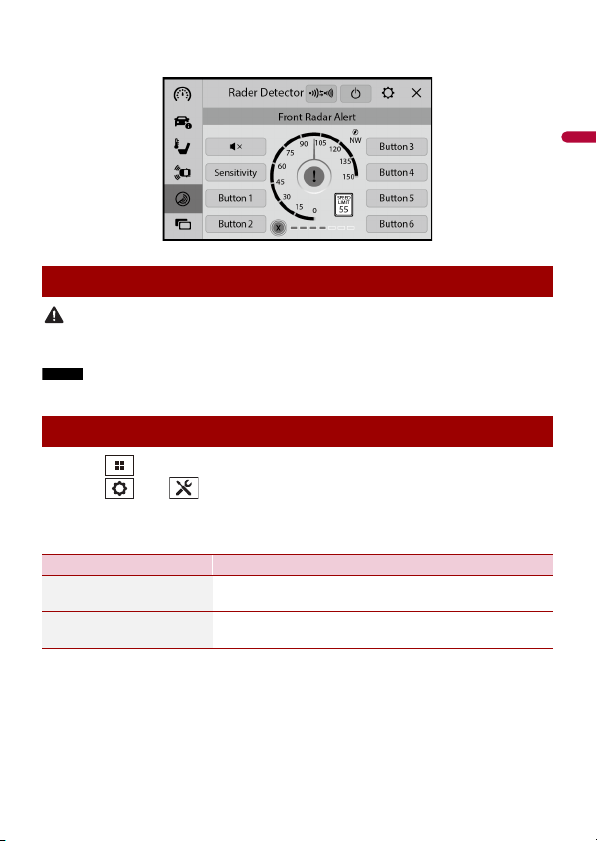
- 98 -
English
Speed Radar Detector screen
CAUTION
This function is intended solely to assist the driver’s vision. It does not detect all dangers and obstacles
and is not a substitute for your attentiveness, judgement, and care while parking your vehicle.
NOTE
This function is only available for vehicles equipped with a parking sensor system.
1 Touch then swipe left on the screen.
2 Touch then .
3 Touch [OEM Settings] or [OEM Volume Settings].
The setting screen for iDatalink appears.
Displaying obstacle detection information
iDatalink settings
Menu Item Description
[OEM Settings] Setting for iDatalink function when the iDatalink adaptor is
connected to the unit.
[OEM Volume Settings] Setting for iDatalink function volume when the iDatalink
adaptor is connected to the unit.

English
- 99 -
Access the vehicle information and many of the OEM systems such as climate control,
driver safety systems, etc. and display them on this product by replacing the Metra parts
kit with interface conversion.
NOTE
Since the type of module varies depending on the vehicle model, search for your vehicle via the
following URL to determine which features are available for each module.
http://metraonline.com/
Important
• For details about vehicle models that are compatible with the Metra interface conversion unit, refer to
the information on Metra website.
• After installing the Metra interface conversion unit, be sure to check that it operates properly.
• Functions and displays vary depending on the vehicle model. For details on the functions available
for each model, refer to the information on our website.
• For troubleshooting information about the Metra interface conversion functions, visit the following
website. http://www.metraonline.com/contact-us
Limitations
• The data is transmitted to this product from your vehicle system via the connected
Metra interface conversion unit. Therefore, the actual data contents displayed on your
product may differ from the contents on the screen described in this manual.
1 Connect the Metra interface conversion unit to this product.
For details, refer to the Installation manual.
2 Touch then swipe left on the screen.
3 Touch [Car Features].
The menu screen appears.
You can check and use the following screens after selecting [Car Features] in the starting
procedure. Touch one of the icons on the left side of the screen to change a feature.
Metra Axxess
Using Metra
Starting procedure
Using the functions on [Car Features]
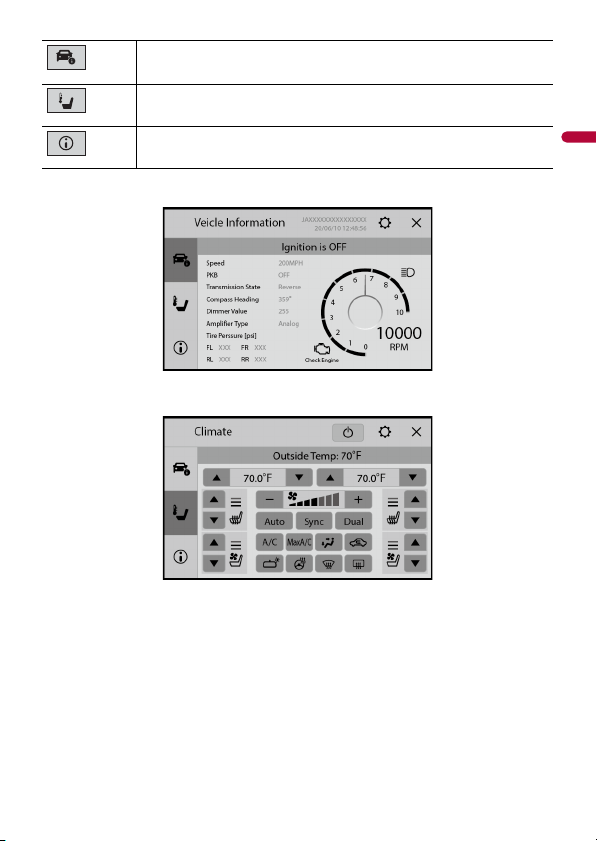
- 100 -
English
Displays the Vehicle Information screen.
Displays the Climate screen.
Displays the Radio ID screen.
Vehicle information screen
Climate screen
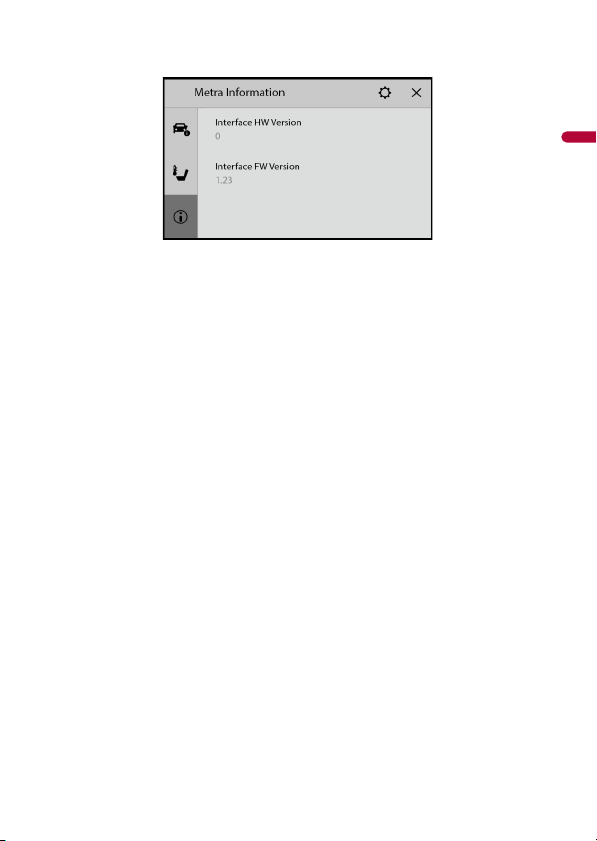
English
- 101 -
Radio ID screen

- 102 -
English
You can adjust various settings in the main menu.
1 Touch then swipe left on the screen.
2 Touch .
3 Touch one of the following categories, then select the options.
System settings (page 102)
Theme settings (page 111)
Audio settings (page 113)
Video settings (page 117)
Communication settings (page 118)
The menu items vary according to the source.
Settings
Displaying the setting screen
System settings
[AV Source Settings]
Menu Item Description
[Suggestions]
[On] [Off]
Select [On] to activate the suggested radio stations or area
radio stations list function.
[Radio settings] (page 52)
[SiriusXM settings] (page 87)
[Bluetooth Audio]
[On] [Off]
Setting Bluetooth audio source activation.
[Beep Tone]
Menu Item Description
[Beep Tone]
[On] [Off]
Select [Off] to disable the beep sound when the button or
the screen is touched.

English
- 103 -
* DMH-WT8600NEX, DMH-WT7600NEX, DMH-WT76NEX, DMH-WC6600NEX, DMH-W4660NEX
A separately sold rear view camera (e.g. ND-BC8) is required for utilizing the rear view
camera function. (For details, consult your dealer.)
▶Rear view camera
This product features a function that automatically switches to the full-screen image of
the rear view camera installed on your vehicle when the shift lever is in the REVERSE (R)
position.
Camera View mode also allows you to check what is behind you while driving.
TIP
The parking assist guidelines can be displayed temporarily on the rear view camera screen by touching
the icon at the top left of the screen. The guidelines can be adjusted. For details on how to adjust the
guidelines, see [Parking Assist Guide Adjust] (page 105).
▶Camera for Camera View mode
Camera View can be displayed at all times. Note that with this setting, the camera image
is not resized to fit, and that a portion of what is seen by the camera is not viewable.
To display the camera image, touch [Camera View] on the source/application selection
screen (page 47).
NOTES
• To set the rear view camera as the camera for Camera View mode, set [Back Camera Input] to [On]
(page 104).
• When using the 2nd camera, set [AV Input] to [2nd Camera] (page 103).*
• When the camera view of both the rear view camera and 2nd camera are available, the key to switch
the display appears. Touch this key to switch the display between the rear view image and 2nd
camera image.*
* DMH-WT8600NEX, DMH-WT7600NEX, DMH-WT76NEX, DMH-WC6600NEX, DMH-W4660NEX
[Input/Output settings]
Menu Item Description
[USB MTP]
[Off] [On]
Select [On] to use the USB MTP (Media Transfer Protocol)
connection.
Select [Off] to use Android Auto.
[AV Input]
[2nd Camera]* [iDataLink]
[Off]
Select AV input source.
[AUX Input]
[On] [Off]
Set to [On] for AUX source (page 91).
[Camera settings]
- 104 -
English
CAUTION
Pioneer recommends the use of a camera which outputs mirror reversed images, otherwise the screen
image may appear reversed.
• Immediately verify whether the display changes to the rear view camera image when the shift lever is
moved to REVERSE (R) from another position.
• When the screen changes to full-screen rear view camera image during normal driving, switch to the
opposite setting in [Camera Polarity].
• If you touch while the camera image is displayed, the displayed image turns off temporarily.
Menu Item Description
[Back Camera Input]
[Off] [On]
Setting rear view camera activation.
[Camera Polarity] Setting the polarity of the rear view camera.
[Battery] The polarity of the connected lead is positive.
[Ground] The polarity of the connected lead is negative.
NOTE
This function is available when [Back Camera Input] is set to [On].
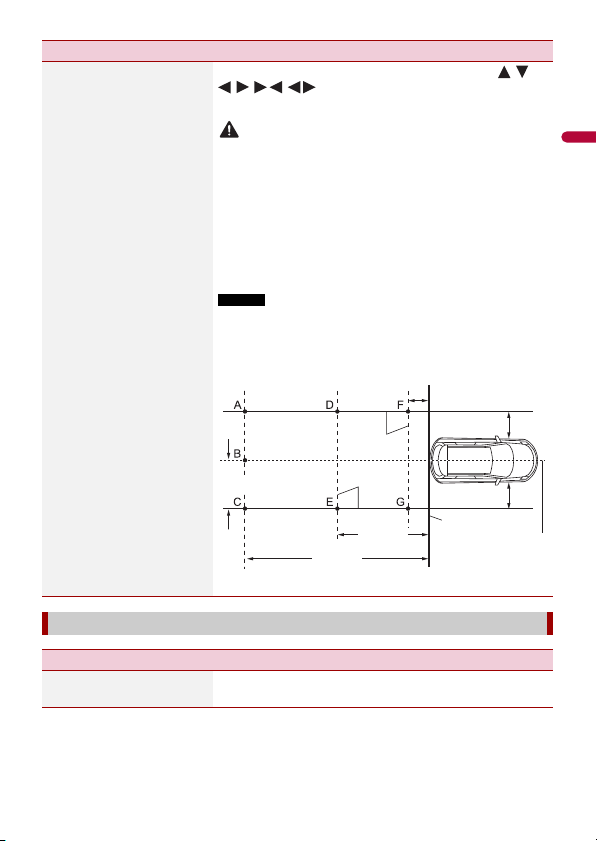
English
- 105 -
[Parking Assist Guide
Adjust]
Adjusting the guidelines by dragging or touching / /
/ / / on the screen.
Touch [Default] to reset the settings.
CAUTION
• When adjusting the guidelines, park the vehicle in a safe place
and apply the parking brake; this setting is available only when
the vehicle is parked with the parking brake applied.
• Turn the vehicle off before getting out to place the markings.
• The range projected by the rear view camera is limited. Also, the
vehicle width and distance guidelines displayed on the rear view
camera image may differ from the actual vehicle width and
distance. (The guidelines are straight lines.)
• The image quality may deteriorate depending on the usage
environment, such as at night or in dark surroundings.
NOTES
• Use painter's tape or similar tape to place markings as shown
below before setting up the guidelines.
• Adjust the guidelines so that they overlay the tape markings as
closely as possible.
[Demo Mode]
Menu Item Description
[Demo Mode]
[On] [Off]
Setting the demo mode.
Menu Item Description
30 cm (1 ft)
Markings
Markings
Rear bumper
Vehicle Longitudinal
Centerline
3.05 m
(10 ft)
6.1 m
(20 ft)
1.52 m (5 ft)
25 cm (9-7/8 in.)
25 cm (9-7/8 in.)
- 106 -
English
[System Language]
Menu Item Description
[System Language] Select the system language.
NOTES
• If the embedded language and the selected language setting are
not the same, the text information may not display properly.
• Some characters may not be displayed properly.
[Restore Settings]
Menu Item Description
[All Settings] Touch [Restore] to restore the settings to the default
settings.
CAUTION
Do not turn off the engine while restoring the settings.
NOTES
• This setting is available only when you stop your vehicle in a safe
place and apply the parking brake.
• The source is turned off and the Bluetooth connection is
disconnected before the process starts.
• Before starting the restore process, disconnect any device that is
connected to the USB port. Otherwise, some settings may not be
restored correctly.
[Clock Settings]
Menu Item Description
[Clock Settings] Setting or adjusting the following time and clock display.
• Date display format:
day-month-year, month-day-year, or year-month-day
• Time display format:
[12hour] or [24hour]
• UTC (Universal Time Coordinated) time zone difference:
[UTC-12h] to [UTC+14h]
• Day-light saving time:
[On] or [Off]

English
- 107 -
NOTE
This setting is available only when you stop your vehicle in a safe place and apply the parking brake.
You can adjust the picture for each source, rear view camera.
CAUTION
For safety reasons, you cannot use some of these functions while your vehicle is in motion. To enable
these functions, you must stop in a safe place and apply the parking brake.
[Dimmer Settings]
Menu Item Description
[Dimmer Trigger] Setting the dimmer brightness.
[Auto] Switches the dimmer to on or off automatically according
to your vehicle’s headlight turning on or off.
[Manual] Switches the dimmer to on or off manually.
[Time] Switches the dimmer to on or off at the time you adjusted.
[Day/Night] Setting the dimmer duration by day or night.
You can use this function when [Dimmer Trigger] is set to
[Manual].
[Day] Turns the dimmer function to off.
[Night] Turns the dimmer function to on.
[Dimmer Duration] Adjust the time that the dimmer is turned on or off by
dragging the cursors or touching or .
You can use this function when [Dimmer Trigger] is set to
[Time].
TIPS
• Each touch of or moves the cursor backward or forward
in the 15 minute width.
• When the cursors are placed on the same point, the dimmer
available time is 0 hours.
• When the cursor for off time setting is placed on the left end and
the cursor for on time setting is placed on the right end, the
dimmer available time is 0 hours.
• When the cursor for on time setting is placed on the left end and
the cursor for off time setting is placed on the right end, the
dimmer available time is 24 hours.
NOTE
The time display of the dimmer duration adjusting bar depends on
the clock display setting (page 121).
[Picture Adjustment]

- 108 -
English
To adjust following menu, touch , , , to adjust.
* With some pictures, you cannot adjust [Hue] and [Color].
NOTES
• The adjustments of [Brightness], [Contrast], and [Dimmer] are stored separately when your vehicle's
headlights are off (daytime) and on (nighttime).
• [Brightness] and [Contrast] are switched automatically depending on the setting of [Dimmer
Settings].
• [Dimmer] can be changed the setting or the time to switch it to on or off (page 107).
• The picture adjustment may not be available with some rear view cameras.
• The setting contents can be memorized separately.
Menu Item Description
[Brightness]
[-24] to [+24]
Adjust the black intensity.
[Contrast]
[-24] to [+24]
Adjust the contrast.
[Color]*
[-24] to [+24]
Adjust the color saturation.
[Hue]*
[-24] to [+24]
Adjust the tone of color (which color is emphasized, red, or
green).
[Dimmer]
[+1] to [+48]
Adjust the brightness of the display.
[Temperature]
[-3] to [+3]
Adjust the color temperature, resulting in a better white
balance.
[System Information]
Menu Item Description
[Firmware Information] Displaying the firmware version.

English
- 109 -
[Firmware Update] Update to the latest version of the firmware by using a USB
storage device or wireless connection. To update the
firmware via wireless connection, CarAVAssist is required.
For details on performing the wireless update, refer to
Updating the firmware wirelessly (page 43).
CAUTION
• The USB storage device for updating must contain only the
correct update file.
• Never turn this product off, disconnect the USB storage device
while the firmware is being updated.
• You can only update the firmware when the vehicle is stopped
and the parking brake is engaged.
1 Download the firmware update files into your
computer.
2 Connect a blank (formatted) USB storage device to
your computer then locate the correct update file and
copy it onto the USB storage device.
3 Connect the USB storage device to this product
(page 54).
4 Turn the source off (page 47).
5 Display the [System] setting screen (page 102).
6 Touch [System Information].
7 Touch [Firmware Update].
8 Touch [USB].
9 Touch [Continue].
Follow the on-screen instructions to finish updating the
firmware.
NOTES
• This product will reset automatically after the firmware
update is completed if the update is successful.
• If an error message appears on the screen, touch the
display and perform the above steps again.
Menu Item Description

- 110 -
English
[3D Calibration Status] Check the sensor learning status, such as the degree of
learning. You can also check the current sensor values and
the total number of speed pulses.
To delete the learned results stored in the sensor, follow
the below instructions.
1 Touch [Distance] or [Speed Pulse], and then touch
[Yes].
2 Touch [Learning status] and then touch [Reset All].
TIP
Touch [Reset All] to reset the sensor after changing the
installation position or angle.
NOTE
If you touch [Reset Distance], all learned results stored in
[Distance] are cleared.
[Connection Status] Check that the leads are properly connected between this
product and vehicle.
[GPS Antenna] Displays the connection status of the GPS antenna ([OK] or
[NOK]) and the reception sensitivity.
NOTE
If reception is poor, change the installation position of the GPS
antenna.
[Positioning Status] Displays the positioning status (3D positioning, 2D
positioning, or no positioning), the number of satellites
used for positioning (orange), and the number of satellites
that have received signals (yellow). If signals from more
than three satellites are received, the current location can
be measured.
[Installation] Indicates whether the installation position of this product
is correct or not. If installed correctly, [OK] appears. When
this product is installed at an extreme angle exceeding the
limitation of the installing angle, [NOK(Inst. Angle)] is
displayed. If the installation of this product is continually
changed and it is not firmly fixed into place,
[NOK(Vibration)] is displayed.
[Speed Pulse] The speed pulse value detected by this product is shown.
[Back Signal] When the shift lever is shifted to “R” (reverse position), the
signal switches to [High] or [Low]. The signal displayed
varies depending on the vehicle.
[License] Displays the open source license for this unit.
Menu Item Description
English
- 111 -
Setting the Amazon Alexa (page 80).
The menu items vary according to the source.
[OEM Settings]
Menu Item Description
[OEM Settings] (page 98).
[OEM Volume Settings]
Menu Item Description
[OEM Volume Settings] (page 98).
[Amazon Alexa setting]
[Terms of Use / Privacy]
Menu Item Description
[Terms of Use / Privacy] Select to accept or withdraw from the Internet
Communication Service the Terms of Use and Privacy
Policy.
NOTES
• The following functions are not activated unless you agree to the
Internet Communication Service the Terms of Use and Privacy
Policy:
– Sports
– Browser
– Weather
–Amazon Alexa
• If you do not agree to the Internet Communication Service the
Terms of Use and Privacy Policy, the Wi-Fi connection cannot be
used to acquire the radio stations list data for the suggested
radio stations or area radio stations list function.
Theme settings
- 112 -
English
Menu Item Description
[Background] Select the wall paper from the preset items in this product
or original pictures via the external device.
The wall paper can be set from selections for the home
menu screen and AV operation screen.
TIP
The colors of the center image and the second image from the
right (for the AV operation screen) change randomly, or they
change to match the color used for the artwork image.
NOTE
The [Background] settings are saved for each cellular phone
connected via Bluetooth. The settings change depending on the
cellular phone that is connected to this unit. If two cellular phones
are connected to this unit at the same time, the settings of the first
phone are applied.
Preset Display Select the desired preset background display.
(custom)*1 Displays the background display image imported from the
USB storage device.
(off) Hides the background display.
[Illumination]*2 Select an illumination color from the color list or create a
defined color.
Colored Keys Select the desired preset color.
(custom) Displays the screen to customize the illumination color.
To customize the defined color, touch then touch
or to adjust the brightness and the level of red, green
and blue to create favorite color.
To store the customized color in the memory, touch and
hold [Memo], and the customized color will be available at
the next illumination setting by touching .
TIP
You can also adjust the color tone by dragging the color bar.
(rainbow) Shifts gradually between the preset colors in sequence.
[Theme]*2 Select the theme color.
[Clock] Select the style of the clock from the preset image for the
[Home] or [AV] screen.
Preset Images Select the desired preset style for the clock.
(off) Hides the clock display on the [AV] screen.
English
- 113 -
*1 Refer to Still image source (page 59).
*2 You can preview the home menu screen or the AV operation screen by touching [Home] or [AV]
respectively.
The menu items vary according to the source. Some of the menu items become
unavailable when the volume is set to mute.
[Home Custom Setting] Customize the home menu screen of the following items.
• Switch the favorite source/application area
• Customize the displayed favorite source/application
• Rearrange the displayed favorite source/application
Audio settings
Menu Item Description
[Fader/Balance] Touch or to adjust the front/rear speaker balance.
Set [Front] and [Rear] to [0] when using a dual speaker
system.
Touch or to adjust the left/right speaker balance.
TIP
You can also set the value by dragging the point on the displayed
table.
NOTE
This function is available when [Standard Mode] is selected as the
speaker mode and [Rear] is selected in [Rear Speaker Output].
[Loudness]
[Off] [Low] [Mid] [High]
Compensates for deficiencies in the low-frequency and
high-frequency ranges at low volume.
[Source Level Adjuster]
[-4] to [+4]
Adjust the volume level of each source to prevent radical
changes in volume when switching between sources other
than FM.
Touch or to adjust the source volume after
comparing the FM tuner volume level with the level of the
source.
TIP
If you directly touch the area where the cursor can be moved, the
SLA (source level adjustment) setting will be changed to the value
of the touched point.
NOTES
• Settings are based on the FM tuner volume level, which remains
unchanged.
• This function is not available when the FM tuner is selected as
the AV source.
Menu Item Description
- 114 -
English
[Master Sound Reviver]
[Off] [Mode1] [Mode2]
Enhances and complements compressed audio and
restores it to High-Resolution Audio quality.
[Mode1]: Suitable for compressed audio at bitrates higher
than 256 kbps.
[Mode2]: Suitable for compressed audio at bitrates lower
than 256 kbps.
[Speaker Level]
Listening Position*1*2
[Off] [Front Left] [Front
Right] [Front] [All]
Standard Mode*3
[Front Left] [Front Right]
[Rear Left] [Rear Right]
[Subwoofer]
Network Mode*3
[High Left] [High Right]
[Mid Left] [Mid Right]
[Subwoofer]
Speaker output level
[-24] to [10]
Adjust the speaker output level of the listening position.
1 Touch or to select the listening position then
select the output speaker.
2 Touch or to adjust the selected speaker output
level.
NOTE
This function is available when [Subwoofer] is set to [On].
[Listening Position]*1
[Off] [Front Left] [Front
Right] [Front] [All]
Select a listening position that you want to make as the
center of sound effects.
[Balance] Touch or to adjust the left/right balance.
NOTE
This function is available when [Network Mode] is selected as the
speaker mode, or when [Standard Mode] is selected as the speaker
mode and [Subwoofer] is selected in [Rear Speaker Output].
Menu Item Description
English
- 115 -
[Time Alignment]
[On] [Off]
Listening Position*1*2
[Off] [Front Left] [Front
Right] [Front] [All]
Standard Mode*3*4
[Front Left] [Front Right]
[Rear Left] [Rear Right]
[Subwoofer]
Network Mode*3*4
[High Left] [High Right]
[Mid Left] [Mid Right]
[Subwoofer]
Distance
[0] to [210]
Select or customize the time alignment settings to reflect
the distance between the listener’s position and each
speaker. You need to measure the distance between the
head of the listener and each speaker unit.
1 Touch or to select the listening position then
select the alignment speaker.
2 Touch or to input the distance between the
selected speaker and listening position.
TIP
If you touch [TA On], the time alignment is turned off mandatorily.
NOTE
This function is available only when the listening position setting
is set to [Front Left] or [Front Right].
[Graphic EQ]
[Super Bass (S.Bass)]
[Powerful] [Natural]
[Vocal] [Flat] [Dynamic]
[Vivid] [Custom1]
[Custom2]
Select or customize the equalizer curve.
Select a curve that you want to use as the basis of
customizing then touch the frequency that you want to
adjust.
TIPS
• If you make adjustments when a curve [Super Bass (S.Bass)],
[Powerful], [Natural], [Vocal], [Flat], [Dynamic] or [Vivid] is
selected, the equalizer curve settings will be changed to
[Custom1] mandatorily.
• If you make adjustments when the [Custom2] curve is selected
for example, the [Custom2] curve will be updated.
• [Custom1] and [Custom2] curves can be created common to all
sources.
• If you trail a finger across the bars of multiple equalizer bands,
the equalizer curve settings will be set to the value of the
touched point on each bar.
[Subwoofer]
[On] [Off]
Select enable or disable rear subwoofer output from this
product.
[Crossover]*5 Select a speaker unit (filter) to adjust the HPF or LPF cutoff
frequency and the slope for each speaker unit (page 116).
[Dynamic Bass Enhancer]
[Off] [Low] [High]
Increases the bass boost level and gives sound a more
dynamic effect.
[Rear Speaker Output]
[Rear] [Subwoofer]
Select the rear speaker output.
NOTE
This function is available when [Standard Mode] is selected as the
speaker mode.
Menu Item Description
- 116 -
English
*1 [All] is not available when [Network Mode] is selected as the speaker mode.
*2 If you change the listening position setting, the set values for all speakers will change in
conjunction with this setting.
*3 To use this function, the vehicle’s acoustics must be measured in advance.
*4 This function is available only when the listening position setting is set to [Front Left] or [Front
Right].
*5 This function is not available when adjusting the High speaker in [Network Mode].
You can adjust the cutoff frequency value of each speaker.
The following speakers can be adjusted:
[Standard Mode]: Front, Rear, Subwoofer.
[Network Mode]: High, Mid, Subwoofer.
NOTE
[Subwoofer Settings] is available only when [Subwoofer] is [On].
1 Touch then swipe left on the screen.
2 Touch then .
3 Touch [Crossover] or [Subwoofer Settings].
4 Touch or to switch the speaker.
[Mute Level] If an interruption caused by an audio signal occurs while
Apple CarPlay or Android Auto is being used, select mute
or attenuate the volume of the AV source and iPhone/
smartphone application.
[ATT] The volume becomes 10 dB lower than the current volume.
[Mute] The volume becomes 0.
[Off] The volume does not change.
[Subwoofer Settings]*5 Select the subwoofer phase (page 116).
[Save Settings] Save to recall the following current sound settings by
touching [OK]: slope, subwoofer phase, speaker level,
Graphic EQ, HPF/LPF, listening position, crossover, time
alignment.
TIP
When you touch [Cancel], return to the [Audio] setting screen.
[Load Settings]
[Initial Settings] [Sound
Setting]
Load the sound settings.
NOTE
[Sound Setting] is available only when you have already saved the
sound settings (page 116).
Adjusting the cutoff frequency value
Menu Item Description
English
- 117 -
5
Drag the graph line to set the cutoff position.
6 Drag the lowest point of the graph to set the cutoff slope.
The following items can also be set.
The menu items vary according to the source.
* DMH-WT8600NEX, DMH-WT7600NEX, DMH-WT76NEX, DMH-WC6600NEX, DMH-W4660NEX
Switches the subwoofer phase between normal and reverse position.
TIP
You can also adjust the [High] and [Mid] phase in [Network Mode].
[LPF]/[HPF]
Switches the [LPF]/[HPF] setting to [On] or [Off]. When it is turned off, the high-
pass filter or low-pass filter of each speaker can also be turned on by touching the
graph lines.
Video settings
[Time Per Photo Slide]
Menu Item Description
[Time Per Photo Slide]
[5sec] [10sec] [15sec]
[Manual]
Select the interval of image file slideshows on this product.
[Video Signal Setting]
Menu Item Description
[AUX]
[Auto] [PAL] [NTSC] [PAL-
M] [PAL-N] [SECAM]
Select the suitable video signal setting when you connect
this product to an AUX equipment.
[Back Camera]
[Auto] [PAL] [NTSC] [PAL-
M] [PAL-N] [SECAM]
Select the suitable video signal setting when you connect
this product to a rear view camera.
[2nd Camera]*
[Auto] [PAL] [NTSC] [PAL-
M] [PAL-N] [SECAM]
Select the suitable video signal setting when you connect
this product to a 2nd camera.
[RSE]
[Auto] [PAL] [NTSC] [PAL-
M] [PAL-N] [SECAM]
Select the suitable video signal setting when you connect
this product to a rear monitor via iDatalink.
- 118 -
English
Setting the Bluetooth (page 25) and Hands-free phone (page 30).
Setting the Wi-Fi connection and network (page 36).
Setting the infrastructure mode network (page 37).
Communication settings
[Connection]
Menu Item Description
[Connection] Displaying a list of mobile devices that have been
connected via Bluetooth or USB.
Connect, disconnect, or delete registered mobile device
manually.
Touch to delete registered device.
To connect a registered device manually, perform the
following:
• For an Apple CarPlay or Android Auto connection, touch
the name of the device.
• For a Bluetooth connection, touch .
To disconnect the device, touch in the list.
TIP
When there is not device in the list, the device search list screen
appears then you can connect selected device.
NOTE
Connect the Bluetooth device manually in the following cases:
• Two or more Bluetooth devices are registered, and you want to
manually select the device to be used.
• You want to reconnect a disconnected Bluetooth device.
• Connection cannot be established automatically for some
reason.
[Bluetooth Settings]
[Wi-Fi Settings: Hotspot]
[Wireless Settings: Smartphone]

English
- 119 -
[Driving Position]
Menu Item Description
[Driving Position]
[Right] [Left]
Setting the driving position.
• Apple CarPlay™ (page 65)
• Android Auto™ (page 68)
[Android Auto Auto-launch]
Menu Item Description
[Android Auto Auto-
launch]
[On] [Off]
Select [On] to display the Android Auto screen
automatically when an Android device is connected to the
unit.

- 120 -
English
Registering your favorite menu items in shortcuts allows you to quickly jump to the
registered menu screen by a simple touch on the [Favorites] screen.
NOTE
Up to 12 menu items can be registered in the favorite menu.
1 Touch then swipe left on the screen.
2 Touch .
3 Touch the star icon of the menu item for which to create a shortcut.
The star icon for the selected menu is filled in.
TIP
To cancel the registration, touch the star icon in the menu column again.
1 Touch then swipe left on the screen.
2 Touch .
3 Touch the desired menu item.
1 Touch then swipe left on the screen.
2 Touch .
3 Touch and hold the menu item that you want to remove.
The selected menu item is removed from the [Favorites] screen.
Favorite menu
Creating a shortcut
Selecting a shortcut
Removing a shortcut
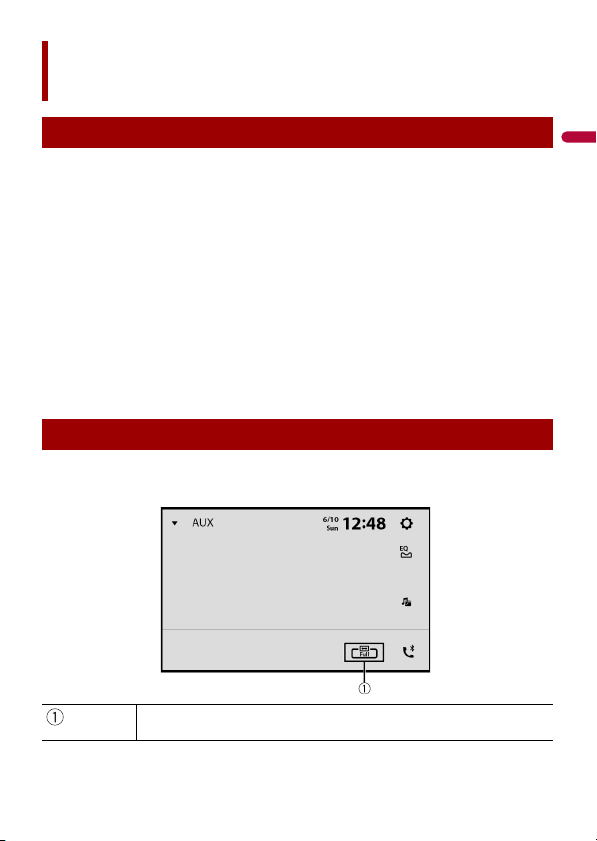
English
- 121 -
You can set the time format, time zone, daylight saving, and the date format.
However, the time and date are automatically adjusted by the GPS antenna and cannot
be adjusted by the user.
1 Touch the current time on the screen.
2 Set the following items in the settings.
• The date display format:
day-month-year, month-day-year, or year-month-day
• The time display format:
[12hour] or [24hour]
• The UTC (Universal Time Coordinated) time zone difference:
[UTC-12h] to [UTC+14h]
• Day-light saving time:
[On] or [Off]
You can also configure these items in [Clock Settings] (page 106).
You can set the screen mode for AV screen and image files.
1 Touch the screen display mode key.
Other functions
Setting the clock display
Changing the wide screen mode
Screen display mode key
- 122 -
English
2 Touch the desired mode.
TIPS
• Different settings can be stored for each video source.
• When a video is viewed in wide screen mode that does not match its original aspect ratio, it may
appear different.
• The video image will appear coarser when viewed in [Zoom] mode.
NOTES
• Image files can be set to either [Normal] or [Trimming] in wide screen mode.
• Depending on the software version of this unit, this function may vary.
You can restore settings or recorded content to the default settings from [Restore
Settings] in (page 106).
[Full] Displays images across the entire screen.
NOTE
Some images may not be displayed across the entire screen.
[Zoom] Displays the images enlarging them vertically.
[Normal] Displays images without changing the ratio.
[Trimming] An image is displayed across the entire screen with the horizontal-to-vertical ratio
left as is. If the screen ratio differs from the image, the image may be displayed
partly cut off either at the top/bottom or sides.
NOTE
[Trimming] is for image files only.
Restoring this product to the default settings
English
- 123 -
If you have problems operating this
product, refer to this section. The most
common problems are listed below, along
with likely causes and solutions. If a
solution to your problem cannot be found
here, contact your dealer or the nearest
authorized Pioneer service facility.
A black screen is displayed, and
operation is not possible using the touch
panel keys.
→ [Power OFF] mode is on.
– Touch any button on this product to
release the mode.
Bluetooth operation does not work.
→ The power failed for the Bluetooth
module of this product.
– Turn the ignition switch to OFF and
then to ON.
If the error message is still displayed
after performing the above action,
please contact your dealer or an
authorized Pioneer Service Station.
The screen is covered by a caution
message and the video cannot be shown.
→ The parking brake lead is not connected
or the parking brake is not applied.
– Connect the parking brake lead
correctly, and apply the parking brake.
→ The speed sensor detects that the
vehicle is moving.
– Park your vehicle in a safe place and
apply the parking brake.
No video output from the connected
equipment.
→ The [AV Input] or [AUX Input] setting is
incorrect.
– Correct the settings.
The audio or video skips.
→ This product is not firmly secured.
– Secure this product firmly.
No sounds are produced. The volume
level will not rise.
→ Cables are not connected correctly.
– Connect the cables correctly.
The icon is displayed, and operation is
impossible.
→ The operation is not compatible with
the video configuration.
– The operation is not possible.
Random playback in Music Browse mode
is released in the USB storage device.
→ Random playback in Music Browse
mode is canceled after the ignition
switch is turned off (ACC OFF).
– Switch to Music Browse mode again
and turn on random playback.
The picture is stretched, with an incorrect
aspect ratio.
→ The aspect setting is incorrect for the
display.
– Select the appropriate setting for that
image.
iPhone cannot be operated.
→ The iPhone is frozen.
– Reconnect the iPhone with the USB
interface cable for iPhone.
Appendix
Troubleshooting
Common problems
Problems with the AV screen
English
- 124 -
– Update the iPhone software version.
→ An error has occurred.
– Reconnect the iPhone with the USB
interface cable for iPhone.
– Park your vehicle in a safe place, and
then turn off the ignition switch (ACC
OFF). Subsequently, turn the ignition
switch to on (ACC ON) again.
– Update the iPhone software version.
– Reconnect the iPhone via the Wi-Fi
connection.
→ Cables are not connected correctly.
– Connect the cables correctly.
Sound from the iPhone cannot be heard.
→ The audio output direction may switch
automatically when the Bluetooth and
USB connections are used at the same
time.
– Use the iPhone to change the audio
output direction.
No back camera image when the vehicle
is in reverse.
→ The back camera input setting on the
receiver is set to Off.
– Change the back camera setting to On
in the settings menu. (Refer to the
System Settings section of this manual
to adjust.)
→ The camera input may be loose or not
connected.
– Check the connection and make sure
the male end of the camera is
connected to the brown input on the
back of the receiver. (Refer to the
installation manual.)
→ The reverse lead on the receiver may
not be connected to the proper wire at
the reverse lamp.
– Check the connection and make sure
that the violet/white lead of the
receiver is connected to the lead
whose voltage changes when the shift
lever is put in reverse. (Refer to the
installation manual.)
Black screen displayed when the vehicle
is in reverse, with no camera installed.
→ Back camera input is set to On.
– Turn the setting to Off in the settings
menu. (Refer to the System Settings
section of this manual to adjust.)
Back image displayed when vehicle is not
in reverse.
→ The camera polarity is not set properly
in the Camera settings menu.
– Review System Settings section of this
manual for steps to switch the camera
polarity. Park in a safe place, then
while keeping your foot firmly on the
brake, put the vehicle in reverse,
access the System Settings menu, and
change the camera polarity setting.
Put vehicle back in park. (Refer to the
System Settings section of this manual
to adjust.)
Dialing is impossible because the touch
panel keys for dialing are inactive.
→ Your phone is out of range for service.
– Retry after re-entering the range for
service.
→ The connection between the cellular
phone and this product cannot be
established.
– Perform the connection process.
→ Of the two cellular phones connected
to this product at the same time, if the
first phone is dialing, ringing or a call is
in progress, dialing cannot be
performed on the second phone.
– When the operation on the first of the
two cellular phones is completed, use
the switch devices key to switch to the
second phone and then dial.
Problems with the phone screen

English
- 125 -
A black screen is displayed.
→ While operating an application, the
application was ended on the
smartphone side.
–Touch to display the home menu
screen.
→ The smartphone OS may be awaiting
screen operation.
– Stop the vehicle in a safe place and
check the screen on the smartphone.
The screen is displayed, but operation
does not work at all.
→ An error has occurred.
– Park your vehicle in a safe place, and
then turn off the ignition switch (ACC
OFF). Subsequently, turn the ignition
switch to on (ACC ON) again.
– When an Android device is connected,
disconnect the Bluetooth connection
from this product and then reconnect
it.
The smartphone was not charged.
→ Charging stopped because the
temperature of the smartphone rose
due to prolonged use of the
smartphone during charging.
– Disconnect the smartphone from the
cable, and wait until the smartphone
cools down.
→ More battery power was consumed
than was gained from charging.
– This problem may be resolved by
stopping any unnecessary services on
the smartphone.
When problems occur with this product, an
error message appears on the display.
Refer to the table below to identify the
problem, then take the suggested
corrective action. If the error persists,
record the error message and contact your
dealer or your nearest Pioneer service
center.
AMP Error
→ This product fails to operate or the
speaker connection is incorrect; the
protective circuit is activated.
– Check the speaker connection. If the
message fails to disappear even after
the engine is switched off/on, contact
your dealer or an authorized Pioneer
Service Station for assistance.
Product overheat. System will be shut
down automatically in 1 minute. Restart
the product by ACC-Off/On may fix this
problem. If this message keep showing
up, it is possible that some problem
occured in the product.
→ The temperature of the main unit is too
high.
– Turn off the ignition switch (ACC OFF)
then wait until the main unit
temperature reaches low.
Check Antenna
→ The antenna connection is incorrect.
– Check the antenna connection. If the
message fails to disappear even after
the engine is switched off/on, contact
your dealer or the nearest authorized
Pioneer service center for assistance.
Check Tuner
→ The SiriusXM Connect Vehicle Tuner
connection is incorrect.
– Check the tuner connection and
battery voltage. If the message fails to
Problems with Application
screen
Error messages
Common
SiriusXM® Satellite Radio

English
- 126 -
disappear even after the engine is
switched off/on, contact your dealer
or the nearest authorized Pioneer
service center for assistance.
No Signal
→ The SiriusXM Connect Vehicle Tuner is
having difficulty receiving the SiriusXM
satellite signal.
– Verify that your vehicle is outdoors
with a clear view of the southern sky.
– Verify that the SiriusXM magnetic
mount antenna is mounted on a metal
surface on the outside of the vehicle.
– Move the SiriusXM antenna away from
any obstructions.
No Content
→ TuneScan™ is not available.
– Perform the operation with another
preset channel.
Channel Not Available
→ The channel that you have requested is
not a valid SiriusXM channel.
– Visit www.siriusxm.com for more
information about the SiriusXM
channel lineup.
Subscription Updated Press Enter to
Continue
→ This product has detected a change in
your SiriusXM subscription status.
– Touch [Enter] to clear the message.
In the U.S.A., visit www.siriusxm.com
or call 1-866-635-2349 if you have
questions about your subscription. In
Canada, visit www.siriusxm.ca or call
1-877-438-9677 if you have questions
about your subscription.
Channel Not Subscribed. Call SiriusXM to
Subscribe.
→ The channel that you have requested is
not included in your SiriusXM
subscription package.
– Check the content of your SiriusXM
subscription package.
In the U.S.A., visit www.siriusxm.com
or call 1-866-635-2349 if you have
questions about your subscription
package or would like to subscribe to
this channel. In Canada, visit
www.siriusxm.ca or call 1-877-438-
9677.
Channel Locked Please Enter the Lock
Code
→ Locked by the radio Parental Control
feature.
– Release the channel lock.
Memory Full
→ The memory has become full while
playback was paused.
– Resume playback.
Memory Nearly Full
→ The memory has become nearly full
while playback was paused.
– Resume playback.
There are no qualified TuneMix music
channels in this band.
→ There are no qualified TuneMix
channels in this band.
– Requires two or more qualified music
channels to be stored as presets in the
current band.
Error-02-9X/-DX
→ Communication failed.
– Turn the ignition switch OFF and back
ON.
– Disconnect the USB storage device.
– Change to a different source. Then,
return to the USB storage device.
Unplayable File
→ There is no playable file in the USB
storage device.
USB storage device

English
- 127 -
– Check that the files in the USB storage
device are compatible with this
product.
→ Security for the connected USB storage
device is enabled.
– Follow the USB storage device
instructions to disable security.
Skipped
→ The connected USB storage device
contains DRM protected files.
– The protected files are skipped.
Protect
→ All the files on the connected USB
storage device are embedded with
DRM.
– Replace the USB storage device.
Incompatible USB
→ The connected USB storage device is
not supported by this product.
– Disconnect your device and replace it
with a compatible USB storage device.
Check USB
→ The USB connector or USB cable has
short-circuited.
– Check that the USB connector or USB
cable is not caught in something or
damaged.
→ The connected USB storage device
consumes more than maximum
allowable current.
– Disconnect the USB storage device
and do not use it. Turn the ignition
switch to OFF, then to ACC or ON and
then connect a compliant USB storage
device.
HUB Error
→ The connected USB hub is not
supported by this product.
– Directly connect the USB storage
device to this product.
No Response
→ This product cannot recognize the
connected USB storage device.
– Disconnect the device and replace it
with another USB storage device.
→ The USB connector or USB cable has
short-circuited.
– Check that the USB connector or USB
cable is not caught in something or
damaged.
→ The connected USB storage device
consumes more than maximum
allowable current.
– Disconnect the USB storage device
and do not use it. Turn the ignition
switch to OFF, then to ACC or ON and
then connect a compliant USB storage
device.
→ The USB interface cable for iPhone has
short-circuited.
– Confirm that the USB interface cable
for iPhone or USB cable is not caught
in something or damaged.
Your device is not authorized to play this
DivX protected video.
→ This product cannot play copy-
protected DivX files.
– Select a file that can be played.
Audio Format not supported
→ This type of file is not supported on this
product.
– Select a file that can be played.
There was a problem communicating
with your iPhone. Please reconnect.
→ iPhone failure.
– Disconnect the cable from the iPhone.
Once the iPhone’s main menu is
displayed, reconnect the iPhone and
reset it.
→ The iPhone firmware version is old.
– Update the iPhone version.
iPhone

English
- 128 -
Connection failed.
→ Communication failed and the system is
trying to connect.
→ Wait for a while. Then, perform the
actions below if the error message is still
displayed.
– Restart the iPhone.
– Disconnect the cable from the iPhone,
and then connect the iPhone again
after a few seconds.
– Turn the ignition switch to OFF and
then to ON.
Please attach the GPS antenna in order to
use Apple CarPlay over Wireless.
→ This unit cannot properly detect the
GPS signal from the GPS antenna.
– Check the GPS antenna installation
and connection. For details about the
connection and installation, refer to
the Installation Manual.
The speed sensor is disconnected. Please
attach it.
→ The speed sensor cannot detect any
signal.
– Check the speed signal cable
connection. For details about the
connection, refer to the Installation
Manual.
Please attach the GPS antenna and the
speed sensor in order to use Apple
CarPlay over Wireless.
→ This unit cannot detect the GPS signal
from the GPS antenna and the speed
signal from the speed sensor.
– Check the connection and installation
for both. For details about the
connection and installation, refer to
the Installation Manual.
If the error message is still displayed after
performing the above action, please
contact your dealer or an authorized
Pioneer Service Station.
Android Auto has stopped.
→ The connected device is not compatible
with Android Auto.
– Check if the device is compatible with
Android Auto.
→ The startup of Android Auto failed for
some reasons.
– Disconnect the cable from the
smartphone, and then connect the
smartphone again after a few seconds.
– Restart the smartphone.
– Turn the ignition switch to OFF and
then to ON.
Android Auto has stopped. Please adjust
the time to match that of the Android
phone, or check the screen of your
Android phone when it is safe to do so.
→ The time set in this product or the
smartphone is not correct.
– Set the correct time.
If the error message is still displayed after
performing the above action, please
contact your dealer or an authorized
Pioneer Service Station.
Bluetooth pairing failed.
→ The Bluetooth pairing failed for some
reasons.
– Pair this product with the device
manually.
To use Android Auto, please stop your car
and check your Android phone.
→ The default settings are displayed on
the screen of the Android Auto
compatible device or images are not
output from the Android Auto
compatible device.
– Park your vehicle in a safe place, and
follow the instructions displayed on
Apple CarPlay
Android Auto

English
- 129 -
the screen. If the error message is still
displayed after performing on-screen
instructions, please reconnect the
device.
Common notes about the USB storage
device
• Do not leave the USB storage device in
any location with high temperatures.
• Depending on the kind of the USB
storage device you use, this product may
not recognize the storage device or files
may not be played back properly.
• The text information of some audio and
video files may not be correctly
displayed.
• File extensions must be used properly.
• There may be a slight delay when starting
playback of files on an USB storage
device with complex folder hierarchies.
• Operations may vary depending on the
kind of an USB storage device.
• It may not be possible to play some music
files from USB because of file
characteristics, file format, recorded
application, playback environment,
storage conditions, and so on.
USB storage device compatibility
• For details about USB storage device
compatibility with this product, refer to
Specifications (page 138).
• Protocol: bulk
• You cannot connect a USB storage device
to this product via a USB hub.
• Partitioned USB storage device is not
compatible with this product.
• Firmly secure the USB storage device
when driving. Do not let the USB storage
device fall onto the floor, where it may
become jammed under the brake or gas
pedal.
• There may be a slight delay when starting
playback of audio files encoded with
image data.
• Some USB storage devices connected to
this product may generate noise on the
radio.
• Do not connect anything other than the
USB storage device.
The sequence of audio files on USB storage
device.
For USB storage device, the sequence is
different from that of USB storage device.
Handling guidelines and supplemental
information
• Copyright protected files cannot be
played back.
Common notes about DivX files
Notes specific to DivX files
• Only DivX files downloaded from DivX
partner sites are guaranteed for proper
operation. Unauthorized DivX files may
not operate properly.
• This product corresponds to a DivX file
display of up to 1 590 minutes 43
seconds. Search operations beyond this
time limit are prohibited.
• For details on the DivX video versions
that can be played on this product, refer
to Specifications (page 138).
• For more details about DivX, visit the
following site: https://www.divx.com/
General
• Maximum playback time of audio file
stored on an USB storage device: 8 h (480
minutes)
Detailed information
for playable media
Compatibility
Media compatibility chart
English
- 130 -
USB storage device
MP3 compatibility
• Ver. 2.x of ID3 tag is prioritized when both
Ver. 1.x and Ver. 2.x exist.
• This product is not compatible with the
following: MP3i (MP3 interactive), mp3
PRO, m3u playlist
WMA compatibility
• This product is not compatible with the
following: Windows Media™ Audio 9.2
Professional, Lossless, Voice
WAV compatibility
• The sampling frequency shown in the
display may be rounded.
AAC compatibility
• This product plays back AAC files
encoded by iTunes.
FLAC compatibility
DSD compatibility
DivX compatibility
• This product is not compatible with the
following: DivX Ultra format, DivX files
without video data, DivX files encoded
with LPCM (Linear PCM) audio codec.
• Some special operations may be
prohibited because of the composition of
DivX files.
USB storage device
Video files compatibility
• Files may not be played back properly
depending on the environment in which
the file was created or on the contents of
the file.
• This product is not compatible with
packet write data transfer.
• This product can recognize up to 32
characters, beginning with the first
character, including extension for the file
and folder name. Depending on the
display area, this product may try to
CODEC FORMAT MP3, WMA,
WAV, AAC,
FLAC, DSD, AVI,
MPEG-PS,
MPEG-TS, MP4,
3GP, MKV,
MOV, ASF, FLV,
M4V
SAMPLING FREQUENCY 8 kHz to 48 kHz
TRANSMISSION RATE 8 kbps to 320
kbps (CBR)/VBR
ID3 TAG Folder Browse
mode
ver.1.0/1.1/2.2/
2.3/2.4
Music Browse
mode
ver.2.2/2.3/2.4
SAMPLING FREQUENCY 32 kHz to 48
kHz
TRANSMISSION RATE 8 kbps to 320
kbps (CBR)/VBR
SAMPLING FREQUENCY 16 kHz to 192
kHz
QUANTIZATION BIT RATE 8 bit/16 bit/24
bit/32 bit (int
only)
SAMPLING FREQUENCY 8 kHz to 48 kHz
TRANSMISSION RATE 16 kbps to 320
kbps (CBR)
SAMPLING FREQUENCY 8 kHz to 192
kHz
QUANTIZATION BIT RATE 8 bit/16 bit/24
bit
SAMPLING FREQUENCY DSD64:
2.8 MHz
DSD128:
5.6 MHz
QUANTIZATION BIT RATE 1 bit
EXTENSION .divx, .avi
MAX RESOLUTION 720 × 576

English
- 131 -
display them with a reduced font size.
However, the maximum number of the
characters that you can display varies
according to the width of each character,
and of the display area.
• Folder selection sequence or other
operations may be altered, depending on
the order in which files are saved to the
USB storage device.
• Regardless of the length of blank section
between the songs of original recording,
compressed audio files play with a short
pause between songs.
• Files may not be able to be played back
depending on the bit rate.
• The maximum resolution depends on the
compatible video codec.
• This product's display does not have Full
HD rendering capability.
.avi
.mpg/.mpeg
.divx
.mp4
.3gp
.mkv
.mov
.flv
.wmv/.asf
.m4v
.ts/.m2ts/.mts
Example of a hierarchy
NOTE
This product assigns folder numbers. The
user cannot assign folder numbers.
Compatible video codec MPEG4, DivX,
H.264, H.263
Maximum resolution 1 920 × 1 080
Maximum frame rate 30 fps
Compatible video codec MPEG2
Maximum resolution 720 × 576
Maximum frame rate 30 fps
Compatible video codec DivX
Maximum resolution 720 × 576
Maximum frame rate 30 fps
Compatible video codec MPEG4, H.264,
H.263
Maximum resolution 1 920 × 1 080
Maximum frame rate 30 fps
Compatible video codec H.263
Maximum resolution 1 920 × 1 080
Maximum frame rate 30 fps
Compatible video codec MPEG4, H.264,
VC-1
Maximum resolution 1 920 × 1 080
Maximum frame rate 30 fps
Compatible video codec MPEG4, H.264,
H.263
Maximum resolution 1 920 × 1 080
Maximum frame rate 30 fps
Compatible video codec H.264
Maximum resolution 1 920 × 1 080
Maximum frame rate 30 fps
Compatible video codec VC-1
Maximum resolution 1 920 × 1 080
Maximum frame rate 30 fps
Compatible video codec MPEG4, H.264,
H.263
Maximum resolution 1 920 × 1 080
Maximum frame rate 30 fps
Compatible video codec MPEG4, H.264,
MPEG2
Maximum resolution 1 920 × 1 080
Maximum frame rate 30 fps

English
- 132 -
The Bluetooth® word mark and logos are
registered trademarks owned by Bluetooth SIG,
Inc. and any use of such marks by Pioneer
Corporation is under license. Other trademarks
and trade names are those of their respective
owners.
USB Type-C® and USB-C® are registered
trademarks of USB Implementers Forum.
The terms HDMI and HDMI High-Definition
Multimedia Interface, and the HDMI Logo
are trademarks or registered trademarks of
HDMI Licensing Administrator, Inc.
SiriusXM and all related marks and logos are
trademarks of Sirius XM Radio, Inc. All rights
reserved.
Wi-Fi® is a registered trademark of Wi-Fi
Alliance®.
Wi-Fi Protected Setup™ is a trademark of
Wi-Fi Alliance®.
The Wi-Fi CERTIFIED™ Logo and the Wi-Fi
Protected Setup™ Logo are registered
trademarks of Wi-Fi Alliance®.
HD Radio Technology manufactured under
license from iBiquity Digital Corporation.
U.S. and Foreign Patents. For patents see
http://dts.com/patents. HD Radio and the
HD, HD Radio, and "ARC" logos are
registered trademarks or trademarks of
iBiquity Digital Corporation in the United
States and/or other countries.
This product will down-mix Dolby Digital signals
internally and the sound will be output in stereo.
• Manufactured under license from Dolby
Laboratories. Dolby and the double-D
symbol are trademarks of Dolby
Laboratories.
Bluetooth
USB Type-C
HDMI
SiriusXM® Satellite
Radio
Wi-Fi
HD Radio™ Technology
Dolby Digital
English
- 133 -
Windows Media is either a registered trademark
or trademark of Microsoft Corporation in the
United States and/or other countries.
• This product includes technology owned
by Microsoft Corporation and cannot be
used or distributed without a license
from Microsoft Licensing, Inc.
Copyright © 2000-2009 Josh Coalson
Copyright © 2011-2013 Xiph.Org
Foundation
Redistribution and use in source and
binary forms, with or without modification,
are permitted provided that the following
conditions are met:
– Redistributions of source code must
retain the above copyright notice, this list
of conditions and the following
disclaimer.
– Redistributions in binary form must
reproduce the above copyright notice,
this list of conditions and the following
disclaimer in the documentation and/or
other materials provided with the
distribution.
– Neither the name of the Xiph.org
Foundation nor the names of its
contributors may be used to endorse or
promote products derived from this
software without specific prior written
permission.
THIS SOFTWARE IS PROVIDED BY THE
COPYRIGHT HOLDERS AND
CONTRIBUTORS “AS IS” AND ANY EXPRESS
OR IMPLIED WARRANTIES, INCLUDING, BUT
NOT LIMITED TO, THE IMPLIED
WARRANTIES OF MERCHANTABILITY AND
FITNESS FOR A PARTICULAR PURPOSE ARE
DISCLAIMED. IN NO EVENT SHALL THE
FOUNDATION OR CONTRIBUTORS BE
LIABLE FOR ANY DIRECT, INDIRECT,
INCIDENTAL, SPECIAL, EXEMPLARY, OR
CONSEQUENTIAL DAMAGES (INCLUDING,
BUT NOT LIMITED TO, PROCUREMENT OF
SUBSTITUTE GOODS OR SERVICES; LOSS OF
USE, DATA, OR PROFITS; OR BUSINESS
INTERRUPTION) HOWEVER CAUSED AND
ON ANY THEORY OF LIABILITY, WHETHER
IN CONTRACT, STRICT LIABILITY, OR TORT
(INCLUDING NEGLIGENCE OR OTHERWISE)
ARISING IN ANY WAY OUT OF THE USE OF
THIS SOFTWARE, EVEN IF ADVISED OF THE
POSSIBILITY OF SUCH DAMAGE.
DivX® Home Theater Certified devices have been
tested for high-quality DivX Home Theater video
playback (including .avi, .divx). When you see
the DivX logo, you know you have the freedom
to play your favorite videos.
DivX®, DivX Certified® and associated logos are
trademarks of DivX, LLC and are used under
license.
This DivX Certified® device can play DivX® Home
Theater video files up to 576p (including .avi,
.divx).
Download free software at www.divx.com to
create, play and cast digital videos.
AAC is short for Advanced Audio Coding
and refers to an audio compression
technology standard used with MPEG-2
and MPEG-4. Several applications can be
used to encode AAC files, but file formats
and extensions differ depending on the
WMA
FLAC
DivX
AAC
English
- 134 -
application which is used to encode. This
unit plays back AAC files encoded by
iTunes.
The product with this logo is conformed to
High-Resolution Audio standard defined
by Japan Audio Society. This logo is used
under license from Japan Audio Society.
In order to listen music with Hi-Res sound
quality, all components complied with
High-Resolution Audio Standard of Japan
Audio Society are recommended to use.
Google, Google Play and Android are
trademarks of Google LLC.
Android Auto is a trademark of Google LLC.
• Pioneer accepts no responsibility for data
lost from an iPhone, even if that data is
lost while using this product. Please back
up your iPhone data regularly.
• Do not leave the iPhone in direct sunlight
for extended amounts of time. Extended
exposure to direct sunlight can result in
iPhone malfunction due to the resulting
high temperature.
• Do not leave the iPhone in any location
with high temperatures.
• Firmly secure the iPhone when driving.
Do not let the iPhone fall onto the floor,
where it may become jammed under the
brake or gas pedal.
• For details, refer to the iPhone manuals.
Use of the Made for Apple badge means that
an accessory has been designed to connect
specifically to the Apple product(s) identified
in the badge, and has been certified by the
developer to meet Apple performance
standards. Apple is not responsible for the
operation of this device or its compliance with
safety and regulatory standards.
Please note that the use of this accessory
with an Apple product may affect wireless
performance.
iPhone and Lightning are trademarks of
Apple Inc., registered in the U.S. and other
countries.
High-Resolution Audio
Google, Google Play,
Android
Android Auto
Detailed information
regarding connected
iPhone devices
iPhone and Lightning®
English
- 135 -
App Store is a service mark of Apple Inc.
iOS is a trademark on which Cisco holds
the trademark right in the US and certain
other countries.
iTunes is a trademark of Apple Inc.,
registered in the U.S. and other
countries.
Apple Music is a trademark of Apple
Inc., registered in the U.S. and other
countries.
Apple CarPlay is a trademark of Apple Inc.
Use of the Works with Apple badge means
that an accessory has been designed to work
specifically with the technology identified in
the badge and has been certified by the
developer to meet Apple performance
standards.
Works with Siri through the microphone.
• iPhone XS
• iPhone XS Max
• iPhone XR
• iPhone X
• iPhone 8
• iPhone 8 Plus
• iPhone 7
• iPhone 7 Plus
• iPhone SE
• iPhone 6s
• iPhone 6s Plus
• iPhone 6
• iPhone 6 Plus
• iPhone 5s
Depending on the iPhone models, it may
not be compatible with some AV sources.
For details about iPhone compatibility with
this product, refer to the information on
our website.
Amazon, Alexa, Kindle, Audible, Echo,
Amazon Music and all related logos are
trademarks of Amazon.com, Inc. or its
affiliates.
App Store
iOS
iTunes
Apple Music
Apple CarPlay
Siri
Compatible iPhone models
Amazon, Alexa, Kindle,
Audible, Echo, Amazon
Music
METRA
®

English
- 136 -
Gracenote, the Gracenote logo and
logotype are either a registered trademark
or a trademark of Gracenote, Inc. in the
United States and/or other countries.
Important
Requirements to access app-based
connected content services using this
product:
• Latest version of the Pioneer compatible
connected content application(s) for the
smartphone, available from the service
provider, downloaded to your
smartphone.
• A current account with the content
service provider.
• Smartphone Data Plan.
Note: if the Data Plan for your
smartphone does not provide for
unlimited data usage, additional charges
from your carrier may apply for accessing
app-based connected content via 3G,
EDGE and/or LTE (4G) networks.
• Connection to the Internet via 3G, EDGE,
LTE (4G) or Wi-Fi network.
• Optional Pioneer adaptor cable
connecting your iPhone to this product.
Limitations:
• Access to app-based connected content
will depend on the availability of cellular
and/or Wi-Fi network coverage for the
purpose of allowing your smartphone to
connect to the Internet.
• Service availability may be
geographically limited to the region.
Consult the connected content service
provider for additional information.
• Ability of this product to access
connected content is subject to change
without notice and could be affected by
any of the following: compatibility issues
with future firmware versions of
smartphone; compatibility issues with
future versions of the connected content
application(s) for the smartphone;
changes to or discontinuation of the
connected Content application(s) or
service by its provider.
• Pioneer is not liable for any issues that
may arise from incorrect or flawed app-
based content.
• The content and functionality of the
supported applications are the
responsibility of the App providers.
• In Apple CarPlay and Android Auto,
functionality through the product is
limited while driving, with available
functions determined by the App
providers.
• Availability of Apple CarPlay and Android
Auto functionalities is determined by the
App provider, and not determined by
Pioneer.
• Apple CarPlay and Android Auto allow
access to applications other than those
listed (subject to limitations while
driving), but the extent to which content
can be used is determined by the App
providers.
Remember that use of this system for
commercial or public viewing purposes
may constitute an infringement on the
author’s rights as protected by the
Copyright Law.
Gracenote
Using app-based
connected content
Notice regarding video
viewing

English
- 137 -
• When the LCD screen is subjected to
direct sunlight for a long period of time, it
will become very hot, resulting in
possible damage to the LCD screen.
When not using this product, avoid
exposing it to direct sunlight as much as
possible.
• The LCD screen should be used within
the temperature ranges shown in
Specifications on page 138.
• Do not use the LCD screen at
temperatures higher or lower than the
operating temperature range, because
the LCD screen may not operate normally
and could be damaged.
• The LCD screen is exposed in order to
increase its visibility within the vehicle.
Please do not press strongly on it as this
may damage it.
• Do not push the LCD screen with
excessive force as this may scratch it.
• Never touch the LCD screen with
anything besides your finger when
operating the touch panel functions. The
LCD screen can scratch easily.
• If the LCD screen is near the vent of an air
conditioner, make sure that air from the
air conditioner is not blowing on it. Heat
from the heater may break the LCD
screen, and cool air from the cooler may
cause moisture to form inside this
product, resulting in possible damage.
• Small black dots or white dots (bright
dots) may appear on the LCD screen.
These are due to the characteristics of the
LCD screen and do not indicate a
malfunction.
• The LCD screen will be difficult to see if it
is exposed to direct sunlight.
• When using a cellular phone, keep the
antenna of the cellular phone away from
the LCD screen to prevent disruption of
the video in the form of disturbances
such as spots or colored stripes.
• When removing dust from or cleaning
the LCD screen, first turn this product off
and then wipe the screen with a soft dry
cloth.
• When wiping the LCD screen, take care
not to scratch the surface. Do not use
harsh or abrasive chemical cleaners.
A light emitting diode is used inside the
display to illuminate the LCD screen.
• At low temperatures, using the LED
backlight may increase image lag and
degrade the image quality because of the
characteristics of the LCD screen. Image
quality will improve with an increase in
temperature.
• The product lifetime of the LED backlight
is more than 10 000 hours. However, it
may decrease if used in high
temperatures.
• If the LED backlight reaches the end of its
product lifetime, the screen will become
dimmer and the image will no longer be
visible. In that case, please consult your
dealer or the nearest authorized Pioneer
Service Station.
Using the LCD screen
correctly
Handling the LCD screen
Liquid crystal display (LCD)
screen
Maintaining the LCD screen
LED (light-emitting diode)
backlight

English
- 138 -
General
Rated power source:
14.4 V DC (10.8 V to 15.1 V allowable)
Grounding system:
Negative type
Maximum current consumption:
10.0 A
Dimensions (W × H × D):
(DMH-WT8600NEX)
Chassis (D):
178 mm × 50 mm × 165 mm (7 in. × 2
in. × 6-1/2 in.)
Nose:
170 mm × 46 mm × 7.5 mm (6-3/4 in. ×
1-3/4 in. × 1/4 in.)
Monitor:
257 mm × 147 mm × 37 mm (10-1/8 in.
× 5-3/4 in. × 1-1/2 in.)
(DMH-WT7600NEX/DMH-WT76NEX)
Chassis (D):
178 mm × 50 mm × 165 mm (7 in. × 2
in. × 6-1/2 in.)
Nose:
170 mm × 46 mm × 7.5 mm (6-3/4 in. ×
1-3/4 in. × 1/4 in.)
Monitor:
231 mm × 131 mm × 37 mm (9-1/8 in.
× 5-1/8 in. × 1-1/2 in.)
(DMH-WC6600NEX)
Body:
178 mm × 50 mm × 135 mm (7 in. × 2
in. × 5-3/8 in.)
Monitor:
230 mm × 130 mm × 29 mm (9 in. × 5-
1/8 in. × 1-1/8 in.)
(DMH-W4660NEX/DMH-W4600NEX)
Chassis (D):
178 mm × 100 mm × 87 mm (7 in. × 3-
7/8 in. × 3-3/8 in.)
Nose:
171 mm × 97 mm × 3 mm (6-3/4 in. ×
3-7/8 in. × 1/8 in.)
Weight:
(DMH-WT8600NEX)
Body:
1.4 kg (3.1 lbs)
Monitor:
0.9 kg (2.0 lbs)
(DMH-WT7600NEX/DMH-WT76NEX)
Body:
1.4 kg (3.1 lbs)
Monitor:
0.7 kg (1.5 lbs)
(DMH-WC6600NEX)
Body:
0.8 kg (1.8 lbs)
Monitor:
0.8 kg (1.8 lbs)
(DMH-W4660NEX/DMH-W4600NEX)
0.9 kg (2.0 lbs)
Display
Screen size/aspect ratio:
(DMH-WT8600NEX)
10.1 inch wide/16:9 (effective display
area: 223.68 mm × 125.82 mm) (8-3/4 in.
× 4-7/8 in.)
(DMH-WT7600NEX/DMH-WT76NEX)
9.0 inch wide/16:9 (effective display area:
198.72 mm × 111.78 mm) (7-3/4 in. × 4-
3/8 in.)
(DMH-WC6600NEX)
9.0 inch wide/16:9 (effective display area:
198.72 mm × 111.78 mm) (7-3/4 in. × 4-
3/8 in.)
(DMH-W4660NEX/DMH-W4600NEX)
6.78 inch wide/16:9 (effective display
area: 152.4 mm × 80.208 mm) (6 in. × 3-1/
8 in.)
Pixels:
(DMH-WT8600NEX/DMH-WT7600NEX/
DMH-WT76NEX/DMH-WC6600NEX)
1 280 (Width) × 720 (Height) × 3 (RGB)
(DMH-W4660NEX/DMH-W4600NEX)
800 (Width) × 480 (Height) × 3 (RGB)
Display method:
TFT Active matrix driving
Specifications

English
- 139 -
Color system:
PAL/NTSC/PAL-M/PAL-N/SECAM
compatible
Temperature range:
-10 ˚C to +60 ˚C (+14 ˚F to +140 ˚F)
Audio
Maximum power output:
• 50 W × 4
• 50 W × 2 ch/4 Ω + 70 W × 1 ch/2 Ω (for
subwoofer)
Continuous power output:
22 W × 4 (50 Hz to 15 kHz, 5 %THD, 4 Ω
LOAD, Both Channels Driven)
Load impedance:
4 Ω (4 Ω to 8 Ω [2 Ω for 1 ch] allowable)
Preout output level (max): 4.0 V
Equalizer (13-Band Graphic Equalizer):
Frequency:
50 Hz/80 Hz/125 Hz/200 Hz/315 Hz/
500 Hz/800 Hz/1.25 kHz/2 kHz/3.15
kHz/5 kHz/8 kHz/12.5 kHz
Gain: ±12 dB (2 dB/step)
<Standard Mode>
HPF: ON/OFF
Frequency:
25 Hz/31.5 Hz/40 Hz/50 Hz/63 Hz/80
Hz/100 Hz/125 Hz/160 Hz/200 Hz/250
Hz
Slope:
-6 dB/oct, -12 dB/oct, -18 dB/oct, -24
dB/oct
LPF (Subwoofer): ON/OFF
Frequency:
25 Hz/31.5 Hz/40 Hz/50 Hz/63 Hz/80
Hz/100 Hz/125 Hz/160 Hz/200 Hz/250
Hz
Slope:
-6 dB/oct, -12 dB/oct, -18 dB/oct, -24
dB/oct, -30 dB/oct, -36 dB/oct
Phase: Normal/Reverse
Time alignment:
0 to 210 inch (0.6 inch/step)
Speaker level:
+10 dB to -24 dB (1 dB/step)
<Network Mode>
HPF (High): ON/OFF
Frequency:
1.25 kHz/1.6 kHz/2 kHz/2.5 kHz/3.15
kHz/4 kHz/5 kHz/6.3 kHz/8 kHz/10 kHz/
12.5 kHz
Slope:
-6 dB/oct, -12 dB/oct, -18 dB/oct, -24
dB/oct
Phase (High): Normal/Reverse
HPF (Mid): ON/OFF
Frequency:
25 Hz/31.5 Hz/40 Hz/50 Hz/63 Hz/80
Hz/100 Hz/125 Hz/160 Hz/200 Hz/250
Hz
Slope:
-6 dB/oct, -12 dB/oct, -18 dB/oct, -24
dB/oct
LPF (Mid): ON/OFF
Frequency:
1.25 kHz/1.6 kHz/2 kHz/2.5 kHz/3.15
kHz/4 kHz/5 kHz/6.3 kHz/8 kHz/10 kHz/
12.5 kHz
Slope:
-6 dB/oct, -12 dB/oct, -18 dB/oct, -24
dB/oct
Phase (Mid): Normal/Reverse
LPF (Subwoofer): ON/OFF
Frequency:
25 Hz/31.5 Hz/40 Hz/50 Hz/63 Hz/80
Hz/100 Hz/125 Hz/160 Hz/200 Hz/250
Hz
Slope:
-6 dB/oct, -12 dB/oct, -18 dB/oct, -24
dB/oct, -30 dB/oct, -36 dB/oct
Phase (Subwoofer): Normal/Reverse
Time alignment:
0 to 210 inch (0.6 inch/step)
Speaker level:
+10 dB to -24 dB (1 dB/step)
USB
USB standard spec:
USB 1.1, USB 2.0 full speed, USB 2.0 high
speed
Max current supply: 3.0 A

English
- 140 -
USB Class:
MSC (Mass Storage Class), MTP (Media
Transfer Protocol)
File system: FAT16, FAT32, NTFS
<USB audio>
MP3 decoding format:
MPEG-1 & 2 & 2.5 Audio Layer 3
WMA decoding format:
Ver. 7, 7.1, 8, 9, 10, 11, 12 (2 ch audio)
(Windows Media Player)
AAC decoding format:
MPEG-4 AAC (iTunes encoded only) (Ver.
12.5 and earlier)
FLAC decoding format (MSC Mode only)
WAV signal format (MSC Mode only):
Linear PCM
Sampling frequency:
16 kHz/22.05 kHz/24 kHz/32 kHz/44.1
kHz/48 kHz/96 kHz/192 kHz
DSD64, DSD128 format (MSC Mode only)
<USB image>
JPEG decoding format (MSC Mode only):
.jpeg, .jpg, .jpe
Pixel Sampling: 4:2:2, 4:2:0
Decode Size:
MAX: 7 680 (H) × 8 192 (W)
MIN: 32 (H) × 32 (W)
PNG decoding format (MSC Mode only):
.png
Decode Size:
MAX: 576 (H) × 720 (W)
MIN: 32 (H) × 32 (W)
BMP decoding format (MSC Mode only):
.bmp
Decode Size:
MAX: 936 (H) × 1 920 (W)
MIN: 32 (H) × 32 (W)
<USB video>
H.264 video decoding format:
Base Line Profile, Main Profile, High
Profile
H.263 video decoding format:
Base Line Profile 0/3
VC-1 video decoding format:
Simple Profile, Main Profile, Advanced
Profile
DivX:
Home Theater
MPEG4 video decoding format:
Simple Profile, Advanced Simple Profile
MPEG2 video decoding format:
Main Profile
Bluetooth
Version:
Bluetooth 4.2 certified
Output power:
+4 dBm Max. (Power class 2)
BLE (Bluetooth Low Energy) output power:
+3.5 dBm Max.
Frequency band(s):
2 402 MHz to 2 480 MHz
Bluetooth profiles:
HFP (Hands Free Profile) 1.7
PBAP (Phone Book Access Profile) 1.2
A2DP (Advanced Audio Distribution
Profile) 1.3
AVRCP (Audio/Video Remote Control
Profile) 1.6.1
SPP (Serial Port Profile) 1.2
AVCTP (Audio/Video Control Transport
Protocol) 1.4
AVDTP (Audio/Video Distribution
Transport Protocol) 1.3
DID (Device ID Profile) 1.3
GAVDP (Generic Audio/Video
Distribution Profile) 1.3
IOP (Interoperability Test Specification)
OPP (Object Push Profile)
RFCOMM (RFCOMM with TS 07.10) 1.2
FM tuner
Frequency range:
87.9 MHz to 107.9 MHz
Usable sensitivity:
12 dBf (1.1 μV/75 Ω, mono, S/N: 30 dB)
Signal-to-noise ratio:
(DMH-WT8600NEX/DMH-WT7600NEX/
DMH-WT76NEX/DMH-WC6600NEX/DMH-
W4660NEX)
65 dB (digital broadcasting) (IHF-A
network)

English
- 141 -
65 dB (analog broadcasting) (IHF-A
network)
(DMH-W4600NEX)
65 dB (IHF-A network)
AM tuner
Frequency range:
530 kHz to 1 710 kHz
Usable sensitivity:
25 μV (S/N: 20 dB)
Signal-to-noise ratio:
(DMH-WT8600NEX/DMH-WT7600NEX/
DMH-WT76NEX/DMH-WC6600NEX/DMH-
W4660NEX)
60 dB (digital broadcasting) (IHF-A
network)
60 dB (analog broadcasting) (IHF-A
network)
(DMH-W4600NEX)
60 dB (IHF-A network)
Wi-Fi
Frequency channel:
1 to 11 ch (2.4 GHz)
149, 151, 155 ch (5 GHz)
Security:
OPEN/WEP/WPA (personal)/WPA2
(personal)
GPS
GNSS receiver
System:
GPS L1C/Ac, SBAS L1C/A, GLONASS
L1OF, Galileo E1B/C
SPS (Standard Positioning Service)
Reception system:
72 channel Multi-channel reception
system
Reception frequency:
1 575.42 MHz/1 602 MHz
Sensitivity:
-140 dBm (typ)
Frequency:
Approx. once per second
GPS antenna
Antenna:
Micro strip flat antenna/right-handed
helical polarization
Antenna cable:
3.55 m (11ft. 7in.)
Dimensions (W × H × D):
33 mm × 14.7 mm × 36 mm (1-1/4 in. ×
1/2 in. × 1-3/8 in.)
Weight:
73.7 g (0.2 lbs)
CTA2006 Specifications
Power output:
14 W RMS × 4 Channels (4 Ω and 1 %
THD+N)
S/N ratio:
90 dB (IHF-A)
NOTE
Specifications and design are subject to possible
modifications without notice due to
improvements.
<
=