Owner Manual Professional Air Purifier
Operation
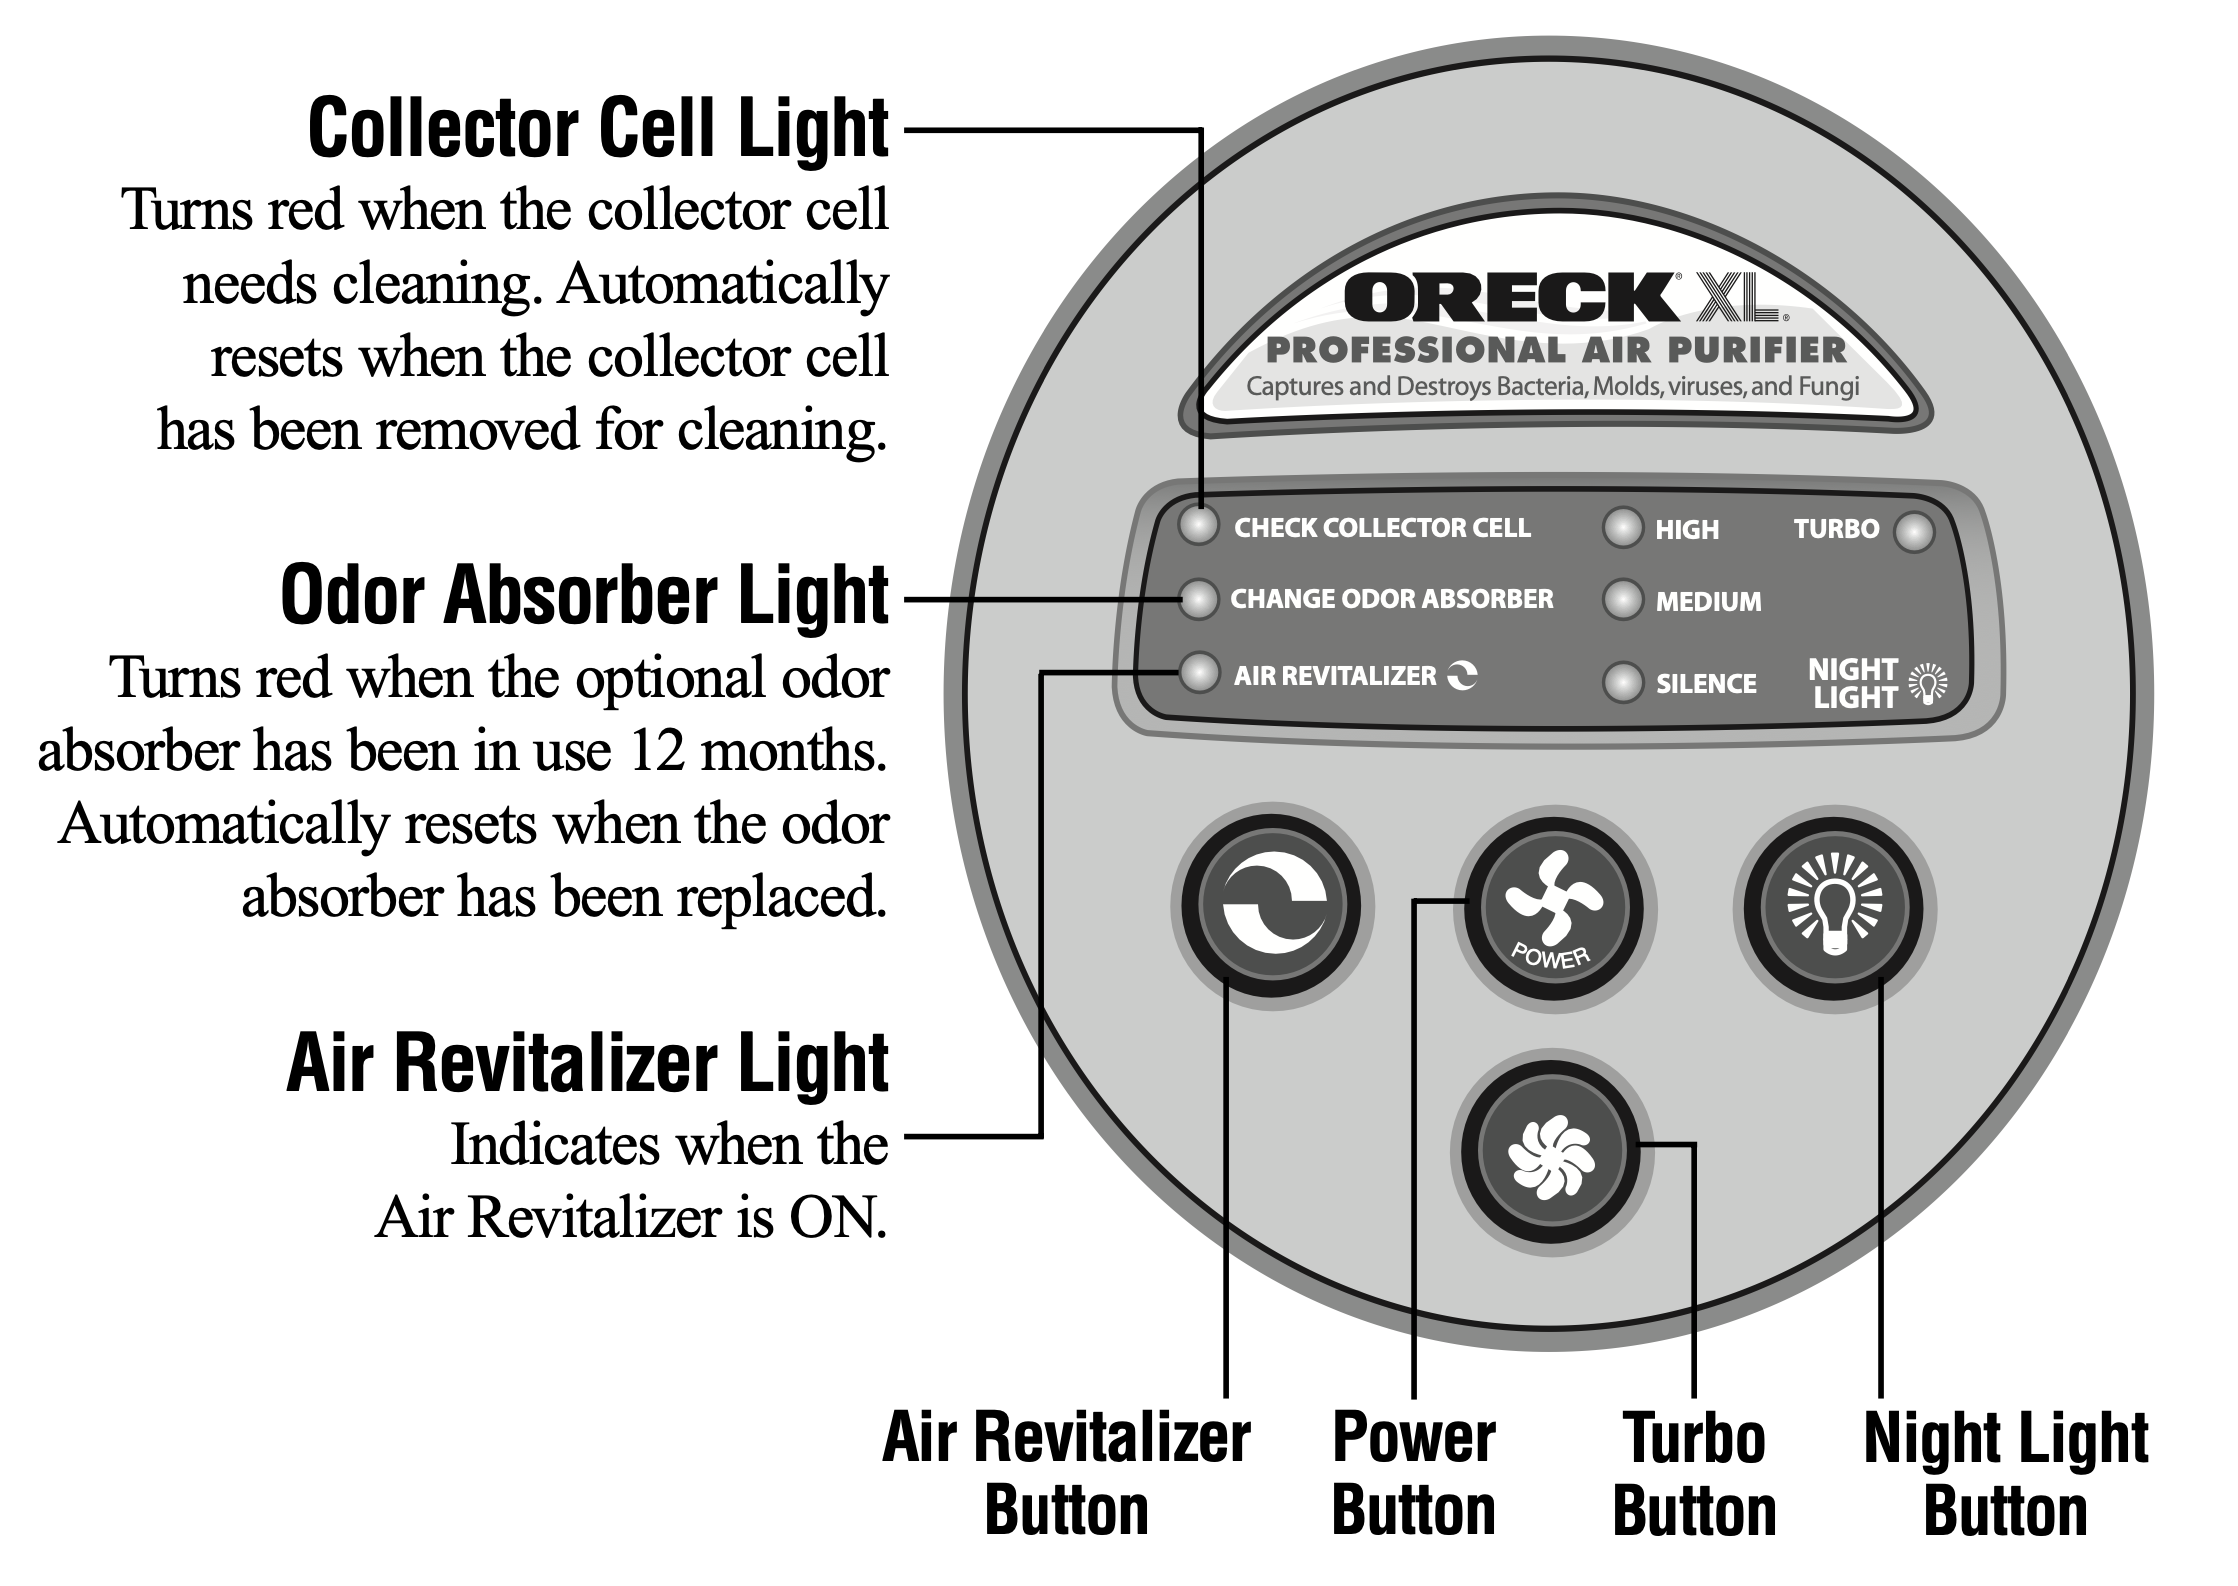
Simply follow the numbered steps to use your Air Purifier.
Each call out describes the features of the Air Purifier and how it functions.

- Place.
Locate the air purifier on the floor.
Do not position the air purifier so that it draws dirty air across the head or body.
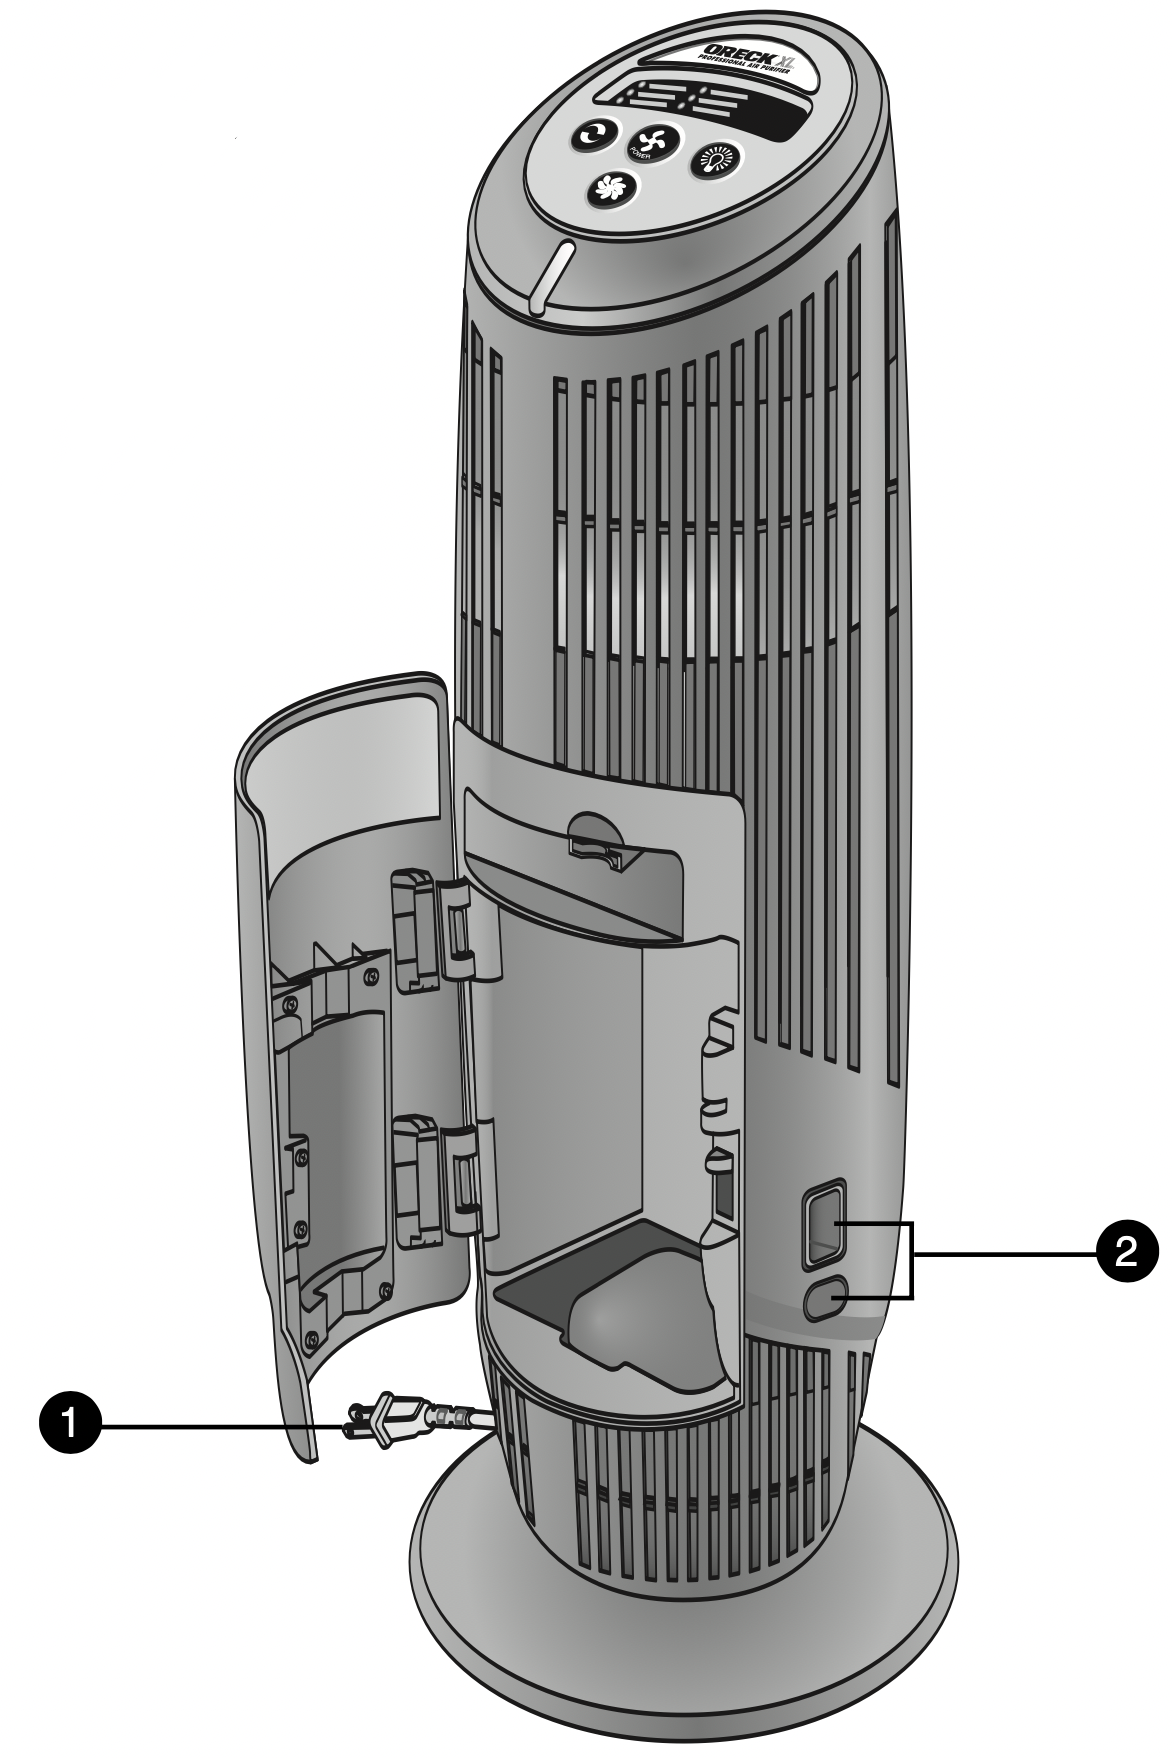
- Plug In.
Plug into nearest standard electrical outlet that accepts a polarized plug.
- Select the air cleaning speed.
Press the power button for the desired speed.
High for maximum cleaning.
Medium for normal use.
Silence for Silence Technology® .
The quietest setting, cleaning the air as effectively but more slowly than the higher settings.
Turbo provides greatest cleaning power for the toughest problems.
- Turn on the Air Revitalizer.
Provides additional air freshness and a pleasant, clean scent through the release of negative ions. Negative ions may cause dust to settle from the air onto the air purifier and surrounding furnishings. Designed to run continually, but may be turned off if desired.
Cleaning
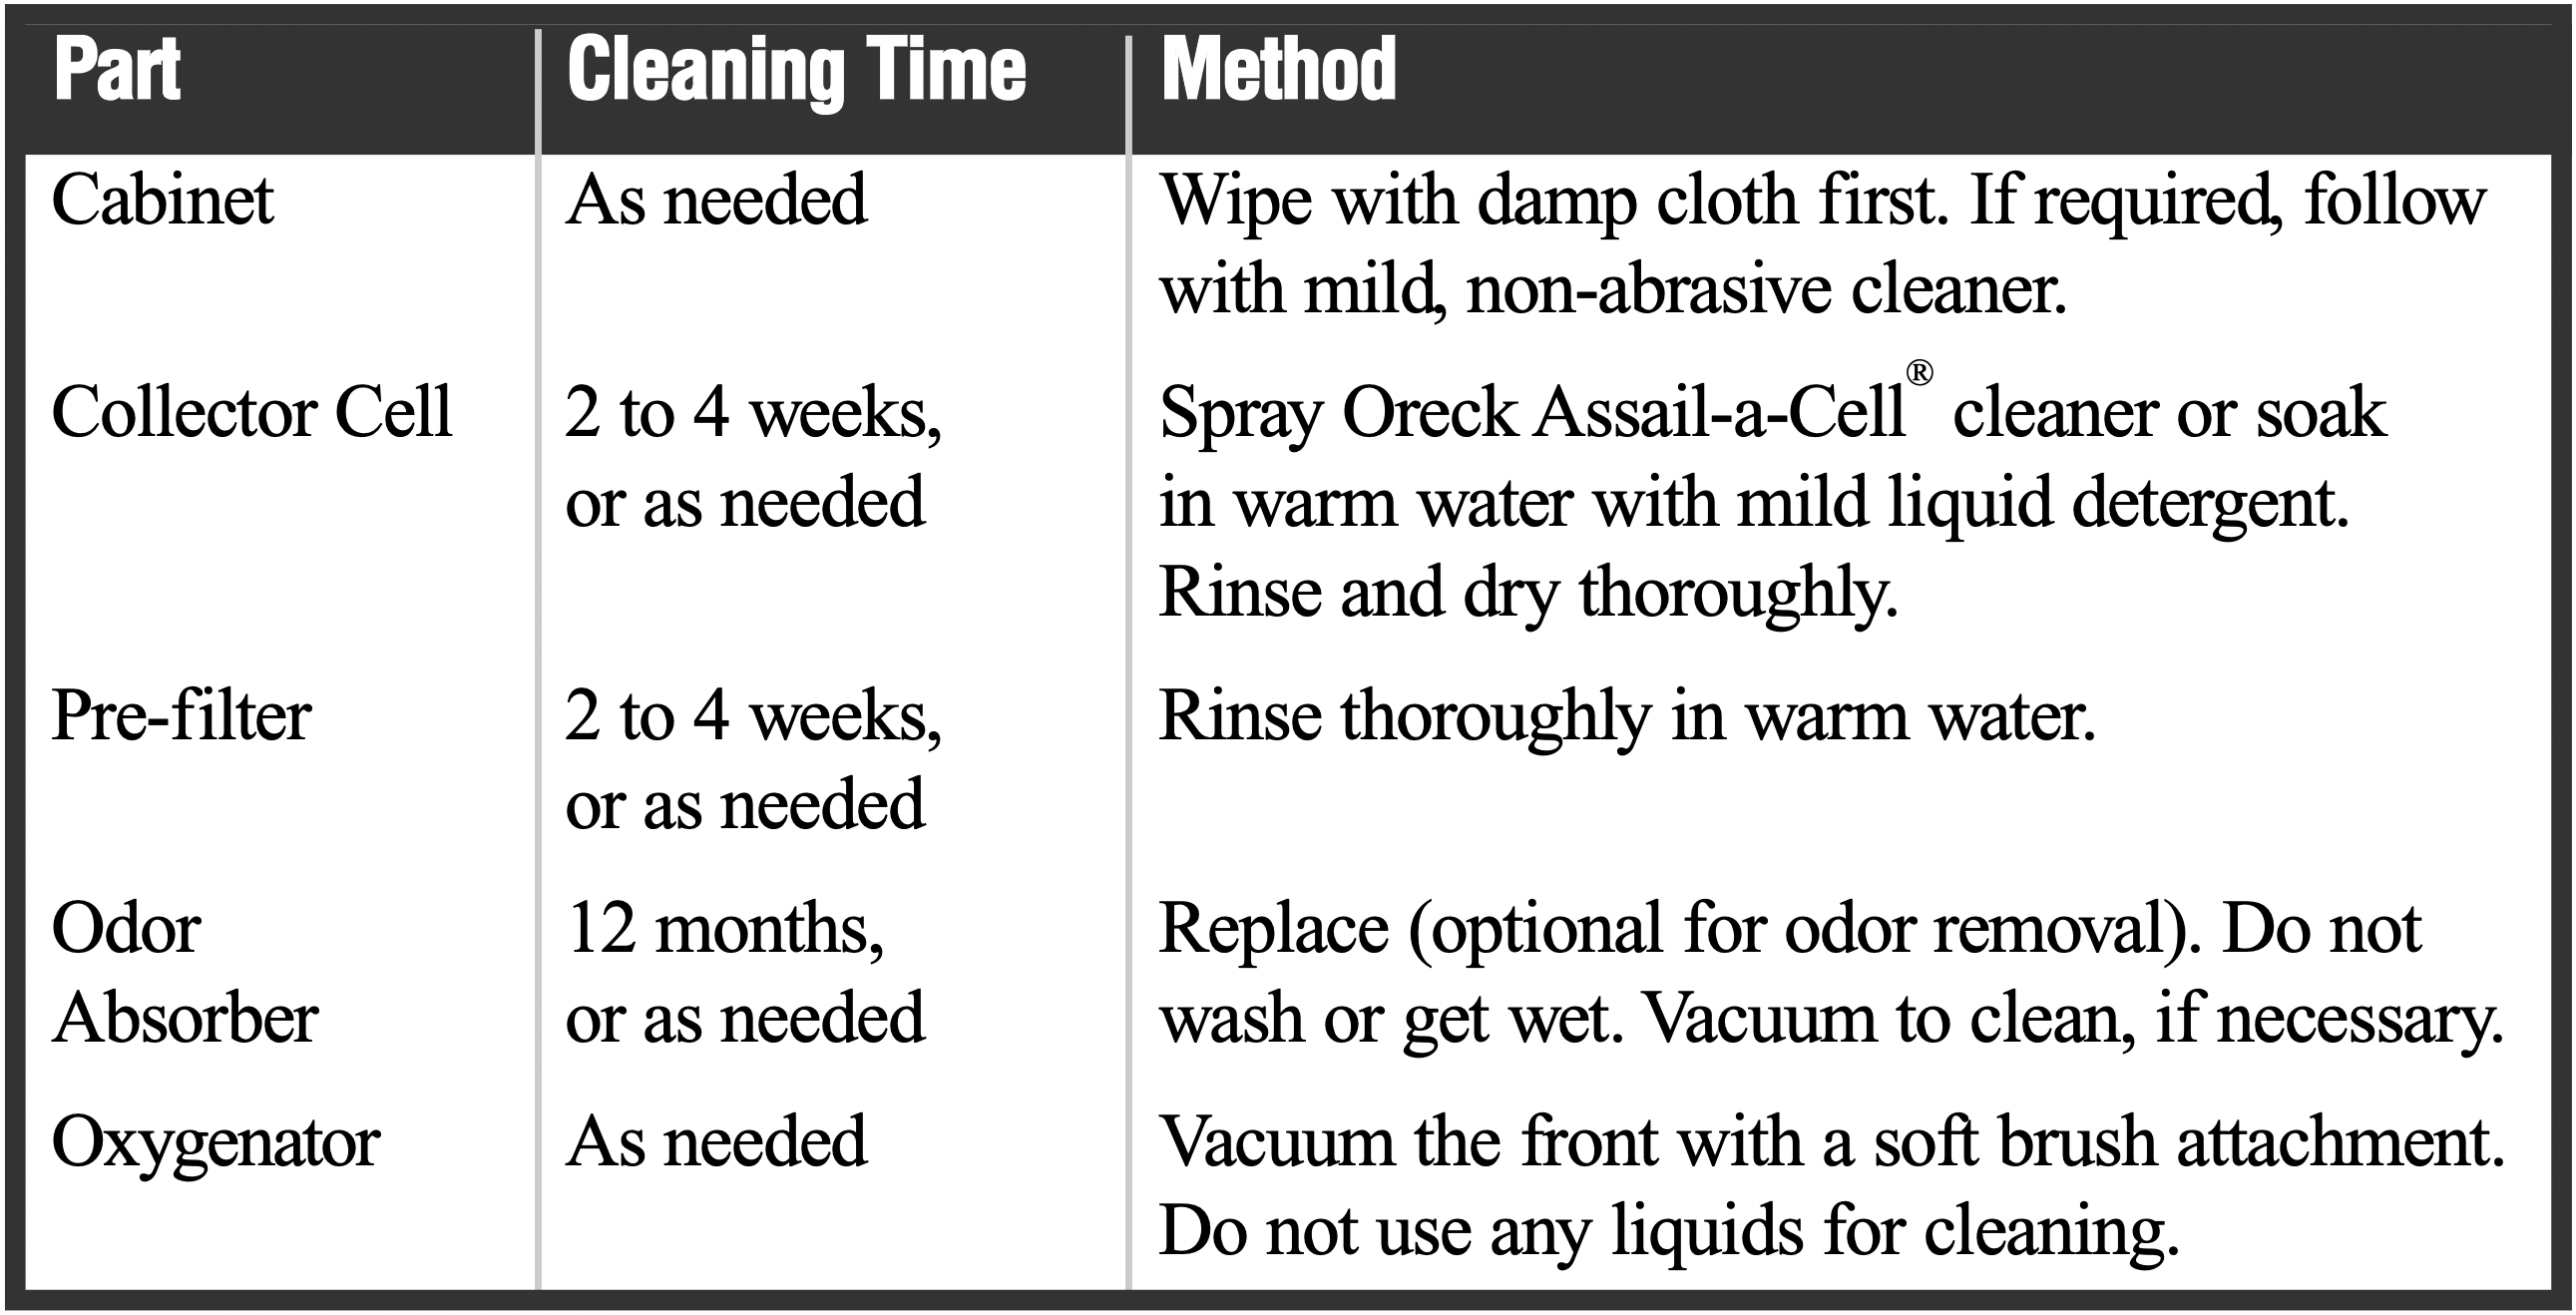
Cleaning Times
Proper care and cleaning of the air purifier is critical to performance. The unit has been designed to make this as simple as possible. The following chart shows the cleaning intervals and methods.
WARNING! Cleaning the unit while it is plugged in may result in electric shock, electric spark and serious injury. Unplug the unit before cleaning or maintenance.
Cleaning the Cabinet
You can clean the Air Purifier cabinet with mild, non-abrasive cleanser and a soft cloth.
IMPORTANT: Unplug the unit from its electrical power source. Do not spray cleansers or furniture polish into louvers or grill areas.
Cleaning the Air Purifier Components
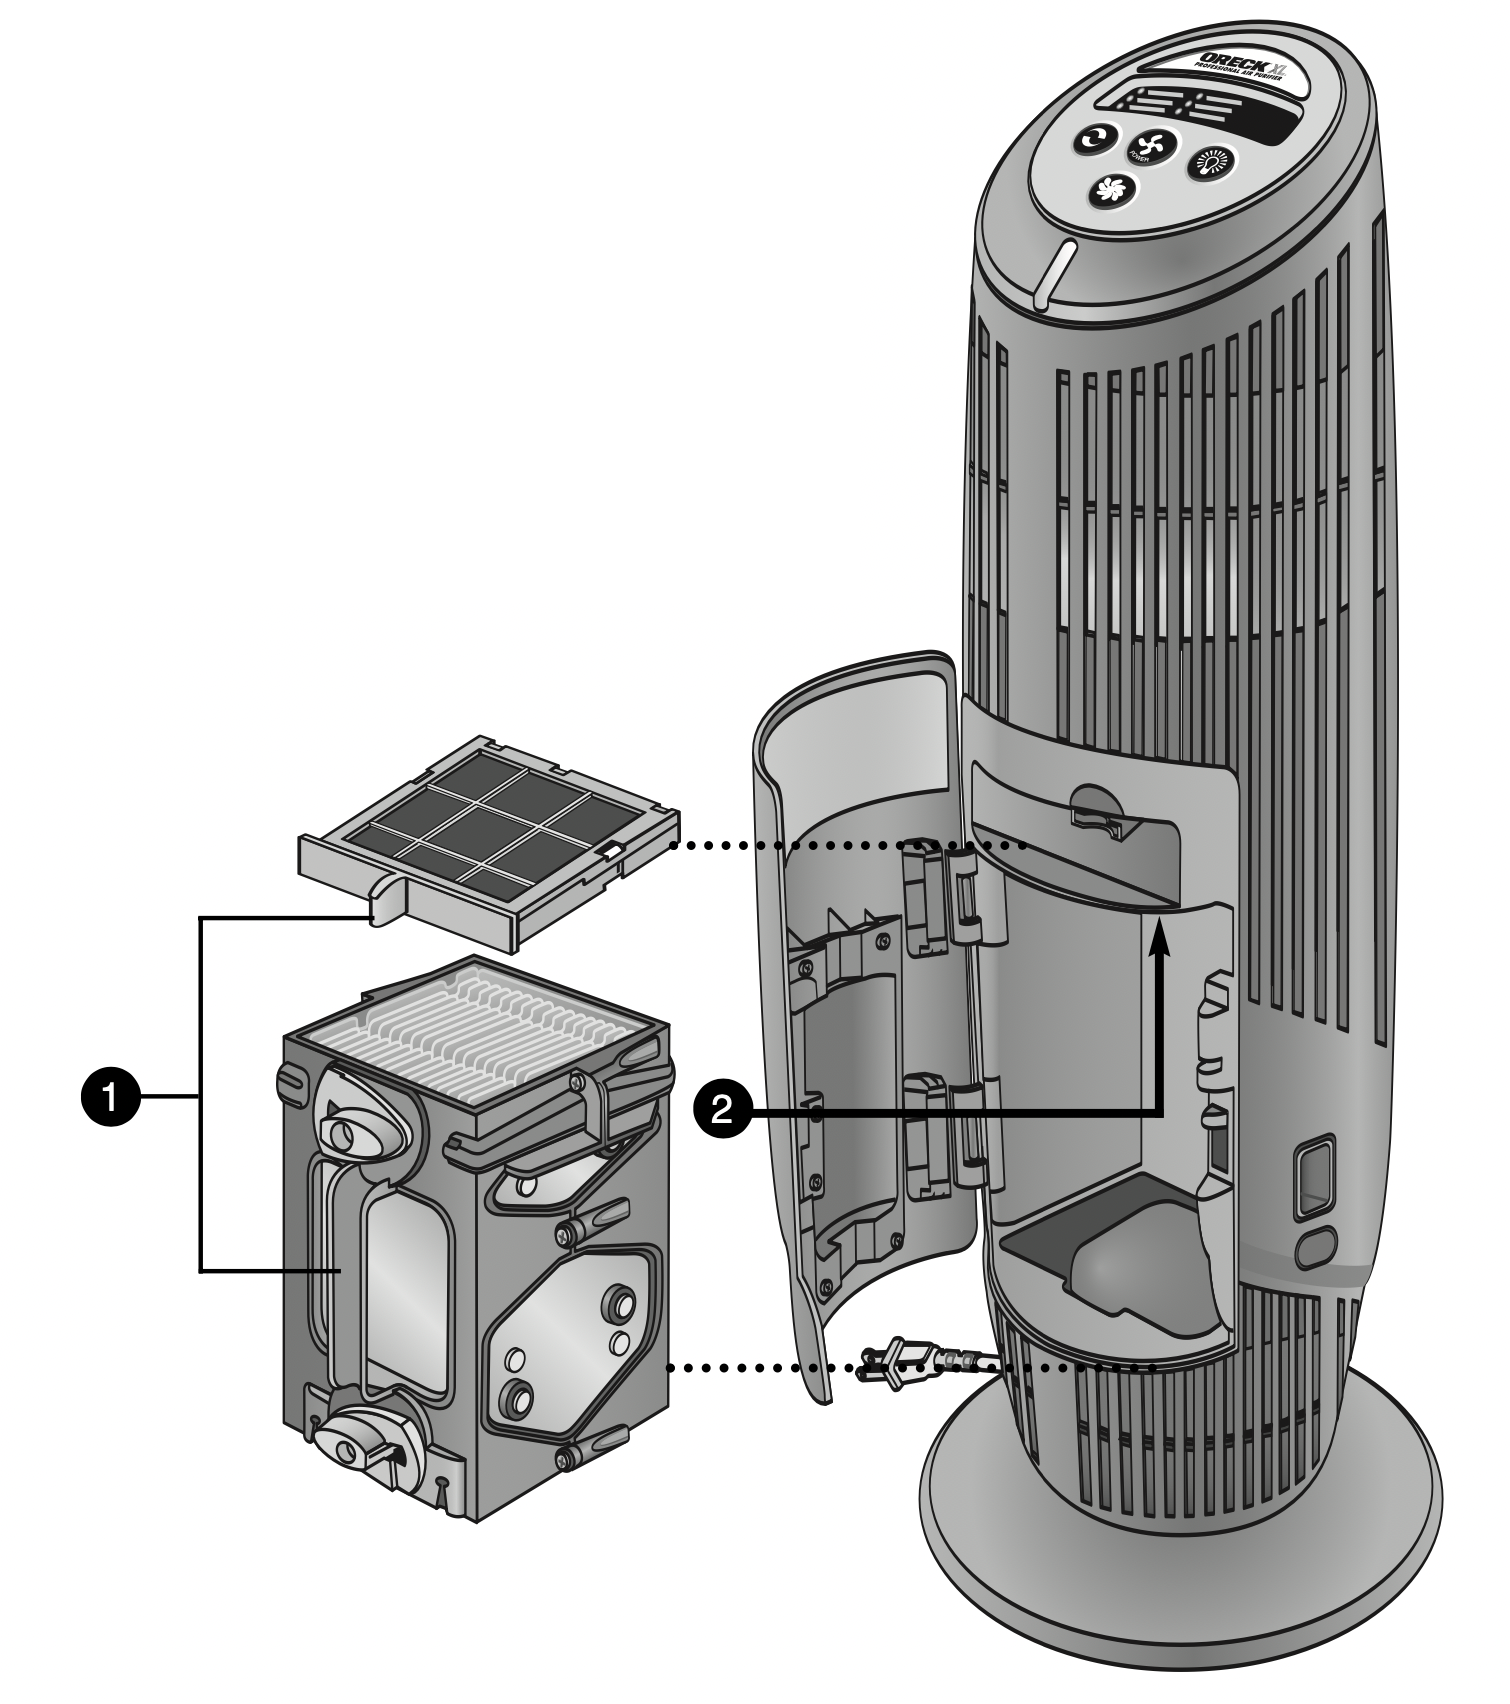
All components to your air purifier are located behind the cabinet door. Before you begin any cleaning process you must:
- Unplug the air purifier.
- Open the cabinet door, press in on the bottom button and press down on the top button.
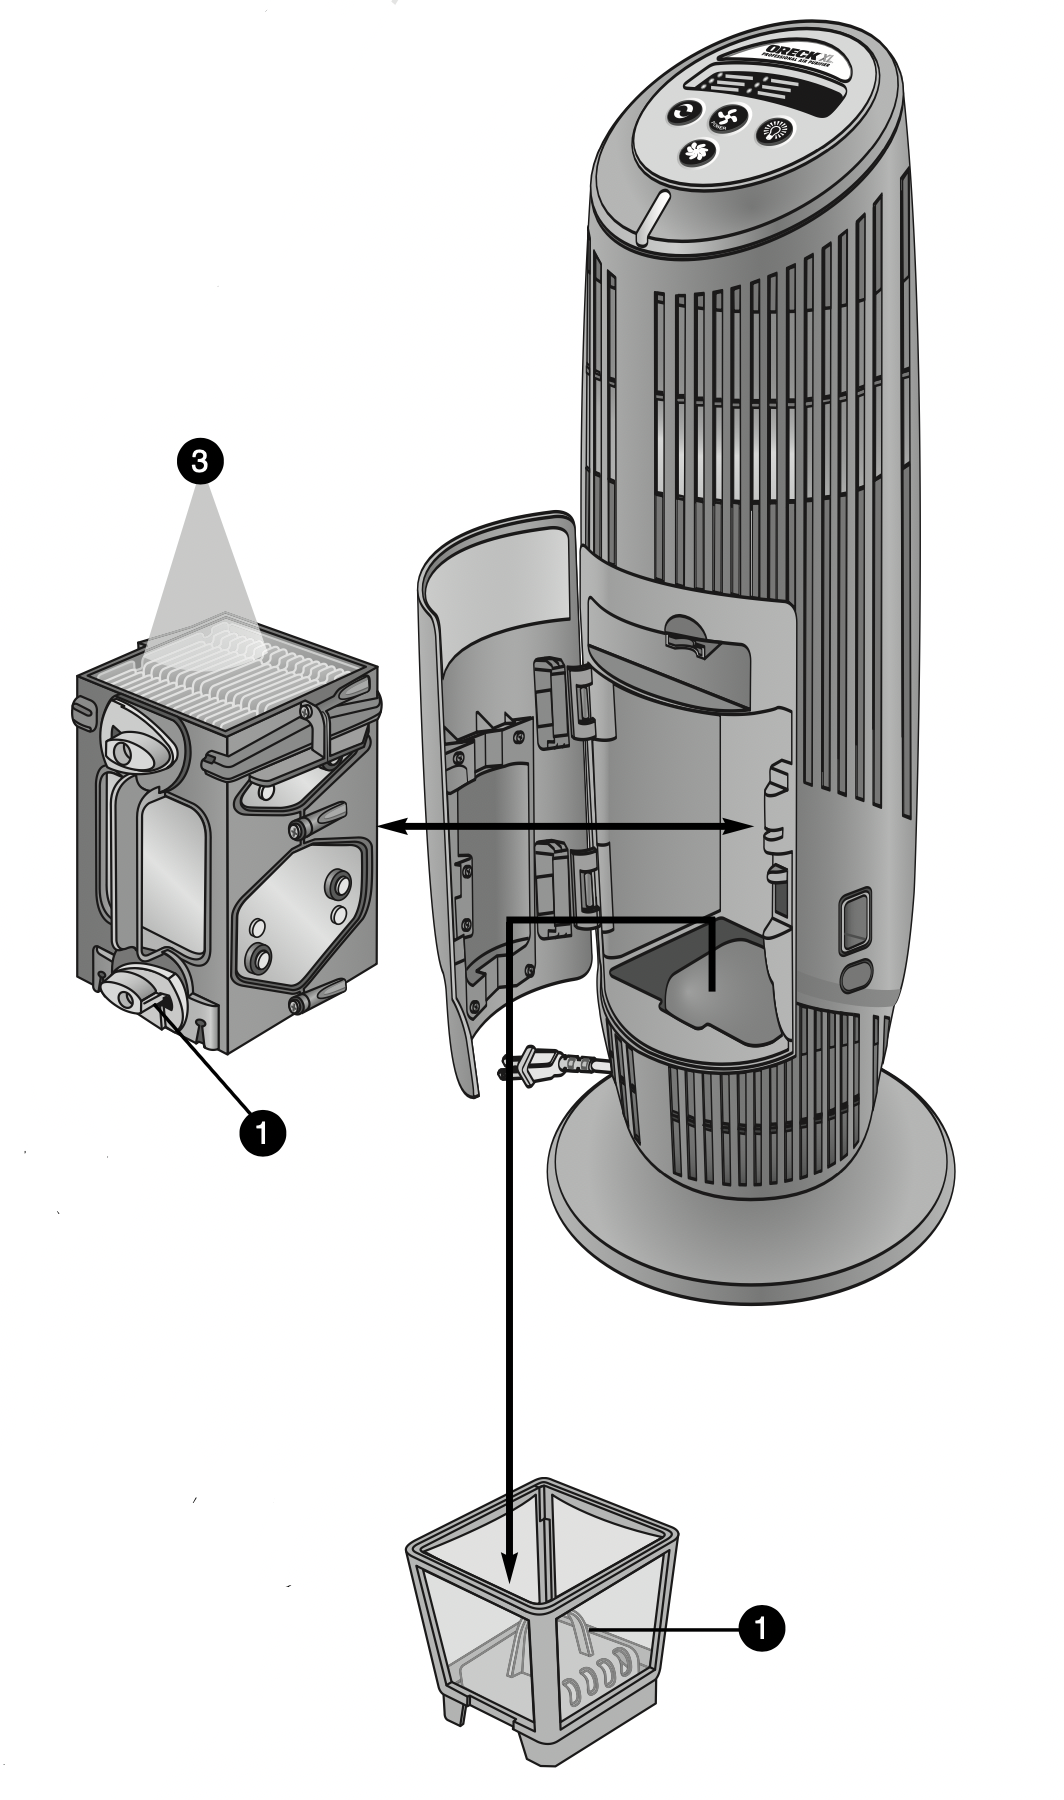
Cleaning the Collector Cell
Note: The collector cell may require more frequent cleaning if “arcing” occurs. Arcing is a sharp snapping sound that occurs when large particles of dust are collected in the collector cell. If prolonged or continuous arcing occurs the collector cell should be cleaned.
IMPORTANT: Do not try to clean the collector cell by inserting a cloth, brush, or other object between the cell plates.
- To remove the collector cell, turn the yellow latches counterclockwise. Pull straight out by the black handle.
- Place collector cell in sink, bathtub, or other location where cleaner and contaminants will rinse away without damaging surfaces.
- Spray Oreck Assail-A-Cell® cleaner thoroughly between each cell plate. Allow the cleaner to soak for a few minutes and rinse with clean water. Do not let the cleaner dry on the collector cell.
An alternative method to clean the collector cell is to soak it in warm water for two to three hours. Mild liquid dish detergent may be used to help break down dirt. Rinse thoroughly with water. Note: Do not put in dishwasher or insert objects to clean the collector cell. Do not wash the collector cell with bleach or other abrasive cleaners.
Tough residue such as tar from tobacco smoke may need additional applications or longer soaking.
- Allow to dry completely outside of the air purifier.
Do not use heated or compressed air to dry.
IMPORTANT: Do not reinsert the collector cell until it is completely dry. If the “Check Collector Cell” light blinks red after replacing the collector cell, then the collector cell is still wet. Remove the collector cell and allow it to finish air drying.
- Place the collector cell back into the air purifier by sliding it straight into the cabinet. Lock the yellow latches by turning clockwise.
- Close the cabinet door securely.
Cleaning the Pre-Filter
Note: The pre-filter is located under the collector cell. You must remove the collector cell first by following step 1 in the above procedure.
- Grasp the blue handle located in the middle of the pre-filter basket and pull the pre-filter straight up and out of the cabinet.
- Lightly brush the surface to loosen the dirt and wash the filter in warm water. Do not bend or twist the filter during cleaning.
- Thoroughly rinse the pre-filter and let it air dry completely before placing it back in the cabinet. Do not use heated or compressed air as part of the drying process.
- Place the pre-filter back into the unit and then replace the collector cell by following step 4 in the above procedure.
- Close the cabinet door securely.
Cleaning the Oxygenator
- Remove the collector cell and odor absorber.
- Locate the Oxygenator above the fragrance compartment. Lightly vacuum the bottom of the Oxygenator with a soft-brush attachment. Do not use liquids to clean. Liquids will damage the oxygenator.
- Replace collector cell and odor absorber. Make sure the door is closed securely.
Maintenance
Replacing the optional Odor Absorber
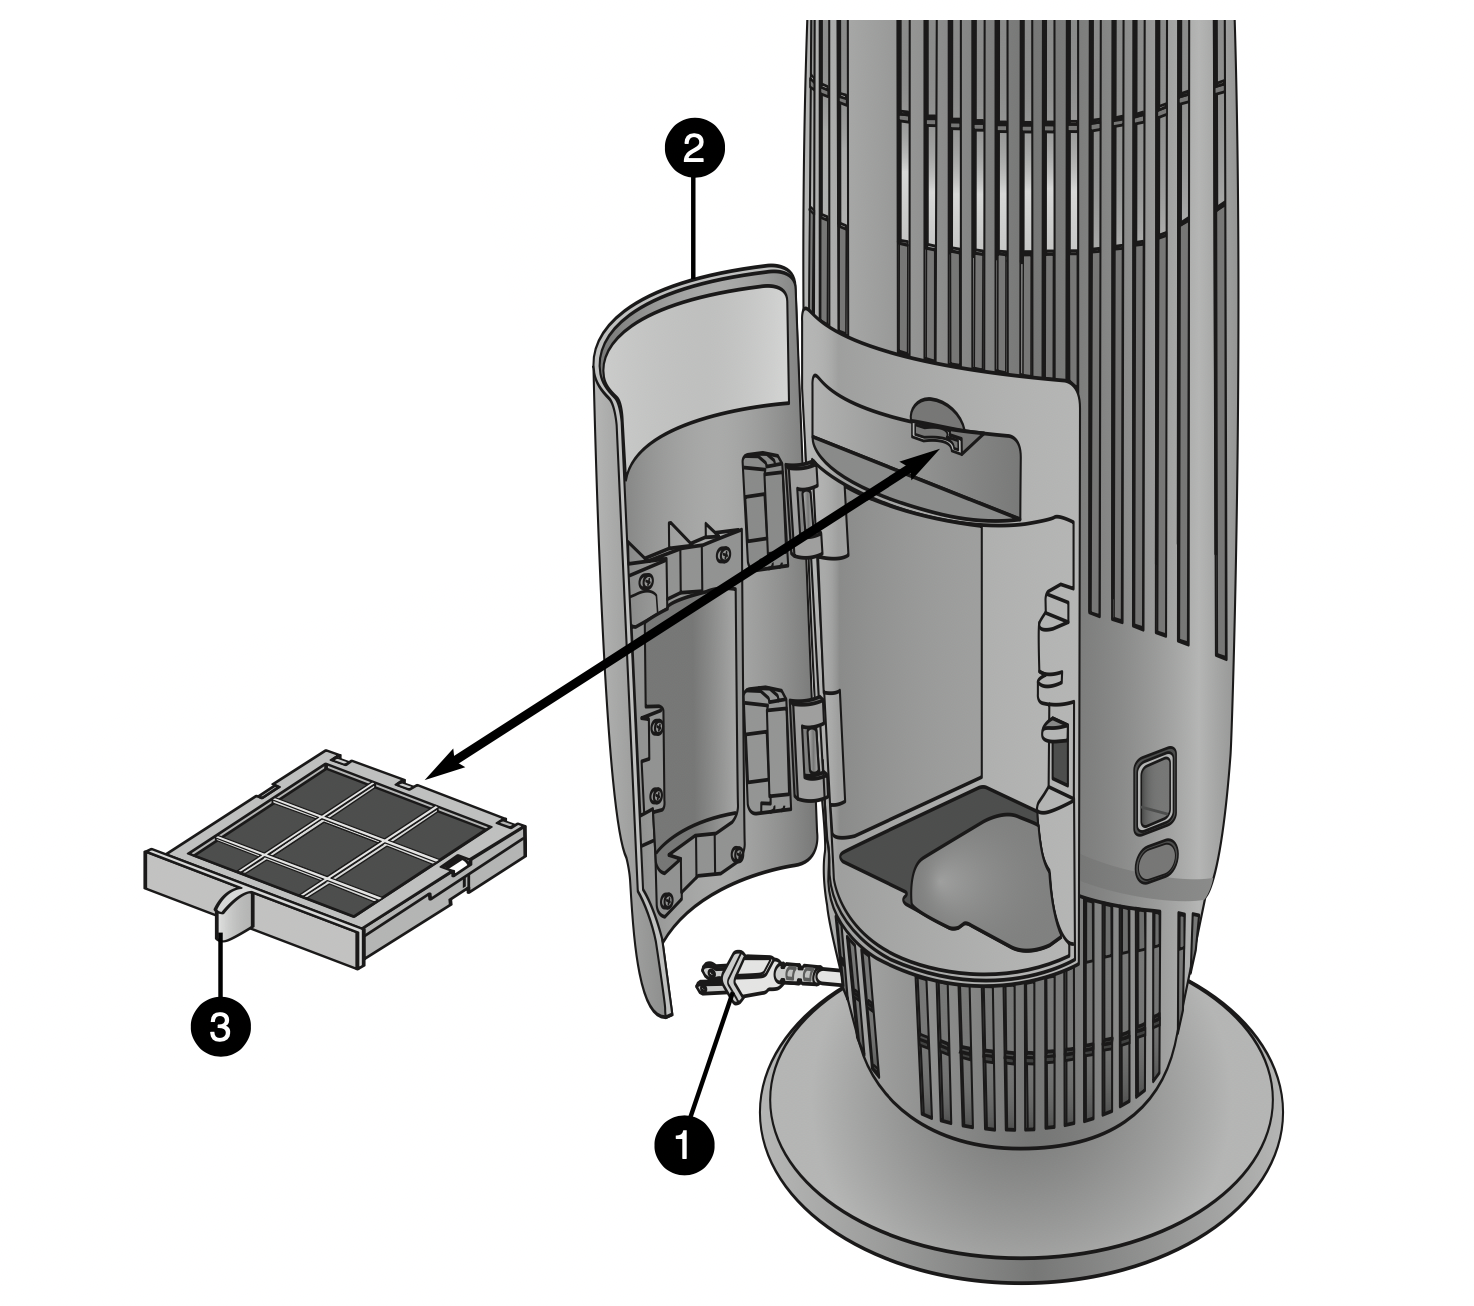
- Unplug the air purifier.
- Open the cabinet door.
- Grasp and squeeze the odor absorber handle and pull straight out.
- Replace with a new odor absorber. The odor absorber is designed so that it can only be inserted in one direction.
- Close the door securely.
Troubleshooting
Service problems that appear to be major can often be solved easily. You can be your own troubleshooter by reviewing this guide.
All other servicing should be done by an Oreck authorized service center.
|
Problem
|
Check
|
What to do
|
|
Unit does not turn on.
|
- Power Cord
- Power Button
- Cabinet Door
|
- Plug in the power cord.
- Set power button for desired blower speed.
- Make sure cabinet door is closed securely.
|
|
“Check Collector Cell” has turned red.
|
|
- Wash collector cell. Make sure it is thoroughly clean and dry beforereinstalling.
|
|
“Check Collector Cell” light is flashing red.
|
|
- Collector cell may need cleaning.
- Clean collector cell.
- Collector cell may not be completely dry. Allow it to air dry longer.
- Collector cell may be damaged.
- Contact Oreck for service.
|
|
Unit does not remove pollutants.
|
|
- Wash collector cell. Make sure it is thoroughly clean and dry before reinstalling.
|
|
Unit sparks, crackles and pops.
|
|
- Sparking or popping noise (arcing) occurs when a large particle is captured in the collector cell.
- If the unit is arcing excessively, the collector cell may be dirty. Try cleaning the collector cell.
- If excessive arcing continues after proper cleaning, the cell may be damaged or wet. If damaged, contact Oreck for service.
|
|
“Check Odor Absorber” light has turned red.
|
|
- Replace odor absorber if desired.
- If the odor absorber is not replaced, remove old odor absorber to turn off “Check Odor Absorber” light.
|
|
Does not remove odor.
|
|
- Vacuum odor absorber with a soft brush attachment if dirty. Do not use any liquids to clean the odor absorber.
- Replace odor absorber if desired.
|
|
Unit still does not operate properly.
|
- Check all the above points.
|
- Contact Oreck for service.
|