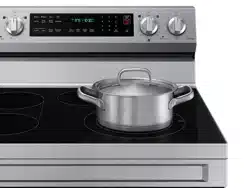
Electric Range
User manual
NE63*6511S*
2 English
WARNING
To reduce the risk of tipping the range, the range must be secured
by a properly installed Anti-Tip device. AFTER THE RANGE HAS
BEEN INSTALLED, CONFIRM THAT THE ANTI-TIP DEVICE HAS BEEN
PROPERLY INSTALLED AND VERIFY THAT THE ANTI-TIP DEVICE IS
PROPERLY ENGAGED. Refer to the installation manual for instructions.
a) If the Anti-Tip device is not installed, a child or adult can tip the
range and be killed.
b) Verify that the Anti-Tip device has been properly installed and
engaged at the rear right (or rear left) of the range bottom.
c) If you move the range and then move it back into place, ensure
the Anti-Tip device is re-engaged at the right or left rear of the
range bottom.
d) Do not operate the range without the Anti-Tip device in place and
engaged.
e) Failure to do so can result in death or serious burns to children
or adults.
WARNING
Do not step, lean, or sit on the doors of the range. You can cause the
range to tip, resulting in burns or serious injuries.
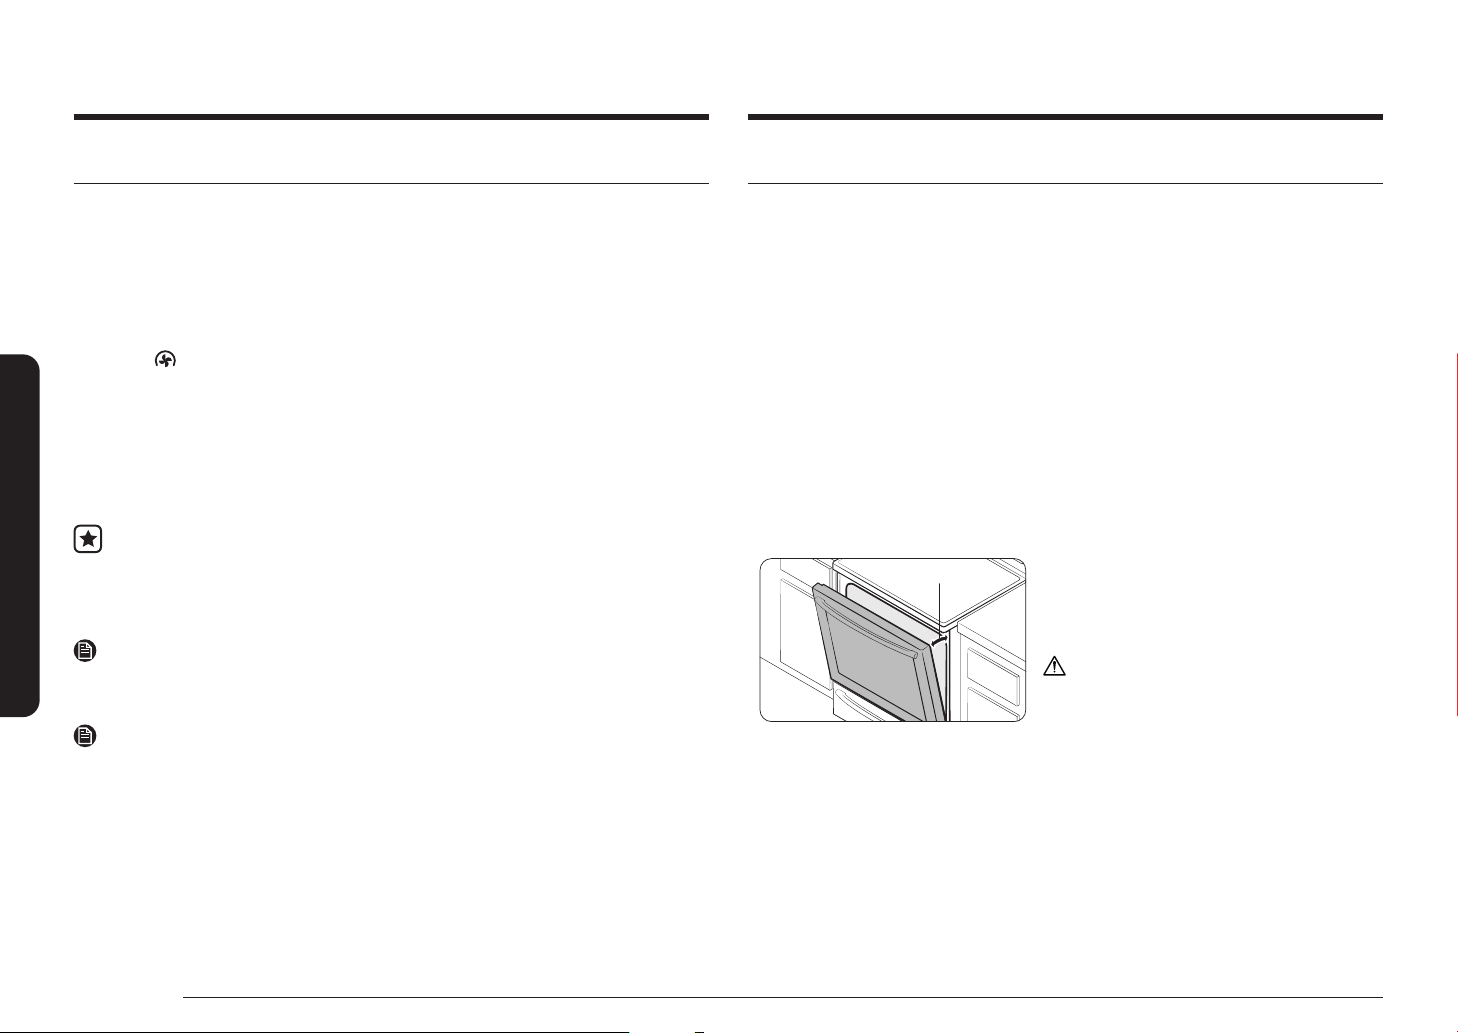
Conrm that the Anti-Tip device is installed properly. Then, to verify
that the Anti-Tip device is engaged, grasp the top rear edge of the
range and carefully attempt to tilt it forward. The Anti-Tip device
should prevent the range from tilting forward more than a few inches.
If you pull the range out from the wall for any reason, make sure the
Anti-Tip device is properly engaged when you push the range back
against the wall. If it is not, there is a risk of the range tipping over
and causing injury if you or a child stand, sit, or lean on the open door.
Never completely remove the leveling legs. If you remove the leveling
legs, the range will not be secured to the Anti-Tip device properly.
Anti-tip device
English 3
FCC STATEMENT:
This equipment has been tested and found to comply within the
limits for a Class B digital device, pursuant to part 15 of the FCC
Rules. These limits are designed to provide reasonable protection
against harmful interference in a residential installation.
This equipment generates, uses, and can radiate radio
frequency energy and, if not installed and used in accordance
with the instructions, may cause harmful interference to radio
communications. However, there is no guarantee that interference
will not occur in a particular installation. If this equipment does
cause harmful interference to radio or television reception, which
can be determined by turning the equipment off and on, the user is
encouraged to try to correct the interference by one or more of the
following measures:
• Reorienting or relocating the receiving antenna.
• Increasing the separation between the equipment and receiver.
• Connecting the equipment to an outlet that is on a different
circuit than the radio or TV.
• Consulting the dealer or an experienced radio/TV technician for
help.
Regulatory Notice
1. FCC Notice
CAUTION
FCC CAUTION: Any changes or modications not expressly approved
by the party responsible for compliance could void the user’s
authority to operate the equipment.
This device complies with part 15 of FCC Rules. Operation is Subject
to following two conditions:
1) This device may not cause harmful interference, and
2) This device must accept any interference received including
interference that cause undesired operation.
For products sold in the US and Canadian markets, only channels
1–11 are available. You cannot select any other channels.

4 English
FCC RADIATION EXPOSURE STATEMENT:
This equipment complies with FCC radiation exposure limits set
forth for an uncontrolled environment. This equipment should be
installed and operated so there is at least 8 inches (20 cm) between
the radiator and your body. This device and its antenna(s) must not
be co-located or operated in conjunction with any other antenna or
transmitter.
2. IC Notice
The term “IC” before the radio certication number only signies
that Industry Canada technical specications were met. Operation
is subject to the following two conditions: (1) this device may not
cause interference, and (2) this device must accept any interference,
including interference that may cause undesired operation of the
device.
This Class B digital apparatus complies with Canadian ICES-003.
For products sold in the US and Canadian markets, only channels
1–11 are available. You cannot select any other channels.
IC RADIATION EXPOSURE STATEMENT:
This equipment complies with IC RSS-102 radiation exposure limits
set forth for an uncontrolled environment. This equipment should be
installed and operated so there is at least 8 inches (20 cm) between
the radiator and your body. This device and its antenna(s) must not
be co-located or operated in conjunction with any other antenna or
transmitter.

English 5
Contents
Contents
Important safety instructions 6
Introducing your new range 21
Overview 21
What’s included 21
Before you begin 22
Energy saving tips 22
Surface cooking 22
About surface cooking 22
How to set the appliance for surface cooking 24
Using the proper cookware 26
Choosing the proper cookware 27
Protecting the cooktop 27
Operating the oven 28
The oven control panel 28
Oven lock 28
Setting the clock 29
Setting the kitchen timer 29
Timed cooking 29
Delay start 30
Turning the oven light on and off 30
Minimum and maximum settings 30
Using the oven racks 31
Baking 32
Convection baking 33
Convection roasting 34
Broiling 34
Air fry 35
Using the special function 36
Using the keep warm feature 37
Using the smart control feature 38
Using the voice control 38
Using the options function 40
Using the Sabbath feature 42
Maintaining your appliance 43
Self-cleaning 43
Steam-cleaning 45
Care and cleaning of the oven 46
Care and cleaning of the glass cooktop 48
Removing and reinstalling the oven door 50
Removing and reinstalling the storage drawer 52
Changing the oven light 52
Troubleshooting 53
Troubleshooting 53
Information codes 58
Warranty (U.S.A) 58
Warranty (CANADA) 60
Appendix 61
Open Source Announcement 61
6 English
Important safety instructions
Important safety instructionsImportant safety instructions
SAVE THESE INSTRUCTIONS
CAUTION
To reduce the risk of re, explosion, electric shock, or personal injury
when using your range, follow these basic safety precautions.
Do NOT attempt.
Do NOT disassemble.
Do NOT touch.
Follow directions explicitly.
Unplug the power plug from the wall socket.
Make sure the machine is grounded to prevent electric shock.
Call a Samsung service center for help.
Note
These warning signs are here to prevent injury to you and others.
Please follow them explicitly.
After reading this section, keep it in a safe place for future reference.
CALIFORNIA PROPOSITION 65 WARNING
WARNING
Cancer and Reproductive Harm - www.P65Warnings.ca.gov.
Important safety instructions
Read and follow all instructions before using your range to prevent
the risk of re, electric shock, personal injury, or damage when using
the range. This guide does not cover all possible conditions that may
occur. Always contact your service agent or the manufacturer about
problems that you do not understand.
WHAT YOU NEED TO KNOW ABOUT
SAFETY INSTRUCTIONS
Warnings and Important safety instructions in this manual do not
cover all possible conditions and situations that may occur. It is
your responsibility to use common sense, caution, and care when
installing, maintaining, and operating your oven.
Important safety symbols and precautions
What the icons and signs in this user manual mean:
WARNING
Hazards or unsafe practices that may result in severe personal injury
or death.
CAUTION
Hazards or unsafe practices that may result in minor personal injury
or property damage.
English 7
Important safety instructions
SAVE THESE INSTRUCTIONS
FOR YOUR SAFETY
When using electrical appliances, you should follow basic safety
precautions, including the following:
CAUTION
• Use this appliance only for its intended purpose as described in
this Owner’s Manual.
• Potentially hot surfaces include the cooktop, areas facing the
cooktop, the oven vent opening, surfaces near the opening, and
crevices around the oven door.
Be sure your appliance is properly installed and grounded by a
qualied technician.
User servicing - Do not repair or replace any part of the
appliance unless specically recommended in this manual. All
other servicing should be referred to a qualied technician.
Always disconnect the power to the appliance before servicing
by removing the fuse or switching off the circuit breaker.
• Do not enter the oven.
• Do not store items of interest to children in cabinets above
the range or on the back guard of the range. Children
climbing on the range to reach items could be seriously
injured.
• Do not leave children alone. Never leave children alone or
unattended in an area where this appliance is in use. They
should never be allowed to sit or stand on any part of the
appliance.
• Never use your appliance for warming or heating the room.
• Do not use water on grease res. Turn off the oven to avoid
spreading the ames. Smother the re or ames by closing
the door or use a dry chemical, baking soda, or foam-type
extinguisher.
• Avoid scratching or striking the glass doors, the cooktop, or
the control panel. Doing so may lead to glass breakage. Do
not cook on a product with broken glass. Shock, re, or cuts
may occur.

8 English
Important safety instructions
Important safety instructionsImportant safety instructions
SAVE THESE INSTRUCTIONS
• If there is a re in the oven during self-cleaning, turn the
oven off and wait for the re to go out. Do not force the
door open. The introduction of fresh air at self-cleaning
temperatures may lead to a burst of ame from the oven.
Failure to follow these instructions may result in severe
burns.
• If the oven is heavily soiled with oil, self-clean the oven
before using the oven again. Leaving the oil in place creates
a risk of re.
• Wipe up heavy soil on the oven bottom with a paper towel
or rag before self-cleaning. Self-cleaning the oven when
there is heavy soil on the oven bottom requires longer
cleaning cycles and produces more smoke.
• Storage in or on the appliance. Do not store ammable
materials in the oven or near the surface units. Be sure all
packing materials are removed from the appliance before
operating it. Keep plastics, clothes, and paper away from
parts of the appliance that may become hot.
• Wear proper apparel. Never wear loose-tting or hanging
garments while using the appliance.
• Use only dry potholders. Placing moist or damp potholders
on hot surfaces may result in burns from steam. Do not
let the potholder touch hot heating elements. Do not use a
towel or other bulky cloth.
• Teach children not to play with the controls or any other
part of the range.
• For your safety, do not use high-pressure water cleaners or
steam jet cleaners to clean any part of the range.
• If the power cord is damaged, it must be replaced by
the manufacturer, its service agent, or similarly qualied
persons to avoid creating a hazard.
• The appliance is not intended for use by persons (including
children) with reduced physical, sensory or mental
capabilities, or lack of experience and knowledge, unless
they have been given supervision or instruction concerning
use of the appliance by a person responsible for their safety.
• Do not lean on the range as you may turn the control knobs
inattentively.

English 9
Important safety instructions
SAVE THESE INSTRUCTIONS
SURFACE COOKING UNITS
• Never leave surface units unattended at high heat settings.
Boilovers cause smoking and greasy spillovers that may
ignite.
• Protective Liners – Do not use aluminum foil to line surface
unit drip bowls or oven bottoms, except as suggested in the
manual. Improper installation of these liners may result in a
risk of electric shock or re.
• To avoid oil spillover and re, use a minimum amount of oil
when shallow pan-frying and avoid cooking frozen foods
that have excessive amounts of ice.
• Do not lift the cooktop. Lifting the cooktop can damage the
range and cause the range to malfunction.
• Do not operate the cooktop without cookware. If the
cooktop operates without cookware, the control knobs will
become hot.
• Never use the glass cooktop surface as a cutting board.
• Use care when touching the cooktop. The glass surface of
the cooktop will retain heat after the controls have been
turned off.
• Do not move the container and bowl in a horizontal position
on cooktop surface.
• Be careful when placing spoons or other stirring utensils
on the glass cooktop surface when it is in use. They may
become hot and could cause burns.
• Use proper pan sizes. This appliance is equipped with
surface units of different size. Select pots and pans that
have at bottoms large enough to cover the surface area of
the heating element. Using undersized cookware will expose
a portion of the heating element to direct contact and may
result in the ignition of clothing. Matching the size of the
pot or pan to the burner will also improve efciency.
• Cookware Handles Should Be Turned Inward and Not
Extend Over Adjacent Surface Units. To reduce the risk of
burns, ignition of ammable materials, or spillage due to
unintentional contact with cookware, position cookware
handles so that they are turned inward and do not extend
over adjacent surface units.
• Glazed cookware. Only certain types of glass, glass/ceramic,
ceramic, earthenware, or other glazed cookware can be
used for rangetop service without breaking due to sudden
changes in temperature.
• Cleaning. Read and follow all instructions and warnings on
the cleaning cream labels.
10 English
Important safety instructions
Important safety instructionsImportant safety instructions
SAVE THESE INSTRUCTIONS
• Be sure you know which control knob operates each surface
unit. Make sure you turned on the correct surface unit.
• Always turn the surface units off before removing cookware.
• When preparing aming foods under the hood, turn the fan on.
• Keep an eye on foods being fried at high or medium high
heat settings.
• Do not store heavy items above the cooktop surface that
could fall and damage it.
• Do not use decorative surface element covers – If an element
is accidentally turned on, the decorative cover will become
hot and possibly melt. Burns will occur if the hot covers are
touched. Damage may also be done to the cooktop.
ELECTRICAL SAFETY
• Proper Installation - Be sure your appliance is properly
installed and grounded by a qualied technician.
• The appliance should be serviced only by qualied service
personnel. Repairs carried out by unqualied individuals
may cause injury or a serious malfunction. If your appliance
is in need of repair, contact a Samsung authorized service
center. Failure to follow these instructions may result in
damage and void the warranty.
• Flush-mounted appliances may be operated only after they
have been installed in cabinets and workplaces that conform
to the relevant standards. This ensures that the appliances
are installed in compliance with the appropriate safety
standards.
• If your appliance malfunctions or if fractures, cracks, or
splits appear:
- switch off all cooking zones.
- unplug the range from the AC wall outlet.
- contact your local Samsung service center.
WARNING
If the surface is cracked, switch off and unplug the appliance to avoid
the possibility of electrical shock. Do not use your cooktop until the
glass surface has been replaced.
WARNING
• Ensure that the appliance is switched off before replacing the
lamp to avoid the possibility of electric shock.
• The range should not be placed on a base.
English 11
Important safety instructions
SAVE THESE INSTRUCTIONS
CHILD SAFETY
WARNING
• This appliance is not intended for use by young children or inrm
persons without the adequate supervision of a responsible adult.
• Young children should be supervised to ensure that they do not
play with the appliance.
• Keep children away from the door when opening or closing it as
they may bump themselves on the door or catch their ngers in
the door.
• The cooking zones will become hot when you cook. To keep small
children from being burned, always keep them away from the
appliance while you are cooking.
• During self-cleaning, the surfaces may get hotter than usual.
Keep small children away from the range when it is in the self-
cleaning mode.
WARNING
Accessible parts may become hot during use. To avoid burns, young
children should be kept away.
OVEN
• DO NOT TOUCH THE HEATING ELEMENTS OR INTERIOR
SURFACES OF THE OVEN. Heating elements may be hot even
though they are dark in color. Interior surfaces of an oven
become hot enough to cause burns. During and after use,
do not touch or let clothing or other ammable materials
contact the heating elements or interior surfaces of the oven
until they have had sufcient time to cool. Other surfaces
of the appliance may become hot enough to cause burns.
Among these surfaces are oven vent openings and surfaces
near these openings, the oven door, and the window of the
oven door.
• Do not heat unopened food containers. The build-up of
pressure may cause the container to burst and result in
injury.
• Do not use the oven to dry newspapers. If overheated,
newspapers can catch on re.
• Do not use the oven for a storage area. Items stored in an
oven can ignite.

12 English
Important safety instructions
Important safety instructionsImportant safety instructions
SAVE THESE INSTRUCTIONS
• Use care when opening the door. Let hot air or steam escape
before you remove food from or put food into the oven.
• Protective liners. Do not use aluminum foil to line the oven
bottoms, except as suggested in the manual. Improper
installation of these liners may result in a risk of electric
shock or re.
• Keep oven vent ducts unobstructed. The oven vent is
located above the right rear surface unit. This area could
become hot during oven use. Never block this vent or place
plastic or heat-sensitive items on it.
• Placement of oven racks. Always place oven racks in the
desired location while the oven is cool. If the rack must be
moved while the oven is hot, use potholders. Do not let the
potholders come in contact with the hot heating element in
the oven.
• Do not allow aluminum foil or a meat probe to contact the
heating elements.
• During use, the appliance becomes hot.
Care should be taken to avoid touching heating elements
inside the oven.
• Do not use harsh abrasive cleaners or sharp metal scrapers
to clean the oven door glass. They can scratch the surface,
which may result in the glass shattering.
CAUTION
Do not attempt to operate the oven during a power failure. If the
power fails, always turn the oven off. If the oven is not turned off
and the power returns, the oven may begin to operate again. Food
left unattended could catch re or spoil.
REMOTE OPERATION
This appliance is congurable to allow remote operation at any time.
• Do not store any ammable materials or temperature
sensitive items inside, on top, or near surface units of the
appliance.

English 13
Important safety instructions
SAVE THESE INSTRUCTIONS
SELFCLEANING OVENS
Do not clean the door gasket. The door gasket is essential for
a good seal. Care should be taken not to rub, damage, or move
the gasket.
• Never keep pet birds in the kitchen. Birds are extremely
sensitive to the fumes released during an oven self-clean
cycle. Fumes may be harmful or fatal to birds. Move birds to
a well-ventilated room.
• Clean only the parts listed in this manual in the self-clean
cycle. Before self-cleaning the oven, remove the partition,
rack, utensils, and any food.
• Before operating the self-clean cycle, wipe grease and food
soils from the oven. Excessive amounts of grease may
ignite, leading to smoke damage to your home.
• Do not use any commercial oven cleaner or oven liner
protective coating of any kind in or on the outside of the
oven.
• Remove the nickel oven shelves from the oven before you
begin the self-cleaning cycle or they may discolor.
• If the self-cleaning mode malfunctions, turn the oven off
and disconnect the power supply. Have it serviced by a
qualied technician.
• Excess spillage must be removed before you run the self-
cleaning cycle.
VENTILATING HOOD
• Clean ventilating hoods frequently. Do not let grease
accumulate on the hood or lter.
• When aming foods under the hood, turn the fan on.
14 English
Important safety instructions
Important safety instructionsImportant safety instructions
SAVE THESE INSTRUCTIONS
GLASS/CERAMIC COOKING SURFACES
• DO NOT TOUCH SURFACE UNITS OR AREAS NEAR UNITS.
Surface units may be hot even though they are dark in color.
Areas near surface units may become hot enough to cause
burns. During and after use, do not touch, let clothing, or
other ammable materials contact the surface units or areas
near the units until they have had sufcient time to cool.
Among these areas are the cooktop and the facing of the
cooktop.
• Do not cook on a broken cooktop. If the cooktop should
break, cleaning solutions and spillovers may penetrate the
broken cooktop and create a risk of electric shock. Contact a
qualied technician immediately.
Clean the cooktop with caution. If a wet sponge or cloth is used
to wipe spills on a hot cooking area, be careful to avoid steam
burns. Some cleaners can produce noxious fumes if applied to a
hot surface.
CRITICAL INSTALLATION WARNINGS
WARNING
• This appliance must be installed by a qualied technician or
service company.
- Failing to have a qualied technician install the range
may result in electric shock, re, an explosion, problems
with the product, or injury.
• Unpack the oven, remove all packaging material and
examine the oven for any damage, such as dents on the
interior or exterior of the oven, broken door latches, cracks
in the door, or a door that is not lined up correctly. If there
is any damage, do not operate the oven and notify your
dealer immediately.
• Plug the power cord into a properly grounded outlet with
the proper conguration. Your oven should be the only item
connected to this circuit.
• Keep all packaging materials out of the reach of children.
Children may use them for play and injure themselves.
• Install your appliance on a hard, level oor that can support
its weight.
- Failing to do so may result in abnormal vibrations, noise,
or problems with the product.

English 15
Important safety instructions
SAVE THESE INSTRUCTIONS
• This appliance must be properly grounded.
• Do not ground the appliance to a gas pipe, plastic water
pipe, or telephone line.
- This may result in electric shock, re, an explosion, or
problems with the product.
• Do not cut or remove the ground prong from the power
cord under any circumstances.
• Connect the oven to a circuit that provides the correct
amperage.
• Do not install this appliance in a humid, oily or dusty
location, or in a location exposed to direct sunlight or water
(rain drops).
- This may result in electric shock or re.
• Do not use a damaged power cord or loose wall socket.
- This may result in electric shock or re.
• Do not pull or excessively bend the power cord.
• Do not twist or tie the power cord.
• Do not hook the power cord over a metal object, place a
heavy object on the power cord, or insert the power cord
between objects.
- This may result in electric shock or re.
If the power cord is damaged, contact your nearest Samsung
service center.
CRITICAL USAGE WARNING
CAUTION
• If the appliance is ooded by any liquid, please contact your
nearest Samsung service center. Failing to do so may result
in electric shock or re.
• If the appliance produces a strange noise, a burning smell,
or smoke, unplug the power plug immediately and contact
your nearest Samsung service center.
- Failing to do so may result in electric shock or re
• In the event of a gas leak (such as propane gas, LP gas, etc.),
ventilate the area immediately. Do not touch the power
cord. Do not touch the appliance.
- A spark may result in an explosion or re.

16 English
Important safety instructions
Important safety instructionsImportant safety instructions
SAVE THESE INSTRUCTIONS
• Take care not to contact the oven door, heating elements, or
any of the other hot parts with your body while cooking or
just after cooking.
- Failing to do so may result in burns.
• If materials inside the oven should ignite, keep the oven
door closed, turn the oven off and disconnect the power
cord, or shut off power at the fuse or circuit breaker panel.
If the door is opened, the re may spread.
• Always observe safety precautions when using your
oven. Never try to repair the oven on your own - there is
dangerous voltage inside. If the oven needs to be repaired,
contact an authorized Samsung service center near you.
• If you use the appliance when it is contaminated by foreign
substance, such as food waste, it may result in a problem
with the appliance.
• Take care when removing the wrapping from food taken out
of the appliance.
- If the food is hot, hot steam may be emitted abruptly
when you remove the wrapping and this may result in
burns.
• Do not attempt to repair, disassemble, or modify the
appliance yourself.
- Since a high voltage current enters the product chassis,
it may result in electric shock or re.
- When a repair is needed, contact your nearest Samsung
service center.
• If any foreign substance, such as water has entered the
appliance, contact your nearest Samsung service center.
- Failing to do so may result in electric shock or re.
• Do not touch the power cord with wet hands.
- This may result in electric shock.
• Do not turn the appliance off while an operation is in
progress.
- This may cause a spark and result in electric shock or
re.
• Keep all packaging materials well out of the reach of
children, as packaging materials can be dangerous to
children.
- If a child places a plastic bag over its head, the child can
suffocate.

English 17
Important safety instructions
SAVE THESE INSTRUCTIONS
• Do not let children or any person with reduced physical,
sensory, or mental capabilities use this appliance
unsupervised.
• Make sure that the appliance’s controls and cooking areas
are out of the reach of children.
- Failing to do so may result in electric shock, burns, or
injury.
• Do not touch the inside of the appliance immediately after
cooking. The inside of the appliance will be hot.
- Failing to do so may result in burns.
• Do not use or place ammable sprays or objects near the
oven.
- Flammable items or sprays can cause res or an
explosion.
• Do not insert ngers, foreign substances, or metal objects,
such as pins or needles into inlets, outlets, or holes. If
foreign substances are inserted into any of these holes,
contact your product provider or nearest Samsung service
center.
• Do not tamper with, make any adjustments, or repairs to the
door. Under no circumstances should you remove the door
or outer shell of the oven.
• Do not store or use the oven outdoors.
• Never use this appliance for purposes other than cooking.
- Using the appliance for any purpose other than cooking
may result in re.
• Open the cap or stopper of sealed containers (herb tonic tea
bottle, baby bottle, milk bottle, and so on) before heating
them. Make a hole in food items that have shells (eggs,
chestnuts, etc) with a knife before cooking them.
- Failing to do so may result in burns or injury.
• Never heat plastic, paper containers, and do not use them
for cooking.
- Failing to do so may result in re.
• Do not heat food wrapped in paper from magazines,
newspapers, etc.
- This may result in re.
• Do not open the door when the food in the oven is burning.
- If you open the door, it causes an inow of oxygen and
may cause the food to ignite.

18 English
Important safety instructions
Important safety instructionsImportant safety instructions
SAVE THESE INSTRUCTIONS
• Do not apply excessive pressure to the door or the inside
of the appliance. Do not strike the door or the inside or the
appliance.
- Hanging on to the door may result in the product falling
and cause serious injury.
- If the door is damaged, do not use the appliance. Contact
a Samsung service center.
• Do not hold food in your bare hands during or immediately
after cooking.
- Use cooking gloves. The food may be very hot and you
could burn yourself.
- As the handle and oven surfaces may be hot enough to
cause burns after cooking, use cooking gloves to protect
your hands from burns.
USAGE CAUTIONS
CAUTION
• If the surface is cracked, turn the appliance off.
- Failing to do so may result in electric shock.
• Dishes and containers can become hot. Handle with care.
• Hot foods and steam can cause burns. Carefully remove
container coverings, directing the steam away from your
hands and face.
• Remove lids from baby food jars before heating. After
heating baby food, stir well to distribute the heat evenly.
Always test the temperature by tasting before feeding the
baby. The glass jar or the surface of the food may appear to
be cooler than the interior, which can be hot enough to burn
an infant’s mouth.
• Take care as beverages or food may be very hot after
heating.
- Especially when feeding a child. Check that it has cooled
sufciently.
English 19
Important safety instructions
SAVE THESE INSTRUCTIONS
• Take care when heating liquids, such as water or other
beverages.
- Make sure to stir during or after cooking.
- Avoid using a slippery container with a narrow neck.
- Wait at least 30 seconds after heating before removing
the heated liquid.
- Failing to do so may result in an abrupt overow of the
contents and cause burns.
• Do not stand on top of the appliance or place objects (such
as laundry, an oven cover, lighted candles, lighted cigarettes,
dishes, chemicals, metal objects, etc.) on the appliance.
- Items, such as a cloth, may get caught in the door.
- This may result in electric shock, re, problems with the
product, or injury.
• Do not operate the appliance with wet hands.
- This may result in electric shock.
• Do not spray volatile substances, such as insecticide onto
the surface of the appliance.
- As well as being harmful to humans, it may also result in
electric shock, re, or problems with the product.
• Do not put your face or body close to the appliance while
cooking or when opening the door just after cooking.
- Take care that children do not come too close to the
appliance.
- Failing to do so may result in children burning
themselves.
• Do not place food or heavy objects over the edge of the
oven door.
- If you open the door, the food or object may fall and this
may result in burns or injury.
• Do not abruptly cool the door, the inside of the appliance, or
a dish by pouring water over it during or just after cooking.
- This may result in damage to the appliance. The steam
or water spray may result in burns or injury.
• Do not operate while empty except for self-cleaning.
• Do not defrost frozen beverages in narrow-necked bottles.
The bottles can break.
• Do not scratch the glass of the oven door with a sharp
object.
- This may result in the glass being damaged or broken.
• Do not store anything directly on top of the appliance when
it is in operation.

20 English
Important safety instructions
Important safety instructionsImportant safety instructions
SAVE THESE INSTRUCTIONS
• Do not use sealed containers. Remove seals and lids before
cooking. Sealed containers can explode due to the build up
of pressure even after the oven has been turned off.
• Take care that food you are cooking in the oven does not
come into contact with the heating element.
- This may result in re.
• Do not overheat food.
- Overheating food may result in re.
CRITICAL CLEANING WARNINGS
CAUTION
• Do not clean the appliance by spraying water directly on to
it.
• Do not use benzene, thinner, or alcohol to clean the
appliance.
- This may result in discoloration, deformation, damage,
electric shock, or re.
• Take care not to hurt yourself when cleaning the appliance
(externally or internally).
- You may hurt yourself on the sharp edges of the
appliance.
• Do not clean the appliance with a steam cleaner.
- This may result in corrosion.
• Keep the inside of the oven clean. Food particles or
spattered oils stuck to the oven walls or oor can cause
paint damage and reduce the efciency of the oven.

English 21
Introducing your new range
What’s included
Wire racks (2) *
NOTE
If you need an accessory marked with a *, you can buy it from the Samsung
Contact Center (1-800-726-7864).
Introducing your new range
Overview
02
03
04
05
07
06
08
09
10
11
01
01 Oven control panel
(See page 28 for
more information)
02 * Surface control
knobs
(See page 23 for
more information)
03 Glass surface
04 Oven door 05 Storage drawer 06 Door latch
07 Automatic oven
light switch
08 * Oven light 09 Convection fan
10 Shelf position 11 Gasket

22 English
Before you begin
Before you beginBefore you begin
Clean the oven thoroughly before using it for the rst time. Then, remove the
accessories, set the oven to bake, and then run the oven at 400 °F for 1 hour. There
will be a distinctive odor. This is normal.
Ensure your kitchen is well ventilated during this conditioning period.
Energy saving tips
• During cooking, the oven door should remain closed except when you turn
food over.
Do not open the door frequently during cooking to maintain the oven
temperature and to save energy.
• If cooking time is more than 30 minutes, you can switch the oven off
5-10 minutes before the end of the cooking time to save energy. The residual
heat will complete the cooking process.
• To save energy and reduce the time needed for reheating the oven, plan oven
use to avoid turning the oven off between cooking one item and the next.
• Whenever possible, cook more than one item at a time.
Surface cooking
About surface cooking
CAUTION
BEFORE COOKING
• Do not use the glass cooktop surface as a cutting board.
• Do not place or store items that can melt or catch re on the glass cooktop,
even when it is not being used.
• Turn the surface units on only after placing cookware on them.
• Do not store heavy items above the cooktop surface. They could fall and
damage it.
CAUTION
DURING COOKING
• Do not place aluminum foil or plastic items, such as salt and pepper shakers,
spoon holders, or plastic wrappings on the range when it is in use. The hot air
from the vent could melt plastics or ignite ammable items.
• Make sure the correct surface unit is turned on.
• Never cook directly on the glass. Always use cookware.
• Always place the pan in the center of the surface unit you are cooking on.
• Never leave surface units unattended while using a high heat setting.
Boilovers cause smoking and greasy spillovers that may catch on re.
• Turn the surface units off before removing cookware.
• Do not use plastic wrap to cover food. Plastic may melt onto the surface and
be very difcult to remove.

English 23
Surface cooking
CAUTION
AFTER COOKING
• Do not touch the surface units until they have cooled down.
• The surface may still be hot and burns may occur if you touch the glass
surface before it has cooled down sufciently.
• Immediately clean spills on the cooking area to prevent a tough cleaning
chore later.
• If cabinet storage is provided directly above the cooking surface, make sure
that the items are infrequently used and can be safely stored in an area
subjected to heat. Temperatures may be unsafe for items, such as volatile
liquids, cleaners, or aerosol sprays.
About the radiant surface elements
The temperature rises gradually and evenly. As the temperature rises, the radiant
element will glow red. To maintain the selected setting, the element will cycle
on and off. The heating element retains enough heat to provide a uniform and
consistent heat during the off cycle. For efcient cooking, turn off the element
several minutes before cooking is complete. This will allow residual heat to
complete the cooking process.
NOTE
Radiant elements have a limiter that allows the element to cycle ON and OFF, even
at the HI setting. This helps to prevent damage to the ceramic cooktop. Cycling at
the HI setting is normal and can occur if the cookware is too small for the radiant
element or if the cookware bottom is not at.
Location of the radiant surface elements and controls
The radiant control knobs operate the radiant surface elements on the cooktop as
shown below.
06
02
04
03
07
05
01
01 Left Rear:
6", 1200 W
02 Left Front:
6"/9”, 1400 W /
3300 W
03 Right Front:
9"/12”, 1900 W /
3000 W
04 Right Rear:
6", 1200 W
05 Warming Center:
100 W
06 Hot surface
indicator
07 Cooktop On/Off
lamp
24 English
Surface cooking
Surface cooking
Hot surface indicator
• Comes on when the unit is turned on or hot to the touch.
• Stays on even after the unit is turned off.
• Glows until the unit is cooled to approximately 150 °F.
Cooktop on/off lamp
• The lamp turns on when the surface control knobs are not in off position.
• The lamp turns off when the surface control knobs are in off position.
Cooking areas
• The cooking areas on your range are identied by permanent circles on the
glass cooking surface. For the most efcient cooking, t the pan size to the
element size.
• Pans should not extend more than ½˝ to 1˝ beyond the cooking area.
• When a control is turned on, you can see a glow through the glass cooking
surface. The element will cycle on and off to maintain the preset heat setting,
even at high settings.
• For more information on selecting proper types of cookware, refer to the
section "Using the proper cookware" on page 26.
How to set the appliance for surface cooking
CAUTION
• The surface elements may be hot even when off and burns can occur. Do not
touch the surface elements until they have cooled down sufciently.
• At high or medium-high settings, never leave food unattended. Boilovers
cause smoking and greasy spillovers may catch on re.
• Be sure you turn the control knob to OFF when you nish cooking.
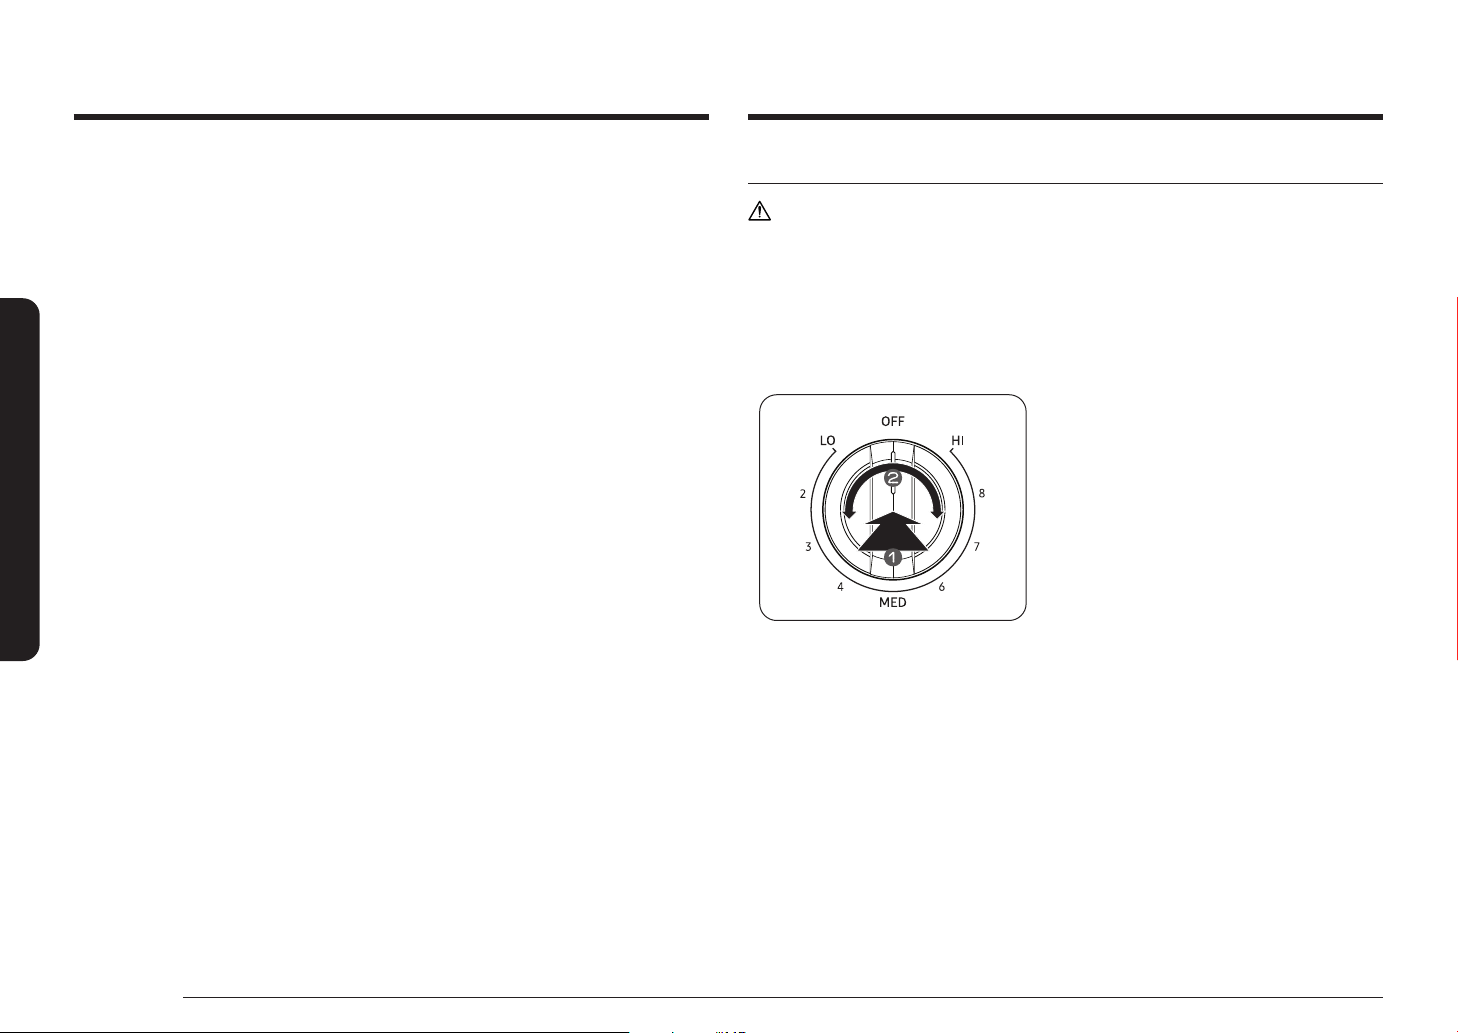
Single surface unit control knob (Left Rear, Right Rear)
1. Push the knob in.
2. Turn in either direction to the setting
you want.
• At both the off and high settings,
the knob clicks into position.

English 25
Surface cooking
Dual surface unit control knob (Left Front, Right Front)
1. Push the knob in.
2. Turn in either direction to the setting
you want.
• To use the single surface unit,
turn the control knob to the single
burner (A) setting.
• To use the dual surface unit, turn
the control knob to the dual burner
(B) setting.
NOTE
If you remove the knob for cleaning, make sure to reattach it in the correct
orientation. (Refer to the illustration above.)
CAUTION
• Please note, operation of lighting knob may not synchronize with the actual
operation of the radiant heater when there is a problem with the product.
• The area on the knob between the high and off settings is not appropriate for
cooking.
Recommended settings
SETTING TYPE OF COOKING
HIGH Starting most foods, bringing water to a boil, pan broiling
MEDIUM HIGH Continuing a rapid boil, frying, deep fat frying
MEDIUM Maintaining a slow boil, thickening sauces and gravies,
steaming vegetables
MEDIUM LOW Keeping foods cooking, poaching, stewing
LOW Keeping foods warm, melting, simmering
Using the warming center
The warming center, located in the back center of the glass surface, will keep hot,
cooked food at serving temperature.
NOTE
The surface warmer will not glow red like the cooking elements.
CAUTION
• Do not warm food on the warming center for more than two hours.
• Use only cookware and dishes recommended as safe for oven and cooktop
use.
• Always use potholders or oven mitts when removing food from the warming
center as cookware and plates will be hot.
• When warming pastries and breads, use covers that have an opening to allow
moisture to escape.
• Do not use plastic wrap to cover foods. Plastic may melt onto the surface and
be very difcult to clean off.
• Always start with hot food. Eating uncooked or cold food placed on the
warming center could result in illness.
26 English
Surface cooking
Surface cooking
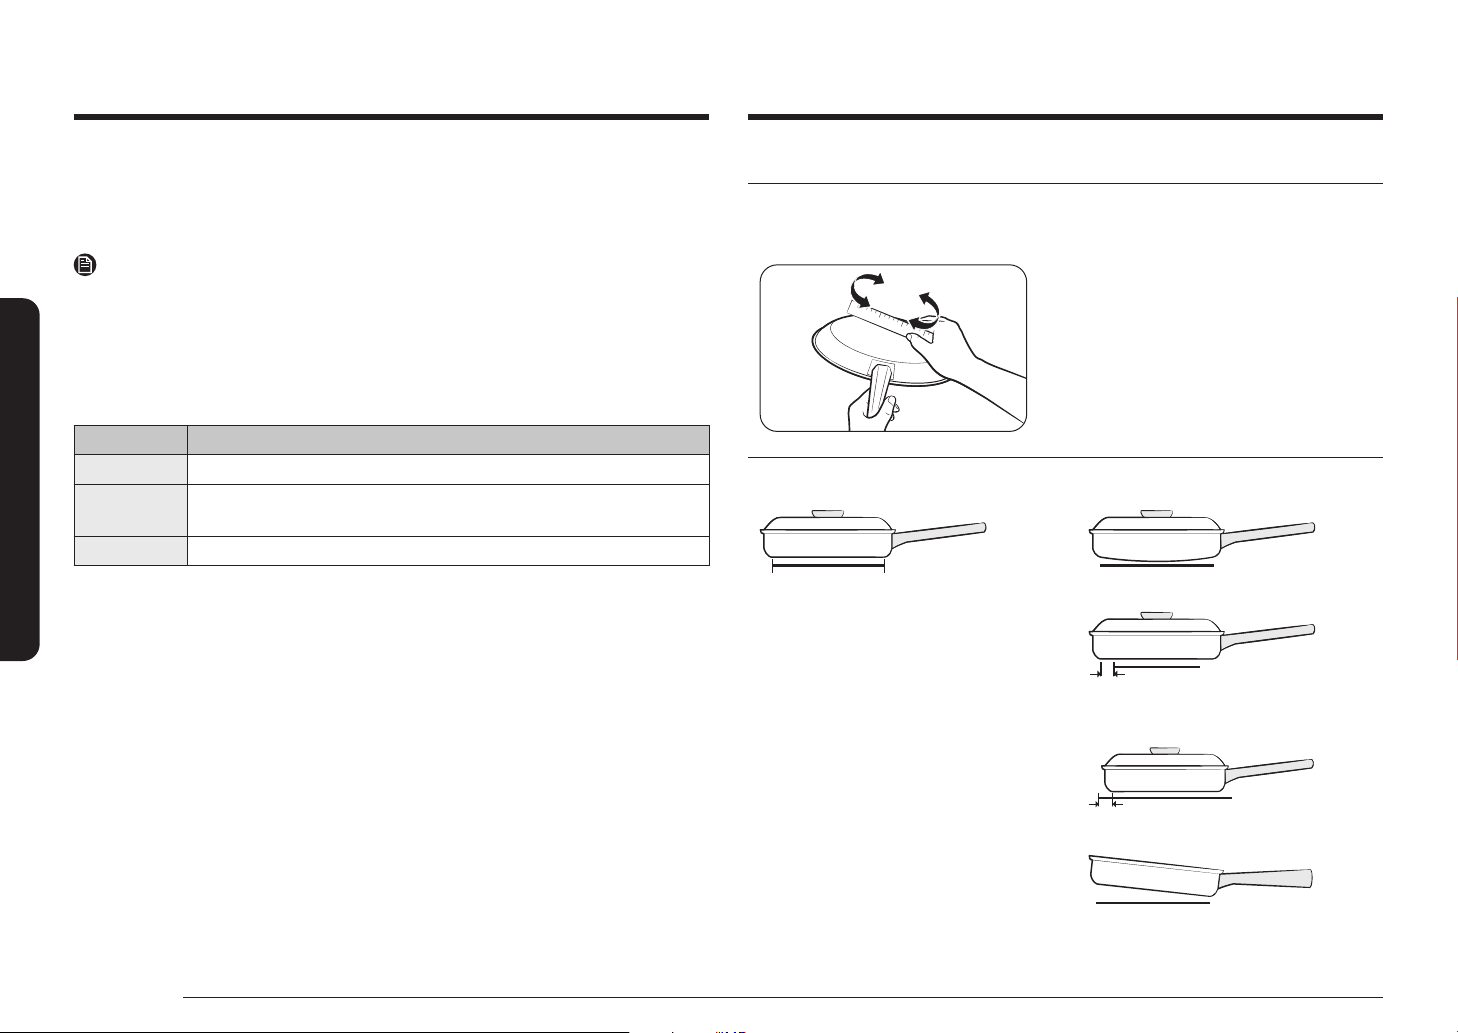
Using the proper cookware
Using the right cookware can prevent many problems, such as uneven cooking or
extended cooking times. Using the proper pots and pans will reduce cooking times
and cook food more evenly.
Check for atness by rotating a ruler across
the bottom of the cookware.
CORRECT INCORRECT
Flat bottom and straight sides.
• Tight tting lids.
• Weight of handle does not tilt
pan.
• Pan is well balanced.
• Pan size matches the amount of
food to be prepared and the size
of the surface element.
• Made of a material that
conducts heat well.
Always match pot diameter to
element surface diameter.
Curved and warped pan bottoms.
Pan overhangs element by more
than one-half inch.
Pan is smaller than element.
Heavy handle tilts pan.
1. To turn the warming center on, press the Warming Center On/Off pad.
2. Select the power setting you want. Press the Warming Center Level pad once
for Low, twice for Medium, or three times for High.
3. To turn the warming center off, press the Warming Center On/Off pad.
NOTE
• Pressing OFF/CLEAR does not turn the warming center off.
• For best results, all foods on the warming center should be covered with a lid
or aluminum foil. When warming pastries or breads, the lid or foil should be
vented to allow moisture to escape.
Recommended settings
LEVEL TYPE OF FOOD
Low Breads/pastries, casseroles, gravies, eggs
Medium Dinner plate with foods, soups (cream), vegetables, sauces, stews,
meats
High Fried foods, soups (liquid), hot beverages

English 27
Surface cooking
Protecting the cooktop
Cleaning
• Clean the cooktop before using it for the rst time.
• Clean your cooktop daily or after each use. This will keep your cooktop
looking good and can prevent damage.
• If a spillover occurs while you are cooking, immediately clean the spill from
the cooking area while it is hot to prevent a tough cleaning chore later. Using
extreme care, wipe the spill with a clean, dry towel.
• Do not allow spills to remain on the cooking area or the cooktop trim for a
long period of time.
• Do not use abrasive cleansing powders or scouring pads, which will scratch
the cooktop.
• Do not use chlorine bleach, ammonia, or other cleansers not specically
recommended for use on a glass-ceramic surface.
Preventing marks and scratches
• Do not use glass cookware. It may scratch the cooktop.
• Do not place a trivet or wok ring between the cooktop and the pan. These
items can mark or scratch the cooktop.
• Make sure the cooktop and the pan bottom are clean.
• Do not slide metal pans across the cooktop.
Preventing stains
• Do not use a soiled dish cloth or sponge to clean the cooktop surface. A lm
will remain, which may cause stains on the cooking surface after the area is
heated.
• Continuously cooking on a soiled surface can result in a permanent stain.
Preventing other damage
• Do not allow plastic, sugar, or foods with high sugar content to melt onto the
hot cooktop. Should this happen, clean immediately.
• Do not let a pan boil dry as this will damage the cooktop and the pan.
• Do not use the cooktop as a work surface or cutting board.
• Do not cook food directly on the cooktop. Always use the proper cookware.
Choosing the proper cookware
What your cookware is made of determines how evenly and quickly heat is
transferred from the surface element to the pan bottom.
• ALUMINUM - Excellent heat conductor. Some types of food will cause the
aluminum to darken. (Anodized aluminum cookware resists staining & pitting).
If aluminum pans are slid across the ceramic cooktop, they may leave metal
marks that resemble scratches. Remove these marks as soon as the cooktop
cools down.
• COPPER - Excellent heat conductor but discolors easily. May leave metal
marks on ceramic glass (to remove, see above.)
• STAINLESS STEEL - Slow heat conductor with uneven cooking results.
It's durable, easy to clean, and resists staining.
• CAST IRON - A poor conductor; retains heat very well. Cooks evenly once
cooking temperature is reached. Not recommended for use on ceramic
cooktops.
• ENAMELWARE - Heating characteristics will vary depending on the base
material. Porcelain enamel coating must be smooth to avoid scratching
ceramic cooktops.
• GLASS - Slow heat conductor. Not recommended for ceramic cooktop surfaces
because it may scratch the surface.
28 English
Operating the oven
Operating the ovenOperating the oven
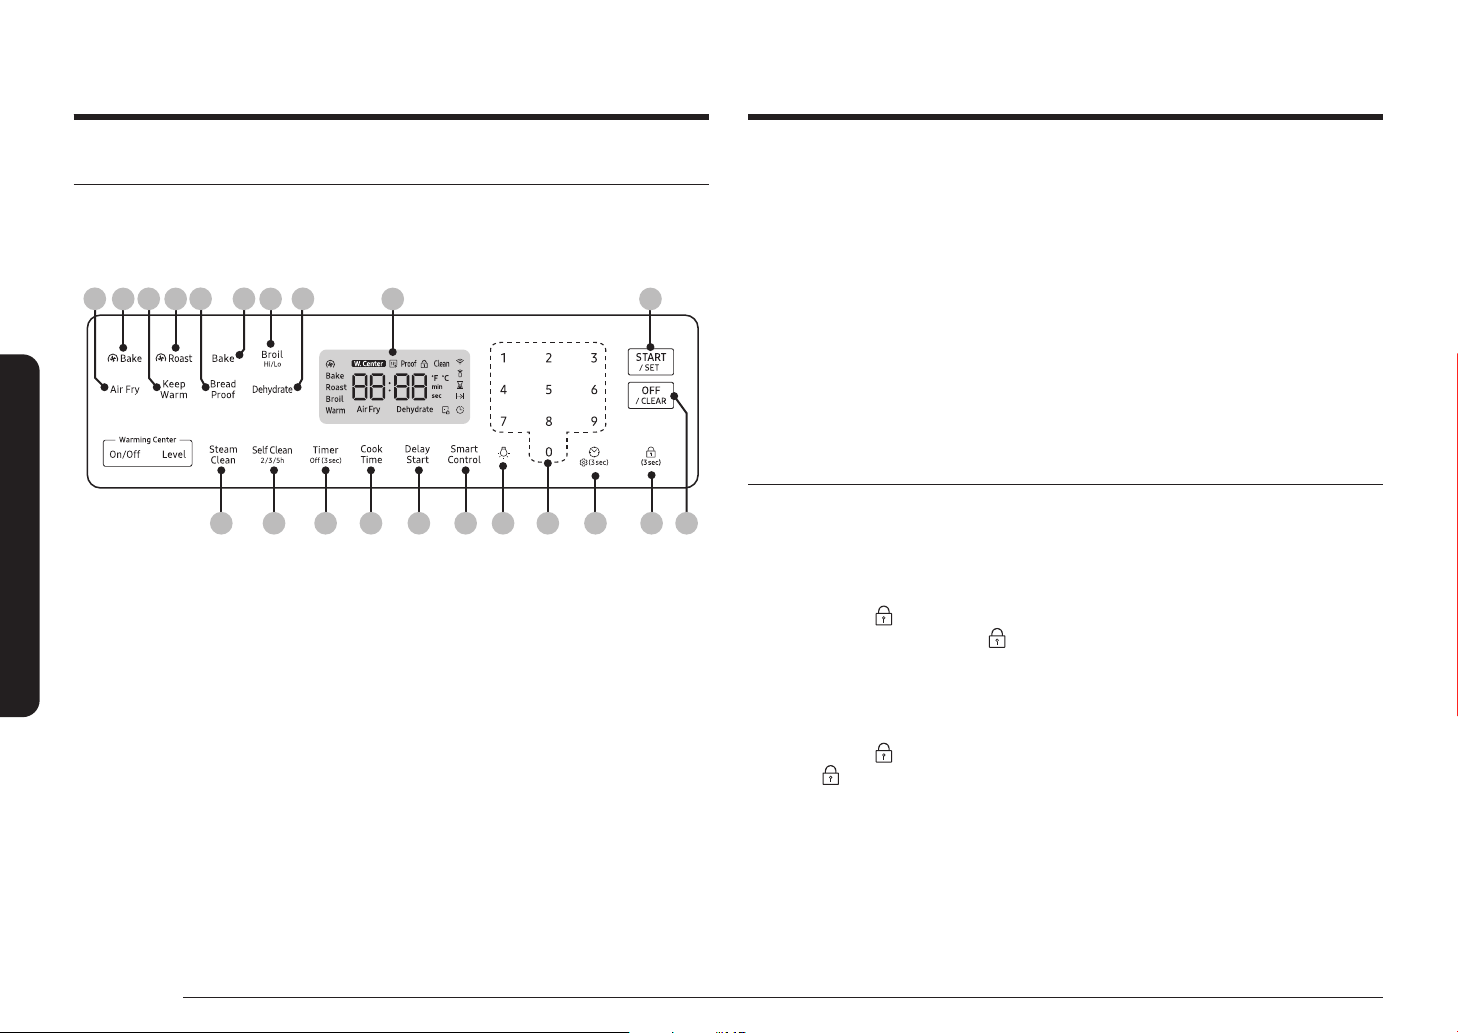
The oven control panel
READ THE INSTRUCTIONS CAREFULLY BEFORE USING THE OVEN. For satisfactory
use of your oven, become familiar with the various features and functions of the
oven as described below. Detailed instructions for each feature and function follow
later in this user manual.
06
07 08 09
01 1902 03 05
1110 12 13 14 15 2016 2117 18
04
01 Display: Shows the time of day, oven temperature, what mode the oven is
operating in, and the time set for the timer or automatic oven operations.
02 Convection Bake: Use to select the Convection bake function of the oven.
03 Convection Roast: Use to select the Convection roast function of the oven.
04 Bake: Use to select the bake function of the oven.
05 Broil: Use to select the broil function of the oven.
06 Air Fry: Use to select the air fry function of the oven.
07 Keep Warm: Use to select the keep warm function of the single oven to keep
cooked foods warm.
08 Bread Proof: Use to select the bread proof function of the oven.
09 Dehydrate: Use to select the dehydrate function of the oven.
10 Steam Clean: Use to select the steam cleaning function of the oven.
11 Self Clean: Use to select the self-cleaning function of the oven.
12 Timer: Use to set or cancel the kitchen timer. The kitchen timer does not start
or stop cooking. Press and hold for 3 seconds to turn off the timer.
13 Cook Time: Press and then use the number pad to set the amount of time you
want your food to cook. The oven will shut off when the cooking time has run
out.
14 Delay Start: Press to set the oven to start and stop automatically at a time you
set.
15 Smart Control: Use to select the smart control feature.
16 Number pad: Use to set any function requiring numbers, such as the time of
day on the clock, the timer, the oven temperature, the start time and length of
operation for timed baking, etc.
17 Lamp: Press to turn the oven light on or off.
18 Clock / Setting : Use to set the time of day. Use to bring up the user preference
menu in the display. (Press for 3 seconds.)
19 START / SET: Use to start any cooking or cleaning function in the oven.
20 OFF / CLEAR: Press to cancel all oven operations except the clock and timer.
Press to cancel a previously entered temperature or time.
21 Oven lock: Use to disable all oven functions.
Oven lock
Lock the oven door and the buttons on the touch pad so they cannot be activated
accidentally.
Oven lock can only be activated in standby mode.
How to activate the oven lock feature
Press Oven lock
for 3 seconds.
The display will show the Lock
icon as well as the current time.
All functions must be cancelled before Oven lock is activated.
This function is available only when the oven temperature is under 400 °F.
How to unlock the Oven
Press Oven lock
for 3 seconds.
The Lock icon will disappear from the display.
English 29
Operating the oven
Setting the clock
The clock must be set to the correct time of day for the automatic oven timing
functions to work properly.
• The time of day cannot be changed during timed cooking, delay-timed
cooking, or a self-cleaning cycle.
How to set the clock
1. Press Clock
.
2. Enter the current time in hours and minutes on the number pad, e.g., 1, 3, 0,
for 1:30.
3. Press Clock or START/SET to save the changes.
Setting the kitchen timer
The kitchen timer serves as an extra timer that will beep when the set time has
elapsed. It does not start or stop cooking functions. You can use the kitchen timer
with any of the other oven functions.
How to set the timer
1. Press Timer.
2. Enter a desired time using the number pad.
3. When done, press START/SET.
4. To cancel the Timer settings, press and hold Timer for 3 seconds.
5. When the set time elapses, the oven beeps and displays the “End” message.
Press Timer to delete the message.
NOTE
To change the programmed timer, press Timer, enter a different time, and then
press START/SET.
Timed cooking
In timed cooking, the oven turns on immediately and cooks for the length of time
you select. At the end of the cooking time, the oven turns off automatically.
• You can use the timed cooking feature only with another cooking operation
(bake, convection bake, convection roast, air y, dehydrate).
How to set the oven for timed cooking
1. Start the cooking operation you want, e.g., Bake.
The default temperature is 350 °F.
2. Press Cook Time.
• You can set the Cook Time at any time. (After selecting the cook mode,
during preheating, after preheating.)
3. Enter the cooking time you want, e.g., 45 min, using the number pad.
You can set the cooking time for any amount of time from 1 minute to 9 hours
and 59 minutes.
4. Press START/SET. The temperature display will start to change once the oven
temperature reaches 175 °F.
The oven will continue to cook until the set amount of time has elapsed, then
turn off automatically unless you set the keep warm feature. (Refer to the
section on the keep warm feature on page 37.)
5. You can cancel a cook time at any time by setting the cook time to 0 minutes.
(Press Cook Time -> set cook time to 0 min -> press START/SET)
NOTE
When timed cooking is done, the range will beep several times.
CAUTION
Use caution with the timed cooking or delay start features. Use these features to
cook cured or frozen meats and most fruits and vegetables. Foods that can easily
spoil, such as milk, eggs, sh, meat, or poultry, should be chilled in the refrigerator
rst. Even when chilled, they should not stand in the oven for more than 1 hour
before cooking begins, and should be removed promptly when cooking is
completed. Eating spoiled food can result in sickness from food poisoning.
30 English
Operating the oven
Operating the oven
Delay start
In a delay timed cooking, the oven’s timer turns the oven on and off at times you
select in advance.
• You can use the delay start feature only with another cooking operation (bake,
convection bake, convection roast, air y, dehydrate, or self-clean).
• You can set the oven for a delay start before setting other cooking operations.
• The clock must be set to the current time.
How to set the oven for delay start
1. Position the oven rack(s) and place the food in the oven.
2. Press the pad for the cooking operation you want, e.g., Bake.
The default temperature is 350 °F.
3. Enter the temperature you want, e.g., 375 °F, using the number pad.
4. Set the cooking time if you want. (Refer to the section on the timed cooking
feature on page 29.)
5. Press Delay Start.
6. Enter the time you want the oven to turn on, e.g., 4:30, using the number pad.
7. Press START/SET. At the set time, a short beep will sound. The oven will begin
to bake.
Turning the oven light on and off
• The oven light turns on automatically when the door is opened.
• The oven light turns off automatically when the door is closed.
• You can turn the oven light on and off manually by pressing the pad.
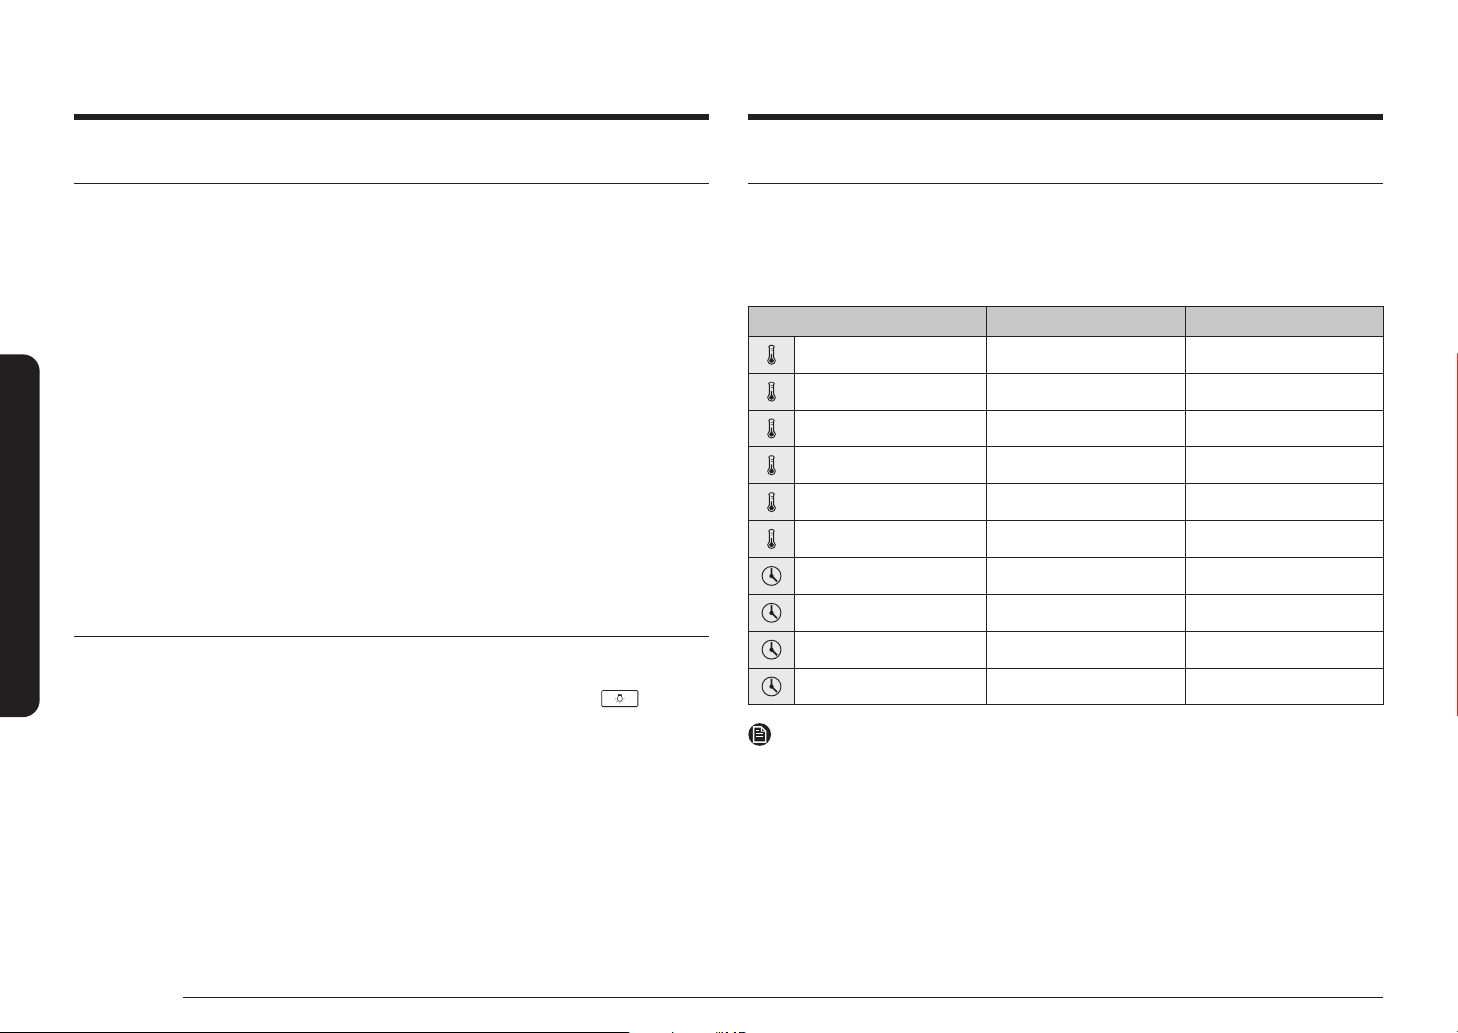
Minimum and maximum settings
All of the features listed in the table below have minimum and maximum time
or temperature settings. A beep will sound each time a pad on the control panel
is pressed and the entry is accepted. An error tone will sound in the form of a
long beep if the entered temperature or time is below the minimum or above the
maximum setting for the feature.
FEATURE MINIMUM MAXIMUM
Bake 175 °F (80 °C) 550 °F (285 °C)
Broil LO HI
Convection Bake 175 °F (80 °C) 550 °F (285 °C)
Convection Roast 175 °F (80 °C) 550 °F (285 °C)
Air Fry 350 °F (175 °C) 500 °F (260 °C)
Dehydrate 100 °F (40 °C) 225 °F (105 °C)
Keep Warm* - 3 Hr.
Bread Proof - 12 Hrs.
Self Clean 2 Hr. 5 Hr.
Steam Clean 20 Min. 20 Min.
NOTE
If you turn off the 12-hour energy saving feature, the feature marked with a * will
operate until canceled. (12-hour energy saving's default setting : on) See page 41
for more information.

English 31
Operating the oven
Using the oven racks
Oven rack positions
1
2
3
4
5
6
7
Recommended rack position for cooking
TYPE OF FOOD RACK POSITION
Broiling hamburgers 7
Broiling meats or small
cuts of poultry, sh
4-6
Bundt cakes, pound
cakes, frozen pies,
casseroles
3 or 4
Angel food cakes, small
roasts, fresh and frozen
pizza
2
Turkey, large roast,
hams, fresh pizza
1
• This table is for reference only.
Rack and Pan placement
3 4
Single Oven RackSingle Oven Rack
Centering the baking pans in the oven as
much as possible will produce better results.
If baking with more than one pan, place the
pans so each has at least 1˝ to 1½˝ of air
space around it.
When baking on a single oven rack, place
the oven rack in position 3 or 4.
See the gure on the left.
5
3
Multiple Oven RackMultiple Oven Rack
2
5
Cakes place the oven racks in positions 3
and 5, Cookies place the racks in positions
2 and 5.
Using Multiple Oven Racks
Type of Baking Rack Positions
Cookies 2 and 5
Cakes 3 and 5
32 English
Operating the oven
Operating the oven
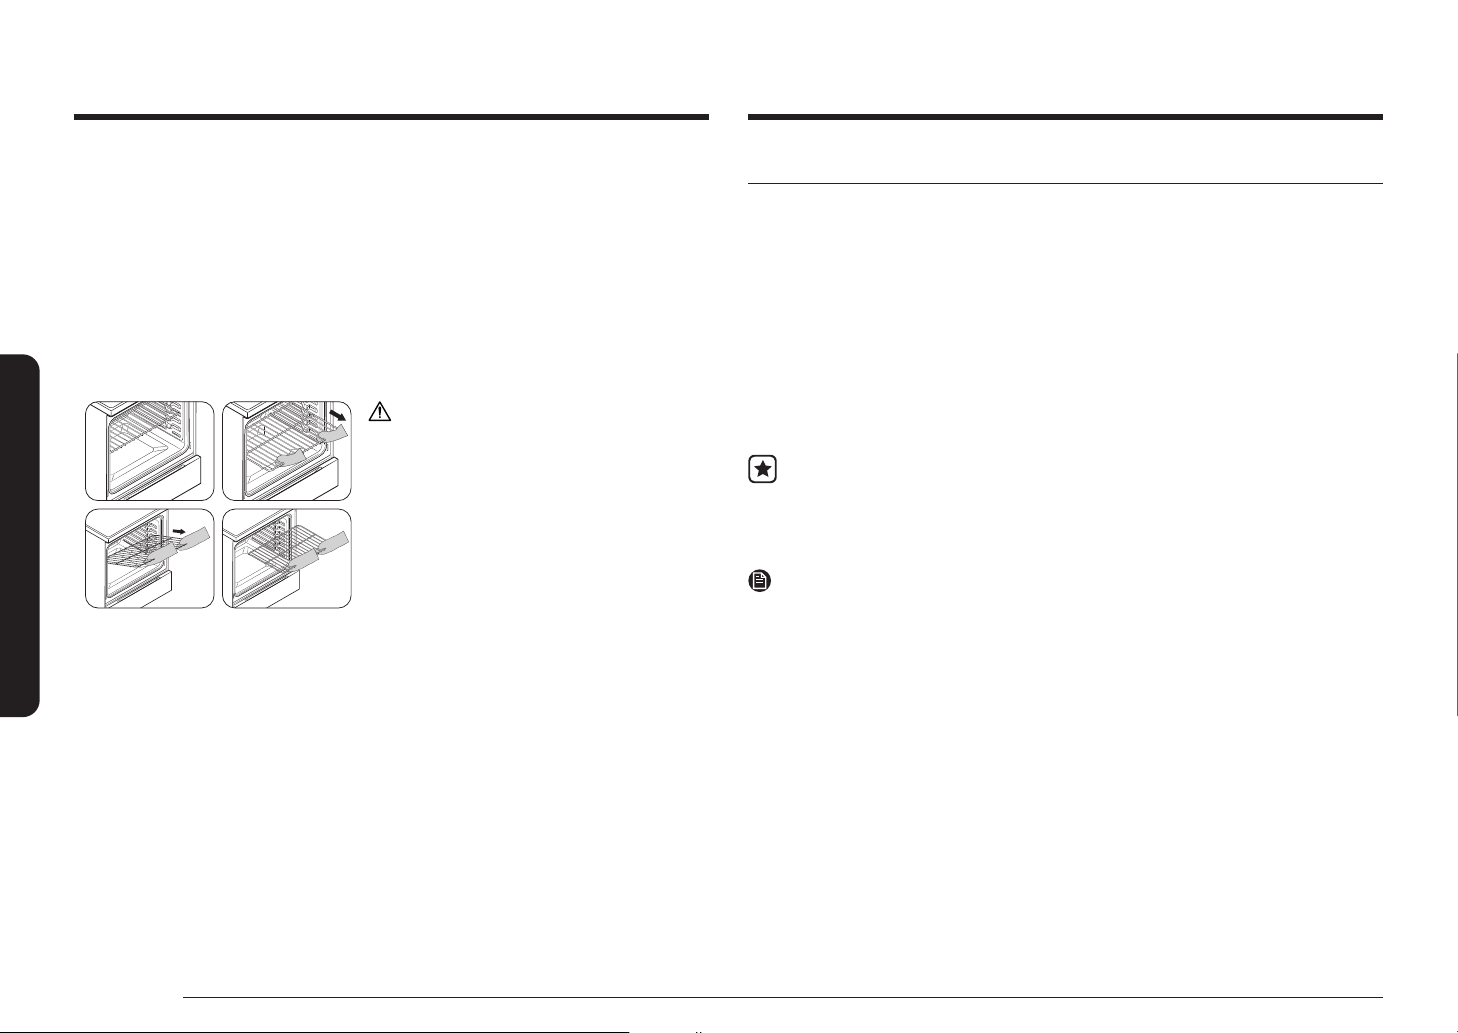
Before using the racks
The oven has two racks.
Each rack has stops that need to be placed correctly on the supports. These stops
will keep the rack from coming completely out.
REMOVING THE RACKS
1. Pull the rack straight out until it stops.
2. Lift up the front of the rack, and then pull it out.
REPLACING THE RACKS
1. Place the end of the rack on the support.
2. Tilt the front end up and push the rack in.
CAUTION
• Do not cover a rack with aluminum
foil or place aluminum foil on the
oven bottom. This will hamper heat
circulation, resulting in poor baking,
and may damage the oven bottom.
• Arrange the oven racks only when the
oven is cool.
Baking
The oven can be programmed to bake at any temperature from 175 °F to 550 °F.
Baking temperature and time will vary depending on the ingredients and the size
and shape of the baking pan used. Dark or nonstick coatings may cook faster with
more browning.
How to set the temperature
1. Press Bake. The default temperature is 350 °F.
2. Enter the temperature you want on the number pad, e.g., 3, 7, 5.
3. Press START/SET. The temperature display will start to change once the oven
temperature reaches 175 °F.
4. If you want to cancel baking or if you have nished, press OFF/CLEAR.
• Place food in the oven after preheating if the recipe calls for it.
Preheating is very important for good results when baking cakes,
cookies, pastry, and breads. After the oven has reached the desired
temperature, the range will beep several times.
NOTE
For performance reasons, the convection fan may be turned on or off during the
operation.
How to adjust the temperature while cooking
1. Press Bake. The display will show the present temperature, e.g., 375 °F.
2. Enter the temperature you want, e.g., 425 °F, using the number pad.
3. Complete the entry by pressing START/SET.

English 33
Operating the oven
Convection baking
1
2
3
4
5
6
7
By using the convection bake feature, you
will be able to cook faster. Convection
baking uses a fan to circulate the oven’s
heat evenly and continuously within the
oven. This improved heat distribution allows
for even cooking and excellent results
while using multiple racks at the same
time. Foods cooked on a single oven rack
will generally cook faster and more evenly
with convection baking. Multiple oven rack
cooking may slightly increase cook times
for some foods, but the overall result is
time saved. Breads and pastries brown
more evenly. You can program the oven
for convection baking at any temperature
between 175 °F and 550 °F.
Tips for convection baking
The amount of time you save will vary depending on the amount and type of food
you are cooking. When baking cookies or biscuits, you should use pans with no
sides or very low sides to allow the heated air to circulate around the food. Using
a pan with a dark nish will produce faster cooking times.
When using convection baking with a single rack, place the oven rack in position
3 or 4. If cooking on multiple racks, place the oven racks in position 3 and 5 or 2
and 5.
When baking a cake, using the bake mode (not the convection bake mode) will
produce better results.
How to set the oven for convection baking
1. Press Bake. The default temperature is 325 °F.
2. Enter the temperature you want, e.g., 400 °F, using the number pad.
3. Press START/SET.
The temperature display will start to change once the oven temperature
reaches 175 °F.
The range will beep several times when the oven reaches the adjusted oven
temperature.
4. To turn off or cancel convection baking, press OFF/CLEAR.
• The convection oven fan shuts off when the oven door is opened.
• DO NOT leave the door open for long periods of time while using
convection cooking or you may shorten the life of the convection
heating element.
NOTE
• If you leave the oven door open for more than 2 minutes when the oven is on,
all heating elements will shut off automatically.
NOTE
For performance reasons, the convection fan may be turned on or off during the
operation.
34 English
Operating the oven
Operating the oven
Convection roasting
Convection roasting is good for cooking large tender cuts of meat, uncovered.
Heat comes from the top heating element. The convection fan circulates the heated
air evenly over and around the food. Meat and poultry are browned on all sides as
if they were cooked on a rotisserie. The heated air seals in juices quickly for moist
and tender results while, at the same time, creating a rich golden brown exterior.
How to set the oven for convection roasting
1. Press
Roast. The default temperature is 325 °F.
2. Enter the temperature you want, e.g., 400 °F, using the number pad.
3. Press START/SET.
The temperature display will start to change once the oven temperature
reaches 175 °F. The range will beep several times when the oven reaches the
adjusted oven temperature.
4. To turn off or cancel convection roasting, Press OFF/CLEAR.
• The convection oven fan shuts off when the oven door is opened.
• DO NOT leave the door open for long periods of time while using
convection cooking or you may shorten the life of the convection
heating element.
NOTE
If you leave the oven door open for more than 2 minutes when the oven is on, all
heating elements will shut off automatically.
NOTE
For performance reasons, the convection fan may be turned on or off during the
operation.
Broiling
Broiling is a method of cooking tender cuts of meat by direct heat under the broil
element of the oven.
The high heat cooks quickly and gives a rich, brown outer appearance. Broil mode
is best for meats, sh, and poultry up to 1" thick.
Always preheat the oven for 4 minutes before broiling.
How to set the oven for broiling
1. Press Broil once for Hi or twice for Lo.
Use Lo to cook foods such as poultry or thick cuts of meat thoroughly without
over-browning them.
2. To start broiling, press START/SET.
Broil one side until the food is browned. Turn over and broil the other side.
3. Press OFF/CLEAR once you have nished cooking or if you want to cancel
broiling.
Broil stop position
Broil stop position
Leave the door open at the broil stop
position. The door will stay open by itself,
yet the proper temperature is maintained in
the oven.
CAUTION
Should an oven re occur, close the oven
door and turn the oven off. If the re
continues, throw baking soda on the re
or use a foam-type re extinguisher. Do
not put water or our on the re. Flour can
explode and water can cause a grease re
to spread and cause personal injury.
English 35
Operating the oven
Broiling Recommendation Guide
The size, weight, thickness, starting temperature, and your doneness preference
will affect broiling times. This guide is based on meats at refrigerator temperature.
Always use a broiler pan and its grid when broiling. Always preheat the oven for
4 minutes before broiling.
Food Doneness Size Thickness
Broil
Setting
Rack
position
Cooking time
1st side 2nd side
Hambugers Medium 9 patties 1" HI 7 3:20-3:40 2:20-2:40
Beef steak
Medium - 1" HI 5 7:00-8:00 6:00-7:00
Medium - ¾" HI 5 6:00-7:00 5:00-6:00
Chicken pieces Well done 2-2½ lbs. ¾"-1" HI 4 15:00-16:00 13:00-14:00
Pork chops Well done 1 lb. ½" LO 5 15:00-16:00 13:00-14:00
Lamb chops Well done 1 lb. ¾"-1" HI 5 5:00-6:00 4:00-5:00
Salmon steak Well done 3 pcs. ¾"-1" HI 5 4:00-7:00 3:00-6:00
Air fry
This feature works special hot air for crispier and healthier frozen or fresh foods
without or less oil than normal convection modes. For best results, use this mode
on a single oven rack and place the Air fry tray on the position 3. The temperature
can be set between 350 °F and 500 °F. Preheating is not necessary for this mode.
Follow recipe or package directions for set temperature, time or quantity.
How to set the oven for Air Fry mode
1. Place the tray on rack position 3.
2. Select Air Fry mode.
3. Use the number pad to change the default temperature. Enter the suggested
temperature for your food as recommended cooking guide. The default
temperature is 425 °F.
4. Set the Cook Time or Delay Start, if necessary.
5. Tap START/SET.
6. When cooking is complete, tap OFF/CLEAR and take out the food.
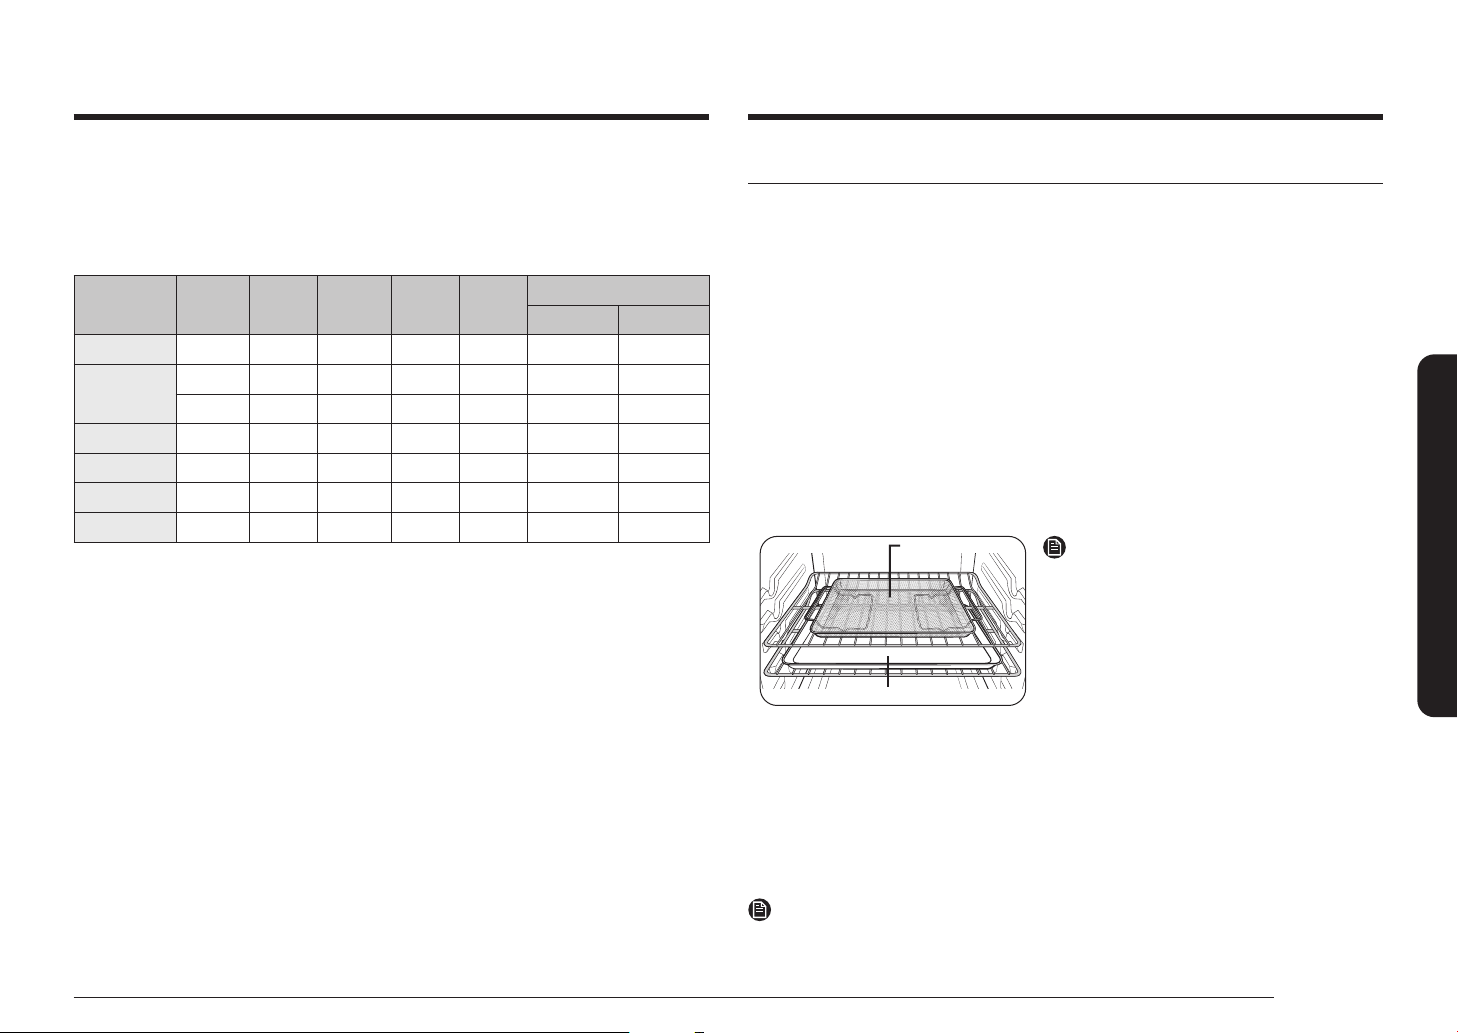
Tray or Baking sheetTray or Baking sheet
Air fry trayAir fry tray
Air Fry Tray recommended
placement
NOTE
• Place a baking sheet or tray on the
rack below the Air fry tray for getting
any drippings. This will help to reduce
splatter and smoke.
• Before using a baking sheet, check the
maximum allowable temperature of
baking sheet.
• Air fry is designed for a single oven
rack. Place food on rack position 3 for
best results.
• For cooking fresh or homemade foods,
spread the oil over a larger area more
evenly, crisping up the food more
effectively.
NOTE
Air fry tray not include in this model, but you can buy it from the Samsung Contact
Center (1-800-726-7864).
36 English
Operating the oven
Operating the oven
Air fry cooking guide
Item Amount Temperature Time
Potatoes
Frozen French Fries 30-35 oz 425 °F-450 °F 25-30 min
Frozen French Fries,
Seasoned
25-30 oz 425 °F-450 °F 20-25 min
Frozen Tater Tots 40-45 oz 450 °F 20-25 min
Frozen Hash Brown 25-30 oz 425 °F-450 °F 20-25 min
Frozen Potato Wedges 30-35 oz 425 °F-450 °F 20-25 min
Homemade French Fries 25-30 oz 400 °F-425 °F 25-30 min
Homemade Potato Wedges 40-45 oz 425 °F-450 °F 25-30 min
Frozen
Frozen Chicken Nuggets 24-28 oz 400 °F-425 °F 15-25 min
Frozen Chicken Wings 30-35 oz 425 °F-450 °F 20-30 min
Frozen Onion Rings 20-25 oz 400 °F-425 °F 15-20 min
Frozen Fish Fingers 20-25 oz 425 °F 18-22 min
Frozen Chicken Strips 25-30 oz 425 °F-450 °F 20-30 min
Frozen Churros 20-25 oz 425 °F 18-22 min
Item Amount Temperature Time
Poultry
Fresh Drumsticks 40-45 oz 425 °F-450 °F 30-35 min
Fresh Chicken Wings 30-35 oz 425 °F-450 °F 27-32 min
Chicken Breasts, Breaded 25-30 oz 450 °F 25-30 min
Vegetables
Asparagus, Breaded 15-20 oz 425 °F 20-25 min
Egg Plants, Breaded 20-25 oz 425 °F 20-25 min
Mushroom, Breaded 18-22 oz 425 °F 20-25 min
Onions, Breaded 18-22 oz 425 °F 20-25 min
Cauliowers, Breaded 40-45 oz 400 °F-425 °F 20-25 min
Vegetable Mix, Breaded 30-35 oz 425 °F 20-25 min
Using the special function
Dehydrate
Dehydrate dries food or removes moisture from food via heat circulation. After
drying the food, keep it in a cool and dry place. For fruit, adding lemon, pineapple
juice, or sprinkling sugar on the fruit helps the fruit retain sweetness.
See the table below for Dehydrate settings.
1. Press Dehydrate.
2. Press START/SET.
3. Press OFF/CLEAR at any time to turn off the Dehydrate feature.
NOTE
Use rack position 3 or 4 for dehydrating.
English 37
Operating the oven
Bread Proof
The Bread Proof function automatically provides the optimum temperature for the
bread proof process and, therefore does not have a temperature adjustment.
If you press Bread Proof when the oven temperature is above 95 °F, Hot will
appear in the display. Because these functions produce the best results when
started while the oven is cool, we recommend that you wait until the oven has
cooled down and Hot disappears from the display.
1. Press Bread Proof.
2. Press START/SET.
3. Press OFF/CLEAR at any time to turn off the Bread Proof feature.
NOTE
Use rack position 3 for bread proong.
CAUTION
• Do not use Bread proof for warming food. The proong temperature is not hot
enough to keep food warm.
• Place the dough in a heat-safe container on rack position 3 and cover it
with a cloth or with plastic wrap. The plastic wrap may need to be anchored
underneath the container so that the oven does not blow the plastic wrap off
the dough.
• To avoid lowering the temperature and extending proong time, do not open
the oven door.
Using the keep warm feature
When cooking is nished, Keep Warm will hold the food at a safe serving
temperature for up to 3 hours.
After 3 hours, the feature will shut off automatically. You can use the keep warm
feature without any other cooking operations, or you can set it to activate after a
timed or delay timed cooking operation.
You should not use this feature to reheat cold food.
How to use the keep warm feature
1. Press Keep Warm.
2. Press START/SET.
3. Press OFF/CLEAR at any time to turn the feature off.
How to set the oven to activate the keep warm mode after a timed cooking
1. Set Timed Cooking to start cooking.
(Refer to the section on the timed cooking feature on page 29.)
2. Press Keep Warm to use the feature.
3. Cooking mode is switched directly to Keep Warm mode after the Timed
cooking period has ended. In this case, you can turn off Keep Warm by
pressing OFF/CLEAR.
• Press Keep Warm once again to cancel Keep Warm setting during cooking
mode operation.
NOTE
If you turn off the 12-hour energy saving feature, the keep warm feature will
operate until canceled. (12-hour energy saving's default setting : on). See page 41
for more information.
38 English
Operating the oven
Operating the oven
Using the smart control feature
Functions that can be operated from the SmartThings app may not work smoothly
if communication condition becomes poor, or the product is installed in a place
with a weak Wi-Fi signal.
Please refer to the following table for the main functions that can be operated
from the app.
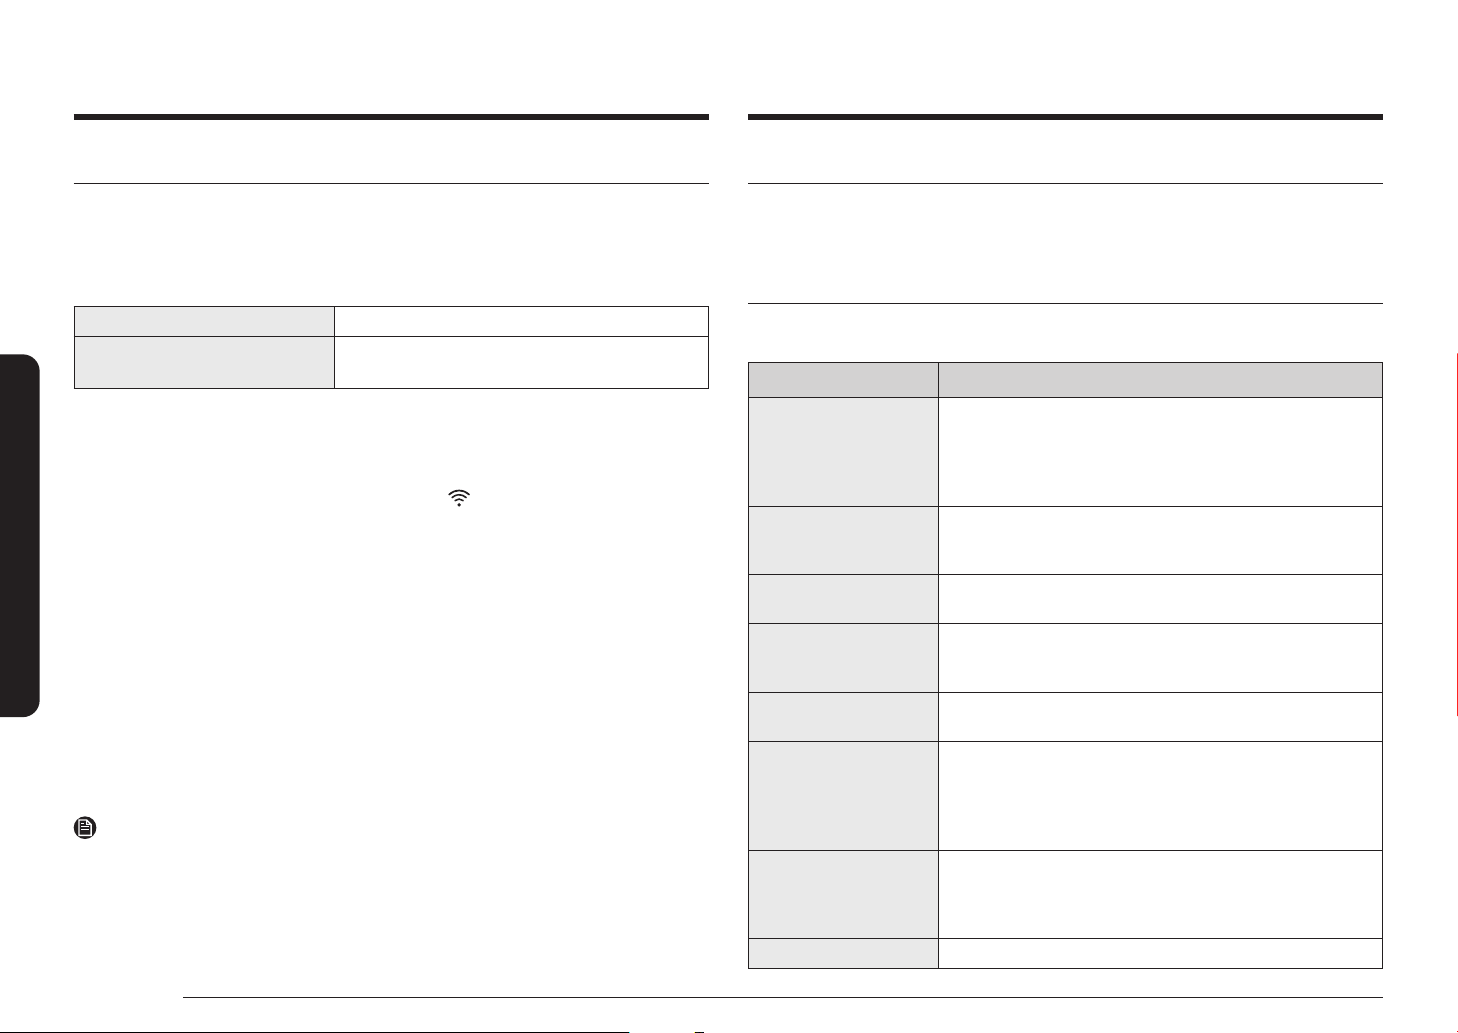
When the remote control is off Monitoring (Oven, Cooktop), Oven off
When the remote control is on Monitoring (Oven, Cooktop), Oven start, Oven
off, Error check
How to connect the oven
1. Download and open the SmartThings app on your smart device.
2. Follow the app’s on-screen instructions to connect your range.
3. Once the process is complete, the connected
icon located on your range
displays and the app will conrm you are connected.
4. If the connection icon does not turn on, follow the instruction in the app to
reconnect.
To start the oven remotely
1. Press Smart Control appears in the display. The oven can now be started
remotely with a connected device.
Oven remote control
• Transfer the oven setting (mode, time, temperature) from the device to the oven.
• Remotely start the oven (Only available for Electric range).
• Turn the oven off remotely.
• Once cooking starts, you can change the time, temperature remotely.
• Self clean mode cannot be started remotely.
NOTE
• Opening the oven door or pressing Smart Control will disable Smart Control
and prevent you from turning the oven on remotely.
• If it is not shown on the display, you can still monitor the oven and cooktop
status and turn the oven off.
• When oven cooking is nished or cancelled, Smart Control will turn off.
Using the voice control
To use the Range’s Voice Control function, you need Bixby / Amazon Alexa App /
Google Assistant App on your mobile device.
Refer to the table below for all available functions.
Bixby
Start conversation with Bixby on SAMSUNG mobile by saying “Hi Bixby” or by
pressing the side key.
Function “Hi Bixby”
Start/Preheat
• Preheat the range(oven).
• Start the range(oven) in convection bake mode[Mode]
at 325 degrees[Temp] for 1 hour[Time].
• Convection bake[Mode] in the range[Device Name] at
325 degrees[Temp].
Turn Off/Stop
• Cancel the range(oven).
• Turn off the range(oven).
• Stop baking in the range(oven).
Check Temp
• What is the temperature of the range(oven)?
• Check the range(oven) temperature.
Check Time
• Check the remaining time of the range(oven).
• How much range(oven) time is left on the timer?
• How much time is left on the range timer?
Check Mode (States)
• Check the range status.
• Check the status of the range(oven).
Temp Control
• Set the temperature of the range(oven) to 300.
• Increase the temp of the range(oven) by 20.
• Decrease the temp of the range(oven) by 20.
• Turn the range(oven) temperature up to 100 degrees.
• Turn the range(oven) temperature down to 50 degrees.
Oven Light
• Turn on the oven light (lamp).
• Turn on the range oven light.
• Turn off the oven light (lamp).
• Turn off the range oven light.
Oven Timer (Cook Time)
• Set the timer on the range(oven) to 1 hour.

English 39
Operating the oven
Function “Alexa”
“Ok Google”
Check Temp
• What is the temperature of
the oven[Device name]?
• What is the temperature of
the oven[Device name]?
Check Time
-
• What time is left on the
oven[Device name]?
Check Mode
(States)
• Is the oven[Device name]
running?
• Is the oven[Device name]
on?
• Is the oven[Device name]
running?
• What mode is the
oven[Device name] set to?
Temp Control
• Set oven[Device name] to
300 degrees [Temp].
• Set oven[Device name] to
300 degrees [Temp].
Oven Timer
(Cook Time)
• Set oven[Device name] to 3
hours[Time].
• Add 10 minutes/hours[Time]
to the oven[Device name].
• Set oven[Device name] to 3
hours[Time].
• Add 10 minutes/hours[Time]
to the oven[Device name].
NOTE
On/Off spec of smart control is same as guided in SmartThings app.
Amazon Alexa & Google Assistant
Samsung smart home appliances are supported by SmartThings skill in Alexa &
action in Google Assistant.
Installation Guide
Here’s how to link SmartThings account into Amazon Alexa or Google Assistant.
SmartThings App and Alexa App(or Google Assistant App) should be installed on
your phone.
1. Setup the supported devices to SmartThings.
2. After device setup, tap + button on the screen.
3. Tap ‘Voice assistant’ and link your Samsung account to Amazon Alexa.
(or Google Assistant)
4. Check the devices are visible on Amazon Alexa app. Then account linking is
complete. (Check the devices are visible and set the location(home&room) of
devices in Google home app. Then account linking is complete.)
Function “Alexa”
“Ok Google”
Start/Preheat
• Preheat the oven[Device
name].
• Start the oven[Device name].
• Turn on the oven[Device
name].
• Set the oven[Device name] to
bake [Mode].
• Set the oven[Device name] to
bake [Mode] for 1hour [Time]
at 350 degrees[Temp].
• Set the oven[Device name]
to bake [Mode] at 350
degrees[Temp].
• Set the oven[Device name] to
bake [Mode] for 1hour [time].
• Preheat the oven[Device
name].
• Start the oven[Device name].
• Turn on the oven[Device
name].
• Set the oven[Device name] to
bake [Mode].
Turn Off/Stop
• Turn off the oven[Device
name].
• Stop the oven[Device name].
• Turn off the oven[Device
name].
• Stop the oven[Device name].
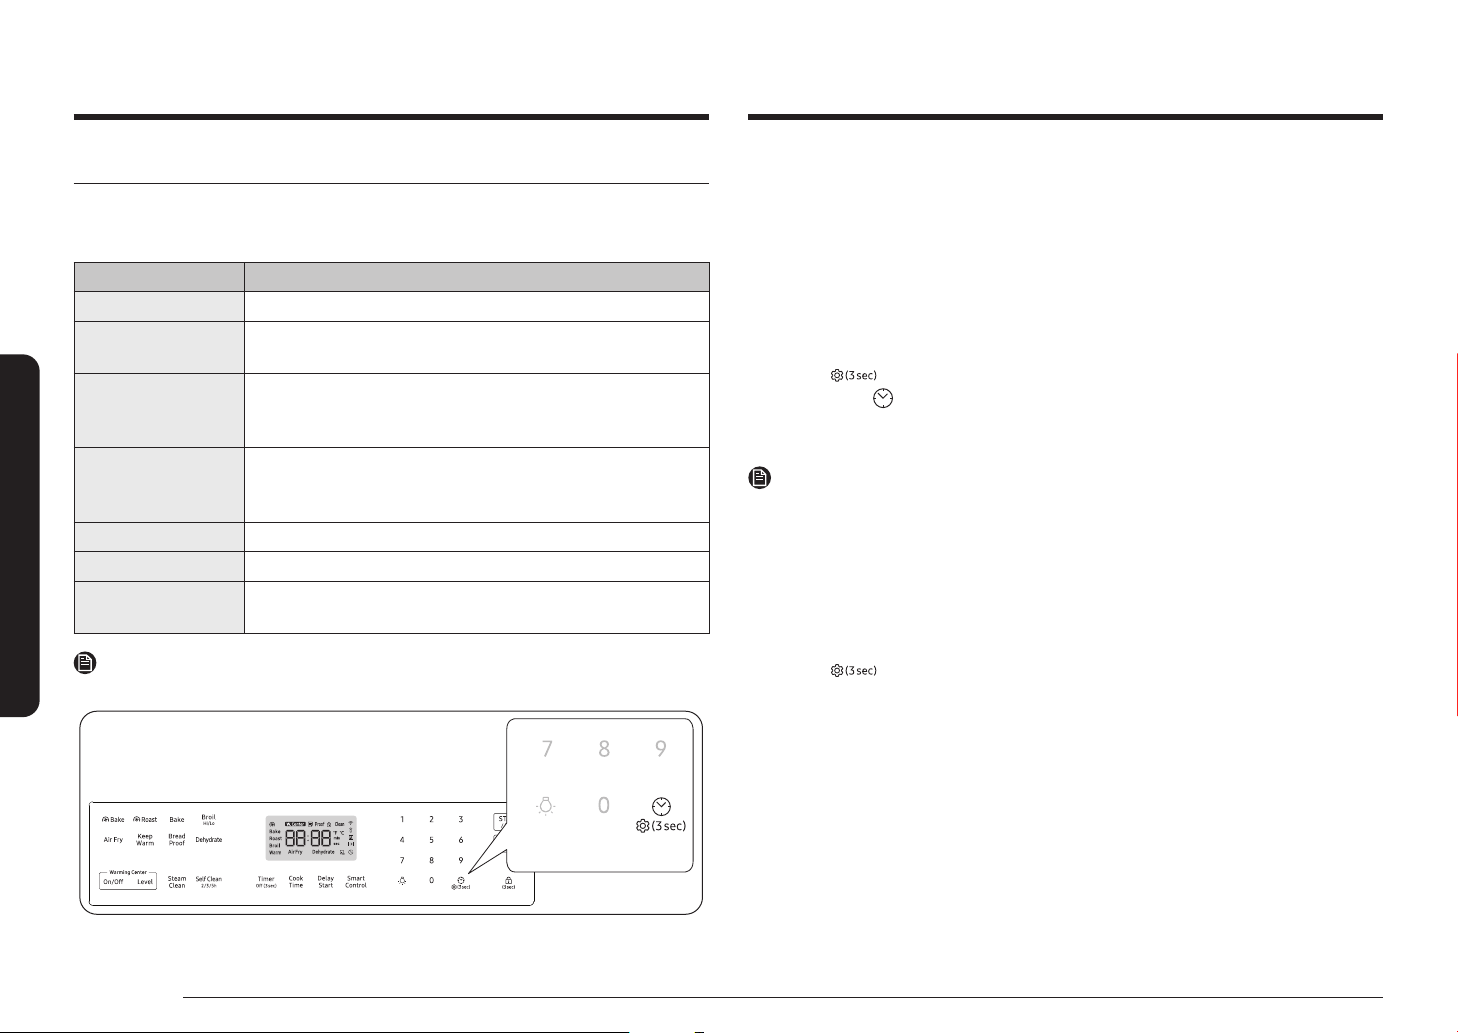
40 English
Operating the oven
Operating the oven
Temp Adjust
The temperature in the oven has been calibrated at the factory. When rst using
the oven, be sure to follow recipe times and temperatures. If you think the oven is
too hot or too cool, you can correct the temperature in the oven. Before correcting,
test a recipe by using a temperature setting that is higher or lower than the
recommended temperature. The baking results should help you to decide how
much of an adjustment is needed.
The oven temperature can be adjusted ±35 °F (±19 °C ).
How to correct the oven temperature
1. Press
Options for 3 seconds, and then Press 1 on the number pad.
2. Press Clock to select higher or lower than the current temperature.
3. Enter the adjustment you want to make using the number pad. (0-35).
4. Press START/SET to save the changes.
NOTE
This adjustment will not affect the broiling or the self-cleaning temperatures. The
adjustment will be retained in memory after a power failure.
Temp Unit (Fahrenheit or Celsius temperature selection)
You can program the oven control to display the temperature in Fahrenheit or
Celsius. The oven has been preset at the factory to display in Fahrenheit.
How to change the display from Fahrenheit to Celsius or Celsius to Fahrenheit
1. Press Options for 3 seconds, and then Press 2 on the number pad.
2. Press 1 (Fahrenheit) or 2 (Celsius) on the number pad.
3. Press START/SET to save the changes.
Using the options function
This function enables you to control various electronic control options.
Refer to the following table for available options.
The option menu is only available when the oven is not being used (not cooking).
Options Feature
1. Temp Adjust Lets you correct the temperature in the oven.
2. Temp Unit Lets you program the oven control to display
temperatures in Fahrenheit or Celsius.
3. Auto Conversion The convection auto conversion feature automatically
converts entered regular baking temperatures to
convection baking temperatures.
4. 12-hour energy
saving
This feature automatically turns off the oven after
12-hours during baking functions or after 3 hours during
a broil function.
5. Sound On/Off Lets you set the oven controls to operate silently.
6. Wi-Fi On/Off Lets you set the wi- network to deactivate.
0. Demo mode This option is for use by retail establishments for display
purposes only.
NOTE
Options key location.
English 41
Operating the oven
Auto Conversion
When you use the auto conversion feature, the convection auto conversion feature
will automatically convert entered regular baking temperatures to convection
baking temperatures.
If this feature is activated, the display will show the actual converted (reduced)
temperature. For example, if you enter a regular recipe temperature of 350 °F and
press Oven Start/Set, the display will show the converted temperature of 325 °F.
(Default setting : off)
How to enable or disable the auto conversion feature
1. Press
Options for 3 seconds, and then Press 3 on the number pad.
2. Press 1 (On) or 2 (Off) on the number pad.
3. Press START/SET to save the changes.
12-hour energy saving
If you accidently leave the oven on, this feature will automatically turn off the
oven after 12-hours during baking functions or after 3 hours during a broil
function. (Default setting : on)
How to turn the 12-hour energy saving feature on or off
1. Press
Options for 3 seconds, and then Press 4 on the number pad.
2. Press 1 (On) or 2 (Off) on the number pad.
3. Press START/SET to save the changes.
Sound On/Off
Using Sound On/OFF, you can set the oven controls to operate silently.
How to turn the sound on or off
1. Press
Options for 3 seconds, and then Press 5 on the number pad.
2. Press 1 (On) or 2 (Off) on the number pad.
3. Press START/SET to save the changes.
Wi-Fi On/Off
You can turn the range’s Wi-Fi connection on or off.
How to turn the Wi-Fi on or off
1. Press
Options for 3 seconds, and then Press 6 on the number pad.
2. Press 1 (On) or 2 (Off) on the number pad.
3. Press START/SET to save the changes.
NOTE
When you turn the range’s Wi-Fi connection off, users can’t set to easy setup.
Demo mode
This option is for use by retail establishments for display purposes only.
(The heating element does not operate.)
How to enable or disable the demo mode
1. Press
Options for 3 seconds, and then Press 0 on the number pad.
2. Press 1 (On) or 2 (Off) on the number pad.
3. Press START/SET to save the changes.

42 English
Operating the oven
Operating the oven
Using the Sabbath feature
(For use on the Jewish Sabbath & Holidays)
K
For further assistance, guidelines for proper usage, and a complete list
of models with the Sabbath feature, please visit the web at
http:\\www.star-k.org.
You can use the Sabbath feature with baking only. The oven temperature may
be set higher or lower after you set the Sabbath feature. (The oven temperature
adjustment feature should be used only during Jewish holidays.) The display,
however, will not change and tones will not sound when a change occurs. Once
the oven is properly set for baking with the Sabbath feature active, the oven will
remain on continuously until the Sabbath feature is cancelled. This will override
the factory preset 12-hour energy saving feature. If the oven light is needed
during the Sabbath, press
before activating the Sabbath feature. Once the
oven light is turned on and the Sabbath feature is active, the oven light will remain
on until the Sabbath feature is turned off. If the oven light needs to be off, be sure
to turn the oven light off before activating the Sabbath feature.
How to use the Sabbath feature
1. Press Bake.
The default temperature is 350 °F.
2. Enter the temperature you want, e.g., 375 °F, by using the number pad.
3. Press START/SET.
The temperature display will start to change once the oven temperature
reaches 175 °F.
4. Press Bake and 1 at the same time for 3 seconds.
The display will show SAb.
Once SAb appears in the display, the oven will not beep or display any further
changes.
You may change the oven temperature once baking has started. Remember
that the oven will not beep or display any further changes once the Sabbath
feature is engaged.
5. You can turn the oven off at any time by pressing OFF/CLEAR. This will turn
only the oven off. If you want to deactivate the Sabbath feature, hold down
Bake and 1 at the same time for 3 seconds. Sab will disappear from the
display.

English 43
Maintaining your appliance
Do not to attempt to activate any other program feature except BAKE while
the Sabbath feature is active. ONLY the following key pads will function
correctly with the Sabbath feature on: Number, Bake, START/SET and OFF/
CLEAR. All other keys should not be used once the Sabbath feature is
activated.
You can change the oven temperature, but the display will not change
and tones will not sound when a change occurs. (The oven temperature
adjustment feature should be used only on Jewish holidays.) After changing
the temperature while the unit is in Sabbath mode, there is a 15-second
delay before the unit recognizes the change.
You can set the Cook time function before activating the Sabbath feature.
Should you experience a power failure or interruption, the oven will shut off.
When power is returned, the oven will not turn back on automatically. SAb
will be displayed in the oven control display, but the oven will not operate.
Food may be safely removed from the oven while it is still in the Sabbath
mode, however the oven cannot be turned back on until after the Sabbath/
Holidays. After the Sabbath observance, turn OFF the Sabbath mode. Press
and hold both Bake and 1 for at least 3 seconds simultaneously to turn the
Sabbath mode off. The oven can then be used with all normal functions.
Do not open the oven door or change the oven temperature for about 30
minutes after you have started Sabbath mode to allow the oven to reach the
set temperature. Note that, for best performance, the oven fan operates only
when the oven temperature is rising.
Do not cover the surface cooktop with a blech.
Maintaining your appliance
Self-cleaning
This self-cleaning oven uses high temperatures (well above cooking temperatures)
to burn off leftover grease and residue completely or reduce them to a nely
powdered ash that you can wipe away with a damp cloth.
CAUTION
• During the self-cleaning cycle, the outside of the range will become very hot
to the touch. Do not leave small children unattended near the appliance.
• Some birds are extremely sensitive to the fumes given off during the self-
cleaning cycle of any range. Move birds to another well-ventilated room.
• Do not line the oven walls, racks, bottom, or any other part of the range with
aluminum foil. Doing so will result in poor heat distribution, poor baking
results, and cause permanent damage to the oven interior. Aluminum foil will
melt and adhere to the interior surface of the oven.
• Do not force the oven door open. This can damage the automatic door locking
system. Use care when opening the oven door after the self-cleaning cycle is
complete. Stand to the side of the oven when opening the door to allow hot
air or steam to escape. The oven may still be VERY HOT.
• Wear the glove during cleaning.
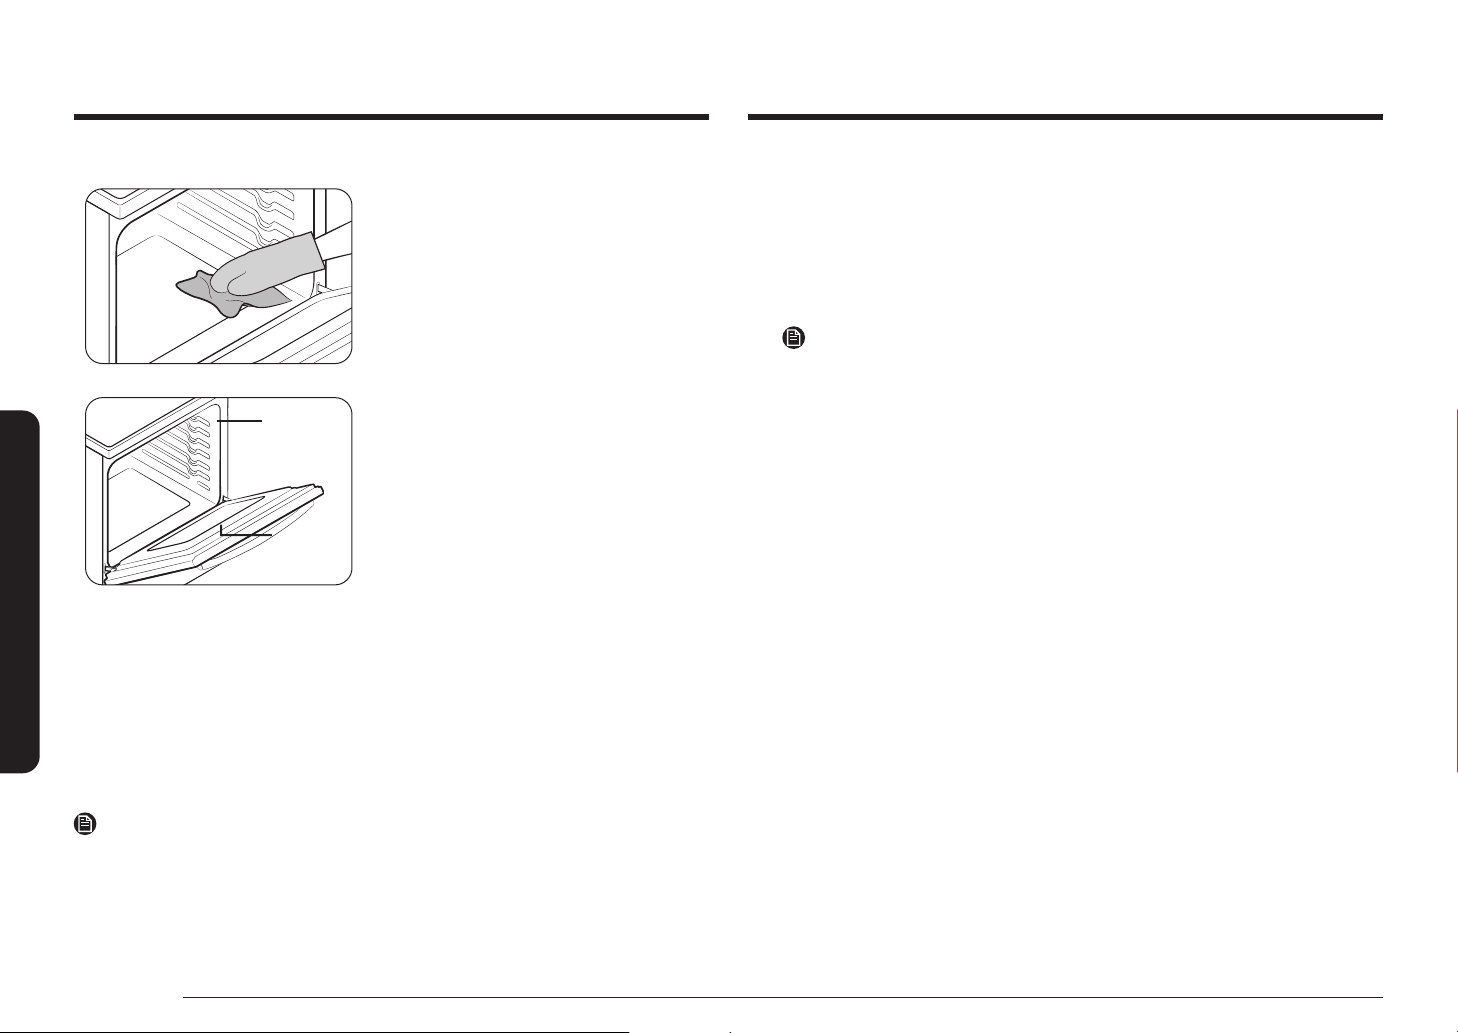
44 English
Maintaining your appliance
Maintaining your appliance
Before a self-cleaning cycle
Fig. 1Fig. 1
Fig. 2Fig. 2
Don’t hand Don’t hand
clean the clean the
oven door oven door
gasket.gasket.
You may You may
hand clean hand clean
the door.the door.
• We recommend venting your kitchen
with an open window or using a
ventilation fan or hood during the self-
cleaning cycle.
• Remove the wire rack, broil pan, broil
pan insert, all cookware, and any
aluminum foil from the oven.
• Wipe up debris from the oven bottom.
(Fig. 1)
• The silver-colored oven racks can be
self-cleaned, but they will darken, lose
their luster, and become hard to slide.
• Residue on the front frame of the range
and outside the gasket on the door
will need to be cleaned by hand. Clean
these areas with hot water, soap-lled
steel-wool pads, or cleansers, such as
Soft Scrub. Rinse well with clean water
and dry.
• Do not clean the gasket. The berglass
material of the oven door gasket cannot
withstand abrasion. It is essential for
the gasket to remain intact. If you
notice it becoming worn or frayed, have
it replaced. (Fig. 2)
• Make sure the oven light bulb cover is
in place and the oven light is off.
NOTE
Remove oven racks and accessories before starting the self-clean mode.
How to run a self-cleaning cycle
1. Select the length of time for the self-cleaning operation, e.g., 3 hours.
Press Self Clean once for a 3 hour clean time, twice for a 5 hour clean time, or
3 times for a 2 hour clean time
The default setting is 3 hours.
2. Press START/SET to start the self-cleaning cycle.
The motor-driven door lock will engage automatically.
NOTE
• You will not be able to start a self-cleaning cycle if the Oven lock feature
is activated or if the oven’s temperature is too hot.
• The oven door locks automatically. The display will show the cleaning
time remaining. It is not be possible to open the oven door until the
temperature drops to a safe and cool temperature.
• The self-cleaning feature will not operate when the warming center is on.
3. When the self-cleaning cycle is done, End will appear in the display and the
range will beep several times.
How to delay the start of self-cleaning
1. Press Self Clean.
Select the desired self-clean time by pressing Self Clean.
2. Press Delay Start.
3. Enter the time you want the clean cycle to start.
4. Press START/SET.
The display will show Delay, Self clean, and the Lock icon. The motor-driven
door lock will engage automatically.
5. The Self-Cleaning cycle will turn on automatically at the set time.

English 45
Maintaining your appliance
How to turn off the self-cleaning feature
You may nd it necessary to stop or interrupt a self-cleaning cycle due to smoke in
the oven.
1. Press OFF/CLEAR.
2. You will be able to open the oven door once the oven has cooled down for
approximately 1 hour.
After a self-cleaning cycle
• You may notice some white ash in the oven. Wipe it up with a damp cloth
after the oven cools. (If white spots remain, remove them with a soap-lled
steel wool pad and rinse thoroughly with a vinegar and water mixture).
• If the oven is not clean after one cycle, repeat the cycle.
• You cannot set the oven for cooking until the oven is cool enough for the door
to unlock.
Steam-cleaning
How to set the oven for steam-cleaning
For light cleaning, the steam-cleaning function saves time and energy. For heavier-
duty cleaning, use the self-cleaning function.
1. Remove all accessories from the oven.
2. Pour approximately 10 oz. (300 ml) of
water onto the bottom of the empty
oven and then close the oven door.
Use normal water only, not distilled
water.
3. Press Steam Clean.
4. Press START/SET.
When the operation is complete, the
display will blink and a beep will sound.
5. Press OFF/CLEAR.
6. Clean the oven’s interior.
There will be a signicant amount of
water remaining on the bottom of the
oven after a steam-cleaning cycle.
Remove the residual water with a
sponge or soft dry cloth.
NOTE
When steam-cleaning, use exactly 10 oz. of water since this produces the best
results.
NOTE
If you press Steam Clean when the oven temperature is above 100˚F, Hot will
appear in the display. Because this function produces the best results when started
while the oven is cool, we recommend that you wait until the oven has cooled
down and Hot disappears from the display.
CAUTION
Wear the glove during cleaning.
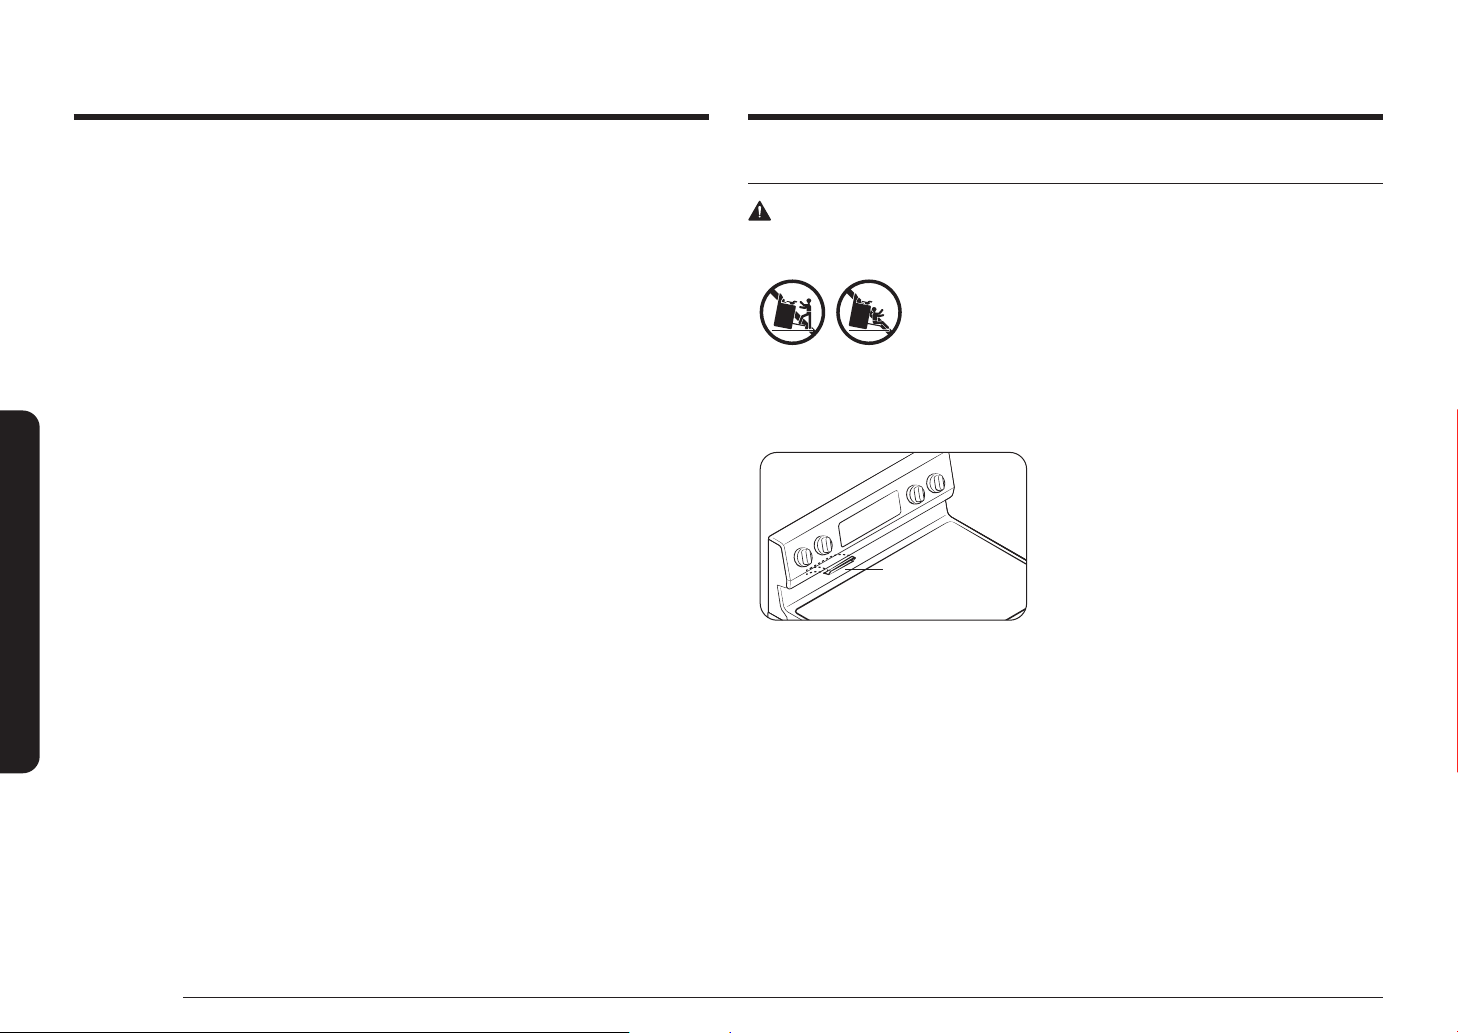
46 English
Maintaining your appliance
Maintaining your appliance
After a steam-cleaning cycle
• Take care when opening the door before a steam-cleaning procedure has
ended. The water on the bottom is hot.
• Open the oven door and remove the remaining water with a sponge. Do not
leave the residual water in the oven for any length of time. Wipe the oven
clean and dry with a soft cloth. Do not forget to wipe under the oven door
seal.
• Use a detergent-soaked sponge, a soft brush, or a nylon scrubber to wipe the
oven interior. Remove stubborn residue with a nylon scourer. You can remove
lime deposits with a cloth soaked in vinegar.
• If the oven remains dirty, you can repeat the procedure once the oven has
cooled.
• For heavy residue, such as grease left over from roasting, we recommend
that you rub detergent into the residue before activating the steam-cleaning
function.
• After cleaning, leave the oven door ajar at a 15° angle to allow the interior
enamel surface to dry thoroughly.
Care and cleaning of the oven
WARNING
• Be sure all controls are OFF and all surfaces are COOL before cleaning any part
of the range.
• If your range is moved for cleaning, servicing, or any
reason, be sure the Anti-Tip device is re-engaged
properly when the range is replaced. If you fail to re-
engage the Anti-Tip device, the range could tip and cause
serious injury.
Vent
• The oven vent is located above the left
rear surface unit.
• This area could become hot during oven
use.
• It is normal for steam to come out of
the vent.
• The vent is important for proper air
circulation. Never block this vent.
Oven vent
English 47
Maintaining your appliance
Oven racks
If the racks are left in the oven during a self-cleaning cycle, their color will turn
slightly blue and the nish will be dull. After the self-cleaning cycle is complete
and the oven has cooled, rub the sides of the racks with wax paper or a cloth
containing a small amount of oil. This will help the racks glide more easily on their
tracks.
NOTE
• Do not clean in a dishwasher.
• If the rack becomes hard to remove or replace, lightly wipe the oven rack
guides with cooking oil. Do not wipe cooking oil on the slides.
• If the rack becomes difcult to slide, the rack may need to be lubricated using
a graphite lubricant.
NOTE
• To order graphite lubricant., call Samsung customer care at 1-800-SAMSUNG
(726-7864) or visit our homepage (www.samsung.com/us/support, www.
samsung.com/ca/support, or www.samsung.com/ca_fr/support) and reference
part number DG81-01629A.
• If you want to buy directly, connect to http://www.samsungparts.com/Default.
aspx.
Cleaning painted parts and decorative trim
• For general cleaning, use a cloth with hot, soapy water.
• For more difcult residue and built-up grease, apply a liquid detergent directly
onto the area and leave for 30 to 60 minutes. Wipe with a damp cloth and dry.
Do not use abrasive cleaners on any of these surfaces. They can scratch.
Cleaning stainless steel surfaces
1. Shake the bottle of STAINLESS STEEL APPLIANCE CLEANER or POLISH well.
2. Place a small amount of STAINLESS STEEL APPLIANCE CLEANER or POLISH on
a damp cloth or damp paper towel.
3. Clean a small area, rubbing with the grain of the stainless steel if applicable.
4. Dry and buff with a clean, dry paper towel or soft cloth.
5. Repeat as necessary.
NOTE
• Do not use a steel-wool pad. It will scratch the surface.
• If a mineral oil-based STAINLESS STEEL APPLIANCE CLEANER has been used
before to clean the appliance, wash the surface with dishwashing liquid and
water prior to using the STAINLESS STEEL APPLIANCE CLEANER or POLISH.
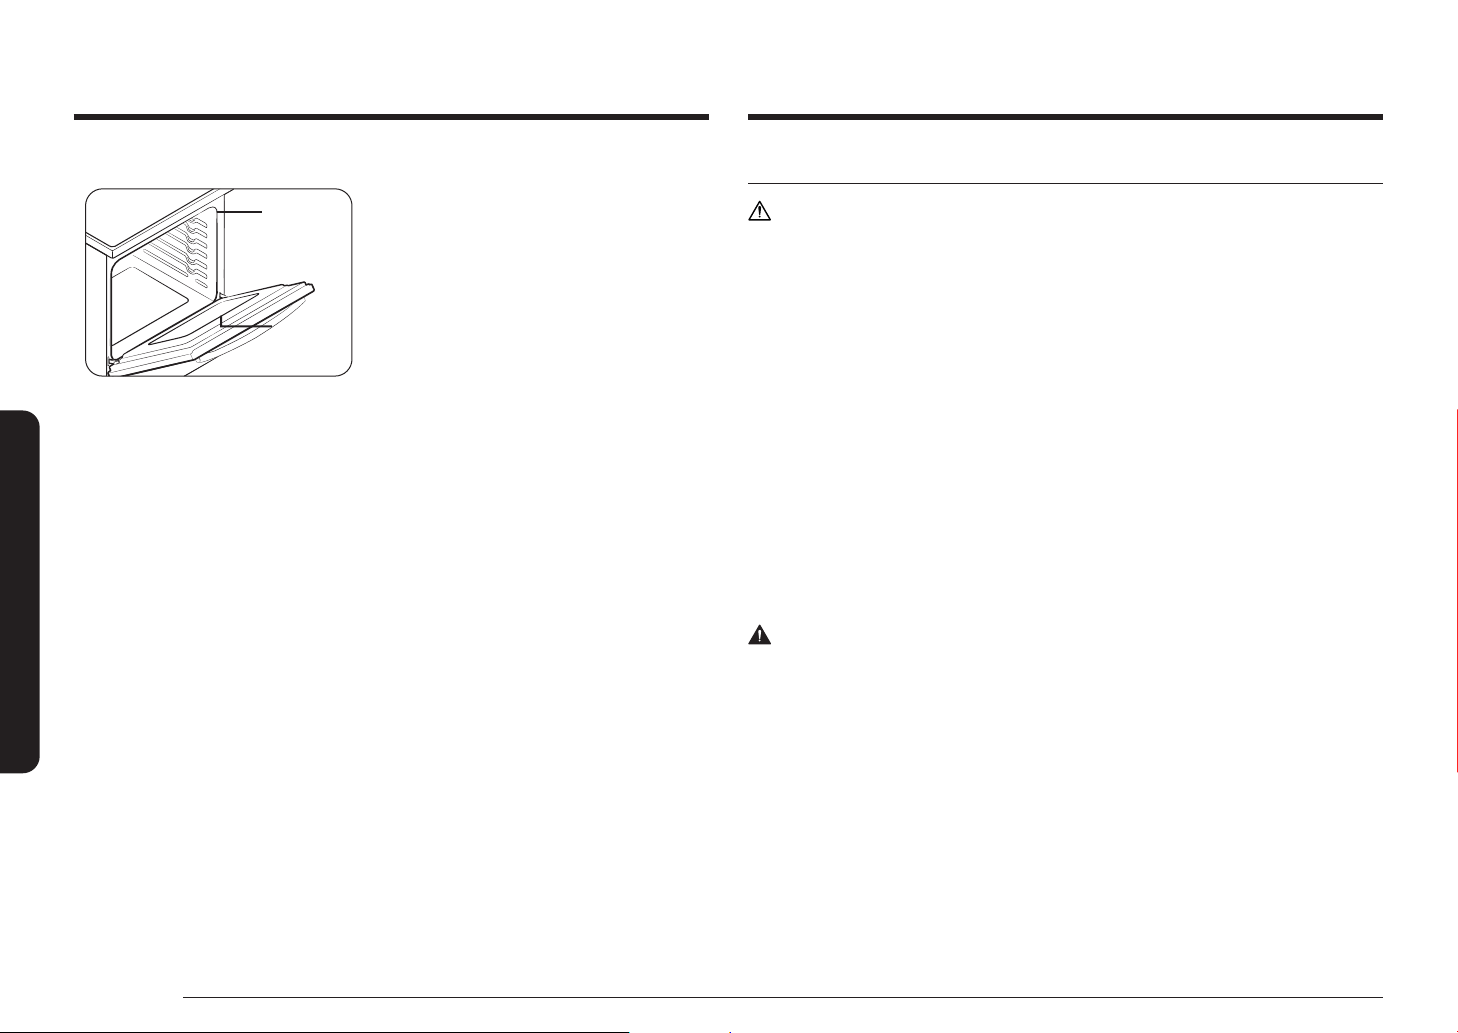
48 English
Maintaining your appliance
Maintaining your appliance
Care and cleaning of the glass cooktop
CAUTION
Do not block the vent and cooling motors or let any foreign matter get into them
when cleaning the cooktop.
Normal daily use cleaning
Use only a ceramic cooktop cleaner. Other creams may not be as effective.
By following these steps, you can maintain and protect the surface of your glass
cooktop.
1. Before using the cooktop for the rst time, clean it with a ceramic cooktop
cleaner.
This helps protect the top and makes cleanup easier.
2. Daily use of a ceramic cooktop cleaner will help keep the cooktop looking new.
3. Shake the cleaning cream well. Apply a few drops of cleaner directly to the
cooktop.
4. Use a paper towel or a cleaning pad for ceramic cooktops to clean the entire
cooktop surface.
5. Use a dry cloth or paper towel to remove all cleaning residue. No need to
rinse.
WARNING
DAMAGE to your glass surface may occur if you use scrub pads other than those
recommended.
Oven door
Don’t hand Don’t hand
clean the clean the
oven door oven door
gasket.gasket.
You may You may
hand clean hand clean
the door.the door.
• Use soap and water to thoroughly
clean the top, sides, and front of the
oven door. Rinse well. You may use a
glass cleaner on the outside glass of
the oven door. DO NOT immerse the
door in water. DO NOT spray or allow
water or the glass cleaner to enter the
door vents. DO NOT use oven cleaners,
cleaning powders, or any harsh
abrasive cleaning materials on the
outside of the oven door.
• DO NOT clean the oven door gasket.
The oven door gasket is made of a
woven material, which is essential for a
good seal. Care should be taken not to
rub, damage, or remove this gasket.
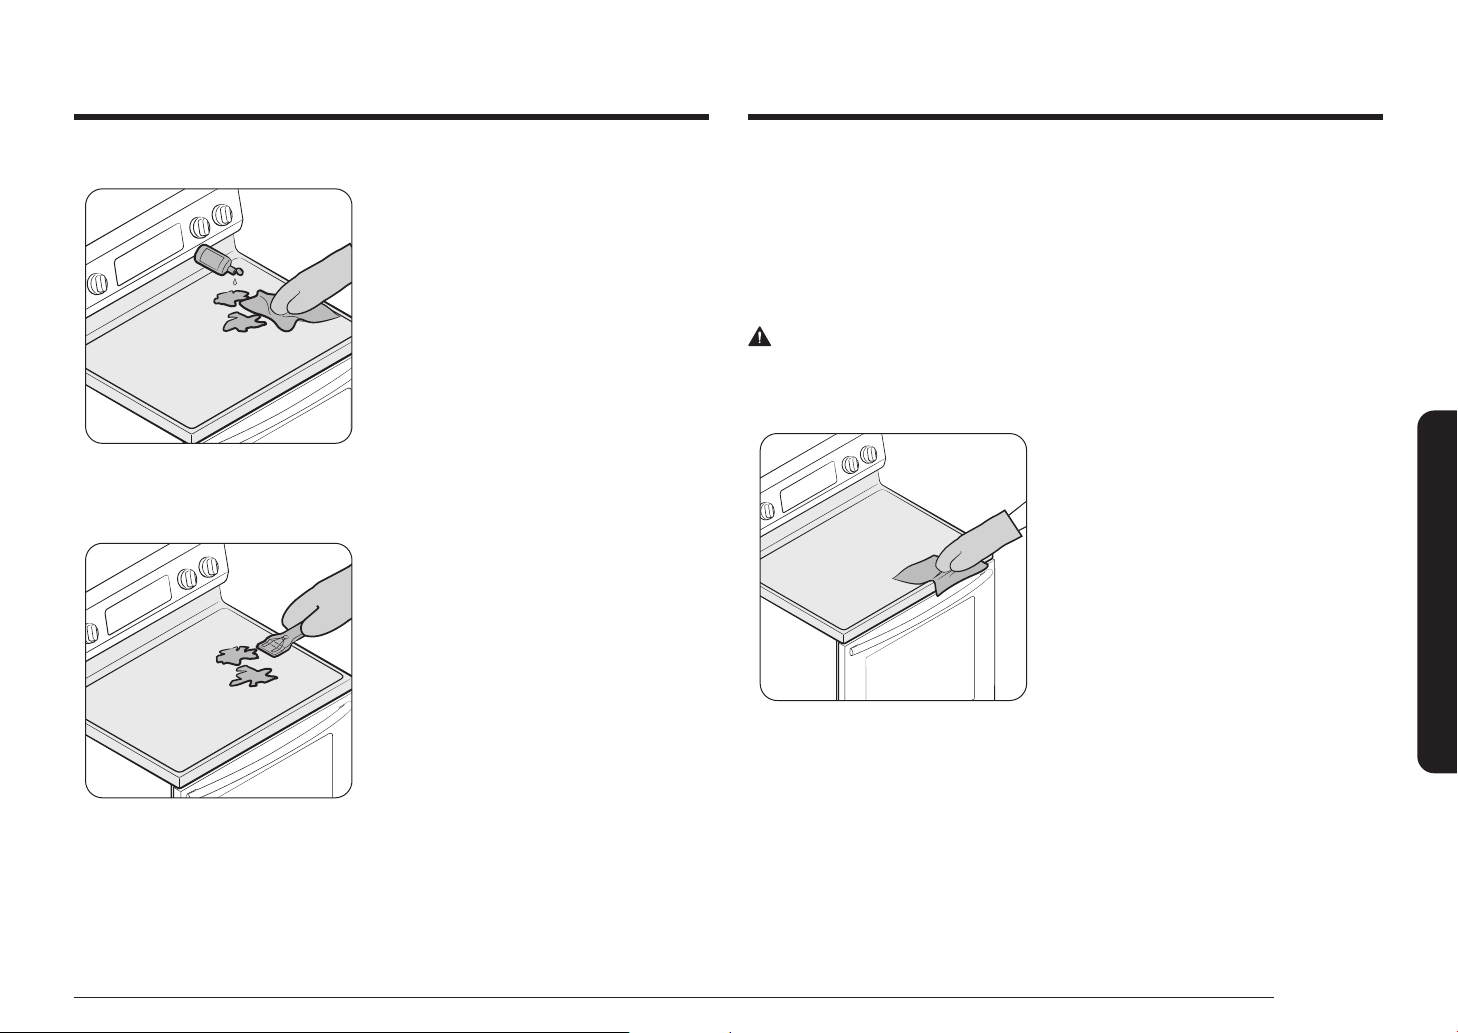
English 49
Maintaining your appliance
Removing metal marks and scratches
1. Be careful not to slide pots and pans across your cooktop. It will leave marks
on the cooktop surface. You can remove these marks by applying ceramic
cooktop cleaner with a cleaning pad for ceramic cooktops.
2. If pots with a thin overlay of aluminum or copper are allowed to boil dry, the
overlay may leave black discoloration on the cooktop. You should remove this
discoloration immediately or it may become permanent.
WARNING
Carefully check the bottoms of pans for roughness that may scratch the cooktop.
Cleaning the cooktop seal
To clean the seal around the edges of
the glass, lay a wet cloth on it for a few
minutes, then wipe clean with a nonabrasive
cleaner.
Removing burned-on residue
1. Allow the cooktop to cool.
2. Spread a few drops of ceramic cooktop
cleaner on the entire burned residue
area.
3. Using a cleaning pad for ceramic
cooktops, rub the residue area, applying
pressure as needed.
4. If any residue remains, repeat the steps
listed above as needed.
5. For additional protection, after all
residue has been removed, polish the
entire surface by applying ceramic
cooktop cleaner with a paper towel.
Removing heavy, burned-on residue
1. Allow the cooktop to cool.
2. Use a single-edge razor-blade scraper
at approximately a 45° angle against
the glass surface and scrape the soil. It
will be necessary to apply pressure to
remove the residue.
3. After scraping with the razor scraper,
spread a few drops of ceramic cooktop
cleaner on the entire burned residue
area. Use a cleaning pad to remove any
remaining residue. (Do not scrape the
seal.)
4. For additional protection, after all
residue has been removed, polish the
entire surface by applying ceramic
cooktop cleaner with a paper towel.
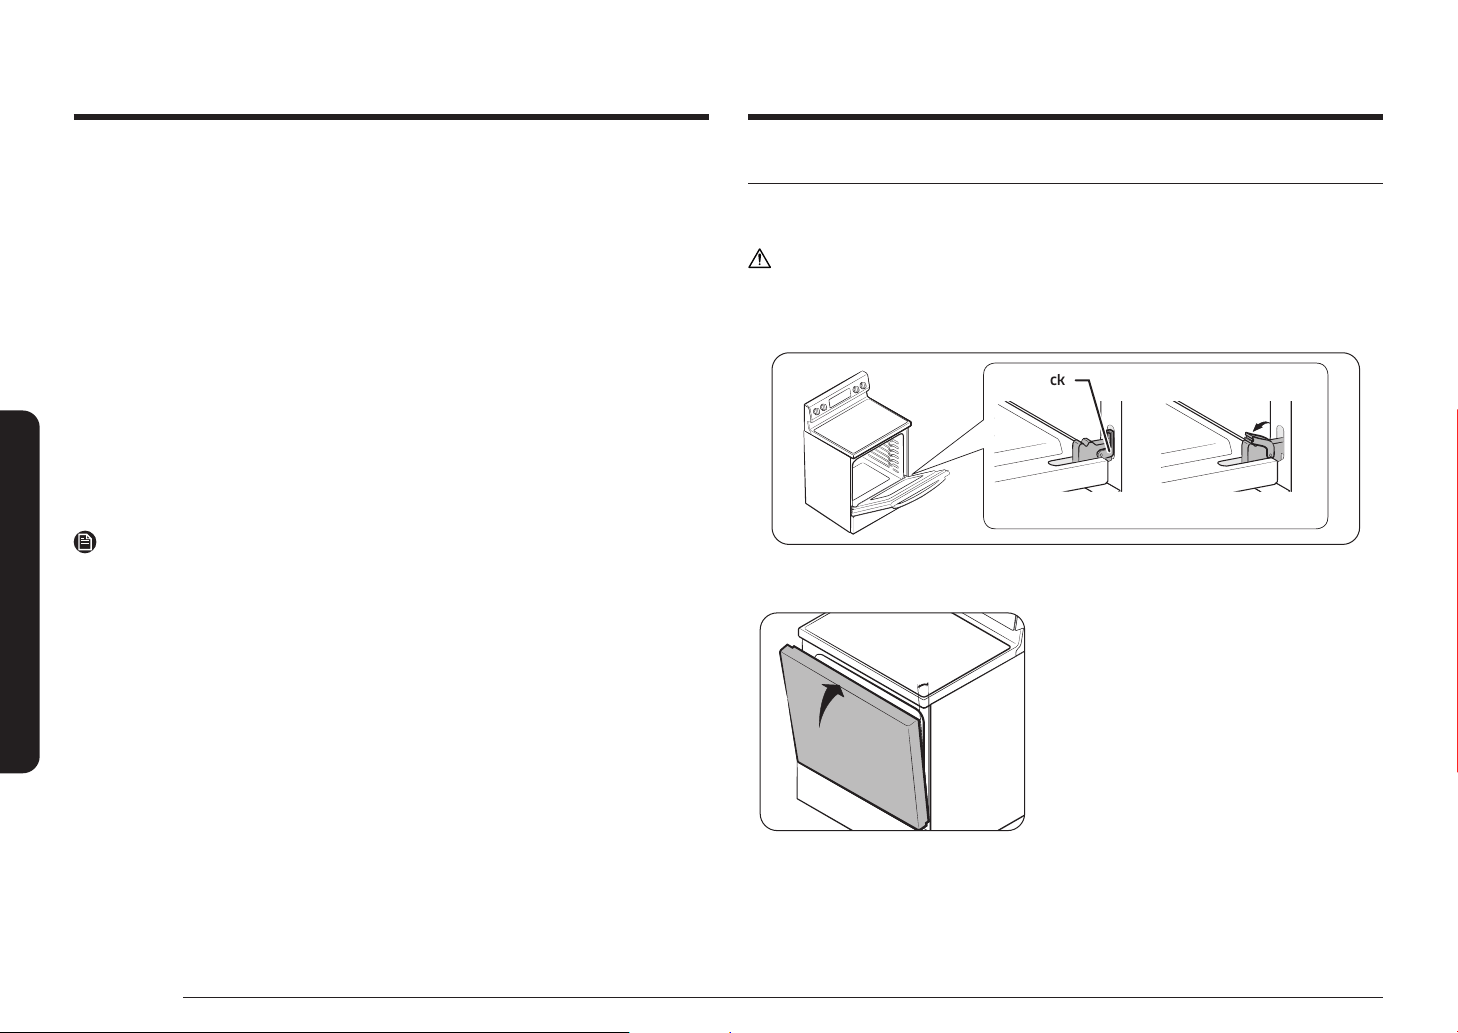
50 English
Maintaining your appliance
Maintaining your appliance
Removing and reinstalling the oven door
How to remove the door
CAUTION
• The door is very heavy. Be careful when removing and lifting the door.
Do not lift the door by the handle.
• Turn the power OFF before removing the door.
Hinge lockHinge lock
Locked positionLocked position Unlocked positionUnlocked position
1. Open the door completely.
2. Pull the hinge locks down toward the door frame to the unlocked position.
about 5 °about 5 °
Fig. 1Fig. 1
3. Firmly grasp both sides of the door at
the top.
4. Close the door to the door removal
position, which is approximately
5 degrees from vertical (Fig. 1).
Potential for permanent damage to the glass surface
• Sugary spillovers (such as jellies, fudge, candy, syrups) or melted plastics can
cause pitting of the surface of your cooktop. This is not covered under the
warranty. You should clean the spill while it is still hot. Take special care when
removing hot substances. Refer to the section below.
• When using a scraper, be sure it is new and the razor blade is still sharp. Do
not use a dull or nicked blade.
Cleaning sugary spills and melted plastic
1. Turn off all surface units. Remove hot pans.
2. Wearing an oven mitt, use a single-edge razor blade scraper to move the spill
to a cool area of the cooktop. Remove the spill with paper towels.
3. Any remaining spillover should be left until the surface of the cooktop has
cooled.
4. Don’t use the surface units again until all of the residue has been completely
removed.
NOTE
If pitting or indentations in the glass surface have already occurred, the cooktop
glass will have to be replaced. In this case, service will be necessary.
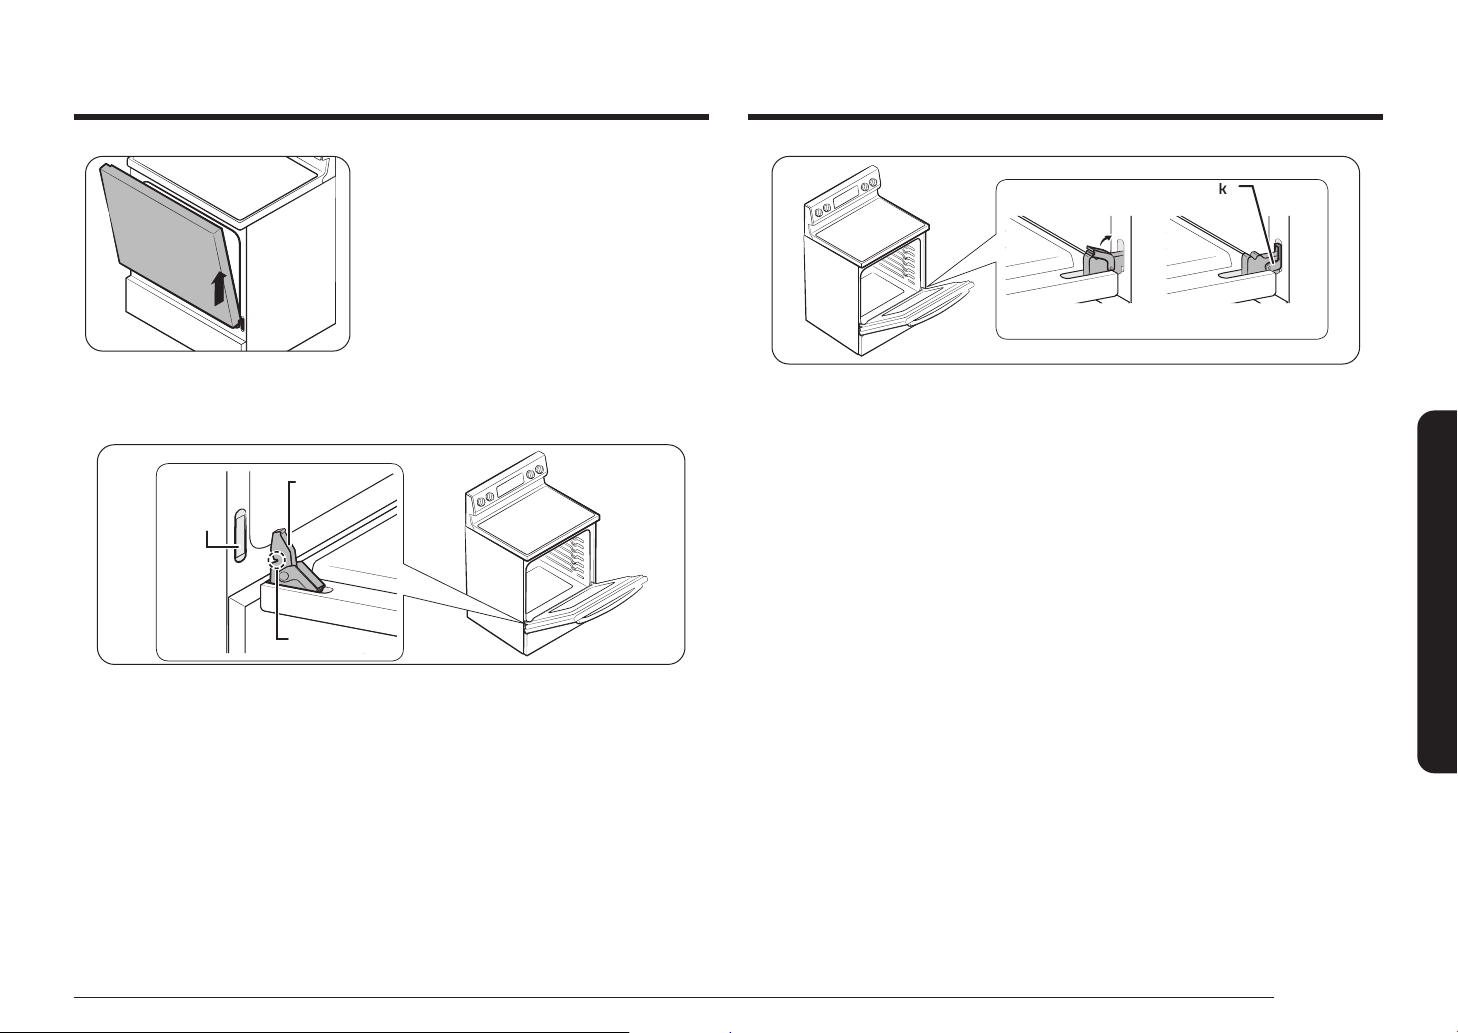
English 51
Maintaining your appliance
Hinge lockHinge lock
Locked positionLocked positionUnlocked positionUnlocked position
3. Open the door fully. If the door will not open fully, the indentation is not
inserted correctly in the bottom edge of the slot.
4. Push the hinge locks up against the front frame of the oven cavity to the
locked position.
5. Close the oven door.
Fig. 2Fig. 2
5. Lift door up and out until the hinge arm
is clear of the slot (Fig. 2).
How to re-install the door
Hinge armHinge arm
Bottom Bottom
edge of edge of
slotslot
IndentationIndentation
1. Firmly grasp both sides of the door at the top.
2. With the door at the same angle as the removal position, slide the indentation
of the hinge arm into the bottom edge of the hinge slot. The notch in the
hinge arm must be fully inserted into the bottom of the slot.
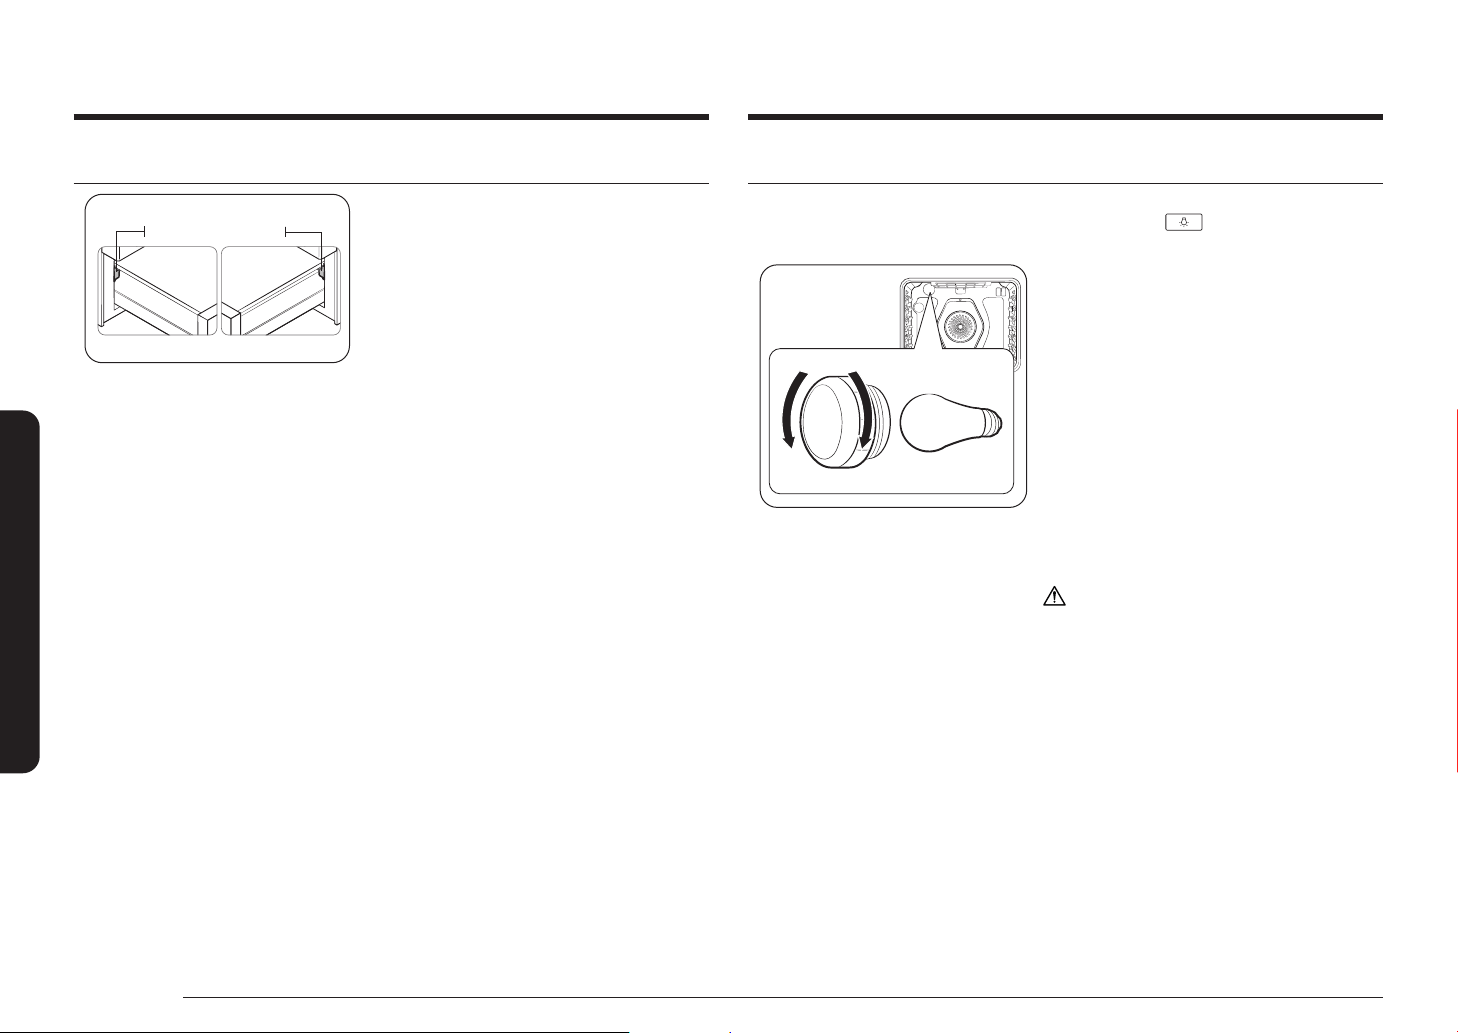
52 English
Maintaining your appliance
Maintaining your appliance
Changing the oven light
The oven light is a standard 40-watt appliance bulb. It will come on when the oven
door is open. When the oven door is closed, press the pad to turn it on or
off. It will not work during a self-cleaning cycle.
RemoveRemove
Glass bulb coverGlass bulb cover BulbBulb
ReplaceReplace
1. Make sure the oven and the bulb are
cool.
2. Unplug the range or disconnect the
power.
3. Turn the glass bulb cover in the back of
the oven counterclockwise to remove.
4. Turn the bulb counterclockwise to
remove it from its socket.
5. Insert a new 40 watt appliance bulb,
and then turn it clockwise to tighten.
Replace the bulb cover by turning
clockwise.
6. Plug in the range or reconnect the
power.
CAUTION
Before changing your oven light bulb,
disconnect the electrical power to the range
at the main fuse or circuit breaker panel.
Make sure the oven and the bulb are cool.
Removing and reinstalling the storage drawer
HookHook HookHook
How to remove the storage drawer
1. Pull the drawer out until it stops.
2. Tilt the front of the drawer and pull
out it.
How to replace the storage drawer
1. Put the left side of the drawer over the
left hook and the right side over the
right hook.
2. Push the drawer until it stops.
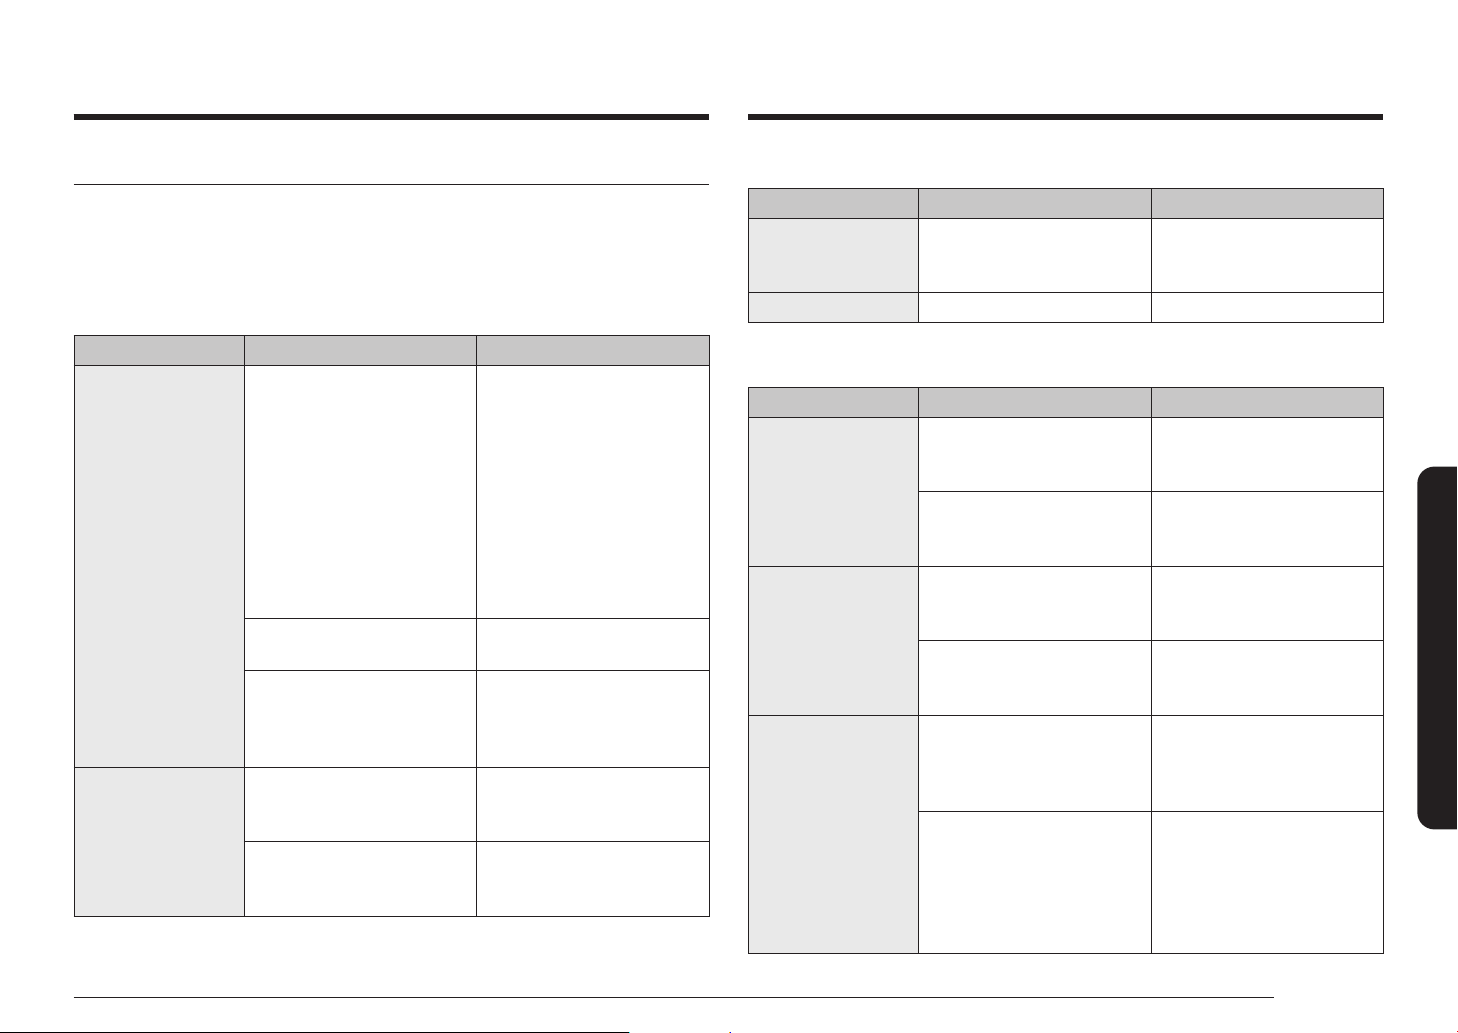
English 53
Troubleshooting
CONTROL DISPLAY
Problem Possible cause Solution
The display goes
blank.
A fuse in your home may
be blown or the circuit
breaker tripped.
Replace the fuse or reset
the circuit breaker.
The display ashes. There was a power failure. Reset the clock.
COOKTOP
Problem Possible cause Solution
The surface units
will not maintain
a rolling boil or
will not cook fast
enough.
You may be using
inappropriate cookware.
Use pans that are at and
match the diameter of the
surface unit selected.
In some areas, the power
(voltage) may be low.
Cover the pan with a lid
until the desired heat is
obtained.
The surface units
will not turn on.
A fuse in your home may
be blown or a circuit
breaker may have tripped.
Replace the fuse or reset
the circuit breaker.
The cooktop controls are set
improperly.
Check if the correct control
is set for the surface unit
you are using.
Areas of
discoloration on the
cooktop.
Food spillover was not
cleaned.
Refer to the section on
the care and cleaning of
the glass cooktop on page
48.
The surface is hot and the
model features a light-
colored cooktop.
This is normal. The surface
may appear discolored
when it is hot. This is
temporary and will
disappear as the glass
cools.
Troubleshooting
Troubleshooting
Samsung works hard to ensure that you don’t have problems with your new
electric range. If you run into unexpected trouble, look rst for a solution in the
tables below. If you’re still having trouble after trying the suggested solution, call
Samsung at 1-800-SAMSUNG (1-800-726-7864).
Installation
Problem Possible cause Solution
The range is not
level.
The appliance has been
installed improperly.
• Place the oven rack
in the center of the
oven. Place a level on
the oven rack. Adjust
the leveling legs at the
base of the range until
the oven rack is level.
• Insure the oor is level
and strong and stable
enough to adequately
support the range.
The oor is sagging or
sloping.
Contact a carpenter to
correct the situation.
The kitchen cabinets are not
properly aligned and make
the range appear to be not
level.
Insure the cabinets are
square and provide
sufcient room for
installation.
The appliance
must be accessed
for servicing and
cannot be moved
easily.
The kitchen cabinets are not
square and too close to the
appliance.
Contact a builder or
installer to make the
appliance accessible.
Carpet is interfering with
movement of the range.
Provide sufcient space so
the range can be lifted over
the carpet.
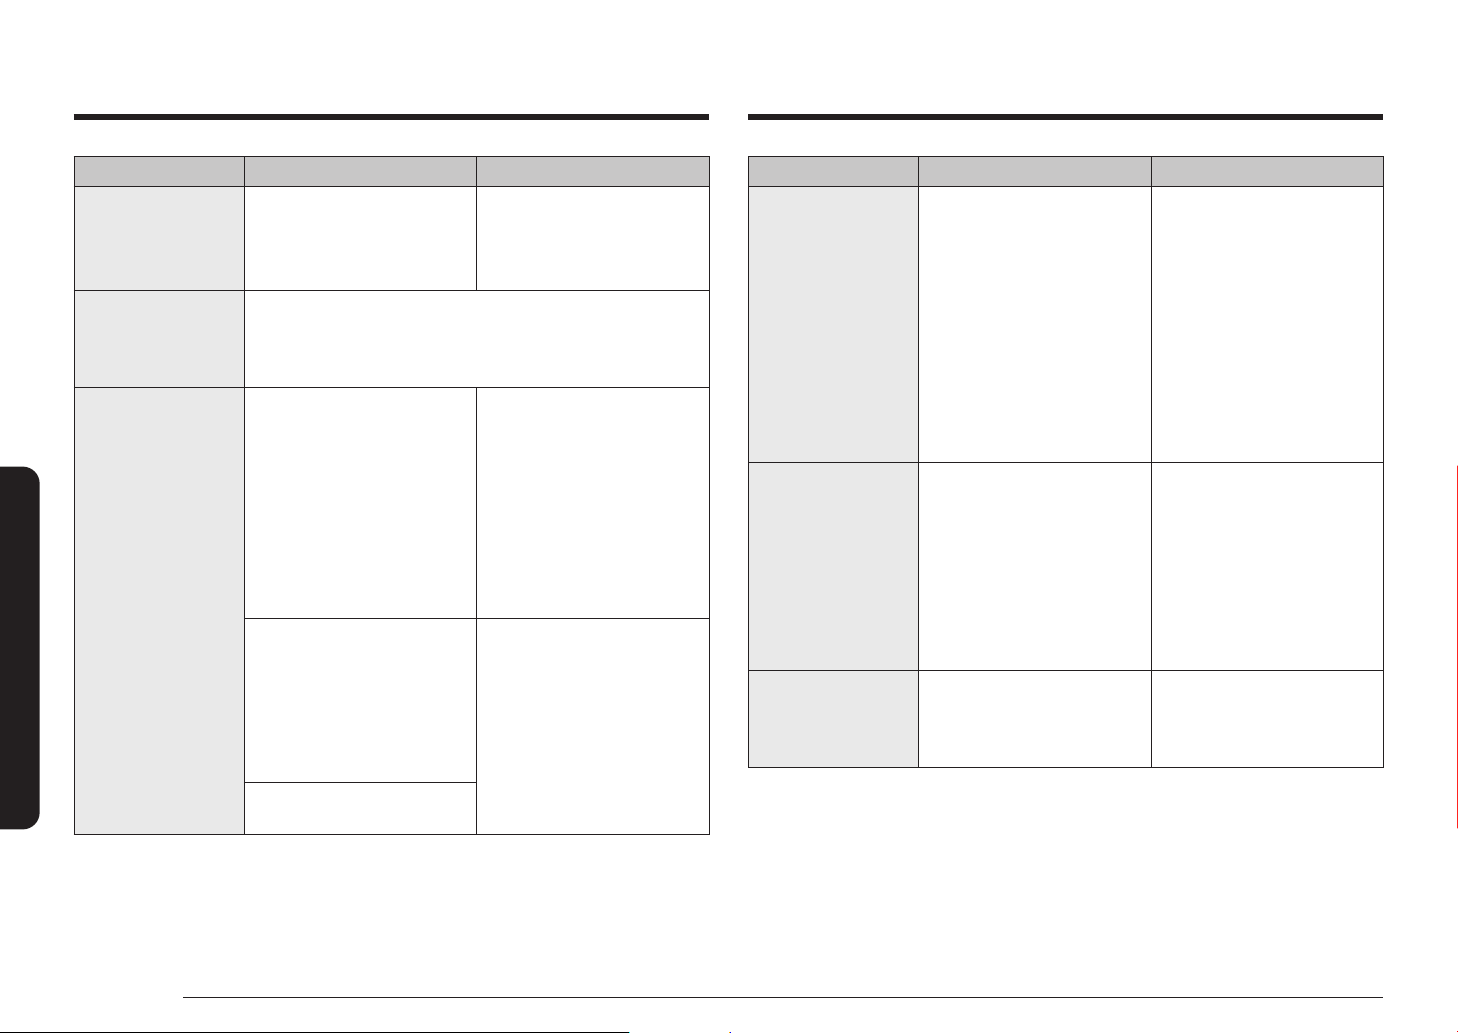
54 English
Troubleshooting
Troubleshooting
Problem Possible cause Solution
The surface unit
frequently cycles
on and off.
The element will cycle on
and off to maintain the
power setting.
This is normal operation,
and not a system failure.
Use the range as usual.
The surface unit
stops glowing when
changed to a lower
setting.
This is normal. The unit is still on and hot.
Scratches or
abrasions on the
cooktop surface.
The cooktop is being
cleaned improperly.
Scratches are not
removable. Tiny scratches
will become less visible in
time as a result of cleaning.
Use ceramic glass top
cleaning cream. Do not
use chemical or corrosive
agents. These agents may
damage the surface of the
product.
Cookware with rough
bottoms was used on the
cooktop or there were
coarse particles (e.g., salt or
sand) present between the
cookware and the surface
of the cooktop.
To avoid scratches, follow
the recommended cleaning
procedures. Make sure
cookware bottoms are
clean before use, and use
cookware with smooth
bottoms.
Cookware has been slid
across the cooktop surface.
Problem Possible cause Solution
Brown streaks or
specks.
Boilovers have been cooked
onto the surface.
• Wait until the surface
cools down. Then,
use a single-edge
razor-blade scraper at
approximately a 45°
angle against the glass
surface to remove the
soil.
• See the section on the
care and cleaning of
the glass cooktop on
page 48.
Areas of
discoloration with
metallic sheen.
Mineral deposits from
water and food have been
left on the surface of the
cooktop.
• Remove using a
ceramic-glass cooktop
cleaning cream.
• Use cookware with
clean, dry bottoms.
Clean the cooktop with
a ceramic cleaning
agent regularly every
week.
"Cracking" or
"popping" sound.
This is the sound of the
metal heating and cooling
during both the cooking
and self-cleaning functions.
This is normal operation,
and not a system failure.
Use the range as usual.
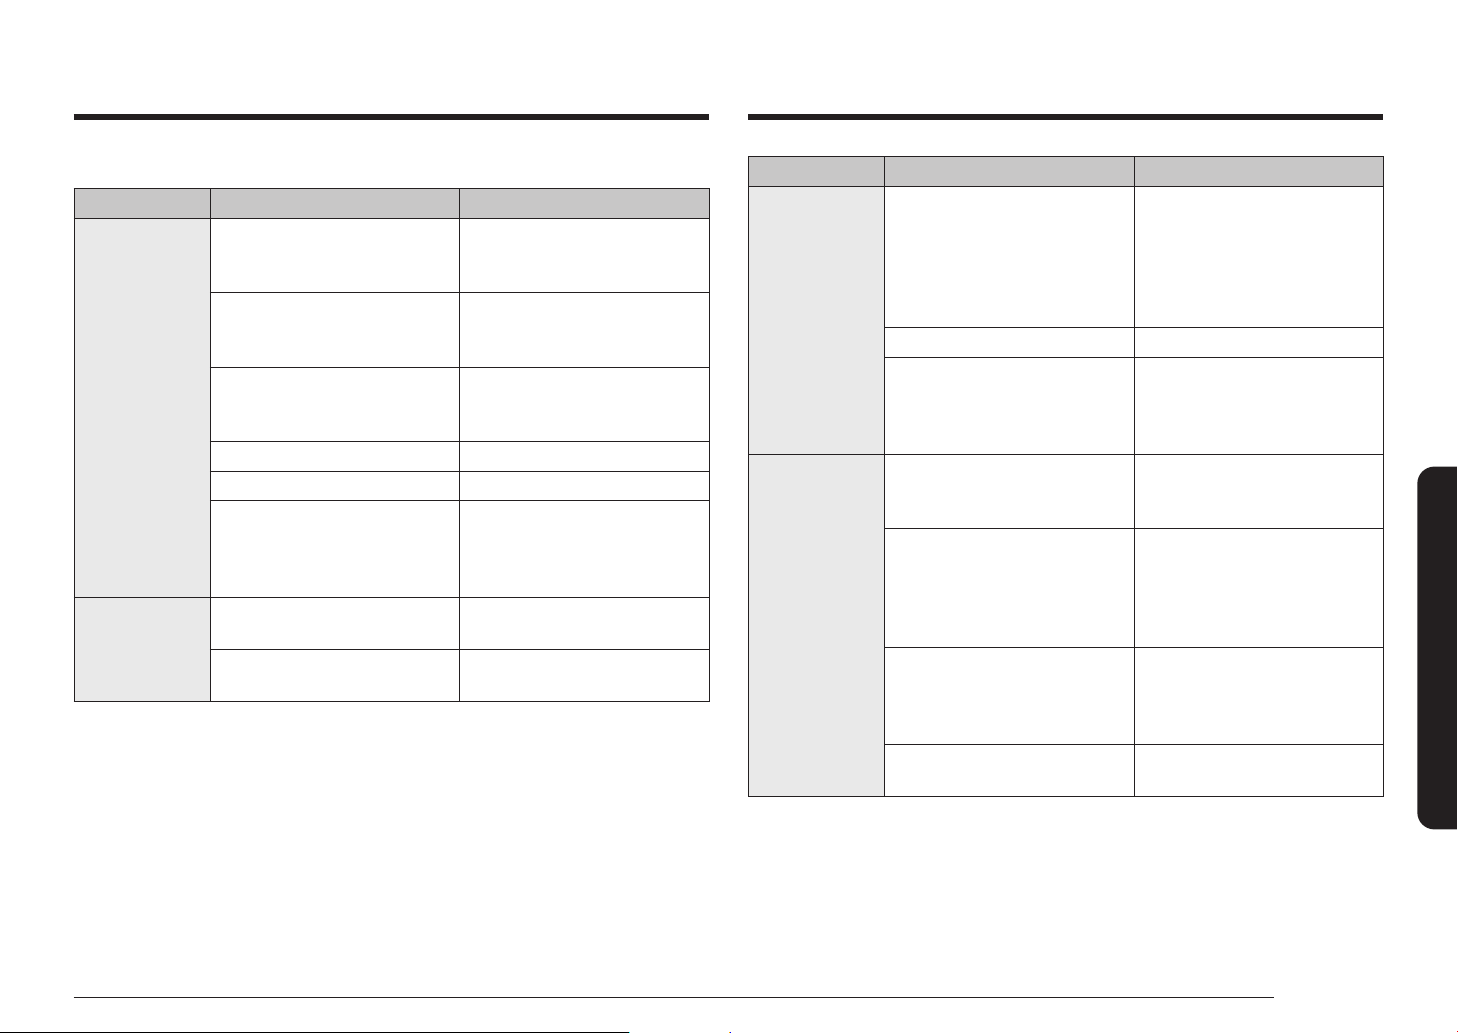
English 55
Troubleshooting
OVEN
Problem Possible cause Solution
The oven will
not turn on.
The range is not completely
plugged into the electrical
outlet.
Make sure the electrical
plug is inserted into a live,
properly grounded outlet.
A fuse in your home may be
blown or a circuit breaker
may have tripped.
Replace the fuse or reset the
circuit breaker.
The oven controls have been
set improperly.
See the chapter on operating
the oven starting on page
28.
The oven is too hot. Allow the oven to cool.
Incomplete service wiring. Call for service.
Power outage. Check to see if the house
lights will turn on. If
necessary, call your local
electric company for service.
The oven light
will not turn
on.
The light bulb is loose or
defective.
Tighten or replace the bulb.
The switch operating the light
is broken.
Call for service.
Problem Possible cause Solution
The appliance
will not turn
on.
The appliance is not
completely plugged into the
electrical outlet or a fuse in
your home may be blown or
a circuit breaker may have
tripped.
Make sure the power cord is
plugged into a live, properly
grounded outlet. Check the
fuse and circuit breakers.
Incomplete service wiring. Call for service.
Power outage. Check to see if the house
lights will turn on. If
necessary, call your local
electric company for service.
The oven
smokes
excessively
during broiling.
The oven controls have not
been set properly.
Refer to the section on using
the broiler starting on page
34.
The meat has been placed too
close to the element.
Reposition the rack to provide
proper clearance between
the meat and the element.
Preheat the broil element for
searing.
The meat has not been
properly prepared.
Remove the excess fat from
the meat. Cut away fatty
edges that may curl, leaving
the lean intact.
Grease has built up on oven
surfaces.
Regular cleaning is necessary
when broiling frequently.
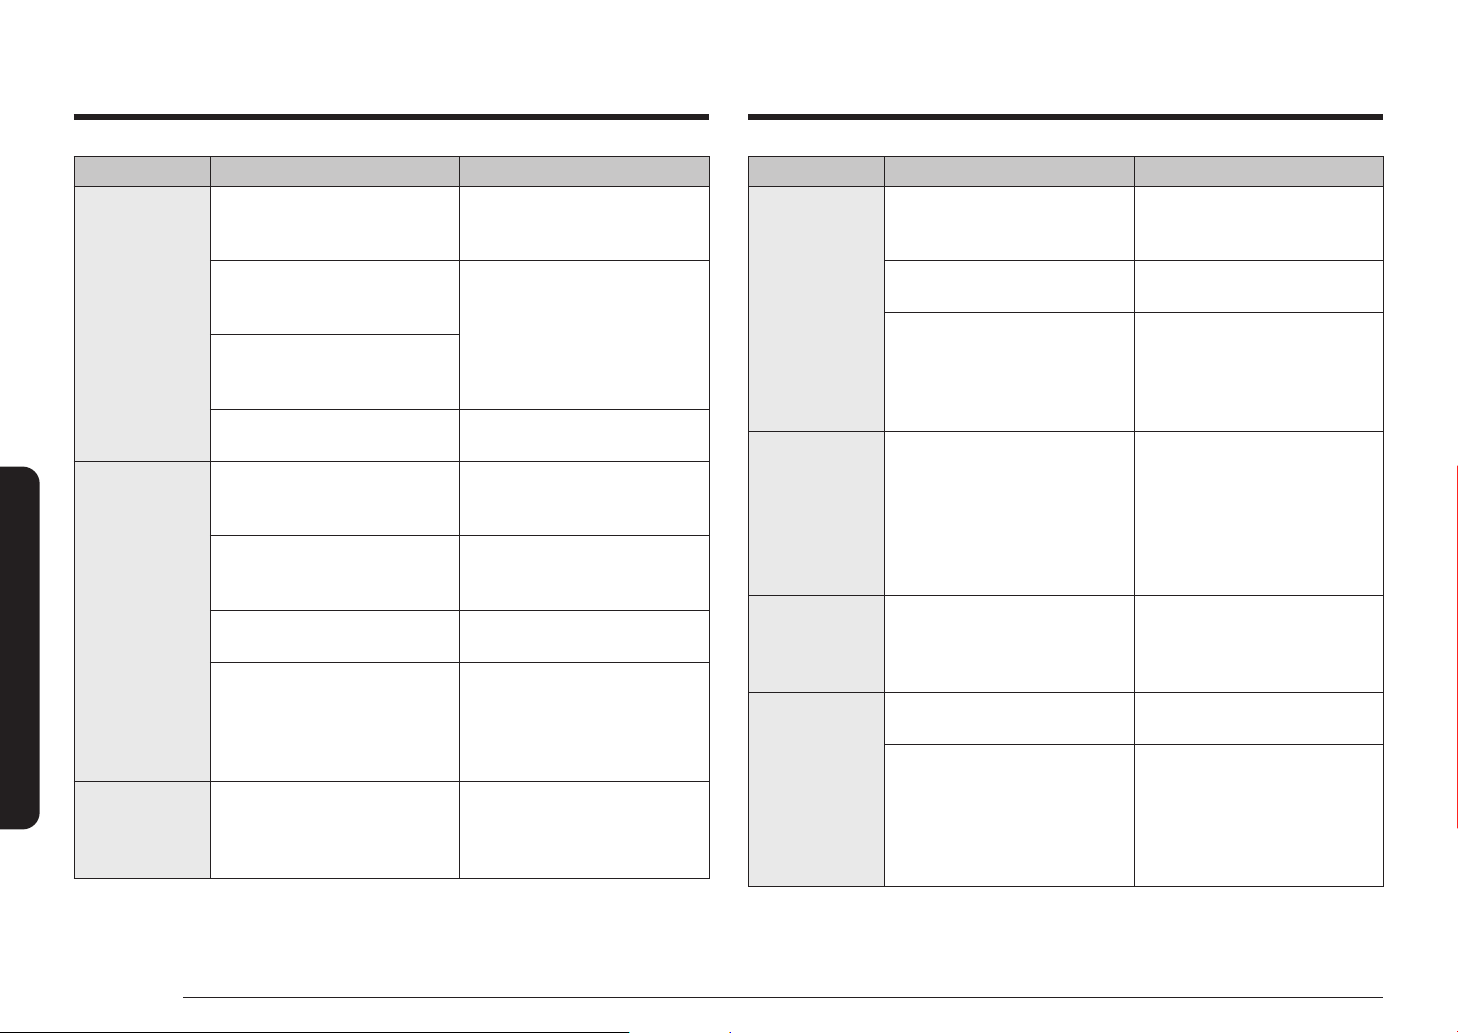
56 English
Troubleshooting
Troubleshooting
Problem Possible cause Solution
Food does not
bake or roast
properly.
The oven controls have not
been set correctly.
See the chapter on operating
the oven starting on page
28.
The oven rack has been
positioned incorrectly or is
not level.
See the section on using the
oven racks on page 31.
Incorrect cookware or
cookware of improper size is
being used.
The oven sensor needs to be
adjusted.
See the section on adjusting
the thermostat on page 40.
Food does not
broil properly.
The serving size may not be
appropriate.
Refer to the cooking guide for
serving sizes on page 35,
and then try again.
The rack has not been
properly positioned.
See the broiling
recommendation guide on
page 35.
The cookware is not suited for
broiling.
Use suitable cookware.
In some areas, the power
(voltage) may be low.
• Preheat the broil element
for 10 minutes.
• See the broiling
recommendation guide
on page 35.
The oven
temperature is
too hot or too
cold.
The oven sensor needs to be
adjusted.
See the section on adjusting
the thermostat on page 40.
Problem Possible cause Solution
The oven will
not self-clean.
The oven temperature is
too high to start a self-clean
operation.
Allow the range to cool and
then reset the controls.
The oven controls have been
set incorrectly.
See the section on self-
cleaning on page 43.
A self-cleaning cycle cannot
be started if the oven lock
feature has been activated or
if a radiant surface element
is on.
Deactivate the oven lock
(see page 28). Make sure all
surface elements are turned
off.
Excessive
smoking during
a self-cleaning
cycle.
There is excessive soiling in
the oven.
Press OFF/CLEAR. Open the
windows to rid the room of
smoke. Wait until the self-
cleaning cycle is cancelled.
Wipe up the excessive soil
and then start the self-
cleaning cycle again.
The oven door
will not open
after a self-
cleaning cycle.
The oven is too hot. Allow the oven to cool.
The oven is not
clean after a
self-cleaning
cycle.
The oven controls were not
set correctly.
See the section on self-
cleaning on page 43.
The oven was heavily soiled. Wipe up heavy spillovers
before starting the self-
cleaning cycle. Heavily soiled
ovens may need to be self-
cleaned again or for a longer
period of time.
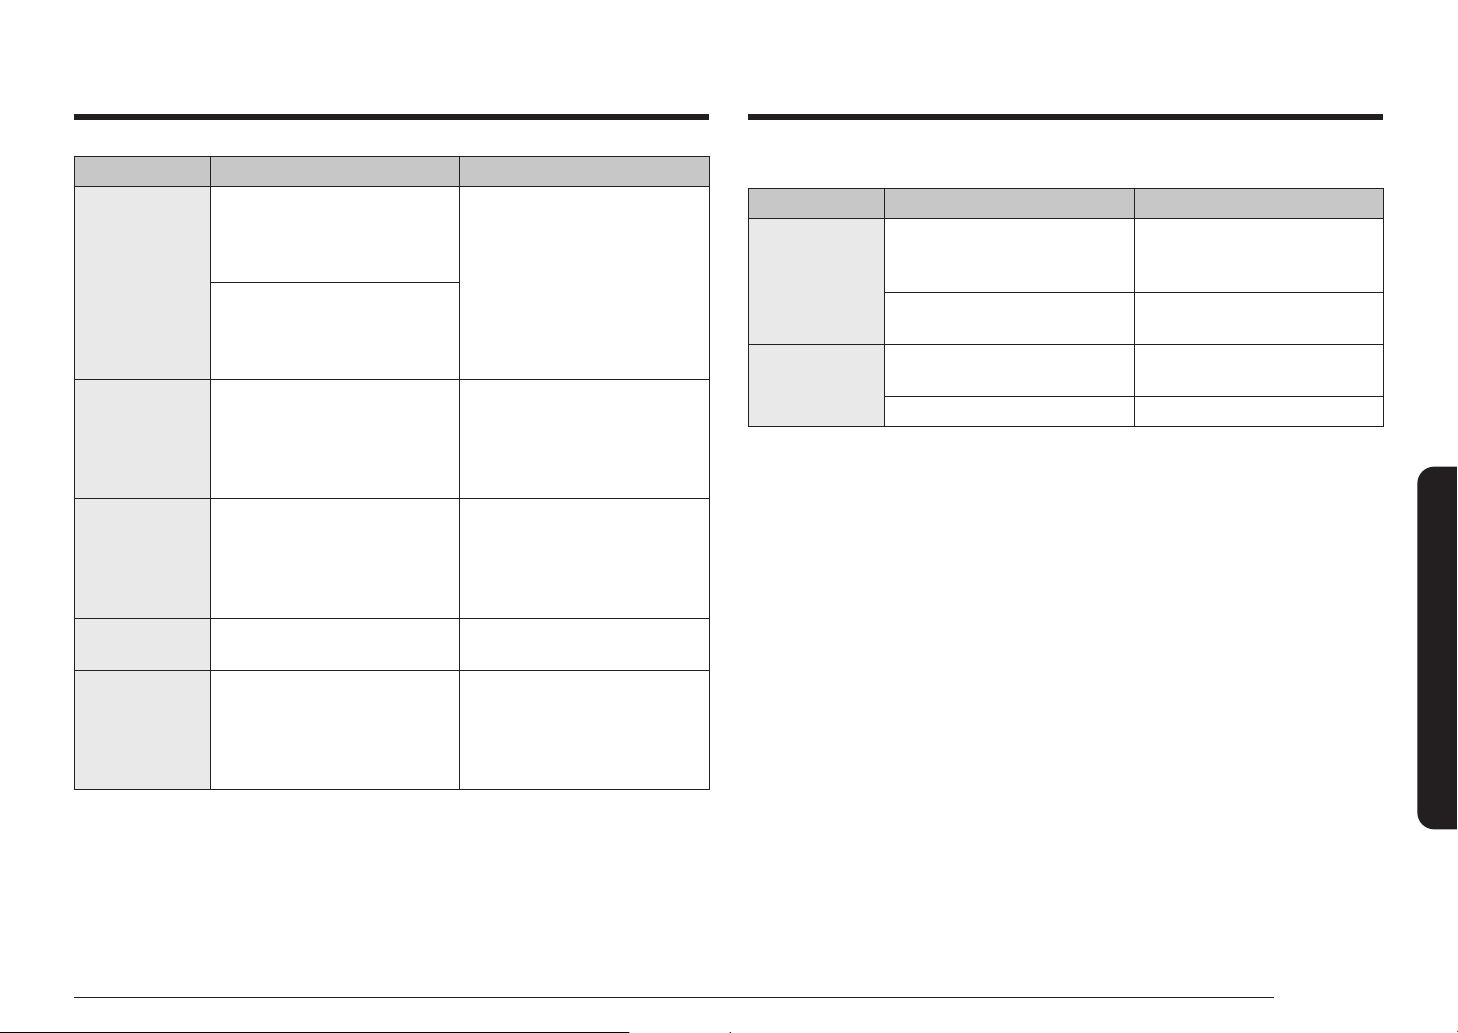
English 57
Troubleshooting
Problem Possible cause Solution
Steam is
coming out of
the vent.
When using the convection
feature, it is normal to see
steam coming out of the oven
vent.
This is normal operation and
not a system failure.
Use the range as usual.
As the number of racks or
amount of food being cooked
increases, the amount of
visible steam will increase.
A burning or
oily odor is
coming from
the vent.
This is normal in a new oven
and will disappear in time.
• To speed the process, set
a self-cleaning cycle for a
minimum of 3 hours.
• See the section on self-
cleaning on page 43.
Strong odor. An odor coming from the
insulation around the inside
of the oven is normal for the
rst few times the oven is
used.
Operate the oven empty on
the bake setting at 400 °F for
1 hour.
Fan noise. A convection fan may
automatically turn on and off.
This is not a system failure
but normal operation.
Oven racks
are difcult to
slide.
The shiny, silver-colored
racks were cleaned in a self-
cleaning cycle.
Apply a small amount of
vegetable oil to a paper towel,
and then wipe the edges of
the oven racks with the paper
towel.
DRAWER
Problem Possible cause Solution
The drawer
does not slide
smoothly or
drags.
The drawer is out of
alignment.
Fully extend the drawer and
push it all the way in. See the
page 52.
The drawer is overloaded or
the load is unbalanced.
Reduce weight. Redistribute
drawer contents.
Excessive
condensation
in the drawer.
There is liquid present in the
drawer.
Remove the liquid.
Uncovered foods. Cover food with a lid.
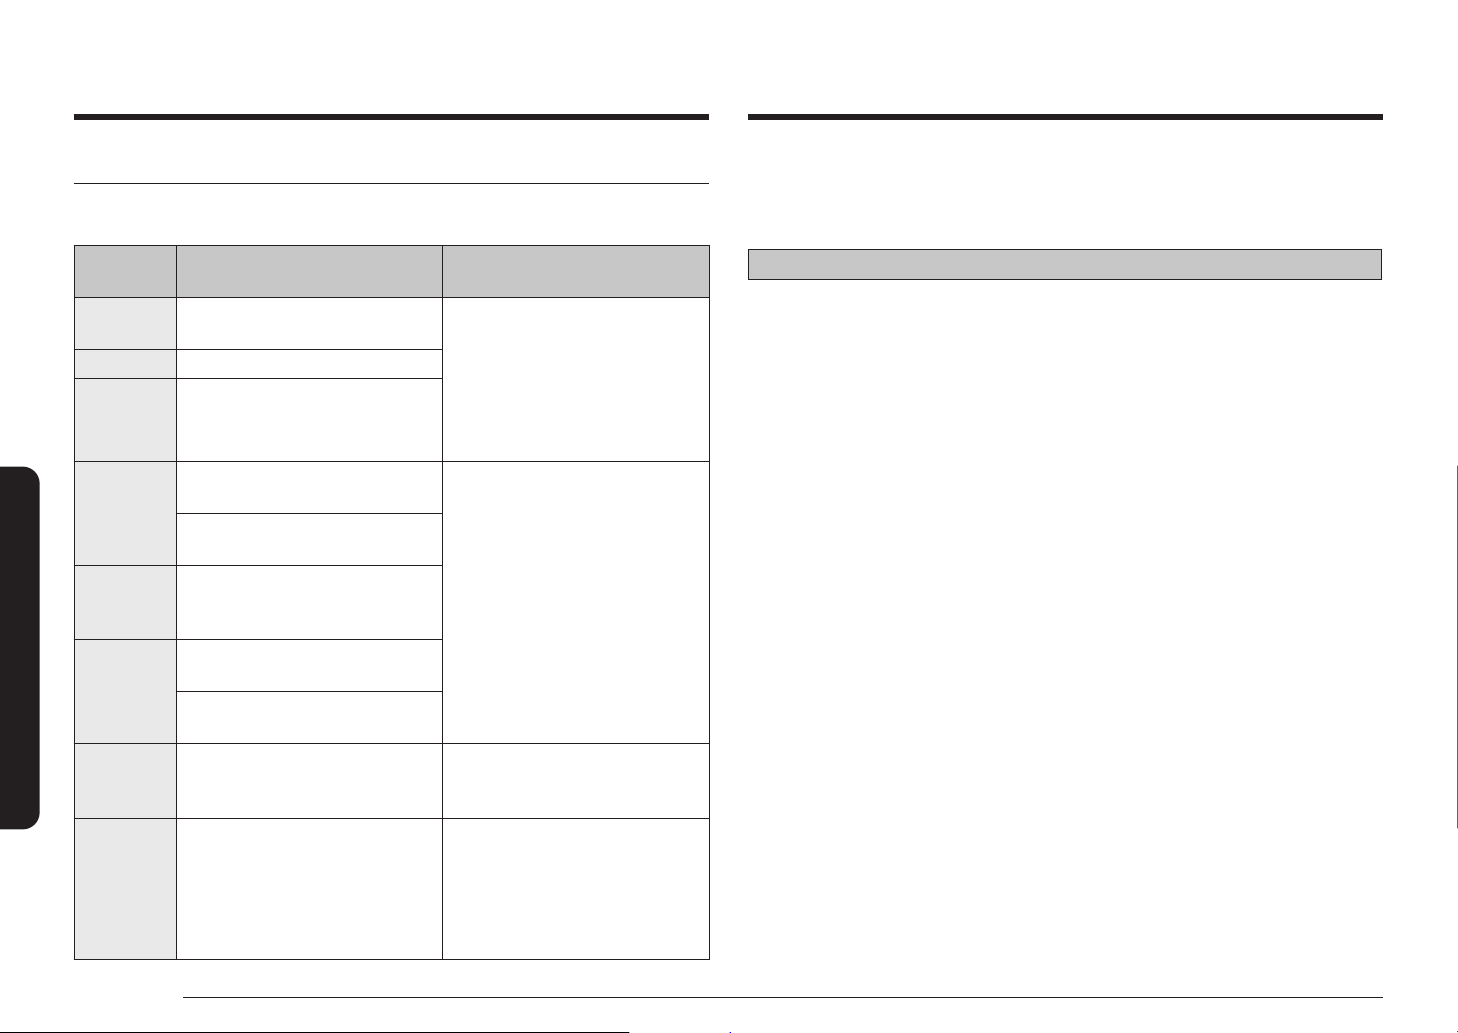
58 English
Troubleshooting
Troubleshooting
Information codes
OVEN
Displayed
Code
Possible cause Solution
C-d0
There is a short in the control
key.
Press OFF/CLEAR, and then
restart the oven. If the problem
persists, disconnect all power
to the range for at least 30
seconds and then reconnect the
power. If this does not solve the
problem, call for service.
C-d1 The door lock is misaligned.
C-F2
This code occurs if
communication between the
Main and Touch is interrupted.
C-20
The oven sensor is open when
the oven is operating.
Press OFF/CLEAR, and then
restart the oven. If the problem
persists, disconnect all power
to the range for at least 30
seconds and then reconnect the
power. If this does not solve the
problem, call for service.
There is a short in the Oven
sensor.
C-21
This code occurs if the internal
temperature rises abnormally
high.
C-30
The main PCB sensor is open
when the oven is operating.
There is a short in the main PCB
sensor.
C-31
This code occurs if the PCB
temperature rises abnormally
high.
Call for service.
bAd LinE
This error message appears
if the power cord is installed
improperly.
If the power connection is
plugged in improperly, “bAd
LinE” appears on the display.
Reconnect the power connection
properly, and the message
disappears.
Warranty (U.S.A)
PLEASE DO NOT DISCARD. THIS PAGE REPLACES THE WARRANTY PAGE IN THE
USE & CARE GUIDE
SAMSUNG ELECTRIC RANGE
LIMITED WARRANTY TO ORIGINAL PURCHASER WITH PROOF OF PURCHASE
This SAMSUNG brand product, as supplied and distributed by SAMSUNG
ELECTRONICS AMERICA, INC. (SAMSUNG) and delivered new, in the original
carton to the original consumer purchaser, is warranted by SAMSUNG against
manufacturing defects in materials or workmanship for the limited warranty
period, starting from the date of original purchase, of:
One (1) Year Parts and Labor
This limited warranty is valid only on products purchased and used in the United
States that have been installed, operated, and maintained according to the
instructions attached to or furnished with the product. To receive warranty service,
the purchaser must contact SAMSUNG at the address or phone number provided
below for problem determination and service procedures. Warranty service can
only be performed by a SAMSUNG authorized service center. The original dated
bill of sale must be presented upon request as proof of purchase to SAMSUNG or
SAMSUNG’s authorized service center to receive warranty service.
SAMSUNG will provide in-home service within the contiguous United States
during the warranty period at no charge, subject to availability of SAMSUNG
authorized servicers within the customer’s geographic area. If in-home service is
not available, SAMSUNG may elect, at its option, to provide transportation of the
product to and from an authorized service center. If the product is located in an
area where service by a SAMSUNG authorized servicer is not available, you may
be responsible for a trip charge or required to bring the product to a SAMSUNG
authorized service center for service.
To receive in-home service, product must be unobstructed and accessible to the
service agent.

English 59
Warranty (U.S.A)
EXCLUSION OF IMPLIED WARRANTIES
IMPLIED WARRANTIES, INCLUDING THE IMPLIED WARRANTIES OF
MERCHANTABILITY OR FITNESS FOR A PARTICULAR PURPOSE, ARE LIMITED TO
ONE YEAR OR THE SHORTEST PERIOD ALLOWED BY LAW. Some states do not allow
limitations on how long an implied warranty lasts, so the above limitations or
exclusions may not apply to you. This warranty gives you specic rights, and you
may also have other rights, which vary from state to state.
LIMITATION OF REMEDIES
YOUR SOLE AND EXCLUSIVE REMEDY IS PRODUCT REPAIR, PRODUCT
REPLACEMENT, OR REFUND OF THE PURCHASE PRICE AT SAMSUNG’S OPTION,
AS PROVIDED IN THIS LIMITED WARRANTY. SAMSUNG SHALL NOT BE LIABLE
FOR SPECIAL, INCIDENTAL OR CONSEQUENTIAL DAMAGES, INCLUDING BUT NOT
LIMITED TO TIME WAY FROM WORK, HOTELS AND/OR RESTAURANT MEALS,
REMODELING EXPENSES, LOSS OF REVENUE OR PROFITS, FAILURE TO REALIZE
SAVINGS OR OTHER BENEFITS REGARDLESS OF THE LEGAL THEORY ON WHICH
THE CLAIM IS BASED, AND EVEN IF SAMSUNG HAS BEEN ADVISED OF THE
POSSIBILITY OF SUCH DAMAGES. Some states do not allow exclusion or limitation
of incidental or consequential damages, so the above limitations or exclusions may
not apply to you. This warranty gives you specic rights, and you may also have
other rights, which vary from state to state.
SAMSUNG does not warrant uninterrupted or error-free operation of the product.
No warranty or guarantee given by any other person, rm, or corporation with
respect to this product shall be binding on SAMSUNG.
To obtain warranty service, please contact SAMSUNG at:
Samsung Electronics America, Inc.
85 Challenger Road
Ridgeeld Park, NJ 07660
1-800-SAMSUNG (726-7864) and www.samsung.com/us/support
During the applicable warranty period, a product will be repaired, replaced, or
the purchase price refunded, at the sole option of SAMSUNG. SAMSUNG may use
new or reconditioned parts in repairing a product, or replace the product with
a new or reconditioned product. Replacement parts and products are warranted
for the remaining portion of the original product’s warranty or ninety (90) days,
whichever is longer. All replaced parts and products are the property of SAMSUNG
and you must return them to SAMSUNG.
This limited warranty covers manufacturing defects in materials or workmanship
encountered in normal household, noncommercial use of this product and shall
not cover the following: damage that occurs in shipment, delivery, installation, and
uses for which this product was not intended; damage caused by unauthorized
modication or alteration of the product; product where the original factory
serial numbers have been removed, defaced, changed in any way, or cannot
be readily determined; cosmetic damage including scratches, dents, chips, and
other damage to the product’s nishes; damage caused by abuse, misuse, pest
infestations, accident, re, oods, or other acts of nature or God; damage caused
by use of equipment, utilities, services, parts, supplies, accessories, applications,
installations, repairs, external wiring or connectors not supplied or authorized by
SAMSUNG; damage caused by incorrect electrical line current, voltage, uctuations
and surges; damage caused by failure to operate and maintain the product
according to instructions; in-home instruction on how to use your product; and
service to correct installation not in accordance with electrical or plumbing codes
or correction of household electrical or plumbing (i.e., house wiring, fuses, or water
inlet hoses). In addition, damage to the glass cooktop caused by (i) use of cleaners
other than the recommended cleaners and pads or (ii) hardened spills of sugary
materials or melted plastic that are not cleaned according to the directions in the
use and care guide are not covered by this limited warranty.
The cost of repair or replacement under these excluded circumstances shall be the
customer’s responsibility.
Visits by an authorized servicer to explain product functions, maintenance or
installation are not covered by this limited warranty.Please contact SAMSUNG at
the number below for assistance with any of these issues.

60 English
Warranty (CANADA)
Warranty (CANADA)Warranty (CANADA)
PLEASE DO NOT DISCARD. THIS PAGE REPLACES THE WARRANTY PAGE IN THE
USE & CARE GUIDE
SAMSUNG ELECTRIC RANGE
LIMITED WARRANTY TO ORIGINAL PURCHASER
This SAMSUNG brand product, as supplied and distributed by SAMSUNG
ELECTRONICS CANADA, INC. (SAMSUNG) and delivered new, in the original
carton to the original consumer purchaser, is warranted by SAMSUNG against
manufacturing defects in materials and workmanship for a limited warranty period
of:
One (1) Year Parts and Labor, One (1) Year Parts Warranty
For Glass Cooktop and Radiant Heater
This limited warranty begins on the original date of purchase, and is valid only
on products purchased and used in the CANADA. To receive warranty service,
the purchaser must contact SAMSUNG for problem determination and service
procedures. Warranty service can only be performed by a SAMSUNG authorized
service center. The original dated bill of sale must be presented upon request as
proof of purchase to SAMSUNG or SAMSUNG’s authorized service center. Samsung
will provide in-home service during the warranty period at no charge subject to
availability within the contiguous CANADA. In home service is not available in all
areas. To receive in home service product must be unobstructed and accessible
to the service agent. If service is not available Samsung may elect to provide
transportation of the product to and from an authorized service center.
SAMSUNG will repair or replace this product, at our option and at no charge
as stipulated herein, with new or reconditioned parts or products if found to
be defective during the limited warranty period specied above. All replaced
parts and products become the property of SAMSUNG and must be returned
to SAMSUNG. Replacement parts and products assume the remaining original
warranty, or ninety (90) days, whichever is longer. This limited warranty covers
manufacturing defects in materials and workmanship encountered in normal,
noncommercial use of this product and shall not apply to the following: damage
which occurs in shipment; delivery and installation; applications and uses for
which this product was not intended; altered product or serial numbers; cosmetic
damage or exterior nish; accidents, abuse, neglect, re, water, lightning or
other acts of nature; use of products, equipment, systems, utilities, services,
parts, supplies, accessories, applications, installations, repairs, external wiring or
connectors not supplied or authorized by SAMSUNG which damage this product or
result in service problems; incorrect electrical line voltage, uctuations and surges;
customer adjustments and failure to follow operating instructions, maintenance
and environmental instructions that are covered and prescribed in the instruction
book; product removal and reinstallation; problems caused by pest infestations,
and overheating or overcooking by user. This limited warranty shall not cover
cases of incorrect electric current, voltage or supply, light bulbs, house fuses,
house wiring, cost of a service call for instructions, or xing installation errors.
Furthermore, damage to the glass cooktop caused by the use of cleaners other
than the recommended cleaners and pads, damage to the glass cook top caused
by hardened spills of sugary materials or melted plastic that are not cleaned
according to the directions in the use and care guide are not covered. SAMSUNG
does not warrant uninterrupted or error-free operation of the product.

English 61
Appendix
Appendix
Open Source Announcement
The software included in this product contains open source software.
The following URL http://opensource.samsung.com/opensource/SMART_TP2_0/
seq/0 leads to open source license information as related to this product.
EXCEPT AS SET FORTH HEREIN THERE ARE NO WARRANTIES ON THIS
PRODUCT EITHER EXPRESS OR IMPLIED AND SAMSUNG DISCLAIMS ALL
WARRANTIES INCLUDING, BUT NOT LIMITED TO, ANY IMPLIED WARRANTIES OF
MERCHANTABILITY, INFRINGEMENT OR FITNESS FOR A PARTICULAR PURPOSE. NO
WARRANTY OR GUARANTY GIVEN BY ANY PERSON, FIRM OR CORPORATION WITH
RESPECT TO THIS PRODUCT SHALL BE BINDING ON SAMSUNG. SAMSUNG SHALL
NOT BE LIABLE FOR LOSS OF REVENUE OR PROFITS, FAILURE TO REALIZE SAVINGS
OR OTHER BENEFITS, OR ANY OTHER SPECIAL, INCIDENTAL OR CONSEQUENTIAL
DAMAGES CAUSED BY THE USE, MISUSE OR INABILITY TO USE THIS PRODUCT,
REGARDLESS OF THE LEGAL THEORY ON WHICH THE CLAIM IS BASED, AND EVEN
IF SAMSUNG HAS BEEN ADVISED OF THE POSSIBILITY OF SUCH DAMAGES. NOR
SHALL RECOVERY OF ANY KIND AGAINST SAMSUNG BE GREATER IN AMOUNT
THAN THE PURCHASE PRICE OF THE PRODUCT SOLD BY SAMSUNG AND CAUSING
THE ALLEGED DAMAGE. WITHOUT LIMITING THE FOREGOING, PURCHASER
ASSUMES ALL RISK AND LIABILITY FOR LOSS, DAMAGE OR INJURY TO PURCHASER
AND PURCHASER’S PROPERTY AND TO OTHERS AND THEIR PROPERTY ARISING
OUT OF THE USE, MISUSE OR INABILITY TO USE THIS PRODUCT. THIS LIMITED
WARRANTY SHALL NOT EXTEND TO ANYONE OTHER THAN THE ORIGINAL
PURCHASER OF THIS PRODUCT, IS NONTRANSFERABLE AND STATES YOUR
EXCLUSIVE REMEDY.
Some states do not allow limitations on how long an implied warranty lasts, or
the exclusion or limitation of incidental or consequential damages, so the above
limitations or exclusions may not apply to you. This warranty gives you specic
legal rights, and you may also have other rights which vary from state to state.
To obtain warranty service, please contact SAMSUNG at:
Samsung Electronics Canada Inc.
2050 Derry Road West, Mississauga, Ontario L5N 0B9 Canada
1-800-SAMSUNG (726-7864) and www.samsung.com/ca/support (English)
www.samsung.com/ca_fr/support (French)

Please be advised that the Samsung warranty does NOT cover service calls to explain product operation, correct improper installation, or perform normal cleaning or
maintenance.
QUESTIONS OR COMMENTS?
COUNTRY CALL OR VISIT US ONLINE AT
U.S.A
Consumer Electronics
1-800-SAMSUNG (726-7864) www.samsung.com/us/support
CANADA 1-800-SAMSUNG (726-7864)
www.samsung.com/ca/support (English)
www.samsung.com/ca_fr/support (French)
NE63A6511S*-01
Scan the QR code* or visit
www.samsung.com/spsn
to view our helpful
How-to Videos and Live Shows
* Requires reader to be installed on your
smartphone

Estufa eléctrica
Manual del usuario
NE63*6511S*

2 Español
ADVERTENCIA
Para reducir el riesgo de inclinación o vuelco de la estufa, ésta debe
estar asegurada mediante un dispositivo antivuelco correctamente
instalado. DESPUÉS DE INSTALAR LA ESTUFA, CONFIRME QUE EL
DISPOSITIVO ANTIVUELCO ESTÉ CORRECTAMENTE INSTALADO Y
BIEN ACOPLADO. Consulte el manual de instalación donde se brindan
las instrucciones correspondientes.
v) Si el dispositivo antivuelco no está instalado, un niño o un adulto
podrían inclinar la estufa y morir
w) Verique que el dispositivo antivuelco haya sido instalado
y conectado correctamente en la parte posterior derecha (o
posterior izquierda) de la base de la estufa.
x) Si desplaza la estufa y luego vuelve a colocarla en su lugar,
asegúrese de que el dispositivo antivuelco esté acoplado en la
parte posterior derecha o izquierda de la base de la estufa.
y) No opere la estufa sin el dispositivo antivuelco en su lugar y
acoplado.
z) No hacerlo puede provocar la muerte o quemaduras serias a
niños o adultos.
ADVERTENCIA
No se pare sobre las puertas de la estufa, ni se apoye o siente sobre
ellas. Puede causar que la estufa se incline o vuelque, produciendo
quemaduras o lesiones severas.
Conrme que el dispositivo antivuelco se encuentre instalado
correctamente. Luego, para vericar que dicho dispositivo
esté conectado, tome el borde superior trasero de la estufa y
cuidadosamente intente inclinarla hacia adelante. El dispositivo
antivuelco debería prevenir que la estufa se incline hacia adelante
más de unas pocas pulgadas.
Si, por cualquier razón, hala la estufa alejándola de la pared,
asegúrese de que el dispositivo antivuelco encaje correctamente
cuando empuje la estufa a su lugar contra la pared. De lo contrario, si
usted o un niño se paran, sientan o apoyan sobre la puerta abierta, la
estufa podría inclinarse o volcar y causar lesiones.
Nunca retire completamente las patas niveladoras. De lo contrario, la
estufa no quedará bien sujeta con el dispositivo antivuelco.
Dispositivo antivuelco
Español 3
DECLARACIÓN DE LA FCC:
Este equipo ha sido sometido a pruebas y se ha determinado que
se encuentra dentro de los límites para los dispositivos digitales
clase B, de acuerdo con la sección 15 de las Normas de la FCC. Estos
límites están destinados a ofrecer una protección razonable contra
interferencias perjudiciales en una instalación residencial.
Este equipo genera, utiliza y puede irradiar energía de
radiofrecuencia y, si no se lo instala y utiliza de acuerdo con
las instrucciones, puede provocar interferencia perjudicial a las
comunicaciones de radio. Sin embargo, no se garantiza que no habrá
interferencia en alguna instalación determinada. Si este equipo
causa interferencia perjudicial con la recepción de radio o televisión,
lo que puede determinarse apagando y encendiendo el equipo, se
recomienda que el usuario intente corregir la interferencia de una de
las siguientes maneras:
• Reorientar o reubicar la antena receptora.
• Aumentar la separación entre el equipo y el receptor.
• Conectar el equipo a una toma de un circuito distinto de aquel al
que están conectados la radio o el televisor.
• Consultar al distribuidor o a un técnico de radio/TV
experimentado para obtener ayuda.
Aviso sobre regulaciones
1. Aviso de la FCC
PRECAUCIÓN
PRECAUCIÓN DE LA FCC: Todos los cambios y las modicaciones
que no cuenten con la aprobación expresa de la parte responsable
del cumplimiento invalidará la autoridad del usuario para operar el
equipo.
Este dispositivo cumple con la sección 15 de las Normas de la FCC. El
funcionamiento se encuentra sujeto a las siguientes dos condiciones:
1) Este dispositivo no puede causar interferencia dañina, y
2) Este dispositivo debe aceptar la recepción de cualquier
interferencia, incluidas aquellas que puedan causar un
funcionamiento indeseado.
En los productos vendidos en los mercados de Estados Unidos y
Canadá, solo están disponibles los canales 1–11. No se pueden
seleccionar otros canales.

4 Español
DECLARACIÓN DE LA FCC SOBRE LA EXPOSICIÓN A LA RADIACIÓN:
Este equipo cumple con los límites de exposición a la radiación
establecidos por la FCC para un entorno no controlado. Este equipo
debe ser instalado y operado a una distancia mínima de 8 pulgadas
(20 cm) entre su cuerpo y el radiador. Este dispositivo y su(s)
antena(s) no deben ubicarse cerca ni utilizarse junto con ninguna otra
antena o transmisor.
2. Aviso de IC
El término “IC” antes del número de certicación de radio indica que
se cumplieron las especicaciones técnicas de Industry Canada. El
funcionamiento se encuentra sujeto a las siguientes dos condiciones:
(1) este dispositivo no puede causar interferencias, y (2) este
dispositivo debe aceptar cualquier interferencia, incluidas aquellas
que puedan provocar un funcionamiento no deseado.
Este aparato digital de Clase B cumple con la norma ICES-003 de
Canadá.
En los productos vendidos en los mercados de Estados Unidos y
Canadá, solo están disponibles los canales 1–11. No se pueden
seleccionar otros canales.
DECLARACIÓN DE IC SOBRE LA EXPOSICIÓN A LA RADIACIÓN:
Este equipo cumple con los límites de exposición a la radiación IC
RSS-102 establecidos para un entorno no controlado. Este equipo
debe ser instalado y operado a una distancia mínima de 8 pulgadas
(20 cm) entre su cuerpo y el radiador. Este dispositivo y su(s)
antena(s) no deben ubicarse cerca ni utilizarse junto con ninguna otra
antena o transmisor.
Español 5
Contenido
Contenido
Instrucciones de seguridad importantes 6
Introducción a su nueva estufa 21
Descripción general 21
Elementos incluidos 21
Antes de comenzar 22
Sugerencias para ahorrar energía 22
Supercie de cocción 22
Acerca de la supercie de cocción 22
Como regular el electrodoméstico para la cocción en supercie 24
Utilización de los recipientes de cocción correctos 26
Selección de los recipientes de cocción correctos 27
Protección de la cubierta 27
Funcionamiento del horno 28
Panel de control del horno 28
Bloqueo del horno 28
Ajuste del reloj 29
Cómo programar el temporizador de cocina 29
Cocción por temporizador 29
Retrasar el inicio 30
Cómo encender y apagar la luz del horno 30
Ajustes mínimos y máximos 30
Uso de las parrillas del horno 31
Hornear 32
Horneado por convección 33
Asar por convección 34
Asar a la parrilla 34
Freidora de aire 35
Uso de la función especial 36
Cómo usar la función de mantener caliente 37
Uso de la función de control inteligente 38
Uso de la función de control por voz 38
Cómo usar la función de opciones 39
Uso de la función Sabbat 41
Mantenimiento de su electrodoméstico 42
Autolimpieza 42
Limpiar al vapor 44
Cuidado y limpieza del horno 45
Cuidado y limpieza de la cubierta de vidrio 47
Cómo retirar y volver a instalar la puerta del horno 49
Cómo retirar y volver a instalar el cajón de almacenamiento 51
Recambio de la luz del horno 51
Resolución de problemas 52
Resolución de problemas 52
Códigos de información 56
Garantía (EE.UU.) 57
Garantía (CANADÁ) 58
Apéndice 60
Anuncio de código abierto 60

6 Español
Instrucciones de seguridad importantes
Instrucciones de seguridad importantesInstrucciones de seguridad importantes
CONSERVE ESTAS INSTRUCCIONES
PRECAUCIÓN
Para reducir el riesgo de incendio, explosión, descarga eléctrica o
lesiones personales cuando utilice la estufa, siga estas instrucciones
básicas de seguridad.
NO intentar.
NO desensamblar.
NO tocar.
Siga las instrucciones elmente.
Desenchufe el enchufe de alimentación eléctrica del
tomacorriente de la pared.
Asegúrese de que la máquina tenga buena conexión a tierra
para evitar descargas eléctricas.
Comuníquese con un centro de servicio técnico de Samsung
para obtener ayuda.
Nota
Estas señales de advertencia se incluyen para evitar lesiones a usted
y a otras personas. Sígalos explícitamente.
Una vez que haya leído esta sección, consérvela en un lugar seguro
para consultas futuras.
Instrucciones de seguridad importantes
Lea y siga todas las instrucciones antes de utilizar su estufa con
el n de evitar riesgos de incendio, descargas eléctricas, lesiones
personales o daños al utilizar su estufa. Esta guía no cubre todas
las situaciones que podrían ocurrir. Siempre tome contacto con su
agente de servicio o con el fabricante para consultar sobre cualquier
problema que usted no comprenda.
LO QUE NECESITA SABER SOBRE LAS
INSTRUCCIONES DE SEGURIDAD
Las advertencias y las instrucciones de seguridad importantes
de este manual no cubren todos los problemas y situaciones que
podrían ocurrir. Usted tiene la responsabilidad de usar el sentido
común, de ser precavido y cuidadoso al instalar, mantener y manejar
su horno.
Símbolos y precauciones de seguridad importantes
Signicado de iconos y símbolos en este manual del usuario:
ADVERTENCIA
Prácticas peligrosas o inseguras que pueden provocar lesiones
graves o la muerte.
PRECAUCIÓN
Prácticas peligrosas o inseguras que pueden provocar lesiones leves
o daños a la propiedad.

Español 7
Instrucciones de seguridad importantes
CONSERVE ESTAS INSTRUCCIONES
ADVERTENCIA DE LA PROPOSICIÓN
65 DEL ESTADO DE CALIFORNIA
ADVERTENCIA
Cáncer y Daño Reproductivo - www.P65Warnings.ca.gov
PARA SU SEGURIDAD
Cuando utilice electrodomésticos, debe seguir precauciones de
seguridad básicas, a saber:
PRECAUCIÓN
• Utilice este electrodoméstico solo para el uso para el que fue
destinado, tal como se describe en este Manual del propietario.
• Las supercies que podrían estar calientes incluyen la cubierta,
las áreas enfrente de la cubierta, la abertura de ventilación del
horno, las supercies cercanas a dicha abertura y las hendeduras
alrededor de la puerta del horno.
Asegúrese de que su electrodoméstico sea correctamente instalado
y conectado a tierra por un técnico calicado.
Mantenimiento del usuario - No repare ni reemplace ninguna
pieza de este electrodoméstico salvo que esto se encuentre
especícamente recomendado en este manual. Todas las demás
tareas de reparación o mantenimiento deben ser encomendadas a
un técnico calicado.
Antes de realizar tareas de mantenimiento o reparación, siempre
desconecte la alimentación eléctrica al electrodoméstico quitando el
fusible o accionando el disyuntor.
• No se introduzca en el horno.
• Ningún artículo que pueda resultar de interés para los niños
debe almacenarse en gabinetes arriba de la estufa o en su
anaquel posterior. Los niños que se trepasen a la estufa para
alcanzar los elementos podrían resultar seriamente lesionados.
• No deje solos a los niños. Los niños nunca deben quedar solos o
sin vigilancia en el lugar donde se utiliza este electrodoméstico.
Nunca se les debe permitir sentarse o pararse sobre ninguna
parte del electrodoméstico.
• Nunca utilice su electrodoméstico para entibiar o calentar el
ambiente.
• No eche agua sobre grasas en llamas. Apague el horno para
evitar que las llamas se extiendan. Ahogue el fuego o las llamas
cerrando la puerta, o bien utilice un producto químico seco,
bicarbonato de sosa o un extintor de incendio a base de espuma.
• Evite rayar o impactar las puertas de vidrio, la cubierta o el
panel de control. Hacerlo puede producir rotura de vidrios. No
cocine sobre un producto con vidrios rotos. Se pueden producir
descargas eléctricas, un incendio o cortes.

8 Español
Instrucciones de seguridad importantes
Instrucciones de seguridad importantesInstrucciones de seguridad importantes
CONSERVE ESTAS INSTRUCCIONES
• Si se produce un incendio en el horno durante la autolimpieza,
apague el horno y espere a que se extinga el fuego. No
fuerce la apertura de la puerta. La entrada de aire fresco a
las temperaturas de autolimpieza puede avivar las llamas en
el horno. No cumplir con estas instrucciones puede dar como
resultado quemaduras graves.
• Si el horno está muy sucio de aceite, realice una autolimpieza
del mismo antes de usarlo nuevamente. Dejar el aceite crea un
riesgo de incendio.
• Friegue la suciedad resistente de la parte baja del horno con
un trapo o una toalla de papel antes de la autolimpieza. Hacer
autolimpieza del horno cuando hay aceite pesado en el interior
requiere ciclos de limpieza más largos y produce más humo.
• Almacenamiento en o sobre el electrodoméstico. No almacene
materiales inamables en el horno o cerca de las unidades de
supercie. Asegúrese de que todos los materiales de empaque
hayan sido retirados del electrodoméstico antes de ponerlo en
funcionamiento. Mantenga materiales plásticos, indumentaria y
papeles alejados de las partes del electrodoméstico que podrían
calentarse.
• Utilice la indumentaria apropiada. Nunca use prendas amplias o
colgantes mientras utiliza el electrodoméstico.
• Utilice solamente agarradores aislantes secos. Colocar
agarradores aislantes mojados o húmedos sobre supercies
calientes podría producir quemaduras por vapor. No permita que
el agarrador entre en contacto con los elementos calentadores
cuando están calientes. No utilice una toalla o cualquier otra tela
voluminosa.
• Enseñe a los niños que no deben jugar con los controles ni con
ninguna otra parte de la estufa.
• Para su seguridad, no use limpiadores de agua a alta presión ni
limpiadores a chorro de vapor para limpiar ninguna pieza de la
estufa.
• Si el cable de alimentación está dañado, deberá ser reemplazado
por el fabricante, su agente de servicio técnico o personas con
una calicación similar a n de evitar riesgos.
• El uso de este electrodoméstico no es apto para personas
(incluidos los niños) con capacidades físicas, sensoriales
o mentales reducidas, o que no tengan experiencia y
conocimientos, a menos que sean supervisados o hayan recibido
instrucción sobre el uso del electrodoméstico por parte de una
persona responsable de su seguridad.
• No se apoye sobre la estufa ya que podría girar las perillas de
control sin darse cuenta.

Español 9
Instrucciones de seguridad importantes
CONSERVE ESTAS INSTRUCCIONES
UNIDADES DE SUPERFICIE DE COCCIÓN
• Nunca deje sin atención unidades de supercie reguladas a altas
temperaturas. Los derrames por exceso de hervor producen
humo y los derrames de sustancias grasas pueden arder en
llamas.
• Revestimientos protectores – No utilice papel de aluminio para
revestir los boles recogegotas o el fondo del horno, salvo de la
manera sugerida en el manual. La instalación incorrecta de estos
revestimientos puede causar riesgos de descarga eléctrica o
incendio.
• Para evitar derrame de aceite e incendio, use una cantidad
mínima de aceite cuando haga frituras y evite cocinar alimentos
congelados que tengan cantidades excesivas de hielo.
• No levante la cubierta. Levantar la cubierta puede dañar la
estufa y generar un funcionamiento defectuoso.
• No haga funcionar la cubierta sin utensilios de cocina. Si se hace
funcionar la cubierta sin un recipiente de cocción, se calentarán
las perillas de control.
• Nunca utilice la supercie de la cubierta de vidrio como tabla
para cortar.
• Sea precavido al tocar la cubierta. La supercie de vidrio de la
cubierta retendrá el calor aún después de que se hayan apagado
los controles.
• No mueva el recipiente ni el bol a una posición horizontal de la
supercie de la cubierta.
• Tenga cuidado cuando coloque cucharas u otros utensilios para
revolver sobre la supercie de vidrio de la cubierta mientras se
encuentre en uso. Podrían calentarse y causar quemaduras.
• Utilice recipientes de cocción del tamaño adecuado. Este
electrodoméstico se encuentra equipado con unidades de
supercie de diferentes tamaños. Seleccione ollas y sartenes
que tengan bases planas lo sucientemente grandes para cubrir
la supercie del elemento calentador. Si se utilizan recipientes
demasiado pequeños, una porción del elemento calentador
quedará expuesta al contacto directo y podría causar que sus
ropas ardieran. Hacer coincidir el tamaño de la olla o sartén con
el quemador también mejorará la eciencia.
• Las manijas de los recipientes de cocción deben estar
posicionadas hacia adentro y sin proyectarse sobre unidades
de supercie adyacentes. Para reducir el riesgo de quemaduras,
encendido de materiales inamables y derrames causados por
contactos accidentales con los recipientes de cocción, posicione
las manijas de estos hacia adentro y sin proyectarse sobre
unidades de supercie adyacentes.
• Utensilios recubiertos. Solamente ciertos tipos de utensilios para
cocinar de vidrio, vitro-cerámico o cerámica, o con supercies
esmaltadas o con otros tratamientos pueden usarse en la
supercie de cocción sin romperse por bruscas diferencias de
temperatura.
• Limpieza. Lea y siga todas las instrucciones y advertencias de
las etiquetas de las cremas de limpieza.

10 Español
Instrucciones de seguridad importantes
Instrucciones de seguridad importantesInstrucciones de seguridad importantes
CONSERVE ESTAS INSTRUCCIONES
• Asegúrese de saber cuál de las perillas controla cada unidad de
supercie. Asegúrese de que encendió la unidad de supercie
correcta.
• Siempre apague las unidades de supercie antes de retirar los
recipientes de cocción.
• Cuando prepare platillos ambeados debajo de la campana,
encienda el ventilador.
• Vigile las frituras que se realicen con regulaciones de
temperatura altas o medianas.
• No almacene objetos pesados sobre la supercie de cocción que
pudieran caerse y dañarla.
• No utilice fundas decorativas sobre los elementos de la
supercie: si accidentalmente se enciende un elemento, la funda
decorativa se calentará y, posiblemente, se derretirá. Si toca las
fundas calientes, podría quemarse. También se puede dañar la
cubierta.
SEGURIDAD ELÉCTRICA
• Instalación adecuada- Asegúrese de que su electrodoméstico
sea correctamente instalado y conectado a tierra por un técnico
calicado.
• El electrodoméstico debe ser reparado únicamente por personal
técnico calicado. Las reparaciones realizadas por personas no
calicadas pueden causar lesiones o fallas graves. Si necesita
reparar su electrodoméstico, comuníquese con un centro de
servicio autorizado de Samsung. No seguir estas instrucciones
puede resultar en daños y anular la garantía.
• Los electrodomésticos montados a nivel pueden operarse solo
después de que fueron instalados en gabinetes y lugares de
trabajo que cumplen con las normas pertinentes. Esto asegura
que los electrodomésticos sean instalados cumpliendo con las
normas de seguridad adecuadas.
• Si su electrodoméstico funciona mal o si aparecen roturas,
rajaduras o grietas:
- apague todas las zonas de cocción.
- desenchufe la estufa del tomacorriente CA de la pared.
- comuníquese con su centro de servicio local de Samsung.
ADVERTENCIA
Si la supercie está rajada, apague y desenchufe el electrodoméstico
para evitar la posibilidad de una descarga eléctrica. No utilice su
cubierta hasta que la supercie de vidrio haya sido reemplazada.
Español 11
Instrucciones de seguridad importantes
CONSERVE ESTAS INSTRUCCIONES
ADVERTENCIA
• Asegúrese de que el electrodoméstico esté apagado antes de
reemplazar la bombilla de luz para evitar la posibilidad de una
descarga eléctrica.
• La estufa no debe colocarse sobre una base.
SEGURIDAD DE LOS NIÑOS
ADVERTENCIA
• Este electrodoméstico no está previsto para ser utilizado por
niños o personas enfermas sin la adecuada supervisión de un
adulto responsable.
• Los niños deben ser supervisados para garantizar que no
jueguen con el electrodoméstico.
• Mantenga a los niños alejados de la puerta cuando la abra o la
cierre ya que podría golpearlos o pillarles los dedos.
• Las zonas de cocción se calentarán cuando usted cocine. Para
evitar que los niños pequeños se quemen, siempre manténgalos
alejados del electrodoméstico cuando cocina.
• Durante la autolimpieza, las supercies pueden calentarse más
de lo normal. Mantenga los niños pequeños alejados de la estufa
cuando está en el modo de autolimpieza.
ADVERTENCIA
Las partes accesibles pueden calentarse durante el uso. Los niños
pequeños deben mantenerse alejados para evitar quemaduras.
HORNO
• NO TOQUE LOS ELEMENTOS CALENTADORES NI LAS
SUPERFICIES INTERIORES DEL HORNO. Los elementos
calentadores pueden estar calientes aun cuando su color sea
oscuro. Las supercies interiores de un horno se calientan lo
suciente como para producir quemaduras. Durante y después
del uso, no toque los elementos calentadores ni las supercies
interiores del horno y tampoco permita que sus ropas ni otros
materiales inamables entren en contacto con ellos hasta que
haya transcurrido tiempo suciente como para que se enfríen.
Otras supercies del electrodoméstico pueden calentarse lo
suciente como para producir quemaduras. Entre ellas se
encuentran las aberturas de ventilación del horno y supercies
cercanas a estas aberturas, la puerta del horno y la ventana de
la puerta del horno.
• No caliente envases de alimentos que no hayan sido abiertos.
La acumulación de presión puede hacer que el envase explote y
cause lesiones.
• No utilice el horno para secar periódicos. Si se recalientan,
pueden arder en llamas.
• No utilice el horno para almacenar objetos ni alimentos. Los
elementos almacenados en un horno pueden prenderse fuego.
12 Español
Instrucciones de seguridad importantes
Instrucciones de seguridad importantesInstrucciones de seguridad importantes
CONSERVE ESTAS INSTRUCCIONES
• Cuando abra la puerta, hágalo con precaución. Permita la salida
del vapor o aire caliente antes de retirar o volver a colocar los
alimentos en el horno.
• Revestimientos protectores. No utilice papel de aluminio para
revestir el fondo del horno, salvo de la manera sugerida en el
manual. La instalación incorrecta de estos revestimientos puede
causar riesgos de descarga eléctrica o incendio.
• Mantenga los conductos de ventilación del horno libres de
obstrucciones. La abertura de ventilación se encuentra ubicada
por sobre la unidad de supercie trasera derecha. Esta área
podría calentarse durante el uso del horno. Nunca tapone esta
abertura de ventilación ni coloque elementos de plástico o
sensibles al calor sobre dicha abertura.
• Colocación de las parrillas del horno. Siempre coloque las
parrillas del horno en la posición deseada mientras el horno esté
frío. Si es imprescindible mover la parrilla mientras el horno
se encuentra caliente, use agarradores aislantes. No deje que
los agarradores aislantes entren en contacto con el elemento
calentador caliente en el horno.
• No permita que papel de aluminio o una sonda para carne
entren en contacto con los elementos calentadores.
• Durante el uso, el electrodoméstico se calienta.
Se debe tener la precaución de evitar tocar los elementos
calentadores del interior del horno.
• No utilice limpiadores abrasivos ni espátulas de metal losas
para limpiar el vidrio de la puerta del horno. Podrían rayar la
supercie, lo cual puede provocar que el vidrio se haga añicos.
PRECAUCIÓN
No intente hacer funcionar el horno durante un corte de energía
eléctrica. Si se produce un corte de energía, siempre apague el horno.
Si no se apaga el horno y se restablece el suministro de energía, el
horno puede empezar a funcionar nuevamente. Los alimentos que
quedaron desatendidos podrían arder en llamas o arruinarse.
OPERACIÓN REMOTA
Este electrodoméstico puede congurarse para operarlo de manera
remota en cualquier momento.
• No almacene ningún material inamable ni elementos sensibles
a la temperatura dentro, sobre ni cerca de unidades de
supercie del electrodoméstico.
Español 13
Instrucciones de seguridad importantes
CONSERVE ESTAS INSTRUCCIONES
HORNOS AUTOLIMPIANTES
No limpie la junta selladora de la puerta. La junta de la puerta es
esencial para lograr que el horno quede bien sellado. Se debe tener
cuidado de no frotar, dañar o mover la junta.
• Nunca tenga aves mascota en la cocina. Las aves son
extremadamente sensibles a las emanaciones gaseosas que
se producen durante el ciclo de autolimpieza del horno. Tales
emanaciones pueden resultar dañinas o mortales para las aves.
Lleve las aves a una habitación bien ventilada.
• Aplique el ciclo de autolimpieza únicamente a las piezas
enumeradas en este manual. Antes de la autolimpieza del horno,
quite la partición, la parrilla, los utensilios y los alimentos.
• Antes de hacer funcionar el ciclo de autolimpieza, limpie la grasa
y los restos de comida del horno. Unas cantidades excesivas de
grasa podrían encenderse y generar daños por el humo en su
hogar.
• No use ningún producto limpiador de hornos ni revestimiento
protector dentro del horno ni sobre sus supercies exteriores.
• Retire los estantes niquelados del horno antes de comenzar el
ciclo de autolimpieza, de lo contrario pueden sufrir alteraciones
de color.
• Si el ciclo de autolimpieza funciona mal, apague el horno y
desconecte la alimentación eléctrica. Hágalo reparar por un
técnico calicado.
• Los derrames excesivos deben eliminarse antes de ejecutar el
ciclo de autolimpieza.
CAMPANAS DE VENTILACIÓN
• Limpie con frecuencia las campanas de ventilación. No deje que
se acumule grasa en la campana o el ltro.
• Cuando ambee alimentos debajo de la campana, encienda el
ventilador.

14 Español
Instrucciones de seguridad importantes
Instrucciones de seguridad importantesInstrucciones de seguridad importantes
CONSERVE ESTAS INSTRUCCIONES
SUPERFICIES DE COCCIÓN VITROCERÁMICAS
• NO TOQUE LAS UNIDADES DE SUPERFICIE NI LAS ÁREAS
CERCANAS A LAS UNIDADES.
Las unidades de supercie pueden estar calientes aun cuando su
color sea oscuro. Las áreas cercanas a las unidades de supercie
pueden calentarse lo suciente como para producir quemaduras.
Durante y después del uso, no toque las unidades de supercie
ni las áreas cercanas ni tampoco permita que sus ropas ni otros
materiales inamables entren en contacto con ellas hasta que
haya transcurrido tiempo suciente como para que se enfríen.
Entre estas áreas se cuentan la cubierta y su revestimiento.
• No cocine sobre una cubierta quebrada. Si la cubierta se
quebrase, las soluciones de limpieza y sustancias derramadas
podrían penetrar la cubierta quebrada y generar riesgos de
descarga eléctrica. Comuníquese inmediatamente con un técnico
calicado.
Limpie la cubierta con precaución. Si utiliza una esponja o un paño
húmedo para limpiar derrames en una supercie de cocción caliente,
cuídese de posibles quemaduras por vapor. Algunos productos de
limpieza pueden producir emanaciones nocivas si se aplican sobre
una supercie caliente.
ADVERTENCIAS FUNDAMENTALES PARA
LA INSTALACIÓN
ADVERTENCIA
• La instalación de este electrodoméstico debe estar a cargo de un
técnico o una compañía de servicio calicados.
- Si la estufa no es instalada por un técnico calicado, pueden
producirse descargas eléctricas, incendios, explosiones,
problemas con el producto o lesiones.
• Desembale el horno, quite todo el material de embalaje y
examine el horno para determinar si hay daños tales como
abolladuras en el interior o exterior del electrodoméstico,
pestillos de la puerta rotos, rajaduras en la puerta o una puerta
que no esté correctamente alineada. Si hay algún daño, no
ponga el horno en funcionamiento y notique de inmediato al
distribuidor.
• Enchufe el cable de alimentación en un tomacorriente conectado
a tierra con la conguración adecuada. Su horno debe ser el
único elemento conectado en este circuito.
• Mantenga todos los materiales de empaque fuera del alcance de
los niños. Podrían utilizarlos para jugar y lastimarse.
• Instale el electrodoméstico en un piso nivelado y resistente que
pueda soportar el peso.
- De no hacerlo así, se pueden producir vibraciones
anormales, ruidos o problemas con el producto.

Español 15
Instrucciones de seguridad importantes
CONSERVE ESTAS INSTRUCCIONES
• Este electrodoméstico debe conectarse a tierra correctamente.
• No conecte el electrodoméstico a una tubería de gas, una tubería
plástica de agua o un cable de teléfono.
- Esto puede provocar descarga eléctrica, incendio, explosión
o problemas con el producto.
• No corte ni retire el pin de conexión a tierra del cable de
alimentación bajo ninguna circunstancia.
• Conecte el horno a un circuito que proporcione el amperaje
correcto.
• No instale este electrodoméstico en un lugar húmedo, engrasado
o cubierto de polvo, ni en un lugar expuesto a la luz solar
directa o al agua (gotas de lluvia).
- Se puede producir una descarga eléctrica o un incendio.
• No utilice un cable de alimentación dañado ni un tomacorriente
de pared ojo.
- Se puede producir una descarga eléctrica o un incendio.
• No jale ni doble excesivamente el cable de alimentación.
• No retuerza ni ate el cable de alimentación.
• No enganche el cable de alimentación de un objeto metálico,
ni coloque un objeto pesado sobre el cable de alimentación, ni
inserte el cable de alimentación entre objetos.
- Se puede producir una descarga eléctrica o un incendio.
Si se daña el cable de alimentación, comuníquese con el centro de
servicio técnico Samsung más cercano.
ADVERTENCIA FUNDAMENTAL PARA EL USO
PRECAUCIÓN
• Si el electrodoméstico se inunda con cualquier líquido,
comuníquese con el centro de servicio técnico Samsung más
cercano. No hacerlo puede provocar una descarga eléctrica o un
incendio.
• Si el electrodoméstico produce un ruido extraño, olor a
quemado o humo, desenchufe de inmediato la alimentación y
comuníquese con el centro de servicio técnico Samsung más
cercano.
- No hacerlo puede provocar una descarga eléctrica o un
incendio
• En caso de producirse una fuga de gas (como gas propano,
gas LP, etc.), ventile el área de inmediato. No toque el cable de
alimentación. No toque el electrodoméstico.
- Una chispa puede causar una explosión o un incendio.
16 Español
Instrucciones de seguridad importantes
Instrucciones de seguridad importantesInstrucciones de seguridad importantes
CONSERVE ESTAS INSTRUCCIONES
• Tenga cuidado de no entrar en contacto con la puerta del horno,
los elementos calentadores o cualquier otra pieza caliente con su
cuerpo mientras cocina o justo después de cocinar.
- No hacerlo puede provocar quemaduras.
• Si los materiales en el interior del horno se encendieran,
mantenga la puerta cerrada, apague el horno y desconecte el
cable de alimentación o corte la alimentación en el panel del
disyuntor o fusible. Si abre la puerta, el fuego puede expandirse.
• Siempre respete las precauciones de seguridad cuando utilice su
horno. Nunca intente reparar el horno: contiene voltaje peligroso
en el interior. Si se debe reparar el horno, comuníquese con un
centro de servicio técnico Samsung autorizado cercano.
• Si utiliza el electrodoméstico cuando está contaminado por
sustancias extrañas, como restos de comida, pueden surgir
problemas.
• Tenga cuidado al quitar el envoltorio cuando retira comida del
electrodoméstico.
- Si la comida está caliente, puede salir vapor caliente cuando
retira el envoltorio y esto puede provocar quemaduras.
• No intente reparar, desarmar ni modicar el electrodoméstico.
- Como ingresa corriente de alta tensión en el chasis del
producto, esto puede provocar una descarga eléctrica o un
incendio.
- Cuando sea necesaria una reparación, comuníquese con el
centro de servicio técnico Samsung más cercano.
• Si alguna sustancia extraña, como agua, ingresa en el
electrodoméstico, comuníquese con el centro de servicio técnico
Samsung más cercano.
- No hacerlo puede provocar una descarga eléctrica o un
incendio.
• No toque el cable de alimentación con las manos húmedas.
- Se puede producir una descarga eléctrica.
• No apague el electrodoméstico cuando hay una operación en
progreso.
- Esto puede provocar chispas y causar una descarga eléctrica
o un incendio.
• Mantenga todos los materiales de empaque fuera del alcance de
los niños, ya que pueden ser peligrosos para ellos.
- Si un niño se coloca una bolsa de plástico en la cabeza,
puede asxiarse.

Español 17
Instrucciones de seguridad importantes
CONSERVE ESTAS INSTRUCCIONES
• No deje que los niños ni ninguna persona con capacidades
físicas, sensoriales o mentales reducidas utilice el
electrodoméstico sin supervisión.
• Asegúrese de que los controles del electrodoméstico y las áreas
de cocción estén fuera del alcance de los niños.
- No hacerlo puede provocar una descarga eléctrica,
quemaduras o lesiones.
• No toque el interior del electrodoméstico inmediatamente
después de cocinar. El interior del electrodoméstico estará
caliente.
- No hacerlo puede provocar quemaduras.
• No utilice ni coloque objetos ni aerosoles inamables cerca del
horno.
- Los elementos inamables o aerosoles pueden causar
incendios o una explosión.
• No introduzca los dedos, sustancias extrañas ni objetos
metálicos, como alleres o agujas, en las entradas,
tomacorrientes u oricios. Si se introducen sustancias extrañas
en alguno de estos oricios, comuníquese con el distribuidor
del producto o con el centro de servicio técnico Samsung más
cercano.
• No altere ni haga ajustes ni reparaciones en la puerta. Bajo
ninguna circunstancia debe quitar la puerta o la coraza externa
del horno.
• No almacene ni utilice el horno al aire libre.
• Nunca use este electrodoméstico con otros nes que no sean
cocinar.
- El uso de este electrodoméstico para otro n que no sea
cocinar puede provocar un incendio.
• Abra la tapa o el tapón de recipientes sellados (botellas de té
tónico de hierbas, mamaderas, botellas de leche, etc.) antes de
calentarlos. Haga un oricio en alimentos que tiene cáscaras
(huevos, castañas, etc.) con un cuchillo, antes de cocinarlos.
- No hacerlo puede provocar quemaduras o lesiones.
• Nunca caliente en recipientes de plástico ni papel y no los utilice
para cocinar.
- Podría provocar un incendio.
• No caliente comida envuelta en papel de revistas, periódicos,
etc.
- Se podría provocar un incendio.
• No abra la puerta cuando los alimentos en el horno se están
quemando.
- Si lo hace, esto provoca una entrada de oxígeno que puede
causar que los alimentos se prendan fuego.
18 Español
Instrucciones de seguridad importantes
Instrucciones de seguridad importantesInstrucciones de seguridad importantes
CONSERVE ESTAS INSTRUCCIONES
• No aplique presión excesiva a la puerta o al interior del
electrodoméstico. No golpee la puerta o la parte interior del
electrodoméstico.
- Colgarse de la puerta puede provocar fallas en el producto y
causar lesiones graves.
- Si la puerta está dañada, no use el electrodoméstico.
Comuníquese con un centro de servicio técnico Samsung.
• No sostenga alimentos con los manos durante o inmediatamente
después de cocinar.
- Use guantes de cocina. Los alimentos pueden estar muy
calientes y podría quemarse.
- Use guantes de cocina para protegerse las manos, ya
que la manija y las supercies del horno pueden estar lo
sucientemente calientes como para causar quemaduras.
PRECAUCIONES PARA EL USO
PRECAUCIÓN
• Si la supercie está rajada, apague el electrodoméstico.
- No hacerlo puede provocar una descarga eléctrica.
• La vajilla y los envases pueden calentarse. Manipúlelos con
cuidado.
• Los alimentos calientes y el vapor pueden provocar quemaduras.
Retire cuidadosamente las tapas de los envases, dirigiendo el
vapor lejos de las manos y la cara.
• Retire las tapas de los frascos de alimentos para bebé antes
de calentarlos. Después de calentar los alimentos para bebé,
revuelva bien para distribuir el calor en forma pareja. Siempre
pruebe los alimentos para corroborar la temperatura antes de
alimentar al bebé. Los frascos de vidrio o la supercie de los
alimentos pueden parecer más fríos que el interior, el cual puede
estar lo sucientemente caliente como para quemar la boca de
un niño.
• Tenga cuidado dado que las bebidas o los alimentos pueden
estar muy calientes después de calentarlos.
- Especialmente cuando alimenta a un niño. Compruebe que
se enfrió lo suciente.

Español 19
Instrucciones de seguridad importantes
CONSERVE ESTAS INSTRUCCIONES
• Tenga cuidado al calentar líquidos tales como agua u otras
bebidas.
- Asegúrese de revolver durante o después de cocinar.
- Evite utilizar un recipiente resbaladizo con cuello angosto.
- Espere al menos 30 segundos después del calentamiento
antes de quitar el líquido calentado.
- No hacerlo puede provocar el derrame del contenido y
causar quemaduras.
• No se pare sobre el electrodoméstico ni coloque sobre él
objetos (como ropa sucia, fundas para hornos, velas encendidas,
cigarrillos encendidos, platos, productos químicos, objetos
metálicos, etc.).
- Artículos tales como paños pueden quedar enganchados en
la puerta.
- Se pueden producir descargas eléctricas, incendios,
problemas con el producto o lesiones personales.
• No haga funcionar el electrodoméstico con las manos húmedas.
- Se puede producir una descarga eléctrica.
• No rocíe sustancias volátiles como insecticidas en la supercie
del electrodoméstico.
- Además de ser perjudiciales para las personas, pueden
producirse descargas eléctricas, un incendio o problemas en
el producto.
• No acerque el rostro ni el cuerpo al electrodoméstico mientras
está cocinando o al abrir la puerta inmediatamente después de
la cocción.
- Asegúrese de que los niños no se acerquen demasiado al
electrodoméstico.
- No hacerlo puede provocar quemaduras en los niños.
• No coloque alimentos ni objetos pesados sobre el borde de la
puerta del horno.
- Si abre la puerta, los alimentos o el objeto podrían caerse y
provocar quemaduras o lesiones.
• No enfríe abruptamente la puerta, el interior del
electrodoméstico ni el plato vertiendo agua sobre estas partes
durante o después de la cocción.
- Esto puede provocar daños en el electrodoméstico. El vapor
o el rocío de agua pueden provocar quemaduras o lesiones.
• No haga funcionar el horno mientras está vacío excepto para
autolimpieza.
• No descongele bebidas congeladas en botellas de cuello
angosto. Las botellas pueden romperse.
• No raye el vidrio de la puerta del horno con un objeto
puntiagudo.
- Esto puede provocar que el vidrio se dañe o se rompa.
• No almacene nada directamente encima del electrodoméstico
cuando está en funcionamiento.

20 Español
Instrucciones de seguridad importantes
Instrucciones de seguridad importantesInstrucciones de seguridad importantes
CONSERVE ESTAS INSTRUCCIONES
• No utilice recipientes sellados. Quíteles los sellos y las tapas
antes de cocinar. Los recipientes sellados pueden explotar
debido a la acumulación de presión incluso después de que el
horno se ha apagado.
• Tenga cuidado de que los alimentos que está cocinando en el
horno no entren en contacto con el elemento calentador.
- Se podría provocar un incendio.
• No caliente en exceso los alimentos.
- El sobrecalentamiento podría provocar un incendio.
ADVERTENCIAS FUNDAMENTALES PARA
LA LIMPIEZA
PRECAUCIÓN
• No rocíe agua directamente sobre el electrodoméstico para
limpiarlo.
• No utilice benceno, diluyente ni alcohol para limpiar el
electrodoméstico.
- Esto puede provocar decoloración, deformación, daños,
descarga eléctrica o incendio.
• Tenga cuidado de no lastimarse cuando limpia el
electrodoméstico (exterior/interior).
- Puede lastimarse con los bordes puntiagudos del
electrodoméstico.
• No limpie el electrodoméstico con un limpiador a vapor.
- Esto puede provocar corrosión.
• Mantenga limpia la parte interna del horno. Las partículas
de alimentos o los aceites salpicados que se adhieren a las
paredes o al piso pueden causar daños en la pintura y reducir la
eciencia del horno.
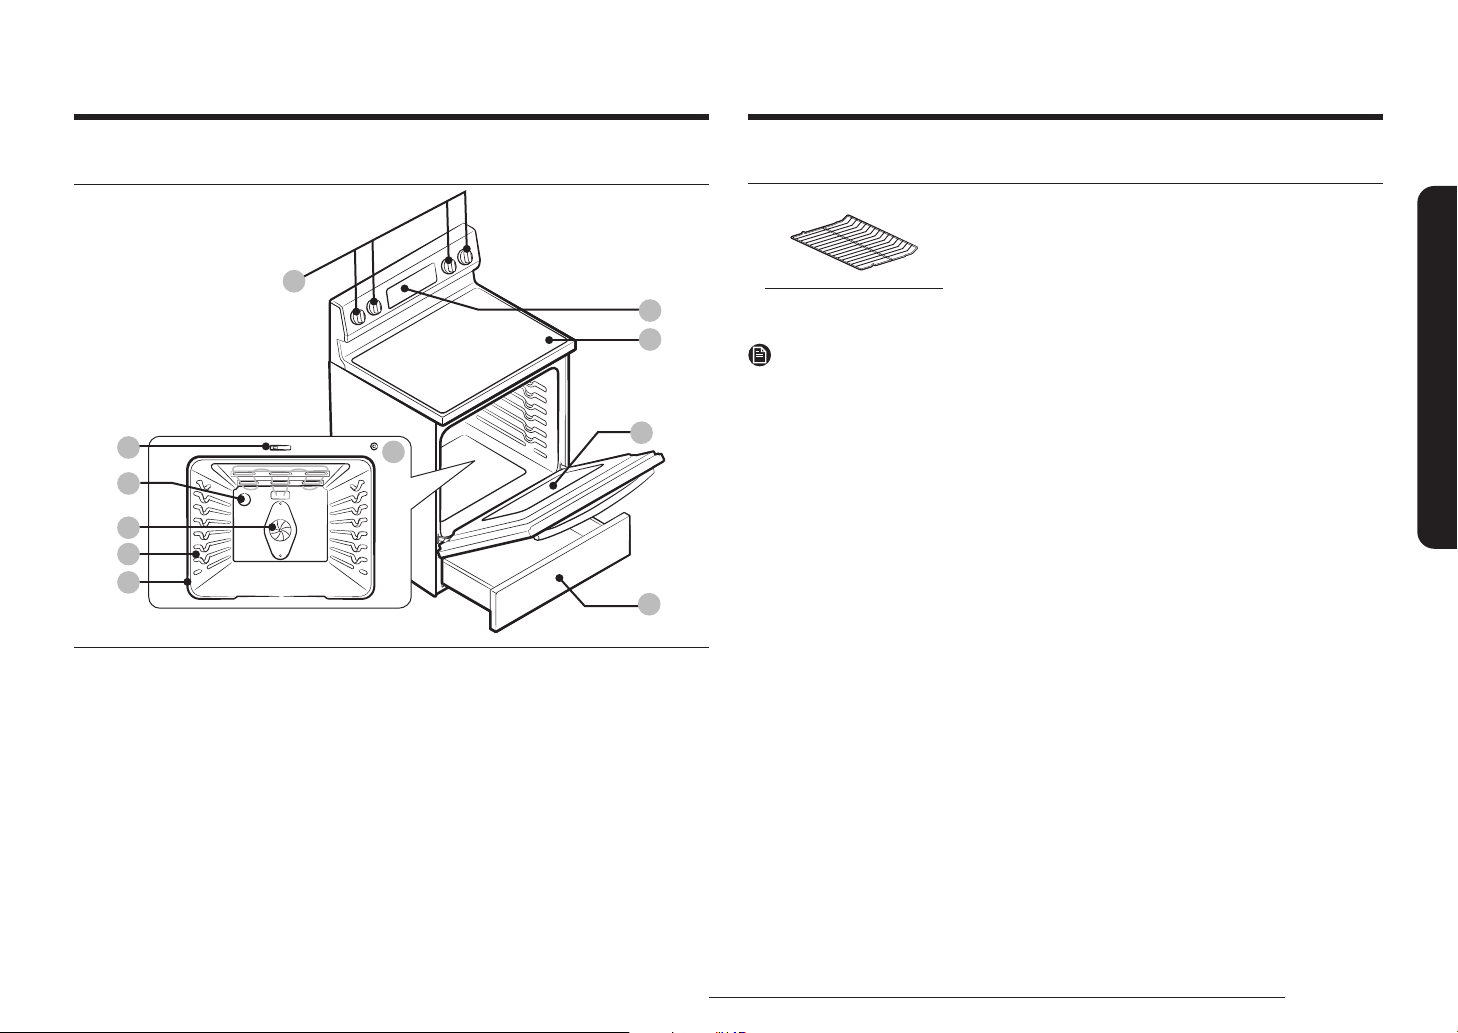
Español 21
Introducción a su nueva estufa
Elementos incluidos
Parrillas de alambre (2) *
NOTA
Si necesita un accesorio marcado con un *, puede adquirirlo en el Centro de contacto de Samsung
(1-800-726-7864).
Introducción a su nueva estufa
Descripción general
02
03
04
05
07
06
08
09
10
11
01
01 Panel de control del
horno (consulte la
página 28 para obtener
más información).
02 * Perillas de control
de la supercie
(consulte la página
23 para obtener más
información).
03 Supercie de vidrio
04 Puerta del horno 05 Cajón de
almacenamiento
06 Pestillo de la puerta
07 Interruptor de la luz
automática del horno
08 * Luz del horno 09 Ventilador de
convección
10 Posición del estante 11 Junta selladora

22 Español
Antes de comenzar
Antes de comenzarAntes de comenzar
Limpie el horno a fondo antes de utilizarlo por primera vez. Luego, retire los accesorios,
programe el horno para hornear y luego haga funcionar el horno a 400 °F durante 1 hora. Se
notará un olor característico. Esto es normal.
Asegúrese de que su cocina se encuentre bien ventilada durante el período de acondicionamiento.
Sugerencias para ahorrar energía
• Durante la cocción, la puerta del horno debe permanecer cerrada excepto para dar la vuelta
a los alimentos.
No abra la puerta con frecuencia durante la cocción para mantener la temperatura del horno
y ahorrar energía.
• Si el tiempo de cocción supera los 30 minutos, puede apagar el horno 5-10 minutos antes
del n del tiempo de cocción para ahorrar energía. El calor residual completará el proceso
de cocción.
• Para ahorrar energía y reducir el tiempo necesario para volver a calentar el horno,
planique el uso del horno para evitar tener que apagarlo entre la cocción de un alimento y
el siguiente.
• Cuando sea posible cocine más de un alimento a la vez.
Supercie de cocción
Acerca de la supercie de cocción
PRECAUCIÓN
ANTES DE COCINAR
• No utilice la supercie de vidrio de la cubierta como tabla para cortar.
• No coloque ni almacene sobre la cubierta de vidrio elementos susceptibles de derretirse o
prenderse fuego, aun cuando no se encuentre en uso.
• Encienda las unidades de supercie solamente después de colocar recipientes de cocción
sobre ellas.
• No almacene objetos pesados por encima de la supercie de la cubierta. Podrían caerse y
dañar tal supercie.
PRECAUCIÓN
DURANTE LA COCCIÓN
• Mientras la estufa esté en uso, no coloque sobre ella papel de aluminio ni elementos
plásticos tales como saleros y pimenteros, apoyacucharas o envoltorios plásticos. El aire
caliente que sale por la abertura de ventilación podría derretir plásticos o hacer arder
elementos inamables.
• Asegúrese de que se encuentre encendida la unidad de supercie correcta.
• Nunca cocine directamente sobre el vidrio. Siempre utilice recipientes.
• Siempre coloque la cacerola o sartén en el centro de la unidad de supercie sobre la cual
está cocinando.
• Nunca deje las unidades de supercie sin atención mientras las utiliza reguladas a altas
temperaturas. Los derrames por exceso de hervor producen humo y los derrames de
sustancias grasas pueden arder en llamas.
• Apague las unidades de supercie antes de retirar los recipientes de cocción.
• No utilice películas plásticas para tapar los alimentos. El plástico podría derretirse, caer
sobre la supercie y resultar muy difícil de quitar.

Español 23
Supercie de cocción
PRECAUCIÓN
DESPUÉS DE COCINAR
• No toque las unidades de supercie hasta que se hayan enfriado.
• La supercie podría estar caliente aún y producirle quemaduras si toca la supercie de
vidrio antes de que se haya enfriado lo suciente.
• Limpie inmediatamente los derrames sobre las áreas de cocción, a n de evitar un duro
trabajo de limpieza más adelante.
• Si hay gabinetes de almacenamiento instalados directamente sobre la supercie de limpieza,
procure que sean elementos de uso infrecuente y asegúrese de que puedan ser almacenados
con seguridad en un lugar que reciba calor. Las temperaturas alcanzadas pueden resultar
inseguras para elementos tales como líquidos volátiles, agentes limpiadores o spray en
aerosol.
Sobre los elementos radiantes de la supercie
La temperatura se eleva en forma gradual y pareja. Al elevarse la temperatura, el elemento
irradiará un color rojo. Para mantener la regulación seleccionada, el elemento alternará ciclos de
encendido y apagado. El elemento calentador retiene calor suciente como para suministrar calor
suciente y uniforme durante su ciclo de apagado. Para mejorar la eciencia de cocción, apague
el elemento varios minutos antes de que se complete la cocción. Esto permitirá que el calor
residual complete el proceso de cocción.
NOTA
Los elementos radiantes tienen un dispositivo limitante que les permite alternar en ciclos de
encendido y de apagado aun en la regulación HI (ALTO). Esto ayuda a evitar daños a la cubierta
vitrocerámica. La alternancia en ciclos en la regulación HI (ALTO) es normal y puede ocurrir si el
recipiente de cocción es demasiado pequeño para el elemento radiante o si la base del recipiente
no es plana.
Ubicación de los elementos radiantes de la supercie y los controles
Las perillas controlan los elementos radiantes de la supercie de cocción tal como se indica a
continuación.
06
02
04
03
07
05
01
01 Trasero izquierdo:
6", 1200 W
02 Delantero izquierdo:
6"/9", 1400 W / 3300 W
03 Delantero derecho:
9"/12”, 1900 W /
3000 W
04 Trasero derecho:
6", 1200 W
05 Centro de
calentamiento: 100 W
06 Indicador de supercie
caliente
07 Lámpara de encendido/
apagado de la cubierta
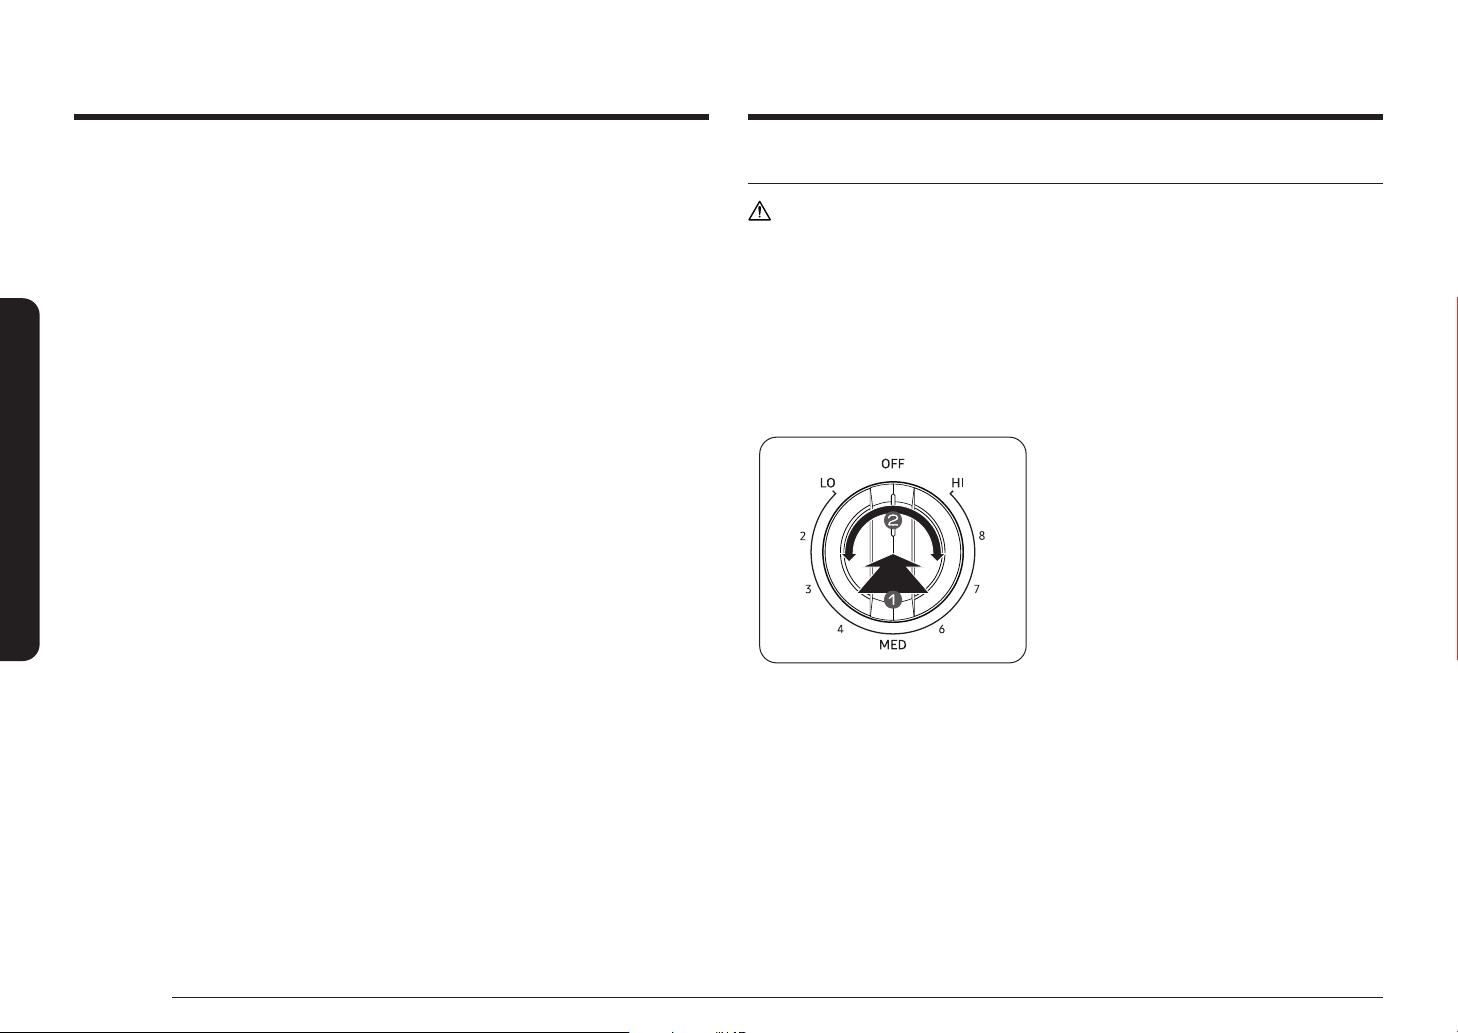
24 Español
Supercie de cocción
Supercie de cocción
Indicador de supercie caliente
• Se ilumina cuando la unidad se encuentra encendida o caliente al tacto.
• Permanece encendido aún después de que se haya apagado la unidad.
• Emite luz hasta que la unidad se haya enfriado hasta aproximadamente 150 °F.
Lámpara de encendido/apagado de la cubierta
• La lámpara se enciende cuando las perillas de control de la supercie están encendidas.
• La lámpara se apaga cuando las perillas de control de la supercie están apagadas.
Áreas de cocción
• Las áreas de cocción de su estufa están señaladas por círculos permanentes sobre la
supercie de cocción de vidrio. Para lograr la máxima eciencia de cocción, seleccione un
tamaño de recipiente adecuado con relación al elemento calentador.
• Los recipientes de cocción no deben extenderse más de ½" a 1" más allá del área de cocción.
• Cuando un control se encuentra encendido, puede ver una luz tenue a través de la supercie
de cocción de vidrio. El elemento alternará ciclos de encendido y apagado para mantener
la regulación de temperatura seleccionada previamente, aun cuando se hayan regulado
temperaturas altas.
• Para obtener más información sobre la selección de los tipos correctos de recipientes de
cocción, consulte la sección "Utilización de los recipientes de cocción correctos" en la página
26.
Como regular el electrodoméstico para la cocción en supercie
PRECAUCIÓN
• Los elementos de supercie pueden estar calientes incluso cuando están apagados y pueden
causar quemaduras. No toque los elementos de supercie hasta que se hayan enfriado lo
suciente.
• Nunca deje la comida desatendida, cuando haya regulado temperaturas altas o medio altas.
Los derrames por exceso de hervor producen humo y los derrames de sustancias grasas
pueden arder.
• Asegúrese de girar la perilla de control a OFF (APAGAR) cuando termine de cocinar.
Perilla de control de unidades de supercie simples (trasera izquierda, trasera derecha)
1. Empuje la perilla hacia adentro.
2. Gire en cualquier dirección hasta la regulación
deseada.
• Tanto en la posición de OFF (APAGAR)
como en la regulación alta, la perilla se
asienta en la posición con un "clic".
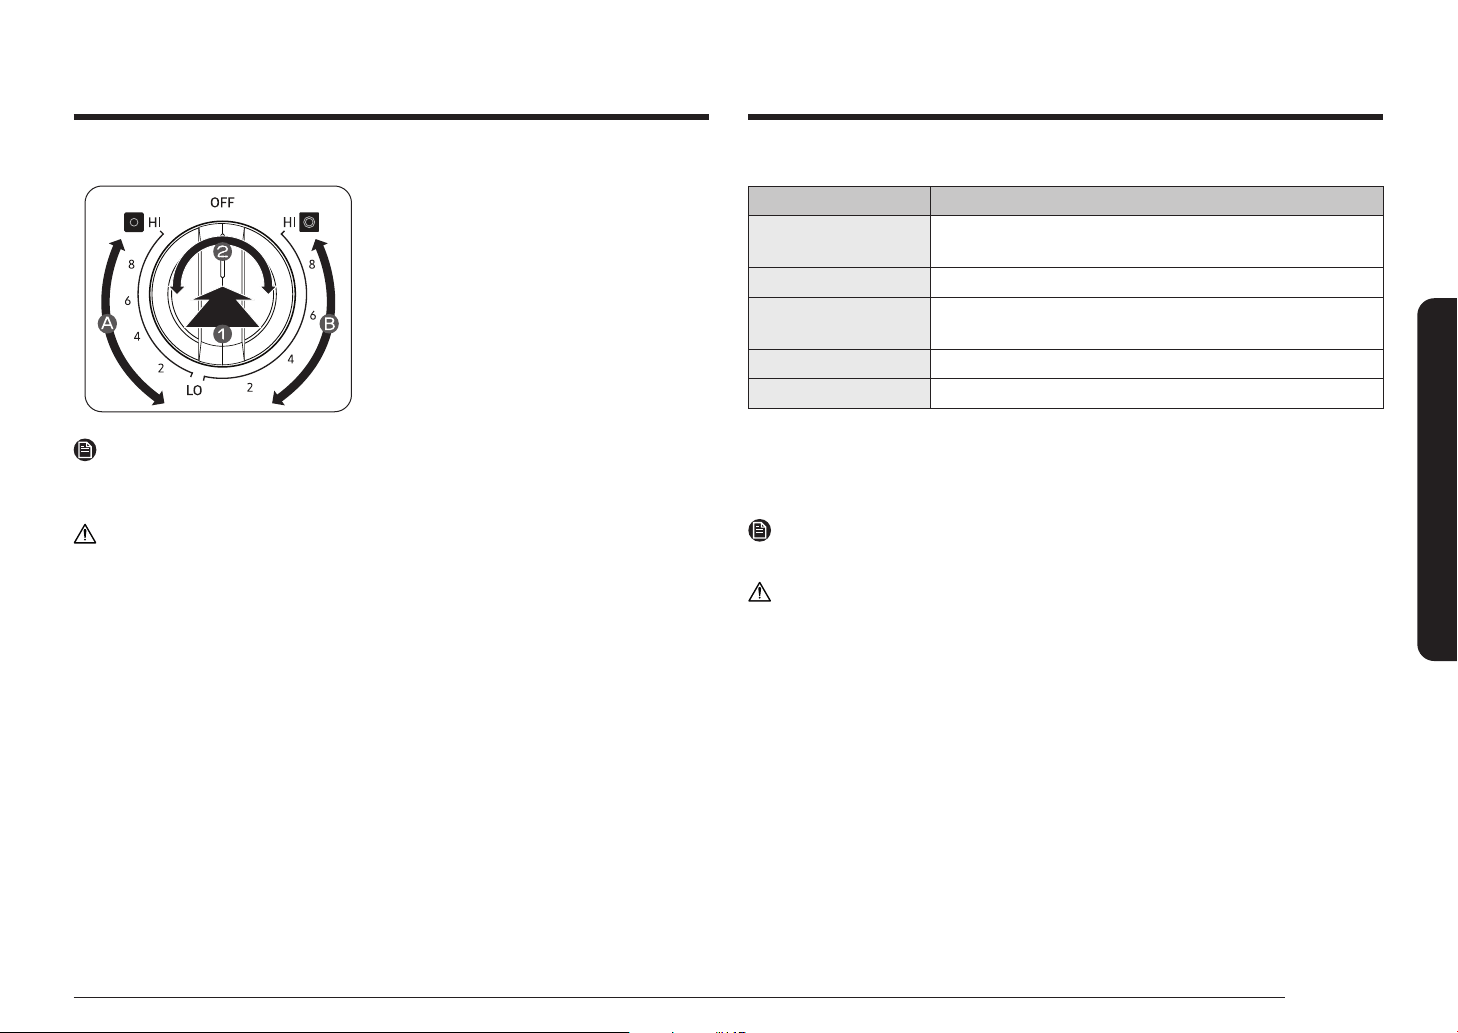
Español 25
Supercie de cocción
Perilla de control de la unidad de supercie dual (delantera izquierda, delantera derecha)
1. Empuje la perilla hacia adentro.
2. Gire en cualquier dirección hasta la regulación
deseada.
• Para utilizar la unidad de supercie
simple, gire la perilla de control a la
posición de regulación quemador simple
(A).
• Para utilizar la unidad de supercie dual,
gire la perilla a la posición de regulación
quemador dual (B).
NOTA
Si quita la perilla para limpiarla, asegúrese de volver a insertarla en la dirección correcta.
(Consulte la ilustración anterior).
PRECAUCIÓN
• Tenga en cuenta que si hay algún problema con el producto, es posible que la perilla de la
luz no se sincronice con el funcionamiento real del calentador radiante.
• La zona en la perilla entre las regulaciones Alta y Apagada no es apropiada para cocinar.
Regulaciones recomendadas
REGULACIÓN TIPO DE COCCIÓN
ALTO Cocción inicial de la mayoría de las comidas, hacer hervir agua,
asar en cacerola
MEDIO ALTO Mantener un hervor rápido, frituras, frituras sumergidas en grasa
MEDIO Mantener un hervor lento, reducir salsas y jugos de cocción,
cocción al vapor de vegetales
MEDIO BAJO Mantener el proceso de cocción, escalfado, cocer guisados
BAJO Mantener alimentos calientes, derretir, hervir a fuego lento
Uso del centro de calentamiento
El centro de calentamiento, ubicado en la parte posterior central de la supercie de vidrio
mantendrá calientes los alimentos ya cocidos, a temperatura apta para servir.
NOTA
El calentador de supercie no se pondrá rojo como los demás elementos de cocción.
PRECAUCIÓN
• No mantenga alimentos sobre el centro de calentamiento por más de dos horas.
• Utilice únicamente recipientes y vajilla recomendada como segura para uso en horno y
sobre supercies de cocción.
• Siempre utilice agarradores o guantes aislantes cuando retira los alimentos del centro de
calentamiento ya que los recipientes y los platos estarán calientes.
• Cuando se calientan pasteles y panes, use tapas que tengan una abertura para permitir que
escape la humedad.
• No utilice películas plásticas para tapar la comida. El plástico podría derretirse sobre la
supercie y ser muy difícil de limpiar.
• Siempre comience con alimentos calientes. Consumir alimentos que fueron colocados sobre
el centro de calentamiento crudos o fríos podría causar enfermedades.
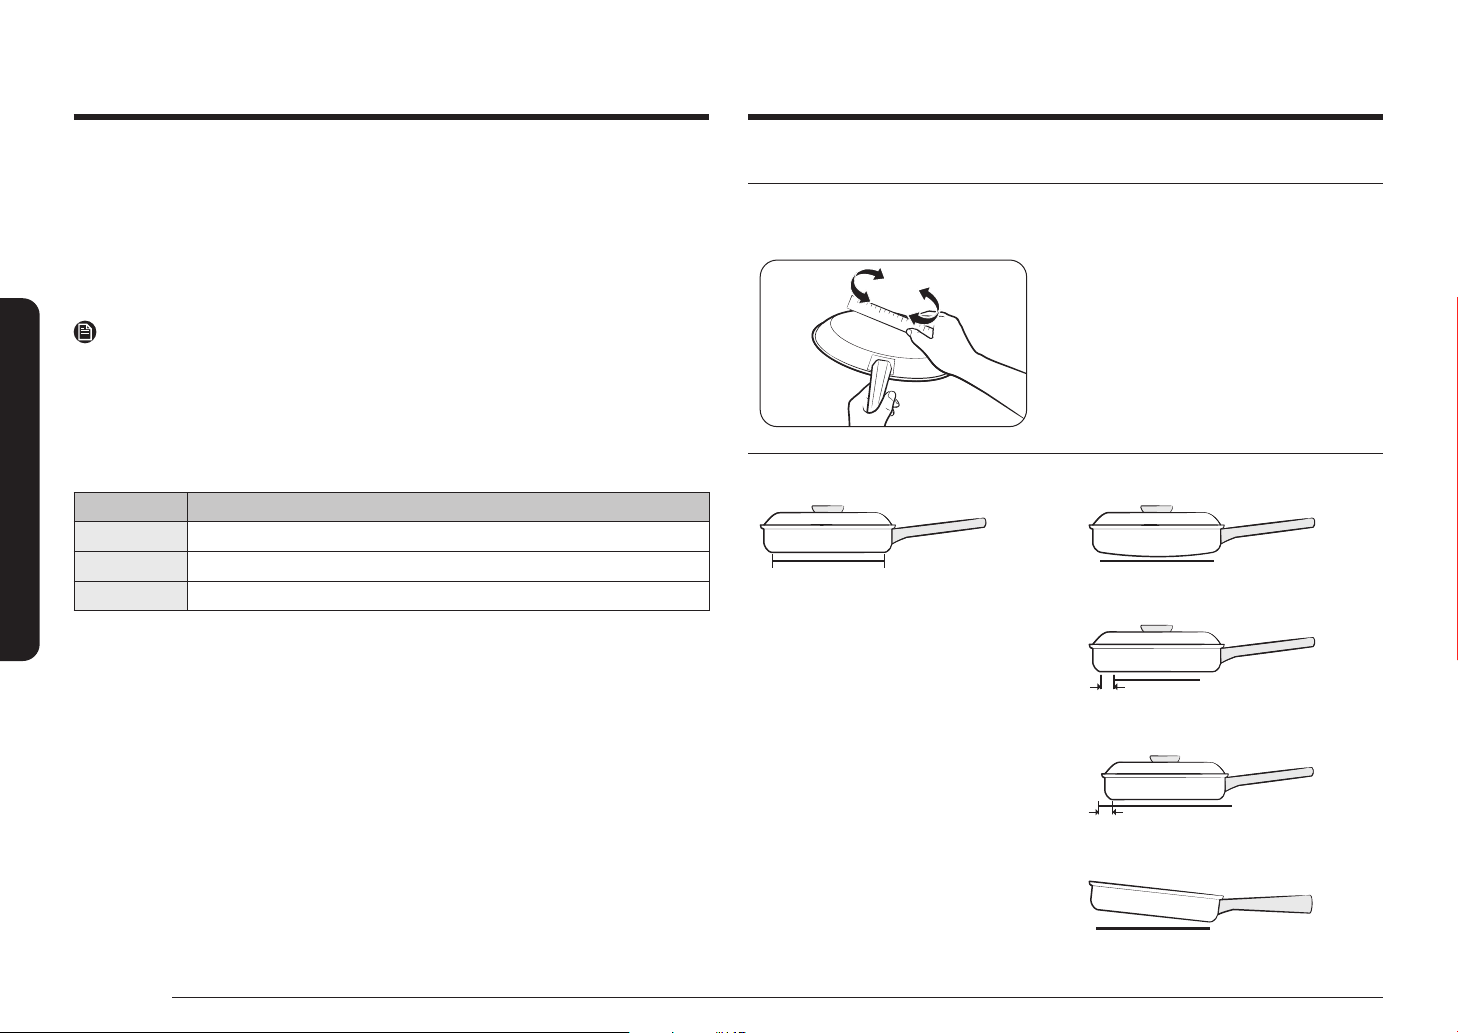
26 Español
Supercie de cocción
Supercie de cocción
Utilización de los recipientes de cocción correctos
Utilizar los recipientes de cocción correctos puede evitar muchos problemas, tales como cocción
despareja o tiempos de cocción demasiado largos. Utilizar las cacerolas y sartenes adecuadas
redundará en menor tiempo de cocción y los alimentos se cocinarán en forma más pareja.
Controle que el fondo sea plano haciendo girar una
regla sobre la base del recipiente.
CORRECTO INCORRECTO
Fondo plano y lados verticales.
• Tapas bien ajustadas.
• El peso del mango no inclina el
recipiente.
• El recipiente está bien equilibrado.
• El tamaño del recipiente guarda
adecuada relación con la cantidad de
alimento que se preparará y con el
elemento calentador.
• Hecho de un material que es buen
conductor del calor.
Siempre haga corresponder el diámetro del
recipiente con el diámetro del elemento
calentador.
Recipientes cuyos fondos están curvados o
deformados.
El recipiente sobresale del elemento en más
de media pulgada.
El recipiente es más pequeño que el elemento
calentador.
Mango demasiado pesado causa inclinación
del recipiente.
1. Para encender el centro de calentamiento, presione la tecla Warming Center On/Off (Centro
de calentamiento Encender/Apagar).
2. Regule la potencia al nivel deseado. Presione la tecla Warming Center Level (Centro de
calentamiento Nivel) una vez para el nivel Bajo, dos veces para el nivel Medio o 3 veces
para el nivel Alto.
3. Para apagar el centro de calentamiento, presione la tecla Warming Center On/Off (Centro de
calentamiento Encender/Apagar).
NOTA
• Presionar OFF/CLEAR (APAGAR/BORRAR) no apaga el centro de calentamiento.
• Para obtener óptimos resultados, todas las comidas en el centro de calentamiento deben
cubrirse con una tapa o papel de aluminio. Cuando se calientan pasteles o panes, la tapa o
papel de aluminio debe tener una abertura para permitir que escape la humedad.
Regulaciones recomendadas
NIVEL TIPO DE ALIMENTO
Bajo Panes y pasteles, guisados, reducciones de cocción, huevos
A punto Plato de mesa con alimentos, sopas crema, vegetales, salsas, guisos, carnes
Alto Comidas fritas, sopas líquidas, bebidas calientes

Español 27
Supercie de cocción
Protección de la cubierta
Limpieza
• Limpie la cubierta antes de utilizarla por primera vez.
• Limpie su cubierta diariamente o después de cada uso. Esto mantendrá la buena apariencia
de la cubierta y puede evitar daños.
• Si durante la cocción ocurre un derrame, límpielo inmediatamente del área de cocción
mientras esté caliente para evitar tener que hacer un duro trabajo de limpieza más adelante.
Con extremo cuidado, limpie el derrame con una toalla limpia y seca.
• No permita que los derrames permanezcan mucho tiempo en el área de cocción o las
terminaciones de la cubierta.
• No utilice polvos limpiadores abrasivos, paños abrasivos ni esponjas metálicas, porque
producirán rayaduras en la cubierta.
• No utilice cloro, amoníaco ni otros productos limpiadores no especícamente recomendados
para ser usados en supercies vitrocerámicas.
Cómo evitar marcas y rayaduras
• No utilice recipientes de cocción de vidrio. Pueden causar rayaduras en la cubierta.
• No coloque un trébedes o un aro para wok entre la cubierta y el recipiente. Estos elementos
pueden marcar o rayar la cubierta.
• Asegúrese de que la cubierta y el fondo del recipiente se encuentren limpios.
• No deslice recipientes metálicos sobre la cubierta.
Prevención de manchas
• No utilice paños ni esponjas sucias para limpiar la supercie de la cubierta. Quedará una
película que podría causar manchas sobre la supercie de cocción cuando se caliente el área.
• La cocción continuada sobre una supercie sucia puede causar manchas permanentes.
Prevención de otros daños
• No permita que plásticos, azúcar o alimentos con alto contenido de azúcar se derritan sobre
la cubierta. Si esto ocurriese, limpie inmediatamente.
• No permita que un recipiente quede seco por hervor prolongado, ya que esto dañará la
cubierta y el recipiente.
• No utilice la cubierta como mesada ni como tabla para cortar.
• No cocine alimentos directamente sobre la cubierta. Use siempre los recipientes de cocción
adecuados.
Selección de los recipientes de cocción correctos
El material del que están hechos sus recipientes de cocción determina que tan rápida y
parejamente se transere el calor del elemento calentador de la supercie al fondo del recipiente.
• ALUMINIO - Excelente conductor de calor. Algunos tipos de alimentos causarán el
oscurecimiento del aluminio. (Los recipientes de aluminio anodizado son resistentes a las
manchas y a las picaduras). Si se deslizan recipientes de aluminio sobre la cubierta de
cocción cerámica, podrían quedar marcas de metal semejantes a rayaduras. Retire estas
marcas ni bien la cubierta se enfríe.
• COBRE - Excelente conductor de calor pero su color se altera con facilidad. Puede dejar
marcas de metal sobre la supercie vitrocerámica (para eliminarlas, ver arriba).
• ACERO INOXIDABLE - Lento conductor de calor, los resultados de cocción pueden ser
disparejos. Es duradero, fácil de limpiar y resistente a las manchas.
• HIERRO FUNDIDO - Mal conductor del calor; retiene el calor muy bien. Una vez alcanzada
la temperatura necesaria, produce cocción uniforme. Se desaconseja su uso en cubiertas
vitrocerámicas.
• UTENSILIOS ESMALTADOS - Las características de conducción de calor dependerán del
material base. Los revestimientos de porcelana deben ser lisos para evitar rayaduras en las
cubiertas vitrocerámicas.
• VIDRIO - Lento conductor de calor. Se desaconseja su uso en supercies de cubiertas de
cerámica porque puede causar rayaduras.
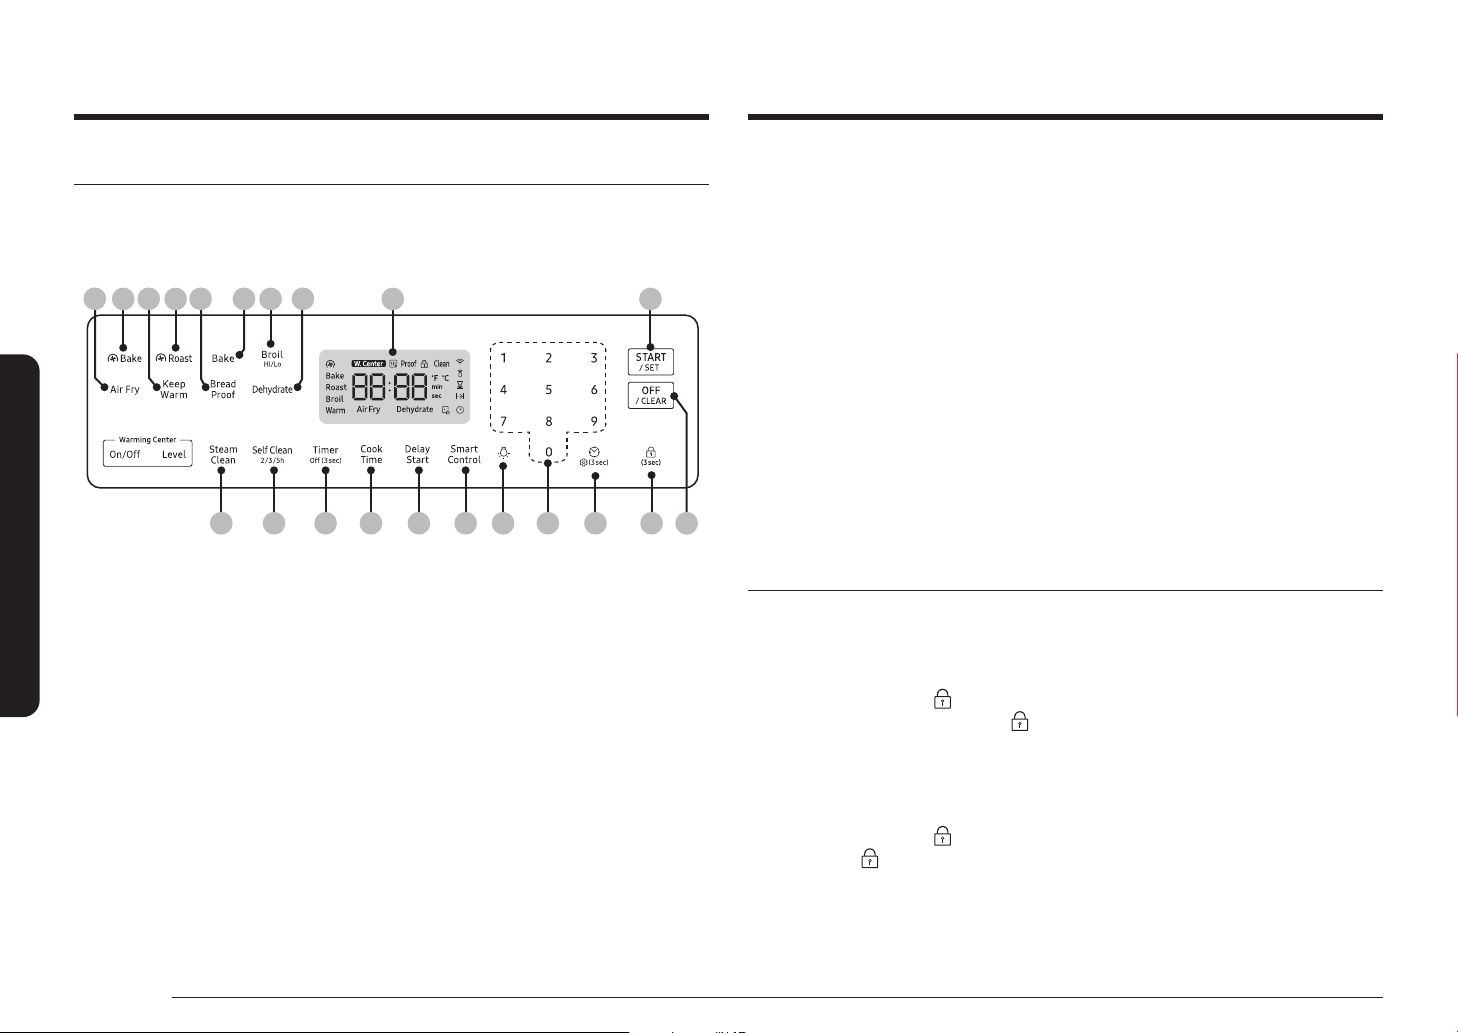
28 Español
Funcionamiento del horno
Funcionamiento del hornoFuncionamiento del horno
Panel de control del horno
LEA LAS INSTRUCCIONES CON ATENCIÓN ANTES DE UTILIZAR EL HORNO. Para obtener un
funcionamiento satisfactorio del horno, familiarícese con las diversas características y funciones
que se describen a continuación. Encontrará instrucciones detalladas para cada característica y
función más adelante en este manual.
06
07 08 09
01 1902 03 05
1110 12 13 14 15 2016 2117 18
04
01 Pantalla: Muestra la hora del día, la temperatura del horno, el modo en que está funcionando y el
tiempo establecido para el temporizador o las funciones automáticas del horno.
02 Convection Bake (Hornear por convección): Use para seleccionar la función de horneado por
convección del horno.
03 Convection Roast (Asar por convección): Use para seleccionar la función de asar por convección
del horno.
04 Bake (Hornear): Use para seleccionar la función de hornear del horno.
05 Broil (Asar a la parrilla): Use para seleccionar la función de asar a la parrilla del horno.
06 Air Fry (Freidora de aire): Use para seleccionar la función de freidora de aire del horno.
07 Keep Warm (Mantener caliente): Use para seleccionar la función de mantener caliente del horno
simple para mantener calientes los alimentos cocidos.
08 Bread Proof (Levantamiento del pan): Use para seleccionar la función de levantar el pan del horno.
09 Dehydrate (Deshidratar): Use para seleccionar la función de deshidratación del horno.
10 Steam Clean (Limpieza con vapor): Use para seleccionar la función de limpieza con vapor del
horno.
11 Self Clean (Autolimpieza): Use para seleccionar la función de autolimpieza del horno.
12 Timer (Temporizador): Use para programar o cancelar el cronómetro. El cronómetro no inicia ni
detiene la cocción. Mantenga presionado durante 3 segundos para apagar el temporizador.
13 Cook Time (Tiempo de cocción): Presione y luego utilice el teclado numérico para programar
la duración de la cocción para los alimentos en cuestión. El horno se apagará cuando haya
transcurrido el tiempo de cocción.
14 Delay Start (Retrasar el inicio): Presione para programar que el horno se active y detenga
automáticamente a las horas que usted je.
15 Smart Control: Use para seleccionar la función de Smart Control.
16 Teclado numérico: Use para marcar o jar cualquier función que requiera números tales como la
hora en el reloj, el temporizador, la temperatura del horno, la hora de comienzo y la duración de la
operación para el caso de cocción con temporizador, etc.
17 Luz: Presione para encender o apagar la luz del horno.
18 Reloj/Ajuste: Use para jar la hora del día. Use para mostrar el menú de preferencia del usuario en
la pantalla. (Presione durante 3 segundos).
19 START/SET (INICIO/CONFIGURAR): Use para iniciar cualquier función de cocción o de limpieza en
el horno.
20 OFF/CLEAR (APAGAR/BORRAR): Presione para cancelar todas las operaciones del horno
excepto reloj y temporizador. Presione para cancelar una temperatura o un tiempo ingresados
previamente.
21 Bloqueo del horno: Use para desactivar todas las funciones del horno.
Bloqueo del horno
Bloquee la puerta del horno y los botones del panel táctil de modo que no puedan activarse
accidentalmente. La función Bloqueo del horno solo se puede activar en modo de espera.
Cómo activar la función de bloqueo del horno
Presione Bloqueo del horno
durante 3 segundos.
La pantalla indicará el icono de Bloqueo al igual que la hora actual.
Se deben cancelar todas las funciones antes de activar el bloqueo del horno.
Esta función solo está disponible si la temperatura del horno es inferior a 400 °F.
Cómo desbloquear el horno
Presione Bloqueo del horno
durante 3 segundos.
El icono Bloqueo desaparecerá de la pantalla.
Español 29
Funcionamiento del horno
Ajuste del reloj
El reloj debe ajustarse para mostrar la hora correcta y permitir el buen funcionamiento de las
opciones de temporizador del horno.
• La hora del día no se puede cambiar mientras estén en proceso una cocción con
temporizador, una cocción diferida o un ciclo de autolimpieza.
Cómo ajustar el reloj
1. Presione Reloj
.
2. Ingrese la hora actual en horas y minutos mediante el teclado numérico, por ejemplo: 1, 3, 0,
para 1:30.
3. Presione Reloj o START/SET (INICIO/CONFIGURAR) para guardar los cambios.
Cómo programar el temporizador de cocina
El temporizador de cocina funciona como un temporizador adicional que emitirá un sonido agudo
cuando el tiempo jado haya transcurrido. No inicia ni detiene las funciones de cocción. Puede
usar el temporizador de cocina con cualquiera de las funciones del horno.
Cómo programar el temporizador
1. Presione Timer (Temporizador).
2. Ingrese el tiempo deseado con el teclado numérico.
3. Una vez realizado, presione START/SET (INICIO/CONFIGURAR).
4. Para cancelar los ajustes del temporizador, mantenga presionado Timer (Temporizador)
durante 3 segundos.
5. Cuando se cumple el tiempo establecido, el horno emite un pitido y muestra el mensaje
"End" (Fin). Presione Timer (Temporizador) para eliminar el mensaje.
NOTA
Para cambiar el temporizador programado, presione Timer (Temporizador), ingrese un tiempo
diferente y presione START/SET (INICIO/CONFIGURAR).
Cocción por temporizador
En un proceso de cocción regido por el temporizador, el horno se enciende inmediatamente y
cocina durante el tiempo que usted je. Una vez completado ese tiempo de cocción, el horno se
apaga automáticamente.
• La función de cocción por temporizador se puede utilizar únicamente en combinación con
otra operación de cocción (hornear, hornear por convección, asar por convección, freidora de
aire, deshidratar).
Cómo programar el horno para cocción con temporizador
1. Comience con la operación de cocción deseada, p. ej., Bake (Hornear).
La temperatura predeterminada es de 350 °F.
2. Presione Cook Time (Tiempo de cocción).
• Puede programar el tiempo de cocción en cualquier momento. (Luego de seleccionar el
modo de cocción, durante o después del precalentamiento).
3. Ingrese el tiempo de cocción deseado, p. ej., 45 minutos, mediante el teclado numérico.
El tiempo de cocción se puede jar para cualquier duración desde 1 minuto hasta 9 horas y
59 minutos.
4. Presione START/SET (INICIO/CONFIGURAR). El indicador de temperatura comenzará a variar
una vez que la temperatura del horno alcance 175 °F.
El horno continuará cocinando hasta que haya transcurrido el tiempo jado, luego se
apagará automáticamente salvo que se haya programado la función de mantener la
temperatura. (Consulte la sección sobre la función de mantener caliente en la página 37.)
5. Puede cancelar un tiempo de cocción en cualquier momento ajustando el tiempo de cocción
en 0 minutos. (Presione Cook Time (Tiempo de cocción) -> ajuste el tiempo de cocción en 0
minutos -> presione START/SET (INICIO/CONFIGURAR))
NOTA
Cuando haya transcurrido el tiempo de cocción, la estufa emitirá una señal sonora varias veces.
PRECAUCIÓN
Tenga precaución al utilizar las funciones Cocción con temporizador o Retrasar el inicio. Utilice
estas funciones para cocinar carnes curadas o congeladas y la mayor parte de las frutas y
vegetales. Los alimentos que se pueden echar a perder con facilidad tales como leche, huevos,
pescado, carnes (incluidas las aves) deben enfriarse previamente en el refrigerador. Aun
enfriados, no deben permanecer en el horno durante más de 1 hora antes de que se inicie la
cocción y una vez completada la cocción deben retirarse a la brevedad. La ingestión de alimentos
en mal estado puede producir intoxicación alimentaria.
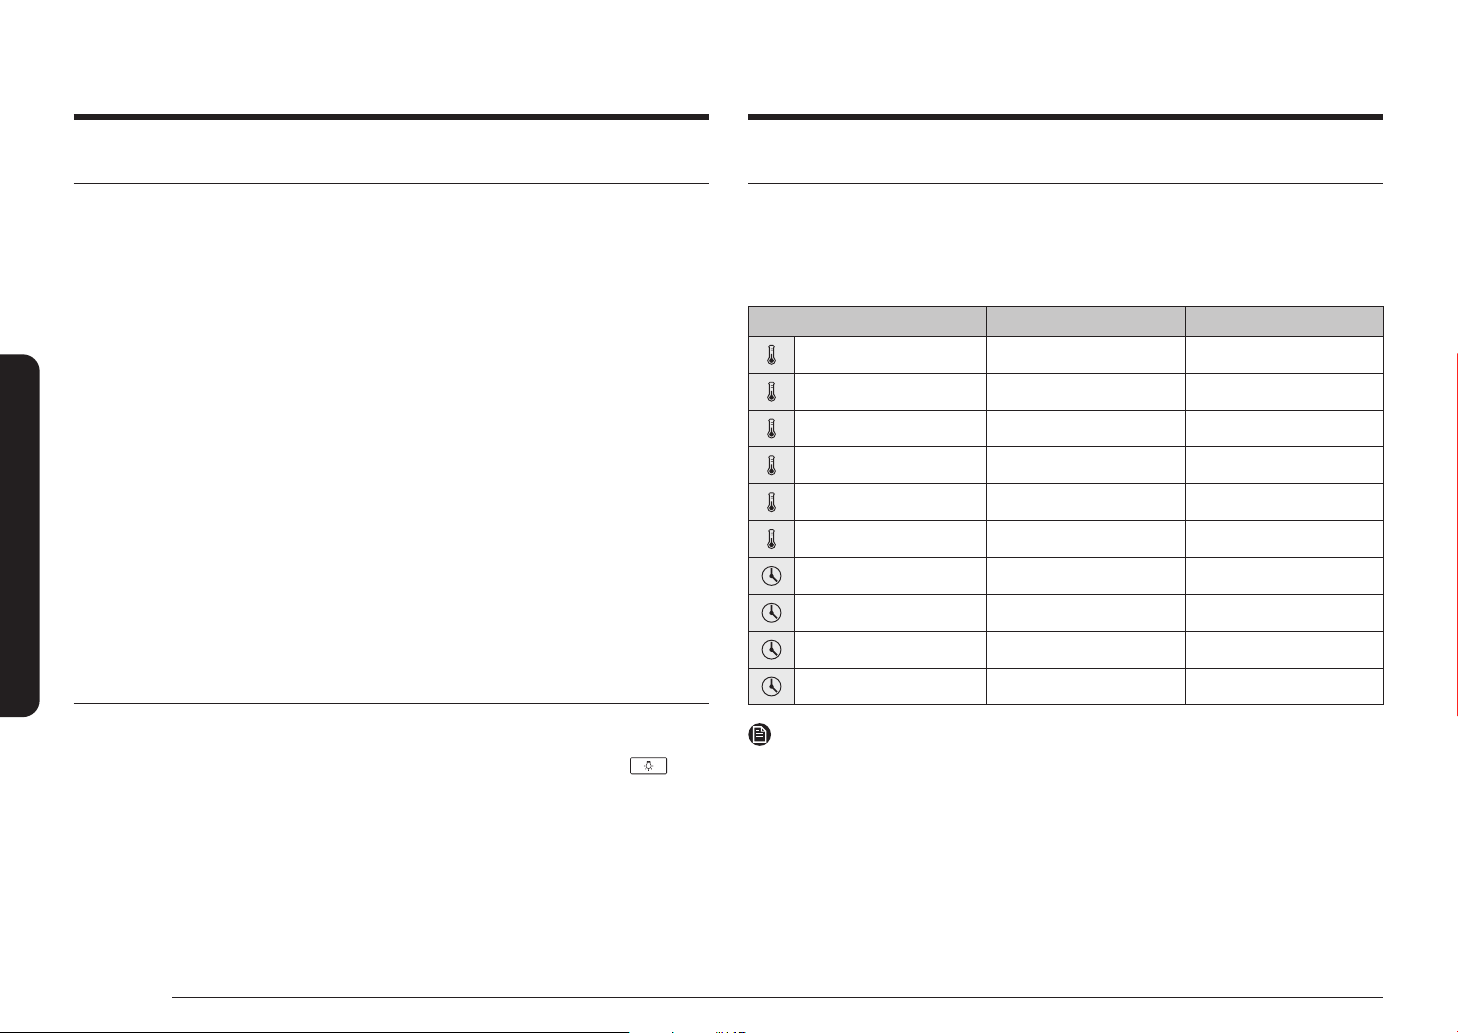
30 Español
Funcionamiento del horno
Funcionamiento del horno
Retrasar el inicio
En una cocción con inicio retardado, el temporizador del horno enciende y apaga el horno a las
horas que usted seleccione con anticipación.
• La función de retrasar el inicio se puede utilizar únicamente en combinación con otra
operación de cocción (hornear, hornear por convección, asar por convección, freidora de
aire, deshidratar, o autolimpieza).
• Se puede programar el horno para un inicio retardado antes de seleccionar las otras
operaciones de cocción.
• Se debe ajustar el reloj en la hora actual.
Cómo programar el horno para retrasar el inicio
1. Coloque la(s) parrilla(s) y los alimentos en el horno.
2. Presione la tecla para denir la operación de cocción deseada, p. ej., Bake (Hornear).
La temperatura predeterminada es de 350 °F.
3. Ingrese la temperatura deseada, p. ej., 375 °F, mediante el teclado numérico.
4. Ajuste el tiempo de cocción si lo desea. (Consulte la sección sobre la función de cocción con
temporizador en la página 29.)
5. Presione Delay Start (Retrasar el inicio).
6. Ingrese la hora a la cual desea que se encienda el horno, p. ej., 4:30, mediante el teclado
numérico.
7. Presione START/SET (INICIO/CONFIGURAR). A la hora jada, se emitirá una breve señal
sonora. El horno comenzará la cocción.
Cómo encender y apagar la luz del horno
• La luz del horno se enciende automáticamente cuando se abre la puerta.
• La luz del horno se apaga automáticamente cuando se cierra la puerta.
• La luz del horno se puede encender y apagar manualmente presionando la tecla .
Ajustes mínimos y máximos
Todas las funciones enumeradas en la siguiente tabla tienen ajustes de tiempo o temperatura
mínimos y máximos. Se oirá una señal sonora cada vez que se presione una tecla del panel de
control y el dato ingresado haya sido aceptado. Si la temperatura o el tiempo ingresados se
encuentran por debajo del mínimo o por arriba del valor ajustable máximo para la función en
cuestión, sonará un tono de error en la forma de un sonido más prolongado.
FUNCIÓN MÍNIMO MÁXIMO
Hornear 175 °F (80 °C) 550 °F (285 °C)
Asar a la parrilla BAJO ALTO
Hornear por convección 175 °F (80 °C) 550 °F (285 °C)
Asar por convección 175 °F (80 °C) 550 °F (285 °C)
Freidora de aire 350 °F (175 °C) 500 °F (260 °C)
Deshidratar 100 °F (40 °C) 225 °F (105 °C)
Mantener caliente* - 3 h
Levantamiento del pan - 12 horas
Autolimpieza 2 h 5 h
Limpieza con vapor 20 min 20 min
NOTA
Si desactiva la función Ahorro de energía de 12 horas, la función marcada con un asterisco (*)
funcionará hasta que la cancele. (Ajuste predeterminado del ahorro de energía de 12 horas:
activado). Consulte la página 40 para obtener más información.
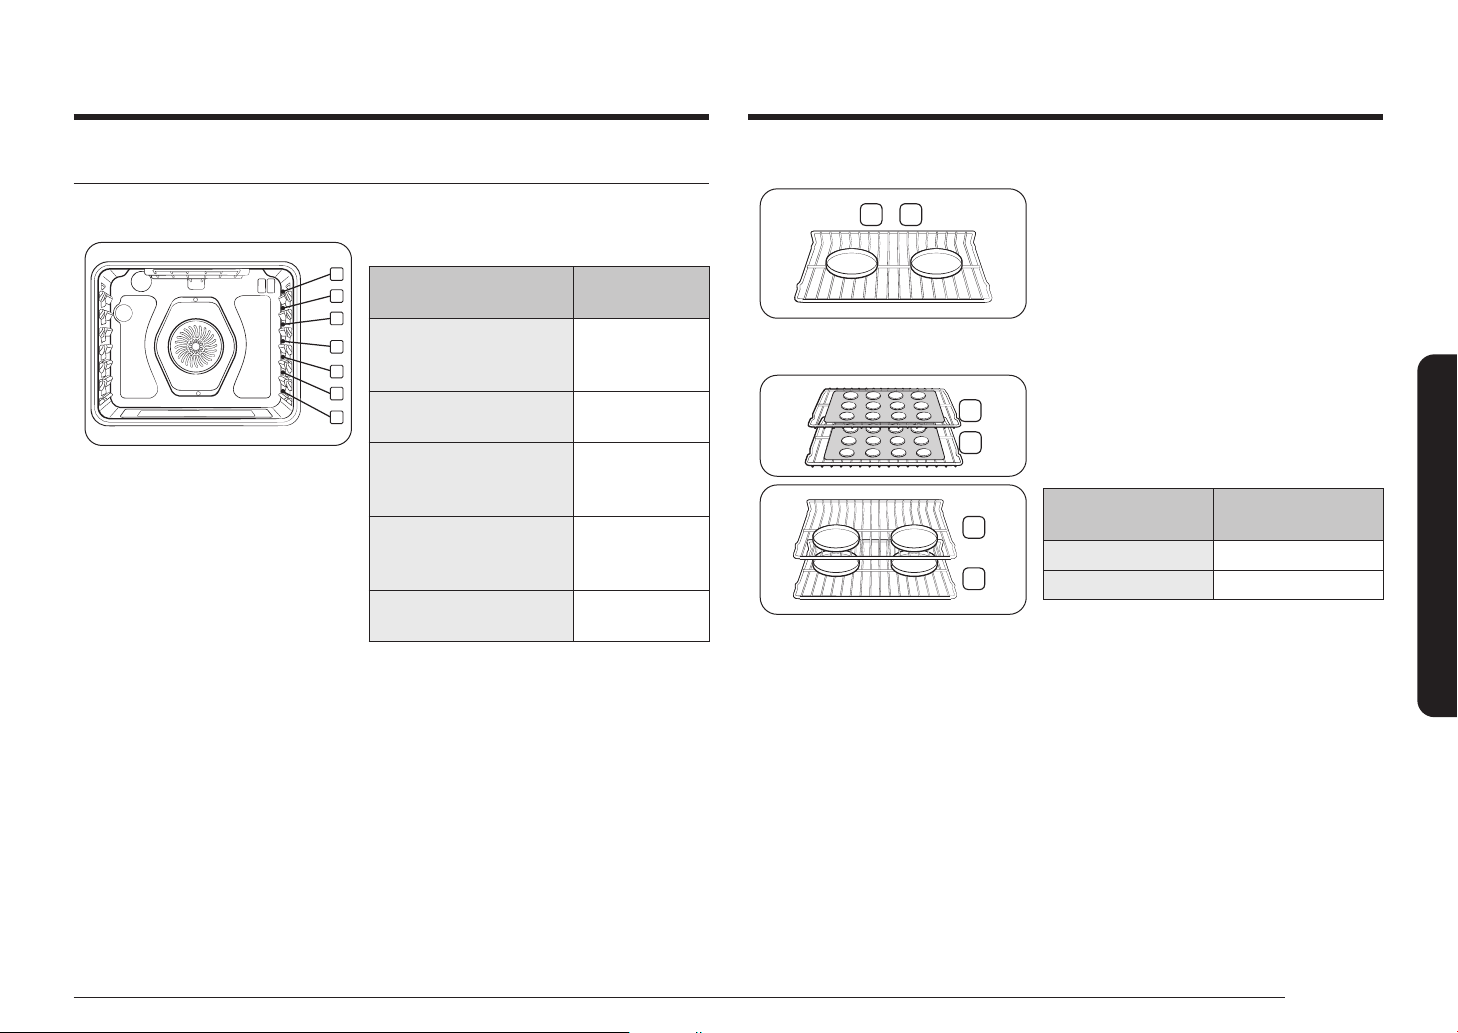
Español 31
Funcionamiento del horno
Uso de las parrillas del horno
Posiciones de las parrillas en el horno
1
2
3
4
5
6
7
Posición recomendada de las parrillas para cocción
TIPO DE ALIMENTO
POSICIÓN DE LA
PARRILLA
Hamburguesas a la parrilla 7
Carnes o cortes pequeños de
ave, pescado, a la parrilla
4-6
Panqués, pasteles molde
savarín, tartas congeladas,
guisos
3 o 4
Pasteles de ángel, carnes
asadas de pequeño tamaño,
pizzas frescas y congeladas
2
Pavo, carne asada de gran
tamaño, jamones, pizza fresca
1
• Esta tabla es para referencia solamente.
Colocación de parrillas y recipientes
3 4
Única parrilla de hornoÚnica parrilla de horno
Colocar los moldes o las charolas lo más cerca
posible del centro del horno producirá los mejores
resultados. Si hornea con más de un recipiente,
colóquelos de manera tal que cada uno tenga 1" a
1½" de espacio libre a su alrededor.
Cuando hornea en una única parrilla, coloque la
parrilla del horno en la posición 3 o 4.
Consulte la gura de la izquierda.
5
3
Múltiples parrillas de hornoMúltiples parrillas de horno
2
5
Cuando hornee pasteles, coloque las parrillas en las
posiciones 3 y 5; cuando hornee galletitas, coloque
las parrillas en las posiciones 2 y 5.
Uso de múltiples parrillas de horno
Tipo de horneado Posiciones de las
parrillas
Galletitas 2 y 5
Pasteles 3 y 5

32 Español
Funcionamiento del horno
Funcionamiento del horno
Antes de usar las parrillas
El horno tiene dos parrillas.
Cada parrilla tiene topes que requieren una colocación correcta sobre las guías. Estos topes
impedirán que la parrilla se salga completamente
RETIRAR LAS PARRILLAS
1. Jale la parrilla directamente hacia afuera hasta que se trabe.
2. Levante la parte delantera de la parrilla y extráigala.
VOLVER A COLOCAR LAS PARRILLAS
1. Coloque el extremo de la parrilla sobre la guía.
2. Incline el extremo delantero y empuje la parrilla hacia adentro.
PRECAUCIÓN
• No use papel de aluminio para cubrir las
parrillas ni el fondo del horno. Tales acciones
entorpecerían la circulación del calor, crearían
problemas en el proceso de horneado y
podrían dañar el fondo del horno.
• Coloque las parrillas en la distribución deseada
solamente cuando el horno se encuentre frío.
Hornear
El horno puede programarse para hornear a cualquier temperatura en el rango de 175 °F a
550 °F.
La temperatura y el tiempo de horneado varían según los ingredientes y el tamaño y la forma
de la bandeja de hornear utilizada. Los recubrimientos oscuros y antiadherentes cocinan los
alimentos más rápidos y los doran más.
Cómo ajustar la temperatura
1. Presione Bake (Hornear). La temperatura predeterminada es de 350 °F.
2. Ingrese la temperatura deseada mediante el teclado numérico, p. ej., 3, 7, 5.
3. Presione START/SET (INICIO/CONFIGURAR). El indicador de temperatura comenzará a variar
una vez que la temperatura del horno alcance 175 °F.
4. Si desea cancelar el horneado o si terminó, presione OFF/CLEAR (APAGAR/BORRAR).
• Coloque los alimentos en el horno después de precalentarlo, si así lo requiere la
receta. El precalentamiento es muy importante para lograr buenos resultados cuando
se hornean tortas, pasteles, galletas, masas y panes. Cuando el horno haya alcanzado
la temperatura deseada, la estufa emitirá una señal sonora varias veces.
NOTA
Por razones de rendimiento, el ventilador de convección puede encenderse o apagarse durante el
funcionamiento.
Cómo ajustar la temperatura durante el proceso de cocción
1. Presione Bake (Hornear). La pantalla mostrará la temperatura jada hasta el momento, por
ejemplo 375 °F.
2. Ingrese la temperatura deseada, p. ej., 425 °F, mediante el teclado numérico.
3. Complete el ingreso presionando START/SET (INICIO/CONFIGURAR).

Español 33
Funcionamiento del horno
Horneado por convección
1
2
3
4
5
6
7
Utilizar la función de horneado por convección, le
permitirá una cocción más rápida. En el horneado
por convección se activa un ventilador para hacer
circular el calor del horno en forma pareja y
continua. Esta mejor distribución del calor posibilita
la cocción pareja y excelentes resultados cuando
se utilizan múltiples parrillas al mismo tiempo. Los
alimentos que se cocinen sobre una única parrilla
generalmente se cocinarán en forma más rápida
y pareja si se utiliza la función de horneado por
convección. La cocción utilizando múltiples parrillas
en el horno puede resultar en tiempos de cocción
un poco más largos para ciertas comidas, pero a n
de cuentas se ahorra tiempo. Los panes, pasteles
y masas se doran en forma más pareja. Se puede
programar el horno para hornear por convección a
temperaturas de entre 175 °F y 550 °F.
Consejos para el horneado por convección
El tiempo que ahorre dependerá del tipo y de la cantidad de alimento que esté cocinando. Al
hornear galletas, se aconseja utilizar charolas sin lados o con lados muy bajos para permitir que
el aire caliente circule alrededor de la comida. Utilizar una charola de supercie oscura resultará
en unos tiempos de cocción más rápidos.
Cuando hornee por convección con una única parrilla, colóquela en la posición 3 o 4. Si cocina con
parrillas múltiples, colóquelas en las posiciones 3 y 5 o 2 y 5.
Si hornea una torta o pastel, el modo de hornear simple (no el modo de hornear por convección)
producirá mejores resultados.
Cómo ajustar el horno para hornear por convección
1. Presione Bake (Hornear por convección). La temperatura predeterminada es de 325 °F.
2. Ingrese la temperatura deseada, p. ej., 400 °F, mediante el teclado numérico.
3. Presione START/SET (INICIO/CONFIGURAR).
El indicador de temperatura comenzará a variar una vez que la temperatura del horno
alcance 175 °F. La estufa emitirá una señal sonora varias veces cuando el horno alcance la
temperatura deseada.
4. Para apagar o cancelar el horneado por convección presione OFF/CLEAR (APAGAR/BORRAR).
• Cuando se abre la puerta del horno, el ventilador del horno de convección se apaga.
• NO DEJE la puerta del horno abierta durante mucho tiempo mientras funciona en
modo de convección porque ello podría reducir la vida útil del elemento calentador
de convección.
NOTA
Si deja la puerta del horno abierta durante más de 2 minutos cuando el horno está encendido,
todos los elementos calentadores se apagarán automáticamente.
NOTA
Por razones de rendimiento, el ventilador de convección puede encenderse o apagarse durante el
funcionamiento.

34 Español
Funcionamiento del horno
Funcionamiento del horno
Asar por convección
Asar al horno por convección es conveniente para cortes de carne tiernos y de gran tamaño, sin
cubrir.
El calor procede del elemento calentador de la parte superior. El ventilador de convección hace
circular el aire caliente en forma pareja sobre y por alrededor de la comida. Las carnes, incluidas
las aves, se doran por todos lados como si hubiesen sido cocidas en un asador giratorio. El aire
caliente rápidamente sella los alimentos dejando dentro los jugos y el producto resulta jugoso y
tierno, a la vez que el exterior adquiere un atractivo color pardo dorado.
Cómo ajustar el horno para asar al horno por convección
1. Presione
Roast (Asar por convección). La temperatura predeterminada es de 325 °F.
2. Ingrese la temperatura deseada, p. ej., 400 °F, mediante el teclado numérico.
3. Presione START/SET (INICIO/CONFIGURAR).
El indicador de temperatura comenzará a variar una vez que la temperatura del horno
alcance 175 °F. La estufa emitirá una señal sonora varias veces cuando el horno alcance la
temperatura deseada.
4. Para apagar o cancelar el asado por convección, presione OFF/CLEAR (APAGAR/BORRAR).
• Cuando se abre la puerta del horno, el ventilador del horno de convección se apaga.
• NO DEJE la puerta del horno abierta durante mucho tiempo mientras funciona en
modo de convección porque ello podría reducir la vida útil del elemento calentador
de convección.
NOTA
Si deja la puerta del horno abierta durante más de 2 minutos cuando el horno está encendido,
todos los elementos calentadores se apagarán automáticamente.
NOTA
Por razones de rendimiento, el ventilador de convección puede encenderse o apagarse durante el
funcionamiento.
Asar a la parrilla
Asar a la parrilla es un método de cocinar cortes tiernos de carne mediante el calor directo bajo el
elemento de asado a la parrilla del horno.
La elevada temperatura realiza una cocción rápida y deja el exterior con un aspecto sabroso y
dorado. El modo asar a la parrilla es el mejor para carnes, pescados y aves de hasta 1" de grosor.
Antes de asar a la parrilla, precaliente siempre el horno por 4 minutos.
Cómo ajustar el horno para asar a la parrilla
1. Presione Broil (Asar a la parrilla) una vez para HI (ALTO) o dos veces para LO (BAJO).
Use LO (BAJO) para cocinar comidas tales como aves o cortes de carne gruesos sin tostarlos
en exceso.
2. Para iniciar el asado a la parrilla, presione START/SET (INICIO/CONFIGURAR).
Ase un lado hasta que los alimentos estén dorados. Delos vuelta y ase el otro lado.
3. Presione OFF/CLEAR (APAGAR/BORRAR) cuando haya completado la cocción o si desea
cancelarla.
Posición de traba para asar a la parrilla
Posición de traba para asar a la parrillaPosición de traba para asar a la parrilla
Deje la puerta abierta en la posición de traba para
asar a la parrilla. La puerta se mantendrá abierta en
esa posición por si sola; sin embargo, el horno se
mantiene a la temperatura correcta.
PRECAUCIÓN
Si se produjese fuego dentro del horno, cierre la
puerta del horno y apague el horno. Si el fuego
continúa, arroje bicarbonato de sodio sobre las
llamas o utilice un extintor de espuma. No eche
agua ni harina sobre el fuego. La harina podría
explotar y el agua puede causar que la grasa en
llamas se extienda y cause lesiones personales.
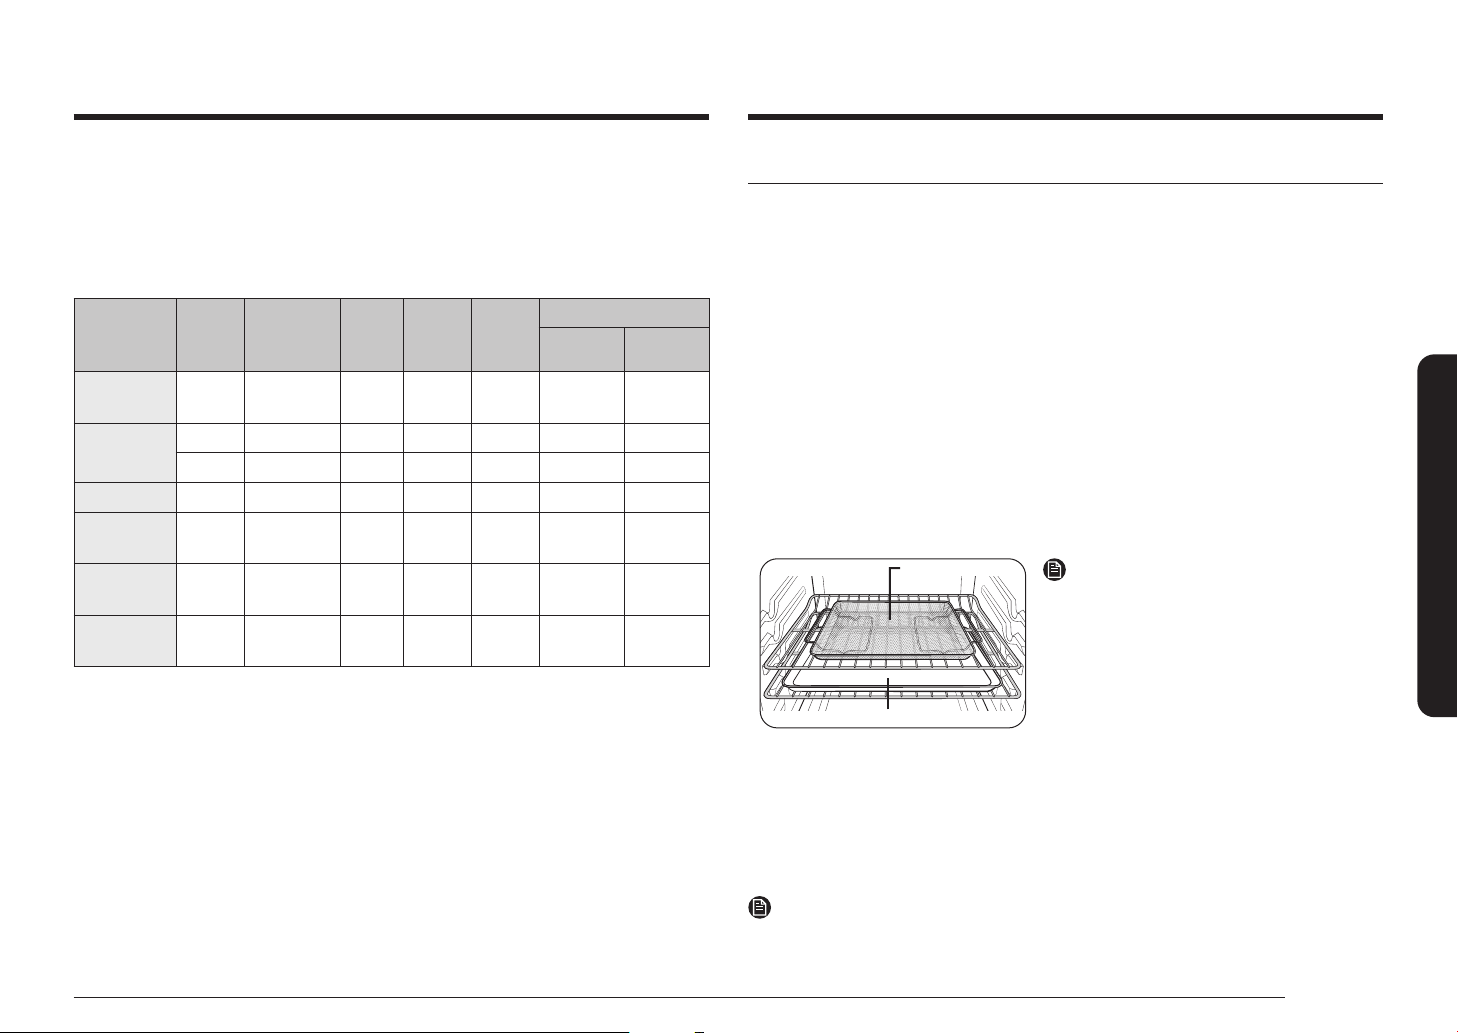
Español 35
Funcionamiento del horno
Guía de recomendaciones para asar a la parrilla
Los tiempos necesarios para asar a la parrilla dependerán del tamaño, peso, espesor, temperatura
inicial y su preferencia en cuanto al grado de cocción. Esta guía está basada en carnes a
temperatura de refrigerador.
Para asar a la parrilla, utilice siempre una asadera y su rejilla. Antes de asar a la parrilla,
precaliente siempre el horno por 4 minutos.
Alimento
Grado de
cocción
Tamaño Espesor
Ajuste de
asado a la
parrilla
Posición
de la
parrilla
Tiempo de cocción
1er lado 2do lado
Hamburguesas A punto
9
hamburguesas
1" ALTO 7 3:20-3:40 2:20-2:40
Bistec
A punto - 1" ALTO 5 7:00-8:00 6:00-7:00
A punto - ¾" ALTO 5 6:00-7:00 5:00-6:00
Presas de pollo Cocido 2-2½ lb ¾"-1" ALTO 4 15:00-16:00 13:00-14:00
Costillas de
cerdo
Cocido 1 lb ½" BAJO 5 15:00-16:00 13:00-14:00
Chuletas de
cordero
Cocido 1 lb ¾"-1" ALTO 5 5:00-6:00 4:00-5:00
Filete de
salmón
Cocido 3 uds. ¾"-1" ALTO 5 4:00-7:00 3:00-6:00
Freidora de aire
Esta función utiliza aire caliente para conseguir alimentos frescos o congelados más crocantes y
sanos sin el uso de aceite o con menos cantidad que la usada en los modos de convección normal.
Para obtener mejores resultados, use este modo con una única parrilla de horno y coloque la
bandeja de la freidora de aire en la posición 3. La temperatura puede ajustarse entre 350 °F y
500 °F. No es necesario precalentar el horno con este modo. Siga las instrucciones de la receta o
el envase para ajustar la temperatura, el tiempo o la cantidad.
Cómo programar el horno para el modo Freidora de aire
1. Coloque la bandeja sobre la parrilla en la posición 3.
2. Seleccione el modo Air Fry (Freidora de aire).
3. Utilice el teclado numérico para cambiar la temperatura predeterminada. Ingrese la
temperatura sugerida para el tipo de alimento según lo que indique la guía de cocción. La
temperatura predeterminada es de 425 °F.
4. De ser necesario, establezca el tiempo de cocción o el inicio retardado.
5. Toque START/SET (INICIO/CONFIGURAR).
6. Al nalizar la cocción, presione OFF/CLEAR (APAGAR/BORRAR), y luego retire los alimentos.
Bandeja o placa para hornoBandeja o placa para horno
Bandeja de la Bandeja de la
freidora de airefreidora de aire
Ubicación recomendada para la bandeja
de la freidora de aire
NOTA
• Coloque una placa o bandeja para horno sobre
la parrilla, debajo de la bandeja de la freidora
de aire para atrapar la grasa. Esto contribuirá a
reducir las salpicaduras y el humo.
• Antes de utilizar una placa para horno,
verique su temperatura máxima admisible.
• La freidora de aire está diseñada solo para
una única parrilla de horno. Para mejores
resultados, coloque los alimentos sobre la
parrilla en la posición 3.
• Para cocinar alimentos frescos o caseros,
esparza aceite por una zona más amplia de
manera pareja para una cocción más crocante.
NOTA
La bandeja de la freidora de aire no está incluida en este modelo, pero puede adquirirla en el
Centro de contacto de Samsung (1-800-726-7864).
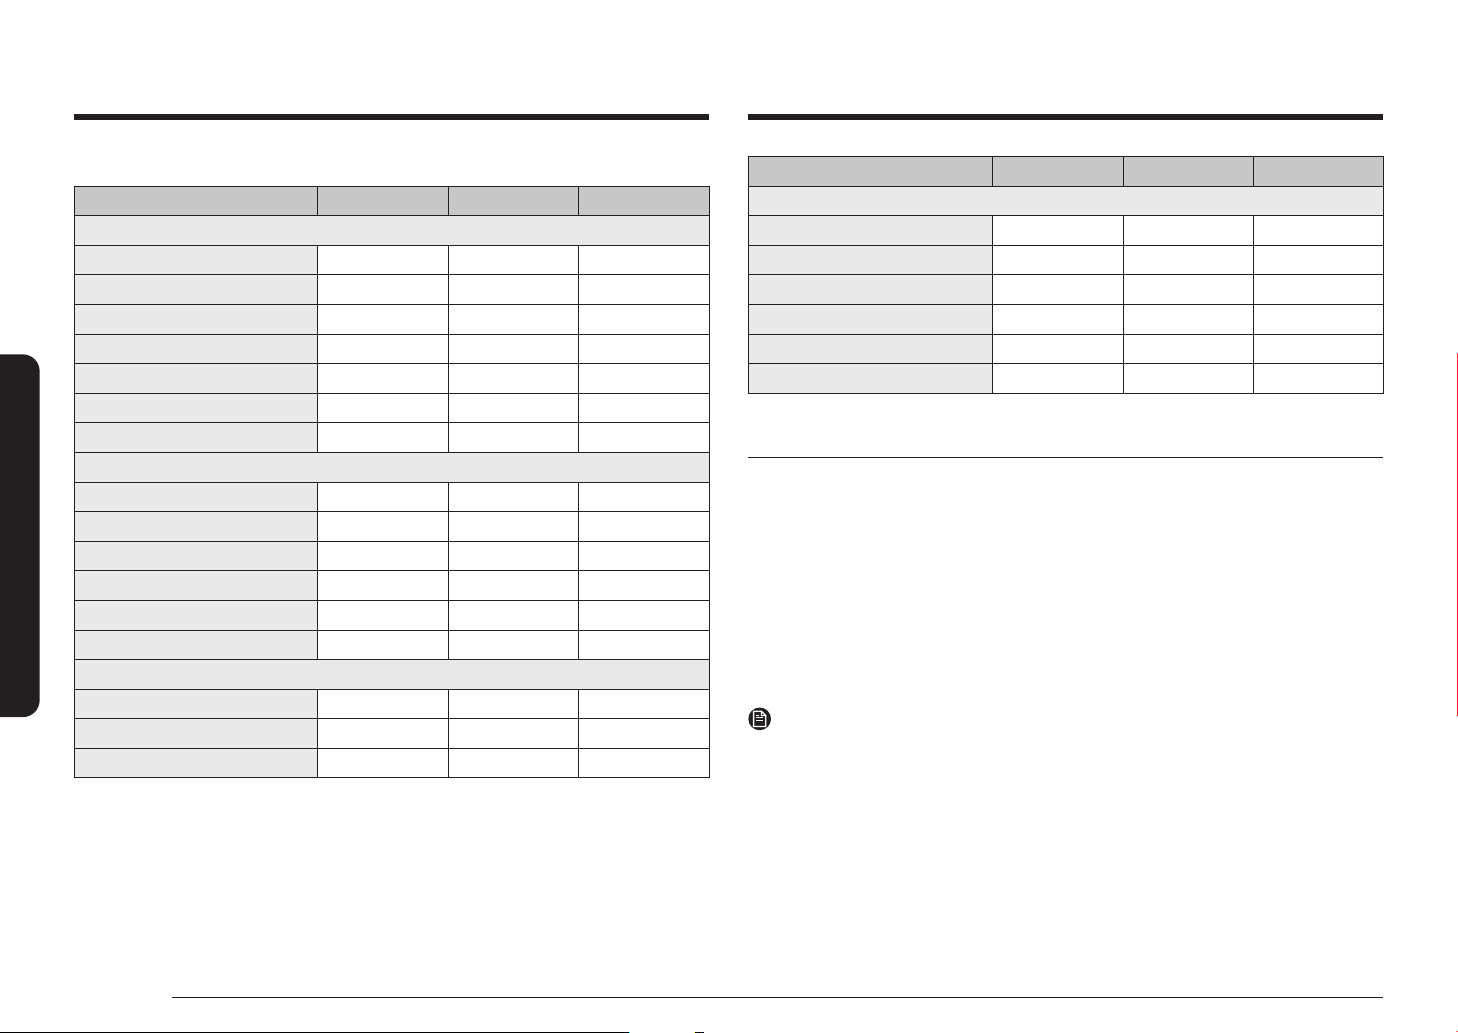
36 Español
Funcionamiento del horno
Funcionamiento del horno
Guía de cocción con freidora de aire
Elemento Cantidad Temperatura Tiempo
Papas
Papas fritas congeladas 30-35 oz 425 °F-450 °F 25-30 min
Papas fritas congeladas, sazonadas 25-30 oz 425 °F-450 °F 20-25 min
Cilindros de papa congelados 40-45 oz 450 °F 20-25 min
Tortitas de papa congeladas 25-30 oz 425 °F-450 °F 20-25 min
Papas trozadas congeladas 30-35 oz 425 °F-450 °F 20-25 min
Papas fritas caseras 25-30 oz 400 °F-425 °F 25-30 min
Papas trozadas caseras 40-45 oz 425 °F-450 °F 25-30 min
Congelados
Nuggets de pollo congelados 24-28 oz 400 °F-425 °F 15-25 min
Alitas de pollo congeladas 30-35 oz 425 °F-450 °F 20-30 min
Aros de cebolla congelados 20-25 oz 400 °F-425 °F 15-20 min
Varitas de pescado congeladas 20-25 oz 425 °F 18-22 min
Tiras de pollo congeladas 25-30 oz 425 °F-450 °F 20-30 min
Churros congelados 20-25 oz 425 °F 18-22 min
Carne de ave
Muslos frescos 40-45 oz 425 °F-450 °F 30-35 min
Alitas de pollo frescas 30-35 oz 425 °F-450 °F 27-32 min
Pechugas de pollo, empanadas 25-30 oz 450 °F 25-30 min
Elemento Cantidad Temperatura Tiempo
Verduras
Espárragos empanizados 15-20 oz 425 °F 20-25 min
Berenjenas empanizadas 20-25 oz 425 °F 20-25 min
Champiñones empanizados 18-22 oz 425 °F 20-25 min
Cebollas empanizadas 18-22 oz 425 °F 20-25 min
Coliores empanizados 40-45 oz 400 °F-425 °F 20-25 min
Mezcla de verduras empanizadas 30-35 oz 425 °F 20-25 min
Uso de la función especial
Deshidratar
Deshidratar seca los alimentos o elimina la humedad de los alimentos a través de la circulación de
calor. Después de secar los alimentos, guárdelos en un lugar fresco y seco. Agregar jugo de limón
o ananá o espolvorear azúcar sobre las frutas ayuda a conservar su dulzura.
Consulte la tabla a continuación para ver los ajustes de la función Deshidratar.
1. Presione Dehydrate (Deshidratar).
2. Presione START/SET (INICIO/CONFIGURAR).
3. Presione OFF/CLEAR (APAGAR/BORRAR) en cualquier momento para desactivar la función
Deshidratar.
NOTA
Para deshidratar, utilice las parrillas en la posición 3 o 4.
Español 37
Funcionamiento del horno
Levantamiento del pan
Esta función automáticamente genera la temperatura óptima para el proceso de levantamiento
del pan y, por ende, no requiere ningún ajuste de temperatura.
Si presiona Levantamiento del pan cuando la temperatura del horno es superior a los 95 °F, la
palabra Hot (Caliente) aparecerá en la pantalla. Dado que estas funciones producen mejores
resultados si se inician cuando el horno esta frío, le recomendamos que aguarde hasta que el
horno se haya enfriado y Hot (Caliente) desaparezca de la pantalla.
1. Presione Bread Proof (Levantamiento del pan).
2. Presione START/SET (INICIO/CONFIGURAR).
3. Presione OFF/CLEAR (APAGAR/BORRAR) en cualquier momento para desactivar la función
de levantamiento del pan.
NOTA
Utilice la parrilla en la posición 3 para el levantamiento del pan.
PRECAUCIÓN
• No utilice la opción de levantamiento del pan para calentar alimentos. La temperatura no
estará lo sucientemente caliente como para mantener los alimentos calientes.
• Coloque la masa en un recipiente resistente al calor en la posición 3 de la parrilla y cúbrala
con un paño o con una envoltura de plástico. Es posible que el plástico deba engancharse
debajo del recipiente para que el ventilador del horno no lo separe de la masa.
• Para evitar reducir la temperatura del horno y extender el tiempo de levado, no abra la
puerta del horno.
Cómo usar la función de mantener caliente
Cuando la cocción naliza, Mantener caliente mantiene los alimentos a una temperatura segura
para servirlos por hasta 3 horas.
Después de 3 horas, la función se apagará automáticamente. Puede usar la función de mantener
caliente sin combinar con otras operaciones de cocción o puede congurarla para que se active
después de una operación de cocción con temporizador o de inicio retardado.
No debe usar esta función para recalentar alimentos fríos.
Cómo utilizar la función de mantener caliente
1. Presione Keep Warm (Mantener caliente).
2. Presione START/SET (INICIO/CONFIGURAR).
3. Presione OFF/CLEAR (APAGAR/BORRAR) en cualquier momento para desactivar esta
función.
Cómo programar el horno para que se active la función de mantener caliente a continuación de
una cocción con temporizador
1. Programa la función Timed Cooking (Cocción con temporizador) para iniciar la cocción.
(Consulte la sección sobre cocción con temporizador en la página 29.)
2. Presione Keep Warm (Mantener caliente) para usar la función.
3. Una vez nalizado el período de cocción con temporizador, el modo de cocción cambia
directamente al modo Mantener caliente. En este caso, puede desactivar la función Mantener
caliente presionando OFF/CLEAR (APAGAR/BORRAR).
• Vuelva a presionar Keep Warm (Mantener caliente) una vez para cancelar este modo
durante el funcionamiento del modo de cocción.
NOTA
Si desactiva la función Ahorro de energía de 12 horas, la función Mantener caliente funcionará
hasta que la cancele. (Ajuste predeterminado del ahorro de energía de 12 horas: activado).
Consulte la página 40 para obtener más información.
38 Español
Funcionamiento del horno
Funcionamiento del horno
Uso de la función de control inteligente
Las funciones disponibles desde la aplicación SmartThings pueden no funcionar adecuadamente si el
estado de la comunicación es deciente o si el producto está instalado en un lugar con una señal Wi-Fi
débil.
Consulte la tabla siguiente para conocer las funciones principales disponibles desde la aplicación.
Cuando el control remoto está apagado Supervisión (horno, cubierta), apagar horno
Cuando el control remoto está encendido Supervisión (horno, cubierta), encender horno, apagar
horno, detección de errores
Cómo conectar el horno
1. Descargue y abra la aplicación SmartThings en su dispositivo inteligente.
2. Siga las instrucciones en pantalla de la aplicación para conectar la estufa.
3. Una vez completado el proceso, se muestra el icono de conexión ubicado en la estufa y la
aplicación conrma que está conectado.
4. Si el icono de conexión no se enciende, siga la instrucción en la aplicación para volver a conectarse.
Para iniciar el horno de manera remota
1. Presione Smart Control en la pantalla. El horno ahora puede iniciarse de manera remota con
un dispositivo conectado.
Control remoto del horno
• Transferir la conguración del horno (modo, hora, temperatura) desde el dispositivo al horno.
• Iniciar el horno remotamente (disponible solo para estufas eléctricas).
• Apagar el horno remotamente.
• Una vez iniciada la cocción, cambiar remotamente la hora o la temperatura.
• El modo de autolimpieza no se puede iniciar de manera remota.
NOTA
• Si abre la puerta del horno o presiona Smart Control, el control inteligente se desactiva y no podrá
encender el horno remotamente.
• Si no aparece en la pantalla, aún puede supervisar el estado del horno y la cubierta y apagar el
horno.
• Cuando la cocción del horno naliza o se cancela, el Smart Control se apaga.
Uso de la función de control por voz
Para utilizar la función de control por voz de la estufa, debe instalar en su dispositivo móvil la
aplicación Bixby, Amazon Alexa o el Asistente de Google.
Consulte la tabla a continuación para ver todas las funciones disponibles.
Bixby
Inicie una conversación con Bixby en su móvil Samsung diciendo “Hi, Bixby” o presionando la
tecla lateral. Consulte el manual en inglés para los comandos de voz detalladas.
Amazon Alexa y el Asistente de Google
Los electrodomésticos inteligentes de Samsung son compatibles con la habilidad SmartThings de
Alexa y la acción del Asistente de Google. Consulte el manual en inglés para los comandos de voz
detalladas.
Guía de instalación
A continuación, se indica cómo vincular la cuenta de SmartThings en Amazon Alexa o en el
Asistente de Google. Debe instalar la aplicación SmartThings y la aplicación de Alexa (o el
Asistente de Google) en su teléfono.
1. Congure los dispositivos compatibles en SmartThings.
2. Después de congurar los dispositivos, toque el botón + que aparece en la pantalla.
3. Toque “Voice assistant” (Asistente de voz) y vincule su cuenta de Samsung con Amazon
Alexa (o con el Asistente de Google).
4. Compruebe que los dispositivos estén visibles en la aplicación de Amazon Alexa. Luego la
vinculación de la cuenta habrá terminado. (Compruebe que los dispositivos estén visibles
y congure la ubicación [casa y habitación] de los dispositivos en la aplicación de Google
Home. Luego la vinculación de la cuenta habrá terminado.)
NOTA
Las especicaciones de encendido y apagado de Smart Control son iguales a las indicadas para la
aplicación SmartThings.
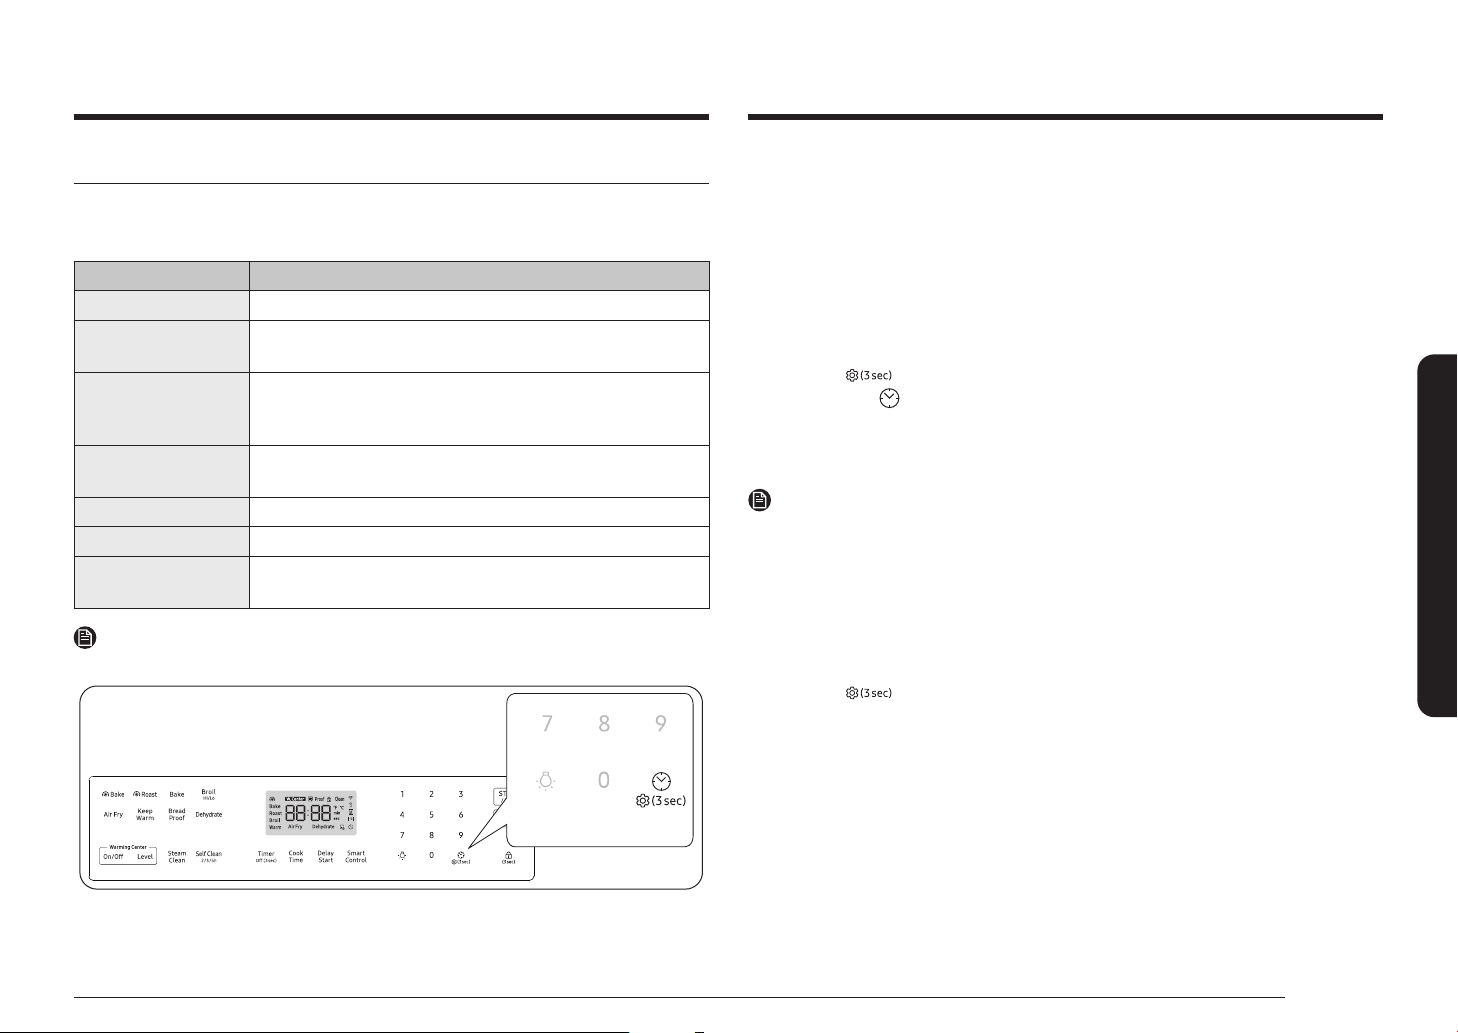
Español 39
Funcionamiento del horno
Ajuste de temperatura
La temperatura dentro del horno ya ha sido calibrada en la fábrica. Al principio, cuando utilice
el horno, asegúrese de seguir las indicaciones de tiempo y temperatura de las recetas. Si
cree que la temperatura del horno es excesiva o insuciente, es posible corregirla. Antes de
corregirla, pruebe una receta utilizando una regulación de temperatura más alta o más baja que
la recomendada. Los resultados de horneado de esa manera probablemente le sirvan de guía para
decidir la magnitud del ajuste requerido.
La temperatura del horno puede ajustarse en ±35 °F (±19 °C ).
Cómo corregir la temperatura del horno
1. Presione
Opciones durante 3 segundos y luego 1 en el teclado numérico.
2. Presione Reloj para seleccionar una temperatura más alta o más baja que la temperatura
actual.
3. Ingrese el ajuste que desea utilizando el teclado numérico. (0-35).
4. Presione START/SET (INICIO/CONFIGURAR) para guardar los cambios.
NOTA
Este ajuste no afectará la temperatura para asar a la parrilla ni la de autolimpieza. El ajuste se
mantendrá en la memoria incluso después de un corte de electricidad.
Unidad de temperatura (selección de temperatura entre Fahrenheit o Centígrados)
Puede programar el control del horno para mostrar la temperatura en Fahrenheit o Centígrados.
El horno viene de fábrica congurado para mostrar las temperaturas en Fahrenheit.
Cómo cambiar la pantalla de Fahrenheit a Centígrados o de Centígrados a Fahrenheit
1. Presione
Opciones durante 3 segundos y luego 2 en el teclado numérico.
2. Presione 1 (Fahrenheit) o 2 (Centígrados) en el teclado numérico.
3. Presione START/SET (INICIO/CONFIGURAR) para guardar los cambios.
Cómo usar la función de opciones
Esta función le permite controlar diversas opciones de control electrónico.
Consulte la siguiente tabla para ver las opciones disponibles. El menú de opciones solo está disponible
cuando el horno no está en uso (no está realizando ningún tipo de cocción).
Opciones Función
1. Ajuste de temperatura Le permite corregir la temperatura del horno.
2. Unidad de temperatura Le permite programar el control del horno para mostrar temperaturas en
grados Fahrenheit o Centígrados.
3. Autoconversión La función de autoconversión de convección automáticamente convierte
temperaturas de horneado regulares a temperaturas de horneado por
convección.
4. Ahorro de energía de
12 horas
Esta función automáticamente apaga el horno después de 12 horas durante las
funciones de horneado o después de 3 horas durante una función de asado.
5. Activar/Desactivar sonido Le permite programar los controles del horno para que funcionen en silencio.
6. Activar/Desactivar Wi-Fi Permite congurar la red Wi-Fi para desactivarla.
0. Modo demostración Esta opción es para ser usada por comercios minoristas para nes de
exhibición únicamente.
NOTA
Ubicación de la tecla de opciones.

40 Español
Funcionamiento del horno
Funcionamiento del horno
Activar/Desactivar sonido
Mediante esta función, puede congurar los controles del horno para que funcionen
silenciosamente.
Cómo activar o desactivar el sonido
1. Presione
Opciones durante 3 segundos y luego 5 en el teclado numérico.
2. Presione 1 (Activado) o 2 (Desactivado) en el teclado numérico.
3. Presione START/SET (INICIO/CONFIGURAR) para guardar los cambios.
Activar/Desactivar Wi-Fi
Puede encender o apagar la conexión Wi-Fi de la estufa.
Cómo activar o desactivar la Wi-Fi
1. Presione
Opciones durante 3 segundos y luego 6 en el teclado numérico.
2. Presione 1 (Activado) o 2 (Desactivado) en el teclado numérico.
3. Presione START/SET (INICIO/CONFIGURAR) para guardar los cambios.
NOTA
Cuando la conexión Wi-Fi de la estufa está desactivada, los usuarios no pueden establecer la
conguración fácil.
Modo demostración
Esta opción es para ser usada por comercios minoristas para nes de exhibición únicamente.
(El elemento calentador no funciona.)
Cómo activar o desactivar el modo demostración
1. Presione
Opciones durante 3 segundos y luego 0 en el teclado numérico.
2. Presione 1 (Activado) o 2 (Desactivado) en el teclado numérico.
3. Presione START/SET (INICIO/CONFIGURAR) para guardar los cambios.
Autoconversión
Cuando se utiliza la función de autoconversión, la función de autoconversión por convección
convertirá automáticamente las temperaturas normales ingresadas a las temperaturas
correspondientes para convección.
Si se encuentra activada esta función, en la pantalla se verá la temperatura real convertida
(reducida). Por ejemplo, si usted ingresa una temperatura de receta normal de 350 °F y presiona
Oven Start/Set (Inicio/Congurar horno), la pantalla mostrará la temperatura convertida de 325 °F.
(Ajuste predeterminado: desactivado)
Cómo activar o desactivar la función de autoconversión
1. Presione
Opciones durante 3 segundos y luego 3 en el teclado numérico.
2. Presione 1 (Activado) o 2 (Desactivado) en el teclado numérico.
3. Presione START/SET (INICIO/CONFIGURAR) para guardar los cambios.
Ahorro de energía de 12 horas
Si accidentalmente dejara el horno encendido, esta función automáticamente apagará el horno
transcurridas 12 horas si está operando en funciones de horneado o transcurridas 3 horas si está
asando a la parrilla. (Ajuste predeterminado: desactivado)
Cómo activar o desactivar la función de ahorro de energía de 12 horas.
1. Presione
Opciones durante 3 segundos y luego 4 en el teclado numérico.
2. Presione 1 (Activado) o 2 (Desactivado) en el teclado numérico.
3. Presione START/SET (INICIO/CONFIGURAR) para guardar los cambios.

Español 41
Funcionamiento del horno
Uso de la función Sabbat
(Para uso en el Sabbat y otras fechas sagradas judías)
K
Para obtener asistencia adicional, pautas para el uso adecuado y una lista completa
de modelos con la función Sabbat, visite la web en http:\\www.star-k.org.
Puede usar la función Sabbat solo con horneado. La temperatura del horno se puede regular
más alta o más baja después de haber congurado la función Sabbat. (La función de ajuste de
temperatura del horno debe utilizarse solamente durante fechas sagradas judías.) Sin embargo,
la pantalla no cambiará ni se producirán sonidos cuando se produzca un cambio. Una vez que
el horno se encuentre correctamente congurado para hornear con la función Sabbat activada,
el horno permanecerá encendido continuamente hasta que se cancele la función Sabbat. Esto
anulará la función predeterminada de fábrica de ahorro de energía de 12 horas. Si la luz del
horno es necesaria durante el Sabbat, presione
antes de activar la función Sabbat. Una vez
que la luz del horno se encuentre encendida y se encuentre activada la función Sabbat, la luz del
horno permanecerá encendida hasta que la función Sabbat sea desactivada. Si la luz del horno
debe estar apagada, asegúrese de apagarla antes de activar la función Sabbat.
Cómo utilizar la función Sabbat
1. Presione Bake (Hornear).
La temperatura predeterminada es de 350 °F.
2. Ingrese la temperatura deseada, p. ej., 375 °F, mediante el teclado numérico.
3. Presione START/SET (INICIO/CONFIGURAR).
El indicador de temperatura comenzará a variar una vez que la temperatura del horno
alcance 175 °F.
4. Presione Bake (Hornear) y 1 a la vez durante 3 segundos.
En la pantalla se verá SAb.
Una vez que SAb haya aparecido en la pantalla, el horno ya no emitirá señales sonoras ni
mostrará ningún cambio.
Usted podrá cambiar la temperatura del horno una vez comenzada la operación de hornear.
Recuerde que, una vez activada la función Sabbat, el horno ya no emitirá señales sonoras ni
mostrará ningún cambio.
5. Puede apagar el horno en cualquier momento presionando OFF/CLEAR (APAGAR/BORRAR).
Esto apagará el horno. Si quiere desactivar la función Sabbat, mantenga presionado Bake
(Hornear) y 1 al mismo tiempo durante 3 segundos. La palabra Sab desaparecerá de la
pantalla.

42 Español
Funcionamiento del horno
Funcionamiento del horno
No intente activar ninguna otra función de programa excepto Hornear mientras la función
Sabbat está activa. ÚNICAMENTE las siguientes teclas funcionarán correctamente con la
función Sabbat activada: Número, Bake (Hornear), START/SET (INICIO/CONFIGURAR) y
OFF/CLEAR (APAGAR/BORRAR). Ninguna de las demás teclas deben utilizarse una vez que
se haya activado la función Sabbat.
Puede cambiar la temperatura del horno, pero la pantalla no cambiará y los tonos no
sonarán cuando se produzca un cambio. (La función de ajuste de temperatura del horno
debe utilizarse solamente en fechas sagradas judías.) Después de cambiar la temperatura
mientras la unidad está en modo Sabbat, hay una demora de 15 segundos antes de que la
unidad reconozca el cambio.
Puede programar la función de tiempo de cocción antes de activar la función Sabbat.
Si se produjera un corte o interrupción de electricidad, el horno se apagará. Cuando vuelva
la electricidad el horno no se encenderá automáticamente. Aparecerá SAb en la pantalla
de control del horno, pero el horno no funcionará. Los alimentos pueden retirarse con
seguridad del horno mientras está en la función Sabbat, sin embargo, el horno no puede
volver a encenderse hasta después del Sabbat/fechas sagradas judías. Después de la
celebración del Sabbat apague el modo Sabbat. Mantenga presionados simultáneamente
Bake (Hornear) y 1 durante al menos 3 segundos para apagar el modo Sabbat. El horno
puede entonces usarse con todas las funciones normales.
No abra la puerta del horno ni cambie la temperatura del horno durante alrededor de
30 minutos después de haber iniciado el modo Sabbat para permitir que el horno alcance
la temperatura jada. Observe que para obtener un mejor rendimiento, el ventilador del
horno funciona solamente cuando la temperatura del horno está aumentando.
No cubra la supercie de la placa de cocción con una placa de metal.
Mantenimiento de su electrodoméstico
Autolimpieza
Este horno autolimpiante utiliza altas temperaturas (mucho más altas que las temperaturas de
cocción) para eliminar por incineración los restos de grasa y otros residuos o reducirlas a no
polvo de ceniza que se puede limpiar con un paño húmedo.
PRECAUCIÓN
• Durante el ciclo de autolimpieza, el exterior de la estufa puede volverse muy caliente al
tacto. No deje a niños pequeños sin vigilancia en la proximidad del electrodoméstico.
• Algunas aves son muy sensibles a las emanaciones que se producen durante el ciclo de
autolimpieza de cualquier estufa. Lleve las aves a otra habitación bien ventilada.
• No revista con papel de aluminio las paredes del horno, parrillas, fondo o ninguna otra parte
de la estufa. Hacerlo podría tener como consecuencia una mala distribución del calor, malos
resultados de horneado y daños permanentes al interior del horno. El papel de aluminio se
derretirá y adherirá a la supercie interior del horno.
• No fuerce la apertura de la puerta del horno. Tales maniobras pueden dañar el sistema de
traba automática de la puerta. Tenga precaución al abrir la puerta del horno cuando se haya
completado el ciclo de autolimpieza. Tome una posición hacia un lado del horno cuando
abra la puerta para dejar salir el vapor o aire caliente. El horno aún se puede encontrar MUY
CALIENTE.
• Use el guante durante la limpieza.

Español 43
Mantenimiento de su electrodoméstico
Cómo hacer funcionar un ciclo de autolimpieza
1. Seleccione la duración de la operación de autolimpieza, por ejemplo: 3 horas.
Presione Self Clean (Autolimpieza) una vez para un tiempo de limpieza de 3 horas, dos
veces para un tiempo de limpieza de 5 horas, o 3 veces para un tiempo de limpieza de
2 horas.
La conguración predeterminada es de 3 horas.
2. Presione START/SET (INICIO/CONFIGURAR) para iniciar el ciclo de autolimpieza.
La traba de la puerta del horno accionada por motor se cerrará automáticamente.
NOTA
• Le resultará imposible iniciar un ciclo de autolimpieza si se encuentra activada la
función de bloqueo del horno o si la temperatura del horno es demasiado elevada.
• La puerta del horno se traba automáticamente. En la pantalla se verá el tiempo que
falta para completar la limpieza. La apertura de la puerta será imposible hasta que la
temperatura del horno disminuya hasta un nivel seguro.
• La función de autolimpieza no funcionará cuando el centro de calentamiento esté
encendido.
3. Cuando el ciclo de autolimpieza haya nalizado, la palabra End (Fin) aparecerá en la pantalla
y la estufa emitirá una señal sonora varias veces.
Cómo retrasar el inicio del proceso de autolimpieza
1. Presione Self Clean (Autolimpieza).
Seleccione el tiempo de autolimpieza deseado presionando Self Clean (Autolimpieza).
2. Presione Delay Start (Retrasar el inicio).
3. Ingrese la hora a la que desea que inicie el ciclo de limpieza.
4. Presione START/SET (INICIO/CONFIGURAR).
En la pantalla se verá Retrasar el inicio, Autolimpieza y el icono de bloqueo. La traba de la
puerta del horno accionada por motor se cerrará automáticamente.
5. El ciclo de autolimpieza se activará automáticamente a la hora jada.
Antes de un ciclo de autolimpieza
Fig. 1Fig. 1
Fig. 2Fig. 2
No limpie No limpie
manualmente la manualmente la
junta selladora de la junta selladora de la
puerta del horno.puerta del horno.
La puerta se La puerta se
puede limpiar puede limpiar
manualmente.manualmente.
• Recomendamos habilitar una ventilación en su
cocina con una ventana abierta o mediante una
campana de ventilación o ventilador durante el
ciclo de autolimpieza.
• Retire del horno las parrillas, la asadera y su
accesorio, todos los recipientes de cocción y
todo el papel de aluminio.
• Utilice una esponja o un paño para retirar la
suciedad del fondo del horno. (Fig. 1)
• Las parrillas plateadas pueden soportar el ciclo
de autolimpieza, pero se oscurecerán, perderán
lustre y se volverán difíciles de deslizar.
• Los residuos sobre el marco frontal de
la estufa y la parte que queda por fuera
de la junta selladora de la puerta deben
ser limpiados manualmente. Limpie estas
áreas con agua caliente, esponjas de lana
de acero bien enjabonadas o productos de
limpieza, tales como Soft Scrub. Enjuague
cuidadosamente con agua limpia y seque las
supercies.
• No limpie la junta selladora. El material de
bra de vidrio de la junta de la puerta del
horno no resiste la abrasión. Es fundamental
que esa junta selladora permanezca intacta.
Si usted nota que se está desgastando o
deshilachando, reemplácela. (Fig. 2)
• Asegúrese de que la cubierta de la bombilla de
la luz del horno se encuentre bien colocada y
que la luz del horno esté apagada.
NOTA
Quite las parrillas y los accesorios del horno antes de activar el modo de autolimpieza.

44 Español
Mantenimiento de su electrodoméstico
Mantenimiento de su electrodoméstico
Como apagar la función de autolimpieza
Es posible que se vea en la necesidad de detener o interrumpir un ciclo de autolimpieza debido a
humo dentro del horno.
1. Presione OFF/CLEAR (APAGAR/BORRAR).
2. La puerta solamente se podrá abrir cuando la temperatura del horno se haya reducido lo
suciente, lo cual demora aproximadamente una hora.
Después de un ciclo de autolimpieza
• Es posible que note una cierta cantidad de ceniza blanca dentro del horno. Límpiela con un
paño húmedo una vez que el horno se haya enfriado. (Si quedan manchas blancas, quítelas
con una esponja de lana de acero bien enjabonada y enjuague a fondo con una mezcla de
vinagre y agua).
• Si el horno no ha quedado limpio después de un ciclo, repita el ciclo.
• No se puede programar el horno para cocción hasta que su temperatura se haya reducido lo
suciente como para permitir que la puerta se destrabe.
Limpiar al vapor
Cómo programar el horno para limpiar con vapor
Para limpieza liviana, la función de limpieza con vapor ahorra tiempo y energía. Si se requiere un
trabajo de limpieza más intenso, use la función de autolimpieza.
1. Retire del horno todos los accesorios.
2. Vierta aproximadamente 10 onzas (300 ml) de
agua en el fondo del horno vacío y cierre la
puerta del horno.
Utilice solamente agua normal, no agua
destilada.
3. Presione Steam Clean (Limpieza con vapor).
4. Presione START/SET (INICIO/CONFIGURAR).
Cuando se haya completado la operación, la
pantalla parpadeará y se oirá una señal sonora.
5. Presione OFF/CLEAR (APAGAR/BORRAR).
6. Limpie el interior del horno.
Después de un ciclo de limpieza al vapor
quedará una signicativa cantidad de agua
en la parte inferior del horno. Retire el agua
residual utilizando una esponja o un paño
suave seco.
NOTA
Al realizar la limpieza al vapor, utilice exactamente 10 onzas de agua, ya que así se obtienen los
mejores resultados.
NOTA
Si presiona Steam Clean (Limpieza con vapor) cuando la temperatura del horno se encuentra por
encima de los 100 °F, aparecerá la palabra Hot (caliente) en la pantalla. Dado que esta función
produce mejores resultados si se inicia cuando el horno está frío, le recomendamos que aguarde
hasta que el horno se enfríe y Hot (caliente) desaparezca de la pantalla.
PRECAUCIÓN
Use el guante durante la limpieza.

Español 45
Mantenimiento de su electrodoméstico
Cuidado y limpieza del horno
ADVERTENCIA
• Asegúrese de que todos los controles estén APAGADOS y todas las supercies FRÍAS antes
de limpiar cualquier parte de la estufa.
• Si mueve su estufa para limpieza, reparación o cualquier motivo,
asegúrese de que el dispositivo antivuelco se vuelva a encastrar
correctamente cuando se vuelva a colocar la estufa. Si no encastra
el dispositivo antivuelco, la estufa podría inclinarse y producir
lesiones graves.
Ventilación
VentilaciónVentilación
• El conducto de ventilación del horno está
ubicado en la parte superior izquierda de la
unidad.
• Esta área podría calentarse durante el uso del
horno.
• Es normal que salga vapor por esta abertura.
• La abertura de ventilación es importante para
la correcta circulación del aire. Nunca tapone
esta abertura de ventilación.
Después de un ciclo de limpieza con vapor
• Tenga cuidado al abrir la puerta antes de que nalice el procedimiento de limpieza con
vapor. El agua en la base está caliente.
• Abra la puerta del horno y retire el agua remanente con una esponja. No permita que el
agua residual permanezca en el horno por más tiempo que el indispensable. Limpie el horno
y séquelo con un paño suave. No olvide limpiar debajo de la junta selladora de la puerta del
horno.
• Para limpiar el interior del horno, utilice una esponja empapada en detergente, un cepillo
suave, o un estropajo de nylon. Quite los residuos tenazmente adheridos con un estropajo
de nylon. Para quitar los depósitos calcáreos puede utilizar un paño empapado en vinagre.
• Si el horno aún está sucio, puede repetir el proceso una vez que el horno se haya enfriado.
• Para el caso de residuos pesados, tales como la grasa remanente después de asar, le
recomendamos que frote detergente sobre el residuo antes de activar la función de limpieza
al vapor.
• Después de limpiar, deje la puerta del horno entornada en un ángulo de 15° para que la
supercie interior esmaltada pueda secarse completamente.
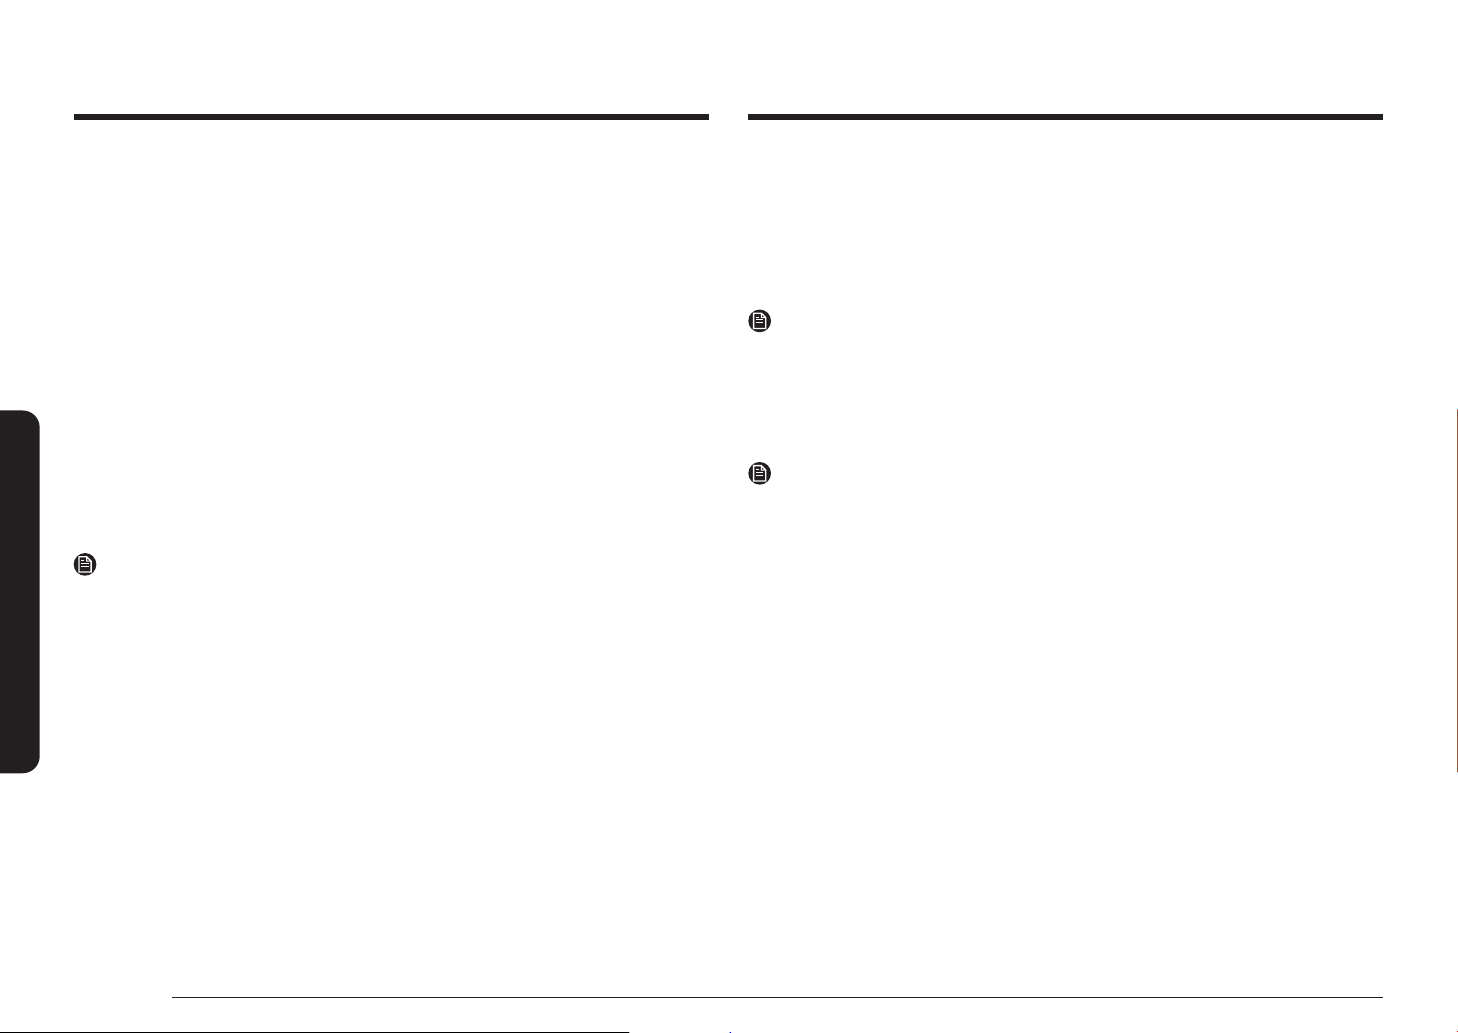
46 Español
Mantenimiento de su electrodoméstico
Mantenimiento de su electrodoméstico
Limpieza de las partes pintadas y las terminaciones decorativas
• Para su limpieza general, utilice un paño con agua jabonosa caliente.
• Para residuos más resistentes o grasa acumulada, aplique un detergente líquido
directamente sobre el área y espere de 30 a 60 minutos. Limpie con un paño húmedo y
luego seque. No utilice limpiadores abrasivos sobre ninguna de estas supercies. Pueden
causar rayaduras.
Limpieza de supercies de acero inoxidable
1. Agite bien el envase del PRODUCTO LIMPIADOR DE ELECTRODOMÉSTICOS DE ACERO
INOXIDABLE o de LÍQUIDO DE PULIR.
2. Coloque una pequeña cantidad de PRODUCTO LIMPIADOR DE ELECTRODOMÉSTICOS DE
ACERO INOXIDABLE o de LÍQUIDO DE PULIR sobre un paño húmedo o sobre una toalla de
papel húmeda.
3. Limpie un área pequeña, frotando en la dirección del grano del acero inoxidable, si fuese el
caso.
4. Seque y lustre con una toalla de papel seca y limpia o un paño húmedo.
5. Repita en la medida de lo necesario.
NOTA
• No use una esponja de lana de acero. Rayará la supercie.
• Si el electrodoméstico se limpió anteriormente con un PRODUCTO LIMPIADOR DE
ELECTRODOMÉSTICOS DE ACERO INOXIDABLE a base de aceite mineral, lave la
supercie con líquido lavavajilla y agua antes de utilizar un PRODUCTO LIMPIADOR DE
ELECTRODOMÉSTICOS DE ACERO INOXIDABLE o LÍQUIDO DE PULIR.
Parrillas del horno
Si las parrillas se dejan en el horno durante un ciclo de autolimpieza, su color virará a tonos
azulados y se volverán opacas. Una vez nalizado el ciclo de autolimpieza y que se haya
enfriado el horno, frote las barras laterales de las parrillas con un papel encerado o con un paño
humedecido con una pequeña cantidad de aceite. Esto permitirá que las parrillas se deslicen más
fácilmente en sus carriles.
NOTA
• No las limpie en una lavavajillas.
• Si se hace difícil retirar o colocar la parrilla, aplique una pequeña cantidad de aceite de
cocina en las guías de las parrillas del horno. No pase aceite de cocina en los deslizadores.
• Si se torna difícil deslizar la parrilla, puede ser necesario lubricarla usando lubricante de
grato.
NOTA
• Para pedir lubricante de grato, llame a nuestro centro al 1-800-SAMSUNG (726-7864) o
visite nuestra página web (www.samsung.com/us/support, www.samsung.com/ca/support,
www.samsung.com/ca_fr/support) y busque la referencia número DG81-01629A.
• Si quiere comprarlo directamente, vaya a http://www.samsungparts.com/Default.aspx.

Español 47
Mantenimiento de su electrodoméstico
Cuidado y limpieza de la cubierta de vidrio
PRECAUCIÓN
Al limpiar la cubierta, tenga cuidado de no obstruir la ventilación ni los motores de enfriamiento,
y no permita que cualquier sustancia extraña ingrese en estos.
Limpieza en el uso normal diario
Use solo un producto de limpieza para placas de cocción vitrocerámicas. Otras cremas podrían
resultar menos efectivas.
Seguir estos pasos le permitirá mantener y proteger la supercie de su cubierta de vidrio.
1. Antes de utilizar la cubierta por primera vez, límpiela con un producto de limpieza para
supercies de cocción vitrocerámicas.
Esto ayuda a proteger la cubierta y facilita la limpieza.
2. Utilizar diariamente un producto de limpieza para cubiertas vitrocerámicas ayudará a que la
cubierta mantenga la apariencia de nueva.
3. Agite bien la crema de limpieza. Aplique unas pocas gotas del producto de limpieza
directamente sobre la cubierta.
4. Utilice una toalla de papel o una almohadilla para limpiar supercies de cocción
vitrocerámicas para limpiar toda la supercie de la cubierta.
5. Utilice un paño seco o una toalla de papel para quitar todos los residuos de la limpieza. No
es necesario enjuagar.
ADVERTENCIA
Se podrían producir DAÑOS a la supercie de vidrio si se utilizaran almohadillas o estropajos
distintos de los recomendados.
Puerta del horno
• Utilice agua y jabón para limpiar a fondo
la parte superior, los lados y el frente de la
puerta del horno. Enjuague bien. Se puede
utilizar un líquido limpiavidrios sobre la cara
exterior de la ventana de la puerta del horno.
NO sumerja la puerta en agua. NO rocíe ni
permita que agua ni líquido limpiavidrios
penetre en los oricios de ventilación de
la puerta. NO utilice productos para limpiar
hornos, polvos de pulir, ni ningún material
de limpieza fuertemente abrasivo sobre el
exterior de la puerta del horno.
• NO limpie la junta selladora de la puerta del
horno. La junta selladora de la puerta del
horno está confeccionada con un material
tejido que es esencial para un cierre bien
sellado. Se debe tener cuidado de no frotar,
dañar o retirar la junta.
La puerta se La puerta se
puede limpiar puede limpiar
manualmente.manualmente.
No limpie No limpie
manualmente la manualmente la
junta selladora de la junta selladora de la
puerta del horno.puerta del horno.
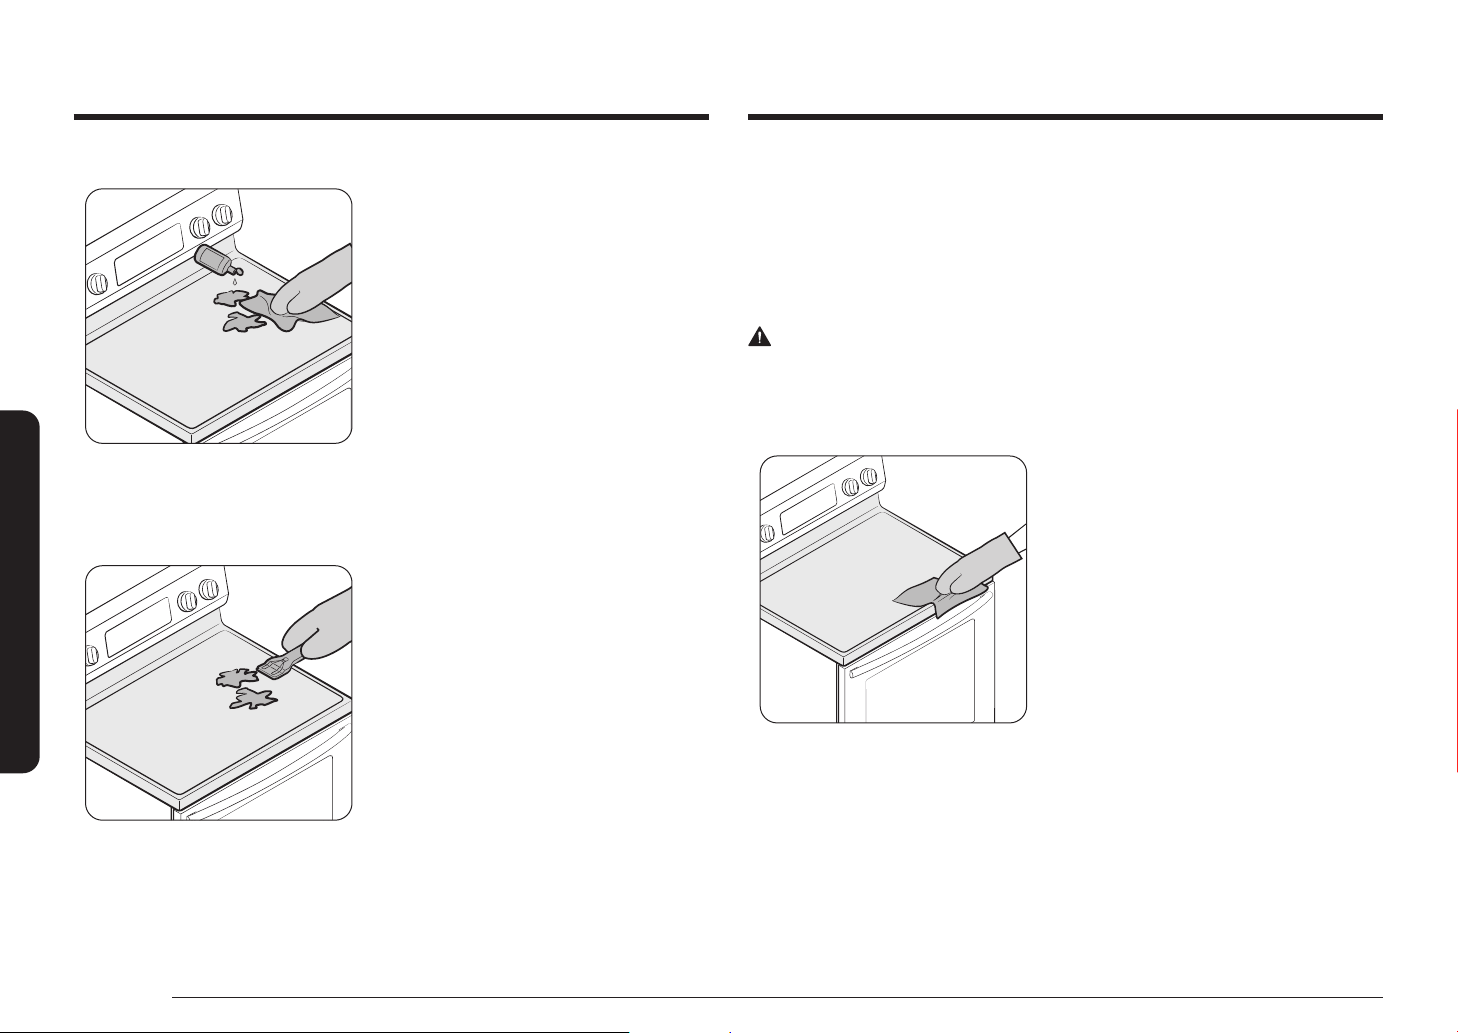
48 Español
Mantenimiento de su electrodoméstico
Mantenimiento de su electrodoméstico
Cómo quitar los residuos quemados
1. Espere que la cubierta se enfríe.
2. Esparza unas pocas gotas de limpiador para
cubiertas vitrocerámicas sobre toda la zona de
residuos quemados.
3. Utilice un paño de limpieza para cubiertas
vitrocerámicas y frote la zona de los residuos
aplicando la presión necesaria.
4. Si queda algún residuo, repita los pasos arriba
enumerados según resulte necesario.
5. Para protección adicional, después de
haber quitado todo el residuo, lustre toda la
supercie aplicando un producto de limpieza
para cubiertas vitrocerámicas con una toalla
de papel.
Cómo quitar gruesas capas de residuos quemados y adheridos
1. Espere que la cubierta se enfríe.
2. Utilice una rasqueta de navaja de un solo lo a
un ángulo de 45° sobre la supercie de vidrio
y raspe la suciedad. Será necesario aplicar
presión para poder quitar los residuos.
3. Después de raspar con la rasqueta de navaja,
esparza unas pocas gotas de limpiador para
cubiertas vitrocerámicas sobre toda la zona de
residuos quemados. Utilice el paño de limpieza
para quitar los residuos que queden. (No raspe
la junta selladora).
4. Para protección adicional, después de
haber quitado todo el residuo, lustre toda la
supercie aplicando un producto de limpieza
para cubiertas vitrocerámicas con una toalla
de papel.
Cómo quitar marcas de metal y arañazos
1. Tenga cuidado de no deslizar cacerolas y sartenes sobre su cubierta. Esto dejará marcas en
la supercie de la cubierta. Puede quitar estas marcas utilizando un limpiador para cubiertas
vitrocerámicas con un paño de limpieza especíco para limpiar estas supercies.
2. Si se dejan hirviendo hasta secarse los recipientes de limpieza someramente revestidos con
aluminio o cobre, el revestimiento puede dejar manchas de color sobre la cubierta. Estas
manchas de color se deben quitar inmediatamente o se pueden volver permanentes.
ADVERTENCIA
Controle cuidadosamente los fondos de los recipientes de cocción para asegurarse de que estén
libres de rugosidades que puedan rayar la cubierta.
Limpieza de la junta selladora de la cubierta
Para limpiar la junta selladora a lo largo de los
bordes del vidrio, deje un paño mojado reposando
contra ella por unos minutos y luego limpie con un
producto no abrasivo.
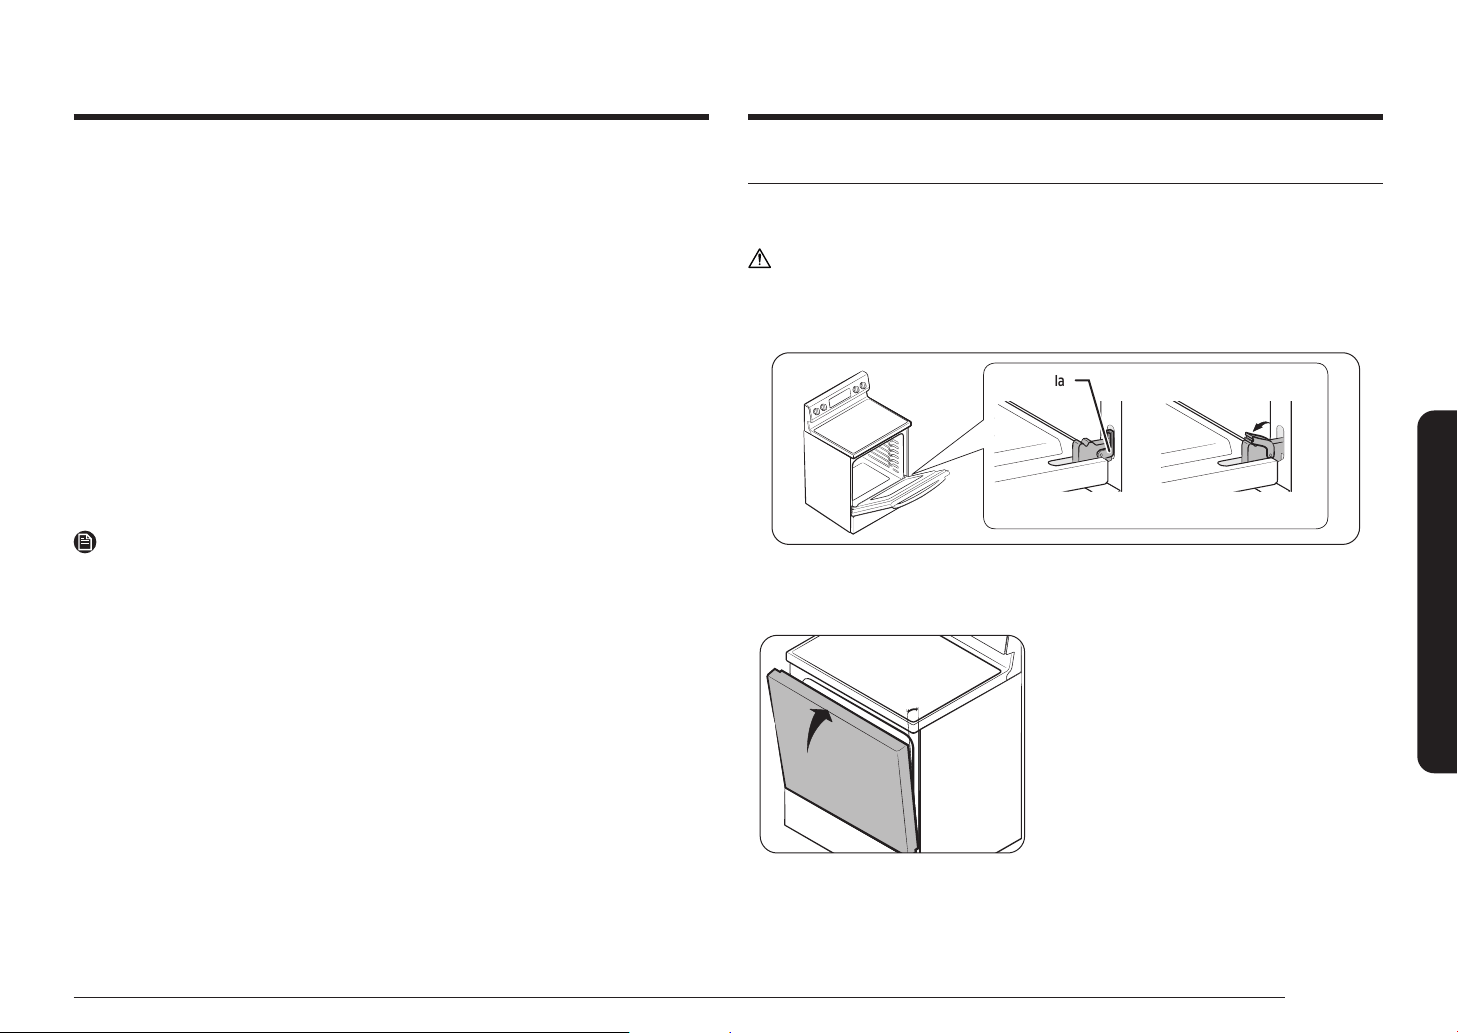
Español 49
Mantenimiento de su electrodoméstico
Cómo retirar y volver a instalar la puerta del horno
Cómo retirar la puerta
PRECAUCIÓN
• La puerta es muy pesada. Tenga cuidado al retirarla y levantarla.
No levante la puerta por la manija.
• Desconecte la electricidad antes de retirar la puerta.
Traba de la Traba de la
bisagrabisagra
Posición trabadaPosición trabada Posición destrabadaPosición destrabada
1. Abra la puerta por completo.
2. Jale las trabas de las bisagras hacia abajo, hacia el marco de la puerta hasta la posición
destrabada.
aprox. 5 °aprox. 5 °
Fig. 1Fig. 1
3. Sujete rmemente ambos lados de la puerta en
su extremo superior.
4. Cierre la puerta hasta la posición de remoción,
que es aproximadamente a 5 grados de la
posición vertical (Fig. 1).
Potenciales daños permanentes a la supercie de vidrio
• Los derrames de materiales azucarados (tales como jaleas, caramelo, almíbares) o plásticos
fundidos pueden causar picaduras en la supercie de la cubierta. Esta situación no está
cubierta por la garantía. El derrame debe limpiarse mientras permanezca caliente. Tenga
especial cuidado al quitar sustancias calientes. Consulte la sección a continuación.
• Si utiliza una rasqueta, asegúrese de que sea nueva y que su navaja mantenga buen lo. No
utilice una navaja sin lo o con mordeduras.
Limpieza de derrames azucarados y plástico fundido
1. Apague todas las unidades de supercie. Quite todos los recipientes de cocción calientes.
2. Usando un guante aislante, utilice una rasqueta de navaja de un solo lo para mover la
sustancia derramada a una zona de la cubierta que no se encuentre caliente. Quite la
sustancia derramada con toallas de papel.
3. El remanente del derrame debe dejarse hasta que la supercie de cocción se haya enfriado.
4. No vuelva a utilizar las unidades de supercie hasta que todo el residuo haya sido eliminado
completamente.
NOTA
Si ya se han producido picaduras o hendiduras en la supercie de vidrio, la cubierta de vidrio
deberá ser reemplazada. En tal caso, será necesario llamar al servicio de reparaciones.
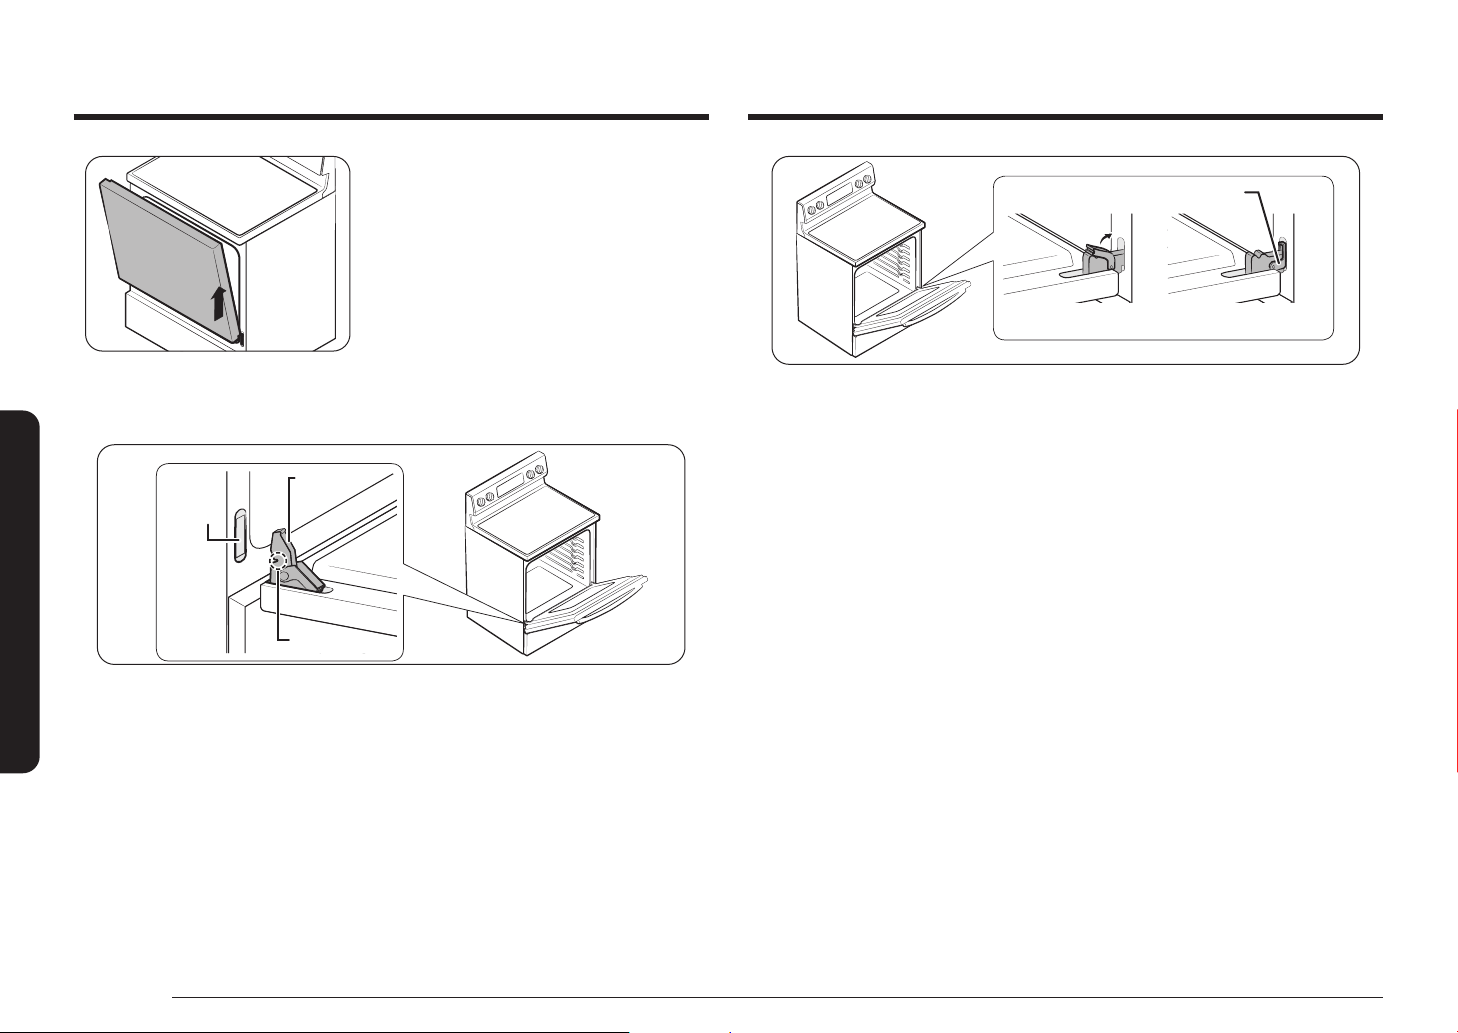
50 Español
Mantenimiento de su electrodoméstico
Mantenimiento de su electrodoméstico
Fig. 2Fig. 2
5. Levante la puerta y jale hacia afuera hasta que
el brazo de la bisagra esté fuera de la ranura
(Fig. 2).
Cómo volver a instalar la puerta
Brazo de la bisagraBrazo de la bisagra
Borde Borde
inferior de inferior de
la ranurala ranura
MuescaMuesca
1. Sujete rmemente ambos lados de la puerta en su extremo superior.
2. Con la puerta en el mismo ángulo que en la posición para retirar, deslice la muesca del brazo
de la bisagra hasta que encaje en el borde inferior de la ranura para la bisagra. La muesca
en el brazo de la bisagra debe quedar completamente inserta en la parte inferior de la
ranura.
Posición trabadaPosición trabadaPosición destrabadaPosición destrabada
Traba de la Traba de la
bisagrabisagra
3. Abra la puerta por completo. Si la puerta no se abre completamente, la muesca no se
encuentra correctamente insertada en el borde inferior de la ranura.
4. Empuje las trabas de bisagra hacia arriba contra el marco frontal de la cavidad del horno
hasta que queden en la posición trabada.
5. Cierre la puerta del horno.
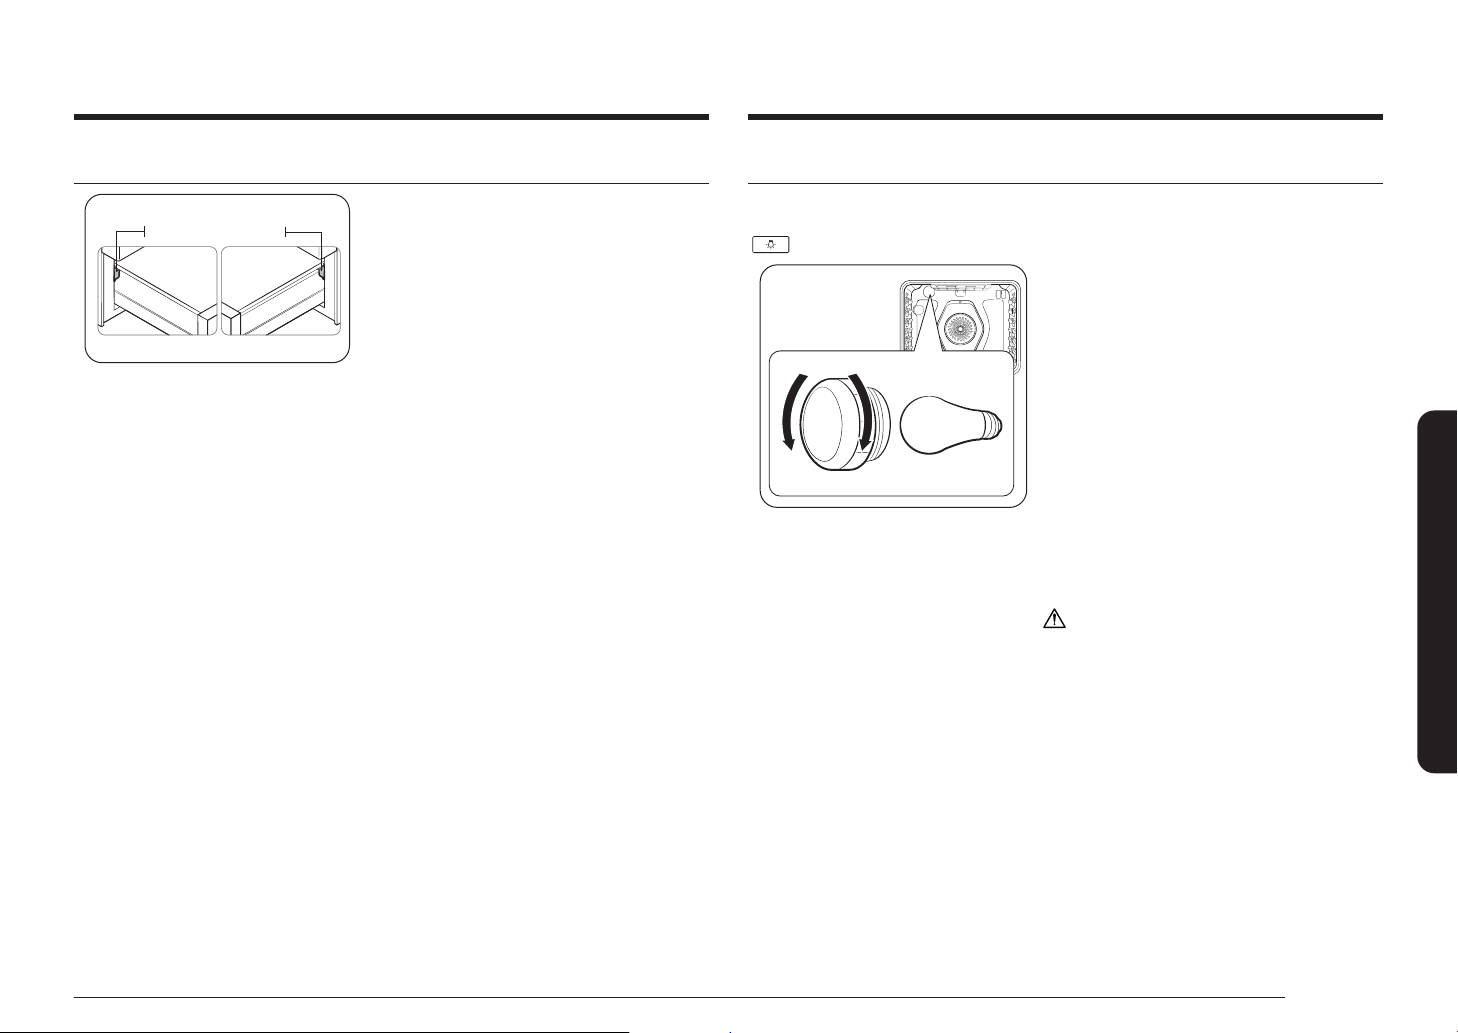
Español 51
Mantenimiento de su electrodoméstico
Recambio de la luz del horno
La luz del horno es una bombilla para electrodomésticos estándar de 40 watts. Se encenderá al
abrirse la puerta del horno. Cuando la puerta del horno se encuentre cerrada, presione la tecla
para encenderla o apagarla. No funcionará durante el ciclo de autolimpieza.
RetirarRetirar
BombillaBombilla
Volver a colocarVolver a colocar
1. Asegúrese de que el horno y la bombilla se
encuentren fríos.
2. Desenchufe la estufa o desconecte la corriente.
3. Para retirar la cubierta de vidrio de la bombilla
en la parte trasera del horno, gírela en sentido
contrario a las agujas del reloj.
4. Gire la bombilla en sentido contrario a las
agujas del reloj para retirarla de su casquillo.
5. Inserte una bombilla nueva para
electrodomésticos de 40 watts y, luego,
gírela hacia la derecha para ajustarla. Vuelva
a colocar la cubierta de la bombilla girando
hacia la derecha.
6. Enchufe la estufa o vuelva a conectar la
electricidad.
PRECAUCIÓN
Antes de cambiar la bombilla de la luz de su horno,
desconecte la alimentación de electricidad a la
estufa en el fusible principal o en el panel del
disyuntor. Asegúrese de que el horno y la bombilla
se encuentren fríos.
Cubierta de vidrio de Cubierta de vidrio de
la bombillala bombilla
Cómo retirar y volver a instalar el cajón de almacenamiento
GanchoGancho GanchoGancho
Cómo retirar el cajón de almacenamiento
1. Jale el cajón hacia afuera hasta que se trabe.
2. Incline el frontal del cajón y extráigalo.
Cómo volver a colocar el cajón de almacenamiento
1. Ponga el lado izquierdo del cajón sobre el
gancho izquierdo y el lado derecho sobre el
gancho derecho.
2. Empuje el cajón hasta que se detenga.

52 Español
Resolución de problemas
Resolución de problemas
PANTALLA DE CONTROL
Problema Causa posible Solución
La pantalla queda en
blanco.
Puede haberse quemado un
fusible en su casa o haberse
disparado el disyuntor.
Reemplace el fusible o reinicie el
disyuntor.
La pantalla destella. Hubo un corte de energía
eléctrica.
Reajuste el reloj.
CUBIERTA
Problema Causa posible Solución
Las unidades de
supercie no mantienen
un hervor continuo o no
cocinan con la rapidez
esperable.
Puede estar usando recipientes
de cocción inadecuados.
Utilice recipientes playos y cuyo
diámetro se corresponda con la
unidad de supercie seleccionada.
En algunas áreas, el potencial
eléctrico (voltaje) puede estar
demasiado bajo.
Cubra el recipiente con una
tapa hasta que se alcance la
temperatura deseada.
Las unidades de
supercie no se
encienden.
Puede haberse quemado un
fusible en su casa o haberse
disparado un disyuntor.
Reemplace el fusible o reinicie el
disyuntor.
Los controles de la supercie de
cocción están incorrectamente
congurados.
Controle que se encuentre
congurado el control correcto
para la unidad de supercie en
uso.
Zonas con alteraciones
de color en la cubierta.
Se omitió limpiar alimentos
derramados.
Consulte la sección sobre cuidado
y limpieza de la cubierta de
vidrio, en la página 47.
La supercie está caliente y el
modelo se caracteriza por una
cubierta de color claro.
Esto es normal. El color de
la supercie puede aparecer
alterado cuando está caliente.
Esto es transitorio y desaparecerá
a medida que el vidrio se enfríe.
Resolución de problemas
Resolución de problemas
Samsung hace grandes esfuerzos para asegurar que usted no experimente problemas con su
nueva estufa eléctrica. Si se encuentra con problemas inesperados, como primera medida busque
la solución en las siguientes tablas. Si aún experimenta problemas luego de intentar la solución
sugerida, comuníquese con Samsung al 1-800-SAMSUNG (1-800-726-7864).
Instalación
Problema Causa posible Solución
La estufa está
desnivelada.
El electrodoméstico fue instalado
incorrectamente.
• Coloque la parrilla en el
centro del horno. Coloque un
nivel sobre la parrilla. Ajuste
las patas de nivelación en la
base de la estufa hasta que
la parrilla del horno quede
nivelada.
• Asegúrese de que el piso
esté nivelado y sea lo
sucientemente fuerte y
estable como para soportar
la estufa.
El piso se encuentra vencido,
combado, hundido o inclinado.
Contáctese con un carpintero para
corregir esta situación.
Son los gabinetes de cocina
los que están desalineados y
hacen que la estufa parezca
desnivelada.
Asegúrese de que los gabinetes
se encuentren en escuadra y
dejan suciente lugar para la
instalación.
Es necesario acceder
al electrodoméstico
para efectuarle servicio
de mantenimiento o
reparación y resulta
difícil de mover.
Los gabinetes de cocina no
están en escuadra o están
construidos demasiado cerca del
electrodoméstico.
Comuníquese con un constructor
o instalador para posibilitar el
acceso al electrodoméstico.
La alfombra interere con el
movimiento de la estufa.
Despeje suciente espacio para
que la estufa pueda ser levantada
por encima de la alfombra.
Español 53
Resolución de problemas
Problema Causa posible Solución
La unidad de supercie
alterna frecuentemente
entre encendido y
apagado.
El elemento pasará por ciclos
de encendido y apagado para
mantener la regulación de
energía.
Este funcionamiento es normal
y no se debe a una falla del
sistema. Use la estufa como
siempre.
La unidad de supercie
deja de estar al rojo
vivo cuando se cambia
a una regulación más
baja.
Esto es normal. La unidad todavía se encuentra encendida y caliente.
Rayaduras o abrasiones
en la supercie de la
cubierta.
La limpieza de la cubierta se está
realizando incorrectamente.
Las rayaduras son imposibles de
quitar. Por efectos de la limpieza,
las rayaduras muy pequeñas se
volverán menos visibles con el
transcurrir del tiempo. Use una
crema para limpiar la supercie
vitrocerámica. No use sustancias
químicas ni productos abrasivos.
Estos productos pueden dañar la
supercie del electrodoméstico.
Se usaron sobre la cubierta
recipientes de cocción con
fondos rugosos, o se depositaron
partículas gruesas y abrasivas
(por ejemplo, sal o arena) entre
los recipientes y la supercie de
la cubierta.
Para evitar rayaduras, siga los
procedimientos de limpieza
recomendados. Asegúrese de
que los fondos de los recipientes
de cocción estén limpios antes
de usarlos. Utilice recipientes de
fondos lisos.
Se ha deslizado algún utensilio
de cocina sobre la supercie de
cocción.
Problema Causa posible Solución
Pintas o vetas pardas. Ocurrieron derrames que fueron
cocinados hasta adherirse a la
supercie.
• Espere hasta que la
supercie se enfríe. Luego,
utilice una rasqueta de
navaja de un solo lo a un
ángulo de aproximadamente
45° sobre la supercie de
vidrio y raspe la suciedad.
• Consulte la sección sobre
cuidado y limpieza de la
cubierta de vidrio, en la
página 47.
Zonas con alteración de
color con brillo metálico.
Depósitos minerales originados
en el agua o los alimentos
permanecieron sobre la supercie
de la cubierta.
• Quítelos utilizando una
crema de limpieza para
cubiertas vitrocerámicas.
• Utilice recipientes de
cocción con fondos limpios
y secos. Limpie la cubierta
con un limpiador para
vitrocerámica regularmente
cada semana.
Se oyen ruidos como
"crujidos" o "suaves
estallidos".
Estos son los ruidos que emite
el metal al calentarse y enfriarse
durante las funciones de cocción
y autolimpieza.
Este funcionamiento es normal
y no se debe a una falla del
sistema. Use la estufa como
siempre.
54 Español
Resolución de problemas
Resolución de problemas
HORNO
Problema Causa posible Solución
El horno no se
enciende.
La estufa no se encuentra bien
enchufada al tomacorriente.
Asegúrese de que el enchufe
se encuentre insertado en un
tomacorriente alimentado con
corriente y bien conectado a tierra.
Puede haberse quemado un fusible
en su casa o haberse disparado un
disyuntor.
Reemplace el fusible o reinicie el
disyuntor.
Los controles del horno se han
congurado incorrectamente.
Consulte el capítulo donde se
describe la operación del horno a
partir de la página 28.
El horno está demasiado caliente. Espere a que el horno se enfríe.
El servicio técnico no completó la
conexión de cables.
Solicite servicio técnico.
Hay un corte de energía en su
localidad.
Controle si se encienden las luces de
su casa. De ser necesario, llame a su
compañía de electricidad local.
No se enciende la
luz del horno.
La bombilla está oja o fallada. Ajuste o reemplace la bombilla.
El interruptor de la luz está roto. Solicite servicio técnico.
La estufa no se
enciende.
La estufa no se encuentra bien
enchufada al tomacorriente o tal
vez en su casa se haya quemado un
fusible o activado un disyuntor.
Asegúrese de que el cable de
alimentación se encuentre
enchufado en un tomacorriente
alimentado con corriente y bien
conectado a tierra. Controle los
fusibles y disyuntores.
El servicio técnico no completó la
conexión de cables.
Solicite servicio técnico.
Hay un corte de energía en su
localidad.
Controle si se encienden las luces de
su casa. De ser necesario, llame a su
compañía de electricidad local.
Problema Causa posible Solución
El horno emite
demasiado humo
cuando se asa a la
parrilla.
Los controles del horno no se han
congurado adecuadamente.
Consulte la sección sobre cómo asar
a la parrilla a partir de la página 34.
La carne fue colocada demasiado
próxima al elemento.
Cambie la posición de la parrilla
para dejar el espacio adecuado entre
la carne y el elemento radiante. Si
desea sellar la carne, precaliente el
elemento radiante.
La carne no fue preparada
correctamente.
Quite el exceso de grasa de la carne.
Corte y retire los bordes grasos que
podrían retorcerse, dejando intacto
la carne magra.
Hay acumulación de grasa sobre las
supercies del horno.
Es necesario limpiar con regularidad
si se asa a la parrilla con frecuencia.
Los alimentos no
se hornean o asan
como es debido.
Los controles del horno no se han
congurado correctamente.
Consulte el capítulo donde se
describe la operación del horno a
partir de la página 28.
La parrilla del horno fue colocada
en una posición incorrecta o no se
encuentra nivelada.
Consulte la sección sobre el uso de
las parrillas del horno en la página
31.
Se están utilizando recipientes de
cocción no adecuados o de tamaño
incorrecto.
El sensor del horno requiere ajuste. Consulte la sección sobre cómo
ajustar el termostato en la página
39.
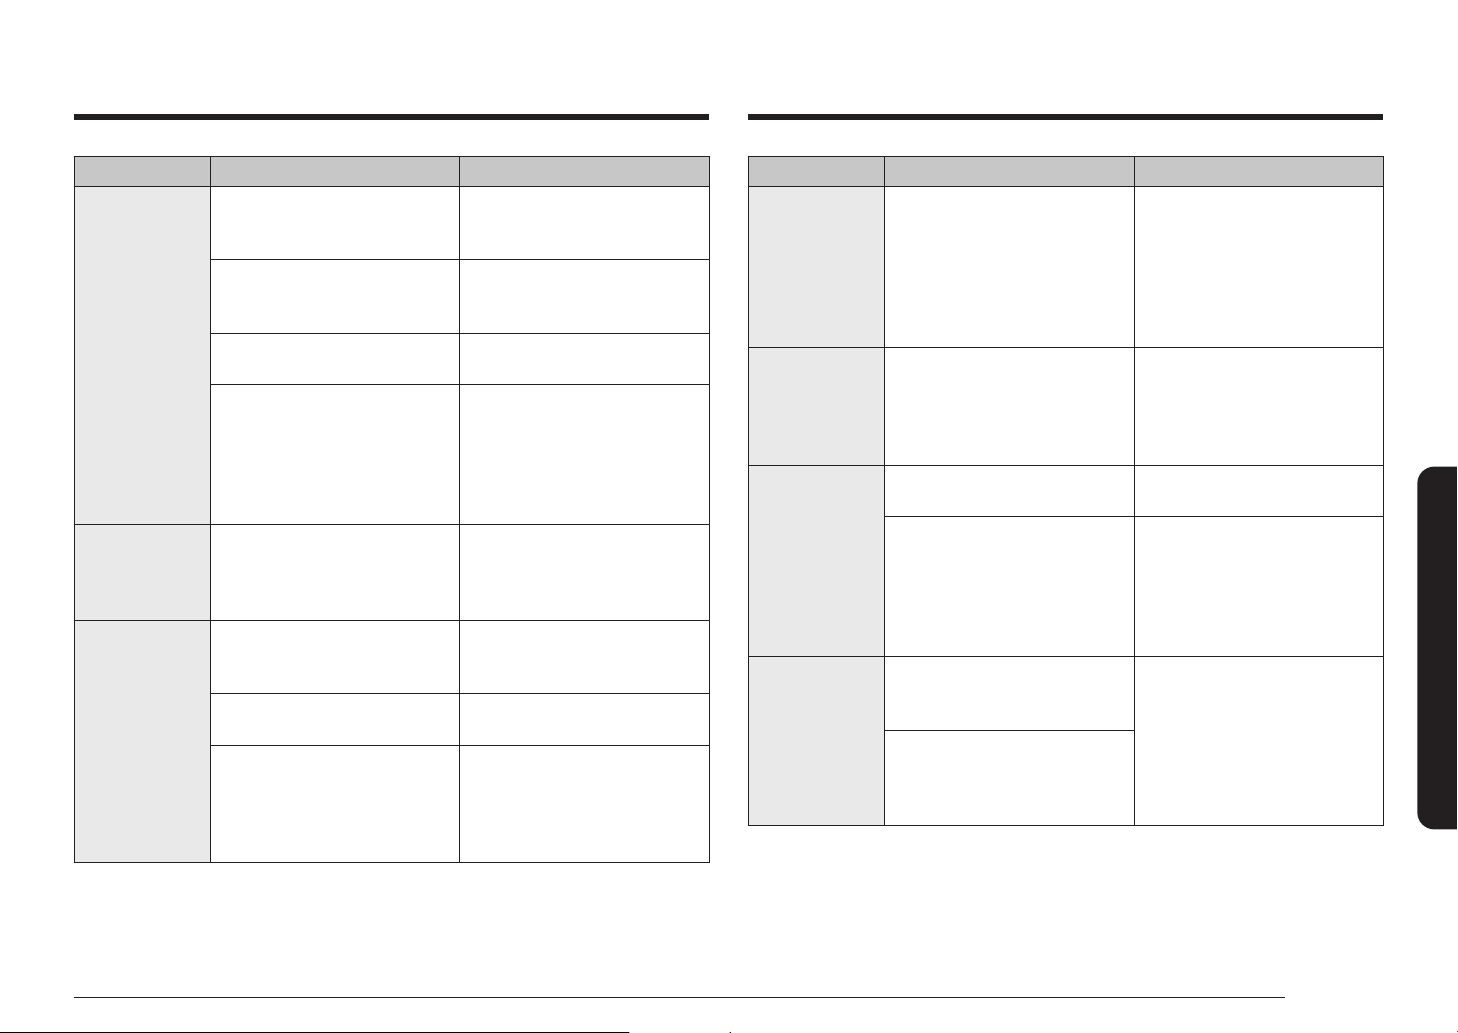
Español 55
Resolución de problemas
Problema Causa posible Solución
Los alimentos
no se asan
a la parrilla
correctamente.
El tamaño de la porción puede no
ser el adecuado.
Consulte la guía de cocción para
el tamaño de las porciones en la
página 35, y vuelva a intentarlo.
La parrilla fue colocada en una
posición incorrecta.
Consulte la guía de recomendaciones
para asar a la parrilla en la página
35.
El recipiente no es adecuado para
asar a la parrilla.
Utilice utensilios de cocción
adecuados.
En algunas áreas, el potencial
eléctrico (voltaje) puede estar
demasiado bajo.
• Precaliente durante 10 minutos
el elemento radiante para asar
a la parrilla.
• Consulte la guía de
recomendaciones para asar a la
parrilla en la página 35.
El horno está
a temperatura
demasiado alta o
demasiado baja.
El sensor del horno requiere ajuste. Consulte la sección sobre cómo
ajustar el termostato en la página
39.
El horno no
ejecuta el proceso
de autolimpieza.
La temperatura del horno es
demasiado alta como para iniciar
una operación de autolimpieza.
Deje que la estufa se enfríe y, luego,
restablezca los controles.
Los controles del horno se han
congurado incorrectamente.
Consulte la sección sobre
autolimpieza en la página 42.
No se puede iniciar un ciclo de
autolimpieza si ha activado la
función de bloqueo del horno o
si algún elemento radiante de
supercie se encuentra encendido.
Desactive el bloqueo del horno
(consulte la página 28). Asegúrese
de que todos los elementos
superiores estén apagados.
Problema Causa posible Solución
Humo excesivo
durante un ciclo de
autolimpieza.
El horno se encuentra demasiado
sucio.
Presione OFF/CLEAR (APAGAR/
BORRAR). Abra las ventanas para
que el humo salga del ambiente.
Aguarde hasta que el ciclo de
autolimpieza se cancele. Limpie toda
la suciedad excesiva y luego inicie el
ciclo de autolimpieza.
Después de
un ciclo de
autolimpieza la
puerta del horno,
no se abre.
El horno está demasiado caliente. Espere a que el horno se enfríe.
Cumplido un ciclo
de autolimpieza, el
horno aún no está
limpio.
Los controles del horno se han
congurado incorrectamente.
Consulte la sección sobre
autolimpieza en la página 42.
El horno tenía suciedad pesada. Limpie los derrames pesados antes
de iniciar el ciclo de autolimpieza.
Cuando el horno está muy sucio,
puede ser necesario repetir la
autolimpieza o darle una duración
mayor.
Sale vapor por
la abertura de
ventilación.
Cuando se usa la función de
convección, es normal ver salir
vapor por la abertura de ventilación.
Este funcionamiento es normal y no
se debe a una falla del sistema.
Use la estufa como siempre.
La cantidad de vapor visible
aumenta cuando se usan más
parrillas o se cocina mayor cantidad
de alimento.
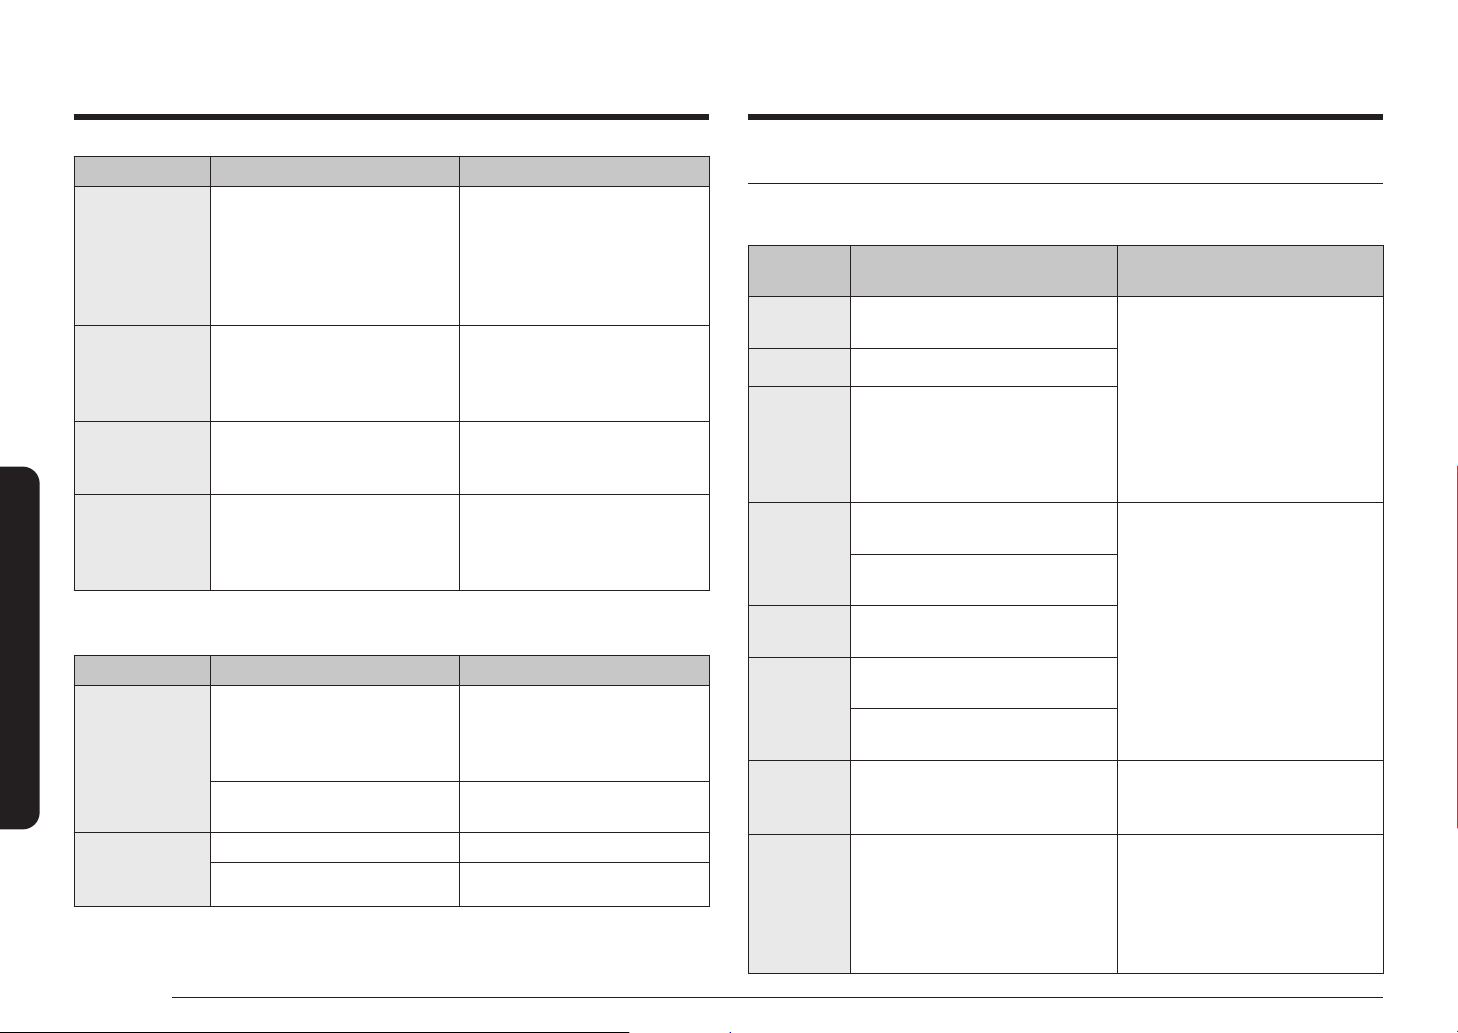
56 Español
Resolución de problemas
Resolución de problemas
Problema Causa posible Solución
Sale olor a
quemado o a
aceite de la
abertura de
ventilación.
Esto es normal cuando el horno es
nuevo y desaparecerá con el tiempo.
• Para acelerar este proceso,
programe un ciclo de
autolimpieza de por lo menos
3 horas.
• Consulte la sección sobre
autolimpieza en la página 42.
Olor fuerte. Las primeras veces que se usa el
horno, es normal que emane olor
del material aislante que envuelve
al horno.
Opere el horno vacío en el ajuste
de horneado a 400 °F durante una
hora.
Ruido del
ventilador.
Un ventilador de convección
puede encenderse y apagarse
automáticamente.
Esto no es una falla del sistema, sino
el funcionamiento normal.
Resulta difícil
deslizar las
parrillas del horno.
Las parrillas plateadas quedaron
dentro del horno durante un ciclo de
autolimpieza.
Aplique una pequeña cantidad de
aceite vegetal sobre una toalla de
papel y, luego, frote con ella los
lados de las parrillas.
CAJÓN
Problema Causa posible Solución
El cajón no se
desliza con
suavidad o se
arrastra con
fricción.
El cajón se encuentra desalineado. Jale el cajón hacia afuera
completamente y empújelo
totalmente hacia adentro. Vea la
página 51.
El cajón está sobrecargado o la
carga está desbalanceada.
Reduzca el peso. Redistribuya el
contenido de los cajones.
Condensación
excesiva dentro
del cajón.
Hay líquido en el cajón. Extraiga el líquido.
Alimentos sin cubrir. Cubra los alimentos con una tapa.
Códigos de información
HORNO
Código
mostrado
Causa posible Solución
C-d0
Hay un cortocircuito en la tecla de
control.
Toque OFF/CLEAR (APAGAR/BORRAR)
y luego reinicie el horno. Si el
problema persiste, desconecte toda
alimentación eléctrica a la estufa
durante por lo menos 30 segundos
y luego reconecte la alimentación
eléctrica. Si esto no soluciona el
problema, llame al servicio de
reparaciones.
C-d1 La traba de la puerta no está alienada.
C-F2
Este código se muestra si se
interrumpe la comunicación entre el
principal y el táctil.
C-20
El sensor del horno está abierto
cuando el horno está funcionando.
Toque OFF/CLEAR (APAGAR/BORRAR)
y luego reinicie el horno. Si el
problema persiste, desconecte toda
alimentación eléctrica a la estufa
durante por lo menos 30 segundos
y luego reconecte la alimentación
eléctrica. Si esto no soluciona el
problema, llame al servicio de
reparaciones.
Hay un cortocircuito en el sensor del
horno.
C-21
Este código se muestra si la temperatura
interna es anormalmente alta.
C-30
El sensor del PCB principal está abierto
cuando el horno está funcionando.
Hay un cortocircuito en el sensor del
PCB principal.
C-31
Este código se muestra si la
temperatura de PCB es anormalmente
alta.
Solicite servicio técnico.
bAd LinE
Este mensaje de error aparece si el
cable de alimentación no está instalado
correctamente.
Si la conexión de alimentación está
mal realizada, aparece el mensaje
"bAd LinE” en la pantalla. Vuelva a
realizar la conexión de alimentación
correctamente y el mensaje
desaparecerá.

Español 57
Garantía (EE.UU.)
Garantía (EE.UU.)
NO LA DESECHE. ESTA HOJA REEMPLAZA LA PÁGINA DE GARANTÍA EN LA
GUÍA DE USO Y MANTENIMIENTO
ESTUFA ELÉCTRICA SAMSUNG
GARANTÍA LIMITADA AL COMPRADOR ORIGINAL CON COMPROBANTE DE COMPRA
El presente producto de la marca SAMSUNG, tal como lo provee y distribuye SAMSUNG
ELECTRONICS AMERICA, INC. (SAMSUNG) y lo entrega como nuevo, en su empaque de cartón
original al comprador o consumidor original, está garantizado por SAMSUNG contra defectos de
fabricación de los materiales o la mano de obra durante el período limitado de la garantía, que
comienza desde la fecha de la compra original, de:
Un (1) año para piezas y mano de obra
Esta garantía limitada solo es válida para productos comprados y utilizados en Estados Unidos
de América que hayan sido instalados, operados y mantenidos de acuerdo a las instrucciones que
se adjuntaron o proporcionaron con el producto. Para recibir el servicio técnico de la garantía,
el comprador debe comunicarse con SAMSUNG en la dirección o con el número de teléfono
detallado en esta garantía con el n de que se determine el problema y los procedimientos del
servicio. El servicio técnico de la garantía solo puede ser prestado por un centro de servicio
técnico autorizado de SAMSUNG. Se debe presentar la factura de compra original como prueba
de compra a SAMSUNG o al centro de servicio técnico autorizado de SAMSUNG para recibir el
servicio técnico de la garantía.
SAMSUNG brindará servicio técnico a domicilio sin costo dentro de los Estados Unidos contiguos
durante el período de garantía, sujeto a disponibilidad de los prestadores de servicio técnico
autorizados dentro del área geográca del cliente. Si el servicio a domicilio no está disponible,
SAMSUNG podrá, según su criterio, optar por brindar el servicio de transporte del producto de ida
y vuelta al centro de servicio. Si el producto se encuentra en un área sin prestadores de servicio
técnico autorizado de SAMSUNG, es posible que se cobre el costo del viaje o se solicite que el
cliente lleve el producto a un centro de servicio técnico autorizado de SAMSUNG para que se
realice el servicio técnico.
Como condición para que se preste este servicio a domicilio, el producto debe encontrarse libre
de obstrucciones y accesible para el agente de servicio.
Durante el período de garantía correspondiente, el producto se reparará, reemplazará, o se
devolverá el monto de la compra, según decida SAMSUNG. SAMSUNG podrá utilizar piezas
nuevas o reparadas al reparar el producto, o lo reemplazará con un producto nuevo o reparado.
Las piezas y los productos reemplazados estarán garantizados por la garantía del producto
original que resta, o noventa (90) días, el período que sea más prolongado. Todas las piezas y los
productos reemplazados son propiedad de SAMSUNG y deben ser devueltos a SAMSUNG.
Esta garantía limitada cubre los defectos de fabricación de los materiales o la mano de obra
durante el uso para nes domésticos, no comerciales del producto, y no cubrirá lo siguiente:
daños producidos durante el envío, la entrega o la instalación o por uso distinto al previsto
para este producto; daños producidos por modicación o alteración no autorizada del producto;
productos a los que se le borraron, desguraron o cambiaron de forma alguna los números de
serie de fabricación originales, o en los que no se puede leer con claridad; daños cosméticos como
rayones, abolladuras o muescas, o cualquier daño al acabado del producto; daños producidos
por abuso, uso incorrecto, infestación de plagas, accidentes, incendios, inundaciones u otros
fenómenos de la naturaleza o casos de fuerza mayor; daños producidos por uso de equipos,
herramientas, servicios, piezas, suministros, accesorios, aplicaciones, instalaciones, reparaciones,
cableado externo o conectores no suministrados o autorizados por SAMSUNG; daños causados por
corriente o voltaje incorrectos, sobretensión o uctuación de la línea eléctrica; daños causados
por no operar o mantener el producto como establecen las instrucciones; instrucción a domicilio
sobre el uso del producto; servicio técnico para el arreglo de instalaciones que no se adecuan a
los códigos de electricidad y fontanería o arreglo de conexiones eléctricas o de fontanería del
hogar (por ejemplo, arreglos de cableado, fusibles o tuberías de la toma de agua). Tampoco están
cubiertos por esta garantía limitada los daños a la cubierta de vidrio causados por (i) el uso de
productos y elementos de limpieza distintos de los productos y almohadillas recomendados o por
(ii) derrames endurecidos de sustancias azucaradas o plásticos fundidos que no hubiesen sido
limpiados de acuerdo con las instrucciones incluidas en la guía de uso y cuidados.
El costo de reparación o reemplazo bajo estas circunstancias excluidas le corresponderá al cliente.
Las visitas de un técnico de servicio autorizado para que explique las funciones, el mantenimiento
o la instalación del producto no están cubiertas por esta garantía limitada. Comuníquese con
SAMSUNG al número que gura a continuación si necesita asistencia con estos problemas.

58 Español
Garantía (EE.UU.)
Garantía (EE.UU.)
EXCLUSIÓN DE GARANTÍAS IMPLÍCITAS
GARANTÍAS TÁCITAS, INCLUYENDO LAS GARANTÍAS DE COMERCIABILIDAD O APTITUD PARA UN
PROPÓSITO ESPECIAL, POSEEN UN TÉRMINO LIMITADO DE UN AÑO O EL PERÍODO MÁS CORTO
PERMITIDO POR LA LEY. Algunos estados no permiten limitaciones en cuanto al plazo de una
garantía implícita, por lo tanto las limitaciones o exclusiones antedichas pueden no aplicarse en
su caso. Esta garantía le otorga derechos especícos, y además puede tener otros derechos que
varían según el Estado en el que se encuentre.
LIMITACIÓN DE COMPENSACIÓN
SU ÚNICA COMPENSACIÓN ES LA REPARACIÓN DEL PRODUCTO, EL REEMPLAZO DEL PRODUCTO
O LA DEVOLUCIÓN DEL MONTO DE LA COMPRA, SEGÚN DECIDA SAMSUNG, DE ACUERDO A
LO ESTIPULADO EN ESTA GARANTÍA LIMITADA. SAMSUNG NO SERÁ RESPONSABLE DE DAÑOS
IMPREVISTOS O DERIVADOS, QUE INCLUYEN PERO NO SE LIMITAN AL TIEMPO Y FORMA DEL
TRABAJO, HOTELES Y/O COMIDAS DE RESTAURANTES, GASTOS DE REMODELACIÓN, PÉRDIDA DE
INGRESOS O GANANCIAS, NO OBTENCIÓN DE AHORROS U OTROS BENEFICIOS SIN IMPORTAR LA
TEORÍA JURÍDICA EN LA QUE SE BASA EL RECLAMO, INCLUSO SI SE HA NOTIFICADO A SAMSUNG
QUE TALES DAÑOS ERAN POSIBLES. Algunos estados no permiten la exclusión o limitación
de daños imprevistos o derivados, por lo tanto las limitaciones o las exclusiones nombradas
anteriormente podrían no aplicarse. Esta garantía le otorga derechos especícos, y además puede
tener otros derechos que varían según el Estado en el que se encuentre.
SAMSUNG no garantiza el funcionamiento ininterrumpido o sin errores del producto. Ninguna
otra garantía otorgada por persona, compañía o corporación alguna con respecto al presente
producto revestirá carácter vinculante para SAMSUNG.
Para recibir un servicio técnico de garantía, comuníquese con SAMSUNG a:
Samsung Electronics America, Inc.
85 Challenger Road
Ridgeeld Park, NJ 07660
1-800-SAMSUNG (726-7864) y www.samsung.com/us/support
Garantía (CANADÁ)
NO LA DESECHE. ESTA HOJA REEMPLAZA LA PÁGINA DE GARANTÍA EN LA
GUÍA DE USO Y MANTENIMIENTO
ESTUFA ELÉCTRICA SAMSUNG
GARANTÍA LIMITADA PARA EL COMPRADOR ORIGINAL
El presente producto de la marca SAMSUNG, tal como lo provee y distribuye SAMSUNG
ELECTRONICS CANADA, INC. (SAMSUNG) y lo entrega como nuevo, en su empaque de cartón
original al comprador o consumidor original, está garantizado por SAMSUNG contra defectos de
fabricación de los materiales y la mano de obra durante el período limitado de la garantía de:
Un (1) año para las piezas y la mano de obra, un (1) año para las piezas de la Garantía
Para la cubierta de vidrio y la hornalla radiante
La presente garantía limitada comienza en la fecha original de compra y es válida únicamente
para productos comprados y usados en CANADÁ. Para recibir el servicio técnico de la garantía,
el comprador debe comunicarse con SAMSUNG con el n de que se determine el problema
y los procedimientos del servicio. El servicio técnico de la garantía solo puede ser prestado
por un centro de servicio técnico autorizado de SAMSUNG. Se debe presentar la factura de
compra original como prueba de compra a SAMSUNG o al centro de servicio técnico autorizado
de SAMSUNG. Samsung brindará servicio técnico a domicilio sin cargo durante el período de
garantía, sujeto a disponibilidad, dentro del territorio contiguo de CANADÁ. El servicio técnico
a domicilio no se encuentra disponible en todas las áreas. Como condición para que se preste
este servicio a domicilio, el producto debe encontrarse libre de obstrucciones y accesible para el
agente de servicio. Si el servicio no está disponible, Samsung podrá optar por brindar el servicio
de transporte del producto de ida y vuelta al centro de servicio.

Español 59
Garantía (CANADÁ)
SAMSUNG reparará o reemplazará el producto a nuestra discreción y sin cargo tal como
se establece en la presente garantía, con piezas o productos nuevos o reacondicionados si
se comprueba que es defectuoso durante el período limitado de la garantía especicado
anteriormente. Todas las piezas y los productos reemplazados pasan a ser propiedad de
SAMSUNG y deben ser devueltos a SAMSUNG. Las piezas y los productos reemplazados asumen
la garantía original que resta, o noventa (90) días, el período que sea el más prolongado. La
presente garantía limitada cubre defectos de fabricación de los materiales y la mano de obra
encontrados durante el uso normal y doméstico de este producto y no será válida para lo
siguiente: daños que ocurran durante el envío; entrega e instalación; aplicaciones y usos para
los cuales el presente producto no fue destinado; producto o números de serie alterados; daño
cosmético o acabado exterior; accidentes, abuso, descuido, incendio, inundación, caída de rayos, u
otros casos fortuitos o de fuerza mayor; uso de productos, equipo, sistemas, utilidades, servicios,
piezas, suministros, accesorios, aplicaciones, instalaciones, reparaciones, cableado externo o
conectores no provistos ni autorizados por SAMSUNG que dañen este producto o que acarreen
problemas en el servicio; voltaje de la línea eléctrica incorrecto, uctuaciones y sobretensión;
ajustes del cliente e incumplimiento de lo establecido en el manual de instrucciones sobre
instrucciones de utilización, mantenimiento y ambientales que están cubiertas y recomendadas
en el manual de instrucciones; desmontaje y reinstalación del producto; problemas causados por
plagas; recalentamiento o exceso de cocción causado por el usuario. Esta garantía limitada no
cubre casos de corriente, voltaje o alimentación eléctrica incorrectos, bombillas de luz, fusibles
y cableado en la casa, el costo de las llamadas al servicio técnico para solicitar instrucciones,
ni la corrección de errores de instalación. Tampoco están cubiertos los daños a la cubierta de
vidrio causados por el uso de productos y elementos de limpieza distintos de los productos y
almohadillas recomendadas, daños a la cubierta de vidrio causados por derrames endurecidos
de sustancias azucaradas o plásticos fundidos que no hubiesen sido limpiados de acuerdo con las
instrucciones incluidas en la guía de uso y cuidados. SAMSUNG no garantiza el funcionamiento
ininterrumpido o sin errores del producto.
SALVO LO ESTABLECIDO EN ESTE DOCUMENTO, NO EXISTEN GARANTÍAS RESPECTO DE ESTE
PRODUCTO NI EXPRESAS NI TÁCITAS Y SAMSUNG DESCONOCE Y RECHAZA TODA GARANTÍA
INCLUIDAS, AUNQUE NO TAXATIVAMENTE ENUMERADAS, TODA GARANTÍA TÁCITA DE
COMERCIABILIDAD, INFRACCIÓN O APTITUD PARA UN PROPÓSITO ESPECIAL. NINGUNA OTRA
GARANTÍA OTORGADA POR PERSONA, COMPAÑÍA O CORPORACIÓN ALGUNA CON RESPECTO
AL PRESENTE PRODUCTO REVESTIRÁ CARÁCTER VINCULANTE PARA SAMSUNG. SAMSUNG
NO SERÁ RESPONSABLE POR PÉRDIDA DE INGRESOS O LUCRO CESANTE, IMPOSIBILIDAD
DE GENERAR AHORROS U OBTENER OTROS BENEFICIOS, O CUALQUIER DAÑO DERIVADO DE
CIRCUNSTANCIAS ESPECIALES, DAÑO IMPREVISTO O DERIVADO CAUSADO POR EL USO, USO
INCORRECTO, O INCAPACIDAD PARA USAR EL PRESENTE PRODUCTO, INDEPENDIENTEMENTE
DE LA TEORÍA LEGAL EN QUE SE FUNDE EL RECLAMO Y AUN CUANDO SE LE HAYA NOTIFICADO
A SAMSUNG DE LA POSIBILIDAD DE TALES DAÑOS. NINGÚN RESARCIMIENTO DE NINGUNA
ÍNDOLE CONTRA SAMSUNG SUPERARÁ EL MONTO DEL PRECIO DE COMPRA DEL PRODUCTO
VENDIDO POR SAMSUNG Y CAUSANTE DEL PRESUNTO DAÑO. SIN LIMITAR LO PRECEDENTE, EL
COMPRADOR ASUME TODO EL RIESGO Y LA RESPONSABILIDAD POR PÉRDIDA, DAÑO O LESIÓN
AL COMPRADOR Y A LOS BIENES DEL COMPRADOR Y A TERCEROS Y A SUS BIENES DERIVADOS
DEL USO, USO INCORRECTO O INCAPACIDAD PARA USAR EL PRESENTE PRODUCTO. LA PRESENTE
GARANTÍA LIMITADA NO SE EXTENDERÁ A NINGUNA PERSONA DISTINTA DEL COMPRADOR
ORIGINAL DEL PRESENTE PRODUCTO, ES INTRANSFERIBLE Y ESTABLECE SU EXCLUSIVA
REPARACIÓN.
Algunos Estados no permiten limitaciones en cuanto al plazo de una garantía implícita, o
la exclusión o limitación de daños imprevistos o derivados, por lo tanto las limitaciones o
exclusiones antedichas pueden no aplicarse en su caso. Esta garantía le otorga derechos legales
especícos, y además puede tener otros derechos que varían según el Estado en el que se
encuentre.
Para recibir un servicio técnico de garantía, comuníquese con SAMSUNG a:
Samsung Electronics Canada Inc.
2050 Derry Road West, Mississauga, Ontario L5N 0B9 Canada
1-800-SAMSUNG (726-7864) y www.samsung.com/ca/support (English)
www.samsung.com/ca_fr/support (French)
60 Español
Apéndice
NotasApéndice
Anuncio de código abierto
El software incluido en este producto contiene software de código abierto.
Consulte la información de licencia de origen relacionada con este producto a través de la
siguiente URL http://opensource.samsung.com/opensource/SMART_TP2_0/seq/0.

Notas

Tenga en cuenta que la garantía de Samsung NO cubre las llamadas de servicio para explicar el funcionamiento del producto, corregir una instalación inadecuada o realizar tareas de limpieza o
mantenimiento.
¿TIENE PREGUNTAS O COMENTARIOS?
PAÍS LLAME AL O VISÍTENOS EN LÍNEA EN
U.S.A
Consumer Electronics
1-800-SAMSUNG (726-7864) www.samsung.com/us/support
CANADA 1-800-SAMSUNG (726-7864)
www.samsung.com/ca/support (English)
www.samsung.com/ca_fr/support (French)
NE63A6511S*-01
Escanee el código QR* o visite
www.samsung.com/spsn
para ver nuestros útiles
videos instructivos y programas en vivo
* Requiere un lector instalado en su teléfono
inteligente

Cuisinière électrique
Manuel d'utilisation
NE63*6511S*

2 Français
AVERTISSEMENT
An d'éviter tout risque de basculement de la cuisinière, xez-
la correctement à l'aide d'un dispositif anti-basculement. APRÈS
AVOIR INSTALLÉ LA CUISINIÈRE, VÉRIFIEZ QUE LE DISPOSITIF ANTI-
BASCULEMENT EST BIEN INSTALLÉ ET FIXÉ. Reportez-vous au manuel
d'installation pour plus d'instructions.
v) Si le dispositif anti-basculement n'est pas installé, un enfant ou
un adulte peut faire basculer la cuisinière et être tué.
w) Vériez que le dispositif anti-basculement ait été correctement
installé et xé à l'arrière droite (ou arrière gauche) du dessous de
la cuisinière.
x) Si vous déplacez la cuisinière puis la remettez en place, assurez-
vous que le dispositif anti-basculement est rexé à l'arrière
droite ou gauche du dessous de l'appareil.
y) N'utilisez pas la cuisinière si le dispositif anti-basculement n'est
pas en place et bien xé.
z) Le non-respect de cette consigne peut entraîner des brûlures
graves ou des blessures mortelles chez l'enfant et l'adulte.
AVERTISSEMENT
Ne marchez pas, ne vous appuyez pas et ne vous asseyez pas sur les
portes de la cuisinière. L'appareil risquerait de basculer et provoquer
de graves blessures.
Conrmez que le dispositif anti-basculement est correctement
installé. Puis, vériez que le dispositif anti-basculement est xé,
saisissez l'arrière de la cuisinière par le bord arrière et essayez de
l'incliner vers l'avant avec précaution. Le dispositif anti-basculement
empêche la cuisinière de basculer vers l'avant au-delà de quelques
pouces.
Si vous devez, pour une quelconque raison, retirer la cuisinière
du mur, assurez-vous de bien xer le dispositif anti-basculement
lorsque vous remettez la cuisinière en place contre le mur. Si le
dispositif n'a pas été correctement installé, la cuisinière risque de
basculer et de provoquer des blessures si une personne ou un enfant
marche, s'assoit ou s'appuie sur la porte ouverte.
Ne retirez jamais complètement les pieds de mise à niveau. Si vous
retirez les pieds de mise à niveau, la cuisinière ne sera pas xée
correctement au dispositif anti-basculement.
Dispositif anti-basculement

Français 3
DÉCLARATION DE LA FCC :
Cet appareil a été testé ; il est conforme aux limitations applicables
aux appareils numériques de classe B, selon le paragraphe 15 de la
réglementation de la FCC. Ces limitations sont destinées à assurer
une protection sufsante contre les interférences néfastes dans une
zone résidentielle.
Cet appareil génère, utilise et peut émettre de l'énergie
radioélectrique. S'il n'est pas installé et utilisé selon les instructions,
il peut produire des interférences néfastes pour les communications
radio. Il n'est toutefois pas garanti qu'aucune interférence ne se
produise dans le cadre d'une installation en particulier. S'il s'avère
que cet appareil produit des interférences néfastes pour la réception
de la radio ou de la télévision (pour le vérier, éteignez puis rallumez
l'appareil), essayez de les éliminer à l'aide d'une ou de plusieurs des
mesures suivantes :
• Réorientation ou déplacement de l'antenne de réception.
• Augmentation de la distance entre l'appareil et le récepteur.
• Branchement de l'appareil sur une prise se trouvant sur un circuit
différent de la radio ou de la télévision
• Demande d'aide auprès du revendeur ou d'un technicien radio/TV
expérimenté
Informations relatives à la réglementation
1. Avis de la FCC
ATTENTION
MISE EN GARDE DE LA FCC : Tout(e) changement ou modication
effectué(e) sans l'accord express de la partie responsable de la
conformité peut rendre caduque l'autorisation accordée à l'utilisateur
d'utiliser l'appareil.
Cet appareil est conforme au paragraphe 15 de la réglementation
de la FCC. Son fonctionnement est soumis aux deux conditions
suivantes :
1) Cet appareil ne doit pas provoquer d'interférences néfastes ; et
2) Cet appareil doit accepter toute interférence reçue, y compris les
interférences entraînant un fonctionnement indésirable.
Concernant les appareils vendus sur les marchés américain et
canadien, seules les chaînes 1 à 11 sont disponibles. Vous ne pouvez
sélectionner aucune autre chaîne.

4 Français
DÉCLARATION DE LA FCC RELATIVE À L'EXPOSITION AUX
RAYONNEMENTS :
Cet appareil est conforme aux limites d'exposition aux rayonnements
établies par la FCC, dénies pour un environnement non contrôlé.
Cet appareil doit être installé et utilisé en laissant une distance d'au
moins 8 pouces (20 cm) entre le radiateur et votre corps. Cet appareil
ainsi que son ou ses antenne(s) ne doivent pas être situés au même
endroit et être utilisés conjointement à tout(e) autre antenne ou
émetteur.
2. Avis d'IC
Le terme « IC » placé avant le numéro de certication pour les
radiofréquences signie seulement que les spécications techniques
d'Industry Canada ont été respectées. Son fonctionnement est
soumis aux deux conditions suivantes : (1) cet appareil ne doit pas
provoquer d'interférences ; et (2) cet appareil doit accepter toute
interférence, y compris les interférences susceptibles d'entraîner un
fonctionnement indésirable de l'appareil.
Cet appareil numérique de classe B est conforme à la norme ICES-
003 du Canada.
Concernant les appareils vendus sur les marchés américain et
canadien, seules les chaînes 1 à 11 sont disponibles. Vous ne pouvez
sélectionner aucune autre chaîne.
DÉCLARATION D'IC RELATIVE À L'EXPOSITION AUX RAYONNEMENTS :
Cet appareil est conforme aux limites d'exposition aux rayonnements
établies par la norme RSS-102 d'IC, dénies pour un environnement
non contrôlé. Cet appareil doit être installé et utilisé en laissant une
distance d'au moins 8 pouces (20 cm) entre le radiateur et votre
corps. Cet appareil ainsi que son ou ses antenne(s) ne doivent pas
être situés au même endroit et être utilisés conjointement à tout(e)
autre antenne ou émetteur.

Français 5
Table des matières
Table des matières
Consignes de sécurité importantes 6
Présentation de votre nouvelle cuisinière 21
Présentation 21
Accessoires fournis 21
Avant de commencer 22
Conseils pour économiser de l'énergie 22
Table de cuisson 22
À propos de la table de cuisson 22
Comment régler l'appareil pour utiliser la table de cuisson ? 24
Utilisation des ustensiles de cuisine appropriés 26
Choix des ustensiles de cuisine appropriés 27
Protection de la table de cuisson 27
Utilisation du four 28
Panneau de commande du four 28
Verrouillage du four 28
Réglage de l'horloge 29
Réglage de la minuterie 29
Cuisson minutée 29
Départ différé 30
Activation et désactivation de l'éclairage du four 30
Réglages minimum et maximum 30
Utilisation des grilles du four 31
Cuisson traditionnelle 32
Cuisson par convection 33
Rôtissage par convection 34
Cuisson au gril 34
Friture par application d'air 35
Utilisation de Fonction spéciale 36
Utilisation de la fonction Maintien au chaud 37
Utilisation de la fonction Smart Control 38
Utilisation de la fonction commande vocale 38
Utilisation de la fonction des options 39
Utilisation de la fonction Sabbat 41
Entretien de votre appareil 42
Auto-nettoyage 42
Nettoyage vapeur 44
Entretien et nettoyage du four 45
Entretien et nettoyage de la table de cuisson vitrée 47
Retrait et réinstallation de la porte du four 49
Retrait et réinstallation du tiroir de rangement 51
Remplacement de l'ampoule du four 51
Dépannage 52
Dépannage 52
Codes d'information 56
Garantie (ÉTATS-UNIS) 57
Garantie (CANADA) 58
Annexe 60
Annonce de contenu libre 60

6 Français
Consignes de sécurité importantes
Consignes de sécurité importantesConsignes de sécurité importantes
CONSERVEZ PRÉCIEUSEMENT CES INSTRUCTIONS
ATTENTION
An de réduire les risques d'incendie, d'explosion, d'électrocution
ou de blessures lors de l'utilisation de votre cuisinière, vous devez
respecter ces règles de sécurité de base.
NE PAS tenter.
NE PAS démonter.
NE PAS toucher.
Suivez scrupuleusement les consignes.
Débranchez la che d'alimentation de la prise murale.
Assurez-vous que l'appareil est relié à la terre an d'éviter tout
risque d'électrocution.
Pour obtenir de l'aide, communiquez avec un centre technique
Samsung.
Remarque
Les symboles d'avertissement sont là pour minimiser les risques de
blessure ; veillez à bien les respecter.
Après lecture de cette rubrique, conservez le manuel dans un endroit
sûr an de pouvoir le consulter ultérieurement.
Consignes de sécurité importantes
Lisez et suivez toutes les consignes avant d'utiliser votre cuisinière
an d'éviter tout risque d'incendie, d'électrocution, de blessure ou
de dommage lors de son utilisation. Le présent guide ne couvre
pas toutes les situations susceptibles de se produire. Communiquez
toujours avec votre réparateur ou le fabricant en cas de
fonctionnement anormal de l'appareil.
CE QUE VOUS DEVEZ SAVOIR SUR LES
CONSIGNES DE SÉCURITÉ
Les avertissements et les consignes de sécurité importantes contenus
dans ce manuel ne sont pas exhaustifs. Il est de votre responsabilité
de faire appel à votre bon sens et de faire preuve de prudence et de
minutie lors de l'installation, de l'entretien et de l'utilisation du four.
Symboles de sécurité importants et précautions
Signication des icônes et des symboles utilisés dans ce manuel :
AVERTISSEMENT
Risques ou manipulations dangereuses susceptibles d'entraîner des
blessures graves, voire mortelles.
ATTENTION
Risques ou manipulations dangereuses susceptibles d'entraîner des
blessures légères ou des dégâts matériels.

Français 7
Consignes de sécurité importantes
CONSERVEZ PRÉCIEUSEMENT CES INSTRUCTIONS
AVERTISSEMENT DE LA PROPOSITION
65 ADOPTÉE PAR LA CALIFORNIE
AVERTISSEMENT
Cancer et Troubles de l'appareil reproducteur - www.P65Warnings.ca.gov
POUR VOTRE SÉCURITÉ
Lorsque vous utilisez des appareils électriques, respectez les
consignes de sécurité de base suivantes :
ATTENTION
• Utilisez cet appareil uniquement pour l'usage auquel il est destiné
(tel que décrit dans ce manuel d'utilisation).
• Les surfaces potentiellement chaudes comprennent la table de
cuisson, les zones faisant face à la table de cuisson, l'orice de
ventilation du four, les surfaces situées à proximité de cette
ouverture et les rainures situées autour de la porte du four.
Assurez-vous que votre appareil est correctement installé et mis à la
terre par un technicien qualié.
Entretien par l'utilisateur - Ne réparez ni ne remplacez jamais les
pièces de l'appareil vous-même, sauf si le présent manuel vous
y autorise. Toute autre réparation devra être effectuée par un
technicien qualié.
Éteignez toujours l'appareil avant de procéder à une réparation, en
retirant le fusible ou en coupant le disjoncteur.
• Ne pénétrez pas à l'intérieur du four.
• Ne rangez pas d'objets susceptibles d'éveiller l'intérêt des
enfants dans les placards situés au-dessus de la cuisinière ou
sur le dosseret de la cuisinière (risque de chute et de blessures
graves).
• Ne laissez pas les enfants seuls. Ne laissez jamais un enfant
sans surveillance dans la pièce où est installé l'appareil. Ne
les autorisez jamais à monter sur une quelconque partie de
l'appareil.
• N'utilisez jamais l'appareil pour chauffer une pièce.
• N'utilisez pas d'eau pour éteindre les ammes de friture.
Éteignez le four pour éviter leur propagation. Étouffez le feu ou
les ammes en fermant la porte ou en utilisant un extincteur à
poudre, à mousse ou à dioxyde de carbone.
• Évitez de rayer ou de heurter les portes en verre, la surface de
cuisson ou le tableau de commande. Le verre pourrait se briser.
N'effectuez pas de cuisson avec un verre brisé. Vous risquez une
électrocution, un incendie ou des coupures.

8 Français
Consignes de sécurité importantes
Consignes de sécurité importantesConsignes de sécurité importantes
CONSERVEZ PRÉCIEUSEMENT CES INSTRUCTIONS
• S'il se produit un incendie à l'intérieur du four pendant l'auto-
nettoyage, éteignez le four et attendez que le feu s'éteigne.
Ne forcez jamais l'ouverture de la porte. L'introduction d'air
frais à des températures d'auto-nettoyage peut provoquer un
embrasement du four. Le non-respect de ces consignes risque
d'entraîner de graves brûlures.
• En cas de taches de graisse importantes, activez la fonction
d'auto-nettoyage avant d'utiliser le four à nouveau. Laisser de
l'huile à l'intérieur génère un risque d'incendie.
• Essuyez les salissures importantes sur le fond du four avec une
serviette en papier ou un chiffon avant de démarrer le cycle
d'auto-nettoyage. L'auto-nettoyage du four lorsqu'il y a des
taches de graisse importantes sur le fond nécessite des cycles
de nettoyage plus longs et produit plus de fumée.
• Stockage à l'intérieur ou sur le dessus de l'appareil. N'entreposez
aucun matériau inammable dans ou à proximité du four.
Retirez tous les éléments d'emballage de l'appareil avant de
l'utiliser. Maintenez tout objet en plastique, vêtement et papier à
distance des pièces susceptibles d'être chaudes.
• Portez les vêtements appropriés. Ne portez jamais de vêtements
amples lorsque vous utilisez cet appareil.
• Utilisez uniquement des maniques sèches. L'utilisation de
maniques humides ou mouillées sur les surfaces chaudes peut
entraîner des brûlures en raison de la vapeur qui se dégage à ce
moment-là. Les maniques ne doivent pas entrer en contact avec
les éléments chauffants. N'utilisez pas de serviette ou tout autre
torchon volumineux.
• Apprenez aux enfants à ne pas jouer avec les commandes ou les
autres éléments de la cuisinière.
• Pour votre sécurité, n'utilisez de nettoyeur haute pression, à eau
ou à vapeur, sur aucune partie de la cuisinière.
• Si le cordon d'alimentation de l'appareil est endommagé, il devra
être remplacé par le fabricant, son réparateur agréé ou par toute
personne qualiée an d'éviter de créer un danger.
• Cet appareil n'est pas conçu pour être utilisé par des personnes
(y compris les enfants) inexpérimentées ou dont les capacités
physiques, sensorielles ou mentales sont réduites, sauf si
celles-ci sont sous la surveillance ou ont reçu les instructions
d'utilisation appropriées de la personne responsable de leur
sécurité.
• Ne vous appuyez pas sur la cuisinière car vous risqueriez de
tourner malencontreusement les boutons de commande.
Français 9
Consignes de sécurité importantes
CONSERVEZ PRÉCIEUSEMENT CES INSTRUCTIONS
TABLES DE CUISSON
• Ne laissez jamais la table de cuisson sans surveillance lorsqu'un
brûleur fonctionne à puissance élevée. En cas de débordement,
les particules graisseuses provenant des aliments risquent de
s'enammer.
• Couches protectrices – N'utilisez pas de papier d'aluminium
pour recouvrir le fond des bacs de récupération ou la sole
du four, sauf si les instructions le suggèrent. Une installation
inappropriée de ces couches protectrices est susceptible de
provoquer une décharge électrique ou un incendie.
• Pour éviter le débordement d'huile et un incendie, employez
une quantité minimale d'huile dans une poêle peu profonde et
évitez de faire cuire les aliments surgelés avec des quantités
excessives de glace.
• Ne soulevez pas la table de cuisson. Vous risqueriez de
l'endommager et de provoquer des dysfonctionnements.
• Ne faites jamais fonctionner la table de cuisson sans récipient.
Les boutons de commande deviendraient brûlants.
• N'utilisez jamais la table de cuisson vitrée comme planche à
découper.
• Soyez prudent lorsque vous touchez la table de cuisson. La
surface vitrée restera chaude quelques minutes même après
l'arrêt de la cuisson.
• Ne déplacez pas le récipient et le bol dans une position
horizontale sur la table de cuisson.
• Posez les ustensiles de cuisine sur la table de cuisson avec
précaution, surtout lorsque celle-ci fonctionne. Ils peuvent
devenir chauds et vous risqueriez de vous brûler.
• Utilisez des plats de taille appropriée. L'appareil est doté de
foyers de différentes tailles. Utilisez des casseroles et des
poêles à fond plat, sufsamment larges pour recouvrir toute
la surface de chauffe. L'utilisation d'ustensiles de taille trop
petite exposerait une partie de l'élément chauffant à un risque
de contact et d'inammation (ex. : tissu). Des casseroles et des
poêles de taille adéquate augmenteront en outre l'efcacité de
la cuisson.
• Le manche des ustensiles doit être dirigé vers l'intérieur et
non au-dessus des foyers adjacents. An de réduire tout risque
de brûlure, d'inammation de matières inammables ou de
projections dû à un contact accidentel avec les ustensiles,
dirigez leur manche vers l'intérieur et non au-dessus des foyers
adjacents.
• Ustensiles en faïence. An d'éviter tout risque de fêlure lié aux
brusques changements de températures, utilisez uniquement
des ustensiles en verre, en vitrocéramique, en céramique, en
terre cuite ou en faïence.
• Nettoyage. Suivez les consignes et avertissements gurant sur
les étiquettes des produits nettoyants.

10 Français
Consignes de sécurité importantes
Consignes de sécurité importantesConsignes de sécurité importantes
CONSERVEZ PRÉCIEUSEMENT CES INSTRUCTIONS
• Assurez-vous que vous savez quel bouton de commande
correspond à chaque foyer. Assurez-vous d'avoir allumé le bon
foyer.
• Éteignez toujours le foyer avant de retirer la casserole.
• Si vous préparez des aliments qui s'enamment sous la hotte,
activez la ventilation.
• Surveillez les aliments frits à température élevée ou moyenne.
• Ne stockez pas d'objets lourds au-dessus de la table de cuisson
qui pourraient tomber et l'endommager.
• N'utilisez pas de caches décoratifs sur les foyers de la table
de cuisson ; en cas d'allumage accidentel d'un foyer, le cache
décoratif deviendrait chaud et risquerait de fondre. Des brûlures
peuvent se produire si les caches chauds sont manipulés. La
table de cuisson peut également être endommagée.
SÉCURITÉ ÉLECTRIQUE
• Installation appropriée : assurez-vous que votre appareil est
correctement installé et mis à la terre par un technicien qualié.
• L'entretien de cet appareil doit impérativement être effectué
par une main d'œuvre qualiée. Des réparations effectuées
par des personnes non qualiées peuvent causer des blessures
corporelles ou des dégâts matériels graves. Si votre cuisinière
nécessite des réparations, contactez un service d'assistance
technique agréé Samsung. Le non-respect de ces instructions
peut provoquer des dommages et entraîner l'annulation de la
garantie.
• Les appareils encastrés ne doivent être mis en marche qu'après
avoir été installés dans un meuble ou un lieu de travail
conforme aux normes en vigueur. Cela garantit une installation
des appareils conforme aux normes de sécurité appropriées.
• En cas de dysfonctionnement ou de détérioration (cassure,
fêlure) de l'appareil :
- éteignez toutes les zones de cuisson.
- débranchez la cuisinière de la prise murale CA.
- contactez le centre de dépannage Samsung le plus proche.
AVERTISSEMENT
Si la surface est fendue, éteignez et débranchez l'appareil an
d'éviter tout risque d'électrocution. N'utilisez pas la table de cuisson
tant que la surface vitrée n'a pas été remplacée.
AVERTISSEMENT
• An d'éviter tout risque d'électrocution, veillez à ce que l'appareil
soit hors tension avant de procéder au remplacement de
l'ampoule.
• La cuisinière ne doit pas être placée sur un socle.

Français 11
Consignes de sécurité importantes
CONSERVEZ PRÉCIEUSEMENT CES INSTRUCTIONS
SÉCURITÉ ENFANTS
AVERTISSEMENT
• Cet appareil n'est pas conçu pour être utilisé par des jeunes
enfants ou des personnes invalides non assistés par un adulte
responsable.
• Les jeunes enfants ne doivent pas utiliser l'appareil sans la
surveillance d'un adulte.
• Veillez à ce que les enfants soient éloignés de la porte lors de son
ouverture ou de sa fermeture car ils pourraient se cogner contre
la porte ou se coincer les doigts dedans.
• Les zones de cuisson chauffent lorsque vous cuisinez. Pour éviter
aux jeunes enfants d'être brûlés, maintenez-les toujours éloignés
de l'appareil lorsque vous cuisinez.
• Pendant l'auto-nettoyage, les surfaces peuvent dépasser leur
température habituelle. Tenez les enfants éloignés de la cuisinière
lorsqu'elle est en mode d'auto-nettoyage.
AVERTISSEMENT
Les parties accessibles peuvent devenir chaudes pendant l'utilisation.
Les enfants en bas âge doivent être tenus à l'écart de l'appareil an
d'éviter toute brûlure.
FOUR
• NE TOUCHEZ PAS LES ÉLÉMENTS CHAUFFANTS OU LES
SURFACES INTERNES DU FOUR. Les éléments chauffants peuvent
être chauds même s'ils sont noirs. Les surfaces internes d'un four
deviennent sufsamment chaudes pour provoquer des brûlures.
Pendant et après le fonctionnement, ne touchez pas les éléments
chauffants et les surfaces internes du four et ne laissez aucun
vêtement ou produit inammable entrer en contact avec ces
derniers tant qu'ils n'ont pas refroidis. Certaines autres surfaces
du four peuvent devenir chaudes au point de provoquer des
brûlures. Il s'agit des orices de ventilation du four et surfaces
situées à proximité de ces orices, de la porte du four et de la
vitre de la porte du four.
• Ne faites pas chauffer des aliments contenus dans des récipients
fermés. L'accumulation de pression pourrait faire exploser le
contenant et provoquer des blessures.
• N'utilisez pas le four pour sécher des journaux. En cas de
surchauffe, les journaux risquent de s'enammer.
• N'utilisez pas le four comme espace de rangement. Les éléments
rangés dans le four peuvent s'enammer.
12 Français
Consignes de sécurité importantes
Consignes de sécurité importantesConsignes de sécurité importantes
CONSERVEZ PRÉCIEUSEMENT CES INSTRUCTIONS
• Soyez prudent lorsque vous ouvrez la porte. Laissez l'air chaud
ou la vapeur s'échapper avant de retirer les aliments du four ou
de les placer à l'intérieur.
• Couches protectrices. N'utilisez pas de papier d'aluminium pour
recouvrir la sole du four, sauf si les instructions le suggèrent.
Une installation inappropriée de ces couches protectrices
est susceptible de provoquer une décharge électrique ou un
incendie.
• N'obstruez pas les conduits de ventilation du four. L'orice de
ventilation est situé au-dessus du foyer arrière droit. Pendant le
fonctionnement du four, cette zone peut devenir extrêmement
chaude. N'obstruez jamais ces orices de ventilation et ne placez
pas de matière plastique ou d'éléments sensibles à la chaleur
dessus.
• Insertion des grilles du four. Placez toujours les grilles du four à
la hauteur appropriée tant que le four est encore froid. Si vous
devez déplacer une grille alors que le four est chaud, utilisez des
maniques. Les poignées des récipients ne doivent jamais toucher
les éléments chauffants du four.
• L'aluminium ou la sonde thermique ne doit pas toucher les
éléments chauffants.
• Cet appareil devient chaud pendant son utilisation.
Prenez garde à ne pas toucher les éléments chauffants situés à
l'intérieur du four.
• N'utilisez pas de nettoyants fortement abrasifs ou de grattoirs
métalliques pointus pour nettoyer la vitre de la porte du four. Ils
sont susceptibles de rayer la surface et la vitre risque de voler
en éclats.
ATTENTION
N'essayez pas d'utiliser le four pendant une panne de courant. En
cas de panne de courant, arrêtez toujours le four. Si le four n'est pas
arrêté et que l'alimentation est rétablie, le four peut commencer
à fonctionner à nouveau. Les aliments laissés sans surveillance
peuvent s'enammer ou s'altérer.
COMMANDE À DISTANCE
Cet appareil peut être conguré pour pouvoir le commander à
distance à tout moment.
• Ne placez pas de matières inammables ou de produits
thermosensibles à l'intérieur, par-dessus, ou près des foyers de
l'appareil.

Français 13
Consignes de sécurité importantes
CONSERVEZ PRÉCIEUSEMENT CES INSTRUCTIONS
FOURS AUTONETTOYANTS
Ne nettoyez jamais le joint de la porte. Le joint de la porte est
indispensable pour assurer une bonne étanchéité. Veillez à ne pas
frotter, endommager ni déplacer le joint.
• Ne laissez jamais vos oiseaux de compagnie dans la cuisine. Les
oiseaux sont extrêmement sensibles à la fumée émise durant les
cycles d'auto-nettoyage du four. La fumée peut être dangereuse,
voire mortelle pour les oiseaux. Déplacez les oiseaux dans une
pièce bien aérée.
• Procédez au cycle d'auto-nettoyage uniquement sur les parties
mentionnées dans le présent manuel. Avant de procéder à
l'auto-nettoyage du four, retirez la plaque de séparation, la grille,
les ustensiles et tous les aliments.
• Avant de lancer le cycle d'auto-nettoyage, essuyez la graisse et
les résidus alimentaires dans le four. Une quantité excessive de
graisse peut s'enammer, provoquant de la fumée dommageable
pour votre intérieur.
• Aucun nettoyant ou revêtement de protection pour four
disponible dans le commerce ne doit être utilisé pour l'intérieur
ou l'extérieur du four.
• Retirez les grilles en nickel avant de démarrer le cycle d'auto-
nettoyage du four an d'éviter qu'elles ne se décolorent.
• Si le mode d'auto-nettoyage ne fonctionne pas, éteignez le four
et débranchez-le de la prise d'alimentation. Faites-le réparer par
un technicien qualié.
• Nettoyez les projections les plus importantes avant de procéder
à l'auto-nettoyage.
HOTTE D'ASPIRATION
• Nettoyez fréquemment la hotte d'aspiration. Ne laissez pas la
graisse s'accumuler sur la hotte ou le ltre.
• Si les aliments situés sous la hotte s'enamment, activez la
ventilation.

14 Français
Consignes de sécurité importantes
Consignes de sécurité importantesConsignes de sécurité importantes
CONSERVEZ PRÉCIEUSEMENT CES INSTRUCTIONS
SURFACES DE CUISSON EN VITROCÉRAMIQUE
• NE TOUCHEZ PAS LES FOYERS OU LES ZONES SITUÉES À
PROXIMITÉ.
Les foyers peuvent être chauds même s'ils sont noirs. Les zones
situées à proximité des foyers peuvent devenir chaudes au point
de provoquer des brûlures. Pendant et après le fonctionnement
de la cuisinière, ne touchez pas les foyers ou les zones situées
à proximité des foyers et évitez que des vêtements ou produits
inammables n'entrent en contact avec ces derniers tant qu'ils
n'ont pas entièrement refroidi. Ces zones incluent notamment la
table de cuisson et les zones situées face à la table de cuisson.
• Ne faites rien cuire sur une table de cuisson brisée. Si la table
de cuisson est cassée, vous risquez de vous électrocuter en la
nettoyant ou en cuisinant dessus. Contactez immédiatement un
technicien qualié.
Nettoyez la table de cuisson avec précaution. Si vous utilisez une
éponge ou un chiffon humide pour essuyer les salissures sur une
table de cuisson chaude, veillez à ne pas vous brûler avec la vapeur.
Certains nettoyants peuvent former des fumées toxiques s'ils sont
appliqués sur une surface chaude.
AVERTISSEMENTS IMPORTANTS
RELATIFS À L'INSTALLATION
AVERTISSEMENT
• Cet appareil doit être installé par un technicien qualié ou une
société de dépannage.
- Le non-respect de cette consigne d'installation par un
technicien qualié peut provoquer une électrocution, un
incendie, une explosion, un dysfonctionnement de l'appareil ou
des blessures.
• Déballez le four, retirez tous les éléments d'emballage et vériez
que le four n'est pas endommagé. Il peut s'agir par exemple de
traces de choc à l'intérieur ou à l'extérieur du four, de loquets de
porte cassés, de ssures au niveau de la porte ou d'une porte mal
alignée. En cas de dommages, n'utilisez pas le four et contactez
immédiatement votre revendeur.
• Branchez le cordon d'alimentation sur une prise adaptée
correctement reliée à la terre. Ne branchez aucun autre appareil
électrique sur ce même circuit.
• Gardez tous les éléments d'emballage hors de la portée des
enfants. Ceux-ci risqueraient de les utiliser pour jouer et se blesser.
• Installez votre appareil sur un revêtement plat et dur, capable de
supporter son poids.
- Le non-respect de cette consigne risque d'entraîner des
vibrations anormales, des bruits ou d'autres problèmes avec
l'appareil.
Français 15
Consignes de sécurité importantes
CONSERVEZ PRÉCIEUSEMENT CES INSTRUCTIONS
• Cet appareil doit être correctement relié à la terre.
• Ne reliez jamais cet appareil à une conduite de gaz, à un tuyau
d'eau en plastique ou à une ligne téléphonique.
- Cela pourrait entraîner un risque d'électrocution, d'incendie,
d'explosion ou de défaillance de l'appareil.
• Ne coupez ni ne retirez JAMAIS la broche de mise à la terre de la
che du cordon d'alimentation.
• Assurez-vous que l'ampérage de la prise sur laquelle est branché
l'appareil est adapté.
• N'installez pas cet appareil dans un endroit humide, graisseux ou
poussiéreux et veillez à ce qu'il ne soit pas exposé directement à la
lumière du soleil ou à une source d'eau (eau de pluie).
- Cela pourrait entraîner un risque d'électrocution ou d'incendie.
• N'utilisez jamais un cordon d'alimentation endommagé ou une
prise murale mal xée.
- Cela pourrait entraîner un risque d'électrocution ou d'incendie.
• Ne tirez jamais sur le cordon d'alimentation et ne le pliez pas de
façon excessive.
• Ne vrillez et ne serrez pas le cordon d'alimentation.
• N'accrochez pas le cordon d'alimentation sur un objet métallique ;
ne placez pas d'objet lourd sur le cordon d'alimentation ; n'insérez
pas le cordon d'alimentation entre des objets.
- Cela pourrait entraîner un risque d'électrocution ou d'incendie.
Si le cordon d'alimentation est endommagé, contactez le centre de
dépannage Samsung le plus proche.
AVERTISSEMENTS IMPORTANTS
RELATIFS À L'UTILISATION
ATTENTION
• Si votre appareil est submergé par un liquide quel qu'il soit,
veuillez prendre contact avec le centre de dépannage Samsung
le plus proche. Le non-respect de cette consigne peut entraîner
un risque d'électrocution ou d'incendie.
• Si l'appareil génère un bruit anormal, une odeur de brûlé ou de
la fumée, débranchez immédiatement la prise et contactez le
centre de maintenance Samsung le plus proche.
- Le non-respect de cette consigne peut entraîner un risque
d'électrocution ou d'incendie.
• En cas de fuite de gaz (propane, GPL, etc.), aérez immédiatement
la pièce. Ne touchez pas le cordon d'alimentation. Ne touchez
pas l'appareil.
- La moindre étincelle risquerait de provoquer une explosion
ou un incendie.
16 Français
Consignes de sécurité importantes
Consignes de sécurité importantesConsignes de sécurité importantes
CONSERVEZ PRÉCIEUSEMENT CES INSTRUCTIONS
• Prenez garde à ne pas toucher la porte du four, les éléments
chauffants ou toute autre partie de l'appareil susceptible d'avoir
chauffé.
- Le non-respect de cette consigne risque d'entraîner des
brûlures.
• En cas de départ de feu à l'intérieur du four, laissez sa porte
fermée, éteignez l'appareil et débranchez la prise ou coupez
l'alimentation au niveau du tableau de fusibles ou du disjoncteur.
Si vous ouvrez la porte du four, l'incendie risque de se propager.
• Respectez systématiquement les consignes de sécurité lorsque
vous utilisez votre four. Ne tentez jamais de réparer vous-même
l'appareil ; le courant électrique circulant à l'intérieur est très
élevé. Si le four nécessite des réparations, contactez un centre
de maintenance Samsung agréé proche de chez vous.
• Si vous utilisez l'appareil alors qu'il est contaminé par des
substances étrangères, par exemple des résidus d'aliments, cela
risque de provoquer un dysfonctionnement de l'appareil.
• Retirez l'emballage des aliments avec précaution lorsque vous
sortez ces derniers du four.
- Si les aliments sont chauds, de la vapeur chaude peut
s'échapper soudainement lorsque vous en retirez
l'emballage, et vous risquez de vous brûler.
• Ne tentez pas de réparer, démonter ou modier vous-même
l'appareil.
- Le châssis de l'appareil étant traversé par un courant à haute
tension, il existe un risque d'électrocution ou d'incendie.
- Si le four nécessite des réparations, contactez le centre de
maintenance Samsung le plus proche de chez vous.
• Si une substance étrangère, telle que de l'eau, a pénétré dans
l'appareil, contactez le centre de dépannage Samsung le plus
proche.
- Le non-respect de cette consigne peut entraîner un risque
d'électrocution ou d'incendie.
• Ne manipulez pas le cordon d'alimentation avec les mains
mouillées.
- Cela pourrait entraîner un risque d'électrocution.
• N'éteignez pas l'appareil s'il est en cours de fonctionnement.
- Cela pourrait provoquer une étincelle et entraîner un risque
d'électrocution ou d'incendie.
• Conservez tous les matériaux d'emballage hors de portée des
enfants : les matériaux d'emballage présentent un danger pour
les enfants.
- Risque d'asphyxie avec les sacs plastique notamment.

Français 17
Consignes de sécurité importantes
CONSERVEZ PRÉCIEUSEMENT CES INSTRUCTIONS
• Ne laissez pas les enfants ou toute personne à capacités
physiques, sensorielles ou mentales réduites utiliser cet appareil
sans surveillance.
• Veillez à ce que les commandes et les zones de cuisson du four
soient hors de portée des enfants.
- Le non-respect de cette consigne peut entraîner un risque
d'électrocution, de brûlures ou de blessures.
• Ne touchez pas l'intérieur du four juste après son
fonctionnement ; les éléments sont encore brûlants.
- Le non-respect de cette consigne risque d'entraîner des
brûlures.
• N'utilisez et n'entreposez pas d'aérosols ou d'objets
inammables à proximité du four.
- Les matériaux inammables et les aérosols peuvent créer un
incendie ou une explosion.
• N'insérez pas vos doigts, de substances étrangères ou d'objets
métalliques, tels que des épingles ou des aiguilles dans les
entrées, les sorties ou les orices de l'appareil. En cas d'insertion
de substances étrangères dans l'une de ces ouvertures, contactez
votre fournisseur ou le centre de maintenance Samsung le plus
proche.
• N'essayez pas de modier, d'ajuster ou de réparer la porte. NE
retirez JAMAIS la porte ou l'habillage du four.
• N'entreposez et n'utilisez jamais le four en extérieur.
• Cet appareil ne doit jamais être utilisé à d'autres ns que la
cuisson.
- Si vous vous servez de l'appareil pour un autre usage que
celui auquel il est destiné, vous risquez de provoquer un
incendie.
• Ôtez le couvercle ou le bouchon des récipients fermés (bouteille
de thé aux herbes, biberon, bouteille de lait, etc.) avant de les
réchauffer. Faites un trou avec un couteau dans les aliments
contenant des coquilles (œufs, châtaignes, etc.) avant de les
cuisiner.
- Le non-respect de cette consigne risque d'entraîner des
brûlures ou des blessures.
• Ne faites jamais chauffer des récipients en plastique ou en
papier et ne les utilisez pas pour la cuisson.
- Le non-respect de cette consigne risque d'entraîner un
incendie.
• Ne faites pas chauffer d'aliments emballés dans du papier tel
que des pages de magazine ou du journal, etc.
- Cela pourrait provoquer un incendie.
• N'ouvrez pas la porte si les aliments à l'intérieur du
compartiment de cuisson sont en ammes.
- Si vous ouvrez la porte, de l'oxygène pénétrera à l'intérieur
et cela risque de provoquer un incendie.

18 Français
Consignes de sécurité importantes
Consignes de sécurité importantesConsignes de sécurité importantes
CONSERVEZ PRÉCIEUSEMENT CES INSTRUCTIONS
• N'exercez pas de pression excessive sur la porte ou à l'intérieur
de l'appareil. Évitez tout choc sur la porte ou à l'intérieur de
l'appareil.
- S'accrocher à la porte de l'appareil risque de le faire basculer
et de provoquer de graves blessures.
- Si la porte du four est endommagée, ne vous servez pas de
l'appareil. Contactez un centre de maintenance Samsung.
• Ne touchez pas les aliments pendant ou immédiatement après la
cuisson.
- Utilisez des maniques an d'éviter toute brûlure.
- Utilisez des maniques car les surfaces des poignées et du
four peuvent être sufsamment chaudes pour provoquer
des brûlures après cuisson.
AVERTISSEMENTS RELATIFS À L'UTILISATION
ATTENTION
• Si la surface du four est ssurée, n'utilisez pas l'appareil.
- Le non-respect de cette consigne risque d'entraîner une
électrocution.
• Les plats et récipients peuvent devenir extrêmement chauds.
Manipulez-les avec précaution.
• Les plats chauds et la vapeur peuvent provoquer des brûlures.
Retirez le couvercle des récipients avec précaution en veillant
à éloigner ces derniers de votre visage et de vos mains an
d'éviter que le dégagement de vapeur ne vous brûle.
• Retirez les couvercles des petits pots pour bébé avant de les
faire chauffer. Lorsque vous réchauffez des aliments pour bébé,
remuez-les bien pour répartir la chaleur uniformément. Testez
toujours la température des aliments avant de les donner à un
bébé Contrairement à ce qu'il paraît, le récipient en verre ou la
surface des aliments peuvent être chauds au point de brûler la
bouche du bébé.
• Soyez prudent car les boissons ou aliments peuvent être très
chaud(e)s après avoir été réchauffé(e)s.
- Vériez que les aliments ont sufsamment refroidi avant de
les donner aux jeunes enfants.

Français 19
Consignes de sécurité importantes
CONSERVEZ PRÉCIEUSEMENT CES INSTRUCTIONS
• Montrez-vous particulièrement vigilant lorsque vous faites
chauffer des liquides, par exemple de l'eau ou d'autres boissons.
- Veillez à remuer pendant ou après la cuisson.
- Évitez d'utiliser des récipients glissants à goulot étroit.
- Attendez au moins 30 secondes après la cuisson avant de
retirer le liquide qui vient d'être chauffé.
- Le non-respect de cette consigne risque de provoquer un
soudain débordement de son contenu et d'entraîner des
brûlures.
• Ne montez pas sur l'appareil et ne placez pas d'objets (ex. : linge,
couvercle de four, bougies allumées, cigarettes allumées, plats,
produits chimiques, objets métalliques, etc.) dessus.
- Des articles peuvent rester coincés dans la porte.
- Cela pourrait entraîner un risque d'électrocution, d'incendie,
de défaillance de l'appareil ou des blessures.
• N'utilisez pas l'appareil avec les mains mouillées.
- Cela pourrait entraîner un risque d'électrocution.
• Ne vaporisez pas de substances volatiles, par exemple un
insecticide, sur la surface de l'appareil.
- Ces substances sont non seulement nocives pour la santé,
mais elles peuvent également entraîner une électrocution,
un incendie ou une défaillance de l'appareil.
• N'approchez pas votre visage ou votre corps de l'appareil
pendant la cuisson ou lors de l'ouverture de la porte juste après
la cuisson.
- Veillez à ce que les enfants ne s'approchent pas trop près de
l'appareil.
- Le non-respect de cette consigne risque d'entraîner des
brûlures pour les enfants.
• Ne posez pas d'aliments ou d'objets lourds sur la porte lorsque
celle-ci est ouverte.
- Si vous ouvrez la porte, vous risqueriez de vous brûler ou
de vous blesser si les aliments ou des objets chutaient.
• Ne créez pas de choc thermique brutal au niveau de la porte,
de l'intérieur de l'appareil ou du plat (ex. : en versant de l'eau
dessus pendant ou juste après la cuisson).
- Cela risque d'endommager l'appareil. La vapeur ou les
projections d'eau pourraient entraîner des brûlures ou des
blessures.
• Ne faites jamais fonctionner l'appareil à vide, sauf en mode
d'auto-nettoyage.
• Ne faites jamais décongeler de boissons surgelées contenues
dans des bouteilles à col étroit. Celles-ci risqueraient d'éclater.
• Ne rayez pas la surface vitrée de la porte du four à l'aide d'un
objet tranchant.
- Cela pourrait endommager, voire briser la vitre.
• Ne posez rien sur l'appareil lorsque celui-ci fonctionne.

20 Français
Consignes de sécurité importantes
Consignes de sécurité importantesConsignes de sécurité importantes
CONSERVEZ PRÉCIEUSEMENT CES INSTRUCTIONS
• N'utilisez pas de récipients fermés hermétiquement. Retirez
les opercules et les couvercles avant la cuisson. Les récipients
fermés hermétiquement peuvent exploser en raison de
l'accumulation de pression, même après l'arrêt du four.
• Veillez à ce que les aliments ne touchent pas les éléments
chauffants du four.
- Cela pourrait provoquer un incendie.
• Évitez de surchauffer les aliments.
- Cela pourrait provoquer un incendie.
AVERTISSEMENTS IMPORTANTS
RELATIFS AU NETTOYAGE
ATTENTION
• Ne nettoyez pas l'appareil en pulvérisant directement de l'eau
dessus.
• N'utilisez pas de benzène, de diluant ou d'alcool pour nettoyer
l'appareil.
- Cela pourrait entraîner une décoloration, une déformation,
des dommages sur l'appareil ainsi qu'un risque
d'électrocution ou d'incendie.
• Prenez garde à ne pas vous blesser en nettoyant l'appareil
(extérieur ou intérieur).
- Les arêtes de celui-ci peuvent se révéler très tranchantes.
• Ne nettoyez pas l'appareil à l'aide d'un nettoyeur vapeur.
- Cela pourrait entraîner un phénomène de corrosion.
• Veillez à maintenir l'intérieur du four toujours propre. Les
particules d'aliments ou les projections d'huile adhérant aux
parois risquent d'abîmer le four ou d'en réduire son efcacité.
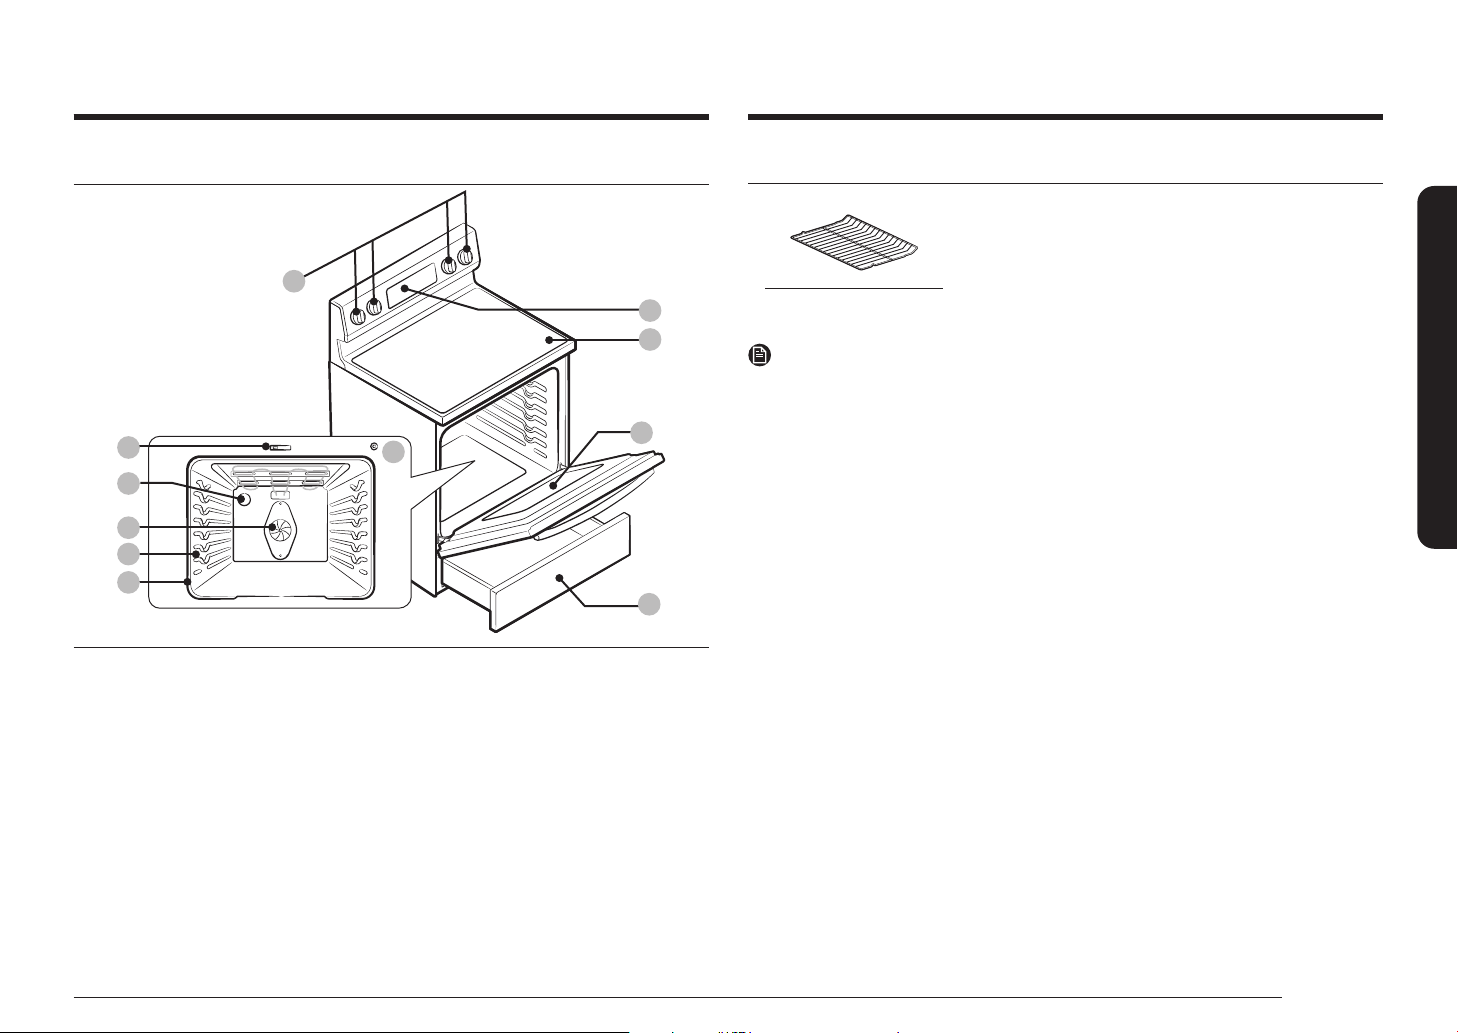
Français 21
Présentation de votre nouvelle cuisinière
Accessoires fournis
Grilles de cuisson (2) *
REMARQUE
Si vous souhaitez acheter un accessoire repéré par un astérisque (*), vous pouvez le commander
auprès du Centre d'assistance Samsung (1-800-726-7864).
Présentation de votre nouvelle cuisinière
Présentation
02
03
04
05
07
06
08
09
10
11
01
01 Panneau de commande
du four (reportez-vous
en page 28 pour plus
d'informations.)
02 * Boutons de
commande de la
surface (reportez-vous
en page 23 pour plus
d'informations.)
03 Surface vitrée
04 Porte du four 05 Tiroir de rangement 06 Loquet de porte
07 Commutateur
d'éclairage automatique
du four
08 * Éclairage du four 09 Ventilateur de
convection
10 Hauteur 11 Joint
22 Français
Avant de commencer
Avant de commencerAvant de commencer
Nettoyez soigneusement le four avant de l'utiliser pour la première fois. Ensuite, retirez les
accessoires, lancez un cycle de cuisson traditionnelle et faites fonctionner le four à 400 °F
pendant 1 heure. Il est normal qu'une odeur caractéristique se dégage lors de cette opération.
Ceci est tout à fait normal.
Aérez convenablement la pièce pendant cette période.
Conseils pour économiser de l'énergie
• Au cours de la cuisson, la porte du four doit être fermées sauf lorsque vous retournez les
aliments.
Veuillez ne pas ouvrir trop souvent la porte au cours de la cuisson an de maintenir la
température du four et d'économiser de l'énergie.
• Si le temps de cuisson est supérieur à 30 minutes, vous pouvez éteindre le four 5 à
10 minutes avant la n du temps de cuisson pour économiser de l'énergie. La chaleur
résiduelle terminera le processus de cuisson.
• Pour économiser de l'énergie et réduire le temps nécessaire pour faire réchauffer le four,
organisez l'utilisation du four an d'éviter d'avoir à l'éteindre entre deux cuissons.
• Lorsque c'est possible, faites cuire plusieurs aliments à la fois.
Table de cuisson
À propos de la table de cuisson
ATTENTION
AVANT LA CUISSON
• N'utilisez pas la table de cuisson vitrée comme planche à découper.
• Ne placez et ne rangez rien qui soit susceptible de fondre ou de s'enammer sur la surface
vitrée, même si elle n'est pas utilisée.
• Allumez la table de cuisson uniquement après avoir placé un récipient sur le foyer.
• Ne stockez pas d'objets lourds au-dessus de la table de cuisson. Ils pourraient tomber et
l'endommager.
ATTENTION
PENDANT LA CUISSON
• Ne placez pas de papier d'aluminium ou d'objets en plastique, tel que des salières et
poivrières, des porte-cuillères ou des emballages en plastique, sur la cuisinière lorsque vous
l'utilisez. L'air chaud provenant de l'orice de ventilation risque de faire fondre le plastique ou
d'enammer les objets.
• Assurez-vous que le foyer correct est allumé.
• Ne faites jamais cuire les aliments directement sur la surface vitrée. Utilisez toujours un
récipient.
• Veillez à toujours centrer la casserole sur le foyer que vous utilisez.
• Ne laissez jamais les foyers sans surveillance lorsque vous utilisez une température élevée.
En cas de débordement, les particules graisseuses provenant des aliments risquent de
s'enammer.
• Éteignez les foyers avant de retirer la casserole.
• Ne couvrez pas les aliments de lm plastique. Le plastique risque de fondre sur la surface et
de s'avérer très difcile à nettoyer.
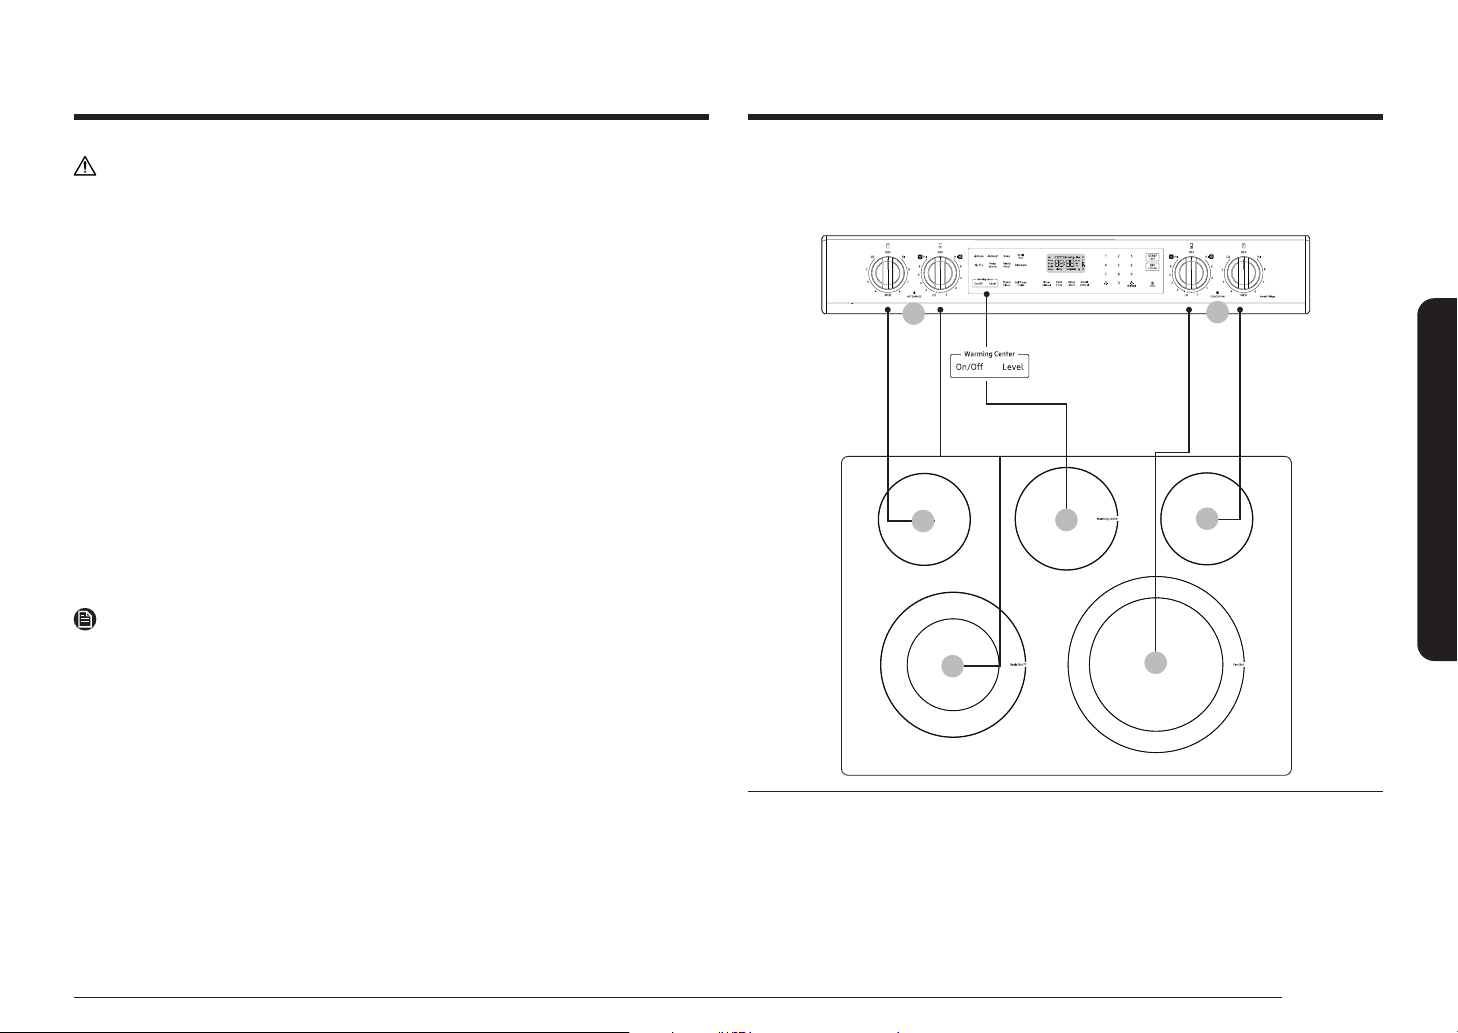
Français 23
Table de cuisson
ATTENTION
APRÈS LA CUISSON
• Ne touchez pas les foyers avant qu'ils n'aient refroidi.
• Le foyer peut encore être chaud et vous risquez de vous brûler si vous touchez la surface
vitrée avant qu'elle ait sufsamment refroidi.
• Nettoyez immédiatement les éclaboussures de la table de cuisson an d'éviter qu'elles ne
s'incrustent et soient difciles à nettoyer.
• Si un placard de rangement est installé directement au-dessus de la table de cuisson,
assurez-vous que les éléments rangés sont rarement utilisés et qu'ils peuvent être rangés en
toute sécurité dans un endroit soumis à la chaleur. La chaleur peut s'avérer dangereuse dans
le cas de liquides volatils, de nettoyants ou de produits en aérosol.
À propos des foyers radiants
La température augmente de manière progressive et uniforme. À mesure que la température
augmente, le foyer radiant devient rouge. An que soit conservé le réglage sélectionné, l'élément
se met en marche et s'arrête alternativement. L'élément chauffant conserve assez de chaleur pour
fournir une température uniforme et constante durant le cycle de désactivation. Pour une cuisson
efcace, éteignez l'élément chauffant quelques minutes avant la n de la cuisson. Ainsi, la chaleur
résiduelle permet de terminer le processus de cuisson.
REMARQUE
Les foyers radiants sont équipés d'un limiteur leur permettant de s'allumer et de s'éteindre,
même avec le réglage HI (Élevé). Cela permet d'éviter toute détérioration de la table de cuisson
en céramique. L'activation et la désactivation pendant le réglage HI (Élevé) sont normales et se
produisent si la casserole est trop petite pour le foyer radiant utilisé ou si le fond de la casserole
n'est pas plat.
Emplacement des foyers radiants et des commandes
Les boutons de commande permettent d'activer les foyers radiants de la table de cuisson comme
indiqué ci-dessous.
06
02
04
03
07
05
01
01 Arrière gauche :
6", 1200 W
02 Avant gauche :
6"/9", 1400 W / 3300 W
03 Avant droit :
9"/12”, 1900 W /
3000 W
04 Arrière droit :
6", 1200 W
05 Zone chauffe-plat :
100 W
06 Témoin de surface
chaude
07 Voyant de marche/arrêt
de la table de cuisson
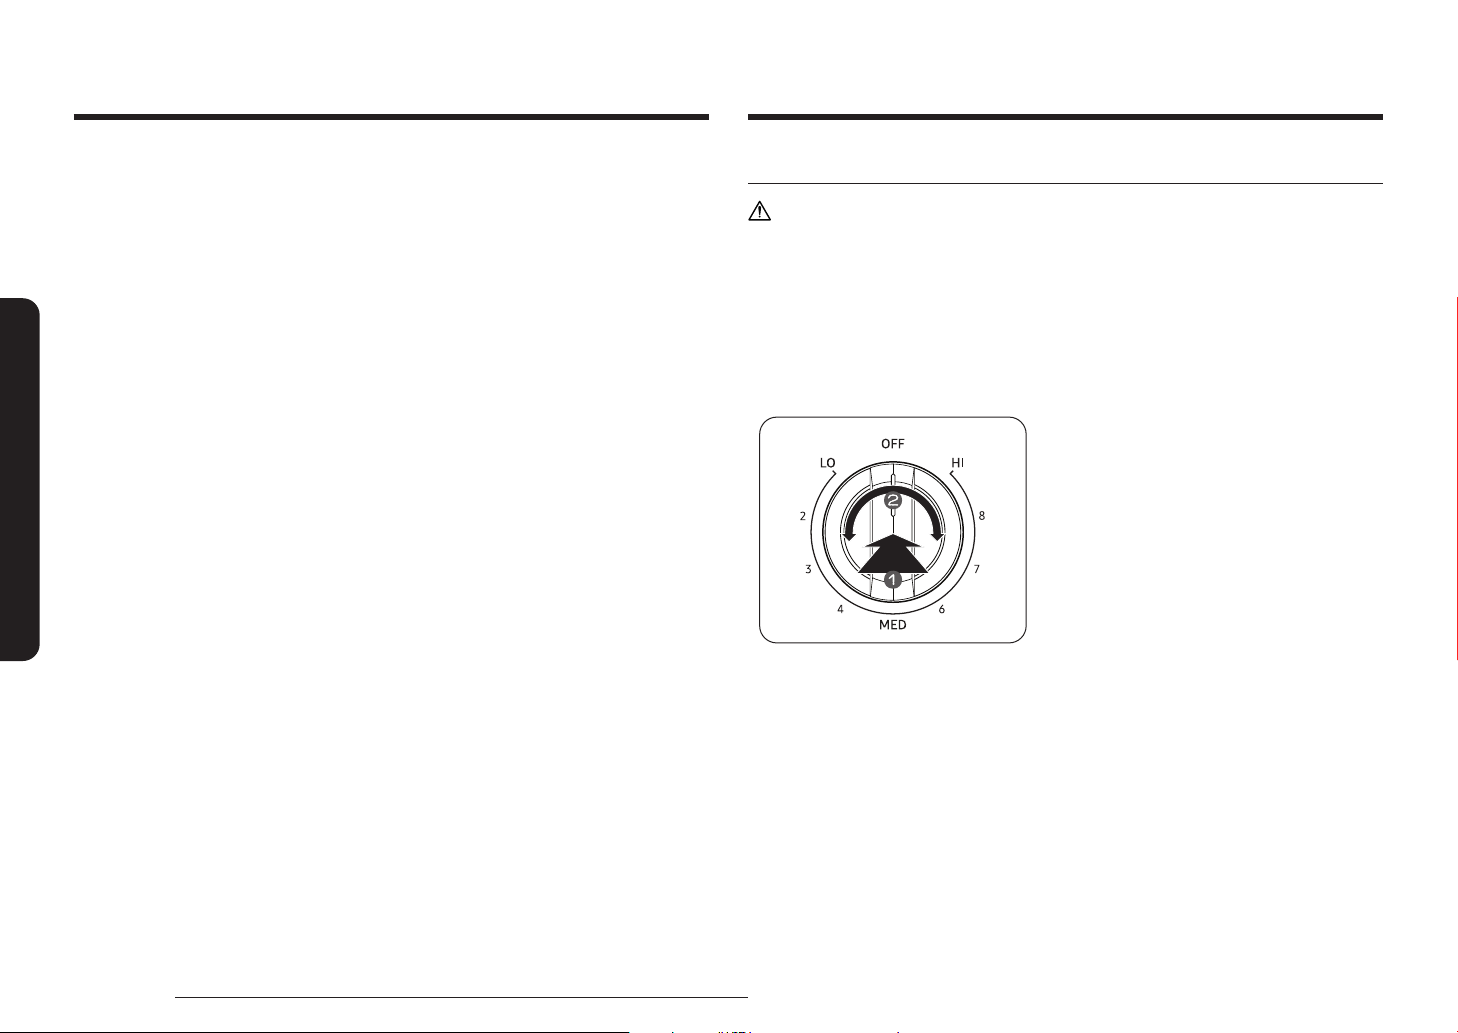
24 Français
Table de cuisson
Table de cuisson
Témoin de surface chaude
• S'allume lorsque la surface est allumée ou est chaude au toucher.
• Reste allumé même après la mise hors tension du foyer.
• Reste allumé jusqu'à ce que la surface descende à environ 150 °F.
Voyant de marche/arrêt de la table de cuisson
• Le voyant s'allume lorsque les boutons de commande de la table ne se trouvent pas sur la
position OFF (ARRÊT).
• Le voyant s'éteint lorsque les boutons de commande de la table se trouvent sur la position
OFF (ARRÊT).
Zones de cuisson
• Les zones de cuisson de votre cuisinière sont matérialisées par des cercles permanents sur
la table de cuisson vitrée. Pour une cuisson plus efcace, utilisez des récipients de même
taille que les foyers.
• Les récipients ne doivent pas dépasser de plus de ½" à 1" la zone de cuisson.
• Lorsqu'un bouton est activé, une lueur est visible à travers la table de cuisson vitrée.
L'élément s'allume et s'éteint alternativement an de maintenir la chaleur préréglée, même
lorsque le réglage de température est élevé.
• Pour obtenir plus d'informations sur la sélection des ustensiles de cuisine appropriés,
reportez-vous à la section « Utilisation des ustensiles de cuisine appropriés » en page 26.
Comment régler l'appareil pour utiliser la table de cuisson ?
ATTENTION
• Les foyers de la table de cuisson peuvent être chauds, même éteints, et provoquer des
brûlures. Ne touchez pas les foyers avant qu'ils n'aient sufsamment refroidi.
• Ne laissez jamais la cuisson sans surveillance à température élevée ou moyennement
élevée. En cas de débordement, les particules de graisse provenant des aliments risquent de
s'enammer.
• Veillez à tourner le bouton de commande sur OFF (ARRÊT) à la n de la cuisson.
Bouton de commande de l'élément unique (arrière gauche, arrière droit)
1. Enfoncez le bouton.
2. Tournez dans l'une ou l'autre direction selon le
réglage souhaité.
• Sur les positions OFF (ARRÊT) et Élevée,
un déclic est émis.
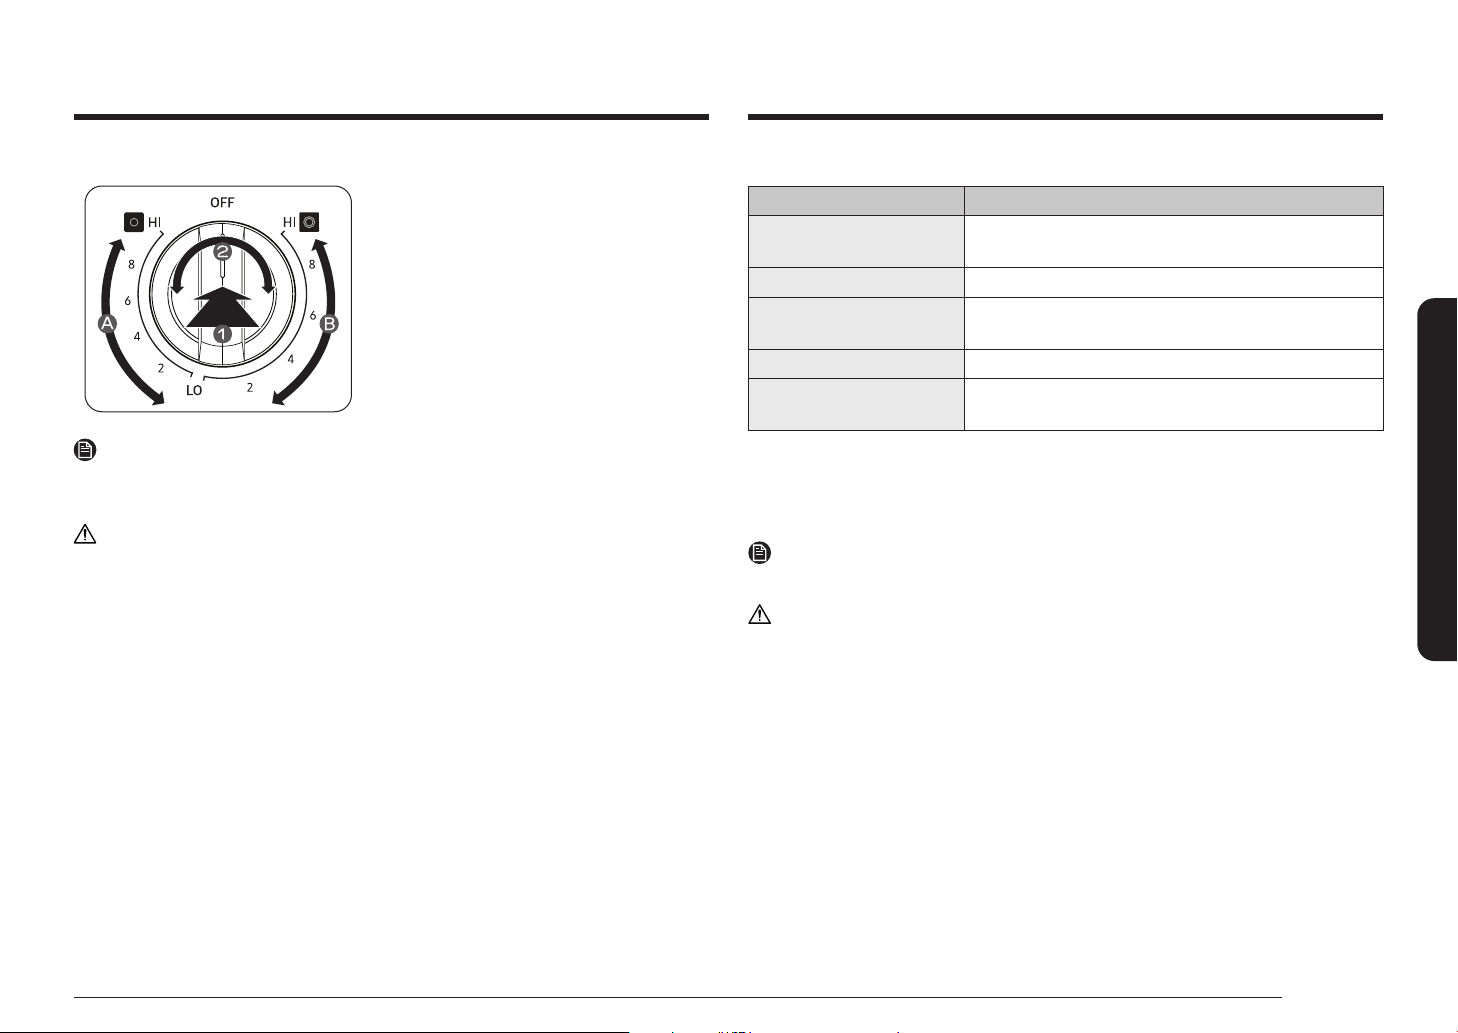
Français 25
Table de cuisson
Bouton de commande du foyer double (avant gauche, avant droite)
1. Enfoncez le bouton.
2. Tournez dans l'une ou l'autre direction selon le
réglage souhaité.
• Pour utiliser le foyer simple, tournez le
bouton de commande sur le réglage foyer
simple (A).
• Pour utiliser le foyer double, tournez le
bouton de commande sur le réglage foyer
double (B).
REMARQUE
Si vous retirez le bouton à des ns de nettoyage, veillez à bien le remettre en place dans la bonne
direction. (Reportez-vous à l'illustration ci-dessous.)
ATTENTION
• Veuillez noter qu'en cas de problème avec l'appareil, l'utilisation du bouton d'éclairage peut
ne pas se synchroniser avec le comportement du foyer radiant.
• La zone située entre le réglage élevé et désactivé n'est pas adaptée à la cuisson.
Réglages recommandés
RÉGLAGE TYPE DE CUISSON
Élevée Démarrer la cuisson de la plupart des aliments, amener l'eau à
ébullition, griller dans une poêle
Moyennement élevée Griller rapidement à la poêle, frire, frire dans un bain d'huile
Moyenne Maintenir à faible ébullition, épaissir des sauces, cuire des
légumes à la vapeur
Moyennement faible Poursuivre la cuisson, pocher, faire mijoter
Faible Maintenir au chaud les aliments, faire fondre, cuire
doucement
Utilisation de la zone chauffe-plat
La zone chauffe-plat, située dans la partie centrale arrière de la surface vitrée, conserve les
aliments cuits à température de consommation.
REMARQUE
La zone chauffe-plat ne devient pas rouge comme les autres foyers de cuisson.
ATTENTION
• Ne réchauffez pas les aliments pendant plus de deux heures sur la zone chauffe-plat.
• Utilisez uniquement des ustensiles et plats recommandés pour une utilisation sûre dans le
four et sur la table de cuisson.
• Utilisez toujours des maniques ou des gants lorsque vous retirez les aliments de la zone
chauffe-plat, car les ustensiles et les plats restent chauds.
• Lorsque vous faites chauffer des pâtisseries et du pain, ménagez une ouverture dans le
couvercle an de permettre à la vapeur de s'échapper.
• Ne couvrez pas les aliments de lm plastique. Le plastique risque de fondre sur la surface et
de s'avérer très difcile à enlever.
• Les aliments doivent être déjà chauds. La consommation d'aliments crus ou froids placés sur
la zone chauffe-plat risque de vous rendre malade.
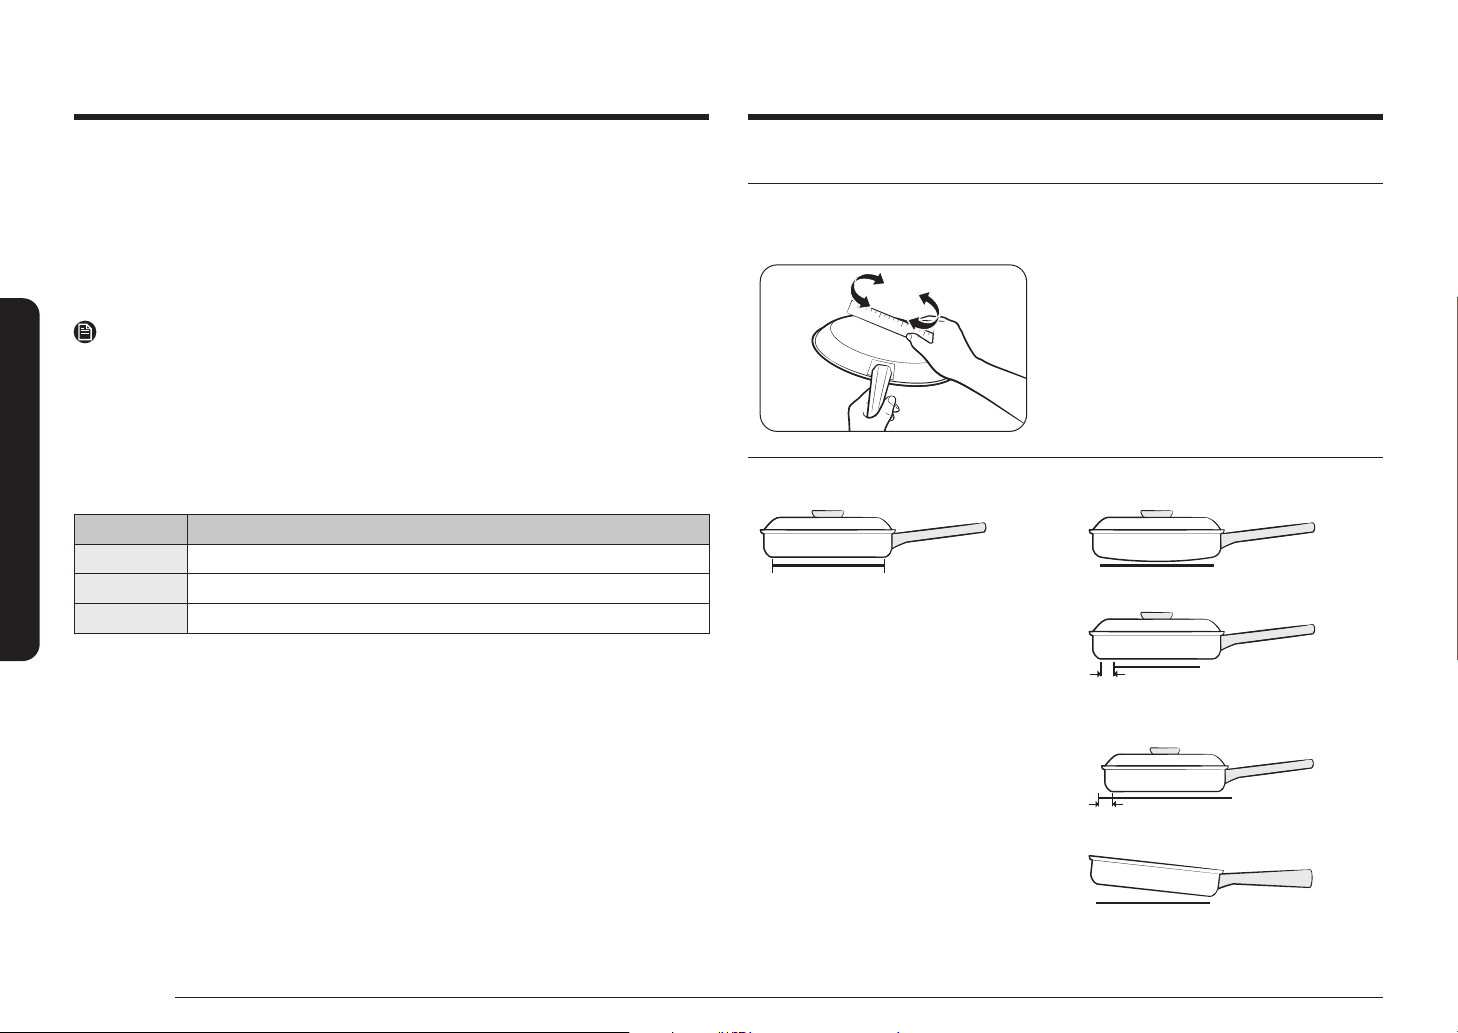
26 Français
Table de cuisson
Table de cuisson
Utilisation des ustensiles de cuisine appropriés
L'utilisation de l'ustensile de cuisine approprié permet d'éviter de nombreux problèmes tels qu'une
cuisson inégale ou un temps de cuisson trop long. Utiliser les casseroles et plats adaptés permet
de réduire les temps de cuisson et de cuire uniformément les aliments.
Vériez que le fond du récipient est plat en faisant
tourner une règle dessus.
APPROPRIÉ NON APPROPRIÉ
Fond plat et bords droits.
• Couvercles hermétiques.
• Le poids du manche ne fait pas
incliner la casserole.
• Casserole bien équilibrée.
• La taille de la casserole est adaptée à
la quantité d'aliments à préparer et à
la taille du foyer.
• Matériau permettant une bonne
conduction de la chaleur.
Le diamètre du récipient doit toujours
correspondre à celui du foyer.
Fond de casserole bombé et déformé.
La casserole dépasse du foyer de plus d'un
pouce et demi.
La casserole est plus petite que le foyer.
Le manche fait incliner la casserole.
1. Pour activer la zone chauffe-plat, appuyez sur la touche Warming Center On/Off
(Activation/Désactivation de la zone chauffe-plat).
2. Sélectionnez la puissance de votre choix. Appuyez une fois sur la touche Warming Center
Level (Niveau de la zone chauffe-plat) pour sélectionner le réglage Faible, deux fois pour le
réglage Moyenne, ou trois fois pour le réglage Élevée.
3. Pour désactiver la zone chauffe-plat, appuyez sur la touche Warming Center On/Off
(Activation/Désactivation de la zone chauffe-plat).
REMARQUE
• Appuyer sur OFF/CLEAR (ARRÊT/EFFACER) n'éteint pas la zone chauffe-plat.
• Pour de meilleurs résultats, recouvrez les aliments placés sur la zone chauffe-plat d'un
couvercle ou d'un lm d'aluminium. Lorsque vous faites chauffer des pâtisseries ou du pain,
ménagez une ouverture dans le couvercle à l'aide d'aluminium an de permettre à la vapeur
de s'échapper.
Réglages recommandés
NIVEAU TYPE D'ALIMENTS
Faible Pains/pâtisseries, plats mijotés, sauces, œufs
À point Assiettes-repas, soupes (veloutés), légumes, sauces, ragoûts, viandes
Élevé Aliments frits, soupes (bouillons), boissons chaudes

Français 27
Table de cuisson
Protection de la table de cuisson
Nettoyage
• Nettoyez la table de cuisson avant de l'utiliser pour la première fois.
• Nettoyez votre table de cuisson quotidiennement ou après chaque utilisation. Ainsi, vous
conserverez votre table de cuisson en bon état et éviterez les dommages.
• Si la casserole déborde durant la cuisson, nettoyez immédiatement la zone de cuisson tant
qu'elle est chaude ; un nettoyage ultérieur s'avèrerait plus difcile. Nettoyez prudemment les
éclaboussures à l'aide d'un chiffon propre et sec.
• Évitez qu'elles ne restent trop longtemps sur la zone de cuisson ou la garniture de la table
de cuisson.
• N'utilisez pas de poudre à récurer ou de tampon abrasif qui risquerait de rayer la table de
cuisson.
• N'utilisez pas d'agent de blanchiment chloré, d'ammoniac ou de nettoyant non recommandé
pour une utilisation sur une surface en vitrocéramique.
Prévention des traces et des rayures
• N'utilisez pas d'ustensiles en verre. Ils pourraient rayer la table de cuisson.
• Ne placez pas de grille ou d'anneau wok entre la table de cuisson et la casserole. Ces
accessoires sont susceptibles de marquer ou de rayer la table de cuisson.
• Assurez-vous que la table de cuisson et le fond de la casserole sont propres.
• Ne faites pas glisser de plats métalliques sur la table de cuisson.
Prévention des taches
• N'utilisez pas de torchon ou d'éponge sale pour nettoyer la table de cuisson. Un lm
subsisterait, provoquant des taches sur la table de cuisson après son chauffage.
• Si vous continuez d'utiliser la table de cuisson alors que celle-ci est sale, les taches peuvent
devenir dénitives.
Prévention d'autres dommages
• Évitez de laisser du plastique, du sucre ou des aliments à forte teneur en sucre fondre sur la
table de cuisson chaude. Si cela se produit, nettoyez-la immédiatement.
• Ne laissez pas une casserole bouillir jusqu'à évaporation complète. La table de cuisson et la
casserole en seraient endommagées.
• N'utilisez pas la table de cuisson comme plan de travail ou planche à découper.
• Ne faites jamais cuire d'aliments directement sur la table de cuisson. Utilisez toujours des
ustensiles de cuisine appropriés.
Choix des ustensiles de cuisine appropriés
Le matériau de l'ustensile de cuisine assure que la chaleur émise par le foyer se propage
uniformément et rapidement au fond de la casserole.
• ALUMINIUM - Excellent conducteur thermique. Certains types d'aliments font noircir
l'aluminium (les ustensiles en aluminium anodisé résistent aux taches et aux piqûres). Si
vous faites glisser des casseroles en aluminium sur la table de cuisson en céramique, des
traces métalliques semblables à des rayures peuvent apparaître. Retirez ces traces dès le
refroidissement de la table de cuisson.
• CUIVRE - Excellent conducteur thermique mais se décolore facilement. Peut laisser des
traces métalliques sur la vitrocéramique (pour les effacer, reportez-vous ci-dessus).
• INOX - Conducteur thermique lent entraînant une cuisson inégale. Durable, facile à nettoyer
et résistant aux taches.
• FONTE - Mauvais conducteur, conserve très bien la chaleur. La cuisson n'est uniforme qu'une
fois la température de cuisson atteinte. Son utilisation n'est pas recommandée pour les
surfaces de cuisson en céramique.
• CASSEROLE ÉMAILLÉE - Les caractéristiques thermiques varient en fonction du matériau de
base. Les revêtements en émail vitrié doivent être lisses an d'éviter de rayer les surfaces
de cuisson en céramique.
• VERRE - Conducteur thermique lent. Son utilisation n'est pas recommandée sur les surfaces
de cuisson en céramique car il peut rayer la surface.
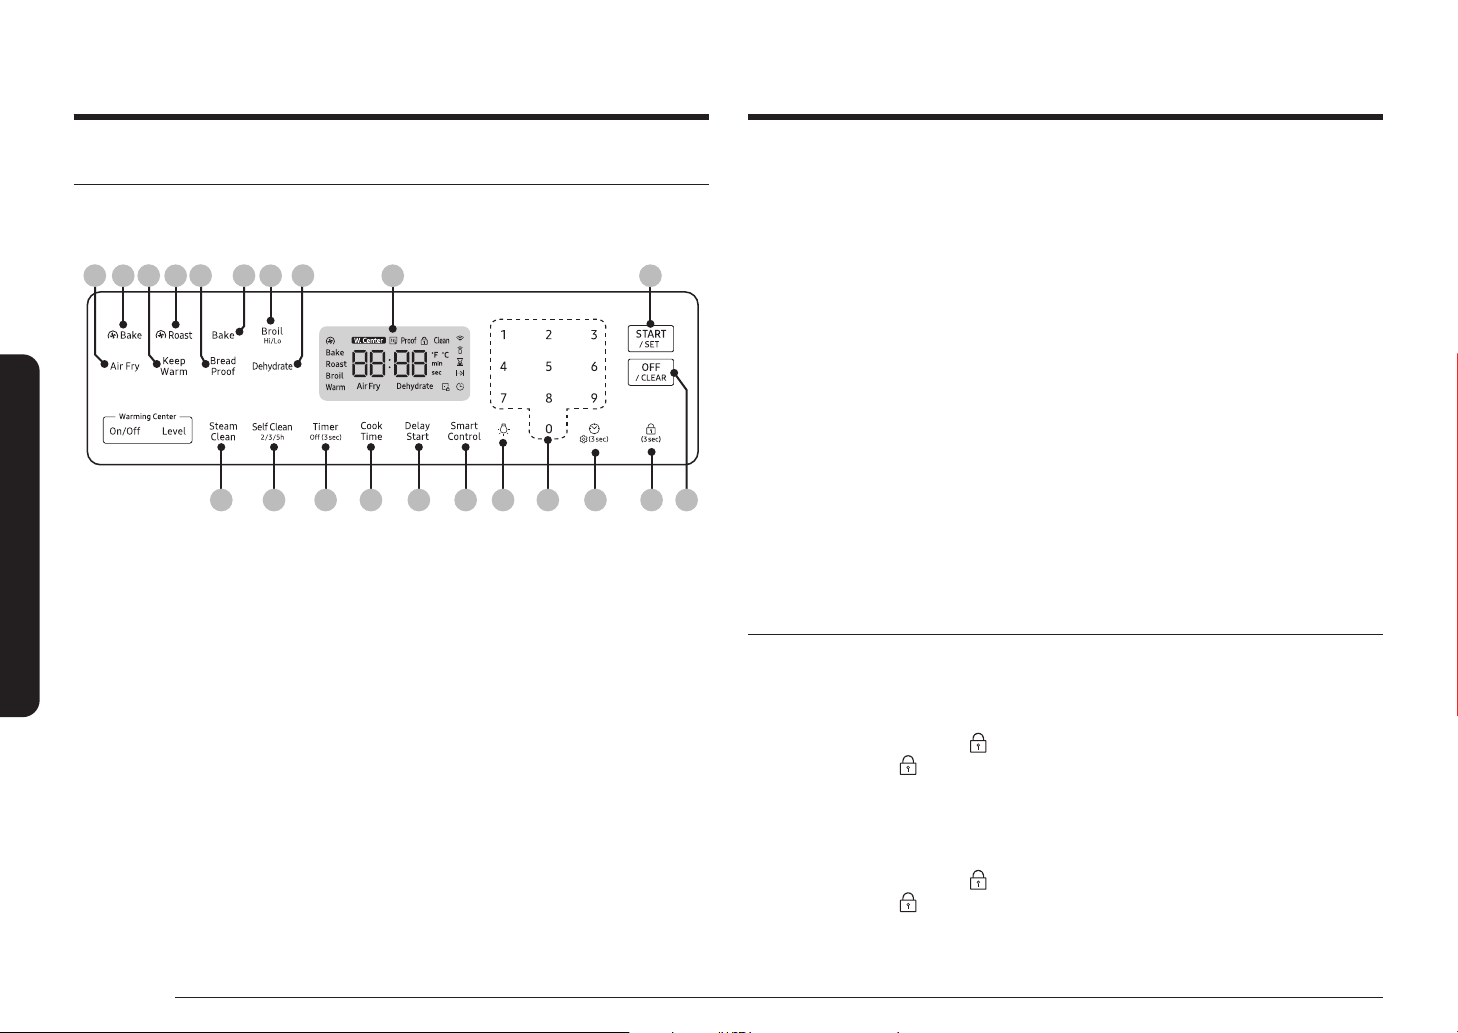
28 Français
Utilisation du four
Utilisation du fourUtilisation du four
Panneau de commande du four
LISEZ ATTENTIVEMENT LES CONSIGNES D'UTILISATION AVANT DE VOUS SERVIR DU FOUR. An de
proter au mieux de votre four, familiarisez-vous avec les fonctionnalités décrites ci-dessous. Vous
trouverez un descriptif détaillé de chaque fonction et de chaque caractéristique plus loin dans ce manuel.
06 07 08 09
01 1902 03 05
1110 12 13 14 15
2016
2117 18
04
01 Afchage : indique l’heure, la température du four, son mode de fonctionnement et le temps
programmé pour le fonctionnement de la minuterie ou du four automatique.
02 Convection Bake (Cuisson par convection) : permet d'activer la fonction Cuisson par convection
dans le four.
03 Convection Roast (Rôtissage par convection) : permet d'activer la fonction de Rôtissage par
convection dans le four.
04 Bake (Cuisson traditionnelle) : permet d'activer la fonction de cuisson traditionnelle dans le four.
05 Broil (Cuisson au gril) : permet d'activer la fonction de gril dans le four.
06 Air Fry (Friture par application d'air) : permet d'activer la fonction Friture par application d'air
dans le four.
07 Keep Warm (Maintien au chaud) : utilisé pour activer la fonction de maintien au chaud du four en
mode unique pour conserver les aliments cuits au chaud.
08 Bread Proof (Pain précuit) : permet d'activer la fonction Pain précuit dans le four.
09 Dehydrate (Déshydratation des aliments) : permet d'activer la fonction éshydratation des aliments
dans le four.
10 Steam Clean (Nettoyage vapeur) : permet d'activer la fonction de nettoyage vapeur dans le four.
11 Self Clean (Auto-nettoyage) : permet d'activer la fonction d'auto-nettoyage dans le four.
12 Timer (Minuterie) : permet de régler ou d'annuler la minuterie. La minuterie ne permet de
démarrer ou d'arrêter la cuisson. Appuyez sur ce bouton pendant 3 secondes pour désactiver la
minuterie.
13 Cook Time (Temps de cuisson) : appuyez sur cette touche puis utilisez le pavé numérique et
dénissez le temps de cuisson des aliments. Le four s'éteint une fois le temps de cuisson écoulé.
14 Delay Start (Départ différé) : permet de régler le départ et l'arrêt automatique du four selon
l'heure dénie.
15 Smart Control : permet de sélectionner la fonction Smart Control.
16 Pavé numérique : permet de régler l'une des fonctions à l'aide de chiffres, notamment l'heure
de l'horloge, la minuterie, la température du four, l'heure de départ et le temps de la cuisson
programmée, etc.
17 Éclairage : permet d'allumer ou d'éteindre l'éclairage du four.
18 Horloge/Réglage : permet de régler l'heure. Appuyez sur cette touche pour afcher le menu de
préférence de l'utilisateur. (Appuyez dessus pendant 3 secondes.)
19 START/SET (DÉPART/RÉGLAGE) : permet de démarrer un programme de cuisson ou de nettoyage
dans le four.
20 OFF/CLEAR (ARRÊT/EFFACER) : permet d'annuler tous les programmes en cours, à l'exception
de l'horloge et de la minuterie. Appuyez dessus pour annuler la température ou le temps
précédemment saisi(e).
21 Verrouillage du four : permet d'utiliser toutes les fonctions du four.
Verrouillage du four
Verrouillez les boutons et la porte du four an qu'ils ne puissent pas être actionnés par accident.
La fonction Verrouillage du four ne peut être activée qu'en mode veille.
Comment activer la fonction Verrouillage du four ?
Appuyez sur Verrouillage du four
pendant 3 secondes.
L'icône de verrouillage ainsi que l'heure actuelle s'afchent à l'écran.
Toutes les fonctions doivent être annulées avant l'activation de la fonction Verrouillage du four.
Cette fonction est disponible uniquement lorsque la température du four est inférieure à 400 °F.
Comment déverrouiller le four ?
Appuyez sur Verrouillage du four
pendant 3 secondes.
L'icône de verrouillage disparaît alors de l'écran.

Français 29
Utilisation du four
Réglage de l'horloge
L'horloge doit être réglée sur l'heure correcte an que la minuterie automatique du four
fonctionne correctement.
• L'heure ne peut pas être modiée durant la cuisson minutée, la cuisson minutée différée ou
le cycle d'auto-nettoyage.
Comment régler l'horloge ?
1. Appuyez sur Horloge
.
2. Saisissez l'heure actuelle en heures et minutes à l'aide du pavé numérique, par ex. 1, 3, 0
pour 1:30.
3. Appuyez sur Horloge ou sur START/SET (DÉPART/RÉGLAGE) pour enregistrer les
modications.
Réglage de la minuterie
La minuterie émet un signal sonore une fois que le temps réglé est écoulé. Elle ne permet pas de
démarrer ou d'arrêter les fonctions de cuisson. Vous pouvez utiliser la minuterie avec toutes les
autres fonctions du four.
Comment régler la minuterie ?
1. Appuyez sur Timer (Minuterie).
2. Saisissez l’heure souhaitée à l’aide du pavé numérique.
3. Lorsque vous avez terminé, appuyez sur START/SET (DÉMARRAGE/RÉGLAGE).
4. Pour annuler les réglages de la minuterie, appuyez sur la touche Timer (Minuterie) et
maintenez-la enfoncée pendant 3 secondes.
5. Lorsque le temps programmé est écoulé, le four émet un signal sonore et afche le message
« End » (Fin). Appuyez sur la touche Timer (Minuterie) pour supprimer le message.
REMARQUE
Pour modier la minuterie programmée, appuyez sur la touche Timer (Minuterie), saisissez une
heure différente, puis appuyez sur START/SET (DÉMARRAGE/RÉGLAGE).
Cuisson minutée
Durant la cuisson minutée, le four s'allume immédiatement et fonctionne pendant la durée que
vous avez sélectionnée. À la n du temps de cuisson, le four s'éteint automatiquement.
• Vous ne pouvez utiliser la fonction de cuisson minutée qu'en parallèle à une autre option de
cuisson (Cuisson traditionnelle, Cuisson par convection, Rôtissage par convection, Friture par
application d'air, Déshydratation des aliments).
Comment régler le four pour la cuisson minutée ?
1. Démarrez le mode de cuisson de votre choix, par ex. Bake (Cuisson traditionnelle).
La température par défaut est de 350 °F.
2. Appuyez sur Cook Time (Temps de cuisson).
• Vous pouvez régler le temps de cuisson à tout moment. (Après avoir sélectionné le
mode de cuisson, pendant le préchauffage, après le préchauffage.)
3. Saisissez le temps de cuisson de votre choix, par ex. 45 min, à l'aide du pavé numérique.
Pour régler le temps de cuisson, sélectionnez une durée comprise entre 1 minute et 9 heures
59 minutes.
4. Appuyez sur START/SET (DÉPART/RÉGLAGE). La température afchée change dès que le four
atteint 175 °F.
Le four poursuit la cuisson jusqu'à ce que le temps réglé se soit écoulé, puis s'éteint
automatiquement sauf si vous avez activé la fonction de maintien au chaud. (Reportez-vous
au chapitre relatif à la fonction de maintien au chaud, en page 37.)
5. Vous pouvez annuler un temps de cuisson à tout moment en réglant le temps de cuisson sur
0 minute.
(Appuyez sur Cook Time (Temps de cuisson) -> réglez le temps de cuisson sur 0 min ->
appuyez sur START/SET (DÉPART/RÉGLAGE).)
REMARQUE
Une fois la cuisson minutée terminée, la cuisinière émet un signal sonore plusieurs fois.
ATTENTION
Faites attention avec les fonctions de cuisson minutée ou de départ différé. Utilisez ces fonctions
pour la cuisson des viandes salées ou surgelées ainsi que de la plupart des fruits et légumes.
Les aliments pouvant s'altérer facilement (ex. : lait, œufs, poisson, viande ou volaille) doivent
sortir directement du réfrigérateur. Même réfrigérés, ces aliments ne doivent pas reposer au
four pendant plus d'une heure avant le démarrage de la cuisson. De plus, ils doivent être retirés
rapidement une fois la cuisson terminée. La consommation d'aliments gâtés peut entraîner des
maladies liées à un empoisonnement alimentaire.

30 Français
Utilisation du four
Utilisation du four
Départ différé
Durant la cuisson minutée différée, la minuterie du four permet d'allumer et d'éteindre le four aux
heures que vous avez sélectionnées préalablement.
• Vous ne pouvez utiliser la fonction de Départ différé qu'en parallèle avec une autre option de
cuisson (Cuisson traditionnelle, Cuisson par convection, Rôtissage par convection,
Friture par
application d'air, Déshydratation des aliments,
ou Auto-nettoyage).
• Vous pouvez régler le four pour un départ différé avant de régler les autres options de cuisson.
• L'horloge doit être réglée sur l'heure actuelle.
Comment régler le four pour le départ différé ?
1. Positionnez la ou les grilles du four sur la hauteur appropriée et enfournez les aliments.
2. Appuyez sur la touche correspondant au mode de cuisson de votre choix, par ex. Bake
(Cuisson traditionnelle).
La température par défaut est de 350 °F.
3. Saisissez la température de votre choix, par ex. 375 °F, à l'aide du pavé numérique.
4. Réglez le temps de cuisson si vous le souhaitez. (Reportez-vous à la section relative à la
fonction de cuisson minutée, en page 29.)
5. Appuyez sur Delay Start (Départ différé).
6. Saisissez l'heure à laquelle vous souhaitez que le four s'allume, par ex. 4:30, à l'aide du pavé
numérique.
7. Appuyez sur START/SET (DÉPART/RÉGLAGE). À l'heure réglée, un court signal sonore
retentit. Le four commence alors à chauffer.
Activation et désactivation de l'éclairage du four
• L'éclairage du four s'allume automatiquement à l'ouverture de la porte.
• L'éclairage du four s'éteint automatiquement à la fermeture de la porte.
• Vous pouvez activer et désactiver l'éclairage du four manuellement en appuyant sur .
Réglages minimum et maximum
Toutes les fonctions listées dans le tableau ci-dessous ont un réglage minimum et un réglage
maximum de la durée ou de la température. Un signal sonore retentit chaque fois que vous
appuyez sur une touche et que la saisie est validée. Un signal d'erreur retentit sous la forme
d'un signal sonore prolongé si une température ou une durée inférieure au réglage minimum ou
supérieure au réglage maximum de la fonction est saisie.
FONCTION MINIMUM MAXIMUM
Cuisson traditionnelle 175 °F (80 °C) 550 °F (285 °C)
Cuisson au gril Faible Élevée
Cuisson par convection 175 °F (80 °C) 550 °F (285 °C)
Rôtissage par convection 175 °F (80 °C) 550 °F (285 °C)
Friture par application d'air 350 °F (175 °C) 500 °F (260 °C)
Déshydratation des aliments 100 °F (40 °C) 225 °F (105 °C)
Maintien au chaud* - 3 h
Pain précuit - 12 h
Auto-nettoyage 2 h 5 h
Nettoyage vapeur 20 min 20 min
REMARQUE
Si vous désactivez la fonction Économie d'énergie 12 heures, la fonction marquée d'un *
fonctionnera jusqu'à son annulation. (Réglage par défaut de la fonction Économie d'énergie
12 heures : Activation) Reportez-vous en page 40 pour en savoir plus.
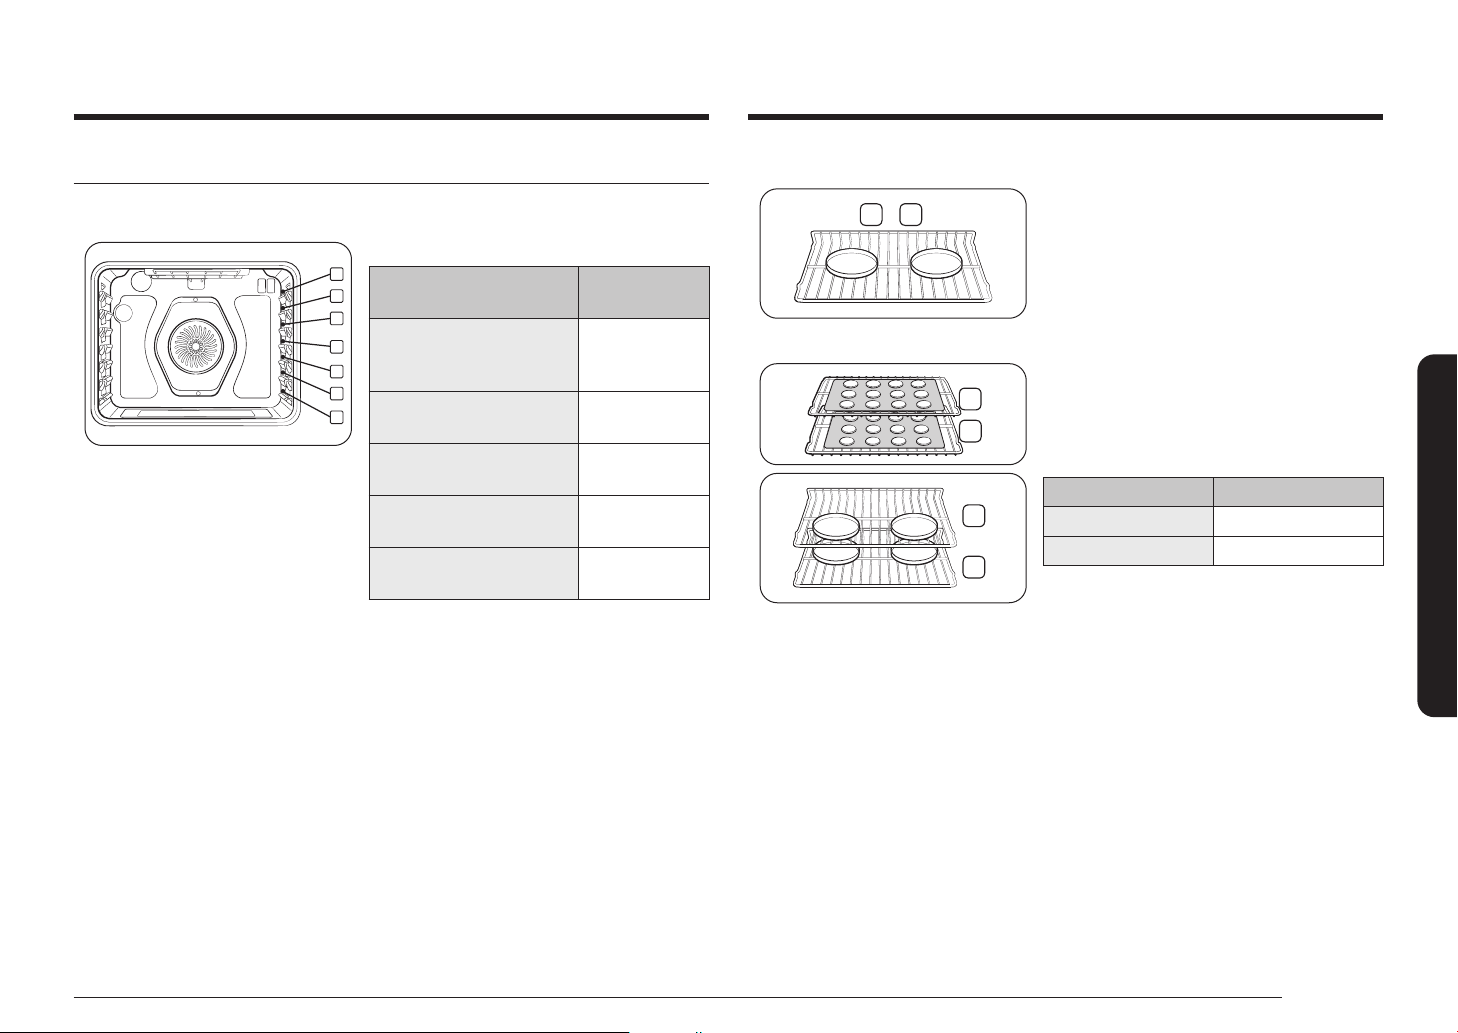
Français 31
Utilisation du four
Utilisation des grilles du four
Hauteurs de grille
1
2
3
4
5
6
7
Position recommandée de la grille pour la cuisson
TYPE D'ALIMENTS
HAUTEUR DE
GRILLE
Cuisson d'hamburgers au gril 7
Gril de viandes ou de petits
morceaux de volaille, poisson
4 à 6
Couronnes, quatre-quarts,
tourtes surgelées, plats mijotés
3 ou 4
Gâteaux des anges, petits rôtis,
pizza fraîche ou surgelée
2
Dinde, gros rôti, jambons, pizza
fraîche
1
• Ce tableau n'est communiqué qu'à titre indicatif.
Emplacement de la grille et des plats
3 4
Grille uniqueGrille unique
Positionnez les moules à gâteaux le plus au centre
possible du four pour assurer de meilleurs résultats.
Si vous utilisez plusieurs moules, espacez-les d'au
moins 1" à 1½".
Lorsque vous cuisinez sur une seule grille du four,
placez-la en position 3 ou 4.
Reportez-vous à la gure sur la gauche.
5
3
Plusieurs grilles de cuissonPlusieurs grilles de cuisson
2
5
Pour des gâteaux, placez les grilles du four aux
positions 3 et 5. Pour des cookies, placez les grilles
aux positions 2 et 5.
Utilisation de plusieurs grilles de four
Type de cuisson Position des grilles
Cookies 2 et 5
Gâteaux 3 et 5

32 Français
Utilisation du four
Utilisation du four
Avant d'utiliser les grilles
Le four est équipé de deux grilles.
Chacune comporte une butée qui doit être correctement installée sur son support. Les butées
empêchent la grille de sortir complètement de son logement.
RETRAIT DES GRILLES
1. Tirez la grille horizontalement vers l'extérieur jusqu'à ce qu'elle bute.
2. Soulevez l'avant de la grille, puis retirez-la.
RÉINSERTION DES GRILLES
1. Posez l'extrémité de la grille sur le support.
2. Inclinez l'extrémité avant vers le haut et insérez la grille.
ATTENTION
• Ne couvrez pas une grille de papier
d'aluminium. Ne posez pas de papier
d'aluminium au fond du four. Cela empêcherait
la circulation de l'air, ce qui altérerait la cuisson
et endommagerait la sole du four.
• Installez les grilles du four uniquement lorsque
le four est froid.
Cuisson traditionnelle
Le four peut être programmé pour cuire à toute température comprise entre 175 °F et 550 °F.
La température et le temps de cuisson varient en fonction des ingrédients, ainsi que de la taille
et de la forme du plat de cuisson utilisé. Les revêtements sombres ou antiadhésifs peuvent
permettre de cuire les aliments plus rapidement avec plus de brunissement.
Comment régler la température ?
1. Appuyez sur Bake (Cuisson traditionnelle). La température par défaut est de 350 °F.
2. Saisissez la température de votre choix à l'aide du pavé numérique, par ex. 3, 7, 5.
3. Appuyez sur START/SET (DÉPART/RÉGLAGE). La température afchée commence à changer
dès que le four atteint 175 °F.
4. Si vous souhaitez annuler la cuisson ou si vous avez terminé, appuyez sur OFF/CLEAR
(ARRÊT/EFFACER).
• Si la recette l'indique, enfournez la nourriture une fois le four préchauffé. Le
préchauffage assure de bons résultats pour la cuisson de gâteaux, biscuits, pâte et
petits pains. Une fois la température souhaitée atteinte dans le four, la cuisinière
émet un signal sonore plusieurs fois.
REMARQUE
Pour des raisons de performance, le ventilateur de convection peut être allumé ou éteint durant
le fonctionnement.
Comment régler le thermostat en cours de cuisson ?
1. Appuyez sur Bake (Cuisson traditionnelle). La température actuelle s'afche, par ex. 375 °F.
2. Saisissez la température de votre choix, par ex. 425 °F, à l'aide du pavé numérique.
3. Terminez la saisie en appuyant sur START/SET (DÉPART/RÉGLAGE).
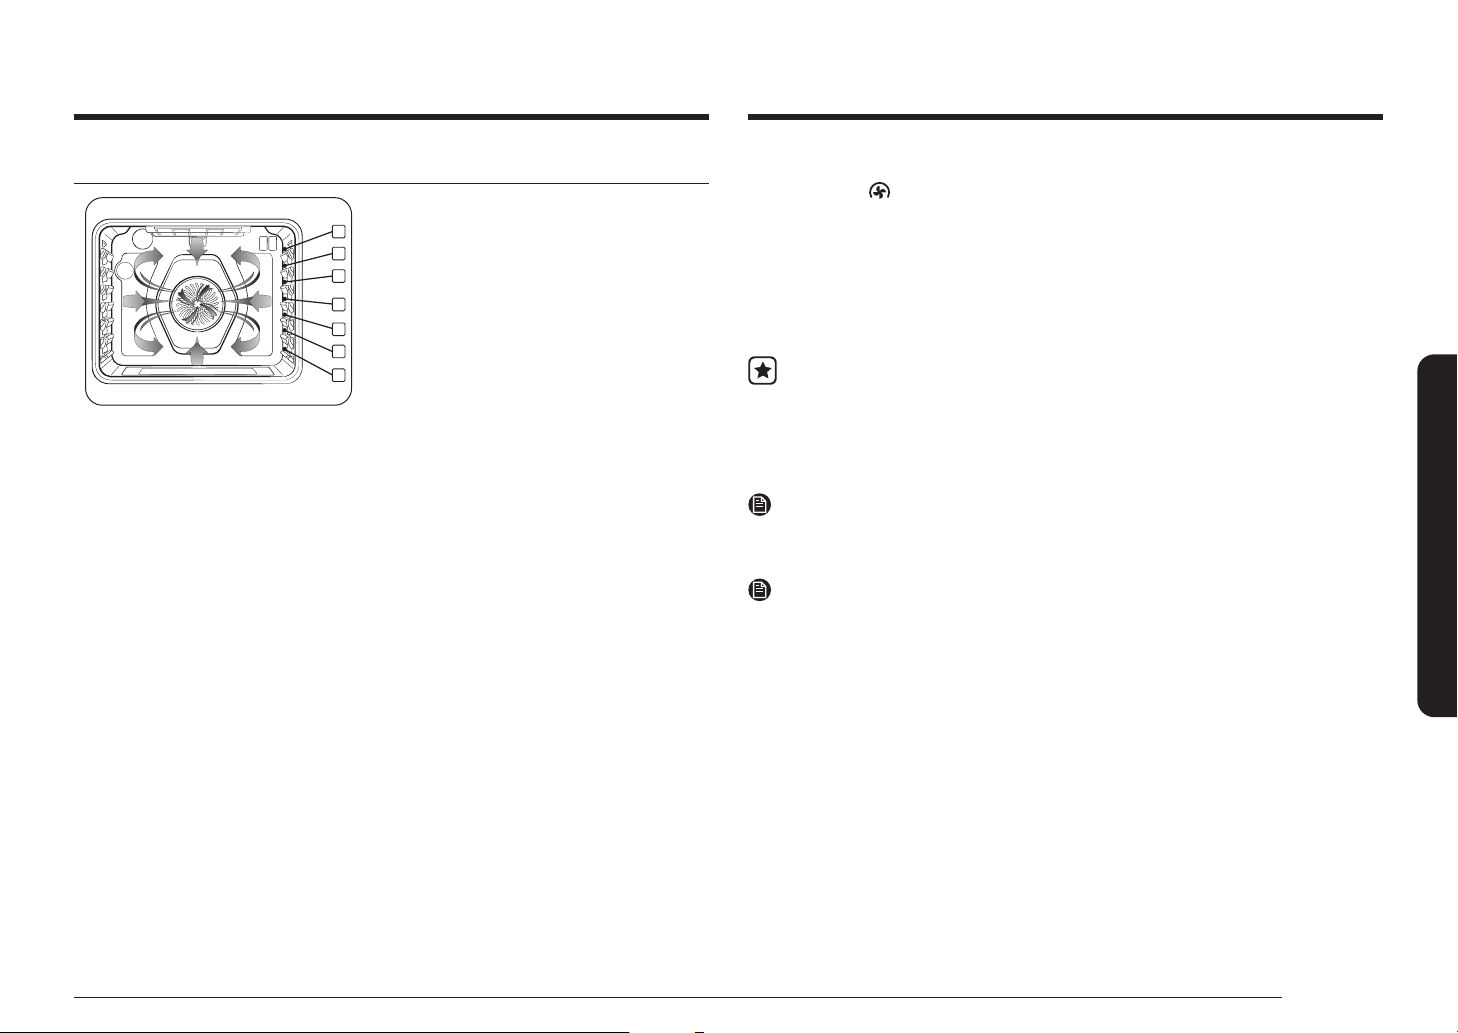
Français 33
Utilisation du four
Cuisson par convection
1
2
3
4
5
6
7
La fonction de cuisson par convection permet
d'accélérer la cuisson. Lors de la cuisson par
convection, un ventilateur permet de faire circuler la
chaleur de façon homogène et continue dans le four.
Cette distribution efcace de la chaleur vous permet
d'obtenir une cuisson homogène et excellente
lorsque vous utilisez plusieurs grilles dans le même
temps. Les aliments cuits sur une seule grille cuisent
en général plus vite et de façon plus homogène
en mode de cuisson par convection. La cuisson sur
plusieurs grilles nécessite généralement des temps
de cuisson plus importants pour certains aliments.
Mais en dénitive, elle permet des gains de temps.
Les pains et pâtisseries dorent plus uniformément.
Vous pouvez programmer la cuisson par convection
pour toute température comprise entre 175 °F et
550 °F.
Conseils pour la cuisson par convection
Le temps gagné dépend de la quantité et du type d'aliments que vous cuisinez. Pour cuire des
petits gâteaux ou des biscuits, utilisez de préférence des plats sans rebords ou dont les rebords
sont très bas an que l'air chauffé circule autour de la nourriture. L'utilisation d'un moule à
revêtement foncé réduit le temps de cuisson.
Lorsque vous cuisez des aliments par convection sur une seule grille, placez cette dernière sur la
position 3 ou 4. Si vous cuisinez sur plusieurs grilles, placez les grilles du four aux positions 3 et
5 ou 2 et 5.
Lorsque vous cuisez des gâteaux, l'utilisation du mode Cuisson traditionnelle (et non du mode
Cuisson par convection) offre de meilleurs résultats.
Comment régler le four pour la cuisson par convection ?
1. Appuyez sur Bake (Cuisson par convection). La température par défaut est de 325 °F.
2. Saisissez la température de votre choix, par ex. 400 °F, à l'aide du pavé numérique.
3. Appuyez sur START/SET (DÉPART/RÉGLAGE).
La température afchée commence à changer dès que le four atteint 175 °F.
La cuisinière émet plusieurs signaux sonores lorsque le four atteint la température ajustée.
4. Pour désactiver ou annuler la cuisson par convection, appuyez sur OFF/CLEAR (ARRÊT/
EFFACER).
• Le ventilateur de convection du four se désactive dès que la porte du four est
ouverte.
• ÉVITEZ de laisser la porte ouverte pendant une période prolongée lorsque vous
utilisez la cuisson par convection. Sinon, vous réduisez la durée de vie de l'élément
de chauffe par convection.
REMARQUE
Si vous laissez la porte du four ouverte pendant plus de 2 minutes alors que le four est allumé,
tous les éléments chauffants se couperont automatiquement.
REMARQUE
Pour des raisons de performance, le ventilateur de convection peut être allumé ou éteint durant
le fonctionnement.
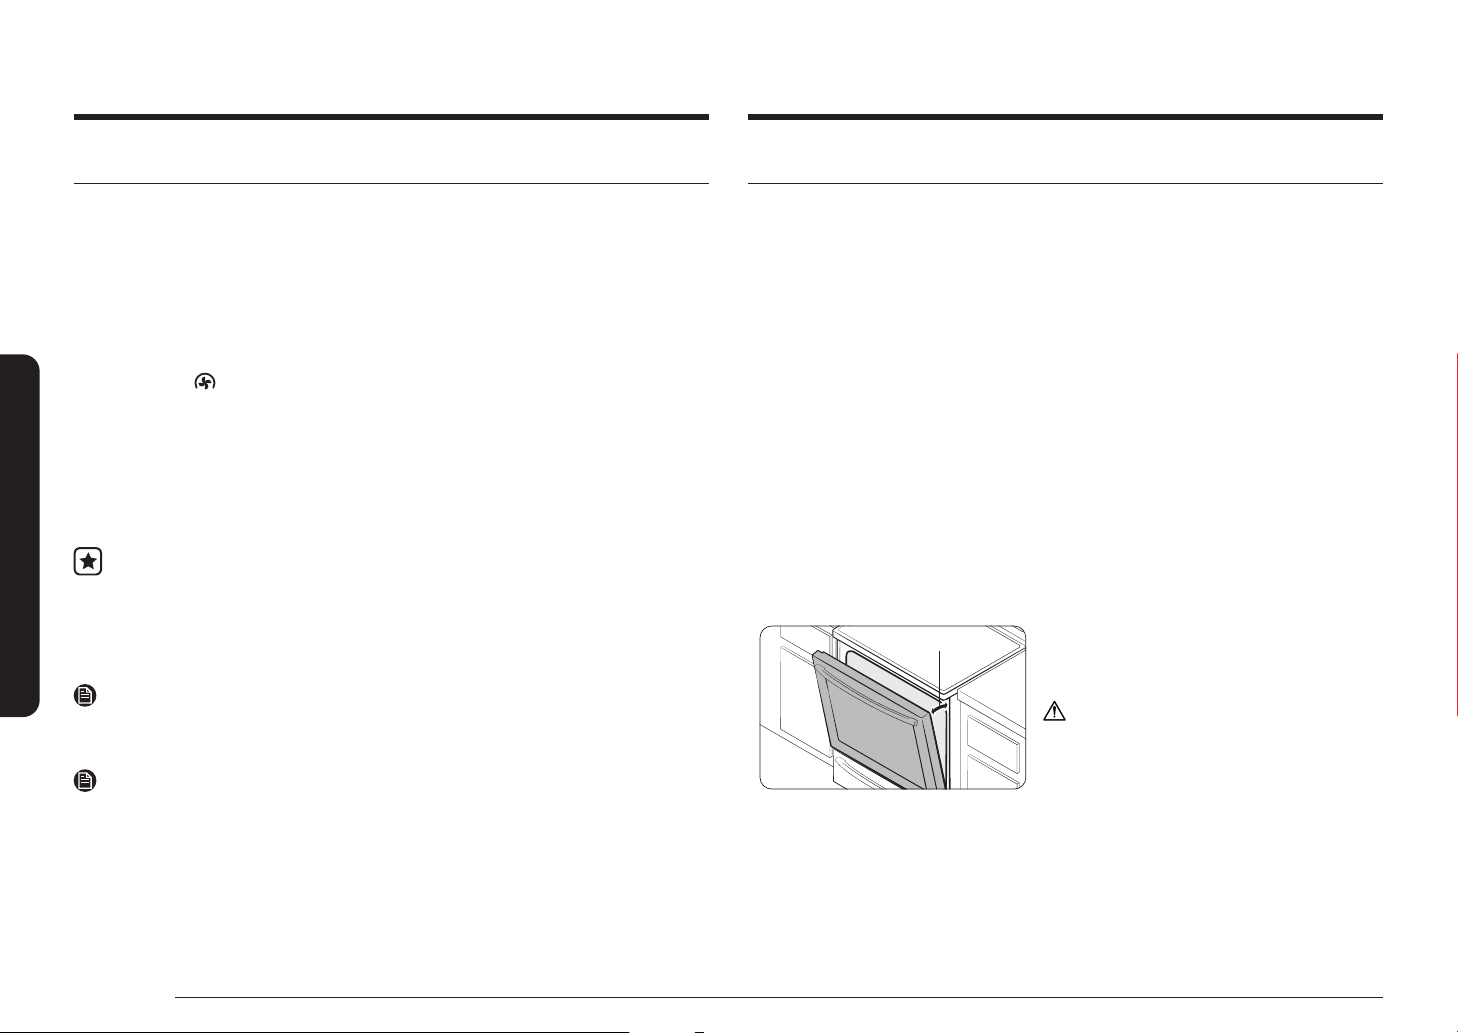
34 Français
Utilisation du four
Utilisation du four
Rôtissage par convection
Le rôtissage par convection est conseillé pour la cuisson de morceaux de viande très tendres qu'il
faut préparer sans couvrir.
La chaleur provient de l'élément chauffant supérieur. Le ventilateur de convection distribue l'air
chauffé de manière uniforme sur la nourriture et autour. La viande et la volaille sont dorées de
toutes parts, comme après une cuisson en rôtissoire. L'air chauffé se mélange rapidement au jus
pour une cuisson moelleuse et tendre du morceau tout en dorant parfaitement l'extérieur.
Comment régler le four pour le rôtissage par convection ?
1. Appuyez sur
Roast (Rôtissage par convection). La température par défaut est de 325 °F.
2. Saisissez la température de votre choix, par ex. 400 °F, à l'aide du pavé numérique.
3. Appuyez sur START/SET (DÉPART/RÉGLAGE).
La température afchée commence à changer dès que le four atteint 175 °F. La cuisinière
émet plusieurs signaux sonores lorsque le four atteint la température ajustée.
4. Pour désactiver ou annuler le rôtissage par convection, appuyez sur OFF/CLEAR (ARRÊT/
EFFACER).
• Le ventilateur de convection du four se désactive dès que la porte du four est
ouverte.
• ÉVITEZ de laisser la porte ouverte pendant une période prolongée lorsque vous
utilisez la cuisson par convection. Sinon, vous réduisez la durée de vie de l'élément
de chauffe par convection.
REMARQUE
Si vous laissez la porte du four ouverte pendant plus de 2 minutes alors que le four est allumé,
tous les éléments chauffants se couperont automatiquement.
REMARQUE
Pour des raisons de performance, le ventilateur de convection peut être allumé ou éteint durant
le fonctionnement.
Cuisson au gril
La cuisson au gril est une méthode de cuisson des morceaux de viande tendres utilisant la chaleur
directe sous le gril du four.
La chaleur élevée permet de cuire plus rapidement et permet de brunir les aliments. Le mode
Cuisson au gril est le mode le plus adapté aux viandes, aux poissons et à la volaille d'une
épaisseur maximale de 1".
Préchauffez toujours le four pendant 4 minutes avant un gril.
Comment régler le four pour la cuisson au gril ?
1. Appuyez une fois sur Broil (Cuisson au gril) pour Élevée et deux fois pour Faible.
Sélectionnez Faible pour cuire des aliments tels que de la volaille ou des morceaux épais de
viande sans risquer de trop les brunir.
2. Pour démarrer la cuisson au gril, appuyez sur START/SET (DÉPART/RÉGLAGE).
Faites cuire un premier côté au gril jusqu'à ce qu'il dore. Retournez et faites griller le
deuxième côté.
3. Appuyez sur OFF/CLEAR (ARRÊT/EFFACER) à la n de la cuisson ou si vous souhaitez
annuler la cuisson au gril.
Position gril
Position gril
Laissez la porte entrouverte sur la position gril. Elle
reste ouverte toute seule, ce qui n'empêche pas la
température d'être maintenue à l'intérieur du four.
ATTENTION
En cas d'incendie à l'intérieur du four, fermez la
porte du four et éteignez-le. Si les ammes ne
s'éteignent pas, versez-y du bicarbonate de soude
ou utilisez un extincteur à mousse. Ne versez ni eau
ni farine sur le feu. La farine risque d'entraîner des
explosions et l'eau risque d'aggraver l'incendie.

Français 35
Utilisation du four
Guide de recommandations concernant la cuisson au gril
Les temps de cuisson au gril dépendent de la taille, du poids, de l'épaisseur, de la température
de départ ainsi que de vos préférences de cuisson. Ce guide se base sur des viandes sortant du
réfrigérateur.
Utilisez toujours une lèchefrite et sa grille pour une cuisson au gril. Préchauffez toujours le four
pendant 4 minutes avant une cuisson au gril.
Aliment Cuisson Dimensions Épaisseur
Réglage
du gril
Hauteur
de grille
Temps de cuisson
1er côté 2ème côté
Hamburgers À point 9 boulettes 1" Élevée 7 3:20 à 3:40 2:20 à 2:40
Bifteck
À point - 1" Élevée 5 7:00 à 8:00 6:00 à 7:00
À point - ¾" Élevée 5 6:00 à 7:00 5:00 à 6:00
Morceaux de
poulet
Bien cuit 2 à 2½ lb ¾" à 1" Élevée 4 15:00 à 16:00 13:00 à 14:00
Côtelettes de
porc
Bien cuit 1 lb ½" Faible 5 15:00 à 16:00 13:00 à 14:00
Côtelettes
d'agneau
Bien cuit 1 lb ¾" à 1" Élevée 5 5:00 à 6:00 04:00 à 5:00
Steak de
saumon
Bien cuit 3 parts ¾" à 1" Élevée 5 04:00 à 7:00 03:00 à 6:00
Friture par application d'air
Cette fonction applique de l'air chaud pour que les aliments frais ou surgelés soient plus croustillants
et sains, en utilisant pas d'huile ou moins que les modes normaux par convection. Pour des résultats
optimaux, utilisez ce mode sur une seule grille et placez la plaque de friture par application d'air à
la position 3. Vous pouvez régler la température entre 350 °F et 500 °F. Il n'est pas nécessaire de
préchauffer le four pour ce mode. Pour la température, le temps et la quantité, suivez la recette ou les
instructions gurant sur l'emballage.
Comment régler le four pour le mode de friture par application d'air ?
1. Placez la plaque à la position 3.
2. Sélectionnez le mode
Air Fry (Friture par application d'air)
.
3. Utilisez le pavé numérique pour modier la température par défaut.
Saisissez la température
recommandée pour vos aliments sur le guide de cuisson. La température par défaut est de 425 °F.
4. Réglez l'option
Temps de cuisson
ou
Départ différé
, si nécessaire.
5. Appuyez doucement sur
START/SET (DÉPART/RÉGLAGE)
.
6. Une fois la cuisson terminée, appuyez doucement sur
OFF/CLEAR (ARRÊT/EFFACER)
puis
sortez les aliments.
Plateau ou plaque à pâtisseriePlateau ou plaque à pâtisserie
Plaque de friture par Plaque de friture par
application d'airapplication d'air
Position recommandée pour la plaque
de friture par application d'air
REMARQUE
• Placez une plaque à pâtisserie ou un plaque
sur la grille située sous la plaque de friture par
application d'air, an de récupérer les égouttures.
Cela contribuera à réduire les éclaboussures et la
formation de fumée.
• Avant d'utiliser une plaque à pâtisserie, vériez
la température maximale admissible de cette
dernière.
• La fonction Friture par application d'air est conçue
pour être utilisée avec une seule grille de cuisson.
Pour des résultats optimaux, placez les aliments à
la position 3.
• Pour la cuisson d'aliments frais ou maison, étalez
uniformément l'huile sur une partie plus large an
que les aliments soient plus croustillants.
REMARQUE
Le plateau Air Fry n’est pas inclus avec ce modèle, mais vous pouvez le commander auprès du
Centre d'assistance Samsung (1-800-726-7864).
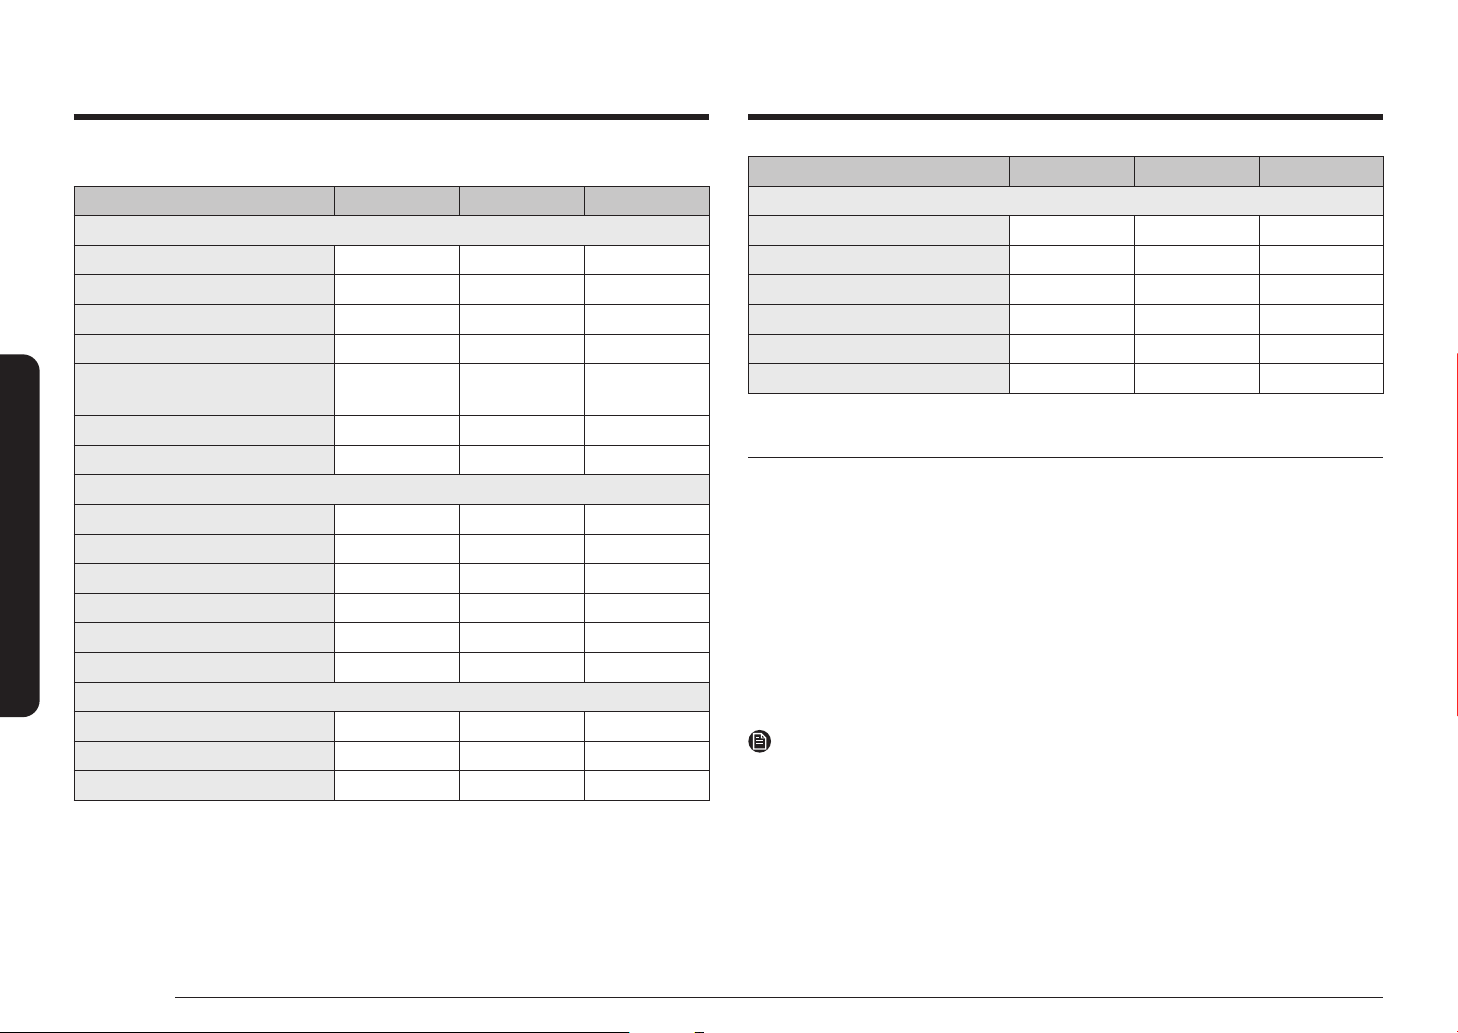
36 Français
Utilisation du four
Utilisation du four
Guide de cuisson pour la fonction Friture par application d'air
Accessoire Quantité Température Heure
Pommes de terre
Frites surgelées 30 à 35 oz 425 °F à 450 °F 25 à 30 min
Frites surgelées, assaisonnées 25 à 30 oz 425 °F à 450 °F 20 à 25 min
Tater Tots surgelés 40 à 45 oz 450 °F 20 à 25 min
Pommes de terre rissolées surgelées 25 à 30 oz 425 °F à 450 °F 20 à 25 min
Tranches de pommes de terre
congelées
30 à 35 oz 425 °F à 450 °F 20 à 25 min
Frites maison 25 à 30 oz 400 °F à 425 °F 25 à 30 min
Tranches de pommes de terre maison 40 à 45 oz 425 °F à 450 °F 25 à 30 min
Surgelé
Croquettes de poulet congelées 24 à 28 oz 400 °F à 425 °F 15 à 25 min
Ailes de poulet surgelées 30 à 35 oz 425 °F à 450 °F 20 à 30 min
Rondelles d'oignon congelées 20 à 25 oz 400 °F à 425 °F 15 à 20 min
Bâtonnets de poisson surgelés 20 à 25 oz 425 °F 18 à 22 min
Lamelles de poulet surgelées 25 à 30 oz 425 °F à 450 °F 20 à 30 min
Churros congelés 20 à 25 oz 425 °F 18 à 22 min
Volaille
Pilons de poulet frais 40 à 45 oz 425 °F à 450 °F 30 à 35 min
Ailes de poulet fraîches 30 à 35 oz 425 °F à 450 °F 27 à 32 min
Escalopes de poulet, panées 25 à 30 oz 450 °F 25 à 30 min
Accessoire Quantité Température Heure
Légumes
Asperges, panées 15 à 20 oz 425 °F 20 à 25 min
Aubergines, panées 20 à 25 oz 425 °F 20 à 25 min
Champignons, panés 18 à 22 oz 425 °F 20 à 25 min
Oignons, panés 18 à 22 oz 425 °F 20 à 25 min
Chou-eur, pané 40 à 45 oz 400 °F à 425 °F 20 à 25 min
Poêlée de légumes, panée 30 à 35 oz 425 °F 20 à 25 min
Utilisation de Fonction spéciale
Déshydratation des aliments
La fonction Déshydratation des aliments assèche les aliments ou retire l'humidité qu'ils
contiennent via la circulation de la chaleur. Une fois que les aliments sont déshydratés,
conservez-les dans un endroit frais et sec. Pour des fruits, ajoutez du jus de citron ou d'ananas ou
saupoudrez du sucre sur les fruits pour qu'ils conservent leur caractère sucré.
Reportez-vous au tableau ci-dessous pour les paramètres du mode Déshydratation des aliments.
1. Appuyez sur Dehydrate (Déshydratation des aliments).
2. Appuyez sur START/SET (DÉPART/RÉGLAGE).
3. Appuyez sur OFF/CLEAR (ARRÊT/EFFACER) à tout moment pour désactiver la fonction
Déshydratation des aliments.
REMARQUE
Utilisez la position 3 ou 4 pour la déshydratation des aliments.

Français 37
Utilisation du four
Pain précuit
La fonction Pain précuit fournit automatiquement la température optimale pour le processus de
précuisson du pain. Par conséquent, aucun réglage de température n'est nécessaire.
Si vous appuyez sur Pain précuit alors que la température du four est supérieure à 95 °F, le
message Hot (Chaud) s'afche à l'écran. Pour assurer des résultats optimaux, il est préférable de
démarrer cette fonction à four froid. C'est pourquoi, nous vous conseillons d'attendre que le four
ait refroidi et que l'indication Hot (Chaud) disparaisse de l'afchage.
1. Appuyez sur Bread Proof (Pain précuit).
2. Appuyez sur START/SET (DÉPART/RÉGLAGE).
3. Appuyez sur OFF/CLEAR (ARRÊT/EFFACER) à tout moment pour désactiver la fonction Pain
précuit.
REMARQUE
Placez la grille en position 3 pour précuire du pain.
ATTENTION
• N'utilisez pas Pain précuit pour réchauffer des aliments. La température de précuisson n'est
pas sufsamment élevée pour maintenir les aliments au chaud.
• Placez la pâte dans un récipient résistant à la chaleur sur la grille à la position 3 et couvrez-
la avec un chiffon ou un lm plastique. Le lm plastique doit être immobilisé sous le
récipient, an qu'il ne soit pas soulevé par la ventilation du four.
• Pour éviter d'abaisser la température du four et d'augmenter le temps de précuisson,
n'ouvrez pas la porte du four.
Utilisation de la fonction Maintien au chaud
Une fois la cuisson terminée, la fonction Maintien au chaud maintient les aliments à une
température idéale pour le service pendant une durée de 3 heures maximum.
Au bout de 3 heures, la fonction s'éteint automatiquement. Vous pouvez utiliser la fonction de
maintien au chaud sans autre mode de cuisson, ou vous pouvez l'activer après utilisation de la
minuterie ou du départ différé.
N'utilisez pas cette fonction pour faire réchauffer des aliments froids.
Comment utiliser la fonction de maintien au chaud ?
1. Appuyez sur Keep Warm (Maintien au chaud).
2. Appuyez sur START/SET (DÉPART/RÉGLAGE).
3. Appuyez sur OFF/CLEAR (ARRÊT/EFFACER) à tout moment pour désactiver la fonction.
Comment activer le mode de maintien au chaud après la cuisson minutée ?
1. Réglez la fonction Timed Cooking (Cuisson minutée) pour commencer la cuisson.
(Reportez-vous à la section relative à la fonction de cuisson minutée, en page 29.)
2. Appuyez sur Keep Warm (Maintien au chaud) pour utiliser la fonction.
3. Le mode de cuisson passe directement en mode Maintien au chaud une fois la période de
cuisson minutée terminée. Dans ce cas, vous pouvez désactiver la fonction Maintien au
chaud en appuyant sur OFF/CLEAR (ARRÊT/EFFACER).
• Appuyez à nouveau sur Keep Warm (Maintien au chaud) pour annuler le réglage
Maintien au chaud pendant l'utilisation du mode de cuisson.
REMARQUE
Si vous désactivez la fonction Économie d'énergie 12 heures, la fonction Maintien au chaud
fonctionnera jusqu'à son annulation (réglage par défaut de la fonction Économie d'énergie
12 heures : Activation). Reportez-vous en page 40 pour plus d'informations.

38 Français
Utilisation du four
Utilisation du four
Utilisation de la fonction Smart Control
Les fonctions pouvant être actionnées depuis l'application SmartThings peuvent ne pas fonctionner avec
uidité si les conditions de communication se détériorent ou si l'appareil est installé dans un endroit
avec un faible signal Wi-Fi. Veuillez vous reporter au tableau suivant pour connaître les principales
fonctions pouvant être actionnées depuis l'application.
Lorsque la commande à distance est désactivée Surveillance (four, table de cuisson), arrêt du four
Lorsque la commande à distance est activée Surveillance (four, table de cuisson), démarrage du four,
arrêt du four, contrôle des erreurs
Connexion du four
1. Téléchargez et ouvrez l'application SmartThings sur votre appareil mobile.
2. Suivez les instructions afchées à l'écran de l'application pour connecter votre cuisinière.
3. Une fois le processus terminé, l'icône de connexion , située sur l'écran de votre cuisinière, ainsi
que l'application vous conrmeront que la connexion est établie.
4. Si l'icône de connexion n'apparaît pas, suivez les instructions sur l'application pour vous reconnecter.
Démarrage du four à distance
1. Appuyez sur Smart Control qui apparaît à l'écran. Le four peut maintenant être démarré à distance
à l'aide d'un appareil connecté.
Commande à distance du four
• Transférez le paramètre du four (mode, durée, température) depuis le périphérique vers le four.
• Démarrez le four à distance (uniquement disponible pour les cuisinières électriques).
• Éteignez le four à distance.
• Une fois que la cuisson commence, vous pouvez modier la durée et la température à distance.
• Le mode Auto-nettoyage ne peut pas être activé à distance.
REMARQUE
• Si vous ouvrez la porte ou appuyez sur Smart Control, la fonction Smart Control est alors
désactivée et vous ne pouvez plus allumer le four à distance.
• Si tel est le cas, vous pouvez quand-même surveiller l'état du four et de la table de cuisson
et éteindre le four.
• Lorsque la cuisson au four est terminée ou annulée, la fonction Smart Control se désactive.
Utilisation de la fonction commande vocale
Pour utiliser la fonction de commande vocale de la cuisinière, vous devez disposer des
applications Bixby, Amazon Alexa ou Assistant Google sur votre téléphone portable.
Référez-vous au tableau ci-dessous pour voir toutes les fonctions offertes.
Bixby
Démarrez la conversation avec Bixby sur un appareil mobile SAMSUNG en disant « Hi, Bixby »
ou en appuyant sur la touche latérale. Reportez-vous au manuel en anglais pour les commandes
vocales détaillées.
Amazon Alexa et Assistant Google
Les appareils électroménagers intelligents de Samsung sont compatibles avec SmartThings
dans Alexa et avec action dans l’Assistant Google. Reportez-vous au manuel en anglais pour les
commandes vocales détaillées.
Guide d’installation
Voici la manière de connecter un compte SmartThings à Amazon Alexa ou à l’Assistant Google.
Les applications SmartThings et Alexa (ou Assistant Google) doivent être installées sur votre
téléphone.
1. Congurez les appareils pris en charge pour SmartThings.
2. Après la conguration de l’appareil, appuyez sur le bouton + à l’écran.
3. Appuyez sur «Assistant vocal» et connectez votre compte Samsung à Amazon Alexa
(ou l’Assistant Google).
4. Vériez que les appareils sont visibles sur l’application Amazon Alexa. La connexion
au compte est ainsi terminée. (Vériez que les appareils sont visibles et dénissez
l’emplacement [maison et pièce] des appareils dans l’application Google home. La connexion
au compte est ainsi terminée).
REMARQUE
Les spécications Allumer/Éteindre des commandes intelligentes sont les mêmes que celles
indiquées dans l’application SmartThings.
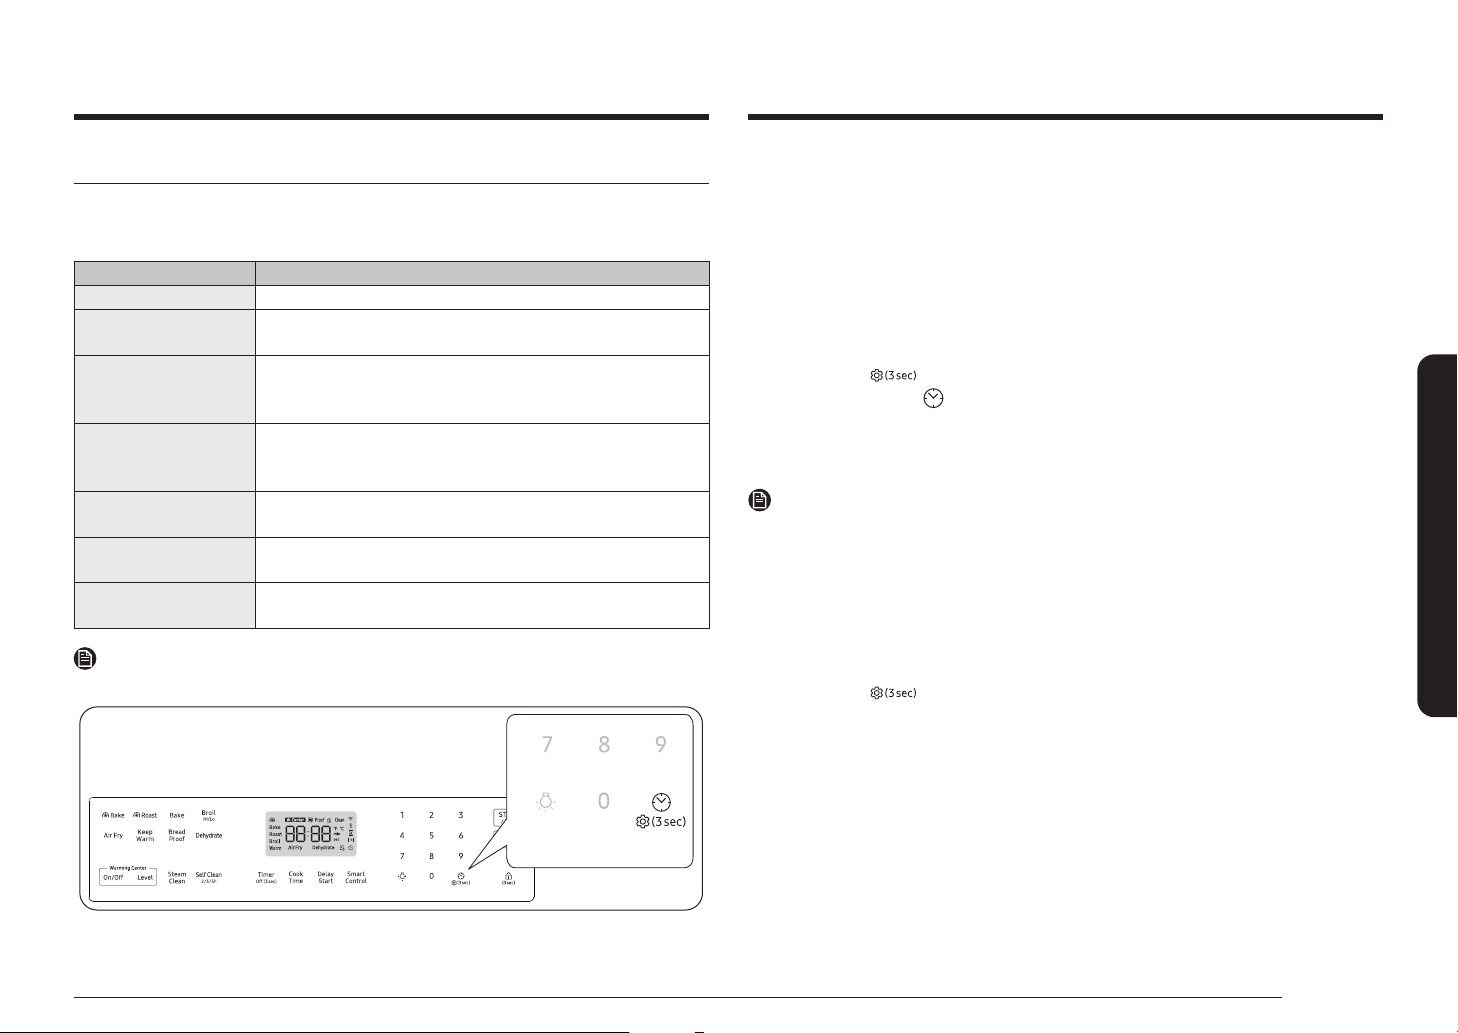
Français 39
Utilisation du four
Réglage de la température
Les températures du four ont été étalonnées en usine. Lorsque vous utilisez votre four pour la
première fois, veillez à respecter les temps et températures de cuisson. Si vous pensez que la
température est trop élevée ou trop basse, vous pouvez la corriger une nouvelle fois. Avant de
la corriger, essayez une recette en sélectionnant une température supérieure ou inférieure à
celle recommandée. Les résultats de cuisson devraient vous indiquer si un nouveau réglage est
nécessaire ou non.
La température du four peut être réglée à ±35 °F (±19 °C).
Comment corriger la température du four ?
1. Appuyez sur
Options pendant 3 secondes, puis sur la touche 1 du pavé numérique.
2. Appuyez sur Horloge pour sélectionner une température supérieure ou inférieure à la
température actuelle.
3. Saisissez la température de votre choix à l'aide du pavé numérique (entre 0 et 35).
4. Appuyez sur START/SET (DÉPART/RÉGLAGE) pour enregistrer les modications.
REMARQUE
Ce réglage n'affecte en rien les températures de cuisson au gril ou d'auto-nettoyage. Le réglage
sera conservé en mémoire même après une coupure de courant.
Unité de température (Sélection de la température en Fahrenheit ou Celsius)
Le four peut être programmé pour afcher la température en degrés Fahrenheit ou Celsius. Par
défaut, le four est réglé pour que la température s'afche en degrés Fahrenheit.
Comment passer des degrés Fahrenheit aux degrés Celsius et inversement ?
1. Appuyez sur
Options pendant 3 secondes, puis sur la touche 2 du pavé numérique.
2. Appuyez sur 1 (Fahrenheit) ou 2 (Celsius) sur le pavé numérique.
3. Appuyez sur START/SET (DÉPART/RÉGLAGE) pour enregistrer les modications.
Utilisation de la fonction des options
Cette fonction vous permet de contrôler plusieurs options de commande électronique.
Reportez-vous au tableau suivant pour connaître les options disponibles. Le menu des options est
disponible uniquement lorsque le four n'est pas en cours d'utilisation (pas en cours de cuisson).
Options Fonction
1. Réglage de la température Vous permet de corriger la température du four.
2. Unité de température Vous permet de programmer la commande du four pour afcher les
températures en degrés Fahrenheit ou Celsius.
3. Conversion automatique La fonction de conversion automatique de la convection convertit les
températures de cuisson normales saisies en températures de cuisson par
convection.
4. Économie d'énergie
12 heures
Cette fonction viendra automatiquement éteindre le four après 12 heures
d'utilisation pendant une cuisson traditionnelle, ou après 3 heures pendant
une cuisson au gril.
5. Activation/Désactivation
du son
Vous permet de régler le four et ses commandes sur un mode silencieux.
6. Activation/Désactivation de
la connexion Wi-Fi
Vous permet de régler le réseau Wi-Fi à désactiver.
0. Mode Démo Cette option est destinée à être utilisée par les points de vente au détail à des
ns d'afchage uniquement.
REMARQUE
Emplacement de la touche Options.
40 Français
Utilisation du four
Utilisation du four
Activation/Désactivation du son
La fonction Activation/Désactivation du son vous permet de couper le son des commandes du
four.
Comment activer ou désactiver le son ?
1. Appuyez sur
Options pendant 3 secondes, puis sur la touche 5 du pavé numérique.
2. Appuyez sur 1 (Activée) ou 2 (Désactivée) sur le pavé numérique.
3. Appuyez sur START/SET (DÉPART/RÉGLAGE) pour enregistrer les modications.
Activation/Désactivation de la connexion Wi-Fi
Vous pouvez activer ou désactiver la connexion Wi-Fi de la cuisinière.
Activation ou désactivation de la connexion Wi-Fi
1. Appuyez sur
Options pendant 3 secondes, puis sur la touche 6 du pavé numérique.
2. Appuyez sur 1 (Activée) ou 2 (Désactivée) sur le pavé numérique.
3. Appuyez sur START/SET (DÉPART/RÉGLAGE) pour enregistrer les modications.
REMARQUE
Lorsque vous désactivez la connexion Wi-Fi de la cuisinière, les utilisateurs ne peuvent pas
utiliser la fonction Conguration facile.
Mode Démo
Cette option est destinée à être utilisée par les points de vente au détail à des ns d'afchage
uniquement. (L'élément chauffant ne fonctionne pas.)
Comment activer ou désactiver le mode démo ?
1. Appuyez sur
Options pendant 3 secondes, puis sur la touche 0 du pavé numérique.
2. Appuyez sur 1 (Activée) ou 2 (Désactivée) sur le pavé numérique.
3. Appuyez sur START/SET (DÉPART/RÉGLAGE) pour enregistrer les modications.
Conversion automatique
Lorsque vous utilisez la fonction de conversion automatique, la fonction de convection par
conversion automatique permet de convertir automatiquement les températures de la cuisson
classique en températures de cuisson par convection.
Si cette fonction est activée, l'écran indique la température réelle convertie (réduite). Par exemple,
si vous sélectionnez une température de cuisson classique de 350 °F et si vous appuyez sur la
touche Oven Start/Set (Démarrage/Réglage du four), l'afchage indique la température convertie,
soit 325 °F. (Réglage par défaut : désactivée)
Comment désactiver ou activer la fonction de conversion automatique ?
1. Appuyez sur
Options pendant 3 secondes, puis sur la touche 3 du pavé numérique.
2. Appuyez sur 1 (Activée) ou 2 (Désactivée) sur le pavé numérique.
3. Appuyez sur START/SET (DÉPART/RÉGLAGE) pour enregistrer les modications.
Économie d'énergie 12 heures
Si vous laissez accidentellement le four allumé, cette fonction assure l'arrêt automatique du four
après 12 heures d'utilisation pendant une cuisson traditionnelle, ou après 3 heures d'utilisation
pendant une cuisson au gril. (Réglage par défaut : Activation)
Comment activer ou désactiver la fonction Économie d'énergie 12 heures ?
1. Appuyez sur
Options pendant 3 secondes, puis sur la touche 4 du pavé numérique.
2. Appuyez sur 1 (Activée) ou 2 (Désactivée) sur le pavé numérique.
3. Appuyez sur START/SET (DÉPART/RÉGLAGE) pour enregistrer les modications.

Français 41
Utilisation du four
Utilisation de la fonction Sabbat
(Utilisée pour les fêtes juives et le sabbat)
K
Pour en savoir plus et obtenir des instructions d'utilisation et une liste complète des
modèles équipés de la fonction Sabbat, veuillez consulter le site Internet sur
http:\\www.star-k.org.
Vous pouvez utiliser la fonction Sabbat avec la cuisson uniquement. La température du four
peut être montée ou baissée après avoir réglé la fonction Sabbat. (La fonction de réglage de la
température du four ne doit être utilisée que pendant les fêtes juives.) Cependant, l'afchage
ne change pas et les signaux sonores ne sont pas émis lors des changements. Une fois le four
correctement réglé pour la cuisson avec la fonction Sabbat activée, le four reste allumé jusqu'à
l'annulation de la fonction Sabbat. Ce réglage écrase la fonction Économie d'énergie 12 heures
qui est préréglée en usine. Si vous souhaitez allumer l'éclairage du four durant le sabbat, appuyez
sur
avant d'activer la fonction Sabbat. Une fois l'éclairage du four allumé et le mode Sabbat
activé, l'éclairage du four reste allumé jusqu'à la désactivation du mode Sabbat. Si vous souhaitez
éteindre l'éclairage du four, assurez-vous de le désactiver avant d'activer le mode Sabbat.
Comment utiliser la fonction Sabbat ?
1. Appuyez sur Bake (Cuisson traditionnelle).
La température par défaut est de 350 °F.
2. Saisissez la température de votre choix, par ex. 375 °F, à l'aide du pavé numérique.
3. Appuyez sur START/SET (DÉPART/RÉGLAGE).
La température afchée commence à changer dès que le four atteint 175 °F.
4. Appuyez simultanément sur Bake (Cuisson traditionnelle) et sur 1 pendant 3 secondes.
L'écran afche alors SAb.
Une fois que le message SAb s'afche à l'écran, le four n'émet pas de signal sonore et
l'afchage reste inchangé.
Vous pouvez modier la température du four une fois la cuisson commencée. N'oubliez pas
que le four n'émet pas de signal sonore et que l'afchage reste inchangé une fois la fonction
Sabbat activée.
5. Vous pouvez éteindre le four à tout moment en appuyant sur OFF/CLEAR (ARRÊT/EFFACER).
Ainsi, seul le four s'éteint. Si vous souhaitez désactiver la fonction Sabbat, appuyez
simultanément sur Bake (Cuisson traditionnelle) et sur 1 pendant 3 secondes. Le message
SAb n'est plus afché.
42 Français
Utilisation du four
Utilisation du four
Il est déconseillé d'activer un programme autre que la fonction Cuisson traditionnelle
pendant que la fonction Sabbat est activée. Seules les touches suivantes fonctionnent
correctement parallèlement à la fonction Sabbat : pavé numérique, Bake (Cuisson
traditionnelle), START/SET (DÉPART/RÉGLAGE) et OFF/CLEAR (ARRÊT/EFFACER). Toutes les
autres touches ne doivent pas être utilisées tant que la fonction Sabbat est activée.
Vous pouvez modier la température du four, mais l'afchage restera le même et aucun
signal sonore ne retentira au moment des changements. (La fonction de réglage de la
température du four ne doit être utilisée que pendant les fêtes juives.) Après avoir modié
la température alors que l'appareil est en mode Sabbat, le four ne reconnaît le changement
qu'après un délai de 15 secondes.
Vous pouvez régler la fonction Temps de cuisson avant d'activer la fonction Sabbat.
En cas de coupure de courant ou d'interruption, le four s'éteint. Lors de la remise sous
tension, le four ne se rallume pas automatiquement. Le message SAb s'afche à l'écran
de commande du four, mais le four ne fonctionne pas. Vous pouvez retirer les aliments
du four tout en restant en mode Sabbat. Cependant le four ne peut être rallumé qu'après
la période de sabbat/de fêtes. Lorsque le sabbat est terminé, désactivez le mode Sabbat.
Appuyez simultanément sur Bake (Cuisson traditionnelle) et sur 1 pendant au moins
3 secondes pour désactiver le mode Sabbat. Le four peut ainsi être à nouveau utilisé avec
toutes les fonctions normales.
N'ouvrez pas la porte du four et ne changez pas la température du four pendant environ
30 minutes après avoir lancé le mode Sabbat, an que le four atteigne la température
réglée. Notez que, pour de meilleures performances, le ventilateur du four ne fonctionne
que lorsque la température du four augmente.
Ne recouvrez pas le foyer de la table de cuisson avec un agent blanchissant.
Entretien de votre appareil
Auto-nettoyage
Ce four auto-nettoyant utilise des températures élevées (bien supérieures aux températures de
cuisson) pour brûler complètement les résidus de graisse ou les réduire en ne poudre qu'il vous
suft d'essuyer à l'aide d'un torchon humide.
ATTENTION
• Durant l'auto-nettoyage, les parois externes de la cuisinière peuvent devenir extrêmement
chaudes au toucher. Ne laissez jamais les enfants en bas âge sans surveillance à proximité
de l'appareil.
• Certains oiseaux sont extrêmement sensibles aux fumées émises durant les cycles d'auto-
nettoyage, et ce, quel que soit l'appareil. Déplacez les oiseaux dans une autre pièce bien
aérée.
• Ne tapissez jamais les parois, les grilles, le fond ou toute autre partie du four de papier
d'aluminium. La chaleur serait ainsi mal distribuée, les résultats de cuisson altérés et
l'intérieur du four endommagé de façon irréversible. Le papier aluminium peut fondre et
adhérer à la surface intérieure du four.
• Ne forcez jamais l'ouverture de la porte du four. Vous risqueriez d'endommager le système
de verrouillage automatique de la porte. Soyez vigilant lorsque vous ouvrez la porte du four
une fois le cycle d'auto-nettoyage terminé. Pour permettre à l'air chaud ou à la vapeur de
s'échapper, maintenez-vous sur le côté du four lorsque vous ouvrez la porte. Le four peut
encore être TRÈS CHAUD.
• Portez des gants pendant le nettoyage.
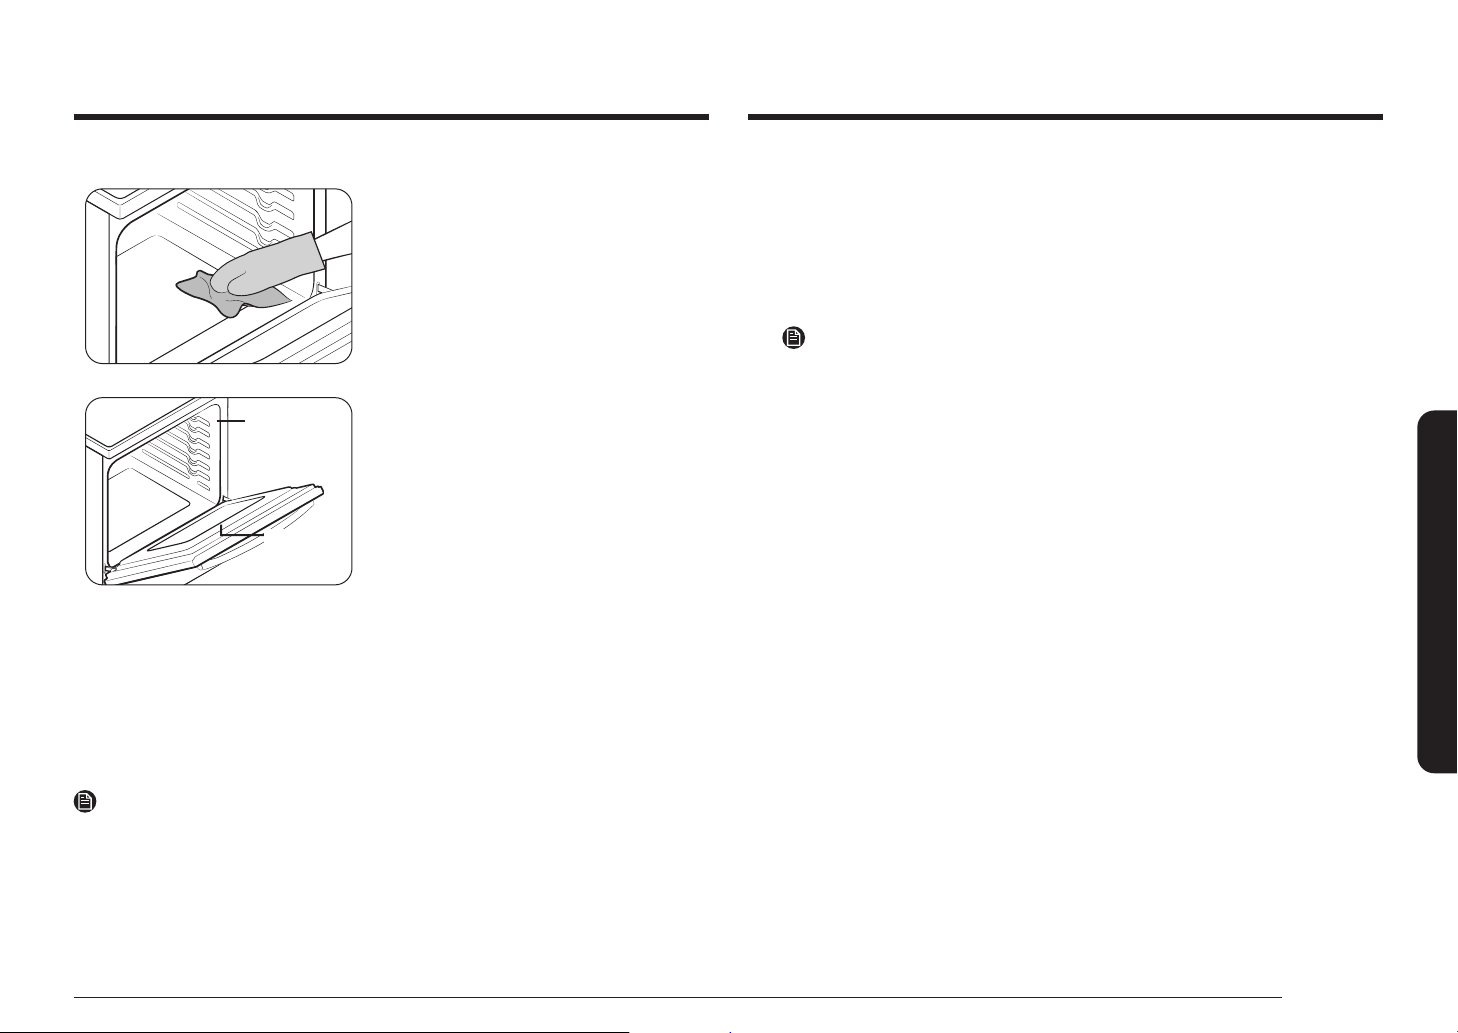
Français 43
Entretien de votre appareil
Comment lancer un cycle d'auto-nettoyage
1. Sélectionnez le temps d'auto-nettoyage, par ex. 3 heures.
Appuyez sur Self Clean (Auto-nettoyage) une fois pour un cycle de 3 heures, 2 fois pour un
cycle de 5 heures ou 3 fois pour un cycle de 2 heures.
Par défaut, le cycle dure 3 heures.
2. Appuyez sur START/SET (DÉPART/RÉGLAGE) pour démarrer le cycle d'auto-nettoyage.
Le verrouillage entraîné par moteur de la porte s'enclenche automatiquement.
REMARQUE
• Vous ne pourrez pas démarrer le cycle d'auto-nettoyage si la fonction Verrouillage du
four est activée ou si la température du four est trop élevée.
• La porte du four se verrouille automatiquement. Le temps de nettoyage restant
s'afche. La porte du four ne peut être ouverte tant que la température n'est pas
descendue à une température basse et sans danger.
• La fonction d'auto-nettoyage ne fonctionne pas si la zone chauffe-plat fonctionne.
3. Une fois le cycle d'auto-nettoyage terminé, le message End (Fin) s'afche à l'écran et la
cuisinière émet un signal sonore plusieurs fois.
Comment utiliser le départ différé pour le cycle d'auto-nettoyage ?
1. Appuyez sur Self Clean (Auto-nettoyage).
Sélectionnez l'heure d'auto-nettoyage souhaitée en appuyant sur Self Clean (Auto-
nettoyage).
2. Appuyez sur Delay Start (Départ différé).
3. Saisissez l'heure à laquelle vous souhaitez lancer l'auto-nettoyage.
4. Appuyez sur START/SET (DÉPART/RÉGLAGE).
Les icônes Départ différé, Auto-nettoyage et Verrouillage s'afchent à l'écran. Le verrouillage
entraîné par moteur de la porte s'enclenche automatiquement.
5. Le cycle d'auto-nettoyage démarre automatiquement à l'heure réglée.
Avant le cycle d'auto-nettoyage
Fig. 1Fig. 1
Fig. 2Fig. 2
Le joint de la porte Le joint de la porte
du four ne doit du four ne doit
pas être nettoyé pas être nettoyé
manuellement.manuellement.
La porte peut La porte peut
être nettoyée être nettoyée
manuellement.manuellement.
• Durant le cycle d'auto-nettoyage, nous vous
conseillons d'aérer votre cuisine en ouvrant
une fenêtre ou en activant un ventilateur ou
une hotte.
• Retirez la grille métallique, la lèchefrite, le gril
de la lèchefrite, le papier d'aluminium et tous
les ustensiles du four.
• Essuyez les résidus qui se trouvent au fond du
four. (Fig. 1).
• Les grilles argentées peuvent être auto-
nettoyées, mais elles noircissent, perdent leur
lustre et glissent plus difcilement.
• Les résidus situés en façade de la cuisinière et
ailleurs que sur le joint de la porte doivent être
nettoyés à la main. Nettoyez ces zones à l'aide
d'eau chaude, de tampons à récurer imbibés de
savon ou d'un nettoyant doux. Rincez à l'eau
claire et essuyez.
• Ne nettoyez pas le joint en lui-même. La bre
de verre utilisée pour le joint de la porte
ne résiste pas au nettoyage. Le joint doit
absolument rester intact. Si vous constatez
qu'il s'use ou se rétracte, faites-le remplacer.
(Fig. 2).
• Assurez-vous que la protection de l'ampoule
est en place et que l'éclairage est éteint.
REMARQUE
Retirez les grilles du four et les accessoires avant de lancer le mode d'auto-nettoyage.
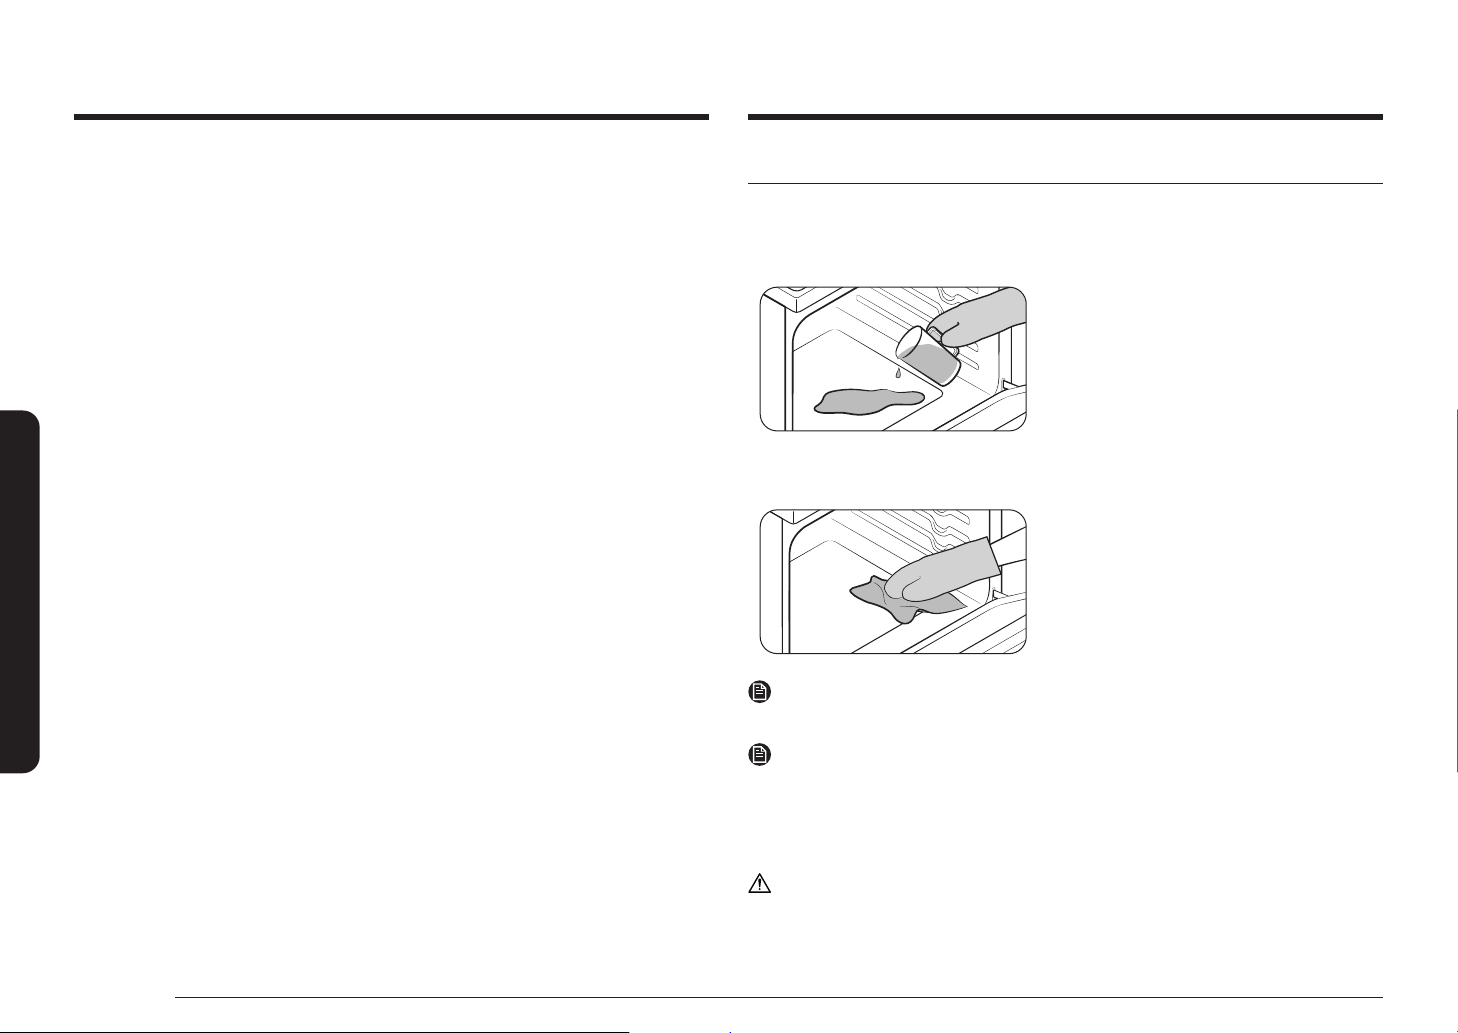
44 Français
Entretien de votre appareil
Entretien de votre appareil
Comment désactiver la fonction d'auto-nettoyage ?
Vous pourrez arrêter ou interrompre un cycle d'auto-nettoyage si la fumée produite lors de
l'opération venait à vous gêner.
1. Appuyez sur OFF/CLEAR (ARRÊT/EFFACER).
2. Vous pourrez à nouveau ouvrir la porte du four une fois que le four aura refroidi pendant
environ 1 heure.
Après un cycle d'auto-nettoyage
• Il est possible que de la cendre reste dans le four. Essuyez-la à l'aide d'un torchon humide
une fois le four refroidi (Si la cendre laisse des traces blanches, effacez-les à l'aide d'un
tampon à récurer imbibé de savon et rincez abondamment à l'aide d'une solution d'eau et de
vinaigre blanc.)
• Si le four n'est toujours pas propre après un cycle, répétez le cycle.
• Le four ne peut être réglé pour la cuisson tant qu'il n'a pas refroidi sufsamment pour
permettre l'ouverture de la porte.
Nettoyage vapeur
Comment régler le four pour le nettoyage vapeur ?
La fonction de nettoyage vapeur permet d'effectuer un nettoyage superciel en économisant du
temps et de l'énergie. Pour un nettoyage plus efcace, utilisez la fonction d'auto-nettoyage.
1. Retirez tous les accessoires du four.
2. Versez environ 10 oz (300 ml) d'eau dans la
sole du four vide, puis fermez la porte.
Utilisez uniquement de l'eau normale et non de
l'eau distillée.
3. Appuyez sur Steam Clean (Nettoyage vapeur).
4. Appuyez sur START/SET (DÉPART/RÉGLAGE).
Une fois l'opération terminée, l'afchage
clignote et un signal sonore retentit.
5. Appuyez sur OFF/CLEAR (ARRÊT/EFFACER).
6. Nettoyez l'intérieur du four.
Une quantité importante d'eau reste dans
la sole du four après un cycle de nettoyage
vapeur. Ôtez l'eau à l'aide d'une éponge ou d'un
torchon sec.
REMARQUE
Pour que le nettoyage vapeur offre des résultats optimaux, utilisez exactement 10 oz d'eau.
REMARQUE
Si vous appuyez sur Steam Clean (Nettoyage vapeur) alors que la température du four est
supérieure à 100 °F, l'indication Hot (Chaud) s'afche à l'écran. Pour assurer des résultats
optimaux, il est préférable de démarrer cette fonction à four froid. C'est pourquoi, nous vous
conseillons d'attendre que le four ait refroidi et que le message Hot (Chaud) disparaisse de l'écran.
ATTENTION
Portez des gants pendant le nettoyage.
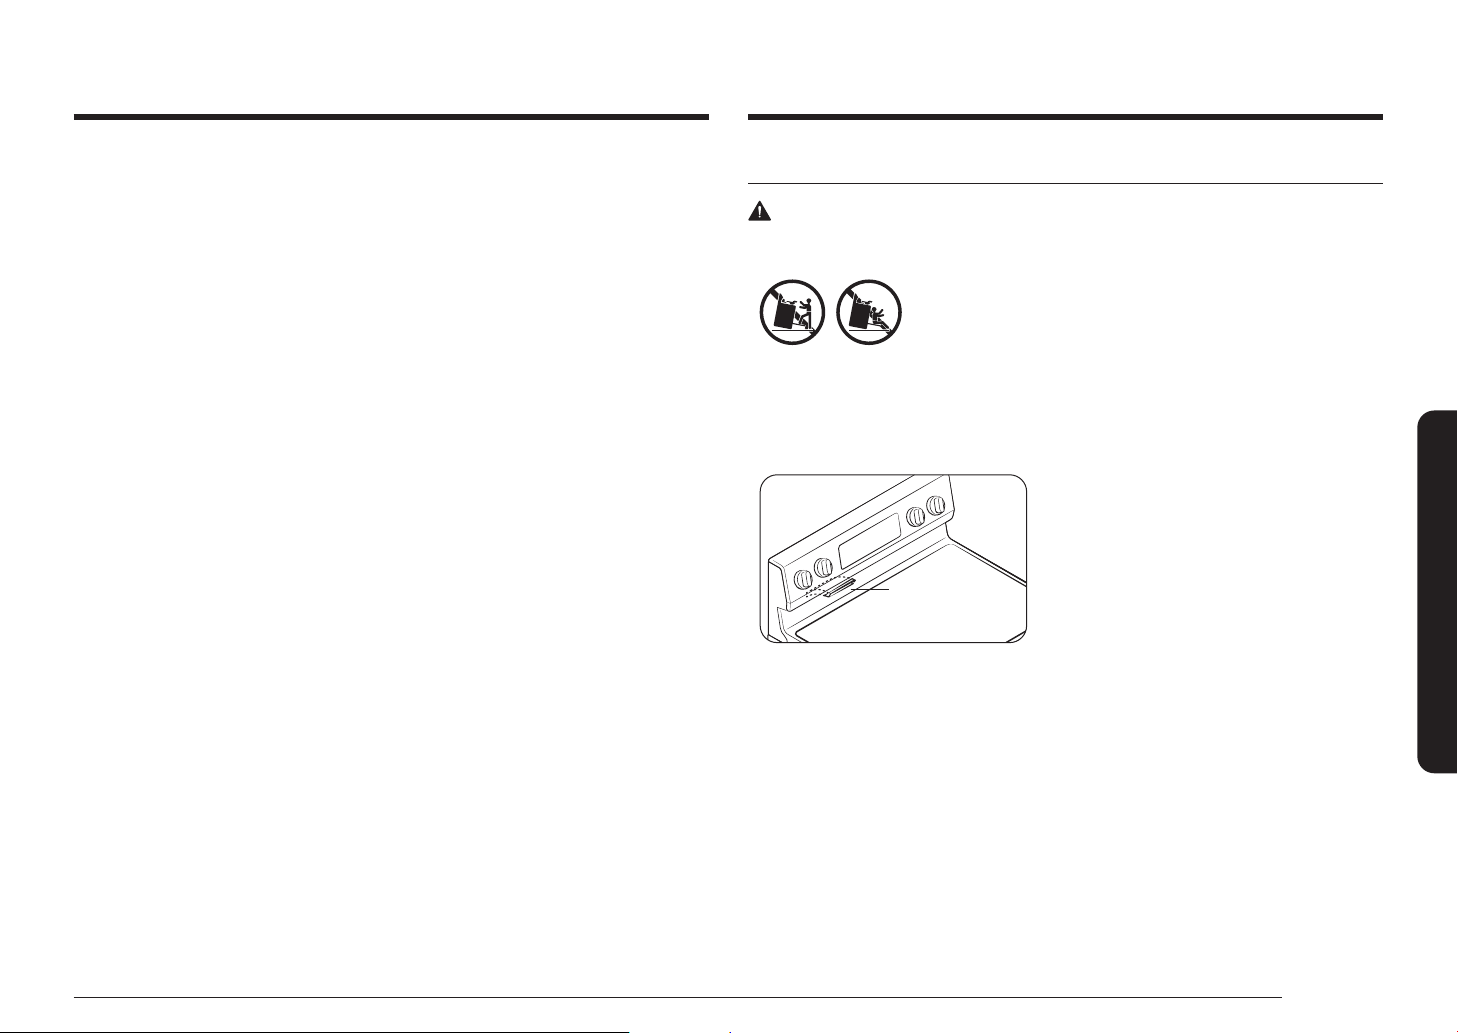
Français 45
Entretien de votre appareil
Entretien et nettoyage du four
AVERTISSEMENT
• Avant de nettoyer une quelconque partie de la cuisinière, assurez-vous que toutes les
commandes sont DÉSACTIVÉES et que toutes les surfaces sont FROIDES.
• Si vous êtes amené à déplacer votre cuisinière pour des raisons
de nettoyage, réparation ou autre, assurez-vous que le dispositif
anti-basculement est convenablement réinstallé une fois que la
cuisinière est remise en place. Si vous omettez de remettre en
place le dispositif anti-basculement, la cuisinière pourrait basculer
et causer de graves blessures.
Ventilation
VentilationVentilation
• La ventilation du four est située au-dessus du
foyer arrière gauche.
• Pendant le fonctionnement du four, cette zone
peut devenir extrêmement chaude.
• Il est normal que la vapeur s'échappe de cet
orice.
• La ventilation est importante pour assurer une
bonne circulation de l'air. Veillez à ne jamais
l'obstruer.
Après un cycle de nettoyage vapeur
• Soyez prudent lorsque vous ouvrez la porte avant la n du programme de nettoyage
vapeur. L'eau située dans le fond du four est extrêmement chaude.
• Ouvrez la porte du four et épongez l'eau restante. Ne laissez pas stagner l'eau qui reste dans
le four. Essuyez le four et séchez-le à l'aide d'un chiffon doux. N'oubliez pas d'essuyer sous le
joint de la porte.
• Pour nettoyer la cavité du four, utilisez une éponge, une brosse souple ou un tampon à
récurer en nylon imbibé(e) de nettoyant. Retirez la crasse incrustée à l'aide d'un tampon
à récurer en nylon. Les dépôts de tartre peuvent être ôtés à l'aide d'un chiffon imbibé de
vinaigre blanc.
• Si la saleté persiste, vous pouvez répéter l'opération une fois le four refroidi.
• Pour les résidus plus importants (ex. : graisse provenant du rôtissage), nous vous conseillons
d'étaler du nettoyant sur les traces avant d'activer la fonction de nettoyage vapeur.
• Une fois le nettoyage terminé, laissez la porte du four entrouverte à un angle de 15° pour
permettre à la surface émaillée interne de sécher complètement.
46 Français
Entretien de votre appareil
Entretien de votre appareil
Nettoyage des parties peintes et ornements décoratifs
• Pour le nettoyage sommaire, utilisez un torchon imbibé d'eau chaude savonneuse.
• Pour ôter les résidus incrustés et la graisse accumulée, versez un nettoyant liquide
directement sur la zone et laissez agir 30 à 60 minutes. Frottez à l'aide d'un torchon humide,
puis essuyez. N'appliquez jamais de nettoyants abrasifs sur ces surfaces. Ils risquent de les
rayer.
Nettoyage des surfaces en inox
1. Secouez rigoureusement la bouteille de NETTOYANT POUR APPAREILS EN ACIER
INOXYDABLE ou de PRODUIT LUSTRANT.
2. Versez-en une petite quantité sur un torchon ou du papier absorbant humide.
3. Nettoyez une petite zone, en frottant si possible l'inox dans le sens du grain.
4. Séchez et lustrez à l'aide de papier absorbant ou d'un torchon doux propre et sec.
5. Répétez l'opération si nécessaire.
REMARQUE
• N'utilisez pas de tampon à récurer métallique. La surface serait rayée.
• Si un NETTOYANT POUR APPAREILS EN ACIER INOXYDABLE à base d'huile minérale a
préalablement été utilisé pour nettoyer l'appareil, nettoyez la surface à l'aide de liquide
vaisselle et d'eau avant d'appliquer le NETTOYANT POUR APPAREILS EN ACIER INOXYDABLE
ou le PRODUIT LUSTRANT.
Grilles de cuisson
Si vous laissez les grilles dans le four durant un cycle d'auto-nettoyage, leur couleur deviendra
légèrement bleutée et l'aspect de leur surface se ternira. Une fois le cycle d'auto-nettoyage
terminé et le four refroidi, essuyez les parties latérales des grilles à l'aide d'un papier sulfurisé
ou d'un chiffon légèrement huilé. Cela permettra une meilleure insertion des grilles dans leurs
glissières.
REMARQUE
• Ne les nettoyez pas au lave-vaisselle.
• S'il devient difcile de retirer ou remplacer la grille, essuyez légèrement les glissières de la
grille du four avec de l'huile de cuisson. N'essuyez pas l'huile de cuisson sur les glissières.
• Si la grille devient difcile à faire coulisser, il peut s'avérer nécessaire de la lubrier avec un
lubriant au graphite.
REMARQUE
• Pour commander du lubriant au graphite, appelez le centre d'assistance
clientèle SAMSUNG au 1-800-SAMSUNG (726-7864) ou consultez notre site Web
(www.samsung.com/us/support, www.samsung.com/ca/support, ou www.samsung.com/
ca_fr/support) et le numéro de la pièce de référence DG81-01629A.
• Si vous souhaitez en acheter directement, connectez-vous à l'adresse
http://www.samsungparts.com/Default.aspx.
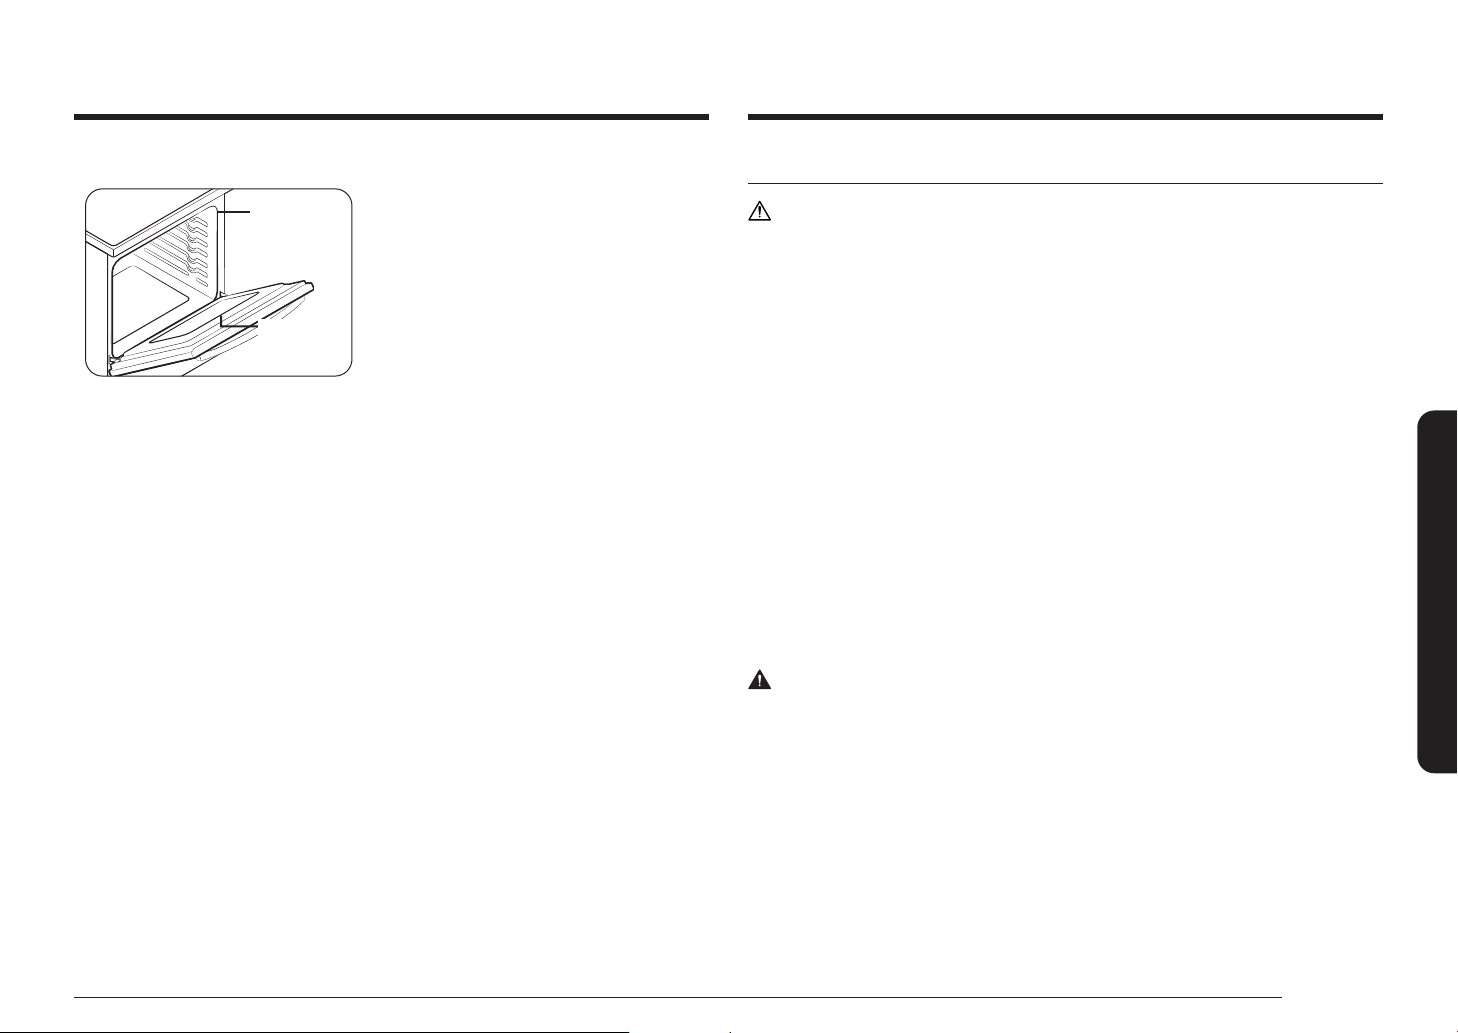
Français 47
Entretien de votre appareil
Entretien et nettoyage de la table de cuisson vitrée
ATTENTION
N'obstruez pas l'orice de ventilation et les moteurs de refroidissement, et ne laissez pas non plus
y pénétrer de substances étrangères lors du nettoyage de la table de cuisson.
Nettoyage après une utilisation quotidienne
Utilisez uniquement un nettoyant céramique pour la table de cuisson. L'utilisation d'autres crèmes
n'a pas la même efcacité.
En respectant les étapes suivantes, vous parviendrez à maintenir en bon état et à protéger votre
table de cuisson vitrée.
1. Avant d'utiliser votre table de cuisson pour la première fois, nettoyez-la à l'aide d'un
nettoyant pour table de cuisson en céramique.
Vous protégerez ainsi la surface et faciliterez son nettoyage.
2. L'usage quotidien d'un nettoyant pour table de cuisson en céramique permet de préserver
l'aspect neuf de votre table de cuisson.
3. Secouez bien la crème nettoyante. Versez quelques gouttes de nettoyant directement sur la
table de cuisson.
4. Utilisez une serviette en papier ou un tampon de nettoyage pour table de cuisson en
céramique pour nettoyer l'intégralité de la table de cuisson.
5. Utilisez un chiffon sec ou une serviette en papier pour retirer tout résidu de produit
nettoyant. Il est inutile de rincer.
AVERTISSEMENT
Vous risquez d'ENDOMMAGER votre surface vitrée si vous utilisez d'autres tampons de nettoyage
que ceux recommandés.
Porte du four
• Utilisez du savon et de l'eau pour un
nettoyage minutieux des parties supérieure,
latérale et frontale de la porte du four. Rincez
abondamment. Utilisez un produit vitre pour
nettoyer la vitre extérieure de la porte du
four. N'IMMERGEZ PAS la porte dans de l'eau.
NE VAPORISEZ PAS ou ne faites pas pénétrer
de l'eau ou du produit vitre à l'intérieur des
orices de ventilation de la porte. N'UTILISEZ
PAS de nettoyants pour four, de poudres à
récurer ou tout autre nettoyant fortement
abrasif sur la partie extérieure de la porte du
four.
• NE NETTOYEZ PAS le joint de la porte. Le joint
de la porte du four se compose d'une matière
tissée, essentielle à une bonne étanchéité.
Veillez à ne pas frotter, endommager ou retirer
ce joint.
Le joint de la porte Le joint de la porte
du four ne doit du four ne doit
pas être nettoyé pas être nettoyé
manuellement.manuellement.
La porte peut La porte peut
être nettoyée être nettoyée
manuellement.manuellement.
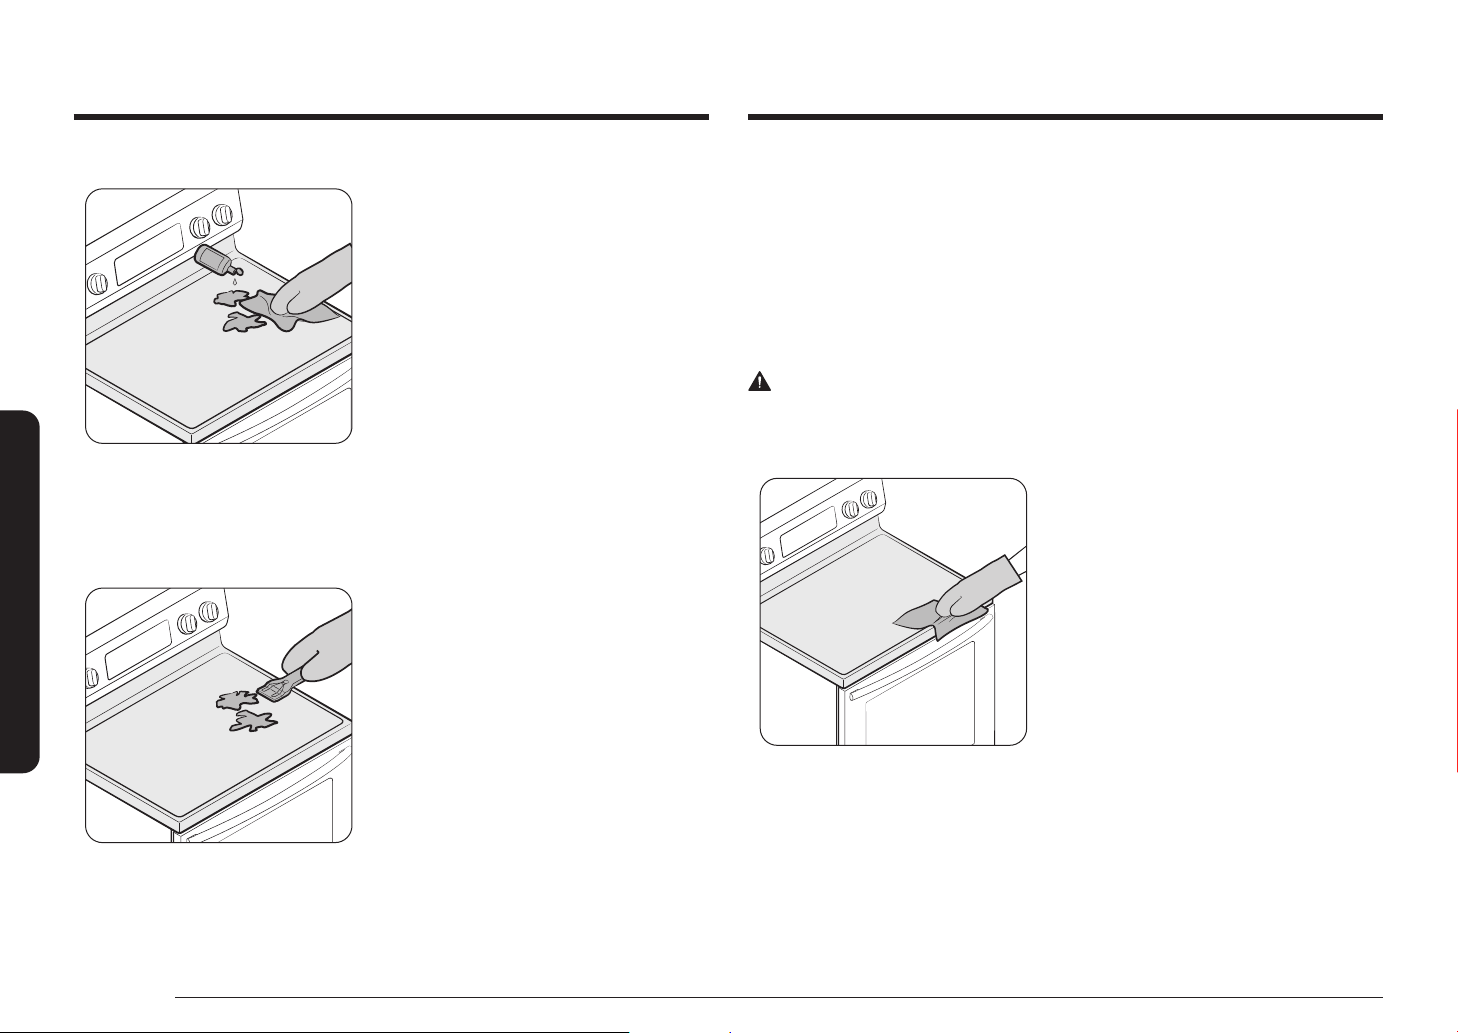
48 Français
Entretien de votre appareil
Entretien de votre appareil
Élimination des résidus brûlés
1. Laissez refroidir la table de cuisson.
2. Étalez quelques gouttes de nettoyant pour
table de cuisson en céramique sur l'ensemble
de la surface couverte de résidus brûlés.
3. En utilisant un tampon de nettoyage conçu
pour les surfaces de cuisson en céramique,
frottez la zone couverte de résidus, en
appuyant si nécessaire.
4. Si des résidus subsistent, répétez autant de
fois que nécessaire les étapes décrites ci-
dessus.
5. Pour une protection optimale, et une fois tous
les résidus éliminés, frottez toute la surface en
appliquant du nettoyant pour table de cuisson
en céramique à l'aide d'une serviette en papier.
Élimination des résidus importants de brûlé
1. Laissez refroidir la table de cuisson.
2. À l'aide d'un grattoir à lame de rasoir unique
incliné d'environ 45° sur la surface vitrée,
grattez les salissures. Vous devez appuyer et
frotter pour supprimer les résidus.
3. Après avoir gratté à l'aide du grattoir à lame
de rasoir, étalez quelques gouttes de nettoyant
pour surface en céramique sur l'ensemble de
la surface couverte de résidus brûlés. Utilisez
un tampon de nettoyage pour supprimer tout
résidu restant. (Ne grattez pas le joint).
4. Pour une protection optimale, et une fois tous
les résidus éliminés, frottez toute la surface en
appliquant du nettoyant pour table de cuisson
en céramique à l'aide d'une serviette en papier.
Suppression des rayures et traces de métal
1. Évitez de faire glisser les casseroles et plats sur la table de cuisson. Vous risquez ainsi de
rayer la table de cuisson. Vous pouvez supprimer ces traces en appliquant un nettoyant pour
table de cuisson en céramique à l'aide d'un tampon de nettoyage pour tables de cuisson en
céramique.
2. Si vous laissez des casseroles à n revêtement d'aluminium ou de cuivre bouillir jusqu'à
évaporation complète, le revêtement peut laisser une marque de décoloration noire
sur la table de cuisson. Pour éviter que cette trace ne devienne indélébile, éliminez-la
immédiatement.
AVERTISSEMENT
Vériez que le fond de vos plats est lisse pour éviter de rayer la table de cuisson.
Nettoyage du joint de la table de cuisson
Pour nettoyer le joint situé sur le pourtour de la
vitre, appliquez un chiffon humide durant quelques
minutes, puis nettoyez à l'aide d'un nettoyant non
abrasif.
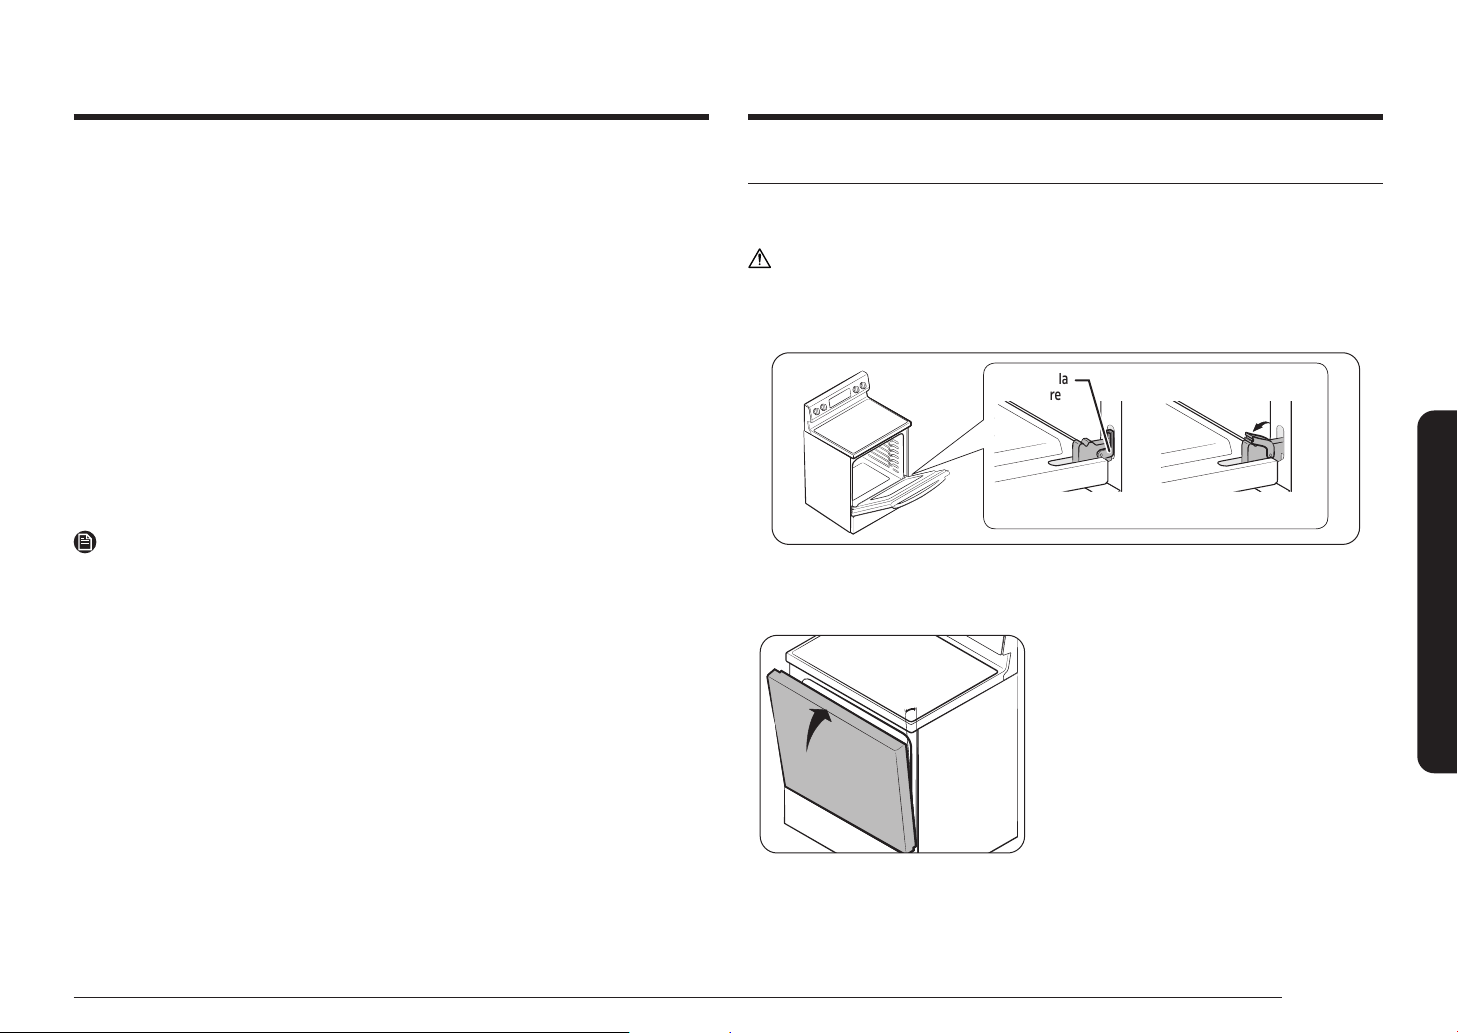
Français 49
Entretien de votre appareil
Retrait et réinstallation de la porte du four
Comment retirer la porte ?
ATTENTION
• La porte est très lourde. Soyez prudent lorsque vous retirez et soulevez la porte.
Ne soulevez pas la porte par la poignée.
• Mettez la cuisinière hors tension avant de retirer la porte.
Verrou de la Verrou de la
charnièrecharnière
Position de verrouillagePosition de verrouillage Position de déverrouillagePosition de déverrouillage
1. Ouvrez la porte au maximum.
2. Abaissez les verrous de la charnière vers l'encadrement de porte pour les mettre en position
de déverrouillage.
environ 5°environ 5°
Fig. 1Fig. 1
3. Saisissez fermement les deux côtés de la porte
par le haut.
4. Fermez la porte jusqu'à la position de retrait
de la porte, soit à environ 5 degrés de la
position verticale (Fig. 1).
Risques d'endommagement dénitif de la surface vitrée
• Les éclaboussures de sucre (comme celles produites par les contures, le caramel, le sucre,
les sirops) ou les plastiques fondus peuvent faire apparaître des piqûres sur la surface de
votre table de cuisson. Ces dommages ne sont pas couverts par la garantie. Il est conseillé
de nettoyer la projection tant qu'elle est encore chaude. Soyez particulièrement vigilant
lorsque vous retirez des substances chaudes. Reportez-vous à la section ci-dessous.
• Lorsque vous utilisez un grattoir, assurez-vous qu'il est neuf et que la lame de rasoir est
toujours aiguisée ; n'utilisez pas de lame émoussée ou en mauvais état.
Nettoyage des éclaboussures de sucre et du plastique fondu
1. Éteignez tous les foyers. Retirez les plats chauds.
2. Après avoir enlé des maniques, munissez-vous d'un grattoir à lame de rasoir unique
pour déplacer les éclaboussures vers une partie froide de la table de cuisson. Retirez les
éclaboussures à l'aide de papier absorbant.
3. Aucun résidu d'éclaboussure ne doit subsister tant que la table de cuisson est encore chaude.
4. Ne réutilisez pas les foyers tant que tous les résidus n'ont pas été complètement supprimés.
REMARQUE
Si une piqûre ou des creux se sont déjà formés sur la surface vitrée, le verre de la table de
cuisson devra être remplacé. Dans ce cas, une intervention est nécessaire.
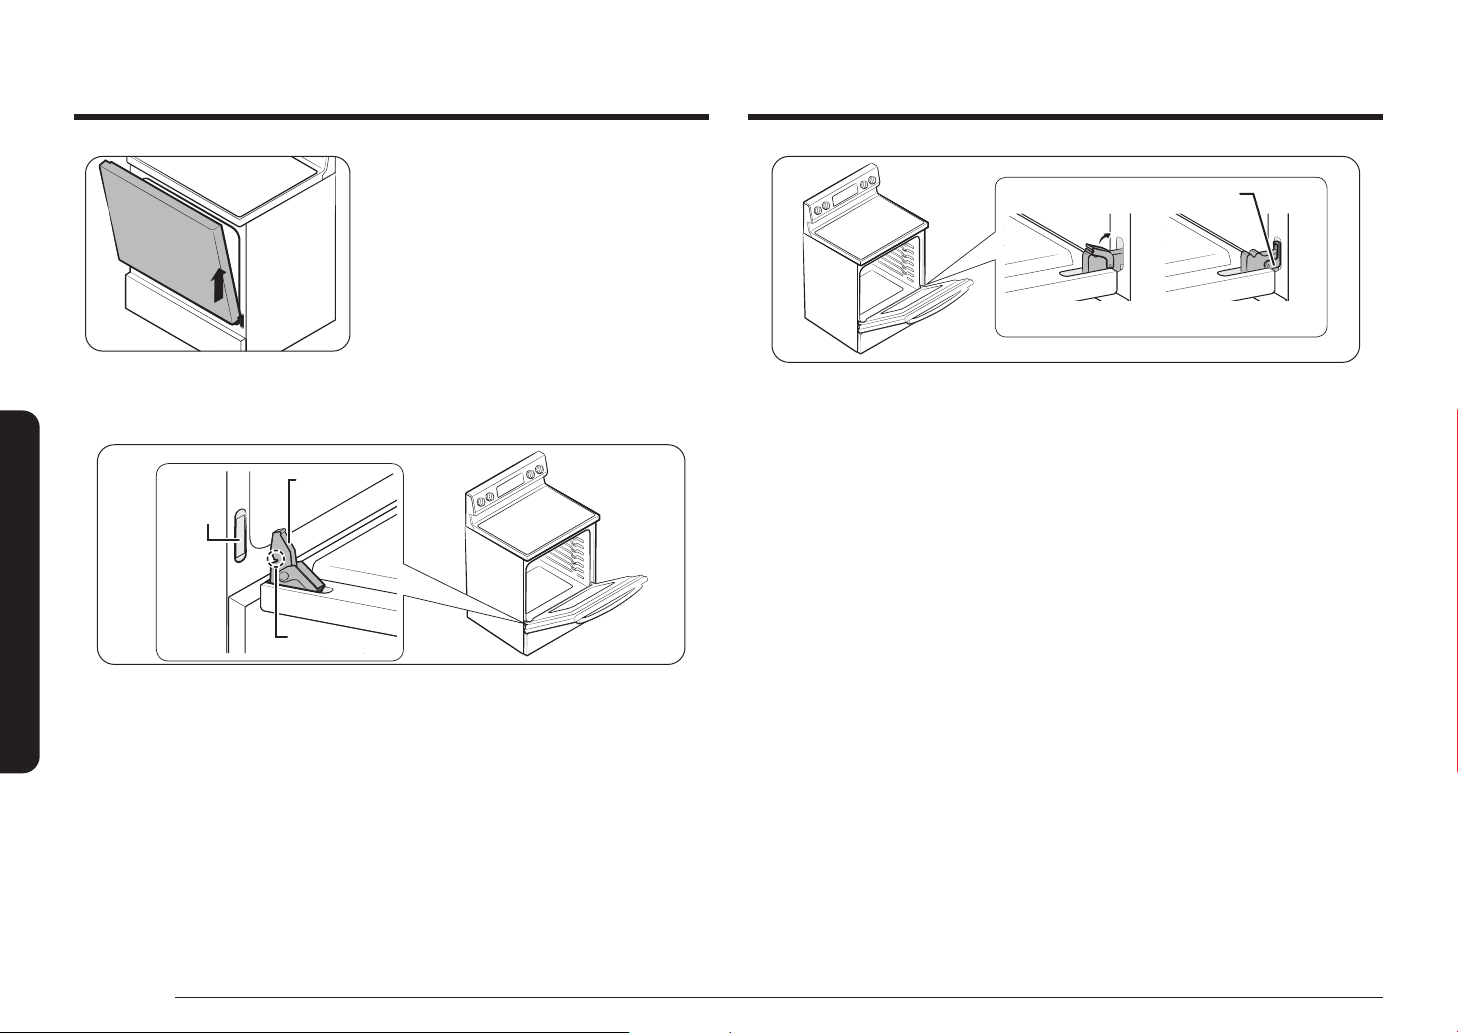
50 Français
Entretien de votre appareil
Entretien de votre appareil
Fig. 2Fig. 2
5. Soulevez et retirez la porte jusqu'à ce que
le bras de la charnière soit enlevé de son
logement (Fig. 2).
Comment réinstaller la porte ?
Bras de la charnièreBras de la charnière
Partie Partie
inférieure inférieure
du logementdu logement
Partie creusePartie creuse
1. Saisissez fermement les deux côtés de la porte par le haut.
2. En maintenant la porte dans le même angle que lors de son retrait, faites glisser la partie
creuse du bras de la charnière dans la partie inférieure du logement de la charnière.
L'encoche située sur le bras de la charnière doit être insérée entièrement dans la partie
inférieure du logement.
Position de verrouillagePosition de verrouillagePosition de déverrouillagePosition de déverrouillage
Verrou de la Verrou de la
charnièrecharnière
3. Ouvrez la porte au maximum. Si la porte ne s'ouvre pas complètement, c'est que la partie
creuse n'est pas correctement insérée dans la partie inférieure du logement.
4. Poussez les verrous de la charnière vers le haut contre le cadre de la cavité du four pour les
mettre en position de verrouillage.
5. Fermez la porte du four.

Français 51
Entretien de votre appareil
Remplacement de l'ampoule du four
L'éclairage du four nécessite une ampoule standard de 40 watts. L'éclairage s'active à l'ouverture
de la porte. Lorsque la porte du four est fermée, appuyez sur pour activer ou désactiver
l'éclairage. L'éclairage ne s'active pas durant un cycle d'auto-nettoyage.
RetirerRetirer
Cache en verreCache en verre AmpouleAmpoule
Remise en placeRemise en place
1. Assurez-vous que le four et l'ampoule sont
froids.
2. Débranchez la cuisinière ou mettez-la hors
tension.
3. Tournez le cache en verre situé à l'arrière du
four dans le sens inverse des aiguilles d'une
montre pour le retirer.
4. Tournez l'ampoule dans le sens inverse des
aiguilles d'une montre pour la retirer de sa
douille.
5. Insérez une ampoule neuve de 40 watts, puis
faites-la tourner dans le sens horaire pour la
serrer. Replacez le cache de l'ampoule en le
faisant tourner dans le sens horaire.
6. Branchez la cuisinière ou mettez-la sous
tension.
ATTENTION
Avant de remplacer l'ampoule de votre four,
débranchez la cuisinière au niveau du panneau de
fusibles ou du tableau à disjoncteurs. Assurez-vous
que le four et l'ampoule sont froids.
Retrait et réinstallation du tiroir de rangement
Point Point
d'accroched'accroche
Point Point
d'accroched'accroche
Comment retirer le tiroir de rangement ?
1. Tirez le tiroir vers vous jusqu'à ce qu'il arrive
en butée.
2. Inclinez l'avant du tiroir et tirez-le vers vous
jusqu'à ce qu'il arrive en butée.
Comment remettre le tiroir de rangement en
place ?
1. Placez le côté gauche du tiroir sur le crochet
gauche et le côté droit sur le crochet droit.
2. Poussez sur le tiroir jusqu’à ce qu’il arrive en
butée.
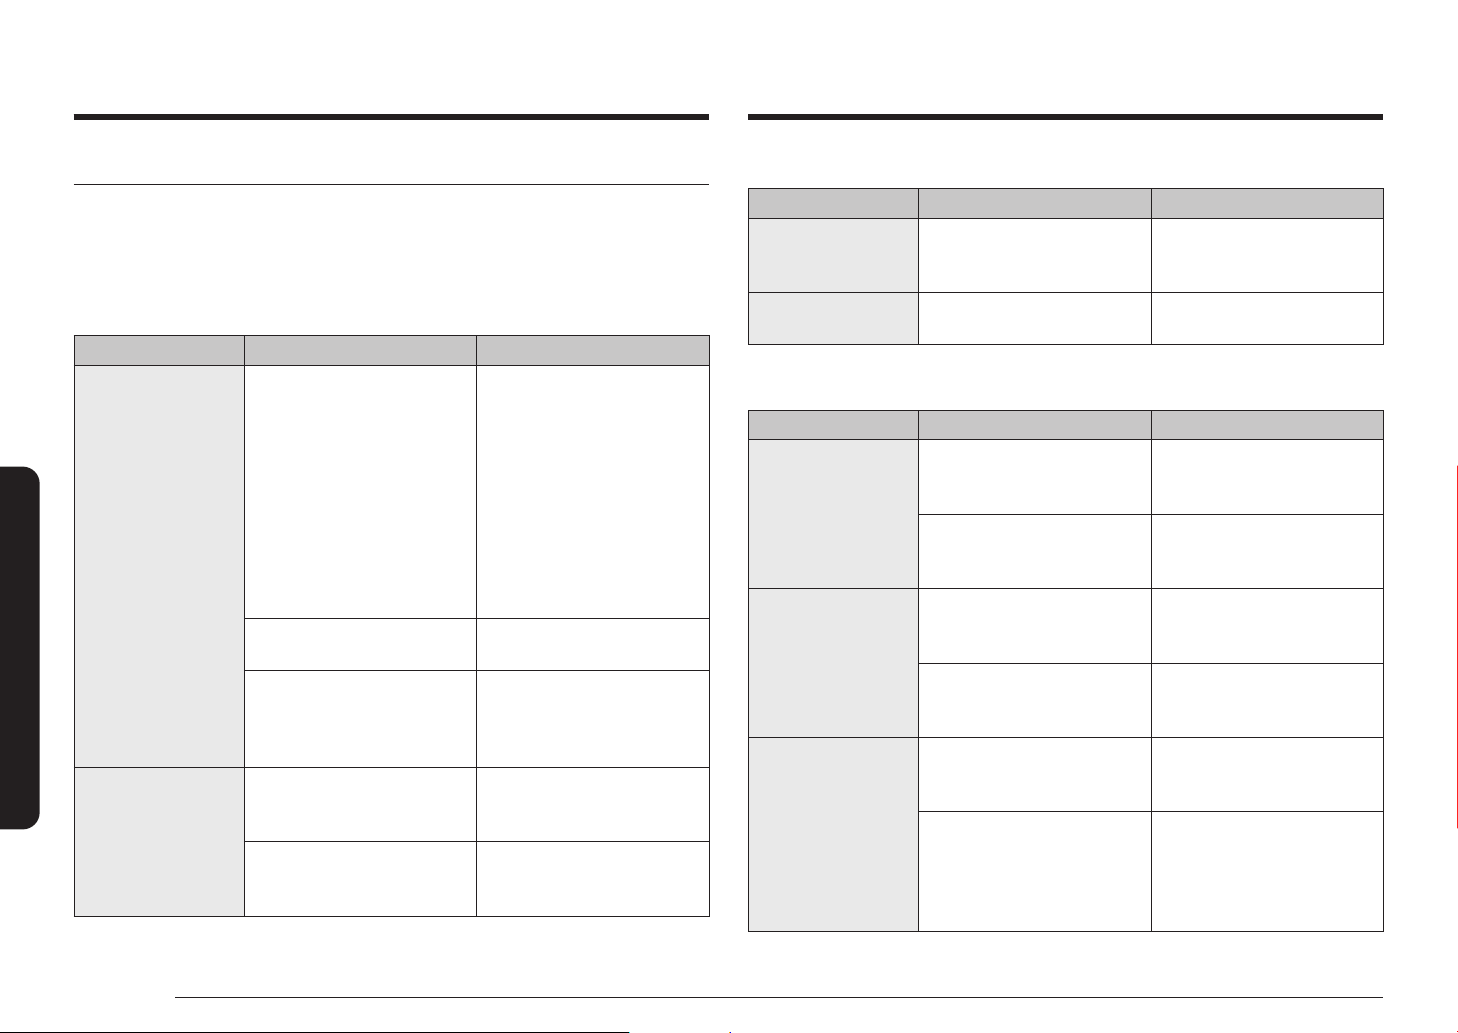
52 Français
Dépannage
DépannageDépannage
Dépannage
Samsung veille à ce que vous ne rencontriez pas de problèmes lors de l'utilisation de votre
nouvelle cuisinière électrique. En cas de problème inattendu, recherchez en premier lieu une
solution dans les tableaux ci-dessous. Si vous rencontrez encore des problèmes après avoir
essayé la solution suggérée, appelez Samsung au 1-800-SAMSUNG (1-800-726-7864).
Installation
Problème Cause possible Solution
La cuisinière n'est pas à
niveau.
La cuisinière n'a pas été installée
correctement.
• Placez la grille de cuisson
au centre du four. Placez un
niveau sur la grille de cuisson.
Ajustez les pieds de mise à
niveau situés sur la base de
la cuisinière jusqu'à ce que la
grille de cuisson soit à niveau.
• Assurez-vous que le sol est
plan et sufsamment solide et
stable pour supporter le poids
de la cuisinière.
Le sol est affaissé ou incliné. Contactez un menuisier pour
remédier à la situation.
Les placards de la cuisine ne
sont pas correctement alignés
et donnent l'impression que la
cuisinière n'est pas de niveau.
Assurez-vous que les éléments de
cuisine sont droits et que l'espace
est sufsant pour l'installation.
L'accès à la cuisinière
est nécessaire pour
sa réparation mais la
déplacer s'avère difcile.
Les éléments de la cuisine ne sont
pas droits et situés trop près de
l'appareil.
Contactez un maçon ou un
installateur pour rendre la cuisinière
accessible.
La moquette interfère avec les
mouvements de la cuisinière.
Ménagez un espace sufsant
pour que la cuisinière puisse être
soulevée de la moquette.
ÉCRAN DE COMMANDE
Problème Cause possible Solution
L'afchage s'atténue. Un fusible de votre habitation est
peut-être grillé ou le disjoncteur
peut s'être déclenché.
Remplacez le fusible concerné ou
réenclenchez le disjoncteur.
L'afchage clignote. Une coupure de courant s'est
produite.
Réglez l'heure à nouveau.
TABLE DE CUISSON
Problème Cause possible Solution
Les foyers ne
maintiennent pas une
chaleur continue ou
ne cuisent pas assez
rapidement.
Le récipient n'est peut-être pas
adapté à la surface de cuisson.
Utilisez des casseroles à fond plat
et correspondant au diamètre du
foyer sélectionné.
À certains endroits, la puissance
(tension) peut être faible.
Placez un couvercle sur la casserole
jusqu'à ce que la chaleur souhaitée
soit atteinte.
Les foyers ne s'allument
pas.
Un fusible de votre habitation est
peut-être grillé ou un disjoncteur
s'est peut-être déclenché.
Remplacez le fusible concerné ou
réenclenchez le disjoncteur.
Les commandes de la table de
cuisson sont mal réglées.
Vériez que vous utilisez bien la
commande correspondant au foyer
utilisé.
Zones de décoloration sur
la table de cuisson.
Des éclaboussures n'ont pas été
nettoyées.
Reportez-vous au chapitre relatif
à l'entretien et au nettoyage de la
table de cuisson vitrée, en page 47.
La surface est chaude et la table de
cuisson paraît de couleur claire.
Ceci est tout à fait normal. Il est
possible que la surface paraisse
décolorée lorsqu'elle est chaude.
Ce phénomène est provisoire et
disparaît lorsque le verre refroidit.
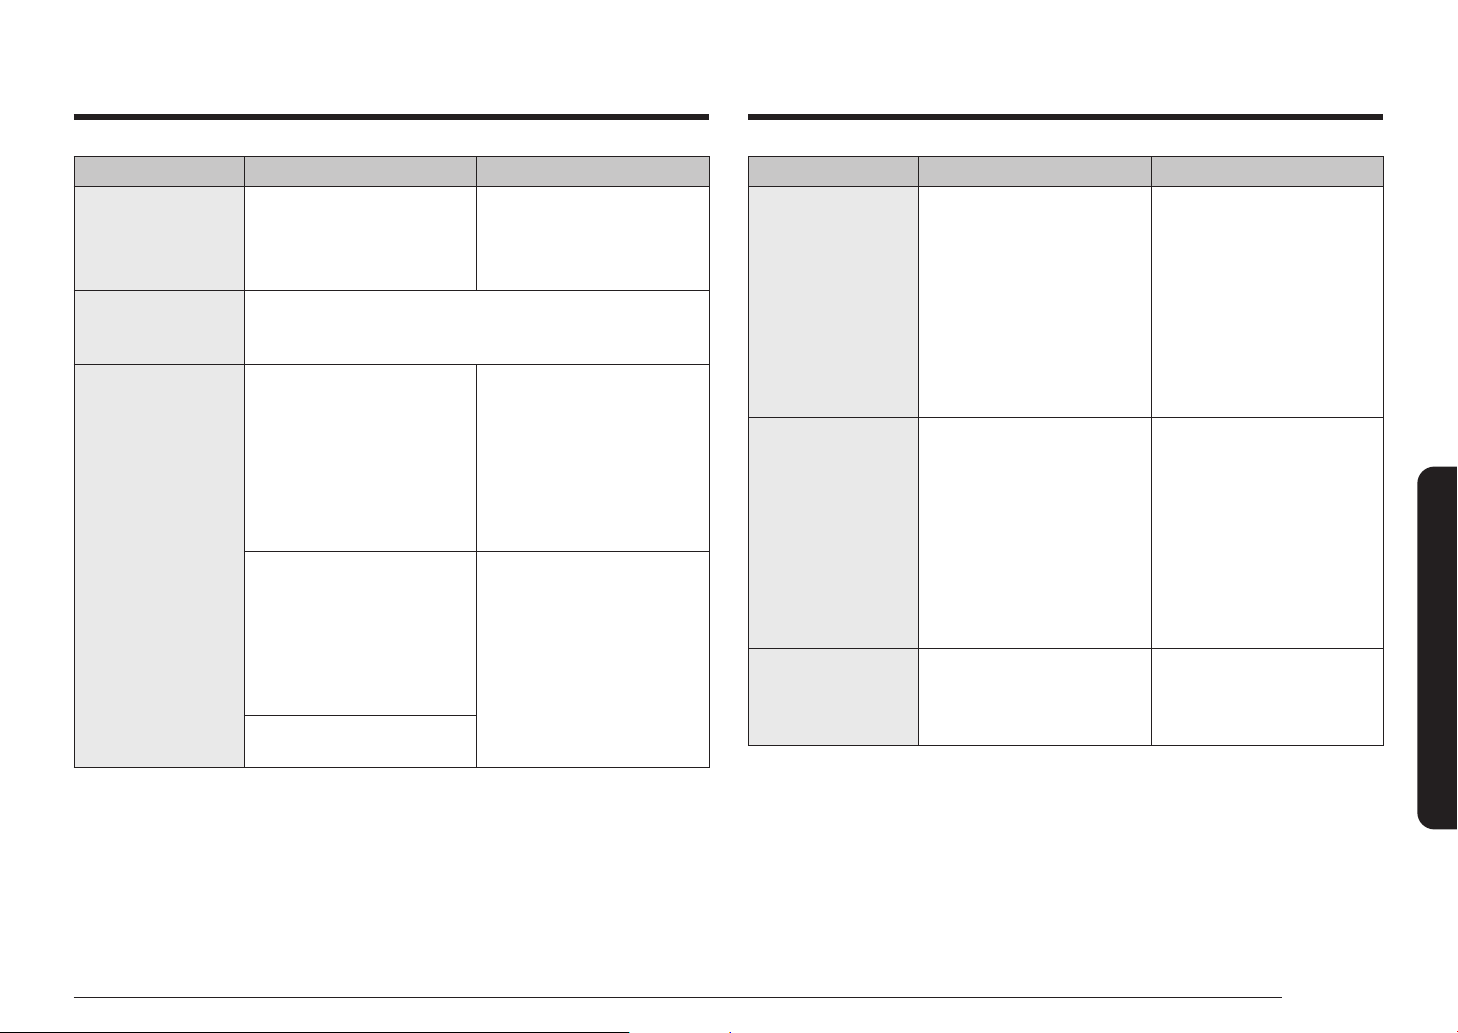
Français 53
Dépannage
Problème Cause possible Solution
Traînées ou taches
brunes.
Des plats cuisinés ont débordé sur
la table de cuisson.
• Attendez que la surface
refroidisse. Par ailleurs, à
l'aide d'un grattoir à lame de
rasoir unique incliné d'environ
45° sur la surface vitrée,
retirez les salissures.
• Reportez-vous au chapitre
relatif à l'entretien et au
nettoyage de la table de
cuisson vitrée, en page 47.
Zones de décoloration à
reets métalliques.
Des dépôts minéraux d'eau et
d'aliments sont restés sur la table
de cuisson.
• Supprimez-les à l'aide d'une
crème nettoyante spéciale
pour table de cuisson en verre
et céramique.
• Utilisez des récipients à fond
propre et sec. Nettoyez la
table de cuisson avec un
agent de nettoyage spécial
vitrocéramique, de façon
régulière chaque semaine.
Bruit de « craquement »
ou de « crépitement ».
Ce bruit provient du métal lorsqu'il
chauffe et qu'il refroidit pendant
l'utilisation des fonctions de cuisson
et d'auto-nettoyage.
Ce phénomène est normal et ne
constitue pas un dysfonctionnement
du système. Utilisez la cuisinière
normalement.
Problème Cause possible Solution
Le foyer s'éteint et se
rallume fréquemment.
Le foyer s'éteint et se rallume an
de conserver la puissance réglée.
Ce phénomène est normal et ne
constitue pas un dysfonctionnement
du système. Utilisez la cuisinière
normalement.
Le foyer redevient noir
lorsqu'un réglage plus
faible est sélectionné.
Ceci est tout à fait normal. Le foyer est toujours allumé et chaud.
Rayures ou éraures sur
la surface de la table de
cuisson.
La table de cuisson n'est pas
correctement nettoyée.
Les rayures ne peuvent être ôtées.
Les rayures légères s'estomperont
dans le temps au l des nettoyages.
Utilisez une crème nettoyante
spéciale vitrocéramique. N'utilisez
pas d'agents chimiques ou corrosifs.
Ces agents peuvent endommager la
surface de l'appareil.
Des récipients à fond rugueux
ont été en contact avec la table
de cuisson, ou bien de grosses
particules (comme du gros sel ou
du sable) se sont trouvées entre les
récipients et la surface de la table
de cuisson.
An d'éviter les rayures, suivez
les procédures de nettoyage
recommandées. Assurez-vous que le
fond des récipients est propre avant
d'utiliser ces derniers et choisissez
des récipients à fond lisse.
Vous avez fait glisser des récipients
sur la table de cuisson.
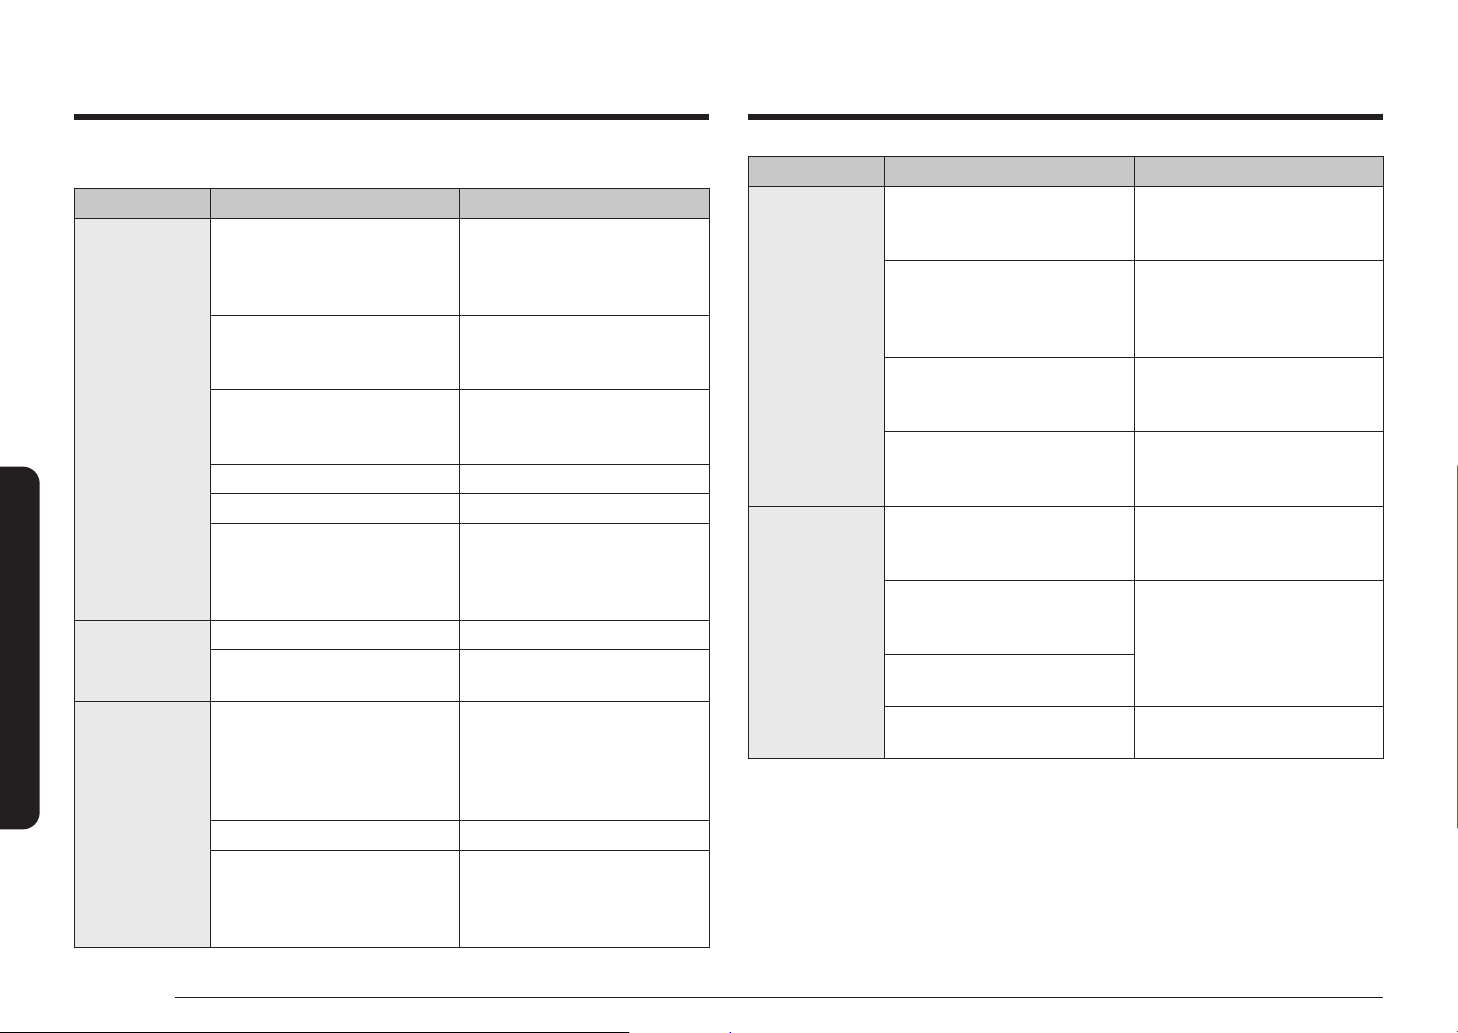
54 Français
Dépannage
Dépannage
FOUR
Problème Cause possible Solution
Le four ne s'allume
pas.
La cuisinière n'est pas correctement
branchée sur la prise murale.
Assurez-vous que la cuisinière est
branchée sur une prise en état de
marche et correctement mise à la
terre.
Un fusible de votre habitation est
peut-être grillé ou un disjoncteur s'est
peut-être déclenché.
Remplacez le fusible concerné ou
réenclenchez le disjoncteur.
Les commandes du four n'ont pas été
correctement réglées.
Reportez-vous à la section relative à
l'utilisation du four, commençant en
page 28.
Le four est trop chaud. Laissez le four refroidir.
Câblage incomplet. Contactez un centre de dépannage.
Coupure de courant. Vériez que les lampes de votre
habitation s'allument. Au besoin,
demandez de l'aide auprès de votre
compagnie d'électricité.
L'éclairage du four
ne s'allume pas.
L'ampoule est dévissée ou défectueuse. Revissez ou remplacez l'ampoule.
Le commutateur permettant d'activer
l'éclairage est cassé.
Contactez un centre de dépannage.
La cuisinière ne
s'allume pas.
La cuisinière n'est pas correctement
branchée sur la prise murale, un
fusible de votre habitation est peut-
être grillé ou un disjoncteur s'est peut-
être déclenché.
Assurez-vous que le cordon
d'alimentation est branché sur
une prise en état de marche et
correctement mise à la terre. Vériez
le fusible et le disjoncteur.
Câblage incomplet. Contactez un centre de dépannage.
Coupure de courant. Vériez que les lampes de votre
habitation s'allument. Au besoin,
demandez de l'aide auprès de votre
compagnie d'électricité.
Problème Cause possible Solution
Le four émet une
fumée excessive
durant la cuisson.
Les commandes du four n'ont pas été
correctement réglées.
Reportez-vous à la section relative à
l'utilisation du gril, commençant en
page 34.
La viande a été placée trop près de
l'élément.
Repositionnez la grille de façon à
ménager un espace sufsant entre la
viande et l'élément. Préchauffez le gril
pour saisir la viande.
La viande n'a pas été correctement
préparée.
Retirez l'excès de gras de la viande.
Coupez les bords gras susceptibles de
se recourber, laissant le maigre intact.
La graisse s'est accumulée sur les
surfaces du four.
Un nettoyage régulier est nécessaire
en cas d'utilisation répétée de la
fonction gril.
Les aliments ne
cuisent pas ou
ne sont pas rôtis
correctement.
Les commandes du four n'ont pas été
correctement réglées.
Reportez-vous à la section relative à
l'utilisation du four, commençant en
page 28.
La grille de cuisson n'a pas été
positionnée correctement ou n'est pas
à niveau.
Reportez-vous au chapitre relatif à
l'utilisation des grilles du four, en
page 31.
Un récipient inadapté ou de taille
inappropriée est utilisé.
Le capteur du four doit être réglé. Reportez-vous au chapitre relatif au
réglage du thermostat, en page 39.
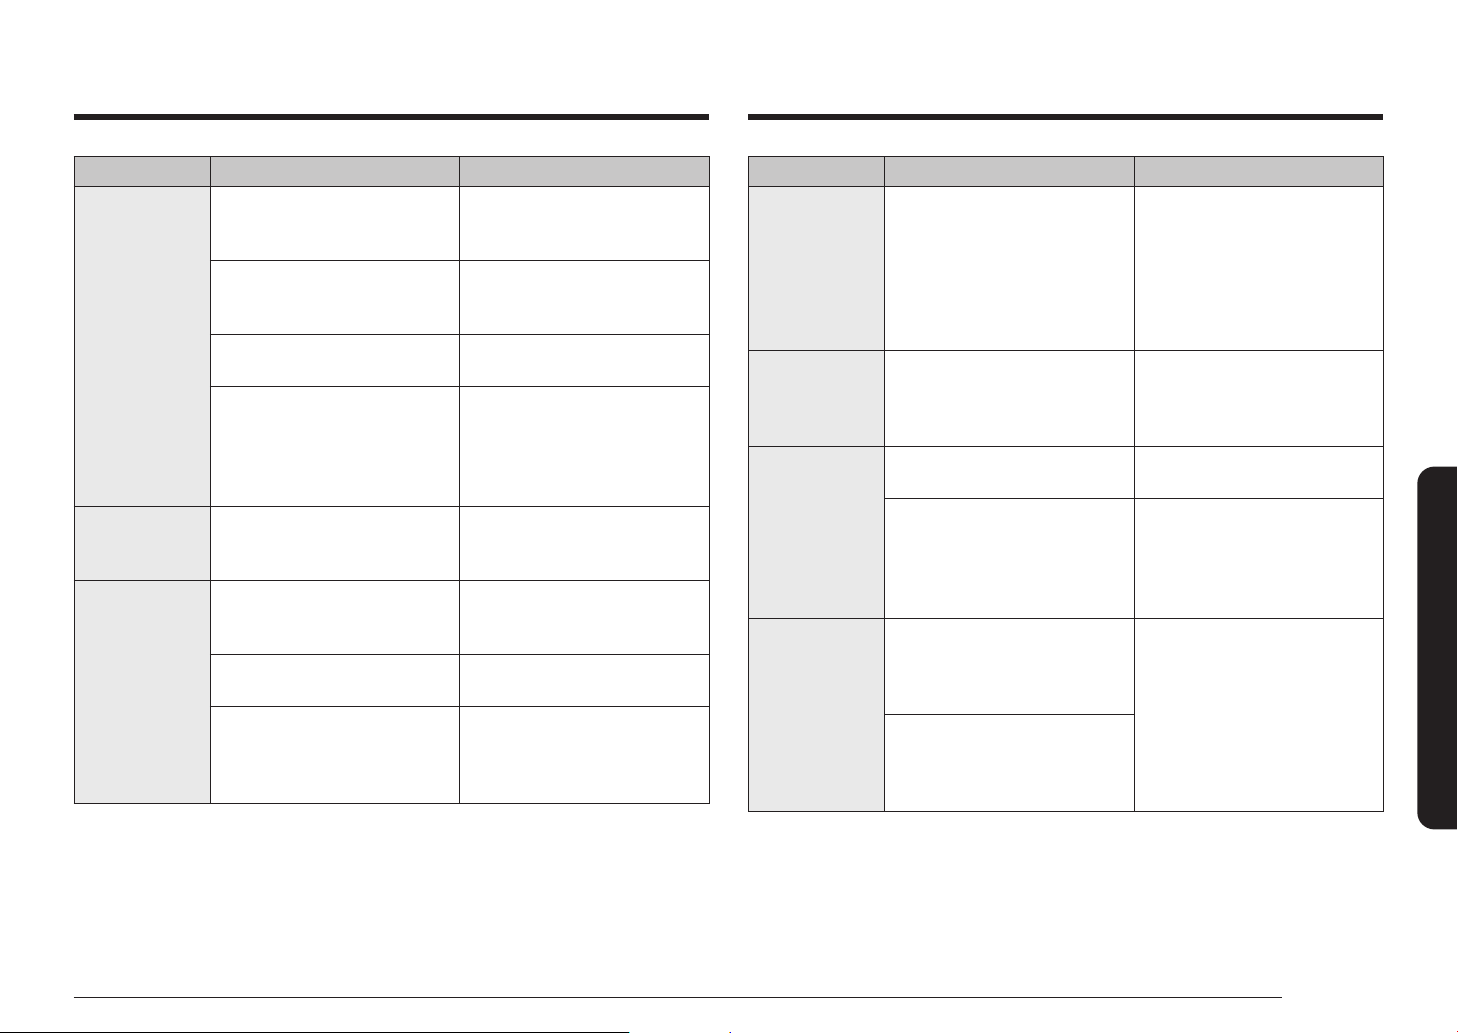
Français 55
Dépannage
Problème Cause possible Solution
Fumée excessive
durant un cycle
d'auto-nettoyage.
L'intérieur de votre four est
excessivement sale.
Appuyez sur OFF/CLEAR (ARRÊT/
EFFACER). Ouvrez les fenêtres pour
évacuer la fumée de la pièce. Attendez
que le cycle d'auto-nettoyage soit
annulé. Essuyez la saleté excessive,
puis relancez le cycle d'auto-
nettoyage.
La porte du four ne
s'ouvre pas après
un cycle d'auto-
nettoyage.
Le four est trop chaud. Laissez le four refroidir.
Le four est toujours
sale après un cycle
d'auto-nettoyage.
Les commandes du four n'ont pas été
correctement réglées.
Reportez-vous au chapitre relatif à
l'auto-nettoyage, en page 42.
Le four était très sale. Essuyez les éclaboussures importantes
avant de démarrer le cycle d'auto-
nettoyage. Les fours excessivement
sales nécessitent un nouvel auto-
nettoyage plus long.
De la vapeur
s'échappe des
orices de
ventilation.
En cas d'utilisation de la fonction
de convection, il est normal que de
la vapeur s'échappe des orices de
ventilation du four.
Ce phénomène est normal et ne
constitue pas un dysfonctionnement
du système.
Utilisez la cuisinière normalement.
La quantité de vapeur visible
augmente proportionnellement au
nombre de grilles ou à la quantité
d'aliments en cours de cuisson.
Problème Cause possible Solution
Les aliments
ne grillent pas
correctement.
La quantité peut ne pas être
appropriée.
Reportez-vous au guide de cuisson
pour connaître les quantités, en
page 35, puis réessayez.
La grille n'a pas été positionnée
correctement.
Reportez-vous au guide de
recommandations concernant la
cuisson au gril, en page 35.
Le récipient utilisé n'est pas adapté
au gril.
Utilisez un récipient adapté.
À certains endroits, la puissance
(tension) peut être faible.
• Préchauffez le gril pendant
10 minutes.
• Reportez-vous au guide de
recommandations concernant la
cuisson au gril, en page 35.
La température du
four est trop chaude
ou trop froide.
Le capteur du four doit être réglé. Reportez-vous au chapitre relatif au
réglage du thermostat, en page 39.
Le four ne s'auto-
nettoie pas.
La température du four est trop élevée
pour permettre de programmer un
auto-nettoyage.
Laissez la cuisinière refroidir, puis
réinitialisez les commandes.
Les commandes du four n'ont pas été
correctement réglées.
Reportez-vous au chapitre relatif à
l'auto-nettoyage, en page 42.
Un cycle d'auto-nettoyage ne peut
démarrer si la fonction Verrouillage
du four a été activée ou si un foyer
radiant est allumé.
Désactivez la fonction Verrouillage
du four (reportez-vous en page 28).
Assurez-vous que tous les foyers sont
éteints.

56 Français
Dépannage
Dépannage
Problème Cause possible Solution
Odeur de brûlé ou
d'huile provenant
de la ventilation.
Ce phénomène est tout à fait normal
dans le cas d'un four neuf. L'odeur
disparaîtra au l des utilisations.
• Pour accélérer la disparition de
ce phénomène, programmez un
cycle d'auto-nettoyage d'une
durée minimale de 3 heures.
• Reportez-vous au chapitre relatif
à l'auto-nettoyage, en page 42.
Odeur forte. Il est normal de constater une odeur
provenant de l'isolation de la cavité du
four lors des premières utilisations de
votre four.
Faites fonctionner le four à vide en
mode Cuisson traditionnelle sur 400 °F
pendant 1 heure.
Bruit au niveau du
ventilateur.
Un ventilateur de convection
peut se déclencher ou s'arrêter
automatiquement.
Ceci est tout à fait normal, il ne s'agit
pas d'un dysfonctionnement du
système.
Vous avez des
difcultés à faire
glisser les grilles
du four.
Les grilles, brillantes et de couleur
argentée, ont été nettoyées au cours
d'un cycle d'auto-nettoyage.
À l'aide de papier absorbant imbibé
d'huile végétale, essuyez les bords des
grilles du four.
TIROIR
Problème Cause possible Solution
Le tiroir ne glisse
pas correctement
ou se bloque.
Le tiroir n'est pas correctement
aligné.
Ouvrez complètement le tiroir
et repoussez-le au maximum.
Reportez-vous en page 51.
Le tiroir est surchargé ou sa charge
est mal répartie.
Réduisez-en le poids. Réorganisez
le contenu du tiroir.
Condensation
excessive dans le
tiroir.
Du liquide se trouve dans le tiroir. Retirez le liquide.
Aliments non couverts. Couvrez les aliments d'un
couvercle.
Codes d'information
FOUR
Code afché Cause possible Solution
C-d0
La touche de commande est en court-
circuit.
Appuyez sur OFF/CLEAR (ARRÊT/
EFFACER), puis redémarrez le four. Si le
problème persiste, coupez l'alimentation
de la cuisinière pendant 30 secondes puis
rétablissez-la. Si le problème n'est pas
résolu, contactez un centre de dépannage.
C-d1 Le verrou de la porte est désaxé.
C-F2
Ce code apparaît si la communication
entre la carte de circuit imprimé
principale et la carte de circuit imprimé
des commandes tactiles est interrompue.
C-20
Le capteur du four est ouvert lorsque le
four est utilisé.
Appuyez sur OFF/CLEAR (ARRÊT/
EFFACER), puis redémarrez le four. Si le
problème persiste, coupez l'alimentation
de la cuisinière pendant 30 secondes puis
rétablissez-la. Si le problème n'est pas
résolu, contactez un centre de dépannage.
Le capteur du four est en court-circuit.
C-21
Ce code apparaît si la température
interne augmente à un niveau
anormalement élevé.
C-30
Le capteur de la carte de circuit imprimé
principale est en circuit ouvert lorsque le
four est utilisé.
Le capteur de la carte de circuit imprimé
principale est en court-circuit.
C-31
Ce code apparaît si la température de la
carte de circuit imprimé augmente à un
niveau anormalement élevé.
Contactez un centre de dépannage.
bAd LinE
Ce message d'erreur s'afche si le
cordon d'alimentation n'est pas installé
correctement.
Si les ls d'alimentation sont mal
branchés, le message « bAd LinE »
apparaît à l'écran. Rebranchez
correctement les ls d'alimentation ; le
message disparaît alors.
Français 57
Garantie (ÉTATS-UNIS)
Pendant la période de garantie applicable, l'appareil sera réparé, remplacé ou remboursé à la
valeur de son prix d'achat, à la seule discrétion de SAMSUNG. SAMSUNG peut être amenée à
utiliser des pièces neuves ou reconditionnées lors de la réparation de l'appareil, ou à remplacer
l'appareil par un appareil neuf ou reconditionné. Les pièces et appareils de rechange sont garantis
pendant la partie restante de la garantie initiale de l'appareil ou alors pendant quatre-vingt-
dix (90) jours, selon la période qui est la plus longue. Toute pièce ou tout appareil remplacé
devient la propriété de SAMSUNG et vous devez les restituer à SAMSUNG.
La présente garantie limitée couvre les défauts de fabrication au niveau des pièces et de la main-
d'œuvre survenant dans le cadre d'un usage domestique normal, non commercial de cet appareil
et ne couvre pas les situations suivantes : dommages survenant pendant le transport, la livraison,
l'installation et l'utilisation de l'appareil qui serait contraire au but auquel il était destiné ;
dommages causés par une modication ou altération non autorisée de l'appareil ; appareils dont
le numéro de série initial apposé en usine a été effacé, déformé, modié d'une quelconque façon
ou est illisible ; dommages de nature esthétique notamment les rayures, piqûres, éclats et autres
dommages sur la nition de l'appareil ; dommages causés par un abus, un usage inapproprié,
une prolifération d'insectes nuisibles, un accident, un incendie, des inondations, ou d'autres
catastrophes naturelles ; dommages causés par l'utilisation de matériel, utilitaires, services, pièces,
fournitures, accessoires, applications, installations, réparations, câblage externe ou connecteurs
non fournis ou non autorisés par SAMSUNG ; dommages causés par un courant de phase ou
une tension électrique incorrect(e), des uctuations et surtensions ; dommages causés par le
non-respect des instructions d'utilisation et de maintenance de l'appareil ; instructions à domicile
sur la bonne utilisation de votre appareil ; et interventions visant à corriger une installation qui
n'est pas conforme aux normes d'électricité et de plomberie ou à corriger les raccordements
électriques ou de plomberie du domicile (c.-à-d. câblage du domicile, fusibles, ou tuyaux d'arrivée
d'eau). En outre, la présente garantie limitée ne prend pas en charge les dommages de la table de
cuisson vitrée causés par (i) l'utilisation de produits et de tampons nettoyants non recommandés
ou (ii) les éclaboussures durcies de sucre ou de plastique fondu qui n'auraient pas été nettoyées
selon les instructions fournies dans le guide d'utilisation et d'entretien.
Le coût des réparations ou du remplacement dans de telles circonstances exclues sera à la charge
du client.
Les interventions par un réparateur agréé visant à expliquer les fonctions de l'appareil ou les
procédures de maintenance ou d'installation ne sont pas couvertes par la présente garantie
limitée. Veuillez communiquer avec SAMSUNG au numéro indiqué ci-dessous pour obtenir de
l'aide sur l'un de ces problèmes.
Garantie (ÉTATS-UNIS)
VEUILLEZ NE PAS JETER. CETTE PAGE REMPLACE LA PAGE DE GARANTIE CONTENUE DANS LE
GUIDE D'UTILISATION ET D'ENTRETIEN.
CUISINIÈRE ÉLECTRIQUE SAMSUNG
GARANTIE LIMITÉE POUR L'ACHETEUR INITIAL AVEC PREUVE D'ACHAT
Ce produit de la marque SAMSUNG, fourni, distribué par SAMSUNG ELECTRONICS AMERICA,
INC. (SAMSUNG) et livré neuf, dans son carton d'origine à l'acheteur et consommateur initial,
s'accompagne d'une garantie de SAMSUNG contre tout vice de fabrication au niveau des pièces et
de la main d'œuvre pendant une période limitée, commençant à la date d'achat initial, de :
Un (1) an (pièces et main d'œuvre)
La présente garantie limitée ne s'applique qu'aux appareils achetés et utilisés au sein des
États-Unis et ayant été installés, utilisés et entretenus conformément aux instructions jointes ou
fournies avec l'appareil. Pour se prévaloir du service de garantie, l'acheteur doit communiquer
avec SAMSUNG à l'adresse ou au numéro de téléphone fournis ci-dessous an d'établir les
procédures relatives au diagnostic et à l'intervention nécessaire. Pour être couverte par la
garantie, la maintenance ne peut être effectuée que par un service technique agréé SAMSUNG. La
facture datée et originale doit être présentée sur demande comme preuve d'achat à SAMSUNG ou
au centre technique agréé SAMSUNG pour pouvoir bénécier du service de garantie.
SAMSUNG vous assure un service de réparation à domicile au sein des États-Unis contigus
pendant la période de garantie et ce gratuitement, sous réserve de disponibilité des agents
agréés du centre technique SAMSUNG dans la zone géographique du client. Si le service de
réparation à domicile n'est pas disponible, SAMSUNG peut organiser, à sa seule discrétion, le
transport de l'appareil vers ou depuis un centre technique agréé. Si l'appareil se trouve dans une
zone où la réparation par un agent agréé du centre technique SAMSUNG n'est pas disponible, il se
peut que vous deviez vous acquitter de frais de transport ou apporter l'appareil dans un centre
technique agréé SAMSUNG pour faire la réparation.
Pour bénécier du service de réparation à domicile, vous devez veiller à ce que l'appareil soit
dépourvu d'obstacle accessible à l'agent de maintenance.

58 Français
Garantie (ÉTATS-UNIS)
Garantie (ÉTATS-UNIS) Garantie (CANADA)
VEUILLEZ NE PAS JETER. CETTE PAGE REMPLACE LA PAGE DE GARANTIE CONTENUE DANS LE
GUIDE D'UTILISATION ET D'ENTRETIEN.
CUISINIÈRE ÉLECTRIQUE SAMSUNG
GARANTIE LIMITÉE POUR L'ACHETEUR INITIAL
Ce produit de la marque SAMSUNG, fourni, distribué par SAMSUNG ELECTRONICS CANADA,
INC. (SAMSUNG) et livré neuf, s'accompagne d'une garantie de SAMSUNG contre tout vice de
fabrication au niveau des pièces et de la main d'œuvre pendant une période limitée de :
Garantie un (1) an pour les pièces et la main d'œuvre, un (1) an pour les pièces
de la table de cuisson vitrée et du chauffage par rayonnement
La présente garantie limitée entre en vigueur à compter de la date d'acquisition initiale et couvre
uniquement les appareils achetés et utilisés au CANADA. Pour se prévaloir du service de garantie,
l'acheteur doit contacter SAMSUNG an d'établir les procédures relatives au diagnostic et à
l'intervention nécessaire. Pour être couverte par la garantie, la maintenance ne peut être effectuée
que par un service technique agréé SAMSUNG. Lors de la remise d'un produit défectueux à
SAMSUNG ou à un centre de service SAMSUNG agréé, l'acquéreur est tenu de présenter le coupon
d'achat d'origine à la demande des intéressés à titre de preuve d'achat. Samsung vous assure
un service à domicile pendant la période de garantie sans frais supplémentaires en fonction
des disponibilités sur le territoire canadien contigu. Le service de réparation à domicile n'est
pas disponible partout. Pour bénécier du service à domicile, l'appareil doit être situé dans un
emplacement dépourvu d'obstacle et accessible à notre personnel. En cas d'indisponibilité de
ce service, Samsung pourra choisir le moyen de transport adéquat pour acheminer ou renvoyer
l'appareil vers et depuis un centre de service agréé.
EXCLUSION DE GARANTIES IMPLICITES
LES GARANTIES IMPLICITES, Y COMPRIS LES GARANTIES IMPLICITES DE QUALITÉ MARCHANDE
OU D'ADÉQUATION À UN USAGE PARTICULIER, SONT LIMITÉES À UN AN OU À LA PLUS COURTE
PÉRIODE AUTORISÉE PAR LA LOI. Certains États et certaines juridictions n'autorisent pas de
limitations quant à la durée d'une garantie implicite ; il se peut par conséquent que les limitations
et exclusions énoncées ci-dessus ne s'appliquent pas à votre cas. La présente garantie vous
confère des droits spéciques ; il est donc possible que vous bénéciiez d'autres droits qui
varieront d'un État ou d'une juridiction à un(e) autre.
LIMITATION DE RECOURS
VOTRE SEUL ET EXCLUSIF RECOURS EST LA RÉPARATION DE L'APPAREIL, SON REMPLACEMENT,
OU LE REMBOURSEMENT DE SON PRIX D'ACHAT À LA SEULE DISCRÉTION DE SAMSUNG,
COMME PROPOSÉ DANS LA PRÉSENTE GARANTIE LIMITÉE. SAMSUNG NE SAURA ÊTRE TENU
RESPONSABLE EN CAS DE DOMMAGES ACCESSOIRES, INDIRECTS OU SPÉCIAUX, NOTAMMENT
MAIS SANS POUR AUTANT S'Y LIMITER LE TEMPS PRIS SUR LE TRAVAIL, LES FRAIS D'HÔTELS
ET/OU DE RESTAURATION, LES DÉPENSES DE RÉNOVATION, LA PERTE DE BÉNÉFICES OU DE
REVENUS OU L'IMPOSSIBILITÉ DE RÉALISER LES ÉCONOMIES ESCOMPTÉES, QUELLE QUE SOIT LA
BASE JURIDIQUE INVOQUÉE POUR JUSTIFIER L'ASSERTION, ET MÊME SI SAMSUNG A ÉTÉ AVISÉ
DE LA POSSIBILITÉ DE TELS DOMMAGES. Certains États et certaines juridictions n'autorisent
pas l'exclusion ou les limitations pour dommages accessoires ou indirects. Il est donc possible
que les limitations ou exclusions ci-dessus ne s'appliquent pas à votre cas. La présente garantie
vous confère des droits spéciques ; il est donc possible que vous bénéciiez d'autres droits qui
varieront d'un État ou d'une juridiction à un(e) autre.
SAMSUNG ne garantit pas un fonctionnement continu ou sans erreur de ce produit. Samsung ne
sera tenu d'honorer aucune autre garantie donnée par toute autre personne, rme ou société
quant à cet appareil.
Pour bénécier d'un service d'assistance couvert par votre garantie, contactez SAMSUNG à
l'adresse suivante :
Samsung Electronics America, Inc.
85 Challenger Road
Ridgeeld Park, NJ 07660
1-800-SAMSUNG (726-7864) et www.samsung.com/us/support

Français 59
Garantie (CANADA)
SAUF EXCEPTION MENTIONNÉE DANS LE PRÉSENT DOCUMENT, SAMSUNG NE FOURNIT AUCUNE
GARANTIE SUR CET APPAREIL, EXPRESSE OU IMPLICITE, Y COMPRIS, MAIS SANS S'Y LIMITER, LES
GARANTIES IMPLICITES DE QUALITÉ COMMERCIALE, DE CONTREFAÇON, OU D'APTITUDE À UN
USAGE PARTICULIER. AUCUNE GARANTIE, QU'ELLE SOIT DONNÉE PAR UNE TIERCE PERSONNE,
UNE ENTREPRISE OU UNE PERSONNE MORALE, NE POURRA ÊTRE CONSIDÉRÉE COMME UN
ENGAGEMENT DE LA PART DE SAMSUNG. SAMSUNG N'ENDOSSE AUCUNE RESPONSABILITÉ EN
CAS DE PERTE DE REVENU, DE MANQUE À GAGNER, D'INCAPACITÉ À RÉALISER DES ÉCONOMIES
OU TOUT AUTRE AVANTAGE FINANCIER, OU EN CAS DE DOMMAGE RÉSULTANT DE L'UTILISATION
OU D'UNE MAUVAISE UTILISATION DE CET APPAREIL OU D'UNE INCAPACITÉ À UTILISER
CET APPAREIL, QUELLE QUE SOIT LA BASE LÉGALE SUR LAQUELLE REPOSE LA PLAINTE, ET
MÊME SI SAMSUNG A ÉTÉ AVERTIE DE L'ÉVENTUALITÉ DE TELS DOMMAGES. TOUT TYPE DE
COMPENSATION EXIGÉE AUPRÈS DE SAMSUNG NE SAURA EN AUCUN CAS EXCÉDER LE PRIX
D'ACHAT DE L'APPAREIL VENDU PAR SAMSUNG ET À L'ORIGINE DES PRÉTENDUS DOMMAGES.
SANS LIMITATION AUX DISPOSITIONS SUSDITES, L'ACQUÉREUR PREND EN CHARGE TOUS LES
RISQUES ET TOUTES LES RESPONSABILITÉS CONCERNANT LA PERTE, LES DOMMAGES OU LES
BLESSURES SUBIS PAR L'ACQUÉREUR ET LES BIENS DE CELUI-CI ET TOUTE AUTRE PERSONNE OU
BIEN RÉSULTANT DE L'UTILISATION, LA MAUVAISE UTILISATION DE L'APPAREIL OU L'INCAPACITÉ
À UTILISER LE PRÉSENT APPAREIL. LA PRÉSENTE GARANTIE LIMITÉE N'EST VALABLE POUR
PERSONNE D'AUTRE QUE L'ACHETEUR INITIAL DE L'APPAREIL N'EST PAS TRANSFÉRABLE ET
ÉNONCE VOTRE RECOURS EXCLUSIF.
Certains États et certaines juridictions n'autorisent pas de limitations quant à la durée des
garanties implicites ni l'exclusion ou la limitation de dommages accessoires ou indirects ; il se
peut par conséquent que les limitations et exclusions énoncées ci-dessus ne s'appliquent pas à
votre cas. Cette garantie vous confère des droits légaux spéciques, vous pouvez également avoir
d'autres droits qui varient d'un État à l'autre.
Pour bénécier d'un service d'assistance couvert par votre garantie, contactez SAMSUNG à
l'adresse suivante :
Samsung Electronics Canada Inc.
2050 Derry Road West, Mississauga, Ontario L5N 0B9 Canada
1-800-SAMSUNG (726-7864) et www.samsung.com/ca/support (English)
www.samsung.com/ca_fr/support (French)
La société SAMSUNG prendra en charge, à sa convenance, la réparation ou le remplacement du
produit à ses frais tel que stipulé dans les présentes conditions et procédera au remplacement
ou au changement des pièces ou des produits si ces derniers s'avèrent défectueux dans la limite
de la période de garantie mentionnée précédemment. Toute pièce ou tout produit remplacé
devient la propriété de SAMSUNG et doit lui être restitué. Les pièces et produits de rechange
sont protégés pendant le reste de la période de garantie initiale, ou pendant quatre-vingt-dix
(90) jours, la période la plus longue s'appliquant. La présente garantie limitée couvre les défauts
de fabrication au niveau des pièces et de la main-d'œuvre survenant dans le cadre d'un usage
normal et non commercial de cet appareil et ne couvre pas les situations suivantes : dommages
survenant pendant le transport, la livraison et l'installation ; utilisation de l'appareil contraire
au but auquel il était destiné ; appareils dont le numéro de produit ou de série a été modié ;
dommages sur la nition extérieure de l'appareil ou de nature esthétique ; dommages causés
par un accident, un abus, une négligence, un incendie, une inondation, la foudre ou d'autres
catastrophes naturelles ; utilisation de produits, équipements, systèmes, appareils, services,
pièces, fournitures, accessoires, applications, installations, réparations, câblages externes ou
connecteurs non fournis ou non autorisés par SAMSUNG et susceptibles d'endommager ledit
appareil ou de nuire à son fonctionnement ; dommages causés par un courant de phase ou une
tension électrique incorrect(e), des uctuations et surtensions ; réglage effectué par l'acquéreur et
non-respect des instructions d'utilisation, d'entretien et de respect de l'environnement couvertes
et prescrites dans le carnet d'entretien ; démontage et réinstallation de l'appareil ; problèmes
résultant d'une prolifération d'insectes nuisibles, d'une surchauffe ou d'une surcuisson par le
faute de l'utilisateur. La présente garantie limitée ne peut s'étendre aux cas d'alimentation ou de
tension électrique incorrectes, d'ampoules inappropriées, d'installations électriques défectueuses,
aux cas de demandes d'assistance pour information ou de résolutions d'erreurs d'installation. En
outre, elle ne prend pas en charge l'endommagement de la table de cuisson vitrée qui résulterait
de l'utilisation de produits et de tampons nettoyants non recommandés, l'endommagement de la
table de cuisson vitrée provoqué par des éclaboussures durcies de sucre ou de plastique fondu
qui n'auraient pas été nettoyées selon les instructions fournies dans le manuel d'entretien et
d'utilisation. SAMSUNG ne garantit pas un fonctionnement continu ou sans erreur de ce produit.

60 Français
Annexe
NotesAnnexe
Annonce de contenu libre
Le présent produit contient un logiciel libre.
L’URL http://opensource.samsung.com/opensource/SMART_TP2_0/seq/0 suivante permet
d’accéder aux informations sur la licence de source libre relatives à ce produit.

Notes

Veuillez noter que la garantie Samsung n'inclut pas les déplacements du service après-vente pour expliquer le fonctionnement de l'appareil, corriger une installation non correcte ou exécuter des travaux de
nettoyage ou d'entretien réguliers.
UNE QUESTION ? UN COMMENTAIRE ?
PAYS N° DE TÉLÉPHONE SITE INTERNET
U.S.A
Consumer Electronics
1-800-SAMSUNG (726-7864) www.samsung.com/us/support
CANADA 1-800-SAMSUNG (726-7864)
www.samsung.com/ca/support (English)
www.samsung.com/ca_fr/support (French)
NE63A6511S*-01
Scannez le code QR* ou rendez-vous sur
le site www.samsung.com/spsn pour
voir nos vidéos et démonstrations en
direct d'utilisation.
* Requiert l'installation d'un lecteur sur votre
smartphone