
HW-Q600A
FULL MANUAL
Imagine the possibilities
Thank you for purchasing this Samsung product.
To receive more complete service, please register
your product at www.samsung.com/register
ENG - ii
SAFETY INFORMATION
SAFETY WARNINGS
TO REDUCE THE RISK OF ELECTRIC SHOCK, DO
NOT REMOVE THE COVER (OR BACK).
NO USER-SERVICEABLE PARTS ARE INSIDE.
REFER SERVICING TO QUALIFIED SERVICE
PERSONNEL.
Refer to the table below for an explanation of
symbols which may be on your Samsung product.
CAUTION
RISK OF ELECTRIC SHOCK.
DO NOT OPEN.
This symbol indicates that high voltage
is present inside. It is dangerous to
make any kind of contact with any
internal part of this product.
This symbol indicates that this product
has included important literature
concerning operation and maintenance.
Class II product : This symbol indicates
that it does not require a safety
connection to electrical earth (ground).
If this symbol is not present on a
product with a power cord, the product
MUST have a reliable connection to
protective earth (ground).
AC voltage : This symbol indicates that
the rated voltage marked with the
symbol is AC voltage.
DC voltage : This symbol indicates that
the rated voltage marked with the
symbol is DC voltage.
Caution, Consult instructions for use :
This symbol instructs the user to
consult the user manual for further
safety related information.
WARNING
not expose this appliance to rain or moisture.
CAUTION
TO PREVENT ELECTRIC SHOCK, MATCH WIDE
BLADE OF PLUG TO WIDE SLOT, FULLY INSERT.
This apparatus shall always be connected to a
AC outlet with a protective grounding
connection.
To disconnect the apparatus from the mains,
the plug must be pulled out from the mains
socket, therefore the mains plug shall be
readily operable.
Do not expose this apparatus to dripping or
liquids, such as vases on the apparatus.
To turn this apparatus off completely, you
must pull the power plug out of the wall
socket. Consequently, the power plug must
be easily and readily accessible at all times.
ENG - iii
PRECAUTIONS
1. Ensure that the AC power supply in your
house complies with the power
sticker located on the bottom of your
product. Install your product horizontally, on
a suitable base (furniture), with enough
space around it for ventilation (7~10 cm).
Make sure the ventilation slots are not
or other equipment which may become hot.
This unit is designed for continuous use. To
fully turn off the unit, disconnect the AC plug
from the wall outlet. Unplug the unit if you
intend to leave it unused for a long period of
time.
2. During thunderstorms, disconnect the AC
plug from the wall outlet. Voltage peaks due
to lightning could damage the unit.
3. Do not expose the unit to direct sunlight or
other heat sources. This could lead to
overheating and cause the unit to
malfunction.
4. Protect the product from moisture (i.e.
equipment creating strong magnetic or
the AC wall socket if the unit malfunctions.
Your product is not intended for industrial
use. It is for personal use only. Condensation
may occur if your product has been stored in
cold temperatures. If transporting the unit
during the winter, wait approximately
2 hours until the unit has reached room
temperature before using.
5. The battery used with this product contains
chemicals that are harmful to the
environment. Do not dispose of the battery
in the general household trash. Do not
expose the battery to excess heat, direct
disassemble, or overheat the battery.
CAUTION : Danger of explosion if the battery
is replaced incorrectly. Replace only with the
same or equivalent type.
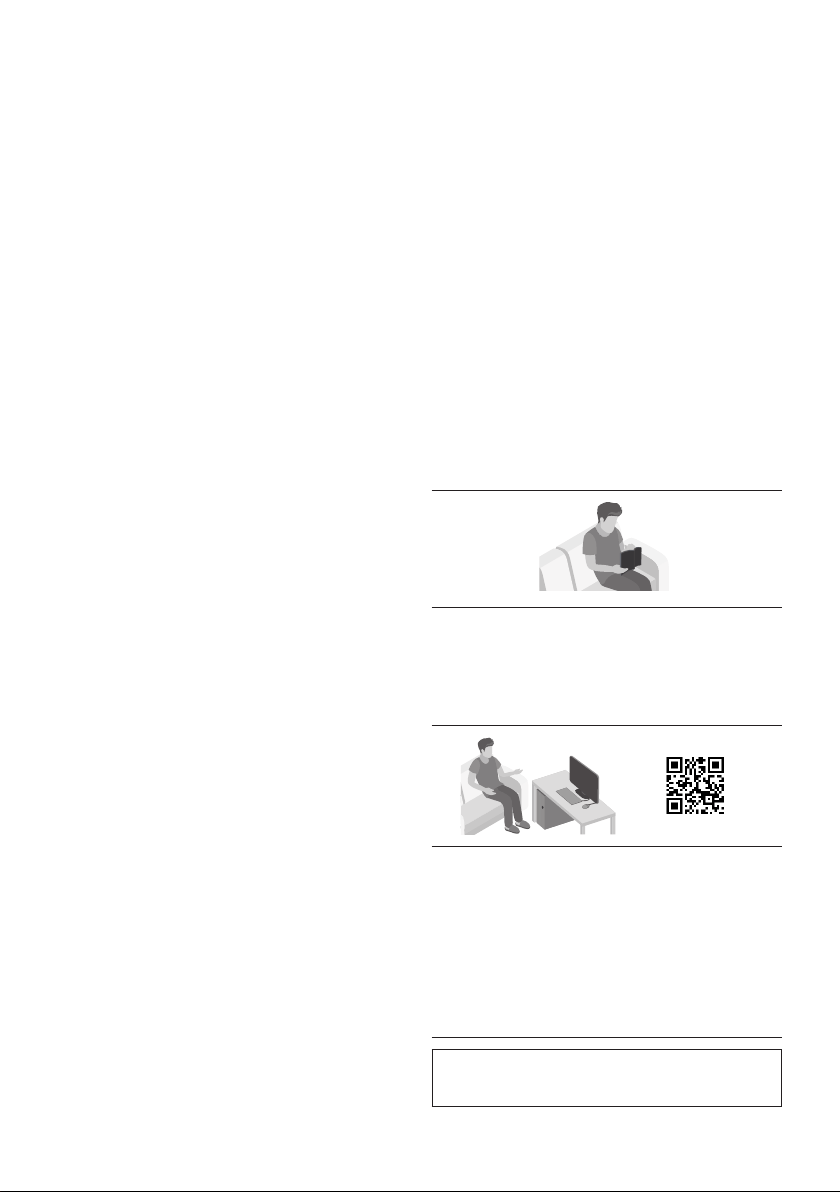
ABOUT THIS MANUAL
The user manual has two parts: simple paper
USER MANUAL and a detailed FULL MANUAL you
can download.
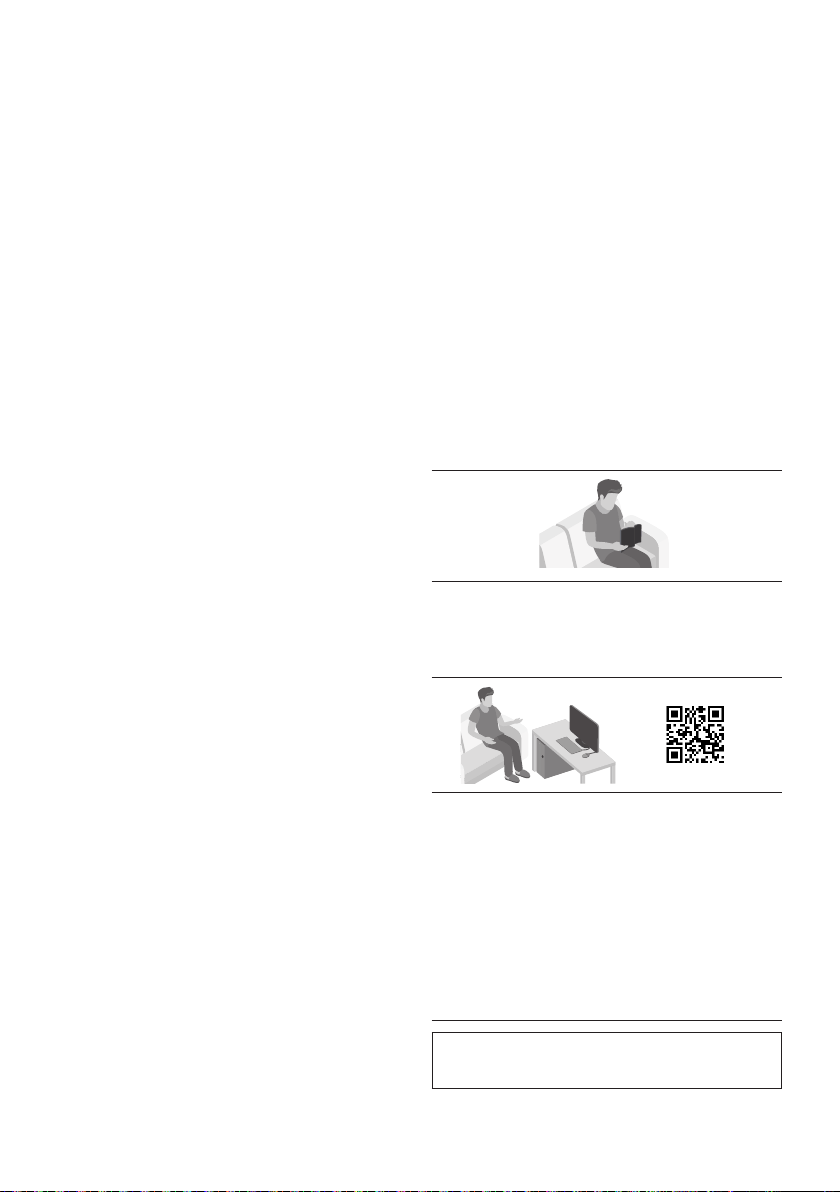
USER MANUAL
See this manual for safety instructions,
product installation, components,
FULL MANUAL
You can access the FULL MANUAL on
Samsung’s on-line customer support centre by
scanning the QR code. To see the manual on
your PC or mobile device, download the
manual in document format from Samsung’s
website. (http://www.samsung.com/support)
without prior notice.

ENG - iv
CONTENTS
01 Checking the Components 2
Inserting Batteries before using the Remote Control (AA batteries X 2) ------------------------- 2
02 Product Overview 3
Front Panel / Top Panel of the Soundbar ------------------------- 3
Bottom Panel of the Soundbar ------------------------- 4
03 Connecting the Soundbar 5
Connecting Electrical Power
-------------------------
5
Connecting the Soundbar to the Subwoofer
-------------------------
6
– Automatic connection between the Subwoofer and the Soundbar
-------------------------
6
– Manually connecting the Subwoofer if automatic connection fails
-------------------------
7
Connecting an SWA-9100S (Sold Separately) to your Soundbar
-------------------------
9
04 Connecting to your TV 11
Method 1. Connecting with a Cable
-------------------------
11
– Connecting a TV using an HDMI Cable
-------------------------
11
– Connecting using an Optical Cable
-------------------------
13
Method 2. Connecting Wirelessly
-------------------------
15
– Connecting a TV via Bluetooth
-------------------------
15
05 Connecting an External Device 17
Connecting using an HDMI Cable
(Capable of Dolby Atmos decoding and playback)
-------------------------
17
Connecting using an Optical Cable
-------------------------
18
06 Connecting a USB Storage Device 19

ENG - v
07 Connecting a Mobile Device 20
Connecting via Bluetooth
-------------------------
20
Using the Tap Sound
-------------------------
24
08 Using the Remote Control 25
How to Use the Remote Control
-------------------------
25
Adjusting the Soundbar volume with a TV remote control ------------------------- 28
Using the Hidden Buttons (Buttons with more than one function)
-------------------------
29
-------------------------
29
09 Installing the Wall Mount 30
Installation Precautions
-------------------------
30
Wallmount Components
-------------------------
30
10 Placing the Soundbar on a TV stand 32
11 Software Update 33
Update Procedure
-------------------------
33
If UPDATE is not displayed
-------------------------
34
Reset
-------------------------
34
12 Troubleshooting 35
13 Licence 37
14 Open Source Licence Notice 38
15 Important Notes About Service 38
16 SpecicationsandGuide 39
-------------------------
39
ENG - 2
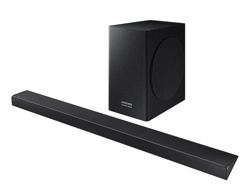
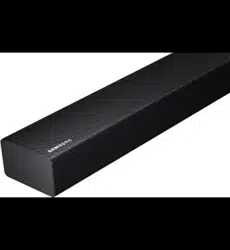
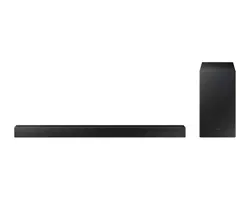
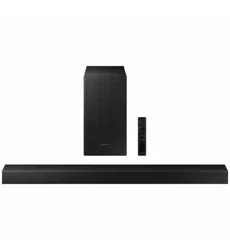
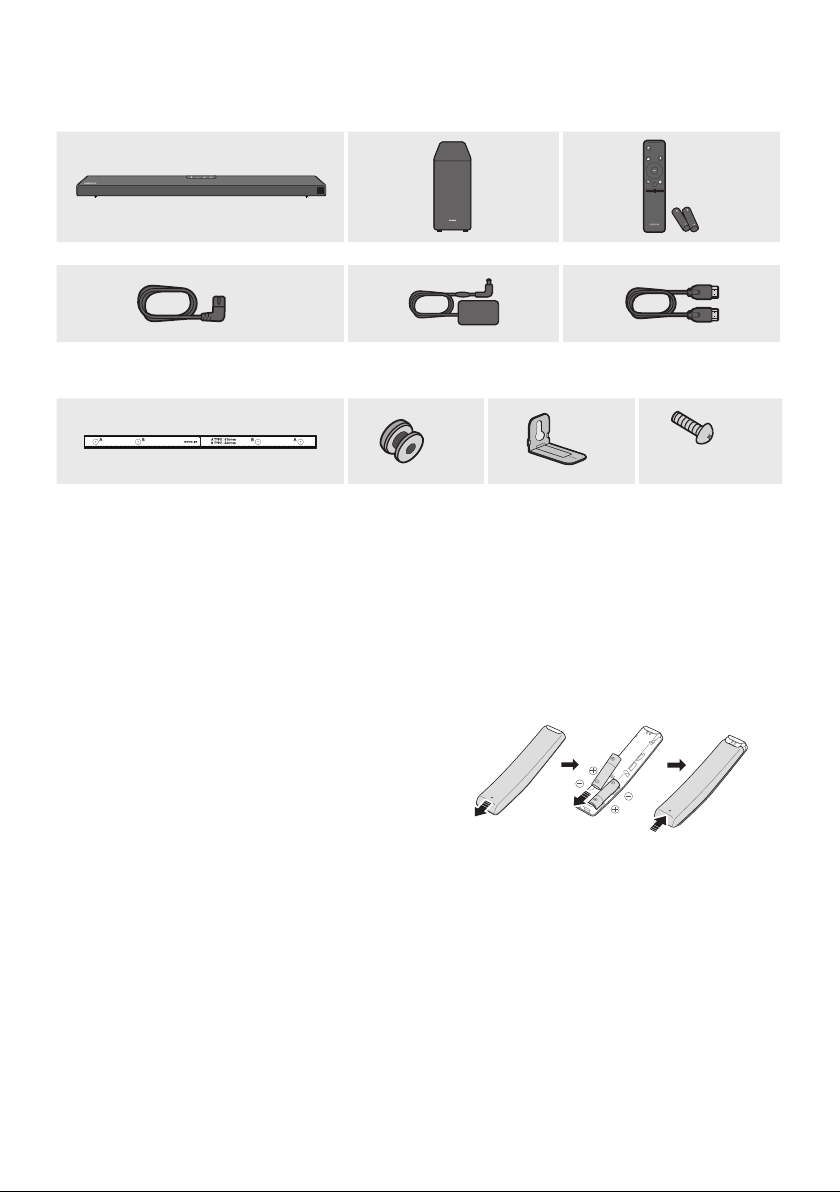
01 CHECKING THE COMPONENTS
VOL WOOFER
SOUNDBAR
SOUND
MODE
PAIR
Soundbar Main Unit Subwoofer Remote Control / Batteries
x 2
Power Cord
(Subwoofer, Soundbar)
AC/DC Adapter
(Soundbar)
HDMI Cable
x 2
x 2
(M4 x L10)
x 2
Wall Mount Guide
Holder-Screw
Bracket-Wall Mount
Screw
For more information about the power supply and power consumption, refer to the label attached
to the product. (Label: Bottom of the Soundbar Main Unit)
To purchase additional components or optional cables, contact a Samsung Service Centre or
Samsung Customer Care.
The appearance of the accessories may differ slightly from the illustrations above.
Inserting Batteries before using the Remote Control (AA batteries X 2)
Slide the back cover in the direction of the arrow
until it is completely removed. Insert 2 AA batteries
(1.5V) oriented so that their polarity is correct. Slide
the back cover back into position.
ENG - 3
02 PRODUCT OVERVIEW
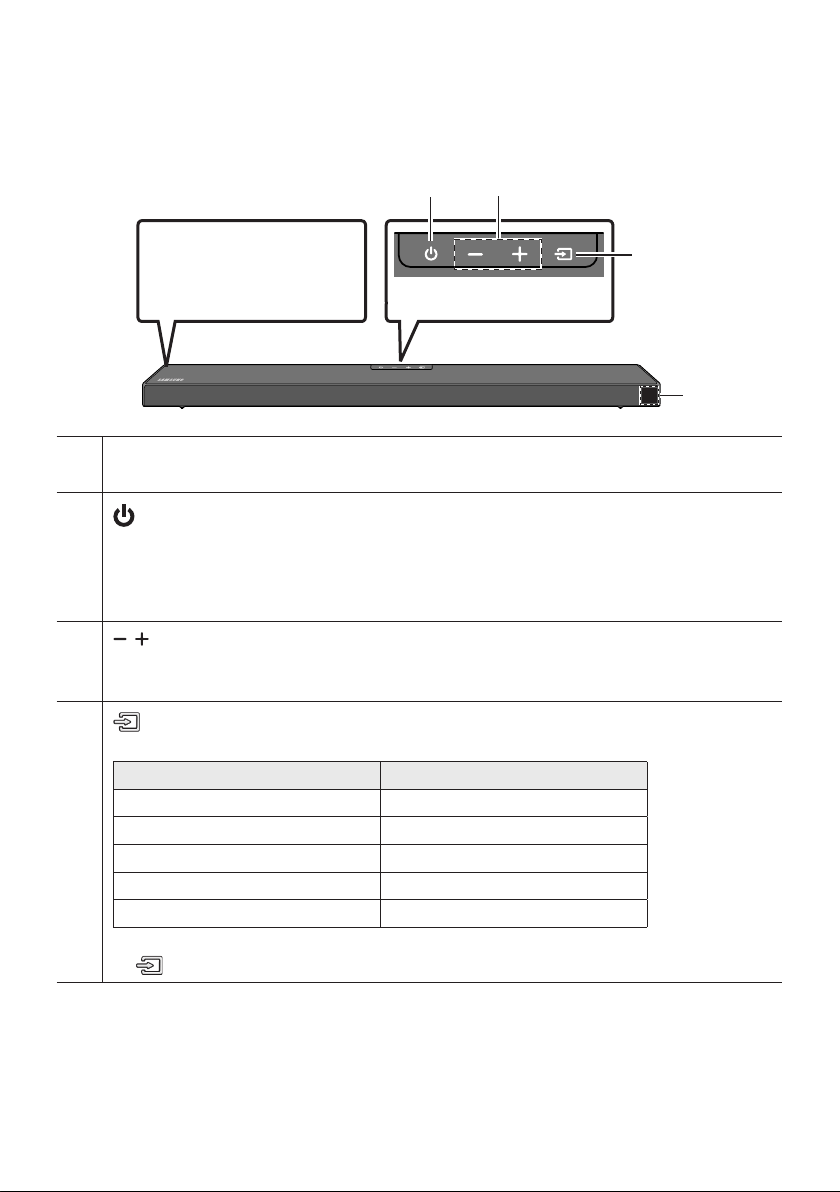
Front Panel / Top Panel of the Soundbar
Position the product so that
the SAMSUNG logo is
located on the top.
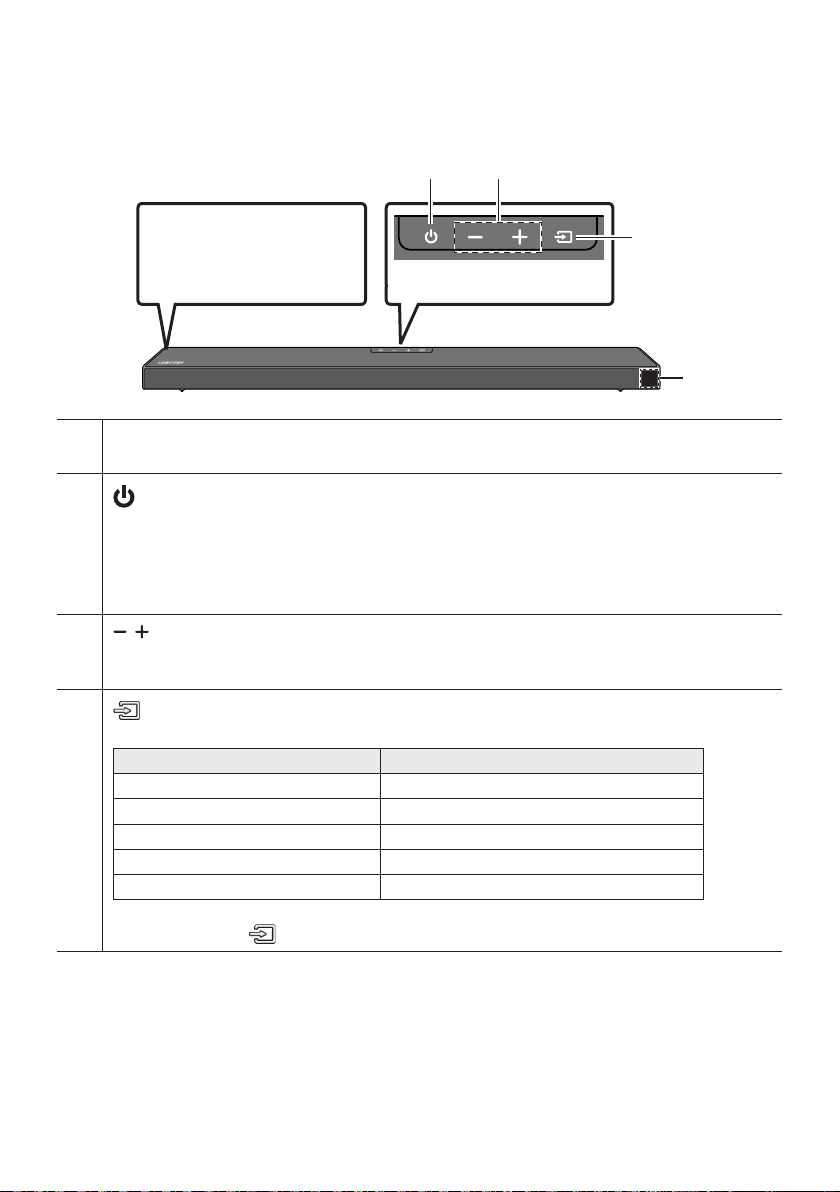
Top Panel
Display
Displays the product’s status and current mode.
(Power) Button
Turns the power on and off.
Auto Power Down Function
The unit turns off automatically in the following situations:
– In D.IN / HDMI / BT / USB Mode : If there is no audio signal for 20 minutes.
(Volume) Button
Adjusts the volume.
When adjusted, the volume level appears on the Soundbar’s front display.
(Source) Button
Selects the source input mode.
Input mode Display
Optical Digital input D.IN
ARC (HDMI OUT) input D.IN TV ARC (Auto conversion)
HDMI input HDMI
BLUETOOTH mode BT
USB mode USB
To turn on “BT PAIRING” mode, change the source to “BT” mode, and then press and hold the
(Source) button for more than 5 seconds.
When you plug in the AC cord, the power button will begin working in 4 to 6 seconds.
When you turn on this unit, there will be a 4 to 5 second delay before it produces sound.
If you want to enjoy sound only from the Soundbar, you must turn off the TV’s speakers in the Audio
Setup menu of your TV. Refer to the owner’s manual supplied with your TV.

ENG - 4
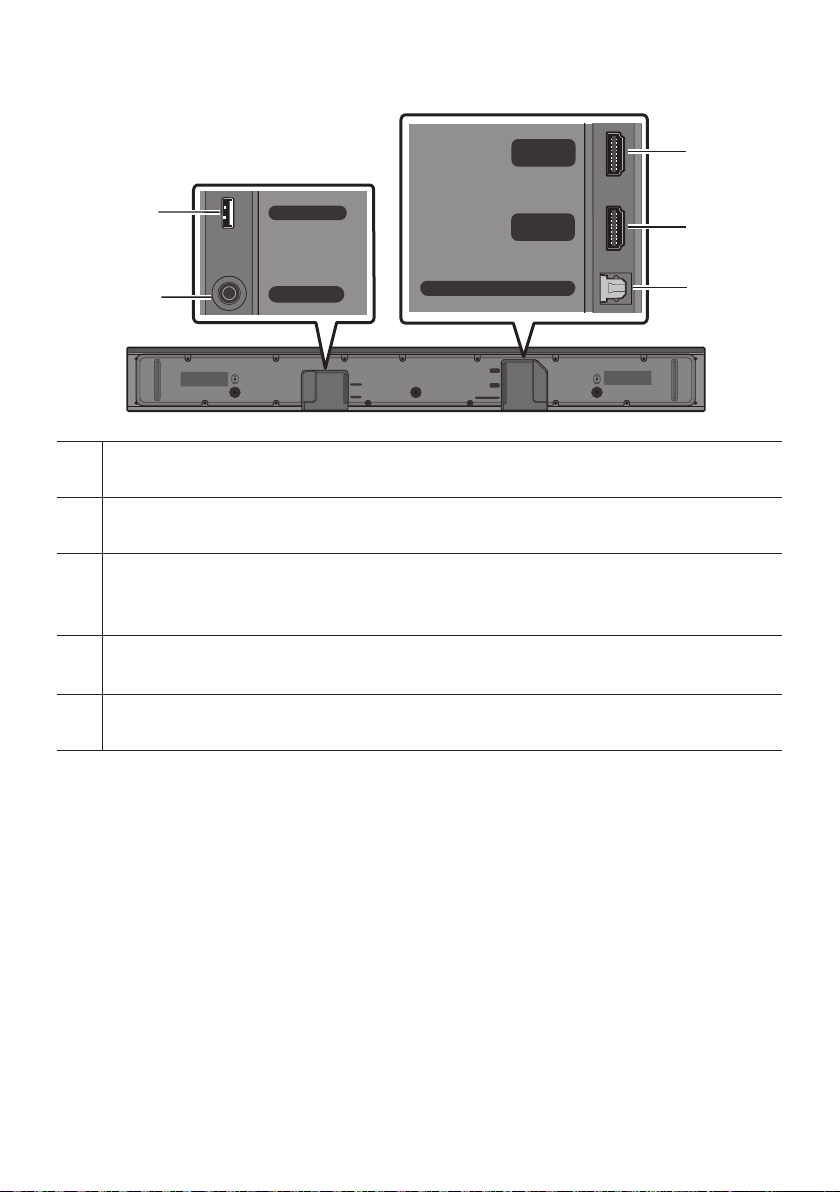
Bottom Panel of the Soundbar
HDMI
HDMI TO TV
(ARC)
USB (5V 0.5A)
DC 24V
DIGITAL AUDIO IN (OPTICAL)
HDMI
HDMI TO TV
(ARC)
DIGITAL AUDIO IN (OPTICAL)
USB (5V 0.5A)
DC 24V
HDMI
HDMI TO TV
(ARC)
USB (5V 0.5A)
DC 24V
DIGITAL AUDIO IN (OPTICAL)
HDMI
HDMI TO TV
(ARC)
DIGITAL AUDIO IN (OPTICAL)
USB (5V 0.5A)
DC 24V
HDMI
HDMI TO TV
(ARC)
USB (5V 0.5A)
DC 24V
DIGITAL AUDIO IN (OPTICAL)
HDMI
HDMI TO TV
(ARC)
DIGITAL AUDIO IN (OPTICAL)
USB (5V 0.5A)
DC 24V
USB (5V 0.5A)
DC 24V (Power Supply In)
Connect the AC/DC power adapter.
HDMI
Inputs digital video and audio signals simultaneously using an HDMI cable.
Connect to the HDMI output of an external device.
HDMI TO TV (ARC)
Connect to the HDMI (ARC) port on a TV.
DIGITAL AUDIO IN (OPTICAL)
Connect to the digital (optical) output of an external device.
When disconnecting the power cable of the AC/DC power adapter from a wall outlet, pull the plug.
Do not pull the cable.
Do not connect this unit or other components to an AC outlet until all connections between
components are complete.
ENG - 5
03 CONNECTING THE SOUNDBAR
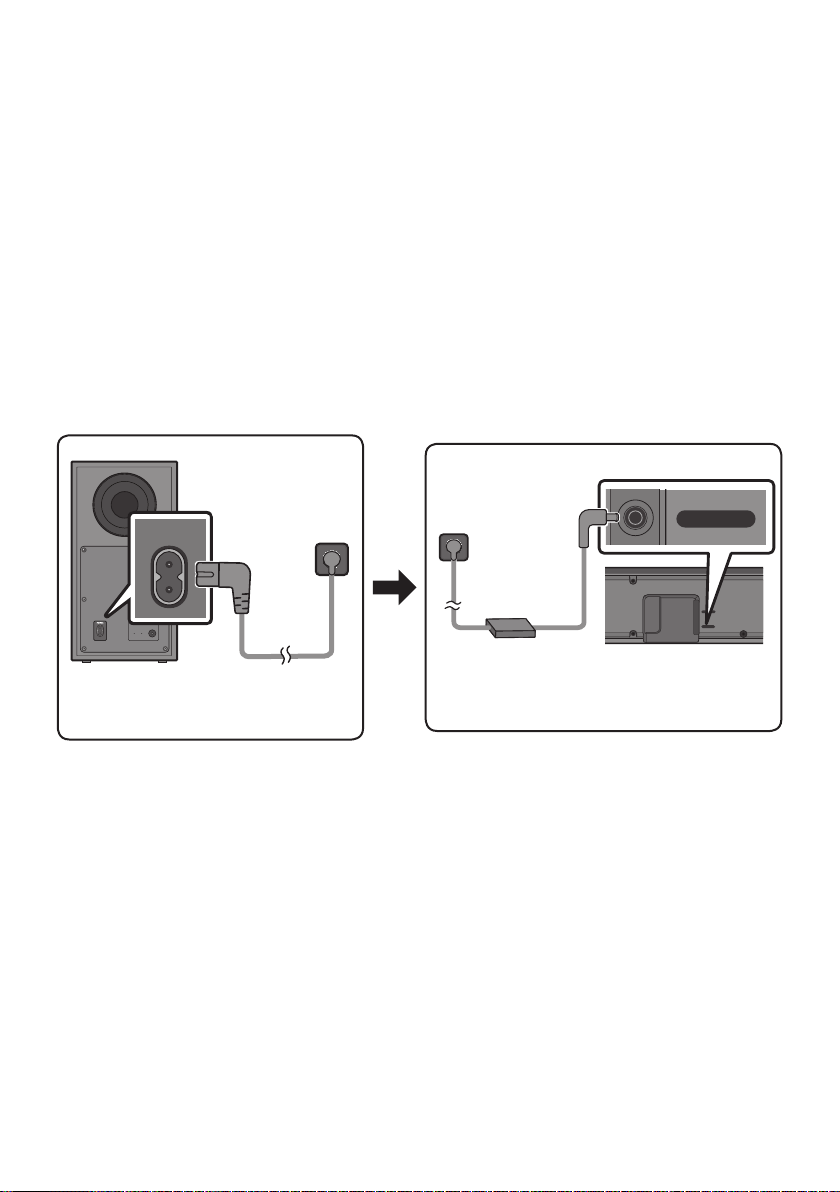
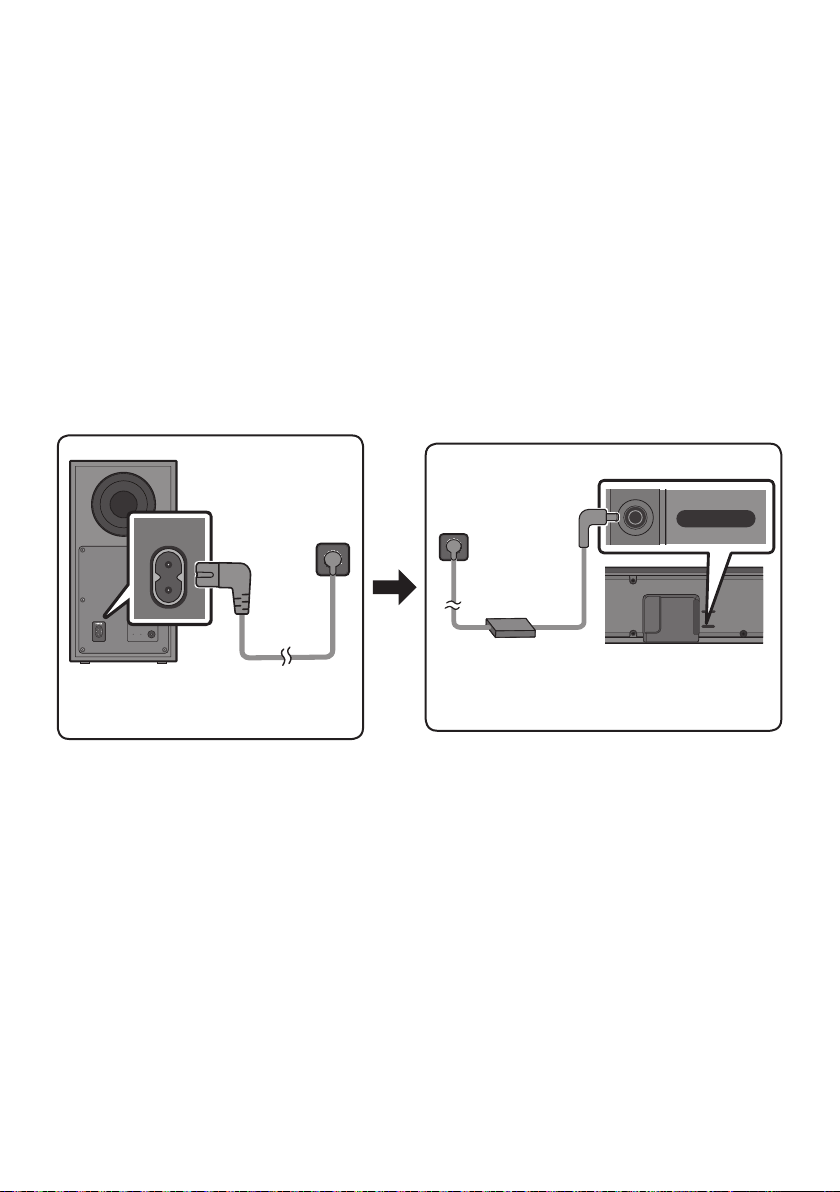
Connecting Electrical Power
Use the power components to connect the Subwoofer and Soundbar to an electrical outlet in the following
order:
1. Connect the power cord to the Subwoofer.
2. Connect the power output cable to the power adapter, and then to the Soundbar.
3. Connect the power cord to a wall socket.
See the illustrations below.
For more information about the required electrical power and power consumption, refer to the
label attached to the product. (Label: Bottom of the Soundbar Main Unit)
POWER
Rear of Subwoofer
Power Cord
Connecting
Electrical Power
USB (5V 0.5A)
DC 24V
DC 24V
Bottom of the
Soundbar Main Unit
AC/DC Adapter
Power Cord
Connecting
Electrical Power
that it is hanging with the AC cord input facing upwards, water or other foreign substances could
enter the Adapter and cause the Adapter to malfunction.

ENG - 6
Connecting the Soundbar to the Subwoofer
When the subwoofer is connected, you can enjoy rich bass sound.
Automatic connection between the Subwoofer and the Soundbar
When you turn the power on after connecting the power cables to the Soundbar and subwoofer, the
subwoofer is automatically connected to the Soundbar.
When auto pairing is complete, the blue indicator at the rear of the subwoofer turn on.
LED Indicator Lights on the Rear of Subwoofer
LED Status Description Resolution
Blue
On
Successfully connected
(normal operation)
-
Blinking Recovering the connection
Check if the power cable attached to the
main Soundbar unit is connected properly
or wait about 5 minutes. If blinking persists,
try manually connecting the subwoofer.
See page 7.
Red On
Standby (with the Soundbar
main unit turned off)
Check if the power cable attached to the
main Soundbar unit is connected properly.
Connection failed
Connect again. See the instructions for
manual connection on page 7.
Red and
blue
Blinking Malfunction
See the contact information for the
Samsung Service Centre in this manual.
ENG - 7
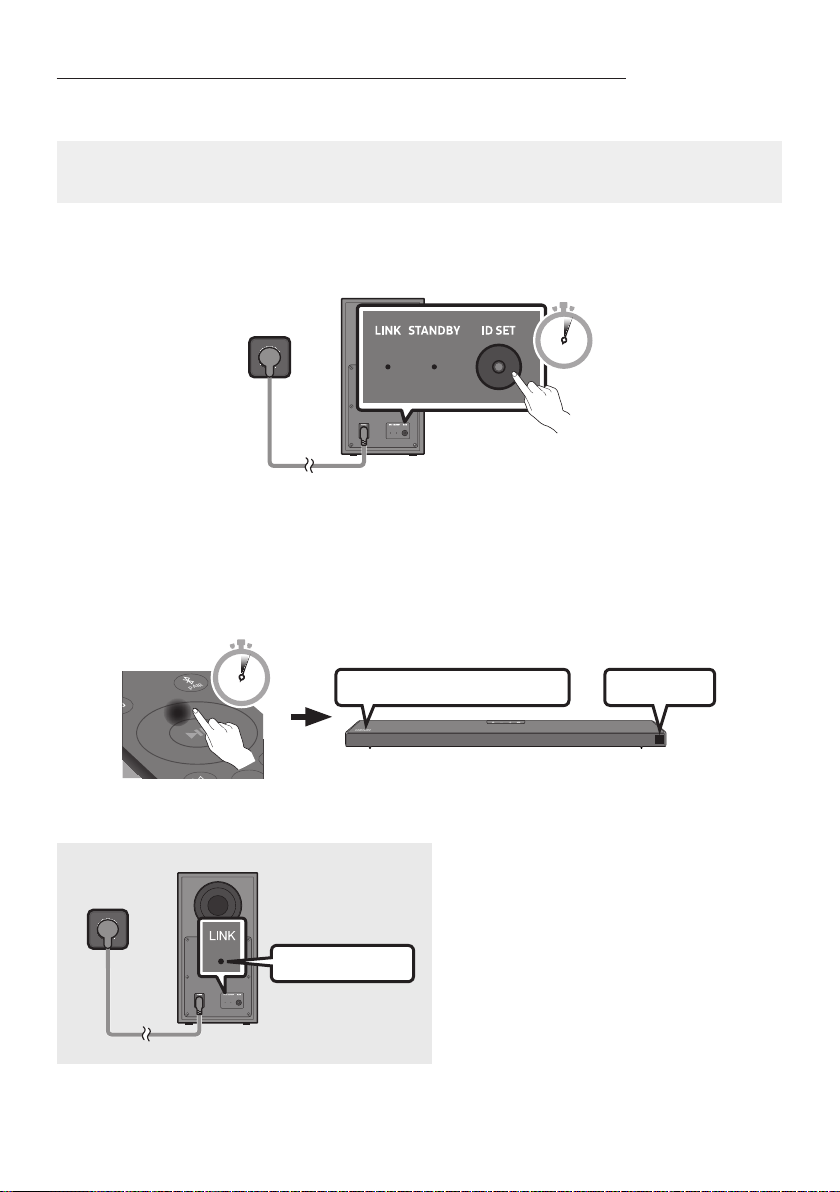
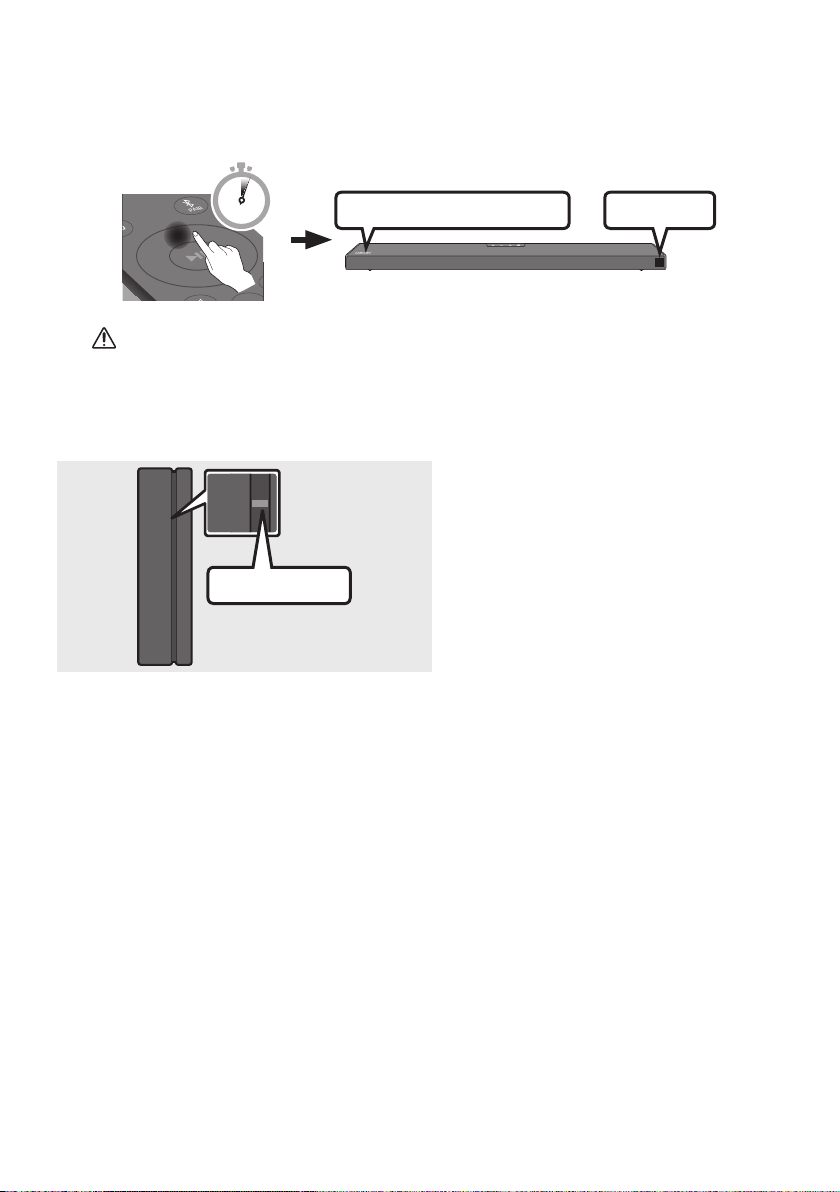
Manually connecting the Subwoofer if automatic connection fails
Before performing the manual connection procedure below:
Check whether the power cables for the Soundbar and subwoofer are connected properly.
Make sure that the Soundbar is turned on.
1. Press and hold ID SET on the rear of the subwoofer for at least 5 seconds.
The red indicator on the rear of the subwoofer turns off and the blue indicator blinks.
5 Sec
Rear of Subwoofer
2. Press and hold the Up button on the remote control for at least 5 seconds.
The ID SET message appears on the display of the Soundbar for a moment, and then it
disappears.
The Soundbar will automatically power on when ID SET is complete.
SOUND
MODE
PAIR
5 Sec
ID SET
SAMSUNG logo is on the top
3. Check if the LINK LED is solid blue (connection complete).
Blue is On
The LINK LED indicator stops blinking and
glows a solid blue when a connection is
established between the Soundbar and the
Wireless Subwoofer.

ENG - 8
NOTES
Do not connect the power cord of this product or your TV to a wall outlet until all connections
between components are complete.
Before moving or installing this product, be sure to turn off the power and disconnect the power cord.
If the main unit is powered off, the wireless subwoofer will go into stand-by mode and the
STANDBY LED on the rear of the sub-woofer will turn red after blinking blue several times.
If you use a device that uses the same frequency (5.8GHz) as the Soundbar near the Soundbar,
interference may cause some sound interruption.
The maximum transmission distance of the main unit’s wireless signal is about 10 meters, but may
vary depending on your operating environment. If a steel-concrete or metallic wall is between the
main unit and the wireless subwoofer, the system may not operate at all because the wireless
signal cannot penetrate metal.
PRECAUTIONS
Wireless receiving antennas are built into the wireless subwoofer. Keep the unit away from water
and moisture.
For optimal listening performance, make sure that the area around the wireless subwoofer and the
Wireless Receiver Module (sold separately) is clear of any obstructions.
ENG - 9
Connecting an SWA-9100S (Sold Separately) to your Soundbar
Expand to true wireless surround sound by connecting the Samsung Wireless Rear Speaker Kit
(SWA-9100S, sold separately) to your Soundbar.
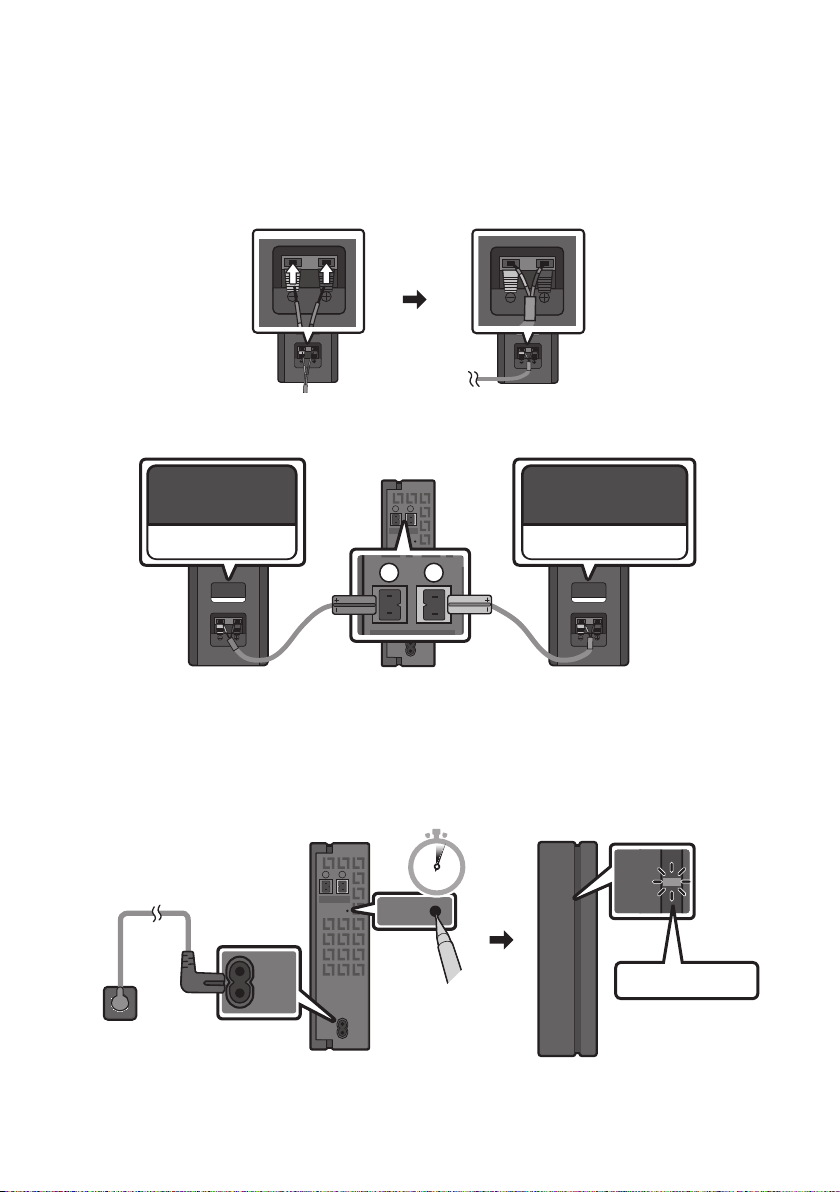
1. Connect the Wireless Receiver Module to 2 Surround Speakers.
– When connecting the speaker cable, connect the core wire to the speaker.
SURROUND-RIGHT
SURROUND-RIGHT
– The speaker cables are colour coded.
SURROUND-LEFT
ID SET
L
R
SURROUND SPEAKERS OUT
SPEAKER IMPEDANCE : 3Ω
POWER
ID SET
L
R
SURROUND SPEAKERS OUT
SPEAKER IMPEDANCE : 3Ω
SURROUND-RIGHT
SURROUND-LEFT SURROUND-RIGHT
2. Check the standby status of the Wireless Receiver Module after plugging it into an electrical outlet.
The LINK LED indicator (blue LED) on the Wireless Receiver Module blinks. If the LED does not
blink, press the ID SET button on the back of the Wireless Receiver Module with a pen tip for
5~6 seconds until the LINK LED indicator blinks (in Blue). For more about the LED, please refer
to the SWA-9100S user manual.
ID SET
L
R
SURROUND SPEAKERS OUT
SPEAKER IMPEDANCE : 3Ω
POWER
POWER
ID SET
SURROUND SPEAKERS OUT
SPEAKER IMPEDANCE : 3Ω
STANDBY
LINK
STANDBY
LINK
Blue blinking
5 Sec
ENG - 10
3. Press and hold the Up button on the remote control for at least 5 seconds.
The ID SET message appears on the display of the Soundbar for a moment, and then it
disappears.
The Soundbar will automatically power on when ID SET is complete.
SOUND
MODE
PAIR
5 Sec
ID SET
SAMSUNG logo is on the top
CAUTION
If your Soundbar was playing music when it connects to the SWA-9100S, you may hear some
4. Check if the LINK LED is solid blue (connection complete).
STANDBY
LINK
STANDBY
LINK
Blue is On
The LINK LED indicator stops blinking and
glows a solid blue when a connection is
established between the Soundbar and the
Wireless Receiver Module.
5. If the SWA-9100S is not connected, repeat the procedure from Step 2.
ENG - 11
04 CONNECTING TO YOUR TV
Hear TV sound from your Soundbar through wired or wireless connections.
When the Soundbar is connected to selected Samsung TVs, the Soundbar can be controlled using
the TV’s remote control.
– This feature is supported by 2017 and later Samsung Smart TVs that support Bluetooth when
you connect the Soundbar to the TV using an optical cable.
–
as well as the volume and mute.
Method 1. Connecting with a Cable
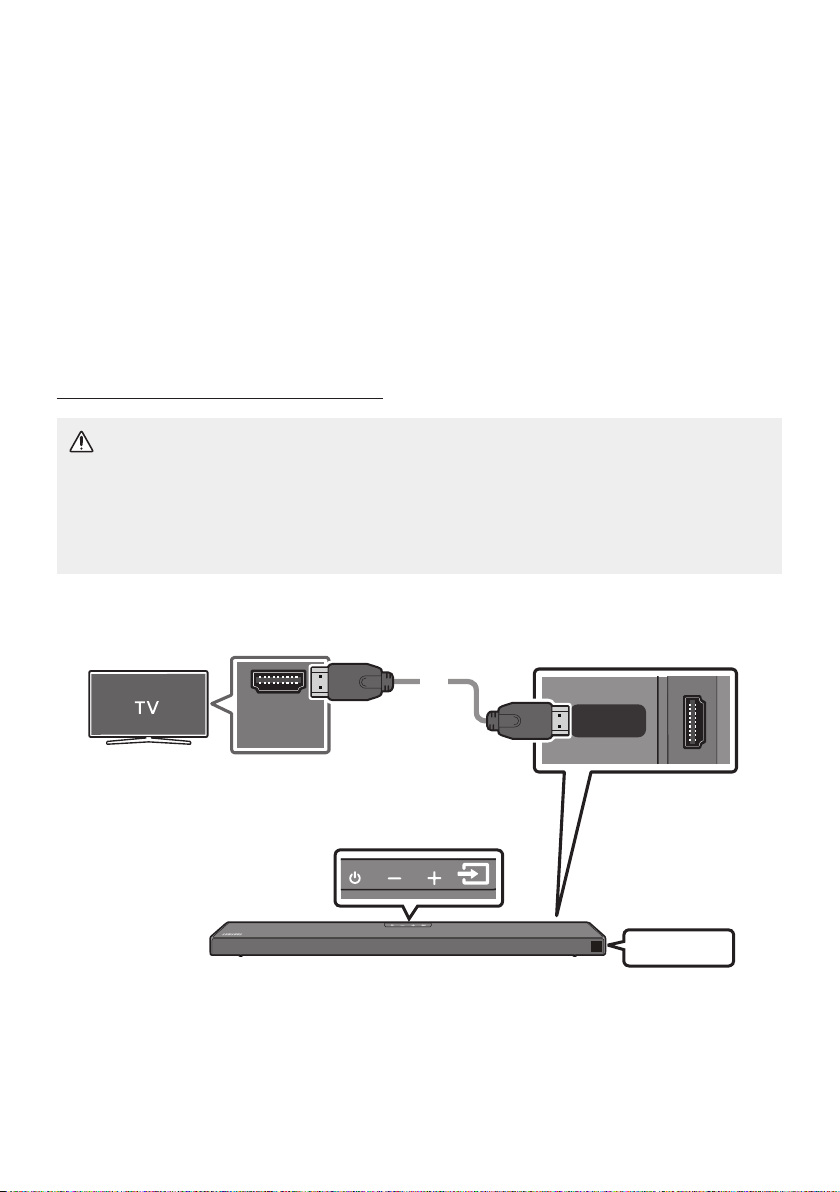
Connecting a TV using an HDMI Cable
CAUTION
To connect the HDMI cable between the TV and Soundbar, be sure to connect the terminals
marked ARC. Otherwise, the TV sound may not be output.
The recommended cable is High Speed HDMI Cable with Ethernet.
Connect to the HDMI IN
(ARC) port of your TV.
HDMI IN
(ARC)
HDMI TO TV
(ARC)
DIGITAL AUDIO IN (OPTICAL)
HDMI Cable
Bottom of the Soundbar
Connect to the HDMI TO TV (ARC) port
of the Soundbar main unit.
Top of the Soundbar
TV ARC
1.
2. “TV ARC” appears in the display window of the Soundbar main unit and the Soundbar plays TV
sound.

ENG - 12
If TV sound is inaudible, press the (Source) button on the remote control or on the top of
the Soundbar to switch to “D.IN” mode. The screen displays “D.IN” and “TV ARC” in sequence,
and TV sound is played.
If “TV ARC
HDMI cable is connected to the correct port.
Use the volume buttons on the TV’s remote control to change the volume on the Soundbar.
NOTES
HDMI is an interface that enables the digital transmission of video and audio data with just a single
connector.
If the TV provides an ARC port, connect the HDMI cable to the HDMI IN (ARC) port.
We recommend you use a coreless HDMI cable if possible. If you use a cored HDMI cable, use one
whose diameter is less than 14 mm.
This function is not available if the HDMI cable does not support ARC
When the audio in a broadcast is encoded in Dolby Digital and the “Digital Output Audio Format” on
your TV is set to PCM, we recommend that you change the setting to Dolby Digital. When the
setting on the TV is changed, you will experience better sound quality. (The TV menu may use
different words for Dolby Digital and PCM depending on the TV manufacturer.).
ENG - 13
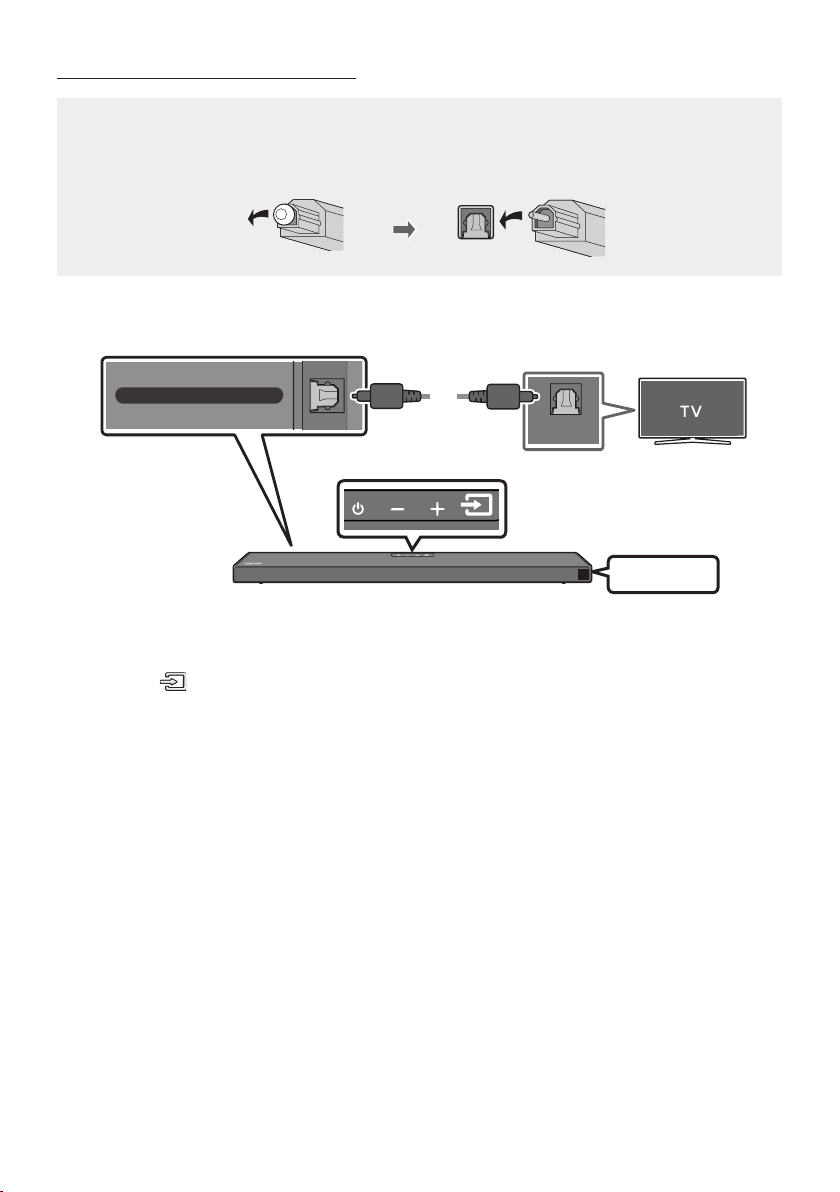
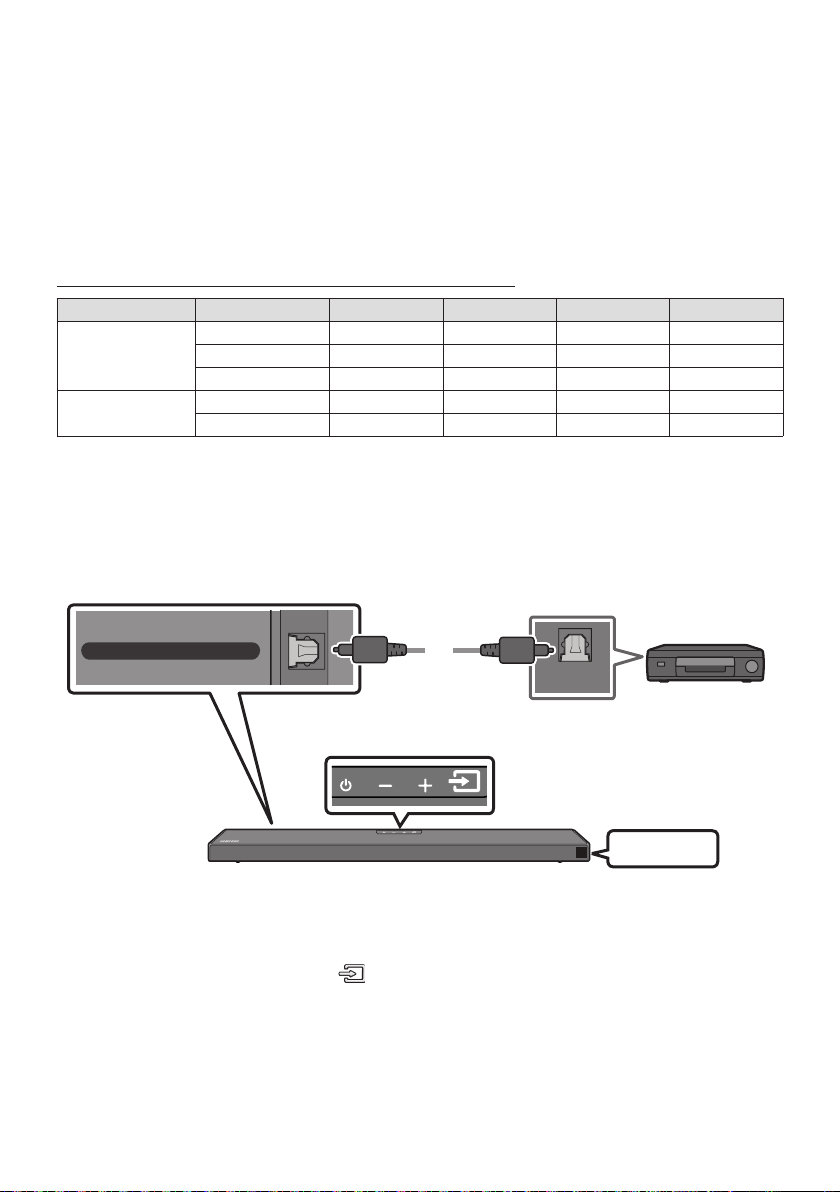
Connecting using an Optical Cable
Pre-connection Checklist
When you use an optical cable and the terminals have covers, be sure to remove the covers.
OPTICAL OUT
DIGITAL AUDIO IN (OPTICAL)
Bottom of the Soundbar
Top of the Soundbar
Optical Cable
(not supplied)
D.IN
1. Connect the DIGITAL AUDIO IN (OPTICAL) port on the Soundbar to the OPTICAL OUT port of the
TV with a digital Optical Cable (not supplied).
2. Press the (Source) button on the top panel or remote control, and then select the “D.IN” mode.

ENG - 14
Using the Q-Symphony Function
For Q-Symphony, the Soundbar syncs with a Samsung TV to output sound through two devices for
optimum surround effect. When the Soundbar is connected, the option, “TV+Soundbar” appears under
the Sound Output menu of the TV. Select the corresponding menu.
TV Menu
OR
Optical Cable (not supplied)
HDMI Cable
D.IN
TV menu example: TV + [AV] Soundbar series name [HDMI]
NOTES
It can operate according to the Codec supported by TV.
This function is supported only when the HDMI Cable or Optical Cable (not supplied) is connected.
This function is available in Samsung TVs released in or after 2020 and some Soundbar models.

ENG - 15
Method 2. Connecting Wirelessly
Connecting a TV via Bluetooth
When a TV is connected using Bluetooth, you can hear stereo sound without the hassle of cabling.
Only one TV can be connected at a time.
SOUND
MODE
PAIR
OR
The initial connection
1. Press the PAIR button on the remote control to enter the “BT PAIRING” mode.
(OR)
a. Press the (Source) button on the top panel and then select “BT”.
“BT” changes to “BT PAIRING” in a few seconds automatically or changes to “BT READY” if
there is a connect record.
b. When “BT READY” appears, press and hold the (Source) button on the top panel of the
Soundbar for more than 5 seconds to display “BT PAIRING”.
2. Select Bluetooth mode on the TV. (For more information, see the TV’s manual.)
3. Select “[AV] Samsung Soundbar Q6A-Series” from the list on TV’s screen.
An available Soundbar is indicated with “Need Pairing” or “Paired” on the TV’s Bluetooth device
list. To connect the TV to the Soundbar, select the message, and then establish a connection.
When the TV is connected, [TV NameBT” appears on the Soundbar’s front display.
4. You can now hear TV sound from the Soundbar.
If the device fails to connect
If a previously connected Soundbar listing (e.g. “[AV] Samsung Soundbar Q6A-Series”) appears in
the list, delete it.
Then repeat steps 1 through 3.
NOTE
BT READY” mode to
reconnect.

ENG - 16
Disconnecting the Soundbar from the TV
Press the (Source) button on the top panel or on the remote control and switch to any mode but “BT”.
Disconnecting takes time because the TV must receive a response from the Soundbar.
(The time required may differ, depending on the TV model.)
To cancel the automatic Bluetooth connection between the Soundbar and TV, press the
Left button
on the remote control for 5 seconds with the Soundbar in “BT READY
What is the difference between BT READY and BT PAIRING?
BT READY : In this mode, you can search for previously connected TVs or connect a previously
connected mobile device to the Soundbar.
BT PAIRING : In this mode, you can connect a new device to the Soundbar. (Press the PAIR button
on the remote control or press and hold the (Source) button on the top of the Soundbar for
more than 5 seconds while the Soundbar is in “BT” mode.)
NOTES
If asked for a PIN code when connecting a Bluetooth device, enter <0000>.
In Bluetooth connection mode, the Bluetooth connection will be lost if the distance between the
Soundbar and the Bluetooth device exceeds 10 meters.
The Soundbar automatically turns off after 20 minutes in the Ready state.
The Soundbar may not perform Bluetooth search or connection correctly under the following
circumstances:
–
– If two or more Bluetooth devices are simultaneously paired with the Soundbar.
– If the Bluetooth device is turned off, not in place, or malfunctions.
Electronic devices may cause radio interference. Devices that generate electromagnetic waves
must be kept away from the Soundbar main unit - e.g., microwaves, wireless LAN devices, etc.
ENG - 17
05 CONNECTING AN EXTERNAL DEVICE
Connect to an external device via a wired connection or Bluetooth connection to play the external
device’s sound through the Soundbar.
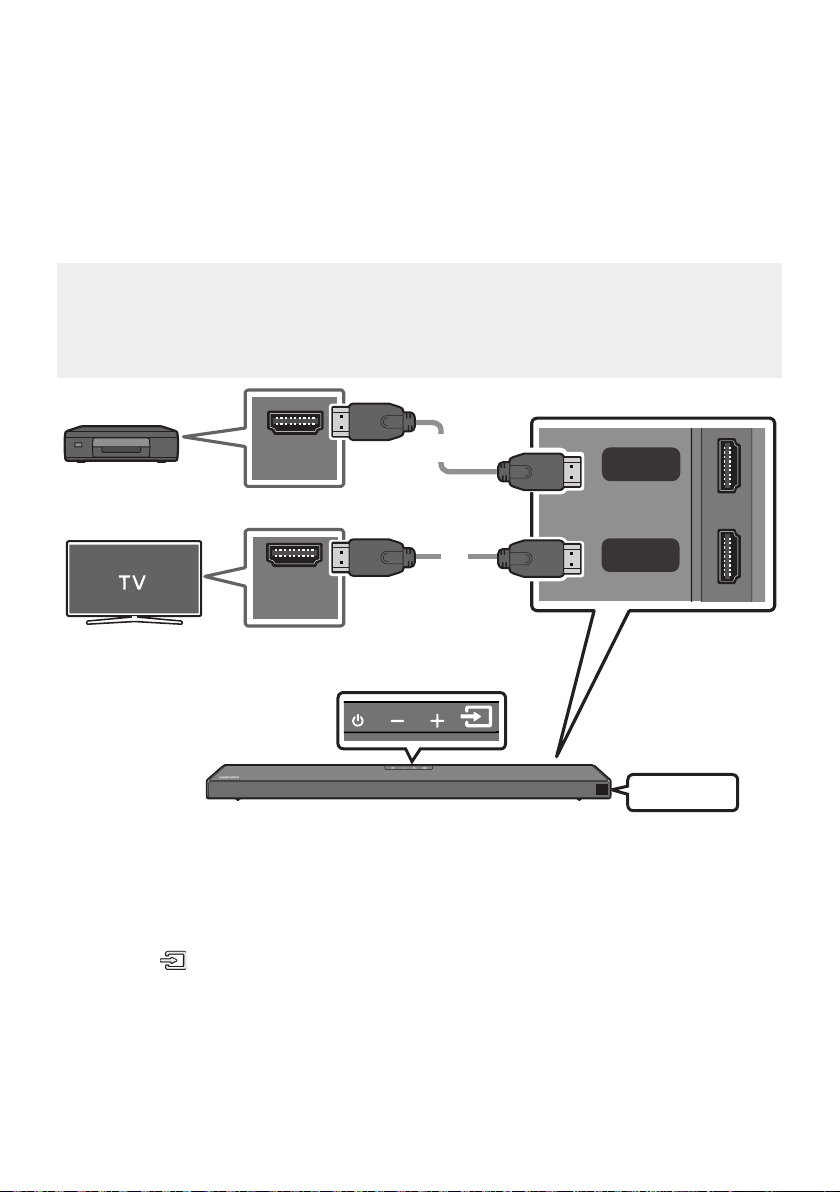
Connecting using an HDMI Cable (Capable of Dolby Atmos decoding
and playback)
Pre-connection Checklist
Dolby Atmos® and DTS:X are supported in HDMI mode only.
If the Audio Output options include Secondary Audio, make sure Secondary Audio is set to Off.
Make sure that the content supports Dolby Atmos®.
HDMI OUT
HDMI IN
(ARC)
HDMI
HDMI TO TV
(ARC)
DIGITAL AUDIO IN (OPTICAL)
HDMI Cable
HDMI Cable
Bottom of the Soundbar
External Device
Top of the Soundbar
HDMI
1. Connect an HDMI cable from the HDMI port on the back of the product to the HDMI OUT port on
your digital device.
2. Connect an HDMI cable from the HDMI TO TV (ARC) port on the back of the product to the HDMI IN
port on your TV.
3. Press the (Source) button on the top panel or on the remote control, and then select “HDMI”.
4. “HDMI” mode is displayed on the Soundbar display panel and sound plays.
ENG - 18
NOTES
When you use Dolby Atmos®: If the input source is Dolby Atmos®, 5.1.2 channels are outputted.
When Dolby Atmos® is activated, “DOLBY ATMOS” appears in the front display.
ConguringDolbyAtmos®onyourBDplayerorotherdevice.
Open the audio output options on the settings menu of your BD player or other device and make
sure that “No Encoding” is selected for Bitstream. For example, on a Samsung BD Player, go to
SupportedUHDSignalsSpecication(3840x2160p)
Frame rate (fps) Colour depth RGB4:4:4 YCbCr4:4:4 YCbCr4:2:2 YCbCr4:2:0
< 60
8 bit
10 bit - -
12 bit - -
120
8 bit - - - -
10 bit - - - -
Connecting using an Optical Cable
OPTICAL OUT
HDMI TO TV
(ARC)
DIGITAL AUDIO IN (OPTICAL)
Optical Cable
(not supplied)
Bottom of the Soundbar
BD / DVD player /
Set-top box /
Game console
Top of the Soundbar
D.IN
1. Connect DIGITAL AUDIO IN (OPTICAL) on the main unit to the OPTICAL OUT port of the Source
Device using a digital Optical Cable (not supplied).
2. Select “D.IN” mode by pressing the (Source) button on the top panel or on the remote control.
ENG - 19
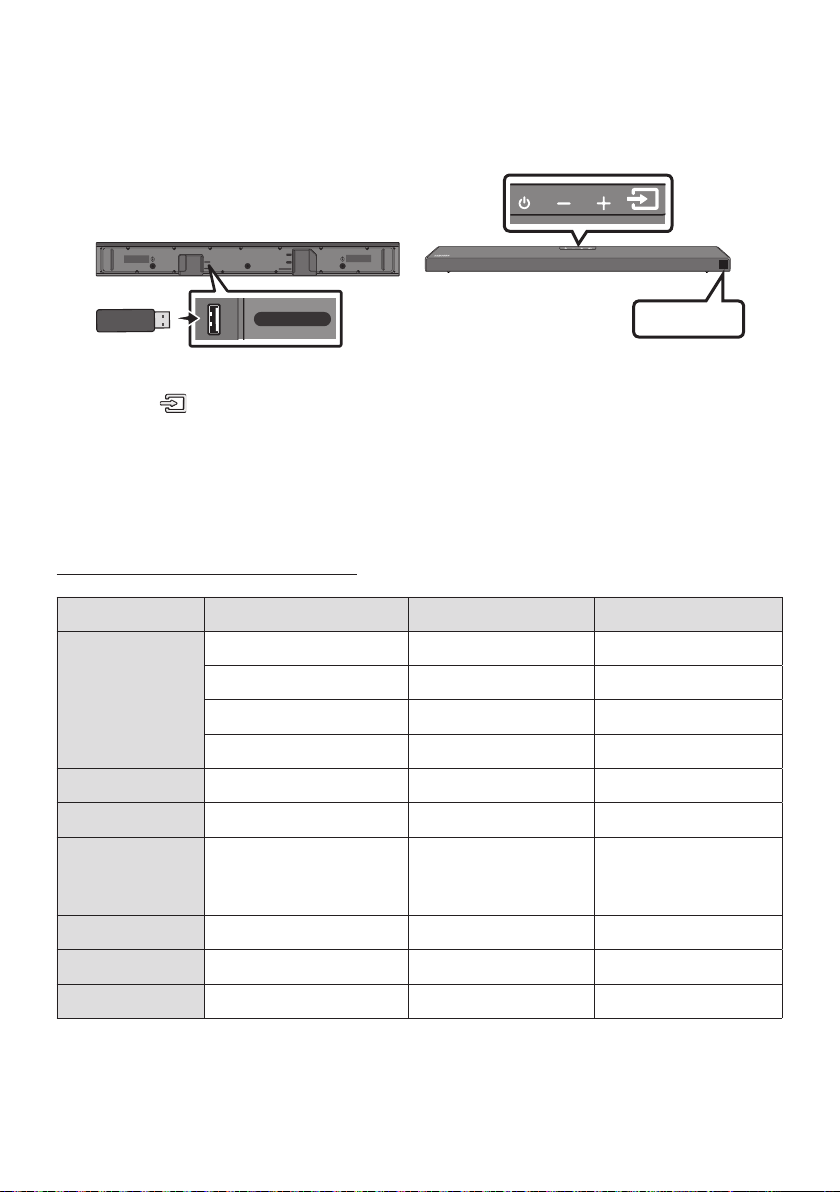
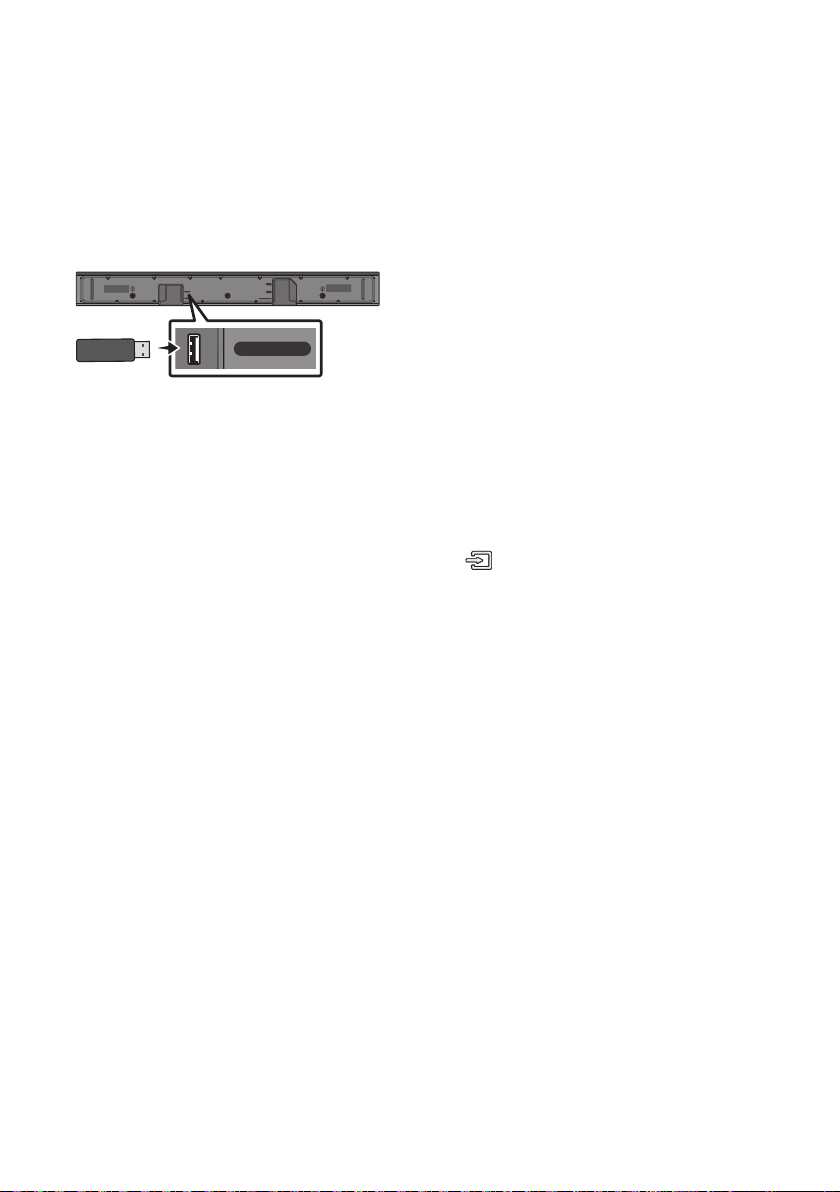
06 CONNECTING A USB STORAGE DEVICE
USB port
HDMI
HDMI TO TV
(ARC)
USB (5V 0.5A)
DC 24V
DIGITAL AUDIO IN (OPTICAL)
USB (5V 0.5A)
USB
1. Connect the USB device to the USB port on the bottom of the product.
2. Press the (Source) button on the top panel or on the remote control, and then select “USB”.
3. “USB” appears in the display screen.
4.
The Soundbar automatically turns off (Auto Power Down) if no USB device has been connected
for more than 20 minutes.
File Format Type Compatibility list
Extension Codec Sampling Rate Bit rate
*.mp3 MPEG1 Layer2 32kHz ~ 48kHz 32kbps ~ 320kbps
MPEG1 Layer3 32kHz ~ 48kHz 32kbps ~ 320kbps
MPEG2 Layer3 16kHz ~ 24kHz 8kbps ~ 160kbps
MPEG2.5 Layer3 8kHz ~ 12kHz 8kbps ~ 160kbps
*.wma WMA7/8/9 (Audio Only) 32kHz ~ 48kHz 32kbps ~ 320kbps
*.ogg Vorbis 32kHz ~ 48kHz 45kbps ~ 500kbps
*.aac
*.m4a
*.mp4
A AC-LC
(MPEG2/MPEG4 Audio Only)
32kHz ~ 48kHz 32kbps ~ 320kbps
*.wav LPCM 32kHz ~ 192kHz 1,024kbps ~ 9,216kbps
*.ac FLAC 32kHz ~ 192kHz 162kbps ~ 8,100kbps
*.aiff AIFF 32kHz ~ 192kHz 1,024kbps ~ 9,216kbps
ENG - 20
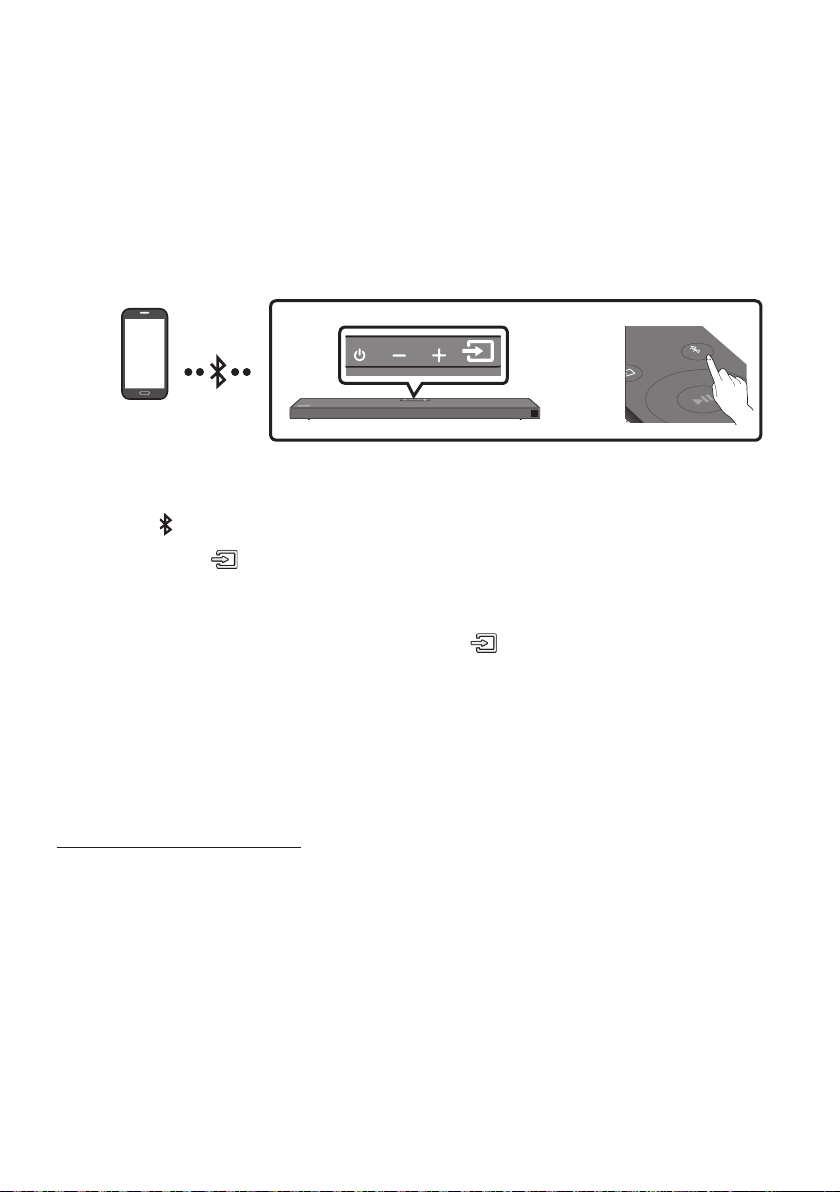
07 CONNECTING A MOBILE DEVICE
Connecting via Bluetooth
When a mobile device is connected using Bluetooth, you can hear stereo sound without the hassle of
cabling.
The connection is limited to one TV or two Bluetooth devices at the same time.
Bluetooth device
SOUND
MODE
PAIR
OR
The initial connection
1. Press the PAIR button on the remote control to enter the “BT PAIRING” mode.
(OR)
a. Press the (Source) button on the top panel and then select “BT”.
“BT” changes to “BT PAIRING” in a few seconds automatically or changes to “BT READY” if
there is a connect record.
b. When “BT READY” appears, press and hold the (Source) button on the top panel of the
Soundbar for more than 5 seconds to display “BT PAIRING”.
2. On your device, select “[AV] Samsung Soundbar Q6A-Series” from the list that appears.
When the Soundbar is connected to the Bluetooth device, [Bluetooth Device NameBT”
appears in the front display.
3.
If the device fails to connect
If a previously connected Soundbar listing (e.g. “[AV] Samsung Soundbar Q6A-Series”) appears in
the list, delete it.
Then repeat steps 1 and 2.
NOTE
BT READY”
mode to reconnect.

ENG - 21
What is the difference between BT READY and BT PAIRING?
BT READY : In this mode, you can search for previously connected TVs or connect a previously
connected mobile device to the Soundbar.
BT PAIRING : In this mode, you can connect a new device to the Soundbar. (Press the PAIR button
on the remote control or press and hold the (Source) button on the top of the Soundbar for
more than 5 seconds while the Soundbar is in “BT” mode.)
NOTES
If asked for a PIN code when connecting a Bluetooth device, enter <0000>.
In Bluetooth connection mode, the Bluetooth connection will be lost if the distance between the
Soundbar and the Bluetooth device exceeds 10 meters.
The Soundbar automatically turns off after 20 minutes in the Ready state.
The Soundbar may not perform Bluetooth search or connection correctly under the following
circumstances:
–
– If several Bluetooth devices are simultaneously paired with the Soundbar.
– If the Bluetooth device is turned off, not in place, or malfunctions.
Electronic devices may cause radio interference. Devices that generate electromagnetic waves
must be kept away from the Soundbar main unit - e.g., microwaves, wireless LAN devices, etc.
The Soundbar supports SBC data (44.1kHz, 48kHz).
Connect only to a Bluetooth device that supports the A2DP (AV) function.
You cannot connect the Soundbar to a Bluetooth device that supports only the HF (Hands Free)
function.
Once you have paired the Soundbar to a Bluetooth device, selecting “[AV] Samsung Soundbar Q6A-
Series” from the device’s scanned devices list will automatically change the Soundbar to “BT” mode.
– Available only if the Soundbar is listed among the Bluetooth device’s paired devices.
(The Bluetooth device and the Soundbar must have been previously paired at least once.)
The Soundbar will appear in the Bluetooth device’s searched devices list only when the Soundbar is
displaying “BT READY”.
Bluetooth Power On (SOUND MODE)
If a previously paired Bluetooth device tries to pair with the Soundbar when the Bluetooth Power On
function is on and the Soundbar is turned off, the Soundbar turns on automatically.
1. Press and hold the SOUND MODE button for more than 5 seconds on the remote while the
Soundbar is turned on.
2. “ON-BLUETOOTH POWER” appears on the Soundbar’s display.

ENG - 22
Disconnecting the Bluetooth device from a Soundbar
You can disconnect a Bluetooth device from the Soundbar. For instructions, see the Bluetooth device’s
user manual.
The Soundbar will be disconnected.
When the Soundbar is disconnected from the Bluetooth device, the Soundbar will display
“BT DISCONNECTED” on the front display.
Disconnecting the Soundbar from the Bluetooth device
Press the (Source) button on the top panel or on the remote control, and then change to any mode
except “BT”.
Disconnecting takes time because the Bluetooth device must receive a response from the
Soundbar. (Disconnection time may differ, depending on the Bluetooth device)
When the Soundbar is disconnected from the Bluetooth device, the Soundbar will display
“BT DISCONNECTED” on the front display.
NOTES
In Bluetooth connection mode, the Bluetooth connection will be lost if the distance between the
Soundbar and the Bluetooth device exceeds 10 meters.
The Soundbar automatically turns off after 20 minutes in the Ready state.
More About Bluetooth
Bluetooth is a technology that enables Bluetooth-compliant devices to interconnect easily with each
other using a short wireless connection.
A Bluetooth device may cause noise or malfunction, depending on usage, if:
– A part of your body is in contact with the receiving/transmitting system of the Bluetooth
device or the Soundbar.
–
– It is exposed to electrical interference from same frequency-band devices including medical
equipment, microwave ovens, and wireless LANs.
Pair the Soundbar with the Bluetooth device while they are close together.
The further the distance between the Soundbar and Bluetooth device, the worse the quality is.
If the distance exceeds the Bluetooth operational range, the connection is lost.
In poor reception areas, the Bluetooth connection may not work properly.
The Bluetooth connection only works when it is close to the unit. The connection will be
automatically cut off if the Bluetooth device is out of range. Even within range, the sound quality
may be degraded by obstacles such as walls or doors.
This wireless device may cause electric interference during its operation.

ENG - 23
Bluetooth Multi connection
The Soundbar can be connected to 2 Bluetooth devices at the same time.
Bluetooth device A Bluetooth device B
1. Connect the Soundbar to up to two Bluetooth devices. (See page 20)
2. Play music from one of the connected Bluetooth devices while two devices are connected.
3. If music is played from the Bluetooth device “B” while playing from the device “A”, the music is
started playing on the device “B” and automatically being stopped/paused playback on the device
“A”.
4. In versions prior to AVRCP V1.4, the switching time of the device playing music may be delayed.
NOTES
Some devices do not support Bluetooth multi connection.
“BT PAIRING” mode stops when no device is paired within 3 minutes.
Switching devices may take about 7 seconds on some apps.
If you attempt to connect a 3rd Bluetooth device, the A or B devices will be disconnected.
(A device that is not currently playing will be disconnected.)
Only one Samsung TV, or 2 Bluetooth devices can be connected at the same time.
The Soundbar will be disconnected from Bluetooth devices when it receives a connection request
from a Samsung TV.
ENG - 24
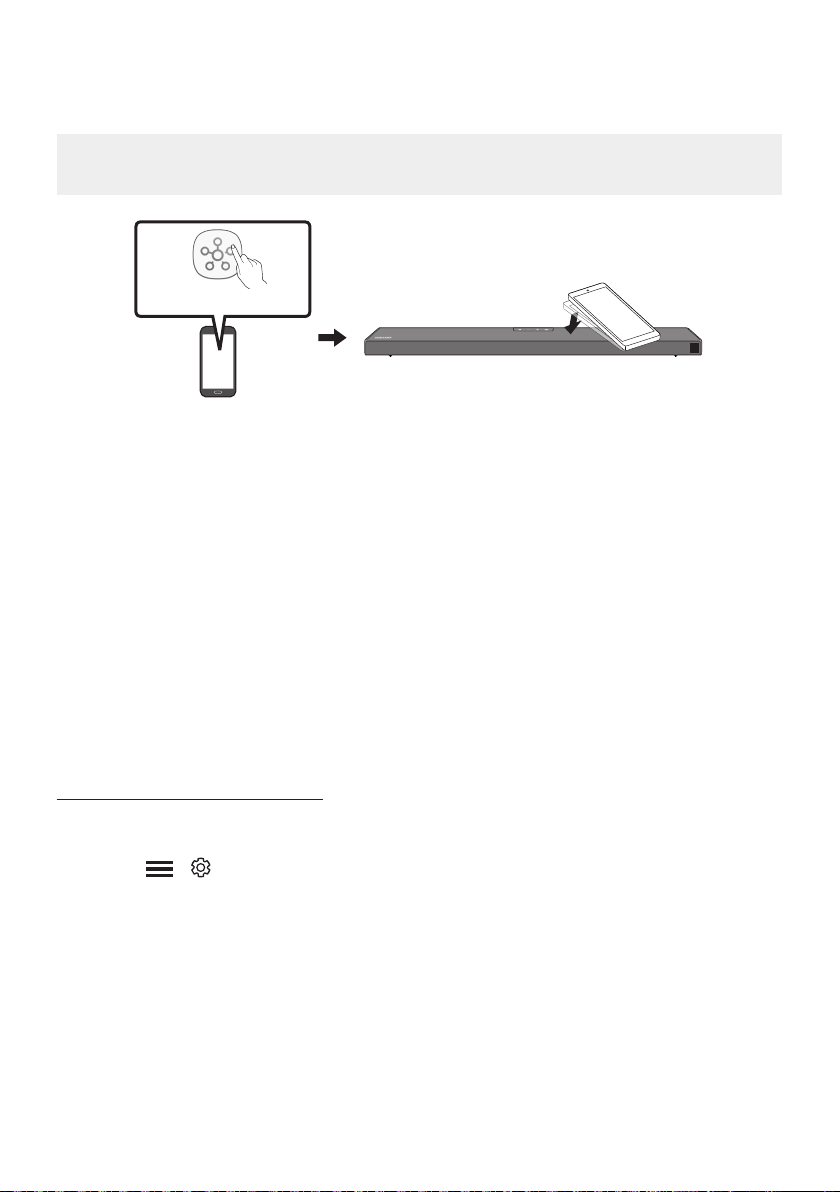
Using the Tap Sound
Tap the Soundbar with your mobile device to play audio from the mobile device through the Soundbar.
This function may not be supported, depending on the mobile device.
This function is only compatible with Samsung mobile devices with Android 8.1 or later.
Mobile device
SmartThings App
Top of the Soundbar
1. Turn on the Tap Sound function on your mobile device.
For details on how to turn on the function, refer to “Enable the Tap Sound function” below.
2. Tap the Soundbar with the mobile device. Select “Start now” in the displayed message window.
A connection is established between the mobile device and Soundbar via Bluetooth.
3. Play audio from the mobile device through the Soundbar.
This function connects a mobile device to the Soundbar via Bluetooth by detecting vibration
that occurs when the device touches the Soundbar.
Make sure the mobile device does not tap a sharp corner of the Soundbar. The Soundbar or
mobile device may become scratched or damaged.
It is recommended that the mobile device be covered with a case. Lightly tap the wide area in
the upper portion of the Soundbar, without using excessive force.
To use this function, update the SmartThings app to the latest version.
The function may not be supported, depending on the app version.
Enable the Tap Sound function
Use the SmartThings app to turn on the Tap View, Tap Sound function.
1. On the mobile device, run the SmartThings app.
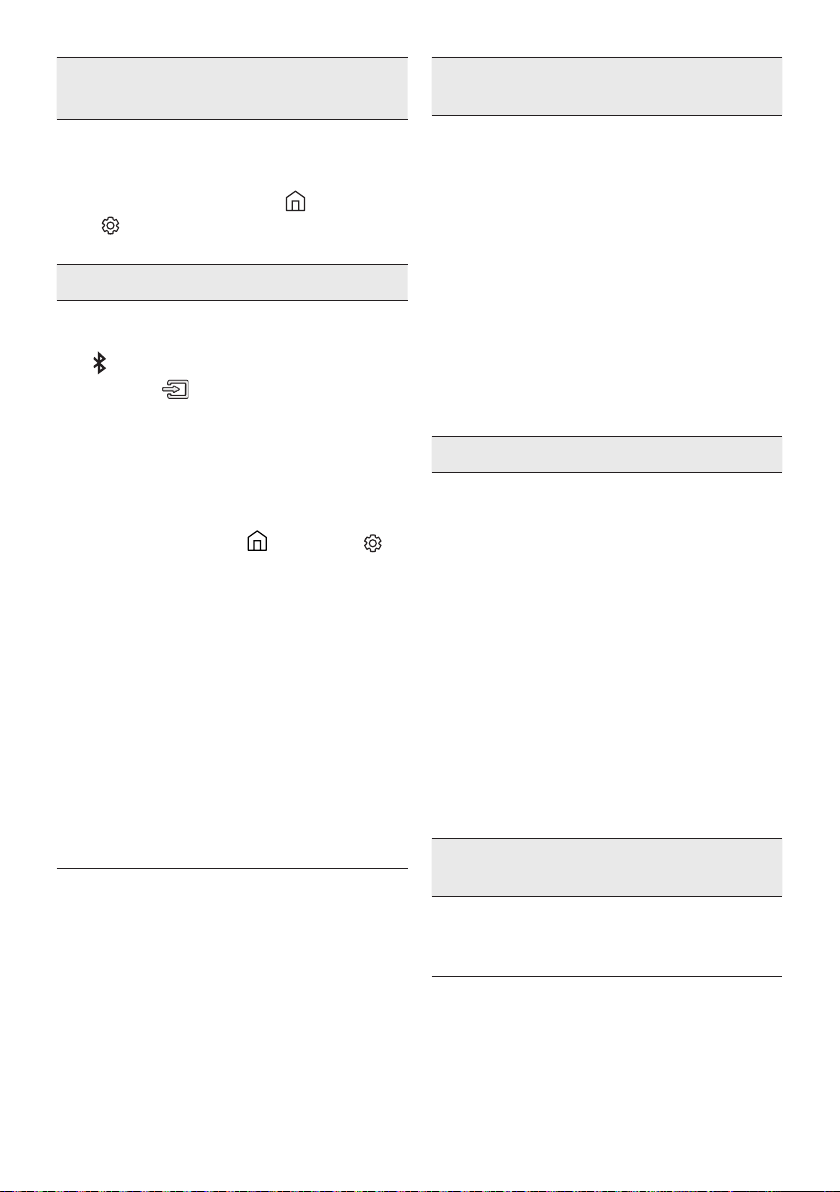
2. Select ( ) in the SmartThings app screen displayed on the mobile device.
3. Set “Tap View, Tap Sound” to On to allow the function to work when a mobile device moves close to
the Soundbar.
NOTES
When the mobile device is in power-saving mode, the Tap Sound function does not work.
The Tap Sound function may not work if there are devices near the Soundbar that cause radio
interference such as electric devices. Make sure devices that may cause radio interference are

ENG - 25
08 USING THE REMOTE CONTROL
How to Use the Remote Control
VOL WOOFER
SOUNDBAR
SOUND
MODE
PAIR
Power
VOL WOOFER
SOUND
MODE
PAIR
Turns the Soundbar on and off.
VOL WOOFER
SOUND
MODE
PAIR
Source
Press to select a source connected to the
Soundbar.
Mute
VOL WOOFER
SOUND
MODE
PAIR
Press the (Mute) button to mute the sound.
Press it again to unmute the sound.
SOUND MODE
VOL WOOFER
SOUND
MODE
PAIR
Press to cycle through the available sound modes:
SURROUND SOUND, GAME PRO, ADAPTIVE
SOUND,
or STANDARD.
– SURROUND SOUND
– GAME PRO
Provides stereoscopic sound to immerse
you in the action while gaming.
– ADAPTIVE SOUND
Analyses the content in real time and
automatically provides an optimal sound
content.
– STANDARD
Outputs the original sound.
DRC (Dynamic Range Control)
Lets you apply dynamic range control to
Dolby Digital tracks. Press and hold the
SOUND MODE button for more than
to turn DRC (Dynamic Range Control) on or
off. With the DRC turned on, loud sound is
reduced. (The sound may be distorted.)
ENG - 26
Bluetooth Power
This feature automatically turns the Soundbar on when it receives a connection
request from a previously connected TV or Bluetooth device. The setting is On by
default.
– Press and hold the SOUND MODE button for more than 5 seconds to turn off the
Bluetooth Power function.
VOL WOOFER
SOUND
MODE
PAIR
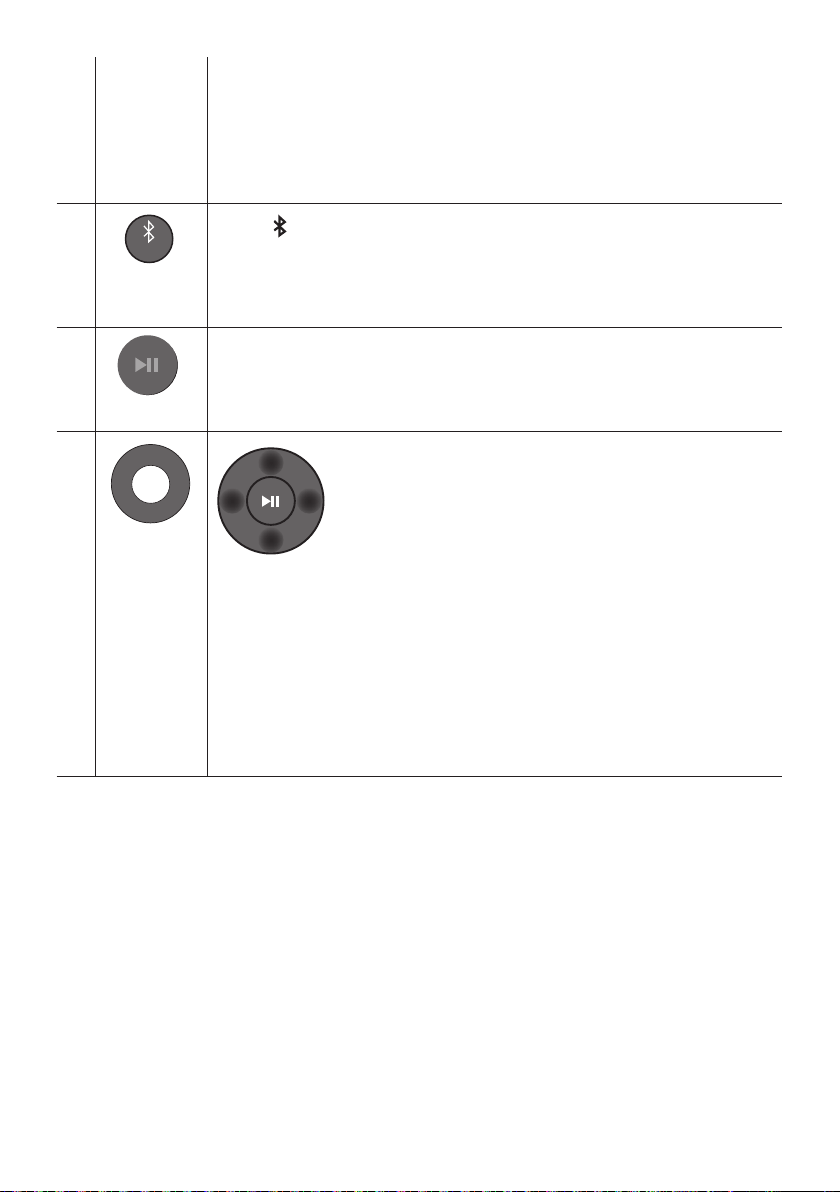
Bluetooth
PAIR
Press the PAIR button. “BT PAIRING” appears in the Soundbar’s display.
You can connect the Soundbar to a new Bluetooth device in this mode by selecting the
Soundbar from the Bluetooth device's search list.
Play / Pause
VOL WOOFER
SOUND
MODE
PAIR
Press the p
VOL WOOFER
SOUND
MODE
PAIR
Up/Down/
Left/Right
Press the indicated areas to select Up/Down/Left/Right.
Press Up/Down/Left/Right on the button to select or set functions.
Repeat
To use the Repeat function in “USB” mode, press the Up button.
Music Skip
Press the RightLeft button to select the
ID SET
Press and hold the Up button for 5 seconds to complete ID SET (when connecting to a
wireless subwoofer or wireless rear speakers).
ENG - 27
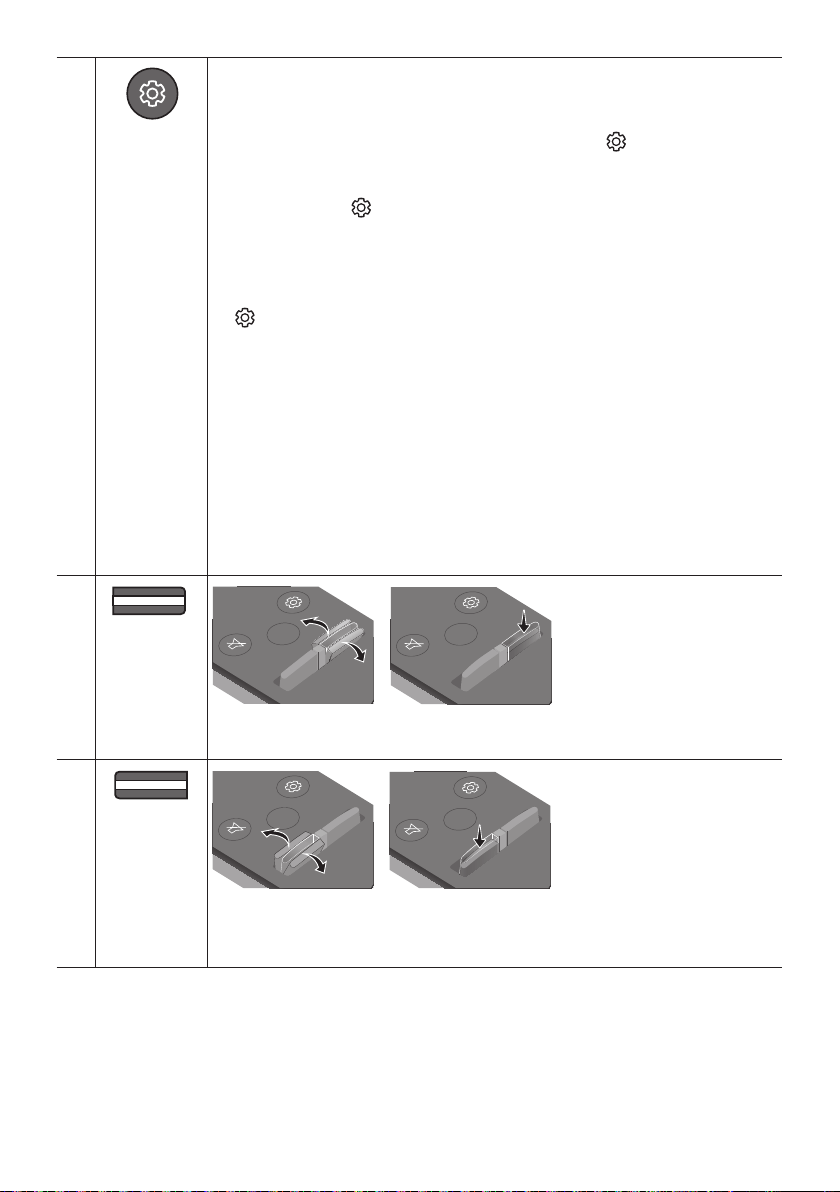
Sound Control
VOL WOOFER
SOUND
MODE
PAIR
When pressed, the settings TREBLE, BASS, AUDIO SYNC, CENTER LEVEL, TOP LEVEL, and
VIRTUAL ON/OFF are displayed in sequence.
The desired settings can be adjusted using the Up/Down buttons.
To control the volume of the treble or bass sound, press the (Sound Control)
button to select TREBLE or BASS and then adjust the volume between -6~+6 by using
the Up/Down buttons.
(Make sure the Sound mode is set to “STANDARD”.)
Press and hold the (Sound Control) button for about 5 seconds to adjust the sound
for each frequency band. 150Hz, 300Hz, 600Hz, 1.2kHz, 2.5kHz, 5kHz, and 10kHz are
selectable using the Left/Right buttons and each can be adjusted to a setting between
-6 to +6 using the Up/Down buttons. (Make sure the Sound mode is set to “STANDARD”.)
If the video on the TV and audio from the Soundbar are not synchronised, press the
(Sound Control) button to select AUDIO SYNC and then
set the audio delay
by using the Up/Down buttons. (Not available in “USB” or
“BT” mode.)
AUDIO SYNC is only supported for some functions.
To control the volume of the each speaker select CENTER LEVEL, or TOP LEVEL in
Sound Settings, and then adjust the volume between -6~+6 by using the Up/Down
buttons.
The VIRTUAL Speaker function can be turned ON/OFF by using the Up/Down buttons.
When the Rear Speakers (sold separately) are connected, the settings REAR SPEAKER
ON/OFF and REAR LEVEL are supported.
Use the Up/Down buttons to set the REAR SPEAKER ON/OFF and to adjust the
volume of the REAR LEVEL between -6 to +6.
VOL WOOFER
SOUND
MODE
PAIR
WOOFER
(BASS) LEVEL
SOUND
MODE
VOL
WOOFER
SOUNDBAR
SOUND
MODE
VOL
WOOFER
SOUNDBAR
SOUND
MODE
VOL
WOOFER
SOUNDBAR
SOUND
MODE
VOL
WOOFER
SOUNDBAR
Push the button up or down to adjust the level of the woofer (bass) to -12 or between -6 to
+6. To set the woofer (bass) volume level to 0 (Default), press the button.
VOL WOOFER
SOUND
MODE
PAIR
VOL
(Volume)
SOUND
MODE
VOL
WOOFER
SOUNDBAR
SOUND
MODE
VOL
WOOFER
SOUNDBAR
SOUND
MODE
VOL
WOOFER
SOUNDBAR
SOUND
MODE
VOL
WOOFER
SOUNDBAR
Push the button up or down to adjust the volume.
Mute
Press the VOL button in to mute the sound. Press it in again to unmute the sound.
ENG - 28
Adjusting the Soundbar volume with a TV remote control
Adjust the Soundbar volume using the TV’s remote control.
This function can be used with IR remote controls only. Bluetooth remote controls (remote
controls that require pairing) are not supported.
Set the TV speaker to External Speaker to use this function.
Manufacturers supporting this function:
VIZIO, LG, Sony, Sharp, PHILIPS, PANASONIC, TOSHIBA, Hisense, RCA
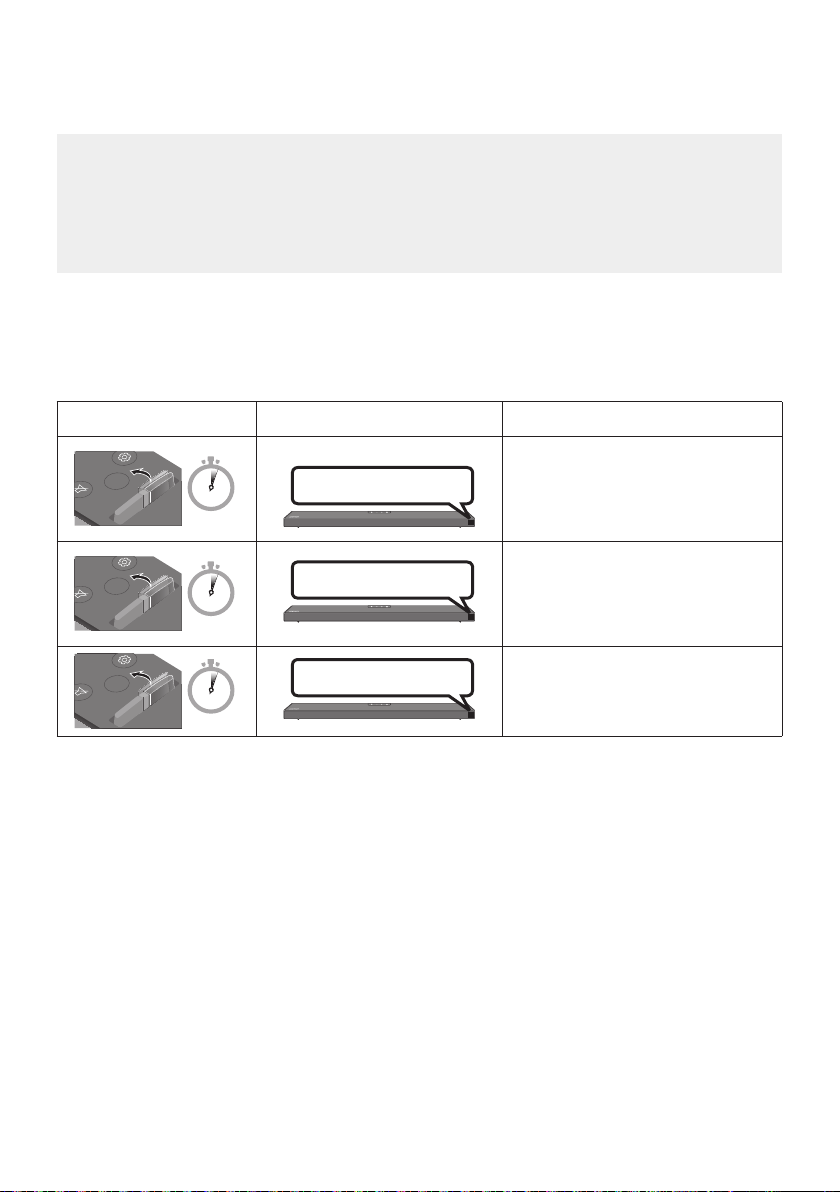
1. Turn Off the Soundbar.
2. Push up and hold the WOOFER button for 5 seconds.
Each time you push the WOOFER button up and hold it for 5 seconds, the mode switches in the
following order: “OFF-TV REMOTE” (Default mode), “SAMSUNG-TV REMOTE”, “ALL-TV REMOTE”.
Remote Control Button Display Status
SOUND
MODE
VOL
WOOFER
SOUNDBAR
5 Sec
OFF-TV REMOTE
(Default mode)
Disable the TV remote control.
SOUND
MODE
VOL
WOOFER
SOUNDBAR
5 Sec
SAMSUNG-TV REMOTE
Enable a Samsung TV’s IR remote
control.
SOUND
MODE
VOL
WOOFER
SOUNDBAR
5 Sec
ALL-TV REMOTE
Enable a third-party TV’s IR remote
control.
ENG - 29
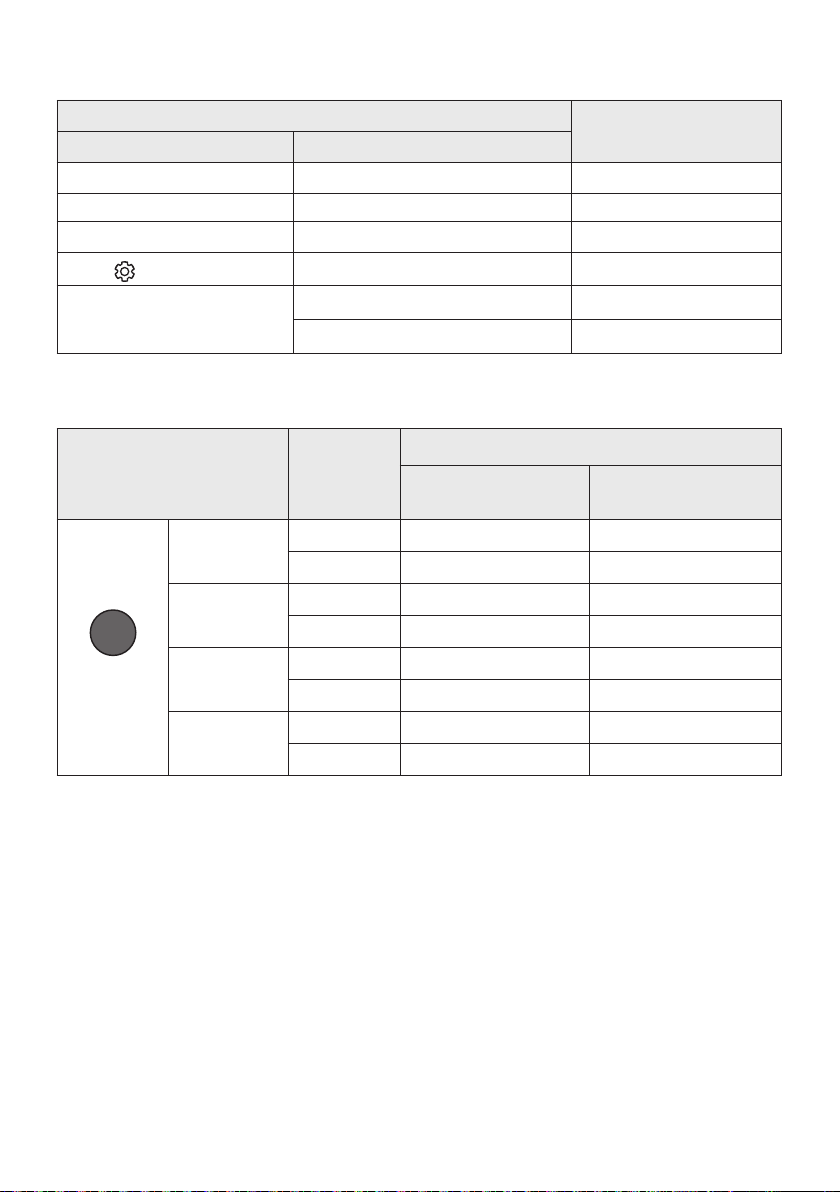
Using the Hidden Buttons (Buttons with more than one function)
Hidden Button
Reference page
Remote Control Button Function
WOOFER (Up) TV remote control On/Off (Standby) page 28
Left TV Auto connect On/Off (BT Ready) page 16
Up ID SET page 26
(Sound Control)
7 Band EQ page 27
SOUND MODE
DRC ON/OFF (Standby) page 25
Bluetooth Power page 26
Outputspecicationsforthedifferentsoundeffectmodes
Effect Input
Output
Without Wireless Rear
Speaker Kit
With Wireless Rear
Speaker Kit
SOUND MODE
Surround
VOL WOOFER
SOUND
MODE
Bluetooth
POWER
SURROUND
SOUND
2.0 ch
3.1.2 ch 5.1.2 ch
5.1 ch 3.1.2 ch 5.1.2 ch
GAME PRO
2.0 ch
3.1.2 ch 5.1.2 ch
5.1 ch 3.1.2 ch 5.1.2 ch
ADAPTIVE
SOUND
2.0 ch
3.1.2 ch 5.1.2 ch
5.1 ch 3.1.2 ch 5.1.2 ch
STANDARD
2.0 ch
2.1 ch 2.1 ch
5.1 ch 3.1 ch 5.1 ch
The Samsung Wireless Rear Speaker Kit can be purchased separately. To purchase a Kit, contact the
vendor you purchased the Soundbar from.
When the input source is Dolby Atmos®, the Subwoofer-only setup provides 3.1.2 channel audio,
while the Subwoofer & Wireless Rear Speaker Kit setup provides 5.1.2 channel audio.
The Surround Speakers will not produce sounds for 2 channel output while STANDARD mode is in
use. To enable sound for the Surround Speakers, change the effect mode to SURROUND SOUND.
ENG - 30
09 INSTALLING THE
WALL MOUNT
Installation Precautions
Install on a vertical wall only.
Do not install in a place with high
temperature or humidity.
Verify whether the wall is strong enough to
support the product’s weight. If not, reinforce
the wall or choose another installation point.
anchors appropriate for the kind of wall you
have (plaster board, iron board, wood, etc.). If
studs.
Purchase wall mounting screws according to
the type and thickness of the wall you want to
mount the Soundbar on.
– Diameter: M5
– Length: 35 mm or longer recommended.
Connect cables from the unit to external
devices before you install the Soundbar on
the wall.
Make sure the unit is turned off and
unplugged from the power source before you
install it. Otherwise, it may cause an electric
shock.
Wallmount Components
Wall Mount Guide
x 2
(M4 x L10)
x 2
Holder-Screw Screw
x 2
Bracket-Wall Mount
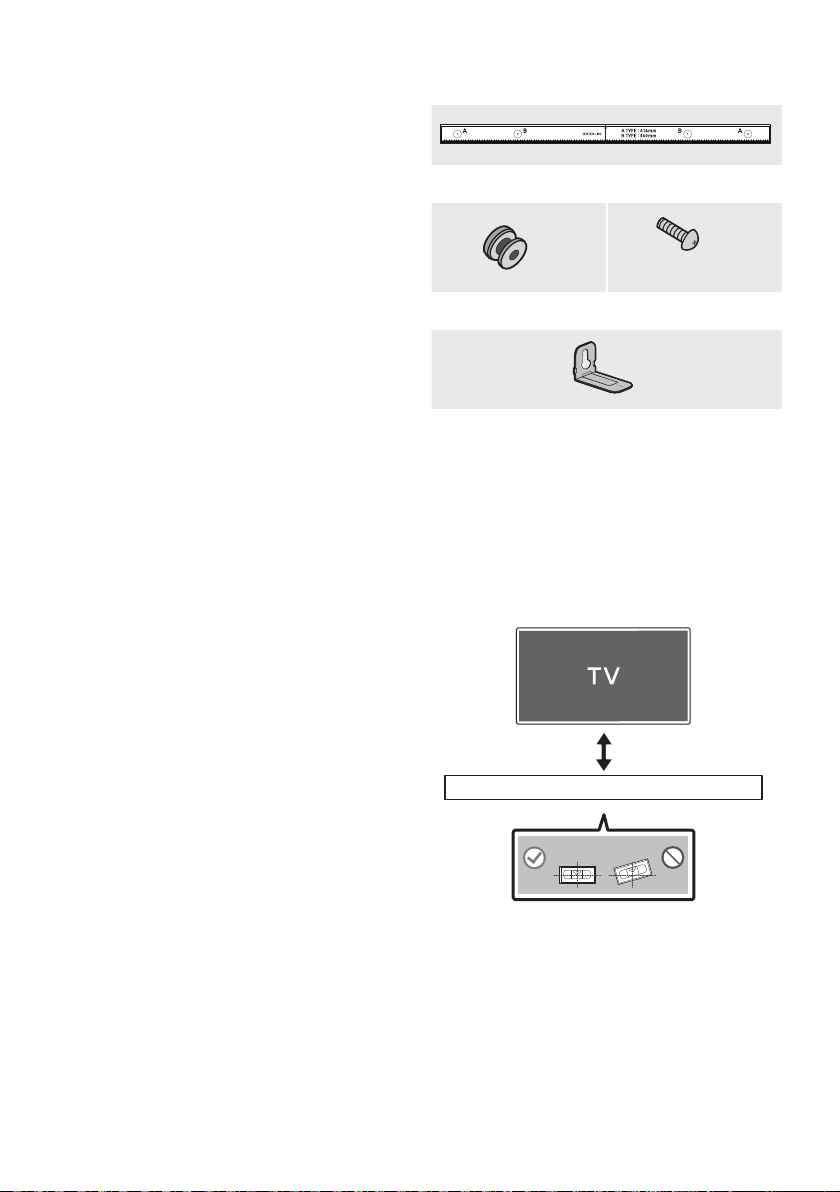
1. Place the Wall Mount Guide against the wall
surface.
The Wall Mount Guide must be level.
If your TV is mounted on the wall, install
the Soundbar at least 5 cm below the TV.
5 cm or more
ENG - 31
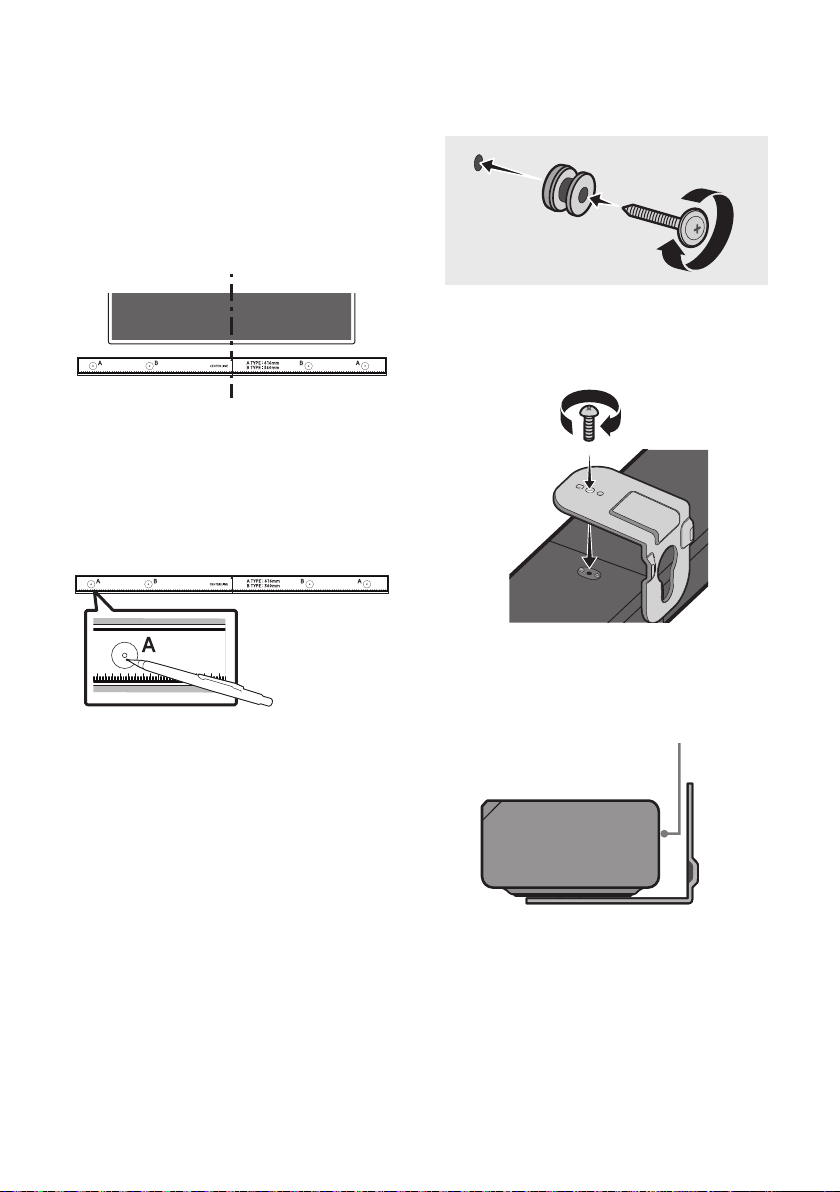
2. Align the Wall Mount Guide’s Centre Line
with the centre of your TV (if you are
mounting the Soundbar below your TV), and
Wall Mount Guide to the wall
using tape.
If you are not mounting below a TV, place
the Centre Line in the centre of the
installation area.
Centre Line
3. Push a pen tip or sharpened pencil tip
through the centre of the A-TYPE images on
each end of the Guide to mark the holes for
the supporting screws, and then remove the
Wall Mount Guide.
4. Using an appropriately sized drill bit, drill a
hole in the wall at each marking.
If the markings do not correspond to the
positions of studs, make sure you insert
appropriate anchors into the holes before
you insert the support screws. If you use
anchors, make sure the holes you drill are
large enough for the anchors you use.
5. Push a screw (not supplied) through each
Holder-Screw, and then screw each screw
6. Install the 2 Bracket-Wall Mounts in the
correct orientation on the bottom of the
Soundbar using 2 Screws.
When assembling, make sure the hanger
part of the Bracket-Wall Mounts are
located behind the rear of the Soundbar.
Rear of Soundbar
Right end of Soundbar

ENG - 32
7. Install the Soundbar with the attached
Bracket-Wall Mounts by hanging the
Bracket-Wall Mounts on the Holder-Screws
on the wall.
8. Slide the Soundbar down as shown below so
that the Bracket-Wall Mounts rest securely
on the Holder-Screws.
Insert the Holder-Screws into the wide
(bottom) part of the Bracket-Wall
Mounts, and then slide the Bracket-Wall
Mounts down so that the Bracket-Wall
Mounts rest securely on the
Holder-Screws.
10 PLACING THE
SOUNDBAR ON A
TV STAND
Place the Soundbar on a TV stand.
3cm or more
As illustrated in the image, align the centre of the
Soundbar with the centre of the TV, carefully
place the Soundbar onto the TV stand.
For optimal sound quality, position the Soundbar
at least 3 cm away from the TV front.
NOTE
and solid surface.
ENG - 33
11 SOFTWARE
UPDATE
Samsung may offer updates for the Soundbar’s
systemrmwareinthefuture.
USB port
HDMI
HDMI TO TV
(ARC)
USB (5V 0.5A)
DC 24V
DIGITAL AUDIO IN (OPTICAL)
USB (5V 0.5A)
If an update is offered, you can update the
your Soundbar. For more information about how
website at www.samsung.com
Support.
Then, select the product type or enter the model
number of your Soundbar, select the Software &
Apps option, and then Downloads. Note that the
option names can vary.
Update Procedure
After the update completes, all your customized
user settings are maintained.
1. Connect a USB thumb drive to the USB port
on your computer.
Important: Make sure there are no music
2. Go to (samsung.com)
select Enter Model
Number and enter the model of your
Soundbar. Select manuals and downloads
3. Save the downloaded software to a USB
stick and select “Extract Here” to unzip the
folder.
4. Turn off the Soundbar and connect the USB
stick containing the software update to the
USB port.
5. Power on the Soundbar, press the
(Source) button on the Soundbar, and
then select the “USB” mode. “UPDATE”
appears on the display, starting the update.
Soundbar is rebooted automatically when
the update is completed.
This product has a DUAL BOOT function.
During update, do not turn it off or
remove the USB.
If the latest version is already installed on
the Soundbar, the update will not install.
Depending on the USB type, update may
not be supported.
6. Restore your settings on the Soundbar.

ENG - 34
If UPDATE is not displayed
1. Turn off the Soundbar, disconnect and then
reconnect the USB storage device that
USB port.
2. Disconnect the Soundbar’s power cord,
reconnect it, and then turn on the Soundbar.
NOTES
stored in the USB storage device.
Do not disconnect the power or remove the
USB device while updates are being applied.
The main unit will turn on automatically after
If the connection to the subwoofer is not
re-established automatically after the
update, refer to page 6.
If the software update fails, check if the USB
stick is defective.
Mac OS users should use MS-DOS (FAT) as the
USB format.
Updating via USB may not be available,
depending on the USB storage device
manufacturer.
Reset
INIT OK
Top of the Soundbar
With the Soundbar on, press the (Volume)
buttons on the body at the same time for at least
5 seconds. “INIT OK” appears on the display and
then the Soundbar is reset.
CAUTION
All the settings of the Soundbar are reset.
Be sure to perform this only when a reset is
required.
ENG - 35
12 TROUBLESHOOTING
Before seeking assistance, check the following.
Soundbar does not turn on.
; Check whether the power cord of the
Soundbar is correctly inserted into the
outlet.
Soundbar works erratically.
; After removing the power cord, insert it
again.
; Remote the power cord from the external
device and try again.
; If there is no signal, the Soundbar
automatically turns off after a certain
period of time. Turn on the power. (See
page 3.)
In case the remote control does not work.
; Point the remote directly at the Soundbar.
; Replace the batteries with new ones.
Soundbar does not output any sound.
; The volume of the Soundbar is too low or
muted. Adjust the volume.
; When any external device (STB, Bluetooth
device, mobile device, etc.) is connected,
adjust the volume of the external device.
; For sound output of the TV, select
Soundbar. (Samsung TV: Home (
Settings (
Select Soundbar)
; The cable connection to the Soundbar may
not be loose. Remove the cable and
connect again.
; Remove the power cord completely,
reconnect, and turn the power on.
; Reset the product and try again.
(See page 34.)
Subwoofer does not output any sound.
; Check whether the LED indicator on the
rear of the Subwoofer is on in blue.
Reconnect the Soundbar and Subwoofer if
the indicator is blinking in blue or turned
red. (See page 7.)
; You may experience an issue if there is an
obstacle between the Soundbar and
Subwoofer. Move devices to an area away
from obstacles.
; Other devices sending radio frequency
signals in proximity may interrupt the
connection.
Keep your speaker away from such devices.
; Remove and reconnect the power plug.
The Subwoofer volume is too low.
; The original volume of the content you are
playing may be low. Try adjusting the
Subwoofer level. (See page 27.)
; Bring the Subwoofer speaker closer to you.
In case the TV is not connected via HDMI TO
TV (ARC).
; Check whether the HDMI cable is correctly
connected to the ARC terminal.
11.)
; Connection may not be possible due to the
connected external device (set-top box,
game machine, etc.). Directly connect the
Soundbar.
; HDMI-CEC may not be activated on the TV.
Turn on the CEC on the TV menu. (Samsung
TV: Home (
(HDMI-CEC) ON)
ENG - 36
There is no sound in when connecting to the
TV in HDMI TO TV (ARC) mode.
; Your device is unable to play the input
signal. Change the TV’s audio output to
PCM or Dolby Digital.
(For a Samsung TV: Home (
(
Output Audio Format)
Soundbar does not connect via Bluetooth.
; When connecting a new device, switch to
“BT PAIRING” for connection. (Press the
PAIR button on the remote control or
press the (Source) button on the body
for at least 5 seconds.)
; If the Soundbar is connected to another
switch the device.
; Reconnect it after removing the Bluetooth
speaker list on the device to connect.
(Samsung TV: Home ( )
Speaker List)
; The automatic TV connection may be
disabled. While the Soundbar is in “BT
READY”, press and hold the Left button on
the Soundbar remote control for 5 seconds
to select ON-TV CONNECT. If you see
OFF-TV CONNECT, press and hold Left
button again for 5 seconds to switch the
selection.
; Remove and reconnect the power plug,
then try again.
; Reset the product and try again.
(See page 34.)
Sound drops out when connected via
Bluetooth.
; Some devices can cause radio interference
if they are located too close to the
Soundbar. e. g. microwaves, wireless
routers, etc.
; If your device that is connected via
Bluetooth moves too far away from the
Soundbar, it may cause the sound to drop
out. Move the device closer to the
Soundbar.
; If a part of your body is in contact with the
Bluetooth transceiver or the product is
installed on metal furniture, sound may
drop out. Check the installation
environment and conditions for use.
Bluetooth multi connection does not work.
; When the TV is connected to the soundbar,
Bluetooth multi connection may not
operate. Disconnect the Soundbar from the
TV and try again.
; Check whether the Bluetooth Multi
connection setting is turned on.
(Refer to the “Soundbar does not connect
via Bluetooth.” section.)
; Disconnect the device currently playing,
pair with the device that you want to
connect, and reconnect the previous
device.
; If the sound is inaudible even after
connecting properly, refer to the “Sound
drops out when connected via Bluetooth.”
section.
Soundbar does not turn on automatically with
the TV.
; When you turn off the Soundbar while
watching TV, power synchronization with
the TV is disabled. First turn off the TV.

ENG - 37
13 LICENCE
Dolby, Dolby Atmos, and the double-D symbol
are registered trademarks of Dolby
Laboratories Licensing Corporation.
Manufactured under license from Dolby
Copyright © 2012-2020 Dolby Laboratories. All
rights reserved.
For DTS patents, see http://patents.dts.com.
Manufactured under license from DTS, Inc. (for
companies headquartered in the U.S./Japan/
Taiwan) or under license from DTS Licensing
Limited (for all other companies). DTS, DTS:X,
and the DTS:X logo are registered trademarks
or trademarks of DTS, Inc. in the United States
and other countries. © 2020 DTS, Inc. ALL
RIGHTS RESERVED.
Multimedia Interface, and the HDMI Logo are
trademarks or registered trademarks of HDMI
Licensing Administrator, Inc. in the United
States and other countries.
The Bluetooth® word mark and logos are
registered trademarks owned by the Bluetooth
SIG, Inc. and any use of such marks by Samsung
Electronics Co., Ltd. is under license. Other
trademarks and trade names are those of their
respective owners.
[ENERGY STAR]
ENERGYSTARqualiedmodelonly
– Your Samsung product is ENERGY STAR
Change to certain features, settings and
functionality in this product can change the
power consumption, possibly beyond the
limits required for ENERGY STAR
– Environmental Protection Agency and
Department of Energy. ENERGY STAR is a
joint program of the Government agencies,
products and practices.
Refer to www.energystar.gov for more
information of the ENERGY STAR Program.
ENERGYSTARqualiedmodelonly
(Applicable to Thin Client models only)
As an ENERGY STAR® Partner, SAMSUNG has
determined that this product meets the
ENERGY STAR® guidelines for energy
– The ENERGY STAR Program has been to
reduced greenhouse gas emissions and
save energy through voluntary labeling.
– Power management setting of this product
have been enabled by default, and have
various timing setting from 1 minutes to 5
hours.
– The product can wake with a button press
on the chassis from sleep mode.
ENERGYSTARqualiedmodelonly(Theother
models)
– As an ENERGY STAR Partner, Samsung has
determined that this product or product
models meets the ENERGY STAR guideline

ENG - 38
14 OPEN SOURCE
LICENCE NOTICE
To send inquiries and requests for questions
regarding open sources, contact Samsung Open
Source (http://opensource.samsung.com)
15 IMPORTANT
NOTES ABOUT
SERVICE
Figures and illustrations in this User Manual
are provided for reference only and may differ
from actual product appearance.
An administration fee may be charged if
either
(a) an engineer is called out at your request
and there is no defect with the product (i.e.
where the user manual has not been read).
(b) you bring the unit to a repair centre and
there is no defect with the product (i.e.
where the user manual has not been read).
You will be informed of the administration fee
amount before a technician visits.

ENG - 39
16 SPECIFICATIONS AND GUIDE
Specications
Model Name HW-Q600A
USB 5V/0.5A
Weight 3.4 kg
Dimensions (W x H x D) 980.0 x 58.0 x 105.0 mm
Operating Temperature Range +5°C to +35°C
Operating Humidity Range 10 % ~ 75 %
AMPLIFIER
Rated Output power 200W (30W x 6 + 10W x 2)
Supported play formats
Dolby Atmos (True HD / Digital Plus), Dolby
Digital, DTS-HD Master Audio, DTS:X, DTS
WIRELESS DEVICE OUTPUT POWER
BT max transmitter power
SRD max transmitter power
6mW at 2.402GHz – 2.480GHz
25mW at 5.725GHz – 5.825GHz
Subwoofer Name PS-WA67B
Weight 5.8 kg
Dimensions (W x H x D) 205.0 x 353.0 x 303.2 mm
AMPLIFIER
Rated Output power 160W
WIRELESS DEVICE OUTPUT POWER
SRD max transmitter power
25mW at 5.725GHz – 5.825GHz
Overall Standby Power Consumption (W) 2.0W
Bluetooth
Port deactivation method
Press and hold the SOUND MODE button for
more than 5 seconds to turn off Bluetooth Power
function.
NOTES
Weight and dimensions are approximate.

ENG - 40
Hereby, Samsung declares that this radio equipment is in compliance with Directive 2014/53/EU and the
relevant UK statutory requirements.
The full text of the declaration of conformity is available at the following internet address:
http://www.samsung.com go to Support and enter the model name.
This equipment may be operated in all EU countries and in the UK.
[Correct disposal of batteries in this product]
(Applicable in countries with separate collection systems)
This marking on the battery, manual or packaging indicates that the batteries in this product should not be
disposed of with other household waste at the end of their working life. Where marked, the chemical
symbols Hg, Cd or Pb indicate that the battery contains mercury, cadmium or lead above the reference
levels in EC Directive 2006/66.
If batteries are not properly disposed of, these substances can cause harm to human health or the
environment.
To protect natural resources and to promote material reuse, please separate batteries from other types of
waste and recycle them through your local, free battery return system.
Correct Disposal of This Product
(Waste Electrical & Electronic Equipment)
(Applicable in countries with separate collection systems)
This marking on the product, accessories or literature indicates that the product and its electronic
accessories (e.g. charger, headset, USB cable) should not be disposed of with other household waste at the
end of their working life. To prevent possible harm to the environment or human health from uncontrolled
waste disposal, please separate these items from other types of waste and recycle them responsibly to
promote the sustainable reuse of material resources.
Household users should contact either the retailer where they purchased this product, or their local
recycling.
Business users should contact their supplier and check the terms and conditions of the purchase contract.
This product and its electronic accessories should not be mixed with other commercial wastes for disposal.
e.g. REACH, WEEE, Batteries, visit:
www.samsung.com/uk/aboutsamsung/sustainability/environment/our-commitment/data/
COMMISSION REGULATION (EU) 2019/1782
Ecodesign requirements for external power supplies :
www.samsung.com/global/ecodesign_component
DEU - ii
SICHERHEITSINFORMATIONEN
HINWEISE ZUR SICHERHEIT
ZUR VERMEIDUNG VON STROMSCHLÄGEN DARF
DIESES GERÄT NICHT GEÖFFNET WERDEN.
ES ENTHÄLT KEINE BAUTEILE, DIE VOM
BENUTZER GEWARTET ODER REPARIERT
WERDEN KÖNNEN. WARTUNGS- UND
REPARATURARBEITEN DÜRFEN NUR VON
FACHPERSONAL AUSGEFÜHRT WERDEN.
Erklärung zu Symbolen, die sich möglicherweise
ACHTUNG
GEFAHR ELEKTRISCHER
SCHLÄGE! GERÄT NICHT
ÖFFNEN!
Dieses Symbol zeigt an, dass im Inneren
Hochspannung vorhanden ist. Es ist
gefährlich, Teile im Inneren dieses
Bildschirms zu berühren.
Dieses Symbol weist darauf hin, dass
diesem Gerät wichtige Anweisungen zum
Betrieb und zur Wartung beigefügt sind.
Produkt der Klasse-II: Dieses Symbol
zeigt an, dass das Gerät keinen
elektrischen Erdungsanschluss (Masse)
benötigt. Wenn dieses Symbol bei einem
Produkt mit Netzkabel nicht vorhanden
ist, MUSS das Produkt zuverlässig mit
einem Schutzleiter (Erde) verbunden sein.
Wechselspannung: Dieses Symbol zeigt
an, dass es sich bei der mit diesem
Symbol gekennzeichneten
Nennspannung um eine
Wechselspannung handelt.
Gleichspannung: Dieses Symbol zeigt an,
dass es sich bei der mit diesem Symbol
gekennzeichneten Nennspannung um
eine Gleichspannung handelt.
Achtung! Gebrauchsanweisung
beachten: Dieses Symbol weist den
Benutzer an, weitere
sicherheitsrelevante Informationen der
Gebrauchsanweisung zu entnehmen.
WARNUNG
Setzen Sie das Gerät nicht Nässe oder
Feuchtigkeit aus, um die Gefahr eines
Brandes bzw. eines elektrischen Schlags zu
vermeiden.
ACHTUNG
UM ELEKTRISCHE SCHLÄGE ZU VERMEIDEN,
RICHTEN SIE DEN BREITEN KONTAKTSTIFT
DES STECKERS AN DEM BREITEN
STECKPLATZ AUS, UND STECKEN SIE DEN
STECKER VOLL EIN.
Dieses Gerät darf nur an eine Netzsteckdose
mit Schutzerdung angeschlossen werden.
Um das Gerät vom Netzbetrieb zu trennen,
muss der Stecker aus der Netzsteckdose
gezogen werden. Deshalb sollte der
Netzstecker jederzeit zugänglich und leicht
trennbar sein.
Das Gerät keinem Spritz- oder Tropfwasser
aussetzen. Keine mit Flüssigkeit gefüllten
Behälter, wie Vasen auf das Gerät stellen.
Um das Gerät vollständig auszuschalten,
muss der Netzstecker aus der Steckdose
gezogen werden. Somit muss der Netzstecker
immer bequem erreichbar sein.
DEU - iii
HINWEISE
1. Stellen Sie sicher, dass die Stromversorgung
in Ihrem Haushalt den auf dem Etikett auf
der Unterseite des Geräts angegebenen
Anforderungen entspricht. Stellen Sie Ihr
Produkt horizontal auf einer geeigneten
Unterlage (Möbel) auf, so dass rundherum
ausreichend Platz 7~10 cm zur Belüftung
bleibt. Achten Sie darauf, dass die
Belüftungsöffnungen nicht abgedeckt sind.
Stellen Sie das Gerät nicht auf Verstärker
oder andere Geräte, die heiß werden können.
Das Gerät ist für Dauerbetrieb eingerichtet.
Um das Gerät vollständig auszuschalten, den
Stecker aus der Steckdose ziehen. Ziehen Sie
den Netzstecker des Geräts wenn Sie
beabsichtigen, es für längere Zeit nicht zu
nutzen.
2. Ziehen Sie bei Gewittern das Stromkabel aus
der Steckdose. Durch Blitze verursachte
Spannungsspitzen können zur Beschädigung
des Geräts führen.
3. Halten Sie das Gerät von direkter
Sonneneinstrahlung oder anderen
Wärmequellen fern. Dies kann zu einer
Überhitzung führen und zu einer
Fehlfunktion des Geräts führen.
4. Schützen Sie das Produkt vor Feuchtigkeit
(z. B. Vasen), übermäßiger Hitze (z. B.
Kamine) oder Geräten, die starke
magnetische oder ele trische Felder
erzeugen. Trennen Sie das Netzkabel bei
Fehlfunktionen des Geräts von der
Stromversorgung. Ihr Produkt ist nicht für
den gewerblichen Einsatz vorgesehen.
Verwenden Sie dieses Produkt nur für den
privaten Bereich. Wenn Ihr Produkt oder die
CD bei kalten Temperaturen aufbewahrt
wurden, kann Kondensation auftreten. Wenn
Sie das Gerät bei kaltenTemperaturen
transportiert haben, warten Sie mit der
Inbetriebnahme circa 2 Stunden, bis das
Gerät Raumtemperatur erreicht hat.
5. Die in diesem Produkt verwendeten
Batterien enthalten umweltschädliche
Chemikalien. Entsorgen Sie die Batterien
nicht im Hausmüll. Entsorgen Sie Batterien
niemals in einem Feuer. Schließen Sie die
Batterien nicht kurz, zerlegen und
überhitzen Sie sie nicht. ACHTUNG : Bei
unsachgemäßem Austausch von Batterien
besteht Explosionsgefahr. Setzen Sie nur
Batterien des gleichen oder eines
gleichwertigen Typs ein.
ÜBER DIESES HANDBUCH
Das Benutzerhandbuch hat zwei Teile: das
einfache BENUTZERHANDBUCH als
Papierversion und ein detailliertes
VOLLSTÄNDIGES HANDBUCH zum Download.
BENUTZERHANDBUCH
Siehe dieses Handbuch für Sicherheitshinweise,
Produktinstallation, Komponenten,
VOLLSTÄNDIGES HANDBUCH
Sie können auf die VOLLSTÄNDIGES
HANDBUCH im Online-Kundendienstcenter
von Samsung durch Scannen des QR-Codes
zugreifen. Um die Gebrauchsanweisung auf
Ihrem PC oder Mobilgerät anzusehen, laden
Sie sich die Gebrauchsanweisung im
Dokumentenformat von der Samsung-
Webseite herunter.
(http://www.samsung.com/support)
Design und technische Daten können sich ohne
vorherige Ankündigung ändern.

DEU - iv
INHALT
01 Überprüfen der Komponenten 2
Einlegen der Batterien vor der Verwendung der Fernbedienung
(AA-Batterien X 2) ------------------------- 2
02 Produktübersicht 3
Bedienfeld auf der Vorder-/Oberseite der Soundbar ------------------------- 3
Unterseite der Soundbar ------------------------- 4
03 Anschliessen der Soundbar 5
Stromanschluss
-------------------------
5
Verbinden der Soundbar mit dem Subwoofer
-------------------------
6
– Automatische Verbindung zwischen Subwoofer und Soundbar
-------------------------
6
– Manuelles Verbinden des Subwoofers bei Fehlschlagen der
automatischen Verbindung
-------------------------
7
Verbinden des SWA-9100S (separat erhältlich) mit einer Soundbar
-------------------------
9
04 Anschluss an ihr Fernsehgerät 11
Methode 1. Verbindung mit einem Kabel
-------------------------
11
– Einen Fernseher über ein HDMI-Kabel verbinden
-------------------------
11
– Verbindung mit einem optischen Kabel
-------------------------
13
Methode 2. Drahtlose Verbindung
-------------------------
15
– Verbindung eines Fernsehers per Bluetooth
-------------------------
15
05 Verbindung Mit Einem Externen Gerat
Herstellen 17
Über ein HDMI-Kabel verbinden (mit Unterstützung der Dekodierung
und Wiedergabe von Dolby Atmos)
-------------------------
17
Verbindung mit einem optischen Kabel
-------------------------
18
06 Verbinden eines USB speichergeräts 19

DEU - v
07 Anschliessen eines Mobilgeräts 20
Anschließen per Bluetooth
-------------------------
20
Verwendung von Tap Sound
-------------------------
24
08 Verwenden der Fernbedienung 25
So verwenden Sie die Fernbedienung
-------------------------
25
Anpassen der Soundbar-Lautstärke mit einer TV-Fernbedienung ------------------------- 28
Verwenden der verborgenen Tasten (Tasten mit mehr als einer funktion)
-------------------------
29
-------------------------
29
09 Installieren der Wandhalterung 30
Vorsichtsmaßnahmen für die Installation
-------------------------
30
Komponenten für die Anbringung an der Wand
-------------------------
30
10 Platzieren der Soundbar auf einem TV-ständer 32
11 Softwareaktualisierung 33
Updateverfahren
-------------------------
33
Wenn UPDATE nicht angezeigt wird
-------------------------
34
Zurücksetzen
-------------------------
34
12 Fehlerbehebung 35
13 Lizenz 37
14 Bekanntmachung zu Open Source Lizenzen 38
15 Wichtige Hinweise zum Kundendienst 38
16 SpezikationenundLeitfaden 39
Technische daten
-------------------------
39

DEU - 2
01 ÜBERPRÜFEN DER KOMPONENTEN
VOL WOOFER
SOUNDBAR
SOUND
MODE
PAIR
Soundbar-Hauptgerät Subwoofer Fernbedienung / Batterien
x 2
Stromkabel
(Subwoofer, Soundbar)
Netzadapter
(Soundbar)
HDMI-Kabel
x 2
x 2
(M4 x L10)
x 2
Montagehilfe für die Wandhalterung Aufhängungsschraube
Wandhalterung
Schraube
dem Etikett am Gerät. (Etikett: Unterseite des Soundbar-Hauptgeräts)
Wenden Sie sich für den Kauf zusätzlicher Komponenten oder optionaler Kabel an ein
Servicezentrum oder den Kundendienst von Samsung.
Das Aussehen des Zubehörs kann etwas von den Abbildungen oben abweichen.
Einlegen der Batterien vor der Verwendung der Fernbedienung
(AA-Batterien X 2)
Schieben Sie die rückseitige Abdeckung in
Pfeilrichtung, bis sie vollständig entfernt ist.
Legen Sie 2 AA-Batterien (1,5V) so ausgerichtet ein,
dass ihre Polarität richtig ist. Schieben Sie die
rückseitige Abdeckung wieder vollständig zurück.
DEU - 3
02
PRODUKTÜBERSICHT
Bedienfeld auf der Vorder-/Oberseite der Soundbar
Positionieren Sie das
Produkt so, dass sich das
SAMSUNG Logo auf der
Bedienfeld auf der Oberseite
Anzeige
Zeigt den Status und den aktuellen Modus des Produkts an.
(Strom)-Taste
Schaltet den Strom ein und aus.
Auto Power Down-Funktion
In folgenden Situationen wird das Gerät automatisch ausgeschaltet.
– Modus D.IN / HDMI / BT / USB: Wenn seit mehr als 20 Minuten kein Audiosignal empfangen
wurde.
(Lautstärke)-Taste
Stellt die Lautstärke ein.
Der Lautstärkepegel wird beim Einstellen auf der vorderen Anzeige der Soundbar angezeigt.
(Quelle)-Taste
Wählt den Quelleneingangsmodus aus.
Eingangsmodus Anzeige
Optischer digitaler Eingang D.IN
ARC (HDMI OUT)-Eingang D.IN TV ARC (Automatische Umwandlung)
HDMI-Eingang HDMI
BLUETOOTH-Modus BT
USB-Modus USB
Zum Einschalten des Modus „BT PAIRING“ schalten Sie die Quelle auf den Modus „BT“ um und halten
Sie dann die taste (Quelle) länger als 5 Sekunden lang gedrückt.
Nach dem Anschluss des Netzkabels muss 4 bis 6 Sekunden gewartet werden, bis der Netzschalter
bedient werden kann.
Wenn Sie dieses Gerät einschalten, vergeht eine Verzögerungszeit von 4 bis 5 Sekunden, bevor eine
Tonausgabe erfolgt.
Wenn Sie den Ton nur über den Soundbar hören wollen, müssen Sie die Lautsprecher des
Fernsehgeräts im Audio Setup Menü Ihres Fernsehgeräts ausschalten. Weitere Informationen über
DEU - 4
Unterseite der Soundbar
HDMI
HDMI TO TV
(ARC)
USB (5V 0.5A)
DC 24V
DIGITAL AUDIO IN (OPTICAL)
HDMI
HDMI TO TV
(ARC)
DIGITAL AUDIO IN (OPTICAL)
USB (5V 0.5A)
DC 24V
HDMI
HDMI TO TV
(ARC)
USB (5V 0.5A)
DC 24V
DIGITAL AUDIO IN (OPTICAL)
HDMI
HDMI TO TV
(ARC)
DIGITAL AUDIO IN (OPTICAL)
USB (5V 0.5A)
DC 24V
HDMI
HDMI TO TV
(ARC)
USB (5V 0.5A)
DC 24V
DIGITAL AUDIO IN (OPTICAL)
HDMI
HDMI TO TV
(ARC)
DIGITAL AUDIO IN (OPTICAL)
USB (5V 0.5A)
DC 24V
USB (5V 0.5A)
Hier ein USB-Gerät anschließen, um Musikdateien auf dem USB-Gerät über die Soundbar wiederzugeben.
DC 24V (Stromversorgungseingang)
Den Netzadapter anschließen.
HDMI
Gibt digitale Video- und Audiosignale über ein HDMI-Kabel simultan ein.
An den HDMI-Ausgang eines externen Geräts anschließen.
HDMI TO TV (ARC)
An die HDMI (ARC)-Buchse an einem Fernseher anschließen.
DIGITAL AUDIO IN (OPTICAL)
An den digitalen (optischen) Ausgang eines externen Geräts anschließen.
Ziehen Sie, wenn Sie das Stromkabel des AC/DC-Adapters von der Steckdose trennen möchten, am
Stecker. Ziehen Sie nicht am Kabel.
Schließen Sie dieses Gerät oder andere Geräteteile nicht an eine AC-Steckdose an, bis alle
Anschlüsse zwischen den Teilen hergestellt sind.
DEU - 5
03 ANSCHLIESSEN DER SOUNDBAR
Stromanschluss
Verwenden Sie die Stromkomponenten, um den Subwoofer und die Soundbar in der folgenden
Reihenfolge an die Stromversorgung anzuschließen:
1. Schließen Sie das Stromkabel an den Subwoofer an.
2. Schließen Sie das Stromausgangskabel an das Netzteil und danach an die Soundbar an.
3. Schließen Sie das Stromkabel an die Steckdose an.
Siehe die nachfolgenden Abbildungen.
dem Etikett am Gerät. (Etikett: Unterseite des Soundbar-Hauptgeräts)
POWER
Rückseite des
Subwoofers
Stromkabel
Stromanschluss
USB (5V 0.5A)
DC 24V
DC 24V
Unterseite des
Soundbar-Hauptgeräts
Netzadapter
Stromkabel
Stromanschluss
Wenn Sie den Netzadapter in hängender Position mit dem Netzkabeleingang nach oben platzieren,
könnten Wasser oder sonstige Fremdstoffe in den Adapter gelangen und zu Fehlfunktionen führen.

DEU - 6
Verbinden der Soundbar mit dem Subwoofer
Wenn der Subwoofer verbunden ist, können Sie einen vollen Bass-Ton genießen.
Automatische Verbindung zwischen Subwoofer und Soundbar
Wenn Sie den Strom einschalten, nachdem Sie die Stromkabel an die Soundbar und den Subwoofer
angeschlossen haben, wird der Subwoofer automatisch mit der Soundbar verbunden.
Wenn die automatische Kopplung abgeschlossen ist, leuchtet die blaue Anzeige auf der Rückseite
des Subwoofers auf.
LED-Anzeigelichter auf der Rückseite des Subwoofers
LED Status Beschreibung Abhilfe
Blau
Ein
Erfolgreich verbunden
(normaler Betrieb)
-
Blinkend
Verbindung wird wieder
hergestellt
Prüfen Sie, ob das am Soundbar-Hauptgerät
angeschlossene Stromkabel richtig verbunden
ist oder warten Sie 5 Minuten. Falls das Blinken
andauert, versuchen Sie, den Subwoofer
manuell anzuschließen. Siehe Seite 7.
Rot Ein
Standby (bei
ausgeschaltetem
Soundbar-Hauptgerät)
Prüfen Sie, ob das Stromkabel richtig am
Soundbar-Hauptgerät angeschlossen ist.
Verbindung
fehlgeschlagen
Erneut verbinden. Siehe die Anweisungen zur
manuellen Verbindung auf Seite 7.
Rot und
blau
Blinkend Fehlfunktion
Siehe die Kontaktinformationen für das
Samsung Servicezentrum in dem Handbuch.
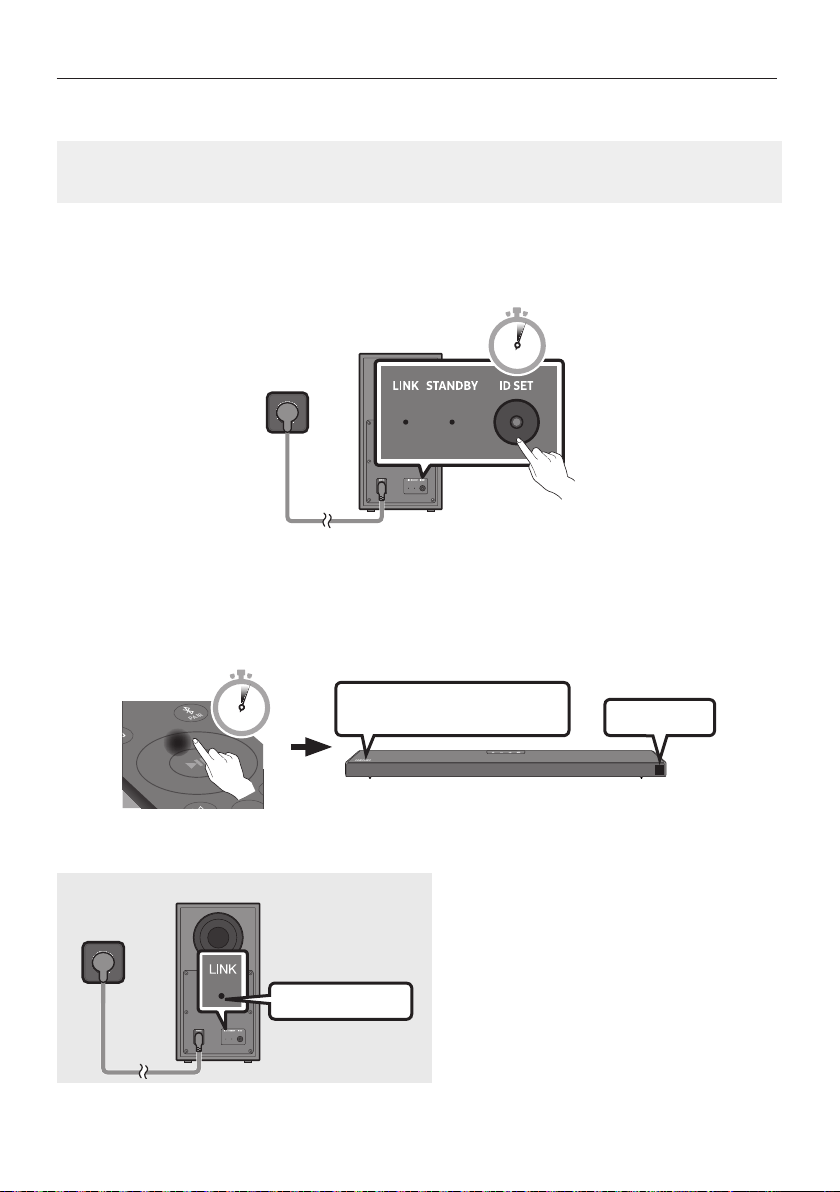
DEU - 7
Manuelles Verbinden des Subwoofers bei Fehlschlagen der automatischen Verbindung
Vor dem Ausführen der folgenden Verbindungsschritte:
Überprüfen Sie, ob die Stromkabel der Soundbar und des Subwoofers richtig angeschlossen sind.
Stellen Sie sicher, dass die Soundbar eingeschaltet ist.
1. Halten Sie ID SET auf der Rückseite des Subwoofers mindestens 5 Sekunden lang gedrückt.
Die rote Anzeigeleuchte auf der Rückseite des Subwoofers erlischt und die blaue
Anzeigeleuchte blinkt.
5 Sec
Rückseite des Subwoofers
2. Halten Sie die Taste Oben auf der Fernbedienung länger als 5 Sekunden gedrückt.
Für kurze Zeit erscheint nun die Meldung ID SET im Display der Soundbar und erlischt dann.
Die Soundbar wird automatisch eingeschaltet, wenn ID SET abgeschlossen ist.
SOUND
MODE
PAIR
5 Sec
ID SET
DasSAMSUNG-Logobendetsich
auf der Oberseite
3. Prüfen Sie, ob die LINK-LED blau leuchtet (Verbindung hergestellt).
Leuchtet blau
Die LINK-LED-Anzeige blinkt nicht länger,
sondern leuchtet blau, wenn zwischen der
Soundbar und dem Wireless-Subwoofer eine
Verbindung besteht.

DEU - 8
HINWEISE
Schließen Sie das Stromkabel dieses Produkts oder Ihr TV-Gerät nicht an eine Steckdose an, bis alle
Anschlüsse zwischen den Teilen hergestellt sind.
Stellen Sie vor dem Verschieben oder Aufstellen des Produkts sicher, dass das Gerät ausgeschaltet
ist und das Stromkabel getrennt.
Wenn die Haupteinheit ausgeschaltet ist, geht der drahtlose Subwoofer in den Standby-Modus und
die STANDBY-LED auf der Rückseite blinkt mehrmals blau und wird dann rot.
Wenn Sie in der Nähe der Soundbar ein Gerät mit gleicher Frequenz (5,8GHz) verwenden, kann es
zu Interferenzen und damit zu Tonunterbrechungen kommen.
Die maximale Übertragungsentfernung des drahtlosen Signals der Haupteinheit beträgt ca. 10 m,
kann jedoch in Abhängigkeit Ihrer Betriebsumgebung unterschiedlich sein. Wenn sich eine
funktioniert die Anlage möglicherweise gar nicht, weil das drahtlose Signal Metall nicht
durchdringen kann.
VORSICHTSMASSNAHMEN
Es sind Antennen für den drahtlosen Empfang in den drahtlosen Subwoofer eingebaut. Halten Sie
die Einheiten fern von Wasser und Feuchtigkeit.
Für eine optimale Wiedergabeleistung stellen Sie sicher, dass der Bereich um den drahtlosen
Subwoofer und das Drahtlosempfängermodul (separat erhältlich) frei von Behinderungen ist.
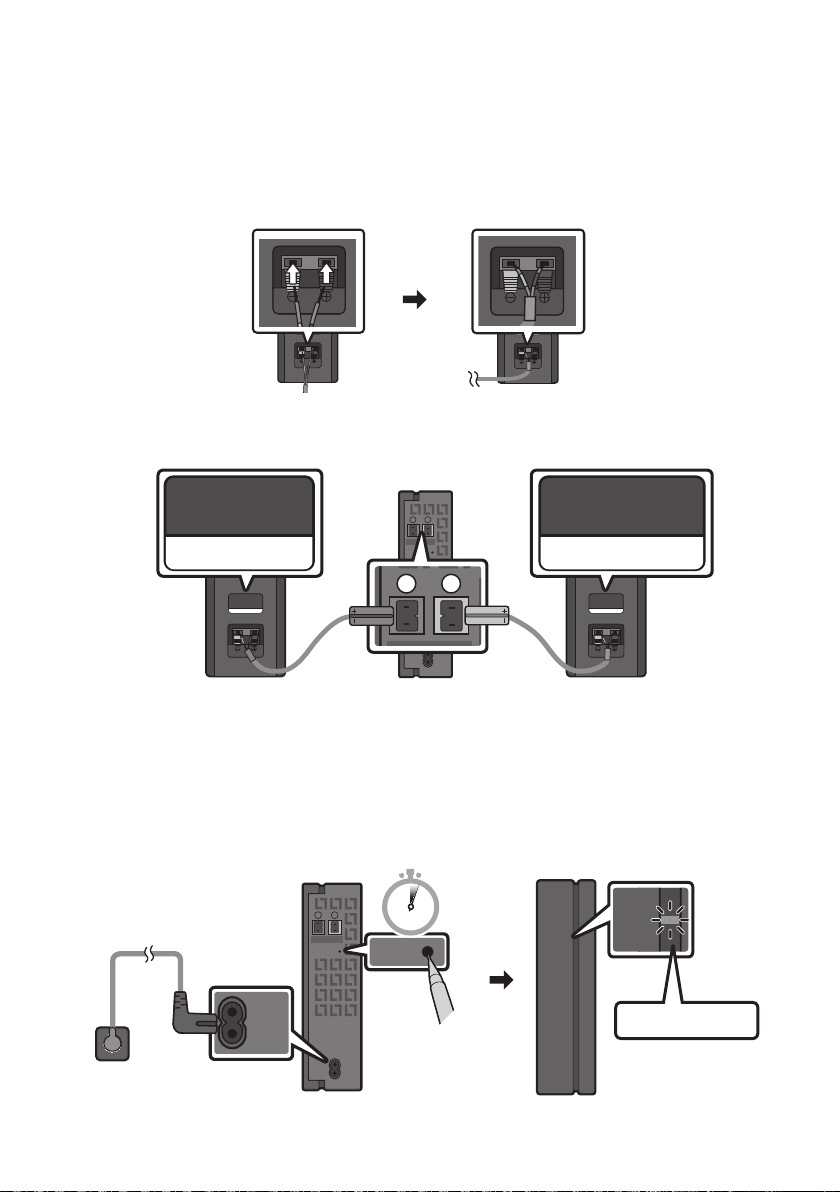
DEU - 9
Verbinden des SWA-9100S (separat erhältlich) mit einer Soundbar
Erweitern Sie das System um echten drahtlosen Surround-Sound, indem Sie das Drahtlose
Rücklautsprecherkit (SWA-9100S, separat erhältlich) von Samsung an Ihre Soundbar anschließen.
1. Verbinden Sie das drahtlose Empfangsmodul an 2 Surround-Lautsprecher.
– Schließen Sie beim Anschließen des Lautsprecherkabels das Kernkabel am Lautsprecher an.
SURROUND-RIGHT
SURROUND-RIGHT
– Die Lautsprecherkabel sind farbcodiert.
SURROUND-LEFT
ID SET
L
R
SURROUND SPEAKERS OUT
SPEAKER IMPEDANCE : 3Ω
POWER
ID SET
L
R
SURROUND SPEAKERS OUT
SPEAKER IMPEDANCE : 3Ω
SURROUND-RIGHT
SURROUND-LEFT SURROUND-RIGHT
2. Überprüfen Sie den Standby-Status des drahtlosen Empfangsmoduls, nachdem es an eine
Steckdose angeschlossen worden ist.
Die LINK LED-Anzeige (blaue LED-Lampe) auf dem drahtlosen Empfängermodul blinkt. Wenn
die LED nicht blinkt, halten Sie die Taste ID SET auf der Rückseite des drahtlosen
Rücklautsprecherkits mit einer Stiftspitze 5 bis 6 Sekunden lang gedrückt, bis die LED-
Verbindungsanzeige LINK auf dem drahtlosen Rücklautsprecherkit blinkt (blau). Weitere
ID SET
L
R
SURROUND SPEAKERS OUT
SPEAKER IMPEDANCE : 3Ω
POWER
POWER
ID SET
SURROUND SPEAKERS OUT
SPEAKER IMPEDANCE : 3Ω
STANDBY
LINK
STANDBY
LINK
Blinkt blau
5 Sec

DEU - 10
3. Halten Sie die Taste Oben auf der Fernbedienung länger als 5 Sekunden gedrückt.
Für kurze Zeit erscheint nun die Meldung ID SET im Display der Soundbar und erlischt dann.
Die Soundbar wird automatisch eingeschaltet, wenn ID SET abgeschlossen ist.
SOUND
MODE
PAIR
5 Sec
ID SET
DasSAMSUNG-Logobendetsich
auf der Oberseite
ACHTUNG
Wenn die Soundbar Musik abspielt, während sie mit der SWA-9100S eine Verbindung herstellt,
hören Sie möglicherweise ein Stottern aus dem Woofer, während die Verbindung hergestellt wird.
4. Prüfen Sie, ob die LINK-LED blau leuchtet (Verbindung hergestellt).
STANDBY
LINK
STANDBY
LINK
Leuchtet blau
Die LINK-LED-Anzeige blinkt nicht länger,
sondern leuchtet blau, wenn zwischen der
Soundbar und dem drahtlosen
Empfangsmodul eine Verbindung besteht.
5. Wenn der SWA-9100S nicht angeschlossen ist, wiederholen Sie den Vorgang ab Schritt 2.
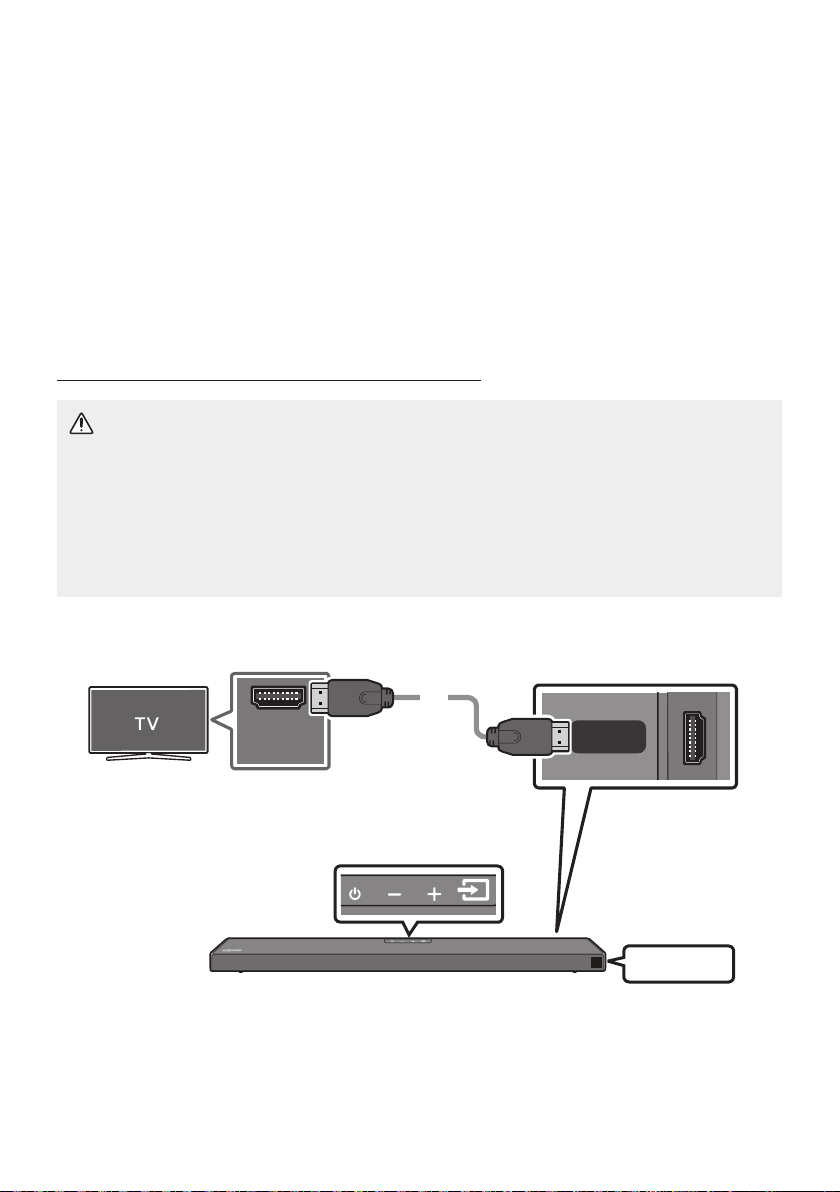
DEU - 11
04 ANSCHLUSS AN IHR FERNSEHGERÄT
Hören Sie den TV-Ton durch kabelgebundene oder kabellose Verbindungen über Ihre Soundbar.
Wenn die Soundbar an einen ausgewählten Samsung TV angeschlossen ist, kann die Soundbar über
die Fernbedienung des Fernsehers bedient werden.
– Diese Funktion wird durch Samsung Smart-Fernsehermodelle von 2017 und später unterstützt,
die Bluetooth unterstützen, wenn Sie die Soundbar mit einem optischen Kabel mit dem
Fernseher verbinden.
– Mit dieser Funktion können Sie auch das TV-Menü verwenden, um das Klangfeld und
verschiedene Einstellungen sowie die Lautstärke und die Stummschaltung anzupassen.
Methode 1. Verbindung mit einem Kabel
Einen Fernseher über ein HDMI-Kabel verbinden
ACHTUNG
Wenn sowohl das HDMI-Kabel als auch das optische Kabel angeschlossen sind, wird zuerst das
HDMI-Signal empfangen.
Um das HDMI-Kabel zwischen dem Fernseher und der Soundbar anzuschließen, vergewissern
Sie sich, dass Sie die mit ARC gekennzeichneten Anschlüsse anschließen. Andernfalls wird der
Ton des Fernsehers möglicherweise nicht ausgegeben.
Es wird ein High-Speed HDMI Cable with Ethernet empfohlen.
Überprüfen Sie (ARC) am
HDMI IN-Anschluss Ihres Fernsehers.
HDMI IN
(ARC)
HDMI TO TV
(ARC)
DIGITAL AUDIO IN (OPTICAL)
HDMI-Kabel
Unterseite der Soundbar
Überprüfen Sie den HDMI TO TV (ARC)
-Anschluss am Soundbar-Hauptgerät.
Oberseite der Soundbar
TV ARC
1. Bei eingeschalteter Soundbar und eingeschaltetem Fernseher das HDMI-Kabel wie in der
Abbildung gezeigt anschließen.
2. Das Anzeigefenster des Soundbar-Hauptgeräts zeigt „TV ARC“ an und die Soundbar gibt den
TV-Ton wieder.

DEU - 12
Falls der Ton des Fernsehers nicht hörbar ist, drücken Sie die Taste (Quelle) auf der
Fernbedienung oder auf der Oberseite der Soundbar, um in den „D.IN“-Modus zu wechseln. Der
Bildschirm zeigt der Reihe nach „D.IN“ und „TV ARC“ an und der TV-Ton wird wiedergegeben.
Wenn im Displayfenster des Soundbar-Hauptgeräts „TV ARC“ nicht angezeigt wird, stellen Sie
sicher, dass das HDMI-Kabel an den korrekten Anschluss angeschlossen ist.
Ändern Sie die Lautstärke der Soundbar mit den Lautstärketasten an der TV-Fernbedienung.
HINWEISE
HDMI ist eine Schnittstelle, die die digitale Übertragung von Video- und Audiodaten mit einem
einzigen Anschluss ermöglicht.
Wenn das TV-Gerät über einen ARC-Anschluss verfügt, verbinden Sie das HDMI-Kabel mit dem
HDMI-IN-(ARC)-Anschluss.
Wir empfehlen, falls möglich, die Verwendung eines kernlosen HDMI-Kabels. Wenn Sie ein HDMI-
Kabel mit Kern verwenden, sollte der Kabeldurchmesser weniger als 14 mm betragen.
Diese Funktion ist nicht verfügbar, wenn das HDMI-Kabel ARC nicht unterstützt.
Wenn Rundfunksignale Dolby Digital sind und die Einstellung für „Digitales Ausgangsaudioformat”
auf Ihrem Fernseher auf PCM gestellt ist, wird empfohlen, die Einstellung auf Dolby Digital zu
ändern. Nach dem Ändern der Einstellung können Sie eine bessere Soundqualität genießen. (Das
Menü des Fernsehers kann je nach dem Hersteller des Fernsehers unterschiedliche Bezeichnungen
für Dolby Digital und PCM verwenden.)
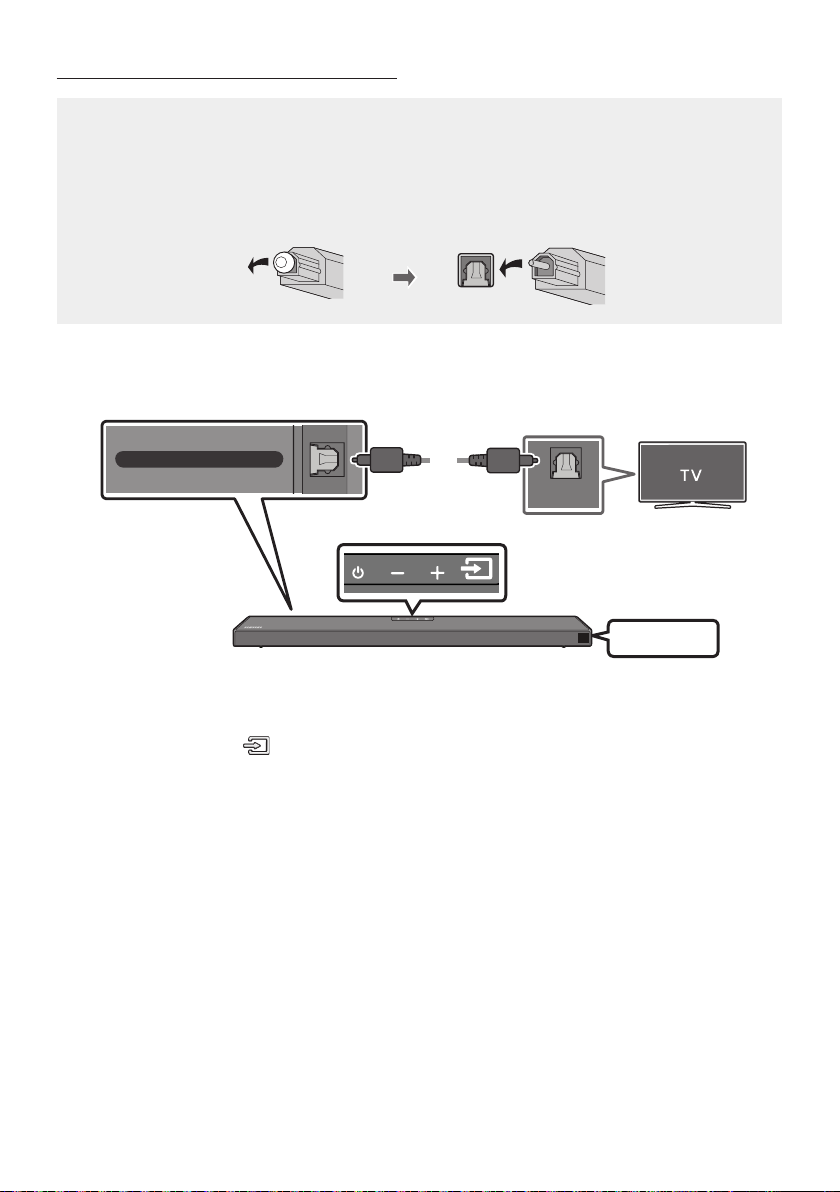
DEU - 13
Verbindung mit einem optischen Kabel
Checkliste vor dem Verbinden
Wenn sowohl das HDMI-Kabel als auch das optische Kabel angeschlossen sind, wird zuerst das
HDMI-Signal empfangen.
Wenn Sie ein optisches Kabel verwenden und die Anschlüsse über Abdeckungen verfügen,
müssen Sie die Abdeckungen unbedingt entfernen.
OPTICAL OUT
DIGITAL AUDIO IN (OPTICAL)
Unterseite der Soundbar
Oberseite der Soundbar
Optisches Kabel
(nicht
mitgeliefert)
D.IN
1. Verbinden Sie den Anschluss DIGITAL AUDIO IN (OPTICAL) der Soundbar über ein optisches
Digitalkabel (nicht mitgeliefert) mit dem Anschluss OPTICAL OUT des Fernsehers.
2. Drücken Sie die Taste (Quelle) auf dem Bedienfeld der Oberseite oder auf der Fernbedienung
und wählen Sie dann den „D.IN“-Modus aus.
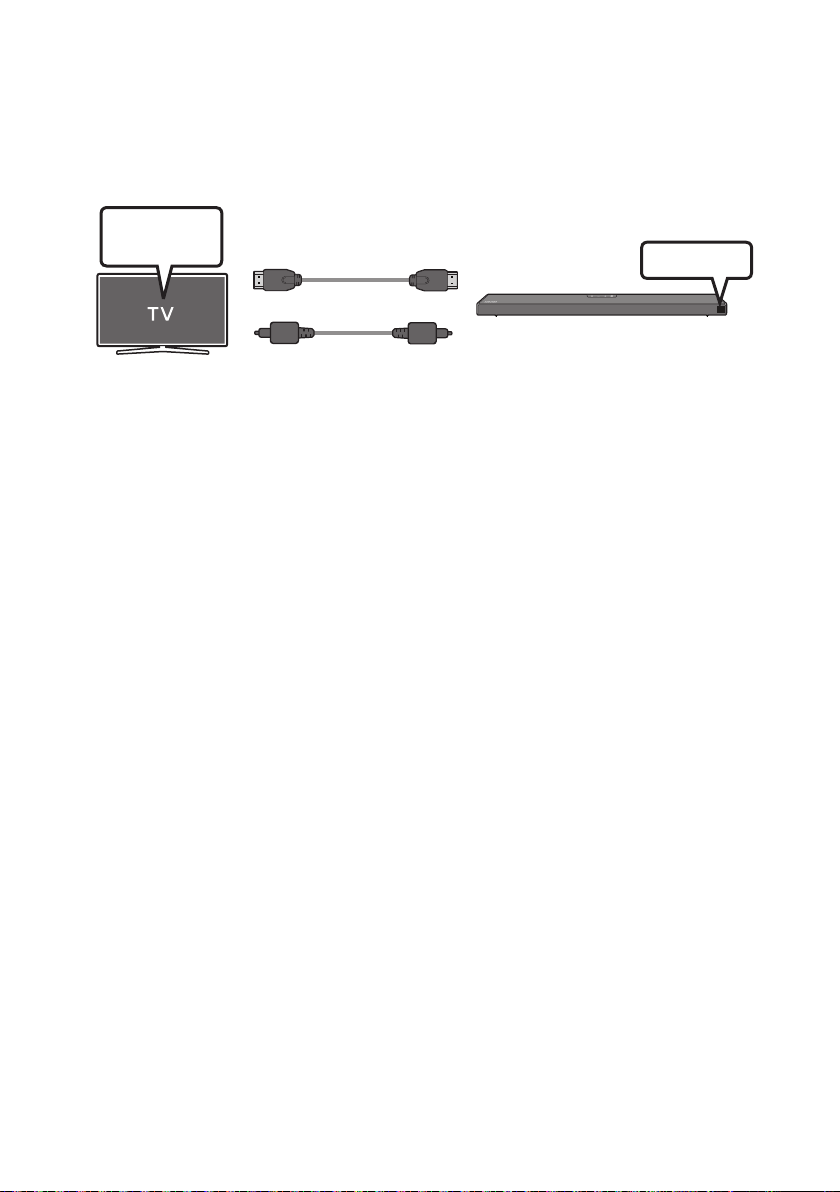
DEU - 14
Verwenden der Q-Symphony-Funktion
Bei der Q-Symphony wird die Soundbar mit einem Samsung Fernsehgerät synchronisiert, um Ton aus
zwei Geräten für einen optimalen Surround-Effekt zu erzielen. Wenn die Soundbar verbunden ist,
erscheint das Menü „TV+Soundbar“ unter dem Tonausgabe-Menü des Fernsehgeräts. Wählen Sie das
entsprechende Menü aus.
Menü des
Fernsehgeräts
ODER
Optisches Kabel
(nicht mitgeliefert)
HDMI-Kabel
D.IN
Beispiel für Menü des Fernsehgeräts: TV + [AV] Soundbar Serienbezeichnung [HDMI]
HINWEISE
Kann entsprechend des von dem Fernsehgerät unterstützten Codecs betrieben werden.
Diese Funktion wird nur unterstützt, wenn das HDMI-Kabel oder das optische Kabel (nicht
mitgeliefert) verbunden ist.
Diese Funktion ist bei Samsung Fernsehgeräten verfügbar, die ab 2020 veröffentlicht wurden,
sowie bei einigen Soundbar-Modellen.
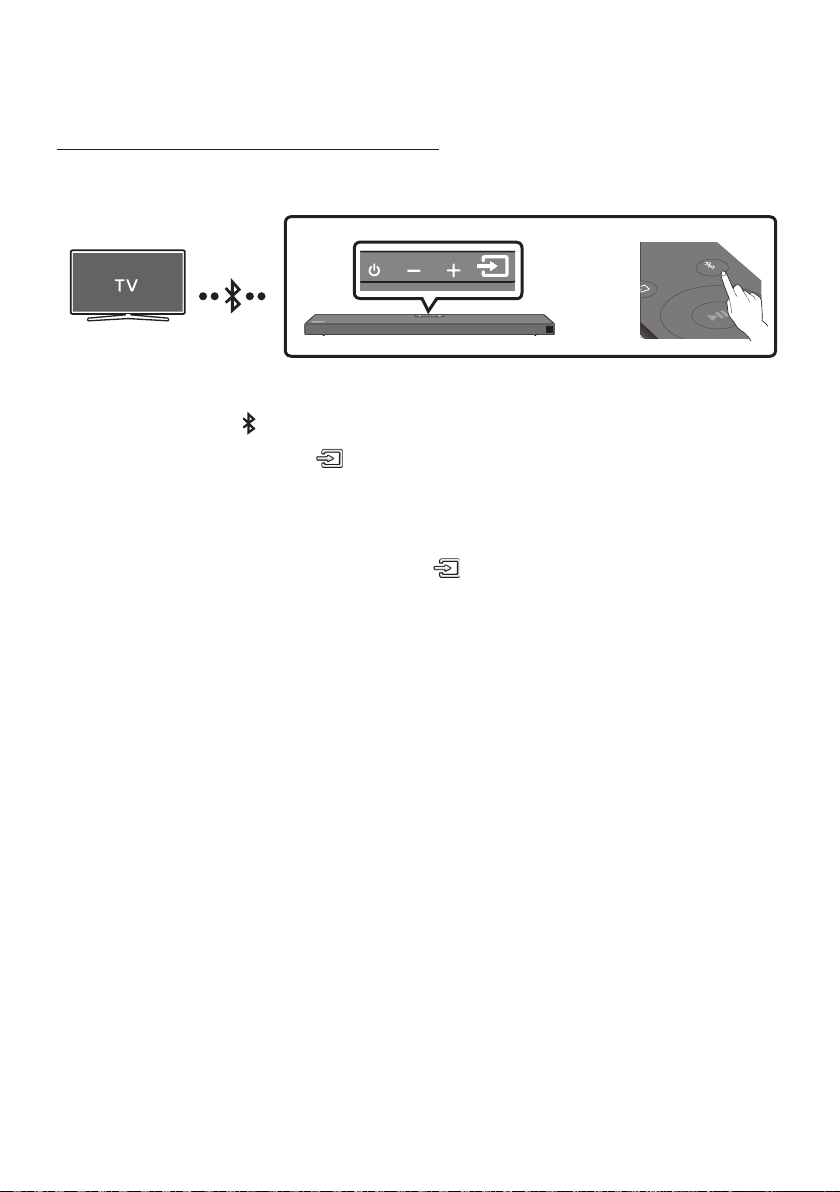
DEU - 15
Methode 2. Drahtlose Verbindung
Verbindung eines Fernsehers per Bluetooth
Wenn ein Fernseher über Bluetooth verbunden wird, können Sie einen Stereoton ohne lästige Kabel hören.
Es kann nur ein Fernseher gleichzeitig verbunden werden.
SOUND
MODE
PAIR
ODER
Die erste Verbindung
1. Drücken Sie die Taste PAIR auf der Fernbedienung, um in den Modus „BT PAIRING“ zu wechseln.
(ODER)
a. Drücken Sie die Taste (Quelle) auf dem Bedienfeld der Oberseite und wählen Sie
dann „BT“ aus.
„BT“ wird in wenigen Sekunden automatisch zu „BT PAIRING“ oder zu „BT READY“, falls
eine Verbindung bereits verzeichnet wurde.
b. Wenn „BT READY“ erscheint, die Taste (Quelle) auf dem Bedienfeld der Oberseite
der Soundbar für mehr als 5 Sekunden gedrückt halten, damit „BT PAIRING“ angezeigt
wird.
2.
Handbuch des Fernsehers.)
3. Wählen Sie „[AV] Samsung Soundbar Q6A-Series“ aus der Liste auf dem Bildschirm des Fernseher aus.
Eine verfügbare Soundbar wird durch „Need Pairing“ oder „Paired“ auf der Bluetooth-Geräteliste des
Fernsehers angezeigt. Zum Verbinden der Soundbar wählen Sie die Meldung und stellen Sie eine
Verbindung her.
Wenn der Fernseher verbunden ist, erscheint [Name des FernsehersBT“ auf der vorderen
Anzeige des Fernsehers.
4. Sie können den TV-Ton jetzt aus der Soundbar hören.
Falls das Gerät nicht verbunden werden kann
[AV] Samsung Soundbar Q6A-Series“)
in der Liste erscheint, löschen Sie sie.
Wiederholen Sie dann die Schritte 1 bis 3.
HINWEIS
Nachdem Sie die Soundbar zum ersten Mal mit Ihrem Fernseher verbunden haben, verwenden Sie
den Modus „BT READY“ um erneut eine Verbindung herzustellen.

DEU - 16
Trennen der Soundbar vom Fernseher
Drücken Sie die Taste (Quelle) auf dem Bedienfeld der Oberseite oder auf der Fernbedienung und
wechseln Sie dann in einen beliebigen Modus außer in den „BT“-Modus.
Das Trennen dauert einige Zeit, da der Fernseher ein Antwortsignal von der Soundbar empfangen
muss. (Die benötigte Zeit kann je nach Fernsehermodell unterschiedlich sein.)
Um die automatische Bluetooth-Verbindung zwischen der Soundbar und dem Fernsehgerät
aufzuheben, drücken Sie die Taste Links an der Fernbedienung für 5 Sekunden, wenn sich die
Soundbar im Status „BT READY
Was ist der Unterschied zwischen BT READY und BT PAIRING?
BT READY : In diesem Modus können Sie nach zuvor verbundenen Fernsehern suchen oder ein
zuvor verbundenes Mobilgerät mit der Soundbar verbinden.
BT PAIRING : In diesem Modus können Sie ein neues Gerät mit der Soundbar verbinden. (Drücken
Sie die Taste PAIR auf der Fernbedienung oder halten Sie die Taste
(Quelle)
auf der Oberseite
der Soundbar für mehr als 5 Sekunden gedrückt, während die Soundbar im „BT“-Modus ist.)
HINWEISE
Falls sie beim Verbinden mit einem Bluetooth-Gerät nach einem PIN-Code gefragt werden, geben
Sie <0000> ein.
Im Bluetooth-Verbindungsmodus geht die Bluetooth-Verbindung verloren, wenn der Abstand
zwischen der Soundbar und dem Bluetooth-Gerät 10 m überschreitet.
Die Soundbar schaltet sich nach 20 Minuten im Bereitschaftszustand automatisch aus.
Die Soundbar könnte unter den folgenden Umständen die Bluetooth-Suche oder -Verbindung
eventuell nicht korrekt ausführen:
– Wenn die Soundbar von einem starken elektrischen Feld umgeben ist.
– Falls zwei oder mehr Bluetooth-Geräte gleichzeitig mit der Soundbar gekoppelt sind.
–
nicht funktioniert.
Elektronische Geräte können Funkstörungen verursachen. Elektromagnetische Wellen erzeugende
Geräte müssen vom Soundbar-Hauptgerät ferngehalten werden - z. B. Mikrowellen, WLAN-Geräte
etc.
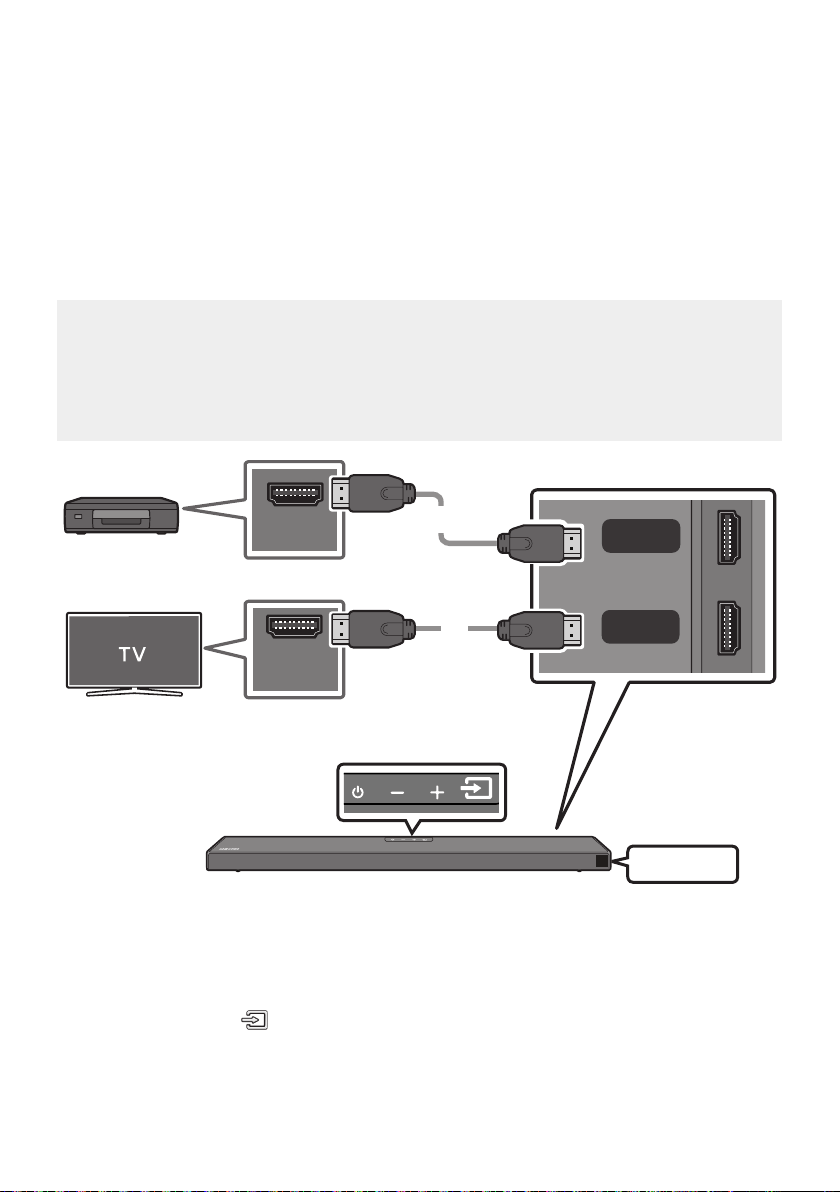
DEU - 17
05 VERBINDUNG MIT EINEM EXTERNEN
GERAT HERSTELLEN
Stellen Sie über eine Kabel- oder Bluetooth-Verbindung eine Verbindung mit einem externen Gerät her,
um den Ton des externen Geräts über die Soundbar wiederzugeben.
Über ein HDMI-Kabel verbinden (mit Unterstützung der
Dekodierung und Wiedergabe von Dolby Atmos)
Checkliste vor dem Verbinden
Dolby Atmos® und DTS:X werden nur im HDMI-Modus unterstützt.
Falls die Audioausgabeoptionen sekundäres Audio beinhalten, stellen Sie sicher, dass sekundäres
Audio ausgeschaltet ist.
Stellen Sie sicher, dass die Inhalte Dolby Atmos® unterstützen.
HDMI OUT
HDMI IN
(ARC)
HDMI
HDMI TO TV
(ARC)
DIGITAL AUDIO IN (OPTICAL)
HDMI-Kabel
HDMI-Kabel
Unterseite der Soundbar
Externes Gerät
Oberseite der Soundbar
HDMI
1. Verbinden Sie den Anschluss HDMI auf der Rückseite des Geräts über ein HDMI-Kabel mit dem
Anschluss HDMI OUT Ihres Digitalgeräts.
2. Verbinden Sie den Anschluss HDMI TO TV (ARC) auf der Rückseite des Geräts über ein
HDMI-Kabel mit dem Anschluss HDMI IN Ihres Fernsehers.
3. Drücken Sie die Taste (Quelle) auf dem Bedienfeld der Oberseite oder auf der Fernbedienung
und wählen Sie dann „HDMI“ aus.
4. Der Modus „HDMI“ wird auf dem Anzeigefeld der Soundbar angezeigt und der Ton wird
wiedergegeben.

DEU - 18
HINWEISE
Wenn Sie Dolby Atmos® verwenden: Wenn die Eingangsquelle Dolby Atmos® ist, wird 5.1.2 Kanal
ausgegeben.
Wenn Dolby Atmos® aktiviert ist, wird „DOLBY ATMOS“ in der vorderen Anzeige angezeigt.
KongurierenvonDolbyAtmos®anIhremBD-PlayerodersonstigenGeräten.
Öffnen Sie die Audio-Ausgabeoptionen im Einstellungsmenü Ihres BD-Players oder eines anderen
Gerätes und stellen Sie sicher, dass „No Encoding“ für den Bitstream ausgewählt ist. Gehen Sie z. B.
Bitstream (unverarbeitet).
UnterstützteUHD-Signalspezizierung(3840x2160p)
Framerate (f/s) Farbtiefe RGB4:4:4 YCbCr4:4:4 YCbCr4:2:2 YCbCr4:2:0
< 60
8 Bit
10 Bit - -
12 Bit - -
120
8 Bit - - - -
10 Bit - - - -
Nutzungsbedingungen unterscheiden.
Verbindung mit einem optischen Kabel
OPTICAL OUT
HDMI TO TV
(ARC)
DIGITAL AUDIO IN (OPTICAL)
Optisches Kabel
(nicht
mitgeliefert)
Unterseite der Soundbar
BD / DVD-Player /
Set-Top-Box /
Spielkonsole
Oberseite der Soundbar
D.IN
1. Verbinden Sie den Anschluss DIGITAL AUDIO IN (OPTICAL) am Hauptgerät über ein optisches
Digitalkabel (nicht mitgeliefert) mit dem Anschluss OPTICAL OUT des Quellgeräts.
2. Wählen Sie den „D.IN“-Modus aus, indem Sie die Taste (Quelle) auf dem Bedienfeld der
Oberseite oder auf der Fernbedienung drücken.
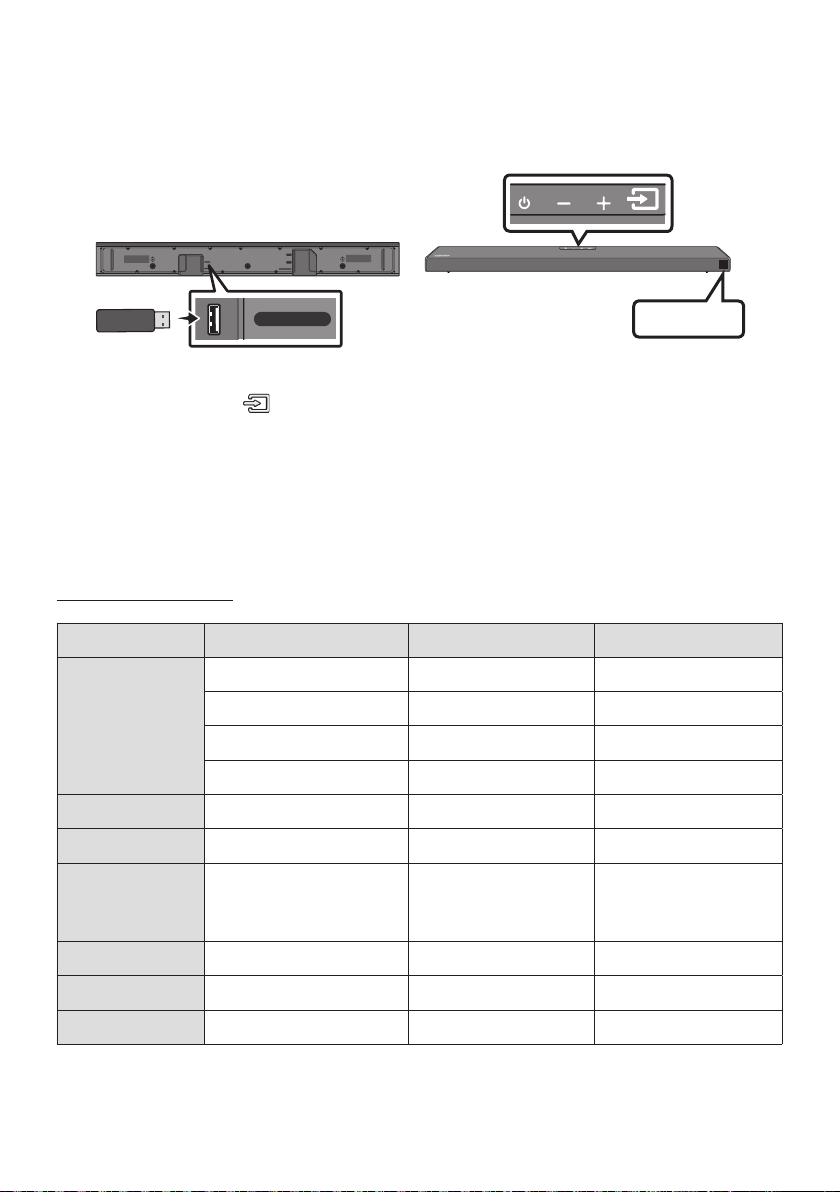
DEU - 19
06 VERBINDEN EINES USB SPEICHERGERÄTS
USB-Anschluss
HDMI
HDMI TO TV
(ARC)
USB (5V 0.5A)
DC 24V
DIGITAL AUDIO IN (OPTICAL)
USB (5V 0.5A)
USB
1. Verbinden Sie das USB-Gerät mit dem USB-Anschluss an der Unterseite des Geräts.
2. Drücken Sie die Taste (Quelle) auf dem Bedienfeld der Oberseite oder auf der Fernbedienung
und wählen Sie dann „USB“ aus.
3. Auf dem Anzeigebildschirm wird „USB“ angezeigt.
4. Musikdateien vom Speichergerät über die Soundbar wiedergeben.
Die Soundbar wird automatisch ausgeschaltet (Auto Power Down), wenn länger als
20 Minuten kein USB-Gerät angeschlossen wurde.
Kompatibilitätsliste
Verlängerung Codec Samplingrate Bitrate
*.mp3 MPEG1 Layer2 32kHz ~ 48kHz 32 ~ 320kbps
MPEG1 Layer3 32kHz ~ 48kHz 32 ~ 320kbps
MPEG2 Layer3 16kHz ~ 24kHz 8 ~ 160kbps
MPEG2.5 Layer3 8kHz ~ 12kHz 8 ~ 160kbps
*.wma WMA7/8/9 (Nur Audio) 32kHz ~ 48kHz 32 ~ 320kbps
*.ogg Vorbis 32kHz ~ 48kHz 45 ~ 500kbps
*.aac
*.m4a
*.mp4
A AC-LC
(MPEG2/MPEG4 Nur Audio)
32kHz ~ 48kHz 32 ~ 320kbps
*.wav LPCM 32kHz ~ 192kHz 1024 ~ 9216kbps
*.ac FLAC 32kHz ~ 192kHz 162 ~ 8100kbps
*.aiff AIFF 32kHz ~ 192kHz 1024 ~ 9216kbps
Sind zu viele Ordner (ungefähr 200) und Dateien (ungefähr 2000) auf dem USB-Gerät gespeichert,
kann es einige Zeit dauern, bis die Soundbar auf die Dateien zugreifen und diese abspielen kann.
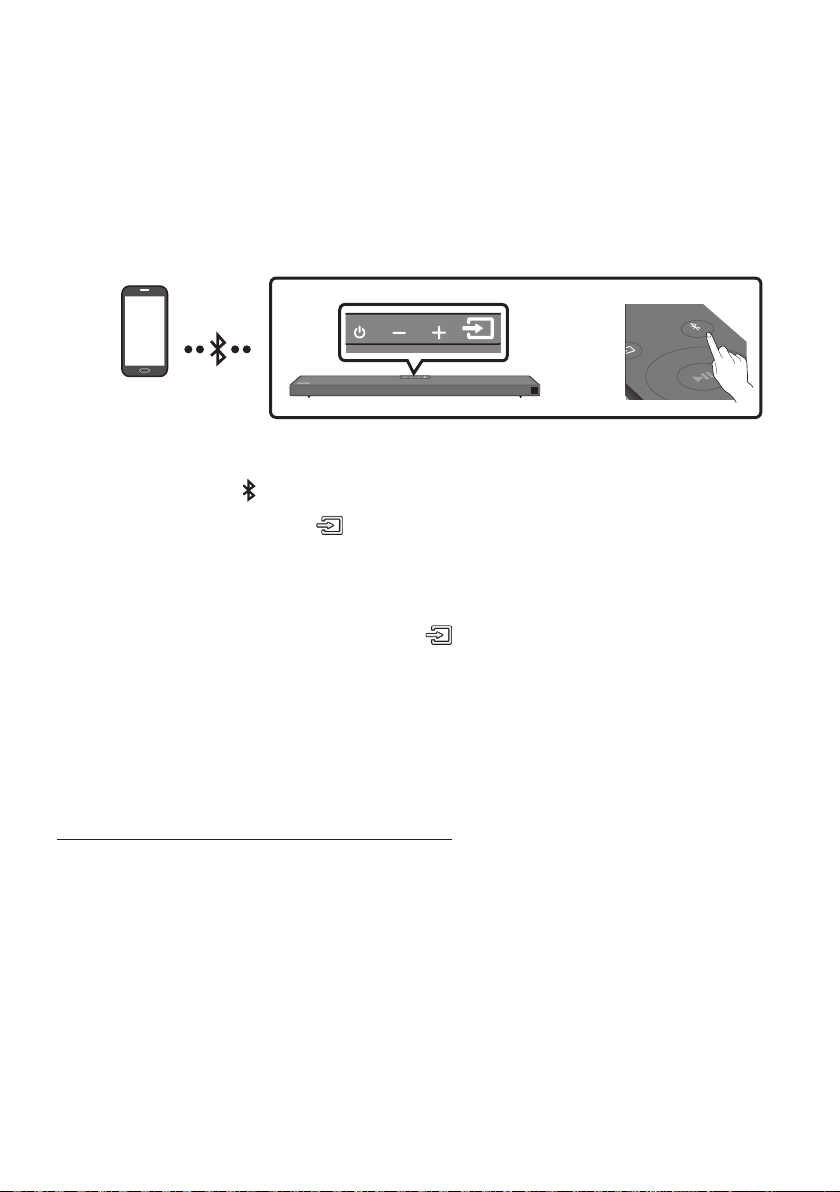
DEU - 20
07 ANSCHLIESSEN EINES MOBILGERÄTS
Anschließen per Bluetooth
Wenn ein Mobilgerät über Bluetooth verbunden wird, können Sie einen Stereoton ohne lästige Kabel
hören.
Die Verbindung ist auf einen Fernseher oder zwei Bluetooth-Geräte gleichzeitig eingeschränkt.
Bluetooth-Gerät
SOUND
MODE
PAIR
ODER
Die erste Verbindung
1. Drücken Sie die Taste PAIR auf der Fernbedienung, um in den Modus „BT PAIRING“ zu wechseln.
(ODER)
a. Drücken Sie die Taste (Quelle) auf dem Bedienfeld der Oberseite und wählen Sie
dann „BT“ aus.
„BT“ wird in wenigen Sekunden automatisch zu „BT PAIRING“ oder zu „BT READY“, falls
eine Verbindung bereits verzeichnet wurde.
b. Wenn „BT READY“ erscheint, die Taste (Quelle) auf dem Bedienfeld der Oberseite der
Soundbar für mehr als 5 Sekunden gedrückt halten, damit „BT PAIRING“ angezeigt wird.
2. Wählen Sie „[AV] Samsung Soundbar Q6A-Series“ aus der Liste aus.
Wenn eine Soundbar mit dem Bluetooth-Gerät verbunden ist, wird [Bluetooth-Gerätename
„BT“ in der vorderen Anzeige angezeigt.
3. Geben Sie Musikdateien auf dem über Bluetooth verbundenen Gerät über die Soundbar aus.
Falls das Gerät nicht verbunden werden kann
[AV] Samsung Soundbar Q6A-Series“)
in der Liste erscheint, löschen Sie sie.
Wiederholen Sie dann Schritt 1 und 2.
HINWEIS
Nachdem Sie die Soundbar zum ersten Mal mit Ihrem Mobilgerät verbunden haben, verwenden Sie
den Modus „BT READY“ um erneut eine Verbindung herzustellen.

DEU - 21
Was ist der Unterschied zwischen BT READY und BT PAIRING?
BT READY : In diesem Modus können Sie nach zuvor verbundenen Fernsehern suchen oder ein
zuvor verbundenes Mobilgerät mit der Soundbar verbinden.
BT PAIRING : In diesem Modus können Sie ein neues Gerät mit der Soundbar verbinden. (Drücken
Sie die Taste PAIR auf der Fernbedienung oder halten Sie die Taste
(Quelle)
auf der Oberseite
der Soundbar für mehr als 5 Sekunden gedrückt, während die Soundbar im „BT“-Modus ist.)
HINWEISE
Falls sie beim Verbinden mit einem Bluetooth-Gerät nach einem PIN-Code gefragt werden, geben
Sie <0000> ein.
Im Bluetooth-Verbindungsmodus geht die Bluetooth-Verbindung verloren, wenn der Abstand
zwischen der Soundbar und dem Bluetooth-Gerät 10 m überschreitet.
Die Soundbar schaltet sich nach 20 Minuten im Bereitschaftszustand automatisch aus.
Die Soundbar könnte unter den folgenden Umständen die Bluetooth-Suche oder -Verbindung
eventuell nicht korrekt ausführen:
– Wenn die Soundbar von einem starken elektrischen Feld umgeben ist.
– Falls mehrere Bluetooth-Geräte gleichzeitig mit der Soundbar gekoppelt werden.
–
nicht funktioniert.
Elektronische Geräte können Funkstörungen verursachen. Elektromagnetische Wellen erzeugende
Geräte müssen vom Soundbar-Hauptgerät ferngehalten werden - z. B. Mikrowellen, WLAN-Geräte etc.
Der Soundbar unterstützt SBC data (44,1kHz, 48kHz).
Nur an ein Bluetooth-Gerät anschließen, das die A2DP (AV) Funktion unterstützt.
Es kann keine Verbindungen zwischen dem Soundbar und Bluetooth-Geräten hergestellt werden,
die nur die HF (Hands Free) Funktion unterstützen.
Nachdem Sie eine Verbindung zwischen der Soundbar und einem Bluetooth-Gerät hergestellt
haben, wird durch Auswahl von „[AV] Samsung Soundbar Q6A-Series“ aus der Liste der
gefundenen Geräte die Soundbar automatisch in den „BT“-Modus umgeschaltet.
– Ist nur verfügbar, wenn der Soundbar in der Liste der verbundenen Geräte des Bluetooth-
Geräts aufgelistet ist. (Es muss zuvor mindestens einmal eine Verbindung zwischen dem
Soundbar und dem Bluetooth-Gerät hergestellt worden sein.)
Der Soundbar erscheint nur in der Liste der vom Bluetooth-Gerät gefundenen Geräte, wenn der
Soundbar „BT READY“ anzeigt.
Bluetooth Power Ein (SOUND MODE)
Wenn die Funktion das Gerät über Bluetooth Power Ein aktiviert und der Soundbar ausgeschaltet ist
und ein Bluetooth-Gerät, mit dem bereits zuvor eine Verbindung mit dem Soundbar hergestellt wurde,
versucht, eine Verbindung mit dem Soundbar herzustellen, schaltet sich der Soundbar automatisch ein.
1. Halten Sie die Taste SOUND MODE mindestens 5 Sekunden gedrückt, während die Soundbar
eingeschaltet ist.
2. Auf dem Display der Soundbar erscheint „ON-BLUETOOTH POWER“.

DEU - 22
Das Bluetooth-Gerät von der Soundbar trennen
Sie können die Verbindung zwischen dem Bluetooth-Gerät und Soundbar trennen. Die Anleitung hierzu
Verbindung zum Soundbar wird getrennt.
Wenn die Soundbar von dem Bluetooth-Gerät getrennt ist, zeigt die Soundbar „BT DISCONNECTED“
auf der vorderen Anzeige an.
Trennen der Soundbar vom Bluetooth-Gerät
Drücken Sie die Taste (Quelle) auf dem Bedienfeld oder Oberseite oder auf der Fernbedienung und
wechseln Sie dann in einen beliebigen Modus außer in den „BT“-Modus.
Das Trennen dauert einige Zeit, da das Bluetooth-Gerät ein Antwortsignal von der Soundbar
empfangen muss. (Die Zeit zum Trennen kann je nach Bluetooth-Gerät unterschiedlich sein)
Wenn die Soundbar von dem Bluetooth-Gerät getrennt ist, zeigt die Soundbar „BT DISCONNECTED“
auf der vorderen Anzeige an.
HINWEISE
Bei einer Bluetooth Verbindung geht die Bluetooth Verbindung verloren, wenn der Abstand
zwischen dem Soundbar und dem Bluetooth Gerät 10 m überschreitet.
automatisch aus.
Mehr über Bluetooth
Bluetooth ist eine neue Technologie, mit der es möglich ist, Bluetooth-fähige Geräte über eine kurze
Funkverbindung miteinander zu verbinden.
Ein Bluetooth Gerät kann Störungen erzeugen oder falsch funktionieren, wenn:
– Das Empfangs-/Sendesystem eines Bluetooth-Geräts oder der Haupteinheit mit einem
Körperteil berührt wird.
– Die Funkübertragung durch Wände, Ecken oder Bürotrennwände behindert wird.
– Interferenzen mit Geräten auftreten, welche dasselbe Frequenzband verwenden, wie
medizinische Geräte, Mikrowellenherde oder Funknetzwerke.
Wenn Sie Soundbar über das Bluetooth Gerät betreiben möchten, stellen Sie sicher, dass der
Abstand kurz gehalten wird.
Mit zunehmender Entfernung zwischen Soundbar und Bluetooth-Gerät nimmt die Qualität der
Bluetooth-Verbindung ab. Wenn die Distanz den Bluetooth-Betriebsbereich übersteigt, geht die
Verbindung verloren.
In Gebieten mit geringer Empfangssensibilität ist die Funktion der Bluetooth-Verbindung
möglicherweise eingeschränkt.
Die Bluetooth-Verbindung funktioniert nur mit Geräten in unmittelbarer Nähe. Die Verbindung wird
automatisch unterbrochen, wenn dieser Radius überschritten wird. Selbst innerhalb dieses Radius
kann die Klangqualität durch Hindernisse wie Mauern oder Türen beeinträchtigt werden.
Dieses Drahtlosgerät kann während des Betriebs elektrische Störungen verursachen.

DEU - 23
Bluetooth-Mehrfachverbindung
Die Soundbar kann mit 2 Bluetooth-Geräten gleichzeitig verbunden werden.
Bluetooth-Gerät A Bluetooth-Gerät B
1.
auf Seite 20)
2. Spielen Sie Musik von einem der angeschlossenen Bluetooth-Geräte ab, während zwei Geräte
verbunden sind.
3. Wird bei Wiedergabe auf Gerät „A“ Musik von Bluetooth-Gerät „B“ wiedergegeben, startet die
Musikwiedergabe auf Gerät „B“ und wird auf Gerät „A“ automatisch beendet/angehalten.
4. In früheren Versionen als AVRCP V1.4 kann die Schaltzeit des Gerätes, das Musik abspielt,
verzögert sein.
HINWEISE
Das Gerät kann bei einigen Geräten durch eine Benachrichtigung oder Alarm gewechselt werden.
Einige Geräte unterstützen keine Bluetooth-Mehrfachverbindung.
Der „BT PAIRING“-Modus wird beendet, wenn innerhalb von 3 Minuten kein Gerät gekoppelt wird.
Ein Gerätewechsel kann bei einigen Apps bis zu 7 Sekunden dauern.
Falls Sie versuchen ein 3. Bluetooth-Gerät zu verbinden, werden die Geräte A oder B getrennt.
(Das Gerät, welches gerade nicht abspielt wird, wird getrennt.)
Es können nur ein Samsung Fernsehgerät oder 2 Bluetooth-Geräte gleichzeitig angeschlossen
werden.
Die Soundbar wird von Bluetooth-Geräten getrennt, wenn sie eine Verbindungsanforderung von
einem Samsung-TV erhält.
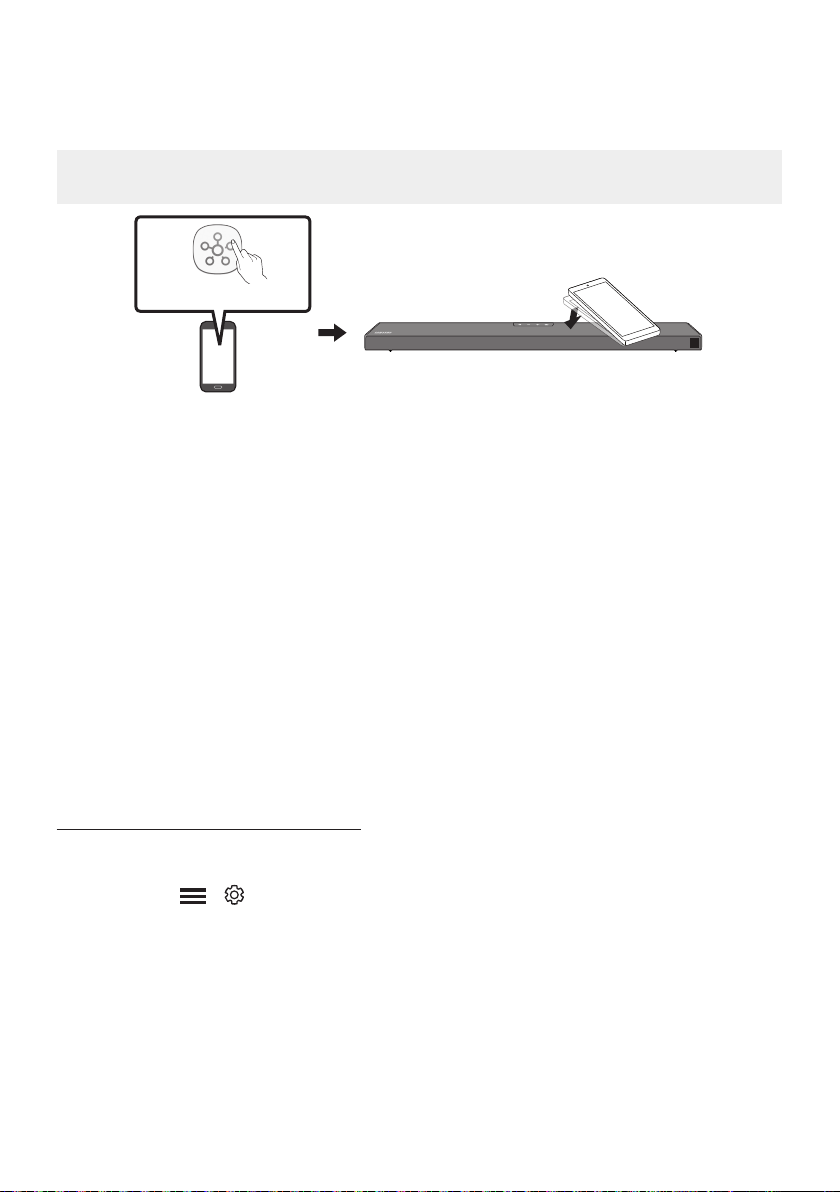
DEU - 24
Verwendung von Tap Sound
Tippen Sie die Soundbar mit Ihrem Mobilgerät an, um Ton vom Mobilgerät über die Soundbar
wiederzugeben.
Diese Funktion wird je nach dem Mobilgerät eventuell nicht unterstützt.
Diese Funktion ist nur mit Samsung Mobilgeräten mit Android 8.1 oder höher kompatibel.
Mobilgerät
SmartThings-App
Oberseite der Soundbar
1. Aktivieren Sie die Tap Sound-Funktion an Ihrem Mobilgerät.
Die Tap Sound-Funktion
aktivieren“.
2. Tippen Sie die Soundbar mit dem Mobilgerät an. Wählen Sie „Jetzt starten“ in dem angezeigten
Nachrichtenfenster.
Eine Verbindung wird zwischen dem Mobilgerät und der Soundbar über Bluetooth hergestellt.
3. Geben Sie Ton vom Mobilgerät über die Soundbar wieder.
Diese Funktion verbindet ein Mobilgerät per Bluetooth mit der Soundbar, indem die Vibration
erkannt wird, die auftritt, wenn das Gerät die Soundbar berührt.
Achten Sie darauf, mit dem Mobilgerät nicht eine Ecke der Soundbar anzutippen. Die Soundbar
oder das Mobilgerät könnten dadurch zerkratzt oder beschädigt werden.
Es wird empfohlen, das mobile Gerät mit einer Schutzhülle abzudecken. Tippen Sie leicht den
breiten Bereich auf der Oberseite der Soundbar an, ohne dabei übermäßige Kraft anzuwenden.
Zum Verwenden dieser Funktion aktualisieren Sie die SmartThings-Anwendung auf die
neueste Funktion. Die Funktion wird je nach der Version der App eventuell nicht unterstützt.
Die Tap Sound-Funktion aktivieren
Verwenden Sie die SmartThings-App zum Aktivieren der Tap View, Tap Sound-Funktion.
1. Führen Sie auf dem Mobilgerät die SmartThings-App aus.
2. Wählen Sie ( ) in dem SmartThings-App-Bildschirm, der auf dem Mobilgerät angezeigt
wird.
3. Aktivieren Sie „Tap View, Tap Sound“, damit die Funktion funktioniert, wenn ein Mobilgerät in die
Nähe der Soundbar bewegt wird.
HINWEISE
Tap Sound-Funktion nicht.
Die Tap Sound-Funktion funktioniert möglicherweise nicht, wenn sich in der Nähe der Soundbar Geräte
Funkstörungen verursachen können, in ausreichender Entfernung von der Soundbar platziert werden.

DEU - 25
08 VERWENDEN DER FERNBEDIENUNG
So verwenden Sie die Fernbedienung
VOL WOOFER
SOUNDBAR
SOUND
MODE
PAIR
Strom
VOL BASS
SOUND
MODE
PAIR
Schaltet die Soundbar ein und aus.
VOL BASS
SOUND
MODE
PAIR
Quelle
Drücken Sie dies, um eine an die Soundbar
angeschlossene Quelle auszuwählen.
Stummschaltung
VOL BASS
SOUND
MODE
PAIR
Drücken Sie die Taste (Stummschaltung), um
den Ton stumm zu schalten. Drücken Sie sie
erneut, um den Ton wieder einzuschalten.
SOUND MODE
VOL BASS
SOUND
MODE
PAIR
Drücken, um die verfügbaren Tonmodi
durchzugehen:
SURROUND SOUND, GAME PRO,
ADAPTIVE SOUND
oder
STANDARD
.
– SURROUND SOUND
Liefert ein größeres Klangfeld als der
Standard.
– GAME PRO
Liefert einen stereoskopischen Sound, der
Sie beim Spielen in die Handlung eintauchen
lässt.
– ADAPTIVE SOUND
Analysiert den Inhalt in Echtzeit und stellt
automatisch das optimale Schallfeld auf
Grundlage der Eigenschaften des Inhalts
zur Verfügung.
– STANDARD
Gibt den Originalton aus.
DRC (Dynamic Range Control)
DRC-Funktion (Dynamic Range Control) auf
Dolby Digital-Tracks anwenden. Halten Sie
bei eingeschalteter Soundbar die Taste
SOUND MODE
gedrückt, um die DRC-Funktion (Dynamic
Range Control) zu aktivieren bzw. zu
deaktivieren. Bei aktivierter DRC-Funktion
wird lauter Ton verringert. (Der Ton kann
verzerrt sein.)

DEU - 26
Bluetooth Power
Mit dieser Funktion schaltet sich die Soundbar automatisch ein, wenn sie eine
Verbindungsanfrage von einem zuvor verbundenen Fernseher oder Bluetooth-Gerät
erhält. Diese Einstellung ist standardmäßig eingeschaltet.
– Halten Sie die Taste SOUND MODE für mindestens 5 Sekunden gedrückt, um die
Bluetooth Power-Funktion auszuschalten.
VOL BASS
SOUND
MODE
PAIR
Bluetooth
PAIR
Drücken Sie die PAIR-Taste. Im Soundbar-Display wird „BT PAIRING“ angezeigt.
In diesem Modus können Sie die Soundbar mit einem neuen Bluetooth-Gerät verbinden,
indem Sie die Soundbar aus der Bluetooth-Gerätesuchliste auswählen.
Wiedergabe /
Pause
VOL BASS
SOUND
MODE
PAIR
Drücken Sie die p-Taste, um eine Musikdatei vorübergehend anzuhalten.
Wenn Sie die Taste erneut drücken, wird die Musikdatei wiedergegeben.
VOL BASS
SOUND
MODE
PAIR
Oben/Unten/
Links/Rechts
Drücken Sie die angegebenen Bereiche zum Auswählen von
Oben/Unten/Links/Rechts.
Drücken Sie Oben/Unten/Links/Rechts auf der Taste zum Auswählen oder Einstellen von
Funktionen.
Wiederholen
Zum Verwenden der Wiederholungsfunktion im „USB“-Modus drücken Sie die Oben-
Taste.
Musiktitel überspringen
Drücken Sie die Taste Rechts, um die nächste Musikdatei auszuwählen. Drücken Sie die
Taste Links, um die vorherige Musikdatei auszuwählen.
ID SET
Drücken und halten Sie die Taste Oben für 5 Sekunden gedrückt, um ID SET
abzuschließen (bei Verbindung mit einem drahtlosen Subwoofer oder bei drahtlosen
hinteren Lautsprechern).

DEU - 27
Klangsteuerung
VOL BASS
SOUND
MODE
PAIR
Beim Drücken werden nacheinander die Einstellung für TREBLE, BASS, AUDIO SYNC,
CENTER LEVEL, TOP LEVEL und VIRTUAL ON/OFF angezeigt.
Die gewünschten Einstellungen können mit den Tasten Oben/Unten eingestellt werden.
Um die Lautstärke der Höhen oder des Basses zu regeln, drücken Sie die Taste
(Klangsteuerung), um TREBLE oder BASS auszuwählen und passen Sie dann die
Lautstärke mit den Oben/Unten-Tasten zwischen -6~+6 an. (Stellen Sie sicher, dass
der Sound-Modus auf „STANDARD“ eingestellt ist.)
Drücken Sie die Taste (Klangsteuerung) und halten Sie sie ca. 5 Sekunden lang
gedrückt, um den Klang für jedes Frequenzband anzupassen. 150Hz, 300Hz, 600Hz,
1,2kHz, 2,5kHz, 5kHz und 10kHz sind durch Verwendung der Tasten Links/Rechts
wählbar und können mit den Tasten Oben/Unten auf eine Einstellung zwischen
-6 bis +6 eingestellt werden. (Stellen Sie sicher, dass der Sound-Modus auf
„STANDARD“ eingestellt ist.)
Falls das Video auf dem Fernseher und der Ton der Soundbar nicht synchron sind,
drücken Sie die
(Klangsteuerung)
-Taste, um AUDIO SYNC auszuwählen und stellen
Sie dann mit den Oben/Unten-Tasten die Audioverzögerung zwischen
USB“- oder „BT“-Modus.)
AUDIO SYNC wird nur bei einigen Funktionen unterstützt.
Um die Lautstärke der einzelnen Lautsprecher zu steuern, wählen Sie CENTER LEVEL
oder TOP LEVEL in den in Sound-Einstellungen und passen Sie dann die Lautstärke mit
Hilfe der Tasten Oben/Unten zwischen +6~+6 an.
Die Lautsprecherfunktion VIRTUAL kann unter Verwendung der Tasten Oben/Unten
auf ON/OFF gestellt werden.
Wenn die hinteren Lautsprecher (separat erhältlich) angeschlossen sind, werden die
Einstellungen REAR SPEAKER ON/OFF und REAR LEVEL unterstützt.
Drücken Sie die Oben/Unten-Tasten, um REAR SPEAKER ON/OFF festzulegen und um
den Wert von REAR LEVEL zwischen -6 und +6 anzupassen.
VOL WOOFER
SOUND
MODE
PAIR
WOOFER
(BASS)-STUFE
SOUND
MODE
VOL
WOOFER
SOUNDBAR
SOUND
MODE
VOL
WOOFER
SOUNDBAR
SOUND
MODE
VOL
WOOFER
SOUNDBAR
SOUND
MODE
VOL
WOOFER
SOUNDBAR
Drücken Sie die Taste nach oben oder unten, um die Lautstärke des Woofers (Bass) auf -12
oder auf -6 bis +6 einzustellen. Um die Woofer (Bass)-Lautstärkestufe auf 0 (Standard)
einzustellen, drücken Sie die Taste.
VOL BASS
SOUND
MODE
PAIR
VOL
(Lautstärke)
SOUND
MODE
VOL
WOOFER
SOUNDBAR
SOUND
MODE
VOL
WOOFER
SOUNDBAR
SOUND
MODE
VOL
WOOFER
SOUNDBAR
SOUND
MODE
VOL
WOOFER
SOUNDBAR
Drücken Sie die Taste nach oben oder unten, um die Lautstärke einzustellen.
Stummschaltung
Drücken Sie die Taste VOL, um den Ton stumm zu schalten. Drücken Sie sie erneut, um
den Ton wieder einzuschalten.
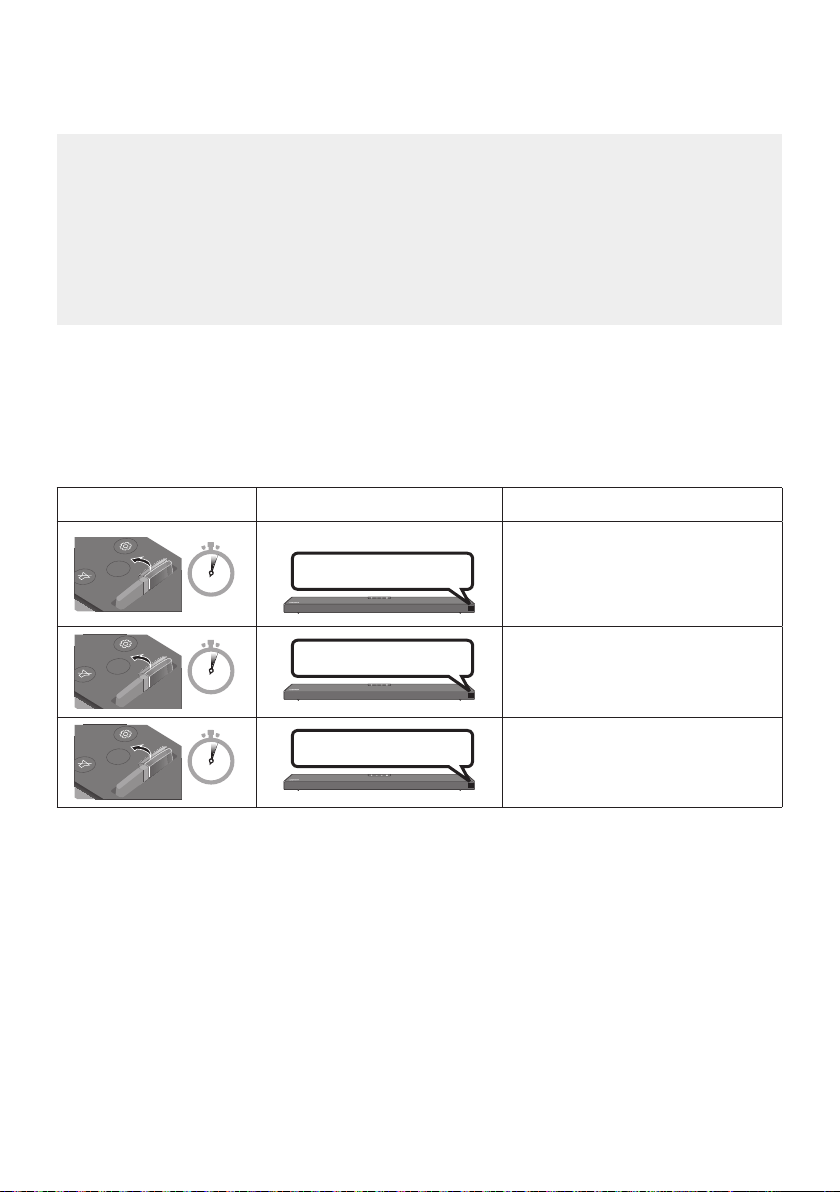
DEU - 28
Anpassen der Soundbar-Lautstärke mit einer TV-Fernbedienung
Passen Sie die Soundbar-Lautstärke mit der TV-Fernbedienung an.
Diese Funktion kann nur mit IR-Fernbedienungen verwendet werden. Bluetooth-
Fernbedienungen (Fernbedienungen, bei denen eine Kopplung notwendig ist) werden nicht
unterstützt.
Stellen Sie den Lautsprecher des Fernsehers auf Ext. Lautsprecher, um diese Funktion zu
verwenden.
Diese Funktion wird von den folgenden Herstellern unterstützt:
VIZIO, LG, Sony, Sharp, PHILIPS, PANASONIC, TOSHIBA, Hisense, RCA
1. Schalten Sie die Soundbar aus.
2. Halten Sie die WOOFER-Taste 5 Sekunden lang gedrückt.
Jedes Mal, wenn Sie die WOOFER-Taste nach oben drücken und für mindestens 5 Sekunden
gedrückt halten, ändert sich der Modus in der folgenden Reihenfolge: „OFF-TV REMOTE“
(Standardmodus), „SAMSUNG-TV REMOTE“, “ALL-TV REMOTE”.
Fernbedienungstaste Anzeige Status
SOUND
MODE
VOL
WOOFER
SOUNDBAR
5 Sec
OFF-TV REMOTE
(Standardmodus)
Die TV-Fernbedienung deaktivieren.
SOUND
MODE
VOL
WOOFER
SOUNDBAR
5 Sec
SAMSUNG-TV REMOTE
Die IR-Fernbedienung eines
Samsung-TVs aktivieren.
SOUND
MODE
VOL
WOOFER
SOUNDBAR
5 Sec
ALL-TV REMOTE
Die IR-Fernbedienung des
Fernsehers eines Drittanbieters
aktivieren.
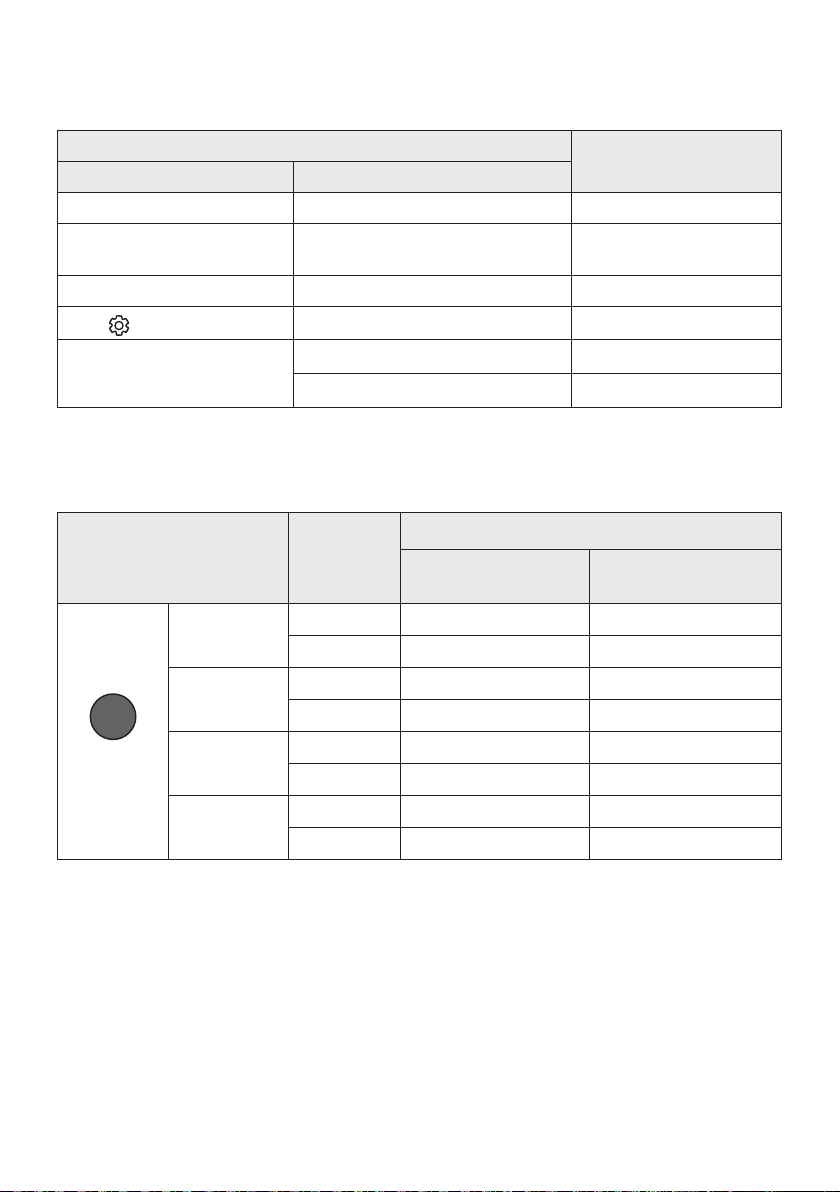
DEU - 29
Verwenden der verborgenen Tasten (Tasten mit mehr als einer
funktion)
Verborgene Taste
Referenzseite
Fernbedienungstaste Funktion
WOOFER (Oben) TV-Fernbedienung Ein/Aus (Standby) Seite 28
Links
Automatische TV-Verbindung Ein/Aus
(BT Bereit)
Seite 16
Oben ID SET Seite 26
(Klangsteuerung)
7 Band EQ Seite 27
SOUND MODE
DRC ON/OFF (Standby) Seite 25
Bluetooth Power Seite 26
Ausgabe-spezikationenfürdieunterschiedlichensound-effekt-
modi
Effekt Eingang
Ausgang
Ohne drahtloses
Rücklautsprecherkit
Mit drahtlosem
Rücklautsprecherkit
SOUND MODE
Surround
VOL WOOFER
SOUND
MODE
Bluetooth
POWER
SURROUND
SOUND
2.0 Kanal
3.1.2 Kanal 5.1.2 Kanal
5.1 Kanal 3.1.2 Kanal 5.1.2 Kanal
GAME PRO
2.0 Kanal
3.1.2 Kanal 5.1.2 Kanal
5.1 Kanal 3.1.2 Kanal 5.1.2 Kanal
ADAPTIVE
SOUND
2.0 Kanal
3.1.2 Kanal 5.1.2 Kanal
5.1 Kanal 3.1.2 Kanal 5.1.2 Kanal
STANDARD
2.0 Kanal
2.1 Kanal 2.1 Kanal
5.1 Kanal 3.1 Kanal 5.1 Kanal
Das drahtlose Rücklautsprecherkit von Samsung ist separat erhältlich. Für den Erwerb eines Kits
kontaktieren Sie den Händler, bei dem Sie die Soundbar erworben haben.
Rücklautsprecherkit einen 5.1.2-Kanal-Ton bietet.
Die Surroundlautsprecher erzeugen keine Töne für die 2-Kanal-Ausgabe, während der Modus
STANDARD verwendet wird. Um den Ton für die Surround-Lautsprecher zu aktivieren, ändern Sie
den Effektmodus auf SURROUND SOUND.

DEU - 30
09 INSTALLIEREN DER
WANDHALTERUNG
Vorsichtsmaßnahmen für die
Installation
Installieren Sie nur an einer vertikalen Wand.
Installieren Sie nicht an einem Ort mit hoher
Temperatur oder Feuchtigkeit.
Überprüfen Sie, ob die Wand stark genug ist,
um das Gewicht des Produkts zu tragen. Falls
nicht, verstärken Sie die Wand oder wählen
Sie einen anderen Installationsort.
Kaufen und verwenden Sie
Befestigungsschrauben oder Verankerungen,
die für Ihre Wandart geeignet sind
(Gipskartonplatte, Eisenplatte, Holz, etc.).
Fixieren Sie die Befestigungsschrauben falls
möglich mit Wandverankerungen.
Kaufen Sie Schrauben für die Wandmontage
entsprechend der Art und der Dicke der
Wand, an der Sie die Soundbar montieren
wollen.
– Durchmesser: M5
– Länge: 35 mm oder länger empfohlen.
Schließen Sie die Kabel vom Gerät an externe
Geräte an, bevor sie die Soundbar an der
Wand installieren.
Vergewissern Sie sich, dass das Gerät
ausgeschaltet und von der Stromquelle
getrennt ist, bevor Sie es installieren.
Andernfalls kann es zu einem elektrischen
Schlag kommen.
Komponenten für die
Anbringung an der Wand
Montagehilfe für die Wandhalterung
x 2
(M4 x L10)
x 2
Aufhängungsschraube Schraube
x 2
Wandhalterung
1. Platzieren Sie die Montagehilfe für die
Wandhalterung an der Wand.
Die Montagehilfe für die Wandhalterung
muss waagerecht positioniert sein.
Falls Ihr Fernseher an der Wand befestigt
ist, installieren Sie die Soundbar
mindestens 5 cm unterhalb des
Fernsehers.
5 cm oder mehr
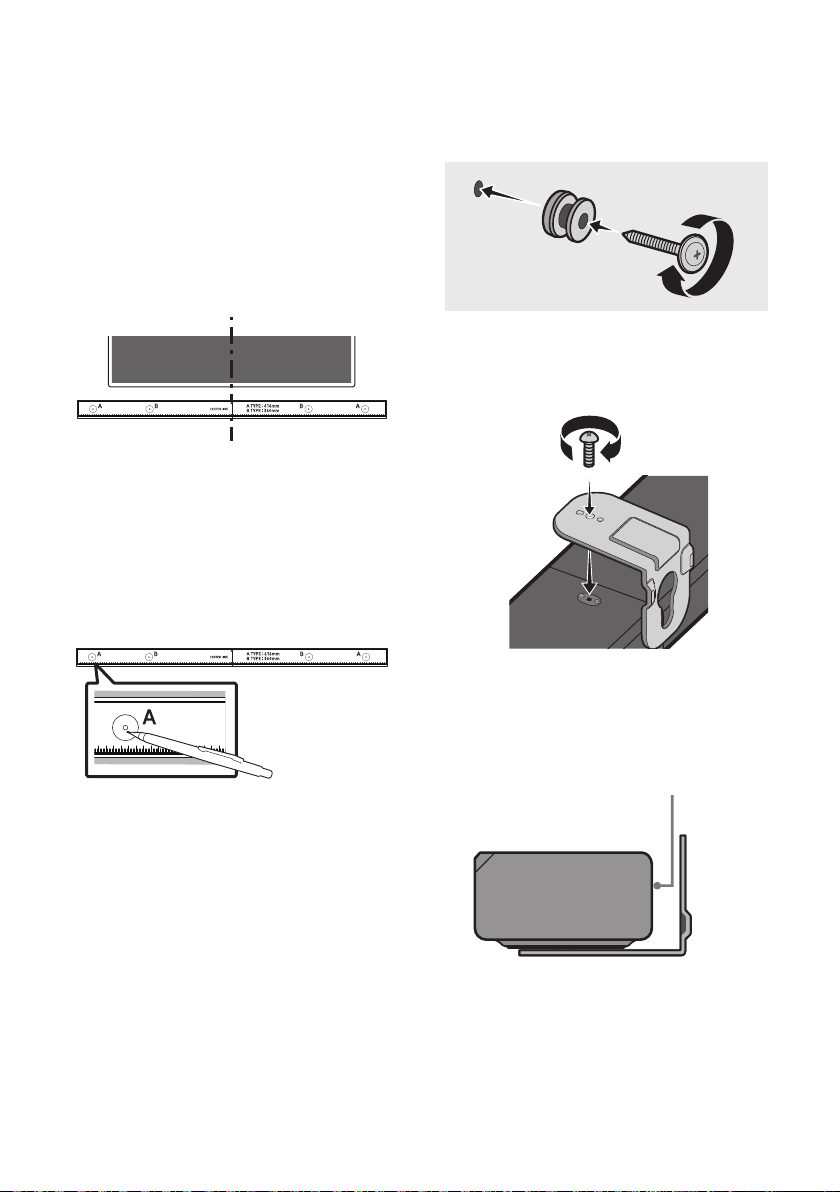
DEU - 31
2. Richten Sie die Mittellinie der Montagehilfe
für die Wandhalterung auf die Mitte des
Fernsehers aus (wenn Sie die Soundbar unter
dem Fernseher montieren) und befestigen
Sie dann die Montagehilfe für die
Wandhalterung mit Klebeband an der Wand.
Wenn Sie die Soundbar nicht unter einem
Fernseher montieren, stellen Sie sicher,
dass sich die Mittellinie in der Mitte des
Mittellinie
3. Drücken Sie die Spitze eines Stifts oder einen
spitzen Bleistift durch die Mitte der A-TYPE-
Bilder an beiden Enden der Montagehilfe, um
die Löcher für die Aufhängungsschrauben zu
markieren. Entfernen Sie dann die
Montagehilfe für die Wandhalterung.
4. Bohren Sie mit einem geeigneten Bohrer an
jeder Markierung ein Loch in die Wand.
Wenn die Markierungen nicht den
Positionen der Halterungsbolzen
entsprechen, achten Sie darauf, geeignete
Dübel in die Löcher einzuführen, bevor Sie
die Aufhängungsschrauben einführen.
Wenn Sie Dübel verwenden, achten Sie
darauf, dass die gebohrten Löcher für die
verwendeten Dübel groß genug sind.
5. Stecken Sie eine Schraube (nicht enthalten)
durch jede Aufhängungsschraube und
drehen Sie dann jede Schraube in einem
Aufhängungsschraubenloch.
6. Installieren Sie 2 Wandhalterung mit der
richtigen Ausrichtung auf der Unterseite der
Soundbar unter Verwendung von 2 Schrauben.
Achten Sie beim Zusammenbau darauf,
dass sich die Aufhängungsteile der
Wandhalterungen hinter der Rückseite
Rückseite der Soundbar
Rechtes Ende der Soundbar
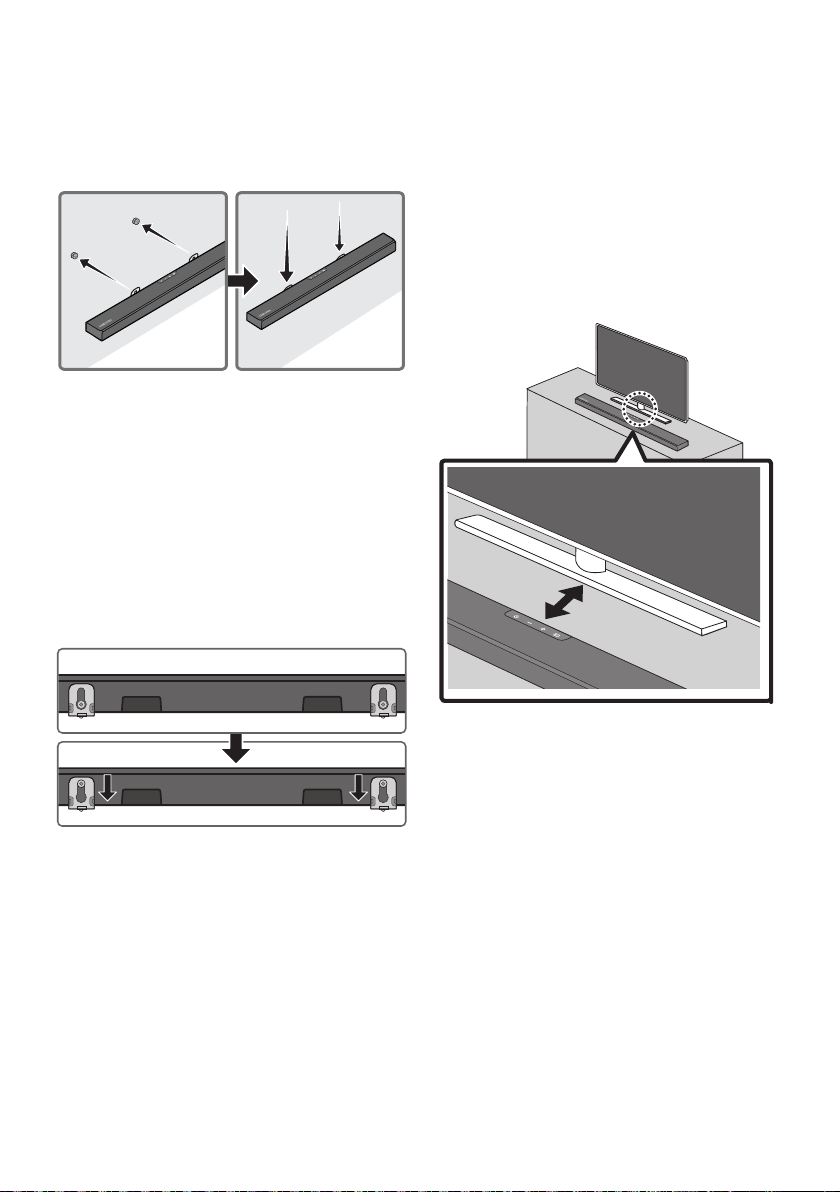
DEU - 32
7. Montieren Sie die Soundbar mithilfe der
befestigten Wandhalterungen, indem Sie die
Wandhalterungen an die
Aufhängungsschrauben an der Wand
hängen.
8. Schieben Sie die Soundbar wie nachfolgend
dargestellt nach unten, sodass die
Wandhalterung sicher auf den
Aufhängungsschraube ruhen.
Setzen Sie die Aufhängungsschraube in
den breiten (unteren) Teil der
Wandhalterung ein und schieben Sie
dann die Wandhalterung nach unten,
sodass die Wandhalterung sicher auf den
Aufhängungsschraube ruhen.
10 PLATZIEREN DER
SOUNDBAR AUF
EINEM TV-
STÄNDER
Platzieren Sie die Soundbar auf einen TV-Ständer.
3 cm oder mehr
Richten Sie wie auf der Abbildung dargestellt die
Mitte der Soundbar auf die Mitte des Fernsehers
aus und positionieren Sie die Soundbar vorsichtig
auf dem Fernsehständer.
Für eine optimale Tonqualität positionieren Sie die
Soundbar mindestens 3 cm von der TV-
Vorderseite entfernt.
HINWEIS
Achten Sie darauf, dass die Soundbar auf
platziert ist.

DEU - 33
11 SOFTWAREAKTUALISIERUNG
Samsung kann in Zukunft Aktualisierungen für
das Firmwaresystem der Soundbar anbieten.
USB-Anschluss
HDMI
HDMI TO TV
(ARC)
USB (5V 0.5A)
DC 24V
DIGITAL AUDIO IN (OPTICAL)
USB (5V 0.5A)
Wenn eine Aktualisierung angeboten wird,
können Sie die Firmware aktualisieren, indem Sie
ein USB-Gerät mit der darauf gespeicherten
Firmware-Aktualisierung an den USB-Anschluss
der Soundbar anschließen. Weitere Informationen
zum Herunterladen der Aktualisierungsdateien
Wählen Sie dann den Produkttyp oder geben Sie
die Modellnummer Ihrer Soundbar ein, wählen Sie
die Option Software & Apps und dann Downloads.
Beachten Sie, dass die Namen der Option
variieren können.
Updateverfahren
Alle Ihre angepassten Benutzereinstellungen
bleiben nach dem Abschluss des Update erhalten.
1. Schließen Sie einen USB-Stick an den
USB-Anschluss Ihres Computers an.
Wichtig: Stellen Sie sicher, dass sich keine
Dies kann dazu führen, dass das Firmware-
Update fehlschlägt.
2. Wechseln Sie zu (samsung.com)
wählen Sie
Modell eingeben aus und geben Sie das
Modell Ihrer Soundbar ein. Wählen Sie die
Handbücher und Downloads aus und landen
Sie die neueste Software-Datei herunter.
3. Speichern Sie die heruntergeladene Software
auf einem USB-Speicher und wählen Sie „Hier
extrahieren“, um den Ordner zu entzippen.
4. Schalten Sie die Soundbar aus und schließen Sie
den USB-Stick mit dem Software-Update an
den USB-Anschluss an.
5. Schalten Sie die Soundbar ein, drücken Sie die
Taste (Quelle) auf der Soundbar und
wählen Sie anschließend den „USB“-Modus
aus. „UPDATE“ wird im Display angezeigt und
das Update startet. Die Soundbar wird nach
Abschluss des Updates automatisch neu
gestartet.
Dieses Produkt verfügt über eine DUAL-
BOOT-Funktion. Wenn die Firmware nicht
aktualisiert werden kann, können Sie sie
erneut aktualisieren.
Schalten Sie sie während des Updates
nicht aus und entfernen Sie den USB-
Stick nicht.
Wenn die neueste Version bereits auf der
Soundbar installiert ist, wird das Update
nicht installiert.
Je nach USB-Typ wird das Update
möglicherweise nicht unterstützt.
6. Stellen Sie Ihre Einstellungen an der
Soundbar wieder her.

DEU - 34
Wenn UPDATE nicht angezeigt
wird
1. Schalten Sie die Soundbar aus, trennen Sie
das Speichergerät mit den Update-Dateien
und verbinden Sie es anschließend erneut
mit dem USB-Anschluss der Soundbar.
2. Ziehen Sie das Stromkabel der Soundbar ab,
schließen Sie es erneut an und schalten Sie
dann die Soundbar ein.
HINWEISE
Das Aktualisieren der Firmware funktioniert
gegebenenfalls nicht richtig, wenn von der
Soundbar unterstützte Audiodateien auf dem
Speichergerät gespeichert sind.
Unterbrechen Sie während des
Aktualisierungsprozesses nicht die
Stromversorgung und entfernen Sie nicht den
USB-Speicher. Die Haupteinheit wird nach
Abschluss des Firmware-Updates automatisch
wieder eingeschaltet.
Wenn die Verbindung zum Subwoofer nach
dem Update nicht automatisch
wiederhergestellt wird, siehe Seite 6.
Wenn das Software-Update fehlschlägt, prüfen
Sie, ob der USB-Speicher defekt ist.
Benutzer von Mac OS sollten als USB-Format
MS-DOS (FAT) verwenden.
Abhängig vom Hersteller des Speichergeräts ist
eine Aktualisierung über USB gegebenenfalls
nicht verfügbar.
Zurücksetzen
INIT OK
Oberseite der Soundbar
Drücken Sie bei eingeschalteter Soundbar
gleichzeitig die Tasten (Lautstärke) an dem
Gehäuse für mindestens 5 Sekunden. „INIT OK“
wird in der Anzeige angezeigt und die Soundbar
wird zurückgesetzt.
ACHTUNG
Alle Einstellungen der Soundbar werden
zurückgesetzt. Achten Sie darauf, dies nur
auszuführen, wenn das Zurücksetzen
erforderlich ist.
DEU - 35
12 FEHLERBEHEBUNG
Bevor Sie sich an den Kundendienst wenden, überprüfen Sie bitte die folgenden Punkte.
Die Soundbar lässt sich nicht einschalten.
; Überprüfen Sie, ob das Stromkabel der
Soundbar korrekt in die Steckdose
eingesteckt ist.
Die Soundbar funktioniert unregelmäßig.
; Nachdem Sie das Stromkabel entfernt
haben setzen Sie es erneut ein.
; Entfernen Sie das Netzkabel vom externen
Gerät und versuchen Sie es erneut.
; Wenn kein Signal vorhanden ist, schaltet sich
die Soundbar nach einer bestimmten
Zeitspanne automatisch aus. Schalten Sie die
Stromversorgung ein. (Siehe Seite 3.)
Falls die Fernbedienung nicht funktioniert.
; Zeigen Sie mit der Fernbedienung direkt
auf die Soundbar.
; Ersetzen Sie die Batterien durch neue.
Die Soundbar gibt keinen Ton aus.
; Die Lautstärke der Soundbar ist zu gering
oder stummgeschaltet. Passen Sie die
Lautstärke an.
; Wenn ein externes Gerät (STB, Bluetooth-
Gerät, Mobilgerät usw.) angeschlossen ist,
passen Sie die Lautstärke des externen
Geräts an.
; Wählen Sie für die Tonausgabe des
Fernsehgeräts die Soundbar aus.
(Samsung-TV: Home (
(
wählen)
; Die Kabelverbindung mit der Soundbar
könnte lose sein. Trennen Sie das Kabel und
schließen Sie es erneut an.
; Entfernen Sie das Netzkabel vollständig,
schließen Sie es erneut an und schalten Sie
die Stromversorgung ein.
; Initialisieren Sie das Produkt und versuchen
Sie es erneut. (Siehe Seite 34.)
Der Subwoofer gibt keinen Ton aus.
; Prüfen Sie, ob die LED-Anzeige auf der
Rückseite des Subwoofers blau leuchtet.
Schließen Sie die Soundbar und den
Subwoofer wieder an, wenn die Anzeige
blau blinkt oder rot wird. (Siehe Seite 7.)
; Es kann ein Problem auftreten, wenn ein
Hindernis zwischen Soundbar und
Subwoofer besteht. Bewegen Sie die
Geräte in einen Bereich, der von den
Hindernissen entfernt ist.
; Andere Geräte, die in der Nähe
Radiofrequenzsignale senden, können die
Verbindung unterbrechen. Halten Sie Ihren
Lautsprecher von solchen Geräten fern.
; Entfernen Sie den Netzstecker und
schließen Sie ihn wieder an.
Die Subwoofer-Lautstärke ist zu niedrig.
; Die ursprüngliche Lautstärke des von Ihnen
wiedergegebenen Inhalts ist
möglicherweise niedrig. Versuchen Sie, die
Subwoofer-Lautstärke anzupassen. (Siehe
Seite 27.)
; Bewegen Sie den Subwoofer-Lautsprecher
näher zu sich heran.
Falls das Fernsehgerät nicht per HDMI TO TV
(ARC) verbunden ist.
; Prüfen Sie, ob das HDMI-Kabel korrekt an
den ARC-Anschluss angeschlossen ist.
(Siehe Seiteh 11.)
; Der Anschluss ist möglicherweise aufgrund
des angeschlossenen externen Geräts
(Set-Top-Box, Spielgerät, etc.) nicht
möglich. Verbinden Sie die Soundbar direkt.
; HDMI-CEC ist eventuell nicht an dem
Fernsehgerät aktiviert. Schalten Sie das CEC
im Menü des Fernsehgeräts ein. (Samsung-
TV: Home (
Anynet+ (HDMI-CEC) EIN)
DEU - 36
Es gibt keinen eingehenden Ton beim Anschluss
an den Fernseher im Modus HDMI TO TV (ARC).
; Ihr Gerät ist nicht in der Lage, das
Eingangssignal wiederzugeben. Ändern Sie
die Audioausgabe des Fernsehers auf PCM
oder Dolby Digital. (Bei einem Samsung TV:
Home (
digitalen Audioausgangs)
Die Soundbar lässt sich nicht über Bluetooth
verbinden.
; Wechseln Sie beim Verbinden eines neuen
Geräts für die Verbindung zu „BT PAIRING“.
(Drücken Sie die Taste PAIR auf der
Fernbedienung oder drücken Sie die Taste
(Quelle) am Gehäuse mindestens
; Wenn die Soundbar mit einem anderen
Gerät verbunden ist, trennen Sie das Gerät
zuerst, um das Gerät zu wechseln.
; Stellen Sie die Verbindung wieder her,
nachdem Sie die Bluetooth-
Lautsprecherliste des zu verbindenden
Geräts entfernt haben. (Samsung-TV:
Home (
; Die automatische TV-Verbindung kann
deaktiviert sein. Währen sich die Soundbar
im Zustand „BT READY
Sie die Taste Links auf der Fernbedienung
der Soundbar 5 Sekunden lang gedrückt,
um ON-TV CONNECT auszuwählen. Wenn
Sie OFF-TV CONNECT sehen, halten Sie die
Links-Taste erneut 5 Sekunden lang
gedrückt, um die Auswahl umzuschalten.
; Entfernen Sie den Netzstecker und
versuchen Sie es dann erneut.
; Initialisieren Sie das Produkt und versuchen
Sie es erneut. (Siehe Seite 34.)
Bei einer Bluetooth-Verbindung
verschwindet der Ton.
; Einige Geräte können Funkstörungen
verursachen, wenn Sie sich zu nah an der
drahtlose Router usw.
; Wenn Ihr über Bluetooth verbundenes
Gerät sich zu weit von der Soundbar
entfernt, kann der Ton verschwinden.
Bewegen Sie das Gerät näher an die
Soundbar heran.
; Wenn ein Teil Ihres Körpers mit dem
Bluetooth-Sender/Empfänger in Kontakt
kommt oder wenn das Produkt auf Möbeln
aus Metall installiert wird, kann der Ton
verschwinden. Überprüfen Sie die
Installationsumgebung und die
Einsatzbedingungen.
Die Bluetooth-Mehrfachverbindung
funktioniert nicht.
; Wenn der TV mit der Soundbar verbunden
ist, wird möglicherweise keine Bluetooth-
Mehrfachverbindung betrieben. Trennen
Sie die Soundbar vom TV und versuchen Sie
es erneut.
; Überprüfen Sie, ob die Einstellung für
Bluetooth-Mehrfachverbindung aktiviert
Abschnitt „Die Soundbar lässt sich nicht
über Bluetooth verbinden.“.)
; Trennen Sie das aktuell wiedergebende
Gerät, koppeln Sie es mit dem Gerät, das
Sie verbinden möchten, und verbinden Sie
das vorherige Gerät erneut.
; Wenn der Ton auch nach einer korrekten
Verbindung nicht gehört werden kann,
schlagen Sie im Abschnitt „Bei einer
Bluetooth-Verbindung verschwindet der
Ton.“ nach.
Die Soundbar schaltet sich nicht automatisch mit
dem TV ein.
; Wenn Sie die Soundbar während des
Fernsehens ausschalten, wird die
Synchronisation der Stromversorgung mit
dem Fernseher deaktiviert. Schalten Sie
zuerst das Fernsehgerät aus.

DEU - 37
13 LIZENZ
Dolby, Dolby Atmos, and the double-D symbol
are registered trademarks of Dolby
Laboratories Licensing Corporation.
Manufactured under license from Dolby
Copyright © 2012-2020 Dolby Laboratories. All
rights reserved.
For DTS patents, see http://patents.dts.com.
Manufactured under license from DTS, Inc. (for
companies headquartered in the U.S./Japan/
Taiwan) or under license from DTS Licensing
Limited (for all other companies). DTS, DTS:X,
and the DTS:X logo are registered trademarks
or trademarks of DTS, Inc. in the United States
and other countries. © 2020 DTS, Inc. ALL
RIGHTS RESERVED.
Multimedia Interface, and the HDMI Logo are
trademarks or registered trademarks of HDMI
Licensing Administrator, Inc. in the United
States and other countries.
The Bluetooth® word mark and logos are
registered trademarks owned by the Bluetooth
SIG, Inc. and any use of such marks by Samsung
Electronics Co., Ltd. is under license. Other
trademarks and trade names are those of their
respective owners.
[ENERGY STAR]
ENERGYSTARqualiedmodelonly
– Your Samsung product is ENERGY STAR
Change to certain features, settings and
functionality in this product can change the
power consumption, possibly beyond the
limits required for ENERGY STAR
– Environmental Protection Agency and
Department of Energy. ENERGY STAR is a
joint program of the Government agencies,
products and practices.
Refer to www.energystar.gov for more
information of the ENERGY STAR Program.
ENERGYSTARqualiedmodelonly
(Applicable to Thin Client models only)
As an ENERGY STAR® Partner, SAMSUNG has
determined that this product meets the
ENERGY STAR® guidelines for energy
– The ENERGY STAR Program has been to
reduced greenhouse gas emissions and
save energy through voluntary labeling.
– Power management setting of this product
have been enabled by default, and have
various timing setting from 1 minutes to 5
hours.
– The product can wake with a button press
on the chassis from sleep mode.
ENERGYSTARqualiedmodelonly(Theother
models)
– As an ENERGY STAR Partner, Samsung has
determined that this product or product
models meets the ENERGY STAR guideline

DEU - 38
14 BEKANNTMACHUNG
ZU OPEN SOURCE
LIZENZEN
Zum Senden von Anfragen und Anliegen
betreffend Open Source kontaktieren Sie
Samsung Open Source
(http://opensource.samsung.com)
15 WICHTIGE
HINWEISE ZUM
KUNDENDIENST
Die Abbildungen in dieser Anleitung dienen
nur als Referenz und können sich vom
aktuellen Produkt unterscheiden.
Es kann eine Gebühr erhoben werden, wenn:
(a) Ein Techniker auf Ihre Anfrage bestellt
wird und am Gerät kein Defekt vorliegt
(z. B. weil Sie diese Bedienungsanleitung
nicht gelesen haben).
(b) Sie das Gerät in einer Reparaturwerkstatt
abgegeben haben und am Gerät kein
Defekt vorliegt
(z. B. weil Sie diese Bedienungsanleitung
nicht gelesen haben).
Die Höhe dieser Gebühr wird Ihnen mitgeteilt,
bevor irgendwelche Arbeiten durchgeführt
werden oder der Hausbesuch erfolgt.

DEU - 39
16 SPEZIFIKATIONEN UND LEITFADEN
Technische daten
Modellname HW-Q600A
USB 5V/0,5A
Gewicht 3,4 kg
Abmessungen (B × H × T) 980,0 x 58,0 x 105,0 mm
Betriebstemperatur +5°C bis +35°C
Zulässige Luftfeuchtigkeit 10 % ~ 75 %
VERSTÄRKER
Nennausgangsleistung 200W (30W x 6 + 10W x 2)
Unterstützte Wiedergabeformate
Dolby Atmos (True HD / Digital Plus), Dolby
Digital, DTS-HD Master Audio, DTS:X, DTS
AUSGANGSLEISTUNG DES DRAHTLOSGERÄTS
BT max. Transmitterleistung
SRD max. Transmitterleistung
6mW bei 2,402GHz - 2,480GHz
25mW bei 5,725GHz – 5,825GHz
Subwoofername PS-WA67B
Gewicht 5,8 kg
Abmessungen (B × H × T) 205,0 x 353,0 x 303,2 mm
VERSTÄRKER
Nennausgangsleistung 160W
AUSGANGSLEISTUNG DES DRAHTLOSGERÄTS
SRD max. Transmitterleistung 25mW bei 5,725GHz – 5,825GHz
Gesamtstromverbrauch im Bereitschaftszustand (W)
2,0W
Bluetooth
Anschlussdeaktivierungsmethode
Halten Sie die Taste SOUND MODE für
mindestens 5 Sekunden gedrückt, um die
Bluetooth Power-Funktion auszuschalten.
HINWEISE
Samsung Electronics Co., Ltd behält sich das Recht auf unangekündigte Änderungen vor.
Gewicht und Abmessungen können von den Angaben abweichen.

DEU - 40
Hiermit erklärt Samsung, dass diese Radioausstattung der Direktive 2014/53/EU und den relevanten
gesetzlichen Anforderungen von Großbritannien konform ist.
Der vollständige Text der Konformitätserklärung ist unter folgender Internetadresse verfügbar:
http://www.samsung.com navigieren Sie dort zu „Support“ und geben Sie den Modellnamen ein.
Dieses Gerät kann in allen Ländern in der EU und in Großbritannien verwendet werden.
[Korrekte Entsorgung der Batterien dieses Produkts]
(Gilt für Länder mit Abfalltrennsystemen)
Die Kennzeichnung auf der Batterie bzw. auf der dazugehörigen Dokumentation oder Verpackung gibt an,
dass die Batterie zu diesem Produkt nach seiner Lebensdauer nicht zusammen mit dem normalen
Haushaltsmüll entsorgt werden darf. Wenn die Batterie mit den chemischen Symbolen Hg, Cd oder Pb
gekennzeichnet ist, liegt der Quecksilber-, Cadmium- oder Blei-Gehalt der Batterie über den in der EG-
Richtlinie 2006/66 festgelegten Referenzwerten. Wenn Batterien nicht ordnungsgemäß entsorgt werden,
können sie der menschlichen Gesundheit bzw. der Umwelt schaden.
Bitte helfen Sie, die natürlichen Ressourcen zu schützen und die nachhaltige Wiederverwertung von
kostenloses Altbatterie- Rücknahmesystem entsorgen.
Korrekte Entsorgung von Altgeräten
(Elektroschrott)
(Gilt für Länder mit Abfalltrennsystemen)
Die Kennzeichnung auf dem Produkt, Zubehörteilen bzw. auf der dazugehörigen Dokumentation gibt an,
dass das Produkt und Zubehörteile (z. B. Ladegerät,Kopfhörer, USB-Kabel) nach ihrer Lebensdauer nicht
zusammen mit dem normalen Haushaltsmüll entsorgt werden dürfen. Entsorgen Sie dieses Gerät und
Zubehörteile bitte getrennt von anderen Abfällen, um der Umwelt bzw. der menschlichen Gesundheit nicht
durch unkontrollierte Müllbeseitigung zu schaden. Helfen Sie mit, das Altgerät und Zubehörteile
Private Nutzer wenden sich an den Händler, bei dem das Produkt gekauft wurde, oder kontaktieren die
zuständigen Behörden, um in Erfahrung zu bringen, wo Sie das Altgerät bzw. Zubehörteile für eine
umweltfreundliche Entsorgung abgeben können.
Gewerbliche Nutzer wenden sich an ihren Lieferanten und gehen nach den Bedingungen des
Verkaufsvertrags vor. Dieses Produkt und elektronische Zubehörteile dürfen nicht zusammen mit anderem
Gewerbemüll entsorgt werden.
www.samsung.com/uk/aboutsamsung/sustainability/environment/our-commitment/data/
VERORDNUNG (EU) 2019/1782 DER KOMMISSION
Ökodesign-Anforderungen an externe Netzteile
www.samsung.com/global/ecodesign_component
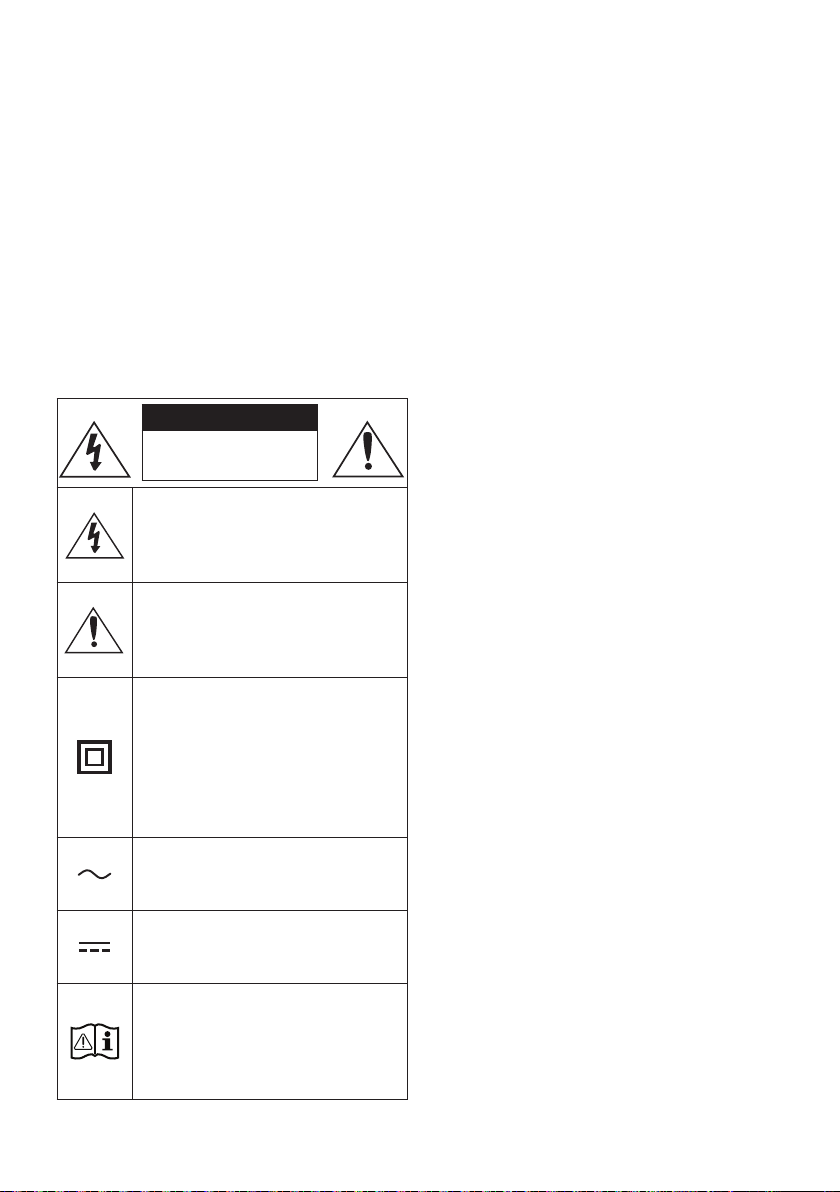
FRA - ii
INFORMATIONS RELATIVES À LA SÉCURITÉ
AVERTISSEMENTS
POUR ÉVITER LES RISQUES DE CHOC
ÉLECTRIQUE, NE DÉMONTEZ PAS LE CAPOT.
L’APPAREIL NE CONTIENT PAS DE PIÈCES
RÉPARABLES PAR L’UTILISATEUR ; S’ADRESSER
À UN SERVICE APRÈS-VENTE QUALIFIÉ.
Reportez-vous au tableau ci-dessous pour une
ATTENTION
RISQUE DE CHOC
ÉLECTRIQUE. NE PAS
OUVRIR
Ce symbole indique que ce produit est
alimenté par haute tension. Il est
située à l'intérieur de ce produit.
Ce symbole indique qu'une
documentation importante relative au
fonctionnement et à l'entretien est
fournie avec le produit.
qu'aucun branchement de sécurité à la
terre (prise de terre) n'est requis.
Si ce symbole n'est pas présent sur un
produit avec un cordon d'alimentation,
le produit DOIT avoir une connexion de
tension nominale indiquée par le
symbole est une tension CA.
tension nominale indiquée par le
symbole est une tension CC.
qu'il doit consulter le manuel
d'utilisation pour en savoir plus sur les
informations relatives à la sécurité.
AVERTISSEMENT
choc électrique, n’exposez pas cet appareil à
la pluie ou à l’ humidité.
ATTENTION
POUR PRÉVENIR LES CHOCS ÉLECTRIQUES,
BRANCHEZ LA FICHE AU FOND, EN
PRENANT SOIN D’INSÉRER LA TIGE LARGE
DANS LA FENTE LARGE.
Cet appareil doit toujours être branché à une
prise terre.
Pour déconnecter l’appareil du circuit
principal, la prise doit être débranchée de la
prise principale ; il est de ce fait nécessaire
Évitez toute projection d’eau sur l’appareil.
Ne posez jamais d’objet contenant un liquide
devez retirer le cordon d’alimentation de la
prise murale. Par conséquent, le cordon
d’alimentation doit être facilement accessible
à tout moment.
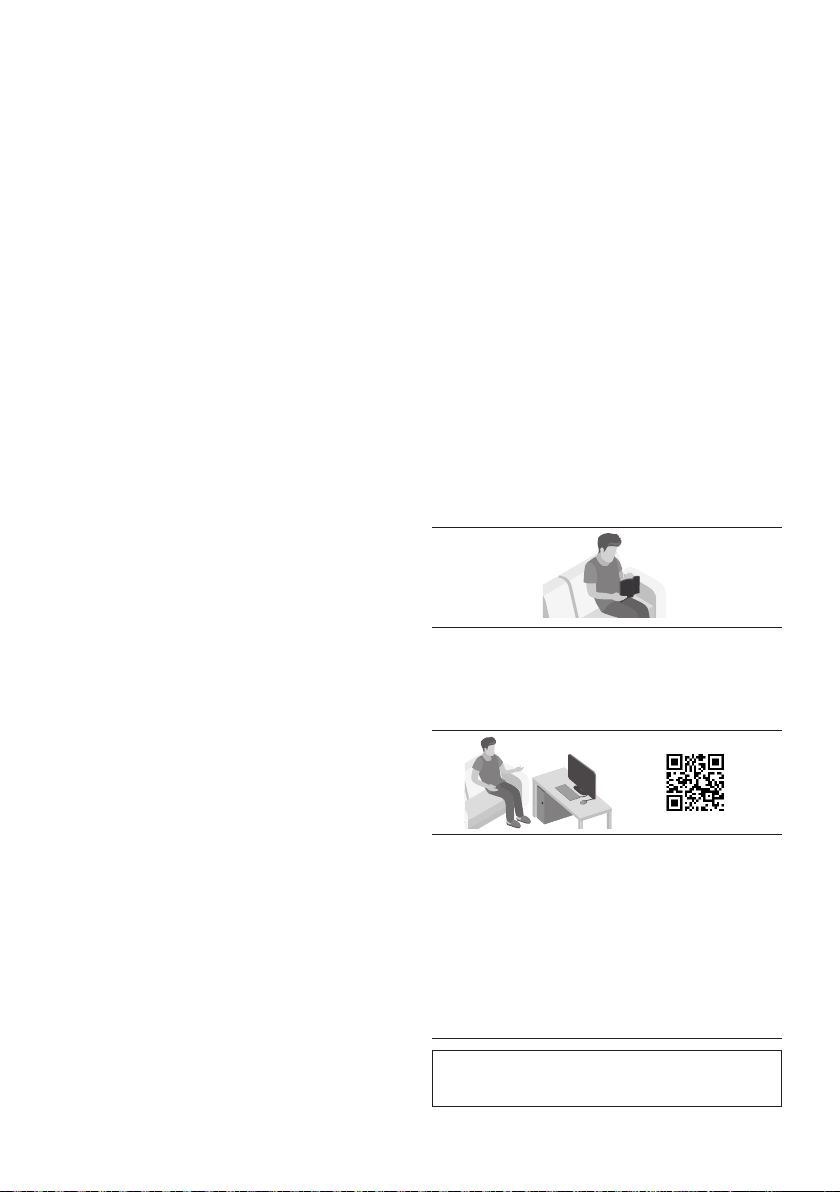
FRA - iii
PRÉCAUTIONS
1.
votre domicile respecte les conditions en
votre produit. Posez votre produit à plat sur
un meuble stable en veillant à laisser un
d’assurer une ventilation correcte de celui-ci.
de ventilation. Ne posez pas l’ensemble sur
susceptible de chauffer. Cet ensemble est
conçu pour une utilisation en continu. Pour
2.
l’appareil de la prise murale. Les surtensions
3. N’exposez pas l’ensemble aux rayons directs
du soleil ou à toute autre source de chaleur.
Ceci pourrait entraîner une surchauffe et un
dysfonctionnement de l’appareil.
4.
vases) et d’une chaleur excessive (comme
une cheminée) ou de tout équipement
ou électriques. Débranchez le câble
d’alimentation en cas de dysfonctionnement.
industriel. Ce produit ne peut être utilisé qu’à
peut se former si le produit ou un disque a
été stocké à basse température.
Si vous devez transporter l’ensemble
pendant l’hiver, attendez environ 2 heures
que l’appareil ait atteint la température de la
5. Les piles utilisées dans ce produit peuvent
pour l’environnement. Ne jetez pas les piles
dans votre poubelle habituelle. Ne vous
débarrassez pas des piles en les faisant
brûler. Ne court-circuitez pas, ne
désassemblez pas ni ne faites pas surchauffer
les batteries. ATTENTION : Le remplacement
incorrect de la batterie entraîne un risque
d’explosion. Ne la remplacez que par une
batterie du même type.
À PROPOS DE CE
MANUEL
le MANUEL D’UTILISATEUR en version papier et le
MANUEL D’UTILISATEUR
Consultez ce manuel pour en savoir plus sur les
MANUEL COMPLET
Vous pouvez accéder au MANUEL COMPLET
Pour consulter le manuel sur votre PC ou

FRA - iv
SOMMAIRE
01 Contrôle des Composants 2
Insertion des piles avant l’utilisation de la télécommande (Piles AA X 2) ------------------------- 2
02 Présentation du Produit 3
------------------------- 3
Panneau inférieur de la Soundbar ------------------------- 4
03 Connexion de la Soundbar 5
Connexion de l’alimentation électrique
-------------------------
5
Connexion de la Soundbar au Caisson de basse
-------------------------
6
– Connexion automatique entre le Caisson de basse et la Soundbar
-------------------------
6
– Connexion manuelle du Caisson de basse si la connexion
automatique échoue
-------------------------
7
Connexion du SWA-9100S (Vendue séparément) à une Soundbar
-------------------------
9
04 Connexion à votre Téléviseur 11
Méthode 1. Connexion avec un câble
-------------------------
11
– Connexion d’un téléviseur à l’aide d’un câble HDMI
-------------------------
11
– Connexion à l’aide d’un câble optique
-------------------------
13
-------------------------
15
– Connexion à un téléviseur via Bluetooth
-------------------------
15
05 Connexion à un Appareil Externe 17
-------------------------
17
Connexion à l’aide d’un câble optique
-------------------------
18
06 Connexion d’un périphérique de stockage USB 19

FRA - v
07 Connexion à un Appareil Mobile 20
Connexion via Bluetooth
-------------------------
20
Utilisation de la fonction Tap Sound
-------------------------
24
08 Utilisation de la télécommande 25
Comment utiliser la télécommande
-------------------------
25
téléviseur ------------------------- 28
Utilisation des touches dissimulées (Touches avec plus d’une fonction)
-------------------------
29
-------------------------
29
09 Installation du Support Mural 30
Précautions d’installation
-------------------------
30
-------------------------
30
10 Installation de la Soundbar sur un socle de
téléviseur 32
11 Mise à jour du Logiciel 33
Procédure de mise à jour
-------------------------
33
-------------------------
34
Réinitialisation
-------------------------
34
12 Dépannage 35
13 Licence 37
14 Avis de Licence Libre 38
15 Remarque Importante à Propos du Service 38
16 SpécicationsetGuide 39
-------------------------
39
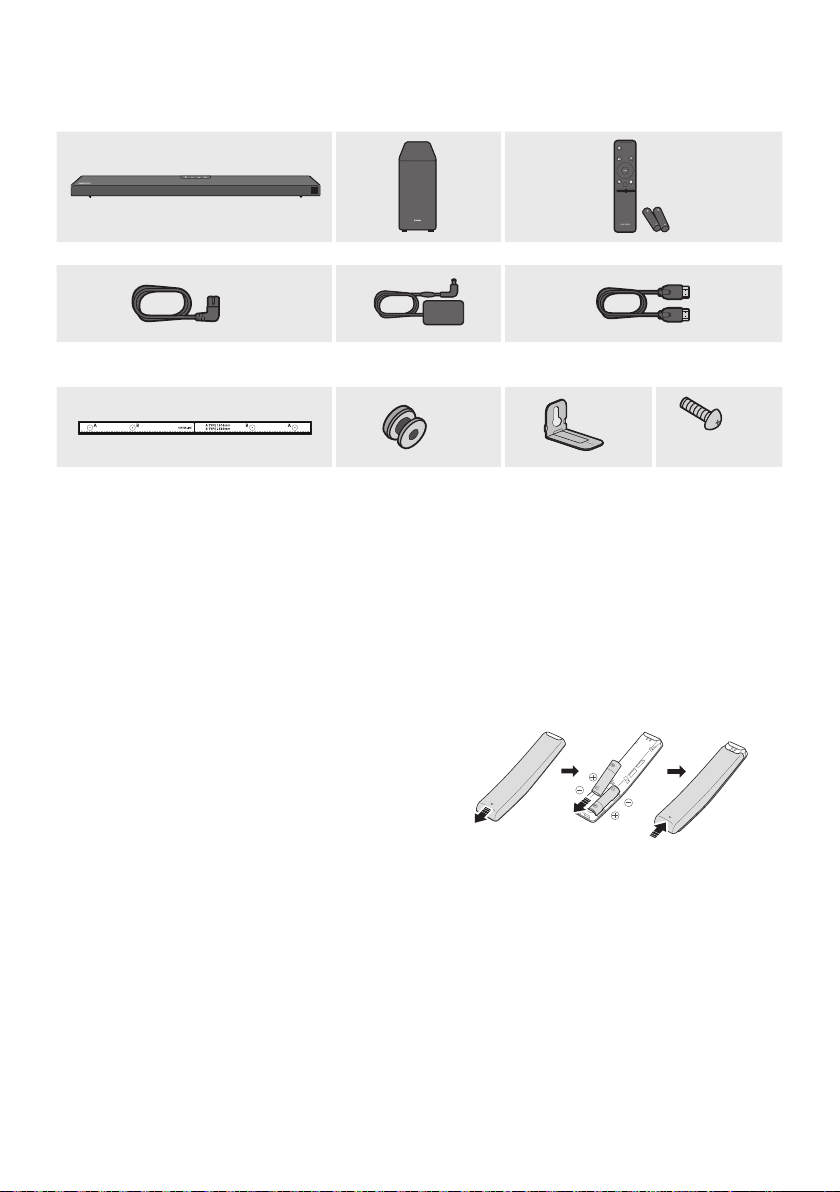
FRA - 2
01 CONTRÔLE DES COMPOSANTS
VOL WOOFER
SOUNDBAR
SOUND
MODE
PAIR
Unité principale Soundbar Caisson de basse Télécommande/Piles
x 2
Cordon d’alimentation
(Caisson de basse, Soundbar)
Adaptateur CA/CC
(Soundbar)
Câble HDMI
x 2
x 2
(M4 x L10)
x 2
Guidedexationmurale Visdexation
Supportdexation
murale
Vis
Pour plus d’informations sur l’alimentation et la consommation électriques, reportez-vous à
Pour acheter des composants supplémentaires ou des câbles optionnels, contactez un Centre de
Insertion des piles avant l’utilisation de la télécommande (Piles AA X 2)
retiré. Insérez 2 piles AA (1,5 V) orientées de sorte
que la polarité soit correcte. Remettez le couvercle

FRA - 3
02
PRÉSENTATION DU PRODUIT
Panneau frontal/supérieur de la Soundbar
Placez le produit de sorte
SAMSUNG
se
trouve sur le dessus.
Panneau supérieur
Afchage
Touche (Alimentation)
Allume et éteint l'appareil.
Fonction Auto Power Down
L’appareil s’éteint automatiquement dans les situations suivantes.
– Mode D.INHDMI BTUSB
Touche (Volume)
Touche (Source)
Sélectionne le mode d'entrée de la source.
Mode d’entrée Afchage
Entrée numérique optique D.IN
Entrée ARC (HDMI OUT) D.IN TV ARC (Conversion automatique)
Entrée HDMI HDMI
Mode BLUETOOTH BT
Mode USB USB
Pour activer le mode «BTPAIRINGBT», puis appuyez et maintenez
enfoncée la touche (Source) pendant plus de 5 secondes.
Lorsque vous mettez l’unité sous tension, il faut compter 4 ou 5 secondes de retard avant le
déclenchement du son.
téléviseur depuis le menu Audio Setup de votre téléviseur. Reportezvous au manuel fourni avec
votre téléviseur.

FRA - 4
Panneau inférieur de la Soundbar
HDMI
HDMI TO TV
(ARC)
USB (5V 0.5A)
DC 24V
DIGITAL AUDIO IN (OPTICAL)
HDMI
HDMI TO TV
(ARC)
DIGITAL AUDIO IN (OPTICAL)
USB (5V 0.5A)
DC 24V
HDMI
HDMI TO TV
(ARC)
USB (5V 0.5A)
DC 24V
DIGITAL AUDIO IN (OPTICAL)
HDMI
HDMI TO TV
(ARC)
DIGITAL AUDIO IN (OPTICAL)
USB (5V 0.5A)
DC 24V
HDMI
HDMI TO TV
(ARC)
USB (5V 0.5A)
DC 24V
DIGITAL AUDIO IN (OPTICAL)
HDMI
HDMI TO TV
(ARC)
DIGITAL AUDIO IN (OPTICAL)
USB (5V 0.5A)
DC 24V
USB (5V 0.5A)
Soundbar.
DC 24V (Entrée d'alimentation électrique)
HDMI
Permet de connecter la sortie HDMI d'un appareil externe.
HDMI TO TV (ARC)
Permet de connecter une prise jack HDMI (ARC) sur un téléviseur.
DIGITALAUDIOIN(OPTICAL)
Permet de connecter la sortie numérique (optique) d'un appareil externe.
Ne branchez pas cette unité ou d’autres composants à une prise CA tant que toutes les connexions
entre les composants ne sont pas terminées.
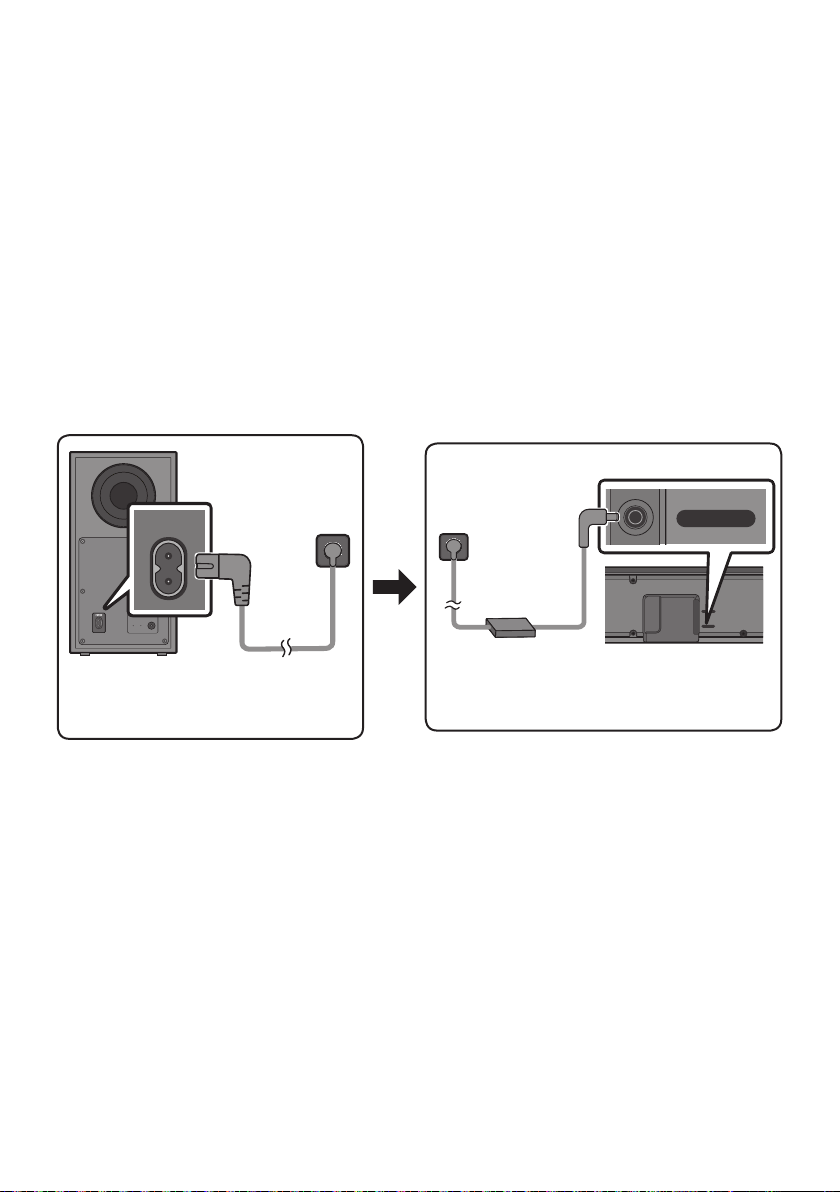
FRA - 5
03 CONNEXION DE LA SOUNDBAR
Connexion de l’alimentation électrique
Utilisez les composants d’alimentation pour connecter le Caisson de basse et la Soundbar à une prise
1. Connectez le cordon d’alimentation au Caisson de basse.
2. Branchez le câble de sortie d’alimentation sur l’adaptateur secteur, puis à la Soundbar.
3. Connectez le cordon d’alimentation à la prise murale.
Reportez-vous aux illustrations ci-dessous.
Pour plus d’informations sur l’alimentation et la consommation électriques requises, reportez-vous
POWER
Arrière du
Caisson de basse
Cordon
d’alimentation
Connexion de
l’alimentation
électrique
USB (5V 0.5A)
DC 24V
DC 24V
Partie inférieure de
l’unité principale
Soundbar
Adaptateur CA/CC
Cordon
d’alimentation
Connexion de
l’alimentation
électrique
risquent de pénétrer dans l’adaptateur et d’entraîner des dysfonctionnements.

FRA - 6
Connexion de la Soundbar au Caisson de basse
Connexion automatique entre le Caisson de basse et la Soundbar
Soundbar et au Caisson de basse, le Caisson de basse est automatiquement connecté à la Soundbar.
s’allume.
Témoins indicateurs LED sur l’arrière du Caisson de basse
LED État Description Résolution
Bleu
Activé
Connexion réussie
(fonctionnement normal)
-
Récupération de la
connexion
l’unité principale Soundbar est connecté
correctement ou attendez environ
essayez de connecter manuellement le
7.
Activé
En veille (avec l’unité
principale de la Soundbar
éteinte)
l’unité principale Soundbar est connecté
correctement.
Échec de la connexion
Reconnectez. Reportez-vous aux
instructions sur la connexion manuelle à
7.
bleu
Dysfonctionnement
Reportez-vous aux informations de
dans le manuel.
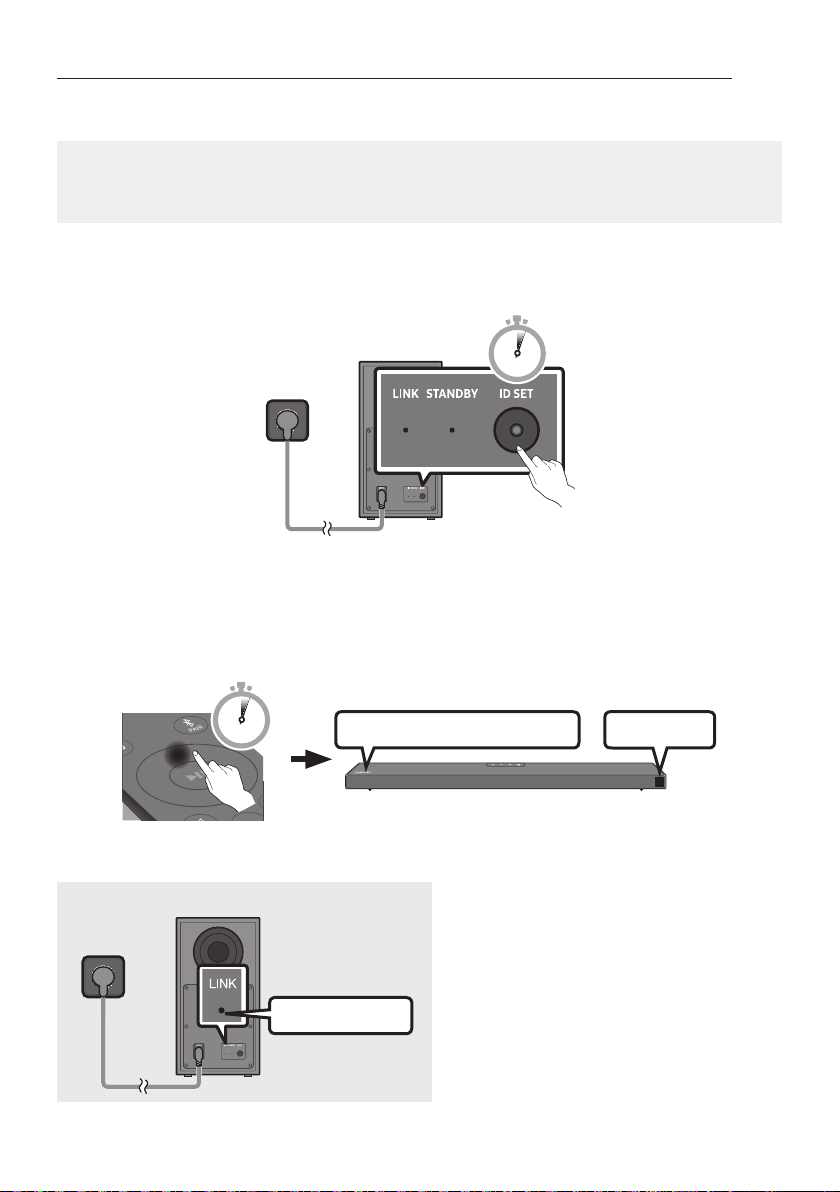
FRA - 7
Connexion manuelle du Caisson de basse si la connexion automatique échoue
Avant d’effectuer la procédure de connexion manuelle ci-dessous :
correctement.
Assurez-vous que la Soundbar est allumée.
1. Appuyez sur la touche ID SET
moins 5 secondes.
5 Sec
Arrière du Caisson de basse
2. Appuyez sur la touche Haut de la télécommande, et maintenez-la enfoncée pendant au moins
ID SET
La Soundbar est automatiquement mise sous tension lorsque ID SET est terminé.
SOUND
MODE
PAIR
5 Sec
ID SET
LelogoSAMSUNGestsurledessus
3.
Allumé en bleu
s’éclaire en bleu en continu lorsqu’une
connexion est établie entre la Soundbar et le

FRA - 8
REMARQUES
Ne branchez pas le cordon d’alimentation de ce produit ou votre téléviseur à une prise de courant
murale tant que toutes les connexions entre les composants ne sont pas terminées.
Avant de déplacer ou d’installer ce produit, assurez-vous de le mettre hors tension et de débrancher
le cordon d’alimentation.
Soundbar, les interférences peuvent provoquer des interruptions de son.
mais peut varier en fonction de votre environnement d’exploitation. Si un mur en béton armé ou
PRÉCAUTIONS
l’eau et de l’humidité.
Pour des performances d’écoute optimales, assurez-vous que la zone autour de l’emplacement du
d’obstacles.
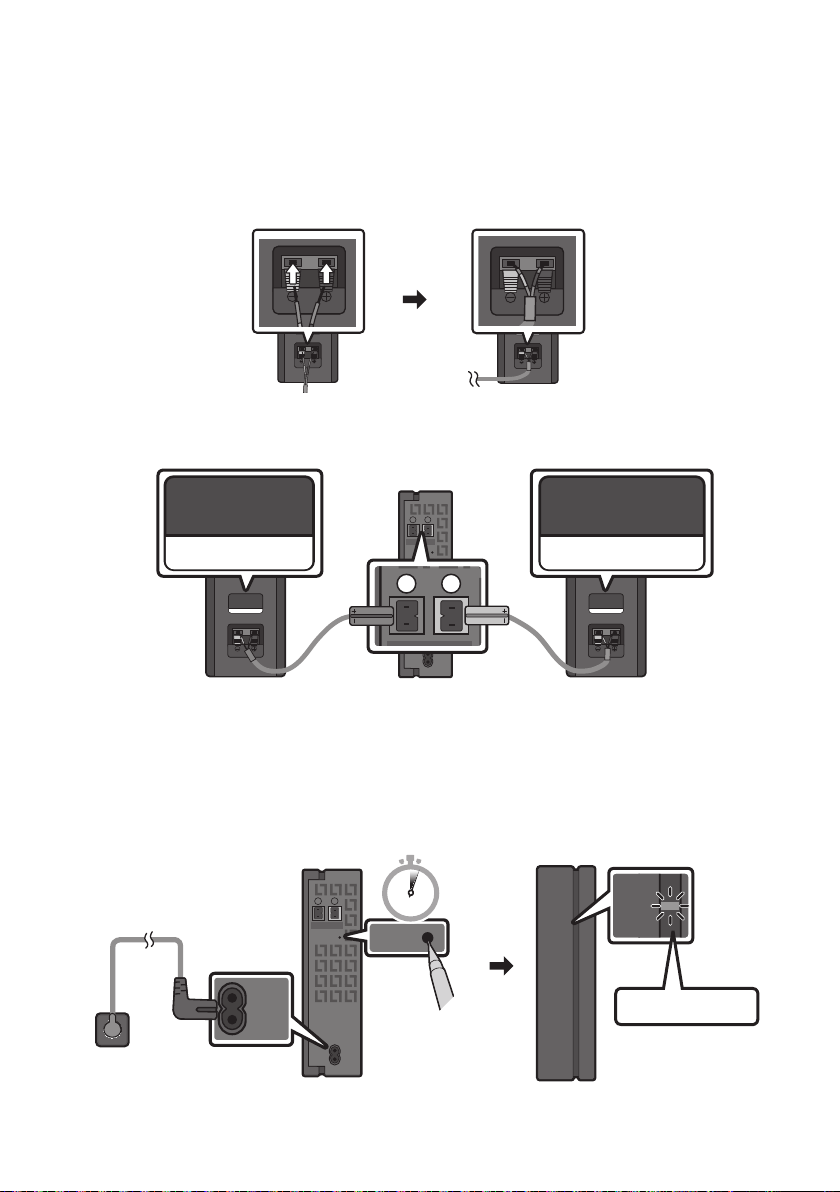
FRA - 9
Connexion du SWA-9100S (Vendue séparément) à une Soundbar
(SWA-9100S, vendu séparément) à votre Soundbar.
1.
–
SURROUND-RIGHT
SURROUND-RIGHT
– Les câbles d’enceinte répondent à un code couleur.
SURROUND-LEFT
ID SET
L
R
SURROUND SPEAKERS OUT
SPEAKER IMPEDANCE : 3Ω
POWER
ID SET
L
R
SURROUND SPEAKERS OUT
SPEAKER IMPEDANCE : 3Ω
SURROUND-RIGHT
SURROUND-LEFT SURROUND-RIGHT
2.
ID SET
plus d’informations sur la LED, veuillez vous reporter au manuel d’utilisation SWA-9100S.
ID SET
L
R
SURROUND SPEAKERS OUT
SPEAKER IMPEDANCE : 3Ω
POWER
POWER
ID SET
SURROUND SPEAKERS OUT
SPEAKER IMPEDANCE : 3Ω
STANDBY
LINK
STANDBY
LINK
Clignotement bleu
5 Sec

FRA - 10
3. Appuyez sur la touche Haut de la télécommande, et maintenez-la enfoncée pendant au moins
ID SET
La Soundbar est automatiquement mise sous tension lorsque ID SET est terminé.
SOUND
MODE
PAIR
5 Sec
ID SET
LelogoSAMSUNGestsurledessus
ATTENTION
Si votre Soundbar diffuse de la musique au moment où elle est connectée au SWA-9100S, vous
4.
STANDBY
LINK
STANDBY
LINK
Allumé en bleu
s’éclaire en bleu en continu lorsqu’une
connexion est établie entre la Soundbar et le
5. Si le SWA-9100S n’est pas connecté, répétez la procédure de l’étape 2.
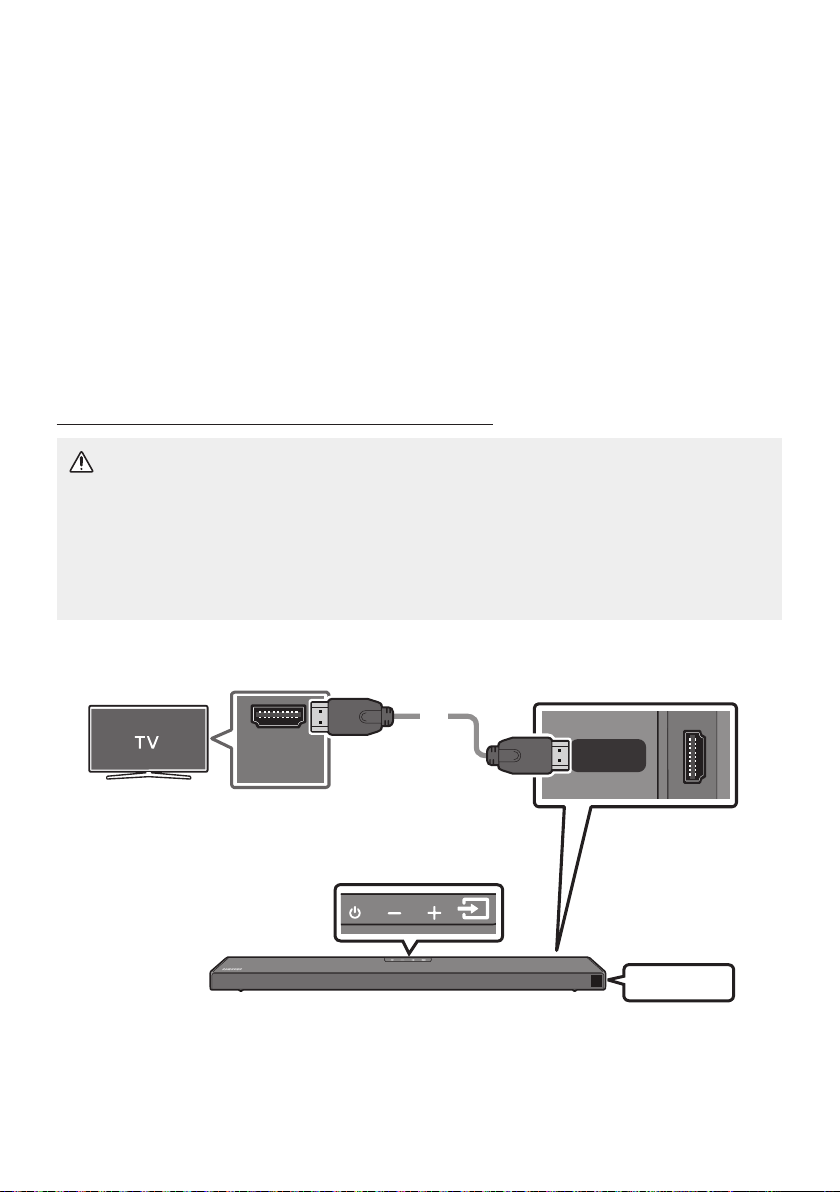
FRA - 11
04 CONNEXION À VOTRE TÉLÉVISEUR
contrôlée à l’aide de la télécommande du téléviseur.
–
téléviseur à l’aide d’un câble optique.
–
Méthode 1. Connexion avec un câble
Connexion d’un téléviseur à l’aide d’un câble HDMI
ATTENTION
reçu en priorité.
Pour raccorder le téléviseur et la Soundbar à l’aide du câble HDMI, veillez à utiliser les bornes
marquées ARC. Dans le cas contraire, le son du téléviseur ne sera pas émis.
Il est recommandé d’utiliser un High-Speed HDMI Cable with Ethernet.
Contrôle de (ARC) au port
HDMI INdevotretéléviseur.
HDMI IN
(ARC)
HDMI TO TV
(ARC)
DIGITAL AUDIO IN (OPTICAL)
Câble HDMI
Partie inférieure de la Soundbar
Contrôlez le port HDMI TO TV (ARC) de
l’unité principale Soundbar.
Partie supérieure de la Soundbar
TV ARC
1. Avec la Soundbar et le téléviseur allumés, connectez le câble HDMI tel qu’illustré.
2. «TV ARC
entendre le son du téléviseur.

FRA - 12
Si le son du téléviseur est inaudible, appuyez sur le bouton (Source) de la télécommande ou
de la partie supérieure de la Soundbar pour passer en mode «D.IN
successivement «D.IN» et «TV ARC», et vous pouvez entendre le son du téléviseur.
Si «TV ARC
le câble HDMI est connecté au bon port.
Soundbar.
REMARQUES
HDMI est une interface qui permet la transmission numérique de données vidéo et audio avec un
seul connecteur.
fabricant.)
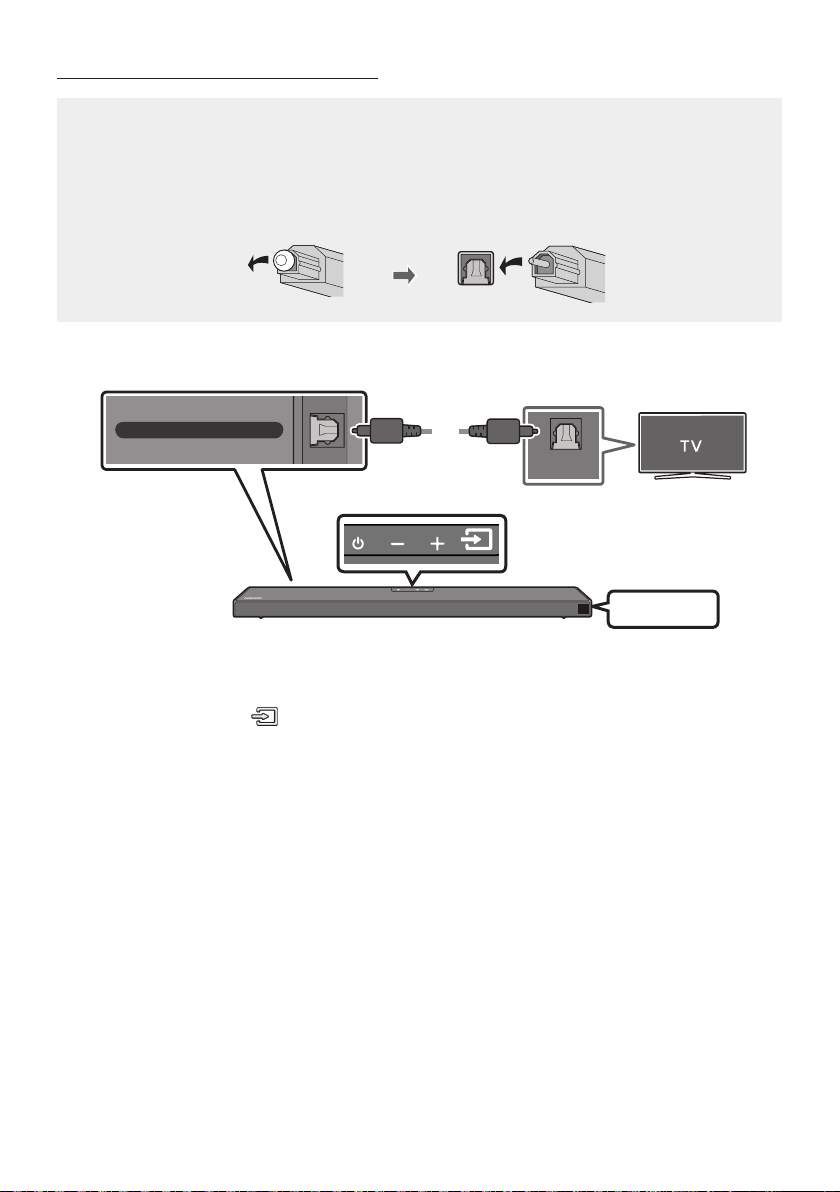
FRA - 13
Connexion à l’aide d’un câble optique
Listedevéricationspréalablesàlaconnexion
reçu en priorité.
Lorsque vous utilisez un câble optique et que les bornes sont dotées d’un cache, veillez à retirer
les caches.
OPTICAL OUT
DIGITAL AUDIO IN (OPTICAL)
Partie inférieure de la Soundbar
Partie supérieure de la Soundbar
Câble optique
(non fourni)
D.IN
1. Raccordez la prise DIGITALAUDIOIN(OPTICAL) de la Soundbar à la prise OPTICAL OUT du
téléviseur à l’aide d’un câble optique (non fourni) numérique.
2. Appuyez sur le bouton (Source) du panneau supérieur ou de la télécommande, puis
sélectionnez le mode «D.IN».
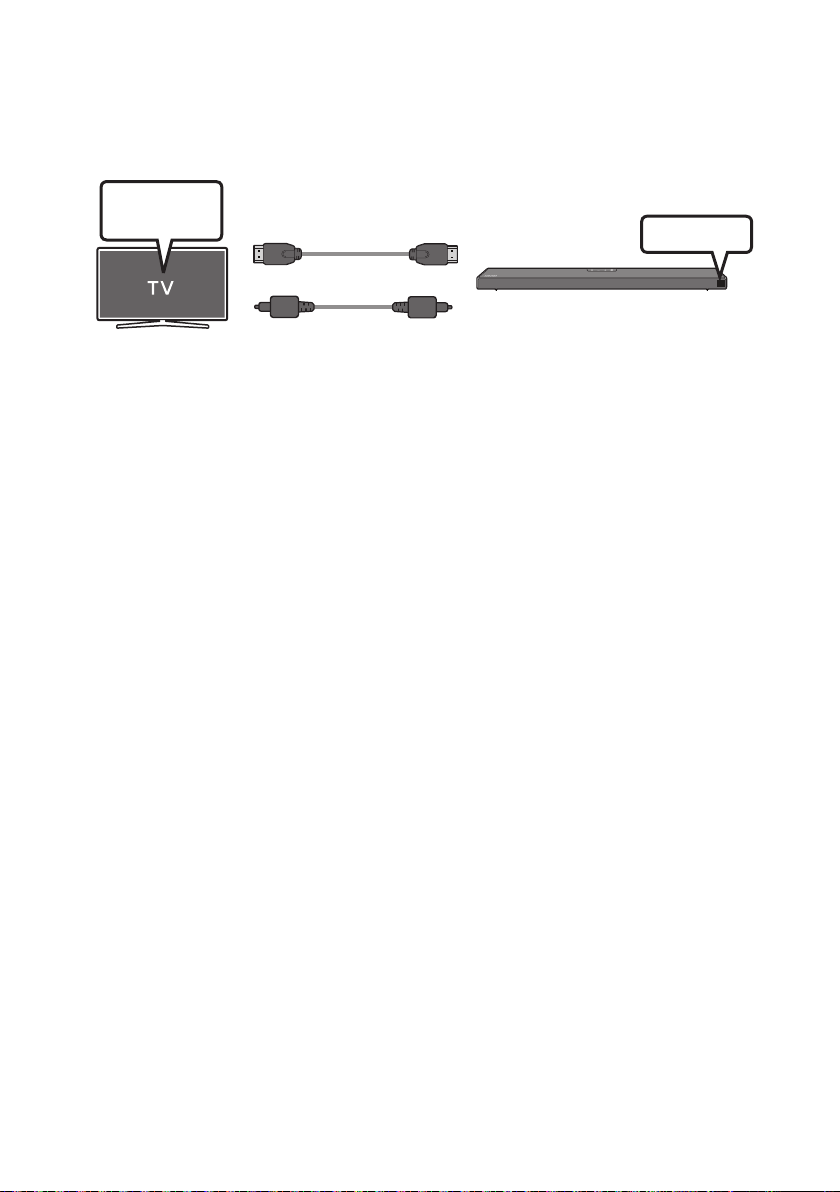
FRA - 14
Utilisation de la fonction Q-Symphony
deux périphériques pour un effet surround optimal. Quand la Soundbar est connectée, le menu
«TV+Soundbar» apparaît dans le menu Sortie son du téléviseur. Sélectionnez le menu correspondant.
Menu TV
OU
Câble optique (non fourni)
Câble HDMI
D.IN
TV + [AV] Soundbar Nom de série [HDMI]
REMARQUES
connecté.
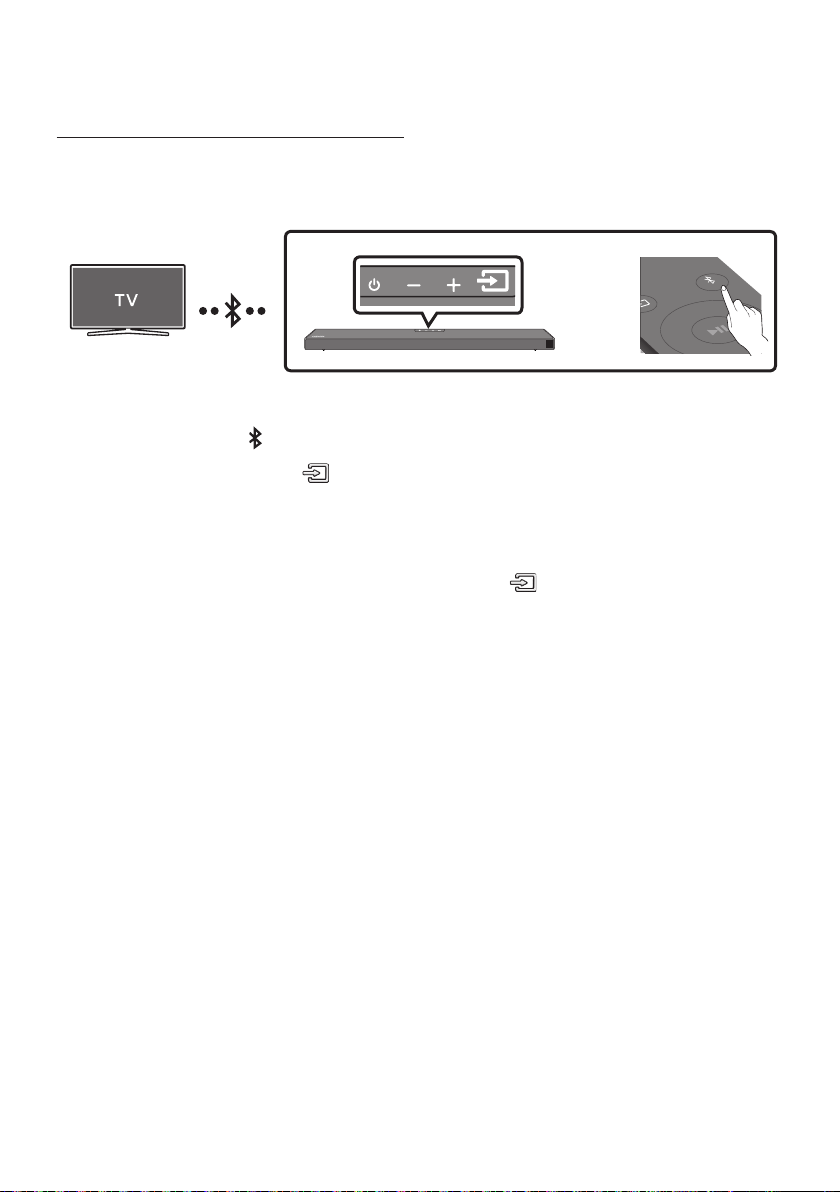
FRA - 15
Méthode2.Connexionsansl
Connexion à un téléviseur via Bluetooth
Lorsqu’un téléviseur est connecté à l’aide de Bluetooth, vous pouvez écouter le son stéréo sans tracas
Seul un téléviseur à la fois peut être connecté.
SOUND
MODE
PAIR
OU
Connexion initiale
1. Appuyez sur la touche PAIR de la télécommande pour passer au mode «BTPAIRING».
(OU)
a. Appuyez sur le bouton (Source) situé sur le panneau supérieur, puis sélectionnez
«BT».
«BT» passe automatiquement en «BTPAIRING» en quelques secondes ou en «BT READY»
b. Lorsque «BT READY» apparaît, maintenez le bouton (Source) enfoncé sur le panneau
BTPAIRING».
2. Sélectionnez le mode Bluetooth sur le téléviseur. (Pour plus d’informations, reportez-vous au
manuel du téléviseur.)
3. Sélectionnez «[AV] Samsung Soundbar Q6A-Series» dans la liste sur l’écran du téléviseur.
Une Soundbar disponible est indiquée «Need Pairing» ou «Paired» dans la liste des appareils
connexion.
Lorsque le téléviseur est connecté, [Nom du téléviseurBT
la Soundbar.
4. Vous pouvez maintenant entendre le son du téléviseur depuis la Soundbar.
Si la connexion de l’appareil échoue
Si la liste de Soundbar connectées précédemment (par ex. «[AV] Samsung Soundbar Q6A-Series»
apparaît dans la liste, supprimez-la.
Ensuite, répétez les étapes 1 à 3.
REMARQUE
BT READY»
pour la reconnexion.

FRA - 16
Déconnexion de la Soundbar à partir du téléviseur
Appuyez sur le bouton (Source) du panneau supérieur ou de la télécommande et activez l’un des
modes, à l’exception du mode «BT».
La déconnexion prend du temps parce que le téléviseur doit recevoir une réponse de la Soundbar.
Pour annuler la connexion Bluetooth automatique entre la Soundbar et le téléviseur, appuyez sur la
touche Gauche sur la télécommande pendant 5 secondes avec la Soundbar en mode «BT READY».
QuelleestladifférenceentreBTREADYetBTPAIRING?
BT READY
connecter un appareil mobile connecté précédemment à la Soundbar.
BTPAIRING
le bouton PAIR de la télécommande ou maintenez le bouton
(Source)
situé sur la partie
supérieure de la Soundbar enfoncé pendant plus de 5 secondes lorsque la Soundbar est en mode
«BT».)
REMARQUES
Si un code PIN est demandé lors de la connexion d’un appareil Bluetooth, saisissez <0000>.
En mode de connexion Bluetooth, la connexion Bluetooth sera perdue si la distance entre la
Soundbar et l’appareil Bluetooth dépasse 10 m.
Il se peut que la Soundbar ne puisse pas effectuer correctement la recherche Bluetooth ou la
– En cas de champ électrique puissant autour de la Soundbar.
– Si deux appareils Bluetooth ou plus sont appariés simultanément avec la Soundbar.
– Si l’appareil Bluetooth est éteint, non installé, ou présente un dysfonctionnement.

FRA - 17
05 CONNEXION À UN APPAREIL EXTERNE
Raccordez un appareil externe via une connexion câblée ou une connexion Bluetooth pour écouter le
son de l’appareil externe via la Soundbar.
Connexion à l’aide d’un câble HDMI (prise en charge du décodage et
de la lecture Dolby Atmos)
Listedevéricationspréalablesàlaconnexion
sur Off.
HDMI OUT
HDMI IN
(ARC)
HDMI
HDMI TO TV
(ARC)
DIGITAL AUDIO IN (OPTICAL)
Câble HDMI
Câble HDMI
Partie inférieure de la Soundbar
Appareil externe
Partie supérieure de la Soundbar
HDMI
1. Raccordez un câble HDMI de la prise HDMI au dos du produit à la prise HDMI OUT de votre appareil
numérique.
2. Raccordez un câble HDMI de la prise HDMI TO TV (ARC) au dos du produit à la prise HDMI IN de
votre téléviseur.
3. Appuyez sur le bouton (Source) du panneau supérieur ou de la télécommande, puis sélectionnez
«HDMI».
4. Le mode «HDMI
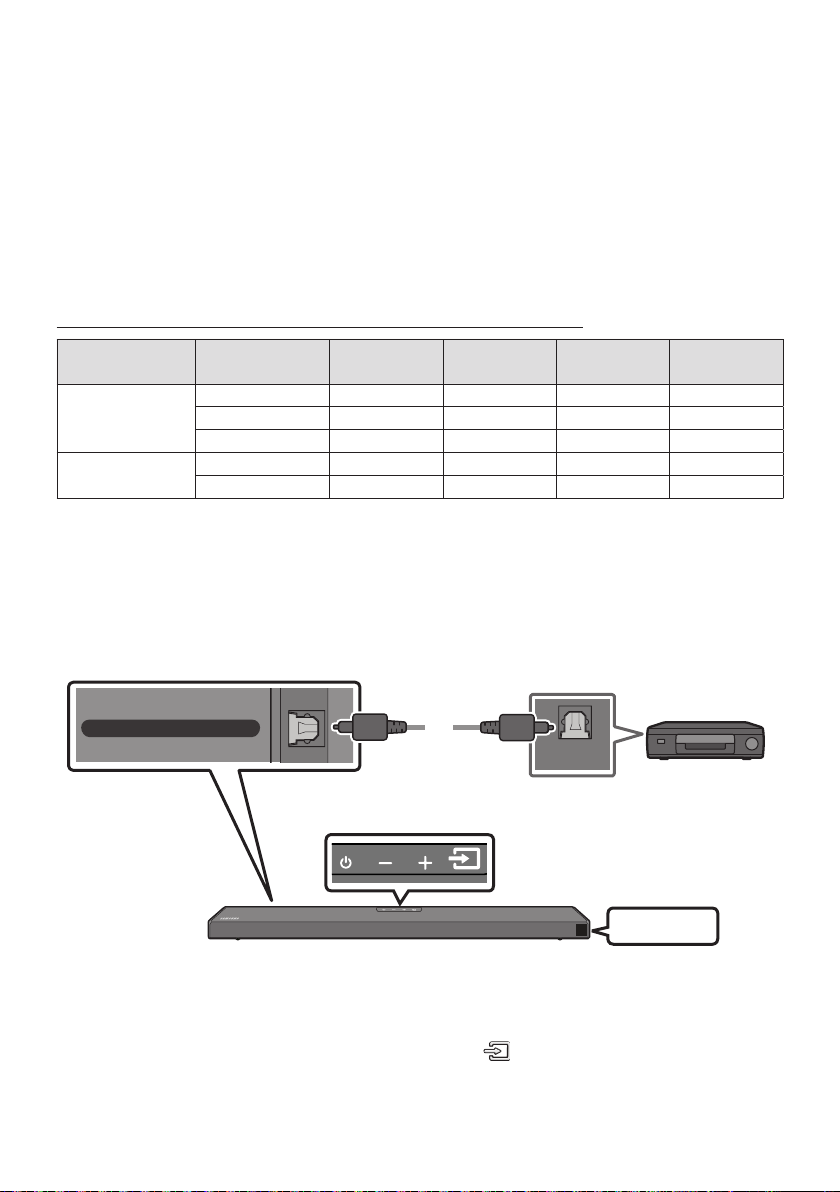
FRA - 18
REMARQUES
Lorsque vous utilisez Dolby Atmos®
5.1.2 sont émises.
Lorsque Dolby Atmos® est actif, « DOLBY ATMOS » apparaît sur l’écran frontal.
CongurationdeDolbyAtmos®survotrelecteurBDouunautreappareil.
(non traité).
SpécicationdessignauxUHDprisencharge(3840x2160p)
Fréquence
d'images (i/s)
Intensité de
couleur
RGB4:4:4 YCbCr4:4:4 YCbCr4:2:2 YCbCr4:2:0
< 60
8 bits
10 bits - -
12 bits - -
120
8 bits - - - -
10 bits - - - -
conditions d’utilisation.
Connexion à l’aide d’un câble optique
OPTICAL OUT
HDMI TO TV
(ARC)
DIGITAL AUDIO IN (OPTICAL)
Câble optique
(non fourni)
Partie inférieure de la Soundbar
Lecteur BD/DVD /
Boîtier décodeur /
Console de jeu
Partie supérieure de la Soundbar
D.IN
1. Raccordez DIGITALAUDIOIN(OPTICAL) de l’unité principale à la prise OPTICAL OUT de l’appareil
source à l’aide d’un câble optique (non fourni) numérique.
2. Sélectionnez le mode «D.IN» en appuyant sur le bouton (Source) situé sur le panneau frontal
ou sur la télécommande.

FRA - 19
06 CONNEXION D’UN PÉRIPHÉRIQUE DE
STOCKAGEUSB
Port USB
HDMI
HDMI TO TV
(ARC)
USB (5V 0.5A)
DC 24V
DIGITAL AUDIO IN (OPTICAL)
USB (5V 0.5A)
USB
1. Connectez l’appareil USB au port USB situé sur la partie inférieure du produit.
2. Appuyez sur le bouton (Source) du panneau supérieur ou de la télécommande, puis
sélectionnez «USB».
3. «USB
4.
connecté pendant plus de 20 minutes.
Liste de compatibilités
Extension Codec Débit d'échantillonnage Débit binaire
*.mp3 MPEG1 Layer2 32 ~ 48 kHz 32 ~ 320 kbps
MPEG1 Layer3 32 ~ 48 kHz 32 ~ 320 kbps
MPEG2 Layer3 16 ~ 24 kHz 8 ~ 160 kbps
MPEG2.5 Layer3 8 ~ 12 kHz 8 ~ 160 kbps
*.wma
32 ~ 48 kHz 32 ~ 320 kbps
*.ogg Vorbis 32 ~ 48 kHz 45 ~ 500 kbps
*.aac
*.m4a
*.mp4
A AC-LC
32 ~ 48 kHz 32 ~ 320 kbps
*.wav LPCM 32 ~ 192 kHz 1024 ~ 9216 kbps
*.ac FLAC 32 ~ 192 kHz 162 ~ 8100 kbps
*.aiff AIFF 32 ~ 192 kHz 1024 ~ 9216 kbps

FRA - 20
07 CONNEXION À UN APPAREIL MOBILE
Connexion via Bluetooth
Lorsqu’un appareil est connecté à l’aide de Bluetooth, vous pouvez écouter le son stéréo sans tracas de
La connexion est limitée à un téléviseur ou deux appareils Bluetooth à la fois.
Appareil Bluetooth
SOUND
MODE
PAIR
OU
Connexion initiale
1. Appuyez sur la touche PAIR de la télécommande pour passer au mode «BTPAIRING».
(OU)
a. Appuyez sur le bouton (Source) situé sur le panneau supérieur, puis sélectionnez
«BT».
«BT» passe automatiquement en «BTPAIRING» en quelques secondes ou en «BT READY»
b. Lorsque «BT READY» apparaît, maintenez le bouton (Source) enfoncé sur le panneau
BTPAIRING».
2. Sélectionnez «[AV] Samsung Soundbar Q6A-Series» dans la liste.
Lorsqu’une Soundbar est connectée à l’appareil Bluetooth, [Nom de l’appareil Bluetooth
«BT
3.
Si la connexion de l’appareil échoue
Si la liste de Soundbar connectées précédemment (par ex. «[AV] Samsung Soundbar Q6A-Series»
apparaît dans la liste, supprimez-la.
Ensuite, répétez les étapes 1 et 2.
REMARQUE
BT
READY» pour la reconnexion.

FRA - 21
QuelleestladifférenceentreBTREADYetBTPAIRING?
BT READY
connecter un appareil mobile connecté précédemment à la Soundbar.
BTPAIRING
le bouton PAIR de la télécommande ou maintenez le bouton
(Source)
situé sur la partie
supérieure de la Soundbar enfoncé pendant plus de 5 secondes lorsque la Soundbar est en mode
«BT».)
REMARQUES
Si un code PIN est demandé lors de la connexion d’un appareil Bluetooth, saisissez <0000>.
En mode de connexion Bluetooth, la connexion Bluetooth sera perdue si la distance entre la
Soundbar et l’appareil Bluetooth dépasse 10 m.
Il se peut que la Soundbar ne puisse pas effectuer correctement la recherche Bluetooth ou la
– En cas de champ électrique puissant autour de la Soundbar.
– En cas d’appariement simultané de plusieurs appareils Bluetooth avec la Soundbar.
– Si l’appareil Bluetooth est éteint, non installé, ou présente un dysfonctionnement.
uniquement la fonction HF (Hands Free).
Lorsque vous avez apparié la barre audio à un périphérique Bluetooth, sélectionner «[AV] Samsung
Soundbar Q6A-Series» parmi la liste des périphériques connectés à ce périphérique placera
automatiquement la barre audio en mode «BT».
– Disponible uniquement si le Soundbar est listé dans les périphériques appariés du périphérique
Bluetooth. (Le périphérique Bluetooth et le Soundbar doivent être appariés au préalable au
moins une fois)
Le Soundbar apparaîtra dans la liste des périphériques recherchés du périphérique Bluetooth
BT READY».
Bluetooth Power Activé (SOUND MODE)
périphérique Bluetooth précédemment associé essaye de se connecter au Soundbar, le Soundbar
s’active automatiquement.
1. Appuyez sur la touche SOUND MODE et maintenez-la enfoncée pendant plus de 5 secondes sur la
télécommande pendant que la Soundbar est sous tension.
2. «ON-BLUETOOTH POWER

FRA - 22
Déconnexion de l’appareil Bluetooth d’une Soundbar
reportez-vous au manuel d’utilisation de ce périphérique.
«BT DISCONNECTED
Déconnexion de la Soundbar à partir de l’appareil Bluetooth
Appuyez sur le bouton (Source) situé sur le panneau supérieur ou la télécommande , puis passez
dans n’importe lequel des modes, à l’exception du mode «BT».
La déconnexion prend du temps parce que l’appareil Bluetooth doit recevoir une réponse de la
Soundbar. (La durée de déconnexion peut varier selon l’appareil Bluetooth)
«BT DISCONNECTED
REMARQUES
périphérique Bluetooth dépasse 10 m.
À propos du Bluetooth
–
– Il est soumis à des variations électriques provenant d’obstructions provoquées par un mur, un
coin ou des cloisonnements de bureaux.
– Il est exposé à des interférences électriques provenant d’appareils utilisant la même bande de
Dans les zones où la réception est faible, la connexion Bluetooth peut ne pas fonctionner
correctement.
La connexion Bluetooth ne fonctionne que lorsqu’elle est proche de l’appareil. La connexion

FRA - 23
Connexion Multi-Bluetooth
Il est possible de connecter la Soundbar à 2 appareils Bluetooth à la fois.
Appareil Bluetooth A Appareil Bluetooth B
1. 20)
2. Lisez de la musique à partir de l’un des appareils Bluetooth connectés lorsque deux appareils sont
connectés.
3.
4. Dans les versions antérieures à AVRCP V1.4, la durée de commutation de l’appareil sur lequel de la
musique est en cours de lecture peut être supérieure.
REMARQUES
certains appareils.
BTPAIRING
(L’appareil qui n’est pas en cours de lecture sera déconnecté.)
La Soundbar sera déconnecté des appareils Bluetooth si elle reçoit une demande de connexion d’un
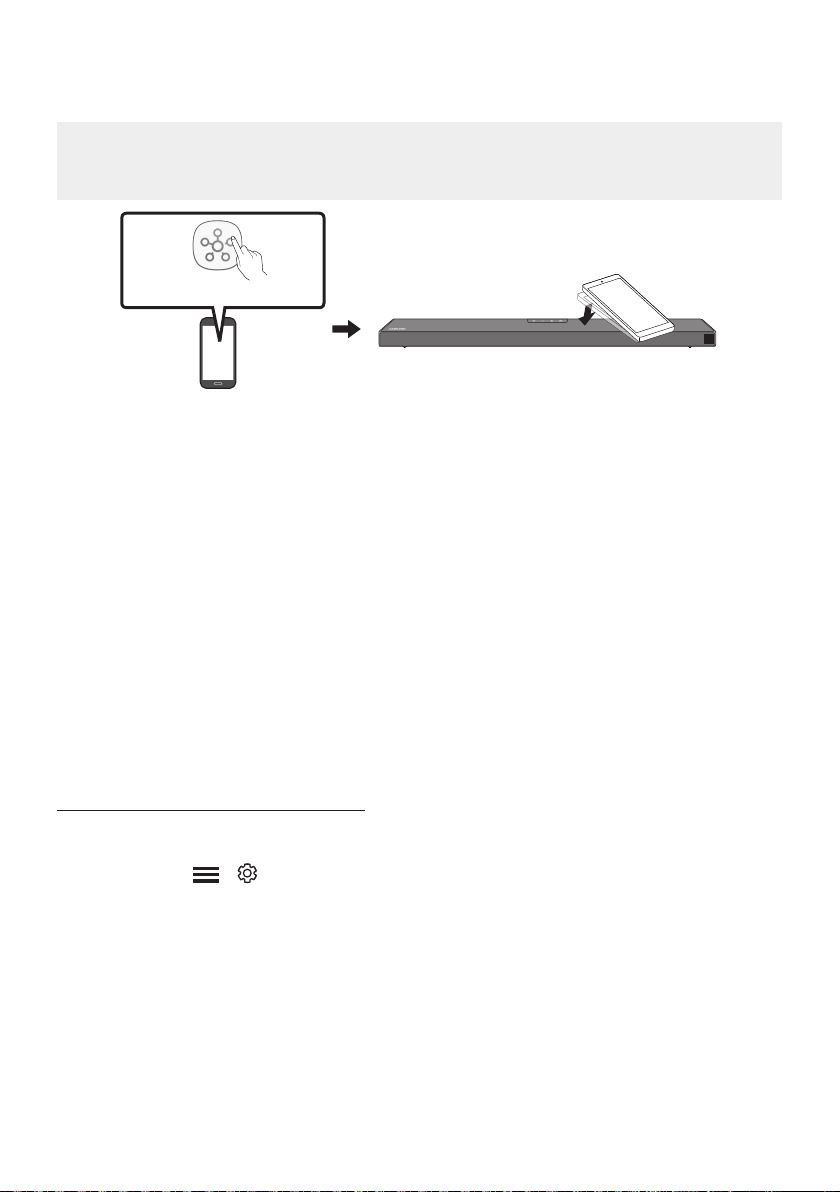
FRA - 24
Utilisation de la fonction Tap Sound
Appuyez sur la Soundbar avec votre appareil mobile pour lire l’audio contenu dans celui-ci via la Soundbar.
ou supérieur.
Appareil mobile
Application SmartThings
Partie supérieure de la
Soundbar
1. Activez la fonction Tap Sound sur votre appareil mobile.
Pour plus de détails sur la façon d’activer la fonction, reportez-vous à «Activation de la
fonction Tap Sound» ci-dessous.
2. Appuyez sur la Soundbar avec votre appareil mobile. Sélectionnez «Démarrer» dans la fenêtre de
Une connexion est établie entre l’appareil mobile et la Soundbar via Bluetooth.
3. Lisez l’audio contenu dans l’appareil mobile via la Soundbar.
Cette fonction permet de connecter un appareil mobile à la Soundbar via Bluetooth en
détectant les vibrations qui se produisent lorsque l’appareil touche la Soundbar.
Pour utiliser cette fonction, mettez à jour l’application SmartThings
Activation de la fonction Tap Sound
Utilisez l’application SmartThings pour activer la fonction Tap View, Tap Sound.
1. Sur l’appareil mobile, exécutez l’application SmartThings.
2. Sélectionnez ( ) dans l’écran d’application SmartThings
3. Placez «Tap View, Tap Sound» sur Activé pour permettre à la fonction de se mettre en marche
lorsqu’un appareil mobile est en mouvement à proximité de la Soundbar.
REMARQUES
Tap Sound ne se met pas en marche.
La fonction Tap Sound pourrait ne pas fonctionner si des appareils situés à proximité de la
Soundbar provoquent des interférences radio, comme par exemple, des appareils électriques.
Assurez-vous que les appareils susceptibles de provoquer des interférences radio sont placés à une
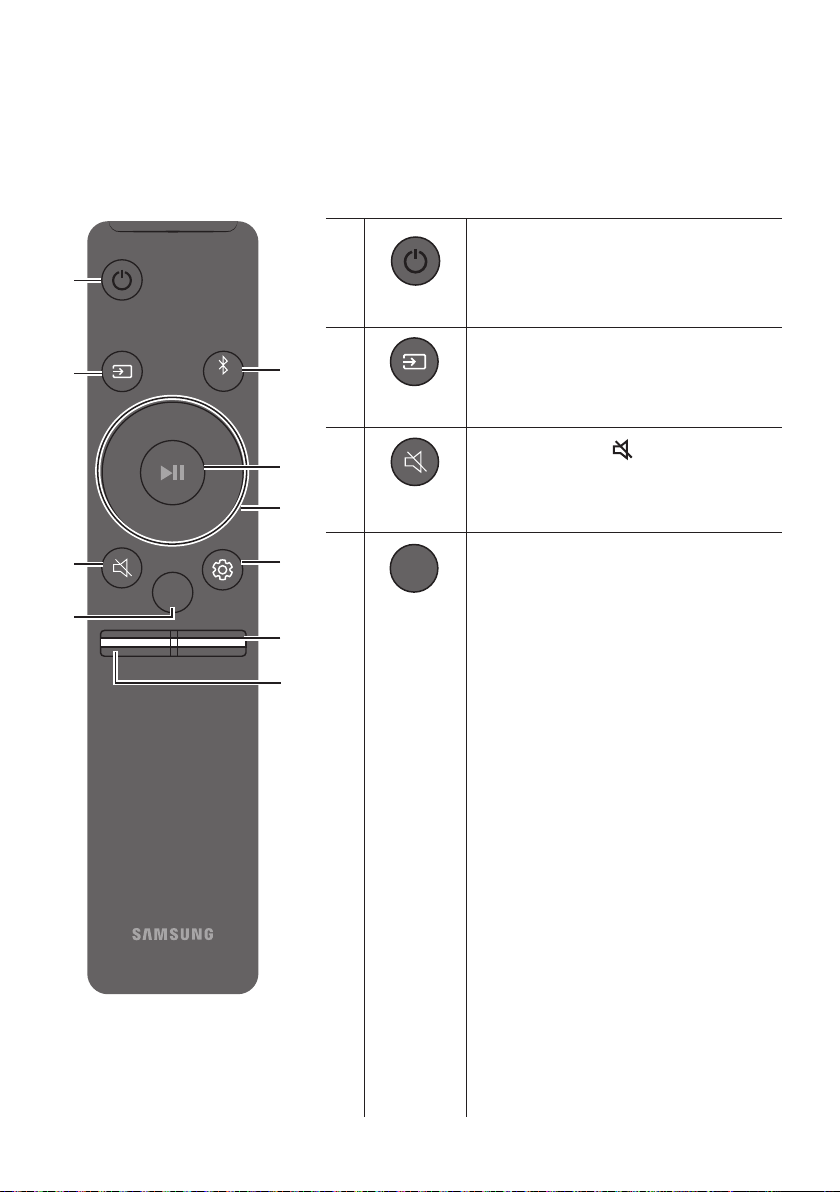
FRA - 25
08 UTILISATION DE LA TÉLÉCOMMANDE
Comment utiliser la télécommande
VOL WOOFER
SOUNDBAR
SOUND
MODE
PAIR
Alimentation
VOL WOOFER
SOUND
MODE
PAIR
Allume et éteint la Soundbar.
VOL WOOFER
SOUND
MODE
PAIR
Source
Appuyez pour sélectionner une source
connectée à la Soundbar.
Coupure de son
VOL WOOFER
SOUND
MODE
PAIR
Appuyez sur la touche (Coupure de son) pour
couper le son. Appuyez de nouveau sur cette
touche pour activer le son.
SOUND MODE
VOL WOOFER
SOUND
MODE
PAIR
SURROUND SOUND, GAMEPRO,
ADAPTIVE SOUND
ou
STANDARD
.
– SURROUND SOUND
norme.
– GAMEPRO
Fournit un son stéréoscopique vous
permettant une immersion dans l’action
pendant le jeu.
– ADAPTIVE SOUND
Analyse le contenu en temps réel et fournit
automatiquement le champ sonore optimal
sur la base des caractéristiques du contenu.
– STANDARD
DRC (Dynamic Range Control)
Vous permet d’appliquer un contrôle de
Appuyez sur le bouton SOUND MODE
Soundbar est hors tension pour activer ou
Control). Quand la fonction DRC est activée,
les sons forts sont atténués. (Il peut se
produire une distorsion du son.)
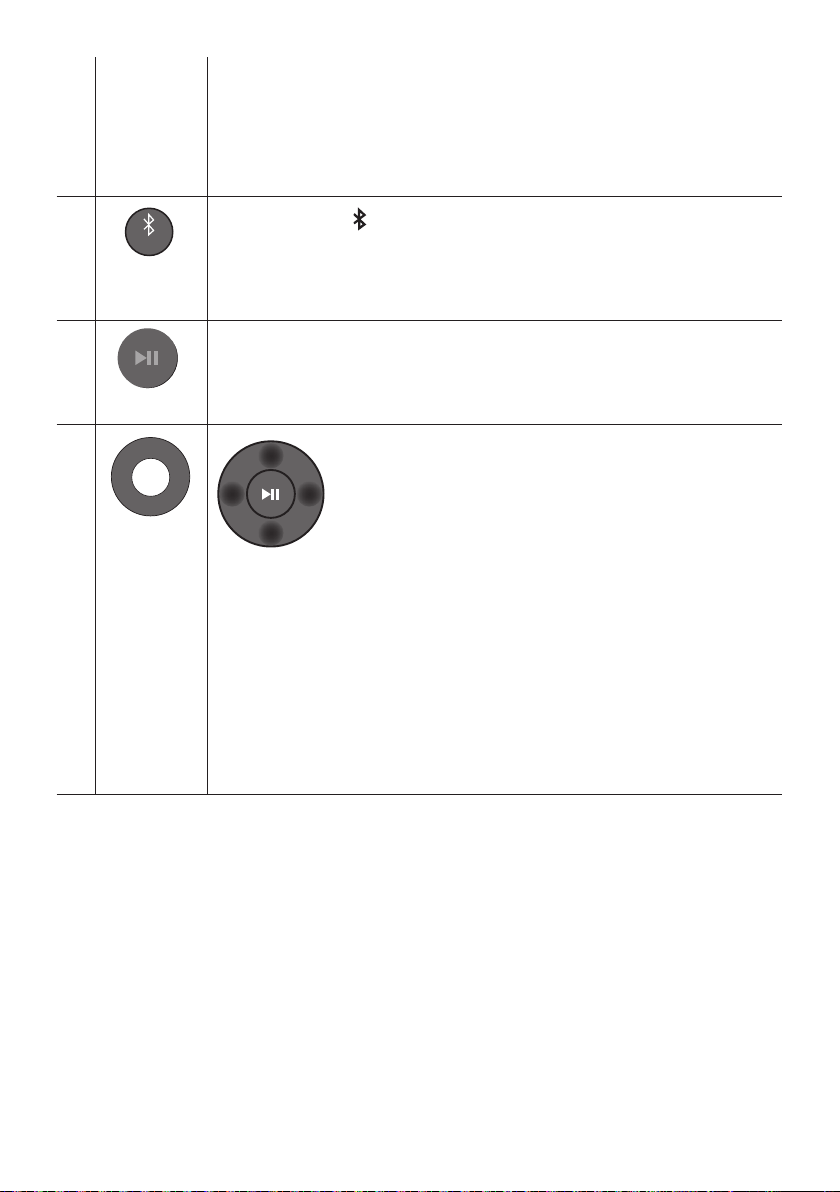
FRA - 26
Bluetooth Power
Cette fonction allume automatiquement la Soundbar à la réception d’une demande de
connexion d’un téléviseur ou d’un appareil Bluetooth connecté précédemment. Le
– Appuyez et maintenez enfoncée la touche SOUND MODE pendant plus de
VOL WOOFER
SOUND
MODE
PAIR
Bluetooth
PAIR
Appuyez sur la touche PAIR. «BTPAIRING
Vous pouvez connecter la Soundbar à un nouvel appareil Bluetooth dans ce mode en
sélectionnant la Soundbar dans la liste de recherche d'appareils Bluetooth.
Lecture / Pause
VOL WOOFER
SOUND
MODE
PAIR
Appuyez sur la touche p
VOL WOOFER
SOUND
MODE
PAIR
Haut/Bas/
Gauche/
Droite
Appuyez sur les zones indiquées pour sélectionner Haut/Bas/
Gauche/Droite.
fonctions.
Répétition
Pour utiliser la fonction de répétition en mode «USB», appuyez sur la touche Haut.
Sautdechiermusical
Appuyez sur la touche Droite
Appuyez sur la touche Gauche
ID SET
Appuyez et maintenez enfoncée la touche Haut pendant 5 secondes pour terminer
ID SET
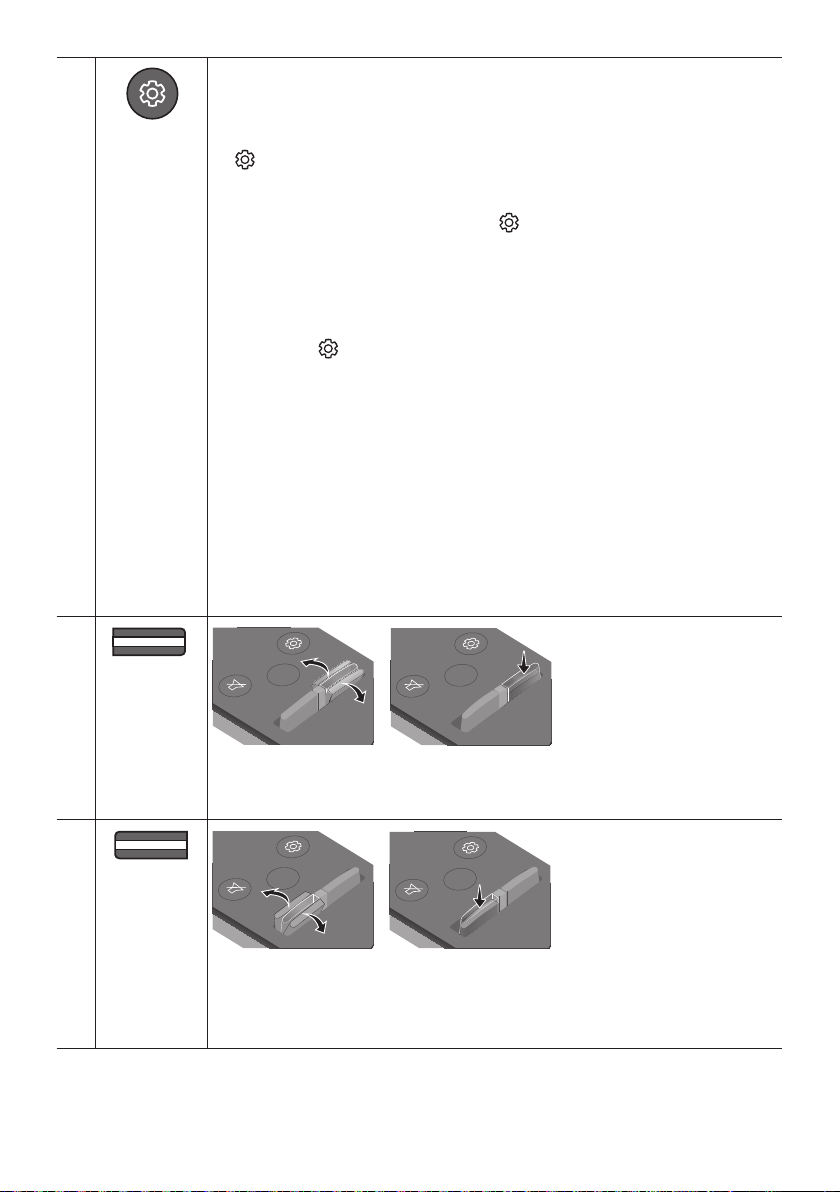
FRA - 27
Commande
sonore
VOL WOOFER
SOUND
MODE
PAIR
TREBLE, BASS, AUDIO SYNC, CENTER
LEVEL, TOP LEVEL et VIRTUAL ON/OFF
Haut/Bas.
(Commande sonore) pour sélectionner TREBLE ou BASS puis ajustez le volume, de
-6 à +6, à l’aide des touches Haut/Bas
STANDARD ».)
Appuyez et maintenez enfoncée la touche (Commande sonore) pendant environ
5 secondes pour ajuster le son pour chaque bande de fréquence. 150 Hz, 300 Hz,
600 Hz, 1,2 kHz, 2,5 kHz, 5 kHz et 10 kHz peuvent être sélectionnés à l’aide des touches
Gauche/Droite
Haut/BasSTANDARD ».)
sur la touche (Commande sonore) pour sélectionner AUDIO SYNC
Haut/Bas. (Non
disponible en mode «USB» ou «BT»)
AUDIO SYNC
Pour contrôler le volume de chaque enceinte, sélectionnez CENTER LEVEL, ou TOP
LEVEL
Haut/Bas.
La fonction de l’enceinte VIRTUAL peut être sur ON/OFF à l’aide des touches Haut/
Bas.
REAR
SPEAKER ON/OFF et REAR LEVEL sont disponibles.
Utilisez les boutons Haut/BasREAR SPEAKER ON/OFF et pour
REAR LEVEL
VOL WOOFER
SOUND
MODE
PAIR
NIVEAU DU
WOOFER
(GRAVES)
SOUND
MODE
VOL
WOOFER
SOUNDBAR
SOUND
MODE
VOL
WOOFER
SOUNDBAR
SOUND
MODE
VOL
WOOFER
SOUNDBAR
SOUND
MODE
VOL
WOOFER
SOUNDBAR
touche.
VOL WOOFER
SOUND
MODE
PAIR
VOL
(Volume)
SOUND
MODE
VOL
WOOFER
SOUNDBAR
SOUND
MODE
VOL
WOOFER
SOUNDBAR
SOUND
MODE
VOL
WOOFER
SOUNDBAR
SOUND
MODE
VOL
WOOFER
SOUNDBAR
Sourdine
Appuyez sur la touche VOL pour couper le son. Appuyez de nouveau sur cette touche
pour réactiver le son.
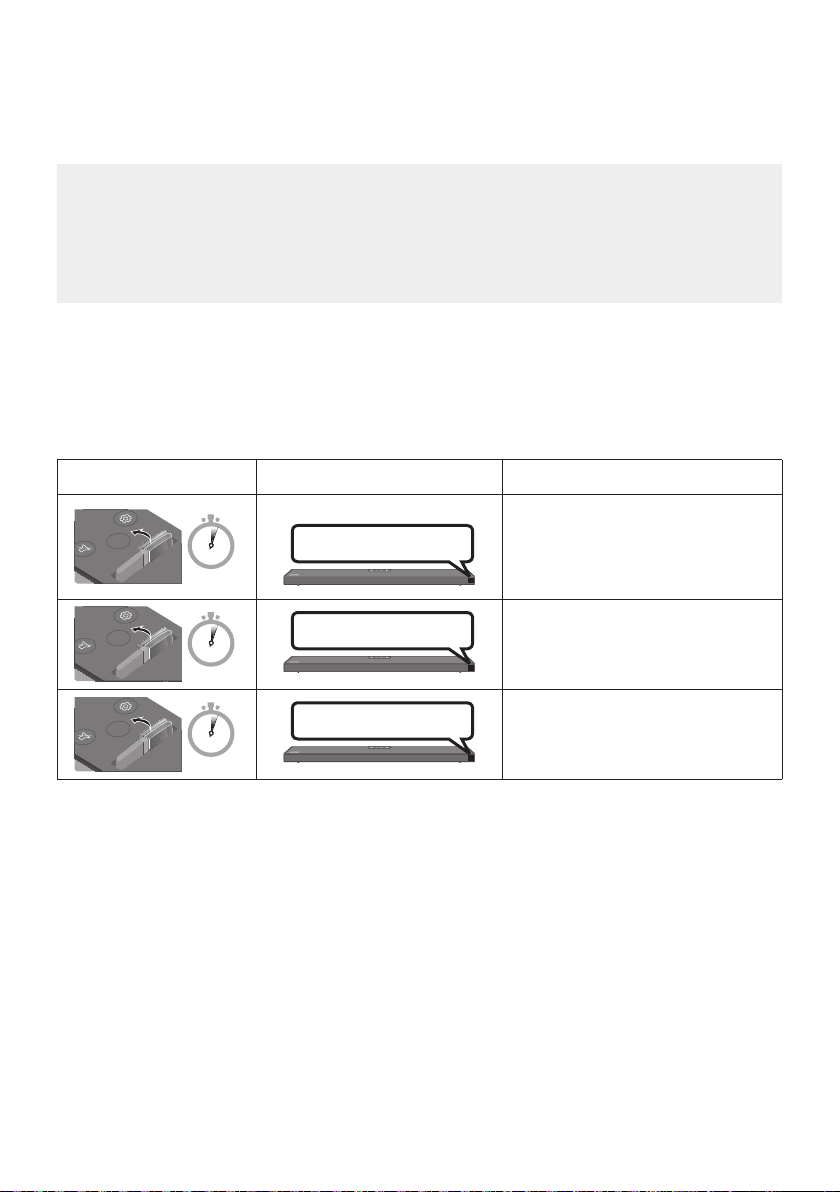
FRA - 28
Réglage du volume de la Soundbar avec une télécommande de
téléviseur
Hautparleur ext pour utiliser cette fonction.
VIZIO, LG, Sony, Sharp, PHILIPS, PANASONIC, TOSHIBA, Hisense, RCA
1.
2. Appuyez et maintenez enfoncée la touche WOOFER pendant 5 secondes.
Chaque fois que vous appuyez sur la touche WOOFER et la maintenez pendant 5 secondes, le mode
OFF-TV REMOTE » (Mode par défaut), « SAMSUNG-TVREMOTE »,
ALL-TV REMOTE ».
Touche de télécommande Écran État
SOUND
MODE
VOL
WOOFER
SOUNDBAR
5 Sec
OFF-TV REMOTE
(Mode par défaut)
Désactive la télécommande de
téléviseur.
SOUND
MODE
VOL
WOOFER
SOUNDBAR
5 Sec
SAMSUNG-TVREMOTE
Active une télécommande de
SOUND
MODE
VOL
WOOFER
SOUNDBAR
5 Sec
ALL-TV REMOTE
Active toute autre télécommande de
SOUND
MODE
VOL
WOOFER
SOUNDBAR
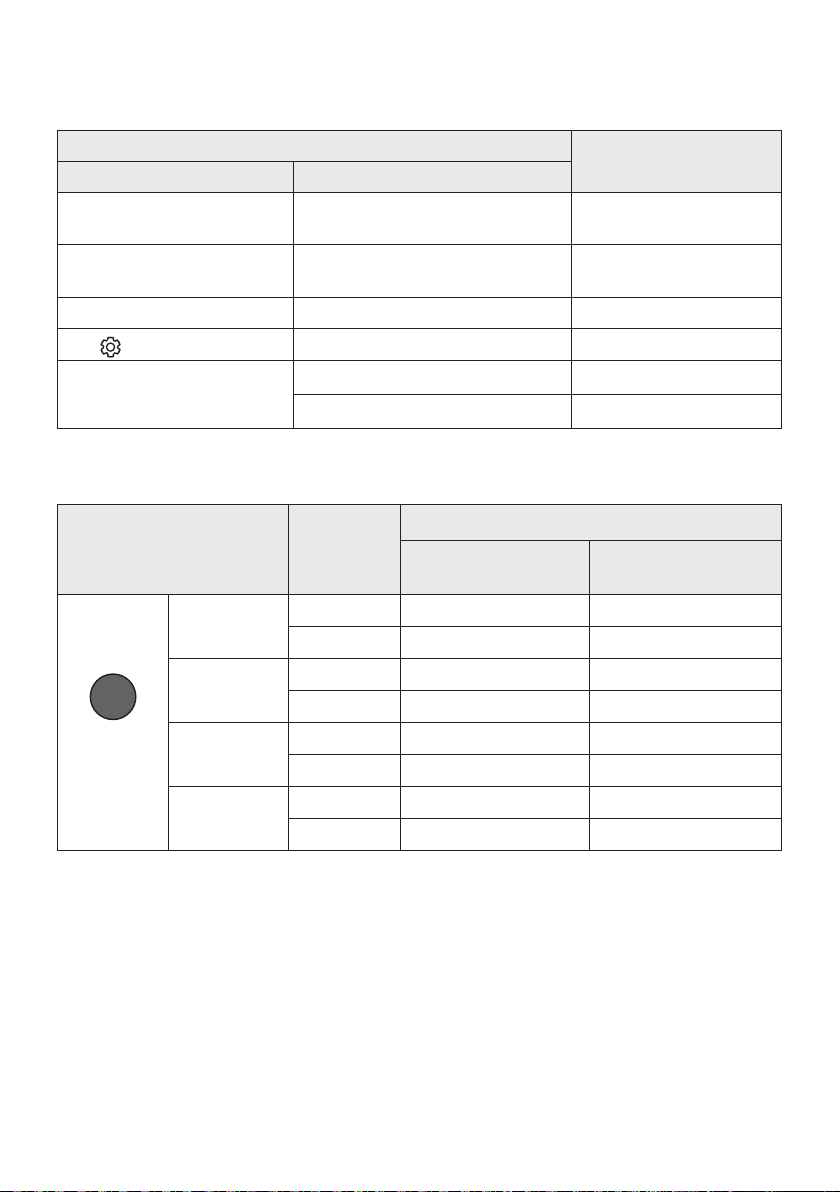
FRA - 29
Utilisation des touches dissimulées (Touches avec plus d’une
fonction)
Touche dissimulée
Page de référence
Touche de télécommande Fonction
WOOFER (Haut)
Télécommande de votre téléviseur
(Veille)
28
Gauche
automatique au téléviseur (BT prêt)
16
Haut ID SET 26
(Commande sonore)
EQ bande 7 27
SOUND MODE
Veille) 25
26
Spécicationsdesortiepourlesdifférentsmodesd’effetssonores
Effet Entrée
Sortie
Sans kit d’enceintes
arrièresansl
Avec kit d’enceintes arrière
sansl
SOUND MODE
Surround
VOL WOOFER
SOUND
MODE
Bluetooth
POWER
SURROUND
SOUND
2.0 canaux
3.1.2 canaux 5.1.2 canaux
5.1 canaux 3.1.2 canaux 5.1.2 canaux
GAME PRO
2.0 canaux
3.1.2 canaux 5.1.2 canaux
5.1 canaux 3.1.2 canaux 5.1.2 canaux
ADAPTIVE
SOUND
2.0 canaux
3.1.2 canaux 5.1.2 canaux
5.1 canaux 3.1.2 canaux 5.1.2 canaux
STANDARD
2.0 canaux
2.1 canaux 2.1 canaux
5.1 canaux 3.1 canaux 5.1 canaux
contactez le vendeur chez qui vous avez acheté la Soundbar.
canal audio 5.1.2.
Les enceintes surround ne produisent pas de bruits pour 2 canaux de sortie pendant que le mode
STANDARD
SURROUND SOUND.
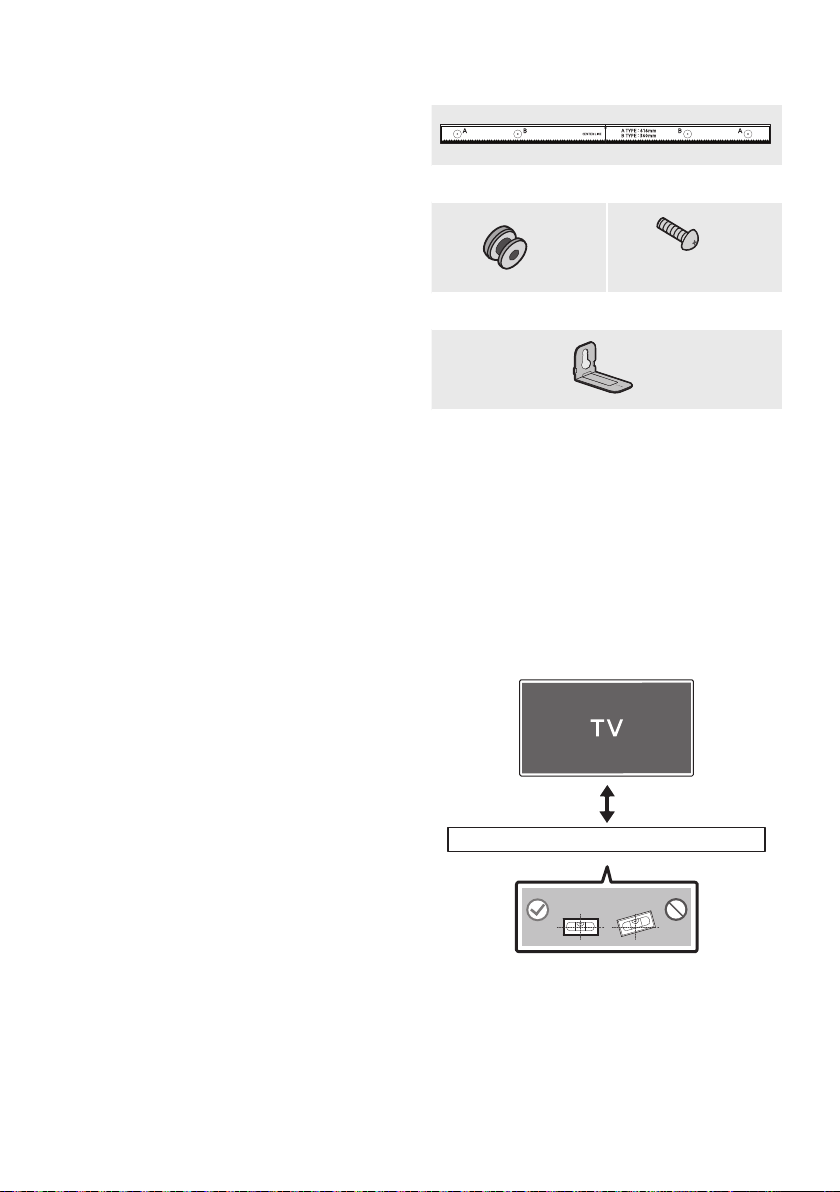
FRA - 30
09 INSTALLATION
DU SUPPORT
MURAL
Précautions d’installation
Installez sur un mur vertical uniquement.
N’installez pas dans un endroit à température
élevée ou humide.
pour supporter le poids du produit.
Sinon, renforcez le mur ou choisissez un autre
point d’installation.
vous disposez (plaque de plâtre, plaque
portantes dans les poteaux.
Achetez les vis de support mural selon le type
et l’épaisseur du mur sur lequel vous
souhaitez monter la Soundbar.
–
–
Connectez les câbles depuis l’unité aux
appareils externes avant d’installer la
Soundbar sur le mur.
Veillez à ce que l’unité soit éteinte et
débranchée de la source d’alimentation avant
de procéder à l’installation. Dans le cas
contraire, il existe un risque d’électrocution.
Composantsdexationaumur
Guidedexationmurale
x 2
(M4 x L10)
x 2
Visdexation Vis
x 2
Supportdexationmurale
1. Placez le Guidedexationmurale contre le
mur.
Le Guidedexationmurale doit être de
niveau.
Si votre téléviseur est monté sur le mur,
installez la Soundbar à au moins 5 cm
sous le téléviseur.
5 cm minimum
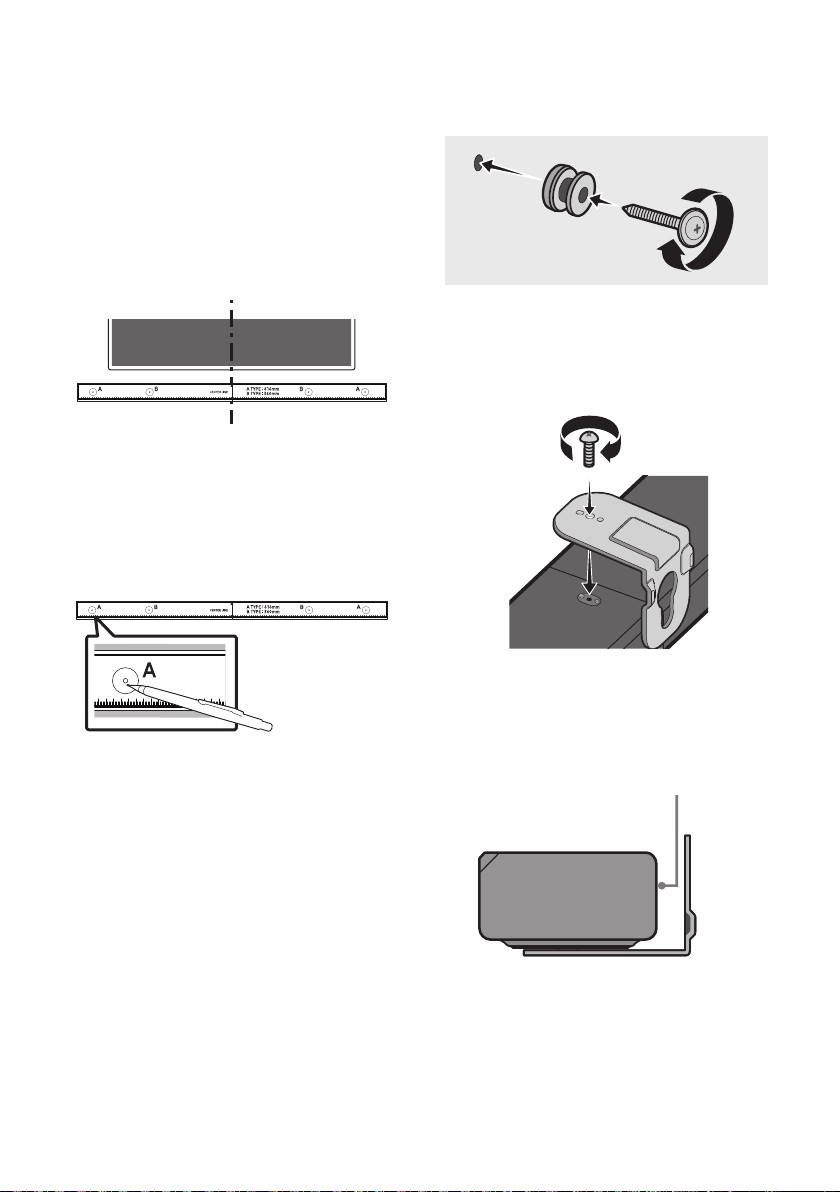
FRA - 31
2. LignecentraleduGuidede
xationmurale avec le centre de votre
Guidede
xationmurale au mur avec du ruban
adhésif.
téléviseur, placez la Ligne centrale au
centre de la zone d’installation.
Ligne centrale
3. Appuyez avec la pointe d’un stylo ou d’un
A-TYPE
marquer les trous des vis portantes, puis
retirez le Guidedexationmurale.
4.
trou dans le mur au niveau de chaque
marque.
Si les marques ne correspondent pas aux
positions des poteaux muraux, veillez à
trous avant d’insérer les vis portantes. Si
accueillir.
5. Enfoncez une vis (non fournie) dans chaque
Visdexation, puis vissez fermement
chaque vis dans un trou pour vis portante.
6. Installez les Supportdexationmurale sur
la partie inférieure de la Soundbar, en
veillant à les positionner correctement, en
utilisant 2 Vis.
l’accroche des Supportdexation
murale
Soundbar.
Arrière de la Soundbar
Extrémité droite de la Soundbar
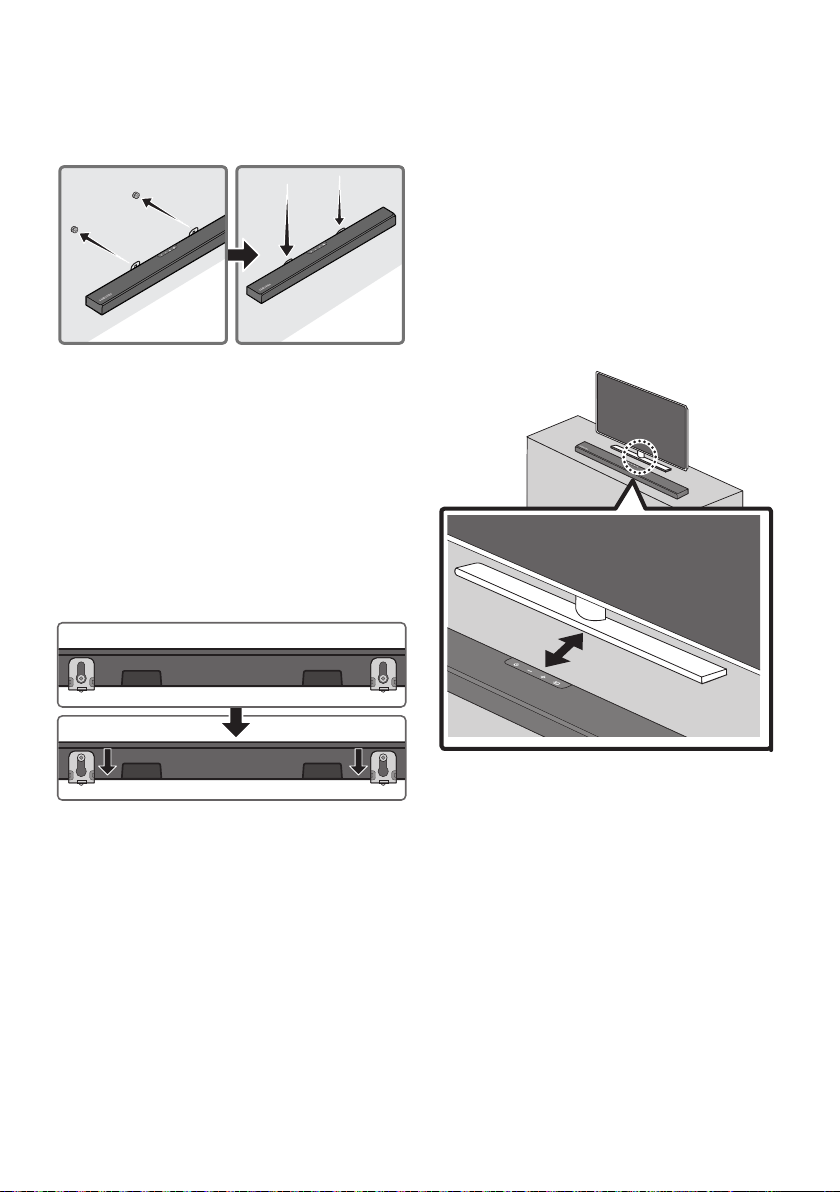
FRA - 32
7.
les Supportsdexationmurale, en
accrochant les Supportsdexationmurale
sur les Visdexation sur le mur.
8.
Support de
xationmurale
sur les Visdexation.
Insérez les Visdexation dans la partie
Supportdexation
muraleSupport de
xationmurale
Supportdexationmurale reposent de
Visdexation.
10 INSTALLATION
DE LA
SOUNDBAR SUR
UN SOCLE DE
TÉLÉVISEUR
Placez la Soundbar sur un socle de téléviseur.
3 cm ou plus
de la Soundbar avec le centre du téléviseur, en
insérant avec précaution la Soundbar dans le
socle du téléviseur.
Pour obtenir une qualité sonore optimale,
positionnez la Soundbar à une distance d’au
moins 3 cm de la partie avant du téléviseur.
REMARQUE
Veillez à ce que la Soundbar soit placée sur
une surface plane et stable.
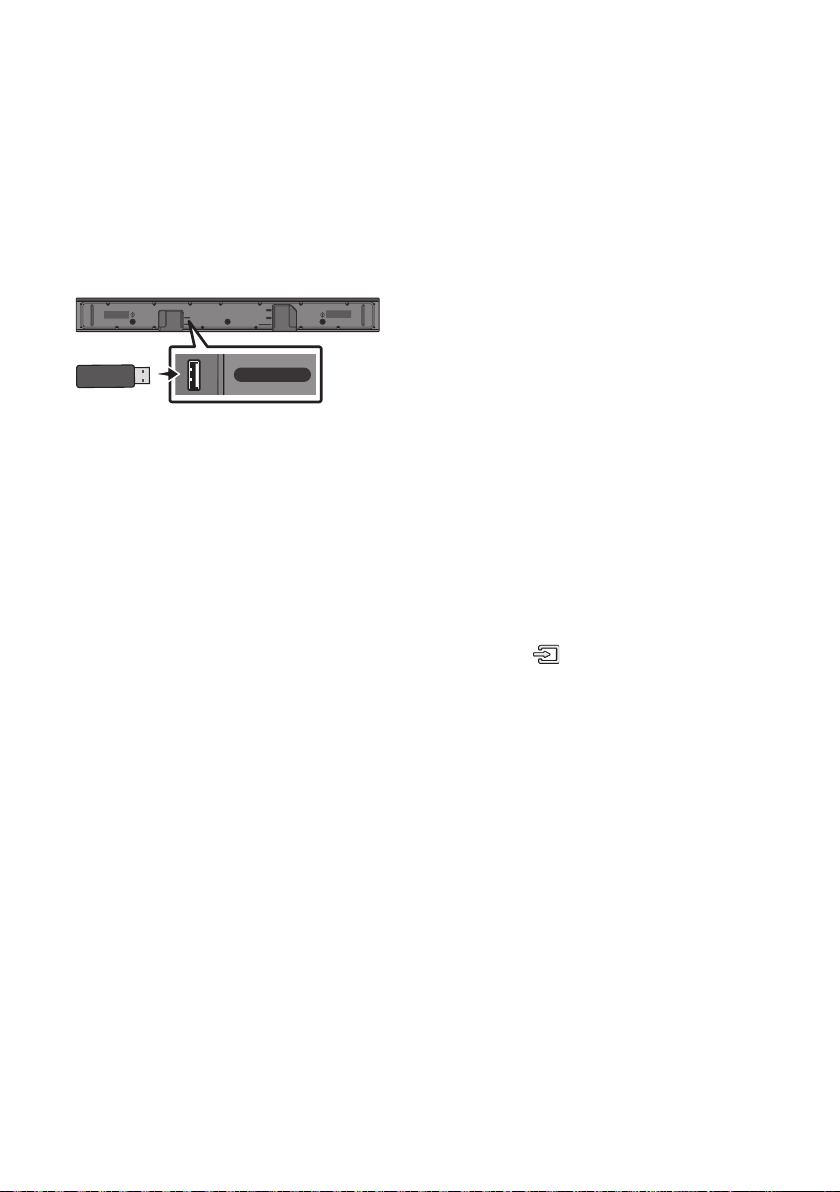
FRA - 33
11 MISE À JOUR DU
LOGICIEL
Samsung peut proposer des mises à jour pour le
microprogramme du système de la Soundbar
prochainement.
Port USB
HDMI
HDMI TO TV
(ARC)
USB (5V 0.5A)
DC 24V
DIGITAL AUDIO IN (OPTICAL)
USB (5V 0.5A)
Si une mise à jour est proposée, vous pouvez
le périphérique USB contenant la mise à jour du
Soundbar. Pour plus d’informations sur comment
Support).
Ensuite, sélectionnez le type de produit ou entrez
peuvent varier.
Procédure de mise à jour
Une fois la mise à jour terminée, tous vos
conservés.
1. Connectez une clé USB au port USB de votre
ordinateur.
Important: Assurez-vous qu’il n’y a pas de
entraîner l’échec de la mise à jour du
2.
jour.
3.
clé USB et sélectionnez «Extraire ici» pour
4.
5. Mettez sous tension la Soundbar, appuyez sur
le bouton
(Source)
de la Soundbar, puis
sélectionnez le mode «USB». «UPDATE»
La Soundbar redémarre automatiquement
quand la mise à jour est terminée.
Ce produit est équipé de la fonction DUAL
échoue, vous pouvez exécuter à nouveau
la mise à jour.
l’appareil et ne retirez pas la clé USB.
la Soundbar, la mise à jour ne s’installe pas.
Selon le type de clé USB utilisée, la mise à
6.
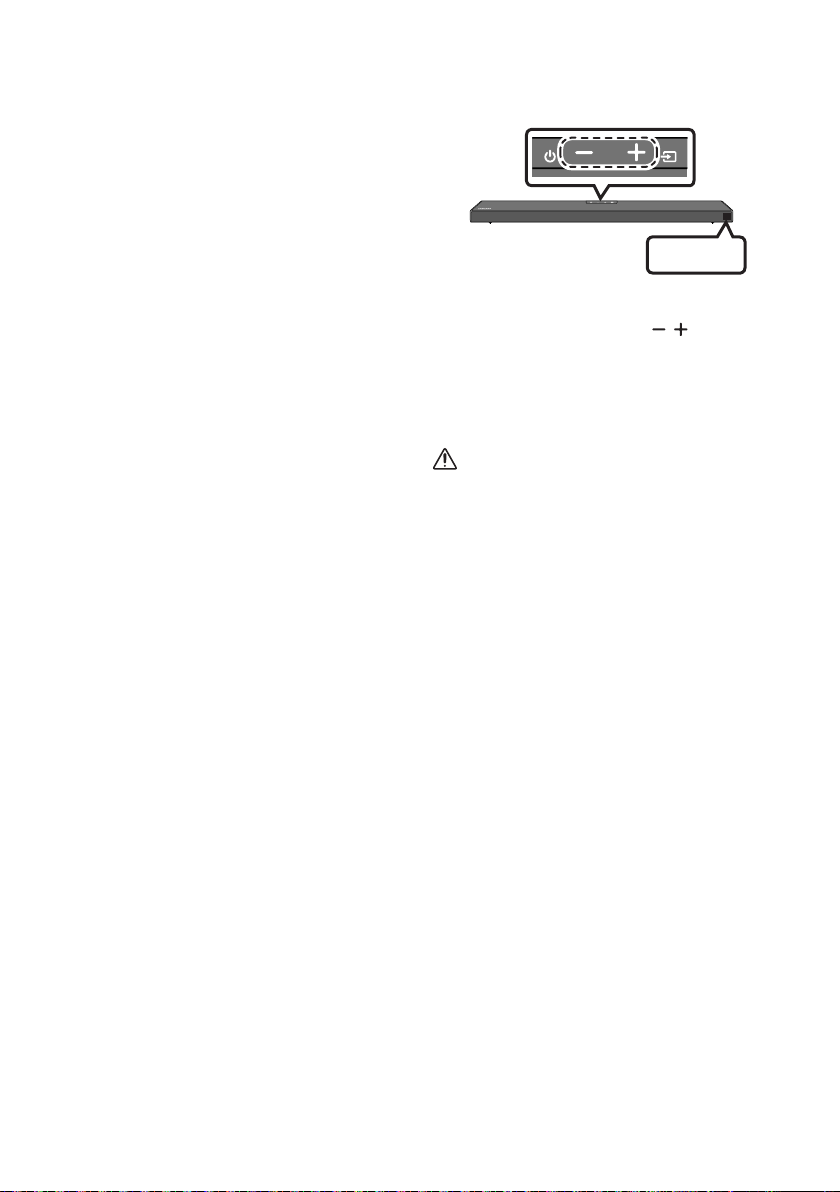
FRA - 34
SiUPDATEnes’afchepas
1.
de la Soundbar.
2. Débranchez le cordon d’alimentation de la
Soundbar, rebranchez-le, puis allumez la
Soundbar.
REMARQUES
reconnus par la Soundbar sont stockés dans
périphérique USB lorsque les mises à jour
sont en train d’être appliquées. L’unité
principale s’allume automatiquement une fois
6.
si la clé USB est défectueuse.
Les utilisateurs de Mac OS doivent utiliser
MS-DOS (FAT) comme format USB.
L’exécution de la mise à jour via USB peut ne
pas être possible en fonction du fabricant du
Réinitialisation
INIT OK
Partie supérieure de la Soundbar
Alors que la Soundbar est allumée, appuyez
simultanément sur les boutons (Volume)
«INIT OK
réinitialisée.
ATTENTION
réinitialisés. Veillez à n’effectuer cette
opération que lorsque la réinitialisation est
nécessaire.
FRA - 35
La Soundbar ne s’allume pas.
;
Soundbar est correctement inséré dans la prise.
La Soundbar fonctionne par intermittence.
; Retirez le cordon d’alimentation, puis
insérez-le à nouveau.
; Débranchez le cordon d’alimentation de
l’appareil externe et réessayez.
;
3.)
Si la télécommande ne fonctionne pas.
; Pointez la télécommande directement vers
la Soundbar.
; Remplacez les piles de la télécommande
par des piles neuves.
La Soundbar n'émet aucun son.
; Le volume de la Soundbar est trop bas ou a
; Si un appareil externe (STB, appareil
Bluetooth, appareil mobile, etc.) est
externe.
; Sélectionnez la Soundbar comme sortie du
Accueil (
; La connexion du câble à la Soundbar peut
ne pas être desserrée. Débranchez le câble
et connectez-le de nouveau.
;
d’alimentation, reconnectez-le, puis
allumez l’alimentation.
; Initialisez l’appareil et réessayez.
34.)
Le caisson de basse n’émet aucun son.
;
7.)
;
un obstacle entre la Soundbar et le
zone sans obstacle.
;
d’autres appareils à proximité peuvent
interrompre la connexion.
;
d’alimentation.
Le volume du subwoofer est trop faible.
;
27.)
;
Si le téléviseur n'est pas connecté via HDMI
TO TV (ARC).
;
11.)
; La connexion peut être rendue impossible
par l’appareil externe connecté (décodeur,
console de jeu, etc.). Connectez
directement la Soundbar.
; Il est possible que HDMI-CEC ne soit pas
activé sur le téléviseur. Activez CEC sur le
Accueil (
12 DÉPANNAGE
Avant de contacter l’assistance, veuillez lire ce qui suit.
FRA - 36
Il n’y a aucun son lors de la connexion au
téléviseur en mode HDMI TO TV (ARC).
;
)
La Soundbar ne se connecte pas via
Bluetooth.
; Lors de la connexion d’un nouvel appareil,
BTPAIRING
établir la connexion. (Maintenez la touche
PAIR de la télécommande ou la touche
(Source) située sur le boîtier de la
Soundbar enfoncée pendant au moins
; Si la Soundbar est connectée à un autre
appareil, déconnectez d’abord cet appareil
; Supprimez la liste des enceintes Bluetooth
sur l’appareil à connecter, puis reconnectez-
Liste des haut-parleurs Bluetooth)
; La connexion automatique au téléviseur
peut être désactivée. Lorsque la Soundbar
est sur « BT READY », appuyez et maintenez
enfoncée la touche Gauche sur la
télécommande de la Soundbar pendant
ON-TV
CONNECT. Si vous voyez OFF-TV CONNECT,
appuyez et maintenez enfoncée de nouveau
la touche Gauche pendant 5 secondes pour
;
d’alimentation, et réessayez.
; Initialisez l’appareil et réessayez.
34.)
Le son se coupe lors d’une connexion via
Bluetooth.
; Certains appareils peuvent créer des
interférences radio s’ils sont placés trop
proches de la Soundbar (p. ex. les micro-
; Si votre appareil connecté via Bluetooth se
situe à une distance trop importante de la
Soundbar, il est possible que le son soit
coupé. Rapprochez l’appareil de la
Soundbar.
; Si une partie du corps entre en contact
avec l’émetteur Bluetooth ou que le produit
est installé sur un meuble en métal, il est
possible que le son émis soit coupé.
les conditions d’utilisation.
La multiconnexion Bluetooth ne fonctionne
pas.
; Lorsque le téléviseur est connecté à la
Soundbar, la multiconnexion Bluetooth
peut ne pas fonctionner. Déconnectez la
Soundbar du téléviseur et réessayez.
;
multiconnexion Bluetooth est activé.
(Reportez-vous à la section « La Soundbar
ne se connecte pas via Bluetooth. »).
; Déconnectez l’appareil en cours de lecture,
appariez-le avec l’appareil que vous
souhaitez connecter, puis reconnectez
l’appareil précédent.
;
établi correctement la connexion, reportez-
vous à la section « Le son se coupe lors
d’une connexion via Bluetooth. ».
La Soundbar ne s’allume pas automatiquement
avec le téléviseur.
;
le téléviseur entraîne la désactivation de la
synchronisation de l'alimentation du
téléviseur et de la Soundbar. Commencez par
éteindre le téléviseur.

FRA - 37
13 LICENCE
Dolby, Dolby Atmos, and the double-D symbol
Manufactured under license from Dolby
Manufactured under license from DTS, Inc. (for
or trademarks of DTS, Inc. in the United States
RIGHTS RESERVED.
States and other countries.
Electronics Co., Ltd. is under license. Other
trademarks and trade names are those of their
[ENERGYSTAR]
ENERGYSTARqualiedmodelonly
–
limits required for ENERGY STAR
–
products and practices.
ENERGYSTARqualiedmodelonly
(Applicable to Thin Client models only)
As an ENERGY STAR® Partner, SAMSUNG has
determined that this product meets the
–
–
have been enabled by default, and have
hours.
–
on the chassis from sleep mode.
ENERGYSTARqualiedmodelonly(Theother
models)
–
determined that this product or product

FRA - 38
14 AVIS DE LICENCE
LIBRE
Pour envoyer des questions et des demandes
15 REMARQUE
IMPORTANTE À
PROPOS DU
SERVICE
Manuel d’utilisation sont fournies à titre de
référence uniquement et peuvent différer de
l’apparence du produit réel.
Des frais supplémentaires pourront vous être
(a) Vous demandez l’intervention d’un
présente aucune anomalie (par ex. vous
n’avez pas lu ce Manuel d’utilisation).
(b) Vous portez l’unité à un centre de
présente aucune défaillance (par ex. vous
n’avez pas lu ce Manuel d’utilisation).
Le montant de ces frais administratifs vous
visite à votre domicile ne soit effectuée).

FRA - 39
16 SPÉCIFICATIONSETGUIDE
Spécications
HW-Q600A
USB
Poids
Dimensions (L x H x P) 980,0 x 58,0 x 105,0 mm
+5°C à +35°C
10 % ~ 75 %
AMPLIFICATEUR
Puissance de sortie nominale 200W (30W x 6 + 10W x 2)
PUISSANCE DE SORTIE DE L’APPAREIL SANS FIL
Puissance de transmission BT max.
Puissance de transmission SRD max.
6 mW à 2,402 GHz - 2,480 GHz
25 mW à 5,725 GHz – 5,825 GHz
Nom du caisson de basse PS-WA67B
Poids
Dimensions (L x H x P) 205,0 x 353,0 x 303,2 mm
AMPLIFICATEUR
Puissance de sortie nominale 160W
PUISSANCE DE SORTIE DE L’APPAREIL SANS FIL
Puissance de transmission SRD max.
25 mW à 5,725 GHz – 5,825 GHz
Consommation électrique totale en veille (W) 2,0W
Bluetooth
Méthode de désactivation du port
Appuyez et maintenez enfoncée la touche
SOUND MODE pendant plus de 5 secondes pour
REMARQUES
Le poids et les dimensions sont approximatifs.

FRA - 40
Cet équipement peut fonctionner dans tous les pays de l’UE et au Royaume-Uni.
[Elimination des batteries de ce produit]
(Applicable aux pays disposant de systèmes de collecte séparés)
Si les batteries ne sont pas correctement éliminées, ces substances peuvent porter préjudice à la santé
humaine ou à l’environnement.
batteries.
Les bons gestes de mise au rebut de ce produit (Déchets d’équipements électriques &
électroniques)
(Applicable aux pays disposant de systèmes de collecte séparés)
Ce symbole sur le produit, ses accessoires ou sa documentation indique que ni le produit, ni ses accessoires
des autorités locales pour connaître les procédures et les points de collecte de ces produits en vue de leur
conditions de leur contrat de vente. Ce produit et ses accessoires ne peuvent être jetés avec les autres
déchets.
RÈGLEMENT(UE)2019/1782DELACOMMISSION
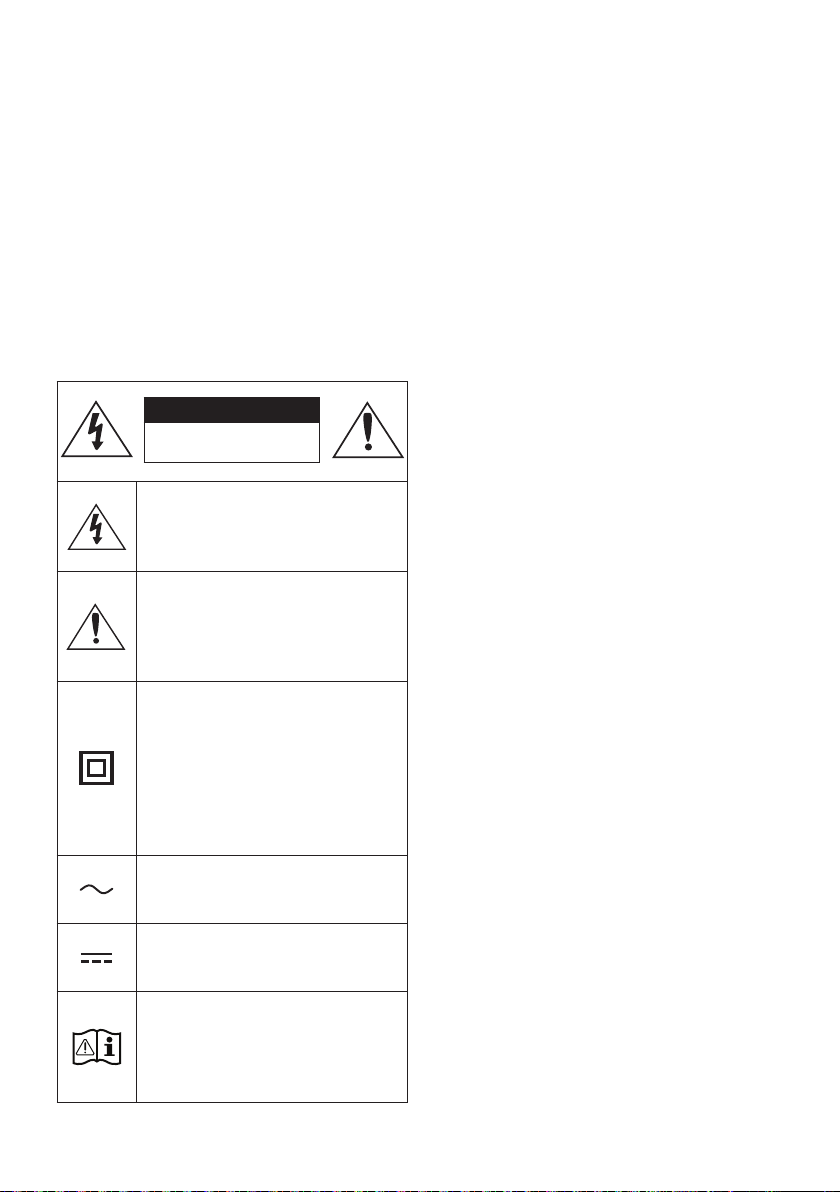
ITA - ii
INFORMAZIONI SULLA SICUREZZA
NORME PER LA SICUREZZA
PER RIDURRE I RISCHI DI FOLGORAZIONE, NON
RIMUOVERE IL COPERCHIO (O IL RETRO),
ALL’INTERNO NON VI SONO PARTI RIPARABILI
DALL’UTENTE. PER L’ASSISTENZA TECNICA FARE
RIFERIMENTO A PERSONALE QUALIFICATO.
Fare riferimento alla seguente tabella per una
descrizione dei simboli che è possibile trovare sul
proprio prodotto Samsung.
ATTENZIONE
RISCHIO DIFOLGORAZIONE.
NON APRIRE.
Questo simbolo indica che all'interno
sono presenti tensioni pericolose.
E' pericoloso toccare in qualsiasi modo
le parti interne di questo prodotto.
Questo simbolo indica la disponibilità di
informazioni importanti nella
letteratura del prodotto relative al
funzionamento e alla manutenzione del
dispositivo.
Prodotto di Classe II: Questo simbolo
indica che il prodotto non necessita di
una connessione di sicurezza alla terra.
Se questo simbolo non è presente su un
prodotto con un cavo di alimentazione,
il prodotto DEVE disporre di una
connessione sicura a una presa di
corrente dotata di messa a terra.
Tensione CA: Questo simbolo indica che
la tensione contrassegnata con questo
simbolo è di tipo CA.
Tensione CC : Questo simbolo indica che
la tensione contrassegnata con questo
simbolo è di tipo CC.
Attenzione, consultare le Istruzioni per
l’uso: Questo simbolo indica all’utente
la necessità di consultare il manuale
dell’utente per ottenere ulteriori
informazioni sulla sicurezza.
AVVERTENZA
• Per ridurre i rischi d’incendio e di scosse
elettriche non esporre l’ apparecchio a
pioggia o umidità.
ATTENZIONE
• PER EVITARE SCOSSE ELETTRICHE, INSERIRE
CORRETTAMENTE E COMPLETAMENTE LA
SPINA.
• Questo dispositivo deve essere sempre
collegato ad una presa elettrica dotata di
messa a terra di protezione.
• Per scollegare il dispositivo dalla rete
elettrica, lo spinotto deve essere estratto
dalla presa, pertanto esso deve essere
facilmente raggiungibile.
• Non schizzare o sgocciolare liquidi
sull’apparecchio. Non sistemare oggetti pieni
di liquidi, come dei vasi, sull’apparecchio.
• Per spegnere completamente l’apparecchio,
estrarre la spina di alimentazione dalla presa
di rete.
Di conseguenza, la spina di alimentazione
deve essere facilmente e prontamente
accessibile in qualsiasi momento.

ITA - iii
PRECAUZIONI
1. Assicurarsi che l’alimentazione CA della
propria abitazione sia conforme ai requisiti di
potenza riportati sull’adesivo di
identicazione situato sulla parte inferiore
del prodotto. Installare il prodotto
orizzontalmente, su un supporto adeguato
(mobile), vericando che vi sia spazio
sufciente per una corretta ventilazione 7 -
10 cm. Assicurarsi che le aperture di
ventilazione non siano coperte. Non
sistemare l’unità su amplicatori o altri
dispositivi che possono diventare caldi.
Questa unità è progettata per un uso
continuo. Per spegnere completamente
l’unità, scollegare il connettore CA dalla
presa di rete. Scollegare l’unità dalla presa se
si prevede di non utilizzarla per un periodo
prolungato.
2. Durante i temporali, scollegare la spina di
alimentazione dalla presa. I picchi di alta
tensione provocati dai fulmini potrebbero
danneggiare l’unità.
3. Non esporre l’unità alla luce diretta del sole o
ad altre fonti di calore. Questo potrebbe
causare il surriscaldamento e il
malfunzionamento dell’unità.
4. Tenere il prodotto lontano da fonti di umidità
(ad es. vasi) e calore eccessivo (ad es. fuoco) o
da apparecchi che generano un forte campo
magnetico o elettrico. In caso di
malfunzionamento dell’unità, scollegare il
cavo di alimentazione dalla presa di corrente.
Il prodotto non è destinato all’uso industriale.
Questo prodotto è destinato esclusivamente
all’uso personale. Se il prodotto o il disco
vengono conservati a basse temperature,
potrebbe formarsi della condensa.
Trasportando l’unità in inverno, attendere
circa 2 ore prima di utilizzarla, in modo che
ritorni a temperatura ambiente.
5. Le batterie utilizzate con questo prodotto
contengono sostanze chimiche dannose per
l’ambiente. Non smaltirle con i comuni riuti
domestici. Non gettare le batterie nel fuoco.
Non cortocircuitare, smontare o
surriscaldare le batterie. ATTENZIONE : Una
installazione scorretta delle batterie può
causarne l’esplosione. Sostituire solo con
batterie dello stesso tipo o equivalenti.
INFORMAZIONI SUL
MANUALE
Il manuale utente è composto da due parti: lo
MANUALE UTENTE cartaceo e il MANUALE
COMPLETO dettagliato disponibile per il download.
MANUALE UTENTE
Consultare questo manuale per istruzioni di
sicurezza, informazioni sull’installazione del
prodotto, i componenti, i collegamenti e le
speciche del prodotto.
MANUALE COMPLETO
È possibile accedere al MANUALE COMPLETO
nel centro di assistenza clienti Samsung online
scansionando il codice QR. Per visualizzare il
manuale sul proprio PC o dispositivo mobile,
scaricarlo dal sito Web Samsung in formato
documento.
(http://www.samsung.com/support)
Le caratteristiche e le speciche sono soggette a
modiche senza preavviso.

ITA - iv
SOMMARIO
Inserimento delle batterie prima dell’utilizzo del telecomando
(2 batterie AA) ------------------------- 2
Pannello anteriore / Pannello superiore della Soundbar ------------------------- 3
Pannello inferiore della Soundbar ------------------------- 4
Collegamento alla rete elettrica
-------------------------
5
Connessione della Soundbar al Subwoofer
-------------------------
6
– Connessione automatica tra il subwoofer e la Soundbar
-------------------------
6
– Connessione manuale del subwoofer in caso di connessione
automatica non riuscita
-------------------------
7
Collegamento del kit SWA-9100S (venduto separatamente) alla Soundbar
---------------------------
9
Metodo 1. Collegamento mediante un cavo
-------------------------
11
– Collegamento di una TV tramite un cavo HDMI
-------------------------
11
– Collegamento tramite un cavo ottico
-------------------------
13
Metodo 2. Connessione wireless
-------------------------
15
– Connessione di una TV mediante Bluetooth
-------------------------
15
Collegamento tramite un cavo HDMI (compatibile con decodicazione
e riproduzione Dolby Atmos)
-------------------------
17
Collegamento tramite un cavo ottico
-------------------------
18

ITA - v
Connessione tramite Bluetooth
-------------------------
20
Utilizzo di Tap Sound
-------------------------
24
Come utilizzare il telecomando
-------------------------
25
Regolazione del volume della Soundbar con il telecomando della TV ------------------------- 28
Utilizzo dei pulsanti nascosti (pulsanti con più di una funzione)
-------------------------
29
Speciche di uscita per diverse modalità di effetti sonori
-------------------------
29
Precauzioni per l’installazione
-------------------------
30
Componenti per il montaggio a parete
-------------------------
30
Procedura per l’aggiornamento
-------------------------
33
Se non compare la scritta UPDATE
-------------------------
34
Ripristino
-------------------------
34
Speciche
-------------------------
39
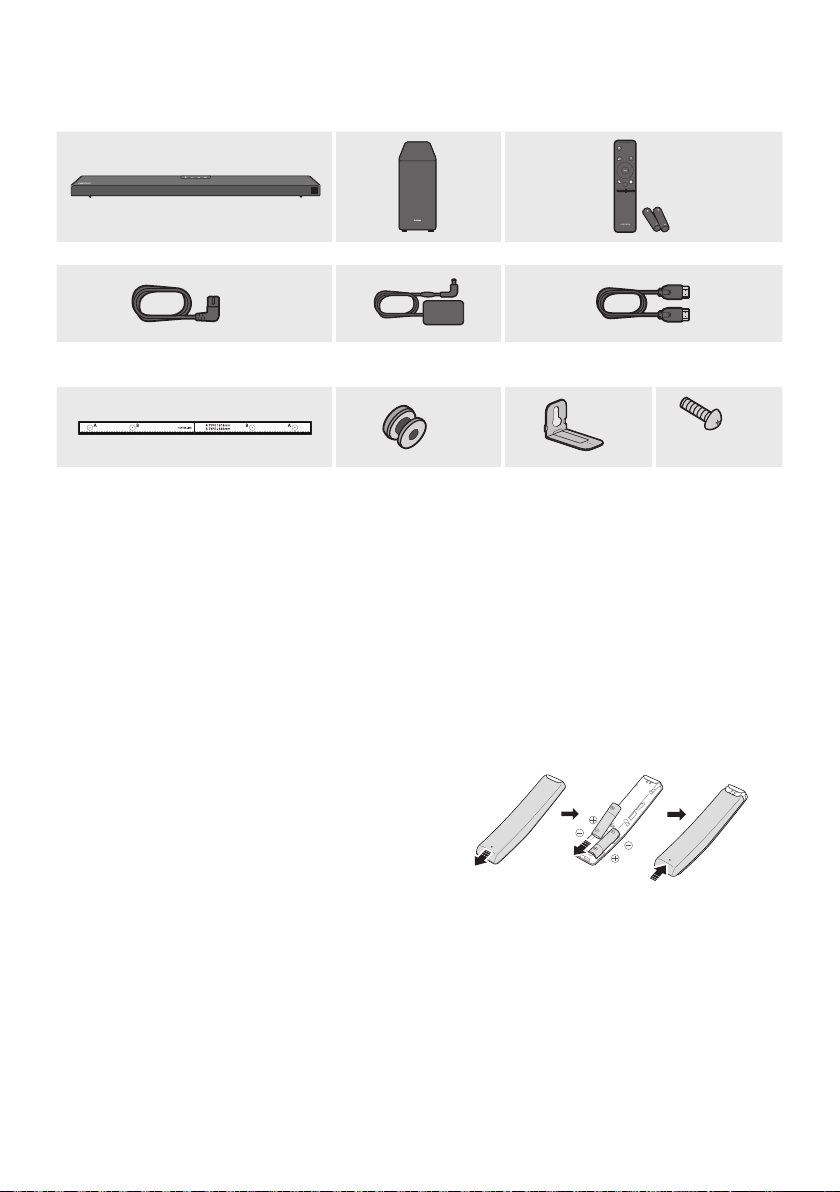
ITA - 2
01 VERIFICA DEI COMPONENTI
VOL WOOFER
SOUNDBAR
SOUND
MODE
PAIR
x 2
x 2
x 2
(M4 x L10)
x 2
• Per ulteriori informazioni sull’alimentazione e il consumo di energia, vedere l’etichetta applicata al
prodotto. (Etichetta : Fondo dell’Unità Principale della Soundbar)
• Per acquistare componenti aggiuntivi o cavi opzionali, contattare un Centro servizi Samsung o
l’Assistenza clienti Samsung.
• L’aspetto degli accessori può variare leggermente dalle illustrazioni riportate sopra.
Far scorrere il coperchio posteriore nella direzione
della freccia no alla completa rimozione.
Inserire 2 batterie AA (1,5 V) orientate in maniera
tale da rispettarne la polarità. Far scorrere il
coperchio posteriore no al raggiungimento della
posizione iniziale.
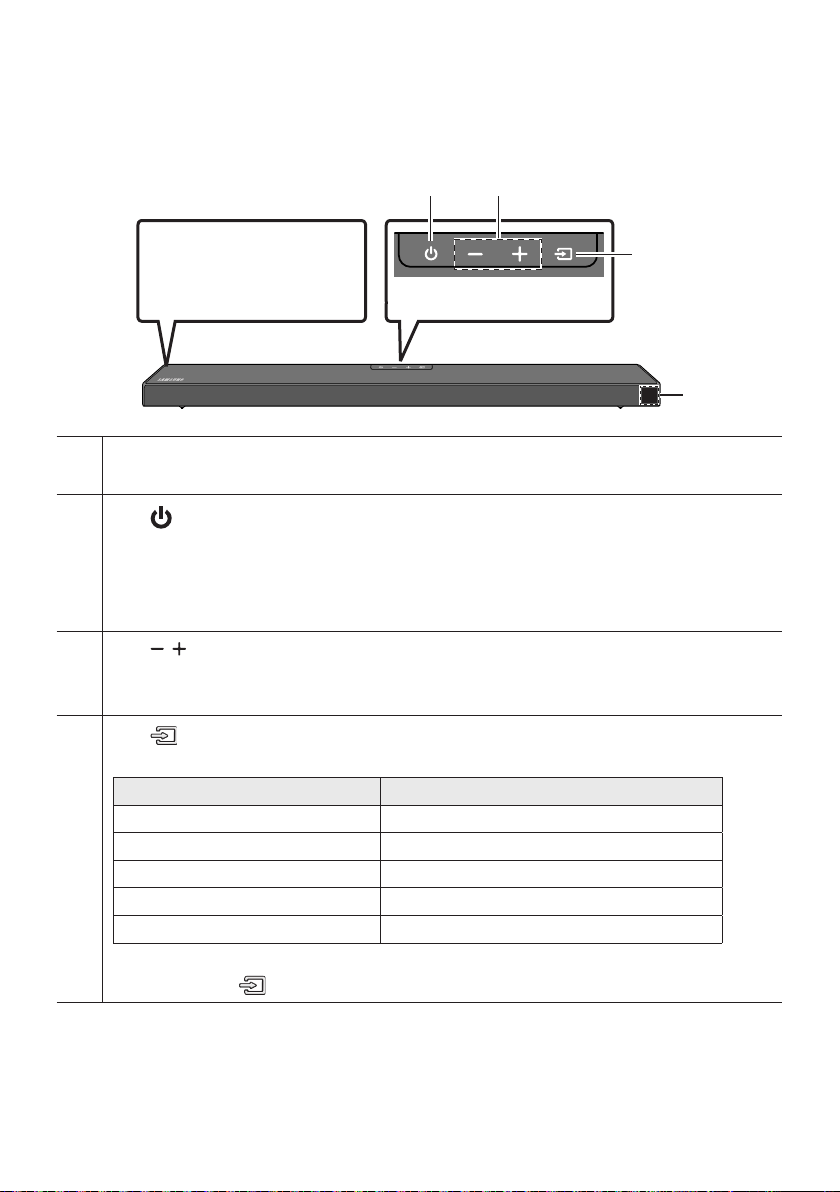
ITA - 3
02 PANORAMICA DEL PRODOTTO
Posizionare il prodotto in
modo tale che il logo
SAMSUNG si trovi nella
parte superiore.
Consente di visualizzare lo stato e il modo attuale del prodotto.
Consente di accendere e spegnere il dispositivo.
•
L’unità si spegne automaticamente nelle situazioni elencate di seguito.
– Modalità D.IN / HDMI / / : Se non è presente un segnale audio per 20 minuti.
Consente di regolare il volume.
• Una volta effettuata la regolazione, il livello del volume viene visualizzato sul display frontale della Soundbar.
Consente di selezionare il modo di ingresso della sorgente.
Ingresso digitale ottico D.IN
Ingresso ARC (HDMI OUT) D.IN TV ARC (Conversione automatica)
Ingresso HDMI HDMI
Modo BLUETOOTH BT
Modo USB USB
• Per attivare il modo “”, cambiare la sorgente passando al modo “”, quindi tenere
premuto il tasto per almeno 5 secondi.
• Quando si inserisce il cavo CA, il tasto di accensione diventa operativo in 4 - 6 secondi.
• Quando si accende l’unità vi è un ritardo di 4 - 5 secondi prima che venga riprodotto il suono.
• Per attivare solo l’audio del Soundbar, disattivare i diffusori della TV nel menu di congurazione
audio della TV. Vedere il manuale fornito con il televisore.
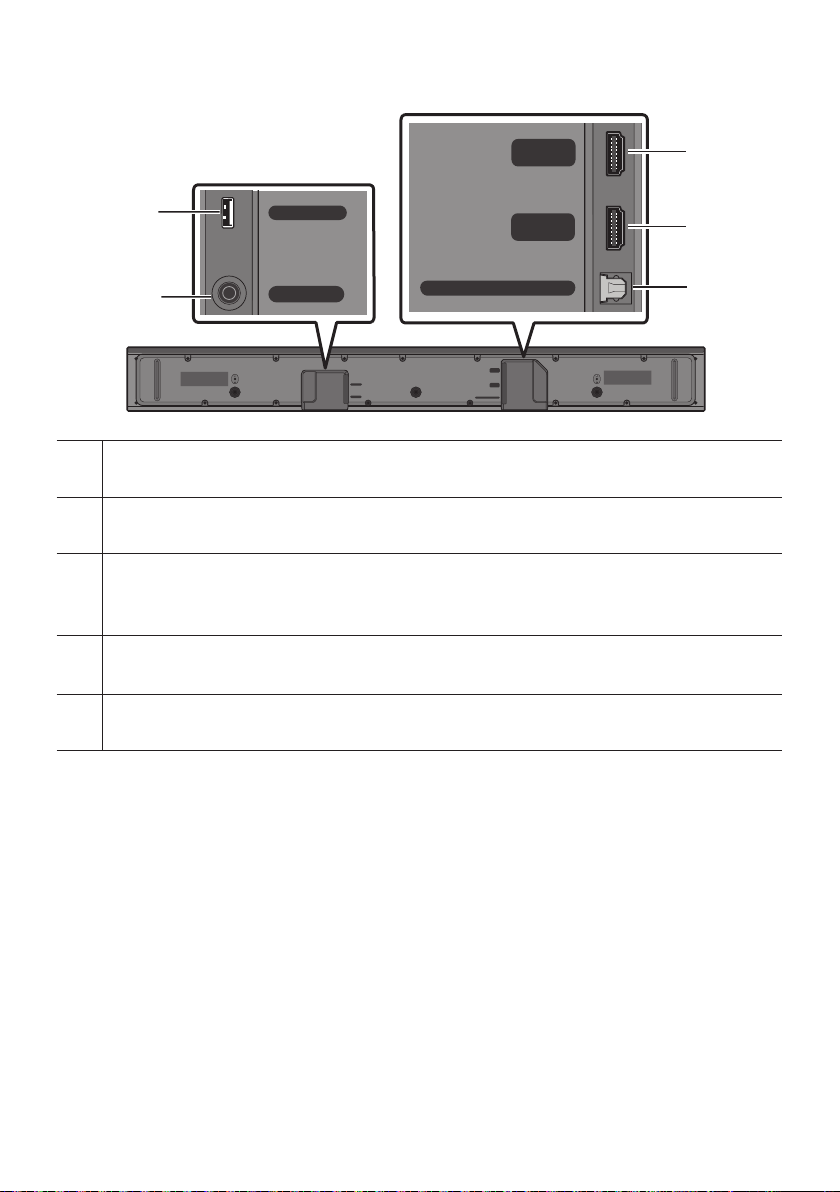
ITA - 4
HDMI
HDMI TO TV
(ARC)
USB (5V 0.5A)
DC 24V
DIGITAL AUDIO IN (OPTICAL)
HDMI
HDMI TO TV
(ARC)
DIGITAL AUDIO IN (OPTICAL)
USB (5V 0.5A)
DC 24V
HDMI
HDMI TO TV
(ARC)
USB (5V 0.5A)
DC 24V
DIGITAL AUDIO IN (OPTICAL)
HDMI
HDMI TO TV
(ARC)
DIGITAL AUDIO IN (OPTICAL)
USB (5V 0.5A)
DC 24V
HDMI
HDMI TO TV
(ARC)
USB (5V 0.5A)
DC 24V
DIGITAL AUDIO IN (OPTICAL)
HDMI
HDMI TO TV
(ARC)
DIGITAL AUDIO IN (OPTICAL)
USB (5V 0.5A)
DC 24V
Collegare a un dispositivo USB per riprodurre le musicali sul dispositivo USB tramite la Soundbar.
Collegare l’adattatore CA/CC.
HDMI
Consente l’ingresso di segnali audio e video contemporaneamente utilizzando un cavo HDMI.
Collegare all’uscita HDMI di un dispositivo esterno.
Collegare alla presa jack HDMI (ARC) di una TV.
Collegare all’uscita digitale (ottica) di un dispositivo esterno.
• Quando si disconnette il cavo di alimentazione dell’adattatore CA/CC da una presa a muro, tirare la
spina. Non tirare il cavo.
• Non collegare questa unità o altri componenti a una presa CA no a quanto tutti i collegamenti tra i
componenti sono stati completati.

ITA - 5
03
Per collegare il subwoofer e la Soundbar a una presa elettrica, utilizzare i componenti di alimentazione
nel seguente ordine:
1. Collegare il cavo di alimentazione al subwoofer.
2. Collegare il cavo di alimentazione in uscita all’adattatore di corrente, quindi alla Soundbar.
3. Collegare il cavo di alimentazione a una presa a muro.
Vedere le gure sottostanti.
• Per ulteriori informazioni sulla potenza elettrica assorbita e sul consumo di energia, vedere
l’etichetta applicata al prodotto. (Etichetta: Fondo dell’unità principale della Soundbar)
POWER
USB (5V 0.5A)
DC 24V
DC 24V
• Assicurarsi di poggiare l’adattatore CA/CC orizzontalmente su un tavolo o sul pavimento. Se si
posiziona l’adattatore CA/CC in modo che penda con l’ingresso del cavo CA rivolto verso l’alto,
acqua o altre sostanze estranee potrebbero penetrare nell’adattatore e causarne il
malfunzionamento.

ITA - 6
Quando è collegato il subwoofer, vengono riprodotti potenti toni bassi.
Al momento dell’accensione dopo il collegamento dei cavi di alimentazione alla Soundbar e al
subwoofer, il subwoofer si connette automaticamente alla Soundbar.
• Una volta completata l’associazione automatica, l’indicatore blu nella parte posteriore del
subwoofer si accende.
LED
Blu
Acceso
Connessione riuscita
(funzionamento normale)
-
Lampeggiante
Ripristino della
connessione
Controllare che il cavo di alimentazione
connesso all’unità principale della Soundbar
sia collegato correttamente oppure
attendere circa 5 minuti. Se continua a
lampeggiare, provare a connettere
manualmente il subwoofer. Consultare la
pagina 7.
Rosso Acceso
Standby (con l’unità
principale della Soundbar
spenta)
Vericare che il cavo di alimentazione sia
collegato correttamente all’unità principale
della Soundbar.
Connessione non riuscita
Procedere nuovamente alla connessione.
Vedere le istruzioni relative alla connessione
manuale a pagina 7.
Rosso e
blu
Lampeggiante Malfunzionamento
Consultare il manuale per i recapiti del
Centro servizi Samsung.
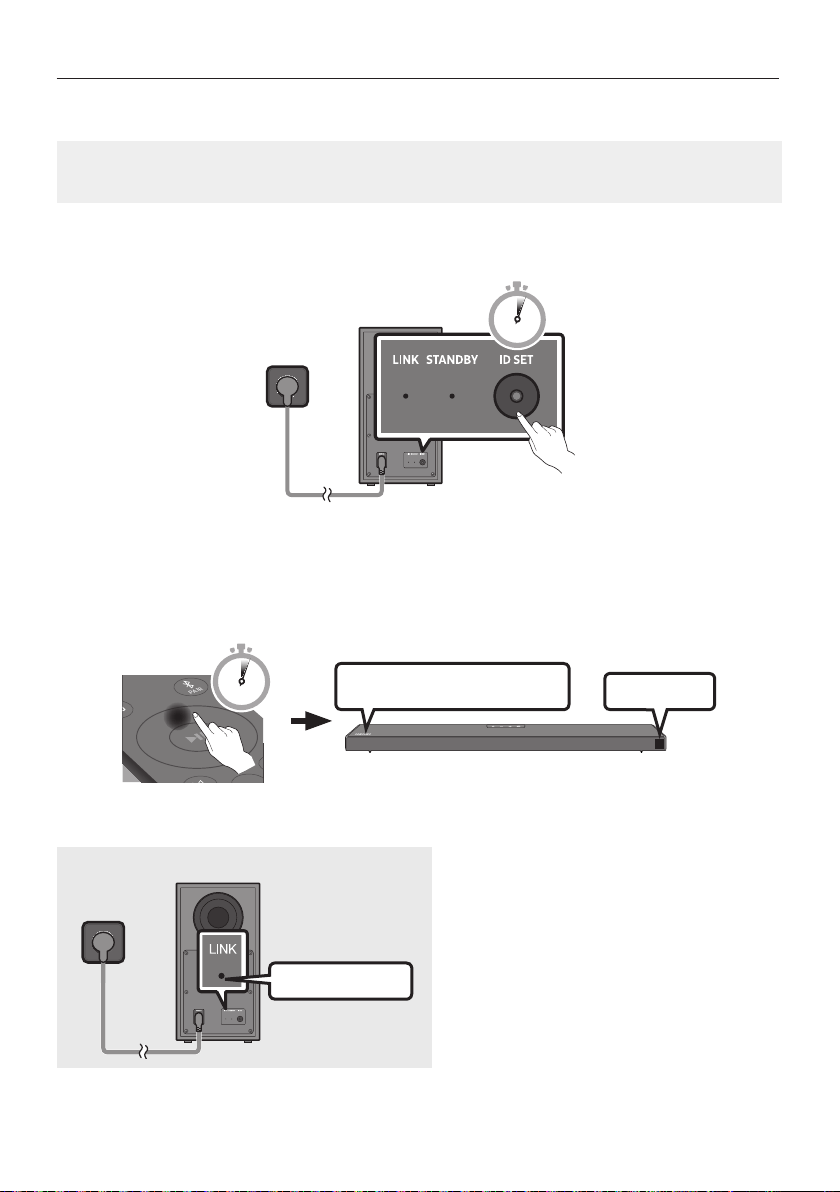
ITA - 7
• Vericare che i cavi di alimentazione della Soundbar e del subwoofer siano collegati correttamente.
• Assicurarsi che la Soundbar sia accesa.
1. Tenere premuto ID SET sul retro del subwoofer per almeno 5 secondi.
• L’indicatore rosso sul retro del diffusore si spegne e l’indicatore blu lampeggia.
5 Sec
2. Tenere premuto il tasto del telecomando per almeno 5 secondi.
• Il messaggio ID SET viene visualizzato brevemente sul display della Soundbar, poi scompare.
• La Soundbar si accenderà automaticamente una volta completata l’ID SET.
SOUND
MODE
PAIR
5 Sec
ID SET
SAMSUNG
3. Vericare che il LED LINK sia di colore blu sso (connessione completata).
L’indicatore a LED LINK smette di
lampeggiare e diventa blu sso quando si
stabilisce una connessione tra la Soundbar e
il subwoofer wireless.

ITA - 8
NOTE
• Non collegare il cavo di alimentazione di questo prodotto o la tua TV a una presa a muro no a
quanto tutti i collegamenti tra i componenti sono stati completati.
• Prima di spostare o installare questo prodotto, assicurarsi di spegnerlo e scollegare il cavo di
alimentazione.
• Se l’unità principale è spenta, il subwoofer wireless entrerà in modo stand-by e l’indicatore Led di
STANDBY sul retro diventerà rosso dopo aver lampeggiato in blu per diverse volte.
• Se si utilizza un dispositivo che sfrutta la medesima frequenza (5,8 GHz) della Soundbar nelle
vicinanze della Soundbar, le interferenze potrebbero causare alcune interruzioni del suono.
• La distanza di trasmissione massima del segnale wireless dell’unità principale è di circa 10 metri, ma
può variare a seconda dell’ambiente di funzionamento. Se tra l’unità principale e il subwoofer si
frappone una parete metallica o di cemento armato, il sistema potrebbe non funzionare affatto in
quanto il segnale wireless non è in grado di attraversare il metallo.
PRECAUZIONI
• Le antenne di ricezione wireless sono integrate nel subwoofer wireless. Tenere le unità al riparo da
acqua e umidità.
• Per prestazioni di ascolto ottimali, assicurarsi che l’area circostante il diffusore wireless e il
posizionamento del modulo di ricezione wireless (venduto separatamente) siano sgombri da
ostacoli.
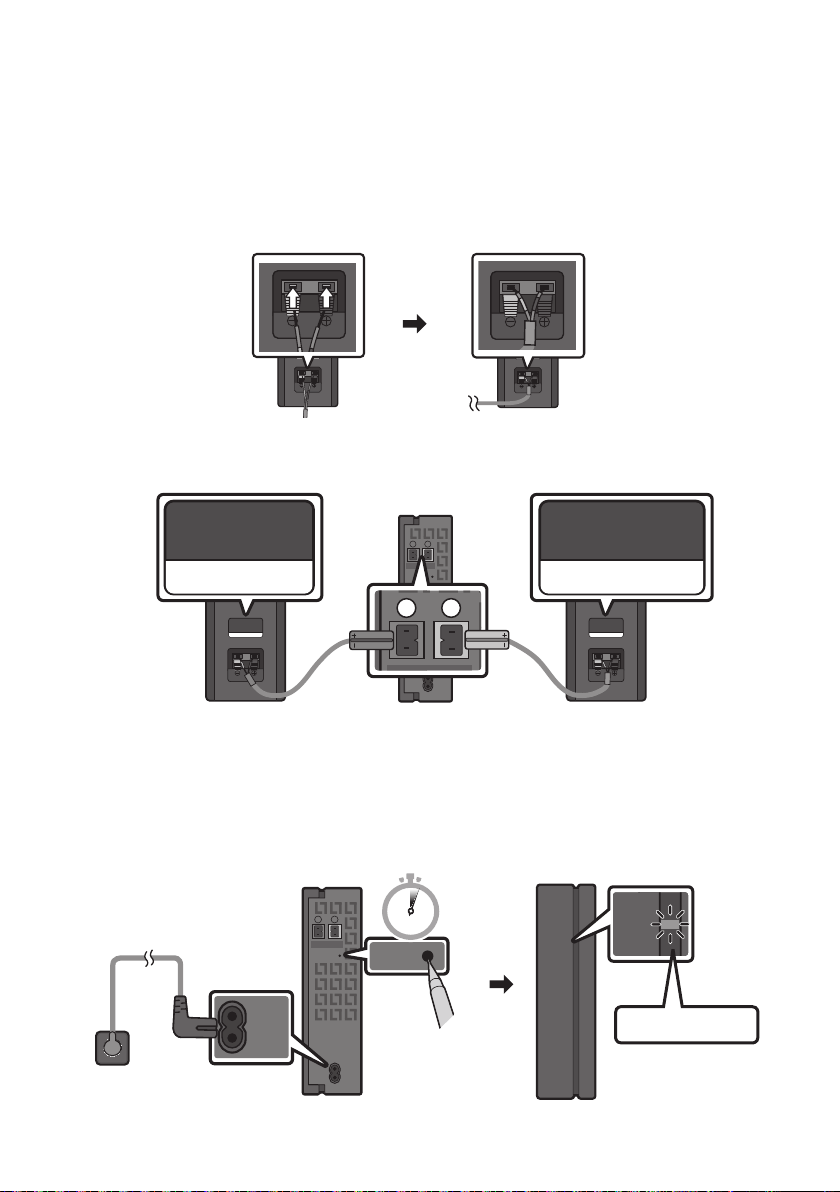
ITA - 9
Per provare il vero impianto audio surround wireless, collegare il kit di diffusori posteriori wireless
Samsung (SWA-9100S, venduto separatamente) alla Soundbar.
1. Collegare il modulo ricevitore wireless ai 2 diffusori surround.
– Quando si connette il cavo dell’altoparlante, connettere il cavo con anima all’altoparlante.
SURROUND-RIGHT
SURROUND-RIGHT
– Il cavi dei diffusori sono identicati tramite un codice colore.
SURROUND-LEFT
ID SET
L
R
SURROUND SPEAKERS OUT
SPEAKER IMPEDANCE : 3Ω
POWER
ID SET
L
R
SURROUND SPEAKERS OUT
SPEAKER IMPEDANCE : 3Ω
SURROUND-RIGHT
SURROUND-LEFT SURROUND-RIGHT
2. Dopo aver inserito il modulo ricevitore wireless in una presa elettrica, vericare che sia in stato di
standby.
• L’indicatore LINK a LED (LED blu) sul Modulo ricevitore wireless lampeggia. Se il LED non
lampeggia, premere il tasto ID SET sul retro del Modulo ricevitore wireless con la punta di una
penna per 5~6 secondi no a che l’indicatore LINK a LED lampeggia (in blu). Per ulteriori
informazioni sul LED, fare riferimento al manuale utente del prodotto SWA-9100S.
ID SET
L
R
SURROUND SPEAKERS OUT
SPEAKER IMPEDANCE : 3Ω
POWER
POWER
ID SET
SURROUND SPEAKERS OUT
SPEAKER IMPEDANCE : 3Ω
STANDBY
LINK
STANDBY
LINK
5 Sec
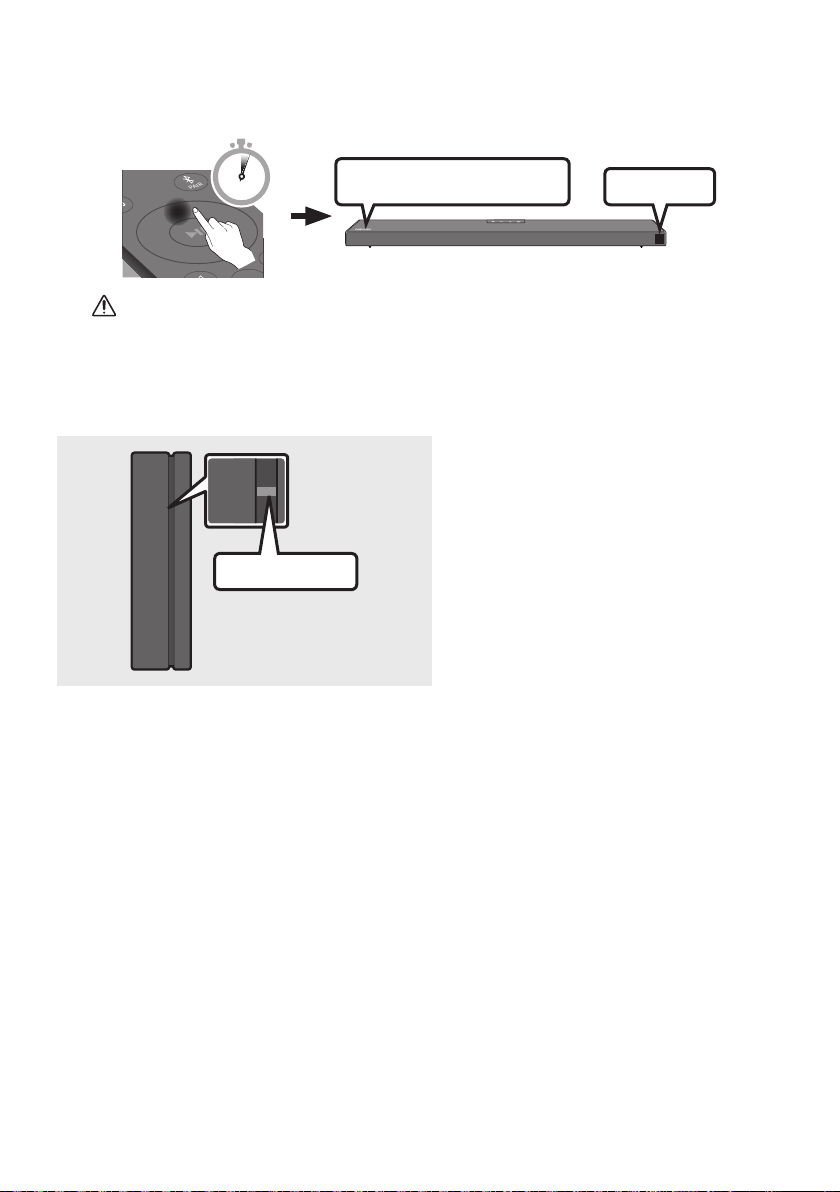
ITA - 10
3. Tenere premuto il tasto del telecomando per almeno 5 secondi.
• Il messaggio ID SET viene visualizzato brevemente sul display della Soundbar, poi scompare.
• La Soundbar si accenderà automaticamente una volta completata l’ID SET.
SOUND
MODE
PAIR
5 Sec
ID SET
SAMSUNG
ATTENZIONE
• Se la Soundbar stava riproducendo musica al momento del collegamento al kit SWA-9100S,
potrebbero udirsi alcune irregolarità emesse dal woofer durante il completamento della
connessione.
4. Vericare che il LED LINK sia di colore blu sso (connessione completata).
STANDBY
LINK
STANDBY
LINK
L’indicatore a LED LINK smette di
lampeggiare e diventa blu sso quando si
stabilisce una connessione tra la Soundbar e
il modulo ricevitore wireless.
5. Se il kit SWA-9100S non si connette, ripetere la procedura dal passaggio 2.

ITA - 11
04 COLLEGAMENTO ALLA TV
È possibile ascoltare l’audio della TV dalla Soundbar grazie a connessioni cablate o wireless.
• Quando la Soundbar è collegata a specici modelli di televisore Samsung, è possibile controllarla
utilizzando il telecomando della TV.
– Questa funzione è supportata dalle Smart TV Samsung del 2017 e successive che sono in grado
di supportare il Bluetooth quando si collega la Soundbar alla TV con un cavo ottico.
– Questa funzione consente inoltre di utilizzare il menu della TV per regolare il campo sonoro e
diverse impostazioni, oltre al volume e alla funzione di muto.
ATTENZIONE
• Dopo aver collegato il cavo HDMI e il cavo ottico, il segnale HDMI viene ricevuto per primo.
• Per collegare il cavo HDMI alla TV e alla Soundbar, assicurarsi di collegare i terminali
contrassegnati ARC. In caso contrario, l’audio della TV non verrà emesso.
• Si consiglia di utilizzare un cavo .
HDMI IN
(ARC)
HDMI TO TV
(ARC)
DIGITAL AUDIO IN (OPTICAL)
TV ARC
1. Con la Soundbar e la TV accese, collegare il cavo HDMI come illustrato nella gura.
2. “TV ARC” compare nella nestra di visualizzazione dell’unità principale della Soundbar e la
Soundbar riproduce l’audio della TV.

ITA - 12
• Se l’audio della TV è inudibile, premere il tasto sul telecomando o sulla parte
superiore della Soundbar per passare al modo “D.IN”. Sullo schermo vengono visualizzati “D.IN”
e “TV ARC” n sequenza e viene riprodotto l’audio della TV.
• Se “TV ARC” non compare nella nestra di visualizzazione dell’unità principale della Soundbar,
vericare che il cavo HDMI sia collegato alla porta corretta.
• Utilizzare i tasti del volume del telecomando della TV per regolare il volume della Soundbar.
NOTE
• L’HDMI è un’interfaccia che permette la trasmissione digitale di dati audio e video con un singolo
connettore.
• Se la TV è dotata di una porta ARC, collegare il cavo HDMI all’ingresso HDMI IN (ARC).
• Consigliamo l’uso di un cavo HDMI coreless, se possibile. Se si utilizza un cavo HDMI cored, usarne
uno il cui diametro sia inferiore ai 14 mm.
• Questa funzione non è disponibile, se il cavo HDMI non supporta l’ARC.
• Quando i segnali di radiodiffusione sono di tipo Dolby Digital e nella TV il “Formato audio dell’uscita
digitale” è impostato su PCM, si raccomanda di modicare l’impostazione passando a Dolby Digital.
Una volta modicata l’impostazione, è possibile godere di una qualità audio più elevata. (Sul menu
del TV le diciture per Dolby Digital e PCM potrebbero essere diverse a seconda del produttore del
TV.)
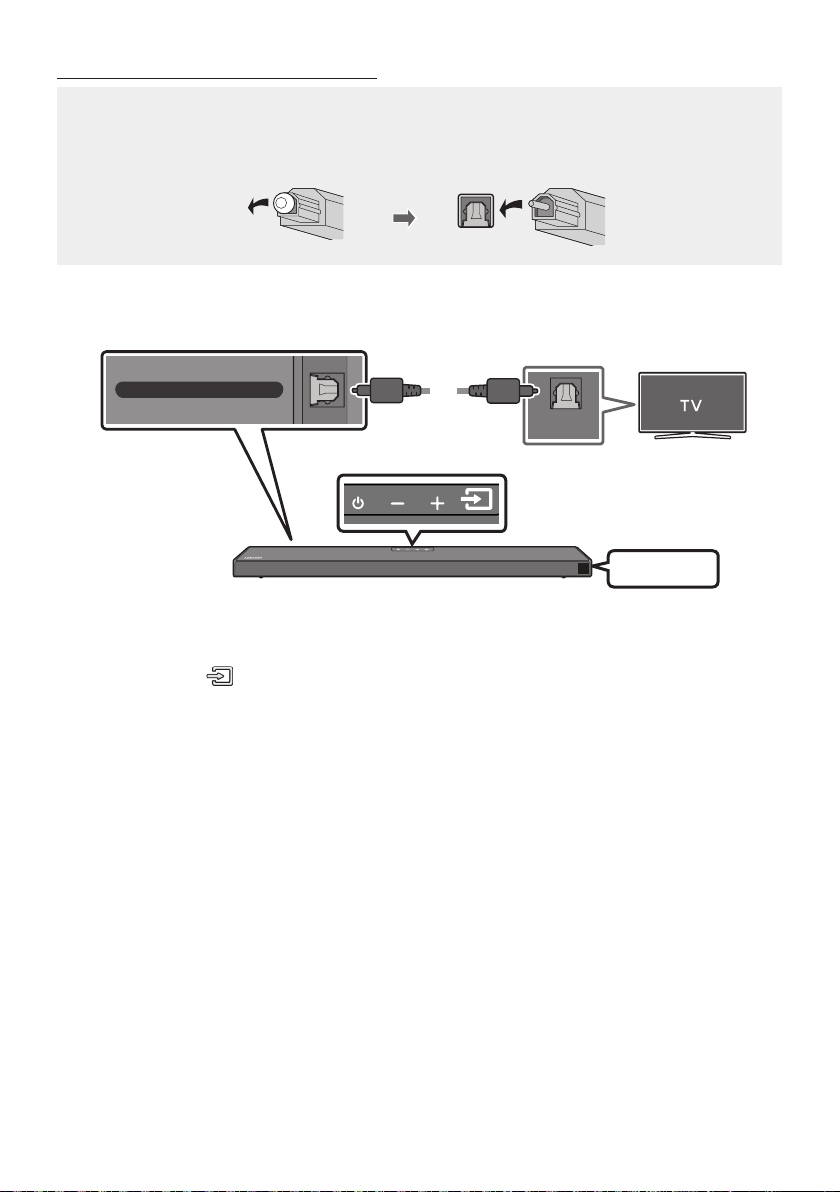
ITA - 13
• Dopo aver collegato il cavo HDMI e il cavo ottico, il segnale HDMI viene ricevuto per primo.
• Quando si utilizza un cavo ottico e i terminali sono coperti, assicurarsi di rimuovere la copertura.
OPTICAL OUT
DIGITAL AUDIO IN (OPTICAL)
D.IN
1. Collegare la presa jack della Soundbar alla presa jack OPTICAL OUT
della TV con un cavo ottico (non fornito in dotazione) digitale.
2. Premere il tasto sul pannello superiore o sul telecomando, quindi selezionare il
modo “D.IN”.

ITA - 14
Per Q-Symphony, la Soundbar si sincronizza con un TV Samsung per emettere l’audio attraverso due
dispositivi per un effetto surround ottimale. Quando la Soundbar è connessa, viene visualizzato il menu
“” nel menu del TV. Selezionare il menu corrispondente.
OPPURE
D.IN
• Esempio di menu del TV:
NOTE
• Può funzionare a seconda del Codec supportato dal TV.
• Questa funzione è supportata solo quando è collegato il cavo HDMI o il cavo ottico (non fornito in
dotazione).
• Questa funzione è disponibile nei TV Samsung rilasciati nel 2020 o successivamente e alcuni
modelli di Soundbar.
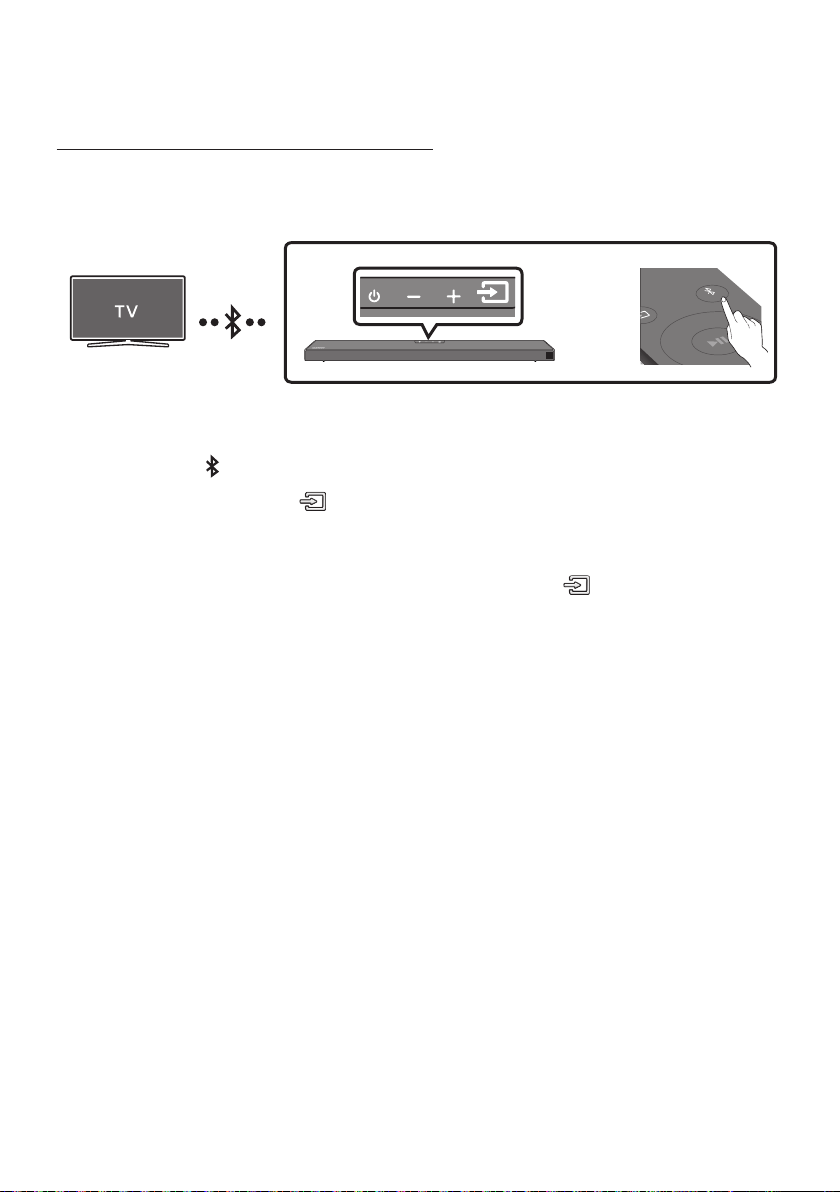
ITA - 15
In caso di connessione di una TV mediante Bluetooth, è possibile percepire l’audio stereo senza i fastidi
dovuti al cablaggio.
• È possibile connettere solo una TV alla volta.
SOUND
MODE
PAIR
OPPURE
1. Premere il tasto PAIR sul telecomando per accedere alla modalità “”.
Premere il tasto sul pannello superiore, quindi selezionare “”.
“” passa automaticamente in pochi secondi a “” oppure a “”
se presente un record di connessione.
Quando compare “”, tenere premuto il tasto nel pannello
superiore della Soundbar per più di 5 secondi per visualizzare “”.
2. Selezionare il modo Bluetooth sulla TV. (Per ulteriori informazioni, consultare il manuale della TV.)
3. Selezionare “” dall’elenco visualizzato nella schermata della
TV. Una Soundbar disponibile è indicata con “” o “” nell’elenco dei dispositivi
Bluetooth della TV. Per connettersi alla Soundbar, selezionare il messaggio e stabilire una
connessione.
• Una volta connessa la TV, viene visualizzato il messaggio [] → “” sul display frontale
della Soundbar.
4. Ora è possibile percepire l’audio della TV dalla Soundbar.
• Se la voce relativa alla Soundbar precedentemente connessa (ad es. “
”) compare nell’elenco, cancellatela.
• Ripetere quindi i passaggi da 1 a 3.
NOTA
• Una volta connessa la Soundbar alla TV per la prima volta, utilizzare la modalità “” per la
riconnessione.

ITA - 16
Premere il tasto sul pannello superiore o sul telecomando, quindi passare a un modo
qualsiasi eccetto “”.
• La disconnessione richiede tempo perché la TV deve ricevere una risposta dalla Soundbar. (Il tempo
necessario potrebbe variare a seconda del modello di TV.)
• Per annullare la connessione Bluetooth automatica tra la Soundbar e il TV, premere il tasto
del telecomando per 5 secondi con la Soundbar in stato “”. (Attivazione → Disattivazione)
• : in questa modalità è possibile cercare delle TV già connesse in passato o connettere
alla Soundbar un dispositivo mobile connesso in passato.
• : in questa modalità, è possibile connettere un nuovo dispositivo alla Soundbar.
(Premere il tasto PAIR sul telecomando o tenere premuto il tasto
nella parte
superiore della Soundbar per più di 5 secondi mentre la Soundbar è in modo “”.)
NOTE
• Se viene richiesto un codice PIN durante la connessione a un dispositivo Bluetooth, immettere
<0000>.
• Nel modo di connessione Bluetooth, la connessione Bluetooth viene persa se la distanza tra la
Soundbar e il dispositivo Bluetooth supera i 10 m.
• La Soundbar si spegne automaticamente dopo 20 minuti nello stato Pronto.
• La Soundbar potrebbe non essere in grado di effettuare la ricerca o la connessione Bluetooth
correttamente nelle seguenti condizioni:
– Se la Soundbar è circondata da un potente campo elettrico.
– Se due o più dispositivi Bluetooth sono associati contemporaneamente alla Soundbar.
– Se il dispositivo Bluetooth è spento, fuori posto o presenta malfunzionamenti.
• I dispositivi elettronici potrebbero causare interferenze radio. I dispositivi che generano onde
elettromagnetiche, come ad esempio forni a microonde, LAN wireless e così via, devono essere
tenuti lontano dall’unità principale della Soundbar.
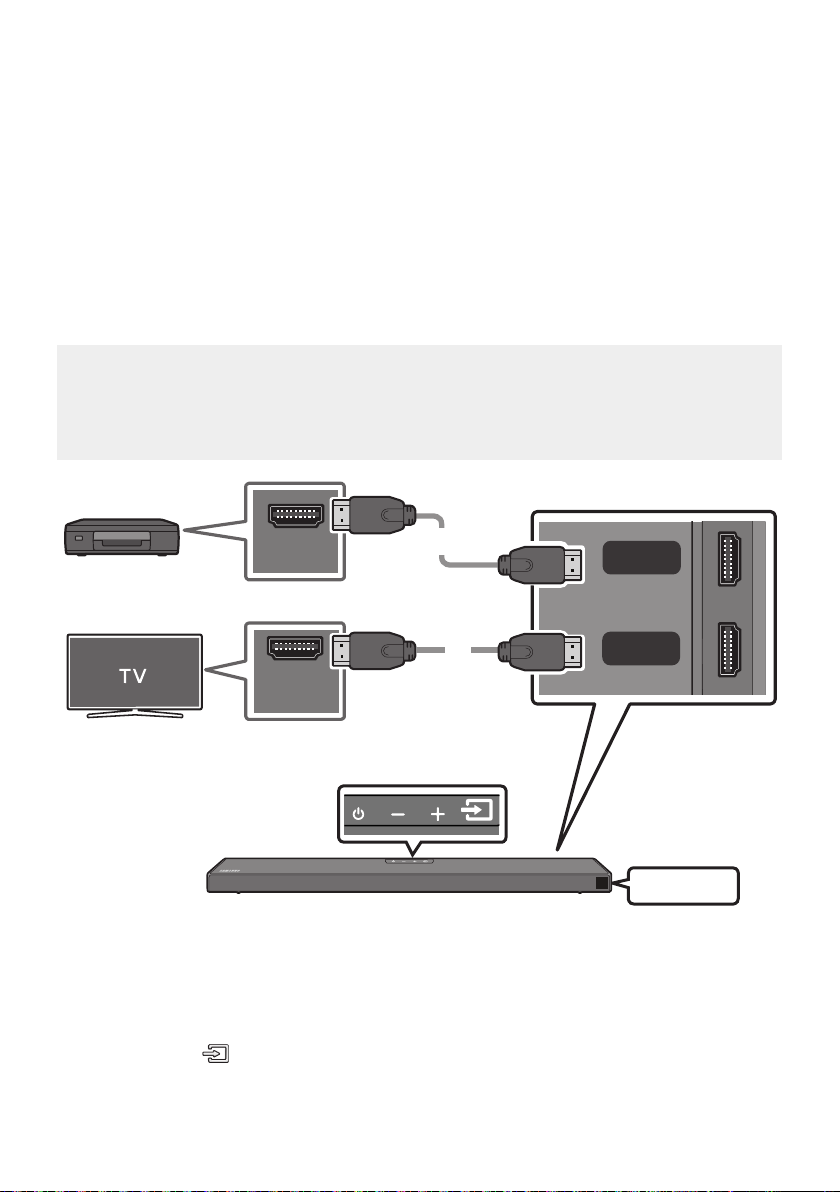
ITA - 17
05 COLLEGAMENTO DI UN DISPOSITIVO
ESTERNO
È possibile connettere un dispositivo esterno tramite una connessione cablata o Bluetooth per
riprodurne l’audio attraverso la Soundbar.
• Dolby Atmos® e DTS:X sono supportati solo in modalità HDMI.
• Se le opzioni Uscita Audio includono Audio secondario, assicurarsi che sia impostato su spento.
• Assicurarsi che il contenuto supporti Dolby Atmos®.
HDMI OUT
HDMI IN
(ARC)
HDMI
HDMI TO TV
(ARC)
DIGITAL AUDIO IN (OPTICAL)
HDMI
1. Collegare un cavo HDMI dalla presa jack HDMI, situata sul retro del prodotto, alla presa jack HDMI
OUT del dispositivo digitale.
2. Collegare un cavo HDMI dalla presa jack , situata sul retro del prodotto, alla
presa jack HDMI IN della TV.
3. Premere il tasto sul pannello superiore o sul telecomando, quindi selezionare “HDMI”.
4. Il modo “HDMI” è visualizzato sul pannello display della Soundbar e l’audio viene riprodotto.
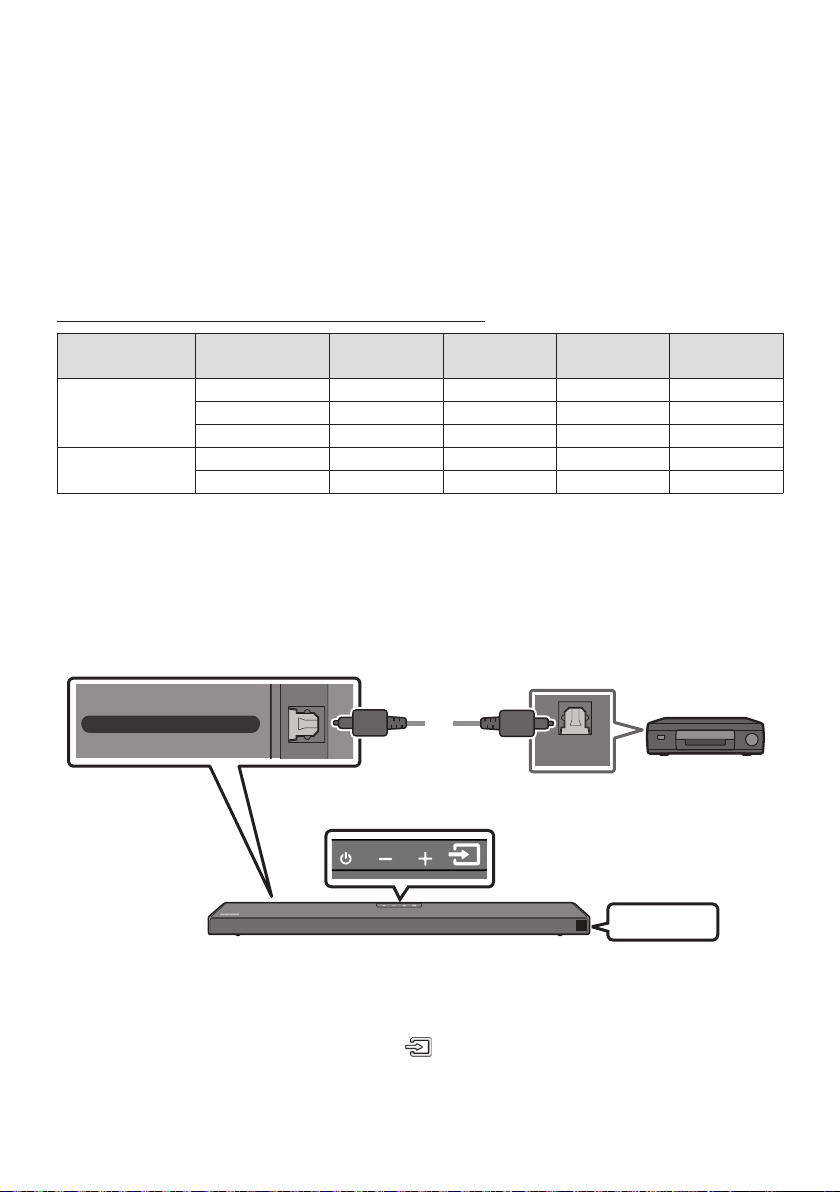
ITA - 18
NOTE
• : Se la sorgente di ingresso è Dolby Atmos®, l’uscita è a 5.1.2 canali.
• Quando Dolby Atmos® viene attivato, sul display anteriore viene visualizzato il messaggio “
ATMOS”.
•
Aprire le opzioni uscita audio sul menu impostazioni del lettore BD o altro dispositivo e assicurarsi
che l’opzione “Nessuna codica” sia selezionata per Bitstream. Ad esempio, su un lettore BD
Samsung, accedere al menu iniziale → Audio → Uscita digitale, quindi selezionare Bitstream (non
elaborato).
< 60
8 bit O O O O
10 bit - - O O
12 bit - - O O
120
8 bit - - - -
10 bit - - - -
• La specica supportata può variare a seconda del dispositivo esterno connesso o delle condizioni di
utilizzo.
OPTICAL OUT
HDMI TO TV
(ARC)
DIGITAL AUDIO IN (OPTICAL)
D.IN
1. Collegare il ell’unità principale alla presa jack OPTICAL OUT del
dispositivo sorgente utilizzando un cavo ottico (non fornito in dotazione) digitale.
2. Selezionare il modo “D.IN” premendo il tasto sul pannello superiore o sul
telecomando.
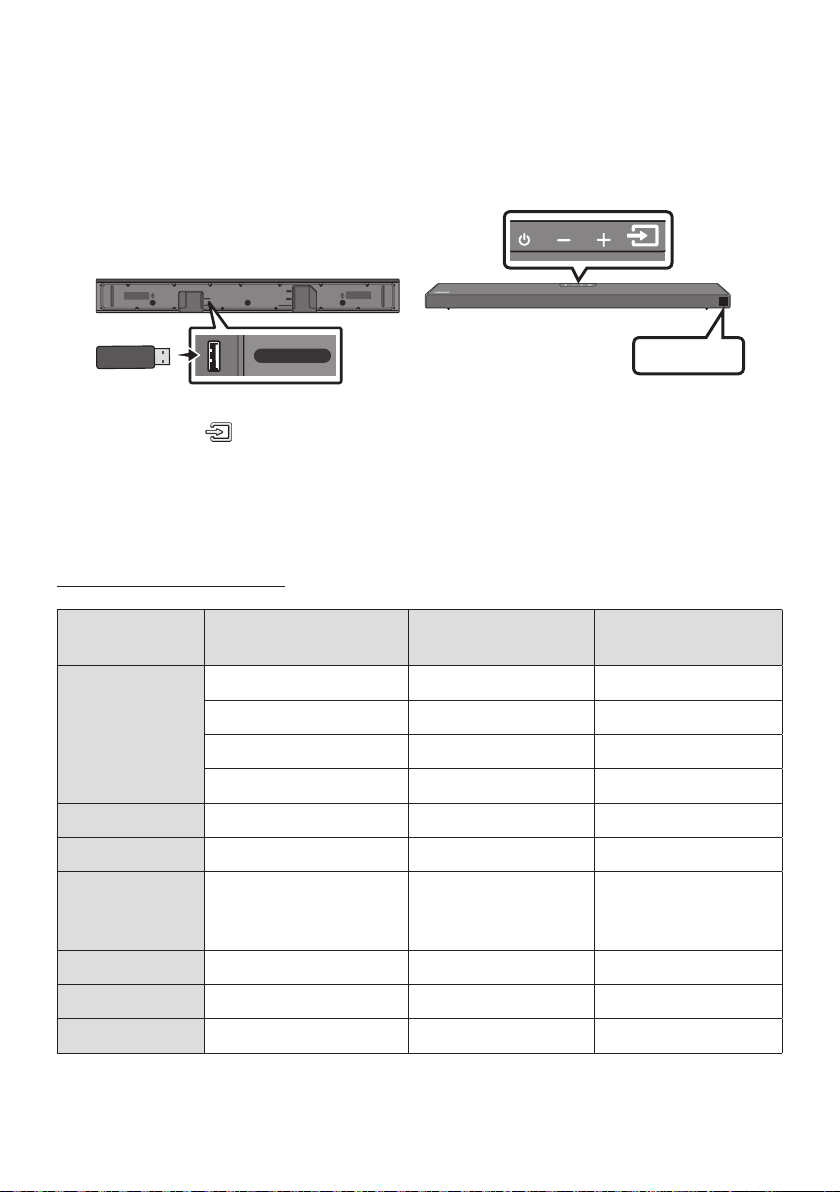
ITA - 19
06 COLLEGAMENTO DI UN DISPOSITIVO DI
È possibile riprodurre tramite la Soundbar le musicali contenuti in dispositivi di memoria.
HDMI
HDMI TO TV
(ARC)
USB (5V 0.5A)
DC 24V
DIGITAL AUDIO IN (OPTICAL)
USB (5V 0.5A)
1. Connettere il dispositivo USB alla porta USB nella parte inferiore del prodotto.
2. Premere il tasto sul pannello superiore o sul telecomando, quindi selezionare “”.
3. Nel display viene visualizzato “”.
4. Riprodurre le musicali dal dispositivo di memoria tramite la Soundbar.
• La Soundbar si spegne automaticamente (Auto Power Down) se non è stato collegato alcun
dispositivo USB per più di 20 minuti.
MPEG1 Layer2 32 kHz ~ 48 kHz 32 ~ 320 kbps
MPEG1 Layer3 32 kHz ~ 48 kHz 32 ~ 320 kbps
MPEG2 Layer3 16 kHz ~ 24 kHz 8 ~ 160 kbps
MPEG2.5 Layer3 8 kHz ~ 12 kHz 8 ~ 160 kbps
WMA7/8/9 (solo audio) 32 kHz ~ 48 kHz 32 ~ 320 kbps
Vorbis 32 kHz ~ 48 kHz 45 ~ 500 kbps
A AC-LC
(MPEG2/MPEG4 solo audio)
32 kHz ~ 48 kHz 32 ~ 320 kbps
LPCM 32 kHz ~ 192 kHz 1024 ~ 9216 kbps
FLAC 32 kHz ~ 192 kHz 162 ~ 8100 kbps
AIFF 32 kHz ~ 192 kHz 1024 ~ 9216 kbps
• Se sul dispositivo USB sono archiviati un elevato numero di cartelle (circa 200) e le (circa 2000) è
possibile che la Soundbar impieghi qualche istante per accedere ai le e riprodurli.
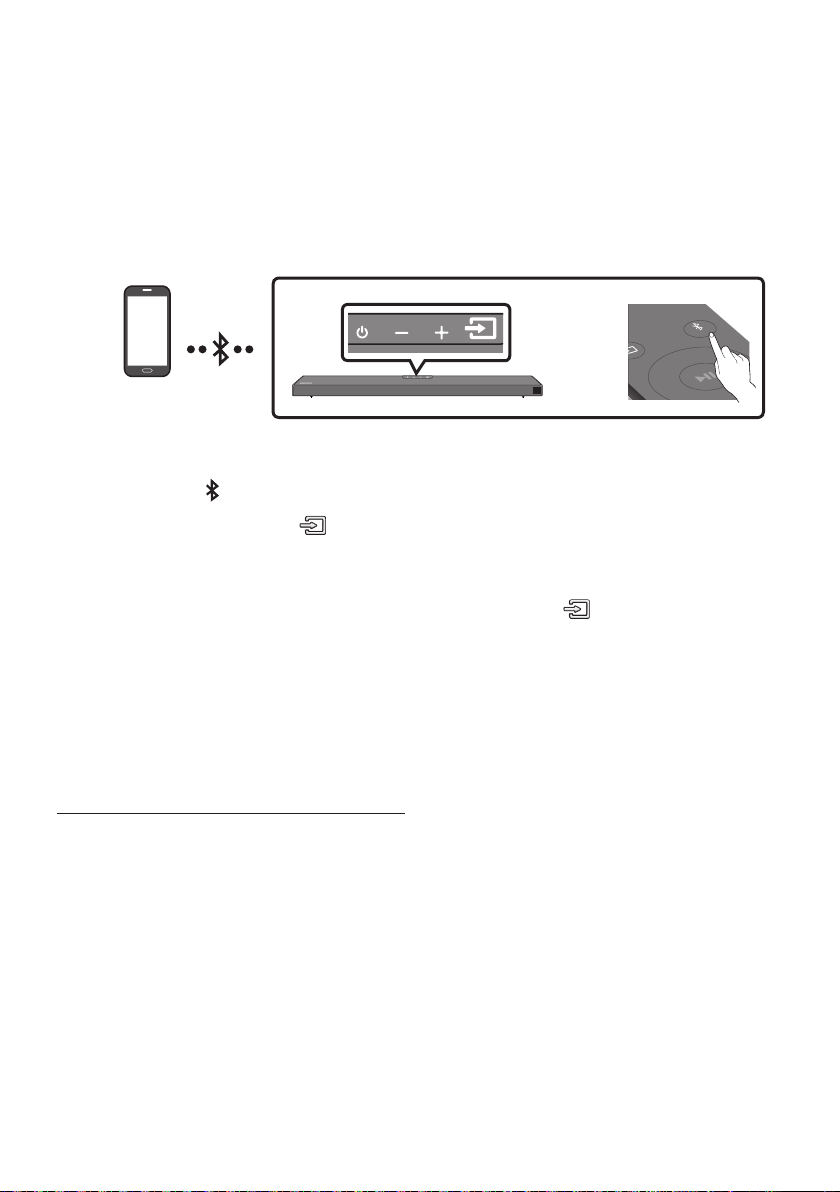
ITA - 20
In caso di connessione di un dispositivo mobile mediante Bluetooth, è possibile percepire l’audio stereo
senza i fastidi dovuti al cablaggio.
• La connessione è limitata a una TV o a due dispositivi Bluetooth contemporaneamente.
SOUND
MODE
PAIR
OPPURE
1. Premere il tasto PAIR sul telecomando per accedere alla modalità “”.
Premere il tasto sul pannello superiore, quindi selezionare “”.
“” passa automaticamente in pochi secondi a “” oppure a “”
se presente un record di connessione.
Quando compare “”, tenere premuto il tasto nel pannello
superiore della Soundbar per più di 5 secondi per visualizzare “”.
2. Selezionare “” all’elenco visualizzato.
• Quando una Soundbar è connessa al dispositivo Bluetooth, nel display frontale viene
visualizzato il messaggio [] → “”.
3. Riprodurre le musicali dal dispositivo, connesso tramite Bluetooth, tramite la Soundbar.
• Se la voce relativa alla Soundbar precedentemente connessa (ad es. “
”) compare nell’elenco, cancellatela.
• Quindi ripetere i passaggi 1 e 2.
NOTA
• Una volta connessa la Soundbar alla dispositivo mobile per la prima volta, utilizzare la modalità
“” per la riconnessione.

ITA - 21
• : in questa modalità è possibile cercare delle TV già connesse in passato o connettere
alla Soundbar un dispositivo mobile connesso in passato.
• : in questa modalità, è possibile connettere un nuovo dispositivo alla Soundbar
(Premere il tasto PAIR sul telecomando o tenere premuto il tasto
nella parte
superiore della Soundbar per più di 5 secondi mentre la Soundbar è in modo “”.)
NOTE
• Se viene richiesto un codice PIN durante la connessione a un dispositivo Bluetooth, immettere
<0000>.
• Nel modo di connessione Bluetooth, la connessione Bluetooth viene persa se la distanza tra la
Soundbar e il dispositivo Bluetooth supera i 10 m.
• La Soundbar si spegne automaticamente dopo 20 minuti nello stato Pronto.
• La Soundbar potrebbe non essere in grado di effettuare la ricerca o la connessione Bluetooth
correttamente nelle seguenti condizioni:
– Se la Soundbar è circondata da un potente campo elettrico.
– Se si effettua l’associazione di diversi dispositivi Bluetooth con la Soundbar in contemporanea.
– Se il dispositivo Bluetooth è spento, fuori posto o presenta malfunzionamenti.
• I dispositivi elettronici potrebbero causare interferenze radio. I dispositivi che generano onde
elettromagnetiche, come ad esempio forni a microonde, LAN wireless e così via, devono essere
tenuti lontano dall’unità principale della Soundbar.
• Il Soundbar supporta i dati SBC (44,1kHz, 48kHz).
• Effettuare il collegamento esclusivamente a un dispositivo Bluetooth che supporti la funzione
A2DP (AV).
• Non è possibile collegare il Soundbar a un dispositivo Bluetooth che supporta soltanto la funzione
HF (Hands Free).
• Una volta stabilito il collegamento tra la Soundbar e un dispositivo Bluetooth, selezionando
“” dall’elenco dei dispositivi trovati, la Soundbar passa
automaticamente al modo “”.
– Disponibile solo se il Soundbar è elencato tra i dispositivi collegati al dispositivo Bluetooth.
(Il dispositivo Bluetooth e il Soundbar devono essere stati collegati in precedenza almeno una volta).
• Il Soundbar appare nell’elenco dei dispositivi cercati del dispositivo Bluetooth solo se il Soundbar
visualizza “”.
Quando la funzione Accensione Bluetooth Power è attivata e il Soundbar è spento, se un dispositivo
Bluetooth collegato in precedenza prova a collegarsi al Soundbar, il Soundbar si accende
automaticamente.
1. Tenere premuto il tasto SOUND MODE sul telecomando per più di 5 secondi mentre si accende la
Soundbar.
2. “” viene visualizzato sul display della Soundbar.

ITA - 22
È possibile scollegare il dispositivo Bluetooth dall’Soundbar. Per le istruzioni, vedere il manuale utente
del dispositivo Bluetooth.
• L’Soundbar viene scollegato.
• Una volta disconnessa la Soundbar dal dispositivo Bluetooth, nel suo display frontale verrà
visualizzato il messaggio “”.
Premere il tasto sul pannello superiore o sul telecomando, quindi passare a un modo
qualsiasi eccetto “”.
• La disconnessione richiede tempo perché il dispositivo Bluetooth deve ricevere una risposta dalla
Soundbar. (Il tempo di disconnessione potrebbe variare a seconda del dispositivo Bluetooth)
• Una volta disconnessa la Soundbar dal dispositivo Bluetooth, nel suo display frontale verrà
visualizzato il messaggio “”.
NOTE
• In modo di connessione Bluetooth, la connessione cade se la distanza tra l’Soundbar e il dispositivo
Bluetooth supera 10 m.
• L’Soundbar si spegne automaticamente dopo 20 minuti in modo Pronto.
Bluetooth è una tecnologia che permette di collegare facilmente tra di loro dispositivi compatibili con
Bluetooth attraverso una connessione wireless a breve raggio.
• Il dispositivo Bluetooth può provocare rumorosità o malfunzionamenti, a seconda delle condizioni di
utilizzo, se:
– Una parte del corpo è a contatto con il sistema di ricezione / di trasmissione del dispositivo
Bluetooth o dell’Soundbar.
– È soggetto a variazioni elettriche dovute a interferenze derivanti da riessioni dei segnali su
pareti, spigoli o tramezzature d’ufcio.
– È esposto a interferenze elettriche derivanti da dispositivi della stessa banda di frequenza,
incluse apparecchiature mediche, forni a microonde e LAN wireless.
• Collegare l’Soundbar al dispositivo Bluetooth mantenendo una distanza ravvicinata.
• Maggiore è la distanza tra l’Soundbar e il dispositivo Bluetooth, peggiore è la qualità.
Se la distanza supera il raggio d’azione del Bluetooth, la connessione si interrompe.
• In aree a bassa sensibilità di ricezione, la connessione Bluetooth potrebbe non funzionare
correttamente.
• Il collegamento Bluetooth funziona solo nelle vicinanze del dispositivo. La connessione viene
automaticamente interrotta se la distanza è superiore a questo limite. La qualità del suono si riduce
in presenza di ostacoli quali pareti o porte, anche entro il limite indicato.
• Questo dispositivo wireless potrebbe causare interferenze elettriche durante il suo funzionamento.

ITA - 23
La Soundbar può essere connessa a 2 dispositivi Bluetooth contemporaneamente.
1. Connettere la Soundbar a un massimo di due dispositivi Bluetooth. (Consultare la pagina 20)
2. Riprodurre la musica da uno dei dispositivi Bluetooth connessi mentre ne sono connessi due.
3. Se la musica viene riprodotta dal dispositivo Bluetooth “B” durante la riproduzione dal dispositivo
“A”, viene avviata la riproduzione della musica sul dispositivo “B” e interrotta/messa in pausa
automaticamente sul dispositivo “A”.
4. Nelle versioni precedenti ad AVRCP V1.4, il tempo necessario per passare da un dispositivo che
riproduce la musica all’altro potrebbe essere maggiore.
NOTE
• Il dispositivo può essere commutato tramite notica o allarme su alcuni dispositivi.
• Alcuni dispositivi non supportano la connessione multipla Bluetooth.
• La modalità “” si arresta quando nessun dispositivo viene accoppiato entro 3 minuti.
• La commutazione dei dispositivi potrebbe richiedere circa 7 secondi su alcune app.
• Se si cerca di connettere un 3° dispositivo Bluetooth, uno tra i dispositivi A o B verrà disconnesso.
(Verrà disconnesso un dispositivo non attualmente in fase di riproduzione.)
• È possibile connettere solo un TV Samsung o 2 dispositivi Bluetooth contemporaneamente.
• La Soundbar verrà disconnessa dai dispositivi Bluetooth se riceverà una richiesta di connessione da
una TV Samsung.
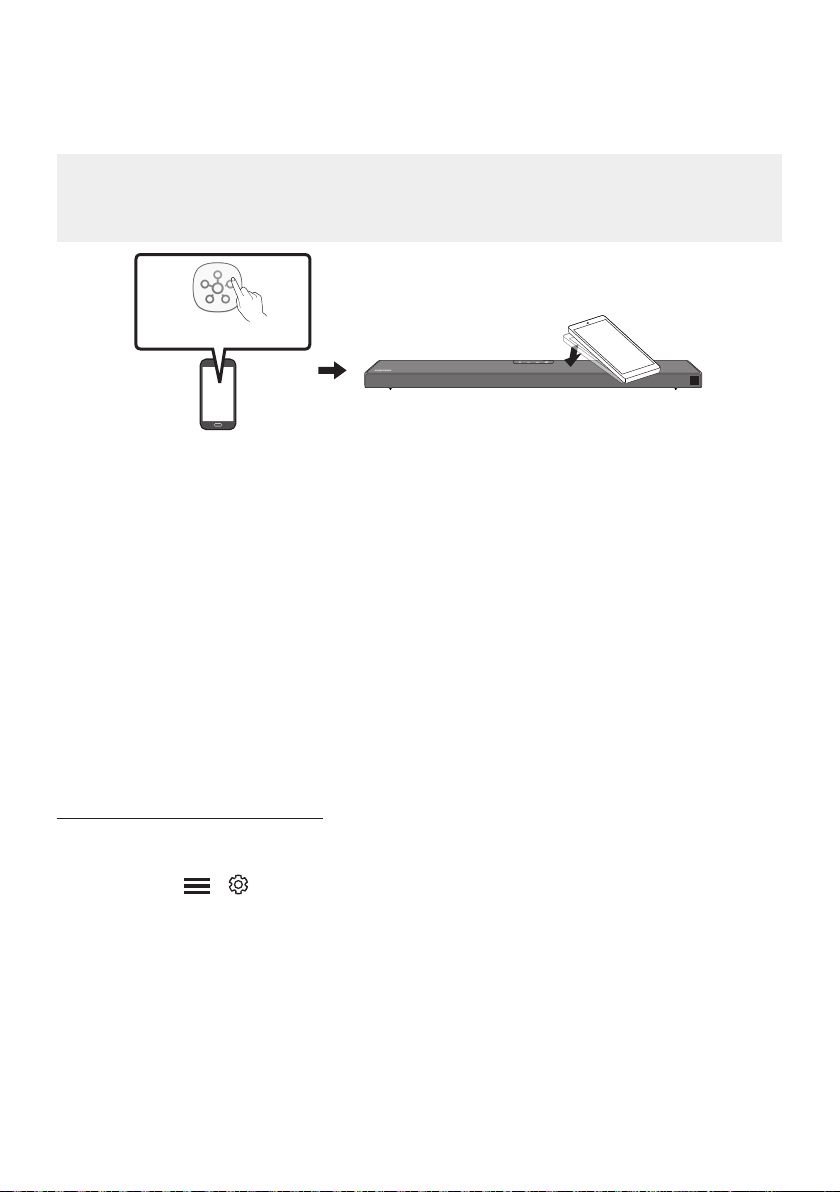
ITA - 24
Toccare la Soundbar con il dispositivo mobile per riprodurre l’audio dal dispositivo mobile tramite la
Soundbar.
• A seconda del dispositivo mobile, questa funzione potrebbe non essere supportata.
• Questa funzione è disponibile solo con i dispositivi mobili Samsung con Android 8.1 o versione
successiva.
1. Attivare la funzione sul dispositivo mobile.
• Per dettagli sull’attivazione della funzione, vedere “” di seguito.
2. Toccare la Soundbar con il dispositivo mobile. Selezionare “” nella nestra dei messaggi
che viene visualizzata. Viene stabilita una connessione Bluetooth tra dispositivo mobile e Soundbar.
3. Riprodurre l’audio dal dispositivo mobile tramite la Soundbar.
• Questa funzione collega un dispositivo mobile alla Soundbar via Bluetooth rilevando le
vibrazioni che si vericano quando il dispositivo tocca la Soundbar.
• Assicurarsi che il dispositivo mobile non tocchi un angolo appuntito della Soundbar.
La Soundbar o il dispositivo mobile può grafarsi o danneggiarsi.
• Si consiglia di applicare una custodia al dispositivo mobile. Toccare leggermente l’ampia area
nella parte superiore della Soundbar, senza esercitare una forza eccessiva.
• Per usare questa funzione, aggiornare l’app all’ultima versione.
A seconda della versione dell’app, questa funzione potrebbe non essere supportata.
Usare l’app per attivare la funzione .
1. Eseguire l’app sul dispositivo mobile.
2. Selezionare ( → ) nella schermata dell’app mostrata sul dispositivo mobile.
3. Impostare “” su Attivo per consentire il funzionamento della funzione quando
un dispositivo mobile si avvicina alla Soundbar.
NOTE
• Quando il dispositivo mobile è in modalità di risparmio energetico, la funzione non è in
operazione.
• La funzione potrebbe non funzionare se ci sono dispositivi vicino alla Soundbar che
causano interferenze radio come i dispositivi elettrici. Assicurarsi che i dispositivi che possono
causare interferenze radio siano posizionati a una distanza sufciente dalla Soundbar.

ITA - 25
08 UTILIZZO DEL TELECOMANDO
VOL WOOFER
SOUNDBAR
SOUND
MODE
PAIR
VOL BASS
SOUND
MODE
PAIR
Consente di accendere e spegnere la Soundbar.
VOL BASS
SOUND
MODE
PAIR
Premere per selezionare una sorgente collegata
alla Soundbar.
VOL BASS
SOUND
MODE
PAIR
Premere il tasto per disattivare
l’audio. Premerlo nuovamente per riattivare
l’audio.
SOUND MODE
VOL BASS
SOUND
MODE
PAIR
Premere per scorrere le modalità audio
disponibili:
SURROUND SOUND, GAME PRO,
ADAPTIVE SOUND
o
STANDARD
.
– SURROUND SOUND
Fornisce un campo sonoro più ampio di
quello standard.
– GAME PRO
Fornisce l’audio stereoscopico che consente
la piena immersione nell’azione di gioco.
– ADAPTIVE SOUND
Analizza il contenuto in tempo reale e
fornisce automaticamente il campo sonoro
ottimale in base alle caratteristiche del
contenuto.
– STANDARD
Emette l’audio originale.
•
Consente di applicare la funzionalità
Dynamic Range Control alle tracce Dolby
Digital. Con la Soundbar spenta, tenere
premuto il tasto SOUND MODE per più di
5secondi per attivare o disattivare la
modalità DRC (Dynamic Range Control). La
modalità DRC, se attivata, attenua i suoni
forti (il suono potrebbe risultare distorto).
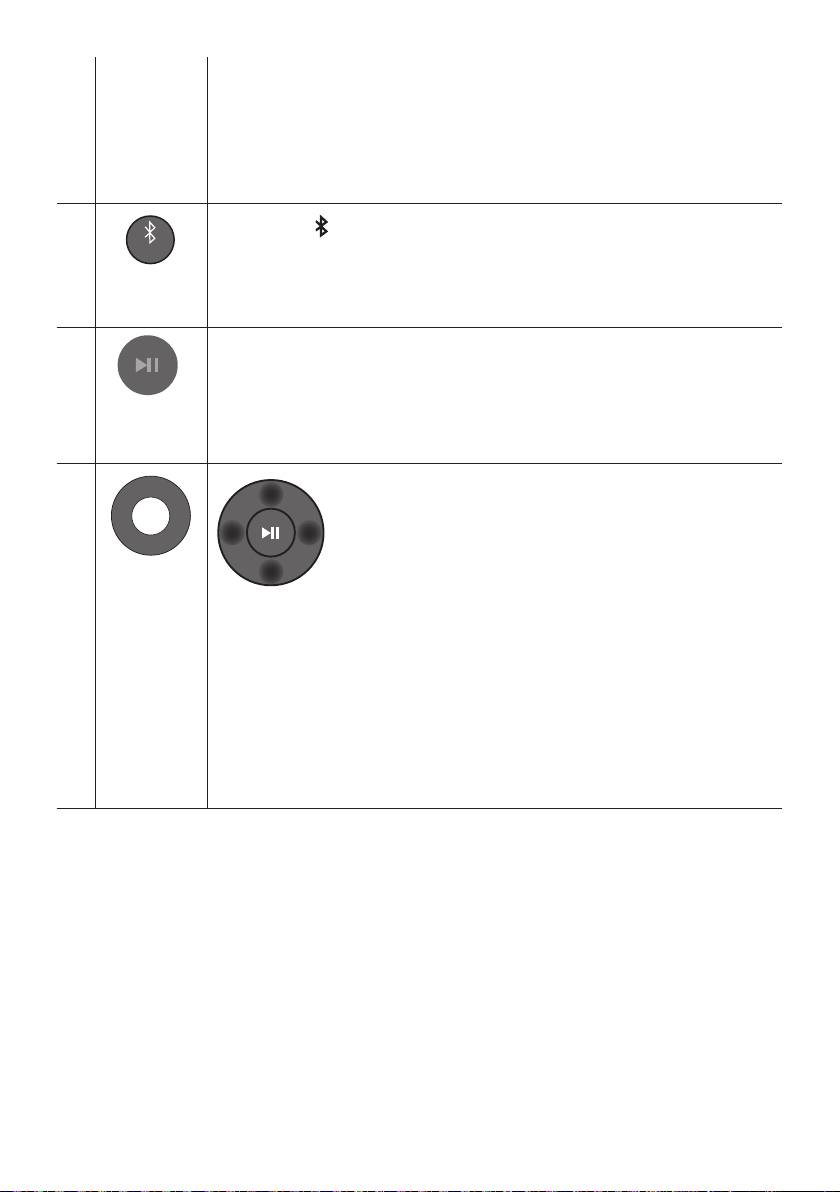
ITA - 26
•
Questa funzione accende automaticamente la Soundbar nel momento in cui riceve una
richiesta di connessione da una TV o da un dispositivo Bluetooth già connessi in
passato. La funzione è Attiva per impostazione predenita.
– Tenere premuto il tasto SOUND MODE per più di 5 secondi per disattivare la
funzione Bluetooth Power.
VOL BASS
SOUND
MODE
PAIR
PAIR
Premere il tasto PAIR. Sul display della Soundbar viene visualizzato “”.
In questa modalità è possibile connettere la Soundbar a un nuovo dispositivo Bluetooth
selezionando la Soundbar dall’elenco di ricerca del dispositivo Bluetooth.
VOL BASS
SOUND
MODE
PAIR
Premere il tasto p per sospendere temporaneamente la riproduzione di un le musicale.
Premendo nuovamente il tasto, si riavvia la riproduzione
VOL BASS
SOUND
MODE
PAIR
Premere Su/Giù/Sinistra/Destra sul tasto per selezionare o impostare funzioni.
•
Per utilizzare la funzione Ripeti nel modo “”, premere il tasto .
•
Premere il tasto per selezionare il le musicale successivo. Premere il tasto
per selezionare il le musicale precedente.
• ID SET
Tenere premuto il tasto per 5 secondi per completare l’ID SET (quando ci si connette
a un subwoofer wireless o ad altoparlanti posteriori wireless).
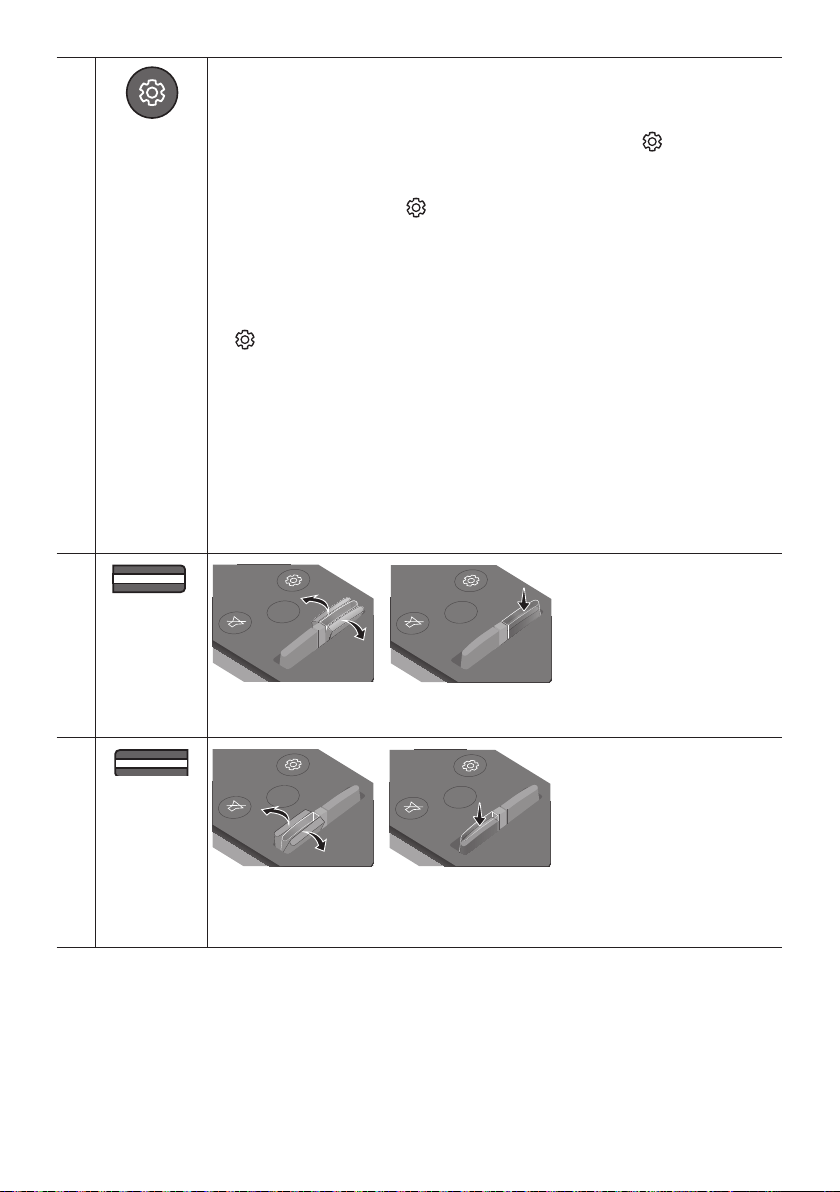
ITA - 27
VOL BASS
SOUND
MODE
PAIR
Quando viene premuto questo tasto, le impostazioni ,,,
CENTER LEVEL, TOP LEVEL e vengono visualizzate in sequenza.
È possibile regolare le impostazioni desiderate utilizzando i tasti .
• Per controllare il volume dell’audio di alti e bassi, premere il tasto
per selezionare o , quindi regolare il volume tra -6~+6 utilizzando i tasti
. (Accertarsi che il modo Audio sia impostata su “STANDARD”.)
• Tenere premuto il pulsante per circa 5 secondi per regolare il
suono di ciascuna banda di frequenza. È possibile utilizzare i pulsanti
per selezionare 150 Hz, 300 Hz, 600 Hz, 1,2 kHz, 2,5 kHz, 5 kHz e 10 kHz e ciascuna
selezione può essere regolata tra -6 e +6 mediante i pulsanti . (Accertarsi che il
modo Audio sia impostata su “STANDARD”.)
• Se il video della TV e l’audio della Soundbar non sono sincronizzati, premere il tasto
per selezionare , quindi impostare il ritardo audio tra
0~300 millisecondi utilizzando i tasti . (Non disponibile nel modo “” o “”.)
• La funzione è supportata soltanto in alcune funzioni.
• Per controllare il volume di ogni diffusore selezionare CENTER LEVEL o TOP LEVEL in
Impostazioni audio, quindi regolare il volume tra -6~+6 usando i tasti .
• La funzione Diffusore VIRTUAL può essere impostata su usando i tasti .
• Quando vengono connessi gli altoparlanti posteriori (venduti separatamente), vengono
supportate le impostazioni e REAR LEVEL.
Utilizzare i tasti per impostare e per regolare il
volume del REAR LEVEL tra -6 e +6.
VOL WOOFER
SOUND
MODE
PAIR
LIVELLO
SOUND
MODE
VOL
WOOFER
SOUNDBAR
SOUND
MODE
VOL
WOOFER
SOUNDBAR
SOUND
MODE
VOL
WOOFER
SOUNDBAR
SOUND
MODE
VOL
WOOFER
SOUNDBAR
Premere il tasto su o giù per regolare il livello del woofer (bassi) a -12 o tra -6 e +6. Per
regolare il livello del volume del woofer (bassi) su 0 (valore predenito), premere il tasto.
VOL BASS
SOUND
MODE
PAIR
VOL
SOUND
MODE
VOL
WOOFER
SOUNDBAR
SOUND
MODE
VOL
WOOFER
SOUNDBAR
SOUND
MODE
VOL
WOOFER
SOUNDBAR
SOUND
MODE
VOL
WOOFER
SOUNDBAR
Premere il tasto su o giù per regolare il volume.
•
Premere il tasto VOL per escludere l’audio. Premerlo nuovamente per riattivare l’audio.
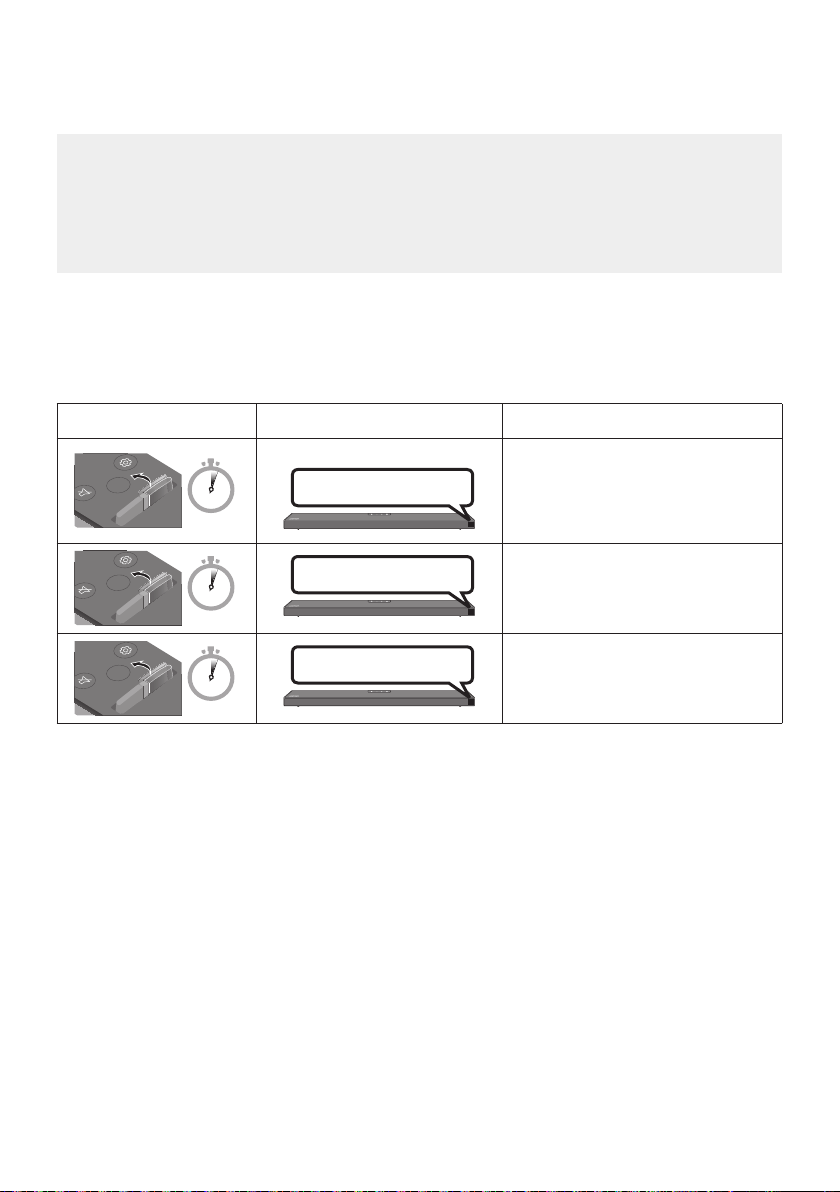
ITA - 28
Regolare il volume della Soundbar usando il telecomando della TV.
• Questa funzione può essere usata solo con telecomandi IR. I telecomandi Bluetooth, che
richiedono l’associazione, non sono supportati.
• Per utilizzare questa funzione, impostare il diffusore TV su .
• Produttori che supportano questa funzione:
VIZIO, LG, Sony, Sharp, PHILIPS, PANASONIC, TOSHIBA, Hisense, RCA
1. Spegnere la Soundbar.
2. Tenere premuto il tasto per 5 secondi.
Ogni volta che si solleva il tasto per 5 secondi, la modalità cambia nel seguente ordine:
“” (modalità predenita), “”, “”.
SOUND
MODE
VOL
WOOFER
SOUNDBAR
5 Sec
(modalità predenita)
Disabilita il telecomando della TV.
SOUND
MODE
VOL
WOOFER
SOUNDBAR
5 Sec
Abilita il telecomando IR di una TV
Samsung.
SOUND
MODE
VOL
WOOFER
SOUNDBAR
5 Sec
Abilita il telecomando IR di una TV di
terze parti.
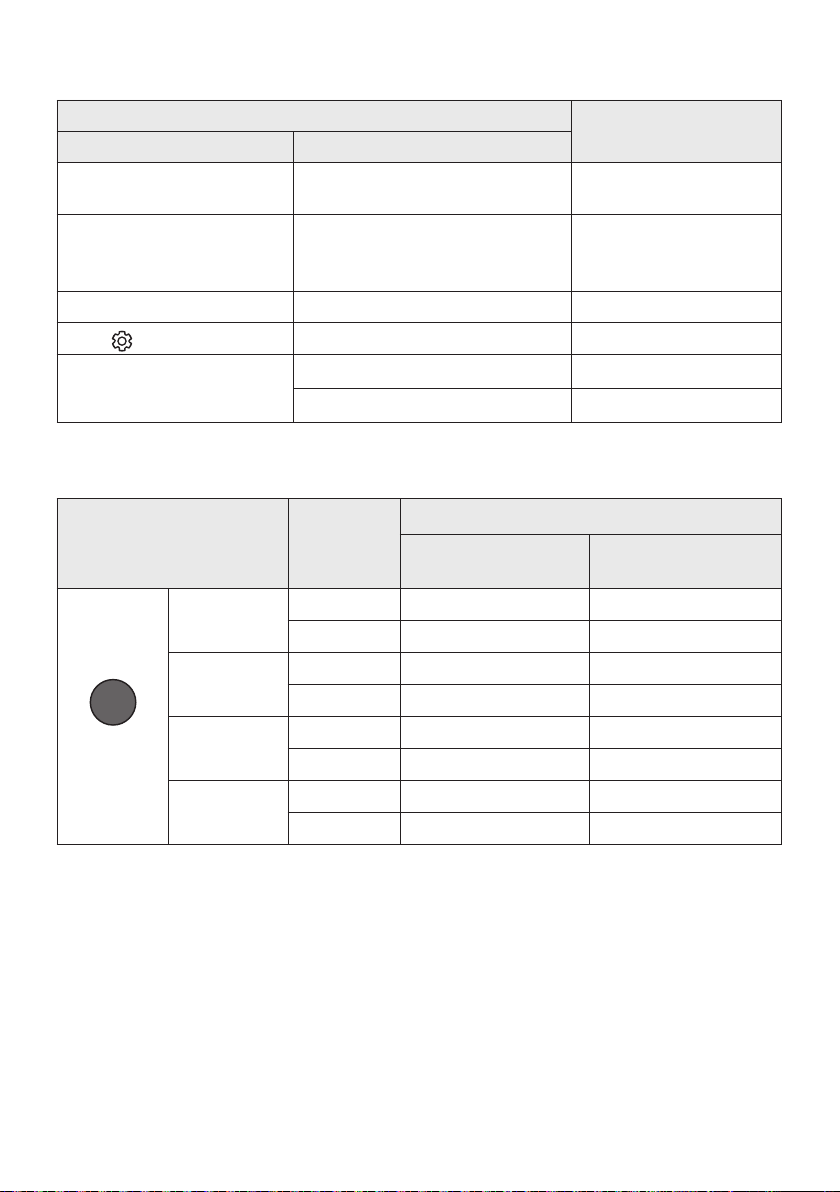
ITA - 29
WOOFER (Su)
Acceso/Spento Telecomando della TV
(Standby)
Pagina 28
Sinistra
Accensione/Spegnimento della
connessione automatica TV
(BT Pronto)
Pagina 16
Su ID SET Pagina 26
(Controllo audio)
EQ 7 bande Pagina 27
SOUND MODE
DRC ON/OFF (Standby) Pagina 25
Bluetooth Power Pagina 26
SOUND MODE
Surround
VOL WOOFER
SOUND
MODE
Bluetooth
POWER
SURROUND
SOUND
2.0 canali
3.1.2 canali 5.1.2 canali
5.1 canali 3.1.2 canali 5.1.2 canali
GAME PRO
2.0 canali
3.1.2 canali 5.1.2 canali
5.1 canali 3.1.2 canali 5.1.2 canali
ADAPTIVE
SOUND
2.0 canali
3.1.2 canali 5.1.2 canali
5.1 canali 3.1.2 canali 5.1.2 canali
STANDARD
2.0 canali
2.1 canali 2.1 canali
5.1 canali 3.1 canali 5.1 canali
• È possibile acquistare il kit di diffusori posteriori wireless Samsung separatamente. Per acquistare
un kit, contattare il venditore da cui avete acquistato la Soundbar.
• Quando la sorgente di ingresso è Dolby Atmos®, la congurazione solo subwoofer fornisce audio a
3.1.2 canali, mentre la congurazione con subwoofer e kit diffusori posteriori wireless fornisce audio
a 5.1.2 canali.
• I diffusori surround non producono suoni per l’uscita a 2 canali se è in uso la modalità STANDARD.
Per abilitare il suono per i diffusori surround, impostare la modalità effetti sonori su SURROUND
SOUND.
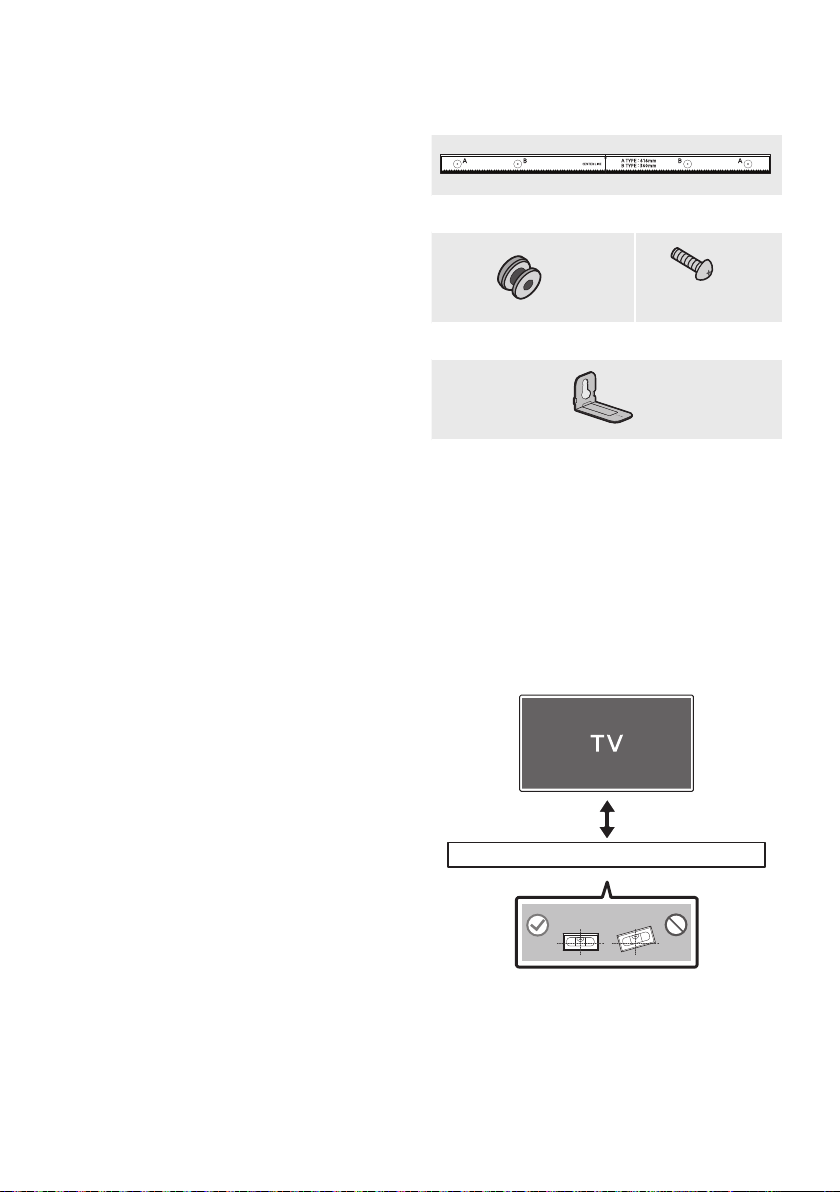
ITA - 30
INSTALLAZIONE
DEL SUPPORTO A
PARETE
• Installare solamente su pareti verticali.
• Non installare in luoghi caratterizzati da alte
temperature e livelli di umidità.
• Vericare che la parete sia sufcientemente
robusta da sostenere il peso del prodotto. In
caso contrario, provvedere a rinforzare la
parete o scegliere un altro luogo di
installazione.
• Acquistare e utilizzare viti e ancoraggi di
ssaggio adatti alla tipologia di parete scelta
(cartongesso, ferro, legno, ecc.). Se possibile,
ssare le viti di supporto ai montanti della
parete.
• Acquistare viti per il montaggio a parete a
seconda della tipologia e dello spessore del
muro su cui si intende montare la Soundbar.
– Diametro: M5
– Lunghezza: si consiglia 35 mm o
maggiore.
• Collegare i cavi dall’unità ai dispositivi esterni
prima di installare la Soundbar sulla parete.
• Assicurarsi che l’unità sia spenta e scollegata
dall’alimentazione prima di installarla. In caso
contrario, potrebbero vericarsi scariche
elettriche.
x 2
(M4 x L10)
x 2
x 2
1. Posizionare la
contro la supercie della parete.
• La deve
essere livellata.
• Se la TV è montata sulla parete, installare
la Soundbar almeno 5 cm sotto la TV.
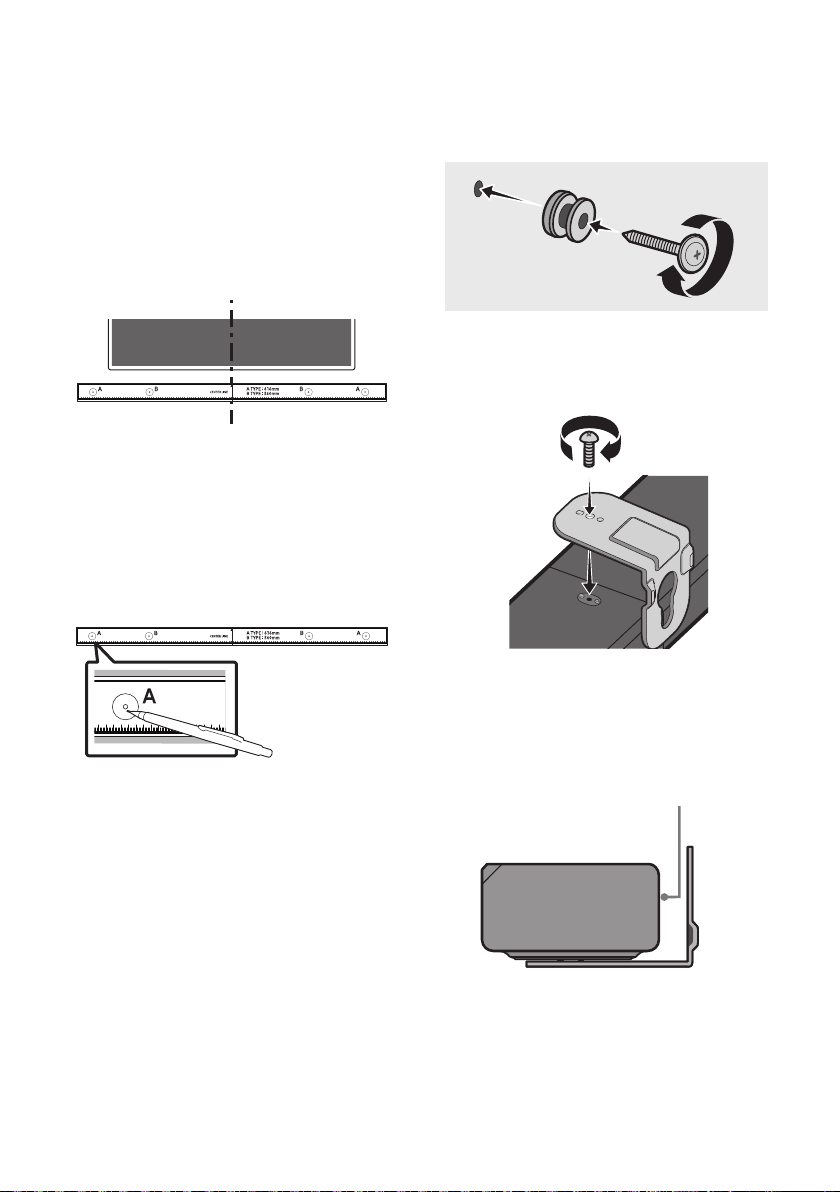
ITA - 31
2. Allineare la
con il centro della TV (in
caso di montaggio della Soundbar sotto la
TV), quindi ssare la
alla parete con del nastro adesivo.
• Se non si intende montare la Soundbar
sotto una TV, posizionare la
al centro dell’area di
installazione.
3. Con la punta di una penna o di una matita
temperata forare il centro delle immagini
su ciascuna estremità della Guida
per contrassegnare i punti destinati ai fori
delle viti di supporto, quindi rimuovere la
.
4. Utilizzando una punta da trapano delle
giuste dimensioni, praticare un foro nella
parete in corrispondenza di ciascun segno.
• Se i contrassegni non corrispondono alle
posizioni dei prigionieri, accertarsi di
inserire tasselli adeguati nei fori prima di
inserire le viti di ssaggio. Quando si usano
i tasselli, accertarsi che i fori praticati siano
abbastanza larghi per i tasselli utilizzati.
5. Far passare una vite (non fornita in
dotazione) attraverso ciascuna
, quindi avvitare saldamente
ciascuna vite in un apposito foro.
6. Installare 2
con l’orientamento corretto sul fondo
della Soundbar, utilizzando 2 .
• Durante l’assemblaggio, assicurarsi che la
parte a sospensione dei
sia situata dietro la
parte posteriore della Soundbar.
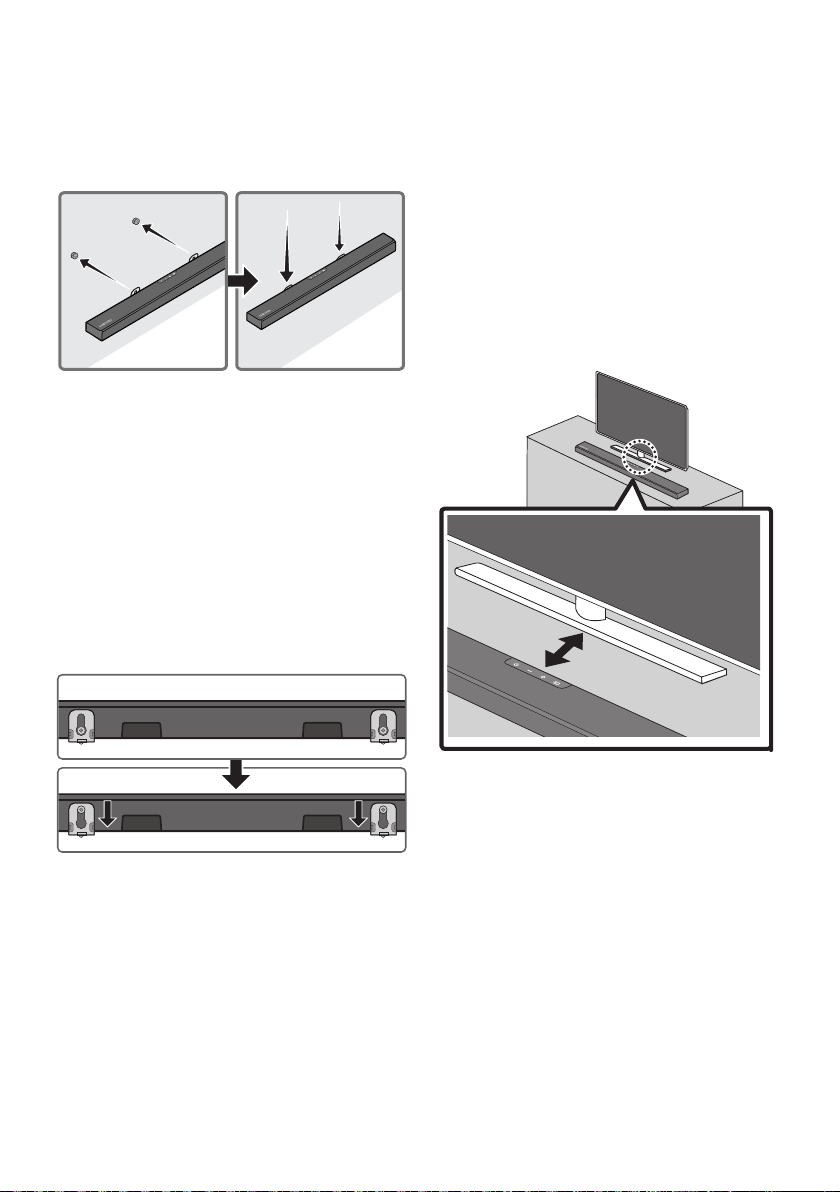
ITA - 32
Installare la Soundbar con gli annessi
appendendo i
alle sulla
parete.
8. Far scorrere la Soundbar verso il basso come
illustrato di seguito, in modo che le
si appoggino
saldamente sulle .
• Inserire le nella
parte larga (fondo) delle
, quindi far scorrere le
verso il
basso, in modo che le
si appoggino
saldamente sulle .
10 COLLOCAMENTO
DELLA
PIEDISTALLO DI
UNA TV
Collocare la Soundbar sul piedistallo di una TV.
Come illustrato nell’immagine, allineare il centro
della Soundbar con il centro del TV, quindi,
prestando la massima attenzione, posizionare la
Soundbar sul piedistallo del TV.
Per una qualità audio ottimale, posizionare la
Soundbar ad almeno 3 cm dalla parte anteriore
della TV.
NOTA
• Assicurarsi di collocare la Soundbar su una
supercie piana e solida.
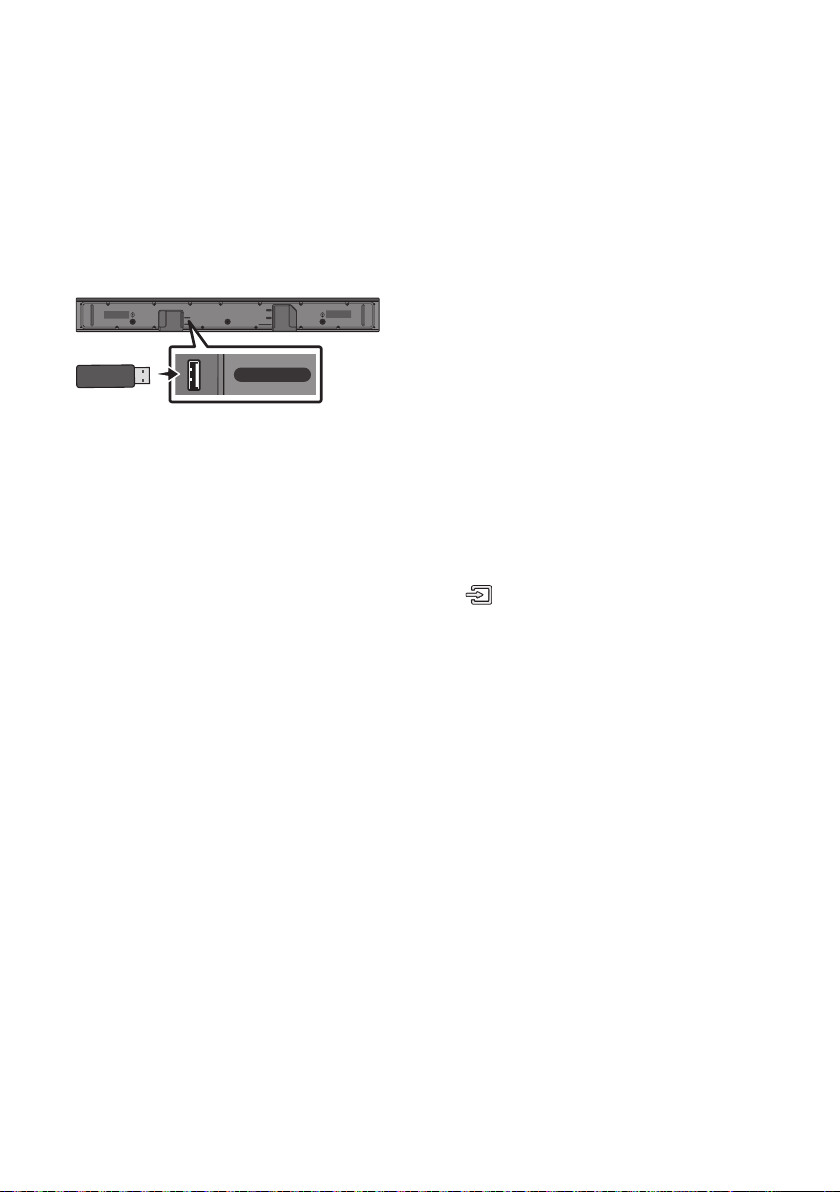
ITA - 33
11 AGGIORNAMENTO
HDMI
HDMI TO TV
(ARC)
USB (5V 0.5A)
DC 24V
DIGITAL AUDIO IN (OPTICAL)
USB (5V 0.5A)
Se viene messo a disposizione un aggiornamento,
è possibile aggiornare il rmware collegando un
dispositivo USB, su cui è stato preventivamente
salvato l’aggiornamento del rmware, alla porta
USB della Soundbar. Per ulteriori informazioni su
come scaricare i le di aggiornamento, visitare il
sito Web Samsung all’indirizzo
(www.samsung.com
Support).
Selezionare quindi il tipo di prodotto o fornire il
numero di modello della Soundbar, selezionare
l’opzione Software & Apps, quindi Downloads.
Tenere presente che i nomi delle opzioni possono
variare.
Una volta completato l’aggiornamento, tutte le
impostazioni utente personalizzate vengono
mantenute.
1. Connettere la chiavetta USB alla porta USB
del computer.
assicurarsi che la chiavetta USB
non contenga le musicali. In caso contrario
l’aggiornamento del rmwall potrebbe non
riuscire.
2. Andare a (samsung.com)
selezionare
Immetti numero modello e immettere il
modello della Soundbar. Selezionare manuali
e download e scaricare la versione più
aggiornata del le software.
3. Salvare il software scaricato su un archivio
USB e selezionare “Estrai qui” per
decomprimere la cartella.
4. Spegnere la Soundbar e connettere la
chiavetta USB contenente l’aggiornamento
software alla porta USB.
5. Attivare la Soundbar, premere il pulsante
sulla Soundbar, quindi
selezionare la modalità “”. “UPDATE” viene
visualizzato sul display e l’aggiornamento verrà
avviato. Al termine dell’aggiornamento, la
Soundbar verrà riavviata automaticamente.
• Il prodotto ha una funzione DUAL BOOT.
Se il rmware non riesce a completare
l’aggiornamento, sarà possibile
aggiornare nuovamente il rmware.
• Durante l’aggiornamento, non spegnere
né rimuovere il dispositivo USB.
• Se è già installata la versione più recente
sulla Soundbar, l’aggiornamento non
verrà installato.
• A seconda del tipo di dispositivo USB,
l’aggiornamento potrebbe non essere
supportato.
6. Ripristinare le impostazioni della Soundbar.
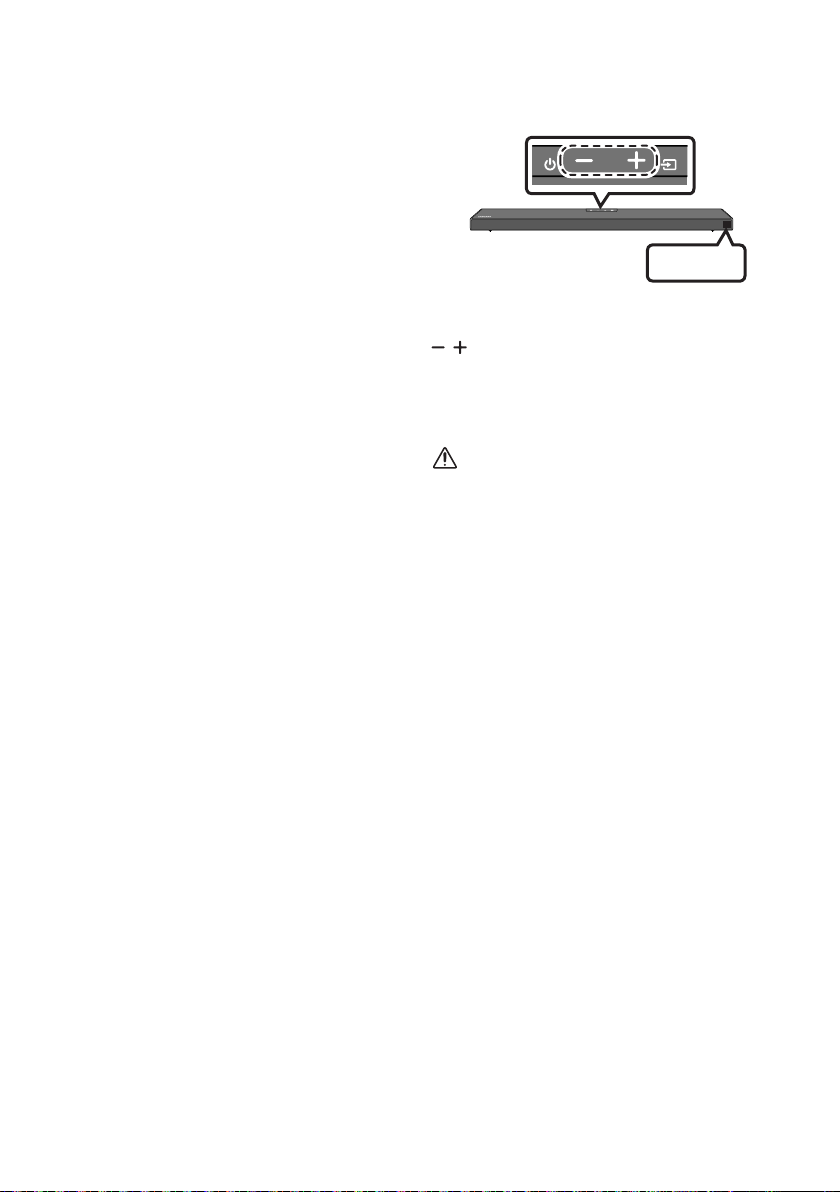
ITA - 34
UPDATE
1. Spegnere la Soundbar, scollegare e
ricollegare il dispositivo di archiviazione che
contiene i le di aggiornamento alla porta
USB della Soundbar.
2. Scollegare il cavo di alimentazione della
Soundbar, ricollegarlo, quindi accendere la
Soundbar.
NOTE
• L’aggiornamento del rmware potrebbe non
funzionare correttamente se sul dispositivo di
archiviazione sono presenti le audio
supportati dalla Soundbar.
• Non scollegare l’alimentazione o rimuovere il
dispositivo USB durante l’applicazione degli
aggiornamenti. L’unità principale si accenderà
automaticamente al completamento
dell’aggiornamento rmware.
• Se la connessione al subwoofer non viene
ristabilita automaticamente dopo
l’aggiornamento, fare riferimento a
pagina6.
• Se l’aggiornamento software fallisce,
vericare che l’archivio USB non sia difettoso.
• Gli utenti di Mac OS dovrebbero usare
MS-DOS (FAT) come formato USB.
• L’aggiornamento tramite USB potrebbe non
essere disponibile, a seconda del produttore
del dispositivo di archiviazione.
INIT OK
Con la soundbar attivata, premere il pulsante
sul corpo in contemporanea per
almeno 5 secondi. “INIT OK” viene visualizzato sul
display e la Soundbar viene azzerata.
ATTENZIONE
• Tutte le impostazioni della Soundbar
verranno ripristinate.
Assicurarsi di eseguire questa procedura
soltanto se è necessario il ripristino.
ITA - 35
; Assicurarsi che il cavo di alimentazione
della Soundbar sia inserita correttamente
nella presa.
; Disinserire e reinserire il cavo di
alimentazione.
; Rimuovere il cavo di alimentazione dal
dispositivo esterno e riprovare.
; In assenza di segnale, la Soundbar si
spegne automaticamente dopo un certo
periodo di tempo. Accendere la Soundbar.
(Andare a pagina 3.)
; Puntare il telecomando direttamente sulla
Soundbar.
; Sostituire le batterie.
; Il volume della Soundbar è troppo basso o
azzerato. Regolare il volume.
; Quando è connesso un dispositivo esterno
(STB, dispositivo Bluetooth, dispositivo
mobile e così via), regolare il volume del
dispositivo esterno.
; Per l’uscita audio della TV, selezionare
Soundbar. (TV Samsung: Home ( ) →
Impostazioni ( ) → Suono → Uscita audio
→ Seleziona Soundbar)
; Il collegamento del cavo alla Soundbar non
può essere allentato. Rimuovere il cavo e
ricollegarlo.
; Rimuovere completamente il cavo di
alimentazione, ricollegarlo e accendere il
prodotto.
; Inizializzare il prodotto e riprovare.
(Andare a pagina 34.)
; Assicurarsi che l’indicatore LED nella parte
posteriore del subwoofer emetta una luce
blu. Ricollegare la Soundbar e il subwoofer
se l’indicatore lampeggia in blu o in rosso.
(Andare a pagina 7.)
; Potrebbe vericarsi un problema se è
presente un ostacolo tra la Soundbar e il
subwoofer. Spostare i dispositivi in un’area
libera da ostacoli.
; Altri dispositivi che inviano segnali in
radiofrequenza nelle vicinanze potrebbero
interrompere il collegamento. Tenere
lontano il diffusore da questi dispositivi.
; Rimuovere e ricollegare la spina di
alimentazione.
; Il volume originale del contenuto riprodotto
potrebbe essere basso. Provare a regolare
il livello del subwoofer.
(Andare a pagina 27.)
; Avvicinare a sé il diffusore del subwoofer.
; Assicurarsi che il cavo HDMI sia inserito
correttamente nel terminale ARC.
(Andare a pagina 11.)
; La connessione potrebbe essere impedita
da un dispositivo esterno connesso (set-top
box, console per videogame e così via).
Connettere direttamente la Soundbar.
; HDMI-CEC potrebbe non essere attivo sulla
TV. Attivare CEC sul menu della TV. (TV
Samsung: Home ( ) → Impostazioni ( )
→ Generali → Gestione dispositivi esterni →
Anynet+ (HDMI-CEC) ACCESO)
12
Prima di contattare l’assistenza, controllare quanto segue.
ITA - 36
; Il dispositivo non è in grado di riprodurre il
segnale di ingresso. Impostare l’uscita
audio della TV su PCM o Dolby Digital.
(Per una TV Samsung: Home ( ) →
Impostazioni ( ) → Suono → Impostazioni
avanzate → Formato audio dell’uscita
digitale)
; Quando si connette un nuovo dispositivo,
passare a “” per la connessione.
(Premere il tasto PAIR sul telecomando o
il tasto sul corpo per
almeno 5secondi.)
; la Soundbar è collegata a un altro
dispositivo, scollegarlo prima di cambiare
dispositivo.
; Riconnetterlo dopo aver rimosso l’elenco
dei diffusori Bluetooth sul dispositivo da
connettere. (TV Samsung: Home ( ) →
Impostazioni ( ) → Suono → Uscita audio
→ Elenco altoparlanti Bluetooth)
; Il collegamento automatico della TV
potrebbe essere disabilitato. Con la
Soundbar in “”, tenere premuto il
tasto sul telecomando della
Soundbar per 5 secondi per selezionare
. Se viene visualizzato il
messaggio , tenere
premuto il tasto per 5 secondi per
cambiare selezione.
; Rimuovere e ricollegare la spina di
alimentazione, quindi riprovare.
; Inizializzare il prodotto e riprovare.
(Andare a pagina 34.)
; Alcuni dispositivi possono causare
interferenze radio se posizionati troppo
vicino alla Soundbar, es. microonde, router
wireless, ecc.
; Se il dispositivo connesso tramite
Bluetooth si sposta troppo lontano dalla
Soundbar, potrebbe causare l’interruzione
dell’audio. Avvicinare il dispositivo alla
Soundbar.
; Se una parte del corpo entra in contatto
con il trasmettitore Bluetooth o il prodotto
è installato su mobili di metallo, il suono
potrebbe interrompersi. Vericare
l’ambiente di installazione e le condizioni di
utilizzo.
; Quando il TV è connesso alla soundbar, la
connessione multipla Bluetooth potrebbe
non funzionare. Scollegare la Soundbar dal
TV e riprovare.
; Vericare se l’impostazione della
connessione multipla Bluetooth è attivata.
(Fare riferimento alla sezione “
”)
; Scollegare il dispositivo attualmente in
corso di riproduzione, associare al
dispositivo che si desidera collegare e
ricollegare il dispositivo precedente.
; Se il suono non viene emesso neanche con
una connessione adeguata, fare riferimento
alla sezione “
”.
; Quando si spegne la Soundbar mentre si
guarda la TV, la sincronizzazione della
potenza con la TV è disattivata. Spegnere la
TV.

ITA - 37
13 LICENZA
Dolby, Dolby Atmos, and the double-D symbol
are registered trademarks of Dolby
Laboratories Licensing Corporation.
Manufactured under license from Dolby
Laboratories. Condential unpublished works.
Copyright © 2012-2020 Dolby Laboratories. All
rights reserved.
For DTS patents, see http://patents.dts.com.
Manufactured under license from DTS, Inc. (for
companies headquartered in the U.S./Japan/
Taiwan) or under license from DTS Licensing
Limited (for all other companies). DTS, DTS:X,
and the DTS:X logo are registered trademarks
or trademarks of DTS, Inc. in the United States
and other countries. © 2020 DTS, Inc. ALL
RIGHTS RESERVED.
The terms HDMI and HDMI High-Denition
Multimedia Interface, and the HDMI Logo are
trademarks or registered trademarks of HDMI
Licensing Administrator, Inc. in the United
States and other countries.
The Bluetooth® word mark and logos are
registered trademarks owned by the Bluetooth
SIG, Inc. and any use of such marks by Samsung
Electronics Co., Ltd. is under license. Other
trademarks and trade names are those of their
respective owners.
– Your Samsung product is ENERGY STAR
qualied in its factory default setting.
Change to certain features, settings and
functionality in this product can change the
power consumption, possibly beyond the
limits required for ENERGY STAR
qualication.
– Environmental Protection Agency and
Department of Energy. ENERGY STAR is a
joint program of the Government agencies,
designed to promote energy efcient
products and practices.
Refer to www.energystar.gov for more
information of the ENERGY STAR Program.
As an ENERGY STAR® Partner, SAMSUNG has
determined that this product meets the
ENERGY STAR® guidelines for energy
efciency.
– The ENERGY STAR Program has been to
reduced greenhouse gas emissions and
save energy through voluntary labeling.
– Power management setting of this product
have been enabled by default, and have
various timing setting from 1 minutes to 5
hours.
– The product can wake with a button press
on the chassis from sleep mode.
– As an ENERGY STAR Partner, Samsung has
determined that this product or product
models meets the ENERGY STAR guideline
for energy efciency.

ITA - 38
14 AVVISO DI
LICENZA OPEN
SOURCE
Per inviare richieste di informazioni e domande
sulle risorse open source, contattare Samsung
Open Source (http://opensource.samsung.com).
15 NOTA
IMPORTANTE SUL
SERVIZIO
• Le gure e le illustrazioni del presente
manuale utente sono fornite soltanto come
riferimento. Possono differire rispetto
all’aspetto effettivo del prodotto.
• È possibile che vengano addebitate delle
spese amministrative nei seguenti casi:
(a) l’uscita del tecnico in seguito a una
chiamata non rileva difetti nel prodotto (ad
es. nel caso l’utente abbia omesso di
leggere questo manuale utente).
(b) utente ha portato l’unità presso un centro
di riparazione che non rileva difetti nel
prodotto (ad es. nel caso l’utente abbia
omesso di leggere questo manuale
utente).
• L’importo di tali spese amministrative verrà
comunicato all’utente prima di eseguire una
visita a domicilio o un eventuale intervento di
manutenzione.
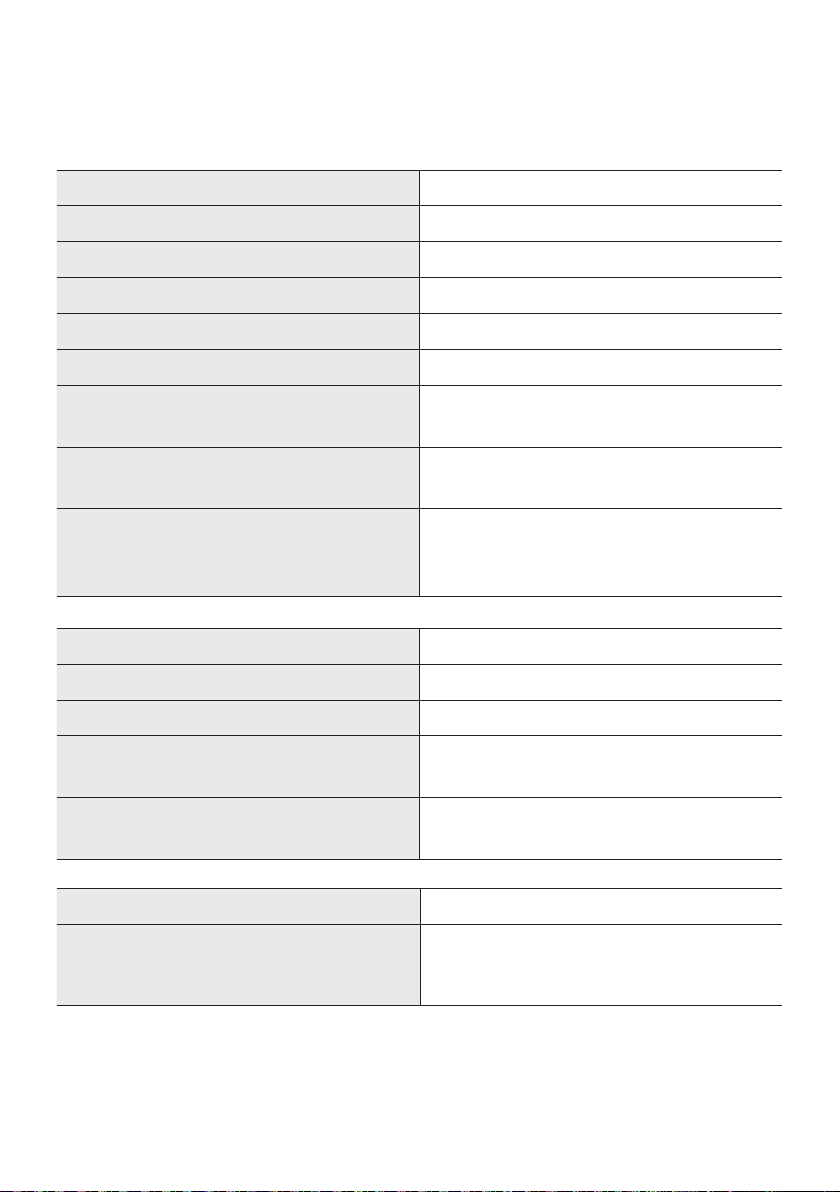
ITA - 39
16 SPECIFICHE E GUIDA
Nome del modello HW-Q600A
USB 5V/0,5A
Peso 3,4 kg
Dimensioni (L x A x P) 980,0 x 58,0 x 105,0 mm
Temperatura di esercizio +5°C e +35°C
Umidità di esercizio 10 % e 75 %
AMPLIFICA TORE
Potenza di uscita nominale 200W (30W x 6 + 10W x 2)
Formati di riproduzione supportati
Dolby Atmos (True HD / Digital Plus), Dolby Digital,
DTS-HD Master Audio, DTS:X, DTS
POTENZA IN USCITA DEL DISPOSITIVO WIRELESS
Potenza max. trasmettitore BT
Potenza max. trasmettitore SRD
6 mW a 2,402 GHz - 2,480 GHz
25 mW a 5,725 GHz – 5,825 GHz
Nome del subwoofer PS-WA67B
Peso 5,8 kg
Dimensioni (L x A x P) 205,0 x 353,0 x 303,2 mm
AMPLIFICA TORE
Potenza di uscita nominale 160W
POTENZA IN USCITA DEL DISPOSITIVO WIRELESS
Potenza max. trasmettitore SRD 25 mW a 5,725 GHz – 5,825 GHz
Consumo energetico complessivo in standby (W) 2,0W
Bluetooth
Metodo di disattivazione porta
Tenere premuto il tasto SOUND MODE per più di
5 secondi per disattivare la funzione Bluetooth
Power.
NOTE
• Samsung Electronics Co., Ltd si riserva il diritto di modicare le speciche senza preavviso.
• Peso e dimensioni sono approssimativi.

ITA - 40
Con la presente, Samsung dichiara che questa apparecchiatura radio è conforme alla Direttiva
2014/53/UE e ai relativi requisiti di legge del Regno Unito.
Il testo completo della dichiarazione di conformità è disponibile al seguente indirizzo:
http://www.samsung.com accedere alla pagina Supporto e immettere il nome del modello.
L’uso di questa apparecchiatura è consentito in tutti i Paesi dell’UE e nel Regno Unito.
Il simbolo riportato sulla batteria o sulla sua documentazione o confezione indica che le batterie di questo
prodotto non devono essere smaltite con altri riuti al termine del ciclo di vita. Dove rafgurati, i simboli
chimici Hg, Cd o Pb indicano che la batteria contiene mercurio, cadmio o piombo in quantità superiori ai
livelli di riferimento della direttiva CE 2006/66.
Se le batterie non vengono smaltite correttamente, queste sostanze possono causare danni alla salute
umana o all’ambiente.
Per proteggere le risorse naturali e favorire il riutilizzo dei materiali, separare le batterie dagli altri tipi di
riuti e utilizzare il sistema di conferimento gratuito previsto nella propria area di residenza.
Il simbolo riportato sul prodotto, sugli accessori o sulla documentazione indica che il prodotto e i relativi
accessori elettronici (quali caricabatterie, cufa e cavo USB) non devono essere smaltiti con altri riuti al
termine del ciclo di vita. Per evitare eventuali danni all’ambiente o alla salute causati dallo smaltimento dei
riuti non corretto, si invita l’utente a separare il prodotto e i suddetti accessori da altri tipi di riuti,
conferendoli ai soggetti autorizzati secondo le normative locali.
Gli utenti domestici, in alternativa alla gestione autonoma di cui sopra, potranno consegnare
l’apparecchiatura che si desidera smaltire al rivenditore, al momento dell’acquisto di una nuova
apparecchiatura di tipo equivalente. Presso i rivenditori di prodotti elettronici con supercie di vendita di
almeno 400 m2 è inoltre possibile consegnare gratuitamente, senza obbligo di acquisto, i prodotti
elettronici da smaltire con dimensioni inferiori a 25 cm.
Gli utenti professionali (imprese e professionisti) sono invitati a contattare il proprio fornitore e vericare i
termini e le condizioni del contratto di acquisto. Questo prodotto e i relativi accessori elettronici non
devono essere smaltiti unitamente ad altri riuti commerciali.
Per informazioni sugli impegni ambientali assunti da Samsung e gli obblighi normativi specici del
prodotto, ad es. REACH, WEEE, batterie, visitare la pagina
http://www.samsung.com/it/aboutsamsung/sustainability/environment/our-commitment/data/
Speciche per la progettazione ecocompatibile degli alimentatori esterni :
www.samsung.com/global/ecodesign_component

© 2021 Samsung Electronics Co., Ltd. All rights reserved.
Contact SAMSUNG WORLD WIDE
If you have any questions or comments relating to Samsung products, please contact the SAMSUNG customer
care Centre.
Country
Samsung Service Centre
Web Site
`
Europe
UK 0333 000 0333
www.samsung.com/uk/
support
IRELAND (EIRE) 0818 717100
www.samsung.com/ie/
support
GERMANY 06196 77 555 77
www.samsung.com/de/
support
FRANCE 01 48 63 00 00
www.samsung.com/fr/
support
ITALIA 800-SAMSUNG (800.7267864)
www.samsung.com/it/
support
SPAIN 91 175 00 15
www.samsung.com/es/
support
PORTUGAL 808 207 267
www.samsung.com/pt/
support
LUXEMBURG 261 03 710
www.samsung.com/be_
fr/support
NETHERLANDS 088 90 90 100
www.samsung.com/nl/
support
BELGIUM 02-201-24-18
www.samsung.com/be/
support (Dutch)
www.samsung.com/
be_fr/support (French)
NORWAY 21629099
www.samsung.com/no/
support
DENMARK 707 019 70
www.samsung.com/dk/
support
FINLAND 030-6227 515
support
SWEDEN 0771 726 786
www.samsung.com/se/
support
POLAND
801-172-678* lub +48 22 607-93-33*
pl/support/
HUNGARY 0680SAMSUNG (0680-726-7864)
www.samsung.com/hu/
support
AUSTRIA 0800 72 67 864 (0800-SAMSUNG)
www.samsung.com/at/
support
SWITZERLAND 0800 726 786
www.samsung.com/ch/
support (German)
www.samsung.com/
ch_fr/support (French)
Country
Samsung Service Centre
Web Site
CZECH 800 - SAMSUNG (800-726786)
www.samsung.com/cz/
support
SLOVAKIA 0800 - SAMSUNG (0800-726 786)
www.samsung.com/sk/
support
CROATIA 072 726 786
www.samsung.com/hr/
support
BOSNIA 055 233 999
www.samsung.com/
support
NORTH
MACEDONIA
023 207 777
www.samsung.com/mk/
support
MONTENEGRO 020 405 888
www.samsung.com/
support
SLOVENIA
www.samsung.com/si/
support
SERBIA 011 321 6899
www.samsung.com/rs/
support
KOSOVO 0800 10 10 1
www.samsung.com/
support
ALBANIA 045 620 202
www.samsung.com/al/
support
BULGARIA
www.samsung.com/bg/
support
ROMANIA
0800872678 - Apel gratuit
www.samsung.com/ro/
support
CYPRUS
8009 4000 only from landline, toll
free
www.samsung.com/gr/
support
GREECE
80111-SAMSUNG (80111 726 7864) only
from land line
(+30) 210 6897691 from mobile and
land line
LITHUANIA 8-800-77777
www.samsung.com/lt/
support
LATVIA 8000-7267
www.samsung.com/lv/
support
ESTONIA 800-7267
www.samsung.com/ee/
support