Loading ...
Loading ...
Loading ...
ENGLISH
24
MAINTENANCE
WARNING: To reduce the risk of injury, turn unit
off and disconnect it from power source before
installing and removing accessories, before
adjusting or when making repairs. An accidental
start-up can causeinjury.
DANGER: To avoid injury, never put lubricants on
the blade while it is spinning.
WARNING: To avoid fire or toxic reaction, never
use gasoline, naphtha acetone, lacquer thinner
or similar highly volatile solvents to clean the
miter saw.
WARNING: To avoid injury from unexpected
starting or electrical shock, unplug the power
cord before working on the saw.
WARNING: To avoid electrical shock, fire or
injury, use only parts identical to those identified
in the parts list. Reassemble exactly as the original
assembly to avoid electrical shock.
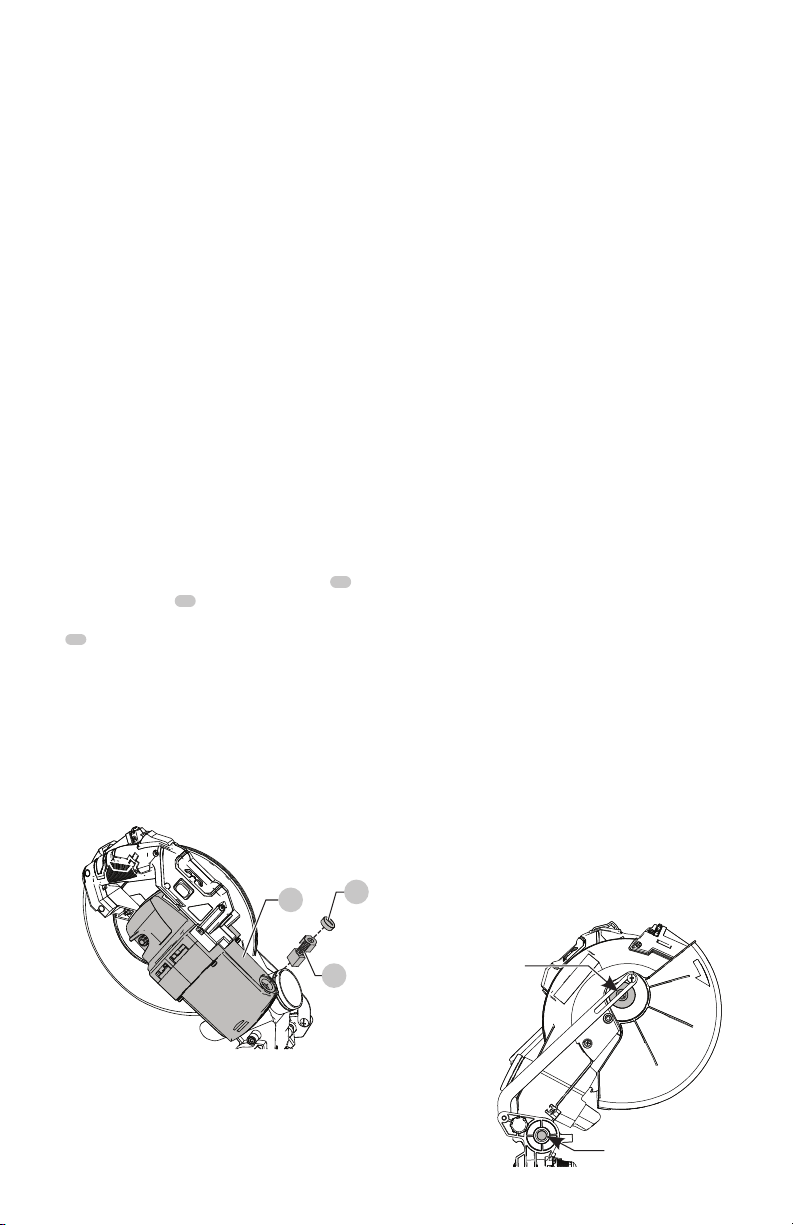
Replacing Carbon Brushes (Fig. OO)
The carbon brushes furnished will last approximately
50 hours of running time, or 10,000 ON/OFF cycles. Replace
both carbon brushes when either has less than 1/4 in.
length of carbon remaining, or if the spring or wire is
damaged or burned. To inspect or replace brushes, first
unplug the saw. Then remove the black plastic cap
55
on the side of the motor
56
. Remove the cap cautiously,
because it is springloaded. Then pull out the carbon
brush
57
and replace. To reassemble, reverse the
procedure. The ears on the metal end of the assembly go
in the same hole the carbon part fits into. Tighten the cap
snugly, but do not overtighten. Repeat for the carbon brush
located on the other side of motor.
NOTE: To reinstall the same brushes, first make sure the
brushes go back in the way they came out. This will avoid
a break-in period that reduces motor performance and
increases wear.
Fig.OO
55
56
57
Lower Blade Guard
Do not use the saw without the lower blade guard.
The lower blade guard is attached to the saw for your
protection. Should the lower guard become damaged,
do not use the saw until the damaged guard has been
replaced. Regularly check to make sure the lower guard
is working properly. Also check before each use that all
bolts/screws are tight. Clean the lower guard of any dust or
buildup with a damp cloth.
WARNING: When cleaning the lower guard, unplug
the saw from the power source receptacle to avoid
unexpected start-up.
WARNING: Do not use solvents on the guard. They
could make the plastic “cloudy” and brittle.
Sawdust
Periodically, sawdust will accumulate under the work table
and base. This could cause difficulty in the movement of
the worktable when setting up a miter cut. Frequently
blow out or vacuum up the sawdust.
Remove small pieces of material from the table cavity if
needed. (See the section on Removing and Installing the
Table Insert on page 12.)
To empty the dust bag, remove the sawdust bag from the
dust collection elbow. Open the zipper on the sawdust bag
and empty out the sawdust inside. Close the zipper and
reinstall the dust bag as described on page 9.
WARNING: Wear proper eye protection to keep
debris from entering eyes when removing
sawdust from unit.
Lubrication (Fig. PP)
All the motor bearings in this tool are lubricated with a
sufficient amount of high grade lubricant for the life of
the unit under normal operating conditions; therefore, no
further lubrication is required.
Lubricate the following as necessary:
Chop pivot: Apply light machine oil to points indicated in
illustration.
Central pivot of plastic guard: Use light household
oil (sewing machine oil) on metal-to-metal or metal-to-
plastic guard contact areas as required for smooth, quiet
operation. Avoid excessive oil, to which sawdust will cling.
Fig.PP
Central pivot of
plastic guard
(oil here)
Chop Pivot (oil here
and on opposite side)
Loading ...
Loading ...
Loading ...