Loading ...
Loading ...
Loading ...
ENGLISH
14
Miter Scale (Fig. U)
The miter saw scale can be easily read, showing miter angles
from 0° to 48° to the left, and 0° to 55° to the right. The miter
saw table has positive stops at most common angle settings
at 0°, 15°, 22.5°, 31.6°, 45° right & left, and 55° right. These
positive stops position the blade at the desired angle quickly
and accurately. Follow the process below for quickest and
most accurate adjustments.
Miter Angles Adjustment
1. Unlock the table by turning the miter handle
7
counterclockwise.
2. Move the turntable while lifting up on the positive stop
lock lever
8
to align the miter scale pointer
41
to the
desired degree measurement.
3. If the desired angle is one of the ten positive stops,
release the positive stop lock lever
8
, making sure the
lever snaps into position, and then secure by tightening
the miter handle
7
.
4. If the miter angle desired is not one of the ten positive
stops, simply lock the miter table into desired angle
position by turning the miter handle
7
in the clockwise
direction.
Miter Angle Pointer Adjustment
1. Move the table to the 0° positive stop.
2. Loosen the screw
42
that holds the pointer
41
with a
Phillips screwdriver.
3. Adjust the pointer
41
to the 0° mark and retighten the
screw.
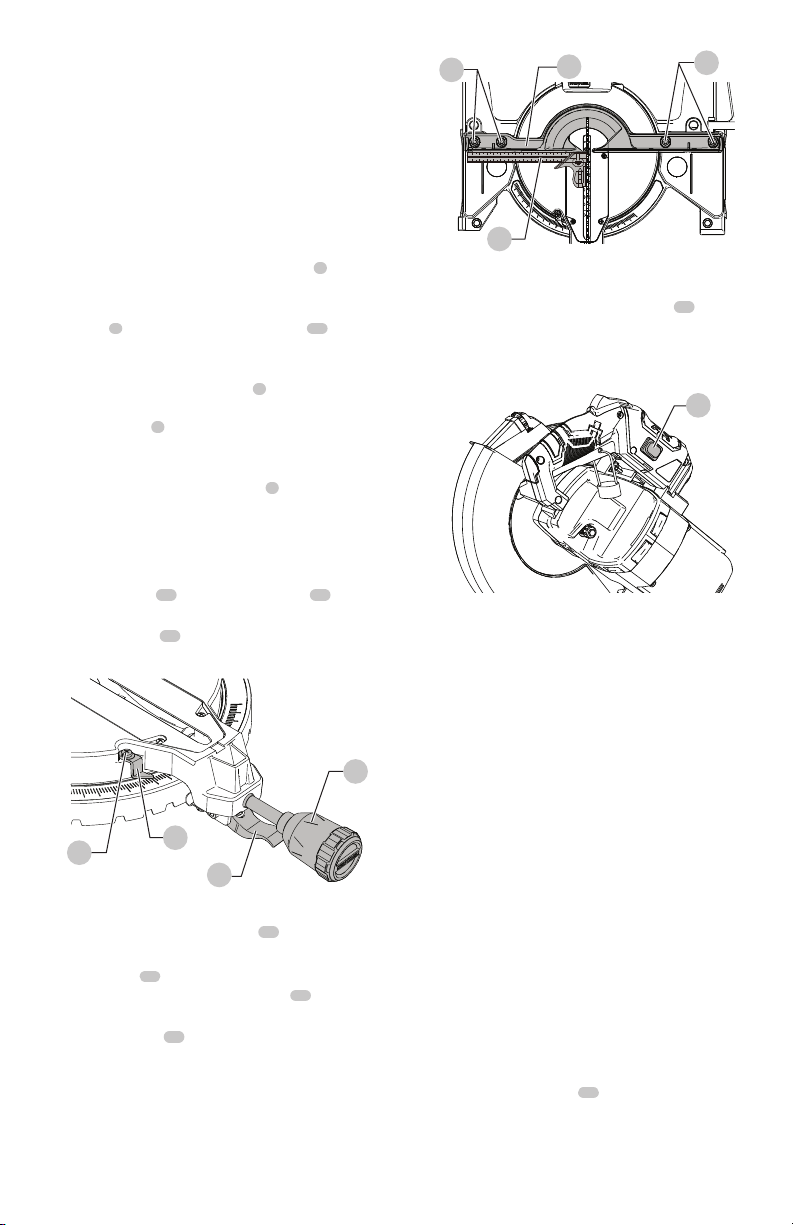
Adjusting Fence Squareness (Fig. V)
1. Loosen the four fence locking bolts
43
.
2. Lower the cutting arm and lock in position.
3. Using a square
34
, lay the heel of the square against
the blade and the ruler against the fence
11
as shown.
4. Adjust the fence 90° to the blade and tighten the four
fence locking bolts
43
.
NOTE: If the saw has not been used recently, recheck
blade squareness to the fence and readjust if needed.
5. After fence has been aligned, using a scrap piece of
wood, make a cut at 90° then check squareness on the
piece. Readjust if necessary.
Fig.U
7
8
41
42
Turning Laser Guide On (Fig. W)
1. To turn laser on, press on/off rocker switch
44
to “ON”
position.
2. To turn laser off, press on/off rocker switch to “OFF”
position.
Aligning The Laser Guide
The laser line must always be correctly aligned with the
blade to ensure straight, even cutting. The laser line will
enable you to preview the saw blade path on the stock
to be cut before starting the miter saw. This laser guide is
powered by the transformed alternating current supply
directly through the power lead. The saw must be
connected to the power source and the laser on/off
switch must be turned on for the laser line to show.
WARNING: To prevent serious injury, insert a padlock
(not provided) or chain with padlock through the hole
in the On/Off Trigger Switch prior to making any laser
adjustment.
WARNING: Do not remove the lock from the On/Off
Trigger Switch during any laser adjustment.
Avoid Direct Eye Contact With Laser
(Fig. X)
WARNING: A laser line radiates from the laser
aperture when the laser guide is turned on. Avoid
direct eye contact.
WARNING:
•
Laser Warning Label
45
: Laser radiation do
not view directly with optical instruments class 1M
laser product < 0.39 mW, 400-700 nm, CW, Acc.IEC
60825-1.
Fig.V
43
11
43
34
Fig.W
44
Loading ...
Loading ...
Loading ...