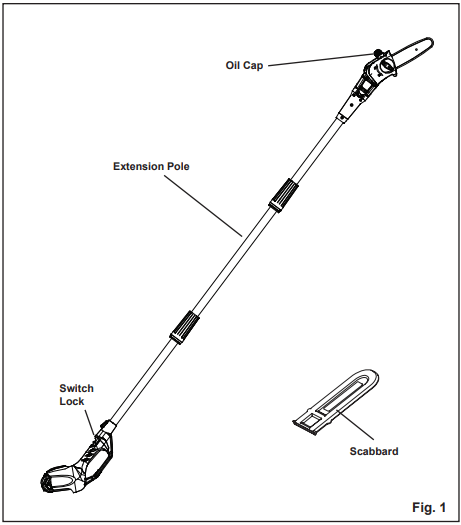
Read this operator's manual and safety rules before operating your pole saw. Compare the illustration in Figure 1 to your lawn mower in order to familiarize yourself with the location of various controls and adjustments. Save this manual for future reference.
ASSEMBLY INSTRUCTIONS
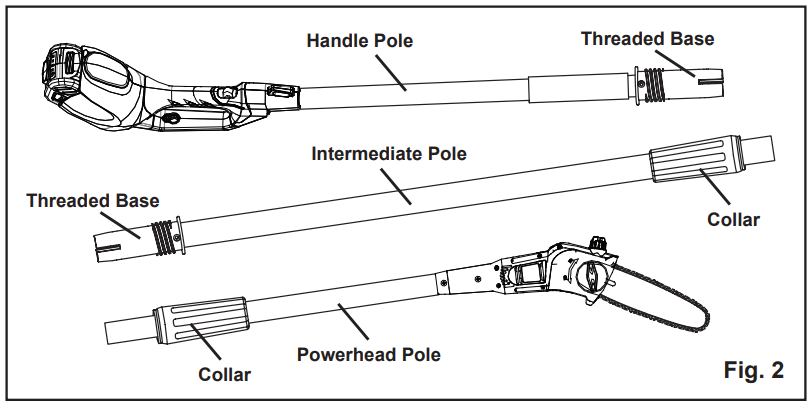
CONNECTING THE POLES (See Figure 2)
Before using the pole saw, assembly is required. When removed from the box, there are the three poles as shown above.
Remove packaging material from cord and discard.
Insert the intermediate pole into the handle pole and slide together. The tubes are egg-shaped and will only install one way.
Lower the collar on the intermediate pole to the threaded base on the handle pole and rotate clockwise to secure.
Repeat this process to attach the intermediate pole to the powerhead pole.
WARNING Failure to lock powerhead pole as directed above could result in serious injury or death.
OPERATING YOUR POLE SAW
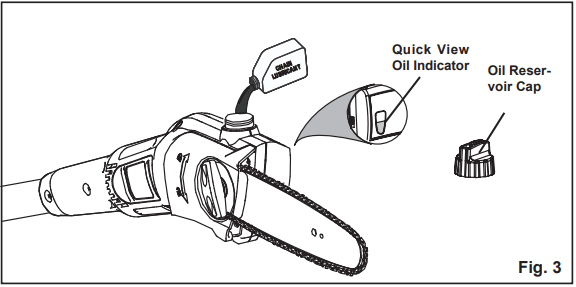
ADDING BAR AND CHAIN LUBRICANT (See Figure 3)
Use GREENWORKS Bar and Chain Lubricant. It is designed for chains and chain oilers, and is formulated to perform over a wide temperature range with no dilution required.
NOTE: Pole saw comes from the factory with no bar and chain oil added. Level should also be checked after every 20 minutes of use and refilled as needed.
Remove oil cap.
Carefully pour the bar and chain oil into the tank.
Wipe off excess oil.
Check and fill the oil tank when there is no oil in the oil tank.
Repeat as needed.
NOTE: Do not use dirty, used or otherwise contaminated oils. Damage may occur to the bar or chain.
NOTE: It is normal for oil to seep from the saw when not in use. To prevent seepage, empty the oil tank after each use then run for one minute. When storing the unit for a long period of time (three months or longer) be sure the chain is lightly lubricated; this will prevent rust on the chain and bar sprocket.
IMPORTANT To preserve natural resources, please recycle or dispose of oil properly. Consult your local waste authority for information regarding available recycling and/disposal options.
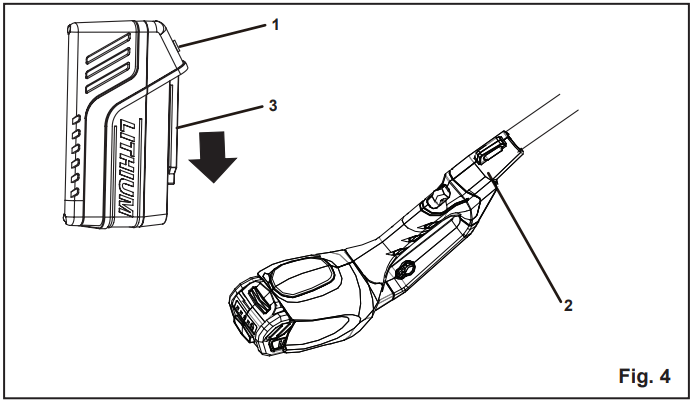
BATTERY PACK (See Figure 4)
IMPORTANT The battery pack is not charged when it is purchased. Before using the pole saw for the first time, place the battery pack in the battery charger and charge it fully. Be sure to read all safety precautions, and follow the instructions in the section entitled Charging Procedure. With regular use, the battery will require shorter charging times. When storing the pole saw for a prolonged period of time, remove the battery. When the pole saw is going to be used again, charge the battery pack for at least a full charging period. This product has no memory effect.
REMOVING THE BATTERY PACK
Press the latch button (1) on the battery pack down and hold.
Grasp the pole saw (2) firmly, and pull the battery pack out of the handle.
Note: The battery pack fits into the handle snugly in order to prevent accidental dislodging. It may require a strong pull to remove it.
INSTALLING THE BATTERY PACK
Align the tongue (3) of the battery pack with the cavity.
Grasp the pole saw (2) firmly.
Push the battery pack into the handle until the latch locks into place.
Do not use force when inserting the battery pack. It should slide into position and “click”.
WARNING
Follow these instruction in order to avoid injury and to reduce the risk of electric shock or fire:
Replace the battery pack or the charger immediately if the battery case or charger cord is damaged.
Verify that the switch is in the OFF position before inserting or removing the battery pack.
Verify that the battery pack is removed and the switch is in the OFF position before inspecting, adjusting, or performing maintenance on any part of the pole saw.
Read, understand, and follow the instructions contained in the section entitled Charging Procedure.
IMPORTANT
This Lithium-ion battery pack is equipped with an internal circuit breaker which will automatically shut off the power to the tool and then reset itself once cooled.
Follow these steps if an overload occurs while under heavy use:
Release the power switch and restart tool by depressing switch.
The battery may need to be removed for approximately 1 minute, allowed to cool and then reinstalled for use.
STARTING AND STOPPING (See Figure 5)
TO START THE MOTOR:
Fit the battery pack into the pole saw.
Press and hold the switch lock. This makes the switch trigger operational.
Press and hold the switch trigger, release the switch lock and continue to squeeze the switch trigger for continued operation.
TO STOP THE MOTOR:
Release the switch trigger.
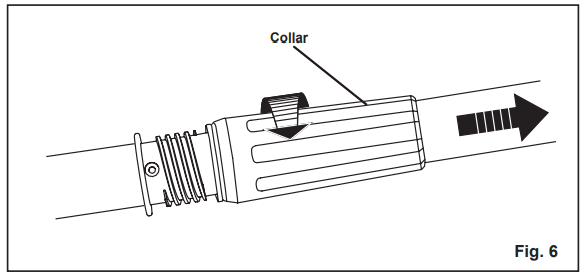
ADJUSTING TELESCOPING POLE (See Figure 6)
Remove the battery pack from the pole saw.
Rotate the collar counterclockwise to loosen.
Push poles towards each other to shorten the pole or pull away from each other to lengthen the pole.
NOTE: Extend the pole only to the length required to reach the limb being cut. Do not extend the handle above waist height.
When the desired length is achieved, rotate the collar clockwise to secure.
NOTE: Adjust hand placement on the shaft of the pole saw to keep proper balance. Do not attempt to use the pole saw at a length which does not allow you to achieve proper footing and balance at all times.
ASSEMBLING THE POLES (See Figure 6)
Remove the battery pack from the pole saw.
Insert handle pole into intermediate pole or powerhead pole firmly.
Turn the collar clockwise to lock the poles together.
NOTE: Assemble poles only to the length required to reach the limb being cut. Do not extend the handle above waist height.
NOTE: Adjust hand placement on the shaft of the pole saw to keep proper balance. Do not attempt to use the pole saw at a length which does not allow you to achieve proper footing and balance at all times.
PREPARATION FOR CUTTING (See Figure 7-8)
Wear non-slip gloves for maximum grip and protection. grip the rear handle while your left hand has a firm grip on the pole shaft.
Maintain a proper grip on the unit whenever the motor is running. Use your right hand to firmly grip the rear handle while your left hand has a firm grip on the pole shaft.
Hold unit firmly with both hands. Always keep your left hand on the pole shaft and your right hand on the rear handle, so your body is to the left of the chain line. Never use a left-handed (cross-handed) grip, or any stance that places your body or arm across the chain line.
Never stand directly under the limb you are cutting.
Be certain the collars are fully tightened before operating equipment; check them periodically for tightness during use to avoid serious injury.
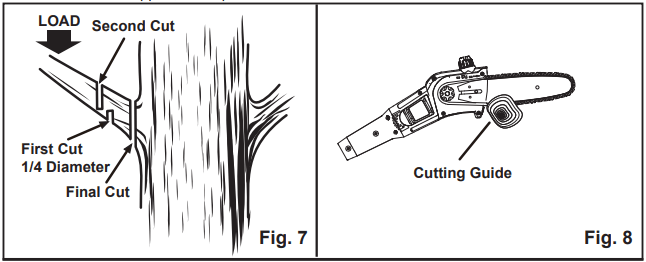
BASIC CUTTING PROCEDURE
Follow the steps below to prevent damage to tree or shrub bark. Do not use a back-and-forth sawing motion.
Make a shallow first cut (1/4 of limb diameter) on the underside of the limb close to the main limb or trunk.
Make a second cut from the top side of the limb outboard from the first cut. Continue the cut through the limb until the limb separates from the tree. Be prepared to balance the weight of the tool when the limb falls.
Make a final cut close to trunk.
NOTE: For second and final cuts (from top of limb or branch), hold front cutting guide against the limb being cut. This will help steady the limb and make it easier to cut. Allow chain to cut for you; exert only light downward pressure. If you force the cut, damage to the bar, chain, or motor can result.
Release the trigger as soon as the cut is completed. Failure to follow proper cutting procedures will result in the bar and chain binding and becoming pinched or trapped in the limb. If this should happen:
Stop the motor and remove the battery from the pole saw.
If the limb can be reached from the ground, lift the limb while holding the saw. This should release the “pinch” and free the saw.
If the saw is still trapped, call a professional for assistance.
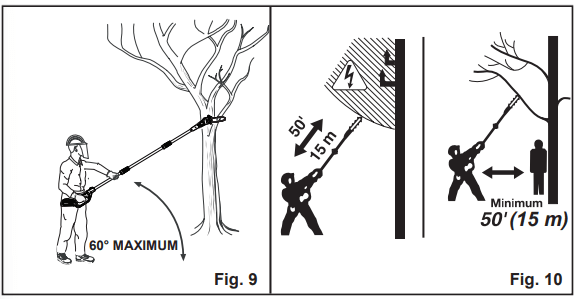
LIMBING AND PRUNING (See Figure 9-10)
This unit is designed for trimming small branches and limbs up to 6" (15.2 cm) in diameter. For best results, observe the following precautions.
Plan the cut carefully. Be aware of the direction in which the branch will fall.
Branches may fall in unexpected directions. Do not stand directly under the branch being cut.
The most typical cutting application is to position the unit at an angle of 60° or less, depending on the specific situation, as shown. As the angle of the pole saw shaft to ground increases, the difficulty of making the first cut (from the underside of limb) increases.
Remove long branches in several stages.
Cut lower branches first to allow the top branches more room to fall.
Work slowly, keeping both hands on the saw with a firm grip. Maintain secure footing and balance.
Keep the tree between you and the chain while limbing. Cut from side of tree opposite branch you are cutting.
Do not cut from a ladder; this is extremely dangerous. Leave this operation for professionals.
Do not make the flush cut next to the main limb or trunk until you have cut off the limb further out to reduce the weight.
Following proper cutting procedures will prevent stripping the bark from the main member.
Do not use the pole saw for felling or bucking.
To prevent electrocution, do not operate within 50' (15 m) of overhead electrical lines.
Keep bystanders at least 50' (15 m) away.
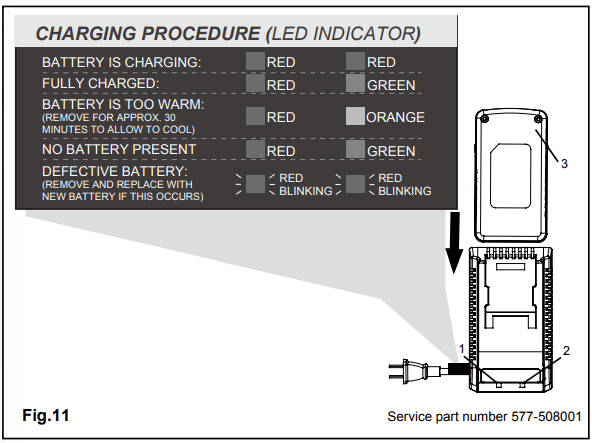
BATTERY CHARGER
CHARGING PROCEDURE (See Figure 11. )
NOTE: The battery is not shipped fully charged. It is recommended to fully charge before first use to ensure that maximum run time can be achieved. This lithium-ion battery will not develop a memory and may be charged at any time. A fully discharged battery pack will require approximately 90 minutes to fully charge from a discharged state.
Plug the charger into an AC power outlet.
Insert the battery pack (3) into the charger.
This is a diagnostic charger. The Charger LED Lights will illuminate in specific order to communicate the current battery status. They are as follows:
CHECKING THE CHARGE
If the battery pack does not charge properly:
Check the current at the power outlet with another tool. Make sure that the outlet is not turned off.
Check that the charger contacts have not been shorted by debris or foreign material.
If the surrounding air temperature is not normal room temperature, move the charger and battery pack to a location where the temperature is between 50˚F and 100˚F.
CHARGER MAINTENANCE
Keep the charger clean and clear of debris. Do not allow foreign material into the recessed cavity or on the contacts. Wipe with a dry cloth. Do not use solvents, water, or place in wet conditions.
Always unplug the charger when there is no battery pack in it.
The battery pack may be stored in the charger. however, it is recommended to disconnect the charger from the power source. To ensure safety and reliability all repairs should be performed by a qualified service technician.
Check that the charger contacts have not been shorted by debris or foreign material.
If the surrounding air temperature is not normal room temperature, move the charger and battery pack to a location where the temperature is between 65 and 75˚F (18 and 24˚C).
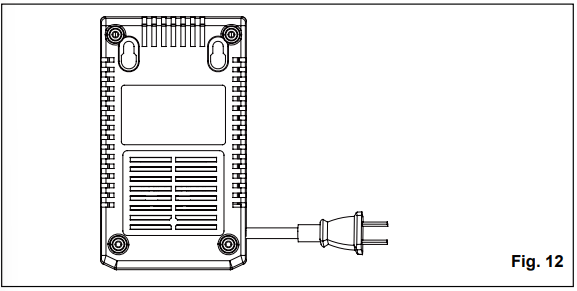
CHARGER MOUNTING (See Figure 12.)
This charger can be installed hanging on a wall using two screws (not supplied)
Locate the placement for the charger to be wall mounted.
If fastening to wood studs use 2 wood screws.
Drill two holes 2 3/8" (6 cm) on center ensuring they are level.
If fastening to drywall use wall anchors and screws to secure the charger to the wall.
MAINTENANCE
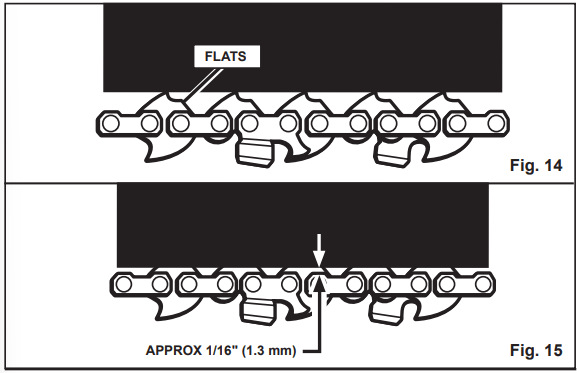
CHAIN TENSION (See Figure 14-19)
Stop the motor and disconnect from power supply before setting the chain tension. Make sure the guide bar nut is loose enough to finger tighten, turn the chain tensioning screw (see figure 18) clockwise to tension the chain. Refer to Replacing the Bar and chain for additional information.
NOTE: A cold chain is correctly tensioned when there is no slack on the underside of the guide bar, the chain is snug, but it can be turned by hand without binding.
Chain must be retensioned whenever the flats on the drive links hang out of the bar groove as shown in Fig. 14.
During normal operation, the temperature of the chain will increase. The drive links of a correctly tensioned warm chain will hang approximately 1/16" (1.3 mm) out of the bar groove, as shown in Fig. 15.
NOTE: New chain tends to stretch; check chain tension frequently and tension as required.
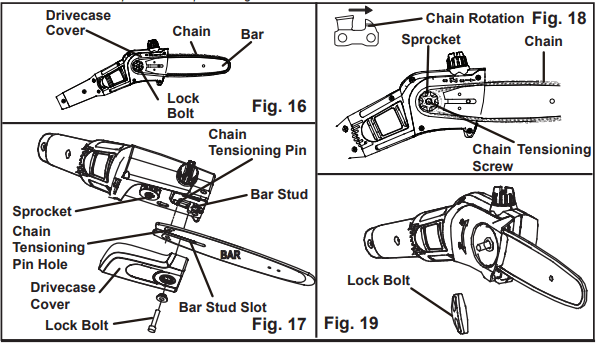
REPLACING THE BAR AND CHAIN (See Figure 16-19)
Remove the lock bolt and drivecase cover.
The bar contains a bar stud slot that fits over the bar stud. The bar also contains a chain tensioning pin hole which fits over the chain tensioning pin.
Place the bar onto the bar stud so that the chain tensioning pin fits into the chain tensioning hole.
Fit the chain over the sprocket and into the bar groove. The cutters on the top of the bar should face toward the bar tip, in the direction of the chain rotation.
Replace the drivecase cover and install the lock bolt. Tighten the bar nut finger tight only. The bar must be free to move for tension adjustment.
Remove all slack from chain by turning the chain tensioning screw clockwise, assuring that the chain seats into the bar groove during tensioning.
Lift the tip of the bar up to check for sag. Release the tip of the bar, and turn the chain tensioning screw 1/2 turn clockwise.
Repeat this process until sag does not exist.
Hold the tip of the bar up and tighten the lock bolt securely.
Chain is correctly tensioned when there is no slack on the underside of the bar, the chain is snug, but it can be turned by hand without binding.
NOTE: If chain is too tight, it will not rotate. Loosen the bar nut slightly and turn adjusting screw 1/4 turn counterclockwise. Lift the tip of the bar up and retighten lock bolt.
CHAIN OILER (See Figure 20)
Use Premium Bar and Chain Lubricant. It is designed for chains and chain oilers and is formulated to perform over a wide temperature range with no dilution required.
Remove the cap and carefully pour approximately 2 oz (57 g) of bar and chain lubricant into the bar lube reservoir.
Replace the cap and tighten securely.
Check and refill the bar lube reservoir every time the pole saw is used.
NOTE: Do not use dirty, used, or otherwise contaminated lubricants. Damage may occur to the oil pump, bar, or chain.
NOTE: There is foam inserted inside the oil reservoir to filter dirt and debris from the oil pump. Do not remove the foam.
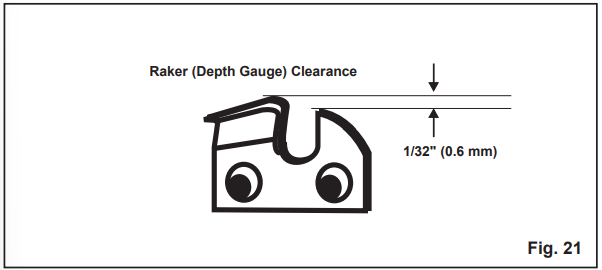
CHAIN MAINTENANCE (See Figure 21)
For smooth and fast cutting, the chain needs to be maintained properly. The following conditions indicate that the chain requires sharpening:
Wood chips are small and powdery
Chain must be forced through the wood during cutting
Chain cuts to one side
During maintenance of the chain, consider the following:
Improper filing angle of the side plate can increase the risk of a severe kickback.
Depth gauge (or raker clearance) setting determines the height the cutter enters the wood and the size of the wood chip that is removed. Too much clearance increases the potential for kickback. Too little clearance decreases the size of the wood chip thus decreasing the chain's cutting ability.
If cutter teeth have hit hard objects such as nails and stones, or have been abraded by mud or sand on the wood, have service dealer sharpen chain.
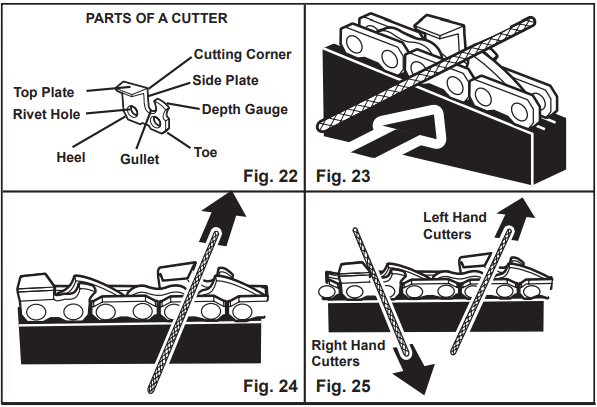
HOW TO SHARPEN THE CUTTERS (See Figure 22-25)
Be careful to file all cutters to the specified angles and to the same length, as fast cutting can be obtained only when all cutters are uniform.
Tighten the chain tension enough that the chain does not wobble. Do all of your filing at the midpoint of the bar. Wear gloves for protection.
Use a round file and holder.
Keep the file level with the top plate of the tooth. Do not let the file dip or rock.
Using light but firm pressure, stroke towards the front corner of the tooth. Lift file away from the steel on each return stroke.
Put a few firm strokes on every tooth. File all left hand cutters in one direction. Then move to the other side and file the right hand cutters in the opposite direction. Occasionally remove filings from the file with a wire brush.
TROUBLESHOOTING
PROBLEM
POSSIBLE CAUSE
SOLUTION
Bar and chain running hot and smoking.
Check chain tension for overtightened condition.
Bar lube reservoir empty.
Tension chain. Refer to Chain Tension earlier in this manual.
Check bar lube reservoir.
Motor runs, but chain is not rotating.
Chain tension too tight.
Check guide bar and chain assembly.
Check guide bar and chain for damage.
Retention chain. Refer to Chain Tension earlier in this manual.
Refer to Replacing the Bar and Chain earlier in this manual.