
CSF403
EN OPERATOR MANUAL
ES MANUAL DEL OPERADOR
CHAINSAW
SIERRA DE CADENA

1 Description.................................... 5
1.1
Purpose...................................................... 5
1.2 Overview.................................................... 5
2 General power tool safety
warnings........................................ 5
2.1 Work area safety........................................ 5
2.2 Electrical safety.......................................... 5
2.3 Personal safety...........................................5
2.4 Power tool use and care.............................5
2.5 Battery tool use and care........................... 6
2.6 Service....................................................... 6
3 Chainsaw safety warnings.............6
4 Prevent operator kickback.............7
5 Child Safety................................... 7
6 Symbols on the product.................7
7 Risk levels..................................... 7
8 Environmentally safe battery
disposal......................................... 8
9 Installation..................................... 8
9.1 Unpack the machine...................................8
9.2 Assemble the guide bar and the chain....... 8
9.3 Remove the battery pack........................... 9
9.4
Install the battery pack............................... 9
10 Operation.......................................9
10.1 Start the machine....................................... 9
10.2 Stop the machine....................................... 9
10.3 Prepare for cutting......................................9
10.4 Basic operation procedures........................9
10.5 Remove the buttress roots....................... 10
10.6 Fell a tree................................................. 10
10.7 Limb a tree............................................... 10
10.8 Buck a log.................................................10
11 Maintenance................................11
11.1 Add the bar and chain lubricant................11
11.2 Adjust the chain tension........................... 11
11.3 Sharpen the cutters.................................. 11
11.4 Guide bar maintenance............................ 12
12 Transportation and storage......... 12
13 Troubleshooting...........................12
14 Technical data............................. 13
15 Limited warranty.......................... 13
16 Exploded view............................. 14
4
English
EN

1 DESCRIPTION
1.1 PURPOSE
This chainsaw is designed for cutting branches, trunks,
logs and beams of a diameter determined by the cutting
length of the guide bar. It is only designed to cut wood.
It is only to be used in an outdoor, domestic application
by adults.
Do not use the chainsaw for any purpose not listed
above.
This chainsaw is not to be used for professional tree
services. It is not to be used by children or by persons
not wearing adequate personal protective equipment
and clothing.
1.2 OVERVIEW
Figure 1-16.
1
Bar
2
Chain
3
Chain cover
4
Chain cover screw
5
Chain tension
screw
6
Rear handle
7
Front handle
8
Chain brake
9
Lock-out button
10
Trigger
11
Oil tank
12
Drive links
13
Bar groove
14
Cutters
15
Sprocket
16
Chain tension pin
hole
17
Bolt for chain
tension
18
Vertical cut
19
Horizontal cut
20
Loose section
21
Danger areas
22
Felling direction
23
Escape paths
24
Lower horizontal
notching cut
25
Felling cut
26
Hinge
27
Round file
28
Cutting corner
29
Flat file
30
Top plate
31
Side plate
32
Depth gauge
2 GENERAL POWER TOOL
SAFETY WARNINGS
WARNING
Read all safety warnings and all instructions. Failure to
follow the warnings and instructions may result in
electric shock, fire and/or serious injury.
Save all warnings and instructions for future reference.
The term “power tool” in the warnings refers to your
battery-operated (cordless) power tool.
2.1 WORK AREA SAFETY
• Keep work area clean and well lit.
Cluttered or dark
areas invite accidents.
• Do not operate power tools in explosive
atmospheres, such as in the presence of flammable
liquids, gases or dust.
Power tools create sparks
which may ignite the dust or fumes.
• Keep children and bystanders away while operating
a power tool.
Distractions can cause you to lose
control.
2.2 ELECTRICAL SAFETY
• Do not expose power tools to rain or wet
conditions.
Water entering a power tool will increase
the risk of electric shock.
2.3 PERSONAL SAFETY
• Stay alert, watch what you are doing and use
common sense when operating a power tool. Do not
use a power tool while you are tired or under the
influence of drugs, alcohol or medication.
A lapse of
attention while operating power tools may result in
serious personal injury.
• Use personal protection. Always wear eye
protection.
Protective products such as dust mask,
non-skid safety shoes, hard hat or hearing
protection used appropriately will reduce personal
injuries.
• Prevent unintentional starting. Ensure the switch is
in the off position before connecting to power source
and/or battery pack and when picking up or carrying
the tool.
Carrying power tools with your finger on the
switch or energizing power tools that have the
switch on invites accidents.
• Remove any adjusting key or wrench before turning
the power tool on.
A wrench or a key left attached to
a rotating part of the power tool may result in
personal injury.
• Do not over-reach. Keep proper footing and balance
at all times.
This enables better control of the power
tool in unexpected situations.
• Dress properly. Do not wear loose clothing or
jewellery. Keep your hair, clothing and gloves away
from moving parts.
Loose clothes, jewellery or long
hair can be caught in moving parts.
• If devices are provided for the connection of dust
extraction and collection facilities, ensure these are
connected and properly used.
Use of dust collection
can reduce dust related hazards.
2.4 POWER TOOL USE AND CARE
• Do not force the power tool. Use the correct power
tool for your application.
The correct power tool will
do the job better and safer at the rate for which it
was designed.
5
English
EN

• Do not use the power tool if the switch does not turn
it on and off.
Any power tool that cannot be
controlled with the switch is dangerous and must be
repaired.
• Disconnect the plug from the power source and/or
the battery pack from the power tool before making
any adjustments, changing accessories, or storing
power tools.
Such preventive safety measures
reduce the risk of starting the power tool
accidentally.
• Store idle power tools out of the reach of children
and do not allow persons unfamiliar with the power
tool or these instructions to operate the power tool.
Power tools are dangerous in the hands of untrained
users.
• Maintain power tools. Check for misalignment or
binding of moving parts, breakage of parts and any
other condition that may affect the power tool’s
operation. If damaged, have the power tool repaired
before use.
Many accidents are caused by poorly
maintained power tools.
• Keep cutting tools sharp and clean.
Properly
maintained cutting tools with sharp cutting edges
are less likely to bind and are easier to control.
• Use the power tool, accessories and tool bits etc. in
accordance with these instructions, taking into
account the working conditions and the work to be
performed.
Use of the power tool for operations
different from those intended could result in a
hazardous situation.
2.5 BATTERY TOOL USE AND CARE
• Recharge only with the charger specified by the
manufacturer.
A charger that is suitable for one type
of battery pack may create a risk of fire when used
with another battery pack.
• Use power tools only with specifically designated
battery packs.
Use of any other battery packs may
create a risk of injury and fire.
• When battery pack is not in use, keep it away from
other metal objects like paper clips, coins, keys,
nails, screws, or other small metal objects that can
make a connection from one terminal to another.
Shorting the battery terminals together may cause
burns or fire.
• Under abusive conditions, liquid may be ejected
from the battery; avoid contact. If contact
accidentally occurs, flush with plenty of soap and
water. If liquid contacts eyes, immediately seek
medical help.
Liquid ejected from the battery may
cause irritation or burns.
2.6 SERVICE
• Have your power tool serviced by a qualified repair
person using only identical replacement parts.
This
will ensure that the safety of the power tool is
maintained.
3 CHAINSAW SAFETY
WARNINGS
• Keep all parts of the body away from the saw chain
when the chainsaw is operating. Before you start the
chainsaw, make sure the saw chain is not in contact
with anything.
A moment of inattention while
operating chainsaws may cause entanglement of
your clothing or body with the saw chain.
• Hold the power tool by insulated gripping surfaces
only, because the saw chain many contact hidden
wiring.
Saw chains contacting a “live” wire may
make exposed metal parts of the power tool “live”
and could give the operator an electric shock.
• Always hold the chainsaw with your right hand at the
rear handle and your left hand at the front handle.
Holding the chainsaw with a reversed hand
configuration increases the risk of personal injury
and should never be done.
• Wear safety glasses and hearing protection. Further
protective product for head, hands, legs and feet is
recommended.
Adequate protective clothing will
reduce personal injury from flying debris or
accidental contact with the saw chain.
• Do not operate a chainsaw in a tree.
Operation of a
chainsaw while up in a tree may result in personal
injury.
• Always keep proper footing and operate the
chainsaw only when standing on fixed, secure and
level surface.
Slippery or unstable surfaces such as
ladders may cause loss of balance or control of the
chainsaw.
• When cutting a limb that is under tension, be alert of
spring back.
When the tension in the wood fibres is
released, the spring loaded limb may strike the
operator and/or throw the chainsaw out of control.
• Use extreme caution when cutting brush and
saplings.
The slender material may catch the saw
chain and be whipped toward you or pull you off
balance.
• Carry the chainsaw by the front handle with the
chainsaw switched off and away from your body.
When transporting or storing the chainsaw, always
fit the guide bar cover.
Proper handling of the
chainsaw will reduce the likelihood of accidental
contact with the moving saw chain.
• Follow instructions for lubricating, chain tensioning
and changing accessories.
Improperly tensioned or
lubricated chain may either break or increase the
chance for kickback.
• Keep handles dry, clean, and free from oil and
grease.
Greasy, oily handles are slippery, causing
loss of control.
• Cut wood only. Do not use chainsaw for purposes
not intended. For example: do not use chainsaw for
cutting plastic, masonry or non-wood building
materials.
Use of the chainsaw for operations other
than intended could result in a hazardous situation.
6
English
EN
4 PREVENT OPERATOR
KICKBACK
Kickback may occur when the nose or tip of the guide
bar touches an object, or when the wood closes in and
pinches the saw chain in the cut.
Tip contact in some cases may cause a sudden reverse
reaction, kicking the guide bar up and back towards the
operator.
Pinching the saw chain along the top of the guide bar
may push the guide bar rapidly back towards the
operator.
Either of these reactions may cause you to lose control
of the saw which could result in serious personal injury.
Do not rely exclusively upon the safety devices built into
your saw. As a chainsaw user, you should take several
steps to keep your cutting jobs free from accident or
injury.
Kickback is the result of tool misuse and/or incorrect
operating procedures or conditions and can be avoided
by taking proper precautions as given below:
• Maintain a firm grip, with thumbs and fingers
encircling the chainsaw handles, with both hands on
the saw and your body and arm positioned to allow
you to resist kickback forces.
Kickback forces can be controlled by the operator, if
proper precautions are taken. Do not let go of the
chainsaw.
• Do not overreach and do not cut above shoulder
height.
This helps prevent unintended tip contact
and enables better control of the chainsaw in
unexpected situations.
• Only use replacement bars and chains specified by
the manufacturer. Incorrect replacement bars and
chains may cause chain breakage and/or kickback.
• Follow the manufacturer’s sharpening and
maintenance instructions for the saw chain.
Decreasing the depth gauge height can lead to
increased kickback.
5 CHILD SAFETY
Tragic accidents can occur if the operator is not aware
of the presence of children.
•
Keep children out of the working area and under the
watchful care of a responsible adult.
• Do not allow children under the age of 14 to operate
this machine. Children who are 14 years of age and
older must read and understand the operating
instructions and safety rules in this manual and must
be trained and supervised by a parent.
• Stay alert, and turn the machine off if a child or any
other person enters the working area.
• Use extreme care when approaching blind corners,
doorways, shrubs, trees, or other objects that may
obscure your view of a child who may run into the
path of the machine.
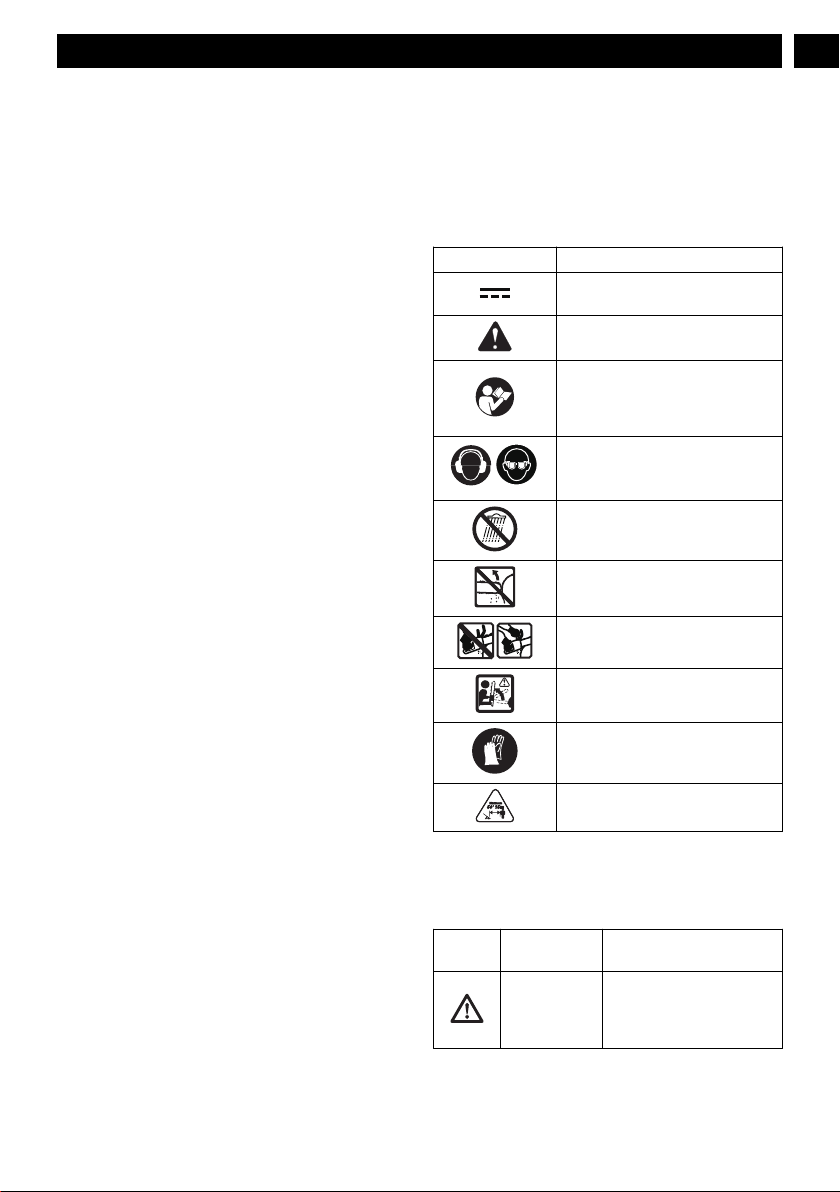
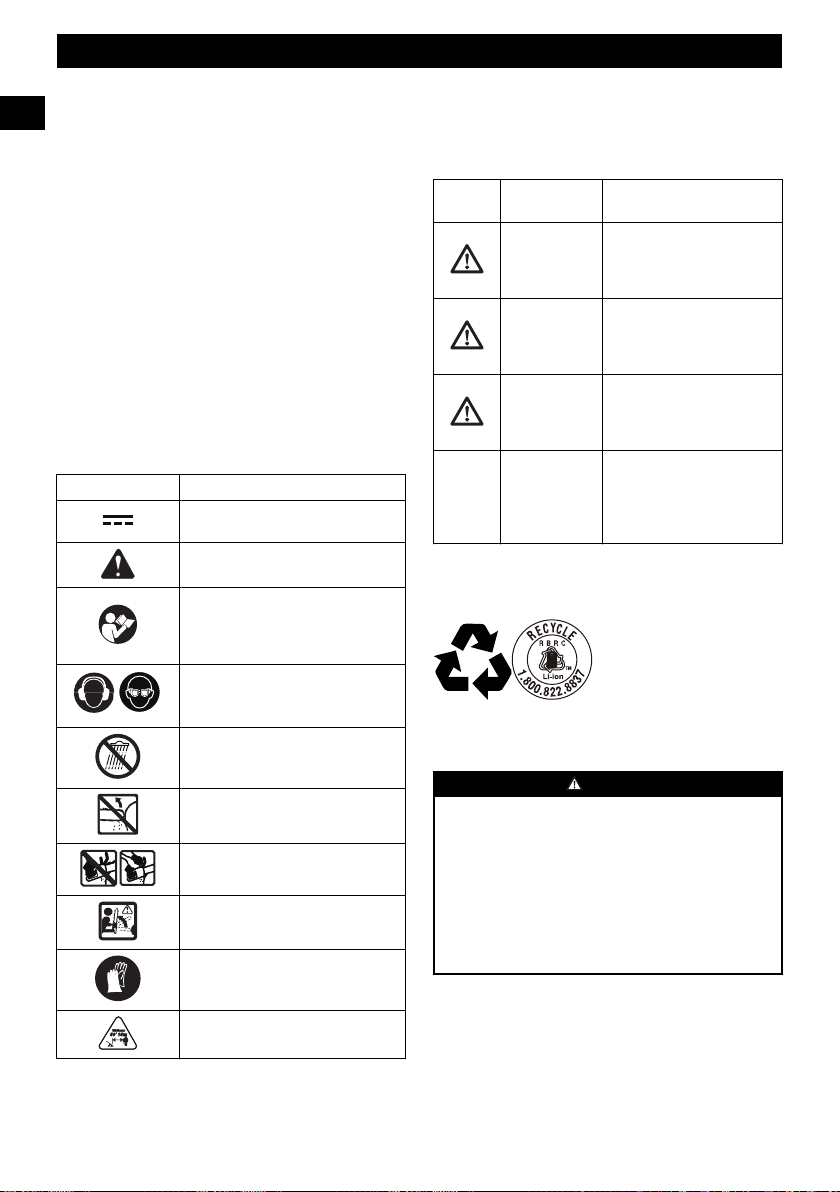
6 SYMBOLS ON THE PRODUCT
Some of the following symbols may be used on this
product. Please study them and learn their meaning.
Proper interpretation of these symbols will allow you to
operate the product better and safer.
Symbol Explanation
Direct current-Type or characteris-
tic of current.
Precautions that involve your safe-
ty.
Read and understand all instruc-
tions before operating the product,
and follow all warnings and safety
instructions.
Wear eye and ear protection.
Do not expose the product to rain
or moist conditions.
Avoid bar nose contact.
Hold with both hands.
DANGER! Be careful with kick-
backs.
Wear non-slip, heavy duty gloves.
Keep all bystanders at least 15m
away.
7 RISK LEVELS
The following signal words and meanings are intended
to explain the levels of risk associated with this product.
SYM-
BOL
SIGNAL MEANING
DANGER Indicates an imminently
hazardous situation,which,
if not avoided, will result in
death or serious injury.
7
English
EN
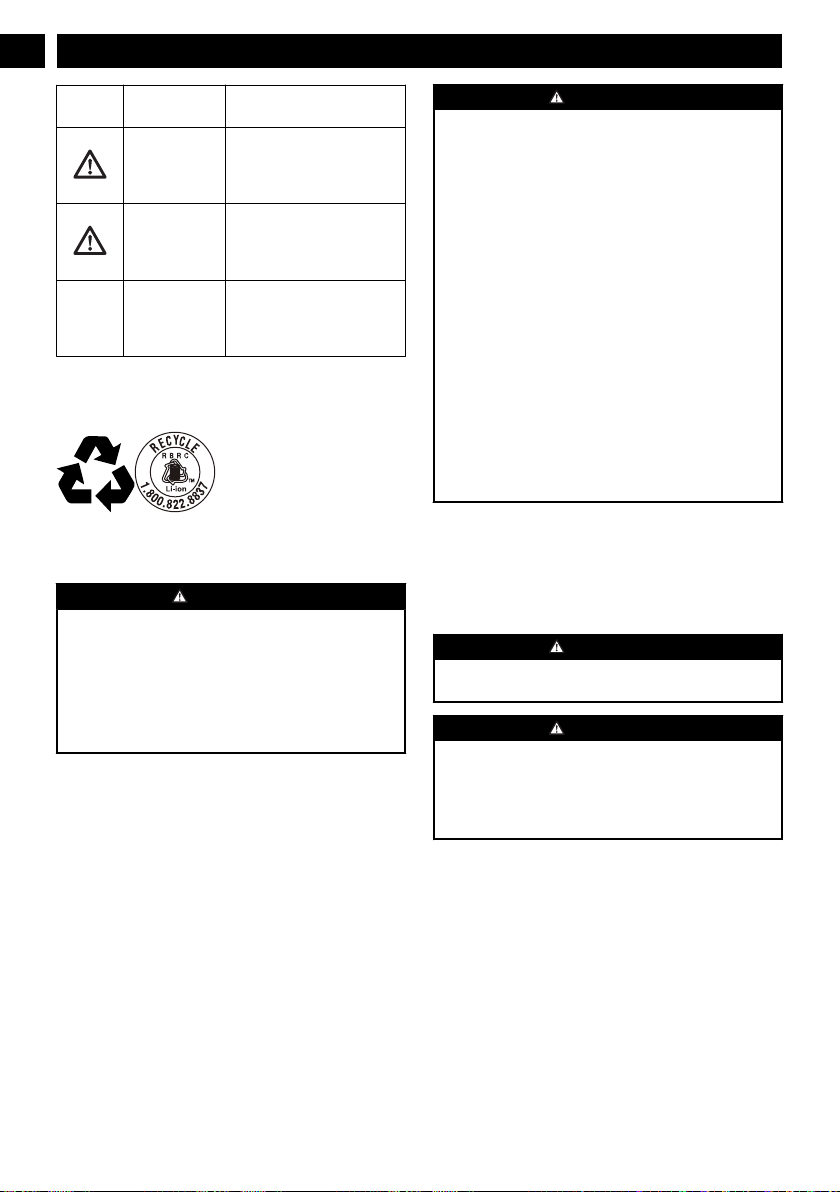
SYM-
BOL
SIGNAL MEANING
WARNING Indicates a potentially haz-
ardous situation,which, if
not avoided, could result in
death or serious injury.
CAUTION Indicates a potentially haz-
ardous situation, which, if
not avoided, may result in
minor or moderate injury.
CAUTION (Without Safety Alert Sym-
bol) Indicates a situation
that may result in property
damage.
8 ENVIRONMENTALLY SAFE
BATTERY DISPOSAL
The toxic and corrosive materials below are in the
batteries used in this machine: Lithium-Ion, a toxic
material.
WARNING
Discard all toxic materials in a specified manner to
prevent contamination of the environment. Before
discarding damaged or worn out Li-ion battery, contact
your local waste disposal agency, or the local
Environmental Protection Agency for information and
specific instructions. Take the batteries to a local
recycling and/or disposal center, certified for lithium-
ion disposal.
WARNING
If the battery pack cracks or breaks, with or without
leaks, do not recharge it and do not use. Discard it
and replace with a new battery pack. DO NOT TRY
TO REPAIR IT! To prevent injury and risk of fire,
explosion, or electric shock, and to avoid damage to
the environment:
• Cover the terminals of the battery with heavy-duty
adhesive tape.
• DO NOT try to remove or destroy any of the
battery pack components.
• DO NOT try to open the battery pack.
• If a leak develops, the released electrolytes are
corrosive and toxic. DO NOT get the solution in the
eyes or on skin, and do not swallow it.
• DO NOT put these batteries in your regular
household trash.
• DO NOT incinerate.
• DO NOT put them where they will become part of
any waste landfill or municipal solid waste stream.
• Take them to a certified recycling or disposal
center.
9 INSTALLATION
The operator must know how to assemble the guide bar
and saw chain.
9.1 UNPACK THE MACHINE
WARNING
Make sure that you correctly assemble the machine
before use.
WARNING
• If the parts have damage, do not use the machine.
•
If you do not have all the parts, do not operate the
machine.
• If the parts are damaged or missing, speak to the
service center.
1. Open the package.
2.
Read the documentation in the box.
3. Remove all the unassembled parts from the box.
4. Remove the machine from the box.
5. Discard the box and package in compliance with
local regulations.
9.2 ASSEMBLE THE GUIDE BAR AND
THE CHAIN
Figure 1-7.
1. Remove the battery pack from the machine.
8
English
EN

2. Remove the chain cover nuts with the wrench.
3.
Remove the chain cover.
4. Put the chain drive links into the bar groove.
5. Put the chain cutters in the direction of the chain
operation.
6. Put the chain in position and make sure that the
loop is behind the guide bar.
7. Hold the chain and bar.
8. Put the chain loop around the sprocket.
9. Make sure the chain tension pin hole on the guide
bar fits correctly with the bolt.
10. Install the chain cover.
11. Tighten the chain. Refer to
Adjust the chain tension.
12. Tighten the nuts when the chain is well tensioned.
NOTE
If you start the chain saw with a new chain, have a test
for 2-3 minutes. After that, examine the tension again
and tighten the chain if necessary.
9.3 REMOVE THE BATTERY PACK
Figure 8
1. Push and hold the battery release button.
2. Remove the battery pack from the machine.
9.4 INSTALL THE BATTERY PACK
Figure 8
WARNING
• If the battery pack or charger is damaged, replace
the battery pack or the charger.
•
Stop the machine and wait until the engine stops
before you install or remove the battery pack.
• Read, know, and do the instructions in the battery
and charger manual.
1. Align the lift ribs on the battery pack with the
grooves in the battery compartment.
2.
Push the battery pack into the battery compartment
until the battery pack locks into place.
3. When you hear a click, the battery pack is installed.
10 OPERATION
NOTE
Remove the battery pack and keep hands clear of the
lock out button when you move the machine.
IMPORTANT
Examine the chain tension before each use.
10.1 START THE MACHINE
Figure 1.
1. Press the lock-out button.
2. Press the trigger while you hold the lock-out button.
3. Release the lock-out button.
IMPORTANT
If unit does not start, ensure chain brake is
disengaged.
10.2 STOP THE MACHINE
Figure 1.
1. Release the trigger to stop the machine.
10.3 PREPARE FOR CUTTING
Figure 9.
• Wear non-slip gloves for maximum grip and
protection.
• Hold the machine with hands tightly. Always keep
your left hand on the front handle and your right
hand on the rear handle. So your body is to the left
of the chain line.
• Hold the handles with the thumbs and the fingers
around them. It is dangerous If the thumb and
fingers are on the same side of the handle. Because
a slight kickback of the machine can cause loss of
control.
WARNING
Do not let any part of your body to be in the chain line
while you operate the machine.
WARNING
Do not use a lefthanded (cross-handed) grip or any
stance that can put your body or arm across the chain
line.
10.4 BASIC OPERATION PROCEDURES
Practice cutting a few small logs with the below
technique to get the “feel” of using the machine before
you begin a major operation.
•
Take the proper stance in front of the wood.
• Press the lock-out button and press the trigger, then
release the lock-out button and let the chain
increase to full speed before you enter the cut.
• Start your cut with the saw against the log.
• Keep a stable speed during operation.
• The chain will cut for you with only light downward
pressure. Force the machine to cut can result in
damage to the bar, chain, or motor.
9
English
EN

• Release the trigger as soon as the cut is completed
and stop the machine. If you run the machine
without a cutting load, unnecessary wear can occur
to the chain, bar, and unit.
•
Do not put pressure on the machine at the end of
the cut.
10.5 REMOVE THE BUTTRESS ROOTS
Figure 10.
A buttress root is a large root extending from the trunk
of the tree above the ground. Remove large buttress
roots prior to felling.
• Make the horizontal cut into the buttress.
• Make the vertical cut then.
• Remove the resulting loose section.
10.6 FELL A TREE
Figure 11-13.
Recommendation that the first-time user should, as a
minimum practice, cutting logs on a saw-horse or
cradle.
Before you start to fell a tree, make sure that
• The minimum distance between the areas of
bucking and felling is two times the height of the
tree.
• The operation does not
• Cause injury to personnel.
• Hit utility lines. If the tree touches utility lines,
immediately tell the utility company.
• Cause losses in property.
• The user is not in the dangerous area, for example,
the downhill side of the area.
• The escape paths that extend back and diagonally
behind the felling direction are clear. The felling
direction is controlled by
• The natural lean of the tree.
• The location of larger branches.
• The wind direction.
• There are no dirt, stones, loose bark, nails, and
staples on the tree.
1. Make a lower level notching cut. Make sure that this
cut is
a) 1/3 wide of the diameter of the tree.
b) Perpendicular to the felling direction.
CAUTION
The level notching cut helps prevent pinching of
the saw chain or the guide bar when you make the
second notch.
2. Make the felling cut no less than 50 mm and higher
than the level notching cut. Make sure that this cut
a)
Is parallel to the level notching cut.
b) Keeps sufficient wood to become a hinge which
prevents the tree from twisting and felling to the
wrong direction.
When the felling cut gets near the hinge, the tree
falls. Stop the felling cut if the tree
• Does not fall to the correct direction or
• Move rearward and forward and stuck the chain.
3. Use felling wedge to open the cut and let the tree
fall to the correct direction.
4. When the tree starts to fall,
a) Remove the chainsaw from the cut.
b) Stop the machine.
c) Put the machine down.
d) Go away through the escape path. Be careful
with overhead branches and your footing.
10.7 LIMB A TREE
Figure 14.
Limbing is to remove the branches from a fallen tree.
1. Keep the larger lower branches to hold the log off
the ground.
2. Remove the small limbs in one cut.
3. Limb the branches with tension from the bottom to
up.
4. Keep the larger lower branches as a support until
the log is limbed.
10.8 BUCK A LOG
Figure 14.
Bucking is to cut a log into lengths. Keep your body
balance. If it is possible, lift the log and hold it with
branches, logs or chock.
• When the log is held along the full length, cut it from
the top.
• When the log is held on one end,
1. Cut the first time 1/3 of the diameter from the
bottom.
2. Cut the second time from the top to complete the
bucking.
• When the log is held on two ends,
1. Cut the first time 1/3 of the diameter from the
top.
2. Cut the second time lower 2/3 from the bottom to
complete the bucking.
• When the log is on a slope,
1. Stand on the uphill side.
2. Control the chainsaw.
10
English
EN

3. Hold the handles tightly.
4.
Release the cut pressure near the end of the
cut.
NOTE
Do not let the chainsaw touch the ground.
When bucking is complete,
1. Release the trigger.
2. Stop the chainsaw fully.
3. Move the chainsaw from tree to tree.
11 MAINTENANCE
CAUTION
Do not let brake fluids, gasoline, petroleum-based
materials touch the plastic parts. Chemicals can cause
damage to the plastic, and make the plastic
unserviceable.
CAUTION
Do not use strong solvents or detergents on the plastic
housing or components.
WARNING
Remove the battery pack from the machine before
maintenance.
11.1 ADD THE BAR AND CHAIN
LUBRICANT
Figure 15.
Examine the amount of oil in the machine. If the oil level
is low, add the bar and chain lubricant as follows.
IMPORTANT
Use bar and chain lubricant that is only for chains and
chain oilers.
NOTE
The machine comes from the factory without bar and
chain lubricant.
1. Loosen and remove the cap from the oil tank.
2.
Put the oil into the oil tank.
3. Monitor the oil indicator to make sure that no dirt in
the oil tank while you add the oil.
4. Put the oil cap on.
5. Tighten the oil cap.
6. Check oil level every 5-10 minutes.
IMPORTANT
Do not use dirty, used or contaminated oil. Damage
can occur to the bar or chain.
11.2 ADJUST THE CHAIN TENSION
Figure 3-4.
CAUTION
Wear protective gloves if you touch the chain, bar or
areas around the chain.
1. Loosen the lock nuts with the wrench.
NOTE
It is not necessary to remove the chain cover to adjust
the chain tension.
2. Turn the chain adjustment screw clockwise to
increase the chain tension.
3.
Turn the chain adjustment screw counterclockwise
to decrease the chain tension.
4. When the chain is at the wanted tension, tighten the
lock nuts.
11.3 SHARPEN THE CUTTERS
Sharpen the cutters if it is not easy for the chain to go
into the wood.
NOTE
We recommend a service center which has the
electric sharpener, does the high level or important
sharpening work.
Figure 16.
1. Tensioning chain.
2. Sharpen the cutters corner with a 5/32 in. (4 mm)
diameter round file .
3. Sharpen the top plate, side plate and depth gauge
with a flat file.
4. File all the cutters to the specified angles and the
same length.
NOTE
During the process,
•
Keep the file flat with the surface to be sharpened.
• Use the midpoint of the file bar.
• Use light but firm pressure when sharpening the
surface.
• Lift the file away on each return stroke.
• Sharpen the cutters on one side and then move to
the other side.
Replace the chain if:
11
English
EN

• The length of the cutting edges is less than 5 mm.
•
There is too much space between the drive links
and the rivets.
• The cut speed is slow
• Sharpening the chain many times but it does not
increase the cutting speed. The chain is worn.
11.4 GUIDE BAR MAINTENANCE
NOTE
Make sure that it is turned over periodically to keep
symmetrical wear on the bar.
Replace the bar if:
•
the groove is not fit with the height of the drive links
(which must never touch the bottom).
• the inside of the guide bar is worn and make the
chain lean to one side.
12 TRANSPORTATION AND
STORAGE
Before you move the machine, always
•
Remove the battery pack from the machine.
• Keep hands clear of the lock-out button.
• Put the scabbard on the guide bar and the chain.
Before you put the machine into storage, always
• Remove the battery pack from the machine.
• Clean all unwanted material from the machine.
• Make sure that the storage area is
• Not available to children.
• Away from agents which can cause corrosion,
such as garden chemicals and de-icing salts.
13 TROUBLESHOOTING
Problem Possible cause Solution
The guide bar
and the chain
become hot and
release smoke.
The chain is too
tight.
Adjust the chain
tension.
The oil tank is
empty.
Add lubricants.
Contamination
causes a block-
age of the dis-
charge port.
Remove the
guide bar and
clean the dis-
charge port.
Contamination
causes a block-
age of the oil
tank.
Clean the oil
tank. Add new
lubricant.
Contamination
causes a block-
age of the guide
bar and the oil
tank cap.
Clean the guide
bar and the oil
tank cap.
Contamination
causes a block-
age of the
sprocket or
guide wheels.
Clean the
sprocket and the
guide wheels.
The motor runs
but the chain
does not rotate.
The chain is too
tight.
Adjust the chain
tension.
The guide bar
and the chain
are damaged.
Replace the
guide bar and
the chain if it is
necessary.
The motor is
damaged.
1. Remove the
battery pack
from the ma-
chine.
2.
Remove the
guide bar
cover.
3. Remove the
bar and saw
chain.
4. Clean the
machine.
5. Install battery
pack and op-
erate the ma-
chine.
If the sprocket
rotates, it means
the motor works
properly. If not,
call service cen-
ter.
12
English
EN

Problem Possible cause Solution
The motor runs
and the chain ro-
tates, but the
chain does not
cut.
The chain is
blunt.
Sharpen or re-
place the saw
chain.
The chain is in
the incorrect di-
rection.
Turn the chain
loop to the other
direction.
The chain is tight
or loose.
Adjust the chain
tension.
The machine
does not start.
The chain brake
is engaged.
Pull the chain
brake in the di-
rection of the
user to disen-
gage it.
The machine
and battery are
not connected
correctly.
Make sure that
the battery re-
lease button
clicks when you
install the battery
pack.
The battery level
is low.
Charge the bat-
tery pack.
The lock out but-
ton and the trig-
ger are not push-
ed at the same
time.
1. Push the
lock-out but-
ton and hold
it.
2. Push the trig-
ger to start
the machine.
The battery is
too hot or too
cold.
Refer to battery
and charger
manual.
Problem Possible cause Solution
The motor runs,
but the chain
does not cut cor-
rectly, or the mo-
tor stops after
around 3 sec-
onds.
The machine is
in the protection
mode to protect
the PCB.
Release the trig-
ger and start the
machine again.
Do not force the
machine to cut.
The battery is
not charged.
Charge the bat-
tery. Refer to the
battery and
charger manual
for correct charg-
ing procedures.
The chain is not
lubricated.
Lubricate the
chain to de-
crease the fric-
tion. Do not let
the guide bar
and the chain
operate without
sufficient lubri-
cant.
Incorrect battery
storage tempera-
ture
Cool the battery
pack until it de-
creases to the
ambient temper-
ature.
14 TECHNICAL DATA
Voltage 40 V DC
No load speed 20 m/s
Guide bar length 14'' (350 mm)
Chain pitch 3/8" LP (9.5 mm)
Chain gauge .043" (1.1 mm)
Drive links 52 DL
Chain oil capacity
180 ml
Weight (without battery
pack)
7.5 Ibs (3.4 kg)
Chain CL14352TL
Guide bar M1431452-1041TL
Battery model BAF722 and other BAF
series
Charger model CAF series or 29482
charger
13
English
EN

15 LIMITED WARRANTY
TOOL WARRANTY
YEAR/ANS/AÑOS
GARANTIE DE
L’OUTI
L
HERRAMIENTA
Greenworks
®
hereby warranties this product, to the
original purchaser with proof of purchase, for a period of
three (3) years against defects in materials, parts or
workmanship. Greenworks
®
, at its own discretion will
repair or replace any and all parts found to be defective,
through normal use, free of charge to the customer.
This warranty is valid only for units which have been
used for personal use that have not been hired or
rented for industrial/commercial use, and that have
been maintained in accordance with the instructions in
the owners’ manual supplied with the product from new.
ITEMS NOT COVERED BY WARRANTY:
1. Any part that has become inoperative due to
misuse, commercial use, abuse, neglect, accident,
improper maintenance, or alteration; or
2. The unit, if it has not been operated and/or
maintained in accordance with the owner's manual;
or
3. Normal wear, except as noted below;
4. Routine maintenance items such as lubricants,
blade sharpening;
5. Normal deterioration of the exterior finish due to use
or exposure.
HELPLINE:
Warranty service is available by calling our toll-free
helpline, at 1-888-909-6757.
TRANSPORTATION CHARGES:
Transportation charges for the movement of any power
equipment unit or attachment are the responsibility of
the purchaser. It is the purchaser’s responsibility to pay
transportation charges for any part submitted for
replacement under this warranty unless such return is
requested in writing by Greenworks
®
.
14
English
EN
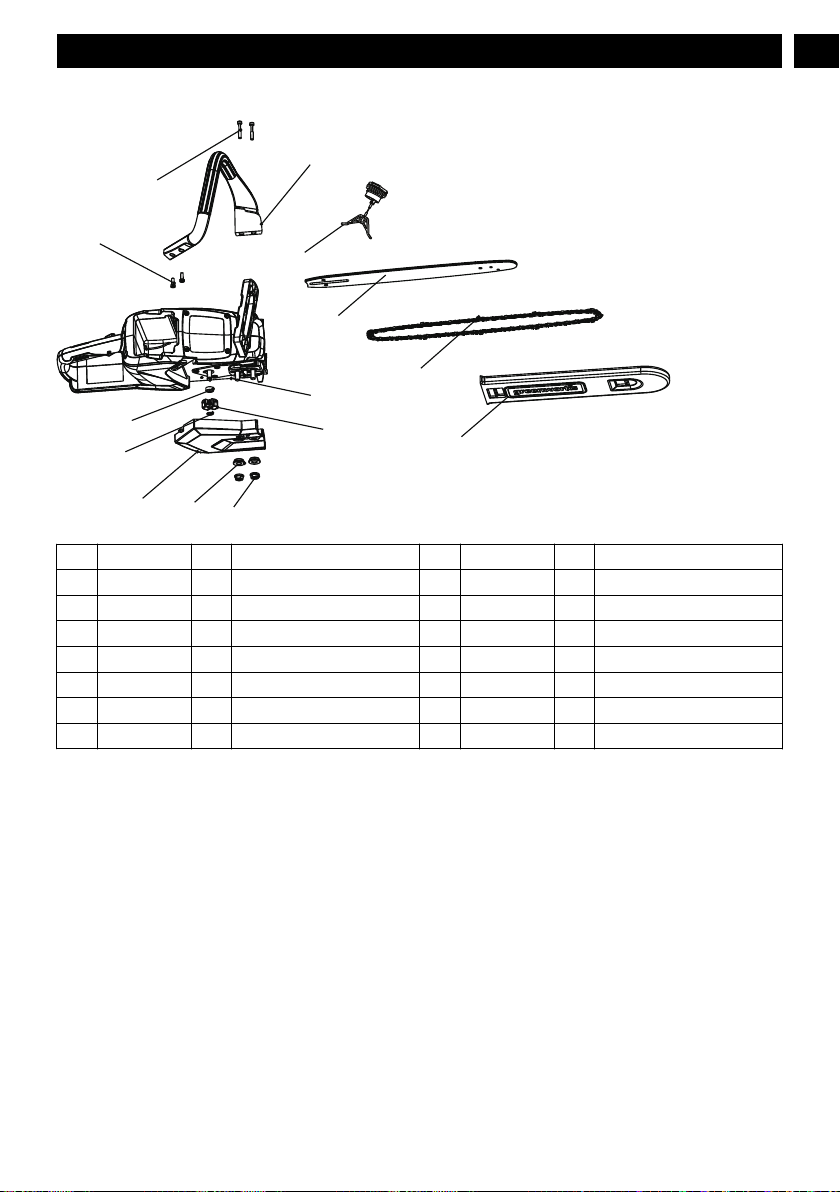
16 EXPLODED VIEW
12
11
10
13
3
9
2
1
4
7
5
6
8
14
No. Part No. Qty Description No. Part No. Qty Description
1 322091063-1 2 Nut 8 34114405-1 1 Scabbard
2 33906159-1 2 Bushing 9 341022030 1 Side cover
3 32209590A 1 Clip 10 32206590 2 Screw
4 33902102C 1 Sprocket 11 32211590 2 Screw
5 311122030 1 Bar 12 341062030 1 Assistant handle
6 311021068 1 Saw chain 13 322032030 1 Spacer bushing
7 311202030 1 Chainsaw housing assembly 14 311052703B 1 Oil cap assembly
Greenworks Tools
PO Box 1238
Mooresville, NC 28115
15
English
EN

1 Descripción..................................17
1.1
Uso previsto............................................. 17
1.2 Descripción general..................................17
2 Advertencias de seguridad
generales para herramientas
eléctricas..................................... 17
2.1 Seguridad en el lugar de trabajo.............. 17
2.2 Seguridad eléctrica...................................17
2.3 Seguridad personal.................................. 17
2.4 Uso y cuidado de la herramienta
eléctrica.................................................... 18
2.5 Uso y cuidado de la batería de la
herramienta.............................................. 18
2.6 Mantenimiento y reparación..................... 18
3 Advertencias de seguridad
relacionadas con el uso de
motosierras..................................18
4 Prevención de los retrocesos...... 19
5 Seguridad Infantil........................ 19
6 Símbolos en el producto..............20
7 Niveles de riesgo.........................20
8 Eliminación de la batería de
modo ecológico........................... 20
9 Instalación................................... 21
9.1 Desembalar la máquina........................... 21
9.2
Montaje de la espada y la cadena............21
9.3 Retire la batería........................................21
9.4 Instalación de la batería........................... 21
10 Modo de empleo..........................21
10.1 Cómo poner la máquina en marcha......... 22
10.2 Cómo detener la máquina........................ 22
10.3 Preparación para el corte......................... 22
10.4 Procedimientos básicos........................... 22
10.5 Quitar raíces gruesas............................... 22
10.6 Talar un árbol........................................... 22
10.7 Desrame de árboles................................. 23
10.8 Trozar un tronco....................................... 23
11 Mantenimiento.............................23
11.1 Añadir lubricante para la espada y la
cadena......................................................24
11.2 Ajustar la tensión de la cadena................ 24
11.3 Afilar los dientes de corte......................... 24
11.4 Mantenimiento de la espada.................... 24
12 Transporte y almacenamiento.....24
13 Resolución de problemas............25
14 Datos técnicos.............................26
15 Garantía limitada......................... 26
16 Vista en despiece........................ 27
16
Español
ES

1 DESCRIPCIÓN
1.1 USO PREVISTO
Esta motosierra ha sido diseñada para cortar ramas,
troncos, leños y vigas con un diámetro determinado por
la longitud de corte de la espada. Este producto ha sido
diseñado únicamente para cortar madera.
Este producto solo debe ser utilizado por adultos y
únicamente en aplicaciones domésticas al aire libre.
No utilice la motosierra para ninguna otro finalidad que
no se haya descrito arriba.
Esta motosierra no está diseñada para ser utilizada por
servicios de poda y tala profesionales. Este producto no
deben usarlo los niños ni las personas que no llevan
una indumentaria y un equipo de protección
apropiados.
1.2 DESCRIPCIÓN GENERAL
Imágenes 1-16
1
Espada
2
Cadena
3
Cubierta de la
cadena
4
Tornillo de la
cubierta de la
cadena
5
Tornillo tensor de
la cadena
6
Empuñadura
posterior
7
Empuñadura
frontal
8
Freno de la cadena
9
Botón de
desbloqueo
10
Gatillo
11
Depósito de aceite
12
Eslabones de
arrastre
13
Surco de la espada
14
Dientes de corte
15
Piñón
16
Orificio para la
espiga de tensión
de la cadena
17
Perno para tensar
la cadena
18
Corte vertical
19
Corte horizontal
20
Parte suelta
21
Zonas de peligro
22
Dirección de tala
23
Rutas de escape
24
Corte direccional
horizontal inferior
25
Corte de tala
26
Bisagra
27
Lima redonda
28
Esquina de corte
29
Lima plana
30
Placa superior
31
Placa lateral
32
Tope de
profundidad
2 ADVERTENCIAS DE
SEGURIDAD GENERALES
PARA HERRAMIENTAS
ELÉCTRICAS
AVISO
Lea todas las advertencias de seguridad y todas las
instrucciones. En caso de no seguir las advertencias e
instrucciones podría producirse una descarga
eléctrica, incendio y lesiones graves.
Conserve todas las advertencias e instrucciones para
cualquier consulta posterior.
El término "herramienta eléctrica" en las advertencias
hace referencia a su herramienta eléctrica a batería
(inalámbrica).
2.1 SEGURIDAD EN EL LUGAR DE
TRABAJO
• Mantenga el área de trabajo limpia y bien iluminada.
Los lugares desordenados o insuficientemente
iluminados invitan a accidentes.
• No use herramientas eléctricas en atmósferas
explosivas, como aquellas donde haya polvos,
líquidos o gases inflamables.
Las herramientas
eléctricas generan chispas que podrían actuar como
detonante de vapores y partículas de polvo.
• Mantenga a los niños y demás personas alejados
cuando utilice una herramienta eléctrica.
Cualquier
distracción podría hacerle perder el control de la
herramienta.
2.2 SEGURIDAD ELÉCTRICA
• No deje las herramientas eléctricas expuestas a la
lluvia o la humedad.
La entrada de agua en la
herramienta eléctrica aumentará el riesgo de
electrocución.
2.3 SEGURIDAD PERSONAL
• Manténgase alerta, preste atención a lo que está
haciendo y use el sentido común cuando esté
utilizando una herramienta eléctrica. No utilice
herramientas eléctricas cuando esté cansado o se
encuentre bajo los efectos de las drogas, el alcohol
o los fármacos.
Cualquier descuido cuando utiliza
herramientas eléctricas podría ocasionar lesiones
graves.
• Utilice un equipo de protección personal. Utilice
siempre protección ocular.
Los equipos de
protección, tales como máscaras antipolvo,
calzados de seguridad antideslizantes, cascos de
seguridad o protecciones auditivas, cuando se
utilizan apropiadamente, reducirán el riesgo de
sufrir lesiones.
• Procure evitar la activación fortuita de la
herramienta. Asegúrese de que el interruptor está
en la posición de apagado antes de conectar la
17
Español
ES

herramienta a la red eléctrica y/o instalar la batería,
o al coger o transportar la herramienta.
Transportar
las herramientas eléctricas con el dedo en el
interruptor, o energizarlas con el interruptor en la
posición de encendido, invita a accidentes.
• Retire cualquier llave de ajuste o llave inglesa de la
herramienta antes de activarla.
Cualquier llave o útil
sujeto a un elemento rotativo de la herramienta
eléctrica podría ocasionar lesiones.
• No adopte una postura forzada. Procure mantener
un buen equilibrio y un apoyo firme en todo
momento.
De esta manera tendrá un mejor control
de la herramienta eléctrica en situaciones
inesperadas.
• Utilice una indumentaria apropiada. No use ropa
holgada ni joyas. Mantenga el cabello, la ropa y los
guantes apartados de las partes móviles.
La ropa
holgada, las joyas y el pelo largo podrían
engancharse a las partes móviles.
• De suministrarse elementos de conexión a
dispositivos de extracción y recogida del polvo,
asegúrese de conectarlos y utilizarlos
adecuadamente.
La utilización de colectores de
polvo puede reducir los peligros asociados al polvo.
2.4 USO Y CUIDADO DE LA
HERRAMIENTA ELÉCTRICA
• No fuerce la herramienta eléctrica. Utilice la
herramienta eléctrica adecuada para la tarea que
vaya a realizar.
La utilización de la herramienta
eléctrica correcta a la velocidad de funcionamiento
para la que ha sido diseñada le ayudará a efectuar
el trabajo de manera más fácil y segura.
• No utilice la herramienta eléctrica si el interruptor no
funciona correctamente.
Cualquier herramienta
eléctrica que no pueda controlarse desde el
interruptor es peligrosa y debe ser reparada antes
de volver a utilizarse.
• Desenchufe las herramientas eléctricas, o
desinstale sus baterías, antes de realizar cualquier
ajuste, cambiar de accesorios o guardarlas.
Estas
medidas preventivas reducirán el riesgo de que la
herramienta eléctrica pueda activarse
accidentalmente.
• Guarde las herramientas eléctricas apagadas en un
lugar fuera del alcance de niños y no deje que las
usen personas que no estén familiarizadas con
estas instrucciones o con las herramientas.
Las
herramientas eléctricas son peligrosas en manos de
personas inexpertas.
• Mantenga las herramientas eléctricas en buen
estado. Examine las herramientas eléctricas en
busca de elementos móviles desalineados o
trabados, piezas rotas o alguna otra circunstancia
que afecte a su funcionamiento. En caso de daños,
lleve a reparar la herramienta eléctrica antes de
volver a utilizarla.
Muchos de los accidentes están
causados por herramientas eléctricas mal cuidadas.
• Mantenga las herramientas de corte limpias y
afiladas.
Las herramientas de corte bien cuidadas y
afiladas son menos propensas a trabarse y más
fáciles de controlar.
• Utilice la herramienta eléctrica, los accesorios, las
brocas, etc., conforme a lo indicado en estas
instrucciones y considerando las condiciones de
trabajo y el trabajo a efectuar.
El uso de la
herramienta eléctrica para fines diferentes a
aquellos para los que ha sido diseñada puede
resultar peligroso.
2.5 USO Y CUIDADO DE LA BATERÍA
DE LA HERRAMIENTA
• Recargue la herramienta utilizando únicamente el
cargador especificado por el fabricante.
Un
cargador que es adecuado para un tipo de batería
podría ocasionar un incendio si se utiliza con otro
tipo de batería.
• Utilice las herramientas eléctricas solamente con las
baterías específicamente diseñadas para las
mismas.
La utilización de otro tipo de baterías
podría dar lugar a lesiones e incendios.
• Cuando no esté utilizando la batería, manténgala
apartado de objetos metálicos, tales como clips
para papeles, monedas, llaves, clavos, tornillos, o
cualquier otro objeto metálico de pequeño tamaño
que pudiera causar una conexión en sus terminales.
El cortocircuito de los terminales de la batería
puede causar quemaduras o incendios.
• En condiciones de uso intensivo, es posible que se
produzca una fuga del líquido de la batería. Evite el
contacto. En caso de contacto accidental,
enjuáguese con agua jabonosa abundante. Si el
líquido entra en contacto con los ojos, solicite
atención médica inmediatamente.
El líquido vertido
por la batería puede causar irritación o quemaduras.
2.6 MANTENIMIENTO Y REPARACIÓN
• Solicite la reparación de su herramienta eléctrica a
un técnico cualificado que utilice solamente piezas
de repuesto idénticas.
De este modo se conservará
la seguridad de la herramienta eléctrica.
3 ADVERTENCIAS DE
SEGURIDAD RELACIONADAS
CON EL USO DE
MOTOSIERRAS
• Mantenga todas las partes del cuerpo apartadas de
la cadena de corte cuando utilice la motosierra.
Antes de poner en marcha la motosierra, asegúrese
de que la cadena no esté haciendo contacto con
ningún objeto.
Cualquier momento de distracción
durante la utilización de una motosierra podría
hacer que su ropa o alguna parte del cuerpo
quedasen enganchadas en la cadena.
18
Español
ES

• Sujete la motosierra solo por las superficies de
agarre aisladas, ya que la cuchilla podría entrar en
contacto con cables ocultos.
El contacto de las
cuchillas con un cable bajo tensión podría
electrificar las piezas metálicas expuestas de la
motosierras y causar una descarga eléctrica al
usuario.
• La motosierra deberá sujetarse siempre utilizando la
mano derecha para la empuñadura trasera y la
mano izquierda para la empuñadura delantera.
Sujetar la motosierra al revés aumentará el riesgo
de sufrir lesiones y debe evitarse a toda costa.
• Utilice gafas de seguridad y protección auditiva.
Asimismo, se recomienda utilizar un equipo de
protección personal complementario para la cabeza,
las manos, las piernas y los pies.
La utilización de
protecciones reducirá el riesgo de lesión debido a
los detritos arrojados por la cadena de la sierra o el
contacto accidental con ésta.
• No utilice la motosierra mientras esté subido en un
árbol.
El manejo de una motosierra cuando se está
subido a un árbol puede provocar lesiones
personales.
• Mantenga los pies siempre en una postura correcta
y utilice la motosierra solo cuando esté de pie sobre
una superficie fija, segura y plana.
Las superficies
resbaladizas o inestables, como las escaleras de
mano, pueden hacer que pierda el equilibrio o el
control de la motosierra.
• Preste especial atención al cortar ramas sometidas
a tensión, ya que podrían rebotar hacia usted.
Al
liberarse la tensión existente en las fibras de la
madera, la rama en cuestión podría golpearle o
hacerle perder el control de la motosierra.
• Extreme las precauciones al cortar matorrales y
arbustos.
El material fino puede quedar atrapado en
la cadena de la sierra y golpearle o hacerle perder
el equilibrio.
• Transporte la motosierra sujetándola por su
empuñadura delantera, asegurándose de que está
apagada y manteniéndola apartada de su cuerpo.
Cuando transporte o almacene la motosierra, ponga
siempre la cubierta de la barra de guía.
El manejo
correcto de la motosierra le ayudará a reducir la
probabilidad de contacto accidental con la cadena
de corte en movimiento.
• Siga las instrucciones para lubricar y tensar la
cadena y cambiar de accesorios.
Una cadena mal
lubricada o tensada podría romperse o aumentar el
riesgo de retroceso.
• Mantenga las empuñaduras secas, limpias y sin
restos de aceite o grasa.
Unas empuñaduras con
restos de aceite o grasa pueden ser resbaladizas y
hacerle perder el control.
• Corte madera solamente. No utilice la motosierra
para otros fines distintos al uso previsto. Por
ejemplo: no use la motosierra para cortar plástico,
mampostería o materiales de construcción que no
estén hechos de madera.
El uso de la motosierra
para otros fines distintos al previsto puede provocar
situaciones de peligro.
4 PREVENCIÓN DE LOS
RETROCESOS
El retroceso puede producirse cuando la punta de la
espada hace contacto con un objeto, o al estrecharse el
corte realizado en la madera y aprisionar la cadena de
la sierra.
En algunos casos, el contacto de la punta puede
producir una reacción repentina en dirección opuesta
que hace rebotar la espada hacia el usuario.
Si la cadena de la sierra se atasca en la parte superior
de la barra de guía, ésta podría rebotar rápidamente en
dirección al usuario.
Cualquiera de estas reacciones podría hacerle perder el
control de la sierra y causarle lesiones graves. No
confíe únicamente en los dispositivos de seguridad
incorporados en la sierra. Como usuario de la
motosierra, debería adoptar diversas medidas para
evitar los accidentes y lesiones en sus trabajos de
corte.
El retroceso se produce por un uso o una manipulación
incorrectos de la herramienta o debido a su mal estado,
y puede evitarse tomando las precauciones siguientes:
• Agarre la motosierra firmemente con ambas manos,
con los dedos y los pulgares rodeando las
empuñaduras, y manteniendo una postura correcta
de su cuerpo y sus brazos para poder resistir los
retrocesos.
Los retrocesos pueden ser controlados por el
usuario si se toman las precauciones adecuadas.
No suelte la motosierra.
• No adopte una postura forzada ni realice cortes por
encima de la altura del hombro. Esto le ayudará a
evitar el contacto involuntario con la punta y le
permitirá controlar mejor la motosierra si se
producen situaciones inesperadas.
• Utilice únicamente las cadenas y espadas de
repuesto especificadas por el fabricante. La
utilización de cadenas y espadas de recambio
incorrectas podría provocar la ruptura de la cadena
y/o aumentar los riesgos de retroceso.
• Siga las instrucciones de afilado y mantenimiento
de la cadena indicadas por el fabricante. Una
reducción de la altura de los limitadores de
profundidad puede aumentar el riesgo de retroceso.
5 SEGURIDAD INFANTIL
Si el operario no es consciente de la presencia de
niños, podrían producirse un accidente trágico.
19
Español
ES
• Mantenga a los niños fuera de la zona de trabajo y
bajo la estrecha vigilancia de un adulto responsable.
•
No permita que los niños menores de 14 años
utilicen este aparato. Los niños de 14 años o
mayores deben leer y comprender las instrucciones
de funcionamiento y las normas de seguridad de
este manual y deben tener formación y estar bajo la
supervisión de un padre.
• Esté alerta, y apague el aparato si un niño u otra
persona entra en la zona de trabajo.
• Extreme las precauciones al aproximarse a rincones
sin visibilidad, puertas, arbustos, árboles u otros
objetos que pudieran obstaculizar su capacidad de
ver si un niño corre y entra en la ruta de la máquina.
6 SÍMBOLOS EN EL PRODUCTO
Algunos de los siguientes símbolos podrían ser
utilizados en este producto. Por favor, estúdielos y
aprenda su significado. La interpretación correcta de
estos símbolos le permitirá usar mejor el producto y de
manera más segura.
Símbolo Explicación
Corriente directa o característica
de la corriente.
Precauciones a tomar por su se-
guridad.
Antes de utilizar el producto, lea y
comprenda todas las instrucciones
y siga todas las advertencias y
medidas de seguridad.
Utilice protección para los ojos y
los oídos.
No exponga el producto a la lluvia
ni la humedad.
Evite hacer contacto con la punta
de la espada.
Sujete con ambas manos.
¡PELIGRO! Tenga cuidado con los
retrocesos.
Utilice unos guantes resistentes y
antideslizantes.
Mantenga a otras personas a una
distancia mínima de 15 m.
7 NIVELES DE RIESGO
Las siguientes señales, palabras y significados tienen
como fin explicar los niveles de riesgo asociados a este
producto.
SÍMBO-
LO
SEÑAL SIGNIFICADO
PELIGRO Indica una situación de pel-
igro inminente que si no se
evita podría causar le-
siones graves o la muerte.
ADVERTEN-
CIA
Indica una situación de pel-
igro potencial que si no se
evita podría causar le-
siones graves o la muerte.
PRECAU-
CIÓN
Indica una situación de pel-
igro potencial que si no se
evita podría causar le-
siones leves o moderadas.
PRECAU-
CIÓN
(Sin símbolo de adverten-
cia sobre seguridad) Indica
un situación que podría
causar daños a la propie-
dad.
8 ELIMINACIÓN DE LA BATERÍA
DE MODO ECOLÓGICO
Los siguientes materiales tóxicos y corrosivos se
encuentran en la batería utilizada por este aparato: El
ión-litio es un material tóxico.
AVISO
Elimine todos los materiales tóxicos del modo
adecuado para evitar la contaminación del medio
ambiente. Antes de desechar una batería de ión-litio
dañada o agotada, póngase en contacto con la
agencia local de eliminación de desechos, o la
Agencia Local de Protección del Medio Ambiente para
informarse y recibir instrucciones específicas. Lleve
las baterías a un punto local de reciclaje y eliminación
de desechos, certificado para la eliminación de ión-
litio.
20
Español
ES

AVISO
Si la batería se agrieta o rompe, con o sin fugas de
líquido, no deberá recargarla ni utilizarla. Deséchela y
sustitúyala por una batería nueva. ¡NO INTENTE
REPARARLA! Para evitar lesiones y el riesgo de
incendio, explosión o descarga eléctrica, y para evitar
perjudicar el medio ambiente:
• Cubra los bornes de la batería con cinta aislante
fuerte.
• NO intente retirar ni destruir ninguno de los
componentes de la batería.
• NO intente abrir la batería.
• Si se produce una fuga, el líquido electrolito es
corrosivo y tóxico. El líquido NO debe estar en
contacto con su ojos ni su piel, y no debe ingerirlo.
• NO tire esta batería en la basura doméstica de su
hogar.
• NO quemar.
• NO colocar donde vayan a parar a un vertedero
municipal.
• Llévela a un centro oficial para el reciclaje y la
eliminación de desechos.
9 INSTALACIÓN
El usuario debe saber cómo se monta la espada y la
cadena de la sierra.
9.1 DESEMBALAR LA MÁQUINA
AVISO
Asegúrese de montar correctamente la máquina antes
de utilizarla.
AVISO
• Si hay alguna pieza dañada, no utilice la máquina.
•
Si falta alguna pieza, no utilice la máquina.
• Si falta alguna pieza o está dañada, póngase en
contacto con el servicio técnico.
1. Abra el envase.
2.
Lea la documentación incluida en la caja.
3. Extraiga todas las pieza desmontadas de la caja.
4. Extraiga la máquina de la caja.
5. Deseche la caja y el envase siguiente la normativa
local.
9.2 MONTAJE DE LA ESPADA Y LA
CADENA
Imagen 1-7.
1. Quite la batería de la herramienta.
2. Quite las tuercas de la cubierta de la cadena con la
llave de tuercas.
3.
Retire la cubierta de la cadena.
4. Coloque los eslabones de arrastre en el surco de la
espada.
5. Ponga los dientes de corte en la dirección de
funcionamiento de la cadena.
6. Ponga la cadena en la posición correcta y
asegúrese de que el bucle esté detrás de la espada.
7. Sujete la cadena y la espada.
8. Ponga el bucle de la cadena alrededor del piñón.
9. Compruebe que el orificio para la espiga de tensión
de la cadena en la espada encaje correctamente
con el perno.
10. Coloque la cubierta de la cadena.
11. Tense la cadena. Consulte
Ajustar la tensión de la
cadena.
12. Apriete las tuercas cuando la cadena esté bien
tensada.
NOTA
Si pone en marcha la motosierra con una cadena
nueva, pruébela durante 2 a 3 minutos. A
continuación, examine de nuevo la tensión y tense la
cadena en caso necesario.
9.3 RETIRE LA BATERÍA
Imagen 8
1. Mantenga pulsado el botón de liberación de la
batería.
2. Retire la batería del aparato.
9.4 INSTALACIÓN DE LA BATERÍA
Imagen 8
AVISO
• Reemplace la batería o el cargador si llegaran a
dañarse.
•
Pare la máquina y espere a que el motor se
detenga antes de instalar o desinstalar la batería.
• Lea, comprenda y siga las instrucciones de la
batería y el cargador.
1. Alinee las nervaduras de la batería con las ranuras
del compartimento de la batería.
2.
Empuje hacia dentro la batería en el compartimento
hasta que quede encajada en su sitio.
3. Cuando escuche un clic, la batería estará instalada.
21
Español
ES

10 MODO DE EMPLEO
NOTA
Quite el acumulador y mantenga las manos apartadas
del botón de desbloqueo cuando traslade la
herramienta.
IMPORTANTE
Compruebe la tensión de la cadena antes de cada
uso.
10.1 CÓMO PONER LA MÁQUINA EN
MARCHA
Imagen 1.
1. Presione el botón de desbloqueo.
2. Presione el gatillo al mismo tiempo que mantiene
presionado botón de desbloqueo.
3. Suelte el botón de desbloqueo.
IMPORTANTE
Si el aparato no se pone en marcha, asegúrese de
que el freno de la cadena no esté activado.
10.2 CÓMO DETENER LA MÁQUINA
Imagen 1.
1. Suelte el gatillo para detener la máquina.
10.3 PREPARACIÓN PARA EL CORTE
Imagen 9.
• Utilice guantes antideslizantes para un mayor
agarre y protección.
• Sujete la máquina firmemente con las manos.
Mantenga siempre la mano izquierda en la
empuñadura delantera y la mano derecha en la
empuñadura trasera. Su cuerpo deberá quedar
siempre a la izquierda de la línea de corte de la
cadena.
• Sujete las empuñaduras rodeándolas con los
pulgares y los dedos. Es peligroso que el pulgar y
los demás dedos estén al mismo lado de la
empuñadura. Un ligero retroceso de la máquina
puede hacerle perder el control.
AVISO
No deje que ninguna parte de su cuerpo esté en la
línea d corte de la cadena cuando utilice la
herramienta.
AVISO
No sujete la motosierra con las manos colocadas al
revés de lo indicado ni en cualquier otra postura que
pudiera colocar su cuerpo o brazo en la línea de corte
de la cadena.
10.4 PROCEDIMIENTOS BÁSICOS
Practique cortando algunos troncos pequeños con la
técnica que se indica abajo para acostumbrarse al uso
de la máquina antes de iniciar una operación de más
envergadura.
•
Adopte la postura adecuada delante de la madera.
• Presione el botón de desbloqueo y el gatillo. A
continuación, suelte el botón de desbloqueo y deje
que la cadena se acelere hasta la velocidad plena
antes de iniciar el corte.
• Comience el corte con la sierra contra el tronco.
• Mantenga una velocidad estable durante el
funcionamiento.
• La cadena cortará y usted solo tendrá que ejercer
una ligera presión hacia abajo. Si se fuerza la
máquina puede dañarse la espada, la cadena o el
motor.
• En cuanto haya terminado el corte, suelte el gatillo y
pare la máquina. Si pone en marcha la máquina sin
una carga de corte, se produce un desgaste
innecesario de la cadena, la espada y el aparato.
• No ejerza presión sobre la máquina al final del
corte.
10.5 QUITAR RAÍCES GRUESAS
Imagen 10.
Una raíz gruesa es una raíz grande que se extiende
desde el tronco del árbol por encima del suelo. Quite
las raíces gruesas y grandes antes de talar un árbol.
• Realice el corte horizontal en la raíz gruesa.
• A continuación, haga un corte vertical.
• Quite la parte que queda suelta.
10.6 TALAR UN ÁRBOL
Imagen 11-13.
Cuando una persona vaya a utilizar la motosierra por
primera vez, se recomienda que practique como
mínimo cortando troncos sobre un caballete para serrar
o un soporte.
Antes de empezar a talar un árbol, asegúrese de lo
siguiente:
• La distancia mínima entre las áreas de tala y
trozado es dos veces la altura del árbol.
• La operación no:
• provoca lesiones al personal.
22
Español
ES

• golpea líneas de suministro. Si el árbol toca las
líneas de suministro, avise inmediatamente a la
compañía.
•
Provoca daños materiales.
• El usuario no está en el área peligrosa, por ejemplo,
la parte cuesta abajo del área.
• Las rutas de escape que discurren hacia atrás y en
diagonal detrás de la dirección de tala están
despejadas. La dirección de tala se controla
mediante:
• la inclinación natural del árbol.
• la ubicación de las ramas más grandes.
• la dirección del viento.
• No hay suciedad, piedras, corteza suelta, clavos y
grapas en el árbol.
1. realice un corte direccional horizontal inferior.
Asegúrese de que el corte:
a) tenga una anchura de 1/3 del diámetro del árbol.
b) sea perpendicular a la dirección de tala.
PRECAUCIÓN
El corte dirección horizontal ayuda a evitar que se
atasque la cadena de la sierra cuando se hace el
segundo corte.
2. Haga el corte de tala al menos 50 mm más alto que
el corte direccional horizontal. Asegúrese de que
este corte:
a) sea paralelo al corte direccional horizontal.
b) deje suficiente madera para que se forme una
bisagra, evitando que el árbol se tuerza y caiga
en la dirección equivocada.
Cuando el corte de tala se acerca a la bisagra, el
árbol cae. Deje de talar si el árbol:
• no cae en la dirección correcta o
• se mueve hacia atrás y hacia delante y atasca la
cadena.
3. Use una cuña de tala para abrir el corte y dejar que
el árbol caiga en la dirección correcta.
4. Cuando el árbol empiece a caer:
a) saque la cadena del corte.
b) pare la máquina.
c) deposite la máquina.
d) Aléjese a través de la ruta de escape. Esté
atento a las ramas superiores y tenga cuidado
dónde pone los pies.
10.7 DESRAME DE ÁRBOLES
Imagen 14.
Desramar consiste en quitar las ramas de un árbol
caído.
1. Deje las ramas bajas más grandes para apoyar el
tronco en el suelo.
2. Quite las ramas pequeñas con un corte.
3.
Las ramas que están en tensión deben cortarse de
abajo hacia arriba.
4. Deje las ramas grandes inferiores como apoyo
hasta que el tronco esté desramado.
10.8 TROZAR UN TRONCO
Imagen 14.
Trozar es partir un tronco en unidades más cortas.
Mantenga el cuerpo equilibrado. Si es posible, levante
el tronco y sujételo con ramas, tocones o calzos.
• Cuando el tronco esté apoyado en toda su longitud,
córtelo desde la parte superior.
• Cuando el tronco esté apoyado únicamente en un
extremo:
1. Corte primero 1/3 del diámetro desde abajo.
2. Corte una segunda vez desde arriba para
completar el trozado.
• Cuando el tronco esté apoyado en dos extremos:
1. Corte primero 1/3 del diámetro desde arriba.
2. Corte una segunda vez 2/3 desde la parte de
abajo para completar el trozado.
• Cuando el tronco esté en una pendiente:
1. Colóquese en el lado cuesta arriba.
2. Controle la motosierra.
3. Sujete firmemente las empuñaduras.
4. Afloje la presión de corte cuando se acerque al
final del corte.
NOTA
No deje que la motosierra entre en contacto con el
suelo.
Una vez finalizado el trozado:
1.
Suelte el gatillo.
2. Pare completamente la motosierra.
3. Desplace la motosierra de un árbol a otro.
11 MANTENIMIENTO
PRECAUCIÓN
No permita que el líquido para frenos, gasolina,
sustancias derivadas del petróleo estén en contacto
con las piezas de plástico. Las sustancias químicas
pueden dañar el plástico, de modo que sea inservible.
PRECAUCIÓN
No utilice solventes o detergentes fuertes sobre la
carcasa de plástico o los componentes.
23
Español
ES

AVISO
Antes de realizar el mantenimiento, retire la batería de
la máquina.
11.1 AÑADIR LUBRICANTE PARA LA
ESPADA Y LA CADENA
Imagen 15.
Compruebe el nivel de aceite en la máquina. Si el nivel
de aceite es bajo, añada lubricante para la cadena y la
espada del modo siguiente.
IMPORTANTE
Utilice lubricante para la espada y la cadena que sea
solo para cadenas y lubricadores de cadenas.
NOTA
La cadena se suministra de fábrica sin lubricante para
la espada y la cadena.
1. Desenrosque y retire el tapón del depósito de
aceite.
2.
Ponga aceite en el depósito de aceite.
3. Controle el indicador de aceite para asegurarse de
que no entre suciedad en el depósito cuando añada
aceite.
4. Ponga el tapón del depósito de aceite.
5. Apriete el tapón del depósito de aceite.
6. Compruebe el nivel de aceite cada 5-10 minutos.
IMPORTANTE
No use aceite sucio, usado o contaminado. De lo
contrario, podrían producirse daños en la espada o la
cadena.
11.2 AJUSTAR LA TENSIÓN DE LA
CADENA.
Imagen 3-4.
PRECAUCIÓN
Utilice guantes de protección cuando manipule la
cadena, la espada o las zonas adyacentes a la
cadena.
1. Afloje las tuercas con la llave de tuercas.
NOTA
No es necesario quitar la cubierta de la cadena para
ajustar la tensión.
2. Gire el tornillo de ajuste de la cadena en sentido
horario para aumentar la tensión de la cadena.
3.
Gire el tornillo de ajuste de la cadena en sentido
antihorario para reducir la tensión de la cadena.
4. Una vez que haya tensado la cadena como desee,
apriete las tuercas.
11.3 AFILAR LOS DIENTES DE CORTE
Afile los dientes de corte si la cadena no penetra
fácilmente en la madera.
NOTA
Le recomendamos que acuda a un centro de servicio
técnico que tenga un afilador eléctrico para realizar el
trabajo de afilado importante o de alto nivel.
Imagen 16.
1. Tense la cadena.
2. Afile la esquina de los dientes de corte con una lima
redonda de 5/32 pulgadas (4 mm) de diámetro.
3. Afile la placa superior, la placa lateral y el tope de
profundidad con una lima plana.
4. Lime todos los dientes de corte con los ángulos
especificados y a la misma longitud.
NOTA
Durante el proceso:
•
Mantenga la lima plana con la superficie a afilar.
• Use el punto medio de la barra de lima.
• Ejerza una presión ligera pero firme para afilar la
superficie.
• Levante la lima en cada pasada de retroceso.
• Afile los dientes de corte por un lado y después
pase al otro lado.
Cambie la cadena si:
•
La longitud de los bordes de corte es menor que
5 mm.
• Hay demasiado espacio entre los eslabones de
arrastre y los remaches.
• La velocidad de corte es lenta.
• Se ha afilado la cadena muchas veces pero no
aumenta la velocidad de corte. La cadena está
desgastada.
11.4 MANTENIMIENTO DE LA ESPADA
NOTA
Asegúrese de invertirla periódicamente para mantener
un desgaste simétrico de la espada.
Cambie la espada si:
•
La ranura no encaja con la altura de los eslabones
de arrastre (que nunca deben tocar el fondo).
• El interior de la espada está desgastado y hace que
la cadena apoye hacia un lado.
24
Español
ES

12 TRANSPORTE Y
ALMACENAMIENTO
Antes de desplazar la herramienta, haga siempre lo
siguiente:
•
Quite la batería de la herramienta.
• Mantenga las manos apartadas del botón de
desbloqueo.
• Ponga la funda en la espada y la cadena.
Antes de almacenar la herramienta, haga siempre lo
siguiente:
• Quite la batería de la herramienta.
• Quite todo el material extraño de la herramienta.
• Asegúrese de que el área de almacenamiento:
• No sea accesible para los niños.
• Esté alejada de productos que puedan causar
corrosión, como sustancias químicas de
jardinería y sal para deshielo.
13 RESOLUCIÓN DE PROBLEMAS
Problema Causa posible Solución
La espada y la
cadena se cal-
ientan y de-
sprenden humo.
La cadena está
demasiado ten-
sa.
Ajuste la tensión
de la cadena.
El depósito de
aceite está vac-
ío.
Añada lubri-
cantes.
La suciedad pro-
voca un bloqueo
del puerto de
descarga.
Quite la espada
y limpie el puerto
de descarga.
La suciedad pro-
voca un bloqueo
del depósito de
aceite.
Limpie el depósi-
to de aceite.
Añada lubricante
nuevo.
La suciedad pro-
voca un bloqueo
de la espada y el
tapón del depós-
ito de aceite.
Limpie la espada
y el tapón del
depósito de
aceite.
La suciedad pro-
voca un bloqueo
del piñón o las
ruedas de guía.
Limpie el piñón y
las ruedas de
guía.
Problema Causa posible Solución
El motor funcio-
na, pero la cade-
na no gira.
La cadena está
demasiado ten-
sa.
Ajuste la tensión
de la cadena.
La espada y la
cadena están
dañadas.
Cambie la espa-
da y la cadena
en caso neces-
ario.
El motor está da-
ñado.
1. Quite la bate-
ría de la her-
ramienta.
2.
Quite la cu-
bierta de la
espada.
3. Quite la es-
pada y la ca-
dena.
4. Limpie la má-
quina.
5. Instale la ba-
tería y ponga
la máquina
en marcha.
Si el piñón gira,
significa que el
motor funciona
correctamente.
De lo contrario,
avise al centro
de servicio técni-
co.
El motor funcio-
na y la cadena
gira, pero la ca-
dena no corta.
La cadena está
roma.
Afile la cadena
de la sierra o
cámbiela.
La cadena está
en la dirección
incorrecta.
Gire el bucle de
la cadena en la
otra dirección.
La cadena está
demasiado tensa
o demasiado flo-
ja.
Ajuste la tensión
de la cadena.
25
Español
ES

Problema Causa posible Solución
La máquina no
arranca. El freno de la ca-
dena está activa-
do.
Tire del freno de
la cadena en la
dirección del
usuario para de-
sactivarlo.
La máquina y la
batería no están
conectadas cor-
rectamente.
Asegúrese de
que el botón de
desbloqueo de la
batería haga clic
cuando instale la
batería.
El nivel de carga
de la batería es
bajo.
Cargue la bate-
ría.
El botón de des-
bloqueo y el ga-
tillo no se han
presionado al
mismo tiempo.
1. Presione el
botón de
desbloqueo y
manténgalo
apretado.
2. Presione el
gatillo para
accionar la
máquina.
la batería está
demasiado cal-
iente o demasia-
do fría.
Consulte el man-
ual de la batería
y del cargador.
El motor funcio-
na, pero la cade-
na no corta cor-
rectamente o el
motor se para al
cabo de unos 3
segundos.
La máquina está
en el modo de
protección para
proteger la placa
de circuitos.
Suelte el gatillo y
vuelva a arran-
car la máquina.
No fuerce la má-
quina para el
corte.
La batería no es-
tá cargada.
Cargue la bate-
ría. Consulte el
procedimiento
de carga correc-
to en el manual
de la batería y
del cargador.
La cadena no
está lubricada.
Lubrique la ca-
dena para reduc-
ir la fricción. No
deje que la es-
pada y la cadena
funcionen sin su-
ficiente lubri-
cante.
Temperatura de
almacenamiento
de la batería in-
correcta
Enfríe la batería
hasta que al-
cance la temper-
atura ambiente.
14 DATOS TÉCNICOS
Tensión 40 V DC
Velocidad sin carga 20
m/s
Longitud de la espada 14'' (350 mm)
Paso de la cadena 3/8" LP (9.5 mm)
Calibre de cadena .043" (1.1 mm)
Eslabones de arrastre 52 DL
Capacidad de aceite de
cadena
180 ml
Peso (sin batería) 7.5Ibs (3.4 kg)
Cadena CL14352TL
Espada M1431452-1041TL
Modelo de la batería BAF722 y demás series
BAF
Modelo de cargador Serie CAF o cargador
29842
15 GARANTÍA LIMITADA
TOOL WARRANTY
YEAR/ANS/AÑOS
GARANTIE DE
L’OUTI
L
HERRAMIENTA
Greenworks
®
Por la presente, se garantiza este
producto al comprador original en posesión de la
prueba de compra por un periodo de tres (3) años
contra defectos de material, piezas o mano de obra.
Greenworks
®
, a su propia discreción, reparará o
reemplazará todas y cada una de las piezas que se
encuentren defectuosas, en base a un uso normal, sin
costo alguno para el cliente. Esta garantía es válida
para aparatos de los que se ha realizado un uso
personal y no han sido alquilados para aplicaciones
comerciales/industriales, y que han sido sometidos a un
mantenimiento tal y como se indica en las instrucciones
del manual del usuario suministrado con el producto
nuevo.
LO QUE NO CUBRE LA GARANTÍA:
1.
Cualquier pieza que no funcione debido al uso
incorrecto, uso comercial, abusivo, negligencia,
accidente, mantenimiento inadecuado, o alteración;
o
2. La unidad, si no ha sido utilizada y/o mantenida
siguiendo el manual del propietario; o
3. El desgaste normal, excepto según se indica a
continuación.
26
Español
ES
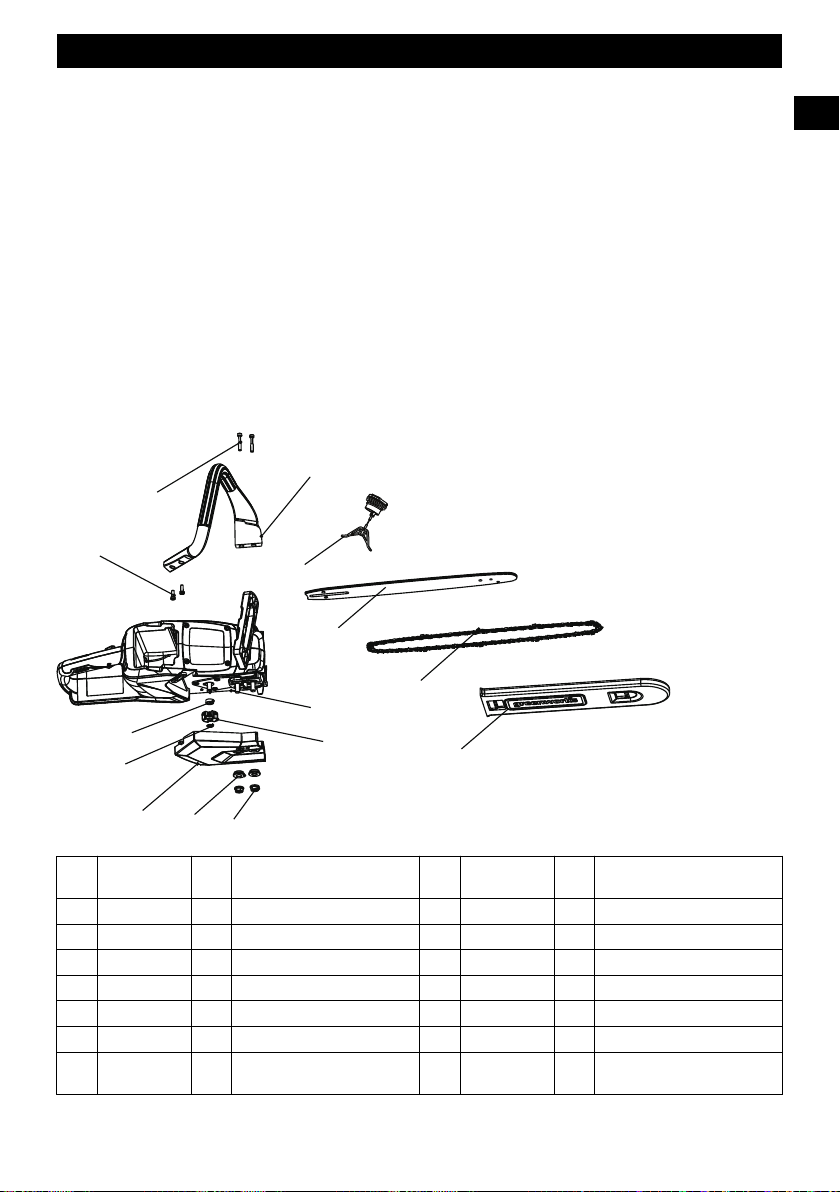
4. Piezas que requieren un mantenimiento rutinario
como lubricantes, afilar la cuchilla;
5.
El deterioro normal del acabado exterior debido al
uso o exposición.
ASISTENCIA AL USUARIO:
El servicio de garantía está disponible llamando a
nuestra línea de asistencia gratuita al 1-888-909-6757.
GASTOS DE TRANSPORTE:
Los gastos de transporte del traslado de cualquier
herramienta eléctrica o accesorio será responsabilidad
del comprado. Es responsabilidad del comprador pagar
los gastos de transporte de cualquier pieza enviada
para su reemplazo bajo esta garantía, salvo que dicha
devolución sea solicitada por escrito por Greenworks
®
.
16 VISTA EN DESPIECE
12
11
10
13
3
9
2
1
4
7
5
6
8
14
N.º N.º de pieza Ctad
.
Descripción N.º N.º de pieza Ctad
.
Descripción
1 322091063-1 2 Tuerca 8 34114405-1 1 Funda de la espada
2 33906159-1 2 Casquillo 9 341022030 1 Cubierta lateral
3 32209590A 1 Clip 10 32206590 2 Tornillo
4 33902102C 1 Piñón 11 32211590 2 Tornillo
5 311122030 1 Espada 12 341062030 1 Empuñadura auxiliar
6 311021068 1 Cadena de la sierra 13 322032030 1 Casquillo distanciador
7 311202030 1 Conjunto de la carcasa de la
motosierra
14 311052703B 1 Conjunto del tapón del de-
pósito de aceite
27
Español
ES

Greenworks Tools
PO Box 1238
Mooresville, NC 28115
28
Español
ES