1
NOTE: The following images are for reference only. Your unit and shaft collar may
look different.
You may need:
• 3/8" (10 mm) Open End Wrench
• 3/16" (5 mm) Hex Key Wrench
Shaft Collar
Model 041D8615
Included Items
Shaft Collar . . . . . . . . . . . . . . . . . . . . . . . . . . . . . . . . . . . . . . . . . . . . . . . . . . . . . (1)
WARNING: This product can expose you to chemicals including
lead, which are known to the State of California to cause cancer or
birth defects or other reproductive harm. For more information go to
www.P65Warnings.ca.gov
To prevent possible SERIOUS INJURY or DEATH:
• Disconnect ALL electric and battery power BEFORE performing ANY service or
maintenance.
To prevent damage to the receiver logic board, DO NOT touch printed circuit
board of replacement receiver logic board during installation.
ALWAYS wear protective gloves and eye protection when changing the battery or
working around the battery compartment.
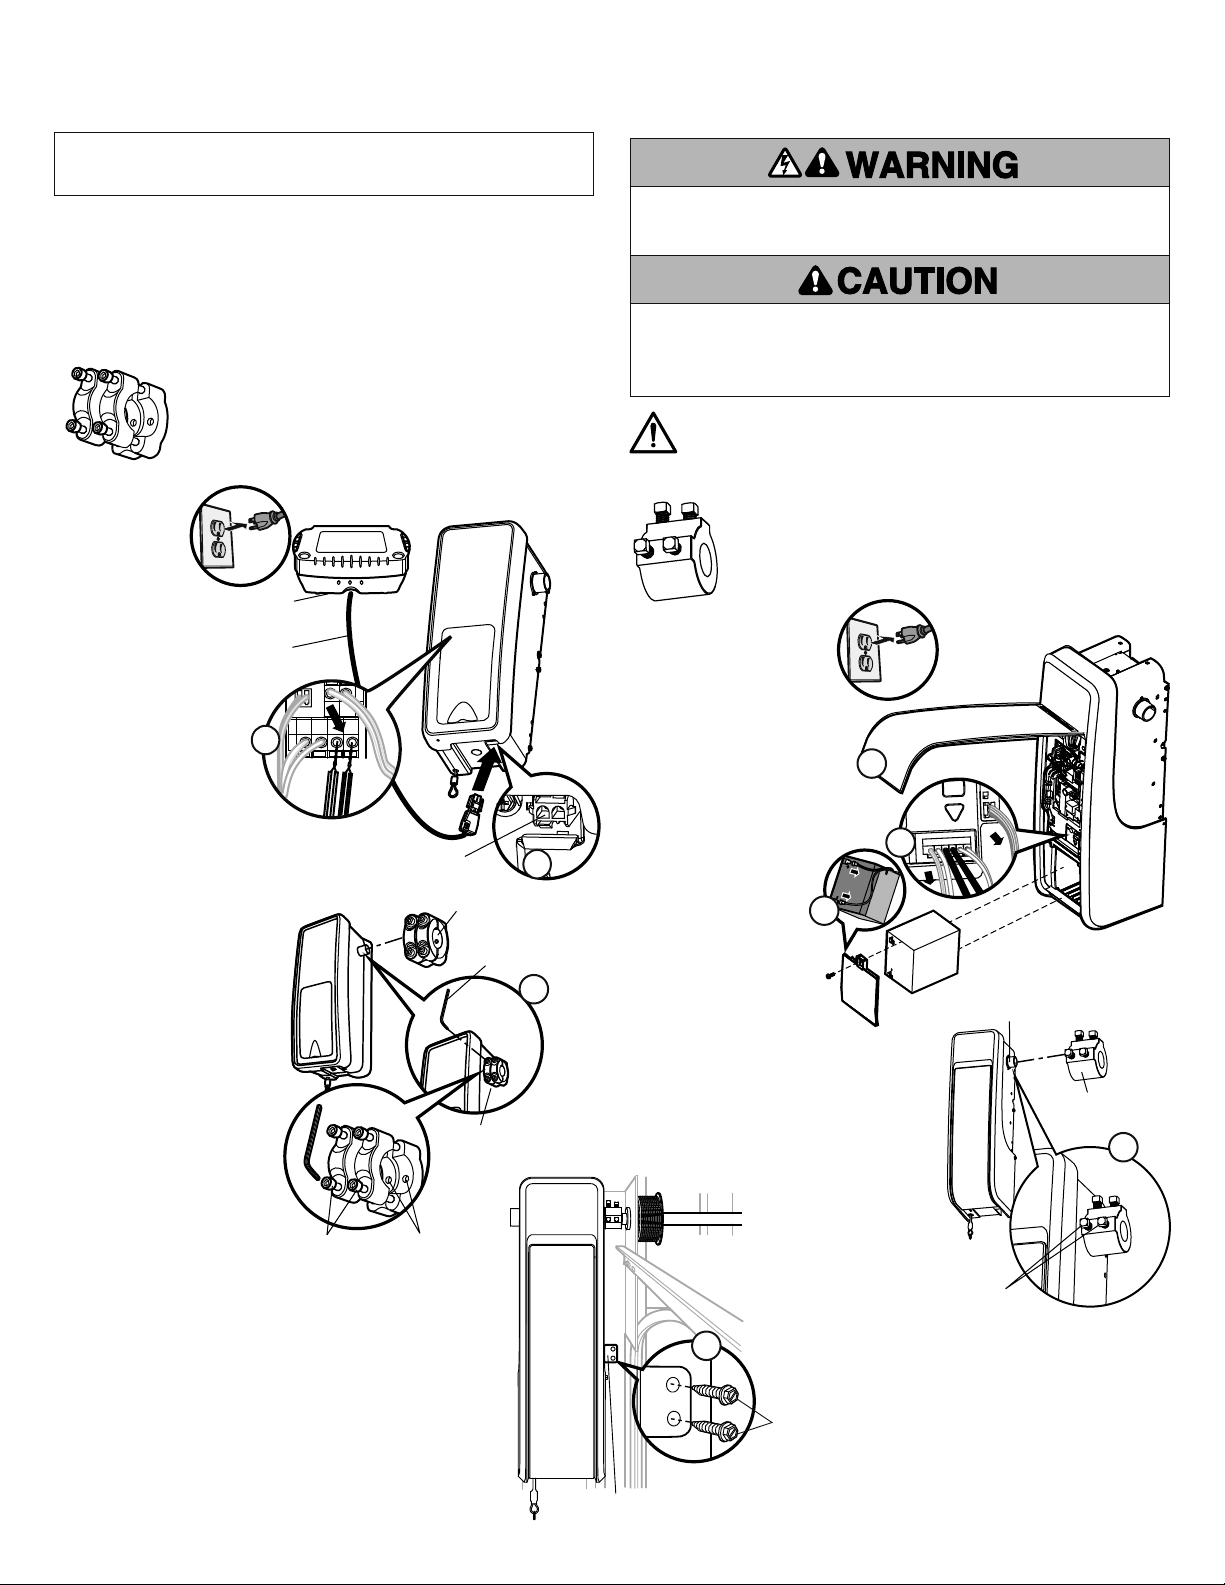
1. Close the
garage door.
2. Disconnect
power from
the outlet and
remove the battery
if applicable.
3. To remove the battery,
press the clip to remove
the connector from the
unit (A).
4. Remove wires from the
unit and label them for
reinstallation. Disconnect
wires from the quick
connect terminals (B).
5. Loosen the shaft collar.
Use a 3/16" (5mm) hex
key wrench to loosen the
shaft collar (C).
7. Using a 3/8" (10 mm) open
end wrench, remove the two
14-10 x 2" screws holding
the mounting bracket to the
wall (E).
8. Remove the motor unit
from wall.
9. Discard the old shaft collar.
Battery
Backup Cord
475LM
Battery Backup
Connector
WHT/
BLK
WHT
A
B
Collar Screws
Shaft Collar
3/16" (5 mm)
Hex Key Wrench
Collar Screws Set Screws
C
1. Close the garage door.
2. Disconnect power from
the outlet and remove the
battery if applicable.
3. Open the front panel (A).
4. Remove the battery cover.
Disconnect the battery (if
applicable). Remove the
battery and set aside (B).
5. Remove wires from the
unit and label them for
reinstallation.
Disconnect wires
from the quick
connect terminals (C).
6. Loosen the shaft collar.
Use a 3/8" (10 mm) open
end wrench to loosen the
shaft collar (D).
7. Using a 3/8" (10 mm) open end wrench,
remove the two 14-10 x 2" screws holding
the mounting bracket to the wall (E).
8. Remove the motor unit from wall.
9. Discard the old shaft collar.
Set Screws
Motor Shaft
Shaft Collar
Mounting Bracket
Screws
14-10 x 2"
E
A
B
C
D
Follow these steps for shaft collars
that install with a hex key wrench
Follow these steps for shaft collars
that install with an open end wrench
2
Installation
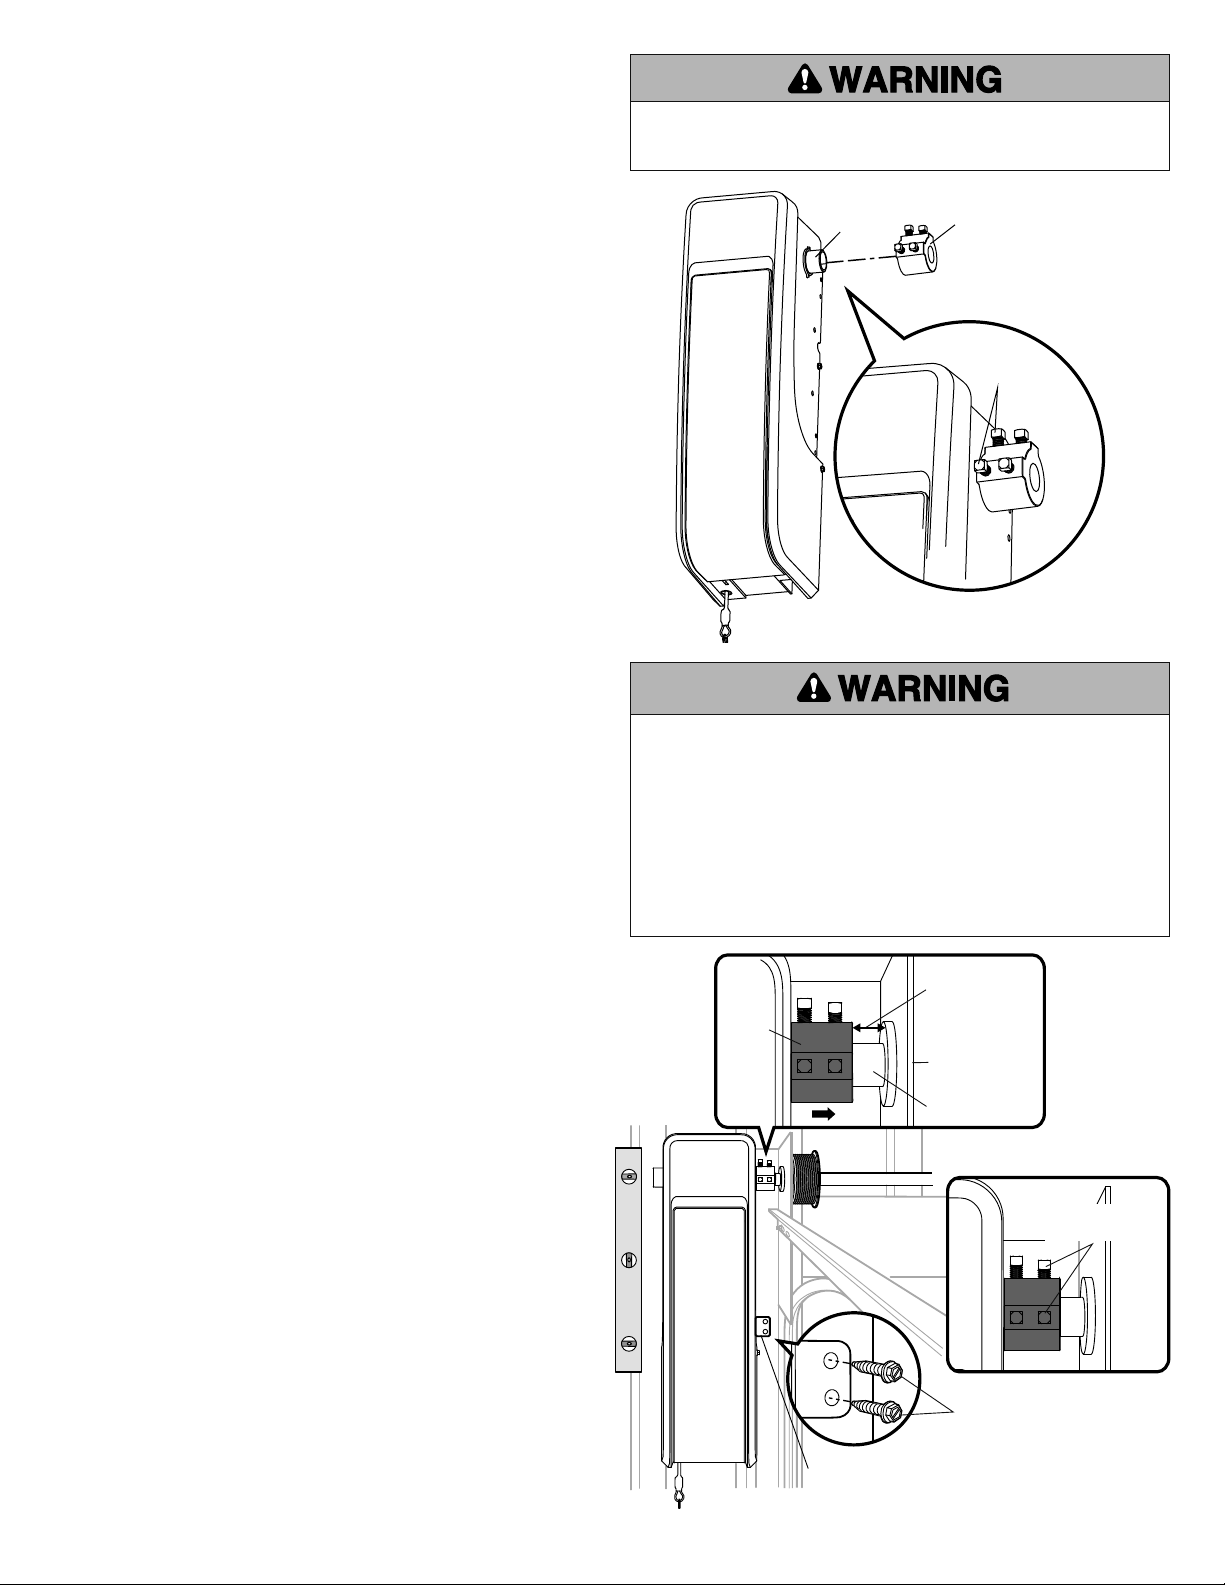
1 Attach the shaft collar to garage door opener
To avoid installation diffi culties, do not run the garage door opener until
instructed to do so.
1. Loosen the set screws.
2. Attach shaft collar to the garage door opener motor shaft. The side of the shaft
collar with the larger hole should be placed on the motor shaft. Ensure that the
shaft collar is seated all the way on motor shaft until stop is reached.
3. Position the shaft collar so the screws are facing out and are accessible when
attached to the torsion bar.
4. Securely tighten the 2 square head set screws closest to the motor shaft by
turning the screws 1/4 - 1/2 turn after making contact with the motor shaft.
Set
Screws
Shaft Collar
Motor
Shaft
To prevent possible SERIOUS INJURY or DEATH:
• Concrete anchors MUST be used if mounting bracket into masonry.
• NEVER try to loosen, move or adjust garage door, springs, cables, pulleys,
brackets or their hardware, ALL of which are under EXTREME tension.
• ALWAYS call a trained door systems technician if garage door binds, sticks or
is out of balance. An unbalanced garage door might NOT reverse when required.
• Garage door opener MUST be mounted at a right angle to the torsion bar to
avoid premature wear on the collar.
• Upon completion of Installation, test safety reversal system. Door MUST
reverse on contact with a 1-1/2" (3.8 cm) high object (or a 2x4 laid fl at) on the
fl oor.
To prevent possible SERIOUS INJURY or DEATH, the collar MUST be properly
tightened. The door may NOT reverse correctly or limits may be lost due to collar
slip.
2 Position and mount the garage door opener
NOTE: For additional mounting options, refer to your owner's manual.
1. Close the garage door completely.
2. Slide the garage door opener onto the end of the torsion bar.
NOTE: Ensure the shaft collar does NOT touch the bearing.
If the replacement shaft collar matches the previous shaft collar, align the garage
door opener mounting bracket to the existing holes. Use a level to position and
vertically align the garage door opener. Skip to Step 6.
If the replacement shaft collar does NOT match the previous shaft collar, start at
Step 3.
3. To mark new mounting holes: Tighten the set screws on the torsion bar to hold
the garage door opener in place while marking the new mounting holes using
the mounting bracket. Use a level to position and vertically align the garage
door opener.
NOTE: The garage door opener does not have to be fl ush to the wall.
4. After marking new mounting holes, remove the garage door opener from the
torsion bar. Drill 3/16" pilot holes at the marked locations. Drill through metal
door rail plates if necessary.
5. Slide the garage door opener back onto the torsion bar until the pilot holes
align with mounting bracket.
6. Tighten the 2 square head set screws on the torsion bar. For a hollow torsion
bar, tighten screws 3/4 - 1 full turn after making contact with the bar. For a
solid shaft torsion bar, tighten screws 1/4 - no more than 1/2 turn after making
contact with the shaft. If installing on a keyed torsion bar, DO NOT tighten the
set screws into the keyway.
7. Secure the mounting bracket to the wall and to the garage door opener. Use the
14-10 x 2" screws to secure the mounting bracket to the wall.
Set screws
(Torsion bar)
Bearing
Plate
Shaft
Collar
Torsion Bar
.25" (.6 cm) min.
space between
bearing and
shaft collar
Mounting Bracket
Screws 14-10 x 2"
3
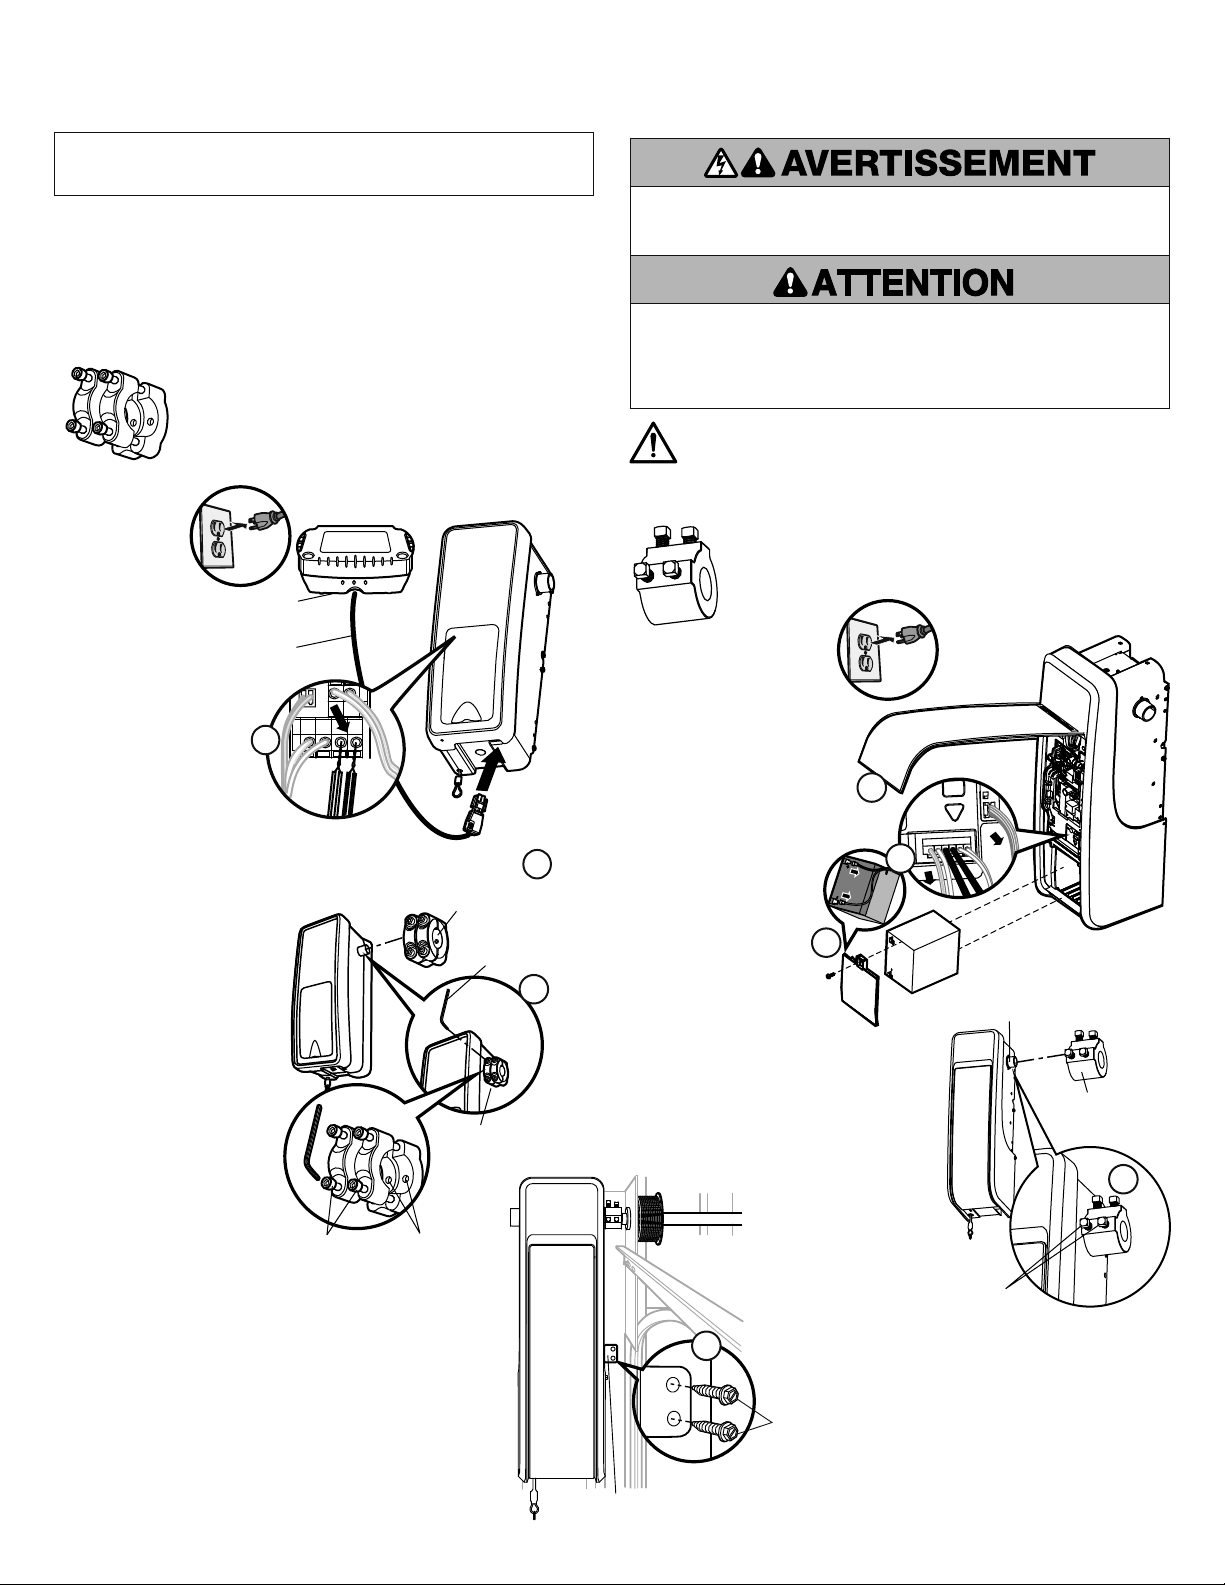
1. Fermer la porte
de garage.
2. Débrancher
l’alimentation
de la prise
de courant et
enlever la batterie s’il y a
lieu.
3. Pour enlever la batterie,
enfoncer l’agrafe pour
enlever le connecteur de
l’unité. (A).
4. Enlever les fi ls de l’unité
et les étiqueter en vue de
les réinstaller plus tard.
Déconnecter les fi ls des
bornes à raccordement
rapide. (B).
5. Desserrer l’embase de
butée. Se servir" d’une
clé hexagonale de 5mm
(3/16po) pour desserrer
l’embase de butée. (C).
7. Avecune clé à fourche de
10mm (3/8po), enlever
les deux vis 14-10 x 2" qui
retiennent le support de
montage au mur. (E).
8. Enlever l’unité du moteur du
mur.
9. Jeter l'embase de butée usée.
Cordon de
batterie de secours
Batterie de
secours 475LM
Connecteur
BLC/
NR
BLC
A
B
Vis de l’embase
Embase de butée
Clé hexagonale
de 5mm (3/16po)
Vis de l’embase Vis de pression
C
Vis de pression
Arbre du moteur
Embase de butée
Vis 14-10x2 po
Support de montage
REMARQUE: Les illustrations suivantes sont fournies uniquement à des fi ns de ré-
férence. L’embase de butée et votre unité pourraient avoir une apparence différente.
Il vous faudra:
• Clé à fourche de 10mm (3/8po)
• Clé hexagonale de 5mm (3/16po)
Embase de butée
Modèle 041D8615
Articles inclus
Embase de butée. . . . . . . . . . . . . . . . . . . . . . . . . . . . . . . . . . . . . . . . . . . . . . . . . (1)
AVERTISSEMENT: Ce produit peut vous exposer à des produits chi-
miques, y compris du plomb, reconnus par l’État de la Californie comme
étant cancérigènes ou pouvant causer des anomalies congénitales ou
d’autres préjudices à l’appareil reproducteur. Pour plus d’informations,
visitez www.P65Warnings.ca.gov
Pour éviter des BLESSURES GRAVES, VOIRE MORTELLES:
• Débrancher TOUTE alimentation électrique et la batterie AVANT d’effectuer TOUT
entretien ou TOUTE intervention.
Pour empêcher tout dommage à la carte logique du récepteur, NE PAS toucher le
circuit imprimé de la carte logique du récepteur de remplacement durant l'installation.
Porter TOUJOURS des gants de protection et des lunettes de sécurité lors du
remplacement de la batterie ou d’une intervention à proximité du compartiment de la
batterie.
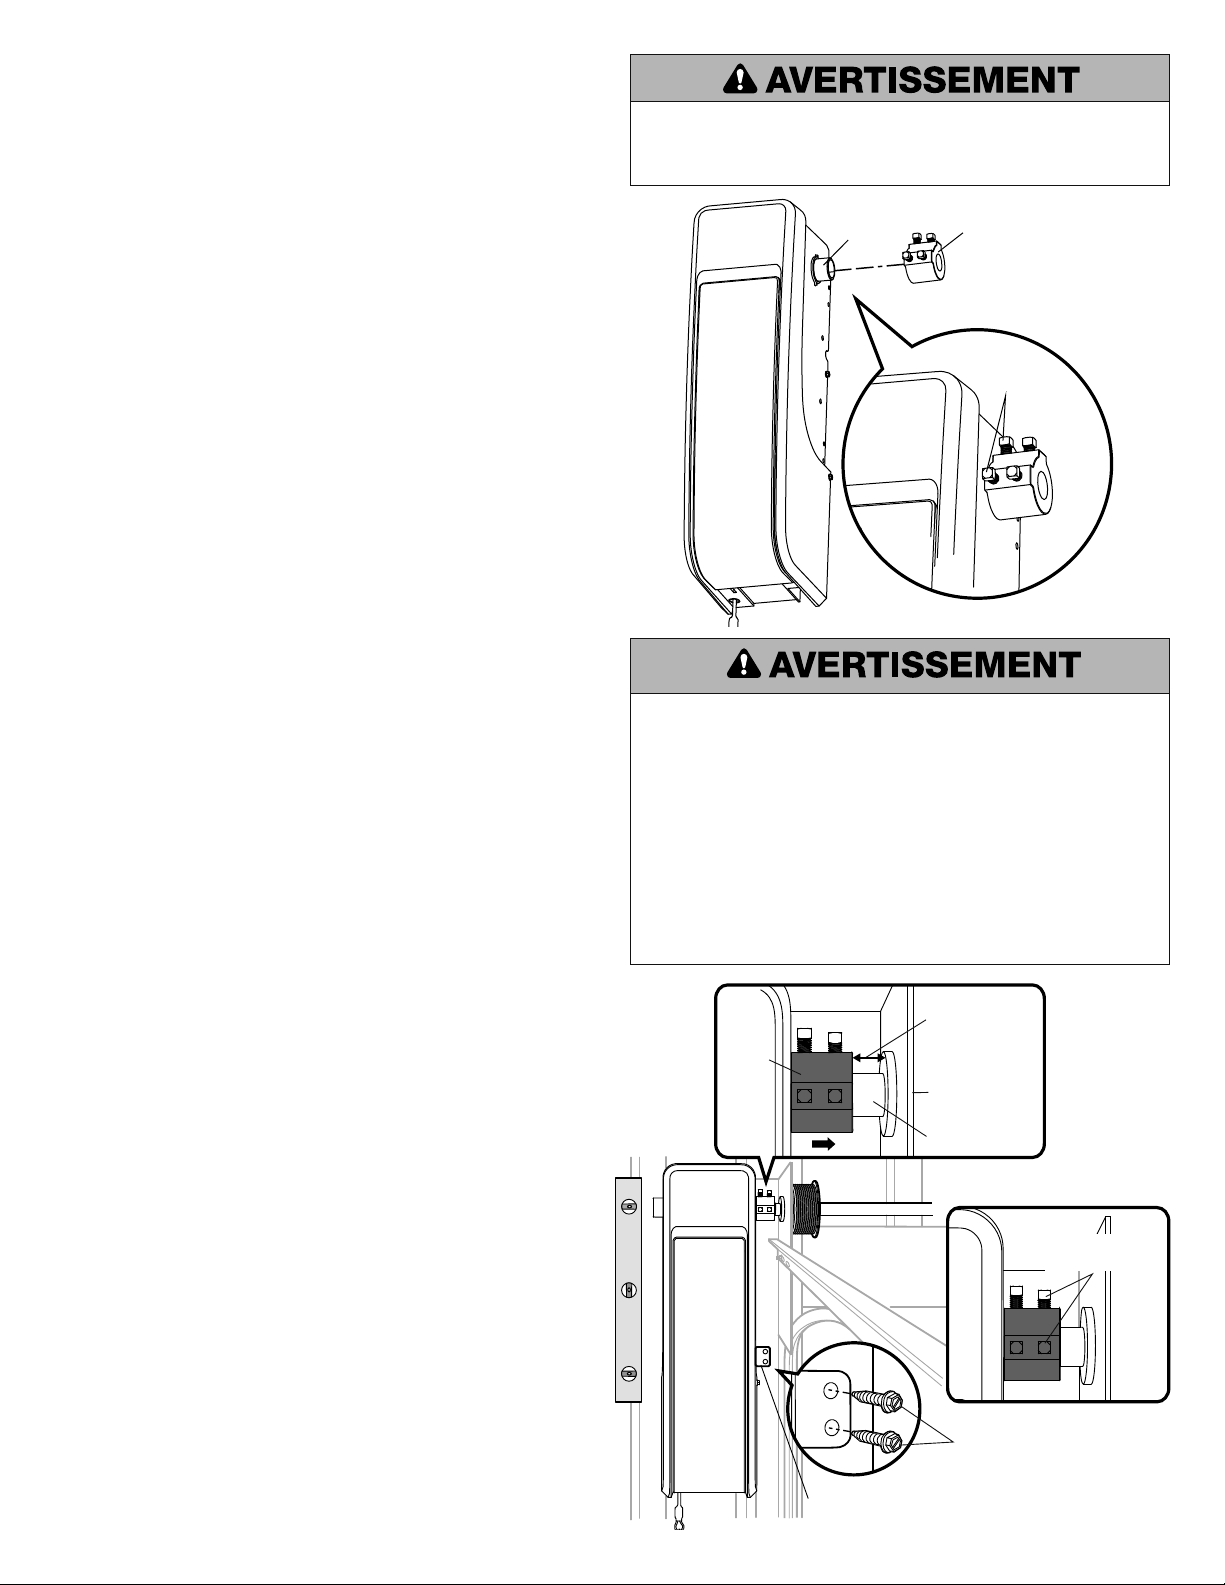
1. Fermer la porte de garage.
2. Débrancher l’alimentation
de la prise de courant et
enlever la batterie s’il y a lieu.
3. Ouvrir le panneau avant (A).
4. Remettre en place le couvercle
de la batterie. Déconnecter la
batterie (s’il y a lieu). Enlever
la batterie et la mettre de côté. (B).
5. Enlever les fi ls de l’unité et les
étiqueter en vue de les
réinstaller plus tard.
Déconnecter les fi ls des
bornes à raccordement
rapide. (C).
6. Desserrer l’embase de
butée. Se servir d’un foret
étagé de" clé à fourche
de 10mm pour desserrer
l’embase de butée (D).
7. Avecune clé à fourche de 10mm (3/8po),
enlever les deux vis 14-10 x 2" qui retiennent
le support de montage au mur. (E).
8. Enlever l’unité du moteur du mur.
9. Jeter l'embase de butée usée.
E
A
B
C
D
Suivre ces étapes pour les embases
de butée qui doivent être installées en
utilisant une clé hexagonale.
Suivre ces étapes pour les embases de butée
qui doivent être installées en utilisant une clé à
fourche.
4
Installation
1 Fixation de l’embase de butée à l’ouvre-porte de garage
Pour éviter les diffi cultés pendant l’installation, ne faire fonctionner l’ouvre-
porte de garage que lorsque cela est expressément indiqué.
1. Dévisser les vis de pression.
2. Fixer l’embase de butée à l’arbre du moteur de l’ouvre-porte de garage. Le côté
de l’embase doté du plus grand orifi ce doit être placé sur l’arbre du moteur.
S’assurer que l’embase est bien assise sur l’arbre jusqu’à ce qu’elle atteigne la
butée.
3. Positionner l’embase de sorte que les vis sont orientées vers l’extérieur et
accessibles lorsqu’elles sont fi xées à la barre de torsion.
4. Bien serrer les vis de pression à tête carrée les plus proches de l’arbre moteur en
les tournant d’un quart à un demi-tour après être entrées en contact avec l’arbre
moteur.
Vis de
pression
Arbre du
moteur
Embase de butée
Pour éviter des BLESSURES GRAVES, VOIRE MORTELLES:
• Des ancrages en béton DOIVENT être utilisés si le support est monté dans la
maçonnerie.
• Ne JAMAIS tenter de desserrer, déplacer ou régler la porte de garage ainsi
que les ressorts, les câbles, les poulies, les supports de porte ou leurs ferru-
res de montage, lesquels sont TOUS sous une tension EXTRÊME.
• Appeler TOUJOURS un technicien formé en systèmes de porte si la porte de
garage force ou est déséquilibrée.
• L’ouvre-porte de garage DOIT être monté à angle droit avec la barre de torsion
pour éviter l’usure prématurée de l’embase.
• Au terme de l’installation, faire l’essai du système d’inversion de sécurité. La
porte DOIT remonter au contact d’un objet d’une hauteur de 3,8cm (1½po)
(ou un 2 x 4 posé à plat) sur le sol.
Pour prévenir d’éventuelles blessures GRAVES, voire MORTELLES, l’embase DOIT
être adéquatement serrée. La porte pourrait NE PAS inverser correctement sa
course ou les limites de course pourraient être perdues en raison d’un glissement
de l’embase.
2 Positionnement et montage de l’ouvre-porte de garage
REMARQUE: Pour des options de montage supplémentaires, consulter le manuel du
propriétaire.
1. Fermer complètement la porte du garage.
2. Glisser l’ouvre-porte de garage sur l’extrémité de la barre de torsion.
REMARQUE: S’assurer que l’embase ne touche PAS le roulement.
Si l’embase de butée de rechange correspond à la précédente, aligner le support
de montage de l’ouvre-porte de garage sur les trous existants. Se servir d’un
niveau pour positionner et aligner l’ouvre-porte de garage à la verticale. Passer à
l’étape6.
Si l’embase de butée NE correspond pas à l’embase de butée précédente,
commencer à l’étape3.
3. Pour marquer l’emplacement des nouveaux trous de montage: Serrer les vis
de pression sur la barre de torsion de manière à tenir l’ouvre-porte de garage
en place pendant que l’on se sert du support de montage pour marquer
l’emplacement des nouveaux trous de montage. Se servir d’un niveau pour
positionner et aligner l’ouvre-porte de garage à la verticale.
REMARQUE: L’ouvre-porte de garage n’a pas besoin d’affl eurer le mur.
4. Après quoi, retirer l’ouvre-porte de garage de la barre de torsion. Percer" des
trous guides de 5mm (3/16po) aux endroits marqués. Percer à travers les
plaques de rail de porte en métal au besoin.
5. Glisser de nouveau l’ouvre-porte de garage sur la barre de torsion jusqu’à ce
que les trous guides soient alignés sur le support de montage.
6. Serrer les deux vis de pression à tête carrée sur la barre de torsion. Pour une
barre de torsion creuse, serrer les vis en les tournant de trois quarts de tour à
un tour complet après être entrées en contact avec la barre. Pour une barre de
torsion solide, serrer les vis en les tournant d’un quart de tour, mais pas plus
d’un demi-tour après être entrées en contact avec l’arbre. Lors de l’installation
sur une barre de torsion clavetée, NE PAS serrer les vis dans la rainure de
clavette.
7. Fixer le support de montage au mur et à l’ouvre-porte de garage. Utiliser les vis
14-10 x 2po (5cm) pour fi xer le support de montage au mur.
Vis de pression
(Barre de torsion)
Plaque
d'appui
Barre de torsion
0,6 cm (0,25 po)
min. d’espace
entre le roulement
et embase de butée
Support de montage
Vis 14-10x2 po
Embase
de butée
5
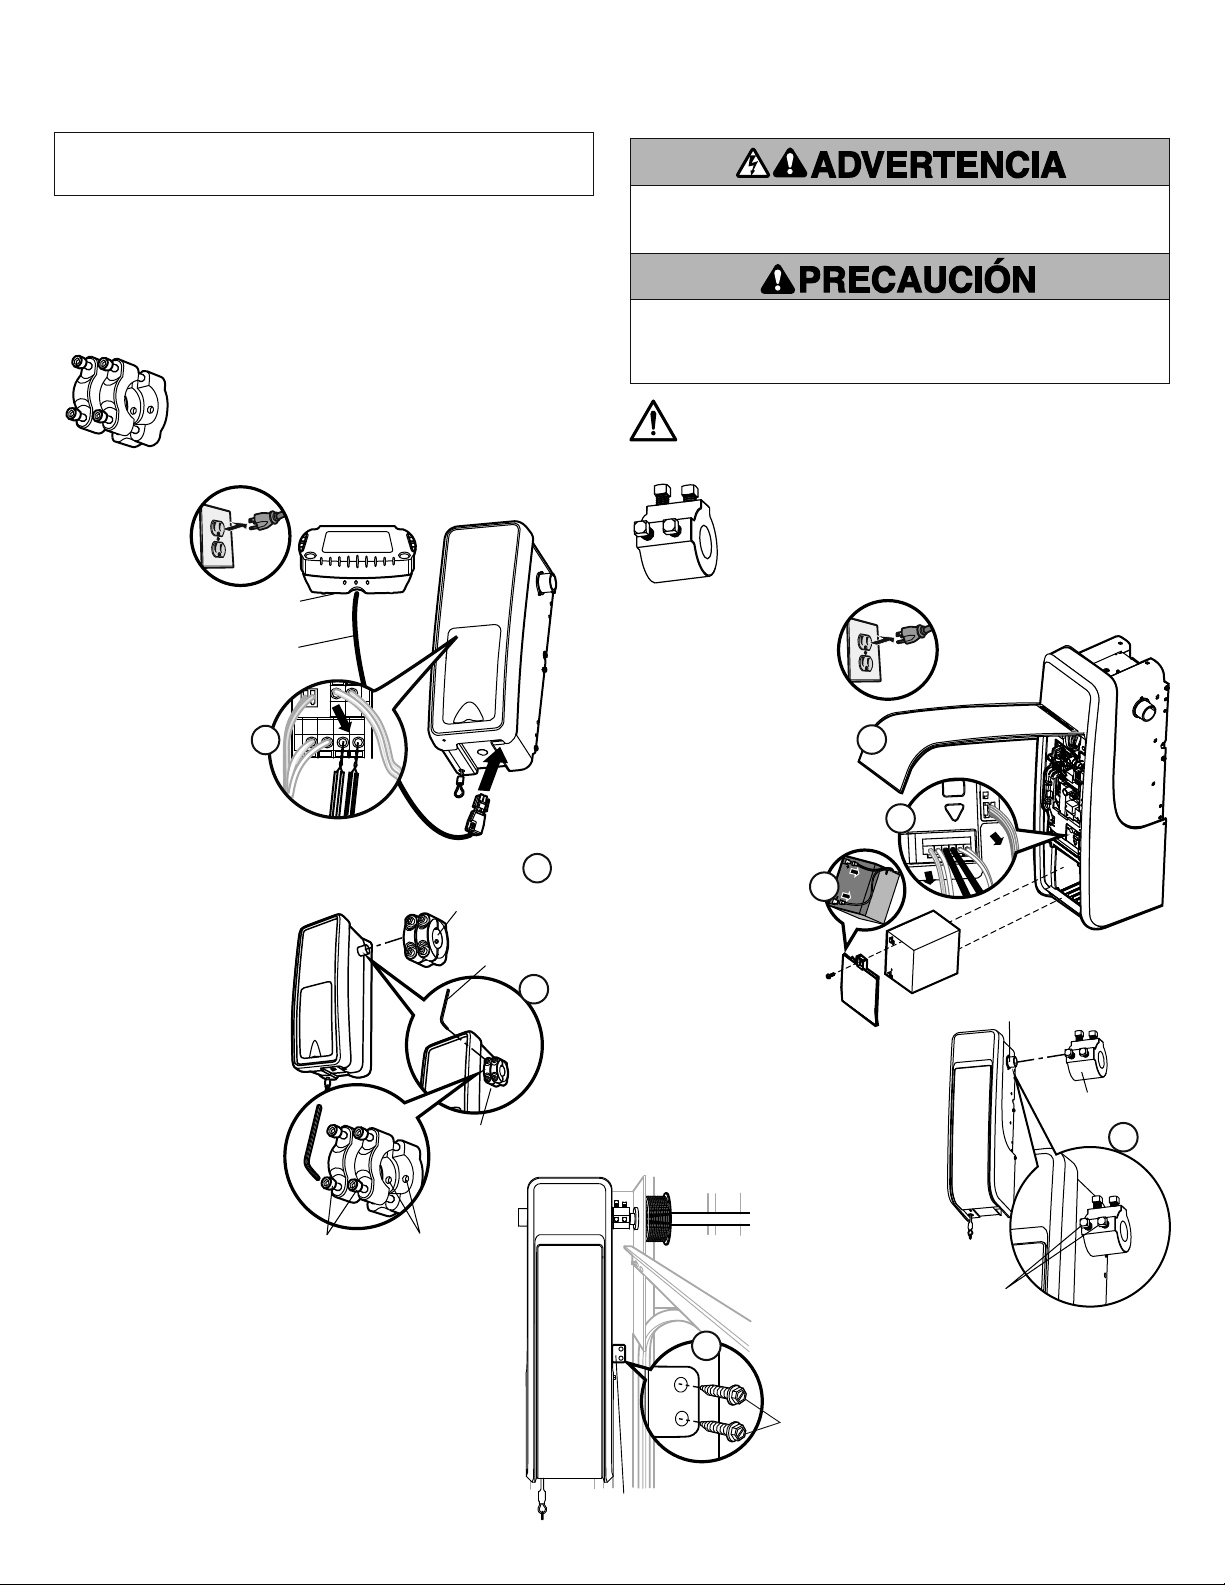
1. Cierre la puerta
del garaje.
2. Desconecte la
alimentación del
enchufe y retire
la batería si
corresponde.
3. Para retirar la batería,
presione el gancho para
retirar el conector de la
unidad. (A).
4. Retire los cables de la
unidad y etiquételos
para la reinstalación.
Desconecte los cables
de los terminales de
conexión rápida. (B).
5. Afl oje el collar de eje. Use
una llave hexagonal" de 5
mm (3/16 de pulg.) para
afl ojar el collar de eje.
(C).
7. Use una llave de boca de 10
mm(3/8 de pulg.) para retirar
los dos tornillos 14-10 x 2"
4. Asegure la ménsula de
montaje a la pared (E).
8. Retire la unidad del motor de
la pared.
9. Deseche el collar de eje viejo.
Cable de la
batería de respaldo
Batería de
respaldo 475LM
Conector
BLC/
NGR
BLC
A
B
Tornillos del collar
Collar de eje
Llave hexagonal
de 5 mm
(3/16 de pulg.)
Tornillos del collar Tornillos de fijación
C
Tornillos
de fijación
Eje del motor
Collar de eje
Ménsula de montaje
Tornillos de
14-10 x 2 pulg.
NOTA: Las siguientes ilustraciones solo son de referencia. Su unidad y el collar de
eje pueden tener un aspecto diferente.
Podrá necesitar lo siguiente:
• Llave de boca de 10 mm (3/8 de pulg.)
• Llave hexagonal de 5 mm (3/16 de pulg.)
Collar de eje
Modelo 041D8615
Elementos que se incluyen
Collar de eje . . . . . . . . . . . . . . . . . . . . . . . . . . . . . . . . . . . . . . . . . . . . . . . . . . . . (1)
ADVERTENCIA: Este producto puede exponer le a productos químicos
(incluido el plomo), que a consideración del estado de California causan
cáncer, defectos congénitos u otros daños reproductivos. Para más infor-
mación, visite www.P65Warnings.ca.gov
Para evitar posibles LESIONES GRAVES o la MUERTE:
• Desconecte TOTALMENTE la corriente eléctrica y de la batería ANTES de
realizar CUALQUIER servicio o mantenimiento.
Para prevenir daños en el receptor/tablero lógico, NO toque el tablero de circuito
impreso de reemplazo del receptor/tablero lógico durante la instalación.
Use SIEMPRE guantes protectores y protección para la vista al cambiar la batería
o al trabajar cerca del compartimiento de la batería.
1. Cierre la puerta del garaje.
2. Desconecte la alimentación
del enchufe y retire la batería
si corresponde.
3. Abra el panel delantero (A).
4. Retire la cubierta de la batería.
Desconecte la batería (si
corresponde). Retire la batería
y colóquela a un costado. (B).
5. Retire los cables de la unidad
y etiquételos para la r
einstalación. Desconecte
los cables de los
terminales de conexión
rápida. (C).
6. Afl oje el collar de eje. Use
una broca escalonada"
llave de boca de 10 mm
(3/8 de pulg.) para afl ojar
el collar de eje (D).
7. Use una llave de boca de 10 mm (3/8 de
pulg.) para retirar los dos tornillos
14-10 x 2" 4. Asegure la ménsula de
montaje a la pared (E).
8. Retire la unidad del motor de la pared.
9. Deseche el collar de eje viejo.
E
A
B
C
D
Siga estos pasos para los collares
de eje que se instalan con una llave
hexagonal
Siga estos pasos para los collares de eje que
se instalan con una llave de boca
6
Instalación
1 Sujete el collar de eje al abre-puertas de garaje
No encienda ni use el abre-puertas hasta que llegue al paso de la instalación
correspondiente, de otra manera corre el riesgo de complicar el proceso de
instalación.
1. Afl oje los tornillos de fi jación.
2. Sujete el collar de eje al eje del motor del abre-puertas de garaje. El lado del collar
con el orifi cio más grande se debe colocar en el eje del motor. Asegúrese de que
el collar esté bien asentado en el eje del motor hasta alcanzar el tope.
3. Ubique el collar de manera que los tornillos queden hacia afuera y se pueda
acceder a ellos cuando se sujeten a la barra de torsión.
4. Ajuste fi rmemente los 2 tornillos de fi jación de cabeza cuadrada más cercanos al
eje del motor haciendo un giro de 1/4 a 1/2 después de hacer contacto con el eje
del motor.
Tornillos de
fijación
Eje del
motor
Collar de eje
Para evitar posibles LESIONES GRAVES o la MUERTE:
• Se DEBEN usar anclajes para concreto si la ménsula se monta en mampostería.
• NUNCA trate de afl ojar, mover, ni ajustar la puerta del garaje, los resortes, los
cables, las poleas, las ménsulas ni la pernería, pues TODAS estas piezas están
bajo una tensión EXTREMA.
• SIEMPRE llame a un técnico especializado en sistemas de puertas si la puerta
del garaje se atasca, atora o si está desequilibrada. Una puerta de garaje que no
esté equilibrada puede no retroceder cuando se requiera.
• El abre-puertas de garaje DEBE estar montado a un ángulo adecuado para evitar
el desgaste prematuro del collar.
• Pruebe el sistema de reversa de seguridad al terminar la instalación. La puerta
del garaje DEBE retroceder al entrar en contacto con un objeto de 3.8 cm (1-1/2
de pulg.) de altura (o de 5 x 10 cm (2 x 4 pulg.) acostado en el piso.
Para evitar posibles LESIONES GRAVES o la MUERTE, el collar DEBE estar cor-
rectamente ajustado. Es posible que la puerta NO retroceda correctamente o que
se pierdan los límites debido al deslizamiento del collar.
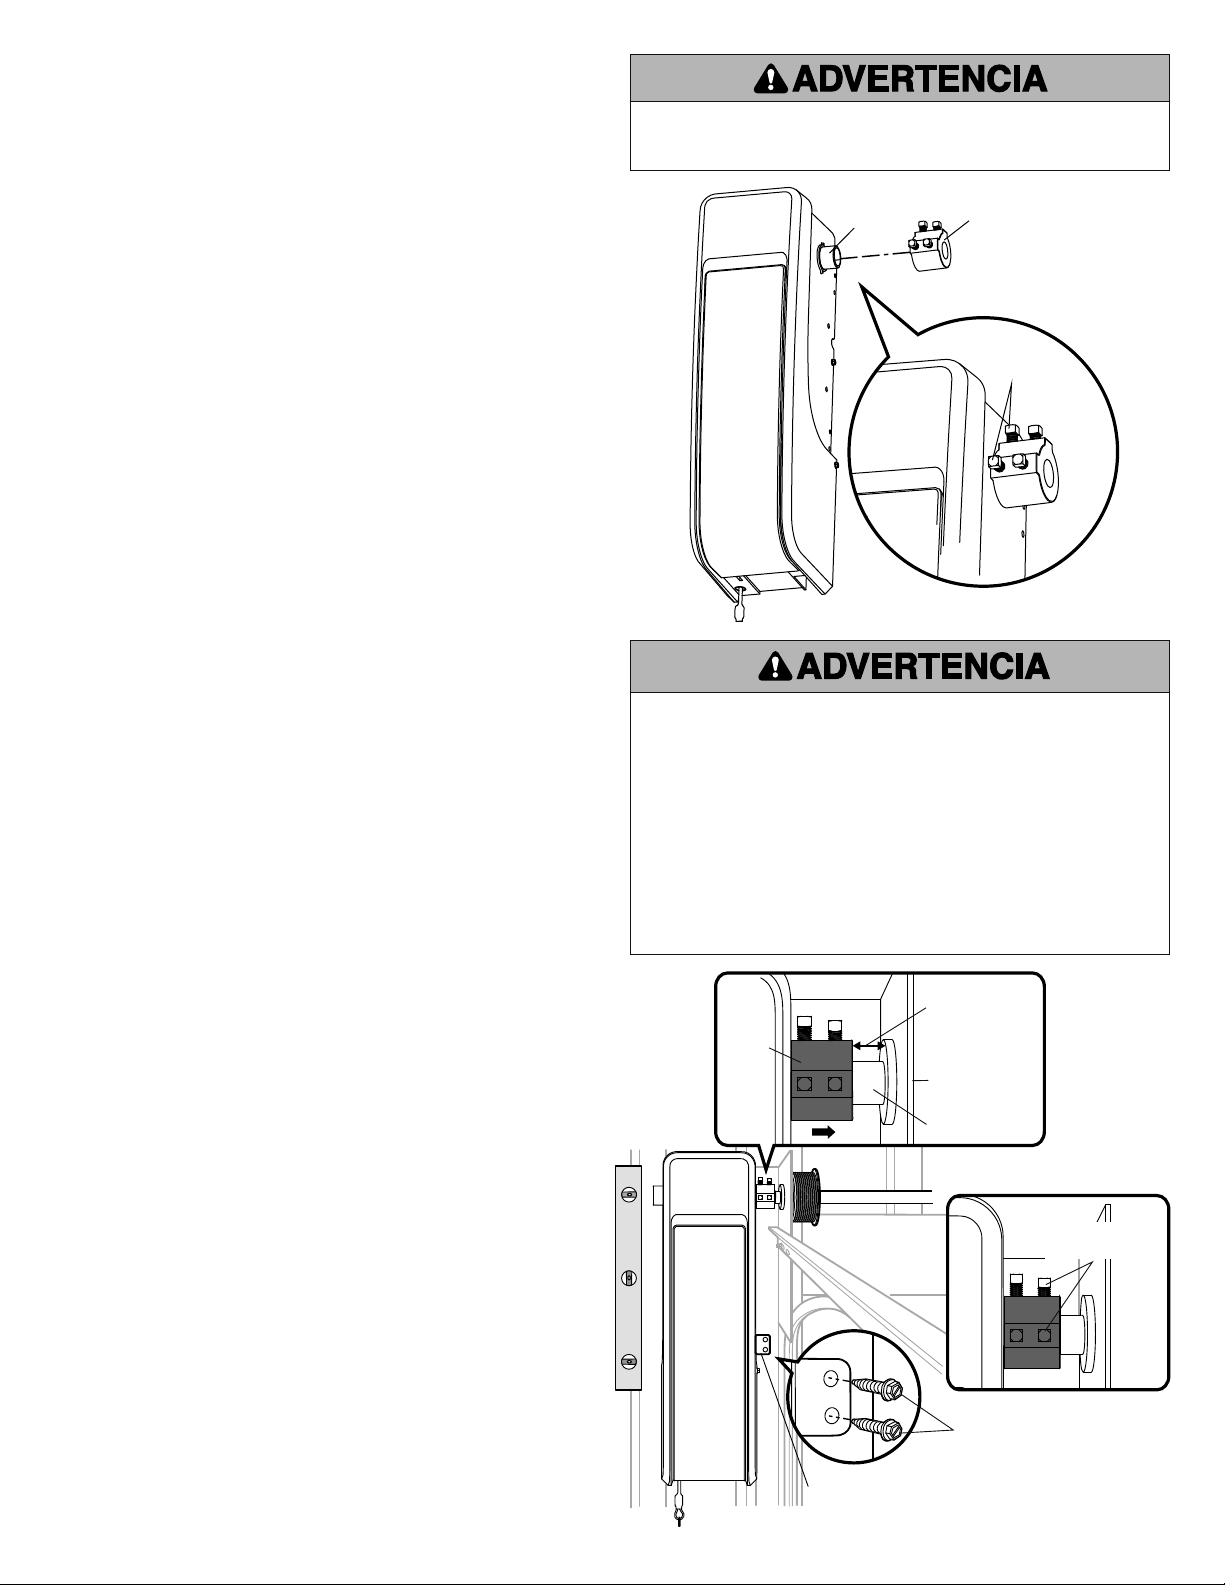
2 Ubicación y montaje del abre-puertas de garaje
NOTA: Para ver las opciones de montaje adicionales, consulte el manual del propi-
etario.
1. Cierre completamente la puerta de garaje.
2. Deslice el abre-puertas de garaje hacia el extremo de la barra de torsión.
NOTA: Asegúrese de que el collar de eje NO esté en contacto con la placa de
apoyo.
Si el collar de eje de repuesto coincide con el anterior, alinee la ménsula de
montaje del abre-puertas de garaje a los orifi cios existentes. Use un nivel para
ubicar y alinear verticalmente el abre-puertas de garaje. Vaya al Paso 6.
Si el collar de eje de repuesto NO coincide con el collar de eje anterior, comience
en el Paso 3.
3. Para marcar los orifi cios de montaje nuevos: Ajuste los tornillos de fi jación en
la barra de torsión para sostener el abre-puertas de garaje mientras marca los
orifi cios de montaje nuevos usando la ménsula de montaje. Use un nivel para
ubicar y alinear verticalmente el abre-puertas de garaje.
NOTA: El abre-puertas de garaje no debe quedar a ras de la pared.
4. Después de marcar los orifi cios de montaje nuevos, quite el abre-puertas de
garaje de la barra de torsión. Taladre" orifi cios piloto de 3/16 de pulg. en las
ubicaciones marcadas. Taladre las placas del riel metálico si fuera necesario.
5. Deslice el abre-puertas de garaje en la barra de torsión hasta que los orifi cios
piloto queden alineados con la ménsula de montaje.
6. Ajuste los 2 tornillos de fi jación de cabeza cuadrada en la barra de torsión.
Si la barra de torsión es hueca, ajuste los tornillos de 3/4 a 1 giro completo
después de hacer contacto con la barra. Si la barra de torsión es sólida, ajuste
los tornillos de 1/4 a no más de 1/2 giro después de hacer contacto con el eje.
Si está instalando una barra de torsión con chaveta, NO ajuste los tornillos en
el chavetero.
7. Sujete la ménsula de montaje a la pared y al abre-puertas de garaje. Use los
tornillos 14-10 x 2" para sujetar la ménsula de montaje a la pared.
Tornillos de fijación
(Barra de torsión)
Placa de apoyo
Barra de torsión
0.6 cm (.25 pulg.)
mínimo espacio
entre la placa de
apoyo y el collar
de eje
Ménsula de montaje
Tornillos de 14-10 x 2 pulg.
Collar
de eje

7

8
© 2018, The Chamberlain Group
All Rights Reserved
Tous droits réservés
114A5159 Todos los Derechos Reservados
