
Troubleshooting
Symptoms Possible Causes
Light does not respond to Pico wireless
control
• The dimmer / switch failed to pair with Pico wireless control; see Set-Up.
• The dimmer / switch has already received and responded to a command or is already at the light
setting the Pico wireless control is sending.
• The Pico wireless control is outside the 30 ft (9 m) operating range.
• The battery in the Pico wireless control is low.
• The battery in the Pico wireless control is installed incorrectly.
When in set-up mode, the LEDs on the
dimmer / switch flash when trying to set up
with the Pico wireless control or sensor
• The maximum number of Pico wireless controls or sensors has been paired with the
dimmer / switch. More Pico wireless controls or sensors cannot be added. See Un-pairing a
Pico Wireless Control.
Important Notes
Please Read Before Installing
1. This install guide provides simple setup instructions for Maestro
Wireless and Caséta Wireless systems only. If you are using your
Pico wireless control with any other Lutron system, please refer to
the system setup guide. If you no longer have your system setup
guide, please download the latest version by following the links at
www.lutron.com
2. The Pico wireless control uses one (1) CR2032 battery
(pre-installed). DONOT use rechargeable batteries. Using improper
batteries could damage the Pico wireless control. DONOT dispose
of the battery in normal household waste. Please recycle, take to a
proper battery disposal facility, or contact your local waste disposal
provider regarding local restrictions on the disposal or recycling of
batteries.
WARNING: Risk of fire, explosion and burns. May result
in serious injury or death. DO NOT recharge, disassemble,
crush, puncture, heat above 212 °F (100°C) or incinerate
the battery. The battery in this device contains Perchlorate
Material — special handling may apply. For more information.
visit www.dtsc.ca.gov/hazardouswaste/perchlorate
3. The Pico wireless control must be paired with dimmer(s) / switch(es)
before it can communicate.
4. Refer to product specification submittals at www.lutron.com for
system specifications on the maximum number of configurable Pico
wireless controls per device / system.
5. The range of the Pico wireless control is 30 ft (9 m). Performance is
highly dependent on a variety of complex factors, such as:
• Distance between system components
• Geometry of the building structure
• Construction of walls separating system components
• Electrical equipment located near system components
6. Clean Pico wireless control with a soft damp cloth only.
7. DO NOT paint the Pico wireless control.
8. DO NOT mount the Pico wireless control to a metal surface.
Un-pairing a Pico Wireless Control
To un-pair a previously paired Pico wireless control from your
system, perform the following steps:
1. Quickly tap the OFF button on the Pico wireless control (Figure 2)
3 times and continue to hold it for 6 seconds after the third tap.
2. Once the indicator LED comes on solid, quickly tap the OFF button
3 times. Do not continue to hold on the third tap.
3. To test that the Pico wireless control has been successfully
removed from the system, press the ON button and verify that the
Pico wireless control no longer controls the load.
NOTE: This will remove all dimmers / switches with which it was
previously paired.
Lutron,
)
Lutron, HomeWorks, Maestro Wireless, Pico, Quantum, RadioRA, Serena, Caséta, and Sivoia are trademarks of Lutron Electronics Co., Inc., registered in the U.S. and other countries.
RadioRA 2, Vive, and myRoom are trademarks of Lutron Electronics Co., Inc.
© 2017 Lutron Electronics Co., Inc.
Lutron Electronics Co., Inc.
7200 Suter Road
Coopersburg, PA 18036-1299
Pico Wireless Control
3 V
-
10 mA
Mounting accessories sold separately.
For a complete listing of Pico wireless control mounting
accessories and more information about Pico wireless
controls, please visit www.lutron.com/pico
English
Model
Numbers:
PJ2-2B
PJ2-2BRL
PJ2-3B
PJ2-3BRL
Operation
Customer Assistance www.lutron.com/support
U.S.A., Canada, Caribbean: 1.844.LUTRON1
Mexico: +1.888.235.2910
Others: +1.610.282.6701
For questions concerning the installation or operation of this product, call
Lutron Customer Assistance. Please provide exact model number when
calling.
Set-Up
(for Maestro Wireless and Caséta Wireless systems only)
To communicate with other systems or devices, including
RadioRA 2, HomeWorks QS, QSG, QS sensor module (QSM),
Quantum, myRoom, Vive, Serena Shades, and Sivoia QS, refer to
the system setup guides.
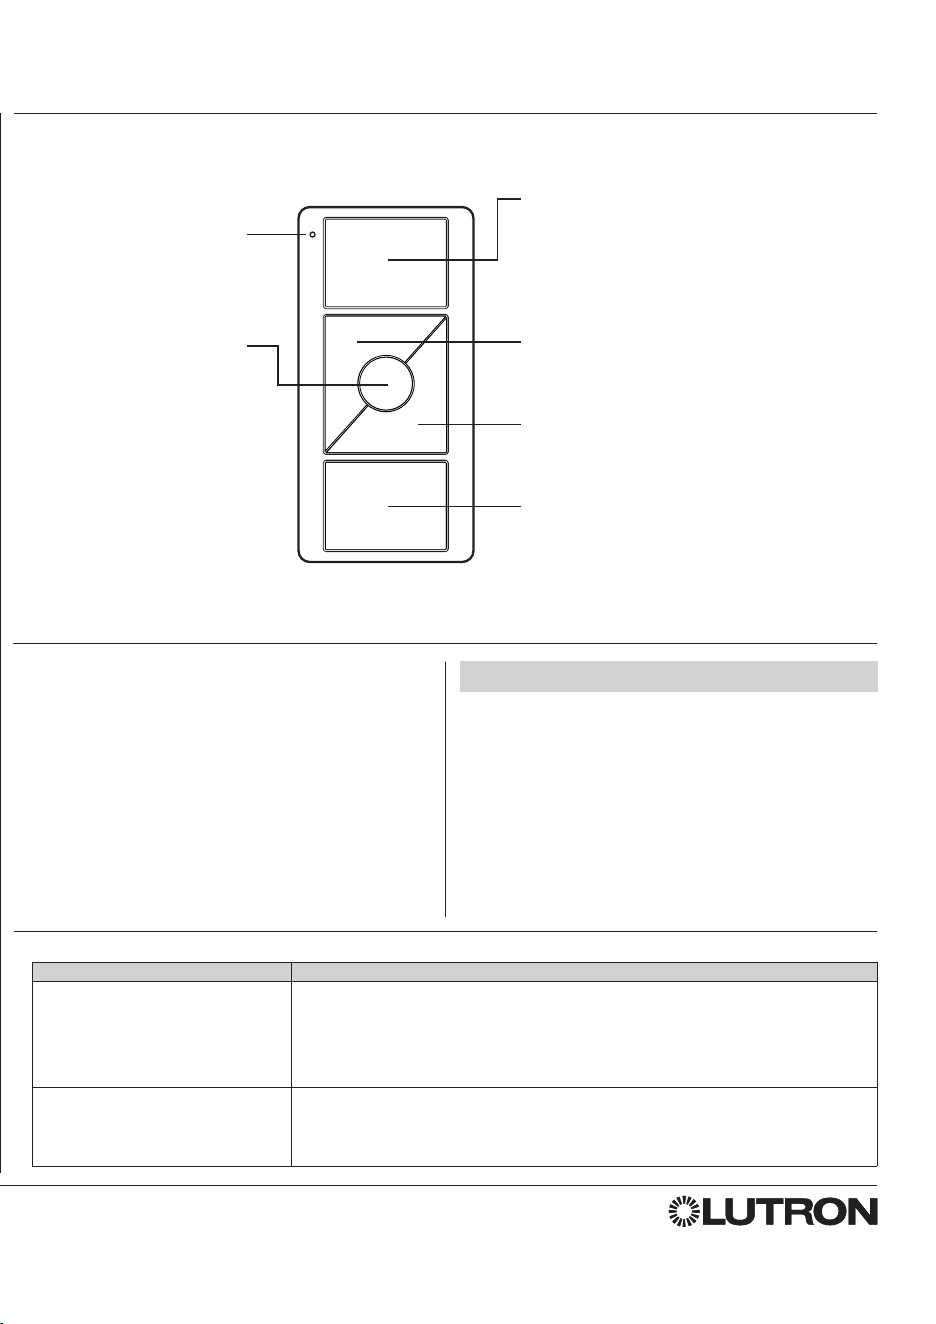
Important: Set up a Pico wireless control to a dimmer / switch
before use.
1. Press and hold the dimmer / switch Tap button or Off button
(Figure1) for approximately 6seconds. Once the LED(s) start to
blink slowly, release the Tap or Off button.
2. Press and hold the Off button on the Pico wireless control (Figure2)
for approximately 6seconds.
3. Once the dimmer / switch pairs with the Pico wireless control, the
LED(s) on the dimmer / switch and the load will flash 3 times and
they will exit Set-Up mode.
4. Repeat steps 1– 3 to pair multiple Pico wireless controls with a
single dimmer / switch. Repeat steps 1– 3 to pair a single Pico
wireless control with multiple dimmers / switches.
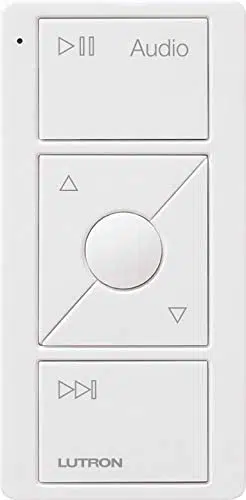
5. Pressing the Preset button (-3B and -3BRL models only) on a
Pico wireless control will cause all paired dimmers to go to the
favorite light settings. Switches can be configured to turn On or
Off. To save a favorite light setting, adjust all the dimmers/switches
controlled by a Pico wireless control to the desired light setting.
Then press and hold the Preset button on the Pico wireless control
for 6 seconds until all LEDs on the dimmers/switches flash several
times.
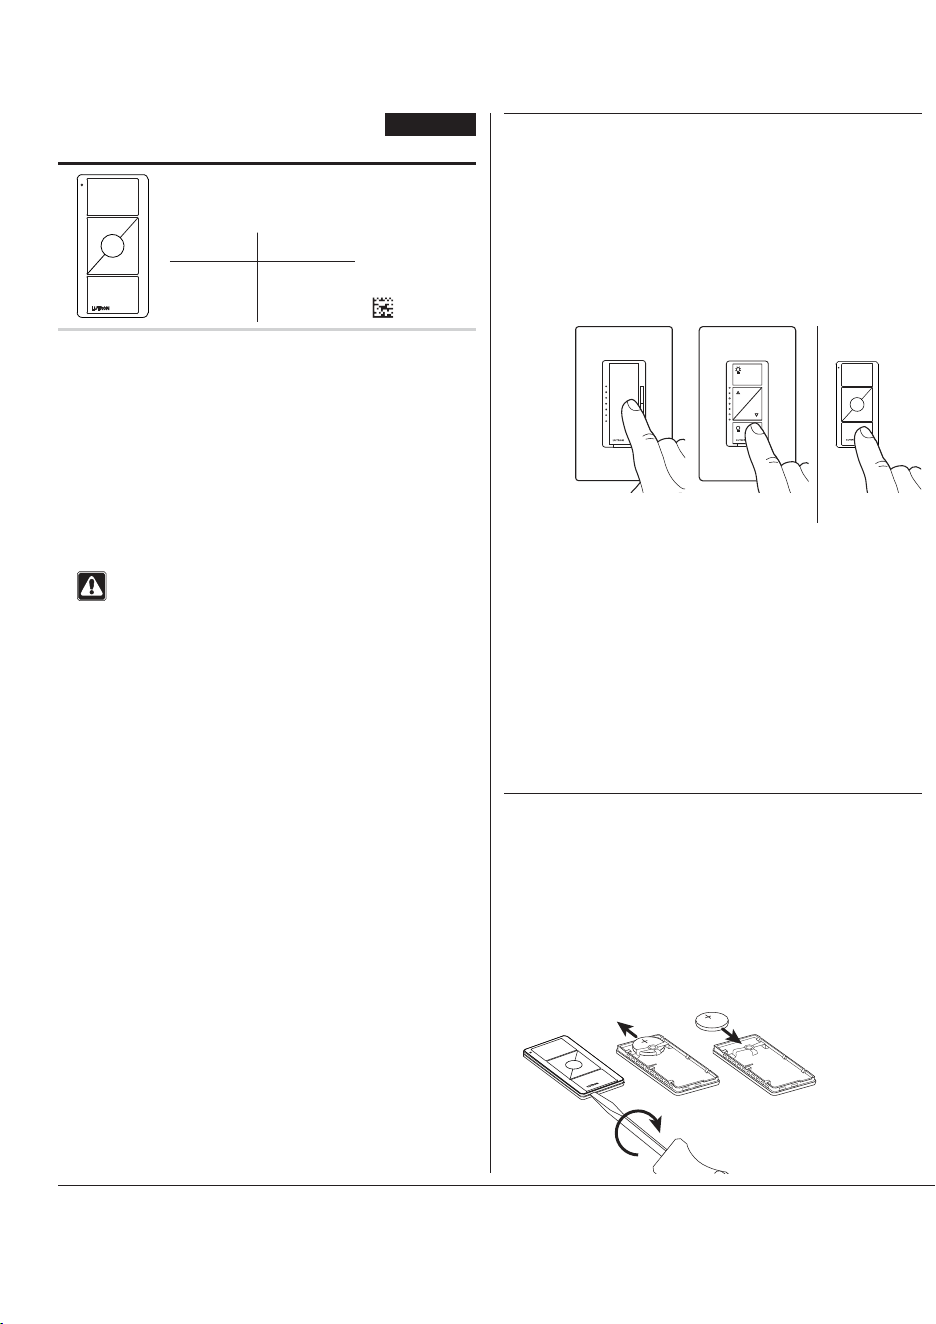
Replacing the Battery in a Pico Wireless Control
1. Place a flathead screwdriver into the slot at the bottom of the Pico
wireless control. Twist to open. DO NOT press buttons without
back enclosure on.
2. Slide the battery out, toward the top of the Pico wireless control.
3. Slide a new battery underneath the contact strap, with the (–)
terminal toward the front of the Pico wireless control.
4. Replace the back enclosure.
5. Confirm proper installation by turning the receiving device ON and
OFF using the Pico wireless control.
P/N 040429 Rev. A
08/2017
FCC / IC Information
This device complies with part 15 of the FCC Rules and Industry Canada license-exempt RSS
standard(s). Operation is subject to the following two conditions:
(1) This device may not cause interference, and
(2) this device must accept any interference, including interference that may cause undesired
operation. Modifications not expressly approved by Lutron Electronics Co., Inc. could void the user’s
authority to operate this equipment.
Note: This equipment has been tested and found to comply with the limits for a Class B digital device,
pursuant to part 15 of the FCC Rules. These limits are designed to provide reasonable protection
against harmful interference in a residential installation. This equipment generates, uses and can
radiate radio frequency energy and, if not installed and used in accordance with the instructions, may
cause harmful interference to radio communications. However, there is no guarantee that interference
will not occur in a particular installation. If this equipment does cause harmful interference to radio
or television reception, which can be determined by turning the equipment off and on, the user is
encouraged to try to correct the interference by one or more of the following measures:
—Reorient or relocate the receiving antenna
—Increase the separation between the equipment and receiver
— Connect the equipment into an outlet on a circuit different from that to which the receiver is
connected
—Consult the dealer or an experienced radio / TV technician for help
Figure 1
Maestro Wireless
Dimmer / Switch
Caséta Wireless
Dimmer / Switch
Pico
Wireless Control
Figure 2
L
U
T
R
O
N
LUTRON
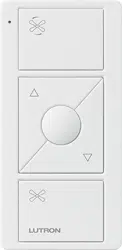
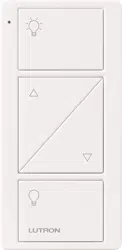
Raise Button (2BRL & 3BRL models only)
Lights increase in intensity and shades /draperies move
towards open limit.
Bottom Button
Lights dim to off and shades /draperies go to close
limit. Activates “OFF” scene when used in scene
mode with GRAFIKEye QS wireless applications.
Indicator LED
Flashes to indicate a button
press or when unit is in
programming mode.
Top Button
Lights brighten to full intensity and shades /
draperies go to open limit. Activates scene 1 when
used in scene mode with GRAFIKEye QS wireless
applications.
Lower Button (2BRL & 3BRL models only)
Lights decrease in intensity and shades /draperies move
towards close limit.
Preset Button
(3B & 3BRL models only)
Tap once:
Devices go to preset
levels / positions. Activates
scene 16 when used in scene
mode with GRAFIKEye QS
wireless applications.
Press and hold:
To save new preset level or
position, press and hold
for 6 seconds.
World Headquarters
TEL: +1.610.282.3800
FAX: +1.610.282.1243
Assistência ao Cliente: 1.844.LUTRON1
BAA Model
Numbers:
UPJ2-2B
UPJ2-2BRL
UPJ2-3B
UPJ2-3BRL

Troubleshooting
Symptoms Possible Causes
Light does not respond to Pico wireless
control
• The dimmer / switch failed to pair with Pico wireless control; see Set-Up.
• The dimmer / switch has already received and responded to a command or is already at the light
setting the Pico wireless control is sending.
• The Pico wireless control is outside the 30 ft (9 m) operating range.
• The battery in the Pico wireless control is low.
• The battery in the Pico wireless control is installed incorrectly.
When in set-up mode, the LEDs on the
dimmer / switch flash when trying to set up
with the Pico wireless control or sensor
• The maximum number of Pico wireless controls or sensors has been paired with the
dimmer / switch. More Pico wireless controls or sensors cannot be added. See Un-pairing a
Pico Wireless Control.
Important Notes
Please Read Before Installing
1. This install guide provides simple setup instructions for Maestro
Wireless and Caséta Wireless systems only. If you are using your
Pico wireless control with any other Lutron system, please refer to
the system setup guide. If you no longer have your system setup
guide, please download the latest version by following the links at
www.lutron.com
2. The Pico wireless control uses one (1) CR2032 battery
(pre-installed). DONOT use rechargeable batteries. Using improper
batteries could damage the Pico wireless control. DONOT dispose
of the battery in normal household waste. Please recycle, take to a
proper battery disposal facility, or contact your local waste disposal
provider regarding local restrictions on the disposal or recycling of
batteries.
WARNING: Risk of fire, explosion and burns. May result
in serious injury or death. DO NOT recharge, disassemble,
crush, puncture, heat above 212 °F (100°C) or incinerate
the battery. The battery in this device contains Perchlorate
Material — special handling may apply. For more information.
visit www.dtsc.ca.gov/hazardouswaste/perchlorate
3. The Pico wireless control must be paired with dimmer(s) / switch(es)
before it can communicate.
4. Refer to product specification submittals at www.lutron.com for
system specifications on the maximum number of configurable Pico
wireless controls per device / system.
5. The range of the Pico wireless control is 30 ft (9 m). Performance is
highly dependent on a variety of complex factors, such as:
• Distance between system components
• Geometry of the building structure
• Construction of walls separating system components
• Electrical equipment located near system components
6. Clean Pico wireless control with a soft damp cloth only.
7. DO NOT paint the Pico wireless control.
8. DO NOT mount the Pico wireless control to a metal surface.
Un-pairing a Pico Wireless Control
To un-pair a previously paired Pico wireless control from your
system, perform the following steps:
1. Quickly tap the OFF button on the Pico wireless control (Figure 2)
3 times and continue to hold it for 6 seconds after the third tap.
2. Once the indicator LED comes on solid, quickly tap the OFF button
3 times. Do not continue to hold on the third tap.
3. To test that the Pico wireless control has been successfully
removed from the system, press the ON button and verify that the
Pico wireless control no longer controls the load.
NOTE: This will remove all dimmers / switches with which it was
previously paired.
Lutron,
)
Lutron, HomeWorks, Maestro Wireless, Pico, Quantum, RadioRA, Serena, Caséta, and Sivoia are trademarks of Lutron Electronics Co., Inc., registered in the U.S. and other countries.
RadioRA 2, Vive, and myRoom are trademarks of Lutron Electronics Co., Inc.
© 2017 Lutron Electronics Co., Inc.
Lutron Electronics Co., Inc.
7200 Suter Road
Coopersburg, PA 18036-1299
Pico Wireless Control
3 V
-
10 mA
Mounting accessories sold separately.
For a complete listing of Pico wireless control mounting
accessories and more information about Pico wireless
controls, please visit www.lutron.com/pico
English
Model
Numbers:
PJ2-2B
PJ2-2BRL
PJ2-3B
PJ2-3BRL
Operation
Customer Assistance www.lutron.com/support
U.S.A., Canada, Caribbean: 1.844.LUTRON1
Mexico: +1.888.235.2910
Others: +1.610.282.6701
For questions concerning the installation or operation of this product, call
Lutron Customer Assistance. Please provide exact model number when
calling.
Set-Up
(for Maestro Wireless and Caséta Wireless systems only)
To communicate with other systems or devices, including
RadioRA 2, HomeWorks QS, QSG, QS sensor module (QSM),
Quantum, myRoom, Vive, Serena Shades, and Sivoia QS, refer to
the system setup guides.
Important: Set up a Pico wireless control to a dimmer / switch
before use.
1. Press and hold the dimmer / switch Tap button or Off button
(Figure1) for approximately 6seconds. Once the LED(s) start to
blink slowly, release the Tap or Off button.
2. Press and hold the Off button on the Pico wireless control (Figure2)
for approximately 6seconds.
3. Once the dimmer / switch pairs with the Pico wireless control, the
LED(s) on the dimmer / switch and the load will flash 3 times and
they will exit Set-Up mode.
4. Repeat steps 1– 3 to pair multiple Pico wireless controls with a
single dimmer / switch. Repeat steps 1– 3 to pair a single Pico
wireless control with multiple dimmers / switches.
5. Pressing the Preset button (-3B and -3BRL models only) on a
Pico wireless control will cause all paired dimmers to go to the
favorite light settings. Switches can be configured to turn On or
Off. To save a favorite light setting, adjust all the dimmers/switches
controlled by a Pico wireless control to the desired light setting.
Then press and hold the Preset button on the Pico wireless control
for 6 seconds until all LEDs on the dimmers/switches flash several
times.
Replacing the Battery in a Pico Wireless Control
1. Place a flathead screwdriver into the slot at the bottom of the Pico
wireless control. Twist to open. DO NOT press buttons without
back enclosure on.
2. Slide the battery out, toward the top of the Pico wireless control.
3. Slide a new battery underneath the contact strap, with the (–)
terminal toward the front of the Pico wireless control.
4. Replace the back enclosure.
5. Confirm proper installation by turning the receiving device ON and
OFF using the Pico wireless control.
P/N 040429 Rev. A
08/2017
FCC / IC Information
This device complies with part 15 of the FCC Rules and Industry Canada license-exempt RSS
standard(s). Operation is subject to the following two conditions:
(1) This device may not cause interference, and
(2) this device must accept any interference, including interference that may cause undesired
operation. Modifications not expressly approved by Lutron Electronics Co., Inc. could void the user’s
authority to operate this equipment.
Note: This equipment has been tested and found to comply with the limits for a Class B digital device,
pursuant to part 15 of the FCC Rules. These limits are designed to provide reasonable protection
against harmful interference in a residential installation. This equipment generates, uses and can
radiate radio frequency energy and, if not installed and used in accordance with the instructions, may
cause harmful interference to radio communications. However, there is no guarantee that interference
will not occur in a particular installation. If this equipment does cause harmful interference to radio
or television reception, which can be determined by turning the equipment off and on, the user is
encouraged to try to correct the interference by one or more of the following measures:
—Reorient or relocate the receiving antenna
—Increase the separation between the equipment and receiver
— Connect the equipment into an outlet on a circuit different from that to which the receiver is
connected
—Consult the dealer or an experienced radio / TV technician for help
Figure 1
Maestro Wireless
Dimmer / Switch
Caséta Wireless
Dimmer / Switch
Pico
Wireless Control
Figure 2
L
U
T
R
O
N
LUTRON
Raise Button (2BRL & 3BRL models only)
Lights increase in intensity and shades /draperies move
towards open limit.
Bottom Button
Lights dim to off and shades /draperies go to close
limit. Activates “OFF” scene when used in scene
mode with GRAFIKEye QS wireless applications.
Indicator LED
Flashes to indicate a button
press or when unit is in
programming mode.
Top Button
Lights brighten to full intensity and shades /
draperies go to open limit. Activates scene 1 when
used in scene mode with GRAFIKEye QS wireless
applications.
Lower Button (2BRL & 3BRL models only)
Lights decrease in intensity and shades /draperies move
towards close limit.
Preset Button
(3B & 3BRL models only)
Tap once:
Devices go to preset
levels / positions. Activates
scene 16 when used in scene
mode with GRAFIKEye QS
wireless applications.
Press and hold:
To save new preset level or
position, press and hold
for 6 seconds.
World Headquarters
TEL: +1.610.282.3800
FAX: +1.610.282.1243
Assistência ao Cliente: 1.844.LUTRON1
BAA Model
Numbers:
UPJ2-2B
UPJ2-2BRL
UPJ2-3B
UPJ2-3BRL

Dépannage
Symptômes Causes possibles
L’éclairage ne répond pas à la commande
sans fil Pico.
• La gradateur /commutateur n’est pas parvenue à s’associer à la commande sans fil Pico; voir
Configuration.
• La gradateur /commutateur a déjà reçu et répondu à une commande ou se trouve déjà au niveau de
réglage d’éclairage envoyé par la commande sans fil Pico.
• La commande sans fil Pico se trouve en-dehors du rayon de fonctionnement de 9 m (30pi).
• La pile de la commande sans fil Pico est faible.
• La pile de la commande sans fil Pico est installée de façon incorrecte.
En mode de configuration, les DEL du
gradateur / interrupteur clignotent lorsqu’elles
tentent de se configurer avec la commande
ou le détecteur sans fil Pico
• Le nombre maximal de commandes ou de détecteurs sans fil Pico a été associé à la gradateur /
commutateur. Davantage de commandes ou détecteurs sans fil Pico ne peuvent pas être ajoutés.
Voir Désassocier une commande sans fil Pico.
Remarques importantes
Veuillez lire avant l’installation
1. Ce guide d’installation fournit des instructions de configuration simples
pour les systèmes Maestro Wireless et Caséta Wireless seulement.
Si vous utilisez votre commande sans fil Pico avec un autre système
Lutron, veuillez vous reporter au guide de configuration du système.
Si vous ne disposez plus de votre guide de configuration du système,
veuillez télécharger la dernière version en suivant les liens sur
www.lutron.com
2. La commande sans fil Pico utilise une pile (1) CR2032 (pré-installée).
NE PAS utiliser de piles rechargeables. L’utilisation de piles incorrectes
pourrait endommager la commande sans fil Pico. NE PAS jeter les
piles avec les déchets ménagers normaux. Veuillez recycler les piles,
les apporter à un centre de traitement de piles ou contactez votre
service local d’élimination des déchets pour prendre connaissance des
restrictions en vigueur sur l’élimination ou le recyclage des piles.
AVERTISSEMENT: Risque d’incendie, d’explosion et de
brûlures. Peut causer des blessures graves ou la mort. NE
PAS recharger, démonter, écraser, percer, chauffer au-dessus de
100°C (212 °F) ou brûler la pile. La pile de cet appareil contient
du perchlorate — une manipulation particulière peut
être nécessaire. Pour plus d’informations, consultez
www.dtsc.ca.gov/hazardouswaste/perchlorate
3. La commande sans fil Pico doit être associée aux gradateurs/
interrupteurs avant de pouvoir communiquer.
4. Reportez-vous aux spécifications des produits sur www.lutron.com pour
connaître les spécifications du système concernant le nombre maximal
de commandes sans fil Pico configurables par appareil / système.
5. La portée de la commande sans fil Pico est de 9m (30pi). Ses
performances dépendent grandement d’un ensemble de facteurs
complexes, tels que:
• La distance entre les composants du système
• La géométrie de la structure du bâtiment
• La construction des murs séparant les composants du système
• L’équipement électrique se situant proche des composants du
système
6. Nettoyez la commande sans fil Pico avec un chiffon doux et humide
seulement. NE PAS utiliser de nettoyants chimiques.
7. NE PAS peindre la commande sans fil Pico.
8. NE PAS monter la commande sans fil Pico sur une surface métallique.
Désassocier une commande sans fil Pico
Pour désassocier une commande sans fil Pico précédemment
associée de votre système, effectuez les étapes suivantes :
1. Appuyez 3 fois rapidement sur le bouton Arrêt, Figure 2, de la
commande sans fil Pico et continuez à le maintenir enfoncé
pendant 6 secondes après la troisième pression.
2. Une fois que le voyant del s’allume, appuyez 3 fois rapidement
sur le bouton Arrêt. Ne le maintenez pas enfoncé à la troisième
pression.
3. Pour vérifier que la commande sans fil Pico a bien été supprimée
du système, appuyez sur le bouton Activation et vérifiez que la
commande sans fil Pico ne commande plus la charge.
REMARQUE : Cela supprimera tous les gradateurs/interrupteurs
auxquels elle était associée précédemment.
Lutron,
)
Lutron, HomeWorks, Maestro Wireless, Pico, Quantum, RadioRA, Serena, Caséta, et Sivoia sont des marques commerciales de Lutron Electronics Co., Inc., enregistrées aux États-Unis et dans d’autres pays.
RadioRA 2, Vive, et myRoom sont des marques commerciales de Lutron Electronics Co., Inc.
© 2017 Lutron Electronics Co., Inc.
Lutron Electronics Co., Inc.
7200 Suter Road
Coopersburg, PA 18036-1299
Commande sans fil Pico
3 V
-
10 mA
Accessoires de montage vendus séparément.
Pour une liste complète des accessoires de montage sans
fil Pico et pour plus de renseignements sur les commandes
sans fil Pico, veuillez consulter www.lutron.com/pico
Français
Numéros de
modèle :
PJ2-2B
PJ2-2BRL
PJ2-3B
PJ2-3BRL
Fonctionnement
Assistance à la clientèle www.lutron.com/support
États-Unis, Canada, Caraïbes: 1.844.LUTRON1
Mexique: +1.888.235.2910
Autres : +1.610.282.3800
Pour toute question concernant l’installation ou le fonctionnement de ce
produit, appelez l’assistance à la clientèle de Lutron. Veuillez fournir le numéro
exact du modèle lorsque vous appelez.
Configuration
(pour les systèmes Maestro Wireless et Caséta Wireless seulement)
Pour communiquer avec d’autres systèmes ou appareils, y compris le
RadioRA 2, le HomeWorks QS, le QSG, le module de détection QS
(QSM), le Quantum, le myRoom, le Vive, les stores Serena et le
Sivoia QS, reportez-vous aux guides de configuration du système.
Important : Associez une commande sans fil Pico à une gradateur /
interrupteur avant de l’utiliser.
1. Appuyez et maintenez le bouton Poussoir du gradateur /
interrupteur ou le bouton Arrêt (Off) (Figure1) enfoncé pendant
environ 6 secondes. Dès que la ou les DEL commencent à clignoter
doucement, relâchez le bouton Poussoir ou le bouton Arrêt (Off).
2. Appuyez et maintenez le bouton Arrêt enfoncé sur la commande sans
fil Pico (Figure 2) pendant environ 6 secondes.
3. Une fois que le gradateur / interrupteur s’associe à la commande
sans fil Pico, les DEL du gradateur / interrupteur et de la charge
clignoteront 3 fois puis elles quitteront le mode de configuration.
4. Recommencez l’étapes 1– 3 pour associer plusieurs commandes sans
fil Pico à un unique gradateur / interrupteur. Recommencez les étapes
1– 3 pour associer une unique commande sans fil Pico à plusieurs
gradateurs / interrupteurs.
5. Appuyer sur le bouton Préréglage (modèles -3B et -3BRL
seulement) d’une commande sans fil Pico entraine tous les
gradateurs associés à passer aux réglages d’éclairage favoris. Les
interrupteurs peuvent être configurés pour s’allumer ou s’éteindre.
Pour enregistrer un réglage favori, réglez tous les gradateurs /
commutateurs contrôlés par une commande sans fil Pico au niveau
d’éclairage souhaité. Ensuite, appuyez et maintenez le bouton
Préréglage sur la commande sans fil Pico pendant 6 secondes
jusqu’à ce que toutes les DEL des gradateurs/commutateurs
clignotent plusieurs fois.
Remplacer la pile d’une commande sans fil Pico
1. Placez un tournevis plat dans la fente en bas de la commande sans
fil Pico. Tournez pour l’ouvrir. NE PAS appuyer sur les boutons sans le
couvercle arrière.
2. Sortez la pile en la faisant glisser vers le haut de la commande sans fil
Pico.
3. Glissez une nouvelle pile sous la fixation de contact, avec la borne (–)
vers l’avant de la commande sans fil Pico.
4. Replacez le couvercle arrière.
5. Confirmez sa bonne installation en allumant et en éteignant l’appareil de
réception à l’aide de la commande sans fil Pico.
P/N 040429 Rev. A
08/2017
Informations sur la FCC/IC
Ce dispositif est conforme à la partie15 des règles de la FCC et à la (aux) norme(s) CNR d’exemption
de licence d’Industrie Canada. Son fonctionnement est soumis aux deux conditions suivantes: (1) ce
dispositif ne peut pas provoquer d’interférence, et (2) ce dispositif doit accepter toute interférence, y
compris une interférence qui pourrait causer un fonctionnement non souhaité. Les modifications non
expressément approuvées par Lutron Electronics Co., Inc. pourront annuler le droit de l’utilisateur à
faire fonctionner cet équipement.
Remarque: cet équipement a été testé et déclaré en conformité avec les limites correspondant à
un dispositif numérique de catégorieB, en vertu de la partie15 des règles de la FCC. Ces limites
visent à fournir une protection raisonnable contre les interférences préjudiciables dans une installation
résidentielle. Cet équipement génère, utilise et peut émettre une énergie de fréquence radio et,
s’il n’est pas installé et utilisé conformément aux instructions, peut provoquer une interférence
préjudiciable avec les transmissions radio. Toutefois, il n’est pas garanti qu’aucune interférence ne se
produira dans une installation particulière. Si cet équipement provoque une interférence préjudiciable
à la réception radio ou télévisuelle, laquelle peut être déterminée en éteignant et en mettant en
marche l’équipement, l’utilisateur est invité à corriger cette interférence en prenant l’une, ou plusieurs,
des mesures suivantes:
—Réorienter ou déplacer l’antenne de réception.
—Augmenter la distance entre l’équipement et le récepteur.
— Brancher l’équipement à une prise qui se trouve sur un circuit différent de celui sur lequel le
récepteur est branché.
— Consulter le distributeur ou un technicien radio/TV expérimenté pour toute assistance.
Figure 1
Gradateur / Interrupteur
Maestro Wireless
Gradateur / Interrupteur
Caséta Wireless
Commande sans
fil Pico
Figure 2
L
U
T
R
O
N
LUTRON
Bouton Monter (modèles 2BRL & 3BRL seulement)
L’intensité de l’éclairage augmente et les stores / rideaux
se déplacent vers leur limite d’ouverture.
Bouton inférieur
L’éclairage se tamise jusqu’à l’extinction et les stores/
rideaux atteignent leur limite de fermeture. Active la
scène «ARRÊT» lorsqu’il est utilisé en mode scène
avec des applications sans fil GRAFIKEye QS.
Indicateur DEL
Clignote pour indiquer la pression
d’un bouton ou lorsque l’unité est
en mode de programmation.
Bouton supérieur
L’éclairage augmente à pleine intensité et les stores /
rideaux atteignent leur limite d’ouverture. Active la
scène1 lorsqu’il est utilisé en mode scène avec des
applications sans fil GRAFIKEyeQS.
Bouton Baisser (modèles 2BRL & 3BRL seulement)
L’intensité de l’éclairage diminue et les stores/rideaux se
déplacent vers leur limite de fermeture
Bouton Préréglage
(modèles 3B & 3BRL
seulement)
Appuyez une fois :
Les appareils adoptent les
positions / niveaux préréglés.
Active la scène16 lorsqu’il
est utilisé en mode scène
avec des applications sans fil
GRAFIKEyeQS.
Pressez-le et maintenez-le:
Pour enregistrer une nouvelle
position ou un nouveau niveau
préréglés, appuyez et maintenez
le bouton pendant 6secondes.
Siège mondial
TÉL : +1.610.282.3800
FAX : +1.610.282.1243
Assistance à la clientèle: 1.844.LUTRON1
Numéros de
modèle BAA :
UPJ2-2B
UPJ2-2BRL
UPJ2-3B
UPJ2-3BRL

Solución de problemas
Síntomas Causas posibles
La luz no responde al control
inalámbrico Pico.
• El atenuador / interruptor no pudo emparejarse con el control inalámbrico Pico; consulte
Configuración.
• El atenuador / interruptor ya ha recibido y respondido a un comando o ya se encuentra en la
configuración de luz que le está enviando el control inalámbrico Pico.
• El control inalámbrico Pico se encuentra fuera del rango operativo de 9 m (30 pies).
• La batería del control inalámbrico Pico tiene poca carga.
• La batería del control inalámbrico Pico se ha instalado incorrectamente.
Cuando se está en el modo de
configuración, los LED del atenuador /
interruptor destellan cuando se trata de
configurarlos con el control o sensor Pico
inalámbrico.
• Se ha gestionado con el control de la carga el número máximo de controles o sensores Pico
inalámbricos. No se puede añadir más controles o sensores Pico inalámbricos. Consulte
Desemparejamiento de un control inalámbrico Pico.
Notas importantes
Por favor leer antes de instalar
1. Esta guía de instalación proporciona instrucciones sencillas de
configuración para los sistemas Maestro Wireless y Caséta Wireless
únicamente. Si está utilizando su control inalámbrico Pico con cualquier
otro sistema de Lutron, consulte la guía de configuración del sistema. Si
ya no tuviera su guía de configuración del sistema, descargue la última
versión siguiendo los enlaces presentes en www.lutron.com
2. El control inalámbrico Pico utiliza una (1) batería CR2032 (preinstalada).
NO utilice baterías recargables. El empleo de baterías inadecuadas
podría dañar el control inalámbrico Pico. NO deseche la batería en la
basura doméstica normal. Recíclela, llévela a un servicio de desecho
de baterías adecuado o póngase en contacto con su proveedor local
de eliminación de desechos respecto de las restricciones locales sobre
descarte o reciclaje de las baterías.
ADVERTENCIA: Riesgo de incendio, explosión y
quemaduras. Podría ocasionar lesiones graves o la muerte.
NO recargue, desarme, aplaste, pinche, caliente a más de
100 °C (212 °F) ni incinere la batería. La batería de este
dispositivo contiene perclorato y puede requerir una
manipulación especial. Para obtener más información visite
www.dtsc.ca.gov/hazardouswaste/perchlorate
3. El control inalámbrico Pico debe ser emparejado con los atenuadores/
interruptores antes de que pueda comunicarse.
4. Para obtener las especificaciones del sistema sobre el número
máximo de controles inalámbricos Pico configurables por
dispositivo / sistema consulte las propuestas de especificaciones
del producto en www.lutron.com.
5. El rango del control inalámbrico Pico es de 9 m (30 pies). El desempeño
depende mucho de una variedad de factores complejos, tales como:
• Distancia entre los componentes del sistema
• Geometría de la estructura del edificio
• Construcción de las paredes que separan los componentes
del sistema
• Equipos eléctricos situados cerca de los componentes del sistema
6. Limpie el control inalámbrico Pico con un paño suave y húmedo
únicamente. NO utilice ningún limpiador químico.
7. NO pinte el control inalámbrico Pico.
8. NO monte el control inalámbrico Pico sobre una superficie metálica.
Desemparejamiento de un control inalámbrico Pico
Para desemparejar de su sistema un control inalámbrico Pico
previamente emparejado realice los siguientes pasos:
1. Toque rápidamente tres veces el botón APAGAR, Figura 2, en
el control inalámbrico Pico, y continúe manteniéndolo pulsado
durante 6 segundos luego del tercer toque.
2. Una vez que el indicador LED se ilumine de manera continua, pulse
rápidamente tres veces el botón APAGAR. No continúe reteniendo
luego del tercer toque.
3. Para comprobar que el control inalámbrico Pico ha sido retirado
exitosamente del sistema, pulse el botón ENCENDER y verifique
que el control inalámbrico Pico ya no controla la carga.
NOTA: Esto eliminará todos los atenuadores/interruptores con los
que estuvo previamente emparejado.
Lutron,
)
Lutron, HomeWorks, Maestro Wireless, Pico, Quantum, RadioRA, Serena, Caséta, y Sivoia son marcas comerciales de Lutron Electronics Co., Inc. registradas en E.U.A. y otros países.
RadioRA 2, Vive, y myRoom son marcas registradas de Lutron Electronics Co., Inc.
© 2017 Lutron Electronics Co., Inc.
Lutron Electronics Co., Inc.
7200 Suter Road
Coopersburg, PA 18036-1299
Control inalámbrico Pico
3 V
-
10 mA
Accesorios de montaje vendidos por separado.
Para obtener un listado completo de accesorios de montaje
del Pico inalámbrico y más información sobre los controles
inalámbricas Pico, visite www.lutron.com/pico
Español
Números de
modelo:
PJ2-2B
PJ2-2BRL
PJ2-3B
PJ2-3BRL
Operación
Asistencia al cliente www.lutron.com/support
E.U.A., Canadá y el Caribe: 1.844.LUTRON1
México: +1.888.235.2910
Demás países: +1.610.282.3800
Si tuviera preguntas acerca de la instalación u operación de este producto,
llame a la Asistencia técnica de Lutron. Cuando llame indique el número exacto
del modelo.
Configuración
(sólo para los sistemas Maestro Wireless y Caséta Wireless)
Para comunicarse con otros sistemas o dispositivos, entre ellos
RadioRA 2, HomeWorks QS, QSG, el módulo sensor QS (QSM),
Quantum, myRoom, Vive, las persianas Serena y los equipos Sivoia
QS, consulte las guías de configuración del sistema.
Importante: Configure un control inalámbrico Pico a un
atenuador / interruptor antes de su uso.
1. Pulse y mantenga pulsado el botón Tocar o el botón Apagar
del atenuador / interruptor (Figura 1) durante aproximadamente 6
segundos. Una vez que los LED comiencen a destellar lentamente,
suelte el botón Tocar o el botón Apagar.
2. Pulse y mantenga pulsado el botón Apagar del control inalámbrico
Pico (Figura 2) durante aproximadamente 6 segundos.
3. Una vez que el atenuador/interruptor se empareje con el control
inalámbrico Pico, los LED del atenuador / interruptor y la carga
destellarán tres veces y los mismos saldrán del modo de configuración.
4. Repita los pasos 1– 3 para emparejar múltiples controles inalámbricos
Pico con un único atenuador / interruptor. Repita los pasos 1 y 2
para emparejar un único control inalámbrico Pico con múltiples
atenuadores / interruptores.
5. La pulsación del botón Preselección (modelos -3B y -3BRL
únicamente) en un control inalámbrico Pico hará que todos
los atenuadores emparejados pasen a las configuraciones de
luz favoritas. Los interruptores pueden ser configurados para
Encender o Apagar. Para guardar una configuración de luz
favorita, ajuste todos los atenuadores / interruptores controlados por
un control inalámbrico Pico a la configuración deseada de la luz.
Luego pulse y mantenga pulsado el botón Preselección del control
inalámbrico Pico durante 6 segundos hasta que todos los LED de
los atenuadores / interruptores destellen varias veces.
Reemplazo de la batería en un control
inalámbrico Pico
1. Coloque un destornillador de punta plana en la ranura ubicada en la
parte inferior del control inalámbrico Pico. Gire para abrir. NO pulse los
botones sin la cubierta trasera colocada.
2. Deslice la batería hacia afuera, hacia la parte superior del control
inalámbrico Pico.
3. Deslice una nueva batería por debajo de la correa de contacto, con el
terminal (–) hacia la parte delantera del control inalámbrico Pico.
4. Reponga la cubierta trasera.
5. Confirme la instalación correcta ENCENDIENDO y APAGANDO el
dispositivo receptor con el control inalámbrico Pico.
P/N 040429 Rev. A
08/2017
Información de la FCC/IC
Este dispositivo cumple con la parte 15 de las reglas de la FFC (Comisión Federal
deComunicaciones) y con las normas RSS de IC (Industry Canada) para dispositivos exentos de
licencia. La operación está sujeta a las dos condiciones siguientes: (1)Estedispositivo no debe
causar interferencia perjudicial y (2) este dispositivo debe aceptar cualquier interferencia recibida,
incluyendo las que pueden causar una operación indeseada. Cualquier cambio o modificación sin
la aprobación explícita deLutron Electronics Co., Inc. puede anular la autorización del usuario para
operar elequipo.
Nota: Este equipo ha sido probado y se comprobó que cumple con los límites para dispositivos
digitales de ClaseB, de acuerdo con la Parte15 de las Reglas de la FCC. Estos límites se han
diseñado para proveer una protección razonable contra interferencias dañinas en una instalación
residencial. Este equipo genera, usa ypuede emitir energía de radiofrecuencia y si no se instala
yutiliza de acuerdo con las instrucciones, puede causar interferencia dañina en las comunicaciones
de radio. Sin embargo, no hay garantía de que no ocurrirá interferencia en una instalación
determinada. Si este equipo causa interferencia dañina en la recepción de la radio ola televisión,
que se puede determinar encendiendo y apagando el equipo, elusuario puede tratar de corregir la
interferencia mediante uno o más de los siguientes procedimientos:
—Cambiar la orientación o ubicación de la antena receptora.
—Aumentar la separación entre el equipo y el receptor.
— Conectar el equipo a un receptáculo que esté en un circuito diferente al del receptor.
— Consultar al distribuidor o a un técnico experimentado en radio/TV para obtener ayuda.
Figura 1
Atenuador / Interruptor
Maestro Wireless
Atenuador / Interruptor
Caséta Wireless
Control
inalámbrico Pico
Figura 2
L
U
T
R
O
N
LUTRON
Botón Subir (sólo en los modelos 2BRL y 3BRL)
Las luces aumentan de intensidad y las persianas/cortinas
se dirigen a su límite de apertura.
Botón Inferior
Las luces se atenúan hasta apagarse y las
persianas / cortinas se dirigen a su límite de cierre.
Activa la escena “APAGADO” cuando se utiliza en el
modo de escenas con las aplicaciones inalámbricas
GRAFIK Eye QS.
Indicador LED
Destella para indicar la pulsación
de un botón o cuando el equipo
está en el modo de
programación.
Botón Superior
Las luces brillan a su máxima intensidad y las
persianas/cortinas se dirigen a su límite de apertura.
Activa la escena 1 cuando se utiliza en modo de
escenas con las aplicaciones inalámbricas GRAFIK
Eye QS.
Botón Bajar (sólo en los modelos 2BRL y 3BRL)
Las luces disminuyen de intensidad y las persianas/
cortinas se dirigen a su límite de cierre.
Botón Preselección
(sólo en los modelos 3B y 3BRL)
Pulse una vez:
Los dispositivos pasan
a los niveles/posiciones
preconfigurados. Activa la escena
16 cuando se utiliza en modo
de escenas con las aplicaciones
inalámbricas GRAFIK Eye QS.
Pulse y mantenga pulsado:
Para guardar el nuevo nivel o
posición preestablecidos, pulse y
mantenga pulsado durante
6 segundos.
Centro de operaciones mundial
TEL: +1.610.282.3800
FAX: +1.610.282.1243
Asistencia al cliente: 1.844.LUTRON1
Números de
modelo BAA:
UPJ2-2B
UPJ2-2BRL
UPJ2-3B
UPJ2-3BRL
Resolução de Problemas
Sintomas Causas Possíveis
A luz não responde ao controlo remoto
sem fios Pico.
• O dispositivo / interruptor falhou em emparelhar com o controlo remoto sem fios Pico; consulte a
secção Configuração.
• O dispositivo / interruptor já recebeu e respondeu a um comando ou já se encontra na definição
de luz que o controlo remoto sem fios Pico está a enviar.
• O controlo remoto sem fios Pico está fora da faixa de extensão de funcionamento de 9 m (30 pés).
• A pilha do controlo remoto sem fios Pico está fraca.
• A pilha do controlo remoto sem fios Pico está instalada incorretamente.
Quando no modo de configuração,
os LED no dispositivo / interruptor de
regulação da intensidade de luz piscam
quando tenta configurar com o sensor ou
controlo remoto sem fios Pico.
• O número máximo de sensores ou controlos remotos sem fios Pico foi emparelhado com o
controlo de carga. Não podem ser adicionados mais sensores ou controlos remotos sem fios
Pico. Consulte a secção Desemparelhar o Controlo Remoto Sem Fios a Pico.
Notas Importantes
Ler antes de instalar
1. Este guia de instalação fornece instruções de configuração simples
apenas para os sistemas Maestro Wireless e Caséta Wireless. Se estiver
a usar o controlo remoto sem fios Pico com qualquer outro Sistema da
Lutron, consulte o guia de configuração do sistema. Se já não tem na
sua posse o guia de configuração do sistema, descarregue (download) a
versão mais recente seguindo as hiperligações em www.lutron.com
2. O controlo remoto sem fios Pico usa uma (1) pilha CR2032 (pré-
instalada). NÃO use pilhas recarregáveis. O uso de pilhas incorretas
pode danificar o controlo remoto sem fios Pico. NÃO elimine a pilha
juntamente com os resíduos domésticos normais. A pilha deve ser
reciclada. Para isso deverá entregá-la numa instalação apropriada
de reciclagem, ou contacte as autoridades locais competentes
responsáveis pela eliminação de resíduos no que respeita às restrições
locais sobre eliminação ou reciclagem de pilhas.
AVISO: Risco de incêndio, explosão ou queimaduras. Pode
resultar em lesões físicas graves ou fatais. NÃO carregue,
desmonte, esmague, perfure, aqueça a uma temperatura acima
dos
100 °C (212 °F)
, nem incinere a pilha. A pilha contida neste
dispositivo contem substâncias de Perclorato — poderá requerer
manuseamento especial. Para obter mais informações, visite:
www.dtsc.ca.gov/hazardouswaste/perchlorate
3. O controlo remoto sem fios Pico tem de ser emparelhado com
dispositivo(s) / interruptor(es) de regulação da intensidade de luz antes
de poderem comunicar.
4. Consulte as especificações do produto no site www.lutron.com para
saber as especificações do sistema sobre o número máximo de
controles sem fio Pico configuráveis por dispositivo / sistema.
5. A faixa de extensão do controlo remoto sem fios Pico é de
9 m (30 pés). O desempenho depende grandemente de uma variedade
de fatores complexos, tais como:
• Distância entre os componentes do sistema
• Geometria da estrutura do edifício
• Construção das paredes que separam os componentes do sistema
• Equipamento elétrico localizado próximo dos componentes do
sistema
6. Limpe o controlo remoto sem fios Pico apenas com um pano húmido macio.
NÃO use qualquer produto de limpeza contendo substâncias químicas.
7. NÃO pinte o controlo remoto sem fios Pico
8. NÃO monte o controlo remoto sem fios Pico sobre uma
superfície metálica.
Desemparelhamento do Controlo Remoto
Sem Fios Pico
Para desemparelhar um controlo remoto sem fios Pico
emparelhado no seu Sistema, siga os seguintes passos:
1. Toque ligeira e rapidamente 3 vezes no botão OFF (Desligar), Figura
2, no controlo remoto sem fios Pico, e continue a premir sem soltar
durante 6 segundos após o terceiro toque.
2. Quando o indicador LED se iluminar com uma cor sólida, toque
ligeira e rapidamente 3 vezes no botão OFF (Desligar). Não
continue a premir após o terceiro toque.
3. Para testar se o controlo remoto sem fios Pico foi removido do
Sistema com sucesso, prima o botão ON (Ligar) e verifique se o
controlo remoto sem fios Pico já deixou de controlar a carga.
NOTA: Isto irá remover todos os dispositivos / interruptores de
regulação da intensidade de luz com os quais se encontrava
previamente emparelhado.
Lutron,
)
Lutron, HomeWorks, Maestro Wireless, Pico, Quantum, RadioRA, Serena, Caséta, e Sivoia são marcas comerciais da Lutron Electronics Co., Inc. registada nos EUA e em outros países.
RadioRA 2, Vive, e myRoom são marcas comerciais da Lutron Electronics Co., Inc.
© 2017 Lutron Electronics Co., Inc.
Lutron Electronics Co., Inc.
7200 Suter Road
Coopersburg, PA 18036-1299
Controlo Remoto
Sem Fios Pico
3 V
-
10 mA
Acessórios de montagem vendidos separadamente.
Para obter uma lista complete de acessórios de montagem
sem fios Pico, e para obter mais informações sobre os
controlos remotos sem fios Pico, visite www.lutron.com/pico
Português
Números dos
modelos:
PJ2-2B
PJ2-2BRL
PJ2-3B
PJ2-3BRL
Funcionamento
Assistência ao Cliente www.lutron.com/support
EUA, Canadá, Caraíbas: 1.844.LUTRON1
México: +1.888.235.2910
Brazil: +55.11.3257.6745
Outros: +1.610.282.6701
Quanto a questões referentes à instalação ou funcionamento deste produto,
entre em contacto telefónico com a Assistência ao Cliente da Lutron. Tenha
presente o número exato do modelo quando telefonar.
Configuração
(apenas para os sistemas Maestro Wireless e Caséta Wireless)
Para comunicar com outros sistemas ou dispositivos, incluindo
RadioRA 2, HomeWorks QS, QSG, módulo sensor QS (QSM),
Quantum, myRoom, Vive, Estores Serena, e Sivoia QS, consulte os
guias de configuração.
Importante: Antes de usar, configure um controlo remoto sem fios Pico
com um dimmer / interruptor.
1. Pressione o botão Tap (de toque) do dimmer / interruptor ou o botão
Off (Desligar) (Figura1) por cerca de 6segundos. Quando o(s)
LED(s) começar(em) a piscar lentamente, solte o botão Tap ou Off.
2. Prima sem soltar o botão Off (Desligar) situado no controlo remoto
sem fios Pico (Figura 2) por aproximadamente 6 segundos.
3. Quando o dimmer / interruptor emparelhar com o controle sem fio
Pico, o(s) LED(s) do dimmer / interruptor e a carga piscarão 3 vezes
e sairão do modo de configuração.
4. Repita o passos 1– 3 para emparelhar vários controlos remotos sem
fios Pico com um
dispositivo / interruptor
. Repita os passos 1– 3
para emparelhar um único controlo remoto sem fios Pico com vários
dispositivos / interruptores
.
5. Pressionar o botão Preset (pré-configuração) (somente nos
modelos 3B e 3BRL) em um controle sem fio Pico fará com que
todos os dimmers emparelhados assumam as configurações de
iluminação favoritas. Os interruptores podem ser configurados
para Ligarem ou Desligarem. Para salvar uma configuração
de iluminação favorita, ajuste todos os dimmers/interruptores
controlados pelo controle sem fio Pico na configuração desejada.
A seguir, pressione o botão Preset (pré-configuração) do controle
sem fio Pico por 6 segundos, até que todos os LEDs dos dimmers/
interruptores pisquem várias vezes.
Substituição da pilha num Controlo Remoto
Sem Fios Pico
1. Coloque uma chave de fendas de cabeça chata na ranhura na parte
inferior do controlo remoto sem fios Pico. Rode para abrir. NÃO prima os
botões sem que a caixa protetora traseira esteja colocada no seu lugar.
2. Deslize a pilha para fora, em direção à parte superior do controlo
remoto sem fios Pico.
3. Deslize a pilha nova por baixo da tira de contacto, com o terminal
negativo (–) da pilha virado para a parte frontal do controlo remoto sem
fios Pico.
4. Volte a colocar a caixa protetora traseira.
5. Confirme se a instalação está correta ao ligar o dispositivo recetor ON
(Ligar) e OFF (Desligar) usando o controlo remoto sem fios Pico.
P/N 040429 Rev. A
08/2017
Informaçães da FCC/ IC:
Este dispositivo está em conformidade com a Parte 15 das normas FCC e com as normas RSS de
isenção de licença da indústria do Canadá. A operação está sujeita às duas condições abaixo:
(1) Este dispositivo não deve causar interferência prejudicial e
(2) este dispositivo aceita qualquer interferência recebida, incluindo interferência que possa causar
funcionamento indesejado. Modificações não expressamente autorizadas pela Lutron Electronics Co.,
Inc poderão anular a permissão do usuário para operar este equipamento.
Nota: Este equipamento foi testado e considerado adequado aos limites para a Classe B de
dispositivos digitais, de acordo com a Parte 15 das normas da FCC. Esses limites foram criados
para oferecer uma proteção razoável contra interferência nociva em uma instalação residencial.
Este equipamento gera, usa e pode irradiar energia de radiofreqüência e, caso não seja instalado e
utilizado de acordo com as instruções, pode causar interferência nociva às comunicações de rádio.
No entanto, não há garantia de que tal interferência não ocorra em uma determinada instalação.
Se esse equipamento causar interferência nociva à recepção de rádio ou televisão, que pode ser
percebida ao ligar e desligar o equipamento, o usuário é encorajado a tentar corrigir o problema por
meio de uma ou mais das seguintes medidas:
—Mude a direção ou a localização da antena de recepção
—Aumente a separação entre o equipamento e o receptor
— Conecte o equipamento a uma saída em um circuito diferente daquele ao qual o receptor
está conectado
—Consulte o distribuidor ou um experiente técnico de rádio/TV para obter ajuda
Figura 1
Dispositivo / Interruptor
Maestro Wireless
Dispositivo / Interruptor
Caséta Wireless
Controle
remoto Pico
Figura 2
LUTRON
Botão sobe (somente nos modelos 2BRL e 3BRL)
As luzes aumentam de intensidade, e as persianas/
cortinas movimentam-se para o limite de abertura.
Botão inferior
As luzes dimerizam até se apagarem, e as persianas /
cortinas vão para o limite de fechamento. Ativa a cena
“OFF” (desligada), quando usado no modo de cena
com os aplicativos sem fio GRAFIKEye QS.
Indicador LED
Pisca para indicar uma pressão
de botão ou quando a unidade
se encontra no modo de
programação.
Botão superior
As luzem brilham na intensidade máxima, e as
persianas / cortinas movimentam-se para o limite de
abertura. Ativa a cena 1, quando usado no modo de
cena com os aplicativos sem fio GRAFIKEye QS.
Botão desce (somente nos modelos 2BRL e 3BRL)
As luzes diminuem de intensidade, e as persianas / cortinas
movimentam-se para o limite de fechamento.
Botão de pré-configuração
(somente nos modelos 3B e 3BRL)
Toque uma vez:
Os dispositivos assumem as
posições/os níveis de
pré-configuração. Ativa a cena 16,
quando usado no modo de cena
com os aplicativos sem fio
GRAFIK Eye QS.
Pressione e mantenha:
Para salvar um novo nível de
pré-configuração ou posição,
pressione e mantenha por
6segundos.
Sede Mundial
TEL: +1.610.282.3800
FAX: +1.610.282.1243
Toll Free:1.844.LUTRON1
Números dos
modelos BAA:
UPJ2-2B
UPJ2-2BRL
UPJ2-3B
UPJ2-3BRL
L
U
T
R
O
N