User Guide for Smart Remote Control
Important Notes
Please Read Before Installing
1. This install guide provides simple setup instructions for Maestro Wireless and Caséta Wireless systems only. If you are using your Pico wireless control with any other Lutron system, please refer to the system setup guide. If you no longer have your system setup guide, please download the latest version by following the links at lutron
2. The Pico wireless control uses one (1) CR2032 battery (pre-installed). DO NOT use rechargeable batteries. Using improper batteries could damage the Pico wireless control. DO NOT dispose of the battery in normal household waste. Please recycle, take to a proper battery disposal facility, or contact your local waste disposal provider regarding local restrictions on the disposal or recycling of batteries.
WARNING: Risk of fire, explosion and burns. May result in serious injury or death. DO NOT recharge, disassemble, crush, puncture, heat above 212 °F (100 °C) or incinerate the battery. The battery in this device contains Perchlorate Material — special handling may apply.
3. The Pico wireless control must be paired with dimmer(s) / switch(es) before it can communicate.
4. Refer to product specification submittals at www.lutron.com for system specifications on the maximum number of configurable Pico wireless controls per device / system.
5. The range of the Pico wireless control is 30 ft (9 m). Performance is highly dependent on a variety of complex factors, such as:
• Distance between system components
• Geometry of the building structure
• Construction of walls separating system components
• Electrical equipment located near system components
6. Clean Pico wireless control with a soft damp cloth only.
7. DO NOT paint the Pico wireless control.
8. DO NOT mount the Pico wireless control to a metal surface.
Set-Up
(for Maestro Wireless and Caséta Wireless systems only)
To communicate with other systems or devices, including RadioRA 2, HomeWorks QS, QSG, QS sensor module (QSM), Quantum, myRoom, Vive, Serena Shades, and Sivoia QS, refer to the system setup guides. Important: Set up a Pico wireless control to a dimmer / switch before use.
1. Press and hold the dimmer / switch Tap button or Off button (Figure 1) for approximately 6 seconds. Once the LED(s) start to blink slowly, release the Tap or Off button.
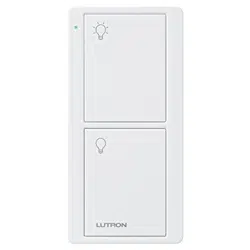
2. Press and hold the Off button on the Pico wireless control (Figure 2) for approximately 6 seconds.
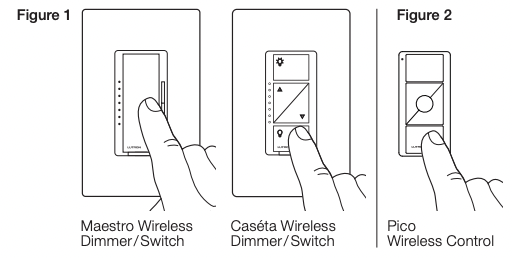
3. Once the dimmer / switch pairs with the Pico wireless control, the LED(s) on the dimmer / switch and the load will flash 3 times and they will exit Set-Up mode.
4. Repeat steps 1– 3 to pair multiple Pico wireless controls with a single dimmer / switch. Repeat steps 1– 3 to pair a single Pico wireless control with multiple dimmers / switches.
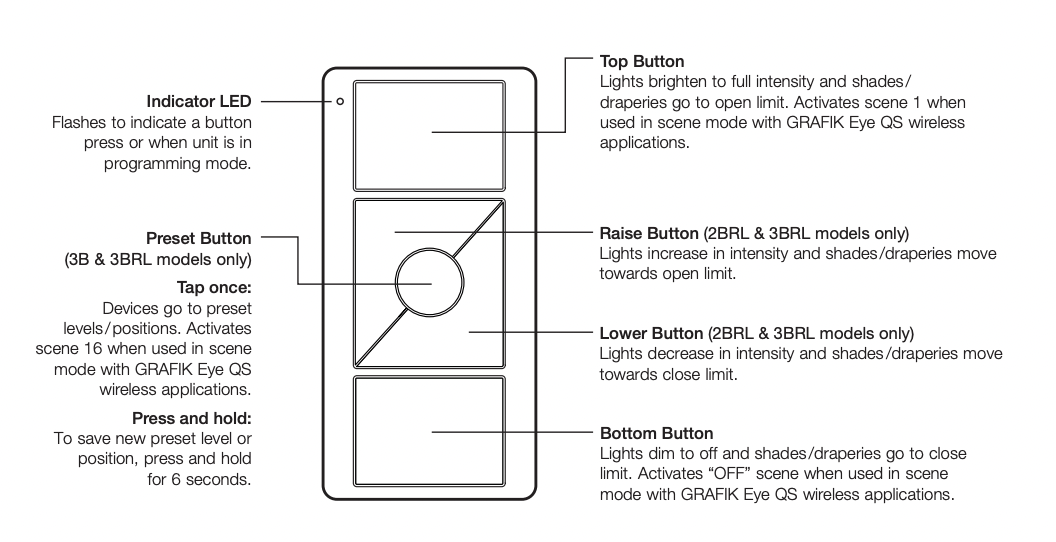
5. Pressing the Preset button (-3B and -3BRL models only) on a Pico wireless control will cause all paired dimmers to go to the favorite light settings. Switches can be configured to turn On or Off. To save a favorite light setting, adjust all the dimmers/switches controlled by a Pico wireless control to the desired light setting. Then press and hold the Preset button on the Pico wireless control for 6 seconds until all LEDs on the dimmers/switches flash several times.
Replacing the Battery in a Pico Wireless Control
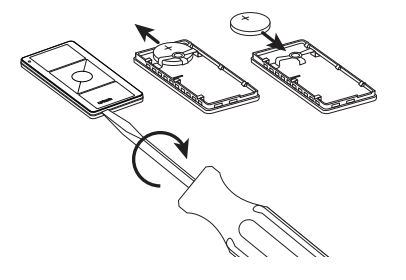
1. Place a flathead screwdriver into the slot at the bottom of the Pico wireless control. Twist to open. DO NOT press buttons without back enclosure on.
2. Slide the battery out, toward the top of the Pico wireless control.
3. Slide a new battery underneath the contact strap, with the (–) terminal toward the front of the Pico wireless control.
4. Replace the back enclosure.
5. Confirm proper installation by turning the receiving device ON and OFF using the Pico wireless control.
Operation
Un-pairing a Pico Wireless Control
To un-pair a previously paired Pico wireless control from your system, perform the following steps:
1. Quickly tap the OFF button on the Pico wireless control (Figure 2) 3 times and continue to hold it for 6 seconds after the third tap.
2. Once the indicator LED comes on solid, quickly tap the OFF button 3 times. Do not continue to hold on the third tap.
3. To test that the Pico wireless control has been successfully removed from the system, press the ON button and verify that the Pico wireless control no longer controls the load.
NOTE: This will remove all dimmers / switches with which it was previously paired.
Troubleshooting
| Symptoms |
Possible Causes |
| Light does not respond to Pico wireless control |
• The dimmer / switch failed to pair with Pico wireless control; see Set-Up.
• The dimmer / switch has already received and responded to a command or is already at the light setting the Pico wireless control is sending.
• The Pico wireless control is outside the 30 ft (9 m) operating range.
• The battery in the Pico wireless control is low.
• The battery in the Pico wireless control is installed incorrectly
|
| When in set-up mode, the LEDs on the dimmer / switch flash when trying to set up with the Pico wireless control or sensor |
• The maximum number of Pico wireless controls or sensors has been paired with the dimmer / switch. More Pico wireless controls or sensors cannot be added. See Un-pairing a Pico Wireless Control. |
This device complies with part 15 of the FCC Rules and Industry Canada license-exempt RSS standard(s). Operation is subject to the following two conditions:
(1) This device may not cause interference, and
(2) this device must accept any interference, including interference that may cause undesired operation. Modifications not expressly approved by Lutron Electronics Co., Inc. could void the user’s authority to operate this equipment.
Note: This equipment has been tested and found to comply with the limits for a Class B digital device, pursuant to part 15 of the FCC Rules. These limits are designed to provide reasonable protection against harmful interference in a residential installation. This equipment generates, uses and can radiate radio frequency energy and, if not installed and used in accordance with the instructions, may cause harmful interference to radio communications. However, there is no guarantee that interference will not occur in a particular installation. If this equipment does cause harmful interference to radio or television reception, which can be determined by turning the equipment off and on, the user is encouraged to try to correct the interference by one or more of the following measures:
— Reorient or relocate the receiving antenna — Increase the separation between the equipment and receiver
— Connect the equipment into an outlet on a circuit different from that to which the receiver is connected
— Consult the dealer or an experienced radio / TV technician for help