User Guide
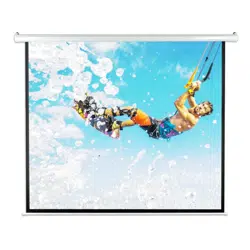
TRIPOD PROJECTOR SCREEN
EN
EN
Model: TT-HP021
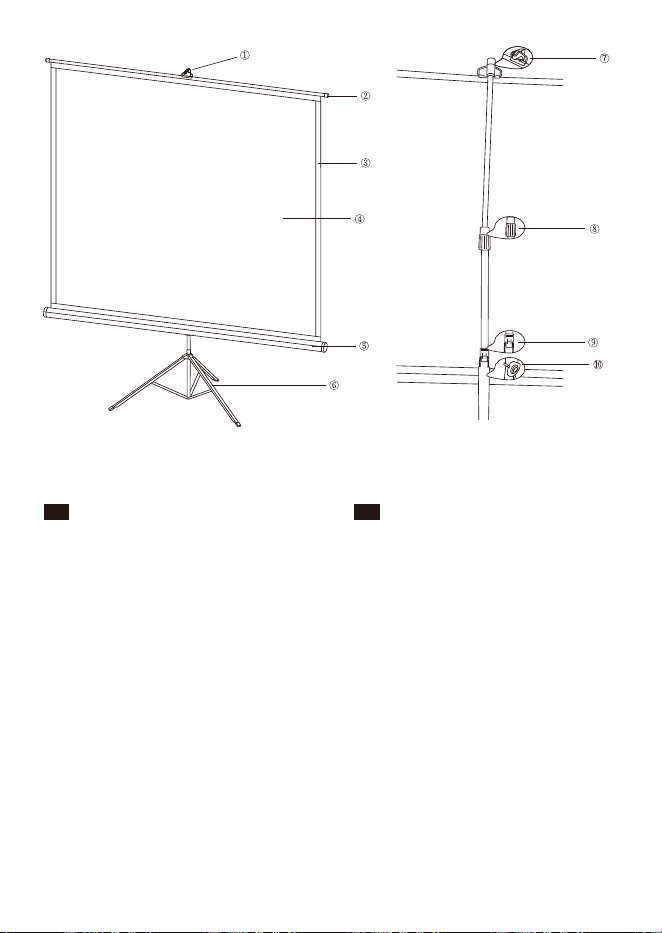
Product Diagram
①
②
③
④
⑤
⑥
⑦
⑧
⑨
⑩
Screen Handle
Hanging Rod
Black Borders
Screen
Screen Case
Tripod
Hanging Hook
Vertical Rod & Locking Sleeve Ring
Screen Bottom Adjustment Lock &
Release Tab
Assembly Nut & Tab
DE
DE
Produkt Diagramm
①
②
③
④
⑤
⑥
⑦
⑧
⑨
⑩
Leinwand Griff
Hängestange
Schwarzer Rand
Leinwand
Leinwand Gehäuse
Dreibein Stativ
Aufhängehaken
Vertikale Verschlusshülse Ring
Verschluss & Freigabe Hebel
der Leinwand Höhe Einstellung
Montagemutter & Tab
FR
Schéma produit
①
②
③
④
⑤
⑥
⑦
Poignée de la toile
Tringle de fixation
Bords noirs
Écran (Toile)
Rangement de la toile
Trépied
Crochet de fixation
Tige verticale & Anneau de
verrouillage
Verrouillage de l'ajustement du fond
de l'écran
Écrou & Patte de montage
ES
Diagrama del producto
①
②
③
④
⑤
⑥
⑦
Manija de la pantalla
Varilla colgante
Bordes negros
Pantalla
Funda de pantalla
Trípode
Gancho colgante
⑧
⑨
⑩
⑧
⑨
⑩
Anillo de bloqueo vertical
Ajuste de la altura de la pantalla.
Lengüeta de bloqueo y desbloqueo
Tuerca y lengüeta de montaje
IT
Schema del Prodotto
①
②
③
④
⑤
⑥
⑦
⑧
⑨
⑩
Maniglia Schermo
Asta per Appendere
Margini Neri
Schermo
Custodia Schermo
Treppiedi
Gancio per Appendere
Anello di Bloccaggio Scorrimento
Verticale
Leva Bloccaggio / Rilascio di
Regolazione Altezza Schermo
Giunto e Fermo d’Assemblaggio
1 2 3
6 74 5
JP
製品図
①
②
③
④
⑤
⑥
⑦
⑧
⑨
⑩
スクリーンハンドル
つかみ部分横
黒 スクリー ン
スクリー ン
スクリーン収納部
三脚
吊り下げフック
ロックスリーブリング(棒の高さを調整)
高さ調整タブ(スクリーン収納部の高さ
を調整)
組 立 ナ ット & タ ブ
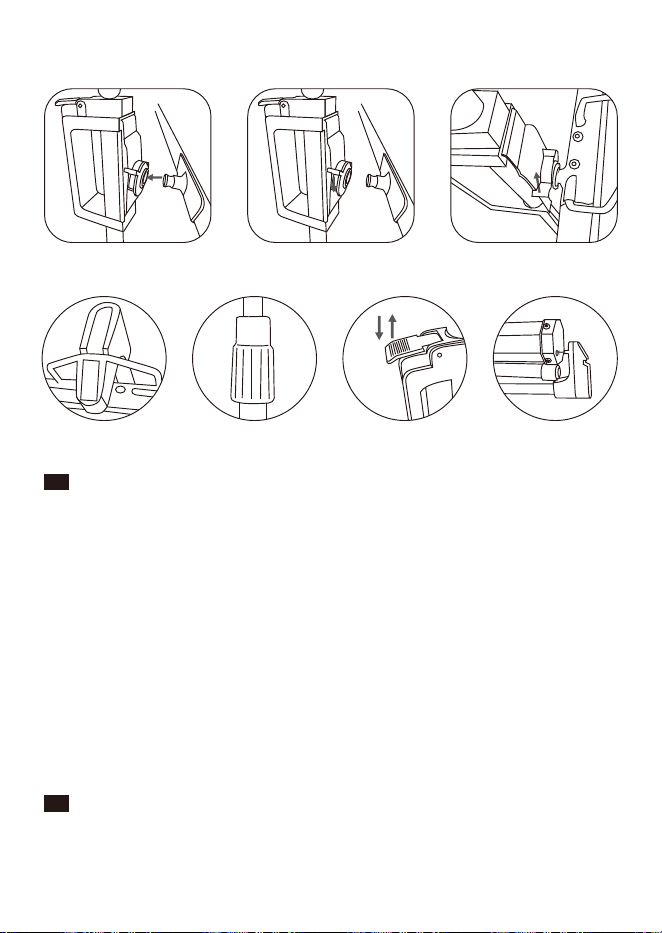
1. Stand the tripod upright on a at, open area.
2. The screen case is detachable. To detach, press down the tab on the assembly nut
and pull out the screen case. To attach, press down the tab on the assembly nut. Make
sure the screen handle is facing the bottom of the top hook. Push the bolt on the screen
case into the assembly nut and lift the tab to lock both parts in place.(Diagram 1, 2, 3)
3. Rotate the hanging rod 180° to make it parallel to the ground. Pull out the screen with
the screen handle and place it on the top hook.(Diagram 4)
4. Twist the sleeve ring to lock / unlock the position of the vertical bar and adjust the
screen height. (Diagram 5)
5. Lift up the adjustment tab to raise / lower the bottom of the screen. Press down the tab
to lock the position in place. (Diagram 6)
6. When not in use, detach the screen handle from the hanging hook, slowly retract the
screen back into the case. Insert the notch on top of the extension bar into the hole on
the screen case cap to lock both parts together. (Diagram 7)
Note: Store the screen into the storage bag when not to be used for a long time to
protect against dusts and wrinkles.
1. Stellen Sie das Dreibein Stativ auf einen achen, offenen Bereich.
2. Das Leinwand Gehäuse ist abnehmbar. Um es zu lösen, drücken Sie den Hebel auf
der Montagemutter herunter und ziehen Sie das Leinwand Gehäuse heraus. Um es zu
FR
1. Placez le trépied debout sur une surface plane et dégagée.
2. Le rangement de l'écran est détachable. Pour le détacher, appuyez sur le levier de
l'écrou d'assemblage et retirez Le rangement de l'écran. Pour l'attacher, appuyez sur
le levier de l'écrou. Assurez-vous que la poignée est alignée avec le crochet du haut.
Pressez l'écrou du rangement dans l'écrou d'assemblage et levez la patte pour
verrouiller les deux parties en place.(Schéma 1, 2, 3)
3. Pivotez la tringle de xation à 180° pour la rendre parallèle au sol. Sortez l'écran avec
la poignée et placez-la sur le crochet supérieur.(Schéma 4)
4. Tournez l'anneau bleu pour verrouiller / déverrouiller la position de la barre verticale et
ajuster la hauteur de l'écran.(Schéma 5)
5. Levez le levier d'ajustement pour lever / baisser le bas de l'écran. Abaissez le levier
pour verrouiller la position.(Schéma 6)
6. Lorsque vous ne l'utilisez pas, détachez la poignée du crochet de xation, rétractez
doucement l'écran dans son rangement. Insérez l'encoche du haut de la barre
d'extension dans le trou du rangement pour verrouiller les deux parties
ensemble.(Schéma 7)
Note: Rangez la toile dans un sac de rangement si vous ne l'utilisez pas pendant
longtemps pour la protéger de la poussière et des plis.
ES
1. Coloque el trípode en posición vertical sobre una supercie plana y abierta.
2. La funda de la pantalla es desmontable. Para separarla, presione hacia abajo la
lengüeta de la tuerca de montaje y saque la pantalla. Para jar, presione hacia
abajo la lengüeta de la tuerca de montaje. Asegúrese de que la manija de la
pantalla esté hacia la parte inferior del gancho superior. Empuje el perno en la caja
de la pantalla en la tuerca de montaje y levante la lengüeta para bloquear ambas
partes en su lugar.(Diagrama 1, 2. 3)
3. Gire la varilla colgante 180 ° para que sea paralela al suelo. Saque la pantalla con la
manija de la pantalla y colóquela en el gancho superior.(Diagrama 4)
www.taotronics.com
NORTH AMERICA
E-mail: support@taotronics.com (US)
support.ca@taotronics.com(CA)
Tel: 1-888-456-8468 (Monday-Friday: 9:00 – 17:00 PST)
Address: 46724 Lakeview Blvd, Fremont, CA 94538
EUROPE
E-mail: support.uk@taotronics.com (UK)
support.de@taotronics.com (DE)
support.fr@taotronics.com (FR)
support.es@taotronics.com (ES)
support.it@taotronics.com (IT)
EU Importer: ZBT International Trading GmbH, Halstenbeker
Weg 98C, 25462 Rellingen, Deutschland
ASIA PACIFIC
E-mail: support.jp@taotronics.com (JP)
www.taotronics.com
Installation/Installation/Installation/Instalación/Installazione/装着
befestigen, drücken Sie den Hebel auf der Montagemutter herunter. Stellen Sie sicher,
dass der Leinwandgriff dem unteren Ende des Tophakens zugewandt ist. Drücken Sie
den Bolzen auf dem Leinwand Gehäuse in die Montagemutter und heben Sie den
Hebel an, um beide Teile einzurasten. (Diagramm 1, 2, 3)
3. Rotieren Sie die Hängestange um 180°, damit sie parallel mit dem Boden wird. Ziehen
Sie die Leinwand mit Leinwandgriff heraus und hängen Sie sie auf den Top Haken.
(Diagramm 4)
4. Drehen Sie den Hülsen Ring, um die vertikale Stange zu verriegeln / entriegeln und die
Höhe der Leinwand einzustellen.(Diagramm 5)
5. Heben Sie den Hebel zur Einstellung an, um den Boden der Leinwand zu heben /
senken. Drücken Sie den Hebel, um in der Position zu verriegeln.(Diagramm 6)
6. Wenn Sie die Leinwand nicht verwenden, lösen Sie den Leinwandgriff vom Aufhänge-
haken, ziehen Sie die Leinwand langsam zurück in das Gehäuse ein. Setzen Sie die
Nut oben auf Verlängerungsschiene in das Loch auf dem Deckel des Leinwand
Gehäuses, um beide Teile einzurasten.(Diagramm 7)
Anmerkung: Lagern Sie die Leinwand in der Aufbewahrungstasche, wenn sie für längere
Zeit nicht genutzt wird, um sie gegen Staub und Falten zu schützen.
www.taotronics.com
User Guide
TRIPOD PROJECTOR SCREEN
EN
EN
Model: TT-HP021
Product Diagram
①
②
③
④
⑤
⑥
⑦
⑧
⑨
⑩
Screen Handle
Hanging Rod
Black Borders
Screen
Screen Case
Tripod
Hanging Hook
Vertical Rod & Locking Sleeve Ring
Screen Bottom Adjustment Lock &
Release Tab
Assembly Nut & Tab
DE
DE
Produkt Diagramm
①
②
③
④
⑤
⑥
⑦
⑧
⑨
⑩
Leinwand Griff
Hängestange
Schwarzer Rand
Leinwand
Leinwand Gehäuse
Dreibein Stativ
Aufhängehaken
Vertikale Verschlusshülse Ring
Verschluss & Freigabe Hebel
der Leinwand Höhe Einstellung
Montagemutter & Tab
FR
Schéma produit
①
②
③
④
⑤
⑥
⑦
Poignée de la toile
Tringle de fixation
Bords noirs
Écran (Toile)
Rangement de la toile
Trépied
Crochet de fixation
Tige verticale & Anneau de
verrouillage
Verrouillage de l'ajustement du fond
de l'écran
Écrou & Patte de montage
ES
Diagrama del producto
①
②
③
④
⑤
⑥
⑦
Manija de la pantalla
Varilla colgante
Bordes negros
Pantalla
Funda de pantalla
Trípode
Gancho colgante
⑧
⑨
⑩
⑧
⑨
⑩
Anillo de bloqueo vertical
Ajuste de la altura de la pantalla.
Lengüeta de bloqueo y desbloqueo
Tuerca y lengüeta de montaje
IT
Schema del Prodotto
①
②
③
④
⑤
⑥
⑦
⑧
⑨
⑩
Maniglia Schermo
Asta per Appendere
Margini Neri
Schermo
Custodia Schermo
Treppiedi
Gancio per Appendere
Anello di Bloccaggio Scorrimento
Verticale
Leva Bloccaggio / Rilascio di
Regolazione Altezza Schermo
Giunto e Fermo d’Assemblaggio
1 2 3
6 74 5
JP
製品図
①
②
③
④
⑤
⑥
⑦
⑧
⑨
⑩
スクリーンハンドル
つかみ部分横
黒 スクリー ン
スクリー ン
スクリーン収納部
三脚
吊り下げフック
ロックスリーブリング(棒の高さを調整)
高さ調整タブ(スクリーン収納部の高さ
を調整)
組 立 ナ ット & タ ブ
1. Stand the tripod upright on a at, open area.
2. The screen case is detachable. To detach, press down the tab on the assembly nut
and pull out the screen case. To attach, press down the tab on the assembly nut. Make
sure the screen handle is facing the bottom of the top hook. Push the bolt on the screen
case into the assembly nut and lift the tab to lock both parts in place.(Diagram 1, 2, 3)
3. Rotate the hanging rod 180° to make it parallel to the ground. Pull out the screen with
the screen handle and place it on the top hook.(Diagram 4)
4. Twist the sleeve ring to lock / unlock the position of the vertical bar and adjust the
screen height. (Diagram 5)
5. Lift up the adjustment tab to raise / lower the bottom of the screen. Press down the tab
to lock the position in place. (Diagram 6)
6. When not in use, detach the screen handle from the hanging hook, slowly retract the
screen back into the case. Insert the notch on top of the extension bar into the hole on
the screen case cap to lock both parts together. (Diagram 7)
Note: Store the screen into the storage bag when not to be used for a long time to
protect against dusts and wrinkles.
1. Stellen Sie das Dreibein Stativ auf einen achen, offenen Bereich.
2. Das Leinwand Gehäuse ist abnehmbar. Um es zu lösen, drücken Sie den Hebel auf
der Montagemutter herunter und ziehen Sie das Leinwand Gehäuse heraus. Um es zu
FR
1. Placez le trépied debout sur une surface plane et dégagée.
2. Le rangement de l'écran est détachable. Pour le détacher, appuyez sur le levier de
l'écrou d'assemblage et retirez Le rangement de l'écran. Pour l'attacher, appuyez sur
le levier de l'écrou. Assurez-vous que la poignée est alignée avec le crochet du haut.
Pressez l'écrou du rangement dans l'écrou d'assemblage et levez la patte pour
verrouiller les deux parties en place.(Schéma 1, 2, 3)
3. Pivotez la tringle de xation à 180° pour la rendre parallèle au sol. Sortez l'écran avec
la poignée et placez-la sur le crochet supérieur.(Schéma 4)
4. Tournez l'anneau bleu pour verrouiller / déverrouiller la position de la barre verticale et
ajuster la hauteur de l'écran.(Schéma 5)
5. Levez le levier d'ajustement pour lever / baisser le bas de l'écran. Abaissez le levier
pour verrouiller la position.(Schéma 6)
6. Lorsque vous ne l'utilisez pas, détachez la poignée du crochet de xation, rétractez
doucement l'écran dans son rangement. Insérez l'encoche du haut de la barre
d'extension dans le trou du rangement pour verrouiller les deux parties
ensemble.(Schéma 7)
Note: Rangez la toile dans un sac de rangement si vous ne l'utilisez pas pendant
longtemps pour la protéger de la poussière et des plis.
ES
1. Coloque el trípode en posición vertical sobre una supercie plana y abierta.
2. La funda de la pantalla es desmontable. Para separarla, presione hacia abajo la
lengüeta de la tuerca de montaje y saque la pantalla. Para jar, presione hacia
abajo la lengüeta de la tuerca de montaje. Asegúrese de que la manija de la
pantalla esté hacia la parte inferior del gancho superior. Empuje el perno en la caja
de la pantalla en la tuerca de montaje y levante la lengüeta para bloquear ambas
partes en su lugar.(Diagrama 1, 2. 3)
3. Gire la varilla colgante 180 ° para que sea paralela al suelo. Saque la pantalla con la
manija de la pantalla y colóquela en el gancho superior.(Diagrama 4)
www.taotronics.com
NORTH AMERICA
E-mail: support@taotronics.com (US)
support.ca@taotronics.com(CA)
Tel: 1-888-456-8468 (Monday-Friday: 9:00 – 17:00 PST)
Address: 46724 Lakeview Blvd, Fremont, CA 94538
EUROPE
E-mail: support.uk@taotronics.com (UK)
support.de@taotronics.com (DE)
support.fr@taotronics.com (FR)
support.es@taotronics.com (ES)
support.it@taotronics.com (IT)
EU Importer: ZBT International Trading GmbH, Halstenbeker
Weg 98C, 25462 Rellingen, Deutschland
ASIA PACIFIC
E-mail: support.jp@taotronics.com (JP)
www.taotronics.com
Installation/Installation/Installation/Instalación/Installazione/装着
befestigen, drücken Sie den Hebel auf der Montagemutter herunter. Stellen Sie sicher,
dass der Leinwandgriff dem unteren Ende des Tophakens zugewandt ist. Drücken Sie
den Bolzen auf dem Leinwand Gehäuse in die Montagemutter und heben Sie den
Hebel an, um beide Teile einzurasten. (Diagramm 1, 2, 3)
3. Rotieren Sie die Hängestange um 180°, damit sie parallel mit dem Boden wird. Ziehen
Sie die Leinwand mit Leinwandgriff heraus und hängen Sie sie auf den Top Haken.
(Diagramm 4)
4. Drehen Sie den Hülsen Ring, um die vertikale Stange zu verriegeln / entriegeln und die
Höhe der Leinwand einzustellen.(Diagramm 5)
5. Heben Sie den Hebel zur Einstellung an, um den Boden der Leinwand zu heben /
senken. Drücken Sie den Hebel, um in der Position zu verriegeln.(Diagramm 6)
6. Wenn Sie die Leinwand nicht verwenden, lösen Sie den Leinwandgriff vom Aufhänge-
haken, ziehen Sie die Leinwand langsam zurück in das Gehäuse ein. Setzen Sie die
Nut oben auf Verlängerungsschiene in das Loch auf dem Deckel des Leinwand
Gehäuses, um beide Teile einzurasten.(Diagramm 7)
Anmerkung: Lagern Sie die Leinwand in der Aufbewahrungstasche, wenn sie für längere
Zeit nicht genutzt wird, um sie gegen Staub und Falten zu schützen.
www.taotronics.com

DE
ES
IT
JP
5. Levante la lengüeta de ajuste para subir o bajar la varilla de soporte de la pantalla.
Presione hacia abajo la lengüeta para bloquear la posición en su lugar.(Diagrama 6)
6. Cuando no esté en uso, separe la manilla de la pantalla del gancho colgante,
retraiga lentamente la pantalla de nuevo en la caja. Inserte la muesca en la parte
superior de la barra de extensión en el oricio de la tapa de la caja de la pantalla
para bloquear ambas piezas juntas.(Diagrama 7)
Nota: Guarde la pantalla en la bolsa de almacenamiento cuando no se use durante
mucho tiempo para protegerla del polvo y las arrugas.
IT
1. Posizionare il treppiedi su una supercie piana.
2. La custodia dello schermo è rimovibile. Premere il fermo del giunto d’assemblag-
gio verso il basso per slarla e rimuoverla dallo schermo. Per riattaccarla,
premere il fermo del giunto d’assemblaggio verso il basso. Assicurarsi che la
maniglia dello schermo sia orientata verso il basso del gancio superiore. Premere
il bosso della custodia dello schermo nel giunto e sollevare il fermo per ssare le
due parti assieme.(Schema 1, 2, 3)
3. Ruotare l’asta per appendere di 180° perché questa sia parallela al pavimento.
Far fuoriuscire lo schermo con la maniglia dello schermo e posizionarla sul
gancio superiore. (Schema 4)
4. Ruotare l’anello dell’asta per bloccare / sbloccare la posizione della barra
verticale e regolare l’altezza dello schermo. (Schema 5)
5. Sollevare la leva di bloccaggio per sollevare / abbassare l’asta di supporto dello
schermo. Premere la leva verso il basso per ssare in posizione. (Schema 6)
6. Quando non utilizzato, distaccare la maniglia dello schermo dal gancio di
ssaggio e rimettere lo schermo all’interno della propria custodia. Inserire il bosso
presente sulla barra d’estensione nel foro sul tappo della custodia dello schermo
per ssare le due parti assieme. (Schema 7)
Nota: Mettere lo schermo in una sacca / custodia per proteggerlo da pieghe e
polvere se non utilizzato per lunghi periodi di tempo.
JP
1. 平らな場所に三脚を開いて立てます。
2. スクリーン収納部は着脱式です。組立ナットのタブを押し下げ、スクリーン収納部のボルトを組立用
ナットに差し込みます。ボルトを差し込んだ後、タブを持ち上げてしっかり固定します。スクリーンハ
ンドルが上を向くように設置してください。(図1,図2,図3)
3. 接続したスクリーン収納部を地面と平行にします。 スクリーンハンドルで画面を引き出し、上のフッ
クに 掛 けます。 (図4)
4.ロックスリーブリングで高さを調 整します。反 時 計 回りに回して緩め、時計回りに回して固 定します。
(図5)
5. 高さ調整タブを上げて、ハンドル部分を上下させることでスクリーン収納部の高さを調整します。タ
ブを押し下げて位置を固定します。(図6)
6. 使用終了後は、吊り下げフックからスクリーンハンドルを外し、ゆっくりとスクリーン収納部に戻しま
す。スクリーン収納部のボルトと組立用ナットを外し、2つに分けます。吊り下げフックの下にある突
起とスクリーン収納部の穴、スクリーンハンドルの突起と組立用ナットを接続することで、まとめて
保管袋に収納することができます。(図7)
付記: ホコリやシワなどから守るために、長期に使用しない時は、スクリーンは保管袋に入れるように
してください。
Specifications
Model
Screen Size
Display
Projection Surface Size
Total Dimensions (Unfolded)
Viewing Angle
Screen Type
Screen Material
TT-HP021
100 inch diagonal
16:9 Aspect Ratio
221.3 x 124.5 cm
87.1 x 49.0 in
238 x 87 x 260 cm
93.7 x 34.3 x 102.4 in
160°
Tripod Projector Screen
Polyester
Características Técnicas
Modelo
Tamaño de la pantalla
Monitor
Tamaño de Supercie de Proyección
Dimensiones totales (desplegadas)
Ángulo de visión
Tipo de pantalla
Material de la pantalla
TT-HP021
100 pulgadas en diagonal
Proporción de aspecto 16:9
221.3 x 124.5 cm
238 x 87 x 260 cm
160°
Pantalla del proyector trípode
Poliéster
1. No peque o presione con intención la pantalla.
2. No se permite tocar la pantalla con objetos punzantes.
3. No derrame líquidos u otras sustancias químicas sobre la pantalla.
4. Use un cepillo o una bola de algodón para limpiar la pantalla suavemente. No utilice
detergente.
5. No tire la pantalla con fuerza excesiva.
6. Doble y guarde la pantalla en la bolsa de almacenamiento si no se va a usar
durante mucho tiempo para protegerla de las manchas y el polvo.
Atenciones
Speciche Tecniche
Modello
Taglia Schermo
Schermo
Taglia Superficie di Proiezione
Dimensioni
Complessive (aperto)
Angolo Visivo
Tipo di Schermo
Materiale Schermo
TT-HP021
100 pollici in diagonale
Proporzione 16:9
221.3 x 124.5 cm
238 x 87 x 260 cm
160°
Schermo di Proiezione con Treppiedi
Poliestere
1. Non piegare o premere lo schermo.
2. Evitare che oggetti appuntiti entrino in contatto con lo schermo.
3. Evitare che liquidi e sostanze chimiche entrino in contatto con lo schermo.
4. Utilizzare spazzola o cotone per pulire delicatamente lo schermo. Non utilizzare un
detergente per la pulizia.
5. Non tirare lo schermo con forza eccessiva.
6. Arrotolare lo schermo nell’apposita sacca / custodia per proteggerlo da pieghe e
polvere se non utilizzato per lunghi periodi di tempo.
Attenzione
1. 画面を折りたたまないでください。
2.スクリーンに鋭利な物が当たらないようにしてください。
3.水分、及び化学物質をスクリーンにこぼさないようにしてください。
4.スクリーンはブラシや綿のホコリ取りでやさしく掃除してください。
5.過度な力で引っ張らないようにしてください。
6.長期間使用しないときは、ホコリや汚れを防ぐために収納袋に入れるようにしてください。
注意
製品仕様
型番
スクリーンサイズ
画面
投影面サイズ
合計寸法(組立状態)
視野角度
スクリーンタイプ
スクリー ン素 材
TT-HP021
100 インチ 対角線
アスペクト比16:9
221.3 x 124.5 cm
238 x 87 x 260 cm
160°
三脚式 プロジェクター スクリーン
ポリエステル
1. Ne pas plier ou appuyer délibérément sur la toile.
2. Ne pas laisser d'objets coupants approcher la toile.
3. Ne pas verser de liquides ou autres substances chimiques sur l'écran.
4. Utiliser un pinceau ou du coton pour nettoyer la toile en douceur. Ne pas utiliser de
détergent.
5. Ne pas tirer la toile trop fort.
6. Rétracter et ranger la toile dans son sac de rangement si elle n'est pas utilisée
pendant longtemps pour la protéger des tâches et de la poussière.
Prudence
Caution
1. Do not deliberately fold or press the screen.
2. Do not allow sharp objects to touch the screen.
3. Do not spill liquids or other chemical substances onto the screen.
4. Use a brush or a cotton ball to clean the screen gently. Do not use any detergent.
5. Do not pull the screen with excessive force.
6. Retract and store the screen into the storage bag if not to be used for a long time to
protect from stains and dusts.
Spezikationen
Modell
Bildschirmgröße
Display
Größe der Projektionsäche
Gesamtgröße (Entrollt)
Blickwinkel
Leinwand Typ
Leinwand Material
TT-HP021
100 Zoll Diagonale
16:9 Bildverhältnis
221.3 x 124.5 cm
238 x 87 x 260 cm
160°
Dreibein Stativ Projektionsleinwand
Polyester
EN
1. Falten oder drücken Sie die Leinwand nicht absichtlich.
2. Schützen Sie die Leinwand vor scharfen Gegenstände.
3. Verschütten Sie keine Flüssigkeiten oder chemische Substanzen auf die Leinwand.
4. Verwenden Sie eine Bürste oder ein Baumwolltuch, um die Leinwand sanft zu reinigen.
Verwenden Sie keine Reinigungsmittel.
5. Ziehen Sie die Leinwand nicht mit übermäßiger Kraft.
6. Ziehen Sie die Leinwand ein und lagern Sie sie in der Lagertasche, wenn sie für
längere Zeit nicht verwendet wird, um sie vor Flecken und Staub zu schützen.
Vorsicht
FR
Spécications
Modèle
Taille d'écran
Afchage
Taille de Surface de Projection
Dimensions totales (Déplié)
Angle de vision
Type de toile
Matériau de la toile
TT-HP021
100 pouces de diagonale
16:9 Ratio
221.3 x 124.5 cm
238 x 87 x 260 cm
160°
Écran à trépied pour projecteur
Polyester

User Guide
TRIPOD PROJECTOR SCREEN
EN
EN
Model: TT-HP021
Product Diagram
①
②
③
④
⑤
⑥
⑦
⑧
⑨
⑩
Screen Handle
Hanging Rod
Black Borders
Screen
Screen Case
Tripod
Hanging Hook
Vertical Rod & Locking Sleeve Ring
Screen Bottom Adjustment Lock &
Release Tab
Assembly Nut & Tab
DE
DE
Produkt Diagramm
①
②
③
④
⑤
⑥
⑦
⑧
⑨
⑩
Leinwand Griff
Hängestange
Schwarzer Rand
Leinwand
Leinwand Gehäuse
Dreibein Stativ
Aufhängehaken
Vertikale Verschlusshülse Ring
Verschluss & Freigabe Hebel
der Leinwand Höhe Einstellung
Montagemutter & Tab
FR
Schéma produit
①
②
③
④
⑤
⑥
⑦
Poignée de la toile
Tringle de fixation
Bords noirs
Écran (Toile)
Rangement de la toile
Trépied
Crochet de fixation
Tige verticale & Anneau de
verrouillage
Verrouillage de l'ajustement du fond
de l'écran
Écrou & Patte de montage
ES
Diagrama del producto
①
②
③
④
⑤
⑥
⑦
Manija de la pantalla
Varilla colgante
Bordes negros
Pantalla
Funda de pantalla
Trípode
Gancho colgante
⑧
⑨
⑩
⑧
⑨
⑩
Anillo de bloqueo vertical
Ajuste de la altura de la pantalla.
Lengüeta de bloqueo y desbloqueo
Tuerca y lengüeta de montaje
IT
Schema del Prodotto
①
②
③
④
⑤
⑥
⑦
⑧
⑨
⑩
Maniglia Schermo
Asta per Appendere
Margini Neri
Schermo
Custodia Schermo
Treppiedi
Gancio per Appendere
Anello di Bloccaggio Scorrimento
Verticale
Leva Bloccaggio / Rilascio di
Regolazione Altezza Schermo
Giunto e Fermo d’Assemblaggio
1 2 3
6 74 5
JP
製品図
①
②
③
④
⑤
⑥
⑦
⑧
⑨
⑩
スクリーンハンドル
つかみ部分横
黒 スクリー ン
スクリー ン
スクリーン収納部
三脚
吊り下げフック
ロックスリーブリング(棒の高さを調整)
高さ調整タブ(スクリーン収納部の高さ
を調整)
組 立 ナ ット & タ ブ
1. Stand the tripod upright on a at, open area.
2. The screen case is detachable. To detach, press down the tab on the assembly nut
and pull out the screen case. To attach, press down the tab on the assembly nut. Make
sure the screen handle is facing the bottom of the top hook. Push the bolt on the screen
case into the assembly nut and lift the tab to lock both parts in place.(Diagram 1, 2, 3)
3. Rotate the hanging rod 180° to make it parallel to the ground. Pull out the screen with
the screen handle and place it on the top hook.(Diagram 4)
4. Twist the sleeve ring to lock / unlock the position of the vertical bar and adjust the
screen height. (Diagram 5)
5. Lift up the adjustment tab to raise / lower the bottom of the screen. Press down the tab
to lock the position in place. (Diagram 6)
6. When not in use, detach the screen handle from the hanging hook, slowly retract the
screen back into the case. Insert the notch on top of the extension bar into the hole on
the screen case cap to lock both parts together. (Diagram 7)
Note: Store the screen into the storage bag when not to be used for a long time to
protect against dusts and wrinkles.
1. Stellen Sie das Dreibein Stativ auf einen achen, offenen Bereich.
2. Das Leinwand Gehäuse ist abnehmbar. Um es zu lösen, drücken Sie den Hebel auf
der Montagemutter herunter und ziehen Sie das Leinwand Gehäuse heraus. Um es zu
FR
1. Placez le trépied debout sur une surface plane et dégagée.
2. Le rangement de l'écran est détachable. Pour le détacher, appuyez sur le levier de
l'écrou d'assemblage et retirez Le rangement de l'écran. Pour l'attacher, appuyez sur
le levier de l'écrou. Assurez-vous que la poignée est alignée avec le crochet du haut.
Pressez l'écrou du rangement dans l'écrou d'assemblage et levez la patte pour
verrouiller les deux parties en place.(Schéma 1, 2, 3)
3. Pivotez la tringle de xation à 180° pour la rendre parallèle au sol. Sortez l'écran avec
la poignée et placez-la sur le crochet supérieur.(Schéma 4)
4. Tournez l'anneau bleu pour verrouiller / déverrouiller la position de la barre verticale et
ajuster la hauteur de l'écran.(Schéma 5)
5. Levez le levier d'ajustement pour lever / baisser le bas de l'écran. Abaissez le levier
pour verrouiller la position.(Schéma 6)
6. Lorsque vous ne l'utilisez pas, détachez la poignée du crochet de xation, rétractez
doucement l'écran dans son rangement. Insérez l'encoche du haut de la barre
d'extension dans le trou du rangement pour verrouiller les deux parties
ensemble.(Schéma 7)
Note: Rangez la toile dans un sac de rangement si vous ne l'utilisez pas pendant
longtemps pour la protéger de la poussière et des plis.
ES
1. Coloque el trípode en posición vertical sobre una supercie plana y abierta.
2. La funda de la pantalla es desmontable. Para separarla, presione hacia abajo la
lengüeta de la tuerca de montaje y saque la pantalla. Para jar, presione hacia
abajo la lengüeta de la tuerca de montaje. Asegúrese de que la manija de la
pantalla esté hacia la parte inferior del gancho superior. Empuje el perno en la caja
de la pantalla en la tuerca de montaje y levante la lengüeta para bloquear ambas
partes en su lugar.(Diagrama 1, 2. 3)
3. Gire la varilla colgante 180 ° para que sea paralela al suelo. Saque la pantalla con la
manija de la pantalla y colóquela en el gancho superior.(Diagrama 4)
www.taotronics.com
NORTH AMERICA
E-mail: support@taotronics.com (US)
support.ca@taotronics.com(CA)
Tel: 1-888-456-8468 (Monday-Friday: 9:00 – 17:00 PST)
Address: 46724 Lakeview Blvd, Fremont, CA 94538
EUROPE
E-mail: support.uk@taotronics.com (UK)
support.de@taotronics.com (DE)
support.fr@taotronics.com (FR)
support.es@taotronics.com (ES)
support.it@taotronics.com (IT)
EU Importer: ZBT International Trading GmbH, Halstenbeker
Weg 98C, 25462 Rellingen, Deutschland
ASIA PACIFIC
E-mail: support.jp@taotronics.com (JP)
www.taotronics.com
Installation/Installation/Installation/Instalación/Installazione/装着
befestigen, drücken Sie den Hebel auf der Montagemutter herunter. Stellen Sie sicher,
dass der Leinwandgriff dem unteren Ende des Tophakens zugewandt ist. Drücken Sie
den Bolzen auf dem Leinwand Gehäuse in die Montagemutter und heben Sie den
Hebel an, um beide Teile einzurasten. (Diagramm 1, 2, 3)
3. Rotieren Sie die Hängestange um 180°, damit sie parallel mit dem Boden wird. Ziehen
Sie die Leinwand mit Leinwandgriff heraus und hängen Sie sie auf den Top Haken.
(Diagramm 4)
4. Drehen Sie den Hülsen Ring, um die vertikale Stange zu verriegeln / entriegeln und die
Höhe der Leinwand einzustellen.(Diagramm 5)
5. Heben Sie den Hebel zur Einstellung an, um den Boden der Leinwand zu heben /
senken. Drücken Sie den Hebel, um in der Position zu verriegeln.(Diagramm 6)
6. Wenn Sie die Leinwand nicht verwenden, lösen Sie den Leinwandgriff vom Aufhänge-
haken, ziehen Sie die Leinwand langsam zurück in das Gehäuse ein. Setzen Sie die
Nut oben auf Verlängerungsschiene in das Loch auf dem Deckel des Leinwand
Gehäuses, um beide Teile einzurasten.(Diagramm 7)
Anmerkung: Lagern Sie die Leinwand in der Aufbewahrungstasche, wenn sie für längere
Zeit nicht genutzt wird, um sie gegen Staub und Falten zu schützen.
www.taotronics.com