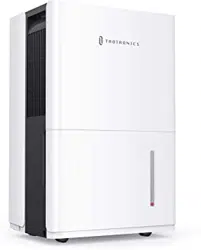
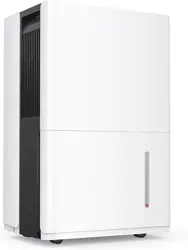
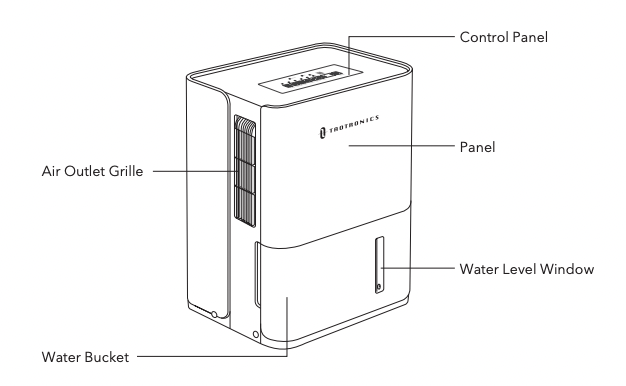
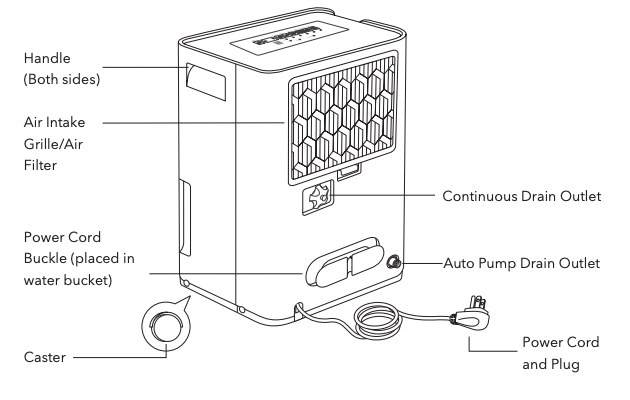
Product Diagram
Before First Use
This unit may have been tilted or placed upside down during transportation. To prevent any internal damage and ensure this unit works properly, please set it upright for at least 24 hours before initial use to allow the refrigerant to stabilize.
Getting Started
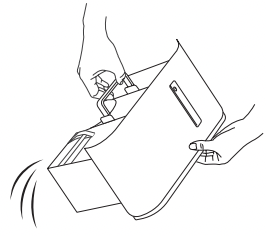
1 Carefully take out your dehumidifier from the box and remove all packaging materials.
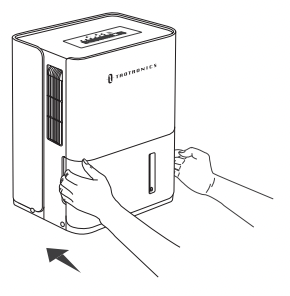
2 Place the unit on a firm, level and flat floor.
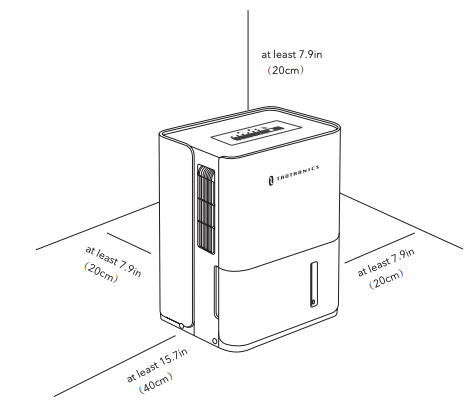
For proper air circulation, locate the unit at least 20cm of air space on all sides of the unit (at least 40cm of air space on air outlet).
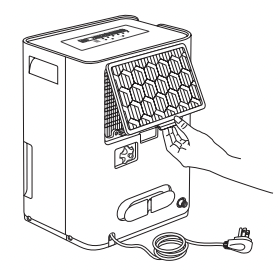
Make sure none of the grilles are blocked.
Make sure the Casters installed at four points on the bottom of the dehumidifier can move freely.
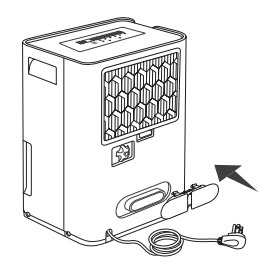
3 Take out the power cord buckle from the water bucket of the dehumidifier, then install by pressing it into the rear cover.
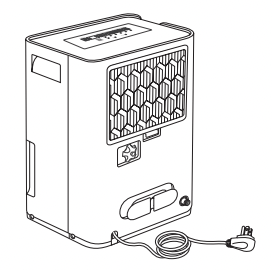
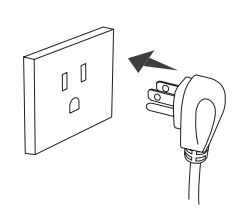
4 Plug into an appropriate voltage AC outlet. Then the dehumidifier is ready for use
Note: For optimal efficiency, the dehumidifier shall be operated in an enclosed area. Keep all doors, windows and other outside entrances to the room closed.
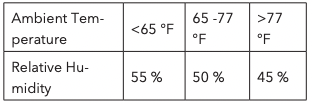
Place the dehumidifier in an area where the temperature will not drop below 41°F (5°C). This dehumidifier is designed to operate with a working environment between 41°F (5°C) and 90°F (32°C).
Do not force casters to move over carpet, or move the dehumidifier with water in the bucket. (The dehumidifier may tip over and spill water.)
Once the power cord buckle has been installed, it cannot be removed. The power cord buckle is used only when storing the unit.
Operations and Functions
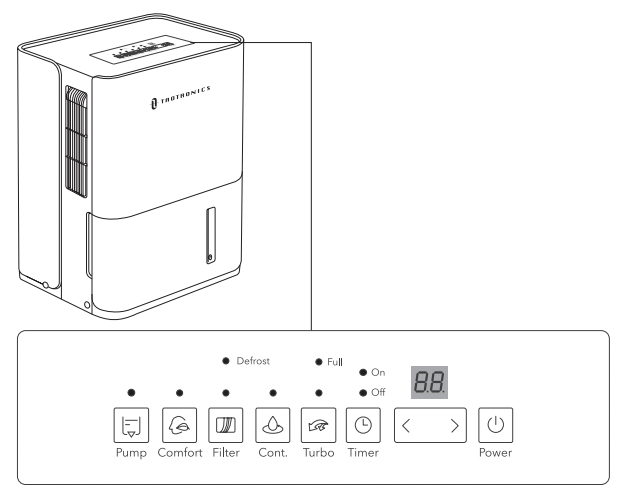
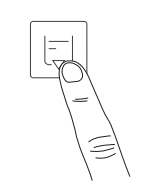
 Power Button
Press to turn the dehumidifier ON or OFF.
 LED Display
Shows the current (±5% accuracy) room %humidity level in a range of 30% to 90% RH (Relative Humidity).
Shows the set %humidity level (35% ~ 85% RH) or Auto Start/ Stop time (0 ~ 24) while setting.
Malfunction Code Meaning
AS Humidity sensor error
ES Temperature sensor error
P2 Water bucket full or not secured properly in place. Empty the water bucket and place it in the right position.
Note: When one of the above malfunctions occurs, turn off the dehumidifier, and check for any obstructions. Restart the unit, if the problem still persists, turn off the unit and unplug the power cord. Contact the Customer the Customer Support at [email protected] for repair and/or replacement.
 Humidity Setting
Set the humidity level within a range of 35% to 85%RH in 5% increments.
For drier air, press < button to set a lower RH%.
For damper air, press > button to set a higher RH%.
Timer Setting
Press < or > button to set Auto Start and Auto Stop timer from 0.0 to 24.
 Auto Pump Drain Mode
Press to activate the Auto Pump Drain function. When the water bucket is full, the drain pump will automatically pump the water out of the bucket to the drain. For detailed information, please see “Continuous Water Drainage – Using the Auto Pump Drain Option” section.
 Comfort Button
Press to turn the comfort function on/off. Under this mode, the humidity cannot be adjusted manually but will be preset to a recommended comfortable and healthy level based on the ambient temperature.
 Filter Button
When the Filter indicator is ON, it is time to clean the filter. Switch the unit OFF and carefully remove the filter from the unit and clean. The Filter indicator will flash after 250 hours of operation.
To reset after cleaning the filter, press the Filter button and the indicator will go off.
 Continuous Button
Press to activate the Continuous Mode, the unit will dehumidify continuously
 Turbo Button
Press to control the fan speed: High or Normal fan speed. When the Turbo indicator is on, the unit is running at High fan speed.
 Timer Button
Press to activate Auto Start and Auto Stop feature. Then press < or > button to set the timer from 0.0 to 24.
Auto Stop Timer: When the unit is ON, press the Timer Button, the OFF indicator will be illuminated. Then press < or > to set the number of hours (0.5- 24 hours) you want the unit to run before it switches off.
Auto Start Timer: When the unit is OFF, press the Timer Button, the ON indicator will be illuminated. Then press < or > to set the number of hours (0.5- 24 hours) you want the unit to start running automatically.
Note:
In 5 seconds without operation, the Timer starts function. Then the LED display will show the previous humidity setting.
To cancel Timer settings, turn the unit ON or OFF at any time or adjust the timer setting to 0.0.
When code “P2” is displayed, the Auto Start / Stop function will also be cancelled.
 Defrost
Auto Defrost
When frost builds up on the evaporator coils, the internal compressor will turn off and the fan will continue to run until the frost has melted. Once the internal coils have defrosted and dried, the compressor or fan will automatically restart and dehumidifying will resume.
 Full
Full
Water Bucket Full / Not Secured Properly In Place
When the water bucket is full or not secured properly in place, the indicator will be illuminated. To switch off the indicator, empty the water bucket and place it in the right position.

Auto Start Indicator
When the Auto Start feature is activated, the ON indicator will be illuminated.

Auto Stop Indicator
When the Auto Stop feature is activated, the OFF indicator will be illuminated.
When both Auto Start and Auto Stop feature are activated, the ON and OFF indicators will be illuminated.
Other Features
Auto Shut Off
When the humidity setting is reached, the dehumidifier will shut off automatically after about 3 minutes (the fan motor will continue running for about 3 minutes). When the water bucket is full and/or not secured properly in place, the dehumidifier will shut off automatically (the fan motor will continue running for a few seconds).
Auto Restart
If the dehumidifier shuts off unexpectedly due to power outage, the dehumidifier will restart with the previous function setting automatically when the power resumes.
Draining the Collected Water
(Three ways to drain the collected water)
Using the Water Bucket
When the water bucket is full, the dehumidifier will automatically shut OFF and the Full indicator will illuminate.
1 Grip both sides of the water bucket, gently pull it out.
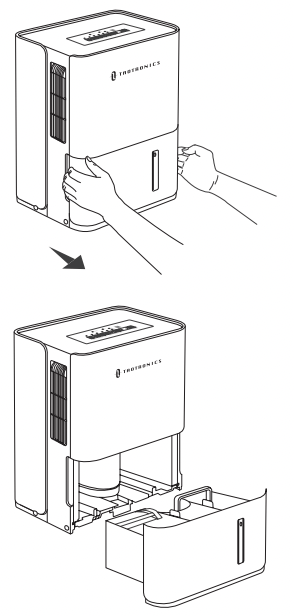
2 Grip the handle inside the water bucket and pour the water out.
3 Place the empty water bucket back. Keep the bucket in the correct position and securely seated for the dehumidifier to operate.
- IMPORTANT: Always drain and discard the water collected in the water bucket. The water is not clean and cannot be used for drinking.
- IMPORTANT: Do not move the dehumidifier when the Water Bucket is full as it will be heavy and can cause water spillage.
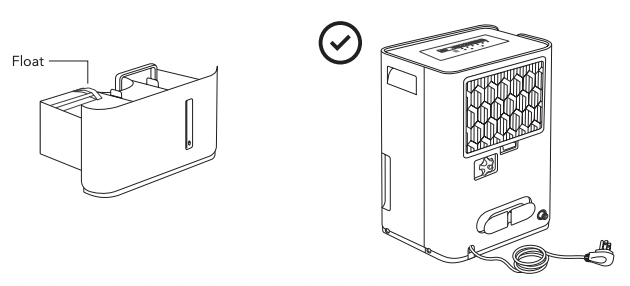
Note: There is a Float inside the water bucket that senses the water level to automatically stop dehumidification when the water bucket is full. Do Not Remove This Float.
Make sure the dehumidifier is placed on a firm, level and flat floor to avoid any possible float failure or water leakage.
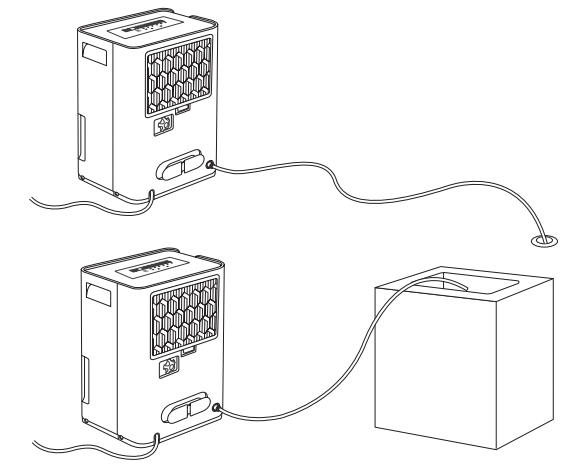
 Continuous Water Draining – Using a Continuous Water Drain Hose
Water can be automatically emptied into a floor drain by attaching the unit with a continuous water drain hose (not included) and a female threaded end (not included). The floor drain or a suitable drainage facility shall be lower than the drain outlet of the dehumidifier. Make sure the water hose is not bent or kinked to let the water flow out smoothly
 Note: Make sure the water hose is secured over the drain and will not fall out of place causing unwanted water spillage.
When the continuous drain feature is not being used, remove the drain hose from the outlet and dry the water in it. Then screw the Water Drain Cap back.
Continuous Water Drainage – Using the Auto Pump Drain Option
The Auto Pump Drain is available if you want to use the continuous drain function, but the drain is further away, or located above the dehumidifier. When the water bucket is full, the drain pump will automatically pump the water out of the bucket to the drain.

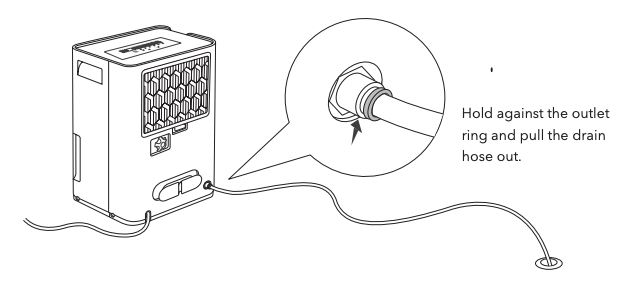
1 Attach the Auto Pump Drain Hose to the Pump Drain Outlet located on the back side of the dehumidifier.

2 Press the Pump Button to activate the Auto Pump Drain function. Once on, the indicator will light up.
3 Place the other end of the tube into the sink or drain. The water can be pumped up to 16.4 ft (5 m) vertically or horizontally. When the water bucket is full, the drain pump will automatically pump the water out of the bucket to the drain.
4 To remove the pump drain hose from the outlet, press the Pump Button to turn off the Auto Pump Drain function first, then press the pump drain outlet to pull the drain hose out.
Note: Before the pump operation is activated, make sure the Auto Pump Drain Hose is installed into the unit and the continuous drain hose is removed from the unit.
Make sure the hose is secure so there are no leaks.
Do not use this operation when the outdoor temperature is equal to or less than 32 °F.
When the pump operational failure occurs, the Pump indicator will flash. Please turn off the unit and unplug the power cord.
1 Remove the water bucket from the unit, take down the pump and remove the filter of the pump.
2 Rinse the filter with water and reinstall it after cleaning
3 Check that the pump drain hose does not link or back.
4 Empty the water in the bucket.
5 Reinstall the pump hose if it drops and place the water bucket properly.
6 Turn on the unit. If the error repeats, contact TaoTronics Customer Support at [email protected].
Cleaning and Maintenance
WARNING: Always switch OFF the dehumidifier and unplug it from the electrical outlet before cleaning or maintaining.
Cleaning the Main Unit
Switch OFF and unplug the dehumidifier from the electrical outlet.
Use a soft cloth with water or a mild detergent to clean the outer case. Do not use bleach or other abrasive cleaners, etc. on and/or in the unit while cleaning as they will damage the product.
Use a vacuum attachment or soft brush to clean the air outlet grille which can get soiled easily.
Do not splash water directly onto the main unit. Doing so may cause an electrical shock, insulation deterioration, or rust in the unit.
Do not stick any foreign objects or your fingers inside of the unit.
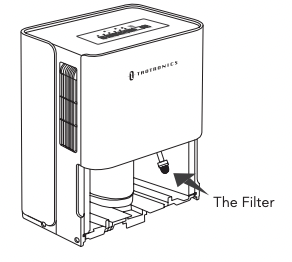
Cleaning the Air Filter
The Air Filter located at the back of the dehumidifier helps to remove dust particles from the air. For optimum dehumidification, it is recommended to clean the air filter every 2 weeks based on normal operating conditions.
1 Switch OFF and unplug the dehumidifier from the electrical outlet.
2 Carefully pull out the filer from the dehumidifier.
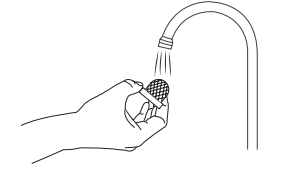
3 Rinse the air filter under running water, or vacuum away the dust with a vacuum cleaner.
4 Dry in a cool, shaded place, then carefully install it back to the unit.
Note: Do not operate the dehumidifier without a filter because dirt and dust particles will clog it and reduce the performance.
Cleaning the Water Bucket
To prevent growth of mold, mildew and bacteria, it is recommended to clean the water bucket based on actual conditions.
1 Partially fill the bucket with clean water and add a little mild detergent. Swish it around in the bucket, empty and rinse.
2 After cleaning, place the water bucket back and secure properly in place for the dehumidifier to operate.
Note: Do not use a dishwasher to clean the bucket.
End of Season Storage & Maintenance
When not using the dehumidifier for an extended period of time:
Switch OFF and unplug the dehumidifier from the electrical outlet.
Wait one day, then empty the water bucket and let it dry.
If your dehumidifier is connected to the continuous drain hose, you must disconnect the hose, dry and then place the drain cap back to the drain outlet.
Clean the main dehumidifier, water bucket and air filter. Dry the air filter and install back to the unit.
Make sure all parts of the dehumidifier and accessories are dry before storage.
Cover the dehumidifier with a cloth/ plastic bag before storage, to protect the surface from dust and scratches.
It is recommended to coil the power cord and store it off the floor to ensure it is protected from bends and kinks.
Store the unit upright in a dry, well-ventilated place, away from direct sunlight.
Troubleshooting
The following troubleshooting guide addresses the most common problems. If problems persist, contact the Customer Support at [email protected].
Malfunction Codes on LED Display
AS: Humidity sensor error
- Contact TaoTronics Customer Support.
ES: Temperature sensor error
- Contact TaoTronics Customer Support.
P2: Water bucket full or not secured properly in place
- Empty the water bucket and place it in the right position.
Dehumidifier doesnot start
Power cord is not properly plugged in.
- Connect the plug to a powered electrical outlet.
Power cord is damaged.
- Immediately stop using and contact TaoTronics Customer Support.
Water bucket is full or not secured properly in place.
- Empty the water bucket and secure it properly in place.
Preset humidity level is reached.
- This is normal. When the humidity setting is reached, the dehumidifier will shut off automatically.
Dehumidifier runs constantly / does not stop
Too large area to be dehumidified.
- The capacity of your dehumidifier may not be adequate for the room it is used in. It is recommended to add an extra dehumidifier for large areas.
A door or window is open, letting in new moisture.
- For optimal efficiency, the dehumidifier shall be operated in an enclosed area. Keep all doors, windows and other outside entrances to the room closed.
Continuous Button pressed.
- Check if the dehumidifier is running under Continuous Mode
Dehumidifier does not dry the air as it should
Not enough free space around the dehumidifier.
- Make sure there are no curtains, blinds or furniture blocking the front or back of the dehumidifier.
- Leave the unit at least 20cm/8in free space around and at least 40cm/16in free space above.
Air intake or outlet is blocked. Remove objects blocking the air intake or outlet.
- Air filter is dirty/blocked. Clean the air filter (see Cleaning and Maintenance).
Temperature in the room is too low.
- The dehumidifier is designed to operate between 41°F (5°C) and 89°F ( 32°C). Moisture removal is greatly reduced if room temperature is out of this temperature range.
A door or window is open, letting in new moisture.
- For optimal efficiency, the dehumidifier shall be operated in an enclosed area. Keep all doors, windows and other outside entrances to the room closed.
Humidity level setting is too high.
- Decrease the humidity level setting.
There are other sources of humidity in the room (e.g. boiling water in pot).
- Turn off kerosene heater or something giving off water vapor in the room.
Dehumidifier does not dry the air as it should
Insufficient time for the dehumidifier to remove moisture.
- After initial installation, allow hours operation to maintain desired dryness.
Excessive noise
Air filter is dirty/blocked.
- Clean the air filter (see Cleaning and Maintenance).
Dehumidifier is tilted or placed on an uneven surface.
- Place the unit on a level and flat floor.
Fan is working.
- It is normal that the fan creates sounds during operation.
Frost appears on the coils
Dehumidifier has been recently turned on in low room temperatures (usually below 41°F (5°C)).
- This is normal. The dehumidifier comes with Auto Defrost feature.
Water does not drain from the water hose
Some floors may have an uneven surface which may affect the continuous drainingFunction.
- The water hose must be placed lower than the drain outlet of the dehumidifier. Make sure the water hose is not bent or kinked to let the water flow out smoothly.
Water on floor
Hose to connector or hose connection may be loose.
- Check the connections between the hose and the drain outlet.
You intended to use the water bucket to collect water but the back drain cap is removed.
- Screw the drain cap back to the unit.
Warranty and Service
This product is covered with TaoTronics product and labor warranty for 12 months from the date of its original purchase. If any problems occur, please contact the TaoTronics Customer Care Centre via the contact information listed in this User Guide.
We can only provide after sales service for products that are sold by TaoTronics or TaoTronics authorized retailers and distributors. If you have purchased your unit from a different place, please contact your seller for return and warranty issues.