Loading ...
Loading ...
Loading ...
- 6
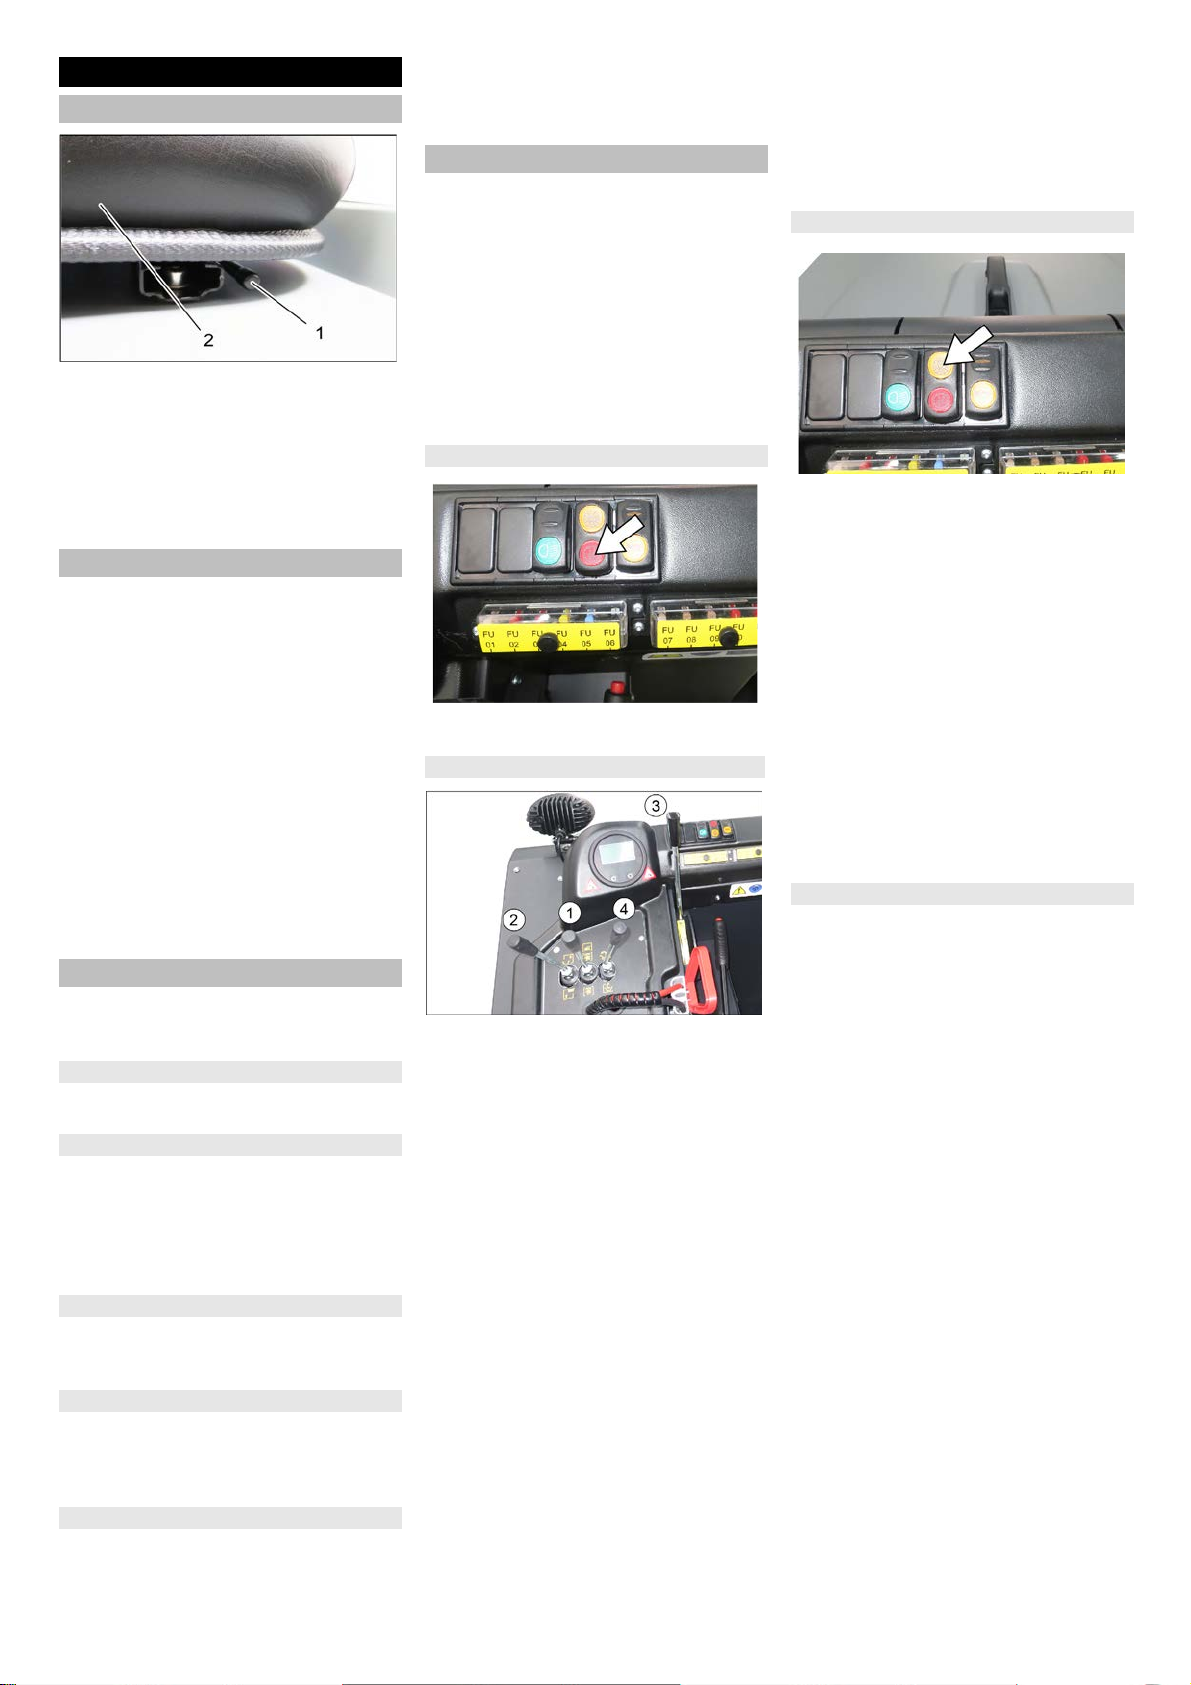
1 Lever for seat adjustment
2 Driver seat
Pull seat adjustment lever outwards.
Slide seat, release lever and lock in
place.
Check that the seat is properly locked in
position by attempting to move it back-
wards and forwards.
Note: The machine is equipped with a seat
contact switch If the driver's seat is vacat-
ed, the machine is switched off.
Note: The fine dust filter is automatically
cleaned when the device is started.
Sit on the driver's seat.
Lock parking brake.
Insert the ignition key into the ignition
switch.
Turn the ignition key to position "I".
The appliance is now ready for opera-
tion.
Turn the ignition key to position "II".
The appliance can now be driven.
Note: The display of the battery capac-
ity will show the actual charge status af-
ter about 10 seconds.
Press brake pedal and keep it de-
pressed.
Release parking brake.
Slowly press the accelerator pedal to
the front.
Danger
Risk of injury! While reversing, ensure that
there is nobody in the way, ask them to
move if somebody is around.
Slowly press the accelerator pedal
backwards.
The accelerator pedal can be used to
vary the driving speed infinitely.
Avoid jerking the pedal.
Release the accelerator pedal, the ma-
chine brakes automatically and stops.
Note: The braking effect can be supported
by pressing the brake pedal.
Driving over fixed obstacles which are 70
mm high or less:
Drive forwards slowly and carefully.
Driving over fixed obstacles which are
more than 70 mm high:
Only drive over these obstacles using a
suitable ramp.
ATTENTION
Do not sweep up packing strips, wire or
similar objects as this may damage the
sweeping mechanism.
Note: To achieve an optimum cleaning re-
sult, the driving speed should be adjusted
to take specific situations into account.
Note: The fine dust filter is automatically
cleaned every 10 minutes during operation.
Note: For increased work in the fine dust
area, the filter must also be cleaned by
pressing the filter cleaning switch.
Clean the fine dust filter with the filter
cleaning button.
1 Roller brush and side brush
control le-
ver
2 Control lever waste container
3 Roller brush control lever
4 Control lever container flap
Roller brush and side brush control le-
ver
Control lever (1) forwards: Switches the
roller brush on and lowers and switches
the side brushes on.
Control lever (1) backwards: Switches
the roller brush on.
Control lever waste container
Control lever waste container (2) to the
front: Waste container is lowered.
Control lever waste container (2) to the
back: Waste container is raised.
Control lever roller brush
Roller brush control lever (3) forwards:
Raises the roller brush.
Roller brush control lever (3) back-
wards: Lowers the roller brush.
Control lever container flap
Control lever container flap (4) to the
front: The container flap of the waste
container opens.
Note: The green indicator lamp must
light up.
Control lever container flap (4) to the
back: The container flap of the waste
container closes.
Note: The red indicator lamp must light
up.
Switch on the blower.
With surface cleaning:
Roller brush and side brush control le-
ver (1) backwards: Switches the roller
brush on.
Roller brush control lever (3) back-
wards: Lowers the roller brush.
Control lever container flap (4) to the
front: Container flap opens.
Note: The green indicator lamp must
light up.
With cleaning of side edges:
Roller brush and side brush control le-
ver (1) forwards: Switches the roller
brush on, switches the side brushes on
and lowers them.
Roller brush control lever (3) back-
wards: Lowers the roller brush.
Switch off the blower.
With surface cleaning:
Roller brush and side brush control le-
ver (1) backwards: Switches the roller
brush on.
Roller brush control lever (3) back-
wards: Lowers the roller brush.
Control lever container flap (4) to the
front: Container flap opens.
Note: The green indicator lamp must
light up.
With cleaning of side edges:
Roller brush and side brush control le-
ver (1) forwards: Switches the roller
brush on, switches the side brushes on
and lowers them.
Roller brush control lever (3) back-
wards: Lowers the roller brush.
Operation
Adjusting driver's seat
Starting the machine
Drive the machine
Drive forward
Reverse drive
Driving method
Brakes
Driving over obstacles
Sweeping mode
Cleaning the fine dust filter manually
Control lever
Sweeping dry floors
Sweeping damp or wet floors
34 EN
Loading ...
Loading ...
Loading ...