Loading ...
Loading ...
Loading ...
19
INSTALLATION INSTRUCTIONS
EN
Option 2: Sloped roof installation
(For flat roof installations see Option 3)
●
Choose location on the rear slope of the roof that minimizes vent run.
Avoid obstacles such as TV leads, electric lines, etc. If the remote blower top
is level with the roof peak, it will not be seen from the street. Remember this
location as you work from the inside of the roof space.
●
Mark a point half way between the rafters and drill a guide hole at this point.
●
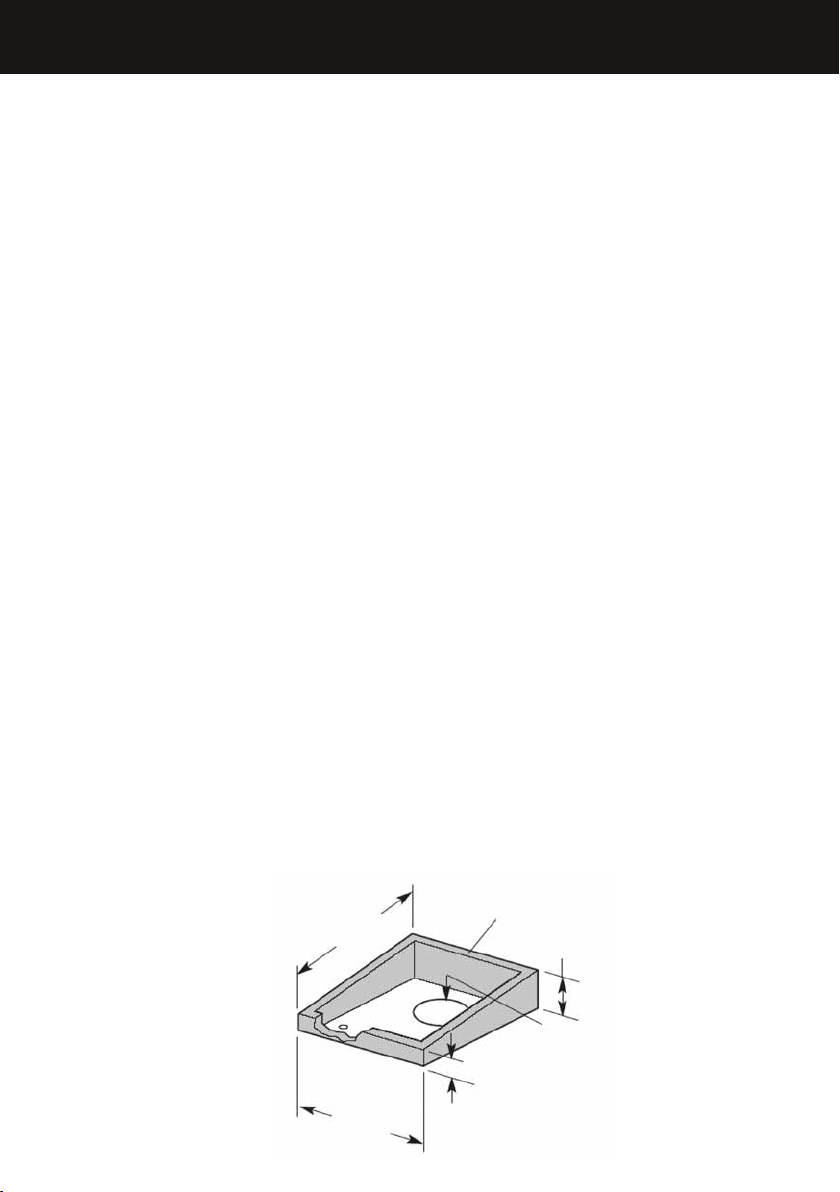
From the outside, using the guide hole as a starting point, mark the rectangular
cut-out as indicated in Fig.12. Remove ONLY the roof shingles in THIS AREA.
●
Mark an 11” (279mm) diameter circle around guide hole as indicated in Fig.12.
●
Mark the center of the 1¼” (32mm) diameter hole for electrical wiring as
indicated in Fig.12.
●
Cut out the roof boards along the 11” (279mm) diameter circle.
●
Drill the 1¼” (32mm) diameter electrical wiring hole.
●
Remove the roofing nails from the upper two-thirds of the shingles to allow the
back flashing sheet on the remote blower housing to fit under them.
●
Center the remote blower ring in the 11” (279mm) diameter hole, making sure that the
1¼” (32 mm) diameter electrical wiring hole lines up with the hole in the wiring box.
●
Attach the remote blower to roof or frame using screws appropriate for your
installation. All four holes in the back panel must be filled to prevent moisture
that may get inside the remote blower housing from leaking into the home.
●
Seal all the shingles around the remote blower housing, flashing sheet, and
mounting screw heads or frame with roofing cement. The top and side flanges
of the back plate may be covered with trim. It is recommended that electrical
connection be made and checked first. Do not block the vent grill opening at
the bottom of the trim. Doing so will decrease blower performance.
●
Continue to the ‘Prepare for electrical connection’ section on page 20.
Option 3: Flat roof installation
●
Locate the 11” (279 mm) diameter hole between rafters.
●
Build a sloping base that will mount the remote blower at a minimum pitch of
2½” (64mm) see Fig.13 for an example showing 5” (127mm) pitch.
●
Weatherproof the base as required.
●
Locate the base so that the remote blower’s vent aligns with the 11” (279 mm)
diameter hole and the blower sits evenly on the base with no gaps.
Note: Make sure that the discharge end of the remote blower faces away
from the direction of prevailing winds.
●
Use dimensions from Fig.12 to locate the 1¼” (32mm) diameter wiring hole.
●
Continue from point 8 from the previous ‘sloped roof installation’ section.
26¾”
(679mm)
2” (51mm)
33¼”
(845mm)
2” x 4” (51mm x 102mm)
discharge side
of blower
11” (279mm)
dia. hole
7” (178mm)
Fig.13
Loading ...
Loading ...
Loading ...