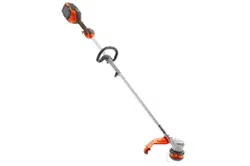
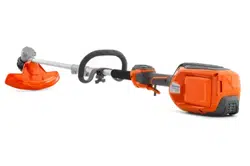
Husqvarna 115iL is a battery grass trimmer with an electrical motor.
Work is constantly in progress to increase your safety and efficiency during operation. Speak to your servicing dealer for more information.
Intended use
The product is used with a trimmer head to cut grass. Do not use the product for other tasks than grass trimming and grass clearing.
Note: National regulations can set limit to the operation of the product.
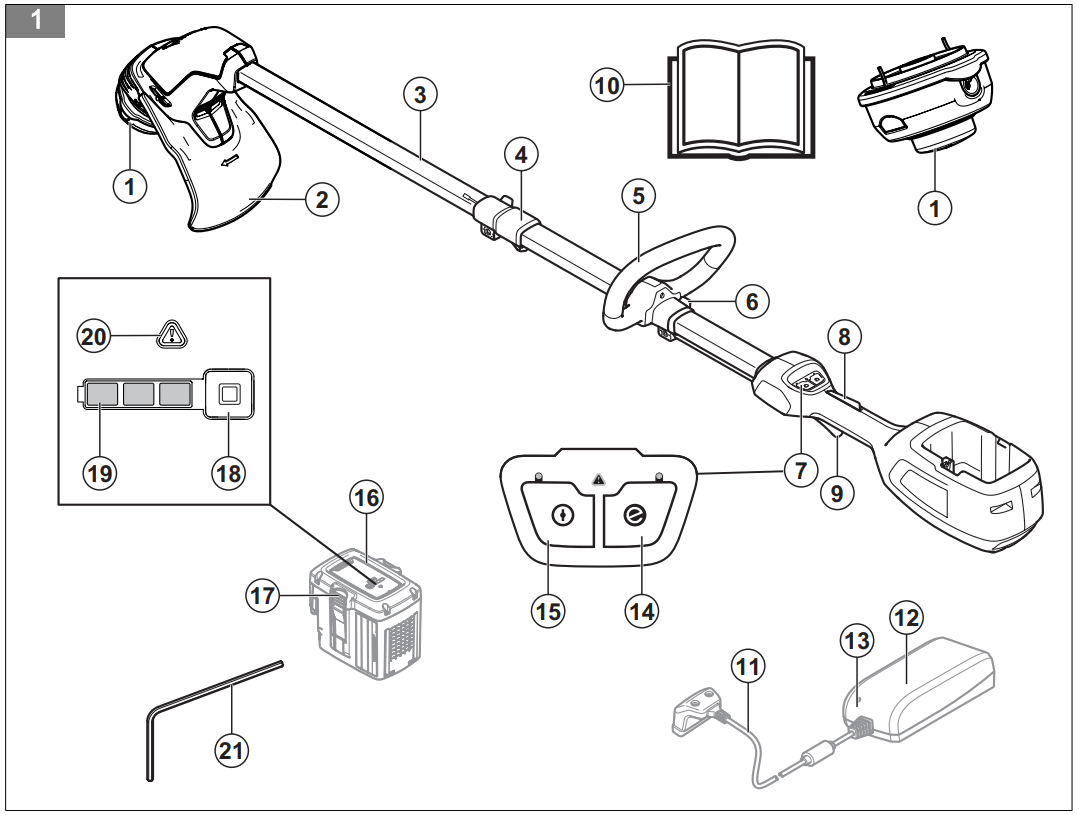
Product overview
Trimmer head
Cutting attachment guard
Shaft
Shaft adjustment (telescope)
Loop handle
Handle adjustment
Keypad
Power trigger lockout
Power trigger
Operator's manual
Cord
Battery charger
Power on and warning indicator
SavE button
Start/stop button
Battery
Battery release buttons
Battery indicator button
Battery status
Warning indicator
Hex key
Symbols on the product
WARNING: This product can be dangerous and cause serious injury or death to the operator or others. Be careful and use the product correctly. Read the operator's manual carefully and make sure that you understand the instructions before you use the product.
Use the approved hearing protection and eye protection.
Maximum speed of the output shaft.
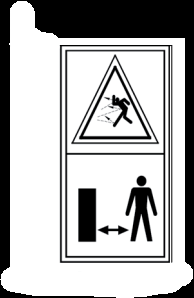
Keep bystanders away.
Use approved protective gloves.
Use heavy-duty slip-resistant boots.
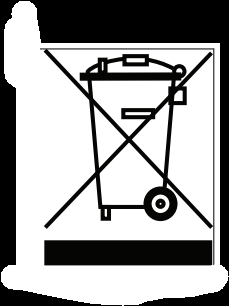
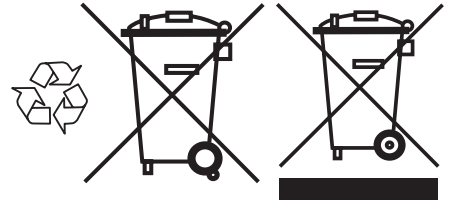
The product or package cannot be disposed as domestic waste. Recycle it at a recycling station for electrical and electronic equipment (applies to Europe only).
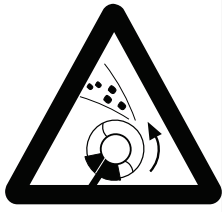
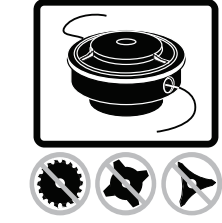
Watch out for thrown objects and ricochets.
Only use a flexible cutting attachment. Do not use metal cutting attachments.
Do not expose to rain.
Direct current.
yyyywwxxx xx The rating plate shows the serial number. yyyy is the production year, ww is the production week.
Symbols on the battery and/or on the battery charger
Recycle this product at a recycling station for electrical and electronic equipment. (Applies to Europe only)
Fail-safe transformer.
Use and keep the battery charger indoors only.
Double insulation.
California Proposition 65
This product contains or emits a chemical known to the State of California to cause cancer or birth defects or other reproductive harm.
Assembly
Introduction
WARNING: Read and understand the safety chapter before you assemble the product.
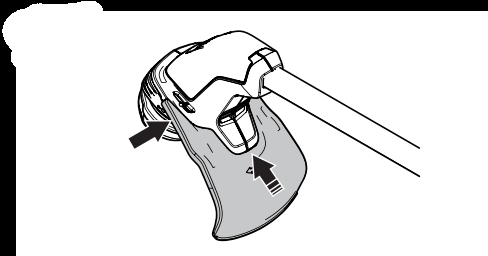
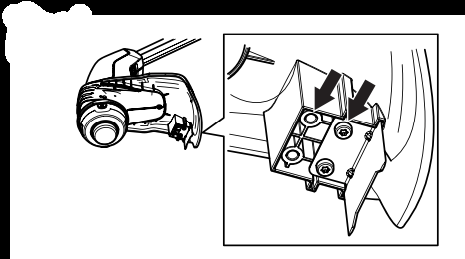
To assemble the trimmer guard 1
.1. Assemble the trimmer guard.
2. Install the bolt through the housing of the trimmer head and the trimmer guard.
3. Tighten the bolt.
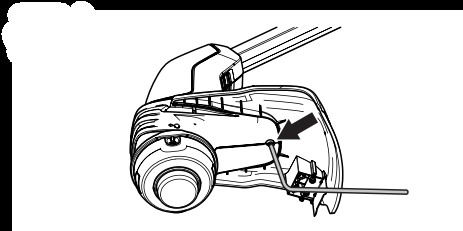
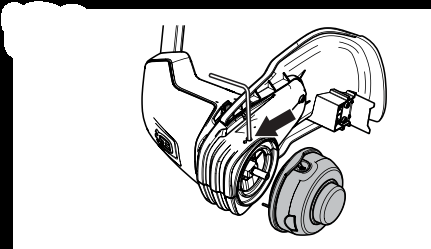
To assemble the trimmer head
Turn the output shaft until the hole in the drive disc aligns with the hole in the gear housing.
nstall the locking pin in the hole to lock the shaft.
Turn the trimmer head counterclockwise.
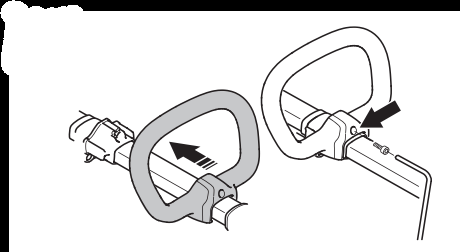
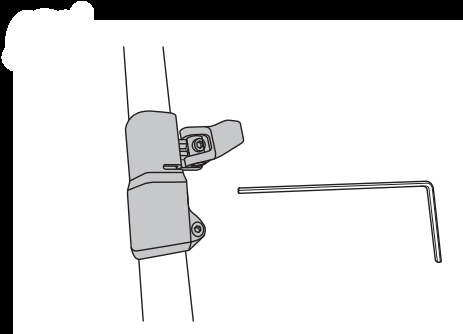
To assemble the loop handle
1. Install the screw into the loop handle.
2. Assemble the loop handle to the attachment on the shaft.
3. Tighten the screws.
4. Adjust the loop handle to a correct position.
Operation
Introduction
WARNING: Read and understand the safety chapter before you use the product.
Before you operate the product
Examine the work area to make sure that you know the type of terrain. Examine the slope of the ground and if there are obstacles such as stones, branches and ditches.
Do an overhaul inspection of the product.
Do the safety inspections, maintenance and servicing that are given in this manual.
Examine the motor for dirt or cracks. Use a brush to clean the motor from grass and leaves. Use gloves when it is necessary.
Examine the trimmer head and cutting attachment guard for damages or cracks. Replace the trimmer head and cutting attachment guard if they are hit or if they have cracks.
Make sure that all nuts and screws are tight.
Make sure that all covers, guards, handles and the cutting equipment are correctly attached and not damaged before you start the product.
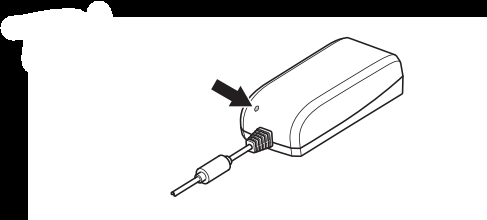
To connect the battery charger
Connect the battery charger to the voltage and frequency that is specified on the rating plate.
Put the plug in a grounded socket outlet. The LED on the battery charger flashes green one time.
Note: The battery does not charge if the battery temperature is more than 50 °C/122 °F. If the temperature is more than 50 °C/122 °F, the battery charger makes the battery become cool before the battery charges.
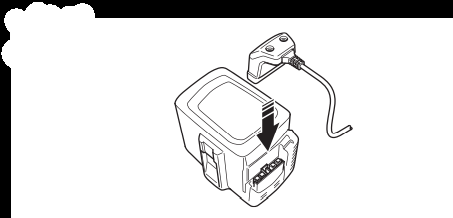
To charge the battery
Note: Charge the battery if it is the first time that you use it. A new battery is only 30% charged.
1. Connect the battery to the battery charger.
2. Make sure that the green charging light on the battery charger comes on. That means that the battery is connected correctly to the battery charger.
3. When all LEDs on the battery come on, the battery is fully charged.
4. To disconnect the battery charger from the mains socket, pull the plug. Do not pull the cable.
5. Disconnect the battery from the battery charger.
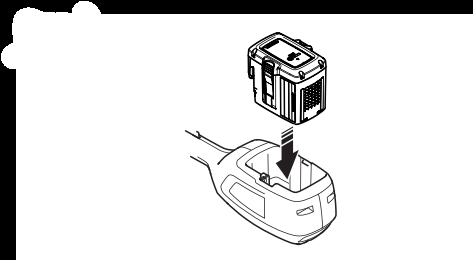
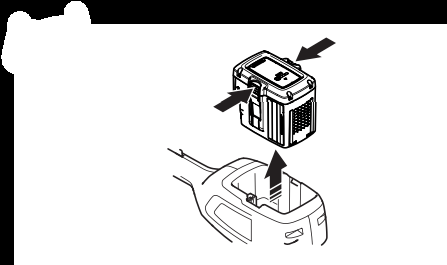
To connect the battery to the product
WARNING: Only use the initial Husqvarna battery for the product.
Fully charge the battery.
Push the battery into the battery holder of the product. The battery locks into position when you hear a click.
CAUTION: If the battery does not move easily into the battery holder, the battery is not installed correctly. This can cause damage to the product.
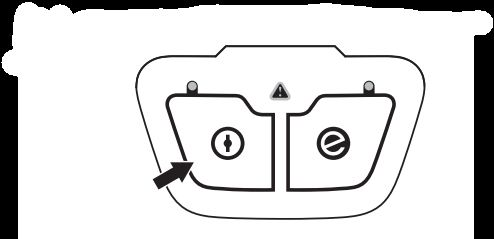
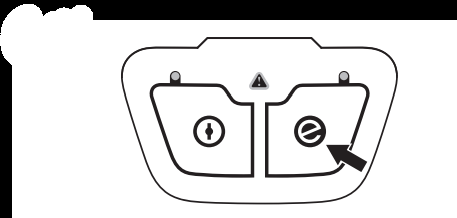
To start the product
1. Push and hold the start/stop button until the green LED comes on.
2. Push the power trigger lockout and the power trigger. The cutting equipment starts to rotate.
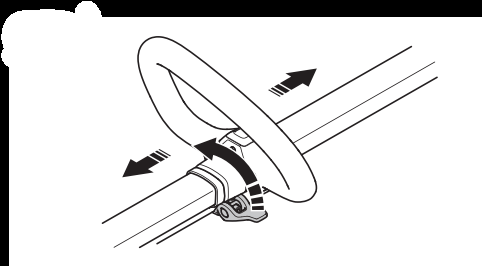
To adjust the loop handle and telescopic shaft
1. Loosen the locking handle and adjust the loop handle to a correct position.
2. Close the locking handle.
3. Loosen the lever on the shaft.
4. Set the necessary length on the shaft.
5. Close the lever and tighten the screw.
To adjust the length of trimmer line
Make sure that the cutter on the trimmer guard is not damaged. This is used to cut the line to the correct length.
Move the cutter on the trimmer guard to adjust the length of the trimmer line. The cutter can be adjusted on 2 different positions on the trimmer guard.
Make sure that the trimmer line has the correct length and that it is cut by the guard knife.
To use the SavE function
This product has a power saving function, SavE.
Note: The SavE function does not decrease the cutting power of the product.
Press the SavE button on the keypad.
Make sure that the green LED comes on.
Press the SavE button again to disconnect the function. The green LED goes out.
Automatic shutdown function
The product has an automatic shutdown function that stops the product if it is not used. The green LED for start/stop indication goes off and the product stops after 45 seconds.
To operate the product
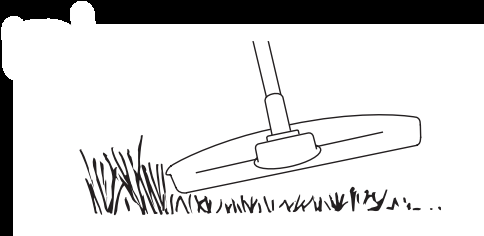
To trim the grass
1. Hold the trimmer head immediately above the ground at an angle. Do not push the trimmer line into the grass.
2. Decrease the length of the trimmer line by 10-12 cm / 4-4.75 in.
3. Decrease the engine speed to decrease the risk of damage to plants.
4. Use 80 % throttle when you cut grass near objects.
To clear grass
1. Keep the trimmer head above the ground.
2. Tilt the trimmer head.
3. Cut with the end of the trimmer line around objects in the work area.
CAUTION: Cut grass. Other objects that are hit by the trimmer line, increases the wear on the trimmer line.
4. Use 80% speed when you cut and clear vegetation. This decreases the wear on the trimmer head and trimmer line.
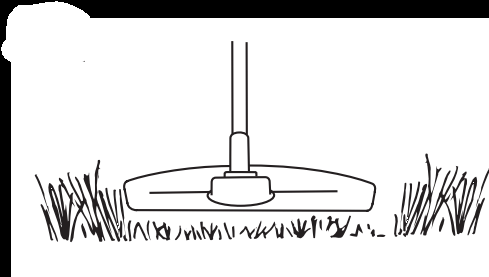
To cut the grass
1. Make sure that the trimmer line is parallel to the ground when you cut the grass.
2. Do not push the trimmer head to the ground. This can cause damage to the product.
3. Move the product from side to side when you cut grass. Use full speed.
To sweep the grass
The airflow from the rotating trimmer line can be used to remove cut grass from an area.
Hold the trimmer head and the trimmer line parallel to the ground and above the ground.
Apply full throttle.
Move the trimmer head from side to side and sweep the grass.
WARNING: Clean the trimmer head cover each time you assemble new trimmer line to prevent unbalance and vibrations in the handles. Also do a check of the other parts of the trimmer head and clean it if necessary.
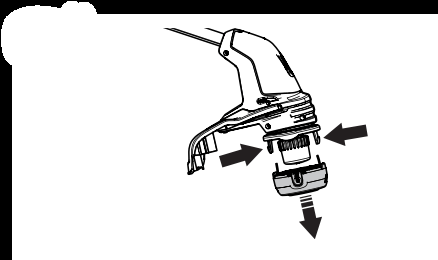
To stop the product
Release the power trigger and the power trigger lockout.
Push the start/stop button until the green LED goes out.
Push the release buttons on the battery and remove the battery from the product.
Maintenance
WARNING: Remove the battery before you do maintenance.
Maintenance
Daily
Weekly
Monthly
Clean the external parts of the product with a dry cloth. Do not use water.
X
Examine that the start and stop button works correctly and is not damaged.
X
Make sure that the power trigger and the power trigger lockout function correctly from a safety point of view.
X
Make sure that all controls work and are not damaged.
X
Keep the handles dry, clean and free from oil and grease.
X
Make sure that the cutting attachment is not damaged. Replace the cutting attachment if it is damaged.
X
Make sure that the cutting attachment guard is not damaged. Replace the cutting attachment guard if it is damaged.
X
Make sure that the screws and nuts are tight.
X
Make sure that the battery release buttons on the battery works and locks the battery in the product.
X
Examine that the battery charger is not damaged and function correctly.
X
Make sure that the battery is not damaged.
X
Make sure that the battery is charged.
X
Make sure that the battery charger is not damaged.
X
Examine all cables, couplings and connections. Make sure they are not damaged and free from dirt.
X
Do a check of the connections between the battery and the product. Do a check of the connection between the battery and the battery charger
X
To examine the battery and the battery charger
Examine the battery for damages, for example cracks.
Examine the battery charger for damages, for example cracks.
Make sure that the connection cord of the battery charger is not damaged and that there are no cracks in it.
To clean the product, the battery and the battery charger
Clean the product with a dry cloth after use.
Clean the battery and battery charger with a dry cloth. Keep the battery guide tracks clean.
Make sure that the terminals on the battery and the battery charger are clean before the battery is put in the battery charger or the product.
To replace the trimmer head
1. Do a check of the trimmer head for damages and cracks.
2. Pull out the chute assembly for the trimmer line.
3. Remove the trimmer head.
4. Replace the trimmer head.
5. Assemble the trimmer head.
Troubleshooting
Keypad
LED screen
Possible faults
Possible solutions
The error LED flashes.
Overload
The cutting attachment cannot move freely. Release the cutting attachment.
Temperature deviation
Let the product cool down.
The product does not start.
Push the power trigger and press the start button at the same time.
Release the power trigger and stop the product.
The error LED comes on with red light.
It is necessary to do servicing on the product
Speak to your service dealer.
Battery
LED display
Possible faults
Possible action
The green LED flashes.
Low battery voltage.
Charge the battery.
The error LED flashes
Temperature deviation.
Use the battery in temperatures between -10°C (14°F) and 40°C (104°F).
Too much voltage.
Make sure that the mains voltage aligns with the voltage stated on the rating plate of the product.
Remove the battery from the battery charger
The error LED is on.
Cell difference is too much (1V)
Speak to your servicing dealer
Battery charger
Problem
Possible faults
Possible solution
Red error LED flashes.
Temperature deviation.
Use the battery charger in temperatures between 5 °C (41 °F) and 40 °C (104 °F).
#2 How long will the battery last under normal use?
The battery life on the 115iL is about 97 minutes with savE activated. Of course, specific run-time varies since the power is variable based on how much the trigger is pulled. If you’re running continuously at full power, obviously battery power will be depleted faster than running the trimmer at a lower power, or running power levels sporadically. Regardless, you’ll have plenty of run-time to trim an average size yard. I assure you that run time is very comparable to run-time of a gas-powered trimmers. Battery recharges in about 2 hours.
#3 Just arrived.no lights lit when charging unless i press button,then only 1 lit. should all 3 light when fully charged? anyone w/this issue?
When all the LEDs are lit on the battery, it is fully charged.
#4 Does it have the capability of edging the laen?
Yes, you can use any string trimmer to edge. It's all in the technique. There are edger attachments that you can attach to a string timmer, as well as standalone edgers that personally think are easier to use. It's really all about your personal preference.