Loading ...
Loading ...
Loading ...
14
Initial Setup
Date & Time
Follow the on-screen instructions to set the date and time of
BCC50 Thermostat and then click Next.
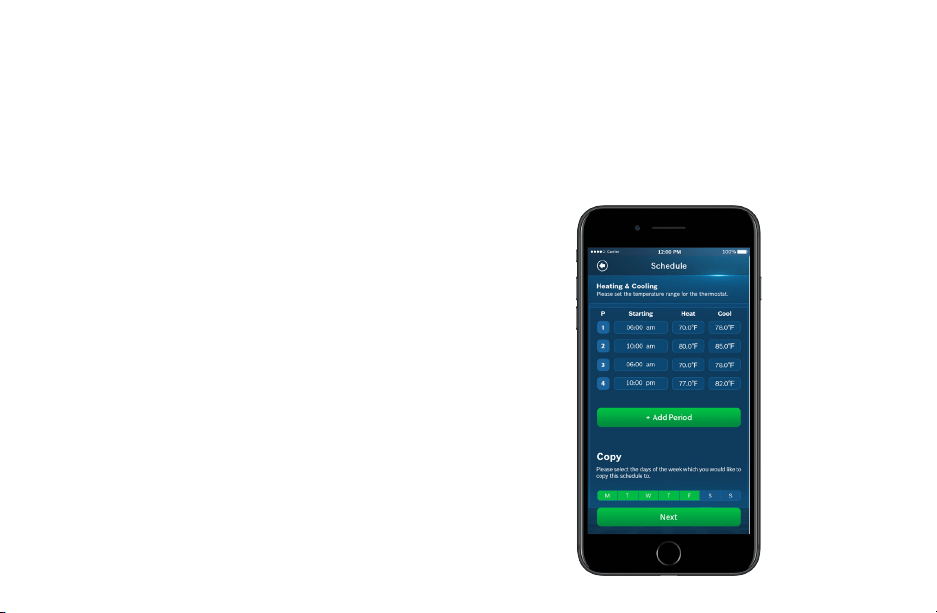
Schedule
1. Choose the schedule you would like to modify or click No
Schedule if you do not wish to set up a schedule at this
time, and click Next.
Note: Home is the default schedule for your BCC50. If you
wish to add a different schedule, click the plus (+) button in
the top right hand corner of the screen.
2. To set up your periods for the day, click on the Start Time
bubble of the period and use the scroll wheel to set the
start time of the first period of the day.
3. Next, click the Heat bubble and use the scroll wheel to set
the heating setpoint for the first period of the day.
4. Then, click the Cool bubble and use the scroll wheel to set
the cooling setpoint for the first period of the day.
Note: There is a 5 degree deadband required between
heating and cooling setpoints to prevent your equipment
from short cycling.
5. If you want to add more periods, then click add period
button and repeat the above 3 steps until you have set all
your periods for the day.
Note: You are allowed a maximum of 8 periods per day.
6. If you want to delete a period, swipe left on the period and
click delete.
7. After you have set up one day of the week, use the Copy
section to mirror the same daily schedule to other days of
the week by clicking on the days you would like to copy that
daily set of periods. Then click next.
Note: If you have not copied your schedule to all 7 days of
the week, you will be required to repeat the above steps until
you have set a schedule for everyday of the week.
Need
Screen
Loading ...
Loading ...
Loading ...