Loading ...
Loading ...
Loading ...
24
CUTTING BOWED MATERIAL
(FIGURE BB)
To avoid injury from
materials being thrown, always unplug
the saw to avoid accidental starting
and remove small pieces of material
from the table cavity.
• The table insert may be removed for
this purpose, but always reattach table
insert prior to performing a cutting
operation.
• A bowed workpiece (1) must be
positioned against the fence and
secured with a clamping device (2) as
shown before cutting. Do not position
workpiece incorrectly or try to cut the
workpiece without the support of the
fence. This will cause the blade to bind
and could result in personal injury.
WORKPIECE SUPPORT (FIGURE CC)
Long pieces need extra support. The
support should be placed under the
workpiece. Keep your hand holding the
workpiece positioned 6-3/4 inches or more
away from the blade. The support must
let the workpiece lay at on the work table
during the cutting operation.
NOTE: When mounted on a at surface,
the saw table is 2-4/5 inches high.
BB
WARNING
!
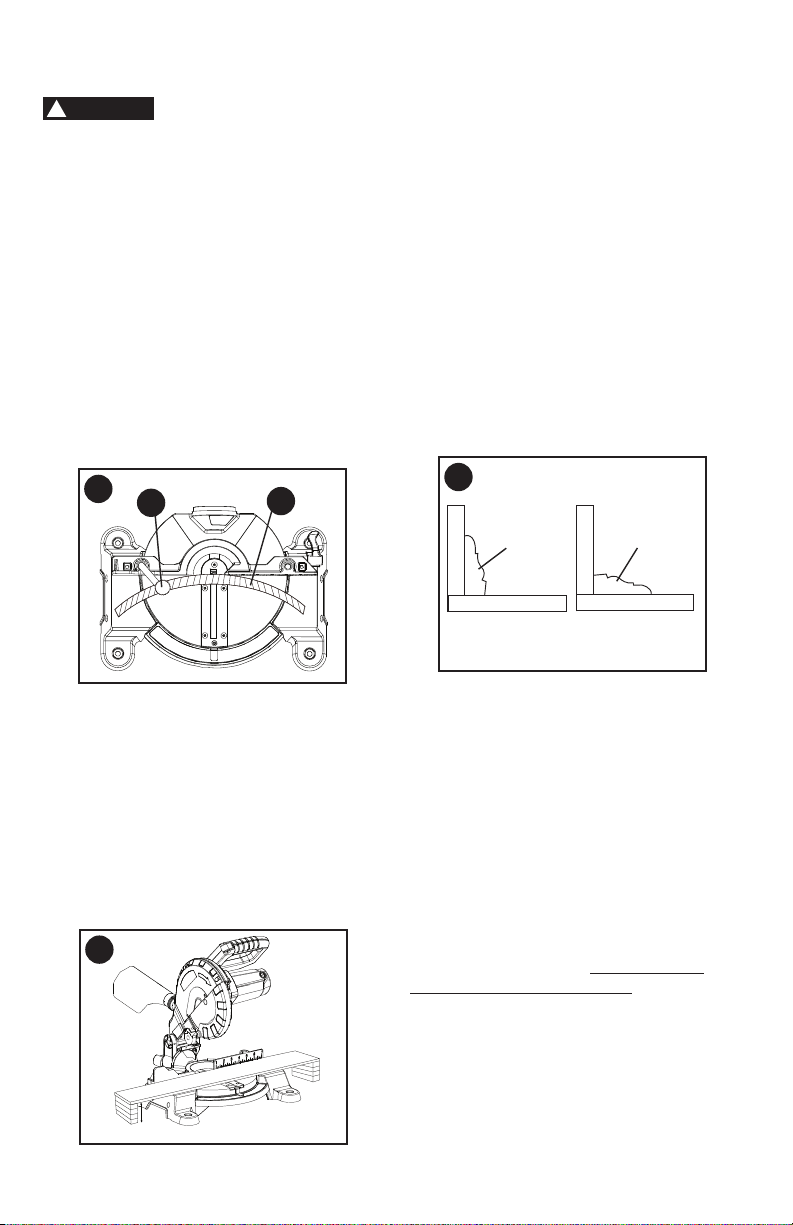
CUTTING BASE MOLDING
(FIGURE DD)
Base moldings and many other moldings
can be cut on a compound miter saw.
The setup of the saw depends on molding
characteristics and application, as shown.
Perform practice cuts on scrap material to
achieve best results:
• Always make sure moldings rest rmly
against fence and table. Use hold-down,
crown molding vise or C-clamps,
whenever possible, and place tape on
the area being clamped to avoid marks.
• Reduce splintering by taping the cut
area prior to making the cut. Mark the
cut line directly on the tape.
• Splintering typically happens due to an
incorrect blade application and thinness
of the material.
NOTE: Always perform a dry run cut so
you can determine if the operation being
attempted is possible before power is
applied to the saw.
CUTTING CROWN MOLDING
(FIGURE EE, FF)
Your compound miter saw is suited for
the difcult task of cutting crown molding.
To t properly, crown molding must be
compound-miterd with extreme accuracy.
The two surfaces on a piece of crown
molding that t at against the ceiling and
wall are at angles that, when added
together equal exactly 90°.
2
1
miter at 45°, bevel at 0° miter at 0°, bevel at 45°
Miter saw table
Miter saw table
F
e
n
c
e
F
e
n
c
e
Workpiece Workpiece
DD
CC
2-4/5 in.
Loading ...
Loading ...
Loading ...