Loading ...
Loading ...
Loading ...
15
J
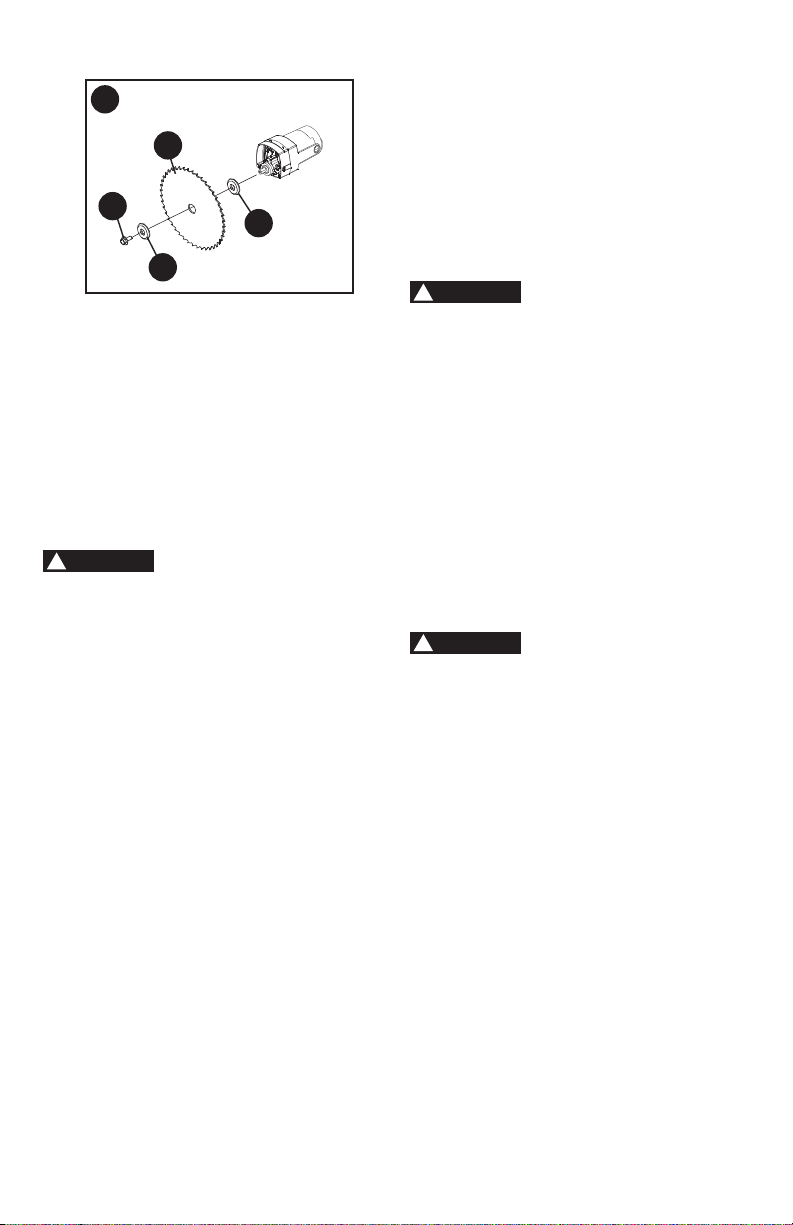
7
6
5
3
• Raise up the lower blade guard and
hold it while removing the arbor bolt (3),
outer blade collar (5), and the blade (6).
DO NOT REMOVE THE INNER BLADE
COLLAR (7).
NOTE:
Pay attention to the pieces
removed, noting their position and
direction they face. Wipe the blade
collars clean of any sawdust before
installing the new blade.
Installing Blade (Figure H, I, J)
Unplug the miter saw
before changing/installing the blade.
• Install a 7-1/4 in. blade with a 5/8 in.
arbor and no more that 7 degree hook
angle, making sure the rotation arrow
on the blade matches the clockwise
rotation arrow on the upper guard, and
the blade teeth are pointing downward.
• Raise up the lower blade guard and
hold it while placing the outer blade
collar (5) against the blade and on the
arbor. Thread the arbor bolt (3) into the
arbor in a counterclockwise direction.
(Figure J)
IMPORTANT:
Make sure the ats of the
blade collars are engaged with the ats
on the arbor shaft. Also, the at side of
the arbor collar must be placed against
the blade.
• Place the blade wrench on the arbor
bolt.
• Press the arbor lock button (4-
Figure
I), holding it in rmly while turning
the blade counterclockwise. When it
engages, continue to press the arbor
lock button in, while tightening the arbor
bolt (3) securely (left hand threads).
(Figure H)
WARNING
!
• Rotate the cover plate (2) back to its
original position until the slot in the
cover plate engages with the cover
plate screw (1). Tighten the screw with
a Phillips screwdriver.
• Verify the operation of the guard. Make
sure it does not bind or stick.
• Be sure the arbor lock button (4) is
released so the blade turns freely by
spinning the blade until the arbor lock
disengages.
(Figure I)
• To avoid injury, never use the saw
without the cover plate secure in
place. It keeps the arbor bolt from
falling out if it accidentally loosens,
and helps prevent the spinning blade
from coming off the saw. It also
keeps the guard from contacting a
spinning blade.
• Make sure the collars are clean and
properly arranged. Lower the blade
into the table and check for any
contact with the metal base or the
turn table.
MOUNTING THE MITER SAW
(FIGURE K, L)
To avoid injury form
unexpected saw movement:
• Before moving the saw, disconnect
the power cord from the outlet, and
lock the cutting arm in the lower
position using the hold-down latch.
NOTE: The hold-down latch is for
carrying or storing the tool. It is not
to be used for holding the saw while
cutting. Lower blade and press in
hold-down latch to secure saw for
transportation or storage.
• Never carry the miter saw by the
power cord or by the switch handle.
Carrying the tool by the power
cord could cause damage to the
insulation or wire connections
resulting in electric shock or re.
• To avoid injury from ying debris,
do not allow visitors to stand behind
the saw.
WARNING
!
WARNING
!
Loading ...
Loading ...
Loading ...