Loading ...
Loading ...
Loading ...
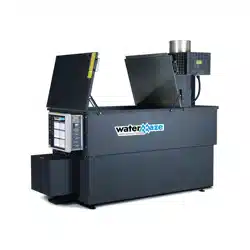
HBG EVAPORATOR OPERATOR’S MANUAL
15
HBG • 8.913-990.0-K
13. Press button, (P1tr Ac) will appear in red. Value
(no) will appear in green. No change is necessary.
14. Press button, (Ac Out) will appear in red.
(-L-L-L) will appear in green. No change is necessary.
15. Press button, (OutrES) will appear in red.
(0.01SEC) will appear in green. No change is nec-
es sary.
16. Press button, (OutPut) will appear in red.
(1t 0.10) will appear in green. No change is nec es sary.
17. Press button, (OutPut) will appear in red.
(2t 0.10) will appear in green. No change is nec es sary.
18. Press button, (OutPut) will appear in red.
(3t 0.10) will appear in green. No change is nec es sary.
19. Press button, (rEUOut) will appear in red.
(-n-n-n) will appear in green. Press button until mid dle
(-n) value is blinking. Press ▲ button until (-y) value is
show ing.
20. Press button, (rEUAnu) will appear in red.
(-n-n-n) will appear in green. No change is nec es sary.
21. Press button, (OutP.uP) will appear in red.
(PPP) will appear in green. Press button until left
(P) value is blinking. Press ▲ button until (P) val ue
ap pears. Do the same for center and right, all values
should read (-P)
22. Press button, (USr In 1) will appear in red.
(rSt. -L) will appear in green. Press ▲ button until
(Pro.dis) ap pears.
23. Press button, (USr FI) will appear in red. (rst-
L) will appear in green. No change is necessary.
24. Press button, (CodE) will appear in red. Value
(0) will appear in green. No change is nec es sary.
25. Press button, (ScroLL) will appear in red.
(no)
will appear in green. No change is necessary.
26. Press button, (FAcSEt) will appear in red. (no)
will appear in green. No change is necessary.
27. Press and hold button for 2 seconds. (Prog)
will appear in red and (SAVE) will appear in green.
To complete setting the batch counter, fi rst pull the face
plate of the batch counter out of its holder with your fi n-
gers. This will expose the internal circuit boards. Along
the left side (wall) circuit board are the dip switch es.
These switch es are numbered 1 through 7. Switches 2,
5, and 7 need to be in the up (ON) po si tion.
Slide the batch counter back into its holder. Initial pro-
gram ming of the batch cycle con trol ler is now complete.
(NOTE: Programming cannot be performed if dip switch
#7 in the up (ON) position). If ad just ment to the batch
cy cle count value is to be re pro grammed, dip switch #7
needs to be in the down (OFF) position. When re pro -
gram ming is com plete, set dip switch #7 back to the up
(ON) position).
INITIAL PROGRAMMING OF
BATCH CYCLE COUNTER
Function Settings
Reset Button. Push to restart machine after batch
cycle completed.
Scroll Button. Push to select the different pro-
gram ming modes. Also saves program values.
Vertical Scroll changes programming values.
Horizontal Scroll for multiple values. Also chang es
pro gram ming values.
NOTE: Original batch counter has been preset at
factory.
Programming
1. Press and hold button for 2 seconds. (Entry) will
ap pear in red. (Auto Sc) will appear in green. No change
is necessary.
2. Press button once, (Ac PSc) will appear in red.
(-L) will appear in green and does not need to be
changed.
3. Press button, (PSc ALr) will appear in red.
(1.00000) will appear in green and does not need to
be changed.
4. Press button, (dEc Pt) will appear in red.
(------) will appear in green. This value can't be changed.
5. Press button, (Cnt In) will appear in red. (Cl-ud)
will appear in green. No change is nec es sary.
6. Press button, (OPEr 1) will appear in red. (11) will
appear in green. Press button until (1) is show ing.
7. Press button, (C2 ASn) will appear in red. (bAtch)
will appear in green. No change is nec es sary.
8. Press button, (OPEr 2) will appear in red. (1) will
ap pear in green. No change is necessary.
9.Press button, (Ac PrS) will appear in red.
(-y-y-y) will appear in green. Press button until the far
left (-y) value is blinking. To change, press ▲ button until
(-L) is showing. Press once, the middle (-y) value
will blink. Press ▲ button until (-n) is showing. Press
button once more and the far right (-y) will blink. Press
s but ton until (-n) is showing.
10. Press button, (PrESEt) will appear in red. The
value to set is predetermined from the waste wa ter anal-
y sis. This value is known as PRS1 (Preset 1). Press the
▲ or buttons to set the batch cycle value.
11. Press button, (PrESEt) will appear in red. This
value, PRS2 (preset 2), must be set with the same val ue
as (preset 1). Press the s or buttons to set value.
12. Press button, (PrESEt) will appear in red. This
is (pre set 3) and must be set with the value 999999.
Press and hold the ▲ button until achieved.
▲
Loading ...
Loading ...
Loading ...