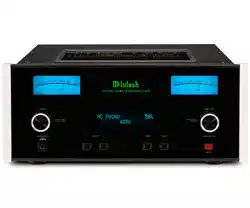
Loading ...
Loading ...
Loading ...
16
The C2700 has four Power Control Triggers Connec-
tions. When the C2700 Is On, the Triggers are either
activated or deactivated. Trigger 1, 2, 3 and 4 settings
can be set for a variety of selected Inputs and differ-
ent Internal Operation Functions. These settings will
control the Operational Power to the components con-
nected to the various C2700 Trigger Output Connec-
tors. Perform the following steps to setup the Trigger
Functions:
1. Press and hold in the INPUT Control to enter the
SETUP MODE. Refer to figure 2 on page 13.
2. Rotate the INPUT Control until “SETUP: Trig-
gers, (Hold INPUT)” appears on the Information
Display. Refer to figure 28.
3. Press and hold in the INPUT Control, “SETUP:
TRIGGER 1, Main” appears on the Information
Display. Refer to figure 29.
Rotating the INPUT Control allows selection of
“SETUP: TRIGGER 2, Main”, “SETUP: TRIG-
GER 3, Main” or “SETUP: TRIGGER 4, Main”.
4. Rotate the INPUT Control to return the “SETUP:
TRIGGER 1, Main”.
5. Rotate the VOLUME Control and the Information
Display will now indicate “SETUP: TRIGGER 1,
Output 1”. Refer to figure 30.
6. Then rotate the VOLUME Control again and the
Information display will now indicate “SETUP:
TRIGGER 1 , Output 2” followed by “SETUP:
TRIGGER 1 , Input (Hold INPUT)”. Refer to
f igure 31.
7. Now Press and hold in the INPUT Control again,
“SETUP: TRIGGER 1, BAL 1: OFF” appears on
the Information Display. Refer to figure 32. BAL
1 is one of the C2700 Input Sources.
8. To activate the “BAL 1” Source, rotate the VOL-
UME Control so the Information Display indicates
“SETUP: TRIGGER 1, BAL 1: ON”. Refer to
figure 33.
Power Control Triggers
Figure 33
SETUP: TRIGGER 1
BAL 1: ON
8. Exit the SETUP Mode by several presses of the
INPUT Control.
Figure 27
SETUP: HEADPHONES
Mute No Outputs
Figure 31
SETUP: TRIGGER 1
Input (Hold INPUT)
Figure 32
SETUP: TRIGGER 1
BAL 1: OFF
Figure 28
SETUP: Triggers
(Hold INPUT)
9. The other inputs that can be assigned for TRIG-
GER 1 include the following:
BAL 2, BAL 3, UNBAL 1, UNBAL 2, UNBAL 3,
UNBAL 4, MM PHONO, MC PHONO, COAX 1,
COAX 2, OPTI 1, OPTI 2, USB, MCT, HDMI(ARC).
10. The other TRIGGERs can be selected by first
returning to “SETUP: TRIGGER 1 , Input (Hold
INPUT)”, refer to figure 31. Then rotate the IN-
PUT Control to select TRIGGER 2, TRIGGER 3
or TRIGGER 4.
11. Then repeat steps 8 and 9 to select the desired the
desired inputs for TRIGGER 2, TRIGGER 3 or
TRIGGER 4.
Figure 29
SETUP: TRIGGER 1
Main
Figure 30
SETUP: TRIGGER 1
Output 1
Loading ...
Loading ...
Loading ...