Loading ...
Loading ...
Loading ...
13
the Setup Mode.
1. Press and hold in the INPUT Control to enter
Setup Mode.
2. Referring to the Front Panel Information Display-
the number after the character “V” is the Firm-
ware number. Refer to figure 2.
To view the second Firmware Number, which is for
the Digital Audio Circuitry of the C2700, perform the
following steps:
3. Press and hold in the INPUT Control to enter
Setup Mode.
4. Rotate the INPUT Control until the Front Panel
Information Display indicates “DA2 Firmware,
V1.00” (or higher Digital Audio Firmware ver-
sion). Refer to figure 4.
5. To exit the Setup Mode, press the INPUT Control.
4. To exit from the SETUP Mode, press and hold in
the INPUT Control and the Front Panel Display
will revert back to its normal display. Refer to
figure 1.
Your McIntosh C2700 has been factory configured for
default operating settings that will allow immediate
enjoyment of superb audio without the need for fur-
ther adjustments. If you wish to make changes to the
factory default settings, a Setup Feature is provided to
customize the operating settings using the Front Panel
Information Display. Refer to the C2700 Front Panel
Illustration on the previous page while performing the
following steps.
Note: If the C2700 is currently On, proceed to step 2.
1. Press the STANDBY/ON Push-button on the Front
Panel or press the (Power ON) Push-button on
the Remote Control to switch On the C2700. Refer
to page 9 for information about Switching Power
On to the C2700. After the C2700 goes through
its startup, the Front Panel Information Display
indicates the last used source and volume setting.
This is followed by the volume setting indication
starting at zero and then increasing to the last used
volume setting. Refer to figure 1.
2. Press and hold in the INPUT Control until the
Front Panel Information Display indicates “C2700,
V1.00 - S/N: AHM____” (or higher Firmware
version). Refer to figure 2.
3. Rotate the INPUT Control to select the next
Setup Mode Menu item, “SETUP: Inputs, (Hold
INPUT)”. Refer to figure 3. Continue to rotate
the INPUT CONTROL to view the other SETUP
Mode Options.
How to Operate the Setup Mode
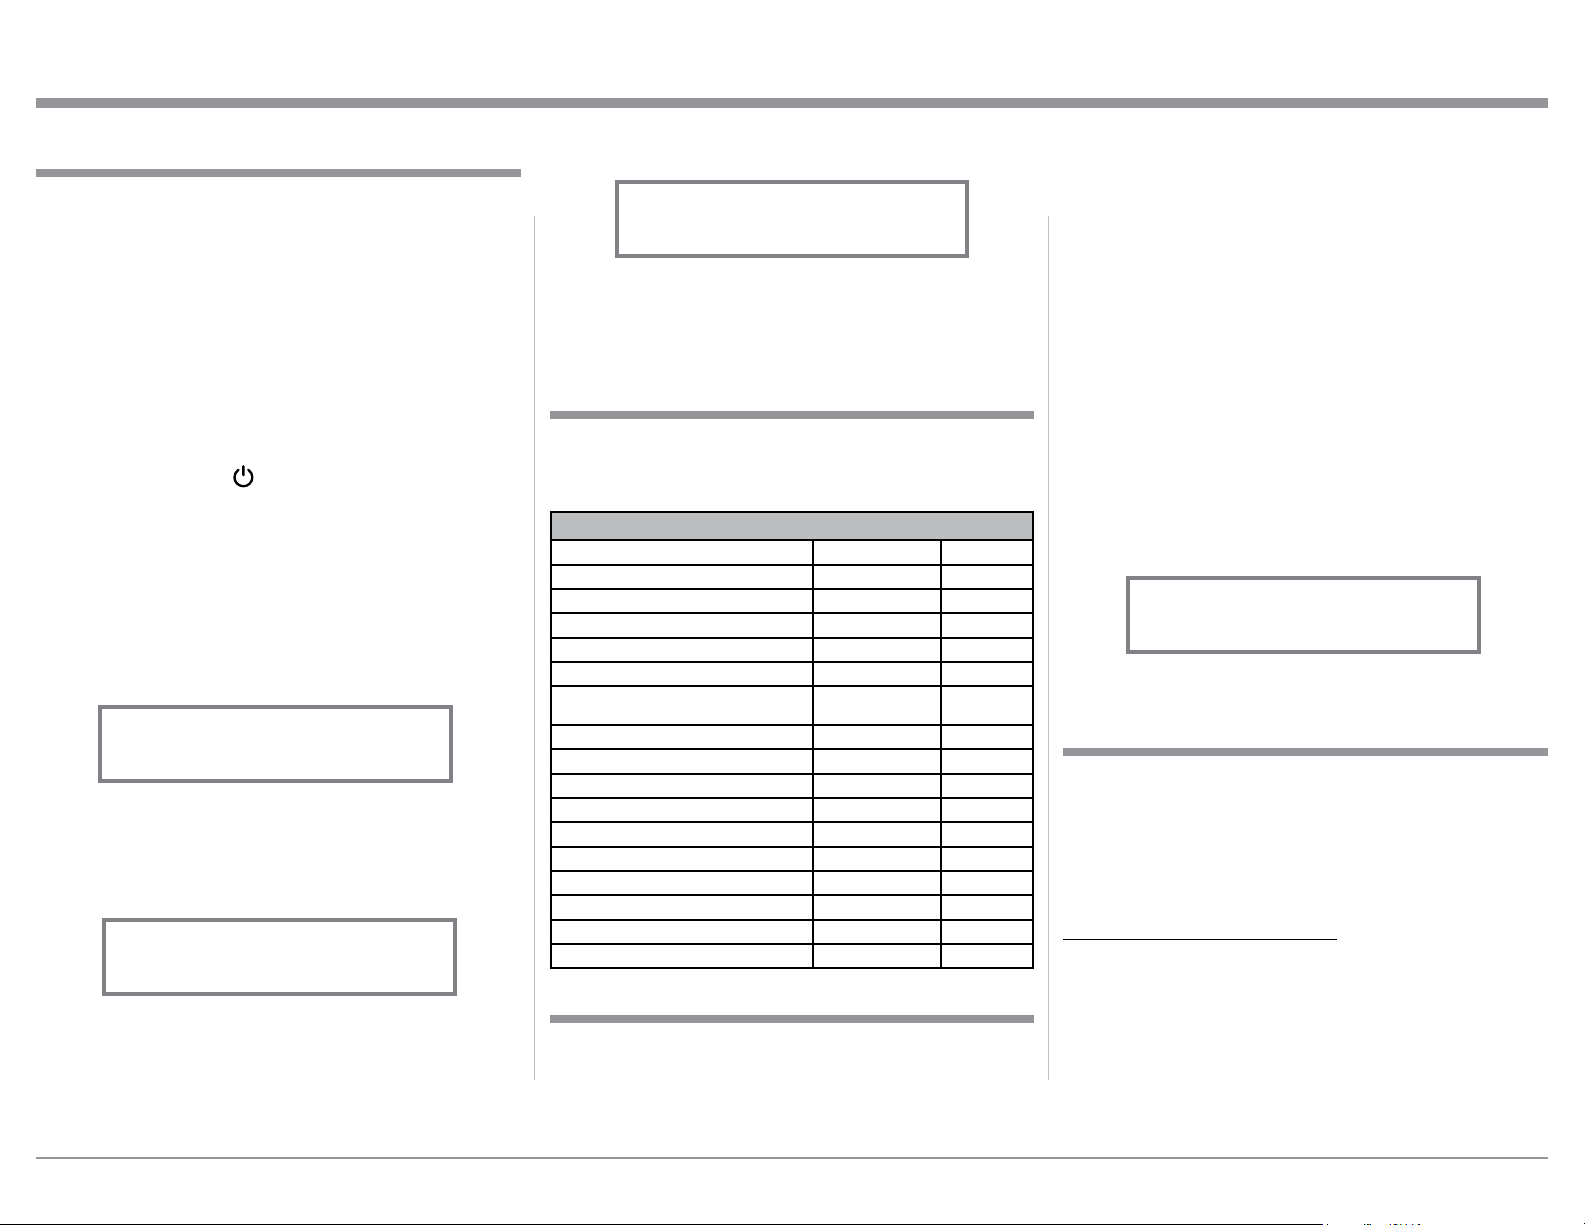
The Default Settings Chart below indicates the Func-
tion Name, Default Setting and the Page Number for
additional information.
Default Settings
Firmware Version
Setup
Figure 2
C2700 V1.00
S/N: AHM____
Figure 1
BAL 1 15%
The C2700 provides the ability to switch unused
INPUTS Off (or back On if they have been previously
switched Off). The default INPUT Names can be
changed to match the name of the component con-
nected to it or any other custom name desired (within
10 Characters).
INPUT SWITCHED ON/OFF:
In the following example, the UNBAL 4 Input will be
switched Off.
Note: When an INPUT is swiched Off, its name will
no longer appear on the Front Panel Informa-
tion Display when using the INPUT Control
(Front Panel or Remote Control).
1. Press and hold in the INPUT Control to enter the
SETUP MODE. Refer to figure 3.
Input Settings
Figure 3
SETUP: Inputs
(Hold INPUT)
Default Settings
Function Name Setting Page No.
C2700 V1.00 13
DA2 V1.00 13
INPUTS On / Rename 13-15
OUTPUTS (1 & 2 & Headphones) Switched 15
POWER CONTOL TRIGGERS Various Settings 16
DATA PORTS
(1 thru 4)
All Data 16
PASSTHRU OFF 17
HDMI CEC (Consumer Electronic Control) Control Command 17
HDMI CEC Power Power On or Off 17
Lip Synchronize Mode (Video and Audio) Activate or Deactivate 18
Digital Gain (for HDMI, Optical 1 & Optical 2) Input Comparison 18
Comm Port Baud Rate 115200 Baud 18
Remote Control Codes Normal 19
IR Sensor Enabled 19
Power Mode Enabled 19
Factory Reset Default Settings 20
Figure 4
DA2 FIRMWARE
V1.00
The C2700 functionality is controlled by internal
software that is know as Firmware. There are two
Firmware Identification Numbers for the C2700. The
first Firmware Number is for the Main Circuitry of the
C2700 and can be identified at any time by utilizing
Loading ...
Loading ...
Loading ...