Loading ...
Loading ...
Loading ...
7 6
Temperature Control Dial
• Adjustable temperature control for perfect frying
• Select deep frying temperatures from 300°F to 375°F
30 Minute Timer Dial
• Once the temperature control dial is set, turn the timer dial on and select deep frying cooking time.
• When selecting the desired frying time, add an additional 10-15 minutes to the desired frying/
cooking time to account for the pre-heating time.
NOTE: Preheat time may vary between 10-15 minutes.
• Once both the desired frying temperate and cooking time is selected, the Deep Fryer will begin heating
the oil.
NOTE: The unit will not turn on and begin to pre-heat unless the timer dial is turned ON and
thedesired frying time has been selected.
• One beep will sound when the set time is up.
• Check food for browning and doneness.
NOTE: Always turn the timer dial ON and select the desired cooking time in order to ensure that
the unit turns on and begins preheating. The unit will not start to preheat until BOTH the desired
cooking temperature and cooking time is selected.
IMPORTANT: When the timer sounds, the Deep Fryer will turn off automatically.
When all deep frying is nished, turn the temperature control dial to “MIN” and the timer dial to “0”.
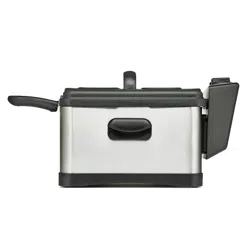
Assembling Frying Basket Handles
1. Your fryer will be shipped with the basket handles in the
storage position. To attach a handle to a frying basket,
hold the arms of the handle inside fry basket as shown.
Gently squeeze the arms of the handle so they t into
the eyelets on the frying basket (see Figure 2).
2. Release the arms of the frying basket and push handle
against the back of the frying basket until it locks into
place (see gure 3).
Before Using for the First Time
1. Remove all packing material and labels from the inside and outside of the Deep Fryer. Check that
there is no packaging underneath and around the oil tank and control panel/heater assembly.
2. During rst use of the Deep Fryer, the oil tank and fry basket may emit a slight odor. This is normal.
To avoid this odor, please follow the instructions outlined below.
3. Set the lid and 1 large + 2 small fry baskets aside.
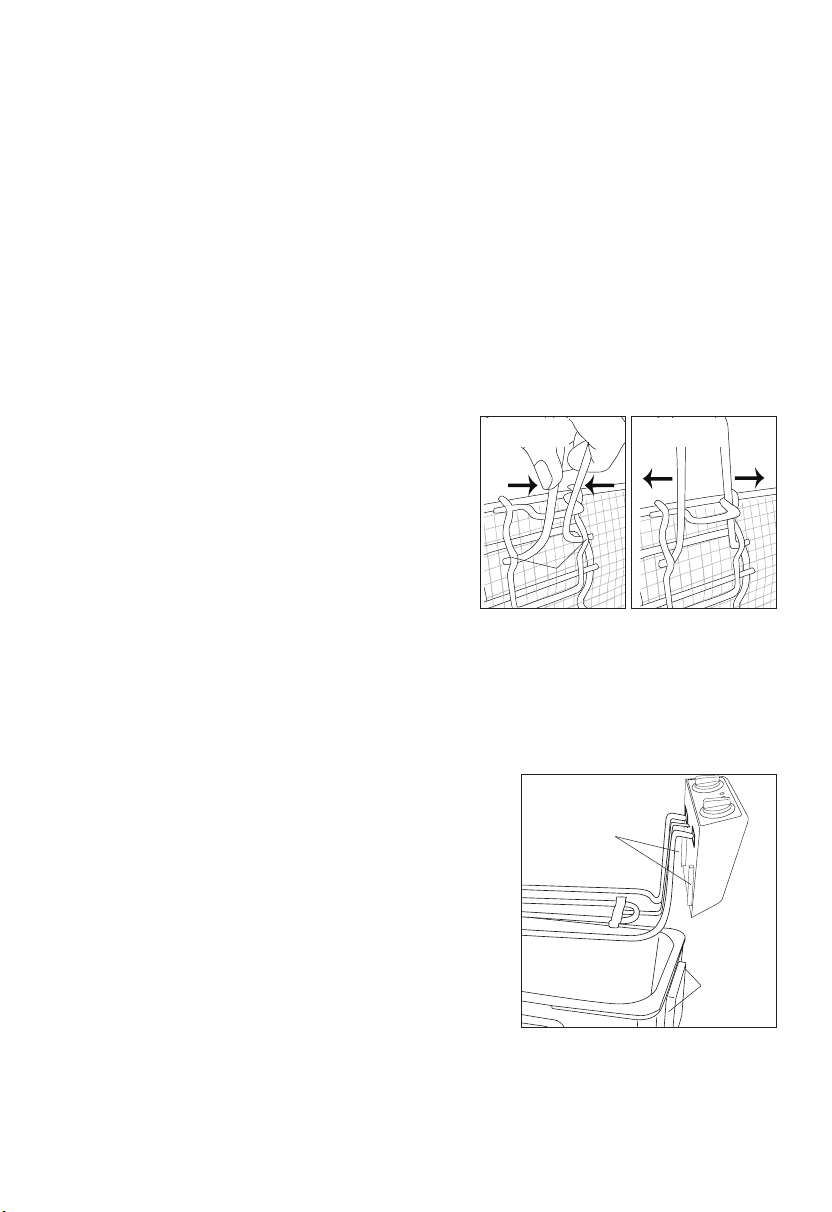
4. Grasp the sides of the control panel/heater assembly rmly and lift up and off the Deep Fryer body
(see Figure 4.) Carefully set control panel/heater assembly aside.
5. Lift the oil tank up and out of the deep fryer body.
6. Wash lid, 3 fry baskets, and oil tank in hot, soapy water.
DO NOT IMMERSE THE CONTROL PANEL/HEATER
ASSEMBLY IN WATER. Wipe control panel/heater assembly
and deep fryer body with a damp cloth. Dry all parts
thoroughly.
7. Insert oil tank into deep fryer body. Be sure tank is centered
and resting properly on top of the stainless steel body.
8. Attach the control panel/heater assembly. Slide the
2brackets located on the inside wall of the heater assembly
down into the
2 retaining slots on the back of the deep fryer body
(seegure 4). Make sure the brackets are tted securely
inthe 2 slots.
IMPORTANT: The Deep Fryer will not operate if the heater
assemblybrackets are not fully inserted and properly
attached tothe deep fryer body.
9. Fold each fry basket handle over into the basket. (See Figure 3.)
Place 3 folded baskets into the oil tank.
10. Remove detachable cord and place it into the oil tank.
11. Replace lid on top of oil tank. Store until ready to use.
Figure 2 Figure 3
Eyelets
Figure 4
Brackets
Retaining
Slots
Operating Instructions
WARNING! This unit should not be used to boil water.
1. Place the Deep Fryer on a clean, dry, at, heat-resistant surface such as a table or counter top,
approximately 2 feet from a standard 120V AC electrical outlet.
2. Remove lid and folded fry basket(s).
3. Be sure the oil tank is properly seated inside deep fryer body. Pour liquid cooking oil (corn,
vegetable, peanut, etc.) into the tank. Fill with oil to a level between the MIN and MAX marks.
NOTE: The minimum oil capacity is 3.91 liters (4.13 qt./17 cups). The maximum oil capacity is
4.5liters (4.75 qt./19 cups). (See Figure 4.)
WARNING: Under- or over-lling the oil tank may damage the Deep Fryer and could result in serious
personal injury.
4. To prevent condensation from fogging the viewing window on lid, use a paper towel or napkin to
spread athin layer of cold cooking oil onto inside of viewing window.
5. Depending on the frying task, place either the 1 large fry basket or 2 small fry baskets into the oil
tank. When cooking, the bottom of the fry basket(s) will rest on the heater coils.
IMPORTANT: When frying 2 baskets of food, it is best to keep food tastes alike. For instance,
2baskets ofvegetables, 2 baskets of sh, 2 baskets of desserts.
6. Then position the lid over the basket or baskets with the ltered air outlet away from basket
handles. The single set of cutouts will t over the heater coils. The double set of cutouts in the lid
will t over the fry basket handle(s).
7. Turn the Temperature control dial to “MIN” and the timer dial to OFF.
8. Connect the detachable power cord into the
appliance receptacle, with the “THIS SIDE UP”
topside (see Figure 5.) Make sure the cord is
rmly in place. Then connect the polarized plug to
the wall outlet.
The red POWER light will illuminate.
CAUTION: Do not let the cord hang over
the edge of table or counter.
9. See the Cooking Chart for suggested temperatures and cooking times. Turn the temperature control dial
to the desired cooking temperature and turn the timer dial on toselect the desired cooking time. When
selecting the desired frying time, add an additional 10-15 minutes to the desired frying/cooking time to
account for the pre-heating time.
NOTE: Preheat time may vary between 10-15 minutes.
The green READY light will cycle on and off. When the oil reaches the selected cooking
temperature, thegreen READY light will illuminate steadily.
NOTE: Always turn the timer dial ON and select the desired cooking time in order to ensure that
theunitturns on and begins preheating. The unit will not start to preheat until BOTH the desired
cookingtemperature and cooking time is selected.
NOTE: Allow 10 to 15 minutes for the oil to preheat.
NOTE: Oil may make a “popping” sound inside the Deep Fryer as the oil heats. This is normal.
10. Remove lid and set aside. Wearing an oven mitt, grasp the fry basket handle and lift fry basket out
of the oil. Carefully rest the fry basket(s) on the back of the oil tank.
CAUTION: Do not touch any interior parts of the Deep Fryer or the oil during use as they are hot!
WARNING! Be careful around hot parts and hot spitting oil. Remember that the oil is actually hotter
than boiling water! Never put hands in the oil. Always keep hands and face away from rising steam or
spitting oil.
11. Carefully place food into the fry basket(s), being careful not to touch the fry basket as it may be hot.
Do not overll fry basket with food.
NOTE: Maximum food frying capacity for the large fry basket is 12 cups, almost 4 lbs.
Maximum food frying capacity for the small fry baskets is 4 cups, almost 1.5 lb. per basket.
CAUTION: The fry basket should never be more than 2/3 full of food to be fried.
12. Grasp fry basket handle and carefully lower fry basket with food into the hot oil. Replace the lid.
13. Set the timer control dial to the desired fry time.
WARNING: This appliance generates heat and escaping steam during use. Use proper precautions
to prevent the risk of burns, res, or other injury to persons or damage to property.
14. As the Deep Fryer cooks the food and the oil cools, the heater coils and the green READY light will
cycle on and off as proper cooking temperature of the oil is maintained. See the Cooking Chart for
sample cooking times and temperatures.
Figure 5
SO-312096_14406 BELLA 4.5L deep fryer IM_R6.indd 6-7 2016-08-23 9:36 AM
Loading ...
Loading ...
Loading ...